

Page 1

PIZZA OVEN / PIZZAOFEN / FOUR À PIZZA
SPO 910 A1
PIZZA OVEN
Operating instructions
FOUR À PIZZA
Mode d’emploi
PEC NA PIZZU
Návod k obsluze
PEC NA PIZZU
Návod na obsluhu
PIZZAOVN
Betjeningsvejledning
PIZZASÜTŐ
Használati utasítás
IAN 388914_2107
PIZZAOFEN
Bedienungsanleitung
PIZZAOVEN
Gebruiksaanwijzing
PIEC DO PIZZY
Instrukcja obsługi
HORNO PARA PIZZA
Instrucciones de uso
FORNO PER PIZZA
Istruzioni per l'uso
PEČICA ZA PICO
Navodila za uporabo
Page 2

Before reading, unfold the page containing the illustrations and familiarise yourself with all functions of the
device.
Klappen Sie vor dem Lesen die Seite mit den Abbildungen aus und machen Sie sich anschließend mit
allen Funktionen des Gerätes vertraut.
Avant de lire le mode d‘emploi, ouvrez la page contenant les illustrations et familiarisez-vous ensuite avec
toutes les fonctions de l‘appareil.
Vouw vóór het lezen de pagina met de afbeeldingen open en maak u vertrouwd met alle functies van het
apparaat.
Před čtením si otevřete stranu s obrázky a potom se seznamte se všemi funkcemi přístroje.
Przed przeczytaniem proszę rozłożyć stronę z ilustracjami, a następnie proszę zapoznać się z wszystkimi
funkcjami urządzenia.
Pred čítaním si odklopte stranu s obrázkami a potom sa oboznámte so všetkými funkciami prístroja.
Antes de empezar a leer abra la página que contiene las imágenes y, en seguida, familiarícese con todas
las funciones del dispositivo.
Før du læser, vend siden med billeder frem og bliv bekendt med alle apparatets funktioner.
Prima di leggere aprire la pagina con le immagini e prendere confidenza con le diverse funzioni
dell'apparecchio.
Olvasás előtt kattintson az ábrát tartalmazó oldalra és végezetül ismerje meg a készülék mindegyik funkcióját.
Pred branjem odprite stran s slikami in se nato seznanite z vsemi funkcijami naprave.
GB / IE Operating instructions Page 1
DE / AT / CH Bedienungsanleitung Seite 19
FR / BE Mode d’emploi Page 37
NL / BE Gebruiksaanwijzing Pagina 57
CZ Návod k obsluze Strana 75
PL Instrukcja obsługi Strona 93
SK Návod na obsluhu Strana 111
ES Instrucciones de uso Página 129
DK Betjeningsvejledning Side 147
IT Istruzioni per l'uso Pagina 165
HU Használati utasítás Oldal 183
SI Navodila za uporabo Stran 201
Page 3

A
B
Page 4

Contents
Introduction ...................................................2
Intended use ..................................................2
Package contents and transport inspection .........................2
Unpacking ..............................................................3
Disposal of the packaging .................................................. 3
Appliance description ...........................................3
Technical specifications ..........................................4
Safety information .............................................4
Before first use ................................................6
Setting up and assembly ........................................7
Handling and operation .........................................8
Preparing mini-pizzas ...................................................... 8
Baking mini-pizzas ........................................................ 8
Cleaning and maintenance .....................................10
Storage .....................................................11
Troubleshooting ..............................................11
Disposal .....................................................12
Kompernass Handels GmbH warranty ............................12
Service ................................................................ 14
Importer ...............................................................14
Recipes ......................................................14
Salami pizza with wheat flour base .........................................14
Vegetarian pizza with wholemeal spelt base ..................................16
│
SPO 910 A1 GB
│
IE
1 ■
Page 5

Introduction
Congratulations on the purchase of your new appliance.
You have selected a high-quality product. The operating instructions are part of
this product. They contain important information about safety, usage and disposal.
Before using the product, please familiarise yourself with all operating and safety
instructions. Use the product only as described and for the specified range of
applications. Please also pass these operating instructions on to any future
owner.
Intended use
This appliance is intended exclusively for baking mini-pizzas inside. Any other
use or use beyond that specified is considered improper use. The appliance is
not intended for use in commercial or industrial environments.
Claims of any kind for damage resulting from misuse, incompetent repairs, unauthorised modification or the use of unauthorised replacement parts will not
be accepted. The operator bears sole liability.
Package contents and transport inspection
The appliance is supplied with the following components as standard:
▯ Pizza oven (basic appliance, baking tray and terracotta dome)
▯ 6 pizza peels
▯ Dough cutter
▯ Operating instructions
NOTE
► Check the package for completeness and signs of visible damage.
► The terracotta dome is handmade and consists of natural materials.
Consequently, there may be small imperfections in the product. These do
not affect the quality of the product. This does not affect the stability of the
terracotta dome!
► If any items are missing or damaged as a result of defective packaging
or transportation, contact the service hotline (see section "Service").
│
IE
SPO 910 A1■ 2 │ GB
Page 6

Unpacking
WARNING! RISK OF INJURY!
► Do not allow children to play with packaging materials. Risk of suffocation!
1) Remove all parts of the appliance and the operating instructions from the box.
2) Remove all packaging materials as well as any protective films and labels
from the appliance.
Disposal of the packaging
The packaging materials have been selected for their environmental friendliness
and ease of disposal, and are therefore recyclable. Dispose of packaging materials that are no longer needed in accordance with applicable local regulations.
Dispose of the packaging in an environmentally friendly manner. Note the labelling on the packaging and separate the packaging material components for
disposal if necessary. The packaging material is labelled with abbreviations (a)
and numbers (b) with the following meanings: 1–7: plastics, 20–22: paper and
cardboard, 80–98: composites.
NOTE
► If possible, keep the original packaging during the warranty period so that
the appliance can be properly packed for returning in the event of a
warranty claim.
Appliance description
Figure A:
1 Warming plate
2 Terracotta dome
3 Opening
4 Baking tray
5 Control lamp (red, lights up during operation)
6 Basic appliance
7 Heating elements (top and bottom)
Figure B:
8 Pizza peel
9 Dough cutter
SPO 910 A1 GB
│
IE
│
3 ■
Page 7

Technical specifications
Power supply 220‒240 V ∼ (AC), 50‒60 Hz
Power consumption 910 W
All of the parts of this appliance that come into
contact with food are food-safe.
Safety information
DANGER! ELECTRIC SHOCK!
► Prior to use, check the appliance for visible external dama-
ge. Do not use an appliance that has been damaged or
dropped.
► Do not expose the appliance to rain, and never use it in a
humid or wet environment. Ensure that the power cable
never becomes wet or moist during operation.
► The appliance must be connected to a mains socket with
a protective earth.
► Protect the power cable from contact with hot appliance
parts. Never use the appliance near naked flames, a
hotplate or a heated oven.
► The power cable must be checked for signs of damage
at regular intervals. If the power cable is damaged, the
appliance may no longer be used.
► To avoid potential risks, if the appliance power cable is da-
maged, it must be replaced by the manufacturer, its
customer service or by a qualified technician.
► Do not allow the appliance to come into contact with
moisture such as rain or water.
Never immerse the appliance in water or any other
liquids! There is a risk of fatal electric shock if residual
liquids come into contact with live components during
operation.
│
IE
SPO 910 A1■ 4 │ GB
Page 8

WARNING! RISK OF INJURY!
► This appliance may be used by children over the age of
8 and by persons with reduced physical, sensory or mental
abilities or by those without experience and/or knowledge,
if they are supervised or have been instructed in the safe
use of the appliance and have understood the potential
risks.
► Do not allow children to play with the appliance.
► Cleaning and user maintenance must not be performed by
children unless they are older than 8 years of age and are
supervised.
► Children younger than eight years of age must be kept away
from the appliance and the power cable.
► After use, allow the appliance to cool down completely
before cleaning it! Risk of burns!
► If possible, set up the appliance close to a power socket.
Ensure that the power plug is quickly reachable in case of
danger and that the cable poses no risk of tripping.
► Provide a stable location for the appliance.
► Always operate the pizza oven with the terracotta dome
in place.
Caution! Hot surface!
► The appliance and the accessories in use become very hot
during operation. Do not move the appliance and only
touch the handles of the pizza peels.
SPO 910 A1 GB
│
IE
│
5 ■
Page 9

CAUTION! PROPERTY DAMAGE!
► Do not use an external timer switch or a separate remote
control system to operate the appliance.
► Never leave the appliance unattended during operation.
► Ensure that the appliance, the power cable and the plug do
not come into contact with heat sources such as hotplates or
naked flames.
► Do not use charcoal or similar fuels to operate the appli-
ance!
► Never cover the pizza oven with cloths or other items during
operation. They could catch fire!
► Treat the terracotta dome carefully. It is fragile!
► Operate the appliance only with the original accessories
supplied.
Before first use
1) Clean all parts as described in the section "Cleaning and care" to remove any
production residues. Make sure that all parts are completely dry before operating the appliance.
WARNING! RISK OF FIRE!
► Never set up the appliance underneath wall cupboards or next to curtains,
cupboard walls or other flammable objects.
► Always place the appliance on a heat-resistant surface.
2) Set up the appliance as described in the section "Setting up and assembly".
3) Insert the plug into the mains power socket. The control lamp 5 lights up red
to indicate that the appliance is in operation. The heating elements 7 start to
heat up.
4) Preheat the appliance for 10 minutes.
│
IE
SPO 910 A1■ 6 │ GB
Page 10

NOTE
► The fi rst time the appliance heats up, a small amount of smoke and odour
may result from production-related residues. This is normal and is completely
harmless. Ensure suffi cient ventilation; for example, by opening a window.
5) Remove the plug from the mains power socket.
6) Allow the appliance to cool down for 30 minutes before dismantling and
cleaning it.
7) After heating the appliance for the fi rst time, clean it again as described
in the section "Cleaning and care".
Setting up and assembly
WARNING! RISK OF FIRE!
► Never set up the appliance underneath wall cupboards or next to curtains,
cupboard walls or other fl ammable objects.
► Always place the appliance on a heat-resistant surface.
1) Place the basic appliance 6 on a level surface. This must be heat-resistant,
splash-resistant and dry. Make sure that you do not place the appliance right
next to a wall or a cupboard.
3) Place the terracotta dome 2 carefully onto the basic appliance 6. The two
heating elements 7 and the baking tray 4 are now located in the baking
chamber of the pizza oven. Make sure that you place the terracotta dome 2
on the appliance so that none of the openings 3 are blocked by the vertical
part of the heating element 7. Otherwise, you will not be able to fi t a pizza
peel 8 through the opening 3.
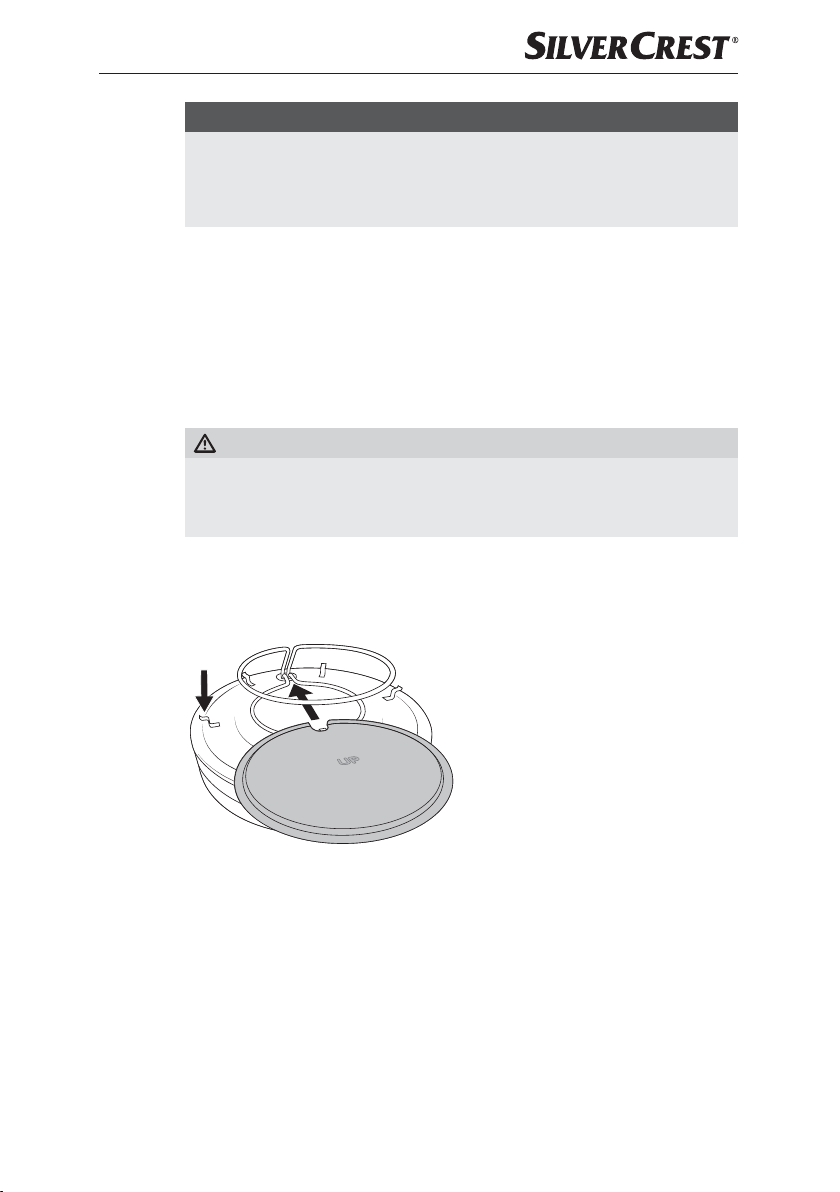
2) Put the baking tray 4 onto the basic
appliance 6: Turn the baking tray 4
around so that the embossed "UP"
is readable on the upper side. Then
push the baking tray 4 between
the two heating elements 7. The
semi-circular cut-out on the baking
tray 4 encloses the vertical part of
the heating element 7. Then place
the baking tray 4 onto the six sup-
ports provided. These supports fi x
the baking tray 4 in place so that
it cannot slip during operation.
SPO 910 A1 GB
│IE│
7 ■
Page 11

Handling and operation
You can bake up to six mini-pizzas simultaneously in the baking chamber. There
are six openings 3 for this in the terracotta dome 2. Use the supplied pizza
peels 8 to push the mini-pizzas through the openings 3 and onto the baking
tray 4. Once the mini-pizzas are fully cooked, use the pizza peels 8 to remove
them from the baking tray 4.
Preparing mini-pizzas
1) Prepare the pizza dough and the toppings. Cut the food into small pieces
(1–2 cm).
2) Lightly grease the pizza peels 8. This is will make it easier to remove the
ready-baked mini-pizzas from the metal tray.
3) Roll out the pizza dough to a thickness of 2–4 mm and then use the dough
cutter 9 to cut out pieces of dough. These pieces of dough form the bases
for the mini-pizzas and fit onto the pizza peels 8.
4) Place the pizza bases on the pizza peels 8. Shape the edge of the mini-pizza
by pushing the slightly overhanging dough up a little. This creates a small
raised edge which prevents the toppings from sliding off the pizza base.
WARNING! RISK OF FIRE!
► Place the ingredients only on the pizza base! Do not place any meat or
other ingredients directly onto the pizza peels 8. Escaping fat can splash.
Fat dripping onto the heating elements 7 can catch fire!
5) Top the pizzas according to your taste. Make sure that the pizza peel 8 is
not loaded too high. Otherwise, the mini-pizzas will not pass through the
openings 3 in the terracotta dome 2.
Baking mini-pizzas
WARNING! RISK OF INJURY!
► The appliance and the accessories in use become very hot during operati-
on. Do not move the appliance and only touch the handles of the pizza
peels 8.
NOTE
► Do not bake large pizzas or other ingredients directly on the baking tray 4.
Always place the mini-pizzas onto pre-greased pizza peels 8. Then place
the loaded pizza peels 8 onto the baking tray 4. Do not grease the
baking tray 4.
│
IE
SPO 910 A1■ 8 │ GB
Page 12

Set up the appliance as described in the section "Setting up and assembly".
1) Prepare the mini-pizzas.
2) Insert the plug into the mains power socket. The control lamp 5 lights up red
to indicate that the appliance is in operation. The heating elements 7 start to
heat up.
3) Preheat the appliance for 10 minutes.
4) Push the pizza peels 8 through the openings 3 in the terracotta dome 2
and place them onto the baking tray 4. When doing so, make sure that the
ingredients do not come into contact with the upper heating element 7.
WARNING! RISK OF INJURY!
► The pizza peels 8 get very hot! Therefore, always hold them using the
plastic handles!
ATTENTION! PROPERTY DAMAGE!
► Make sure that no ingredients fall from the mini-pizzas onto the baking
tray 4. Any food residues left in the baking chamber will burn!
5) Bake the mini-pizzas for around 7–12 minutes. The actual baking time depends
on the thickness of the dough and the quantity of ingredients and can therefore
vary.
6) Pull the pizza peels 8 carefully by the handles out of the appliance as soon
as the ingredients are cooked and pizzas have reached the desired degree
of browning.
NOTE
► You can place the mini-pizzas on the warming plate 1. Place only ready-
baked mini-pizzas on there and not any other ingredients.
► Bear in mind that the mini-pizzas will continue cooking. They can dry out
if left on the warming plate 1 for too long.
7) After use, place the individual pizza peels 8 on a stable and heat-resistant
surface. After the pizza peels 8 have cooled down a little, they can be used
again. You may need to re-grease them lightly before use.
8) Once you have finished using the appliance, pull the plug out of the socket.
The red control lamp 5 goes out.
9) Allow the appliance to cool down for 30 minutes before dismantling and
cleaning it.
SPO 910 A1 GB
│
IE
│
9 ■
Page 13

Cleaning and maintenance
DANGER! ELECTRIC SHOCK!
► Before cleaning the appliance, disconnect the power plug from the mains
power socket! There is a risk of electric shock!
Never immerse the appliance in water or other liquids!
WARNING! RISK OF INJURY!
► Always allow the appliance to cool down before cleaning it. There is a risk
of burns!
ATTENTION! PROPERTY DAMAGE!
► Do not use abrasive or aggressive cleaning materials. They can irreparably
damage the surfaces!
► Do not expose the terracotta dome 2 to extreme cold to cool it down,
the material can crack! Allow it to cool down at room temperature.
► Do not heat up the terracotta dome 2 again until it has completely dried
out. The damp material can crack!
► Never clean the terracotta dome 2 or the basic appliance 6 in the dish-
washer!
NOTE
► The terracotta dome 2 is made from natural materials. Do not use any
chemical cleaning agents to clean it. After repeated use, a patina will form.
This discolouration of the material is normal and does not impair the function. It also has no impact on hygiene.
► A permanent discolouration of the baking tray 4 may also occur as it lies
very close to the heating elements 7. If necessary, soak the baking tray 4 in
water and add a little washing-up liquid.
■ Clean the terracotta dome 2 carefully with warm water and a washing-up
cloth. You can also use a soft brush. Do not immerse the terracotta dome 2
in washing-up water as the material soaks up water. Allow it to air dry afterwards. Make sure that the terracotta dome 2 is completely dry before heating
it again.
■ Wipe the basic appliance 6 including the completely cooled heating ele-
ments 7 with a damp cloth. If necessary, apply a mild detergent to the cloth
and wipe with a cloth moistened only with water. Dry everything properly.
│
IE
SPO 910 A1■ 10 │ GB
Page 14

■ Clean the baking tray 4, the pizza peels 8 and the dough cutter 9 in
warm soapy water. If the parts are heavily soiled, you can soak them a little.
Dry all the parts thoroughly after cleaning.
NOTE
For gentle cleaning, we recommend hand washing. However, the
pizza peels 8, baking tray 4 and dough cutter 9 are also dishwasher-safe. Place them in the top compartment of the dishwasher,
taking care not to trap any parts.
Storage
■ After it has cooled down, store the cleaned appliance and accessories in a
dust-free and dry location. Do not store the terracotta dome 2 in an enc-
losed space, but rather somewhere where the air can circulate freely.
Troubleshooting
Fault Cause Solution
The plug is not connected to
the mains power.
The mains power socket is
defective.
The appliance is not
working.
If the malfunction cannot be corrected using one of the suggestions above, or
if you have found some other kind of malfunction, please contact our Customer
Service department.
The appliance is defective.
The thermal cut-out has been
triggered.
Insert the plug into a mains
power socket.
Use a different mains power
socket.
Contact the Customer Service
department.
Disconnect the plug from the
mains power socket and wait
until the appliance has cooled
down. If the appliance still does
not function after cooling down,
contact the Customer Service
department.
SPO 910 A1 GB
│
IE
│
11 ■
Page 15

Disposal
The symbol showing a crossed-out dustbin means that this appliance is subject to
Directive 2012/19/EU. This directive states that this appliance may not be disposed of in the normal household waste at the end of its useful life, but must be
taken to specially set-up collection locations, recycling depots or disposal companies. This disposal is free of charge for the user. Protect the environment and
dispose of this appliance properly.
Your local community or municipal authorities can provide information on how
to dispose of the worn-out product.
The product is recyclable, subject to extended producer responsibility and is
collected separately.
Kompernass Handels GmbH warranty
Dear Customer,
This appliance has a 3-year warranty valid from the date of purchase. If this product
has any faults, you, the buyer, have certain statutory rights. Your statutory rights
are not restricted in any way by the warranty described below.
Warranty conditions
The warranty period starts on the date of purchase. Please keep your receipt in a
safe place. This will be required as proof of purchase.
If any material or manufacturing fault occurs within three years of the date of
purchase of the product, we will either repair or replace the product for you or
refund the purchase price (at our discretion). This warranty service requires that
you present the defective appliance and the proof of purchase (receipt) within
the three-year warranty period, along with a brief written description of the fault
and of when it occurred.
If the defect is covered by the warranty, your product will either be repaired or
replaced by us. The repair or replacement of a product does not signify the beginning of a new warranty period.
Warranty period and statutory claims for defects
The warranty period is not prolonged by repairs effected under the warranty.
This also applies to replaced and repaired components. Any damage and defects present at the time of purchase must be reported immediately after unpacking. Repairs carried out after expiry of the warranty period shall be subject to
a fee.
│
IE
SPO 910 A1■ 12 │ GB
Page 16

Scope of the warranty
This appliance has been manufactured in accordance with strict quality guidelines and inspected meticulously prior to delivery.
The warranty covers material faults or production faults. The warranty does not
extend to product parts subject to normal wear and tear or to fragile parts which
could be considered as consumable parts such as switches, batteries or parts
made of glass.
The warranty does not apply if the product has been damaged, improperly used
or improperly maintained. The directions in the operating instructions for the
product regarding proper use of the product are to be strictly followed. Uses and
actions that are discouraged in the operating instructions or which are warned
against must be avoided.
This product is intended solely for private use and not for commercial purposes.
The warranty shall be deemed void in cases of misuse or improper handling, use
of force and modifications / repairs which have not been carried out by one of
our authorised Service centres.
Warranty claim procedure
To ensure quick processing of your case, please observe the following instructions:
■ Please have the till receipt and the item number (IAN)388914_2107
available as proof of purchase.
■ You will find the item number on the type plate on the product, an engraving
on the product, on the front page of the operating instructions (below left) or
on the sticker on the rear or bottom of the product.
■ If functional or other defects occur, please contact the service department
listed either by telephone or by e-mail.
■ You can return a defective product to us free of charge to the service address
that will be provided to you. Ensure that you enclose the proof of purchase
(till receipt) and information about what the defect is and when it occurred.
You can download these instructions along with many other manuals, product
videos and installation software at www.lidl-service.com.
This QR code will take you directly to the Lidl service page
(www.lidl-service.com) where you can open your operating instructions
by entering the item number (IAN)388914_2107.
SPO 910 A1 GB
│
IE
│
13 ■
Page 17

Service
Importer
Recipes
Service Great Britain
Tel.: 0800 404 7657
E-Mail: [email protected]
Service Ireland
Tel.: 1890 930 034
(0,08EUR / Min.,(peak))
(0,06EUR / Min.,(off peak))
E-Mail: [email protected]
IAN 388914_2107
Please note that the following address is not the service address. Please use the
service address provided in the operating instructions.
KOMPERNASS HANDELS GMBH
BURGSTRASSE 21
44867 BOCHUM
GERMANY
www.kompernass.com
These recipe examples feature two different types of pizza bases.
The toppings can be changed in many ways. Top the pizza according to your
personal taste and preferences. However, bear in mind that the baking time
varies depending on the topping and quantity.
Salami pizza with wheat flour base
Ingredients (for around 8–12 mini pizzas)
For the dough:
■ 250 g wheat flour
■ 150 ml lukewarm water
■ 7 g fresh yeast or 1/2 sachet of dry yeast (3–4 g)
■ 10 ml olive oil
■ 1/2 tsp. sugar
■ 1/2 tsp. salt
│
IE
SPO 910 A1■ 14 │ GB
Page 18

For the tomato sauce:
■ 100 g tomato passata
■ 1 clove of garlic
■ 1/2 tsp. dried oregano
■ Add a pinch of salt and pepper to taste
For the topping:
■ 100 g salami slices
■ 150 g grated cheese (e.g. Gouda or gratin cheese)
Preparation:
1) Dissolve the yeast and sugar in 3 tbsp. of lukewarm water.
2) Mix the flour with the salt, oil and yeast-sugar solution in a bowl.
3) Gradually add the remaining water and work it into the dough.
4) Knead the dough until it has a smooth surface.
5) Cover the dough with a clean cloth and leave to rise in a warm place for
1 hour.
6) Prepare the sauce and the other ingredients: Cut the garlic into small pieces
or press the cloves through a garlic press. Mix the strained tomatoes with the
garlic and oregano, and then season with salt and pepper. Cut the salami
slices into small pieces.
7) After the rising time, place the dough on a floured work surface. You can
divide the dough into two pieces and work each piece separately.
8) Roll out the dough to a thickness of 2–4 mm and cut out the pizza bases
with the dough cutter 9. Place the pizza bases on the lightly greased pizza
peels 8. Shape the edge of the mini-pizza by pushing the slightly overhanging
dough up a little. This creates a small raised edge which prevents the toppings
from sliding off the pizza base.
9) Spread on a little tomato sauce, then top with salami and cheese.
10) Push the pizza peels 8 through the openings 3 onto the baking tray 4.
Bake the mini-pizzas for around 7–12 minutes. The actual baking time depends
on the thickness of the dough and the quantity of ingredients and can therefore vary.
TIP: As a quick alternative, you can also use ready-made pizza dough. Top with
tomato sauce and other ingredients as desired.
SPO 910 A1 GB
│
IE
│
15 ■
Page 19

Vegetarian pizza with wholemeal spelt base
Ingredients (for around 8–12 mini pizzas)
For the dough:
■ 150 g spelt flour
■ 50 g wholemeal spelt flour
■ 150 ml lukewarm water
■ 7 g fresh yeast or 1/2 sachet of dry yeast (3–4 g)
■ 1 tsp. honey
■ 1 tbsp. olive oil
■ 1/2 tsp. salt
For the tomato sauce:
■ 100 g tomato passata
■ 1/2 tsp. dried oregano
■ Add a pinch of salt and pepper to taste
For the topping:
■ 100 g tinned sweetcorn
■ 100 g red pepper
■ 1 medium-sized onion
■ 150 g grated cheese (e.g. Gouda or gratin cheese)
Preparation:
1) Put the wholemeal spelt flour and spelt flour in a bowl and mix. Remove
100 g from the flour mixture.
2) Pour the 100 g flour mixture into another bowl and add the lukewarm water,
dry yeast and honey. Knead everything well into a pre-dough.
3) Place the pre-dough in a bowl, cover with a clean cloth or cling film. Leave
to rise for 30 minutes.
4) Then add the remaining ingredients to the pre-dough. Mix everything together
and knead until a dough with a smooth surface is formed.
5) Place the dough in a bowl, cover it again with a clean cloth or cling film.
Leave the dough to stand for a second, this time for 3–4 hours.
│
IE
SPO 910 A1■ 16 │ GB
Page 20

NOTE
► You can also leave the yeast dough to stand overnight in the fridge. Place it
in a bowl, cover with a cloth or cling film and leave it to stand for a period
of 18–24 hours. The dough will continue to rise, albeit a little slower than
at room temperature. Make sure that there is enough room for this in the
container.
6) Prepare the sauce and the other ingredients: Mix the strained tomatoes with
the garlic and oregano, and then season with salt and pepper. Finely dice
the pepper, peel and halve the onions and cut them into strips.
7) After the rising time, place the dough on a floured work surface. You can
divide the dough into two pieces and then work each piece separately.
8) Roll out the dough to a thickness of 2–4 mm and cut out the pizza bases with
the dough cutter 9. Sprinkle a little flour onto the dough if it is still sticky and
then press it flat with your fingers and the palms of your hands. Add a little
flour to your hands if necessary.
9) Place the pizza bases on the lightly greased pizza peels 8. Shape the edge
of the mini-pizza by pushing the slightly overhanging dough up a little. This
creates a small raised edge which prevents the toppings from sliding off the
pizza base.
10) Spread on a little tomato sauce, then top with the sweetcorn, diced peppers
and onion strips. Afterwards, sprinkle with cheese.
11) Push the pizza peels 8 through the openings 3 onto the baking tray 4.
Bake the mini-pizzas for around 7–12 minutes. The actual baking time depends
on the thickness of the dough and the quantity of ingredients and can therefore
vary.
TIP: Sprinkle some washed and finely chopped rocket salad on the pizza after
baking. This gives the mini-pizza a fresh, spicy taste!
SPO 910 A1 GB
│
IE
│
17 ■
Page 21

│
IE
SPO 910 A1■ 18 │ GB
Page 22

Inhaltsverzeichnis
Einleitung ....................................................20
Bestimmungsgemäßer Gebrauch ................................20
Lieferumfang und Transportinspektion ...........................20
Auspacken ............................................................. 21
Entsorgung der Verpackung ............................................... 21
Gerätebeschreibung ...........................................21
Technische Daten ..............................................22
Sicherheitshinweise ...........................................22
Vor dem ersten Gebrauch ......................................24
Aufstellen und Zusammensetzen. . . . . . . . . . . . . . . . . . . . . . . . . . . . . . . . . 25
Bedienung und Betrieb .........................................26
Mini-Pizzen vorbereiten ...................................................26
Mini-Pizzen backen ......................................................26
Reinigung und Pflege ..........................................28
Aufbewahrung ...............................................29
Fehlerbehebung ..............................................29
Entsorgung. . . . . . . . . . . . . . . . . . . . . . . . . . . . . . . . . . . . . . . . . . . . . . . . . . . 30
Garantie der Kompernaß Handels GmbH .........................30
Service ................................................................ 32
Importeur ..............................................................32
Rezepte .....................................................32
Salamipizza mit Weizenmehl-Boden ......................................... 32
Vegetarische Pizza mit Dinkel-Vollkorn-Boden ..................................34
SPO 910 A1 DE
│AT│
CH
│
19 ■
Page 23

Einleitung
Herzlichen Glückwunsch zum Kauf Ihres neuen Gerätes.
Sie haben sich damit für ein hochwertiges Produkt entschieden. Die Bedienungs-
anleitung ist Bestandteil dieses Produkts. Sie enthält wichtige Hinweise für
Sicherheit, Gebrauch und Entsorgung. Machen Sie sich vor der Benutzung des
Produkts mit allen Bedien- und Sicherheitshinweisen vertraut. Benutzen Sie das
Produkt nur wie beschrieben und für die angegebenen Einsatzbereiche.
Händigen Sie alle Unterlagen bei Weitergabe des Produkts an Dritte mit aus.
Bestimmungsgemäßer Gebrauch
Dieses Gerät dient ausschließlich dem Backen von Mini-Pizza im Innenbereich.
Eine andere oder darüber hinausgehende Benutzung gilt als nicht bestimmungsgemäß. Das Gerät ist nicht zur Verwendung in gewerblichen oder industriellen
Bereichen vorgesehen.
Ansprüche jeglicher Art wegen Schäden aus nicht bestimmungsgemäßer Verwendung, unsachgemäßen Reparaturen, unerlaubt vorgenommenen Veränderungen
oder Verwendung nicht zugelassener Ersatzteile sind ausgeschlossen. Das Risiko
trägt allein der Betreiber.
Lieferumfang und Transportinspektion
Das Gerät wird standardmäßig mit folgenden Komponenten geliefert:
▯ Pizzaofen (Basisgerät, Backblech und Terrakotta-Kuppel)
▯ 6 Pizzaheber
▯ Teigausstecher
▯ Bedienungsanleitung
HINWEIS
► Prüfen Sie die Lieferung auf Vollständigkeit und auf sichtbare Schäden.
► Die Terrakotta-Kuppel ist handgefertigt und besteht aus natürlichen Materi-
alien. Darum können kleine Unebenheiten im Produkt sein, welche die
Qualität des Produktes jedoch nicht mindern. Die Stabilität der TerrakottaKuppel wird dadurch nicht beeinträchtigt!
► Bei einer unvollständigen Lieferung oder Schäden infolge mangelhafter
Verpackung oder durch Transport wenden Sie sich an die Service-Hotline
(siehe Kapitel „Service“).
│AT│
CH
SPO 910 A1■ 20 │ DE
Page 24

Auspacken
WARNUNG! VERLETZUNGSGEFAHR!
► Verpackungsmaterialien dürfen von Kindern nicht zum Spielen verwendet
werden. Erstickungsgefahr!
1) Entnehmen Sie alle Teile des Gerätes und die Bedienungsanleitung aus dem
Karton.
2) Entfernen Sie sämtliches Verpackungsmaterial sowie eventuelle Schutzfolien
und Aufkleber vom Gerät.
Entsorgung der Verpackung
Die Verpackungsmaterialien sind nach umweltverträglichen und entsorgungstechnischen Gesichtspunkten ausgewählt und deshalb recyclebar. Entsorgen Sie nicht
mehr benötigte Verpackungsmaterialien gemäß den örtlich geltenden Vorschriften.
Entsorgen Sie die Verpackung umweltgerecht.
Beachten Sie die Kennzeichnung auf den verschiedenen Verpackungsmaterialien
und trennen Sie diese gegebenenfalls gesondert. Die Verpackungsmaterialien
sind gekennzeichnet mit Abkürzungen (a) und Ziffern (b) mit folgender Bedeutung: 1–7: Kunststoffe, 20–22: Papier und Pappe, 80–98: Verbundstoffe.
HINWEIS
► Heben Sie, wenn möglich, die Originalverpackung während der Garantie-
zeit des Gerätes auf, um das Gerät im Garantiefall ordnungsgemäß verpacken zu können.
Gerätebeschreibung
Abbildung A:
1 Warmhaltefläche
2 Terrakotta-Kuppel
3 Öffnung
4 Backblech
5 Kontrollleuchte (rot, leuchtet bei Betrieb)
6 Basisgerät
7 Heizelemente (oben und unten)
Abbildung B:
8 Pizzaheber
9 Teigausstecher
SPO 910 A1 DE
│AT│
CH
│
21 ■
Page 25

Technische Daten
Netzspannung 220-240 V ∼ (Wechselstrom), 50-60 Hz
Leistungsaufnahme 910 W
Alle Teile dieses Gerätes, die mit Lebensmitteln in
Berührung kommen, sind lebensmittelecht.
Sicherheitshinweise
GEFAHR! ELEKTRISCHER SCHLAG!
► Kontrollieren Sie das Gerät vor der Verwendung auf äußere,
sichtbare Schäden. Nehmen Sie ein beschädigtes oder
heruntergefallenes Gerät nicht in Betrieb.
► Setzen Sie das Gerät nicht dem Regen aus und benutzen
Sie es auch niemals in feuchter oder nasser Umgebung.
Achten Sie darauf, dass die Netzleitung während des
Betriebs niemals nass oder feucht wird.
► Das Gerät muss an eine Steckdose mit Schutzleiter ange-
schlossen werden.
► Schützen Sie die Netzleitung vor Berührungen mit heißen
Geräteteilen. Benutzen Sie das Gerät niemals in der Nähe
einer offenen Flamme, einer Heizplatte oder eines beheizten
Ofens.
► Das Netzkabel muss regelmäßig auf Zeichen von Beschädi-
gungen untersucht werden. Falls das Netzkabel beschädigt
ist, darf das Gerät nicht mehr benutzt werden.
► Wenn die Netzanschlussleitung dieses Gerätes beschädigt
wird, muss sie durch den Hersteller oder seinen Kundendienst oder eine ähnlich qualifizierte Person ersetzt werden,
um Gefährdungen zu vermeiden.
► Das Gerät darf nicht mit Feuchtigkeit, wie Regen oder Nässe,
in Berührung kommen.
│AT│
CH
SPO 910 A1■ 22 │ DE
Page 26

GEFAHR! ELEKTRISCHER SCHLAG!
Tauchen Sie das Gerät niemals in Wasser oder andere
Flüssigkeiten! Hier kann Lebensgefahr durch elektrischen
Schlag entstehen, wenn im Betrieb Flüssigkeitsreste auf
spannungsführende Teile gelangen.
WARNUNG! VERLETZUNGSGEFAHR!
► Dieses Gerät kann von Kindern ab 8 Jahren sowie von
Personen mit reduzierten physischen, sensorischen oder
mentalen Fähigkeiten oder Mangel an Erfahrung und/oder
Wissen benutzt werden, wenn sie beaufsichtigt oder bezüglich
des sicheren Gebrauchs des Gerätes unter wiesen wurden und
die daraus resultierenden Gefahren verstanden haben.
► Kinder dürfen nicht mit dem Gerät spielen.
► Reinigung und Benutzerwartung dürfen nicht durch Kinder
durchgeführt werden, es sei denn, sie sind älter als 8 Jahre
und beaufsichtigt.
► Kinder jünger als 8 Jahre sind vom Gerät und der Anschluss-
leitung fernzuhalten.
► Lassen Sie das Gerät nach dem Gebrauch abkühlen, bevor
Sie es reinigen! Verbrennungsgefahr!
► Stellen Sie das Gerät möglichst in der Nähe einer Steck-
dose auf. Sorgen Sie dafür, dass der Netzstecker bei
Gefahr schnell erreichbar ist und die Netzleitung nicht zur
Stolperfalle werden kann.
► Sorgen Sie für einen sicheren Stand des Gerätes.
► Betreiben Sie den Pizzaofen immer nur mit der aufgesetzten
Terrakotta-Kuppel.
Vorsicht! Heiße Oberfläche!
► Das Gerät und das verwendete Zubehör werden während
des Betriebs sehr heiß. Stellen Sie das Gerät nicht um und
berühren Sie nur die Griffe der Pizzaheber.
SPO 910 A1 DE
│AT│
CH
│
23 ■
Page 27

ACHTUNG! SACHSCHADEN!
► Benutzen Sie keine externe Zeitschaltuhr oder ein sepa rates
Fernwirksystem, um das Gerät zu betreiben.
► Lassen Sie das Gerät während des Betriebes niemals
unbeaufsichtigt.
► Stellen Sie sicher, dass das Gerät, das Netzkabel oder
der Netzstecker nicht mit heißen Quellen, wie Kochplatten
oder offenen Flammen, in Berührung kommen.
► Benutzen Sie keine Kohle oder ähnliche Brennstoffe, um das
Gerät zu betreiben!
► Decken Sie den Pizzaofen während des Betriebs niemals
mit Tüchern oder Gegenständen zu. Diese können Feuer
fangen!
► Gehen Sie vorsichtig mit der Terrakotta-Kuppel um. Sie kann
zerbrechen!
► Betreiben Sie das Gerät ausschließlich mit dem mitgelie-
ferten Originalzubehör.
Vor dem ersten Gebrauch
1) Reinigen Sie die Teile wie im Kapitel „Reinigung und Pflege“ beschrieben,
um mögliche Rückstände aus der Produktion zu entfernen. Stellen Sie sicher,
dass alle Teile vollständig getrocknet sind bevor Sie das Gerät in Betrieb
nehmen.
WARNUNG! BRANDGEFAHR!
► Stellen Sie das Gerät niemals unter Hängeschränke oder neben Gardinen,
Schrankwände oder andere entzündliche Gegenstände.
► Stellen Sie das Gerät nur auf eine hitzebeständige Unterlage.
2) Stellen Sie das Gerät auf, wie im Kapitel „Aufstellen und Zusammensetzen“
beschrieben.
3) Stecken Sie den Netzstecker in die Netzsteckdose. Die Kontrolleuchte 5
leuchtet rot und signalisiert, dass das Gerät in Betrieb ist. Die
Heizelemente 7 beginnen sich zu erhitzen.
4) Lassen Sie das Gerät 10 Minuten aufheizen.
│AT│
CH
SPO 910 A1■ 24 │ DE
Page 28

HINWEIS
► Beim erstmaligen Aufheizen des Gerätes kann es durch fertigungsbedingte
Rückstände zu leichter Rauch- und Geruchsentwicklung kommen. Das ist
normal und völlig ungefährlich. Sorgen Sie für ausreichende Belüftung,
öff nen Sie z. B. ein Fenster.
5) Ziehen Sie den Netzstecker aus der Netzsteckdose.
6) Lassen Sie dann das Gerät 30 Minuten abkühlen bevor Sie es abbauen oder
reinigen.
7) Reinigen Sie das Gerät nach dem erstmaligen Erhitzen erneut, wie in Kapitel
„Reinigung und Pfl ege“ beschrieben.
Aufstellen und Zusammensetzen
WARNUNG! BRANDGEFAHR!
► Stellen Sie das Gerät niemals unter Hängeschränke oder neben Gardinen,
Schrankwände oder andere entzündliche Gegenstände.
► Stellen Sie das Gerät auf eine hitzebeständige Unterlage.
1) Stellen Sie das Basisgerät 6 auf eine ebene Fläche. Diese muss hitzebestän-
dig und spritzbeständig sowie trocken sein. Achten Sie dabei darauf, dass Sie
das Gerät nicht direkt an eine Wand oder einen Schrank stellen.
2) Platzieren Sie nun das Backblech 4
auf dem Basisgerät 6:
Drehen Sie das Backblech 4 so
herum, dass sich das eingeprägte
„UP“ lesbar auf der Oberseite befi ndet. Schieben Sie dann das Backblech 4 zwischen den beiden
Heizelementen 7 hindurch. Die
halbrunde Aussparung am Backblech 4 umschließt das aufsteigen-
de Heizelement 7.
Legen Sie das Backblech 4 dann
auf die sechs dafür vorgesehenen Halter. Die Halter fi xieren das
Backblech 4, so dass es während des Betriebs nicht verrutscht.
3) Setzen Sie die Terrakotta-Kuppel 2 vorsichtig auf das Basisgerät 6. Die
zwei Heizelemente 7 und das Backblech 4 befi nden sich dann im Backraum des Pizzaofens. Beachten Sie, dass Sie die Terrakotta-Kuppel 2 so
aufsetzen, dass keine Öff nung 3 durch das aufsteigende Heizelement 7
versperrt wird. Ansonsten passt kein Pizzaheber 8 durch diese Öff nung 3.
SPO 910 A1 DE
│AT│CH│
25 ■
Page 29

Bedienung und Betrieb
Im Backraum können Sie bis zu sechs Mini-Pizzen gleichzeitig backen. In der
Terrakotta-Kuppel 2 befinden sich dafür sechs Öffnungen 3. Mit den mitgelie-
ferten Pizzahebern 8 schieben Sie die Mini-Pizzen auf das Backblech 4 durch
die Öffnungen 3 hindurch. Wenn die Mini-Pizzen fertig gebacken sind, dann
ziehen Sie diese mit Hilfe der Pizzaheber 8 wieder von dem Backblech 4
herunter.
Mini-Pizzen vorbereiten
1) Bereiten Sie den Pizzateig und den Belag vor. Schneiden Sie die Lebensmittel
in kleine Stücke (1-2 cm).
2) Fetten Sie die Pizzaheber 8 leicht ein, dann lösen sich die fertig gebackenen
Mini-Pizzen leichter von dem Metall.
3) Rollen Sie den Pizzateig 2-4 mm dick aus und stechen Sie mit dem Teigausstecher 9 die Teigstücke aus. Diese Teigstücke sind die Pizzaböden der Mini-
Pizzen und passen auf die Pizzaheber 8.
4) Legen Sie die Pizzaböden auf die Pizzaheber 8. Formen Sie den Rand der
Mini-Pizza, indem Sie den leicht überstehenden Teig etwas nach oben drücken. So entsteht ein kleiner, erhöhter Rand und die Zutaten können nicht so
leicht vom Pizzaboden rutschen.
WARNUNG! BRANDGEFAHR!
► Legen Sie die Zutaten immer nur auf den Pizzaboden! Legen Sie kein
Fleisch oder andere Lebensmittel direkt auf die Pizzaheber 8. Austretendes Fett kann spritzen. Wenn Fett auf die Heizelemente 7 gelangt, können
diese Feuer fangen!
5) Belegen Sie die Pizzaböden nach Wunsch. Achten Sie darauf, dass die
Pizzaheber 8 nicht zu hoch belegt werden. Die Mini-Pizzen passen dann
nicht mehr durch die Öffnungen 3 in der Terrakotta-Kuppel 2.
Mini-Pizzen backen
WARNUNG! VERLETZUNGSGEFAHR!
► Das Gerät und das verwendete Zubehör werden während des Betriebs
sehr heiß. Stellen Sie das Gerät nicht um und berühren Sie nur die Griffe
der Pizzaheber 8.
HINWEIS
► Backen Sie weder große Pizzen noch andere Zutaten direkt auf dem Back-
blech 4. Legen Sie die Mini-Pizzen immer nur auf die zuvor eingefetteten
Pizzaheber 8. Die belegten Pizzaheber 8 legen Sie dann auf dem Backblech 4 ab. Fetten Sie das Backblech 4 nicht ein.
│AT│
CH
SPO 910 A1■ 26 │ DE
Page 30

Bereiten Sie das Gerät so vor, wie in dem Kapitel „Aufstellen und Zusammensetzen“ beschrieben.
1) Bereiten Sie die Mini-Pizzen vor.
2) Stecken Sie den Netzstecker in die Netzsteckdose. Die Kontrolleuchte 5
leutet rot und signalisiert, dass das Gerät in Betrieb ist. Die Heizelemente 7
beginnen sich zu erhitzen.
3) Lassen Sie das Gerät 10 Minuten vorheizen.
4) Schieben Sie die Pizzaheber 8 durch die Öffnungen 3 in der TerrakottaKuppel 2 und legen diese auf dem Backblech 4 ab. Achten Sie dabei darauf, dass die Zutaten nicht das obere Heizelement 7 berühren.
WARNUNG! VERLETZUNGSGEFAHR!
► Die Pizzaheber 8 werden sehr heiß! Fassen Sie diese daher nur an den
Kunststoffgriffen an!
ACHTUNG! SACHSCHADEN!
► Achten Sie darauf, dass keine Zutaten von den Mini-Pizzen auf das Back-
blech 4 fallen. Im Backraum verbleibende Zutatenreste brennen an!
5) Lassen Sie die Mini-Pizzen ca. 7-12 Minuten backen. Die Backzeit hängt von
der Dicke des Teiges und der Menge der Zutaten ab und kann deshalb variieren.
6) Ziehen Sie die Pizzaheber 8 an den Griffen vorsichtig aus dem Gerät, sobald die Zutaten gar sind und die Mini-Pizzen den gewünschten Bräunungsgrad erreicht haben.
HINWEIS
► Auf der Warmhaltefläche 1 können Sie Mini-Pizzen ablegen. Legen Sie
dort nur fertig gebackene Mini-Pizzen ab und keine anderen Zutaten.
► Beachten Sie, dass die Mini-Pizzen dabei weiter garen. Sie können trocken
werden, wenn Sie zu lange auf der Warmhaltefläche 1 liegen.
7) Legen Sie einzelne Pizzaheber 8 nach der Verwendung auf einer stabilen
und hitzebeständigen Unterlage ab. Nachdem die Pizzaheber 8 etwas
abgekühlt sind, können sie erneut verwendet werden. Fetten Sie diese zuvor
ggfs. erneut leicht ein.
8) Wenn Sie das Gerät nicht weiter benötigen, dann ziehen Sie den Netzstecker
aus der Netzsteckdose. Die rote Kontrolleuchte 5 erlischt.
9) Lassen Sie das Gerät 30 Minuten abkühlen, bevor Sie es abbauen und reinigen.
SPO 910 A1 DE
│AT│
CH
│
27 ■
Page 31

Reinigung und Pflege
GEFAHR! ELEKTRISCHER SCHLAG!
► Ziehen Sie vor jeder Reinigung den Netzstecker aus der Netzsteckdose!
Es besteht die Gefahr eines elektrischen Schlages!
Tauchen Sie das Gerät niemals in Wasser oder andere Flüssigkeiten!
WARNUNG! VERLETZUNGSGEFAHR!
► Lassen Sie das Gerät immer erst abkühlen, bevor Sie es reinigen. Es besteht
Verbrennungsgefahr!
ACHTUNG! SACHSCHADEN!
► Verwenden Sie keine scheuernden oder aggressiven Reinigungsmittel.
Diese können die Oberflächen irreparabel beschädigen!
► Setzen Sie die Terrakotta-Kuppel 2 zum Abkühlen keiner großen Kälte
aus, das Material kann reißen! Lassen Sie es bei Zimmertemperatur abkühlen.
► Erhitzen Sie die Terrakotta-Kuppel 2 erst wieder, wenn sie vollständig
durchgetrocknet ist. Das feuchte Material kann reißen!
► Reinigen Sie die Terrakotta-Kuppel 2 und das Basisgerät 6 niemals in der
Spülmaschine!
HINWEIS
► Die Terrakotta-Kuppel 2 ist ein Produkt aus natürlichen Materialien. Ver-
wenden Sie keine chemischen Reinigungsmittel, um sie zu säubern. Nach
wiederholter Verwendung wird sich zunehmend eine Patina bilden. Diese
Verfärbung des Materials ist normal und hat keine Beeinträchtigung der
Funktion zur Folge. Auch für die Hygiene ist es unbedeutend.
► Eine bleibende Verfärbungen des Backblechs 4 kann ebenso auftreten, da
es dicht an den Heizelementen 7 liegt. Lassen Sie das Backblech 4 zur
Reinigung ggfs. in Wasser einweichen, dem Sie etwas Spülmittel hinzufügen.
■ Reinigen Sie die Terrakotta-Kuppel 2 vorsichtig mit warmem Wasser und
einem Spültuch. Sie können auche eine weiche Bürste dazu verwenden. Legen Sie die Terrakotta-Kuppel 2 nicht in Spülwasser ein, denn das Material
saugt Wasser auf. Lassen Sie sie gut an der Luft trocknen. Sorgen Sie dafür,
dass die Terrakotta-Kuppel 2 vollständig durchgetrocknet ist, bevor Sie sie
erneut erhitzen.
■ Wischen Sie das Basisgerät 6 inkl. der vollständig abgekühlten Heizelemen-
te 7 mit einem feuchten Tuch ab. Geben Sie bei Bedarf ein mildes Spülmittel
auf das Tuch und wischen Sie mit einem nur mit Wasser befeuchteten Tuch
nach. Trocknen Sie alles gut ab.
│AT│
CH
SPO 910 A1■ 28 │ DE
Page 32
■ Reinigen Sie das Backblech 4, die Pizzaheber 8 und den
Teigausstecher 9 in warmem Spülwasser. Wenn die Teile stärker verschmutzt
sind, können sie diese ggfs. etwas einweichen lassen. Trocknen Sie alle Teile
nach der Reinigung gut ab.
HINWEIS
Für eine schonende Reinigung empfehlen wir mit der Hand zu spülen.
Die Pizzaheber 8, das Backblech 4 und der Teigausstecher 9 sind
jedoch auch spülmaschinengeeignet. Legen Sie diese in das obere
Fach der Spülmaschine und achten Sie darauf, das keine Teile eingeklemmt werden.
Aufbewahrung
■ Bewahren Sie das abgekühlte, gereinigte Gerät und Zubehör an einem staub-
freien und trockenen Ort auf. Die Terrakotta-Kuppel 2 nicht verschlossen
aufbewahren, sondern an einem Ort, an dem etwas Luft zirkuliert.
Fehlerbehebung
Fehler Ursache Lösung
Der Netzstecker ist nicht mit
dem Stromnetz verbunden.
Die Netzsteckdose ist defekt.
Das Gerät
funktioniert
nicht.
Sollten sich die Störungen nicht mit oben stehenden Lösungen beheben lassen
oder, wenn Sie andere Arten von Störungen feststellen, wenden Sie sich bitte an
unseren Kundenservice.
Das Gerät ist defekt.
Der Überhitzungsschutz wurde ausgelöst.
Stecken Sie den Netzstecker in
eine Netzsteckdose.
Benutzen Sie eine andere Netzsteckdose.
Wenden Sie sich an den KundenService.
Ziehen Sie den Netzstecker aus
der Netzsteckdose und warten
Sie, bis sich das Gerät abgekühlt
hat. Sollte das Gerät auch nach
dem Abkühlen nicht funktionieren, wenden Sie sich an den
Kundenservice.
SPO 910 A1 DE
│AT│
CH
│
29 ■
Page 33

Entsorgung
Das Symbol einer durchgestrichenen Mülltonne auf Rädern zeigt an, dass dieses
Gerät der Richtlinie 2012/19/EU unterliegt. Diese Richtlinie besagt, dass Sie
dieses Gerät am Ende seiner Nutzungszeit nicht mit dem normalen Haushaltsmüll
entsorgen dürfen, sondern in speziell eingerichteten Sammelstellen, Wertstoffhöfen oder Entsorgungsbetrieben abgeben müssen. Diese Entsorgung ist für Sie
kostenfrei. Schonen Sie die Umwelt und entsorgen Sie fachgerecht.
Möglichkeiten zur Entsorgung des ausgedienten Produkts erfahren Sie bei Ihrer
Gemeinde- oder Stadtverwaltung.
Das Produkt ist recycelbar, unterliegt einer erweiterten Herstellerverantwortung
und wird getrennt gesammelt.
Garantie der Kompernaß Handels GmbH
Sehr geehrte Kundin, sehr geehrter Kunde,
Sie erhalten auf dieses Gerät 3 Jahre Garantie ab Kaufdatum. Im Falle von Män-
geln dieses Produkts stehen Ihnen gegen den Verkäufer des Produkts gesetzliche
Rechte zu. Diese gesetzlichen Rechte werden durch unsere im Folgenden dargestellte Garantie nicht eingeschränkt.
Garantiebedingungen
Die Garantiefrist beginnt mit dem Kaufdatum. Bitte bewahren Sie den Kassenbon
gut auf. Dieser wird als Nachweis für den Kauf benötigt.
Tritt innerhalb von drei Jahren ab dem Kaufdatum dieses Produkts ein Materialoder Fabrikationsfehler auf, wird das Produkt von uns – nach unserer Wahl – für
Sie kostenlos repariert, ersetzt oder der Kaufpreis erstattet. Diese Garantieleistung setzt voraus, dass innerhalb der Dreijahresfrist das defekte Gerät und der
Kaufbeleg (Kassenbon) vorgelegt und schriftlich kurz beschrieben wird, worin
der Mangel besteht und wann er aufgetreten ist.
Wenn der Defekt von unserer Garantie gedeckt ist, erhalten Sie das reparierte
oder ein neues Produkt zurück. Mit Reparatur oder Austausch des Produkts beginnt kein neuer Garantiezeitraum.
Garantiezeit und gesetzliche Mängelansprüche
Die Garantiezeit wird durch die Gewährleistung nicht verlängert. Dies gilt auch
für ersetzte und reparierte Teile. Eventuell schon beim Kauf vorhandene Schäden
und Mängel müssen sofort nach dem Auspacken gemeldet werden. Nach Ablauf
der Garantiezeit anfallende Reparaturen sind kostenpflichtig.
│AT│
CH
SPO 910 A1■ 30 │ DE
Page 34

Garantieumfang
Das Gerät wurde nach strengen Qualitätsrichtlinien sorgfältig produziert und vor
Auslieferung gewissenhaft geprüft.
Die Garantieleistung gilt für Material- oder Fabrikationsfehler. Diese Garantie
erstreckt sich nicht auf Produktteile, die normaler Abnutzung ausgesetzt sind und
daher als Verschleißteile angesehen werden können oder für Beschädigungen an
zerbrechlichen Teilen, z. B. Schalter, Akkus oder Teile, die aus Glas gefertigt sind.
Diese Garantie verfällt, wenn das Produkt beschädigt, nicht sachgemäß benutzt
oder gewartet wurde. Für eine sachgemäße Benutzung des Produkts sind alle in
der Bedienungsanleitung aufgeführten Anweisungen genau einzuhalten. Verwendungszwecke und Handlungen, von denen in der Bedienungsanleitung abgeraten oder vor denen gewarnt wird, sind unbedingt zu vermeiden.
Das Produkt ist nur für den privaten und nicht für den gewerblichen Gebrauch bestimmt. Bei missbräuchlicher und unsachgemäßer Behandlung, Gewaltanwendung und bei Eingriffen, die nicht von unserer autorisierten Serviceniederlassung
vorgenommen wurden, erlischt die Garantie.
Abwicklung im Garantiefall
Um eine schnelle Bearbeitung Ihres Anliegens zu gewährleisten, folgen Sie bitte
den folgenden Hinweisen:
■ Bitte halten Sie für alle Anfragen den Kassenbon und die Artikelnummer
(IAN)388914_2107 als Nachweis für den Kauf bereit.
■ Die Artikelnummer entnehmen Sie bitte dem Typenschild am Produkt, einer
Gravur am Produkt, dem Titelblatt der Bedienungsanleitung (unten links) oder
dem Aufkleber auf der Rück- oder Unterseite des Produktes.
■ Sollten Funktionsfehler oder sonstige Mängel auftreten, kontaktieren Sie zu-
nächst die nachfolgend benannte Serviceabteilung telefonisch oder
perE-Mail.
■ Ein als defekt erfasstes Produkt können Sie dann unter Beifügung des Kaufbelegs
(Kassenbon) und der Angabe, worin der Mangel besteht und wann er aufgetreten ist, für Sie portofrei an die Ihnen mitgeteilte Serviceanschrift übersenden.
Auf www.lidl-service.com können Sie diese und viele weitere Handbücher,
Produktvideos und Installationssoftware herunterladen.
Mit diesem QR-Code gelangen Sie direkt auf die Lidl-Service-Seite
(www.lidl-service.com) und können durch die Eingabe der Artikelnummer
(IAN)388914_2107 Ihre Bedienungsanleitung öffnen.
SPO 910 A1 DE
│AT│
CH
│
31 ■
Page 35
Service
Service Deutschland
Tel.: 0800 5435 111 (kostenfreiausdemdt.Festnetz / Mobilfunknetz)
E-Mail: [email protected]
Service Österreich
Tel.: 0820 201 222 (0,15 EUR / Min.)
E-Mail: [email protected]
Service Schweiz
Tel.: 0842 665566 (0,08CHF / Min.,Mobilfunkmax.0,40CHF / Min.)
E-Mail: [email protected]
IAN 388914_2107
Importeur
Bitte beachten Sie, dass die folgende Anschrift keine Serviceanschrift ist.
Kontaktieren Sie zunächst die benannte Servicestelle.
KOMPERNASS HANDELS GMBH
BURGSTRASSE 21
44867 BOCHUM
DEUTSCHLAND
www.kompernass.com
Rezepte
In den Rezeptbeispielen finden Sie zwei verschiedene Arten von Pizzaböden.
Die Beläge sind vielfältig veränderbar. Belegen Sie die Pizza ganz nach Ihrem
Geschmack und Ihren Vorlieben. Beachten Sie jedoch dabei, dass die Backzeit
je nach Belag und Menge varriert.
Salamipizza mit Weizenmehl-Boden
Zutaten (für ca. 8-12 Mini-Pizzen)
Für den Teig:
■ 250 g Weizenmehl
■ 150 ml lauwarmes Wasser
■ 7 g frische Hefe oder 1/2 Beutel Trockenhefe (3-4 g)
■ 10 ml Olivenöl
■ 1/2 TL Zucker
■ 1/2 TL Salz
│AT│
CH
SPO 910 A1■ 32 │ DE
Page 36

Für die Tomatensauce:
■ 100 g passierte Tomaten
■ 1 Knoblauchzehe
■ 1/2 TL getrockneter Oregano
■ 1 Prise Salz und Pfeffer nach Geschmack
Für den Belag:
■ 100 g Salamischeiben
■ 150 g geriebenen Käse (z.B. Gouda oder Gratin-Käse)
Zubereitung:
1) Die Hefe und den Zucker in 3 EL lauwarmem Wasser auflösen.
2) Das Mehl mit dem Salz, dem Öl und der Hefe-Zucker-Lösung in einer Schüssel vermengen.
3) Das restliche Wasser nach und nach hinzufügen und in den Teig einarbeiten.
4) Kneten Sie den Teig so lange, bis eine glatte Oberfläche entsteht.
5) Den Teig mit einem sauberen Tuch zudecken und an einem warmen Ort
1 Stunde ruhen lassen.
6) Bereiten Sie die Sauce und die weiteren Zutaten vor: Knoblauch in kleine
Stücke schneiden oder die Zehen durch eine Knoblauchpresse drücken. Die
passierten Tomaten mit dem Knoblauch und dem Oregano mischen, mit Salz
und Pfeffer würzen. Salamischeiben in kleine Stücke schneiden.
7) Legen Sie den Teig nach der Ruhezeit auf eine bemehlte Arbeitsfläche. Für
die weitere Bearbeitung können Sie ihn in zwei Stücke teilen und diese jeweils
einzeln bearbeiten.
8) Das Teigstück 2-4 mm dick ausrollen und mit dem Teigausstecher 9 die Pizzaböden ausstechen. Legen Sie die Pizzaböden auf die leicht eingefetteten
Pizzaheber 8. Formen Sie den Rand der Mini-Pizza, indem Sie den leicht
überstehenden Teig etwas nach oben drücken. So entsteht ein kleiner, erhöhter Rand und die Zutaten können nicht so leicht vom Pizzaboden rutschen.
9) Mit der Tomatensauce bestreichen, dann mit Salami und Käse belegen.
10) Schieben Sie die Pizzaheber 8 durch die Öffnungen 3 auf das
Backblech 4. Lassen Sie die Pizzen ca. 7-12 Minuten backen. Die Backzeit
hängt von der Dicke des Teiges und der Menge der Zuaten ab und kann
deshalb variieren.
TIPP: Als schnelle Alternative können Sie auch fertig gekauften Pizzateig verwenden. Belegen Sie diesen nach Wunsch mit Tomatensauce und weiteren Zutaten.
SPO 910 A1 DE
│AT│
CH
│
33 ■
Page 37

Vegetarische Pizza mit Dinkel-Vollkorn-Boden
Zutaten (für ca. 8-12 Mini-Pizzen)
Für den Teig:
■ 150 g Dinkelmehl
■ 50 g Dinkelvollkornmehl
■ 150 ml lauwarmes Wasser
■ 7 g frische Hefe oder 1/2 Beutel Trockenbackhefe (3-4 g)
■ 1 TL Honig
■ 1 EL Olivenöl
■ 1/2 TL Salz
Für die Tomatensauce:
■ 100 g passierte Tomaten
■ 1/2 TL getrockneter Oregano
■ 1 Prise Salz und Pfeffer nach Geschmack
Für den Belag:
■ 100 g Mais aus der Dose
■ 100 g rote Paprika
■ 1 mittelgroße Zwiebeln
■ 150 g geriebener Käse (z.B. Gouda oder Gratin-Käse)
Zubereitung:
1) Dinkelvollkornmehl und Dinkelmehl in eine Schüssel füllen und vermischen.
Entnehmen Sie der Mehlmischung wieder 100 g.
2) Füllen Sie die 100 g Mehlmischung in eine andere Schüssel und fügen das
lauwarme Wasser, die Trockenhefe und den Honig hinzu. Alles gut zu einem
Vorteig kneten.
3) Legen Sie den Vorteig in eine Schüssel, decken diese mit einem sauberen
Tuch oder mit Frischhaltefolie ab. Lassen sie das Ganze 30 Minuten ruhen.
4) Fügen Sie zu dem Vorteig die restlichen Zutaten hinzu. Vermengen Sie alles
miteinander und kneten dies durch bis ein Teig mit glatter Oberfläche entsteht.
5) Legen Sie den Teig in eine Schüssel, decken diese erneut mit einem sauberen
Tuch oder mit Frischhaltefolie ab. Lassen Sie den Teig ein zweites Mal ruhen,
diesmal für die Dauer von 3-4 Stunden.
│AT│
CH
SPO 910 A1■ 34 │ DE
Page 38

HINWEIS
► Sie können den Hefeteig auch über Nacht im Kühlschrank ruhen lassen.
Legen Sie ihn in eine Schüssel, decken diese mit einem Tuch oder mit Frischhaltefolie ab und lassen ihn für eine Dauer von 18-24 Stunden ruhen. Der
Teig wird weiter aufgehen, wenn auch etwas langsamer als bei Zimmertemperatur. Achten Sie darauf, dass in dem Gefäß noch Platz dafür ist.
6) Bereiten Sie die Sauce und die weiteren Zutaten vor: Die passierten Tomaten
mit dem Knoblauch und dem Oregano mischen, mit Salz und Pfeffer würzen.
Paprika in kleine Würfel schneiden, die Zwiebeln halbieren und in kurze Streifen schneiden.
7) Legen Sie den Teig nach der Ruhezeit auf eine bemehlte Arbeitsfläche. Für
die weitere Bearbeitung können Sie ihn in zwei Stücke teilen und diese jeweils
einzeln weiter bearbeiten.
8) Das Teigstück 2-4 mm dick ausrollen und mit dem Teigausstecher 9 die Pizzaböden ausstechen. Streuen Sie etwas Mehl auf den Teig, sollte er kleben
und drücken ihn ggfs. mit bemehlten Fingern und dem Handballen flach.
9) Legen Sie die Pizzaböden auf die leicht eingefetteten Pizzaheber 8. Formen
Sie den Rand der Mini-Pizza, indem Sie den leicht überstehenden Teig etwas
nach oben drücken. So entsteht ein kleiner, erhöhter Rand und die Zutaten
können nicht so leicht vom Pizzaboden rutschen.
10) Mit der Tomatensauce bestreichen, mit Mais, Paprika und Zwiebelstreifen
belegen. Abschließend Käse darauf streuen.
11) Schieben Sie die Pizzaheber 8 durch die Öffnungen 3 auf das
Backblech 4. Lassen Sie die Pizzen ca. 7-12 Minuten backen. Die Backzeit
hängt von der Dicke des Teiges und der Menge der Zuaten ab und kann
deshalb variieren.
TIPP: Streuen Sie nach dem Backen etwas gewaschenen und klein geschnittenen
Rukola-Salat auf die Pizza. Die Mini-Pizza bekommt dadurch einen frisch-würzgen Geschmack!
SPO 910 A1 DE
│AT│
CH
│
35 ■
Page 39

│AT│
CH
SPO 910 A1■ 36 │ DE
Page 40

Table des matières
Introduction ..................................................38
Utilisation conforme à l'usage prévu .............................38
Matériel livré et inspection après transport ........................38
Déballage ............................................................. 39
Élimination de l'emballage .................................................39
Description de l'appareil .......................................39
Caractéristiques techniques .....................................40
Avertissements de sécurité ......................................40
Avant la première utilisation ....................................42
Installation et assemblage ......................................43
Utilisation et fonctionnement ....................................44
Préparer les mini-pizzas ................................................... 44
Cuire des mini-pizzas .....................................................44
Nettoyage et entretien .........................................46
Rangement ..................................................47
Dépannage ..................................................47
Recyclage ....................................................48
Garantie pour Kompernass Handels GmbH pour la Belgique .........48
Garantie pour Kompernass Handels GmbH pour la France ...........50
Service après-vente ...........................................53
Importateur ..................................................53
Recettes .....................................................53
Pizza au salami avec un fond en farine de blé .................................53
Pizza végétarienne avec un fond en farine d'épeautre complet ....................55
│
SPO 910 A1 FR
│
BE
37 ■
Page 41

Introduction
Toutes nos félicitations pour l'achat de votre nouvel appareil.
Vous venez ainsi d'opter pour un produit de grande qualité. Le mode d'emploi fait
partie intégrante de ce produit. Il contient des remarques importantes concernant
la sécurité, l'utilisation et le recyclage. Avant d'utiliser le produit, veuillez vous
familiariser avec toutes les consignes d'utilisation et avertissements de sécurité.
N'utilisez le produit que conformément aux descriptions et pour les domaines
d'utilisation indiqués. Si vous cédez le produit à un tiers, remettez-lui également
tous les documents.
Utilisation conforme à l'usage prévu
Cet appareil est destiné exclusivement à la cuisson de mini-pizzas à l'intérieur.
Toute utilisation autre ou dépassant ce cadre est réputée non conforme.
L'appareil n'est pas conçu pour être utilisé dans des secteurs commerciaux ou
industriels.
Aucune réclamation ne sera prise en compte pour des dommages résultant d'une
utilisation du matériel non conforme à sa destination, de réparations effectuées
incorrectement, de modifications non autorisées, ou encore de l'utilisation de
pièces de rechange non agréées. L'utilisateur répond lui seul des risques encourus.
Matériel livré et inspection après transport
L'appareil est livré équipé standard avec les composants suivants:
▯ Four à pizza (appareil de base, plaque de cuisson et dôme en terre cuite)
▯ 6 pelles à pizza
▯ Emporte-pièce
▯ Mode d'emploi
REMARQUE
► Vérifiez si la livraison est au complet et ne présente aucun dégât apparent.
► Le dôme en terre cuite est fait main avec des matériaux naturels. Le produit
peut donc présenter de petites irrégularités, qui ne diminuent en aucun cas
la qualité du produit. La stabilité du dôme en terre cuite n'en est pas affectée !
► En cas de livraison incomplète ou de dommages résultant d'un emballage
défectueux ou du transport, veuillez vous adresser au service après-vente
(voir chapitre "Service après-vente").
│
BE
SPO 910 A1■ 38 │ FR
Page 42
Déballage
AVERTISSEMENT! RISQUE DE BLESSURES!
► Les matériaux d'emballage ne doivent pas être utilisés par les enfants pour
jouer. Risque d'étouffement!
1) Sortez du carton toutes les pièces de l'appareil et le mode d'emploi.
2) Enlevez tout le matériel d'emballage, ainsi que les éventuels films et autocollants de l'appareil.
Élimination de l'emballage
Les matériaux d'emballage ont été sélectionnés selon des critères de respect de
l'environnement, de technique d'élimination et de recyclage. Veuillez éliminer
les matériaux d'emballage qui ne servent plus en respectant la réglementation
locale.
Recyclez l'emballage d'une manière respectueuse de l'environnement. Observez
le marquage sur les différents matériaux d'emballage et triez-les séparément si
nécessaire. Les matériaux d'emballage sont repérés par des abréviations (a) et
des numéros (b) qui ont la signification suivante: 1-7: plastiques, 20-22: papier
et carton, 80-98: matériaux composites.
REMARQUE
► Dans la mesure du possible, conservez l'emballage d'origine pendant la
période sous garantie pour pouvoir emballer et expédier l'appareil en
bonne et due forme si vous étiez amené à faire valoir la garantie.
Description de l'appareil
Figure A:
1 Surface de maintien au chaud
2 Dôme en terre cuite
3 Ouverture
4 Plaque de cuisson
5 Témoin lumineux (rouge, allumé lors du fonctionnement)
6 Appareil de base
7 Éléments chauffants (supérieur et inférieur)
Figure B:
8 Pelles à pizza
9 Emporte-pièce
SPO 910 A1 FR
│
BE
│
39 ■
Page 43

Caractéristiques techniques
Tension secteur 220-240 V ∼ (courant alternatif), 50-60 Hz
Puissance absorbée 910W
Toutes les parties de cet appareil en contact
avec des aliments conviennent aux produits
alimentaires.
Avertissements de sécurité
DANGER! ÉLECTROCUTION!
► Avant d'utiliser l'appareil, vérifiez que celui-ci ne présente
aucun dégât extérieur visible. Ne mettez pas en service un
appareil endommagé ou qui a chuté.
► N'exposez pas l'appareil à la pluie et ne l'utilisez jamais
dans un environnement humide ou mouillé. Assurez-vous
que le cordon d'alimentation ne soit jamais mouillé ou
humide pendant le fonctionnement de l'appareil.
► L'appareil doit être raccordé à une prise secteur avec un
conducteur de protection.
► Évitez tout contact du cordon d'alimentation avec des objets
brûlants. N'utilisez jamais l'appareil à proximité d'une flamme nue, d'une plaque chauffante ou d'un four chauffé.
► Le cordon d'alimentation doit régulièrement être contrôlé
pour vérifier qu'il n'est pas endommagé. Si le cordon
d'alimentation est endommagé, il ne faut plus utiliser
l'appareil.
► Si le cordon d'alimentation de cet appareil est endommagé,
il doit être remplacé par le fabricant, son service après-vente
ou une personne de qualification similaire afin d'éviter tout
risque.
► Il faut impérativement éviter tout contact avec l'humidité,
comme par ex. de la pluie ou des zones mouillées.
│
BE
SPO 910 A1■ 40 │ FR
Page 44
DANGER! ÉLECTROCUTION!
N'immergez jamais l'appareil dans de l'eau ni dans
d'autres liquides! Il y a danger de mort par électrocution si des restes de liquide entrent en contact avec des
pièces sous tension pendant le fonctionnement.
AVERTISSEMENT! RISQUE DE BLESSURES!
► Cet appareil peut être utilisé par des enfants à partir de
8ans et par des personnes ayant des capacités physiques,
sensorielles ou mentales réduites ou un manque d'expérience
et/ou de connaissances à condition qu'ils soient supervisés
ou qu'ils aient reçu des instructions concernant l'utilisation
de l'appareil en toute sécurité et qu'ils aient compris les
dangers en résultant.
► Ne pas laisser les enfants jouer avec l'appareil.
► Le nettoyage et la maintenance utilisateur ne doivent pas
être effectués par des enfants à moins qu'ils aient plus de
8ans et soient sous surveillance.
► Maintenir l'appareil et son cordon d'alimentation hors de
portée des enfants de moins de 8ans.
► Après utilisation, laissez l'appareil refroidir avant de le
nettoyer! Risque de brûlure!
► Dans la mesure du possible, placez l'appareil à proximité
immédiate d'une prise de courant. Veillez à ce que la fiche
secteur soit rapidement accessible en cas de danger et à ce
que le cordon d'alimentation ne fasse trébucher personne.
► Veillez à ce que l'appareil soit posé bien d'aplomb.
► Utilisez toujours le four à pizza avec le dôme en terre cuite.
Prudence! Surface brûlante!
► L'appareil et les accessoires utilisés deviennent très chauds
en cours de fonctionnement. Ne déplacez pas l'appareil et
touchez uniquement les poignées des pelles à pizza.
SPO 910 A1 FR
│
BE
│
41 ■
Page 45

ATTENTION! RISQUE DE DÉGÂTS MATÉRIELS!
► N'utilisez pas de minuterie externe ni de dispositif de com-
mande à distance séparé pour faire fonctionner l'appareil.
► Ne laissez jamais l'appareil sans surveillance lorsque vous
l'utilisez.
► Assurez-vous que l'appareil, le cordon d'alimentation ou
la fiche secteur n'entre pas en contact avec des sources de
chaleur telles que des plaques de cuisson ou des flammes
nues.
► N'utilisez pas de charbon ou de combustibles similaires
pour faire fonctionner l'appareil!
► Ne recouvrez jamais le four à pizza avec des torchons ou
d'autres objets pendant la cuisson. Ils risquent de prendre
feu !
► Manipulez le dôme en terre cuite avec précaution. Il risque
de se briser !
► Utilisez l'appareil uniquement avec les accessoires d'origine
fournis.
Avant la première utilisation
1) Nettoyez les pièces comme décrit au chapitre "Nettoyage et entretien"
afin de retirer d'éventuels résidus de production. Assurez-vous que toutes
les pièces sont bien sèches avant de mettre l'appareil en service.
AVERTISSEMENT! RISQUE D'INCENDIE!
► N'installez jamais l'appareil sous des placards suspendus ou à côté de
rideaux, de parois d'armoire ou d'autres objets inflammables.
► N'installez l'appareil que sur un support résistant à la chaleur.
2) Posez l'appareil comme décrit au chapitre "Installation et assemblage".
3) Branchez la fiche secteur dans la prise secteur. Le témoin lumineux 5
s'allume en rouge et signalise que l'appareil fonctionne. Les éléments chauffants 7 commencent à chauffer.
4) Laissez l'appareil chauffer pendant 10 minutes.
│
BE
SPO 910 A1■ 42 │ FR
Page 46
REMARQUE
► Lorsque vous faites chauff er l'appareil pour la première fois, les résidus
de fabrication peuvent entraîner un léger dégagement de fumée ou une
légère odeur. Ce phénomène est tout à fait normal et sans risque. Assurez
une aération suffi sante, en ouvrant une fenêtre par exemple.
5) Débranchez la fi che secteur de la prise secteur.
6) Laissez ensuite refroidir l'appareil pendant 30 minutes avant de le désassembler
ou de le nettoyer.
7) Nettoyez à nouveau l'appareil après l'avoir fait chauff er pour la première
fois, comme décrit au chapitre "Nettoyage et entretien".
Installation et assemblage
AVERTISSEMENT! RISQUE D'INCENDIE!
► N'installez jamais l'appareil sous des placards suspendus ou à côté de
rideaux, de parois d'armoire ou d'autres objets infl ammables.
► Installez l'appareil sur un support résistant à la chaleur.
1) Placez l'appareil de base 6 sur une surface plane. Cette dernière doit résister à la chaleur et aux éclaboussures et être sèche. Veillez ce faisant à ne pas
placer l'appareil directement contre un mur ou un placard.
4 directement sur les six supports prévus à cet eff et. Les supports fi xent la
plaque de cuisson 4 de manière à ce qu'elle ne glisse pas pendant le fonctionnement.
3) Posez le dôme en terre cuite 2 avec précaution sur l'appareil de base 6.
Les deux éléments chauff ants 7 et la plaque de cuisson 4 se trouvent alors
dans l'espace de cuisson du four à pizza. Veillez à poser le dôme en terre
cuite 2 de manière à ce qu'aucune ouverture 3 ne soit bloquée par
l'élément chauff ant 7 montant. Sinon les pelles à pizza 8 ne passent pas
dans cette ouverture 3.
2) Positionnez maintenant la plaque
de cuisson 4 sur l'appareil de base
6: tournez la plaque de cuisson 4
de manière à ce que la mention
"UP" se trouve de manière bien
lisible sur le dessus. Glissez ensuite
la plaque de cuisson 4 entre les
deux éléments chauff ants 7.
L'évidement semi-circulaire sur la
plaque de cuisson 4 entoure
l'élément chauff ant 7 montant.
Placez ensuite la plaque de cuisson
SPO 910 A1 FR
│BE│
43 ■
Page 47

Utilisation et fonctionnement
Vous pouvez cuire jusqu'à six mini-pizzas en même temps dans l'espace de cuisson. Le dôme en terre cuite 2 compte six ouvertures 3. Les pelles à pizza 8
fournies permettent de glisser les mini-pizzas sur la plaque de cuisson 4 au
travers des ouvertures 3. Une fois les mini-pizzas cuites, sortez-les à l'aide
des pelles à pizza 8 de la plaque de cuisson 4.
Préparer les mini-pizzas
1) Préparez la pâte à pizza et la garniture. Coupez les aliments en petits
morceaux (1-2 cm).
2) Graissez légèrement les pelles à pizza 8, les mini-pizzas cuites sont alors
plus faciles à décoller du métal.
3) Abaissez la pâte à pizza jusqu'à une épaisseur de 2-4mm et découpez des
morceaux de pâte à pizza adaptés avec l'emporte-pièce 9. Ces morceaux
de pâte forment les fonds de mini-pizzas et sont adaptés aux pelles à pizza
8.
4) Posez les fonds de pizza sur les pelles à pizza 8. Formez le bord de la
mini-pizza en repoussant un peu vers le haut la pâte qui dépasse légèrement.
Vous obtenez ainsi un petit bord surélevé, et les ingrédients ne peuvent pas
glisser aussi facilement du fond de pizza.
AVERTISSEMENT! RISQUE D'INCENDIE!
► Placez toujours les ingrédients sur le fond de pizza seulement ! Ne posez
pas de viande ou d'autres aliments directement sur les pelles à pizza 8.
La graisse qui s'écoule risque de gicler. Si de la graisse entre en contact
avec les éléments chauffants 7, ces derniers risquent de prendre feu !
5) Garnissez les fonds de pizza en fonction de vos envies. Veillez à ce que la
garniture des pelles à pizza 8 ne soit pas trop haute. Les mini-pizzas ne
rentrent alors plus dans les ouvertures 3 du dôme en terre cuite 2.
Cuire des mini-pizzas
AVERTISSEMENT! RISQUE DE BLESSURES!
► L'appareil et les accessoires utilisés deviennent très chauds en cours de
fonctionnement. Ne déplacez pas l'appareil et touchez uniquement les
poignées des pelles à pizza 8.
REMARQUE
► Ne faites pas cuire de grandes pizzas ni d'autres ingrédients directement
sur la plaque de cuisson 4. Posez toujours les mini-pizzas sur les pelles
à pizza 8 préalablement graissées. Posez ensuite les pelles à pizza 8
sur la plaque de cuisson 4. Ne graissez pas la plaque de cuisson 4.
│
BE
SPO 910 A1■ 44 │ FR
Page 48

Préparez l'appareil comme décrit au chapitre "Installation et assemblage".
1) Préparez les mini-pizzas.
2) Branchez la fiche secteur dans la prise secteur. Le témoin lumineux 5
s'allume en rouge et signalise que l'appareil fonctionne. Les éléments chauffants 7 commencent à chauffer.
3) Laissez l'appareil préchauffer pendant 10 minutes.
4) Glissez les pelles à pizza 8 dans les ouvertures 3 du le dôme en terre cuite
2 et posez-les sur la plaque de cuisson 4. Veillez à ce que les ingrédients
ne touchent pas l'élément chauffant 7 supérieur.
AVERTISSEMENT! RISQUE DE BLESSURES!
► Les pelles à pizza 8 deviennent brûlantes! Pour cette raison, ne les saisissez
qu'au niveau des poignées en plastique!
ATTENTION! RISQUE DE DÉGÂTS MATÉRIELS!
► Veillez à ce qu'aucun ingrédient des mini-pizzas ne tombe sur la plaque de
cuisson 4. Les restes d'ingrédients dans l'espace de cuisson brûlent !
5) Faites cuire les mini-pizzas env. 7-12 minutes. Le temps de cuisson dépend de
l'épaisseur de la pâte et de la quantité d'ingrédients et peut de ce fait varier.
6) Sortez les pelles à pizza 8 avec précaution de l'appareil, en les saisissant
par les poignées, dès que les ingrédients sont cuits et que les mini-pizzas ont
atteint le degré de dorage souhaité.
REMARQUE
► Vous pouvez poser les mini-pizzas sur la surface de maintien au chaud 1.
Placez-y uniquement des mini-pizza cuites et aucun autre ingrédient.
► Tenez compte du fait que les pizzas continuent de cuire. Elles risquent de
se dessécher si vous les laissez trop longtemps sur la surface de maintien
au chaud 1.
7) Après les avoir utilisées, posez les pelles à pizza 8 sur une surface stable
et résistant à la chaleur. Une fois les pelles à pizza 8 légèrement refroidies,
vous pouvez les réutiliser. Si nécessaire, graissez-les à nouveau un peu au
préalable.
8) Débranchez la fiche secteur de la prise secteur lorsque vous n'avez plus
besoin de l'appareil. Le témoin lumineux rouge 5 s'éteint.
9) Laissez refroidir l'appareil pendant 30 minutes avant de le désassembler
et de le nettoyer.
SPO 910 A1 FR
│
BE
│
45 ■
Page 49

Nettoyage et entretien
DANGER! RISQUE D'ÉLECTROCUTION!
► Avant chaque nettoyage, retirez la fiche secteur de la prise secteur!
Il existe un risque d'électrocution!
N'immergez jamais l'appareil dans de l'eau ni dans d'autres liquides!
AVERTISSEMENT! RISQUE DE BLESSURES!
► Laissez toujours refroidir l'appareil avant de le nettoyer. Il y a risque de
brûlure!
ATTENTION! RISQUE DE DÉGÂTS MATÉRIELS!
► N'utilisez pas de produits nettoyants abrasifs ou agressifs. Ceux-ci peuvent
détériorer les surfaces de manière irréversible!
► N'exposez pas le dôme en terre cuite 2 à un froid excessif pour le faire
refroidir, le matériau risque de se fêler! Laissez-le refroidir à température
ambiante.
► Ne chauffez à nouveau le dôme en terre cuite 2 qu'une fois entièrement
sec. Le matériau humide risque de se fêler !
► Ne lavez jamais le dôme en terre cuite 2 et l'appareil de base 6 au
lave-vaisselle!
REMARQUE
► Le dôme en terre cuite 2 est un produit en matériaux naturels. N'utilisez
pas de produits nettoyants chimiques pour le nettoyer. Une patine va se
former après plusieurs utilisations. Cette coloration du matériau est normale
et ne perturbe en aucun cas le bon fonctionnement. Elle n'a aucune influence sur l'hygiène.
► Une coloration permanente de la plaque de cuisson 4 peut également sur-
venir, car elle est placée très près des éléments chauffants 7. Si nécessaire,
faites tremper la plaque de cuisson 4 dans de l'eau avec un peu de liquide
vaisselle pour la laver.
■ Nettoyez avec précaution le dôme en terre cuite 2 après chaque utilisation,
avec de l'eau chaude et une lavette. Vous pouvez également utiliser une
brosse à poils souples. Ne mettez pas le dôme en terre cuite 2 dans de
l'eau de vaisselle, car le matériau absorbe l'eau. Laissez-le ensuite sécher à
l'air libre. Veillez à ce que le dôme en terre cuite 2 soit entièrement sec
avant de le faire chauffer à nouveau.
■ Essuyez l'appareil de base 6, y compris les éléments chauffants 7 entière-
ment refroidis à l'aide d'un chiffon humide. Si nécessaire, ajoutez du produit
vaisselle doux sur le chiffon et rincez avec un chiffon uniquement humidifié à
l'eau. Séchez bien le tout.
│
BE
SPO 910 A1■ 46 │ FR
Page 50
■ Nettoyez la plaque de cuisson 4, les pelles à pizza 8 et l'emporte-pièce 9
dans de l'eau de vaisselle chaude. Si les pièces sont plus sales, vous pouvez
le cas échéant les faire tremper un peu. Veillez à bien sécher toutes les pièces
après le nettoyage.
REMARQUE
Rangement
■ Conservez l'appareil refroidi et nettoyé et les accessoires dans un endroit
sec et exempt de poussières. Ne pas ranger le dôme en terre cuite 2 à un
endroit fermé, mais à un endroit avec une bonne circulation d'air.
Dépannage
Erreur Cause Solution
Pour un nettoyage en douceur, nous recommandons un lavage à la
main. Les pelles à pizza 8, la plaque de cuisson 4 et l'emportepièce 9 peuvent cependant être aussi lavés au lave-vaisselle.
Placez-les dans le panier supérieur du lave-vaisselle et veillez à ce
qu'aucune pièce ne soit coincée.
La fiche secteur n'est pas
raccordée au réseau
électrique.
La prise secteur est
défectueuse.
L'appareil
ne fonctionne pas.
Si vous ne parvenez pas à remédier aux pannes à l'aide des solutions données
ci-dessus ou si vous constatez d'autres types de pannes, veuillez vous adresser à
notre Service après-vente.
L'appareil est défectueux.
La protection anti-surchauffe
a été déclenchée.
Branchez la fiche secteur dans
une prise secteur.
Utilisez une autre prise secteur.
Adressez-vous au Service
après-vente.
Débranchez la fiche secteur de
la prise secteur et attendez que
l'appareil refroidisse. Si l'appareil
ne fonctionne toujours pas après
le refroidissement, adressez-vous
au service après-vente.
SPO 910 A1 FR
│
BE
│
47 ■
Page 51

Recyclage
Le symbole d'une poubelle barrée sur roues indique que l'appareil doit respecter
la directive 2012/19/EU. Cette directive stipule que vous ne devez pas éliminer
cet appareil en fin de vie avec les ordures ménagères, mais le rapporter aux
points de collecte, aux centres de recyclage ou aux entreprises de gestion des
déchets spécialement équipés à cet effet. Ce recyclage est gratuit. Respectez
l'environnement et recyclez en bonne et due forme.
Renseignez-vous auprès de votre commune ou des services administratifs de
votre ville pour connaître les possibilités de recyclage du produit usagé.
Le produit récyclable doit être trié ou rapporté dans un point de collecte pour
être recycle.
Garantie pour Kompernass Handels GmbH
pour la Belgique
Chère cliente, cher client,
Cet appareil est garanti 3 ans à partir de la date d’achat. Si ce produit venait à
présenter des vices, vous disposez de droits légaux face au vendeur de ce produit. Vos droits légaux ne sont pas restreints par notre garantie présentée ci-dessous.
Conditions de garantie
La période de garantie débute à la date d’achat. Veuillez bien conserver le ticket
de caisse. Celui-ci servira de preuve d’achat.
Si dans un délai de trois ans suivant la date d’achat de ce produit, un vice de
matériel ou de fabrication venait à apparaître, le produit sera réparé, remplacé
gratuitement par nos soins ou le prix d’achat remboursé, selon notre choix. Cette
prestation sous garantie nécessite, dans le délai de trois ans, la présentation de
l’appareil défectueux et du justificatif d’achat (ticket de caisse) ainsi que la description brève du vice et du moment de son apparition.
Si le vice est couvert par notre garantie, vous recevrez le produit réparé ou un
nouveau produit en retour. Aucune nouvelle période de garantie ne débute avec
la réparation ou l’échange du produit.
Période de garantie et réclamation légale pour vices cachés
L’exercice de la garantie ne prolonge pas la période de garantie. Cette disposition s’applique également aux pièces remplacées ou réparées. Les dommages et
vices éventuellement déjà présents à l’achat doivent être signalés immédiatement
après le déballage. Toute réparation survenant après la période sous garantie
fera l’objet d’une facturation.
│
BE
SPO 910 A1■ 48 │ FR
Page 52

Étendue de la garantie
L’appareil a été fabriqué avec soin conformément à des directives de qualité
strictes et consciencieusement contrôlé avant sa livraison.
La prestation de la garantie s’applique aux vices de matériel et de fabrication.
Cette garantie ne s’étend pas aux pièces du produit qui sont exposées à une usure
normale et peuvent de ce fait être considérées comme pièces d’usure, ni aux détériorations de pièces fragiles, par ex. interrupteurs, batteries ou pièces en verre.
Cette garantie devient caduque si le produit est détérioré, utilisé ou entretenu de
manière non conforme. Toutes les instructions listées dans le manuel d’utilisation
doivent être exactement respectées pour une utilisation conforme du produit. Des
buts d’utilisation et actions qui sont déconseillés dans le manuel d’utilisation, ou
dont vous êtes avertis doivent également être évités.
Le produit est uniquement destiné à un usage privé et ne convient pas à un usage professionnel. La garantie est annulée en cas d’entretien incorrect et inapproprié, d’usage de la force et en cas d’intervention non réalisée par notre centre de
service après-vente agréé.
Procédure en cas de garantie
Afin de garantir un traitement rapide de votre demande, veuillez suivre les indications suivantes :
■ Veuillez avoir à portée de main pour toutes questions le ticket de caisse et la
référence article (IAN)388914_2107 en tant que justificatif de votre achat.
■ Vous trouverez la référence sur la plaque signalétique sur le produit, une
gravure sur le produit, sur la page de garde du mode d’emploi (en bas à
gauche) ou sur l’autocollant au dos ou sur le dessous du produit.
■ Si des erreurs de fonctionnement ou d’autres vices venaient à apparaître,
veuillez d’abord contacter le département service clientèle cité ci-dessous par
téléphone ou par e-mail.
■ Vous pouvez ensuite retourner un produit enregistré comme étant défectueux
en joignant le ticket de caisse et en indiquant en quoi consiste le vice et
quand il est survenu, sans devoir l’affranchir à l’adresse de service après-vente communiquée.
Sur www.lidl-service.com, vous pourrez télécharger ce mode d’emploi et de
nombreux autres manuels, vidéos produit et logiciels d’installation.
Grâce à ce code QR, vous arriverez directement sur le site Lidl service aprèsvente (www.lidl-service.com) et vous pourrez ouvrir votre mode d’emploi en
saisissant votre référence (IAN)388914_2107.
SPO 910 A1 FR
│
BE
│
49 ■
Page 53

Garantie pour Kompernass Handels GmbH
pour la France
Chère cliente, cher client,
Cet appareil est garanti 3 ans à partir de la date d’achat. Si ce produit venait à
présenter des vices, vous disposez de droits légaux face au vendeur de ce produit. Vos droits légaux ne sont pas restreints par notre garantie présentée ci-dessous.
Conditions de garantie
La période de garantie débute à la date d’achat. Veuillez bien conserver le ticket
de caisse. Celui-ci servira de preuve d’achat.
Si dans un délai de trois ans suivant la date d’achat de ce produit, un vice de
matériel ou de fabrication venait à apparaître, le produit sera réparé, remplacé
gratuitement par nos soins ou le prix d’achat remboursé, selon notre choix. Cette
prestation sous garantie nécessite, dans le délai de trois ans, la présentation de
l’appareil défectueux et du justificatif d’achat (ticket de caisse) ainsi que la description brève du vice et du moment de son apparition.
Si le vice est couvert par notre garantie, vous recevrez le produit réparé ou un
nouveau produit en retour. Aucune nouvelle période de garantie ne débute avec
la réparation ou l’échange du produit.
Période de garantie et réclamation légale pour vices cachés
L’exercice de la garantie ne prolonge pas la période de garantie. Cette disposition s’applique également aux pièces remplacées ou réparées. Les dommages et
vices éventuellement déjà présents à l’achat doivent être signalés immédiatement
après le déballage. Toute réparation survenant après la période sous garantie
fera l’objet d’une facturation.
Étendue de la garantie
L’appareil a été fabriqué avec soin conformément à des directives de qualité
strictes et consciencieusement contrôlé avant sa livraison.
La prestation de la garantie s’applique aux vices de matériel et de fabrication.
Cette garantie ne s’étend pas aux pièces du produit qui sont exposées à une usure
normale et peuvent de ce fait être considérées comme pièces d’usure, ni aux détériorations de pièces fragiles, par ex. interrupteurs, batteries ou pièces en verre.
Cette garantie devient caduque si le produit est détérioré, utilisé ou entretenu de
manière non conforme. Toutes les instructions listées dans le manuel d’utilisation
doivent être exactement respectées pour une utilisation conforme du produit. Des
buts d’utilisation et actions qui sont déconseillés dans le manuel d’utilisation, ou
dont vous êtes avertis doivent également être évités.
│
BE
SPO 910 A1■ 50 │ FR
Page 54

Le produit est uniquement destiné à un usage privé et ne convient pas à un usage professionnel. La garantie est annulée en cas d’entretien incorrect et inapproprié, d’usage de la force et en cas d’intervention non réalisée par notre centre de
service après-vente agréé.
Article L217-16 du Code de la consommation
Lorsque l‘acheteur demande au vendeur, pendant le cours de la garantie commerciale qui lui a été consentie lors de l‘acquisition ou de la réparation d‘un bien
meuble, une remise en état couverte par la garantie, toute période
d‘immobilisation d‘au moins sept jours vient s‘ajouter à la durée de la garantie
qui restait à courir. Cette période court à compter de la demande d‘intervention
de l‘acheteur ou de la mise à disposition pour réparation du bien en cause, si
cette mise à disposition est postérieure à la demande d‘intervention.
Indépendamment de la garantie commerciale souscrite, le vendeur reste tenu des
défauts de conformité du bien et des vices rédhibitoires dans les conditions prévues aux articles L217-4 à L217-13 du Code de la consommation et aux articles
1641 à 1648 et 2232 du Code Civil.
Article L217-4 du Code de la consommation
Le vendeur livre un bien conforme au contrat et répond des défauts de
conformité existant lors de la délivrance. Il répond également des défauts de
conformité résultant de l‘emballage, des instructions de montage ou de
l‘installation lorsque celle-ci a été mise à sa charge par le contrat ou a été réalisée sous sa responsabilité.
Article L217-5 du Code de la consommation
Le bien est conforme au contrat :
1° S´il est propre à l‘usage habituellement attendu d‘un bien semblable et, le
cas échéant :
– s‘il correspond à la description donnée par le vendeur et posséder les qua-
lités que celui-ci a présentées à l‘acheteur sous forme d‘échantillon ou de
modèle ;
– s‘il présente les qualités qu‘un acheteur peut légitimement attendre eu
égard aux déclarations publiques faites par le vendeur, par le producteur
ou par son représentant, notamment dans la publicité ou l‘étiquetage ;
2° Ou s‘il présente les caractéristiques définies d‘un commun accord par les par-
ties ou être propre à tout usage spécial recherché par l‘acheteur, porté à la
connaissance du vendeur et que ce dernier a accepté.
Article L217-12 du Code de la consommation
L‘action résultant du défaut de conformité se prescrit par deux ans à compter de
la délivrance du bien.
SPO 910 A1 FR
│
BE
│
51 ■
Page 55

Article 1641 du Code civil
Le vendeur est tenu de la garantie à raison des défauts cachés de la chose vendue qui la rendent impropre à l‘usage auquel on la destine, ou qui diminuent
tellement cet usage que l‘acheteur ne l‘aurait pas acquise, ou n‘en aurait donné
qu‘un moindre prix, s‘il les avait connus.
Article 1648 1er alinéa du Code civil
L‘action résultant des vices rédhibitoires doit être intentée par l‘acquéreur dans
un délai de deux ans à compter de la découverte du vice.
Les pièces détachées indispensables à l’utilisation du produit sont disponibles
pendant la durée de la garantie du produit.
Procédure en cas de garantie
Afin de garantir un traitement rapide de votre demande, veuillez suivre les indications suivantes :
■ Veuillez avoir à portée de main pour toutes questions le ticket de caisse et la
référence article (IAN)388914_2107 en tant que justificatif de votre achat.
■ Vous trouverez la référence sur la plaque signalétique sur le produit, une
gravure sur le produit, sur la page de garde du mode d’emploi (en bas à
gauche) ou sur l’autocollant au dos ou sur le dessous du produit.
■ Si des erreurs de fonctionnement ou d’autres vices venaient à apparaître,
veuillez d’abord contacter le département service clientèle cité ci-dessous par
téléphone ou par e-mail.
■ Vous pouvez ensuite retourner un produit enregistré comme étant défectueux
en joignant le ticket de caisse et en indiquant en quoi consiste le vice et
quand il est survenu, sans devoir l’affranchir à l’adresse de service après-vente communiquée.
Sur www.lidl-service.com, vous pourrez télécharger ce mode d’emploi et de
nombreux autres manuels, vidéos produit et logiciels d’installation.
Grâce à ce code QR, vous arriverez directement sur le site Lidl service aprèsvente (www.lidl-service.com) et vous pourrez ouvrir votre mode d’emploi en
saisissant votre référence (IAN)388914_2107.
│
BE
SPO 910 A1■ 52 │ FR
Page 56

Service après-vente
Service France
Tel.: 0800 919270
E-Mail: [email protected]
Service Belgique
Tel.: 070 270 171 (0,15 EUR/Min.)
E-Mail: [email protected]
IAN 388914_2107
Importateur
Veuillez tenir compte du fait que l’adresse suivante n’est pas une adresse de
service après-vente. Veuillez d’abord contacter le service mentionné.
KOMPERNASS HANDELS GMBH
BURGSTRASSE 21
44867 BOCHUM
ALLEMAGNE
www.kompernass.com
Recettes
Vous trouverez deux types de fonds de pizza dans les exemples de recettes.
Les garnitures peuvent être variées à souhait. Garnissez la pizza en fonction de
vos goûts et de vos préférences. Tenez cependant compte du fait que le temps
de cuisson varie en fonction de la garniture et de la quantité.
Pizza au salami avec un fond en farine de blé
Ingrédients (pour env. 8-12 mini-pizzas)
Pour la pâte :
■ 250g de farine de blé
■ 150ml d'eau tiède
■ 7g de levure fraîche ou 1/2 sachet de levure sèche (3-4g)
■ 10ml d'huile d'olive
■ 1/2 c. à c. de sucre
■ 1/2 c. à c. de sel
SPO 910 A1 FR
│
BE
│
53 ■
Page 57

Pour la sauce tomate :
■ 100 g de coulis de tomates
■ 1 gousse d'ail
■ 1/2 c. à c. d'origan séché
■ 1 pincée de sel et poivre en fonction des goûts
Pour la garniture :
■ 100 g de salami en tranches
■ 150g de fromage râpé (par ex. gouda ou fromage à gratiner)
Préparation:
1) Dissoudre la levure et le sucre dans 3 c. à s. d'eau tiède.
2) Dans un saladier, mélanger la farine, le sel, l'huile et le mélange levure et
sucre.
3) Ajouter peu à peu l'eau restante et l'incorporer à la pâte.
4) Pétrir la pâte jusqu'à ce qu'elle ait une surface lisse.
5) Couvrir la pâte avec un torchon propre et la laisser lever dans un endroit
chaud pendant env. 1 heure.
6) Préparer la sauce et les autres ingrédients : couper l'ail en petits morceaux ou
presser les gousses au presse-ail. Mélanger le coulis de tomates avec l'ail et
l'origan, saler et poivrer. Couper les rondelles de salami en petits morceaux.
7) Une fois levée, posez la pâte sur une surface de travail farinée. Pour la suite,
vous pouvez diviser la pâte en deux morceaux et les travailler respectivement
un à un.
8) Abaisser le morceau de pâte au rouleau sur 2-4 mm d'épaisseur, puis découper
les fonds de pizza à l'emporte-pièce 9. Poser les fonds de pizza sur les
pelles à pizza 8 légèrement graissées. Formez le bord de la mini-pizza en
repoussant un peu vers le haut la pâte qui dépasse légèrement. Vous obtenez
ainsi un petit bord surélevé, et les ingrédients ne peuvent pas glisser aussi
facilement du fond de pizza.
9) Badigeonner de sauce tomate, puis garnir de salami et de fromage.
10) Glisser les pelles à pizza 8 sur la plaque de cuisson 4 au travers des
ouvertures 3. Faites cuire les pizzas env. 7-12 minutes. Le temps de cuisson
dépend de l'épaisseur de la pâte et de la quantité d'ingrédients et peut de
ce fait varier.
CONSEIL : vous pouvez également utiliser une pâte à pizza du commerce pour
aller vite. La garnir en fonction de vos goûts avec de la sauce tomate et d'autres
ingrédients.
│
BE
SPO 910 A1■ 54 │ FR
Page 58

Pizza végétarienne avec un fond en farine d'épeautre
complet
Ingrédients (pour env. 8-12 mini-pizzas)
Pour la pâte :
■ 150 g de farine d'épeautre
■ 50 g de farine d'épeautre complet
■ 150ml d'eau tiède
■ 7g de levure fraîche ou 1/2 sachet de levure sèche (3-4g)
■ 1 c. à c. de miel
■ 1 c. à s. d'huile d'olive
■ 1/2 c. à c. de sel
Pour la sauce tomate :
■ 100 g de coulis de tomates
■ 1/2 c. à c. d'origan séché
■ 1 pincée de sel et poivre en fonction des goûts
Pour la garniture :
■ 100 g de maïs en boîte
■ 100 g de piment rouge
■ 1 oignon de taille moyenne
■ 150g de fromage râpé (par ex. gouda ou fromage à gratiner)
Préparation:
1) Verser la farine d'épeautre complet et la farine d'épeautre dans un bol et
les mélanger. Prélever à nouveau 100 g du mélange de farines.
2) Verser les 100 g de mélange de farine dans un autre bol et ajouter de l'eau
tiède, la levure sèche et le miel. Pétrir bien le tout pour former un levain.
3) Placer le levain dans un bol, le couvrir d'un torchon propre ou de film
plastique. Laisser lever le tout pendant 30 minutes.
4) Ajouter les ingrédients restants au levain. Mélanger bien le tout et pétrir
jusqu'à obtenir une pâte à surface lisse.
5) Placer le levain dans un bol, le couvrir à nouveau d'un torchon propre ou
de film plastique. Faire lever le levain une seconde fois, cette fois pendant
3-4 heures.
SPO 910 A1 FR
│
BE
│
55 ■
Page 59

REMARQUE
► Vous pouvez laisser reposer la pâte levée toute la nuit au réfrigérateur.
Placer le levain dans un bol, le couvrir d'un torchon ou de film plastique et
le laisser reposer pendant 18-24 heures. La pâte continuera à lever, mais
un peu plus lentement qu'à température ambiante. Veiller à ce qu'il y ait
encore de la place dans le bol.
6) Préparer la sauce et les autres ingrédients : mélanger le coulis de tomates
avec l'ail et l'origan, saler et poivrer. Couper le piment en petits dés, couper
les oignons en deux, puis en courtes lamelles.
7) Une fois levée, posez la pâte sur une surface de travail farinée. Pour la suite,
vous pouvez diviser la pâte en deux morceaux et continuer à les travailler
respectivement un à un.
8) Abaisser le morceau de pâte au rouleau sur 2-4 mm d'épaisseur, puis découper
les fonds de pizza à l'emporte-pièce 9. Farinez légèrement la pâte si elle
colle et aplatissez-la si nécessaire avec les doigts farinés et la paume de
main.
9) Poser les fonds de pizza sur les pelles à pizza 8 légèrement graissées.
Formez le bord de la mini-pizza en repoussant un peu vers le haut la pâte
qui dépasse légèrement. Vous obtenez ainsi un petit bord surélevé, et les
ingrédients ne peuvent pas glisser aussi facilement du fond de pizza.
10) Badigeonner de sauce tomate, garnir de maïs, piment et de lamelles
d'oignons. Pour finir, parsemer de fromage.
11) Glisser les pelles à pizza 8 sur la plaque de cuisson 4 au travers des
ouvertures 3. Faites cuire les pizzas env. 7-12 minutes. Le temps de cuisson
dépend de l'épaisseur de la pâte et de la quantité d'ingrédients et peut de
ce fait varier.
CONSEIL : après la cuisson, répartissez un peu de roquette lavée et finement
coupée sur la pizza. Elle donnera à la mini-pizza un goût frais et savoureux.
│
BE
SPO 910 A1■ 56 │ FR
Page 60

Inhoud
Inleiding .....................................................58
Gebruik in overeenstemming met bestemming .....................58
Inhoud van het pakket en inspectie na transport ...................58
Uitpakken .............................................................. 59
De verpakking afvoeren. . . . . . . . . . . . . . . . . . . . . . . . . . . . . . . . . . . . . . . . . . . . . . . . . . . 59
Apparaatbeschrijving ..........................................59
Technische gegevens ..........................................60
Veiligheidsvoorschriften ........................................60
Vóór het eerste gebruik ........................................62
Plaatsing en montage ..........................................63
Bediening en gebruik ..........................................64
Minipizza's voorbereiden .................................................64
Minipizza's bakken ...................................................... 64
Reiniging en onderhoud ........................................66
Opbergen ...................................................67
Problemen oplossen ...........................................67
Afvoeren ....................................................68
Garantie van Kompernaß Handels GmbH .........................68
Service ................................................................ 70
Importeur ..............................................................70
Recepten ....................................................70
Pizza salami met een bodem van tarwemeel ..................................70
Vegetarische pizza met spelt-volkorenbodem .................................. 72
│
SPO 910 A1 NL
│
BE
57 ■
Page 61

Inleiding
Hartelijk gefeliciteerd met de aankoop van uw nieuwe apparaat.
U hebt hiermee gekozen voor een hoogwaardig product. De gebruiksaanwijzing
maakt deel uit van dit product. Hij bevat belangrijke aanwijzingen voor de veiligheid, het gebruik en het afvoeren van dit product. Lees alle bedienings- en veiligheidsaanwijzingen voordat u het product in gebruik neemt. Gebruik het product
uitsluitend op de voorgeschreven wijze en voor de aangegeven doeleinden.
Geef alle documenten mee als u het product doorgeeft aan een derde.
Gebruik in overeenstemming met bestemming
Dit apparaat is uitsluitend bedoeld voor het bakken van minipizza's binnenshuis.
Een ander of verdergaand gebruik geldt als niet in overeenstemming met de
bestemming. Het apparaat is niet bedoeld voor gebruik in commerciële of industriële omgevingen.
De fabrikant aanvaardt geen aansprakelijkheid voor schade als gevolg van niet
met de bestemming overeenkomend gebruik, onvakkundige reparaties, niet-toegestane veranderingen of het gebruik van niet-toegestane vervangingsonderdelen. Het risico ligt uitsluitend bij de gebruiker.
Inhoud van het pakket en inspectie na transport
Het apparaat wordt standaard met de volgende componenten geleverd:
▯ Pizzaoven (basisapparaat, bakplaat en terracotta koepel)
▯ 6 pizzascheppen
▯ Deeguitsteker
▯ Gebruiksaanwijzing
OPMERKING
► Controleer of het pakket compleet is en of er geen sprake is van zichtbare
schade.
► De terracotta koepel is handgemaakt en bestaat uit natuurlijke materialen.
Daarom kunnen er kleine onvolkomenheden in het product zitten, maar
deze doen niets af aan de kwaliteit van het product. Dit heeft geen invloed
op de stabiliteit van de terracotta koepel!
► Neem contact op met de servicehelpdesk (zie het hoofdstuk “Service”) als
het pakket niet compleet is, of als er sprake is van schade door gebrekkige
verpakking of transport.
│
BE
SPO 910 A1■ 58 │ NL
Page 62
Uitpakken
WAARSCHUWING! LETSELGEVAAR!
► Verpakkingsmaterialen mogen door kinderen niet als speelgoed worden
gebruikt. Verstikkingsgevaar!
1) Haal alle onderdelen van het apparaat en de gebruiksaanwijzing uit de
doos.
2) Verwijder alle verpakkingsmateriaal en eventuele beschermfolie en stickers
van het apparaat.
De verpakking afvoeren
De verpakkingsmaterialen zijn niet schadelijk voor het milieu. Ze zijn gekozen op
grond van milieuvriendelijkheid en daarom recyclebaar. Voer niet meer benodigde
verpakkingsmaterialen af conform de plaatselijk geldende voorschriften.
Voer de verpakking af conform de milieuvoorschriften. Let op de aanduiding op
de verschillende verpakkingsmaterialen en voer ze zo nodig gescheiden af.
De verpakkingsmaterialen zijn voorzien van afkortingen (a) en cijfers (b) met
de volgende betekenis: 1–7: kunststoffen, 20–22: papier en karton, 80–98:
composietmaterialen.
OPMERKING
► Bewaar zo mogelijk de originele verpakking gedurende de garantieperiode
van het apparaat, om het apparaat in geval van een garantiekwestie
volgens de voorschriften te kunnen verpakken.
Apparaatbeschrijving
Afbeelding A:
1 Warmhoudvlak
2 Terracotta koepel
3 Opening
4 Bakplaat
5 Indicatielampje (rood, brandt bij bedrijf)
6 Basisapparaat
7 Verwarmingselementen (boven en onder)
Afbeelding B:
8 Pizzascheppen
9 Deeguitsteker
SPO 910 A1 NL
│
BE
│
59 ■
Page 63
Technische gegevens
Netspanning 220‒240 V ∼ (wisselstroom), 50‒60 Hz
Opgenomen vermogen 910 W
Alle delen van dit apparaat die in aanraking komen
met levensmiddelen, zijn levensmiddelveilig.
Veiligheidsvoorschriften
GEVAAR! ELEKTRISCHE SCHOK!
► Controleer het apparaat vóór gebruik op zichtbare schade
aan de buitenzijde. Gebruik geen apparaat dat beschadigd
of gevallen is.
► Stel het apparaat niet bloot aan regen en gebruik het ook
nooit in een vochtige of natte omgeving. Let erop dat het snoer
nooit nat of vochtig wordt als het apparaat is ingeschakeld.
► Het apparaat moet worden aangesloten op een stopcontact
met randaarde.
► Zorg ervoor dat het snoer geen hete delen van het apparaat
kan aanraken. Gebruik het apparaat nooit in de buurt van
open vuur, een kookplaat of een ingeschakelde oven.
► Controleer het snoer regelmatig op beschadigingen. Het
apparaat mag niet meer worden gebruikt als het snoer
beschadigd is.
► Wanneer het snoer van dit apparaat beschadigd raakt,
moet het worden vervangen door de fabrikant of de klantenservice van de fabrikant of een persoon met vergelijkbare
kwalificaties, om risico's te voorkomen.
► Het apparaat mag niet in aanraking komen met vocht, zoals
regen of vloeistoffen.
Dompel het apparaat nooit onder in water of in andere
vloeistoffen! Er kan levensgevaar ontstaan door een
elektrische schok, wanneer bij gebruik vloeistofresten in
aanraking komen met onderdelen onder spanning.
│
BE
SPO 910 A1■ 60 │ NL
Page 64
WAARSCHUWING! LETSELGEVAAR!
► Dit apparaat mag worden gebruikt door kinderen vanaf
8 jaar en door personen met beperkte fysieke, zintuiglijke of
geestelijke vermogens of gebrek aan ervaring en/of kennis,
mits ze onder toezicht staan of over het veilige gebruik van
het apparaat zijn geïnstrueerd en de daaruit resulterende
gevaren hebben begrepen.
► Kinderen mogen niet met het apparaat spelen.
► Kinderen mogen geen reinigings- of onderhoudswerkzaam-
heden aan het apparaat uitvoeren, tenzij ze ouder dan
8 jaar zijn en onder toezicht staan.
► Houd het apparaat en het snoer buiten bereik van kinderen
jonger dan 8 jaar.
► Laat het apparaat na gebruik afkoelen alvorens het te reini-
gen! Verbrandingsgevaar!
► Plaats het apparaat bij voorkeur dicht bij een stopcontact.
Zorg ervoor dat de stekker bij gevaar goed bereikbaar is
en dat u niet kunt struikelen over het snoer.
► Zorg ervoor dat het apparaat op een veilige manier opge-
steld staat.
► Gebruik de pizzaoven altijd met de erop geplaatste terra-
cotta koepel.
Voorzichtig! Heet oppervlak!
► Het apparaat en de gebruikte accessoires kunnen zeer heet
worden als het apparaat in werking is. Zet het apparaat
niet op zijn kop en raak alleen de handgrepen van de
pizzascheppen aan.
│
SPO 910 A1 NL
│
BE
61 ■
Page 65

LET OP! MATERIËLE SCHADE!
► Gebruik geen externe timer of een aparte afstandsbediening
om het apparaat te bedienen.
► Laat het apparaat nooit onbeheerd als het is ingeschakeld.
► Let erop dat het apparaat, het snoer en de stekker nooit in
aanraking komen met warmtebronnen zoals kookplaten of
open vuur.
► Gebruik geen kolen of soortgelijke brandstoffen om het
apparaat te laten werken!
► Bedek de pizzaoven nooit met doeken of voorwerpen tijdens
het gebruik. Deze kunnen vlam vatten!
► Ga voorzichtig om met de terracotta koepel. Deze kan breken!
► Gebruik het apparaat alleen met de meegeleverde originele
accessoires.
Vóór het eerste gebruik
1) Reinig de onderdelen zoals beschreven in het hoofdstuk “Reiniging en onderhoud” om mogelijke uit de productie afkomstige resten te verwijderen. Controleer of alle onderdelen volledig droog zijn, voordat u het apparaat in gebruik neemt.
WAARSCHUWING! BRANDGEVAAR!
► Zet het apparaat nooit onder hangkasten of naast gordijnen, kastenwanden
of andere ontvlambare voorwerpen.
► Plaats het apparaat uitsluitend op een hittebestendige ondergrond.
2) Stel het apparaat op zoals beschreven in het hoofdstuk “Plaatsing en montage”.
3) Steek de stekker in het stopcontact. Het indicatielampje 5 brandt rood en
geeft aan dat het apparaat in gebruik is. De verwarmingselementen 7
beginnen op te warmen.
4) Laat het apparaat 10 minuten opwarmen.
│
BE
SPO 910 A1■ 62 │ NL
Page 66
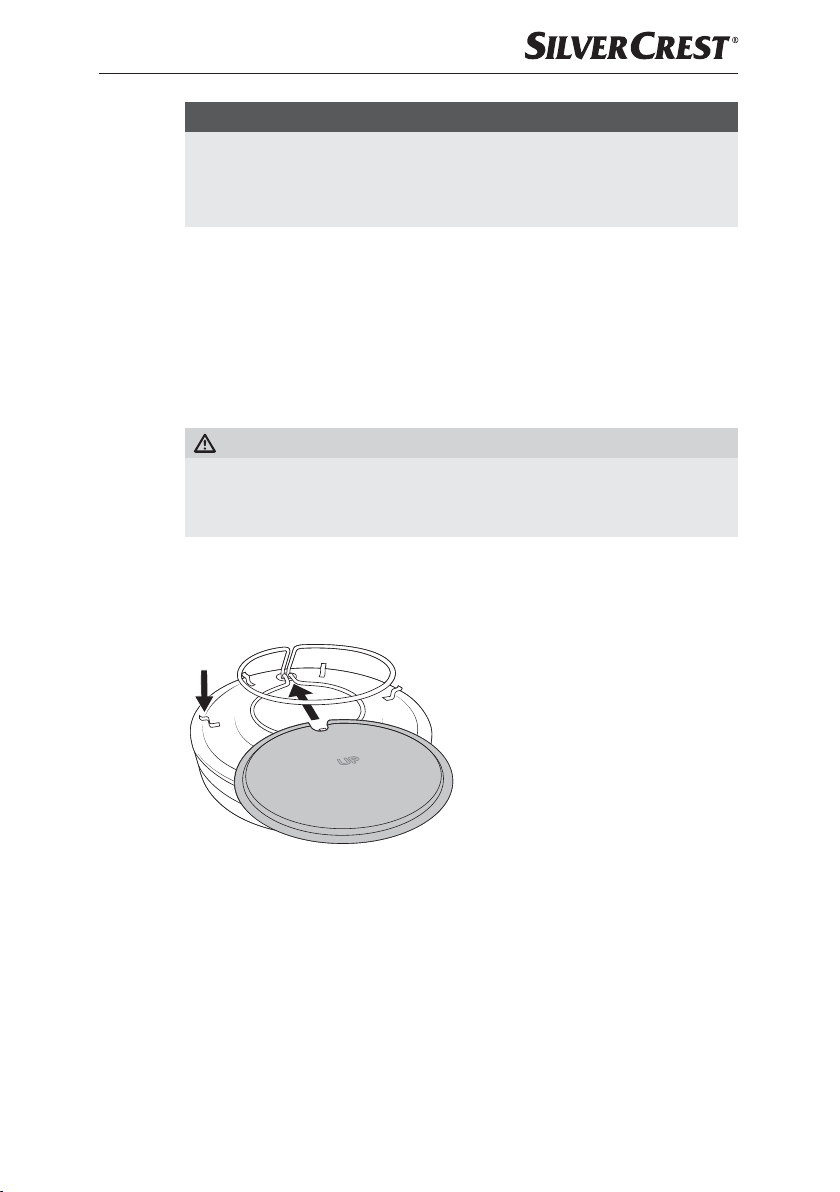
OPMERKING
► Wanneer u het apparaat voor het eerst opwarmt, kunnen restanten van het
productieproces lichte rook- en geurontwikkeling veroorzaken. Dat is normaal
en volkomen ongevaarlijk. Zorg voor voldoende ventilatie, open bijvoorbeeld
een raam.
5) Haal de stekker uit het stopcontact.
6) Laat vervolgens het apparaat 30 minuten afkoelen voor u het demonteert
of reinigt.
7) Maak het apparaat na de eerste keer opwarmen opnieuw schoon zoals
beschreven in het hoofdstuk “Reiniging en onderhoud”.
Plaatsing en montage
WAARSCHUWING! BRANDGEVAAR!
► Zet het apparaat nooit onder hangkasten of naast gordijnen, kastenwanden
of andere ontvlambare voorwerpen.
► Plaats het apparaat op een hittebestendige ondergrond.
1) Plaats het basisapparaat 6 op een vlakke ondergrond. Deze moet hittebestendig, spatwaterdicht en droog zijn. Zorg ervoor dat u het apparaat niet
direct tegen een muur of kast plaatst.
3) Plaats de terracotta koepel 2 voorzichtig op het basisapparaat 6. De
twee verwarmingselementen 7 en de bakplaat 4 bevinden zich dan in de
bakruimte van de pizzaoven. Zorg ervoor dat u de terracotta koepel 2 zo
plaatst dat geen enkele opening 3 door het opstaande verwarmings-
element 7 wordt geblokkeerd. Anders past er geen pizzaschep 8 door deze
opening 3.
2) Plaats nu de bakplaat 4 op het
basisapparaat 6: draai de bakplaat 4 om, zodat het gegraveerde
“UP” aan de bovenkant leesbaar is.
Schuif vervolgens de bakplaat 4
tussen de twee verwarmingselementen 7 door. De halfronde uitsparing
op de bakplaat 4 omringt het
opstaande verwarmingselement 7.
Leg de bakplaat 4 vervolgens op
de zes daarvoor bestemde houders.
De houders fi xeren de bakplaat 4
zodat deze niet wegglijdt tijdens het
gebruik.
SPO 910 A1 NL
│BE│
63 ■
Page 67

Bediening en gebruik
In de bakruimte kunt u tot zes minipizza's tegelijk bakken. In de terracotta koepel 2
bevinden zich daarvoor zes openingen 3. Met de meegeleverde pizzascheppen
8 schuift u de minipizza's door de openingen 3 op de bakplaat 4. Als de
minipizza's gebakken zijn, haalt u ze met behulp van de pizzascheppen 8
van de bakplaat 4.
Minipizza's voorbereiden
1) Maak het pizzadeeg en het beleg klaar. Snijd het voedsel in kleine stukjes
(1-2 cm).
2) Vet de pizzascheppen 8 licht in, dan komen de bereide minipizza's
makkelijker van het metaal af.
3) Rol het pizzadeeg uit tot een dikte van 2-4 millimeter en steek er met de deeguitsteker 9 de stukken deeg uit. Deze stukken deeg zijn de pizzabodems
van de minipizza's en passen op de pizzascheppen 8.
4) Leg de pizzabodems op de pizzascheppen 8. Maak de rand van de mini-
pizza door het iets overhangende deeg een beetje omhoog te duwen. Hierdoor ontstaat een kleine, opstaande rand en kunnen de ingrediënten niet
zo gemakkelijk van de pizzabodem glijden.
WAARSCHUWING! BRANDGEVAAR!
► Leg de ingrediënten altijd alleen op de pizzabodem! Leg geen vlees of
ander voedsel direct op de pizzascheppen 8. Lekkend vet kan spatten.
Als er vet op de verwarmingselementen 7 komt, kunnen ze vlam vatten!
5) Beleg de pizzabodems naar wens. Zorg ervoor dat de pizzascheppen 8
niet te hoog belegd worden. De minipizza's passen dan niet meer door de
openingen 3 in de terracotta koepel 2.
Minipizza's bakken
WAARSCHUWING! LETSELGEVAAR!
► Het apparaat en de gebruikte accessoires kunnen zeer heet worden als
het apparaat in werking is. Zet het apparaat niet op zijn kop en raak
alleen de handgrepen van de pizzascheppen 8 aan.
OPMERKING
► Bak geen grote pizza's of andere ingrediënten rechtstreeks op de bak-
plaat 4. Leg de minipizza's altijd alleen op de vooraf ingevette pizzascheppen 8. Leg vervolgens de belegde pizzascheppen 8 op de
bakplaat 4. Vet de bakplaat 4 niet in.
│
BE
SPO 910 A1■ 64 │ NL
Page 68

Maak het apparaat klaar zoals beschreven in het hoofdstuk “Plaatsing en montage”.
1) Prepareer de minipizza's.
2) Steek de stekker in het stopcontact. Het indicatielampje 5 brandt rood en
geeft aan dat het apparaat in werking is. De verwarmingselementen 7
beginnen op te warmen.
3) Laat het apparaat 10 minuten voorverwarmen.
4) Schuif de pizzascheppen 8 door de openingen 3 in de terracotta koepel
2 en plaats ze op de bakplaat 4. Zorg ervoor dat de ingrediënten het
bovenste verwarmingselement niet raken 7 .
WAARSCHUWING! LETSELGEVAAR!
► De pizzascheppen 8 worden erg heet! Raak ze daarom alleen aan bij
de kunststof handgrepen!
LET OP! MATERIËLE SCHADE!
► Zorg ervoor dat er geen ingrediënten van de minipizza's op de bakplaat
4 vallen. Ingrediënten die nog in de oven zitten, verbranden!
5) Laat de minipizza's ongeveer 7-12 minuten bakken. De baktijd is afhankelijk
van de dikte van het deeg en de hoeveelheid ingrediënten en kan dus variëren.
6) Trek de pizzascheppen 8 voorzichtig aan de handgrepen uit het apparaat
zodra de ingrediënten gaar zijn en de minipizza's de gewenste bruiningsgraad hebben bereikt.
OPMERKING
► U kunt de minipizza's op het warmhoudvlak 1 leggen. Leg er alleen
bereide minipizza's in en geen andere ingrediënten.
► Let op: de minipizza's blijven ondertussen verder garen. Ze kunnen droog
worden als ze te lang op het warmhoudvlak 1 blijven liggen.
7) Leg de afzonderlijke pizzascheppen 8 na gebruik op een stabiel en hittebes-
tendig oppervlak. Nadat de pizzascheppen 8 een beetje afgekoeld zijn,
kunnen ze opnieuw gebruikt worden. Vet ze zo nodig vooraf nog eens licht
in.
8) Als u het apparaat niet meer nodig hebt, haalt u de stekker uit het stopcontact.
Het rode indicatielampje 5 dooft.
9) Laat het apparaat 30 minuten afkoelen alvorens het uit elkaar te halen en
schoon te maken.
SPO 910 A1 NL
│
BE
│
65 ■
Page 69

Reiniging en onderhoud
GEVAAR! ELEKTRISCHE SCHOK!
► Trek voordat u het apparaat schoonmaakt altijd eerst de stekker uit het
stopcontact! Er bestaat gevaar voor een elektrische schok!
Dompel het apparaat nooit onder in water of andere vloeistoffen!
WAARSCHUWING! LETSELGEVAAR!
► Laat het apparaat na gebruik altijd afkoelen alvorens het te reinigen.
Er bestaat verbrandingsgevaar!
LET OP! MATERIËLE SCHADE!
► Gebruik geen schurende of bijtende schoonmaakmiddelen. Deze kunnen
de oppervlakken onherstelbaar aantasten!
► Stel de terracotta koepel 2 niet bloot aan lage temperaturen om hem af
te koelen, het materiaal kan barsten! Laat hem afkoelen op kamertemperatuur.
► Verwarm de terracotta koepel 2 pas weer als hij helemaal droog is.
Het vochtige materiaal kan barsten!
► Reinig de terracotta koepel 2 en het basisapparaat 6 nooit in de vaat-
wasser!
OPMERKING
► De terracotta koepel 2 is een product dat is gemaakt van natuurlijke
materialen. Gebruik geen chemische reinigingsmiddelen om hem schoon
te maken. Na herhaald gebruik zal zich in toenemende mate een patina
vormen. Deze verkleuring van het materiaal is normaal en doet geen
afbreuk aan de werking. Het heeft ook geen invloed op de hygiëne.
► Ook kan de bakplaat 4 blijvend verkleuren, omdat deze zich dicht bij de
verwarmingselementen 7 bevindt. Week de bakplaat 4 zo nodig voor in
water en voeg een beetje afwasmiddel toe.
■ Maak de terracotta koepel 2 zorgvuldig schoon met warm water en een
vaatdoek. U kunt daarvoor ook een zachte borstel gebruiken. Leg de terracotta koepel 2 niet in zeepsop, omdat het materiaal water absorbeert. Laat
hem goed aan de lucht drogen. Zorg ervoor dat de terracotta koepel 2
volledig droog is alvorens hem opnieuw te verwarmen.
■ Veeg het basisapparaat 6 inclusief de volledig afgekoelde verwarmingsele-
menten 7 af met een vochtige doek. Zo nodig doet u wat mild afwasmiddel
op de doek en veegt u alles schoon met een doek die alleen met water is
bevochtigd. Droog alles goed af.
│
BE
SPO 910 A1■ 66 │ NL
Page 70
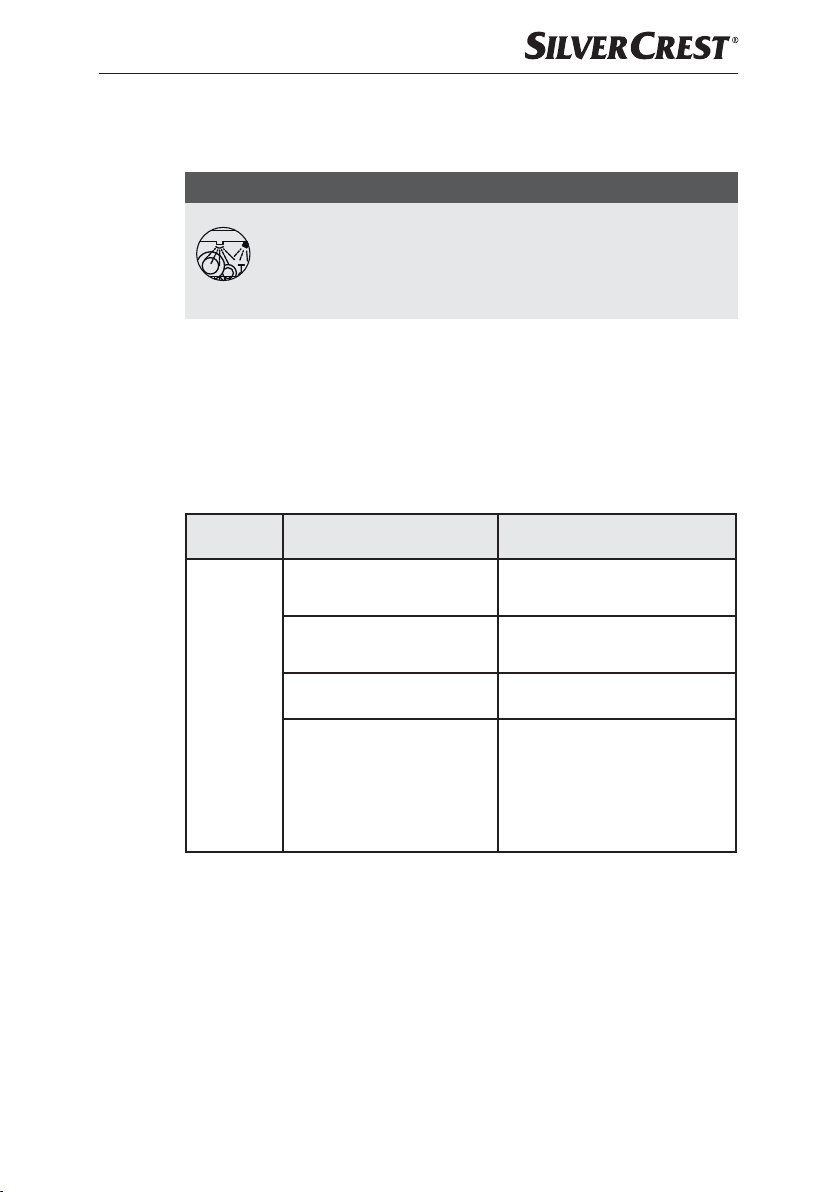
■ Reinig de bakplaat 4, de pizzascheppen 8 en de deeguitsteker 9 in warm
zeepsop. Als de onderdelen zwaarder vervuild zijn, kunt u ze indien nodig
een beetje laten weken. Droog alle onderdelen na reiniging goed af.
OPMERKING
Voor een zachtere reiniging raden wij aan het product met de hand
af te wassen. De pizzascheppen 8, de bakplaat 4 en de dee-
guitsteker 9 zijn echter ook vaatwasmachinebestendig. Plaats ze in
het bovenste vak van de afwasmachine en zorg ervoor dat er geen
onderdelen klem komen te zitten.
Opbergen
■ Bewaar het afgekoelde, gereinigde apparaat en de accessoires op een
stofvrije en droge plaats. Bewaar de terracotta koepel 2 niet afgesloten,
maar op een plaats waar wat lucht circuleert.
Problemen oplossen
Probleem Oorzaak Oplossing
De stekker zit niet in het
stopcontact.
Het stopcontact is defect. Gebruik een ander stopcontact.
Het apparaat
werkt niet.
Neem contact op met de klantenservice als de storingen met de bovenstaande
oplossingen niet verholpen kunnen worden of indien u andere storingen constateert.
Het apparaat is defect.
De oververhittingsbeveiliging
is geactiveerd.
Steek de stekker in een stopcontact.
Neem contact op met de klantenservice.
Trek de stekker uit het stopcontact en wacht tot het apparaat is
afgekoeld. Als het apparaat ook
na het afkoelen niet werkt, neemt
u contact op met de klantenservice.
SPO 910 A1 NL
│
BE
│
67 ■
Page 71

Afvoeren
Het pictogram met een doorgekruiste vuilnisbak geeft aan dat dit apparaat is
onderworpen aan Richtlijn 2012/19/EU. Deze richtlijn stelt dat u dit apparaat
aan het einde van zijn levensduur niet met het normale huisvuil mag afvoeren,
maar moet inleveren bij speciaal daartoe bestemde inzamelpunten, milieuparken
of afvalverwerkingsbedrijven. Dit afvoeren is voor u kosteloos. Bescherm het
milieu en voer afgedankte producten op een correcte manier af.
Informatie over mogelijkheden voor het afvoeren van het afgedankte product
krijgt u bij uw stad of gemeente.
Het product is recycleerbaar; er is een uitgebreide producentenverantwoordelijkheid op van toepassing en het afval wordt gescheiden ingezameld.
Garantie van Kompernaß Handels GmbH
Geachte klant,
U hebt op dit apparaat 3 jaar garantie vanaf de aankoopdatum. In geval van
ge breken in dit product hebt u wettelijke rechten tegenover de verkoper van het
product. Deze wettelijke rechten worden door onze hierna beschreven garantie
niet beperkt.
Garantievoorwaarden
De garantieperiode geldt vanaf de datum van aankoop. Bewaar de kassabon
zorgvuldig. U hebt hem nodig als bewijs van aankoop.
Als er binnen drie jaar vanaf de aankoopdatum van dit product een materiaal- of
fabricagefout optreedt, wordt - naar onze keuze - het product door ons kosteloos
gerepareerd of vervangen of wordt de koopprijs terugbetaald. Voorwaarde voor
deze garantie is dat het defecte apparaat en het aankoopbewijs (kassabon)
binnen de termijn van drie jaar worden overlegd en dat kort wordt omschreven
waaruit het gebrek bestaat en wanneer het is opgetreden.
Wanneer het defect door onze garantie wordt gedekt, krijgt u het gerepareerde
product of een nieuw product retour. Met de reparatie of vervanging van het
product begint er geen nieuwe garantieperiode.
Garantieperiode en wettelijke aanspraken bij gebreken
De garantieperiode wordt door deze waarborg niet verlengd. Dat geldt ook
voor vervangen en gerepareerde onderdelen. Eventueel al bij aankoop aanwezige schade en gebreken moeten meteen na het uitpakken worden gemeld. Voor
reparaties na afloop van de garantieperiode worden kosten in rekening gebracht.
│
BE
SPO 910 A1■ 68 │ NL
Page 72

Garantieomvang
Het apparaat is op basis van strenge kwaliteitsnormen met de grootst mogelijke
zorg vervaardigd en voorafgaand aan de levering nauwkeurig gecontroleerd.
De garantie geldt voor materiaal- of fabricagefouten. Deze garantie geldt niet
voor productonderdelen die onderhevig zijn aan normale slijtage en die daarom
als slijtonderdelen worden beschouwd, of voor schade aan breekbare onderdelen zoals schakelaars, accu‘s of onderdelen die van glas zijn gemaakt.
Deze garantie vervalt wanneer het product is beschadigd, ondeskundig is gebruikt of is gerepareerd. Voor deskundig gebruik van het product moeten alle in de
gebruiksaanwijzing beschreven aanwijzingen precies worden opgevolgd. Gebruiksdoeleinden en handelingen die in de gebruiksaanwijzing worden afgeraden of waarvoor wordt gewaarschuwd, moeten beslist worden vermeden.
Het product is uitsluitend bestemd voor privégebruik en niet voor bedrijfsmatige
doeleinden. Bij verkeerd gebruik en ondeskundige behandeling, bij gebruik van
geweld en bij reparaties die niet door ons erkend servicefiliaal zijn uitgevoerd,
vervalt de garantie.
Afhandeling bij een garantiekwestie
Voor een snelle afhandeling van uw aanvraag neemt u de volgende aanwijzingen
in acht:
■ Houd voor alle aanvragen de kassabon en het artikelnummer
(IAN)388914_2107 als aankoopbewijs bij de hand.
■ Het artikelnummer vindt u op het typeplaatje van het product, op het product
gegraveerd, op de titelpagina van de gebruiksaanwijzing (linksonder) of op
de sticker op de achter- of onderkant van het product.
■ Als er fouten in de werking of andere gebreken optreden, neemt u eerst con-
tract op met de hierna genoemde serviceafdeling, telefonisch of
viae-mail.
■ Een als defect geregistreerd product kunt u dan zonder portokosten naar het
aan u doorgegeven serviceadres sturen. Voeg het aankoopbewijs (kassabon)
bij en vermeld waaruit het gebrek bestaat en wanneer het is opgetreden.
Op www.lidl-service.com kunt u deze en vele andere handleidingen,
productvideo‘s en installatiesoftware downloaden.
Met deze QR-code gaat u direct naar de website van Lidl Service
(www.lidl-service.com) en kunt u met het invoeren van het artikelnummer
(IAN)388914_2107 de gebruiksaanwijzing openen.
SPO 910 A1 NL
│
BE
│
69 ■
Page 73

Service
Service Nederland
Tel.: 0900 0400223 (0,10 EUR/Min.)
E-Mail: [email protected]
Service België
Tel.: 070 270 171 (0,15 EUR/Min.)
E-Mail: [email protected]
IAN 388914_2107
Importeur
Let op: het volgende adres is geen serviceadres. Neem eerst contact op met het
opgegeven serviceadres.
KOMPERNASS HANDELS GMBH
BURGSTRASSE 21
44867 BOCHUM
DUITSLAND
www.kompernass.com
Recepten
In de receptvoorbeelden vindt u twee verschillende soorten pizzabodems.
Het beleg kan op vele manieren worden veranderd. Beleg de pizza naar eigen
smaak en voorkeur. Houd er echter rekening mee dat de baktijd varieert, afhankelijk van het beleg en de hoeveelheid.
Pizza salami met een bodem van tarwemeel
Ingrediënten (voor ca. 8-12 minipizza's)
Voor het deeg:
■ 250 g tarwemeel
■ 150 ml lauw water
■ 7 g verse gist of 1/2 zakje droge gist (3-4 g)
■ 10 ml olijfolie
■ 1/2 tl suiker
■ 1/2 tl zout
│
BE
SPO 910 A1■ 70 │ NL
Page 74

Voor de tomatensaus:
■ 100 g gezeefde tomaten
■ 1 knoflookteentje
■ 1/2 tl gedroogde oregano
■ 1 snufje zout en peper naar wens
Voor het beleg:
■ 100 g plakjes salami
■ 150 g geraspte kaas (bijv. Goudse kaas of gratineerkaas)
Bereiding:
1) Los de gist en de suiker op in 3 el lauw water.
2) Meng het meel met het zout, de olie en de gist-suikeroplossing in een kom.
3) Voeg beetje bij beetje de rest van het water toe en roer het door het deeg.
4) Kneed het deeg tot u een glad oppervlak krijgt.
5) Dek het deeg af met een schone doek en laat het 1 uur rusten op een warme
plaats.
6) Prepareer de saus en de andere ingrediënten: snijd de knoflook in kleine
stukjes of pers de teentjes in een knoflookpers. Meng de gezeefde tomaten
met de knoflook en de oregano, breng op smaak met zout en peper. Snijd
de plakjes salami in kleine stukjes.
7) Leg het deeg na de rusttijd op een met bloem bestoven werkvlak. Voor verdere
verwerking kunt u het in twee stukken verdelen en elk stuk afzonderlijk verwerken.
8) Rol het deeg uit tot een dikte van 2-4 mm en snijd de pizzabodems uit met de
deeguitsteker 9. Leg de pizzabodems op de licht ingevette pizzascheppen 8.
Maak de rand van de minipizza door het iets overhangende deeg een beetje
omhoog te duwen. Hierdoor ontstaat een kleine, opstaande rand en kunnen
de ingrediënten niet zo gemakkelijk van de pizzabodem glijden.
9) Besmeer met de tomatensaus en beleg met salami en kaas.
10) Schuif de pizzascheppen 8 door de openingen 3 op de bakplaat 4. Laat
de pizza's ongeveer 7-12 minuten bakken. De baktijd is afhankelijk van de
dikte van het deeg en de hoeveelheid ingrediënten en kan dus variëren.
TIP: als snel alternatief kunt u ook kant-en-klaar pizzadeeg gebruiken. Beleg de
pizza's met tomatensaus en andere ingrediënten naar wens.
SPO 910 A1 NL
│
BE
│
71 ■
Page 75

Vegetarische pizza met spelt-volkorenbodem
Ingrediënten (voor ca. 8-12 minipizza's)
Voor het deeg:
■ 150 g speltmeel
■ 50 g speltvolkorenmeel
■ 150 ml lauw water
■ 7 g verse gist of 1/2 zakje droge bakkersgist (3-4 g)
■ 1 tl honing
■ 1 el olijfolie
■ 1/2 tl zout
Voor de tomatensaus:
■ 100 g gezeefde tomaten
■ 1/2 tl gedroogde oregano
■ 1 snufje zout en peper naar wens
Voor het beleg:
■ 100 g maïs uit blik
■ 100 g rode paprika
■ 1 middelgrote ui
■ 150 g geraspte kaas (bijv. Goudse kaas of gratineerkaas)
Bereiding:
1) Doe het speltvolkorenmeel en het speltmeel in een kom en meng ze. Haal
weer 100 g uit het meelmengsel.
2) Doe de 100 g meelmengsel in een andere kom en voeg het lauwe water,
de droge gist en de honing toe. Kneed alles goed door elkaar tot een
basisdeeg.
3) Leg het basisdeeg in een kom en dek het af met een schone doek of huishoudfolie. Laat het 30 minuten rusten.
4) Voeg de overige ingrediënten toe aan het basisdeeg. Meng alles door
elkaar en kneed tot er een deeg met een glad oppervlak ontstaat.
5) Doe het deeg in een kom en dek het weer af met een schone doek of
vershoudfolie. Laat het deeg een tweede maal rusten, ditmaal gedurende 3-4
uur.
│
BE
SPO 910 A1■ 72 │ NL
Page 76

OPMERKING
► U kunt het gistdeeg ook een nacht in de koelkast laten rusten. Doe het in
een kom, dek het af met een doek of vershoudfolie en laat het 18-24 uur
rusten. Het deeg zal blijven rijzen, zij het iets langzamer dan bij kamertemperatuur. Zorg ervoor dat er nog plaats voor is in de kom.
6) Prepareer de saus en de andere ingrediënten: meng de gezeefde tomaten
met de knoflook en de oregano, breng op smaak met zout en peper. Snijd
de paprika's in kleine blokjes, halveer de uien en snijd ze in korte reepjes.
7) Leg het deeg na de rusttijd op een met bloem bestoven werkvlak. Voor verdere verwerking kunt u het in twee stukken verdelen en elk stuk afzonderlijk
verwerken.
8) Rol het deeg uit tot een dikte van 2-4 mm en snijd de pizzabodems uit met de
deeguitsteker 9. Strooi wat bloem op het deeg als het plakt en druk het plat
met bebloemde vingers en de bal van uw hand.
9) Leg de pizzabodems op de licht ingevette pizzascheppen 8. Maak de rand
van de minipizza door het iets overhangende deeg een beetje omhoog te
duwen. Hierdoor ontstaat een kleine, opstaande rand en kunnen de ingrediënten niet zo gemakkelijk van de pizzabodem glijden.
10) Bestrijk met de tomatensaus en leg er de maïs, paprika en uienreepjes op.
Strooi er tenslotte kaas over.
11) Schuif de pizzascheppen 8 door de openingen 3 op de bakplaat 4. Laat
de pizza's ongeveer 7-12 minuten bakken. De baktijd is afhankelijk van de
dikte van het deeg en de hoeveelheid ingrediënten en kan dus variëren.
TIP: strooi na het bakken wat gewassen en fijngesneden rucola over de pizza.
Dit geeft de minipizza een frisse, pittige smaak!
SPO 910 A1 NL
│
BE
│
73 ■
Page 77

│
BE
SPO 910 A1■ 74 │ NL
Page 78

Obsah
Úvod ........................................................76
Použití vsouladu surčením .....................................76
Rozsah dodávky a kontrola po přepravě .........................76
Vybalení ...............................................................77
Likvidace obalu ......................................................... 77
Popis přístroje ................................................77
Technické údaje ...............................................78
Bezpečnostní pokyny ..........................................78
Před prvním použitím ..........................................80
Umístění a sestavení ...........................................81
Obsluha a provoz .............................................82
Příprava mini pizzy ...................................................... 82
Pečení mini pizz ......................................................... 82
Čištění a údržba ..............................................84
Skladování ..................................................85
Odstranění závad .............................................85
Likvidace ....................................................86
Záruka společnosti Kompernass Handels GmbH. . . . . . . . . . . . . . . . . . . . 86
Servis .................................................................88
Dovozce ............................................................... 88
Recepty .....................................................88
Salámová pizza s korpusem z pšeničné mouky ................................ 88
Vegetariánská pizza s korpusem z celozrnné špaldové mouky ..................... 90
SPO 910 A1 CZ │ 75 ■
Page 79

Úvod
Blahopřejeme vám kzakoupení vašeho nového přístroje.
Rozhodli jste se tím pro vysoce kvalitní výrobek. Návod kobsluze je součástí
tohoto výrobku. Obsahuje důležité informace obezpečnosti, použití a likvidaci.
Před použitím výrobku se seznamte se všemi provozními a bezpečnostními pokyny.
Výrobek používejte pouze předepsaným způsobem a pro uvedené oblasti použití.
Při předávání výrobku třetím osobám předejte spolu sním ityto podklady.
Použití vsouladu surčením
Tento přístroj je určen výhradně k pečení mini pizzy ve vnitřních prostorách. Jiné
použití než kurčenému účelu nebo nad jeho rámec je považováno za použití
vrozporu surčením. Přístroj není vhodný kpoužití vživnostenských provozovnách nebo průmyslových podnicích.
Nároky na náhradu škody jakéhokoli druhu vzniklé vdůsledku použití vrozporu
surčením, neodborné opravy, neoprávněně provedené změny nebo úpravy
nebo vdůsledku použití nepovolených náhradních dílů jsou vyloučeny. Riziko
nese výhradně uživatel.
Rozsah dodávky a kontrola po přepravě
Přístroj se standardně dodává snásledujícími komponenty:
▯ pec na pizzu (základní přístroj, pečicí plech a terakotová kopule)
▯ 6 lopatek na pizzu
▯ vykrajovátko na těsto
▯ návod k obsluze
UPOZORNĚNÍ
► Zkontrolujte, zda je dodávka kompletní a není viditelně poškozená.
► Terakotová kopule je vyrobena ručně z přírodních materiálů. Proto se na
výrobku mohou vyskytovat drobné nerovnosti, které však nesnižují jeho
kvalitu. To nemá vliv na stabilitu terakotové kopule!
► Vpřípadě neúplné dodávky nebo poškození vzniklých vdůsledku vadného
obalu nebo při přepravě kontaktujte telefonicky servisní poradenskou linku
(viz kapitola „Servis“).
SPO 910 A1■ 76 │ CZ
Page 80
Vybalení
VÝSTRAHA! NEBEZPEČÍ ZRANĚNÍ!
► Děti si nesmí hrát s obalovým materiálem. Nebezpečí udušení!
1) Vyjměte všechny části přístroje a návod kobsluze zkrabice.
2) Z přístroje odstraňte veškerý obalový materiál a všechny ochranné fólie
a nálepky.
Likvidace obalu
Zvolený obalový materiál odpovídá hlediskům ochrany životního prostředí
a likvidace, a je tudíž recyklovatelný. Již nepotřebný obalový materiál zlikvidujte
podle místních platných předpisů.
Obal zlikvidujte ekologicky. Dbejte na označení na různých obalových materiálech a v případě potřeby tyto obaly roztřiďte. Obalové materiály jsou označeny
zkratkami (a) a číslicemi (b) s následujícím významem: 1–7: plasty, 20–22:
papír a lepenka, 80–98: kompozitní materiály.
UPOZORNĚNÍ
► Originální obal pokud možno uschovejte po dobu záruční doby přístroje,
aby bylo možné vpřípadě uplatnění záruky přístroj řádně zabalit.
Popis přístroje
Obrázek A:
1 plocha k udržování tepla
2 terakotová kopule
3 otvor
4 pečicí plech
5 kontrolka (červená, svítí při provozu)
6 základní přístroj
7 topné články (horní a spodní)
ObrázekB:
8 lopatky na pizzu
9 vykrajovátko na těsto
SPO 910 A1 CZ │ 77 ■
Page 81
Technické údaje
Síťové napětí 220–240 V ∼ (střídavý proud), 50–60 Hz
Příkon 910 W
Všechny části tohoto přístroje přicházející do
styku s potravinami jsou bezpečné pro potraviny.
Bezpečnostní pokyny
NEBEZPEČÍ! ÚRAZ ELEKTRICKÝM PROUDEM!
► Před použitím zkontrolujte, zda přístroj není zvenčí viditelně
poškozený. Poškozený nebo na zem spadlý přístroj
neuvádějte do provozu.
► Přístroj nevystavujte působení deště a rovněž jej nikdy
nepoužívejte ve vlhkém nebo mokrém prostředí. Dbejte na
to, aby síťový kabel nebyl během provozu nikdy vlhký nebo
mokrý.
► Přístroj se musí zastrčit do zásuvky sochranným vodičem.
► Síťový kabel chraňte před kontaktem shorkými díly přístroje.
Přístroj nikdy nepoužívejte vblízkosti otevřeného plamene,
topné desky nebo horkých kamen.
► Síťový kabel se musí pravidelně kontrolovat zhlediska
poškození. Je-li síťový kabel poškozen, nesmí se přístroj
dále používat.
► Pokud se napájecí kabel tohoto přístroje poškodí, musí jej
vyměnit výrobce, jeho zákaznický servis nebo obdobně
kvalifikovaná osoba, aby se tak zabránilo nebezpečím.
► Do přístroje se nesmí dostat vlhkost, jako je déšť nebo voda.
Přístroj nikdy neponořujte do vody nebo do jiných kapalin!
Pokud se během provozu dostanou zbytky tekutiny do
kontaktu se součástmi, které jsou pod napětím, může
dojít kohrožení života vdůsledku zásahu elektrickým
proudem.
SPO 910 A1■ 78 │ CZ
Page 82

VÝSTRAHA! NEBEZPEČÍ ZRANĚNÍ!
► Děti od 8let a osoby somezenými fyzickými, smyslovými
nebo mentálními schopnostmi či nedostatkem zkušeností
a/nebo znalostí mohou tento přístroj používat pouze tehdy,
pokud jsou pod dohledem nebo byly poučeny obezpečném
používání přístroje a porozuměly nebezpečí, které vyplývá
zjeho použití.
► Děti si nesmí spřístrojem hrát.
► Čištění a uživatelskou údržbu nesmí provádět děti, ledaže
jsou starší 8let a jsou pod dohledem.
► Děti mladší 8let nesmí mít přístup kpřístroji a přívodnímu
kabelu.
► Než se pustíte do čištění, nechte přístroj po použití dostatečně
vychladnout! Nebezpečí popálení!
► Přístroj umístěte pokud možno do blízkosti zásuvky. Zajistěte,
aby síťová zástrčka byla vpřípadě nebezpečí rychle
dosažitelná a aby nebylo možné zakopnout osíťový kabel.
► Zajistěte stabilní polohu přístroje.
► Pec na pizzu vždy provozujte s nasazenou terakotovou
kopulí.
Opatrně! Horký povrch!
► Přístroj a použité příslušenství se mohou během provozu
velmi zahřát. Přístroj nepřemisťujte a dotýkejte se pouze
rukojetí lopatek na pizzu.
SPO 910 A1 CZ │ 79 ■
Page 83

POZOR! HMOTNÉ ŠKODY!
► Kprovozu přístroje nepoužívejte externí spínací hodiny ani
samostatné dálkové ovládání.
► Přístroj během provozu nikdy nenechávejte bez dozoru.
► Zajistěte, aby se přístroj, síťový kabel nebo síťová zástrčka
nedostaly do kontaktu stepelnými zdroji, jakými jsou
například varná plotýnka nebo otevřený oheň.
► Pro provoz přístroje nepoužívejte uhlí nebo podobná paliva!
► Během provozu nikdy nezakrývejte pec na pizzu tkaninami
nebo předměty. Ty se mohou vznítit!
► S terakotovou kopulí manipulujte opatrně. Může se rozbít!
► Přístroj provozujte výhradně spolu sdodaným originálním
příslušenstvím.
Před prvním použitím
1) Vyčistěte díly tak, jak je popsáno vkapitole „Čištění a údržba“, aby se
odstranily možné zbytky zvýroby. Před uvedením přístroje do provozu je
nutné se ujistit, zda jsou všechny díly úplně suché.
VÝSTRAHA! NEBEZPEČÍ POŽÁRU!
► Přístroj nikdy nestavte pod závěsné skříňky nebo vedle záclon, skříňových
stěn nebo jiných snadno zápalných předmětů.
► Přístroj postavte pouze na žáruvzdorný podklad.
2) Přístroj postavte, jak je popsáno v kapitole „Umístění a sestavení“.
3) Zasuňte síťovou zástrčku do síťové zásuvky. Kontrolka 5 svítí červeně a sig-
nalizuje, že je přístroj v provozu. Topné články 7 se začnou zahřívat.
4) Přístroj nechte 10minut vychladnout.
SPO 910 A1■ 80 │ CZ
Page 84
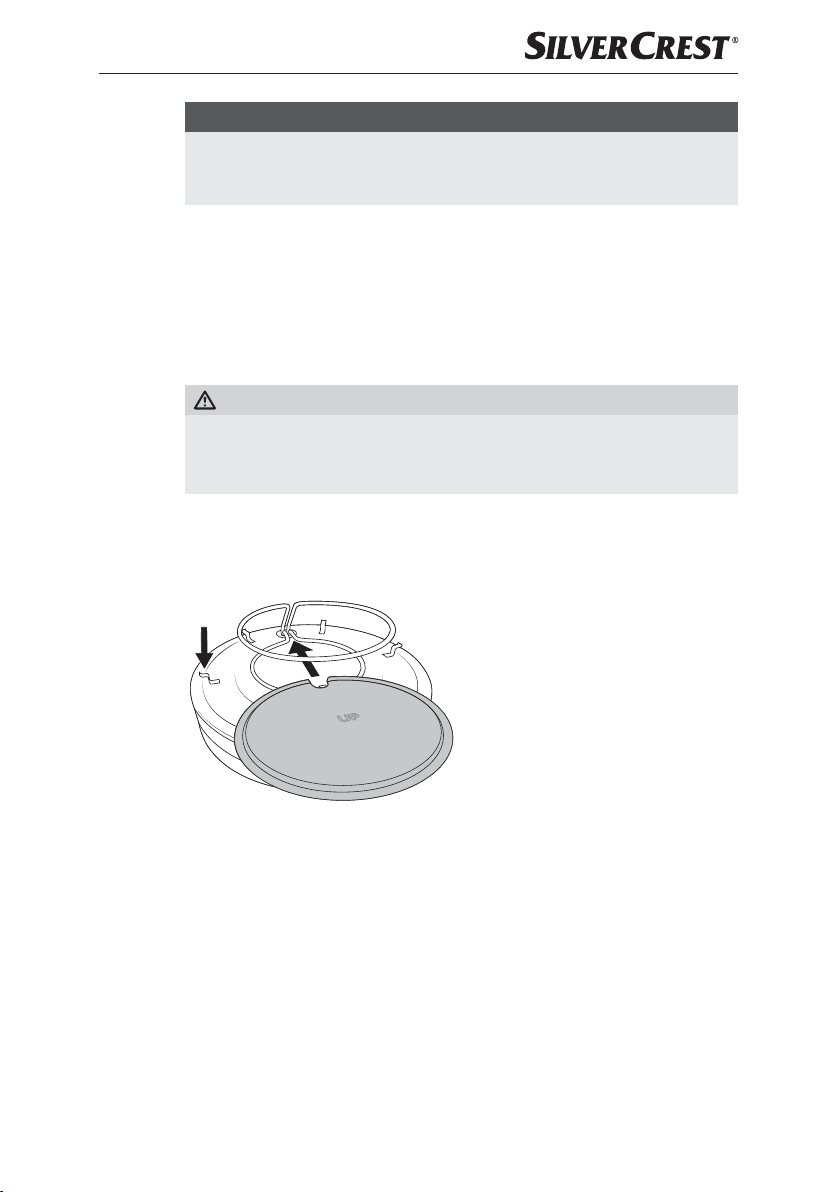
UPOZORNĚNÍ
► Při prvním nahřívání přístroje může v důsledku zbytků vzniklých při výrobě
dojít kvýskytu lehkého kouře nebo zápachu. To je zcela normální a není to
nebezpečné. Zajistěte dostatečné větrání, např. otevřete okno.
5) Vytáhněte síťovou zástrčku ze zásuvky.
6) Přístroj poté nechte 30 minut vychladnout, než jej rozeberete nebo vyčistíte.
7) Přístroj při prvním nahřátí znovu vyčistěte, jak je popsáno vkapitole „Čištění
a údržba“.
Umístění a sestavení
VÝSTRAHA! NEBEZPEČÍ POŽÁRU!
► Přístroj nikdy nestavte pod závěsné skříňky nebo vedle záclon, skříňových
stěn nebo jiných snadno zápalných předmětů.
► Přístroj postavte na žáruvzdorný podklad.
1) Základní přístroj 6 postavte na rovnou plochu. Ta musí být odolná vůči teplu,
rozstřikům a suchá. Dbejte přitom na to, aby přístroj nestál přímo ustěny
nebo skříně.
3) Opatrně umístěte terakotovou kopuli 2 na základní přístroj 6. Oba topné
články 7 a pečicí plech 4 se pak budou nacházet v pečicím prostoru pece
na pizzu. Dbejte, abyste terakotovou kopuli 2 umístili tak, aby žádný otvor 3
nebyl blokován stoupajícím topným článkem 7. Jinak se žádná lopatka na
pizzu 8 do tohoto otvoru 3 nevejde.
2) Nyní umístěte pečicí plech 4 na
základní přístroj 6: obraťte pečicí
plech 4 tak, aby byl na horní
straně čitelný vyražený nápis „UP“
(Nahoru). Poté zasuňte pečicí
plech 4 mezi oba topné články 7.
Půlkruhové vybrání na pečicím
plechu 4 obklopuje stoupající topný článek 7. Poté umístěte pečicí
plech 4 na šest určených držáků.
Pečicí plech 4 je uchycen držáky
tak, aby během provozu neklouzal.
SPO 910 A1 CZ│ 81 ■
Page 85

Obsluha a provoz
V pečicím prostoru můžete péct až šest mini pizzy najednou. V terakotové kopuli 2
je k tomuto účelu zhotoveno šest otvorů 3. Pomocí dodaných lopatek na pizzu 8
zasuňte mini pizzy na pečicím plechu 4 do otvorů 3. Mini pizzy po upečení
opět vytáhněte pomocí lopatek na mini pizzy 8 z pečicího plechu 4.
Příprava mini pizzy
1) Připravte si těsto na pizzu a oblohu. Nakrájejte potraviny na malé kousky
(1–2 cm).
2) Lopatky na pizzu 8 lehce vymažte a hotové mini pizzy se budou z kovu
snáze sundávat.
3) Těsto na pizzu rozválejte na tloušťku 2–4 mm a vykrajujte z něj vhodné
kousky pomocí vykrajovátka na těsto 9. Tyto kousky těsta jsou korpusy na
mini pizzu a pokládají se na lopatky na pizzu 8. Korpusy položte na lopatky
na pizzu 8. Okraj mini pizzy vytvarujte tak, že mírně převislé těsto trochu
zatlačíte nahoru. Tím se vytvoří malý vyvýšený okraj a ingredience nemohou
z korpusu na pizzu tak snadno sklouznout.
VÝSTRAHA! NEBEZPEČÍ POŽÁRU!
► Suroviny vždy pokládejte pouze na korpus na pizzu! Maso ani jiné potraviny
nepokládejte přímo na lopatky na pizzu 8. Uvolněný tuk může stříkat.
Pokud se na topné články 7 dostane tuk, mohou se vznítit!
4) Korpusy na pizzu obložte podle potřeby. Dbejte na to, aby lopatky na pizzu 8
nebyly příliš silně obložené. Mini pizzy se nevejdou do otvorů 3 v terakotové
kopuli 2.
Pečení mini pizz
VÝSTRAHA! NEBEZPEČÍ ZRANĚNÍ!
► Přístroj a použité příslušenství se mohou během provozu velmi zahřát.
Přístroj nepřemisťujte a dotýkejte se pouze rukojetí lopatek na pizzu 8.
UPOZORNĚNÍ
► Nepečte velké pizzy ani jiné suroviny přímo na pečicím plechu 4. Mini
pizzy pokládejte vždy jen na předem vymaštěné lopatky na pizzu 8.
Obložené lopatky na pizzu 8 poté položte na pečicí plech 4. Pečicí
plech 4 nevymašťujte.
SPO 910 A1■ 82 │ CZ
Page 86

Připravte přístroj podle popisu v kapitole „Umístění a sestavení“.
1) Připravte si mini pizzy.
2) Zasuňte síťovou zástrčku do síťové zásuvky. Kontrolka 5 svítí červeně
a signalizuje, že je přístroj v provozu. Topné články 7 se začnou zahřívat.
3) Přístroj nechte 10minut předehřát.
4) Lopatky na pizzu 8 prostrčte otvory 3 v terakotové kopuli 2 a položte je
na pečicí plech 4. Dbejte přitom na to, aby se suroviny nedotýkaly horního
topného článku 7.
VÝSTRAHA! NEBEZPEČÍ ZRANĚNÍ!
► Lopatky na pizzu 8 se velmi zahřívají! Proto je uchopujte pouze za plastové
rukojeti!
POZOR! HMOTNÉ ŠKODY!
► Dbejte na to, aby suroviny z mini pizz nepadaly na pečicí plech 4.
Všechny zbytky surovin v pečicím prostoru se připálí!
5) Mini pizzy nechte péct cca 7–12 minut. Doba pečení závisí na tloušťce těsta
a množství surovin, a proto se může lišit.
6) Jakmile jsou suroviny tepelně upravené a mini pizzy dosáhnou
požadovaného stupně propečení, opatrně vytáhněte lopatky na pizzu 8 z
přístroje za rukojeti.
UPOZORNĚNÍ
► Mini pizzy 1 lze odložit na ploše k udržování tepla. Umisťujte na ni pouze
hotové mini pizzy a žádné další suroviny.
► Dbejte na to, že mini pizzy se na ní dále tepelně upravují. Pokud je
ponecháte na ploše k udržování tepla 1 příliš dlouho, mohou se vysušit.
7) Po použití položte jednotlivé lopatky na pizzu 8 na stabilní a žáruvzdorný
podklad. Poté, co lopatky na pizzu 8 trochu vychladnou, je možné je znovu
použít. V případě potřeby je předtím znovu lehce vymažte.
8) Když přístroj dále nepotřebujete, potom vytáhněte síťovou zástrčku ze zásuvky.
Červená kontrolka 5 zhasne.
9) Přístroj nechte 30 minut vychladnout, než jej rozeberete a vyčistíte.
SPO 910 A1 CZ │ 83 ■
Page 87

Čištění a údržba
NEBEZPEČÍ! ÚRAZ ELEKTRICKÝM PROUDEM!
► Před každým čištěním vytáhněte zástrčku ze zásuvky! Hrozí nebezpečí
úrazu elektrickým proudem!
Přístroj nikdy neponořujte do vody či jiných kapalin!
VÝSTRAHA! NEBEZPEČÍ ZRANĚNÍ!
► Před čištěním nechte přístroj vždy nejprve vychladnout. Hrozí nebezpečí
popálení!
POZOR! HMOTNÉ ŠKODY!
► Nepoužívejte abrazivní nebo agresivní čisticí prostředky. Ty mohou
neopravitelně poškodit povrchy!
► Terakotovou kopuli 2 při chladnutí nevystavujte velkému chladu – materiál
může popraskat! Nechte ji vychladnout při pokojové teplotě.
► Terakotovou kopuli 2 znovu nezahřívejte, dokud nebude zcela suchá.
Vlhký materiál může prasknout!
► Terakotovou kopuli 2 a základní přístroj 6 nikdy nemyjte v myčce nádobí!
UPOZORNĚNÍ
► Terakotová kopule
nepoužívejte chemické čisticí prostředky. Po opakovaném používání se stále
více vytváří patina. Toto zabarvení materiálu je normální a neovlivňuje jeho
funkci. Je také nevýznamné z hygienického hlediska.
► Může také dojít k trvalému zabarvení pečicího plechu 4, protože se nachází
v blízkosti topných článků 7. V případě potřeby plech 4 před čištěním
namočte do vody a přidejte do ní trochu prostředku na mytí nádobí.
■ Terakotovou kopuli 2 pečlivě očistěte teplou vodou a utěrkou. Můžete také
použít měkký kartáč. Terakotovou kopuli 2 nevkládejte do vody na oplacho-
vání, protože materiál absorbuje vodu. Poté jej nechte dobře vyschnout na
vzduchu. Před dalším zahříváním se ujistěte, že je terakotová kopule 2 zcela
suchá.
■ Základní přístroj 6 vč. úplně ochlazených topných článků 7 otřete vlhkým
hadříkem. Podle potřeby dejte na hadřík jemný mycí prostředek a vyčištěné
plochy otřete hadříkem navlhčeným pouze čistou vodou. Vše dobře osušte.
2
je výrobek z přírodních materiálů. K čištění
SPO 910 A1■ 84 │ CZ
Page 88
■ Vyčistěte pečicí plech 4, lopatky na pizzu 8 a vykrajovátko na těsto 9
v teplé vodě na oplachování. Pokud jsou díly více znečištěné, můžete je
v případě potřeby trochu namočit. Po umytí všechny díly dobře osušte.
UPOZORNĚNÍ
Pro šetrné čištění doporučujeme mytí ručně. Lopatky na pizzu 8,
pečicí plech 4 a vykrajovátko na těsto 9 lze však mýt i v myčce
nádobí. Vložte je do horní přihrádky myčky nádobí a dbejte na to,
aby se žádné díly nevzpříčily.
Skladování
■ Vychladlý, vyčištěný přístroj a příslušenství uložte na bezprašném a suchém
místě. Terakotovou kopuli 2 neskladujte uzavřenou, ale skladujte ji na místě,
kde cirkuluje vzduch.
Odstranění závad
Závada Příčina Řešení
Zástrčka není zastrčená do
zásuvky.
Síťová zásuvka je vadná. Použijte jinou síťovou zásuvku.
Přístroj nefunguje.
Pokud nelze odstranit poruchy výše popsanými řešeními nebo pokud zjistíte
jakoukoli jinou závadu, obraťte se na náš zákaznický servis.
Přístroj je vadný. Obraťte se na zákaznický servis.
Aktivovala se ochrana proti
přehřátí.
Zapojte síťovou zástrčku do
síťové zásuvky.
Vytáhněte zástrčku ze síťové
zásuvky a vyčkejte, dokud
přístroj nevychladne. Pokud by
přístroj nefungoval ani po ochlazení, obraťte se na zákaznický
servis.
SPO 910 A1 CZ │ 85 ■
Page 89

Likvidace
Symbol přeškrtnuté pojízdné popelnice označuje, že tento přístroj podléhá
směrnici č. 2012/19/EU. Tato směrnice uvádí, že tento přístroj se na konci své
životnosti nesmí likvidovat sběžným domovním odpadem, ale musí se odevzdat
vurčených sběrných místech či dvorech nebo podnicích oprávněných knakládání
sodpady. Tato likvidace je pro vás zdarma. Chraňte životní prostředí a zajistěte
odbornou likvidaci přístroje.
Informace omožnostech likvidace vysloužilého výrobku získáte na vašem
obecním nebo městském úřadě.
Výrobek je recyklovatelný, podléhá rozšířené odpovědnosti výrobce a je shromažďován odděleně.
Záruka společnosti Kompernass Handels GmbH
Vážená zákaznice, vážený zákazníku,
na tento přístroj získáváte záruku v trvání 3let od data zakoupení. V případě
závad tohoto výrobku máte zákonná práva vůči prodejci výrobku. Tato zákonná
práva nejsou omezena naší níže uvedenou zárukou.
Záruční podmínky
Záruční doba začíná plynout dnem nákupu. Dobře uschovejte pokladní doklad.
Tento doklad je potřebný jako důkaz okoupi.
Pokud se do tří let od data zakoupení tohoto výrobku vyskytne vada materiálu
nebo výrobní závada, pak Vám podle našeho uvážení výrobek zdarma opravíme, vyměníme nebo uhradíme kupní cenu. Předpokladem této záruky je, že bude
během tříleté lhůty předložen vadný přístroj a doklad okoupi (pokladní doklad)
a stručně se popíše, včem závada spočívá a kdy se vyskytla.
Vztahuje-li se na závadu naše záruka, obdržíte zpět buď opravený nebo nový
produkt. Opravou nebo výměnou výrobku nezačne plynout nová záruční doba.
Záruční doba a zákonné nároky vyplývající ze závad
Záručním plněním se záruční doba neprodlužuje. To platí ipro vyměněné a opravené součásti. Poškození nebo vady vyskytující se případně již při nákupu se musí
oznámit ihned po vybalení. Po uplynutí záruční doby podléhají veškeré opravy
zpoplatnění.
SPO 910 A1■ 86 │ CZ
Page 90
Rozsah záruky
Přístroj byl vyroben pečlivě podle přísných směrnic kvality a před expedicí byl
svědomitě vyzkoušen.
Záruka se vztahuje na materiálové nebo výrobní vady. Tato záruka se nevztahuje
na součásti výrobku, které jsou vystaveny běžnému opotřebení, a proto je lze
považovat za spotřební díly, nebo na poškození křehkých součástí, jako jsou
např. spínače, akumulátory nebo díly, které jsou vyrobeny ze skla.
Tato záruka zaniká, pokud je výrobek poškozen, nebyl řádně používán nebo
udržován. Pro zajištění správného používání výrobku se musí přesně dodržovat
všechny pokyny uvedené v návodu kobsluze. Účelům použití a úkonům, které se
v návodu kobsluze nedoporučují nebo se před nimi varuje, je třeba se
bezpodmínečně vyhnout.
Výrobek je určen pouze pro soukromé účely a ne pro komerční použití. Při
nesprávném a neodborném používání, při použití násilí a při zásazích, které
nebyly provedeny našimi autorizovanými servisními provozovnami, záruční nároky zanikají.
Vyřízení v případě záruky
Pro zajištění rychlého Vaší žádosti postupujte podle následujících pokynů:
■ Pro všechny dotazy mějte připraven pokladní lístek a číslo výrobku
(IAN)388914_2107 jako doklad o koupi.
■ Číslo výrobku naleznete na typovém štítku na výrobku, rytině na výrobku, na
titulní straně návodu k obsluze (vlevo dole) nebo na nálepce na zadní nebo
spodní straně výrobku.
■ Pokud by se měly vyskytovat funkční vady nebo jiné závady, kontaktujte ne-
jprve níže uvedené servisní oddělení telefonicky nebo e-mailem.
■ Výrobek, zaevidovaný jako vadný výrobek pak můžete při přiložení dokladu
o nákupu (pokladní lístek) a při uvedení, v čem spočívá vada a kdy k ní došlo,
poslat výrobek pro Vás bez poštovného na adresu, kterou Vám oznámí servis.
Na webových stránkách www.lidl-service.com si můžete stáhnout tyto a mnoho dalších příruček, videí o výrobku a instalační software.
Pomocí kódu QR se dostanete přímo na stránku servisu Lidl
(www.lidl-service.com) a můžete pomocí zadání čísla výrobku
(IAN)388914_2107 otevřít svůj návod k obsluze.
SPO 910 A1 CZ │ 87 ■
Page 91

Servis
Servis Česko
Tel.: 800143873
E-Mail: [email protected]
IAN 388914_2107
Dovozce
Dbejte prosím na to, že následující adresa není adresou servisu. Kontaktujte
nejprve uvedený servis.
KOMPERNASS HANDELS GMBH
BURGSTRASSE 21
44867 BOCHUM
NĚMECKO
www.kompernass.com
Recepty
V příkladech receptů najdete dva různé typy korpusů na pizzu.
Oblohu lze měnit mnoha způsoby. Suroviny můžete přidávat podle své chuti
a preferencí. Vezměte však na vědomí, že doba pečení se liší v závislosti
na druhu surovin a jejich množství.
Salámová pizza s korpusem z pšeničné mouky
Suroviny (na cca 8–12 mini pizz)
Na těsto:
■ 250 g pšeničné mouky
■ 150 ml vlažné vody
■ 7 g čerstvého droždí nebo 1/2 sáčku sušeného droždí (3–4 g)
■ 10 ml olivového oleje
■ 1/2 ČL cukru
■ 1/2 ČL soli
SPO 910 A1■ 88 │ CZ
Page 92

Na rajskou omáčku:
■ 100 g rajčatového protlaku
■ 1 stroužek česneku
■ 1/2 ČL sušeného oregana
■ 1 špetka soli a pepře dle chuti
Na oblohu:
■ 100 g krájeného salámu
■ 150 g strouhaného sýra (např. gouda nebo gratinovaný sýr)
Příprava:
1) Droždí a cukr rozpusťte ve 3 PL vlažné vody.
2) Mouku smíchejte v misce se solí, olejem a směsí droždí s cukrem.
3) Postupně přidávejte zbývající vodu a zapracujte ji do těsta.
4) Těsto hněťte tak dlouho, dokud nebude mít hladký povrch.
5) Těsto přikryjte čistou utěrkou a nechte na teplém místě asi 1 hodinu odpočívat.
6) Připravte si omáčku a ostatní ingredience: Česnek nakrájejte na malé kousky
nebo stroužky prolisujte v lisu na česnek. Pasírovaná rajčata smíchejte s
česnekem a oreganem, osolte a opepřete. Krájený salám nakrájejte na malé
kousky.
7) Těsto po kynutí položte na pomoučenou pracovní plochu. Pro další zpracování
jej můžete rozdělit na dvě části a každou zpracovat zvlášť.
8) Těsto rozválejte na tloušťku asi 2–4 mm a vykrajovátkem na těsto 9 vykrajujte
korpusy na pizzu. Korpusy na pizzu položte na lehce vymaštěné lopatky
na pizzu 8. Okraj mini pizzy vytvarujte tak, že mírně převislé těsto trochu
zatlačíte nahoru. Tím se vytvoří malý vyvýšený okraj a ingredience nemohou
z korpusu na pizzu tak snadno sklouznout.
9) Korpus potřete rajčatovou omáčkou a navrch dejte salám a sýr.
10) Lopatky na pizzu 8 nasuňte skrz otvory 3 na pečicí plech 4. Pizzy nechte
péct cca 7–12 minut. Doba pečení závisí na tloušťce těsta a množství surovin,
a proto se může lišit.
TIP: Jako rychlou alternativu můžete použít i hotové těsto na pizzu. Podle potřeby
je obložte rajčatovou omáčkou a dalšími surovinami.
SPO 910 A1 CZ │ 89 ■
Page 93

Vegetariánská pizza s korpusem z celozrnné špaldové
mouky
Suroviny (na cca 8–12 mini pizz)
Na těsto:
■ 150 g špaldové mouky
■ 50 g celozrnné mouky ze špaldy
■ 150 ml vlažné vody
■ 7 g čerstvého droždí nebo 1/2 sáčku sušeného droždí na pečení (3–4 g)
■ 1 ČL medu
■ 1 PL olivového oleje
■ 1/2 ČL soli
Na rajskou omáčku:
■ 100 g rajčatového protlaku
■ 1/2 ČL sušeného oregana
■ 1 špetka soli a pepře dle chuti
Na oblohu:
■ 100 g kukuřice z konzervy
■ 100 g červené papriky
■ 1 středně velké cibule
■ 150 g strouhaného sýra (např. gouda nebo gratinovaný sýr)
Příprava:
1) Celozrnnou špaldovou mouku a špaldovou mouku nasypte do mísy a
promíchejte. Z moučné směsi opět odeberte 100 g.
2) Těchto 100 g moučné směsi nasypte do jiné mísy a přidejte vlažnou vodu,
sušené droždí a med. Vše dobře prohněťte, abyste vytvořili předpracované
těsto.
3) Předpracované těsto vložte do mísy, přikryjte čistou utěrkou nebo potravinovou fólií. Vše nechte 30minut odpočívat.
4) Do předpracovaného těsta přidejte zbývající suroviny. Vše promíchejte
a hněťte, dokud nevznikne hladké těsto.
5) Těsto vložte do mísy, opět přikryjte čistou utěrkou nebo potravinovou fólií.
Těsto nechte podruhé odpočívat, tentokrát po dobu 3–4 hodin.
SPO 910 A1■ 90 │ CZ
Page 94

UPOZORNĚNÍ
► Kynuté těsto můžete také nechat odpočívat přes noc v lednici. Vložte ho do
mísy, přikryjte utěrkou nebo potravinovou fólií a nechte 18–24 hodin
odpočívat. Těsto bude dál kynout, i když o něco pomaleji než při pokojové
teplotě. Ujistěte se, že je pro něj v nádobě ještě místo.
6) Připravte omáčku a ostatní ingredience: Pasírovaná rajčata smíchejte s
česnekem a oreganem, osolte a opepřete. Papriky nakrájejte na malé
kostičky, cibuli rozpulte a nakrájejte na krátké proužky.
7) Těsto po kynutí položte na pomoučenou pracovní plochu. Pro další zpracování
jej můžete rozdělit na dvě části a každou zpracovat dále zvlášť.
8) Těsto rozválejte na tloušťku asi 2–4 mm a vykrajovátkem na těsto 9 vykrajujte
korpusy na pizzu. Pokud se těsto lepí, posypte ho moukou a v případě potřeby
ho přitlačte pomoučenými prsty a dlaní.
9) Korpusy na pizzu položte na lehce vymaštěné lopatky na pizzu 8. Okraj
mini pizzy vytvarujte tak, že mírně převislé těsto trochu zatlačíte nahoru. Tím
se vytvoří malý vyvýšený okraj a ingredience nemohou z korpusu na pizzu
tak snadno sklouznout.
10) Potřete je rajčatovou omáčkou, posypte kukuřicí, paprikou a proužky cibule.
Nakonec posypte sýrem.
11) Lopatky na pizzu 8 nasuňte skrz otvory 3 na pečicí plech 4. Pizzy nechte
péct cca 7–12 minut. Doba pečení závisí na tloušťce těsta a množství surovin,
a proto se může lišit.
TIP: Po upečení posypte pizzu omytou a nadrobno nakrájenou rukolou. Ta dodá
mini pizze svěží a pikantní chuť!
SPO 910 A1 CZ │ 91 ■
Page 95

SPO 910 A1■ 92 │ CZ
Page 96

Spis treści
Wstęp .......................................................94
Użytkowanie zgodne zprzeznaczeniem ..........................94
Zakres dostawy iprzegląd po transporcie ........................94
Rozpakowanie .......................................................... 95
Utylizacja opakowania ...................................................95
Opis urządzenia ..............................................95
Dane techniczne ..............................................96
Wskazówki bezpieczeństwa ....................................96
Przed pierwszym użyciem ......................................99
Ustawianie imontaż ..........................................100
Obsługa ieksploatacja .......................................101
Przygotowanie mini pizz .................................................101
Pieczenie mini pizz .....................................................101
Czyszczenie ipielęgnacja ......................................103
Przechowywanie ............................................104
Usuwanie usterek ............................................104
Utylizacja ...................................................105
Gwarancja Kompernaß Handels GmbH ..........................105
Serwis ...............................................................107
Importer ..............................................................107
Przepisy ....................................................107
Pizza zsalami na podkładzie pszennym .....................................107
Pizza wegetariańska na pełnoziarnistym, orkiszowym spodzie ...................109
SPO 910 A1 PL │ 93 ■
Page 97

Wstęp
Gratulujemy zakupu nowego urządzenia.
Wybrany produkt charakteryzuje się wysoką jakością. Instrukcja obsługi jest
częścią składową produktu. Zawiera ona ważne wskazówki na temat
bezpieczeństwa, użytkowania iutylizacji. Przed rozpoczęciem użytkowania
produktu zapoznaj się ze wszystkimi wskazówkami dotyczącymi obsługi
ibezpieczeństwa. Używaj produktu wyłącznie zgodnie zzamieszczonym tu
opisem oraz wpodanym zakresie zastosowań. Przekazując produkt osobie
trzeciej, dołącz do niego również całą dokumentację.
Użytkowanie zgodne zprzeznaczeniem
To urządzenie jest przeznaczone wyłącznie do pieczenia mini pizzy w pomieszczeniach zamkniętych. Inny sposób użycia lub użycie wykraczające poza
powyższy zakres uznaje się za niezgodne zprzeznaczeniem. Urządzenie nie
jest przeznaczone do zastosowań komercyjnych ani przemysłowych.
Roszczenia wszelkiego rodzaju, wynikające ze szkód powstałych wskutek
użytkowania niezgodnego zprzeznaczeniem, przeprowadzenia niefachowych
napraw, zmian wprowadzonych bez zezwolenia lub wskutek zastosowania
niedopuszczonych części zamiennych, są wykluczone. Wszelkie ryzyko ponosi
wyłącznie użytkownik.
Zakres dostawy iprzegląd po transporcie
Urządzenie dostarczane jest standardowo znastępującymi elementami:
▯ Piec do pizzy (urządzenie podstawowe, blacha do pieczenia ikopuła
zterakoty)
▯ 6 łopatek do pizzy
▯ Wycinak ciasta
▯ Instrukcja obsługi
WSKAZÓWKA
► Dostarczone urządzenie należy sprawdzić pod kątem kompletności
elementów iwidocznych uszkodzeń.
► Kopuła zterakoty jest wykonana ręcznie iskłada się znaturalnych
materiałów. Dlatego też w produkcie mogą występować drobne
nierówności, które jednak nie obniżają jego jakości. Nie ma to wpływu na
stabilność kopuły z terakoty!
► W przypadku niekompletnej dostawy bądź wystąpienia uszkodzeń wskutek
wadliwego opakowania lub transportu skontaktuj się z infolinią serwisową
(patrz rozdział „Serwis”).
SPO 910 A1■ 94 │ PL
Page 98
Rozpakowanie
OSTRZEŻENIE! NIEBEZPIECZEŃSTWO OBRAŻEŃ!
► Materiałów opakowania nie udostępniać dzieciom do zabawy.
Niebezpieczeństwo uduszenia!
1) Wyjmij zkartonu wszystkie części urządzenia oraz instrukcję obsługi.
2) Wyjmij zurządzenia całe opakowanie iewentualnie folie ochronne oraz
naklejki.
Utylizacja opakowania
Materiały opakowaniowe są przyjazne dla środowiska imożna je poddać
procesowi recyklingu. Zbędne materiały opakowaniowe należy usuwać zgodnie
zlokalnymi przepisami.
Opakowania należy utylizować wsposób przyjazny dla środowiska. Przestrzegaj
oznaczeń na różnych materiałach opakowaniowych i w razie potrzeby utylizuj
je zgodnie z zasadami segregacji odpadów. Materiały opakowaniowe są oznaczone skrótami (a) icyframi (b) wnastępujący sposób: 1–7: tworzywa sztuczne,
20–22: papier itektura, 80–98: kompozyty.
WSKAZÓWKA
► W miarę możliwości zachowaj oryginalne opakowanie na czas trwania
gwarancji, by wrazie odsyłania urządzenia móc je prawidłowo zapakować.
Opis urządzenia
Rysunek A:
1 Powierzchnia do utrzymywania ciepła.
2 Kopuła zterakoty
3 Otwór
4 Blacha do pieczenia
5 Lampka kontrolna (czerwona, świeci się podczas pracy)
6 Urządzenie podstawowe
7 Grzałki (góra i dół)
Rysunek B:
8 Łopatka do pizzy
9 Wycinak ciasta
SPO 910 A1 PL │ 95 ■
Page 99

Dane techniczne
Napięcie zasilania 220‒240 V ∼ (prąd przemienny), 50‒60 Hz
Pobór mocy 910 W
Wszystkie części tego urządzenia mające
kontakt zżywnością są do tego odpowiednio
dopuszczone.
Wskazówki bezpieczeństwa
NIEBEZPIECZEŃSTWO! PORAŻENIE PRĄDEM
ELEKTRYCZNYM!
► Przed przystąpieniem do użytkowania należy sprawdzić,
czy urządzenie nie ma widocznych uszkodzeń. Nie wolno
uruchamiać urządzenia, gdy jest uszkodzone lub spadło n
a podłoże.
► Urządzenia nie wolno narażać na oddziaływanie deszczu
ani używać go wwilgotnym lub mokrym środowisku. Dopilnuj,
aby kabel sieciowy wtrakcie użytkowania urządzenia nie
był mokry ani wilgotny.
► Urządzenie musi zostać podłączone do gniazda zprzewo-
dem ochronnym.
► Chroń kabel sieciowy przed zetknięciem zgorącymi elemen-
tami urządzenia. Nigdy nie używaj urządzenia wpobliżu
nieosłoniętego ognia, płyty grzewczej lub piekarnika.
► Kabel sieciowy należy regularnie sprawdzać pod kątem
uszkodzeń. Jeśli dojdzie do uszkodzenia kabla, zabrania
się dalszego korzystania zurządzenia.
► Wprzypadku uszkodzenia kabla zasilającego zleć jego
wymianę producentowi, wpunkcie serwisowym lub osobie
posiadającej podobne kwalifikacje. Dzięki temu unikniesz
poważnych zagrożeń.
► Urządzenie nie może być narażone na działanie wilgoci
związanej na przykład zopadami deszczu lub mokrymi
warunkami.
SPO 910 A1■ 96 │ PL
Page 100
NIEBEZPIECZEŃSTWO! PORAŻENIE PRĄDEM
ELEKTRYCZNYM!
Nigdy nie zanurzaj urządzenia w wodzie lub innych
cieczach! Przedostanie się resztek cieczy na części
przewodzące prąd podczas pracy urządzenia może
spowodować grożące śmiercią porażenie prądem
elektrycznym.
OSTRZEŻENIE! NIEBEZPIECZEŃSTWO OBRAŻEŃ!
► To urządzenie może być używane przez dzieci od 8. roku
życia oraz przez osoby o ograniczonych zdolnościach
fizycznych, sensorycznych lub umysłowych bądź też osoby
nieposiadające odpowiedniego doświadczenia i/lub wiedzy,
wyłącznie pod nadzorem lub po przeszkoleniu w zakresie
bezpiecznego używania urządzenia oraz wynikających
z niego zagrożeń.
► Dzieciom nie wolno bawić się urządzeniem.
► Czyszczenia ani konserwacji nie mogą wykonywać dzieci,
chyba że ukończyły one 8 rok życia isą pod nadzorem.
► Dzieci wwieku poniżej 8 roku życia należy trzymać zdala
od urządzenia ikabla zasilającego.
► Przed przystąpieniem do czyszczenia po korzystaniu
zurządzenia odczekaj do jego całkowitego ostygnięcia!
Niebezpieczeństwo poparzenia!
► Postaw urządzenie jak najbliżej gniazda sieciowego.
Pamiętaj, by wtyk sieciowy był łatwo dostępny wcelu
wyjęcia go zgniazda wprzypadku zagrożenia, atakże,
by kabel sieciowy nie był przyczyną potknięcia.
► Ustaw urządzenie na stabilnym podłożu.
► Piec do pizzy uruchamiaj zawsze z założoną kopułą ztera-
koty.
SPO 910 A1 PL │ 97 ■
 Loading...