

Page 1

BROTBACKAUTOMAT SBB 850 B1
BROTBACKAUTOMAT
Bedienungsanleitung
SFORNAPANE AUTOMATICO
Istruzioni per l'uso
IAN 274313
MACHINE À PAIN
Mode d'emploi
BREAD MAKER
Operating instructions
Page 2

Klappen Sie vor dem Lesen die Seite mit den Abbildungen aus und machen Sie sich anschließend mit allen
Funktionen des Gerätes vertraut.
Avant de lire le mode d'emploi, ouvrez la page contenant les illustrations et familiarisez-vous ensuite avec
toutes les fonctions de l'appareil.
Prima di leggere aprire la pagina con le immagini e prendere confi denza con le diverse funzioni
dell'apparecchio.
Before reading, unfold the page containing the illustrations and familiarise yourself with all functions of
the device.
DE / AT / CH Bedienungsanleitung Seite 1
FR / CH Mode d'emploi Page 23
IT / CH Istruzioni per l'uso Pagina 45
GB Operating instructions Page 67
Page 3

A
B
C
RMV
Page 4

Inhaltsverzeichnis
Einleitung . . . . . . . . . . . . . . . . . . . . . . . . . . . . . . . . . . . . . . . . . . . . . . . . . . . . . . . . . . . . . .2
Bestimmungsgemäßer Gebrauch . . . . . . . . . . . . . . . . . . . . . . . . . . . . . . . . . . . . . . . . . .2
Lieferumfang . . . . . . . . . . . . . . . . . . . . . . . . . . . . . . . . . . . . . . . . . . . . . . . . . . . . . . . . . . .2
Gerätebeschreibung. . . . . . . . . . . . . . . . . . . . . . . . . . . . . . . . . . . . . . . . . . . . . . . . . . . . .2
Technische Daten . . . . . . . . . . . . . . . . . . . . . . . . . . . . . . . . . . . . . . . . . . . . . . . . . . . . . . .2
Sicherheitshinweise . . . . . . . . . . . . . . . . . . . . . . . . . . . . . . . . . . . . . . . . . . . . . . . . . . . . .3
Vor dem ersten Gebrauch . . . . . . . . . . . . . . . . . . . . . . . . . . . . . . . . . . . . . . . . . . . . . . . .7
Eigenschaften . . . . . . . . . . . . . . . . . . . . . . . . . . . . . . . . . . . . . . . . . . . . . . . . . . . . . . . . . .7
Bedienfeld . . . . . . . . . . . . . . . . . . . . . . . . . . . . . . . . . . . . . . . . . . . . . . . . . . . . . . . . . . . . .7
Programme . . . . . . . . . . . . . . . . . . . . . . . . . . . . . . . . . . . . . . . . . . . . . . . . . . . . . . . . . . . .9
Timer-Funktion . . . . . . . . . . . . . . . . . . . . . . . . . . . . . . . . . . . . . . . . . . . . . . . . . . . . . . . .10
Vor dem Backen . . . . . . . . . . . . . . . . . . . . . . . . . . . . . . . . . . . . . . . . . . . . . . . . . . . . . . .10
Brot backen . . . . . . . . . . . . . . . . . . . . . . . . . . . . . . . . . . . . . . . . . . . . . . . . . . . . . . . . . . .11
Reinigung und Pfl ege . . . . . . . . . . . . . . . . . . . . . . . . . . . . . . . . . . . . . . . . . . . . . . . . . . .13
Entsorgung . . . . . . . . . . . . . . . . . . . . . . . . . . . . . . . . . . . . . . . . . . . . . . . . . . . . . . . . . . .14
Garantie und Service . . . . . . . . . . . . . . . . . . . . . . . . . . . . . . . . . . . . . . . . . . . . . . . . . . .14
Importeur . . . . . . . . . . . . . . . . . . . . . . . . . . . . . . . . . . . . . . . . . . . . . . . . . . . . . . . . . . . .15
Programmablauf . . . . . . . . . . . . . . . . . . . . . . . . . . . . . . . . . . . . . . . . . . . . . . . . . . . . . .16
Fehlerbehebung Brotbackautomat . . . . . . . . . . . . . . . . . . . . . . . . . . . . . . . . . . . . . . . .20
SBB 850 B1
DE│AT│CH
│
1 ■
Page 5

BROTBACKAUTOMAT
Einleitung
Herzlichen Glückwunsch zum Kauf Ihres neuen
Gerätes.
Sie haben sich damit für ein hochwertiges Produkt
entschieden. Die Bedienungsanleitung ist Bestandteil dieses Produkts. Sie enthält wichtige Hinweise
für Sicherheit, Gebrauch und Entsorgung. Machen
Sie sich vor der Benutzung des Produkts mit allen
Bedien- und Sicherheitshinweisen vertraut. Benutzen Sie das Produkt nur wie beschrieben und für
die angegebenen Einsatzbereiche. Händigen Sie
alle Unterlagen bei Weitergabe des Produkts an
Dritte mit aus.
Bestimmungsgemäßer
Gebrauch
Benutzen Sie Ihren Brotbackautomaten nur zum
Brotbacken und zur Herstellung von Marmeladen/
Konfi türen im häuslichen Bereich.
Verwenden Sie das Gerät nicht zum Trocknen von
Lebensmitteln oder Gegenständen. Verwenden Sie
den Brotbackautomat nicht im Freien.
Verwenden Sie nur vom Hersteller empfohlenes
Zubehör. Nicht empfohlenes Zubehör kann das
Gerät beschädigen.
Dieses Gerät ist ausschließlich für die Benutzung in
privaten Haushalten bestimmt.
Benutzen Sie das Gerät nicht gewerblich!
Lieferumfang
Brotbackautomat
Backform
2 Knethaken
Messbecher
Messlöff el
Knethakenentferner
Bedienungsanleitung
Kurzinformation
Rezeptheft
HINWEIS
Kontrollieren Sie das Gerät nach dem Aus-
►
en auf Vollständigkeit und auf Transport-
pack
schäden. Wenden Sie sich gegebenenfalls
an den Service (siehe Kapitel "Garantie und
Service").
Gerätebeschreibung
Abbildung A:
1 Sichtfenster
2 Gerätedeckel
3 Belüftungsschlitze
4 Netzkabel
5 Bedienfeld
Abbildung B:
6 2 Knethaken
7 Backform bis zu 1250 g Brotgewicht
8 Messbecher
9 Messlöff el
0 Knethakenentferner
Technische Daten
Nennspannung: 220 - 240 V ~ / 50 Hz
Leistungsaufnahme: 850 Watt
Alle Teile dieses Gerätes, die mit
Lebensmitteln in Berührung kommen,
sind lebensmittelecht.
■ 2 │ DE
│AT│
CH
SBB 850 B1
Page 6

Sicherheitshinweise
► Lesen Sie bitte die Bedienungsanleitung erst vollständig durch, bevor Sie
das Gerät benutzen!
GEFAHR - ELEKTRISCHER SCHLAG!
► Überprüfen Sie vor jedem Gebrauch Netzkabel und -stecker.
Wenn das Netzkabel dieses Gerätes beschädigt wird, muss es
durch den Hersteller, seinen Kundendienst oder eine ähnlich qualifi zierte Person ersetzt werden, um Gefährdungen zu vermeiden.
► Verlegen Sie das Netzkabel nicht über scharfe Kanten oder in
der Nähe von heißen Flächen oder Gegenständen. Die Isolierung des Kabels kann beschädigt werden.
► Ziehen Sie den Netzstecker bei Nichtgebrauch und vor jeder Reini-
gung des Gerätes aus der Steckdose.
► Tauchen Sie den Brotbackautomaten nicht in Wasser oder andere
Flüssigkeiten. Es besteht Stromschlaggefahr!
► Reinigen Sie das Gerät nicht mit kratzenden Putzschwämmen.
Wenn sich Partikel des Schwammes lösen und mit elektrischen
Teilen in Berührung kommen, besteht Stromschlaggefahr.
WARNUNG! VERLETZUNGSGEFAHR!
► Erstickungsgefahr! Kinder ersticken bei unsachgemäßem Gebrauch
des Verpackungsmaterials. Entsorgen Sie dieses sofort nach dem
Auspacken oder bewahren Sie es für Kinder unzugänglich auf.
► Um Stolper- oder Unfallgefahren zu vermeiden, ist das Gerät mit
einem kurzen Netzkabel ausgestattet.
► Lassen Sie das Gerät abkühlen und ziehen Sie den Netzstecker,
bevor Sie Teile des Zubehörs herausnehmen oder einsetzen.
► Verlegen Sie ein Verlängerungskabel so, dass niemand darüber
stolpern und unbeabsichtigt daran ziehen kann.
SBB 850 B1
DE│AT│CH
│
3 ■
Page 7

WARNUNG! VERLETZUNGSGEFAHR!
► Wenn Kinder in der Nähe sind, bitte das Gerät gut beaufsichti-
gen! Wenn das Gerät nicht benutzt wird, wie auch vor dem Reinigen, bitte den Netzstecker ziehen. Vor dem Abnehmen einzelner
Teile das Gerät auskühlen lassen.
► Dieses Gerät kann von Kindern ab 8 Jahren sowie von Personen
mit reduzierten physischen, sensorischen oder mentalen Fähigkeiten
oder Mangel an Erfahrung und/oder Wissen benutzt werden,
wenn sie beaufsichtigt oder bezüglich des sicheren Gebrauchs
des Gerätes unterwiesen wurden und die daraus resultierenden
Gefahren verstanden haben.
► Kinder dürfen nicht mit dem Gerät spielen.
► Reinigung und Benutzer-Wartung dürfen nicht durch Kinder durch-
geführt werden, es sei denn, sie sind älter als 8 Jahre und beaufsichtigt.
► Kinder jünger als 8 Jahre sind vom Gerät und der Anschlusslei-
tung fernzuhalten.
► Dieses Gerät entspricht den einschlägigen Sicherheitsbestimmun-
gen. Überprüfung, Reparatur und technische Wartung dürfen
nur von einem qualifi zierten Fachhändler durchgeführt werden.
Ansonsten erlischt der Garantieanspruch.
► Vorsicht! Der Brotbackautomat wird heiß. Fassen Sie das Gerät
erst an, wenn es sich abgekühlt hat oder benutzen Sie zum Anfassen einen Topfl appen.
► Versetzen Sie den Brotbackautomaten nicht, wenn sich heißer
oder fl üssiger Inhalt, z. B. Konfi türe, in der Backform befi ndet. Es
besteht Verbrennungsgefahr!
► Kommen Sie nie während der Benutzung mit den rotierenden
Knethaken in Berührung. Es besteht Verletzungsgefahr!
► Während des Betriebs kann die Temperatur der berührbaren
Oberfl äche sehr hoch sein. Verbrennungsgefahr!
■ 4 │ DE
│AT│
CH
SBB 850 B1
Page 8

WARNUNG! VERLETZUNGSGEFAHR!
Achtung! Heiße Oberfl äche!
Teile des Gerätes werden während
des Betriebes sehr heiß! Verbrennungsgefahr!
WARNUNG! BRANDGEFAHR!
► Benutzen Sie keine externe Zeitschaltuhr oder ein separates Fern-
wirksystem um das Gerät zu betreiben.
► Stellen Sie das Gerät nicht in der Nähe von brennbaren Mate-
rialien, explosiven und/oder brennbaren Gasen auf. Zu anderen
Gegenständen muss ein Mindestabstand von 10 cm eingehalten
werden.
► Decken Sie das Gerät niemals mit einem Handtuch oder anderen
Materialien ab. Hitze und Dampf müssen entweichen können. Ein
Brand kann entstehen, wenn das Gerät mit brennbarem Material
abgedeckt wird oder in Kontakt kommt, wie z. B. mit Vorhängen.
► Stellen Sie keine Gegenstände auf das Gerät und bedecken Sie es
nicht.
► Legen Sie nie Alufolie oder andere metallische Gegenstände in
den Brotbackautomaten. Dies kann zu einem Kurzschluss führen.
► Überschreiten Sie beim Backen niemals die Menge von 700 g
Mehl und geben Sie niemals mehr als 1 ¼ Päckchen Trockenhefe
dazu. Der Teig kann überlaufen und einen Brand verursachen!
Ausgenommen hiervon sind glutenfreie Brote. Hierbei dürfen bis
maximal 2 Päckchen Trockenhefe hinzugegeben werden (siehe
Rezeptheft).
ACHTUNG – SACHSCHADEN!
► Achten Sie darauf, dass die Lüftungsschlitze des Gerätes nicht
verdeckt werden. Überhitzungsgefahr!
► Lassen Sie das Gerät während des Betriebes nie unbeaufsichtigt!
► Das Gerät nur innerhalb von Gebäuden benutzen.
SBB 850 B1
DE│AT│CH
│
5 ■
Page 9

ACHTUNG – SACHSCHADEN!
► Das Gerät nie auf oder neben einen Gas- oder Elektroherd, einen
heißen Backofen oder sonstigen Hitzequellen stellen. Überhitzungsgefahr!
► Die Verwendung von nicht vom Hersteller empfohlenem Zubehör
kann zu Beschädigungen führen. Das Gerät nur für den vorgesehenen Zweck verwenden. Ansonsten erlischt der Garantieanspruch.
► Starten Sie ein Backprogramm nur mit eingesetzter Backform.
Ansonsten kann es zu irreparablen Schäden am Gerät führen.
► Ziehen Sie den Stecker nicht am Netzkabel aus der Steckdose.
► Benutzen Sie den Brotbackautomaten nicht, um darin Speisen
oder Utensilien aufzubewahren.
► Benutzen Sie das Gerät nie mit leerer oder ohne Backform. Das
führt zu irreparablen Schäden am Gerät.
► Schließen Sie immer den Deckel während des Betriebs.
► Entfernen Sie nie die Backform während des Betriebs.
► Stellen Sie das Gerät ausschließlich auf eine trockene, ebene und
hitzeunempfi ndliche Oberfl äche.
► Überprüfen Sie vor dem Anschluss, ob Stromart und Netzspannung
mit den Angaben auf dem Typenschild übereinstimmen.
► Wenn Sie ein Verlängerungskabel verwenden, muss die maximal
zulässige Leistung des Kabels der Leistung des Brotbackautomaten
entsprechen.
■ 6 │ DE
│AT│
CH
SBB 850 B1
Page 10

Vor dem ersten Gebrauch
Auspacken
■ Packen Sie das Gerät aus und entfernen Sie
jegliches V
Aufkleber und Schutzfolien.
■ Kontrollieren Sie das Gerät nach dem Auspa-
cken auf Vollständigkeit und auf Transportschäden. Wenden Sie sich gegebenenfalls an den
Service (siehe Kapitel "Garantie und Service").
Erste Reinigung
Wischen Sie Backform 7, Knethaken 6 und
Außenfl äche des Brotbackautomaten vor der Inbetriebnahme mit einem sauberen, feuchten Tuch ab.
Verwenden Sie keine kratzenden Putzschwämme
oder Scheuermittel. Entfernen Sie, falls noch nicht
geschehen, die Schutzfolie auf dem Bedienfeld 5.
Erstes Aufheizen
1) Setzen Sie ausschließlich beim erstmaligen
Aufheizen die leere Backform 7 in das Gerät
ein und schließen Sie den Gerätedeckel 2.
WARNUNG! BRANDGEFAHR!
► Lassen Sie den Brotbackautomaten nicht länger
als 5 Minuten mit leer
zen. Es besteht die Gefahr der Überhitzung.
2) Wählen Sie das Programm 12, wie im Kapitel
„Programme“ beschrieben und drücken Sie
Start/Stop , um das Gerät für 5 Minuten
aufzuheizen.
3) Drücken Sie nach 5 Minuten die Taste Start/
Stop , bis ein langer Signalton ertönt, um
das Programm zu beenden.
erpackungsmaterial, sowie eventuelle
er Backform 7 aufhei-
4) Lassen Sie das Gerät vollständig abkühlen und
wischen Sie noch einmal Backform 7, Knethaken 6 und Außenfl äche des Brotbackautomaten mit einem sauberen, feuchten Tuch ab.
Eigenschaften
Mit dem Brotbackautomat haben Sie die Möglichkeit Brot nach Ihrem Geschmack zu backen.
■ Sie können zwischen 12 verschiedenen Pro-
gr
ammen wählen.
■ Sie können fertige Backmischungen verarbeiten.
■ Sie können Nudel- oder Brötchenteig kneten
lassen oder Marmelade her
■ Durch das Programm „Glutenfrei” können Sie
glutenfreie Backmischungen und Rezepte mit
glutenfreien Mehlen, wie z. B. Maismehl, Buchweizenmehl und Kartoff elmehl, backen.
stellen.
Bedienfeld
RMV
HINWEIS
Da die Heizelemente leicht eingefettet sind, kann
s bei der ersten Inbetriebnahme zu leichter
e
Geruchsbildung kommen. Diese ist unschädlich
und hört nach kurzer Zeit auf. Sorgen Sie für
ausreichende Belüftung, öff nen Sie zum Beispiel
ein Fenster.
SBB 850 B1
DE│AT│CH
│
7 ■
Page 11

Display
Anzeige für
die Auswahl des Gewichts
(750 g, 1000 g, 1250 g)
die noch verbleibende Betriebszeit in Stunden
und die programmierte Zeitvorwahl
das Herausnehmen der Knethaken
(„RMV“ = „Remove“)
den gewählten Bräunungsgrad (Hell
Mittel , Dunkel , Schnell )
die gewählte Programm-Nummer
den Programmablauf
das Zugeben von Zutaten („ADD“)
Start / Stop
Zum Starten und Beenden des Betriebes oder um
eine Timer-Programmierung zu löschen.
Um den Betrieb anzuhalten, drücken Sie kurz die
Start/Stop-Taste , bis ein Signalton ertönt und die
Zeit im Display blinkt. Durch erneutes Drücken
der Start/Stop-Taste kann der Betrieb innerhalb
von 10 Minuten wieder fortgesetzt werden. Wenn
Sie vergessen, das Programm fortzusetzen, wird das
Programm nach 10 Minuten automatisch fortgesetzt.
Um den Betrieb vollständig zu beenden oder die Einstellungen zu löschen, drücken Sie für 3 Sekunden die
Start/Stop-Taste bis ein langer Signalton ertönt.
HINWEIS
► Drücken Sie nicht die Start/Stop-Taste ,
enn Sie lediglich den Zustand des Brotes
w
kontrollieren wollen. Beobachten Sie den
Backvorgang durch das Sichtfenster 1.
ACHTUNG!
► Beim Drücken aller Tasten muss ein Signalton
tönen, ausgenommen, während das Gerät
er
in Betrieb ist.
,
Bräunungsgrad
(oder Schnellmodus)
Wahl des Bräunungsgrades oder wechseln in
den Schnellmodus (Hell/Mittel/Dunkel/Schnell).
Drücken Sie wiederholt die Taste Bräunungsgrad ,
bis der Pfeil über dem gewünschten Bräunungsgrad
erscheint. Für die Programme 1 - 4 können Sie durch
mehrmaliges Drücken der Taste Bräunungsgrad
den Schnellmodus aktivieren, um den Backvorgang
zu verkürzen. Drücken Sie die Taste Bräunungsgrad
so oft, bis der Pfeil über „Schnell“ erscheint. Bei den
Programmen 6, 7 und 11 kann kein Bräunungsgrad
gewählt werden.
Timer
Zeitverzögertes Backen.
HINWEIS
► Bei Programm 11 können Sie kein zeitverzö-
ger
Betriebsindikationslampe
Die Betriebsindikationslampe zeigt mit ihrem
Leuchten an, dass grade ein Programm läuft.
Wenn Sie ein Programm mit der Timer-Funktion
zeitverzögert starten wollen, blinkt die Betriebsindikationslampe , sobald Sie die Einstellung des
Timers bestätigt haben. Sobald das Programm
startet, leuchtet die Betriebsindikationslampe
dauerhaft.
Brotgewicht
Wahl des Brotgewichtes (750 g / 1000 g / 1250 g).
Drücken Sie diese Taste wiederholt, bis der Pfeil
unter dem gewünschten Gewicht erscheint. Die
Gewichtsangaben (750 g / 1000 g / 1250 g) beziehen sich auf die Menge der eingefüllten Zutaten
in die Backform 7.
HINWEIS
► Die Voreinstellung beim Einschalten des Gerätes
ist 1250 g. Bei den Pr
12 können Sie das Brotgewicht nicht einstellen.
tes Backen einstellen.
ogrammen 6, 7, 11 und
■ 8 │ DE
│AT│
CH
SBB 850 B1
Page 12

Programmwahl (Menü)
Aufrufen des gewünschten Backprogramms (1-12).
Im Display erscheint die Programm-Nummer
und die entsprechende Backzeit.
Memory-Funktion
Das Programm wird beim Wiedereinschalten nach
einem Stromausfall von bis zu ca. 10 Minuten an
gleicher Stelle fortgesetzt. Dies gilt jedoch nicht
bei Löschen/Beenden des Backvorgangs oder bei
Betätigung der Start/Stop-Taste bis ein langer
Signalton ertönt.
Sichtfenster 1
Durch das Sichtfenster 1 können Sie den Backvorgang beobachten.
Programme
Mit der Taste Programmwahl wählen Sie das
gewünschte Programm aus. Die entsprechende
Programm-Nummer wird im Display angezeigt.
Die Backzeiten sind abhängig von den gewählten
Programmkombinationen. Siehe Kapitel
„Programmablauf“.
Programm 1: Normal
Für Weiß- und Mischbrote die hauptsächlich aus
Weizen- oder Roggenmehl bestehen. Das Brot hat
eine kompakte Konsistenz. Die Bräunung des Brotes stellen Sie mit der Taste Bräunungsgrad ein.
Programm 2: Locker
Für leichte Brote aus gut gemahlenem Mehl. Das
Brot ist in der Regel locker und hat eine knusprige
Kruste.
Programm 3: Vollkorn
Für Brote mit kräftigeren Mehlsorten, z. B. Weizenvollkornmehl und Roggenmehl. Das Brot wird
kompakter und schwerer.
Programm 4: Süß
Für Brote mit Zutaten aus Fruchtsäften, Kokosnussfl ocken, Rosinen, Trockenfrüchten, Schokolade oder
zusätzlichem Zucker. Durch eine längere Aufgehphase wird das Brot leichter und luftiger.
Programm 5: Express
Für das Kneten, Teig gehen lassen und das Backen
wird weniger Zeit benötigt. Für dieses Programm sind
jedoch nur Rezepte geeignet, die keine schweren Zutaten oder kräftige Mehlsorten enthalten. Beachten
Sie, dass das Brot bei diesem Programm weniger
luftig und nicht ganz so schmackhaft werden kann.
Programm 6: Teig (kneten)
Zur Herstellung von Hefeteig für Brötchen, Pizza oder
Zöpfe. Der Backvorgang entfällt bei diesem Programm.
Programm 7: Nudelteig
Für die Zubereitung von Nudelteig. Der Backvorgang
entfällt bei diesem Programm.
Programm 8: Buttermilchbrot
Für Brote die aus Buttermilch oder Joghurt hergestellt werden.
Programm 9: Glutenfrei
Für Brote aus glutenfreien Mehlen und Backmischungen. Glutenfreie Mehle benötigen länger für
die Aufnahme von Flüssigkeiten und haben andere
Triebeigenschaften.
Programm 10: Kuchen
Die Zutaten werden bei diesem Programm geknetet,
gehen gelassen und gebacken. Benutzen Sie Backpulver für dieses Programm.
Programm 11: Marmelade
Zum Herstellen von Marmeladen, Konfi türen,
Gelees und Fruchtaufstrichen.
Programm 12: Backen
Zum Nachbacken von Broten, die zu hell oder
nicht ganz durch gebacken sind oder Fertigteige.
Alle Knet- oder Ruhevorgänge entfallen bei diesem
Programm. Das Brot wird bis zu einer Stunde nach
Ende des Backvorgangs warm gehalten. Dadurch
wird verhindert, dass das Brot zu feucht wird. Das
Programm 12 backt das Brot für 60 Minuten.
Um diese Funktionen vorzeitig zu beenden,
drücken Sie die Start/Stop-Taste , bis ein langer
Signalton ertönt. Um das Gerät auszuschalten,
trennen Sie das Gerät vom Stromnetz.
SBB 850 B1
DE│AT│CH
│
9 ■
Page 13

HINWEIS
Bei den Programmen 1, 2, 3, 4, 5, 6, 8 und
►
tönt während des Programmablaufs ein
9 er
Signalton und „ADD“ erscheint im Display.
Fügen Sie unmittelbar danach weitere Zutaten,
wie Früchte oder Nüsse hinzu. Sie müssen
dazu das Programm nicht unterbrechen.
Die Zutaten werden durch den Knethaken 6
nicht zerkleinert. Wenn Sie den Timer eingestellt haben, können Sie sämtliche Zutaten
auch zu Programmbeginn in die Backform 7
geben. Früchte und Nüsse sollten Sie in diesem Fall vor der Zugabe etwas zerkleinern.
Timer-Funktion
Die Timer-Funktion ermöglicht Ihnen ein zeitverzögertes Backen.
Mit den Pfeiltasten
gewünschten Endzeitpunkt des Backvorgangs ein.
Die maximale Zeitverzögerung beträgt 15 Stunden.
WARNUNG! BRANDGEFAHR!
► Bevor Sie ein bestimmtes Brot mit der Timer-
funktion back
Rezept erst aus, um sicherzustellen, dass das
Verhältnis der Zutaten zueinander stimmt, der
Teig nicht zu fest oder zu dünn ist oder die
Menge zu groß ist und dann evtl. überläuft.
1) Wählen Sie ein Programm. Das Display
zeigt Ihnen die benötigte Backdauer.
2) Mit der Pfeiltaste
Ende des Programmes. Beim erstmaligen
Betätigen verschiebt sich die Endzeit bis zum
nächsten Zehner. Jedes weitere Drücken der
Pfeiltaste
Minuten. Bei gedrückter Pfeiltaste beschleunigen Sie diesen Vorgang. Das Display zeigt
Ihnen die Gesamtdauer von Backzeit und
Verzögerungszeit.
Bei einer Überschreitung der möglichen Zeit-
verschiebung können Sie mit der Pfeiltaste
die Zeit korrigieren.
3) Bestätigen Sie die Einstellung des Timers mit
der Start/Stop-Taste .
und stellen Sie den
en wollen, probieren Sie das
verschieben Sie das
verschiebt die Endzeit um 10
Die Betriebsindikationslampe beginnt zu blin-
ken. Der Doppelpunkt im Display blinkt und
die programmierte Zeit beginnt abzulaufen.
Sobald das Programm startet, leuchtet die Betriebsindikationslampe dauerhaft. Bei Beendigung des
Backvorgangs ertönen zehn Signaltöne und das
Display zeigt 0:00 an.
Beispiel:
Es ist 8.00 Uhr und Sie möchten in 7 Stunden
und 30 Minuten, also um 15:30 Uhr, frisches Brot
haben. Wählen Sie zunächst das Programm 1 und
drücken Sie dann die Pfeiltasten so lange, bis
im Display 7:30 erscheint, da die Zeit bis zur
Fertigstellung 7 Stunden und 30 Minuten beträgt.
HINWEIS
► Bei dem Programm „Marmelade“ steht die
imer-Funktion nicht zur Verfügung.
T
HINWEIS
► Verwenden Sie die Timer-Funktion nicht, wenn
Sie schnell v
Milch, Sahne oder Käse verarbeiten.
erderbliche Lebensmittel wie Eier,
Vor dem Backen
Für einen erfolgreichen Backvorgang berücksichtigen Sie bitte folgende Faktoren:
Zutaten
WARNUNG! BRANDGEFAHR!
► Nehmen Sie die Backform 7 aus dem Ge-
häuse, be
Zutaten in den Backraum gelangen, kann
durch die Erhitzung der Heizschlangen ein
Brand entstehen.
■ Geben Sie die Zutaten immer in der angegebenen
R
eihenfolge in die Backform 7.
■ Alle Zutaten sollten auf Zimmertemperatur
erwärmt sein, um einen optimalen Gärvorgang
der Hefe zu erhalten.
vor Sie die Zutaten einfüllen. Wenn
■ 10 │ DE
│AT│
CH
SBB 850 B1
Page 14

WARNUNG! BRANDGEFAHR!
► Verwenden Sie auf keinen Fall größere Men-
gen als angegeben. Zu viel T
die Backform 7 laufen und an den heißen
Heizschlangen einen Brand verursachen.
■ Achten Sie auf ein genaues Abmessen der
Zutatenmengen. Ber
von der im Rezept angegebenen Menge können
das Backergebnis beeinfl ussen.
eits geringe Abweichungen
eig kann über
Brot backen
Vorbereitung
HINWEIS
► Stellen Sie den Brotbackautomaten auf einen
aden und festen Untergrund.
ger
1) Ziehen Sie die Backform 7 aus dem Gerät
nach oben heraus.
2) Stecken Sie die Knethaken 6 auf die Antriebswellen in der Backform 7. Achten Sie darauf,
dass sie fest sitzen.
3) Geben Sie die Zutaten Ihres Rezeptes in die
Backform 7. Geben Sie zuerst die Flüssigkeiten, Zucker, Salz und dann Mehl hinzu, die
Hefe als letzte Zutat.
HINWEIS
► Achten Sie darauf, dass Hefe nicht mit Salz
oder Flüssigk
4) Setzen Sie die Backform 7 wieder ein. Achten
Sie darauf, dass sie richtig einrastet.
5) Schließen Sie den Gerätedeckel 2.
6) Stecken Sie den Netzstecker in die Steckdose.
Es ertönt ein Signalton und im Display er-
scheint die Programm-Nummer und Zeitdauer
für das Programm 1.
7) Wählen Sie Ihr Programm mit der Programmwahl-Taste . Jede Eingabe wird mit einem
Signalton bestätigt.
8) Wählen Sie gegebenenfalls die Größe des
Brotes mit der Taste .
eiten in Berührung kommt.
9) Wählen Sie den Bräunungsgrad Ihres Brotes.
Im Display zeigt Ihnen der Pfeil, ob Sie Hell,
Mittel oder Dunkel eingestellt haben. Sie können
hier auch die Einstellung „Schnell“ wählen, um
die Zeit, in der der Teig geht, abzukürzen.
HINWEIS
► Für die Programme 6, 7 und 11 ist die Funkti-
äunungsgrad” nicht möglich.
on „Br
Die Funktion „Schnell“ ist nur für die Programme 1 - 4 möglich.
Für die Programme 6, 7, 11 und 12 ist die
Einstellung des Brotgewichts nicht möglich.
10) Sie haben jetzt die Möglichkeit über die TimerFunktion den Endzeitpunkt Ihres Programms
einzustellen. Sie können eine maximale Zeitverschiebung von bis zu 15 Stunden eingeben.
HINWEIS
► Für das Programm 11 ist diese Funktion nicht
möglich.
ogramm starten
Pr
Starten Sie nun das Programm mit der Start/Stop
Taste .
HINWEIS
► Die Programme 1, 2, 3, 4, 6 und 8 starten mit
einer 10- bis 30-minütigen V
Schnell-Modus, siehe Tabelle Programmablauf).
Die Knethaken 6 bewegen sich hierbei nicht.
Das ist kein Fehler des Gerätes.
Das Programm führt automatisch die verschiedenen
Arbeitsgänge durch.
HINWEIS
► Bei den Programmen 1, 2, 3, 4, 5, 8, 9 und 10
tönen nach Beendigung des Programmab-
er
schnittes „Gehen 2" 10 Signaltöne und „RMV"
erscheint im Display . Sie können nun die
Knethaken 6 aus dem Teig entfernen.
Wenn Sie die Knethaken 6 nicht entfernen
wollen, warten Sie einfach ab. Das Gerät setzt
das Programm automatisch fort.
orheizphase (außer
SBB 850 B1
DE│AT│CH
│
11 ■
Page 15

Sie können den Programmablauf über das Sichtfenster 1 Ihres Brotbackautomaten beobachten.
Gelegentlich kann es während des Backvorgangs
zur Feuchtigkeitsbildung im Sichtfenster 1
kommen. Der Gerätedeckel 2 kann während der
Knetphase geöff net werden.
HINWEIS
► Öff nen Sie den Ger
der Geh- oder Backphase. Das Brot kann in sich
zusammenfallen.
Programm beenden
Bei Beendigung des Backvorgangs ertönen zehn
Signaltöne und das Display zeigt 0:00 an.
Bei Beendigung des Programms schaltet das Gerät
automatisch auf einen bis zu 60 Minuten andauernden Warmhaltebetrieb.
HINWEIS
► Das gilt nicht für die Programme 6, 7 und 11.
Dabei zirkuliert warme Luft im Gerät. Die Warmhaltefunktion können Sie vorzeitig beenden, indem
Sie die Start/Stop-Taste bis zum Ertönen der
Signaltöne gedrückt halten.
GEFAHR! ELEKTRISCHER SCHLAG!
► Ziehen Sie den Netzstecker aus der Steckdo-
vor Sie den Gerätedeckel 2 öff nen.
se, be
Bei Nichtbenutzung sollte das Gerät immer
vom Stromnetz getrennt werden!
Brot entnehmen
Verwenden Sie beim Herausnehmen der Backform
7 immer Topfl appen oder Schutzhandschuhe.
Halten Sie die Backform 7 schräg über einen
Rost und schütteln leicht, bis sich das Brot aus der
Backform 7 löst.
ätedeckel 2 nicht während
Falls Sie die Knethaken nicht schon vorher entnommen haben:
Löst sich das Brot nicht von den Knethaken 6,
entfernen Sie vorsichtig die Knethaken 6 mit dem
beiliegenden Knethakenentferner 0.
HINWEIS
Benutzen Sie keine Metallgegenstände, die zu
atzern auf der Antihaftbeschichtung führen
Kr
können. Spülen Sie gleich nach der Brotentnahme die Backform 7 mit warmem Wasser aus.
Sie verhindern ein Festsetzen der Knethaken 6
an der Antriebswelle.
■ Drücken Sie kurz die Start/Stop- Taste , um
das Pr
ogramm ganz zu Anfang der Backphase
zu unterbrechen oder ziehen Sie den Stecker
aus der Netzsteckdose. Sie müssen den Netzstecker innerhalb von 10 Minuten wieder mit dem
Stromnetz verbinden, damit der Backvorgang
anschließend fortgesetzt werden kann.
■ Öff nen Sie den Gerätedeckel 2 und nehmen
Sie die Backform 7 heraus. Mit bemehlten
Händen können Sie den Teig entnehmen und
die Knethaken 6 entfernen.
■ Legen Sie den Teig wieder in die Backform 7.
Setzen Sie die Backform 7 wieder ein und
schließen Sie den Gerätedeckel 2.
■ Stecken Sie ggf. den Netzstecker in die Steckdose.
Das Backprogramm wird fortgesetzt.
Lassen Sie das Brot 15 - 30 Minuten abkühlen,
bevor Sie es verzehren.
Vergewissern Sie sich vor dem Anschneiden des
Brotes immer, dass sich kein Knethaken 6 im Teig
befi ndet.
Fehlermeldungen
■ Wenn das Display „HHH“ anz
das Programm gestartet wurde, ist die Temperatur des Brotbackautomaten noch zu hoch.
Stoppen Sie das Programm und ziehen Sie den
Netzstecker. Öff nen Sie den Gerätedeckel 2
und lassen Sie das Gerät 20 Minuten abkühlen,
bevor Sie es weiter benutzen.
eigt, nachdem
■ 12 │ DE
│AT│
CH
SBB 850 B1
Page 16

■ Wenn sich kein neues Programm starten lässt,
nachdem der Brotbackautomat ein Programm
bereits abgeschlossen hat, ist er noch zu heiß. In
diesem Fall springt die Displayanzeige auf die
Grundeinstellung (Programm 1). Öff nen Sie den
Gerätedeckel 2 und lassen Sie das Gerät 20
Minuten abkühlen, bevor Sie es weiter benutzen.
HINWEIS
► Versuchen Sie nicht, das Gerät in Betrieb zu
nehmen, be
funktioniert nur bei dem Programm 12.
■ Wenn das Display „EE0“, „EE1“ oder „LLL”
anz
eigt, nachdem das Programm gestartet
wurde, schalten Sie den Brotbackautomaten
zunächst aus und danach wieder ein, indem Sie
den Netzstecker aus der Steckdose ziehen und
ihn dann wieder einstecken. Sollte die Fehleranzeige weiterhin bestehen, wenden Sie sich an
den Kundendienst.
vor es sich abgekühlt hat. Das
Reinigung und Pfl ege
GEFAHR! ELEKTRISCHER SCHLAG!
► Ziehen Sie vor jeder Reinigung den Netzste-
er aus der Steckdose und lassen Sie das
ck
Gerät ganz abkühlen.
Schützen Sie das Gerät vor Feuchtigkeit,
da dies einen Stromschlag zur Folge haben
kann. Beachten Sie dazu bitte auch die
Sicherheitshinweise.
ACHTUNG! SACHSCHADEN!
► Die Geräte- bzw. Zubehörteile sind nicht
spülmaschinengeeignet!
► Benutzen Sie zum Reinigen des Brotbackauto-
maten k
eine chemischen Reinigungsmittel oder
Verdünner.
Gehäuse, Deckel, Backraum
■ Entfernen Sie alle Rückstände im Backraum mit
einem feuchten T
feuchteten weichen Schwamm.
■ Wischen Sie das Gehäuse und den Deckel
ebenfalls nur mit einem feuchten Tuch oder
Schwamm ab.
uch oder einem leicht ange-
Zur leichten Reinigung kann der Gerätedeckel
2 vom Gehäuse entfernt werden:
– Öff nen Sie den Gerätedeckel 2 so
die Kunststoff zapfen durch die Öff nungen
der Scharnierführungen passen:
– Ziehen Sie den Gerätedeckel 2 aus den
Scharnierführungen heraus.
■ Um den Gerätedeckel 2 nach der Reinigung
wieder zu montieren, führen Sie die Kunststoff zapfen durch die Öff nung der Scharnierführungen.
■ Trocknen Sie alles gut ab und stellen Sie sicher,
or einer erneuten Benutzung alle Teile
dass v
trocken sind.
Backform, Knethaken und Zubehör
ACHTUNG! SACHSCHADEN!
► Tauchen Sie die Backform 7 niemals in
asser oder andere Flüssigkeiten.
W
► Die Oberfl ächen der Backform 7 und der
Knethak
en 6 sind mit einer Antihaftbe-
schichtung versehen. Benutzen Sie bei der
Reinigung keine aggressiven Reinigungsmittel,
Scheuermittel oder Gegenstände, die zu Kratzern auf den Oberfl ächen führen können.
HINWEIS
► Durch Feuchtigkeit und Dampf kann sich das
Aussehen der Oberfl ächen im Laufe der Zeit
verändern. Dies ist keine Beeinträchtigung der
Funktionsfähigkeit oder Qualitätsminderung.
weit, bis
SBB 850 B1
DE│AT│CH
│
13 ■
Page 17

■ Nehmen Sie vor der Reinigung die Backform 7
und die Knethaken 6 aus dem Backraum.
■ Nehmen Sie die Knethaken 6 aus der Back-
form 7. Sollten sich die Knethaken 6 nicht aus
der Backform 7 lösen, füllen Sie die Backform 7
für etwa 30 Minuten mit heißem Wasser. Die
Knethaken 6 sollten sich nun lösen lassen.
Reinigen Sie die Knethaken 6 in warmem Wasser und geben Sie ein mildes Spülmittel hinzu.
Bei hartnäckigen Verkrustungen, lassen Sie
die Knethaken 6 solange in dem Spülwasser
einweichen, bis sich die Verkrustungen mit Hilfe
einer Spülbürste lösen lassen.
Ist die Einsatzhalterung im Knethaken 6
verstopft, können Sie diese vorsichtig mit einem
Holzstäbchen reinigen.
Trocknen Sie die Knethaken 6 nach der Reinigung gründlich ab.
■ Wischen Sie die Außenseite der Backform 7
mit einem feuchten Tuch ab.
■ Reinigen Sie den Innenraum der Backform 7
mit warmem Wasser und etwas Spülmittel. Bei
Verkrustungen in der Backform 7, füllen Sie
Wasser in die Backform 7 und geben Sie ein
mildes Spülmittel hinzu. Lassen Sie es solange
stehen, bis die Verkrustungen eingeweicht sind
und sich mit einer Spülbürste lösen lassen. Spülen Sie die Backform 7 danach mit viel klarem
Wasser aus und trocknen Sie diese gut ab.
■ Reinigen Sie den Messbecher 8, den Mess-
el 9 und den Knethakenentferner 0 in
löff
warmem Wasser und geben Sie ein mildes
Spülmittel hinzu. Spülen Sie die Teile danach mit
klarem Wasser ab, um Spülmittelreste zu beseitigen. Trocknen Sie alles gründlich ab.
Entsorgung
Werfen Sie das Gerät keines-
falls in den normalen Hausmüll.
Dieses Produkt unterliegt der
europäischen Richtlinie
2012/19/EU.
Entsorgen Sie das Gerät über einen zugelassenen
Entsorgungsbetrieb oder über Ihre kommunale
Entsorgungseinrichtung.
Beachten Sie die aktuell geltenden Vorschriften.
Setzen Sie sich im Zweifelsfall mit Ihrer Entsorgungseinrichtung in Verbindung.
Führen Sie alle Verpackungsmaterialien
einer umweltgerechten Entsorgung zu.
Garantie und Service
Sie erhalten auf dieses Gerät 3 Jahre Garantie ab
Kaufdatum. Das Gerät wurde sorgfältig produziert
und vor Anlieferung gewissenhaft geprüft.
Bitte bewahren Sie den Kassenbon als Nachweis
für den Kauf auf. Bitte setzen Sie sich im Garantiefall mit Ihrer Servicestelle telefonisch in Verbindung.
Nur so kann eine kostenlose Einsendung Ihrer
Ware gewährleistet werden.
Die Garantieleistung gilt nur für Material- oder
Fabrikationsfehler, nicht aber für Transportschäden,
Verschleißteile, wie Backformen oder Knethaken,
oder für Beschädigungen an zerbrechlichen Teilen,
z. B. Schalter oder Akkus. Das Produkt ist lediglich
für den privaten und nicht für den gewerblichen
Gebrauch bestimmt.
Bei missbräuchlicher und unsachgemäßer Behandlung, Gewaltanwendung und bei Eingriff en, die
nicht von unserer autorisierten Service-Niederlassung vorgenommen wurden, erlischt die Garantie.
Ihre gesetzlichen Rechte werden durch diese
Garantie nicht eingeschränkt.
Die Garantiezeit wird durch die Gewährleistung
nicht verlängert. Dies gilt auch für ersetzte und reparierte Teile. Eventuell schon beim Kauf vorhandene Schäden und Mängel müssen sofort nach dem
Auspacken gemeldet werden, spätestens aber zwei
Tage nach Kaufdatum. Nach Ablauf der Garantiezeit anfallende Reparaturen sind kostenpfl ichtig.
■ 14 │ DE
│AT│
CH
SBB 850 B1
Page 18

Service Deutschland
Tel.: 0800 5435 111 (Kostenfrei aus dem
dt. Festnetz/Mobilfunknetz)
E-Mail: [email protected]
IAN 274313
Service Österreich
Tel.: 0820 201 222 (0,15 EUR/Min.)
E-Mail: [email protected]
IAN 274313
Service Schweiz
Tel.: 0842 665566 (0,08 CHF/Min.,
Mobilfunk max. 0,40 CHF/Min.)
E-Mail: [email protected]
IAN 274313
Importeur
KOMPERNASS HANDELS GMBH
BURGSTRASSE 21
44867 BOCHUM
GERMANY
www.kompernass.com
SBB 850 B1
DE│AT│CH
│
15 ■
Page 19

Programmablauf
Programm 1. Normal 2. Locker
Bräunungsgrad
Größe 750 g 1000 g 1250 g 750 g 1000 g 1250 g 750 g 1000 g 1250 g 750 g 1000 g 1250 g
Zeit (Stunden) 2:58 3:05 3:15 2:14 2:20 2:25 3:13 3:18 3:25 2:18 2:25 2:30
Hell
Mittel
Dunkel
Schnell
Hell
Mittel
Dunkel
Schnell
Vorheizen (Min)
Kneten 1 (Min)
Gehen 1 (Min)
Kneten 2 (Min)
Gehen 2 (Min)
Signaltöne zum ent-
fernen der Knethaken
Gehen 3 (Min)
Backen (Min)
Warmhalten (Min)
Zutaten hinzugeben
(Stunden
verbleibend)
Voreinstellung
der Zeit
15 15 20 N/A N/A N/A 10 10 15 N/A N/A N/A
12 13 13 12 13 13 12 12 15 12 13 13
25 25 25 10 10 10 20 20 20 10 10 10
2
2
2
2
2
2
2
2
2
2
2
3A*
5A
5A
1A
2A
2A
3A*
5A
5A
5
5
5
5
5
5
8
8
30 30 30 18 18 18 43 41 35 18 18 18
RMV RMV RMV RMV RMV RMV RMV RMV RMV RMV RMV RMV
30 30 30 30 30 30 35 35 35 30 30 30
56 60 65 56 60 65 60 65 70 60 65 70
60 60 60 60 60 60 60 60 60 60 60 60
2:01 2:05 2:10 1:49 1:53 1:58 2:26 2:29 2:28 1:53 1:58 2:03
15h 15h 15h 15h 15h 15h 15h 15h 15h 15h 15h 15h
1A
8
5
2A
2
2A
5
5
* 3A heißt, dass nach den 3 Minuten kneten 10 Signaltöne erklingen und gleichzeitig die Displayanzeige
„ADD“ erscheint. Dies erinnert Sie daran, dass Sie nun Zutaten wie Früchte oder Nüsse hinzugeben
können.
■ 16 │ DE
│AT│
CH
SBB 850 B1
Page 20

Programm 3. Vollkorn 4. Süß
Bräunungsgrad
Größe 750 g 1000 g 1250 g 750 g 1000 g 1250 g 750 g 1000 g 1250 g 750 g 1000 g 1250 g
Zeit (Stunden) 3:18 3:25 3:35 2:24 2:30 2:35 2:56 3:01 3:10 2:10 2:16 2:20
Hell
Mittel
Dunkel
Schnell
Hell
Mittel
Dunkel
Schnell
Vorheizen (Min)
Kneten 1 (Min)
Gehen 1 (Min)
Kneten 2 (Min)
Gehen 2 (Min)
Signaltöne zum ent-
fernen der Knethaken
Gehen 3 (Min)
Backen (Min)
Warmhalten (Min)
Zutaten hinzugeben
(Stunden
verbleibend)
Voreinstellung
der Zeit
15 15 20 N/A N/A N/A 10 10 15 N/A N/A N/A
11 12 12 11 13 13 12 12 12 11 12 12
30 30 30 10 10 10 25 25 25 10 10 10
2
2
2
2
2
2
2
2
2
2
2
3A
5A
5A
2A
2A
2A
4A*
5A
5A
8
8
8
5
5
5
6
6
38 38 38 23 23 23 35 35 35 18 18 18
RMV RMV RMV RMV RMV RMV RMV RMV RMV RMV RMV RMV
35 35 35 35 35 35 30 30 30 30 30 30
56 60 65 56 60 65 52 56 60 52 56 60
60 60 60 60 60 60 60 60 60 60 60 60
2:17 2:21 2:26 1:59 2:03 2:08 2:03 2:07 2:11 1:46 1:50 1:54
15h 15h 15h 15h 15h 15h 15h 15h 15h 15h 15h 15h
1A
6
6
2A
2
2A
6
6
* 4A heißt, dass nach den 4 Minuten kneten 10 Signaltöne erklingen und gleichzeitig die Displayanzeige
„ADD“ erscheint. Dies erinnert Sie daran, dass Sie nun Zutaten wie Früchte oder Nüsse hinzugeben
können.
SBB 850 B1
DE│AT│CH
│
17 ■
Page 21

5.
Programm
Bräunungsgrad
Größe 750 g 1000 g 1250 g N/A N/A 750 g 1000 g 1250 g 750 g 1000 g 1250 g
Zeit (Stunden) 1:15 1:18 1:20 1:50 0:15 3:17 3:21 3:30 2:14 2:20 2:25
Express
Hell
Mittel
Dunkel
6.
Teig
Nudel-
teig
N/A N/A
7.
8.
Buttermilch-
brot
Hell
Mittel
Dunkel
9.
Glutenfrei
Hell
Mittel
Dunkel
Vorheizen (Min)
Kneten 1 (Min)
Gehen 1 (Min)
Kneten 2 (Min)
Gehen 2 (Min)
Signaltöne zum ent-
fernen der Knethaken
Gehen 3 (Min)
Backen (Min)
Warmhalten (Min)
Zutaten hinzugeben
(Stunden
verbleibend)
Voreinstellung
der Zeit
N/A N/A N/A 10 N/A 25 25 30 N/A N/A N/A
8 8 8 12 15 10 10 10 12 13 13
N/A N/A N/A 10 N/A 20 20 20 10 10 10
N/A
N/A
2A
5
N/A N/A N/A 25 N/A 45 45 45 18 18 18
RMV RMV RMV N/A N/A RMV RMV RMV RMV RMV RMV
20 20 20 45 N/A 30 30 30 30 30 30
40 43 45 N/A N/A 52 56 60 56 60 65
60 60 60 N/A N/A 60 60 60 60 60 60
1:05 1:08 1:10 1:15 N/A 2:15 2:19 2:23 1:49 1:53 1:58
15h 15h 15h 15h 15h 15h 15h 15h 15h 15h 15h
N/A
2A
5
2A
N/A
3A
5
5
N/A
N/A
N/A
5A*
2
2
2
2
2
5A*
5A*
8
8
1A
8
5
2A
2
2A
5
5
* 5A heißt, dass nach den 5 Minuten kneten 10 Signaltöne erklingen und gleichzeitig die Displayanzeige
„ADD“ erscheint. Dies erinnert Sie daran, dass Sie nun Zutaten wie Früchte oder Nüsse hinzugeben
können.
■ 18 │ DE
│AT│
CH
SBB 850 B1
Page 22

Programm 10. Kuchen 11. Marmelade 12. Backen
Bräunungsgrad
Größe 750 g 1000 g 1250 g N/A N/A
Zeit (Stunden) 1:30 1:35 1:40 1:20 1:00
Hell
Mittel
Dunkel
N/A
Hell
Mittel
Dunkel
Vorheizen (Min)
Kneten 1 (Min)
Gehen 1 (Min)
Kneten 2 (Min)
Gehen 2 (Min)
Signaltöne zum entfer-
nen der Knethaken
Gehen 3 (Min)
Backen (Min)
Warmhalten (Min)
Zutaten hinzugeben
(Stunden
verbleibend)
Voreinstellung
der Zeit
N/A N/A N/A N/A N/A
15 15 15 N/A N/A
N/A N/A N/A
N/A
N/A
N/A
N/A
15
Gehen
N/A
N/A
N/A
15
Gehen
N/A
N/A
N/A N/A N/A N/A N/A
RMV RMV RMV N/A N/A
N/A N/A N/A
60 65 70
15
Gehen
60 60 60 N/A 60
N/A N/A N/A N/A N/A
15h 15h 15h N/A 15h
15
Hitze + kneten
N/A
N/A
N/A
45
Hitze + kneten
20
Gehen
N/A
N/A
N/A
N/A
N/A
60
SBB 850 B1
DE│AT│CH
│
19 ■
Page 23

Fehlerbehebung Brotbackautomat
Was tun, wenn der Knethaken 6 nach dem
Backen in der Backform 7 stecken bleibt?
Was passiert, wenn das fertige Brot im
Backautomaten bleibt?
Sind Backform 7 und Knethaken 6 spülmaschinengeeignet?
Warum wird der Teig nicht gerührt, obwohl der
Motor läuft?
Was tun, wenn der Knethaken 6 im Brot stecken
bleibt?
Was passiert bei einem Stromausfall während
eines Programms?
Wie lange dauert das Brotbacken? Bitte entnehmen Sie die genauen Zeiten der Tabelle
Welche Brotgewichte kann ich backen? Sie können Brote von 750 g - 1000 g - 1250 g
Füllen Sie heißes Wasser in die Backform 7 und
drehen Sie den Knethaken 6, um die Verkrustungen darunter zu lösen.
Durch die „Warmhalte-Funktion“ wird sichergestellt,
dass das Brot ca. 1 Std. warm gehalten und vor
Feuchtigkeit geschützt wird. Sollte das Brot länger
als 1 Stunde im Backautomaten bleiben, könnte es
feucht werden.
Nein. Bitte spülen Sie die Backform 7 und Knethaken 6 mit der Hand.
Überprüfen Sie, ob die Knethaken 6 und die
Backform 7 richtig eingerastet sind.
Entfernen Sie den Knethaken 6 mit dem
Knethakenentferner 0.
Bei einem Stromausfall bis 10 Minuten wird der
Brotbackautomat das zuletzt ausgeführte Programm zu Ende führen.
„Programmablauf“.
backen.
Warum kann die Timer-Funktion beim Backen mit
frischer Milch nicht benutzt werden?
Was ist passiert, wenn der Brotbackautomat nicht
arbeitet, nachdem man die Start/Stop-Taste
gedrückt hat?
Das Gerät zerhackt die beigegebenen Rosinen. Um das Zerkleinern von Zutaten wie Obst oder
■ 20 │ DE
│AT│
CH
Frische Produkte wie Milch oder Eier verderben,
wenn sie zu lange in dem Gerät bleiben.
Einige Arbeitsgänge wie zum Beispiel „Aufwärmen“ oder „Ruhen“ sind schwer zu erkennen.
Kontrollieren Sie anhand der Tabelle „Programmablauf“, welcher Programmabschnitt gerade läuft.
Kontrollieren Sie, ob das Gerät arbeitet, indem Sie
prüfen, ob die Betriebsindikationslampe leuchtet.
Kontrollieren Sie, ob Sie die Start/Stop-Taste
richtig gedrückt haben.
Kontrollieren Sie, ob der Netzstecker an das Stromnetz angeschlossen ist.
Nüssen zu vermeiden, geben Sie diese erst nach
Ertönen des Signals zum Teig.
SBB 850 B1
Page 24

www.kompernass.com
GESAMTBETRAG/PRIX
NET/PREZZO
COMPLESSIVO
€
zzgl. Kosten für Porto, Handling,
5 €
Verpackung und Versand.
Frais de port, magasinage, embal-
lage et expédition non inclus.
Spese di spedizione
+
€
zzgl. Kosten für Porto, Handling,
3 €
Verpackung und Versand.
Frais de port, magasinage, embal-
lage et expédition non inclus.
Spese di spedizione
+
€
ZAHLUNGSWEISE/
=
Überweisung/Virement/
Bonifi co
MODE DE RÈGLEMENT/
TIPO DI PAGAMENTO
10 €
EINZELPREIS/
PRIX UNITAIRE/
PREZZO SINGOLO
ARTIKELBESCHREIBUNG/
DESCRIPTION DES ARTICLES/
DESCRIZIONE ARTICOLO
► 1 Backform inkl. 2 Knethaken
► 1 forme de cuisson avec 2 fouets à pétrir
► 1 stampo incl. 2 ganci da impasto
10 €
► 4 Knethaken
► 4 fouets à pétrir
► 4 ganci da impasto
Bestellkarte/Carte de commande/Scheda d´ordinazione SBB 850 B1
BESTELLMENGE/QUANTITÉ/
QUANTITÀ DA ORDINARE
(max. 3 Sets/max. 3 sets/max. 3 set)
e il prezzo di spedizione più alto pari a 5 euro!
ez toujours les frais d‘expédition plus élevés de 5 Euros !
den höheren Versandkostenpreis von 5 Euro!
pay
► Hinweis: Wenn Ihre Bestellung aus mehreren Artikeln besteht (4er-Set Knethaken und Backform) zahlen Sie immer
► Remarque : Si votre commande se compose de plusieurs articles (lot de 4 fouets à pétrir et forme de cuisson), vous
sempr
► Avvertenza: Se il vostro ordine si compone di più articoli ( kit da 4 ganci impastatrice e stampo da forno), calcolate
(Ort, Datum/Lieu, date/luogo, data) (Unterschrift/Signature/fi rma)
Page 25

► Bitte frankieren Sie die Sendung ausreichend. Schreiben Sie Ihren Namen als Absender
auf den Umschlag./Veuillez aff ranchir au tarif en vigueur. Ecrivez votre nom comme
expéditeur sur l‘enveloppe./Aff rancare adeguatamente la busta. Scrivere il nome come
mittente sulla busta.
charge./Eff ettuare a proprie spese il bonifi co bancario, assumendosi le spese bancarie
della propria banca.
Lasten./Eff ectuer un transfert bancaire, les frais demandés par votre banque sont à votre
WICHTIG/REMARQUE/IMPORTANTE
► Überweisung bitte spesenfrei ausführen, Kosten Ihrer eigenen Bank bitte zu Ihren eigenen
qui accanto.
Kompernaß Handelsgesellschaft mbH
Burgstraße 21
44867 Bochum
Deutschland/Allemagne/Germania
W
ohnort an. Senden Sie dann die vollständig ausgefüllte Bestellkarte in einem Briefumschlag
an unsere nachstehende Postadresse. / Dans le champ „Motif de l‘opération“, veuillez indi-
quer l‘article de même que votre nom et lieu de résidence. Veuillez nous renvoyer la carte de
commande dûment renseignée dans une enveloppe à notre adresse postale fi gurant ci-après. /
Indicare l‘articolo nella causale del bonifi co, nonché nome, cognome e indirizzo. Inviare quindi
la cartolina di ordinazione interamente compilata, inserendola in una busta, all‘indirizzo indicato
■ Geben Sie bei Ihrer Überweisung als Verwendungszweck den Artikel sowie Ihren Namen und
IBAN: DE03440100460799566462
SWIFT (BIC): PBNKDEFF 440
Bank/Banque/Banca:
Postbank Dortmund AG
2) Überweisen Sie den Gesamtbetrag vorab auf das Konto: / Merci de virer le montant total au
eventuali domande), scrivendo in stampatello.
préalable sur le compte suivant: / Versare l‘importo totale in anticipo sul seguente conto:
Kompernaß Handelsgesellschaft mbH
1) Tragen Sie unter „Absender/Besteller“ Ihren Namen, Ihre Anschrift und Ihre Telefonnummer (für
eventuelle Rückfragen) in Blockschrift ein. / Saisissez votre nom, votre titre et votre numéro de
téléphone (pour d‘éventuelles questions) sous la rubrique „Expéditeur/Acheteur“ en lettres maju-
scules. / Alla voce „Mittente/ordinante“, inserire nome, titolo, indirizzo e numero telefonico (per
Bestellkarte/Carte de commande/Scheda d´ordinazione SBB 850 B1
Telefon/Téléphone/Telefono
Land/Pays/Paese
PLZ, Ort/Code Postal, Ville/Cap, Città
Straße/Rue/Via
MITTENTE
Name, Vorname/Nom, Prénom/Cognome, Nome
(si prega di compilare il modulo in stampatello)
ABSENDER / BESTELLER
(bitte vollständig und in BLOCKSCHRIFT ausfüllen)
EXPÉDITEUR/ACHETEUR
(à compléter en majuscules)
www.kompernass.com
Page 26

Table des matières
Introduction . . . . . . . . . . . . . . . . . . . . . . . . . . . . . . . . . . . . . . . . . . . . . . . . . . . . . . . . . . .24
Usage conforme . . . . . . . . . . . . . . . . . . . . . . . . . . . . . . . . . . . . . . . . . . . . . . . . . . . . . . .24
Matériel livré . . . . . . . . . . . . . . . . . . . . . . . . . . . . . . . . . . . . . . . . . . . . . . . . . . . . . . . . . .24
Description de l'appareil . . . . . . . . . . . . . . . . . . . . . . . . . . . . . . . . . . . . . . . . . . . . . . . .24
Caractéristiques techniques . . . . . . . . . . . . . . . . . . . . . . . . . . . . . . . . . . . . . . . . . . . . . .24
Consignes de sécurité . . . . . . . . . . . . . . . . . . . . . . . . . . . . . . . . . . . . . . . . . . . . . . . . . . .25
Avant la première utilisation . . . . . . . . . . . . . . . . . . . . . . . . . . . . . . . . . . . . . . . . . . . . .29
Propriétés . . . . . . . . . . . . . . . . . . . . . . . . . . . . . . . . . . . . . . . . . . . . . . . . . . . . . . . . . . . .29
Champ de commande. . . . . . . . . . . . . . . . . . . . . . . . . . . . . . . . . . . . . . . . . . . . . . . . . . .29
Programmes . . . . . . . . . . . . . . . . . . . . . . . . . . . . . . . . . . . . . . . . . . . . . . . . . . . . . . . . . .31
Fonction minuterie . . . . . . . . . . . . . . . . . . . . . . . . . . . . . . . . . . . . . . . . . . . . . . . . . . . . .32
Avant la cuisson . . . . . . . . . . . . . . . . . . . . . . . . . . . . . . . . . . . . . . . . . . . . . . . . . . . . . . .32
Faire cuire du pain . . . . . . . . . . . . . . . . . . . . . . . . . . . . . . . . . . . . . . . . . . . . . . . . . . . . .33
Nettoyage et entretien . . . . . . . . . . . . . . . . . . . . . . . . . . . . . . . . . . . . . . . . . . . . . . . . . .35
Mise au rebut . . . . . . . . . . . . . . . . . . . . . . . . . . . . . . . . . . . . . . . . . . . . . . . . . . . . . . . . .36
Garantie et service . . . . . . . . . . . . . . . . . . . . . . . . . . . . . . . . . . . . . . . . . . . . . . . . . . . . .36
Importateur . . . . . . . . . . . . . . . . . . . . . . . . . . . . . . . . . . . . . . . . . . . . . . . . . . . . . . . . . . .37
Déroulement du programme . . . . . . . . . . . . . . . . . . . . . . . . . . . . . . . . . . . . . . . . . . . . .38
Dépannage de la machine à pain . . . . . . . . . . . . . . . . . . . . . . . . . . . . . . . . . . . . . . . . .42
SBB 850 B1
FR│CH
│
23 ■
Page 27

MACHINE À PAIN
Introduction
Toutes nos félicitations pour l'achat de votre nouvel
appareil.
Vous venez ainsi d'opter pour un produit de grande
qualité. Le mode d'emploi fait partie de ce produit.
Il contient des remarques importantes concernant
la sécurité, l'usage et la mise au rebut. Avant d'utiliser le produit, veuillez vous familiariser avec toutes
les consignes d'utilisation et de sécurité. N'utilisez
le produit que conformément aux consignes et pour
les domaines d'utilisation prévus. Si vous cédez le
produit à un tiers, remettez-lui également tous les
documents.
Usage conforme
N'utilisez votre machine à pain que pour la cuisson
du pain et la préparation de marmelades/confi tures
dans le cadre domestique.
N'utilisez en aucun cas l'appareil pour le séchage
d'aliments ou d'objets. N'utilisez pas la machine à
pain à l'extérieur.
Utilisez exclusivement les accessoires recommandés
par le fabricant. L'utilisation d'accessoires non
recommandés peut conduire à un endommagement de l'appareil.
Cet appareil est exclusivement réservé à un usage
domestique.
N'utilisez pas l'appareil pour des applications
commerciales !
Matériel livré
Machine à pain
Moule
2 crochets de pétrissage
Verre mesureur
Cuillère doseuse
Extracteur de crochets de pétrissage
Mode d'emploi
Brève notice
Livret de recettes
REMARQUE
Contrôlez l'intégralité de la machine une fois
►
déballée, ainsi que d'é
transport. Le cas échéant, adressez-vous au
service après-vente (voir chapitre "Garantie et
service après-vente").
ventuels dommages de
Description de l'appareil
Figure A:
1 Fenêtre de contrôle
2 Couvercle d'appareil
3 Fentes d'aération
4 Cordon d'alimentation
5 Champ de commande
Figure B:
6 2 crochets de pétrissage
7 Moule pour un pain d'un poids allant jusqu'à
1250 g
8 Verre mesureur
9 Cuillère doseuse
0 Extracteur de crochet de pétrissage
Caractéristiques techniques
Tension nominale: 220 - 240 V ~ / 50 Hz
Puissance absorbée: 850 watts
Tous les éléments de cet appareil, entrant
en contact avec les aliments sont approuvés
pour le contact alimentaire.
■ 24 │ FR
│
CH
SBB 850 B1
Page 28

Consignes de sécurité
► Veuillez lire intégralement le mode d'emploi avant la première utilisation !
DANGER - RISQUE DE CHOC ÉLECTRIQUE !
► Contrôlez le cordon d'alimentation et la fi che avant toute utilisation.
Si le cordon d'alimentation de cet appareil est endommagé, il
doit impérativement être remplacé par le fabricant, son service
après-vente ou une personne de qualifi cation similaire afi n d'éviter
d'autres risques.
► N'acheminez pas le câble au niveau d'arêtes vives ou à proximité
de surfaces ou d'objets chauds. L'isolement du câble peut être
endommagé.
► Lorsque vous n'utilisez pas l'appareil et avant tout nettoyage,
débranchez la fi che secteur de la prise.
► Ne plongez pas la machine à pain dans de l'eau ou dans
d'autres liquides. Risque d'électrocution!
► Ne nettoyez pas l'appareil avec des éponges récurantes.
Si des particules de l'éponge se désagrègent et entrent en
contact avec des pièces électriques, il y a risque d'électrocution.
ATTENTION ! RISQUE DE BLESSURES !
► Risque d'étouff ement ! Les enfants peuvent étouff er en cas d'utilisa-
tion inappropriée de l'emballage. Mettez-le au rebut immédiatement
après le déballage ou conservez-le hors de portée des enfants.
► Afi n d'éviter tout risque de trébuchement ou d'accident, l'appareil
est équipé d'un cordon d'alimentation court.
► Laissez l'appareil refroidir et débranchez la fi che secteur avant
de retirer ou de mettre en place les pièces accessoires.
► Acheminez une rallonge de telle manière que personne ne puisse
trébucher ou tirer dessus par inadvertance.
SBB 850 B1
FR│CH
│
25 ■
Page 29

ATTENTION ! RISQUE DE BLESSURES !
► Ne laissez pas l'appareil sans surveillance si des enfants se
trouvent à proximité. Retirer la fi che secteur lorsque l'appareil est
inutilisé et avant de le nettoyer. Laisser refroidir l'appareil avant
d'enlever des pièces.
► Cet appareil peut être utilisé par des enfants à partir de 8 ans et
par des personnes ayant des capacités physiques, sensorielles ou
mentales réduites ou un manque d'expérience et /ou de connaissances à condition qu'ils aient reçu une supervision ou des instructions concernant I'utilisation de I'appareil en toute sécurité et qu'ils
comprennent les dangers encourus.
► Les enfants ne doivent pas jouer avec l'appareil.
► Le nettoyage et la maintenance utilisateur ne doivent pas être
réalisées par des enfants, à moins qu'ils soient âgés de plus de 8
ans et surveillés !
► Maintenir l'appareil et son cordon hors de portée des enfants de
moins de 8 ans.
► Cet appareil satisfait aux dispositions de sécurité correspondantes.
Les vérifi cations, les réparations et l'entretien technique sont
exclusivement réservés au revendeur spécialisé qualifi é. Sinon, la
garantie est annulée.
► Prudence! La machine à pain est un appareil qui chauff e. Avant
de toucher l'appareil, attendez qu'il ait refroidi ou utilisez une
manique.
► Ne déplacez pas la machine à pain si le moule contient quelque
chose de brûlant ou un liquide tel que de la confi ture. Il y a un
risque de brûlure !
► Lors de l'utilisation, évitez à tout prix de toucher les crochets de
pétrissage en rotation. Il y a risque de blessures !
► Pendant le fonctionnement, la température de la surface de
contact peut être très élevée. Risque de brûlure!
■ 26 │ FR
│
CH
SBB 850 B1
Page 30

ATTENTION ! RISQUE DE BLESSURES !
Attention ! Surface brûlante!
Les pièces de l'appareil deviennent brûlantes en cours
d'utilisation ! Risque de brûlure!
AVERTISSEMENT! RISQUE D'INCENDIE!
► N'utilisez pas de minuterie externe ou de dispositif de commande
à distance pour faire fonctionner l'appareil.
► N'installez pas l'appareil à proximité de matériaux combustibles,
explosifs et/ou de gaz combustibles. La distance par rapport aux
autres appareils ne doit pas être inférieure de 10 cm.
► Ne recouvrez jamais l'appareil avec une serviette ou tout autre
matériau. La chaleur et la vapeur doivent pouvoir s'échapper. Un
incendie peut se déclarer si l'appareil est recouvert d'un matériau
infl ammable tel que des rideaux ou qu'il entre en contact avec.
► Ne posez pas d'objets sur l'appareil et ne le recouvrez pas.
► Ne mettez jamais de papier d'aluminium ou d'autres objets métal-
liques dans la machine à pain. Cela peut causer un court-circuit.
► Lors de la cuisson, ne dépassez jamais la quantité de 700 g de
farine et n'ajoutez jamais plus de 1 ¼ sachet de levure sèche. La
pâte peut en eff et déborder et provoquer un incendie !
Les pains sans gluten font ici exception. Ici, 2 sachets de levure
sèche maximum peuvent être ajoutés (voir le livret de recettes).
ATTENTION – DOMMAGES MATÉRIELS !
► Assurez-vous que les fentes d'aération de l'appareil ne sont pas
recouvertes. Risque de surchauff e!
► Ne laissez jamais l'appareil fonctionner sans surveillance !
► L'appareil ne doit être utilisé qu'en intérieur.
► Ne jamais placer l'appareil au-dessus ou à côté d'une cuisinière
à gaz ou électrique ou d'un four brûlant ou d'autres sources de
chaleur. Risque de surchauff e!
SBB 850 B1
FR│CH
│
27 ■
Page 31

ATTENTION – DOMMAGES MATÉRIELS !
► L'utilisation d'accessoires non recommandés par le fabricant peut
être à l'origine de dommages. L'appareil ne doit être utilisé que
pour l'emploi auquel il est destiné. Sinon, la garantie est annulée.
► Ne commencez un programme de cuisson qu'après avoir introduit
un moule. L'appareil risque sinon d'être endommagé de manière
irréparable.
► Ne tirez pas sur le cordon d'alimentation pour débrancher la
fi che de la prise.
► N'utilisez pas la machine à pain pour conserver des aliments ou
des ustensiles.
► Ne jamais utiliser l'appareil sans moule ou avec un moule vide.
Ceci risque d'endommager l'appareil de manière irréversible.
► Fermez toujours le couvercle lorsque l'appareil est en marche.
► Ne retirez jamais le moule lorsque l'appareil est en marche.
► Posez l'appareil uniquement sur une surface sèche, plane et non
sensible à la chaleur.
► Avant le raccordement, contrôlez si le type de courant et la
tension du réseau correspondent aux indications fi gurant sur la
plaque signalétique.
► Si vous utilisez une rallonge, la puissance maximum autorisée du
câble doit correspondre à la puissance de la machine à pain.
■ 28 │ FR
│
CH
SBB 850 B1
Page 32
Avant la première utilisation
Déballage
■ Déballez la machine et retirez tout matériau
d'emballage, ainsi que d'é
et fi lms protecteurs.
■ Contrôlez l'intégralité de la machine une fois
déballée, ainsi que d'éventuels dommages de
transport. Le cas échéant, adressez-vous au
service après-vente (voir chapitre "Garantie et
service après-vente").
Premier nettoyage
Essuyez à l'aide d'un chiff on propre et humide le
moule 7, les crochets de pétrissage 6 et la face
extérieure de la machine à pain avant sa mise en
service. N'utilisez pas d'éponges récurantes ou de
produits à récurer. Retirez le fi lm protecteur sur le
champ de commande 5 si ce n'est pas encore fait.
Première opération de chauff age
1) Uniquement la première fois que vous faites
chauff er la machine à pain,placez le moule
7 vide dans la machine et fermez le couvercle
de lw'appareil 2.
ATTENTION ! RISQUE D'INCENDIE!
► Ne laissez jamais la machine à pain chauff er
pendant plus de 5 minutes av
vide. Il y a risque de surchauff e.
2) Sélectionnez le programme 12, comme indiqué
au chapitre "Programmes", et appuyez sur le
bouton Marche/Arrêt pour chauff er l'appareil pendant 5 minutes.
3) Après 5 minutes, appuyez sur la touche Marche/
Arrêt jusqu'à ce qu'un long signal sonore
retentisse, pour interrompre le programme.
ventuels autocollants
ec le moule 7
4) Attendez que l'appareil ait complètement refroidi
et essuyez à nouveau le moule 7, les crochets
de pétrissage 6 et la face extérieure de la
machine à pain à l'aide d'un chiff on propre et
humide.
Propriétés
Avec la machine à pain, vous avez la possibilité
de faire cuire du pain selon votre goût.
■ Vous pouvez choisir entre 12 programmes
diff
érents.
■ Vous pouvez utiliser des mélanges pour pâtes
êts.
tout pr
■ Vous pouvez pétrir de la pâte à petits pains et
confectionner de la marmelade.
■ Grâce au programme "Sans gluten", vous
pouvez cuire des mélanges à pâte sans gluten
et confectionner des recettes à base de farines
sans gluten, comme par ex. la farine de maïs,
la farine de sarrasin et la fécule de pommes de
terre.
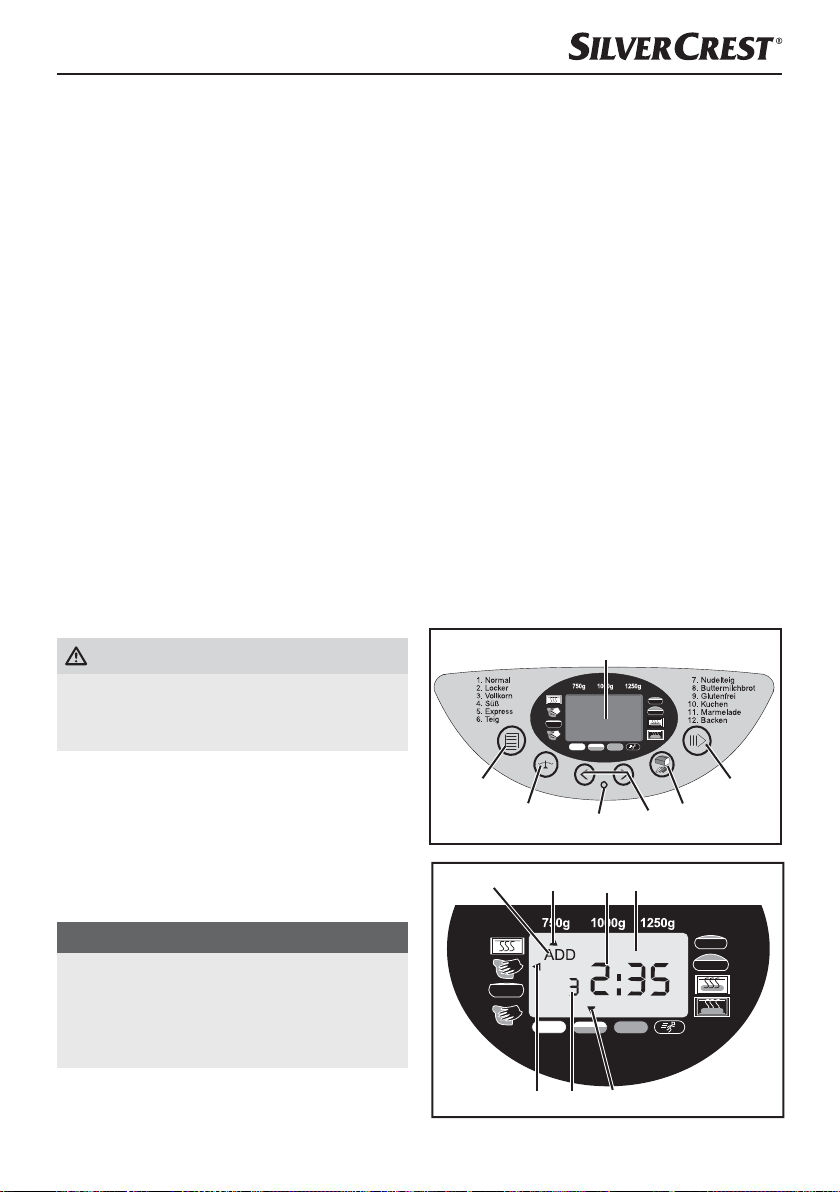
Champ de commande
REMARQUE
Les éléments chauff ants étant légèrement graissés,
une légèr
mière mise en service. Elle n'est pas dangereuse
et se dissipe rapidement. Assurez une aération
suffi sante, en ouvrant une fenêtre par exemple.
e odeur peut se dégager lors de la pre-
SBB 850 B1
RMV
FR│CH
│
29 ■
Page 33
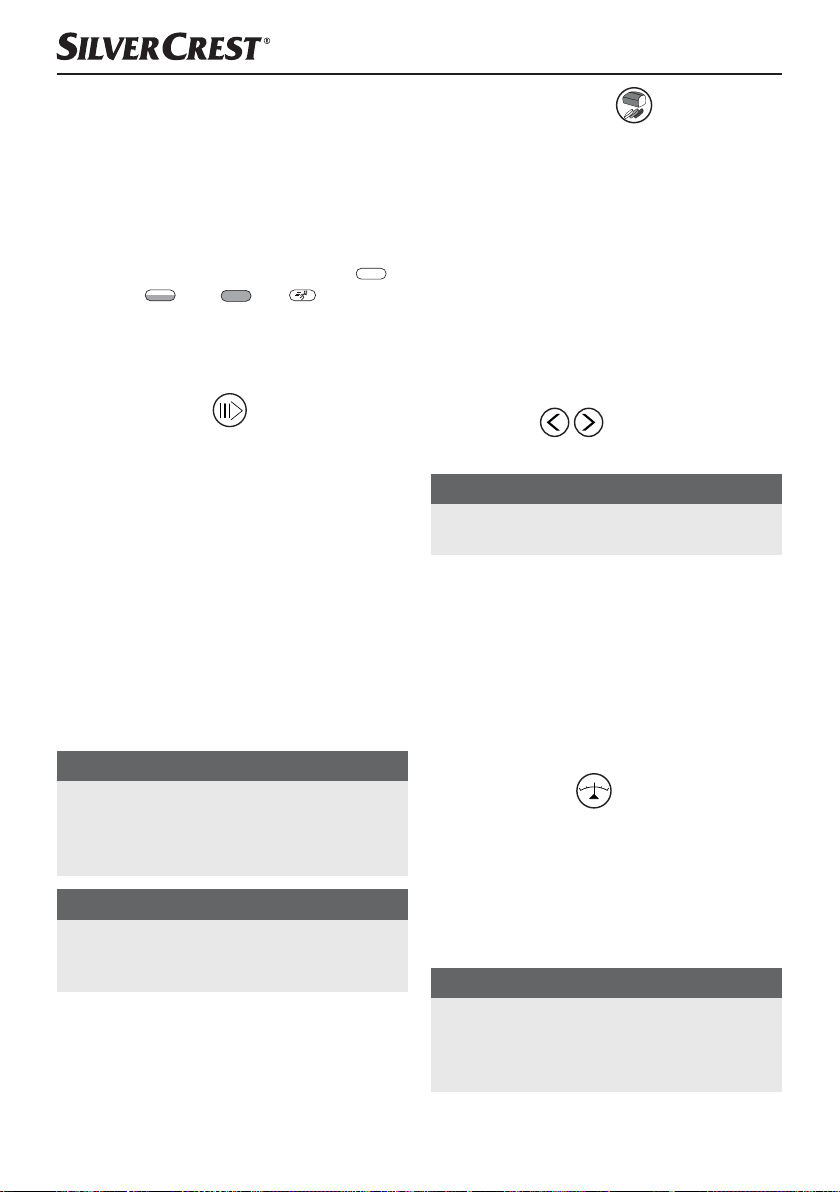
Ecran
L'affi chage indique
la sélection du poids (750 g, 1000 g, 1250 g)
le temps d'opération restant en heures et la
présélection du temps programmée
enlèvement du crochet de pétrissage
("RMV"= "Remove")
le degré de dorage sélectionné (clair,
moyen , doré , vite )
le numéro de programme sélectionné
le déroulement du programme
l'ajout d'ingrédients ("ADD")
Marche / Arrêt
Pour démarrer ou arrêter le fonctionnement ou
pour eff acer une programmation de minuterie.
Pour interrompre l'opération, appuyez brièvement
sur la touche Marche/Arrêt , jusqu'à ce qu'un
signal sonore retentisse et que l'indication des heures
clignote sur l'écran . En appuyant à nouveau
sur la touche Marche/Arrêt , l'opération peut
être poursuivie dans un délai de 10 minutes. Si
vous oubliez d'enclencher le programme, celui-ci
reprend automatiquement après 10 minutes.
Pour arrêter défi nitivement le fonctionnement de
l'appareil ou eff acer la confi guration, appuyez sur
la touche Marche/Arrêt pendant 3 secondes.
Un signal sonore prolongé retentit.
REMARQUE
► N'appuyez pas sur la touche Marche/Arrêt
ous souhaitez uniquement contrôler
, si v
l'état du pain. Observez la procédure de
cuisson par la fenêtre de contrôle 1.
ATTENTION!
► A chaque fois que vous appuyez sur une
touche, un signal sonor
quand l'appareil est en marche.
e doit retentir, à part
,
Degré de dorage
(ou mode Vite)
Sélection du degré de dorage ou passage en
mode Vite (Clair/Moyen/Doré/Vite). Appuyez
plusieurs fois sur la touche Degré de dorage ,
jusqu'à ce que la fl èche apparaisse au-dessus du
degré de dorage souhaité. Pour les programmes 1 4, vous pouvez activer le mode Vite en appuyant
plusieurs fois sur la touche Degré de dorage ,
pour raccourcir la procédure de cuisson. Appuyez
sur la touche Degré de dorage jusqu'à ce que
la fl èche apparaisse au-dessus de "Vite". Il n'est
pas possible de choisir un degré de dorage pour
les programmes 6, 7 et 11.
Minuterie
Cuisson temporisée.
REMARQUE
► Dans le cas du programme 11, vous ne pouvez
pas défi
Voyant lumineux de service
Le voyant lumineux de service montre avec son
allumage qu'un programme est en cours.
Si vous voulez démarrer un programme en diff éré
avec la fonction minuterie, le voyant lumineux de
service clignote dès que vous avez eff ectué le
réglage de la minuterie. Dès que le programme
démarre, le voyant lumineux de service s'allume
en permanence.
Poids du pain
Sélection du poids du pain ( 750 g / 1000 g /
1250 g).
Appuyez plusieurs fois sur cette touche jusqu'à ce
que la fl èche apparaisse sous le poids souhaité. Les
indications de poids (750 g / 1000 g / 1250 g)
se rapportent à la quantité d'ingrédients versés
dans le moule 7.
REMARQUE
► Le réglage par défaut lors de la mise en
che de l'appareil s'élève à 1250 g.
mar
Chez les programmes 6, 7, 11 et 12, vous
ne pouvez pas régler le poids du pain.
nir de cuisson temporisée.
■ 30 │ FR
│
CH
SBB 850 B1
Page 34

Sélection du programme (menu)
Affi chage du programme de cuisson souhaité (1-12).
L'écran affi che le numéro de programme et la
durée de cuisson correspondante.
Fonction Memory
Suite à une coupure de courant n'excédant pas
10 minutes, le programme est poursuivi à l'endroit
où il a été arrêté lorsque l'appareil se remet en
marche. Ceci ne vaut cependant pas lors de la
suppression/fi n de l'opération de cuisson ou lors
de l'actionnement de la touche Marche/Arrêt
jusqu'à ce qu'un long signal sonore retentisse.
Fenêtre de contrôle 1
La fenêtre de contrôle 1 vous permet d'observer
la procédure de cuisson.
Programmes
Avec la touche de sélection de programme , vous
sélectionnez le programme souhaité. Le numéro de
programme correspondant s'affi che sur l'écran .
Les temps de cuisson dépendent des combinaisons
de programme sélectionnées. Voir le chapitre
"Déroulement des programmes".
Programme 1 : Normal (Normal)
Pour les pains mixtes et blancs essentiellement composés de farine de blé ou de seigle. La pain est
d'une consistance compacte. Le dorage du pain est
défi ni à l'aide de la touche Degré de dorage .
Programme 2 : Locker (Léger)
Pour des pains légers composés de farine bien fi ne.
En règle générale, le pain est léger et présente une
croûte croustillante.
Programme 3 : Vollkorn (Pain complet)
Pour les pains à base de farine plus consistante,
par ex. de la farine de blé complète et de la farine
de seigle. Le pain est plus compact et plus lourd.
Programme 4 : Süß (Sucré)
Pour des pains avec des ingrédients composés de
jus de fruits, de fl ocons de noix de coco, de raisins,
de fruits secs, de chocolat ou de sucre supplémentaire. Le pain sera plus léger et plus aéré à l'issue
d'une phase de levée plus longue.
Programme 5 : Express (Express)
Pour le pétrissage, laisser lever la pâte et la cuisson
sera moins longue. Ce programme n'est indiqué que
pour les recettes ne contenant pas d'ingrédients
lourds ou des types de farine complète. Notez
bien qu'avec ce programme, le pain peut devenir
moins moelleux et pas aussi savoureux qu'avec un
autre programme.
Programme 6 : Teig (Pâte)
Pour la fabrication de pâtes levées pour les petits
pains, les pâtes à pizza ou les brioches. La procédure
de cuisson n'est pas applicable pour ce programme.
Programme 7 : Nudelteig (Pâte à pâtes)
Pour la confection de pâtes. La procédure de cuisson
n'est pas applicable pour ce programme.
Programme 8 : Buttermilchbrot
(Pain au petit-lait)
Pour des pains composés de babeurre ou de yaourt.
Programme 9 : Glutenfrei (Sans gluten)
Pour les pains composés de farines et de mélanges
de cuisson sans gluten. Les farines sans gluten ont
besoin d'un temps de cuisson plus long pour l'absorption des liquides et disposent de propriétés de
gonfl ement diff érentes.
Programme 10 : Kuchen (Gâteau)
Les ingrédients sont pétris dans ce programme,
avant être laissés au repos et cuits. Utilisez de la
poudre à lever pour ce programme.
Programme 11 : Marmelade (Confi ture)
Pour la confection de marmelades, de confi tures,
de gelées et de pâtes à tartiner à base de fruits.
Programme 12 : Backen (Cuire)
Pour la recuisson de pains qui sont trop clairs ou
qui ne sont pas bien cuits ou pour des pâtes prêtes
à cuire.. L'ensemble des procédures de pétrissage
et de repos ne sont pas applicables pour ce programme. Après la fi n de la procédure de cuisson,
le pain est maintenu au chaud pendant une heure
maximum. Ce programme empêche que le pain
devienne trop humide. Le programme 12 cuit le
pain pendant 60 minutes.
SBB 850 B1
FR│CH
│
31 ■
Page 35
Pour arrêter prématurément ces fonctions, appuyez
sur la touche Marche/Arrêt , jusqu'à ce qu'un
signal sonore prolongé retentisse. Pour arrêter
l'appareil, coupez l'alimentation électrique.
REMARQUE
► Chez les programmes 1, 2, 3, 4, 5, 6, 8
et 9, un signal sonor
déroulement du programme et "ADD"
apparaît sur l'écran. Ajoutez immédiatement
d'autres ingrédients tels que des fruits ou des
noix. Vous n'avez pas besoin d'interrompre le
programme pour cela.
Les ingrédients ne sont pas réduits en morceaux
par les crochets de pétrissage 6. Si vous
avez réglé la minuterie, vous pouvez verser
tous les ingrédients dans le moule de cuisson
également au début du programme.7. Dans
ce cas, vous devriez légèrement réduire les
fruits et les noix avant de les ajouter.
e retentit pendant le
Fonction minuterie
La fonction de minuterie vous permet de procéder
à une cuisson temporisée.
Les touches fl échées et
de défi nir la fi n de la procédure de cuisson. La
temporisation maximale est égale à 15 heures.
vous permettent
procédure. L'affi chage vous indique la durée
totale du temps de cuisson et le délai.
En cas de dépassement du décalage de temps
possible, vous pouvez corriger le temps à
l'aide de la touche fl échée
3) Confi rmez la confi guration de la minuterie à
l'aide de la touche Marche/Arrêt .
Le voyant lumineux de service commence à
clignoter. Le double point clignote à l'écran
et le temps programmé commence à s'écouler.
Dès que le programme démarre, le voyant lumineux
de service s'allume en permanence. Lorsque
la procédure de cuisson est terminée, dix signaux
sonores retentissent et l'écran affi che 0:00.
Exemple :
Il est 8h00 et vous souhaitez avoir du pain frais
dans 7 heures et 30 minutes, c'est-à-dire à 15h30.
Dans un premier temps, sélectionnez le programme
1 et maintenez la touche fl échée enfoncée
jusqu'à ce que l'écran affi che 7:30 dans la
mesure où le temps de la préparation s'élève à 7
heures et 30 minutes.
REMARQUE
► La fonction de minuterie n'est pas disponible
pour le pr
ogramme "Marmelade".
.
ATTENTION ! RISQUE D'INCENDIE!
► Avant de procéder à la cuisson d'un pain
donné av
d'abord la recette afi n de vous assurer que
les ingrédients affi chent une bonne proportion entre eux, que la pâte n'est pas trop
ferme ou trop mince ou que la quantité n'est
pas trop importante pour éviter tout risque de
débordement.
1) Sélectionnez un programme. L'écran indique
la durée de cuisson requise.
2) La touche fl échée
ler la fi n du programme. Lorsque vous appuyez
pour la première fois, la fi n est décalée de
10 minutes. A chaque fois que vous appuyez à
nouveau sur la touche fl échée
est décalé de 10 minutes. En maintenant la
touche fl échée enfoncée, vous accélérez cette
■ 32 │ FR
ec la fonction de minuterie, testez
vous permet de déca-
le temps
│
CH
REMARQUE
► Ne pas utiliser la fonction de minuterie en cas
ansformation de denrées alimentaires
de tr
rapidement périssables tels que le lait, les
œufs, la crème fraîche ou le fromage, etc.
Avant la cuisson
Pour réussir une procédure de cuisson, veuillez tenir
compte des facteurs suivants :
Ingrédients
ATTENTION ! RISQUE D'INCENDIE!
► Retirez le moule 7 du corps de l'appar
avant de verser les ingrédients. Si des ingrédients pénètrent dans la zone de cuisson, un
incendie peut se déclencher suite au réchauffement des serpentins de chauff age.
eil
SBB 850 B1
Page 36

■ Mettez toujours les ingrédients dans l'ordre
indiqué dans le moule 7.
■ Tous les ingrédients doivent être à température
ambiante afi n d'obtenir une procédure de
fermentation optimale de la levure.
ATTENTION ! RISQUE D'INCENDIE!
► N'utilisez en aucun cas des quantités plus
tantes que celles indiquées. Une quantité
impor
excessive de pâte peut déborder du moule 7
et un incendie peut se déclencher suite au
réchauff ement des serpentins de chauff age.
■ Veillez à la mesure exacte des ingrédients. De
légèr
es divergences par rapport aux quantités
indiquées dans la recette peuvent déjà infl uencerle résultat de cuisson.
Faire cuire du pain
Préparation
REMARQUE
► Installez la machine à pain sur une surface
plane et ferme.
Retirez le moule 7 de l'appareil par le haut.
1)
2) Enfoncez les crochets de pétrissage 6 sur
l'arbre d'entraînement dans le moule 7.
Veillez à ce qu'ils soient fermement positionnés.
3) Versez les ingrédients de votre recette dans le
moule 7. Ajoutez tout d'abord les liquides, le
sucre, le sel puis la farine, et, pour terminer, la
levure.
REMARQUE
► Veillez à ce que la levure n'entre pas en
contact av
4) Remettez le moule 7 en place. Veillez à ce
qu'elle s'enclenche correctement.
5) fermez le couvercle de l'appareil 2.
6) Insérez la fi che secteur dans la prise secteur.
Un signal sonore retentit et l'écran affi che
le numéro du programme et la durée du
programme 1.
7) Sélectionnez votre programme avec la touche
de choix de programme . Chaque entrée est
confi rmée par un signal acoustique.
ec le sel ou des liquides.
8) Le cas échéant, sélectionnez la taille du pain à
l'aide de la touche .
9) Sélectionnez le degré de dorage de votre
pain. Dans l'écran , la fl èche vous indique
si vous avez opté pour Clair, Moyen ou Doré.
Vous pouvez en l'occurrence également sélectionner le mode "Vite" pour raccourcir le temps
de levée de la pâte.
REMARQUE
► La fonction "Degré de dorage" nest pas dis-
ponible pour les pr
La fonction "Vite" est uniquement possible
pour les programmes 1 - 4.
Pour les programmes 6, 7, 11 et 12, le
réglage du poids du pain n'est pas possible.
10) Vous avez maintenant la possibilité de régler
l'heure de fi n de votre programme à l'aide de
la fonction de minuterie. Vous pouvez saisir un
décalage maximal allant jusqu'à 15 heures.
REMARQUE
► Cette fonction n'est pas possible pour le
ogramme 11.
pr
Démarrer le programme
Démarrez à présent le programme à l'aide de la
touche Marche/Arrêt .
REMARQUE
► Les programmes 1, 2, 3, 4, 6 et 8 démarrent
ec une phase de préchauff age de 10 à
av
30 minutes (à l'exception du mode Vite, voir
le tableau du déroulement des programmes).
Les crochets de pétrissage 6 ne bougent
pas. Il ne s'agit pas d'une erreur de l'appareil.
Le programme exécute automatiquement les diff érentes étapes de travail.
REMARQUE
► Pour les programmes 1, 2, 3, 4, 5, 8, 9 et 10,
10 signaux sonor
partie du programme "Lever 2" et "RMV"
apparait à l'écran . Vous pouvez maintenant
retirer le crochet de pétrissage 6 de la pâte.
Si vous ne souhaitez pas retirer le crochet de
pétrissage 6, patientez simplement. L'appareil
poursuit automatiquement le programme.
ogrammes 6, 7 et 11.
es retentissent à la fi n de la
SBB 850 B1
FR│CH
│
33 ■
Page 37

La fenêtre de contrôle 1 vous permet d'observer
la procédure de cuisson de votre machine à pain.
De l'humidité peut occasionnellement se former sur
la fenêtre de contrôle 1 pendant la procédure
de cuisson. Pendant la phase de pétrissage, le
couvercle 2 peut être ouvert.
REMARQUE
► N'ouvrez pas le couvercle de la machine 2
s de la phase de levée et de cuisson.
au cour
Le pain peut s'aff aisser.
Terminer le programme
Lorsque la procédure de cuisson est terminée, dix
signaux sonores retentissent et l'écran affi che
0:00. Lorsque le programme est terminé, l'appareil passe automatiquement en mode "Garder au
chaud" qui dure 60 minutes maximum.
REMARQUE
► Ceci ne s'applique pas aux programmes 6,
7 et 11.
endant ce temps, de l'air chaud circule dans
P
l'appareil. Vous pouvez mettre fi n prématurément
à la fonction "Garder au chaud" en maintenant la
touche Marche/Arrêt enfoncée jusqu'à ce que
les signaux sonores retentissent.
DANGER ! DÉCHARGE ÉLECTRIQUE !
► Débranchez la fi che secteur de la prise avant
d'ouvrir le couv
n'est pas utilisé, débranchez toujours ce
dernier de l'alimentation électrique.
Sortir le pain
Lorsque vous sortez le moule 7 de l'appareil, utilisez
toujours une manique ou des gants de protection.
Maintenez le moule 7 penché au-dessus d'une
grille et secouez-le légèrement jusqu'à ce que le
pain se décolle du moule de cuisson 7.
ercle 2. Lorsque l'appareil
Si vous n'avez pas déjà enlevé le crochet de
pétrissage auparavant :
Si le pain ne se détache pas des crochets de
pétrissage 6, retirez doucement les crochets de
pétrissage 6 à l'aide de l'extracteur de crochets
de pétrissage 0.
REMARQUE
N'utilisez aucun objet métallique susceptible de
ayer le revêtement antiadhésif. Aussitôt après
r
avoir retiré le pain, rincez le moule 7 à l'eau
chaude. Vous empêchez ainsi que les crochets de
pétrissage 6 ne colle sur l'arbre d'entraînement.
CONSEIL
Si vous retirez les crochets de pétrissage 6 apr
le dernier pétrissage de la pâte, le pain n'est pas
déchiré au moment de le sortir du moule 7.
■ Appuyez brièvement sur la touche Marche/
Arr
êt pour interrompre le programme au
tout début de la phase de cuisson ou retirez la
fi che de la prise réseau. Vous devez rétablir la
connexion avec le réseau électrique dans un
délai de 10 minutes afi n d'assurer la poursuite
de la procédure de cuisson.
■ Ouvrez le couvercle 2 et sor
Appliquez de la farine sur les mains pour sortir
la pâte et retirer les crochets de pétrissage 6.
■ Placez à nouveau la pâte dans le moule 7.
Insér
ez à nouveau le moule 7 et fermez le
couvercle de l'appareil 2.
■ Le cas échéant, enfi chez la fi che secteur dans la
prise de cour
poursuivi.
Laissez le pain refroidir pendant 15 à 30 minutes
avant de le consommer.
Avant de couper le pain, assurez-vous toujours qu'il ne
reste pas de crochets de pétrissage 6 dans la pâte.
Messages d'erreur
■ Lorsque l'écran affi
démarrage du programme, cela signifi e que la
température de la machine à pain est encore
trop élevée. Arrêtez le programme et retirez la
fi che secteur. Ouvrez le couvercle de l'appareil 2
et laissez refroidir l'appareil pendant 20 minutes
avant de l'utiliser à nouveau.
ant. Le programme de cuisson est
tez le moule 7.
che "HHH" après le
ès
■ 34 │ FR
│
CH
SBB 850 B1
Page 38
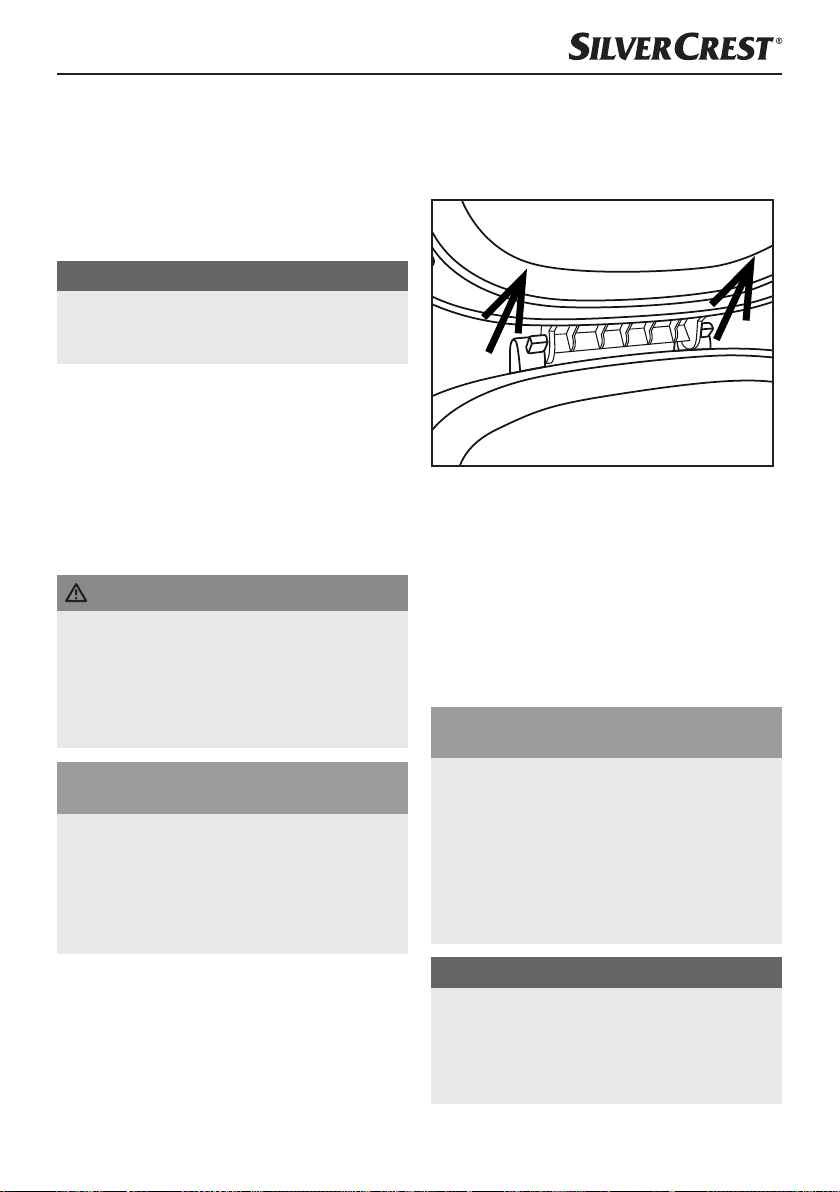
■ S'il s'avère impossible de démarrer un nouveau
programme alors que la machine à pain vient
d'en achever un, cela signifi e que l'appareil est
encore trop chaud. Dans ce cas, l'écran affi che
le réglage de base (Programme 1). Ouvrez le
couvercle de l'appareil 2 et laissez refroidir
l'appareil pendant 20 minutes avant de l'utiliser
à nouveau.
REMARQUE
► N'essayez pas de mettre en service l'appareil
ant qu'il ne se soit refroidi. Cela fonctionne
av
uniquement pour le programme 12.
■ Lorsque l'écran affi
que le programme ait été démarré, éteignez
dans un premier temps la machine à pain, puis
rallumez-la, en débranchant la fi che de la prise
secteur puis en la rebranchant aussitôt. Si le
messsage d'erreur persiste, adressez-vous au
service après-vente.
che "EE0", "EE1" ou "LLL", après
Nettoyage et entretien
DANGER ! DÉCHARGE ÉLECTRIQUE !
► Avant tout nettoyage, débranchez la fi che
secteur de la prise et laissez tout d'abor
l'appareil refroidir entièrement.
Protégez l'appareil à l'encontre de l'humidité,
car ceci peut entraîner un choc électrique.
Respectez à cet eff et les consignes de sécurité.
ATTENTION!
RISQUE DE DÉGÂTS MATÉRIELS!
► Les éléments de l'appareil et les accessoires
ne sont pas adaptés au lav
selle !
► N'utilisez aucun produit de nettoyage chimique
o
u diluant pour le nettoyage de la machine
à pain.
Corps de l'appareil, couvercle, cuve
■ Retirez tous les résidus de la cuve avec un chiff on
h
umide ou une éponge légèrement humidifi ée.
■ Essuyez également le corps de l'appareil et
le couvercle avec un chiff on ou une éponge
humide.
age en lave-vais-
d
Pour faciliter le nettoyage, retirez le couvercle 2
du corps de l'appareil :
– Ouvrez le couvercle 2 jusqu'à ce que les
tenons en plastique soient intr
les ouvertures des guides de la charnière.
– Retirez le couvercle 2 des guides de la
charnière.
■ Pour remonter le couvercle 2 après le nettoyage,
passez les tenons en plastique à travers l'ouverture des guides de la charnière.
■ Séchez bien le tout et assurez-vous que toutes
les pièces soient bien sèches av
utilisation.
Moule, crochets de pétrissage et accessoires
ATTENTION!
RISQUE DE DÉGÂTS MATÉRIELS!
► Ne plongez jamais le moule 7 dans de l'eau
ou tout autre liquide.
► La surface du moule 7 et des cr
pétrissage 6 est recouverte d'un revêtement
antiadhésif. Lors du nettoyage, n'utilisez pas
de produits nettoyants agressifs, de récurants
ou d'objets qui pourraient provoquer des
rayures sur les surfaces.
REMARQUE
► De par l'humidité et la vapeur, l'apparence des
faces peut se modifi er au cours du temps.
sur
Cet état ne correspond pas à un entravement
du fonctionnement ou à une réduction de la
qualité.
oduits dans
ant une nouvelle
ochets de
SBB 850 B1
FR│CH
│
35 ■
Page 39

■ Avant le nettoyage, retirez le moule 7 et les
crochets de pétrissage 6 de la zone de cuisson.
■ Retirez les crochets de pétrissage 6 du moule 7.
Si les crochets de pétrissage 6 ne se détachent
pas du moule 7 remplissez le moule 7 d'eau
chaude pendant 30 minutes. Les crochets de
pétrissage 6 devraient maintenant pouvoir être
détachés.
Nettoyez les crochets de pétrissage 6 à l'eau
chaude et ajoutez un peu de liquide de vaisselle
doux. En cas d'incrustations coriaces, laissez les
crochets de pétrissage 6 tremper dans l'eau de
rincage jusqu'à ce que les incrustations puissent
être éliminées avec une brosse.
Si le support de fi xation à l'intérieur des crochets
de pétrissage 6 est bouché, vous pouvez le
nettoyer prudemment à l'aide d'une baguette
de bois.
Séchez bien les crochets de pétrissage 6 après
le nettoyage.
■ Essuyez l'extérieur du moule 7 à l'aide d'un
chiff on humide.
■ Nettoyez l'intérieur du moule 7 à l'eau chaude
savonneuse. En cas d'incrustations dans le moule
7, remplissez de l'eau chaude dans le moule de
cuisson 7 et ajoutez un peu de liquide vaisselle
doux. Laissez-le tremper jusqu'à ce que les incrustations soient ramollies et puissent être éliminées
à l'aide d'une brosse. Rincez ensuite le moule 7
à l'eau claire abondante et séchez-le bien.
■ Nettoyez le verre mesureur 8,la cuillère
doseuse 9 et l'extracteur de crochets de pétrissage 0 à l'eau chaude et ajoutez un peu de
liquide vaisselle doux. Rincez ensuite les pièces
à l'eau claire pour éliminer les résidus de liquide
de vaisselle. Séchez soigneusement le tout.
Mise au rebut
Ne jamais jeter l'appareil avec
les ordures ménagères. Ce produit est assujetti à la directive
européenne 2012/19/EU-DEEE.
Recyclez l'appareil via une entreprise de recyclage
agréée ou via votre centre de recyclage communal.
Respectez la réglementation en vigueur. En cas de
doute, veuillez contacter votre centre de recyclage.
Eliminer l'ensemble des matériaux d'em-
ballage d'une manière respectueuse de
l'environnement.
Garantie et service
Cet appareil est garanti 3 ans à partir de la date
d'achat. L'appareil a été fabriqué avec soin et
contrôlé consciencieusement avant sa livraison.
Veuillez conserver le ticket de caisse en guise de
preuve d'achat. En cas d'exercice de la garantie,
veuillez contacter le service après-vente compétent.
Cette condition doit être respectée pour assurer
l'expédition gratuite de votre marchandise.
La garantie est uniquement valable en cas d'erreurs
de fabrication ou de matériel, mais pas pour les
dommages de transport, les pièces d'usure, telles
que les moules ou les crochets de pétrissage, ou
en cas de détériorations de pièces fragiles, par
ex. interrupteurs ou accus. Le produit est destiné
uniquement à un usage privé et ne répond pas à
un usage professionnel.
La garantie est annulée en cas d'entretien incorrect
et inapproprié, d'usage de la force et en cas d'intervention non réalisée par notre centre de service
après-vente agréé. Vos droits légaux ne sont pas
restreints par la présente garantie.
L'exercice de la garantie ne prolonge pas la période
de garantie. Cette disposition s'applique également
aux pièces remplacées ou réparées. Signalez sans
attendre toute anomalie éventuelle sur le matériel
au moment du déballage et au plus tard deux jours
après la date d'achat. Toute réparation fera l'objet
d'une facturation après expiration de la période de
garantie.
■ 36 │ FR
│
CH
SBB 850 B1
Page 40

Service France
Tel.: 0800 919270
E-Mail: [email protected]
IAN 274313
Service Suisse
Tel.: 0842 665566 (0,08 CHF/Min.,
mobile max. 0,40 CHF/Min.)
E-Mail: [email protected]
IAN 274313
Importateur
KOMPERNASS HANDELS GMBH
BURGSTRASSE 21
44867 BOCHUM
GERMANY
www.kompernass.com
SBB 850 B1
FR│CH
│
37 ■
Page 41
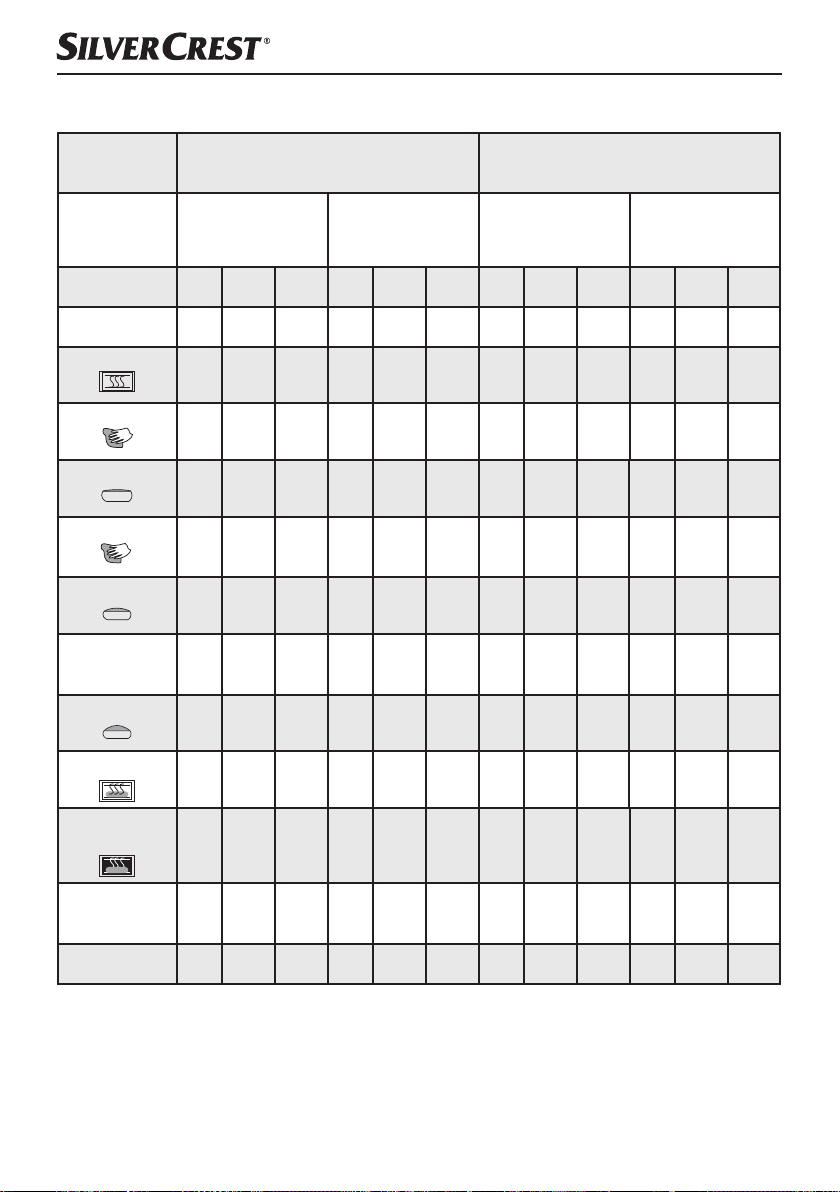
Déroulement du programme
Pro-
gramme
Degré de
dorage
Taille 750 g 1000 g 1250 g 750 g 1000 g 1250 g 750 g 1000 g 1250 g 750 g 1000 g 1250 g
Temps (heures) 02:58 03:05 03:15 02:14 02:20 02:25 03:13 3:18 03:25 02:18 2:25 2:30
Préchauff age (min)
Pétrir 1 (min)
Lever 1 (min)
Pétrir 2 (min)
Lever 2 (min)
Signaux sonores pour
supprimer le crochet
de pétrissage
Lever 3 (min)
15 15 20 N/A N/A N/A 10 10 15 N/A N/A N/A
12 13 13 12 13 13 12 12 15 12 13 13
25 25 25 10 10 10 20 20 20 10 10 10
2
3A*
5
30 30 30 18 18 18 43 41 35 18 18 18
RMV RMV RMV RMV RMV RMV RMV RMV RMV RMV RMV RMV
30 30 30 30 30 30 35 35 35 30 30 30
1. Normal 2. Léger
Clair
Moyen
Doré
2
5A
5
5A
Vite
2
2
2
2A
2
2A
5
5
1A
5
5
3A*
Clair
Moyen
Doré
2
2
5A
8
8
5A
Vite
2
2
2
1A
8
2A
5
5
2
2A
5
Cuire (min)
Garder au chaud
(min)
Ajouter les
ingrédients
(Heures restantes)
Préréglage du temps 15h 15h 15h 15h 15h 15h 15h 15h 15h 15h 15h 15h
56 60 65 56 60 65 60 65 70 60 65 70
60 60 60 60 60 60 60 60 60 60 60 60
02:01 02:05 02:10 01:49 01:53 01:58 02:26 02:29 02:28 01:53 1:58 2:03
* 3A signifi e que suite aux 3 minutes de pétrissage, 10 signaux sonores retentissent et que l'affi chage
écran "ADD" apparait. Ceci vous rappelle d'ajouter des ingrédients comme des fruits ou des noix.
■ 38 │ FR
│
CH
SBB 850 B1
Page 42
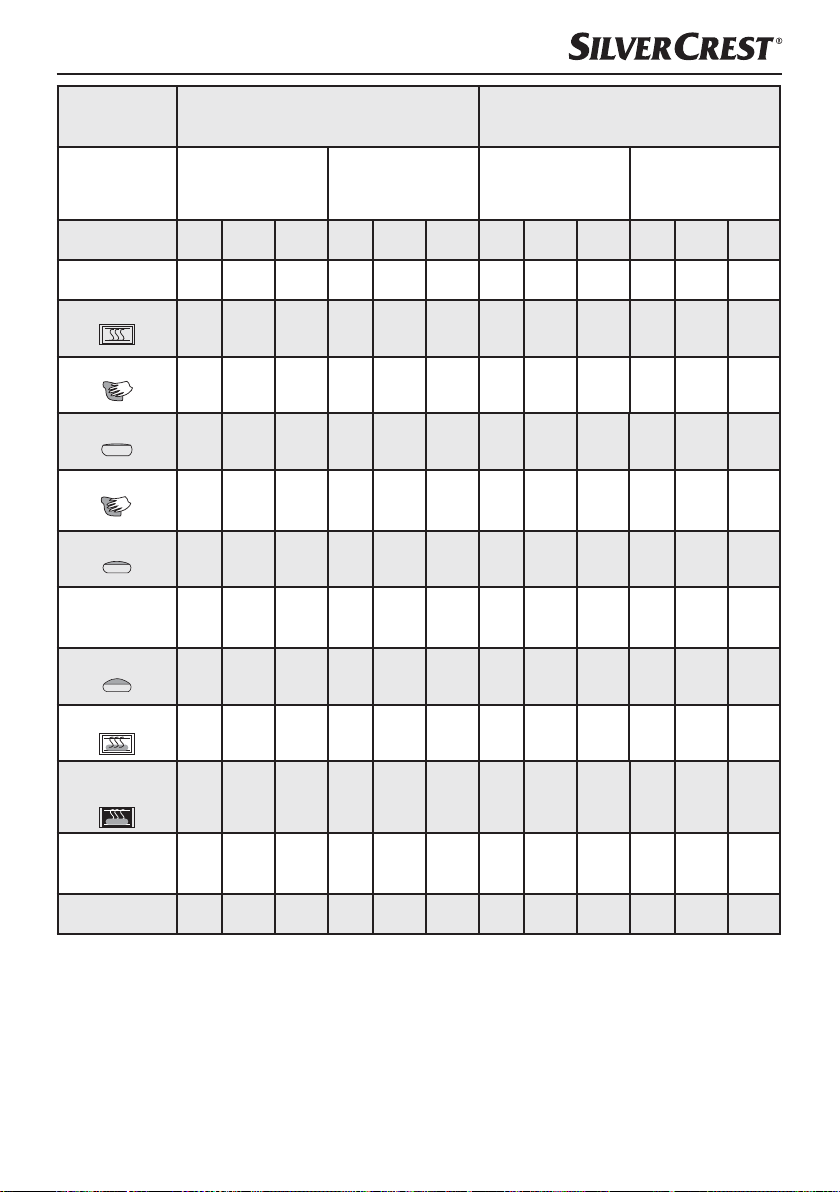
Pro-
gramme
3. Pain complet 4. Sucré
Degré de
dorage
Taille 750 g 1000 g 1250 g 750 g 1000 g 1250 g 750 g 1000 g 1250 g 750 g 1000 g 1250 g
Temps (heures) 3:18 3:25 3:35 2:24 2:30 2:35 2:56 3:01 3:10 2:10 2:16 2:20
Préchauff age (min)
Pétrir 1 (min)
Lever 1 (min)
Pétrir 2 (min)
Lever 2 (min)
Signaux sonores pour
supprimer le crochet
de pétrissage
Lever 3 (min)
Cuire (min)
Clair
Moyen
Doré
15 15 20 N/A N/A N/A 10 10 15 N/A N/A N/A
11 12 12 11 13 13 12 12 12 11 12 12
30 30 30 10 10 10 25 25 25 10 10 10
2
2
5A
2
5A
8
8
3A
8
38 38 38 23 23 23 35 35 35 18 18 18
RMV RMV RMV RMV RMV RMV RMV RMV RMV RMV RMV RMV
35 35 35 35 35 35 30 30 30 30 30 30
56 60 65 56 60 65 52 56 60 52 56 60
2A
Vite
2
2
2
2A
5
2A
5
5
2
4A*
6
Clair
Moyen
Doré
2
5A
6
5A
Vite
2
2
2
1A
6
2A
6
6
2
2A
6
Garder au chaud
(min) 60 60 60 60 60 60 60 60 60 60 60 60
Ajouter les
ingrédients
(Heures restantes)
Préréglage du temps 15h 15h 15h 15h 15h 15h 15h 15h 15h 15h 15h 15h
2:17 2:21 2:26 1:59 2:03 2:08 2:03 2:07 2:11 1:46 1:50 1:54
* 4A signifi e que suite aux 4 minutes de pétrissage, 10 signaux sonores retentissent et que l'affi chage
écran "ADD" apparait. Ceci vous rappelle d'ajouter des ingrédients comme des fruits ou des noix.
SBB 850 B1
FR│CH
│
39 ■
Page 43
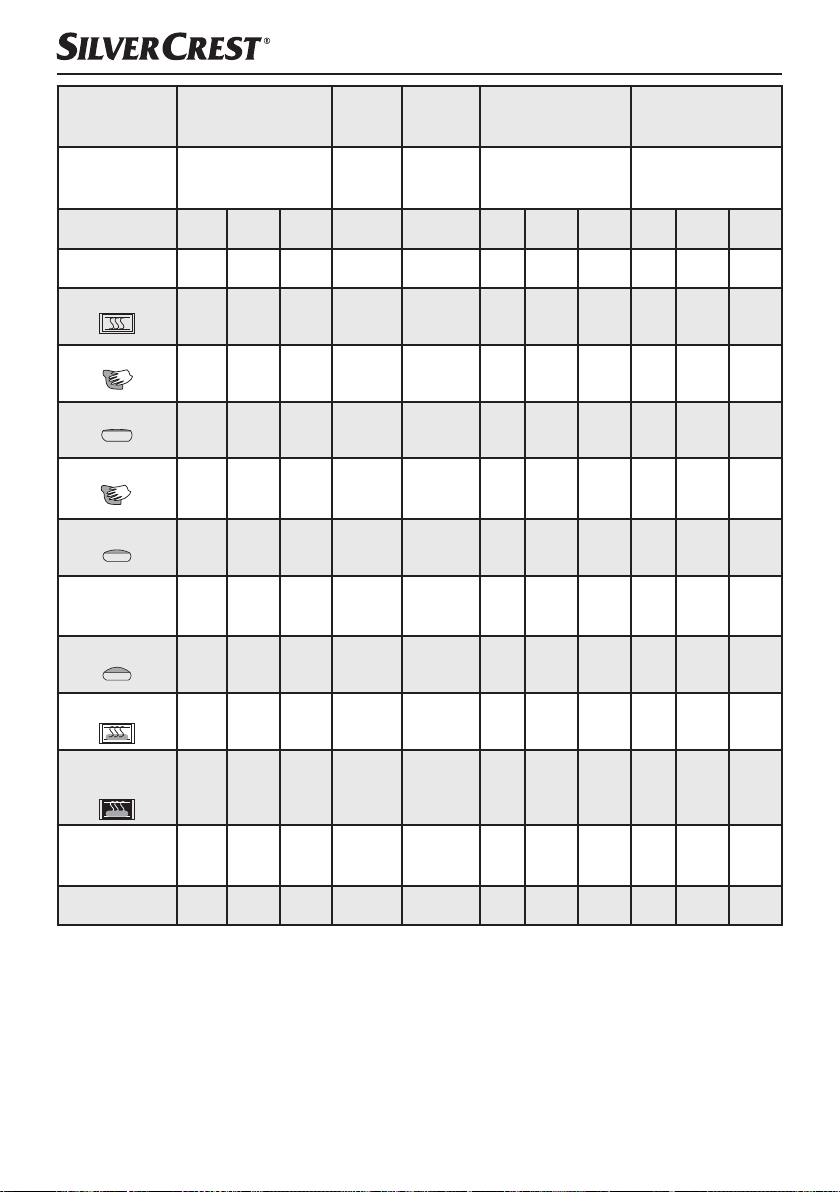
Pro-
gramme
Degré de dorage
Taille 750 g 1000 g 1250 g P/I P/I 750 g 1000 g 1250 g 750 g 1000 g 1250 g
Temps (heures) 1:15 1:18 1:20 1:50 0:15 3:17 3:21 3:30 2:14 2:20 2:25
5. Express
Clair
Moyen
Doré
P
7. Pâte
6.
à pâtes
âte
P/I P/I
8. Pain au
petit-lait
Clair
Moyen
Doré
9. Sans gluten
Clair
Moyen
Doré
Préchauff age (min)
Pétrir 1 (min)
Lever 1 (min)
Pétrir 2 (min)
Lever 2 (min)
Signaux sonores pour
supprimer le crochet
de pétrissage
Lever 3 (min)
Cuire (min)
Garder au chaud
(min)
Ajouter les
ingrédients
(Heures restantes)
Préréglage du temps 15h 15h 15h 15h 15h 15h 15h 15h 15h 15h 15h
N/A N/A N/A 10 P/I 25 25 30 N/A N/A N/A
8 8 8 12 15 10 10 10 12 13 13
P/I P/I P/I 10 P/I 20 20 20 10 10 10
P/I
P/I
2A
P/I
2A
5
2A
5
P/I P/I P/I 25 P/I 45 45 45 18 18 18
RMV RMV RMV N/A N/A RMV RMV RMV RMV RMV RMV
20 20 20 45 P/I 30 30 30 30 30 30
40 43 45 P/I P/I 52 56 60 56 60 65
60 60 60 P/I P/I 60 60 60 60 60 60
1:05 1:08 1:10 1:15 P/I 2:15 2:19 2:23 1:49 1:53 1:58
P/I
3A
5
5
P/I
N/A
N/A
5A*
2
2
2
2
5A*
8
5A*
8
8
1A
2
2A
5
5
2
2A
5
* 5A signifi e que suite aux 5 minutes de pétrissage, 10 signaux sonores retentissent et que l'affi chage
écran "ADD" apparait. Ceci vous rappelle d'ajouter des ingrédients comme des fruits ou des noix.
■ 40 │ FR
│
CH
SBB 850 B1
Page 44
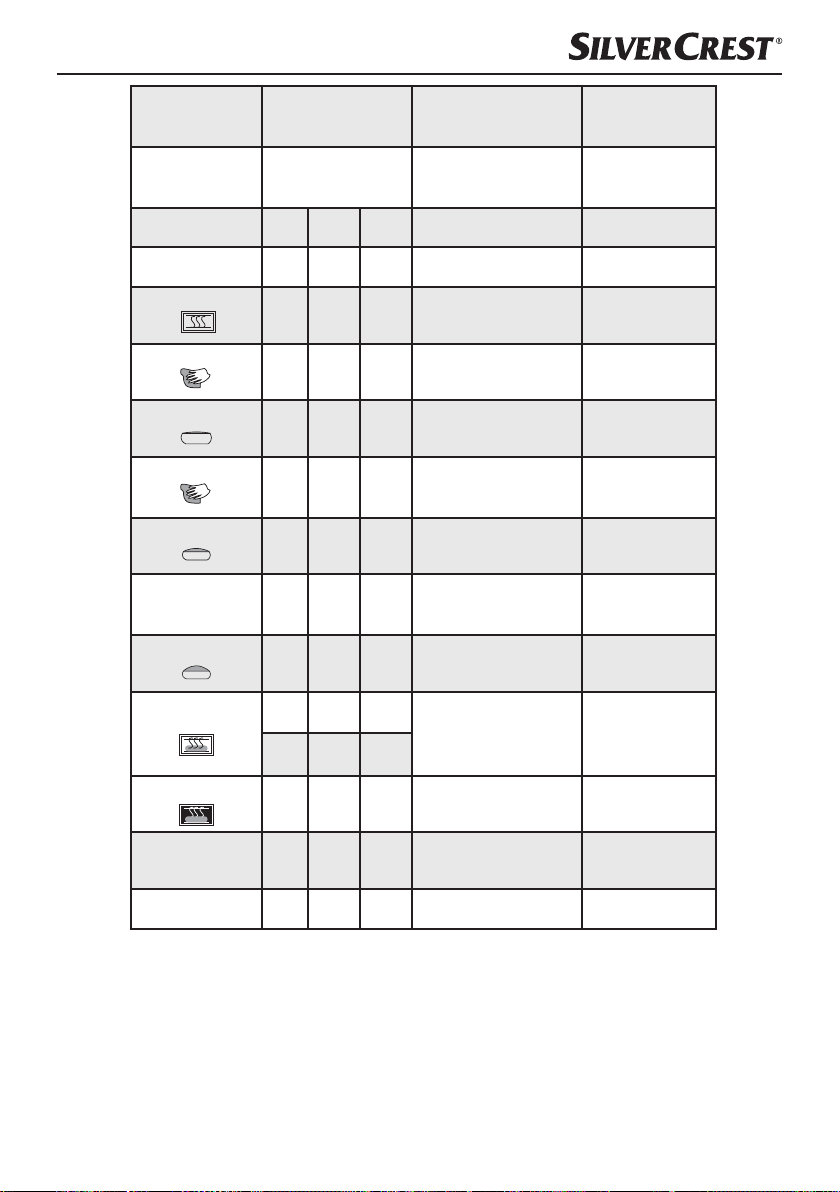
Pro-
gramme
Degré de dorage
Taille 750 g 1000 g 1250 g P/I P/I
Temps (heures) 1:30 1:35 1:40 1:20 1:00
10. Gâteau 11. Confi ture 12. Cuire
Clair
Moyen
Doré
P/I
Clair
Moyen
Doré
Préchauff age (min)
Pétrir 1 (min)
Lever 1 (min)
Pétrir 2 (min)
Lever 2 (min)
Signaux sonores pour
supprimer le crochet de
pétrissage
Lever 3 (min)
Cuire (min)
Garder au chaud (min)
Ajouter les ingrédients
(Heures restantes)
P/I P/I P/I P/I N/A
15 15 15 P/I P/I
P/I P/I P/I
P/I
P/I
N/A
N/A
P/I
N/A
N/A
N/A
N/A
P/I P/I P/I P/I P/I
RMV RMV RMV N/A N/A
P/I P/I P/I
60 65 70
15
15 Lever 15 Lever
Lever
60 60 60 P/I 60
P/I P/I P/I P/I P/I
15
Chaleur + pétrir
P/I
N/A
N/A
45
Chaleur + pétrir
20
Lever
P/I
P/I
N/A
N/A
P/I
60
Préréglage du temps 15h 15h 15h P/I 15h
SBB 850 B1
FR│CH
│
41 ■
Page 45

Dépannage de la machine à pain
Que faire si les crochets de pétrissage 6 restent
bloqués dans le moule 7 après la cuisson ?
Que se passe-t-il si le pain cuit reste dans la
machine à pain ?
Le moule 7 et les crochets de pétrissage 6
peuvent-ils être lavés au lave-vaisselle ?
Pourquoi la pâte n'est-elle pas pétrie bien que le
moteur tourne ?
Que faire si les crochets de pétrissage 6 restent
coincés dans le pain ?
Que se passe-t-il lors d'une coupure de courant
pendant un programme ?
Combien de temps dure la cuisson du pain ? Veuillez consulter les durées exactes dans le
Quels poids de pain puis-je cuire ? Vous pouvez cuire des pains de 750 g - 1000 g -
Versez de l'eau chaude dans le moule 7 et tournez
les crochets de pétrissage 6 pour détacher la
pâte incrustée.
Grâce à la fonction "Garder au chaud", le pain est
maintenu au chaud pendant env. 1 heure, tout en
étant protégé de l'humidité. Si le pain devait rester
plus d'une heure dans la machine à pain, il risque
de s'humidifi er.
Non. Rincez le moule 7 et les crochets de pétrissage 6 à la main.
Assurez-vous que les crochets de pétrissage 6 et
le moule 7 sont correctement insérés.
Retirez les crochets de pétrissage 6 avec
l'extracteur de crochets de pétrissage 0.
Dans le cas d'une panne de courant de 10 minutes
maximum, la machine à pain va poursuivre le
programme exécuté en dernier.
tableau Déroulement du programme.
1250 g.
Pourquoi est-ce que la fonction de minuterie ne
peut pas être utilisée
pour une préparation avec du lait frais ?
Que s'est-il passé lorsque la machine ne fonctionne pas, alors que l'on a appuyé sur la touche
Marche/Arrêt ?
L'appareil réduit en morceaux les raisins secs
ajoutés.
■ 42 │ FR
│
CH
Des produits frais comme le lait ou les œufs s'avarient s'ils restent trop longtemps dans l'appareil.
Certaines étapes sont diffi ciles à reconnaître, comme
par ex. "Préchauff er" ou "Reposer". A l'aide du
tableau "Déroulement des programmes", vérifi ez
quelle étape du programme est en cours.
Veuillez vérifi er si l'appareil travaille en contrôlant
si la lampe témoin s'allume. Vérifi ez que vous
avez bien appuyé sur la touche Marche/Arrêt .
Vérifi ez que la fi che secteur est bien branché sur
l'alimentation électrique.
Pour éviter la réduction en morceaux des ingrédients
comme des fruits ou des noix, ajoutez ces derniers
uniquement après le retentissement du signal sonore.
SBB 850 B1
Page 46
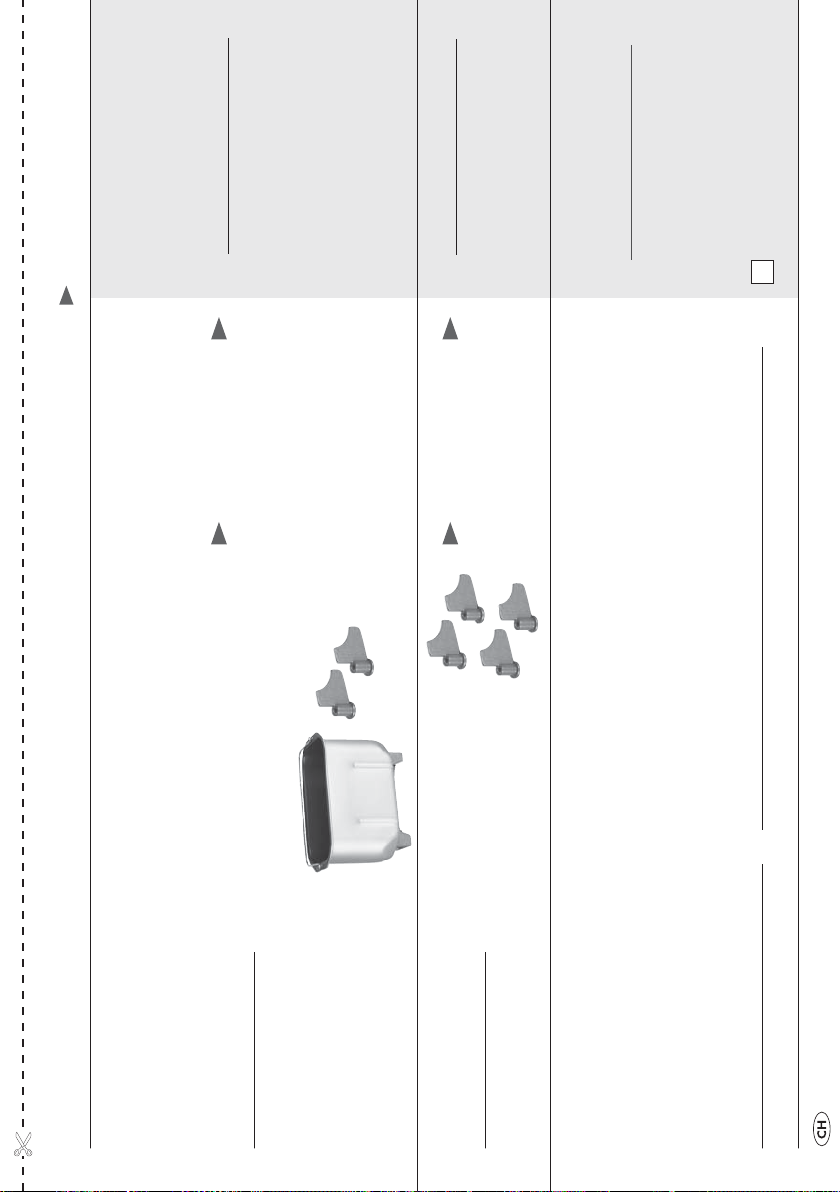
www.kompernass.com
GESAMTBETRAG/PRIX
NET/PREZZO
COMPLESSIVO
€
zzgl. Kosten für Porto, Handling,
5 €
Verpackung und Versand.
Frais de port, magasinage, embal-
lage et expédition non inclus.
Spese di spedizione
+
€
zzgl. Kosten für Porto, Handling,
3 €
Verpackung und Versand.
Frais de port, magasinage, embal-
lage et expédition non inclus.
Spese di spedizione
+
€
ZAHLUNGSWEISE/
=
Überweisung/Virement/
Bonifi co
MODE DE RÈGLEMENT/
TIPO DI PAGAMENTO
10 €
EINZELPREIS/
PRIX UNITAIRE/
PREZZO SINGOLO
ARTIKELBESCHREIBUNG/
DESCRIPTION DES ARTICLES/
DESCRIZIONE ARTICOLO
► 1 Backform inkl. 2 Knethaken
► 1 forme de cuisson avec 2 fouets à pétrir
► 1 stampo incl. 2 ganci da impasto
10 €
► 4 Knethaken
► 4 fouets à pétrir
► 4 ganci da impasto
Bestellkarte/Carte de commande/Scheda d´ordinazione SBB 850 B1
BESTELLMENGE/QUANTITÉ/
QUANTITÀ DA ORDINARE
(max. 3 Sets/max. 3 sets/max. 3 set)
e il prezzo di spedizione più alto pari a 5 euro!
ez toujours les frais d‘expédition plus élevés de 5 Euros !
den höheren Versandkostenpreis von 5 Euro!
pay
► Hinweis: Wenn Ihre Bestellung aus mehreren Artikeln besteht (4er-Set Knethaken und Backform) zahlen Sie immer
► Remarque : Si votre commande se compose de plusieurs articles (lot de 4 fouets à pétrir et forme de cuisson), vous
sempr
► Avvertenza: Se il vostro ordine si compone di più articoli ( kit da 4 ganci impastatrice e stampo da forno), calcolate
(Ort, Datum/Lieu, date/luogo, data) (Unterschrift/Signature/fi rma)
Page 47
► Bitte frankieren Sie die Sendung ausreichend. Schreiben Sie Ihren Namen als Absender
auf den Umschlag./Veuillez aff ranchir au tarif en vigueur. Ecrivez votre nom comme
expéditeur sur l‘enveloppe./Aff rancare adeguatamente la busta. Scrivere il nome come
mittente sulla busta.
charge./Eff ettuare a proprie spese il bonifi co bancario, assumendosi le spese bancarie
della propria banca.
Lasten./Eff ectuer un transfert bancaire, les frais demandés par votre banque sont à votre
WICHTIG/REMARQUE/IMPORTANTE
► Überweisung bitte spesenfrei ausführen, Kosten Ihrer eigenen Bank bitte zu Ihren eigenen
qui accanto.
Kompernaß Handelsgesellschaft mbH
Burgstraße 21
44867 Bochum
Deutschland/Allemagne/Germania
W
ohnort an. Senden Sie dann die vollständig ausgefüllte Bestellkarte in einem Briefumschlag
an unsere nachstehende Postadresse. / Dans le champ „Motif de l‘opération“, veuillez indi-
quer l‘article de même que votre nom et lieu de résidence. Veuillez nous renvoyer la carte de
commande dûment renseignée dans une enveloppe à notre adresse postale fi gurant ci-après. /
Indicare l‘articolo nella causale del bonifi co, nonché nome, cognome e indirizzo. Inviare quindi
la cartolina di ordinazione interamente compilata, inserendola in una busta, all‘indirizzo indicato
■ Geben Sie bei Ihrer Überweisung als Verwendungszweck den Artikel sowie Ihren Namen und
IBAN: DE03440100460799566462
SWIFT (BIC): PBNKDEFF 440
Bank/Banque/Banca:
Postbank Dortmund AG
2) Überweisen Sie den Gesamtbetrag vorab auf das Konto: / Merci de virer le montant total au
eventuali domande), scrivendo in stampatello.
préalable sur le compte suivant: / Versare l‘importo totale in anticipo sul seguente conto:
Kompernaß Handelsgesellschaft mbH
1) Tragen Sie unter „Absender/Besteller“ Ihren Namen, Ihre Anschrift und Ihre Telefonnummer (für
eventuelle Rückfragen) in Blockschrift ein. / Saisissez votre nom, votre titre et votre numéro de
téléphone (pour d‘éventuelles questions) sous la rubrique „Expéditeur/Acheteur“ en lettres maju-
scules. / Alla voce „Mittente/ordinante“, inserire nome, titolo, indirizzo e numero telefonico (per
Bestellkarte/Carte de commande/Scheda d´ordinazione SBB 850 B1
Telefon/Téléphone/Telefono
Land/Pays/Paese
PLZ, Ort/Code Postal, Ville/Cap, Città
Straße/Rue/Via
MITTENTE
Name, Vorname/Nom, Prénom/Cognome, Nome
(si prega di compilare il modulo in stampatello)
ABSENDER / BESTELLER
(bitte vollständig und in BLOCKSCHRIFT ausfüllen)
EXPÉDITEUR/ACHETEUR
(à compléter en majuscules)
www.kompernass.com
Page 48

Indice
Introduzione . . . . . . . . . . . . . . . . . . . . . . . . . . . . . . . . . . . . . . . . . . . . . . . . . . . . . . . . . .46
Uso conforme . . . . . . . . . . . . . . . . . . . . . . . . . . . . . . . . . . . . . . . . . . . . . . . . . . . . . . . . .46
Volume della fornitura . . . . . . . . . . . . . . . . . . . . . . . . . . . . . . . . . . . . . . . . . . . . . . . . . .46
Descrizione dell'apparecchio . . . . . . . . . . . . . . . . . . . . . . . . . . . . . . . . . . . . . . . . . . . . .46
Dati tecnici . . . . . . . . . . . . . . . . . . . . . . . . . . . . . . . . . . . . . . . . . . . . . . . . . . . . . . . . . . . .46
Indicazioni di sicurezza . . . . . . . . . . . . . . . . . . . . . . . . . . . . . . . . . . . . . . . . . . . . . . . . .47
Prima del primo impiego . . . . . . . . . . . . . . . . . . . . . . . . . . . . . . . . . . . . . . . . . . . . . . . .51
Caratteristiche . . . . . . . . . . . . . . . . . . . . . . . . . . . . . . . . . . . . . . . . . . . . . . . . . . . . . . . . .51
Pannello di comando . . . . . . . . . . . . . . . . . . . . . . . . . . . . . . . . . . . . . . . . . . . . . . . . . . .51
Programmi . . . . . . . . . . . . . . . . . . . . . . . . . . . . . . . . . . . . . . . . . . . . . . . . . . . . . . . . . . .53
Funzione Timer . . . . . . . . . . . . . . . . . . . . . . . . . . . . . . . . . . . . . . . . . . . . . . . . . . . . . . . .54
Prima della cottura . . . . . . . . . . . . . . . . . . . . . . . . . . . . . . . . . . . . . . . . . . . . . . . . . . . . .54
Cottura del pane . . . . . . . . . . . . . . . . . . . . . . . . . . . . . . . . . . . . . . . . . . . . . . . . . . . . . . .55
Pulizia e manutenzione . . . . . . . . . . . . . . . . . . . . . . . . . . . . . . . . . . . . . . . . . . . . . . . . .57
Smaltimento . . . . . . . . . . . . . . . . . . . . . . . . . . . . . . . . . . . . . . . . . . . . . . . . . . . . . . . . . .58
Garanzia e assistenza . . . . . . . . . . . . . . . . . . . . . . . . . . . . . . . . . . . . . . . . . . . . . . . . . .58
Importatore. . . . . . . . . . . . . . . . . . . . . . . . . . . . . . . . . . . . . . . . . . . . . . . . . . . . . . . . . . .59
Decorso del programma . . . . . . . . . . . . . . . . . . . . . . . . . . . . . . . . . . . . . . . . . . . . . . . .60
Eliminazione dei guasti macchina per il pane . . . . . . . . . . . . . . . . . . . . . . . . . . . . . . .64
│
SBB 850 B1
IT
CH
│
45 ■
Page 49

SFORNAPANE AUTOMATICO
Introduzione
Congratulazioni per l'acquisto del vostro nuovo
apparecchio.
È stato scelto un prodotto di alta qualità. Il manuale
di istruzioni è parte integrante del presente prodotto.
Esso contiene importanti indicazioni per la sicurezza,
l'uso e lo smaltimento. Prima di utilizzare il prodotto,
familiarizzarsi con tutte le indicazioni relative ai
comandi e alla sicurezza. Utilizzare l'apparecchio
solo come descritto e per i campi d'impiego indicati.
In caso di cessione del prodotto a terze persone,
consegnare anche tutta la relativa documentazione.
Uso conforme
Utilizzare la macchina per il pane solo per la cottura
del pane e la preparazione di marmellate/confetture in ambito domestico.
Non utilizzare l'apparecchio per asciugare alimenti
od oggetti. Non usare la macchina per il pane
all'aperto.
Usare solo accessori consigliati dal produttore. Gli
accessori non raccomandati possono danneggiare
l'apparecchio.
Questo apparecchio è destinato esclusivamente
all'uso in ambienti domestici.
Non utilizzare l'apparecchio a fi ni commerciali!
Volume della fornitura
Sfornapane automatico
Stampo
2 ganci da impasto
Misurino
Cucchiaio misurino
Accessorio per la rimozione dei ganci da impasto
Manuale di istruzioni
Informazioni abbreviate
Ricettario
AVVERTENZA
Dopo il disimballaggio controllare se l'appa-
►
ecchio è completo e intatto o se presenta danni
r
dovuti al trasporto. All'occorrenza rivolgersi al
servizio di assistenza (vedi capitolo "Garanzia
e assistenza").
Descrizione dell'apparecchio
Figura A:
1 Oblò
2 Coperchio dell'apparecchio
3 Feritoie di aerazione
4 Cavo di rete
5 Pannello di comando
Figura B:
6 2 ganci da impasto
7 Stampo di cottura max. 1250 g di peso del
pane
8 Misurino (bicchiere)
9 Misurino (cucchiaio)
0 Dispositivo di rimozione ganci da impasto
Dati tecnici
Tensione nominale: 220 - 240 V ~ / 50 Hz
Assorbimento di potenza: 850 Watt
Tutte le parti di questo apparecchio che
vengono a contatto con alimenti sono
adatti all’uso alimentare.
■ 46 │ IT
│
CH
SBB 850 B1
Page 50

Indicazioni di sicurezza
► Si prega di leggere completamente le istruzioni per l'uso prima di utilizzare
l'apparecchio!
PERICOLO DI FOLGORAZIONE!
► Prima di ogni utilizzo controllare il cavo e la spina di rete. Se il
cavo di rete dell'apparecchio risultasse danneggiato, farlo sostituire dal produttore, dal centro di assistenza ai clienti autorizzato o
da altro personale qualifi cato, per evitare pericoli.
► Non far passare il cavo lungo spigoli affi lati o in prossimità di
superfi ci od oggetti caldi. Il materiale isolante del cavo può danneggiarsi.
► Disinserire la spina dalla presa quando non si utilizza l'apparec-
chio e prima di ogni pulizia.
► Non immergere la macchina per il pane nell'acqua o in altri liqui-
di. Sussiste pericolo di folgorazione!
► Non pulire l'apparecchio con spugne graffi anti.
Se si staccano delle particelle dalla spugna e vengono in contatto con parti elettriche, sussiste pericolo di folgorazione.
ATTENZIONE! PERICOLO DI LESIONI!
► Pericolo di soff ocamento! I bambini possono soff ocare a causa
dell'uso non conforme del materiale da imballaggio. Smaltire tale
materiale subito dopo il disimballaggio o tenerlo lontano dalla
portata dei bambini.
► Al fi ne di evitare il pericolo che ci si inciampi o che si verifi chino
altri tipi di incidenti, l'apparecchio è dotato di un cavo di rete
corto.
► Lasciare raff reddare l'apparecchio e disinserire la spina di rete
prima di rimuovere o sostituire accessori.
► Posizionare il cavo di prolunga in modo tale che nessuno possa
inciamparsi con esso e dunque tirarlo involontariamente.
SBB 850 B1
IT
│
CH
│
47 ■
Page 51

ATTENZIONE! PERICOLO DI LESIONI!
► Sorvegliare attentamente l'apparecchio se ci sono bambini nelle
vicinanze! Staccare sempre la spina dalla presa se l'apparecchio
non viene utilizzato e prima della pulizia. Fare raff reddare l'apparecchio prima di prelevarne singole componenti.
► Questo apparecchio può essere utilizzato dai bambini di almeno
8anni di età e da persone con capacità fi siche, sensoriali o
mentali ridotte o insuffi ciente esperienza o conoscenza, solo se
sorvegliati o istruiti sull'uso sicuro dell'apparecchio e qualora ne
abbiano compreso i pericoli associati.
► I bambini non devono giocare con l'apparecchio.
► La pulizia e la manutenzione a cura dell'utente non devono esse-
re eseguite da bambini, a meno che non abbiano almeno 8anni
di età e siano sorvegliati.
► Tenere lontano dall'apparecchio e dal cavo i bambini di età infe-
riore agli 8anni.
► Questo apparecchio è conforme alle relative disposizioni di
sicurezza. Controlli, riparazioni e manutenzione tecnica devono
essere eff ettuati solo da un rivenditore specializzato qualifi cato.
In caso contrario, la garanzia decade.
► Attenzione! La macchina per il pane diventa bollente. Toccare
l'apparecchio solo quando è completamente raff reddato, oppure
utilizzare delle presine.
► Non spostare la macchina per il pane con lo stampo pieno di ma-
teriale bollente o liquido, come ad esempio confettura. Sussiste il
pericolo di ustioni.
► Non toccare mai i ganci rotanti da impasto durante l'uso. Sussiste
il pericolo di lesioni!
► Durante l'uso la temperatura della superfi cie con cui si può venire
a contatto potrebbe essere molto alta. Pericolo di ustioni!
■ 48 │ IT
│
CH
SBB 850 B1
Page 52

ATTENZIONE! PERICOLO DI LESIONI!
Attenzione! Superfi cie rovente!
Durante l'uso alcune parti dell'apparecchio diventano
molto calde! Pericolo di ustioni!
ATTENZIONE! PERICOLO D'INCENDIO!
► Non usare timer esterni o un sistema di telecomando separato
per azionare l'apparecchio.
► Non collocare l'apparecchio nelle vicinanze di materiali infi am-
mabili, gas esplosivi e/o combustibili. Tenere l'apparecchio a una
distanza minima di almeno 10 cm dagli altri oggetti.
► Non coprire mai l'apparecchio con un panno o altri materiali.
Il calore e il vapore devono potersi disperdere liberamente. Se
l'apparecchio viene coperto o viene a contatto con materiale
infi ammabile, come ad es. tende, si può sviluppare un incendio.
► Non collocare alcun oggetto sull'apparecchio e non coprirlo.
► Non collocare mai pellicola di alluminio o altri oggetti metallici
nella macchina per il pane. Ciò può dare luogo a un cortocircuito.
► Per cuocere al forno non superare mai i 700 g di farina e non
aggiungere mai più di 1 ¼ bustine di lievito. L'impasto potrebbe
trabordare e causare un incendio!
Fanno eccezione i tipi di pane senza glutine. In questo caso si
possono aggiungere al massimo 2 bustine di lievito (vedi ricettario).
ATTENZIONE – DANNI MATERIALI!
► Assicurarsi che le fessure di aerazione dell'apparecchio non sia-
no ostruite. Pericolo di surriscaldamento!
► Durante l'uso non lasciare mai l'apparecchio incustodito!
► Utilizzare l'apparecchio solo all'interno di edifi ci.
► Non collocare mai l'apparecchio sopra o accanto a un fornello a
gas o elettrico o altre fonti di calore. Pericolo di surriscaldamento!
SBB 850 B1
IT
│
CH
│
49 ■
Page 53

ATTENZIONE – DANNI MATERIALI!
► L'impiego di accessori non consigliati dal produttore può dare
luogo a danneggiamenti. Utilizzare l'apparecchio solo per lo
scopo previsto.
In caso contrario, la garanzia decade.
► Avviare un programma di cottura solo con lo stampo già inserito.
Ciò potrebbe causare danni irreparabili all'apparecchio.
► Non disinserire la spina dalla presa tirandola dal cavo di rete.
► Non utilizzare la macchina per il pane per conservare alimenti o
utensili.
► Non utilizzare mai l'apparecchio senza stampo o con lo stampo
vuoto. Ciò provoca danni irreparabili all'apparecchio.
► Chiudere sempre il coperchio durante il funzionamento.
► Non rimuovere mai lo stampo durante il funzionamento.
► Posizionare l'apparecchio esclusivamente su una superfi cie asciutta,
piana e resistente al calore.
► Prima della connessione alla rete elettrica, controllare la corrispon-
denza del tipo di corrente e della tensione di rete con i dati riportati
sull'etichetta dell'apparecchio.
► Se si utilizza un cavo di prolunga, la massima potenza del cavo
ammessa deve corrispondere alla potenza della macchina per il
pane.
■ 50 │ IT
│
CH
SBB 850 B1
Page 54
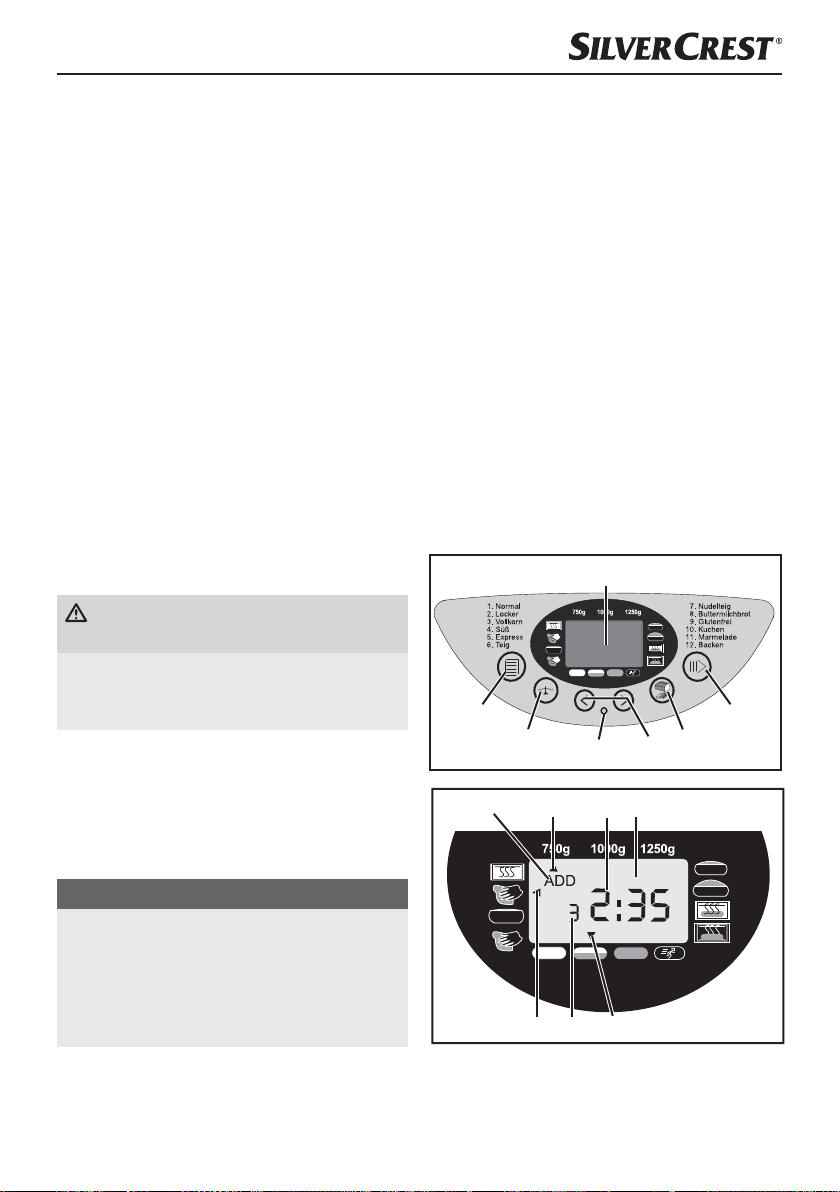
Prima del primo impiego
Apertura della confezione
■ Disimballare l'apparecchio e rimuovere qualsiasi
materiale d'imballaggio ed e
pellicole protettive dall'apparecchio.
■ Dopo il disimballaggio controllare se l'appa-
recchio è completo e intatto o se presenta danni
dovuti al trasporto. All'occorrenza rivolgersi al
servizio di assistenza (vedi capitolo "Garanzia
e assistenza").
Prima pulizia
Prima dell'uso, pulire lo stampo 7, i ganci 6 e la
superfi cie esterna della macchina per il pane con
un panno pulito e umido. Non usare spugne o prodotti abrasivi. Se non è già stato fatto, rimuovere la
pellicola protettiva dal pannello di comando 5.
Primo riscaldamento
1) Inserire solo al primo riscaldamento lo stampo
vuoto 7 nell'apparecchio e chiudere il coperchio 2.
AVVERTENZA!
PERICOLO D'INCENDIO!
► Non fare riscaldare la macchina per il pane
e 5 minuti con lo stampo vuoto 7.
per oltr
Ciò provoca il rischio di surriscaldamento.
2) Selezionare il programma 12 come descritto
al capitolo "Programmi" e premere il tasto
Start/Stop per riscaldare l'apparecchio
per 5 minuti.
3) Dopo 5 minuti premere il tasto Start/Stop
fi no all'emissione di un segnale acustico.
AVVERTENZA
Poiché gli elementi riscaldanti sono leggermente
assati, alla prima messa in funzione si può
ingr
manifestare una lieve formazione di odore.
Si tratta di fumi innocui che scompaiono dopo
breve tempo. Provvedere a un'aerazione suffi ciente, aprendo ad esempio una fi nestra.
ventuali etichette e
4) Fare raff reddare completamente l'apparecchio
e pulire ancora una volta lo stampo da forno 7,
i ganci da impasto 6 e la superfi cie esterna
della macchina per il pane con un panno
umido pulito.
Caratteristiche
Con la macchina per il pane è possibile cuocere
il pane secondo i propri gusti.
■ Si può scegliere fra 12 programmi diversi.
■ È possibile lavorare miscele per la cottura già
pr
onte.
■ È possibile preparare impasto per la pasta o per
i panini o preparare la marmellata.
■ Tramite il programma di cottura "Senza glutine",
si possono utilizzare tipi di farina senza glutine,
come ad esempio la farina di mais, di grano
saraceno o la fecola di patate.
Pannello di comando
RMV
SBB 850 B1
IT
│
CH
│
51 ■
Page 55
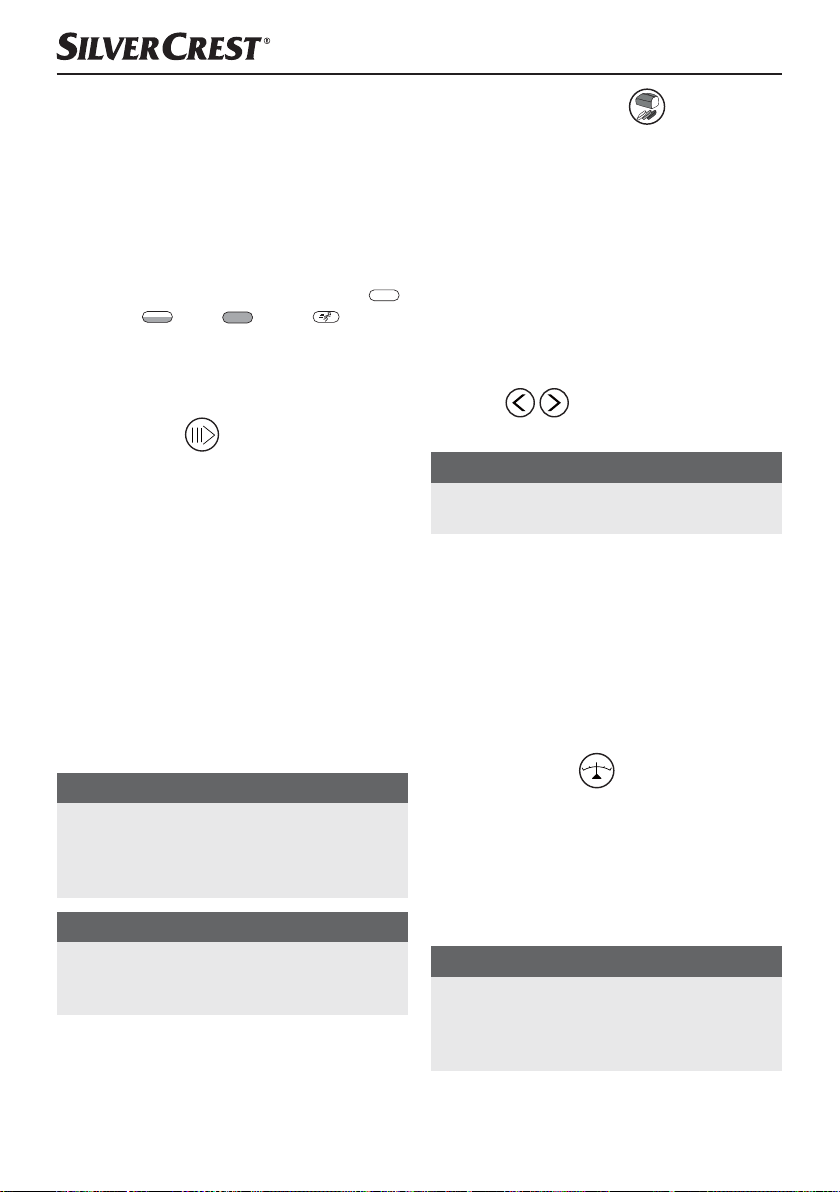
Display
Indicazione per
la selezione del peso
(750 g, 1000 g, 1250 g)
il tempo di cottura rimanente espresso in ore
e la preselezione programmata del tempo
l'estrazione dei ganci da impasto
("RMV" = "Remove")
il grado di doratura selezionato (chiaro
medio , scuro , rapido )
il numero di programma selezionato
il decorso del programma
l'aggiunta di ingredienti ("ADD")
Start / Stop
Per avviare o interrompere il funzionamento o per
cancellare una programmazione del timer.
Per interrompere il funzionamento, premere brevemente il tasto Start/Stop , fi no all'emissione di
un segnale acustico e al lampeggiare dell'ora nel
display . Premendo nuovamente il tasto Start/
Stop è possibile riprendere il funzionamento
entro 10 minuti. Se si dimentica di fare proseguire
il programma, esso proseguirà automaticamente
dopo 10 minuti.
Per arrestare defi nitivamente il funzionamento o
cancellare l'impostazione, premere per 3 secondi il
tasto Start/Stop fi no all'emissione di un segnale
acustico prolungato.
AVVERTENZA
► Non premere il tasto Start/Stop se si
a semplicemente controllare la cottura
desider
del pane. Osservare il processo di cottura
tramite l'oblò 1.
ATTENZIONE!
► La pressione di tutti i tasti deve generare un
segnale acustico, a meno che l'appar
non sia in funzione.
ecchio
Grado di doratura
(o modalità rapida)
Selezione del grado di doratura o passaggio alla
modalità rapida (chiaro/medio/scuro/rapido).
Premere ripetutamente il tasto Grado di doratura ,
fi no a quando non compare la freccia sul grado
di doratura desiderato. Per i programmi di cottura
1 - 4, premendo quattro volte il tasto Grado di doratura , è possibile attivare la modalità rapida,
per accorciare il procedimento di cottura. Premere
,
ripetutamente il tasto Grado di doratura fi no alla
comparsa della freccia su "Rapido". Per i programmi
6, 7 e 11 non si può scegliere il grado di doratura.
Timer
Cottura in diff erita.
AVVERTENZA
► Per il programma 11 è possibile impostare la
cottur
Spia d'indicazione del funzionamento
La spia d'indicazione del funzionamento indica
che è attualmente in corso un programma.
Se si desidera far partire un programma in ritardo
con la funzione Timer, la spia d'indicazione del
funzionamento lampeggia non appena è stata
confermata l'impostazione del timer. Non appena
il programma si avvia, la spia d'indicazione del
funzionamento rimane fi ssa.
Peso del pane
Selezione del peso del pane (750 g / 1000 g /
1250 g).
Premere questo tasto ripetutamente fi no alla comparsa della freccia sotto il peso desiderato. I dati
del peso (750 g / 1000 g / 1250 g) si riferiscono
alla quantità degli ingredienti inseriti nello stampo
da forno 7.
AVVERTENZA
► La preimpostazione all'accensione dell'appa-
ecchio è 1250 g. Per i programmi 6, 7, 11
r
e 12 non è possibile impostare il peso del
pane.
a in diff erita.
■ 52 │ IT
│
CH
SBB 850 B1
Page 56

Selezione dei programmi (menu)
Richiamo del programma di cottura desiderato
(1-12). Nel display compare il numero del programma desiderato e il relativo tempo di cottura.
Funzione di memoria
Alla riaccensione dell'apparecchio a seguito di
interruzione di corrente non superiore a 10 minuti,
il programma prosegue dallo stesso punto in cui
è stato interrotto. Ciò tuttavia non vale nel caso di
annullamento/arresto del procedimento di cottura
o in caso di azionamento del tasto Start/Stop
fi no all'emissione di un segnale acustico prolungato.
Oblò 1
Tramite l'oblò 1 si può osservare il procedimento
di cottura.
Programmi
Selezionare il programma desiderato con il tasto
Scelta del programma . Il relativo numero di
programma viene visualizzato nel display .
I tempi di cottura dipendono dalle combinazioni
dei programmi scelti. Vedi capitolo "Decorso del
programma".
Programma 1: Normal (Normale)
Per pane bianco e pane di farine miste contenente
principalmente farina di segale e di frumento.
Il pane ha una consistenza compatta. È possibile
impostare la doratura del pane con il tasto Grado
di doratura .
Programma 2: Locker (Morbido)
Per pani leggeri composti di farina molto fi ne. Il pane
è di solito morbido e ha una crosta croccante.
Programma 3: Vollkorn (Integrale)
Per pane con farine più sostanziose, come ad es.
la farina di grano integrale e di segale. Il pane
diventa più compatto e più pesante.
Programma 4: Süß (Dolce)
Per pani con ingredienti contenenti succhi di frutta,
fi occhi di noce di cocco, uvetta, frutta secca, cioccolata o zuccheri aggiunti. Con una fase di lievitazione
più lunga il pane diventa più leggero e friabile.
Programma 5: Express (Express)
Per l'impasto, fare lievitare la pasta e sarà necessario meno tempo per la cottura. Per questo programma sono tuttavia indicate solo ricette che non
contengono ingredienti pesanti o farine sostanziose.
Tenere presente che con questo programma il pane
può diventare meno leggero e non molto gustoso.
Programma 6: Teig (Impasto (impastare))
Per la preparazione di pasta lievitata per panini,
pizza o pani a treccia. Con questo programma
non si attiva il ciclo di cottura.
Programma 7: Nudelteig
(Impasto per pasta)
Per la preparazione dell'impasto per pasta. Con
questo programma non si attiva il ciclo di cottura.
Programma 8: Buttermilchbrot
(Pane al latticello)
Per pani ottenuti con latticello o yogurt.
Programma 9: Glutenfrei (Senza glutine)
Per pani ottenuti da farine e preparati per panifi cazione senza glutine. Le farine senza glutine necessitano di tempi più lunghi per l'assorbimento dei
liquidi e hanno caratteristiche di lievitazione diverse.
Programma 10: Kuchen (Torta)
Gli ingredienti, con questo programma, vengono
impastati, fatti lievitare e cotti. Per questo programma utilizzare lievito in polvere.
Programma 11:
Per la produzione di marmellate, confetture, gelatine
e composte di frutta.
Programma 12: Backen (Cottura)
Per la ricottura di pani troppo chiari o non suffi cientemente cotti, o di impasti già pronti. Questo
programma non prevede i processi di impasto e di
riposo. Il pane viene mantenuto caldo per un'ora
dopo la fi ne del ciclo di cottura. In tal modo si
evita che il pane si inumidisca eccessivamente.
Il programma 12 cuoce il pane per 60 minuti.
Per terminare anticipatamente queste funzioni,
premere il tasto Start/Stop , fi no all'emissione
di un segnale acustico prolungato. Per spegnere
l'apparecchio, scollegarlo dalla rete elettrica.
Marmelade (Marmellata)
SBB 850 B1
IT
│
CH
│
53 ■
Page 57
AVVERTENZA
con i programmi 1, 2, 3, 4, 5, 6, 8 e 9,
►
ante il decorso del programma risuona
dur
un segnale acustico e nel display compare
"ADD" . Aggiungere ulteriori ingredienti,
come frutta e frutta secca, subito dopo tale
segnale. Non è necessario interrompere il
programma a tale scopo.
Con il gancio da impasto 6 gli ingredienti
non vengono tagliati a pezzetti. Una volta
impostato il timer, è possibile inserire tutti gli
ingredienti nello stampo di cottura 7 anche
all'inizio del programma. In tal caso, sminuzzare la frutta e la frutta secca prima di
aggiungerle.
Funzione Timer
La funzione Timer permette una cottura in diff erita.
Con i tasti freccia e impostare il tempo
fi nale del procedimento di cottura desiderato.
Il tempo massimo di ritardo è di 15 ore.
3) Confermare l'impostazione del timer con il tasto
Start/Stop . La spia d'indicazione del funzionamento inizia a lampeggiare. Il doppio
punto nel display lampeggia e il tempo
programmato comincia a scorrere.
Non appena il programma si avvia, la spia d'indicazione del funzionamento si accende in modo
permanente. Al termine del procedimento di cottura,
risuonano dieci segnali acustici e il display indica
0:00.
Esempio:
sono le ore 08:00 e si desidera avere del pane fresco dopo 7 ore e 30 minuti, quindi alle ore 15:30.
Selezionare prima il programma 1 e premere poi
il tasto Timer , fi no alla comparsa di 7:30 nel
display , cioè il tempo di 7 ore e 30 minuti,
intercorrente fi no alla preparazione.
AVVERTENZA
► per il programma "Marmellata" non è dispo-
nibile la funzione T
imer.
AVVERTENZA!
PERICOLO D'INCENDIO!
► Prima di cuocere un determinato tipo di pane
con la funzione timer
volta la ricetta, per assicurarsi che il rapporto
degli ingredienti sia giusto, che l'impasto non
sia troppo denso o troppo liquido o abbia
una quantità eccessiva che provochi la fuoriuscita dell'impasto stesso.
1) Scegliere un programma. Il display mostra
il tempo di cottura necessario.
2) Con il tasto freccia
del programma. Azionando il tasto una volta
si ritarda il termine ai dieci minuti successivi.
Ogni ulteriore pressione del tasto freccia
sposta il termine di ulteriori 10 minuti. Tenendo
premuto il tasto con la freccia si accelera questa
operazione. Sul display compare la durata
complessiva del tempo di cottura e il tempo di
rinvio.
In caso di superamento del tempo di rinvio, si
può correggere il tempo con il tasto freccia
.
■ 54 │ IT
│
CH
, provare prima una
si ritarda il termine
AVVERTENZA
► non usare la funzione Timer se l'impasto inclu-
e alimenti facilmente deteriorabili come uova,
d
latte, panna o formaggio.
Prima della cottura
Per un procedimento di cottura riuscito, tenere
presenti i seguenti fattori:
Ingredienti
AVVERTENZA!
PERICOLO D'INCENDIO!
► Prelevare lo stampo 7 dall'alloggiamento
prima di inserir
dienti cadono nel vano di cottura, il calore
della serpentina può dare luogo a un incendio.
■ Inserire gli ingredienti nello stampo 7 sempr
secondo la sequenza indicata.
■ Tutti gli ingredienti devono essere riscaldati a
temperatura ambiente, per garantire una lievitazione ottimale.
e gli ingredienti. Se gli ingre-
SBB 850 B1
e
Page 58

AVVERTENZA!
PERICOLO D'INCENDIO!
► Non utilizzare mai quantità maggiori rispetto
a quelle indicate. Una quantità eccessiv
impasto potrebbe traboccare dallo stampo 7
e cadere sulle serpentine bollenti, causando
un incendio.
■ Misurare le quantità degli ingredienti con pre-
cisione. Anche il minimo cambiamento della
quantità indicata nella ricetta può infl
risultato della cottura.
a di
uire sul
Cottura del pane
Preparativi
AVVERTENZA
► Collocare il forno automatico su un piano
liscio e saldo.
Rimuovere lo stampo di cottura 7 dall'appa-
1)
recchio estraendolo dall'alto.
2) Infi lare i ganci da impasto 6 sull'albero
motore nello stampo 7. Badare che siano
posizionati saldamente nella loro sede.
3) Versare gli ingredienti della ricetta nello stampo 7. Aggiungere prima i liquidi, lo zucchero,
il sale e poi la farina e infi ne il lievito come
ultimo ingrediente.
AVVERTENZA
► Controllare che il lievito non venga a contatto
con il sale o con i liquidi.
Reinserire lo stampo di cottura 7. Accertarsi
4)
che venga posizionato correttamente.
5) Chiudere il coperchio dell'apparecchio 2.
6) Inserire la spina nella presa. Viene emesso un
segnale acustico e nel display compare il
numero del programma e la durata temporale
per il programma 1.
7) Selezionare il programma desiderato con il
selettore di programma . Ogni immissione
viene confermata da un segnale acustico.
8) Selezionare eventualmente la dimensione del
pane con il tasto .
9) Selezionare il grado di doratura del pane.
Nel display la freccia indica se è stato
impostato il grado di cottura chiaro, medio o
scuro. Si può selezionare anche l'impostazione
"Rapido", per abbreviare il tempo di lievitazione
dell'impasto.
AVVERTENZA
► Per i programmi 6, 7 e 11 non è presente la
funzione "Gr
La funzione "Rapido" è disponibile solo per i
programmi da 1 a 4.
I programmi 6, 7, 11 e 12 non prevedono
l'impostazione del peso del pane.
10) Ora è possibile impostare il termine del programma tramite la funzione Timer. Si può
impostare un diff erimento massimo di 15 ore.
AVVERTENZA
► Il programma 11 non prevede tale funzione.
Avvio del programma
Avviare quindi il programma con il tasto Start/
Stop .
AVVERTENZA
► I programmi 1, 2, 3, 4, 6, e 8 si avviano con
una fase di pr
10 e i 30 minuti (esclusa la Modalità rapida,
vedi tabella Decorso del programma). I ganci
da impasto 6 in questo caso restano fermi.
Non si tratta di un guasto dell'apparecchio.
Il programma esegue automaticamente le varie fasi
di lavoro.
AVVERTENZA
► Con i programmi 1, 2, 3, 4, 5, 8, 9 e 10, al
termine della par
2" risuonano 10 segnali acustici e sul display
compare "RMV" . Ora si possono rimuo-
vere i ganci da impasto 6 dall'impasto. Se non
si intende rimuovere i ganci da impasto 6,
basta attendere. L’apparecchio prosegue il
programma automaticamente.
ado di doratura".
eriscaldamento compresa fra i
te di programma "Lievitazione
SBB 850 B1
IT
│
CH
│
55 ■
Page 59

Il decorso del programma può essere osservato
tramite l'oblò 1 della macchina per il pane.
Occasionalmente, durante il procedimento di cottura,
sull'oblò 1 può formarsi dell'umidità. Il coperchio
dell'apparecchio 2 può essere aperto durante la
fase di impasto.
AVVERTENZA
► Non aprire il coperchio dell'apparecchio 2
ante la fase di lievitazione o di cottura.
dur
Il pane può sgonfi arsi.
Termine del programma
Al termine del procedimento di cottura, risuonano
dieci segnali acustici e il display indica 0:00.
Quando il programma è giunto al termine, l'apparecchio passa automaticamente alla funzione di
riscaldamento, dalla durata massima di 60 minuti.
AVVERTENZA
► Tale funzione non è valida per i programmi
6, 7 e 11.
cola aria calda nell'apparecchio. La funzione
Qui cir
di riscaldamento può essere terminata anticipatamente, tenendo premuto il tasto Start/Stop fi no
all'emissione dei segnali acustici.
PERICOLO DI SCOSSA ELETTRICA!
► Estrarre la spina di rete dalla presa di corrente
prima di aprir
2. In caso di mancato utilizzo, l'apparecchio
dev'essere sempre scollegato dalla rete
elettrica!
Rimozione del pane
Nell'estrarre lo stampo di cottura 7 utilizzare sem-
pre presine o guanti da cucina. Inclinare lo stampo
di cottura 7 su una griglia e scuotere brevemente,
fi no a quando il pane non si stacca dallo stampo
di cottura 7.
e il coperchio dell'apparecchio
Qualora i ganci da impasto non siano già stati
rimossi:
Se il pane non si stacca dai ganci da impasto 6,
rimuovere cautamente i ganci 6 con l'apposito
dispositivo in dotazione 0.
AVVERTENZA
Non usare oggetti metallici che possono graffi a
il rivestimento antiaderente. Dopo aver prelevato il
pane lavare subito lo stampo 7 con acqua calda.
In tal modo si evita che i ganci da impasto 6 si
attacchino all'albero motore.
SUGGERIMENTO
Se si prelevano i ganci da impasto 6 dopo
l'ultima oper
romperà nel rimuoverlo dallo stampo 7.
■ Premere brevemente il tasto Start/Stop , per
interr
di cottura o staccare la spina dalla presa. Per
consentire la ripresa del procedimento di cottura, reinserire la spina nella presa di corrente
entro 10 minuti.
■ Aprire il coperchio dell'apparecchio 2 e pre-
levare lo stampo 7. Con le mani infarinate, si
può prelevare l'impasto e rimuovere i ganci 6.
■ Rimettere l'impasto nello stampo 7. R
lo stampo 7 e chiudere il coperchio dell'apparecchio 2.
■ Se necessario, inserire la spina nella presa di
corrente. Il programma di cottura prosegue.
Fare raff reddare il pane per 15 - 30 minuti prima
di consumarlo.
Assicurarsi prima di tagliare il pane che in esso
non siano presenti ganci da impasto 6.
Messaggi di errore
■ Se sul display compar
del programma, signifi ca che la temperatura
della macchina per il pane è ancora troppo
alta. Fermare il programma e staccare la spina
dalla presa di corrente. Aprire il coperchio
dell'apparecchio 2 e fare raff reddare l'appa-
recchio per 20 minuti prima di riutilizzarlo.
azione d'impasto, il pane non si
ompere il programma all'inizio della fase
e "HHH" dopo l'avvio
re
einserire
■ 56 │ IT
│
CH
SBB 850 B1
Page 60
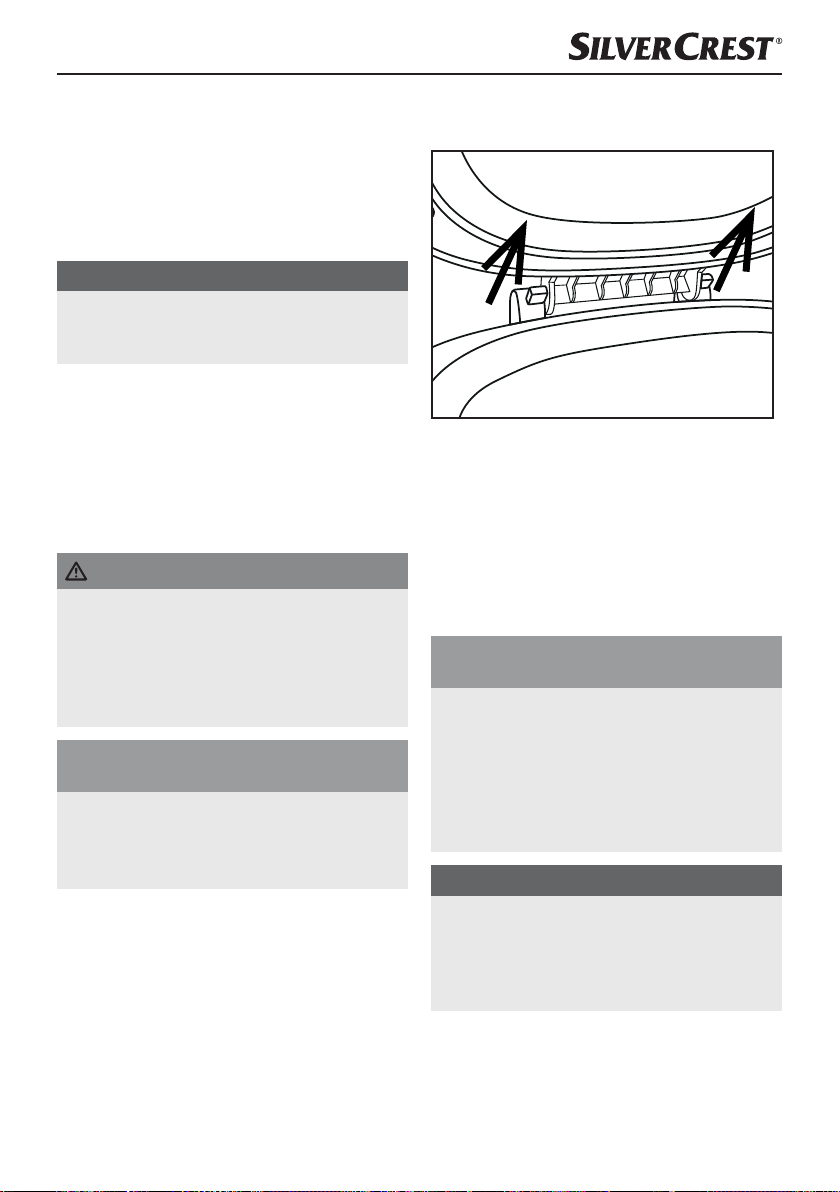
■ Se non si riesce ad avviare alcun nuovo pro-
gramma non appena la macchina per il pane
ha concluso un programma precedente, signifi ca che essa è ancora troppo calda. In tal caso,
il display passa automaticamente all'impostazione di base (Programma 1). Aprire il coperchio
dell'apparecchio 2 e fare raff reddare l'appa-
recchio per 20 minuti prima di riutilizzarlo.
AVVERTENZA
► Non cercare di azionare l'apparecchio prima
che esso si sia r
per il programma 12.
■ Se il display indica "EE0", "EE1" o "LLL" dopo
l'avvio del pr
la macchina per il pane, staccando e riattaccando la spina alla presa. Se il messaggio di errore
continua a comparire, rivolgersi al servizio
clienti.
aff reddato. Ciò è possibile solo
ogramma, spegnere e riaccendere
Pulizia e manutenzione
PERICOLO DI SCOSSA ELETTRICA!
► Prima di ogni pulizia, staccare la spina dalla
esa e fare raff reddare completamente
pr
l'apparecchio.
Proteggere l'apparecchio dall'umidità che potrebbe causare scosse elettriche. Osservare
al riguardo anche le avvertenze di sicurezza.
ATTENZIONE!
PERICOLO DI DANNI MATERIALI!
► Le parti dell'apparecchio e degli accessori
non sono idonee al lav
► Per la pulizia della macchina per il pane non
usar
e detergenti chimici o diluenti.
Alloggiamento, coperchio, vano di cottura
■ Rimuovere tutti i residui nello spazio di cottura
con un panno umido oppur
morbida leggermente inumidita.
■ Pulire anche l'alloggiamento e il coperchio solo
con un panno o una spugna inumidita.
Per facilitare la pulizia, è possibile rimuovere
il coperchio dell'apparecchio 2 dall'alloggia-
mento:
aggio in lavastoviglie!
e con una spugna
– aprire il coperchio dell'apparecchio 2 fi
che i perni di plastica non si infi lano perfettamente nelle aperture guide delle cerniere:
– Estrarre il coperchio dell'apparecchio 2
dalle guide delle cerniere.
■ Per rimontare il coperchio dell'apparecchio 2
dopo la pulizia, far passare i perni di plastica
attraverso le aperture delle guide.
■ Asciugare bene tutto e accertarsi che tutti i com-
ponenti siano asciutti prima di un nuovo utilizzo.
Stampo, ganci da impasto e accessori
ATTENZIONE!
PERICOLO DI DANNI MATERIALI!
► Non immergere mai lo stampo 7 in acqua o
in altri liquidi.
► Le superfi ci dello stampo 7 e dei ganci da
impasto 6 sono pr
tiaderente. Per la pulizia non usare detergenti
aggressivi, prodotti abrasivi o oggetti che
possono graffi are le superfi ci.
AVVERTENZA
► A causa dell'umidità e del vapore, l'aspetto
delle superfi
tempo. Questo non danneggia la capacità di
funzionamento e non infl uisce negativamente
sulla qualità.
ovviste di rivestimento an-
ci può cambiare nel corso del
no a
SBB 850 B1
IT
│
CH
│
57 ■
Page 61

■ Prima della pulizia, prelevare lo stampo 7 e i
ganci da impasto 6 dal vano di cottura.
■ Rimuovere i ganci da impasto 6 dallo stampo
7. Se i ganci da impasto 6 non si staccano
dallo stampo 7, riempire lo stampo 7 di ac-
qua bollente lasciandovela per circa 30 minuti.
Ora dovrebbe essere possibile staccare i ganci
da impasto 6. Pulire i ganci da impasto 6 in
acqua calda aggiungendovi del detersivo delicato. In caso di incrostazioni ostinate, lasciare
a mollo nell'acqua i ganci da impasto 6 fi no a
quando non si riesce a rimuovere le incrostazioni
con l'ausilio di una spazzola.
Se il supporto del gancio da impasto 6 è otturato, lo si può pulire con cautela utilizzando un
bastoncino di legno.
Dopo il lavaggio asciugare bene i ganci da
impasto 6.
■ Pulire l'esterno dello stampo 7 con un panno
umido.
■ Pulire l'interno dello stampo 7 con acqua calda
e un po' di detersivo. In caso di incrostazioni
all'interno dello stampo 7, versare acqua nello
stampo 7 e aggiungervi del detersivo delicato.
Lasciare in posa fi no a quando le incrostazioni
non si sono ammorbidite e si lasciano staccare
con una spazzola. Dopo di ciò sciacquare lo
stampo 7 con abbondante acqua pulita e
asciugarlo bene.
■ Pulire il misurino 8, il cucchiaino misurino 9
e il dispositiv
impasto 0 in acqua calda aggiungendo un detersivo delicato. Infi ne risciacquare tutte le parti
con molta acqua calda, in modo da rimuovere
i resti di detersivo. Asciugare bene tutto.
o per la rimozione dei ganci da
Smaltimento
Non smaltire per alcun motivo
l'apparecchio assieme ai normali
rifi uti domestici. Questo prodotto
è soggetto alla Direttiva Europea
2012/19/EU.
Far smaltire l'apparecchio da un'azienda di smaltimento autorizzata o dall'ente di smaltimento comunale.
Rispettare le norme attualmente in vigore. In caso
di dubbi mettersi in contatto con l'ente di smaltimento
competente.
Smaltire tutti i materiali dell'imballaggio
in modo ecologicamente compatibile.
Garanzia e assistenza
Questo apparecchio è garantito per tre anni a
partire dalla data di acquisto. L'apparecchio è
stato prodotto con cura e debitamente collaudato
prima della consegna.
Conservare lo scontrino come prova di acquisto.
Nei casi contemplati dalla garanzia, mettersi in
comunicazione telefonicamente con il centro di
assistenza più vicino. Solo in tal modo è possibile
garantire una spedizione gratuita della merce.
La garanzia vale solo per errori di materiale o di
fabbricazione, non si applica invece in caso di danni
dovuti al trasporto, in caso di componenti soggetti
ad usura come formine o ganci per impastare o in
caso di danni a parti delicate, per es. interruttori
o batterie. Il prodotto è destinato esclusivamente
all'uso domestico e non a quello commerciale.
La garanzia decade in caso di impiego improprio
o manomissione, uso della forza e interventi non
eseguiti dalla nostra fi liale di assistenza autorizzata.
Questa garanzia non costituisce alcun limite ai
diritti legali del consumatore.
Il periodo di garanzia non viene prolungato da
interventi in garanzia. Ciò vale anche per le parti
sostituite e riparate. I danni e difetti eventualmente
presenti già all'atto dell'acquisto devono venire
comunicati immediatamente dopo il disimballo, e
comunque entro e non oltre due giorni dalla data
di acquisto. Le riparazioni eseguite dopo la scadenza del periodo di garanzia sono a pagamento.
■ 58 │ IT
│
CH
SBB 850 B1
Page 62

Assistenza Italia
Tel.: 02 36003201
E-Mail: [email protected]
IAN 274313
Assistenza Svizzera
Tel.: 0842 665566 (0,08 CHF/Min., telefonia mobile max. 0,40 CHF/Min.)
E-Mail: [email protected]
IAN 274313
Importatore
KOMPERNASS HANDELS GMBH
BURGSTRASSE 21
44867 BOCHUM
GERMANY
www.kompernass.co
SBB 850 B1
IT
│
CH
│
59 ■
Page 63
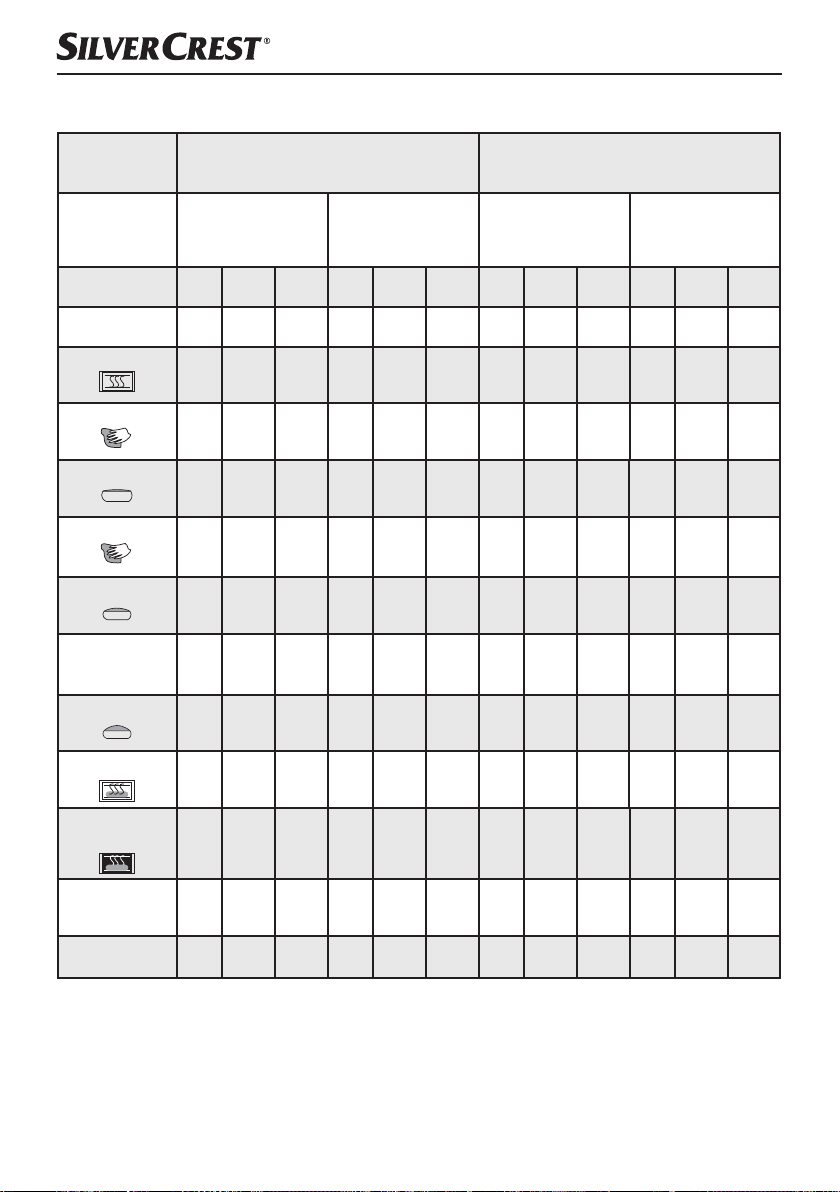
Decorso del programma
Program-
ma
Grado di
doratura
Grandezza 750 g 1000 g 1250 g 750 g 1000 g 1250 g 750 g 1000 g 1250 g 750 g 1000 g 1250 g
Tempo (ore) 02:58 03:05 03:15 02:14 02:20 02:25 03:13 3:18 03:25 02:18 2:25 2:30
Preriscaldamento (min)
Impasto 1 (min)
Lievitazione 1 (min)
Impasto 2 (min)
Lievitazione 2 (min)
Segnali acustici per
la rimozione dei
ganci da impasto
Lievitazione 3 (min)
15 15 20 N/A N/A N/A 10 10 15 N/A N/A N/A
12 13 13 12 13 13 12 12 15 12 13 13
25 25 25 10 10 10 20 20 20 10 10 10
2
3A*
5
30 30 30 18 18 18 43 41 35 18 18 18
RMV RMV RMV RMV RMV RMV RMV RMV RMV RMV RMV RMV
30 30 30 30 30 30 35 35 35 30 30 30
1. Normal 2. Locker
Chiaro
Medio
Scuro
2
5A
5
5A
Rapido
2
2
2
2A
2
2A
5
5
1A
5
5
3A*
Chiaro
Medio
Scuro
2
2
5A
8
8
5A
Rapido
2
2
2
1A
8
2A
5
5
2
2A
5
Cottura (min)
Funzione per mante-
nere i cibi caldi (min)
Aggiunta ingredienti
(ore rimanenti)
Preimpostazione
del tempo
56 60 65 56 60 65 60 65 70 60 65 70
60 60 60 60 60 60 60 60 60 60 60 60
02:01 02:05 02:10 01:49 01:53 01:58 02:26 02:29 02:28 01:53 1:58 2:03
15h 15h 15h 15h 15h 15h 15h 15h 15h 15h 15h 15h
* 3A signifi ca che dopo i 3 minuti di impasto risuonano 10 segnali acustici e contemporaneamente com-
pare sul display la scritta "ADD" . Essa ricorda che ora si possono aggiungere gli ingredienti come
frutta o noci.
■ 60 │ IT
│
CH
SBB 850 B1
Page 64
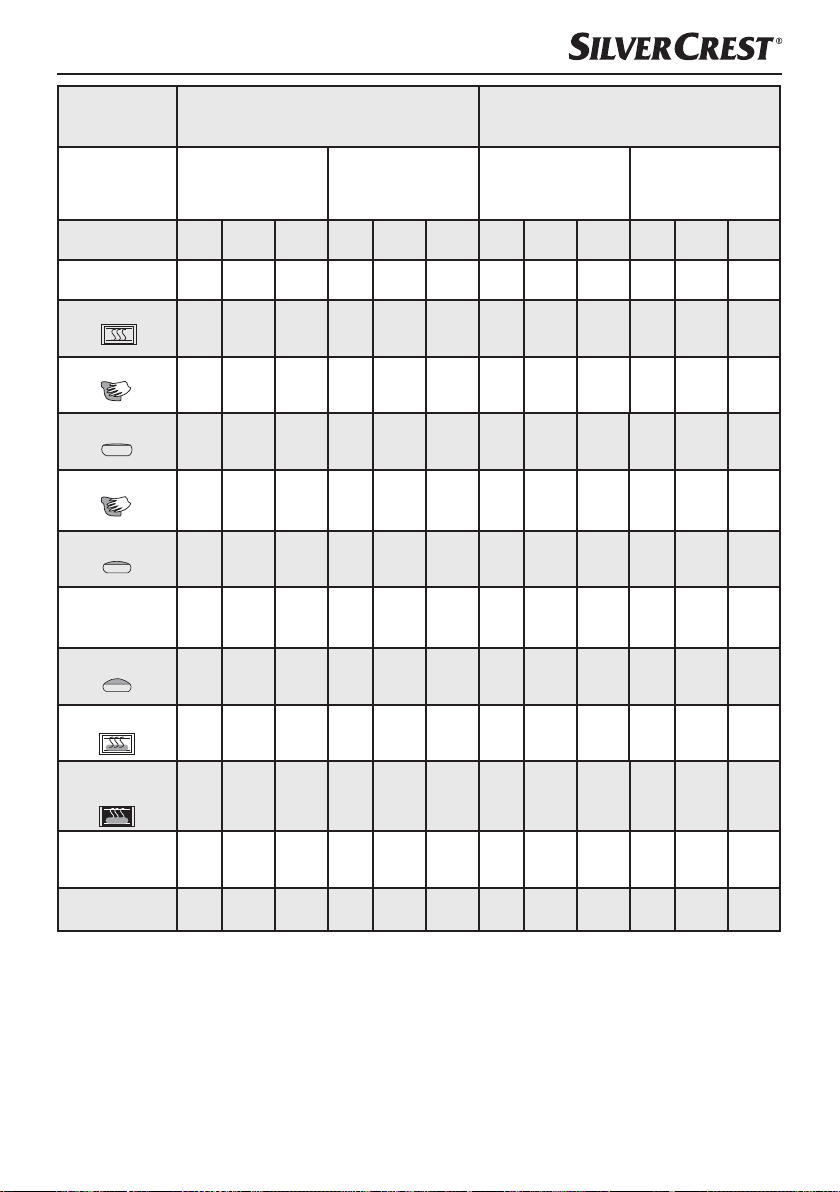
Program-
ma
3. Vollkorn 4. Süß
Grado di
doratura
Grandezza 750 g 1000 g 1250 g 750 g 1000 g 1250 g 750 g 1000 g 1250 g 750 g 1000 g 1250 g
Tempo (ore) 3:18 3:25 3:35 2:24 2:30 2:35 2:56 3:01 3:10 2:10 2:16 2:20
Preriscaldamento (min)
Impasto 1 (min)
Lievitazione 1 (min)
Impasto 2 (min)
Lievitazione 2 (min)
Segnali acustici per
la rimozione dei
ganci da impasto
Lievitazione 3 (min)
Cottura (min)
Chiaro
Media
Scuro
15 15 20 N/A N/A N/A 10 10 15 N/A N/A N/A
11 12 12 11 13 13 12 12 12 11 12 12
30 30 30 10 10 10 25 25 25 10 10 10
2
2
5A
2
5A
8
8
3A
8
38 38 38 23 23 23 35 35 35 18 18 18
RMV RMV RMV RMV RMV RMV RMV RMV RMV RMV RMV RMV
35 35 35 35 35 35 30 30 30 30 30 30
56 60 65 56 60 65 52 56 60 52 56 60
2A
Rapido
2
2
2
2A
5
2A
5
5
2
4A*
6
Chiaro
Media
Scuro
2
5A
6
5A
Rapido
2
2
2
1A
6
2A
6
6
2
2A
6
Funzione per mante-
nere i cibi caldi (min) 60 60 60 60 60 60 60 60 60 60 60 60
Aggiunta ingredienti
(ore rimanenti)
Preimpostazione
del tempo
2:17 2:21 2:26 1:59 2:03 2:08 2:03 2:07 2:11 1:46 1:50 1:54
15h 15h 15h 15h 15h 15h 15h 15h 15h 15h 15h 15h
* 4A signifi ca che dopo i 4 minuti di impasto risuonano 10 segnali acustici e contemporaneamente compare
sul display la scritta "ADD" . Essa ricorda che ora si possono aggiungere gli ingredienti come frutta o
noci.
│
SBB 850 B1
IT
CH
│
61 ■
Page 65
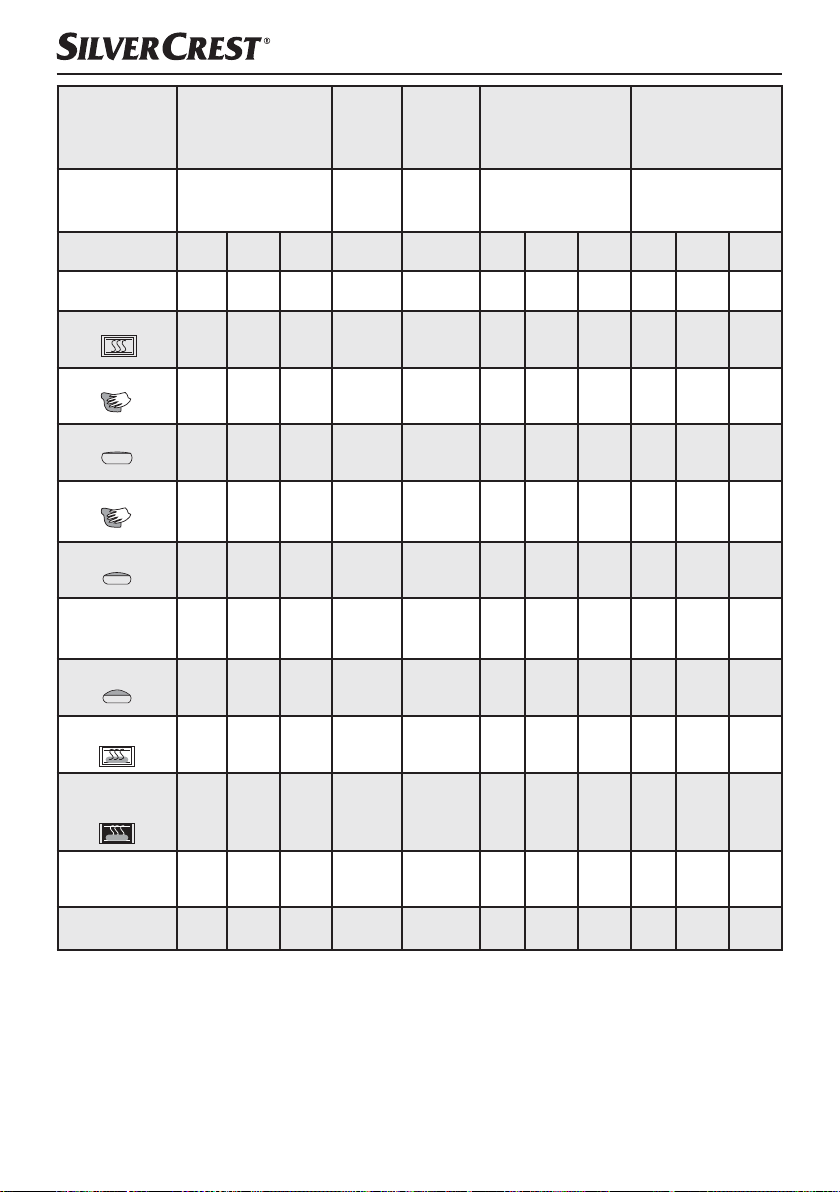
6.
Program-
ma
Grado di doratura
Grandezza 750 g 1000 g 1250 g N/A N/A 750 g 1000 g 1250 g 750 g 1000 g 1250 g
Tempo (ore) 1:15 1:18 1:20 1:50 0:15 3:17 3:21 3:30 2:14 2:20 2:25
5. Express
Chiaro
Media
Scuro
Teig
7. Nu-
delteig
N/A N/A
8. Buttermilchbrot
Chiaro
Media
Scuro
9. Glutenfrei
Chiaro
Media
Scuro
Preriscaldamento (min)
Impasto 1 (min)
Lievitazione 1 (min)
Impasto 2 (min)
Lievitazione 2 (min)
Segnali acustici per
la rimozione dei
ganci da impasto
Lievitazione 3 (min)
Cottura (min)
Funzione per mante-
nere i cibi caldi (min)
Aggiunta ingredienti
(ore rimanenti)
Preimpostazione
del tempo
N/A N/A N/A 10 N/A 25 25 30 N/A N/A N/A
8 8 8 12 15 10 10 10 12 13 13
N/A N/A N/A 10 N/A 20 20 20 10 10 10
N/A
N/A
2A
5
N/A N/A N/A 25 N/A 45 45 45 18 18 18
RMV RMV RMV N/A N/A RMV RMV RMV RMV RMV RMV
20 20 20 45 N/A 30 30 30 30 30 30
40 43 45 N/A N/A 52 56 60 56 60 65
60 60 60 N/A N/A 60 60 60 60 60 60
1:05 1:08 1:10 1:15 N/A 2:15 2:19 2:23 1:49 1:53 1:58
15h 15h 15h 15h 15h 15h 15h 15h 15h 15h 15h
N/A
2A
5
2A
N/A
3A
5
5
N/A
N/A
N/A
5A*
2
2
2
2
2
5A*
5A*
8
8
1A
8
5
2A
2
2A
5
5
* 5A signifi ca che dopo i 5 minuti di impasto risuonano 10 segnali acustici e contemporaneamente compare
sul display la scritta "ADD" . Essa ricorda che ora si possono aggiungere gli ingredienti come frutta o
noci.
■ 62 │ IT
│
CH
SBB 850 B1
Page 66
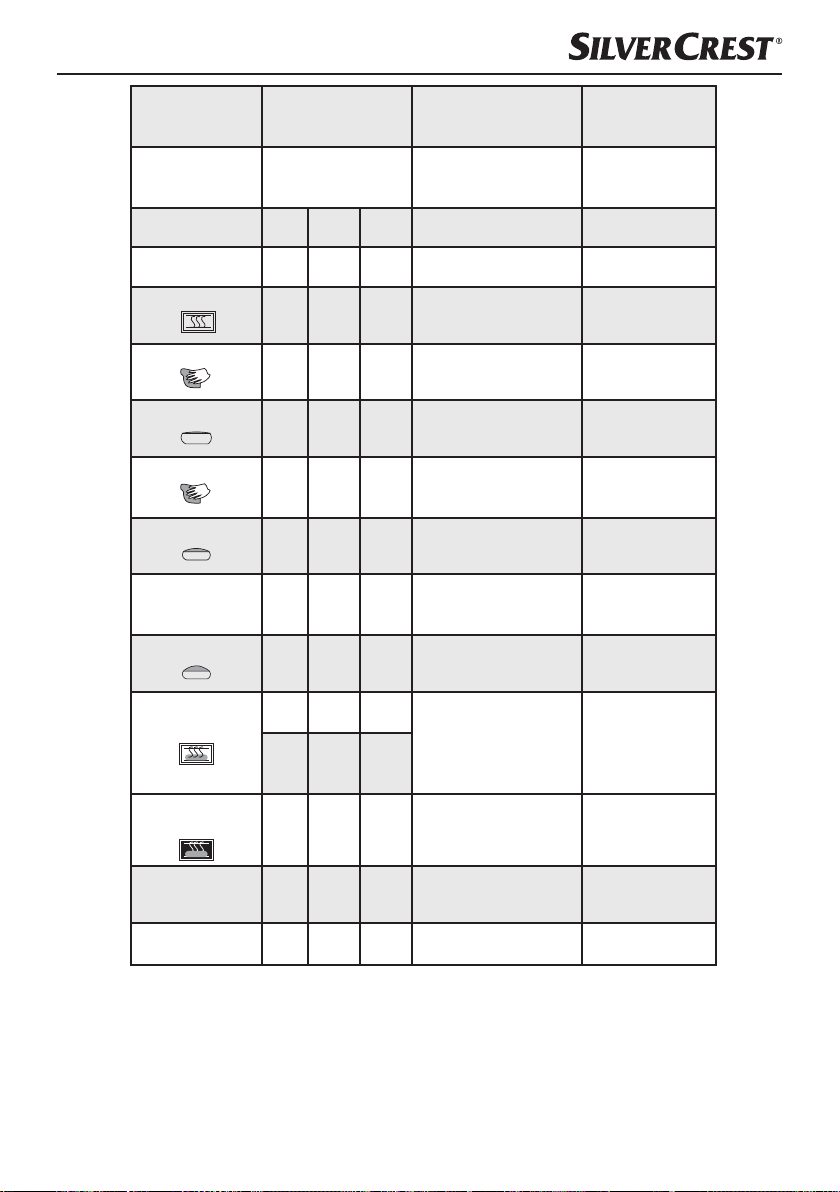
Program-
ma
Grado di
doratura
Grandezza 750 g 1000 g 1250 g N/A N/A
Tempo (ore) 1:30 1:35 1:40 1:20 1:00
10. Kuchen 11. Marmelade 12. Backen
Chiaro
Media
Scuro
N/A
Chiaro
Media
Scuro
Preriscaldamento (min)
Impasto 1 (min)
Lievitazione 1 (min)
Impasto 2 (min)
Lievitazione 2 (min)
Segnali acustici per la
rimozione dei ganci da
impasto
Lievitazione 3 (min)
Cottura (min)
Funzione per mantenere
i cibi caldi (min)
N/A N/A N/A N/A N/A
15 15 15 N/A N/A
N/A N/A N/A
N/A
N/A
N/A
N/A
tazione
N/A
N/A
N/A
15 Lievi-
tazione
N/A
N/A
N/A N/A N/A N/A N/A
RMV RMV RMV N/A N/A
N/A N/A N/A
60 65 70
15
15 Lievi-
Lievita-
zione
60 60 60 N/A 60
15
Riscaldamento + impasto
N/A
N/A
N/A
45
Riscaldamento + impasto
20
Lievitazione
N/A
N/A
N/A
N/A
N/A
60
Aggiunta ingredienti
SBB 850 B1
(ore rimanenti)
Preimpostazione
del tempo
N/A N/A N/A N/A N/A
15h 15h 15h N/A 15h
IT
│
CH
│
63 ■
Page 67

Eliminazione dei guasti macchina per il pane
Che cosa fare se il gancio da impasto 6 resta
incastrato nello stampo 7 dopo la cottura?
Cosa succede se il pane pronto rimane nella
macchina?
Lo stampo 7 e il gancio da impasto 6 sono
idonei al lavaggio in lavastoviglie?
Perché l'impasto non viene amalgamato sebbene il
motore sia in funzione?
Che fare se il gancio da impasto 6 resta incastrato
nel pane?
Cosa succede se viene a mancare la corrente
durante il corso di un programma?
Quanto tempo dura la cottura del pane? I tempi precisi sono indicati nella tabella "Decorso
Quali pesi di pane si possono cuocere? Si possono cuocere pani di peso pari a 750 g -
Perché la funzione Timer non può essere utilizzata
nella cottura con latte fresco?
Riempire lo stampo 7 con acqua bollente e
ruotare il gancio da impasto 6 per staccare le
incrostazioni che si trovano sotto quest'ultimo.
Con la "Funzione di riscaldamento" il pane viene
mantenuto caldo e protetto dall'umidità per circa
un'ora. Rimanendo per oltre un'ora nella macchina,
il pane potrebbe inumidirsi.
No. Lavare a mano lo stampo 7 e i ganci da
impasto 6.
Controllare che i ganci da impasto 6 e lo stampo
7 siano correttamente innestati in posizione.
Rimuovere il gancio da impasto 6 con
il dispositivo di rimozione dei ganci da impasto 0.
In caso di interruzione di corrente per un massimo
di 10 minuti, la macchina per il pane porterà a
termine il programma selezionato per ultimo.
del programma".
1000 g - 1250 g.
I prodotti freschi come latte o uova si deteriorano
se rimangono troppo a lungo nell'apparecchio.
Che cosa succede se la macchina per il pane non
funziona dopo aver premuto il tasto Start/Stop ?
L'apparecchio taglia l'uvetta aggiunta. Per evitare che ingredienti come frutta o frutta
■ 64 │ IT
│
CH
Alcuni processi di lavoro come ad esempio
"Riscaldamento" o "Riposo" sono diffi cilmente
riconoscibili.
Controllare sulla base della tabella "Decorso del
programma", per sapere quale parte del programma
è in corso.
Verifi care se l'apparecchio sta lavorando controllando se la spia d'indicazione del funzionamento
è accesa.
Controllare di aver premuto correttamente il tasto
Start/Stop . Controllare che la spina sia collegata
alla presa di rete.
secca vengano sminuzzati, aggiungerli all'impasto
solo dopo l'emissione del segnale acustico.
SBB 850 B1
Page 68
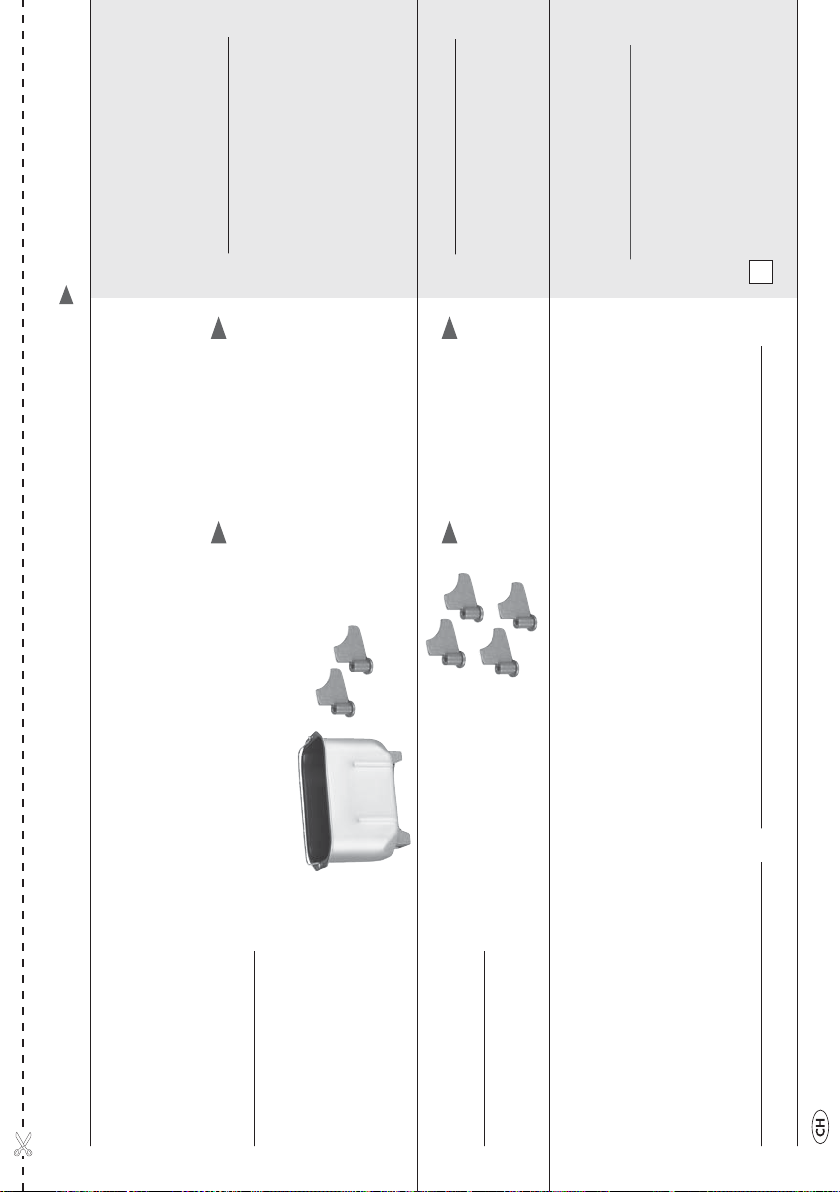
www.kompernass.com
GESAMTBETRAG/PRIX
NET/PREZZO
COMPLESSIVO
€
zzgl. Kosten für Porto, Handling,
5 €
Verpackung und Versand.
Frais de port, magasinage, embal-
lage et expédition non inclus.
Spese di spedizione
+
€
zzgl. Kosten für Porto, Handling,
3 €
Verpackung und Versand.
Frais de port, magasinage, embal-
lage et expédition non inclus.
Spese di spedizione
+
€
ZAHLUNGSWEISE/
=
Überweisung/Virement/
Bonifi co
MODE DE RÈGLEMENT/
TIPO DI PAGAMENTO
10 €
EINZELPREIS/
PRIX UNITAIRE/
PREZZO SINGOLO
ARTIKELBESCHREIBUNG/
DESCRIPTION DES ARTICLES/
DESCRIZIONE ARTICOLO
► 1 Backform inkl. 2 Knethaken
► 1 forme de cuisson avec 2 fouets à pétrir
► 1 stampo incl. 2 ganci da impasto
10 €
► 4 Knethaken
► 4 fouets à pétrir
► 4 ganci da impasto
Bestellkarte/Carte de commande/Scheda d´ordinazione SBB 850 B1
BESTELLMENGE/QUANTITÉ/
QUANTITÀ DA ORDINARE
(max. 3 Sets/max. 3 sets/max. 3 set)
e il prezzo di spedizione più alto pari a 5 euro!
ez toujours les frais d‘expédition plus élevés de 5 Euros !
den höheren Versandkostenpreis von 5 Euro!
pay
► Hinweis: Wenn Ihre Bestellung aus mehreren Artikeln besteht (4er-Set Knethaken und Backform) zahlen Sie immer
► Remarque : Si votre commande se compose de plusieurs articles (lot de 4 fouets à pétrir et forme de cuisson), vous
sempr
► Avvertenza: Se il vostro ordine si compone di più articoli ( kit da 4 ganci impastatrice e stampo da forno), calcolate
(Ort, Datum/Lieu, date/luogo, data) (Unterschrift/Signature/fi rma)
Page 69
► Bitte frankieren Sie die Sendung ausreichend. Schreiben Sie Ihren Namen als Absender
charge./Eff ettuare a proprie spese il bonifi co bancario, assumendosi le spese bancarie
della propria banca.
auf den Umschlag./Veuillez aff ranchir au tarif en vigueur. Ecrivez votre nom comme
expéditeur sur l‘enveloppe./Aff rancare adeguatamente la busta. Scrivere il nome come
mittente sulla busta.
Lasten./Eff ectuer un transfert bancaire, les frais demandés par votre banque sont à votre
WICHTIG/REMARQUE/IMPORTANTE
► Überweisung bitte spesenfrei ausführen, Kosten Ihrer eigenen Bank bitte zu Ihren eigenen
qui accanto.
Kompernaß Handelsgesellschaft mbH
Burgstraße 21
44867 Bochum
Deutschland/Allemagne/Germania
W
ohnort an. Senden Sie dann die vollständig ausgefüllte Bestellkarte in einem Briefumschlag
an unsere nachstehende Postadresse. / Dans le champ „Motif de l‘opération“, veuillez indi-
quer l‘article de même que votre nom et lieu de résidence. Veuillez nous renvoyer la carte de
commande dûment renseignée dans une enveloppe à notre adresse postale fi gurant ci-après. /
Indicare l‘articolo nella causale del bonifi co, nonché nome, cognome e indirizzo. Inviare quindi
la cartolina di ordinazione interamente compilata, inserendola in una busta, all‘indirizzo indicato
■ Geben Sie bei Ihrer Überweisung als Verwendungszweck den Artikel sowie Ihren Namen und
IBAN: DE03440100460799566462
SWIFT (BIC): PBNKDEFF 440
Bank/Banque/Banca:
Postbank Dortmund AG
2) Überweisen Sie den Gesamtbetrag vorab auf das Konto: / Merci de virer le montant total au
eventuali domande), scrivendo in stampatello.
préalable sur le compte suivant: / Versare l‘importo totale in anticipo sul seguente conto:
Kompernaß Handelsgesellschaft mbH
1) Tragen Sie unter „Absender/Besteller“ Ihren Namen, Ihre Anschrift und Ihre Telefonnummer (für
eventuelle Rückfragen) in Blockschrift ein. / Saisissez votre nom, votre titre et votre numéro de
téléphone (pour d‘éventuelles questions) sous la rubrique „Expéditeur/Acheteur“ en lettres maju-
scules. / Alla voce „Mittente/ordinante“, inserire nome, titolo, indirizzo e numero telefonico (per
Bestellkarte/Carte de commande/Scheda d´ordinazione SBB 850 B1
Telefon/Téléphone/Telefono
Land/Pays/Paese
PLZ, Ort/Code Postal, Ville/Cap, Città
Straße/Rue/Via
MITTENTE
Name, Vorname/Nom, Prénom/Cognome, Nome
(si prega di compilare il modulo in stampatello)
ABSENDER / BESTELLER
(bitte vollständig und in BLOCKSCHRIFT ausfüllen)
EXPÉDITEUR/ACHETEUR
(à compléter en majuscules)
www.kompernass.com
Page 70

Contents
Introduction . . . . . . . . . . . . . . . . . . . . . . . . . . . . . . . . . . . . . . . . . . . . . . . . . . . . . . . . . . .68
Intended use . . . . . . . . . . . . . . . . . . . . . . . . . . . . . . . . . . . . . . . . . . . . . . . . . . . . . . . . . .68
Package contents . . . . . . . . . . . . . . . . . . . . . . . . . . . . . . . . . . . . . . . . . . . . . . . . . . . . . .68
Description of the appliance . . . . . . . . . . . . . . . . . . . . . . . . . . . . . . . . . . . . . . . . . . . . .68
Technical data . . . . . . . . . . . . . . . . . . . . . . . . . . . . . . . . . . . . . . . . . . . . . . . . . . . . . . . . .68
Safety instructions . . . . . . . . . . . . . . . . . . . . . . . . . . . . . . . . . . . . . . . . . . . . . . . . . . . . .69
Before initial use . . . . . . . . . . . . . . . . . . . . . . . . . . . . . . . . . . . . . . . . . . . . . . . . . . . . . . .73
Features . . . . . . . . . . . . . . . . . . . . . . . . . . . . . . . . . . . . . . . . . . . . . . . . . . . . . . . . . . . . . .73
Control panel . . . . . . . . . . . . . . . . . . . . . . . . . . . . . . . . . . . . . . . . . . . . . . . . . . . . . . . . .73
Programme . . . . . . . . . . . . . . . . . . . . . . . . . . . . . . . . . . . . . . . . . . . . . . . . . . . . . . . . . . .75
Timer function . . . . . . . . . . . . . . . . . . . . . . . . . . . . . . . . . . . . . . . . . . . . . . . . . . . . . . . . .76
Before baking . . . . . . . . . . . . . . . . . . . . . . . . . . . . . . . . . . . . . . . . . . . . . . . . . . . . . . . . .76
Baking bread . . . . . . . . . . . . . . . . . . . . . . . . . . . . . . . . . . . . . . . . . . . . . . . . . . . . . . . . .77
Cleaning and care . . . . . . . . . . . . . . . . . . . . . . . . . . . . . . . . . . . . . . . . . . . . . . . . . . . . . .79
Disposal . . . . . . . . . . . . . . . . . . . . . . . . . . . . . . . . . . . . . . . . . . . . . . . . . . . . . . . . . . . . . .80
Warranty and service . . . . . . . . . . . . . . . . . . . . . . . . . . . . . . . . . . . . . . . . . . . . . . . . . .80
Importer . . . . . . . . . . . . . . . . . . . . . . . . . . . . . . . . . . . . . . . . . . . . . . . . . . . . . . . . . . . . .81
Programme sequence . . . . . . . . . . . . . . . . . . . . . . . . . . . . . . . . . . . . . . . . . . . . . . . . . .82
Troubleshooting the bread maker . . . . . . . . . . . . . . . . . . . . . . . . . . . . . . . . . . . . . . . .86
│
GB
SBB 850 B1
67 ■
Page 71

BREAD MAKER
Introduction
Congratulations on the purchase of your new
appliance.
You have selected a high-quality product.
The operating instructions are part of this product.
They contain important information on safety, usage
and disposal. Before using the product, familiarise
yourself with all handling and safety guidelines.
Use the product only as described and for the range
of applications specifi ed. Please also pass these
operating instructions on to any future owner(s).
Intended use
This bread maker is intended only for home use for
baking bread or for cooking jams and preserves.
Do not use the appliance for drying foodstuff s
or other objects. Do not use the bread maker
outdoors.
Use only the accessories recommended by the
manufacturer. Other accessories can cause damage
to the appliance.
This appliance is intended solely for use in private
households.
Not for commercial use!
Package contents
Bread maker
Baking mould
2 kneading blades
Measuring cup
Measuring spoon
Kneading blade remover
Operating instructions
Brief information
Recipe Book
NOTE
When unpacking the appliance, check it
►
oughly for possible transport damage.
thor
If required, contact the Service Centre (see
section "Warranty and Service").
Description of the appliance
Figure A:
1 Viewing window
2 Appliance lid
3 Ventilation slots
4 Msains cable
5 Control panel
Figure B:
6 2 kneading blades
7 Baking mould for loaves with weights
of up to 1250 g
8 Measuring cup
9 Measuring spoon
0 Kneading blade remover
Technical data
Rated voltage: 220 - 240 V ~ /50 Hz
Power consumption: 850 Watt
All of the parts of this appliance that come
into contact with food are food-safe.
■ 68 │ GB
SBB 850 B1
Page 72

Safety instructions
► Please read the operating instructions completely before using the appli-
ance for the fi rst time!
DANGER – ELECTRIC SHOCK!
► Always check the power cable and plug before use. To reduce po-
tential risks in the event of damage to the power cable, arrange for
it to be examined and repaired as soon as possible by the manufacturer, by Customer Services or by a similarly qualifi ed person.
► Do not place the power cable over sharp edges or close to hot
surfaces or objects. These may damage the insulation of the
power cable.
► When not in use, and before cleaning the appliance, remove the
power cable from the plug.
► Never immerse the bread maker in water or other liquids. Risk of
electrical shock!
► Do not clean the appliance with abrasive cleaning sponges.
If parts come loose from the sponge and come into contact with
electrical components, there is a risk of electric shock.
WARNING! RISK OF INJURY!
► Risk of suff ocation! Children can suff ocate through the improper
use of packaging materials. Dispose of them immediately after
unpacking or store them in a place that is out of reach of children.
► To prevent the risk of tripping accidents, the appliance is
equipped with a short power cable.
► Before taking out or inserting accessories, unplug the appliance
and allow it to cool down.
► Place an extension cable in such a way as to prevent anyone
from tripping over it or inadvertently pulling on it.
SBB 850 B1
GB
│
69 ■
Page 73

WARNING! RISK OF INJURY!
► If there are any children nearby, please watch over the appliance
closely! If the appliance is not in use, and also before cleaning it,
remove the plug from the power socket. Allow the appliance to
cool down before removing individual parts.
► This appliance may be used by children of the age of 8 years or
more and by persons with reduced physical, sensory or mental
capabilities or lack of experience and/or knowledge if they are
being supervised or have been instructed with regard to the safe
use of the appliance and have understood the potential risks.
► Do not allow children to play with the appliance.
► Cleaning and user maintenance may not be carried out by children,
unless they are older than 8 years of age and supervised.
► Children younger than eight years of age must be kept away
from the appliance and the power cable.
► This appliance complies with all pertinent safety regulations.
Inspection, repair and technical maintenance may only be performed by a qualifi ed specialist. Improper usage invalidates all
claims under the warranty.
► Attention! The bread maker gets very hot during operation. Do
not touch the appliance until it has cooled down, or use oven
gloves.
► Do not move the bread maker if the baking mould contains hot or
liquid contents, e.g. jams. There is a risk of burns!
► Do not attempt to touch the rotating kneading blades during use.
There is a risk of injury!
► During operation, the temperature of exposed surfaces can be
very high. Risk of burns!
Caution! Hot surface!
Parts of the appliance get very hot during use!
Risk of burns!
■ 70 │ GB
SBB 850 B1
Page 74

WARNING! RISK OF FIRE!
► Do not use an external timing switch or a separate remote control
system to operate the appliance.
► Do not place the appliance near infl ammable materials or explo-
sive/combustible gases. Maintain a minimum distance of 10 cm
to all other objects.
► Never cover the appliance with a towel or other material. Heat
and steam must be able to escape. A fi re can be caused if the
appliance is covered with infl ammable material or comes into
contact with infl ammable materials, e.g. curtains.
► Do not place any objects on the appliance and do not cover it
during use.
► Never place aluminium foil or other metallic objects in the bread
maker. This could cause a short circuit.
► Never use more than 700 g of fl our when baking and never add
more than 1¼ packets of dried yeast. The dough could overfl ow
and cause a fi re!
The only exception to this rule is gluten-free bread. In this case,
a maximum of 2 packets of dried yeast may be used (see recipe
booklet).
CAUTION – PROPERTY DAMAGE!
► Ensure that the ventilation slots of the appliance are not obstructed
at any time. Risk of overheating!
► Never leave the appliance unsupervised whilst in use!
► Only use the appliance inside of buildings.
► Never place the appliance on or close to a gas or electric cooker,
a hot oven or any other heat source. Risk of overheating!
SBB 850 B1
GB
│
71 ■
Page 75

CAUTION – PROPERTY DAMAGE!
► The use of accessories not recommended by the manufacturer may
cause damage to the appliance. Only use the appliance for its
intended purposes. Improper usage invalidates all claims under
the warranty.
► Do not start a baking programme if the baking mould is not in the
appliance.
This could cause irreparable damage to the appliance.
► Do not pull on the cable to remove the plug from the socket;
always pull on the plug itself.
► Do not use the bread maker to store foods or utensils.
► Never use the appliance without a baking mould or with an
empty one. This will irreparably damage the appliance.
► Always close the lid during use.
► Never attempt to remove the baking mould during use.
► Always place the appliance on a dry, fl at and heat-resistant
surface.
► Before plugging the appliance in, check to ensure that the kind of
current and mains voltage match the information given on the
type plate.
► If you use an extension cable, ensure that the maximum permitted
power rating for the cable corresponds to that of the bread maker.
■ 72 │ GB
SBB 850 B1
Page 76
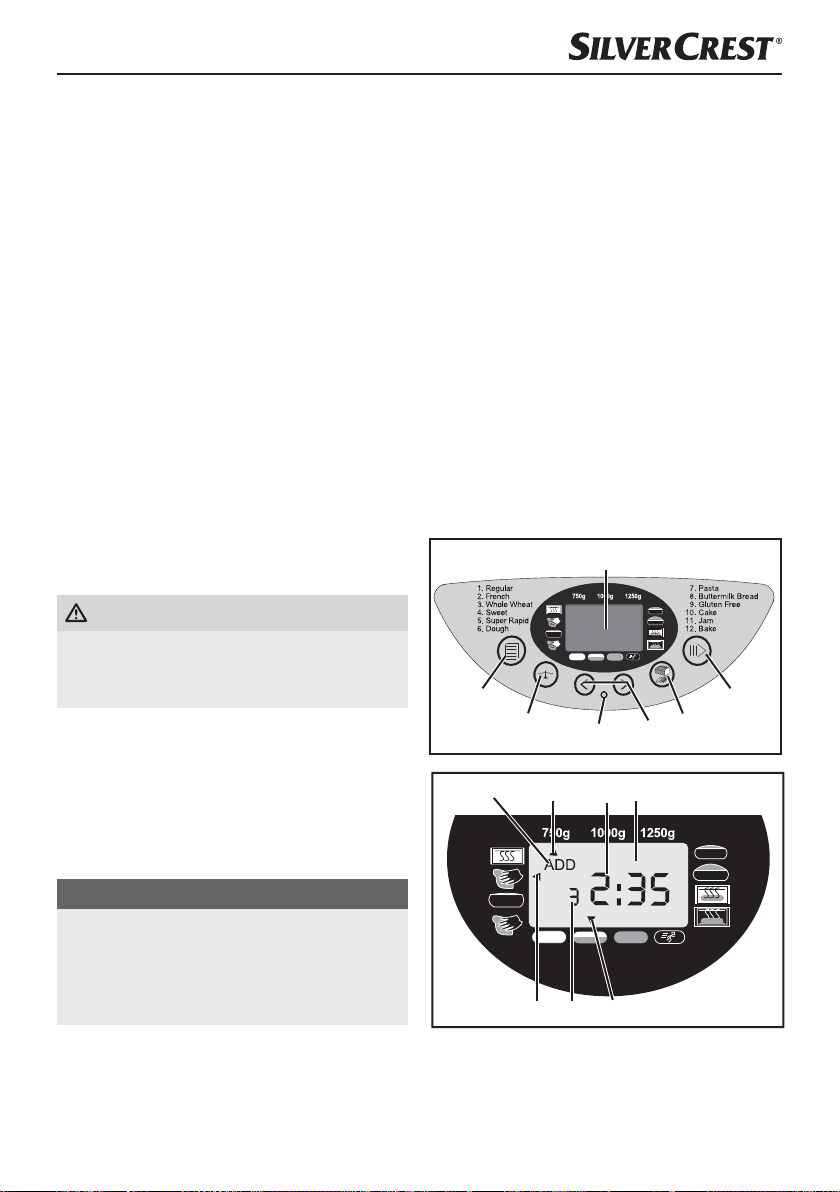
Before initial use
Unpacking
■ Unpack the appliance and remove all packaging
materials as w
fi lms.
■ When unpacking the appliance, check it thor-
oughly for possible transport damage. If required,
contact the Service Centre (see section "Warranty
and Service").
Initial cleaning
Wipe the baking mould 7, kneading blades 6
and upper surfaces of the bread maker with a
clean moist cloth before taking it into operation.
Do not use abrasive sponges or abrasive cleaning
agents. Remove the protective foil from the control
panel 5 if you have not already done so.
Initial heating
1) When heating for the fi rst time, place the
empty baking mould 7 into the appliance and
then close the lid 2.
WARNING! RISK OF FIRE!
► Do not heat the bread maker for more than
5 minutes with an empt
There is a risk of overheating.
2) Select programme 12, as described in the
section "Programmes", and press the Start/
Stop button to heat up the appliance for
5 minutes.
3) After 5 minutes, end the programme by pressing and holding the Start/Stop button until
you hear a long signal tone.
NOTE
As the heating elements are lightly greased, you
may notice a slight smell when using the appliance for the fi
after a short time. Ensure suffi cient ventilation; for
example, by opening a window.
ell as any stickers and protective
y baking mould 7.
rst time. This is harmless and stops
4) Let the appliance cool down completely and
once again wipe the baking mould 7, knead-
ing blades 6 and the outer surfaces of the
bread maker with a clean moist cloth.
Features
This bread maker allows you to bake bread just
the way you like it.
■ You can choose from 12 diff erent baking
pr
ogrammes.
■ You can use ready-to-use baking mixtures.
■ You can prepare dough for rolls and noodles
ven make marmalades and jams.
and e
■ By using the programme “Gluten-free” you
can bake gluten-free baking mixes and recipes
containing gluten-free fl ours, such as cornfl our,
buckwheat fl our or potato fl our.
Control panel
RMV
SBB 850 B1
GB
│
73 ■
Page 77
Display
Display for
selecting the weight (750 g, 1000 g, 1250 g)
the remaining baking time in minutes and the
preselected programme time
removal of the kneading hooks
("RMV" = "Remove")
the selected browning level (Light
Medium , Dark , Rapid )
the selected programme number
the programme sequence
the addition of ingredients ("ADD")
Start/Stop
To start and stop operation or to delete a timer
programme.
To interrupt operation, briefl y press the Start/Stop
button until you hear a beep and the time fl ashes
on display . If you press the Start/Stop button
again within the next 10 minutes, operation will be
resumed. If you forget to restart the programme, it
will resume automatically after 10 minutes.
To completely terminate the operation or to delete
a programme, press the Start/Stop button for
3 seconds, until you hear a long beep.
NOTE
► Do not press the Start/Stop button if y
want to simply check the condition of the
bread. You can check the baking progress
through the viewing window 1.
CAUTION!
► You should always hear a beep when pressing
ny button while the appliance is running.
a
,
ou
Browning level
(or rapid mode)
Select the browning level or switch into the rapid
mode (Light/Medium/Dark/Rapid). Press the
browning level button repeatedly, until the
arrow appears above the desired browning level.
For programmes 1–4 you can, through repeated
pressing of the browning level button , activate
the rapid mode to shorten the baking process.
Press the browning level button repeatedly until
the arrow appears above "Rapid" icon. A browning
level cannot be selected with the programmes 6,
7 and 11.
Timer
Time-delayed baking.
NOTE
► Time-delayed baking cannot be set for
pr
Operating light
The operating light lights up when a programme
is running.
If you want to start a programme with a time delay,
the operating light fl ashes as soon as the timer
setting is confi rmed. As soon as the programme
starts, the operating light lights up permanently.
Bread weight
Select the bread weight (750 g/1000 g/1250 g).
Press the button repeatedly until the arrow appears
under the desired weight. The weight specifi cations
(750 g/1000 g/1250 g) refer to the total amount
of ingredients placed in the baking mould 7.
NOTE
► The default setting when switching the appli-
ance on is 1250 g. Y
bread weight with the Programmes 6, 7, 11
and 12.
ogramme 11.
ou cannot adjust the
■ 74 │ GB
SBB 850 B1
Page 78

Programme selection (menu)
Call up the desired baking programme (1–12).
The programme number appears on the display
along with the respective baking time.
Memory function
When the appliance is switched back on after
a power failure of up to about 10 minutes, the
programme will continue from the same point. This,
however, does not apply to deleting/ending the
baking process or pressing the Start/Stop button
until you hear a long beep.
Viewing window 1
You can monitor the baking process through the
viewing window 1.
Programme
Select the desired programme using the programme selection button . The corresponding
programme number is shown on the display .
The baking times are dependent on the selected
programme combinations. See section "Programme
sequence".
Programme 1: Regular
For white and mixed-fl our breads, comprising
predominantly wheat and rye. The bread has a
compact consistency. Set the degree of browning
of the bread using the browning level button .
Programme 2: French
For light breads from well-milled fl our. As a rule, the
bread is light and has a crispy crust.
Programme 3: Whole Wheat
For breads made from robust fl ours, e.g. whole
wheat fl our and whole rye fl our. The bread will
be more compact and heavy.
Programme 4: Sweet
For breads with ingredients like fruit juices, coconut
fl akes, raisins, dried fruit, chocolate or additional
sugar. By means of an extended rising phase the
bread is lighter and airier.
Programme 5: Super Rapid
Less time is required for kneading, rising and baking.
For this programme, however, use only recipes that
do not contain any heavy ingredients or heavy
varieties of fl our. Note that in this programme the
bread is less aerated and might not come out quite
as tasty.
Programme 6: Dough (kneading)
For the preparation of yeast dough for rolls, pizza
or plaits. This programme does not include a baking
process.
Programme 7: Pasta
For the preparation of pasta dough. This programme
does not include a baking process.
Programme 8: Buttermilk Bread
For breads made with buttermilk or yoghurt.
Programme 9: Gluten Free
For breads made with gluten-free fl ours and baking
mixes. Gluten-free fl ours take longer to absorb
liquids and they have diff ering rising properties.
Programme 10: Cake
In this programme, the ingredients are kneaded,
allowed to rise and then baked. Use baking
powder for this programme.
Programme 11: Jam
For making jams, preserves, jellies and fruit
spreads.
Programme 12: Bake
For the additional baking of breads that are not
brown enough, not baked through or for readymade doughs. There are no kneading and rising
processes in this programme. The bread is kept
warm for up to one hour after the baking process.
This prevents the bread from becoming too moist.
Programme 12 bakes the bread for 60 minutes.
To stop these functions early, press the Start/Stop
button until your hear a long signal tone. To
switch the appliance off , remove the plug from the
wall power socket.
SBB 850 B1
GB
│
75 ■
Page 79
NOTE
In programmes 1, 2, 3, 4, 5, 6, 8 and 9, a
►
signal tone sounds during the sequence and
"ADD" appear
after this, add the other ingredients, such as
fruit or nuts. You do not need to interrupt the
programme.
The kneading blades 6 will not chop the
ingredients. If you have set the timer, you can
put all the ingredients into the baking mould 7
at the programme start. In this case, however,
fruits and nuts should be chopped beforehand.
s on the display. Directly
Timer function
The timer function allows you to delay the baking
process by a preset time.
Use the arrow buttons
desired completion time for the baking process.
The maximum time delay is 15 hours.
WARNING! RISK OF FIRE!
► Before you bake a particular type of bread
with time delay
ensure that the proportions of the ingredients
are correct, that the dough is not too fi rm or
too thin, and that the quantities are not too
much and could possibly overfl ow.
1) Select a programme. The display indicates
the required baking time.
2) Using the arrow key
the end of the programme. The fi rst activation
pushes the completion time back to the next full
interval of 10 minutes. Each subsequent press
of the arrow key delays the completion
time by 10 minutes. You can accelerate this
procedure by holding the button pressed
down. The display shows you the whole period
of the baking time and delay time.
If you exceed of the maximum time delay, you
can correct the time with the arrow key
3) Confi rm the programming of the timer with the
Start/Stop button .
and to set the
, try out the recipe fi rst to
, you can delay
.
The operating light starts to fl ash. The colon
on the display fl ashes and the programmed
time starts to run.
As soon as the programme starts, the operating
light is on permanently. When the baking process has been completed, you will hear ten beeps
and the display indicates 0:00.
Example:
It is 8:00 a.m. and you would like to have fresh
bread in 7 hours and 30 minutes, in other words
at 3:30 p.m. Start by selecting programme 1 and
then press the arrow keys until 7:30 appears
in the display , as the time until completion is
7 hours and 30 minutes.
NOTE
► The timer function cannot be activated with
ogramme "Jam".
the pr
NOTE
► Please do not use perishable ingredients such
as milk, eggs, cr
using the time delay function.
eam or cheese, etc. when
Before baking
For a successful baking process, please consider
the following factors:
Ingredients
WARNING! RISK OF FIRE!
► Remove the baking mould 7 fr
ance before fi lling it with ingredients. If any
ingredients drop into the baking chamber, a
fi re may be caused by them from heating of
the heating elements.
■ Always add the ingredients into the baking
mould 7 in the specifi
■ To ensure an optimal rising result from the yeast,
all ingredients should be at room temperature.
ed sequence.
om the appli-
■ 76 │ GB
SBB 850 B1
Page 80

WARNING! RISK OF FIRE!
► Never use quantities greater than those speci-
ed. If there is too much dough, some could
fi
spill over the baking mould 7, drop onto the
hot heating elements and cause a fi re.
■ Ensure that you measure the ingredients precisely.
E
ven small deviations from the quantities specifi ed
in the recipe may aff ect the baking results.
Baking bread
Preparation
NOTE
► Place the bread maker on a level and fi rm
face.
sur
1) Pull the baking mould 7 upwards and out of
the appliance.
2) Push the kneading blades 6 onto the drive
shafts in the baking mould 7. Ensure that they
are fi rmly seated.
3) Add the ingredients into the baking mould 7.
First add the liquids, sugar and salt, then the
fl our. Add the yeast as the last ingredient.
NOTE
► Ensure that the yeast does not come into
contact with salt or liquids.
Insert the baking mould 7 again. Ensure that it
4)
clicks into place correctly.
5) Close the appliance lid 2.
6) Put the power plug into the mains power socket.
You will hear a beep and the programme
number and the duration for programme 1
will appear on the display .
7) Select the programme you want using the
programme select button . Every input is
acknowledged with a beep.
8) If necessary, use button to select the size
of bread you want to bake.
9) Select the required level of browning for
your bread. The arrow on the display shows
you if you have selected, light, medium or dark.
Here you can also select the setting "Super
Rapid" to shorten the time during which the
dough rises.
NOTE
► A browning level cannot be selected for
ogrammes 6, 7 and 11.
pr
The function "Rapid" is only available for
programmes 1–4.
A bread weight cannot be selected for programmes 6, 7, 11 and 12.
10) You now have the option of setting the end time
of your programme using the timer function.
You can enter in a maximum time delay of up
to 15 hours.
NOTE
► This function is not available for programme 11.
tarting a programme
S
Start the programme with the Start/Stop button .
NOTE
► Programmes 1, 2, 3, 4, 6 and 8 start with a
10 to 30 minute pr
Super Rapid, see table for programme sequences). The kneading blades 6 do not
move. This is not a malfunction of the appliance.
The programme will carry out the various operations
automatically.
NOTE
► For the programmes 1, 2, 3, 4, 5, 8, 9 and
ou will hear a beep after the "Rise 2"
10, y
programme section and "RMV" appears
on the display . You can now remove the
kneading blades 6 from the dough. If you do
not want to remove the kneading blades 6,
simply wait. The appliance will automatically
resume the programme.
eheating phase (except
SBB 850 B1
GB
│
77 ■
Page 81

You can monitor the programme sequence through
the viewing window 1 of your bread maker.
Occasionally, condensation may build up on the
viewing window 1 during baking. The appliance
lid 2 may be opened during the kneading phase.
NOTE
► Do not open the appliance lid 2 during the
rising or baking phases. The br
collapse.
Ending a programme
When the baking process has been completed,
you will hear ten beeps and the display indicates
0:00. At the end of the programme, the appliance
automatically changes to a keep-warm mode for
up to 60 minutes.
NOTE
► This does not apply to programmes 6, 7 and
11.
In this mode, w
ance. The keep-warm function can be ended early
by keeping the Start/Stop button pressed until
a beep is heard.
DANGER! ELECTRIC SHOCK!
► Before opening the appliance lid 2, discon-
nect the po
appliance should always be disconnected
from the power grid when not in use!
Taking out the bread
Always use pot holders or oven gloves when removing the hot baking mould 7. Hold the baking
mould 7 tilted over a grill tray and shake it lightly
until the bread slides out of the baking mould 7.
arm air circulates inside the appli-
wer plug from the socket. The
ead could
If you haven't already removed the kneading hooks:
If the bread does not slip off the kneading blades 6,
carefully remove the kneading blades 6 using the
supplied kneading blade remover 0.
NOTE
Do not use any metal objects that could cause
atches on the non-stick coating. Rinse the
scr
baking mould 7 with warm water directly after
removing the bread. This will help prevent the
kneading blades 6 becoming stuck on the drive
shafts.
■ Press the Start/Stop button briefl
the programme at the very start of the baking
phase or, pull the power plug out of the socket.
Ensure that you replace the power plug within
10 minutes so that the baking process can be
continued.
■ Open the appliance lid 2 and r
baking mould 7. With fl oured hands, you can
remove the dough and then pull out the kneading blades 6.
■ Replace the dough in the back baking mould 7.
Replace the baking mould 7 and close the
appliance lid 2.
■ Put the power plug into the socket if necessary.
The baking program continues from where it
was stopped.
Allow the bread to cool for 15–30 minutes before
eating it.
Before cutting the bread, always check to ensure
that the kneading blades 6 have been removed
from it.
Error messages
■ If the display sho
gramme has been started, it indicates that the
temperature in the bread maker is still too high.
Stop the programme and remove the power
plug. Open the appliance lid 2 and allow the
machine to cool down for 20 minutes before
reusing it.
ws "HHH" after the pro-
y to pause
emove the
■ 78 │ GB
SBB 850 B1
Page 82
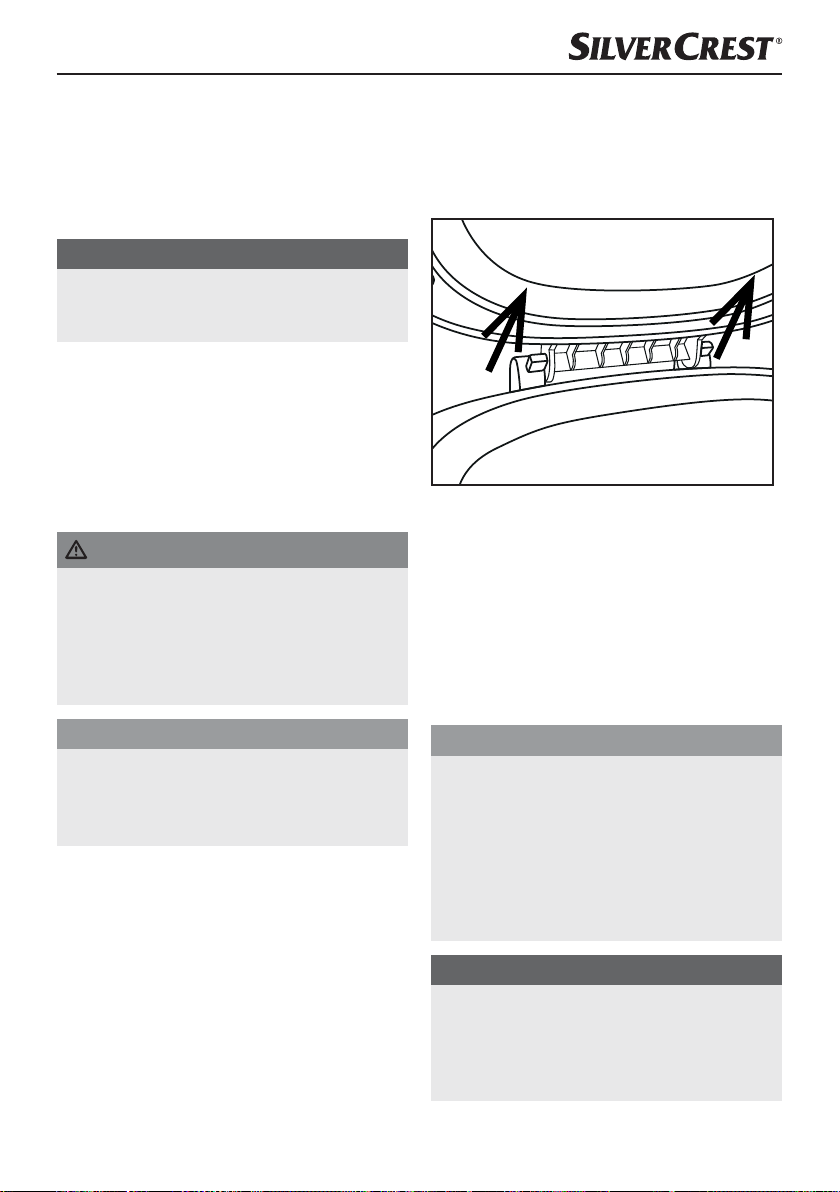
■ If a new programme cannot be started directly
after the bread maker has completed a baking
process, it means the appliance is still too hot.
In this case, the display panel reverts to the
default setting (programme 1). Open the appliance lid 2 and allow the machine to cool
down for 20 minutes before reusing it.
NOTE
► Do not attempt to reuse the appliance until it
has cooled itself do
programme 12.
■ If "EE0", "EE1" or "LLL" appears on the display
af
ter the programme has started, switch the
bread maker off and then on again by removing
the plug from the socket and then putting it
back in. If the failure display persists, contact
Customer Service.
wn. This functions only in
For easier cleaning, the appliance lid 2 can be
removed from the housing:
– Open the appliance lid 2 until the plastic
pegs fi
t through the openings of the hinge
guides.
Cleaning and care
DANGER! ELECTRIC SHOCK!
► Before cleaning the appliance, always remove
the plug fr
ance to cool down completely.
Protect the appliance from moisture, as
this can lead to electric shock. Please also
observe the safety instructions.
CAUTION! MATERIAL DAMAGE!
► The appliance and its accessories are not
dishw
► Do not use any chemical cleaning agents or
solv
Housing, lid, baking chamber
■ Remove all residues from the inside of the
baking chamber using a w
damp soft sponge.
■ Wipe both the housing and the lid also only
with a moist cloth or sponge.
om the socket and allow the appli-
asher-proof!
ents to clean the bread maker.
et cloth or a slightly
– Pull the appliance lid 2 out of the hinge
guides.
■ To replace the appliance lid 2 af
guide the plastic locking tabs through the opening
of the hinge guides.
■ Dry everything thoroughly and make sure that
all parts are dry before reuse.
Baking mould, kneading blades and
accessories
CAUTION! MATERIAL DAMAGE!
► Never immerse the baking mould 7 in w
or other liquids.
► The surfaces of the baking mould 7 and the
kneading blades 6 ar
stick coating. When cleaning the appliance,
do not use aggressive detergents, abrasive
cleaning agents or objects that may cause
scratches to the surfaces.
NOTE
► Due to moisture and vapours, the surfaces of
arious parts may change in their appear-
v
ance over the course of time. This has no
infl uence on the function nor does it reduce
the quality of the baking results.
e coated with a non-
ter cleaning,
ater
SBB 850 B1
GB
│
79 ■
Page 83
■ Before cleaning, remove the baking mould 7
and the kneading blades 6 from the baking
chamber.
■ Remove the kneading blades 6 from the bak-
ing mould 7. If the kneading blades 6 cannot
be removed from the baking mould 7, fi ll the
baking mould 7 with hot water for around
30 minutes. The kneading blades 6 should
now be easy to remove.
Clean the kneading blades 6 in warm water
with mild dishwashing detergent. For stubborn incrustations, you can leave the kneading blades 6
in the washing water until the incrustations can
be removed by means of a dishwashing brush.
If the mounting holes in the kneading hooks 6
are blocked, these can be carefully cleaned with
a wooden toothpick or similar.
Dry the kneading blades 6 thoroughly after
cleaning.
■ Wipe the exterior surfaces of the baking mould 7
with a moist cloth.
■ Clean the interior of the baking mould 7 with
warm water and a little dishwashing detergent.
If there are incrustations in the baking mould 7,
fi ll the baking mould 7 with water and add mild
dishwashing detergent. Let it soak until the incrustations have softened and can be removed with
a dishwashing brush. Afterwards, rinse the baking
mould 7 with clean water and dry it off thoroughly.
■ Clean the measuring cup 8, the measuring
spoon 9 and the kneading blade r
warm water with a little mild washing-up liquid.
Then rinse all parts with plenty of clean water
to remove all detergent residues. Dry everything
thoroughly.
emover 0 in
Disposal
Never dispose of the appliance
in the normal domestic waste.
This product is subject to the
provisions of European Directive
2012/19/EU.
Dispose of the appliance through an approved
disposal centre or at your community waste facility.
Please observe applicable regulations. Please
contact your waste disposal facility if you are in
any doubt.
Dispose of all packaging materials in an
environmentally friendly manner.
Warranty and service
This appliance is provided with a 3-year warranty
valid from the date of purchase. This appliance
has been manufactured with care and inspected
meticulously prior to delivery.
Please retain your receipt as proof of purchase. In
the event of a warranty claim, please contact your
Customer Service unit by telephone. This is the only
way to guarantee free return of your goods.
The warranty only covers claims for material and
manufacturing defects, not for transport damage,
wearing parts, such as baking trays or dough hooks,
or for damage to fragile components such as
switches or batteries. This appliance is intended
solely for private use and not for commercial
purposes.
The warranty shall be deemed void in cases of
misuse or improper handling, use of force and
modifi cations/repairs which have not been carried
out by one of our authorised Service centres. Your
statutory rights are not restricted by this warranty.
The warranty period is not prolonged by repairs
eff ected under the warranty. This also applies to
replaced and repaired components. Any damage
and defects present at the time of purchase must be
reported immediately after unpacking, but no later
than two days after the date of purchase. Repairs
carried out after expiry of the warranty period shall
be subject to charge.
■ 80 │ GB
SBB 850 B1
Page 84

Service Great Britain
Tel.: 0871 5000 720 (£ 0.10/Min.)
E-Mail: [email protected]
IAN 274313
Importer
KOMPERNASS HANDELS GMBH
BURGSTRASSE 21
44867 BOCHUM
GERMANY
www.kompernass.com
SBB 850 B1
GB
│
81 ■
Page 85
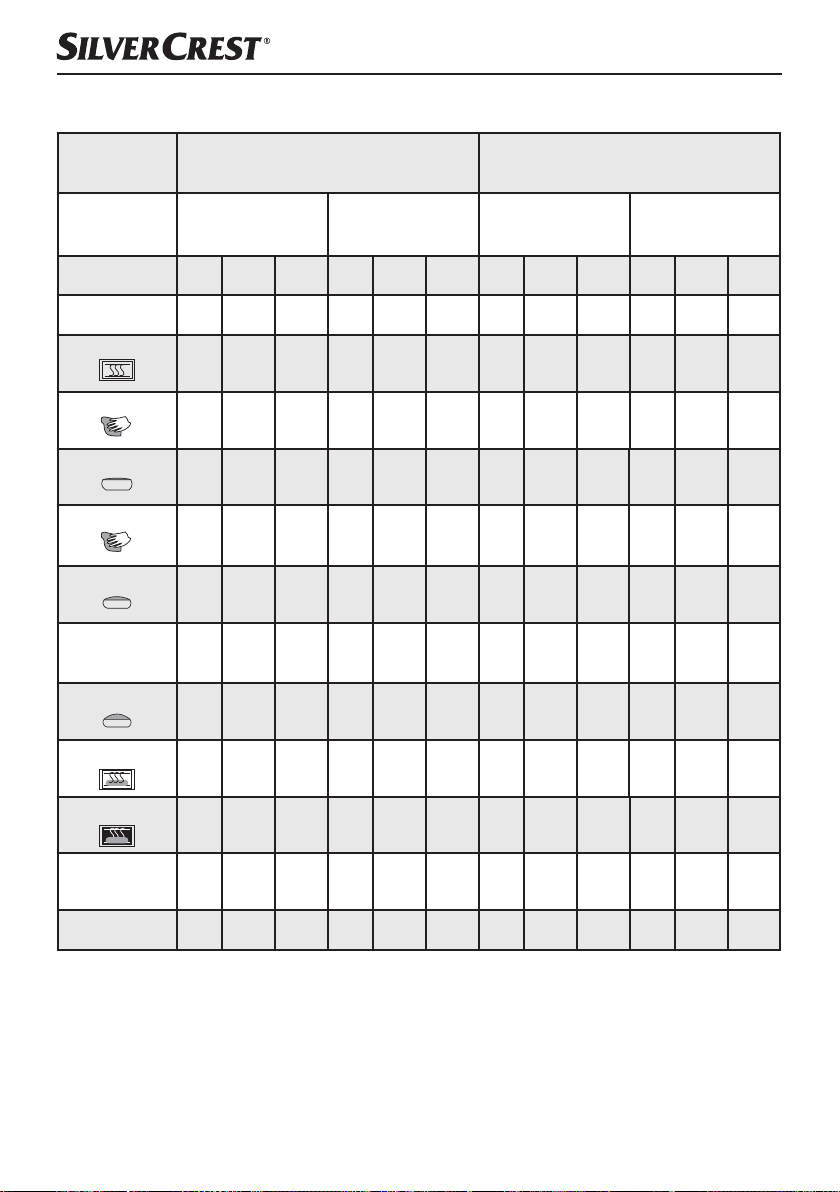
Programme sequence
Pro-
gramme
Browning level
Size 750 g 1000 g 1250 g 750 g 1000 g 1250 g 750 g 1000 g 1250 g 750 g 1000 g 1250 g
Time (hours) 02:58 03:05 03:15 02:14 02:20 02:25 03:13 0 3:18 03:25 02:18 0 2:25 0 2:30
Preheating (min)
Kneading 1 (min)
Rising 1 (min)
Kneading 2 (min)
Rising 2 (min)
Beeps to indicate
kneading hooks can
be removed.
Rising 3 (min)
15 15 20 N/A N/A N/A 10 10 15 N/A N/A N/A
12 13 13 12 13 13 12 12 15 12 13 13
25 25 25 10 10 10 20 20 20 10 10 10
2
3A*
5
30 30 30 18 18 18 43 41 35 18 18 18
RMV RMV RMV RMV RMV RMV RMV RMV RMV RMV RMV RMV
30 30 30 30 30 30 35 35 35 30 30 30
1. Regular 2. French
Light
Medium
Dark
2
5A
5
5A
Rapid
2
2
2
2A
2
2A
5
5
1A
5
5
3A*
Light
Medium
Dark
2
2
5A
8
8
5A
Rapid
2
2
2
1A
8
2A
5
5
2
2A
5
Baking (min)
Keep warm time (min)
Add the ingredients
(remaining hours)
Presetting the time 15 hrs 15 hrs 15 hrs 15 hrs 15 hrs 15 hrs 15 hrs 15 hrs 15 hrs 15 hrs 15 hrs 15 hrs
56 60 65 56 60 65 60 65 70 60 65 70
60 60 60 60 60 60 60 60 60 60 60 60
02:01 02:05 02:10 01:49 01:53 01:58 02:26 02:29 02:28 01:53 0 1:58 0 2:03
* 3A means that after 3 minutes of kneading, you will hear 10 beeps and "ADD" will be displayed at
the same time. This reminds you that you can now add ingredients such as fruit or nuts.
■ 82 │ GB
SBB 850 B1
Page 86
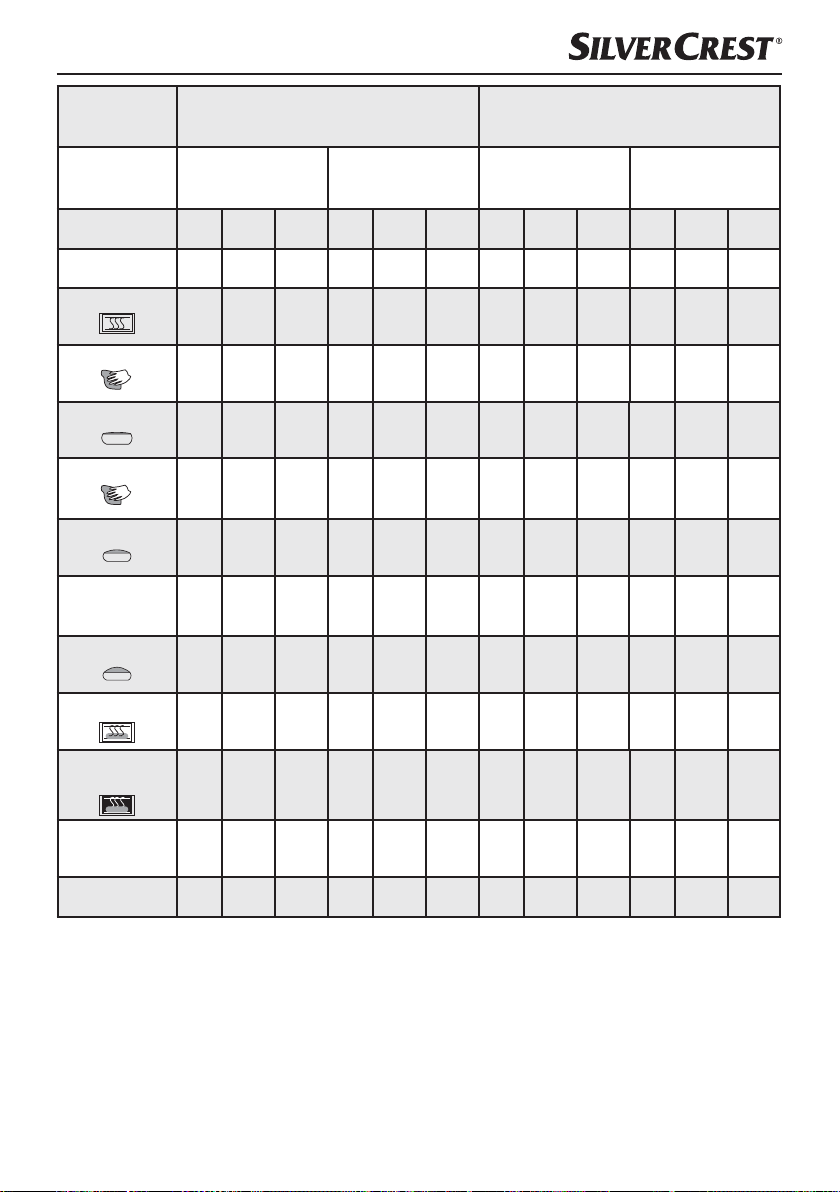
Pro-
gramme
Browning level
Size 750 g 1000 g 1250 g 750 g 1000 g 1250 g 750 g 1000 g 1250 g 750 g 1000 g 1250 g
Time (hours) 0 3:18 0 3:25 0 3:35 0 2:24 0 2:30 0 2:35 0 2:56 0 3:01 0 3:10 0 2:10 0 2:16 0 2:20
3. Whole Wheat 4. Sweet
Light
Medium
Dark
Rapid
Light
Medium
Dark
Rapid
Preheating (min)
Kneading 1 (min)
Rising 1 (min)
Kneading 2 (min)
Rising 2 (min)
Beeps to indicate
kneading hooks can
be removed.
Rising 3 (min)
Baking (min)
Keep warm time
(Min)
Add the ingredients
(remaining hours)
15 15 20 N/A N/A N/A 10 10 15 N/A N/A N/A
11 12 12 11 13 13 12 12 12 11 12 12
30 30 30 10 10 10 25 25 25 10 10 10
2
2
2
2
2
2
2
2
2
2
2
3A
5A
5A
2A
2A
2A
4A*
5A
5A
8
8
8
5
5
5
6
6
38 38 38 23 23 23 35 35 35 18 18 18
RMV RMV RMV RMV RMV RMV RMV RMV RMV RMV RMV RMV
35 35 35 35 35 35 30 30 30 30 30 30
56 60 65 56 60 65 52 56 60 52 56 60
60 60 60 60 60 60 60 60 60 60 60 60
0 2:17 0 2:21 0 2:26 0 1:59 0 2:03 0 2:08 0 2:03 0 2:07 0 2:11 0 1:46 0 1:50 0 1:54
1A
6
6
2A
2
2A
6
6
Presetting the time 15 hrs 15 hrs 15 hrs 15 hrs 15 hrs 15 hrs 15 hrs 15 hrs 15 hrs 15 hrs 15 hrs 15 hrs
* 4A means that after 4 minutes of kneading, you will hear 10 beeps and "ADD" will be displayed at
the same time. This reminds you that you can now add ingredients such as fruit or nuts.
│
GB
SBB 850 B1
83 ■
Page 87
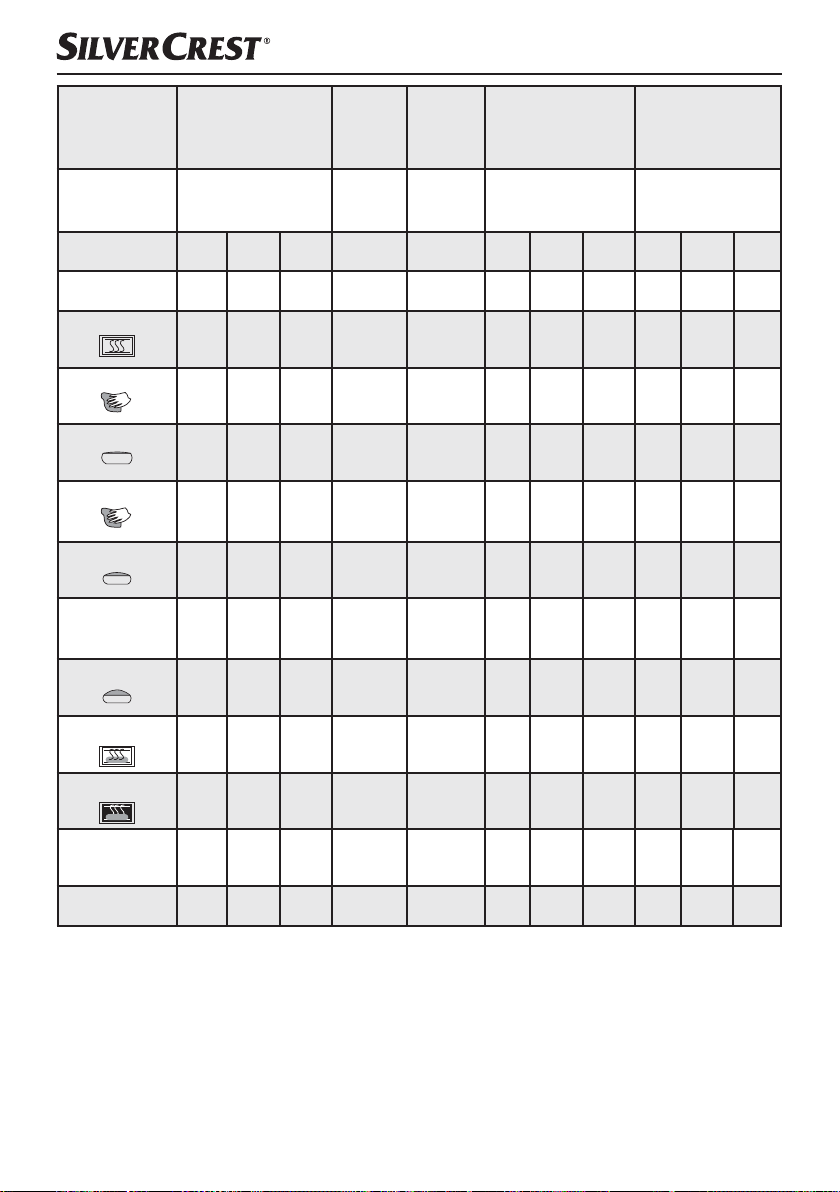
Pro-
gramme
Browning level
Size 750 g 1000 g 1250 g N/A N/A 750 g 1000 g 1250 g 750 g 1000 g 1250 g
Time (hours) 0 1:15 0 1:18 0 1:20 0 1:50 0 0:15 0 3:17 0 3:21 0 3:30 0 2:14 0 2:20 0 2:25
5. Super Rapid
Light
Medium
Dark
6.
Dough
N/A N/A
7.
Pasta
8. Buttermilk
Bread
Light
Medium
Dark
9. Gluten Free
Light
Medium
Dark
Preheating (min)
Kneading 1 (min)
Rising 1 (min)
Kneading 2 (min)
Rising 2 (min)
Beeps to indicate
kneading hooks can
be removed.
Rising 3 (min)
Baking (min)
Keep warm time (min)
Add the ingredients
(remaining hours)
N/A N/A N/A 10 N/A 25 25 30 N/A N/A N/A
8 8 8 12 15 10 10 10 12 13 13
N/A N/A N/A 10 N/A 20 20 20 10 10 10
N/A
N/A
2A
5
N/A N/A N/A 25 N/A 45 45 45 18 18 18
RMV RMV RMV N/A N/A RMV RMV RMV RMV RMV RMV
20 20 20 45 N/A 30 30 30 30 30 30
40 43 45 N/A N/A 52 56 60 56 60 65
60 60 60 N/A N/A 60 60 60 60 60 60
0 1:05 0 1:08 0 1:10 0 1:15 N/A 0 2:15 0 2:19 0 2:23 0 1:49 0 1:53 0 1:58
N/A
2A
5
2A
N/A
3A
5
5
N/A
N/A
N/A
5A*
2
2
2
2
2
5A*
5A*
8
8
1A
8
5
2A
2
2A
5
5
Presetting the time 15 hrs 15 hrs 15 hrs 15 hrs 15 hrs 15 hrs 15 hrs 15 hrs 15 hrs 15 hrs 15 hrs
* 5A means that after 5 minutes of kneading, you will hear 10 beeps and "ADD" will be displayed at
the same time. This reminds you that you can now add ingredients such as fruit or nuts.
■ 84 │ GB
SBB 850 B1
Page 88
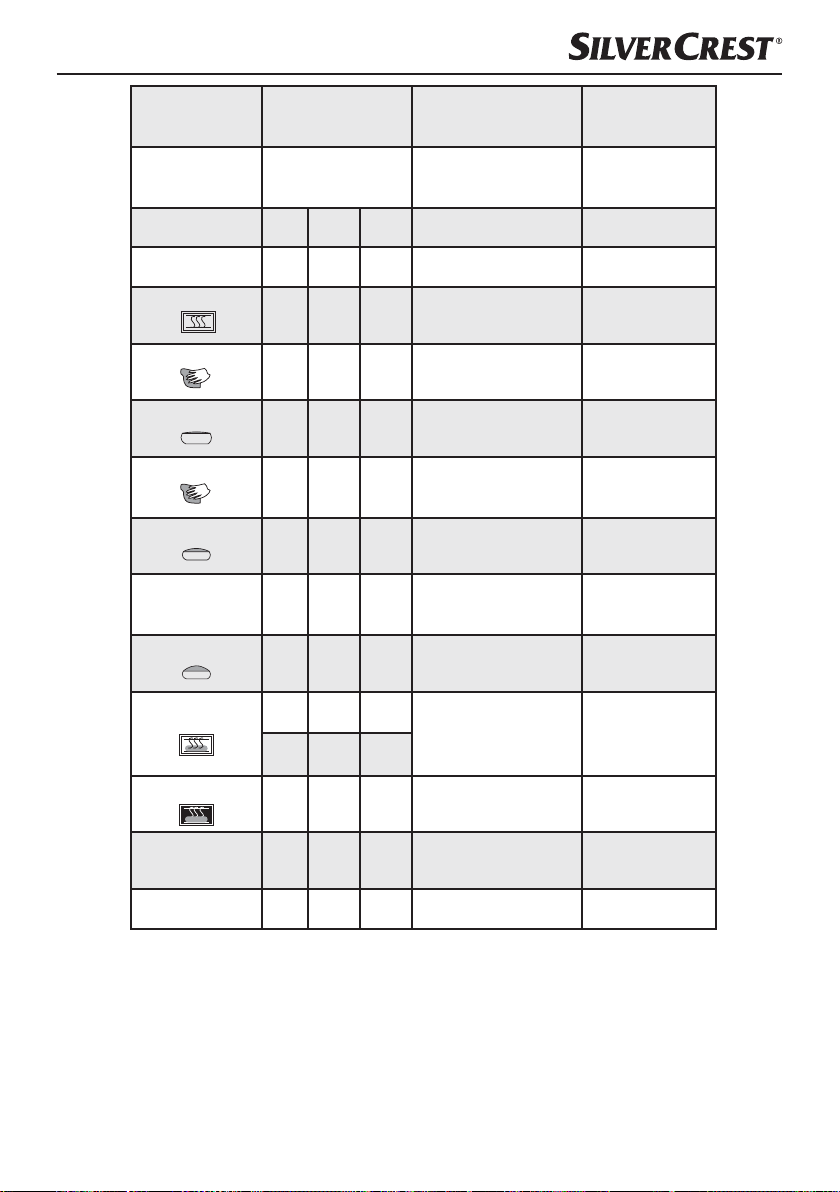
Pro-
gramme
Browning level
Size 750 g 1000 g 1250 g N/A N/A
Time (hours) 0 1:30 0 1:35 0 1:40 0 1:20 0 1:00
10. Cake 11. Jam 12. Bake
Light
Medium
Dark
N/A
Medium
Light
Dark
Preheating (min)
Kneading 1 (min)
Rising 1 (min)
Kneading 2 (min)
Rising 2 (min)
Beeps to indicate
kneading hooks can be
removed.
Rising 3 (min)
Baking (min)
Keep warm time (min)
Add the ingredients
(remaining hours)
N/A N/A N/A N/A N/A
15 15 15 N/A N/A
N/A N/A N/A
N/A
N/A
N/A
N/A
N/A
N/A
N/A
N/A
N/A
N/A N/A N/A N/A N/A
RMV RMV RMV N/A N/A
N/A N/A N/A
60 65 70
15
15 rising 15 rising
rising
60 60 60 N/A 60
N/A N/A N/A N/A N/A
15
Heat + kneading
N/A
N/A
N/A
45
Heat + kneading
20
Rise
N/A
N/A
N/A
N/A
N/A
60
SBB 850 B1
Presetting the time 15 hrs 15 hrs 15 hrs N/A 15 hrs
GB
│
85 ■
Page 89

Troubleshooting the bread maker
What do I do if the kneading blades 6 are stuck
in the baking mould 7 after baking?
What happens if the fi nished bread is left inside the
bread maker?
Can the baking mould 7 and kneading blades 6
be cleaned in the dishwasher?
Why doesn't the dough get stirred, even though the
motor is running?
What do I do if a kneading blade 6 is stuck in the
bread?
What happens if there is a power failure when a
programme is running?
How long does it take to bake bread? Please check the times given in the table "Programme
What weights of breads can I bake? You can bake breads with weights of 750 g -
Fill the baking mould 7 with hot water and twist
the kneading blades 6 to loosen the incrustation
underneath.
The "Keep warm function" ensures that the bread
is kept warm for about 1 hour and also that it is
protected against moisture. If the bread remains
in the bread maker for longer than 1 hour, it may
become moist.
No. Please rinse the baking mould 7 and the
kneading blades 6 by hand.
Check to see if the kneading blades 6 and the
baking mould 7 are correctly engaged.
Remove the kneading blade 6 with the
kneading blade remover 0.
In the case of a power failure of up to 10 minutes,
the bread maker will complete the last set programme through to the end.
sequence".
1000 g - 1250 g.
Why can I not use the timer function for baking
with fresh milk?
Why does the bread maker not start up after the
Start/Stop button has been pressed?
The appliance crushes the added raisins. To avoid the crushing of ingredients such as fruit or
■ 86 │ GB
Fresh products such as milk or eggs spoil if they
remain in the appliance for too long.
Some baking processes, such as "Warming up“ or
"Resting" are diffi cult to recognise.
Using the table "Programme sequence" to check
which programme section is currently in operation.
Verify that the appliance is functioning by checking
whether the operation lamp is on.
Check to see if you have pressed the Start/Stop
button correctly.
Check to see if the power plug is connected to the
power grid.
nuts, add them to the dough after the signal tone
has sounded.
SBB 850 B1
Page 90

KOMPERNASS HANDELS GMBH
BURGSTRASSE 21
44867 BOCHUM
DEUTSCHLAND / GERMANY
www.kompernass.com
Stand der Informationen · Version des informations
Versione delle informazioni · Last Information Update:
02 / 2016 · Ident.-No.: SBB850B1-012016-2
IAN 274313
Page 91
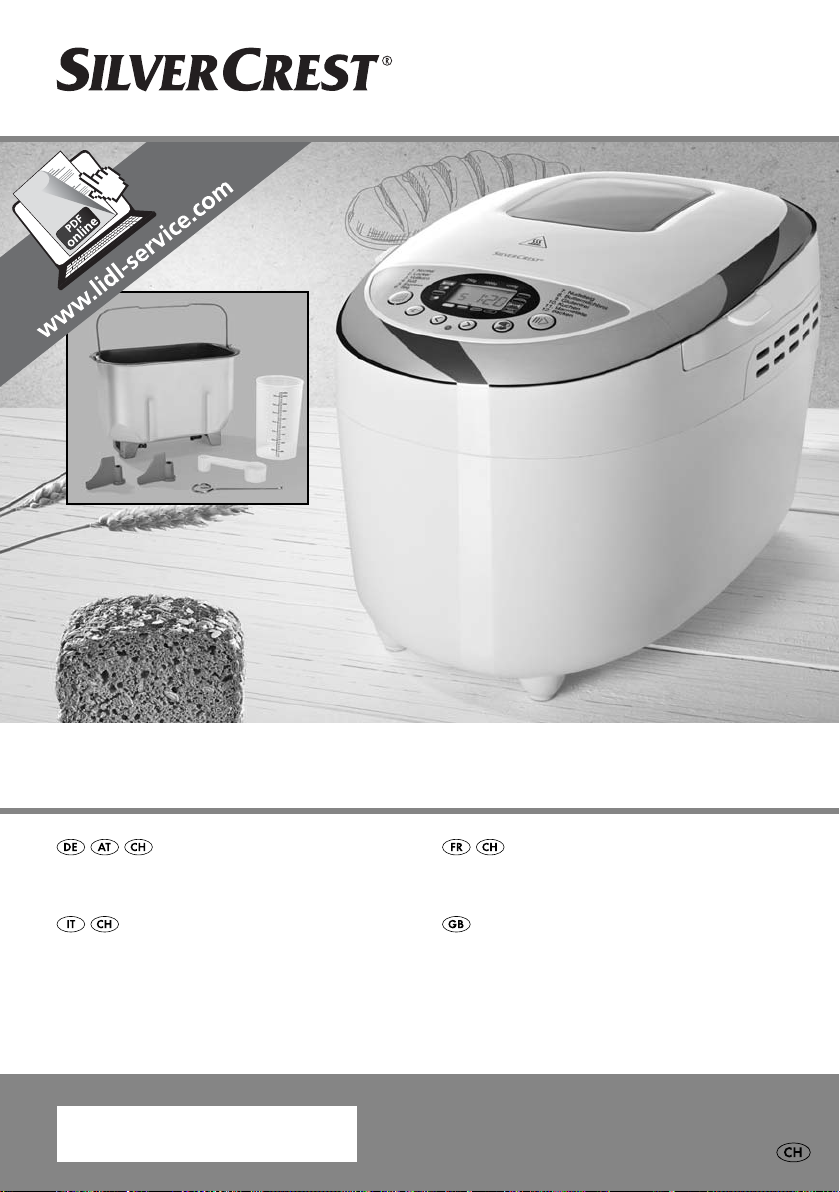
BROTBACKAUTOMAT SBB 850 B1
REZEPTHEFT
RICETTARIO
IAN 274313
LIVRET DE RECETTES
RECIPE BOOK
Page 92

REZEPTHEFT SEITE
Wissenswertes über Zutaten 2
Backtipps 3
Fertig-Backmischungen 4
Brot schneiden und aufbewahren 4
Rezepte für je ca. 1000 g Brot 5
Programm 1 Normal . . . . . . . . . . . . . . . . . . . . . . . . . . . . . . . . . . . . . . . . . . . . . . . . . . . . . . . . .5
Programm 2 Locker . . . . . . . . . . . . . . . . . . . . . . . . . . . . . . . . . . . . . . . . . . . . . . . . . . . . . . . . . .6
Programm 3 Vollkorn . . . . . . . . . . . . . . . . . . . . . . . . . . . . . . . . . . . . . . . . . . . . . . . . . . . . . . . . .6
Programm 4 Süß . . . . . . . . . . . . . . . . . . . . . . . . . . . . . . . . . . . . . . . . . . . . . . . . . . . . . . . . . . . .7
Programm 5 Express . . . . . . . . . . . . . . . . . . . . . . . . . . . . . . . . . . . . . . . . . . . . . . . . . . . . . . . . .8
Programm 6 Teig (kneten) . . . . . . . . . . . . . . . . . . . . . . . . . . . . . . . . . . . . . . . . . . . . . . . . . . . . .8
Programm 7 Nudelteig . . . . . . . . . . . . . . . . . . . . . . . . . . . . . . . . . . . . . . . . . . . . . . . . . . . . . . .9
Programm 8 Buttermilchbrot . . . . . . . . . . . . . . . . . . . . . . . . . . . . . . . . . . . . . . . . . . . . . . . . . . .9
Programm 9 Glutenfrei . . . . . . . . . . . . . . . . . . . . . . . . . . . . . . . . . . . . . . . . . . . . . . . . . . . . . . .9
Programm 10 Kuchen . . . . . . . . . . . . . . . . . . . . . . . . . . . . . . . . . . . . . . . . . . . . . . . . . . . . . . .10
Programm 11 Marmelade . . . . . . . . . . . . . . . . . . . . . . . . . . . . . . . . . . . . . . . . . . . . . . . . . . .10
Fehlerbehebung Rezepte 12
- 1 -
Page 93
Wissenswertes über Zutaten
Mehl-Sorte Beschreibung
MEHL
Geeignet sind die meisten handelsüblichen Mehlsorten wie Weizen- oder Roggenmehl (Typ 405-
1150). Die Typenbezeichnung der Mehlsorten
können je nach Land variieren. Durch das Backprogramm “Glutenfrei” können Sie glutenfreie
Mehlsorten, wie z.B. Mais-, Buchweizen- oder
Kartoffelmehl verwenden. Sie können auch FertigBackmischungen benutzen. Für Zugaben von
kleineren Anteilen (10 - 20%) an Körnern oder
Getreideschrot sind die Programme 1 und 2
geeignet. Bei größeren Anteilen an Vollkornmehl
(70 - 95%) verwenden Sie Programm 3.
Bei den Rezepten werden folgende Mehlsorten verwendet:
Typ 405 normales Weizenmehl
HEFE
Durch den Gärprozess spaltet Hefe die im Teig
enthaltenen Zucker- und Kohlenhydratanteile auf,
wandelt sie in Kohlendioxid um und bewirkt so,
dass der Brotteig aufgeht. Hefe ist in verschiedenen
Formen erhältlich: als Trockenhefe, als Frischhefe
oder als schnell gärende Hefe. Wir empfehlen für
den Brotbackautomaten die Verwendung von
Trockenhefe, da hiermit die besten Ergebnisse
erzielt werden.
Bei der Verwendung von frischer Hefe anstatt
Trockenhefe sind die Angaben auf der Verpackung
maßgebend.
In der Regel entspricht 1 Päckchen Trockenhefe
ca. 21 g frischer Hefe und eignet sich für ca. 500 g
Mehl. Bewahren Sie Hefe immer im Kühlschrank
auf, da Wärme sie verdirbt. Prüfen Sie, ob das
Verfallsdatum abgelaufen ist. Nach Öffnen der
Verpackung sollte unbenutzte Hefe wieder sorgsam
eingewickelt und im Kühlschrank aufbewahrt
werden.
Typ 550
Typ 997 normales Roggenmehl
Typ 812
Typ 1050
Typ 1150
backstarkes Weizenmehl,
für feinporige Teige
Weizenmehl, für helle
Mischbrote
dunkles Weizenmehl, für
Mischbrote oder herzhafte
Backwaren
Roggenmehl mit hohem
Mineralstoffgehalt
Hinweis:
Bei der Erstellung der Rezepte in dieser
Bedienungsanleitung wurde die Verwendung von
Trockenhefe zu Grunde gelegt.
ZUCKER
Zucker hat einen wichtigen Einfluss auf den
Bräunungsgrad und Geschmack des Brotes. Bei
den Rezepten in dieser Bedienungsanleitung wird
die Verwendung von Kristallzucker vorausgesetzt.
Verwenden Sie keinen Puderzucker, es sei denn,
dies wird ausdrücklich spezifiziert. Süßstoffe eignen
sich nicht als Ersatz für Zucker.
SALZ
Salz ist für den Geschmack und für den Bräunungsgrad wichtig. Salz wirkt auch hemmend auf die
Gärung der Hefe. Überschreiten Sie daher nicht
die in den Rezepten angegebenen Salzmengen.
- 2 -
Page 94

Aus diätetischen Gründen kann das Salz weggelassen werden. In diesem Fall kann das Brot stärker als
gewöhnlich aufgehen.
FLÜSSIGKEITEN
Flüssigkeiten wie Milch, Wasser oder in Wasser
aufgelöstes Milchpulver können bei der Herstellung
von Brot verwendet werden. Milch steigert den
Geschmack des Brotes und erweicht die Kruste,
während reines Wasser eine knusprigere Kruste
bewirkt. In einigen Rezepten wird die Verwendung
von Fruchtsäften spezifiziert, um dem Geschmack
des Brotes eine bestimmte Note zu verleihen.
EIER
Eier bereichern das Brot und verleihen ihm eine
weichere Struktur. Verwenden Sie beim Backen
nach den Rezepten in dieser Bedienungsanleitung
Eier der oberen Größenklasse.
FETTE: BACKFETT, BUTTER, ÖL
Backfette, Butter und Öl machen hefehaltiges Brot
mürbe. Das Brot nach französischer Art verdankt
seine einzigartige Kruste und Struktur seinen fettarmen Zutaten. Brot, bei dessen Herstellung Fett verwendet wird, bleibt jedoch länger frisch. Wenn Sie
Butter direkt aus dem Kühlschrank verwenden,
sollten Sie diese in kleine Stücke schneiden, um die
Vermengung mit dem Teig während der Knetphase
zu optimieren.
GLUTEN FREI
Zöliakie, bei Erwachsenen auch Sprue genannt, ist
eine chronische Krankheit, die durch den Genuss glutenhaltiger Speisen ausgelöst wird. Das in Weizen und
Dinkel enthaltene Klebereiweiß Gluten (Gliadin) und
ähnliche Eiweißkörner in Roggen, Gerste und Hafer
führen zu einer Schädigung der Dünndarmschleimhaut. Verzehrt werden darf nur noch Spezialbrot aus
dem Reformhaus oder aus der eigenen Küche, hergestellt mit glutenfreien Mehlen.
Mit glutenfreien Mehlen Brot und Kuchen zu backen,
bedarf allerdings einiger Übung. Solche Mehle benö-
tigen länger für die Aufnahme der Flüssigkeit und haben andere Triebeigenschaften. Glutenfreie Mehle
müssen auch mit glutenfreien Lockerungsmitteln gebunden oder gelockert werden. Das sind beispielweise
Weinsteinbackpulver, Hefe, Sauerteig aus Mais- oder
Reismehl, Backferment auf Maisbasis oder Bindemittel
wie Guarkernmehl,
Johannisbrotkernmehl, Kuzu, Pektin, Pfeilwurzelstärke
oder Carrageen. Außerdem muss man auf den
gewohnten Brotgeschmack verzichten. Auch die
Konsistenz glutenfreier Brote ist anders als die von
Weizenmehlbroten.
ABMESSEN DER ZUTATEN
Mit unserem Brotbackautomaten bekommen Sie
folgende Messbehälter mitgeliefert, die Ihnen das
Abmessen der Zutaten erleichtern sollen:
1 Messbecher mit Mengenangaben
1 großer Messlöffel, entspricht einem Esslöffel (EL)
1 kleiner Messlöffel, entspricht einem Teelöffel (TL)
Stellen Sie den Messbecher auf eine ebene Fläche.
Achten Sie auch darauf, dass die Mengen genau
den Messlinien entsprechen. Beim Abmessen
trockener Zutaten achten Sie darauf, dass der
Messbehälter trocken ist.
Backtipps
Backen in verschiedenen Klimazonen
In höher gelegenen Gebieten führt der niedrige
Luftdruck zu einem schnelleren Gären der Hefe.
Daher ist hier weniger Hefe erforderlich.
In trockenen Regionen ist das Mehl trockener und
erfordert daher etwas mehr Flüssigkeit.
In feuchten Regionen ist das Mehl feuchter und
nimmt somit weniger Flüssigkeit auf. Hier benötigen
Sie etwas mehr Mehl.
- 3 -
Page 95
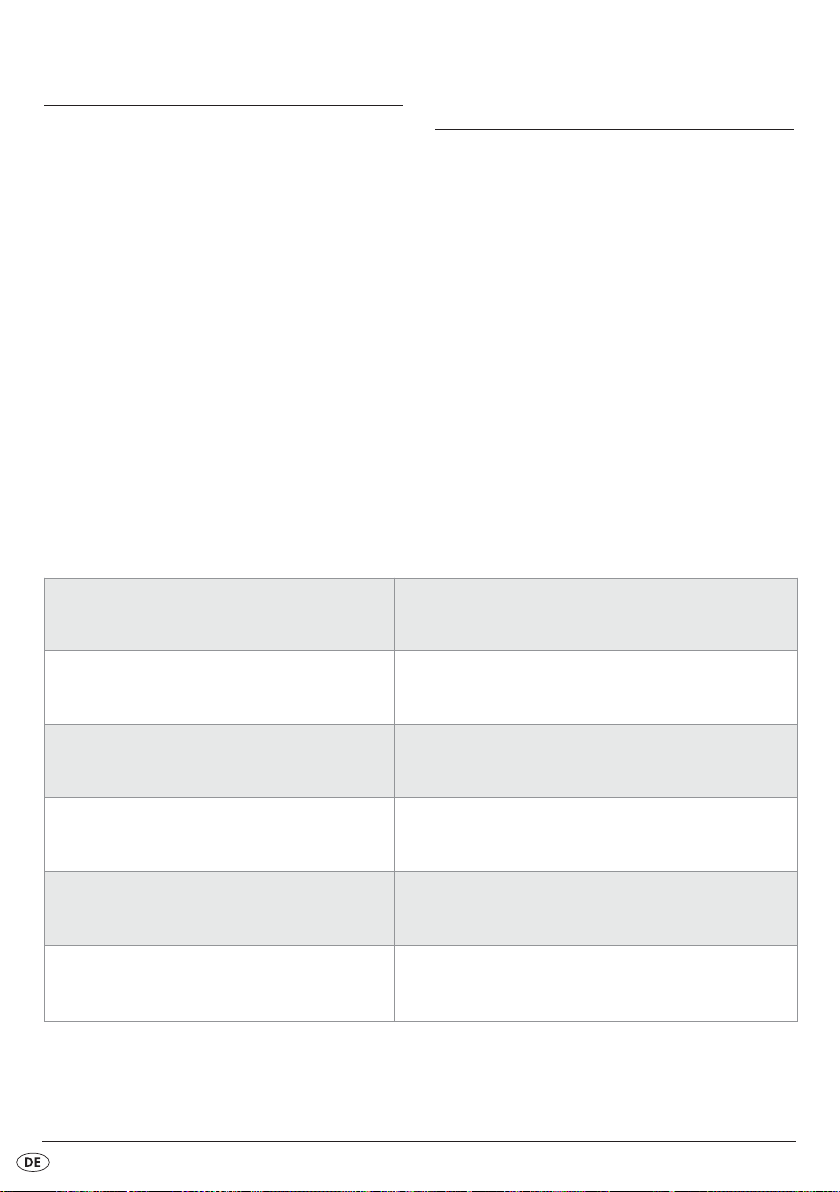
Fertig-Backmischungen
Brot schneiden und
aufbewahren
Sie können auch Fertig-Backmischungen für diesen
Brotbackautomaten nutzen.
Beachten Sie dazu die Angaben des Herstellers
auf der Verpackung.
In der Tabelle finden Sie Umrechnungsbeispiele
von einigen Brotbackmischungen:
Backmischung für ein Brot ca. 750 g
Sie erzielen die besten Ergebnisse, wenn Sie das
frisch gebackene Brot vor dem Anschneiden auf einen Rost legen und 15 bis 30 Minuten abkühlen
lassen. Benutzen Sie eine Brotschneidemaschine
oder ein Sägemesser zum Schneiden des Brotes.
Nicht verzehrtes Brot kann bei Raumtemperatur bis
zu drei Tagen in Frischhaltebeuteln oder Kunststoffbehältern aufbewahrt werden. Bei längeren
Aufbewahrungszeiten (bis 1 Monat) sollten Sie es
einfrieren.
Da selbstgebackenes Brot keine Konservierungsstoffe enthält, verdirbt es schneller als gewerblich
hergestelltes Brot.
Vital-Mehrkornbrot
Sonnenblumenkernbrot
Rustikales Vollkornbrot
Bauernbrot
Ciabatta
Für diesen Brotbackautomaten eignen sich besonders die Fertig-Backmischungen, die Sie bei Lidl erhalten
können. Beachten Sie die Zubereitungshinweise auf der Verpackung.
500 g Backmischung
350 ml Wasser
500 g Backmischung
350 ml Wasser
500 g Backmischung
370 ml Wasser
500 g Backmischung
350 ml Wasser
500 g Backmischung
360 ml Wasser
1 TL Olivenöl
- 4 -
Page 96

Rezepte für je ca. 1000 g Brot
Hinweis: Um ein besseres Backergebnis zu erhalten, bereiten Sie den Teig mit einem Mixer zu.
Geben Sie anschließend den fertigen Teig in die
Backform. Stellen Sie mit der Taste “Brotgewicht”
das Gewicht 1000 g ein. Wählen Sie den gewünschten Bräunungsgrad Ihres Brotes. Beachten
Sie, dass es sich bei den Mengenangaben um
Richtwerte handelt. Es können geringe Schwankungen beim Backergebnis auftreten.
Programm 1 Normal
Sonnenblumenbrot
300 ml lauwarme Milch
1 EL Butter
540 g Mehl Typ 550
5 EL Sonnenblumenkerne
1 TL Salz
1/2 TL Zucker
1 Päckchen Trockenhefe
Sauerteigbrot
50 g Sauerteig
350 ml Wasser
1,5 EL Butter
1,5 TL Salz
1 TL Zucker
180 g Mehl Type 997
360 g Mehl Type 1050
1 Päckchen Trockenhefe
Bauernbrot
300 ml Milch
1,5 TL Salz
2 Eier
1,5 EL Butter/Margarine
540 g Mehl Type 1050
1 EL Zucker
1 Päckchen Trockenhefe
Kartoffelbrot
300 ml Wasser/Milch
2 EL Butter
1 Ei
90 g zerdrückte, gekochte Kartoffeln
1 TL Salz
2 EL Zucker
540 g Mehl Typ 550
1 Päckchen Trockenhefe
Kräuterbrot
350 ml Buttermilch
1 TL Salz
1,5 EL Butter
1 EL Zucker
540 g Mehl Typ 550
4 EL feingehackte Petersilie
3/4 Päckchen Trockenhefe
Pizzabrot
300 ml Wasser
1 EL Öl
1 TL Salz
1 TL Zucker
1 TL getr. Oregano
2 EL ger. Parmesan
50 g kleingeschnittene Salami
540 g Mehl Typ 550
3/4 Päckchen Trockenhefe
Bierbrot
150 ml Wasser
150 ml helles Bier
540 g Mehl Type 550
3 EL Buchweizenmehl
1,5 EL Kleie
1 TL Salz
3 EL Sesamsamen
1,5 EL Malzextrakt (Sirup)
1/2 Päckchen Trockenhefe
150 ml Sauerteigansatz
- 5 -
Page 97

Maisbrot
350 ml Wasser
1 EL Butter
540 g Mehl Type 550
3 EL Maisgrieß
1/2 gehackter Apfel mit Schale
3/4 Päckchen Trockenhefe
Programm 2 Locker
Weißbrot „Klassisch“
320 ml Wasser/Milch
2 EL Butter
1,5 TL Salz
2 EL Zucker
600 g Weizenmehl Typ 550
1 Päckchen Trockenhefe
Helles Weißbrot
320 ml Wasser
20 g Butter
1,5 TL Salz
1,5 TL Zucker
600 g Weizenmehl Typ 405
1 Päckchen Trockenhefe
1 Ei
Honigbrot
320 ml Wasser
1,5 TL Salz
2,5 TL Olivenöl
1,5 EL Honig
600 g Mehl Type 550
1 Päckchen Trockenhefe
Mohnbrot
300 ml Wasser
540 g Mehl Type 550
1 TL Zucker
1 TL Salz
75 g gemahlener Mohn
1 EL Butter
1 Prise Muskatnuss
3/4 Päckchen Trockenhefe
1 EL ger. Parmesan
Paprikabrot
310 ml Wasser
1,5 TL Salz
1,5 TL Öl
1,5 TL Paprikapulver
530 g Mehl Type 812
1 Päckchen Trockenhefe
130 g rote Paprikaschoten, fein gewürfelt
Programm 3 Vollkorn
Roggenvollkornbrot
75 g Sauerteig
325 ml warmes Wasser
2 EL Tannenhonig
350 g Roggenvollkornmehl
150 g Weizenvollkornmehl
1 EL Johannisbrotkernmehl
1/2 EL Salz
1 Päckchen Trockenhefe
Dinkelbrot
350 ml Buttermilch
360 g Dinkelvollkornmehl
90 g Roggenvollkornmehl
90 g Dinkelschrot
50 g Sonnenblumenkerne
1 TL Salz
1/2 TL Zucker
75 ml Sauerteigansatz
3/4 Päckchen Trockenhefe
- 6 -
Page 98

Weizenschrotbrot
350 ml Wasser
1 TL Salz
2 EL Butter
1,5 EL Honig
360 g Mehl Type 1050
180 g Weizenvollkornmehl
50 g Weizenschrot
3/4 Päckchen Trockenhefe
Vollkornbrot
350 ml Wasser
25 g Butter
1 TL Salz
1 TL Zucker
270 g Mehl Type 1050
270 g Weizenvollkornmehl
3/4 Päckchen Trockenhefe
Roggenbrot
300 ml Wasser
1,5 EL Butter
1,5 EL Essig
1 TL Salz
1,5 EL Zucker
180 g Roggenmehl Type 1150
360 g Mehl Type 1050
1 Päckchen Trockenhefe
Siebenkornbrot
300 ml Wasser
1,5 EL Butter
1 TL Salz
2,5 EL Zucker
240 g Mehl Typ 1050
240 g Weizenvollkornmehl
60 g 7 Korn-Flocken
3/4 Päckchen Trockenhefe
Schwarzbrot
400 ml warmes Wasser
160 g Weizenmehl Typ 550
200 g grobes Roggenvollkornschrot
180 g feines Roggenschrot
1 TL Salz
100 g Sonnenblumenkerne
100 ml dunkler Rübensirup
1 Päckchen Trockenhefe
1 Packung Trockensauerteig
Programm 4 Süß
Rosinenbrot
300 ml Wasser
2,5 EL Butter
1,5 EL Honig
1 TL Salz
540 g Weizenmehl Type 405
100 g Rosinen
3/4 Päckchen Trockenhefe
Rosinen-Nuss-Brot
300 ml Wasser
1,5 EL Butter
1 TL Salz
1 EL Zucker
540 g Mehl Typ 405
100 g Rosinen
3 EL geh. Walnüsse
3/4 Päckchen Trockenhefe
- 7 -
Page 99

Schokoladenbrot
400 ml Milch
100 g Magerquark
1,5 TL Salz
1,5 TL Zucker
600 g Weizenvollkornmehl
10 EL Kakao
100 g geh. Vollmilchschokolade
1 Päckchen Trockenhefe
Verwenden Sie Vollmilch- oder Zartbitterschokolade.
Wenn Sie den Teig nach dem Kneten mit 1 EL
Milch bestreichen, wird die Kruster dunkler.
Süßes Brot
300 ml Wasser/Milch
2 EL Butter
2 Eier
1,5 TL Salz
1,5 EL Honig
600 g Mehl Type 550
1 Päckchen Trockenhefe
Programm 5 Express
Weißbrot Express
360 ml Wasser
5 EL Öl
4 TL Zucker
4 TL Salz
630 g Weizenmehl Typ 405
1 Päckchen Trockenhefe
Pfeffer-Mandel-Brot
300 ml Wasser
540 g Mehl Type 550
1 TL Salz
1 TL Zucker
2 EL Butter
100 g Mandelblättchen (geröstet)
1 EL eingelegte grüne Pfefferkörner
3/4 Päckchen Trockenhefe
Möhrenbrot
330 ml Wasser
1,5 EL Butter
600 g Mehl Typ 550
90 g fein zerkleinerte Möhren
2 TL Salz
1,5 TL Zucker
1 Päckchen Trockenhefe
Programm 6 Teig (kneten)
Pizzateig (für 2 Pizzen)
300 ml Wasser
1 EL Olivenöl
3/4 TL Salz
2 TL Zucker
450 g Weizenmehl Type 405
1 Päckchen Trockenhefe
Vollkornpizzateig
300 ml Wasser
1 EL Olivenöl
3/4 TL Salz
1 EL Honig
450 g Weizenvollkornmehl
50 g Weizenkeime
1 Päckchen Trockenhefe
Rollen Sie den Teig aus und lassen Sie ihn
ca. 10 Minuten gehen. Belegen Sie den Teig nach
Wunsch und backen Sie den belegten Pizzateig bei
180°C ca. 20 Minuten.
Kleie-Brötchen
200 ml Wasser
50 g Butter
3/4 TL Salz
1 Ei
3 EL Zucker
500 g Mehl Type 1050
50 g Weizenkleie
1 Päckchen Trockenhefe
- 8 -
Page 100

Brezeln
200 ml Wasser
1/4 TL Salz
360 g Mehl Type 405
1/2 TL Zucker
1/2 Päckchen Trockenhefe
Formen Sie den Teig zu Brezeln. Anschließend bestreichen Sie die Brezeln mit 1 verquirlten Ei und
streuen grobes Salz darüber (für ca. 12 Brezeln
insgesamt 1-2 EL grobes Salz). Die Brezeln bei ca.
230°C ca. 15-20 Minuten backen.
Französische Baguettes
300 ml Wasser
1 EL Honig
1 TL Salz
1 TL Zucker
540 g Mehl Typ 550
1 Päckchen Trockenhefe
Formen Sie Laibe aus dem Teig und schneiden die
Oberseite der geformten Baguettes schräg an. Lassen Sie den Teig für ca. 30-40 Minuten gehen. Bei
ca. 175°C ca. 25 Minuten backen.
Programm 7 Nudelteig
5 Eier (Zimmertemperatur)
oder 300 ml Wasser
250 g Weichweizenmehl Type 405
250 g Hartweizenmehl Type 1050
Buttermilchbrot (Typ 2)
250 ml Buttermilch
130 ml Wasser
600 g Weizenmehl Type 1050
60 g Roggenmehl Type 997
1,5 TL Salz
1 Päckchen Trockenhefe
Joghurtbrot
250 ml Wasser oder Milch
150 g Joghurt
1 TL Salz
1 TL Zucker
500 g Mehl Type 550
3/4 Päckchen Trockenhefe
Quarkbrot
200 ml Wasser/Milch
3 EL Öl
260 g Quark (40% Fettgehalt)
600 g Weizenmehl
1,5 TL Salz
1,5 TL Zucker
1 Päckchen Trockenhefe
Programm 9 Glutenfrei
Hinweis:
Wenn Sie glutenfreie Brote backen wollen, dann reinigen Sie die Backform, die Knethaken und das Gerät
besonders gründlich. Schon kleine Restmengen an
Mehlstaub können bei glutenempfindlichen Menschen
eine allergische Reaktion hervorrufen.
Programm 8 Buttermilchbrot
Buttermilchbrot (Typ 1)
350 ml Buttermilch
2 EL Butter
2 TL Salz
3 EL Zucker
600 g Weizenmehl Type 1050
1 Päckchen Trockenhefe
Glutenfreies Weißbrot
570 ml warmes Wasser (ca. 40°C)
30 g weiche Butter
700 g glutenfreie Mehlmischung
(z.B. „Mix B Weißbrot III“ von Schär)
1
/2TL Salz
2 Päckchen Trockenhefe
- 9 -
 Loading...