


COMBINATION CUTTER PSFS 250 A1
COMBINATION CUTTER
Operation and Safety Notes
Translation of original operation manual
KOMBIFRÄS
Bruksanvisning och säkerhetsanvisningar
Översättning av bruksanvisning i original
KOMBI-FRÄSER
Bedienungs- und Sicherheitshinweise
Originalbetriebsanleitung
IAN 79032
YHDISTELMÄJYRSIN
Käyttö- ja turvaohjeet
Alkuperäisen käyttöohjeen käännös
KOMBI-FRÆSER
Brugs- og sikkerhedsanvisninger
Oversættelse af den originale driftsvejledning

Before reading, unfold the page containing the illustrations and familiarise yourself with all functions of the
device.
Käännä ennen lukemista kuvallinen sivu esiin ja tutustu seuraavaksi laitteen kaikkiin toimintoihin.
Vik ut bildsidan och ha den till hands när du läser igenom anvisningarna och gör dig bekant med
apparatens / maskinens funktioner.
Før du læser, vend siden med billeder frem og bliv bekendt med alle apparatets funktioner.
Klappen Sie vor dem Lesen die Seite mit den Abbildungen aus und machen Sie sich anschließend mit allen
Funktionen des Gerätes vertraut.
GB / IE Operation and Safety Notes Page 5
FI Käyttö- ja turvaohjeet Sivu 13
SE Bruksanvisning och säkerhetsanvisningar Sidan 21
DK Brugs- og sikkerhedsanvisninger Side 29
DE / AT / CH Bedienungs- und Sicherheitshinweise Seite 37

13
12
11
10
9
1
4
5
6
2
3
7
8
A C
4
D
18
17
151419
16
B
E
2
F
5
G H
8 10
11
10
7
13
I
19


Table of contents
Introduction
Intended use ........................................................................................................................................Page 6
Features ...............................................................................................................................................Page 6
Scope of delivery ............................................................................................................................... Page 6
Technical Data ....................................................................................................................................Page 6
General safety advice for electrical power tools
1. Workplace safety ...........................................................................................................................Page 7
2. Electrical safety ..............................................................................................................................Page 7
3. Personal safety ...............................................................................................................................Page 7
4. Careful handling and use of electrical power tools .................................................................... Page 8
5. Service ............................................................................................................................................Page 8
Additional safety information for grinders and polishers .................. Page 9
Additional safety information for routers ......................................................... Page 9
Operation
Switching on / of f ................................................................................................................................Page 9
Setting the speed ................................................................................................................................ Page 9
Changing tools....................................................................................................................................Page 9
Installing sanding belts .......................................................................................................................Page 10
Setting the working depth ..................................................................................................................Page 10
Plunge cutting ......................................................................................................................................Page 10
Pivot handle .........................................................................................................................................Page 10
Using the rip fence ..............................................................................................................................Page 10
Cutting circles......................................................................................................................................Page 10
Dust extraction ....................................................................................................................................Pa ge 11
Continuous tool operation .................................................................................................................Pa g e 11
Maintenance and Cleaning ............................................................................................. Pa ge 11
Service ............................................................................................................................................... P a g e 11
Warranty ........................................................................................................................................Pa g e 11
Disposal ............................................................................................................................................ Page 12
Declaration of Conformity / Manufacturer........................................................Pa g e 12
5 GB/IE

Introduction
Combination Cutter PSFS 250 A1
Introduction
Congratulations on your new product. You have
selected a high quality product. The instructions for
use are a part of this product. They contain important information about safety, use and disposal. Before using the product, please familiarise yourself
with all the operating and safety instructions. Only
use the product as described and for the indicated
purpose. When passing this product on to others
please be sure to also include all of its documentation.
Intended use
This device - used with the recommended tools and
accessories - is designed to work on materials such
as wood, plastic, light metal sheets, fibreboards and
wall tiles. It is also suitable for grinding using various
cylindrical grinders and for milling using milling bits
with a shank diameter of 4.8 mm. Any other use or
modifying the device is considered improper use and
involves considerable accident risks. The manufacturer is not liable for damage caused by improper
use. Not intended for commercial use.
Features
1
Locking switch
2
Variable speed control
3
Mains lead
4
ON / OFF switch
5
Wing setscrew
6
Dust extraction nozzle
7
Base plate
8
Collet
9
Wing bolt (base plate)
10
Clamping nut
11
Spindle lock button
12
Louvres
13
Stop plate
14
Open-ended spanner
15
Circle / parallel cutting guide
16
Sanding belts
6 GB/IE
17
Slot cutter (HSS)
18
Multi-purpose cutter (HSS)
19
Adapter (dust extraction nozzle)
Scope of delivery
1 Combination cutter PSFS 250 A1
1 Parallel fence with circle cutting function
1 Dust extraction adapter
1 Open-ended spanner
1 Multi-purpose cutter (HSS)
1 Slot cutter (HSS)
1 Sanding belt tensioning arbor
6 Sanding belts
1 Operating instructions
Technical Data
Rated power input: 250 W
Voltage: 230 V∼, 50 Hz
Idle speed (n
Collet capacity: 4.8 mm
Protection class: II /
Noise and vibration data:
Noise value determined according to EN 60745.
The A-rated noise level of the electric tool is typically:
Sound pressure level: 75 dB(A)
Sound power level: 86 dB(A)
Uncertainty K: 3 dB(A)
Wear hearing protection!
Evaluated acceleration, typically:
Hand- / arm vibration a
Uncertainty K = 1.5 m / s
these instructions was measured in accordance
with an EN 60745 standardised measurement process and can be used to compare equipment. The
vibration emission value specified can also serve as
a preliminary assessment of the exposure.
The vibration level will change according to the application of the electrical tool and in some cases,
may exceed the value specified in these instructions.
): 10.000–28.000 rpm
0
< 2.5 m / s
h
2
2
The vibration level specified in

Introduction / General safety advice for electrical power tools
Regularly using the electric tool in such a way may
make it easy to underestimate the vibration.
Note: If you wish to make an accurate assessment
of the vibration loads experienced during a particular period of work, you should also take into account
the intervening periods of time when the device is
switched off or is running but is not actually in use.
This can result in a much lower vibration load over
the whole of the work period.
General safety advice for
electrical power tools
Please read all safety
information and instructions. Failure to
observe the safety information and instructions can
result in electric shock, fire and / or serious injury.
For future reference keep all the safety
advice and instructions in a safe place.
The term “electrical tool” used in the safety advice
refers to electrical tools powered by mains electricity (by means of a mains lead) and electrical tools
powered by rechargeable batteries (without a
mains lead).
1. Workplace safety
a) Keep your working area clean and
well lit. Untidy or poorly lit working areas
can lead to accidents.
b) Do not work with the device in poten-
tially explosive environments, which
contain inflammable liquids, gases or
dusts. Electrical power tools create sparks
which can ignite dusts or fumes.
c) Keep children and other people away
whilst operating the electrical tool.
Distractions can cause you to lose control of
the device.
2. Electrical safety
a) The mains plug on the device must
match the mains socket. The plug must
not be modified in any way. Do not
use an adapter plug with devices fitted
with a protective earth. Unmodified plugs
and matching sockets reduce the risk of electric shock.
b) Avoid touching grounded surfaces
such as pipes, radiators, ovens, and
refrigerators. There is a higher risk of elec-
tric shock if your body is earthed.
c) Keep the device away from rain or
moisture. The penetration of water into the
electrical device increases the risk of an electric shock.
d) Do not use the mains lead for any pur-
pose for which it was not intended, e.g.
to carry the device, to hang up the device or to pull the mains plug out of the
mains socket. Keep the mains lead
away from heat, oil, sharp edges or
moving parts of the device. Damaged or
tangled cables increase the risk of an electric
shock.
e) When using electric power tools out-
doors always use extension cords
approved for outdoor use. The use of
an extension cable suitable for outdoor use
reduces the risk of electric shock.
f) Use a residual current device for pro-
tection if the operation of the electrical
power tool in a moist environment
cannot be avoided. The use of an residual
current operated device reduces the risk of
electric shock.
3. Personal safety
a) Remain alert at all times, watch what
you are doing and always proceed
with caution. Do not use the device if
you are tired or under the influence
of drugs, alcohol or medication. One
moment of carelessness when using the electric
7 GB/IE

General safety advice for electrical power tools Additional safety … / Additional safety information for routers / Operation
tool can lead to serious injury.
b) Always wear protective equipment
and wear safety glasses. Depending on
the type of electrical tool and its application,
wearing personal protective equipment such
as ear protection, dust mask or work gloves
reduces the risk of injuries.
c) Avoid unintentional operation of the
device. Check that the electrical power
tool is switched off before you connect
it to the mains, pick it up or carry it.
Accidents can happen if you carry the device
with your finger on the ON / OFF switch or
with the device switched on.
d) Remove any setting tools or spanners
before you switch on the device. A tool
or spanner left attached to a rotating part of a
device can lead to injury.
e) Avoid placing your body in an unnat-
ural position. Keep proper footing
and balance at all times. By doing this,
you will be in a better position to control the
electrical power tool in unforeseen circumstanc
f) Wear suitable clothing. Do not wear
loose clothing or jewellery. Keep your
hair, clothing and gloves clear of moving parts. Loose clothing, jewellery or long
hair can become trapped in moving parts.
g) If vacuum dust extraction and collec-
tion devices are fitted, do not forget
to check that they are properly connected and used correctly. The use of
these devices reduces the hazard presented
by dust.
es.
4. Careful handling and use of
electrical power tools
is dangerous and must be repaired.
c) Pull the mains plug from the socket
before you make any adjustments to
the device, change accessories or when
the device is laid aside. This precaution is
intended to prevent you from unintentionally
starting the device.
d) Always ensure that electrical power
tools are kept out of reach of children
when not in use. Do not let anyone
use the device if he or she is not familiar with it or has not read the instructions and advice. Electrical power tools
are dangerous when they are used by
inexperienced people.
e) Maintain the device carefully. Check
that moving parts are working properly and move freely. Check for any
parts that are broken or damaged
enough to detrimentally affect the
functioning of the device. Have damaged parts repaired before you use
the device. Many accidents have their origins
in poorly maintained electrical power tools.
f) Keep cutting tools clean and sharp.
Carefully maintained cutting tools with sharp
cutting edges are less likely to jam and are
easier to control.
g) Use the electrical power tool, accesso-
ries, inserted tools etc. in accordance
with these instructions and advice,
and the stipulations for this particular
type of device. When doing this, take
the working conditions into consideration, as well as the task at hand. The
use of electrical power tools for purposes other
than those intended can lead to dangerous
situations.
a) Do not overload the device. Always
use an electrical power tool that is
intended for the task you are undertaking. By using the right electrical power
tool for the job, you will work more safely and
achieve a better result.
b) Do not use an electrical power tool if
its switch is defective. An electrical power
tool that can no longer be switched on and off
8 GB/IE
5. Service
a) Only have the equipment repaired by
qualified specialist personnel using
OEM spare parts. This ensures that the
safety of the device is maintained.

Additional safety … / Additional safety information for routers / Operation
Additional safety information
for grinders and polishers
POISONOUS DUSTS! The working of mate-
rials that can produce harmful / toxic dusts
presents a health risk for the operator and for
people located in the close vicinity.
Avoid sanding of paints containing lead or other
material detrimental to your health.
Do not work on materials containing asbestos.
Asbestos is considered carcinogenic.
Wear safety glasses and a dust protection mask!
Additional safety information
for routers
Hold the device by the insulated handle
surfaces as there is a danger of the
cutter striking the device’s mains
lead. Contact with a live wire could cause
metal parts of the device to become live and
lead to electric shock.
Only use cutting bits with the correct size shaft
diameter suitable for the speed of the electric tool.
Fix and secure the work piece to a
stable surface using clamps or other
means. If you only hold the work piece with
your hand or against your body, it will remain
unstable which could lead to a loss of control.
Operation
Never use the device for any purpose other than
the intended purpose and only use it with the original parts and accessories. The use of parts or accessories other than those recommended in the
operating instructions could lead to you suffering
an injury. Use only an extension cable that has
been completely unrolled and is undamaged with
a capacity of at least 5 A.
WARNING: Do not use this tool for the creation
of notches in the vicinity of installations or openings
with live electric cables or in walls behind which
live electric cables could potentially be laid. The bit
could conduct electricity into the tool and this could
involve the risk of electric shock to the operator.
Trigger the circuit breaker or remove the fuse in
order to disconnect the relevant electric circuit.
Attention: Always hold the tool on the plastic
housing and always wear safety goggles when
working with the tool.
Switching ON / OFF (see Fig. A)
Switching on:
Press the ON / OFF switch 4.
Switching off:
Release the ON / OFF switch 4.
Setting the speed (see Fig. B)
Turn the speed controller 2 in a clockwise
direction to increase the speed.
Turn the speed controller 2 in an anticlockwise
direction to reduce the speed.
Changing tools (see Fig. C)
Note: Only use combination cutter accessory
parts with a shaft diameter of ø 4.8 mm.
Hold the spindle lock button 11 pressed down.
Loosen the clamping nut 10 with the wrench 14
by turning in an anticlockwise direction.
Change the tool.
Block the spindle lock, tighten the clamping
10
nut
using the open-ended spanner 14.
Bits:
The bits included are intended for the following
applications (see Fig. D).
Multi-purpose cutter (HSS)
Application: wood, particle board, plastic
Slot cutter (HSS)
Application: wood, particle board, plastic
Sanding belts
Application: sanding wood
17
:
16
:
18
:
9 GB/IE

Operation Operation / Maintenance and Cleaning / Service / Warranty
Note: Please use suitable accessories available
from your speciality retailer to cut wall tiles.
Installing sanding belts
Install the sanding belts 16 as shown in Figure C.
Setting the working depth
(see Fig. E)
Loosen the wing bolt 5.
Slide the base plate 7 to the desired working
depth (to cut through completely set approx.
3.2 mm deeper than the material thickness).
The recommended maximum cutting depth for
wood is 13 mm.
Retighten the wing bolt 5.
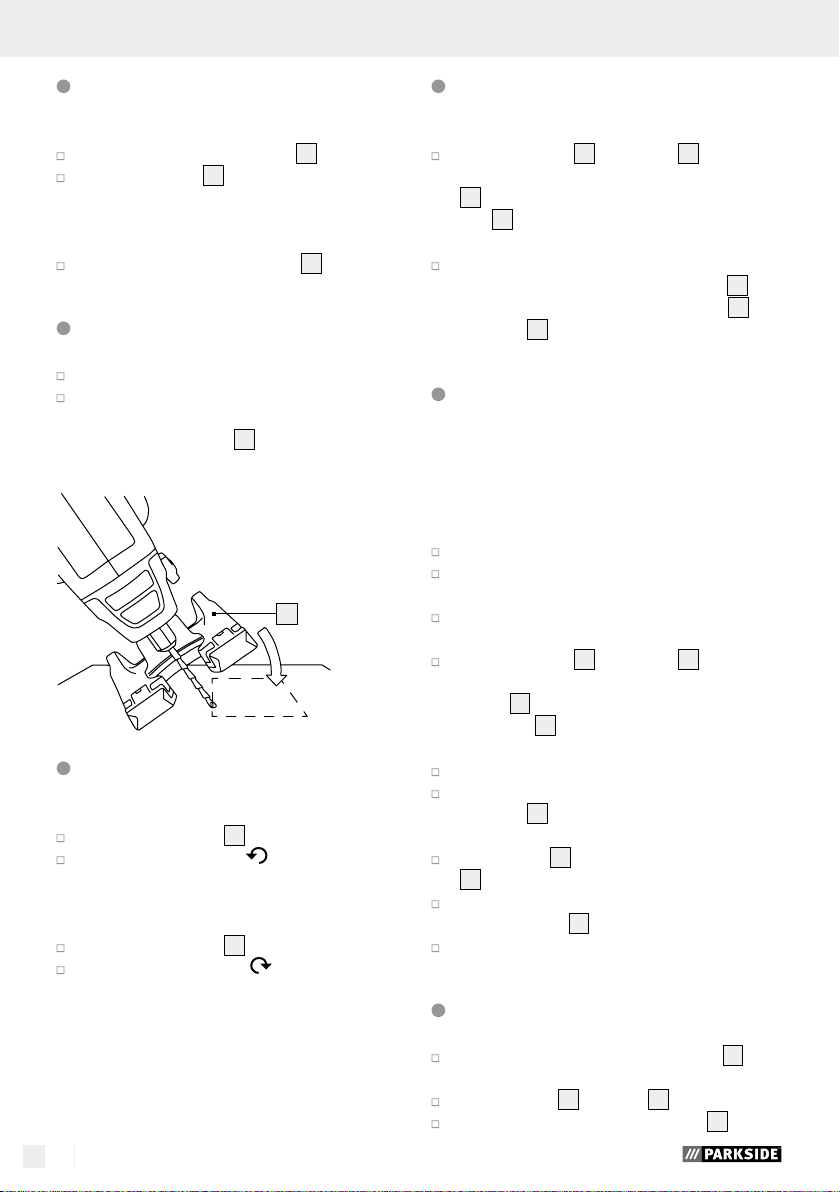
Plunge cutting
Insert the bit into the work piece at an angle
of 45°.
Slowly straighten the bit to an angle of 90° to
begin the cut.
Note: The base plate
material surface.
7
must be flush with the
7
Pivot handle (see Fig. F)
Pivot to horizontal
Press and hold the bevel stop 13.
Turn the handle counter-clockwise from ver-
tical to horizontal until the bevel stop locks in.
10 GB/IE
Pivot to vertical
Press and hold the bevel stop 13.
Turn the handle clockwise from horizontal
to vertical until the bevel stop locks in.
Using the rip fence (see Fig. G)
Loosen the wing bolts 9 on the base plate 7
and slide the guide bar for the circle- / rip
15
fence
tom of the base plate
facing down.
Position the tool the desired distance from the
edge of the work piece. Tighten the wing bolts
to secure the circle- / ripe fence
plate
through the two openings in the bot-
7
, with the rip fence
15
to the foot
7
.
Cutting circles (see Fig. H)
Note: the position of the guide hole depends on
the desired result, either inside or outside of the
edge of the circle: inside for holes, outside for
discs. The radius can be set from ca. 5 to 16 cm.
Make a circle on the work piece.
Mark the centre and drill a hole into the hole
(plunge cut).
Drill a guide hole on the edge of the circle
(plunge cut) (guide hole diameter 3 mm).
Loosen the wing bolts 9 in the foot plate 7
and slide the guide rod for the circle- / rip
fence set
tom of the base plate
facing down.
Insert the centring tip in the middle of the circle.
Adjust the distance of the circle- / rip fence set 15
so as to plunge the bit into the guide hole at
the edge of the circle.
Lock the base plate 7 by tightening the wing
bolts
Press and hold the ON / OFF switch 4 to
power on the unit.
Slowly push the unit forward.
15
through the two holes in the bot-
7
, with the centring tip
9
.
9

Operation / Maintenance and Cleaning / Service / Warranty
Dust extraction (see Fig. I)
The tool features a dust extraction nozzle 6
to vacuum off dust.
Insert the adapter 19 in the extraction nozzle 6.
Connect a vacuum cleaner to the adapter 19.
Continuous tool operation
Locking the ON / OFF switch 4:
Activate the ON / OFF switch 4.
Press the locking switch 1 and release the
ON / OFF switch
Unlocking the ON / OFF switch
Activate the ON / OFF switch 4 and release.
4
.
4
:
Maintenance and Cleaning
The device requires no maintenance.
Clean the unit promptly after use.
Clean the device with a dry cloth, never use
petrol, solvents or cleaning agents harmful to
plastic.
Always keep the vents clear.
Remove dust clinging to the sander with a brush.
pliance has been manufactured with care
and meticulously examined before delivery. Please retain your receipt as proof
of purchase. In the event of a warranty
claim, please make contact by telephone
with our Service Department. Only in this
way can a post-free despatch for your
goods be assured.
The warranty covers only claims for material and
maufacturing defects, but not for transport damage,
for wearing parts or for damage to fragile components, e.g. buttons or batteries. This product is for private use only and is not intended for commercial use.
The warranty is void in the case of abusive and improper handling, use of force and internal tampering not carried out by our authorized service branch.
Your statutory rights are not restricted in any way
by this warranty.
The warranty period will not be extended by repairs
made unter warranty. This applies also to replaced
and repaired parts. Any damage and defects extant
on purchase must be reported immediately after
unpacking the appliance, at the latest, two days after
the purchase date. Repairs made after the expiration
of the warranty period are subject to payment.
Service
Always have your
device repaired by qualified specialist
personnel using only original manu-
facturer parts. This will maintain the safety
of the device.
If the plug or mains
lead needs to be replaced, always
the work performed by the manufac-
turer or its service centre. This will maintain
the safety of the device.
Warranty
The warranty for this appliance is for 3
years from the date of purchase. The ap-
have
GB
Service Great Britain
Tel.: 0871 5000 720
(0,10 GBP/Min.)
e-mail: kompernass@lidl.co.uk
IAN 79032
IE
Service Ireland
Tel: 1890 930 034
(0,08 EUR/Min. (peak)
0,06 EUR/Min. (off peak))
e-mail: kompernass@lidl.ie
IAN 79032
11 GB/IE

Disposal / Declaration of Conformity / Manufacturer Sisällysluettelo
Disposal
The packaging is made of environmentally
friendly materials, which may be disposed
through your local recycling facilities.
Do not dispose of electrical
power tools with household
rubbish!
In accordance with European Directive 2002 / 96 / EC
on waste electrical and electronic equipment and
its implementation into national legislation, worn
out electrical power tools must be collected separately and recycled in an environmentally friendly
fashion.
Contact your local refuse disposal authority for
more details on the disposal of worn out electrical
devices.
Declaration of Conformity /
Manufacturer
We, Kompernaß GmbH, the person responsible for
documents: Mr Semi Uguzlu, Burgstr. 21, D-44867
Bochum, Germany, hereby declare this product to
comply with the following standards, normative
documents and EC Directives:
EN 55014-1/A2:2011
EN 55014-2/A2:2008
EN 61000-3-2/A2:2009
EN 61000-3-3:2008
Type / Description of product:
Combination Cutter PSFS 250 A1
Date of manufacture: 11–2012
Serial number: IAN 79032
Bochum, 30.11.2012
Semi Uguzlu
- Quality Manager -
We reserve the right to make technical modifications
in the interest of product advancement.
Machinery Directive
(2006 / 42 / EC)
EC Low Voltage Directive
(2006 / 95 / EC)
Electromagnetic Compatibility
(2004 / 108 / EC)
RoHS Directive
(2011 / 65 / EC)
harmonised standards applied:
EN 60745-1/A11:2010
EN 60745-2-4/A11:2011
EN 60745-2-17:2010, EN 62233:2008
12 GB/IE

Aluksi
Määräystenmukainen käyttö .............................................................................................................. Sivu 14
Tuotteen osat ........................................................................................................................................ Sivu 14
Toimituksen sisältö ............................................................................................................................... Sivu 14
Tekniset tiedot ......................................................................................................................................Sivu 14
Sähkötyökaluja koskevat yleiset turvaohjeet
1. Työpaikkaturvallisuus ...................................................................................................................... Sivu 15
2. Sähköturvallisuus ............................................................................................................................. Sivu 15
3. Henkilöiden turvallisuus .................................................................................................................. Sivu 15
4. Sähkötyökalujen huolellinen käsittely ja käyttö ............................................................................ Sivu 16
5. Huolto...............................................................................................................................................Sivu 16
Lisäturvaohjeita hiojille ja kiillottajille .................................................................. Sivu 16
Lisäturvaohjeita yläjyrsijöille ........................................................................................ Sivu 17
Käyttö
Päälle- / päältäkyt kentä ......................................................................................................................Sivu 17
Kierrosluvun asettaminen .................................................................................................................... Sivu 17
Työkalun vaihtaminen .......................................................................................................................... Sivu 17
Hiontanauhojen asentaminen ............................................................................................................. Sivu 17
Työstösyvyyden asettaminen .............................................................................................................. Sivu 17
Uppoleikkauksen suorittaminen .........................................................................................................Sivu 18
Kahvan kääntäminen ........................................................................................................................... Sivu 18
Rinnakkaisohjaimen käyttö ................................................................................................................. Sivu 18
Ympyröiden sahaaminen ....................................................................................................................Sivu 18
Pölyn imuroiminen ................................................................................................................................ Sivu 18
Laitteen jatkuva käyttö ........................................................................................................................ Sivu 18
Huolto ja puhdistus ................................................................................................................. Sivu 19
Huoltopalvelu .............................................................................................................................. Sivu 19
Takuu ................................................................................................................................................... Sivu 19
Hävittäminen ............................................................................................................................... Sivu 19
Vaatimustenmukaisuus- vakuutus / Valmistaja ............................................. Sivu 20
13 FI

Yhdistelmäjyrsin PSFS 250 A1
Q
Aluksi
Onnittelemme sinua hyvästä valinnastasi! Valitsit erittäin korkealaatuisen tuotteen. Käyttöohje on osa tätä
tuotetta. Se sisältää tärkeitä turvallisuusohjeita sekä
käyttöä ja hävitystä koskevia ohjeita. Tutustu ennen
tuotteen käyttöä huolellisesti kaikkiin käyttöja turvallisuusohjeisiin. Käytä tuotetta ainoastaan ohjeen
mukaan ja siinä mainittuihin tarkoituksiin. Anna kaikki ohjeet mukaan, jos luovutat tuotteen edelleen.
Määräystenmukainen
käyttö
Tämä laite on tarkoitettu – sopivilla työkaluilla ja
lisätarvikkeilla varustettuna – materiaalien kuten
puun, muovin, ohutmetallilevyjen, kuitulevyjen ja
seinälaattojen työstöön. Se soveltuu myös hiontaan
erilaisilla pyöröhiontalaitteilla sekä jyrsintään jyrsintäpaloilla, joiden varren läpimitta on 4,8 mm.
Kaikki muu käyttö tai laitteen muuttaminen ei ole
määräystenmukaista ja se voi aiheuttaa huomattavia
vaaratilanteita. Valmistaja ei ota vastuuta vahingoista,
jotka johtuvat määräystenvastaisesta käytöstä. Ei
sovellu ammattimaiseen käyttöön.
Tuotteen osat
1
Lukituskytkin
2
Portaaton kierrosluvunsäädin
3
Verkkokaapeli
4
Virtakytkin
5
Siipisäätöruuvi
6
Imuistukka
7
Tukilevy
8
Kiristyspihdit
9
Siipiruuvi (tukilevy)
10
Kiristysmutteri
11
Karan lukituspainike
12
Tuuletusraot
13
Vastelevy
14
Kiintoavain
14 FI
15
Pyörö- / rinnakkaisleikkaussuoja
16
Hiontanauhat
17
Urajyrsin (HSS)
18
Monitoimijyrsin (HSS)
19
Sovitin (imuistukka)
Toimituksen sisältö
1 yhdistelmäjyrsin PSFS 250 A1
1 rinnakkaisvaste, jossa pyöröleikkaustoiminto
1 pölynimusovitin
1 kiintoavain
1 monitoimijyrsin (HSS)
1 urajyrsin (HSS)
1 kiinnityskara hiontaan
6 hiontanauhaa
1 käyttöohje
Tekniset tiedot
Nimellisottoteho: 250 W
Jännite: 230 V∼, 50 Hz
Tyhjäkäyntikierrosluku (n
Työkalun kiinnitys: 4,8 mm
Kotelointiluokka: II /
Melu- ja tärinätiedot:
Melun mittausarvo laskettu EN 60745 standardin
mukaisesti. Sähkötyökalun A-mitattu melutaso on
tyypillisesti:
Äänenpainetaso: 75 dB(A)
Äänitehotaso: 86 dB(A)
Epävarmuus K: 3 dB(A)
Käytä kuulosuojaimia!
Arvioitu kiihtyvyys, tyypillisesti:
Käteen ja käsivarteen kohdistuva värinä a
Epävarmuus K = 1,5 m / s
rähtelytaso on määritetty EN 60745 -standardissa
normitetulla mittausmenetelmällä ja sitä voidaan
käyttää laitevertailussa. Mainittua värähtelyarvoa
voidaan käyttää myös altistumisen alustavaan arviointiin.
): 10.000–28.000 / min
0
< 2,5 m / s
2
h
Näissä ohjeissa ilmoitettu vä-
-1
2

Aluksi / Sähkötyökaluja koskevat yleiset turvaohjeetAluksi
Värähtelytaso muuttuu sähkötyökalun käytön mu
ja se saattaa joissakin tapauksissa ylittää tässä ohjeessa mainitun arvon. Värähtelyrasitusta saatetaan
aliarvioida, jos sähkötyökalua käytetään säännöllisesti tällä tavalla.
Huomio: Liikekuormituksen arvioimiseksi tietyn
työajan kestäessä on huomioitava myös ajat, jolloin
laite on sammutettuna, tai ajat, jolloin laite on käynnissä, mutta ei työkäytössä. Tämä saattaa vähentää
merkittävästi liikerasitusta kokonaistyöskentelyajan
kestäessä.
Sähkötyökaluja koskevat
kaan
yleiset turvaohjeet
Lue kaikki turva- ja muut
ohjeet! Turva- ja muiden ohjeiden laiminlyönti
voi aiheuttaa sähköiskun, tulipalon ja / tai vakavia
loukkaantumisia.
Säilytä kaikki turva- ja muut ohjeet tulevaa
tarvetta varten!
Turvallisuusohjeissa käytetty käsite ”sähkötyökalu“
koskee verkkokäyttöisiä sähkötyökoneita (verkkojohdolla) ja akkukäyttösisiä sähkötyökoneita (ilman
johtoa).
1. Työpaikkaturvallisuus
2. Sähköturvallisuus
a) Laitteen pistokkeen pitää sopia pisto-
rasiaan. Pistoketta ei saa muuttaa
millään tavalla. Älä käytä adapteria
yhdessä suojamaadoitettujen laitteiden
kanssa. Alkuperäinen pistoke ja sopivat pis-
torasia vähentävät sähköiskuvaaraa.
b) Vältä kosketusta maadoitettuihin pin-
toihin, kuten putkiin, lämpöpattereihin, liesiin sekä jääkaappeihin. Vaarana
on saada sähköisku, jos kehosi on maadoitettu.
c)
Älä pidä laitetta sateessa tai muussa
kosteudessa. Veden pääsy laitteeseen lisää
sähköisku vaaraa.
d) Älä kanna laitetta riiputtamalla sitä
kaapelista ja vedä kaapeli irti pistorasiasta pitämällä kiinni pistokkeesta.
Älä jätä
älä päästä siihen öljyä, varo teräviä
reunoja sekä laitteen pyöriviä osia. Vial-
liset tai kietoutuneet kaapelit lisäävät riskiä saada
sähköisku.
e) Jos työskentelet ulkotiloissa, käytä
silloin jatkokaapelia, jonka käyttö on
sallittu myös ulkotilaan. Ulkotilaan sovel-
tuva kaapeli vähentää riskiä saada sähköisku.
f) Jos sähkötyökalua joudutaan käyttä-
mään kosteassa ympäristössä, on
käytettävä vikavirtakytkintä. Vikavirta-
kytkimen käyttö pienentää sähköiskun vaaraa.
kaapelia kuumaan paikkaan,
a) Pidä työskentelypaikka puhtaana ja
hyvin valaistuna. Epäjärjestys ja huono
valaistus voivat johtaa tapaturmiin.
b) Älä käytä laitetta räjähdysvaaralli-
sessa ympäristössä, jossa säilytetään
helposti syttyviä nesteitä, kaasuja tai
jossa kehittyy pölyä. Sähkötyökalut kehit-
tävät kipinöintiä, joka voi sytyttää pölyn tai
höyryn.
c) Lapsien ja asiattomien henkilöiden
läsnäolo työpaikalla laitteen ollessa
käynnissä ei ole sallittua. Voit helposti
menettää kontrollin laitteeseen.
3. Henkilöiden turvallisuus
a) Ole aina tarkkaavainen, tarkista aina,
mitä teet ja toimi järkevästi sähkölaitteilla työskennellessäsi. Älä käytä
laitetta, jos olet väsynyt, käyttänyt
huumeita, alkoholia tai lääkkeitä.
Epätarkkaavaisuus laitetta käytettäessä voi
aiheuttaa vaikeita loukkaantumisia.
b) Käytä henkilökohtaisia turvavarustei-
ta ja suojalaseja aina. Henkilökohtaisen
suojavarustuksen kuten kuulosuojaimen,
pölynaamarin tai työkäsineiden käyttö sähkötyökalun käytöstä riippuen pienentää loukkaantumisriskiä.
15 FI

Sähkötyökaluja koskevat yleiset turvaohjeet / Lisäturvaohjeita hiojille ja kiillottajille Lisäturvaohjeita yläjyrsijöille / Käyttö
c) Varo käynnistämästä laitetta vahin-
gossa. Varmista, että sähkötyökalu
on kytketty pois päältä, ennen kuin
liität sen pistorasiaan, nostat sen tai
kannat sitä. Tapaturmat ovat mahdollisia,
jos sormesi on laitetta kantaessasi virtakytki-
mellä tai laite on kytketty päälle.
d) Poista kaikki työkalut ja ruuviavaimet
paikalta ennen kuin kytket laitteen.
Pyörivässä laiteosassa oleva työkalu tai avain
voi johtaa tapaturmaan.
e) Vältä työskentelemästä epätavalli-
sessa asennossa. Asetu tukevaan
asentoon ja pysyttele koko ajan tasa-
painossa. Pystyt silloin hallitsemaan laitteen
erityisesti yllättävissä tilanteissa.
f) Käytä sopivaa vaatetusta. Älä käytä
löysiä vaatteita äläkä pidä koruja.
Hiukset, vaatteet ja käsineet on pidet-
tävä etäällä liikkuvista osista. Löysät
vaatteet, korut ja avonaiset hiukset voivat jäädä
kiinni liikkuviin osiin.
g) Jos laitteeseen asennetaan pölynimu-
ri- ja lastunkeruulaite, varmistu sitä
ennen, että osat on liitetty ja niitä käy-
tetään oikein. Näiden laitteiden liittäminen
vähentää pölystä aiheutuvia vaaroja.
Älä anna henkilöiden käyttää laitetta,
jos he eivät tunne sitä tai eivät ole lukeneet näitä käyttöohjeita. Sähkötyöka-
lut ovat vaarallisia, jos kokemattomat henkilöt
käyttävät niitä.
e) Hoida laitetta huolellisesti. Tarkasta,
toimivatko sen liikkuvat osat moitteettomasti ja että ne eivät jumitu;
tarkasta, onko joku osa katkennut tai
murtunut tai vahingoittunut niin, että
se haittaa laitteen toimintaa. Korjauta
vialliset osat aina ennen kuin käytät
laitetta. Moni tapaturma johtuu huonosti
huolletuista sähkötyökaluista.
f) Pidä terät terävinä ja puhtaina. Huolella
hoidetut leikkuuterät terävine leikkuureunoineen
eivät juutu niin helposti kiinni työkappaleeseen
ja ne toimivat kevyemmin.
g) Käytä sähkötyökaluja, lisätarvikkei-
ta, käyttötarvikkeita jne. tässä esitettyjen määräysten mukaisesti ja aina
erityistä tyyppiä vastaavasti. Ota
huomioon työolosuhteet ja työ. Sähkö-
työkalujen käyttö muuhun kuin sille määrättyyn
tarkoitukseen voi aiheuttaa vaarallisia tilanteita.
5.
Huolto
4.
Sähkötyökalujen huolellinen
käsittely ja käyttö
a) Älä ylirasita laitetta. Käytä työssäsi
tätä työtä varten tarkoitettua sähkö-
työkalua. Sopivan sähkötyökalun kanssa
työskentelet paremmin ja varmemmin sen teho-
alueella.
b) Älä käytä mitään sähkötyökalua,
jonka käynnistyskytkin on viallinen.
Sähkötyökalu, jota ei voi enää kytkeä päälle
tai päältä, on vaarallinen ja se on korjattava.
c) Irrota pistotulppa pistorasiasta, ennen
kuin säädät laitetta, vaihdat sen va-
rusteita tai laitat sen varastoon. Nämä
varotoimenpiteet estävät sen, että laite käynnistyy
vahingossa.
d) Säilytä sähkötyökaluja silloin, kun nii-
tä ei käytetä, lasten ulottumattomissa.
16 FI
a) Anna laitteet huoltoliikkeen tai sähkö-
liikkeen korjattavaksi. Korjauksissa
s
aa käyttää vain alkuperäisiä varaosia
Laitteesi säilyy näin turvallisena.
Lisäturvaohjeita hiojille
ja kiillottajille
MYRKYLLISIÄ PÖLYJÄ! Vahingollisten /
myrkyllisten pölyjen työstäminen vaarantaa
käyttävän henkilön tai lähellä sijaitsevien henkilöiden terveyden.
Vältä lyijypitoisten maalien tai muiden tervey-
delle haitallisten materiaalien hiomista.
Asbestipitoista materiaalia ei saa työstää.
Asbestia pidetään syöpää aiheuttavana.
Käytä suojalaseja ja pölysuojainta.
.

Lisäturvaohjeita yläjyrsijöille
Pidä laitetta vain eristetyistä otepin-
noista, koska jyrsin saattaa osua
omaan verkkojohtoonsa. Kosketus jän-
nitteelliseen johtoon voi johtaa jännitteen myös
laitteen metalliosiin, jolloin seurauksena voi olla
sähköisku.
Käytä vain varren läpimitaltaan oikeankokoisia
jyrsimiä, jotka sopivat sähkölaitteen kierroslu-
kuun.
Kiinnitä ja varmista työkappale ruuvi-
puristimilla tai muilla tavoilla tukevaan
alustaan.
kiinni tai kehoasi vasten, se saattaa johtaa kont-
rollin menetykseen.
Käyttö
Käytä laitetta aina asiaankuuluvasti ja vain alkuperäisillä osilla/tarvikkeilla. Muiden kuin käyttöohjeessa
suositeltujen osien tai muiden varusteiden käyttö voi
aiheuttaa loukkaantumisriskin. Käytä vain täysin
auki kierrettyjä ja vahingoittumattomia jatkojohtoja,
joiden varauskyky on vähintään 5 A.
VAROITUS: Älä leikkaa laitteella reikiä asennusten
tai sähköäjohtavien johtojen läheisyyteen tai seiniin,
joiden takana on mahdollisesti sähköäjohtavia johtoja. Pala saattaisi johtaa sähköä laitteeseen, mikä
voisi aiheuttaa käyttäjälle sähköiskun vaaran.
Irrota suoja-automaatti tai poista sulake, jotta voit
kytkeä vastaavan sähköpiirin jännitteettömäksi.
Huomio: Pidä laitetta aina kuoren muovisesta
osasta kiinni ja käytä suojalaseja työstäessäsi
laitteella.
Jos pidät työkappaletta vain käsin
Kierrosluvun asettaminen
(ks. kuva B)
Käännä kierrosluvunsäädin 2 oikealle, jotta
voit nostaa kierroslukua.
Käännä kierrosluvunsäädintä 2 vasemmalle,
jotta voit pienentää kierroslukua.
Työkalun vaihtaminen
(ks. kuva C)
Huomautus: Käytä vain yhdistelmäjyrsijän tarvik-
keita, joiden varren ø on 4,8 mm.
Pidä karan lukituspainike 11 alaspainettuna.
Löysää kiristysmutteria 10 kiintoavaimella 14
kääntämällä sitä vastapäivään.
Vaihda työkalu.
Lukitse karan lukitus, vedä kiristysmutteri 10
kiintoavaimen avulla
Palat:
Laitteen mukana toimitetut palat sopivat seuraaviin
käyttötarkoituksiin (ks. kuva D):
Monitoimijyrsin (HSS)
Sopivuus: puu, kiinnityslevyt, muovi
Urajyrsin (HSS)
Sopivuus: puu, kiinnityslevyt, muovi
Hiontanauhat
Sopivuus: puun hiontaan
Huomautus: Käytä erikoisliikkeestä hankittuja
tarvikkeita seinälaattojen leikkaukseen.
14
kireälle.
18
:
17
:
16
:
Päälle- / päältäkytkentä
(ks. kuva A)
Päällekytkentä:
Paina virtakytkintä 4.
Päältäkytkentä:
Vapauta virtakytkin 4.
Hiontanauhojen asentaminen
Asenna hiontanauhat 16 kuvan C osoittamalla
tavalla.
Työstösyvyyden asettaminen
(ks. kuva E)
Löysää siipisäätöruuvia 5.
Työnnä tukilaatta 7 haluttuun työstösyvyyteen
17 FI

(täydellinen läpileikkaus 3,2 mm yli materiaalin
paksuuden). Suurin suositeltava puun leikkaussyvyyson 13 mm.
Vedä siipisäätöruuvi 5 jälleen kireälle.
Uppoleikkauksen
suorittaminen
Kiinnitä pala 45 asteen kulmassa työkappaleeseen.
Nosta pala hitaasti 90 asteen kulmassa ylös,
jotta voit aloittaa leikkaamisen.
Huomautus: Tukilaatan
materiaalin pinnassa.
7
täytyy sijaita tasaisesti
7
Kahvan kääntäminen
(ks. kuva F)
Vaakasuoraan asentoon kääntäminen
Paina vastelevyä 13 ja pidä sitä alaspainettuna.
Käännä kahvaa niin kauan vastapäivään
pystysuorasta vaakasuoraan asentoon, kunnes
vastelevy lukittuu.
7
tukilevyn
läpi, niin että rinnakkaisohjain näyttää alaspäin.
Asennoi työkalu haluttuun etäisyyteen työkap-
paleen reunasta. Vedä siipiruuvit
jotta voit kiinnittää pyörö-/rinnakkaisleikkaussuo-
jan
alasivulla olevan kahden aukon
15
tukilevyyn 7.
9
kireälle,
Ympyröiden sahaaminen
(ks. kuva H)
Huomautus: Ohjausreikä asetetaan ympyrän
reunan sisäpuolelle tai ulkopuolelle halutusta tuloksesta riippuen: sisäpuolelle reikää varten - ulkopuolelle pyörölevyä varten. Säde voidaan kiinnittää n.
5 - 16 cm:n välille.
Vedä ympyrä työkappaleeseen.
Merkitse ympyrän keskus ja poraa reikä tähän
(uppoleikkaukseen).
Poraa ohjausreikä ympyrän reunaan (uppoleik-
kaus) (ohjausreiän halkaisija 3 mm).
Löysää tukilevyn 7 siipiruuvit 9 ja työnnä
pyörö- / rinnakkaisleikkaussuojan
tukilevyn
läpi, niin että keskiökärki näyttää alaspäin.
Aseta keskiökärki ympyrän keskikohtaan.
Asennoi pyörö-/rinnakkaisleikkaussuojan 15
väli niin, että pala uppoaa ympyrän reunassa
olevaan ohjausreikään.
Lukitse tukilevy 7 kiristämällä siipiruuvit 9.
Kytke laite päälle painamalla virtakytkintä 4
ja pitämällä sitä alaspainettuna.
Työnnä laitetta hitaasti eteenpäin.
7
alasivulla olevan kahden aukon
15
ohjaustanko
Pystysuoraan asentoon kääntäminen
Paina vastelevyä 13 ja pidä sitä alaspainettuna.
Käännä kahvaa niin kauan myötäpäivään
vaakasuorasta pystysuoraan asentoon, kunnes
vastelevy lukittuu.
Rinnakkaisohjaimen käyttö
(ks. kuva G)
Löysää tukilevyn 7 siipiruuvit 9 ja työnnä
pyörö- / rinnakkaisleikkaussuojan
18 FI
15
ohjaustanko
Pölyn imuroiminen (ks. kuva I)
Laite on varustettu imuistukalla 6 pölyn imu-
rointia varten.
Aseta sovitin 19 imuistukkaan 6.
Liitä pölynimuri sovittimeen 19.
Laitteen jatkuva käyttö
Lukitse virtakytkin 4:
Paina virtakytkintä 4.

Käyttö / Huolto ja puhdistus / Huoltopalvelu / Takuu / HävittäminenKäyttö
Paina sitten lukituskytkintä 1 ja vapauta
virtakytkin
Virtakytkimen lukituksen poistaminen
Paina virtakytkintä 4 ja vapauta se.
4
.
4
Huolto ja puhdistus
Laite on huoltovapaa.
Puhdista laite heti työskentelyn päätteeksi.
Käytä laitteen puhdistukseen kuivaa liinaa. Älä
missään tapauksessa käytä bensiiniä, liuottimia
äläkä puhdistusaineita, jotka syövyttävät muovia.
Pidä tuuletusaukot aina vapaina.
Poista kiinni tarttunut hiontapöly pensselillä.
Huoltopalvelu
Anna laitteen huolto-
toimenpiteet pätevien ammattihenki-
löiden tehtäväksi. Käytä ainoastaan
alkuperäisiä varaosia. Laitteen käyttö
pysyy näin turvallisena.
Laitteen pistokkeen
tai sähköjohdon saa vaihtaa vain
laitteen valmistaja tai sen valtuuttama
huoltopalvelu. Laitteen käyttö pysyy näin
turvallisena.
Q
Takuu
Laitteen takuu on 3 vuotta ostopäivästä.
Laite on valmistettu huolellisesti ja tarkistettu tarkasti ennen toimitusta. Säilytä
ostokuitti todisteeksi takuun voimassaolosta. Ota takuutapauksessa puhelimitse
yhteyttä huoltopisteeseesi. Vain näin
voidaan taata tuotteesi maksuton lähettäminen huoltoon.
Väärä tai asiaton käyttö, väkivallan käyttö ja muiden
kuin valtuutetun huoltopisteen suorittamat korjaukset
aiheuttavat takuun raukeamisen. Tämä takuu ei
rajoita kuluttajan lakisääteisiä oikeuksia.
:
Takuukorjaus ei pidennä takuuaikaa. Tämä koskee myös
vaihdettuja ja korjattuja osia. Mahdollisista jo ostettaessa
olemassa olevista vahingoista ja puutteista on ilmoitettava välittömästi pakkauksesta purkamisen jälkeen, kuitenkin viimeistään kaksi päivää ostopäiväyksen jälkeen.
Takuuajan jälkeen suoritetut korjaukset ovat maksullisia.
FI
Huolto Suomi
Tel.: 010309 3582
e-mail: kompernass@lidl.fi
IAN 79032
Q
Hävittäminen
Pakkaus on valmistettu ympäristöystäväl-
lisistä kierrätettävistä materiaaleista.
Älä heitä sähkötyökaluja
talousjätteiden joukkoon!
Sähkölaitteiden hävittämistä koskevan EU-normin
2002 / 96 / EC mukaan käytöstä poistettuja sähkölaitteita hävitettäessä on huolehdittava materiaalien
erottelusta ja kierrätyksestä.
Lisätietoja antavat mm. paikalliset ympäristöviranomaiset.
Takuu koskee ainoastaan materiaali- ja valmistusvirheitä, ei kuitenkaan kuljetusvaurioita, kuluvia osia tai
herkästi vaurioituvien osien, esim. kytkinten tai akkujen
vaurioita. Tuote on tarkoitettu ainoastaan yksityiseen,
ei kaupalliseen käyttöön.
19 FI

Vaatimustenmukaisuusvakuutus / Valmistaja Innehållsförteckning
Q
Vaatimustenmukaisuus-
vakuutus / Valmista ja
Me, Kompernaß GmbH, dokumentoinnista vastaava:
herra Semi Uguzlu, Burgstr. 21, D-44867 Bochum,
Saksa, vakuutamme täten, että tämä tuote vastaa
seuraavia standardeja, normatiivisia dokumentteja
ja EY-direktiivejä
Konedirektiivi
(2006 / 42 / EC)
Pienjännitedirektiivi
(2006 / 95 / EC)
Elektromagneettista yhteensopivuutta
koskevat direktiivit
(2004 / 108 / EC)
RoHS Direktiivi
(2011 / 65 / EC)
Sovelletut harmonisoidut normit
EN 60745-1/A11:2010
EN 60745-2-4/A11:2011
EN 60745-2-17:2010, EN 62233:2008
EN 55014-1/A2:2011
EN 55014-2/A2:2008
EN 61000-3-2/A2:2009
EN 61000-3-3:2008
Tyyppi / Laitekuvaus:
Yhdistelmäjyrsin PSFS 250 A1
Date of manufacture (DOM): 11–2012
Sarjanumero: IAN 79032
Bochum, 30.11.2012
Semi Uguzlu
- Laatumanageri -
Pidätämme oikeuden muutoksiin.
20 FI

Inledning
Ändamålsenlig användning ..............................................................................................................Sidan 22
Utrustning ...........................................................................................................................................Sidan 22
Leveransomfattning ............................................................................................................................Sidan 22
Tekniska data .....................................................................................................................................Sidan 22
Allmänna säkerhetsanvisningar för elverktyg
1. Säkerhet på arbetsplatsen ...........................................................................................................Sidan 23
2. Elsäkerhet .......................................................................................................................................Sidan 23
3. Personsäkerhet ..............................................................................................................................Sidan 23
4. Omsorgsfull hantering och användning av elverktyg ................................................................Sidan 24
5. Service ...........................................................................................................................................Sidan 24
Kompletterande säkerhetsinformation för slip- och
polermaskiner ...........................................................................................................................Sidan 24
Kompletterande säkerhetsinformation för handöverfräsar ...........Sidan 25
Användning
Till / från ..............................................................................................................................................Sidan 25
Inställning av varvtal .........................................................................................................................Sidan 25
Verkt ygsbyte ......................................................................................................................................Sidan 25
Montering av slipband ......................................................................................................................Sidan 25
Inställning av arbetsdjup ...................................................................................................................Sidan 26
Instickssågning ...................................................................................................................................Sidan 26
Att svänga handtaget ........................................................................................................................Sidan 26
Användning av parallell styrning .....................................................................................................Sidan 26
Cirkelsågning .....................................................................................................................................Sidan 26
Dammsugning ....................................................................................................................................Sidan 26
Användning av maskinen i permanent drift .....................................................................................Sidan 27
Rengöring och underhåll .................................................................................................Sidan 27
Service ..............................................................................................................................................Sidan 27
Garanti .............................................................................................................................................Sidan 27
Avfallshantering ......................................................................................................................Sidan 28
Konformitetsdeklaration / tillverkarintyg ........................................................Sidan 28
21 SE

Kombifräs PSFS 250 A1
Q
Inledning
Vi gratulerar till köpet av den nya apparaten. Du
har köpt en högklassig produkt. Bruksanvisningen
hör till produkten. Den innehåller viktiga anvisningar för säkerhet, användning och avfallshantering.
Läs säkerhetsanvisningarna och monteringsanvisningen innan du använder produkten. Använd pro
dukten
endast enligt beskrivningen och endast för de angivna ändamålen. Se till att bruksanvisningen alltid
finns tillgänglig även vid vidare användning av
tredje man.
Ändamålsenlig
användning
Tillsammans med de rekommenderade verktygen
och tillbehören – är denna maskin avsedd för
bearbetning av material som trä, plast, lättmetall,
fiberplattor och kakel. Den lämpar sig också för
slipning med olika rundslipmaskiner samt för fräsning
med fräsbits med 4,8 mm skaftdiameter. Varje annan användning är icke ändamålsenlig och kan
förorsaka allvarliga olyckor. Tillverkaren ansvarar inte
för skador som förorsakas av icke ändamålsenlig
användning. Ej lämplig för yrkesmässig användning.
Utrustning
1
Spärrknapp
2
Steglös varvtalsregulator
3
Nätanslutningskabel
4
TILL- / FRÅN-brytare
5
Vingskruv (justerskruv)
6
Sugstuts
7
Fotplatta
8
Chuck
9
Vingskruv (fotplatta)
10
Spännmutter
11
Spindellåsknapp
12
Ventilationsöppningar
13
Svängspärr
22 SE
14
Skruvnyckel
15
Tillsats för cirkel- / parallellsnitt
16
Slipband
17
Spårfräs (HSS)
18
Universalfräs (HSS)
19
Adapter (sugstuts)
Leveransomfattning
1 kombifräs PSFS 250 A1
1 parallellanslag med funktion för cirkelsnitt
1 adapter för dammsugning
1 skruvnyckel
1 universalfräs (HSS)
1 spårfräs (HSS)
1 fräsdorn slipning
6 slipband
1 bruksanvisning
Tekniska data
Nominell effekt: 250 W
Spänning: 230 V∼, 50 Hz
Tomgångsvarvtal (n0): 10.000–28.000 / min
Verktygshållare för: 4,8 mm
Skyddsklass: II /
Buller- och vibrationsinformation:
Mätvärden för buller fastställda enligt EN 60745.
Elverktygets A-värde för bullernivå är typiskt:
Ljudtryck: 75 dB(A)
Ljudnivå: 86 dB(A)
Osäkerhet K: 3 dB(A)
Använd hörselskydd!
Vägd acceleration, typisk:
Vibration hand och arm a
Osäkerhet = 1,5 m / s
2
< 2,5 m / s
h
2
Den vibrationsnivå som anges i
dessa anvisningar har uppmäts enligt en i EN 60745
standardiserad mätmetod och kan används som
jämförelse för olika verktyg. Det angivna vibrations
missionsvärdet kan även användas för en inledan
bedömning av avbrottet.
-1
de
e-

Inledning / Allmänna säkerhetsanvisningar för elverktyg
Vibrationsnivån förändras beroende på elverktygets
användning och kan i vissa fall överstiga det i dessa
anvisningar angivna värdet. Vibrationsbelastningen
kan underskattas om elverktyget regelbundet används på ett sådant sätt.
Obs: För att kunna bestämma svängningsbelastningen bör även tiden under en bestämd arbetstid
beräknas under vilket verktyget är avstängt eller
startats utan att verkligen användas. Detta kan
reducera svängningsbelastningen väsentligt under
den totala arbetstiden.
Allmänna säkerhetsanvisningar
för elverktyg
Läs alla säkerhetsinstruk-
tioner och anvisningar! Felhantering vid till-
lämpning av nedan angivna säkerhetsinstruktioner
och anvisningar kan medföra elstötar, brand och /
eller allvarliga skador.
Förvara alla säkerhetsinstruktioner och
anvisningar för framtida behov!
Begreppet ”elverktyg” i säkerhetsinstruktionerna gäl
elverktyg med ström (med nätkabel) och batteridrivna
Elverktyg (utan nätkabel).
ler
1. Säkerhet på arbetsplatsen
a) Se till att arbetsplatsen är städad och
ombesörj ordentlig belysning. Oreda
och dålig belysning kan medföra olycksfall.
b) Använd inte verktyget i explosionsfar-
liga eller eldfarliga miljöer, t.ex. i närheten av brännbar vätska, gas eller
damm. Elverktyg genererar gnistor som kan
antända damm eller ångor.
c) Se till att barn och andra personer inte
riskerar skador när elverktyget används. Låt dig inte störas under användningen,
håll uppsikt hela tiden.
2. Elsäkerhet
a) Apparatkontakten måste passa i
uttaget. Kontakten får inte modifieras
på något sätt. Använd inte adapterkontakter tillsammans med jordade
verktyg. Originalkontakter och passande
uttag minskar risken för elstötar.
b) Undvik kroppskontakt med jordade
ytor, t.ex. rör, värmeelement, spis och
kylskåp. Ökad risk för elstötar föreligger
om din kropp är jordad.
c) Använd aldrig verktyget i regn eller
väta. Inträngande vatten i en elektrisk appa-
rat ökar risken för elstötar
d) Använd inte kabeln på annat sätt än
den är avsedd för, t.ex.
raten, hänga upp den. Dra inte i kabeln för att dra ut kontakten, greppa
tag i kontakten. Se till att kabeln inte
utsätts för värme, olja, skarpa kanter
eller rörliga apparatdelar. Skadad eller
invecklad kabel eller kontakt ökar risken för
elstötar.
e) Använd endast förlängningskablar
som är tillåtna för utomhusbruk om
verktyget används utomhus. Användning
av godkänd förlängningskabel för utomhusbruk
reducerar risken för elstötar.
f)
Använd jordfelsbrytare om elverktyget
måste användas i fuktig omgivning.
Användning av jordfelsbrytare minimerar risken
för elstötar.
.
att bära appa-
3. Personsäkerhet
a) Var alltid medveten om vad du gör
och använd sunt förnuft. Använd inte
verktyget om ni är trött eller påverkad
av droger, alkohol eller läkemedel.
Ett ögonblick av ouppmärksamhet kan medföra
skador under användningen.
b) Använd personlig skyddsutrustning
och alltid skyddsglas ögon. För att minska
riskerna för personskador bör man använda
lämplig personlig skyddsutrustning som hör-
23 SE

selskydd, andningsskydd eller arbetshandskar
när man använder elektriska verktyg.
c) Undvik att verktyget startar av miss
Kontrollera att elverktyget är avstängt
innan strömförsörjningen kopplas till
eller innan verktyget hanteras eller
transporteras. Bär inte verktyget med fing-
ret placerat på PÅ / AV-knappen eller se till att
verktyget inte är anslutet till strömförsörjningen.
Detta kan medföra olyckor.
d) Ta bort inställningsverktyg eller skruv-
nycklar innan du startar verktyget. Ett
verktyg eller en nyckel som befinner sig vid en
roterande maskindel kan medföra allvarliga
skador.
e) Undvik att arbeta med obekväm
kroppshållning. Se till att du står stadigt. Därmed kan du kontrollera verktyget
bättre om oförutsedda situationer skulle uppstå.
f) Använd alltid lämplig klädsel. Bär inte
vida klädesplagg eller smycken. Håll
håret, klädesplagg och handskar borta från roterande maskindelar. Löst sit-
tande klädesplagg, smycken eller hår kan fastna
i roterande maskindelar.
g) Kontrollera att dammsugare eller
uppsamlingsbehållare är korrekt
anslutna och används på rätt sätt.
Använd sådan utrustning för att minska förekommande damm och därmed förbundna risker.
tag.
d)
Placera ett elverktyg som inte används
utom räckhåll för barn. Låt inte personer använda verktyget utan att de
känner till användningen eller har läst
användningsinstruktionerna. Elverktyg
är farliga om oerfarna personer använder dem.
e) Ta hand om verktyget väl. Kontrollera
att rörliga delar fungerar utan problem
och inte kärvar, kontrollera även om
delar är brutna eller skadade eller
påverkar verktygets funktion negativt på något sätt. Reparera skadade
delar innan verktyget används. Många
olyckor har förorsakats av dåligt omhändertagna elverktyg.
f) Se till att arbetsplatsen är städad och
i ordning. Välskötta skärverktyg med skarpa
skärtrissor klämmer inte och är lättareatt föra
genom arbetsmaterialet.
g) Använd elverktyg, tillbehör, extra
verktyg osv. enligt dessa anvisningar
på det sätt som är föreskrivet för denna speciella verktygstyp. Ta hänsyn
till arbetsvillkoren och det arbete som
skall utföras. Användning av elverktyg på
annat sätt än föreskrivna anvisningar kan
medföra farliga situationer.
5. Service
4.
Omsorgsfull hantering och
användning av elverktyg
a) Överbelasta inte maskinen! Använd
rätt elverktyg för respektive arbete.
Med passande elverktyg blir arbetsresultatet
bättre och säkrare inom angivet effektområde.
b) Använd inte elverktyg där strömknap-
pen är skadad. Ett elverktyg som inte längre
kan startas och stoppas är farligt och måste
repareras.
c) Dra ut kontakten ur vägguttaget inn-
an du gör inställningar på verktyget,
byter tillbehörsdelar eller lägger undan
verktyget. Denna försiktighetsåtgärd förhin-
drar oavsiktlig start av verktyget.
24 SE
a) Låt endast behörig elektriker reparera
utrustningen och använd endast reservdelar i original. Därmed säkerställs
verktygets säkerhet.
Kompletterande
säkerhetsinformation för
slip- och polermaskiner
GIFTIGT DAMM! Bearbetning av skadligt/
giftigt damm är hälsofarligt för den person som
använder maskinen och för de personer som
befinner sig i närheten.
Undvik att slipa på blyhaltig färg eller andra
hälsovådliga material.

... / Kompletterande säkerhetsinformation för handöverfräsar / Användning... / Kompletterande säkerhetsinformation för slip- och polermaskiner
Material innehållande asbest får inte bearbetas.
Asbest kan förorsaka cancer.
Använd skyddsglasögon och lämplig damm-
skyddsmask!
Kompletterande säkerhetsinfor-
mation för handöverfräsar
Håll verktyget endast i de isolerade
handtagen, då fräsen kan träffa den
egna nätkabeln. Beröring med en spän-
ningsförande
metalldelar blir
stötar föreligger.
Använd endast fräsar med rätt skaftdiameter,
som är lämpliga för den elektriska apparatens
varvtal.
Spänn fast och säkra arbetsstycket
på ett stabilt underlag med hjälp av en
skruvtving eller på ett annat
du fast arbetsstycket endast
mot din kropp, saknas stabilitet, vilket kan leda
till att kontrollen förloras.
Användning
Använd aldrig apparaten för icke avsedda ändamål
och endast med original delar och tillbehör. Användning av apparaten med andra delar och tillbehör än
de som rekommenderas i bruksanvisningen kan
förorska personskador. Använd endast fullständigt
avlindade och oskadade förlängningskablar med
en kapacitet på minst 5 A.
VARNING: Använd denna apparat inte för att
tillverka ursparningar i närheten av installationer
eller öppningar med strömförande elkablar eller i
väggar, med eventuella bakomliggande strömförande elkablar. Verktygets bit kan komma att leda
in ström i verktyget, vilket för användaren innebär
risk för elektriska stötar.
Utlös automatsäkringen eller ta ut säkringen,
för att stänga av spänningen på beträffande
strömkrets.
OBS! Håll apparaten alltid i plastkåpan och använd
alltid skyddsglasögon när du arbetar med verktyget.
kabel kan medföra att produktens
strömförande. Risk för elektriska
sätt. Håller
med handen eller
Till / från (se bild A)
Påslagning:
Tryck på TILL / FRÅN -knappen 4.
Avstängning:
Släpp TILL / FRÅN-knappen 4.
Inställning av varvtal (se bild B)
Vrid varvtalsregulatorn 2 åt höger, för att höja
varvtalet.
Vrid varvtalsregulatorn 2 åt vänster, för att
minska varvtalet.
Verktygsbyte (se bild C)
Hänvisning: Använd endast tillbehör till kombifräs
med en skaftdiameter på ø 4,8 mm.
Håll spindellåsknappen 11 intryckt.
Lossa spännmuttern 10 med skruvnyckeln 14,
genom att skruva denna motsols.
Byta verktyg.
Blockera spindellåset, dra åt spännmuttern 10
med hjälp av skruvnyckeln
Bits:
Medföljande bits täcker följande användningsområden
(se bild D).
Universalfräs (HSS)
Lämplig för: Trä, spånskivor, plast
Spårfräs (HSS)
Lämplig för: Trä, spånskivor, plast
Slipband
Lämplig för: Slipning av trä
Hänvisning: Använd lämpligt tillbehör som finns
i handeln om du vill skära i kakel.
17
:
16
:
14
.
18
:
Montering av slipband
Montera slipband 16 i enlighet med beskriv-
ningen på bild C.
25 SE
Användning / Rengöring och underhåll / Service / Garanti Användning
Inställning av arbetsdjup
(se bild E)
Lossa vingskruven (justerskruv) 5.
För fram fotplattan 7 på önskat
komplett kapning ca 3,2 mm utöver materialtjockleken). Det maximalt rekommenderade
skärdjupet för trä är 13 mm.
Dra åt vingskruven (justerskruv) 5 igen.
arbetsdjup (för
Instickssågning
För in din bit med 45° vinkel i arbetsstycket.
Rikta sakta upp din bit till 90° vinkel för att
kunna börja utföra snittet.
Hänvisning: Fotplattan
med materialytan.
7
måste ligga an jäms
7
Att svänga handtaget (se bild F)
Svängning i horisontellt läge
Tryck på svänglåset 13 och håll detta intryckt.
Vrid handtaget motsols ur det horisontella
läget ända tills svänglåset klickar fast.
Svängning i vertikalt läge
Tryck på svänglåset 13 och håll detta intryckt.
Vrid handtaget medsols ur det horisontella
och in i det vertikala läget ända tills svänglåset
klickar fast.
Användning av parallell
styrning (se bild G)
Lossa fotplattans 7 vingskruvar 9 och för
styrstången på tillsatsen för cirkel- / parallellsnitt
15
genom de två ursparningarna på fotplat-
7
tans
undersida, så att parallellstyrningen
pekar nedåt.
Rikta in verktyget med önskat avstånd till ar-
betsstyckets kant. Dra åt vingskruvarna
att fästa tillsatsen för cirkel-/parallellsnitt
fotplattan
7
.
9
, för
15
på
Cirkelsågning (se bild H)
Hänvisning: Styrhålet placeras, beroende på
önskat resultat, inne eller ute på cirkelns kant: Inne
för ett hål - ute för en skiva. Radien kan fixeras från
ca 5 till 16 cm.
Rita en cirkel på arbetsstycket.
Markera och borra ett hål i mitten på cirkeln
(instickssnitt).
Borra ett styrhål vid cirkelns kant (instickssnitt)
(diameter styrhål 3 mm).
Lossa fotplattans 7 vingskruvar 9 och för
fram styrstången på tillsatsen för cirkel- / paral-
15
lellsnitt
fotplattans
pekar nedåt.
Stick in centrerspetsen i mitten på cirkeln.
Rikta in avståndet på tillsatsen för cirkel- / pa-
rallellsnitt
styrhålet vid cirkelns kant.
Lås fotplattan 7 genom att dra åt vingmuttrarna
9
Slå på maskinen genom att trycka på TILL- /
FRÅN-knappen
För maskinen långsamt framåt.
genom de två ursparningarna på
7
undersida, så att centrerspetsen
15
, så att nämnda bit försvinner in i
.
4
. Håll knappen intryckt.
Dammsugning (se bild I)
26 SE
Maskinen har försetts med en sugstuts 6 för
dammsugning.
Sätt adaptern 19 i sugstuts 6.
Anslut en dammsugare till adaptern 19.
Användning av maskinen i
permanent drift
Låsning av TILL- / FRÅN-knappen 4:
Tryck på TILL- / FRÅN-knappen 4.
Tryck nu på spärrknappen 1 och släpp
därmed TILL- / FRÅN-brytaren
Upphävning av TILL- / FRÅN-knappens
låsning:
Tryck på TILL- / FRÅN-knappen 4 och släpp
den.
4
fri.
Rengöring och underhåll
Denna maskin är underhållsfri.
Rengör maskinen alltid så snart du använt den
färdigt.
Använd en torr duk för rengöring av maskinen,
använd under inga omständigheter bensin,
lösningsmedel eller rengöringsmedel, som
angriper plast.
Se till att ventilationsöppningar alltid är fria.
Avlägsna slipdamm som fastnat med en pensel.
Service
Låt endast kundtjänst
eller en behörig elektriker reparera
verktyget och använd endast original
reservdelar. Därmed garanteras, att appa-
ratens säkerhet bevaras.
Byte av stickkontakt
eller nätkabel får endast utföras av
tillverkaren eller dennes kundtjänst.
Därmed garanteras, att apparatens säkerhet
bevaras.
leveransen. Var god bevara kassakvittot
som köpbevis. Vi ber dig att kontakta ditt
serviceställe per telefon vid garantifall. Endast då kan produkten skickas in fraktfritt.
Garantin gäller bara för bara för material- eller fabrikationsfel, den täcker inte transportskador, förslitningsdelar eller skador på ömtåliga delar som t ex
4
brytare och batterier. Produkten är endast avsedd
för privat bruk och får inte användas yrkesmässigt.
Vid missbruk och felaktig behandling, användande
av våld och vid ingrepp som inte gjorts av vår auktoriserade servicefilial upphör garantin att gälla.
Den lagstadgade garantin begränsas inte av denna garanti.
Garantitiden förlängs inte för att man utnyttjar garantiförmånerna. Det gäller även för utbytta eller
reparerade delar. Eventuella skador och brister
som upptäcks redan vid köpet måste anmälas omedelbart efter uppackningen, dock senast två dagar
efter inköpsdatum. När garantitiden är slut måste
man betala för eventuella reparationer.
SE
Service Sverige
Tel.: 0770 930739
e-mail: kompernass@lidl.se
IAN 79032
FI
Service Suomi
Tel.: 010309 3582
e-mail: kompernass@lidl.fi
IAN 79032
Q
Garanti
För den här apparaten lämnar vi tre års
garanti från och med inköpsdatum. Den
här apparaten har tillverkats med omsorg
och genomgått en noggrann kontroll innan
27 SE

Avfallshantering / Konformitetsdeklaration / Tillverkarintyg
Q
Avfallshantering
Förpackningen består av miljövänligt
material som kan avfallshanteras vid
lokala återvinningsställen.
Kasta inte elverktyg i
hushållssoporna!
Enligt EU-direktiv 2002 / 96 / EC gällande Begagnad elektrisk och elektronisk utrustning skall trasiga
eller begagnade elverktyg avfallshanteras separat
och tillföras återvinningen enligt gällande miljölagstiftning.
Kontakta miljökontoret på din ort för vidare information om avfallshantering av förbrukad utrustning.
Q
Konformitetsdeklar ation /
Tillverkarintyg
Vi, Kompernaß GmbH, dokumentansvarig: Herr
Semi Uguzlu, Burgstr. 21, D-44867 Bochum, Tyskland, förklarar härmed att detta produkt motsvarar
följande normer, normade dokument och EU-direktiv:
Maskindirektiv
(2006 / 42 / EC)
Lågspänningsdirektiv
(2006 / 95 / EC)
Elektromagnetisk kompatibilitet
(2004 / 108 / EC)
RoHS Direktiv
(2011 / 65 / EC)
använda harmoniserade normer
EN 60745-1/A11:2010
EN 60745-2-4/A11:2011
EN 60745-2-17:2010, EN 62233:2008
EN 55014-1/A2:2011
EN 55014-2/A2:2008
EN 61000-3-2/A2:2009
EN 61000-3-3:2008
28 SE
Typ / Beteckning:
Kombifräs PSFS 250 A1
Date of manufacture (DOM): 11–2012
Serienummer: IAN 79032
Bochum, 30.11.2012
Semi Uguzlu
- Kvalitetsmanager -
Rätt till tekniska ändringar för fortsatt
produktutveckling förbehålles.

Indledning
Bestemmelsesmæssig anvendelse ......................................................................................................Side 30
Udstyr ...................................................................................................................................................Side 30
Levering ................................................................................................................................................Side 30
Tekniske data .......................................................................................................................................Side 30
Generelle sikkerhedsinstrukser for elektrisk værktøj
1. Sikkerhed på arbejdsstedet ............................................................................................................Side 31
2. Elektrisk sikkerhed ...........................................................................................................................Side 31
3. Personlig sikkerhed .........................................................................................................................Side 32
4. Omhu i omgangen med og anvendelsen af elektriske redskaber ..............................................Side 32
5. Service .............................................................................................................................................Side 33
Supplerende sikkerhedshenvisninger til sliber og polerer .................Side 33
Supplerende sikkerhedshenvisninger til fræsning foroven................Side 33
Betjening
Tænding / slukning ...............................................................................................................................Side 33
Indstil omdrejningstallet .......................................................................................................................Side 33
Udskiftning af værktøj .........................................................................................................................Side 33
Montering af slibebånd ......................................................................................................................Side 34
Indstil arbejdsdybden ..........................................................................................................................Side 34
Udørelse af dybdesnit .........................................................................................................................Side 34
Håndgreb drejes..................................................................................................................................Side 34
Parallelføring anvendes ......................................................................................................................Side 34
Sav kredse ............................................................................................................................................Side 34
Sug støv ud...........................................................................................................................................Side 35
Anvendelse af værktøj i konstant drift ................................................................................................Side 35
Vedligeholdelse og rengøring ......................................................................................Side 35
Service ................................................................................................................................................Side 35
Garanti ...............................................................................................................................................Side 35
Bortskaffelse ................................................................................................................................Side 36
Konformitetserklæring / Fremstiller .........................................................................Side 36
29 DK
Kombi-fræser PSFS 250 A1
Q
Indledning
Vi ønsker dig tillykke med købet af dit
nye produkt. Du har besluttet dig for et
produkt af høj kvalitet. Brugervejledning
en
er en del af dette produkt. Den indeholder vigtige
informationer om sikkerhed, brug og bortskaffelse.
Gør dig inden ibrugtagning af produktet fortrolig
med alle betjenings- og sikkerhedsanvisninger. Benyt kun produktet som beskrevet og til de oplyste
formål. Videregiv alle papirer, hvis du giver produktet videre til tredjemand.
Bestemmelsesmæssig
anvendelse
Dette apparat er - med det anbefalede værktøj og
tilbehør - beregnet til forarbejdning af materialer
som træ, kunststof, letmetalsblik, fiberplader og
vægfliser. Det egner sig også til slibning med forskellige rundslibere samt til fræsning med fræse-bits
med en skaftdiameter på 4,8 mm. Enhver anden
anvendelse eller ændring af maskinen gælder som
værende i strid med formålsbestemmelsen og rummer fare for alvorlige ulykker. Producenten hæfter
ikke for skader, der er opstået ved anvendelse i
strid med produktets bestemmelse. Ikke egnet til
erhvervsmæssig indsats.
Udstyr
1
Låsekontakt
2
Trinløs omdrejningsregulator
3
Ledning
4
TÆND- / SLUK-knap
5
Vingeskrue
6
Udsugningsstuds
7
Fodplader
8
Spændetang
9
Vingeskrue (fodplader)
10
Spændemøtrik
11
Koblingslåsetaste
12
Ventilationslids
13
Svingspærring
14
Gaffelnøgle
15
Kreds-/parallelskæreforsats
16
Slibebånd
17
Notfræser (HSS)
18
Universelfunktionsfræser (HSS)
19
Adapter (udsugningstuds)
Levering
1 kombifræser PSFS 250 A 1
1 parallelanslag med kredsskærefunktion
1 støvudsugningsadapter
1 gaffelnøgle
1 universelfunktionsfræser (HSS)
1 notfræser (HSS)
1 opspændingstap slibning
6 slibebånd
1 betjeningsvejledning
Tekniske data
Nominelt forbrug: 250 W
Spænding: 230 V∼, 50 Hz
Omdrejningstal i tomgang (n
Værktøjoptagelse til: 4,8 mm
Sikkerhedsklasse: II /
Støj- og vibrationsinformationer:
Måleværdien for støj undersøges i overensstemmelse
med EN 60745. Elektroværktøjets A-vurderede
støjniveau er typisk:
Lydtrykniveau: 75 dB(A)
Lydeffektniveau: 86 dB(A)
Usikkerhed K: 3 dB(A)
Anvend høreværn!
Vægtet acceleration, typisk:
Hånd-arm-vibration a
Usikkerhed K = 1,5 m / s
0
< 2,5 m / s
h
2
): 10.000–
28.000 / min
2
-1
30 DK

Indledning / Generelle sikkerheds instrukser for elektrisk værktøj
Det i disse anvisninger angivne
svingningsniveau er blevet målt svarende til en i
EN 60745 nomeret målemetode og kan anvendes
til sammenligning af apparater. Den angivne svingningsemissionsværdi kan også benyttes til et indledende skøn af standsningen.
Svingningsniveauet ændrer sig svarende til anvendel
af det elektriske værktøj og kan i nogle tilfælde ligge
over den værdi der er angivet i disse anvisninger.
Svingningsbelastningen kan undervurderes, hvis det
elektriske værktøj jævnligt bliver anvendt på en sådan måde.
Obs: For at opnå en nøjagtig vurdering af svingningsbelastningen i et bestemt arbejdstidsrum er
man også nødt til at medregne de tidspunkter, hvor
apparatet er slukket, eller ganske vist er tændt, men
egentlig ikke anvendes. Dette kan reducere svingningsbelastningen over hele tidsrummet betydeligt.
Generelle sikkerhedsinstrukser
sen
for elektrisk værktøj
Alle sikkerhedsinstrukser
og anvisninger skal læses! Forsømmelighed
over for sikkerhedsinstrukserne og anvisninger kan
resultere i elektriske stød, brand og / eller alvorlige
kvæstelser.
Alle sikkerhedsinstrukser og anvisninger
skal opbevares til senere brug!
Begrebet “elektroværktøj“ der anvendes i sikkerhedsanvisningerne, relaterer sig til elektriske redskaber
der anvendes med ledning til lysnettet og til akkumulatordrevne elektriske redskaber (uden ledning
til lysnettet).
1. Sikkerhed på arbejdsstedet
a) Arbejdsområdet skal være ryddeligt
og have god belysning. Uorden og
ubelyste arbejdsområder kan være årsag til
ulykker.
b) Apparatet må ikke anvendes i eksplo-
sionstruede omgivelser hvor der befinder sig brændbare væsker, luftarter
eller støvpartikler. Elektriske redskaber
danner gnister der kan antænde dampe eller
støv.
c) Børn og andre personer skal holdes
på afstand når redskabet bliver benyttet. Hvis man bliver afledt, kan man miste
kontrollen over apparatet.
2. Elektrisk sikkerhed
a) Apparatets stik skal passe til stikdå-
sen. Stikket må ikke ændres på nogen
måde. Der må ikke anvendes adapeterstik sammen med apparatet der
har sikkerhedsjording. Uændrede stik og
passende stikdåser nedsætter risikoen for elektrisk stød.
b) Undgå kropskontakt med jordede
overflader som f.eks. rør, varmeapparater, komfurer og køleskabe. Der
er øget risiko ved et elektrisk stød hvis legemet
har jordforbindelse.
c) Apparatet skal beskyttes mod regn og
væde. Hvis der trænger vand ind i et elektrisk
apparat er der forøget risiko for elektrisk stød.
d) Ledningen må ikke benyttes til at
bære maskinen i, hænge den op i eller
til at trække stikket ud med. Ledningen
skal holdes på afstand varme, olie,
skarpe kanter eller dele af apparatet
der er i bevægelse. Beskadigede eller for-
snoede ledninger forhøjer risikoen for elektrisk
stød.
e) Til arbejde med elektriske redskaber
under åben himmel, skal der anvendes forlængerledninger der også er
godkendt til udendørs anvendelse.
Anvendelsen af en sådan ledning nedsætter
risikoen for elektrisk stød.
f) Hvis det ikke er til at undgå at elektrisk
værktøj skal bruges i fugtige omgivelser, skal der anvendes en fejlstrømskontakt. En sådan forringer risikoen for
elektrisk stød.
31 DK

3. Personlig sikkerhed
a) Bevar hele tiden opmærksomheden,
pas på hvad De foretage Dem og gå
til værks med det elektriske værktøj
med fornuften i behold. Undlad at
bruge apparatet hvis De er træt eller
under indflydelse af euforiserende
stoffer, alkohol eller medikamenter.
Et øjebliks uopmærksomhed under benyttelse
af apparatet kan føre til alvorlige kvæstelser.
b) Ifør Dem personligt sikkerhedsudstyr,
og bær altid sikkerhedsbriller. Personligt
sikkerhedsudstyr som høreværn, støvmaske eller
arbejdshandsker, alt efter art og anvendelse af
elektroværktøjet, nedsætter risikoen for skader.
c) Undgå utilsigtet igangsætning. Der
skal drages omsorg for at det elektriske redskab er slået fra før det bliver
forbundet med elektricitetsforsynin
når det tages op eller bliver båret.
Hvis man har en finger på afbryderen eller
apparatet er slået til medens det bliver båret,
kan dette have ulykker til følge.
d) Indstillingsredskaber eller skruenøg-
ler skal fjernes før apparatet bliver
startet. Et stykke værktøj eller en nøgle der
sidder i en bevægelig del af apparatet, kan
afstedkomme kvæstelser.
e) Undgå at indtage anormal kropshold-
ning. De skal sørge for at De står
sikkert og hele tiden er i balance.
På den måde kan apparatet bedre kontrolleres
i uventede situationer.
f) Ifør Dem egnet beklædning. Den må
ikke være vid, og smykker skal lægges
væk. Hår, beklædningsdele og handsker skal holdes borte fra bevægelige
dele. Hvis De har langt hår, bør De bruge
et hårnet. Løst siddende beklædning, smykker
eller hår kan blive grebet af dele der bevæger sig.
g) Hvis der monteres opsugnings- og
opfangsanordninger, skal disse være
sluttet til og anvendes korrekt. Anven-
delse af den slags anordninger nedsætter
faremomenterne som følge af støv.
32 DK
gen,
4.
Omhu i omgangen med og
anvendelsen af elektriske
redskaber
a) Undgå at overbelaste apparatet.
Anvend det elektriske redskab der er
bestemt til Deres arbejde. Med det pas-
sende elektriske værktøj er det bedre og mere
sikkert at arbejde i det angivne effektområde.
b) Tag ikke elektriske redskaber i brug
hvor kontakten er defekt. Et elektrisk
apparat der ikke kan tændes eller slukkes, er
farligt og skal repareres.
c) Stikket skal strækkes ud af stikkon-
takten før der må foretages indstillinger af maskinen, tilbehørsdele bliver
udskiftet, eller maskinen lægges væk.
Disse sikkerhedstiltag forhindrer utilsigtet
igangsætning af apparatet.
d) Elektriske redskaber der ikke er i
brug, skal opbevares uden for børns
rækkevidde. Lad ikke personer
benyttet apparatet hvis de ikke er
fortrolig med det eller ikke har læst
disse anvisninger. Elektrisk værktøj er
farligt hvis det benyttes af uerfarne personer.
e) Apparatet skal behandles med omhu.
Det skal kontrolleres om bevægelige
dele af apparatet fungerer fejlfrit og
ikke er fastklemt, om noget dele er
knækket eller beskadiget så apparatets funktion er forstyrret. Beskadigede
dele skal repareres før apparatet tages
i brug. Mange uheld skyldes dårligt vedlige-
holdte elektriske apparater.
f) S
kærende værktøjer skal holdes skarpe
og rene. Ordentligt vedligeholdte skærered-
skaber med skarpe ægge klemmer sig ikke så
ofte fast og er lettere at føre.
g) Redskabet, tilbehør, udskiftelige dele
osv. skal anvendes i overensstemmelse
med disse anvisninger og sådan som
det er foreskrevet for denne særlige
type apparat. Her skal der også tages
hensyn til arbejdsbetingelserne og den
opgave der skal udføres. Anvendelse af
elektriske redskaber til andre formål end de
angivne kan føre til farlige situationer.

... / Supplerende ... / Supplerende sikkerhedshenvisninger ... / Betjening
5. Service
a) Deres apparater bør De kun lade
reparere hos serviceafdelingen eller
af en fagmand og kun med originale
reservedele. På den måde er der garanti
for at apparatets sikkerhed bevares.
Supplerende sikkerhedshenvis-
ninger til sliber og polerer
GIFTIGT STØV! Forarbejdningen af skadeligt /
giftigt støv udgør en sundhedsfare for operatøren eller personer der befinder sig i nærheden.
Undgå slibning af blyholdige farver eller andre
sundhedsskadelige materialer.
Asbestholdigt materiale må ikke bearbejdes.
Asbest anses for kræftfremkaldende.
Bær beskyttelsesbriller og en egnet støvmaske!!
Supplerende sikkerhedshenvis-
ninger til fræsning foroven
Hold kun fast ved værktøjets isolerede
gribeflader, da fræseren kan støde på
det egne strømkabel. Kontakten med en
strømførende
under
Anvend kun fræsere med den rigtige skaftdiameter,
som er egnet til elektroværktøjets omdrejningstal.
Fastgør og skab sikkerhedsforanstalt-
ninger til emnet ved hjælp af tvinger
eller på anden måde og vis ved et
stabilt underlag.
med hånden eller mod deres krop, forbliver det
labilt, hvilket kan føre til tab af kontrollen.
Betjening
Anvend aldrig apparatet uhensigtsmæssigt og kun
med originaldele/-tilbehør. Anvendelse af andre dele
eller andet tilbehør, end det i brugervejledningen
anbefalet, kan betyde risiko for skader hos Dem.
Anvend kun fuldstændig afrullede og ubeskadigede
forlængelseskabler med mindst 5 A.
ledning kan også sætte metaldele
spænding og resultere i et elektrisk stød.
Når De kun holder emnet
ADVARSEL: Anvend dette værktøj ikke til fremstilling af udskæringer i omgivelsen af installationer
eller åbninger med strømførende strømkabler eller i
vægge, bag hvilke der muligvis er lagt strømførende
strømkabler. Tool-bitten kunne lede strøm i værktøjet,
hvilket er forbundet med fare for elektrisk stød for
operatøren.
Udløs sikringsautomaten eller tag sikringen ud, for
at tænde for den nævnte strømkreds spændingsfri.
Advarsel: Hold værktøjet altid ved kunststofkabinettet og bær altid beskyttelsesbriller når De arbejder
med værktøjet.
Tænding / slukning (se illustr. A)
Tænd:
Tryk på TÆND- / SLUKKONTAKTEN 4.
Slukning:
Slip TÆND- / SLUKKONTAKTEN 4.
Indstil omdrejningstallet
(se illustr. B)
Drej fartregulatoren 2 mod højre for at forhøje
omdrejningstallet.
Drej fartregulatoren 2 mod venstre for at
formindske omdrejningstallet.
Udskiftning af værktøj
(se illustr. C)
Henvisning: Anvend kun kombifræser- tilbehørs-
dele med en skaftdiameter på ø 4,8 mm.
Hold koblingsskruens låsetast 11 trykket.
Fastspændingsmøtrikken 10 løsnes med
14
nøglen
Udskift værktøjet.
Bloker koblingsskruelåsen; fastspænd spæn-
dingsmøtrikken
Bits:
De medleverede bits dækker følgende anvendelsesområder (se illustr. D).
idet De drejer denne imod urets retning
10
ved hjælp af gaffelnøglen 14.
gaffel-
33 DK
.

Universelfunktionsfræser (HSS) 18:
Egnet til: træ, spånplader, kunststof
Notfræser (HSS)
Egnet til: træ, spånplader, kunststof
Slibebånd
Egnet til: slibning af træ
Henvisning: Til skæring af vægfliser bedes De
anvende tilsvarende tilbehør fra faghandlen.
17
:
16
:
Montering af slibebånd
Monter slibebåndene 16 som vist på afbild-
ning C.
Indstil arbejdsdybden
(se illustr. E)
Vingeskruen 5 løsnes.
Skub fodpladen 7 til den
(til fuldstændig gennemskæring omkring 3,2 mm
over materialestyrken). Den maksimalt anbefalede snitdybde for træer 13 mm.
Træk vingeskruen 5 fast igen.
ønskede arbejdsdybde
Håndgreb drejes (se illustr. F)
Drejes i horisontal position
Tryk drejespærringen 13 og hold denne trykket.
Drej håndgrebet så lang tid mod urets retning
fra den vertikale position til den horisontale
position, indtil drejespærringen går i hak.
Drej i den vertikale position
Tryk drejespærringen 13 og hold denne trykket.
Drej håndgrebet så lang tid mod urets retning
fra den vertikale posotion til den horisontale
position, indtil drejespærringen går i hak.
Parallelføring anvendes
(se illustr. G)
Fodpladens 7 vingeskruer løsnes 9 og kreds- /
parallelskæringforsatsens føringsstang
bes gennem de to udskæringer på fodpladens
underside
nedad.
Juster værktøjet til den ønskede afstand til ele-
mentets kant. Spænd vingeskruerne
at fastgøre kreds- / parallelskæringsforsatsen
ved fodpladen
7
, sådan at parallelføringen peger
7
.
15
skub-
9
fast, for
15
Udørelse af dybdesnit
Før bitten ind i emnet med en vinkel på 45°.
Ret bitten langsomt op til en vinkel på 90° for
at kunne begynde snittet.
Henvisning: Fodpladen
mod materialeoverfladen.
34 DK
7
skal ligge vandret
7
Sav kredse (se illustr. H)
Henvisning: Føringshullet bliver, afhængig af det
ønskede resultat, sat ind- eller udvendig ved kredsranden: indvendig til et hul, udvendig til en skive.
Radiussen er fikserbar fra ca. 5 til 16 cm.
Træk en kreds på emnet.
Kredsens midte markeres og De borer et hul i
denne markering (dyksnit).
Bor er føringshul ved kredsens rand (dyksnit)
(diameter føringshul 3 mm).
Fodpladens 7 vingeskruer 9 løsnes og kreds- /
parallelskæringsforsatsens føringsstang
skubbes gennem de to udskæringer på fodpla-
dens underside
peger nedad.
Stik centrerspidsen i kredsens midte.
7
, sådan at centrerspidsen
15

Betjening / Vedligeholdelse og rengøring / Service / Garanti
Juster kreds- / parallelforskæringsforsatsens 15
afstand sådan, at bitten dykker ned i kredsrandens føringshul.
Lås fodpladen 7 gennem fastspænding af
vingeskruerne
Tænd for værktøjet, idet De trykker på ON- /
OFF-kontakten
Skub værktøjet langsomt fremad.
9
.
4
og holder denne trykket.
Sug støv ud (se illustr. I)
Værktøjet er udstyret med en udsugningsstuds 6
til støvudsugningen.
Sæt adapteren 19 ind i udsugningsstudsen 6.
Slut en støvsuger til adapteren 19.
Anvendelse af værktøj i
konstant drift
TÆND- / SLUK-knap 4 låses:
Betjen TÆND- / SLUKKONTAKTEN 4.
Tryk nu låseknappen 1 og frigiv TÆND- /
SLUKKONTAKTEN
Låsningen af TÆND- / SLUKKONTAKTEN
ophæves:
Betjen TÆND- / SLUKKONTAKTEN 4 og slip
denne.
4
.
Service
Lad deres apparater
repareres af servicestedet eller en
faguddannet elektriker og kun med
original reservedele. Dermed er der ga-
ranti for at maskinens sikkerhed bibeholdes.
Lad udskiftningen af
stikket eller strømledningen altid udføres af apparatets producent eller
dennes kundeservice. Dermed sikres at
apparatets sikkerhed bibeholdes.
Q
Garanti
På denne donkraft får du 3 års garanti
fra købsdatoen. Apparatet er produceret
omhyggeligt og inden levering afprøvet
samvittighedsfuldt. Opbevar kassebonen
som bevis for købet. I garantitilfælde be
du kontakte service-afdelingen telefonisk.
På denne måde kan gratis indsendelse af
varen garanteres.
Garantiydelsen gælder kun for materiale- eller fa-
4
brikationsfejl, men ikke for transportskader, sliddele
eller skader på skrøbelige dele som f.eks. kontakter
eller batterier. Produktet er kun beregnet til privat
og ikke til erhvervsmæssigt brug.
des
Vedligeholdelse og rengøring
Apparatet er vedligeholdelsesfrit.
Rengør enheden regelmæssigt, lige efter at
arbejdet er afsluttet.
Til rengøring af apparatet skal der anvendes
en tør klud og under ingen omstændigheder
benzin, fortynder eller midler der angriber
syntetisk materiale.
Ventilationsåbningerne skal altid holdes fri.
Fjern fastsiddende slibestøv med en pensel.
Ved misbrug og uhensigtsmæssig behandling, anvendelse af vold og ved indgreb, som ikke er foretaget
af vores autoriserede service-afdeling, ophører
garantien. Dine juridiske rettigheder indskrænkes
ikke ved denne garanti.
Garantiperioden forlænges ikke på grund af produktansvaret. Det gælder også for udskiftede og
reparerede dele. Eventuelle skader og mangler,
som allerede findes ved køb, skal straks anmeldes
efter udpakning og senest to dage efter købsdatoen.
Når garantiperioden er udløbet, skal udgifterne til
reparationer betales normalt.
35 DK

Garanti / Bortskaffelse / Konformitetserklæring / Fremstiller
DK
Service Danmark
Tel.: 32 710005
e-mail: kompernass@lidl.dk
IAN 79032
Q
Bortskaffelse
Emballagen består af mljøvenlige
materialer og kan smides ud på de
lokale genbrugsstationer.
Elektriske apparater hører
ikke til i husholdningsaffaldet!
I henhold til Europæisk direktiv 2002 / 96 / EC om
udtjente elektriske apparater og dets omsætning til
national lov skal brugte elektriske redskaber indsamles
særskilt og bringes til miljvenlig genindvinding.
Mulighederne for at komme af med et udtjent apparat
kan De få at vide hos de lokale myndigheder.
Q
Konformitetserklæring /
Fremstiller
Vi, Kompernaß GmbH, ansvarlig for dokumenter:
Semi Uguzlu, Burgstr. 21, D-44867 Bochum, Tyskla
erklærer hermed, at dette produkt stemmer overens
med de følgende normer, normative dokumenter
og EF-retningslinjer:
Maskindirektiv
(2006 / 42 / EC)
EC-lavspændingsdirektiv
(2006 / 95 / EC)
Elektromagnetisk fordragelighed
(2004 / 108 / EC)
RoHS Direktiv
(2011 / 65 / EC)
Anvendte harmoniserede standarder
EN 60745-1/A11:2010
EN 60745-2-4/A11:2011
EN 60745-2-17:2010, EN 62233:2008
EN 55014-1/A2:2011
EN 55014-2/A2:2008
EN 61000-3-2/A2:2009
EN 61000-3-3:2008
nd,
36 DK
Maskintype / Type:
Kombi-fræser PSFS 250 A1
Date of manufacture (DOM): 11–2012
Serienummer: IAN 79032
Bochum, 30.11.2012
Semi Uguzlu
- Kvalitetsmanager -
Tekniske ændringer af hensyn til den videre
udvikling forbeholdes.

Inhaltsverzeichnis
Einleitung
Bestimmungsgemäßer Gebrauch ......................................................................................................Seite 38
Ausstattung .......................................................................................................................................... Seite 38
Lieferumfang .......................................................................................................................................Seite 38
Technische Daten ................................................................................................................................Seite 38
Allgemeine Sicherheitshinweise für Elektrowerkzeuge
1. Arbeitsplatz-Sicherheit ...................................................................................................................Seite 39
2. Elektrische Sicherheit .....................................................................................................................Seite 39
3. Sicherheit von Personen .................................................................................................................Seite 40
4. Verwendung und Behandlung des Elektrowerkzeugs ................................................................ Seite 40
5. Service ............................................................................................................................................S e i t e 41
Ergänzende Sicherheitshinweise für Schleifer und Polierer ..............S e i t e 41
Ergänzende Sicherheitshinweise für Oberfräsen ....................................... Seite 41
Bedienung
Ein- / aussc halten ................................................................................................................................Seite 41
Drehzahl einstellen ............................................................................................................................. Seite 42
Werkzeug wechseln ...........................................................................................................................Seite 42
Schleifbänder montieren ....................................................................................................................Seite 42
Arbeitstiefe einstellen .........................................................................................................................Seite 42
Tauchschnitt ausführen .......................................................................................................................Seite 42
Handgriff schwenken .........................................................................................................................Seite 42
Parallelführung verwenden ................................................................................................................Seite 43
Kreise sägen........................................................................................................................................Seite 43
Staub absaugen .................................................................................................................................Seite 43
Werkzeug im Dauerbetrieb verwenden ...........................................................................................Seite 43
Wartung und Reinigung .....................................................................................................Seite 43
Service ............................................................................................................................................... Seite 43
Garantie ...........................................................................................................................................Seite 44
Entsorgung.....................................................................................................................................Seite 44
Konformitätserklärung / Hersteller ......................................................................... Seite 45
37 DE/AT/CH
Einleitung
Kombi-Fräser PSFS 250 A1
Einleitung
Wir beglückwünschen Sie zum Kauf Ihres neuen
Gerätes. Sie haben sich damit für ein hochwertiges
Produkt entschieden. Die Bedienungsanleitung ist
Teil dieses Produkts. Sie enthält wichtige Hinweise
für Sicherheit, Gebrauch und Entsorgung. Machen
Sie sich vor der Benutzung des Produkts mit allen
Bedien- und Sicherheitshinweisen vertraut. Benutzen
Sie das Produkt nur wie beschrieben und für die
angegebenen Einsatzbereiche. Händigen Sie alle
Unterlagen bei Weitergabe des Produkts an Dritte
mit aus.
Bestimmungsgemäßer
Gebrauch
Dieses Gerät ist – mit dem empfohlenen Werkzeug
und Zubehör – zum Bearbeiten von Materialien
wie Holz, Kunststoff, Leichtmetallblechen, Faserplatten und Wandfliesen vorgesehen. Es eignet sich
auch zum Schleifen mit verschiedenen Rundschleifern
sowie zum Fräsen mit Fräs-Bits von 4,8 mm Schaftdurchmesser. Jede andere Verwendung oder Veränderung des Gerätes gilt als nicht bestimmungsgemäß und birgt erhebliche Unfallgefahren. Für
aus bestimmungswidriger Verwendung entstandene
Schäden übernimmt der Hersteller keine Haftung.
Nicht für gewerblichen Einsatz bestimmt.
Ausstattung
1
Arretierschalter
2
stufenloser Drehzahlregler
3
Netzkabel
4
EIN- / AUS-Schalter
5
Flügelstellschraube
6
Absaugstutzen
7
Fußplatte
8
Spannzange
9
Flügelschraube (Fußplatte)
10
Spannmutter
11
Spindelarretierungstaste
12
Lüftungsschlitze
13
Schwenksperre
14
Maulschlüssel
15
Kreis- / Parallelschneidevorsatz
16
Schleifbänder
17
Nutfräser (HSS)
18
Mehrzweckfräser (HSS)
19
Adapter (Absaugstutzen)
Lieferumfang
1 Kombi-Fräser PSFS 250 A1
1 Parallelanschlag mit Kreisschneidefunktion
1 Staubabsaugadapter
1 Maulschlüssel
1 Mehrzweckfräser (HSS)
1 Nutfräser (HSS)
1 Aufspanndorn Schleifen
6 Schleifbänder
1 Bedienungsanleitung
Technische Daten
Nennaufnahme: 250 W
Spannung: 230 V∼, 50 Hz
Leerlaufdrehzahl (n
): 10.000–28.000 / min
0
Werkzeugaufnahme für: 4,8 mm
Schutzklasse: II /
Geräusch- und Vibrationsinformationen:
Messwert für Geräusch ermittelt entsprechend
EN 60745. Der A bewertete Geräuschpegel des
Elektrowerkzeugs beträgt typischerweise:
Schalldruckpegel: 75 dB(A)
Schallleistungspegel: 86 dB(A)
Unsicherheit K: 3 dB(A)
Gehörschutz tragen!
Bewertete Beschleunigung, typischerweise:
Hand- / Armvibration ah < 2,5 m / s
Unsicherheit K = 1,5 m / s
2
2
-1
38 DE/AT/CH

Einleitung / Allgemeine Sicherheitshinweise für Elektrowerkzeuge
Der in diesen Anweisungen
angegebene Schwingungspegel ist entsprechend
einem in EN 60745 genormten Messverfahren gemessen worden und kann für den Gerätevergleich
verwendet werden. Der angegebene Schwingungsemissionswert kann auch zu einer einleitenden Einschätzung der Aussetzung verwendet werden.
Der Schwingungspegel wird sich entsprechend dem
Einsatz des Elektrowerkzeugs verändern und kann
in manchen Fällen über dem in diesen Anweisungen
angegebenen Wert liegen. Die Schwingungsbelastung
könnte unterschätzt werden, wenn das Elektrowerkzeug regelmäßig in solcher Weise verwendet wird.
Hinweis: Für eine genaue Abschätzung der
Schwingungsbelastung während eines bestimmten
Arbeitszeitraumes sollten auch die Zeiten berücksichtigt werden, in denen das Gerät abgeschaltet
ist oder zwar läuft, aber nicht tatsächlich im Einsatz
ist. Dies kann die Schwingungsbelastung über den
gesamten Arbeitszeitraum deutlich reduzieren.
Allgemeine Sicherheitshinweise
für Elektrowerkzeuge
Lesen Sie alle Sicherheits-
hinweise und Anweisungen. Versäumnisse
bei der Einhaltung der Sicherheitshinweise und
Anweisungen können elektrischen Schlag, Brand
und / oder schwere Verletzungen verursachen.
Bewahren Sie alle Sicherheitshinweise
und Anweisungen für die Zukunft auf.
Der in den Sicherheitshinweisen verwendete Begriff
„Elektrowerkzeug“ bezieht sich auf netzbetriebene
Elektrowerkzeuge (mit Netzkabel) und auf akkubetriebene Elektrowerkzeuge (ohne Netzkabel).
1. Arbeitsplatz-Sicherheit
a) Halten Sie Ihren Arbeitsbereich sauber
und gut beleuchtet. Unordnung und unbe-
leuchtete Arbeitsbereiche können zu Unfällen
führen.
b) Arbeiten Sie mit dem Elektrowerk-
zeug nicht in explosionsgefährdeter
Umgebung, in der sich brennbare
Flüssigkeiten, Gase oder Stäube
befinden. Elektrowerkzeuge erzeugen Funken,
die den Staub oder die Dämpfe entzünden
können.
c) Halten Sie Kinder und andere Personen
während der Benutzung des Elektrowerkzeugs fern. Bei Ablenkung können
Sie die Kontrolle über das Gerät verlieren.
2. Elektrische Sicherheit
a) Der Anschlussstecker des Elektrowerk-
zeuges muss in die Steckdose passen.
Der Stecker darf in keiner Weise verändert werden. Verwenden Sie keine
Adapterstecker gemeinsam mit schutzgeerdeten Elektrowerkzeugen. Unver-
änderte Stecker und passende Steckdosen verringern das Risiko eines elektrischen Schlages.
b) Vermeiden Sie Körperkontakt mit ge-
erdeten Oberflächen, wie von Rohren,
Heizungen, Herden und Kühlschränken.
Es besteht ein erhöhtes Risiko durch elektrischen
Schlag, wenn Ihr Körper geerdet ist.
c) Halten Sie Elektrowerkzeuge von Re-
gen oder Nässe fern. Das Eindringen von
Wasser in ein Elektrogerät erhöht das Risiko
eines elektrischen Schlages.
d) Zweckentfremden Sie das Kabel nicht,
um das Elektrowerkzeug zu tragen,
aufzuhängen oder um den Stecker
aus der Steckdose zu ziehen. Halten
Sie das Kabel fern von Hitze, Öl, scharfen Kanten oder sich bewegenden
Geräteteilen. Beschädigte oder verwickelte
Kabel erhöhen das Risiko eines elektrischen
Schlages.
e) Wenn Sie mit einem Elektrowerkzeug
im Freien arbeiten, verwenden Sie
nur Verlängerungskabel, die auch für
den Außenbereich zugelassen sind.
Die Anwendung eines für den Außenbereich
geeigneten Verlängerungskabels verringert
das Risiko eines elektrischen Schlages.
39 DE/AT/CH

f) Wenn der Betrieb des Elektrowerk-
zeuges in feuchter Umgebung nicht
vermeidbar ist, verwenden Sie einen
Fehlerstromschutzschalter. Der Einsatz
eines Fehlerstromschutzschalters vermindert
das Risiko eines elektrischen Schlages.
3. Sicherheit von Personen
a) Seien Sie stets aufmerksam, achten
Sie darauf, was Sie tun und gehen Sie
mit Vernunft an die Arbeit mit einem
Elektrowerkzeug. Benutzen Sie kein
Elektrowerkzeug, wenn Sie müde sind
oder unter dem Einfluss von Drogen,
Alkohol oder Medikamenten stehen.
Ein Moment der Unachtsamkeit beim Gebrauch
des Elektrowerkzeuges kann zu ernsthaften
Verletzungen führen.
b) Tragen Sie persönliche Schutzausrü-
stung und immer eine Schutzbrille. Das
Tragen persönlicher Schutzausrüstung wie
Gehörschutz, Staubmaske oder Arbeitshand-
schuhe, je
zeugs, verrin
c) Vermeiden Sie eine unbeabsichtigte
Inbetriebnahme. Vergewissern Sie sich,
dass das Elektrowerkzeug ausgeschal-
tet ist, bevor Sie es an die Stromver-
sorgung anschließen, es aufnehmen
oder tragen. Wenn Sie beim Tragen des
Elektrowerkzeuges den Finger am Schalter haben
oder das Gerät bereits eingeschaltet an die
Stromversorgung anschließen, kann dies zu
Unfällen führen.
d) Entfernen Sie Einstellwerkzeuge oder
Schraubenschlüssel, bevor Sie das
Elektrowerkzeug einschalten. Ein Werk-
zeug oder Schlüssel, der sich in einem drehenden
Geräteteil befindet, kann zu Verletzungen führen.
e) Vermeiden Sie eine abnormale Körper-
haltung. Sorgen Sie für einen sicheren
Stand und halten Sie jederzeit das
Gleichgewicht. Dadurch können Sie das
Elektrowerkzeug in unerwarteten Situationen
besser kontrollieren.
40 DE/AT/CH
nach Art und Einsatz des Elektrowerk-
gert das Risiko von Verletzungen.
f) Tragen Sie geeignete Kleidung. Tragen
Sie keine weite Kleidung oder Schmuck.
Halten Sie Haare, Kleidung und Handschuhe fern von sich bewegenden
Teilen. Lockere Kleidung, Schmuck oder lange
Haare können von sich bewegenden Teilen
erfasst werden.
g) Wenn Staubabsaug- und -auffangein-
richtungen montiert werden können,
vergewissern Sie sich, dass diese angeschlossen sind und richtig verwendet
werden. Die Verwendung einer Staubabsau-
gung kann Gefährdungen durch Staub verringern.
4. Verwendung und Behandlung
des Elektrowerkzeugs
a) Überlasten Sie das Gerät nicht. Ver-
wenden Sie für Ihre Arbeit das dafür
bestimmte Elektrowerkzeug. Mit dem
passenden Elektrowerkzeug arbeiten Sie besser
und sicherer im angegebenen Leistungsbereich.
b) Benutzen Sie kein Elektrowerkzeug,
dessen Schalter defekt ist. Ein Elektrowerk-
zeug, das sich nicht mehr ein- oder ausschalten
lässt, ist gefährlich und muss repariert werden.
c) Ziehen Sie den Stecker aus der Steck-
dose, bevor Sie Geräteeinstellungen
vornehmen, Zubehörteile wechseln
oder das Gerät weglegen. Diese
Vorsichtsmaßnahme verhindert den unbeabsichtigten Start des Elektrowerkzeuges.
d) Bewahren Sie unbenutzte Elektrowerk-
zeuge außerhalb der Reichweite von
Kindern auf. Lassen Sie Personen das
Gerät nicht benutzen, die mit diesem
nicht vertraut sind oder diese Anweisungen nicht gelesen haben. Elektrowerk-
zeuge sind gefährlich, wenn sie von unerfahrenen Personen benutzt werden.
e) Pflegen Sie Elektrowerkzeuge mit
Sorgfalt. Kontrollieren Sie, ob bewegliche Teile einwandfrei funktionieren
und nicht klemmen, ob Teile gebrochen
oder so beschädigt sind, dass die Funktion des Elektrowerkzeuges beeinträchtigt ist. Lassen Sie beschädigte Teile vor

… / Ergänzende … / Ergänzende Sicherheitshinweise für Oberfräsen / BedienungAllgemeine Sicherheitshinweise für Elektrowerkzeuge
dem Einsatz des Gerätes reparieren.
Viele Unfälle haben ihre Ursache in schlecht
gewarteten Elektrowerkzeugen.
f) Halten Sie Schneidwerkzeuge scharf
und sauber. Sorgfältig gepflegte Schneid-
werkzeuge mit scharfen Schneidkanten verklemmen sich weniger und sind leichter zu führen.
g) Verwenden Sie Elektrowerkzeug,
Zubehör, Einsatzwerkzeuge usw.
entsprechend diesen Anweisungen.
Berücksichtigen Sie dabei die Arbeitsbedingungen und die auszuführende
Tätigkeit. Der Gebrauch von Elektrowerkzeugen
für andere als die vorgesehenen Anwendungen
kann zu gefährlichen Situationen führen.
5. Service
a) Lassen Sie Ihr Elektrowerkzeug nur
von qualifiziertem Fachpersonal und
nur mit Original-Ersatzteilen reparieren.
Damit wird sichergestellt, dass die Sicherheit
des Elektrowerkzeugs erhalten bleibt.
Ergänzende Sicherheitshinwei-
se für Schleifer und Polierer
GIFTIGE STÄUBE! Das Bearbeiten von schäd-
lichen / giftigen Stäuben stellt eine Gesundheitsgefährdung für die Bedienperson oder in der
Nähe befindliche Personen dar.
Vermeiden Sie das Schleifen von bleihaltigen
Farben oder anderen gesundheitsschädlichen
Materialien.
Asbesthaltiges Material darf nicht bearbeitet
werden. Asbest gilt als krebserregend.
Tragen Sie Schutzbrille und eine geeignete
Staubschutzmaske!
Kontakt mit einer spannungsführenden Leitung
kann auch metallene Geräteteile unter Spannung
setzen und zu einem elektrischen Schlag führen.
Verwenden Sie nur Fräser des richtigen Schaft-
durchmessers, die für die Drehzahl des Elektrowerkzeugs geeignet sind.
Befestigen und sichern Sie das Werk-
stück mittels Zwingen oder auf andere
Art und Weise an einer stabilen Unterlage. Wenn Sie das Werkstück nur mit der
oder gegen Ihren Körper halten, bleibt es labil,
was zum Verlust der Kontrolle führen kann.
Bedienung
Verwenden Sie das Gerät niemals zweckentfremdet
und nur mit Originalteilen / -zubehör. Der Gebrauch
anderer als in der Bedienungsanleitung empfohlener
Teile oder anderen Zubehörs kann eine Verletzungsgefahr für Sie bedeuten. Verwenden Sie nur vollständig abgewickelte und unbeschädigte Verlängerungskabel mit einer Kapazität von mindestens 5 A.
WARNUNG: Verwenden Sie dieses Werkzeug
nicht zum Herstellen von Ausschnitten in der Umgebung von Installationen oder Öffnungen mit stromführenden Elektrokabeln oder in Wänden, hinter
denen möglicherweise stromführende Elektrokabel
verlegt sind. Das Bit könnte Strom in das Werkzeug
leiten, was für den Bediener mit der Gefahr eines
elektrischen Schlags verbunden ist.
Lösen Sie den Sicherungsautomaten aus oder
nehmen Sie die Sicherung heraus, um den betreffenden Stromkreis spannungsfrei zu schalten.
Achtung: Halten Sie das Werkzeug immer am
Kunststoffgehäuse und tragen Sie beim Arbeiten mit
dem Werkzeug immer eine Schutzbrille.
Hand
Ein- / ausschalten (siehe Abb. A)
Ergänzende Sicherheitshinwei-
se für Oberfräsen
Halten Sie das Werkzeug nur an iso-
lierten Griffflächen, da der Fräser das
eigene Netzkabel treffen kann. Der
Einschalten:
Drücken Sie den EIN- / AUS-Schalter 4.
Ausschalten:
Lassen Sie den EIN- / AUS-Schalter 4 los.
41 DE/AT/CH
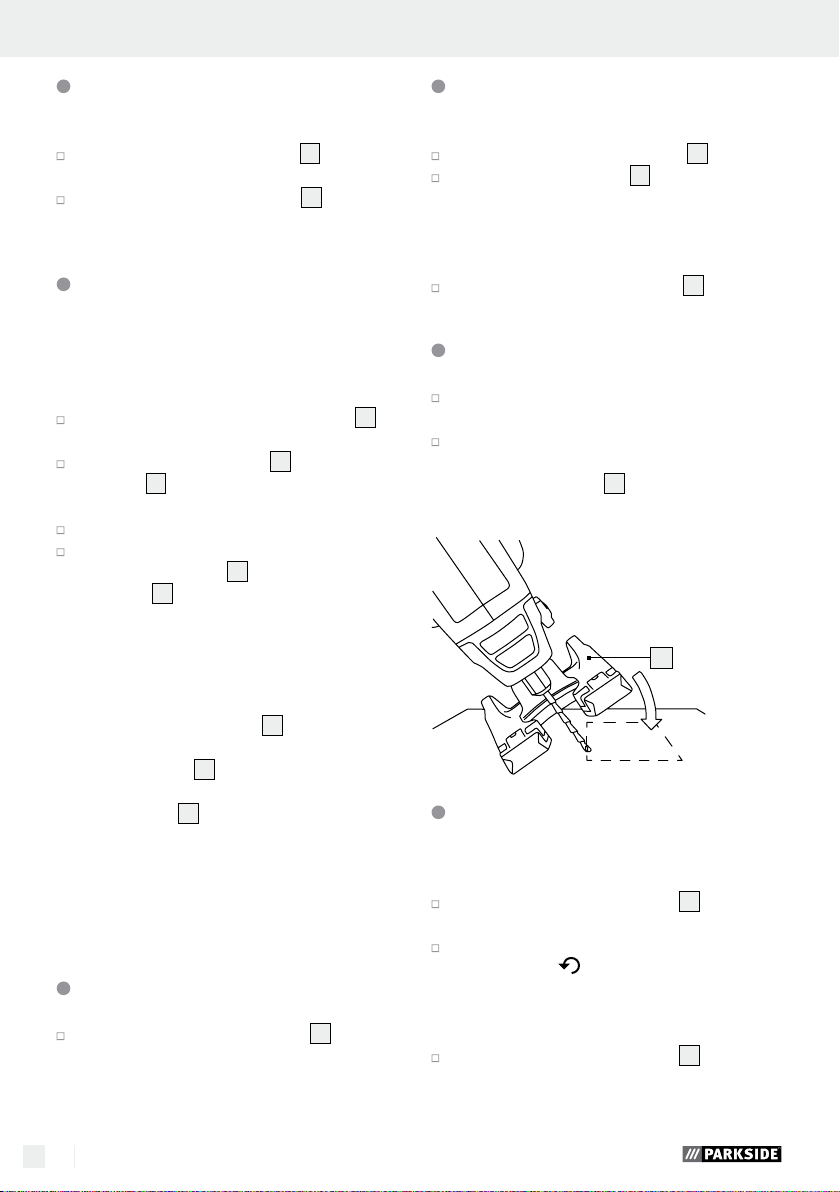
Drehzahl einstellen
(siehe Abb. B)
Arbeitstiefe einstellen
(siehe Abb. E)
Drehen Sie den Drehzahlregler 2 nach rechts,
um die Drehzahl zu erhöhen.
Drehen Sie den Drehzahlregler 2 nach links,
um die Drehzahl zu verringern.
Werkzeug wechseln
(siehe Abb. C)
Hinweis: Verwenden Sie nur Kombifräser-Zube-
hörteile mit einem Schaftdurchmesser von ø 4,8 mm.
Halten Sie die Spindelarretierungstaste 11 ge-
drückt.
Lösen Sie die Spannmutter 10 mit dem Maul-
schlüssel
gersinn drehen.
Wechseln Sie das Werkzeug.
Blockieren Sie die Spindelarretierung, ziehen
Sie die Spannmutter
schlüssels
Bits:
Die mitgelieferten Bits decken folgende Anwendungsbereiche ab (siehe Abb. D).
Mehrzweckfräser (HSS)
Eignung: Holz, Spanplatten, Kunststoff
Nutfräser (HSS)
Eignung: Holz, Spanplatten, Kunststoff
Schleifbänder
Eignung: Schleifen von Holz
14
, indem Sie diese gegen den Uhrzei-
10
mit Hilfe des Maul-
14
fest.
18
:
17
:
16
:
Lösen Sie die Flügelstellschraube 5.
Schieben Sie die Fußplatte 7 auf die ge
Arbeitstiefe (für vollständiges Durchschneiden
etwa 3,2 mm über der Materialstärke). Die
maximal empfohlene Schnitttiefe für Holz
beträgt 13 mm.
Ziehen Sie die Flügelstellschraube 5 wieder fest.
wünschte
Tauchschnitt ausführen
Führen Sie das Bit im Winkel von 45° in das
Werkstück ein.
Richten Sie das Bit langsam im Winkel von 90°
auf, um den Schnitt zu beginnen.
Hinweis: Die Fußplatte
Materialoberfläche anliegen.
7
muss bündig auf der
7
Handgriff schwenken
(siehe Abb. F)
Hinweis: Zum Schneiden von Wandfliesen ver-
wenden Sie bitte entsprechendes Zubehör aus dem
Fachhandel.
Schleifbänder montieren
Montieren Sie die Schleifbänder 16 wie in
Abbildung C dargestellt.
42 DE/AT/CH
In horizontale Position schwenken
Drücken Sie die Schwenksperre 13 und halten
Sie diese gedrückt.
Drehen Sie den Handgriff so lange gegen den
Uhrzeigersinn
zontale Position, bis die Schwenksperre einrastet.
In vertikale Position schwenken
Drücken Sie die Schwenksperre 13 und halten
Sie diese gedrückt.
aus der vertikalen in die hori-

Bedienung / Wartung und Reinigung / ServiceBedienung
Drehen Sie den Handgriff so lange im Uhrzeiger-
sinn
aus der horizontalen in die vertikale
Position, bis die Schwenksperre einrastet.
Parallelführung verwenden
(siehe Abb. G)
Lösen Sie die Flügelschrauben 9 der Fußplatte
7
und schieben Sie die Führungsstange des
Kreis- / Parallelschneidevorsatzes
zwei Aussparungen an der Unterseite der Fuß-
7
platte
unten zeigt.
Richten Sie das Werkzeug im gewünschten Ab-
stand zur Werkstückkante aus. Ziehen Sie die
Flügelschrauben
schneidevorsatz
befestigen.
, so dass die Parallelführung nach
9
an, um den Kreis- / Parallel-
15
an der Fußplatte 7 zu
15
durch die
Kreise sägen (siehe Abb. H)
Hinweis: Das Führungsloch wird abhängig von
dem gewünschten Ergebnis innen oder außen
am Kreisrand gesetzt: Innen für ein Loch - außen
für eine Scheibe. Der Radius ist fixierbar von
ca. 5 bis 16 cm.
Schalten Sie das Werkzeug ein, indem Sie den
EIN- / AUS-Schalter
Schieben Sie das Werkzeug langsam vorwärts.
4
drücken und halten.
Staub absaugen
(siehe Abb. I)
Das Werkzeug ist mit einem Absaugstutzen 6
für die Staubabsaugung versehen.
Setzen Sie den Adapter 19 in den Absaug-
6
stutzen
Schließen Sie einen Staubsauger an den
Adapter
.
19
an.
Werkzeug im Dauerbetrieb
verwenden
EIN- / AUS-Schalter 4 arretieren:
Betätigen Sie den EIN- / AUS-Schalter 4.
Drücken Sie jetzt den Arretierschalter 1 und
geben Sie den EIN- / AUS-Schalter
Arretierung des EIN- / AUS-Schalters
aufheben:
Betätigen Sie den EIN- / AUS-Schalter 4 und
lassen Sie ihn los.
4
frei.
4
Ziehen Sie einen Kreis auf dem Werkstück.
Markieren Sie die Kreismitte und bohren Sie ein
Loch in diese (Tauchschnitt).
Bohren Sie ein Führungsloch am Kreisrand
(Tauchschnitt) (Durchmesser Führungsloch 3 mm).
Lösen Sie die Flügelschrauben 9 der Fußplatte
7
und schieben Sie die Führungsstange des
Kreis- / Parallelschneidevorsatzes
zwei Aussparungen an der Unterseite der Fuß-
7
platte
unten zeigt.
Stecken Sie die Zentrierspitze in die Kreismitte.
Richten Sie den Abstand des Kreis- / Parallel-
schneidevorsatz
Führungsloch am Kreisrand eintaucht.
Arretieren Sie die Fußplatte 7 durch Festziehen
der Flügelschrauben
, so dass die Zentrierspitze nach
15
so aus, dass das Bit in das
9
.
15
durch die
Wartung und Reinigung
Das Gerät ist wartungsfrei.
Reinigen Sie das Gerät direkt nach Abschluss
der Arbeit.
Verwenden Sie zur Reinigung des Gerätes ein
trockenes Tuch und keinesfalls Benzin, Lösungs-
mittel oder Reiniger, die Kunststoff angreifen.
Halten Sie Lüftungsöffnungen immer frei.
Entfernen Sie anhaftenden Schleifstaub mit
einem Pinsel.
Service
Lassen Sie Ihre Ge-
räte von der Servicestelle oder einer
Elektrofachkraft und nur mit Original-
43 DE/AT/CH

Service / Garantie / Entsorgung Konformitätserklärung / Hersteller
Ersatzteilen reparieren. Damit wird sichergestellt, dass die Sicherheit des Gerätes erhalten bleibt.
Lassen Sie den Aus-
tausch des Steckers oder der Netzleitung immer vom Hersteller des Gerätes
oder seinem Kundendienst ausführen.
Damit wird sichergestellt, dass die Sicherheit des
Gerätes erhalten bleibt.
Garantie
Sie erhalten auf dieses Gerät 3 Jahre Garantie ab Kaufdatum. Das Gerät wurde
sorgfältig produziert und vor Anlieferung
gewissenhaft geprüft. Bitte bewahren Sie
den Kassenbon als Nachweis für den Kauf
auf. Bitte setzen Sie sich im Garantiefall mit
Ihrer Servicestelle telefonisch in Verbin
Nur so kann eine kostenlose Einsendung
Ihrer Ware gewährleistet werden.
Die Garantieleistung gilt nur für Material- oder
Fabrikationsfehler, nicht aber für Transportschäden,
Verschleißteile oder für Beschädigungen an zerbrechlichen Teilen, z. B. Schalter oder Akkus.
Das Produkt ist lediglich für den privaten und nicht
für den gewerblichen Gebrauch bestimmt.
dung.
DE
Service Deutschland
Tel.: 01805772033
(0,14 EUR / Min. aus dem dt.
Festnetz, Mobilfunk max.
0,42 EUR / Min.)
E-Mail: kompernass@lidl.de
IAN 79032
AT
Service Österreich
Tel.: 0820 201 222
(0,15 EUR / Min.)
E-Mail: kompernass@lidl.at
IAN 79032
CH
Service Schweiz
Tel.: 0842 665566
(0,08 CHF / Min., Mobilfunk
max. 0,40 CHF / Min.)
E-Mail: kompernass@lidl.ch
IAN 79032
Entsorgung
Bei missbräuchlicher und unsachgemäßer Behandlung, Gewaltanwendung und bei Eingriffen, die nicht
von unserer autorisierten Service-Niederlassung
vorgenommen wurden, erlischt die Garantie. Ihre
gesetzlichen Rechte werden durch diese Garantie
nicht eingeschränkt.
Die Garantiezeit wird durch die Gewährleistung nicht
verlängert. Dies gilt auch für ersetzte und reparierte
Teile. Eventuell schon beim Kauf vorhandene Schäden
und Mängel müssen sofort nach dem Auspacken
gemeldet werden, spätestens aber zwei Tage nach
Kaufdatum. Nach Ablauf der Garantiezeit anfallende
Reparaturen sind kostenpflichtig.
44 DE/AT/CH
Die Verpackung besteht aus umweltfreundlichen Materialien, die Sie über die örtlichen Recyclingstellen entsorgen können.
Werfen Sie Elektrowerkzeuge
nicht in den Hausmüll!
Gemäß Europäischer Richtlinie 2002 / 96 / EC über
Elektro- und Elektronik-Altgeräte und Umsetzung in
nationales Recht müssen verbrauchte Elektrowerkzeuge getrennt gesammelt und einer umweltgerechten Wiederverwertung zugeführt werden.
Möglichkeiten zur Entsorgung des ausgedienten
Gerätes erfahren Sie bei Ihrer Gemeinde- oder
Stadtverwaltung.

Konformitätserklärung /
Hersteller
Wir, Kompernaß GmbH, Dokumentenverantwortlicher:
Herr Semi Uguzlu, Burgstr. 21, D-44867 Bochum,
Deutschland, erklären hiermit, dass dieses Produkt
mit den folgenden Normen, normativen Dokumenten
und EG-Richtlinien übereinstimmt:
Maschinenrichtlinie
(2006 / 42 / EC)
EG-Niederspannungsrichtlinie
(2006 / 95 / EC)
Elektromagnetische Verträglichkeit
(2004 / 108 / EC)
RoHS Richtlinie
(2011 / 65 / EC)
angewandte harmonisierte Normen:
EN 60745-1/A11:2010
EN 60745-2-4/A11:2011
EN 60745-2-17:2010, EN 62233:2008
EN 55014-1/A2:2011
EN 55014-2/A2:2008
EN 61000-3-2/A2:2009
EN 61000-3-3:2008
Typ / Gerätebezeichnung:
Kombi-Fräser PSFS 250 A1
Herstellungsjahr: 11–2012
Seriennummer: IAN 79032
Bochum, 30.11.2012
Semi Uguzlu
- Qualitätsmanager -
Technische Änderungen im Sinne der Weiterentwicklung sind vorbehalten.
45 DE/AT/CH

KOMPERNASS GMBH
Burgstraße 21
D-44867 Bochum
© by ORFGEN Marketing
Last Information Update · Tietojen tila · Informationsstatus
Tilstand af information · Stand der Informationen:
11 / 2012 · Ident.-No.: PSFS250A1112012-3
IAN 79032
 Loading...