

Page 1
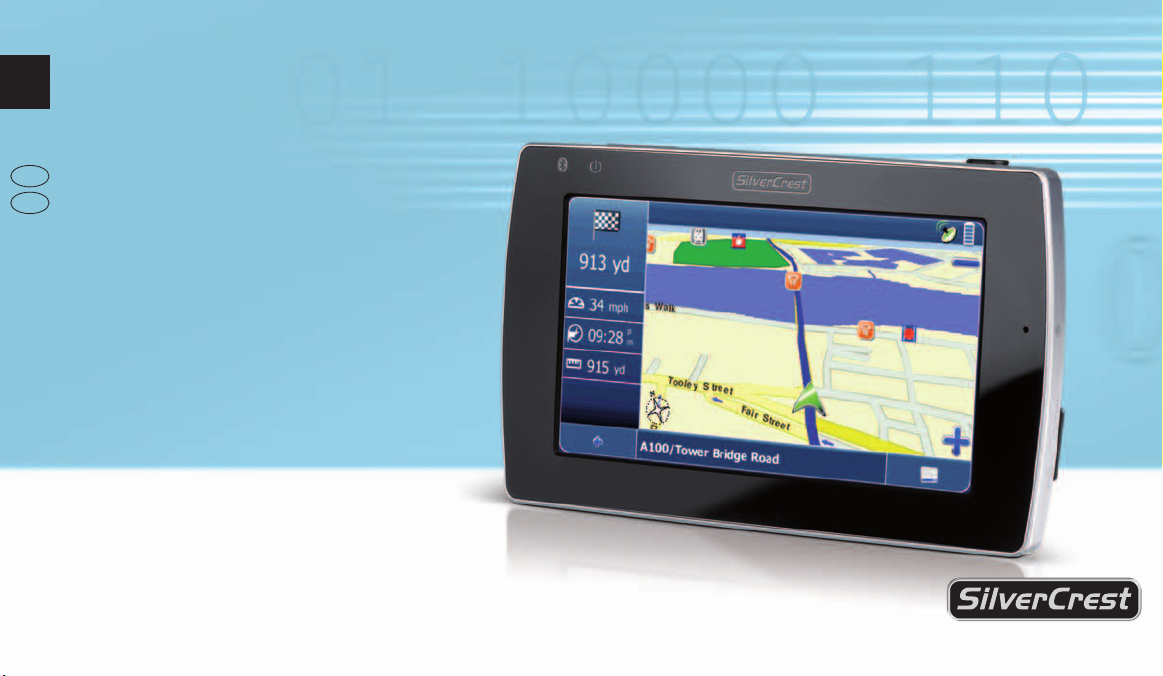
MOBILE NAVIGATION SYSTEM
GB
User manual
IE
and service information
PNA-M4310
Page 2

Page 3
Navigation Device PNA-M4310 English
Navigation Device PNA-M4310
A detailed description on how to use the
navigation software can be found on the
included DVD.
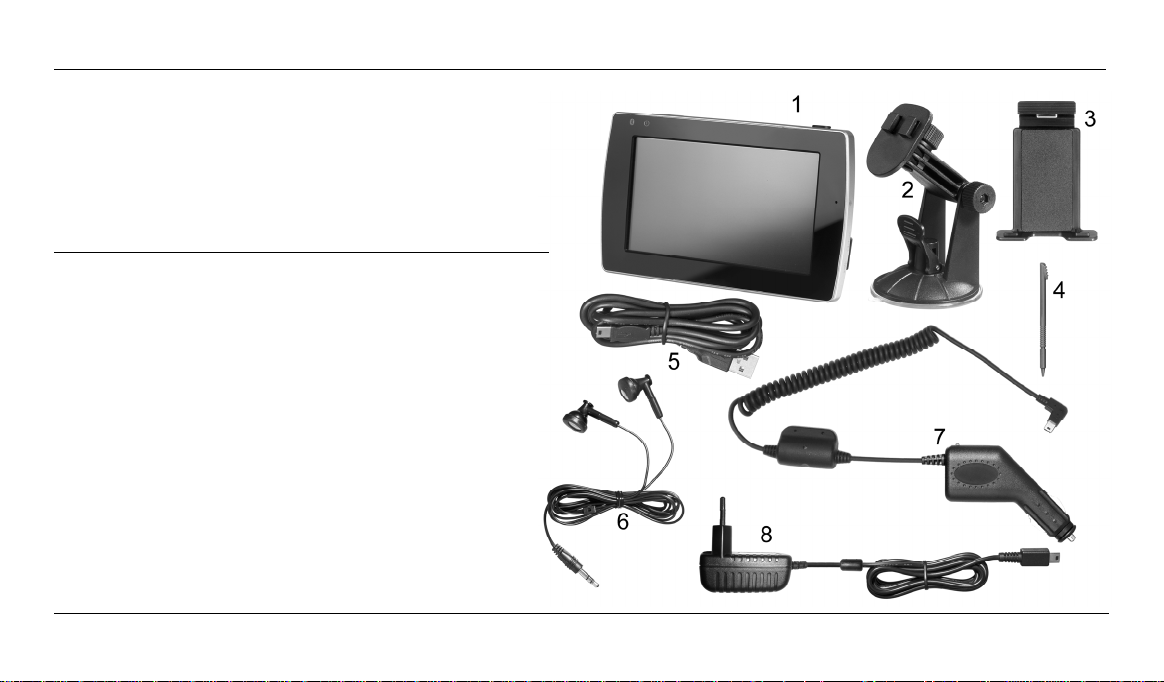
Package contents
1 Navigation Device PNA-M4310
2 Car mount
3 Adapter plate for car mount
4 Stylus
5 USB cable
6 Earphones
7 Car charger cable
8 Power adapter
(model depends on the local region)
9 Bag (not illustrated)
10 Software DVD (not illustrated)
11 User’s Manual (not illustrated)
1
Page 4

English Navigation Device PNA-M4310
Table of Contents
Package contents ............................................................... 1
Important Safety Instructions............................................ 4
Operating Environment ..................................................... 4
Power Supply.................................................................... 5
Rechargeable Battery ....................................................... 5
Cables............................................................................... 5
Maintenance and Care...................................................... 6
Children............................................................................. 6
Intended Use.....................................................................6
RF Interface ...................................................................... 7
Conformity ......................................................................... 8
Disposal of Old Devices.................................................... 8
Introduction......................................................................... 9
Summary........................................................................... 9
2
Charging the Battery....................................................... 10
Recharging in the Car.................................................. 11
Recharging from a Power Outlet ................................. 12
Recharging from a Computer ...................................... 13
Car mount ....................................................................... 14
Connecting an External GPS Antenna............................ 16
First-Time Setup.............................................................. 17
Setting the Display Language...................................... 18
Setting the Date........................................................... 18
Setting the Time .......................................................... 19
Powering the Device On/Off............................................ 20
Powering Off to Standby Mode....................................20
Powering Off Using the Main Power Switch ................ 20
Powering On Using the Main Power Switch ................ 21
Powering On from Standby Mode................................ 22
Button Lock..................................................................... 22
Inserting a Memory Card................................................. 23
The Main Menu.................................................................. 24
Page 5

Navigation Device PNA-M4310 English
Navigation........................................................................25
First-Time Setup ..........................................................25
The Navigation Main Menu..............................................27
Speed Warning ................................................................31
Manual Input................................................................34
Hands-free.......................................................................35
Bluetooth ......................................................................35
Setting Up a Connection..............................................35
Dial...............................................................................37
Auto Answer.................................................................37
Last Calls.....................................................................38
Paired List....................................................................38
Travel Kit .........................................................................39
Music............................................................................39
Video............................................................................41
Photo............................................................................43
Simultaneous Use........................................................45
Settings ...........................................................................46
Volume......................................................................... 46
Touch Lock ..................................................................47
Audio Output................................................................48
Display.........................................................................48
Language.....................................................................49
Date and time...............................................................49
Power Status................................................................50
Factory Defaults...........................................................50
System Info..................................................................50
Upgrading the Firmware...............................................51
Advanced...........................................................................52
Connecting to a Computer...............................................52
The DVD..........................................................................54
Installing the Software..................................................54
The User’s Manual.......................................................57
Licensing.........................................................................58
Technical Specifications..................................................59
Details of Guarantee........................................................60
3
Page 6

English Navigation Device PNA-M4310
Important Safety Instructions
Before you use this device for the first time, please read the
following notes in this manual and heed all warnings, even if
you are familiar with handling electronic devices. Keep this
manual in a safe place for future reference. If you sell or pas s
this device on to another person, it is imperative that you also
hand over this manual.
Operating Environment
Position the device on a stable, even surface and do not
place any objects on the device. The device is not for use in
environments with a high temperature or humidity (e.g.
bathrooms), and must be kept free of dust. Operating
temperature and humidity: 5 °C to 35 °C, max. 85 % RH.
When using the navigation device in a vehicle, please install
it on the supplied car mount only and make sure that the
device sits properly on the car mount. Do not install the car
mount (with or without the navigation device) within the
operating area of the vehicle’s airbag and install the car
mount so that the driver’s view is not obstructed.
Always make sure that
there is free circulation of air (do not place the device on
shelves, on a thick carpet, on a bed, or anywhere that
obstructs the ventilation slots, and leave at least 10cm
clearance on all sides);
no direct heat sources (e.g. heating) can affect the
device;
no direct sunlight or bright artificial light reaches the
device. When installing the device in a vehicle, make sure
that it doesn’t become overheated;
contact with sprayed and dripping water and abrasive
liquids must be avoided and the device should never be
operated near water. It must especially never be
immersed (do not place any recipients containing liquids
such as beverages, vases, etc. onto or next to the
device);
the device is never placed in the immediate vicinity of
magnetic fields (e.g. loudspeakers);
no fire sources (e.g. burning candles) are placed on or
near the device;
no foreign bodies are introduced into the device;
4
Page 7

Navigation Device PNA-M4310 English
the device is not subject to any great temperature
changes as this may cause moisture through
condensation and short-circuit;
the device is not subject to excessive shocks and
vibrations.
the supplied earphones, model EE-640V-41EN [page 1,
item 6] are to be used for this navigation device only.
Power Supply
Use only the supplied power adapter model
KSAA0500100W1UK, the supplied car charger cable
Silvercrest TCP10050BC or the supplied USB cable to avoid
overheating, deformation of housing, fire, electric shock,
explosions and other dangers. Never connect this power
adapter, the car charger cable or the USB cable to other
devices.
Warning! Notice on Mains Separation. In order to completely
disconnect the power adapter from the mains, the power
adapter must be pulled out from the wall outlet. For this
reason, the power adapter should be positioned in a way that
assures unobstructed access to the power outlet so that the
power adapter can be immediately pulled out in an
emergency situation. To avoid the danger of fire if the po wer
adapter is not going to be used for a long while (e.g. during
holidays), it should always be disconnected from the power
socket. Before stormy weather when there is the danger of
lightning, disconnect the power adapter from the power
supply.
Rechargeable Battery
This device uses a high-end Li-Ion battery. This battery
should only be removed or replaced by an authorized service
centre. Under very rare conditions, sparks may appear at the
contacts causing any explosive and/or inflammable gases to
ignite. Therefore we recommend that you do not use the
device in dangerous areas such as fuel stations and to power
it off.
Cables
Always hold all cables by the plug and never pull on the
cable itself. Never hold the power adapter with wet hands as
this may cause a short circuit or electric shock. Never place
the device, heavy objects or furniture on the cable and take
care that the cord does not become trapped, especially at the
plug and socket. Never make knots in the cable and do not
5
Page 8

English Navigation Device PNA-M4310
tie it together with other cords. All cables should be
positioned so that nobody can trip over them or be
obstructed by them. A damaged power adapter can cause a
fire or an electric shock. Inspect the power adapter from time
to time. Never use adapter plugs or extension cables that do
not comply with the current safety regulations in your
country, and do not modify the power adapter or cables
yourself.
Maintenance and Care
Servicing is required when this device has been damaged in
any way, for example, when the power adapter or device
housing is damaged, when liquid or objects have entered the
device, when the product has been exposed to rain or
moisture, when the product does not work normally or if the
product has been dropped. If you notice any smoke, unusual
noise or strange smells, switch off the device immediately
and pull the corresponding charger cable from the power
supply. In this case the device should not be used further
and should be inspected by authorized service personnel.
Please contact qualified personnel when servicing is needed.
Never open the housing of the device, or the power adapter.
6
If the housing is opened, your life is in da nger due to electric
shock. Only use a clean, dry cloth for cleaning. Never use
any abrasive liquids. Do not attempt to open the hous ing of
the device otherwise you will void your warranty.
Children
Electrical appliances do not belong in the hands of children!
Do not allow children to play with electrical devic es when not
under supervision. Children may not be able to comprehend
the presence of potential risks. Small parts can represent
choking hazards. Keep the packaging away from children to
avoid the danger of suffocation.
Intended Use
This is an information technology electronics devic e. It may
only be used for private use, not industrial or commercial
purposes. In its default configuration, this product has not
been designed for medical, lifesaving, rescue or lifemaintaining purposes. Furthermore, the device may not be
used in tropical climates. Only connection cables and
external devices may be used that comply with safety
standards and the electromagnetic compatibility and
shielding quality of this device. This device fulfils all that
Page 9

Navigation Device PNA-M4310 English
relates to CE Conformity, relevant norms and standards. Any
changes to the equipment other than the recommended
changes by the manufacturer may lead to the result that
these directives are not met any more. Only use accessories
recommended by the manufacturer. If you are not using the
device within the Republic of Germany, you must observe
the regulations and laws in the country of use.
RF Interface
This navigation device features two RF components. An F M
transmitter is used to send short-range audio signals to your
car radio and a Bluetooth interface allows you to connect to
your mobile phone. Be sure to read and understand the
following notes concerning these two RF components:
Turn the RF components off when located onboard an
aircraft, in a hospital, a surgery area or near electronic
medical equipment. The RF signals may interfere with
the functionality of sensitive devices.
Place the device at least 20cm (8 inches) away from
pacemakers, as the RF signals may interfere with the
functionality of the pacemaker.
The transmitted RF signals can cause interference with
hearing aids.
Do not place the device with the wireless adapter turned
on near flammable gases or in an explosion-sensitive
area (e.g. a paint shop), as the transmitted RF signals
may cause explosions or fire.
When transmitting wireless data it is possible that
unauthorized parties may receive data. Targa GmbH is
not liable for any interference caused to RF or TV signals
through unauthorized modification to this device.
Furthermore, Targa does not assume any liability for
replacing any cables or devices that have not been
specifically approved by Targa GmbH. The user is solely
responsible and liable for troubleshooting any
interference caused by unauthorized modification of this
device and for replacing any appliances.
7
Page 10
English Navigation Device PNA-M4310
Conformity
This device has been tested and approved for
compliance with the basic and other relevant
requirements of the EMC Directive 2004/108/EC,
the Low-voltage Directive 2006/95/EC and the
R&TTE Directive 99/5/EC.
Disposal of Old Devices
If the product is labelled with a struck-out waste
bin, it is subject to the European Guideline
2002/96/EC. All electric and electronic devices
must be disposed of separately from household
waste at established bodies. Avoid damaging the
environment and danger to your personal health by disposing
of the device properly. For further information about proper
disposal, contact your local government, disposal bodies or
the shop where you bought the device.
8
Page 11
Navigation Device PNA-M4310 English
Introduction
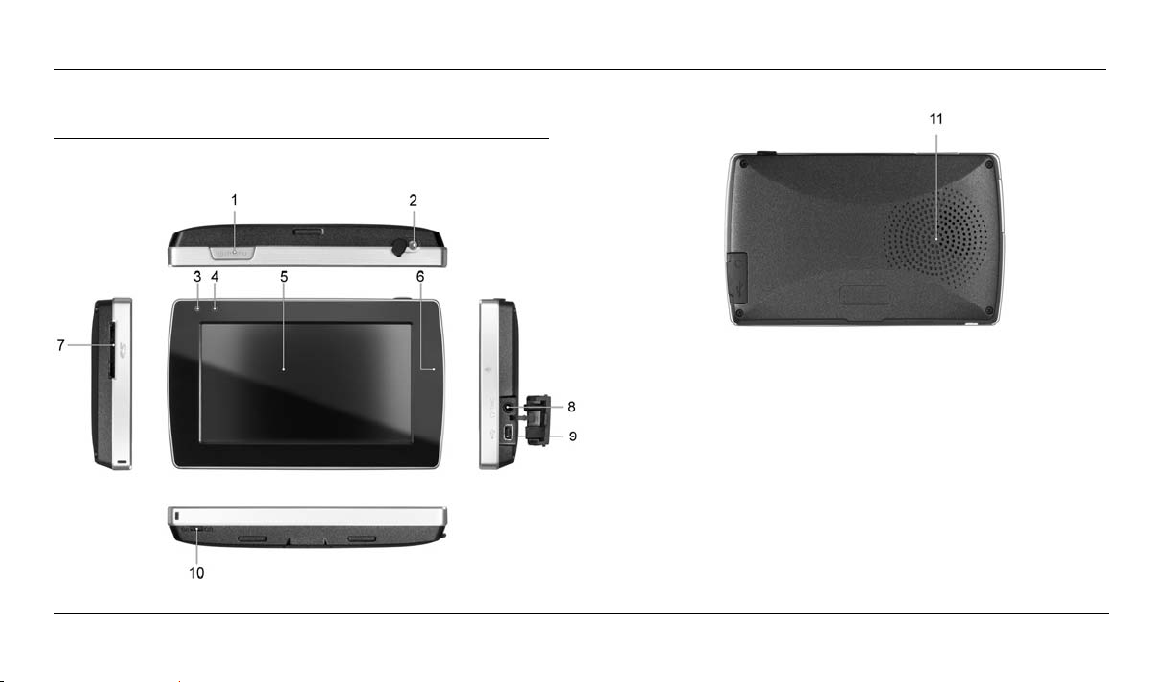
Summary
1 On/Off button
2 Connector for external GPS antenna
3 Bluetooth indicator
4 Power indicator
5 Display
6 Microphone
7 Memor y card s lot
8 Earphones connector
9 Mini-USB and charger connector
10 Main power switch
11 Speaker
9
Page 12

English Navigation Device PNA-M4310
Thank you for choosing this high-end SilverCrest product.
The navigation device PNA-M4310 enables accurate
navigation to your destination and also comfortable handsfree functionality for your mobile phone, as well as the
playing of popular audio and video formats.
Please always bear in mind that the Road Traffic Act
always has priority over any instructions output by
!
your navigation device. Do not operate the device
while driving.
Please only use the supplied earphones [page 1,
item 6] with this navigation device.
!
10
The navigation device features a touchscreen and ther efore
needs no further buttons or controls. You can perform any
settings by tapping the corresponding button using your
finger or the supplied stylus [page 1, item 4].
Charging the Battery
If the capacity of the built-in battery becomes low, the
message Low Battery will appear on the display. Recharge
the battery either in your car, using a power outlet or a
computer, by means of the USB cable.
You can continue using the device while recharging it from
the car cigarette lighter or a power outlet. When recharging it
from a computer the device will be locked and cannot be
operated.
Please note that the main power switch [page 9, item
10] must be turned on in order for the built-in battery
!
to be recharged (see page 17 - First-Time Setup).
Page 13
Navigation Device PNA-M4310 English
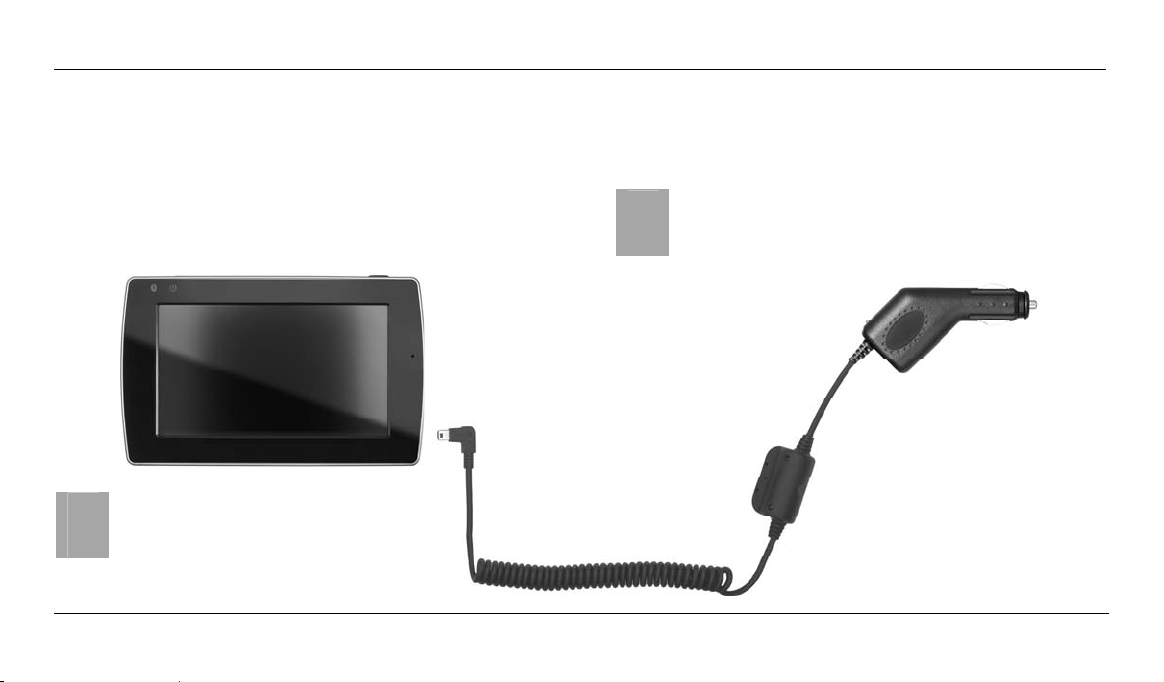
Recharging in the Car
1. Plug the Mini-USB connector of the car charger
cable [page 1, item 7] into the receptacle [page 9,
item 9] of your navigation device.
2. T hen connect the car charger to a suitable cigarette
lighter in your car.
You can connect the car charger to
a 12V or 24V cigarette lighter.
i
3. The charging process starts automatically, and the
charger indicator [page 9, item 4] lights orange.
When the charging process is completed, the status
indicator will light green.
In order to protect your device from any sudden
voltage surges, connect the car charger cable after
!
you have started your car engine.
11
Page 14
English Navigation Device PNA-M4310
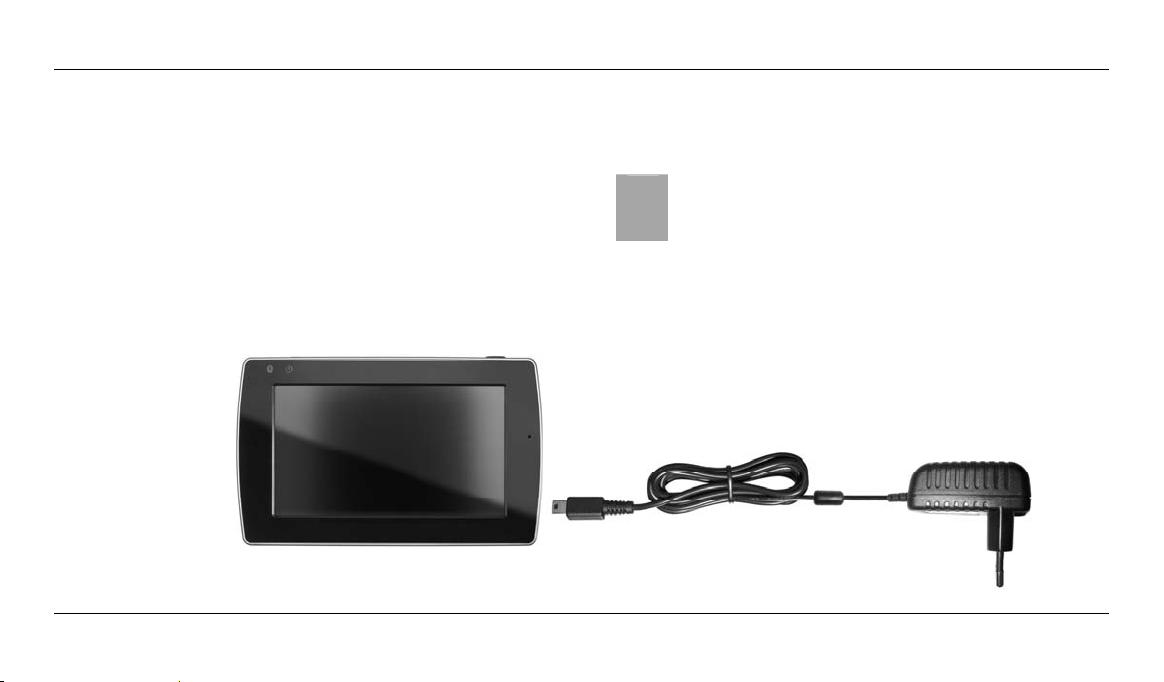
Recharging from a Power Outlet
1. Plug the Mini-USB connector of the power adapter
cable [page 1, item 8] into the receptacle [page 9,
item 9] of your navigation device.
2. Plug the power adapter into a wall outlet.
3. The charging process starts automatically, and the
charger indicator [page 9, item 4] lights orange.
When the charging process is completed, the status
indicator will light green.
12
The power adapter design varies according to the
region. Therefore the figure may differ from the
i
supplied power adapter.
Page 15
Navigation Device PNA-M4310 English
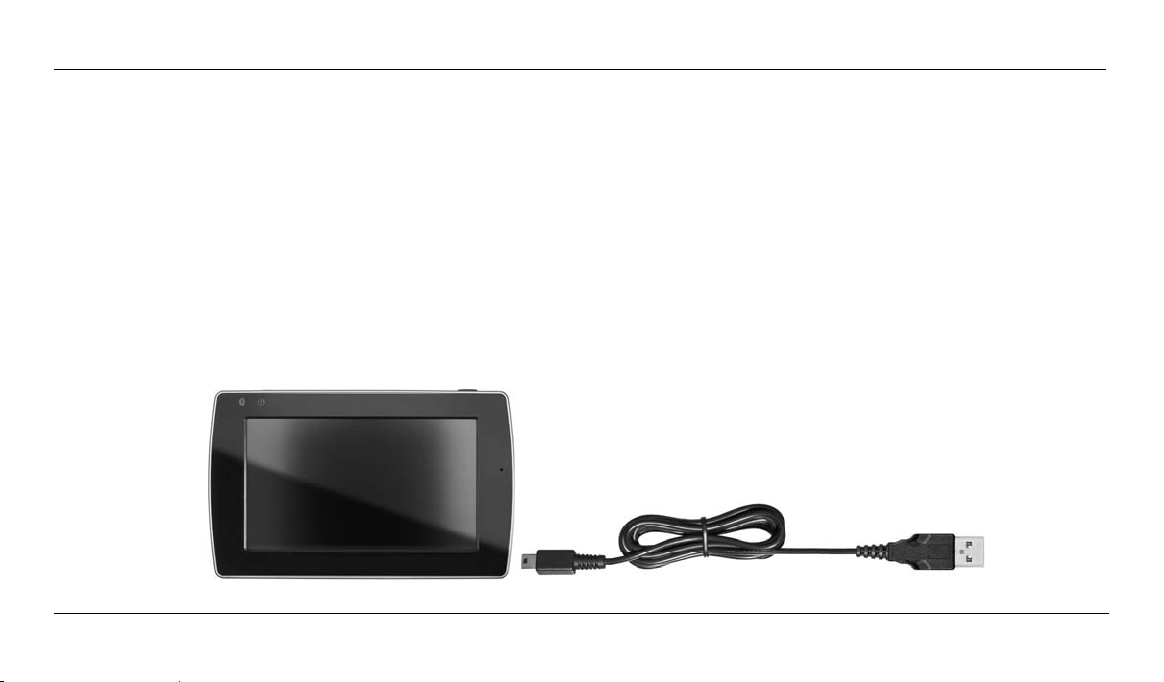
Recharging from a Computer
1. Plug the Mini-USB connector of the USB cable
[page 1, item 5] into the receptacle [page 9, item 9]
of your navigation device.
2. Plug the USB conn ector of the cable into a USB port
on your computer. If your navigation device was in
standby mode it will power on automatically.
3. The charging process starts automatically, and the
charger indicator [page 9, item 4] lights orange. At
the same time the computer will detect and connect
a mass storage device (see page 52 – Connecting
to a Computer).
13
Page 16
English Navigation Device PNA-M4310
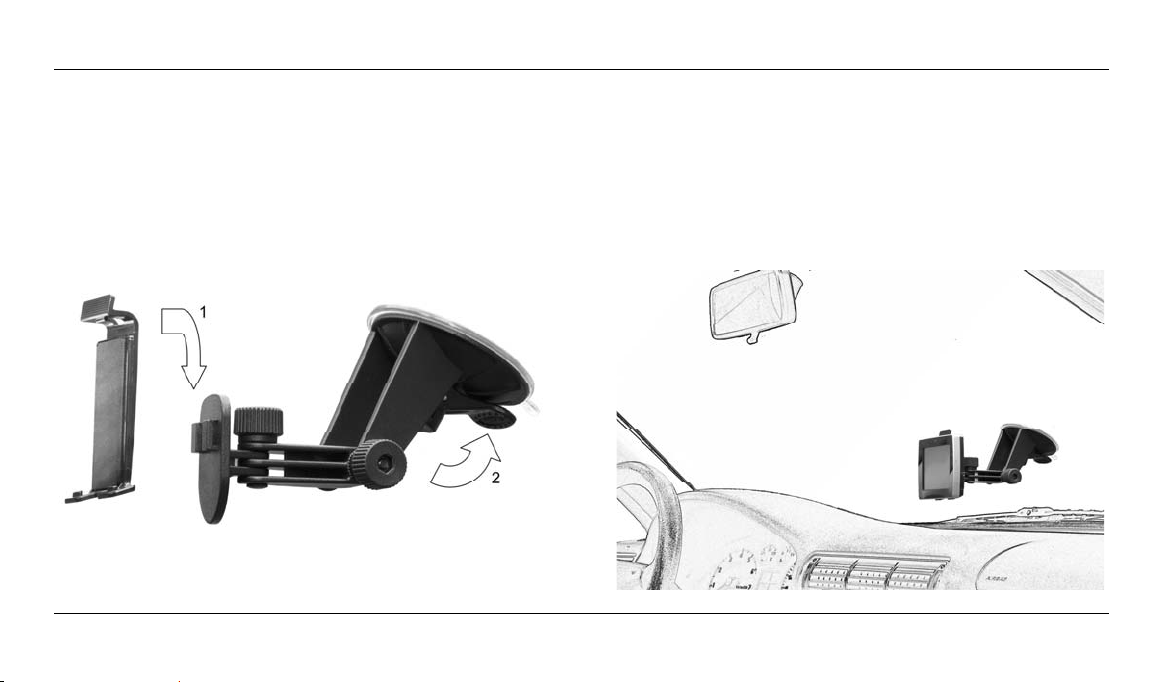
Car mount
To install the navigation device on its car mount, first install
the supplied adapter plate [page 1, item 3] on the car mount
(see figure, arrow 1).
Then press the suction pad of the car mount against the
windshield and fix it by turning the lock (see figure, arrow 2).
14
In order to obtain good GPS signal reception the navigation
device must be placed so it has an obstacle-free sight to the
sky. Choose a suitable location on the car’s windshield.
Page 17
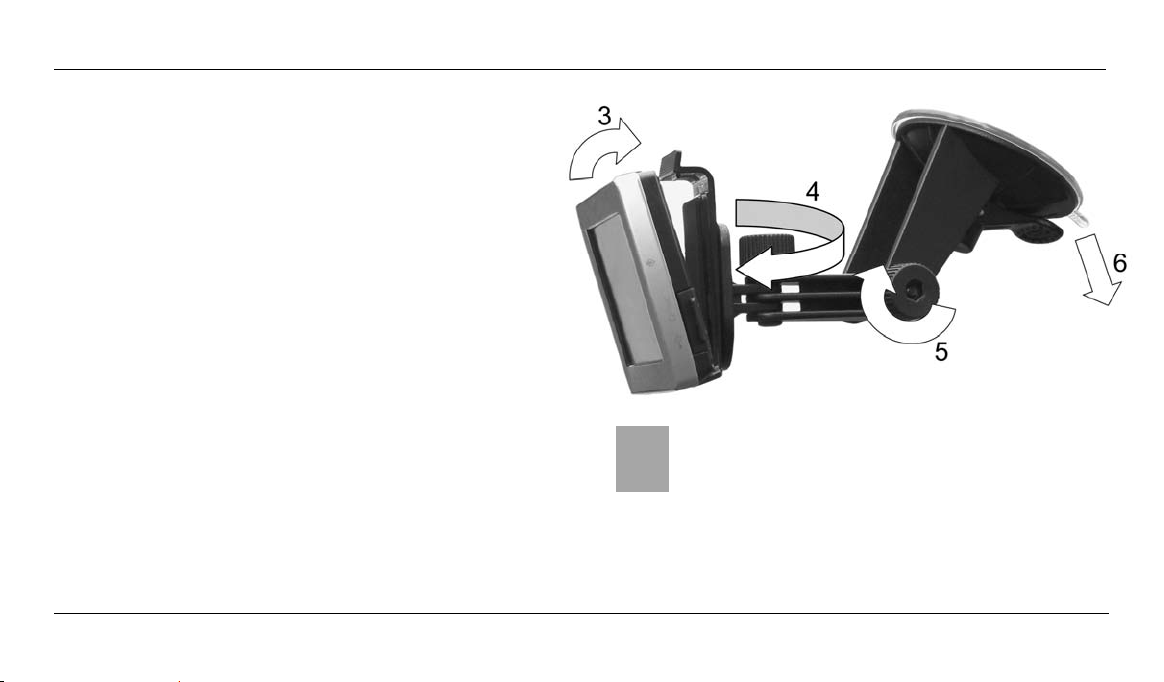
Navigation Device PNA-M4310 English
Once the car mount has been fixed in place you can insert
the navigation device into the adapter plate. The noses on
the adapter plate must fit into the corresponding holes of the
navigation device (see figure, arrow 3). Loosen the screws of
the car mount to change the navigation device position and
then tighten the screws in the chosen position (see figure,
arrows 4 and 5).
To loosen the navigation device from the car mount, press o n
the latch on top of the adapter plate and remove the device.
To remove the car mount from the windshield, rotate the lock
again and then pull from the latch located at the bottom of
the suction pad (see figure, arrow 6).
Do not install the car mount (with or without the
navigation device) within the operating area of the
!
vehicle’s airbag and install the car mount so that the
driver’s view is not obstructed.
15
Page 18

English Navigation Device PNA-M4310
Connecting an External GPS Antenna
If required, you can connect a conventional external GPS
antenna to your navigation device. This might be necessar y
when using the device in a vehicle with a vertical windshield
(like a truck or bus) obstructing the sight to the sky. Also,
some modern vehicles have a metallised windshield causing
a shield effect to the GPS signals.
The external antenna must have an SMB connector in order
to connect it to the corresponding receptacle [page 9, item 2]
on the navigation device.
The device will receive the signals from the additional
antenna automatically: no further settings are required.
16
Page 19
Navigation Device PNA-M4310 English
First-Time Setup
Upon first setup of your navigation device you can set the
user interface language as well as the current date and time.
1. Slide the main power switch [page 9, item 10] of the
device into the On position.
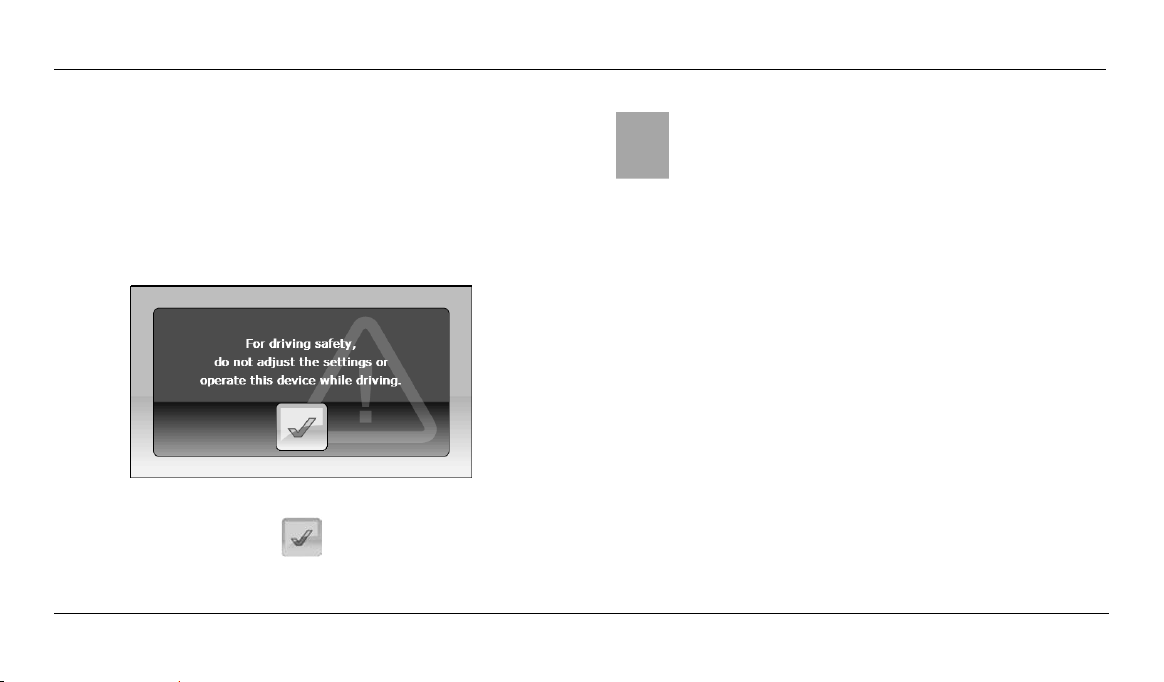
2. The manufacturer logo will appear for a few moments
followed by this message:
Confirm the setting by tapping the button.
Prior to using the device for the first time, charge the
battery completely. To do so, you must toggle the
!
main power switch to On.
17
Page 20
English Navigation Device PNA-M4310
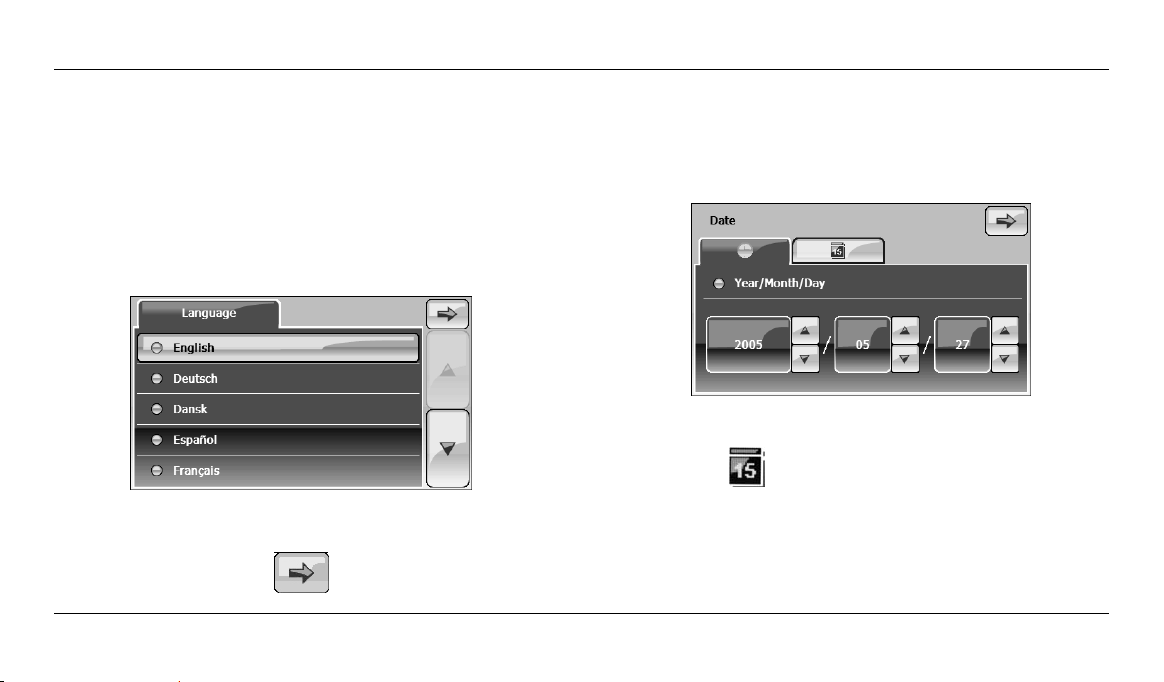
Setting the Display Language
A dialog box for setting the user interface language will
appear. Select a language by tapping on it. The display will
toggle to the new language immediately.
Tap the button ▲ or ▼ to scroll through the language list if
your language does not appear in the visible list of
languages.
To proceed tap the button:
18
Then set the current date and time.
Setting the Date
- Tap the icon:
- Tap ▲ or ▼ to select the current year, month and
day.
Page 21

Navigation Device PNA-M4310 English
Setting the Time
- Tap the icon:
- Choose between the 12 Hours or 24 Hours format
by tapping the corresponding button.
- Tap ▲ or ▼ to select the current Hour and Minute.
When using the 12 Hours format select between AM
(before noon time) and PM (afternoon).
To proceed tap the button:
The main menu appears (for more information, see page 24
– The Main Menu).
19
Page 22

English Navigation Device PNA-M4310
Powering the Device On/Off
Powering Off to Standby Mode
1. Press and hold the On/Off button [page 9, item 1]
for approx. three seconds until the device powers
off. The status indicator [page 9, item 4] stops
lighting and the device switches to standby mode.
The device consumes electricity in the Standby
mode. Therefore it can discharge the battery when
!
in standby mode over a longer period of time. If
you will not be using the device for several days,
we recommend that you power it off by using the
main power switch.
20
Powering Off Using the Main Power Switch
1. To po wer the device off completely, slide the main
power switch [page 9, item 10] into the Off position.
The status indicator [page 9, item 4] stops lighting.
When powering the device off by using the main
power switch, all user-defined settings will be lost.
i
Only the chosen user interface language and the
time format (12 Hours or 24 Hours) will be kept.
To be able to power the device off by using the main
power switch you must toggle it to standby mode
i
first by pressing the On/Off button.
Page 23

Navigation Device PNA-M4310 English
Powering On Using the Main Power Switch
1. Slide the main power switch [page 9, item 10] of the
device into the On position. The status indicator
[page 9, item 4] lights green.
2. Analogue to the first-time setup, the manufacturer
logo will appear for a few moments followed by this
message: “For driving safety, do not adjust the
settings or operate this device while driving.”
3. Confirm the setting by tapping this button:
4. The main menu appears (see page 24).
After powering the device on via the main power switch, only
the chosen user interface language and the time format (12
Hours or 24 Hours) have been kept. Any user-defined
settings have been restored to the factory-default values.
The navigation device can obtain the current date and time
from the GPS signals. To do this, start a routing. For this, you
must have selected the correct time zone (see page 25 –
First-Time Setup for Navigation).
21
Page 24

English Navigation Device PNA-M4310
Powering On from Standby Mode
If you powered the device off by pressing the On/Off button
[page 9, item 1] it will be in standby mode. To power it on,
proceed as follows:
1. Press and hold the On/Off button [page 9, item 1]
for approx. three seconds.
2. The main menu (see page 24) will appear and the
status indicator [page 9, item 4] lights green.
22
Button Lock
In the factory-default configuration the button lock is enabl ed.
If you do not press any button for a few minutes the display
will be locked and the message Locked! Press the button
to unlock. appears. Then tap the button:
Confirm the prompt Unlock? by tapping the button:
Read on page 47 - Touch Lock for how to enable or disable
the button lock.
Page 25

Navigation Device PNA-M4310 English
Inserting a Memory Card
The navigation device can read SD and MMC memory cards.
After you insert a memory card the device will detect it
automatically and give you access to any music, video and
picture files stored on it (see from page 39 – Travel Kit).
Inserting a Memory Card
1. Insert a compatible memory card with the contacts
facing forward into the memory card slot [page 9,
item 7] of your navigation device. The labelled face
of the card must be facing to the front. Insert the
card carefully until it clicks in place.
2. The message Memory card inserted! is displayed
on the screen for a few seconds.
Removing a Memory Card
1. Carefully press against the inserted card. It will
unlock and the memory card will be slightly pushed
out by a spring mechanism.
2. The message Memory card removed! is displayed
on the screen for a few seconds.
3. Pull the memory card out.
Remove the memory card only after toggling to the
main menu by pressing the On/Off button [page 9,
!
item 1] and stopping the audio playback. Otherwise
loss of data can occur.
Make sure that the contacts of the memory card are
not dirty and do not apply any pressure on the card.
!
23
Page 26

English Navigation Device PNA-M4310
The Main Menu
The main menu gives you access to the different functions of
your navigation device.
1 2 3
1 Current time
2 Status of Bluetooth connection
3 Remaining battery capacity or power supply indicator
24
Navigation (from page 25)
Navigation and route planning, Navigation
options settings and saving of favourite
destinations.
Hands-free (from page 35)
Bluetooth connection to a mobile phone and
setup of the hands-free mode.
Travel Kit (from page 39)
Playback of music, videos and pictures.
Settings (from page 46)
To change and setup basic settings and to
customise the device according to your needs.
Page 27

Navigation Device PNA-M4310 English
Navigation
Upon delivery the device has the required maps already
installed. Only when launching the device for the first time
will it take a few minutes for initialising. On any further use
this procedure will only take a few seconds.
During a running routing you can always open the main
menu to set up the audio playback, to make a phone call or
to change any settings. To do so, press the On/Off button
[page 9, item 1] once. After you have finished your setup, o n
the main menu tap on Navigation to return to the routing.
Please read the following pages to learn how to start
navigation and how to enter a destination. For detailed
operating instructions please see the included DVD.
For GPS tracking a free sight to the sky is required.
Navigation does not work inside a building or in a
i
tunnel. Also a dense forest can reduce the GPS
signal strength.
First-Time Setup
- In the main menu tap on Navigation to start
navigation.
- Depending on the available voices you may be
prompted to select a voice for the spoken driving
instructions. Tap the desired item from the list:
One or more of the following may be available: a
male voice, a female voice or a female voice with
street name output (TTS - Text To Speech).
25
Page 28

English Navigation Device PNA-M4310
If only one voice is available it will be selected
automatically and the selection dialogue will not pop
up.
- Next select your time zone. If required, tap ▲ or ▼
to scroll through the list and tap the desired entry to
highlight it.
- Confirm your selection with the button
26
- A warning message will appear alerting you about
the use of the navigation device whilst driving. Tap
the checkbox that appears before the option Hide at
startup to suppress the message when starting the
software next time.
Page 29

Navigation Device PNA-M4310 English
The Navigation Main Menu
The Navigation main menu will appear al lowing you to enter
all further settings and parameters.
The main menu includes the groups Destination, Favourites,
Settings and Exit. On the right, the options for the highlighted
group are displayed.
- To enter a new destination, tap the Find Address
option. The following screen will appear:
- Tap Country and select the country of your
destination from the list by tapping on it.
- To locate the cit y you can either enter the post code
or the name of the town. To do so, tap Post Code or
City.
- In the following example we enter the name of the
city.
27
Page 30

English Navigation Device PNA-M4310
28
An on-screen keyboard will be displayed where you
can select all letters and digits. While entering the
characters via the on-screen keyboard, characters
will be greyed-out that do not give a result for any of
the stored city names and the characters you have
entered so far.
When you are done, tap the following button to
confirm:
In addition the following special buttons are
available:
Toggles between capital and small
letters
Space
Deletes the last entered character
Special and accented characters
Back to destination input
Confirm input
Page 31

Navigation Device PNA-M4310 English
- Next enter the street number. To do this, tap No.
and enter the street number via the on-screen
keyboard.
It is possible that the street number of outof-town areas or new urbanisations is not
i
registered in the database. In this case
the device will guide you to the centre of
the street and displays the following
message: „Housenumber not found.
Street will be used for desitination.“
- Tap the following button to confirm the street
number:
- After all destination details have been entered tap
the following button to start the route calculation:
- In the foll owing selection you launch the navigation
by tapping Navigate.
For more information about the buttons, please see
the User’s Manual on the included DVD.
- Navigation starts from the current position and
guides you graphically and acoustically to the
destination.
29
Page 32

English Navigation Device PNA-M4310
The Navigation Window
Distance to the next
manoeuvre
Current speed
Estimated Time of Arrival
Distance to destination
Back to destination input
For more information about the buttons and settings,
please see the User’s Manual on the included DVD
i
(see also page 54 - The DVD).
30
Icons for GPS signal strength
and the battery level.
Zoom out (larger scale of the
map)
Route
Present position with driving
direction indication
Zoom in (smaller scale of the
map)
Display more buttons
(navigation continues running
in background)
Page 33

Navigation Device PNA-M4310 English
Speed Warning
The map of your navigation device includes information
about road speed limits. This allows the device to alert you
when exceeding the maximum allo wed speed on a specific
road section.
Please note that this function has been designed as
a helping feature. The Road Traffic Act regulations
!
always have priority over the instructions of your
navigation device.
To enable the speed limit warning, from the main menu (see
figure on page 27) tap on Settings and then tap General
Settings.
From the General Settings menu, tap the Speed Limit button:
The following submenu appears:
31
Page 34

English Navigation Device PNA-M4310
To enable the speed limit warning:
1. Tap the Enable Warner checkbox. A checkmark will
appear in the checkbox.
2. In addition to the optical warning you can also
enable an acoustic warning. To do this, tap the
Warning tone checkbox.
To disable any of these functions, tap the
corresponding checkbox again. The
i
associated checkmark will be removed.
3. Next select a tolerance value. When exceeding this
tolerance the warning will be output. To do this, tap
the desired button:
32
Triggers the warning when exceeding
the speed limit by 5 km/h.
Triggers the warning when exceeding
the speed limit by 10 km/h.
Here you can set a custom tolerance
value (see page 34 – Manual Input).
4. After you have entered all information tap this
button:
5. You are returned to the General Settings menu.
Change any further settings or tap again to
return to the main menu.
Page 35

Navigation Device PNA-M4310 English
While the speed limit warning is enabled, an icon
representing a traffic sign appears in the lower right corner of
the display.
The number indicated on the traffic sign corresponds
to the speed limit stored in the database. This
!
indication provides a help information only and may
differ from the real speed limit (e.g. where road works
are taking place or where the traffic control has
changed).
If you have enabled the acoustic warning too, a repeated
warning signal will sound when exceeding the speed limit.
The speed limit function will only work while
navigating to an entered destination. Once you reach
i
your destination and the destination routing becomes
disabled, the speed limit warning will also be
disabled. If you resume navigating to another
destination, the speed limit warning function also
resumes.
33
Page 36

English Navigation Device PNA-M4310
Manual Input
From the Speed Limits menu (see figure on page 31), tap the
following button:
The following screen will appear:
34
1. Use the numeric keypad to enter a tolerance value
for the speed limit warning.
2. If you make a mistake, tap
entered character.
3. The selected value will be displayed under Actual
tolerance.
4. Tap
submenu.
to confirm your setting and to quit the
to erase the last
Page 37

Navigation Device PNA-M4310 English
Hands-free
In this menu you may use your navigation device as a handsfree kit for the most common mobile phones with Bluetooth®
support.
When establishing the connection for the first time the
devices must be paired. Please consult the technical
documentation of your mobile phone on how to pair it.
Bluetooth
From the main menu tap the Hands-free icon to open the
following menu:
Setting Up a Connection
1. Prepare your mobile phone for pairing. For more
information, consult the User's Manual of your
mobile phone.
2. Place your mobile phone next to your navigation
device in order to obtain a hassle-free pairing.
3. Tap the Bluetooth option (see the figure on the left)
to enable the navigation device’s Bluetooth
interface. As soon as Bluetooth has been launc hed
the status message is On and the Bluetooth
indicator [page 9, item 3] will blink blue.
4. The message Please start pairing from your
bluetooth phone. The passkey is: 0000 is
displayed on the screen.
5. Your mobile phone should d etect and display your
navigation device as PNA-M4310. When prompted,
enter the passkey 0000 on your mobile phone.
35
Page 38

English Navigation Device PNA-M4310
If your mobile phone supports automatic connection
restore, you can enable it. In this case, both devices
i
will interconnect automatically when they are within
their reception range with the Bluetooth component
enabled.
As soon as the connection has been established, you can
use the hands-free feature. Any incoming calls will be
indicated on the navigation device as follows:
36
The following options are available:
Accept call
Tap this button to accept the incoming call.
Hang-Up
Tap this button to finish a call or to reject an
incoming call (the caller will hear a busy tone).
Disable Microphone
Enables or disables the built-in microphone.
Mute
Enables or disables the built-in speaker. You
can set the audio volume by using the volume
control.
Page 39

Navigation Device PNA-M4310 English
Dial
From the Hands-free menu tap the Dial option to open the
following menu:
1
2
3
1. Enter the desired phone number via the numeric
keys.
2. If you make a mistake, tap the button [3] to erase
the last entered character.
3. To start the call, tap the butto n [2].
The paired mobile phone will start calling and the call can be
controlled from your navigation device.
Controlling a call is made in the same way as for an incoming
call (see previous page).
Auto Answer
The Auto Answer function will accept an incoming call
automatically after the first ringtone. This is especially
comfortable when driving.
To do this, from the Hands-free menu tap the Auto Answer
option: The message On confirms the current status. Tap the
same entry again to disable the automatic call answering.
Then the status will be Off.
37
Page 40

English Navigation Device PNA-M4310
Last Calls
This menu gives you an overview on any dialled, accept ed
and missed calls. If required you can highlight a number from
one of the phonebooks by tapping on it and start the calls by
tapping the telephone handset icon.
The trash can button allows you to erase an entry. Confirm
the safety prompt by tapping the following button:
38
Paired List
The paired devices list shows all devices that have been
paired with their name and the corresponding hardware
address.
1
2
3
1 Returns to the Hands-free menu.
2 Establishes a connection to the selected device in the
list.
3 Removes the selected entry from the list (must be
confirmed).
Page 41

Navigation Device PNA-M4310 English
Travel Kit
From this menu you can playback audio, video and picture
files. To do this, insert a memory card containing the
corresponding files into the memory card slot [page 9, item 7]
or save the desired files in the built-in flash memory. For
more information on how to connect the device to a
computer, see page 52.
Music
Select the Music option.
A table showing all available titles stored in the flash memory
will appear (see figure on the right). If there is a memory card
inserted, additionally the Memory Card option will appear.
Tap the buttons ▲ or ▼ to scroll through the list.
The following options are available:
- Tap Continue to resume playback at the position
where you last stopped it.
- Tap Play All to play the entire list.
- Tap Memory Card to show the contents and titles of
the inserted memory card (if any).
- Tap on a title to start playback.
- Tap
i
The option Continue will be available only if you have
stopped a previous playback or during playback.
to return to the Travel Kit selection.
39
Page 42

English Navigation Device PNA-M4310
Current title/total number of
titles
File name of current title
Artist of current title
The album
Status bar and playback time
Previous track (keep this
button pressed for fast reverse
of the title).
Pause / Resume
Next track (keep this button
pressed for fast forward of the
title).
40
Music Playback
Return (playback continues,
see also page 45,
Simultaneous Use)
Increase Volume
Volume display
Reduce Volume
Mute
Repeat mode
Repeats a single title.
Repeats the entire list.
Back to normal playback
Page 43

Navigation Device PNA-M4310 English
Video
From the Travel Kit menu select the Video option.
A table showing all available videos stored in the flash
memory will appear (see figure on the right). If there is a
memory card inserted, additionally the Memory Card option
will appear. Tap the buttons ▲ or ▼ to scroll through the list.
For more information on how to connect the device to
a computer, see page 52.
i
- Tap on a video file to start playback. The file is
played back in full-screen mode.
- Tap Memory Card to show the contents and videos
of the inserted memory card (if any).
- Tap
to return to the Travel Kit selection.
Depending on the aspect ratio of the recorded contents,
black bars may appear on the left and right displa y margins.
This is not a malfunction.
During playback of a video tap the display to show the
following buttons (see next page);
41
Page 44

English Navigation Device PNA-M4310
Operating status icon
Tap this button to go to the
beginning of the video file.
Hold this button to fast reverse
the current video.
Tap this button multiple times
to play the previous video file.
Pause / Resume
42
Video Playback
Current and total playback time
Return (playback stops)
Displays the volume control.
Mute
Tap this button once to play
the next video file. Hold this
button to fast forward the
current video.
Page 45

Navigation Device PNA-M4310 English
Photo
From the Travel Kit menu select the Photo option.
A table showing all available pictures stored in the flash
memory will appear (see figure below). If there is a memory
card inserted, additionally the Memory Card option will
appear. Tap the buttons ▲ or ▼ to scroll through the
overview.
For more information on how to connect the device to
a computer, see page 52.
i
The following options are available:
- Tap on a preview picture to show it in full-screen
mode (see figure on the right).
- Tap Memory Card to show the contents and
pictures of the inserted memory card (if any).
- Tap
Tap on the display once to show the following buttons:
to return to the Travel Kit selection.
43
Page 46

English Navigation Device PNA-M4310
The following options are available:
- Tap the ◄ or ► button to navigate through all
available pictures.
- Tap
- Tap
below).
to return to the overview.
to display more buttons (see the figure
44
The buttons have the following meaning:
Start slide show
Starts the automatic picture playback from the
current picture and swaps to the next picture
after the set interval. Tap the following buttons
to set the interval:
5 seconds
3 seconds
2 seconds
Stop slide show
Stops the automatic picture playback.
Page 47

Navigation Device PNA-M4310 English
Rotate
Tap this button multiple times to rotate the
picture by 90 degrees each time clockwise.
Zoom in
Tap this button multiple times to enlarge the
picture (up to three levels).
Zoom out
Tap this button multiple times to reduce the
picture (only available if the picture has been
zoomed-in previously).
Full-screen
Returns to full-screen mode after zooming a
picture in or out.
Volume control
Opens the volume control (only available if the
music playback has been started previously,
see on the right).
Mute
Disables or enables the sound (only available
if the music playback has been started
previously, see on the right).
Simultaneous Use
The Music function can be used in parallel with the Photo
and Navigation functions.
To launch the music playback, proceed as described on
page 39. Then exit the menu without stopping the music
playback by tapping the button
,
or return to the main menu by pressing the On/Off button
[page 9, item 1] once.
Then launch the Photo playback (see page 43 – Photo) or
the Navigation (see page 27 – Navigation).
To stop the simultaneous playback, go to the music playback
menu and stop playback here.
45
Page 48

English Navigation Device PNA-M4310
Settings
In this menu you can perform different presets to customize
the device to your individual needs.
Volume, see on the right.
Touch Lock, see page 47.
Audio Output, see page 48.
Display, see page 48.
Language, see page 49.
Date & Time, see page 49.
Power Status, see page 50.
Factory Defaults, see page 50.
System Info, see page 50.
Upgrade Firmware, see page 51.
46
Volume
This menu is available only if you have set the Audio
Output function to Speaker (see page 48 - Audio
i
Output).
- Here you can set the volume between 0% and
100%.
- The checkbox Touch Tones allows you to enable or
disable an acoustic signal sounding each time you
press a button.
- By using the Mute icon you can mute or restore the
sound output.
Page 49

Navigation Device PNA-M4310 English
Touch Lock
This lock can be set either manually or automatically. The
option Manual activates an im mediate button lock, the option
Auto locks the buttons when you haven’t pressed any button
for 5 minutes.
How to enable the automatic lock:
- Select Auto and tap to exit the menu. The Auto
function will be enabled immediately.
How to enable the manual lock:
- Select Manual and enable the lock by tapping .
Once the button lock has been enabled the message
Locked! Press the button to unlock. will appear. Then tap
the button:
Confirm the prompt Unlock? by tapping the button:
The button lock applies to any on-screen buttons: it
does not apply to the On/Off button [page 9, item 1].
i
You can also disable the button lock completely by
selecting the Manual lock but by not enabling it and
i
exiting the menu via the key icon .
47
Page 50

English Navigation Device PNA-M4310
Audio Output
Select the Speaker option if you want to output the sound via
the built-in speaker. Select FM Transmitter to use the built-in
FM transmitter to send the sound to you car radio. The signal
quality depends on the car design and the model of the car
radio receiver. In some cars some noise can be heard or the
reception is interfered with or impossible.
To set the FM transmitter:
- Tap the FM Transmitter button:
- Tap the ► or ◄ button to select a frequency between 87.5
MHz and 108.0 MHz or tap any of the four preset stations if
you have already stored a station.
If required you can store the currently tuned frequency
by tapping the floppy disc icon and selecting one of the
i
four presets.
- To exit the menu tap
.
48
Display
In this menu you can set the display brig htness in six levels,
enable a power-saving mode and calibrate the display.
Brightness
- Tap the icon:
- Tap ◄ or ► to set the desired brightness value.
Power-saving mode
- Tap the icon:
- Select one of the default timeouts for powering the
display off or select Off to disable the power-saving
function.
Page 51

Navigation Device PNA-M4310 English
Calibration
- Tap the icon:
- Tap
- Use the stylus [page 1, item 4] to tap on the
A calibration is required when the display does not
respond properly to your input.
i
Language
Select a language by tapping on it. The display will toggle to
the new language immediately. Tap the button ▲ or ▼ to
scroll through the language list if your language does not
appear in the visible list of languages.
to confirm a new calibration or cancel this
process by tapping
displayed target and follow the on-screen
instructions.
.
Date and time
Setting the Date
- Tap the icon:
- Tap ▲ or ▼ to select the current year, month and
day.
Setting the Time
- Tap the icon:
- Choose between the 12 Hours or 24 Hours format
by tapping the corresponding button.
- Tap ▲ or ▼ to select the current Hour and Minute.
When using the 12 Hour format select between AM
(before noon time) and PM (afternoon).
49
Page 52

English Navigation Device PNA-M4310
Power Status
This option shows you the current level of the built-in battery.
Factory Defaults
With this option you can restore the factory-default settings of
your device. All settings will be erased and the device will restart
after restoring the defaults (see page 17 – First-Time Setup).
- Tap the icon
,
to proceed with the restore or tap
,
to cancel restoring the defaults.
Shortly after restoring the factory defaults the message
Finished will appear on the display.
50
System Info
In this menu you will find information on version numb ers, th e
device serial number and the memory status.
Devices submenu
Here you can display the version numbers of the device
software and of the firmware as well as the serial number.
Storage submenu
Shows the total space as well as the available capac ity of
the internal memory (flash drive) and the inserted memory
card (if any).
Page 53

Navigation Device PNA-M4310 English
Upgrading the Firmware
When new firmware is released you can upload it to the
device. Copy the new firmware onto a memory card and
insert the card into the memory card slot [page 9, item 7].
- Tap the button
,
to proceed with the upgrade or tap
,
to cancel the process.
When new firmware is released you’ll find it on our
website http://www.silvercrest.cc.
i
While the upgrade is running never remove the
memory card and do not power the device of.
!
Otherwise the device may suffer severe damage.
If no compatible firmware I found on the memory
card the message Failed! appears on the display.
i
Make sure that the firmware is the only file on the
memory card and that it hasn’t been saved into a
subfolder.
51
Page 54

English Navigation Device PNA-M4310
Advanced
Connecting to a Computer
You can use your computer to access the internal flash
memory of your navigation device in order to upgrade the
maps or to store music, video and picture files on it.
To do so, your computer must run under Windo ws® 2000/XP
or Windows Vista® and have a free USB port (USB 1.1 or
USB 2.0).
As soon as a connection to the computer is
established, the button operation on the device will
i
be locked.
- Plug the Mini-USB connector of the USB cable
[page 1, item 5] into the receptacle [page 9, item 9]
of your navigation device.
- Next, pl ug the other c onnecto r of the USB c able into
a free USB port on your powered-on computer.
- After a few seconds, on the navigation device
display this icon will appear:
52
Page 55

Navigation Device PNA-M4310 English
- The operating system will det ect the flash memory
of the navigation device as a removable media and
will show it under My Computer.
A drive letter will be assigned to the flash memory
depending on the computer configuration.
As soon as the connection has been established you can
proceed as usual to copy, move and delete files.
The folders have the following meaning:
Audio
Cities
MobileNavigator
Photo
Video
Do not change the names and contents of the folders
Cities and MobileNavigator. These folders contain
!
essential data for the proper functioning of the
device.
To save any music files.
Maps for navigation
!
Program files for navigation
!
To save any picture files.
To save any video files.
53
Page 56

English Navigation Device PNA-M4310
The DVD
By using the supplied DVD you can remove or install any
maps as well as read the detailed User’s Manual for the
navigation software.
To do this, insert the DVD into your DVD drive. The follo wing
menu should appear automatically:
54
If the autorun function is disabled on your computer,
you can launch the setup manually by double-clicking
i
the file "setup.exe" on the DVD.
Installing the Software
Before you can install the software on your navigation device
you must connect it to the computer via the USB cable [page
1, item 5].
For more information about connecting to a computer, pl ease
see page 52.
1. Click on “Software PNA-M4310”. Next select your
language.
Page 57

Navigation Device PNA-M4310 English
2. Click “OK”.
3. Continue following the wizard by clicking “Next >”.
4. A window, showing different components will
appear.
5. Select the desired components to install by placing
a checkmark in the corresponding fields.
If you want to remove a particular
component from the device, remove the
i
corresponding checkmark.
55
Page 58

English Navigation Device PNA-M4310
6. Next select the desired language for the driving
instructions.
To do so, move the scroll bar downwards or click ▼
(see the mark) until you can see the desired
language.
56
7. Select “english” to output the driving instructions in
English.
Please always bear in mind that the navigation
software follows the general language setting
i
of your navigation device. Therefore, if you
select “English” as the system language (see
page 18 – Setting the Display Language) you
will have to install the English language
package as well here.
However, we recommend that you install all
available language packages in this step.
8. Once you have made your choice, click “Next >” to
confirm the installation.
9. The setup process begins. This process may take a
few minutes. A progress bar will inform you of the
status of the setup.
Page 59

Navigation Device PNA-M4310 English
10. As soon as the installation process is complete a
dialog box Finished will appear. Then click the
“Finish” button.
11. The DVD main menu will appear. Click “exit” to
close it.
12. The process has finished. Separate the navigation
device from your computer by removing the USB
cable between them.
The User’s Manual
To be able to read the navigation software User’s Manual
you will need Adobe Acrobat Reader
®
. If you haven’t
installed this free programme yet, you will have to install it
now. To do so, click “Adobe Reader 7.05” and follow the onscreen instructions.
After Adobe Acrobat Reader® has been installed or if it was
already installed on your computer, select the User’s Ma nual
in a preferred language by clicking on the corresponding
entry. The User’s Manual will open in Adobe Acrobat
®
Reader
.
57
Page 60

English Navigation Device PNA-M4310
Licensing
In the General Settings of the navigation menu you can vie w
the serial number of the maps and map contents.
1. From the Navigation main menu (see figure on
page 27), tap Settings.
2. Tap General Settings. The following menu will
appear:
3. Tap the Premium icon:
58
4. A table with all installed contents will appear. Tap
the desired entry to show the serial number of the
corresponding contents.
5. Tap the display to close the information.
6. To finish this process tap the following button:
7. You are returned to the General Settings menu.
Continue with your settings or tap
,
to return to the main menu.
Page 61

Navigation Device PNA-M4310 English
Technical Specifications
Navigation Device:
Model:
PNA-M4310
Processor: Samsung 400 MHz processor
Memory: 64MB RAM,
2GB NAND Flash drive
Card reader: SD and MMC cards up to 2GB
®
Operating system: Microsoft Windows
CE 5.0 Core Version
Colour display: 4.3-inch colour display with 65536 colours
GPS Chipset: Sirf Star III
Bluetooth: Class 2
USB port: USB 1.1
Power adapter:
Model:
Targa KSAA0500100W1UK
Input: 100-240VAC, 50/60Hz, 0.14A
Output: 5VDC, 1.0A max.
Car charger:
Model:
Silvercrest TCP10050BC
Input: 8~24VDC, 0.9A
Output: 5VDC, 1.0A max.
Fuse: T2AL / 250V
Smart2go Serial Number
PNA Serial Number
59
Page 62

GB
36 month warranty from date of purchase
IMPORTANT WARRANTY INFORMATION
Dear Customer,
Thank you for purchasing a SILVERCREST product.
Please carefully read through the enclosed documentation or online help before putting your SILVERCREST product into service. If you have a problem,
which can’t be solved in this way, please contact our hotline.
If the problem cannot be solved over the phone, you will be given a reference number (RMA), which you should enclose together with a copy of the proof
of purchase. After you have packaged the unit safe for transport and in plain packaging, please send it for warranty processing, with the RMA noted on
the outside of the package, to the address given to you by our hotline employee. After receiving the unit we will correct the manufacturing and material
defect free of charge.
Up-to-date information and answers to the most frequently asked questions are available on the internet from: www.silvercrest.cc
This guarantee is valid in the UK.
Your statutory guarantees from the seller are in addition to this warranty and are not limited by it.
Hotline number: 0207-3650744
(Please have your serial number to hand!)
www.silvercrest.cc
Manufacturer: TARGA GmbH, Postfach 22 44, D-59482 Soest
Page 63

IE
36 month warranty from date of purchase
IMPORTANT WARRANTY INFORMATION
Dear Customer,
Thank you for purchasing a SILVERCREST product.
Please carefully read through the enclosed documentation or online help before putting your SILVERCREST product into service. If you have a problem,
which can’t be solved in this way, please contact our hotline.
If the problem cannot be solved over the phone, you will be given a reference number (RMA), which you should enclose together with a copy of the proof
of purchase. After you have packaged the unit safe for transport and in plain packaging, please send it for warranty processing, with the RMA noted on
the outside of the package, to the address given to you by our hotline employee. After receiving the unit we will correct the manufacturing and material
defect free of charge.
Up-to-date information and answers to the most frequently asked questions are available on the internet from: www.silvercrest.cc
This guarantee is valid in the Ireland.
Your statutory guarantees from the seller are in addition to this warranty and are not limited by it.
Hotline number: 01-2421583
(Please have your serial number to hand!)
www.silvercrest.cc
Manufacturer: TARGA GmbH, Postfach 22 44, D-59482 Soest
Page 64

TARGA GmbH
Lange Wende 41
D-59494 Soest
Germany
www.silvercrest.cc
ABCHDDKE
FLFINFGBGRI
NLIRL NL P S
CE declaration of conformity: www.silvercrest.cc
MAT-No: 1366597
 Loading...