

Page 1
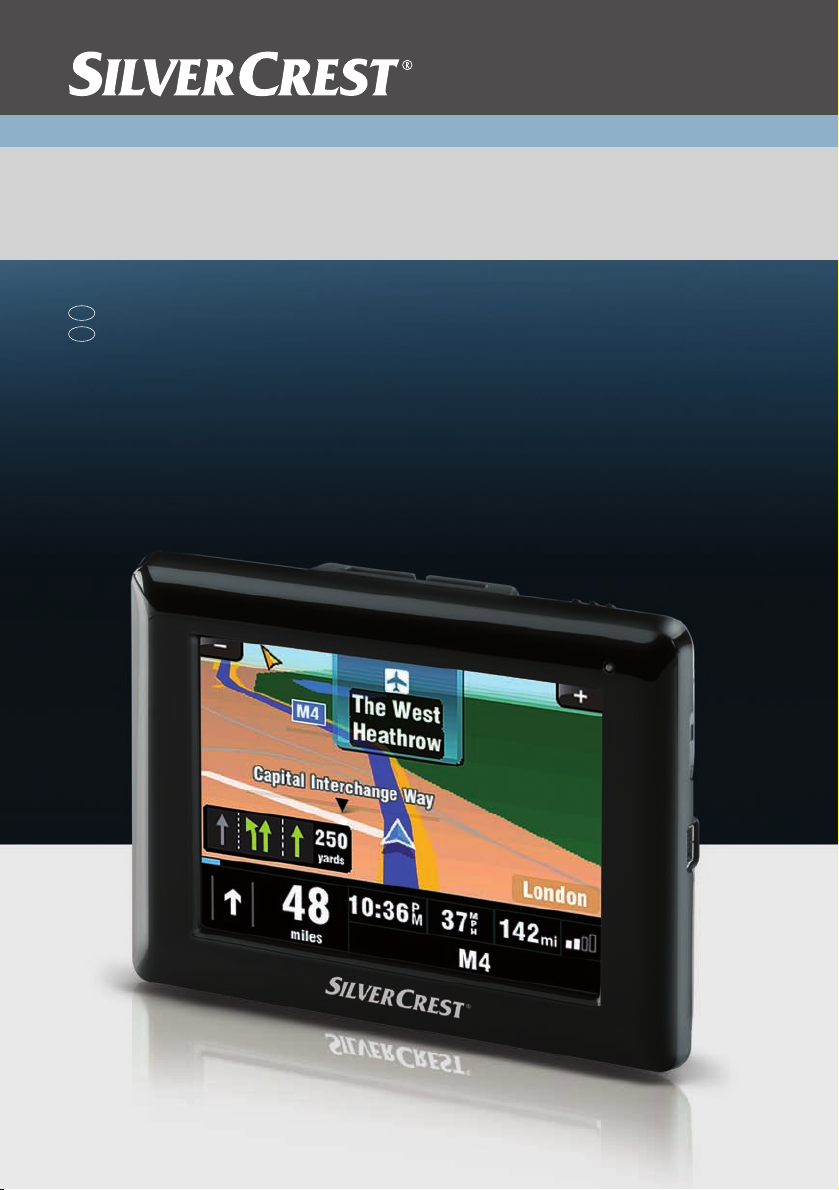
HOME TECH
MOBILE NAVIGATION SYSTEM
GB
User manual and
IE
service information
PNA-E3540N
Page 2

Contents
Navigation Device
Silvercrest PNA-E3540N
Contents
Important Safety Notice Page 6
Introduction Page 11
Navigation Page 32
Appendix Page 100
Contents
Navigation Device PNA-E3540N 1
Page 3

Contents
Important Safety Notice ..........................................6
1.
1.1 Operating Environment .............................................................. 6
1.2 Power Supply............................................................................. 7
Contents
1.3 Rechargeable Battery ................................................................ 8
1.4 Cables........................................................................................ 8
1.5 Repair and Maintenance............................................................ 8
1.6 Children...................................................................................... 9
1.7 Intended Use.............................................................................. 9
1.8 Conformity.................................................................................. 9
1.9 Disposal of Old Devices........................................................... 10
2. Introduction ...........................................................11
2.1 Package Contents.................................................................... 12
2.2 Overview .................................................................................. 14
2.3 Care ......................................................................................... 15
2.3.1 Caring for the Display.......................................................... 15
2.4 General Operation Notes ......................................................... 16
2.5 Charging the Battery ................................................................ 16
2.5.1 Recharging in the Car ......................................................... 17
2.5.2 Recharging from a Computer .............................................. 18
2.6 Memory Card ........................................................................... 19
2.6.1 Inserting the Memory Card.................................................. 19
2.6.2 Removing the Memory Card ............................................... 19
2.7 Car mount ................................................................................ 20
2 English
Page 4

Contents
2.8 Powering the Device On/Off.....................................................23
2.8.1 Daily Use .............................................................................23
2.8.2 Powering Off Completely ..................................................... 23
2.9 First-time Setup ........................................................................ 24
2.10 General Operation Notes .........................................................27
2.10.1 Input.....................................................................................27
2.10.2 Map browsing ......................................................................28
2.10.3 Adjusting the Volume...........................................................29
2.10.3.1 Muting the sound...............................................................31
2.10.3.2 Button sound ..................................................................... 31
3. GPS ........................................................................ 32
3.1 GPS Connection.......................................................................32
3.1.1 SiRFInstantFixII
3.2 The GPS Main Menu................................................................33
3.3 Programming a Route ..............................................................35
3.3.1 Quick Guide ......................................................................... 35
3.3.2 Navigation Display ............................................................... 39
3.3.3 Setting Other Destinations...................................................40
3.3.4 Entering Data without GPS Reception.................................42
TM
................................................................32
3.4 Planning an alternative Route ..................................................43
3.4.1 Avoiding Route Legs............................................................45
3.5 Frequently Visited Destinations................................................46
3.5.1 Favourites ............................................................................ 47
3.5.2 Home Address ..................................................................... 48
3.5.2.1 Set Home Location............................................................48
3.5.2.2 Recalling Your Home Address .......................................... 49
3.5.3 History..................................................................................50
3.6 Map Options ............................................................................. 52
3.6.1 Angle....................................................................................52
Navigation Device PNA-E3540N 3
Contents
Page 5

Contents
3.6.2 Colour.................................................................................. 53
3.6.3 Backlight settings ................................................................ 53
3.6.4 Memorize Position............................................................... 54
3.6.5 Browse map ........................................................................ 55
3.6.5.1 Options for Browse map.................................................... 56
3.6.5.2 Options for the position mark ............................................ 57
3.6.5.3 Avoid... .............................................................................. 58
Contents
3.6.6 Optimising the Display......................................................... 59
3.6.6.1 Signpost Settings .............................................................. 59
3.6.6.2 Rotate display ................................................................... 60
3.6.6.3 Setup for Left-Handed Users ............................................ 61
3.6.6.4 Advanced settings............................................................. 61
3.7 Route Settings ......................................................................... 66
3.7.1 Planning preferences .......................................................... 66
3.7.2 Avoid toll roads.................................................................... 67
3.7.3 Programming Routes .......................................................... 68
3.7.3.1 Editing a Programmed route ............................................. 70
3.7.4 Show route instructions ....................................................... 72
3.7.5 Show route as images......................................................... 73
3.7.6 Show route summary .......................................................... 74
3.7.7 Show on map ...................................................................... 75
3.7.8 Cancel route ........................................................................ 76
3.7.9 Demo................................................................................... 76
3.8 POI - Points of Interest............................................................. 78
3.8.1 Adding a POI ....................................................................... 79
3.8.1.1
Creating a Custom Category............................................. 80
3.8.2 Edit POI name ..................................................................... 82
3.8.3 Delete POI........................................................................... 83
3.8.4 Deleting a Category............................................................. 85
3.8.5 Showing and hiding POIs .................................................... 86
3.8.6 Enable a POI Notification .................................................... 87
4 English
Page 6

Contents
3.9 General Settings.......................................................................89
3.9.1 Selecting a Map ................................................................... 89
3.9.2 Regional settings .................................................................90
3.9.3 Setting the Guidance Voice .................................................91
3.9.4 Setting the On-Screen Keypad ............................................ 92
3.10 Miscellaneous Applications ......................................................94
3.10.1 World Clock .........................................................................95
3.10.2 Calculator.............................................................................95
3.10.3 Unit Convertor......................................................................95
3.10.4 Country info .........................................................................96
3.10.5 GPS Status .......................................................................... 98
3.10.6 Calibrating the Display.........................................................99
4. Appendix ............................................................. 100
4.1 Troubleshooting......................................................................100
4.2 Connecting to a Computer .....................................................102
4.3 The Supplied DVD..................................................................103
4.3.1 Installing Maps...................................................................105
4.3.2 Installing Guidance Voices ................................................106
4.3.3 Support ..............................................................................108
4.4 Map material...........................................................................110
4.5 Index.......................................................................................111
4.6 Technical Specifications.........................................................114
4.7 Details of Guarantee ..............................................................115
4.8 Serial number ......................................................................... 117
4.9 Declaration of conformity........................................................ 118
Navigation Device PNA-E3540N 5
Contents
Page 7
Operating Environment
1. Important Safety Notice
Before you use this device for the first time, please read the following notes in
this manual and heed all warnings, even if you are familiar with handling
electronic devices. Keep this manual safe for future reference. If you sell the
device or pass it on, it is essential you hand over this manual also.
Used icons:
Important Safety Notice
This icon denotes important information for the safe operation of
the product and for the user’s safety.
This symbol denotes further information on the topic.
1.1 Operating Environment
Position the device on a stable, even surface and do not place any objects on
the device. The device is not for use in environments with a high temperature
or humidity (e.g. bathrooms), and must be kept free of dust. Operating
temperature and operating humidity: 5°C to 35°C, max. 85 % RH.
When using the navigation device in a vehicle, please install it on
the supplied car mount only and make sure that the device sits
properly on the car mount.
Install any cables in the vehicle so that neither the driver is
obstructed nor the capacity for driving the car.
6 English
Page 8

Power Supply
Do not install the car mount (with or without the navigation device)
within the operating area of the vehicle’s airbag and install the car
mount so that the driver’s view is not obstructed..
Always make sure that:
there is free circulation of air (do not place the device on shelves, on a
thick carpet, on a bed, or anywhere that obstructs the ventilation slots, and
leave at least 10 cm clearance on all sides;
no direct heat sources (e.g. heating) can affect the device;
no direct sunlight or bright artificial light reaches the device. When
installing the device in a vehicle, make sure that it doesn’t become
overheated;
contact with sprayed and dripping water and abrasive liquids must be
avoided and the device should never be operated near water. It must
especially never be immersed (do not place any recipients containing
liquids such as beverages, vases, etc. onto or next to the device);
the device is never placed in the immediate vicinity of magnetic fields (e.g.
loudspeakers);
no fire sources (e.g. burning candles) are placed on or near the device;
no foreign bodies are introduced into the device;
the device is not subject to any great temperature changes as this may
cause moisture through condensation and short-circuit;
the device is not subject to excessive shocks and vibrations.
1.2 Power Supply
Use only the supplied car charger cable IC-MUBU-DB-G or the supplied USB
cable to avoid overheating, deformation of housing, fire, electric shock,
explosions and other dangers. Never connect the car charger cable or the
USB cable to other devices. Please note that the supplied car charger must
never be used for a vehicle with a 24V power supply. If you wish to use your
Navigation Device PNA-E3540N 7
Important Safety Notice
Page 9

Rechargeable Battery
navigation device in a vehicle with a 24V power supply, you must connect a
24V-to-12V adapter (not supplied).
1.3 Rechargeable Battery
This device uses a high-end Lithium-ion battery. This battery should only be
removed or replaced by an authorized service centre. Under very rare
conditions, sparks may appear at the contacts causing any explosive and/or
Important Safety Notice
inflammable gases to ignite. Therefore we recommend that you do not use the
device in dangerous areas such as fuel stations and to power it off.
1.4 Cables
Always hold cables by the plug and never pull on the cable itself. Never place
the device, heavy objects or furniture on the cable and take care that the cord
does not become trapped, especially at the plug and socket. Never make
knots in the cable and do not tie it together with other cords. All cables should
be positioned so that nobody can trip over them or be obstructed by them.
Never use adapter plugs or extension cables that do not comply with the
current safety regulations in your country, and do not modify any of the cables
yourself.
1.5 Repair and Maintenance
Repairs are required when this device has been damaged in any way, for
example, when the device housing is damaged, when liquid has been spilled
on the product, when objects have fallen into the product, when the product
has been exposed to rain or moisture, when the product does not work
normally or if the product has been dropped. If you notice any smoke, unusual
noise or strange smells, switch off the device immediately and pull the
corresponding charger cable from the power supply. In this case the device
should not be used further and should be inspected by authorized service
personnel. Please contact qualified personnel when servicing is needed.
Never open the housing of the device. By opening the housing you endanger
your life through risk of electric shock. Only use a clean, dry cloth for cleaning.
Never use any abrasive liquids. Do not attempt to open the housing of the
device otherwise you will void your warranty.
8 English
Page 10

Children
1.6 Children
Electrical appliances do not belong in the hands of children! Do not allow
children to use electrical devices when not under supervision. Children may
not comprehend the presence of potential risks. Small parts can represent
choking hazards. Keep the packaging away from children too as there is
danger of suffocation.
1.7 Intended Use
This is an information technology electronics device. It may only be used for
private use, not industrial or commercial purposes. In its default configuration,
this product has not been designed for medical, lifesaving, rescue or lifemaintaining purposes. Furthermore, the device may not be used in tropical
climates. Only connection cables and external devices may be used that
comply with safety standards and the electromagnetic compatibility and
shielding quality of this device. This device fulfils all that relates to CE
Conformity, relevant norms and standards. Any modifications to the equipment
other than recommended changes by the manufacturer may lead to the result
that these directives are not met any more. The manufacturer is not liable for
any damage or interference caused by unauthorized modifications. Only use
the accessories recommended by the manufacturer. Do not use this device for
purposes other than those indicated and do not modify it in any way. Any use
other than that mentioned above does not correspond to the intended use. If
you are not using the device within the Republic of Germany, you must
observe the regulations and laws in the country of use.
1.8 Conformity
This device fully complies with the basic and other relevant
requirements of the Vehicle Directive 2004/104/EC and the EMC
Directive 2004/108/EC.
You’ll find the signed CE Declaration of Conformity on
the website www.silvercrest.cc under Silvercrest PNAE3540N/Manuals as well as at the end of this User’s
Manual.
Navigation Device PNA-E3540N 9
Important Safety Notice
Page 11

Disposal of Old Devices
1.9 Disposal of Old Devices
If the product is labelled with a crossed-out waste bin, it is subject to
the European Guideline 2002/96/EC. All electric and electronic
devices must be disposed of separately from household waste at
established bodies. With the proper disposal of old devices you
avoid damage to the environment and your personal health. For further
information about proper disposal, contact your local government, disposal
Important Safety Notice
bodies or the shop where you bought the device.
10 English
Page 12

Disposal of Old Devices
2. Introduction
Thank you for choosing this high-end Silvercrest product. The navigation
device PNA-E3540N enables accurate navigation to your destination using
different configurations. The device can store multiple destinations as well as
your home address, and when traveling in unknown areas you can navigate to
POIs (points of interest) to find places according to different search criteria.
You can also program a route to your destination before starting your journey,
if necessary also using multiple waypoints.
First of all, read this manual to set up the device and then read from page 33,
to learn more about the different features of the navigation application.
Navigation Device PNA-E3540N 11
Introduction
Page 13

Package Contents
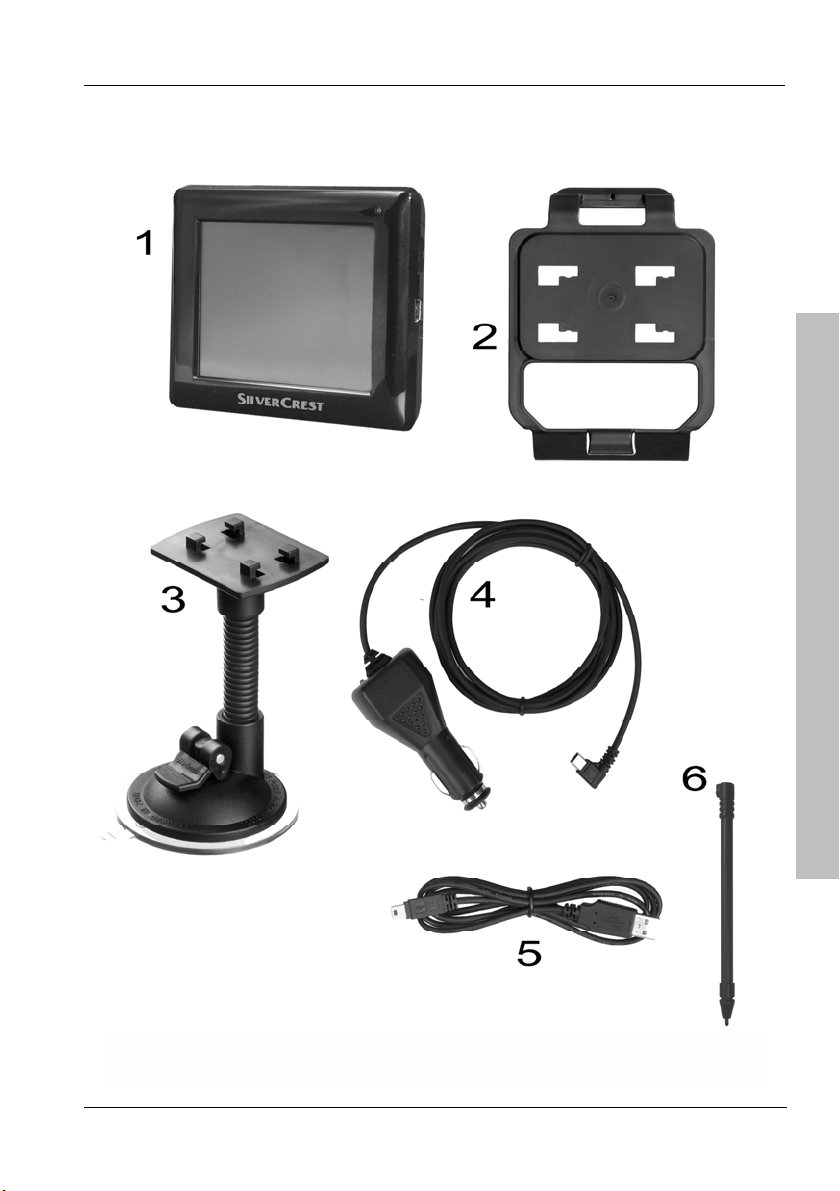
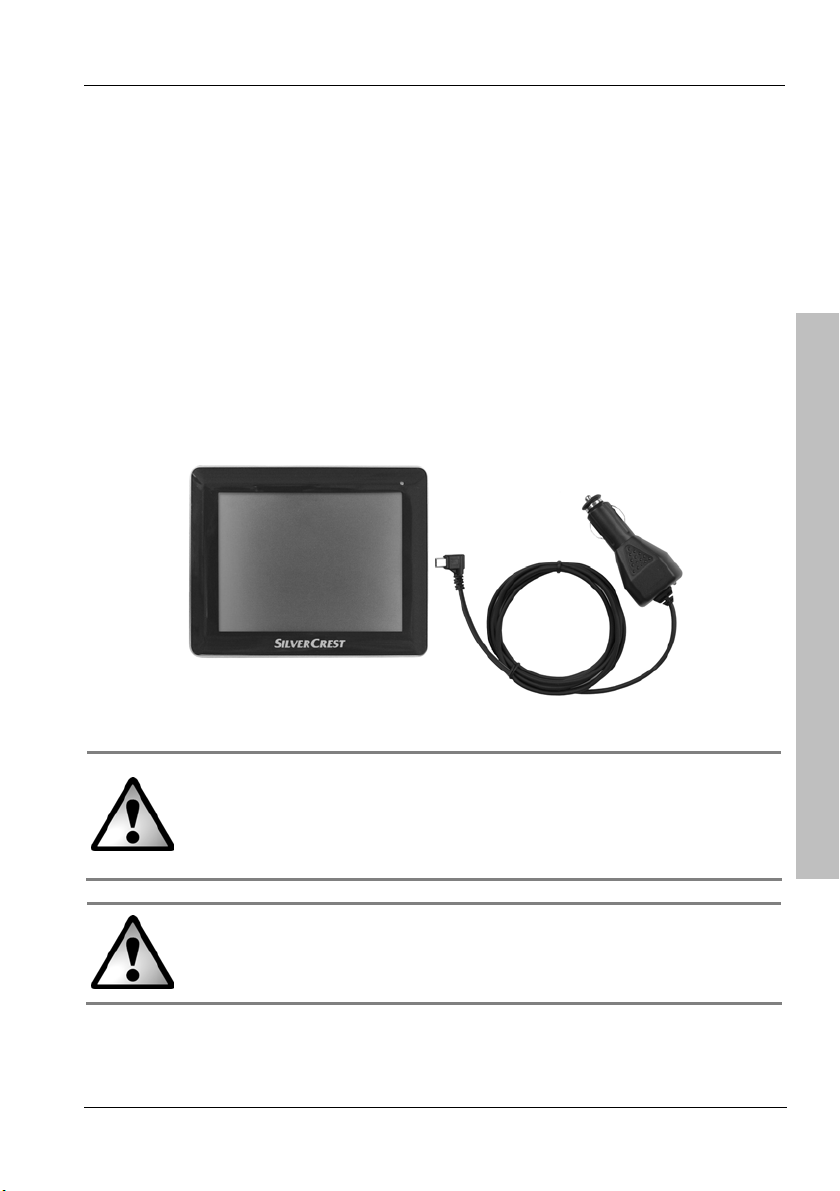
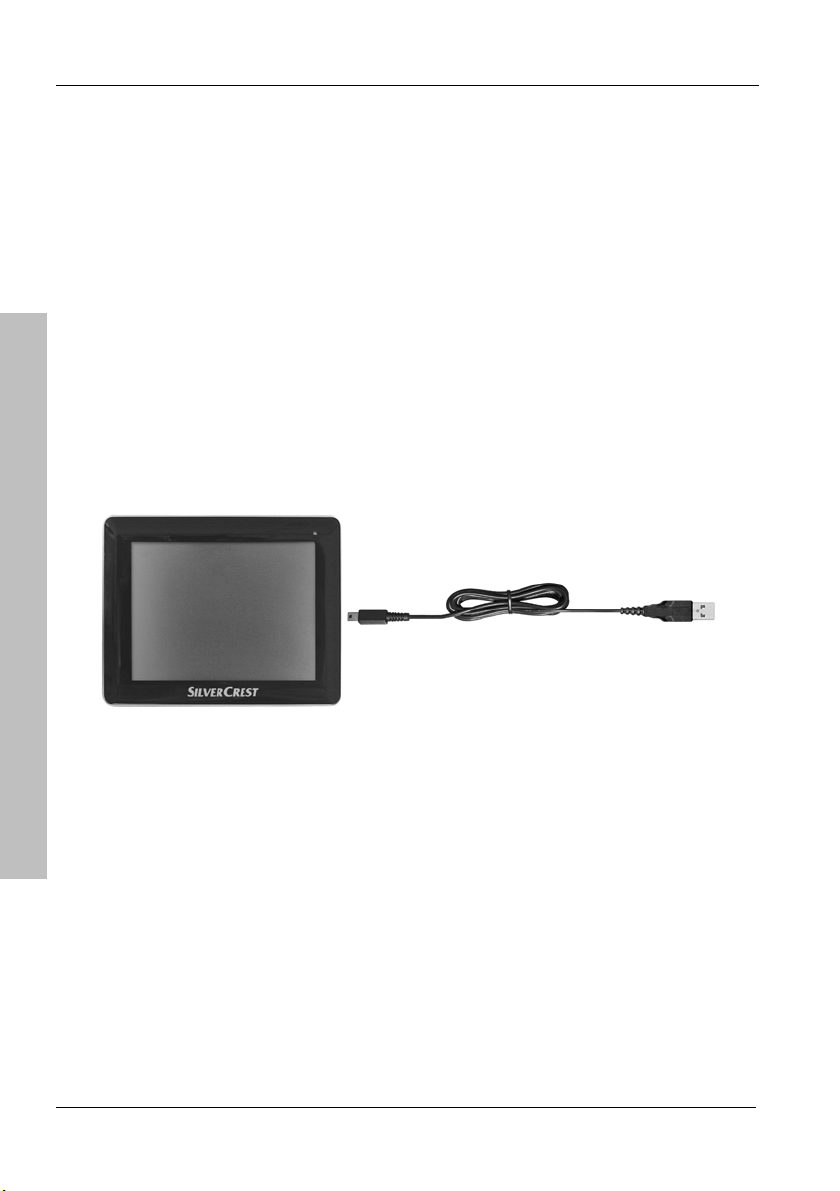
2.1 Package Contents
1 Navigation device PNA-E3540N
2 Adapter plate
3 Car mount
4 Car charger cable (12V)
Introduction
5 USB cable
6 Stylus
7 User's manual (not shown)
8 Software DVD (not illustrated)
12 English
Page 14
Package Contents
Navigation Device PNA-E3540N 13
Introduction
Page 15
Overview
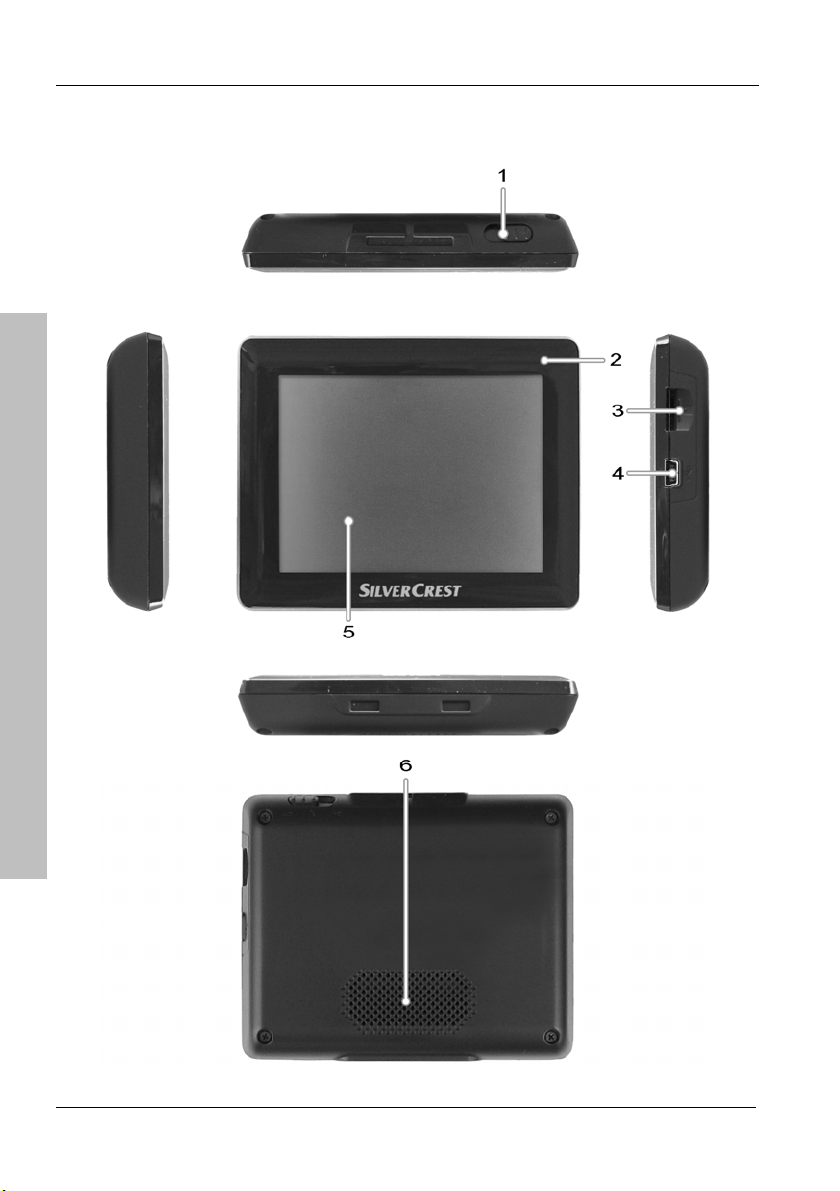
2.2 Overview
Introduction
14 English
Page 16

Care
1 On/Off button
2 Charge indicator
3 Memory card slot
4 Mini-USB port
5 Display
6 Speaker
2.3 Care
2.3.1 Caring for the Display
Avoid scratching the display surface as it can be easily damaged. To operate
the device, use only the supplied stylus or your finger.
If necessary, clean the display with a damp cloth. Never use any abrasive
detergents: use water only. Take care to dry all remaining wetness in order to
avoid any drops accumulating on the display. These can generate sediments
and produce colour distortions.
Navigation Device PNA-E3540N 15
Introduction
Page 17
General Operation Notes
2.4 General Operation Notes
Please always bear in mind that the Road Traffic Act always has
priority over any instructions output by your navigation device.
Do not operate the device while driving.
Introduction
2.5 Charging the Battery
If the capacity of the built-in battery becomes low, the following will appear in
the upper right-hand corner of the display:
Recharge the battery in your car or using a computer by means of the USB
cable. This will guarantee the uninterrupted operation of your device. As soon
as the battery is being charged, this message will disappear.
You can continue using the device while recharging it from the car cigarette
lighter or a power outlet. When recharging it from a computer the device will be
locked and cannot be operated.
16 English
Page 18
Charging the Battery
2.5.1 Recharging in the Car
Plug the Mini-USB connector of the car charger cable [page 13, item 4]
into the receptacle [page 14, item 4] of your navigation device.
Then connect the car charger to a suitable cigarette lighter in your car.
The charging process starts automatically, and the charge indicator
[page 14, item 2] lights green. When charging is completed, the
indicator will stop lighting.
Please note that the supplied car charger must never be used for
a vehicle with a 24V power supply. If you wish to use your
navigation device in a vehicle with a 24V power supply, you must
connect a 24V-to-12V adapter (not supplied).
In order to protect your device from any sudden voltage surges,
connect the car charger cable after you have started your car
engine.
Navigation Device PNA-E3540N 17
Introduction
Page 19
Charging the Battery
2.5.2 Recharging from a Computer
Plug the Mini-USB connector of the USB cable [page 13, item 4] into
the receptacle [page 14, item 4] of your navigation device.
Plug the USB connector of the cable into a USB port on your
Introduction
computer. If your navigation device was in standby mode it will power
on automatically.
The charging process starts automatically, and the charge indicator
[page 14, item 2] lights green. At the same time, the computer will
establish a connection to the built-in memory of the device (see
page 102).
18 English
Page 20
Memory Card
2.6 Memory Card
The navigation device can read SD memory cards. It will detect automatically if
a memory card has been inserted.
Make sure that the contacts of the memory card are not dirty and
do not apply any pressure on the card.
2.6.1 Inserting the Memory Card
Insert a compatible memory card with the contacts facing forward into the
memory card slot [page 14, item 3] of your navigation device. The contacts of
the card must be facing the back. Insert the card carefully until it clicks into
place.
2.6.2 Removing the Memory Card
Gently press onto the inserted memory card to unlock it. The card will protrude
a little so that you can get a hold of it and remove it.
Save any changes and power the device off by briefly pressing the
On/Off button [page 14, item.1] prior to removing the memory card
otherwise loss of data may occur.
Navigation Device PNA-E3540N 19
Introduction
Page 21
Car mount
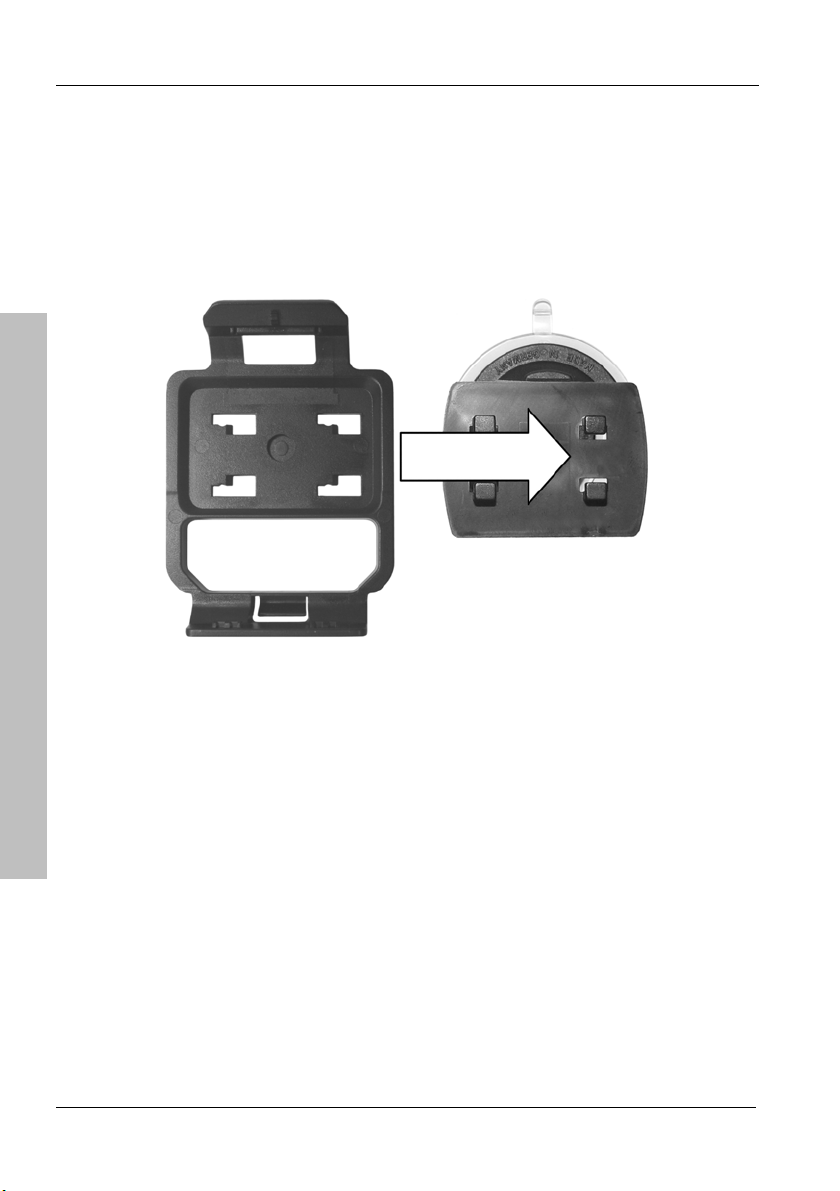
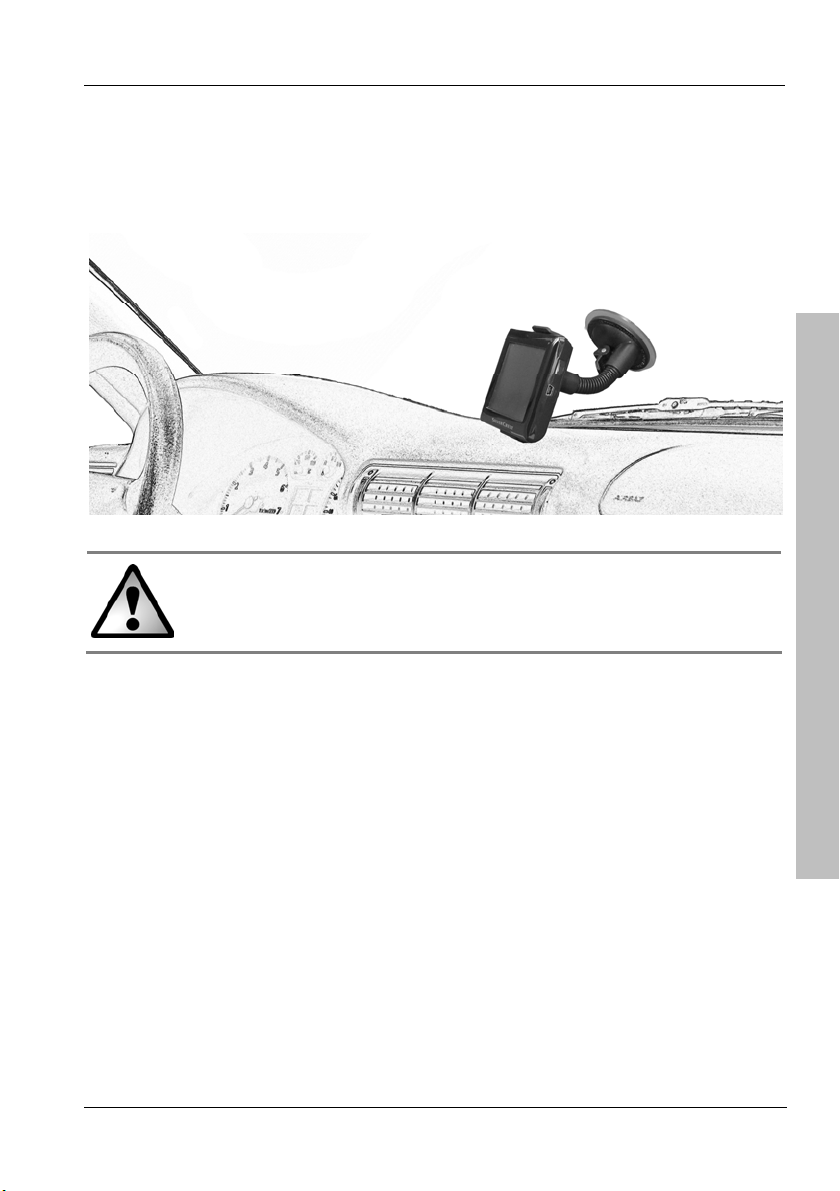
2.7 Car mount
To install the navigation device on its car mount, first install the supplied
adapter plate [page 13, item 2] on the car mount.
Then press the suction pad of the car mount against the windshield and fix it
by turning the lock.
Introduction
20 English
Page 22
Car mount
In order to obtain good GPS signal reception the navigation device must be
placed so it has an obstacle-free sight to the sky. Choose a suitable location
on the car’s windshield.
Do not install the car mount (with or without the navigation device)
within the operating area of the vehicle’s airbag and install the car
mount so that the driver’s view is not obstructed.
Navigation Device PNA-E3540N 21
Introduction
Page 23
Car mount
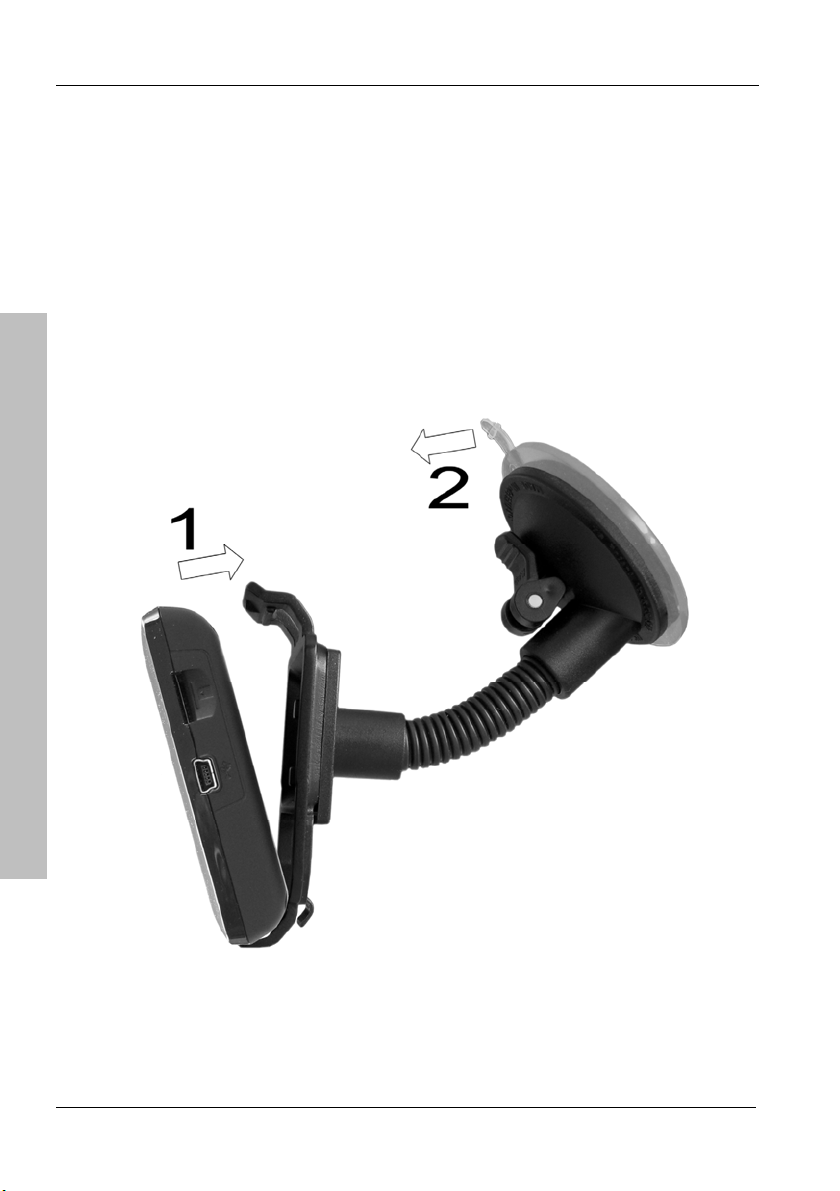
Once the car mount has been fixed in place you can insert the navigation
device into the adapter plate. The noses on the adapter plate must fit into the
corresponding holes of the navigation device (see figure, arrow 1). In order to
orientate the navigation device to the correct viewing angle, move the flexible
gooseneck of the car mount to the desired position.
To loosen the navigation device from the car mount, press on the latch on top
of the adapter plate and remove the device.
Introduction
To remove the car mount from the windshield, rotate the lock again and then
pull from the latch located at the bottom of the suction pad (see figure,
arrow 2).
22 English
Page 24
Powering the Device On/Off
2.8 Powering the Device On/Off
To power the device on for the first time, slide the device’s On/Off switch
[page 14, item 1] from the center position to the ON position and hold it there
for a few seconds. Then release the On/Off switch. The switch will return to the
center position and the device powers on.
On delivery, the battery of your navigation device is not fully
charged. Recharge the battery completely. The device can charge
the battery also while it's powered off.
2.8.1 Daily Use
To power the device off, slide the On/Off switch [page 14, item 1] from the
center position to the ON position and hold it there for a few seconds. Then
release the On/Off switch. The switch will return to the center position and the
device will go to stand-by. All entered information and settings will be saved.
The next time you want to power the device back on, simply slide the On/Off
switch to the ON position. The device will resume power with the last opened
application.
The device consumes electricity in the standby mode. Therefore it
can discharge the battery when in standby mode over a longer
period of time.
2.8.2 Powering Off Completely
To power the device off completely, slide the On/Off switch [page 14, item 1]
into the OFF position. This will not save any changes.
Navigation Device PNA-E3540N 23
Introduction
Page 25
First-time Setup
2.9 First-time Setup
Prior to using the device for the first time, charge the battery
completely. The device can also charge the battery while it's
powered off.
Introduction
Slide the device’s On/Off switch [page 14, item 1] from the center
position to the ON position and hold it there for a few seconds. Then
release the On/Off switch. The switch will return to the center position
and the device powers on.
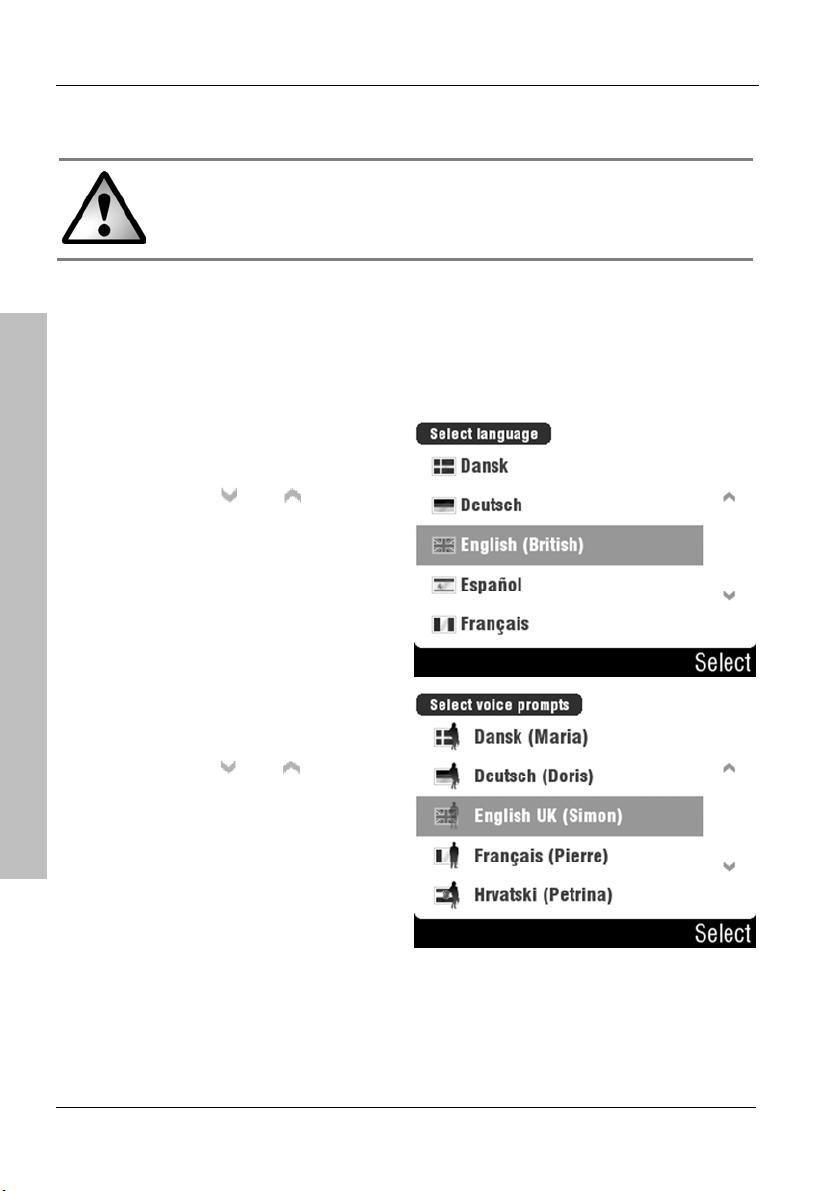
Select a display language by
tapping the corresponding entry.
You can use the
and buttons
to change the displayed page.
Confirm your selection by tapping
the Select button.
Select a voice by tapping the
corresponding entry.
You can use the
and buttons
to change the displayed page.
Confirm your selection by tapping
the Select button.
24 English
Page 26
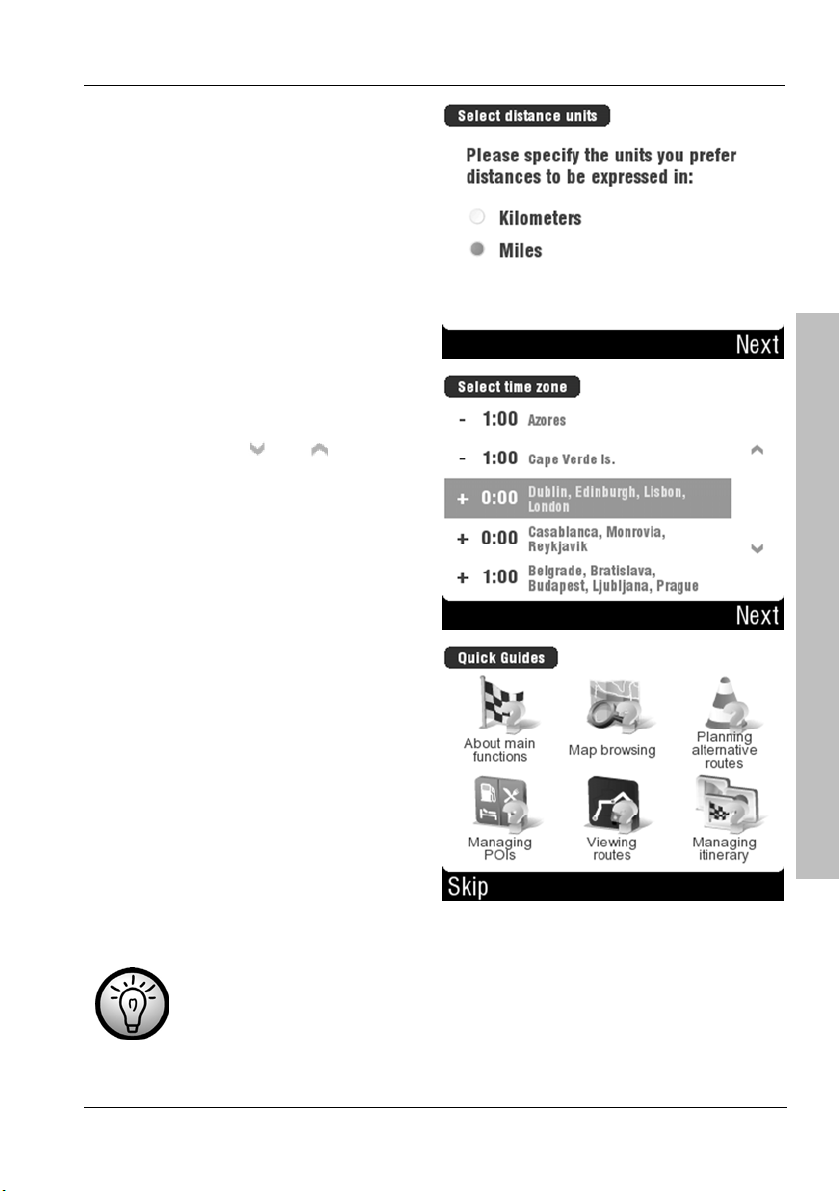
You can choose here whether
distances should be displayed in
kilometres or statute miles.
To do this, tap the corresponding
option.
Confirm your selection by tapping
the Next button.
Next select your time zone by
tapping the corresponding entry.
First-time Setup
You can use the
and buttons
to change the displayed page.
Confirm your selection by tapping
the Next button.
The Help page will be shown. You
can obtain help about a category by
tapping the desired button.
Use the Skip button to continue with
the First-Time Setup.
You can also open the Help at anytime after the First-Time Setup.
To do this, tap Settings from the main menu, navigate to the third
screen page and then tap Help.
Introduction
Navigation Device PNA-E3540N 25
Page 27
First-time Setup
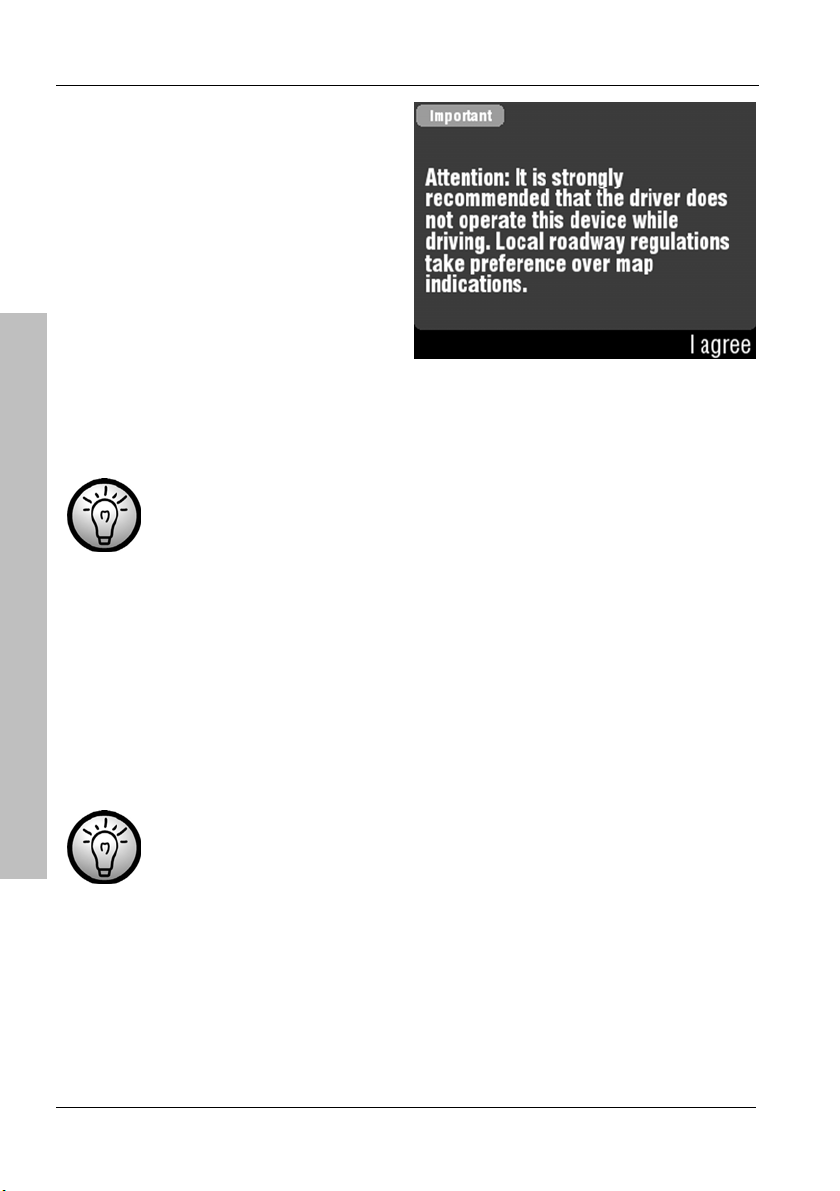
Read the operation notice and tap
I agree.
Introduction
Upon delivery the device has several maps already installed. If necessary, you
can install more maps from the supplied DVD.
The internal memory of the device is limited. Therefore it is not
possible to install all country maps. To install more maps, first you
will need to remove some existing maps. You can do this with the
supplied software (see the description starting from page 103).
When launching the device for the first time may it take a few minutes for
initialising. As soon as enough satellites have been found the
SiRFInstantFixII™ technology will start working (see also page 32). The next
time you power the device on, it will be ready much faster.
When launching the device for the first time will it take a few seconds for
initialising. As soon as this process is completed, the map with your current
position will be displayed.
In the case that no GPS signal is received (e.g. when you have
powered the device on inside a building) no position can be
tracked.
Please read the following pages to learn about the GPS technology and about
general operation for navigation purposes. A quick guide for programming your
first route can be found on page 35.
26 English
Page 28
General Operation Notes
2.10 General Operation Notes
Do not operate the device while driving. Plan your route prior to
start driving. If you need to change the route while on your way,
stop your car at a convenient place.
2.10.1 Input
To control navigation, tap the corresponding icons. If any icons appear greyedout, they are not available at this time. It is only possible to select functions
that are allowed for the current action.
Sometimes labelled switches will be displayed, allowing you to confirm or reset
an action (like "Back" and "Done"). To do this, tap the desired switch:
During navigation you can tap the display at any time to display the navigation
main menu. Any active navigation will continue running in background.
Further control of the navigation settings is done through several icons:
These buttons will display if the menu shown
consists of more than one page. Tap several
times on the button Left or Right to toggle
between the different views.
These buttons will appear when a list
exceeding the display height is shown. Tap
several times on the button Up or Down to
move the list up or down.
This Slider allows choosing a value between a
minimum and maximum. To do this, use the
stylus to tap and hold the mark and slide it to
the desired position.
Navigation Device PNA-E3540N 27
Introduction
Page 29

General Operation Notes
Checkboxes allow you to enable or disable
additional options. Tap on the checkbox to
place a checkmark in it or to remove the
checkmark. It is possible to select multiple or all
options shown.
Radio buttons are used to select one of
multiple options by tapping the corresponding
Introduction
radio button. It is mandatory to select an option.
When selecting a new option, the previous one
will be disabled automatically.
2.10.2 Map browsing
In Browse Map view (see page 55)
When performing a search for destination or nearby places you can move the
displayed map area by placing the stylus or finger onto the map and dragging
it into the desired direction. The displayed map area will follow into this
direction. To enlarge or reduce the map view, drag the slider on the right up or
down.
In Navigation view (see page 39)
In Navigation view you can press the - button in the upper-left corner to
enlarge the displayed map area. Use the button + in the upper-right corner to
reduce the displayed map area. Keep the corresponding button pressed to
accelerate the zoom adjustment. Tap the map to open the GPS main menu.
Any active navigation will continue running in background. Also the voice
guidance will continue.
28 English
Page 30
General Operation Notes
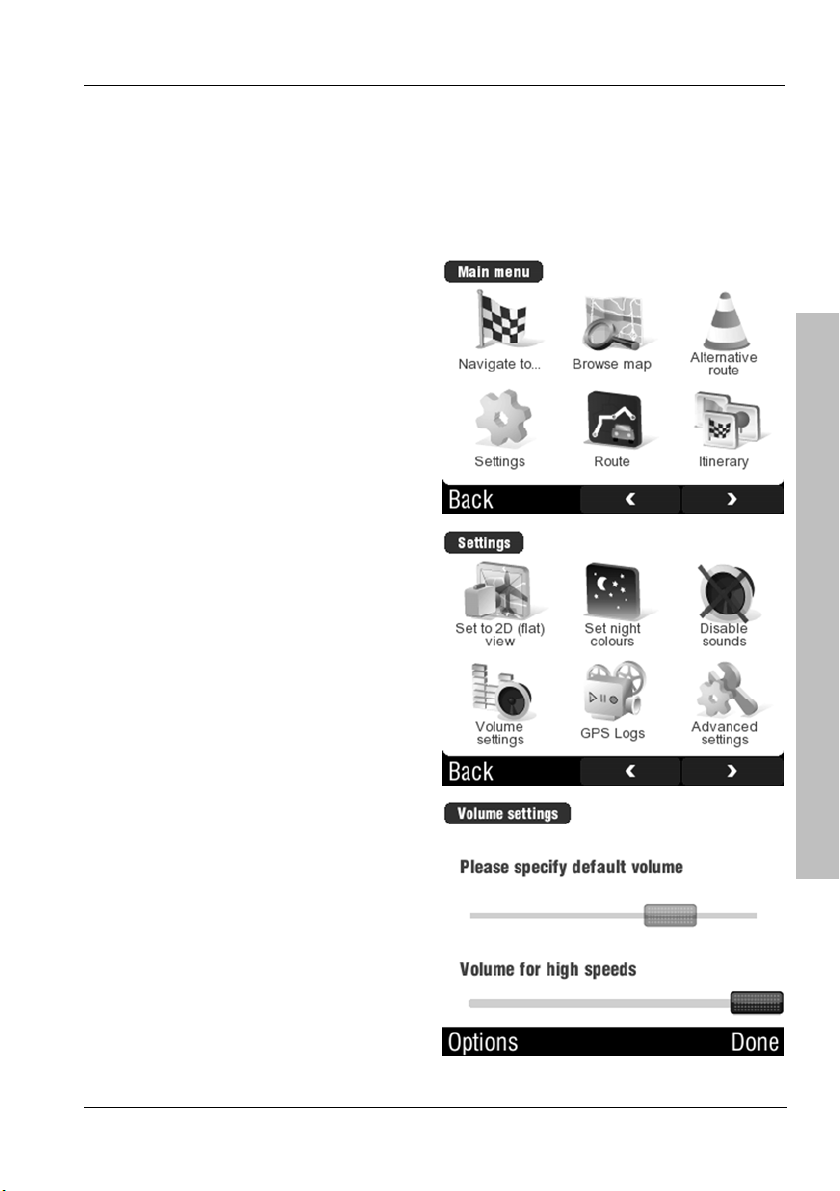
2.10.3 Adjusting the Volume
You can set a default volume and a volume for high speed driving. Tap on the
display to open the GPS main menu.
Tap Settings.
Tap Volume settings.
Use the upper slider to adjust the
default volume.
The lower slider lets you adjust the
intensity of the automatic sound
volume amplification for higher
speeds.
Navigation Device PNA-E3540N 29
Introduction
Page 31

General Operation Notes
If the lower slider is moved fully to the left, the high-speed volume will be the
same as the standard volume. The further you move the slider to the right, the
higher the volume will be increased automatically when reaching the preset
high-speed limit (see below).
To set the speed limit from which the sound output will be raised, click the
Options button.
Use the on-screen keypad to enter
Introduction
a speed value and tap Done to
confirm.
Use the W button to correct any
typos.
For example, if you enter 70 miles the sound volume will be
increased to the set high-speed volume value when driving at
70 miles or faster.
30 English
Page 32

General Operation Notes
2.10.3.1 Muting the sound
Besides adjusting the audio volume you can mute the sound completely. This
applies to all voice instructions and warning sounds.
Tap on the display to open the GPS main menu.
Tap
Tap
Settings.
Disable sounds.
The sound will be muted until you enable it again by repeating the above
procedure.
Tap on the display to open the GPS main menu.
Tap
Tap
Settings.
Enable sounds.
2.10.3.2 Button sound
Tap on the display to open the GPS main menu.
Tap
Tap the
Settings menu.
Tap
The button sound will be disabled unless you enable it again by following the
same procedure to tap the icon
Settings.
button three times to show the fourth page of the
Disabled touch tones.
Enable touch tones.
Introduction
Navigation Device PNA-E3540N 31
Page 33

GPS Connection
3. GPS
3.1 GPS Connection
This navigation device uses the Global Positioning System (GPS). It receives
the signals sent from multiple GPS satellites and processes them to determine
the position on a digitised map.
Navigation
The navigation device displays detailed information about the reception quality
and the current position (see page 98).
For GPS tracking a free sight to the sky is required. Navigation
does not work inside a building or in a tunnel. A dense forest can
also reduce the GPS signal strength.
3.1.1 SiRFInstantFixIITM
This new technology enables the use of your navigation device without any
delays.
In order to track the GPS position properly, the reception of at least four GPS
satellite signals is required. However, the satellites are located on an MEO
orbit and their position changes continuously. In order to be able to locate the
satellite, the navigation device must have a satellite almanac. Regular devices
will download the almanac from the firsts satellite found after powering on.
Therefore the availability of the device for navigation can be delayed for
several minutes.
TM
By using the latest SiRFInstant FixII
technology your navigation device is
able to track the current position from the last known GPS information.
Therefore the almanac has to be loaded only once upon first-time setup.
TM
SiRFInstantFixII
requires the last-saved position. Therefore
make sure that the battery doesn't get fully discharged in the
meantime otherwise the almanac will have to be downloaded
again from the satellite.
32 English
Page 34

The GPS Main Menu
3.2 The GPS Main Menu
The GPS main menu is your central point of access to all functions of your
navigation system. It consists of two display views. To toggle between the
views, tap the
During navigation you can tap the display at any time to show the navigation
main menu. Current navigation will not be interrupted.
The following options are available:
or buttons.
available.
Navigate to...
Shows the active map with the present position. You can
Use this button to start navigation. Several options are
use this function to display addresses or POIs (Points of
Browse map
Alternative
Interest).
Here you can edit a programmed route, for instance to
avoid a traffic jam or to enter a waypoint.
route
The Settings menu offers multiple options to customise
your device to your needs.
Settings
Navigation Device PNA-E3540N 33
Navigation
Page 35

The GPS Main Menu
Route
Itinerary
Navigation
Manage POI
GPS Status
Here you can retrieve detailed information about the set
route.
Here you can plan routes and save them. If required, you
can insert waypoints to be visited in sequence.
This option gives access to the POI menu. You can enter
custom POIs, edit or delete any existing POIs and
determine what POIs should be displayed.
This button allows you to view the coordinates of the
present position as well as information about GPS signal
reception.
Memorize
Saves the present position and adds it to the recent
destinations to allow retrieval at a later time.
position
This menu offers helpful tools like a world clock, a
Extras
calculator and a unit converter. It is also possible to
retrieve country-specific information (such as permitted
maximum speeds, etc.).
This will save all current settings and information and
then switch to Standby mode.
Suspend
34 English
Page 36

Programming a Route
3.3 Programming a Route
3.3.1 Quick Guide
Tap on the display to open the GPS main menu. When entering information in
the following screens, you can always tap the Back button to return to the
previous display.
Tap Navigate to...
Tap Address.
Select the country where your destination city is located by tapping
on it. If required, you can use the
displayed page.
If there is only one country map installed, no prompt for the
destination country will appear.
Navigation Device PNA-E3540N 35
and buttons to change the
Navigation
Page 37

Programming a Route
Enter the name of the city via the
on-screen keypad.
Due to the size of the database the
display may be delayed slightly.
Navigation
Based on the entered characters the device will determine the
possible search results. This enables an input even when you
have mistyped a name.
To enter a special character, tap the äü button. To return to the
previous character set, tap the abc button.
To delete an entered character, tap the W button.
As soon as the name of the desired city appears on the list, tap on
it. It is not necessary to enter the entire name.
Please see page 92 for how to use the on-screen keypad.
Enter the name of the street via the
on-screen keypad. Proceed the
same way as for the city.
36 English
Page 38

Programming a Route
Enter the street number (if you know
it) and tap Done.
If you don't know the street number, there are two possible options for the
destination:
Tap on the Any button to select the middle of the street as destination.
or
From the list of crossing streets, select any street name by tapping on
it. This will set the corresponding street junction as your destination.
Select an available option (for
description see the next page) or
tap on the Route Me! button to
calculate the route.
Navigation Device PNA-E3540N 37
Navigation
Page 39

Programming a Route
On Map
Navigation
Parking
Add to Favourites
The device will calculate the route
and it will appear on the map.
Tap Done to launch the navigation
display.
Displays the entered destination in Browse
map view.
Selects a parking near the entered
destination and calculates the route to go
there.
Adds the entered destination to your favourite
list.
38 English
Page 40

Programming a Route
In Map browsing view, your route will appear as a blue line. Furthermore, the
following information will appear:
Distance to destination
Estimated time of arrival
Time left
Please see page 45 for how to edit your route by using the button Details.
Additionally, you can also edit your route at any time, even while navigating
(see page 43).
3.3.2 Navigation Display
During navigation, the map will display as follows:
Zoom out Zoom in
Direction to
destination
Position m allowed
speed
Progress indicator
Next manoeuvre
and distance to
next manoeuvre
Estimated time
of arrival
Current speed Co-ordinates
of present
position
GPS status
Distance to destination
The information shown at the bottom of the display can be customised. For
more information, please read page 62 - Configuring the Displayed
Information.
Navigation Device PNA-E3540N 39
Navigation
Page 41

Programming a Route
3.3.3 Setting Other Destinations
Besides entering an address there are other possible ways to enter your
destination. The menu Navigate to... consists of two display views. To toggle
between the views, tap the
Navigation
The following options are available:
or buttons.
(Description on page 35)
Address
Select a destination from your own favourite list.
Insert the destination in the form of an address here.
(Please see page 47 for how to create favourites)
Favourite
Your navigation device automatically stores a list of your
last destinations. From this list you can select a
destination again.
History
(Description on page 50)
Here you can choose a destination by category
(Restaurant, Shopping, Major tourist attractions, etc.).
Point of Interest
A submenu allows you to perform the following
operations with a POI:
40 English
Page 42

Post Code
Home
Point on Map
Programming a Route
select at current position
search near an address to be entered
search near the destination
search in a specific city
(For more information about POIs, read the information
starting from page 78)
This button lets you enter the destination as a post code
instead of a city. Further operation is the same as
described on page 35.
Saves your home address as destination.
(For more information about the home address, read the
information starting from page 48)
Displays the map allowing you to place a destination
mark on any location
(see also the Map browsing function from page 55).
Enter GPS
North/South co-ordinates in degrees, minutes and
seconds.
position
Here you can enter a city via the on-screen keypad
without having to specify any further information. The
Here you can enter the destination's West/East and
City Centre
navigation device will then guide you to the city centre. If
required, you will be prompted to choose a district from
another dialog box.
Sets the destination as the last valid GPS position.
Last Valid
Position
Navigation Device PNA-E3540N 41
Navigation
Page 43

Programming a Route
3.3.4 Entering Data without GPS Reception
If no GPS signal is received when entering a route (e.g. when programming it
indoors) the navigation device will be unable to calculate the route. A prompt
offering the following options will appear:
The route calculation will take place automatically as
map
soon as a GPS signal is available.
The last known position will be used as the starting
position. This option is recommended if you haven't
moved much from the last known position since the
device was powered off.
Choose this option and then tap on the desired starting
position on the displayed map. If required you can drag
the map with the stylus and enlarge or reduce the view by
using the zoom slider on the right (see also page 55 –
Browse Map).
Navigation
Wait for valid
signal
Last valid
position
Select from
42 English
Page 44

Planning an alternative Route
3.4 Planning an alternative Route
If you need to set a different or a modified route you can do this via the
Alternative route function.
Alternative routes are necessary:
if a road has been closed or is unusable due to other reasons
if you want to insert another waypoint
if you don't want to use motorways, toll roads, ferries or unpaved roads
Tap on the display to open the GPS main menu.
Tap Alternative route.
Choose an alternative road from
these options.
Navigation Device PNA-E3540N 43
Navigation
Page 45

Planning an alternative Route
Compute alternative
Navigation
Avoid next…
Travel via...
Determines a different route to the present one and
shows it on the map. This function can be executed
several times, as necessary.
Tap here if the road suddenly appears closed for
any reason. Select a default value: 500yd, 1mi,
5mi, 10mi, 15mi or 20mi.
The route will be recalculated immediately and
circumnavigated by the distance set from the
original route.
With this function you can insert a waypoint.
Proceed the same way as for entering a new route.
You can choose whether the waypoint is
to be entered as an address or post code (see
from page 35)
to be selected from your favourites (see page
47)
to be chosen from one of your last destinations
(see page 50)
a POI (see page 78)
your home address. If you haven't set your
home address yet, you can enter it here (see
page 48).
a selected point on the map (see from page 55)
to be entered in the form of geographic
coordinates
to be the city centre of the town you want to
visit, or
to be the last valid GPS position.
Erases all previous alternative routes and restores
Reset to original
a standard route. With this function you can undo
all previous settings.
44 English
Page 46

3.4.1 Avoiding Route Legs
As soon as a new route has been
calculated, it will display on the
Browse map view. For more
settings and information, tap on
Details.
This displays the distance,
estimated time of arrival and the
remaining time en route. The ruler
schematically represents your
position along the total route and
the position of waypoints, if any.
Planning an alternative Route
If the route contains one of the following leg types it will be marked in blue.
You can exclude them from the route by tapping on them. A safety prompt will
appear. Tap Yes to confirm. Next a new route avoiding the unselected leg
types will be calculated.
Navigation Device PNA-E3540N 45
Navigation
Page 47

Frequently Visited Destinations
Inaccessible or restricted route legs (e.g. traffic-reduced
Restricted
Navigation
Motorway
Toll road
Unpaved
Ferry
If the current route contains several of the above options and you
want to exclude one or more of them, you must repeat the above
steps.
areas).
Motorways
Toll roads
You can have the device exclude toll roads completely
(see page 67).
Ferries
Unpaved roads and off-road paths.
3.5 Frequently Visited Destinations
If you frequently have to go to the same destinations you can create a list of
favourites to have them entered faster. It is also possible to enter your home
address in order to accelerate the return trip programming. Your navigation
device furthermore stores the last 30 destinations in History.
46 English
Page 48

Frequently Visited Destinations
3.5.1 Favourites
Tap on the display to open the GPS main menu.
Tap Navigate to...
Tap on Favourite.
Select an entry from your favourite list by tapping on it. Your route will be
calculated immediately.
Please see page 79 on how to create favourites.
Navigation Device PNA-E3540N 47
Navigation
Page 49

Frequently Visited Destinations
3.5.2 Home Address
3.5.2.1 Set Home Location
Enter your home address in order to program any journey back home with just
a few steps. Proceed as follows:
Tap on the display to open the GPS main menu.
Navigation
Tap Settings.
Tap the
button twice to show
the third page of the Settings menu.
48 English
Page 50

Tap Set home location.
Tap Address.
Frequently Visited Destinations
If you have already entered your home address you can tap on
History and choose the entry with your address by tapping on it.
Proceed the same way as for programming a new destination. As soon as you
are finished, you are returned to the map display. The navigation device will
store the entered address under the Home entry. To modify this address,
repeat the above steps to overwrite the existing one.
3.5.2.2 Recalling Your Home Address
If you have entered your home address you can easily set a route for driving
home. Tap on the display to open the GPS main menu.
Navigation Device PNA-E3540N 49
Navigation
Page 51

Frequently Visited Destinations
Tap Navigate to...
Navigation
Tap Home.
The device will calculate the route
and it will appear on the map. With
the first voice instructions the map
will be displayed.
You can optionally tap Done to
launch the navigation display
immediately.
3.5.3 History
Your navigation device automatically stores a list of your 30 last destinations.
You can easily recall them if you need to return to one of these destinations.
Tap on the display to open the GPS main menu.
50 English
Page 52

Tap Navigate to...
Tap on History.
Frequently Visited Destinations
Select the desired entry from your
favourite list by tapping on it.
If there are more than five entries
you can use the
and buttons to
change the displayed page.
Tap the Clear list button to erase the contents of the history list.
To do this, confirm the safety prompt with Yes to continue erasing
or No to cancel.
Navigation Device PNA-E3540N 51
Navigation
Page 53

Map Options
3.6 Map Options
You have several choices for customising the map display. In Browse map
view (see page 55) you can use the digitised map like a normal paper map
and you can display locations or routes in a convenient way.
3.6.1 Angle
Navigation
The map viewing angle allows three different settings for navigation. To toggle
between these settings, proceed as follows:
Tap on the display to open the GPS main menu.
Tap
Settings.
The displays will cycle in sequence, therefore only the icon that represents the
following possible setting will appear.
Tap the icon to change the view. The device will then toggle back to the map
view.
Displays the map in a 3D view with a horizon. During
navigation, the route is always orientated in the driving
3D view
direction, therefore the map display will rotate when
passing a curve.
Shows the map with the observer located over it. The
route will also be orientated in the driving direction.
2D (flat) view
The map display rotates according to the driving
direction.
Shows the map with the observer located over it and
2D view, North up
the North on top. The map will not rotate when
changing the driving direction.
52 English
Page 54

Map Options
3.6.2 Colour
To customise the device according to the environmental lighting conditions you
can toggle between day and night view or have these display modes set
automatically according to the current time. The icons will cycle in sequence,
therefore only the icon that represents the following possible setting will
appear.
Tap on the display to open the GPS main menu.
Tap
Tap the icon to change the colour. To return to map view tap the Back button.
Set automatic
colours
Set daylight
colours
Set night colours
Settings.
Sets the colours according to the current time.
The day mode uses bright and high-contrast colours to
obtain a better readability even under direct sunlight.
The night mode uses dark colours in order to reduce
any dazzling effects when navigating at night.
3.6.3 Backlight settings
The backlight settings allow you to adjust different brightness levels for the day
and night display modes.
Tap on the display to open the GPS main menu.
Navigation
Tap
Tap the
Settings menu.
Tap
Navigation Device PNA-E3540N 53
Settings.
button three times to show the fourth page of the
Backlight settings.
Page 55

Map Options
Use the ruler to select a suitable brightness for the night display. Tap Done to
complete the process. Tap Set day to toggle to the brightness setting for the
day mode. Here you can also tap Done to save the changes and exit, or you
can tap Set night to return to the night mode settings.
3.6.4 Memorize Position
You can save the present position at any time. This allows you to return to it at
a later time without having to enter the address.
Navigation
Tap on the display to open the GPS main menu.
Tap the
button once to show the second page of the Main
menu.
Tap
Memorize position.
The present position will be stored in the destination history. The navigation
device returns to navigation mode and displays the message Current
position was stored in History.
To save the position for a long time it is recommended that you
save it as a favourite (see page 79, Adding a POI).
54 English
Page 56

Map Options
3.6.5 Browse map
Browse map lets you easily display or edit a route, plan a new route or include
POIs (Points of Interest).
Tap on the display to open the GPS main menu.
Tap
Browse map.
The present position will appear on a map. If there is already a
programmed route, this route will also be displayed.
Route
Current position Zoom slider
Position mark
Return to navigation
Options for Browse map
(Description on page 56)
Options for position mark
(Description on page 57)
Navigation Device PNA-E3540N 55
Navigation
Page 57

Map Options
3.6.5.1 Options for Browse map
In Browse map, tap the Options button to display the option menu for the
route. This menu offers different ways to add another position to or next to the
route. This new position can be included as a waypoint of the route.
Navigation
Show current
Show entire route
Show city
Show/Hide POIs...
Find...
position
description starting from page 40).
Shows the present position on a larger scale.
Shows the entire route on the map.
Use this button to specify a city. The mark will be
Opens the menu for entering a destination (see
placed in the city centre and it will appear on the map.
Shows a list of all POI categories. Select the desired
categories by placing a checkmark in the
corresponding checkboxes. Then confirm your
selection by choosing the Done button in order to
display the selected POIs in map browse view.
Tap the button Enable all to select all categories.
The button will switch to Disable all. This allows
you to remove all checkmarks.
56 English
Page 58

Map Options
3.6.5.2 Options for the position mark
Tap any point on the map to mark an additional position. The icon Position
mark will appear on the selected position on the map.
Tap the icon
in the button bar to open the context menu for the position
mark. The following options are available for joining the position mark with the
route:
Replaces the destination by the position marker and
recalculates the route.
Navigate there
Inserts the marked position as a waypoint and
Travel via
calculates a new route. The existing destination will be
preserved.
Adds another destination to a route and moves an
existing destination to become a waypoint.
Continue
Transforms the position mark into a favourite by
Favourites.
Add as POI
tapping
You can also create a category by tapping the New
button. Enter a name for the category, select an icon
from the list, enter a name and tap Done to confirm
(see page 79).
Select a POI by category from the list or select Show
Find nearby POI
All to display all POI entries located near your
destination.
Set a radius around the marked position on the map to
Avoid...
exclude it from the route calculation (see description
on page 58).
Navigation Device PNA-E3540N 57
Navigation
Page 59

Map Options
3.6.5.3 Avoid...
From the Browse map menu, tap the Avoid... icon (see the previous
page). A cross icon will appear on the map instead of the position mark.
Tap next to the cross icon to set the
radius of the avoidance zone.
Then tap the Finish button.
Navigation
If the current route goes through the
avoidance zone it will be
recalculated. Tap Yes to confirm
this action.
The updated route will remain
outside the avoidance zone. Tap
Done to return to navigation.
58 English
Page 60

Map Options
3.6.6 Optimising the Display
There are different options available for adjusting the display properties. You
have already learned about some of these features in the Map Options
chapter.
The map can be displayed in 2D or 3D (see page 52).
For day and night operation it is possible to customize the brightness
(see page 53) and the colours (see page 53).
The on-screen keyboard can be used with different keyboard layouts
(see page 92).
In this section you will learn more about the other functions. All of them allow
you to customise the device according to your needs.
3.6.6.1 Signpost Settings
During navigation it is possible to display any signposts (e.g. motorway signs).
Tap on the display to open the GPS main menu.
Tap
Tap the
Settings.
button once to show the second page of the Main
menu.
Tap
Signpost settings. The following display appears:
Navigation Device PNA-E3540N 59
Navigation
Page 61

Map Options
Select the desired level of
signposts.
Example All directions:
Then tap on Next.
Navigation
Select the size of the directional
signs and tap Done.
3.6.6.2 Rotate display
You can use the device in portrait and landscape orientation.
Tap on the display to open the GPS main menu.
Tap
Tap the
menu.
Tap
screen orientation.
60 English
Settings.
button once to show the second page of the Main
Rotate display to toggle between portrait and landscape
Page 62

3.6.6.3 Setup for Left-Handed Users
The device offers maximum ergonomics for left-handed users.
Tap on the display to open the GPS main menu.
Map Options
Tap
Tap the
Settings.
button once to show the second page of the Main
menu.
Tap
Left handed to enable the setting for left-handed operation.
After selecting the button it will toggle.
Tap
Right handed to return to the right-handed user operation.
3.6.6.4 Advanced settings
Under Advanced settings you'll find some basic configurations. The menu
consists of different displays that toggle in sequence.
Tap on the display to open the GPS main menu.
Tap
Tap
Avoid U-Turns
When calculating the route the device will avoid all U-turns. This is
recommended when using the device in a heavy truck or trailer.
Settings.
Advanced settings.
Navigation Device PNA-E3540N 61
Navigation
Page 63

Map Options
Enable lane assistant
The lane assistant is helpful when driving on motorways. When joining a
motorway, arrows will indicate the lanes where your route continues.
Example of the lane assistant display:
Enable Autozoom
Enlarges the map at lower speed (e.g. when driving in town) in order to offer
Navigation
more details and reduces the map when driving fast (e.g. on a motorway) in
order to provide a better overview.
Warn if Railway crossing
Shortly before crossing a railway the navigation device will output an acoustic
signal.
Please specify how to handle backlight and standby during navigation
Select between the options Always on, Use device default settings (goes off
after a few seconds) and Smart backlight (backlight only when an action
needs to be performed).
Configuring the Displayed Information
Determine the type and arrangement of any additional information shown at
the bottom of the map.
Select position 1 to 4 of the
additional information by tapping the
corresponding icon.
62 English
Page 64

Tap the type of information to be
shown at the selected position.
Map Options
You can use the
and buttons
to change the displayed page.
If a digit appears in front of an entry it represents the current
position on the display.
The following options are available:
Average speed
Current speed
Elevation
Length of route
Distance since start
Distance to destination
Remaining time to destination
Time of day
Time of arrival
Signal indicator
Navigation Device PNA-E3540N 63
Navigation
Page 65

Map Options
Change speed restriction options
Tap the Enable max speed
warning checkbox to enable the
warning.
Tap the checkbox in front of Enable
warning sound to output an
acoustic warning signal.
Navigation
This window will appear only if the option Enable max speed warning has
been enabled.
Select a trigger value for the
warning in towns and outside towns
by adjusting the corresponding
sliders.
Then tap Done.
64 English
Page 66

Map Options
This window will appear only if the option Enable warning sound has been
enabled.
Select a warning sound by tapping
on it. A sound sample will be output
when selecting it.
You can use the
and buttons
to change the displayed page.
Then tap Done.
Not all roads support speed information. This information will be
principally available for motorways and national roads.
Display examples:
Shows the maximum speed
Shows that the maximum speed has been exceeded
The speed values are an extra support function but are not
guaranteed to be complete nor up-to-date.
The Road Traffic Act regulations and traffic signs always have
priority over the instructions of your navigation device.
Navigation
Navigation Device PNA-E3540N 65
Page 67

Route Settings
3.7 Route Settings
Created routes can be viewed on the map, as a list or with individual pictures,
and display an overview together with additional information or be deleted.
In addition, you can plan and program a route with one or more waypoints.
Furthermore, you can view a demo of your created routes.
Navigation
3.7.1 Planning preferences
During route planning you can use basic selection criteria for route calculation.
Under these options you can optimise your navigation device for use in bicycle
or in pedestrian mode.
Tap on the display to open the GPS main menu.
Tap
Tap
Tap
tapping the corresponding radio button.
Fastest route
Computes a route that provides the shortest journey between your start and
destination. Therefore motorways are preferred.
Economic route
The shortest route need not be the most economic one, as a longer journey
may also result more expensive. Use this option to calculate an average route
that provides the most economic journey.
Shortest route
Calculates a route along the shortest distance between your start and
destination. The duration of the journey will not be considered.
Settings.
to show the second page of the Main menu.
Planning preferences and select one of the five options by
66 English
Page 68

Route Settings
Bicycle route
Motorways and roads will not be considered for route calculation. Bicycle
ways, residential areas and countryside paths are preferred.
Pedestrian route
Motorways and roads will not be considered either. In addition to the options
listed under "Bicycle route" pedestrian zones are used.
3.7.2 Avoid toll roads
To include toll roads for your routes there are three possible options. Proceed
as follows:
Tap on the display to open the GPS main menu.
Tap
Tap
Tap
Settings.
to show the second page of the Main menu.
Toll charge settings and select one of three options by
tapping the corresponding button.
Ask me every time
If a calculated route uses a toll road, the system will notify you. The route will
be used only after you confirm it. Otherwise an alternative route will be
calculated.
Always avoid toll roads
Toll roads will not be used for route calculation.
Don't avoid toll roads
Toll roads will be considered for route calculation like any other road.
Navigation
Navigation Device PNA-E3540N 67
Page 69

Route Settings
3.7.3 Programming Routes
You can easily program, save and edit a complete route plan with several
waypoints. This function is useful when planning express carrier delivery
routes, for example. All entries will be used as waypoints, with the route
starting at the present position. During navigation you can move programmed
waypoints on the list or mark as visited.
Navigation
Tap on the display to open the GPS main menu.
Tap
Itinerary.
Tap the New button to program a new route or tap on Current route to
edit the active route.
Tap to create an entry.
Next enter as many waypoints as
necessary.
Repeat the process until all destinations have been entered.
68 English
Page 70

Tap Options to continue editing the
programmed route.
It is also possible to define the
stopovers (icon
, ,…) to
become the start or destination
(icon
, ,…) of your route.
Continue reading on page 70 to
learn more about the available
options for an individual
position.
Optimize itinerary sets the current
position as start and determines the
order of the different destinations by
their distance.
Save itinerary allows you to save
the route under a name of your
choice.
Delete itinerary will remove all
entries.
The list icons have the following meaning:
Route Settings
, , …
Starting position
Points along the route
Destination or waypoint
If you have saved a planned route you can retrieve and execute it
from the Itinerary menu at any time.
Navigation Device PNA-E3540N 69
Navigation
Page 71

Route Settings
)
3.7.3.1 Editing a Programmed route
You can always modify the waypoints of a route either during route
programming or later on after you have saved and opened it again.
For instance you can insert multiple waypoints to plan a route along several
legs.
Navigation
In the list of the planned route, tap
one of the entries.
Select one of the following options.
Only those positions that you have defined as destination (icon
will be notified upon arrival. Any points along the route (icon
, …) will be used for calculating the route but not crossed on the
route.
,
70 English
Page 72

Route Settings
Set as visited
Set as finish
point
Set as via point
Add nearby POI
Delete
Move up
Marks the destination as visited and excludes it from the
route.
Sets a waypoint to become the final destination. The
previous destination in the list will be moved one position
up.
Convert a destination into a waypoint.
Lets you select a POI located close to the destination.
Deletes the selected destination.
Moves the selected destination one position up.
Therefore you will reach it earlier.
Therefore you will reach it later.
Move down
Moves the selected destination one position down.
Navigation Device PNA-E3540N 71
Navigation
Page 73

Route Settings
3.7.4 Show route instructions
You can view a programmed route in list format.
Tap on the display to open the GPS main menu.
Tap
Tap Show route instructions to
Navigation
Route.
open the list:
When viewing a multi-page list you
can use the
and buttons to
change the displayed page.
When tapping onto an entry, the
display will switch to Show
route as images mode.
Tap Options to view the first list column with other information. You can
choose between different output for distance, duration and time.
72 English
Page 74

Route Settings
3.7.5 Show route as images
You can view a programmed route in image format. One image will be
generated for each action.
On the Route menu, tap Show
route as images.
You can use the and
buttons to change the
displayed image.
Tap Done to return to the Route
menu:
Navigation Device PNA-E3540N 73
Navigation
Page 75

Route Settings
3.7.6 Show route summary
The route summary displays the entire route as well as information about
distance, estimated time of arrival and duration.
On the Route menu, tap Show
route summary.
Navigation
This view corresponds to the
overview that displays after entering
a new route. Here you can also
unselect any route items. To do this,
tap Details (see the description
starting from page 45).
if the route consists of several legs with waypoints you can view
the individual legs by tapping the
button.
Tap Done to return to the Route menu.
Additionally you may tap any position on the display to show information about
that position.
74 English
Page 76

3.7.7 Show on map
Shows the entire route on the entire display.
On the Route menu, tap Show on
map.
Use the slider on the right to enlarge
or reduce the displayed map area.
Route Settings
Additionally you may tap any position on the display to show
information about that position.
Example of an information window with name and distance
from the selected position.
Tap Done to return to the Route menu.
Navigation Device PNA-E3540N 75
Navigation
Page 77

Route Settings
3.7.8 Cancel route
Deletes the current route without any further prompts.
On the Route menu, tap Cancel
route.
Navigation
3.7.9 Demo
With this option you can launch a demo journey for your route. All displays will
work as for real navigation.
On the Route menu, tap Show
route demo.
76 English
Page 78

Select an option.
Start
demonstration
Route Settings
Starts the demo.
In addition, the icon will flash. Tap this icon to
access the menu while the demo is running.
resume the demo.
Pauses the current demo. Use the toggle button
to
Pause
Use the slider to set the playback speed between 6%
and 1600%.
Set speed
Repeat
Repeats the demo. Use the toggle button Stop
demonstration repeating to disable the repeat function.
demonstration
Stops the demo. When launching the demo again, it will
begin at the route starting point.
Stop
Navigation Device PNA-E3540N 77
Navigation
Page 79

POI - Points of Interest
3.8 POI - Points of Interest
POI stands for Points of interest and consists of a database containing
information about useful destinations for the users of navigation systems.
These can be restaurants, major tourist attractions and hotels, but also
destinations for use everyday such as petrol stations, car parks, pharmacies or
ATM.
Navigation
All POIs are grouped by category and can be displayed along a programmed
route or near destinations. It is also possible to output a POI notification, so the
system notifies you when approaching a POI of the selected category.
You may create new POIs, edit or delete existing POIs and assign them to
custom or default categories. You can access all POIs from each menu
allowing you to define a route. You may also search for POIs in map view at
any time and drive to them expressly.
The main access for POI options is via the main menu.
Tap on the display to open the navigation main menu.
Tap
Tap
Manage POI.
to show the second page of the navigation main menu.
Select an option.
78 English
Page 80

POI - Points of Interest
3.8.1 Adding a POI
Here you can set any map position or point in History as a POI. You may
create your own category to save it or save as favourite.
On the POI menu, tap
Select a position. Proceed in the
same way as for programming a
destination (see description starting
from page 40).
Select Favourites and tap Done to
store the selected position as
favourite.
If you want to create a custom
category at this point, please
read Chapter 3.8.1.1 starting
from page 80.
Add POI.
Navigation Device PNA-E3540N 79
Navigation
Page 81

POI - Points of Interest
Enter the name of the favourite via
the on-screen keypad.
Then tap on Done.
Navigation
This will take you back to the POI menu. The entered position will be available
under Favourite with the name you selected.
Please see page 40 for how to open Favourite.
3.8.1.1 Creating a Custom Category
Instead of the Favourites list you may also create your own category. You
could name them "Friends" or "Clients", for instance, and fill them with their
addresses.
Of course, you may create more than one custom category. To do
this, simply repeat the following steps.
On the Select or create a category
menu, tap New.
80 English
Page 82

Enter the name of the category via
the on-screen keypad.
Then tap on Done.
Select an icon for your category by
tapping on it.
POI - Points of Interest
You can use the
and buttons
to change the displayed page.
Enter the name of the POI via the
on-screen keypad.
Then tap on Done.
This will take you back to the POI menu. The created POI will appear with the
name you have entered on the POI list. You may create as many categories
and entries as you want.
Navigation
Navigation Device PNA-E3540N 81
Page 83

POI - Points of Interest
3.8.2 Edit POI name
You may rename any custom POIs. This will not affect the category or the POI
position.
On the POI menu, tap Edit POI name.
Navigation
Select the desired category by
tapping on it.
Select the POI that you want to
rename by tapping on it.
Tap Done to cancel the process
without making any changes.
82 English
Page 84

Edit the POI or Favourite name by
overwriting it with a new name.
Then tap on Done.
3.8.3 Delete POI
You can delete any custom POIs.
On the POI menu, tap Delete POI.
Select the desired category by
tapping on it.
POI - Points of Interest
Navigation Device PNA-E3540N 83
Navigation
Page 85

POI - Points of Interest
Select the POI that you want to
delete by tapping on it.
Navigation
Click Yes on the security prompt to
delete the POI.
or
Tap No to cancel the process
without deleting the POI.
84 English
Page 86

POI - Points of Interest
3.8.4 Deleting a Category
You can delete any custom categories. Attention! All POIs contained in it will
be deleted automatically.
On the POI menu, tap Delete POI category.
Select the desired category by
tapping on it.
Click Yes on the security prompt to
delete the category
or
Tap No to cancel the process
without deleting the category.
Navigation Device PNA-E3540N 85
Navigation
Page 87

POI - Points of Interest
3.8.5 Showing and hiding POIs
Here you can select what POI categories you want to display. These settings
affect the Browse map view (page 55) and the navigation display (page 39).
On the POI menu, tap
Select the desired categories by
Navigation
placing a checkmark in the
corresponding fields.
You can use the
and buttons
to change the displayed page.
To hide a single category, tap the corresponding checkbox again.
The checkmark will be removed and the category will not display.
The button Enable all lets you select all categories.
To quickly unselect all categories, first tap the Enable all button.
The button will switch to Disable all. Tap it again to unselect all
categories.
Show/hide POIs.
86 English
Page 88

POI - Points of Interest
3.8.6 Enable a POI Notification
You may enable a notification for any category. During navigation, an acoustic
signal will notify you when approaching a POI of the chosen category.
Optionally you may also display a message over the POI.
On the POI menu, tap
Select a category by tapping on it.
You can use the
and buttons
to change the displayed page.
Set a distance in meters where you
want to receive the notification.
Then tap on Done.
Warn when near POI.
Navigation
Navigation Device PNA-E3540N 87
Page 89

POI - Points of Interest
Select a warning sound by tapping
on it. A sound sample will be output
when selecting it.
You can use the
and buttons
to change the displayed page.
Then tap on Done.
Navigation
Tap to place a checkmark in the
checkbox to enable the on-screen
message.
Then tap on Done.
You are returned to the navigation
display.
To enable the notification for multiple categories, repeat these
steps.
If you have enabled the additional on-screen message, it will
appear when you are located near a POI.
Tap on this message to mark the POI on the map. It will then be
displayed as follows:
88 English
Page 90

General Settings
3.9 General Settings
You can adjust different preferences for the display and operation of your
device. These are units of measurement for distance and time, the guidance
voice and the display of the on-screen keypad.
3.9.1 Selecting a Map
Upon delivery the device has the required maps for your region already
installed. However, the included DVD lets you install more maps. To use a
map section copied onto a memory card, proceed as follows:
Tap on the display to open the GPS main menu.
Tap
Tap the
menu.
Tap
Select the desired map from the list by tapping on it.
Settings.
button twice to show the third page of the Settings
Switch map.
Navigation
Navigation Device PNA-E3540N 89
Page 91

General Settings
3.9.2 Regional settings
The Regional settings let you set the units of measure.
Tap on the display to open the GPS main menu.
Tap
Navigation
Tap the
Tap
menu.
Settings.
button twice to show the third page of the Settings
Regional settings.
Select distance units
Choose between Kilometers and Miles by selecting the corresponding radio
button. Then tap on Next.
Time Zone
Choose the time zone where you will be using your navigation device. For an
easier assignment, major cities can be found behind the entries. If necessary
you can use the
and buttons to change the displayed page. Then tap on
Next.
Time display
Choose the time display format between three different options. Then tap on
Next.
The system will adjust daylight saving automatically.
90 English
Page 92

General Settings
Coordinates
Please specify how you want longitudes and latitudes to be displayed. You can
display the coordinates in Degrees, Minutes or Seconds. To do so, tap the
corresponding radio button to mark it.
Tap Done to return to the Settings menu.
3.9.3 Setting the Guidance Voice
Here you select the voice for the driving instructions. For many languages
there are female and male voices.
Tap on the display to open the GPS main menu.
Tap
Tap the
Settings.
button twice to show the third page of the Settings
menu.
Tap
Set voice.
Select a voice from the list according to the set language. After tapping on it a
sample sentence will be pronounced. Confirm your selection by tapping the
Select button
You are returned to the Settings menu.
Navigation
Navigation Device PNA-E3540N 91
Page 93

General Settings
3.9.4 Setting the On-Screen Keypad
The on-screen keypad can be shown in three different layouts. Tap on the
display to open the GPS main menu.
Tap Settings.
Navigation
Tap the
second page of the Settings menu.
button to show the
Tap Keyboard settings.
92 English
Page 94

Tap on the desired character table
to select it.
General Settings
You can use the
and buttons
to change the displayed page.
Then tap Done.
Some character tables have a > mark. In this case, more options will be
available after confirming them with Done. For instance, you can display a
keyboard with Latin character set as "Qwerty", "QWERTZ" or "Azerty"
keyboard. To do so, tap the desired radio button and then tap Done to
continue (see the sample figure below).
Navigation Device PNA-E3540N 93
Navigation
Page 95

Miscellaneous Applications
3.10 Miscellaneous Applications
The navigation device supports additional applications. These can be
accessed via the Main menu.
Tap on the display to open the GPS main menu.
Tap
Navigation
Tap
Select one of the four following options by tapping on it.
World Clock
Calculator
Unit Convertor
Country info
Extras.
to show the second page of the Main menu.
Description on page 95
Description on page 95
Description on page 95
Description on page 96
94 English
Page 96

Miscellaneous Applications
3.10.1 World Clock
Based on the set time zone (page 90) the device will calculate the time for
three other time zones. Tap Done to switch to the navigation display.
These time zones can be selected at your choice. Proceed as follows:
Tap any of the three clocks to select the corresponding time zone.
Select the desired time zone from the list by tapping on it. You can use
and buttons to change the displayed page.
the
Sometimes it is also possible to specify the cities that will be displayed
under the clock. To do this, choose the appropriate name from the list.
3.10.2 Calculator
This option lets you display a calculator offering the four basic arithmetic
operations plus square root function. To use the calculator, tap the digit and
operator icons.
Tap Done to switch to the navigation display.
Tap the Convert button to send the result to the Unit Convertor.
3.10.3 Unit Convertor
The Unit Convertor is able to convert currencies and different mathematical
and physical units of measure.
Proceed as follows:
Tap Conversion to select the type of conversion from a list.
Tap Input Unit to set the source unit of measure for the conversion.
Tap Amount to enter a value.
After switching to the Unit Convertor from the regular Calculator, the
result from the previous calculation will appear automatically in this
field.
Tap the output unit of measure.
Tap Done to switch to the navigation display or the calculator.
Navigation Device PNA-E3540N 95
Navigation
Page 97

Miscellaneous Applications
3.10.4 Country info
Under Country info you will find helpful information on country-specific details.
These are regulations that are very important for car, truck or motorbike
drivers. Country information such as the currency and the international
telephone prefix is also listed here.
Select the desired country from the list by tapping on it. You can use
and buttons to change the displayed page.
Navigation
Maximum allowed speed on:
the
An overview with the most important speed limits will appear. Any
other information found will also be displayed.
If no speed limit exists, Unl (Unlimited) will display.
Motorways
Country roads
Out-of-town streets
In-town streets
96 English
Page 98

More information:
Maximum permitted alcohol level in per mille
International telephone prefix
Dimmed headlights mandatory during daytime
Toll motorways
High-visibility jacket mandatory
Winter tyres mandatory depending on the weather or season
(the seasons may appear with monthly ranges, e.g. 1.11 1.4
for November 1
Fire extinguisher mandatory
st
until April 1st)
Miscellaneous Applications
This information is an extra support function but is not guaranteed
to be complete nor up-to-date. If you are in doubt, please ask for
information when entering the corresponding country.
Tap the More button to display more information on the country.
If there are more than five entries you can use the
and buttons to
change the displayed page.
Tap Back to return to the previous display.
Tap Back again to return to the country list.
Tap Back to return to the navigation display.
Navigation Device PNA-E3540N 97
Navigation
Page 99

Miscellaneous Applications
3.10.5 GPS Status
This function lets you display information about your present position, the
number of available GPS satellites and their signal level.
Tap on the display to open the GPS main menu.
Tap
Navigation
Tap
GPS Status.
to show the second page of the Main menu.
The following information is available:
Coordinates of
present position
Level indicators of
signal quality
Weak satellite signal
Current speed
Elevation Tracking error
Tap Done to return to the navigation display.
Strong satellite signal
Received time from
GPS satellites
98 English
Page 100

Miscellaneous Applications
3.10.6 Calibrating the Display
A calibration is required when the display does not respond properly to your
input. Proceed as follows:
Tap on the display to open the GPS main menu.
Tap
Tap
Tap
Settings.
three times to show the fourth page of the Main menu.
Calibrate.
Use the stylus to tap on the displayed target and follow the on-screen
instructions.
Navigation Device PNA-E3540N 99
Navigation
 Loading...