

Page 1
3C
MULTI-BAND RADIO
KH 2029
KOMPERNASS GMBH · BURGSTRASSE 21 · D-44867 BOCHUM
www.kompernass.com
ID-Nr.: KH2029-07/08-V1
MULTI-BAND RADIO
Operating instructions
RADIO
Betjeningsvejledning
Page 2
KH 2029
A
g
f
q
d
s
a
o
ew
r
t
y
u
i
B
;
2)
jh
l
k
Page 3

CONTENT PAGE
Intended use 2
Technical Data 2
Safety information 3
Operating elements 4
Starting up 5
Unpack the device ...........................................................................................................................5
Check package contents .................................................................................................................5
Mains and battery operation..........................................................................................................5
General functions 6
Key lock.............................................................................................................................................6
Screen lighting..................................................................................................................................6
Stand..................................................................................................................................................6
Time functions 6
Time, date, time zone and world time............................................................................................6
Select display mode.........................................................................................................................8
Alarm function...................................................................................................................................9
Stop watch function .......................................................................................................................10
Countdown function.......................................................................................................................10
Radio operation 11
Setting the station...........................................................................................................................11
Fine tuning.......................................................................................................................................12
Aerial...............................................................................................................................................12
Memory functions ..........................................................................................................................12
Cleaning 13
Cleaning the housing.....................................................................................................................13
Disposal 13
Warranty & service 14
Importer 14
Read the operating instructions carefully before using the appliance for the first time and preserve this
booklet for later reference. Pass the manual on to whomsoever might acquire the appliance at a later date.
- 1 -
Page 4

MULTI-BAND RADIO
KH 2029
Intended use
Frequency range radio
VHF (FM) 87–109 MHz
SW 5.85–17.90 MHz
MW (AM) Europe 522–1656 kHz
MW (AM) USA 520–1710 kHz
LW 144–299 kHz
This device is designed to receive generally
approved radio transmissions in all countries
(world receiver) and only for domestic use.
It has not been designed to receive transmissions
that are not generally approved, nor as part of
safety radio systems, e. g. on board sports boats,
nor for industrial or commercial use. It has also not
been designed for use in temperatures beyond
those stated in the Technical Data.
Technical Data
This device has been tested and approved for
adherence to the basic requirements and the
other relevant regulations of the EMC Directive
2004/108/EC.
Power consumption: 5 W
Power consumption
Standby: 1.3 W
Operating
temperature: + 5 ~+ 35° C
Humidity: 5 ~90 %
(no condensation)
Dimensions
(L x W x H): 180 x 40 x110 mm
Weight: Approx. 380 g
The technical features of the device enable the
frequency ranges stated above to be set.
Various countries may have different national
rules on the radio frequency ranges assigned.
Please note that you may not sell, transfer to third
parties or abuse information received outside the
assigned radio frequency ranges.
Tuning ranges
FM (VHF) 100 kHz/50 kHz
SW 5 kHz/1 kHz
MW (AM) Europe 9 kHz/1 kHz
MW (AM) USA 10 kHz/1 kHz
LW 1 kHz
Sensitivity: SW can be set to 2 intervals
General
Memory spaces: 400 stations
Headphone
output: 3.5 mm stereo socket
Headphone output
Maximum
output voltage: 30-60 mV
Batteries
4 x 1.5 V, Type AA/LR6/Mignon
(not supplied)
- 2 -
Page 5
Safety information
• This device has not been designed for use
by people (including children) with restricted
physical, sensory or intellectual abilities or lack
of experience and/or knowledge, unless they
are supervised by a responsible person (for
their own safety) or have received instructions
on how to use the device.
• Children should be supervised to ensure that
they do not play with the device.
• In order to avoid the device being switched
on unintentionally, remove the adapter from the
mains socket after each use and before cleaning.
• Check the device and all parts for visible da-
mage. The device’s safety concept can only
work if the device is in perfect condition.
• The mains adapter must always be freely
accessible so that the device can be separated
from the power supply quickly in an emergency.
• Do not expose the device to rain or use it in
a damp or wet environment.
• Ensure that the connection cable is never wet
or damp when in use.
• You must not open or repair the device’s housing. This can be dangerous and renders the
warranty null and void.
• Protect the device from moisture and sprayed
water. Therefore do not place any objects filled
with water (e. g. vases) on or near the device.
Risk of fire!
• Do not use the device near hot surfaces.
• Do not set the device up where it is exposed
to direct sunlight. This could cause it to overheat and damage it beyond repair.
• Never leave the device unattended during
operation.
• Never cover the device’s ventilation slots
when it is switched on.
• Do not place open flames, such as candles,
on or near the device.
Risk of electric shock!
• Only connect the device to a properly installed
and earthed mains socket. The mains voltage
must agree with that stated on the mains
adaptor specification plate.
• Damaged adapters or mains cables should
be exchanged immediately by an authorised
technician or the Customer Service in order to
avoid risks.
• Connection cables or devices that do not
work perfectly or have been damaged should
be repaired or exchanged immediately by Customer Services.
Never immerse the device in water!
Simply wipe it with a slightly damp cloth.
Risk of injury!
• Keep children away from the connection cable
and device. Children frequently underestimate
the danger of electrical devices.
• If the device has fallen down or is damaged it
must no longer be used. Have the device
checked by a qualified specialist and, if necessary, repaired.
• Batteries must not be handled by children.
Children can put batteries in their mouths
and swallow them.
If a battery has been swallowed, obtain
medical assistance immediately.
- 3 -
Page 6
Thunder storms!
Devices connected to mains power can be damaged
during a thunder storm. If there is a thunder storm,
always remove the mains plug from the socket.
• If the appliance is not going to be used for
long periods, remove the batteries.
• If batteries leak, put on protective gloves.
• Clean the battery compartment and contacts
with a dry cloth.
Information on voltage surges
(EFT/electrical fast transient)
and electrostatic discharges:
If the product does not work properly due to electrical fast transient processes (voltage surges) or
electrostatic discharge, it must be reset to restore
normal operation. If necessary, remove the plug
from the power socket and insert it again. The
batteries (if used) must be removed and reinserted.
Information on separating the
device from mains power
The POWER button on this device does not completely
separate it from the mains network. In addition, the
device uses power when in standby mode. In order
to completely separate the device from the mains
supply the plug must be removed from the mains
socket.
Notes on handling batteries
The device uses batteries. Please note the following
on handling batteries:
Risk of explosion!
Do not throw batteries into a fire.
Do not recharge batteries.
• Never open, solder or weld batteries.
There is a risk of explosion and injury!
• Check batteries regularly. Leaking batteries
can damage the device.
Caution!
No liability/warranty applies to damage to the
device caused by moisture due to water penetrating
the device or overheating!
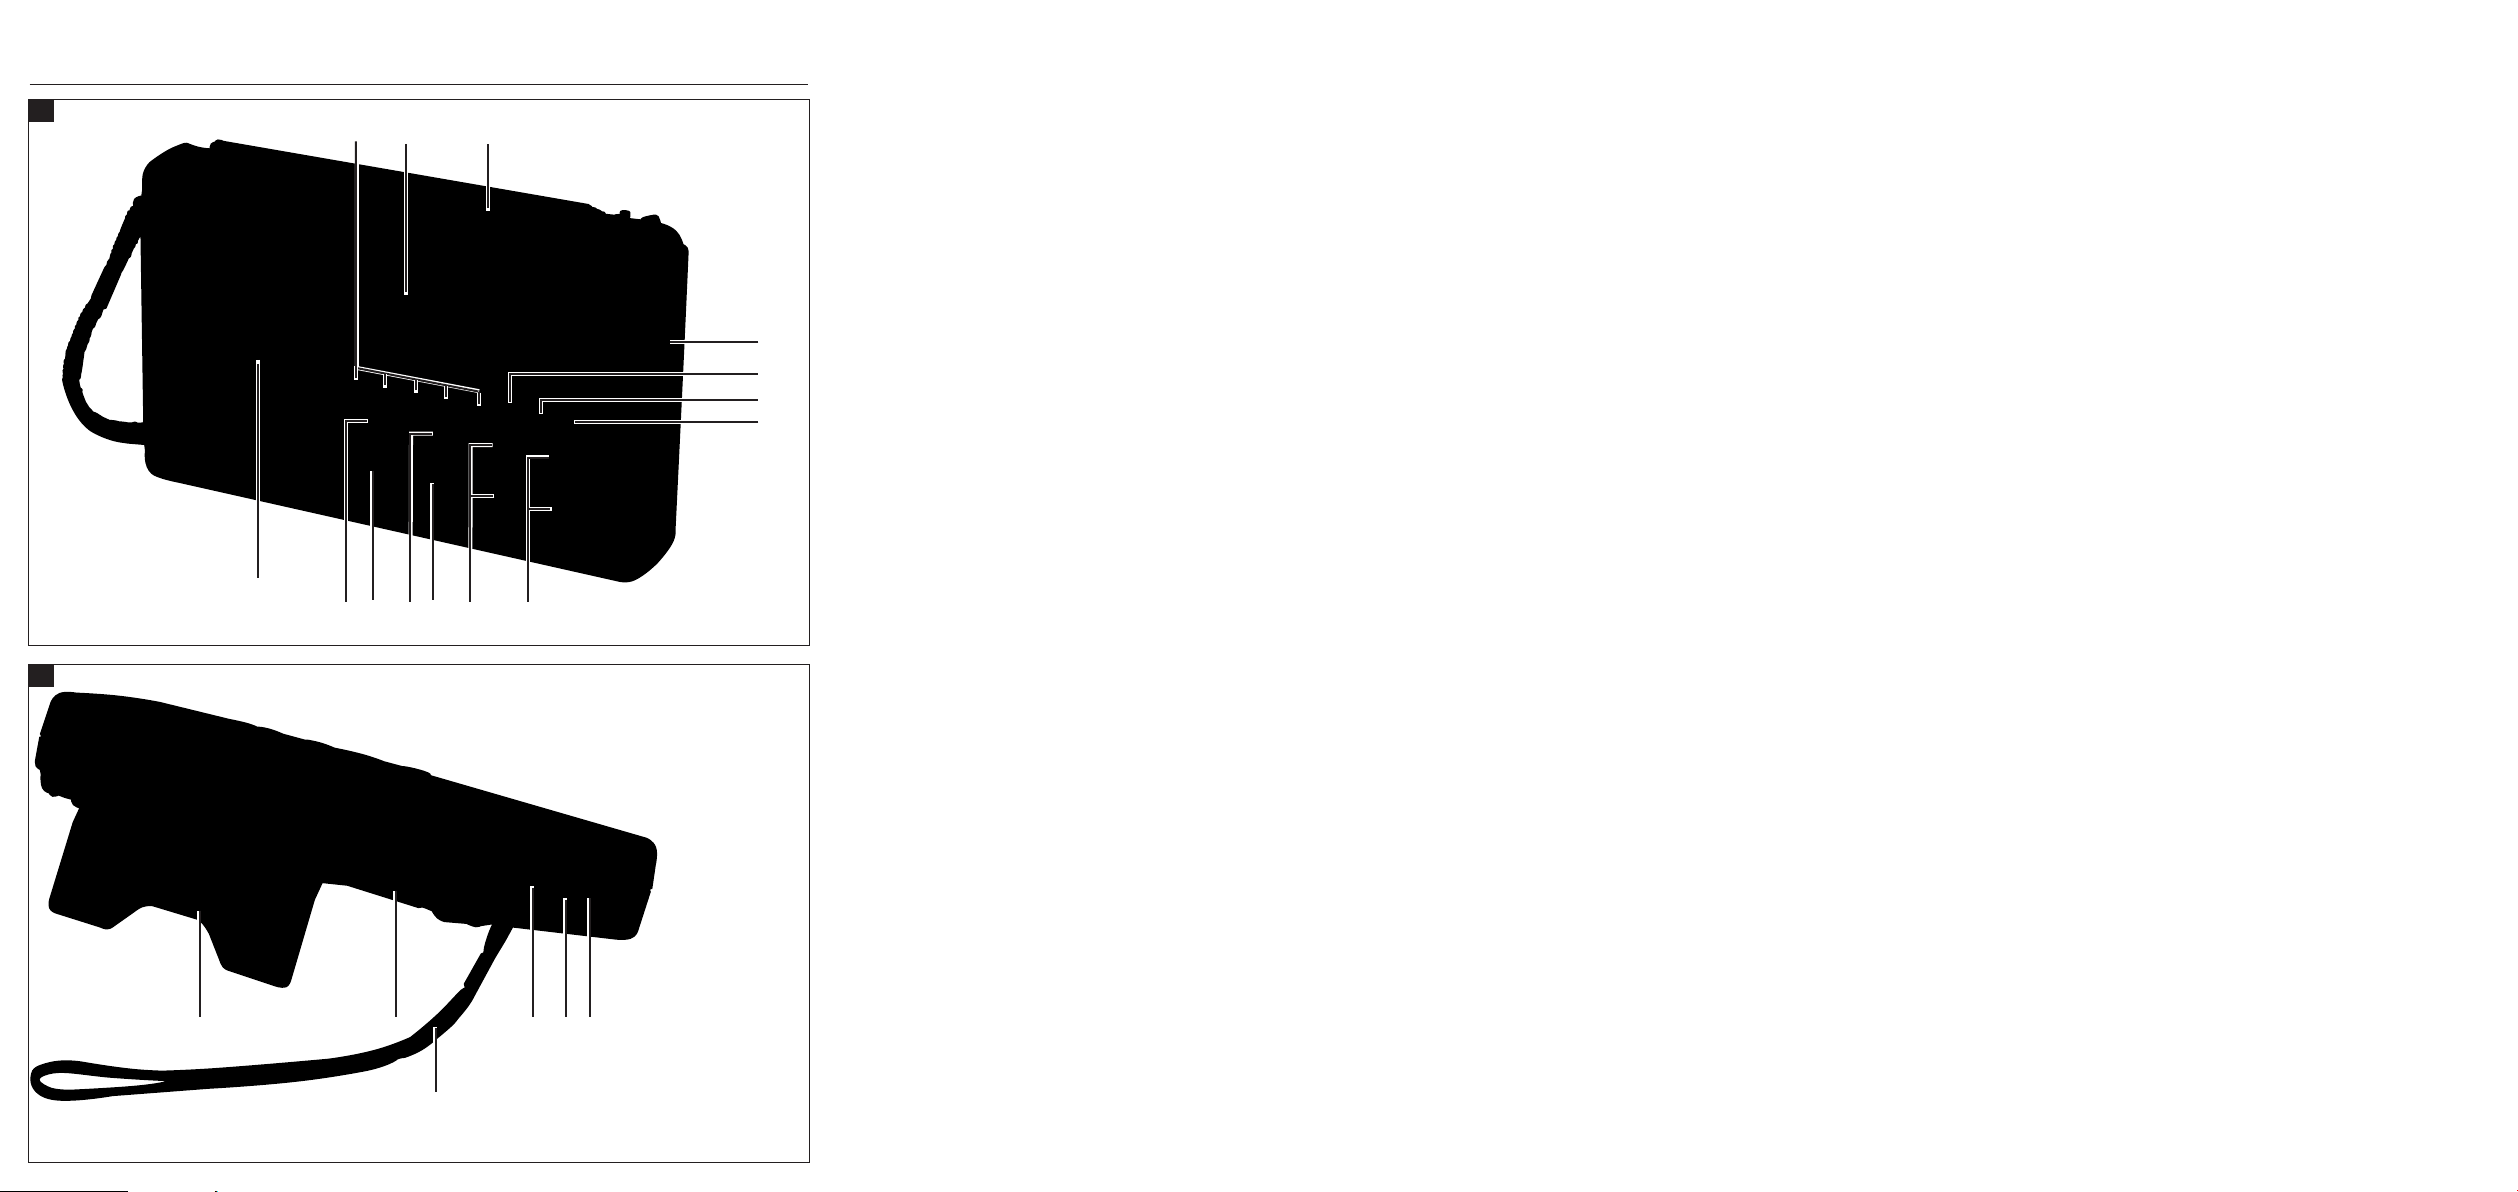
Operating elements
Front side
1
Memory buttons M.0/5–M.4/9
2
Screen
3
Button SNOOZE
4
Frequency selection switch
5
Button PAGE
6
Button FINE
7
Button POWER
8
Buttons UP/DOWN
9
Buttons VOL.+ (AL–1)/VOL.– (AL–2)
0
Button MODE
q
Button BASS
w
Button MEMORY SCAN
e
Button MEM
r
Speakers
Back
t
Stand
z
Aerial
u
Carrying strap
i
Switch SW SEN.
o
Headphone output
p
DC INPUT 7.5 V: Adapter slot
- 4 -
Page 7
Starting up
Unpack the device
Remove all packaging materials.
Caution!
Do not let children play with the plastic film.
There is a risk of suffocation.
Check package contents
When unpacking, ensure that the following parts
are included:
• world receiver
• these operating instructions with warranty card
Mains and battery operation
When you disconnect the radio from the mains
supply, any settings you may have made (time,
alarm, stations in memory) will be lost. If you wish
to keep these settings, insert batteries (see below)
before disconnecting.
Inserting batteries
Instead of using the mains adapter, you can run the
radio from batteries (not supplied). You will need
four 1.5 V mignon batteries, size AA, LR6.
• Open the battery compartment on the rear of
the device by sliding the cover downwards.
• Insert four batteries into the compartment,
paying attention to the polarity.
• Replace the cover on the battery compartment.
Mains connection
• Connect the plug of the mains adapter
to the
DC INPUT 7.5 V socket on the side of the
device.
• Plug the mains adapter into an easily accessible socket. To avoid tripping hazards, please
avoid using an extension cable.
Caution!
Only use an adapter with an output voltage of
7.5 V / 400 mA and check the polarity of the
device’s plug ( ). The use of adapters with a different output voltage may result in
damage to the device or mains adapter.
Automatic time update
• As soon as the mains adapter is connected or
batteries inserted, the world receiver starts in
time mode. The screen repeatedly shows
PLEASE WAIT SYSTEM SETTING.
If an RDS signal is received, the time and date
are set automatically. The correct time will then
be shown on the screen.
If the time is not correct, set the date and time
manually as shown below.
Connecting headphones
On the left side of the radio, you will find the
headphone socket.
• Insert the headphone jack plug into the
headphone output.
If the batteries are too weak, this is indicated on the
screen by a flashing symbol .
The speaker will be deactivated automatically.
Caution!
Listening to music with headphones
over long periods of time and at a high
volume may damage your hearing!
- 5 -
Page 8

General functions
Key lock
In order to prevent changing the settings unintentionally by touching the buttons, you can activate the
key lock.
• Press and hold down the
3 seconds. The screen will flash . All buttons except the
• Press and hold down the
about 3 seconds to cancel the key lock. The
message on the screen disappears.
SNOOZE button are now locked.
MEM button for around
MEM button again for
Screen lighting
• Press any button to illuminate the screen.
The screen will remain lit for about10 seconds.
Stand
• Flip out the stand on the rear of the device
to enable it to stand more stably.
Time functions
The time functions can only be set when the radio is
switched off. If the time cannot be set using the RDS
signal, the default time of the world receiver starts at
0:00 00.
The settings are lost if the device is disconnected
from its power supply.
Time, date, time zone and world time
You can use the MODE button to set the time, date
and time zone, query the world time and set the
date alarm, medium wave reception, alarm time
reception, hourly mode and time update.
When you press MODE, the function to be set flashes
for about15 seconds. During this time, adjust the
setting with the
• Press
• Press
• Press
(„Local city”).
• Press
• Press
• Press
medium wave.
• Press
• Press
• Press
To apply a setting, just wait until the screen stops
flashing (the screen reverts to the time indication)
or press
UP/DOWN buttons.
MODE x 1: Set clock time.
MODE x 2: Set the date.
MODE x 3: Set time zone
MODE x 4: Show world time.
MODE x 5: Date alarm.
MODE x 6: Set reception range for
MODE x 7: Set alarm pause.
MODE x 8: Set 12/24 hour mode.
MODE x 9: Set automatic time query.
MODE to move on to the next function.
Setting clock time
• Press MODE once. The most recently set time
flashes on the screen.
• Press the
forward or backward at minute intervals.
Hold down one of the buttons for a few
seconds to move the setting forward or
backward quickly at10 minute intervals.
UP or DOWN button to move the time
Note:
Set the time without summer time offset.
If summer time is required, this can be set
when setting the time zone (see below).
- 6 -
Page 9
Setting the date
• Press MODE again or twice.
The date set flashes on the screen (Tu 01:01 08
when first switched on).
• Press the
UP or DOWN button to move the date
forward or backward. Keep either of these
buttons pressed for a few seconds to change
the date in ten-day steps.
The weekday indication follows automatically.
The indication uses the first two letters of the
English name of the day.
The built-in calendar runs from 2000 to 2099.
Day of the week indication:
Su = Sunday
Mo = Monday
Tu = Tuesday
We = Wednesday
Th = Thursday
Fr = Friday
Sa = Saturday
Setting the time zone
• Press MODE again or three times. The selected
time zone flashes on the screen as the abbreviation for the corresponding city (UTC when
first switched on); the time disappears.
• Press the
zone forward or backward.
The following table summarises the city abbreviations for the time zones and time differences.
UP or DOWN button to move the time
Συντοµογραφία
HNL –10:00 Χονολουλού/ΗΟΑ
ANC –9:00 Ανκοράζ/ΗΠΑ
YVR –8:00 Βανκούβερ/Καναδάς
LAX –8:00 Λος Άντζελες/ΗΠΑ
DEN –7:00 Ντένβερ/ΗΠΑ
CHI –6:00 Σικάγο/ΗΠΑ
MEX –6:00 Πόλη του Μεξικό/Μεξικό
NYC –5:00 Νέα Υόρκη/ΗΠΑ
YYZ –5:00 Τορόντο/Καναδάς
YUL –5:00 Μόντρεαλ/Καναδάς
CCS –4:00 Καράκας/Βενεζουέλα
RIO –3:00 Ρίο ντε Τζανέιρο/Βραζιλία
BUE –3:00 Μπουένος Άιρες/Αργεντινή
UTC* 0:00 Παγκόσµια Συντονισµένη Ώρα
LON 0:00 Λονδίνο/Μεγάλη Βρετανία
MUN 1:00 Μόναχο/Γερµανία
FRA 1:00 Φρανκφούρτη/Γερµανία
PAR 1:00 Παρίσι/Γαλλία
ROM 1:00 Ρώµη/Ιταλία
CAI 2:00 Κάιρο/Αίγυπτος
IST 2:00 Κωνσταντινούπολη/Τουρκία
MOW 3:00 Μόσχα/Ρωσία
KWI 3:00 Πόλη του Κουβέιτ/Κουβέιτ
DXB 4:00 Ντουµπάι/Σαουδική Αραβία
KHI 5:00 Καράτσι/Πακιστάν
DAC 6:00 Ντάκα/Μπαγκλαντές
BKK 7:00 Μπανγκόγκ/Ταϊλάνδη
SIN 8:00 Σιγκαπούρη
HKG 8:00 Χονγκ Κονγκ
PEK 8:00 Πεκίνο/Κίνα
TYO 9:00 Τόκιο/Ιαπωνία
SYD 10:00 Σίδνεϊ/Αυστραλία
NOU 11:00 Νουµέα/Νέα Καληδονία
AKL 12:00 Ώκλαντ/Νέα Ζηλανδία
∆ιαφ. ώρας
Κ. Ευρ.
Πόλη
*UTC
UTC (Universal Time Coordinated UTC) is the
reference for the times of the various time zones
around the world.
- 7 -
Page 10

Summer time offset
• While the time zone indication is still flashing,
press the
SUN OFF message when summer time has
been deactivated.
• Press the
shows SUN ON. Summer time offset is now
activated and the clock moves one hour
ahead.
SNOOZE button. The screen shows the
SNOOZE button again. The screen now
Show world time
• Press MODE again or four times to show the
world time. The city abbreviation appears with
the corresponding time.
• Press the
zone forward or backward.
UP or DOWN button to move the time
Special date alarm
• Press the MODE button a fifth time to set the special date alarm. The screen flashes SDA1 and
the date in succession.
• Press the
settable date alarms (SDA1–SDA10).
• Press the
which the alarm should sound.
• Press the
ber setting so that the alarm sounds every year.
• If the current date is the same as the SDA date,
an alarm sounds every hour from 8 o’clock on
this day. In addition, the SDA message will
flash on the screen.
• Turn off the alarm by pressing any button.
PAGE button to select one of the ten
UP or DOWN button to set the date on
SNOOZE button to ignore the year num-
Note:
In order to completely deactivate the date
alarm set a date that is in the past!
Setting 12/24 hour mode
• Press MODE eight times. The screen shows
the 24 HR message for 24 hour mode.
• Press the
• Press the
12 HR is displayed on the screen. In the afternoon
in addition PM is shown on the screen.
UP button to set the 24 hour mode.
DOWN button to set the 12 hour mode.
Automatic update (RDS)
The RDS signal transfers additional information such
as the station name, time or song title to the radio.
The time is updated automatically when the RDS
signal is received.
• Press
• Press the
• Press the
MODE nine times. The screen displays
UPDA ON if the update function is activated.
UP button to activate the automatic
update.
If the radio is switched on, a clock symbol now
flashes to the top left of the screen. The time is
now updated automatically if a station with an
RDS signal is received. The update is complete
when the clock symbol stops flashing and is
displayed permanently.
DOWN button to deactivate the auto-
matic update. The screen displays UPDA OFF.
When the radio is switched on, no clock symbol is displayed.
Select display mode
You can select which information is shown on the
screen when the radio is switched off.
The selected mode is indicated by a corresponding
symbol on the screen.
- 8 -
Page 11

When the radio is switched off, select the display
mode by repeatedly pressing the
accordance with the following table:
Symbol on the screen display mode:
CLK only the time is displayed.
CITY the time and world time are shown
in succession.
DATE the time and date are shown in
succession.
CIT DAT the time, date and world time are
shown in succession.
FINE button in
Alarm function
The world receiver provides two alarms that can
be set independently of one another, AL1 and AL2.
For both, you can set ...
... whether the alarm should operate on every
day of the week or only from Monday to
Friday;
... whether you wish to be woken by the alarm
tone or the radio.
Setting the alarm time
You can set two alarm times in your world receiver.
Alarm function Symbol on the screen
Acoustic signals
Radio
Switched off No symbol
• Press the
The screen shows the most recently set alarm
time and the symbol for the alarm type.
• Press the
time forward or backward at minute intervals.
Hold down one of the buttons for a few seconds to move the setting forward or backward
quickly at10 minute intervals.
VOL.+/AL–1 (or VOL.–/AL–2) button.
UP or DOWN button to move the alarm
• Press the VOL.+/AL–1 (or VOL.–/AL–2) button until
the desired alarm function (see table above)
is indicated on the screen.
• Press the
which you want the alarm to sound:
You can choose between week days
(Mo, Tu, We, Th, Fr), weekend (Su, Sa), every
day (Su, Mo, Tu, We, Th, Fr, Sa) or the current
day of the week. The selected setting is shown
on the screen.
• Press the
days are set. Hold down the
the screen shows an individual week day.
• Press the
day.
To go back to selecting week days, weekend or
every day, briefly hold down the
again.
• Press the MODE button to save the setting and return to the time mode. The setting is also saved
if you wait around15 seconds until the screen
returns to displaying the time.
SNOOZE button to set the weekday on
SNOOZE button until the desired alarm
SNOOZE button until
SNOOZE button to set the desired week
SNOOZE button
When the alarm sounds ...
• and the „Radio” alarm function has been
selected, the radio operates for one hour at
a predefined alarm volume. To switch off press
the
VOL.+/AL–1 (or VOL.–/AL–2) button.
• and the „signal sounds” alarm function has
been selected, the signal sound is played for
10 minutes. To switch off press the
or VOL.–/AL–2 button.
VOL.+/AL–1
Note:
Please note that a station must be selected
(see below) for the radio alarm to work.
- 9 -
Page 12

Interrupting the alarm
• Press the SNOOZE button to interrupt the alarm
for10 minutes.
Set snooze time
• Press the MODE button seven times; the screen
displays the snooze time set
(default is SNO10).
• Use the
UP and DOWN buttons to set the snooze
time to a time between 1 and 59 minutes.
Turning off the alarm function
• Press the VOL.+/AL–1 or VOL.–/AL–2 button until
the relevant alarm symbols disappear from
the screen.
Set and save countdown
• Press and hold down the MEMORY SCAN button
for around 2 seconds, the screen shows
D 00.00.
• Press the
desired time.
5 countdown times are preset on the memory
buttons and you can open these directly using
the corresponding memory button:
Button
Button
Button
Button
Button
UP or DOWN button to set the
M.0/5 10:00
M.1/6 30:00
M.2/7 45:00
M.3/8 60:00
M.4/9 90:00
Stop watch function
The stop watch function is only available when the
radio is switched off.
• Press and hold down the PAGE button for around
2 seconds, the screen shows 00.00.0 U.
• Press
• During time measurement, it can be stopped by
• Pressing
• Hold down
• Leave the stop watch by pressing
SNOOZE to start the stop watch. The maxi-
mum time for the stop watch is 99 minutes and
59 seconds. If the stop watch exceeds the maximum time, 99:59.0 is displayed and flashes.
pressing
SNOOZE.
SNOOZE again restarts the stop watch.
SNOOZE to reset the stop watch.
PAGE.
Countdown function
The countdown function is only available when
the radio is switched off.
• Press the
memory space indicator
screen. Now use the
select a memory space; when you press the
relevant memory key the time is saved in this
memory space and the time previously stored
there overwritten.
• When the
you leave the countdown mode.
MEM button to save the set time, the
MEM flashes on the
M.0/5–M.4/9 buttons to
MEMORY SCAN button is pressed again
Call up and activate the countdown function
• Press and hold down the MEMORY SCAN button
for around 2 seconds, the screen shows
D 00.00.
• Select the desired, saved countdown time with
the aid of the
• Press
the
SNOOZE button again pauses the countdown.
M.0/5–M.4/9 memory buttons.
SNOOZE to start the countdown. Pressing
- 10 -
Page 13

When the set time has been counted down, an
alarm sound plays for one minute becoming
gradually higher in tone and louder.
• Press the
countdown and leave countdown mode.
MEMORY SCAN button to pause the
Radio operation
Switching on/volume control
• Press the POWER ON button to switch the radio
on. ON will appear briefly on the screen,
followed by the current frequency and band
selection.
• Press the
control the volume:
Button
Button
The volume is shown on the bar indicator to the
bottom right of the screen.
Switch on bass amplifier
• When the radio is switched on, press the BASS
button to switch on the bass amplifier. The
screen will flash BASS.
• In order to switch the bass amplifier off again,
press
disappears.
VOL.+/AL–1 or VOL.–/AL–2 button to
VOL.+/AL–1: louder.
VOL.–/AL–2: quieter;
BASS one more time. The BASS message
Sleep function
You can activate the sleep function via the SNOOZE
button. You can set a time of up to 90 minutes in tenminute steps, after which the radio will automatically
turn itself off. To do so, first switch the radio off.
• Press the
sleep function and 90 (for 90 minutes)
will appear.
• Press the
is displayed to count down the sleep time
in 10 minute steps.
• Either select a sleep time (the sleep symbol
again until OFF appears on the screen.
The sleep function is now switched off.
SNOOZE button. The symbol for the
SNOOZE button repeatedly until 90
remains on the screen) or press
SNOOZE
Setting the station
• Select the required frequency band (FM, MW,
LW or SW), using the frequency select button.
The corresponding abbreviation will appear on the
screen.
• The UP and DOWN buttons can now be used
to set the desired frequency.
• If you keep
seconds, the automatic station search will start.
• The search stops as soon as a station with
sufficient signal strength is found.
UP or DOWN pressed for about three
Turning off
• Switch the radio off by pressing the POWER
button. OFF is shown briefly on the screen
and the time is displayed again.
In the FM frequency range the RDS symbol
is displayed if an RDS station is received.
- 11 -
Page 14

Setting the MW band
Since the radio transmitter systems differ from one
country to another, you should make the appropriate setting via the reception range setting:
• Press the
MODE button six times and then use the
UP or DOWN button to select the corresponding
reception range as per the following table:
Region Channel spacing Band range
America 10 kHz 520–1710 kHz
Europe 9 kHz 522–1656 kHz
Fine tuning
If a station can not be found precisely the fine
tuning can be use to improve reception.
• During the channel search press the FINE
button, the screen shows FINE.
• The
• By pressing the
This function is not available for the LW frequency
range.
UP and DOWN buttons can now be used to set
the desired frequency in half frequency steps.
FINE again you leave the fine
tuning function again.
Aerial
The rotatable telescopic aerial on the radio can be
used for the FM and SW bands.
• Pull the aerial out fully and arrange it for
optimum reception.
The SW SEN. switch on the left side of the device
can be used to improve the reception quality for
the SW band. Select LX for strong stations and RX
to improve reception for weak stations.
The telescopic aerial does not work in the MW and
LW bands. In these bands, the radio uses its built-in
ferrite aerial.
• Align the radio for best reception.
Memory functions
Save station
The world receiver can save 400 stations in each
frequency range.
To store a station, proceed as follows:
• Set the frequency range with the frequency
selection switch and then the station that you
want to save (see above).
• Press the
PAGE memory page and MEM flashes.
• Within 10 seconds press the
(the PAGE message flashes), and then select
a memory page (from 00–39) using the
or DOWN button.
• Within 10 seconds use the
to select a memory space to store the station. For example, press the
space 0 and again for memory space 5. The occupancy is shown on the screen.
• Press
and MEM messages are shown on a perma-
nent basis.
MEM button. The screen shows the
PAGE button
UP
M.0/5–M.4/9 buttons
M.0/5 button once for memory
MEM again to save the station. The PAGE
Note:
If the world receiver is connected to the mains
adapter and no batteries have been inserted,
the station memories are lost when the adapter
plug is pulled from the socket.
- 12 -
Page 15

Selecting a saved station
• In order to select a saved station directly, first
use the frequency selection switch to select the
frequency range where the station is saved.
• Press the
PAGE button and then use the UP or
DOWN buttons to select a memory page (from
00–39).
• Within 10 seconds press the
buttons to select a memory space to store
the station.
The station is played immediately after entering
the memory space.
M.0/5–M.4/9
Cleaning
Risk of injury from electric shock!
• Never immerse the device’s parts into water
or other liquids!
• Do not allow liquid to penetrate the housing.
Cleaning the housing
Clean the housing surface with a slightly damp
cloth. Never use petrol, solvent or detergents that
could attack the plastic!
Carry out automatic station search
Your world receiver can search the frequencies within a range and store the stations it finds. Do the following to activate the automatic search (automatic
memory scan/AMS):
• Press the
The MEM message flashes.
• Hold down the
for about 1 second.
The world receiver now searches all frequencies in
the currently selected frequency range and saves
the stations it finds from the currently set memory
page and memory space.
MEM button once.
MEMORY SCAN button
Displaying memory spaces
• Press the MEMORY SCAN button to call up the
content of all station memories for the selected
band.
All stored stations will be played in succession
for about five seconds.
• Press any button to stop playing the memory
spaces.
Disposal
Do not dispose of the appliance in
your normal domestic waste. This
product is subject to the European
guideline 2002/96/EC.
Dispose of the appliance through an approved
disposal centre or at your community waste facility.
Observe the currently applicable regulations.
In case of doubt, please contact your waste disposal
centre.
Battery disposal
Batteries may not be disposed of with normal
domestic waste. All consumers are statutorily
obliged to dispose of batteries at the collection point in their community/district or with the
original supplier.
The purpose of this obligation is to ensure that
batteries can be disposed of in an environmentally
friendly manner. Only dispose of batteries when
they are fully discharged.
Disposal of packaging
Dispose of all packaging materials
in an environmentally friendly manner.
- 13 -
Page 16

Warranty & service
Importer
You receive a 3-year warranty on this device from
the date of purchase. If, in spite of our high quality
standards, you have reason to complain about this
device, please contact our service hotline.
If it is not possible to deal with your complaint by
phone, they will provide
• a processing number (RMA number) and
• an address where you can send your product
for repairs under the warranty.
If you send the device please enclose a copy of the
proof of purchase (till receipt). The device must be
packaged securely for transport and the RMA number must be directly visible. Shipments without an
RMA number can not be processed.
Note:
The warranty applies to material or
manufacturing faults.
The warranty does not apply to
• parts subject to wear and tear.
• damage to breakable parts such as
switches and rechargeable batteries.
The product is only designed for private and not
commercial use. Improper handling and usage not
in accordance with the intended purpose, use of
force and any interventions that are not carried out
by our authorised service centre will render the
warranty null and void. This warranty does not
affect your legal rights.
KOMPERNASS GMBH
BURGSTRASSE 21
D-44867 BOCHUM
www.kompernass.com
- 14 -
Page 17

MULTI-BAND RADIO
KH 2029
Warranty
In order to ensure free repairs,
please contact our service hotline.
Ensure that you have your receipt
with you.
Please write sender’s details clearly:
Name
First name
Street
Postal code/city or town
Country
Telephone
Complete this section in full and enclose with the device!
Date/signature
Description of fault:
DES Ltd
Units 14-15
Bilston Industrial Estate
Oxford Street
Bilston
WV14 7EG
Tel.: 0870/787-6177
Fax: 0870/787-6168
e-mail: support.uk@kompernass.com
Irish Connection
Harbour view
Howth
Co. Dublin
Tel: 00353 (0) 87 99 62 077
Fax: 00353 18398056
e-mail: support.ie@kompernass.com
www.mysilvercrest.de
Page 18

Page 19

INDHOLDSFORTEGNELSE SIDE
Anvendelsesformål 18
Tekniske data 18
Sikkerhedsanvisninger 19
Betjeningselementer 20
Ibrugtagning 21
Udpakning af apparatet ...............................................................................................................21
Undersøg, hvad du har modtaget................................................................................................21
Net- og batteridrift .........................................................................................................................21
Generelle funktioner 22
Tastaturlås.......................................................................................................................................22
Displaybelysning............................................................................................................................22
Stander............................................................................................................................................22
Tidsfunktioner 22
Klokkeslæt, dato, tidszone og verdenstid....................................................................................22
Valg af displayfunktion..................................................................................................................25
Vækkefunktion ................................................................................................................................25
Stopursfunktion...............................................................................................................................26
Nedtællingsfunktion.......................................................................................................................26
Radiofunktion 27
Indstilling af stationer.....................................................................................................................27
Finindstilling af stationer ................................................................................................................28
Antenne...........................................................................................................................................28
Hukommelsesfunktioner.................................................................................................................28
Rengøring 29
Rengøring af kabinettet .................................................................................................................29
Bortskaffelse 29
Garanti & Service 30
Importør 30
Læs betjeningsvejledningen igennem før første brug, og opbevar den til senere brug. Lad vejledningen følge
med, hvis apparatet gives videre til andre."
- 17 -
Page 20

RADIO KH 2029
Anvendelsesformål
Dette apparat er beregnet til modtagelse af
alment tilladte radioudsendelser i alle lande
(verdensmodtager) og kun til privat brug.
Det er ikke beregnet til modtagelse af ikke-alment
tilladte udsendelser, som en del af sikkerhedsradioanlæg som f.eks. ombord på lystbåde eller
i erhvervsområder eller industriområder. Det er
endvidere ikke beregnet til klimazoner, der ligger
uden for de tekniske data.
Frekvensområde, radio
FM 87–109 MHz
Kortbølge (SW) 5,85–17,90 MHz
Mellembølge (AM) Europa 522–1656 kHz
Mellembølge (AM) USA 520–1710 kHz
Langbølge 144–299 kHz
Apparatets tekniske egenskaber gør det
muligt at modtage inden for de ovenfor anførte
frekvensområder.
I forskellige lande kan der gælde forskellige
nationale regler for tildelte radiofrekvensområder.
Vær opmærksom på, at du ikke uden tilladelse må
gøre brug af informationer mod taget udenfor det
tildelte radiofrekvensområde, videresende dem til
tredjepart eller bruge dem anderledes end tiltænkt.
Tekniske data
Dette apparat er blevet kontrolleret og godkendt
med hensyn til overensstemmelse med de grundlæggende krav og andre relevante forskrifter i
EMC-direktivet 2004/108/EC.
Effektforbrug: 5 W
Effektforbrug
Standby: 1,3 W
Driftstemperatur: + 5 ~+ 35° C
Luftfugtighed: 5 ~90 %
(ingen kondensation)
Mål
(L x B x H): 180 x 40 x 110 mm
Vægt: ca. 380 g
Batterier
4 x1,5 V, Type AA/LR6/Mignon
(medfølger ikke)
Frekvenstrin
FM 100 kHz/50 kHz
Kortbølge (SW) 5 kHz/1 kHz
Mellembølge (AM) Europa 9 kHz/1 kHz
Mellembølge (AM) USA 10 kHz/1 kHz
Langbølge 1 kHz
Følsomhed: Kortbølge kan
skiftes i 2 trin
Generelt
Hukommelsespladser: 400 Stationer
Hovedtelefonudgang: 3,5 mm stereostik
Hovedtelefonudgang
Maksimal
udgangsspænding: 30-60 mV
- 18 -
Page 21

Sikkerhedsanvisninger
• Dette apparat er ikke beregnet til at blive brugt
af personer (inklusive børn) med begrænsede
fysiske, sansemæssige eller åndelige evner
eller manglende erfaring og/eller viden,
medmindre de er under opsyn af eller modtager anvisninger om brug af apparatet fra en
person, der er ansvarlig for deres sikkerhed.
• Børn skal være under opsyn for at sikre, at de
ikke leger med apparatet.
• For at undgå at komme til at tænde for appara-
tet ved et uheld, bør du tage lysnetadapteren
ud af stikkontakten efter brug og før rengøring.
• Undersøg, om der er synlige skader på appa-
ratet og alle synlige dele. Apparatet fungerer
kun sikkert i fejlfri stand.
• Lysnetadapteren skal altid være let tilgængelig,
så apparatet i nødstilfælde hurtigt kan kobles
fra lysnettet.
Fare for elektrisk stød!
• Tilslut kun apparatet til en forskriftsmæssigt
installeret og jordet stikkontakt. Netspændingen skal stemme overens med angivelserne
på adapter typeskilt.
• For at undgå fare for ulykker skal beskadigede
lysnetadaptere eller lysnetledninger straks
udskiftes af autoriserede fagfolk eller kundeservice.
• Tilslutningsledninger eller apparater, der ikke
fungerer korrekt eller er blevet beskadiget, skal
straks repareres eller ombyttes af kundeservice.
Nedsænk aldrig apparatet i vand. Det må
kun tørres af med en let fugtig klud.
• Apparatet må aldrig stå ude i regn og må
aldrig bruges i fugtige eller våde omgivelser.
• Sørg for, at tilslutningsledningen aldrig bliver
våd eller fugtig under drift.
• Du må aldrig skille apparatet ad eller reparere
det. Dette vil kompromitere sikkerheden, og
garantien bortfalder.
• Beskyt apparatet mod vanddryp og vandstænk.
Stil derfor ikke væskefyldte beholdere (f. eks.
blomstervaser) på eller under apparatet.
Brandfare!
• Brug ikke apparatet i nærheden af varme
overflader.
• Placer ikke apparatet på steder, der er udsat
for direkte sollys. Ellers kan det blive overophedet og ødelagt, så det ikke kan repareres.
• Apparatet må aldrig være uden opsyn, når
det er i drift.
• Apparatets ventilationsåbninger må aldrig
dækkes, når det er tændt.
• Der må ikke placeres åbne brandkilder
som f. eks. et tændt stearinlys i nærheden af
apparatet.
Fare for kvæstelser!
• Hold børn væk fra tilslutningsledningerne og
apparatet. Børn undervurderer ofte den fare,
der er forbundet med elektriske apparater.
• Hvis apparatet falder ned eller bliver beskadiget,
bør du ikke bruge det længere. Få kvalificerede
fagfolk til at efterse apparatet og reparere det
om nødvendigt.
• Børn bør ikke få fat i batterier. Børn kan tage
batterier i munden og sluge dem.
Hvis et batteri sluges, skal der straks søges
læge.
- 19 -
Page 22

Tordenvejr!
Under tordenvejr kan apparater, der er tilsluttet
lysnettet, tage skade. Træk derfor altid lysnetstikket
ud af stikkontakten under tordenvejr.
Anvisninger om stødspændinger
(EFT/kortvarig elektrisk overspænding) og elektrostatiske udladninger:
I tilfælde af fejlfunktioner pga. kortvarig elektrisk
overspænding (stødspændinger) eller elektrostatiske
udladninger skal produktet nulstilles for at få det til
at virke normalt igen. Strømforsyningen skal muligvis
afbrydes og derefter tilsluttes igen. Batterierne skal
(hvis de er sat i) tages ud og derefter sættes i igen.
Anvisninger om isolation fra nettet
Apparatets POWER-knap isolerer ikke apparatet
fuldstændigt fra lysnettet. Desuden bruger
apparatet strøm i standbytilstand. For at isolere
apparatet fuldstændig fra lysnettet skal lysnetadapteren tages ud af stikkontakten.
Anvisninger om
omgang med batterier
Apparatet bruger batterier. Under omgang med
batterier skal du være opmærksom på følgende:
Eksplosionsfare!
Kast ikke batterier på ild. Genoplad aldrig batterier.
• Du må aldrig åbne batterier eller lodde eller
svejse på dem.
Der er fare for eksplosioner og kvæstelser!
• Kontroller batterierne regelmæssigt. Lækkende
batterier kan forårsage skader på apparatet.
• Hvis du ikke bruger apparatet i længere tid,
skal du tage batterierne ud.
• Hvis batterierne lækker, skal du bruge
beskyttelseshandsker.
• Rens batterirummet og batterikontakterne
med en tør klud.
Pas på!
Der accepteres intet ansvar for skader på
apparatet, der er opstået pga. påvirkning af
fugtighed, indtrængende vand eller overophedning, og de dækkes ikke af garantien.
Betjeningselementer
Forside
1
Hukommelsesknapper M.0/5–M.4/9
2
Display
3
Knap SNOOZE
4
Båndvælger
5
Knap PAGE
6
Knap FINE
7
Knap POWER
8
Knapper UP/DOWN
9
Knapper VOL.+ (AL–1)/VOL.– (AL–2)
0
Knap MODE
q
Knap BASS
w
Knap MEMORY SCAN
e
Knap MEM
r
Højttaler
Bagside
t
Fod
z
Antenne
u
Bæresnor
i
Omskifter SW SEN.
o
Hovedtelefonudgang
p
DC INPUT 7,5 V: Tilslutning for lysnetadapter
- 20 -
Page 23

Ibrugtagning
Udpakning af apparatet
Fjern alt indpakningsmateriale.
Pas på!
Lad ikke små børn lege med plastikfolie.
Der er fare for kvælning!
Undersøg, hvad du har modtaget
Forvis dig ved udpakningen om, at du har modtaget
følgende dele:
• Verdensmodtager
• Denne betjeningsvejledning med garantibevis
Net- og batteridrift
Når du kobler apparatet fra lysnettet, mister du,
hvad du eventuelt har indstillet (klokkeslæt, vækketid, radiostationer). Læg i givet fald batterier i først
(se nedenfor), hvis du vil sikre indstillingerne, for
først derefter at koble apparatet fra lysnettet.
Ilægning af batterier
I stedet for lysnet kan apparatet også køre på
batterier (medfølger ikke). Der skal bruges fire
1,5 V Mignonbatterier, Type AA, LR6.
• Luk batterirummet på apparatets bagside
op ved at skubbe dækslet nedad.
• Læg de fire batterier i rummet og vær
opmærksom på polariteten.
• Skyd dækslet tilbage over rummet.
Lysnettilslutning
• Tilslut strømforsyningens apparatkontakt til
stikket
DC INPUT 7,5 V på siden af apparatet.
• Sæt lysnetadapteren i en stikkontakt inden for
bekvem rækkevidde. For at undgå at snuble skal
du bruge apparatet uden forlængerledning.
Pas på!
Brug kun en adapter med en udgangsspænding
på 7,5 V / 400 mA og vær opmærksom på
stikkets polaritet ( ).
Automatisk opdatering af klokkeslæt
• Så snart lysnetadapteren er tilsluttet eller batterierne er lagt i, starter verdensmodtageren i
klokkeslæt-funktionen. I displayet vises PLEASE
WAIT SYSTEM SETTING gentagne gange.
Når der modtages et RDS-signal, indstilles klokkeslæt og dato automatisk. Derefter vises klokkeslættet
i displayet.
Hvis klokkeslættet ikke blev korrekt indstillet, kan
du indstille klokkeslæt og dato manuelt som
beskrevet i det følgende afsnit.
Tilslutning af hovedtelefonen
På apparatets venstre side finder du hovedtelefonudgangen.
• Stik hovedtelefonens jackstik i hovedtelefonudgangen.
Højttaleren slås automatisk fra.
Hvis batterierne bliver for svage, vises dette i
displayet med det blinkende symbol .
Advarsel!
Det kan føre til høreskader at lytte til
musik med hovedtelefoner over længere
tidsrum og med fuld lydstyrke!
- 21 -
Page 24

Generelle funktioner
Tastaturlås
For at forhindre at indstillingerne ændres ved
utilsigtet berøring af knapperne, kan du aktivere
en tastaturlås.
• Tryk og hold knappen
Nu blinker der i displayet. Alle knapper,
bortset fra knappen
• Tryk og hold igen knappen
for at ophæve tastaturlåsen. Det viste i
displayet går ud.
MEM i ca. 3 sekunder.
SNOOZE er nu låst.
MEM i ca. 3 sekunder
Displaybelysning
• Tryk på en vilkårlig knap for at belyse displayet.
Displayet er belyst i ca. 10 sekunder.
Stander
• Klap foden ud fra bagsiden af apparatet for
at opstille det mere stabilt.
Tidsfunktioner
Tidsfunktionerne kan kun indstilles med radioen
slukket. Hvis klokkeslættet ikke kunne indstilles
med RDS-signalet, begynder verdensmodtagerens
forindstillede tid på 00:00 00.
Når apparatet afbrydes fra lysnettet, mister det
indstillingerne.
Klokkeslæt, dato, tidszone
og verdenstid
Med knappen MODE kan du indstille klokkeslæt,
dato og tidszone, aflæse verdenstid, samt indstille
datoalarm, mellembølgemodtagelse, udsættelse af
alarm, timefunktion, og opdatering af klokkeslæt.
Når du trykker på knappen MODE, blinker
funktionen, der skal indstilles, i ca. 15 sekunder.
I dette tidsrum kan du så foretage indstillingen
med knapperne
• Tryk på
• Tryk på
• Tryk på
(„Local City”).
• Tryk på
• Tryk på
• Tryk på
modtageområdet for mellembølge.
• Tryk på
alarmens udsættelse.
• Tryk på
12- eller 24-timers funktion.
• Tryk på
automatisk aflæsning af klokkeslæt.
For at overføre en indstilling, kan du simpelthen
vente til udlæsningen ikke længere blinker (displayet
skifter tilbage til klokkeslæt) eller skifte til næste funktion med knappen
UP/DOWN.
MODE én gang: Indstilling af klokkeslæt.
MODE to gange: Indstilling af dato.
MODE tre gange: Indstilling af tidszone
MODE fire gange: Visning af verdenstid.
MODE fem gange: Datoalarm.
MODE seks gange: Indstilling af
MODE syv gange: Indstilling af
MODE otte gange: Indstilling af
MODE ni gange: Indstilling af
MODE.
Indstilling af klokkeslæt
• Tryk én gang på MODE.
Det seneste klokkeslæt blinker i displayet.
• Tryk på knappen
klokkeslættet frem eller tilbage minut for minut.
Hvis du holder en af knapperne nede i et par
sekunder, indstilles klokkeslættet frem eller
tilbage i intervaller på 10 minutter.
UP eller DOWN for at stille
Bemærk:
Indstil klokkeslættet uden sommertidsforskydning. Eventuel sommertid kan indstilles
under tidszoneindstillingen (se nedenfor).
- 22 -
Page 25

Indstilling af dato
• Tryk én gang til eller to gange på MODE.
Den indstillede dato blinker i displayet
(ved ibrugtagning Tu 01:01 08).
• Tryk på knappen
UP eller DOWN for at stille
datoen frem eller tilbage. Hvis du holder
en af knapperne nede i et par sekunder,
indstilles datoen frem eller tilbage i intervaller
på 10 dage.
Visningen af ugedag følger automatisk med.
Den vises med de to første bogstaver i det
engelske navn for ugedagen.
Den indbyggede kalender går fra 2000 til 2099.
Visning af ugedag:
Su = Søndag
Mo = Mandag
Tu = Tirsdag
We = Onsdag
Th = Torsdag
Fr = Fredag
Sa = Lørdag
Indstilling af tidszone
• Tryk én gang til eller tre gange på MODE. Den
indstillede tidszone blinker i displayet som forkortelsen for den tilhørende by (ved første
ibrugtagning UTC); klokkeslættet forsvinder.
• Tryk på knappen
næste eller forrige tidszone.
Tabellen ved siden af giver en oversigt over
byforkortelserne for tidszonerne og tidsforskellen.
UP eller DOWN for at indstille til
Forkortelse Forsk. t. UTC By
HNL –10:00 Honolulu/USA
ANC –9:00 Anchorage/USA
YVR –8:00 Vancouver/Canada
LAX –8:00 Los Angeles/USA
DEN –7:00 Denver/USA
CHI –6:00 Chicago/USA
MEX –6:00 Mexico City/Mexico
NYC –5:00 New York/USA
YYZ –5:00 Toronto/Canada
YUL –5:00 Montreal/Canada
CCS –4:00 Caracas/Venezuela
RIO –3:00 Rio de Janeiro/Brasilien
BUE –3:00 Buenos Aires/Argentina
UTC* 0:00 Universal Time Coordinated
LON 0:00 London/Storbritannien
MUN 1:00 München/Tyskland
FRA 1:00 Frankfurt/Tyskland
PAR 1:00 Paris/Frankrig
ROM 1:00 Rom/Italien
CAI 2:00 Kairo/Ægypten
IST 2:00 Istanbul/Tyrkiet
MOW 3:00 Moskva/Rusland
KWI 3:00 Kuwait City/Kuwait
DXB 4:00 Dubai/Saudi Arabien
KHI 5:00 Karachi/Pakistan
DAC 6:00 Dacca/Bangladesh
BKK 7:00 Bangkok/Thailand
SIN 8:00 Singapore
HKG 8:00 Hong Kong
PEK 8:00 Beijing/Kina
TYO 9:00 Tokyo/Japan
SYD 10:00 Sydney/Australien
NOU 11:00 Noumea/Ny Kaledonien
AKL 12:00 Auckland/New Zealand
*UTC
Universal Time Coordinated (dansk: koordineret verdenstid). UTC er en referencetid, som tiderne i jordens forskellige tidszoner afledes fra.
- 23 -
Page 26

Sommertidsforskydning
• Tryk på knappen SNOOZE mens tidszonen stadig
vises blinkende. Displayet viser nu SUN OFF
for den deaktiverede sommertidsforskydning.
• Tryk på knappen
nu SUN ON. Sommertidsforskydning er nu
aktiveret og klokkeslættet er en time foran.
SNOOZE igen. Displayet viser
Indstilling af 12- eller 24-timers funktion
• Tryk otte gange på knappen MODE. Displayet vi-
ser nu 24 HR for 24-timers funktionen.
• Tryk på knappen
24-timers funktionen.
• Tryk på knappen
12-timers funktionen.
UP for at indstille
DOWN for at indstille
Visning af verdenstid
• Tryk én gang til eller fire gange på MODE for at
få vist verdenstiden. Nu viser den blinkende byforkortelse sig med den tilhørende tid.
• Tryk på knappen
til næste eller forrige tidszone.
UP eller DOWN for at indstille
Speciel datoalarm (SDA)
• Tryk på knappen MODE en femte gang for
at indstille den specielle datoalarm. I displayet
vises blinkende skiftevis SDA1 og datoen.
• Tryk på knappen
10 indstillelige datoalarmer (SDA1–SDA10).
• Tryk på knappen
hvilken dato alarmen skal lyde på.
• Tryk på knappen
over indtastning af årstal; alarmen vil
så lyde hvert år.
• Når uret når til datoen i SDA-alarmen, lyder
vækketonen hver time fra kl. 8. Nu blinker der
desuden SDA i displayet.
• Sæt alarmen ved tryk på en vilkårlig knap.
PAGE for at vælge mellem
UP eller DOWN for at indstille,
SNOOZE for at springe
Bemærk:
For at deaktivere datoalarmen fuldstændigt,
skal du indstille den til en dato i fortiden!
Displayet viser nu 12 HR. For tiden om
eftermiddagen vises nu desuden PM i displayet.
Automatisk opdatering (RDS)
RDS-signalet overfører ekstra oplysninger til radioen
såsom stationens navn, klokkeslæt, eller nummerets
titel. Klokkeslættet opdateres automatisk ved hjælp
af den automatiske opdatering ved modtagelse af
RDS-signalet.
• Tryk ni gange på knappen
ser nu UPDA ON for den aktiverede opdate-
ringsfunktion.
• Tryk på knappen
automatiske opdatering.
Når radioen er tændt, vil der nu blinke et
ursymbol øverst til højre i displayet.
Klokkeslættet opdateres nu automatisk, hvis
der modtages en station med RDS-signal.
Opdateringen er afsluttet, når ursymbolet
holder op med at blinke og vises permanent.
• Tryk på knappen
automatiske opdatering. Displayet viser nu
UPDA OFF.
Med radioen tændt vises der nu intet ursymbol.
UP for at aktivere den
DOWN for at standse den
MODE. Displayet vi-
- 24 -
Page 27

Valg af displayfunktion
Du kan vælge, hvilke data, der vises i displayet,
når radioen er slukket. Funktionerne angives
med modsvarende symboler i displayet.
Når radioen er slukket, kan du vælge displayets
funktion ved at trykke gentagne gange på knappen
FINE efter følgende tabel:
Symbol i display Displayfunktion
CLK kun klokkeslættet vises
CITY klokkeslæt og verdenstid
vises skiftevis
DATE klokkeslæt og dato vises skiftevis
CIT DAT klokkeslæt, dato og verdenstid
vises skiftevis
Vækkefunktion
Du kan programmere to uafhængige vækketider
AL1 og AL2 på verdensmodtageren. For begge
kan du indstille ...
... om apparatet skal vække på hver ugedag
eller kun mandag til fredag;
... om du vil vækkes med alarmtone eller med
radioen.
Indstilling af vækketid
Du kan programmere to vækketider med
verdensmodtageren.
• Tryk på knappen UP eller DOWN for at stille
vækketiden frem eller tilbage minut for minut.
Hvis du holder en af knapperne nede i et
par sekunder, indstilles klokkeslættet frem
eller tilbage i intervaller på 10 minutter.
• Tryk på knappen
VOL.+/AL–1 (eller VOL.–/
AL–2), indtil den ønskede vækkefunktion
vises på displayet (se tabellen ovenfor).
• Tryk på knappen
ugedage, du ønsker at blive vækket på:
Du kan vælge mellem hverdage (Mo, Tu, We,
Th, Fr), weekend (Su, Sa), hele ugen (Su, Mo,
Tu, We, Th, Fr, Sa) eller den aktuelle ugedag.
Den valgte indstilling vises på displayet.
• Tryk på knappen
vækkedage er indstillet. Hold knappen
trykket ned, indtil der vises en enkelt ugedag
på displayet.
• Tryk på knappen
ønskede ugedag.
For at vende tilbage til valg af hverdage, weekend
eller hele ugen skal du holde knappen
varigt nede igen.
• Tryk på knappen MODE, for at gemme
indstillingen og gå tilbage til klokkeslætfunktionen. Indstillingen gemmes også, hvis
du venter ca. 15 sekunder til displayet igen
viser klokkeslættet.
SNOOZE, for at indstille de
SNOOZE indtil de ønskede
SNOOZE
SNOOZE for at indstille den
SNOOZE kort-
Vækkefunktion Symbol på displayet
Signaltoner
Radio
Slået fra intet symbol
• Tryk på knappen
På displayet vises den sidst indstillede
vækketid og symbolet for alarmtypen.
VOL.+/AL–1 (eller VOL.–/AL–2).
Når alarmen lyder ...
• og vækkefunktionen „Radio” er valgt, spiller
radioen en time med en foruddefineret
vækkelydstyrke. Hvis du vil slukke, skal du
trykke på knappen
• og vækkefunktionen „Signaltoner” er valgt,
lyder signaltonerne i 10 minutter. Hvis du vil
slukke, skal du trykke på knappen
eller VOL.–/AL–2.
- 25 -
VOL.+/AL–1 eller VOL.–/AL–2.
VOL.+/AL–1
Page 28

Bemærk:
Vær opmærksom på, at der skal være en
station indstillet (se nedenfor) for at radioen
kan vække.
Udsættelse af alarm
• Tryk på knappen SNOOZE for at udsætte
vækkefunktionen i 10 minutter.
Indstilling af alarmens udsættelse
• Tryk på knappen MODE syv gange; den
indstillede udsættelse af alarm vises på
displayet (ved ibrugtagning SNO10).
• Knapperne
udsættelse af alarm til en tid mellem 1 og 59
minutter.
UP og DOWN bruges til at indstille
Afbrydelse af vækkefunktionen
• Tryk på knappen VOL.+/AL–1 eller VOL.–/AL–2
flere gange, indtil de tilsvarende alarmsymboler forsvinder fra displayet.
Stopursfunktion
Stopursfunktionen virker kun, når radioen er slået fra.
• Tryk og hold ned på knappen
ca. 2 sekunder; displayet viser 00.00.0 U.
• Tryk på knappen
Den maksimale stopurstid er 99 minutter og
59 sekunder. Hvis stopuret overskrider den
maksimale tid, vil displayet vise 99:59.0
igen og blinkende.
• Tidsmålingen kan afbrydes, mens den er i
gang, ved at trykke på knappen
• Endnu et tryk på knappen
stopuret tælle videre.
• Hold knappen
nulstille stopuret.
• Tryk på knappen
stopursfunktionen.
SNOOZE, for at starte stopuret.
SNOOZE trykket ned, for at
PAGE for at forlade
PAGE i
SNOOZE.
SNOOZE lader
Nedtællingsfunktion
Nedtællingsfunktion virker kun,
når radioen er slået fra.
Sådan indstilles og gemmes nedtællingen
• Tryk og hold ned på knappen MEMORY SCAN i
ca. 2 sekunder; displayet viser D 00.00.
• Tryk på knappen
den ønskede tid.
Der er forudindstillet 5 nedtællingstider på
hukommelsesknapperne og du kan aktivere
dem direkte ved tryk på den modsvarende
hukommelsesknap:
Knap
M.0/5 10:00
Knap
M.1/6 30:00
Knap
M.2/7 45:00
Knap
M.3/8 60:00
Knap
M.4/9 90:00
• Tryk på knappen
indstillet tid; hukommelsespladsen
blinker på displayet. Nu kan du udvælge
en hukommelsesplads med knapperne
M.0/5–M.4/9; ved tryk på den pågældende
hukommelsesknap overføres tiden til denne
hukommelsesplads og tiden, der før blev
gemt der, overskrives.
• Tryk på knappen
forlade nedtællingsfunktionen igen.
Opkald og aktivering af nedtællingsfunktionen
• Tryk og hold ned på knappen MEMORY SCAN i
ca. 2 sekunder; displayet viser D 00. 00.
• Udvælg den ønskede gemte nedtællingstid ved
hjælp af hukommelsesknapperne
• Tryk på knappen
lingen. Endnu et tryk på knappen
der
nedtællingen.
UP eller DOWN for at indstille
MEM for at gemme en
MEM
MEMORY SCAN igen for at
M.0/5–M.4/9.
SNOOZE, for at starte nedtæl-
SNOOZE afbry-
- 26 -
Page 29

Når nedtællingen har talt ned, lyder der i et minut
en alarmtone, der gradvist tiltager i styrke.
• Tryk på knappen MEMORY SCAN for at afbryde
nedtællingen og forlade nedtællingsfunktionen.
Slumrefunktion
Med knappen SNOOZE kan du også aktivere slumrefunktionen. Du kan indstille en tid op til 90 minutter
i ti-minutters-trin, hvorefter radioen automatisk vil
slukkes. Sluk først for radioen.
Radiofunktion
Tænd/lydstyrke
• Tryk på knappen POWER for at tænde for
radioen. Der vises kortvarigt ON på displayet,
derefter vises den indstillede frekvens og det
valgte bølgeområde.
• Lydstyrken justeres med knapperne
og VOL.–/AL–2.
Knap
VOL.+/AL–1: højere.
Knap
VOL.–/AL–2: lavere;
Lydstyrken vises med en bjælke nederst til højre
på displayet.
Tilkobling af basforstærkning
• Tryk på knappen BASS når radioen er tændt for
at tilkoble basforstærkningen. Displayet viser
nu BASS.
• Basforstærkningen kobles fra igen ved at
trykke endnu en gang på knappen
Det viste BASS slukkes.
Sluk
• Radioen slukkes ved at trykke på knappen
POWER. Der vises kortvarigt OFF på displayet,
derefter vises klokkeslættet igen.
VOL.+/AL–1
BASS.
• Tryk på knappen
symbolet for slumrefunktionen og
90 (for 90 minutter).
• Tryk igen på knappen
står 90 på displayet, for at tælle slumretiden
ned i ti-minutters-trin.
• Vælg enten en slumretid (slumresymbolet
vises stadigt) eller tryk igen på knappen
til der vises OFF i displayet. Slumrefunktionen
er nu slukket.
SNOOZE. Nu vises
SNOOZE, så længe der
SNOOZE
Indstilling af stationer
• Benyt båndvælgeren til at vælge det ønskede
frekvensbånd (FM, MW, LW eller SW).
Den modsvarende forkortelse vises på displayet.
• Brug nu knappen
den ønskede modtagefrekvens.
• Hvis du trykker
sekunder, starter du den automatiske søgning.
• Søgningen stopper, så snart der findes en
station med tilstrækkelig sendestyrke.
Ved modtagelse af en RDS-station på FM-båndet
vises RDS-symbolet på displayet.
UP eller DOWN til at indstille
UP eller DOWN ned i ca. tre
- 27 -
Page 30

Indstilling af mellembølgeområdet
Da der er forskel på radiofonisystemer i forskellige
lande, skal du foretage en tilpasning ud over
indstillingen af modtageområdet:
• Tryk seks gange på knappen
med knappen
tageområde ud fra den følgende tabel:
UP eller DOWN det passende mod-
MODE og vælg så
Teleskopantennen virker ikke i lang- og
mellembølgeområdet. I disse områder modtager
apparatet med en indbygget ferrit-antenne.
• Drej apparatet for at opnå bedst mulig
modtagelse.
Hukommelsesfunktioner
Region Kanaltrin Modtageområde
Amerika 10 kHz 520–1710 kHz
Europa 9 kHz 522–1656 kHz
Finindstilling af stationer
Når en station ikke bliver indstillet nøjagtigt, er det
muligt at forbedre modtagelsen ved finindstilling.
• Under stationssøgningen skal du trykke på
knappen
• Brug nu knappen
den ønskede modtagefrekvens i halve
frekvenstrin.
• Tryk på knappen
finindstilling af stationer igen.
Denne funktion er ikke til rådighed i
langbølgeområdet.
FINE; displayet viser FINE.
UP eller DOWN til at indstille
FINE igen for at forlade
Antenne
Den drejelige teleskopantenne på apparatet
virker for FM- og kortbølgeområdet.
• Træk antennen helt ud og drej den til den
bedst mulige modtagelse.
Lagring af stationer
Verdensmodtageren kan gemme 400 stationer
for hvert frekvensbånd.
For at gemme en station, skal du gøre følgende:
• Indstil frekvensbåndet med båndvælgeren
og derefter stationen, som du vil gemme
(se ovenfor).
• Tryk på knappen
PAGE vises på displayet og der vises et
blinkende MEM.
• Indenfor 10 sekunder skal du trykke på
knappen
og derefter udvælge en hukommelsesside
(fra 00–39) med knappen
• Nu skal du indenfor 10 sekunder udvælge
en hukommelsesplads med knapperne
MEM. Hukommelsessiden
PAGE (PAGE blinker på displayet)
UP eller DOWN.
M.0/5–M.4/9, som du vil gemme stationen i.
Tryk f.eks. én gang på knappen
hukommelsespladsen 0 og en gang til for
hukommelsespladsen 5. Den reserverede plads
vises på displayet.
• Tryk igen på
Nu vises PAGE og MEM permanent.
MEM for at gemme stationen.
M.0/5 for
Du kan forbedre modtagekvaliteten for
kortbølgeområdet med omskifteren
apparatets venstre side. Vælg LX for kraftige
stationer og RX for at forbedre modtagelse af
svage stationer.
SW SEN. på
Bemærk:
Når strømforsyningen er tilsluttet verdensmodtageren, og der ikke er indsat batterier,
slettes hukommelsen, hvis du trækker netstikket
ud af stikkontakten.
- 28 -
Page 31

Valg af gemte stationer
• For at udvælge en gemt station direkte,
skal du først indstille båndvælgeren til det
frekvensbånd, hvori stationen findes.
• Tryk på knappen
hukommelsesside (fra 00–39) med knappen
PAGE, og udvælg derefter en
UP eller DOWN.
• Nu skal du indenfor 10 sekunder udvælge den
hukommelsesplads, som stationen er gemt i,
med knapperne
Stationen gengives straks efter hukommelsespladsen
er indtastet.
M.0/5–M.4/9.
Rengøring
Livsfare på grund af elektrisk stød!
• Nedsænk aldrig apparatets dele i vand
eller andre væsker!
• Lad aldrig væsker trænge ind i kabinettet.
Rengøring af kabinettet
Rengør kabinettets overflade med en let fugtet klud.
Brug aldrig benzin, opløsningsmidler eller rensemidler,
som angriber kunststof!
Gennemførsel af automatisk stationssøgning
Verdensmodtageren kan gennemsøge
frekvenserne i et bånd og gemme de fundne
stationer i hukommelsen. Denne automatiske
stationssøgning (Automatic Memory Scan/AMS)
aktiveres som følger:
• Tryk én gang på knappen
MEM blinker på displayet.
• Hold ned på knappen
i ca.1 sekund.
Verdensmodtageren gennemsøger nu all frekvenser
i det indstillede frekvensbånd og gemmer de fundne
stationer på den valgte hukommelsesside og
hukommelsesplads.
MEM.
MEMORY SCAN
Søgning i hukommelsen
• Tryk på knappen MEMORY SCAN for at hente
alle stationerne gemt i hukommelsen for
det valgte frekvensbånd.
Alle gemte stationer afspilles i ca. fem sekunder
efter hinanden.
Bortskaffelse
Kom under ingen omstændigheder
afspilleren i det normale husholdningsaffald. Dette produkt overholder Europa-Parlamentets og Rådets direktiv
2002/96/EF.
Bortskaf afspilleren hos et godkendt affaldsfirma
eller på dit kommunale affaldsanlæg. Følg de
aktuelt gældende regler. Kontakt affaldsordningen,
hvis du er i tvivl.
Batterier
Smid aldrig batterierne ud med det almindelige
husholdningsaffald.
Batterier kan indeholde giftige stoffer, som kan
ødelægge miljøet. Bortskaf derfor altid batterierne
efter de gældende regler i loven.
Bortskaffelse af emballage
Aflever alle emballagematerialer på et
affaldsdepot, så miljøet skånes.
• Tryk på en vilkårlig knap for at afslutte
gengivelsen fra hukommelsen.
- 29 -
Page 32

Garanti & Service
Importør
Der er 3 års garanti fra købsdatoen på dette apparat.
Skulle du trods vore høje kvalitetsstandarder have
grund til reklamationer, bedes du venligst henvende
dig til vores Service-hotline.
Hvis telefonisk behandling af reklamationen ikke er
muligt, modtager du
• et bearbejdningsnummer (RMA-nummer) samt
• en adresse, hvortil du kan indsende produktet
til garantibehandling.
Du bedes vedlægge en kopi af kvitteringen
(kassebon) ved indsendelse. Køkkenradioen skal
være pakket transportsikkert og RMA-nummeret
direkte synligt. Indsendte apparater uden RMAnummer kan ikke behandles.
Bemærk:
Garantiydelsen gælder kun for
materiale- eller fabrikationsfejl.
Garantiydelsen gælder ikke
• for sliddele.
• for skader på skrøbelige dele som
kontakter eller genopladelige batterier.
Produktet er kun beregnet til privat og ikke til
erhvervsmæssigt brug. Ved misbrug eller
uhensigtsmæssig behandling, anvendelse af vold,
og ved indgreb, som ikke er foretaget af vores
autoriserede service- afdeling, bortfalder garantien.
Dine garantikrav, som er lovmæssigt fastsat,
begrænses ikke af denne garanti.
KOMPERNASS GMBH
BURGSTRASSE 21
D-44867 BOCHUM
www.kompernass.com
- 30 -
Page 33

RADIO KH 2029
Garanti
For at garantere reparation uden
udgifter for dig, bedes du henvende
dig til vores Service-hotline.
Ved henvendelsen bedes du have
dit kassebilag parat.
Afsender – skriv venligst tydeligt:
Navn
Fornavn
Gade
Postnummer/By
Land
Telefon
Udfyld dette afsnit fuldstændigt, og vedlæg det apparatet!
Dato/underskrift
Kompernass Service Danmark
Telephone:+45 4975 8454
Telefax: +45 4975 8453
e-mail: support.dk@kompernass.com
www.mysilvercrest.de
Fejlbeskrivelse:
Page 34

 Loading...