

Page 1
4
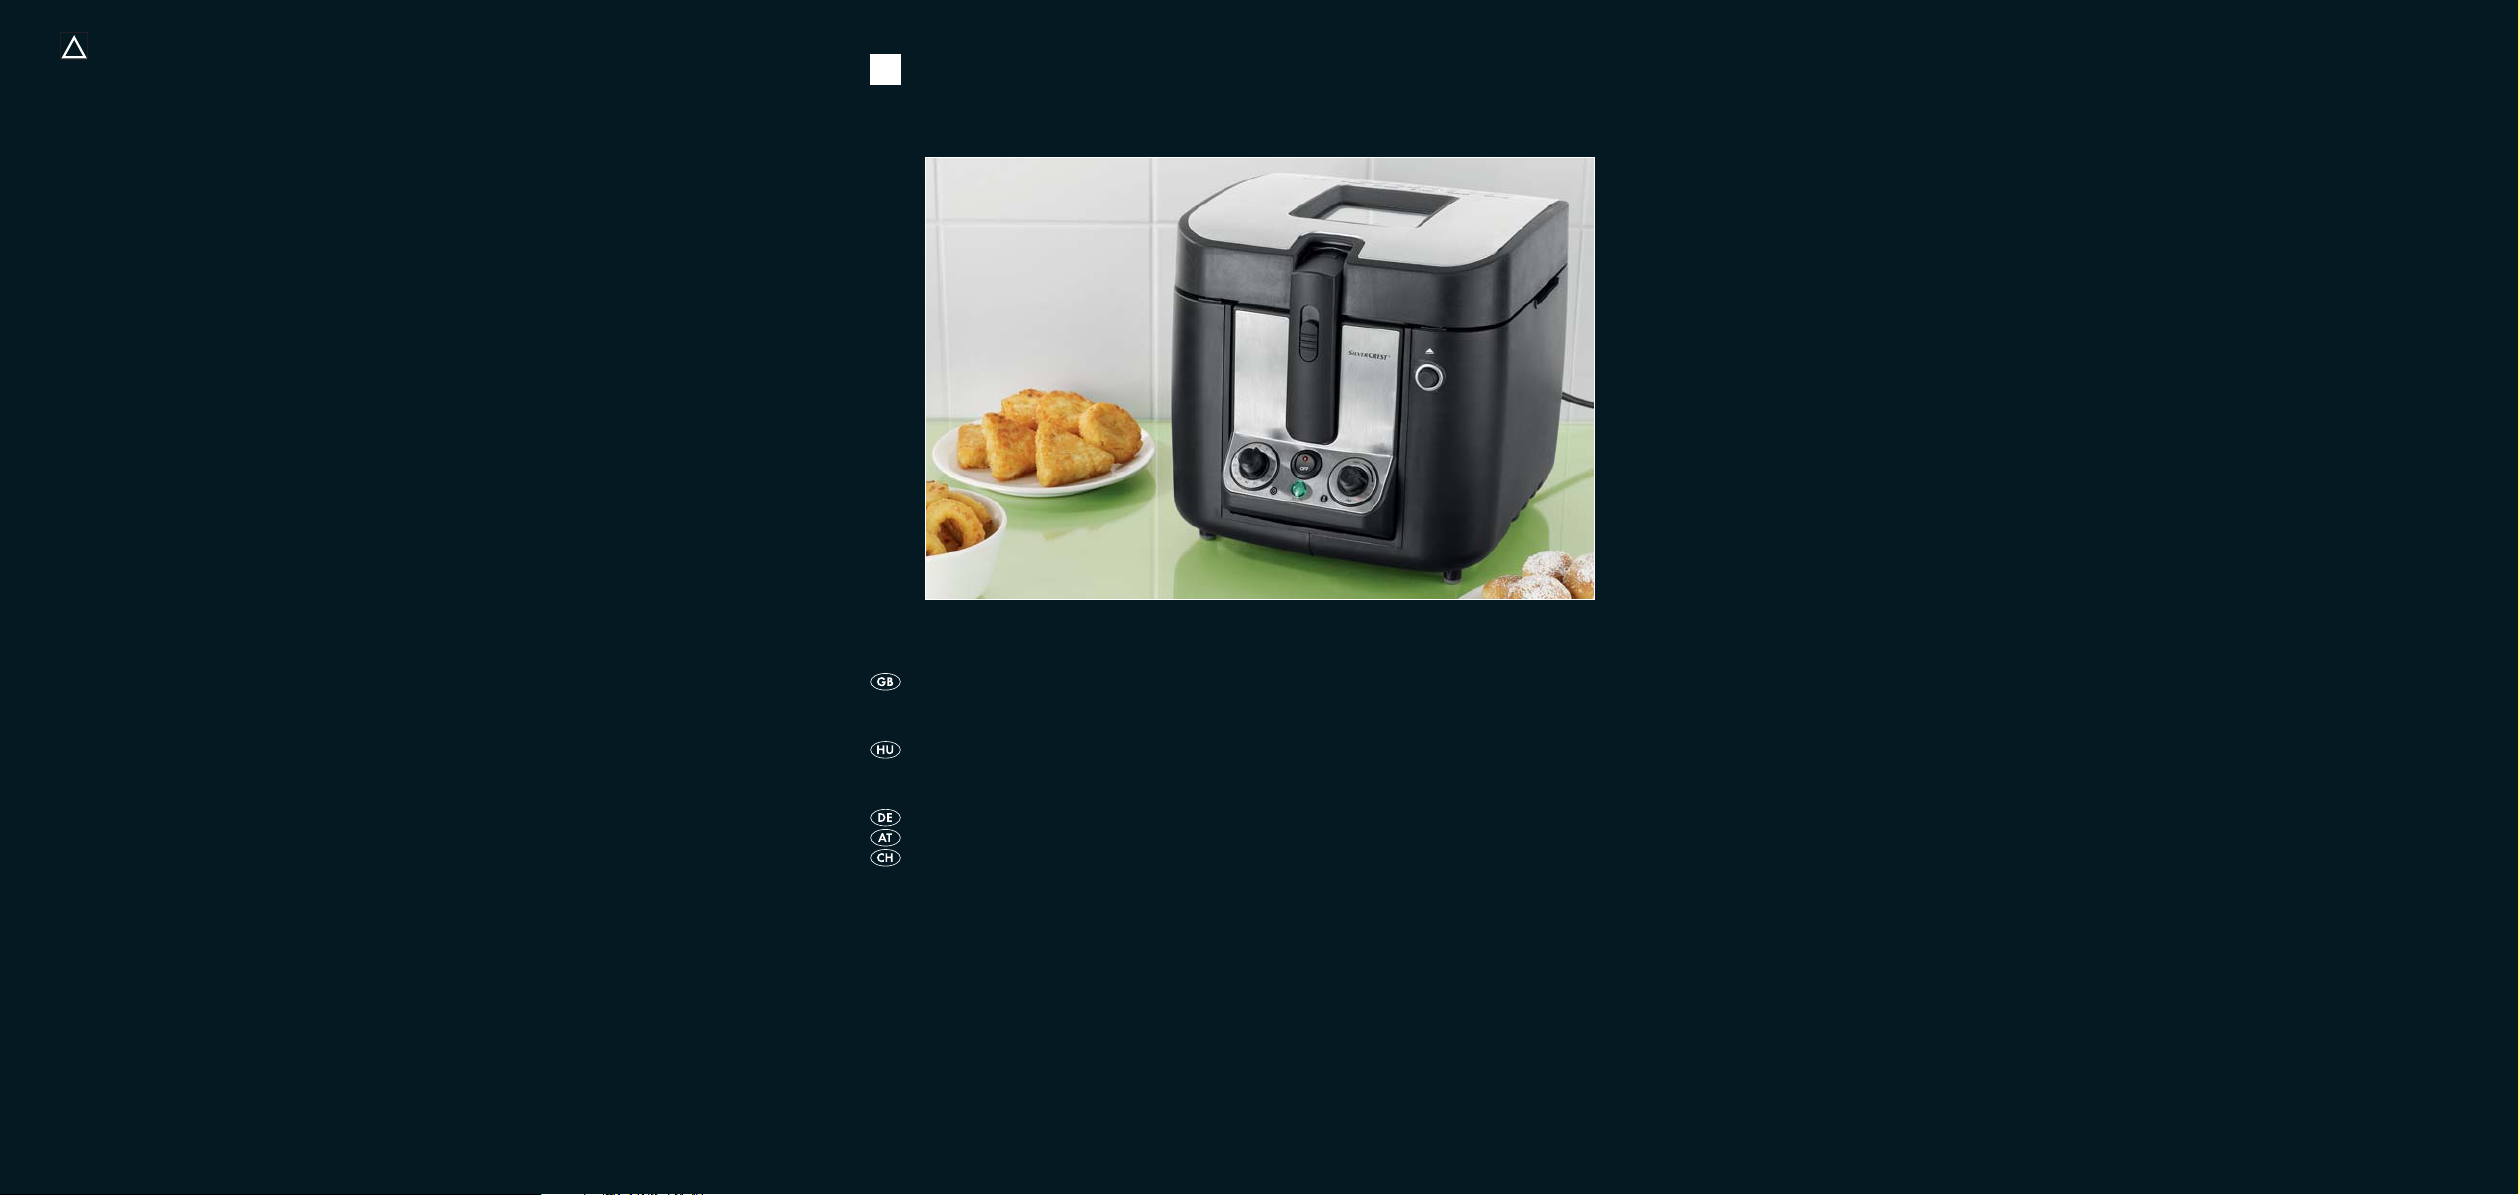
Stainless Steel Deep-Fryer
KH 2001
KOMPERNASS GMBH · BURGSTRASSE 21 · D-44867 BOCHUM
www.kompernass.com
ID-Nr.: KH2001-03/09-V2
Stainless Steel Deep-Fryer
Operating instructions
Nemesacél olajsütő
Használati utasítás
Edelstahl-Fritteuse
Bedienungsanleitung
Page 2
KH 2001
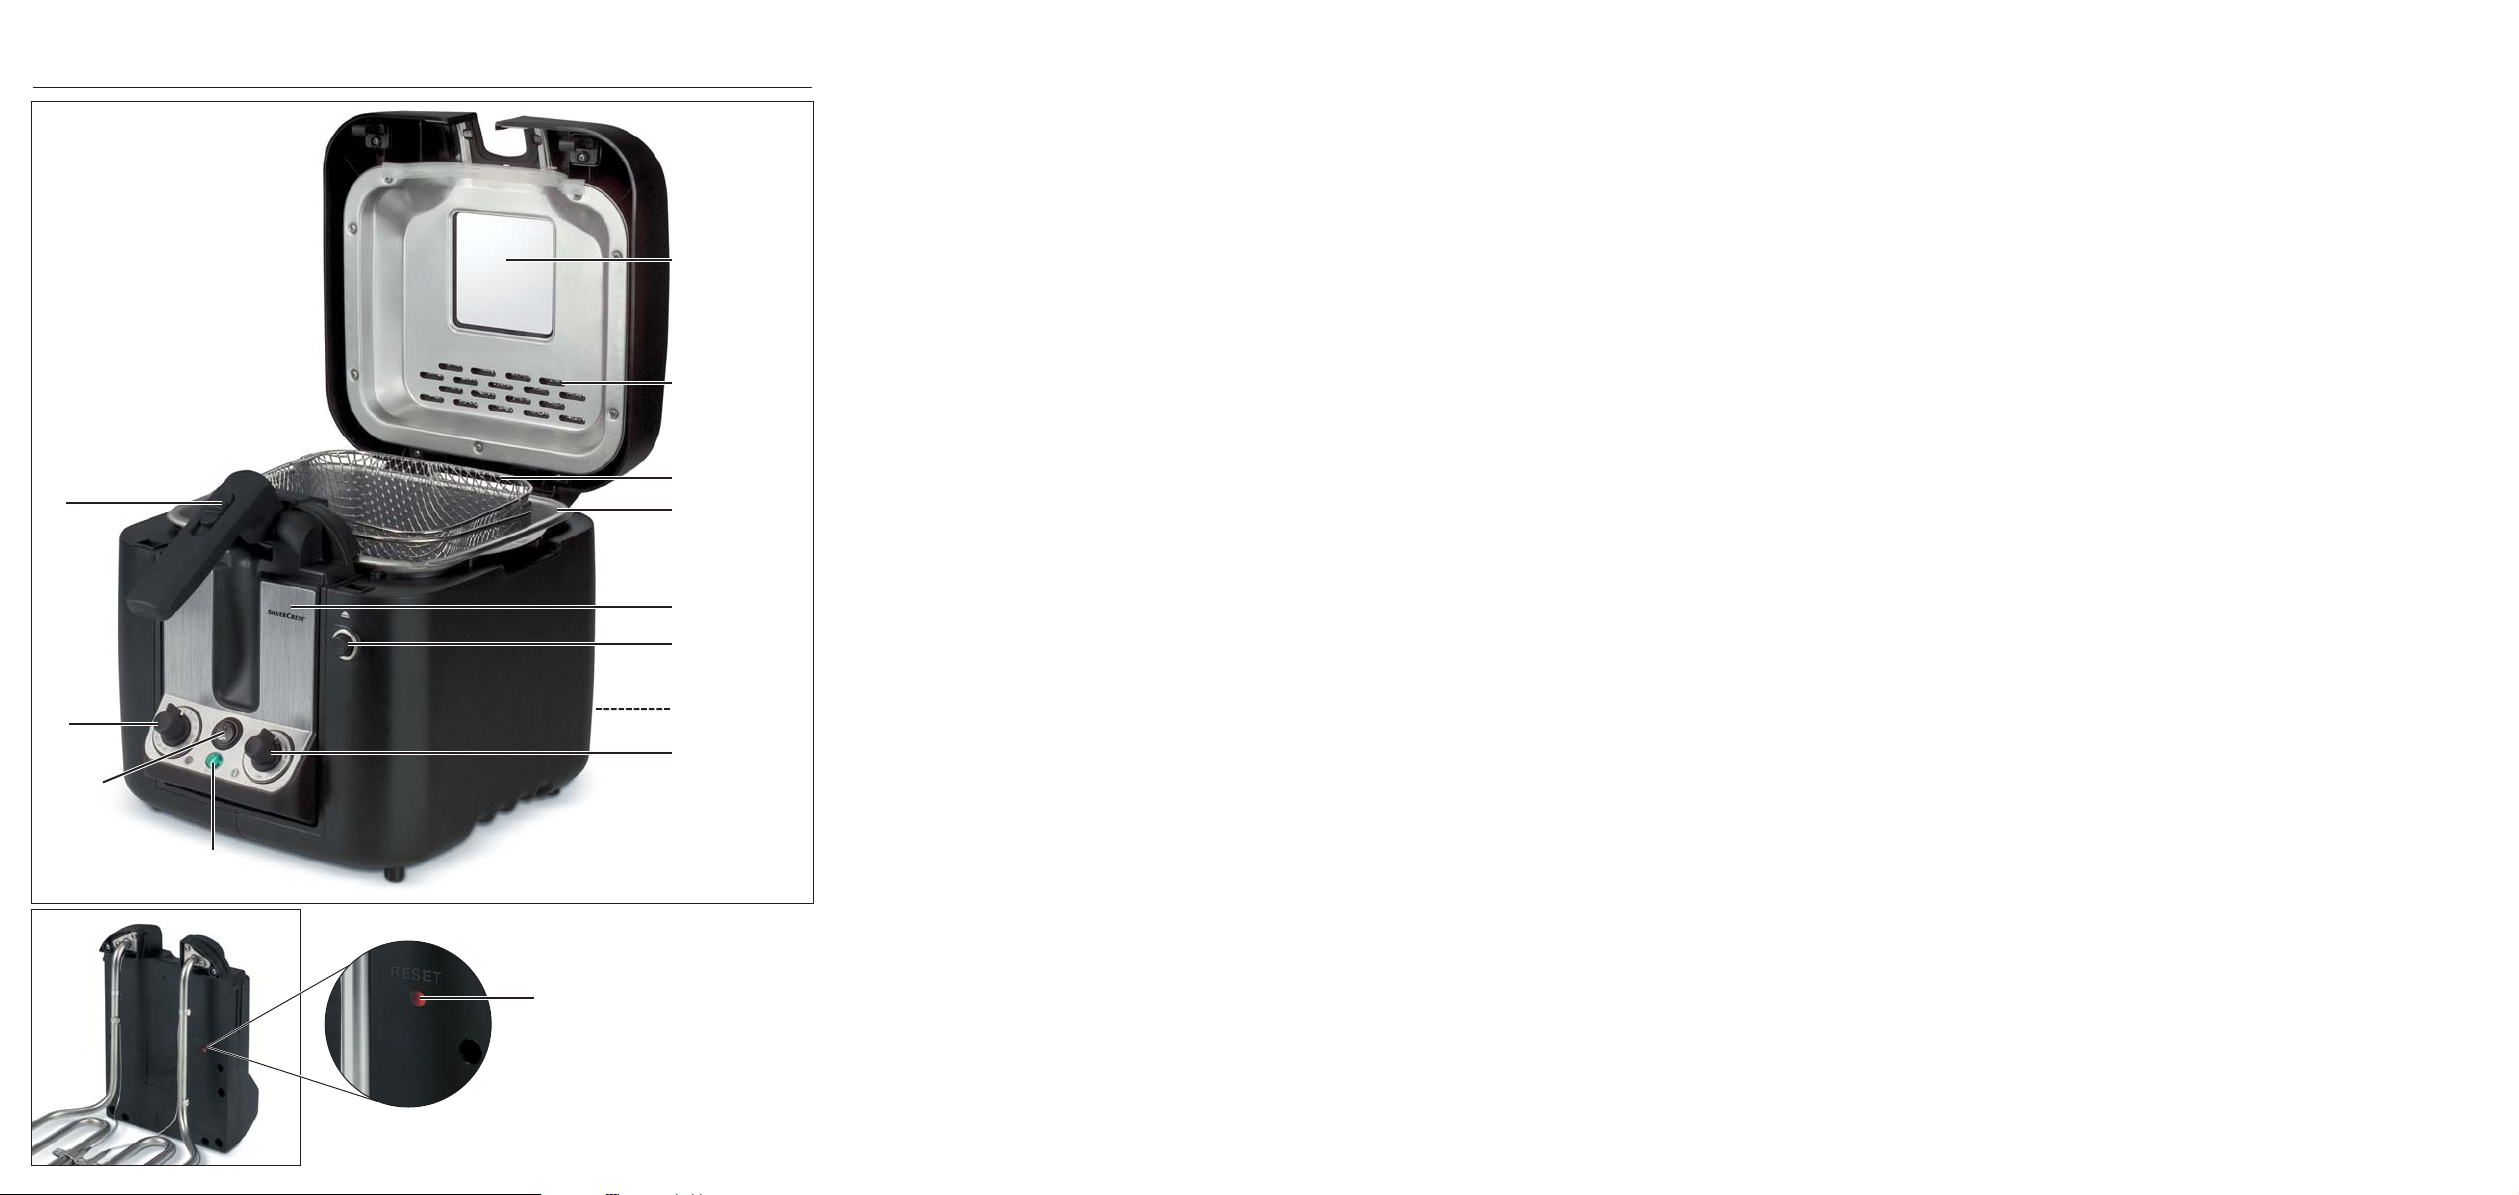
w
1
2
3
4
5
6
q
7
8
0
9
e
Page 3

CONTENT PAGE
Intended Usage 2
Safety instructions 2
Technical Data 3
Items supplied 3
Description of the appliance 3
Before the First Use 3
Low-Acrylamide Cooking 3
Frying 4
Preparation . . . . . . . . . . . . . . . . . . . . . . . . . . . . . . . . . . . . . . . . . . . . . . . . . . . . . . . . . . . . . . . .4
Frying foodstuffs . . . . . . . . . . . . . . . . . . . . . . . . . . . . . . . . . . . . . . . . . . . . . . . . . . . . . . . . . . . .4
Timer . . . . . . . . . . . . . . . . . . . . . . . . . . . . . . . . . . . . . . . . . . . . . . . . . . . . . . . . . . . . . . . . . . . . .5
Solid Cooking Fats . . . . . . . . . . . . . . . . . . . . . . . . . . . . . . . . . . . . . . . . . . . . . . . . . . . . . . . . . .5
After Frying 5
Changing the frying oil or fat 5
Cleaning and Care 6
Tips 7
Home-made chips . . . . . . . . . . . . . . . . . . . . . . . . . . . . . . . . . . . . . . . . . . . . . . . . . . . . . . . . . . .7
Frozen Foods . . . . . . . . . . . . . . . . . . . . . . . . . . . . . . . . . . . . . . . . . . . . . . . . . . . . . . . . . . . . . . .7
How to remove undesirable after-tastes . . . . . . . . . . . . . . . . . . . . . . . . . . . . . . . . . . . . . . . . . .7
Healthy Nutrition . . . . . . . . . . . . . . . . . . . . . . . . . . . . . . . . . . . . . . . . . . . . . . . . . . . . . . . . . . . .8
Overheat Protection 8
Warranty and Service 9
Disposal 9
Importer 9
Table - Frying Times 10
Troubleshooting 11
Read the operating instructions carefully before using the appliance for the first time and preserve this
booklet for later reference. Pass the manual on to whomsoever might acquire the appliance at a later date.
- 1 -
Page 4
Stainless Steel
Deep-Fryer KH 2001
Intended Usage
The deep fryer is intended for use in private households, for frying foodstuffs. It is not intended for use
in commercial or industrial environments.
Safety instructions
Risk of electrical shocks.
• Connect the appliance to a mains power socket
delivering a voltage of 230 V ~50 Hz.
• Arrange for defective power plugs and/or cables
to be replaced at once by qualified technicians
or our Customer Service Department.
• Ensure that the power cable never becomes wet
or moist during operation.
Never submerge the operating/heating element
and the housing with the power cable in water,
and do not clean these components under
running water.
Risk of fire!
• Do not use the appliance in the vicinity of hot
surfaces.
• Do not leave the appliance unattended when in
use.
• Do not use an external timing switch or a separate
remote control system to operate the appliance.
NEVER use water to extinguish the
fire!
• Old or dirty fats and oils can spontaneously ignite
themselves if overheated. Change the oils or fats
in good time. In case of fire, remove the power
plug from the wall and smother the burning fat
or oil with a damp towel or fire blanket.
Risk of personal injury!
• This appliance is not intended for use by individuals
(including children) with restricted physical, physiological or intellectual abilities or deficiences in
experience and/or knowledge unless they are
supervised by a person responsible for their safety
or receive from this person instruction in how the
appliance is to be used.
• Children should be supervised to ensure that
they do not play with the appliance.
• Ensure that the appliance stands with a safe and
secure positioning.
• Do not operate the appliance if it has sustained
a fall or is damaged. Arrange for the appliance
to be checked and, if necessary, repaired by
qualified technicians.
• During the frying process hot steam is generated,
especially when the lid is open. Keep a safe
distance away from the steam.
• Ensure that all parts are completely dry before
pouring oil or liquid fat into the deep fryer.
Otherwise, hot oil or fat could splatter out.
• Carefully pat all foodstuffs dry before placing
them in the deep fryer. Otherwise, hot oil or fat
could splatter out.
• Be especially careful with frozen foodstuffs.
Remove all ice particles. The more ice there is
on the foodstuff, the more the hot oil or fat will
splatter.
- 2 -
Page 5

• Some parts of the appliance become very hot
during operation. Touching these may cause
serious burns.
Warning about damage to the
appliance!
• When charging the stainless steel container with
fat, NEVER fill it to above the MAX marking or to
below the MIN marking. First ensure that there
is sufficient oil or fat in the deep fryer every time
you intend to switch the appliance on.
• NEVER switch the appliance on if there is no oil
of liquid fat in it.
• The deep fryer is only suitable for frying foodstuffs. It is not designed for cooking liquids.
Description of the appliance
1 Viewing window
2 Permanent-Metal filter
3 Frying basket
4 Stainless steel container
5 Removable control and heating element
6 Lid release button
7 Rolled-up cable
8 Infinitely variable temperature regulator
9 Control lamp
0 On/Off switch
q Timer
w Handle locking button
e Reset button
Technical Data
Mains voltage: 230V ~50 Hz
Nominal power: 2300 W
Capacity
Cooking oil: approx. 3 Litre
Solid fats: approx. 2,5 kg
Items supplied
Cold Zone Deep Fryer
Operating instructions
Before the First Use
Before you use the deep fryer for the first time please
clean all individual components thoroughly and carefully dry them (see Chapter "Cleaning").
Low-Acrylamide Cooking
Acrylamide is a possibly carcinogenic substance
formed from a reaction with amino acids when
frying foodstuffs with a high starch content (at
temperatures of more than 175°C).
Therefore, if avoidable, do not fry foodstuffs that
have a high starch content, for example chips, at
temperatures in excess of 170˚C. The items to be
cooked should be fried until they are golden yellow,
instead of dark brown. Only in this way can you
achieve a low acrylamide level.
- 3 -
Page 6

Frying
6. Insert the plug into the mains power socket.
We recommend frying oil or liquid frying fat for use
in this deep fryer. You can also use solid cooking
fats. For this, first read the chapter „Solid Cooking
Fats“.
Preparation
1. Place the appliance on a horizontal, level and
stable surface.
Note:
If you wish to place the deep fryer below the extraction
fan of the cooker, ensure that the cooker is switched
off.
2. Unwind all of the power cable from the power
cable retainer 7.
3. Open the appliance lid by pressing on the lid
release button 6. The appliance lid flips open.
4. Pull the handle upwards until it audibly engages.
Remove the frying basket 3.
Note:
Only use oils or fats which are expressly marked as
non-foaming and are suitable for deep frying. This
information is to be found on the packaging or the
labelling.
5. Fill the dry and empty stainless steel container 4
of the deep fryer with cooking oil or liquid or
molten fat (approx. 3 l oil or approx. 2,5 kg
solid fat) up to the MAX marking.
Note:
When charging the stainless steel container 4 with
fat, NEVER fill it to above the MAX marking or to
below the MIN marking.
The power cable may not make contact with
the hot areas of the deep fryer. Risk of electric
shock!
7. Replace the frying basket 3.
8. Close the appliance lid.
9. Push the handle locking button w downwards
and lower the handle.
Frying foodstuffs
1. Switch the deep fryer on with the On/Off switch 0.
The control lamp integrated into the On/Off
switch 0 starts to glow.
2. Turn the temperature controller 8 to the required
temperature. The cooking oil or the fat is now
heated up to the required temperature. When
the required temperature has been reached the
green control lamp 9 starts to glow.
Note:
The correct frying temperature is to be found either
on the food packaging or from the table in these
operating instructions.
3. Pull the handle upwards until it audibly engages.
4. Open the appliance lid by pressing on the lid
release button 6.
5. Remove the frying basket 3 and place into it the
food to be fried.
6. Carefully replace the frying basket 3 into the
deep fryer.
7. Close the appliance lid. This must click in audibly.
8. Push the handle locking button w downwards.
The handle now allows itself to be lowered. The
frying basket 3 is at the same time lowered into
the hot oil or fat.
NEVER mix different types of oil or fat!
The deep fryer could froth.
Note:
The frying process can be overseen through the
viewing window 1 in the appliance lid.
- 4 -
Page 7

Timer
You can programme in a countdown of up to 60 minutes with the timer:
• Firstly, place the timer q at 60 minutes and then
turn it back to the required countdown time. On
expiry of the countdown a signal tone sounds.
Note:
On expiry of the countdown the heating element 5
is NOT switched off! Therefore pay heed to the
signal tone from the timer switch, so as to avoid
spoiling the food being fried.
Solid Cooking Fats
To avoid both a splattering of the fats and the appliance becoming too hot, please observe the following precautionary measures:
• If you are using fresh fats, first slowly melt the
blocks of fat under low heat in a normal pan.
Then carefully pour the molten fat into the deep
fryer. When this has been done, insert the power
plug into a socket and switch the deep fryer on.
• After use, store the deep fryer with the solidified
fat at room temperatures.
After Frying
• When the food is ready, pull the handle upwards
until the handle locking button w engages.
• Leave the frying basket 3 in this position to drip
off.
• Press the On/Off switch 0. The deep fryer is
now switched off. Remove the power plug from
the wall socket.
• When the food has dripped off, open the appliance lid by pressing the lid release button 6.
• Carefully lift the frying basket 3 out of the deep
fryer. If necessary, shake off any excess oil or fat
over the deep fryer.
• Tip the fried food into a bowl or a sieve (lined
with absorbent kitchen paper!)
If you do not use the deep fryer regularly it is recommended that, after cooling, the oil or liquified
fat is poured into a well sealed container and stored in
the refrigerator or a cool storeroom. Fill the container through a sieve, in order to remove any food
particles from the oil or fat. Solid fats must still be in
a liquid state so that they can be poured.
Should the fat become too cold, it could cause splattering on remelting! To avoid this, poke a few holes
into the solidified fat with a wooden or plastic spatula.
Ensure that no damage is caused to the heating element.
• To melt the fat, switch the appliance on with the
On/Off switch 0 and then adjust the temperature
regulator 8 to 130˚C. The control lamp 9
glows.
• Wait until all of the fat has melted. First then set
the desired frying temperature.
Changing the frying oil or fat
Change the oil first when it has completely cooled
down. Solid fats must still be in a liquid state so that
they can be poured.
• Open the appliance lid.
• Remove the frying basket 3.
• Remove the operating/heating element 5.
Place the operating/heating element 5 at a
clean and dry location.
• Carefully remove the stainless steel container
4 with the oil or fat from the deep fryer.
- 5 -
Page 8
• Pour the oil or fat into suitable containers, for
example bottles.
To simplify cleaning, completely dismantle the deep
fryer:
Note:
The disposal of cooking oils and fats is regulated
differently in every community or town. Frequently,
it is not permitted to dispose of such oils or fats with
normal household refuse. Make enquiries at your
local community administration office about suitable
disposal sites.
• Thoroughly clean all parts of the deep fryer,
as described in the Chapter "Cleaning".
• Refill the deep fryer with fresh oil or fat, as described in the Chapter „Frying“.
Cleaning and Care
Danger!
Remove the power cable from the wall socket before
cleaning. There is a risk of receiving an electric shock!
Danger!
Allow the deep fryer to cool down. Otherwise you
risk being burnt!
NEVER submerse the control and heating element 5, the power cable and plug or the appliance housing under water and NEVER clean
them under running water! This could irreparably damage the appliance. If required, clean
this element with a moist cloth.
Attention! Appliance Damage!
When cleaning the components do not use aggressive or abrasive cleaning agents or materials such
as scouring milk or steel wool. These could damage
the upper surfaces of the appliance!
1. Open the appliance lid and remove it by pulling
it upwards.
2. Pull the handle upwards until it audibly engages.
Remove the frying basket 3.
3. Pull the operating/heating element 5 upwards
from the guiding rails. Place the operating/heating
element 5 at a clean and dry location.
4. Take out the stainless steel container 4 and re-
move the fat or oil
• The frying basket 3 and the stainless steel container 4 can be cleaned in the dishwasher.
They are suitable for dishwashers.
• Clean the housing and the appliance lid with a
damp cloth. If required, use a mild detergent on
the cloth.
Note:
Should you wish to clean the permanent-metal filter 2
inside the appliance lid, then place the appliance
lid in warm water with a mild detergent. Allow it to
soak for a short period and slew it back and forth.
Rinse the appliance lid off with clear water. To dry
it, stand it upright on its side. This allows the water
to drain away.
• Reassemble the deep fryer in the reverse order.
• Lift the appliance with the assistance of the lateral
carrying recesses.
• Wrap the power cable around the power cable
retainer 7.
• Store the appliance with the appliance lid closed.
This will keep the inside of the deep fryer clean
and free of dust.
- 6 -
Page 9

Tips
Home-made chips
• Potatoes intended for frying should be faultless
and not germinating.
• Use potato varieties suitable for frying, such as
"King Edward", "Morris Piper", "Cara" etc.
• After peeling, cut the potatoes according to the
intended preparation (chips or slices).
• Soak the potatoes for approx one hour before
frying. This will help remove a portion of the
sugar content, which is one of the constituent
products for the formation of acrylamides.
• Carefully dry the potatoes.
• Always fry home-made potatoes twice:
• first for 10-12 minutes at 160°C then for 3-4 minutes at 170°C, depending on the desired degree
of browning.
• Deep frozen chips are pre-cooked and thus only
need to be fried once. Comply with the instructions on the packaging.
Attention!
Always close the appliance lid before lowering the
frying basket 3 into the hot oil or fat. There is a risk
of fire caused by splashing fat!
• Always insert the foodstuffs as slowly and carefully as possible into the deep fryer, as deep
frozen foods can cause the oil or fat to bubble
heftily and abruptly.
How to remove undesirable after-tastes
Some foodstuffs, especially fish, release fluids when
being fried. These fluids collect in the oil or fat and
can influence the smell and taste of fried foods that
are later cooked in the same oil or fat.
Proceed as follows to again obtain a neutral tasting
oil or fat:
• Heat the fat or oil to 160°C and and place two
thin slices of bread or a couple of small sprigs of
parsley into the frying basket 3.
Frozen Foods
Deep frozen foodstuffs (-16 to -18 °C) cool the oil
or fat to a considerabe extent, because of this they
do not cook fast enough and possibly also soak up
too much oil of fat. To avoid these occurences, proceed as follows:
• Do not attempt to fry large volumes all at once.
The food to be fried must be completely covered
with cooking oil/fat after lowering the frying
basket 3.
• Heat the oil for at least 15 minutes before inserting
the frozen foodstuffs.
• Adjust the temperature controller 8 to the temperature specified in these operating instructions
or on the packaging of the foodstuff.
• Preferably, allow the deep frozen food to thaw
at room temperature. Remove as much ice and
water as possible before inserting the food into
the deep fryer.
Attention!
Absolutely close the appliance lid before lowering
the frying basket 3 with the parsley or the bread
into hot oil or fat. Splattering fats can cause serious
burns.
• Close the appliance lid and then lower the
frying basket 3 into the fat.
• Wait until the oil or fat is no longer bubbling and
remove the bread or parsley with a skimmer. The
oil or fat now has a neutral taste once again.
- 7 -
Page 10

Healthy Nutrition
Nutritional experts recommend the use of vegetable
oils and fats containing unsaturated fatty acids (e.g.
Linol acid). However, these oils and fats lose their
positive characteristics faster than other oils and
must therefore be exchanged more frequently.
Orientate yourself on the following guidelines:
• Exchange the oil or fat regularly. If you use the
deep fryer mainly to prepare chips and strain
the oil or fat after every use, it can be used 10
to 12 times.
• However, do not use an oil or fat for longer than
six months. Always follow the instruction given
on the packaging.
• As a general rule, oils and fats can be used for
a lesser time if you mainly fry foods with lots of
proteins, such as meat or fish.
• Do not mix fresh oil with old oil.
• Change the oil or fat if it foams on being heated,
it develops a strong taste or odour, it becomes
dark and/or it develops a syrupy consistency.
Overheat Protection
In a case of overheating, the heat protection function
switches the appliance off.
This can happen if there is no, or not sufficient, oil or
fat in the deep fryer or when solid cooking fats are
being molten in the appliance.
With solid cooking fats the heating element cannot
disburse the heat created fast enough.
If the heat protection function has switched the appliance off, please proceed as follows:
• Allow the appliance to cool down.
• Allow the oil or fat to cool down.
• Carefully press the reset button e on the rear
side of the operating element 5 with a small
pointed object. The appliance can now be used
again.
- 8 -
Page 11
Warranty and Service
Disposal
You receive with this appliance a warranty of 3 years
from the date of purchase. This appliance has been
manufactured with care and meticulously examined
before delivery. Please retain your receipt as proof
of purchase. In the case of a warranty claim, please
make contact by telephone with our service department. Only in this way can a post-free despatch for
your goods be assured.
The warranty covers only claims for material and
maufacturing defects, not for wearing parts or for
damage to fragile components, e.g. buttons or batteries. This product is for private use only and is not
intended for commercial applications.
In the event of misuse and improper handling, use of
force and interference not carried out by our authorized service branch, the warranty will become void.
Your statutory rights are not restricted in any way
by this warranty.
DES Ltd
Units 14-15
Bilston Industrial Estate
Oxford Street
Bilston
WV14 7EG
Tel.: 0870/787-6177
Fax: 0870/787-6168
e-mail: support.uk@kompernass.com
Do not dispose of the appliance in your
normal domestic waste. This product is
subject to the provisions of European
Directive 2002/96/EC.
Dispose of the appliance through an approved disposal centre or at your community waste facility.
Observe the currently applicable regulations.
In case of doubt, please contact your waste disposal
centre.
Dispose of all packaging materials in an
environmentally friendly manner.
Importer
KOMPERNASS GMBH
BURGSTRASSE 21
D-44867 BOCHUM
www.kompernass.com
Kompernass Service Ireland
Tel: 1850 930 412
Standard call rates apply. Mobile operators may vary.
e-mail: support.ie@kompernass.com
(0,082 EUR/Min.)
- 9 -
Page 12
Table - Frying Times
This table provides details of the temperatures at which specific foods must be fried and how much frying
time is required for them. Should these details differ from those shown on the food packaging, please observe
the instructions given on the packaging.
In the degree details it can happen that there will be minor temperature variations. The values given in the
table are intended as aids for orientation. They refer to a volume of approx. 300 Gramm. Subject to the
structure of the foodstuff, the times can vary.
When frying larger amounts, always bear in mind that the foods to be fried must be completely covered
with cooking oil/fat after the frying basket 3 has been lowered.
Foodstuff
Beefburger (frozen) 150 °C 3 - 5 Minutes
Cod (frozen,
breaded/battered)
Pork chops (breaded) 150 °C 15 - 25 Minutes
Cod (fresh, in batter) 160 °C 5 - 10 Minutes
Potato chips (fresh) 160 - 170 °C 10 - 15 Minutes
Potato chips (frozen) see manufacturers details see manufacturers details
Scampi (fresh) 170 °C 3 - 5 Minutes
Chicken pieces
(large pieces)
Chicken pieces
(small/medium pieces)
Temperature
(approx.)
150 °C 10 - 15 Minutes
170 °C 8 - 15 Minutes
170 °C 5 - 15 Minutes
Time in minutes
Mushrooms 180 °C 5 Minutes
Plaice (frozen) 190 °C 5 - 6 Minutes
- 10 -
Page 13

Troubleshooting
If the malfunction cannot be corrected with the following suggestions, or if you have determined that the
malfunction has other causes, please make contact with our Service Centre.
Problem Cause Solution
• The appliance does not function.
• The control lamp integrated
into the On/Off switch 0
does not glow.
• The appliance has switched
itself off during use and does
not allow itself to be switched
back on.
• The green control lamp does
not glow.
• The appliance is not connected
with a mains power socket.
• The On/Off switch 0 has not
been activated.
• The heat protection function
has been activated.
• The heat protection function
has been activated.
• The programmed temperature
for the cooking oil/fat has not
been reached.
• Connect the appliance with
a mains power socket.
• Press the On/Off switch 0.
• Allow the appliance to cool
down. Press the reset button e
on the rear of the control and
heating element 5.
1. Remove the plug and allow the
appliance to cool down.
2. Press the reset button e on the
rear of the control and heating
element 5.
• Wait a few minutes until the
required temperature has been
reached.
- 11 -
Page 14

- 12 -
Page 15

TARTALOMJEGYZÉK OLDALSZÁM
Rendeltetésszerű használat 14
Biztonsági utasítások 14
Műszaki adatok 15
Tartozékok 15
A készülék leírása 15
Az első használat előtt 15
Akrilamidban szegény elkészítés 15
Sütés 16
Előkészítés . . . . . . . . . . . . . . . . . . . . . . . . . . . . . . . . . . . . . . . . . . . . . . . . . . . . . . . . . . . . . . . .16
Élelmiszer sütése . . . . . . . . . . . . . . . . . . . . . . . . . . . . . . . . . . . . . . . . . . . . . . . . . . . . . . . . . . .16
Sütőóra . . . . . . . . . . . . . . . . . . . . . . . . . . . . . . . . . . . . . . . . . . . . . . . . . . . . . . . . . . . . . . . . . .17
Szilárd sütőzsír . . . . . . . . . . . . . . . . . . . . . . . . . . . . . . . . . . . . . . . . . . . . . . . . . . . . . . . . . . . . .17
Sütés után 17
A sütőzsiradék cseréje 17
Tisztítás és karbantartás 18
Tippek 19
Saját készítésű sültburgonya . . . . . . . . . . . . . . . . . . . . . . . . . . . . . . . . . . . . . . . . . . . . . . . . . .19
Fagyasztott élelmiszerek . . . . . . . . . . . . . . . . . . . . . . . . . . . . . . . . . . . . . . . . . . . . . . . . . . . . .19
Hogyan szabadulhat meg a nemkívánatos mellékíztől . . . . . . . . . . . . . . . . . . . . . . . . . . . . .19
Egészséges táplálkozás . . . . . . . . . . . . . . . . . . . . . . . . . . . . . . . . . . . . . . . . . . . . . . . . . . . . .20
Hővédelmi funkció 20
Garancia és szerviz 21
Ártalmatlanítás 21
Gyártja 21
A sütési idők táblázata 22
Hibaelhárítás 23
Őrizze meg ezt a leírást arra az esetre, ha később kérdése merülne fel. A készülék harmadik személynek
történő továbbadásakor adja tovább a leírást is!
- 13 -
Page 16
Nemesacél olajsütő
KH 2001
Rendeltetésszerű használat
Az olajsütő élelmiszerek magánháztartásban történő
sütésére van tervezve. Nem kereskedelmi vagy ipari
használatra javallott.
Biztonsági utasítások
Áramütés veszélye!
• Csatlakoztassa a készüléket 230 V ~50 Hz
hálózati feszültségű dugaszoló aljzathoz.
• A veszélyek elkerülése érdekében a sérült hálózati
csatlakozót vagy vezetéket azonnal cseréltesse
ki engedélyeztetett szakemberrel vagy az
ügyfélszolgálattal.
• Ügyeljen rá, hogy a hálózati vezeték üzemeltetés
közben soha ne legyen vizes vagy nedves.
A kezelő-/melegítőelemet és a hálózati vezetékes
burkolatot soha ne merítse vízbe és ne is tisztítsa
ezeket a részeket folyó víz alatt.
Tűzveszély!
• Soha ne használja a készüléket forró felületek
közelében.
• Üzemeltetés közben soha se hagyja a készüléket
felügyelet nélkül.
• Ne használjon a készülék üzemeltetésére külső
időkapcsoló órát vagy külön távirányítós rendszert.
Soha ne használjon az oltáshoz vizet!
• A régi ill. szennyezett zsír vagy olaj túlhevüléskor
magától meggyullad. Idejében cserélje ki az
olajat vagy zsírt. Tűz esetén húzza ki a hálózati
csatlakozót és az égő zsírt vagy olajat takaróval
fojtsa el.
Sérülésveszély!
• A készülék nem alkalmas arra, hogy olyan személyek (ideértve a gyermekeket is) használják,
akiket testi, érzékszervi vagy elmebeli képességeik
vagy tapasztalatuk és ismeretük hiánya megakadályoznának abban, hogy biztonságosan használják a készüléket, kivéve, ha a biztonságukról
gondoskodó felügyelettel vannak, vagy ha előtte
felvilágosították őket a készülék használatáról.
• Vigyázni kell a gyerekekre, hogy ne játsszanak
a készülékkel.
• Biztosítsa a készülék stabil állóhelyzetét.
• Ha a készülék leesett vagy megsérült, nem szabad
tovább használni. A készüléket szakképzett szakemberrel ellenőriztesse és adott esetben javítassa
meg.
• Sütés közben forró gőz képződik, különösen akkor,
ha felnyitja a fedelet. Tartson biztos távolságot
a gőzhöz.
• Gondoskodjon arról, hogy valamennyi rész teljesen
száraz legyen, mielőtt olajat vagy folyékony zsírt
tesz az olajsütőbe. Máskülönben kispriccel a forró
olaj vagy zsír.
• Valamennyi élelmiszert alaposan szárítson meg,
mielőtt betenné az olajsütőbe. Máskülönben
kispriccel a forró olaj vagy zsír.
• Különösen a fagyasztott élelmiszerekkel bánjon
óvatosan. Valamennyi jégdarabot távolítsa el.
Minél több jég található az élelmiszeren, annál
jobban spriccel a forró olaj vagy a forró zsír.
- 14 -
Page 17

• A készülék egyes részei használat közben felforrósodnak. Ne érintse meg ezeket az égésveszély
elkerülése végett.
A készülék sérülésére való
figyelmeztetés!
• Ne töltsön a nemesacél edénybe több zsírt a MAX
jelölésnél és ne töltsön kevesebbet a MIN jelölésnél.
Bekapcsoláskor mindig ügyeljen arra, hogy
elegendő zsír vagy olaj legyen az olajsütőben.
• Soha ne kapcsolja be a készüléket, ha nincs
benne olaj vagy folyékony zsír.
• Az olajsütő csak élelmiszerek sütésére alkalmas.
Nincs folyadékok főzésére tervezve.
Műszaki adatok
Hálózati feszültség: 230 V ~50 Hz
Névleges teljesítmény: 2300 W
Űrtartalom
Olaj: kb. 3 l
Szilárd zsír: kb. 2,5 kg
Tartozékok
Hidegzónás olajsütő
Kezelési útmutató
A készülék leírása
1 betekintő ablak
2 állandó fémszűrő
3 sütőkosár
4 nemesacél tartály
5 levehető kezelő-/fűtőelem
6 fedél nyitógombja
7 kábeltartó
8 fokozatmentes hőmérsékletszabályozó
9 ellenőrző lámpa
0 ki/be kapcsoló
q sütőóra
w nyél reteszelőgombja
e RESET gomb
Az első használat előtt
Az olajsütő első használata előtt kérjük alaposan
tisztítsa meg az egyes részeket és alaposan szárítsa
meg őket (lásd a „Tisztítás és ápolás“ résznél).
Akrilamidban szegény elkészítés
Az akrilamid olyan potenciálisan rákkeltő anyag,
mely keményítőtartalmú élelmiszerek olajban való
sütésekor (175°C feletti hőmérsékleten) aminosavakkal reagálva képződik.
Ezért a keményítőtartalmú élelmiszereket, például
a hasábburgonyát lehetőleg ne süsse 170°C feletti
hőmérsékleten. Az élelmiszert lehetőleg csak aranysárgára, ne sötétre vagy barnára süsse. Csak így
lehetséges az akrilamidban szegény ételkészítés.
- 15 -
Page 18

Sütés
6. Dugja be a hálózati dugót a csatlakozó aljzatba.
Ebben az olajsütőben való használatra sütőolajat
vagy folyékony sütőzsírt ajánlunk. Szilárd sütőzsírt
is használhat. Először olvassa el idevonatkozóan
a „Szilárd sütőzsír“ részt.
Előkészítés
1. Helyezze a készüléket vízszintes, sík és stabil
felületre.
Tudnivaló:
Ha az olajsütőt a szagelszívó alá a tűzhelyre szeretné
tenni, ügyeljen arra, hogy a tűzhely ki legyen kapcsolva.
2. Teljesen csavarja le a kábelt a kábelcsévélőről 7.
3. Nyissa ki a fedelet: nyomja meg a fedél kireteszelő
gombját 6. A készülék fedele felugrik.
4. Húzza felfele a nyelet, amíg az hallhatóan
bepattan a helyére. Vegye ki a sütőkosarat 3.
Tudnivaló:
Csak olyan olajat és zsírt használjon, amelyek kifejezetten nem habzónak vannak jelölve és sütésre
alkalmasak. Erre vonatkozó információt a csomagoláson
vagy a címként találhat meg.
5. Töltse meg a száraz és üres olajsütőt a nemesacél
tartály 4 MAX-jelzéséig olajjal, folyékony vagy
olvasztott zsírral (kb. 3 l olaj vagy kb. 2,5 kg
szilárd zsír).
Tudnivaló:
Soha ne töltsön a MAX jelzésnél több vagy a MIN
jelzésnél kevesebb zsírt a nemesacél tartályba 4.
Soha ne keverjen össze különböző zsír- vagy
olajfajtákat! Az olajsütőből kifuthatna ekkor
a folyadék.
A hálózati vezetéknek nem szabad az olajsütő
forró részeivel érintkeznie. Áramütés veszélye!
7. Ismét helyezze be a sütőkosarat 3.
8. Csukja be a készülék fedelét.
9. Tolja le a nyél reteszelő gombját w és süllyessze
le a nyelet.
Élelmiszer sütése
1. Kapcsolja be az olajsütőt a ki/be kapcsolóval 0.
A ki/be kapcsolóba 0 beépített működésjelző
lámpa világítani kezd.
2. Tolja a hőmérséklet szabályozót 8 a kívánt
hőmérsékletre. Az olaj vagy a zsír a kellő hőmérsékletre melegszik fel. Amint elérte a készülék
a beállított hőfokot, világítani kezd a zöld
ellenőrző lámpa 9 .
Tudnivaló:
a helyes sütési hőmérsékletet a sütnivaló élelmiszer
csomagolásán vagy a használati útmutató táblázatában találja meg.
3. Húzza felfele a nyelet, amíg az hallhatóan
bepattan a helyére.
4. Nyissa ki a fedelet: nyomja meg a fedél kireteszelő
gombját 6.
5. Vegye ki a sütőkosarat 3és tegye bele a sütnivaló
élelmiszert.
6 Óvatosan helyezze vissza a sütőkosarat 3 az
olajsütőbe.
7. Csukja be a készülék fedelét. Ennek hallhatóan
be kell pattannia.
8 Tolja lefele a nyélen lévő reteszelő gombot w.
Ekkor a nyelet le lehet süllyeszteni. A sütőkosár 3
lesüllyed a forró olajba vagy zsírba.
Tudnivaló:
A készülék fedelén 1 található betekintőablakon
keresztül figyelheti a sütést.
- 16 -
Page 19

Sütőóra
A sütőórát legfeljebb 60 percre lehet beállítani:
• Először állítsa be a sütőórát q 60 percre és utána
fordítsa el a kívánt időre. A beállított idő lejárta
után hangjelzés hallható.
Tudnivaló:
A beállított idő lejárta után kikapcsol a fűtőelem 5!
Ezért ügyeljen a sütőóra jelzésére, nehogy megromoljon
az étel.
Szilárd sütőzsír
Az alábbi óvintézkedéseket tegye meg annak elkerülése érdekében, hogy a zsír kispricceljen és a készülék
túl forró legyen:
• Friss zsír használatakor a zsírdarabokat először
lassan melegítse fel alacsony hőfokon egy rendes
serpenyőben. Óvatosan öntse az olvasztott zsírt
az olajsütőbe. Csak utána dugja be a hálózati
vezetéket és kapcsolja be az olajsütőt.
• Használat után az olajsütőt a megdermedt zsírral
szobahőmérsékleten tárolja.
Ha a zsír túl hideg, az ismételt felmelegítéskor spriccelhet! Ennek megakadályozása érdekében szúrjon
a megdermedt zsírba pár lyukat egy fa- vagy műanyag
pálca segítségével. Ügyeljen rá, hogy a fűtőelem ne
sérüljön meg.
Sütés után
• Ha kész van a sütnivaló élelmiszer, húzza fel a
nyelet, amíg a nyél zárógombja wbe nem kattan.
• Hagyja a sütőkosarat 3 ebben a helyzetben,
hogy lecsöpögjön.
• Nyomja meg a be-/kikapcsoló gombot 0.
Az olajsütő ezzel ki van kapcsolva. Húzza ki
a csatlakozót az aljzatból!
• Ha a megsütött élelmiszer lecsöpögött, nyissa
ki a készülék fedelét a fedél nyitógombjának 6
megnyomásával.
• Óvatosan emelje ki az olajsütőből a sütőkosarat
3. Ha szükséges, rázza le a felesleges olajat
vagy zsírt az olajsütő fölött.
• Tegye a megsütött élelmiszert egy tálba vagy
egy szűrőbe (bélelje ki nedvszívó konyhai törlőkendővel!)
Ha nem használja rendszeresen az olajsütőt, ajánlatos
az olajat megdermedés után jól záródó üvegben
lehetőleg a hűtőszekrényben vagy más hűvös helyen
tárolni. Finom szűrővel töltse meg az üvegeket, hogy
az olajból vagy zsírból származó élelmiszerszemcséket kiszűrhesse. A szilárd zsírnak épphogy folyékonynak kell még lenni, hogy ki lehessen önteni.
A sütőzsiradék cseréje
• A zsír megolvasztásához kapcsolja be a készüléke
a ki/be kapcsolóval 0 és állítsa a hőmérsékletszabályozót 8130°C-ra. A működésjelző lámpa 9
világít.
• Várja meg, amíg az egész zsír elolvad.
Csak ezután állítsa be a kíván sütési hőmérsékletet.
Csak akkor cseréljen olajat, ha az teljesen kihűlt.
A szilárd zsírnak épphogy folyékonynak kell még
lenni, hogy ki lehessen önteni.
• Nyissa ki a készülék fedelét.
• Vegye ki a sütőkosarat 3.
• Vegye ki a kezelő-/fűtőelemet 5. Tegye a kezelő-/
fűtőelemet 5 egy tiszta és száraz helyre.
• Óvatosan vegye ki az olajjal vagy zsírral telt
nemesacél tartályt 4 az olajsütőből.
- 17 -
Page 20
• Öntse ki az olajat vagy zsírt arra alkalmas tárolóedénybe, például flakonba/üvegbe.
Tudnivaló:
Minden helységben vagy városban más szabályozás
van érvényben a használt étkezési olaj ártalmatlanításának. Sok helyen nem szabad ezt az olajat vagy
zsírt a rendes háztartási hulladékkal ártalmatlanítani.
Tájékozódjon a községi vagy városi önkormányzatnál
a gyűjtőhelyekről.
Az egyszerű tisztításhoz szedje szét az olajsütőt:
1. Nyissa ki a készülék fedelét és húzza ki felfele.
2. Húzza felfele a nyelet, amíg az hallhatóan
bepattan a helyére. Vegye ki a sütőkosarat 3.
3. Húzza ki felfele a kezelő-/fűtőelemet 5 a veze-
tősínből. Helyezze a kezelő-/fűtőelemet 5 egy
tiszta és száraz helyre.
4. Vegye ki a nemesacél tartályt 4 és vegye ki
a zsírt vagy az olajat.
• Az olajsütő valamennyi részét alaposan tisztítsa
meg, ahogy az a „Tisztítás és ápolás“ részben
le van írva.
• A friss olajat vagy zsírt úgy töltse az olajsütőbe,
ahogy az a „Sütés“ részben le van írva.
Tisztítás és karbantartás
Veszély!
Tisztítás előtt húzza ki a hálózati csatlakozót az aljzatból. Ez esetben áramütés veszélye állhat fenn!
Veszély!
Hagyja lehűlni az olajsütőt. Ellenkező esetben
megégetheti magát!
Soha ne merítse vízbe a kezelő/fűtőelemet 5,
a hálózati vezetéket vagy a burkolatot és ne
tisztítsa folyó víz alatt! Ez a készülékben helyrehozhatatlan kárt okoz. Ezeket a részeket
szükség esetén nedves ronggyal tisztítsa.
Figyelem! Kár keletkezhet
a készülékben!
Ne használjon az alkatrészek tisztításához maró
vagy súroló hatású tisztítószert/-anyagot, mint pl.
súrolószert vagy acélgyapotot.
Ezek megtámadhatják a készülék felületét.
• A sütőkosár 3 és nemesacél edény 4 a moso-
gatógépben tisztítható Alkalmasak a mosogatógépben való tisztításra.
• A készüléket és a burkolat fedelét nedves kendővel
tisztítsa. Szükség esetén tegyen egy kis enyhe
mosogatószert a rongyra.
Tudnivaló:
Ha az állandó fémszűrőt 2 a készülék fedelének
belsejében akarja megtisztítani, akkor helyezze
a készülék fedelét enyhe mosogatószeres meleg
vízbe. Hagyja kis ideig áztatni és mozgassa ide-oda.
A burkolat fedelét tiszta vízzel öblítse le. Állítsa az
oldalára, ha szárítja. Így a víz lecsepeghet róla.
• Az olajsütőt fordított sorrendben szerelje össze.
• A készüléket az oldalsó bemélyedés segítségével
emelje meg vagy hordozza.
• Csavarja a hálózati kábelt a kábelcsévélőre 7.
• A készüléket zárt fedéllel tárolja. Így a sütő belseje
tiszta és pormentes marad.
- 18 -
Page 21

Tippek
Saját készítésű sültburgonya
• A sütéshez kiválasztott burgonyáknak hibátlannak
és csíramentesnek kell lenniük.
• Sütéshez „lisztes" vagy „főként keményrefővő"
burgonyafajtát kell használni.
• A burgonyát meghámozás után a kívánt elkészítési
mód szerint aprítsa fel (csíkokra vagy karikára).
• A további felhasználás előtt a burgonyát kb. egy
óráig vízben áztassa. Ezáltal kiválik a cukor egy
része, ami az akrilamid képzésének egyik
alapanyaga.
• Alaposan szárítsa meg a burgonyákat.
• A saját készítésű sült burgonyát mindig kétszer
süsse:
• először 160°C-on 10-12 percig, majd 170°Con 3-4 percig, a kívánt szín eléréséig.
• A mélyfagyasztott hasábburgonya elő van főzve
és ezért csak egyszer kell megsütni.
Kövesse a csomagoláson található utasítást.
Fagyasztott élelmiszerek
A fagyasztott élelmiszer (-16 és -18 °C között) az
olajat vagy zsírt jelentősen lehűti, ezáltal nem elég
gyorsan süti meg, ezért az lehet, hogy túl sok olajat
vagy zsírt vesz fel. Ennek elkerülése érdekében az
alábbiak szerint járjon el:
• Ne süssön nagy mennyiséget egyszerre. A sütnivaló
élelmiszert a sütőkosár 3 leeresztése után teljesen
lepje el az olaj/zsír.
• Az olajat legalább 15 percig hevítse, mielőtt
beletenné a sütnivaló élelmiszert.
• Állítsa a hőmérsékletszabályozót 8 az ebben
a használati útmutatóba vagy a sütnivaló élelmiszer
csomagolásán található utasítás szerint megadott
hőmérsékletre.
• Ideális esetben engedje fel a mélyhűtött élelmiszert
sütés előtt szobahőmérsékletre. Szedjen le róla
annyi jeget és vizet, amennyi csak lehetséges,
mielőtt a sütnivaló élelmiszert az olajsütőbe tenné.
Figyelem!
Mindig csukja le a készülék fedelét, mielőtt a sütőkosarat 3 beleengedné a forró zsírba.
Megégetheti magát a kispriccelő zsiradékkal!
• A sütnivaló élelmiszert lehetőleg lassan és óvatosan
tegye bele az olajsütőbe, mivel a mélyhűtött élelmiszertől a forró olaj vagy zsír váratlanul és erősen
bugyogni kezd.
Hogyan szabadulhat meg a
nemkívánatos mellékíztől
Néhány élelmiszer, különösképpen a hal, nedvességet
ad le sütés közben. Ez a folyadék összegyűlik
a sütőolajban vagy zsiradékban és befolyásolhatja
az olajban vagy zsírban következőleg felmelegített
élelmiszer ízét.
Az alábbiak szerint járjon el annak érdekében,
hogy ismét semleges ízű olajat vagy zsírt kapjon:
• Forrósítsa fel az olajat vagy zsiradékot 160°C-ra
és tegyen bele két vékony szelet kenyeret és pár
kisebb petrezselyemszálat a sütőkosárba 3.
Figyelem!
Mindenképpen csukja be a készülék fedelét, mielőtt
a petrezselyemmel vagy kenyérrel töltött sütőkosár 3
lemerülne a forró zsírba. A kispriccelő zsír égési
sérüléseket okozhat.
• Csukja be a készülék fedelét és eressze le a
sütőkosarat 3 a zsírba.
• Várja meg, amíg az olaj vagy a zsír már nem
gyöngyözik és vegye ki a kenyeret vagy a petrezselymet egy hableszedő merőkanállal.
Ezzel az olaj vagy zsír ismét semleges ízű.
- 19 -
Page 22

Egészséges táplálkozás
Táplálkozáskutatók olyan növényi olajok és zsírok
használatát javasolják, amelyek telítetlen zsírsavakat
(pl. linolsavat) tartalmaznak. Ezen olajok és zsírok
azonban más fajtákkal szemben hamarabb elveszítik
pozitív tulajdonságaikat és ezért gyakrabban kell
őket cserélni. Az alábbi iránymutatáshoz igazodjon:
• Rendszeresen cserélje az olajat vagy zsírt.
Ha az olajsütővel főként hasábburgonyát készít
és az olajt vagy a zsírt valamennyi használat
után leszűri, 10-12 alkalommal használhatja.
• Ne használja azonban az olajat vagy zsírt fél
évnél hosszabb ideig. Mindig vegye figyelem
be a csomagoláson található utasításokat.
• Általában kevesebb ideig lehet használni az olajat
vagy zsírt, ha olyan főként fehérjetartalmú élelmiszert
sütöttek benne, mint a hús vagy hal..
• Ne keverjen új olajat régivel.
• Cserélje le az olajat vagy zsírt, ha melegítéskor
habzik, erős íze vagy szaga van, vagy ha sötét
és/vagy szörpszerű állaga van.
Hővédelmi funkció
Túlhevülés esetén a hővédelmi funkció kikapcsolja
a készüléket.
Ez akkor fordulhat elő, ha az olajsütőben nincs
vagy nincs elég olaj vagy zsír, illetve ha a szilárd
sütőzsírt olvaszt az olajsütőben.
Szilárd zsír esetén a fűtőelem a képzett hőt nem
tudja elég gyorsan leadni.
Ha a hővédő funkció kikapcsolja a készüléket, az
alábbiak szerint járjon el:
• Hagyja lehűlni a készüléket.
• Hagyja lehűlni az olajat vagy zsírt.
• Egy apró és hegyes tárggyal nyomja meg óvatosan
a kezelő-/fűtőelem 5 hátoldalán lévő Reset
gombot e. A készüléket ekkor újra lehet használni.
- 20 -
Page 23
Garancia és szerviz
Ártalmatlanítás
A készülékre 3 év garanciát adunk a vásárlás dátumától
számítva. A készüléket gondosan gyártottuk, és
szállítás előtt lelkiismeretesen ellenőriztük. Kérjük,
a vásárlás igazolására őrizze meg a pénztári blokkot.
Kérjük, garanciaigény esetén vegye fel a kapcsolatot
telefonon az Ön közelében lévő szervizzel. Csak
ebben az esetben garantálhatjuk, hogy ingyen tudja
beküldeni az árut.
A garancia csak anyag- és gyártási hibára vonatkozik,
nem pedig kopásra vagy törékeny részek (pl. kapcsoló
vagy elem) sérülésére. A termék kizárólag magánhasználatra, nem üzleti használatra készült.
A garancia érvényét veszti visszaélésszerű vagy
szakavatatlan kezelés, erőszak alkalmazása vagy
olyan beavatkozások esetén, amelyeket nem engedélyeztetett szervizelő üzleteink hajtottak végre.
Az ön törvényes jogait ez a garancia nem korlátozza.
Kompernass Service Hungary
Tel.: 06 40 104680
e-mail: support.hu@kompernass.com
Semmi esetre se dobja a készüléket
a háztartási hulladékba. Ez a termék
a 2002/96/EC európai irányelv hatálya
alá tartozik.
A készüléket engedélyeztetett hulladékgyűjtő helyen
vagy a helyi hulladékeltávolító üzemnél tudja
kidobni.
Vegye figyelembe az aktuális előírásokat.
Kétség esetén vegye fel a kapcsolatot a hulladékfeldolgozó vállalattal.
Valamennyi csomagolóanyagot juttasson el
a környezetbarát hulladékhasznosítóhoz.
Gyártja
KOMPERNASS GMBH
BURGSTRASSE 21
D-44867 BOCHUM
www.kompernass.com
- 21 -
Page 24

A sütési idők táblázata
A táblázat pédákat ad meg arra, hogy melyik élelmiszert milyen hőmérsékleten és hány percig süssük.
Amennyiben a sütnivaló élelmiszer csomagolásán lévő utasítások eltérnek ezen táblázat adataitól, akkor
a csomagolás utasítását kövesse.
A fokban megadott adatoknál csekély hőmérséklet-eltérés fordulhat elő. A táblázatban megadott értékek
irányadóak. Kb. 30 dkg-nyi mennyiségre vonatkoznak. Az élelmiszer tulajdonsága szerint változhat
a megadott idő.
Nagyobb mennyiségnél mindig ügyeljen arra, hogy a sütendő élelmiszer a sütőkosár 3 lesüllyedése után
teljesen lemerüljön a zsírban ill. olajban.
Élelmiszer Hőmérséklet (kb.) Idő percekben
fasírt (mélyhűtött) 150 °C 3 - 5 perc
tőkehal (mélyhűtve,
rántva/tésztában)
sertésszelet
(rántva)
tőkehal
(nyers, tésztában)
sültburgonya (nyers) 160 - 170 °C 10 - 15 perc
sültburgonya (mélyhűtött) lásd a gyártó utasításait lásd a gyártó utasításait
garnélarák (nyers) 170 °C 3 - 5 perc
csirke szeletek
(nagy darabok)
csirke szeletek
(kis/közepes darabok)
gomba 180 °C 5 perc
lepényhal (mélyhűtött) 190 °C 5 - 6 perc
150 °C 10 - 15 perc
150 °C 15 - 25 perc
160 °C 5 - 10 perc
170 °C 8 - 15 perc
170 °C 5 - 15 perc
- 22 -
Page 25

Hibaelhárítás
Ha a hibát nem lehet elhárítani az alábi hibaelhárító tippekkel, vagy ha ettől eltérő zavarokat észlel, akkor
forduljon ügyfélszolgálatunkhoz.
Zavar Ok Elhárítás
• A készülék nem működik.
• A ki/be kapcsolóba 0 beépített
működésjelző lámpa nem világít.
• A készülék használat közben
leállt és nem lehet megint
bekapcsolni.
• Az ellenőrző lámpa nem világít:
• A készüléket nem dugta be
dugaszoló aljzatba.
• Nem nyomta meg a be/kikapcsoló gombot 0.
• Ki van oldva a hővédő funkció.
• Ki van oldva a hővédő funkció.
• A sütő még nem érte el az
olaj/zsír beállított hőmérsékletét.
• Dugja be a készüléket egy
dugaszoló aljzatba.
• Nyomja meg a be-/kikapcsoló
gombot 0.
• Hagyja lehűlni a készüléket.
Nyomja meg a kezelő-/
fűtőelem 5 hátoldalán lévő
Reset gombot e.
1. Ezután húzza ki a konnektorból
a hálózati csatlakozót és hagyja
a készüléket lehűlni.
2. Nyomja meg a kezelő-/
fűtőelem 5 hátoldalán
lévő Reset gombot e.
• Várjon pár percig, amíg a sütő
elérte a kívánt hőmérsékletet.
- 23 -
Page 26

- 24 -
Page 27

INHALTSVERZEICHNIS SEITE
Bestimmungsgemäßer Gebrauch 26
Sicherheitshinweise 26
Technische Daten 27
Lieferumfang 27
Gerätebeschreibung 27
Vor dem ersten Gebrauch 27
Acrylamidarme Zubereitung 27
Frittieren 28
Vorbereitungen . . . . . . . . . . . . . . . . . . . . . . . . . . . . . . . . . . . . . . . . . . . . . . . . . . . . . . . . . . . .28
Lebensmittel frittieren . . . . . . . . . . . . . . . . . . . . . . . . . . . . . . . . . . . . . . . . . . . . . . . . . . . . . . . .28
Kurzzeitwecker . . . . . . . . . . . . . . . . . . . . . . . . . . . . . . . . . . . . . . . . . . . . . . . . . . . . . . . . . . . .29
Festes Frittierfett . . . . . . . . . . . . . . . . . . . . . . . . . . . . . . . . . . . . . . . . . . . . . . . . . . . . . . . . . . . .29
Nach dem Frittieren 29
Frittierfett wechseln 29
Reinigung und Pflege 30
Tipps 31
Pommes frites selbst gemacht . . . . . . . . . . . . . . . . . . . . . . . . . . . . . . . . . . . . . . . . . . . . . . . . .31
Tiefkühlkost . . . . . . . . . . . . . . . . . . . . . . . . . . . . . . . . . . . . . . . . . . . . . . . . . . . . . . . . . . . . . . .31
Wie Sie unerwünschten Beigeschmack loswerden . . . . . . . . . . . . . . . . . . . . . . . . . . . . . . . .31
Gesunde Ernährung . . . . . . . . . . . . . . . . . . . . . . . . . . . . . . . . . . . . . . . . . . . . . . . . . . . . . . . .32
Hitzeschutzfunktion 32
Garantie und Service 33
Entsorgen 33
Importeur 33
Tabelle Frittierzeiten 34
Fehlerbehebung 35
Lesen Sie die Bedienungsanleitung vor der ersten Verwendung aufmerksam durch und heben Sie diese für
den späteren Gebrauch auf. Händigen Sie bei Weitergabe des Gerätes an Dritte auch die Anleitung aus.
- 25 -
Page 28
Edelstahl-Fritteuse
KH 2001
Bestimmungsgemäßer
Gebrauch
Die Fritteuse ist zum Frittieren von Lebensmitteln im
privaten Haushalt konzipiert. Sie ist nicht für den
gewerblichen oder industriellen Einsatz gedacht.
Sicherheitshinweise
Gefahr durch elektrischen Schlag!
• Schließen Sie das Gerät an eine Netzsteckdose
mit einer Netzspannung von 230 V ~50 Hz an.
• Lassen Sie beschädigte Netzstecker oder Netzkabel sofort von autorisiertem Fachpersonal
oder dem Kundenservice austauschen, um
Gefährdungen zu vermeiden.
• Achten Sie darauf, dass die Netzleitung
während des Betriebs niemals nass oder feucht
wird.
Tauchen Sie das Bedien-/Heizelement und
das Gehäuse mit der Netzleitung niemals unter Wasser und reinigen Sie diese Teile auch
nicht unter fließendem Wasser.
Brandgefahr!
• Benutzen Sie das Gerät nicht in der Nähe von
heißen Oberflächen.
• Lassen Sie das Gerät während des Betriebs niemals unbeaufsichtigt.
• Benutzen Sie keine externe Zeitschaltuhr oder
ein separates Fernwirksystem um das Gerät zu
betreiben.
Benutzen Sie niemals Wasser zum
Löschen!
• Altes bzw. verschmutztes Fett oder Öl entzündet
sich bei Überhitzung von selbst. Wechseln Sie
das Öl oder Fett rechtzeitig. Im Brandfall Netzstecker ziehen und brennendes Fett oder Öl mit
einer Decke ersticken.
Verletzungsgefahr!
• Dieses Gerät ist nicht dafür bestimmt, durch
Personen (einschließlich Kinder) mit eingeschränkten physischen, sensorischen oder
geistigen Fähigkeiten oder mangels Erfahrung
und/oder mangels Wissen benutzt zu werden,
es sei denn, sie werden durch eine für ihre
Sicherheit zuständige Person beaufsichtigt oder
erhielten von ihr Anweisungen, wie das Gerät
zu benutzen ist.
• Kinder sollten beaufsichtigt werden, um sicherzustellen, dass sie nicht mit dem Gerät spielen.
• Sorgen Sie für einen sicheren Stand des Gerätes.
• Falls das Gerät heruntergefallen oder beschädigt ist, dürfen Sie es nicht mehr in Betrieb
nehmen. Lassen Sie das Gerät von qualifiziertem
Fachpersonal überprüfen und gegebenenfalls
reparieren.
• Während des Frittiervorgangs wird heißer
Dampf freigesetzt, insbesonders, wenn Sie den
Deckel öffnen. Halten Sie einen sicheren
Abstand zum Dampf.
• Stellen Sie sicher, dass alle Teile vollständig
trocken sind, bevor Sie Öl oder flüssiges Fett in
die Fritteuse geben. Heißes Öl oder heißes Fett
spritzt sonst.
• Trocknen Sie alle Lebensmittel sorgfältig ab, bevor Sie sie in die Fritteuse geben. Heißes Öl
oder heißes Fett spritzt sonst.
• Gehen Sie insbesonders mit gefrorenen Lebensmitteln vorsichtig um. Entfernen Sie alle Eisstücke.
Je mehr Eis sich noch an den Lebensmitteln befindet, umso mehr spritzt das heiße Öl oder das
heiße Fett.
- 26 -
Page 29

• Teile des Gerätes werden während des
Gebrauchs heiß. Berühren Sie diese nicht, um
Verbrennungen zu vermeiden.
Warnung vor Beschädigungen am
Gerät!
• Füllen Sie nie mehr Fett als bis zur MAX-Markierung und nie weniger als bis zur MIN-Markierung in den Edelstahl-Behälter ein. Achten Sie
bei jedem Einschalten darauf, dass genügend
Fett oder Öl in der Fritteuse ist.
• Schalten Sie das Gerät niemals ein, wenn sich
kein Öl oder flüssiges Fett darin befindet.
• Die Fritteuse ist nur zum Frittieren von Lebensmitteln geeignet. Sie ist nicht für das Kochen von
Flüssigkeiten konzipiert.
Technische Daten
Netzspannung: 230 V ~50 Hz
Nennleistung: 2300 W
Fassungsvermögen
Öl: ca. 3 Liter
Festes Fett: ca. 2,5 kg
Gerätebeschreibung
1 Sichtfenster
2 Permanent-Metallfilter
3 Frittierkorb
4 Edelstahl-Behälter
5 abnehmbares Bedien-/Heizelement
6 Entriegelungstaste Deckel
7 Kabelaufwicklung
8 Stufenloser Temperaturregler
9 Kontrollleuchte
0 Ein-/Aus-Schalter
q Kurzzeitwecker
w Verriegelungstaste Griff
e Reset-Taste
Vor dem ersten Gebrauch
Bevor Sie die Fritteuse zum ersten Mal benutzen,
reinigen Sie bitte die einzelnen Teile gründlich und
trocknen Sie sie sorgfältig ab (siehe Kapitel
„Reinigung und Pflege“).
Acrylamidarme Zubereitung
Lieferumfang
Kaltzonen-Fitteuse
Bedienungsanleitung
Acrylamid ist ein möglicherweise krebserzeugender
Stoff, der beim Frittieren von stärkehaltigen Lebensmitteln (bei Temperaturen von mehr als 175°C)
durch Reaktionen mit Aminosäuren gebildet wird.
Frittieren Sie daher stärkehaltige Lebensmittel, wie
zum Beispiel Pommes frites, nach Möglichkeit nicht
mit einer Temperatur von über 170˚C. Das Frittiergut sollte nur goldgelb anstatt dunkel oder braun
frittiert werden. Nur so erreichen Sie eine acrylamidarme Zubereitung.
- 27 -
Page 30

Frittieren
6. Stecken Sie den Netzstecker in die Steckdose.
Für den Gebrauch in dieser Fritteuse empfehlen wir
Frittieröl oder flüssiges Frittierfett. Sie können auch
festes Frittierfett benutzen. Lesen Sie hierzu erst das
Kapitel „Festes Frittierfett“.
Vorbereitungen
1. Stellen Sie das Gerät auf eine waagerechte,
ebene und stabile Oberfläche.
Hinweis:
Wenn Sie die Fritteuse unter die Dunstabzugshaube
auf den Herd stellen wollen, achten Sie darauf,
dass der Herd ausgeschaltet ist.
2. Wickeln Sie das Netzkabel komplett von der
Kabelaufwicklung 7.
3. Öffnen Sie den Gerätedeckel, indem Sie die Entriegelungstaste Deckel 6 drücken. Der Gerätedeckel springt auf.
4. Ziehen Sie den Griff nach oben, bis er hörbar
einrastet. Nehmen Sie den Frittierkorb 3 heraus.
Hinweis:
Verwenden Sie nur Öle oder Fette, die ausdrücklich
als nicht schäumend gekennzeichnet und zum Frittieren geeignet sind. Diese Information finden Sie auf
der Verpackung oder dem Etikett.
5. Befüllen Sie die trockene und leere Fritteuse bis
zur MAX-Markierung im Edelstahl-Behälter 4
mit Öl, flüssigem oder geschmolzenem Fett
(ca. 3 l Öl oder ca. 2,5 kg festes Fett).
Hinweis:
Füllen Sie nie mehr Fett als bis zur MAX-Markierung
und nie weniger als bis zur MIN-Markierung in den
Edelstahl-Behälter 4 ein.
Vermischen Sie niemals verschiedene Fett- oder
Ölsorten! Die Fritteuse könnte überschäumen.
Das Netzkabel darf nicht mit den heißen Teilen
der Fritteuse in Berührung kommen. Gefahr
eines elektrischen Schlages!
7. Setzen Sie den Frittierkorb 3 wieder ein.
8. Schließen Sie den Gerätedeckel.
9. Schieben Sie die Verriegelungstaste Griff w
nach unten und senken Sie den Griff ab.
Lebensmittel frittieren
1. Schalten Sie die Fritteuse am Ein-/Aus-Schalter
0 ein. Die im Ein-/Aus-Schalter 0 integrierte
Kontrollleuchte leuchtet auf.
2. Drehen Sie den Temperaturregler 8 auf die ge-
wünschte Temperatur. Das Öl oder Fett wird auf
die gewünschte Temperatur erhitzt. Ist die eingestellte Temperatur erreicht, leuchtet die grüne
Kontrollleuchte 9 auf.
Hinweis:
Die korrekte Frittiertemperatur finden Sie auf der
Packung des Frittierguts oder in der Tabelle dieser
Bedienungsanleitung.
3. Ziehen Sie den Griff nach oben, bis er hörbar
einrastet.
4. Öffnen Sie den Gerätedeckel, indem Sie die Entriegelungstaste Deckel 6 drücken.
5. Nehmen Sie den Frittierkorb 3 heraus und ge-
ben Sie das Frittiergut hinein.
6. Setzen Sie den Frittierkorb 3 vorsichtig wieder
in die Fritteuse ein.
7. Schließen Sie den Gerätedeckel. Dieser muss
hörbar einrasten.
8. Schieben Sie die Verriegelungstaste Griff w
nach unten. Nun lässt sich der Griff absenken.
Der Frittierkorb 3 wird in das heiße Öl oder Fett
mit abgesenkt.
Hinweis:
Durch das Sichtfenster 1 im Gerätedeckel können
Sie den Frittiervorgang überwachen.
- 28 -
Page 31

Kurzzeitwecker
Mit dem Kurzzeitwecker können Sie bis zu 60 Minuten einstellen:
• Stellen Sie zuerst den Kurzzeitwecker q auf 60
Minuten und drehen Sie sie dann zurück auf die
gewünschte Zeit. Nach Ablaufen der eingestellten Zeit ertönt ein Signalton.
Hinweis:
Nach Ablaufen der eingestellten Zeit wird nicht das
Heizelement 5 ausgeschaltet! Achten Sie daher
auf das Signal des Kurzzeitweckers, um ein Verderben der Speisen zu verhindern.
Festes Frittierfett
Um zu verhindern, dass das Fett spritzt und das
Gerät zu heiß wird, treffen Sie bitte folgende Vorsichtsmaßnahmen:
• Bei Verwendung von frischem Fett, schmelzen
Sie die Fettblöcke zunächst langsam bei kleiner
Hitze in einer normalen Pfanne. Gießen Sie das
geschmolzene Fett vorsichtig in die Fritteuse.
Stecken Sie erst dann den Netzstecker ein und
schalten Sie die Fritteuse ein.
• Nach Gebrauch bewahren Sie die Fritteuse mit
dem wieder erstarrten Fett bei Raumtemperatur
auf.
Wenn das Fett zu kalt ist, kann es bei erneutem
Schmelzen spritzen! Um dies zu verhindern, stechen
Sie mit einem Holz- oder Plastikstab einige Löcher in
das wieder fest gewordene Fett. Achten Sie darauf,
dass das Heizelement nicht beschädigt wird.
• Um das Fett zu schmelzen, schalten Sie das Gerät am Ein-/Aus-Schalter 0 an, und stellen Sie
den Temperaturregler 8 auf 130˚C. Die Kon-
trollleuchte 9 leuchtet.
• Warten Sie, bis das gesamte Fett geschmolzen
ist. Stellen Sie erst dann die gewünschte Frittiertemperatur ein.
Nach dem Frittieren
• Wenn das Frittiergut fertig ist, ziehen Sie den
Griff nach oben, bis die Verriegelungstaste Griff
w einrastet.
• Lassen Sie den Frittierkorb 3 zum Abtropfen in
dieser Position.
• Drücken Sie den Ein-/Aus-Schalter 0. Die
Fritteuse ist nun ausgeschaltet. Ziehen Sie den
Netzstecker aus der Netzsteckdose.
• Wenn das Frittiergut abgetropft ist, öffnen Sie
den Gerätedeckel, indem Sie die Entriegelungstaste Deckel 6 drücken.
• Heben Sie den Frittierkorb 3 vorsichtig aus der
Fritteuse. Wenn nötig, schütteln Sie überschüssiges Öl oder Fett über der Fritteuse ab.
• Geben Sie das Frittiergut in eine Schüssel oder
ein Sieb (mit saugfähigem Küchenpapier
auslegen!)
Wenn Sie die Fritteuse nicht regelmäßig benutzen,
empfiehlt es sich, das Öl nach dem Erkalten in gut
verschlossenen Flaschen, oder anderen Behältern,
vorzugsweise im Kühlschrank oder an einem anderen kühlen Ort aufzubewahren. Befüllen Sie die Flaschen durch ein feines Sieb, um Nahrungspartikel
aus dem Öl oder Fett zu entfernen. Festes Fett muss
gerade noch flüssig sein, so dass man es schütten
kann.
Frittierfett wechseln
Wechseln Sie das Öl erst, wenn es völlig erkaltet ist.
Festes Fett muss gerade noch flüssig sein, so dass
man es schütten kann.
• Öffnen Sie den Gerätedeckel.
• Entnehmen Sie den Frittierkorb 3.
• Entnehmen Sie das Bedien-/Heizelement 5.
Legen Sie das Bedien-/Heizelement 5 an
einem sauberen und trockenen Ort ab.
• Nehmen Sie vorsichtig den Edelstahl-Behälter 4
mit dem Öl oder Fett aus der Fritteuse.
- 29 -
Page 32

• Gießen Sie das Öl oder Fett in geeignete Behältnisse, zum Beispiel Flaschen.
Zur einfachen Reinigung, nehmen Sie die Fritteuse
auseinander:
Hinweis:
In jeder Gemeinde oder Stadt ist die Entsorgung
von Speiseölen oder -fetten anders geregelt. Oft ist
es nicht erlaubt solche Öle oder Fette im normalen
Hausmüll zu entsorgen. Bitte informieren Sie sich bei
Ihrer Gemeinde- oder Stadtverwaltung nach den
Entsorgungsmöglichkeiten.
• Reinigen Sie alle Teile der Fritteuse gründlich,
wie im Kapitel „Reinigung und Pflege“ beschrieben.
• Füllen Sie frisches Öl oder Fett in die Fritteuse,
wie im Kapitel „Frittieren“ beschrieben.
Reinigung und Pflege
Gefahr!
Ziehen Sie den Netzstecker vor dem Reinigen aus
der Steckdose. Es besteht die Gefahr eines elektrischen Schlages!
Gefahr!
Lassen Sie die Fritteuse abkühlen. Ansonsten besteht
Verbrennungsgefahr!
Tauchen Sie das Bedien-/Heizelement 5, das
Netzkabel oder das Gehäuse niemals ins
Wasser, reinigen Sie es nie unter fließendem
Wasser! Das führt zu irreparablen Schäden
am Gerät. Reinigen Sie diese Teile bei Bedarf
mit einem feuchten Tuch.
Achtung! Geräteschäden!
Verwenden Sie zur Reinigung der Teile keine
ätzenden oder scheuernden Reinigungsmittel/
-materialien wie Scheuermilch oder Stahlwolle.
Diese können die Oberfläche des Gerätes beschädigen!
1. Öffnen Sie den Gerätedeckel und ziehen Sie ihn
nach oben heraus.
2. Ziehen Sie den Griff nach oben, bis er hörbar
einrastet. Entnehmen Sie den Frittierkorb 3.
3. Ziehen Sie das Bedien-/Heizelement 5 nach
oben aus der Führungsschiene. Legen Sie das
Bedien-/Heizelement 5 an einen sauberen und
trockenen Ort ab.
4. Entnehmen Sie den Edelstahl-Behälter 4 und
entfernen Sie das Fett oder Öl.
• Den Frittierkorb 3 und den Edelstahl-Behälter
4 können Sie in der Spülmaschine reinigen. Sie
sind spülmaschinengeeignet.
• Reinigen Sie das Gehäuse und den Gerätedeckel mit einem feuchten Tuch. Bei Bedarf geben Sie ein mildes Spülmittel auf das Tuch.
Hinweis:
Wenn Sie den Permanent-Metallfilter 2 im Inneren
des Gerätedeckels reinigen wollen, dann legen Sie
den Gerätedeckel in warmes Wasser mit einem milden Spülmittel. Lassen Sie ihn einen Moment einweichen und schwenken Sie ihn hin und her. Spülen Sie
den Gerätedeckel mit klarem Wasser ab. Stellen
Sie ihn zum Trocknen aufrecht auf die Seite. So
kann das Wasser herauslaufen.
• Setzen Sie die Fritteuse in umgekehrter Reihenfolge wieder zusammen.
• Heben oder tragen Sie das Gerät mit Hilfe der
seitlichen Tragemulden.
• Wickeln Sie das Netzkabel um die Kabelaufwikklung 7.
• Lagern Sie das Gerät mit geschlossenem Gerätedeckel. So bleibt das Innere der Fritteuse
sauber und staubfrei.
- 30 -
Page 33

Tipps
Pommes frites selbst gemacht
• Kartoffeln, die zum Frittieren vorgesehen sind,
sollten einwandfrei und nicht angekeimt sein.
• Zum Frittieren sollten „mehligkochende" oder
„vorwiegend festkochende" Kartoffelsorten verwendet werden.
• Nach dem Schälen die Kartoffeln entsprechend
der gewünschten Zubereitung zerkleinern
(Streifen oder Scheiben).
• Wässern Sie die Kartoffeln vor der Weiterverwendung ca. eine Stunde. Dadurch wird ein Teil
des Zuckers, einem der Ausgangsprodukte für
die Bildung von Acrylamid, herausgelöst.
• Lassen Sie die Kartoffeln sorgfältig trocknen.
• Frittieren Sie selbst gemachte Pommes frites stets
zweimal:
• erst 10-12 Minuten bei 160°C dann 3-4 Minuten bei 170°C, je nach gewünschten Bräunungsgrad.
• Tiefgekühlte Pommes frites sind vorgekocht und
müssen daher nur einmal frittiert werden. Folgen
Sie den Anweisungen auf der Packung.
Achtung!
Schließen Sie immer den Gerätedeckel, bevor Sie
den Frittierkorb 3 in das heiße Fett absenken. Verbrennungsgefahr durch spritzendes Fett!
• Geben Sie das Frittiergut möglichst langsam und
vorsichtig in die Fritteuse, da Tiefkühlkost das heiße Öl oder Fett abrupt und heftig zum Sprudeln
bringen kann.
Wie Sie unerwünschten Beigeschmack
loswerden
Manche Nahrungsmittel, insbesondere Fisch, geben
beim Frittieren Flüssigkeit ab. Diese Flüssigkeiten
sammeln sich im Frittieröl oder -fett an und können
den Geruch und Geschmack des nachfolgenden,
im gleichen Öl oder Fett erhitzten, Frittierguts beeinträchtigen.
Gehen Sie wie folgt vor, um wieder geschmacklich
neutrales Öl oder Fett zu erhalten:
• Erhitzen Sie das Öl oder Fett auf 160°C und geben Sie zwei dünne Scheiben Brot oder ein paar
kleine Zweige Petersilie in den Frittierkorb 3.
Tiefkühlkost
Tiefgekühltes Frittiergut (-16 bis -18 °C) kühlt das
Öl oder Fett erheblich ab, brät dadurch nicht
schnell genug an und nimmt daher möglicherweise
zu viel Öl oder Fett auf. Um dies zu vermeiden,
gehen Sie bitte wie folgt vor:
• Frittieren Sie keine größeren Mengen auf einmal.
Das Frittiergut muss nach Absenken des Frittierkorbes 3 vollständig von Öl/Fett bedeckt sein.
• Erhitzen Sie das Öl mindestens 15 Minuten,
bevor Sie das Frittiergut hineingeben.
• Stellen Sie den Temperaturregler 8 auf die in
dieser Bedienungsanleitung oder auf der
Packung des Frittierguts angegebene Temperatur.
• Vorzugsweise lassen Sie Tiefkühlkost vor dem
Frittieren bei Zimmertemperatur antauen. Entfernen Sie so viel Eis und Wasser wie möglich,
bevor Sie das Frittiergut in die Fritteuse geben.
Achtung!
Schließen Sie unbedingt den Gerätedeckel, bevor
Sie den Frittierkorb 3 mit der Petersilie oder dem
Brot in das heiße Fett absenken. Spritzendes Fett
führt zu Verbrennungen.
• Schließen Sie den Gerätedeckel und senken Sie
den Frittierkorb 3 in das Fett ab.
• Warten Sie, bis das Öl oder Fett nicht mehr sprudelt und entfernen Sie das Brot bzw. die Petersilie mit einem Schaumlöffel. Das Öl oder Fett ist
nun wieder geschmacksneutral.
- 31 -
Page 34

Gesunde Ernährung
Ernährungswissenschaftler empfehlen die Verwendung von pflanzlichen Ölen und Fetten, die ungesättigte Fettsäuren (z.B. Linolsäure) enthalten. Allerdings verlieren diese Öle und Fette ihre positiven
Eigenschaften schneller als andere Sorten und müssen daher öfter ausgewechselt werden. Orientieren
Sie sich an den folgenden Richtlinien:
• Wechseln Sie das Öl oder Fett regelmäßig.
Wenn Sie mit der Fritteuse hauptsächlich
Pommes frites zubereiten und das Öl oder Fett
nach jedem Gebrauch durchseihen, können Sie
es 10- bis 12-mal verwenden.
• Verwenden Sie das Öl oder Fett jedoch nicht
länger als sechs Monate. Beachten Sie bitte
auch stets die Anweisungen auf der Verpackung.
• Generell lässt sich Öl oder Fett weniger lang verwenden, wenn Sie hauptsächlich proteinhaltige
Lebensmittel wie Fleisch oder Fisch frittieren.
• Mischen Sie kein frisches Öl mit gebrauchtem.
• Wechseln Sie das Öl oder Fett, wenn es beim Erhitzen schäumt, einen strengen Geschmack oder
Geruch entwickelt oder wenn es dunkel wird
und/oder eine sirupartige Konsistenz entwickelt.
Hitzeschutzfunktion
Bei Überhitzung schaltet die Hitzeschutzfunktion
das Gerät aus.
Dies kann vorkommen, wenn sich kein oder nicht
ausreichend Öl oder Fett in der Fritteuse befindet
oder wenn festes Frittierfett in der Fritteuse geschmolzen wird.
Bei festem Fett kann das Heizelement die erzeugte
Hitze nicht schnell genug abgeben.
Wenn die Hitzeschutzfunktion das Gerät abgeschaltet hat, gehen Sie bitte wie folgt vor:
• Lassen Sie das Gerät abkühlen.
• Lassen Sie das Öl oder Fett abkühlen.
• Drücken Sie mit einem kleinen spitzen Gegenstand vorsichtig die Reset-Taste e an der
Rückseite des Bedien-/Heizelements 5. Das Ge-
rät kann jetzt wieder benutzt werden.
- 32 -
Page 35
Garantie und Service
Entsorgen
Sie erhalten auf dieses Gerät 3 Jahre Garantie ab
Kaufdatum. Das Gerät wurde sorgfältig produziert
und vor Anlieferung gewissenhaft geprüft. Bitte bewahren Sie den Kassenbon als Nachweis für den
Kauf auf. Bitte setzen Sie sich im Garantiefall mit
Ihrer Servicestelle telefonisch in Verbindung. Nur so
kann eine kostenlose Einsendung Ihrer Ware
gewährleistet werden.
Die Garantieleistung gilt nur für Material- oder Fabrikationsfehler, nicht aber für Verschleißteile oder
für Beschädigungen an zerbrechlichen Teilen, z. B.
Schalter oder Akkus. Das Produkt ist lediglich für
den privaten und nicht für den gewerblichen
Gebrauch bestimmt.
Bei missbräuchlicher und unsachgemäßer Behandlung, Gewaltanwendung und bei Eingriffen, die
nicht von unserer autorisierten Service-Niederlassung vorgenommen wurden, erlischt die Garantie.
Ihre gesetzlichen Rechte werden durch diese Garantie nicht eingeschränkt.
Schraven
Service- und Dienstleistungs GmbH
Gewerbering 14
47623 Kevelaer, Germany
Tel.: +49 (0) 180 5 008107
(14 Ct/Min. aus dem dt. Festnetz ggf. abweichende Preise
aus den Mobilfunknetzen)
Fax: +49 (0) 2832 3532
e-mail: support.de@kompernass.com
Werfen Sie das Gerät keinesfalls in den
normalen Hausmüll. Dieses Produkt
unterliegt der europäischen Richtlinie
2002/96/EC.
Entsorgen Sie das Gerät über einen zugelassenen
Entsorgungsbetrieb oder über Ihre kommunale
Entsorgungseinrichtung.
Beachten Sie die aktuell geltenden Vorschriften.
Setzen Sie sich im Zweifelsfall mit Ihrer Entsorgungseinrichtung in Verbindung.
Führen Sie alle Verpackungsmaterialien
einer umweltgerechten Entsorgung zu.
Importeur
KOMPERNASS GMBH
BURGSTRASSE 21
D-44867 BOCHUM
www.kompernass.com
Kompernaß Service Österreich
Tel.: 0820 899 913 (
e-mail: support.at@kompernass.com
Kompernaß Service Switzerland
Tel.: 0848 000 525 (
e-mail: support.ch@kompernass.com
0,20 EUR/Min.)
max. 0,0807 CHF/Min.)
- 33 -
Page 36

Tabelle Frittierzeiten
Die Tabelle gibt Beispiele an, welche Nahrungsmittel bei welcher Temperatur frittiert werden müssen, und
wie viel Frittierzeit Sie dazu benötigen. Falls die Anweisungen auf der Verpackung des Frittierguts von dieser
Tabelle abweichen, folgen Sie bitte den Anweisungen auf der Verpackung.
Bei den Gradangaben kann es zu geringfügigen Temperaturabweichungen kommen. Die in der Tabelle genannten Werte sind Orientierungshilfen. Sie beziehen sich etwa auf eine Menge von ca. 300 Gramm. Je
nach Beschaffenheit der Lebensmittel können die Zeiten vaariieren.
Achten Sie bei größeren Mengen immer darauf, dass das Frittiergut, nach Absenken des Frittierkorbes 3,
komplett von Fett/Öl bedeckt ist.
Lebensmittel Temperatur (ca.) Zeit in Minuten
Frikadelle (gefroren) 150 °C 3 - 5 Minuten
Kabeljau (gefroren,
paniert/Teigmantel)
Schweinekotteletts
(paniert)
Kabeljau (frisch, im
Teigmantel)
Pommes Frittes (frisch) 160 - 170 °C 10 - 15 Minuten
Pommes Frittes (gefroren)
Scampis (frisch) 170 °C 3 - 5 Minuten
Hühnchenportionen
(große Stücke)
Hühnchenportionen
(kleine/mittlere Stücke)
Pilze 180 °C 5 Minuten
Scholle (gefroren) 190 °C 5 - 6 Minuten
150 °C 10 - 15 Minuten
150 °C 15 - 25 Minuten
160 °C 5 - 10 Minuten
siehe Angaben des
Herstellers
170 °C 8 - 15 Minuten
170 °C 5 - 15 Minuten
siehe Angaben des
Herstellers
- 34 -
Page 37

Fehlerbehebung
Sollten sich die Störungen nicht mit folgenden Fehlerbehebungen beheben lassen, oder wenn Sie andere
Arten von Störungen feststellen, wenden Sie sich bitte an unseren Service.
Störung Ursache Behebung
• Das Gerät funktioniert nicht.
• Die Kontrollleuchte im Ein-/AusSchalter 0 leuchtet nicht.
• Das Gerät hat sich während
der Benutzung abgestellt und
läßt sich nicht wieder einschalten.
• Die grüne Kontrollleuchte
leuchtet nicht.
• Das Gerät ist nicht mit einer
Netzsteckdose verbunden.
• Der Ein-/Aus-Schalter 0 wurde
nicht betätigt.
• Die Hitzeschutzfunktion ist ausgelöst.
• Die Hitzeschutzfunktion ist ausgelöst.
• Die eingestellte Temperatur des
Öles/Fettes ist noch nicht
erreicht.
• Verbinden Sie das Gerät mit
einer Netzsteckdose.
• Betätigen Sie den Ein-/AusSchalter 0.
• Lassen Sie das Gerät abkühlen.
Drücken Sie die Reset-Taste e
auf der Rückseite des Bedien/Heizelementes 5.
1. Ziehen Sie den Netzstecker
und lassen Sie das Gerät
abkühlen.
2. Drücken Sie die Reset-Taste e
auf der Rückseite des Bedien/Heizelementes 5.
• Warten Sie einige Minuten, bis
die gewünschte Temperatur
erreicht ist.
- 35 -
Page 38

 Loading...