

Siemens GIGASET 5015 QUICK START GUIDE
IRL
1
Gigaset 5015* Quick Guide
1
1211109
8
7
6
45
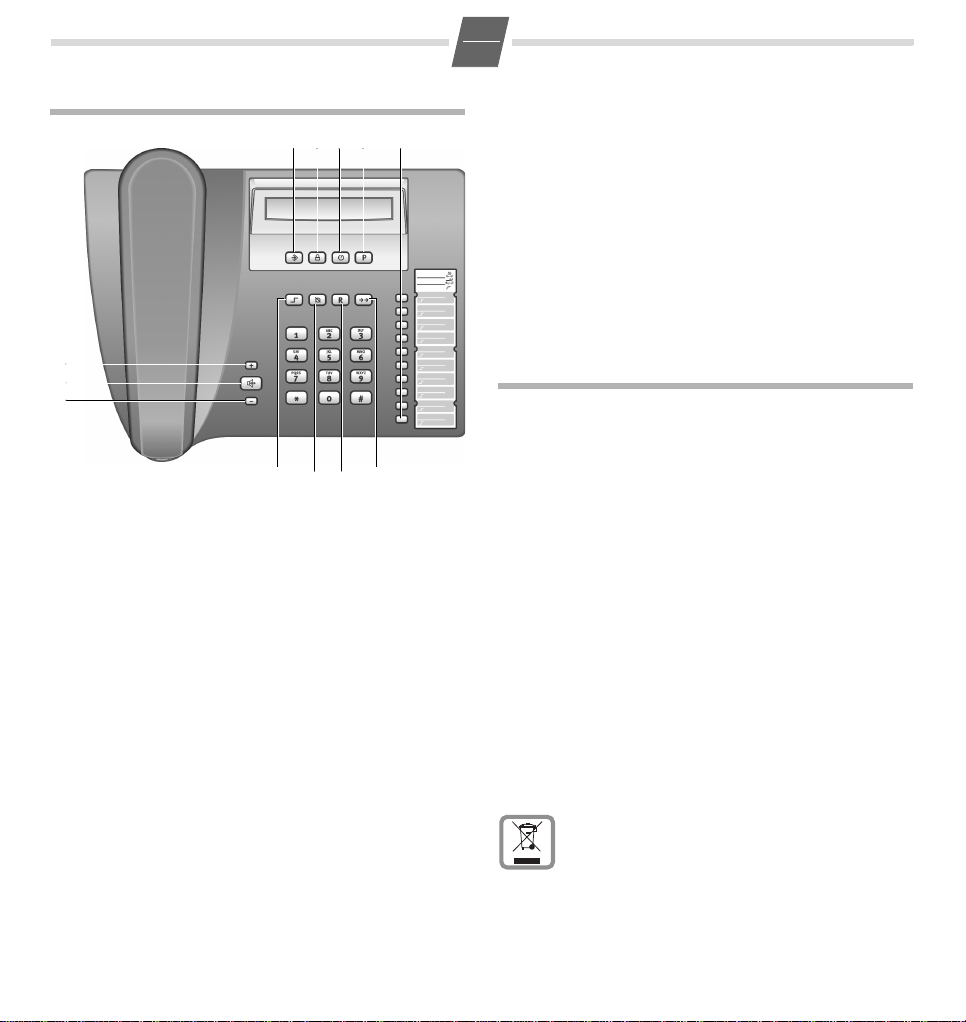
Keys
1 Repertory keys
2 Last number redial key
3 Recall key
4Mute key
5Shift key
6Quiet key
7 Loudspeaker key (handsfree)
8Loud key
9Set key
10 Lock key
11 Reset key (call duration)
12 Pause key
Display symbols
P In setting mode
‡ Shift key pressed
--- Ready for use
y Microphone off
o Entry mark when setting (e.g. volume)
u
P
Recall key pressed
Pause
*Manufactured by Gigaset Communications GmbH under
trademark license of Siemens AG.
23
z
---- PIN entry
zzzz
0
–
9
With tone dialling:
n
-
With additional services from public network providers:
No memory content
Telephone locked
Phone number
– * key pressed
– # key pressed
ë Call waiting
™ Call forwarding immediately
˜ Call forwarding on no reply
— Call forwarding when busy
Safety precautions
When installing, connecting and operating the telephone,
always observe the following precautions:
◆ Only use the plugs and leads supplied.
◆ Only connect the connecting lead to the socket/jack
provided for that purpose.
◆ Only connect approved accessories.
◆ Arrange the connecting lead where it will not cause
accidents.
◆ Position the telephone on a non-slip surface.
◆ For your safety and protection, the telephone must not
be used in bath or shower rooms (wet locations).
The telephone is not splash proof.
◆ Never expose the telephone to sources of heat, direct
sunlight or other electrical devices.
◆ Protect your telephone from moisture, dust, corrosive
liquids and vapours.
◆ Never open up the telephone yourself.
◆ Do not touch the plug contact with pointed or metallic
objects.
◆ Do not carry the telephone by the leads.
◆ If you give your Gigaset 5015 to someone else, make
sure you also give them the user guide.
All electrical and electronic products should be disposed
of separately from the municipal waste stream via designated collection facilities appointed by the government or
the local authorities.
means the product is covered by the European Directive 2002/96/EC.
The correct disposal and separate collection of your old appliance
will help prevent potential negative consequences for the environment and human health. It is a precondition for reuse and recycling
of used electrical and electronic equipment.
For more detailed information about disposal of your old appliance,
please contact your city office, waste disposal service or the shop
where you purchased the product.
This crossed-out wheeled bin symbol on the product
IRL
2
Preparing the telephone for use
Recommended installation of telephone
◆ Do not expose the telephone to direct sunlight or other
sources of heat.
◆ Operate at temperatures between +5°C and +40°C.
◆ Maintain a distance of at least one metre between the
telephone and radio equipment, e.g. wireless
telephones, wireless pagers or TV sets. Otherwise,
telephone communication could be impaired.
◆ Do not install the telephone in dusty areas as this can
shorten the service life of the telephone.
◆ To clean, wipe with a moist or antistatic cloth only, never
with a dry cloth (risk of electrostatic charging and
discharge) or harsh cleaning agent.
◆ Furniture lacquer and polish can be damaged by contact
with parts of the unit (e.g. device feet).
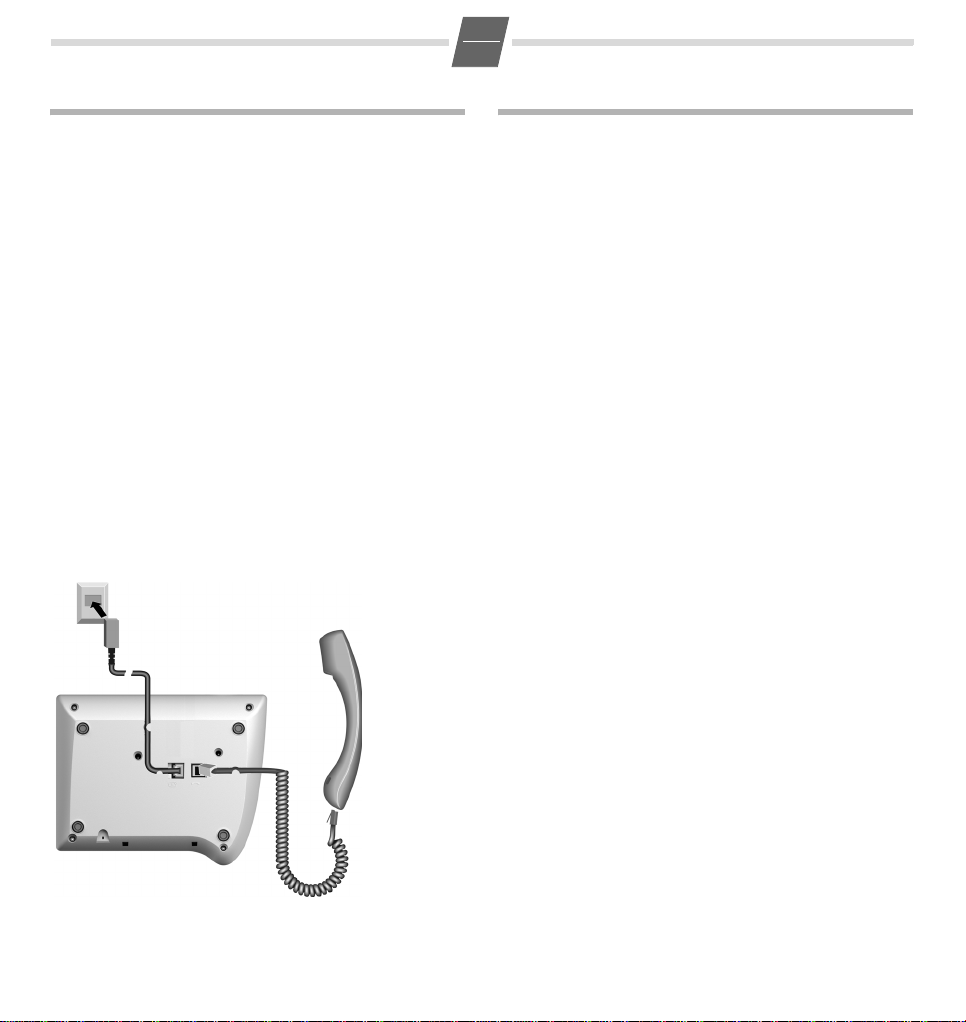
Connecting
Insert the short end of the coiled handset cord in the socket
provided in the handset and the long end in the socket
marked with an
phone cord into the outlet on the wall and the other end
into the socket marked with a
device. Then your telephone is ready to use.
a on the underside of the device. Plug the
Y on the underside of the
Making calls
Dialling a number
co Lift handset, dial number.
Any digits after the 20th digit are moved from right to left in
the display. The Pause key
when dialling, starting from the 2nd digit.
Last number redial (one of the last 5 call numbers)
The last 5 different call numbers dialed are automatically
saved (max. 32 digits each).
c Lift handset (or press the Loudspeaker key L
until the dialling tone is audible).
;...; Press the Redial key repeatedly until the
required call number appears with the place
number (1...5 on the left).
o Enter the place number (1...5).
The relevant call number is redialed.
Dialling using the repertory keys
c Lift handset (or press the Loudspeaker key L
until the dialling tone is audible). (If necessary,
press
: Press repertory key.
< can be used to insert pauses
= for a 2nd level repertory key).

IRL
3
Saving numbers
Different telephone settings must be completed with the
? so that they are available permanently.
Set key
In order to cancel without saving, e. g. after an incorrect
entry, replace the handset instead of pressing
end. The original setting is then retained.
Saving with notebook function
You can also save phone numbers during a conversation
with the notebook function.
Saving repertory numbers
You can save up to 20 phone numbers (or even functions,
see page 6) on both levels of the repertory keys.
c? Lift handset, press the Set key. (For 2nd mem-
ory level, also press
=.)
: Press the repertory key under which you want
to save the repertory number.
A number that has already been saved is
shown in the display. If the memory for this
repertory key is empty,
z
appears in the display
o Enter the number to be saved (up to 32 digits).
or ...
Saving from the redial list:
;...; Press the Redial key repeatedly until the
desired phone number is displayed on the
screen.
?a Press the Set key. Replace handset.
Pressing
After the 20th digit, any following digits are moved from
right to left in the display.
Delete all repertory numbers
< allows you to save pauses (not at the 1st digit).
c?1251
Lift handset, initiate function.
?a Press the Set key. Replace handset.
? at the
Adjusting the telephone
Adjusting the ringer volume
The volume of the ringer can be set to one of 7 levels and
can also be deactivated completely (default setting: level 7,
highest level) or deactivated completely. When the ringer is
deactivated an incoming call is notified in the display only.
◆ To adjust when the telephone is idle:
c?5 Lift handset, initiate function.
H...I Adjust the volume with the Loud/Quiet key.
?a Press the Set key. Replace handset.
◆ To adjust while the telephone is ringing:
Press
H...I before lifting the handset.
The last value set is saved.
Setting the ringer frequency
The frequency (speed) of the ringer can be set to one of
three levels (default setting: level 3).
c?6 Lift handset, initiate function.
1...3 Press one of the keys 1...3:
?a Press the Set key. Replace handset.
Setting the ringtone
Ten different ringtones can be set for the ringer (default
setting: ringtone 0).
c?7 Lift handset, initiate function.
0...9 Press one of the keys 0 ... 9
?a Press the Set key. Replace handset.
Setting the handset volume
The volume on the handset can be set to one of 3 levels and
saved (default setting: level 1).
c?9 Lift handset, initiate function.
H...I Adjust the volume with the Loud/Quiet key.
?a Press the Set key. Replace handset.
Mute
You can deactivate the telephone's handset and
microphone. Then the other party can no longer hear you.
J During a call: Press the Mute key
1: highest frequency; 3: lowest frequency.
Activate: Press the key again.
 Loading...