


Contents
1
Safety precautions ..................... 3
Safety Information ..................... 4
Antenna care ........................... 4
Phone operation ...................... 4
Electronic devices ..................... 5
SAR (Cell Phone Designation) .... 8
Overview of the phone ............ 10
Getting Started ........................ 11
Insert SIM card/battery ........... 12
Charge battery ....................... 13
General Instructions ................. 14
User Guide ............................. 14
Control key ............................ 14
Switch on, off / PIN entry ......... 16
Security .................................... 17
Codes .................................... 17
My phone ................................. 19
Making a phone call ................. 20
Dialing with number keys ....... 20
End call .................................. 20
Set volume ............................. 20
Redial previous numbers ........ 20
When a number is busy .......... 21
Accept call ............................. 21
Reject call .............................. 21
Held call ................................. 22
Call waiting/Swap ................... 22
Multi party ............................. 23
Call menu .............................. 23
Phonebook ................................24
<New entry> .......................... 24
Call/search for an entry ...........25
Call with Record no. ...............25
Edit entry ...............................25
Location: ...............................26
Assign animation .................... 27
Groups ......................................28
SMS to group .......................... 28
Group setup ........................... 29
Call log ......................................30
Messages (SMS) ........................ 31
Read messages ......................31
Inbox/outbox .........................32
Archive ...................................32
Compose a message ...............33
Predefined text .......................34
SMS to group .......................... 34
Picture & Sound ......................35
Surf & fun .................................36
Internet (WAP) ........................36
Games ....................................39
Bitmap viewer ........................40
Sound manager ......................41
Organizer ..................................44
Alarm clock ............................44
Calculator ...............................44
Voice message/Mailbox ............45
CB services ................................46
See also Index at the end of this User Guide

2
Contents
Profiles ..................................... 47
Setup ..................................... 47
Car Kit ................................... 48
Headset ................................. 48
Aircraft mode ......................... 48
Favorites .................................. 49
Fast access key ......................... 50
Control key (on the left) ......... 50
Speed dialing keys .................. 51
Setup ........................................ 52
Display ................................... 52
Audio ..................................... 53
Keys ....................................... 55
Phone setup ........................... 55
Clock ..................................... 58
Connectivity ........................... 59
Security ................................. 62
Network ................................. 63
Accessories ............................ 65
Text entry with "T9" .................. 66
Setup ..................................... 66
Create a word using T9 ........... 66
Display symbols (selection) ......68
Notes A-Z ..................................69
Questions&Answers .................77
Siemens Service ........................80
Specifications ...........................81
Exposure to radiofrequency
signals ....................................81
Technical data ....................... 81
Trademarks ............................81
Maintenance .............................82
Accessories ...............................83
Basics .....................................83
Car Solutions .........................83
U.S. FDA .................................... 84
FCC/Industry Canada Notice .....90
Ten Driving Safety Tips .............91
Intellectual Property .................93
Index .........................................94
See also Index at the end of this User Guide
Safety precautions
3
NOTE:
Review these operating instructions and
safety precautions carefully before use.
Do not use mobile phone in hospitals or in the vicinity of medical
devices, such as pacemakers or
hearing aids. Mobile phones
may interfere with the operation
of these devices. Keep a minimum distance of 8" between
pacemaker and mobile phone.
When using the mobile phone
hold it to the ear farthest from
the pacemaker.
Always use the handsfree kit to
make calls while driving (p. 83).
Turn off mobile phone while
aboard any aircraft. To prevent
accidental activation, see
(p. 48).
Do not use mobile phone near
gas stations, fuel depots, chemical plants or blasting operations. Mobile phones may cause
interference with the operation
of technical installations.
The ring tone and the info tones
are amplified through the earpiece. Never hold the mobile
phone to your ear when it is ringing. Serious and permanent
damage could occur to your
hearing!
Caution! SIM card may be removed. Small parts could be
swallowed by children.
Do not exceed the mains voltage (V) specified on the power
supply unit.
Only use original Siemens batteries (100% mercury-free) and
charging devices. Use of nonSiemens batteries and/or charging devices may cause explosion resulting in serious injury or
property damage.
It is recommended that you
open the phone only to replace
the battery (100% mercury-free)
or SIM card. Do not open the
battery under any circumstances. Any other changes to this
device may invalidate the FCC
authorization required for operation of the unit, and are strictly
prohibited.
Dispose of used batteries and
phones in accordance with applicable laws and safety regulations.
Mobile phones may interfere
with the operation of nearby
TVs, radios or PCs.
Only use original Siemens accessories in order to avoid possible injury and property
damage and to ensure compliance with applicable laws and
regulations.
Improper use invalidates the warranty!

4
Safety Information
Important
Read this information before using
your wireless handheld phone.
As this mobile phone is equipped
with a fixed (non-retractable) antenna, some paragraphs in the below text may not be applicable.
Antenna care
Use only the supplied or an approved
replacement antenna. Unauthorized
antennas, modifications, or attachments could damage the phone and
may violate FCC regulations.
Phone operation
Normal position
Hold the phone as you would any
other telephone with the antenna
pointed up and over your shoulder.
Tips on efficient operation
For your phone to operate most effi-
ciently:
• Extend your antenna fully (if applicable).
• Do not touch the antenna unnecessarily when the phone is in use.
Contact with the antenna affects
call quality and may cause the
phone to operate at a higher power level than otherwise needed.
Driving
Laws pertaining to the use of mobile
phones while driving vary significantly from state-to-state and sometimes even from locality-to-locality
within states. For example, some areas may allow persons to use their
mobile phones only if they employ a
hands-free device, and some areas
may prohibit the use of mobile
phones entirely. Accordingly, Siemens recommends that persons
check the laws for the areas in which
they drive or will be driving. For areas where the use of mobile phones
while driving is permitted, Siemens
encourages persons to use their
phones responsibly and to employ
hands-free devices. Also, if using
your phone while driving, please:
• Give full attention to driving –
driving safely is your first responsibility;
• Use hands-free operation, if available;
• Pull off the road and park before
making or answering a call, if driving conditions so require.

Safety Information
5
For vehicles equipped with Air
Bags
An air bag inflates with great force.
DO NOT place objects, including either installed or portable wireless
equipment, in the area over the air
bag or in the air bag deployment area. If in-vehicle wireless equipment
is improperly installed and the air
bag inflates, serious injury could result.
Electronic devices
Most modern electronic equipment
is shielded from radiofrequency (RF)
signals. However, certain electronic
equipment may not be shielded
against the RF signals from your
wireless phone.
Pacemakers
The Health Industry Manufacturer’s
Association recommends that a minimum separation of six inches (6”) be
maintained between a handheld
wireless phone and a pacemaker to
avoid potential interference with the
pacemaker. These recommendations are consistent with the independent research by and recommendations of Wireless Technology
Research.
Persons with pacemakers:
• should ALWAYS keep the phone
more than six inches from their
pacemaker when the phone is
turned ON;
• should not carry the phone in a
breast pocket;
• should use the ear opposite the
pacemaker to minimize the potential for interference;
• should turn the phone OFF immediately if there is any reason to
suspect that interference is taking
place.
Hearing Aids
Some digital wireless phones may interfere with some hearing aids. In
the event of such interference, you
may want to consult your service
provider or your hearing aid manufacturer to discuss alternatives.
Other Medical Devices
If you use any other personal medical devices, consult the manufacturers of your devices to determine if
they are adequately shielded from
external RF energy. Your physician
may be able to assist you in obtaining this information.
Turn your phone OFF in health care
facilities when any regulations posted in these areas instruct you to do
so. Hospitals or health care facilities
may be using equipment that could
be sensitive to external RF energy.

6
Safety Information
Vehicles
RF signals may affect improperly installed or inadequately shielded
electronic systems in motor vehicles.
Check with the manufacturer or its
representative regarding your vehicle. You should also consult the
manufacturer of any equipment that
has been added to your vehicle.
Posted Facilities
Turn your phone OFF in any facility
where posted notices so require.
Airplanes
FCC and Airline Regulations prohibit
using your phone while in the air.
Turn your phone OFF before boarding an airplane.
Check and comply with the policy of
your airline regarding the use of your
phone while the airplane is on the
ground.
Blasting areas
To avoid interfering with blasting operations, turn your phone OFF when
in a “blasting area” or in areas posted: “Turn off two-way radio.” Obey
all signs and instructions.
Potentially explosive
atmospheres
Turn your phone OFF when in any area with a potentially explosive atmosphere and obey all signs and instructions. Sparks in such areas
could cause an explosion or fire resulting in bodily injury or even
death.
Areas with a potentially explosive atmosphere are often but not always
clearly marked. They include: fueling
areas such as gasoline stations; below deck on boats; fuel or chemical
transfer or storage facilities; vehicles
using liquefied petroleum gas (such
as propane or butane); areas where
the air contains chemicals or particles, such as grain, dust or metal
powders; and any other area where
you would normally be advised to
turn off your vehicle engine.
Emergency calls (SOS)
Your wireless phone can be used to
make emergency calls. You can
make an emergency call from the
main display screen. Enter the local
emergency number such as 911 and
then press the A key
This phone, like any wireless phone,
operates using radio signals, wireless and landline networks, and userprogrammed functions. Because of
this, connections in all conditions
cannot be guaranteed. Therefore,
you should never rely solely on any
wireless phone for essential communications (for example, medical
emergencies). Remember - to make
or receive any calls, the phone must
be switched on and be used in a service area that has adequate signal
strength. Emergency calls might not

Safety Information
be possible on all wireless phone
networks or when certain network
services or phone features are in use.
Check with local service providers regarding their network features.
Always make certain that your
phone is properly charged before attempting any emergency calls. If
you allow your battery to discharge,
you will be unable to receive or make
calls, including emergency calls. You
must then wait a few minutes after
the charging begins to place any
emergency calls.
When making an emergency call, remember to give all of the necessary
information as accurately as possible. Remember that your wireless
phone might be the only means of
communication at the scene of an
accident, therefore you should not
terminate the call until given permission to do so.
7

8
SAR (Cell Phone Designation)
RF EXPOSURE /SPECIFIC
ABSORPTION RATE (SAR)
INFORMATION
THIS SIEMENS A56 PHONE MEETS
THE GOVERNMENT'S
REQUIREMENTS FOR EXPOSURE TO
ELECTROMAGNETIC FIELDS.
Your cell phone is a radio transmitter
and receiver. It is designed and manufactured not to exceed the emission
limits for exposure to radio frequency (RF) energy established by
the Federal Communications Commission (FCC) of the U.S. Government and by Health Canada. These
limits are part of comprehensive
guidelines and establish permitted
levels of RF energy for the general
population. The guidelines were
developed and confirmed by independent scientific organizations
through periodic and thorough evaluation of scientific studies*. The limits include a substantial safety margin designed to assure the safety of
all persons, regardless of age and
health.
The exposure standard for cell
phones employs a unit of measurement known as the Specific Absorption Rate, or SAR. The SAR limit
established by the FCC and by Health
Canada is 1.6 W/kg**. Tests for SAR
are conducted using standard operating positions accepted by the FCC
and by Industry Canada with the
phone transmitting at its highest certified power level in all tested frequency bands. Although the SAR is
determined at the highest certified
power level, the actual SAR level of
the phone while operating can be
well below the maximum value. This
is because the phone is designed to
operate at multiple power levels so
as to use only the power required to
reach the network. In general, the
closer you are to a wireless base station, the lower the power output.
Before a phone model is available for
sale to the public, it must be tested
and the manufacturer must certify to
the FCC and Industry Canada that it
does not exceed the limit established by each government for safe
exposure. The tests are performed in
positions and locations (e.g., at the
ear and worn on the body), reported
to the FCC and available for review
by Industry Canada. The highest SAR
value for this model phone when
testest for use at the ear is
and when worn on the body
Additional information on Specific
Absorption Rates (SAR) can be found
on the Cellular Telecommunications
Internet Association (CTIA) web-site
at www.phonefacts.net or the Canadian Wireless Telecommunications
Association (CWTA) website
www.cwta.ca.
SAR information on this Siemens
A56 phone is on file with the FCC
and can be found under the Display
Grant section of
http://www.fcc.gov/oet/fccid
after searching on FCC ID PWX-A56.
0.76 W/kg***
0.46 W/kg***
+
is

SAR (Cell Phone Designation)
While there may be differences
between the SAR levels of various
phones and at various positions,
all Siemens products meet the
governmental requirements for safe
RF exposure.
+
For body worn operation, this
mobile phone has been tested
and meets FCC RF exposure
guidelines when used with a
Siemens accessory designated
for this product or when used
with a carry accessory that contains no metal and that positions
the handset at least 1.5 cm/0.59
in from the body. Use of other
carry accessories may not ensure
compliance with FCC RF exposure guidelines.
* The World Health Organization
(WHO, CH-1211 Geneva 27,
Switzerland), on the basis of
the actual knowledge, does not
see any necessity for special
precautionary measures when
using cell phones.
Further information:
www.who.int/peh-emf,
www.mmfai.org,
www.my-siemens.com.
** averaged over 1 g of tissue.
***SAR values may vary depending
on national requirements and
network bands. SAR information
for different regions can be
found at www.my-siemens.com
9
10
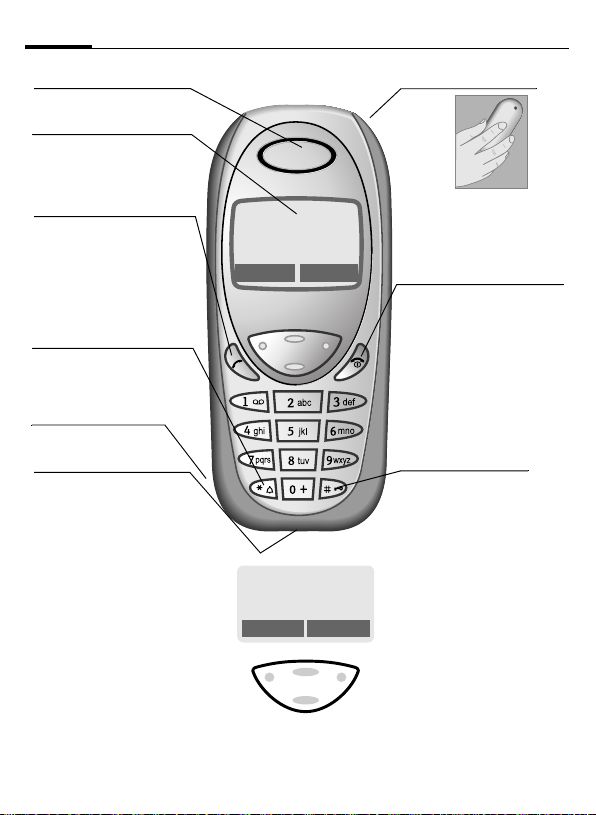
Overview of the phone
Speaker
Display indicators
Signal strength/
battery level.
A
Call key
Dial displayed phone
number or name, accept
calls.
In standby mode:
Display the last calls.
*
Hold down
In standby mode:
Switch signal tones on and
off (see also p. 74).
Microphone
On the underside.
Device interface
Connection for charger,
headset etc.
Control key at the top/at the
bottom
Press at the bottom: Open
Phonebook (in standby mode).
Hold down at the top: Show profiles (in standby mode).
Press at the top: Start volume adjustment (during a call). Then
press at the top/at the bottom to
make your setting.
Scroll up and down in menus and
lists.
_g
Service provider
01.10.2002 12:30
Games Menu
_ g
Service provider
01.10.2002 12:30
Games Menu
Control key on the left/on
the right
Press the control key on the outside left or right, to call up the
function that is displayed as text
or icon on the grey fields above
the key. These are in standby
mode (factory default):
§Games§ or e.g.
} (SIM services) and
§Menu§ (main menu).
Integrated antenna
Do not interfere with the
phone above the battery
cover unnecessarily. This
reduces the signal strength.
B
On/Off/End key
Press briefly:
End call/function or return
to standby mode. In menus:
one menu level back.
Hold down:
Switch phone on/off.
From menus: Return to the
standby mode.
#
Hold down
In standby mode: Switch
key lock on and off.
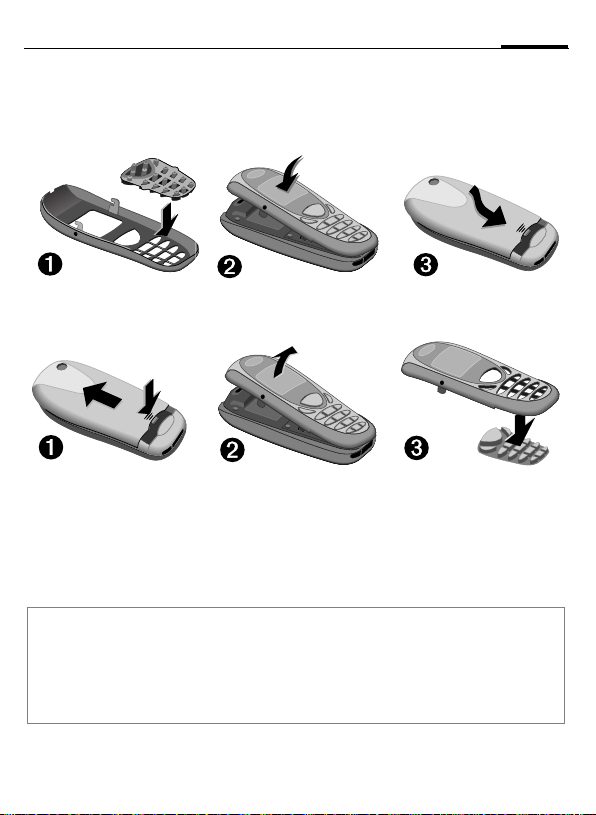
Getting Started
The front and back covers of the casing (CLIPit™ Covers, my-CLIPit™: p. 83) as
well as the keypad can be changed in a matter of seconds - no tools required:
11
To attach
To remove
Note
Your phone's display and the display cover of the top shell are delivered with a protective film.
Remove this film before getting started.
In rare cases the static discharge may cause discolouration at the edges of the display. However this will disappear within 10 minutes.
To avoid damage to the display, the phone should not be used without the upper shell.
12
Getting Started
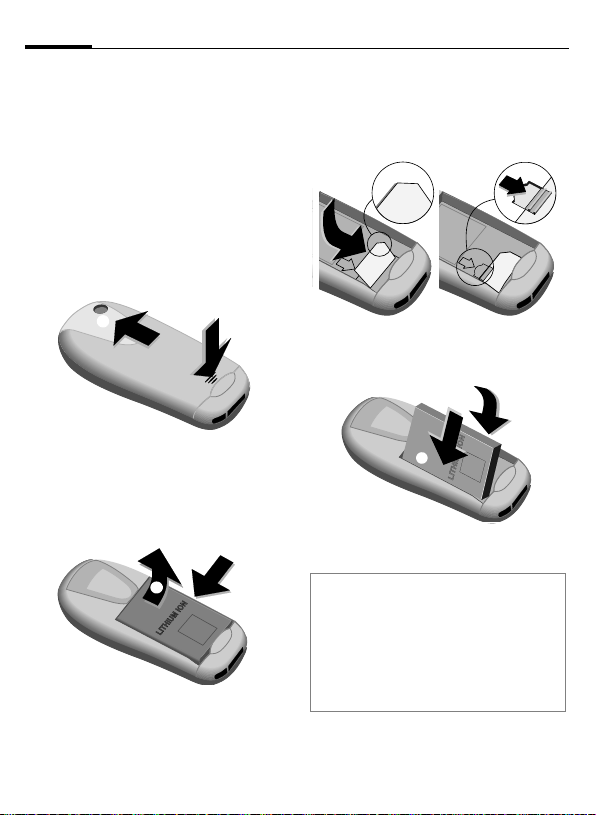
Insert SIM card/battery
The service provider supplies you
with a SIM card on which all the important data for your line is stored. If
the SIM card has been delivered in
credit card size, snap the smaller
segment out and remove any rough
edges.
• Press grooved area
cover in the direction indicated by
the arrow
o
o
• Press latch in the direction indicated by the arrow
the cutout on the side of the
phone, then tilt upwards and remove
.
q
.
p
q
n, then lift
n
, lift battery at
p
• Insert SIM card in the opening,
contacts pointing downwards
(make sure the angled corner is in
correct position
until it engages
). Push gently
r
.
s
s
r
• Insert battery in the phone sideways
, then press downwards
t
until it engages
u.
u
t
• Replace cover and press downwards until it engages.
Note
Always switch off phone before removing
the battery!
Only 3-Volt SIM cards are supported.
Please contact your service provider if you
have an older card.
Functions without SIM card...............p. 76
Getting Started
13
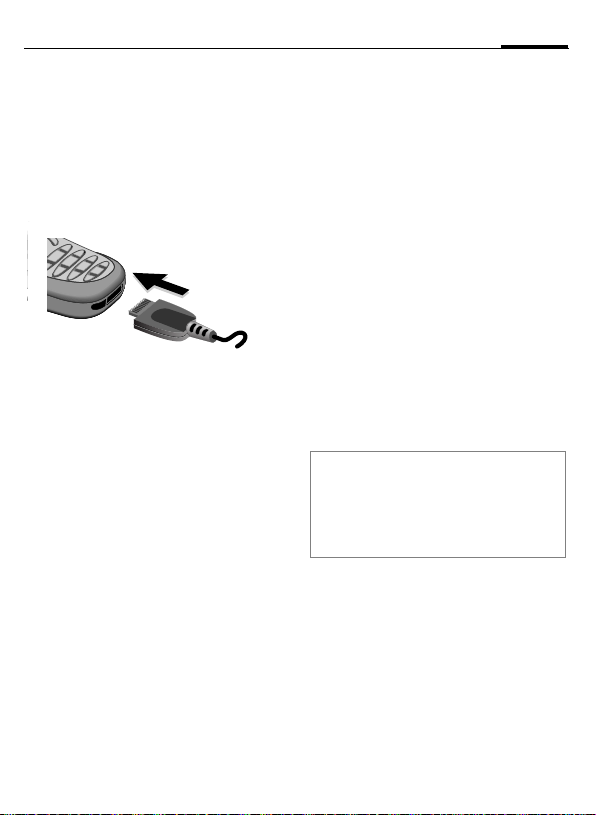
Charge battery
The battery is not fully charged
when delivered. Plug in the charger
cable at the bottom of the phone,
plug in the power supply unit to the
main power socket and charge for at
least two hours.
h Display when charging is
in progress
Charging time
An empty battery is fully charged after about 2 hours. Charging is only
possible in an ambient temperature
of 41°F to 104°F (the charge icon
flashes as a warning when the temperature is 5°C above/below this
range). The voltage specified on the
power supply unit must not be exceeded.
To use the full performance of the
battery, the battery must be fully
charged and discharged at least five
times.
Charge icon not visible
If the battery is totally discharged no
charge icon is displayed when the
charger is plugged in. It is displayed
after 2 hours at most. In this case
the battery is fully charged after
3-4 hours.
Only use the charger provided!
Display while in service
Charge level display during operation (empty-full):
adg
A beep sounds when the battery is
nearly empty. The charge level of the
battery is displayed correctly only after uninterrupted charging/discharging. You should not remove the battery unnecessarily nor end charging
prematurely, if possible.
Note
The charger heats up when used for long
periods. This is normal and not dangerous.
Operating times .................................p. 72
Quality declaration for the battery..... p. 72
14
General Instructions
User Guide
The following symbols are used to
explain operation:
Enter numbers or letters.
J
B
A
G
H
§Menu
L
On/Off/End key.
Call key.
Press control key at the top/
at the bottom to scroll up
and down.
Press control key on the
left/on the right to call a
function.
Displays a function.
Function depends on the
service provider or phone
model. Special registration
for functions like Internet
may be necessary.
Control key
Steps for calling a function are
shown in a condensed form in this user guide, e.g.: to display the call list
for missed calls:
§Menu§
KCall logKMissed calls
This corresponds to:
n
§Menu§ Open menu.
o
F
_g
Service provider
01.10.2002 12:30
Games Menu
From standby mode: Press
control key on the right.
Phonebook
]
Messages
Call log
Scroll to Call log.
Press control key at the bottom to scroll downwards.
Select

General Instructions
15
p
§Select§ Press.
q
§Select§ Press.
Z Call log
Press control key on the right
to open the Call log submenu.
Missed calls
Received calls
Dialed calls
Press control key on the right
to open the list of Missed calls.
Messages
Groups
Select
Select
r
F
s
§View§ Press.
+18001234567
Office
Carol
Scroll to the required
entry.
Press control key at the bottom to scroll downwards.
+49892325678
Office
Carol
Press control key on the left to
display the phone number with
date and time.
t
01.10.2002 12:30
View Options
View Options
Office
+49322325774
Call OK

16
Switch on, off / PIN entry
Switch on/off
B
Hold down On/Off/End key
to switch on or off.
Enter PIN
The SIM card can be protected with a
4-8 digit PIN.
J
§OK§ Press the control key on
Enter the PIN code using
the number keys (the display shows a series of asterisks, if you make a
mistake press §Clear§).
Enter PIN:
* * * *
Clear OK
the right to confirm the in-
put.
Logging on to the net-
work will take a few seconds.
Standby mode
_g
Service provider
01.10.2002 12:30
Games Menu
When the name of the service provider/wallpaper appears on the display, the phone is in standby mode
and ready for use.
Note
_
Signal strength....................p. 73
SIM services............................p. 73
}
§SOS§.................................................p. 69
Change PIN.......................................p. 17
SIM card problems ............................ p. 73
Clear SIM card barring ...................... p. 18
Other network.................................... p. 63
Deactivate/activate screensaver .......p. 52
Set display contrast ...........................p. 53
Set time .............................................p. 58

Security
17
ed against misuse by several security
codes.
Keep these confidential numbers in a
safe place where you can access them
again if required.
PIN
PIN2
PUK
PUK2
Phone
code
§Menu§
Protects your SIM card (personal identification number).
This is needed to set the charge
detail display and to access additional functions on special
SIM cards.
Key code. Used to unlock SIM
cards after the wrong PIN has
been entered.
Protects some functions of your
phone. Must be defined at the
first security setting.
KSetupKSecurity
Kthen select function
Codes
PIN control
The PIN is usually requested each
time the phone is switched on. You
can deactivate this feature but you
risk unauthorised use of the phone.
Some service providers do not permit deactivation of the control.
§Select§ Press.
J Enter PIN.
§OK§ Confirm input.
§Change§ Press.
§OK§ Confirm.
Change PIN
You can change the PIN to any
4-8 digit number you may find
easier to remember.
J Enter old PIN.
§OK§ Press.
§OK§ Enter new PIN.
J
,
§OK§ Repeat new PIN.
J
,
Change PIN 2
(displayed only if PIN 2 is available).
Proceed as with Change PIN.

18
Security
Change Phonecode
You define and enter the phone
code (4 - 8 digits) when calling up a
phone code protected function for
the first time. It is then valid for all
protected functions.
Clear SIM card barring
If the PIN is entered incorrectly three
times, the SIM card is barred. Enter
the PUK (MASTER PIN) provided by
your service provider with the SIM
card, according to instructions. If the
PUK (MASTER PIN) has been lost,
please contact your service provider.
Note
Screensaver......................................p. 52
Auto key lock..................................... p. 55
Further security settings ....................p. 62

My phone
tions so that you can adapt it to meet
your personal requirements.
Ring tones
Assign individual ring tones to caller
groups (p. 54).
The sound manager is available for
managing the ring tones (p. 41).
Wallpaper, Screensaver,
Animation
Adjust your phone according to your
own wishes in the following ways to
give it a personal touch:
To switch on
Select a bitmap style and a greeting
(p. 52) that you create yourself.
Screensaver
You can set an analog clock, an individual picture or an animation as
screensaver (p. 52).
(Provider) wallpaper
Select an individual picture to replace the network provider’s wallpaper/name (p. 52).
19
Favorites
Create your own menu with frequently used functions, phone numbers or WAP pages (p. 49).

20
Making a phone call
Dialing with number keys
The phone must be switched on
(standby mode).
J
A
Enter the number (always
with prefix, if necessary
with the international dialing code).
Clear§ A
§
short press clears
the last digit, a long press
clears the entire number.
Press the Call key. The
phone number displayed
is dialed.
End call
B
Press the End key briefly.
The call is ended. Press
this key even if the person
on the other end of the
line has hung up first.
Set volume
E
You can activate adjustment of the handset volume with the control key
(at the top), but only during a call.
G Set volume.
If a Car kit is used, its volume setting
does not affect the usual setting on
the phone.
Redial previous numbers
To redial the phone number last
called:
A
To redial other numbers that were
dialed previously:
A
G
Press the Call key twice.
Press the Call key once.
Pick out the required
phone number from the
list, then press...
A ... to dial.
Note
Store number .........................p. 24
§Options§ Call lists.............................p. 30
§Hold§ Swap/Multi party .....................p. 22
y menu§ Call menu ..........................p. 23
§Call fwd.§ Call forward set ................p. 55
International dialing codes................ p. 71
Auto key lock .....................................p. 55
Phone number memo........................ p. 72
Mute .................................................. p. 23
Phone number transmission off/on
(Hide ID)............................................p. 55
Control codes (DTMF).......................p. 69

Making a phone call
21
When a number is busy
If the called number is busy or cannot be reached because of network
problems several options are available (depending on the service provider). An incoming call or any other
use of the phone interrupts these
functions.
Either
Auto redial previous numbers
§Auto dial§ Press. The number is auto-
Or
Call back
§Call back§ Press. Your phone rings
Or
Reminder
§Prompt§ Press. A beep reminds you
matically dialed for up to
15 minutes at increasing
intervals. End with:
B End key.
L
when the busy number is
free. Press the Call key to
dial the number.
to redial the displayed
phone number after
15 minutes.
Accept call
i
+18001234567
Answer Reject
The phone must be switched on
(standby mode). An incoming call
will interrupt any other use of the
phone.
§Answer§ Press.
Or
A Press.
If the phone number has been transmitted by the network, it is displayed. If the number and the name
are stored in the Phonebook, the corresponding name is displayed instead. If set, a picture or an animation can be displayed instead of the
bell icon (p. 27).
Reject call
§Reject§ Press.
Or
B Press briefly.
Note
Missed calls...............................p. 30
Accept call using any key .................. p. 55

22
Making a phone call
Held call
You can call another number during
a call.
y menu§ Open call menu.
Hold The current call is put on
Now dial the new phone number
(also from Phonebook: F).
When the new connection is established:
y menu§ Open call menu
Swap Swap back and forth be-
Call waiting/Swap
You may need to register for this
function with the service provider
and set your phone accordingly
(p. 55).
During a call, you may be advised
that there is another call waiting.
You will hear a special tone during
the call. You have the following options:
hold.
_g
Call held
Return
tween both calls.
L
Accept the waiting call
§Swap§ Accept the waiting call
End the current call:
B
§Yes§ Return to the held call.
Or
§No§ The held call is ended.
and place the current call
on hold. To swap between the two calls, proceed as above.
Press. The following query is displayed: "Return to
the call on hold?"
Reject waiting call
§Reject§ Reject the waiting call.
Or
§Call fwd.§ If this is set, the waiting
The caller hears the busy
tone.
call will be forwarded to
the voicemail for example
(setting, p. 55).
End current call
B
§Answer§ Accept the new call.
End the current call.

Making a phone call
23
Multi party
Call up to 5 parties one by one and
link them together in a phone conference. Some of the functions described may not be supported by
your service provider or may have to
be enabled specially.
You have established a connection:
y menu§ Open menu and select
Hold. The current call is
put on hold. Now dial a
new number by using the
number keys or the
phonebook key (p. 25).
When the new connection is established ...
y menu§ ... open menu and select
Multi party. The held call is
joined.
Repeat procedure until all participants are linked together (up to
5participants).
L
End
B
All calls in the conference
are ended simultaneously
when the End key is
pressed.
Call menu
The following functions are only
available during a call:
y menu§ Open menu.
Hold
Mute
Volume
Multi party
Time
Send
DTMF
tones
Call
transfer
L
Main menu
Call status
(p. 22)
Switch mute on/off. If
switched on, the person on
the other end of the line cannot hear you (muting).
Alternatively:
Adjust handset volume.
(p. 23)
While the connection continues, the call duration is displayed.
(p. 69)
The original call is joined to
the second one. For you,
both calls are now ended.
Access to the main menu.
List all held and active calls
(e.g. participants in a conference).
* Hold down.

24
Phonebook
bers in the Phonebook with a special
name. To dial them, simply highlight
the name. If a phone number is
stored with a name, it appears on
the display when you are called. Entries that belong together can be
combined to form a group.
<New entry>
F
D
G
J
Number:
Enter phone number always with
prefix.
Open Phonebook (in
standby mode).
<Own numbers>
<Service numb.>
<New entry>
Select
Select <New entry>.
Activate input fields.
Make the following entries. The maximum
number of characters
available is shown at the
top of the display.
Group:
Default: No group
§Change§ Entries can be organised
by groups (p. 28) for
example:
VIP, Friends, Business,
Family
Location:
Default: SIM
§Change§ Select a storage location:
SIM, Protected SIM or Mobile
(p. 26).
Record no.:
Each entry is automatically assigned
a number under which it can also be
selected (p. 25).
§Change§ Press to change the entry
number.
§Save§ Press to store the new
entry.
Note
<Group> ...........................................p. 29
<Own numbers> ..............................p. 72
§+List International dialing code.......p. 71
Assign animation...............................p. 27
Service numbers ............................... p. 73
Store control codes ...........................p. 69
Name:
Enter (Text entry, p. 25).

Phonebook
25
Text entry
Press number key repeatedly until the required letter is displayed. The cursor advances after a short delay.
2
Ä, ä /1-9 Umlauts and numbers are dis-
§Clear Press briefly to delete the let-
G
#
*
0
1
Press once for a, twice for b
etc. The first letter of a name is
automatically written in UPPERCASE.
Hold down: Writes the digit.
played after the relevant letters.
ter before the cursor.
Hold down to delete the whole
name.
Move the cursor (forward/
back).
Press briefly: Switch between: abc, Abc,T9abc,
T9
Abc, 123. Status indicator in
the top line of the display.
Hold down: All input modes
are displayed.
Press briefly: Select special
characters (p. 70).
Hold down: Open input menu
(p. 71).
Press once/repeatedly:
. , ? ! @ / & ~ + - :
Hold down: Write 0
Space. Only with T9: Press
twice = skip line.
Call/search for an entry
F
J
A
Open Phonebook.
/
Select a name with the
G
first letter and/or scroll.
Dial number.
Call with Record no.
A record number is automatically assigned to every new entry in the
Phonebook.
J
#
A
Enter record number (in
standby mode).
Press.
Press.
Edit entry
G
§Options§ Press and select Edit.
G
J
§Save§ Press.
Select entry in the Phone-
book.
Select required input
field.
Make your changes.

26
Phonebook
Phonebook menu
§Options
View
Edit
New
entry
Delete
Delete all
Send
SMS...
Animation
Capacity
Open menu.
Display entry.
Display entry for changes.
Create a new Phonebook
entry.
Delete entry from the Phonebook.
Select storage location. Dele te
all entries after confirmation.
as entry: Send Phonebook
entry as vCard to recipient.
as text: Send entry as text of
an SMS message.
Assign an individual animation
to the phone number (p. 27).
Display the maximum memory
and the available capacity for
SIM, Protected SIM, phone
memory, animations and
voice dialing.
Location:
An entry can be moved to different
storage locations in the Phonebook
(change entry, p. 25).
SIM (standard)
Entries that are stored in the Phonebook on the SIM card can also be
used on a different GSM Phone.
Protected SIM ¡
Phone numbers can be stored in protected locations on a special SIM
card. A PIN 2 is needed for editing
(p. 17).
Mobile
Phonebook entries are stored in the
memory of the mobile phone when
the memory of the SIM card is full.
Symbols in the opened entry
¢,
¡,v Storage location (p. 26)
›
Å,t,Ä,Ç Groups (p. 28)
¢
L
v
Picture (p. 27)

Phonebook
27
Assign animation
Assign an individual animation to
phone numbers. This animation will
appear in the display when there is a
call from this number.
Assign animation
F
G
§Options Open menu.
§Select§ Select
G
§Load§ The preview p. 40 is
§Select§ The animation is assigned
Open Phonebook.
Select entry.
o Animation.
Select Own animat. or
Own pictures.
Select Animation.
opened and the animation is displayed.
to the phone number. It
appears with a › symbol
in the Phonebook.
Delete/change animation
If an animation is assigned to a
phone number, it can be deleted or
replaced.
G
§Options§ Press.
§Select§ Select
§Delete The assignment is cleared
Or
§Select§ The current animation is
Note
Animations can simply be pictures.
An animation can be assigned to several
phone numbers.
Add pictures/animations ....................p. 40
Select entry with animation › in the Phonebook.
p Animation.
after confirmation.
displayed.

28
it is best to assign them to a group,
e.g.: VIP, Friends, Business, Family
§Menu§
KGroupsKSelect function:
Groups
SMS to group
A memo (SMS) can be sent as a "circular" to all members of a group.
Each SMS is charged separately!
G
Select a group
(the number of the entries is listed behind the
group name).
Å VIP (6)
t Friends (9)
ÄBusiness (12)
Select
Each send operation must be confirmed. It is possible to skip individual recipients.
§Select§ Press. The group is con-
J
A
A
firmed and the editor is
opened.
Compose message.
Press. The first recipient is
displayed.
Press. The SMS is sent.

Groups
29
Group setup
§Menu§KGroupsKGroup setup
Å VIP (6)
t Friends (9)
ÄBusiness (12)
Rename Select
G
§Rename§ Change group name.
§Select§ Display members of the
<New entry>
§View§ Display entry.
§Options See below.
Select a group.
group.
<New entry>
Barbara
Carol
View Options
Make your entries as in
Phonebook (p. 24).
Group entry menu
§Options
View
Edit
New entry
Remove
Remove all
Send SMS...
Animation
Open menu.
Display entry.
Open entry for changes.
Enter new member.
Remove entry only from the
group. It is still available in
the Phonebook.
Remove all entries from the
group.
as entry: Send Phonebook
entry to recipient.
as text: Send entry as text
of an SMS message.
Assign an individual animation to the phone number
(p. 27).

30
Call log
bers of calls for convenient redialing.
KCall log
§Menu§
§Select§ Press.
G
§Select§ Press.
G
Choose call list.
Select phone number.
A Dial phone number.
Or
§View§ Display information on
The following call lists are available:
Missed calls
The phone numbers of calls
that you have received but not answered are stored for call back purposes.
Requirement: The network supports
the "Caller Identity" feature.
Received calls
All accepted calls are listed. Requirement:
The network supports the "Caller
Identity" feature.
the phone number.
L
Icon in standby mode for
missed call. When you
press the control key (on
the left), the phone
number is displayed.
L
Dialed calls
Access to the last ten numbers you
dialed.
A
Erase records
The contents of all call lists are
deleted.
Call list menu
The call list menu can be called up if
an entry is highlighted.
§Options§ Open call list menu.
View
Correct no.
Save no. to
d
Delete
Delete all
Fast access in standby
mode.
View entry.
Load number into display
and correct it there if
necessary.
Store entry in the
Phonebook.
Delete entry after
confirmation.
Delete all entries of the call
list after confirmation.

Messages (SMS)
31
You may transmit and receive very
long messages (up to 760 characters) on your phone, which are automatically composed from several
"normal" SMS messages (note the
accruing charges).
Read messages
Display indicates a new
]
Press the control key on the left to
read the message.
Date/time
No./sender
Message
G
§Reply§ Reply menu shown
§Options§ Inbox/outbox menu
message
.
_g
Service provider
01.10.2002 23:45
] Menu
01.10.2002 23:45
017198987676
Do we meet tomorrow?
Reply Options
Scroll through the message line by line.
below.
(p. 32).
Pictures and sounds in SMS
Pictures or sounds can be part of mes-
sages you receive.
Pictures are shown in the message,
sounds are indicated as notes. If a
note is reached when scrolling
through the message, the corresponding sound is played (to send
pictures and sounds see p. 35).
Note
T Message storage full................p. 71
Use §highlighted§ phone no./URL .....p. 72
Reply menu
§Reply§ Open the reply menu.
Write message
Edit
Answer is YES
Answer is NO
Call back
Delay
Thanks
When the message has been edited
in the editor, it can be stored or sent
with §Options§.
Create a new reply
text.
Edit message received
or assign a new text
to it.
Add YES to the
message.
Add NO to the
message.
Append a standard
text to the message as
a reply.

32
Messages (SMS)
Inbox/outbox
§Menu§KMessages
KInbox / or Outbox /
The list of saved messages is shown.
ƒ Barbara
… Carol
… 023598765432
View Options
§Options§ See below.
Symbol
ƒ
…
Inbox/outbox menu
Different functions are available depending on the context:
§Options§ Open menu.
View
Reply
Send
Edit
Delete
Delete all
Inbox /
Read
Unread
Read entry.
Directly answer incoming
SMS messages.
Dial number or select from
the Phonebook, then send.
Open editor for changes.
Delete selected message.
Delete all entries after
confirmation.
Outbox /
Not sent
Sent
Picture &
Sound
(p. 35)
Capacity
Status report
Mark as
unread
Save no. to
d
Move to
archive
Send with...
List pictures and sounds included in the message.
Display maximum and
available capacity.
(Outbox list only) Request
delivery confirmation for
L
messages sent.
Mark the message as
unread.
Copy a selected phone
number to the Phonebook.
Move message to the archive.
Change SMS profile before
sending (p. 61).
Archive
§Menu§KMessagesKArchive
The list of the messages recorded in
the archive is shown. Different functions are available depending on the
context.

Messages (SMS)
33
Archive menu
§Options§ Open menu.
View
Mark
Delete
Delete all
Rename
Sort
Attributes
Capacity
Read entry.
Highlight text to be edited.
Delete selected message.
Delete all saved messages
after confirmation.
Rename the entry.
Set sort criteria (alphabetical, time).
Display name, size and
date.
Display maximum and
available capacity for SMS
archive, special graphics
etc.
Compose a message
§Menu§KMessagesKNew SMS
J
Text input using "T9" (p. 66)
allows you to quickly create long SMS messages
using just a few key entries.
§Delete§ Press briefly to de-
lete letter by letter, hold
down to delete the entire
word.
A Press.
/
Dial number or pick out
J
Q
§OK§ Confirm. The message is
§OK§ Return to the message.
§Options§ Open menu and select
Display in the uppermost line:
™
abc/Abc/
T9
T9
SMS Display title.
1 Number of the required SMS
739 Number of characters still
Note
Insert pictures&sounds into text........p. 35
If Message type, Validity period,
Service center are requested.......... p. 61
Transmit ring tones............................p. 41
T9 information ..................................p. 66
Enter special characters ....................p. 70
SMS status report..............................p. 74
from the Phonebook.
sent to the service center
for transmission.
Save to store the message.
™
SMS 1 739
We start at 8 a.m.
Example for T9 active.
abc/
Abc/123
Lowercase/uppercase letters
and digits.
messages.
available.

34
Messages (SMS)
Text menu
§Options§ Open the text menu.
Send
Save
Picture &
Sound
Format Line feed
Clear text
Insert text
Insert from
d
Insert URL
Text input
Send
with...
Dial the number or select
from Phonebook, then send.
Save SMS in the outbox list.
Add pictures and sounds to
SMS (p. 35)
Small font, Medium font,
Large font
Underline
Left, Right, Center (align)
Mark text (highlight text with
the scroll key)
Delete the whole text.
Insert predefined text fragment.
Open Phonebook and copy
phone number into the message.
Insert URL from the WAP
bookmarks in the text.
T9 preferred: Activate/de-
activate T9 input (p. 66).
Input language: Select the
language in which the message is to be composed
(p. 66).
Change SMS profile before
sending (p. 61).
Predefined text
Standard text fragments which can
be added to messages are stored in
the phone. You can also create five
additional text fragments yourself.
Write text fragments
§Menu§KMessagesKPredefined text
G
J
§Save§ Press.
Select <New entry>.
Write text fragment.
Use text fragments
J
§Options§ Open the text menu.
G
G
§Select§ Confirm. The text frag-
Compose message.
Select Insert text.
Select text fragment from
the list.
ment is inserted in the
message at the cursor
position.
SMS to group
You can send messages (SMS messages) as "circulars" to all members
of a group (p. 28).

Messages (SMS)
35
Picture & Sound
Insert pictures and sounds in the
message (EMS, p. 70).
J
§Options§ Open the text menu at the
G
G
§Select§ Confirm.
G
§Select§ The picture/the animation
Compose the message.
end of a word.
Select Picture & Sound.
The Pictures&Sound
menu opens:
Fix animations
Fix sounds
Select range.
The first entry of the selected range is displayed.
Scroll in the list to the required entry.
is inserted in the message. Sounds are indicated by a musical note.
Note
Playback only occurs on phones that support this function.
In input mode a musical note is shown instead of the sound.
Sending simultaneous multiple ring tones is
not possible.
Bitmap viewer ..................................p. 40.
Activate SMS profile
You can change the current profile
(change settings, p. 61).
KMessagesKSMS profiles
§Menu§
G
§Select§ Press to activate. The cur-
Irrespective of this setting, you may
always decide before sending an
SMS which profile you want to use
(see text menu §Options§
with..., p. 34).
Select a profile.
rent profile is selected.
KSend

36
Surf & fun
Internet (WAP)
Get the latest WAP information from
the Internet that is specifically adapted to the display options of your
phone. In addition, you can download ringertones and logos to your
phone via WAP. Internet access may
require registration with the service
provider.
Internet access
§Menu§KSurf & funKInternet
The browser is activated as soon as
you call up the function. If necessary, set how the Internet access
should be made (see in the browser
menu Setup
The start menu appears, for
example:
G
§Select§ Confirm.
You can now surf the Internet. For
further instructions see p. 75.
KStart with..., p. 37).
Í Start menu É
1 Homepage
2 Bookmarks
3
Resume
Select required function.
L
Select
Start menu
Homepage
Bookmarks
Resume
Profiles
Inbox
Exit browser
The connection to the Internet provider's portal is
established (may be set/
preset by the service provider).
Display up to 10 URLs
L
stored in the phone for fast
access.
Call up recently visited
pages that are still in the
memory.
Set up to 5 access profiles
(p. 59).
Inbox for messages from
the WAP server.
Close the browser and
clear down the connection.
End connection
B
Hold down to end the
connection.

Surf & fun
37
Browser menu
If the browser is active, the menu
can be activated as follows:
A
or
E
Homepage
Bookmarks
Resume
Go to
URL
Show URL
Reload
Disconnect
More ...
Exit browser
Press
confirm Í.
The first WAP Internet
page that is displayed after connection is established (may have been
set/preset by the service
provider).
Display up to 10 URLs
L
stored in the phone for
fast access.
Call up recently visited
pages that are still in the
memory.
Enter URL for directly ac-
L
cessing an Internet address, e.g.
wap.my-siemens.com
Show the Internet address of the current page.
The page is reloaded.
End connection.
See below.
Close the browser and
clear down the connection.
More ...
Profiles
Reset
Setup Font size
Inbox
About
Openwave
Set up to 5 access profiles
(p. 59).
Delete the pages last
visited (cache).
L
Protocol parameters
•Push
• Push can force online
• Timeout for unanswered
network requests
Security
• Connection prompt
• Secure prompt
• Current certificate
• CA certificates
• Private Key PINs
• Encryption
Start with...
• Start menu
• Browser menu
• Homepage
• Resume
• Bookmarks
Inbox for messages from
the WAP server.
Display the browser
version.

38
Surf & fun
Note
Homepage: The control key (left/right) may
be assigned functions that are controlled
online from the homepage of your service
provider such as "link" or "menu". The contents of the option menus are also variable.
Displays:
Í Browser menu
É Offline
Ê Online
Ì No network
Enter special characters:
0 Press repeatedly for:
. , ? ! @ / & ~ + - :
WAP profiles
Preparation of the phone for Internet
access depends on the service provider currently used:
• If the settings have already beenmade by your service provider you
may begin immediately.
• If access profiles have been assigned by your service provider select a profile and activate it.
• The access profile must be set
manually (p. 59).
WAP profiles may be barred from
manual setting by your service provider. If necessary, check with your
service provider for details.
Activate WAP profiles
You can change the current profile
each time before accessing the Internet.
§Menu§
KSetup
KConnectivity
L
KWAP profiles
G
§Select§ Press to activate. The cur-
Your Internet browser is licensed by:
Activate HTTP profile
§Menu§KSetup
G
§Select§ Press to activate.
Select a profile.
rent profile is selected.
KConnectivity
KHTTP profiles
Select a profile.
L

Surf & fun
Games
§Menu§KSurf & funKGames
Select a game from the list and have
fun!
You will find the games “Stack Attack” and
“Balloon Shooter” on your mobile phone.
Game instructions
You will find special instructions for
each game in the option menu.
§Options§ Provides tips on how to
§Start§ Start game.
Key control
function depends
on the game
or
use the key
play the game, shows the
saved scores and allows
you to set the level of difficulty.
13
2
5
8
6
9
4
7
39
§Menu§
KSurf & fun
KGamesKSetup
Setup
You can activate and deactivate the
following functions for the games:
Sounds
You can switch the sounds for the
games on and off.
Illumination
You can switch off the display illumination to increase standby time.
Vibration
Phone vibrates for special game effects.

40
Surf & fun
Bitmap viewer
Set animations, wallpapers and
screensaver as required in your
phone.
Start bitmap viewer
You will find animations/pictures
and links stored in the phone under:
KSurf & funKBitmap viewer
§Menu§
G
Different functions are available depending on which entry is
highlighted:
Own animations/Own pictures
G
§Select§ Press.
G
§Load§ The animation/picture is
URL
Go to the link and surf online
§Internet§ The selected Internet
Screensaver/Wallpaper
See picture menu §Options§ p. 41.
Select storage location or
link:
Own animations
Own pictures
URL
Select folder.
Select animation/picture.
displayed.
L
L
page is loaded.
Receive pictures
_g
01.10.2002 12:30
— Menu
If a picture (graphic/screensaver) has
been received via SMS the — sym-
bol appears in the display. By pressing the control key (on the left), the
bitmap viewer is started and the picture is displayed.
When downloading via WAP, the bitmap viewer opens automatically.
Note
Pictures in the content of an SMS .....p. 31
Bitmapviewer menu
§Options§ Open menu.
Load ...
Mark
Delete
Delete all
Rename
Load new picture to the bitmap viewer.
Select the pictures/animations to be deleted.
Delete selected/highlighted
picture(s)/animation(s).
Delete all pictures/
animations.
Rename picture/animation.

Surf & fun
41
Sort
Attributes
Capacity
Set sort criteria.
Display name and size in
kByte.
Display available capacity
(in kByte) for sound manager, bitmap viewer and SMS
archive.
Picture menu
§Options§ Open menu.
Load ...
As screensaver
Use as
wallpaper
Delete
Load new picture to the bitmap viewer.
Use current graphic as
screensaver.
Use current graphic as (provider) wallpaper (see also
p. 52).
Delete selected picture.
Sound manager
You can use the sound manager to
play and manage sounds, ring tones
and melodies.
Optional: If you wish, you can also
download further ring tones from
the Internet if you have stored URLs
(links).
§Menu§
KSurf & funKSound manager
A list of the stored ring tones/melodies is displayed:
%
$
i
É URL : Surf online to
É Load via HTTP :
Ring tones/melodies that
have been received via
SMS or downloaded by
WAP/HTTP.
Ring tones/melodies that
you have stored from the
content of an SMS.
Unmodifiable ring tones
stored in the phone.
download ring
tones/melodies.
§Internet§ The selected
Internet page is loaded.
L
L
§Internet§ Enter Internet
address (URL). You can
start downloading with
§OK§.

42
Surf & fun
Sound manager menu
Different functions are available depending on which entry is highlighted.
§Options§ Open menu.
Play
Ring tone
for...
Volume
Delete
Rename
Attributes
Capacity
Play sound.
Assign a function/an anniversary to the ring tone.
Set the playback volume.
Delete sound.
Rename sound.
Display name, size and recording time.
Display available capacity
(in kByte) for sound manager, bitmap viewer and
SMS archive.
Receive melody
_g
01.10.2002 12:30
– Menu
If a melody has been received via
SMS a note
Press the control key (on the left), to
start the sound manager.
When downloading via WAP/
HTTP , the sound manager automatically opens as soon as the
process is completed (WAP-Profil,
p. 38; HTTP profile, p. 38).
– appears in the display.
L

Surf & fun
Ring tone for...
You can choose a special melody for
the call types/functions listed below.
§Menu§
KSurf & funKSound manager
§Options§ Open menu.
G
G
§Select§ Confirm.
G
§Select§ Confirm.
Note
For Other calls, a special ring tone can be
assigned to each of two phone numbers,
depending on your network provider.
Select Ring tone for....
Select call type/function:
d Calls
Group calls
Other calls
Alarms
Messages
Cell broadcast
Choose a melody from
the list.
43

44
Organizer
Alarm clock
§Menu§KOrganizerKAlarm clock
Use this function to set a single time
for the alarm call. The alarm sounds
even when the phone is switched
off.
z 07:30
Mo Tu We Th Fr Sa Su
Change On
§On§ / §Off§ Activate/deactivate the
Setting
§Change§ Display the set time and
alarm.
dates for the alarm calls.
Set the time for the alarm
call (hh:mm).
G Navigate to the days.
§Change§ Set the days for the alarm
§OK§ Confirm settings.
Note
y Alarm clock switched on.
y
z Alarm clock switched off.
call.
Alarm clock active (display in
standby mode).
Calculator
§Menu§KOrganizerKCalculator
J
Enter number
(up to 8 digits).
G Function "+" or "-".
Or
§. =+ - * /§ Press control key repeat-
J
#
Calculator functions
§. =+ - * /§ Press control key repeatedly
.
= Result.
+
*
/
± Toggle between "+" and "-".
% Convert to percentage.
e Exponent (maximum of two
Special keys:
* Set decimal point.
0 Add (hold down).
edly on the right.
Repeat procedure with
other numbers.
Result is displayed.
on the right:
Set decimal point.
Addition.
Subtraction.
Multiplication.
Division.
Save the number displayed.
Retrieve the number saved.
digits).

Voice message/Mailbox
45
Most service providers offer you an
external answering service. In this
voicemail, a caller may leave a voice
message for you
• if your phone is switched off or
not ready to receive,
• if you do not want to answer calls,
• if you are making a phone call
(and if Call waiting is not active,
p. 55).
If the voicemail service is not part of
your service provider's user package,
you will need to register for it and
the settings must be made manually.
The procedure described below may
vary slightly depending on the service provider.
Settings
Your service provider supplies you
with two phone numbers:
Voicemail number
You call this phone number to listen
to the voice mails left for you. To set
it up:
§Menu§
KMessagesKVoice message
Select phone number from Phonebook or dial/change it and confirm
with §OK§.
Call forward
Calls are forwarded to this phone
number. To set it up:
L
§Menu§
KSetupKPhone setup
KCall forward
J
§OK§ Registration at the net-
For further information on call forward, see p. 55.
Play back messages
A new voicemail can be announced
as follows:
\
Or
…
Or
You receive a call with an automatic
announcement.
Call your voicemail and play the message(s) back.
1
Outside your home network, you
may need to dial a different voicemail number and enter a password
to access your voicemail.
Dial the number of the
voicemail.
work will be confirmed
after a few seconds.
L
Icon including beep.
A text message announces a new voicemail.
Hold down (if necessary
enter voicemail number
once only).
Confirm with §OK§ or
§Mailbox§ depending on
your service provider.

46
CB services
mation services (info channels). If reception is activated, you receive
messages on the activated topics in
your "Topic list".
§Menu§
KMessagesKCell broadcast
Reception
You can activate and deactivate the
CB service. If the CB service is activated, the standby time of the phone
will be reduced.
L
Read new CB
All unread CB messages are
displayed.
Topic list
You can add an unrestricted number
of topics to this personal list from the
topic index (Topic index). You can
preset 10 entries with their channel
numbers (ID) and, if applicable, with
their names.
New topic
Select New topic.
• If no topic index (Topic index) is
available enter a topic with its
channel number and confirm
with §OK§.
• If the topic index has already been
transmitted select a topic and confirm with §OK§.
Selection from a list
§Options§ Open list menu.
If a topic is selected in the list you
can have a look at it, activate, deactivate, edit or delete it.
Auto display
CB messages are displayed in standby mode, longer messages are automatically scrolled. This display can
be activated/deactivated for all or
only new messages.
To switch to "full page view":
#, then press §View CB§.
Topic index
The list of topics is displayed for you
to choose from. If none are displayed, you must enter the channel
numbers (ID) manually (Topic list).
Please contact your service provider
for details.
CB languages
You may define whether you want to
receive Cell Broadcast messages in a
specific language only or in all languages.
Displays
o,
…
Topic activated/deactivated.
p
New messages received on
the topic.
L
ƒ Messages already read.

Profiles
47
are made with one function.
• Five profiles are standard with default settings, they can be
changed however:
Normal envi.
Quiet environ.
Noisy environ.
Car Kit
Headset
• You can set one personal profiles
(<Empty>).
• The special profile Aircraft mode is
fixed and cannot be changed
(p. 48).
If the phone is used by several people, they can each activate their own
settings by selecting their individual
profile.
Activate
§Menu§KProfiles
G
§Select§ Activate the profile.
Select default profile or
personal profile.
¾ Normal envi.
½ Quiet environ.
¾Noisy environ.
Options Select
½ Active profile.
Setup
Edit a default profile or create a new
personal profile:
G Select profile.
§Options§ Open menu.
Change settings Select.
The list of available functions is
displayed:
Ringer setting ...................................p. 53
Volume .............................................p. 53
Call screening ...................................p. 54
Vibra. alert ........................................ p. 53
Key tones .........................................p. 54
Info tones ..........................................p. 54
Illumination .......................................p. 53
Big letters ..........................................p. 53
Appearance.......................................p. 52
When you have finished setting a
function, you return to the profile
menu where you can change a further setting.

48
Profiles
Profile menu
§Options§ Open menu.
Change settings
Copy from
Rename
Change profile
settings.
Copy settings from
another profile.
Rename personal
profile.
Car Kit
If an original Siemens Car Kit is used
(p. 83) the profile is activated automatically as soon as the phone is inserted into the cradle (p. 65).
Headset
If an original Siemens headset is
used (p. 83), the profile is activated
automatically as soon as the headset
is plugged in (p. 65).
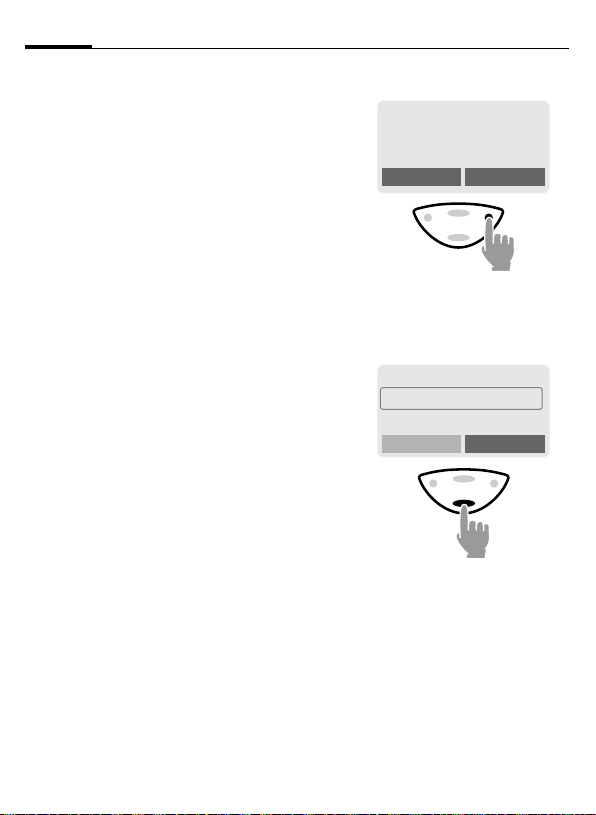
Aircraft mode
All alarms (alarm clock) are deactivated. It is not possible to modify this
profile. When you select this profile,
the phone is switched off after a
prompt.
Activate
G
§Select§ Activate the profile.
Normal operation
The next time you switch on the
phone and return to normal operation the default profile Normal envi.
will be activated.
Scroll to Aircraft mode.
A security prompt must be
confirmed.
The phone switches itself
off automatically.
 Loading...