

Page 1

Gigaset A200 / IM eng / A31008-A200-J101-2-7619 / cover_I.fm / 12.06.2003
s
Be inspired
Gigaset
A 200
A 200 Duo
Page 2
Gigaset A200 / IM eng / A31008-A200-J101-2-7619 / cover_II.fm / 12.06.2003
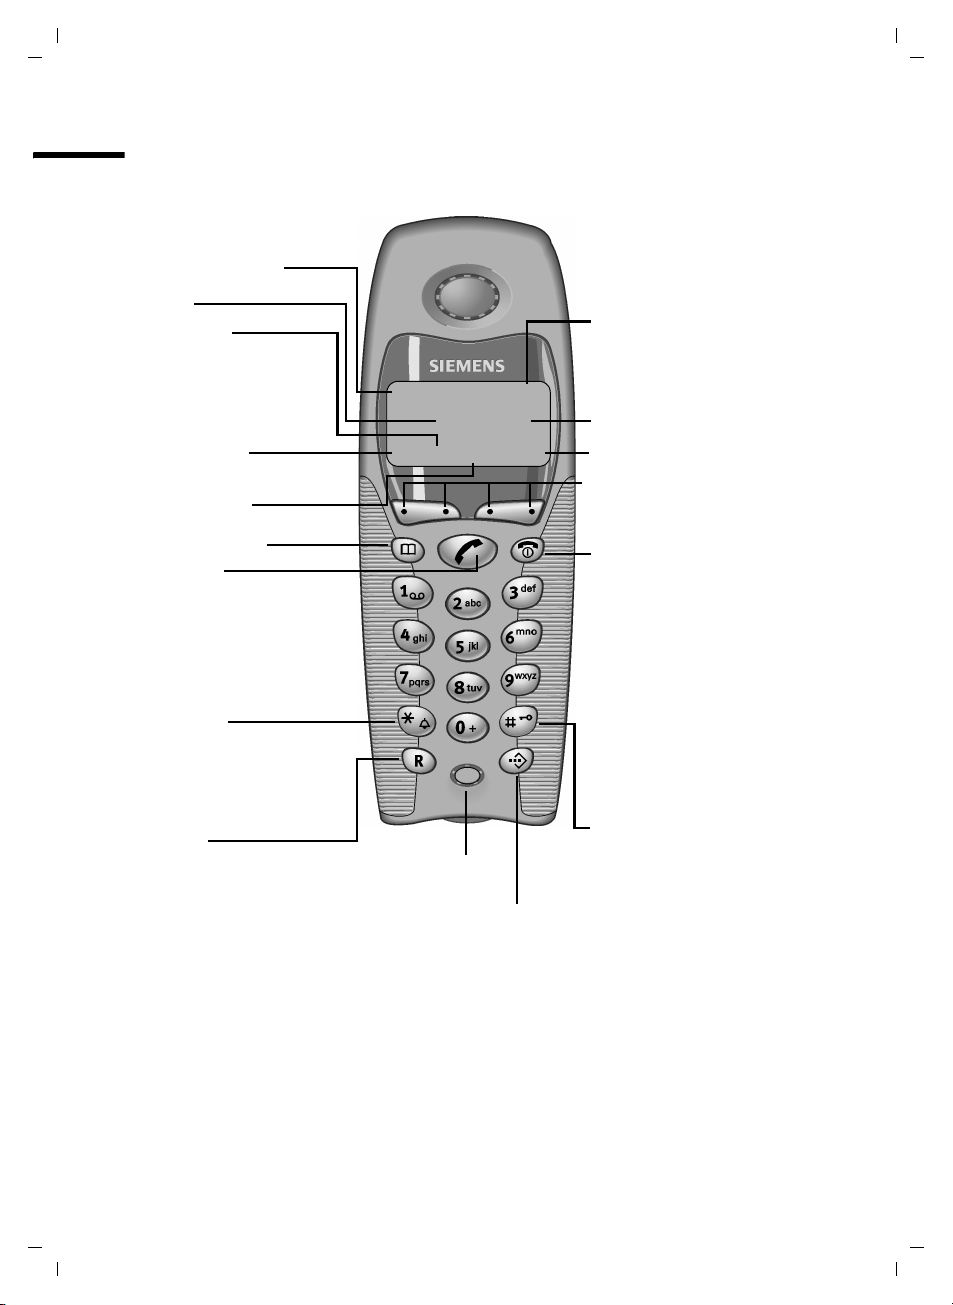
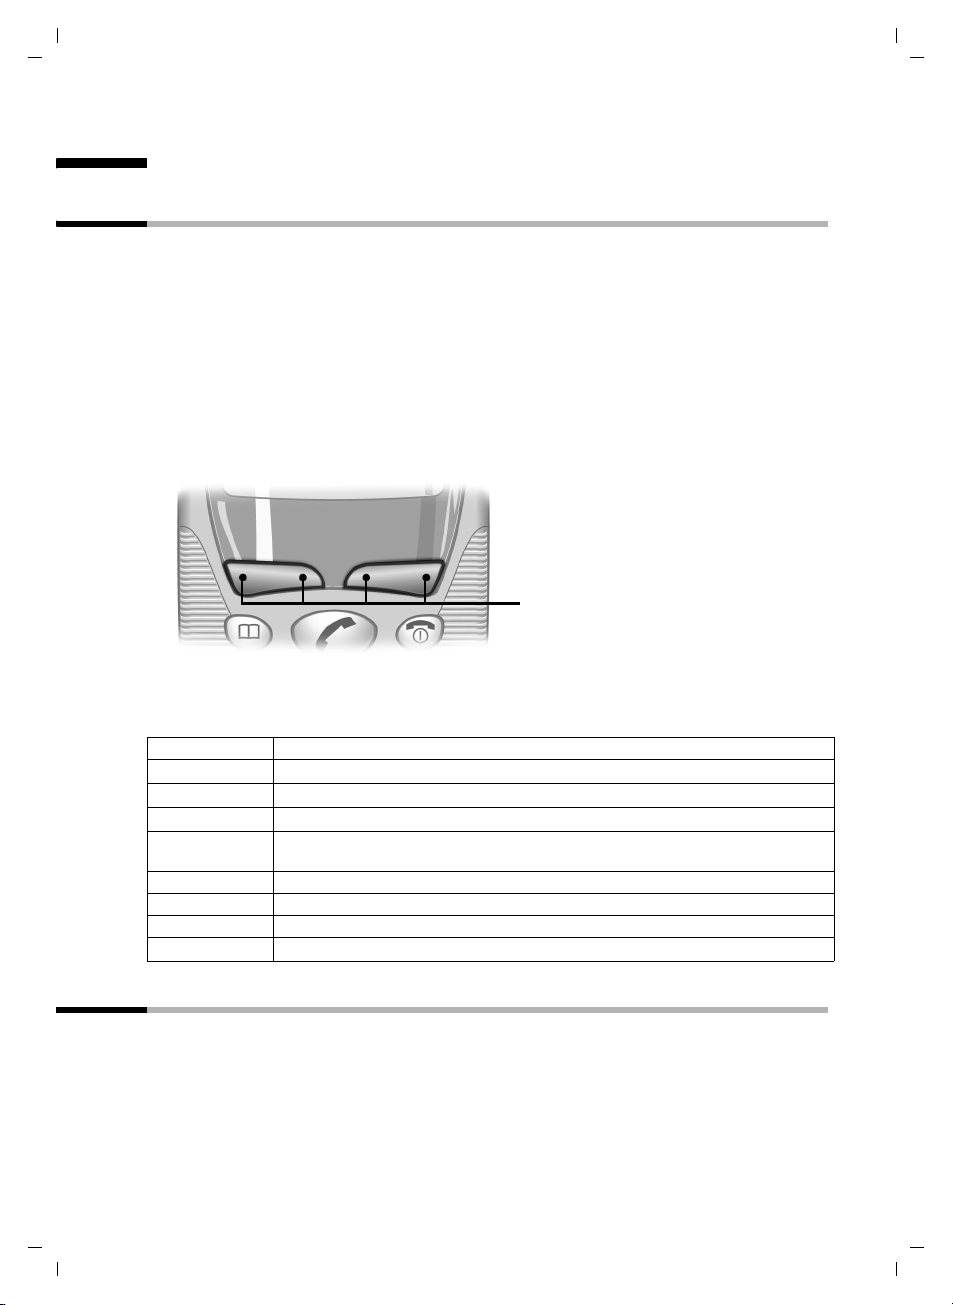
Brief overview
Brief overview
Internal number
of handset
Time
Caller list
Access to
◆ Answering
machine/mail box
◆ Caller list
Redial
Internal list
key
Tal k key
◆ Accept call
◆ Start dialling
Star key
◆ Ringer on/off (press for
approx. 2 secs)
1 V
22-35
ÞÜ INTMENU
Battery charging status
= flat U full
flashing: battery almost
empty
Display
Menu
keys
Activate current functions
in display
End call and
on/off key
◆ End call
◆ End function
◆ Back one menu level
(press briefly)
◆ Back to standby (press
for approx. 1 sec)
◆ Handset on/off (press
for approx. 2 secs)
key
◆ Enquiry (Flash)
◆ Enter dial pause
(hold down)
II
Microphone
Select Services key
Open network access list
Hash key
on/off (approx. 2 secs)
Page 3

Gigaset A200 / IM eng / A31008-A200-J101-2-7619 / A_200IVZ.fm / 12.06.2003
Contents
Brief overview . . . . . . . . . . . . . . . . . . . . . . . . . . . . . . . II
Safety precautions . . . . . . . . . . . . . . . . . . . . . . . . . . . 3
Making the phone ready for service . . . . . . . . . . . . 4
Positioning the base station . . . . . . . . . . . . . . . . . . . . . . . . . . . . . . . . . . . . . . . . . . . . . 4
Step 1: Connecting the base station . . . . . . . . . . . . . . . . . . . . . . . . . . . . . . . . . . . . . . . 5
Step 2: Making the handset ready for service . . . . . . . . . . . . . . . . . . . . . . . . . . . . . . . . 6
Step 3: Registering the handset with the base station and charging the batteries . . . 7
Switching the handset on and off . . . . . . . . . . . . . . . . . . . . . . . . . . . . . . . . . . . . . . . . . 8
Activating/deactivating keypad protection . . . . . . . . . . . . . . . . . . . . . . . . . . . . . . . . . . 8
Operating the phone and menu management . . . . 9
Display keys . . . . . . . . . . . . . . . . . . . . . . . . . . . . . . . . . . . . . . . . . . . . . . . . . . . . . . . . . . 9
Signal tones . . . . . . . . . . . . . . . . . . . . . . . . . . . . . . . . . . . . . . . . . . . . . . . . . . . . . . . . . . 9
Display in idle status . . . . . . . . . . . . . . . . . . . . . . . . . . . . . . . . . . . . . . . . . . . . . . . . . . 10
Menu management . . . . . . . . . . . . . . . . . . . . . . . . . . . . . . . . . . . . . . . . . . . . . . . . . . . 10
Time functions . . . . . . . . . . . . . . . . . . . . . . . . . . . . 11
Set date and time . . . . . . . . . . . . . . . . . . . . . . . . . . . . . . . . . . . . . . . . . . . . . . . . . . . . 11
Contents
Making calls . . . . . . . . . . . . . . . . . . . . . . . . . . . . . . 12
Making external calls and ending a call . . . . . . . . . . . . . . . . . . . . . . . . . . . . . . . . . . . 12
Accepting a call . . . . . . . . . . . . . . . . . . . . . . . . . . . . . . . . . . . . . . . . . . . . . . . . . . . . . . 12
Displaying the caller's phone number (CLIP/CLI) . . . . . . . . . . . . . . . . . . . . . . . . . . . . 12
Putting on hold . . . . . . . . . . . . . . . . . . . . . . . . . . . . . . . . . . . . . . . . . . . . . . . . . . . . . . 13
Using the directory and other lists . . . . . . . . . . . . 14
Directory and network access list . . . . . . . . . . . . . . . . . . . . . . . . . . . . . . . . . . . . . . . . 14
Redial list . . . . . . . . . . . . . . . . . . . . . . . . . . . . . . . . . . . . . . . . . . . . . . . . . . . . . . . . . . . 17
Caller list . . . . . . . . . . . . . . . . . . . . . . . . . . . . . . . . . . . . . . . . . . . . . . . . . . . . . . . . . . . 18
Registering and de-registering handsets . . . . . . . 20
Automatic registration: Gigaset A 2 handset . . . . . . . . . . . . . . . . . . . . . . . . . . . . . . . 20
Manual registration: Gigaset A 2 handset . . . . . . . . . . . . . . . . . . . . . . . . . . . . . . . . . . 20
Specific registration: other handsets . . . . . . . . . . . . . . . . . . . . . . . . . . . . . . . . . . . . . 21
De-registering handsets. . . . . . . . . . . . . . . . . . . . . . . . . . . . . . . . . . . . . . . . . . . . . . . . 21
1
Page 4

Gigaset A200 / IM eng / A31008-A200-J101-2-7619 / A_200IVZ.fm / 12.06.2003
Contents
Operating more than one handset . . . . . . . . . . . . 22
Making internal calls and ending calls . . . . . . . . . . . . . . . . . . . . . . . . . . . . . . . . . . . . . 22
Internal enquiry call . . . . . . . . . . . . . . . . . . . . . . . . . . . . . . . . . . . . . . . . . . . . . . . . . . . 23
Accepting/rejecting a waiting call during an internal call . . . . . . . . . . . . . . . . . . . . . . 23
Barging in on an external call . . . . . . . . . . . . . . . . . . . . . . . . . . . . . . . . . . . . . . . . . . . 24
Paging . . . . . . . . . . . . . . . . . . . . . . . . . . . . . . . . . . . . . . . . . . . . . . . . . . . . . . . . . . . . . . 24
Handset settings . . . . . . . . . . . . . . . . . . . . . . . . . . . 25
Change display language . . . . . . . . . . . . . . . . . . . . . . . . . . . . . . . . . . . . . . . . . . . . . . . 25
Activate/deactivate automatic call acceptance . . . . . . . . . . . . . . . . . . . . . . . . . . . . . . 25
Change volume and ringtone . . . . . . . . . . . . . . . . . . . . . . . . . . . . . . . . . . . . . . . . . . . 25
Activate/deactivate ringer . . . . . . . . . . . . . . . . . . . . . . . . . . . . . . . . . . . . . . . . . . . . . . 26
Activate/deactivate battery warning tone . . . . . . . . . . . . . . . . . . . . . . . . . . . . . . . . . . 26
Return handset to factory settings . . . . . . . . . . . . . . . . . . . . . . . . . . . . . . . . . . . . . . . . 26
Base station settings . . . . . . . . . . . . . . . . . . . . . . . . 27
Changing the system-PIN . . . . . . . . . . . . . . . . . . . . . . . . . . . . . . . . . . . . . . . . . . . . . . . 27
Return base station to factory (default) settings . . . . . . . . . . . . . . . . . . . . . . . . . . . . . 27
Appendix . . . . . . . . . . . . . . . . . . . . . . . . . . . . . . . . . 28
Questions and Answers . . . . . . . . . . . . . . . . . . . . . . . . . . . . . . . . . . . . . . . . . . . . . . . . 28
Care . . . . . . . . . . . . . . . . . . . . . . . . . . . . . . . . . . . . . . . . . . . . . . . . . . . . . . . . . . . . . . . 29
Contact with liquid . . . . . . . . . . . . . . . . . . . . . . . . . . . . . . . . . . . . . . . . . . . . . . . . . . . 29
Operation with a PABX . . . . . . . . . . . . . . . . . . . . . . . . . . . . . . . . . . . . . . . . . . . . . . . . . 29
Other Settings . . . . . . . . . . . . . . . . . . . . . . . . . . . . . . . . . . . . . . . . . . . . . . . . . . . . . . . 30
Technical data . . . . . . . . . . . . . . . . . . . . . . . . . . . . . . . . . . . . . . . . . . . . . . . . . . . . . . . 32
Service (Customer Care) . . . . . . . . . . . . . . . . . . . . . . . . . . . . . . . . . . . . . . . . . . . . . . . 33
Menu overview . . . . . . . . . . . . . . . . . . . . . . . . . . . . 35
Main menu . . . . . . . . . . . . . . . . . . . . . . . . . . . . . . . . . . . . . . . . . . . . . . . . . . . . . . . . . . 35
Directory key and network operator list key . . . . . . . . . . . . . . . . . . . . . . . . . . . . . . . . 36
Caller list . . . . . . . . . . . . . . . . . . . . . . . . . . . . . . . . . . . . . . . . . . . . . . . . . . . . . . . . . . . . 36
Index . . . . . . . . . . . . . . . . . . . . . . . . . . . . . . . . . . . . . 37
2
Page 5

Gigaset A200 / IM eng / A31008-A200-J101-2-7619 / starting.fm / 12.06.2003
Safety precautions
Safety precautions
Use only the power unit supplied, as indicated on the underside of the base
$
station.
Insert only approved rechargeable batteries of the same type (page 32)!
Never use ordinary (non-rechargeable) batteries as they may pose a health
hazard or cause injury.
‹
Œ
Make sure you insert rechargeable batteries the right way round and use the
battery type specified in this operating manual (as indicated in the
battery compartment)
The phone may affect medical equipment. Always observe the technical
restrictions in your environment (e.g. hospitals or doctors' practices).
The handset may cause an unpleasant humming noise in hearing aids. Do not
hold the handset against your ear while it is ringing (incoming call).
Do not install the phone in a bathroom or shower. The handset and base station are not splash proof (page 29).
Do not operate the phone in places where there is a risk of explosion (such as
paint workshops).
.
!
handset
ƒ
If you give your Gigaset to someone else, make sure you also also give them
the operating manual.
Dispose of batteries and phone carefully. Do not pollute the environment.
◆ Emergency numbers cannot be dialled if the keypad lock (page 8) is
i
activated!
◆ Not all the functions described in this operating manual are available
in all countries.
3
Page 6
Gigaset A200 / IM eng / A31008-A200-J101-2-7619 / starting.fm / 12.06.2003
Making the phone ready for service
Making the phone ready for service
Positioning the base station
Advice on a suitable place
The base station is designed for use in a dry, closed space with a temperature range
between +5 °C and +45 °C. Place the base station in a central position in the flat/house,
e.g. in the hallway.
◆ Avoid exposing your phone to sources of heat, direct sunshine, and
W
Range
The range is dependent on the nature of the building and other local conditions.
Outdoors it is approx. 300 m. Indoors the range is up to 50 m.
other electrical devices.
◆ Protect your Gigaset from damp, dust, dangerous liquids and steam.
4
Page 7
Gigaset A200 / IM eng / A31008-A200-J101-2-7619 / starting.fm / 12.06.2003
Making the phone ready for service
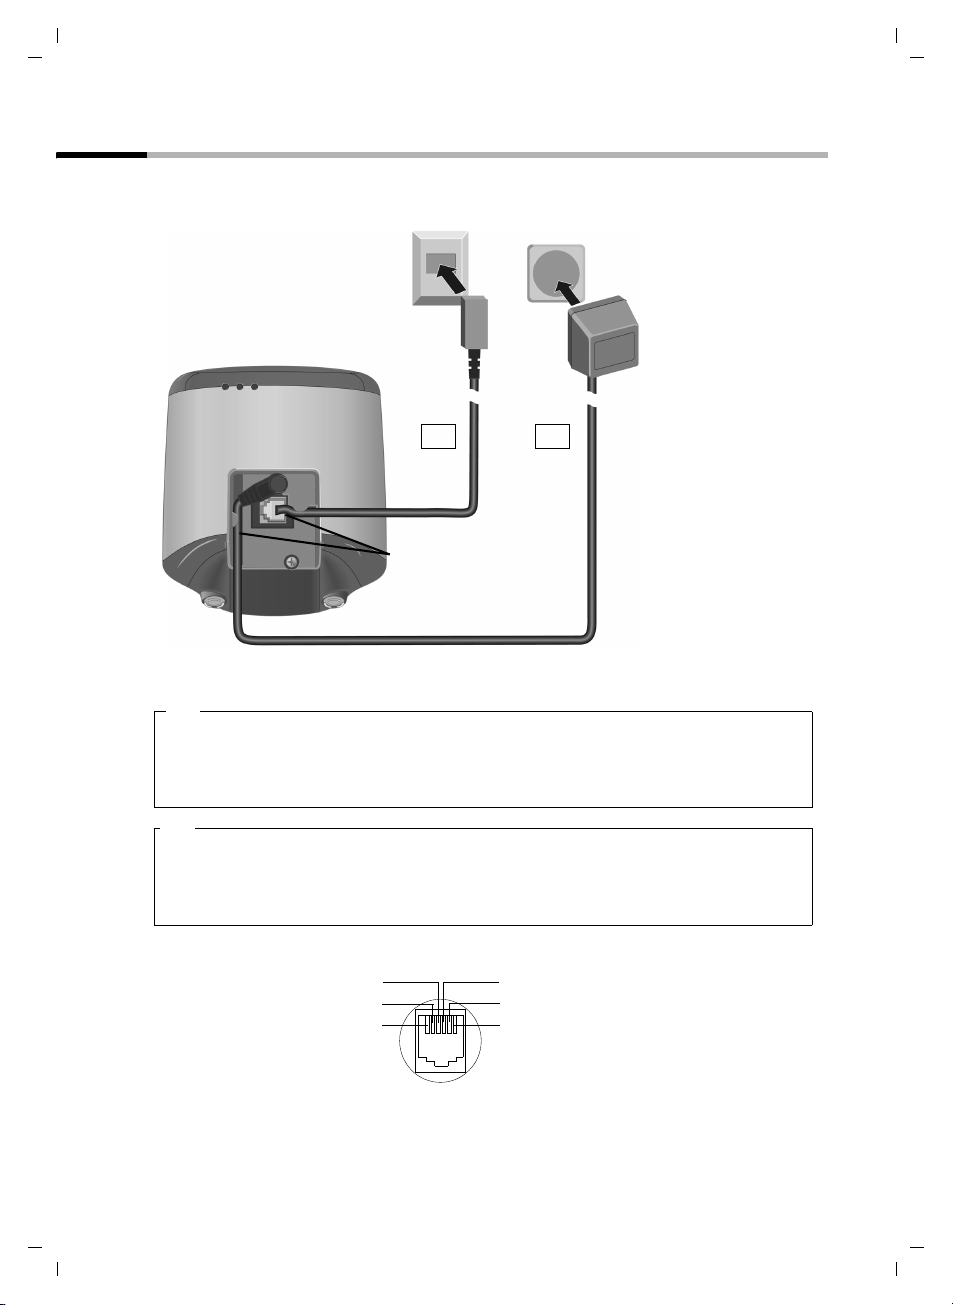
Step 1: Connecting the base station
First connect your base station to the mains supply and the telephone socket.
Telephone jack with
telephone cable
Power supply unit
(220/230V)
with power cable
2. 1.
Cable channels
Underneath the base station
1.
◆ Insert small power cable plug into the socket under the base station.
◆ Lay the cable correctly in the cable channel.
◆ Plug the power supply unit into the power socket.
2.
◆ small coloured plug on the telephone cable into the socket (clicks in).
◆ Lay the cable correctly in the cable channel.
◆ Plug the phone into the phone socket.
Tel eph one jac k as sig nme nt:
4
3
2
1
free
1
free
2
5
a
3
6
b
4
free
5
free
6
5
Page 8
Gigaset A200 / IM eng / A31008-A200-J101-2-7619 / starting.fm / 12.06.2003
Making the phone ready for service
◆ Use only the power supply unit supplied.
◆ If you buy another phone cable, ensure that it has the right connector
i
assignment for your country.
◆ To keep your phone operational, the power supply unit must always
remain plugged in.
Step 2: Making the handset ready for service
Remove protective film
The handset display is protected by a film.
Please remove the protective film!
Insert batteries
◆ Insert the batteries the right way round – see illustration left.
◆ Place the cover on the battery compartment about 3mm down from the latch and
push it up until it clicks into position.
To o pen the cover, press on the ridged section and push downwards.
◆ Insert only approved, rechargeable batteries of the same type
(page 32)! Never use normal batteries, since these could lead to a
W
health hazard or cause injury.
◆ Do not use a non-Siemens charging unit as this could damage the
batteries.
6
Page 9

Gigaset A200 / IM eng / A31008-A200-J101-2-7619 / starting.fm / 12.06.2003
Making the phone ready for service
Step 3: Registering the handset with the base station and charging the batteries
Place your handset in the base station with the display visible at the front – the con-
firmation tone will ring (rising sequence of tones). The handset will then register itself
automatically with the base station (page 20), all symbols flashing in the display. The
process takes about a minute. Once completed, "1" will appear in the top, left-hand cor-
ner of the display. This handset has been allocated the first internal number.
Only for A200 Duo: To register a second handset, proceed as described above. After
successful registration, "2" will then appear in the top, left-hand corner of the display.
i
Now leave the handset in the base station to allow the batteries to charge, since these
are not charged prior to delivery. The battery charging process is indicated on the handset by a flashing battery symbol
= Flat batteries V Batteries
e Batteries
Once the batteries have been charged, your phone is ready for service. You need to set
the date and time to ensure that the time of incoming calls can be noted correctly
(page 11).
i
◆ To regist er further handsets, see page 20 onwards.
=.
2
/3 charged
1
/3 charged U Batteries full
◆ For the first charging we recommend a continuous charging time as
shown in the table (page 32) – regardless of the charging status
shown in the display! Battery capacity reduces for technical reasons
after a period of time.
◆ The batteries warm up during charging - this is normal and not a cause
for concern.
◆ The correct charging status for the batteries will only be shown after
an unbroken charging/discharging cycle. You should therefore not
open the battery compartment unnecessarily.
◆ Once the first charging cycle is completed you can put your handset
back in the base station after each call. Charging is controlled electronically. This ensures optimum battery charging without overloading.
7
Page 10
Gigaset A200 / IM eng / A31008-A200-J101-2-7619 / starting.fm / 12.06.2003
Making the phone ready for service
Switching the handset on and off
To switch the handset on or off, press the end call key a.
Afterwards the confirmation tone rings (see page 9).
i
If you place a handset that is switched off in the base station or a charging
unit, it will automatically switch itself on.
Activating/deactivating keypad protection
You can lock the handset keypad if, for example, you are carrying the handset. This prevents keys beeing pressed by accident.
Activating keypad
protection:
Deactivating keypad
protection:
◆ The key lock switches itself off automatically if you receive a call. At
i
the end of the call it switches itself on again.
◆ Emergency numbers cannot be dialled if the key lock is activated!
Hold hash key R down (confirmation tone). The
symbol
Hold hash key R down (confirmation tone).
Ø appears in the display.
8
Page 11
Gigaset A200 / IM eng / A31008-A200-J101-2-7619 / guidance.fm / 12.06.2003
Operating the phone and menu management
Operating the phone and menu management
Display keys
Display keys are the long keys directly below the display. Your handset has two display
keys. Each of these is operated like a rocker key, i.e. it can be pushed down on the left-
hand as well as the right-hand side. Dependent on the current operating status and
which side of the key you press, you will call up a particular function. This function is
shown directly above the display key.
An example of the right-hand display key:
The word MENU is shown above the right-hand side of the display key. By pressing the
right-hand side you will open the menu. The display symbol INT is shown above the
left-hand side of the display key. By pressing the left-hand side you will open the list of
internal phones.
ÞÜ
The various display symbols have the following meanings:
Display symbol Meaning when pressed
Þ
Ü
[______ ]
INT
[______________ ]
MENU
Automatic redial key: Opens a list of the last 5 numbers dialled (page 17)
Mailbox symbol: Opens caller list and answering machine/mailbox (page 18).
Internal: Opens the list of internal phones.
Menu: Activates the main menu when in standby.
Activates a status-dependent menu when in talk mode.
INT MENU
Display keys
t or s Scrolls up or down.
u or v Moves cursor to the left or right.
ß Delete key: Deletes character by character, from the right to the left.
[______ ]
OK
Confirm menu function or confirm and save entry.
Signal tones
Your phone will inform you acoustically about certain actions and situations.
◆ Rising ringtone (confirmation tone):
The action has been carried out or the entry is correct.
◆ Falling ringtone (error tone):
The function has not worked or the entry is incorrect.
9
Page 12
Gigaset A200 / IM eng / A31008-A200-J101-2-7619 / guidance.fm / 12.06.2003
Operating the phone and menu management
Display in idle status
1 V
22-35
Display in idle status
(date and time already
set)
ÞÜINT MENU
Return from any position in the menu to idle status
◆ Hold down call end key a for approx. 1 sec. or
◆ don't press a key: after 60 secs. the display will automatically return to idle status.
Changes that you have not confirmed by pressing OK will be rejected.
i
If you press the call end key a briefly and just once, you will return to
the previous menu level.
Menu management
Your phone has an extensive range of features. They are presented to you by a menu
th at is m ade up of a nu mber o f lev els. You will find fu ncti ons su ch as AUDIO SET, BASE
SET etc. in the main menu, with their respective sub-menus in the next level. A menu
overview provides the necessary orientation (page 35).
There are two ways to access a function
◆ by scrolling with the t and s keys,
◆ by entering the relevant combination of digits (page 35).
Extract from the menu overview
3
BASE SET
3-1
DATE/TIME
3-1-1
3-1-2
3-1-3
DATE SET
CLOCK SET
CLOCK
MODE
3-1-3-1
3-1-3-2
24 H
12 H
10
Page 13

Gigaset A200 / IM eng / A31008-A200-J101-2-7619 / TimeCalendar.fm / 12.06.2003
Time functions
Time functions
Set date and time
Settings for date and time are needed to ensure that these are shown correctly for
incoming calls. For the time you can choose between a 12-hour and 24-hour display
(default setting).
Date
MENU ¢ BASE SET ¢ DATE/TIME ¢ DATE SET
The current setting is displayed in the format DD-MM-YY.
[______]
OK
Time
MENU ¢ BASE SET ¢ DATE/TIME ¢ CLOCK SET
The current setting is displayed in the format HH-MM.
[______]
OK
Enter day/month/year and confirm.
Example: Press the keys
for "20.05.2003".
Long press (return to idle status).
Enter hours/minutes. Example: Press the keys
2 Q Q 5 Q I
1O Q 5 for "19.05".
Long press (return to idle status).
If you want a 12-hour display you must enter Q M Q 5 for "19:05",
i
confirm with
(AM = 1st half; PM = 2nd half).
OK and then confirm PM OK for the 2nd half of the day
Display mode (24-hour or 12-hour display)
MENU ¢ BASE SET ¢ DATE/TIME ¢ CLOCK MODE
either ...
[__________] [__________________________________________ ____] [___ _______]
12 H OK
or ...
[______________________________________________] [______ ____]
24 H OK
Select 12-hour display:
Select and confirm.
Select 24-hour display:
Confirm.
Long press (return to idle status).
11
Page 14

Gigaset A200 / IM eng / A31008-A200-J101-2-7619 / telephony.fm / 12.06.2003
Making calls
Making calls
Making external calls and ending a call
External calls are calls using the public telephone network.
Enter the phone number and press the talk key.
The phone number is dialled.
Finish call:
Press end call key.
◆ You can also first press the talk key c (you will hear the dial tone)
i
Accepting a call
Your handset rings, the call is shown in the display.
Press the call key
tion and automatic call acceptance is activated (page 25), you only have to pick up the
phone from the station to accept the call.
and then enter the phone number.
◆ You end the call by pressing the end call key a.
◆ To find out how to make internal calls read page 22.
c to accept the call. If the handset is in the base station/charge sta-
If the ringer is disturbing you, press the MENU display key and confirm
i
SILENT with OK. As long as the call is shown in the display, you can
accept it.
Displaying the caller's phone number (CLIP/CLI)
The phone number of the caller is shown in the display during a call.
Requirements:
1. You have asked your network operator to enable the caller's phone number to be
shown in your display (CLIP).
2. The caller has asked the network operator to pass on his/her phone number (CLI).
i
12
Passing on a phone number may incur costs. For more information please
contact your network operator.
Page 15

Gigaset A200 / IM eng / A31008-A200-J101-2-7619 / telephony.fm / 12.06.2003
If you have stored an entry for a phone number in your handset directory (see page 14),
the name in the directory will appear instead of the phone number, e.g. "Tom ".
V
023031230
MENU
If you do not have CLIP, "<< >>" will appear instead of the phone number.
If the caller does not have CLI or has withheld his/her phone number, "WITHHELD" will
appear in the display.
CLIP Calling Line Identification Presentation = the caller's phone number is
displayed
CLI Calling Line Identification = your own phone number is passed on during
external calls.
Phone number
or name
Putting on hold
During external calls you can put the incoming call on hold, so that, you can talk discrectly to another person in the room for example. During this time the caller on the
phone cannot hear you (music on hold). Nor can you hear the caller.
[_______]
INT
[_______________]
MENU
[______________________________________________] [______ ____]
GO BACK OK
Press (INT ). The conversation takes place (music on
hold).
Ending call hold:
Press display key to open menu.
Confirm.
Making calls
i
You can also cancel the “on hold” function by briefly pressing the “replace
handset” key
a.
13
Page 16

Gigaset A200 / IM eng / A31008-A200-J101-2-7619 / Directories.fm / 12.06.2003
Using the directory and other lists
Using the directory and other lists
Directory and network access list
Both lists are used in the same way, except that the h key is pressed to open the directory and the
You can save up to 20 phone numbers and names in the directory
ling easier.
You can save up to 10 prefix numbers from phone companies (call-by-call) in the net-
work access list
Maximum number of characters per entry
◆ Directory entry 22 characters
◆ Network access list entry 12 characters
Save phone number in directory network access list
C key to open the network access list.
h. This makes dial-
C, for cost-effective calling.
or
[_______________]
MENU
[__________] [__________________________________________ ____] [___ _______]
NEW ENTRY OK
[______]
OK
[______]
OK
If your ph one is connected to a PABX that requ ires a prefi x (e.g. "0") for an
i
Directory entries are generally sorted alphabetically, however blanks and digits have
first priority. The sort sequence is as follows:
1. Blank
2. Digits (0–9)
3. Letters (alphabetically)
4. Other characters.
To avoid the alphabetical sort sequence of entries in the directory, enter a blank before
a name. This entry then moves up to the first place (e.g. enter the name " Tom").
i
outside line, then you must save this prefix number as the first digit in all
your directory entries.
Control the cursor with u v. Delete characters with ß. Letters are
always inserted to the left of the cursor.
Open directory or network access list.
Press display key to open menu.
Select and confirm.
Enter phone number and confirm.
Enter name (max. 12 characters)
(Text entry page 31) and confirm.
Long press (return to idle mode).
14
Page 17

Gigaset A200 / IM eng / A31008-A200-J101-2-7619 / Directories.fm / 12.06.2003
Using the directory and other lists
Dialling with the directory
Open directory.
Enter the first letter of the name. For example: with
the name Emma (first letter "E") press the
twice. The first name with "E" is displayed.
If there is more than one entry starting with "E",
select the name you want.
Press the talk key. The number is dialled.
Dialling with the network access list (call-by-call)
With this function the prefix for a network operator can be inserted in front of a phone
number ("chained").
C ¢ MENU ¢ EDIT ENTRY
either ...
or ...
[__________] [______]
OK
... then
Key in phone number:
Enter phone number.
Select phone number from the directory:
Open directory.
Select phone number and confirm.
Press the talk key. The number is dialled.
I key
Speed dialling (call-by-call) from the network access list
You can save eight numbers (2-9) in the network access list for speed dialling. To do so
you must insert the number for speed dialling in front of the name of the network operator.
Example: Enter 2 and then the name of the network operator.
C ¢ MENU ¢ SHOW ENTRY
[___________]
OK
[___________]
u
[___________]
OK
i
When saving a new entry simply enter the speed dial number as the first
digit.
Confirm.
Move the cursor to the first position in the name
field.
Enter speed dialling number, e.g.
Confirm.
2 (press 4 times)
15
Page 18

Gigaset A200 / IM eng / A31008-A200-J101-2-7619 / Directories.fm / 12.06.2003
Using the directory and other lists
In order to use speed dialling:
either ...
Hold down speed dial number e.g. 2:
The previously saved network operator number is
displayed.
Enter phone number to be "linked".
or ...
Open directory.
[_________ ] [______________]
OK
Select entry and confirm.
Press the talk key.
View entry from directory/network access list and change
or
[_________ ] [______________]
MENU
[__________] [__________________________________________ ____] [___ _______]
SHOW ENTRY OK
[______]
OK
[______]
OK
Open directory or network access list
Select entry and press display key.
Select and confirm.
Change phone number and confirm.
If necessary change name (text entry page 31) and
confirm.
Long press (return to idle mode).
Delete single entry from directory/network access list
or
[_________ ] [______________]
MENU
[__________] [__________________________________________ ____] [___ _______]
DELETE ? OK
Open directory or network access list
Select entry and press display key.
Select and confirm.
Long press (return to idle mode).
Delete directory/network access list
Deletion means the selected list is selected with all entries.
or
[_______________]
MENU
[______________________________________________] [______ ____]
DELETE ? OK
open directory or network access list
Press display key to open menu.
Press key L.
Confirm safety check.
Long press (return to idle mode).
16
Page 19

Gigaset A200 / IM eng / A31008-A200-J101-2-7619 / Directories.fm / 12.06.2003
Using the directory and other lists
Redial list
The last five numbers dialled are shown in the redial list. If names have been saved for
these numbers in the directory, then these names will be displayed.
Redialling
You can dial a phone number from the redial list.
Þ
Open redial list.
Select entry and press talk key. The phone number is
redialled.
i
In order to extend or change the phone number, press MENU and confirm
EDIT ENTRY mit OK.
Delete redial list
Þ
[_______________]
MENU
[______________________________________________] [______ ____]
DELETE ? OK
Open redial list.
Press display key to open menu.
Press key
Confirm safety check.
Long press (return to idle mode).
L.
Copy number from the redial list to the directory
Þ
[__________] [______________]
MENU
[__________] [__________________________________________ ____] [___ _______]
COPY TO DIR OK
[______]
OK
[______]
OK
Open redial list.
Select entry and press display key.
Select and confirm.
If necessary change number. Confirm.
If necessary enter name (text entry page 31).
Confirm.
Long press (return to idle mode).
17
Page 20

Gigaset A200 / IM eng / A31008-A200-J101-2-7619 / Directories.fm / 12.06.2003
Using the directory and other lists
Caller list
Use the display key Û to access the caller list and the answering machine/mail box.
The caller list contains the numbers of the last 10 missed calls. Missed calls are dis-
played by a flashing symbol when the phone is in idle mode.
Requirement for this: The caller's number has been sent (CLIP, page 12).
The caller list is shown in the display as follows:
CALLS 02/08
Number of old, previously read entries in the list
Number of entries in the list
Open caller list and select entry
You can view entries in the caller list that have already been read.
Û
[__________] [__________________________________________ ____] [___ _______]
CALLS OK
CALLS 00/10
Û
Open caller list.
Select and confirm.
The last incoming call is displayed.
Select entry.
i
For new incoming calls press the display key . You can then
immediately select a new entry.
Û
Calling back a caller from the list
Open caller list and select entry. Then:
Press the talk key.
Copying an entry from the caller list to the directory or deleting
Open caller list and select entry (see above). Then:
[_______________]
MENU
either ...
[__________] [__________________________________________ ____] [___ _______]
COPY TO DIR OK
[______]
OK
[______]
OK
or ...
[______________________________________________] [______ ____]
OKDELETE
... then
Press display key to open menu.
Copy phone number to the directory:
Select and confirm.
If necessary change number. Confirm.
Enter name (text entry page 31) and confirm.
Delete phone number:
Confirm.
Long press (return to idle mode).
18
Page 21

Gigaset A200 / IM eng / A31008-A200-J101-2-7619 / Directories.fm / 12.06.2003
Using the directory and other lists
Delete complete caller list
Open caller list (see above). Then:
[_______________]
MENU
[__________] [__________________________________________ ____] [___ _______]
DELETE LIST OK
Press display key to open menu.
Select and confirm. Caution: All old and new entries
will be deleted.
Long press (return to idle mode).
Establish date and time of a call
You can check in the caller list to see when a phone call was received.
Requirement: Date and time have been set (see page 11).
Open caller list and select entry (page 18). Then:
[_______________]
MENU
[__________] [__________________________________________ ____] [___ _______]
TIME OK
Example:
23/12 15-56: The call came on 23.12. at 15.56.
If the clock is set on a 12-hour display, an "A" behind the time indicates the first half of
the day and a "P" the second half (for example: "03-56P").
Press display key to open menu.
Select and confirm.
Long press (return to idle mode).
19
Page 22

Gigaset A200 / IM eng / A31008-A200-J101-2-7619 / registration.fm / 12.06.2003
Registering and de-registering handsets
Registering and de-registering handsets
You can register up to six handsets with your base station.
Registration of a Gigaset A 2 handset that has not yet been registered with a base sta-
tion takes place automatically. You must register manually all handsets from the 1000,
2000, 3000 and 4000 Gigaset ranges, as well as C1, C2 and S1 Gigaset handsets and
those from other manufacturers.
Automatic registration: Gigaset A 2 handset
Automatic registration with a base station is only possible for those handsets supplied
with it that have never been registered before.
For first-time registration, place your handset with its display to the front in the base
station. The registration process lasts about a minute, with all symbols flashing in the
display. The handset automatically receives the first unallocated internal number (1-6).
After successful registration this number is shown in the top left of the display, e.g. "1".
That means that the handset has been given the first internal number. If the internal
numbers 1 to 6 have already been allocated (if six handsets have already been registered with a handset), number 6 is de-registered and replaced.
Manual registration: Gigaset A 2 handset
You must activate manual registration of the handset at both the handset and the base
station.
1. At the handset
[_______________]
MENU
[__________] [__________________________________________ ____] [___ _______]
REGISTER HS OK
[______]
OK
During the following registration process, all symbols will flash in the display.
Press display key to open menu.
Select and confirm.
Enter the system PIN for the base station
(default setting: 0000) and confirm.
2. At the base station
Within 60 secs. of entering the system PIN
press the registration/paging key on the front of the
base station for approx. 3 secs.
The registration process then starts.
After successful registration the handset is automatically allocated the next free
number, as described in the section "Automatic registration" (see above).
20
Page 23

Gigaset A200 / IM eng / A31008-A200-J101-2-7619 / registration.fm / 12.06.2003
Registering and de-registering handsets
Specific registration: other handsets
Handsets from the 1000, 2000, 3000 and 4000 Gigaset ranges, C1, C2 and S1 Gigaset
handsets, as well as other GAP-capable handsets can be registered as follows:
1. At the handset
Start the registration of your handset as described in the relevant operating manual.
2. At the base station
Press the registration/paging key (page 20) on the
front of the base station for approx. 3 secs.
Registration is completed.
During registration the handset is automatically allocated the next free internal number
(1–6). If all numbers are allocated, number 6 is overwritten.
De-registering handsets.
You can de-register any handset from another registered Gigaset A2 handset.
[_______]
INT
[__________] [______________]
MENU
[__________] [__________________________________________ ____] [___ _______]
DE-REG H/SET OK
[______]
OK
[______________________________________________] [______ ____]
DE-REGISTER? OK
Open list of handsets.
Select handset and press display key.
Select and confirm.
Enter system PIN for the base station
(default setting: 0000) and confirm.
Confirm safety check.
Press end call key.
◆ The internal number disappears from the de-registered handset.
i
◆ Handsets that have not been de-registered retain their internal num-
bers.
21
Page 24

Gigaset A200 / IM eng / A31008-A200-J101-2-7619 / registration.fm / 12.06.2003
Operating more than one handset
Operating more than one handset
Making internal calls and ending calls
Internal calls are those between handsets that are registered with the same base station. They cost nothing.
[_______]
INT
either ...
or ...
or ...
... then
Open list of handsets.
Your own handset is identified by a "<".
Call a specific handset:
Select handset and press talk key.
Enter number of handset, e.g.
Call all handsets (collective call):
Press star key. All handsets are called.
End call:
Press end call key.
2.
i
If you receive a call during an internal call or collective call, the collective
call will not be interrupted.
Forwarding a call to another handset
You can forward an external call to another h
andset.
[_______]
INT
Instead of announcing the call you can immediately press the end call key
i
a. If the other internal party doesn't answer, or their phone is in use, the
call will automatically return to you.
Open list of handsets.
The external caller hears the music on hold.
Select handset and press talk key. If the internal party
replies, announce the external call.
Press end call key. The external call is forwarded to
the other handset.
22
Page 25

Gigaset A200 / IM eng / A31008-A200-J101-2-7619 / registration.fm / 12.06.2003
Operating more than one handset
Internal enquiry call
You are in conversation with an external caller. You can call another internal party in
order to speak to them, without having to lose the external call. Once you have finished
this internal call, you are connected again with the external caller.
[_______]
INT
[_______________]
MENU
[______________________________________________] [______ ____]
GO BACK OK
Open list of handsets.
The external caller hears the music on hold.
Select handset and press talk key.
End enquiry call:
Press display key to open menu.
Confirm. You are reconnected with the external
caller.
Accepting/rejecting a waiting call during an internal call
If you receive an external call during an internal one, you will hear the call waiting tone
(a short tone). If you have CLIP (page 12), you will also see the number/name of the
waiting caller. This function has to be applied for from the network operator
[_______________]
MENU
either ...
[______________________________________________] [______ ____]
ACCEPT OK
or ...
[__________] [__________________________________________ ____] [___ _______]
REJECT OK
i
If you reject the waiting call on your handset, it will still be heard on other
registered handsets.
Press display key to open menu.
End internal call, accept external call:
Confirm. The internal call is ended.
Reject external call:
Select and confirm. The call waiting tone is turned
off. You remain connected with the internal party.
23
Page 26

Gigaset A200 / IM eng / A31008-A200-J101-2-7619 / registration.fm / 12.06.2003
Operating more than one handset
Barging in on an external call
You are on an external call. An internal party can barge in on this call and take part in
the conversation. The barge-in is signalled to all participants in the call by a signal tone.
It is only possible if the function BARGE IN is activated on the base station (default status: deactivated).
Activating/deactivating the function
MENU ¢ BASE SET ¢ ADD FEATURES
[__________] [__________________________________________ ____] [___ _______]
BARGE IN OK
Barging in
LINE IN USE is shown on your handset display. You would like to link up with an
existing external call.
Select and confirm, in order to activate or deactivate
link up (
Long press (return to idle status).
Press the talk key. You are linked into the call.
All parties hear a signal tone. CONFERENCE is
shown in your handset display.
End barge in:
Press end call key (signal tone).
‰ = on).
If one of the parties presses the end call key a, a signal tone sounds.
i
The connection between the other handset and the external party
remains open.
Paging
If you have mislaid your handset, you can search for it with the help of the base station.
Press the registration/paging key (page 20) on the front of the base station for no more
than 2 secs. All handsets will then ring at the same time (paging).
To end the search, either press the registration/paging key again briefly or press the end
call key
24
c on a handset.
If you press the registration/paging key for more than 2 seconds, the base
i
station will then go into registration mode. The handsets will then not
ring.
Page 27

Gigaset A200 / IM eng / A31008-A200-J101-2-7619 / settings_bs_hs.fm / 12.06.2003
Handset settings
Handset settings
Your handset has default settings. You can change these settings individually.
Change display language
You can set the display texts to appear in one of a number of languages.
[_______________]
MENU
Other languages: see page 31
Activate/deactivate automatic call acceptance
For an incoming call simply take the handset out of the base station or charging unit,
without having to press key
[_______________]
MENU
either ...
or ...
Press display key to open menu.
Using the keys
Press keys
O 2 call up the procedure.
Q 2 for English (default status).
c (default setting: on).
Press display key to open menu.
Deactivate automatic call acceptance:
Press keys O 1 Q.
Activate automatic call acceptance:
Press keys
O 1 1.
Change volume and ringtone
Loudspeaker volume
You can set the loudspeaker volume at three levels – even during an external call.
¢ AUDIO SET ¢ H/SET VOL
MENU
[__________] [______]
OK
Select volume and confirm.
Long press (return to idle status).
25
Page 28

Gigaset A200 / IM eng / A31008-A200-J101-2-7619 / settings_bs_hs.fm / 12.06.2003
Handset settings
Ringer volume
You can choose between seven alternatives:
◆ Five ringer volumes (1–5),
◆ "CRESCENDO" (6; volume increases with each ring),
◆ "OFF" (0; no ringtone)
The current setting is marked with a , e.g. "RINGER 5 ".
¢ AUDIO SET ¢ RINGER
MENU
[_________ ] [_____]
OK
Select volume and confirm.
Long press (return to idle status).
Ringtones
You can choose between ten ringtones (1–10).
The current setting is marked with a , e.g. "MELODY 1 ".
MENU ¢ AUDIO SET ¢ MELODY
[_________ ] [_____]
OK
Select ringtone and confirm.
Long press (return to idle status).
Activate/deactivate ringer
All handsets ring to indicate an incoming external call. You can deactivate the ringer on
your handset permanently or just for the current call. This can be done in the idle status
or during an incoming call before it is accepted.
Deactivating the ringer
permanently:
Reactivating the ringer: Hold down the star key
i
To deactivate the ringer for the current call, open the MENU and
confirm SILENT with OK.
Press the star P key until the ringer can no longer be
heard. The ringer is now permanently switched off.
The symbol
Ú appears in the display.
P in idle mode or during an
incoming call before it is accepted.
Activate/deactivate battery warning tone
With the function activated (default setting: on) you will be informed by an acoustic signal that the battery is almost flat.
Deactivate battery warning: MENU ¢ O 4 Q
Activate battery warning: MENU ¢ O 4 1
Return handset to factory settings
You can return individual settings and changes to the original factory (default) settings
(overview of handset default settings see page 30). Entries in the directory, the caller
26
Page 29

Gigaset A200 / IM eng / A31008-A200-J101-2-7619 / settings_bs_hs.fm / 12.06.2003
Base station settings
list and network access list as well as registration of the handset with the base station
remain unchanged.
[_______________]
MENU
[______________________________________________] [______ ____]
RESET ? OK
Press display key to open menu.
Use the keys O I to call up the procedure.
Confirm safety check.
Base station settings
All base station settings are made via a registered Gigaset A 2 handset.
Changing the system-PIN
To protect the system settings from unauthorised access you should change the systemPIN (factory setting: 0000) to a PIN that only you know.
MENU ¢ BASE SET ¢SYSTEM PIN
[______]
OK
[______]
OK
[______]
OK
Enter the currently valid system PIN (4 digits) and
confirm. For security reasons the entry is shown as
four stars (
Enter new PIN (4 digits) and confirm.
Repeat new system PIN and confirm.
Long press (return to idle status).
****
).
Return base station to factory (default) settings
A reset does not alter the system PIN; handsets remain registered. Overview of base
default settings see page 31.
¢ BASE SET ¢BASE RESET
MENU
[______]
OK
[______________________________________________] [______ ____]
RESET ? OK
Enter system PIN and confirm.
Confirm safety check.
27
Page 30

Gigaset A200 / IM eng / A31008-A200-J101-2-7619 / appendix.fm / 12.06.2003
Appendix
Appendix
Questions and Answers
What happens if … Possible cause Possible solution
… the display is blank? The handset is not
… the handset doesn't react to
a key being pressed?
… all the icons are flashing in
the display and there is no connection with the base station?
… (where multiple handsets
are in use) the handset in the
base station is not charging?
… the handset does not ring? The ringer is switched off.
… the caller can't hear me? You've pressed the
… despite CLIP, the caller's
number is not displayed?
… entries in the caller list don't
show time or date?
… I can't hear the ringer or dialling tone?
… I can hear an error tone
(descending tone sequence)
when keying in?
switched on.
The batteries are empty.
The keypad protection is activated.
The handset is outside the
range of the base station.
The handset has not been registered.
The base station is not
switched on.
The cable has not been correctly placed in the bottom of
the base station.
Charging in the base station
only takes place when a phone
call is not being made at the
same time.
The ringer volume has been
set to "0".
Call divert has been set on
AUTOMATIC.
INT key. As
a result the handset has been
"muted".
Sending the phone number
(CLI) has not been enabled.
Date and time have not been
set.
You have changed the phone
cable on your Gigaset.
The task has been unsuccessful
or the entry is faulty.
Press the end call key a for
approx. 5 secs.
Charge or replace batteries
(page 7).
Press the hash key
approx. 2 secs (page 8).
Reduce distance between
handset and base station.
Register handset (page 20).
Check power cable plug on
base station (page 5).
Check cable placement
(page 5)
Use additional charger unit.
Switch on (page 26) ringer.
Increase ringer volume
(page 26).
Activate the microphone again
with MENU, BACK, OK
(page 13).
The caller should request the
network operator to enable the
transfer of his or her phone
number.
Set date and time (page 11)
When buying a cable at a specialist shop make sure it has the
correct plugs (page 32).
Repeat the process; watch the
display when doing so and if
necessary check with the operating manual.
R for
28
Page 31

Gigaset A200 / IM eng / A31008-A200-J101-2-7619 / appendix.fm / 12.06.2003
Care
Wipe the base station and handset with a damp cloth or with an antistatic wipe. A dry
cloth must never be used. This can cause static discharge.
Appendix
Contact with liquid
Should the handset come in contact with liquid, under no circumstances switch on
the device. Remove all batteries immediately.
Allow the liquid to drip out of the device and afterwards dab all parts dry.
Place the handset without the batteries in a warm, dry place for at least 72 hours. In
many cases it will subsequently be possible to put the phone into service again.
!
Operation with a PABX
The following settings are only necessary if your PABX requires them, please refer to
the operating instructions for your PABX.
Changing the dialling procedure
You have the following options for the dialling procedure:
◆ Tone dialling (DTMF),
◆ Pulse dialling (IWV).
¢ BASE SET ¢ ADD FEATURES ¢ DIAL MODE
MENU
[__________] [______]
OK
i
Temporary switch to tone dialling (DTMF)
If your PABX wo rks with pulse dialling but you need tone dialling for a call
(e.g. to listen to an external mail box/answering machine), you must
switch to pulse dialling during the call.
Requirement: You have already started the call.
¢ TEMP TONE
MENU
Select dialling procedure and confirm.
Long press (return to idle status).
Setting the flash time
MENU ¢ BASE SET ¢ ADD FEATURES ¢ TBR
[__________] [______]
OK
Select flash time (80 ms, 100 ms, 120 ms, 180 ms,
250 ms, 300 ms or 600 ms) and confirm.
Long press (return to idle status).
29
Page 32

Gigaset A200 / IM eng / A31008-A200-J101-2-7619 / appendix.fm / 12.06.2003
Appendix
Changing pause after line seizure
You can set the length of the pause that is inserted between pressing the talk key c
and sending the phone number (default setting: 3 secs.).
[_______________]
MENU
Press display key to open menu.
Press keys
N O 1 L. "916 SET" appears in
the display. The number for the currently set pause
length flashes. 1 = 1 sec.; 2 = 3 secs.; 3 = 7 secs.;
4 = 2.5 secs.
[______]
OK
Enter number and confirm.
Changing pause after recall key (dialling pause)
You can change the length of the dialling pause if your PABX requires this (refer to your
PABX operating instructions).
[_______________]
MENU
[______]
OK
Press display key to open menu.
Enter N O 1 2. "912 SET" appears in the dis-
play. The number for the currently set pause length
flashes.
1 = 800 ms; 2 = 1600 ms; 3 = 3200 ms.
Enter number and confirm.
To insert a dialling pause between a prefix and a phone number: After
i
entering the prefix, hold down the
S key for 2 seconds. A "P" appears in
the display. Then enter the phone number.
Other Settings
Factory settings of handset
Default settings Status after
reset
Loudspeaker volume 1 1 page 25
Ringer volume 5 5 page 26
Ringtones 1 1 page 26
Directory empty unaffected page 14
Redial list empty empty page 17
Caller list empty unaffected page 18
Network ccess list empty unaffected page 14
Automatic call
acceptance
Battery warning tone activated activated page 26
Display language country specific country specific page 25,
activated activated page 25
30
Description
page 31
Page 33

Gigaset A200 / IM eng / A31008-A200-J101-2-7619 / appendix.fm / 12.06.2003
Factory settings of base station
Appendix
Default settings Status after
Description
reset
System PIN 0000 unaffected page 27
Barge in deactivated deactivated page 24
Pause after R key 800 ms 800 ms page 30
Pause after line seizure 3 s 3 s page 30
Flash time 250 ms 250 ms page 29
Dialling procedure MFV MFV page 29
Display language
Setting the display language page 25. Other languages:
Q 1 for German, Q I for French, Q 4 for Italian,
Q 5 for Spanish, Q L for Portuguese, Q M for Dutch,
Q N for Danish, Q O for Norwegian, 1 Q for Swedish,
1 1 for Finnish, 1 2 for Czech, 1 I for Polish,
1 4 for Turkish, 1 5 for Russian, 1 L for Croatian.
Character map and text entry
Either press the relevant key several times, or hold down.
1 x 2 x3 x4 x5 x6 x
blank
1
ABC2
DEF3
GH I4
JKL5
MNO6
PQRS7
TUV8
WXYZ9
+0-|?_
/(),
*
31
Page 34

Gigaset A200 / IM eng / A31008-A200-J101-2-7619 / appendix.fm / 12.06.2003
Appendix
Technical data
Recommended batteries
Nickel-metal-hydride (NiMH) - Type AAA
Sanyo Twicell 700 (700 mAh) GP 700mAh (700 mAh)
Sanyo Twicell 650 (650 mAh) Varta Phone Power AAA (700 mAh)
Panasonic 700mAh „for Dect“ (700 mAh) YDT AAA SUPER 700 (700 mAh)
Handset operating times/charging times
Capacity
(mAh)
700 up to 170 (7 days) approximately 13 approximately 5
Standby time
(hours)
Tal kt ime
(hours)
Charging time
(hours)
Power consumption
◆ In standby mode (without charging) approx. 1.9 watts.
◆ In standby mode while charging approx. 4.6 watts.
◆ During a call approx. 2.1 watts.
General technical data
Feature Value
The DECT standard is supported
The GAP standard is supported
Number of channels 60 duplex channels
Frequency range 1880 – 1900 MHz
Duplex mode Time division, 10 ms frame length
Channel grid 1728 kHz
Bitrate 1152 kbit/s
Modulation GFSK
Speech coding 32 kbit/s
Transmission power Average 10 mW per channel
Range up to 300 m outside, up to 50 m indoors
Power supply Base station 220/230 V ~/50 Hz
Environmental requirements for
operation
Dialling methods DTMF (tone dialling)/DP (pulse dialling)
Flash time 250 ms
Dimensions/base station 115 x 102 x 105 mm (W x L x H)
Dimensions/handset 55 x 152 x 30 mm (W × L × H)
Weight Base station 138 g; handset with batteries 117 g
+5 °C to +45 °C;
20% to 75% relative humidity
32
Page 35

Gigaset A200 / IM eng / A31008-A200-J101-2-7619 / appendix.fm / 12.06.2003
Service (Customer Care)
You can get assistance easily when you have technical questions or questions about
how to use your device by using our online support service on the Internet at:
www.my-siemens.com/customercare
or by referring to the section entitled Questions and answers in this manual (page 28).
If the device needs to be repaired, please contact one of our Customer Care Centers:
Appendix
Abu Dhabi. . . . . . . . . . . . . . . 0 26 42 38 00
Argentina . . . . . . . . . . . . 0 80 08 88 98 78
Australia . . . . . . . . . . . . . . . 18 00 62 24 14
Austria . . . . . . . . . . . . . . . .05 17 07 50 04
Bahrain . . . . . . . . . . . . . . . . . . . . . 40 42 34
Bangladesh . . . . . . . . . . . . . . 0 17 52 74 47
Belgium . . . . . . . . . . . . . . . . 0 78 15 22 21
Bosnia Herzegovina . . . . . . . 0 33 27 66 49
Brazil . . . . . . . . . . . . . . . . 0 80 07 07 12 48
Brunei . . . . . . . . . . . . . . . . . . . 02 43 08 01
Bulgaria. . . . . . . . . . . . . . . . . . 02 73 94 88
Cambodia . . . . . . . . . . . . . . . . 12 80 05 00
Canada . . . . . . . . . . . . . . 1 88 87 77 02 11
China . . . . . . . . . . . . . . . 0 21 50 31 81 49
Croatia . . . . . . . . . . . . . . . . . 0 16 10 53 81
Czech Republic . . . . . . . . . .02 33 03 27 27
Denmark . . . . . . . . . . . . . . . . . 35 25 86 00
Dubai . . . . . . . . . . . . . . . . . . 0 43 96 64 33
Egypt. . . . . . . . . . . . . . . . . . . 0 23 33 41 11
Estonia . . . . . . . . . . . . . . . . . . 06 30 47 97
Finland . . . . . . . . . . . . . . . . 09 22 94 37 00
France. . . . . . . . . . . . . . . . .01 56 38 42 00
Germany. . . . . . . . . . . . . . .01805 333 222
Greece . . . . . . . . . . . . . . 0 80 11 11 11 16
Hong Kong . . . . . . . . . . . . . . . 28 61 11 18
Hungary . . . . . . . . . . . . . . . 06 14 71 24 44
Iceland . . . . . . . . . . . . . . . . . . . 5 11 30 00
India . . . . . . . . . . . . . . 01 13 73 85 89 - 98
Indonesia . . . . . . . . . . . . 0 21 46 82 60 81
Ireland . . . . . . . . . . . . . . . . 18 50 77 72 77
Italy. . . . . . . . . . . . . . . . . . . 02 66 76 44 00
Ivory Coast . . . . . . . . . . . . . . . 80 00 03 33
Jordan. . . . . . . . . . . . . . . . . . 0 64 39 86 42
Kenya . . . . . . . . . . . . . . . . . . . . 2 72 37 17
Kuwait . . . . . . . . . . . . . . . . . . . 2 45 41 78
Latvia . . . . . . . . . . . . . . . . . . . . 7 50 11 14
Lebanon . . . . . . . . . . . . . . . . . 01 44 30 43
Libya . . . . . . . . . . . . . . . . . . 02 13 50 28 82
Lithuania. . . . . . . . . . . . . . . . 8 22 74 20 10
Luxembourg . . . . . . . . . . . . . 43 84 33 99
Macedonia. . . . . . . . . . . . . . . . 02 13 14 84
Malaysia. . . . . . . . . . . . . . . 03 21 63 11 18
Malta . . . . . . . . . . . . 00 35 32 14 94 06 32
Mauritius . . . . . . . . . . . . . . . . . . 2 11 62 13
Mexico . . . . . . . . . . . . . .01 80 07 11 00 03
Morocco . . . . . . . . . . . . . . . . . 22 66 92 09
Netherlands. . . . . . . . . . . . 0900-3333102
New Zealand . . . . . . . . . . . 08 00 27 43 63
Norway . . . . . . . . . . . . . . . . . . 22 70 84 00
Oman. . . . . . . . . . . . . . . . . . . . . . 79 10 12
Pakistan . . . . . . . . . . . . . . . 02 15 66 22 00
Philippines . . . . . . . . . . . . . . 0 27 57 11 18
Poland . . . . . . . . . . . . . . . . 08 01 30 00 30
Portugal . . . . . . . . . . . . . . . . 8 00 85 32 04
Qatar . . . . . . . . . . . . . . . . . . . . 04 32 20 10
Romania . . . . . . . . . . . . . . 02 12 04 60 00
Russia. . . . . . . . . . . . . . . . (800) 200 10 10
Saudi Arabia . . . . . . . . . . . . 0 22 26 00 43
Serbia. . . . . . . . . . . . . . . . . 01 13 22 84 85
Singapore . . . . . . . . . . . . . . . . 62 27 11 18
Slovak Republic . . . . . . . . . 02 59 68 22 66
Slovenia . . . . . . . . . . . . . . . . 0 14 74 63 36
South Africa. . . . . . . . . . . . 08 60 10 11 57
Spain . . . . . . . . . . . . . . . . . . 9 02 11 50 61
Sweden . . . . . . . . . . . . . . . . 0 87 50 99 11
Switzerland . . . . . . . . . . . . 08 48 21 20 00
Taiwan. . . . . . . . . . . . . . . . 02 25 18 65 04
Thailand. . . . . . . . . . . . . . . . 0 22 68 11 18
Tunisia . . . . . . . . . . . . . . . . . 0 71 86 19 02
Turkey . . . . . . . . . . . . . . .0 21 65 79 71 00
Ukraine . . . . . . . . . . . . . . 8 80 05 01 00 00
United Arab Emirates . . . . . 0 43 31 95 78
United Kingdom . . . . . . .0 87 05 33 44 11
USA . . . . . . . . . . . . . . . . . 1 88 87 77 02 11
Vietnam . . . . . . . . . . . . . . . . . . 45 63 22 44
33
Page 36

Gigaset A200 / IM eng / A31008-A200-J101-2-7619 / appendix.fm / 12.06.2003
Appendix
In some countries repair and replace services are impossible where the products are not
sold through our authorised dealers.
Your Gigaset A200 is designed for operation in your country, as indicated on the packaging and on the device itself. Country-specific conditions have been taken into
account. If you have any questions about the differences between the public phone networks, please contact your specialist dealer or network provider.
The CE mark attests to the phone's compliance with the essential requirements of the
R&TTE directive.
Excerpt from the original declaration:
„We, Siemens AG, declare, that the above mentioned product is manufactured according to our Full
Quality Assurance System certified by CETECOM ICT Services GmbH in compliance with ANNEX V
of the R&TTE-Directive 99/05/EC. The presumption of conformity with the essential requirements
regarding Council Directive 99/05/EC is ensured.“
Senior Approvals Manager
The Declaration of Conformity (DoC) has been signed. In case of need a copy of the original DoC
can be made available via the company hotline.
34
Page 37

Gigaset A200 / IM eng / A31008-A200-J101-2-7619 / menuetree.fm / 12.06.2003
Menu overview
You can select a menu function more quickly by opening the menu and then entering a
combination of digits, rather than scrolling through ("shortcut").
For example: MENU
Main menu
Open the phone menu while it is in idle mode. Then:
2 AUDIO SET UP 2-1 H/SET VOL
3BASE SET 3-1DATE/TIME
5REGISTER HS
I12 to set the time.
2-2 RINGER
2-3 MELODY
3-1-1 DATE SET
3-1-2 CLOCK SET
3-1-3 CLOCK MODE
3-1-3-1 24 H
3-1-3-2 12 H
3-2 SYSTEM PIN
3-3 BASE RESET
3-4 ADD FEATURES
3-4-1 DIAL MODE
3-4-1-1 TONE
3-4-1-2 PULSE
3-4-2 TBR
3-4-2-1 80 MS
3-4-2-2 100 MS
3-4-2-3 120 MS
3-4-2-4 180 MS
3-4-2-5 250 MS
3-4-2-6 300 MS
3-4-2-7 600 MS
3-4-3 BARGE IN
3-5 PRESELECT 3-5-1 PRESELECT NO
3-5-2 WITH PRESEL
3-5-3 W/O PRESEL
Menu overview
35
Page 38

Gigaset A200 / IM eng / A31008-A200-J101-2-7619 / menuetree.fm / 12.06.2003
Menu overview
Directory key and network operator list key
Press thS key or C key to open the relevant list, and press MENU.
The following menu functions will then be available:
EDIT ENTRY Extend phone number and use to dial
NEW ENTRY Save new phone number
SHOW ENTRY Show/change phone number
DELETE Delete entry
Caller list
Press display key Û. Two lists are then available:
MAILBOX 00
CALLS 00/00
The mailbox/answering service list is only available if you have registered
i
for this service with your network operator and have received the relevant
phone number.
36
Page 39

Gigaset A200 / IM eng / A31008-A200-J101-2-7619 / A_200SIX.fm / 12.06.2003
Index
Index
A
A200 Duo . . . . . . . . . . . . . . . . . . . . . . 7
Access protection
Activate
keypad lock
Audio warning
see Tone
Automatic call acceptance
. . . . . . . . . . . . . . . 27
. . . . . . . . . . . . . . . . . . . 8
. . . . . . . . . . . . . . . . . . . . 26
. . . . . . . . . 25
B
Base station
making ready for service
registering handset
resetting to factory settings
Batteries
charging
insertion
recommended
Battery display
Battery warning tone
Blocking
external calls
. . . . . . . . . . . . . . . . . . . . . 7
. . . . . . . . . . . . . . . . . . . . . 6
. . . . . . . . . . . . . . . . 32
. . . . . . . . . . . . . . . . . . 7
. . . . . . . . . . . . . . . . . 27
. . . . . . . . . 4
. . . . . . . . . . . . . 5
. . . . . . 27
. . . . . . . . . . . . 26
C
Call
. . . . . . . . . . . . . . . . . . . . . . . . 12
end
transfer
Call acceptance, automatic
Call all
Call waiting
internal call
Call-by-Call
Caller list
delete complete list
delete single entry
Calling
external
Calls
internal
Care of the phone
Character map
Charging time for handset
CLI
CLIP
Confirmation tone
Cursor
. . . . . . . . . . . . . . . . . . . . . 22
. . . . . . . . 25
. . . . . . . . . . . . . . . . . . . . . . . 22
. . . . . . . . . . . . . . . . . . 23
. . . . . . . . . . . . . . . . . . . . 15
. . . . . . . . . . . . . . . . . . . II, 18
. . . . . . . . . . . . 19
. . . . . . . . . . . . . 18
. . . . . . . . . . . . . . . . . . . . . 12
. . . . . . . . . . . . . . . . . . . . . 22
. . . . . . . . . . . . . . . 29
. . . . . . . . . . . . . . . . . 31
. . . . . . . . . 32
. . . . . . . . . . . . . . . . . . . . . . . . . . 12
. . . . . . . . . . . . . . . . 12, 13, 18, 23
. . . . . . . . . . . . . . . . 8
. . . . . . . . . . . . . . . . . . . . . . . 14
Customer Care (Service)
Customer service
. . . . . . . . . . . 33
. . . . . . . . . . . . . . . . 33
D
Date
establish for a call
. . . . . . . . . . . . . . . . . . . . . . . . . 11
set
Deactivate
keypad lock
Default settings
Delete
caller list
directory
network access list
Delete key
Dialling
internal
with directory
with network access list
Dialling pause
Dialling procedure
Directory
delete single entry/all entries
save phone number/entry
view and change entry
Directory key
Display
caller's number (CLIP)
change display language
in idle status
Display keys
. . . . . . . . . . . . . . . . . . . . 19
. . . . . . . . . . . . . . . . . . . . 16
. . . . . . . . . . . . . . . . . . . . . . 9
. . . . . . . . . . . . . . . . . . . . . 22
. . . . . . . . . . . . . . . . . . . . . . 14
. . . . . . . . . . . . . . . . . . . II, 9
. . . . . . . . . . . . . . 19
. . . . . . . . . . . . . . . . . . . 8
. . . . . . . . . . . . . . 27, 30
. . . . . . . . . . . . . 16
. . . . . . . . . . . . . . . . . 15
. . . . . . . . . 15
. . . . . . . . . . . . . . . . . . 30
. . . . . . . . . . . . . . . 29
. . . . . . 16
. . . . . . . . 14
. . . . . . . . . . 16
. . . . . . . . . . . . . . . . . . . 36
. . . . . . . . . . . 12
. . . . . . . . . 25
. . . . . . . . . . . . . . . . . . 10
E
End talk key. . . . . . . . . . . . . . . . . . II, 12
Enquiry call (internal)
Entry (directory)
. . . . . . . . . . . . . . . . . . . . . . 16
delete
view and change
External calls
blocking
. . . . . . . . . . . . . . . . . . . . . 27
. . . . . . . . . . . . . 23
. . . . . . . . . . . 15, 16
F
Flash time . . . . . . . . . . . . . . . . . . . . . 29
37
Page 40

Gigaset A200 / IM eng / A31008-A200-J101-2-7619 / A_200SIX.fm / 12.06.2003
Index
H
Handset
. . . . . . . . . . . . . . . . . . . . . . 21
log off
making ready for service
operating and charging times
. . . . . . . . . . . . . . . . . . . . . 20
register
return to factory settings
. . . . . . . . . . . . . . . . . . . . . . 24
search
silent alert
switch on/off
Handset access protection
Hash key
Hearing aids
Hold music
. . . . . . . . . . . . . . . . . . . 13
. . . . . . . . . . . . . . . . . . 8
. . . . . . . . . . . . . . . . . . . . . II, 8
. . . . . . . . . . . . . . . . . . . . 3
. . . . . . . . . . . . . . . . . . . . 13
. . . . . . . . . 6
. . . . . 32
. . . . . . . . 26
. . . . . . . . . 27
I
Idle status (display) . . . . . . . . . . . . . . 10
Internal
Internal key
Internal phone number
IWV (impulse dialling procedure)
. . . . . . . . . . . . . . . . . . . . . . . . 9
. . . . . . . . . . . . . . . . . . . . . . . . 22
calls
enquiry call
link up
. . . . . . . . . . . . . . . . . . 23
. . . . . . . . . . . . . . . . . . . . . . 24
. . . . . . . . . . . . . . . . . . . . . II
. . . . . . . . . . . . II
. . . . 29
K
Keypad
. . . . . . . . . . . . . . . . . . . . . . . . . 8
lock
lock/release
Keys
display keys
on handset
. . . . . . . . . . . . . . . . . . 12
. . . . . . . . . . . . . . . . . . . 9
. . . . . . . . . . . . . . . . . . . 9
L
Language (display)
. . . . . . . . . . . . . . . . . . . . . 25
change
Link up
List
Lock
Logging off handsets
Loudspeaker volume
. . . . . . . . . . . . . . . . . . . . . . . 24
. . . . . . . . . . . . . . . . . . . . . . . 18
caller
redialling
keypad
. . . . . . . . . . . . . . . . . . . . 17
. . . . . . . . . . . . . . . . . . . . . . 8
. . . . . . . . . . . . . 21
. . . . . . . . . . . . . 25
M
Mailbox/answering machine symbol . . .9
Main menu
Making ready for service
handset
Medical equipment
Menu
management
symbol
Menu key
Microphone
. . . . . . . . . . . . . . . . . . . .35
. . . . . . . . . . . . . . . . . . . .4, 6
. . . . . . . . . . . . . . .3
. . . . . . . . . . . . . . . 9, 10
. . . . . . . . . . . . . . . . . . . . . . .9
. . . . . . . . . . . . . . . . . . . . . . . II
. . . . . . . . . . . . . . . . . . . . . II
N
Network access key . . . . . . . . . . . . . .36
Network access list
delete all entries
delete single entry
Network operator list
save numbers
Number see Phone number
. . . . . . . . . . . . . . .16
. . . . . . . . . . . . .16
. . . . . . . . . . . . . . . . .14
. . . . . . . .14
O
OK key. . . . . . . . . . . . . . . . . . . . . . . . . 9
on/off key
Operating time for handset
Operation
telephone system
. . . . . . . . . . . . . . . . . . . . . . II
. . . . . . . . .32
. . . . . . . . . . . . . .29
P
Paging . . . . . . . . . . . . . . . . . . . . . . . . 24
Pause
after R key
changing after obtaining line
Phone number
save
show caller's (CLIP)
Phoning
accept call
external
PIN (system PIN)
Power cable
Power supply unit
Protective film
. . . . . . . . . . . . . . . . . . .30
. . . . . .30
. . . . . . . . . . . . . . . . . . . . . . . .14
. . . . . . . . . . . . .12
. . . . . . . . . . . . . . . . . . .12
. . . . . . . . . . . . . . . . . . . . .12
. . . . . . . . . . . . . . . . .27
. . . . . . . . . . . . . . . . . . . . .5
. . . . . . . . . . . . . .3, 5
. . . . . . . . . . . . . . . . . . .6
Q
Questions and Answers . . . . . . . . . . . 28
38
Page 41

Gigaset A200 / IM eng / A31008-A200-J101-2-7619 / A_200SIX.fm / 12.06.2003
Index
R
R key . . . . . . . . . . . . . . . . . . . . . . . . . II
pause after
Range
Redial key
Redialling
redialling list
Registration of handsets
Repeat dialling
symbol
Returning call from caller list
Ringer
activate/deactivate
ringtones
volume
Ringtone
select
. . . . . . . . . . . . . . . . . . 30
. . . . . . . . . . . . . . . . . . . . . . . . . 4
. . . . . . . . . . . . . . . . . . . . . . II
. . . . . . . . . . . . . . . . . . . . . 17
. . . . . . . . . . . . . . . . . 17
. . . . . . . . . . 20
. . . . . . . . . . . . . . . . . . . . . . 9
. . . . . . . 18
. . . . . . . . . . . . . 26
. . . . . . . . . . . . . . . . . . . . 26
. . . . . . . . . . . . . . . . . . . . . 26
. . . . . . . . . . . . . . . . . . . . . . 26
. . . . . . . . . . . . . . . . . . . . . . 26
S
Safety precautions . . . . . . . . . . . . . . . 3
Service
Set
Setting
Settings
Shortcut
Signal tone
Silent alert (handset)
Speed dialling
Star key
Switch off
Switching on
System PIN
. . . . . . . . . . . . . . . . . . . . . . . 33
making handset ready for service
. . . . . . . . . . . . . . . . . . . . . . . 11
date
. . . . . . . . . . . . . . . . . . . . . . . 11
time
flash time
ringer volume
loudspeaker volume
. . . . . . . . . . . . . . . . . . . 29
. . . . . . . . . . . . . . . . 26
. . . . . . . . . . . . 25
. . . . . . . . . . . . . . . . . . . . . . 35
. . . . . . . . . . . . . . . . . . . . . 9
. . . . . . . . . . . . . 13
network operator prefixes
. . . . . . . 15
. . . . . . . . . . . . . . . . . . . . II, 26
handset
handset
change
. . . . . . . . . . . . . . . . . . . . . . 8
. . . . . . . . . . . . . . . . . . . . . . 8
. . . . . . . . . . . . . . . . . . . . . 27
. . . 4
Tel ephone system
setting dialling procedure
setting flash time
Tel ephone system (PA BX)
Tex t entry
Time
establish for a call
set
Time functions
Ton e
battery warning tone
signal tone
Tra nsfe r
. . . . . . . . . . . . . . . . . . . . . 31
. . . . . . . . . . . . . . . . . . . . . . . . . . II
. . . . . . . . . . . . . . . . . . . . . . . . . 11
. . . . . . . . . . . . . . . . . . . . . . . 22
. . . . . . . . . . . . . . 29
. . . . . . . . . . . . . . . . . . 11
. . . . . . . . . . . . . . . . . . . . 9
. . . . . . . . 29
. . . . . . . . . . 29
. . . . . . . . . . . . . . 19
. . . . . . . . . . . 26
V
Volume
loudspeaker
ringer
. . . . . . . . . . . . . . . . . . 25
. . . . . . . . . . . . . . . . . . . . . . . 26
T
Tal k key . . . . . . . . . . . . . . . . . . . . II, 12
Technical data
Telephone cable
Telephone plug
. . . . . . . . . . . . . . . . . . 32
. . . . . . . . . . . . . . . . . 5
. . . . . . . . . . . . . . . . . . 5
39
Page 42

Gigaset A200 / IM eng / A31008-A200-J101-2-7619 / cover_IV.fm / 12.06.2003
Issued by
Information and Communication mobile
Schlavenhorst 88
D-46395 Bocholt
© Siemens AG 2003
All rights reserved. Subject to availability.
Right of modification reserved.
Printed in Germany (06/2003).
Siemens Aktiengesellschaft
http://www.my-siemens.com
No.: A31008-A200-J101-2-7619
A31008- A200- J101- 2- 7619
 Loading...