

Page 1

Documentation
OpenScape Alarm Response Professional
OScAR-Pro V3 R2 Classic Applications
OScAR-Pro-TT Dataimport-Tool
User Manual
A31003-S1730-U102-1-7619
Communication for the open minded
Siemens Enterprise Communications
www.siemens-enterprise.com
Page 2

Our Quality and Environmental Management Systems are implemented according to the requirements of the ISO9001 and ISO14001 standard certified by an external certification company.
Communication for the open minded
Siemens Enterprise Communications
www.siemens-enterprise.com
Copyright ©
Communications GmbH & Co. KG 2010
Hofmannstr. 51, 80200 München
Siemens Enterprise Communications GmbH & Co. KG
is a Trademark Licensee of Siemens AG
Reference No.: A31003-S1730-U102-1-7619
The information provided in this document contains
merely general descriptions or characteristics of
performance which in case of actual use do not
always apply as described or which may change as
a result of further development of the products. An
obligation to provide the respective characteristics
shall only exist if expressly agreed in the terms of
contract. Availability and technical specifications are
subject to change without notice.
OpenScape, OpenStage and HiPath are registered
trademarks of Siemens Enterprise
Communications GmbH & Co. KG.
All other company, brand, product and service
names are trademarks or registered trademarks of
their respective holders.
Siemens Enterprise
Page 3

BHB_DATAIMPORT_IVZ.fm
Confidential Contents
Contents 0
1 Conventions and general instructions . . . . . . . . . . . . . . . . . . . . . . . . . . . . . . . . . . . . 1-1
1.1 Reference manuals . . . . . . . . . . . . . . . . . . . . . . . . . . . . . . . . . . . . . . . . . . . . . . . . . . . 1-2
1.2 Conventions and symbols used in this Manual . . . . . . . . . . . . . . . . . . . . . . . . . . . . . . 1-3
1.3 Privacy and data security. . . . . . . . . . . . . . . . . . . . . . . . . . . . . . . . . . . . . . . . . . . . . . . 1-4
2 Description of functions. . . . . . . . . . . . . . . . . . . . . . . . . . . . . . . . . . . . . . . . . . . . . . . . 2-1
2.1 Overview . . . . . . . . . . . . . . . . . . . . . . . . . . . . . . . . . . . . . . . . . . . . . . . . . . . . . . . . . . . 2-1
2.2 General description . . . . . . . . . . . . . . . . . . . . . . . . . . . . . . . . . . . . . . . . . . . . . . . . . . . 2-2
2.3 Start and operation of the OpenScape Alarm Response Professional . . . . . . . . . . . . 2-3
2.4 Plausibility checks . . . . . . . . . . . . . . . . . . . . . . . . . . . . . . . . . . . . . . . . . . . . . . . . . . . . 2-4
3 Installation . . . . . . . . . . . . . . . . . . . . . . . . . . . . . . . . . . . . . . . . . . . . . . . . . . . . . . . . . . . 3-1
3.1 Installing the OpenScape Alarm Response Professional . . . . . . . . . . . . . . . . . . . . . . 3-2
3.2 Removing the OpenScape Alarm Response Professional . . . . . . . . . . . . . . . . . . . . . 3-6
4 Program activation . . . . . . . . . . . . . . . . . . . . . . . . . . . . . . . . . . . . . . . . . . . . . . . . . . . . 4-1
4.1 Starting the DAKS-TT Dataimport Tool . . . . . . . . . . . . . . . . . . . . . . . . . . . . . . . . . . . . 4-2
4.2 Initial startup of the DAKS-TT Dataimport Tool . . . . . . . . . . . . . . . . . . . . . . . . . . . . . . 4-2
4.3 Start the application in a dialog . . . . . . . . . . . . . . . . . . . . . . . . . . . . . . . . . . . . . . . . . . 4-3
4.4 Start the application by entering the logon data . . . . . . . . . . . . . . . . . . . . . . . . . . . . . 4-4
4.5 Start the application with automatic logon . . . . . . . . . . . . . . . . . . . . . . . . . . . . . . . . . . 4-5
4.6 The most important error messages during logon . . . . . . . . . . . . . . . . . . . . . . . . . . . . 4-6
4.7 Define time-controlled program-cueing via “Scheduled tasks“ . . . . . . . . . . . . . . . . . . 4-8
4.8 Logging . . . . . . . . . . . . . . . . . . . . . . . . . . . . . . . . . . . . . . . . . . . . . . . . . . . . . . . . . . . 4-13
5 Operating the OpenScape Alarm Response Professional . . . . . . . . . . . . . . . . . . . . 5-1
5.1 Layout of the interface . . . . . . . . . . . . . . . . . . . . . . . . . . . . . . . . . . . . . . . . . . . . . . . . . 5-2
5.2 Description of the menu items and buttons . . . . . . . . . . . . . . . . . . . . . . . . . . . . . . . . . 5-3
5.3 Start import . . . . . . . . . . . . . . . . . . . . . . . . . . . . . . . . . . . . . . . . . . . . . . . . . . . . . . . . . 5-4
5.4 Save output as. . . . . . . . . . . . . . . . . . . . . . . . . . . . . . . . . . . . . . . . . . . . . . . . . . . . . . . 5-4
5.5 Select INI file . . . . . . . . . . . . . . . . . . . . . . . . . . . . . . . . . . . . . . . . . . . . . . . . . . . . . . . . 5-4
5.6 Edit email properties . . . . . . . . . . . . . . . . . . . . . . . . . . . . . . . . . . . . . . . . . . . . . . . . . . 5-5
5.6.1 Overview . . . . . . . . . . . . . . . . . . . . . . . . . . . . . . . . . . . . . . . . . . . . . . . . . . . . . . . . 5-5
5.6.2 Window “Edit email properties“ . . . . . . . . . . . . . . . . . . . . . . . . . . . . . . . . . . . . . . . 5-6
5.6.3 Window “Relaying“ . . . . . . . . . . . . . . . . . . . . . . . . . . . . . . . . . . . . . . . . . . . . . . . . 5-8
6 INI Editor of the DAKS-TT Dataimport-Tool . . . . . . . . . . . . . . . . . . . . . . . . . . . . . . . . 6-1
6.1 Essential details. . . . . . . . . . . . . . . . . . . . . . . . . . . . . . . . . . . . . . . . . . . . . . . . . . . . . . 6-2
6.2 Layout of the INI Editor . . . . . . . . . . . . . . . . . . . . . . . . . . . . . . . . . . . . . . . . . . . . . . . . 6-3
6.3 Menu items of the INI Editor . . . . . . . . . . . . . . . . . . . . . . . . . . . . . . . . . . . . . . . . . . . . 6-4
6.4 General fields of the INI Editor. . . . . . . . . . . . . . . . . . . . . . . . . . . . . . . . . . . . . . . . . . . 6-5
6.5 Mode: Update subscribers only . . . . . . . . . . . . . . . . . . . . . . . . . . . . . . . . . . . . . . . . . . 6-8
07/2010
DAKS OScAR-Pro-TT Dataimport-Tool, User Manual
0-1
Page 4

BHB_DATAIMPORT_IVZ.fm
Contents Confidential
6.6 Table-dependent fields of the INI Editor . . . . . . . . . . . . . . . . . . . . . . . . . . . . . . . . . . . . 6-9
6.6.1 Table fields . . . . . . . . . . . . . . . . . . . . . . . . . . . . . . . . . . . . . . . . . . . . . . . . . . . . . . . 6-9
6.6.2 Special parameters of the subscriber table . . . . . . . . . . . . . . . . . . . . . . . . . . . . . 6-12
6.6.3 Dynamic creation of broadcast member groups. . . . . . . . . . . . . . . . . . . . . . . . . . 6-13
6.7 Edit values of the table fields . . . . . . . . . . . . . . . . . . . . . . . . . . . . . . . . . . . . . . . . . . . 6-15
6.7.1 Edit an alpha-/numeric value . . . . . . . . . . . . . . . . . . . . . . . . . . . . . . . . . . . . . . . . 6-15
6.7.2 Edit a bitmask . . . . . . . . . . . . . . . . . . . . . . . . . . . . . . . . . . . . . . . . . . . . . . . . . . . . 6-16
6.7.3 Edit the display parameters . . . . . . . . . . . . . . . . . . . . . . . . . . . . . . . . . . . . . . . . . 6-17
7 Description of INI files . . . . . . . . . . . . . . . . . . . . . . . . . . . . . . . . . . . . . . . . . . . . . . . . . . 7-1
7.1 Essential details . . . . . . . . . . . . . . . . . . . . . . . . . . . . . . . . . . . . . . . . . . . . . . . . . . . . . . 7-2
7.2 The syntax of INI files . . . . . . . . . . . . . . . . . . . . . . . . . . . . . . . . . . . . . . . . . . . . . . . . . . 7-2
7.3 Common trigger words . . . . . . . . . . . . . . . . . . . . . . . . . . . . . . . . . . . . . . . . . . . . . . . . . 7-3
7.4 Exemplary INI file . . . . . . . . . . . . . . . . . . . . . . . . . . . . . . . . . . . . . . . . . . . . . . . . . . . . . 7-4
7.5 Table fields . . . . . . . . . . . . . . . . . . . . . . . . . . . . . . . . . . . . . . . . . . . . . . . . . . . . . . . . . . 7-5
7.5.1 Description of the table “Subscribers“ . . . . . . . . . . . . . . . . . . . . . . . . . . . . . . . . . . 7-6
7.5.2 Description of the table “Broadcasts“ . . . . . . . . . . . . . . . . . . . . . . . . . . . . . . . . . . 7-11
7.5.3 Description of the table “Broadcast members“ . . . . . . . . . . . . . . . . . . . . . . . . . . . 7-15
7.5.4 Description of the table “Conference“. . . . . . . . . . . . . . . . . . . . . . . . . . . . . . . . . . 7-17
7.5.5 Description of the table “Conferees“. . . . . . . . . . . . . . . . . . . . . . . . . . . . . . . . . . . 7-21
7.5.6 Description of the table “Call Profile“ . . . . . . . . . . . . . . . . . . . . . . . . . . . . . . . . . . 7-22
7.5.7 Description of the table "Call Profile members" . . . . . . . . . . . . . . . . . . . . . . . . . . 7-26
7.5.8 Coding of iDispProps . . . . . . . . . . . . . . . . . . . . . . . . . . . . . . . . . . . . . . . . . . . . . . 7-27
07/2010
0-2 DAKS OScAR-Pro-TT Dataimport-Tool, User Manual
Page 5

BHB_DATAIMPORT_LOF.fm
Confidential Images
Images 0
Image 2-1 Diagram of a data import. . . . . . . . . . . . . . . . . . . . . . . . . . . . . . . . . . . . . . 2-1
Image 4-1 Log on to DAKS-TT Dataimport Tool . . . . . . . . . . . . . . . . . . . . . . . . . . . . 4-3
Image 5-1 Layout of the interface. . . . . . . . . . . . . . . . . . . . . . . . . . . . . . . . . . . . . . . . 5-2
Image 5-2 The email properties of DAKS-TT Dataimport-Tool . . . . . . . . . . . . . . . . . 5-6
Image 5-3 The relaying properties of the DAKS-TT Dataimport-Tool . . . . . . . . . . . . 5-8
Image 6-1 The INI Editor of the DAKS-TT Dataimport-Tool . . . . . . . . . . . . . . . . . . . . 6-3
07/2010
DAKS OScAR-Pro-TT Dataimport-Tool, User Manual
0-3
Page 6

BHB_DATAIMPORT_LOF.fm
Images Confidential
07/2010
0-4 DAKS OScAR-Pro-TT Dataimport-Tool, User Manual
Page 7

BHB_DATAIMPORT_LOT.fm
Confidential Tables
Tables 0
Table 1-1 Conventions . . . . . . . . . . . . . . . . . . . . . . . . . . . . . . . . . . . . . . . . . . . . . . . 1-3
Table 3-1 Installing the DAKS OScAR-Pro-TT Dataimport-Tool . . . . . . . . . . . . . . . . 3-2
Table 3-2 Uninstalling the DAKS OScAR-Pro-TT Dataimport-Tool. . . . . . . . . . . . . . 3-6
Table 4-1 Description of the fields of the "Logon" window . . . . . . . . . . . . . . . . . . . . 4-3
Table 4-2 The most important fault messages during logon . . . . . . . . . . . . . . . . . . . 4-6
Table 4-3 Creating a "Scheduled task" . . . . . . . . . . . . . . . . . . . . . . . . . . . . . . . . . . . 4-8
Table 5-1 Menu items and buttons of the OpenScape Alarm Response Professional 5-3
Table 5-2 Fields of the window “Email properties“ . . . . . . . . . . . . . . . . . . . . . . . . . . 5-6
Table 5-3 Field of the window “Select relay server“ . . . . . . . . . . . . . . . . . . . . . . . . . 5-8
Table 6-1 Edit INI file with the INI Editor . . . . . . . . . . . . . . . . . . . . . . . . . . . . . . . . . . 6-2
Table 6-2 Menu items of the INI Editor . . . . . . . . . . . . . . . . . . . . . . . . . . . . . . . . . . . 6-4
Table 6-3 General fields of the INI Editor . . . . . . . . . . . . . . . . . . . . . . . . . . . . . . . . . 6-5
Table 6-4 General fields description of the window area “Table fields“: . . . . . . . . . . 6-9
Table 6-5 Special parameters of the subscriber table . . . . . . . . . . . . . . . . . . . . . . . 6-12
Table 6-6 Dynamic creation of groups for broadcast members. . . . . . . . . . . . . . . . 6-13
Table 6-7 Editing an alpha-/numeric value . . . . . . . . . . . . . . . . . . . . . . . . . . . . . . . 6-15
Table 6-8 Example how to edit bitmasks. . . . . . . . . . . . . . . . . . . . . . . . . . . . . . . . . 6-16
Table 6-9 Description of the fields for the display outputs in the "Display" tab . . . . 6-17
Table 7-1 Trigger words of the DATAIMPORT.INI . . . . . . . . . . . . . . . . . . . . . . . . . . 7-3
Table 7-2 Exemplary INI file . . . . . . . . . . . . . . . . . . . . . . . . . . . . . . . . . . . . . . . . . . . 7-4
Table 7-3 Data fields of the “Subscriber“ table . . . . . . . . . . . . . . . . . . . . . . . . . . . . . 7-6
Table 7-4 Data fields of the “Broadcast“ table . . . . . . . . . . . . . . . . . . . . . . . . . . . . . 7-11
Table 7-5 Date fields of the “Broadcast members“ table . . . . . . . . . . . . . . . . . . . . . 7-15
Table 7-6 Data fields of the “Conference“ table. . . . . . . . . . . . . . . . . . . . . . . . . . . . 7-17
Table 7-7 The data fields of the table “Conferees“: . . . . . . . . . . . . . . . . . . . . . . . . . 7-21
Table 7-8 Data fields of the “Call Profile“ table . . . . . . . . . . . . . . . . . . . . . . . . . . . . 7-22
Table 7-9 Data fields of the table “Call Profile members“ . . . . . . . . . . . . . . . . . . . . 7-26
07/2010
DAKS OScAR-Pro-TT Dataimport-Tool, User Manual
0-5
Page 8

BHB_DATAIMPORT_LOT.fm
Tabl es Confidential
07/2010
0-6 DAKS OScAR-Pro-TT Dataimport-Tool, User Manual
Page 9

BHB_DATAIMPORT_01.fm
For internal use only Conventions and general instructions
1 Conventions and general instructions
Target audience and qualifications
This User Manual is written for service staff who are responsible for the initial installation and
startup of the OpenScape Alarm Response Professional.
In addition, it shall assist and support all those who set up and administer the Tool.
A basic knowledge of Windows and administrator skills are required to carry out the operations
described in this document.
Contents
The first chapter is divided into the following sections:
1.1 Reference manuals
1.2 Conventions and symbols used in this Manual
1.3 Privacy and data security
07/2010
DAKS OScAR-Pro-TT Dataimport-Tool, User Manual 1-1
Page 10

BHB_DATAIMPORT_01.fm
Conventions and general instructions For internal use only
Reference manuals
1.1 Reference manuals
Please also see our OScAR-Pro Release 7, HiPath OScAR-Pro V3 R1user manual for further
details and additional assistance when working with OScAR-Pro.
07/2010
1-2 DAKS OScAR-Pro-TT Dataimport-Tool, User Manual
Page 11

BHB_DATAIMPORT_01.fm
For internal use only Conventions and general instructions
Conventions and symbols used in this Manual
1.2 Conventions and symbols used in this Manual
Conventions
The following conventions apply to this User Manual:
Text
Password 123456 ... Details that appear in the continuous text and that are of particu-
global.cfg file Files and directories are indicated by the non-proportional
"Name" Field names, menu names and window descriptions are placed in
<Place holder> Entries or outputs, both of which may vary depending on the indi-
Table 1-1 Conventions
Symbols
The following symbols are used in this Manual:
The "i" is used to signal useful additional information.
All texts taken from the described files and any text you may enter
into these files will appear in the non-proportional Courier type-
face.
lar importance or must be heeded are output in bold print. Buttons are euqally marked in bold.
typeface Courier.
quotation marks.
vidual event and settings, are always placed in angle brackets and
written in italics.
>
07/2010
DAKS OScAR-Pro-TT Dataimport-Tool, User Manual 1-3
Page 12

BHB_DATAIMPORT_01.fm
Conventions and general instructions For internal use only
Privacy and data security
1.3 Privacy and data security
Please note that the system described in this Manual uses and processes personal data.
In Germany, the processing and use of personal data are subject to various regulatory acts,
including the Federal Data Protection Act (Bundesdatenschutzgesetzes, BDSG) and other restrictions. For your and any other country, please be careful to observe all pertinent laws and
regulations that are currently in force and applicable.
The first and foremost purpose of data protection is to protect the individual against any infringement of his/her personal rights through the misuse of his/her personal data.
On the other side, the protection of data privacy also has the aim to protect the data itself from
being misused during the different phases of its processing and in doing so ward off any infringement of outside or internal interests in need of protection.
Help safeguard data privacy and data security by being aware of these issues as you
work:
● Make sure that only authorized persons have access to personal data.
● Consistently make use of every opportunity to assign passwords; do not grant unauthor-
ized persons access to any passwords, e.g. by writing them down.
● Make sure that no unauthorized persons can manipulate, i.e. save, modify, communicate,
block, delete, or use personal data in any way.
● Always safeguard that no unauthorized persons have access to data storage mediums,
e.g. to back up diskettes or protocol printouts. This applies to service work as well as to
any storage or transport.
● Make sure that data storage media that are no longer needed are completely destroyed. In
this context, always check that you do not leave behind any papers that might become
openly accessible to others.
07/2010
1-4 DAKS OScAR-Pro-TT Dataimport-Tool, User Manual
Page 13
BHB_DATAIMPORT_02.fm
For internal use only Description of functions
Overview
2 Description of functions
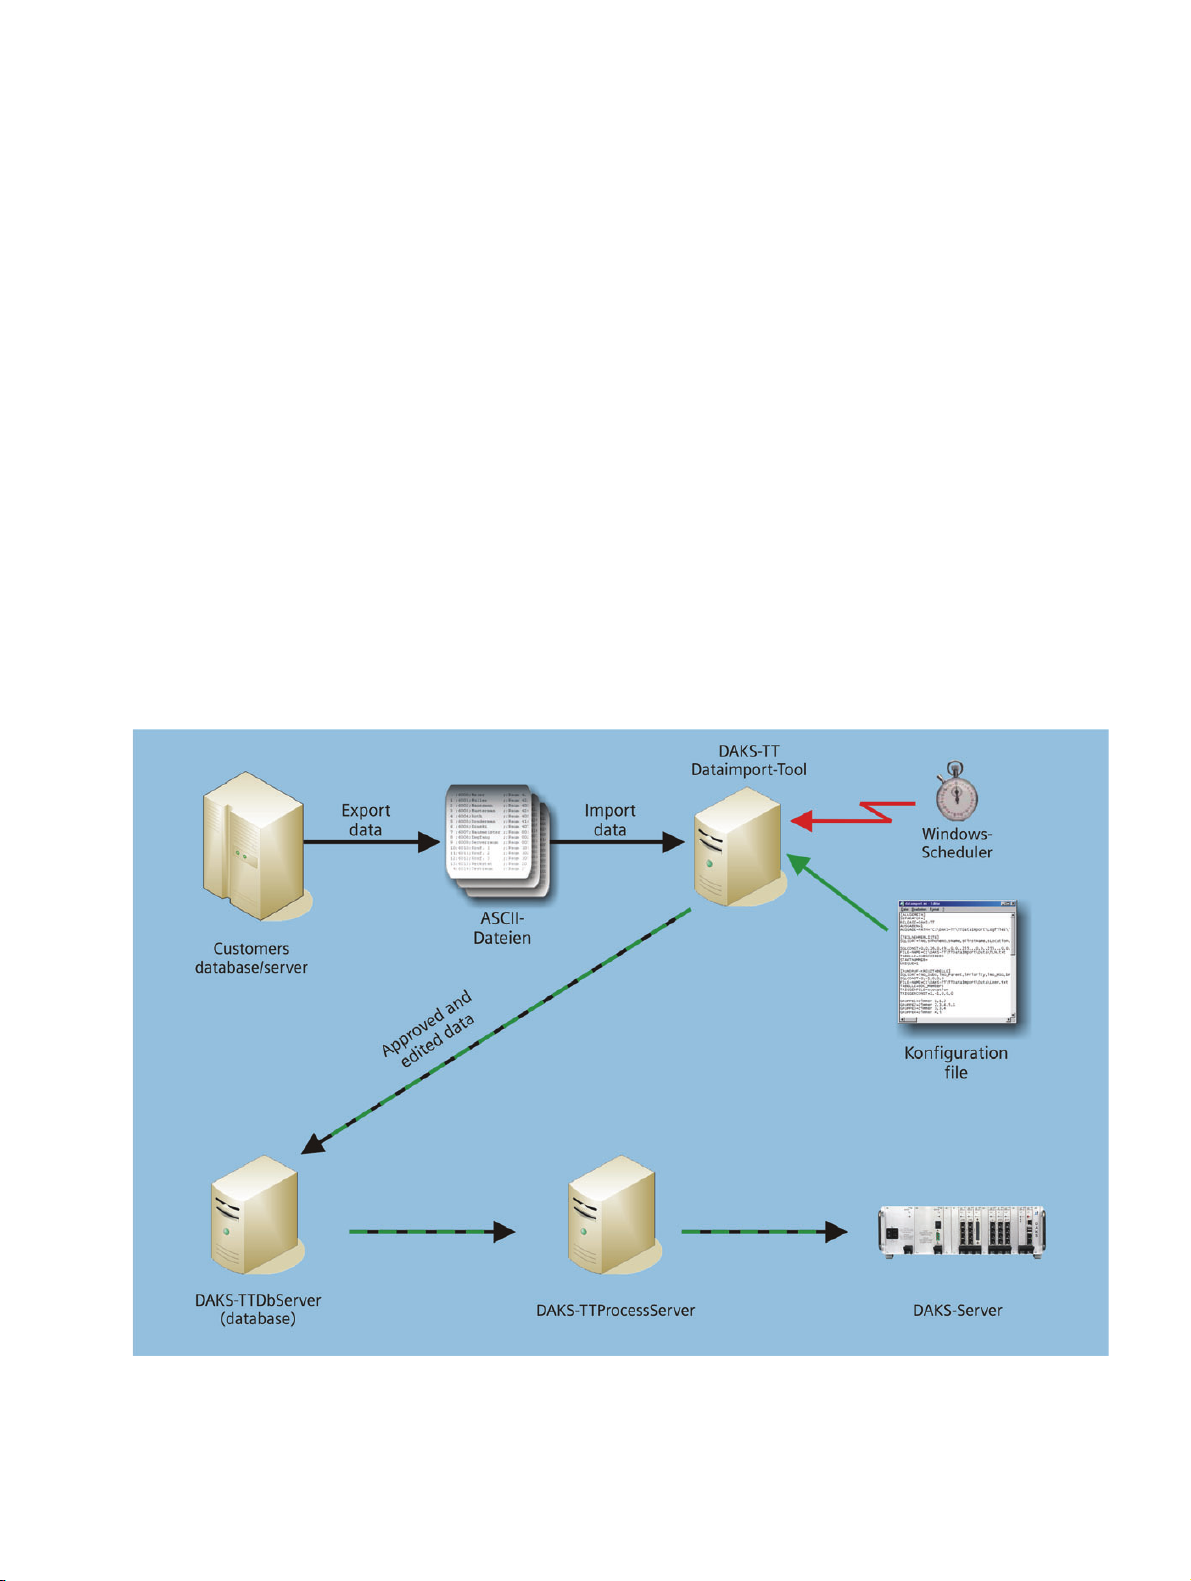
2.1 Overview
With the OpenScape Alarm Response Professional, you can import data easily into tetronik
OScAR-Pro Release 7 or OScAR-Pro V3 R2 Classic Applications (OScAR-Pro = Open Scape
Alarm Response Professional) from customer-own databases using the original source files
in ASCII format.
With the help of a configuration file (INI file), the data import can be tailored so flexibly that
source data files can be read in from just about any database.
In a first step, you need to export the data you want the Dataimport-Tool to later import from the
customer-own database to the source file.
It is these source files that are then read in, verified, and, if fault-free, finally imported by the
OpenScape Alarm Response Professional in accordance with the INI file rules.
The DAKS-TT Dataimport Tool can be started either manually or e.g. via the Windows-Scheduler.
Image 2-1 Diagram of a data import
07/2010
DAKS OScAR-Pro-TT Dataimport-Tool, User Manual 2-1
Page 14

BHB_DATAIMPORT_02.fm
Description of functions For internal use only
General description
2.2 General description
● The OpenScape Alarm Response Professional is an independent Windows program, op-
erable under WINDOWS 2000/XP/2003.
● It accepts data (tables) from source files with corresponding setup and enters it into the
database via OScAR-Pro-TT Server.
For this purpose the program needs separate source files (with the relevant datasets) for
the following tables:
– Subscriber list (obligatory)
– Broadcast groups (if needed)
– Contingency table for broadcast members (if needed)
– Conference groups (if needed)
– Contingency table for conference group members (if needed)
– Call Profiles (if needed)
– Contingency table for call profile group members (if needed)
● Every dataset that needs to be imported must have an unequivocal numeric code (identi-
fier) ranging between 0 and n - 1, with n constituting the maximum number of entries in the
table defined in the OScAR-Pro server's chipcard.
● The flexibility of the OpenScape Alarm Response Professional ensures that in the source
files:
– the fields of the table may be in random order,
– fields located anywhere and not needed by the OScAR-Pro-TT database will be ig-
nored,
– not all fields must be identical with those of the OScAR-Pro-TT database; missing
fields can be filled with absolute terms,
– specific subscriber data sets can be earmarked using unequivocal codes or referenc-
es (e.g. "Default values" from a Microsoft Access database), to safeguard that they will
be found again later after their import.
● Note that subscribers with administrative rights (user) can only be setup and administered
via the OScAR-Pro-TT Administrator Tool.
On condition that the subscriber identifier has not been changed, the administrative and
operative rigts already assigned to a subscriber are retained also after the data import.
● Subscribers can be also entered flexibly into existing broadcasts on the basis of specific
trigger words.
07/2010
2-2 DAKS OScAR-Pro-TT Dataimport-Tool, User Manual
Page 15

BHB_DATAIMPORT_02.fm
For internal use only Description of functions
Start and operation of the OpenScape Alarm Response Professional
● In order to be able to create or edit the INI file as faultless as possible, the DAKS-TT
Dataimport Tool has a corresponding editor with an intuitive user interface (Chapter 6, „INI
Editor of the DAKS-TT Dataimport-Tool“).
Note:
>
Bear in mind that for broadcasts or conferences that are launched via contact or
time-controlled processes, no corresponding references are retained when the
groups are imported.
2.3 Start and operation of the OpenScape Alarm Response Professional
● The OpenScape Alarm Response Professional can be started:
– manually,
– via Windows Scheduler ("Planned tasks“) with two different trigger parameters.
● First, the DAKS-TT Dataimport Tool tries to logon to OScAR-Pro-TT Server with the de-
fined logon data.
Should another user already be logged on to OScAR-Pro-TT Server with the same
>
identification code, your logon attempt will be rejected. If you are using automatic
log-on (Section 4.1, „Starting the DAKS-TT Dataimport Tool“) in this instance, the
program will be ended.
● If the log-on was successful, the INI files are read in and checked for faultlessness.
● Next, the relevant import files are entered in keeping with the INI file rules and the data,
together with the data stock that already exists in the database, is checked for plausibility.
● Any faults or inconsistencies will be output in the display area of the application and, op-
tionally, recorded to individual logfiles.
In the event of a fault, the import process will be aborted.
● Once the data is checked and proves faultless, it is transferred to the database and saved.
● During the saving process, the following connections of OScAR-Pro-TT Server are cut:
– all connections to logged-on administrators, if any
– all connections to logged-on operators, if any
– all connections to OScAR-Pro servers.
07/2010
DAKS OScAR-Pro-TT Dataimport-Tool, User Manual 2-3
Page 16

BHB_DATAIMPORT_02.fm
Description of functions For internal use only
Plausibility checks
2.4 Plausibility checks
In the plausibility check, the source files are examined for:
● redundant or multiple allocation of identifiers in one and the same table
● missing identifiers or identifiers that transgress areas pursuant to the chip-enable gating of
the OScAR-Pro server
● invalid allocations in the contingency tables
● assignments of invalid announcements
● errors in the value range of fields
● missing ‘PIN’ if the field for the operative rights of a subscribers does not equal 0 (zero).
07/2010
2-4 DAKS OScAR-Pro-TT Dataimport-Tool, User Manual
Page 17

BHB_DATAIMPORT_03.fm
For internal use only Installation
3 Installation
Overview
This chapter shows you how to install and, if you should need, remove the DAKS-TT Dataimport Tool to and from your computer.
Contents
The chapter is divided into the following sections:
3.1 Installing the OpenScape Alarm Response Professional
3.2 Removing the OpenScape Alarm Response Professional
07/2010
DAKS OScAR-Pro-TT Dataimport-Tool, User Manual 3-1
Page 18
BHB_DATAIMPORT_03.fm
Installation For internal use only
Installing the OpenScape Alarm Response Professional
3.1 Installing the OpenScape Alarm Response Professional
The entire OpenScape Alarm Response Professional can all be installed in one process.
Please bear in mind that under Windows 2000/XP/2003 Server, you must have ad-
>
Make sure that the following requirements are met before you begin to install the software on
your PC:
● Microsoft Windows 2000, Windows XP or Windows 2003 Server is already installed on
● You are familiar with the Windows operating system and know how to install software.
● OScAR-Pro Release 7 or OScAR V3 R2, respectively, are already installed on your com-
ministrative rights to install the OpenScape Alarm Response Professional!
your computer.
puter or network (see OScAR-Pro User Manual).
● OScAR-Pro-TT Server has already been connected at least once with the corresponding
OScAR-Pro server (been ’online’),
Follow the instructions issued by the program during the installation. Use Back to
>
return to the previous window and make changes, if necessary. You can terminate
the installation at any time with Cancel.
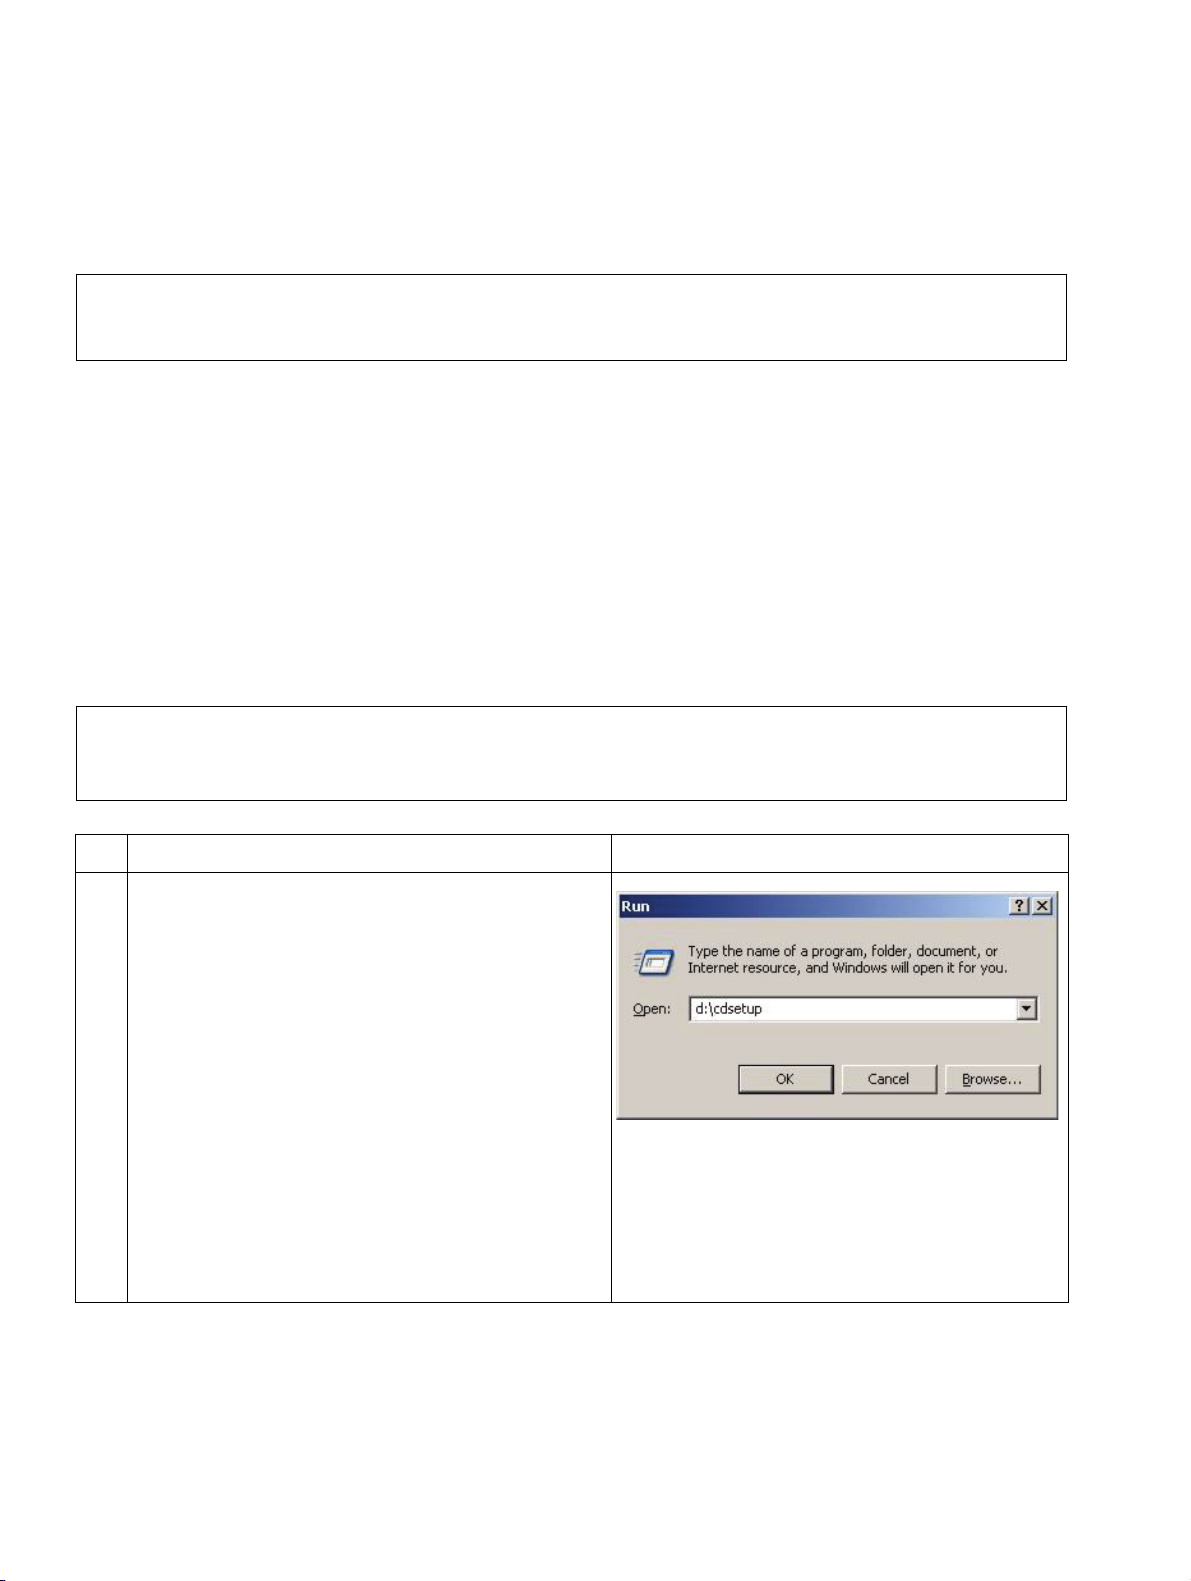
No. Task Window
1. Insert the installation CD in the CD-ROM
drive.
Should the installation software fail to start
automatically, start the CD installation manually from the Windows interface with the
Run... menu command:
To do so, enter
<CD-ROM drive>:\cdsetup
e.g.: d:\cdsetup
in the command line and click OK.
Table 3-1 Installing the DAKS OScAR-Pro-TT Dataimport-Tool
07/2010
3-2 DAKS OScAR-Pro-TT Dataimport-Tool, User Manual
Page 19

BHB_DATAIMPORT_03.fm
For internal use only Installation
Installing the OpenScape Alarm Response Professional
No. Task Window
2. Click on the menu item
’Install dataimport software “Dataimport
V6.01’.
3. Select the language for the installation and
click on OK.
4. The Wizard is now ready to begin with the installation.
Table 3-1 Installing the DAKS OScAR-Pro-TT Dataimport-Tool
07/2010
DAKS OScAR-Pro-TT Dataimport-Tool, User Manual 3-3
Page 20
BHB_DATAIMPORT_03.fm
Installation For internal use only
Installing the OpenScape Alarm Response Professional
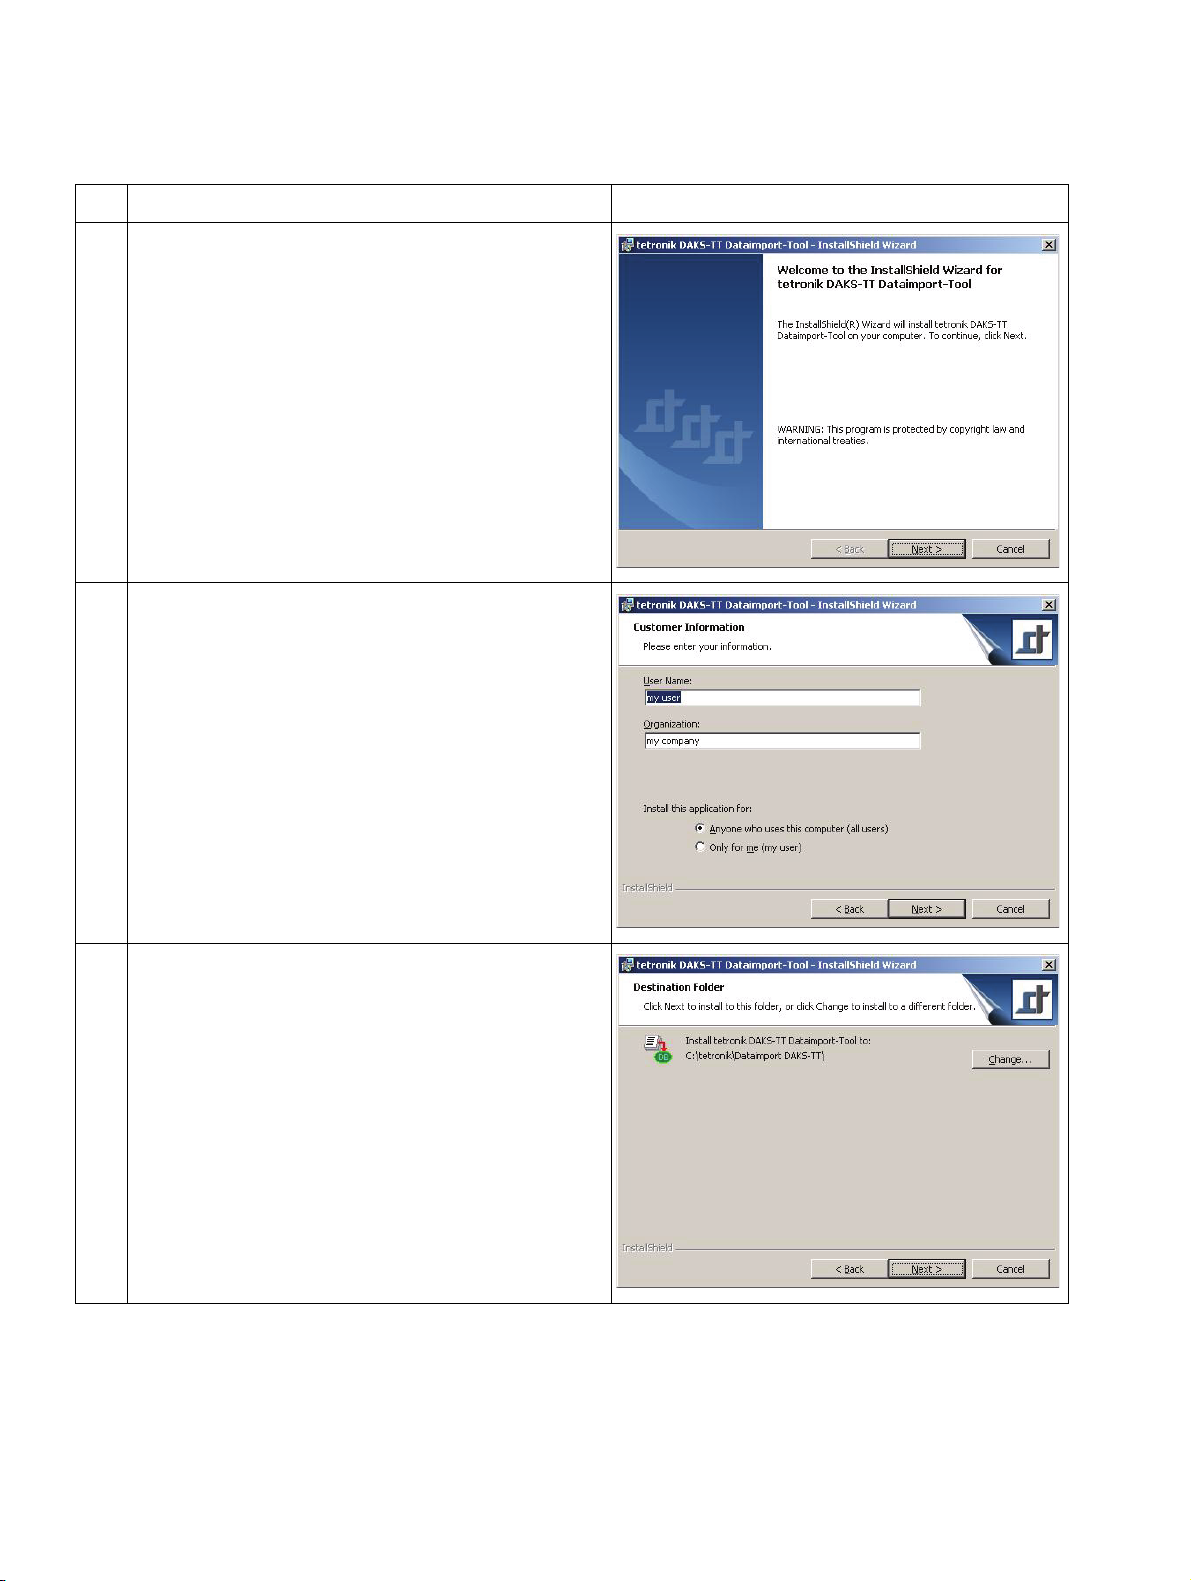
No. Task Window
5. Now click on Next to continue with definition
of the installation settings.
6. Enter the user name and the name of your
company, business or organization (here: ’organization’).
Next, tick if you want the application to be installed for anyone who uses this computer
computer or only for you.
After you have made all necessary entries
move to the next window by clicking on Next.
7. This window serves to define the destination
folder. If you want to install the application in
a different folder, click on Change... and select a new folder in the next window.
After you have made all necessary entries,
click on Next to install the application to the
folder you have selected.
Table 3-1 Installing the DAKS OScAR-Pro-TT Dataimport-Tool
07/2010
3-4 DAKS OScAR-Pro-TT Dataimport-Tool, User Manual
Page 21
BHB_DATAIMPORT_03.fm
For internal use only Installation
Installing the OpenScape Alarm Response Professional
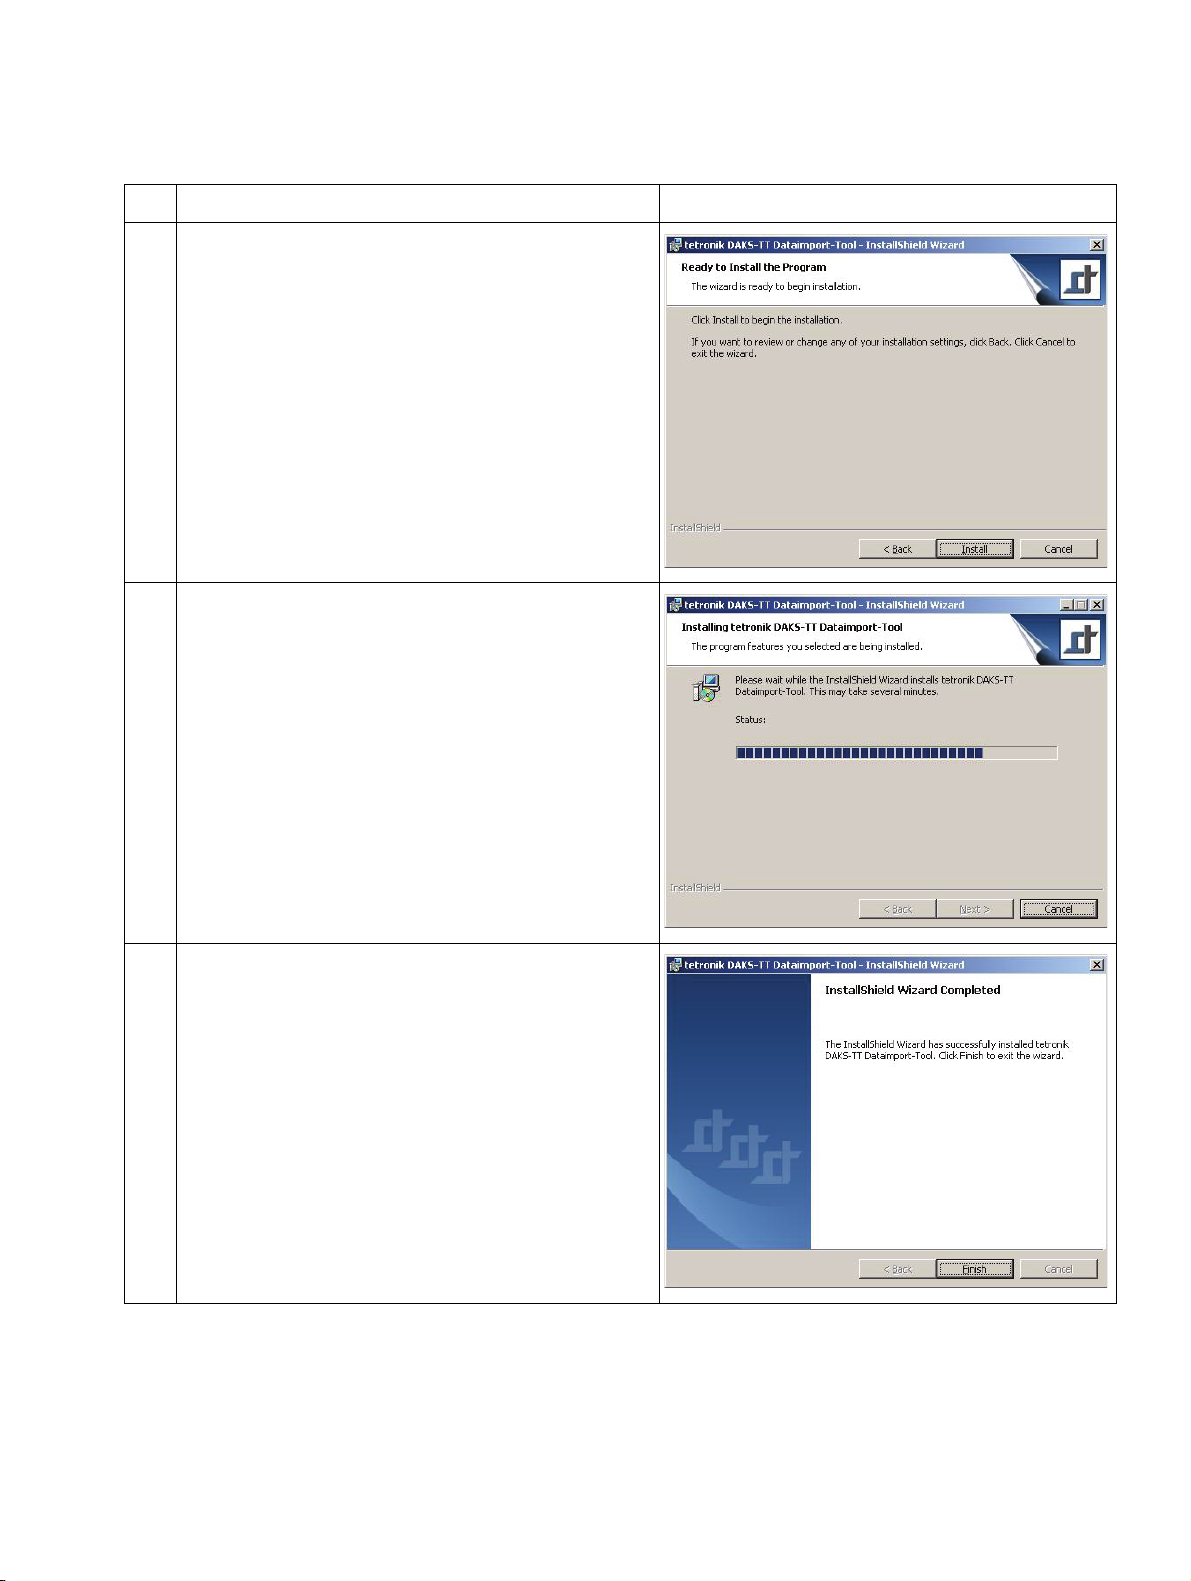
No. Task Window
8. Now click on Install to install the OpenScape
Alarm Response Professional on your computer.
The Wizard will now install the software in the
folder you selected. This may take severeal
minutes. The progress (’status’) of the installation is output in a blue bar.
After the installation has been completed,
click on Next.
9. The software is being installed.
10. Click on Finish to complete the installation
and exit the Wizard.
As soon as the Wizard has successfully installed the OScAR-Pro-TT Dataimport-Tool
on your computer, a corresponding program
symbol will appear in the Windows Program
Manager under the program group "tetronik
OScAR-Pro-TT".
Click on Finish.
Table 3-1 Installing the DAKS OScAR-Pro-TT Dataimport-Tool
07/2010
DAKS OScAR-Pro-TT Dataimport-Tool, User Manual 3-5
Page 22
BHB_DATAIMPORT_03.fm
Installation For internal use only
Removing the OpenScape Alarm Response Professional
3.2 Removing the OpenScape Alarm Response Professional
No. Task Window
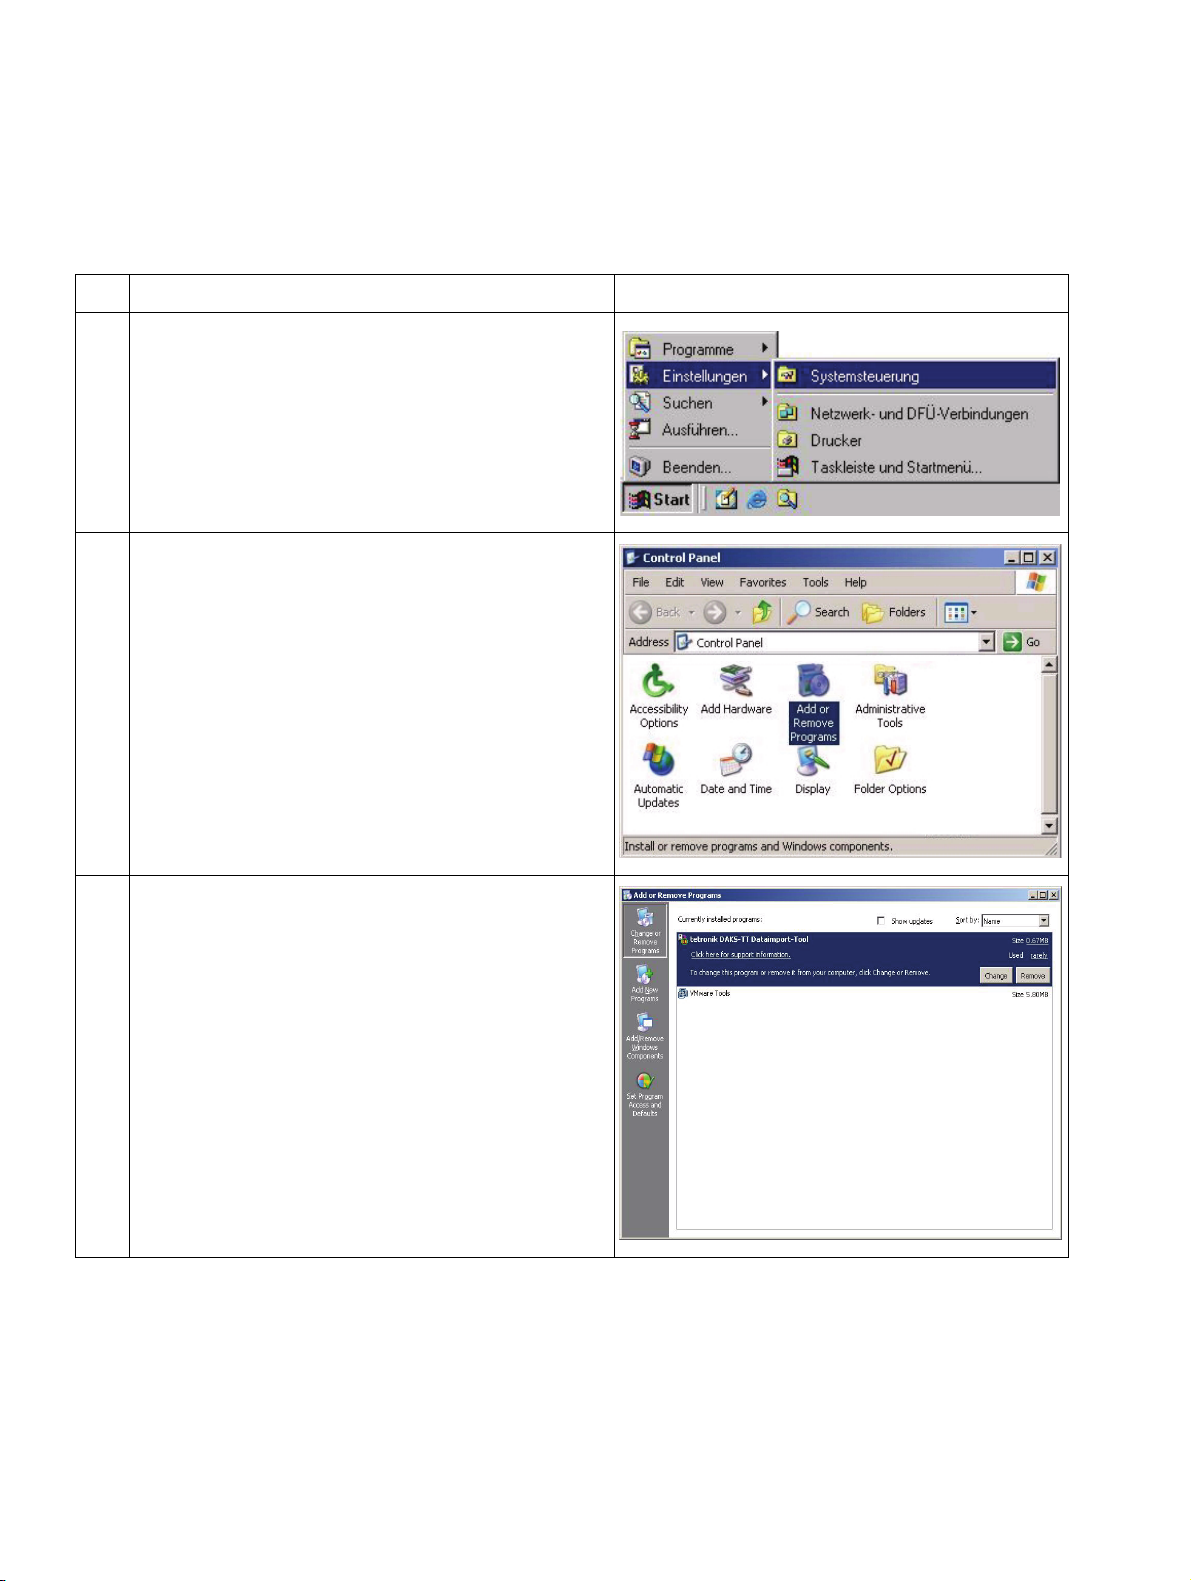
1. Open the Windows Control Panel.
2. Open "Add or Remove Programs".
3. Select the entry "tetronik OpenScape Alarm
Response Professional" and click on Re-
move.
The Wizard will now prepare the removal of
the application.
Table 3-2 Uninstalling the DAKS OScAR-Pro-TT Dataimport-Tool
07/2010
3-6 DAKS OScAR-Pro-TT Dataimport-Tool, User Manual
Page 23
BHB_DATAIMPORT_03.fm
For internal use only Installation
Removing the OpenScape Alarm Response Professional
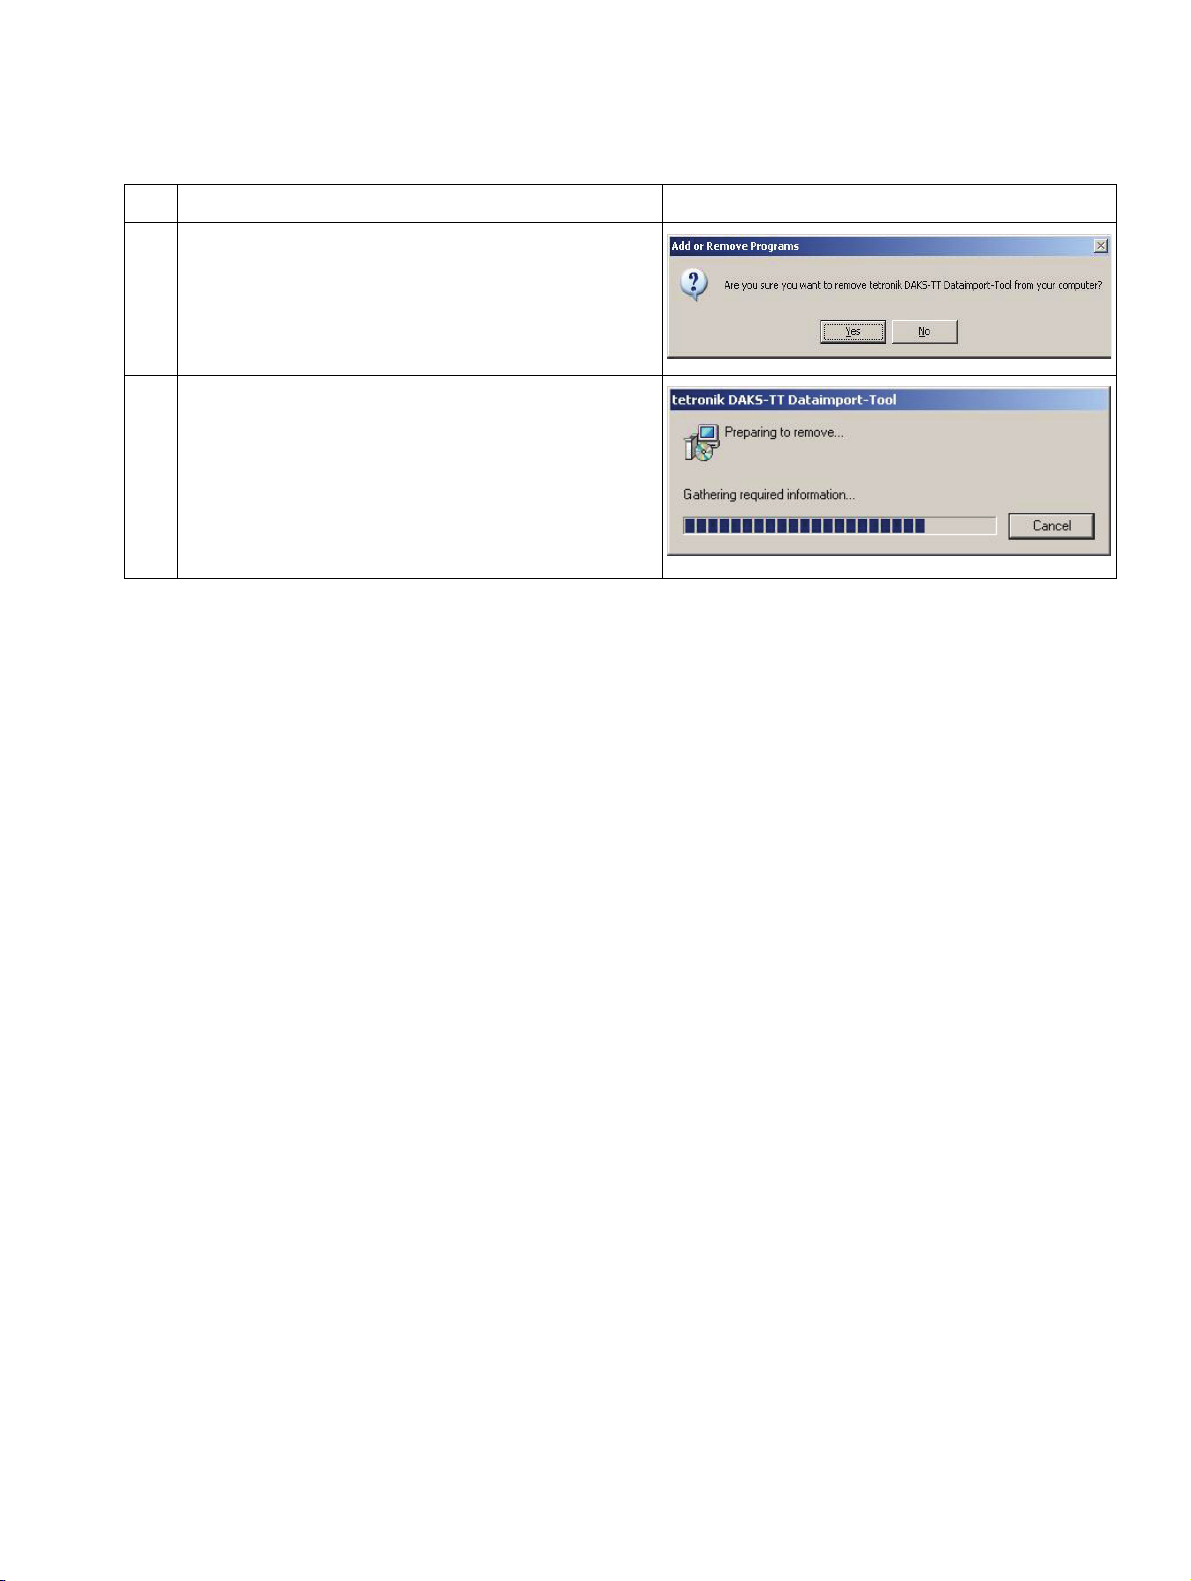
No. Task Window
4. Click YES to confirm the removal of the tetronik OScAR-Pro-TT Dataimport-Tool from
your computer.
5. The Wizard will now remove the application.
Table 3-2 Uninstalling the DAKS OScAR-Pro-TT Dataimport-Tool
07/2010
DAKS OScAR-Pro-TT Dataimport-Tool, User Manual 3-7
Page 24

BHB_DATAIMPORT_03.fm
Installation For internal use only
Removing the OpenScape Alarm Response Professional
07/2010
3-8 DAKS OScAR-Pro-TT Dataimport-Tool, User Manual
Page 25

BHB_DATAIMPORT_04.fm
For internal use only Program activation
4 Program activation
Overview
This chapter shows you how to start the DAKS-TT Dataimport Tool either manually or time-controlled and explains the special features that apply when the application is started for the very
first time.
Contents
The chapter includes the following sections:
4.1 Starting the DAKS-TT Dataimport Tool
4.2 Initial startup of the DAKS-TT Dataimport Tool
4.3 Start the application in a dialog
4.4 Start the application by entering the logon data
4.5 Start the application with automatic logon
4.6 The most important error messages during logon
4.7 Define time-controlled program-cueing via “Scheduled tasks“
07/2010
DAKS OScAR-Pro-TT Dataimport-Tool, User Manual 4-1
Page 26

BHB_DATAIMPORT_04.fm
Program activation For internal use only
Starting the DAKS-TT Dataimport Tool
4.1 Starting the DAKS-TT Dataimport Tool
The OpenScape Alarm Response Professional can be invoked in three different ways:
● Start the application in a dialog, i.e. without prompting parameter
● Start the application by entering the logon data
● Start the application with automatic logon
4.2 Initial startup of the DAKS-TT Dataimport Tool
Log on to the DAKS-TT Dataimport Tool (Section 4.3, „Start the application in a dialog“).
Go to the menu item "Select ➝ INI file options“ and chose a valid INI file (Section 5.5 “Selecting
an INI-file“)..
Please bear in mind that the installation of the Dataimport-Tool will automatically
>
generate the creation of an INI file "DATAIMPORT.INI“ with an example configuration
for your assistance.
Note that the application retains the INI files that were last accessed/edited in the Registry. It
will re-use these files whenever they are cued again later, irrespective of the way in which they
are invoked.
Now proceed to test the data import.
07/2010
4-2 DAKS OScAR-Pro-TT Dataimport-Tool, User Manual
Page 27
BHB_DATAIMPORT_04.fm
For internal use only Program activation
Start the application in a dialog
4.3 Start the application in a dialog
To operate the DAKS-TT Dataimport Tool in a user-controlled way, i.e. in form of a dialog, open
the Windows Program Manager under the program group "tetronik OScAR-Pro-TT" and click
on the DAKS-TT Dataimport Tool symbol.
Due to the fact that the DAKS-TT Dataimport Tool registers onto the OScAR-Pro server in the
same way as the OScAR-Pro-TT Administrator Tool, you can find further details on the registration window in the OScAR-Pro Release 7, OScAR V3 R2 Classic Applications user manual.
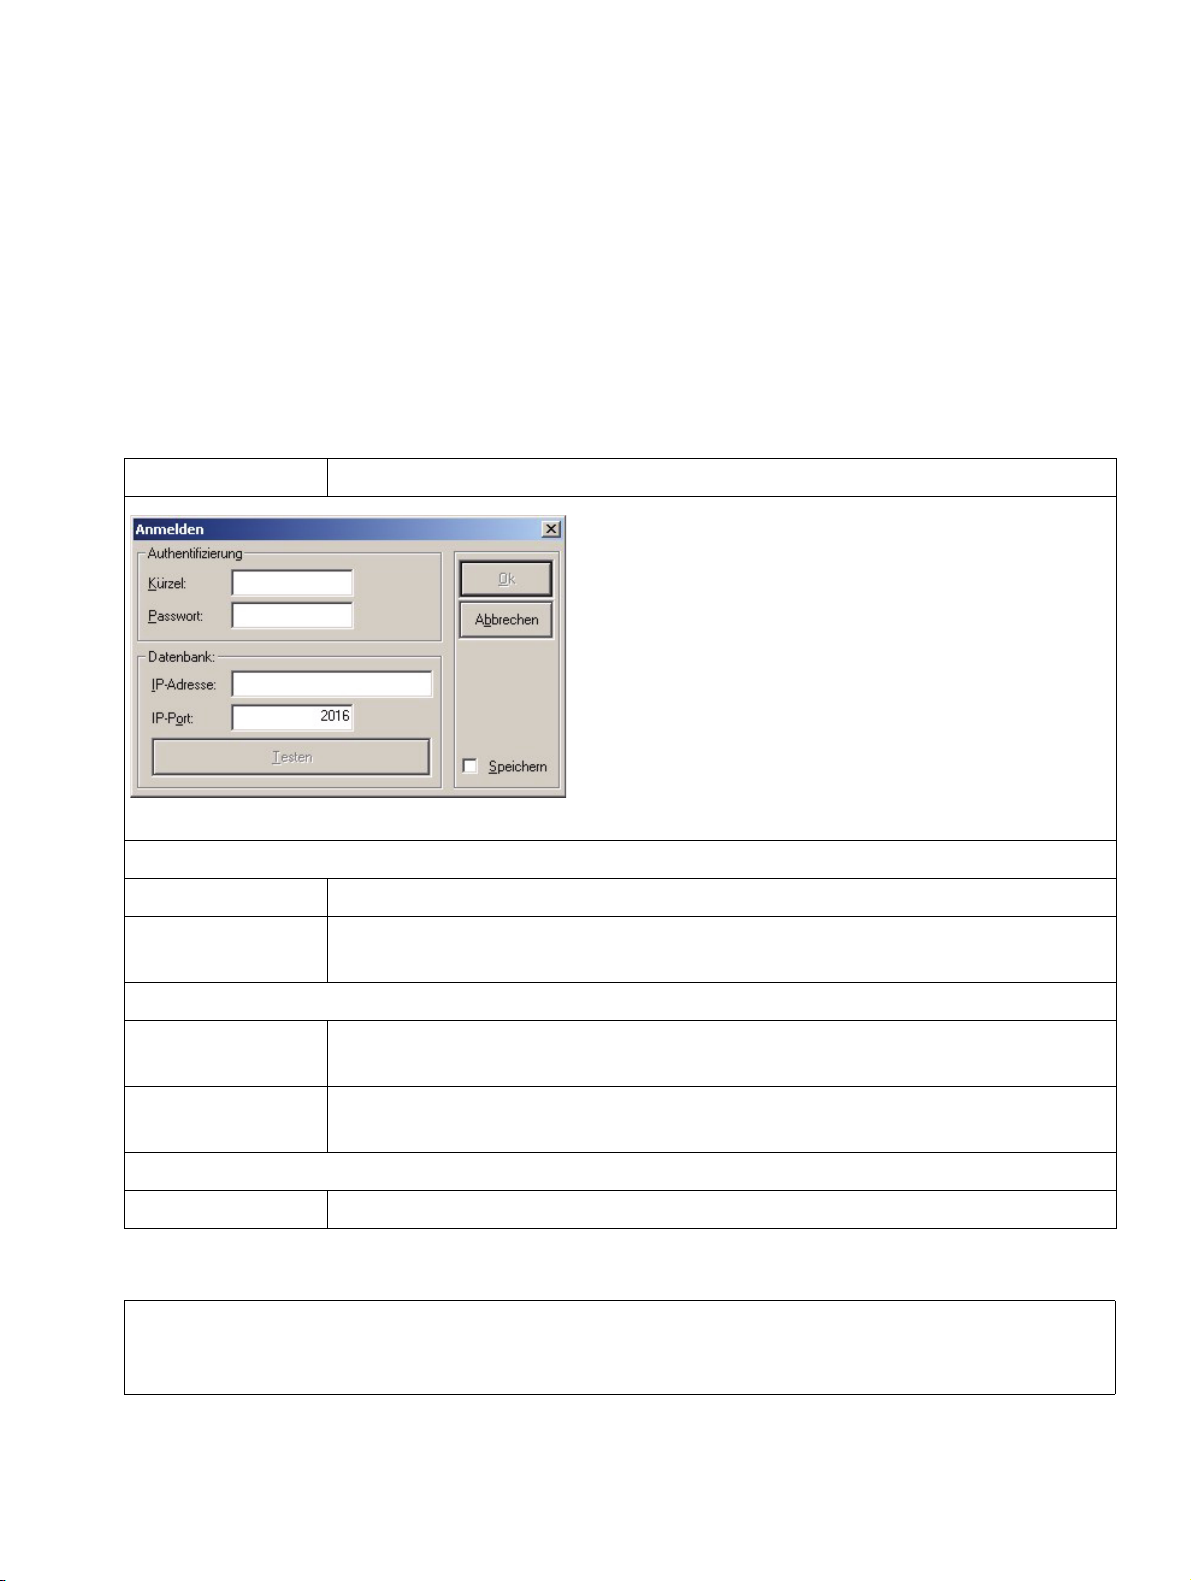
Description of the fields in the "Logon" window
Input field Description
Image 4-1 Log on to DAKS-TT Dataimport Tool
Window area "Authentication"
User Input field to enter the ID of an administrator, max. 30 characters.
Password Input field to enter the password of the aforementioned user, max. 30 char-
acters.
Window area "Database"
IP address Input field to enter the IP address or the name of the computer on which
the OScAR-Pro-TT Server program runs, max. 30 characters.
IP port Input field to enter the IP Port that is used to link-up administration connec-
tions of the OScAR-Pro-TT Server (default: 2016).
Other fields
Save If this field is checked, the logon data is saved encrypted in the Registry.
Table 4-1 Description of the fields of the "Logon" window
Please bear in mind that to start the application with automatic logon, you must have
>
previously logged on successfully at least once to the DAKS-TT Dataimport Tool and
also ticked the box "Save".
07/2010
DAKS OScAR-Pro-TT Dataimport-Tool, User Manual 4-3
Page 28

BHB_DATAIMPORT_04.fm
Program activation For internal use only
Start the application by entering the logon data
4.4 Start the application by entering the logon data
The OpenScape Alarm Response Professional can be started with direct input of the logon data. This is particularly useful when importing data in a time-controlled way usng the Windows
Scheduler.
For this purpose, you must transfer at the program start the trigger word /LOGON:, plus the access data [user name], [password], [IP address], and [port].
Please bear in mind that the logon window will here not open as described in the previous chapter; instead, the application will launch the dataimport process automatically or system-controlled.
Example:
"C:\tetronik\OScAR-Pro-TT Dataimport-Tool\OScAR-Pro-TT Dataimport-Tool.exe" /
LOGON:sys-adm,sysadm,192.168.123.123,2001
The following prerequisites must be met for this function:
● All files that shall be imported must be properly available.
● A valid INI file must be available and assigned.
● We recommend you test the data import manually beforehand to verify that it operates
properly and fault-free (Section 4.3, „Start the application in a dialog“).
Warning
>
Please remember that starting the application with these parameters bears the risk
of third parties reading out the logon data in plaintext, i.e. unencrypted.
07/2010
4-4 DAKS OScAR-Pro-TT Dataimport-Tool, User Manual
Page 29

BHB_DATAIMPORT_04.fm
For internal use only Program activation
Start the application with automatic logon
4.5 Start the application with automatic logon
The OpenScape Alarm Response Professional can also be started with automatic logon. This
is again particularly useful if you want the data to be imported time-controlled using the Windows Schedu-ler.
To start the application with automatic logon, you must first logon successfully in a dialog (Section 4.3, „Start the application in a dialog“) with the box "Save" well ticked.
Next, go to the Windows Scheduler and transfer the trigger word /AUTOC: to the application
at the startup. The OpenScape Alarm Response Professional will read all logon data needed
from the Windows Registry.
The logon data is saved encrypted in the Windows Registry.
Please again bear in mind that the logon window will not open in the way described in the preceding chapter. Instead, the program will launch the import process automatically or systemcontrolled.
For example:
"C:\tetronik\OScAR-Pro-TT Dataimport-Tool\OScAR-Pro-TT Dataimport-Tool.exe" /
AUTOC:
The following prerequisites must be met for this function:
● Valid logon data must be available in the Registry
(Section 4.3, „Start the application in a dialog“).
● The files that shall be imported must be properly available.
● A valid INI file must be available and assigned.
● We recommend you test the dataimport manually beforehand to verify that it operates
properly and fault-free (Section 4.3, „Start the application in a dialog“).
To change logon data stored in the Registry, start the OpenScape Alarm Response
>
Professional in the dialog (Section 4.3, „Start the application in a dialog“) and check
the box "Save".
07/2010
DAKS OScAR-Pro-TT Dataimport-Tool, User Manual 4-5
Page 30
BHB_DATAIMPORT_04.fm
Program activation For internal use only
The most important error messages during logon
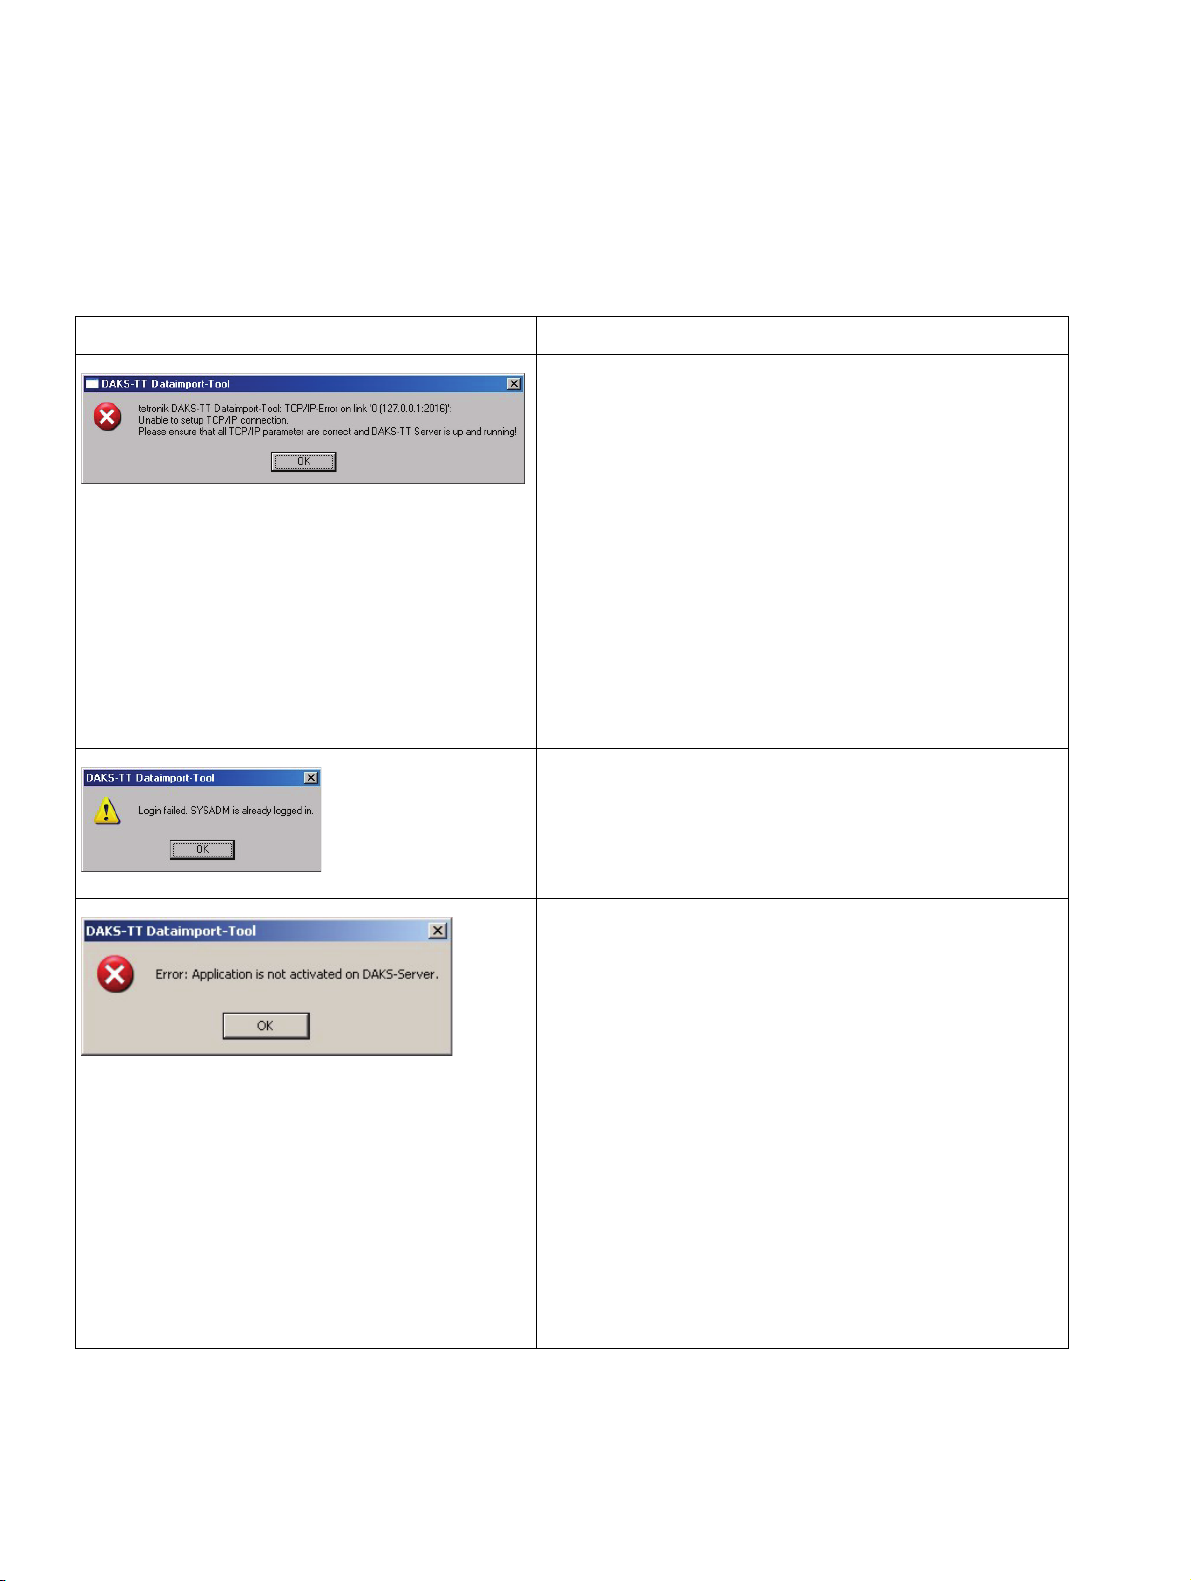
4.6 The most important error messages during logon
The below list covers the most important error messages that may appear during the
logon:
Field Description
Unable to set up TCP/IP connection to OScARPro-TT Server.
Among other reasons, this message may surface
because:
– you entered a wrong IP address or IP
port
– the attempt to connect was forestalled by
a firewall on your local computer, on the
computer used for OScAR-Pro-TT Server, or along the route
– the application OScAR-Pro-TT Server is
not active
The attempt of the OpenScape Alarm Response
Professional to log on to OScAR-Pro-TT Server
with the assigned user name failed because another application is already logged on with this
name.
The application is not enabled in the chipcard
data of OScAR-Pro-TT Server.
If this message appears, verify that:
– the OScAR-Pro server entered in OS-
cAR-Pro-TT Server is properly marked
as primary connection
– OScAR-Pro-TT Server has already been
connected successfully at least once
with the OScAR-Pro server (been ’online’)
– you have acquired the application right-
fully and the chipcard of your OScAR-Pro
server is equipped with the pertinent enabled information
Table 4-2 The most important fault messages during logon
07/2010
4-6 DAKS OScAR-Pro-TT Dataimport-Tool, User Manual
Page 31

BHB_DATAIMPORT_04.fm
For internal use only Program activation
The most important error messages during logon
Field Description
The OpenScape Alarm Response Professional is
unable to create the specified log directory to
store the log files.
If this message appears, enter a valid directory
(see Section 6.4 “General fields of the INI-Editor“).
Table 4-2 The most important fault messages during logon
07/2010
DAKS OScAR-Pro-TT Dataimport-Tool, User Manual 4-7
Page 32

BHB_DATAIMPORT_04.fm
Program activation For internal use only
Define time-controlled program-cueing via “Scheduled tasks“
4.7 Define time-controlled program-cueing via “Scheduled tasks“
The below example of a daily data import shows you how to cue the OpenScape Alarm Response Professional time-controlled under Windows.
The following prerequisites must be met for this function:
● You have started the application previously at least once in the dialog, saved the logon data
there (Section 4.3, „Start the application in a dialog“), and selected an INI file.
● We recommend you test the dataimport manually beforehand to verify that it operates
properly and fault-free (Section 4.3, „Start the application in a dialog“).
The following description was taken from Windows XP (Service Pack 2, German). It
>
serves to illustrated the governing principle. In other Windows operating systems,
the process may be demonstrated differently.
To create a “Scheduled task“ you must carry out the following steps:
No. Task Window
1. Open the Windows application "Scheduled
Tasks" (usually "Start ➝ Programs ➝ Addons ➝ System programs ➝ Scheduled
Tasks“).
2. Double click on "Add Scheduled task".
Table 4-3 Creating a "Scheduled task"
07/2010
4-8 DAKS OScAR-Pro-TT Dataimport-Tool, User Manual
Page 33

BHB_DATAIMPORT_04.fm
For internal use only Program activation
Define time-controlled program-cueing via “Scheduled tasks“
No. Task Window
3. Click on Next.
4. Click on Search.
5. Select the program “OScAR-Pro-TT
Da-taimport-Tool.exe“ in the installation path
and click on Open.
Table 4-3 Creating a "Scheduled task"
07/2010
DAKS OScAR-Pro-TT Dataimport-Tool, User Manual 4-9
Page 34

BHB_DATAIMPORT_04.fm
Program activation For internal use only
Define time-controlled program-cueing via “Scheduled tasks“
No. Task Window
6. Under "Perform task:" specify the recurrence cycle (e.g. Daily“) and click on Next.
7. Now enter the time at which you want the
import to begin under: “Starts at“ (e.g.
00:30 a.m.).
Next, use the field “Perform task on“ to enter the days on which you want the application to start.
Define the "Start date".
Click on Next.
8. If needed, specify the user context in which
you want the application to operate. In certain cases this may also include the entry of
a password (please consult your network
administrator).
Click on Next.
Table 4-3 Creating a "Scheduled task"
07/2010
4-10 DAKS OScAR-Pro-TT Dataimport-Tool, User Manual
Page 35

BHB_DATAIMPORT_04.fm
For internal use only Program activation
Define time-controlled program-cueing via “Scheduled tasks“
No. Task Window
9. Check the field "Open enhanced properties
for this task when clicking on "Finish"“, and
click on Finish.
Table 4-3 Creating a "Scheduled task"
07/2010
DAKS OScAR-Pro-TT Dataimport-Tool, User Manual 4-11
Page 36

BHB_DATAIMPORT_04.fm
Program activation For internal use only
Define time-controlled program-cueing via “Scheduled tasks“
No. Task Window
10. To start the application with automatic logon, add the following parameter to the field
"Perform": /AUTOC:
To start the application by entering the logon data, add the following parameter to the
field "Perform": /LO-GON:<User>,<Pass-
word>,<IP Address>,<IP Port>
Now confirm with OK.
Table 4-3 Creating a "Scheduled task"
07/2010
4-12 DAKS OScAR-Pro-TT Dataimport-Tool, User Manual
Page 37

BHB_DATAIMPORT_04.fm
For internal use only Program activation
Logging
4.8 Logging
To log the import of data, please specify a directory in the INI file where you want the LOG files
to be stored.
The information saved in these LOG files is the same as that which is produced in the output
area of the OpenScape Alarm Response Professional.
LOG files are particularly useful if you want the program to start automatically as they enable
you to verify if your data was imported successfully whenever your need.
Note that LOG files are created every time the DAKS-TT Dataimport Tool is invoked, irrespective of the operation of the application. The LOG file name is put together of the following components:
<year>-<month>-<day>_<hour>-<minute>-<second>__ImportLog.txt__
For example:
2005-12-12-00-31-24__ImportLog.txt
Attention!
>
Please bear in mind that the OpenScape Alarm Response Professional does not delete LOG files autonomously after they have been created, nor does it overwrite
them.
Over time this may lead to the storage of very large amounts of data.
We therefore recommend you archive or delete obsolete LOG files regularly.
07/2010
DAKS OScAR-Pro-TT Dataimport-Tool, User Manual 4-13
Page 38

BHB_DATAIMPORT_04.fm
Program activation For internal use only
Logging
07/2010
4-14 DAKS OScAR-Pro-TT Dataimport-Tool, User Manual
Page 39

BHB_DATAIMPORT_05.fm
For internal use only Operating the OpenScape Alarm Response Professional
5 Operating the OpenScape Alarm Response
Professional
Overview
This chapter shows you how to configure and work with the DAKS-TT Dataimport-Tool.
Contents
The chapter includes the following sections:
5.1 Layout of the interface
5.2 Description of the menu items and buttons
5.3 Start import
5.4 Save output as
5.5 Select INI file
5.6 Edit email properties
5.6.1 Overview
5.6.2 Window “Edit email properties“
5.6.3 Window “Relaying“
07/2010
DAKS OScAR-Pro-TT Dataimport-Tool, User Manual 5-1
Page 40

BHB_DATAIMPORT_05.fm
Operating the OpenScape Alarm Response Professional For internal use only
Layout of the interface
5.1 Layout of the interface
The below screen illustrates the layout of the OpenScape Alarm Response Professional user
interface:
Image 5-1 Layout of the interface
07/2010
5-2 DAKS OScAR-Pro-TT Dataimport-Tool, User Manual
Page 41

BHB_DATAIMPORT_05.fm
For internal use only Operating the OpenScape Alarm Response Professional
Description of the menu items and buttons
5.2 Description of the menu items and buttons
The below table analyzes the different menu items of the OpenScape Alarm Response Professional.
It also includes the assigned keyboard shortcuts and the symbols of the toolbar.
Menu items/buttons Description
"Application" pull-down menu
Start import...
(CTRL+S)
Save output as...
(CTRL+L)
Cancel
(Alt + F4)
"Options" pull-down menu
Select INI file...
(CTRL+I)
Edit INI file...
(CTRL+D)
Email properties...
(CTRL+E)
Starts the verification and the import of the data from the
source files and, if found faultless, stores the imported data
in the database (Section 5.3, „Start import“).
Saves the content of the output area as a text file (Section
5.4, „Save output as“).
Cancels the OpenScape Alarm Response Professional.
Selects an IN file to parameterize the data import (Section
5.5, „Select INI file“).
Opens a dialog to edit an INI file
(Chapter 6, „INI Editor of the DAKS-TT Dataimport-Tool“).
Opens a dialog to edit the email properties (Section 5.6,
„Edit email properties“).
Delete authentication ... Removes the currently stored authentication information
from the Registry after security prompt
(Section 4.3, „Start the application in a dialog“).
"Window" pull-down menu
Toolbar Shows or hides the toolbar with the above-mentioned but-
tons.
Status bar Shows or hides the status bar.
"Help" pull-down menu
Table 5-1 Menu items and buttons of the OpenScape Alarm Response Professional
07/2010
DAKS OScAR-Pro-TT Dataimport-Tool, User Manual 5-3
Page 42

BHB_DATAIMPORT_05.fm
Operating the OpenScape Alarm Response Professional For internal use only
Start import
Menu items/buttons Description
About DAKS OScAR-Pro-TT
Dataimport-Tool...
(F1)
Table 5-1 Menu items and buttons of the OpenScape Alarm Response Professional
Opens the window "About OpenScape Alarm Response
Professional" and displays program information, version
number and copyright.
5.3 Start import
With the function "Start import", you can start the data import manually.
For more details on this process see Section 2.3, „Start and operation of the OpenScape Alarm
Response Professional“.
5.4 Save output as
This feature enables oyu to save the content of your output window in a text file of your choice.
In the process the Wizard will prompt you to specify the text file where you want the output to
be saved.
5.5 Select INI file
This function opens a dialog to select the INI file. Highlight the file you want to use and click on
Open.
The selected INI file is immediately subjected to a plausibility check. Should any errors be detected during this process (e.g. because the INI file was set up for the predecessor program
KONVERnn.EXE), the system will ask you if you want to edit the file.
Confirm with Yes to have the file automatically adjusted.
In the event the application should be unable to adjust/create certain parameters automatically,
the Wizard will ask you to verify the settings manually and make adjustments, if necessary
(Chapter 6, „INI Editor of the DAKS-TT Dataimport-Tool“).
07/2010
5-4 DAKS OScAR-Pro-TT Dataimport-Tool, User Manual
Page 43

BHB_DATAIMPORT_05.fm
For internal use only Operating the OpenScape Alarm Response Professional
Edit email properties
5.6 Edit email properties
5.6.1 Overview
The OpenScape Alarm Response Professional can send emails to report the success or failure
of a data import process.
Here, you can specify the time when you want such emails to be sent, their recipient and subject matter (“Re:“), and also if you want to the emails to be sent with or without logging.
The application routinely resolves the individual domains of the addressees of the emails via
the TCP/IP service DNS and dispatches the emails directly to the proper email servers.
Please note that the direct access to the mail servers might be blocked by firewalls (SMTP-Port
is blocked).
If so, you will need to both enable the function “Relaying“ of emails in your company mail server
for the IP address of the computer you are currently using to run the DAKS-TT Dataimport-Tool
and administrate this information also in the DAKS-TT Dataimport-Tool relay server (Section
5.6.3, „Window “Relaying““).
This setting ensures that the emails are no longer send individually to the target domains. Instead, all emails are sent directly to your company’s server that, in return, forwards and/or distributes them.
07/2010
DAKS OScAR-Pro-TT Dataimport-Tool, User Manual 5-5
Page 44

BHB_DATAIMPORT_05.fm
Operating the OpenScape Alarm Response Professional For internal use only
Edit email properties
5.6.2 Window “Edit email properties“
Description of the fields in the window “Edit email properties“
Field Description
Image 5-2 The email properties of DAKS-TT Dataimport-Tool
Window area “Sender“
Input field Input field for a sender address in keeping with the SMTP
standard (max. 256 characters).
Window area “If successful“
The fields summarized in this window area are only used for successfull data imports.
Send email Check this field if you want the application to notify email re-
cipients of the successful completion of the data import.
Table 5-2 Fields of the window “Email properties“
07/2010
5-6 DAKS OScAR-Pro-TT Dataimport-Tool, User Manual
Page 45

BHB_DATAIMPORT_05.fm
For internal use only Operating the OpenScape Alarm Response Professional
Edit email properties
Field Description
Recipient Input field for the recipient list in keeping with the SMTP
standard (max. 256 characters).
Please note that multiple addressees can be entered here
if separated by semi colons.
Re: Input field to specify the subject matter (“Re:“) of the email
(max. 256 characters).
Header text Input field to enter a text to be placed above the email (max.
2048 characters).
Append protocol to text Check this box if you want content of the output area to be
appended to the email.
Test Click this button to send a test email.
Window area “If failed“
The fields summarized in this window area are only used for failed data imports that could not
be completed.
Send email Check this field if you want the application to notify email re-
cipients of failed and thus incomplete data imports.
Recipients Input field for the recipient list in keeping with the SMTP
standard (max. 256 characters).
Please note that multiple addressees can be entered here
if separated by semi colons.
Re: Input field to specify the subject matter (“Re:“) of the email
(max. 256 characters).
Header text Input field to enter a text to be inserted before the email
(max. 2048 characters).
Append protocol to text Check this field if you want the contents of the output area
to be appended to the email.
Test Click this button to send a test email.
Other fields
Click this button to open the window “Relaying“.
Table 5-2 Fields of the window “Email properties“
07/2010
DAKS OScAR-Pro-TT Dataimport-Tool, User Manual 5-7
Page 46

BHB_DATAIMPORT_05.fm
Operating the OpenScape Alarm Response Professional For internal use only
Edit email properties
5.6.3 Window “Relaying“
This window enables you to select if you want the DAKS-TT Dataimport-Tool not to send emails
directly to the individual target domains (name resolution via DNS), and instead forward all
emails to a relay-capable SMTP server that, in return, carries out the individual mailing.
Should more than one server be entered here, the application will try to reach the first server
first and send the email there. If this should fail, the application will attempt to reach the second
server, the third server aso...
Field Description
Image 5-3 The relaying properties of the DAKS-TT Dataimport-Tool
Window area “Relay server“
IP addresses: Input field to enter a list with the IP addresses of relay-capa-
ble SMTP servers (max. 256 characters).
Please note that multiple addresses can be entered here if
separated by semi colons.
Table 5-3 Field of the window “Select relay server“
07/2010
5-8 DAKS OScAR-Pro-TT Dataimport-Tool, User Manual
Page 47

BHB_DATAIMPORT_06.fm
For internal use only INI Editor of the DAKS-TT Dataimport-Tool
6 INI Editor of the DAKS-TT Dataimport-Tool
Overview
This chapter shows you how to set up and configure an INI file with the help of the INI Editor.
Contents
The chapter includes the following sections:
6.1 Essential details
6.2 Layout of the INI Editor
6.3 Menu items of the INI Editor
6.4 General fields of the INI Editor
6.5 Mode: Update subscribers only
6.6 Table-dependent fields of the INI Editor
6.6.1 Table fields
6.6.2 Special parameters of the subscriber table
6.6.3 Dynamic creation of broadcast member groups
6.7 Edit values of the table fields
6.7.1 Edit an alpha-/numeric value
6.7.2 Edit a bitmask
6.7.3 Edit the display parameters
07/2010
DAKS OScAR-Pro-TT Dataimport-Tool, User Manual 6-1
Page 48

BHB_DATAIMPORT_06.fm
INI Editor of the DAKS-TT Dataimport-Tool For internal use only
Essential details
6.1 Essential details
The OpenScape Alarm Response Professional uses a configuration file (INI file) to parameterize the import of the data.
Here, the configuration files of the predecessor version “KONVERnn.EXE“ can be imported, but
may require some follow-up editing work.
The INI file corresponds to the syntax of Windows INI files.
You can optionally also edit the INI file by hand using the Text Editor (Chapter 7, „Description
of INI files“). To do so, however, we recommend you are already well familiar with the intricacies
of the Text Editor.
Carry out the following steps to edit an INI file with the help of the INI Editor:
No. Task
1. In the pull-down menu “Options“ click on the entry “Select INI file...“, or click directly on
the symbol:
2. The window “INI Editor <file name >“ will pop up.
3. Enter all relevant data in keeping with the ensuing field descriptions.
4. Click on OK to save your data.
Table 6-1 Edit INI file with the INI Editor
07/2010
6-2 DAKS OScAR-Pro-TT Dataimport-Tool, User Manual
Page 49

BHB_DATAIMPORT_06.fm
For internal use only INI Editor of the DAKS-TT Dataimport-Tool
Layout of the INI Editor
6.2 Layout of the INI Editor
Image 6-1 The INI Editor of the DAKS-TT Dataimport-Tool
The window “INI Editor“ is a modal dialog box with menu items. It serves to buffer changes and
open or save other INI files.
The INI Editor window is subdivided into four areas:
● the window area “General“,
● the window area “Table“,
● the window area “Table fields“, and
● a table area that is subject to the table you are currently editing.
07/2010
DAKS OScAR-Pro-TT Dataimport-Tool, User Manual 6-3
Page 50

BHB_DATAIMPORT_06.fm
INI Editor of the DAKS-TT Dataimport-Tool For internal use only
Menu items of the INI Editor
6.3 Menu items of the INI Editor
Menu items/buttons Description
"File" pull-down menu
Open Opens an existing INI file.
First, the opened INI file is checked by the Editor for sufficiency and consistency. Should the Editor detect any discrepancies, it will notify you in a corresponding error message and replace all incorrect entries with default values.
Save Saves the most recent settings in the currently open INI file.
Save as Saves the current settings under a new file name.
Pull-down menu “INI“
Default values Replaces all settings with the original values (Default val-
ues).
Table 6-2 Menu items of the INI Editor
07/2010
6-4 DAKS OScAR-Pro-TT Dataimport-Tool, User Manual
Page 51

BHB_DATAIMPORT_06.fm
For internal use only INI Editor of the DAKS-TT Dataimport-Tool
General fields of the INI Editor
6.4 General fields of the INI Editor
Description of the general fields of the INI Editor:
Field Description
Window area “General“,
Separators Selection field to define the character used to separate the
fields in the source files.
The signs available are:
– comma(,)
– semi colon(;)
– tabulator (TAB)
Output to log file If this box is ticked, the output is saved in log files
(Section 4.8, „Logging“).
Output path Input field to enter the directory where the log files are
saved.
This button opens a dialog to select the path for the log files.
Table 6-3 General fields of the INI Editor
07/2010
DAKS OScAR-Pro-TT Dataimport-Tool, User Manual 6-5
Page 52

BHB_DATAIMPORT_06.fm
INI Editor of the DAKS-TT Dataimport-Tool For internal use only
General fields of the INI Editor
Field Description
Update subscribers only If this box is checked, the DAKS-TT Dataimport-Tool at-
tempts to read the subscriber datasets of your current import against the correlating datasets of a previous import on
the basis of the unequivocal identifier you have specified
(Section 6.5, „Mode: Update subscribers only“).
If this box is checked, the only table you are able to edit is
the “Subscribers“ table.
If this box is NOT checked, all subscriber datasets of the database are removed and created anew.
Window area “Table“,
Name Selection field to select the table whose settings you want
to adjust.
If you change the selection, both the lower (table-independent) part of the window and the value of the field “Text file“
will change.
Depending on the chip card of your OScAR-Pro server, you
can select:
– Subscribers
– Broadcasts
– Broadcast members
– Conferences
– Conferees
– Call Profiles
– Call Profile members
Table 6-3 General fields of the INI Editor
07/2010
6-6 DAKS OScAR-Pro-TT Dataimport-Tool, User Manual
Page 53

BHB_DATAIMPORT_06.fm
For internal use only INI Editor of the DAKS-TT Dataimport-Tool
General fields of the INI Editor
Field Description
Text file Input field for the file path of the source file that contains the
data you want to be imported.
Note that in the tables
– Subscribers,
– Broadcast members,
– Conferees, and
– Call Profile members
you always need to specify a file (provided file is available).
Please remember that if these files are empty, the Editor will
delete the datasets currently stored in the database and not
replace with new ones.
This button opens a dialog to select the path of the source
file.
Import Only if this field is checked will the data for this table actually
be imported.
This field enables you e.g. to skip tables for special imports.
This field is only visible for the following tables:
– Broadcasts,
– Conferences and
– Call Profiles
Table 6-3 General fields of the INI Editor
07/2010
DAKS OScAR-Pro-TT Dataimport-Tool, User Manual 6-7
Page 54

BHB_DATAIMPORT_06.fm
INI Editor of the DAKS-TT Dataimport-Tool For internal use only
Mode: Update subscribers only
6.5 Mode: Update subscribers only
In this mode, the import is exclusively restricted to the subscriber table.
Here, new subscribers are entered while all existing subscribers are collated and, where necessary, adjusted. Also, obsolete subscribers are marked as deleted.
This feature is particularly useful if the application groups (Broadcasts, Conferences, Call Profiles) and their corresponding subscriber references (Broadcast members, Conferees, Call Profile members) are administrated via the OScAR-Pro-TT Administrator Tool and you want to collate the actual subscriber list against the address list in a central database (e.g Microsoft SQL
Server, Oracle, IBM DB2, etc.). Neither the application groups themselves nor their corresponding subscriber references are changed when carrying out imports in this mode.
To update subscribers only, the “PrimaryKey“ data field in the source file must be filled with an
unequivocal value for each subscriber (max. 255 characters).
The purpose of the PrimaryKey is to define each subscriber unambiguously so that he/she can,
if needed, be properly traced in the OScAR-Pro database.
Please bear in mind that for the purposes of the DAKS-TT Dataimport-Tool, it is im-
>
Therefore, as soon as you mark the field “Update subscriber only“, the Editor will automatically
enter the “PrimaryKey“ in the list field as a placeholder for the subscriber's unequivocal value.
portant that the value of the “PrimaryKey“ remains the same (unequivocal) throughout and beyond the life of the dataset in the source database.
If not, subscribers may be given unwanted references to application groups.
07/2010
6-8 DAKS OScAR-Pro-TT Dataimport-Tool, User Manual
Page 55

BHB_DATAIMPORT_06.fm
For internal use only INI Editor of the DAKS-TT Dataimport-Tool
Table-dependent fields of the INI Editor
6.6 Table-dependent fields of the INI Editor
6.6.1 Table fields
General description of the window area “Table fields“:
Field Description
Is imported This field lists all data fields that are fed from the source file.
Apart from the data fields of the table that is currently being
edited, the list also includes so-called “DUMMY“ fields.
Dummy fields are placeholders for data elements that, even
though they exist in the source file, shall be ignored and
omitted by the DAKS-TT Dataimport-Tool.
Here, the order (descending) is identical with the order in
which the data of the dataset in the source file is organized.
The list supports a context menu that can be activated with
a right mouse click on the wanted entry (see ).
Table 6-4 General fields description of the window area “Table fields“:
07/2010
DAKS OScAR-Pro-TT Dataimport-Tool, User Manual 6-9
Page 56

BHB_DATAIMPORT_06.fm
INI Editor of the DAKS-TT Dataimport-Tool For internal use only
Table-dependent fields of the INI Editor
Field Description
This button opens the following menu:
● Move to Absolute values:
see button with arrow pointing to the right
● Move up:
see button with arrow pointing up
● Move down:
see button with arrow pointing down
● Insert DUMMY (insert):
pastes a DUMMY field above the entry that is currently
selected in the list
● Delete DUMMY (delete):
deletes the DUMMY field that is currently selected in
the list
Moves an entry selected in the table field “Absolute values“
to the list “Is imported“ on the left.
Tells the DAKS-TT Dataimport-Tool to feed the corresponding field in the database with the data of your source file.
Moves the entry selected in the list “Is imported“ to the table
field “Absolute values“.
Tells the DAKS-TT Dataimport-Tool to feed the corresponding field in the database with the absolute values.
These two buttons enable you to change the order of the entries in the list “Is imported“. Use the buttons to move a selected entry up further or down.
Table 6-4 General fields description of the window area “Table fields“:
07/2010
6-10 DAKS OScAR-Pro-TT Dataimport-Tool, User Manual
Page 57

BHB_DATAIMPORT_06.fm
For internal use only INI Editor of the DAKS-TT Dataimport-Tool
Table-dependent fields of the INI Editor
Field Description
Absolute values A table field containing the data fields that are NOT taken
from your source file and filled with absolute values, instead.
The column “Field“ contains the pertinent field name while
the column “Value“ indicates the corresponding value that is
assigned to the Field when imported.
To change the value of an entry, click “Edit...“ in the ensuing
context menu or double-click on the wanted entry itself.
The field of table supports the following context menu that
can be activated by making a right mouse click on the wanted entry:
● Is imported (CTRL+DEL):
see button the arrow pointing to the left
● Edit... (CTRL+DEL):
depending on the value area of the fied, different
dialogs will open up to you (Section 6.7, „Edit values of the table fields“)
Table 6-4 General fields description of the window area “Table fields“:
07/2010
DAKS OScAR-Pro-TT Dataimport-Tool, User Manual 6-11
Page 58

BHB_DATAIMPORT_06.fm
INI Editor of the DAKS-TT Dataimport-Tool For internal use only
Table-dependent fields of the INI Editor
6.6.2 Special parameters of the subscriber table
In addition to the general database fields, the subscribers table also includes the following special parameters:
Field Description
Window area "Special parameters"
Start number: - Start value in automatic allocation of the “Identi-fier“ in
the subscriber list.
- Subscribers entered through the OScAR-Pro-TT Administrator Tool whose “Identifier“ is smaller than the
value entered here are not altered and remain unchanged during the import.
This field is only active if the “Update subscriber only“ field
is NOT marked and the “Identifier“ entry was not moved to
the list “Is imported“.
Table 6-5 Special parameters of the subscriber table
07/2010
6-12 DAKS OScAR-Pro-TT Dataimport-Tool, User Manual
Page 59

BHB_DATAIMPORT_06.fm
For internal use only INI Editor of the DAKS-TT Dataimport-Tool
Table-dependent fields of the INI Editor
6.6.3 Dynamic creation of broadcast member groups
References of broadcast members can be generated automatically through logic connections.
This function can also be performed in combination with an import from source files.
Here, you can specify which one of the fields of the subscriber table shall serve as criterion to
add the subscriber as broadcast member.
Start by specifying the content of the subscriber field on the basis of which you want a subscriber to be assigned to a specific broadcast group.
Next, specify the absolute values that shall be used for broadcast members created in this way.
To do so, use the following parameters:
Field Description
Window area “Create groups“
Trigger field Selection field with fields of the subscriber table. Select the
field whose contents shall serve as criterion for the automatic assignment of subscribers to broadcast groups.
Table 6-6 Dynamic creation of groups for broadcast members
07/2010
DAKS OScAR-Pro-TT Dataimport-Tool, User Manual 6-13
Page 60

BHB_DATAIMPORT_06.fm
INI Editor of the DAKS-TT Dataimport-Tool For internal use only
Table-dependent fields of the INI Editor
Field Description
Groups A list that contains all existing criteria, with the columns
“Trig-ger value“ and “Destinations“.
The field “Trigger value“ specifies the data content for which
the “Trig-ger field“ is checked.
The “Destinations“ field contains up to 30 Start IDs for
broadcasts to which a subscriber is added provided his/her
Trigger Field exhibits the pertinent “Trigger value“.
Example (see previous page):
All subscribers whose table field “Location“ exhibits the
text “House 1“ are assigned to the broadcast groups
with the Start ID “10“, “20“ and “30“.
All subscribers whose table field “Location“ exhibits the
text “House 2“ are assigned to the broadcast groups
with the Start ID “15“, “25“ and “35“.
Absolute triggers A field of table containing the data fields that are filled with
absolute values.
The column “Field“ contains all field names of a broadcast
member, while the column “Value“ contains the corresponding value that is assigned to the Field when it is imported.
Double-click on an entry to change its the value.
Depending on the value area of the fied, different dialogs
will be opened (Section 6.7, „Edit values of the table fields“).
Note that fields with the value “Is imported“ cannot be edited.
Table 6-6 Dynamic creation of groups for broadcast members
07/2010
6-14 DAKS OScAR-Pro-TT Dataimport-Tool, User Manual
Page 61

BHB_DATAIMPORT_06.fm
For internal use only INI Editor of the DAKS-TT Dataimport-Tool
Edit values of the table fields
6.7 Edit values of the table fields
6.7.1 Edit an alpha-/numeric value
Whenever a field that you want to edit is filled with an alpha/-numeric value, the following window will pop up:
Field Description
<Entry>,
e.g. “Ident. of client group“
This field is filled with the alpha-/numeric value that shall be
assigned to the entry as absolute value.
Depending on the entry you have selected, you will find the
corresponding value range in Section 7.5, „Table fields“.
Is imported Click here to have the entry moved from the table field to the
list (Section 6.6.1, „Table fields“).
Click on this button to fill the fields in the list with default values (Default settings).
Table 6-7 Editing an alpha-/numeric value
07/2010
DAKS OScAR-Pro-TT Dataimport-Tool, User Manual 6-15
Page 62

BHB_DATAIMPORT_06.fm
INI Editor of the DAKS-TT Dataimport-Tool For internal use only
Edit values of the table fields
6.7.2 Edit a bitmask
Whenever a field you want to edit is filled with a bitmask, the following window will pop up:
Field Description
<Entry>,
Name of the field you are currently editing.
e.g. “Authorizations“
Values list with markable fields List of possible properties.
Mark all properties you want to use.
Depending on the entry you selected, you will find the optional properties in the Section 7.5, „Table fields“.
Is imported If this box is ticked, the entry will be moved from the table
field to the list (Section 6.6.1, „Table fields“).
Click on this button to fill the fields in the list with default values (Default settings).
Table 6-8 Example how to edit bitmasks
07/2010
6-16 DAKS OScAR-Pro-TT Dataimport-Tool, User Manual
Page 63

BHB_DATAIMPORT_06.fm
For internal use only INI Editor of the DAKS-TT Dataimport-Tool
Edit values of the table fields
6.7.3 Edit the display parameters
Whenever a field you want to edit is filled with a so called display parameter, the following window will pop up:
Field Description
Window area "Display outputs to caller"
Text Selection field for the "Connected Name" registered for the subscriber
by OScAR-Pro in the D-channel
● that triggers the broadcast, or
● initiates the conference, or
● activates the call profile.
Selection options
● Group-specific text (default):
The broadcast, conference, Info Telephone or call profile description
● General text:
The specified general text in the respective application-specific
parameters
Table 6-9 Description of the fields for the display outputs in the "Display" tab
07/2010
DAKS OScAR-Pro-TT Dataimport-Tool, User Manual 6-17
Page 64

BHB_DATAIMPORT_06.fm
INI Editor of the DAKS-TT Dataimport-Tool For internal use only
Edit values of the table fields
Field Description
Number Selection field for the "Connected Number" registered for the sub-
scriber by OScAR-Pro in the D-channel
● that triggers the broadcast, or
● initiates the conference, or
● activates the call profile.
For this purpose, the "Code incoming" (Section 5.2, „Description of
the menu items and buttons“) registered in the basic parameters will
be prepended to the selection that is made here.
Selection options
● No further digits (default):
"Code incoming" only
● All suffix digits:
"Code incoming" and all digits dialed by callers after the OScARPro tie line code
● Suffix digits from ID:
"Code incoming" and all digits dialed from the broadcast, conference, Info Telephone or call profile identifier (useful if OScAR-Pro
is e. g. reached by a "fictional" call number that also contains the
suffix code).
Table 6-9 Description of the fields for the display outputs in the "Display" tab
07/2010
6-18 DAKS OScAR-Pro-TT Dataimport-Tool, User Manual
Page 65

BHB_DATAIMPORT_06.fm
For internal use only INI Editor of the DAKS-TT Dataimport-Tool
Edit values of the table fields
Field Description
Window area "Display outputs to targets"
Table 6-9 Description of the fields for the display outputs in the "Display" tab
07/2010
DAKS OScAR-Pro-TT Dataimport-Tool, User Manual 6-19
Page 66

BHB_DATAIMPORT_06.fm
INI Editor of the DAKS-TT Dataimport-Tool For internal use only
Edit values of the table fields
Field Description
Text Selection field for the "Connected Name" registered by OScAR-Pro in
the D-channel or the "Connected Name" for the subscribers
● that are called by OScAR-Pro or
● that called into OScAR-Pro as normal subscribers (i. e. not as ini-
tiator), for example to join a conference or confirm receipt of a
message
Selection options
● General text
– the specified general text in the respective application-specif-
ic parameters
● Group-specific text (default setting for broadcasts and conferenc-
es):
– the broadcast, conference, Info Telephone or call profile de-
scription
● Initiator/input name (default for call profiles):
– for activation via hardware input: the input description
– for activation via light signaling interface: The specified text
from external systems, if necessary, without the first digits
when these are transferred as a number (see below)
– for activation by telephone: The received "Calling Name"
– if more than 16 characters: option to scroll with * and #
● ditto, with A:,C:,P:
– corresponds in principle to the "Initiator/input name" variant,
but is prefixed here by the following letter when activated by
telephone:
A: for alerts /broadcasts
C: for conferences
P: for call profiles ("Personal Calls")
● ditto, after group-specific text:
– corresponds in principle to the "Initiator/input name" variant,
however is still sent before broadcast, conference, Info Tele-
phone or call profile description.
● Subscriber/input name:
– for activation over the phone or through the Operator-Tool:
Shortened subscriber text from the subscriber list
– for input activation: "Input description"
● Announcement-specific text (only in conjunction with broad-
casts):
– Description and content of the field "Display text" for the rel-
evant announcement (played to the called subscriber)
Table 6-9 Description of the fields for the display outputs in the "Display" tab
07/2010
6-20 DAKS OScAR-Pro-TT Dataimport-Tool, User Manual
Page 67

BHB_DATAIMPORT_06.fm
For internal use only INI Editor of the DAKS-TT Dataimport-Tool
Edit values of the table fields
Field Description
Number Selection field for the "Connected Number" registered by OScAR-Pro
in the D-channel or "Calling Number" for the subscribers
● that are called by OScAR-Pro or
● that are called by OScAR-Pro as normal subscribers (i. e. not as
initiator) to join a conference or to confirm receipt of a message,
for example
For this purpose, the "Code outgoing" (Section 5.2, „Description of the
menu items and buttons“) entered in the basic parameters precedes
the one selected here for incoming or outgoing connections.
Selection options
● No further digits (default):
"Code incoming" only
● Access ID
Identifier of the activated or initiated broadcast,
conference, Info Telephone or call profile
● Initiator/input cost center (default for broadcasts and conferenc-
es):
– cost center of the initiating subscriber, operator or inputs (if
unknown: default cost center)
– when, if activated by a nurse call system interface, the dis-
play text specified by the external system begins with up to 6
digits + a space, the digit sequence will be used as the cost
center; if not, the default cost center will be applied
● ditto/via tel. calling no. (default for call profiles):
– when activated via hardware input or Operator-Tool: the cost
center of the hardware input or Operator (if unknown, default
cost center)
– when activated by telephone: the received "Calling Number"
of the caller
– when, if activated by a nurse call system interface, the dis-
play text specified by the external system begins with up to 6
digits + a space, the digit sequence will be used as the cost
center; if not, the default cost center will be applied
Table 6-9 Description of the fields for the display outputs in the "Display" tab
07/2010
DAKS OScAR-Pro-TT Dataimport-Tool, User Manual 6-21
Page 68

BHB_DATAIMPORT_06.fm
INI Editor of the DAKS-TT Dataimport-Tool For internal use only
Edit values of the table fields
Field Description
Number
(continued)
● ditto, outgoing cost center:
– as "ditto/via tel. calling no.", however the cost center of the
subscriber being called is used for all outgoing connections
(if unknown, default cost center)
● ditto/outgoing external cost center:
– as "ditto/via tel. calling no.", however the cost center of the
subscriber being called is used for all outgoing external con-
nections (if unknown, default cost center)
Window area "Display output to pagers"
DTMF message Selection field for the type of message sent by OScAR-Pro if, e. g.
specific pagers are called during broadcasts (such as those that expect a DTMF message in the B-channel).
Selection options
● None (default):
no message
● Initiator/input cost ctr:
cost center of the initiating subscriber or input (if unknown: default
cost center)
● Access ID:
Identifier for activating or for initiating the group or the call profile
● Pager cost center:
The registered call center in the subscriber list for the pager to be
called (if unknown: default cost center)
● Access ID + no. of the act. subs.:
Identifier of the group and call number of the initiating subscriber
(if known)
● Call no. of the act. subs. only:
Call number of the initiating subscriber (if known)
Table 6-9 Description of the fields for the display outputs in the "Display" tab
07/2010
6-22 DAKS OScAR-Pro-TT Dataimport-Tool, User Manual
Page 69

BHB_DATAIMPORT_07.fm
For internal use only Description of INI files
7 Description of INI files
Overview
This chapter explains the set up of the INI files and lists all valid trigger words. It also includes
the value ranges of the table fields of the INI Editor.
Contents
The chapter includes the following sections:
7.1 Essential details
7.2 The syntax of INI files
7.3 Common trigger words
7.4 Exemplary INI file
7.5 Table fields
7.5.1 Description of the table “Subscribers“
7.5.2 Description of the table “Broadcasts“
7.5.3 Description of the table “Broadcast members“
7.5.4 Description of the table “Conference“
7.5.5 Description of the table “Conferees“
7.5.6 Description of the table “Call Profile“
7.5.7 Description of the table "Call Profile members"
7.5.8 Coding of iDispProps
07/2010
DAKS OScAR-Pro-TT Dataimport-Tool, User Manual 7-1
Page 70

BHB_DATAIMPORT_07.fm
Description of INI files For internal use only
Essential details
7.1 Essential details
To interpret the data files it is supposed to import, the OpenScape Alarm Response Professional needs a configuration file (INI file).
The syntax and structure of this configuration file is described below.
7.2 The syntax of INI files
● INI files serve to store:
– the names of the files, incl. the path details of their corresponding source files
*)
– the definitions governing the way in which these source files are structured
– the definitions governing the unconditional (absolute) as well as the variable fields and
their order
– the separators used in between the individual entries
– the reference names (names of databases and tables) of the OScAR-Pro-TT database
– and, if needed, the omission of specific tables (y/n)
*)
These parameters can easily be adjusted via the INI Editor.
Save your changes in the INI Editor to have them automatically written in the INI file.
● Analog to other Windows INI files, the INI file described here consists of the following parts:
The file name, placed in box or square brackets (e.g.
● Within the different sections, all entries are introduced with trigger words that are followed
[General]
).
by an equal sign (“=“), (e.g. “Outputs=1“).
07/2010
7-2 DAKS OScAR-Pro-TT Dataimport-Tool, User Manual
Page 71

BHB_DATAIMPORT_07.fm
For internal use only Description of INI files
Common trigger words
7.3 Common trigger words
The DAKS-TT Dataimport-Tool recognizes the following trigger words:
Trigger word Description
SEPARATOR Separators between the fields
OUTPUTS 0 Output of protocol in process window only.
1 Save protocol also in file.
SQLSORT Order of the imported data:
– Maintain case sensitivity.
– If you want the Tool to skip individual fields during the im-
port, i.e. to omit superfluous data of the source file, simply
insert the “Dummy“ value in the field you want to leave out.
SQLCONST Add absolute fields to the data that shall be read in.
FILE-NAME Name and path of the file to be converted.
Table Name of the table in the OScAR-Pro database.
IMPORT Import of the corresponding group file:
1 yes
0 no
START NUMBER - Fist iNo in the subscriber list used for the automatic data trans-
fer.
- Subscribers entered by the OScAR-Pro-TT Administrator Tool
with a low iNo remain unchanged during the data transfer and
retain their group memberships.
TRIGGER FIELD Name of the data field in the subscriber list that is used to derive the
group membership.
ABSOLUTE-TRIGGER Add absolute fields to the data to be imported.
GROUP1
GROUP2
etc.
- First field: Data of the trigger field from the source database.All
other fields: sLaunchID of broadcast groups where the subscribers shall become members (max. 30).
- Separate the fields with commas.
Table 7-1 Trigger words of the DATAIMPORT.INI
07/2010
DAKS OScAR-Pro-TT Dataimport-Tool, User Manual 7-3
Page 72

BHB_DATAIMPORT_07.fm
Description of INI files For internal use only
Exemplary INI file
7.4 Exemplary INI file
[GENERAL]
SEPARATOR=;
OUTPUT=1
OUTPUT-PATH=\\FILE-SVR\TRANSFER\DATAIMPORT\Logfiles\
UPDATE-ONLY=0
[SUBSCRIBERS]
SQLSORT=INO,SLOCATION,SPHONENO,IPHONEPOSS,SNAME,SFIRSTNAME,SDEPARTMENT,ILANGUAGE,SPROFITCTR,IPRIORITY,SPIN,IPHONETYP
E,SALTNO,IALTTYPE,IALTPOSS,IPERMISSIONS,SUSER,IUSERLANG,SPHONELOC,SALTLOC,IMANDANT,SEMAIL,SDSPTEXT,IPHONETIMEZONES,S
PHONEPREFIX,IALTTIMEZONES,SALTPREFIX,SALTNO1,IALTTYPE1,IALTPOSS1,SALTLOC1,IALTTIMEZONES1,SALTPREFIX1,SALTNO2,IALTTYP
E2,IALTPOSS2,SALTLOC2,IALTTIMEZONES2,SALTPREFIX2
SQLCONST=,,,0,,1,,1,,0,0,0,,49,,,0,,,255,,255,,,0,0,,255,,,0,0,,255,
FILE-NAME=\\FILE-SVR\TRANSFER\DATAIMPORT\SUBSCRIBERS.TXT
STARTNUMBER=0
IMPORT=1
UNIQUE=1
[BROADCAST-MEMBERS]
SQLSORT=INO_SUBS,INO_PARENT,IPRIORITY,INO_MSG,BPRIOISMEMB,IPROPERTIES,IORDERNO
SQLCONST=-1,-1,1,0,0
FILE-NAME=\\FILE-SVR\TRANSFER\DATAIMPORT\BRDCSTMB.TXT
TRIGGERFIELD=SLOCATION
ABSOLUTE-TRIGGER=1,-1,0,0,0
GROUP1=Room1,10,20,30
GROUP2=Room2,15,25,35
GROUP3=Room3,30
IMPORT=1
[BROADCASTS]
SQLSORT=INO,SNAME,IMESS0,SIDLAUNCH,IMESS1,IMESS2,IMESS3,IMESS4,IPROPERTIES,IDISPPROPS,IMANDANT,IMLPP,IWAITSPEC,ICUG_
INDEX,IEMAILPROPS,INO_BDCNOTARGET,INO_BDCNOTARGET2,INOOFTARGETS
SQLCONST=-1,-1,-1,-1,17,65,0,4,0,-1,0,-1,-1,0
FILE-NAME=\\FILE-SVR\TRANSFER\DATAIMPORT\BROADCAST.TXT
IMPORT=1
[CONFEREES]
SQLSORT=INO_SUBS,INO_PARENT,IPROPERTIES,IDISPPOS
SQLCONST=0,0
FILE-NAME=\\FILE-SVR\TRANSFER\DATAIMPORT\COMMTTEEMEMB.TXT
IMPORT=1
[CONFERENCES]
SQLSORT=INO,SNAME,SIDLAUNCH,SIDACTIVE,SIDPASSIVE,IDIALINPROPS,IPROPERTIES,IADDPROPS,IDISPPROPS,SNEXTDIAL,IMAXNODIALI
N,IMSG_MASTER,IMSG_SLAVE,IMSG_DIALIN,IPCPROPS,INFINPUT,IMANDANT,ICUG_INDEX,IMLPP,IMAXMEMOFFHOOK,IMAXOFFHOOK
SQLCONST=0,0,0,0,,0,-1,-1,-1,0,-1,0,-1,4,120,120
FILE-NAME=\\FILE-SVR\TRANSFER\DATAIMPORT\CONFERENCE.TXT
IMPORT=1
[CALLPROFILE-MEMBERS]
SQLSORT=INO_SUBS,INO_PARENT,IPROPERTIES,IRANK
SQLCONST=0,0
FILE-NAME=\\FILE-SVR\TRANSFER\DATAIMPORT\CPMEMBRS.TXT
IMPORT=1
[CALLPROFILES]
SQLSORT=INO,SNAME,SIDLAUNCH,SIDACCESS,IPROPERTIES,IEXPROPERTIES,IDISPPROPS,SPICKUPCODE,INOOFCHANNELS,CALLSCR_ACTION,
CALLSCR_MSG,CALLSCR_SUBS,IMSG_PREVIOUS,IMSG_PHASE1,IMSG_PHASE2,IMSG_WAITING,ICUG_INDEX,IMANDANT,IMLPP,SIDADDITIO-NAL,BRESPONSE
SQLCONST=,,0,0,0,,1,0,-1,-1,-1,-1,-1,-1,-1,0,4,4,0
FILE-NAME=\\FILE-SVR\TRANSFER\DATAIMPORT\CALLPROFILE.TXT
IMPORT=1
Table 7-2 Exemplary INI file
07/2010
7-4 DAKS OScAR-Pro-TT Dataimport-Tool, User Manual
Page 73

BHB_DATAIMPORT_07.fm
For internal use only Description of INI files
Table fields
7.5 Table fields
This section lists all table fields that are recognized by the DAKS-TT Dataimport-Tool.
Each of these entries includes the corresponding valid value range, the default value and a detailed field description.
The column:
● “Field name“
lists the names used in the INI Editor;
● “Keyword“
lists the correlating names in the INI file;
● “Value range“
lists the valid range of values of this field;
● “Dflt. value“
lists the initial or default value of the pertinent field;
● “Description“
gives you further details for the individual fields.
07/2010
DAKS OScAR-Pro-TT Dataimport-Tool, User Manual 7-5
Page 74

Table fields
7-6 DAKS OScAR-Pro-TT Dataimport-Tool, User Manual
Description of INI files For internal use only
BHB_DATAIMPORT_07.fm
7.5.1 Description of the table “Subscribers“
The table “Subscribers“ recognizes the following data fields:
Field name Keyword Value range Dflt. value Description
Identifier iNo 1..(Subs-1) -1 Unequivocal identifier of the subscriber.
Also required if no contingency tables are read in.
-1 invokes that the assignment of the value of the Dataimport-Tool.
The value 0 is reserved for the user “sysadm“.
PrimaryKey sLdapUI 255 charac-
ters
1. Name sName 30 characters <empty> First name field for the subscriber
2. Name sFirstName 30 characters <empty> Second name field for the subscriber
3. Name sLocation 30 characters <empty> Third name field for the subscriber
4. Name sDepartment 30 characters <empty> Fourth name field for a subscriber
Cost center sProfitCtr 16 characters <empty> Default cost center of the subscriber
Ident. of the client
group
ID sUser 12 characters <empty> User name of the subscriber, provided he/she has adminis-
PIN sPin 8 digits <empty> PIN of the subscriber
iMandant 0..9 0 Unequivocal identifier of the client group to which the sub-
<empty> Unequivocal identifier (reference) from an external data-
base, e.g. an LDAP-Meta-Directory
If an absolute value if available for this field, the field will be
ignored in the import.
(e.f. family name)
(e.g. first name)
(e.g. position)
(e.g. Department)
scriber is assigned.
trative rights in OScAR-Pro.
priority iPriority 0..9 1 Priority
Email sEmail 50 characters <empty> Email address
Table 7-3 Data fields of the “Subscriber“ table
07/2010
Page 75

07/2010
DAKS OScAR-Pro-TT Dataimport-Tool, User Manual 7-7
Field name Keyword Value range Dflt. value Description
Authorizations iPermissions s. description 0 Bit mask of the operative rights of the subscriber, provided
Announcement group iLanguage 0..4 0 ID of the subscriber's announcement group
For internal use only Description of INI files
he/she has a PIN:
Bit 00: Edit announcements via 1st destination
Bit 01: Edit announcements via any terminal
Bit 02: Activate broadcast
Bit 03: Convene conference
Bit 04: Switch Info Tel. via 1st destination
Bit 05: Switch Info Tel. via any terminal
Bit 06: Activate special Call Profile
Bit 07: Join conf. A-H via 1st destination
Bit 08: Join conf. A-H via any terminal
Bit 09: Switch hot standby via 1st destination
Bit 10: Switch hot standby via any terminal
Bit 11: Toggle staff protection (on/off)
Bit 12: Launch scenario via 1st destination
Bit 13: Launch scenario via any terminal
Bit 14: Locating phoen via 1st destination
bit 15: Locting phone via any terminal
Bit 16: Edit joker access
Bit 17: View Active No & call screening
Bit 18: Edit Active No & call screening
User language iUserLang 0,1,49,33,39 0 User language, provided the subscriber has administrati-ve
rights.
Display Code sDspText 2x7-Bit-ASCII <empty> Display code for two-line conference display output...
1.Destination:Phone
number
1.Destination: Indent.
of the call type
Table 7-3 Data fields of the “Subscriber“ table
sPhoneNo 18 characters <empty> Phone number of the subscriber's 1st destination
iPhoneType 0..(CT-1) 0 Identifier of the call type of the subscriber's 1st destination
BHB_DATAIMPORT_07.fm
Table fields
Page 76

Table fields
7-8 DAKS OScAR-Pro-TT Dataimport-Tool, User Manual
Field name Keyword Value range Dflt. value Description
1st destination: Cornet-specific perform.
feat.
iPhonePoss s. description 0 Bit mask of the Cornet-specific performance features of the
subscriber's 1st destination:
Bit 00: Intrusion
Bit 01: Forced release
Bit 02: Camp-on
Bit 03: Ignore Call pickup group
Bit 04: External ringing signal
Bit 05: Alarm call
Bit 06: Ignore Call forwarding
Bit 07: Override Executive-secretary configuration
Bit 08: Override Do not disturb
Bit 09: Emergency intrusion
Bit 10: If needed forced release of routes
Bit 11: If needed camp-on of routes
Bit 12: Voice calling (speakerphone control)
Bit 13: (reserved)
Bit 14: Call on holidays and Sundays
Bit 15: Do not call on holidays
Description of INI files For internal use only
BHB_DATAIMPORT_07.fm
+ Bits 4 and 5 are mutually exclusive.
+ Bits 6 and 7 are mutually exclusive.
+ Bits 0,1,2, and 9 are mutually exclusive.
+ Bits 10 and 11 are mutually exclusive.
+ Bits 1 and 7 are mutually exclusive.
+ Bits 14 and 15 are mutually exclusive.
1. Destination:Location sPhoneLoc 30 characters <empty> Location of the subscriber's 1st destination
1.Destination: Time
zones
07/2010
Table 7-3 Data fields of the “Subscriber“ table
iPhoneTimeZones s. description 255 Bit mask of the time zones of the subscriber's 1st destination
Bit 00: A
Bit 01: B
Bit 02: C
Bit 03: D
Bit 04: E
Bit 05: F
Bit 06: G
Bit 07: H
Page 77

07/2010
DAKS OScAR-Pro-TT Dataimport-Tool, User Manual 7-9
Field name Keyword Value range Dflt. value Description
For internal use only Description of INI files
1.Destination:Priority
prefix
2.Destination:Phone
number
2.Destination: Indent.
of the call type
2.Destination: Cornetspecific perform. feat.
2. Destination:Location sAltLoc 30 characters <empty> Location of the subscriber's 2nd destination
2.Destination: Time
zones
2.Destination:Priority
prefix
3.Destination:Phone
number
3.Destination: Indent.
of the call type
3.Destination: Cornetspecific perform. feat.
3. Destination:Location sAltLoc1 30 characters <empty> Location of the subscriber's 3rd destination
sPhonePrefix 4 characters <empty> Priority prefix of the subscriber's 1st destination
sAltNo 18 characters <empty> Phone number of the subscriber's 2nd destination
iAltType 0..(CT-1) 0 Identifier of the call type of the subscriber's 2nd destination
iAltPoss see
iPhonePoss
iAltTimeZones see
iPhoneTim-
eZones
sAltPrefix 4 characters <empty> Priority prefix of the subscriber's 2nd destination
sAltNo1 18 characters <empty> Phone number of the subscriber's 3rd destination
iAltType1 0..(CT-1) 0 Identifier of the call type of the subscriber's 3rd destination
iAltPoss1 see
iPhonePoss
0 Cornet-specific performance features of the subscriber's
2nd destination:
255 charac-
ters
0 Cornet-specific performance features of the subscriber's 3rd
Bitmask of the time zones for the subscriber's 2nd destination
destination:
3.Destination: Time
zones
3.Destination:Priority
prefix
4.Destination:Phone
number
4.Destination: Indent.
of the call type
Table 7-3 Data fields of the “Subscriber“ table
iAltTomeZones1 see
iPhoneTi-m-
sAltPrefix1 4 characters <empty> Priority prefix of the subscriber's 3rd destination
sAltNo2 18 characters <empty> Phone number of the subscriber's 4th destination
sAltType2 0..(CT-1) 0 Identifier of the call type of the subscriber's 4th destination
eZones
255 Bitmask of the time zones for the subscriber's 3rd destina-
tion
BHB_DATAIMPORT_07.fm
Table fields
Page 78

Table fields
7-10 DAKS OScAR-Pro-TT Dataimport-Tool, User Manual
Field name Keyword Value range Dflt. value Description
4.Destination: Cornetspecific perform. feat.
4. Destination:Location sAltLoc2 30 characters <empty> Location of the subscriber's 4th destination
4.Destination: Time
zones
4.Destination:Priority
prefix
Table 7-3 Data fields of the “Subscriber“ table
iAltPoss2 see
iPhonePoss
iAltTimeZones2 see
iPhoneTi-m-
eZones
sAltPrefix2 4 characters <empty> Priority prefix of the subscriber's 4th destination
0 Cornet-specific performance features of the subscriber's 4th
destination:
255 Bitmask of the time zones for the subscriber's 4th destination
Description of INI files For internal use only
BHB_DATAIMPORT_07.fm
07/2010
Page 79

07/2010
DAKS OScAR-Pro-TT Dataimport-Tool, User Manual 7-11
7.5.2 Description of the table “Broadcasts“
The table “Broadcasts“ recognizes the following data fields:
Field name Keyword Value range Dflt. value Description
Identifier iNo 1..(No.-1) - Unequivocal identifier of the broadcast.
For internal use only Description of INI files
Also needed if no contingency tables are read in.
-1 invokes that the assignment of the value of the DataimportTo ol .
Display parameters iDispProps see Section
7.5.8, „Coding
of iDispProps“
ID to launch via telephone
Group name sName 20 characters <empty> Name of the broadcast.
E-mail address csEmailResult 50 characters <empty> E-mail address for broadcast results
Table 7-4 Data fields of the “Broadcast“ table
sIdLaunch 4 characters <empty> ID to start the broadcast over the telephone
- Bit mask of the texts display texts and display numbers, and of
the DTMF message
BHB_DATAIMPORT_07.fm
Table fields
Page 80

Table fields
7-12 DAKS OScAR-Pro-TT Dataimport-Tool, User Manual
Field name Keyword Value range Dflt. value Description
Broadcast parameters iProperties s. description 0 Bit mask of the broadcast parameters
Bit 00: Use Cornet-N(Q)® features
Bit 01: Monitor subscriber status
Bit 02: Is a high priority broadcast
Bit 03: Launch broadcast only from subscriber's 1st desti-
nation
Bit 04: Continue broadcast also after initiator hangs up
Bit 05: End broadcast after first positive confirmation
Bit 06: If needed restart this broadcast after abort by high-
priority process
Bit 07: No printer logging
Bit 08: Also negative confirmation possible
Bit 09: No information to OScAR-Pro PC
Bit 10: Multiple launch of broadcast possible
Bit 11: Process calls according to priority level
Bit 12: End parallel dialing automatically as soon as sub-
scriber is reached
Bit 13: Disconnect initiator after start!!!
Bit 14: Broadcast with positioning request
Bit 15: Thru-connect to reached subscriber
Bit 17: Completed message required
Bit 18: Completed message of initiator required
Bit 19: Position initiator terminal cyclically
Bit 20: Reject disconenction of last callable subscriber
Bit 21: Thru-connect by pressing key 5
Bit 22: (reserved)
Bit 23: Entry of arrival time possible
Bit 24: Convert texts from data interface to voice
Description of INI files For internal use only
BHB_DATAIMPORT_07.fm
07/2010
Table 7-4 Data fields of the “Broadcast“ table
+ Bits 02 and 06 are mutually exclusive.
+ Bits 05 and 12 are mutually exclusive.
+ Bit 13 only in combination with Bit 04.
+ Bit 15 only in combination with Bit 5 or Bit 12,
not together with Bit 13.
+ Bit 18 only in combination with Bit 17.
+ Bit 21 only in combination with Bit 15.
Page 81

07/2010
DAKS OScAR-Pro-TT Dataimport-Tool, User Manual 7-13
Field name Keyword Value range Dflt. value Description
For internal use only Description of INI files
Ident. for default announcement
Ident. for 1st group announcement
Ident. for 2nd group announcement
Ident. for 3rd group announcement
Ident. for 4th group announcement
Ident. of the client group iMandant 0..9 0 Unequivocal identifier of the client group to which the broadcast
MLPP level iMLPP 0..4 4 Default MLPP level of the broadcast.
Spec. waiting time for
confirm.
CUG-Index iCUG_Index 0..99 -1 Closed-User-Group index of the broadcast.
Email send parameters iEMailProps s. description 0 The email send parameters of the broadcast
Ident. of follow-up call
(not reached)
iMess0 -1,
valid ident.
iMess1 -1,
valid ident.
iMess2 -1,
valid ident.
iMess3 -1,
valid ident.
iMess4 -1,
valid ident.
iWaitSpec -1,
0..9999
iNo_BdcNoTarget -1,
valid ident.
-1 Identifier of the default group announcement of the broadcast.
-1 Identifier of the 1st group announcement of the broadcast.
-1 Identifier of the 2nd group announcement of the broadcast.
-1 Identifier of the 3rd group announcement of the broadcast.
-1 Identifier of the 4th group announcement of the broadcast.
is assigned.
0 Special wait time for confirmation in seconds.
0: No sending of emails
1: Send info emails to all broadcast members with
email addresses
2: Individual confirmation emails only if positive
3: Individual confirmation emails only if negative
4: Individual confirmation emails always (positive and
negative)
-1 Identifier of the broadcast to be launched if the required broadcast result was not reached.
BHB_DATAIMPORT_07.fm
Ident. of follow-up call
(reached)
Number of subscribers to
be reached
Table 7-4 Data fields of the “Broadcast“ table
iNo_BdcNoTarget
2
iNoOfTargets 0..(n-1) 0 Exact number of subscribers that shall be reached (0=indefi-
-1,
valid ident.
-1 Identifier of the broadcast to be launched if the required broadcast result was reached or the broadcast was ended for other
reasons.
Table fields
nite).
Page 82

Table fields
7-14 DAKS OScAR-Pro-TT Dataimport-Tool, User Manual
Field name Keyword Value range Dflt. value Description
Number of call recurrence
iNoOfAttempts 0-99 1 Total number of cull recurrence per subscriber
Description of INI files For internal use only
BHB_DATAIMPORT_07.fm
Waiting time between call
recurrence
Max. waiting time for
completed message
Table 7-4 Data fields of the “Broadcast“ table
iWaitAttempts 0-9999 0 Waiting time between the call recurrence per subscriber
iWaitAckFinish 0-9999 60 Maximum waiting time per broadcast for the system to wait for
a completed message
07/2010
Page 83

07/2010
DAKS OScAR-Pro-TT Dataimport-Tool, User Manual 7-15
7.5.3 Description of the table “Broadcast members“
For the purposes of the below table, all members of broadcasts are referred to as members.
The table “Broadcast members“ recognizes the following data fields:
Field name Keyword Value range Dflt. val-ueDescription
For internal use only Description of INI files
Ident. of the announcement
Ident. of the broadcast iNo_Parent Valid ident. -1 Identifier of the broadcast to which the member is assigned.
Ident. of the subscriber iNo_Subs Valid ident. -1 Identifier of the subscriber assigned to the broadcast as member.
Order number iOrderNo 0..255 0 Order number of the member
Member-specific parameters
iNo_MSG -1,
valid ident.
iProperties s. description 0 Bit mask of the member-specific parameters:
-1 Identifier of the member-specific announcement.
(0 = none)
Bits 01/00: Reached criteria
00: no special acknowledgement
01: backwards disconnect
10: by keystroke
11: PIN confirmation
Bits 03/02: Save in SMS memory
00: no transfer
01: only for negative alarm results
10: only for positive alarm results
11: always transfer
Bit 05: Count ringing as reached, or notification in advance
(blue rendition) with wait for confirmation, if needed
Bit 06: Direct PIN entry possible
Bit 07: With neutral announcement on PIN confirmation
Bit 11: With neutral announcement on key stroke
BHB_DATAIMPORT_07.fm
Table 7-5 Date fields of the “Broadcast members“ table
+ Bit 4 may not be set.
+ Bits 6 and 7 may only be set in combination with Bits
0 and 1.
+ Bit 11 may only be setif Bit 0is not set and Bit 1 is set.
Table fields
Page 84

Table fields
7-16 DAKS OScAR-Pro-TT Dataimport-Tool, User Manual
Field name Keyword Value range Dflt. val-ueDescription
Description of INI files For internal use only
BHB_DATAIMPORT_07.fm
Member-specific priority bPrioIsMem--
ber
priority iPriority 0..9 -1 Priority of a member if bPrioIsMember is set to 1.
Table 7-5 Date fields of the “Broadcast members“ table
0,1 0 Marking of the priority source:
0: subscriber priority is valid
1: member-specific priority is valid
07/2010
Page 85

07/2010
DAKS OScAR-Pro-TT Dataimport-Tool, User Manual 7-17
7.5.4 Description of the table “Conference“
The table “Conference“ recognizes the following data fields::
Field name Keyword Value range Dflt. val-ueDescription
Identifier iNo 1-(No.-1) - Unequivocal identifier of the conference.
For internal use only Description of INI files
Also needed if no contingency tables are read in.
-1 invokes that the assignment of the value of the Dataimport-Tool.
Ident. of the client
group
Group name sName 20 characters <empty> Name of the conference
Ident. of the convenor
announcement
Ident. of the announcement for dialed subscribers
Ident of announcement
for subs. dialing in
Security code csSecurityCode 16 numbers <empty> Security code of the conference
Table 7-6 Data fields of the “Conference“ table
iMandant 0..9 0 Unequivocal identifier of the client group to which the conference
belongs.
iMsg_Master -1,
valid ident.
iMsg_Slave -1,
valid ident.
iMsg_Dialin -1,
valid ident.
-1 Identifier of the convenor announcement
-1 Identifier for the announcement played to dialed-in subscribers.
-1 Identifier for the announcement played to subscribers dialing in.
BHB_DATAIMPORT_07.fm
Table fields
Page 86

Table fields
7-18 DAKS OScAR-Pro-TT Dataimport-Tool, User Manual
Field name Keyword Value range Dflt. val-ueDescription
Description of INI files For internal use only
BHB_DATAIMPORT_07.fm
Conference parameters
iProperties s. description 0 Bit mask of the conference parameters:
Bit 00: Use Cornet-N(Q)® features
Bit 01: Monitor subscriber status
Bit 02: Is a high priority conference
Bit 03: Subscribers dialing in with PIN must be predefined
Bit 04: No audio signals during this conference
Bit 06: Conference is always active
Bit 07: Point-to-multipoint conference
Bit 08: End dial-up at first active subscriber reached
Bit 09: Master can manually extend conference
Bit 10: Delayed conference start
Bit 11: Alternative dialing of 1st and 2nd phone number
Bit 12: Switch to mute/active via DTMF enabled
Bit 13: Privacy during conference enabled
Bit 14: Called conferees join only after pressing * key
Bit 15: Queuing when dialing into non-active conference
+ Bits 06 and 07 are mutually exclusive.
+ Bit 11 only in combination with Bit 08.
+ Bit 05 of iProperties and Bit 01 iAddProps are
mutually exclusive.
Other conference parameters
iAddProps s. description 0 Bit mask of the other conference parameters:
Bit 00: Use priority (line 1) prefix in dial-up
Bit 01: Output user ID to all conferees
Bit 02: Accept dial-up of directory subscribers for Progressive
conferences and ad-hoc dialing via PC
Bit 03: Accept only dial-up of group members for Progressive
conferences and ad-hoc dialing via PC
Bit 04: Start conference by operator with call number dialing
Bit 05: Conference with point-to-multipoint functionality
Bit 06: Delayed dialing of non-masters
07/2010
Table 7-6 Data fields of the “Conference“ table
+ Bit 01 of iAddProps and Bit 05 of iProperties are
mutually exclusive.
Page 87

07/2010
DAKS OScAR-Pro-TT Dataimport-Tool, User Manual 7-19
Field name Keyword Value range Dflt. val-ueDescription
Dial-in parameters iDialInProps s. description 0 Bit mask of the conference dial-in parameters:
PC activity parameters iPcProps s. description 0 Bit mask of the parameters for PC activity during the conference:
For internal use only Description of INI files
Bit 0: PIN required to convene
Bit 1: Convene only from 1st phone number of initiator
Bit 2: PIN required for active dial-in
Bit 3: Dialing from 1st phone number required for active dial-
in
Bit 4: PIN required for passive dial-in
Bit 5: Dialing from 1st phone number required for passive
dial-in
Bit 6: Active dialing subscriber becomes master
+ Bit 1 only if Bit 0 is set.
+ Bit 3 only if Bit 2 is set.
+ Bit 5 only if Bit 4 is set.
+ Bit 6 only if Bit 2 is set.
Bit 0: PC logs conference start/end
Bit 1: PC also logs conferee states
Bit 2: Conf. can also be moderated via PC
+ Bit 1 only if Bit 0 is set.
+ Bit 2 only if Bits 1 and 2 are set.
ID to convene sIdLaunch 4 characters <empty> The ID to convene the conference.
ID for active dial-in sIdActive 4 characters <empty> The ID to actively dial into the conference.
ID for passive dial-in sIdPassive 4 characters <empty> The ID for the passive dial-in to the conference.
Display parameters iDispProps see Section
7.5.8, „Coding
of iDispProps“
Simulated substitute dialing
Max. number of nonpredefined subs.
Table 7-6 Data fields of the “Conference“ table
sNextDial 10 characters <empty> Simulated substitute dialing of the conference(<empty>=none).
iMaxNoDialIn 0..60 0 Max. number of non-predefined dial-in subscribers
0 Bit mask of the display texts, display numbers, and DTMF mes-
sage
BHB_DATAIMPORT_07.fm
Table fields
Page 88

Table fields
7-20 DAKS OScAR-Pro-TT Dataimport-Tool, User Manual
Field name Keyword Value range Dflt. val-ueDescription
Description of INI files For internal use only
BHB_DATAIMPORT_07.fm
Assigned audio input iNfInput -1,
0..7
Max. conference duration
Max. participation duration
CUG Index iCUG_Index 0..99 -1 Closed-User-Group index of the conference.
MLPP level iMLPP 0..4 4 Default MLPP level of the conference.
Table 7-6 Data fields of the “Conference“ table
iMaxOffHook -1,
0..999
iMaxMemOffHook -1,
0..999
-1 The assigned audio input played into the conference
(-1=none).
120 Maximum conference duration in seconds
120 Maximum duration in seconds that a conference member may at-
tend the conference.
07/2010
Page 89

07/2010
DAKS OScAR-Pro-TT Dataimport-Tool, User Manual 7-21
7.5.5 Description of the table “Conferees“
For the purposes of the below table, all conferees are referred to as members.
The table “Conferees“ recognizes the following data fields:
Field name Keyword Value range Dflt. val-ueDescription
Ident. of conference iNo_Parent Valid ident. -1 The identifier of the conference to which the conferee belongs.
Ident. of subscriber iNo_Subs Valid ident. -1 Identifier of the subscriber who is a member (conferee) of this con-
Member-specific parameters
For internal use only Description of INI files
ference.
iProperties s. description 0 Bit mask of the member-specific parameters:
Bit 00: Active participation
Bit 01: Master
Bit 02: PIN identification required
Bit 03: '*' key confirmation required
Bit 04: Conferee starts off on hold
Bit 05: Conferee starts off with microphone off
Bit 06: Conferee is always redialed
Bit 07: Conferee is dialed at conference start
+ If you set bit 01, be careful to also set bit 00 and 07,
but not bit 04 or 05.
+ Bit 02 and 03 are mutually exclusive.
Display position iDispPos 0..60 0 The display position of the conferee.
Table 7-7 The data fields of the table “Conferees“:
BHB_DATAIMPORT_07.fm
Table fields
Page 90

Table fields
7-22 DAKS OScAR-Pro-TT Dataimport-Tool, User Manual
Description of INI files For internal use only
BHB_DATAIMPORT_07.fm
7.5.6 Description of the table “Call Profile“
Field name Keyword Value range Dflt. val-ueDescription
Identifier iNo 1-(No.-1) - Unequivocal identifier of the call profile.
Also required if no contingency tables are read in.
-1 invokes the assignment of the value from the Dataimport-Tool.
Profile name sName 20 characters <empty> Name of the call profile
ID to activate via telephone
ID for active no.-access
Table 7-8 Data fields of the “Call Profile“ table
sIdLaunch 4 characters <empty> The ID to activate the call profile over the telephone.
sIdAccess 4 characters <empty> ID to enable the administration to access the Call Profile (e.g. to
change the level of the call-scree-ning or the active number).
07/2010
Page 91

07/2010
DAKS OScAR-Pro-TT Dataimport-Tool, User Manual 7-23
Field name Keyword Value range Dflt. val-ueDescription
For internal use only Description of INI files
Call profile parame-ters
iProperties s. description 0 Bit mask of the call profile parameters:
Bit 00: Use Cornet-N(Q)® features
Bit 01: Is a high priority call (not aborted in high priority pro-
cess)
Bit 02: Release callers if user state changes
Bit 03: Forced extern ringing signal for external callers (except
Emergency call)
Bits 05/04: Busy assessment
00: generally release caller, end call
01: no assessment if line is busy (typical for
‘Group calls’)
10: in Phase 1 transition to phase 2, in phase 2 re-
lease caller
11: <reserved>
Bits 07/06: Announcements for external callers
00: all
01: not before waiting announcement in phase 1
10: not before waiting announcement in phase 2
11: not before call switching
Bit 08: Call forwarding announcement before phase 2 (fol-
lowed by idle tone) in lieu of repeated waiting an-
nouncement in phase 2
Bit 09: Call screening
Bit 10: Path replacement enabled
Bit 11: Call Profile inactive
Bit 12: <reserved>
Bits 14/13: Busy assessment in phase 2
00: generally release caller, end call
01: no assessment if line is busy (typical for ‘Group
calls’)
10: <reserved>
11: <reserved>
BHB_DATAIMPORT_07.fm
Table fields
Table 7-8 Data fields of the “Call Profile“ table
Page 92

Table fields
7-24 DAKS OScAR-Pro-TT Dataimport-Tool, User Manual
Field name Keyword Value range Dflt. val-ueDescription
Bit 15: Active number signifies characters appended to ID
Description of INI files For internal use only
BHB_DATAIMPORT_07.fm
Other Call Profile parameters
Display parameters iDispProps see Section
Call acceptance code sPickUpCode 4 characters <empty> Call acceptance code of the Call Profile.
Max. no. of parallel access
Parameters if authorization is insufficient
Ident. of announcement if authorization is
insufficient
Ident. of subs. if authorization is insufficient
Ident. of the info message played before
the dial-up.
iExProperties - 0 Bitmask of the other Call Profile parameters:
0 Bit mask of the display texts, display numbers, and DTMF message
7.5.8, „Coding
of iDispProps“
iNoOfChannels 1..99 1 The max. number of concurrent access to this profile.
CallScr_Action s. description 0 The response of the system if the authorization is insufficient:
CallScr_Msg -1,
valid ident.
CallScr_Subs -1,
valid ident.
iMsg_Pervious -1,
valid ident.
-1 The identifier of the announcement if the authorization is insuffi-
-1 The identifier of the subscriber to be called if the authorization is in-
-1 The identifier of the information message played before the dial-up
+ Bit 4 may not be set.
+ Bits 6 and 7 may only be set in combination with
bits 0 and 1.
Bit 00: assignment of most recent announcements before the
dial-up
Bit 01: <reserved>
Bit 02: Confirmation callback after setting the active number.
0: disconnect caller
1: play back announcement
2: dial subscriber
cient.
+ If CallScr_Action is set to 1, this value may not be
-1.
sufficient.
+ If CallScr_Action is set to 2, this value may not be
-1.
phases.
07/2010
Table 7-8 Data fields of the “Call Profile“ table
Page 93

07/2010
DAKS OScAR-Pro-TT Dataimport-Tool, User Manual 7-25
Field name Keyword Value range Dflt. val-ueDescription
For internal use only Description of INI files
Ident. of the waiting
message played in
phase 1
Ident. of the waiting
message played in
phase 2
Identifier of the queuing message.
CUG index iCUG_Index 0..99 -1 The Closed-User-Group index of the call profile.
Ident. of the client
group
MLPP level iMLPP 0..4 4 The MLPP level of the call profile.
ID for ’Answering' sIdAdditional 6 characters <empty> The ID for 'Answering'.
’Answering' enabled bResponse 0,1 0 The tag indicating that ’Answering' is enabled:
Table 7-8 Data fields of the “Call Profile“ table
iMsg_Phase1 -1,
valid ident.
iMsg_Phase2 -1,
valid ident.
iMsg_Waiting -1,
valid ident.
iMandant 0..9 0 The unequivocal identifier of the client group to which the call pro-
-1 The identifier of the waiting message played during phase 1.
-1 The identifier of the waiting message played during phase 2.
-1 The identifier of the queuing message.
file is assigned.
0: ward off “Answering“
1: accept “Answering“
Table fields
BHB_DATAIMPORT_07.fm
Page 94

Table fields
7-26 DAKS OScAR-Pro-TT Dataimport-Tool, User Manual
Description of INI files For internal use only
BHB_DATAIMPORT_07.fm
7.5.7 Description of the table "Call Profile members"
For the purposes of the below table, all Call Profile members are referred to as members.
The table “Call Profile members“ recognizes the following data fields:
Field name Keyword Value range Dflt. value Description
Ident. of subscriber iNo_Subs Valid ident. -1 Identifier of the Call Profile to which the member is assigned.
Ident. of the Call Profile iNo_Parent Valid ident. -1 The identifier of the subscriber assigned to the Call Profile as mem-
ber.
Member-spec. parameters
Additional member-specific parameters
Table 7-9 Data fields of the table “Call Profile members“
iProperties s. description 0 Bit mask of the member-specific parameters:
iRank 1..9,
<bit mask>
s. description
Bit 00: Alternative call duration in phase 1
Bit 01: Alternative call duration in phase2
Bit 02: Notification announcement before call
0 Bitmask of the additional member-specific parameters or ranking, re-
spectively
Bit 07 NOT set and additionally:
1..9: member of Call Profile-enabled with rank 1..9.
Bit 07 set and additionally:
Bit 00: Delayed dial-up in phase 1
Bit 01: Delayed dial-up in phase 2
07/2010
Page 95

BHB_DATAIMPORT_07.fm
For internal use only Description of INI files
Table fields
7.5.8 Coding of iDispProps
This section describes in detail the bit-by-bit coding of the iDispProps data field found in the
tables "Broadcasts", "Conferences" and "Call Profiles".
● Bits 2..0: Text displayed to initiator:
– 000 = general text (application-specific)
– 001 = group-specific text (name of group); n/a in abbreviated address call/speed calling
● Bits 5..3: Number displayed to members after sending of the ‘Incoming tie trunk code‘:
– 000 = no further digits
– 001 = received suffix digits
– 010 = received suffix digits without selection of applications or functions
● Bits 8..6: Text displayed to other members after sending of the ‘Incoming or outgoing tie
trunk code’
– 000 = general text (application-specific)
– 001 = group-specific text (name of group); n/a for abbreviated address call/speed calling
– 010 = for activation via telephone always the ‘Calling Name’ received with:
> prepended „A:“, „C:“, „P:“, „Q:“ for alarms, conf., PCS, abbreviated address call/speed dial
> prepended input description when input is activated
> abbreviated subscriber text for PC activation
– 011 = ditto, but in alarms, conf., PCS, and abbreviated address call/speed dial without prepended
„A:“, „C:“, „P:“, „Q:“.
● Bits 11..9: Number displayed to other members after sending of the ‘Incoming or outgoing
tie trunk code’
– 000 = none
– 001 = identifier of the group (for conferences: ID of initiator; for Call Profiles: ID to activate)
– 010 = cost center of the initiator, PC user or contact (if default cost center unknown)
– 011 = for activation via contact or PC: the cost center of the contact or PC user (if default cost center
is unknown); for activation via telephone: the received ‘Calling Number’ of the initiator.
– 100 = same as 011, but for all outgoing connections the cost center of the called subscriber (if de-
fault cost center unknown)
– 101 = same as 011, but for all outgoing external connections the cost center of the called subscriber
(if default cost center unknown)
07/2010
DAKS OScAR-Pro-TT Dataimport-Tool, User Manual 7-27
Page 96

BHB_DATAIMPORT_07.fm
Description of INI files For internal use only
Table fields
07/2010
7-28 DAKS OScAR-Pro-TT Dataimport-Tool, User Manual
Page 97

BHB_DATAIMPORT_IX.fm
Confidential Index
Index Z
Symbole
/AUTOC 4-5, 4-12
/LOGON 4-4, 4-12
A
Absolute values 6-11
Address list 6-8
Administrative rights 2-2, 7-6
Administrator 2-3
Alpha-/numeric values 6-15
Announcements 2-4
B
Bitmask 6-16
Button 5-3
C
CD-ROM 3-2
cdsetup 3-2
Chipcard 2-2, 2-4, 4-6, 6-6
Configuration file 2-1
Conventions 1-3
D
Daily 4-10
DAKS Release 7, OScAR V3 R2 1-2, 3-2
DAKS server 2-3
DAKS-TT Administrator Tool 7-3
DAKS-TT Dataimport Tool
installing and uninstalling 3-1
Start and Operation 2-3
table fields 7-5
DAKS-TT Dataimport-Tool
Logon 4-2, 4-3
DAKS-TT server 2-3
Data fields 7-6
Database 2-1, 4-3
Default settings 6-4, 6-15, 6-16
Destination 6-14
Display 5-4
DNS 5-5
DUMMY 6-9, 6-10
Dynamic creation of groups 6-13
E
Email 5-5, 5-6, 7-6
Error messages 4-6
Execute 3-2
Execute task 4-10
F
Face 5-2
I
IBM DB2 6-8
ID 4-3
Identifier 2-2
ImportLog 4-13
INI Editor 6-1, 6-3, 7-1
INI file 2-1, 2-3, 4-4, 4-5, 4-13, 5-3, 5-4, 6-1,
6-2, 7-1, 7-4
Syntax 7-2
Installation CD 3-2
Installation settings 3-4
IP address 4-3
IP port 4-3
K
Keywords 7-1
KONVERnn.EXE 5-4, 6-2
L
Language 3-3
LOG file 4-7, 4-13, 6-5
Logging 4-13
Logic connection 6-13
Logon data 5-3
M
Menu items 5-3
Microsoft
Access 2-2
SQL-Server 6-8
O
Operating 5-1
Operational rights 7-7
07/2010
DAKS OScAR-Pro-TT Dataimport-Tool, User Manual
Z-1
Page 98

BHB_DATAIMPORT_IX.fm
Index Confidential
Operators 2-3
Oracle 6-8
Order 7-2
Output path 6-5
P
Password 4-3
PIN 2-4, 7-6, 7-7
Planned tasks 2-3
Plausibility 2-3
PrimaryKey 6-8
priority 7-6, 7-16
Privacy and data security 1-4
Program activation 4-1
Protocol 5-7
R
Re
Regarding 5-7
Recipient 5-7
Reference manuals 1-2
References 6-8
Relay server 5-8
Relaying 5-5, 5-7
Requirements 1-1
Starting with automatic logon 4-5
Symbols 1-3
Symbols in this Manual 1-3
T
Table fields 6-9
Tables 2-2
Text editor 6-2
Toolbar 5-3
Transgression of area 2-4
Trigger field 6-14, 7-3
Trigger value 6-14
Trigger words 2-2, 6-14, 7-2, 7-3
U
User 2-2
W
Windows 2-2, 3-2, 6-2, 7-2
S
Safety instructions 1-4
Scheduled tasks 4-8
Scheduler 2-3, 4-5
Sender 5-6
Separator 6-5, 7-2
Service staff 1-1
SMTP
Port 5-5
-Server 5-8
Source database 7-3
Source file 2-1, 2-2, 6-7, 6-13, 7-2
Start DAKS-TT Dataimport-Tool
First start up 4-2
Starting in dialog 4-3
Starting options 4-2
Starting with automatic logon 4-5
Starting with logon data 4-4
Start number 6-12
07/2010
Z-2 DAKS OScAR-Pro-TT Dataimport-Tool, User Manual
 Loading...