

Page 1

Documentation
OpenScape Alarm Response Professional
OScAR-Pro V3 R2 Classic Applications
OScAR-Pro Customized Operator
User Manual
A31003-S1730-U103-1-7619
Communication for the open minded
Siemens Enterprise Communications
www.siemens-enterprise.com
Page 2

Our Quality and Environmental Management Systems are implemented according to the requirements of the ISO9001 and ISO14001 standard certified by an external certification company.
Communication for the open minded
Siemens Enterprise Communications
www.siemens-enterprise.com
Copyright ©
Communications GmbH & Co. KG 2010
Hofmannstr. 51, 80200 München
Siemens Enterprise Communications GmbH & Co. KG
is a Trademark Licensee of Siemens AG
Reference No.: A31003-S1730-U103-1-7619
The information provided in this document contains
merely general descriptions or characteristics of
performance which in case of actual use do not
always apply as described or which may change as
a result of further development of the products. An
obligation to provide the respective characteristics
shall only exist if expressly agreed in the terms of
contract. Availability and technical specifications are
subject to change without notice.
OpenScape, OpenStage and HiPath are registered
trademarks of Siemens Enterprise
Communications GmbH & Co. KG.
All other company, brand, product and service
names are trademarks or registered trademarks of
their respective holders.
Siemens Enterprise
Page 3

BHB_DCO_IVZ.fm
Nur für den internen Gebrauch Contents
Contents 0
1 Conventions and Operating Instructions . . . . . . . . . . . . . . . . . . . . . . . . . . . . . . . . . . 1-1
1.1 Reference manuals . . . . . . . . . . . . . . . . . . . . . . . . . . . . . . . . . . . . . . . . . . . . . . . . . . . 1-2
1.2 Notations and symbols . . . . . . . . . . . . . . . . . . . . . . . . . . . . . . . . . . . . . . . . . . . . . . . . 1-3
1.3 Privacy and data security. . . . . . . . . . . . . . . . . . . . . . . . . . . . . . . . . . . . . . . . . . . . . . . 1-4
2 Overview . . . . . . . . . . . . . . . . . . . . . . . . . . . . . . . . . . . . . . . . . . . . . . . . . . . . . . . . . . . . 2-1
2.1 Description of functions . . . . . . . . . . . . . . . . . . . . . . . . . . . . . . . . . . . . . . . . . . . . . . . . 2-2
2.2 Example application. . . . . . . . . . . . . . . . . . . . . . . . . . . . . . . . . . . . . . . . . . . . . . . . . . . 2-2
2.3 Interactions of the DCO components. . . . . . . . . . . . . . . . . . . . . . . . . . . . . . . . . . . . . . 2-4
2.4 The tasks of the OScAR-Pro Customized Operator . . . . . . . . . . . . . . . . . . . . . . . . . . 2-5
2.5 The tasks of the DCO-Script . . . . . . . . . . . . . . . . . . . . . . . . . . . . . . . . . . . . . . . . . . . . 2-5
2.6 The tasks of the OScAR-Pro-TT Operator-Tool. . . . . . . . . . . . . . . . . . . . . . . . . . . . . . 2-6
3 Installation. . . . . . . . . . . . . . . . . . . . . . . . . . . . . . . . . . . . . . . . . . . . . . . . . . . . . . . . . . . 3-1
3.1 How to install the OpenScape Alarm Response Professional . . . . . . . . . . . . . . . . . . . 3-2
3.2 Uninstall the OpenScape Alarm Response Professional. . . . . . . . . . . . . . . . . . . . . . . 3-6
4 Operating Instructions for the OScAR-Pro Customized Operator . . . . . . . . . . . . . . 4-1
4.1 Start the OScAR-Pro Customized Operator . . . . . . . . . . . . . . . . . . . . . . . . . . . . . . . . 4-2
4.2 Layout of the interface of the OScAR-Pro Customized Operator . . . . . . . . . . . . . . . . 4-3
4.2.1 The menu bar . . . . . . . . . . . . . . . . . . . . . . . . . . . . . . . . . . . . . . . . . . . . . . . . . . . . 4-4
4.2.2 The toolbar . . . . . . . . . . . . . . . . . . . . . . . . . . . . . . . . . . . . . . . . . . . . . . . . . . . . . . 4-4
4.2.3 Description of the menu commands and the buttons of the
OScAR-Pro Customized Operator. . . . . . . . . . . . . . . . . . . . . . . . . . . . . . . . . . . . 4-5
4.2.4 Functions of the mouse. . . . . . . . . . . . . . . . . . . . . . . . . . . . . . . . . . . . . . . . . . . . 4-11
4.2.5 The status bar . . . . . . . . . . . . . . . . . . . . . . . . . . . . . . . . . . . . . . . . . . . . . . . . . . . 4-12
4.3 Setup and application of the Structure window . . . . . . . . . . . . . . . . . . . . . . . . . . . . . 4-13
4.3.1 The tree structure of the Structure window . . . . . . . . . . . . . . . . . . . . . . . . . . . . . 4-14
4.3.2 The list view of the Structure window . . . . . . . . . . . . . . . . . . . . . . . . . . . . . . . . . 4-15
4.4 Setup and application of the Layout window . . . . . . . . . . . . . . . . . . . . . . . . . . . . . . . 4-16
4.4.1 Toolbar and Controls. . . . . . . . . . . . . . . . . . . . . . . . . . . . . . . . . . . . . . . . . . . . . . 4-17
4.4.2 Mark a Frame area or a Control . . . . . . . . . . . . . . . . . . . . . . . . . . . . . . . . . . . . . 4-18
4.4.3 Move Controls . . . . . . . . . . . . . . . . . . . . . . . . . . . . . . . . . . . . . . . . . . . . . . . . . . . 4-19
4.4.4 Change the size of Frames and Controls . . . . . . . . . . . . . . . . . . . . . . . . . . . . . . 4-20
4.4.5 Align and space elements automatically . . . . . . . . . . . . . . . . . . . . . . . . . . . . . . . 4-21
4.5 Setup and application of the Preview window . . . . . . . . . . . . . . . . . . . . . . . . . . . . . . 4-22
4.6 General user dialog windows. . . . . . . . . . . . . . . . . . . . . . . . . . . . . . . . . . . . . . . . . . . 4-23
4.6.1 Edit project properties . . . . . . . . . . . . . . . . . . . . . . . . . . . . . . . . . . . . . . . . . . . . . 4-23
4.6.2 Administration of the Image lists . . . . . . . . . . . . . . . . . . . . . . . . . . . . . . . . . . . . . 4-24
4.6.3 Process colors and Standard colors for process lists . . . . . . . . . . . . . . . . . . . . . 4-26
4.6.4 Edit fonts . . . . . . . . . . . . . . . . . . . . . . . . . . . . . . . . . . . . . . . . . . . . . . . . . . . . . . . 4-29
4.6.5 Edit colors . . . . . . . . . . . . . . . . . . . . . . . . . . . . . . . . . . . . . . . . . . . . . . . . . . . . . . 4-31
07/2010
OScAR-Pro Customized Operator, User Manual
0-1
Page 4

BHB_DCO_IVZ.fm
Contents Nur für den internen Gebrauch
5 The Elements of a DCO-Script . . . . . . . . . . . . . . . . . . . . . . . . . . . . . . . . . . . . . . . . . . . 5-1
5.1 General structure . . . . . . . . . . . . . . . . . . . . . . . . . . . . . . . . . . . . . . . . . . . . . . . . . . . . . 5-5
5.2 The DCO data types and their value ranges. . . . . . . . . . . . . . . . . . . . . . . . . . . . . . . . . 5-7
5.3 Formulas . . . . . . . . . . . . . . . . . . . . . . . . . . . . . . . . . . . . . . . . . . . . . . . . . . . . . . . . . . . . 5-9
5.4 Constants . . . . . . . . . . . . . . . . . . . . . . . . . . . . . . . . . . . . . . . . . . . . . . . . . . . . . . . . . . 5-11
5.4.1 The attributes of Constants . . . . . . . . . . . . . . . . . . . . . . . . . . . . . . . . . . . . . . . . . 5-11
5.4.2 Add a new Constant . . . . . . . . . . . . . . . . . . . . . . . . . . . . . . . . . . . . . . . . . . . . . . . 5-12
5.4.3 Edit the attributes of a Constant . . . . . . . . . . . . . . . . . . . . . . . . . . . . . . . . . . . . . . 5-12
5.5 Parameters . . . . . . . . . . . . . . . . . . . . . . . . . . . . . . . . . . . . . . . . . . . . . . . . . . . . . . . . . 5-13
5.5.1 Add a new Parameter group. . . . . . . . . . . . . . . . . . . . . . . . . . . . . . . . . . . . . . . . . 5-14
5.5.2 The attributes of Parameters . . . . . . . . . . . . . . . . . . . . . . . . . . . . . . . . . . . . . . . . 5-15
5.5.3 Add a new Parameter. . . . . . . . . . . . . . . . . . . . . . . . . . . . . . . . . . . . . . . . . . . . . . 5-16
5.5.4 Edit the attributes of a Parameter. . . . . . . . . . . . . . . . . . . . . . . . . . . . . . . . . . . . . 5-16
5.6 Variables . . . . . . . . . . . . . . . . . . . . . . . . . . . . . . . . . . . . . . . . . . . . . . . . . . . . . . . . . . . 5-17
5.6.1 The attributes of Variables . . . . . . . . . . . . . . . . . . . . . . . . . . . . . . . . . . . . . . . . . . 5-17
5.6.2 Add a new Variable . . . . . . . . . . . . . . . . . . . . . . . . . . . . . . . . . . . . . . . . . . . . . . . 5-18
5.6.3 Edit the attributes of a Variable . . . . . . . . . . . . . . . . . . . . . . . . . . . . . . . . . . . . . . 5-18
5.7 Lists. . . . . . . . . . . . . . . . . . . . . . . . . . . . . . . . . . . . . . . . . . . . . . . . . . . . . . . . . . . . . . . 5-19
5.7.1 The attributes and child nodes of the node "Data lists" . . . . . . . . . . . . . . . . . . . . 5-20
5.7.2 Add a new Data list. . . . . . . . . . . . . . . . . . . . . . . . . . . . . . . . . . . . . . . . . . . . . . . . 5-22
5.7.3 Edit the attributes of a Data list. . . . . . . . . . . . . . . . . . . . . . . . . . . . . . . . . . . . . . . 5-22
5.7.4 Add a new data element. . . . . . . . . . . . . . . . . . . . . . . . . . . . . . . . . . . . . . . . . . . . 5-23
5.7.5 Edit the attributes of a data element. . . . . . . . . . . . . . . . . . . . . . . . . . . . . . . . . . . 5-23
5.7.6 The attributes and child nodes of the node "Filters" . . . . . . . . . . . . . . . . . . . . . . . 5-24
5.7.7 Add a new Filter . . . . . . . . . . . . . . . . . . . . . . . . . . . . . . . . . . . . . . . . . . . . . . . . . . 5-28
5.7.8 Edit the attributes of a Filter . . . . . . . . . . . . . . . . . . . . . . . . . . . . . . . . . . . . . . . . . 5-28
5.7.9 Add an ID range . . . . . . . . . . . . . . . . . . . . . . . . . . . . . . . . . . . . . . . . . . . . . . . . . . 5-29
5.7.10 Edit the attributes of an ID range . . . . . . . . . . . . . . . . . . . . . . . . . . . . . . . . . . . . 5-29
5.7.11 Add an Included ID. . . . . . . . . . . . . . . . . . . . . . . . . . . . . . . . . . . . . . . . . . . . . . . 5-30
5.7.12 Edit the attributes of an Included ID . . . . . . . . . . . . . . . . . . . . . . . . . . . . . . . . . . 5-30
5.7.13 Add an Excluded ID . . . . . . . . . . . . . . . . . . . . . . . . . . . . . . . . . . . . . . . . . . . . . . 5-31
5.7.14 Edit the attributes of an Excluded ID . . . . . . . . . . . . . . . . . . . . . . . . . . . . . . . . . 5-31
5.8 Frames . . . . . . . . . . . . . . . . . . . . . . . . . . . . . . . . . . . . . . . . . . . . . . . . . . . . . . . . . . . . 5-32
5.8.1 The attributes and child nodes of the node "Frames". . . . . . . . . . . . . . . . . . . . . . 5-32
5.8.2 Add a new Frame . . . . . . . . . . . . . . . . . . . . . . . . . . . . . . . . . . . . . . . . . . . . . . . . . 5-36
5.8.3 Edit the attributes of a Frame . . . . . . . . . . . . . . . . . . . . . . . . . . . . . . . . . . . . . . . . 5-36
5.8.4 Add a new Control through the Structure window . . . . . . . . . . . . . . . . . . . . . . . . 5-37
5.8.5 Add a new Control through the Layout window . . . . . . . . . . . . . . . . . . . . . . . . . . 5-38
5.8.6 Edit the attributes of a Control . . . . . . . . . . . . . . . . . . . . . . . . . . . . . . . . . . . . . . . 5-39
5.8.7 OScAR-Pro command templates . . . . . . . . . . . . . . . . . . . . . . . . . . . . . . . . . . . . . 5-40
5.8.8 Add a new OScAR-Pro command template . . . . . . . . . . . . . . . . . . . . . . . . . . . . . 5-52
5.8.9 Edit the attributes of a OScAR-Pro command template . . . . . . . . . . . . . . . . . . . . 5-53
5.8.10 Add a new Function to a Frame . . . . . . . . . . . . . . . . . . . . . . . . . . . . . . . . . . . . . 5-54
5.8.11 Edit the attributes of the Functions of a Frame. . . . . . . . . . . . . . . . . . . . . . . . . . 5-55
07/2010
0-2 OScAR-Pro Customized Operator, User Manual
Page 5

BHB_DCO_IVZ.fm
Nur für den internen Gebrauch Contents
5.9 Controls . . . . . . . . . . . . . . . . . . . . . . . . . . . . . . . . . . . . . . . . . . . . . . . . . . . . . . . . . . . 5-56
5.9.1 The use of Controls. . . . . . . . . . . . . . . . . . . . . . . . . . . . . . . . . . . . . . . . . . . . . . . 5-56
5.9.2 References to Controls . . . . . . . . . . . . . . . . . . . . . . . . . . . . . . . . . . . . . . . . . . . . 5-58
5.9.3 Attributes shared by all Controls . . . . . . . . . . . . . . . . . . . . . . . . . . . . . . . . . . . . . 5-59
5.9.4 Child nodes and special attributes of Static elements. . . . . . . . . . . . . . . . . . . . . 5-62
5.9.5 Special attributes of Edit fields . . . . . . . . . . . . . . . . . . . . . . . . . . . . . . . . . . . . . . 5-68
5.9.6 Special attributes and child nodes of Buttons . . . . . . . . . . . . . . . . . . . . . . . . . . . 5-70
5.9.7 Add Functions to a Button. . . . . . . . . . . . . . . . . . . . . . . . . . . . . . . . . . . . . . . . . . 5-73
5.9.8 Edit the attributes of the Functions of a Button . . . . . . . . . . . . . . . . . . . . . . . . . . 5-74
5.9.9 Add Static elements to a Button . . . . . . . . . . . . . . . . . . . . . . . . . . . . . . . . . . . . . 5-75
5.9.10 Edit the attributes of the Static elements of a Button . . . . . . . . . . . . . . . . . . . . 5-76
5.9.11 Special attributes of Checkboxes . . . . . . . . . . . . . . . . . . . . . . . . . . . . . . . . . . . 5-77
5.9.12 Child nodes and special attributes of Listboxes . . . . . . . . . . . . . . . . . . . . . . . . 5-79
5.9.13 Double-click events of Listboxes. . . . . . . . . . . . . . . . . . . . . . . . . . . . . . . . . . . . 5-84
5.9.14 Add new Process filters to Listboxes. . . . . . . . . . . . . . . . . . . . . . . . . . . . . . . . . 5-85
5.9.15 Edit the attributes of Process filters. . . . . . . . . . . . . . . . . . . . . . . . . . . . . . . . . . 5-86
5.9.16 The child nodes and special attributes of Comboboxes . . . . . . . . . . . . . . . . . . 5-87
5.9.17 Selection events of Comboboxes . . . . . . . . . . . . . . . . . . . . . . . . . . . . . . . . . . . 5-88
5.10 Functions . . . . . . . . . . . . . . . . . . . . . . . . . . . . . . . . . . . . . . . . . . . . . . . . . . . . . . . . . 5-89
5.10.1 The attributes and child nodes of Functions . . . . . . . . . . . . . . . . . . . . . . . . . . . 5-89
5.10.2 Setup and syntax of conditions . . . . . . . . . . . . . . . . . . . . . . . . . . . . . . . . . . . . . 5-91
5.11 Instructions . . . . . . . . . . . . . . . . . . . . . . . . . . . . . . . . . . . . . . . . . . . . . . . . . . . . . . . 5-93
5.11.1 Arguments of Instructions . . . . . . . . . . . . . . . . . . . . . . . . . . . . . . . . . . . . . . . . . 5-93
5.11.2 Overview of Instructions . . . . . . . . . . . . . . . . . . . . . . . . . . . . . . . . . . . . . . . . . . 5-93
5.11.3 Add a new Instruction . . . . . . . . . . . . . . . . . . . . . . . . . . . . . . . . . . . . . . . . . . . . 5-98
5.11.4 Edit Instructions. . . . . . . . . . . . . . . . . . . . . . . . . . . . . . . . . . . . . . . . . . . . . . . . . 5-99
5.11.5 Change the order in which the Instructions are executed . . . . . . . . . . . . . . . . 5-101
5.11.6 The Instruction "AddListToComboBox" . . . . . . . . . . . . . . . . . . . . . . . . . . . . . . 5-102
5.11.7 The Instruction "Call". . . . . . . . . . . . . . . . . . . . . . . . . . . . . . . . . . . . . . . . . . . . 5-103
5.11.8 The Instruction "BroadcastMessage" . . . . . . . . . . . . . . . . . . . . . . . . . . . . . . . 5-104
5.11.9 The Instruction "ClearComboBox". . . . . . . . . . . . . . . . . . . . . . . . . . . . . . . . . . 5-105
5.11.10 The Instruction "Execute" . . . . . . . . . . . . . . . . . . . . . . . . . . . . . . . . . . . . . . . 5-106
5.11.11 The Instruction "GetBroadcasts" . . . . . . . . . . . . . . . . . . . . . . . . . . . . . . . . . . 5-107
5.11.12 The Instruction "GetConferences". . . . . . . . . . . . . . . . . . . . . . . . . . . . . . . . . 5-108
5.11.13 The Instruction "GetComboBoxSelText" . . . . . . . . . . . . . . . . . . . . . . . . . . . . 5-109
5.11.14 The Instruction "GetInfotelephones" . . . . . . . . . . . . . . . . . . . . . . . . . . . . . . . 5-110
5.11.15 The Instruction "GetListBoxSelText" . . . . . . . . . . . . . . . . . . . . . . . . . . . . . . . 5-111
5.11.16 The Instruction "GetMessages". . . . . . . . . . . . . . . . . . . . . . . . . . . . . . . . . . . 5-112
5.11.17 The Instruction "GetScenarios" . . . . . . . . . . . . . . . . . . . . . . . . . . . . . . . . . . . 5-113
5.11.18 The Instruction "GotoFrame". . . . . . . . . . . . . . . . . . . . . . . . . . . . . . . . . . . . . 5-114
5.11.19 The Instruction "OffAllListBoxItemBlink" . . . . . . . . . . . . . . . . . . . . . . . . . . . . 5-114
5.11.20 The Instruction "OffButtonBlink" . . . . . . . . . . . . . . . . . . . . . . . . . . . . . . . . . . 5-115
5.11.21 The Instruction "OffEditBackColorBlink" . . . . . . . . . . . . . . . . . . . . . . . . . . . . 5-115
5.11.22 The Instruction "OffEditTextColorBlink". . . . . . . . . . . . . . . . . . . . . . . . . . . . . 5-116
07/2010
OScAR-Pro Customized Operator, User Manual
0-3
Page 6

BHB_DCO_IVZ.fm
Contents Nur für den internen Gebrauch
5.11.23 The Instruction "OffListBoxItemBlink". . . . . . . . . . . . . . . . . . . . . . . . . . . . . . . 5-117
5.11.24 The Instruction "SetButtonBlink". . . . . . . . . . . . . . . . . . . . . . . . . . . . . . . . . . . 5-118
5.11.25 The Instruction "SetButtonColor" . . . . . . . . . . . . . . . . . . . . . . . . . . . . . . . . . . 5-120
5.11.26 The Instruction "SetButtonPicture" . . . . . . . . . . . . . . . . . . . . . . . . . . . . . . . . . 5-121
5.11.27 The Instruction "SetButtonPictureScal" . . . . . . . . . . . . . . . . . . . . . . . . . . . . . 5-122
5.11.28 The Instruction "SetButtonRect" . . . . . . . . . . . . . . . . . . . . . . . . . . . . . . . . . . . 5-123
5.11.29 The Instruction "SetButtonStaticBackColor". . . . . . . . . . . . . . . . . . . . . . . . . . 5-124
5.11.30 The Instruction "SetButtonStaticBorderColor" . . . . . . . . . . . . . . . . . . . . . . . . 5-125
5.11.31 The Instruction "SetButtonStaticPictureName". . . . . . . . . . . . . . . . . . . . . . . . 5-126
5.11.32 The Instruction "SetButtonStaticPicturePos" . . . . . . . . . . . . . . . . . . . . . . . . . 5-127
5.11.33 The Instruction "SetButtonStaticPictureScale" . . . . . . . . . . . . . . . . . . . . . . . . 5-128
5.11.34 The Instruction "SetButtonStaticRect" . . . . . . . . . . . . . . . . . . . . . . . . . . . . . . 5-129
5.11.35 The Instruction "SetButtonStaticStatus" . . . . . . . . . . . . . . . . . . . . . . . . . . . . . 5-130
5.11.36 The Instruction "SetButtonStaticText" . . . . . . . . . . . . . . . . . . . . . . . . . . . . . . 5-131
5.11.37 The Instruction "SetButtonStaticTextColor" . . . . . . . . . . . . . . . . . . . . . . . . . . 5-132
5.11.38 The Instruction "SetButtonStaticTextPosition" . . . . . . . . . . . . . . . . . . . . . . . . 5-133
5.11.39 The Instruction "SetButtonStatus" . . . . . . . . . . . . . . . . . . . . . . . . . . . . . . . . . 5-134
5.11.40 The Instruction "SetButtonText" . . . . . . . . . . . . . . . . . . . . . . . . . . . . . . . . . . . 5-135
5.11.41 The Instruction "SetButtonTextColor". . . . . . . . . . . . . . . . . . . . . . . . . . . . . . . 5-136
5.11.42 The Instruction "SetCheckBoxBackColor" . . . . . . . . . . . . . . . . . . . . . . . . . . . 5-137
5.11.43 The Instruction "SetCheckBoxCaption" . . . . . . . . . . . . . . . . . . . . . . . . . . . . . 5-138
5.11.44 The Instruction "SetCheckBoxRect" . . . . . . . . . . . . . . . . . . . . . . . . . . . . . . . . 5-139
5.11.45 The Instruction "SetCheckBoxState" . . . . . . . . . . . . . . . . . . . . . . . . . . . . . . . 5-140
5.11.46 The Instruction "SetCheckBoxStatus" . . . . . . . . . . . . . . . . . . . . . . . . . . . . . . 5-141
5.11.47 The Instruction "SetCheckBoxTextColor". . . . . . . . . . . . . . . . . . . . . . . . . . . . 5-142
5.11.48 The Instruction "SetCheckBoxToVariable" . . . . . . . . . . . . . . . . . . . . . . . . . . . 5-143
5.11.49 The Instruction "SetComboBoxBackColor" . . . . . . . . . . . . . . . . . . . . . . . . . . 5-144
5.11.50 The Instruction "SetComboBoxList" . . . . . . . . . . . . . . . . . . . . . . . . . . . . . . . . 5-145
5.11.51 The Instruction "SetComboBoxRect" . . . . . . . . . . . . . . . . . . . . . . . . . . . . . . . 5-146
5.11.52 The Instruction "SetComboBoxStatus". . . . . . . . . . . . . . . . . . . . . . . . . . . . . . 5-147
5.11.53 The Instruction "SetComboBoxTextColor" . . . . . . . . . . . . . . . . . . . . . . . . . . . 5-148
5.11.54 The Instruction "SetComboToVariable" . . . . . . . . . . . . . . . . . . . . . . . . . . . . . 5-149
5.11.55 The Instructions "SetEditBackColor" . . . . . . . . . . . . . . . . . . . . . . . . . . . . . . . 5-150
5.11.56 The Instruction "SetEditBackColorBlink" . . . . . . . . . . . . . . . . . . . . . . . . . . . . 5-151
5.11.57 The Instruction "SetEditRect" . . . . . . . . . . . . . . . . . . . . . . . . . . . . . . . . . . . . . 5-153
5.11.58 The Instruction "SetEditStatus" . . . . . . . . . . . . . . . . . . . . . . . . . . . . . . . . . . . 5-154
5.11.59 The Instruction "SetEditText" . . . . . . . . . . . . . . . . . . . . . . . . . . . . . . . . . . . . . 5-155
5.11.60 The Instruction "SetEditTextColor" . . . . . . . . . . . . . . . . . . . . . . . . . . . . . . . . . 5-156
5.11.61 The Instruction "SetEditTextColorBlink" . . . . . . . . . . . . . . . . . . . . . . . . . . . . . 5-157
5.11.62 The Instruction "SetEditToVariable" . . . . . . . . . . . . . . . . . . . . . . . . . . . . . . . . 5-159
5.11.63 The Instruction "SetFrameColor" . . . . . . . . . . . . . . . . . . . . . . . . . . . . . . . . . . 5-160
5.11.64 The Instruction "SetListBoxBackColor" . . . . . . . . . . . . . . . . . . . . . . . . . . . . . 5-161
5.11.65 The Instruction "SetListBoxBlinkTime" . . . . . . . . . . . . . . . . . . . . . . . . . . . . . . 5-162
5.11.66 The Instruction "SetListBoxItemBlink" . . . . . . . . . . . . . . . . . . . . . . . . . . . . . . 5-163
07/2010
0-4 OScAR-Pro Customized Operator, User Manual
Page 7

BHB_DCO_IVZ.fm
Nur für den internen Gebrauch Contents
5.11.67 The Instruction "SetListBoxItemColor" . . . . . . . . . . . . . . . . . . . . . . . . . . . . . 5-164
5.11.68 The Instruction "SetListBoxList" . . . . . . . . . . . . . . . . . . . . . . . . . . . . . . . . . . 5-165
5.11.69 The Instruction "SetListBoxRect" . . . . . . . . . . . . . . . . . . . . . . . . . . . . . . . . . 5-166
5.11.70 The Instruction "SetListBoxSelectionToVariable" . . . . . . . . . . . . . . . . . . . . . 5-167
5.11.71 The Instructions "SetListBoxStatus" . . . . . . . . . . . . . . . . . . . . . . . . . . . . . . . 5-168
5.11.72 The Instruction "SetListBoxTextColor" . . . . . . . . . . . . . . . . . . . . . . . . . . . . . 5-169
5.11.73 The Instruction "SetListBoxToVariable" . . . . . . . . . . . . . . . . . . . . . . . . . . . . 5-170
5.11.74 The Instruction "SetStaticBackColor" . . . . . . . . . . . . . . . . . . . . . . . . . . . . . . 5-171
5.11.75 The Instruction "SetStaticBorderColor" . . . . . . . . . . . . . . . . . . . . . . . . . . . . . 5-172
5.11.76 The Instruction "SetStaticPictureName" . . . . . . . . . . . . . . . . . . . . . . . . . . . . 5-173
5.11.77 The Instruction "SetStaticPicturePos" . . . . . . . . . . . . . . . . . . . . . . . . . . . . . . 5-174
5.11.78 The Instruction "SetStaticPictureScale" . . . . . . . . . . . . . . . . . . . . . . . . . . . . 5-175
5.11.79 The Instruction "SetStaticRect" . . . . . . . . . . . . . . . . . . . . . . . . . . . . . . . . . . . 5-176
5.11.80 The Instruction "SetStaticStatus" . . . . . . . . . . . . . . . . . . . . . . . . . . . . . . . . . 5-177
5.11.81 The Instruction "SetStaticText" . . . . . . . . . . . . . . . . . . . . . . . . . . . . . . . . . . . 5-178
5.11.82 The Instruction "SetStaticTextColor" . . . . . . . . . . . . . . . . . . . . . . . . . . . . . . . 5-179
5.11.83 The Instruction "SetStaticTextPosition". . . . . . . . . . . . . . . . . . . . . . . . . . . . . 5-180
5.11.84 The Instruction "SetVariable" . . . . . . . . . . . . . . . . . . . . . . . . . . . . . . . . . . . . 5-181
5.11.85 The Instruction "StartProgram" . . . . . . . . . . . . . . . . . . . . . . . . . . . . . . . . . . . 5-182
6 The planning and implementation of a DCO Project . . . . . . . . . . . . . . . . . . . . . . . . . 6-1
6.1 The case study project. . . . . . . . . . . . . . . . . . . . . . . . . . . . . . . . . . . . . . . . . . . . . . . . . 6-4
6.1.1 Case study requirements . . . . . . . . . . . . . . . . . . . . . . . . . . . . . . . . . . . . . . . . . . . 6-4
6.1.2 Case study plant map . . . . . . . . . . . . . . . . . . . . . . . . . . . . . . . . . . . . . . . . . . . . . . 6-5
6.1.3 Objects administrated in OScAR-Pro . . . . . . . . . . . . . . . . . . . . . . . . . . . . . . . . . . 6-6
6.1.4 How to implement the case study . . . . . . . . . . . . . . . . . . . . . . . . . . . . . . . . . . . . . 6-7
6.2 Project administration . . . . . . . . . . . . . . . . . . . . . . . . . . . . . . . . . . . . . . . . . . . . . . . . 6-10
6.2.1 Create the project . . . . . . . . . . . . . . . . . . . . . . . . . . . . . . . . . . . . . . . . . . . . . . . . 6-10
6.2.2 Open an existing project . . . . . . . . . . . . . . . . . . . . . . . . . . . . . . . . . . . . . . . . . . . 6-11
6.3 Create Frames and Controls . . . . . . . . . . . . . . . . . . . . . . . . . . . . . . . . . . . . . . . . . . . 6-12
6.3.1 Create and customize the Frames . . . . . . . . . . . . . . . . . . . . . . . . . . . . . . . . . . . 6-12
6.3.2 Add a background image to the "Main page" . . . . . . . . . . . . . . . . . . . . . . . . . . . 6-14
6.3.3 Add visual separators to the "Main page" . . . . . . . . . . . . . . . . . . . . . . . . . . . . . . 6-15
6.3.4 Add Captions to the "Main page" . . . . . . . . . . . . . . . . . . . . . . . . . . . . . . . . . . . . 6-16
6.3.5 Add Buttons to the "Main page" . . . . . . . . . . . . . . . . . . . . . . . . . . . . . . . . . . . . . 6-19
6.3.6 Add Controls to the Frame "Announcement selection" . . . . . . . . . . . . . . . . . . . . 6-24
6.3.7 Screenshot of the final interface . . . . . . . . . . . . . . . . . . . . . . . . . . . . . . . . . . . . . 6-26
6.4 Create the global objects . . . . . . . . . . . . . . . . . . . . . . . . . . . . . . . . . . . . . . . . . . . . . . 6-29
6.4.1 Create Constants . . . . . . . . . . . . . . . . . . . . . . . . . . . . . . . . . . . . . . . . . . . . . . . . 6-29
6.4.2 Create the Parameters . . . . . . . . . . . . . . . . . . . . . . . . . . . . . . . . . . . . . . . . . . . . 6-30
6.4.3 Create the Variables . . . . . . . . . . . . . . . . . . . . . . . . . . . . . . . . . . . . . . . . . . . . . . 6-31
6.4.4 Create the Lists . . . . . . . . . . . . . . . . . . . . . . . . . . . . . . . . . . . . . . . . . . . . . . . . . . 6-32
6.4.5 Create the OScAR-Pro command template "Invoke broadcast" . . . . . . . . . . . . . 6-33
07/2010
OScAR-Pro Customized Operator, User Manual
0-5
Page 8

BHB_DCO_IVZ.fm
Contents Nur für den internen Gebrauch
6.5 Create the Functions of the "Main page" . . . . . . . . . . . . . . . . . . . . . . . . . . . . . . . . . . 6-34
6.5.1 The User Function: "Fire alert blink on" . . . . . . . . . . . . . . . . . . . . . . . . . . . . . . . . 6-34
6.5.2 The User Function: "Deflagration blink on". . . . . . . . . . . . . . . . . . . . . . . . . . . . . . 6-35
6.5.3 The User Function: "Leakage blink on" . . . . . . . . . . . . . . . . . . . . . . . . . . . . . . . . 6-35
6.5.4 The User Function: "Short circuit blink on" . . . . . . . . . . . . . . . . . . . . . . . . . . . . . . 6-36
6.5.5 The User Function: "More blink on" . . . . . . . . . . . . . . . . . . . . . . . . . . . . . . . . . . . 6-36
6.5.6 The User Function: "Management blink on" . . . . . . . . . . . . . . . . . . . . . . . . . . . . . 6-37
6.5.7 The User Function: "AdminTechnics blink on" . . . . . . . . . . . . . . . . . . . . . . . . . . . 6-37
6.5.8 The User Function: "Production 1 blink on" . . . . . . . . . . . . . . . . . . . . . . . . . . . . . 6-38
6.5.9 The User Function: "Production 2 blink on" . . . . . . . . . . . . . . . . . . . . . . . . . . . . . 6-38
6.5.10 The User Function: "Disable invoke" . . . . . . . . . . . . . . . . . . . . . . . . . . . . . . . . . 6-39
6.5.11 The User Function: "Enable invoke". . . . . . . . . . . . . . . . . . . . . . . . . . . . . . . . . . 6-39
6.5.12 The User Function: "Activate invoke" . . . . . . . . . . . . . . . . . . . . . . . . . . . . . . . . . 6-40
6.5.13 The User Function: "Blink Buttons" . . . . . . . . . . . . . . . . . . . . . . . . . . . . . . . . . . 6-41
6.5.14 The User Function: "Reset areas" . . . . . . . . . . . . . . . . . . . . . . . . . . . . . . . . . . . 6-43
6.5.15 The User Function: "Reset events" . . . . . . . . . . . . . . . . . . . . . . . . . . . . . . . . . . 6-44
6.5.16 The User Function: "Invoke Management". . . . . . . . . . . . . . . . . . . . . . . . . . . . . 6-45
6.5.17 The User Function: "Invoke AdminTechnics" . . . . . . . . . . . . . . . . . . . . . . . . . . . 6-45
6.5.18 The User Function: "Invoke Production 1" . . . . . . . . . . . . . . . . . . . . . . . . . . . . . 6-46
6.5.19 The User Function: "Invoke Production 2" . . . . . . . . . . . . . . . . . . . . . . . . . . . . . 6-46
6.5.20 On_Load Function: "Set Buttons". . . . . . . . . . . . . . . . . . . . . . . . . . . . . . . . . . . . 6-47
6.5.21 The Functions of the Button "Fire alert" . . . . . . . . . . . . . . . . . . . . . . . . . . . . . . . 6-47
6.5.21.1 The Function: "Delete" . . . . . . . . . . . . . . . . . . . . . . . . . . . . . . . . . . . . . . . . . 6-47
6.5.21.2 The Function: "Set" . . . . . . . . . . . . . . . . . . . . . . . . . . . . . . . . . . . . . . . . . . . 6-48
6.5.22 The Functions of the Button "Deflagration" . . . . . . . . . . . . . . . . . . . . . . . . . . . . 6-49
6.5.22.1 The Function: "Delete" . . . . . . . . . . . . . . . . . . . . . . . . . . . . . . . . . . . . . . . . . 6-49
6.5.22.2 The Function: "Set" . . . . . . . . . . . . . . . . . . . . . . . . . . . . . . . . . . . . . . . . . . . 6-50
6.5.23 The Functions of the Button "Leakage" . . . . . . . . . . . . . . . . . . . . . . . . . . . . . . . 6-51
6.5.23.1 The Function: "Delete" . . . . . . . . . . . . . . . . . . . . . . . . . . . . . . . . . . . . . . . . . 6-51
6.5.23.2 The Function: "Set" . . . . . . . . . . . . . . . . . . . . . . . . . . . . . . . . . . . . . . . . . . . 6-52
6.5.24 The Functions of the Button "Short circuit". . . . . . . . . . . . . . . . . . . . . . . . . . . . . 6-53
6.5.24.1 The Function: "Delete" . . . . . . . . . . . . . . . . . . . . . . . . . . . . . . . . . . . . . . . . . 6-53
6.5.24.2 The Function: "Set" . . . . . . . . . . . . . . . . . . . . . . . . . . . . . . . . . . . . . . . . . . . 6-54
6.5.25 The Functions of the Button "More": "Open announcement selection" . . . . . . . 6-55
6.5.26 The Functions of the Button "Management". . . . . . . . . . . . . . . . . . . . . . . . . . . . 6-56
6.5.26.1 The Function: "Delete" . . . . . . . . . . . . . . . . . . . . . . . . . . . . . . . . . . . . . . . . . 6-56
6.5.26.2 The Function: "Set" . . . . . . . . . . . . . . . . . . . . . . . . . . . . . . . . . . . . . . . . . . . 6-56
6.5.27 The Functions of the Button "AdminTechnics" . . . . . . . . . . . . . . . . . . . . . . . . . . 6-57
6.5.27.1 The Function: "Delete" . . . . . . . . . . . . . . . . . . . . . . . . . . . . . . . . . . . . . . . . . 6-57
6.5.27.2 The Function: "Set" . . . . . . . . . . . . . . . . . . . . . . . . . . . . . . . . . . . . . . . . . . . 6-57
6.5.28 The Functions of the Button "Production 1" . . . . . . . . . . . . . . . . . . . . . . . . . . . . 6-58
6.5.28.1 The Function: "Delete" . . . . . . . . . . . . . . . . . . . . . . . . . . . . . . . . . . . . . . . . . 6-58
6.5.28.2 The Function: "Set" . . . . . . . . . . . . . . . . . . . . . . . . . . . . . . . . . . . . . . . . . . . 6-58
07/2010
0-6 OScAR-Pro Customized Operator, User Manual
Page 9

BHB_DCO_IVZ.fm
Nur für den internen Gebrauch Contents
6.5.29 The Functions of the Button "Production 2" . . . . . . . . . . . . . . . . . . . . . . . . . . . 6-59
6.5.29.1 The Function: "Delete" . . . . . . . . . . . . . . . . . . . . . . . . . . . . . . . . . . . . . . . . 6-59
6.5.29.2 The Function: "Set". . . . . . . . . . . . . . . . . . . . . . . . . . . . . . . . . . . . . . . . . . . 6-59
6.5.30 The Functions of the Button "Invoke": "Invoke broadcast" . . . . . . . . . . . . . . . . 6-60
6.6 Create the Functions of the Frame "Announcement selection" . . . . . . . . . . . . . . . . . 6-61
6.6.1 The User Function: "On cancel" . . . . . . . . . . . . . . . . . . . . . . . . . . . . . . . . . . . . . 6-61
6.6.2 On_Load Functions: "Fill announcement list" . . . . . . . . . . . . . . . . . . . . . . . . . . . 6-62
6.6.3 The Functions of the Button "Cancel": "Cancel dialog" . . . . . . . . . . . . . . . . . . . . 6-63
6.6.4 The Functions of the Button "Ok" . . . . . . . . . . . . . . . . . . . . . . . . . . . . . . . . . . . . 6-64
6.6.4.1 The Function: "With selection" . . . . . . . . . . . . . . . . . . . . . . . . . . . . . . . . . . . 6-64
6.6.4.2 The Function: "Without selection". . . . . . . . . . . . . . . . . . . . . . . . . . . . . . . . . 6-65
6.7 Test the DCO-Script . . . . . . . . . . . . . . . . . . . . . . . . . . . . . . . . . . . . . . . . . . . . . . . . . 6-66
7 The DCO in the OScAR-Pro-TT Operator-Tool. . . . . . . . . . . . . . . . . . . . . . . . . . . . . . 7-1
7.1 Publication of the DCO Script . . . . . . . . . . . . . . . . . . . . . . . . . . . . . . . . . . . . . . . . . . . 7-2
7.2 Layout in the OScAR-Pro-TT Operator-Tool . . . . . . . . . . . . . . . . . . . . . . . . . . . . . . . . 7-2
7.2.1 The DCO in the child window . . . . . . . . . . . . . . . . . . . . . . . . . . . . . . . . . . . . . . . . 7-3
7.2.2 The DCO in the toolbar . . . . . . . . . . . . . . . . . . . . . . . . . . . . . . . . . . . . . . . . . . . . . 7-4
7.2.3 Summary of the enhanced menu bar in the OScAR-Pro-TT Operator-Tool . . . . . 7-4
7.3 Operation of the DCO-Window . . . . . . . . . . . . . . . . . . . . . . . . . . . . . . . . . . . . . . . . . . 7-5
7.3.1 Load a DCO-Scripts for the first time in the OScAR-Pro-TT Operator-Tool . . . . . 7-7
7.4 The DCO Parameter Editor . . . . . . . . . . . . . . . . . . . . . . . . . . . . . . . . . . . . . . . . . . . . . 7-9
7.5 Special registry entries for the DCO . . . . . . . . . . . . . . . . . . . . . . . . . . . . . . . . . . . . . 7-10
Index . . . . . . . . . . . . . . . . . . . . . . . . . . . . . . . . . . . . . . . . . . . . . . . . . . . . . . . . . . . . . . . . . Z-1
07/2010
OScAR-Pro Customized Operator, User Manual
0-7
Page 10

BHB_DCO_IVZ.fm
Contents Nur für den internen Gebrauch
07/2010
0-8 OScAR-Pro Customized Operator, User Manual
Page 11

BHB_DCO_LOF.fm
Nur für den internen Gebrauch Images
Images 0
Image 2-1 Example of a DCO output in the OScAR-Pro-TT Operator-Tool. . . . . . . . 2-3
Image 2-2 Integration of the different DCO components in OScAR-Pro Classic . . . . 2-4
Image 4-1 Layout of the interface of the OScAR-Pro Customized Operator . . . . . . . 4-3
Image 4-2 Image of the Structure window with example . . . . . . . . . . . . . . . . . . . . . 4-13
Image 4-3 Image of the Layout window with example . . . . . . . . . . . . . . . . . . . . . . . 4-16
Image 4-4 Image of the Preview window with example project . . . . . . . . . . . . . . . . 4-22
Image 5-1 View of the Structure window with numerous entries . . . . . . . . . . . . . . . . 5-5
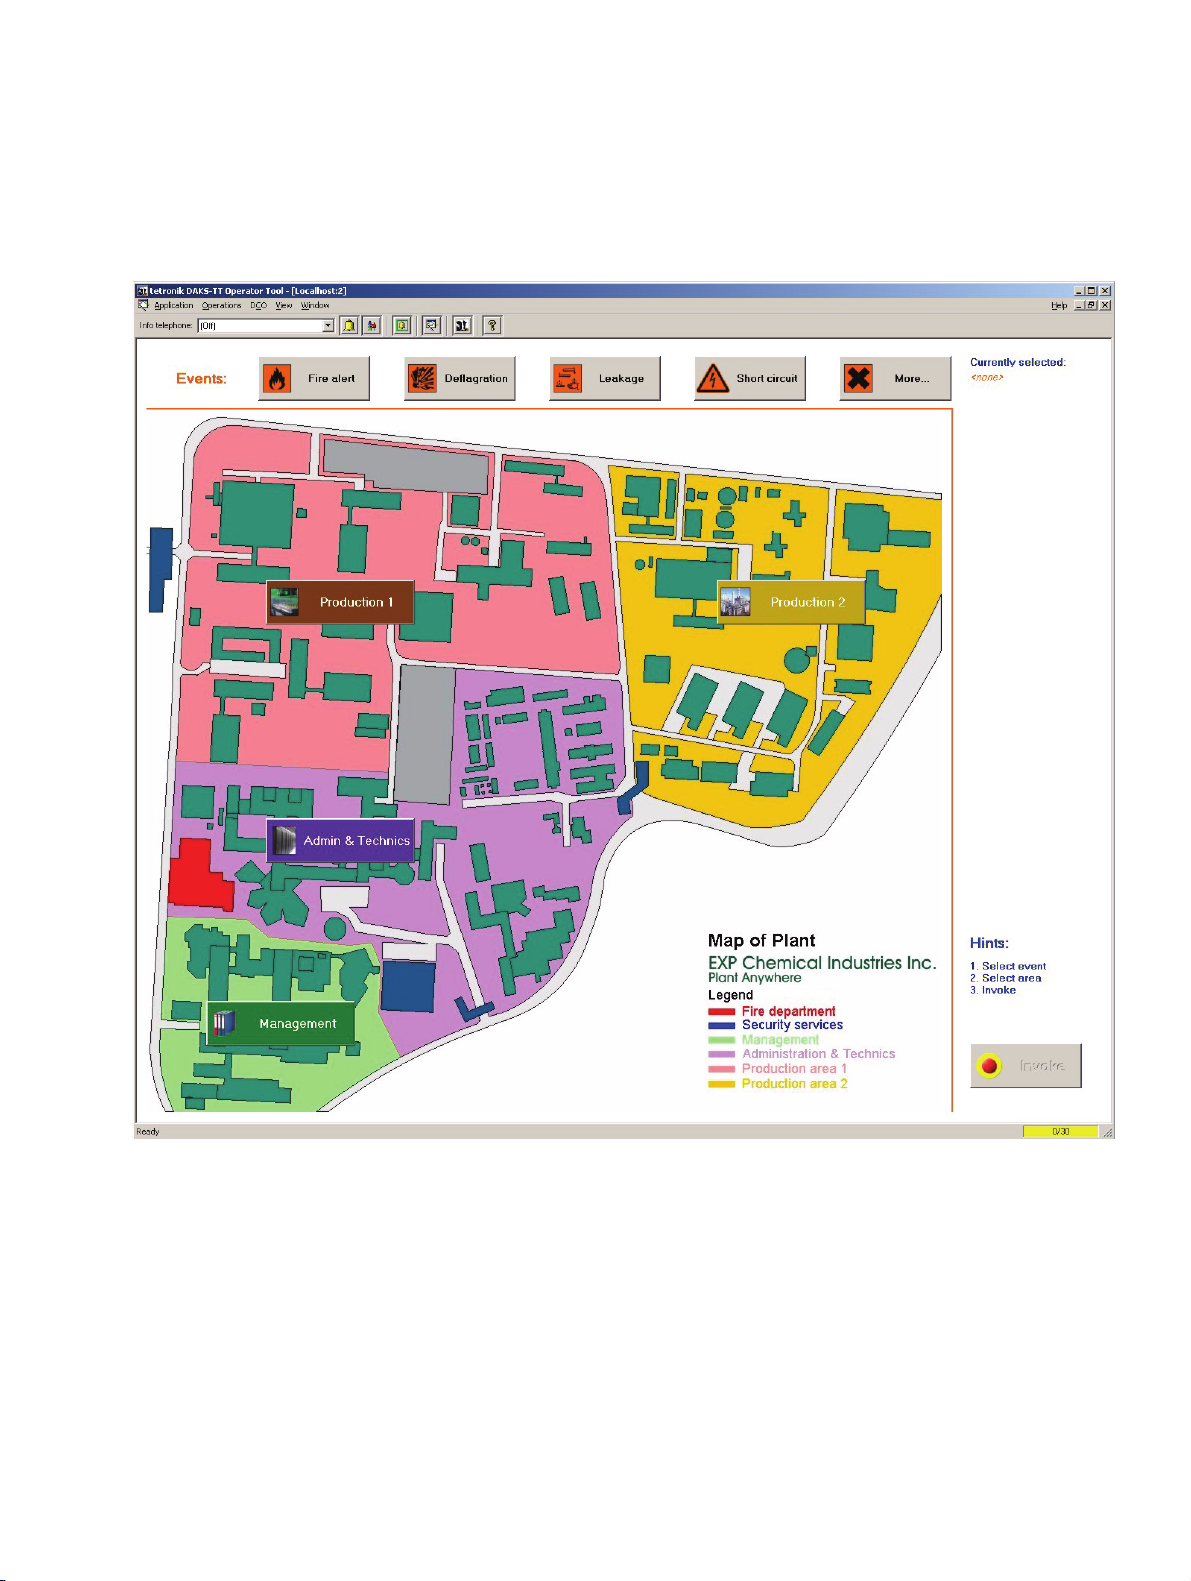
Image 6-1 Plant map of the premises and grounds of "Chemical Industries Inc". . . . 6-5
Image 6-2 Screenshot of the Structure window . . . . . . . . . . . . . . . . . . . . . . . . . . . . 6-26
Image 6-3 Screenshot of the final "Main page" . . . . . . . . . . . . . . . . . . . . . . . . . . . . 6-27
Image 6-4 Screenshot of the final "Announcement selection" Frame . . . . . . . . . . . 6-28
07/2010
OScAR-Pro Customized Operator, User Manual
0-9
Page 12

BHB_DCO_LOF.fm
Images Nur für den internen Gebrauch
07/2010
0-10 OScAR-Pro Customized Operator, User Manual
Page 13

BHB_DCO_LOT.fm
Nur für den internen Gebrauch Tables
Tables 0
Table 1-1 Notations . . . . . . . . . . . . . . . . . . . . . . . . . . . . . . . . . . . . . . . . . . . . . . . . . . 1-3
Table 3-1 How to install the OScAR-Pro Customized Operator . . . . . . . . . . . . . . . . 3-2
Table 3-2 Uninstall the OScAR-Pro Customized Operator. . . . . . . . . . . . . . . . . . . . 3-6
Table 4-1 Start the OScAR-Pro Customized Operator . . . . . . . . . . . . . . . . . . . . . . . 4-2
Table 4-2 Summary of the menu items and buttons of the OScAR-Pro Customized Ope-
rator 4-5
Table 4-3 Summary of all available Controls. . . . . . . . . . . . . . . . . . . . . . . . . . . . . . 4-17
Table 4-4 Rendition of marked objects . . . . . . . . . . . . . . . . . . . . . . . . . . . . . . . . . . 4-18
Table 4-5 Edit project properties . . . . . . . . . . . . . . . . . . . . . . . . . . . . . . . . . . . . . . . 4-23
Table 4-6 Administration of the 'Project image list' . . . . . . . . . . . . . . . . . . . . . . . . . 4-24
Table 4-7 Edit standard colors for process lists. . . . . . . . . . . . . . . . . . . . . . . . . . . . 4-26
Table 4-8 Add new font . . . . . . . . . . . . . . . . . . . . . . . . . . . . . . . . . . . . . . . . . . . . . . 4-29
Table 4-9 Add new font . . . . . . . . . . . . . . . . . . . . . . . . . . . . . . . . . . . . . . . . . . . . . . 4-31
Table 5-1 Description of the predefined nodes of the tree structure . . . . . . . . . . . . . 5-6
Table 5-2 Summary of the different data types . . . . . . . . . . . . . . . . . . . . . . . . . . . . . 5-7
Table 5-3 List of logical operations in Formulas . . . . . . . . . . . . . . . . . . . . . . . . . . . . 5-9
Table 5-4 Attributes of Constants . . . . . . . . . . . . . . . . . . . . . . . . . . . . . . . . . . . . . . 5-11
Table 5-5 Add a new Constant . . . . . . . . . . . . . . . . . . . . . . . . . . . . . . . . . . . . . . . . 5-12
Table 5-6 Edit the attributes of a Constant . . . . . . . . . . . . . . . . . . . . . . . . . . . . . . . 5-12
Table 5-7 Add a new Parameter group . . . . . . . . . . . . . . . . . . . . . . . . . . . . . . . . . . 5-14
Table 5-8 Attributes of Parameters . . . . . . . . . . . . . . . . . . . . . . . . . . . . . . . . . . . . . 5-15
Table 5-9 Add a new Parameter . . . . . . . . . . . . . . . . . . . . . . . . . . . . . . . . . . . . . . . 5-16
Table 5-10 Edit the attributes of Parameters. . . . . . . . . . . . . . . . . . . . . . . . . . . . . . . 5-16
Table 5-11 Attributes of Variables . . . . . . . . . . . . . . . . . . . . . . . . . . . . . . . . . . . . . . . 5-17
Table 5-12 Add a new Variable . . . . . . . . . . . . . . . . . . . . . . . . . . . . . . . . . . . . . . . . . 5-18
Table 5-13 Edit the attributes of a Variable . . . . . . . . . . . . . . . . . . . . . . . . . . . . . . . . 5-18
Table 5-14 Attributes of Data lists . . . . . . . . . . . . . . . . . . . . . . . . . . . . . . . . . . . . . . . 5-20
Table 5-15 The child nodes of the node "Data lists" . . . . . . . . . . . . . . . . . . . . . . . . . 5-20
Table 5-16 Attributes of data elements . . . . . . . . . . . . . . . . . . . . . . . . . . . . . . . . . . . 5-21
Table 5-17 Add a new new Data list . . . . . . . . . . . . . . . . . . . . . . . . . . . . . . . . . . . . . 5-22
Table 5-18 Edit Data list attributes . . . . . . . . . . . . . . . . . . . . . . . . . . . . . . . . . . . . . . 5-22
Table 5-19 Add new data element. . . . . . . . . . . . . . . . . . . . . . . . . . . . . . . . . . . . . . . 5-23
Table 5-20 Edit the attributes of data elements. . . . . . . . . . . . . . . . . . . . . . . . . . . . . 5-23
Table 5-21 The attributes of Filters . . . . . . . . . . . . . . . . . . . . . . . . . . . . . . . . . . . . . . 5-24
Table 5-22 The child nodes of the node "Filters". . . . . . . . . . . . . . . . . . . . . . . . . . . . 5-25
Table 5-23 The attributes of ID ranges . . . . . . . . . . . . . . . . . . . . . . . . . . . . . . . . . . . 5-25
Table 5-24 Attributes of Excluded IDs . . . . . . . . . . . . . . . . . . . . . . . . . . . . . . . . . . . . 5-26
Table 5-25 The attributes of Excluded IDs . . . . . . . . . . . . . . . . . . . . . . . . . . . . . . . . 5-26
Table 5-26 Create the Filter. . . . . . . . . . . . . . . . . . . . . . . . . . . . . . . . . . . . . . . . . . . . 5-28
Table 5-27 Edit the attributes of Filters . . . . . . . . . . . . . . . . . . . . . . . . . . . . . . . . . . . 5-28
07/2010
OScAR-Pro Customized Operator, User Manual
0-11
Page 14

BHB_DCO_LOT.fm
Tabl es Nur für den internen Gebrauch
Table 5-28 Add an ID range . . . . . . . . . . . . . . . . . . . . . . . . . . . . . . . . . . . . . . . . . . . . 5-29
Table 5-29 Edit the attributes of ID ranges . . . . . . . . . . . . . . . . . . . . . . . . . . . . . . . . . 5-29
Table 5-30 Add an Included ID . . . . . . . . . . . . . . . . . . . . . . . . . . . . . . . . . . . . . . . . . . 5-30
Table 5-31 Edit the attributes of "Included IDs" . . . . . . . . . . . . . . . . . . . . . . . . . . . . . 5-30
Table 5-32 Add excluded IDs . . . . . . . . . . . . . . . . . . . . . . . . . . . . . . . . . . . . . . . . . . . 5-31
Table 5-33 Edit the attributes of an Excluded ID . . . . . . . . . . . . . . . . . . . . . . . . . . . . 5-31
Table 5-34 Attributes of Frames . . . . . . . . . . . . . . . . . . . . . . . . . . . . . . . . . . . . . . . . . 5-32
Table 5-35 The child nodes of the node "Frames" . . . . . . . . . . . . . . . . . . . . . . . . . . . 5-35
Table 5-36 Add a new Frame . . . . . . . . . . . . . . . . . . . . . . . . . . . . . . . . . . . . . . . . . . . 5-36
Table 5-37 Edit the attributes of a Frame . . . . . . . . . . . . . . . . . . . . . . . . . . . . . . . . . . 5-36
Table 5-38 Add a new Control through the Structure window . . . . . . . . . . . . . . . . . . 5-37
Table 5-39 Add a new Control through the Layout window . . . . . . . . . . . . . . . . . . . . 5-38
Table 5-40 Edit the attributes of a Control . . . . . . . . . . . . . . . . . . . . . . . . . . . . . . . . . 5-39
Table 5-41 Attributes and child nodes of the node "OScAR-Pro command templates" . 5-
40
Table 5-42 Add a new OScAR-Pro command template . . . . . . . . . . . . . . . . . . . . . . . 5-52
Table 5-43 Edit the attributes of a OScAR-Pro command template . . . . . . . . . . . . . . 5-53
Table 5-44 Add a new Function to a Frame . . . . . . . . . . . . . . . . . . . . . . . . . . . . . . . . 5-54
Table 5-45 Edit the attributes of the Functions of a Frame. . . . . . . . . . . . . . . . . . . . . 5-55
Table 5-46 Application of the Controls . . . . . . . . . . . . . . . . . . . . . . . . . . . . . . . . . . . . 5-56
Table 5-47 Reference declarations for Controls . . . . . . . . . . . . . . . . . . . . . . . . . . . . . 5-58
Table 5-48 Attributes shared by all Controls. . . . . . . . . . . . . . . . . . . . . . . . . . . . . . . . 5-59
Table 5-49 Special attributes of Static elements . . . . . . . . . . . . . . . . . . . . . . . . . . . . 5-62
Table 5-50 The child nodes of Static elements. . . . . . . . . . . . . . . . . . . . . . . . . . . . . . 5-63
Table 5-51 Attributes of the child node "Image" of a Static element. . . . . . . . . . . . . . 5-63
Table 5-52 Attributes of the child node "Caption" of a Static element . . . . . . . . . . . . 5-66
Table 5-53 Special attributes of Edit fields . . . . . . . . . . . . . . . . . . . . . . . . . . . . . . . . . 5-68
Table 5-54 Special attributes of Buttons. . . . . . . . . . . . . . . . . . . . . . . . . . . . . . . . . . . 5-70
Table 5-55 The child nodes of Buttons . . . . . . . . . . . . . . . . . . . . . . . . . . . . . . . . . . . . 5-72
Table 5-56 Add a new Function to a Button . . . . . . . . . . . . . . . . . . . . . . . . . . . . . . . . 5-73
Table 5-57 Edit the attributes of the Functions of a Button. . . . . . . . . . . . . . . . . . . . . 5-74
Table 5-58 Add a new Function to a Button . . . . . . . . . . . . . . . . . . . . . . . . . . . . . . . . 5-75
Table 5-59 Edit the attributes of the Static elements of a Button . . . . . . . . . . . . . . . . 5-76
Table 5-60 Special attributes of Checkboxes . . . . . . . . . . . . . . . . . . . . . . . . . . . . . . . 5-77
Table 5-61 Special attributes of Listbox . . . . . . . . . . . . . . . . . . . . . . . . . . . . . . . . . . . 5-79
Table 5-62 The child nodes of Listboxes . . . . . . . . . . . . . . . . . . . . . . . . . . . . . . . . . . 5-81
Table 5-63 Attributes of Process filters. . . . . . . . . . . . . . . . . . . . . . . . . . . . . . . . . . . . 5-82
Table 5-64 Add Process filters to a Listbox . . . . . . . . . . . . . . . . . . . . . . . . . . . . . . . . 5-85
Table 5-65 Edit the attributes of the Process filters of a Listbox. . . . . . . . . . . . . . . . . 5-86
Table 5-66 Special attributes of Comboboxes . . . . . . . . . . . . . . . . . . . . . . . . . . . . . . 5-87
Table 5-67 The child nodes of Comboboxes . . . . . . . . . . . . . . . . . . . . . . . . . . . . . . . 5-87
Table 5-68 Attributes of Functions . . . . . . . . . . . . . . . . . . . . . . . . . . . . . . . . . . . . . . . 5-89
Table 5-69 The child nodes of the node "Functions" . . . . . . . . . . . . . . . . . . . . . . . . . 5-90
Table 5-70 Overview of Instructions . . . . . . . . . . . . . . . . . . . . . . . . . . . . . . . . . . . . . . 5-93
07/2010
0-12 OScAR-Pro Customized Operator, User Manual
Page 15

BHB_DCO_LOT.fm
Nur für den internen Gebrauch Tables
Table 5-71 Add a new Instruction to a Function . . . . . . . . . . . . . . . . . . . . . . . . . . . . 5-98
Table 5-72 Edit an Instruction of a Function . . . . . . . . . . . . . . . . . . . . . . . . . . . . . . . 5-99
Table 5-73 Edit an Instruction of a Function . . . . . . . . . . . . . . . . . . . . . . . . . . . . . . 5-101
Table 5-74 Arguments of the Instruction "AddListToComboBox" . . . . . . . . . . . . . . 5-102
Table 5-75 The arguments of the Instruction "Call". . . . . . . . . . . . . . . . . . . . . . . . . 5-103
Table 5-76 The arguments of the Instruction "BroadcastMessage" . . . . . . . . . . . . 5-104
Table 5-77 The arguments of the Instruction "ClearComboBox". . . . . . . . . . . . . . . 5-105
Table 5-78 The arguments of the Instruction "Execute" . . . . . . . . . . . . . . . . . . . . . 5-106
Table 5-79 The arguments of the Instruction "GetBroadcast" . . . . . . . . . . . . . . . . . 5-107
Table 5-80 The arguments of the Instruction GetConferences . . . . . . . . . . . . . . . . 5-108
Table 5-81 The arguments of the Instruction GetComboBoxSelText . . . . . . . . . . . 5-109
Table 5-82 The arguments of the Instruction GetInfotelephones . . . . . . . . . . . . . . 5-110
Table 5-83 The arguments of the Instruction GetListBoxSelText . . . . . . . . . . . . . . 5-111
Table 5-84 The arguments of the Instruction GetMessages . . . . . . . . . . . . . . . . . . 5-112
Table 5-85 The arguments of the Instruction GetScenarios . . . . . . . . . . . . . . . . . . 5-113
Table 5-86 The arguments of the Instruction GotoFrame . . . . . . . . . . . . . . . . . . . . 5-114
Table 5-87 The arguments of the Instruction OffAllListBoxItemBlink . . . . . . . . . . . 5-114
Table 5-88 The arguments of the Instruction OffButtonBlink. . . . . . . . . . . . . . . . . . 5-115
Table 5-89 The arguments of the Instruction OffEditBackColorBlink . . . . . . . . . . . 5-115
Table 5-90 The arguments of the Instruction OffEditTextColorBlink . . . . . . . . . . . . 5-116
Table 5-91 The arguments of the Instruction OffListBoxItemBlink . . . . . . . . . . . . . 5-117
Table 5-92 The arguments of the Instruction SetButtonBlink . . . . . . . . . . . . . . . . . 5-118
Table 5-93 The arguments of the Instruction SetButtonColor . . . . . . . . . . . . . . . . . 5-120
Table 5-94 The arguments of the Instruction SetButtonPicture. . . . . . . . . . . . . . . . 5-121
Table 5-95 The arguments of the Instruction SetButtonPictureScal . . . . . . . . . . . . 5-122
Table 5-96 The arguments of the Instruction SetButtonRect . . . . . . . . . . . . . . . . . 5-123
Table 5-97 The arguments of the Instruction SetButtonStaticBackColor . . . . . . . . 5-124
Table 5-98 The arguments of the Instruction SetButtonStaticBorderColor . . . . . . . 5-125
Table 5-99 The arguments of the Instruction SetButtonStaticPictureName . . . . . . 5-126
Table 5-100 The arguments of the Instruction SetButtonStaticPicturePos . . . . . . . . 5-127
Table 5-101 The arguments of the Instruction SetButtonStaticPictureScale. . . . . . . 5-128
Table 5-102 The arguments of the Instruction SetButtonStaticRect . . . . . . . . . . . . . 5-129
Table 5-103 The arguments of the Instruction SetButtonStaticStatus. . . . . . . . . . . . 5-130
Table 5-104 The arguments of the Instruction SetButtonStaticText . . . . . . . . . . . . . 5-131
Table 5-105 The arguments of the Instruction SetButtonStaticTextColor . . . . . . . . . 5-132
Table 5-106 The arguments of the Instruction SetButtonStaticTextPosition . . . . . . . 5-133
Table 5-107 The arguments of the Instruction SetButtonStatus . . . . . . . . . . . . . . . . 5-134
Table 5-108 The arguments of the Instruction SetButtonText. . . . . . . . . . . . . . . . . . 5-135
Table 5-109 The arguments of the Instruction SetButtonTextColor . . . . . . . . . . . . . 5-136
Table 5-110 The arguments of the Instruction SetCheckBoxBackColor . . . . . . . . . . 5-137
Table 5-111 The arguments of the Instruction SetCheckBoxCaption . . . . . . . . . . . . 5-138
Table 5-112 The arguments of the Instruction SetCheckBoxRect . . . . . . . . . . . . . . 5-139
Table 5-113 The arguments of SetCheckBoxState . . . . . . . . . . . . . . . . . . . . . . . . . . 5-140
Table 5-114 The arguments of the Instruction SetCheckBoxStatus . . . . . . . . . . . . . 5-141
07/2010
OScAR-Pro Customized Operator, User Manual
0-13
Page 16

BHB_DCO_LOT.fm
Tabl es Nur für den internen Gebrauch
Table 5-115 The arguments of the Instruction SetCheckBoxTextColor . . . . . . . . . . . 5-142
Table 5-116 The arguments of the Instruction SetCheckBoxToVariable . . . . . . . . . . 5-143
Table 5-117 The arguments of the Instruction SetComboBoxBackColor . . . . . . . . . . 5-144
Table 5-118 The arguments of the Instruction SetComboBoxList . . . . . . . . . . . . . . . 5-145
Table 5-119 The arguments of the Instruction SetComboBoxRect . . . . . . . . . . . . . . 5-146
Table 5-120 The arguments of the Instruction SetComboBoxStatus . . . . . . . . . . . . . 5-147
Table 5-121 The arguments of the Instruction SetComboBoxTextColor . . . . . . . . . . 5-148
Table 5-122 The arguments of the Instruction SetComboToVariable . . . . . . . . . . . . 5-149
Table 5-123 The arguments of the Instruction SetEditBackColor. . . . . . . . . . . . . . . . 5-150
Table 5-124 The arguments of the Instruction SetEditBackColorBlink. . . . . . . . . . . . 5-151
Table 5-125 The arguments of the Instruction SetEditRect . . . . . . . . . . . . . . . . . . . . 5-153
Table 5-126 The arguments of the Instruction SetEditStatus . . . . . . . . . . . . . . . . . . . 5-154
Table 5-127 The arguments of the Instruction SetEditText . . . . . . . . . . . . . . . . . . . . 5-155
Table 5-128 The arguments of the Instruction SetEditTextColor . . . . . . . . . . . . . . . . 5-156
Table 5-129 The arguments of the Instruction SetEditTextColorBlink . . . . . . . . . . . . 5-157
Table 5-130 The arguments of the Instruction SetEditToVariable . . . . . . . . . . . . . . . 5-159
Table 5-131 The arguments of the Instruction SetFrameColor . . . . . . . . . . . . . . . . . 5-160
Table 5-132 The arguments of the Instruction SetListBoxBackColor . . . . . . . . . . . . . 5-161
Table 5-133 The arguments of the Instruction SetListBoxBlinkTime . . . . . . . . . . . . . 5-162
Table 5-134 The arguments of the Instruction SetListBoxItemBlink. . . . . . . . . . . . . . 5-163
Table 5-135 The arguments of the Instruction SetListBoxItemColor . . . . . . . . . . . . . 5-164
Table 5-136 The arguments of the Instruction SetListBoxList . . . . . . . . . . . . . . . . . . 5-165
Table 5-137 The arguments of the Instruction SetListBoxRect . . . . . . . . . . . . . . . . . 5-166
Table 5-138 The arguments of the Instruction SetListBoxSelectionToVariable . . . . . 5-167
Table 5-139 The arguments of the Instruction SetListBoxStatus . . . . . . . . . . . . . . . . 5-168
Table 5-140 The arguments of the Instruction SetListBoxTextColor . . . . . . . . . . . . . 5-169
Table 5-141 The arguments of the Instruction SetListBoxToVariable . . . . . . . . . . . . 5-170
Table 5-142 The arguments of the Instruction SetStaticBackColor . . . . . . . . . . . . . . 5-171
Table 5-143 The arguments of the Instruction SetStaticBorderColor . . . . . . . . . . . . . 5-172
Table 5-144 The arguments of the Instruction SetStaticPictureName . . . . . . . . . . . . 5-173
Table 5-145 The arguments of the Instruction SetStaticPicturePos . . . . . . . . . . . . . . 5-174
Table 5-146 The arguments of the Instruction SetStaticPictureScale . . . . . . . . . . . . 5-175
Table 5-147 The arguments of the Instruction SetStaticRect . . . . . . . . . . . . . . . . . . . 5-176
Table 5-148 The arguments of the Instruction SetStaticStatus . . . . . . . . . . . . . . . . . 5-177
Table 5-149 The arguments of the Instruction SetStaticText . . . . . . . . . . . . . . . . . . . 5-178
Table 5-150 The arguments of the Instruction SetStaticTextColor. . . . . . . . . . . . . . . 5-179
Table 5-151 The arguments of the Instruction SetStaticTextPosition. . . . . . . . . . . . . 5-180
Table 5-152 The arguments of the Instruction SetVariable . . . . . . . . . . . . . . . . . . . . 5-181
Table 5-153 The arguments of the Instruction StartProgram . . . . . . . . . . . . . . . . . . . 5-182
Table 6-1 Create the project . . . . . . . . . . . . . . . . . . . . . . . . . . . . . . . . . . . . . . . . . . . 6-10
Table 6-2 Open an existing project. . . . . . . . . . . . . . . . . . . . . . . . . . . . . . . . . . . . . . 6-11
Table 6-3 Create and adjust the "Main page". . . . . . . . . . . . . . . . . . . . . . . . . . . . . . 6-12
Table 6-4 Create and tweak the Frame "Announcement selection" . . . . . . . . . . . . . 6-13
Table 6-5 Add a background image to the Main page . . . . . . . . . . . . . . . . . . . . . . . 6-14
07/2010
0-14 OScAR-Pro Customized Operator, User Manual
Page 17

BHB_DCO_LOT.fm
Nur für den internen Gebrauch Tables
Table 6-6 Insert separator lines. . . . . . . . . . . . . . . . . . . . . . . . . . . . . . . . . . . . . . . . 6-15
Table 6-7 Add a Caption . . . . . . . . . . . . . . . . . . . . . . . . . . . . . . . . . . . . . . . . . . . . . 6-16
Table 6-8 Insert "Event" Buttons . . . . . . . . . . . . . . . . . . . . . . . . . . . . . . . . . . . . . . . 6-19
Table 6-9 Insert "Area" Buttons . . . . . . . . . . . . . . . . . . . . . . . . . . . . . . . . . . . . . . . . 6-21
Table 6-10 Insert "Invoke" Buttons . . . . . . . . . . . . . . . . . . . . . . . . . . . . . . . . . . . . . . 6-23
Table 6-11 Add Controls to the Frame "Announcement selection" . . . . . . . . . . . . . . 6-24
Table 6-12 Create Constants . . . . . . . . . . . . . . . . . . . . . . . . . . . . . . . . . . . . . . . . . . 6-29
Table 6-13 Create Parameters . . . . . . . . . . . . . . . . . . . . . . . . . . . . . . . . . . . . . . . . . 6-30
Table 6-14 Create Variables . . . . . . . . . . . . . . . . . . . . . . . . . . . . . . . . . . . . . . . . . . . 6-31
Table 6-15 Create Data lists . . . . . . . . . . . . . . . . . . . . . . . . . . . . . . . . . . . . . . . . . . . 6-32
Table 6-16 Create the Filter. . . . . . . . . . . . . . . . . . . . . . . . . . . . . . . . . . . . . . . . . . . . 6-32
Table 6-17 Add a background image to the Main page. . . . . . . . . . . . . . . . . . . . . . . 6-66
Table 7-1 Summary of the enhanced menu bar in the OScAR-Pro-TT Operator-Tool 7-4
Table 7-2 Summary of the menu items and buttons of the DCO-Window. . . . . . . . . 7-5
Table 7-3 Initial loading of a DCO-Script in the OScAR-Pro-TT Operator-Tool . . . . 7-7
Table 7-4 DCO registry entries in the OScAR-Pro-TT Operator-Tool . . . . . . . . . . . 7-10
07/2010
OScAR-Pro Customized Operator, User Manual
0-15
Page 18

BHB_DCO_LOT.fm
Tabl es Nur für den internen Gebrauch
07/2010
0-16 OScAR-Pro Customized Operator, User Manual
Page 19

BHB_DCO_01.fm
For internal use only
Conventions and Operating Instructions
1 Conventions and Operating Instructions
Target audience and qualifications
The DCO-Designer V 1.02 User Manual is designed for all users and service providers involved
in creating and editing customized interfaces for the OScAR-Pro-TT Operator-Tool.
To successfully carry out the operations treated in this document, you need to be familiar with
Windows and you should know how to operate OScAR-Pro through the OScAR-Pro-TT Operator-Tool.
Contents
The chapter covers the following sections:
1.1 Reference manuals
1.2 Notations and symbols
1.3 Privacy and data security
07/2010
OScAR-Pro Customized Operator, User Manual 1-1
Page 20

BHB_DCO_01.fm
Conventions and Operating Instructions For internal use only
Reference manuals
1.1 Reference manuals
The OScAR-Pro-TT User Manual OScAR-Pro Release 7, OScAR-Pro V3 R2 offers additional
detailed information and tutorials that can be of valuable assistance for the operation of OScAR-Pro.
07/2010
1-2 OScAR-Pro Customized Operator, User Manual
Page 21

BHB_DCO_01.fm
For internal use only
Conventions and Operating Instructions
Notations and symbols
1.2 Notations and symbols
Conventions
The following definitions are used in this document:
Text
The password 123456 ... Details and instructions in the continuous text that are of particu-
The global.cfg file Files and directories appear in the non-proportional type-
"Name" Field names, menu names and window descriptions are placed in
Both the texts from the files described in this manual and the entries made into them appear in the non-proportional Courier
typeface.
lar importance or that must be heeded appear in bold print.
Buttons are also in bold print.
face Courier.
quotation marks.
<Place holder> Entries and outputs, both of which may vary depending on the in-
dividual situation, are placed in angle brackets and shown in italics.
Table 1-1 Notations
Symbols
The following symbols are used in the DCO-Designer User Manual:
Throughout this manual, the "i" is used to indicate useful information.
>
07/2010
OScAR-Pro Customized Operator, User Manual 1-3
Page 22

BHB_DCO_01.fm
Conventions and Operating Instructions For internal use only
Privacy and data security
1.3 Privacy and data security
The system described in this manual may draw on and process both personal and corporate
data.
In the Federal Republic of Germany, the processing and use of personal and corporate data is
subject to a number of federal laws and regulations such as the Federal Data Protection Act
(Bundesdatenschutzgesetzes, short BDSG). Please be careful to follow the laws and regulations for personal data protection that are currently in force in the country you work in.
The purpose of data protection is to protect the individual against any infringement of his personal rights through the misuse of personal data.
In addition, data privacy protection has the aim to protect the data itself from being misused
during the different phases of processing and thereby ward off any infringement of external or
internal interests in need of protection.
Please help protect data privacy and data security by being aware of these issues as you
work:
● Make sure that only authorized persons have access to personal data.
● Make consistent use of every opportunity to assign passwords and do not grant unauthor-
ized persons access to passwords, e.g. by writing them down.
● Make sure that no unauthorized persons can manipulate (e.g. save, modify, communicate,
block, delete) or use personal data in any way whatsoever.
● Make sure that no unauthorized persons have access to data storage mediums, for exam-
ple backup disks or printouts of protocols. This applies both to service work performed at
your company and to the storage and transport of data mediums.
● Make sure that all data storage mediums that are no longer needed are completely de-
stroyed. Also, always check that you do not leave behind any papers that could become
openly accessible to others.
07/2010
1-4 OScAR-Pro Customized Operator, User Manual
Page 23

BHB_DCO_02.fm
For internal use only
Overview
2Overview
Overview
This chapter gives you a general overview of the product itself. It explains the philosophy that
underlies the DCO-Designer and covers the different components that are needed for the full
operation of the system.
Contents
The chapter covers the following areas:
2.1 Description of functions
2.2 Example application
2.3 Interactions of the DCO components
2.4 The tasks of the OScAR-Pro Customized Operator
2.5 The tasks of the DCO-Script
2.6 The tasks of the OScAR-Pro-TT Operator-Tool
07/2010
OScAR-Pro Customized Operator, User Manual 2-1
Page 24

BHB_DCO_02.fm
Overview For internal use only
Description of functions
2.1 Description of functions
The OScAR-Pro Customized Operator, short: DCO, enables you to tweak the operation and
output of the OScAR-Pro-TT Operator-Tool to the individual needs and requirements of your
business.
In the past, the corporate persons who operate the OScAR-Pro-TT Operator-Tool have often
found the system's standard visual output too complex to respond quickly and efficiently
enough in an emergency situation or crisis.
It is against this background that the demand was formulated to develop a user-friendly customized interface with a limited number of buttons and, if needed, underlying company and floor
maps.
The solution is the OScAR-Pro Customized Operator, short DCO.
Even without any specific programming skills, any trained person can work with the OScARPro Customized Operator to create an individual customized interface. These customized interfaces can be edited at any later point in time to make sure that changes or increased growing
corporate needs and requirements are continuously met.
2.2 Example application
The below example is taken from a real-life application and demonstrates the user-friendliness
of the DCO system.
In this example, the company styled 'EXP Chemical Industries Inc.' ("EXP" short for: Example),
purchased a OScAR-Pro server for their in-house fire brigade at company site company site
'Yoursite' to help the firefighters respond to every imaginable emergency situation in the fastest
and most efficient way possible.
EXP Chemical Industries is divided into a number of different business areas and every imaginable emergency scenario have been defined and grouped into corresponding alarm plans.
These alarm plans were then realized accordingly in OScAR-Pro:
● For each department, a broadcast group was created with subscribers was.
● For every imaginable emergency situation, a voice announcement was created and record-
ed.
● Also, an additional so-called ad-hoc or current voice announcement was created to for un-
foreseen emergency situations.
At this point the company-own fire-brigade requested that the different departments and announcements be output together so that they could be monitored in parallel. This aim was to
make sure that alarms could be raised quickly via touchscreen with as few mouse clicks as
possible.
07/2010
2-2 OScAR-Pro Customized Operator, User Manual
Page 25
BHB_DCO_02.fm
For internal use only
Overview
Example application
The fire brigade's IT manager enrolled in a training course were he learned how to operate the
OScAR-Pro Customized Operator and then realized the aforementioned corporate requirements as described below (see next page).
Image 2-1 Example of a DCO output in the OScAR-Pro-TT Operator-Tool
07/2010
OScAR-Pro Customized Operator, User Manual 2-3
Page 26
BHB_DCO_02.fm
Overview For internal use only
Interactions of the DCO components
2.3 Interactions of the DCO components
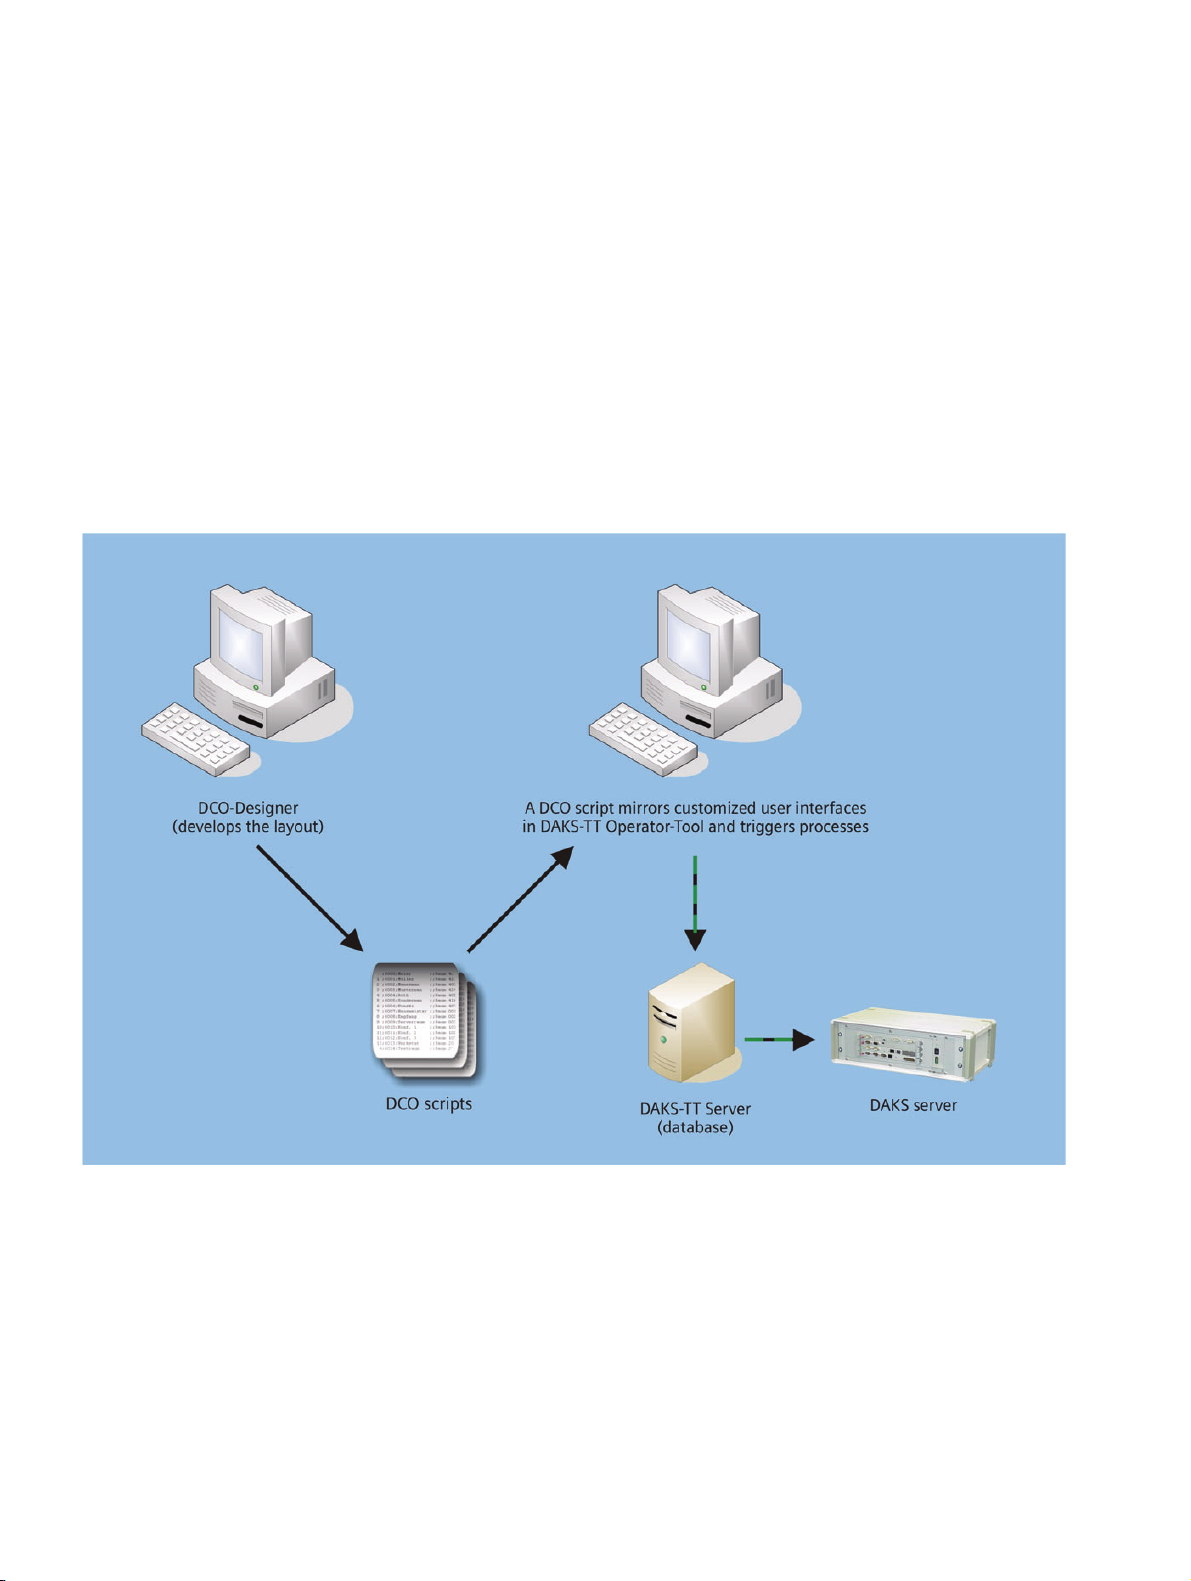
The OScAR-Pro Customized Operator (DCO) is based on the interaction of the following components:
● OScAR-Pro Customized Operator: Editor used to create, edit and validate DCO- Scripts.
● DCO-Scripts: File with a corresponding directory and the figures that are needed to de-
scribe the customized interface.
● OScAR-Pro-TT Operator-Tool: Tool to output the customized interface and execute the OS-
cAR-Pro commands used therein.
The below image illustrates graphically the interaction of the above components:
Image 2-2 Integration of the different DCO components in OScAR-Pro Classic
07/2010
2-4 OScAR-Pro Customized Operator, User Manual
Page 27

BHB_DCO_02.fm
For internal use only
Overview
The tasks of the OScAR-Pro Customized Operator
2.4 The tasks of the OScAR-Pro Customized Operator
The OScAR-Pro Customized Operator is an editor based at the same time on text and structure
as well as on graphics to create the so-called DCO-Scripts and to package the images that are
used therein.
Users principally need no specific programming skills to be able to create a customized interface, but it will surely be helpful if you are have a global understanding of variables, constants,
functions and procedures, and filters.
The OScAR-Pro Customized Operator enables you to:
● create customized interfaces (also multi-level) and design their layout,
● adjust the properties of the objects used in these interfaces, for example their typeface or
color,
● import images,
● create and use constants, variables, functions, and filters, and
● validate and simulate the obtained results.
2.5 The tasks of the DCO-Script
DCO-Scripts are created by the OScAR-Pro Customized Operator and can be edited through
the system whenever necessary.
DCO-Scripts are comparable to small databases as they contain all the information that is
needed by the OScAR-Pro-TT Operator-Tool to output the customized interface and execute
its commands.
In addition, each DCO-Script has a sub-directory titled 'Images' where all the imported images
are stored.
07/2010
OScAR-Pro Customized Operator, User Manual 2-5
Page 28

BHB_DCO_02.fm
Overview For internal use only
The tasks of the OScAR-Pro-TT Operator-Tool
2.6 The tasks of the OScAR-Pro-TT Operator-Tool
The OScAR-Pro-TT Operator-Tool reads and interprets the DCO-Script and outputs the customized interface 1:1 like it was created and simulated in the OScAR-Pro Customized Operator.
In addition, the OScAR-Pro-TT Operator-Tool interprets the OScAR-Pro commands contained
in the DCO-Script and transmits them to the OScAR-Pro server via the OScAR-Pro-TT Server
application.
Every OScAR-Pro process triggered by a DCO-Script, for example a broadcast, is automatically output in the OScAR-Pro-TT Operator-Tool.
The DCO-Script can query at any time the events and results of a process and output both accordingly in the DCO interface.
07/2010
2-6 OScAR-Pro Customized Operator, User Manual
Page 29

BHB_DCO_03.fm
For internal use only
Installation
3 Installation
Overview
This chapter shows you how to install and uninstall the OScAR-Pro Customized Operator.
Contents
The chapter covers the following areas:
3.1 How to install the OpenScape Alarm Response Professional
3.2 Uninstall the OpenScape Alarm Response Professional
07/2010
OScAR-Pro Customized Operator, User Manual 3-1
Page 30
BHB_DCO_03.fm
Installation For internal use only
How to install the OpenScape Alarm Response Professional
3.1 How to install the OpenScape Alarm Response Professional
The entire OpenScape Alarm Response Professional can be installed in a single process.
Please bear in mind that under Windows 2000/XP, you must have the administrative
>
To install the software on your computer, the following requirements must be fulfilled:
● Microsoft Windows 2000 Professional or Windows XP (if necessary also Windows 2003
● You need to be familiar with the Windows operating system and you must know how to
● OScAR-Pro Release 7 or OScAR-Pro V3 R2, respectively, must be installed on your PC or
rights to install OScAR-Pro Cus-tomized Operator (DCO)!
Server) must be installed on your PC.
install software.
in your network (for details please refer to the OScAR-Pro User Manual).
● OScAR-Pro-TT-Server has previously been connected at least once with the correspond-
ing OScAR-Pro server (online).
Follow the system instructions output during the installation. Click Back if you want
>
to return to the previous window, for example to make changes. If you want to end
and not finish the installation, click Cancel.
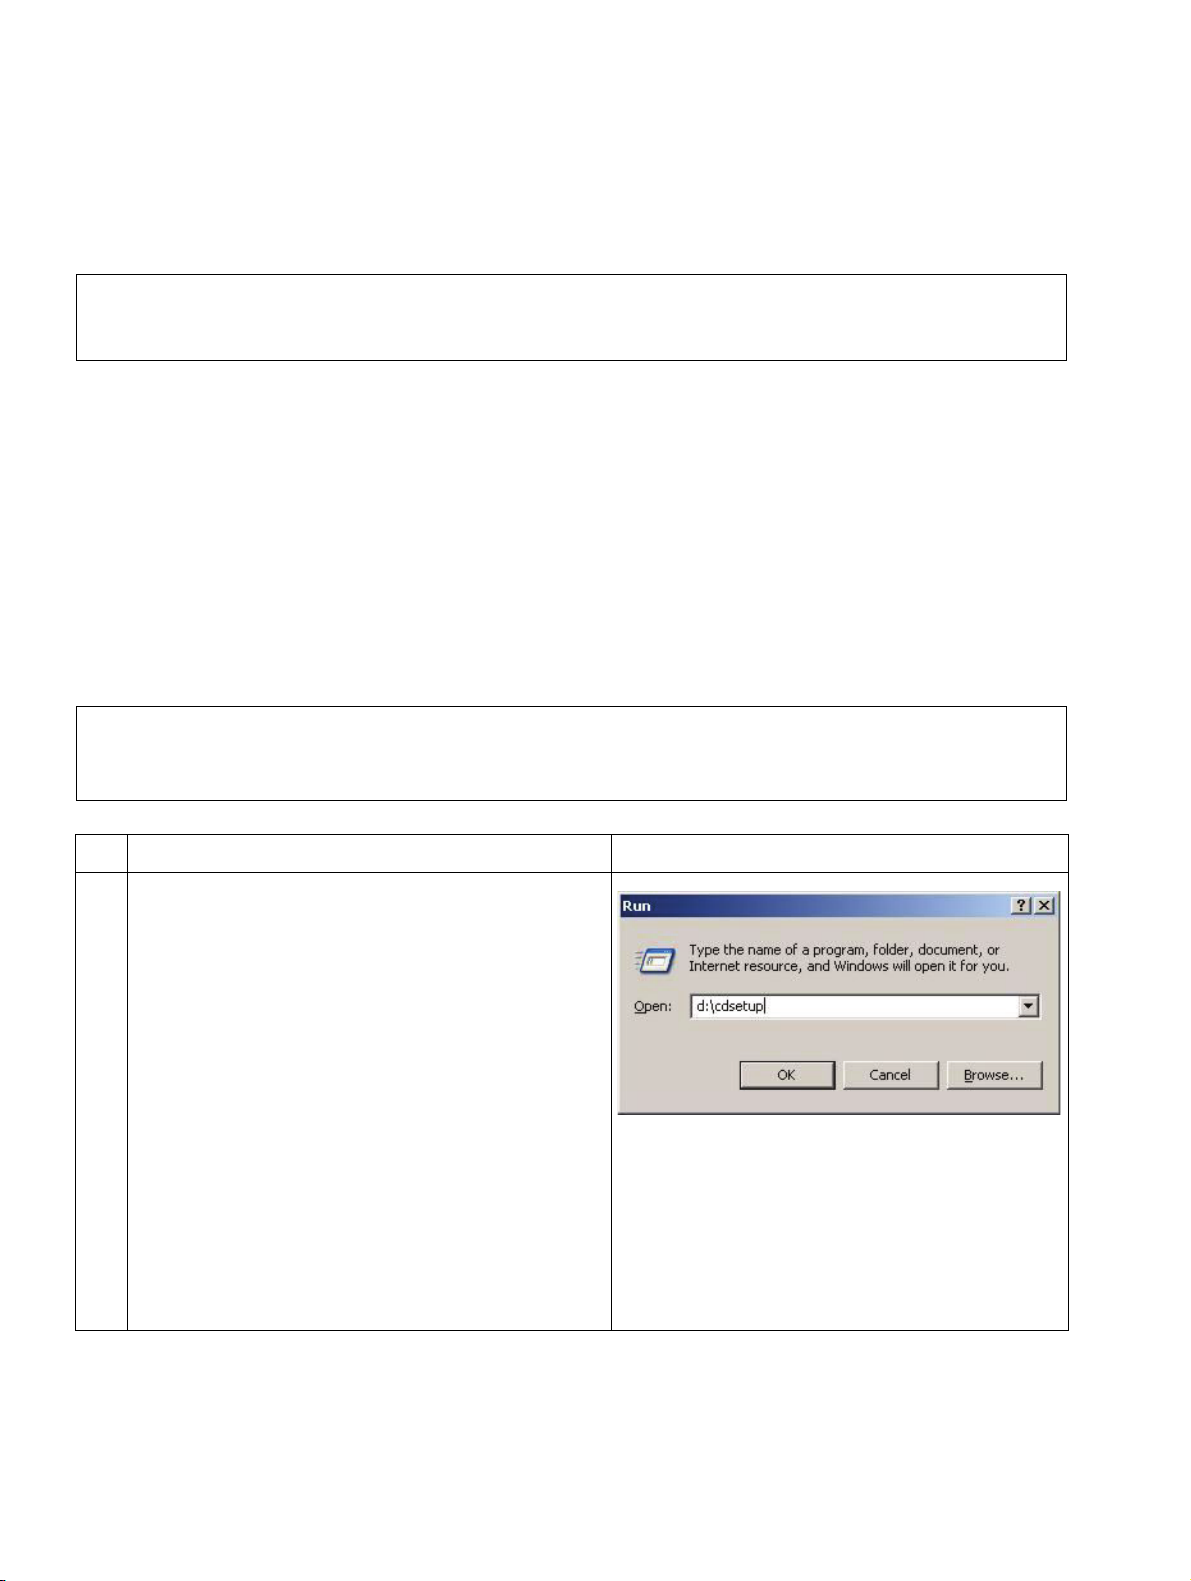
No. Task Window
1. Place the Installation CD in the CD-ROM
drive.
If the installation software fails to start automatically, please start the CD installation
manually from the Windows interface by using the command "Run menu":
To trigger this command you need to enter
<CD-Rom drive>:\cdsetup
e.g.: d:\cdsetup
in the command line and confirm your entry
with OK.
Table 3-1 How to install the OScAR-Pro Customized Operator
07/2010
3-2 OScAR-Pro Customized Operator, User Manual
Page 31

BHB_DCO_03.fm
For internal use only
How to install the OpenScape Alarm Response Professional
No. Task Window
2. Click the menu item
"Install OpenScape Alarm Response
ProfessionalV1...".
3. Select the language you want to use and
confirm with OK.
Installation
4. The installation is now initialized.
Table 3-1 How to install the OScAR-Pro Customized Operator
07/2010
OScAR-Pro Customized Operator, User Manual 3-3
Page 32

BHB_DCO_03.fm
Installation For internal use only
How to install the OpenScape Alarm Response Professional
No. Task Window
5. Click on Next to make all installation settings.
6. Enter the user name and the name of the organization or company.
Specify if you want the software to be installed for all users of this computer or only
for you.
Now click Next.
7. To change the installation path, click Path...
in the corresponding option and select the
new path in the window that opens next.
Now click Next.
Table 3-1 How to install the OScAR-Pro Customized Operator
07/2010
3-4 OScAR-Pro Customized Operator, User Manual
Page 33

BHB_DCO_03.fm
For internal use only
How to install the OpenScape Alarm Response Professional
No. Task Window
8. Click "Install" to install the OpenScape Alarm
Response Professional on your PC.
The software is now installed in the directory
you selected. The progress of the installation
is visualized with a blue progress bar.
Now click Install.
9. The software is now installed in the selected
directory.
Installation
10. Click Finish to complete the installation.
After the installation is completed, the program symbol for the is listed in the Windows
Program Manager, and there under the program group 'OpenScape Alarm Response
Professionaltetronik OScAR-Pro-TT'.
Table 3-1 How to install the OScAR-Pro Customized Operator
07/2010
OScAR-Pro Customized Operator, User Manual 3-5
Page 34

BHB_DCO_03.fm
Installation For internal use only
Uninstall the OpenScape Alarm Response Professional
3.2 Uninstall the OpenScape Alarm Response Professional
No. Task Window
1. Open the Windows Control Panel.
2. Open "Software".
3. Select the entry 'OpenScape Alarm Response Professional ' and click Delete.
4. Confirm your entry with Yes.
The uninstall process is started.
Table 3-2 Uninstall the OScAR-Pro Customized Operator
07/2010
3-6 OScAR-Pro Customized Operator, User Manual
Page 35

BHB_DCO_03.fm
For internal use only
Uninstall the OpenScape Alarm Response Professional
No. Task Window
5. The software is now uninstalled.
Table 3-2 Uninstall the OScAR-Pro Customized Operator
Installation
07/2010
OScAR-Pro Customized Operator, User Manual 3-7
Page 36

BHB_DCO_03.fm
Installation For internal use only
Uninstall the OpenScape Alarm Response Professional
07/2010
3-8 OScAR-Pro Customized Operator, User Manual
Page 37

BHB_DCO_04.fm
For internal use only
Operating Instructions for the OScAR-Pro Customized Operator
4 Operating Instructions for the OScAR-Pro
Customized Operator
Overview
This chapter gives you general operation instructions for the OScAR-Pro Customized
Operator. It also covers the special functions of the system.
Contents
The chapter covers the following areas:
4.1 Start the OScAR-Pro Customized Operator
4.2 Layout of the interface of the OScAR-Pro Customized Operator
4.2.1 The menu bar
4.2.2 The toolbar
4.2.3 Description of the menu commands and the buttons of the OScAR-Pro Customized
Operator
4.2.4 Functions of the mouse
4.2.5 The status bar
4.3 Setup and application of the Structure window
4.3.1 The tree structure of the Structure window
4.3.2 The list view of the Structure window
4.4 Setup and application of the Layout window
4.4.1 Toolbar and Controls
4.4.2 Mark a Frame area or a Control
4.4.3 Move Controls
4.4.4 Change the size of Frames and Controls
4.4.5 Align and space elements automatically
4.5 Setup and application of the Preview window
4.6 General user dialog windows
4.6.1 Edit project properties
4.6.2 Administration of the Image lists
4.6.3 Process colors and Standard colors for process lists
4.6.4 Edit fonts
4.6.5 Edit colors
07/2010
OScAR-Pro Customized Operator, User Manual 4-1
Page 38

BHB_DCO_04.fm
Operating Instructions for the OScAR-Pro Customized Operator For internal use only
Start the OScAR-Pro Customized Operator
4.1 Start the OScAR-Pro Customized Operator
Follow the below instructions to start the OScAR-Pro Customized Operator:
No. Task
1. Click and open the menu 'tetronik' listed under programs.
2. Next, click the menu item 'OScAR-Pro Customized Operator'.
3. This will open the main window of the OScAR-Pro Customized Operator.
Table 4-1 Start the OScAR-Pro Customized Operator
07/2010
4-2 OScAR-Pro Customized Operator, User Manual
Page 39

BHB_DCO_04.fm
For internal use only
Operating Instructions for the OScAR-Pro Customized Operator
Layout of the interface of the OScAR-Pro Customized Operator
4.2 Layout of the interface of the OScAR-Pro Customized Operator
After you have started the OScAR-Pro Customized Operator and created a new or opened a
previous project, the below window will pop up (here already with a finished interface).
Image 4-1 Layout of the interface of the OScAR-Pro Customized Operator
Usually each project has exactly one DCO-Script file.
There are 3 different child windows to every project for the editing and testing, namely:
● The Structure window where the entire project data is output in a hierarchical structure.
This window emulates the Microsoft Windows® Explorer user interface and enables you to
edit all entries directly.
● The Layout window where you can edit both the Frames that are created in a project and
all of its elements.
● The Preview window where you can validate the DCO-Script and check it for errors, but
also carry out extensive testing of a created project.
07/2010
OScAR-Pro Customized Operator, User Manual 4-3
Page 40

BHB_DCO_04.fm
Operating Instructions for the OScAR-Pro Customized Operator For internal use only
Layout of the interface of the OScAR-Pro Customized Operator
4.2.1 The menu bar
The menu bar contains several pull-down menus that help you activate the diverse functions of
the OScAR-Pro Customized Operator.
For a detailed description of the menus and menu items please refer to Section 4.2.3, "Description of the menu commands and the buttons of the OScAR-Pro Customized Operator".
If a menu command entails further user dialogs it has 3 dots after the name (e.g. "New...").
Certain menu commands can also be reached via keyboard shortcuts (e.g. 'Ctrl+N' to create a
new project).
4.2.2 The toolbar
Use the buttons of the toolbar to activate the functions of the OScAR-Pro Customized Operator
directly with a mouse click. The buttons represent functions that can also be reached with the
corresponding menu items (Section 4.2.3, "Description of the menu commands and the buttons
of the OScAR-Pro Customized Operator").
07/2010
4-4 OScAR-Pro Customized Operator, User Manual
Page 41

BHB_DCO_04.fm
For internal use only
Operating Instructions for the OScAR-Pro Customized Operator
Layout of the interface of the OScAR-Pro Customized Operator
4.2.3 Description of the menu commands and the buttons of the OScAR-Pro Customized Operator
The below table itemizes and explains the menu commands of the OScAR-Pro Customized Operatorwith the equivalent keyboard shortcuts and button symbols.
The table is divided into:
● generic entries, i.e. entries that apply to each of the 3 child windows,
● special entries that only appear in the Structure window,
● special entries that only appear in the Layout window, and
● special entries that only appear in the Preview window.
Menu item Description
Generic entries
The pull down menu "Project":
New..
CTRL+N
Opens a window to create a new project (i.e. empty DCOScript directory). If a project is already open at this time the
system will, if necessary, query the user and close it.
Open...
Ctrl + O
Opens a window to open an already existing project (i.e. a
DCO-Script file in a project directory). If a project is already
open at this time, the system will, if necessary, query the user
and close it.
Save
Saves a project after editing.
Ctrl+S
Save as... Saves the DCO-Script of a project under a different name.
Close Closes the project that is currently open.
Pop-up menu "Settings" u
Properties... Opens the window to define the properties of the project
(see Section 4.6.1, "Edit project properties").
Image list ..
F12
End program
Alt+F4
Opens the window to administrate the Project image list
(see Section 4.6.2, "Administration of the Image lists").
Ends the OScAR-Pro Customized Operator after the user confirms positive a security prompt.
Table 4-2 Summary of the menu items and buttons of the OScAR-Pro Customized Op-
erator
07/2010
OScAR-Pro Customized Operator, User Manual 4-5
Page 42

BHB_DCO_04.fm
Operating Instructions for the OScAR-Pro Customized Operator For internal use only
Layout of the interface of the OScAR-Pro Customized Operator
Menu item Description
The pull down menu "Options"
Toolbar Shows or hides the toolbar.
Status bar Shows or hides the status bar.
Default colors... Opens the window to edit the default color selection for new
projects.
Pop-up menu "Languages"
German Specifies that the DCO-Designer language is German.
English Specifies that the DCO-Designer language is English.
Pull down menu "Window"
Structure window
Opens the Structure window and/or brings it to the front.
Ctrl+T
Layout window
Opens the Layout window and/or brings it to the front.
Ctrl+L
Please note that the Layout window can only open if you mark
a child node under the node "Frame" in the Structure window.
Preview window
Ctrl+R
Opens the Preview window and/or brings it to the front. In this
process, the current project is saved and validated after a security prompt.
Pull down menu "?"
About tetronik DCO-Desig-ner..
Opens the about box with details on the OScAR-Pro Customized Operator.
F1
Table 4-2 Summary of the menu items and buttons of the OScAR-Pro Customized Op-
erator
07/2010
4-6 OScAR-Pro Customized Operator, User Manual
Page 43

BHB_DCO_04.fm
For internal use only
Operating Instructions for the OScAR-Pro Customized Operator
Layout of the interface of the OScAR-Pro Customized Operator
Menu item Description
Special entries of the Structure window
Pull down menu "Edit"
New
Creates a new element in the structure of the DCO-Script.
Ins
Make a doubleclick in an
empty area of the list view.
Edit
Alt+Enter
Doubleclick the cell you want
Opens the selected parameter of a structure element for editing. These are usually input or selection fields that are output
directly in the list view.
to edit in the list field view
Undo
Alt+Z
Cut
Ctrl+X
Copy
Ctrl+C
Paste
Ctrl+V
Delete
Ctrl+Del
Undoes the last action. Use this command to renter an entry
that was deleted by mistake.
Cuts the marked entries and copies them to the Win-dows®
Clipboard. Use Paste to insert entries from the clipboard, if
needed at another place in the project.
Cuts the marked entries and copies them to the Win-dows®
Clipboard. Use Paste to insert entries from the clipboard at another place in the project.
Pastes entries copied to the Windows® clipboard to the position of your project that was marked manually.
Deletes the selected element from the structure of the DCOScript.
Table 4-2 Summary of the menu items and buttons of the OScAR-Pro Customized Op-
erator
07/2010
OScAR-Pro Customized Operator, User Manual 4-7
Page 44

BHB_DCO_04.fm
Operating Instructions for the OScAR-Pro Customized Operator For internal use only
Layout of the interface of the OScAR-Pro Customized Operator
Menu item Description
Move up
Moves an entry up in the order of the list view.
Ctrl+Arrow up
Move down
Moves an entry down in the order of the list view.
Ctrl+Arrow down
Table 4-2 Summary of the menu items and buttons of the OScAR-Pro Customized Op-
erator
07/2010
4-8 OScAR-Pro Customized Operator, User Manual
Page 45

BHB_DCO_04.fm
For internal use only
Operating Instructions for the OScAR-Pro Customized Operator
Layout of the interface of the OScAR-Pro Customized Operator
Menu item Description
Special entries in the Layout window
Pull-down menu "Edit"
Delete
Ctrl+Del
Deletes the selected element from the structure of the DCOScript.
Pull-down menu "Layout"
Pop-up menu "Toolbar"
Pointer
Ctrl+1
Static control
Ctrl+2
Selects the tool "Pointer". Use this tool to move graphical object to a new positions or change their size.
Selects the tool "Static control". Use this tool to place new static controls in the current frame, e.g. images or static texts.
Edit field
Ctrl+3
Button
Ctrl+4
Checkbox
Ctrl+5
Listbox
Ctrl+6
Selects the tool "Edit field". Use this tool to add new Edit fields
to the current Frame.
Selects the tool "Button". Use this tool to place new Buttons in
the current Frame.
Selects the tool "Checkbox". Use this tool to place new Checkboxes onto the current Frame.
Selects the tool "Listbox". Use this tool to place a new Listbox
in the current Frame.
Table 4-2 Summary of the menu items and buttons of the OScAR-Pro Customized Op-
erator
07/2010
OScAR-Pro Customized Operator, User Manual 4-9
Page 46

BHB_DCO_04.fm
Operating Instructions for the OScAR-Pro Customized Operator For internal use only
Layout of the interface of the OScAR-Pro Customized Operator
Menu item Description
Combobox
Ctrl+7
Pop-up menu "Align"
Left
Ctrl+Arrow left
Right
Ctrl+Arrow right
To p
Ctrl+Arrow up
Bottom
Ctrl+Arrow down
Horiz. center
Ctrl+Z
Vert. center
Ctrl+V
Pop-up menu "Space evenly"
Selects the tool "Combobox". Use this tool to place a new
drop-down Combobox in the current Frame.
Left-aligns the selected objects with the main selected object.
Right-aligns the selected objects with the main selected object.
Aligns several selected objects with the upper border line of
the main selected object.
Aligns the selected objects with the bottom border line of the
main selected object.
Centers the selected objects with the horizontal center line of
the main selected object.
Centers the selected objects with the vertical center line of the
main selected object.
Across
Alt+Arrow right
Down
Alt+Arrow up
Arranges all selected objects evenly and horizontally between
the outer left and the outer right selected object.
Arranges all selected objects evenly between the highest and
lowest selected object.
Pop-up menu "Make same size"
Width
Ctrl+B
Height
Ctrl+H
Both
Ctrl+G
Matches the width of all selected objects to the width of the
main selected object.
Matches the height of all selected objects to the height of the
main selected object.
Matches the height and width of all selected objects to the
height and width of the main selected object.
Pop-up menu "Frame size" u
320 x 240
Sets the size of the Frame to 320 x 240 pixels.
Ctrl+F7
640 x 480
Sets the size of the Frame to 640 x 480 pixels.
Ctrl+F8
Table 4-2 Summary of the menu items and buttons of the OScAR-Pro Customized Op-
erator
07/2010
4-10 OScAR-Pro Customized Operator, User Manual
Page 47

BHB_DCO_04.fm
For internal use only
Operating Instructions for the OScAR-Pro Customized Operator
Layout of the interface of the OScAR-Pro Customized Operator
Menu item Description
800 x 600
Sets the size of the Frame to 800 x 600 pixels.
Ctrl+F9
1024 x 768
Sets the size of the Frame to 1024 x 768 pixels.
Ctrl+F10
1280 x 1024
Sets the size of the Frame to 1280 x 1024 pixels.
Ctrl+F10
User defined...
Ctrl+F12
Opens a window to adjust the Frame size to your own demands.
Special entries of the Preview window
The pull down menu "Project":
Parameter editor
Opens the editor to edit the parameters of the DCO-Script.
SHIFT+Ctrl+P
Table 4-2 Summary of the menu items and buttons of the OScAR-Pro Customized Op-
erator
4.2.4 Functions of the mouse
The functions of the mouse are largely Windows®-compliant. However, the Structure and the
Layout window of the OScAR-Pro Customized Operator offer some additional functions that are
described below.
The left mouse key
● Drag & Drop with the left mouse key
In the Structure window, the entries in the tree/list view can be moved and copied by "Dragging" them with the left mouse key. In this way you can, for example, move Controls in the
Structure window to a new Frame or copy them by keeping the Ctrl key pressed at the same
time.
In the Layout window, you can duplicate Controls (see below) by keeping the Ctrl key
pressed at the same time.
07/2010
OScAR-Pro Customized Operator, User Manual 4-11
Page 48

BHB_DCO_04.fm
Operating Instructions for the OScAR-Pro Customized Operator For internal use only
Layout of the interface of the OScAR-Pro Customized Operator
The right mouse key
● Context menu
A right mouse key click opens the context menu for the window that is currently open. This
usually enables you to quickly access the functions that can also be reached with the menu
bar drop-down menus or buttons (e. g. "New", "Edit", "Copy" etc.). However, the context
menu additionally offers functions that only make sense for the window that is currently
open.
The most important differences are:
– "Move up" and "Move down" in the Structure window
– "Tools", "Align", "Make same size" and "Space evenly" in the Layout window
– "New", "Edit" etc. in the Structure- as well as in the Layout window
The functions of the context menu entries are the same as the ones of the corresponding
pop-up menu entries (Section 4.2.3, "Description of the menu commands and the buttons
of the OScAR-Pro Customized Operator").
4.2.5 The status bar
The status bar is located at the lower end of the main window. It gives you additional information on the various menu commands and outputs status messages of the program.
07/2010
4-12 OScAR-Pro Customized Operator, User Manual
Page 49

BHB_DCO_04.fm
For internal use only
Operating Instructions for the OScAR-Pro Customized Operator
Setup and application of the Structure window
4.3 Setup and application of the Structure window
The Structure window constitutes the main work station of the OScAR-Pro Customized Operator. It is this window that outputs the entire content of the DCO-Script in a hierarchical tree
structure.
Image 4-2 Image of the Structure window with example
The Structure window is divided into two separate areas:
● the tree structure and
● the list view.
07/2010
OScAR-Pro Customized Operator, User Manual 4-13
Page 50

BHB_DCO_04.fm
Operating Instructions for the OScAR-Pro Customized Operator For internal use only
Setup and application of the Structure window
4.3.1 The tree structure of the Structure window
The tree structure is located underneath the root (with the project name) and has the below five
nodes:
● Constants (seeSection 5.4, "Constants")
● Parameters (see Section 5.5, "Parameters")
● Variables (see Section 5.6, "Variables")
● Lists (see Section 5.7, "Lists")
● Frames (see Section 5.8, "Frames")
You can open the nodes and their child nodes by clicking and close them again by clicking
. In this way you can for example open the entry 'Frames' for a direct overview of all created
Frames. When you select an entry in the tree structure its subentries are, if available, automatically output in the list view. For example, when you select a specific Frame its corresponding
entries such as 'Parameters', 'OScAR-Pro commands templates' etc. are automatically output
in the list view.
07/2010
4-14 OScAR-Pro Customized Operator, User Manual
Page 51

BHB_DCO_04.fm
Old position
New position
For internal use only
Operating Instructions for the OScAR-Pro Customized Operator
Setup and application of the Structure window
4.3.2 The list view of the Structure window
As a rule, the details that are output in the list view always match the entry you select in the tree
structure. If, for example, you select 'Parameters' in the tree structure, the list view will output
all parameters
Change the sequence of the columns
You can also easily change the column order to best meet the own requirements.
Follow the below instructions to change the column order:
No. Task
1. Make a left mouse key click the column header and keep it pressed.
2. Move the column header to the new position. The new position is indicated with a small
arrow:
3. Release the mouse key. The column is shifted.
Sort the list
The list is sorted in the same way as you sort in other Windows programs, namely by making
as single mouse click into the column header. Every further mouse click into the same header
will sort the entries of this column, alternating between ascending and descending order.
Edit entries
For a number of entries in the tree structure, the list view contains at least one column whose
entries can be edited. If you want to edit any of these entries use the left mouse key and doubleclick the entry you want to edit. This will either lead you to a user window in which you can
edit the entry or open an entry or selection field directly in the column itself (if needed with the
option to define the new entry yourself).
07/2010
OScAR-Pro Customized Operator, User Manual 4-15
Page 52

BHB_DCO_04.fm
Frame area
Listbox
Combobox
Checkbox
Background screen
Toolbar
Static element with
image and text
Edit field
Button
Operating Instructions for the OScAR-Pro Customized Operator For internal use only
Setup and application of the Layout window
4.4 Setup and application of the Layout window
The Layout window constitutes the work station for all graphic operations in the OScAR-Pro
Customized Operatorand enables you to edit the representation of the Frames in the DCOScript.
Use the Layout window to place individual Controls in your interface for the operation and for
the output of information.
Image 4-3 Image of the Layout window with example
The frame that is output in the layout window depends on the entry you select in the tree structure. If, for example, the Layout window is open and you select an entry in the tree structure
next to the node 'Frames', the Layout window will output the Frame that was marked last.
4-16 OScAR-Pro Customized Operator, User Manual
07/2010
Page 53

BHB_DCO_04.fm
For internal use only
Operating Instructions for the OScAR-Pro Customized Operator
Setup and application of the Layout window
4.4.1 Toolbar and Controls
The toolbar is usually located at the right hand side of your screen. If you want it to float freely
above your window or anchor at any of the other three sides of your screen, simply make a
mouse click on the upper end of the toolbar, keep the mouse key pressed and drag it to the new
position.
The actual Frame area is located on the gray background screen of the Layout window. It is
within the dimensions of this area that you can place Controls.
By definition, Controls are elements that represent a something further and/or enable you to
actually realize the functions of your interface.
The Layout window includes the following Controls:
Control Description
Static element A 'Static element' serves to place graphics giving information
as well as texts on your interface.
Edit field An 'Edit field' enables the later user (Operator) to enter alpha-
nu-meric and/or numeric information.
Button A 'Button' can set specific modes and trigger events. It can be
compared to a switch.
Checkbox A 'Checkbox' exclusively serves to set specific modes.
Listbox A 'Listbox' outputs lists in which the user can mark individual
entries.
Combobox A 'combobox' serves to give a choice of options from with the
user (Operator) can select exactly one entry.
Table 4-3 Summary of all available Controls
Both the Controls that are placed in a Frame and the Frame area itself can be modified in terms
of size. Also, you can move Controls to a new place or have them aligned or positioned automatically.
07/2010
OScAR-Pro Customized Operator, User Manual 4-17
Page 54

BHB_DCO_04.fm
Operating Instructions for the OScAR-Pro Customized Operator For internal use only
Setup and application of the Layout window
4.4.2 Mark a Frame area or a Control
Before you can edit a Frame area or a Control, you need to mark the corresponding element
(Frame area or Control). For Controls you also have the option to edit several Controls at the
same time.
The below table illustrates the different ways in which marked elements are output on the
screen using the example of marked and unmarked Buttons:
Button Description
Not marked The element is neither marked nor surrounded by an extra
frame.
One Button marked: If only one Button is marked it is surrounded by a frame with
accented edges and squares both at its corner points and in
the center of each line.
More than one Button
marked:
If two or more Buttons are marked, each button is surrounded
by a frame that has accented edges but no squares. The Button that has the focus has an additional solid black frame on
the inside of the accented frame.
Table 4-4 Rendition of marked objects
To mark only one element simply make a left mouse click on the element. This will give the element the bounding box.
07/2010
4-18 OScAR-Pro Customized Operator, User Manual
Page 55

BHB_DCO_04.fm
For internal use only
Operating Instructions for the OScAR-Pro Customized Operator
Setup and application of the Layout window
There are two ways to mark more than one element in one step:
1. Mark the first element, press the SHIFT key and keep it pressed and make a left mouse
click each other element you want to mark. To delete the marking from an element simply
click the element again.
2. Move the mouse cursor over your window or Frame area and find a place where it does not
collide with any other element. Then press the left mouse key, keep it pressed and pull a
bounding box around the elements you want to mark. Now release the mouse key. Every
element that is completely surrounded by the bounding box is marked:
4.4.3 Move Controls
There are two ways to move one or several Controls:
1. Mark the elements you want to move and use the arrow keys () to shift them to
the new position. Each time you press an arrow key the elements are shifted in increments
of one pixel. To increase these increments to five pixels, simply press the SHIFT key together with the arrow key.
2. Mark the elements you want to move to a new position and move the mouse cursor over
one of the marked elements. This will change the mouse cursor to . Now press the left
mouse key and keep it pressed. The elements can now be moved to the new position.
07/2010
OScAR-Pro Customized Operator, User Manual 4-19
Page 56

BHB_DCO_04.fm
Operating Instructions for the OScAR-Pro Customized Operator For internal use only
Setup and application of the Layout window
4.4.4 Change the size of Frames and Controls
There are two ways to change the size of a Control:
1. Mark the elements you want to select, press the SHIFT and Ctrl key and keep both keys
pressed, and use the arrow keys () to increase or decrease the size of the element. Each time you press an arrow key the size of the selected elements will increase or
decrease in increments of 1 pixel.
2. Mark the element you want to select and move the mouse cursor over one of the 8 black
squares of the accented frame. This will change your mouse cursor to:
Position of the black square Cur-
sor
Upper left and lower right corner
Upper and lower center
Left and right center
Lower left and upper right corner
Now press the left mouse key, keep the key pressed and change the size as needed in the
directions indicated by the mouse cursor.
You can also blend several elements in size.
To do so, mark at least two elements you want to blend in size. Here, the DCO-Designer will
usually focus on the first element that is marked. Now go to the menu bar, open "LayoutMake
Same Size" and choose the way in which you want to blend the marked elements ("Width",
"Height" or "Both"). The elements are now blended in size in keeping with this selection and on
the basis of the element that has the focus, usually the one that was marked first.
07/2010
4-20 OScAR-Pro Customized Operator, User Manual
Page 57

BHB_DCO_04.fm
For internal use only
Operating Instructions for the OScAR-Pro Customized Operator
Setup and application of the Layout window
4.4.5 Align and space elements automatically
The DCO-Designer makes it possible to align elements easily with another elements:
To do so, mark at least two objects, go to the menu bar and open "LayoutAlign", and select
the way in which you want to align the objects ("Top", "Left", "Right", "Bottom", "Horiz. center",
"Vert. center"). The DCO-Designer will align the marked objects with the elements that has the
focus.
Just as easily you can also space elements evenly:
To do so, mark at least three objects, go to the menu bar and open "LayoutSpace evenly"
and select the way in which you want to space the objects ("Across", "Down"). The DCO-Designer will evenly space the marked elements:
● "Across", i.e. horizontally from side to side between the outer left and the outer right ele-
ment,
● "Down", i.e. vertically from top to bottom between the highest and the lowest element.
07/2010
OScAR-Pro Customized Operator, User Manual 4-21
Page 58

BHB_DCO_04.fm
Operating Instructions for the OScAR-Pro Customized Operator For internal use only
Setup and application of the Preview window
4.5 Setup and application of the Preview window
The preview window constitutes the test area of theOScAR-Pro Customized Operator. It is this
environment that proofreads your settings in the DCO-Script for validity and consistency and
that makes it possible to test the entire script.
Image 4-4 Image of the Preview window with example project
In this test you can also carry out an easy simulation of the connection to a OScAR-Pro-TT Operator-Tool.
07/2010
4-22 OScAR-Pro Customized Operator, User Manual
Page 59

BHB_DCO_04.fm
For internal use only
Operating Instructions for the OScAR-Pro Customized Operator
General user dialog windows
4.6 General user dialog windows
In addition to the three windows of the working area, there are modal user dialogs that enable
you to enter or select individual values and properties.
4.6.1 Edit project properties
Follow the below instructions to edit the project properties:
No. Task
1. Start the DCO-Designer.
2. Open the menu "Project
The window "Project properties" will automatically pop up.
3. Edit the properties as needed and in keeping with the field descriptions.
4. When you have finished click Ok to save the project properties.
SettingsProperties...".
Table 4-5 Edit project properties
Summary of the fields in the window "Project properties"
Input field Description
Name The field that displays the project name.
Version The field that displays the version number of the DCO-Script.
Start window The field that defines the DCO start window in the OScAR-Pro-TT Opera-
tor-Tool.
Refresh interval Use this field to enter the interval in milliseconds in which you want the
DCO to query the OScAR-Pro-TT Operator-Tool for any changes of the
process status (e.g. Broadcast started/end? Info telephone profile switch?
etc).
Summary of the fields in the window "Project properties"
07/2010
OScAR-Pro Customized Operator, User Manual 4-23
Page 60

BHB_DCO_04.fm
Operating Instructions for the OScAR-Pro Customized Operator For internal use only
General user dialog windows
4.6.2 Administration of the Image lists
The window "Project image list" serves to administrate the images that are used in a project.
Follow the below instructions to edit the Image list:
No. Task
1. Start the DCO-Designer.
2. Open the menu "ProjectSettingsImage list...".
This will open the window "Project image list".
3. Add new images to the project or delete obsolete images from the project (see below).
If you activated the Image list via the properties of a Control, select the image you want
to assign to this Control.
4. Now click Ok to close the Image list or copy the assigned image to the proper Control.
Table 4-6 Administration of the 'Project image list'
07/2010
4-24 OScAR-Pro Customized Operator, User Manual
Page 61

BHB_DCO_04.fm
For internal use only
Operating Instructions for the OScAR-Pro Customized Operator
Summary of the fields in the window "Project image list"
Input field Description
General user dialog windows
Filter by type Editable drop-down combobox to filter the available images by type.
Currently available images
This list outputs all images that are currently available in keeping with the
selected filter (select the image type = *.* to have all images output).
Add images... Use this button to add new images to your image list. When you click this
button a user dialog will automatically open up to select the image file(s)
that you want to add to your image list.
Remove images Use this button to delete the marked image(s) from the image list.
Summary of the fields in the window "Project image list"
07/2010
OScAR-Pro Customized Operator, User Manual 4-25
Page 62

BHB_DCO_04.fm
Operating Instructions for the OScAR-Pro Customized Operator For internal use only
General user dialog windows
4.6.3 Process colors and Standard colors for process lists
With the window "Standard colors for process lists", you can define the colors you want to use
in new projects to signal the different process states. However, please bear in mind that the colors selected at this level are exclusively used for visual outputs within Controls of the type "Listbox".
Use the Listbox property "Process colors" to customize the process colors for each Listbox individually (see Section 5.9.12, "Child nodes and special attributes of Listboxes").
Follow the below instructions to customize standard colors for process lists:
No. Task
1. Start the DCO-Designer.
2. Go to the menu bar and click "OptionsStandard colors...".
This will open the window "Standard colors for process lists".
3. To change a color simply doubleclick the box with its sample next to the entry you want
to edit (see below).
This will open the window "Color (seeSection 4.6.5, "Edit colors") in which you can select the preferred new color.
4. Click OK to save your changes.
Table 4-7 Edit standard colors for process lists
07/2010
4-26 OScAR-Pro Customized Operator, User Manual
Page 63

BHB_DCO_04.fm
For internal use only
Operating Instructions for the OScAR-Pro Customized Operator
General user dialog windows
Summary of the fields in the windows "Standard colors for process lists" and
"Process colors"
Input field Description
Active broadcast: This color visualizes a broadcast that is currently active.
Active confer-
This color visualizes a conference that is currently ongoing.
ence:
Active info tele-
This color visualizes an info telephone profile that is currently active.
phone profile:
Inactive process: This color visualizes an inactive broadcast- or conference process.
Idle subscriber: This color visualizes a broadcast member or conferee whose telephone
line is idle.
Called subscriber:
Subscriber not
reached:
Subscriber listening to announcement
Welcome announcement to
This color visualizes a broadcast member or conferee who is currently being called by the system.
This color stands for a broadcast member or conferee who could not be
reached.
This color visualizes a subscriber who was reached and who is momentarily listening to the broadcast announcement or the welcome message of
the conference.
This color visualizes a subscriber who has been played the full broadcast
announcement or conference welcome announcement.
subscriber completed:
07/2010
OScAR-Pro Customized Operator, User Manual 4-27
Page 64

BHB_DCO_04.fm
Operating Instructions for the OScAR-Pro Customized Operator For internal use only
General user dialog windows
Input field Description
PIN entry requested from sub-
This color visualizes a broadcast member or conferee who has been requested to enter his PIN.
scriber:
Subscriber
reached:
Calling of subscriber paused:
No further processing of sub-
This color visualizes a broadcast member or conferee who is has been
successfully reached.
This color visualizes a broadcast member or conferee who is momentarily
in a dialing pause.
This color visualizes a broadcast member or conferee whose processing
has been fully completed.
scriber:
Conferee has
muted himself:
Conferee participates passively:
Conferee participates actively
This color visualizes a broadcast member or conferee who has switched
himself to mute (microphone OFF).
This color stands for a conference member who is partaking passively in
the conference (i.e. listening only).
This color stands for a conference member to is participating actively in the
conference (i.e. both listening and speaking).
Conferee on hold: This color visualizes a subscriber who has temporarily left the conference
(hearing on-hold message).
Default settings Button to reset all values to the default settings.
Standard colors This button is only visible in the window "Process colors".
Use this button to reset all values to the standard colors.
07/2010
4-28 OScAR-Pro Customized Operator, User Manual
Page 65

BHB_DCO_04.fm
For internal use only
Operating Instructions for the OScAR-Pro Customized Operator
General user dialog windows
4.6.4 Edit fonts
Use the window "Font" to define the fonts of the texts that are output in the various elements of
the Frame.
Follow the below instructions to select a font:
No. Task
1. Start the DCO-Designer.
2. In the tree of the Structure window, open the attributes of the relevant Control and dou-
bleclick 'Font' in the list view.
This will open the window "Font".
3. Select the font, font style and the size you want to use (see below).
4. Click OK to save your changes.
Table 4-8 Add new font
07/2010
OScAR-Pro Customized Operator, User Manual 4-29
Page 66

BHB_DCO_04.fm
Operating Instructions for the OScAR-Pro Customized Operator For internal use only
General user dialog windows
Summary of the fields in the window "Font"
Input field Description
Font Edit field to enter the font you want to use. Underneath this field you will
find a list with all fonts that are available to you.
Font style Edit field to enter the font style you want to use. Underneath this field you
will find a list with all font styles that are available to you.
Size Edit field to enter the font size you want to use. Underneath this field you
will find a list with all font sizes that are available to you.
Summary of the fields in the window "Font"
Note:
>
Each time you close this window with OK, the system will save your changes and
use the settings as a template for new Controls.
07/2010
4-30 OScAR-Pro Customized Operator, User Manual
Page 67

BHB_DCO_04.fm
For internal use only
Operating Instructions for the OScAR-Pro Customized Operator
General user dialog windows
4.6.5 Edit colors
Use the window "Colors" to define the background and foreground color for the different Control
elements of a Frame.
Follow the below instructions to edit the color table:
No. Task
1. Start the DCO-Designer.
2. In the tree of the structure window, open the attributes of the relevant control and dou-
bleclick "Text color" in the list view. This will activate a drop down combobox. Unfold the
combobox and click "Select color...".
The window "Color" will open.
3. Select the color you want to use (see below).
4. Click OK to save your changes.
Table 4-9 Add new font
Summary of the fields in the window "Color"
Input field Description
Basic colors Table with the basic colors that are available in Windows. To choose a color
from this table simply make a left mouse click on the wanted color box.
Custom colors Table with the customized colors you have defined so far. To choose a color
from this table simply make a left mouse click on the wanted color box.
Color|Solid Window with a sample of the color you are currently editing.
Summary of the fields in the window Font"
07/2010
OScAR-Pro Customized Operator, User Manual 4-31
Page 68

BHB_DCO_04.fm
Operating Instructions for the OScAR-Pro Customized Operator For internal use only
General user dialog windows
Input field Description
Hue Edit field to enter the color hue represented by an integer in a scale from
0 to 239. If you change the value of this field the reticle will move horizontally over the above prismatic color system.
Sat. Edit field to enter the color saturation represented by an integer in a scale
from 0 to 240. If you change the value of this field, the reticle will move vertically across the above prismatic color system.
Lum. Edit field to enter the brightness value represented an integer in a range
from 0 to 240. As you change the lumination value, the arrow of the brightness scale next to the prismatic color system will move up and down .
Red Edit field to enter directly the red components of a color represented by an
integer in a scale from 0 to 255. If you modify this integer, the reticle will
jump to the corresponding position in the above prismatic color system and
brightness scale.
Green Edit field to enter directly the green components of a color represented by
an integer in a scale from 0 to 255. If you modify this integer, the reticle will
jump to the corresponding position in the above prismatic color system and
brightness scale.
Blue Edit field to enter directly the blue components of a color represented by
an integer in a scale from 0 to 255. If you modify this integer, the reticle will
jump to the corresponding position in the above prismatic color system and
brightness scale.
Add to Custom
Colors
Summary of the fields in the window Font"
Note:
>
You can also use the right mouse key to click the wanted color directly in the prismatic color system or brightness scale.
Use this button to add the current color to your list of "Custom colors".
07/2010
4-32 OScAR-Pro Customized Operator, User Manual
Page 69

BHB_DCO_05.fm
For internal use only
The Elements of a DCO-Script
5 The Elements of a DCO-Script
Overview
This chapter covers the elements, properties, values etc. of the DCO-Script and shows you how
to use them.
The descriptions and explanations in this chapter are based on the assumption that you have
successfully started the DCO-Designer (see Section 4.1, "Start the OScAR-Pro Customized
Operator") and opened an already existing or created a new project.
Contents
The chapter covers the following areas:
5.1 General structure
5.2 The DCO data types and their value ranges
5.3 Formulas
5.4 Constants
5.4.1 The attributes of Constants
5.4.2 Add a new Constant
5.4.3 Edit the attributes of a Constant
5.5 Parameters
5.5.1 Add a new Parameter group
5.5.2 The attributes of Parameters
5.5.3 Add a new Parameter
5.5.4 Edit the attributes of a Parameter
5.6 Variables
5.6.1 The attributes of Variables
5.6.2 Add a new Variable
5.6.3 Edit the attributes of a Variable
5.7 Lists
5.7.1 The attributes and child nodes of the node "Data lists"
5.7.2 Add a new Data list
5.7.3 Edit the attributes of a Data list
5.7.4 Add a new data element
5.7.5 Edit the attributes of a data element
5.7.6 The attributes and child nodes of the node "Filters"
5.7.7 Add a new Filter
07/2010
OScAR-Pro Customized Operator, User Manual 5-1
Page 70

BHB_DCO_05.fm
The Elements of a DCO-Script For internal use only
5.7.8 Edit the attributes of a Filter
5.7.9 Add an ID range
5.7.10 Edit the attributes of an ID range
5.7.11 Add an Included ID
5.7.12 Edit the attributes of an Included ID
5.7.13 Add an Excluded ID
5.7.14 Edit the attributes of an Excluded ID
5.8 Frames
5.8.1 The attributes and child nodes of the node "Frames"
5.8.2 Add a new Frame
5.8.3 Edit the attributes of a Frame
5.8.4 Add a new Control through the Structure window
5.8.5 Add a new Control through the Layout window
5.8.6 Edit the attributes of a Control
5.8.7 OScAR-Pro command templates
5.8.8 Add a new OScAR-Pro command template
5.8.9 Edit the attributes of a OScAR-Pro command template
5.8.10 Add a new Function to a Frame
5.8.11 Edit the attributes of the Functions of a Frame
5.9 Controls
5.9.1 The use of Controls
5.9.2 References to Controls
5.9.3 Attributes shared by all Controls
5.9.4 Child nodes and special attributes of Static elements
5.9.5 Special attributes of Edit fields
5.9.6 Special attributes and child nodes of Buttons
5.9.7 Add Functions to a Button
5.9.8 Edit the attributes of the Functions of a Button
5.9.9 Add Static elements to a Button
5.9.10 Edit the attributes of the Static elements of a Button
5.9.11 Special attributes of Checkboxes
5.9.12 Child nodes and special attributes of Listboxes
5.9.13 Double-click events of Listboxes
5.9.14 Add new Process filters to Listboxes
5.9.15 Edit the attributes of Process filters
5.9.16 The child nodes and special attributes of Comboboxes
5.9.17 Selection events of Comboboxes
5.10 Functions
5.10.1 The attributes and child nodes of Functions
5.10.2 Setup and syntax of conditions
07/2010
5-2 OScAR-Pro Customized Operator, User Manual
Page 71

BHB_DCO_05.fm
For internal use only
5.11 Instructions
5.11.1 Arguments of Instructions
5.11.2 Overview of Instructions
5.11.3 Add a new Instruction
5.11.4 Edit Instructions
5.11.5 Change the order in which the Instructions are executed
5.11.6 The Instruction "AddListToComboBox"
5.11.7 The Instruction "Call"
5.11.8 The Instruction "BroadcastMessage"
5.11.9 The Instruction "ClearComboBox"
5.11.10 The Instruction "Execute"
5.11.11 The Instruction "GetBroadcasts"
5.11.12 The Instruction "GetConferences"
5.11.13 The Instruction "GetComboBoxSelText"
5.11.14 The Instruction "GetInfotelephones"
5.11.15 The Instruction "GetListBoxSelText"
5.11.16 The Instruction "GetMessages"
5.11.17 The Instruction "GetScenarios"
5.11.18 The Instruction "GotoFrame"
5.11.19 The Instruction "OffAllListBoxItemBlink"
5.11.20 The Instruction "OffButtonBlink"
5.11.21 The Instruction "OffEditBackColorBlink"
5.11.22 The Instruction "OffEditTextColorBlink"
5.11.23 The Instruction "OffListBoxItemBlink"
5.11.24 The Instruction "SetButtonBlink"
5.11.25 The Instruction "SetButtonColor"
5.11.26 The Instruction "SetButtonPicture"
5.11.27 The Instruction "SetButtonPictureScal"
5.11.28 The Instruction "SetButtonRect"
5.11.29 The Instruction "SetButtonStaticBackColor"
5.11.30 The Instruction "SetButtonStaticBorderColor"
5.11.31 The Instruction "SetButtonStaticPictureName"
5.11.32 The Instruction "SetButtonStaticPicturePos"
5.11.33 The Instruction "SetButtonStaticPictureScale"
5.11.34 The Instruction "SetButtonStaticRect"
5.11.35 The Instruction "SetButtonStaticStatus"
5.11.36 The Instruction "SetButtonStaticText"
5.11.37 The Instruction "SetButtonStaticTextColor"
5.11.38 The Instruction "SetButtonStaticTextPosition"
5.11.39 The Instruction "SetButtonStatus"
5.11.40 The Instruction "SetButtonText"
5.11.41 The Instruction "SetButtonTextColor"
5.11.42 The Instruction "SetCheckBoxBackColor"
5.11.43 The Instruction "SetCheckBoxCaption"
The Elements of a DCO-Script
07/2010
OScAR-Pro Customized Operator, User Manual 5-3
Page 72

BHB_DCO_05.fm
The Elements of a DCO-Script For internal use only
5.11.44 The Instruction "SetCheckBoxRect"
5.11.45 The Instruction "SetCheckBoxState"
5.11.46 The Instruction "SetCheckBoxStatus"
5.11.47 The Instruction "SetCheckBoxTextColor"
5.11.48 The Instruction "SetCheckBoxToVariable"
5.11.49 The Instruction "SetComboBoxBackColor"
5.11.50 The Instruction "SetComboBoxList"
5.11.51 The Instruction "SetComboBoxRect"
5.11.52 The Instruction "SetComboBoxStatus"
5.11.53 The Instruction "SetComboBoxTextColor"
5.11.54 The Instruction "SetComboToVariable"
5.11.55 The Instructions "SetEditBackColor"
5.11.56 The Instruction "SetEditBackColorBlink"
5.11.57 The Instruction "SetEditRect"
5.11.58 The Instruction "SetEditStatus"
5.11.59 The Instruction "SetEditText"
5.11.60 The Instruction "SetEditTextColor"
5.11.61 The Instruction "SetEditTextColorBlink"
5.11.62 The Instruction "SetEditToVariable"
5.11.63 The Instruction "SetFrameColor"
5.11.64 The Instruction "SetListBoxBackColor"
5.11.65 The Instruction "SetListBoxBlinkTime"
5.11.66 The Instruction "SetListBoxItemBlink"
5.11.67 The Instruction "SetListBoxItemColor"
5.11.68 The Instruction "SetListBoxList"
5.11.69 The Instruction "SetListBoxRect"
5.11.70 The Instruction "SetListBoxSelectionToVariable"
5.11.71 The Instructions "SetListBoxStatus"
5.11.72 The Instruction "SetListBoxTextColor"
5.11.73 The Instruction "SetListBoxToVariable"
5.11.74 The Instruction "SetStaticBackColor"
5.11.75 The Instruction "SetStaticBorderColor"
5.11.76 The Instruction "SetStaticPictureName"
5.11.77 The Instruction "SetStaticPicturePos"
5.11.78 The Instruction "SetStaticPictureScale"
5.11.79 The Instruction "SetStaticRect"
5.11.80 The Instruction "SetStaticStatus"
5.11.81 The Instruction "SetStaticText"
5.11.82 The Instruction "SetStaticTextColor"
5.11.83 The Instruction "SetStaticTextPosition"
5.11.84 The Instruction "SetVariable"
5.11.85 The Instruction "StartProgram"
07/2010
5-4 OScAR-Pro Customized Operator, User Manual
Page 73

BHB_DCO_05.fm
For internal use only
The Elements of a DCO-Script
General structure
5.1 General structure
As mentioned above in Section 4.3, "Setup and application of the Structure window", the DCOScript is output in the Structure Window in a hierarchical structure.
The below image illustrates the Structure window and its entries that are explained in full detail
in this chapter:
Image 5-1 View of the Structure window with numerous entries
07/2010
OScAR-Pro Customized Operator, User Manual 5-5
Page 74

BHB_DCO_05.fm
The Elements of a DCO-Script For internal use only
General structure
Right underneath the root, the Structure window is divided into
Node Description
Constants Use the node „Constants“ to create unchanging, constant ele-
ments.
These elements remain the same throughout the entire project
and can be placed any number of times at any places you want
in your project. Their values can be adjusted centrally in the
OScAR-Pro Customized Operator.
Parameters Use the node „Parameters“ to create parameterizable ele-
ments. These elements can be used in the same way as Constants with the difference that their values can be adjusted
easily through the Parameter editor of the OScAR-Pro-TT Operator-Tool.
Variables Use the node „Variables“ to create global place holders that
can be used for the exchange of information between Frames.
Lists Use the node „Lists“ to create lists of place holders. These el-
ements will help you to fill the Controls "Listbox" and "Combobox" with data. You can either predefine the individual list entries in the DCO-Script (same as for Constants) or have them
filled with data via various OScAR-Pro-TT Operator-Tool commands.
Frames Use the node „Frames“ to create the Frames that are output on
the screen and their Controls. During a project, the number of
Frames that may be created and that the user may move between is unrestricted.
Table 5-1 Description of the predefined nodes of the tree structure
Also, there are a number of different data types that are used in the DCO-Script and thus in the
Structure window.
07/2010
5-6 OScAR-Pro Customized Operator, User Manual
Page 75

BHB_DCO_05.fm
For internal use only
The Elements of a DCO-Script
The DCO data types and their value ranges
5.2 The DCO data types and their value ranges
Every DCO-Script uses special data types, or references to Controls that belong to these data
types, for the properties of the different objects.
Also, the DCO-Designer only supports meaningful assignments of data types and references
to the pertinent properties.
The below table summarizes the possible data types and their values ranges:
Data type Value range Description
bool 0, 1 Data type for logic statements with
0 = false/untrue/not assigned/not enabled, and
1 = correct/true/assigned/enabled.
byte Positive integer
between 0 and
255
Data type for various small integers.
int Positive or
Data type for overall integers.
negative integer
between
-32768..32767
uint Positive integer
Data type for overall and purely positive integers.
between
0..65535
string Any text,
Data type for texts.
max. 256
phone_no Text, max. 24
characters
Phone numbers with:
space character, #, (, ), *, +, -, /, comma, 0, 1, 2, 3, 4, 5, 6, 7,
8, 9.
float Floating point
Data type for very precise rational values.
number between
± 1,4 e
± 3,4 e
-45
+38
..
bdc_id Broadcast ID Valid ID of a broadcast administrated in the DAKS-TT Admin-
istrator-Tool.
con_id Conference ID Valid ID of a conference administrated in the DAKS-TT Ad-
ministrator-Tool.
cas_id Call profile ID Valid ID of a call profile administrated in the DAKS-TT Admin-
istrator-Tool.
Table 5-2 Summary of the different data types
07/2010
OScAR-Pro Customized Operator, User Manual 5-7
Page 76

BHB_DCO_05.fm
The Elements of a DCO-Script For internal use only
The DCO data types and their value ranges
Data type Value range Description
ann_id Announcement IDValid ID of an announcement administrated in the DAKS-TT
Administrator-Tool.
dsp_txt Display text, max.
64 characters
color #000000...
#FFFFFF
Text message for output on the display of a telephone handset.
Data type to identify color values in hexadecimal convention.
The format is #<red><green><blue>. Each of the 3 color
components may range between 00 .. ff.
Examples:
● #000000: black
● #FF0000: light red
● #00FF00: light green
● #0000FF: deep blue
● #FFFFFF: white
process Process ID ID of one active process in the OScAR-Pro-TT Operator-Tool
(i.e. only in the OScAR-Pro server).
itemlist DCO data types List comprising the data types described in this table.
It is these lists that are used to fill the Controls "Listbox" and
"Combobox".
Table 5-2 Summary of the different data types
07/2010
5-8 OScAR-Pro Customized Operator, User Manual
Page 77

BHB_DCO_05.fm
For internal use only
The Elements of a DCO-Script
Formulas
5.3 Formulas
Formulas can be used nearly everywhere, e.g. to describe the values of attributes or in functions (see below).
Formulas are computing instructions that are used to carry out logic operations with integers or
concatenated strings.
All Formulas applied in a DCO-Script are output in
@( and )@ .
Every Formula consists of a statement with a minimum of 2 elements and a logic operation that
lies between these two elements.
For example, if you take the strictly numeric statement @(1 + 2)@, the integers 1 and 2 represent the elements whereas the + sign represents the logic operation.
Logic operations can be mathematical signs or keywords. You can also add further brackets to
a Formula to add additional statements, e.g. @(1 + ( 2 * 28 ) )@.
Note:
>
In every Formula, a space character must be entered in front of and after every statement and in front of and after each logic operation.
The following rules apply:
● Every Parameter, Variable, or Control (see below) as well as every direct entry can be
an element of a statement.
● All elements in a Formula must be of the same data type (e.g. STRING).
● Do not use any Control names in the Control attributes (see below).
● Every Formula is processed from left to right and in keeping with the the mathematical
rule "first multiplication and division, then addition and subtraction".
List of logical operations in Formulas:
Logical operation
+
Effect on
numeric elements
Effect on
text elements
Adds the two integers Connects two texts
or
ADD
-
or
Subtracts the second integer
from the first
(no function)
SUB
*
or
Multiplies the two integers with
each other
(no function)
MUL
Table 5-3 List of logical operations in Formulas
07/2010
OScAR-Pro Customized Operator, User Manual 5-9
Page 78

BHB_DCO_05.fm
The Elements of a DCO-Script For internal use only
Formulas
Logical operation
/
or
DIV
&
or
AND
|
or
OR
=
or
EQL
!=
or
UEQ
>
or
GT
Effect on
numeric elements
Divides the first integer by the
second
Equals 1 if both integers are 1.
Equals 0 if at least one of the
two integers is 0.
Equals 1 if at least one of the
two integers is 1.
Equals 0 if both integers are 0.
Equals 1 if the two integers are
identical or 0 if the integers are
different.
Equals 1 if the two integers different or 0 if the integers are
identical.
Equals 1 if the first integer is
greater than the second, or 0 if
not.
Effect on
text elements
(no function)
(no function)
(no function)
Equals 1 if the two texts are identical or 0 if
the texts are different.
Equals 1 if the two texts are different or 0 if
the texts are identical.
(no function)
>=
or
GET
<
or
LT
<=
or
LET
Equals 1 if the first integer is
greater than or equal to the second, or 0 if not.
Equals 1 if the first integer is
smaller than the second, or 0 if
not.
Equals 1 if the first integer is
smaller than or equal to the second, or 0 if not.
(no function)
(no function)
(no function)
Table 5-3 List of logical operations in Formulas
07/2010
5-10 OScAR-Pro Customized Operator, User Manual
Page 79

BHB_DCO_05.fm
For internal use only
The Elements of a DCO-Script
Constants
5.4 Constants
Constants are place holders and based on the data types described in the Section 5.2, "The
DCO data types and their value ranges".
Constants always remain the same throughout a project. They can be used any number of
times at any place within the project and their values can easily be edited at a central level in
the OScAR-Pro Customized Operator.
When using a Constant in the subsequent course of the DCO-script, its name is output between
%% characters. In the subsequent execution of the DCO-script, the Constant is automatically
substituted in the script with its assigned values.
Example
You can, for example, define a specific color for a specific type of Button as a Constant and
subsequently assign this Constant as text color to other Buttons. If you want to change the color
of the Buttons of this type later, you do not need to edit each of these Buttons individually but
can change the color of the Constant centrally, instead.
5.4.1 The attributes of Constants
Constants can have the following attributes:
Attribute Description
Name Edit field to enter the name of the Constant. Select a name that
is recognizable and unique among the other Constants and
Parameters.
Type The selection field to enter the Constant type (see Section 5.2,
"The DCO data types and their value ranges").
Value Edit field to enter the initial value of the Constant (in keeping
with the pertinent Constant type).
Table 5-4 Attributes of Constants
07/2010
OScAR-Pro Customized Operator, User Manual 5-11
Page 80

BHB_DCO_05.fm
The Elements of a DCO-Script For internal use only
Constants
5.4.2 Add a new Constant
Follow the below instructions to create a new Constant
No. Task
1. Select the node "Constants" in the tree structure.
2. Now go to the menu bar and select "EditNew".
This will open the following user window to add the new Control:
3. Enter a unique name for the new Constant.
4. Finally, click Ok to close the window.
The DCO-Designer outputs the new Constant in the tree structure of the Structure window, and there in the node "Constants".
If necessary, you can now edit the attributes of the new Constant.
Table 5-5 Add a new Constant
5.4.3 Edit the attributes of a Constant
Follow the below instructions to edit the attributes of an existing Constant:
No. Task
1. Go to the tree structure on the right and open the node "Constants".
2. Select the Constant that you want to edit.
3. To edit the attributes, go to the list view and doubleclick the relevant item listed in the
column "Value".
Table 5-6 Edit the attributes of a Constant
07/2010
5-12 OScAR-Pro Customized Operator, User Manual
Page 81

BHB_DCO_05.fm
For internal use only
The Elements of a DCO-Script
Parameters
5.5 Parameters
Just like the Constants, Parameters are place holders based on the data types that are described in the Section 5.2, "The DCO data types and their value ranges".
Parameters can be used any number of times and at any place wanted in the project. They can
be edited easily through the Parameter editor of the OScAR-Pro-TT Operator-Tool (see Section
7.4, "The DCO Parameter Editor").
When using the Parameters in the course of a DCO-script, their names are output in between
%% signs.
When the DCO-script is loaded in the OScAR-Pro-TT Operator-Tool, the Parameters are initialized with their corresponding values as found in the Parameter file. If no entry is found for a
Parameter in the matching Parameter file, the Parameter is automatically initialized with its default value as assigned in the DCO-script.
Parameters are divided into logical groups. A Parameter is also always assigned to a specific
Parameter group.
Example
For example, you can define an announcement ID as a Parameter and assign it to different Instructions (see Section 5.11, "Instructions").
If the ID of the pertinent announcement is later changed through the DAKS-TT AdministratorTool, you can easily adjust the corresponding Parameter with the Parameter editor of the OScAR-Pro-TT Operator-Tool without having to change the DCO-script.
07/2010
OScAR-Pro Customized Operator, User Manual 5-13
Page 82

BHB_DCO_05.fm
The Elements of a DCO-Script For internal use only
Parameters
5.5.1 Add a new Parameter group
Follow the below instructions to create a new Parameter group:
No. Task
1. Go to the tree structure on the right and select the node "Parameters".
2. Now go to the menu bar and select "EditNew".
This will open the following user window to add the new Control:
3. Enter a unique name for the new Parameter group.
4. Finally, click Ok to close the window.
The DCO-Designer outputs the new Parameter group in the tree structure of the Structure window, and there in the node "Parameters".
Table 5-7 Add a new Parameter group
Note:
>
Note that the name given a created Parameter group cannot be changed afterwards.
07/2010
5-14 OScAR-Pro Customized Operator, User Manual
Page 83

BHB_DCO_05.fm
For internal use only
The Elements of a DCO-Script
Parameters
5.5.2 The attributes of Parameters
Parameters have the following attributes:
Attribute Description
Name Edit field to enter the name of the Parameter. Select a name
that is recognizable and unique among the other Parameters
and Constants.
Type Combobox to specify the type of the Parameter (see Section
5.2, "The DCO data types and their value ranges").
Value Edit field to enter the default value for the Parameter (in keep-
ing with the pertinent Parameter type).
You may leave this field empty. In this case, however, you will
need enter the value through the Parameter editor of the OScAR-Pro-TT Operator-Tool.
Comment Edit field for additional information, e.g. explaining the use of
the Parameter in DCO-script. The comment is output in the Parameter editor of the OScAR-Pro-TT Operator-Tool.
Table 5-8 Attributes of Parameters
07/2010
OScAR-Pro Customized Operator, User Manual 5-15
Page 84

BHB_DCO_05.fm
The Elements of a DCO-Script For internal use only
Parameters
5.5.3 Add a new Parameter
Follow the below instructions to create a new Parameter:
No. Task
1. Go to the tree structure on the right and open the node "Parameters"
2. In the tree, select the Parameter group to which you want to add the new Parameter.
3. Now go to the menu bar and select "Edit
New".
This will open the following user window to add the new Control:
4. Enter a name for the Parameter that is clear and unique.
5. Finally, click Ok to close the window.
The DCO-Designer outputs the new Parameter in the tree structure of the Structure window, and there in its proper group in the node "Parameters".
If needed, you can now edit the attributes of the Parameter.
Table 5-9 Add a new Parameter
5.5.4 Edit the attributes of a Parameter
Follow the below instructions to edit an existing Parameter:
No. Task
1. Go to the tree view of the Structure window and open the node "Parameters".
2. Now open the Parameter group of the Parameter you want to edit.
3. Select the Parameter you want to edit.
4. To edit the attributes, go to the list view and doubleclick the relevant item listed in the
column "Value".
Table 5-10 Edit the attributes of Parameters
07/2010
5-16 OScAR-Pro Customized Operator, User Manual
Page 85

BHB_DCO_05.fm
For internal use only
The Elements of a DCO-Script
Variables
5.6 Variables
Just like Constants and Parameters, Variables are place holders based on the data types as
described in the Section 5.2, "The DCO data types and their value ranges".
Variables can be used any number of times and at any place in a project. Their first and foremost purpose is the exchange of information between the different elements of a Frame or also
between different Frames (global).
Usually, the values of Variables change during the course of a DCO-Script in the OScAR-ProTT Operator-Tool.
When using the Variable in the subsequent course of the DCO-script, its name is output in between $ characters.
Example
You can, for example, create a Variable to memorize in a Frame which announcements were
used by a subscriber for a broadcast. In a OScAR-Pro command template (see Section 5.8.7,
"OScAR-Pro command templates"), the Variable could be used at the beginning of a broadcast
so that the currently assigned value, namely the ID of the selected announcement, is transferred to the OScAR-Pro-TT Operator-Tool.
5.6.1 The attributes of Variables
Variables have the following attributes:
Attribute Description
Name Edit field to enter the name of a Variable. Make sure you select
a name that is recognizable and unique in this list.
Type Combobox to specify the type of the Variable (see Section 5.2,
"The DCO data types and their value ranges").
Value Editable combobox to enter the initial value of the Variable (in
keeping with the pertinent Variable type).
Table 5-11 Attributes of Variables
07/2010
OScAR-Pro Customized Operator, User Manual 5-17
Page 86

BHB_DCO_05.fm
The Elements of a DCO-Script For internal use only
Variables
5.6.2 Add a new Variable
Follow the below instructions to create a new Variable:
No. Task
1. go to the tree structure and open the node "Variables".
2. Now go to the menu bar and select "Edit
New".
This will open the following user window to add the new Control:
3. Assign a unique and recognizable name to the new Variable.
4. Specify the Variable type.
5. Finally, click Ok to close the window.
The DCO-Designer will output the newly created Variable in the tree structure of the
Structure window, and there in the node "Variables".
You can now edit the attributes of the Variable.
Table 5-12 Add a new Variable
5.6.3 Edit the attributes of a Variable
Follow the below instructions to edit an existing Variable:
No. Task
1. Go to the tree structure and open the node "Variables".
2. Now select the Variable you want to edit.
3. To edit the attributes, go to the list view and doubleclick the relevant item listed in the
column "Value".
Table 5-13 Edit the attributes of a Variable
07/2010
5-18 OScAR-Pro Customized Operator, User Manual
Page 87

BHB_DCO_05.fm
For internal use only
The Elements of a DCO-Script
Lists
5.7 Lists
The node "Lists" does not possess any attributes but has the child nodes
● "Data lists" and
● "Filters".
Short summary of the Data lists
The Data lists are place holders of a certain data type (see Section 5.2, "The DCO data types
and their value ranges") with subordinate data elements. They serve to fill the Controls "Listbox" and "Combobox".
The Data lists can be filled in the OScAR-Pro Customized OperatorDCO-Designer with Constant data elements or obtain the data from theSection 5.11, "Instructions" through various Instructions (see OScAR-Pro-TT Operator-Tool).
Apart from the attributes, each Data list also has data elements that are output in the Controls
"Listbox" and "Combobox" and administrated in a special child node called "Data Elements".
Short summary of Filters
The purpose of Filters is to control and restrict the filling of Data lists via the OScAR-Pro-TT
Operator-Tool. For this purpose it is only the so-called IDs that can be used in Filters.
Assign these IDs to broadcast and conference groups, scenarios, info telephone profiles, and
announcements via the DAKS-TT Administrator-Tool.
You can use Filters for the following Instructions (see Section 5.11, "Instructions":
● The Instruction "GetMessages": Fills a Data list with the administrated announce-
ments.
● The Instruction "GetBroadcasts": Fills a Data list with the administrated broadcasts.
● The Instruction "GetConferences": Fills a Data list with the administrated conferences.
● The Instruction "GetScenarios": Fills a Data list with the administrated scenarios.
● The Instruction "GetInfotelephones": Fills a Data list with the administrated info tele-
phone profiles.
07/2010
OScAR-Pro Customized Operator, User Manual 5-19
Page 88

BHB_DCO_05.fm
The Elements of a DCO-Script For internal use only
Lists
5.7.1 The attributes and child nodes of the node "Data lists"
The attributes of Data lists
Data lists have the following attributes:
Attribute Description
Name Edit field to enter the name for the Data list. Select a name that
is recognizable and unique among the Data lists.
Type Combobox to specify the type of the Data list (see Section 5.2,
"The DCO data types and their value ranges").
Table 5-14 Attributes of Data lists
The child nodes of the node "Data lists"
Child node Description
Data elements This child node can carry a whole List of data elements that
are output in form of entries when the superimposed Data list
is assigned to a Listbox.
Table 5-15 The child nodes of the node "Data lists"
07/2010
5-20 OScAR-Pro Customized Operator, User Manual
Page 89

BHB_DCO_05.fm
For internal use only
The Elements of a DCO-Script
Lists
The attributes of data elements
Data elements have the following attributes:
Attribute Description
Displayed text Edit field to enter the text with which the data element is output
in a Listbox or Combobox.
Value Editable combobox to specify the initial value of the data ele-
ment (in keeping with the pertinent Data list type).
Here you can:
● either enter the value of the data element directly
● or use the selection field and assign a Constant, Parame-
ter or Variable.
Color Editable combobox to specify the color in which the entry shall
be rendered in a Listbox entry (ignored in Comboboxes).
Here you can:
● enter a color value,
● click "Select color" and use the next user window to
choose a color (see Section 4.6.5, "Edit colors"), or
● assign a Constant, Parameter or Variable of the data type
color.
Table 5-16 Attributes of data elements
07/2010
OScAR-Pro Customized Operator, User Manual 5-21
Page 90

BHB_DCO_05.fm
The Elements of a DCO-Script For internal use only
Lists
5.7.2 Add a new Data list
Follow the below instructions to create a new Data list:
No. Task
1. Go to the tree view and open "Lists".
2. Next, select the child node "Data lists".
3. Now go to the menu bar and select "EditNew".
This will open the following user window to add the new Control:
4. Assign a unique and recognizable name to the new Data list.
5. Specify the Data list type.
6. Finally, click Ok to close the window.
The DCO-Designer outputs the new Data list in the tree structure of the Structure window, and there in the node "Data lists".
You can now edit the attributes of the Data list and, if needed, add data elements.
Table 5-17 Add a new new Data list
5.7.3 Edit the attributes of a Data list
Follow the below instructions to edit an existing Data list:
No. Task
1. Go to the tree structure and open the node "Lists".
2. Now open the child node "Data lists".
3. In the tree view, select the Data list you want to edit.
4. To edit the attributes, go to the list view and doubleclick the relevant item listed in the
column "Value".
Table 5-18 Edit Data list attributes
07/2010
5-22 OScAR-Pro Customized Operator, User Manual
Page 91

BHB_DCO_05.fm
For internal use only
The Elements of a DCO-Script
Lists
5.7.4 Add a new data element
Follow the below instructions to add a new data element to a Data list:
No. Task
1. Go to the tree structure and open the node "Lists".
2. Now open the child node "Data lists".
3. Open the Data list to which you want to add a new data element.
4. In the relevant Data list, click the child node "Data element".
5. Now go to the menu bar and select "Edit
A new data element is now automatically added to the List.
6. In the active Edit field enter the text with which the data element shall be output in a "Listbox" or "Combobox".
7. If needed, you can now edit the other attributes of the new data element.
Table 5-19 Add new data element
New".
5.7.5 Edit the attributes of a data element
Follow the below instructions to edit an existing data element:
No. Task
1. Go to the tree structure and open the node "Lists".
2. Now open the child node "Data lists".
3. Open the Data list whose data elements you want to edit.
4. In the tree click the child node "Data elements".
5. To edit the attributes, go to the list view and doubleclick the relevant item listed in the
column "Value".
Table 5-20 Edit the attributes of data elements
07/2010
OScAR-Pro Customized Operator, User Manual 5-23
Page 92

BHB_DCO_05.fm
The Elements of a DCO-Script For internal use only
Lists
5.7.6 The attributes and child nodes of the node "Filters"
The actual Filters are created in the node "Filters" that is a child node of the node "Lists". Each
Filter has the following child nodes:
● "ID ranges"
● "Included IDs"
● "Excluded IDs"
The attributes of Filters
Filters have the following attributes:
Attribute Description
Name Edit field to enter the name of the Filter.
Type Combobox to specify the type of the Filter.
Here you can:
● BDC to invoke a list of all broadcasts administered in the
database with the command „The Instruction "GetBroadcasts"“,
● CON to invoke a list of all conferences administered in the
database with the command „The Instruction "GetConferences"“,
● ITL to invoke a list of all info telephone profiles adminis-
tered in the database with the command „The Instruction
"GetInfotelephones"“,
● MSG to invoke a list of all announcements administered
in the database with the command „The Instruction "GetMessages"“, or
● SCN to invoke a list of all scenarios administered in the
database with the command „The Instruction "GetScenarios"“.
Subtype This attribute is only visible for the Filter type "MSG".
Here you can:
● ALL to invoke a list of all announcements (logical and
physical) administered in the database,
● PHYSICAL to invoke a list of all physical announcements
administered in the database, or
● LOGICAL to invoke a list of all logical announcements ad-
ministered in the database.
Table 5-21 The attributes of Filters
07/2010
5-24 OScAR-Pro Customized Operator, User Manual
Page 93

BHB_DCO_05.fm
For internal use only
The Elements of a DCO-Script
Lists
The child nodes of the node "Filters"
Each "Filters" node has the following child nodes:
Child node Description
ID ranges This child node can contain a list of the ID ranges that shall be
considered in a query. The value of each ID range entry lies
within a range that is defined as "from" ..."to".
Included IDs This child node can contain a list of included IDs that are ex-
pressible considered in a query, e.g. to ensure that the ID
4000 is always included in the query if properly administrated
in the database.
Excluded IDs This child node can contain a list of excluded IDs that shall be
neglected in a query, e.g. to ensure that the ID 1000 is never
included in a query, even if properly administrated in the database.
Table 5-22 The child nodes of the node "Filters"
In a query, the lists of a Filter are processed in the following sequence:
● first the entries of the child node "ID ranges"
● then the entries of the child node "Included IDs", and
● finally the entries of the child node "Excluded IDs".
Consequently, every ID that is listed in an ID range or as an Included ID, but at the same time
also specified as Excluded ID, will not appear in the query result.
The attributes of ID ranges
ID ranges have the following attributes:
Attribute Description
from Editable combobox to specify the first ID starting with which
datasets are let pass by the Filter.
Here you can:
● enter a valid ID with up to 4 digits, or
● assign a Constant, a Parameter or a Variable of the data
type bdc_id, con_id, itl_id, scn_id or msg_id.
Table 5-23 The attributes of ID ranges
07/2010
OScAR-Pro Customized Operator, User Manual 5-25
Page 94

BHB_DCO_05.fm
The Elements of a DCO-Script For internal use only
Lists
Attribute Description
to Editable combobox to specify the last ID up to which datasets
are let pass by the Filter.
Here you can:
● enter a valid ID with up to 4 digits, or
● assign a Constant, a Parameter or a Variable of the data
type bdc_id, con_id, itl_id, scn_id or msg_id.
Table 5-23 The attributes of ID ranges
The attributes of "Included IDs"
Included IDs have the following attributes:
Attribute Description
Value Editable combobox to specify an ID that will be accepted by the
Filter.
Here you can:
● enter a valid ID with up to 4 digits, or
● assign a Constant, a Parameter or a Variable of the data
type bdc_id, con_id, itl_id, scn_id or msg_id.
Table 5-24 Attributes of Excluded IDs
The attributes of excluded IDs
Excluded IDs have the following attributes:
Attribute Description
Value Editable combobox to specify an ID that shall be blocked by
the Filter.
Here you can:
● enter a valid ID with up to 4 digits, or
● assign a Constant, a Parameter or a Variable of the data
type bdc_id, con_id, itl_id, scn_id or msg_id.
Table 5-25 The attributes of Excluded IDs
07/2010
5-26 OScAR-Pro Customized Operator, User Manual
Page 95

BHB_DCO_05.fm
For internal use only
The Elements of a DCO-Script
Lists
Example
You may want to create a Filter with the name "Announcement List".
In "ID ranges" you added an entry to cover the value range from "0000" to "1999“.
In "Excluded IDs"you added an entry with the value "1000".
In "Included IDs" you added an entry with the value "4000".
If you invoke this Filter with the command "GetMessages", a Data list will be output with all administrated announcements whose IDs lie between "0000" and "1999". In addition, the List will
include the announcement with the ID "4000" but omit the announcement with the ID "1000".
07/2010
OScAR-Pro Customized Operator, User Manual 5-27
Page 96

BHB_DCO_05.fm
The Elements of a DCO-Script For internal use only
Lists
5.7.7 Add a new Filter
Follow the below instructions to create a new Filter:
No. Task
1. Go to the tree structure and open the node "Lists".
2. Now open the child node "Filters".
3. Now go to the menu bar and select "EditNew".
This will open the below user window to add the new process Filter.
4. Enter a name for the Filter that is clear and unique.
5. Specify the data type of the Filter.
6. Finally, click Ok to close the window.
The DCO-Designer outputs the newly created Filter in the tree structure of the Structure
window, and there in the "Filters" child node of the node "Lists".
If needed you can now edit the attributes of the Filters entries in the subordinate child
nodes "ID ranges", "Included IDs" and "Excluded IDs".
Table 5-26 Create the Filter
5.7.8 Edit the attributes of a Filter
Follow the below instructions to edit an existing Filter:
No. Task
1. Go to the tree structure and open the node "Lists".
2. Now open the child node "Filters" in the tree.
3. In the tree view, select the filter that you want to edit.
4. To edit the attributes, go to the list view and doubleclick the relevant item listed in the
column "Value".
Table 5-27 Edit the attributes of Filters
07/2010
5-28 OScAR-Pro Customized Operator, User Manual
Page 97

BHB_DCO_05.fm
For internal use only
The Elements of a DCO-Script
5.7.9 Add an ID range
Follow the below instructions to create a new ID range in an existing Filter:
No. Task
1. Go to the tree structure and open the node "Lists".
2. Now open the child node "Filters" in the tree.
3. Next, select the filter to which you want to add an ID range.
4. In the tree structure, select the next child node "ID ranges".
5. Now go to the menu bar and select "Edit
The DCO-Designer now outputs a new ID range in the list view on the left.
6. To edit the attributes, go to the list view and doubleclick the relevant item listed in the
column "Value".
Table 5-28 Add an ID range
New".
Lists
5.7.10 Edit the attributes of an ID range
Follow the below instructions to edit the ID range of an existing Filter:
No. Task
1. Go to the tree structure and open the node "Lists".
2. Now open the child node "Filters" in the tree.
3. Still in the tree, open the filter that contains the Excluded ID you want to edit.
4. In the tree structure, select the next child node "ID ranges".
5. To edit the attributes, go to the list view and doubleclick the relevant item listed in the
column "Value".
Table 5-29 Edit the attributes of ID ranges
07/2010
OScAR-Pro Customized Operator, User Manual 5-29
Page 98

BHB_DCO_05.fm
The Elements of a DCO-Script For internal use only
Lists
5.7.11 Add an Included ID
Follow the below instructions to add an Included ID in an existing Filter:
No. Task
1. Go to the tree structure and open the node "Lists".
2. Now open the child node "Filters" in the tree.
3. Still in the tree, open the Filter to which you want to add an Included ID.
4. Click the entry "Included IDs".
5. Now go to the menu bar and select "Edit
New".
The DCO-Designer outputs the new "Included ID" in the list view on the left.
6. To edit the attributes, go to the list view and doubleclick the relevant item listed in the
column "Value".
Table 5-30 Add an Included ID
5.7.12 Edit the attributes of an Included ID
Follow the below instructions to edit the attributes of the included IDs of an existing Filter:
No. Task
1. Go to the tree structure and open the node "Lists".
2. Now open the child node "Filters" in the tree.
3. Next, open the filter whose Included IDs you want to edit.
4. Click the entry "Included IDs".
5. To edit the attributes, go to the list view and doubleclick the relevant item listed in the
column "Value".
Table 5-31 Edit the attributes of "Included IDs"
07/2010
5-30 OScAR-Pro Customized Operator, User Manual
Page 99

BHB_DCO_05.fm
For internal use only
The Elements of a DCO-Script
5.7.13 Add an Excluded ID
Follow the below instructions to add Excluded IDs to an existing filter:
No. Task
1. Go to the tree view of the Structure window and open the node "Filters".
2. Still in the tree, open the filter to which you want to add an Excluded ID.
3. Click the child node "Excluded IDs".
4. Now go to the menu bar and select "EditNew".
The DCO-Designer outputs the new Excluded ID in the list view on the left.
5. To edit the attributes, go to the list view and doubleclick the relevant item listed in the
column "Value".
Table 5-32 Add excluded IDs
5.7.14 Edit the attributes of an Excluded ID
Lists
Follow the below instructions to edit the attributes of the excluded IDs of an existing Filter:
No. Task
1. Go to the tree structure and open the node "Lists".
2. Now open the child node "Filters" in the tree.
3. Next, open the filter whose Included IDs you want to edit.
4. Click the child node "Excluded IDs".
5. To edit the attributes, go to the list view and doubleclick the relevant item listed in the
column "Value".
Table 5-33 Edit the attributes of an Excluded ID
07/2010
OScAR-Pro Customized Operator, User Manual 5-31
Page 100

BHB_DCO_05.fm
The Elements of a DCO-Script For internal use only
Frames
5.8 Frames
Use the node "Frames" to create and edit the various screen frames of the visual interface as
they are output in the OScAR-Pro-TT Operator-Tool through the DCO-script.
You can create any number of Frames and customize their design individually. Use the Layout
window to design the graphic look of the Frames created here.
The Frames themselves are created in the node "Frames". Here, each "Frame" node has the
following three child nodes:
● "Controls",
● "OScAR-Pro command templates", and
● "Functions".
5.8.1 The attributes and child nodes of the node "Frames"
The attributes of Frames
Frames have the following attributes:
Attribute Description
Type Combobox to specify the type of the page.
Here you can:
● select normal to define a normal page or
● select toolbar to define a toolbar page.
Other than the special attributes described below, toolbar
pages do not differ from normal pages.
Name Edit field to enter the name of the Frame. Select a name that
is recognizable and unique among the other Frame names.
Color Editable combobox to choose the background color of the
Frame.
Here you can:
● enter a color value,
● click "Select color" and use the next user window to
choose a color (see Section 4.6.5, "Edit colors"), or
● assign a Constant, Parameter or Variable of the data type
color.
Table 5-34 Attributes of Frames
07/2010
5-32 OScAR-Pro Customized Operator, User Manual
 Loading...