

Page 1

WARNING FCC Regulations state that any unauthorize d changes or modificat ion s to this
equipment not expressly approved by the manufacturer could void the user’s authority to
operate this equipment.
Note: This e qu ip ment ha s be en te ste d an d f ound to co m ply with the limits for a Class B
digital device, pursuant to Part 15 of the FCC Rules.
These limits are designed to provide reasonable protection against harmful interference in
a residential installation.
This equipment generates, uses and can radiate radio frequency energy and, if not installed
and use d in accordance with the instru ctions, may cau se harmful int erference to radio
communicati ons. However, there is no guarantee that interference wil l not occur in a
particular installation. If this equipment does cause harmful interference to radio or
televi sion re ception , which can be d eterm ined by tu rning th e equipm ent off an d on, the
user is encouraged to try to corre ct the interference by one or more of the following
measures:
Reorient or relocate the receiving antenna.
Increase the separa tio n between the equipme nt and the receive r.
Connect the equipment into an outlet on a circuit different from that to which the receiver
is connected.
Consult the dealer or an experienced radio/TV technician for help.
NOTE The laser com ponent of th e UX-1000/1 100 is rated Class 1 and compl ies with 21
CFR 1040.10 and 1040.11 o f the CDRH standards. This m eans that the machine does
not produce hazardous laser radiation.
ABOUT THE TELEPHONE CONSUMER PROTECTION ACT OF 1991
"The Telephone Consumer Protection Act of 1991 makes it unlawful for any person to use
a computer or o ther electronic device to se nd any message via a telephone facsim ile
machine unle ss such me ssage clea rly con ta ins in a marg in a t the top or bo tto m of each
transmitted page or on the fir st page of the transmis sion the follo win g info rm ati on :
(1) The date and time of transmission.
(2) Identification of either the business, business entity or individual sending the message.
(3) Telephone number of either the sending machine, business, business entity or
individual.
In order to program this information into yo ur facsimile machine , please refer to the
appropriate instructions in the operation manual."
As an ENERGY STAR
mined that this product meets the
guidelines for energy efficiency.
®
partner, SHARP has dete r-
ENERGY STAR
®
FOR YOUR RECORDS
Please record the model number and serial number below, for easy reference, in case of loss
or theft. These numbers are located on the rear side of the unit.
Space is also provided for oth er rele va nt inform a tio n.
Model Number____________________________________________________________
Serial Numbe r __ __ __ __ ____ __ __ __ __ ____ __ __ __ __ ____ __ __ __ __ ____ __ __ __ __ ____
Date of Purchase__________________________________________________________
Place of Purchase _________________________________________________________
Page 2

Quick Reference Guide
Install ati on
TEL.
SET
TEL.
LINE
EXT.
PHONE
TEL.
LINE
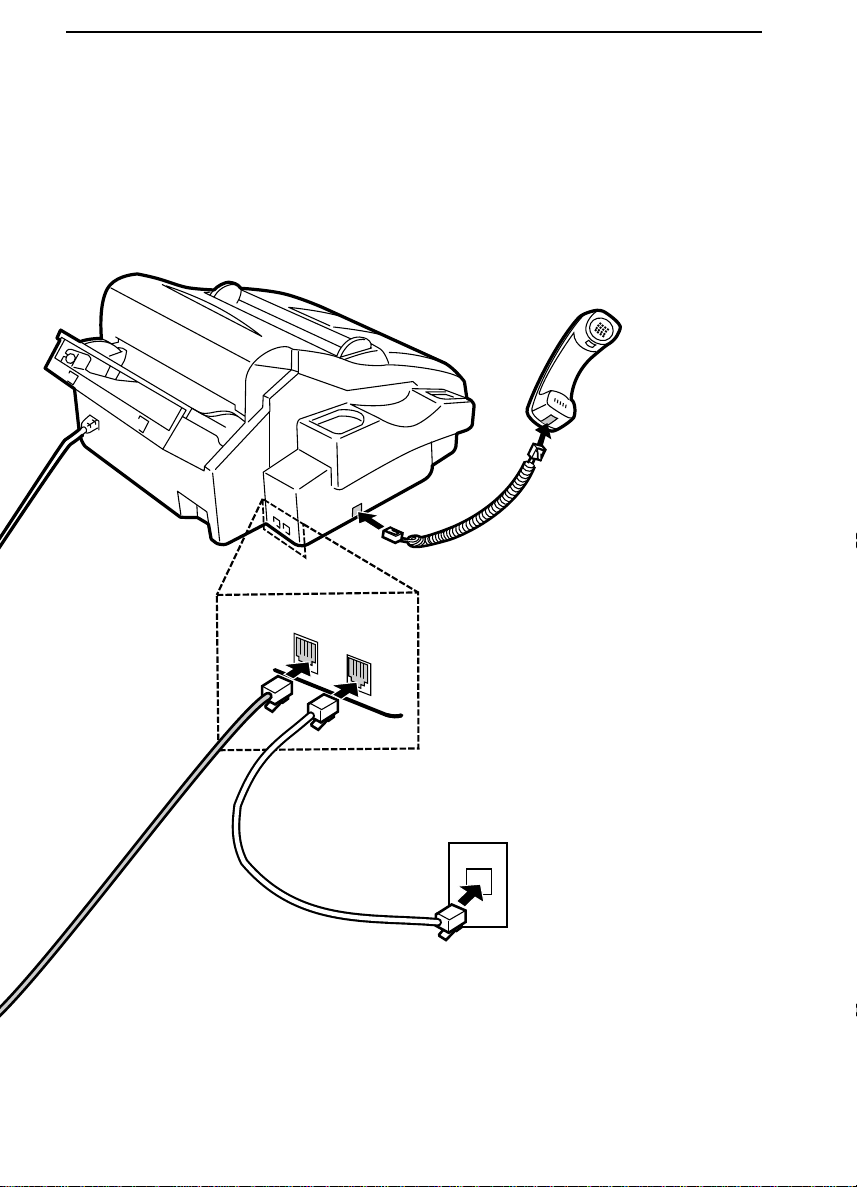
1. Connect the handset as shown.
2. Plug one end o f th e telephone lin e in t o t he
TEL. LINE jack on the rear of the fax, and
the other end into your telephone wall jack.
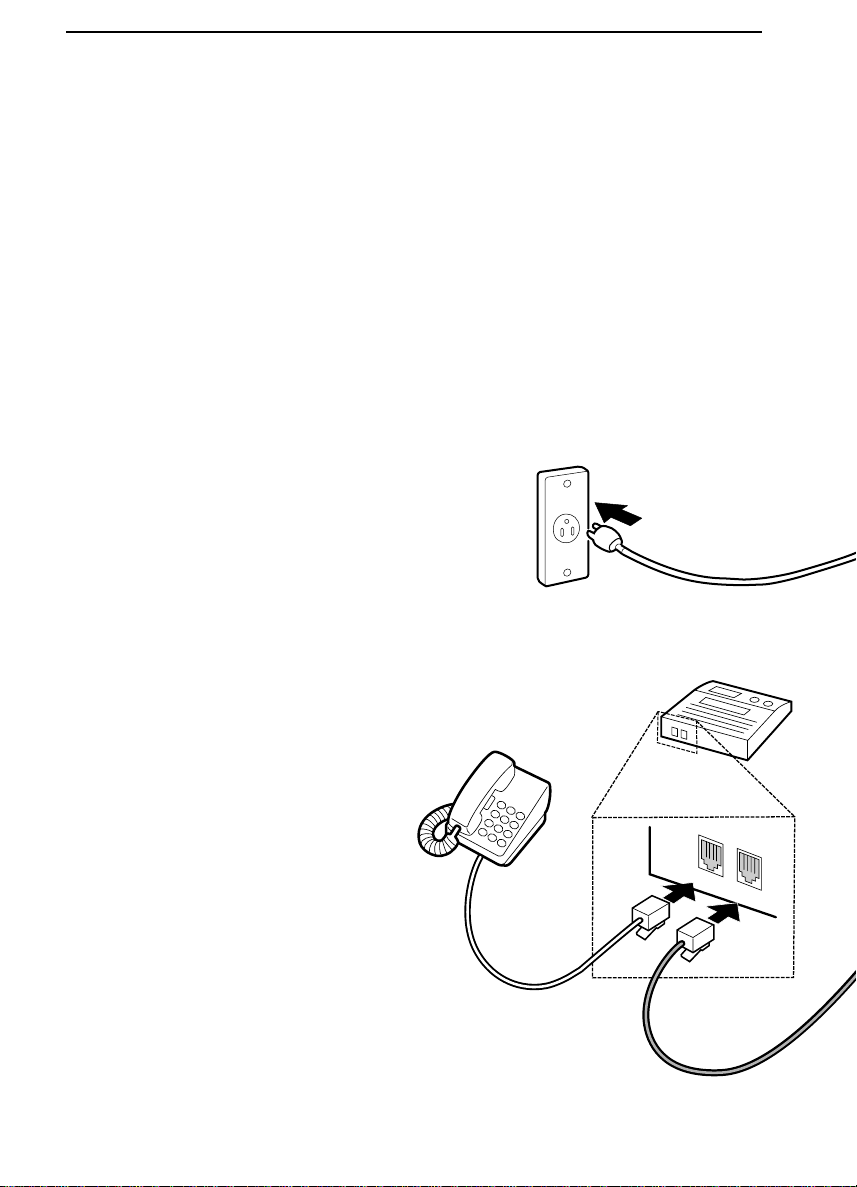
3. Plug the power cord into a grou nd ed , 120 V
outlet.
Installation with an answering machine
and/or extension telephone
4. Remove the seal co ve ring the TEL. SET
jack on the rear of the fax. Connect an extension telephon e or answeri ng machin e to
the TEL. SET jack.
5. If desired, connect an extension phone to
the answering machine.
Entering your name and
number
FCC regulations require your nam e and fax
number to appear on all documents you send.
To program your fax to do this automatically,
follow the steps below:
1.
Press the
"
3":
ENTRY MODE will appear in the display.
2.
Press the "
OWN NUMBER SET will appear in the dis-
play.
3.
Press the
FUNCTION key and then press
FUNCTION
3
#" key twi ce:
START key:
START
4. Enter your fax number (max. of 20 digits)
by pressing the number keys.
♦ If you make a mistake, press the
HOLD/SEARCH key to move the cursor
back to the mistake, then enter the correct
number or letter. (To move the cursor forward, press the
5.
Press the
6. Enter your name by pressing the appropriate number keys as shown below. Press
each key one or more times until the desired letter appears in the display.
ABC DEF
123
GHI JKL MNO
4
TUV WXYZPQRS
7
SPEAKER key.)
START key:
SPEED
DIAL
5
8
REDIAL
6
HOLD/
SEARCH
9
SPEAKER
0
START
Delete s highlighted letter
Upper/lower
case shift key
Moves cursor to
the left.
Moves cursor to
the right.
Press either key one or more times to select
and enter a symbol.
♦ Enter a space with the "1" key.
♦ To enter two letters in succession which re-
quire using the same key, press the
SPEAKER key after entering the first let-
ter.
Example: To enter "ABZ Co.", press:
"2" twice for the letter A,
Press
SPEAKER to move the cursor to the
right,
"
2" three times for the letter B,
9" five times for the letter Z,
"
1" twice for a space,
"
2" four times for the letter C,
"
REDIAL for a lower case letter,
Press
6" four times for the letter o,
"
#" once for a period.
"
7.
When finished, press the
then the
STOP key.
(See Pages 14-15 of your operation manual.)
START key and
START
STOP
Page 3
Quick Reference Guide
Setting the date and time
To set the date and time, press the following
keys:
DATE & TIME SET will appear in the display.
Press the
FUNCTION
3
START key:
START
Enter two digits for the Mont h (01 thro ug h 12).
Enter two digits for the Day (01 through 31).
Enter two digits for the Year (00 throu gh 99).
Enter two digits for the Hour (01 throu gh 12).
Enter two digits for the Minute (00 throu gh 59).
Press the "*" key for A.M. or the "#" key for
P.M.
When finished, press the
then the
STOP key:
START key and
START
STOP
(See Page 17 of your operation manual.)
Storing and clearing numbe rs
for automatic dialing
To store a new number or change an existing
number, press the following se qu ence of keys:
FUNCTION
FAX/TEL # MODE will appear in the display.
1.
Press the "
2. Enter a 2-digit number (from "01" to "99")
by pressing the number keys. This will be
the Speed Dial number.
3. En ter the full telep ho ne /fa x num b er.
4.
Press the
5. Enter the name of the locatio n by pressin g
number keys (max. of 20 characters).
6.
Press the
7. Return to Step 3 to store another number,
or press
3
1" key:
1
START key:
START key:
STOP to exit.
START
START
To clear a Speed Dial number, press the following sequence of keys:
Press "
2" and then enter the 2-digit Speed
Dial number.
Press:
START
STOP
FUNCTION
3
(See Pages 22-24 of your operation manual.)
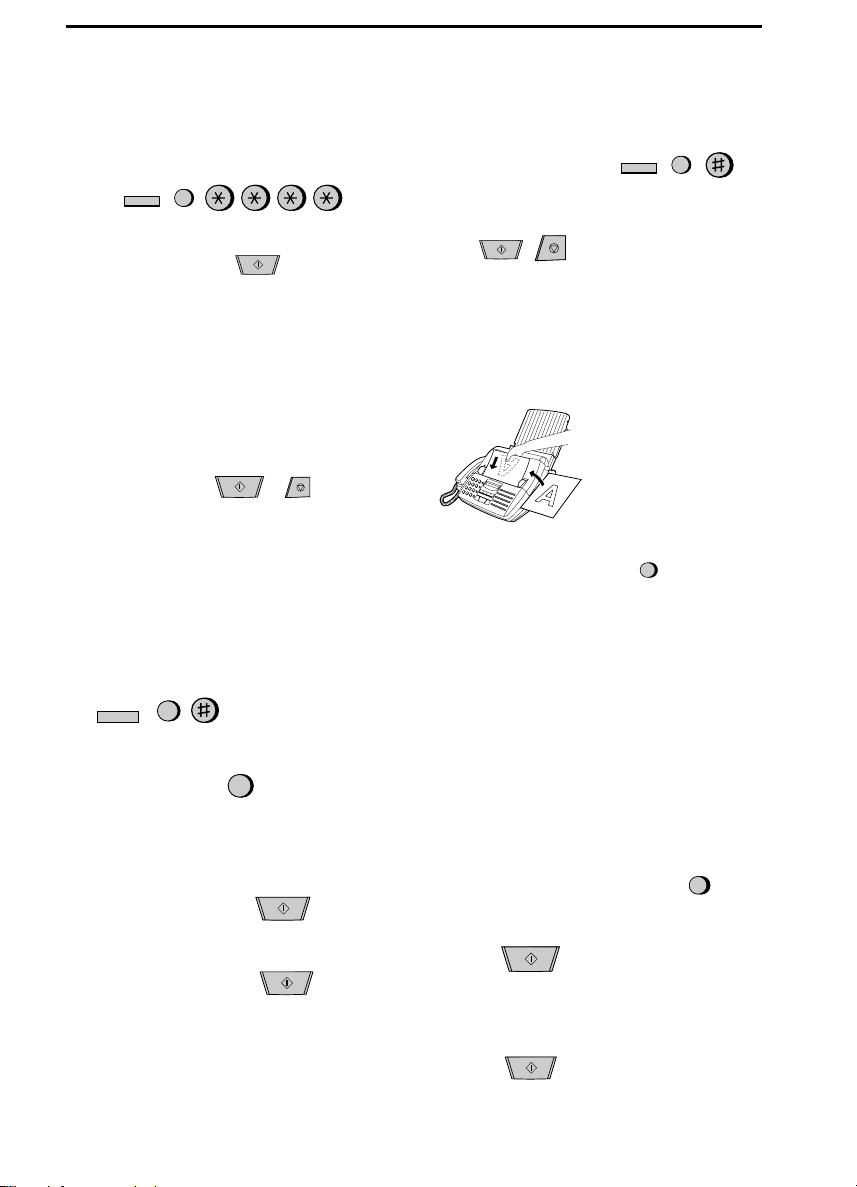
Sending documents
Place your document
(up to 20 pages) face
down in the document
feeder.
Normal Dialing
1. Lift the handset or press
2. Dial the fax number by pressing the number
keys.
3. Wait for the reception tone (if a person answers, ask them to press their Start key).
4.
Press your
the handset.
START key and then replace
Rapid Key Dial ing
Press the appropriate Rapid Key (if the Rapid
Key is from 20 to 38 , press the
first). Transmi ssion will be gin .
Speed Dialing
1.
Press the
SPEED DIAL key:
2. Enter the Speed Dial number by pressing
the number keys.
3. Press:
START
Direct Keypad Dialing
1. Enter the fax number by pressing the number keys.
2. Press:
START
SPEAKER
SHIFT key
SPEED
DIAL
(See Pages 32-34 of your operation manual.)
Page 4

Quick Reference Guide
Receiving Documents
RECEPTION
Press the RECEPTION
MODE
key until "AUTO"
MODE
or "MANU" appears in the
display.
AUTO reception: The fax will automatically answer after four rings and receive the incoming
document.
MANUAL reception: Lift the handset when the
fax rings. If you hear a fax tone, wait until
RECEIVING appears in the display, then hang
up (if RECEIVING doesn’t appear, press the
START key). If the calling party talks to you,
press your
START key to begin reception.
(See Pages 37-38 of your manual.)
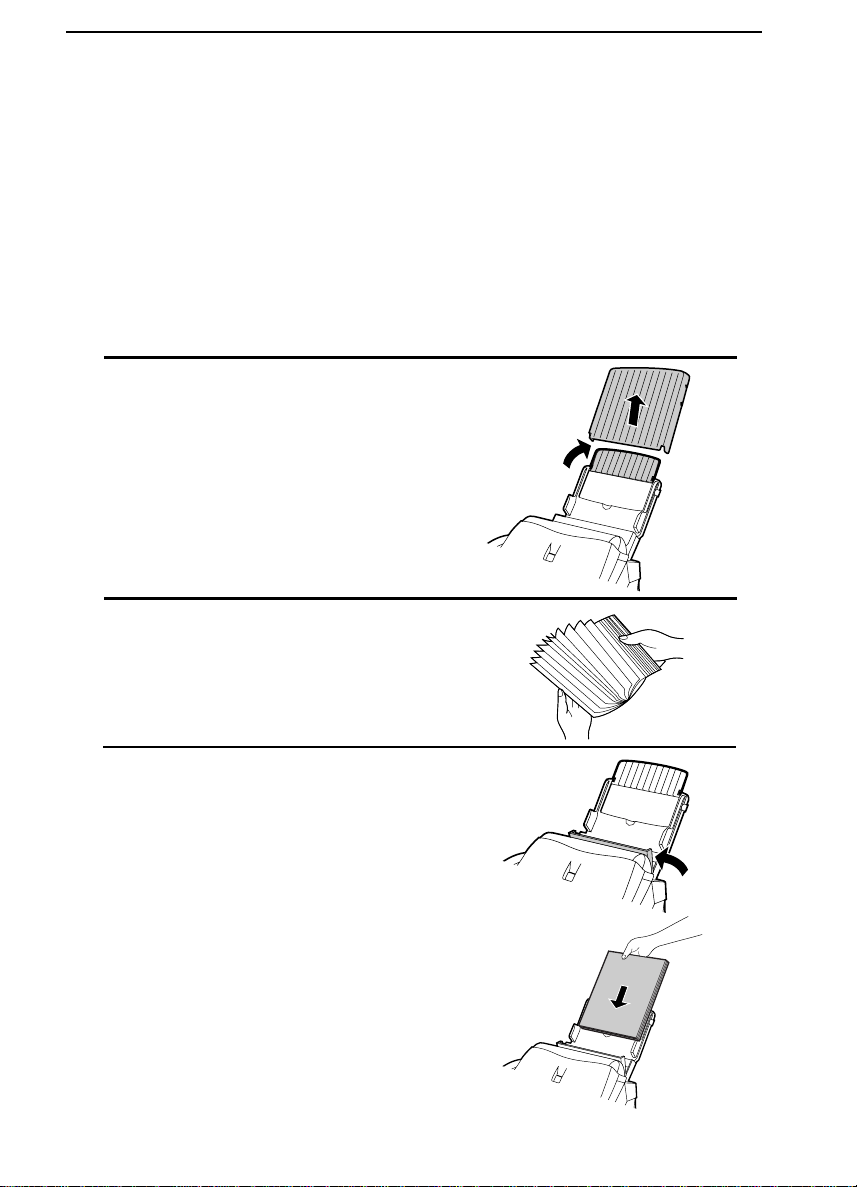
Loading paper
1. Insert the paper tray
into the fax if not yet installed.
2. Remove the paper
cover if it is on the tray.
(For legal paper, flip up
the tray externder.)
3. Pull the paper release
plate towa rd yo u.
♦ If any paper remains in
the tray, take it out and
combine it into a single
stack with the new paper.
4. Insert th e s tac k of
paper into the tray.
Replace the tray
cover and then push
the paper release
plate back down.
5. Press the following sequence of keys:
FUNCTION
6
Press "1" if you loaded letter size paper, or
"
2" if you loaded legal size paper.
When finished, press:
(See pages 9-10 of your manual.)
STOP
LETTER
LEGAL
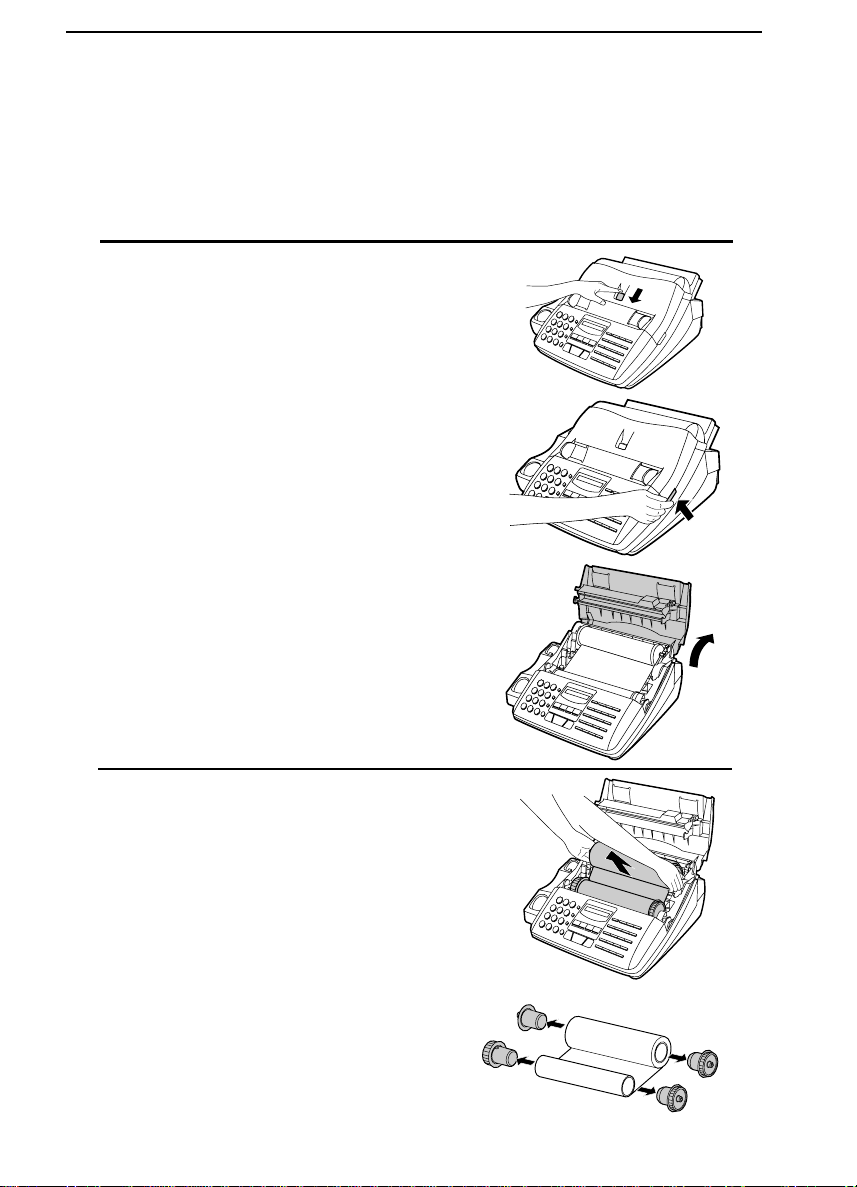
Install ing the imaging film
1. Press the release
marked
OPEN and
open the print compartment cover.
2. Insert two of the
gears in to the ends
of the spool with
film.
3. Hold the empty spool
so that the end with
only one slot is on the
left, and lower the
spools into the printing
compartment so that
th e gears fit into the
slots on each side of
the compartment.
4. Cut the band holding
the spools together
with scissors, and remove it. Insert the remaining gear into the
right end of the
empty spool and the
flange into the left
end of the empty
spool.
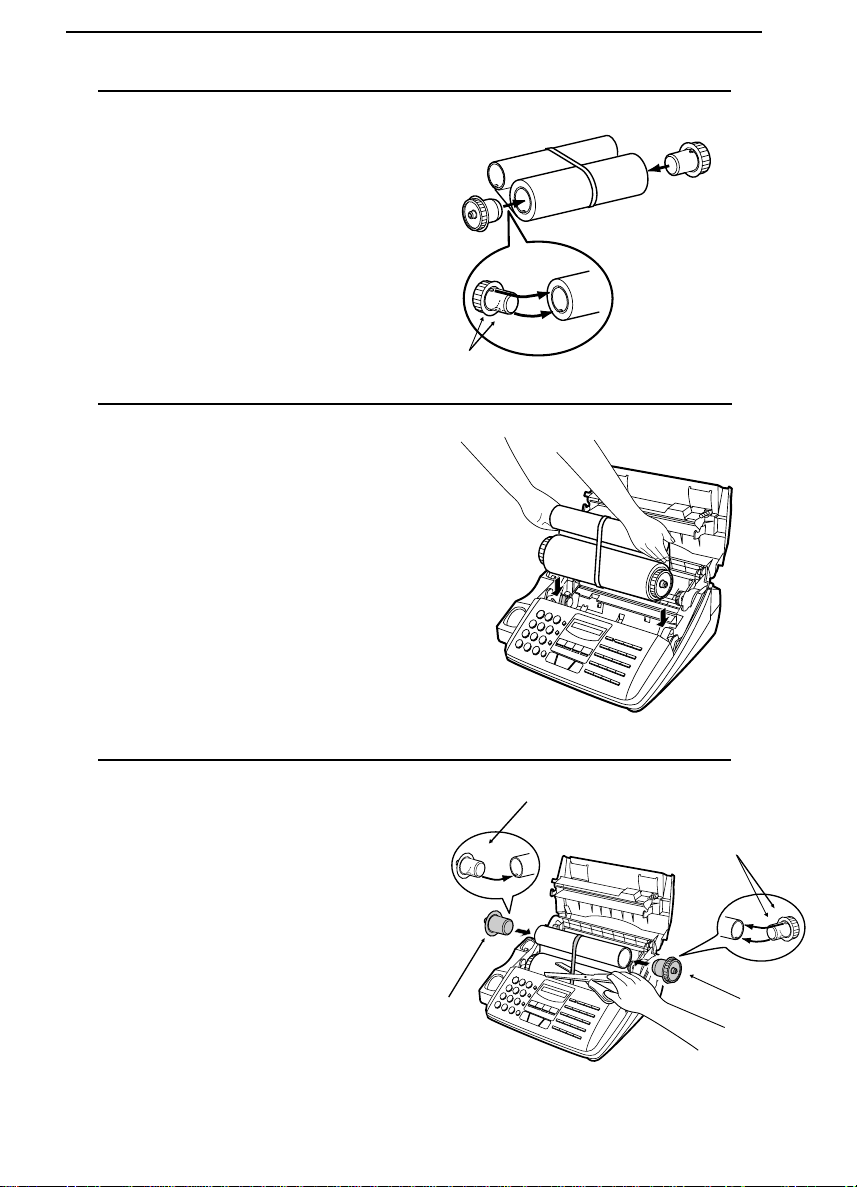
5. Pull the empty spool toward the back of the
compartment, unwinding the leader fro m the
spool with film . Insert
the empty spool into
the compartment so
that the gear and spool
fit into the slots on
each side of the compartment.
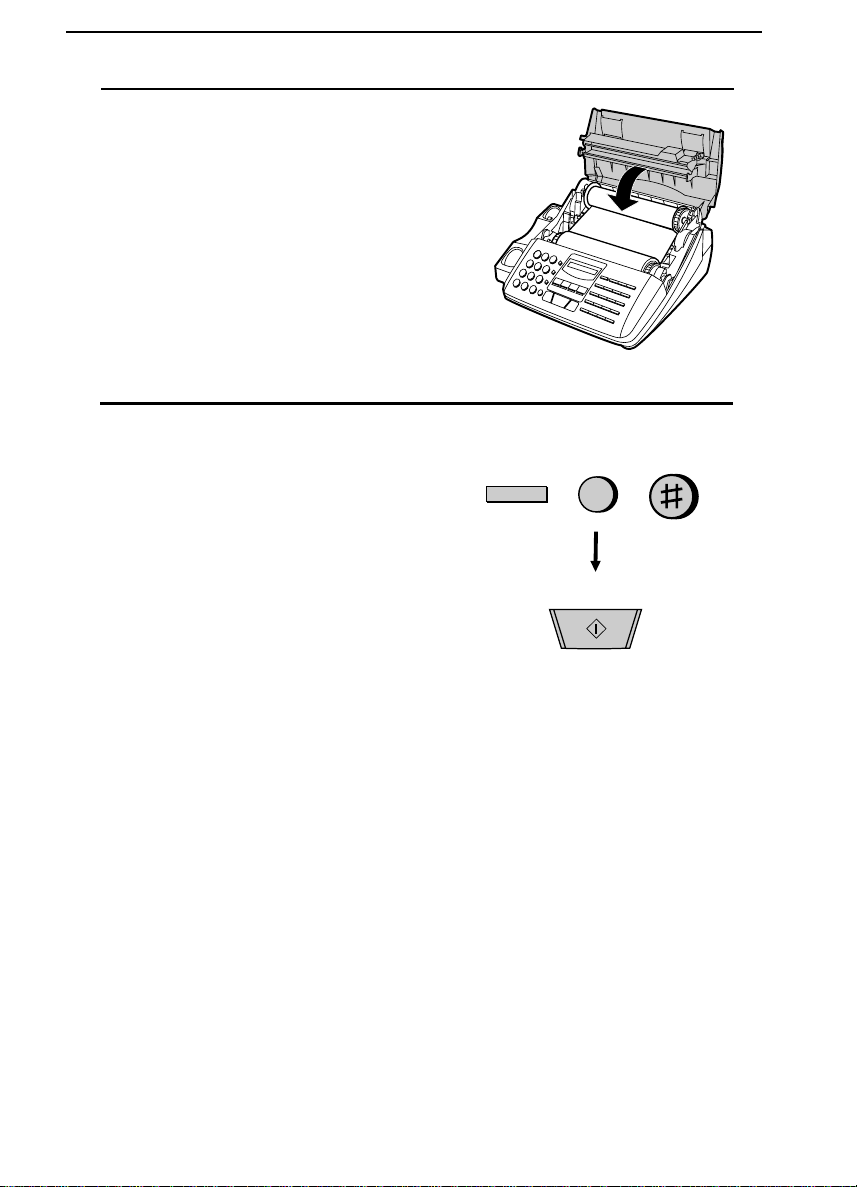
6. Wind the film slightly
to remove slack and
then close the
printer compartment
cover.
7. If you replaced the film, press the foll owin g
sequence of keys (this is not necessary for
the sample film inclu de d with the fax):
FUNCTION
6
(See Pages 2-5 of your operation manual.)
START
Page 5
Quick Reference Guide
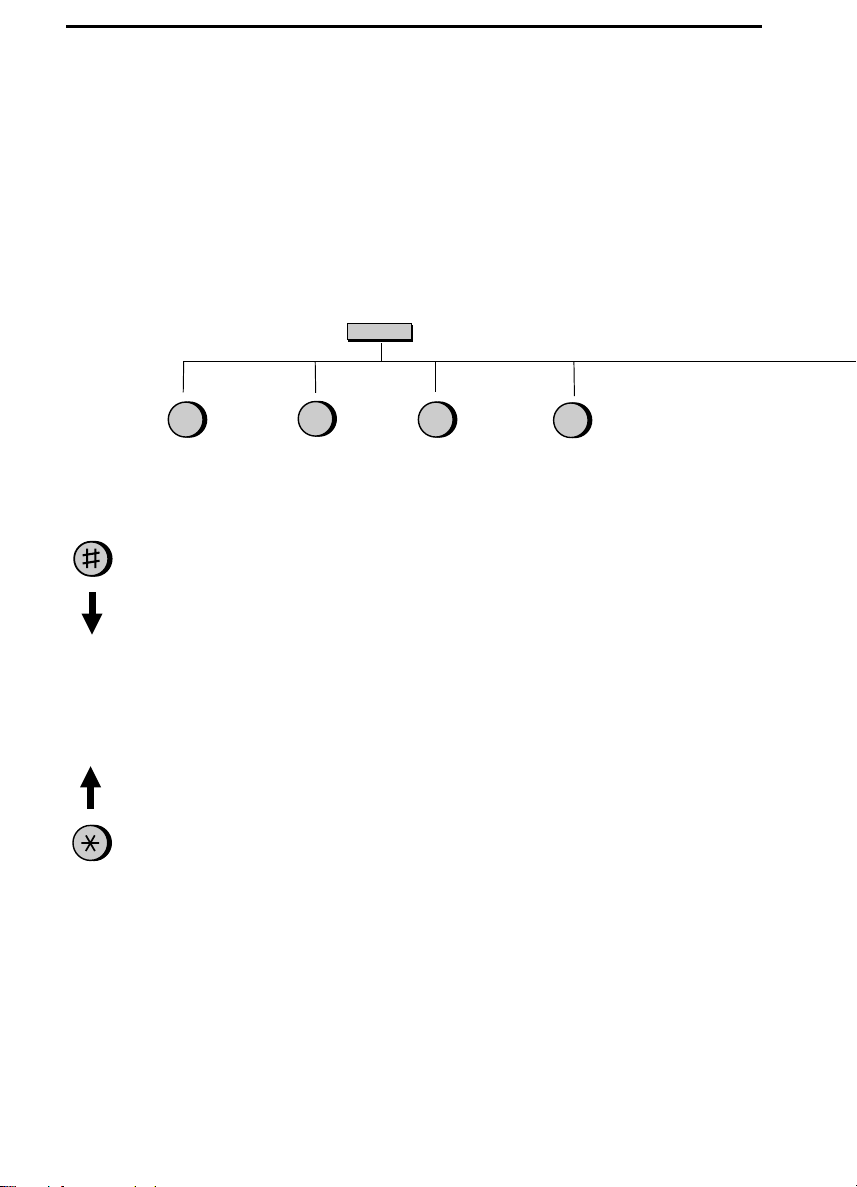
FUNCTION key menu
The follow ing char t shows the layout of the functio ns and setting s acce ssed by pressing the FUNCTION key. First press the FUNCTION key, t he a ppropriate numeric key
as shown, and then "#" or " *" until the desire d item appears.
Instruction s for mak ing each setting appear in the display . If you have any dif fic ulty, refer to the detailed instr uct ions on the page shown below t he se tting.
FUNCTION
1
Timer Mode
Sen d Mode
(66)
Poll Mode
(66)
2
Listing Mode
Activity Report
(77)
Timer List
(79)
Telephone
Number List
(80)
Passcode List
(80)
Option Setting
List
(80)
Anti Junk
Number List
(81)
Program an d
Group List
(81)
Caller ID List
(82)
Print Setup List
(82)
3
Entry Mode
Fax/Tel Numbers for Auto
Dialing
(22)
Own Number
and Name Set
(14)
Polling Security Select
(64)
Passcode Numbers for Polling
(65)
Date and Time
Set
(17)
Daylight Saving
(18)
Store Junk
Number
(57)
Priority Call
Number
(55)
4
Optional Settings
Fine Resolution
Priority
(73)
Number of
Rings in Auto
Mode
(73)
Recall Wait Interval
(74)
Reca ll Times
(74)
Tel/Fax Remote Number
(74)
Remote Reception Select
(74)
Transaction Report Print Select
(74)
Dial Mode
(74)
TAD Connected
(46, 75)
Quiet Detect
Time
(47, 51, 75)
Fax Reception
When TAD
Fails
(52, 75)
Distinctive Ring
(20, 75)
Fax Signal Receive
(75)
Junk Number
Check
(76)
Polling
(76)
Caller ID
(76)
Auto Cover
Sheet
(76)
Activity Rep ort
Auto Print
(76)
ECM (76)
Page 6

Quick Reference Guide
5
Cover Sheet
Cover Sheet
Header
(30)
6
Print Set-up
Initialize Film
(5)
Reception Ratio
(39)
2 in 1 Print
(39)
Paper Type Set
(10)
Paper Size Set
(10)
Copy Cut-off
(42)
7
Program /Group
Program Entry
Mode
(68)
Group Entry
Mode
(25)
Page 7

Introduction
Welcome to the UX-500/51 0 and thank you for choosi ng Sharp! In addition to
providing yo u wit h the ease an d con ven ie nce of plai n-pa pe r pri nti ng, th e UX500/510 featur es a vari et y of spe cial func tions de sign ed t o incre ase the rang e
and power of your communications.
This manu al gives you e asy- to- follow instruct io ns for i nsta llin g and using the
UX-500/510. The Tabl e of Content s will show you where inst ruc tions fo r usin g
each feat ure are loc at ed . W hi le you m ay no t ne ed t o rea d every sect io n in detail
at first, we recom m end you at least look them over br iefly .
If you have any quest io ns or problems which ca nnot be solve d by re adi ng t his
manual, please conta ct Shar p’s Cust om er Infor mati on Cent er. The nu mber is 1800-BE SHARP.
Important:
•• This facsi mi le mach ine is not desi gne d for use on a lin e whi ch has ca ll
waiting, call forwardi ng, or certai n other spec ial ser vices of fer ed by your
telephone com pan y. If you attem pt to use the fax mac hine i n conjun ct ion
with any of these servi ce s, you may expe rienc e errors du rin g tra nsm issi on
and recepti on of fa csi m il e messa ges.
•• This fax machine is not compatible with digital telephon e systems. No other
fax machines ma y be connected to t he sa me line.
Note: The illustrations in this manual show the UX-500.
Page 8

Important safety inform ati on
• If your facsim i le equip me nt is not oper ating properly , you should imm ediately
remove it from your telephone line, as it may cause harm to the telephone
network.
• The power outlet must be installed near the equipment and must be easily
accessible.
• Never install telep hone wiri ng du rin g a light ni ng sto rm .
• Never install telephone jacks in wet locations unless the jack is specifically
designed for wet location s.
• Never touch bare telephone wires or t erminals unl ess the telephone line has been
disconnected at the network interface.
• Use caution when install ing or m odi fyi ng te lepho ne l ines.
• Avoid using a telephone (ot her t han a cor dless t ype ) du rin g an ele ctric al storm .
There may be a remo te risk of electri c shoc k from lightning.
• Do not use a telephone to report a gas leak in the vicini ty of the leak.
• Do not install or use the machine near water, or when you are wet. Take care
not to spill any liquid s o n the ma ch ine .
Page 9

Table of Contents
1 Installation 1
Unpacking Checklist. . . . . . . . . . . . . . . . . . . . . . . . . . . . . . . . . . . . . . . . 1
Loading the Imaging Film . . . . . . . . . . . . . . . . . . . . . . . . . . . . . . . . . . . 2
Connections. . . . . . . . . . . . . . . . . . . . . . . . . . . . . . . . . . . . . . . . . . . . . . . 6
Attachments. . . . . . . . . . . . . . . . . . . . . . . . . . . . . . . . . . . . . . . . . . . . . . . 8
Loading Printing Paper . . . . . . . . . . . . . . . . . . . . . . . . . . . . . . . . . . . . . . 9
2 Initial Settings 11
Setup Guide. . . . . . . . . . . . . . . . . . . . . . . . . . . . . . . . . . . . . . . . . . . . . . 11
A Look at the Operation Panel . . . . . . . . . . . . . . . . . . . . . . . . . . . . . . . 12
Entering Your Name and Fax Number. . . . . . . . . . . . . . . . . . . . . . . . . 14
Entering Letters for Names. . . . . . . . . . . . . . . . . . . . . . . . . . . . . . . . . . 15
Setting the Date and Time. . . . . . . . . . . . . . . . . . . . . . . . . . . . . . . . . . . 17
Selecting the Reception Mode . . . . . . . . . . . . . . . . . . . . . . . . . . . . . . . 19
Distinctive Ring . . . . . . . . . . . . . . . . . . . . . . . . . . . . . . . . . . . . . . . . . . 20
Storing Numbers for Automati c Diali ng . . . . . . . . . . . . . . . . . . . . . . . 22
Volume Adjustment . . . . . . . . . . . . . . . . . . . . . . . . . . . . . . . . . . . . . . . 26
3 Sending Documents 27
Transmittable Documents. . . . . . . . . . . . . . . . . . . . . . . . . . . . . . . . . . . 27
Loading the Document . . . . . . . . . . . . . . . . . . . . . . . . . . . . . . . . . . . . . 28
Optional Transmis sio n Setti ngs . . . . . . . . . . . . . . . . . . . . . . . . . . . . . . 29
Dialing and Transmission. . . . . . . . . . . . . . . . . . . . . . . . . . . . . . . . . . . 32
4 Receiving Documents 37
Using Auto Mode . . . . . . . . . . . . . . . . . . . . . . . . . . . . . . . . . . . . . . . . . 37
Using Manual Mode . . . . . . . . . . . . . . . . . . . . . . . . . . . . . . . . . . . . . . . 37
5 Making Copies 40
6 Making Telephone Calls 43
Page 10

7 Answering Machine Hookup 45
Using the Hookup . . . . . . . . . . . . . . . . . . . . . . . . . . . . . . . . . . . . . . . . 45
Optional Hookup Settin gs . . . . . . . . . . . . . . . . . . . . . . . . . . . . . . . . . . 51
8 Special Functio ns 53
Caller ID . . . . . . . . . . . . . . . . . . . . . . . . . . . . . . . . . . . . . . . . . . . . . . . . 53
Blocking Reception of Unwanted Faxes . . . . . . . . . . . . . . . . . . . . . . . 57
Memory. . . . . . . . . . . . . . . . . . . . . . . . . . . . . . . . . . . . . . . . . . . . . . . . . 59
Broadcasting . . . . . . . . . . . . . . . . . . . . . . . . . . . . . . . . . . . . . . . . . . . . . 61
Polling (Req uesti ng a Fax Transm iss ion ). . . . . . . . . . . . . . . . . . . . . . . 63
Timer Operations . . . . . . . . . . . . . . . . . . . . . . . . . . . . . . . . . . . . . . . . . 66
Entering and Using Programs. . . . . . . . . . . . . . . . . . . . . . . . . . . . . . . . 68
9 Optional Sett ings 73
10 Printing Reports and Lists 77
11 Maintenance 83
12 Troubleshooting 85
Problems and Sol utions. . . . . . . . . . . . . . . . . . . . . . . . . . . . . . . . . . . . . 85
Messages and Signals . . . . . . . . . . . . . . . . . . . . . . . . . . . . . . . . . . . . . . 88
Clearing Paper Jams . . . . . . . . . . . . . . . . . . . . . . . . . . . . . . . . . . . . . . . 90
Specifications 92
FCC Regulatory Information 96
Guia de Consulta Rapida 97
Index 100
Page 11

1
Chapter
Installation
Unpacking Checklist
After unpackin g your fax, make sure you ha ve all the item s shown be low. If any
are missing, contact your dealer or retailer.
Paper tray
cover
Paper tray
Handset
3 gears and
1 flange
Sample
imaging film
Rapid key
labels
Operation
manual
Handset cord
Telephone
line cord
Original document
support (located
between box and
packing case)
Points to keep in mind when setting up
♦ The fax must be installed on a level surface.
♦ Keep the fax away from air conditioners, heaters, direct sunlight, and dust.
♦ Provide easy access to the front, back, and sides of the fax . In particular,
keep the area in front of the fax clear, or the original document may jam as
it comes out after scanning.
♦ If the fax is moved from a cold to a warm place, it is possible that condensa-
tion may form on the reading glass, preventing proper scann ing of documents for transmission. To remove the condensation, turn on the power and
wait approximately two hours before us ing the fax.
♦ If your area experiences a high incidence of lightn ing or power surges, we
recommend that you install surge protectors for the power and telephone
lines. Surge protectors can be purchased at most telephone specialty stores.
1
Page 12
Chapter 1 Installation
Loading the Imaging Film
The prin ter uni t in your fa x cr eate s prin te d te xt and im a ges by appl yi ng he at to
the imaging film , which causes i nk to be transf err ed fr om the fil m to the page.
Follow the step s bel ow to i nsta ll or repla ce the imag ing film.
1
Press the release marked OPEN and
open the print compartment cover.
•• Caution! The printing head (the strip
of metal on the underside of the cover)
applies heat to the printing film. It may
be hot if a document has just been
printed.
2
If you are replacing the imaging film,
take the old film out of the printing compartment and remove the three (3) green
gears and the green flange from the ends
of the spools.
DO NOT DISCARD THE GREEN
GEARS AND THE GREEN
FLANGE!
2
Page 13
3
Take the new film out of its package,
and insert two of the gear s provided with
the fax into the ends of the spool with
film. Make sure that the two tabs on the
gears fit properly into the slots in the
ends of the spool.
•• Do not yet remove the band which
holds the spools together.
4
Hold the empty spool so that the end
with only one slot is on the left, and
lower the spools in to the front of the
printing compartment. The gears in the
ends of the spool with film should fit into
the slots on each side of the printing compartment.
Chapter 1 Installation
2 tabs
5
Cut the band which holds the spools together with scissors, and remove it. Insert
the remaining gear into the right end of
the empty spool and the flange into the
left end of the empty spool. Make sure
the tabs on the gear and the flange fit into
the slots in the ends of the spool (the gear
has two tabs and the flange has one tab).
Flange
1 tab
2 tabs
Gear
3
Page 14

Chapter 1 Installation
6
Pull the empty spool toward the back of
the compartment, unwinding the film as
you pull.
7
Insert the empty spool into the back of
the compartment so that the gear and the
flange fit into the slots on the sides of the
compartment.
•• Make sure that the gear engages with
the gear below it.
8
Wind the film slightly (rotate the gear on
the right side of the empty spool) so that
there is no slack in the film. Make sure
that both edges of the film wind onto the
spool evenly.
4
Page 15
9
Close the print compartment cover, making sure it clicks into place.
•• Caution! Close the cover slowly to
make sure it doesn’t pinch your fingers.
10
If you replaced the film, initialize the
new film by pressing the FUNCTION
key, the "6" key, and the "#" key on the
operation panel. Make sure that INITIALIZE FILM appears in the display, and
then press the START key. (Do not perform this step if you installed the initial
sample roll of film.)
Chapter 1 Installation
FUNCTION
6
START
When to replace the ima ging film
The sample roll of imagi ng fi lm pro vid ed wi th yo ur fa x is capa ble of printing approxim at ely 65 pa ges of lette r siz e pape r. Whe n it is use d up, FIL M END wil l
appear in the displa y. Repla ce it with the foll owin g imag ing film, which is ava ilable at your dealer or retailer.
UX-15CR Imaging Film
One roll of UX-15CR im aging fi lm is capa bl e of print in g approximately 500
pages of lett er size paper whe n pri nt ed cont inu ousl y.
Caution!
The text of documents printed with the imaging film is visible on the used
film. If confidential information has been printed, dispose of the film
appropriately.
5
Page 16
Chapter 1 Installation
Connections
Connect the power cord, telephon e line cord, and handse t as shown below. If desired, you can also connect an answering machine or an extensi on tele pho ne to
your fax.
♦ Connecting an answering machine to the fax will allow you to receive both
voice and fax messages on the same line while you are out. For details on
using this feature, see Chapter 7. (Note: Do not connect an answering machine to your fax if you will be using the distinctive ring feature described
in Chapter 2.)
♦ You can connect an extension phone to the fax to make and receive calls
like any other extension phone on your line. For details on receiving faxes
from an extension phon e, see Chapter 4, "Receiving Documents".
1
Plug the power cord into a 120 V,
60 Hz, grounded (3-prong) outlet.
Caution: Do not plug the power
cord into any other kind of outlet.
This will damage the machine and
is not covered under the warranty.
2
To connect an answering machine
or extension phone to the fax, first
remove the seal covering the TEL.
SET jack on the fax, and then insert
the line for the answering machine
or the extension phone into the
TEL. SET jack. For an answering
machine, the other end of the line
should be connected to the answering machine’s telephone line jack,
not its extension phone jack.
If desired, you can connect an answering
machine to the fax first, and then connect
an extension phone to the answering machine’s extension phone jack.
AC outlet
Extension
telephone
Answering
machine
EXT.
PHONE
TEL.
LINE
6
Page 17
TEL.
SET
TEL.
LINE
Chapter 1 Installation
3
Connect the handset as shown and
place it on the handset rest.
Handset
4
Insert one end of the telephone line
cord into the TEL. LINE jack. Insert the other end into a standard
(RJ11C) single-line telephone wall
jack.
Be sure to insert the telephone line
cord into the TEL. LINE jack. Do
not insert it into the TEL. SET
jack.
Wall jack
Comments:
•• Your fax is set for touch- ton e dialing . If you are on a pulse dial (rota ry) line,
you must set the fax for pul se dialing by ch ang ing Option Set ting 8. T his
procedure is descr ibed in Chapte r 9, "Optiona l Set tings".
•• If you intend to use a computer fax modem on the same phone line, you must
reset Option Se tting 13 to OFF in order to prevent transm issi on and recep tion
errors. Thi s proc edu re is d esc rib ed in Cha pter 9, "Optional Setting s".
7
Page 18
Chapter 1 Installation
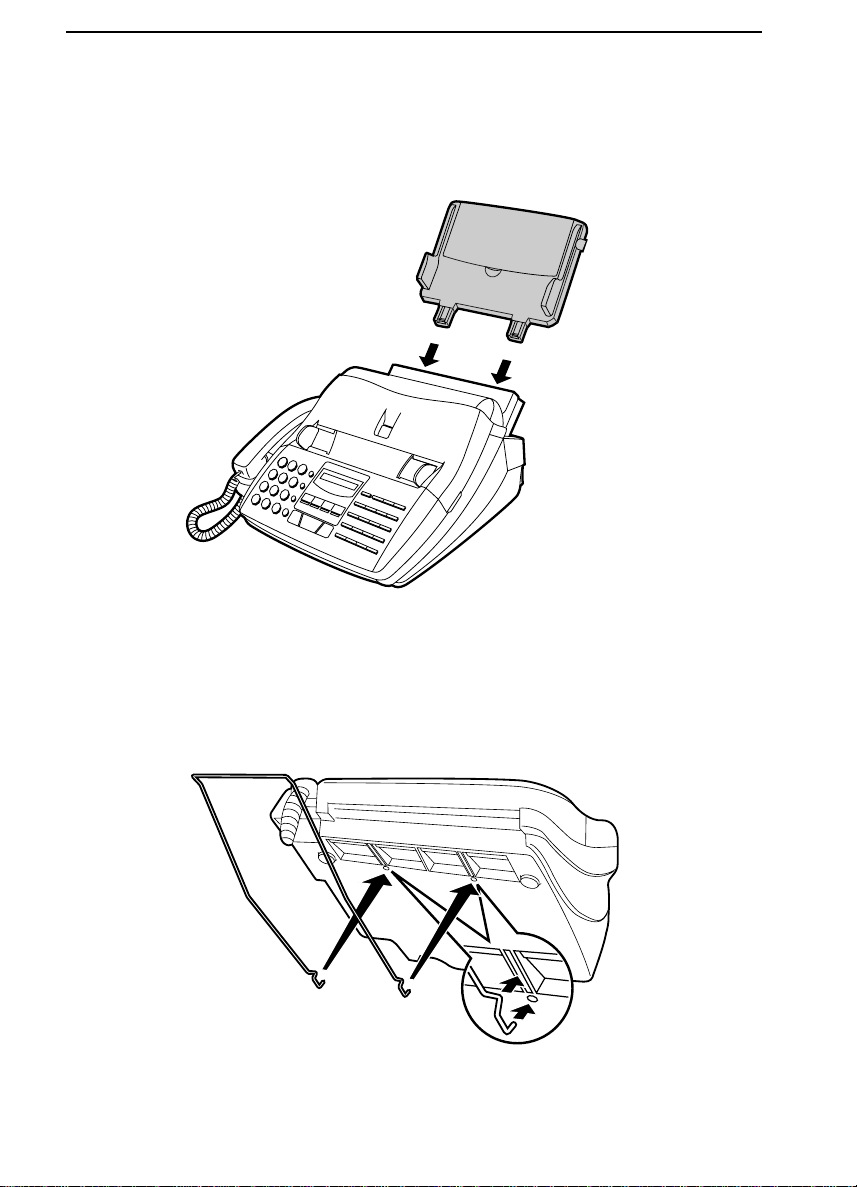
Attachments
Insert the paper tray into the back of the fax as shown.
If desired , attach the origin al docume nt suppor t by inser ting th e ends into th e
holes in the botto m of the fax as shown.
8
Page 19
Chapter 1 Installation
Loading Printing Paper
The paper tray hol ds the pap er on whic h rec eived documents and copies a re
printed. Up to 200 shee ts of lette r or lega l si ze paper fro m 16 to 20 lbs. (60 to 75
2
) can be loaded in the tray. Less shee ts can be loa ded when using heavier
g/m
paper. The max im um allowe d pa per weig ht i s 24 lbs. (90 g/m
Note: When receiving or copying documents, do not allow more than 100
pages to collect in the received document outlet. Otherwise, the outlet may become obstructed, causing paper jams.
1
Remove the paper cover if it is on the paper tray.
•• If you are going to load legal size pa-
per, flip up the paper tray extender.
2
Fan the paper, and then tap the edge
against a flat surface to even the stack.
2
).
3
Pull the paper release plate toward you
and insert the stack of paper into the tray,
print side down.
•• If paper remains in the tray, take it out
and combine it into a single stack with
the new paper before adding the new
paper.
9
Page 20

Chapter 1 Installation
4
Replace the paper cover on the paper
tray and then push the paper release
plate back down.
•• Important: Be sure to replace the pa-
per cover before you push the paper
release plate down.
5
Your fax has been set a t the factory to
scale the size of the printed image to letter size paper. If you have loaded legal
paper, you must change this setting to legal. Press the FUNCTION key, the "6"
key, the "*" key twice, and then press
"1" to select letter, or "2" to select legal.
When finished, press the STOP key. Be
sure to change this setting every time
you change the paper size.
FUNCTION
6
Letter Legal
1
or
STOP
LETTER
LEGAL
2
6
Your fax has been set at the factory to
print on regular paper. If you have
loaded high quality thermal transfer paper, you must change this setting to
HIGH QUALITY. Press the FUNC-
TION key, the "6" key, the "*" key
three times, and then press "1" to select
regular, or "2" to select high quality paper. When finished, press the STOP key.
Be sure to change this setting again if
you change back to regular paper.
10
FUNCTION
6
Regular High quality
or
1
2
STOP
Page 21

2
Initial
Chapter
Setup Guide
Before you can be gin using your fax, there are some setti ngs th at must be made
with the keys on the ope rat ion pan el . Some of the setti ngs ar e requi red for ba sic
use of your fax, oth ers m ay or may not be necessary depending on how you
want to use the fax. The procedu res for making the set tings a re de scr ibed in this
chapter in the order shown below (wit h the exce ption of Caller ID).
Required settings:
♦ Entering your name and fax/telephone number in the fax
♦ S etting the fax to the current date and time
♦ S electing the reception mode
Settings whic h ma y be nec ess a ry :
♦ Distinctive ring: If you subscribe to a distinctive ring service from your
Settings
telephone company (this is a s ervice which allows you to use several different devices, each with its own phone number and ring pattern, on one line),
you will want to select a ring pattern for your fax.
♦ Storing numbers for automatic dialing: Automatic dialing allows you to
dial a full fax or phone number by si mply pressing a Rapid Key, or by
pressing the SPEED DIAL key and entering a 2-digit number. To use automatic dialing, you must store the desired fax and phone numbers in the fax.
♦ Volume: Adjustment of the volume of the sp eaker, handset, and ringer.
♦ Caller ID: If you subscr ibe to a Caller ID service from your telephone com-
pany, the fax will display and retain in formation which the telephone company provides about each call. To use this featur e, set Option Setting 16 as
described in Chapter 9, "O ptional Settings". For information on using
Caller ID, see "Caller ID" in Chapter 8.
11
Page 22

Chapter 2 Initial Settings
A Look at the Operation Panel
Before you make the set tings, ta ke a mome nt to fami li arize yourself with the
operatio n pan el .
SPEED DIAL key
REDIAL key
Press this key to
automatically redial
the last number dialed.
Press this key to
dial a 2-digit Speed
Dial number.
12
Number keys
Use these keys to dial
number s, and e nter
numbers and letters
during number/name
storing procedur es .
ABC DEF
123
GHI JKL MNO
456
TUV WXYZPQRS
789
HOLD/SEARCH key
Press this key to sear ch
for an automatic dialing
number , or, dur ing a
phone conver sation, press
this key to put the ot her
party on hold .
SPEED
DIAL
REDIAL
HOLD/
SEARCH
SPEAKER
0
SPEAKER key
Press this key to
dial a number
without picking up
the handset .
Page 23
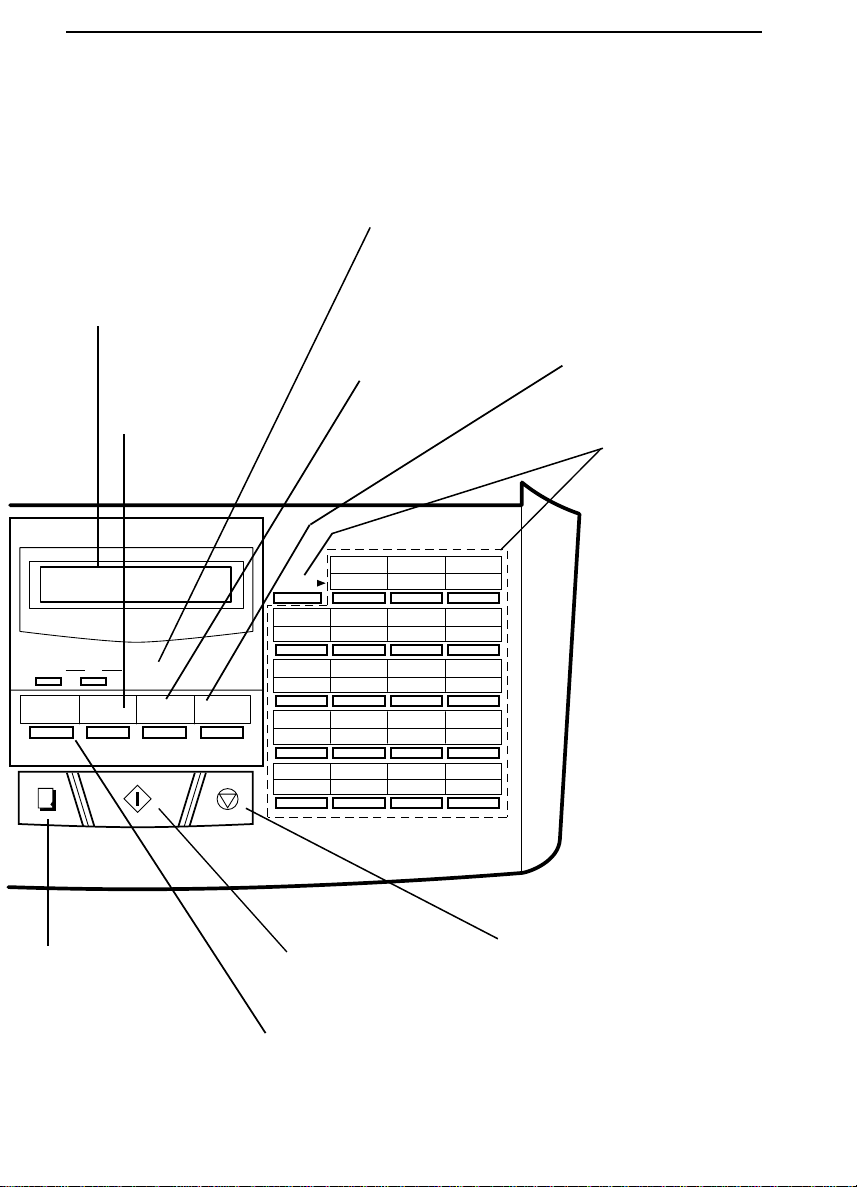
Display
This displays various
messages during operation
and programming.
FUNCTION key
Press this key to
select various
special function s.
DOWN
UP VOLUME
RECEPTION
MODE
COPY/
HELP
RESOLUTION
FUNCTION MEMORY
START
STOP
Chapter 2 Initial Settings
VOLUME keys
Press these keys to adjust the vo lum e of
the handset when the handse t is lifted,
the volume of the speaker when the
SPEAKER key has been pressed, or
the volume of the rin ger at all other time s.
RESOLUTION key
Press this key to
adjust the re solution
and contras t before
sending or copying a
docume nt .
01 02 03
20 21 22
SHIFT
0504 06 07
2423 25 26
0908 10 11
2827 29 30
1312 14 15/POLL
3231 33 34
17/P216/P1 18/G1 19/G2
3635 37 38
MEMORY key
Press this key to
scan a docum ent
into memory before
transmit t ing it.
Rapid Dial Keys
Press one of these
keys to dial a fax or
voice numbe r
automatically. To
dial the bottom
number on a Rapid
Key, press the
SHIFT key before
pressing the Rapid
Key. (Note that you
must attach the
Rapid Key labels.)
COPY/HELP key
When a docum en t is in
the feeder, press this key
to make a copy. At an y
other time, press this key
to print out the Help List,
a quick reference guide
to the operation of your
fax.
START key
Press this key to send
or receive a docum en t.
RECEPTION MODE key
Press this key to select
the mode of reception .
STOP key
Press this key to
stop operation s
before they are
completed .
13
Page 24
Chapter 2 Initial Settings
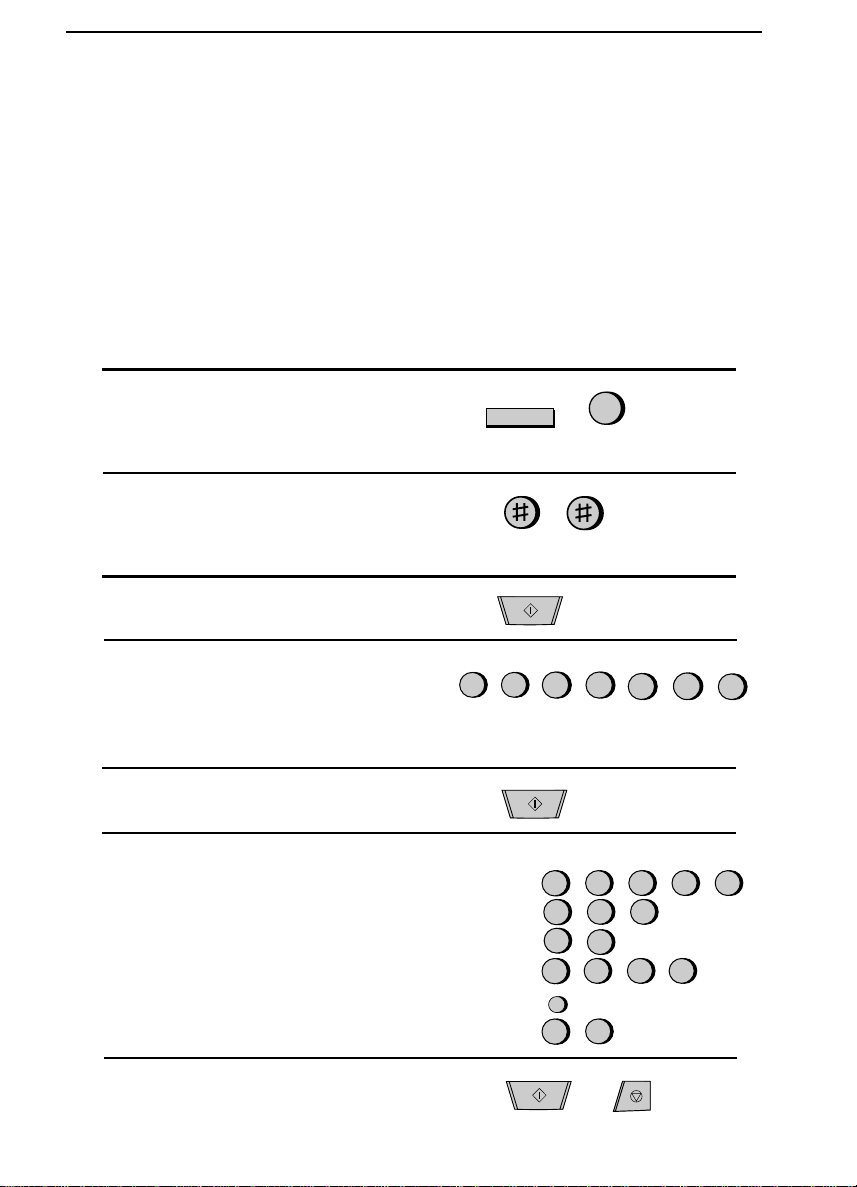
Entering Your Name and Fax Number
To have your name and fa x/t el ep hone num be r printe d at the top of every pa ge
you transmi t, pro gra m them by pressi ng th e pa nel key s as shown be lo w.
♦ You must program your name and fax number in order to comply with the
Consumer Protection Act of 1991 (see inside of front cover).
♦ If you make a mistake, press the HOLD/SEARCH key to move the cursor
back to the mistake, then enter the correct number or letter. (To move the
cursor forward, press the SPEAKER key.)
1
Press the FUNCTION key and then the
"3" key. ENTRY MODE will appear in
the display.
2
Press the "#" key two times.
OWN NUMBER SET will appear in the
display.
3
Press the START key.
4
Enter your fax number (max. of 20 digits) by pressing the number keys. (To insert a space between digits, press the "#"
key. To insert a "+", press the "*" key.)
5
Press the START key.
6
Note that there are letters marked above
each of the number keys. Enter your
name by pressing the app ropr iate number key for each letter several times until
the letter appears in the display. (Max. of
24 characters.) For exa mple , to enter "S"
press "7" five times. See the following
page for more details.
FUNCTION
START
5
5
5
START
(Example: SHARP)
S:
7
4
H:
2
A:
7
R:
SPEAKER
7
P:
3
1
2
(Example)
7 7 7
4 4
2
7 7 7
(Move cursor)
7
3
4
7
7
Press the START key and then the
STOP key.
14
START
STOP
Page 25

Chapter 2 Initial Settings
Entering Letters for Names
Names are progra m me d by pressing the numbe r keys. You wil l notic e that letters are marke d ab ove each of t he nu mb er ke ys "2" throug h "9". To enter a letter
(or number) , press th e approp riate key one or more tim es unt il the lett er appe ars
in the display (t he number will appear fir st, fol lowe d by t he let ters in t he order
marked above the key) . The keys use d for entering l ette rs and editing ar e shown
below.
Comments:
•• To enter two letters i n successi on whi ch requ ire usin g the sam e key, press the
SPEAKER key after ente ri ng th e fi rst let te r to move the cur sor to the righ t.
•• To change a letter, move the cursor using the HOLD/SEARCH key or the
SPEAKER key to the le tter and enter th e de sire d lett er . T he new lett er will
replace the old o ne.
Letters and numbers
Space
Press this key twice
to enter a space.
ABC DEF
123
GHI JKL MNO
4
7
To enter a lette r or num b er , pr es s
the approp riat e key re peat ed ly until
the desired number / lett er app ear s
in the display (the numb er ap pear s
first, then the letters in the order
marked ab ove the ke y) .
SPEED
DIAL
REDIAL
5
TUV WXYZPQRS
8
6
9
HOLD/
SEARCH
SPEAKER
0
Delete
Press this key to delete the
letter highlighted by the cur sor
(if the cursor is to the right of
the last letter entered, it will
backspace and delete t he last
letter).
Shift
Press this key once to change
case (press it again to change
back).
Cursor left
Press this key to move t he
cursor to the left.
Symbols
Press either key re pe at edly unt il the
desired symbol appe ar s (see t he
symbol list on the following page).
Cursor right
Press this key to move the
cursor to the right.
15
Page 26
Chapter 2 Initial Settings
Symbol list
To enter a symbol from the li st below, pre ss the "#" key or the "*" ke y re peatedly until th e desire d sym bol app ea rs.
# → ← *
. / ! " # $ % & ’ ( ) + + , - : ; < = > ? @ [ ¥ ] ^ _ p { | } → ←
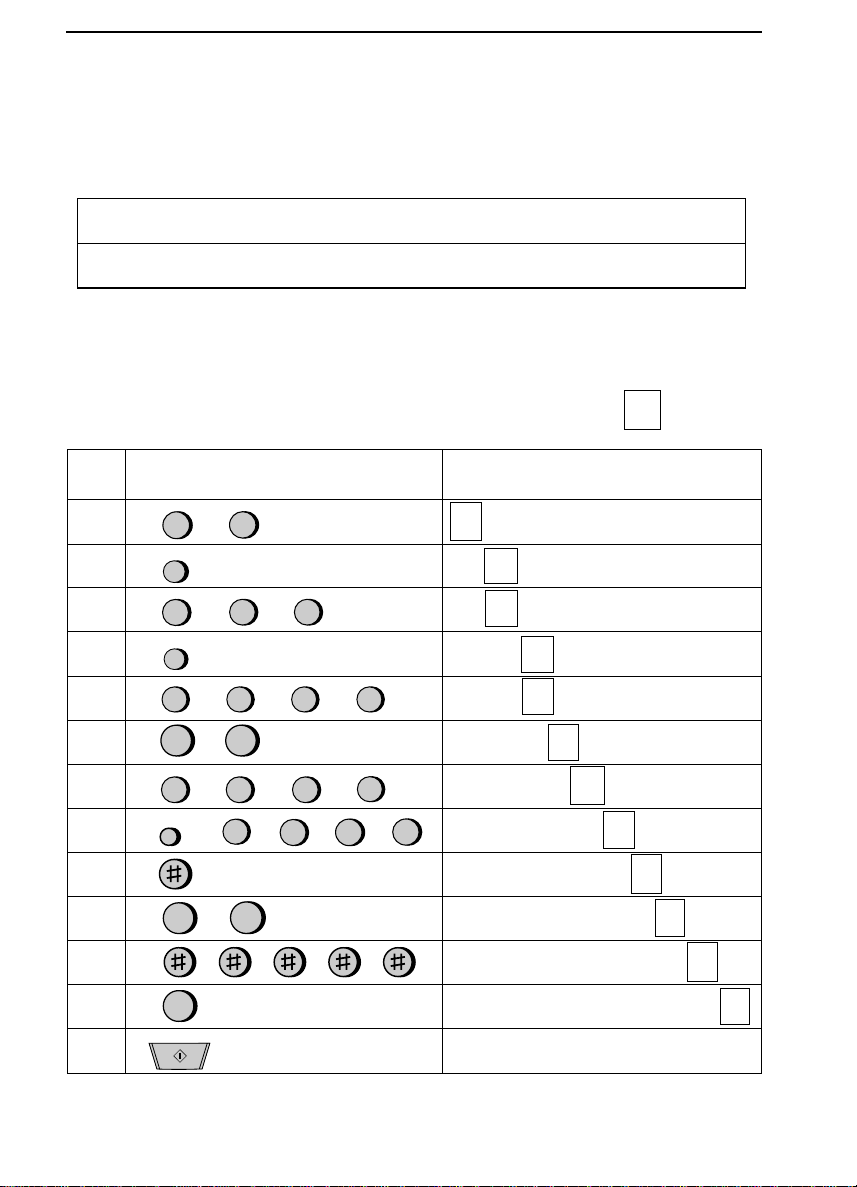
Example
The following is an example of entering the name "ABC Co. #1".
♦ The cursor in the display is indicated below by a rectangle:
Step Pr ess thes e keys : Display
ABC
1
SPEAKER
2
ABC
3
SPEAKER
4
ABC
5
ABC
2
2
A
A
ABC
2
ABC
2
ABC
2
2
2
ABC
ABC
2
2
B
A
A
B
AB
C
16
10
11
12
13
A
B
C
C
BC
BC
C
o
C
o
C
Co
Co
.
.
#
#
.
1
MNO
11
ABC
ABC
2
MNO
6
6
1
ABC
MNO
2
MNO
2
6
6
ABC
ABC
AB
A
6
ABC
7
2
REDIAL
8
9
1
ABC Co.
1
START
A
Page 27
Chapter 2 Initial Settings
Setting the Date and Time
The date and tim e appe ar in the displa y and repo rts, and are printe d at the top of
every page you transm i t. Set the date and time by pre ssin g the keys on the operation panel as shown below.
♦ To correct a mistake, press the SPEED DIAL key to move the cursor back
to the mistake, and then enter the correct number.
1
Press the FUNCTION key and then the
"3" key. ENTRY MODE will appear in
the display.
2
Press the "*" key four times.
DATE & TIME SET will appear in the
display.
FUNCTION
3
3
Press the START key.
4
Enter a two-digit number for the month
("01" for January, "02" for February,
"12" for December, etc.).
5
Enter a two-digit number for the day
("01" to "31").
6
Enter the last two digits of the year.
(Note: In the year 2000, "00" will appear
for the year.)
7
Enter a two-digit number for the hour
("01" to "12") and a two-digit number
for the minute ("00" to "59").
START
0
0
9
0
1
(Example: Janu ary)
5
(Example: th e 5t h)
7
(Example: 1997 )
9
2
5
(Example: 9:25)
17
Page 28

Chapter 2 Initial Settings
8
Press "*" to select A.M., or "#" to select
P.M.
or
9
Press the START key and then the
STOP key.
START
Daylight Saving Time
If desired, you can have the clock i n your fax move forwa rd a nd ba ckwa rd a uto maticall y at the beg inn ing and end of Da ylight Saving T im e . To tu rn on t his
function, press the panel keys a s f ollows:
1
Press the FUNCTION key and then the
"3" key. ENTRY MODE will appear in
the display.
2
Press the "*" key three times.
DAYLIGHT SAVING will appear in the
display.
3
Press "1" to turn on the Daylight Saving
Time function, or "2" to turn it off.
FUNCTION
Yes No
or
1 2
3
4
Press the STOP key.
18
STOP
Page 29

Chapter 2 Initial Settings
Selecting the Reception Mode
Your fax has two mode s for re ce ivi ng i nco ming c al ls an d fax es:
AUTO mode: In AUT O mod e, the fax will automat ically answe r all calls after
four rings and receiv e the incom ing doc um en t.
MANUAL mode: In MANUAL mode, you must answer all calls, including fax
messages, usin g the fax’s han dset or an extension phone conn ecte d to the same
line.
If you only intend to receive fax message s on the line connec ted to your fax ma chine, se lect AUTO m ode . In this case , you wil l probably want to chang e th e
number of rings you r fax wait s bef ore answerin g to one or two rin gs. This is
done by setting Opt io n Set ting 2 as de scr ibe d in Chap ter 9, "Opti ona l Setti ngs".
If you intend to receive bot h fax message s and voic e calls on t he line connec ted
to your fax machine, you can use either AUTO or MANUAL mode. In the case
of AUTO mode, you must answe r incom in g calls befo re the fa x does, but the
fax will be able to receive fax messages at times when you are unable to answer
personally. For more infor ma tion on using AUTO and MANUAL mode s, see
Chapter 4, "Recei vi ng Document s".
Setting the reception mode
Set the mode of reception with the
RECEPTION MODE key on the panel.
•• To select AUTO, press the key until
"AUTO" appears in the display.
•• To select MANUAL, press the key un-
til "MANU" appears in the display.
RECEPTION
MODE
19
Page 30

Chapter 2 Initial Settings
Distinctive Ring
Distinctive ring is a service offer ed by some local telephone companies which allows you to use up to four diffe re nt tel eph one num ber s, eac h with a diffe ren t
ring pattern, on your regular single line. If you subscribe to a distinctive ring
service you can set your fax to automati call y answer whe n it detects on e of
those ring pattern s, a llowin g you t o use the numb er corre spon din g to that pattern
as an exclusive fax numb er.
Important:
•• To use distinct iv e ring, you m ust subscr ibe to a distinc tive ring servi ce from
your local phone company . Do no t make this set ting if you do not subscribe
to a distinct ive ring service.
•• Your fax may not be compa ti ble wit h som e disti nct iv e ring ser vic es.
When using t his fe at ure , you m ust se t th e rece pti on m ode of you r fax to AUT O
as described in "Sele cting the Reception Mode " in this chapt er . When your designated fax numbe r is di aled , your fa x wil l autom ati call y answe r and beg in reception a fte r tw o ring s. No t e that other de vi ce s on the sam e line will also ri n g
until your fax an swers. If on e of your ot her num ber s is dia le d, the fax will rin g;
however, it will not answer.
To use disti nct iv e ri ng, sel ec t one of th e ri ng pa tt ern s bel ow for yo ur fa x by
pressing the panel keys as shown on th e follo wing page. The sel ecti ons are as
follows:
1. RING PATTERN 1: Two short rings.
2. RING PATTERN 2: One short, one long, and one short ring.
3. RING PATTERN 3: Two short rings and one long ring.
4. STANDARD RING: Your standard (normal) ring pattern.
5. OFF SETTING: Answer all ring patterns (this turns distinctive ring
off).
Your fax has been set to "5" at the facto ry.
20
Page 31

Chapter 2 Initial Settings
1
Press the keys shown at right.
OPTION SETTING will appear in the
display.
2
Press the keys shown at right.
DISTINCTIVE RING will appear in th e
display.
3
Select a ring pattern by entering the appropriate number ("1" to "5" as shown in
the list on the previous page).
4
Press the STOP key.
Note:If you are using an answering machine with your distinctive ring service, the answering machine must be connected to a separate wall jack. Do not
connect it directly to your fax.
FUNCTION
1
STOP
4
(Example)
21
Page 32

Chapter 2 Initial Settings
Storing Numbers for Automatic Dialing
Automatic dialin g is a quic k and conv enien t way of diali ng whi ch is done by
either pressin g a Rapid Key (Ra pid Key Di al ing ), or pre ssing the SPEED DIAL
key and entering a 2-digit num ber (Spee d Dia li ng) . Autom at ic dia ling c an be
used for both fax transm issi ons a nd voice calls.
To use autom a ti c dial ing , yo u mu st fi rst st ore the full numbe r in yo ur fa x and assign a 2-digit Speed Dial number to it. You can also ent er a name which app ear s
in the disp l ay wh e n th e num ber is dial ed . Up t o 99 num be r s ca n be stored.
♦ Speed Dial numbers from "01" to "38" can be used for both Rapid Key Di-
aling and Speed Dialing; Speed Dial numbers from "39" to "99" can only
be used for Speed Dialing.
♦ To allow easy identification of the Rapid Keys, attach each strip of Rapid
Key labels above the appropriate row of Rapid Keys. The arrangement of
the keys is shown in "A Look at the Operation Panel" in this chapter. Each
time you store a number for Rapid Key Dialing, write the name of the party
above the appropriate key.
Storing numbers
Comments:
•• You may need to add a pause be twe en cer tain di gi ts in the num ber to allo w
time for connection. For exam ple, if you are on a PBX telephone syste m that
requires an acce ss num ber to be dialed (suc h as "9") to acce ss an outsid e line ,
you will need to ent er a pause bet wee n th e acce ss num be r and the
telephone/fa x numbe r of the other party. Pauses are enter ed by pressi ng the
REDIAL key (2 seconds per pause ). Seve ra l pauses c an be enter ed i n a row.
♦ If you make a mistake, press the HOLD/SEARCH key to move the cursor
back to the mistake, then enter the correct number or letter. (To move the
cursor forward, press the SPEAKER key.)
1
Press the keys shown at right.
FAX/TEL. # MODE will appear in the
display.
2
Press "1" to select SET.
22
FUNCTION
1
3
Page 33

3
Enter a two-digit number (from "01" to
"99") by pressing the number keys. This
will be the Speed Dial number.
4
Enter the fax or voice number by pressing the number keys (max. of 32 digits including pauses).
Chapter 2 Initial Settings
0
5
5
5
1
(Example)
1
(Example)
3
2
4
5
Press the START key.
6
Enter the name of the location or party
by pressing the appropriate number key
for each letter several times until the letter appears in the display (max. of 20
characters). (See "Entering Letters for
Names" in this chapter for more details.)
If you don’t want to enter a na me, skip
this step.
7
Press the START key.
8
Return to Step 3 to store another number, or press STOP to exit. If the number
will be used for Rapid Key Dialing , you
can write the name on the label above
the appropriate Rapid Key.
START
PQRS7PQRS7PQRS
S:
7
GHI4GHI4GHI
H:
4
ABC
A:
2
PQRS7PQRS7PQRS
R:
7
SPEAKER
PQRS7PQRS
P:
7
START
Step 3 or
ABC
2
PQRS
(Move cursor)
(Example: SHARP)
STOP
PQRS
PQRS
7
7
7
23
Page 34

Chapter 2 Initial Settings
Clearing numbe rs
1
Press the keys shown at right.
FAX/TEL. # MODE will appear in the
display.
2
Press "2" to select CLEAR.
3
Enter the Speed Dial number that you
want to clear by pressing the number
keys.
4
Press the START key.
5
Return to Step 3 to clear another number, or press STOP to exit.
FUNCTION
2
0
START
Step 3 or
3
1
STOP
Making changes
To make changes i n a numbe r previ ously stored, repea t the stori ng procedure.
Select the Spe ed Dial num ber for whi ch you want to mak e changes in Step 3,
and then change the numbe r and /or name whe n they appear in the display
(Steps 4 and 6, respe ct iv el y).
(Example)
Numbers and l ette rs are cha nge d as de scr ibe d in "Ent er ing lette rs for names" i n
this chapter.
♦ A lithium battery keeps automatic dial ing number s in memo ry
Your fax uses a lithium battery to keep automatic dial ing numbe rs and other programmed data in memory when the po wer is turn ed of f. Batte ry powe r is consumed prima rily whe n the powe r is off. Wit h the power ke pt cont inu ousl y off,
the life of the batte ry i s abou t 5 years. If the ba tter y die s, have your dea ler or re tailer replace it. Do not try to repla ce it yourse lf.
24
Page 35

Chapter 2 Initial Settings
Storing numbers in Group Key s
Group Keys allow you to dial a group of fax numb ers by sim ply pressi ng t he appropriate Group Key once. They are convenient for the Broadcasting function,
which is used to transm it a document to a group of fax machi ne s.
Rapid Keys 18/G1 and 19/G2 can be progra mme d as Group Keys. T o program
or clear a Group Key , foll ow the ste ps bel ow. Note tha t one ke y cannot be simu ltaneously progr am med as both a Rapid Ke y and a Group Key.
♦ Up to 20 fax numbers can be stored in one Group Key.
♦ Only Speed Dial numbers can be stored in a Group Key. Full numbers can-
not be stored.
♦ A Group Key cannot be cleared if it is has been programmed into a Pro-
gram Key. First clear the Program Key as described in "Entering and Using
Programs" in Chapter 8, then clear the Group Key. If you need to check
which Program Key the Group Key is used in, print out the Program and
Group List as described in Chapter 10.
1
Press the keys shown at right.
GROUP ENTRY MODE will appear in
the display.
2
Press "1" to program a Group Key, or
"2" to clear a Group Key.
3
Press a Group Key (Rapid Key 18/G1 or
19/G2) to select it. If you are clearing
the key, go to Step 5.
4
Enter the Speed Dial numbers of the receiving machines.
5
Press the START key.
6
Return to Step 3 to program or clear another Group Key, or press STOP to exit.
FUNCTION
1
18/G1
37
0 1 0 2
START
Step 3 or
7
or
2
(Example)
(Example)
STOP
25
Page 36

Chapter 2 Initial Settings
Volume Adjustment
You can adjust the vol um e of the speak er, handse t, and ring er usi ng the UP and
DOWN keys on the ope rat io n pan el .
Speake r
The speaker has three volume levels: HIGH, MIDDL E, and LOW . To adjust t he
volume of t he speaker, pre ss the SPEAKE R key and th en press th e UP or
DOWN key until the desir ed leve l appe ars i n the displa y. Press th e SPEAK ER
key again to tur n the speaker off.
Handset
The handset receive r has two vol um e levels: HIGH and MIDDLE . To adjust t he
volume of the handse t rece iv er, lift the hand set and then press the UP or
DOWN key until the desir ed leve l appe ars i n the displa y.
Ringer
The ringer has four vol um e leve ls: HIGH, MIDDLE , LOW, and OFF. To adjust
the volum e of the ri nge r, pre ss the UP or DO WN key until the desire d level appears in the display (make sure the SPEAKER has not been pressed and the
handset is not lifte d). The fax will ri ng a t the ne w volu me level ea ch tim e you
change the level. If you sele ct OFF, press the START key to confirm your selection.
26
Page 37

3
Sending
Chapter
Transmittable Documents
Your fax can transmi t most st andard office docu ment s. Spe cifi c gui de lines a re
as follow s:
Size and weight
The size and wei ght of doc um en ts whi ch yo u ca n loa d in the docu me nt feeder
depend on whet he r you load one she et at a time or severa l she ets at once .
One sheet at a time:
Documents
14 lbs. 36 lbs.
(52 g/m
2
)
(135 g/m
2
)
5.0"
(128 mm)
5.8"
148 mm)
(
8.5"
(216 mm)
Several sheets at once :
14 lbs. 20 lbs.
(52 g/m2)
(75 g/m
2
)
5.0"
(128 mm)
5.8"
(148 mm)
8.5"
(216 mm)
Note: The area of the document which is scanned by the fax is slightly
smaller than the actual document size. The scanning width is 8.3 inches, and
the scanning length is the length of the document minus 0.32 inches.
Other restrictions
♦ Do cuments written in yellow, greenish yellow, or light blue ink cannot be
transmitted, as the scanner does not recognize these colors.
♦ Ink, glue, and correcting fluid on documents must be dry before they pass
through the document feeder.
♦ All clips, staples, and pins must be removed from documents before trans-
mission. If these are not removed, they may damage the fax.
39.4"
(1.0 m)
11"
(279 mm)
♦ Documents which are patched, taped, torn, smaller than the minimum size,
carbon backed, or easily smudged should be photocopied, and the copy
used for transmission.
27
Page 38

Chapter 3 Sending Documents
Loading the Document
Up to 20 page s ca n be pl ac ed in the feede r at one tim e . The page s will be auto matica ll y fe d int o the fax sta rti ng from the page on th e bottom.
♦ If you need to send or copy more than 20 p ages, place the additional pages
gently and carefully in the feeder just before the last page is scanned. Do
not try to force them in, as this may cause double-feeding or jamming.
♦ If your document consists of several large or thick pages w hich must be
loaded one at a time, insert each page into the feeder as the previous page
is being scanned. Insert gently to prevent double-feeding.
1
Adjust the document guides to the w idth
of your document.
2
Place the document face down and push
it gently into the document feeder. The
top edge of the document should enter th e
fax first.
•• The feeder will draw the leading edge
of the document into the fax. READY
TO SEND will appear in the display.
3
You can now either make re sol uti on and/ or co ntr ast settings as
described in the follo wing sect io n, or dial the ot he r party a s described in the section , "Di aling and tran smi ssio n".
Important:
If you need to remove the document from the feeder before transmission or
copying, first open the operation panel by pulling the front edge up (grasp it
at the PANEL RELEASE mark), and then remove the document. If you try
to pull the document out without opening the operation panel, you may
damage the feeder mechanism.
28
Page 39

Chapter 3 Sending Documents
Optional Transmission Settings
If desired, there are severa l transm i ssion settin gs whic h are possibl e before dialing and transmitting the document.
Note: To make the settings, the document must first be loaded in the feeder.
Resolution
Your fax has 4 resolution set tings. If you do not make a settin g, the fax will automatic ally s e nd th e doc um ent in STAND AR D re s ol ution.
STANDARD: Use STANDARD for ordinary documents. This setting
gives you the fastest and most economical transmission.
FINE: Use FINE for improved reproduction, especially wit h
documents containing small letters or fine drawings.
SUPER FINE: Use SUPER FINE when you need the highest quality of
reproduction.
HALF TONE: Use HALF TONE for photographs and illustrations. The
original will be reproduced in 64 shades of gray.
Note: In order to transmit in SUPER FI NE resolution, the receiving fax machine must also have that resolution. If it doesn’t, your fax will automatically
step down to the next best available setting.
Contrast
The contrast is nor ma ll y set to AUT O, whic h mean s tha t th e fax aut omatical ly
controls t he contrast, but fo r fai nt docu me nt s you ca n ch ang e the set ti ng t o
DARK.
Setting the resolution and contrast
Press the RESOLUTION key one or
more times until the desired resolution
and contrast settings appear in the dis play.
•• The first t i me you move through the list
of resolution settings, the contrast setting AUTO will appear next to each
resolution setting. The second time you
move through the list, the contrast setting DARK will appear.
RESOLUTION
29
Page 40

Chapter 3 Sending Documents
Cover Sheet
You can have your fax ge ner ate a cove r shee t and sen d it as the last pa ge of the
transmission. The cover sheet inc lud es the date and time, th e sender ’s nam e and
number, and the rec eiver’s name and nu mb er i f an auto ma ti c dial in g num be r is
used. The tot al number of pages se nt is indi ca te d on the bo tt om .
♦ Your name and number must be programmed in order for them to appear
on the cover sheet. (See "Entering Your Name and Fax N umber" in Chapter 2.)
To include a cover sheet with each transm ission , set Opt ion Settin g 17 to YES
as described in Chapte r 9, "Opti ona l Setti ngs". Note that once Opti on Se tting 17
is set to YES, cov er she ets will be automat ic ally i ncl ude d wit h ev ery transm ission until you ch ang e the set ti ng t o NO.
When the cover she et functi on is t urne d on, you can also select a messa ge which
will appear as a header at the top of the cover sheet. To do so, follow the steps
below. Note that the message sel ecti on is on ly effe ctive for one transmission.
1
Press the keys shown at right.
COVER SHEET HEAD will appear in
the display.
2
Select a message by entering a number
from "1" to "4" as shown below:
"1": URGENT
"2": IMPORTANT
"3": CONFIDENTIAL
"4": PLS. DISTRIBUTE
Example
30
FUNCTION
1
5
(Example)
Page 41

Chapter 3 Sending Documents
Batch Page Numbering
This setting is used to chang e the page nu mb ering of the transm it te d docum ent
from simple numbering ("P.1", "P.2", etc.) to batch numb ering, which mea ns
that a slash and the total number of pages being sent are added after each page
number (for example, "P. 1/5", "P.2/5", etc.). This allows the receiver to check
for any missing pages.
♦ If you are sending a cover sheet, do not include the cover sheet in the total
number of pages. Your fax will adjust the number to include the cover
sheet automatically.
♦ If you need to cancel a batch number entry, remove the document from the
feeder or press the STOP key.
♦ If the number of pages actually transmitted does not coincide with the
batch number entered, the alarm will sound and PAGE COUNT ERROR
will appear in the display. "PAGE E." will also appear in the "NOTE" column of the Transaction Report if it has been set to print out.
1
Press the keys shown at right.
PAGE COUNTER SET will appear in
the display.
FUNCTION
2
Enter the total number of pages ("01" to
"99") by pressing the number keys.
01
(Example)
31
Page 42

Chapter 3 Sending Documents
Dialing and Transmission
Once you have loaded the document and mad e any desi re d transm issi on se ttings, you are read y to di al the numbe r of th e rece ivi ng fa x mac hin e and tra nsmit t he d o c umen t. The re ar e se vera l w ays o f d i aling, an d y o u can se lect th e o ne
which best sui ts you r nee ds.
Normal Dialing
With Normal Dialing, you pi ck up the hand set (or press the SPE AKE R key)
and dial as you would to mak e a teleph one call. If the re ceiv ing machi ne is set
to receive faxes man ual ly (this me an s tha t the rece iving pa rt y answe rs you r call
by picking up the handset and speak ing , and th en presse s the ir Start key to begin
fax recept io n), you c an tal k wit h the m befo re se ndi ng th e fa x.
1
Pick up the handset or press the
SPEAKER key. Listen for the dial tone.
SPEAKER
or
2
Dial the number of the receiving machine by pressing the number keys.
3
Wait for the connection. Dependin g on
the setting of the receiving machine, you
will either hear a facsimile reception
tone or the other perso n will answer.
•• If the other par ty answers, ask them to
press their Start key (if you pressed
the SPEAKER key, pick up the handset to speak with them). This causes
the receiving machine to issue a reception tone.
32
ABC DEF
2
1
GHI JKL MNO
45
TUV WXYZPQRS
78
0
Beep
3
6
9
Page 43

Chapter 3 Sending Documents
4
When you hear the reception tone, press
COPY/
HELP
START
the START key. Replace the handset if
you used it.
•• When transmiss ion is completed, the
fax will beep.
Direct Keypad Dialing
If you do not need to talk wit h th e other party be fore sending the fax, you can
just dial; it isn’t necessary to pick up the handset or press the SPEAKE R ke y.
♦ Direct Keypad Dialing is a form of automatic dialing, so if you need to in-
sert a pause between any digits of the number, press the REDIAL key. (For
more information on pauses, see "Storing Numbers for Au tomatic Dialing"
in Chapter 2.)
1
Enter the number of the receiving machine by pressing the number keys.
ABC DEF
2
1
GHI JKL MNO
45
TUV WXYZPQRS
78
3
6
9
STOP
2
Check the display. If the number of the
receiving machine shown is correct,
press the START key.
•• If it is not correct, press the STOP key
to backspace and clear one digit at a
time, and then re-enter the correct
digit(s).
COPY/
HELP
0
START
STOP
33
Page 44

Chapter 3 Sending Documents
Rapid Key Dia l ing
If the number you want to dial has bee n stored fo r autom at ic dia ling a s a Speed
Dial number from 01 to 38 (see "Stor ing Numb ers fo r Auto mati c Dial ing " in
Chapter 2), you can dial it by pressing t he corre spon din g Rapid Ke y. (If the
Speed Dial number is from 20 to 38, press the SHIFT key and then pre s s the
Rapid key.)
01 02 03
20 21 22
04 05 06 07
23 24 26
08 09 10 11
27 28 30
12
31 32
16
/P117/P2
35 36
13
15
14
/POLL
Example: To dial Speed Dial
number "02", press Rapid Key
02/21.
SHIFT
Example: To dial Speed Dial
number "21", press the
key and then press Rapid Key
02/21.
01 02 03
20 21 22
04 05 06 07
23 24 26
08 09 10 11
27 28 30
12
13
31 32
16
35 36
14
/P117/P2
SHIFT
♦ The name of the receiving party will appear in the display. If no name was
stored, the fax number will appear. (If the name or number is incorrect,
press the STOP key.)
♦ The document will be automatically transmitted once the connection is
made.
Speed Dialing
Speed Dialin g can be used to dial any num be r whic h has been stor ed fo r automatic dia ling (se e "St oring Numbe rs for Aut om at ic Dia li ng" in Chap ter 2).
1
Press the SPEED DIAL key and then enter the two digits of the Speed Dial number by pressing the nu mber keys.
•• To enter numbers 1 thro ugh 9, first en-
ter 0 and then the number.
SPEED
DIAL
15
/POLL
ABC DEF
1
GHI JKL MNO
45
TUV WXYZPQRS
78
2
3
6
9
0
2
Check the display. If the name or number shown is correct, press the START
key. (If not, press the STOP key and
then repeat Step 1.)
34
COPY/
HELP
START
STOP
Page 45

Chapter 3 Sending Documents
Using the HOLD/SEARCH ke y
If you don’t remem ber the Rapid Ke y or Speed Dial number in which yo u have
stored a parti cula r fax number , yo u can search for th e numbe r by fo llowin g the
steps belo w. Onc e yo u hav e found th e num be r, you can di al it and tran smi t the
loaded docum ent by simply pressi ng the START key.
HOLD/
1
Press the HOLD/SEARCH key and then
the "1" key.
2
Enter the first letter of the stored name
by pressing the appropriate number key
(the key below the marked letter) one or
more times until the letter appears in the
display. If the name begins with a special character or number, press "1".
•• If you don’t remember the first letter,
go to Step 3 (you will scroll through
the list from the beginning).
•• If a name wasn’t sto red for the num-
ber, press "0". This will cause numbers, not names, to appear when you
scroll.
SEARCH
ABC DEF
2
1
GHI JKL MNO
45
TUV WXYZPQRS
78
0
1
3
6
9
3
Press the "#" key or the "*" key to scrol l
through the names (numbers if you
pressed "0"). Stop when the desired
name appears in the display.
•• If no names have been stored that be-
gin with the entered letter, you will
scroll from the next name, in alphabetical order, in the list. If no names/numbers have been stored at all, NO
DATA will appear.
4
Press the START key. The document
will be automatically transmitted once
the connection is made.
or
START
35
Page 46

Chapter 3 Sending Documents
Automatic rediali ng
If you use autom at ic diali ng (i ncluding Di rec t Ke ypa d Dia ling) a nd the line is
busy, your fax wil l auto mati call y redia l the numb er. Your fax was set at the factory to make 2 redi al in g at te mp ts at intervals of 5 minutes.
♦ To stop automatic redialing, press the STOP key.
♦ If desired, you can change the number of times the fax redials to any num-
ber from 0 to 15 with Option Setting 4, and the interval at which redialing
is done to any number of minutes fro m 1 to 15 with Option Setting 3. See
Chapter 9, "Optional Settings".
Using the REDIAL ke y
You can press the REDIAL key to red ia l th e last n u mb er dialed . To se n d a
document, proce ed from Step 3 of Normal Diali ng. Note that the speak er will be
automati call y activa ted, so you do not need to pick up the ha ndse t imme dia tely .
36
Page 47

4
Receiving
Chapter
Using Auto Mode
When the reception mod e is set to AUTO (pr ess th e RECEPTIO N MODE key
until AUTO appea rs in the display ), your fax au toma tica lly answe rs al l calls on
4 rings and recei ves t he inco mi ng do cum e nts.
♦ You can change the number of rings on which the fax answers incoming
♦ If you pick up the handset before your fax answers, you can talk to the
Note: If you are using distinctive ring, your fax will answer incoming calls after two rings regardless of the setting of Option Setting 2.
Documents
calls by changing Option Setting 2 (see Chapter 9, "Optional Settings").
Any number from 1 to 5 can be selected. Note , however, that reception of
auto-dialed faxes may not be possible from certain fax machines if you select a high number of rings.
other party and/or receive a document as described below in "Using Manual mode". For example, with the fax set to answer on 4 rings, you can receive both voice calls and fax messages in AUTO mode by answering
before the fourth ring, but still have the fax answer calls automatically at
times when you are unable to respond personally.
Using Manual Mode
When the reception mode is set to MANUAL (press t he RECEPT ION MO DE
key until MANU appe ars in the displa y), you must answer all call s (in cludi ng
fax transmissi ons) using the fax’ s hand set or an extension pho ne conne cted to
the same line.
To receive a document on your fax machine, pick up the handset when it rings.
•• If you hear a fax tone , wait until
RECEIVING appears in the display,
and then replace the handset.
•• If the other party first talks to you and
then wants to send a fax, press the
START key after speaking (press your
START key before the sender presses
their Start key). Replace the handset.
37
Page 48

Chapter 4 Receiving Documents
Note: If you have set Option Setting 1 3 (Fax Signal Receive) to NO and you
hear a fax tone when you pick up the handset, you must press the START
key to begin reception.
Receivi ng docume nts on an extens ion phone
If you hear a soft fax tone when you an swer an ext ension phone , wait unt il your
fax answers (the exte nsio n phon e will go dead if it is conne cted to your fax , or
you will hear pronounc ed high -pi tc hed fax tone s if the pho ne is conn ecte d to a
separate wall jack) , a nd th en ha ng up . You r fax will aut om at ic al ly recei ve t he
document.
♦ If your fax does not respond within 5 seconds, noise on the line may be pre-
venting it from detecting the fax tone. In this case, manually activate fax reception as described in the following paragraph.
If the other part y fi rst t alks to yo u and the n want s to send a do cum e nt, pre ss "5",
"*" and "*" if you are on a touch tone phon e. If you are on a pulse dial phone,
set the handset down (do not hang up ), walk over to the fax, pick up the ha ndset, and pres s the START key.
Comments:
•• Your fax will not accept the signa l to beg in rece pt ion ("5", "*", and "*") i f
a document is loaded in its feeder.
•• If you have set Opti on Set ti ng 13 to NO and hear a fax ton e whe n you
answer the extensi on pho ne, you must press "5", " *", and "*" if yo u are on
a touch-tone phone , or walk ove r to the fa x, pick up the ha ndse t, and pre s s
the START key if you ar e on a pulse dia l phone .
•• The code used to activ ate fax rec ep tion fro m a touc h-t one exten sion phone
("5", "*", and "*") ca n be chan ged if desired. See Opti on Set ting 5
("Tel/Fax Re mo te Numb er") in Chapt er 9, "Option al Settin gs".
•• If you do not intend to use the code for act iva ti ng fa x re ception, you can turn
detection of the cod e off by resett in g Opti on Se tting 6. Thi s will ensure t hat
the fax nev er mist akenly atte m pts t o beg in re ce pt ion if it det ec ts a signa l
similar to "5", "*", and " *" whil e you are talki ng on an exten sion phone .
38
Page 49

Chapter 4 Receiving Documents
2 in 1 Print
To save pape r, you c an ha ve the size of you r inc om in g fax es reduced by 55%.
This will all ow you t o rec eive, for exam ple , a 2-page docu me nt on one page
(note that this may not be possibl e if the docum ent pag es ar e longe r than you r
printing pa per). To turn on this function, fol lo w the steps below.
1
Press the keys shown at right.
2 IN 1 PRINT will appear in the display.
FUNCTION
6
2
Press "1" to turn on the function, or "2"
to turn it off.
3
Press the STOP key.
On Off
or
1
STOP
2
Reception Ratio
Your fax has been set at the fact ory to automa ti call y red uce the size of rece iv ed
documents to fi t the size of the pri nting pa pe r. This ensu res t hat data on the
edges of the document are not cu t off. If desi red , yo u can tur n thi s func ti on of f
and have received documents printed at full size.
Note: If a document is too long to fit on the printing paper, the remainder
will be printed on a second page. In this case, the cut-off point may occur in
the middle of a line.
Note: A utomatic reduction may not be possible if the received document is
too large, contains too many fine graphics or images, or is sent at high resolution. In this case, the remainder of the document will be printed on a second
page.
1
Press the keys shown at right.
RECEPTION RATIO will appear in the
display.
FUNCTION
6
2
Press "1" to turn automatic reduction on,
or "2" to turn it off.
3
Press the STOP key.
On Off
or
1
STOP
2
39
Page 50

5
Making
Chapter
Your fax can also be used to ma ke copi es. Sin gle and multi pl e copie s (up to 99
per origina l) can be made , enabli ng yo ur fax to double as an offi ce cop ier.
♦ The default resolution for copying is SUPER FINE.
♦ If you are making multiple copies of more than one original, you can
Copies
choose whether to have the copies sorted (SORT COPY) or not sorted
(MULTI COPY). The following example shows how the copies are ordered in each case when 3 copies each of 3 originals are made.
Originals
C
B
A
(SORT COPY)
Sorted
C
C
B
B
A
A
1
Load the document(s) face down.
C
B
A
•• If desired, adjus t the resolution and/or
contrast with the RESOLUTION key.
2
Press the COPY/HELP key.
•• If you are only making one copy of the
original (or of each original) and don’t
want to make a reduction or enlargement setting, press the START key
twice. Copying will begin. If you are
only making one copy and want to
make a reduction or enlargement setting, press the START key once and
go to Step 5.
Not sorted (MULTI COPY)
A
B
HELP
C
C
C
START
A
A
B
B
COPY/
STOP
40
Page 51

Chapter 5 Making Copies
3
Press "1" (MULTI COPY) if you don’t
want the copies sorted, or "2" (SORT
COPY) if you want them sorted.
4
Enter the desired number of copies with
the number keys.
•• If the desired number of copies is from
1 to 9, enter "0" first.
•• If you don’t want to make a reduction
or enlargement setting, press the
START key. Copying will begin.
5
Set the amount of reduction or enlargement by entering a number from "1" to
"5" as shown below. Copying will begin.
1: AUTO (automatic size adjustment to
match the size of the printing paper)
2: 50%
3: 100% (no reduction or enlargement)
4: 125%
5: 135%
Multi
1
1
2
or
2
(Example)
(Example)
Sort
2
Note: If you place a large number of originals in the feeder, the memory may
become full before all of them can be scanned (MEMORY IS FULL will appear in the display). If this happens, press the START key to copy the originals which have been scanned, and then repeat the copy procedure for the
remaining originals, including the original which was being scanned when the
memory became full.
41
Page 52

Chapter 5 Making Copies
Copy Cut-off
When making a copy, your fax ha s bee n set at the fact ory to not print t he re maining part of a do cum e nt i f the doc um ent is lo nger than th e pri nt ing pape r. If
you want your fa x to alwa ys pri nt the re m ai nin g par t of the document on a second page, fo llow the steps below.
1
Press the keys shown at right.
COPY CUT-OFF will appear in the display.
2
Press "1" to turn copy cut-off on (the re-
maining part of the document will not be
printed), or "2" to turn it off (the remain-
ing part will be printed on a second page).
FUNCTION
1
6
or
2
3
Press the STOP key.
STOP
42
Page 53

6
Making
Chapter
Your fax can be used like a regul ar tel eph one to make and recei ve vo ice call s.
♦ To make or receive a phone call, the power must be on.
♦ The fax may interrupt a voice call received on an extension phone if there
1
Pick up the handset or press the
SPEAKER key. Listen for the dial tone.
2
Dial the number using one of the following methods:
•• Normal Dialing: Enter the full tele-
phone number with the numeric keys.
•• Rapid Key Dialing: Press the appro-
priate Rapid Key (if the Rapid Key
number is from 20 to 38, press the
SHIFT key first).
Telephone Calls
is a period of silence during the conversation, the fax’s reception mode is
set to AUTO, and Option Setting 9 (TAD CONNECTED) is set to YES. If
you are on a touch-tone extension phone, you can prevent this by pres sing
any three keys on the phone immediately after you answer. (Note: Do not
enter the code to activate fax reception: "5", "*", and "*".)
SPEAKER
or
ABC DEF
2
1
GHI JKL MNO
45
78
3
6
TUV WXYZPQRS
9
0
•• Speed Dialing: Press the SPEED
DIAL key, and enter the 2-digit Speed
Dial number with the numeric keys.
3
Speak with the other party when they answer.
•• If you pressed the SPEAKER key,
pick up the handset to talk.
Note: While the handset of the fax is lifted (off hook), an extension phone
connected directly to the fax cannot be used to speak with the other party.
43
Page 54

Chapter 6 Making Telephone Calls
Using the HOLD/SEARCH k ey
You can use the HOLD/SEARCH key to searc h for a Rapi d Key or Spee d Dial
number. First search for the number as descr ibed in "Using the
HOLD/SEARCH ke y" in "Dial ing and Transm issi on" i n Chapte r 3, then pick up
the handset or press the SPEAKE R key. The number will be dialed automatically (do not pre ss the START key).
Redial
The last number called can be redialed by pressing the REDIAL key (it is not
necessary to pick up the handset or press the SPEAKER key). When the other
party answers, pick up the handse t to talk.
Hold
You can put the other party on ho ld durin g a conve rsat io n by pressin g the
HOLD/SEARCH key. When th is is do ne, they c ann ot hear you. You can put
the handset back in the cradl e withou t bre aking the connection. When you are
ready to speak with them agai n, pick up the handse t. If you did not put the handset back in the cradle, press the HOLD/SEARCH key agai n to resum e conve r-
sation.
44
Page 55

7
Answering
Chapter
Using the Hookup
If you have connected an answerin g mach ine to your fax as descri bed in "Connections" in Chapte r 1, you can rece iv e both voi ce messag es an d fax transmissions on the same line whil e you are out . To use the hook- up, change your
answering mac hin e’s ou tgo ing message and then activat e the hookup before
you go out as describ ed on the foll owi ng page.
Note: If you are using distinctive ringing with an answering machine, do not
follow the instructions in this chapter. (Note that when distinctive ringing is
used, the answering machine must be connected to a separate wall jack, not to
your fax.)
Changing the outgoing message
The outgoing message (OGM) of your answeri ng machin e should be changed to
inform callers w ho want to send a fax to press thei r Start key. For exam pl e, your
message might go as follows:
"Hello. You’ve reache d the ABC comp any . No one is availabl e to take your call
right now. Plea se leav e a messa ge after the beep or pre ss your fa csi m ile Sta rt
key to send a fax. Tha nk yo u for c alli ng. "
Machine Hookup
Comments:
•• Try to keep the length of the message under 10 seconds. If it is too long, you
may have difficult y re ce ivi ng faxes se nt by aut om at ic dia li ng.
•• We recomm end that you leave a pause of about four seconds at the beginning
of the message. This will make it easi er for your fax machi ne to detect fax
tones.
•• Your callers can even leave a voice message and send a fax messag e on the
same call. Modify yo ur out goi ng messa ge to explain that they can fi rst leave
a voice message, and then press their Start key to send a fax.
45
Page 56

Chapter 7 Answering Machine Hookup
Activating the hookup
Before you go out, activat e the answeri ng machi ne hookup as follows:
1
Set Option Setting 9, TAD CONNECTED, to YES:
•• Press the FUNCTION key and then
the "4" key. OPTION SETTING will
appear in the display.
•• Press the " #" key nine times.
TAD CONNECTED will appear in the
display.
FUNCTION
4
•• Press "1" to select YES. (To deactivate
the hookup, press "2" for NO.)
•• Press the STOP key to return to the
date and time display.
2
Set the reception mode of your fax to
AUTO by pressing the RECEPTION
MODE key.
•• Important: For the ho ok-up to operate
properly, the reception mode of your
fax must be set to AUTO.
3
Set your answering mac hine to auto answer. It must answe r on
no more than two rings (i f not , you may not be able to rece ive
faxes sent by au tom a ti c di al ing ).
•• If your answ ering machine has a toll saver function, make sure that it will
answer by the fourth ring.
4
When you return a nd tu rn off your answer ing machi ne, yo u
must set TAD CONNECT E D to NO (see Step 1 abo ve) if you
will be usi ng y o ur fa x in AU T O rec ep ti on m ode . If you wil l
only be using MANUAL reception mode, you can leave TAD
CONNECTED set to YES.
1
STOP
RECEPTION
MODE
Note: The call counter on your ans wering machine may indicate that voice
messages were received, when o nly fax messages were received.
46
Page 57

Chapter 7 Answering Machine Hookup
How the hookup operates
While you are out, all of your in comi ng ca lls wil l be answe red by your answering machine and its outgoing messa ge will play. Voice caller s can leave a message. During this time, your fax machine will quietly monitor the line. If your
fax machine detects a fax tone or a duration of silence equal to four seconds
(called "Qui et Det ect Tim e") , it will t ake ove r the line and be gin recept io n.
Your fa x mach ine listens for a dura tion of silence bec au se som e t ran smi tt in g ma chines do not send a fa x to ne whe n th e fax is sen t manually (thi s me ans t hat the
person fax ing uses the handse t to dial and the n presses t hei r Start key after listening to your outgoin g messag e). Pre ssing the Start key in this case causes th e line
to go silent. T he tim ing for fa x rece pti on is shown be low.
10 sec.
Quiet Detect Time
(Initial setting: 4 sec.)
Sender presses
start key
(Line goes silent)
Fax machine
rings
0 sec.
Outgoing message
(10 sec. max)
Answering machine
answers
Testing for proper opera tion
If needed, test the ope rat io n of the hoo kup as foll ows.
1
Call your fax machi ne from an outside phone line. Cove r the
mouthp iece to ensure that no sou nds ar e transm i tt ed to the fax
machi ne .
2
Your should hear your ou tgo ing message , the beep to leave a
message, and then a fax tone four seco nds late r (fo ur second s
is the ini tial Quie t Dete ct Time set ting). If you hear a fax to ne,
the hookup is opera ti ng proper ly.
14 sec.
Fax reception
begins
3
If the line i s disc onne ct ed befo re yo u hea r a fax to ne, lower t he
Quiet Det ect Tim e setting to three second s and t hen call yo ur
fax mac hine agai n.
47
Page 58

Chapter 7 Answering Machine Hookup
4
If you still do not hear a fax tone, turn off the Quiet Detect
Time function and have calle rs sen d fax es by pr essi ng "5",
"*", "*" and then the ir Start key. For mor e inform a ti on on
this method, see "If it still doesn’ t work" in this chapter .
If you have proble m s
If you have problem s with the hooku p, first check the foll owi ng:
♦ Is the answering machine connected properly to the fax? One end of the an-
swering machine line should be inserted in the "TEL. SET" jack on the
fax, and the other end in the answering machine’s telephone line jack.
♦ Have you set Option Setting 9, TAD C ON NECTED, to YES on your fax as
described on the second page of this chapter, and is the reception mode set
to AUTO?
If the above setti ngs an d connec tions a re corre ct and the hooku p sti ll doesn ’t operate properly, the ope rati on of the fax and the answeri ng mac hin e are probab ly
not synchroniz ed well . Some comm on pro blem s and their sol utions a re described be low.
♦ Are callers who want to leave a voice message being interru pted by the fax
before they can do so?
The fax is set to tak e over th e li ne and be gi n rec ep ti on if it dete ct s a set dura ti on
of silence (called "Quiet Detect Time"). If your outgoin g message contain s a
pause or the caller pauses whi le leavi ng a message , and the pause is longer tha n
the set duration, th e fax wil l interrupt.
It is best to shorten or eli mina te such pause s, but if necessary you can also try
lengthe nin g the Quie t Dete ct Time set ting. This proce dure is de scri be d in "Op tional Hook-up Settin gs" at the end of this chapter.
♦ Are callers who want to send a fax manually having trouble doing so after
your answering machine’s outgoing message plays?
If so, the answering mac hi ne may be disconnec ting t he line (hangi ng up) befo re
your fax has a chance to take over the line and begin reception. You can make
your fax activate sooner by shorteni ng the Quiet Detec t Time sett ing. Thi s procedure is described in "Optiona l Hook -up Se tting s" at the end of this c hap te r.
48
Page 59

Chapter 7 Answering Machine Hookup
♦ Are you having trouble receiving documents sent by automatic dialing?
Make sure that your answeri ng m ac hin e’s ou tgo ing message is less than 10 se c-
onds long, and that your an sweri ng m ac hine is se t to answer on t wo rin gs. Inserting a short pause (about four seconds) a t the begin nin g of you r answe ri ng
machine’s out goi ng messa ge might also help, as this giv es you r fax a chance to
clearly hea r and detec t the fa x "ca ll ing " tone whic h th e transm i tt ing machine
sends in the case of automatic dialing.
♦ Is the fax interrupting voice calls taken on an extension phone?
When Option Setting 9 (TAD CONNECTED) is set to YES and the reception
mode is set to AUTO, the fax may interrup t voice call s recei ved on an extension
phone. If you want to use the answering machine hookup whi le you are in to
monitor i nco mi ng c al ls, you can pr eve nt fax i nte rru pti on of voic e cal ls by pr e ssing any 3 keys on the extensi on phone after answeri ng. (Not e: Do not press "5",
"*", and "*, the code to activate fax reception.)
♦ Is the fax interrupting when you enter your answering machine’s code to re-
trieve voice messages from an outside telephone?
Make sure your answer ing machine ’s rem ot e retr ieve code is differ ent from the
code use d to a ct ivate fax rec ept io n w it h an e xtensi on te le phone ("5 ", "*", and
"*"). If the y are the sam e, en te rin g the rem ot e re trieve code will acti vat e t he fa x
machine .
If it still does n’ t wor k
With certain answering machines, it may not be possible to find a Quiet Detect
Time setti ng whi ch will allow bo th fa x re ce pti on a nd uni nt err upted voice message recording . In this case , callers on t one dia l line s can stil l send fa xes by
pressing "5", "*", and "*" on their fax. This is the code for activating fax recep-
tion (the code can be chang ed by cha ngi ng Opt ion Sett in g 5).
To use this met hod, set Quie t Dete ct Time to "00" to turn it off (se e "Quiet Detect Time" in "Optional Hookup Setti ngs" in this chapte r), and then chang e you r
outgoing messa ge to inf orm call ers that they can sen d a fax by pressin g "5",
"*", "*", and th en their Sta rt key. Your message might go as follows:
"Hello. You’ve reache d the ABC comp any . No one is availabl e to take your call
right now. After the beep, please leave a message, or, if you want to send a fax,
press ’five’ on ce, ’aste ri sk’ twi ce , and then your facsi m il e Start key."
49
Page 60

Chapter 7 Answering Machine Hookup
How fax transmi ssi ons are dete cte d:
Your fax detects fax tran smi ssio ns in two ways whe n an answerin g mach ine is
connecte d, dep end ing on whet he r the document is being sent autom at ic ally or
manually:
Automatic dialin g: If the docume nt is sent usin g a form of autom atic dialing,
such as Rapid Key or Speed Dial ing , the tran smi ttin g fax machine will send a
"calling tone" at 3-sec ond interv al s for a peri od of a bout 30 to 40 seconds a fte r
dialing. W hen your fa x dete ct s this tone , it will disconnect the answeri ng m achine, send a "reception tone" in response, and begin receiving the transmission.
If the transm i tting fax does not recei ve a recep ti on to ne fr om your fa x wit hi n 30
to 40 seconds after dialing, it will usuall y hang up and autom ati call y redia l several m i n u tes la te r.
Since your fax may not be able to dete ct the transm it ting fa x’s c alli ng to ne un til
after the outgoing messag e ends, it is import an t that the answerin g mach ine answers the call withi n two rings a nd th e outgoi ng m essa ge is less tha n 10 sec onds. Otherwi se, your fax may not be able to estab li sh com munication wi th the
transmitting fa x be fore the latt er hangs up .
Manual diali ng: If the doc um ent is be ing sent by norm al (m an ual) di al ing , the
transmitti ng fa x m achin e doe s not send a calling t one . In ste ad, the person fa xi ng
normally wai ts unt il they hear a recept ion ton e and the n presses t hei r Sta rt key.
In the case of an answering machine ho ok-u p, they wil l hear your out goi ng message instead of a rec eptio n ton e, and then pre ss the ir Start key .
However, this does not signa l a fax tran smi ssio n to your fa x. Inste ad , your fa x
must use a function c alle d "Quiet De tect Time" to dete ct the transmission. This
function cause s your fax to disc onn ec t the answeri ng m ac hi ne and be gin reception if it dete ct s a cert ai n dura ti on of sile nc e.
Your fa x is set to auto ma ti ca lly be gin fax recept ion if it detec ts a dura ti on of si lence of four seconds. When the person faxing pr esse s their Start key , the line
will go quiet, and the transmitting fax machine will wait for a reception tone
from your fax. Your fax will disc onne ct the answe ring m achin e four sec onds af ter the key is presse d, and send a recept io n ton e to tell the othe r fax machi ne to
begin transmi ssion .
If your answerin g mach ine has a fast disc onne ct ti me and disconnects the line
before four seconds elapse s, fax reception will not be possible. In this case, you
must shorten the Quie t Detec t Tim e sett in g as described on the follo wing page .
On the othe r hand, if the Quiet Detec t Tim e sett ing is too short , your fa x ma y interrupt voice callers if they pau se dur ing their m essa ge or if there is a peri od of
silence in your ou tgo ing message .
50
Page 61

Chapter 7 Answering Machine Hookup
Optional Hookup Settings
If necessary, you can use the foll owin g set tings to improv e the response of the
answering m achin e hoo kup to inc om in g calls.
Quiet Detec t Time
This function cau ses th e fax mach ine to take ove r the line and be gin recept io n if
a certain duration of silenc e is detected after the answer ing machine answers.
Time selecti ons fo r the per iod of silenc e are 1 to 10 sec ond s. Quiet Det ect Tim e
has been set to 4 seconds a t the fa ctory. This give s the best perf orm an ce with
most answering m ac hi nes; however , you ma y need to adjust this sett in g depending on the disconn ect tim e of your an sweri ng m achi ne.
♦ Some answering machines may have unusually fast disconnect times (equal
to or very slightly less than 4 seconds), which means that the answering machine may disconnect the line before fax reception can begin. In this case,
try a Quiet Detect Time setting of 3 seconds.
♦ If the fax machine is interrupting callers before they can leave a message,
try a longer Quiet Detect Time setting. If your outgoing message includes a
period of silence, make sure that the setting is longer than that period of silence, or re-record your outgoing message to shorten the silence.
To change the Quie t Det ect T ime sett in g, foll ow the steps below.
Note: Quiet Detect Time can be turned off by entering "00" for the time.
Note, however, that the fax machine will not be able to receive manually dialed faxes.
1
Press the FUNCTION key and then the
"4" key. OPTION S ETTIN G will appear
in the display.
2
Press the "*" key 10 times.
QUIET DETECT TM. will appear in
the display.
FUNCTION
4
51
Page 62

Chapter 7 Answering Machine Hookup
3
Set the time in seconds by entering a twodigit number from "01" to "10" (enter
"01" for 1 second, "02" for 2 seconds,
etc.). To turn off the function, enter "00".
•• Note: We recommend that you do not
set Quiet Detect Time below 3 seconds.
40
(Example)
4
Press the STOP key to return to the date
and time display.
STOP
Fax reception when the answ er ing ma chine fails
When this functio n is tu rne d on, your fax will answe r the call aft er 5 rings if the
answering machin e for some reason fail s to answer before that time. This ensures that you will receive fax message s even if the answering machine ’s tape
fills up or the answering m achin e is not turne d on.
This funct ion has been t urne d off at the fact ory . If you wan t to turn it on, foll ow ing the steps below .
Note: When this function is turned on, make sure that the answering machine
is set to answer on 4 r ings or less. If it isn’t, the fax will always answer first,
preventing callers from leaving voice mess ages.
1
Press the FUNCTION key and then the
"4" key. OPTION S ETTIN G will appear
in the display.
2
Press the "*" key 9 times.
FAX RX TAD FAILS will appear in the
display.
FUNCTION
4
3
Press "1" to turn the function on, or "2"
to turn it off.
4
Press the STOP key to return to the date
and time display.
52
1
STOP
or
2
Page 63

8
Special
Chapter
Caller ID
If you subscribe to a caller ident if ic ation servi ce from you r tele phon e comp any ,
you can set your fax to displa y th e name and number of the call er while the fax
rings. The fax will also store informati on ab out unan swere d call s whic h you can
view in the display or print out as a list. Thi s allows you to screen your calls as
they come in, and make s it easy t o resp ond to ca llers wh o do not leave mes sages.
To use the Caller ID function, set Option Set ting 16 to YES a nd enter your area
code as described in Chapte r 9, "Opti ona l Setti ngs".
Important:
•• To use this function, you must subscribe to a caller identification ser vice
•• Your fax may not be compati ble wit h som e caller identifi ca tion ser vic es.
How Caller ID opera tes
When you receive a call, the nam e and phon e numbe r of the calle r wil l alternately appea r in the displ ay , begi nni ng ju st be fore the sec ond ri ng. T he infor ma tion will cont inu e to be displa yed until you pi ck up the hand set , or unti l the fa x
answers automa ticall y if it is in AUTO mode.
Functions
from your telephone com pan y.
Note: Some caller ID services may not provide the name of the caller. In this
case, only the phone number will appear.
53
Page 64

Chapter 8 Special Functions
Displ ay messages
One of the followi ng messa ges will appear whil e the fax rin gs if cal ler inf orm ation is not av ai la ble .
NO SERVICE No caller information was received from your telephone
company. Make sure that the telephone company has
activated your service.
CALLER-ID
ERROR
OUT OF AREA The call was made from an area which does not have a
PRIVATE CALL Caller information was n ot provided by the telephone
Noise on the telephone line prevented reception of caller
information.
caller identification service, or the caller’s service is not
compatible with that of your local phone company.
company at the caller’s request .
Viewing the Call er ID list
If you subscribe to a caller ID service and ha ve set Option Settin g 16 to YES,
your fax machine will keep information on the most re cent 20 unanswer ed c alls
and/or unsucce ssful faxes you ha ve recei ved . (Note that if the caller sen ds a fax
or leaves a voice message in an answering machine connecte d to the fax machine, informa ti on on that call wil l not be stored.) You can view th is in form a tion, which co nsist s of th e name and num ber of each calle r, in the Caller ID L ist .
♦ After you have received 20 unanswer ed calls, each new call will delete the
oldest call.
Follow the ste ps be low t o vie w the Cal ler ID L ist in the di spla y. If de sire d, you
can immediat ely di al a numbe r when it appears.
To print out the li st, see Chap te r 10, "Printi ng Out Repo rts a nd L ist s".
1
Press the keys shown at right.
REVIEWING CALLS will appear in the
display.
2
Press the "#" to scroll through the list
from the most recent call, or the "*" key
to scroll through the list from the oldest
call.
54
HOLD/
SEARCH
2
or
Page 65

3
If you want to dial one of the numbers in
the list, scroll through the list until the
number appears in the display.
•• If you want to send a fax, load the
document and then press the START
key.
•• If you want to make a voice call, pick
up the handset or press the SPEAKER
key. Dialing will begin automatically.
(If you pressed the SPEAKER key,
pick up the handset when the other
party answers.)
Chapter 8 Special Functions
START
4
Press the STOP key when you have finished viewing the list.
STOP
To delete calls from the Ca ll er ID lis t
If you want to delete a single call from the caller list, press the "0" key while the
call appears in the display. If you want to de lete all call s from the list, hold the
"0" key down for at least 3 seconds whil e you are viewing any numb er in the list.
Priority Cal l
If desired, you can se t your fax to make a special ringing so und whe n you receive a call from a designated phone num ber. This le ts you know imm ed iate ly
who is calling wit hou t ha vin g to look a t the displa y. To use this function, ente r
the desired phone num be r by foll owin g the ste ps below (on ly on e phone numb er
can be ente red).
Note: This function cannot be used if you are using the Distinctive Ring function.
1
Press the keys shown at right.
PRIORITY CALL # will appear in the
display.
FUNCTION
3
55
Page 66

Chapter 8 Special Functions
2
Press "1" to enter a number, or "2" to
clear a number. (If you pressed "2", go
1
or
2
to Step 4.)
3
Enter the phone number, including the
area code, by pressing the number keys
(the number must be 10 digits long).
4
Press the START key and then the
STOP key.
5
5 5 1
4 5 5 5
START
Blocking voice calls
With Call er ID turned on , you ca n use the Ant i Jun k Fax fu nct io n desc ri bed in
the following section t o blo ck vo ice call s as wel l as fax re ceptions (the Anti
Junk Fax function normally only blocks faxes).
In this case, when a voice call or a fax transm issi on co mes in fr om a numbe r
you have specifi ed as a "Junk Number", your fax will break the conne ct ion as
soon as it re ceives the call ing phone num be r from the call er ID servi ce (be fore
the second ring).
2 3
(Example)
STOP
To use this func ti on, set Option Setting 14 to YES as de scribed in Chapt er 9,
"Optional Set tings", and then en ter the num ber in the Anti Junk Num ber List as
describ ed in the fol lowi ng se ction , "Bloc kin g Recep ti on of Unwant ed Fa xes".
Note: This function canno t be used if you are using the Distinctive Ring function.
56
Page 67

Chapter 8 Special Functions
Blocking Reception of Unwanted Faxes
The Anti Junk Fax function allows you to block receptio n of faxes fr om parties
which you specify. This save s pape r by no t printing out unwant ed "junk " faxe s.
To use this function, first turn it on by setting Option Setting 14 to YES as described in Ch apt er 9, and th en enter the fax num be rs from whi ch yo u do not
want to receive faxes as shown be low. If you are usin g the Calle r ID funct ion as
described in the previ ous sec ti on, you can also enter vo ice num be rs.
Comments:
•• Up to 5 numbers can be entered in the Anti Junk Num be r List .
•• The Anti Junk function will not operate for a number which has also been
stored as a Priori ty Ca ll num be r.
•• To clear a number from the Anti Junk Number List , you need to know the
1-digit numb er which identifi es it . If you have forgo tten t his nu mber, print
out the Anti Junk Numbe r L ist as descri bed in Chapt er 10.
1
Press the keys shown at right.
STORE JUNK # will appear in the display.
FUNCTION
3
2
Press "1" to store a number in the Anti
Junk Number List, or "2" to clear a num-
ber from the list.
3
Storing: Enter a 1-digit number from
"1" to "5". This number identifies the
fax/voice number you will store in the
next step.
Clearing: Enter the number which identifies the fax/voice number you want to
clear, and go to Step 5.
1
1
or
2
(Example)
57
Page 68

Chapter 8 Special Functions
4
Enter the fax/voice number (max. of 20
digits).
5
5
5
21
3
(Example )
4
5
Press the START key.
6
Return to Step 3 to enter (or clear) another number, or press STOP to exit.
START
STOP
Step 3 or
58
Page 69

Chapter 8 Special Functions
Memory
Your fax has a memory whi ch can be used to tem por arily store bot h incom in g
and outgoing documents.
♦ Approximately 39 pages of average content can be held in memory if they
are all going to be transmitted (27 pages if Option Setting 19, Error Correction Mode, is set to YES), or 30 pages if they are all received (29 pages if
Option Setting 19 is set to YES). Less can be held if any were scanned using fine or halftone resolution.
Sending documents from me m ory
With this f unction, the original docu me nt is scanne d im mediately, stored in
memory, and the n tr ansm i tt ed on ce the conn ecti on to the recei vin g ma ch ine is
made. Thi s is con ven ie nt whe n tr ansm i tt ing to plac es whe re the l ine is oft en
busy, as it saves you from waiti ng to pick up th e ori gi nal doc um ent and frees
the feeder for othe r ope ratio ns. Afte r transmission, the docum ent will be
cleared from memory.
♦ Only one memory transmission can be set at a time.
♦ The amount of memory currently occupied appears as a percentage in the
display while the document is being scanned.
1
Load the document(s).
•• Set the resolution and/or contrast if de-
sired.
2
Press the MEMORY key and then "1".
3
Enter the number of the receiving machine using one of the follow ing methods:
•• Press a Rapid Key.
•• Press the SPEED DIAL key and enter
a Speed Dial number.
•• Enter a full telephone number by p ress-
ing the number keys.
MEMORY
1
01
20
(Example)
59
Page 70

Chapter 8 Special Functions
4
Press the START key if you entered a
Speed Dial number or a full number.
•• The document will be scanned and
stored in memory. Your fax will then
dial the receiving machine and transmit the document (redialling will be
done automatically if necessary).
START
If the memory bec omes full...
If the memory becomes full while the document is being scanned, MEMORY
IS FULL will appear i n the displa y.
♦ P res s the START key if you want to transmit the pages which have been
stored up to that point in memory. The remaining pages will be ejected
from the feeder. After transmission, the memory will be cleared and you
can transmit the remaining pages. You will also need to tr ansmit the page
which was being scanned w hen the memory filled up .
♦ P res s the STOP key if you want to cancel the entir e transmission.
Substitute reception to memory
This is a back-up functi on whi ch is aut om at ical ly activa te d if your fa x run s out
of paper, the pr inting rib bon ne ed s replaceme nt, or the pa pe r ja ms.
When you have received a document in memory, FAX RX IN MEMOR Y will
appear in the display, alternating with OUT OF PAPER, FILM END, or PAPER
JAM. When you add paper , repl ac e the imagin g film , or clear the jam, the stor ed
document s will automa ti call y pri nt ou t.
♦ If you received documents in memory because the fax ran out of paper, be
sure to add paper which is the same size as the pap er previously used. If not ,
the document print-out size may not match the size of the printing paper.
Caution!
•• When docume nts are st ore d in memo r y, do not turn the power off. This will
erase all of th e contents.
•• If documents re ce ived in memo ry are lo st due to a power failur e or othe r
interruption in the power supply, a "CLEAR REPOR T" will be printed out
when the power is restor ed. T his gi ves info rm at ion about the rece ptions l ost,
includi ng th e fa x num be rs of th e tr ansm i tt ing ma chi ne s if th ey a re avai la ble.
60
Page 71

Chapter 8 Special Functions
Broadcasting
This function allows you to send the same do cume nt to as many as 20 diffe ren t
locatio ns wit h just one oper at ion . First store the docu ment in memory, then enter the numbe rs of the receivi ng m achi nes. The docum e nt will be transmitted t o
each loca tion.
♦ You can only use Rapid Keys or Speed Dial numbers to dial the numbers
of the receiving machines.
1
Load the document(s).
2
Press the MEMORY key and then "2".
MEMORY
2
3
Dial the receiving machines (maximum
of 20) using one or both of the following
methods:
•• Enter one or more Speed Dial numbers
by pressing the nu mber keys.
•• Press one or more Rapid Keys.
4
Press the START key.
•• Set the resolution and/or contrast if de-
sired.
2
01
20
START
2
(Example)
61
Page 72

Chapter 8 Special Functions
5
Press the START key. Transmission will
begin.
•• A Transaction Report is automatically
printed out after Broadcasting is completed. Check the "Note" column of the
report to see if any of the locations are
marked "Busy" or have a communication error code. If so, send the document to those locations again.
START
Broadcasting using a Group Key
If the fax ma ch ines to which you want to broa dcast have all been p ro gramme d
into one Group Key, you c an perfo rm the broa dca sti ng op era tion usi ng t he fo llowing simp li fie d pro ce dure :
1
Load the document(s).
•• Make any desired transmission set-
tings (resolution, contrast, etc.).
2
Press the appropriate Group Key. Transmission will begin.
62
18/G1
37
(Example)
Page 73

Chapter 8 Special Functions
Polling (Requesting a Fax Transmission)
Polling allows yo u to reque st anot her fax mac hine t o send a docum ent to your
fax machine. In other words, the receiving fax machine, not the transmitti ng fax
machine, initiat es the transm i ssion . You can use your fax to both poll and be
polled by ot her s.
To use the polli ng fu nction, you must fi rst reset Rapid Key 15/ PO L L for use a s
a polling key. Th is is do ne by rese tt ing Opti on Set ti ng 15 , as desc rib ed i n Cha pter 9, "Optional Set tings".
Requesting transm iss ion
Note: Rapid Dial Keys cannot be used for polling. To dial a Rapid Dial location, press the SPEED DIAL key and then enter the 2-digit number corre-
sponding to the Rapid Key.
1
Dial the fax machine you want to poll using one of the following methods:
•• Pick up the handset (or press the
SPEAKER key) and dial the full number. Wait for the fax answerback tone.
•• Press the SPEED DIAL key and enter
a 2-digit Speed Dial number.
SPEED
DIAL
0
(Example)
1
•• Enter the full number using the nu-
meric keys.
2
Press Rapid Key 15/POLL.
•• If you used the handset, replace it
when POLLING appears in the display.
Reception will begin.
15/POLL
34
63
Page 74

Chapter 8 Special Functions
Being polled (polling standby)
To let another fax ma ch ine poll you r fax , si mp ly s e t th e re ce pti on m ode to
AUTO, and load the documen t(s) to be sent.
Transmission will take plac e when the other fax machi ne calls you r fax and activates polling. Autom at ic recep tion is possibl e whi le your fax is on polling
standby.
Polling security
Polling Sec uri ty allows you t o pre ven t una uthorized polling of your fa x. When
this functi on i s turn ed on, po lling will onl y take pl ace whe n th e fax num be r of
the polling fa x mach ine has be en entere d in your fa x’s list of permitted fax numbers (called "passcode numb ers") . The number of the polling fax must also be
programmed in itself for identifi cati on.
To use Pol li ng Sec uri ty, follow the ste ps bel o w to turn the func ti on on, an d then
enter permitt ed numb ers a s shown on t he following page.
1
Press the keys shown at right.
ENTRY MODE will appear in the display.
FUNCTION
3
2
Press the "#" key three times.
SECURITY SELECT will appear in the
display.
3
Press "1" to turn polling security on, or
"2" to turn it off.
4
Press the START key and then the
STOP key.
64
1
START
or
2
STOP
Page 75

Chapter 8 Special Functions
Storing and clearing fax numbers for polling permission
You can store up to 10 fax numbe rs in your fax’s l ist of per mitt ed number s.
1
Press the keys shown at right.
ENTRY MODE will appear in the display.
2
Press the "#" key four times.
PASSCODE # MODE will appear in the
display.
3
Press "1" to store a number, or "2" to
clear a number.
4
Storing: Enter a 2-digit number from
"01" to "10". This number identifies the
fax number you will store in the next
step.
Clearing: Enter the number which identifies the fax number you want to clear,
and go to Step 6.
FUNCTION
1
0
3
or
1
(Example)
2
5
Enter the fax number (max. of 20 digits).
6
Press the START key.
7
Return to Step 4 to enter (or clear) another number, or press STOP to exit.
5
5 5 1 2 3 4
(Example)
START
STOP
Step 4 or
65
Page 76

Chapter 8 Special Functions
Timer Operations
The Timer func tion allo ws you to set a transmission and/or pol ling ope ra tion to
be performed automa tica lly at a time you spec ify . One transm issi on opera tion
and one polling operation can be set at the same time, and the times they will be
performe d can be specifi ed up to 24 hours in advanc e.
As an example, you can use this func ti on t o take adva nta ge of off-pea k telephone rates without having t o be ther e when the ope ratio n is perfor me d.
Note: Only a Speed Dial number can be used to dial the receiving machine.
Setting a timer operation
1
Press the keys shown at right.
TIMER MODE will appear in the display.
2
Press "#" to set a transmission operation
(SEND MODE), or "*" to set a polling
operation (POLLING MODE).
FUNCTION
1
or
3
Press "1" to select SET.
4
Enter the time at which you want the operation to take place (2 digits for the
hour and 2 digits for the minute).
5
Press "*" to select A.M., or "#" to select
P.M.
6
Press the START key.
66
1
0
START
9
or
2
(Example: 9: 25)
5
Page 77

7
Enter the Speed Dial number of the receiving fax machine.
•• If this is a polling operation, go to
Step 10.
Chapter 8 Special Functions
0
5
(Example)
8
Press the START key.
9
Adjust the resolution and/or contrast
(skip this step if you don’t want to
change settings).
10
Press the START key and then the
STOP key. If this is a transmission op-
eration, load the document in the feeder
sometime before the specified time of
transmission.
START
RESOLUTION
START
To cancel an operation
If you need to canc el an op era ti on a fte r it has be en set, follow the step s bel ow.
1
Press the keys shown at right.
TIMER MODE will appear in the display.
FUNCTION
1
STOP
2
Press "#" to cancel a transmission operation, or "*" to cancel a polling opera-
tion.
3
Press "2" to select CLEAR.
4
Press the START key and then the
STOP key.
2
START
or
STOP
67
Page 78

Chapter 8 Special Functions
Entering and Using Programs
If you frequentl y pe rfor m the same ope ratio n inv olv ing the same party , yo u can
program all the step s of the ope rat ion int o one Progr am Key. This a ll ows you to
perform the operati on by simply pressing that key.
♦ Rapid Keys 16/P1 and 17/P2 can be used as Program Keys. However, a key
cannot be used if it is already being us ed for Rapid Key Dialing.
♦ Only Speed Dial numbers can be used to enter fax numbers of receiving ma-
chines in the Program Keys. Full numbers cannot be entered.
♦ If the program is for a regular transmission or polling operation, a timer set-
ting can be included to have the operation performed auto matically at a selected time.
♦ To clear a mistake, press the STOP key.
Initial proc edure
To program an operation, first perf orm the following procedure. After you h ave
comple ted it , go to the pro cedure for the specifi c ope ra tion you want to progra m.
1
Press the keys shown at right.
PRG. ENTRY MODE will appear in the
display.
2
Press "1" to select SET.
3
Press a Program Key ("16/P1" or
"17/P2") to select it.
4
Enter a name for the program (max. of
20 characters). (See "Entering Letters for
Names" in Chapter 2).
Skip this step if you don’ t want to enter
a name.
68
FUNCTION
1
16/P1
35
ABC
DEF
3
2
GHI
4
7
or
17/P2
36
WXY
……
9
(Example)
Page 79

Chapter 8 Special Functions
5
Press the START key.
6
Press the "#" key or the "*" until the de-
sired operation appears in the dis play.
The operations will appear in the following order:
•• Transmission ("SEND")
•• Polling
•• Broadcasting
7
Press the START key and then continue
with the specific procedure for your operation (see the following pages).
Transmiss ion
(Continued from "Initial procedure".)
8
Press "1" if yo u want the document to be
scanned into memory and then transmitted, or "2" if you want the document to
be transmitted directly from the feeder.
(Note: If you select "2", you can include
a timer setting in the program.)
•• If you pressed "1", go to Step 12 . If
you pressed "2" and don’t want to
make a timer setting, go to Step 11.
START
START
1
or
or
2
9
Enter the time at which you want the operation to take place (2 digits for the
hour and 2 digits for the minute).
10
Press "*" to select A.M., or "#" to select
P.M.
11
Press the START key.
0 9 2
(Example: 9: 25)
or
START
5
69
Page 80

Chapter 8 Special Functions
12
Enter the Speed Dial number of the receiving fax machine.
2
5
(Example)
13
Press the START key.
14
If desired, set the resolution and/or contrast by pressing the RESOLUTION
key (otherwise, skip this step).
15
Press the START key and then the
STOP key.
Pollin g
(Continue d from "Initial procedure".)
8
Enter the time at which you want the operation to take place (2 digits for the
hour and 2 digits for the minute).
If you don’t want to make a timer setting, go to Step 10.
START
RESOLUTION
START
0
9
STOP
2
(Example: 9:25)
5
9
Press "*" to select A.M., or "#" to select
P.M.
10
Press the START key.
11
Enter the Speed Dial number of the receiving fax machine.
12
Press the START key and then the
STOP key.
70
START
2
START
or
5
(Example)
STOP
Page 81

Broadcasting
(Continue d from "Initial procedure".)
8
Enter the Speed Dial numbers of the receiving machines.
Chapter 8 Special Functions
2
5
9
Press the START key.
10
If desired, set the resolution and/or contrast by pressing the RESOLUTION key
(otherwise, skip this step).
11
Press the START key and then the
STOP key.
Clearing a Program key
To clear a Program key, follow t hese ste ps:
1
Press the keys shown at right.
PRG. ENTRY MODE will appear in the
display.
3
RESOLUTION
START
FUNCTION
5
START
(Example)
STOP
7
2
Press "2" to select CLEAR.
3
Press the Program Key you want to clear.
4
Press the START key and then the
STOP key.
16/P1
35
START
2
(Example)
STOP
71
Page 82

Chapter 8 Special Functions
Using a Program key
A programmed opera ti on is perf orm ed as follows:
1
Load the document.
2
Press the appropriate Program Key.
Note: A maximum of 2 timer operations can be set at any one time, including
both timer operations set by pressing a Progra m Key and operations set as described in "Timer Operations" in this chapter.
16/P1
35
(Example)
To cancel a programmed timer operation
If a Program Key has be en pressed for a timer ope ra tion an d you ne ed to cancel
the operat io n bef ore it is perf orm ed, follow the se st eps:
1
Press the Program Key.
2
Press the START key.
72
16/P1
35
(Example)
START
Page 83

9
Optional
Chapter
A variety of optiona l setti ngs a re availa bl e which you can use t o custom iz e your
fax to better suit your ne eds. T he sett ing s are made by pressi ng the pa ne l keys,
and each setti ng i s desc rib ed i n the list be low.
Accessing the Settings
1
Press the keys shown at right.
OPTION SETTING will appear in the
display.
2
Move through the list of settings by
pressing " #" to move forward, or "*" to
move backward. The settings will appear
in the order listed below.
3
When the desired setting appears in the
display, make a selection as described
below. Your selection will be automatically stored.
Settings
FUNCTION
2
4
or
(Example)
4
Press the STOP key.
Settings
Setting 1: FINE RESOLUTION PRIORIT Y
This sets the def aul t re sol uti on (t he resolution used if a setting i s not m ad e with
the RESOLUTIO N key) for t ran smi tt ing doc um ent s. Press "1" (YES) to set it
to FINE, or "2" (NO) to set it to STANDARD.
• Initial setting: "2"
Setting 2: NUMBER OF RINGS TO ANSWER
This sets the numbe r of ri ngs th e fax ma ch ine waits be fore answe ri ng an
incoming call in Aut o rec eption mode. Enter a ny num ber fro m "1" t o "5".
• Initial setting: "4"
STOP
73
Page 84

Chapter 9 Optional Settings
Setting 3: RECALL INTERVAL
This sets the am oun t of tim e your fax will wait be twe en autom at ic redi al s
when the line is busy. Enter "01" for 1 min ute , "02" for 2 minute s, etc. , up to a
maximu m of 15 mi nut es.
• Initial setting: "05"
Setting 4: RECALL TIMES
This sets the ma xi mu m nu mb er of time s your fa x wil l auto ma ti ca lly re dia l i f
the line is busy. Enter any number from "00" to "15".
• Initial setting: "02"
Setting 5: TEL/FAX RE MOTE NUMBER
This sets the 1-di gi t num be r for activ at ing fax rece pt ion from an extension
telephone. Enter any number from "0" to "9".
• Initial setting: "5"
Setting 6: REMOTE RECEPTION SELECT
This turns dete ct ion of the code for activ ating fax rece pt ion from an extensi on
phone on or off. Press "1" to turn detection on, or "2" to turn detection off.
• Initial setting: "1"
Setting 7: TRANSACT ION RE PORT PRINT SELECT
This sets the con dit io n for pr inting out a Transa ct io n Rep ort . Ent er a num ber
from "1" to "5" as follows:
"1" (ALWAYS PRINT): A report will be printed after each transmission,
reception, or error.
"2" (ERR/TIMER/ME M ): A report will be printed after an error, timer
operation, or memory operation.
"3" (SEND ONLY): A report will be printed only after a transmission.
"4" (NEVER PRINT): A report will never be printed.
"5" (ERROR ONLY): A report will be printed only after an err or occurs.
• Initial setting: "5"
Setting 8: DIAL MODE
This sets the mode of diali ng. Press "1" i f you are on a touch- ton e line , or "2" if
you are on a pulse dial lin e. (If yo u don’t kno w whic h type of line you ha ve,
try making phon e calls wit h bot h set tings an d see whic h one works. )
• Initial setting: "1"
74
Page 85

Chapter 9 Optional Settings
Setting 9: TAD CONNE CTED
Press "1" (YES) if an answering machine is connected to the fax and turned on,
or "2" (NO) if not. See Chapter 7 for more details on using an answering
machine hookup.
(Note: Select "NO" if you are using the distinctive ring function.)
• Initial setting: "2"
Setting 10: QUIET DETECT TIME
This sets the durati on of silenc e (in sec onds) after which the fax will take over
the line and begin receptio n when an answeri ng machi ne is conn ected. Enter a
number from "01" t o "10", or ente r "00" to turn off th e fun ct ion. (This set ti n g
is describe d in more detail i n "Optiona l Hoo kup Settings" in Cha pt er 7.)
(Note: We recom mend t hat you do not set Qui et Dete ct Ti me be low 3 secon ds.)
• Initial setting: "04"
Setting 11: FAX RECEPTI ON WHE N TAD FAIL S
Press "1" (YES) to have the fax answer a call if an answeri ng machi ne
connected to the fax does not answe r withi n 5 rings. Press "2" (NO) to turn the
function off. (Th is setti ng is desc rib ed in more deta il in "Optio nal Hooku p
Settings" in Chap ter 7. )
• Initial setting: "2"
Setting 12: DIST INCTIVE RING
This sets the ring pat tern t o which you r fax will answer if you subscri be to a
distinctive ring serv ice. Ente r a number fro m "1" to 5" to s elect a pattern. See
"Distinctive Ring" in Cha pter 2 for mo re deta ils.
• Initial setting: "5"
Setting 13: FAX SI GNAL RE CE IVE
Your fax is set to autom at ic ally be gi n recep ti on if you hear a high -pi tched fax
tone after answeri ng a cal l on your fa x or an extensi on ph one . If you use a
computer fax modem to send docum en ts on the same line, you must tur n this
setting off in order to pre ven t you r fax from mi sta ke nly attem pt in g to rece iv e
documents from th e comp uter fa x modem . Press "1" t o tur n the setti ng on, or
"2" to turn it off.
• Initial setting: "1"
75
Page 86

Chapter 9 Optional Settings
Setting 14: JUNK NUMB ER CHECK
Press "1" to preven t rece pti on fr om fax numbers (a nd voice numbe rs if you ar e
using Caller ID) entered in the Anti Junk Number List. Press "2" to allow
reception from all numbers.
• Initial setting: "2"
Setting 15: POLLING
Press "1" if you want to use Rapid Key 15 /POL L as a polling ke y. Press "2" i f
you want to use it as a regu lar Rap id Ke y.
• Initial setting: "2"
Setting 16: CALLER ID
If you subscribe to a caller ID service and wan t to use the Caller ID funct io n,
press "1", enter your area code by pressing the num ber keys, an d then pre ss the
START key. To turn Ca ller ID off, pre ss "2".
• Initial setting: "2"
Setting 17: AUTO COVER SHE ET
Press "1" (YES) t o hav e th e fa x aut omatic al ly gene ra te a cov er sheet and sen d
it as the last page of each transmission. Press "2" (NO) to turn the functi on off.
• Initial setting: "2"
Setting 18: ACT IVITY RE PORT AUTO PRINT OUT
Press "1" to have your fax aut om atic al ly pr int out an Activ it y Rep ort once
every 30 operation s. (T he li st can still be printed out on deman d when desired.)
Press "2" to turn aut om at ic print-out off.
• Initial setting: "2"
Setting 19: ER ROR CORR EC TI ON MODE (ECM)
Press "1" (YES) to have any dist ort io ns in a transm issi on due to noise on the
telephone line be corre cted be for e the docum en t is print ed out. This i s only
effecti ve when the ot her machine has EC M as wel l. Pre s s "2" (NO) to turn t he
function of f.
• Initial setting: "1"
76
Page 87

10
Printing
Chapter
You can print out a variety of list s showin g set tings an d inf orm at ion ent ered in
the fax. You can also have the fax automatically print out a report on transactions after they ar e made. The lists an d the report are describ ed be lo w.
Printing a list
Reports and Lists
1
Press the keys shown at right. LISTING
MODE will appear in the display.
2
Press the "#" key or the "*" key until
the desired list appears in the display.
3
Press the START key.
Activity Report
This report shows inform a ti on on yo ur most re ce nt ly perfo rm ed se nd an d receive operat io ns (a com bin ed max im um of 30 op era tions c an appear). The report is divided into two parts: the TRANSMISSIONS ACT IVIT Y RE PORT ,
which shows informati on on transm issi ons, and the RECEPT IONS ACT IVI TY
REPORT, which shows inf orm at io n on receptions.
♦ If Option Setting 18 is set to Y ES, a report will be automatically printed
out whenever information on 30 operations has accumulated. (A report can
still be printed on demand at any time.)
♦ All information is erased after a report is printed out. If automatic print- out
is turned off and print-out has not been done manually for 30 operations,
the information on the oldest operation will be overwritten each time a new
operation is performed .
FUNCTION
2
or
START
77
Page 88

Chapter 10 Printing Reports and Lists
Explanation of heading s
SENDER/
RECEIVER
The fax numb er of the other machine involv ed in the transaction . If this
machine doe s not have an ID func tion, the comm unicati on mode wi ll appear
(for exam pl e, "G3").
PAGES Number of pages transm i t t ed or r ec ei ve d.
NOTE
OK - Transmission/reception was normal.
P.FAIL - A power failure occurred.
JAM - A problem with the fax paper or document occurred.
NO PAPER - You ran ou t of fax pape r du ring rece ptio n.
CANCEL - Transmission was cancelled because the STOP key was
press ed, no docu ment was in the fe eder, or th e oth er mach ine re queste d
transm ission usi ng a f unc t io n whi ch your fax doe s not have.
COM.E-0 to COM.E-14 - A teleph one l ine e rror preven ted t he tr ansac tion.
Explanati ons of the e rror numbe rs are given in the foll owing tables, however,
these are primarily for use by service engineers. In general, you will want to
simply try the transaction again. If necessary, check with the other party to
make sure their ma chi ne is fu nct i oni ng pro per l y.
Transmission errors
Able to recognize handshake signal, but it has errors.
E-0
Cannot recognize the handshake signa l from the receiver side.
E-1
Line disconnected during transmission.
E-2
Line disc onnecte d after mode m sp eed fall-back.
E-3
Line disconnected during multi-page transmission.
E-4
Cannot recognize the handshake signa l for next page at receiver side.
E-6
No response from receiver side or "disconnect signal" is received at transmitter
E-7
side.
Error was not corrected after the predete rm ined numb er of retri es because of an
E-8
error in a part of a page.
E-11
E-12
E-13
Error occurred after or while rece pti on by the remot e (receiving ) machi ne was
revealed to be impossible.
Error occurred just after fall -ba ck.
Error occurred after a response to a retransmi ssion end comm an d was received.
78
Page 89

Reception e rrors
Able to recognize handsh ake signa l, bu t it has error s.
E-0
Line disconnected during reception.
E-1
Cannot recognize the handshake signal from the transmitter side.
E-2
Cannot recognize the last handshake signal from the transmitter side.
E-3
Cannot recognize the handshake signal for next page from the transmitter side in
E-4
the case of mode change.
Cannot recognize the handshake signal for next page from transmitter side.
E-5
No response from transm it ter or "disconne ct signal" is received at receive r side.
E-7
Error occurred upon completion of reception of all pages.
E-8
Error occurred when mode was changed or transmission/reception switching was
E-9
performed.
E-10
E-11
E-12
E-13
E-14
Error occurred during partial page or physical page reception.
Error occurred after or during inquiry from the remote (transmitting) machine as to
whether reception was possible or not.
Error occurred during or just after fallback.
Error occurred after retransmission end command was received.
Error occurred after voice communication command was received.
Chapter 10 Printing Reports and Lists
Timer li st
This list shows the timer operati ons whi ch are current ly set.
79
Page 90

Chapter 10 Printing Reports and Lists
Telephone Numbe r Lis t
This list shows the fax and voi ce numbers which ha ve been stored for aut om at ic
dialing.
Passcode List
This list sho ws se ttings made for pol li ng se cur it y, your nam e an d fax /tel eph one
number as entered in the m achine, and a sample of the head er p r int ed at the top
of every page you transmit (HEADER PRINT).
Option Setting List
This list shows the curre nt status of th e optio nal set tings.
80
Page 91

Chapter 10 Printing Reports and Lists
Anti Junk Number List
This list sho ws t he fax numb ers (a nd vo ic e numbers if the Calle r ID func tion i s
being used) fr om which recep ti on is no t allowed.
Program and Group List
The top part of this list shows the program s whi ch have been enter ed. T he bottom part sho ws the fax numbers which have bee n sto red in each Group Ke y.
81
Page 92

Chapter 10 Printing Reports and Lists
Caller ID Lis t
This list shows informat ion about your most rece nt unanswe red call s (maxi mum
of 20 calls). (T hi s list is only av aila ble if you are using the Calle r ID funct ion .)
Print Setup List
This list shows the cur ren t statu s of the printi ng se tt ing s made by pressi ng t he
FUNCTION key and th e "6" key.
Transaction Report
This repor t is pr int ed out auto ma ti ca lly af te r an op era ti on is com pleted to allow
you to check the result. Your fax is set at the factory to print out the report only
when an error occurs. If desired, you can chan ge the sett ing to have it pri nt ed
out under a vari et y of ot her cond itions. This is done by changing Op tion Setting
7 as described in Chapter 9.
♦ The same headings appear in the Transaction Report as in the Activity Re-
port. See "Activity Report" in this chapter for an explanation of the headings.
♦ The Transaction report cannot be printed on demand .
82
Page 93

11
Chapter
Fax print head
Clean the print head frequ ent ly to ensure optim um prin ti ng perfor ma nc e. To
clean the print head , first unpl ug th e power cord, ope n the pri nt com par tm ent
cover (press the rele ase marke d OPEN), and remove the imaging film.
Wipe the print head, frame and roller
with a soft cloth dampened with denatured alcohol.
Maintenance
Print head
Frame
Rollers
Caution!
•• Do not use benzene or thinne r. Avoid tou chi ng the print head wit h hard
objects.
•• The print head may be hot if your fax mac hi ne has just recei ve d a large
number of do cum e nts. If t his i s the case, allow th e pri nt head to c ool prio r to
cleani ng.
83
Page 94

Chapter 11 Maintenance
Scanning glass and rolle rs
Clean the scannin g glass and roller s freq uen tl y to ensure the quali ty of transm it ted images an d cop ie s. Ope n th e ope ra ti on pa nel by pul li ng t he front edge up
(grasp it at the PANEL RELEASE mark), and clean the scanning glass and
rollers as shown below.
Wipe the scanning glass, white backplate, and rollers with a soft cloth.
•• Make sure that all dirt and stains (such
as correcting fluid) are removed, as
these will cause vertical lines on transmitted images and copies.
Document
rollers
Scanning glass
The housing
Wipe the e xte rna l pa rt s and su r fac e of the machi ne with a dry cloth.
Caution!
•• Do not use benze ne or thinne r. These solvents may dam ag e or disco lor the
machine.
84
White
backplate
Page 95

12
Chapter
Troubleshooting
Problems and Solutions
Note: F or problems with an answering machine hookup, see "If you have porblems" in Chapter 7, "Answering Machine Hookup".
Problem Check and remedy
Nothing appears in the display.
The fax does not respo nd
when you press any of its
keys.
Dialing is not possible.
The power is on, bu t no
transmission takes place.
•• Make sure the power cord is pr operly plugg ed
into a power outlet.
•• Connect another electr ical applianc e to the
outlet to see if it has power.
•• If a beep sound is not made when you press the
keys, unplug the power cord and then plug it
back in several seconds later .
•• Make sure the power cord is pr operly plugg ed
into a power outlet.
•• Make sure that the teleph one line is pr oper ly
connected to both the TEL. LINE jack and the
wall jack.
•• Make sure tha t the fax is set t o the cor r ect
dialing mode for your telephone line. See Opti on
Setting 8 in Chapter 9.
•• Make sure that the rece iv ing machine has fax
paper.
•• Make sure tha t the teleph one line cor d is
plugged into the "TEL. LINE" jack, and not the
"TEL. SET" jac k.
•• If the receiving machine is in manua l mode with
no attendant , recept ion w i ll not be possible.
•• If the receiving machine is not a Sharp mod el,
make sure it is G3 compa tible.
•• Check the display for error messages.
•• Pick up the handset and check for a dial tone.
85
Page 96

Chapter 12 Troubleshooting
Autom atic document fe e ding does not work for transmission or copying.
Nothing is printed at the receiving end.
A distorted ima ge is re ceived at the other end.
The power is on, but no reception takes place.
The printing paper does not
come out.
The printing paper comes
out blank when you try to receive a document.
•• Check the size and weight of the document (see
"Transmittable do cumen ts" in Chapter 3).
•• Make sure that the document for transmission is
placed face down in the feeder .
•• Make sure that the fax paper is proper ly loade d
in the receiving machine.
•• Noise on the telephone line may cause
distortion. Try send ing the docu ment again.
•• Make a copy of the doc um ent on yo ur fax. If the
copy is also distor ted, your fax m ay ha ve a
prob le m .
•• Make sure that the telephone line cord is
plugged into the "TEL. LI N E" jack, and not the
"TEL. SET" ja ck.
•• The printing p a per may be jam m ed . See
"Clearing Jammed Print ing Pap er" in this
chapter .
•• Make sure that the print ing pa per is pro per ly
loaded in your mach ine.
•• Make sure that the docum e nt is loaded properly
in the feeder of the tra nsm it ting machine. Make
a copy to confir m the print ing ab ilit y of your
machine.
The received documen t is
faint.
Received images are distorted.
86
•• Ask the other party to sen d higher contras t
documents. If the contrast is still too low, your
fax may have a prob le m . Mak e a copy to check
it.
•• Noise on the telephone line may cause
distortion. Have the othe r party tr y sendin g the
document again.
•• The print hea d m ay be dir t y. See "F ax pr int
head" in Chapter 11.
•• Make a copy of another document on your fax. If
the copy is also distor t ed, your f ax may h a ve a
prob le m .
Page 97

Chapter 12 Troubleshooting
Reception/copyin g is interrupted.
Voice calls taken on an extension phone are interrupted by the fax.
No reception occur s whe n
polling is attempted.
•• If reception or copying has been done
continuously for a long time, the print hea d may
have become overh eat ed. Turn off the power
and let it cool down.
•• The fax may interrupt during a voice call if
Option Sett ing 9 is set to YES an d the re cept ion
mode is set to AUTO. To prevent inte rrup tion on
a touch-to ne ext en sion ph o ne, press an y th re e
keys on the extension ph one aft er answering .
(Note: Do not enter the code to activate fax
reception.)
•• Make sure you ha ve not r un out of prin ting paper .
•• Make sure the transmitt ing mac hine is in
automatic reception mode.
•• If the transmit tin g machine has polling security,
make sur e that your fax num b er has been
entere d bot h in your fax and in the transmit t in g
machine.
87
Page 98

Chapter 12 Troubleshooting
Messages and Signals
Display messages
CHECK PAPER SIZE
COVER OPEN The printing compartment cover is open. Close it.
DOCUMENT JAM
FAX RX IN MEMORY
FILM END
FUNCTION MODE
LINE ERROR
LINE IS IN USE
MEMORY IS FULL The memory is full. See "Memory" in Chapter 8.
The paper size setting is incorrect. Change the
paper size settin g as described in "Loading the
Paper" in Chapter 1.
The o riginal document is jammed. See the
followin g secti on, "Cle arin g Pap er Jams ".
A fax has been received in memory because the
imaging film need s repl acem en t, yo u have run
out of printing paper, or the paper is jammed.
The fax will print out automatically when the
proble m is fixed.
The imaging film may need replacement. Check
the film and replace it if necessary.
The
FUNCTION key has been pressed.
Transmission or reception was not successful.
STOP to clear the message, and the n try
Press
again.
An extension phone conne cted to the fax is being
used. Do not lift the fax’s handset or atte mpt
transm is sion at thi s time, as thi s will interru pt the
conversation on the extension phone.
MEMORY PRINTING
ON HOOK DIAL
OUT OF PAPER You are out of printing paper.
OVER HEAT
PAPER JAMMED
The fax is preparing to or printing out a document
from memory.
The
SPEAKER key has been pressed and the
fax is waiting for you to dial.
The print head has overheated. Operation can be
continued once it cools.
The printing paper is jammed. See the following
section, "Clearing Paper Jams".
Note: If you have turned on the Caller ID function, see "Caller ID" in Chapter 8 for display messages related to Caller ID.
88
Page 99

Audible signa ls
Chapter 12 Troubleshooting
Continuous tone 3 secon ds
Intermittent tone
(3 be eps)
Rapid intermittent tone
5 seconds
(1 second on,
1 second off)
35 seco nd s
(0.7 se conds on,
0.3 se conds off)
Indica te s the end of tran sm i ssi on ,
reception, or copying.
Indicates incomplete
transmission, reception, or
copying.
Indicates that the handset is off
hook.
89
Page 100

Chapter 12 Troubleshooting
Clearing Paper Jams
Clearing a jam med docum e nt
If a document doesn’ t feed prope rly duri ng transm i ssion or copying, or DOCUMENT JAMMED appears in the display, first try pressing the START key. If
the document doesn’t fee d out, op en the opera ti on pa nel (gr asp t he front edge at
the "PANEL RELEASE" ma rk and pull up) and pu ll it out gentl y.
Clearing jammed fax paper
1
Press the release marked OPEN and
open the print compartment cover.
•• Caution! The printing head (the strip
of metal on the underside of the frame)
applies heat to the printing film. It
may be hot if a document has just been
printed.
2
Remove the imaging film from the printing compartment and set it on a sheet of
paper.
90
 Loading...