

Page 1
MODEL
UX-5000
FACSIMILE
OPERATION MANUAL
1. INSTALLATION
2. INITIAL SETTINGS
3. BASIC OPERATIONS
4. SPECIAL FUNCTIONS
5. OPTIONAL SETTINGS
6. PRINTING OUT REPORTS AND LISTS
7. MAINTENANCE
8. TROUBLESHOOTING
SPECIFICATIONS
QUICK REFERENCE GUIDE
INDEX
Page 2
UX5000U-FCC-2
WARNING FCC Regulations state that any unauthorized changes or modifications to this equipment
not expressly ap proved by the ma nufact urer co uld void the user’s auth ority to o perat e this equipm ent.
Note: This equipment has been tested and fo und to com ply with the limits for a Class A digita l device,
pursuant to Part 15 of the FCC Rules.
These limits are designed to provide reasonable protection against harmful interference when the
equipment is oper ated in a comm er cial envir onm ent.
This equipm en t ge ner ates, use s, a nd can ra dia te rad io f requ ency e ner gy an d, if not inst alled and use d
in accordance w ith the instr uction m an ual, may cause har mf ul interf er enc e to radio comm unica tion s.
Operation of this equipm ent in a residential area is likely to cause har mf ul inter fer enc e in which case
the user will be required t o correct the interf eren ce at his own exp ense .
NOTE The laser component of the UX-5000 is rated Class 1 and complies with 21 CFR 1040.10 and
1040.11 of the CDRH standards. This means that the machine does not produce hazardous laser
radiation.
ABOUT THE TELEPHONE CONSUM ER PRO TECTIO N ACT OF 1991
"The Telephone Con sumer Protection Ac t of 1991 makes it unlawf ul for any pe rson to use a comput er
or other electronic device to send any message via a telephone facsimile machine unless such
message clearly cont ains in a mar gin at the top or bot tom of each tr ansmit ted page or on the f irst page
of the transmission the following informatio n:
(1) The date and time of transmission.
(2) Identification of either the busine ss, busine ss entit y or individ ual send ing the message.
(3) Telephone number of either the sending mach ine, business, busines s entity or individual.
In order to program this information into your facsimile machine, please refer to the appropriate
instructions in the ope ra tion manual. "
As an ENERGY STARSM partner, SHARP has determined that this
product m eets the
ENERGY STAR
SM
guidelines for energy efficiency.
FOR YOUR RECORDS
Please record the model number and serial number below, for easy reference, in
case of loss or thef t . These n u mber s ar e locat ed on the re ar side of the unit.
Space is also prov ided f or oth er relev ant information.
Model Number ________________ ____ ____ ____ ________ ____ ____ ____ ____
Serial Numbe r_____________ ____ ____ ____ ____ ________ ____ ____ ____ ____
Date of Purchase __________________________________________________
Place of Purchase______________________ ____ ____ ________ ____ ____ ____
Page 3

<P=001>
UX5000U-INBU
INTRODUCTION
Welcome to the UX-5000 and thank you for choosing Sharp! In addition to providing
you with the ease and convenience of plain-paper printing, the UX-5000 features a
variety of special functions designed to increase the range and power of your
communications.
This manual gives you easy-to-follow instructions for insta lling and using the UX-5000.
The Table of Contents will show you where instructions for using each feature are
located.
If you have any questions or problems which cannot be solved by reading this manual,
please contact Sharp’s Customer Assistance Center at 1-800-BE SHARP.
Important:
••
This facsimi le machine is not des igned f or use on a line which has call waiting, call
forwarding, or certain special ser vices offere d by your telepho ne com p any. If you attem pt to
use the fax machine in conjun ctio n with any of these ser vice s, you may ex per ience errors
during transmission and recep tion of facsimile m ess ages .
••
This machine is not com pat ible w ith digital tele phone syst em s .
Important safety information
• If your facsimile equipment is not operating properly, you should immediately remove
it from your telephone line, as it may cause harm to the telephone network.
• Never install telephone wiring during a lightning storm.
• Never install telephone jacks in wet locations unless the jack is specifically designed
for wet locations.
• Never touch bare telephone wires or terminals unless the telephone line has been
disconnected at the network interface.
• Use caution when installing or modifying telephone lines.
• Avoid using a telephone (other than a cordless type) during an electrical storm. There
may be a remote risk of elect ric shock from lightning.
• Do not use a telephone to report a gas leak in the vicinity of the leak.
• Do not install or use the machine near water, or when you are wet. Take care not to
spill any liquids on the machine.
Caution!!
• Use of controls or adjustments or performance of procedures ot her than those specified
herein may result in hazardous radiation exposure.
i
Page 4

YF <P=001>
UX5000U-TCTC
TABLE OF CONTENTS
1. INSTALL AT IO N 1-1
Unpacking Checklist . . . . . . . . . . . . . . . . . . . . . . . . . . . . . . . . . . 1-1
Installing the Printer Cartridges . . . . . . . . . . . . . . . . . . . . . . . . . . . . 1-2
Assembly and Connections . . . . . . . . . . . . . . . . . . . . . . . . . . . . . . 1-5
Loading Printing Paper . . . . . . . . . . . . . . . . . . . . . . . . . . . . . . . . 1-7
2. INITIAL SETTINGS 2-1
A Look at the Operation Panel . . . . . . . . . . . . . . . . . . . . . . . . . . . . . 2-1
Entering Your Name and Fax Number . . . . . . . . . . . . . . . . . . . . . . . . . 2-4
Entering Letters for Names . . . . . . . . . . . . . . . . . . . . . . . . . . . . . . 2-5
Setting the Date and Time . . . . . . . . . . . . . . . . . . . . . . . . . . . . . . . 2-6
Storing Numbers for Automatic Dialing . . . . . . . . . . . . . . . . . . . . . . . . 2-7
Volume Adjustment . . . . . . . . . . . . . . . . . . . . . . . . . . . . . . . . . 2-11
3. BASIC OPERATIONS 3-1
Sending Documents . . . . . . . . . . . . . . . . . . . . . . . . . . . . . . . . . . 3-1
Receiving Documents . . . . . . . . . . . . . . . . . . . . . . . . . . . . . . . . 3-14
Making Copies . . . . . . . . . . . . . . . . . . . . . . . . . . . . . . . . . . . . 3-17
Making Telephone Calls . . . . . . . . . . . . . . . . . . . . . . . . . . . . . . . 3-19
4. SPECIAL FUNCTIONS 4-1
Broadcasting . . . . . . . . . . . . . . . . . . . . . . . . . . . . . . . . . . . . . . 4-1
Confidential Operations . . . . . . . . . . . . . . . . . . . . . . . . . . . . . . . . 4-3
Relay Request . . . . . . . . . . . . . . . . . . . . . . . . . . . . . . . . . . . . . 4-7
Polling . . . . . . . . . . . . . . . . . . . . . . . . . . . . . . . . . . . . . . . . 4-12
Timer Operations . . . . . . . . . . . . . . . . . . . . . . . . . . . . . . . . . . 4-17
Batch Transmission . . . . . . . . . . . . . . . . . . . . . . . . . . . . . . . . . 4-23
Entering and Using Programs . . . . . . . . . . . . . . . . . . . . . . . . . . . . 4-25
Department Control . . . . . . . . . . . . . . . . . . . . . . . . . . . . . . . . . 4-33
Anti Junk Fax . . . . . . . . . . . . . . . . . . . . . . . . . . . . . . . . . . . . 4-35
Distinctive Ring . . . . . . . . . . . . . . . . . . . . . . . . . . . . . . . . . . . 4-36
5. OPTIONAL SETTINGS 5-1
6. PRINTING OUT REPORT S AND LISTS 6-1
7. MAINTENANCE 7-1
8. TROUBLESHOOT ING 8-1
Problems and Solutions . . . . . . . . . . . . . . . . . . . . . . . . . . . . . . . . 8-1
Messages and Signals . . . . . . . . . . . . . . . . . . . . . . . . . . . . . . . . . 8-3
Clearing Paper Jams . . . . . . . . . . . . . . . . . . . . . . . . . . . . . . . . . 8-5
SPECIFICATI ONS Spec-i
QUICK REFERENCE GUIDE Quick-i
INDEX Index-i
ii
Page 5
YF <P=001>
UX5000U-ISUN
1 INSTALLATION
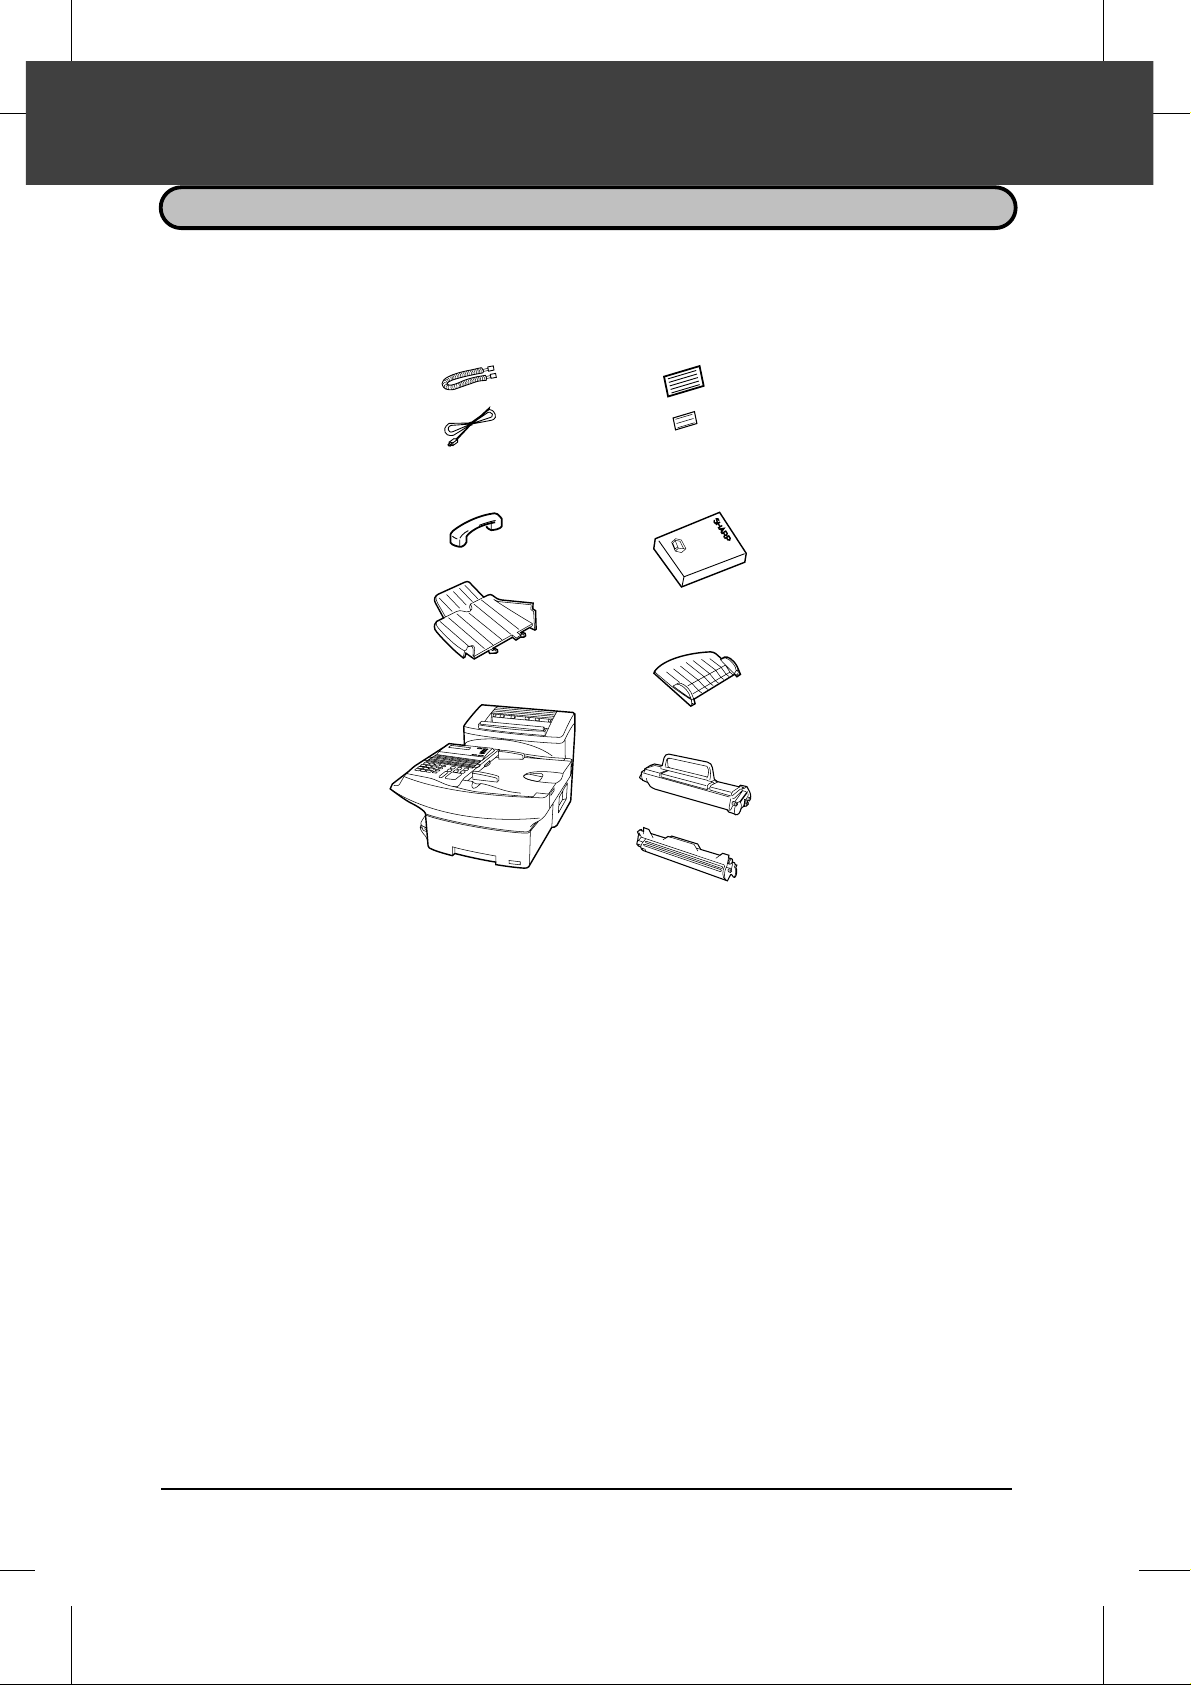
UNPACKING CHECKLIST
After unpacking your fax, make sure you have all the items shown below. If any are
missing, contact your dealer.
Handset cord
Telephone line
cord
Handset
Original document
OUT tray
Rapid key labels
Letter and legal
cassette labels
Operatio n
manual
Received
document tray
Toner cartridge
Drum cartridg e
Precauti ons be fore setting up
♦ The printing unit in the fax generates a small amount of ozone during operation.
The amount is not large enough to be harmful; however, the fax should only be installed in a ventilated room.
♦ The fax must be installed on a level surface.
♦ Keep the fax away from air conditioners, heat ers, direct sunlight, and dust.
♦ If your area experiences a high incidence of lightning or power surges, we recom-
mend that you install surge protectors for the power and telephone lines. Surge protectors can be purchased at most telephone specialty stores.
♦ If the fax is moved from a cold to a warm place, it is possible that condensation may
form on the reading glass, preventing proper scanning of documents for transmission. To remove the condensation, turn on the power and wait approximately two
hours before using the fax.
INSTALLATIO N 1-1
Page 6

YF <P=001>
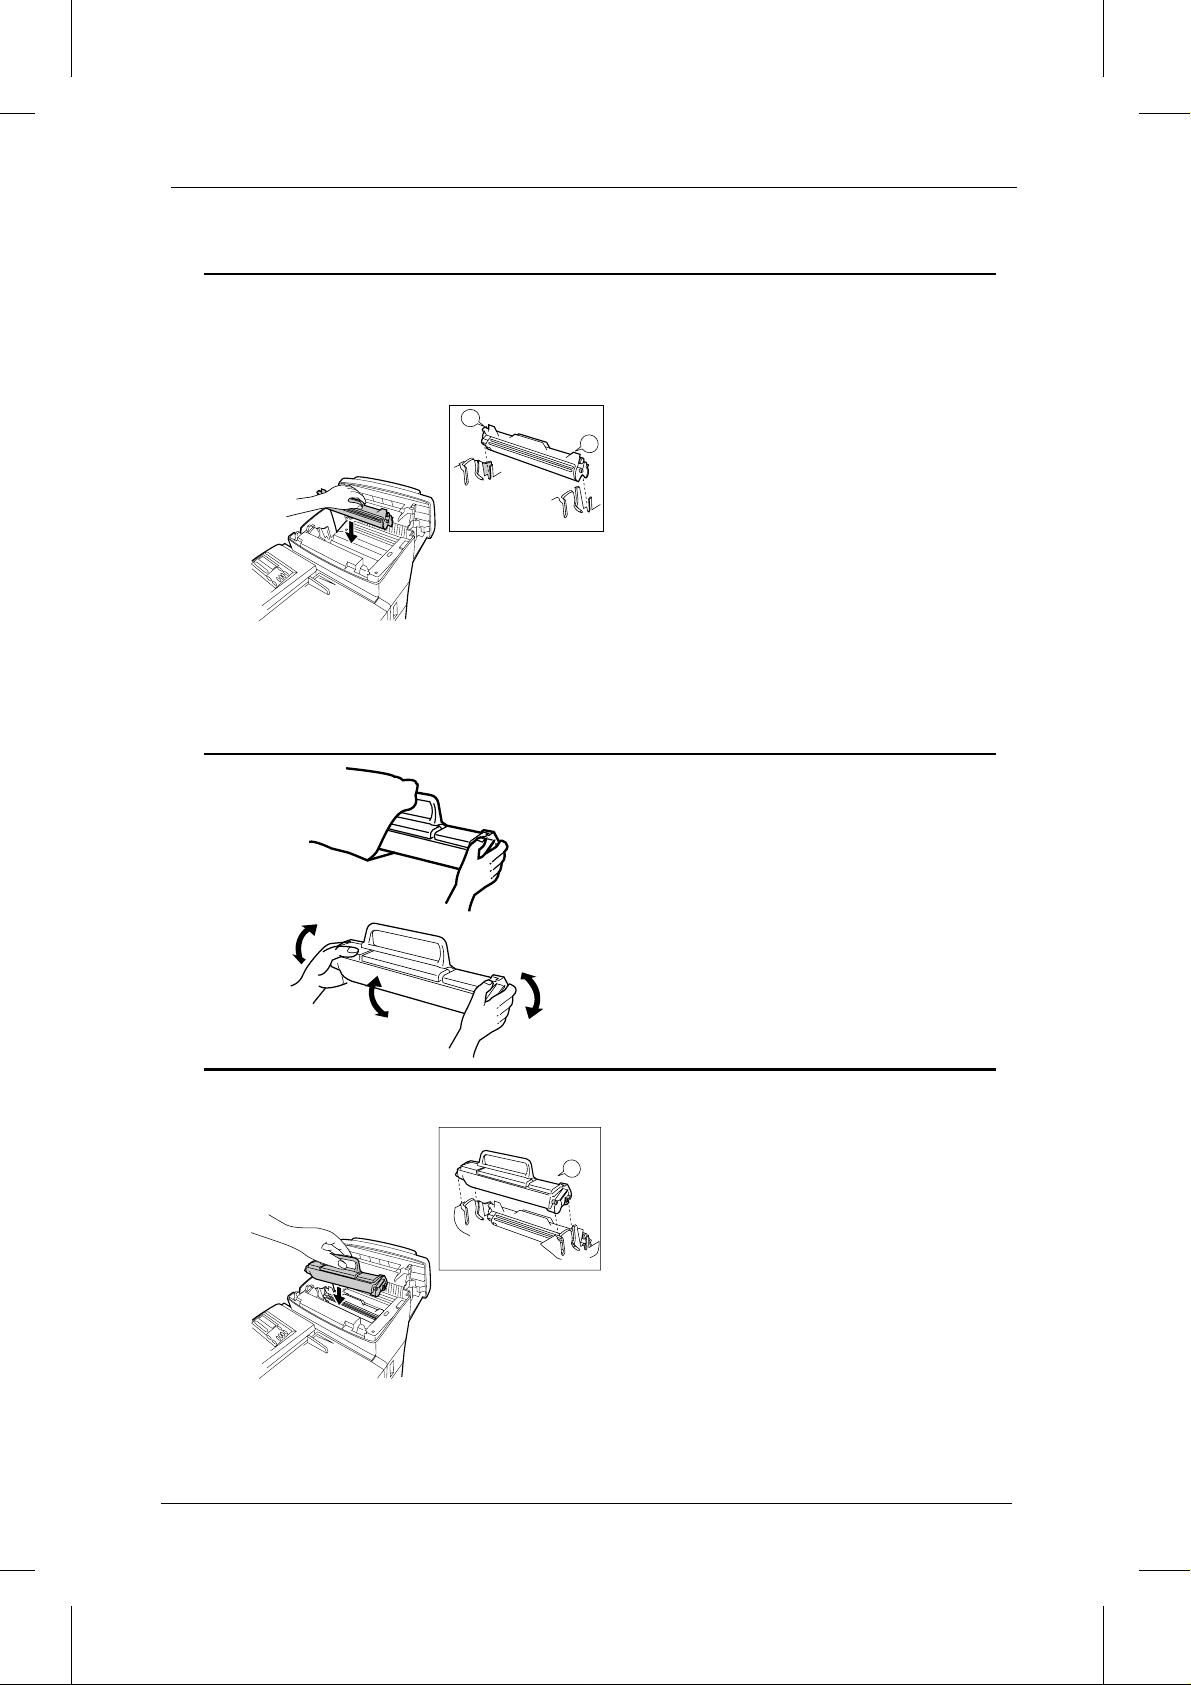
INSTALLING THE PRINTER CARTRIDGES
The laser printer in your fax creates printed text and images by applying toner to the
page with a photoconductive drum. Follow the steps below to install or replace the
toner cartridge and the drum cartridge.
1 Press the butt on on th e si de o f the
UX5000U-ISPC
printer compartmen t, and open the
printer cover.
•• Caution! The ribs on the bottom of the
inside of the printer cover become very
hot during printing. Be careful not to
touch them.
•• If you are installing the cartridges for
the first time, go to Step 4.
2 If you are replacing the cartridges,
grasp the handle on the toner
cartridge, and pull the toner cartridge
out of the compartment.
•• If you are only replacing the drum cartridge, place the toner cartridge on a
piece of paper on a horizontal surface.
•• If you are only replacing the toner cartridge, go to Step 6.
3 Pull the old drum cartridge out of the
compartment.
4 Remove the new drum cartridge from
its packaging.
1-2 INSTALLATION
Page 7
<P=002>
INSTALLING THE PRINTER CARTRI DG ES
5 Align the arrowhead on the right side
of the drum cartridge (the right side is
marked "R") with the arrow head
pointing down which is marked on the
L
Left
Right
right side of the compartment , and
insert the cartridge into the
R1
compartment so that th e ends of the
cartridge move along the guides on
the sides of the compartment. Make
sure the cartridge is set firmly in
place.
•• Place the old drum cartridge (if you removed one) in the empty drum cartridge bag, seal the bag, and dispose
of it in a way that conforms to any local
regulations that may exist in your area.
•• If you are not replacing the toner cartridge, go to Step 7.
6 Remove the new toner cartridge from
its packaging, and shake several
times as shown.
•• This ensures that the toner is well distributed inside the cartridge.
7 Hold the handle of the toner cartridg e
so that the "2" marked on the
2
Left
Right
cartridge is to the right, and insert the
cartridge into the compartment so
that the two knobs on each side of the
cartridge move along the two guides
on each side of the compartment.
Press the handle down so that the
cartridge sets into place.
•• Place the old toner cartridge (if you removed one) in the empty toner cartridge bag, seal the bag, and dispose
of it in a way that conforms to any local
regulations that may exist in your area.
INSTALLATIO N 1-3
Page 8
<P=003>
INSTALLING THE PRINT ER CART RIDG ES
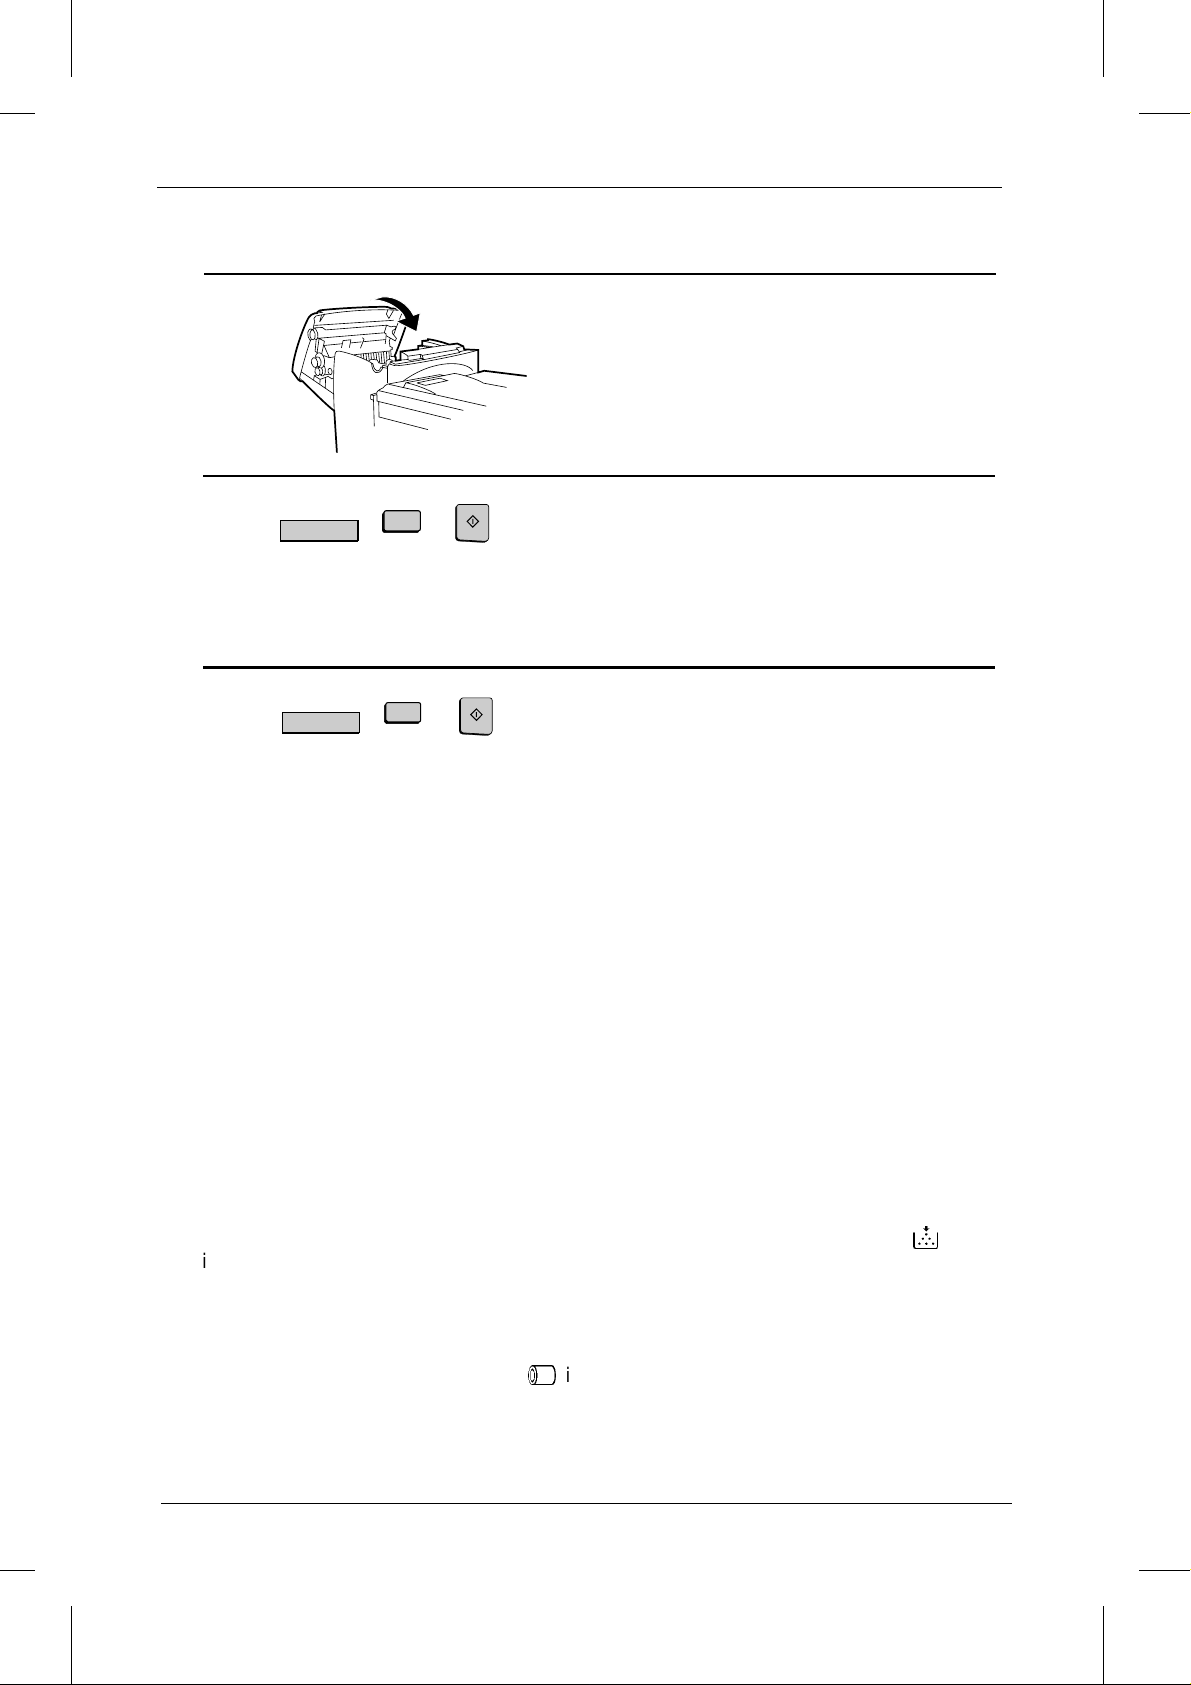
8 Close the printer cover.
9 If you replaced the toner cartridge,
10 If you replaced the drum cartridg e,
Note:
LIFE
V
LIFE
V
If you ever need to move or ship the fax, rem ove th e toner cartridg e and drum cartr idge
from the fax first.
2
START
reset the toner counter by pressing
the LIFE key (flip up the Rapid Key
overlay if necessary), the "2" key, and
the START key.
START
3
reset the drum counter by pressing
the LIFE key (flip up the Rapid Key
overlay if necessary), the "3" key, and
the START key.
Replacing the cartridges
The laser printer in your fax uses the following toner cartridge and drum cartridge.
These can be obtained at your office supply store.
UX-50ND TONER CARTRIDGE
UX-50DR DRUM CARTRIDGE
The sample toner cartridge provided with your fax is capable of printing approximately
3700 pages if letter size paper is used and 4% of each page is covered with toner. The
UX-50ND toner cartridge is capable of printing approximately 5600 pages.
When the toner cartridge nears empty (about 100 pages can still be printed), the
indicator on the operation panel will begin to blink. When the cartridge is empty, the
indicator light will remain on and REPLACE TONER will appear in the display.
Replace the toner cartridge as described above.
The drum cartridge is capable of printing approximately 20,000 pages. When the drum
cartridge nears the end of its life, the % indicator on the operation panel will begin to
blink. The indicator will continue to blink until the cartridge life is over, at which point
the indicator will remain on and DRUM LIFE OVER will appear in the display. Replace
the drum cartridge as described above.
1-4 INSTALLATION
&
Page 9

DD <P=001>
ATTACHMENTS AND CONNECTIONS
Handset
UX5000U-ISAC
Connect the handset co rd to the
handset and the fax as shown.
•• The ends of the handset cord are identical, so they will go into either jack.
Place the handset on the handset rest.
Telephone line cord
TEL.
LINE
Use the handset to make ordinar y
phone calls, or to transmit and
receive documents manually.
Plug one end of the telephone line
cord into the jack on the fax marked
"LINE". Plug the other en d into a
standard single-line telephone wall
jack.
INSTALLATION 1-5
Page 10
<P=002>
ASSEMBLY AND CONNECTI ON S
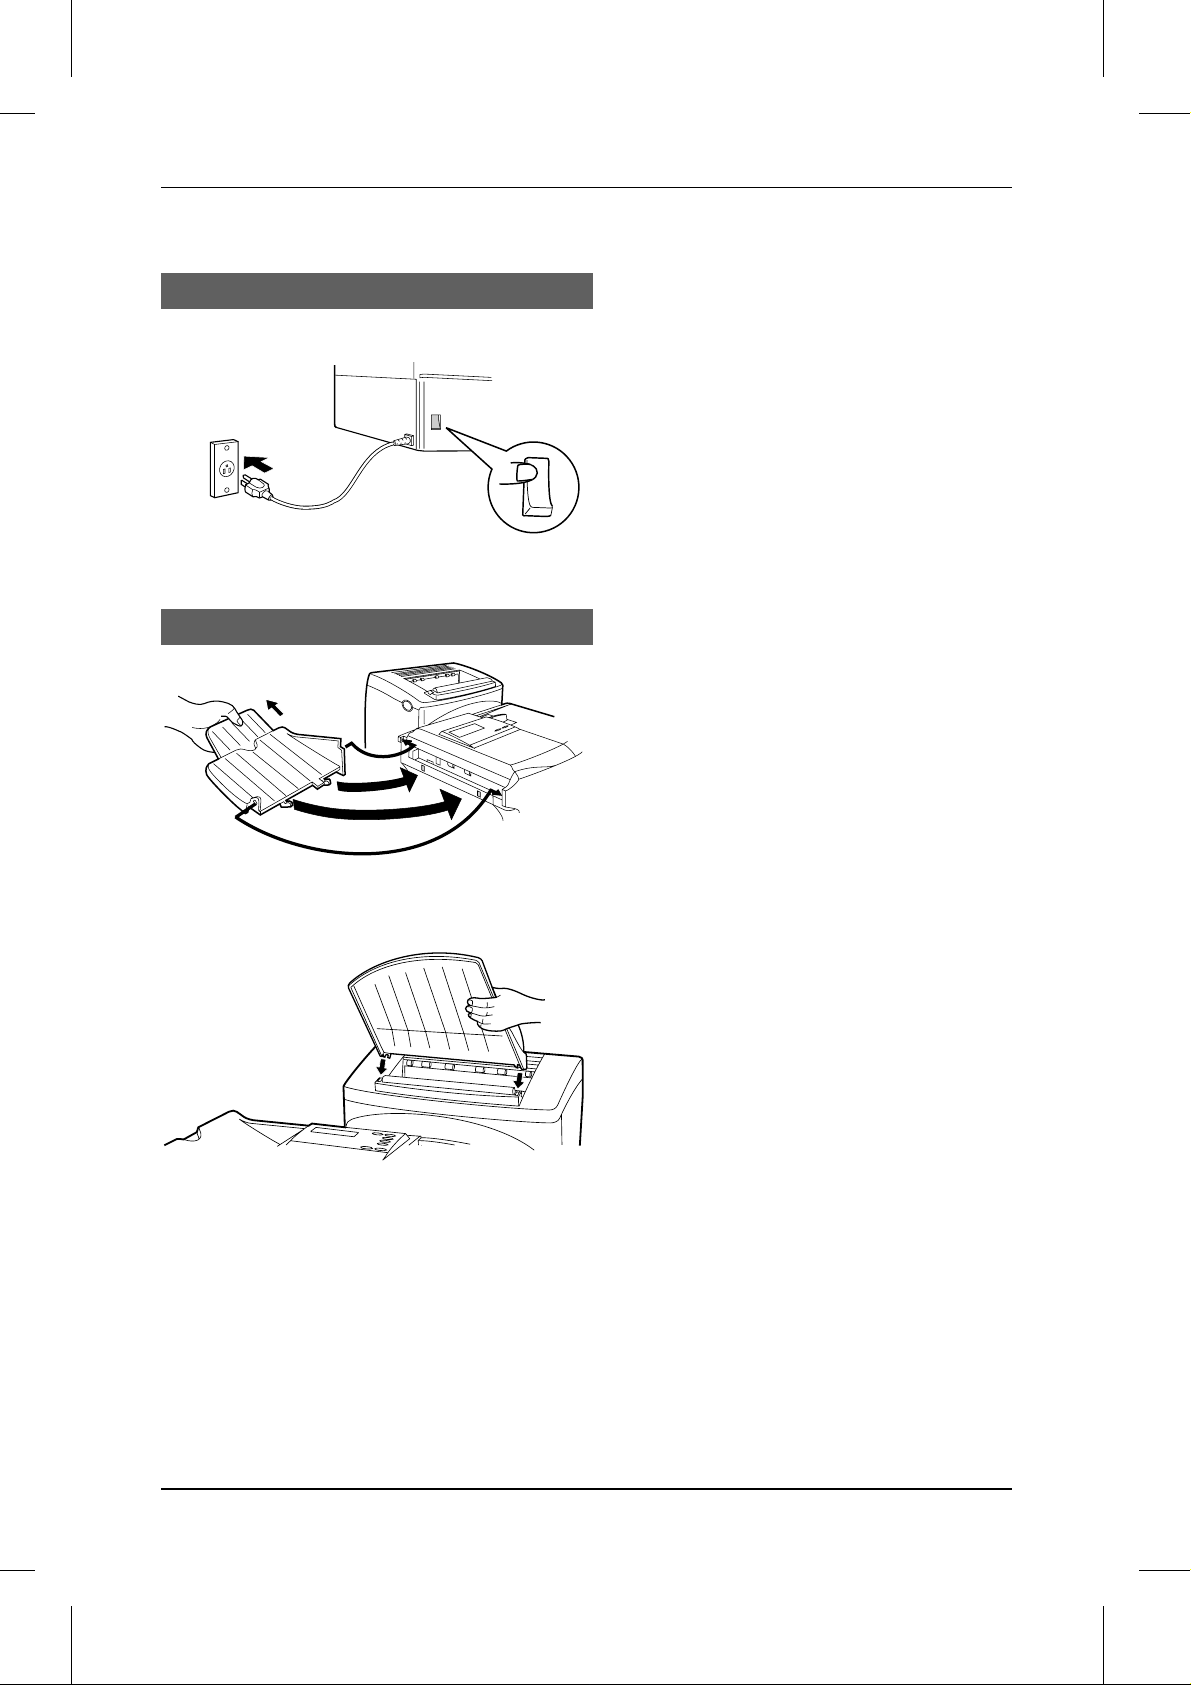
Power lead
ON |
OFF 0
Plug the power lead into a 120 V,
60 Hz, grounded (3-prong) AC outlet.
Press the power switch to turn on the
power.
Trays
Attach the original document OUT
tray by inserting the tabs into the
holes in the fax as shown.
Attach the received document tray by
inserting the tabs into the holes in the
fax as shown .
1-6 INSTALLATION
Page 11
YF <P=001>
UX5000U-ISLP
LOADING PRINTING PAPER
The paper cassette and the paper tray hold the paper on which received documents
are printed.
The paper cassette can hold 500 sheets of legal- or letter-size paper. The paper tray
can hold 150 sheets of legal- or letter-size paper.
♦ Your fax has been set at the factory to automatically select the source from which it
draws paper according to the size of the document received or copied. If desired,
you can change this setting to give priority to the tray or the cassette by setting Option Setting 16 (see Chapter 5, "Optional Settings").
♦ When paper runs out in the currently used source (cassette or tray), your fax will
automatically start drawing from the other sourc e. NO PAP ER will appear in the display, followed by the empty source in parenthesis. If desired, you can stop changeover to the other source by changing Option Setting 17. In this case, received
documents will be stored in memory.
Caution!
••
Do not use paper which has alr ead y been print ed on one side by a laser printe r or copie r.
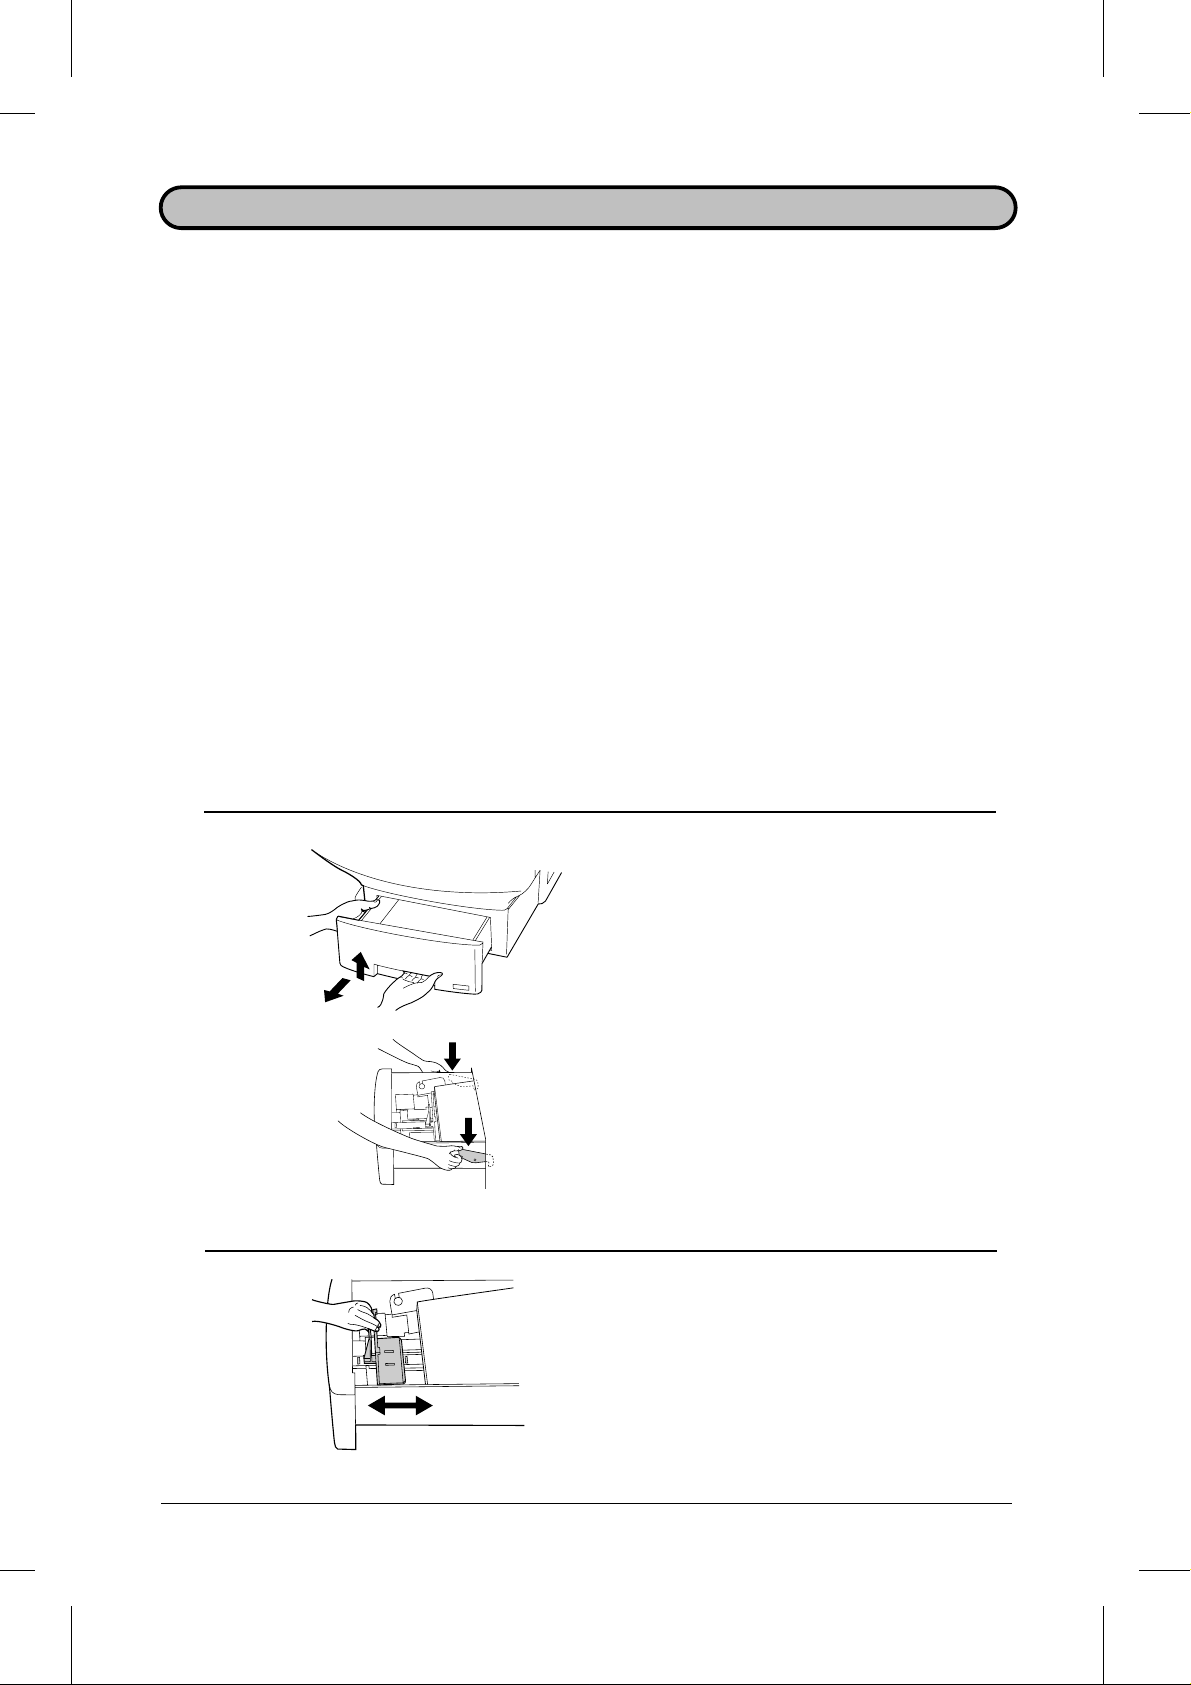
Loading the paper cassette
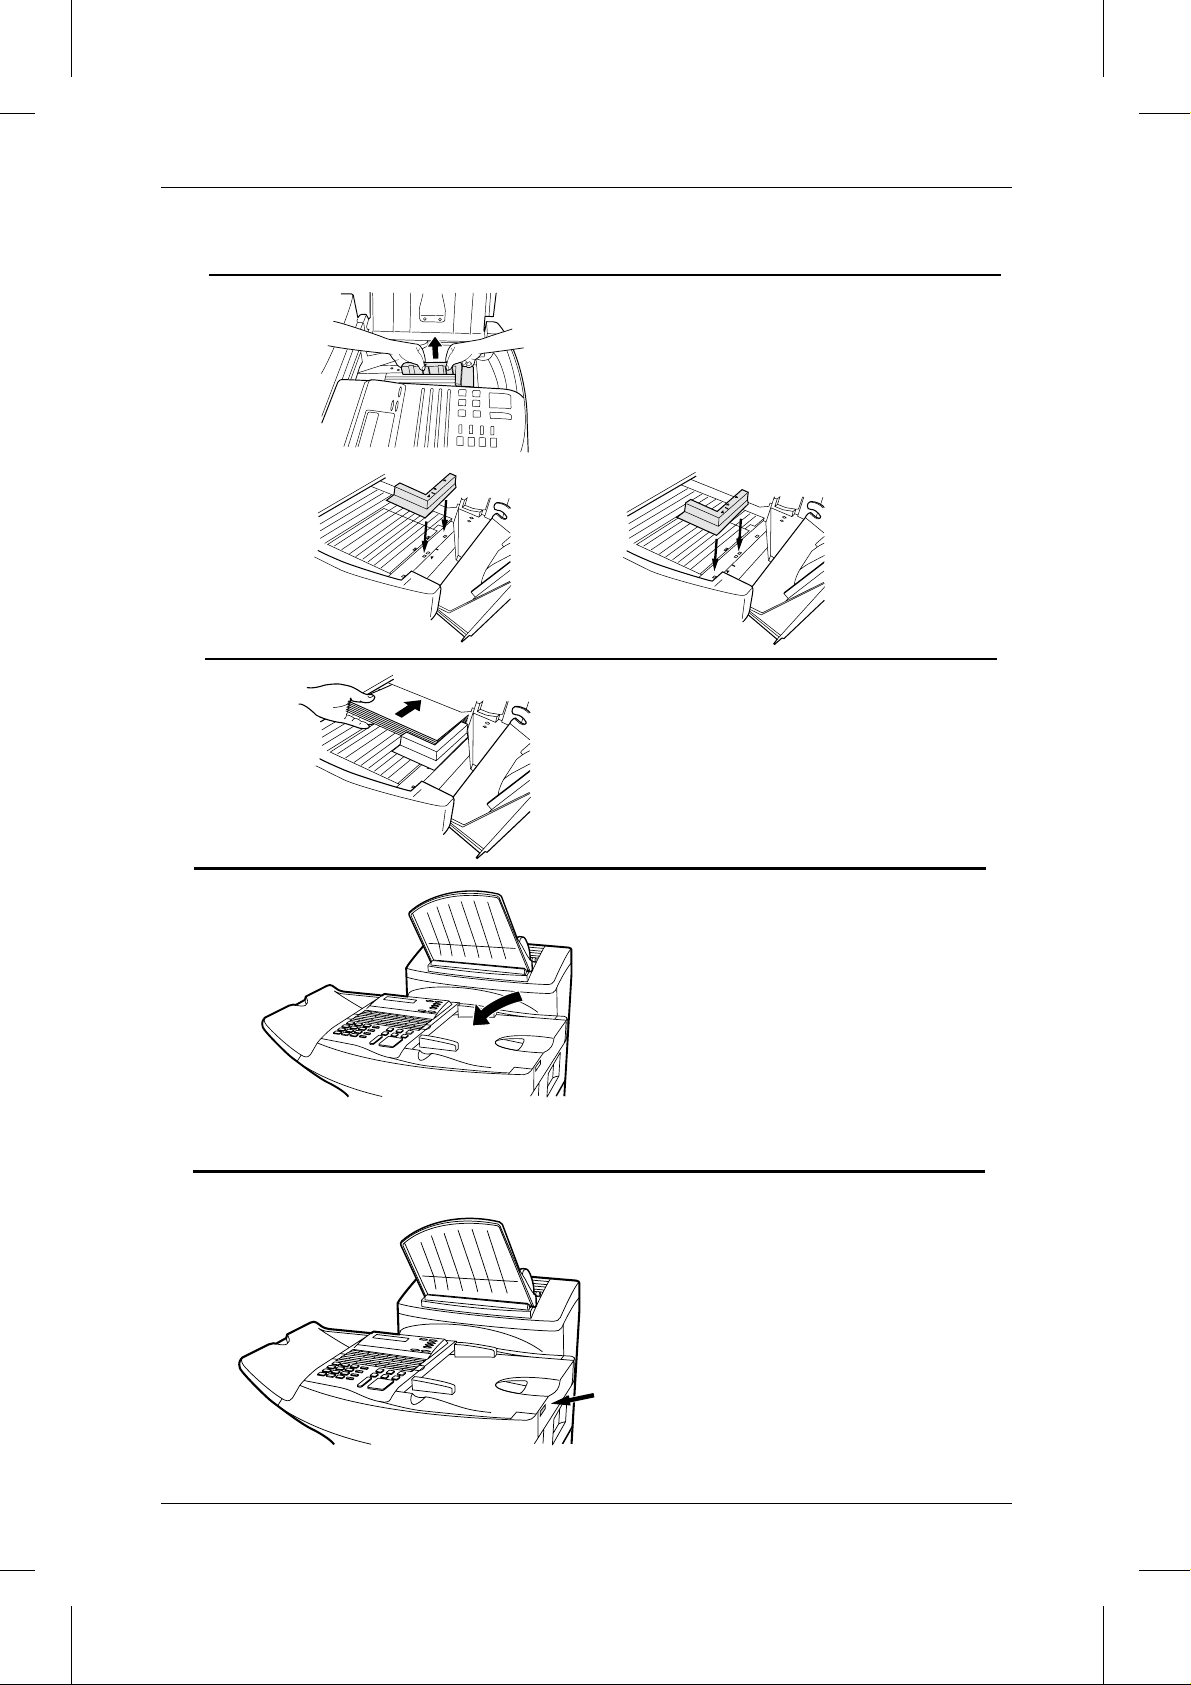
1 Grasp the hand hold on the cassette
as shown, lift the cassette slightly,
and then pull it out until it stops.
Press down on the levers on each
side of the cassette to release it, and
then pull it completely out of the fax
using both hands.
2
Pinch the ends of the paper guide
together, and move the gu ide to the
appropriate position depending on
whether yo u are loadi ng let ter or leg al
size paper.
INSTALLATION 1-7
Page 12
<P=002>
LOADING PAPER
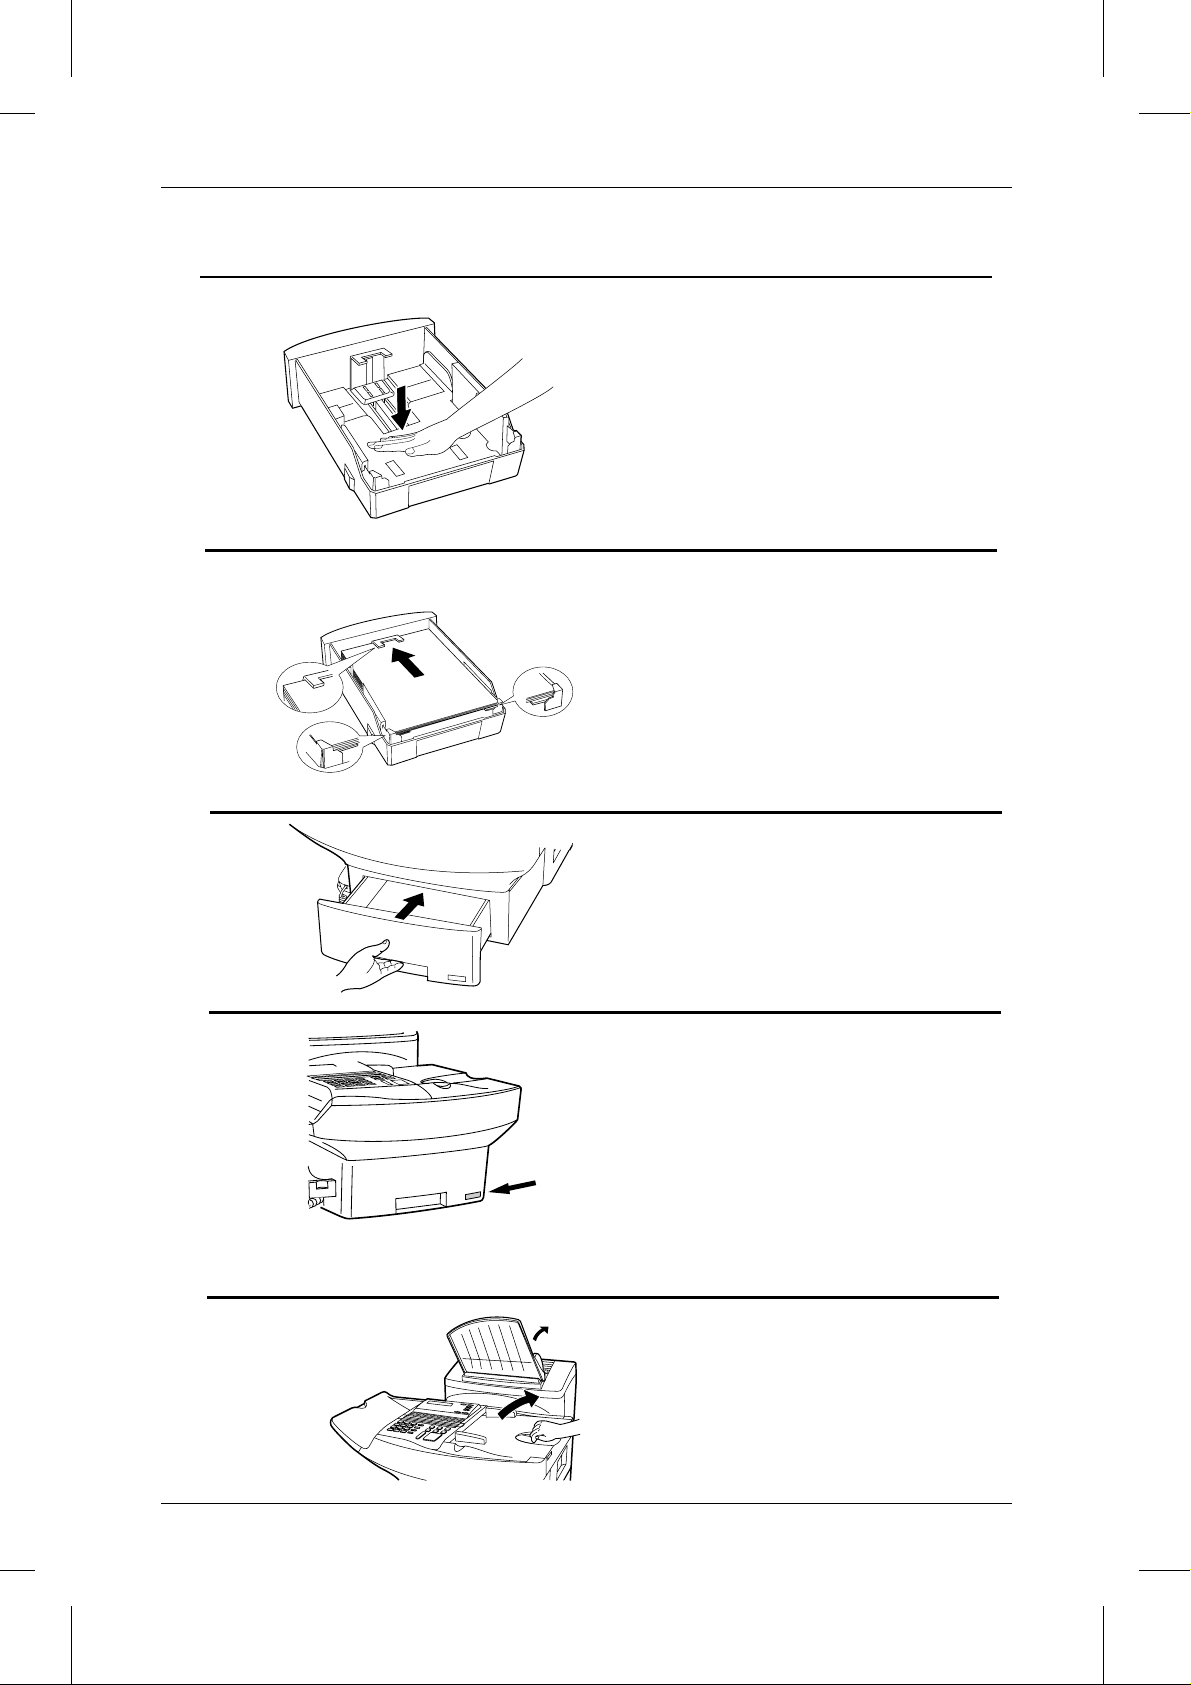
3 Push the pressure plate down until it
locks into position.
4 Place a stack of paper in the cassette,
print side up. Make sure the two far
corners of the pap er go under the
paper holders as shown.
•• Make sure the s tack of paper is not
higher than the tabs at the top of the
paper guide. If it is, remove some of
the paper.
5 Put the cassette back in the fax.
6 If desired, attach a letter or legal
sticker as appropriate to the cassette.
Loading the paper tray
1 Rotate the received document tray
back. Grasp the hand hold on the
original document IN tray as shown,
and open it .
1-8 INSTALLATION
Page 13
<P=003>
LOADING PAPER
2 Move the paper guide to the
appropriate position depending on
whether yo u are loadi ng let ter or leg al
paper.
•• To remove the paper guide, press its inner side at the ar row marks and lift.
Letter
LTR
Legal
LGL
3 Place the paper in the tray.
4 Close the original docu men t IN tray.
5 If desired, attach a letter or legal
sticker as appropriate to the fax.
INSTALLATION 1-9
Page 14

LOADING PAPER
Notes
1-10 INSTALLATION
Page 15
AY < P=001>
UX5000U-IPOP
2 INITIAL SETTINGS
A LOOK AT THE OPERATION PANEL
Before you can begin using your fax machine, there is some information that must be
set using the keys on the operation panel. First take a moment to familiarize yourself
with the operation panel, and then set the information as explained on the following
pages.
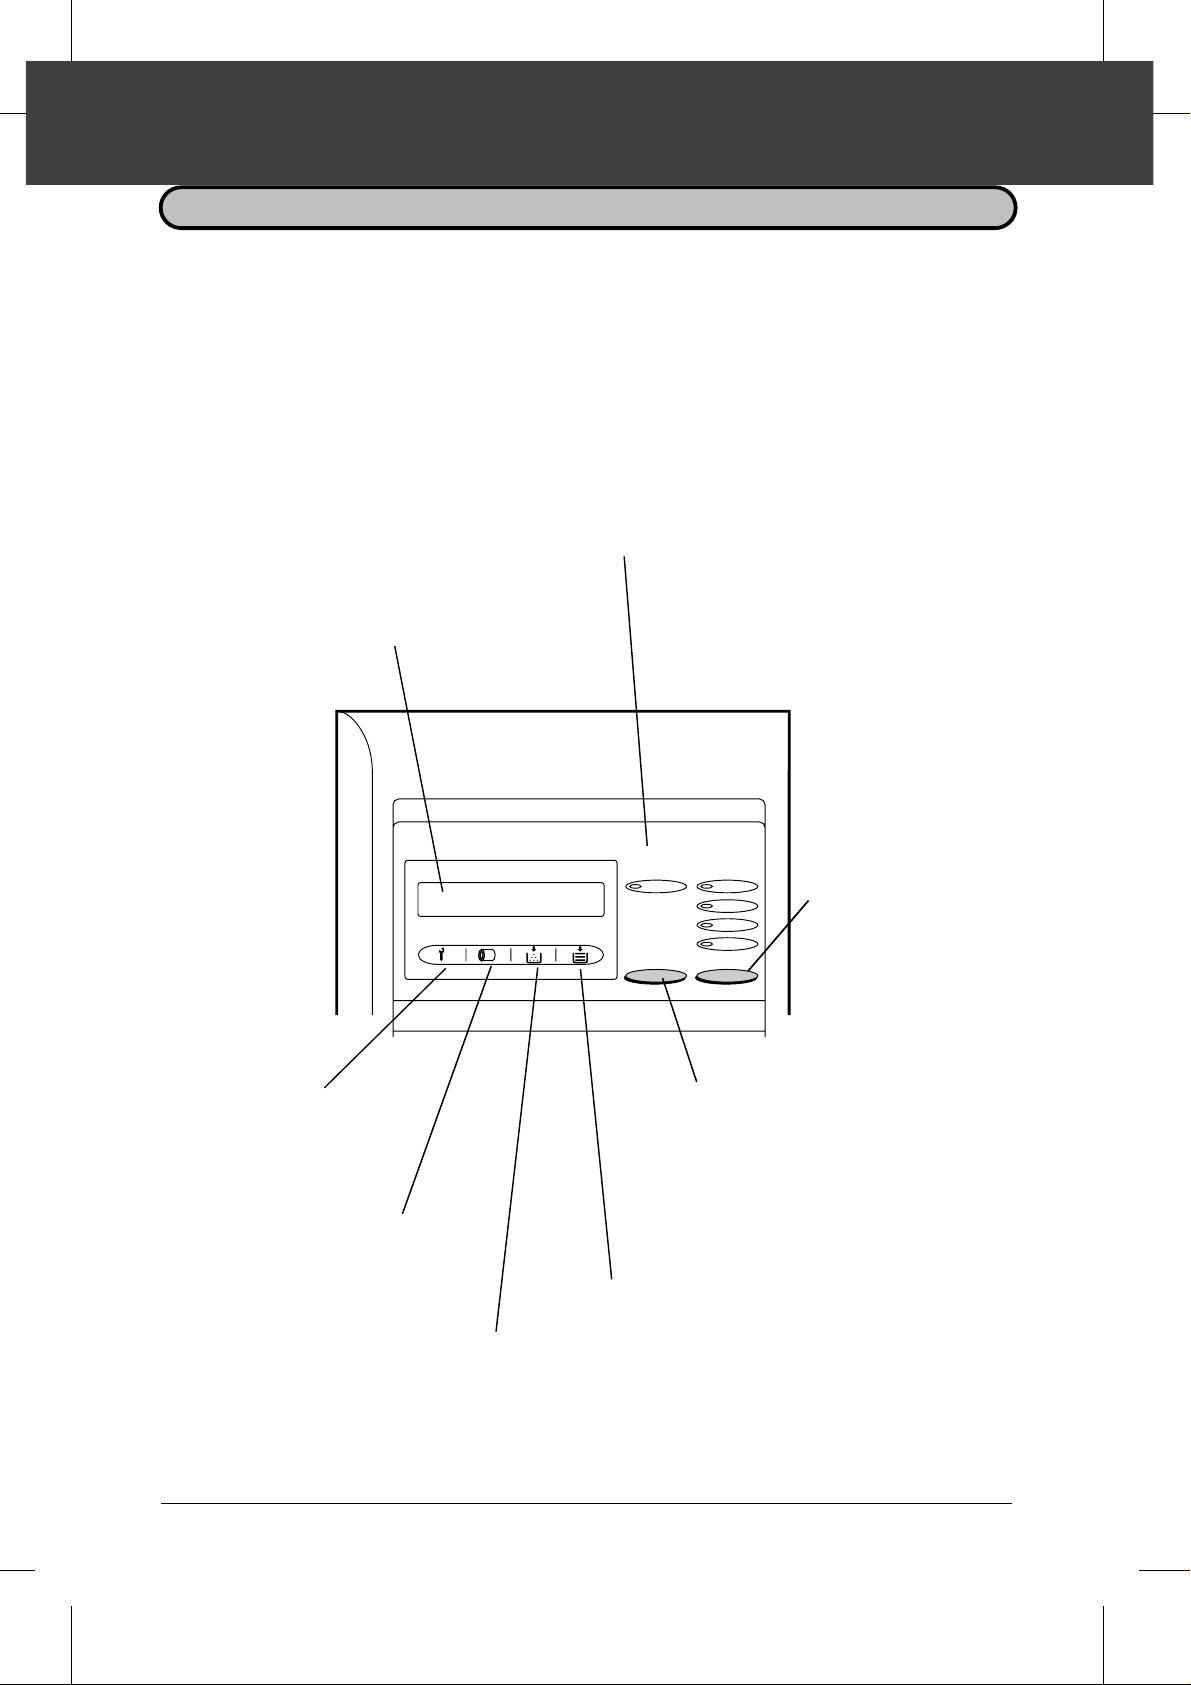
LINE STATUS light
This lights when the fax
machine is using the
telephone line.
Display
This displays various
messages during oper at ion
and program m ing.
Service indi ca to r
This lights when a
problem occurs which
must be fixed by a
service engineer.
Dru m c a rtridge i n d i c ator
This blinks when the drum
cartrid ge nea rs the end of its
life, and lights stead ily when t he
drum cartridge n eeds
replacement.
Toner cartridge indicator
This blinks when toner near s
empty, and lights steadily
when the toner/developer
cartridge needs replacem e nt.
LINE-STATUS RESOLUTION
IN USE STANDARD
FINE
SUPER FINE
HALF TONE
CHANGEOVER
CHANGEOVER key
Two types of information appea r in the
display: prompts related to operations
you are performing, and information
about how the fax is using the telephone
line (transmitting, receiving , etc.). Press
this key to switch betwe e n the two types
of informat io n.
Paper out indicator
This blinks when one of the
paper sou rc es ( cassette or
tray) is out of paper, and lights
steadily when all source s are
out of paper.
RESOLUTION key
Press this key to adjust
the resolution before
sending or copying a
docume nt .
INITIAL SETTINGS 2-1
Page 16
<P=002>
A LOOK AT THE OPERATION PANEL
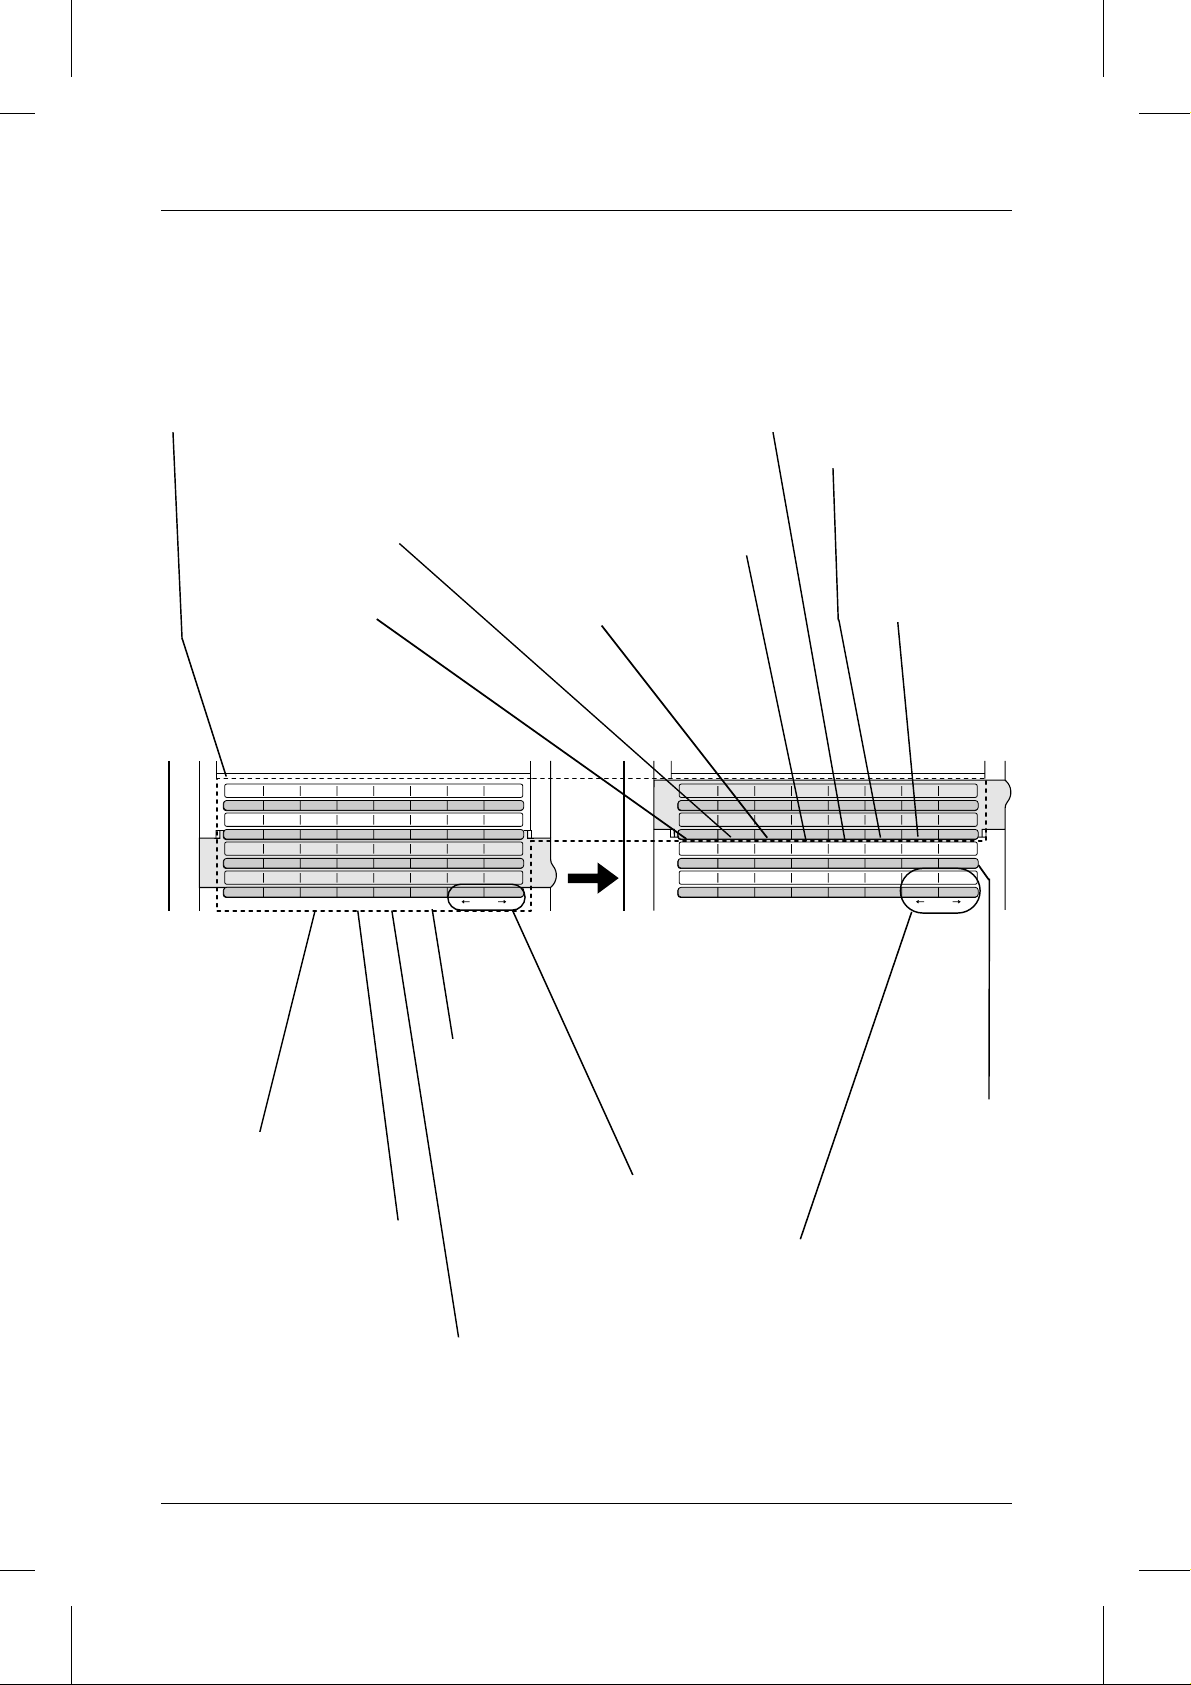
Rapid Dial keys
Press one of these keys to dial a fax
or voice number autom atically (the se
keys also serve as letter ent ry keys
when storing a name).
PAGE COUNTER key
Press this key to have a slash and
the total number of pag es add ed
after each page number on t he
pages of a tra nsm it ted docu m ent .
CONTRAST key
Press this key to adjust the
contrast before send ing or
copying a documen t.
06
05
04
03
02
01
A
09
I
17
Q
25
Y
C
D
B
11
10
K
J
19
18
S
R
27 28 29 30 31 32
26
Z
E
13
12
L
M
21
20
T
U
F
14
N
22
V
CLEARSPSHIFTSPACE
RELAY key
Press this key to send a
document to another fax machine
and have that machine in turn
send the document t o a number
of end receiving mach in es.
TIMER key
Press this key to set an
operation to be pe rfor m ed
automatically at a later time.
CONFIDENTIAL key
Press this key to sen d or
pri nt ou t a c onf iden tia l
document.
08
07
G
H
16
15
O
P
24
23
W
X
(Flip up the
Rapid Key
overlay)
33
A
41
I
CONTRAST
Q
Y
34
B
42
J
PAGE COUNTER
R
Z
35
C
43
K
CONFIDENTIAL
S
LIFE key
Press this key, f ol lowe d
by the "1" key, to check
the to tal num be r of
pages printed by the fax
machine.
MEM. STATUS key
Press this key to see
what documents
have been sca nn ed
into memory for
transmis sion.
36
37
E
45
M
RELAY
U
384639
F
N
LIFE
V
CLEARSPSHIFTSPACE
G
47
O
MEM.STATUS
W
DOWN UP
44
D
L
TIMER
T
40
H
48
P
SEARCH DIAL
X
CLEAR key
Press this key to
clear mistakes
when storing
names and
SPACE key
Press this key to ent er a
space when storing a name.
numbers.
→ key, ← key
Press these ke ys t o move
SHIFT key
Press this key to switch
between upper and
the cursor forward and
backward when storing
names and numbers.
lower case when storing
a nam e.
SP key
Press this key to enter
symbols when storing
a nam e.
2-2 INITIAL SETTINGS
SEARCH DIAL key
Press this key to
search by name for
a number stored
for automat ic
dialing.
UP and DOWN keys
Press these keys to adjust
the volume of the handset
when the handset is lifted,
the volume of the speaker
when the SPEAKER key
has been pressed, or the
volume of the ringer at all
othe r tim es.
Page 17
<P=003>
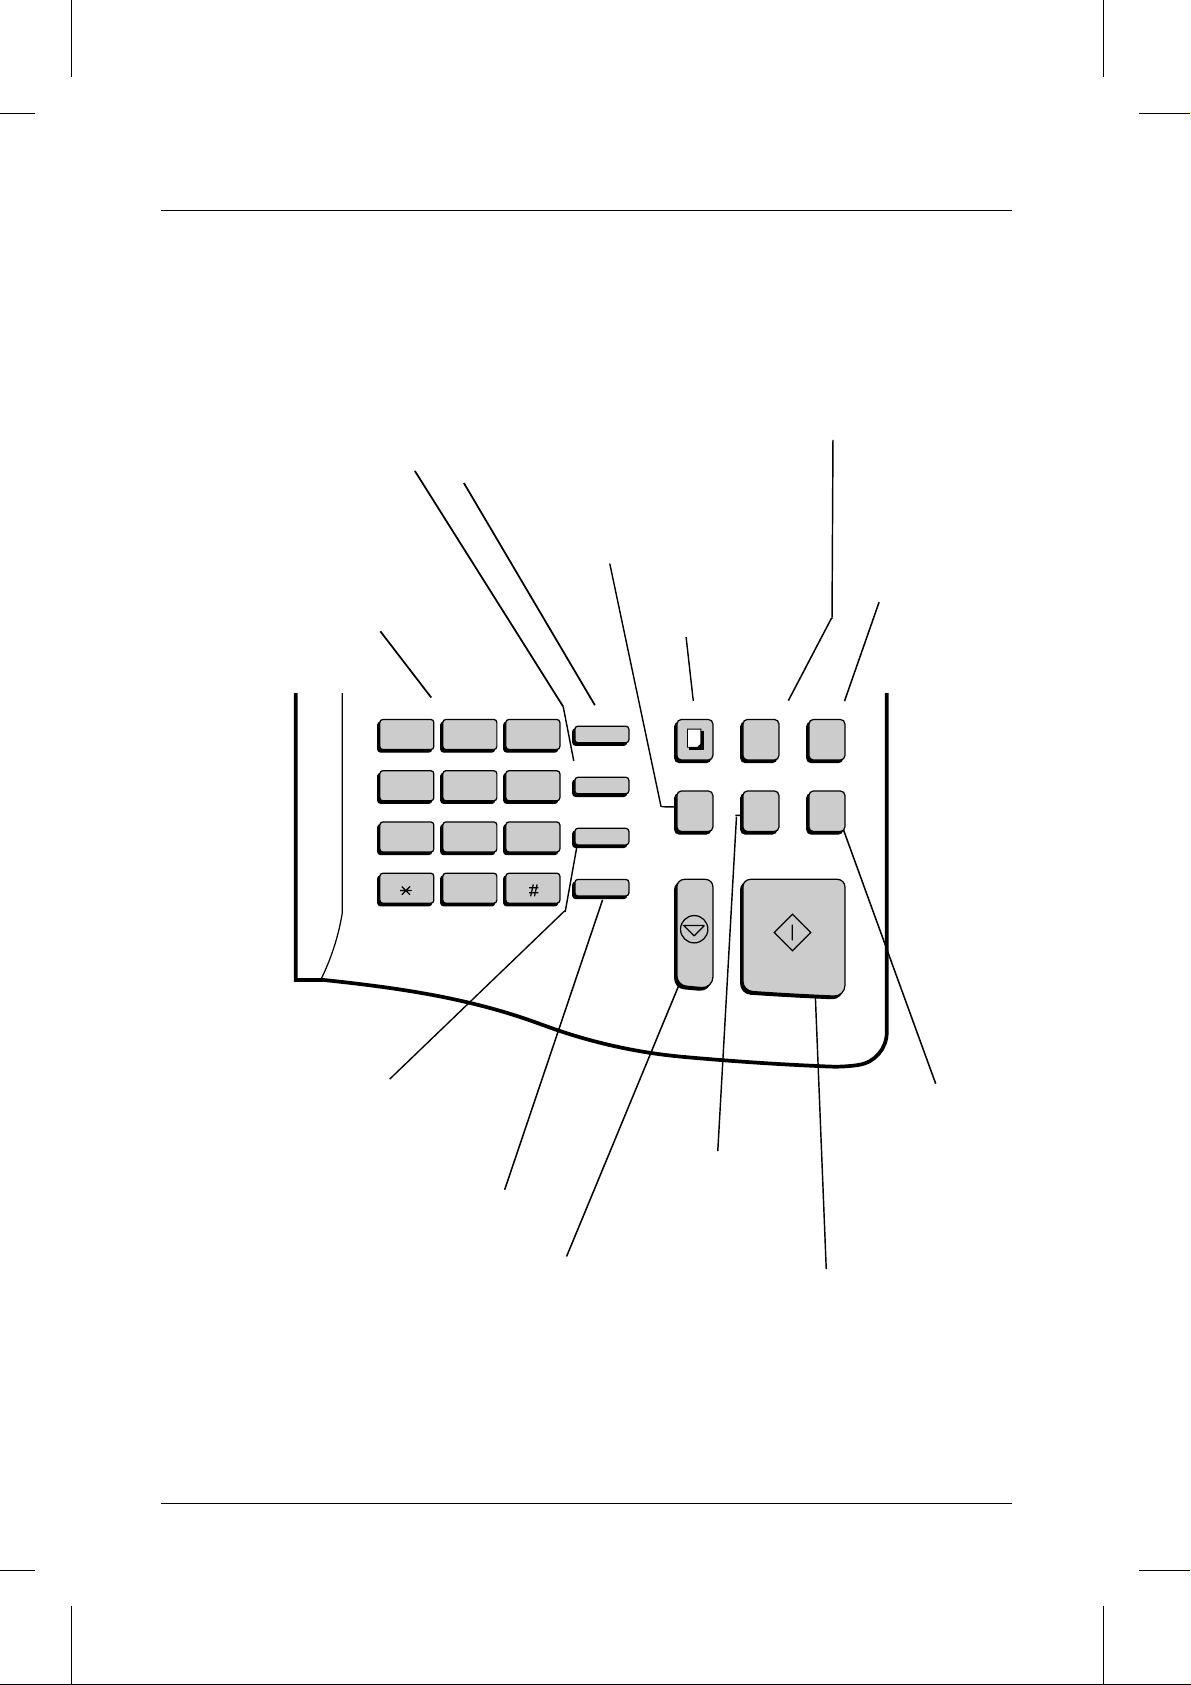
SPEED DIAL key
Press this key to dial a
Speed Dial numbe r.
Telephone dial keypad
(numeric keys)
Use these ke ys t o dial
and program nu mbers.
FUNCTION key
Press this key to select
various special functions.
BROADCAST key
Press this key to sen d a
document to a group of
receiving fax machines.
A LOOK AT THE OPERATION PANEL
REPORT key
Press this key to print out
a report on the tra nsac tion
just complet ed.
DOCUMENT key
Press this key to
transmit a
document without
COPY key
Press this key to make
a copy of a document.
reading it into
memory.
ABC
123
GHI
JKL MNO
456
PRS
TUV WXY
789
OPER
0
REDIAL key
Press this key to auto m atic al ly
redial the last number dialed.
SPEAKER key
Press this key to dial a
number without picking
up the handset .
DEF
FUNCTION
SPEED DIAL
REDIAL
SPEAKER
COVER SHEET key
Press this key to includ e
a cover sheet with a
transmit t ed doc um ent .
STOP key
Press this key to stop
oper at io ns bef or e t hey
are complet ed.
COPY REPORT DOCUMENT
BROADCAST
COVER SHEET
STOP START
PRIORITY
START key
Press this key to send or
receive a document .
PRIORITY ke y
Press this key whe n
you want to tra nsm it
a document ahead of
other docum ents
which are waiting in
memory for
transmission.
INITIAL SETTINGS 2-3
Page 18
RT <P=001>
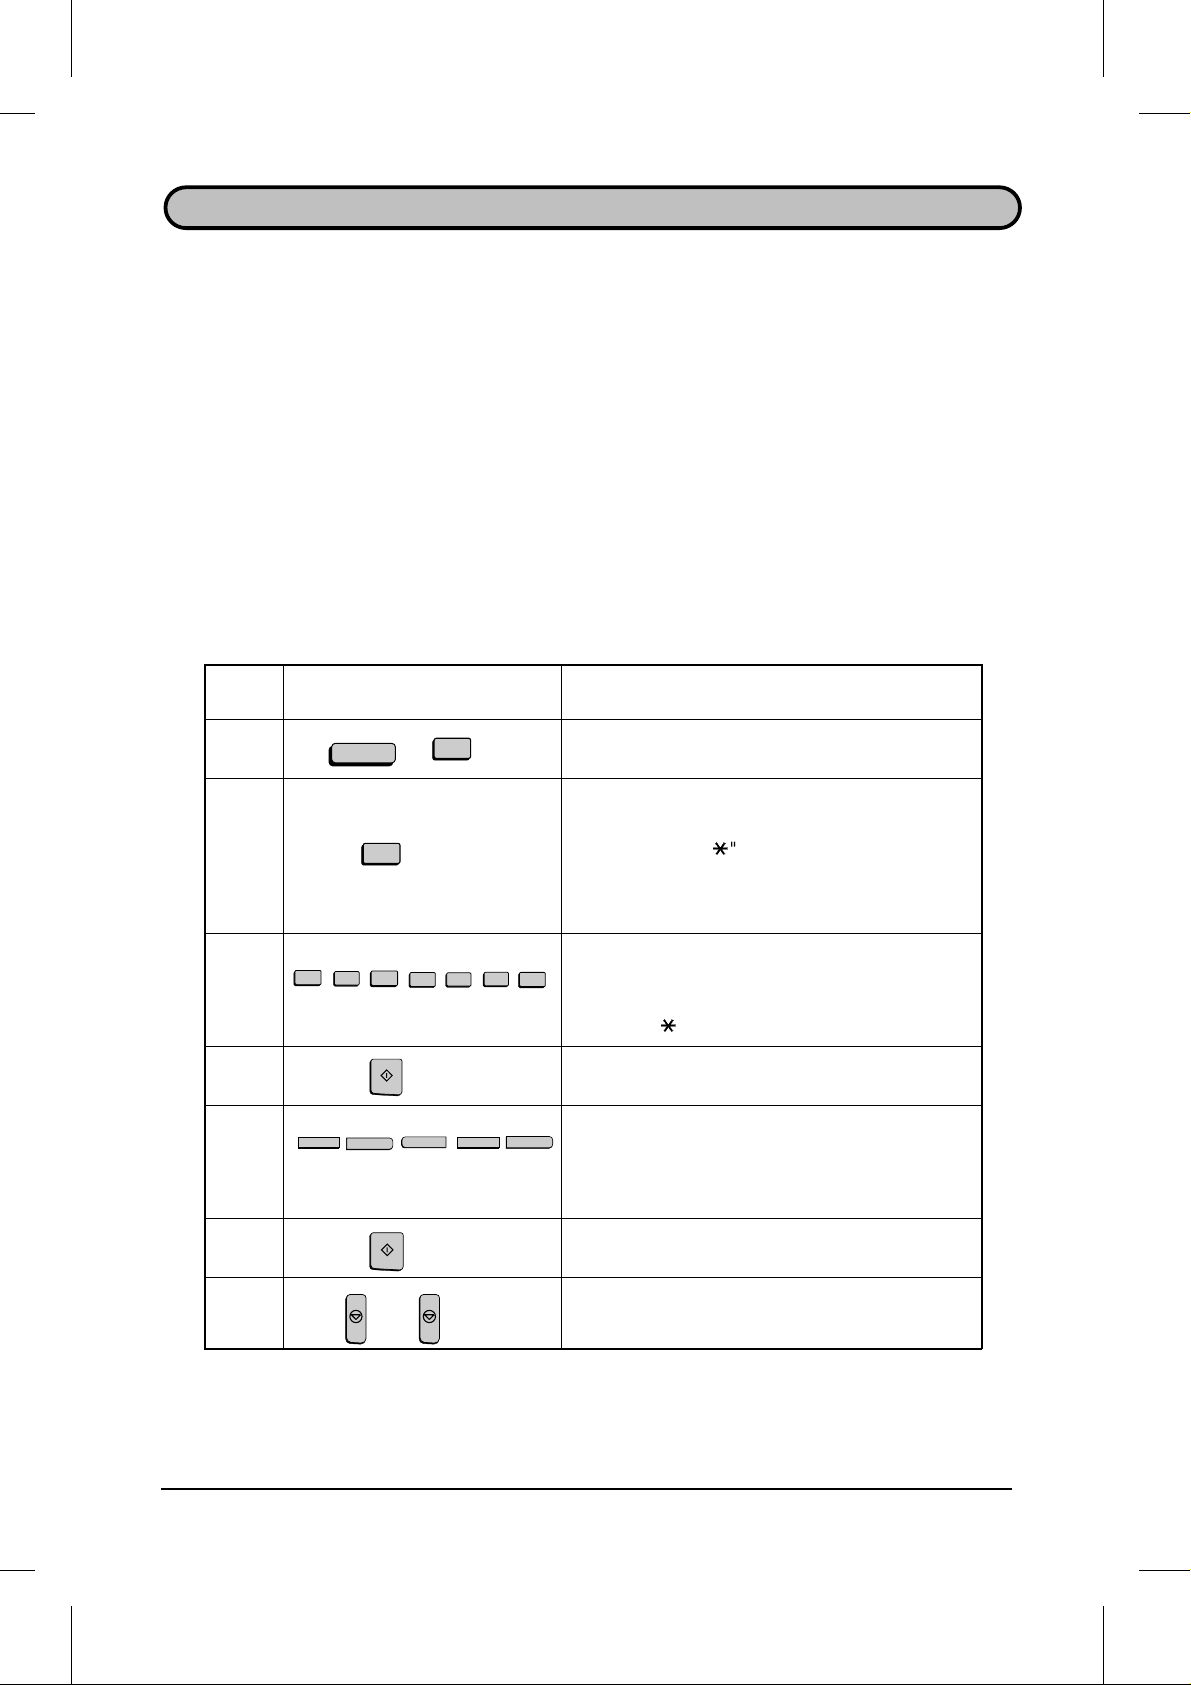
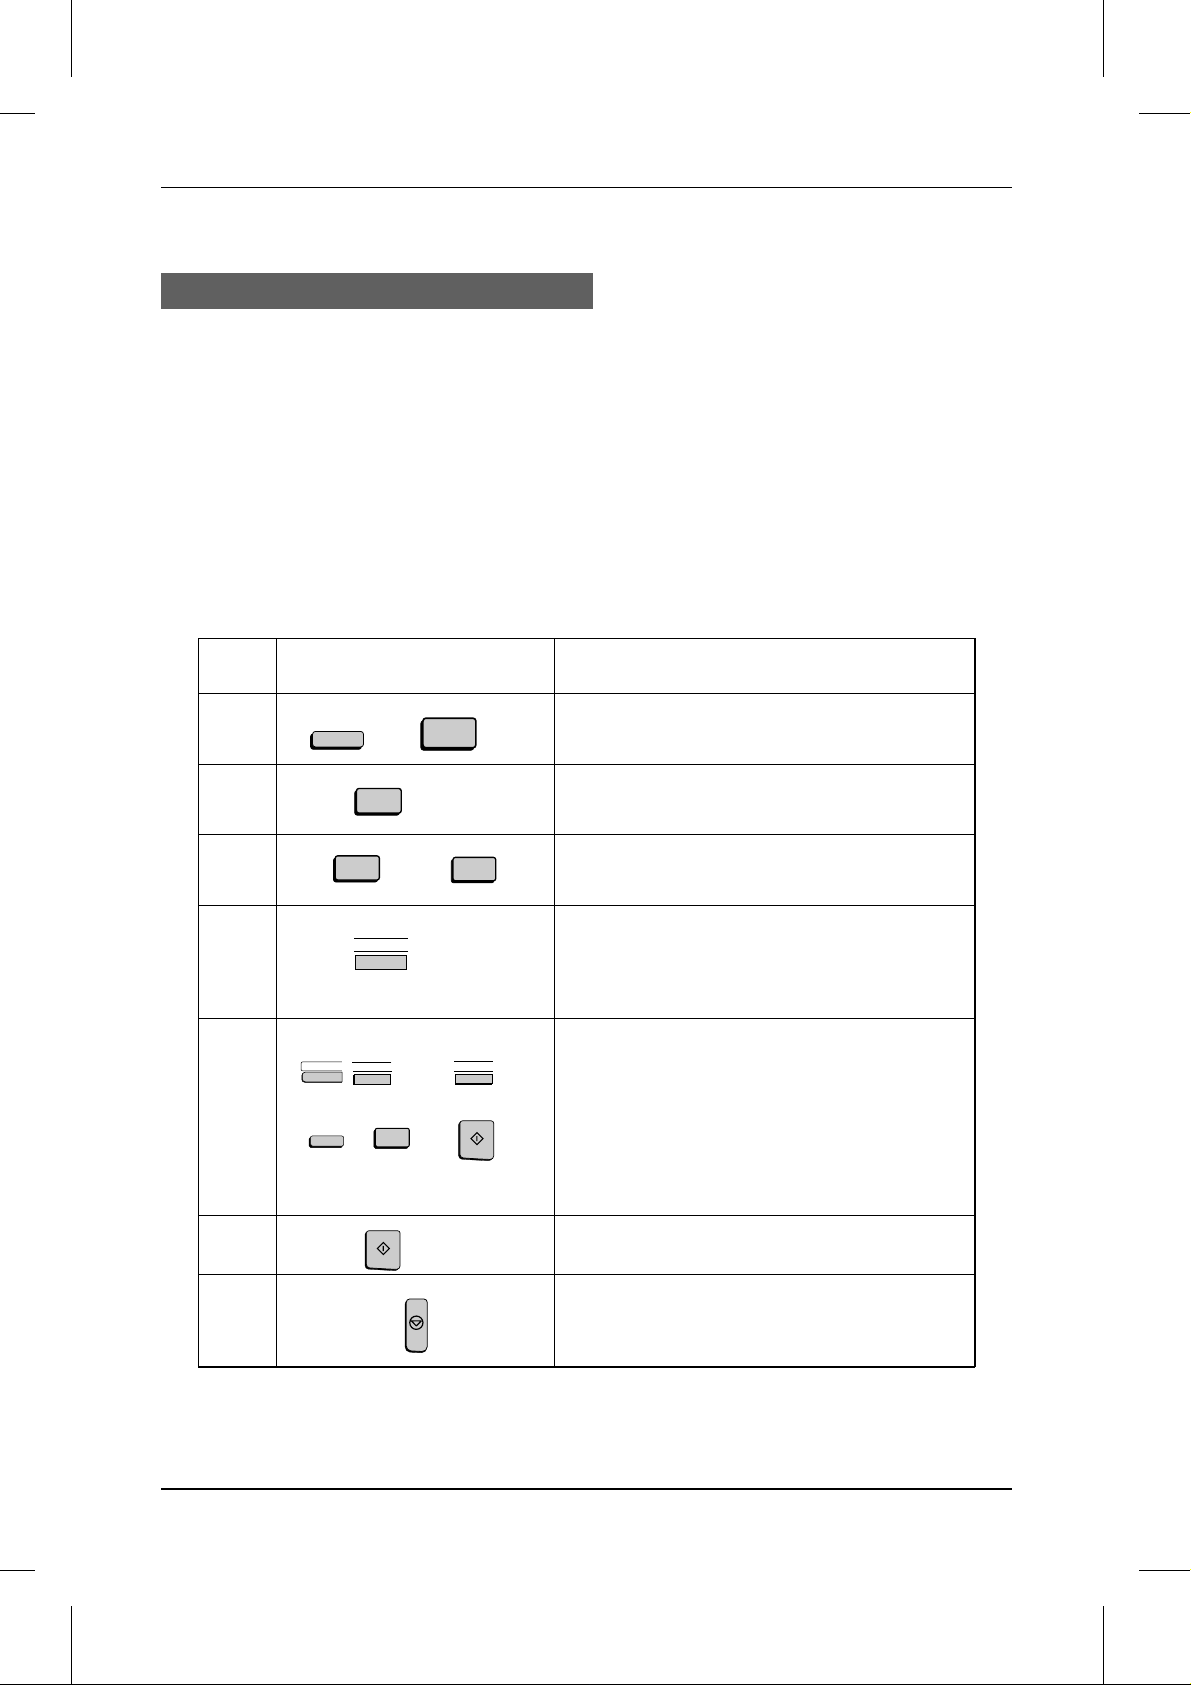
ENTERING YOUR NAME AND FAX NUMBER
To have your name and fax/telephone number (called the "Sender’s name" and
"Sender’s number") printed at the top of every page you transmit, program them by
pressing the panel keys as shown below.
♦ You must program your name and fax number in order to comply with the
Consumer Protection Act of 1991 (see inside of front cover).
♦ If you enter an incorrect number or letter, flip the Rapid Key overlay up (if it is
down), press the "←" key to move the cursor back to the mistake, and then enter
the correct number or letter. (To move the cursor forward, press the "→" key.)
UX5000U-IPSN
Note:
The fax wi ll not respo nd if yo u pr ess the
FUNCTION
telephone line status. Befor e perform ing an y operations requiring the
make sure the disp lay shows the date and tim e (pre ss the
switch between the t eleph one line status an d the date and time).
Step Press these keys: Comments
FUNCTION
1
2
5
3
3
1
3
START
2
3
3
(Example)
"ENTRY MODE" will appear in the display.
"OWN PASSCODE SET" will appear in the
display. Note that instead of pr ess in g "3", you
can press "#" o r "*" to scro l l thr o ugh the
settings in ENTRY MODE until "OWN
PASSCODE SET" appears, and then press the
START key to select it.
4
Enter your fax numbe r (m ax. of 20 digit s) by
5
pressing the numeric keys . (To insert a space
between digits, press the "#" key . To insert a "+",
press the "*" key.)
4
key while the display shows the
FUNCTION
CHANGEOVER
key,
key to
S
A
R
H
P
5
(Example: "SHARP")
START
Flip the Rapid Key overlay down (if it is up), and
enter your name by pressing the appropr iate
keys as shown on the following page.
(Maximum of 24 characters.)
6
STOP STOP
7
2-4 INITIAL SETTINGS
Press the STOP key twice to retur n to the date
and time display.
Page 19

YF
<P=001>
UX5000U-IPEL
ENTERING LETTERS FOR NAMES
Names are programmed by pressing the letter entry keys (if the Rapid Key overlay is
up, first flip it down). To enter a letter, press the key on which the letter is marked. Th e
letter will appear in the display.
Letters
To ente r a le t t er , pr ess the
key on which the letter is
marked.
C
D
E
F
G
B
A
K
L
M
J
I
N
H
O
P
R
Q
Z
Y
Space
Pres s this key t o e nt er
a space.
Shift
Press this key once t o
change case (pr ess it
again to change back).
Comments:
••
To change one individual le tter to anoth e r, move the cursor to tha t letter and ent er th e
desired letter . The new let ter will simply replace the old one.
••
To enter a numbe r as part of a name , pres s the approp riat e nu mer ic key on the teleph one
dial keypad.
Symbol list
S
T
U
V
W
X
CLEARSPSHIFTSPACE
Cursor right
Press this key to move the
cursor to the right.
Curso r left
Press this key to mov e the
cursor to the lef t.
Symbols
Press this key repeat ed ly
until the desired sy m bo l
appears (see the symb ol
list below).
Delete
Press this key to de lete the letter
highlighted by the cursor (if the
cursor is to the righ t of the last
letter entered, it will backspac e
and delete the last lett er) .
To enter a symbol fro m the list below, pr ess the " SP" key repeate dly unti l the
desired symbo l appear s. (Not e: To enter two symbols in a r ow, pre ss the ) key
after you en ter the f irs t symbol. )
! " # $ % & ’ ( ) + + , - / : ; < = > ? [ ¥ ] ^ _ p { | } ) ( @ .
INITIAL SETTINGS 2-5
Page 20
YF <P=001>
The date and time appear in the display, on reports, at the top of each page you
transmit, and are also used for timer operations. Set the date and time by pressing the
keys on the operation panel as shown below.
♦ To correct a mistake, press the STOP key to move the cursor back to the mistake,
and then enter the correct number.
Step Press these keys: Comments
UX5000U-IPSD
SETTING THE DATE AND TIME
FUNCTION
1
2
3
4
5
6
4
0
0
9 9
1
1
5
0
7
START
8
3
(Example: January)
(Example: t he 5t h)
(Example : 1999)
5
2
(Example: 10:25)
or
ENTRY MODE will appear in the display.
DATE & TIME SET MODE will appear in the
display.
Enter the month (2 digits: "01" for Januar y, "02"
for February, "12" for December, etc.).
Enter the day of the month (2 digits : "01" to "31").
Enter the last two digits of the year.
Enter a 2-digit number for the hour ("01" to "12")
and a 2-digit number for the minute ("00 " to "59").
Press "*" to select A.M., or "#" to select P. M.
The clock will now start.
2-6 INITIAL SETTINGS
Page 21

YF <P=001>
UX5000U-IPAD
STORING NUMBERS FOR AUTOMATIC DIALING
Automatic dialing is a quick and convenient way of dialing which is done by either
pressing a Rapid Key (Rapid Key Dialing), or pressing the SPEED DIAL key and
entering a 1-, 2-, or 3-digit number (Speed Dialing). Automatic dialing can be used for
both fax transmissions and voice calls.
To use Automatic Dialing, you must first store the full number in your fax. You can
choose whether to store it in a Rapid Key or assign it to a Speed Dial number. It is
usually convenient to store your most frequently dialed numbers in Rapid Keys.
♦ Rapid Key Dialing: You assign a full fax number to a Rapid Key. You can also
store a name, and a back-up fax number which is automatically dialed if the first fax
number is busy. 48 Rapid Keys are available.
♦ Speed Dialling : You assign a full fax or voice number to a 3-digit Speed Dial num-
ber. You can also store a name. 100 Speed Dial numbers are available.
Chain Dialing for a rea and acc ess code s
You can also store an area code or access code as an automatic dialing number.
Store the code as a Rapid Key or Speed Dial number as described on the following
page, and press "1" in Step 9 to specify it as a Chain Dialing number.
When you dial that number (the area or access code), the fax will wait for you to dial
the remainder of the number (you can dial the remainder of the number by pressing a
Rapid Key, by pressing the Speed Dial key and entering a Speed Dial number, or by
pressing numeric keys). Note that the remainder of the number should not be
specified as a Chain Dialing number if you store it for Rapid Key or Speed Dialing.
♦ The maximum number of digits which can be dialed at one time by Chain Dialing is
50.
Storing numbers
Comments:
••
You may need to add a pause between certain digits in the number to allow time for
connection. For examp le , if you are on a PBX telephone sys te m that requ ires an access
number to be dialed (such as "9") to access an outside line, you will need to enter a pause
between the access numbe r and the telephon e/ fax numbe r of the other part y.
••
Pauses are ent ered by pr es sing the
necessary. The first pause entered gives a time delay of 4 seconds, and subsequent pauses
give delays of 2 seconds each.
••
To enter letter s for nam es or correct a mist ake, see "En tering letter s for nam es" in this
chapter.
REDIAL
INITIAL SETTINGS 2-7
key, and several can be enter ed in a row if
Page 22
<P=002>
STORING NUMBERS FO R AUT OMAT IC DIALING
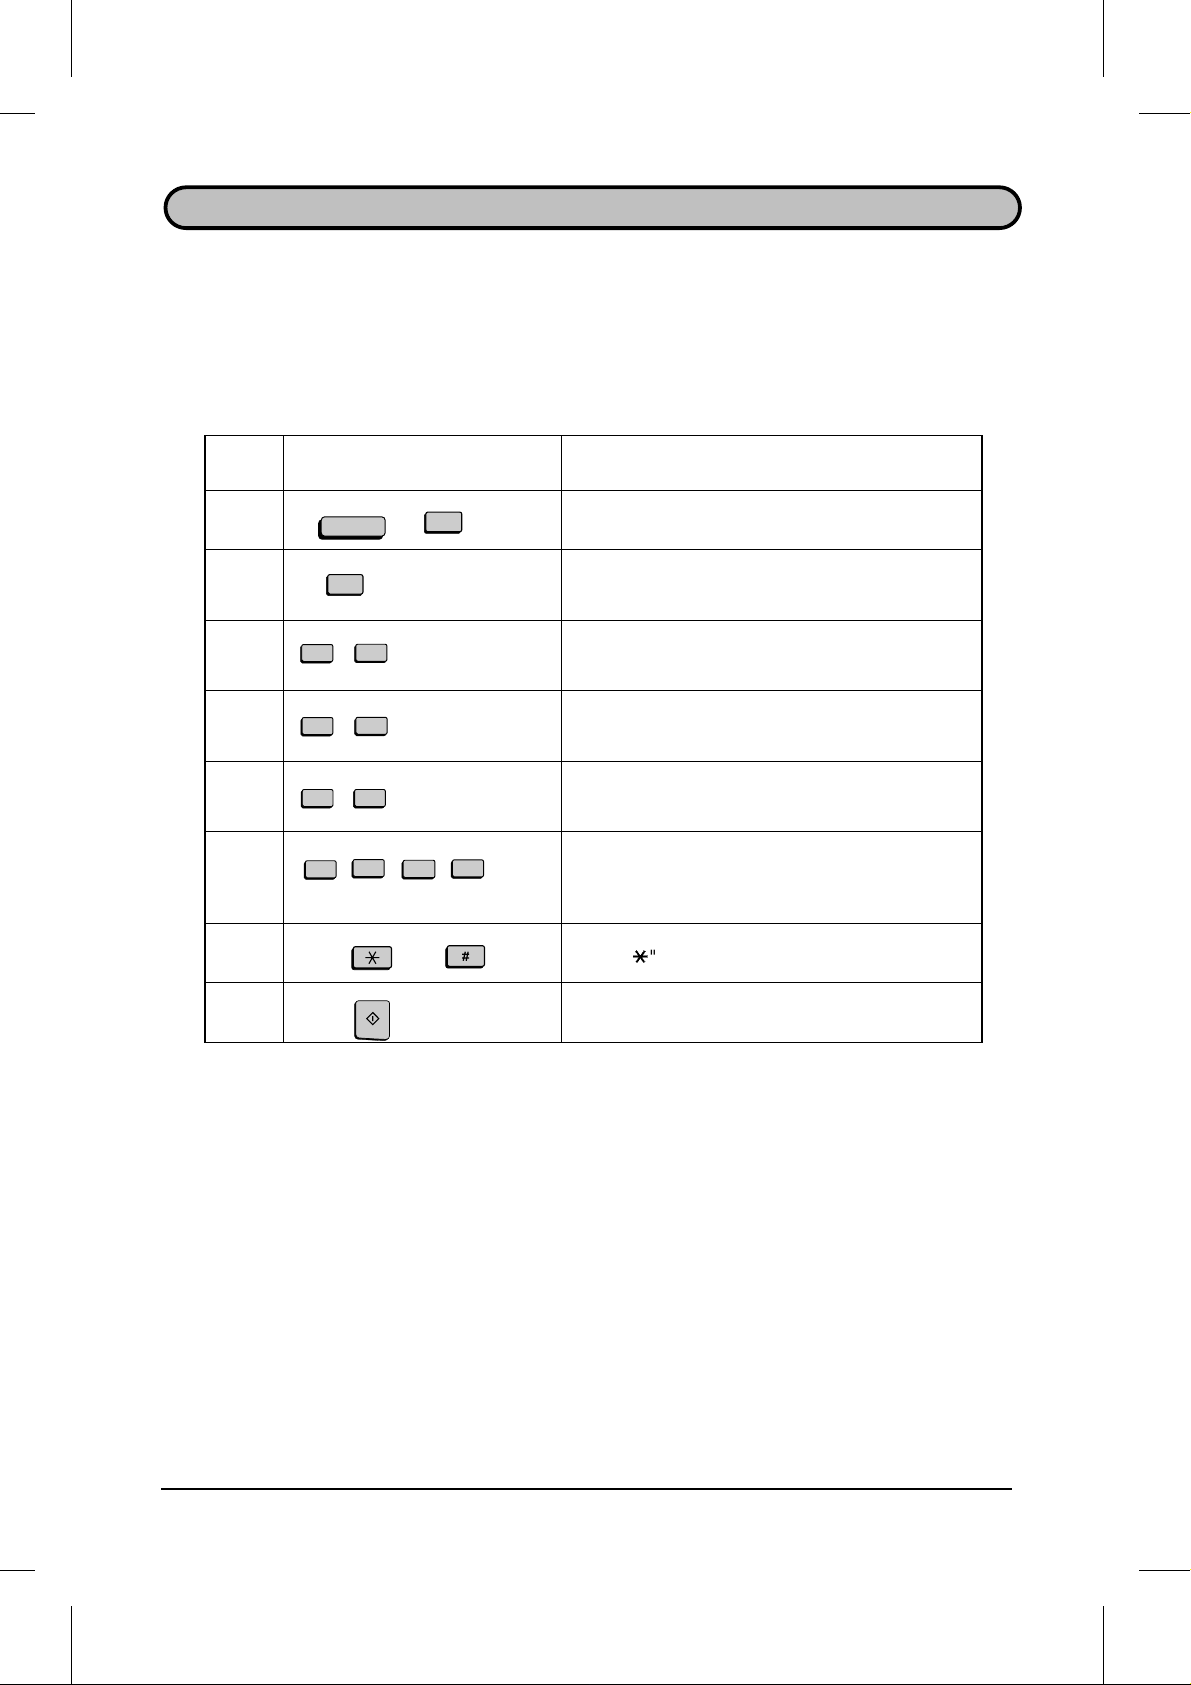
Step Press these keys: Comments
FUNCTION
1
2
3
4
1
1
1
A
5
4
5
START
…
3
0
(Example)
(Example)
"ENTRY MODE" will appear in the display.
"FAX/TEL # MODE" will appear in the display.
Select SET.
To store a Rapid Key number , press a Rapid
Key (to select Rapid Keys 33 throug h 48, flip the
Rapid Key over lay up ).
To store a Speed Dial numbe r, press SPEED
DIAL and the n pr ess up to 3 nu m er ic keys (" 1 "
to "100"). (If you press less than 3 num e ric ke ys,
pres s START to complet e t he entr y.)
Enter the fax number (max. of 34 digits including
pauses) using the num eric key s.
6
S
H
…
P
7
(Example)
START
Enter the name of the location or party by
pressing the lette r entry keys as described i n
"Entering Lett er s for Nam es" in this chapt er
(max. of 20 cha ra ct er s) . I f you don’t want to
enter a name, skip this step.
8
Press "1" if you want to specify t he num b er as a
Chain Dialing number (see the beginning of this
section). Other wise, press "2" or START.
If you press ed "1" or are storing a Speed Dial
number, go to Step 14. (Note: If you specify a
Rapid Key numbe r as a Chain Dial num ber , you
cannot enter a bac k-up f ax num b er .)
Enter a full back-up fax number.
If you don’t want to enter a back-up num be r, go
to Step 13.
9
10
1
4
5
or
4
START
…
2
5
(Example )
11
2-8 INITIAL SETTINGS
Page 23
<P=003>
STORING NUMBERS FOR AUT O MAT I C DIALING
12
S
H
START
…
(Example)
P
13
STOP
14
Clearing numbe rs
Note:
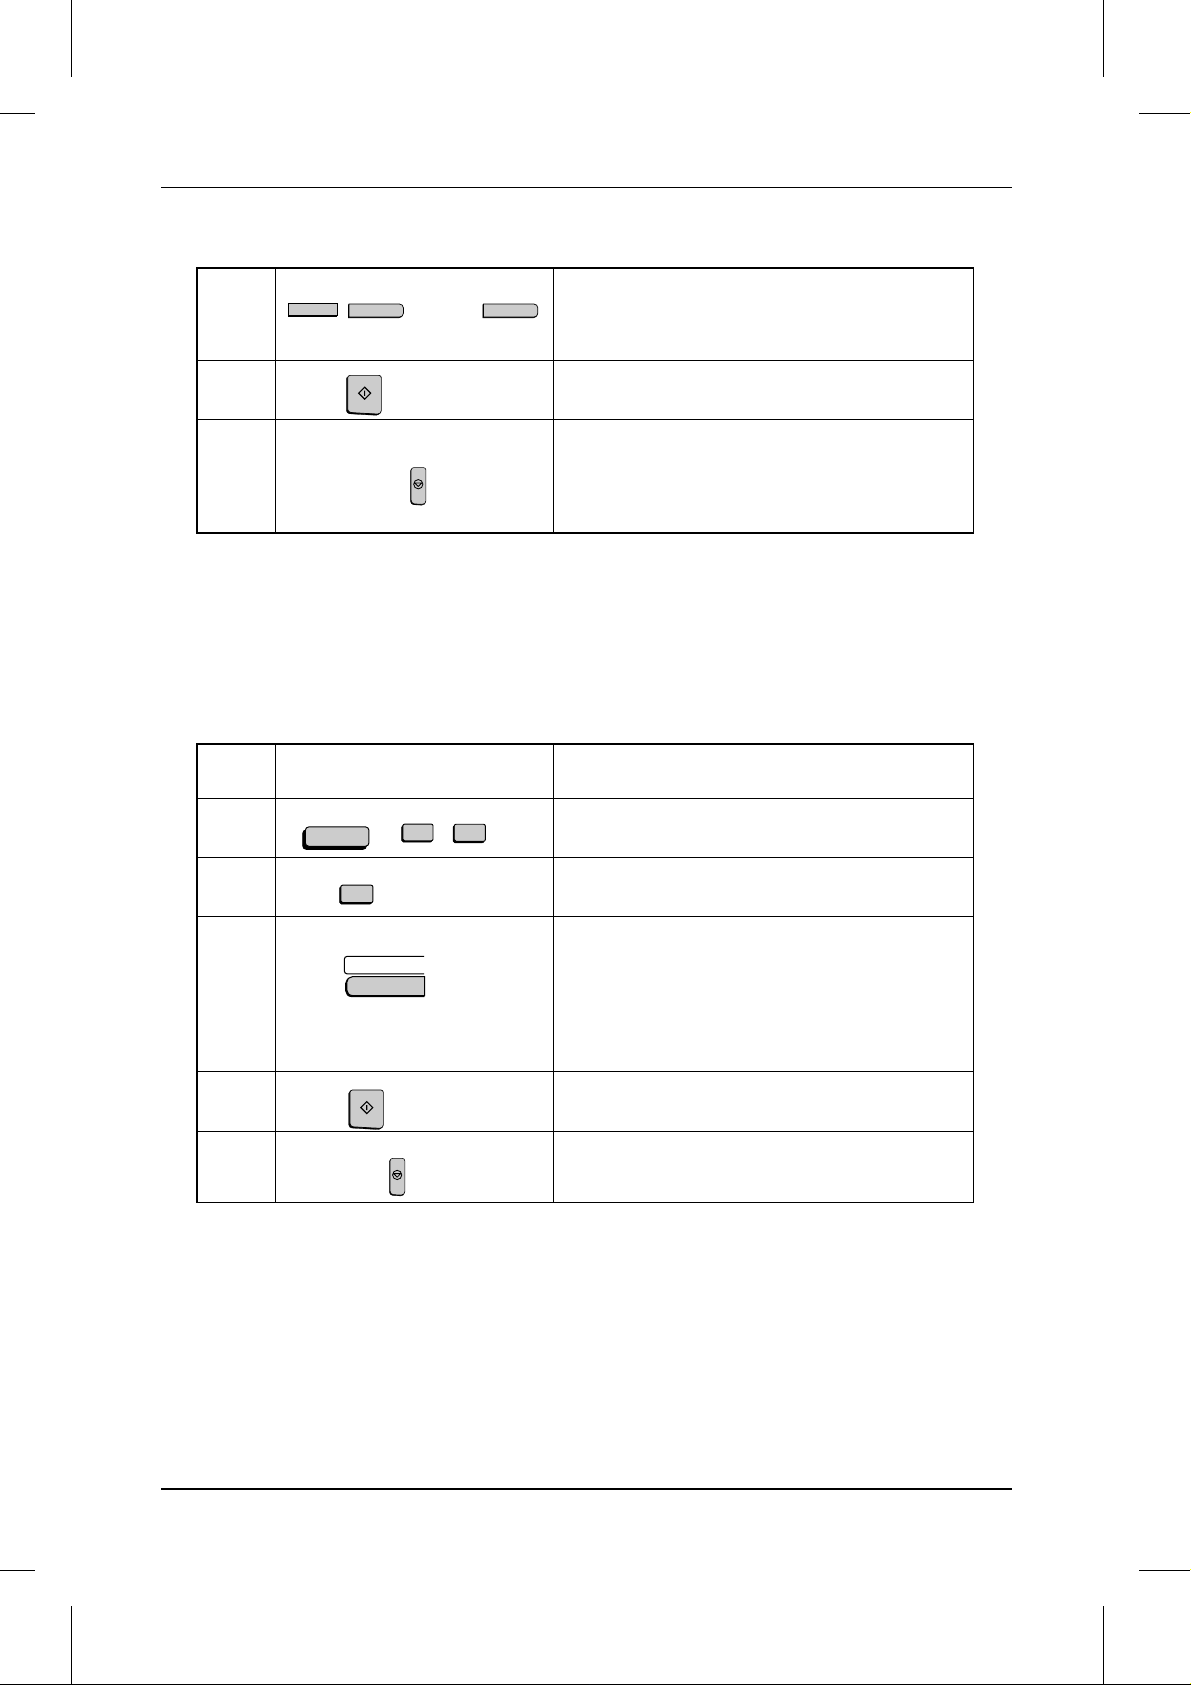
Step Press these keys: Comments
1
Step 4 or
You cannot clear a number if it is used in a progr am or timer ope ra tion , if it is used to
specify the relay fax mach ine in a relay group, or if it is included in a Group Key. First
clear the number from the operation or group, then perform the f o l lowing clearing
procedu re. To check wh ere th e numb e r is used, print out the Pr ogr am /G r oup List , the
Timer List, and/ or the Relay Gr oup List as described in Chapter 6.
FUNCTION
3
1
Enter a name for the back-up number (max. of
20 letters).
If you don’t want to ent er a name, skip this step.
Return to Step 4 t o stor e anoth e r num ber , or
pres s STO P to exit. If the nu m ber is a Rapid Key
numb er , you c an wri t e th e na m e on the lab e l
above the ap propr iat e Rapid Key.
"FAX/TEL. # MODE" will appear in the display.
2
2
1
A
3
(Example)
START
Select CLEAR.
To clear a Rapid Key numb er , pres s the
appropriat e Rapid Key.
To clear a Speed Dial number, press SPEED
DIAL and then enter th e n um b e r wi t h th e
numeric keys. (If you enter less than 3 digit s,
pres s START to complet e t he entr y.)
4
5
Step 3 or
STOP
Making change s
To make changes in a number previously stored, repeat the storing procedure. Select
the code number for which you want to make changes in Step 4, and then change the
number(s) and/or name(s) when they appear in the display (Steps 5, 7, 10 and 12).
Changes are made as described in "Entering Letters For Names" in this chapter.
Return to Step 3 t o clear anot he r nu mber , or
pres s STO P to exit.
INITIAL SETTINGS 2-9
Page 24
<P=004>
STORING NUMBERS FO R AUT OMAT IC DIALING
Storing Numbers in Grou p Keys
Group Keys allow you to dial a group of fax numbers automatically by simply pressing
the appropriate Group Key once. Group Keys are convenient for the Broadcasting and
Serial Polling functions, which are used to transmit to or receive from a group of other
fax machines.
Any Rapid Key which is not already programmed as a Rapid Key or Program Key can
be used as a Group Key. To program or clear a Group Key, follow the steps below.
♦ Up to 147 fax numbers can be stored in one Group Key.
♦ Only Rapid Keys and Speed Dial numbers (excluding numbers specified as Chain
Dialling numbers) can be stored in a Group Key. No full numbers can be stored.
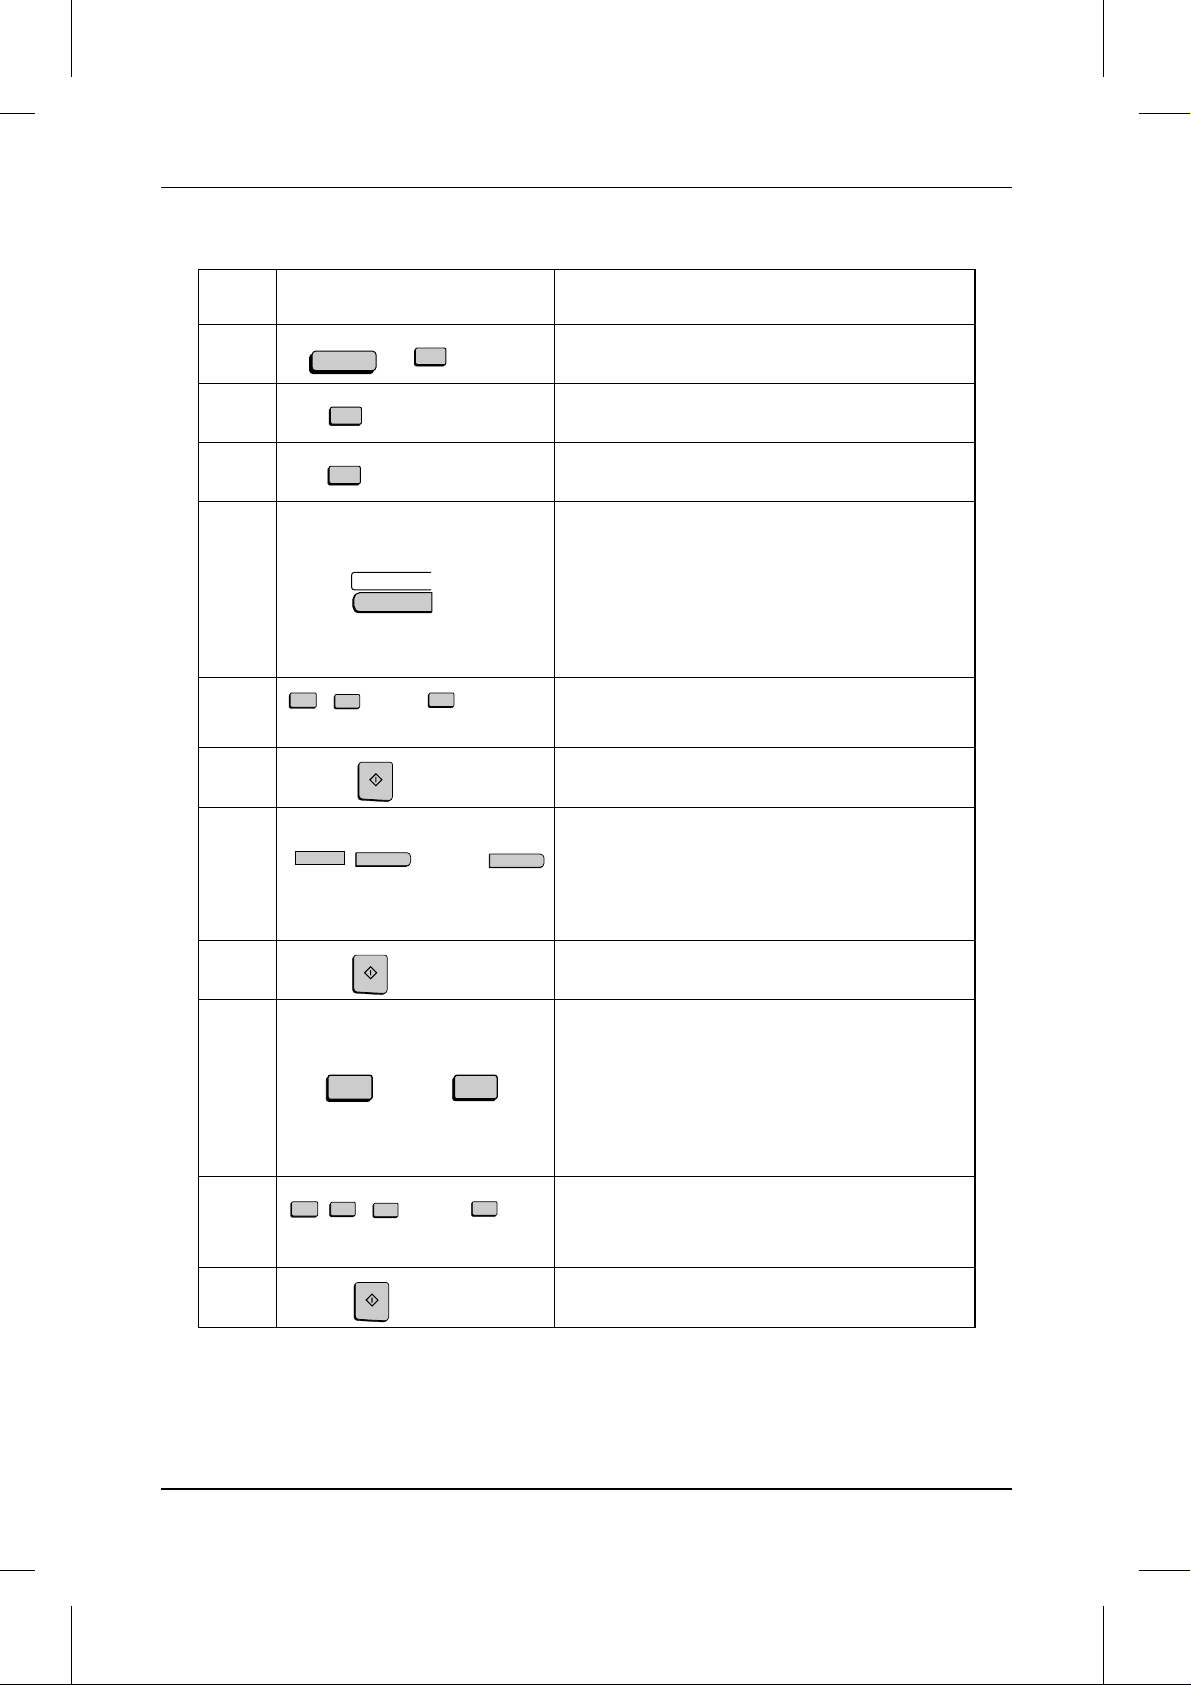
Step Press these keys: Comments
1
2
3
4
FUNCTION
1
7
2
or
2
2
B
(Example)
1
2
A
B
5
SPEED DIAL
1
……
3
C
START
(Example)
START
"PROGRAM/GRO UP MODE" will appear in the
display.
"GROUP ENTRY MODE" will appear in the
display.
Press "1" (SET) to progra m a Group Key, or "2"
(CLEAR) to clear a Group Key.
Press any Rapid Key not already being used to
select it as a Group K ey .
If you are clearing a Group Key, press it and go
to Step 6.
Enter fax numb ers using on e or both of the
following methods:
• Press on e or mo re Rapid Keys.
• Enter one or m or e Spee d Dial numbers with
the numeric keys, pressing SPEED DIA L
before e a ch number (if yo u enter less than
3 digits for a numb er , press START to
complete the en tr y) .
6
STOP
7
Step 4 or
Return to St ep 4 to ent er anoth e r num ber , or
pres s STO P one or mor e t ime s unti l you retu rn
to the date and time display.
2-10 INITIAL SETTINGS
Page 25

DD <P=001>
UX5000U-IPVA
VOLUME ADJUSTMENT
You can adjust the volume of the speaker, handset, and ringer using the UP and
DOWN keys on the operation panel (flip up the Rapid Key overlay to access the keys).
Speaker
The speaker has three volume levels: HIGH, MIDDLE, and LOW. To adjust the
volume of the speaker, press the SPEAKER key and then press the UP or DOWN key
until the desired level appears in the display. Press the STOP key again to turn the
speaker off.
Handse t
The handset receiver has three volume levels: HIGH, MIDDLE, and LOW. To adjust
the volume of the handset receiver, lift the handset and then press the UP or DOWN
key until the desired level appears in the display.
Ringer
The ringer has four volume levels: HIGH, MIDDLE, LOW, and OFF. To adjust the
volume of the ringer, press the UP or DOWN key until the desired level appears in the
display (make sure the SPEAKER has not been pressed and the handset is not lifted).
The fax will ring at the new volume level each time you change the level. If you select
OFF, press the START key to confirm your selection.
INITIAL SETTINGS 2-11
Page 26

VOLUME ADJUSTM ENT
Notes
2-12 INITIAL SETTINGS
Page 27

AY < P=001>
UX5000U-BOPS
3 BASIC OPERATIONS
SENDING DOCUMENTS
Transmittable documents
Your fax can transmit most standard office documents. Specific guidelines are as
follows:
Size and weight
The size and weight of documents which you can load in the document feeder depend
on whether you load one sheet at a time or several sheets at once.
One sheet at a time:
14 lbs. 36 lbs.
2
(52 g/m
) (15 7 g/m2)
Several sheets at once:
14 lbs. 20 lbs.
(52 g/m2)
Note:
The area of the doc um ent which is sca nned by the fa x is slightly sm a ller than t he ac tua l
docume nt size. Any le tter s or graph ic s outside t his ar ea ca nnot be transm it t ed.
Scanning width: 8.5" (216 mm) for docume nt s up to 8.9" (22 6 mm ) wide.
Scanning length: The length of the sheet minus 0.16" (4 mm) from both the
(80 g/m
5.0"
(128 mm)
5.8"
148 mm)
(
5.0"
2
)
(128 mm)
5.8"
148 mm)
(
Maximum of 10.1" (256 mm) for documents 8.9" ( 226 mm)
to 11" (280 mm) wide when reduced automatically (see
following note).
top and bot tom ed g es.
17.0"
(432 mm)
11.0"
(280 mm)
14.3"
(364 mm)
11"
(280 mm)
Note:
When sendin g a docum ent wider than 8.9" (2 2 6 mm), your fax will automatically reduce
the width of the im age t ransm it t ed t o 8.0" (20 3 m m). I f the docum e n t cont ains fin e prin t
or graphics, the copy which the re ceiving pa rty ob tain s may be dif fic ult to r ead du e to
the size reduction. This func tion is autom atic ally disabled if the print ing widt h of the
receiving machin e is greater than or equal to the width of the documen t.
BASIC OPERAT IONS 3-1
Page 28

<P=002>
SENDING DOCUMENTS
Other restrictions
♦ Documents written in yellow, greenish yellow, or light blue ink cannot be transmit-
ted, as the scanner does not recognize these colors.
♦ Ink, glue, and correcting fluid on documents must be dry before they pass through
the document feeder.
♦ All clips, staples, and pins must be removed from documents before transmission. If
these are not removed, they may damage the fax.
♦ Patched or taped documents should be copied on a copy machine, and the copy
used for transmission.
Dual access
The UX-5000 features full dual access, which means that you can load a document
and dial even when the fax is occupied with another operation. After you dial (when
you use automatic dialing), your document will be immediately scanned into memory
and then transmitted once all previously set operations have been completed.
If more than one document has been scanned into memory for transmission, the
documents will be transmitted in the order in which they were scanned. If you have an
urgent transmission and do not want to wait until previously scanned documents are
transmitted, you can press the PRIORIT Y key after loading your document. Your
document will be transmitted immediately after the current document has completed
transmission.
If you don’t want the document to be transmitted from memory, you can press the
DOCUMENT key after loading the document. In this case, the document will not be
scanned until the fax completes all previously set operations and the connection to the
receiving party is made. (To transmit the document ahead of any documents waiting in
memory for transmission, press the PRIORITY key.)
The UX-5000 can hold approximately 50 pages of average content in memory. Less
pages can be held if any were scanned using fine or halftone resolution.
♦ The amount of memory currently occupied appears as a percentage ("M:00%") in
the display.
3-2 BASIC OPERATIONS
Page 29

<P=003>
SENDING DOCUMENTS
If the memory becom e s full ...
If the memory becomes full while the document is being scanned, MEMORY FULL will
appear in the display. If Option Setting 24 (Quick on-line) is set to YES, the
transmission will be canceled and you will need to retransmit all pages of the
document. (If a page remains in the scanner, open the operation panel by squeezing
the release marked "PULL OPEN" and remove it.) If Option Setting 24 is set to NO,
press the START or STOP key as follows :
♦ Press the START key if you want to transmit the pages which have been stored up
to that point in memory. The remaining pages will be ejected from the feeder. After
transmission, the memory w ill be cleared and you can transmit the remaining
pages. You will also need to transmit the page which was being scanned when the
memory filled up.
♦ Press the STOP key if you want to cancel the entire transmission.
If you do not press the START key or the STOP key within one minute, the
transmission will be canceled and the pages already scanned cleared from memory.
You will need to retransmit all pages of the document.
Memory Retransmi s si on
If a line error or power failure occurs during any type of memory transmission, your fax
will automatically redial the number and attempt to complete the transmission.
Retransmission will begin from the page which was being transmitted when the error
occurred.
Your fax has been set at the factory to make 10 attempts at retransmission, with each
attempt made immediately after the previous attempt. If desired, you can change the
number of attempts by changing Option Setting 18, and have the fax wait a selected
number of minutes between each attempt by changing Option Setting 19. See Chapter
5, "Optional Settings".
♦ To stop retransmission, press the STOP key.
♦ The numbering of pages retransmitted will begin from "1" again.
♦ If the error or power failure occurs during transmission of a cover sheet, retransmis-
sion will not take place.
BASIC OPERAT IONS 3-3
Page 30
<P=004>
SENDING DOCUMENTS
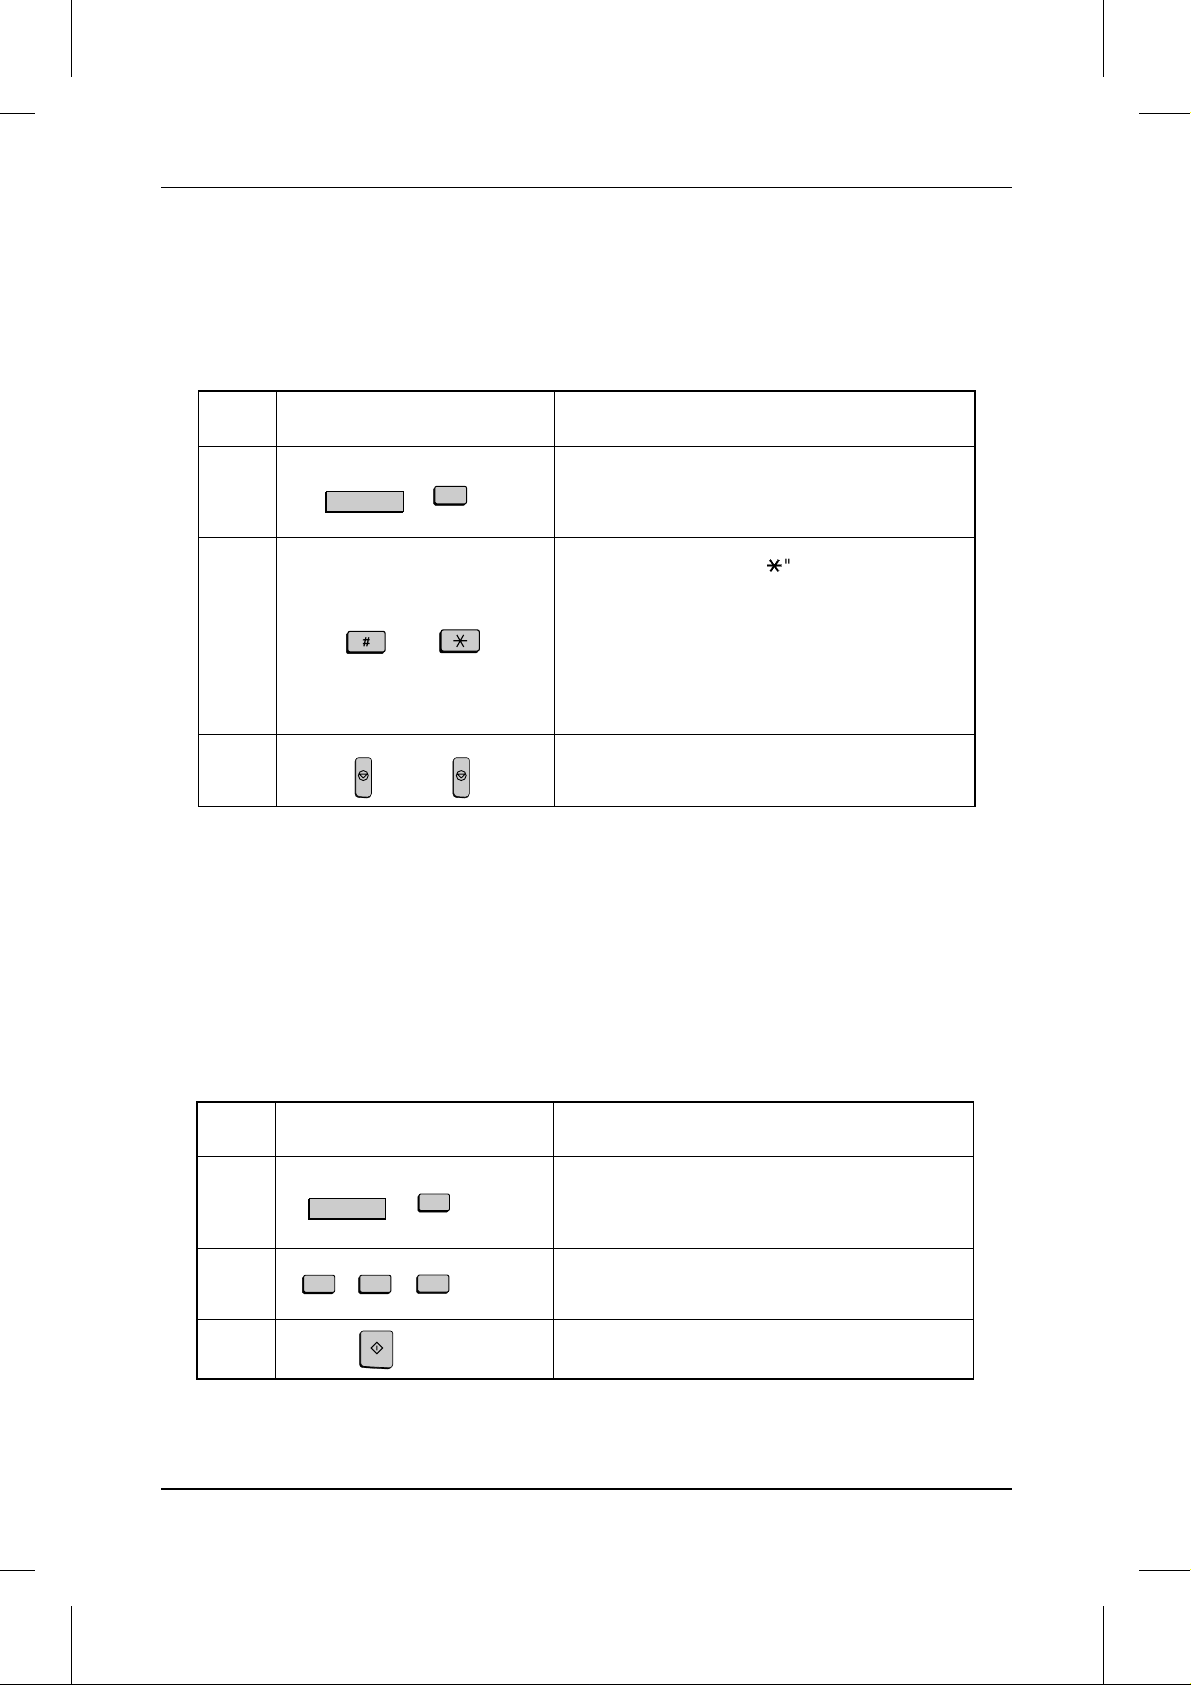
Checking docum e n ts in memor y
To display information on the documents that are waiting in memory for transmission,
follow the steps below. You can also cancel a transmission with this procedure.
Step Press these keys: Comments
1
MEM.STATUS
W
2
STOP
2
or
STOP
3
Pres s the MEM. STATUS key (flip up the Rapid
Key overlay if necess ar y) and the " 2" key. "TX
STATUS" will appear in the display.
Pres s the "#" key or the "*" key to scroll through
the list of transmiss ions. The na me (o r num ber )
of each receiving party will appear in the display,
together with the 3-digit mem ory numbe r
assigned to the transm iss ion. To cancel a
transmission, press the CLEAR key and t hen
the START key while the transmission appear s
in the display.
When you have finished che cking t he list , press
the STOP key twice to exit.
If desired, you can also print out a list of the documents waiting in memory for
tranmission. To do so, press the MEM. STATUS key and then the "5" key.
To cancel a memory transmission
If you know the memory number assigned to a memory transmission, you can cancel
it with the following procedure. (If you don’t know the memory number, use the
procedure above.)
Step Press these keys: Comments
MEM.STATUS
1
W
2
START
4
00
1
(Example)
3
Pres s the MEM. STATUS key (flip up the Rapid
Key overlay if necess ar y) and the " 4" key.
"MESSAGE CLEAR" will appear in the display.
Enter the 3-digit memor y numbe r assigned to
the transmi ss io n you wan t to cancel.
Pres s the START key to cancel the transmission.
3-4 BASIC OPERATIONS
Page 31

<P=005>
SENDING DOCUMENTS
Loading th e document
Up to 50 pages can be placed in the feeder at one time. The pages will be
automatically fed into the fax starting from the page on the bottom.
♦ If you need to send or copy more than 50 pages, place the additional pages gently
and carefully in the feeder just before the last page is scanned. Do not try to force
them in, as this may cause double-feeding or jamming.
♦ If your document consists of several large or thick pages which must be loaded one
at a time, insert each page into the feeder as the previous page is being scanned.
Insert gently to prevent double-feeding.
1 Adjust the document guides to the
width of your document .
2 Place the document face down on the
document feeder and push it gently
into the machine. The to p edge of the
document should enter first.
•• SEND READY will appear in the display.
•• If desired, press the PRIORITY key to
send the document ahead of other
documents waiting in memor y for transmission, and/or the DOCUMENT key
to send the document without reading
it into memory.
3 You can now eith er make o ptio n al
transmission settings as described on
the follo wi n g page, or dial th e oth e r
party as described in the following
section, "Dialing and transmissio n ".
BASIC OPERAT IONS 3-5
Page 32

<P=006>
SENDING DOCUMENTS
Optional tran smissi on setti ng s
If desired, there are several transmission settings which you can make before dialing
and transmitting the document.
Note:
To make the se ttings, the do cum en t must firs t be loaded in the f eede r.
Resolution
Your fax has 4 resolution settings:
STANDARD: Use STANDARD for ordinary documents. This setting
FINE: Use FINE for im proved re product ion, especially with docu-
SUPER FINE: Use SUPER FINE when you need the highest quality of
HALF TONE: Use HALF TONE for photographs and illustrations. The
If you do not make a setting, the machine will automatically send the document in
STANDARD.
♦ In order to transmit with FINE or SUPER FINE resolution, the receiving fax machine
must also have that resolution. If it doesn’t, the next best available setting will be
used.
LINE-STATUS RESOLUTION
IN USE STANDARD
CHANGEOVER
gives you the fastest and most economical tra nsmission .
ments containing small letters or fine drawing s.
reproduction.
original will be reproduced in 64 shades of gray.
To change the setting, press the
RESOLUTION key on e or more times
until the indicator light next to the
desired settin g comes on.
FINE
SUPER FINE
HALF TONE
3-6 BASIC OPERATIONS
Page 33

<P=007>
SENDING DOCUMENTS
Contrast
The contrast is normally set to AUTO, which means that the machine automatically
controls the contrast. However, for very light documents you can change the setting to
DARK, and for documents with a dark background you can change the setting to
LIGHT.
Flip up the Rapid Key overlay if
334134423543364437453846394740
A
I
CONTRAST
Q
Y
C
B
K
J
PAGE COUNTER CONFIDENTIAL
S
R
Z
D
E
L
M
TIMER RELAY
T
U
CLEARSPSHIFTSPACE
F
N
V
LIFE
G
O
MEM.STATUS
W
DOWN UP
H
48
P
SEARCH DIAL
X
necessary and press the CONTRAST
key one or more times until the
desired settin g appears in the display.
•• The contrast setting appears in parentheses after the resolution setting.
Cover Sheet
You can have your fax generate a cover sheet and send it as the last page of the
transmission. The cover sheet includes the date and time, the sender’s name and
number, and the receiver’s name and number if an automatic dialing number is used.
The total number of pages sent is indicated on the bottom.
♦ Your name and number must be programmed in order for them to appear on the
cover sheet. (See "Entering Your Name and Fax Number" in Chapter 2.)
♦ Cover Sheet cannot be selected when you use the Relay Request function.
FUNCTION
SPEED DIAL
REDIAL
SPEAKER
If desired, you can set your fax to automatically send a cover sheet with every
transmission (you do not have to press the COVER SHEET key each time). This is
done by setting Option Setting 10 to YES as described in Chapter 5.
COPY REPORT DOCUMENT
BROADCAST
STOP START
COVER SHEET
PRIORITY
To send a cover sheet, p ress the
COVER SHEET key.
BASIC OPERAT IONS 3-7
Page 34

<P=008>
SENDING DOCUMENTS
Example
Note: For t he r ecipient’s
name to appear, you must
dial using a Rapid Key or
Speed Dial number that has
the nam e pr ogr am m ed .
Batch Page Numbering
This setting is used to change the page numbering of the transmitted document from
simple numbering ("P.1", "P.2", etc.) to batch numbering, which means that a slash
and the total number of pages being sent are added after each page number (for
example, "P. 1/5", "P.2/5", etc.). This allows the receiver to check for any missing
pages.
♦ If you are sending a cover sheet, do not include the cover sheet in the total number
of pages. Your fax will adjust the number to include the cover sheet automatically.
♦ If you need to cancel a batch number entry, remove the document from the feeder
or press the STOP key.
♦ If transmission does not take place within one minute after entering the batch num-
ber, the setting will be canceled.
♦ If the number of pages actually transmitted does not coincide with the batch number
entered, the alarm will sound and PAGE COUNT ERROR will appear in the display.
"PAGE E" will also appear in the "NOTE" column of the Transaction Report if it has
been set to print out .
Step Press these keys: Comments
PAGE COUNTER
1
R
"ENTER # OF PAGE(S)" will appear in the
display.
1
2
3
(Example)
Enter the total number of pages (2 digits - "01" to
"99") by pressing the numeric keys.
3-8 BASIC OPERATIONS
Page 35

YF <P=001>
UX5000U-BOSD
SENDING DOCUMENTS
Dialin g and tra nsmis sion
Once you have loaded the document and made any desired transmission settings,
you are ready to dial the number of the receiving fax machine and transmit the
document. There are several ways of dialing, and you can select the one which best
suits your needs.
Normal Dialing
With Normal Dialing, you pick up the handset (or press the SPEAKER key) and dial
as you would to make a telephone call. If the receiving machine is set to receive faxes
manually (this means that the receiving party answers your call by picking up the
handset and speaking, and then presses their Start key to begin fax reception), you
can talk with them before sending the fax.
♦ When using Normal Dialing, you do not have to load the document before dialing.
You can also load the document and make transmission settings after completing
Step 2 below.
1 Pick up the handset or press the
SPEAKER
or
ABC
JKL MNO
TUV WXY
OPER
0
DEF
2 Dial the number of the receiving
123
GHI
456
PRS
789
SPEAKER key. Listen for the dial tone.
machine by pressing the number keys.
•• If Option Setting 27 has been set to
"YES" and BILLING CODE DIAL has
been set to "AFTER", press the
REDIAL key after dialing.
3 Wait for the con nection. Depend ing
on the setting of the receiving
Beep
machine, you will either hear a
facsimile reception tone or the other
person will answer.
•• If the other party answers, ask them to
press their Start key (if you pressed the
SPEAKER key, pick up the handset to
speak with them). This causes the receiving machine to issue a reception
tone.
BASIC OPERAT IONS 3-9
Page 36

<P=002>
SENDING DOCUMENTS
4 When you hear the reception tone,
START
press the START key. Replace the
handset i f you used it.
•• When transmission is completed, the
fax will beep.
Direc t Ke ypa d Dialing
If you do not need to talk with the other party before sending the fax, you can just dial;
it isn’t necessary to pick up the handset or press the SPEAKER key.
♦ Direct Keypad Dialing is a form of automatic dialing, so if you need to insert a pause
between any digits of the number, press the REDIAL key. (For more information on
pauses, see "Storing Numbers for Automatic Dialing" in Chapter 2.)
♦ When using Direct Keypad Dialing, you do not have to load the document before di-
aling. You can load the document after completing Step 1 below.
ABC
DEF
1 Enter the number of the receiving
123
GHI
JKL MNO
456
PRS
TUV WXY
789
OPER
0
machine by pressing the number keys.
2 Check the display. If the number of
START
the receiving machine show n is
correct, press the START key.
•• If it is not correct, press the STOP key
to backspace and clear one digit at a
time, and then re-enter the correct
digit(s).
Rapid Key Dialing
If the number you want to dial has been stored as a Rapid Key number (see "Storing
Numbers for Automat ic Dialing" in Chapter 2), you can dial it by pressing the
appropriate Rapid Key.
08
07
06
05
04
03
02
01
A
B
C
D
E
F
G
H
16
15
14
13
12
11
10
09
I
J
K
L
M
N
O
P
24
23
22
21
20
19
18
17
Q
R
S
T
U
V
W
27 28 29 30 31 32
26
25
Y
Z
CLEARSPSHIFTSPACE
X
Press the approp riate Rap id Key.
•• The name of the receiving party will appear in the display. If no name was
stored, the fax number will appear. (If
the name or number is incorrect, press
the STOP key.)
•• The document will be automatically
transmitted once the connection is
made.
3-10 BASIC OPERAT IONS
Page 37

<P=003>
SENDING DOCUMENTS
Speed Dia l i ng
If the number you want to dial has been stored as a Speed Dial number, you can dial
it by pressing the SPEED DIAL key and then entering the Speed Dial number (see
"Storing Numbers for Automatic Dialing" in Chapter 2).
ABC
1 Press the SPEED DIAL key and then
SPEED DIAL
123
GHI
456
PRS
789
DEF
JKL MNO
TUV WXY
OPER
0
enter the Speed Dial number by
pressing the numeric keys.
•• If you enter less than 3 digits for the
Speed Dial number, press the START
key to complete the entry.
2 Check the display. If the name or
START
number shown is correct, press the
START key. (If not, press the STOP
key and then repeat Step 1.)
Chain Dialing
An automatic dialing number set for Chain Dialing (see "Storing Numbers for
Automatic Dialing" in Chapter 2) can be combined with another automatic dialing
number or digits entered manually with the numeric keys to dial one phone number up
to 50 digits long. The following are some examples of how this can be done:
♦ Press appropriate Rapid Keys in the proper order. For example, press Rapid Key
01, then Rapid Key 02.
♦ Press a Rapid Key and then manually enter a number by pressing appropriate nu-
meric keys. Press the START key after the final numeric key to begin transmission.
(Use this method, for example, when you have stored a long distance access code
into a Rapid Key, and want to dial this in combination with a number which hasn’t
been stored as an automatic dialing number.)
BASIC OPERATIONS 3-11
Page 38

<P=004>
SENDING DOCUMENTS
Using the SEARCH DIAL key
If you don’t remember the Rapid Key or Speed Dial number in which you have stored
a particular fax number, you can search for the number by following the steps below.
Once you have found the number, you can dial it and transmit the loaded document
by simply pressing the START key.
Note:
Only names programmed for automatic dialing numbers will appear when you search;
the full numbers them selves will not appear. You cannot sea rch for a number if a name
has not been associat ed with it.
1 Press the SEARCH DIAL key.
334134423543364437453846394740
C
D
E
F
G
A
I
CONTRAST
Q
Y
B
J
PAGE COUNTER
R
Z
K
CONFIDENTIAL
S
L
M
TIMER RELAY
T
U
H
48
N
O
P
SEARCH DIAL
MEM.STATUS
LIFE
V
W
X
CLEARSPSHIFTSPACE
UPDOWN
2 Enter the first letter of the stored
name by pressing the appropriate
1
2
3
C
A
B
9
10
11
K
J
I
17
18
19
S
R
Q
27 28 29 30 31 32
25
26
Z
Y
4
5
6
D
E
F
12
13
14
L
M
N
20
21
22
T
U
V
CLEARSPSHIFTSPACE
(Example: " B ")
7
8
G
H
15
16
O
P
23
24
W
X
letter entry key.
•• If you don’t remember the first letter,
go to Step 3 (you will scroll through the
list from the beginning).
3
or
Press the → or the ← key to scroll
through the names. Stop when the
desired name appears in the display.
•• If no numbers have been stored under
the entered letter or you have reached
the end of the list, NO T FOUND will appear.
3-12 BASIC OPERAT IONS
Page 39

<P=005>
SENDING DOCUMENTS
4 Press the START key. The document
Note:
The
SEARCH DIAL
sequence, but not subsequent numbers.
START
will be automatically transmitted once
the connectio n is made.
key can be used to access t he firs t nu mber in a Chain D ialing
Checking the telephone line status
The display normally shows the date and time and prompts related to operations you
are performing. To check and see what number the fax is currently calling or
transmitting to, or what number the fax is currently receiving a document from (if this
information is available), press the CHANGEOVER key. Information on the curr ent
call will appear in the display. To switch back to the date and time display, press the
CHANGEOVER key again.
To cancel a fax transm is sion or re ception
To cancel a fax transmission or reception which is currently in progress, press the
CHANGEOVER key so that the status of the transmission or reception appears in the
display, and then press the STOP key.
Redialing
Automatic redialing
If you use automatic dialing (including Direct Keypad Dialing) and the line is busy,
your fax will automatically redial the number. Your fax was set at the factory to make 2
redialing attempts at intervals of 5 minutes.
To stop automatic redialing, press the CHANGEOVER key to show the telephone line
status in the display (make sure that RECALL MODE appears on the top line of the
display and the number of the receiving party appears on the bottom line to the right),
and then press the STOP key.
♦ If desired, you can change the number of times the fax redials with Option Setting
6, and the interval at which redialing is done with Option Setting 7. See Chapter 5,
"Optional Settings".
Using the REDIAL key
You can press the REDIAL key to redial the last number dialed. To send a document,
proceed from Step 3 of Normal Dialing. Note that the speaker will be automatically
activated, so you do not need to pick up the handset immediately.
BASIC OPERATIONS 3-13
Page 40

YF <P=001>
Your fax has two modes of reception: AUTO and MANUAL. With MANUAL reception,
you must first pick up the handset and then press the START key to receive a
document. With AUT O reception, your fax automatically answers each call and
receives the incoming document.
♦ AUTO reception is most useful when you want to use your line as a dedicated fax
line (you will only be receiving faxes on it).
♦ MANUAL reception is most useful when you will be receiving both voice calls and
fax messages on the same line.
Setting the mode of reception
UX5000U-BORD
RECEIVING DOCUMENTS
The reception mode has been set to AUTO at the factory. If you want to change the
setting, follow the steps below.
Step Press these keys: Co mments
FUNCTION
1
2
1
or
1
2
RECEIVE MODE will appear in the display.
Press "1" to select AUTO , or "2" to select
MANUAL.
AUTO reception
In AUTO reception mode, the fax automatically answers all calls after 1 ring and
receives the incoming documents.
♦ You can change the number of rings on which the fax answers incoming calls by
changing Option Setting 2 (see Chapter 5, "Optional Settings"). Any number from
"0" to "9" can be selected. (Select "0" to have your fax answer calls without ringing.)
♦ If you pick up the handset before your fax answers, you can talk to the other party
and/or receive a document as described below in "MANUAL reception".
Note:
Note:
3-14 BASIC OPERAT IONS
If Option Setting 2 is set to a high number of rings, your fax may not be able to receive
docume nt s sent by au tom at ic dialing . If you hav e difficult y r eceiving docum e nt s, chang e
the setting of Option Set ting 2 t o a lower number .
If you are using distinct ive ringin g, your fax will answer incoming calls afte r two rings
regardless of the set ting of Optio n Set ting 2.
Page 41

<P=002>
RECEIVING DOCUM ENT S
MANUAL reception
1 When you r fax ring s, pick up the
handset.
2 You will either hear a fax tone or the
START
other party will speak to you.
•• If you hear a fax tone, press the
START key.
•• If the other party first speaks with you
and then wants to send a document,
press the START key after speaking.
3 Hang up when RECEIVING appears in
the disp lay.
Note:
As a back-up feature of MANUAL mode, you can set the fax to automatically answer
calls and receive documents on any number of ring s from 1 to 9. This is useful if yo u
are occasionally unab le to respond t o an incom ing call persona lly. The setting is made
with Option Settin g 3. See Chapter 5, "Option al Settings ".
BASIC OPERATIONS 3-15
Page 42
<P=003>
RECEIVING DOCUMENTS
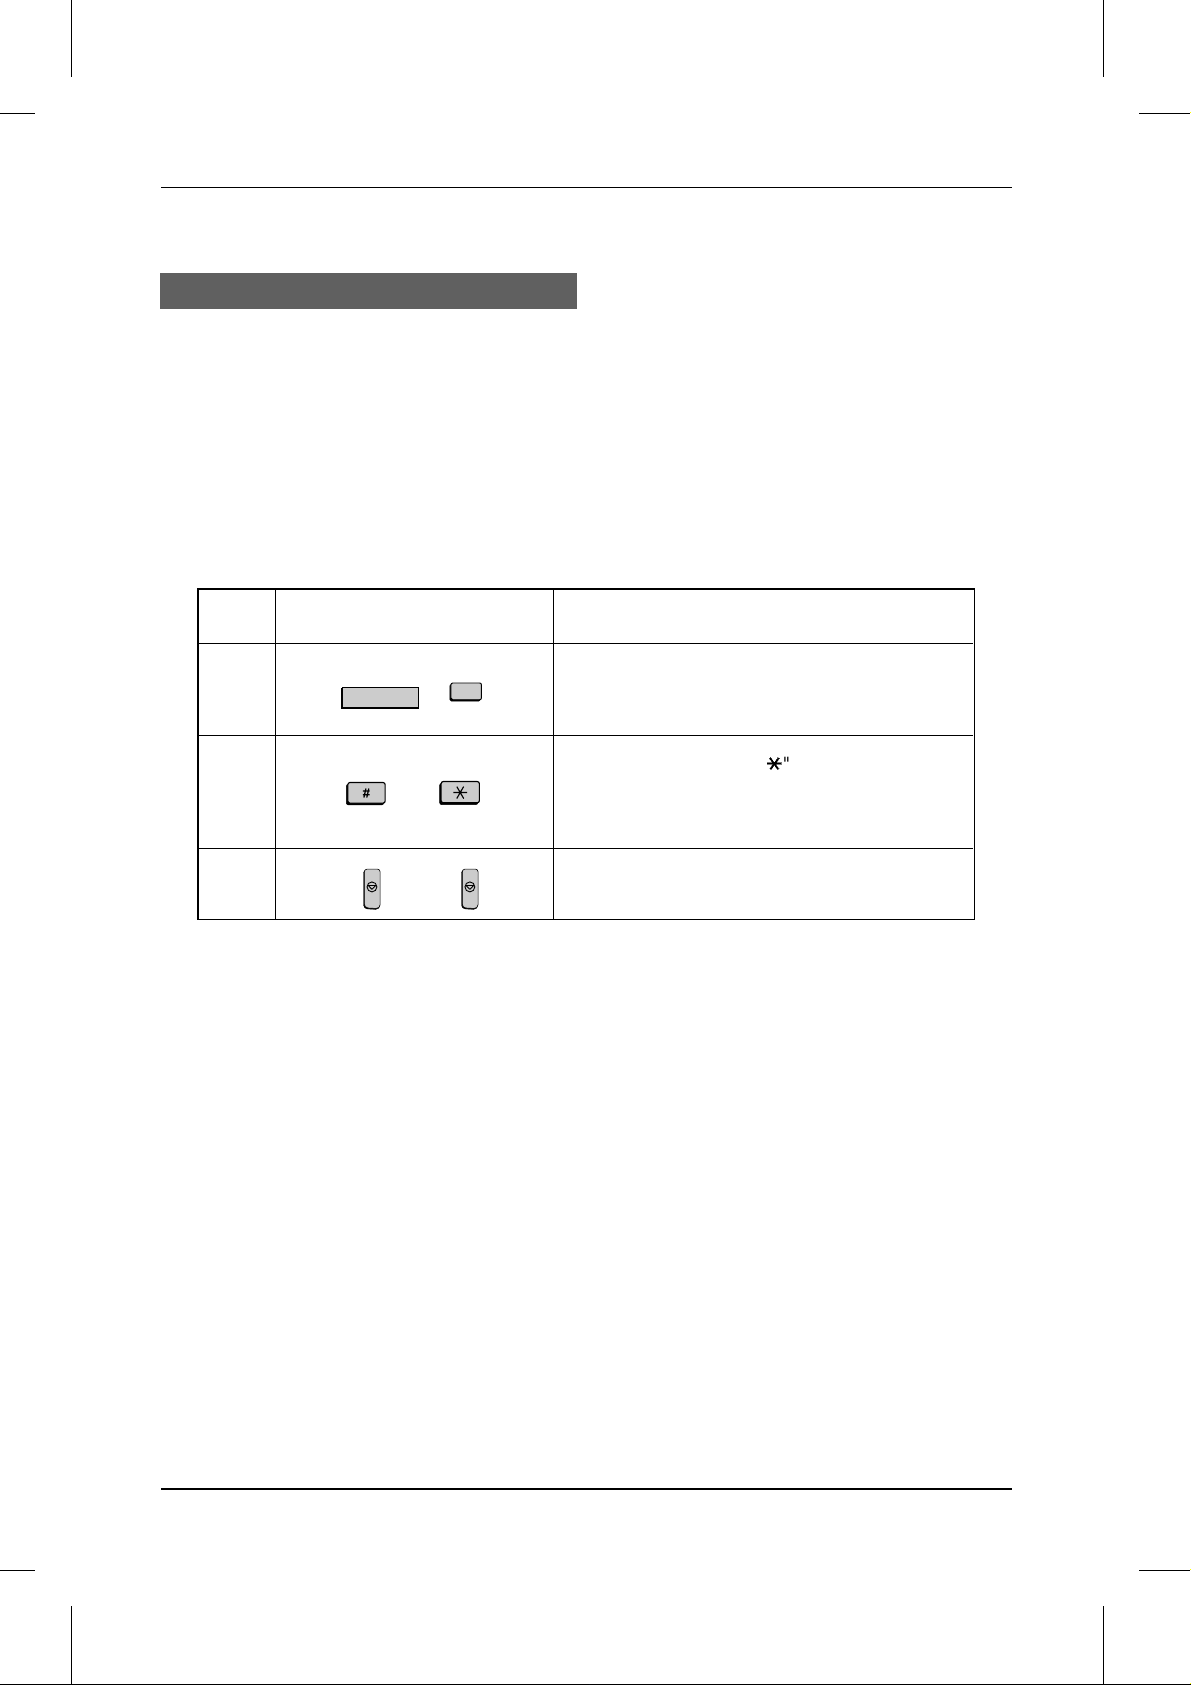
Substitute reception
If your fax runs out of paper, toner, or the paper jams, incoming documents will be
automatically stored in memory.
When you have received a document in memory, FAX RCVD IN MEMORY will appear
in the display, together with NO PAPER, REPLACE T ONE R, or PAPER JAM. Wh en
you add paper, replace the toner cartridge, or clear the jam, the stored documents will
automatically print out.
You can display information on the documents received to memory by following these
steps:
Step Press these keys: Comments
MEM.STATUS
1
W
2
STOP
3
or
STOP
3
Press the MEM. STATUS key (flip up the Rapi d
Key overlay if nece ssar y) and the "3" key. "RX
STATUS" will appear in the display.
Press the "#" key or the "*" key to scroll throu gh
the list of received documents. T he name (or
number) from which each document was
received will successively appear in the display.
When you have finished checking th e list, press
the STOP key twice to exit .
3-16 BASIC OPERAT IONS
Page 43

YF <P=001>
UX5000U-BOCY
MAKING COPIES
Your fax can also be used to make copies. Single and multiple copies (up to 99 per
original) can be made, enabling your fax to double as an office copier.
♦ You can perform all steps of a copy operation even when the fax is busy printing
other copy jobs, or when it is printing a received document after the line has been
disconnected. Your copy job will be automatically stored in memory and then
printed when all previous printing jobs are completed.
♦ The default resolution for copying is FINE.
♦ If you are making multiple copies of more than one original, you can choose
whether to have the copies sorted (SORT COPY) or not sorted (MULTI COPY) . The
following example shows how the copies are ordered in each case when 3 copies
each of 3 originals are made.
C
Originals
B
A
A
A
MULTI COPY
A
B
B
B
C
C
C
SORT COPY
B
A
C
C
B
A
C
B
A
1 Load the documen t(s) face dow n.
•• If desired, adjust the reso lution and
contrast with the RESOLUTION and
CONTRAST keys.
2 Press the COPY key.
COPY
•• If you are only making a single copy of
the original (or of each original), press
the START key. Copying will begin.
3 Enter the desired number o f copies
1
2
(Example)
with the number keys.
•• If the desired number of copies is from
1 to 9, enter "0" first.
4 Press "1" to select MULTI COPY, or
1
or
2
BASIC OPERATIONS 3-17
"2" to select SORT COPY.
Page 44

<P=002>
MAKING COPIES
Checking copy operati ons in me m ory
You can display the status of copy jobs in memory by following the steps below. You
can also cancel copy jobs with this procedure.
Step Press these keys: Comments
MEM.STATUS
1
W
2
STOP
1
or
STOP
3
Pres s the MEM. STATUS key (flip up the Rapid
Key overlay if necess ar y) and the " 1" key.
"COPY STATUS" will appear in the display.
Pres s the "#" key or the "*" key to scroll through
the list of copy jobs. The time the original was
scanned into memory will appear in the display,
together with the 3-digit mem ory numbe r
assigned to the job. To cancel a copy job, press
the CLEAR key and then the START key while
the copy job appears in th e display.
When you have finished che cking t he list , press
the STOP key twice to exit.
3-18 BASIC OPERAT IONS
Page 45

YF <P=001>
UX5000U-BOVC
MAKING TELEPHONE CALLS
Your fax can be used like a regular telephone to make and receive voice calls.
♦ To make or receive a phone call, the power must be on.
1 Pick up the handset or press the
or
SPEAKER
SPEAKER key. Listen for the dial tone.
•• To use Rapid Key Dialing, you must
press the SPEAKER key.
2 Dial the number using one of the
ABC
123
GHI
456
PRS
789
DEF
JKL MNO
TUV WXY
OPER
0
following methods:
•• Normal Dialing: Enter the full tele-
phone number with the numeric keys.
•• Rapid Key Dialing: Press the appropri-
ate Rapid Key. (The voice number will
be dialed.)
•• Speed Dialing : Press the SPEED
DIAL key, and enter the Speed Dial
number with the numeric keys (if you
enter less than 3 digits, press the
START key to complete the entry).
3 Speak with the other party when th ey
answer.
•• If you pressed the SPEAKER key, pick
up the handset to talk.
Redial
The last number called can be redialed by pressing the REDIAL key (it is not
necessary to pick up the handset or press the SPEAKER key). When the other party
answers, pick up the handset to talk.
BASIC OPERATIONS 3-19
Page 46

MAKING TELEPHONE CALLS
Notes
3-20 BASIC OPERAT IONS
Page 47

YF <P=001>
UX5000U-SFBR
4 SPECIAL FUNCTIONS
BROADCASTING
This function allows you to send the same document to many different locations with
just one operation. First load the document, then enter the numbers of the receiving
machines. The document will be automatically transmitted to each location.
1 Load the document(s).
2 Press the BROADCAST key.
FUNCTION
SPEED DIAL
REDIAL
SPEAKER
COPY REPORT DOCUMENT
COVER SHEET
BROADCAST
STOP START
PRIORITY
•• "BROADCAST MODE" will appear in
the display.
3 Dial the receiving units using one or
more of the following methods:
•• Press one or more Rapid Keys.
1
A
2
B
……
3
C
(Example)
•• Enter one or more S peed Dial numbers, pressing the SP EED DIAL key
before each number. (If you enter less
than 3 digits for a number, press the
START key to complete the entry.)
•• Enter one or more full fax numbers
(max. of 20) with the numeric keys,
pressing the START key after each full
number.
•• Press one or more Group Keys.
4 Press the START key.
START
•• Set the resolution and/or contrast if desired.
SPECIAL FUNCTIONS 4-1
Page 48

BROADCAST ING
<P=002>
5 Press the START key twice.
START
START
Transmission will begin.
•• A Transaction Report is automatically
printed out after Broadcasting is completed. Check the "Note" column of the
report to see if any of the locations are
marked "Busy" or have a communication error code. If so, send the document to those locations again.
Broadcasting using a Group Key
If the fax machines to which you want to broadcast have all been programmed into
one Group Key, you can perform the broadcasting operation using the following
simplified procedure:
1 Load the document(s).
•• Make any desired transmission settings (resolution, contrast, etc.).
2 Press the approp riate Grou p Key.
01
A
09
I
17
Q
25
Y
C
D
B
11
10
K
J
19
18
S
R
27 28 29 30 31 32
26
Z
E
13
12
L
M
21
20
T
U
F
G
H
16
15
14
N
O
P
24
23
22
V
W
X
CLEARSPSHIFTSPACE
08
07
06
05
04
03
02
(Example)
4-2 SPECIAL FUNCTIONS
Transmission will begin.
Page 49

YF <P=001>
UX5000U-SFCO
CONFIDENTIAL OPERATIONS
The Confidential function can be used to transmit and receive confidential documents.
Confidential transmission
When you send a document using the Confidential function, the receiving machine
stores it in memory instead of immediately printing it out. When the receiving party
enters the correct passcode, the document will be printed out.
♦ Confidential transmission is only possible when the receiving machine is a Sharp
model with confidential reception capability.
1 Load the document(s).
•• Make any desired transmission settings (resolution, contrast, etc.).
2 Press the CONFIDENT IAL key and
334134423543364437453846394740
A
I
CONTRAST
Q
Y
B
J
PAGE COUNTER
R
Z
C
K
CONFIDENTIAL
S
D
L
TIMER RELAY
T
G
F
E
O
N
M
MEM.STATUS
LIFE
W
V
U
CLEARSPSHIFTSPACE
H
48
P
SEARCH DIAL
X
UPDOWN
1
then the 1 key.
•• CONF.TX will appear in the display.
3 If the receiving machine has mu ltiple
0
1
(Example)
mailboxes, enter the ap prop riat e
mailbox number with the numeric
keys (if not, skip this step).
4 Press the START key.
START
SPECIAL FUNCTIONS 4-3
Page 50

<P=002>
CONFIDE NTI AL OP ERAT ION S
5 Dial the receiving unit using one of
the following metho ds:
•• Press a Rapid Key.
SPEED DIAL
1
START
0
(Example)
•• Press the SPEED DIAL key and enter
a Speed Dial number. (If you enter less
than 3 digits, press the START key to
complete the entry.) Press the START
key.
•• Enter a full telephone number with the
numeric keys, and press the START
key.
Transmissio n will take place once the
connection is made.
Confidential reception
When the transmitting machine sends you a document by confidentia l transmission,
your fax stores it in memory instead of im mediately printing it out. The document
cannot be printed out until you enter the correct passcode.
Your fax has 10 "mailboxes" in which confidential documents can be received. Each
mailbox has its own passcode, allowing up to 10 different people or groups to each
receive their own confidential documents. The mailboxes are identified by 2-digit
numbers.
4-4 SPECIAL FUNCTIONS
Page 51

<P=003>
CONFIDENTIAL OPERATIONS
Programming the confidential passcode
To receive a confidential document, you must first program a 2-digit mailbox number
and a 4-digit passcode.
Step Press these keys: Comments
1
2
3
4
5
6
7
Note:
CONFIDENTIAL
S
3
1
1
START
S
START
After ent ering t he pas scod e, your fa x will prin t it out for you r reco rds. If you for get the
passcode an d have kept no recor d, conta ct your Shar p deale r.
3
(Example)
2
H
3
(Example)
…
(Example)
4
P
"CONF. FUNCTION" will appear in the display.
"CONF. CODE SET" will appear in the display.
Enter a 2-digit num ber ("0 0" to "99") by pressing
the numer ic keys. This nu mber id ent ifies the
mailbox.
Enter the 4-digit passcode wit h the num er ic key s.
Enter a name for the mailbox by pressing t he
letter entry keys as described in "Entering
Letters for Names" in Chapt er 2.
Clearing the pas s c ode
Step Press these keys: Co mments
CONFIDENTIAL
1
2
S
4
SPECIAL FUNCTIONS 4-5
"CONF. FUNCTION" will appear in the display.
"CONF. CODE CLEAR" will appear in the
display.
Page 52

<P=004>
CONFIDE NTI AL OP ERAT ION S
3
1
1
4
START
3
2
(Example)
3
(Example)
4
Enter the 2-digit number ident if ying the mailbox
you want to clear.
Enter the 4-digit passcode wit h the num er ic key s.
5
Printing out received docum en ts
When you have received a confidential document, RCVD CONF. FAX will appear in
the display. Print out the Confidential Reception List as described in Chapter 6 to see
which mailbox has received the document, and then follow the steps below to print out
the document.
Step Press these keys: Comments
1
2
3
4
CONFIDENTIAL
S
2
0
1
START
1
2
(Example)
3
(Example)
4
5
"CONF. FUNCTION" will appear in the display.
"CONF. DATA PRINT" will appear in the display.
Enter your mailbox number.
Enter your co nf idential passcode.
Printing begins . After print -out the doc um ent ( s)
will be erased from memory.
4-6 SPECIAL FUNCTIONS
Page 53

YF <P=001>
UX5000U-SFRR
RELAY REQUEST
Relay Request allows you to send a document to another fax machine and have that
fax broadcast the document to a number of other fax machines. This function is useful
when the relay fax machine is closer to the end fax machines than your fax, as it
reduces telephone line costs.
Important:
••
Relay Request can only be used if the interm ed iate relay machine is a Sharp m ac hine havin g
the Relay Broadcast function.
Storing a relay group
To make a relay request, you must first store a relay group. This consist s of the fax
number of the intermediate relay machine and the fax numbers of the end receiving
machines. Up to 10 different relay groups can be stored.
♦ Fax numbers of the end receiving machines can be entered as Rapid Key numbers,
Speed Dial numbers, and/or Group Key numbers if they have been stored as such
relay
in the
machine for these numbers.
♦ The total number of end receiving machines which can be entered varies with the
model used as the intermediate relay machine. Check with the operator of the relay
machine to find out how many receiving machines can be entered.
♦ A maximum of 400 digit spaces are available in memory for storing the numbers of
end receiving machines. The number of spaces occupied by each number depends
on what kind of number it is:
♦ If the UX-5000 acts as a relay machine and receives a relay request, only Speed
Dial numbers of end receiving machines from "00" to "99" can be entered in the relay group. To allow Speed Dial numbers above "99" to be included in the relay
group, store them in a Group Key on the UX-5000.
machine (not in your fax machine). Check with the operator of the relay
Rapid Key numb er : 4 spaces
Speed Dial numbe r: 2 spaces
Group Key num b er: 4 spaces (for one gro up)
Full number : Number of digits in num b er (max . of 30 per nu m ber )
SPECIAL FUNCTIONS 4-7
Page 54

<P=002>
RELAY REQUEST
Step Press these keys: Comments
RELAY
1
2
3
U
2
0
START
1
(Example)
RELAY FUNCTION will appear in the display.
RELAY GROUP SET will appear in the display.
Enter a 2-digit relay group num b er ("01" to "10").
This number identif ie s the rela y group.
4
SPEED DIAL
5
START
START
1
0
(Example)
Enter the fax numb er of the relay mac hine using
one of the following methods:
• Press a Rapid Key.
• Press SPEED DIA L and en ter a Spe ed Dial
number. (If you ent er less t han 3 digits, press
START to complete the entr y. )
• Enter a full fax num ber.
6
Enter the relay mach in e’s Rapid Key nu mber s of
7
0
2
(Example)
START
the end receiving mac hines by pressing nu m eric
keys (not Rapid Keys). (Skip this step if you
don’t wan t to enter Rapid Key number s. )
8
0
1
9
(Example)
START
Enter the relay mach ine’s Speed Dial numbers
of the end receiving machines (2 digits per
Speed Dial number) by pressing numeric keys.
(Skip this step if you don’t want to enter Speed
Dial numbers.)
10
Enter numb ers of Grou p Keys for end mac hines
by pressing num eric keys. ( Skip this ste p if you
don’t wan t to ent er Gr oup Key num ber s. )
11
1
0
(Example )
START
12
4-8 SPECIAL FUNCTIONS
Page 55

<P=003>
RELAY REQUEST
Enter a full fax num ber (s kip this step if you don’t
5
want to enter fu l l nu m bers). Inc lu de t he area
code (for example "201") if the number is outside
of the calling area of the relay unit, and "1" for a
long distance call. Also include t he dial pref ix
(such as "9") for an outside line if you are on a
PBX.
Press START and go back to St ep 13 if you
want to enter another full number.
13
14
0
1
START
START
3
2
4
(Example)
15
STOP
16
Step 3 or
Clearing a relay group
To clear a relay group, you need to know the 2-digit number which identifies it. You
can check this by printing out the Relay Group List as described in Chapter 6.
Return to Step 3 t o enter anot he r relay gr ou p, or
pres s STO P one or m ore t ime s unti l you retu rn
to the date and time display.
Step Press these keys: Comments
RELAY
1
2
3
U
3
START
0
(Example)
1
RELAY FUNCTION will appear in the display.
RELAY GROUP CLEAR will appear in the
display.
Enter the 2-digit number ident if ying the group
you want to clear.
4
STOP
5
Step 3 or
Return to Step 3 to clear anoth e r relay grou p, or
pres s STO P one or mor e time s unt i l you return
to the date and time display.
SPECIAL FUNCTIONS 4-9
Page 56

<P=004>
RELAY REQUEST
Making a relay request
Important:
••
To make a relay requ est , your fax num be r mus t be enter ed int o the Relay Pass code List of
the relay fax machine by the operat or of th at fax. (Your numb er must also be ent ered in your
fax as described in "Ente ring Your Name and Fa x Num ber " in Chapt er 2.)
1 Load the document.
2 Press the RELAY key and then the "1"
33
A
41
I
CONTRAST
Q
Y
3442354336
C
B
K
J
PAGE COUNTER
CONFIDENTIAL
S
R
Z
37
3846394740
D
E
F
G
44
45
L
M
TIMER
RELAY
T
U
H
48
N
O
P
SEARCH DIAL
MEM.STATUS
LIFE
V
W
X
UPDOWN
CLEARSPSHIFTSPACE
1
key.
3 Enter the number of the appropriate
0
4 Press the START key.
START
5 Press the START key twice.
1
STARTSTART
relay group (2 digits) by pressing the
numeric keys.
•• Set the resolution and/or contrast if desired.
4-10 SPECIAL FUNCTIONS
Page 57

<P=005>
RELAY REQUEST
Relay Broadcast
Your fax can also act as a relay station. It will receive a document from a fax machine
making a relay request, and automatically broadcast it to the stations which the
requesting machine specifies.
In order for a fax machine to make a relay request, you must first give it permission by
storing its fax number in the Relay Passcode List. Follow the steps below to store or
clear a fax number.
♦ When your fax receives a relay request from another fax machine, RCVD RELAY
REQUEST will appear in the display.
♦ If the telephone billing function is turned on, the fax cannot act as a relay station.
♦ To clear a fax number from the Relay Passcode List, you need to know the 2-digit
number which identifies it. You can check this by printing out the Passcode List
(see Chapter 6).
Step Press these keys: Comments
RELAY
1
2
3
4
5
U
4
or
3
2
(Example)
4
(Example)
1
0
0
1
START
1
2
RELAY FUNCTION will appear in the display.
RELAY PASSCODE will appear in the display.
Press "1" t o store a n umber, or "2" to clear a
number .
Storing: Enter a 2-digit number ("01" to "10").
This identif ies the f ax nu m ber you will enter in
the next step.
Clearing: Enter the 2-digit number which
identifies the fax numb er you want to clear, and
go to Step 6.
5
Enter the fax num b er of the mac hine t o be
stored in the list (max. 20 digits).
6
STOP
7
Step 4 or
Return to St ep 4 to ent er anoth e r num ber , or
pres s STO P one or mor e t ime s unti l you retu rn
to the date and time display.
SPECIAL FUNCTIONS 4-11
Page 58

YF <P=001>
Polling allows you to request another fax machine to send a document to your fax
machine. In other words, the receiving fax machine, not the transmitting fax machine,
initiates the transmission. You can use your fax to both poll and be polled by others.
Polling others
To poll another fax machine, follow the steps below.
♦ If desired, you can dial more than one fax number to receive documents
consecutively from a group of fax machines (this is called "Serial Polling").
UX5000U-SFPO
POLLING
1 Press the FUNCTION key and the "8"
FUNCTION
8
key.
•• SERIAL POLL. MODE will appear in
the display.
2 Dial the number(s) of the fax
machine(s) you want to poll using one
(or more) of the follo win g metho ds :
SPEED DIAL
1
(Example)
START
0
•• Press one or more Rapid Keys.
•• Enter one or more S peed Dial num-
bers, pressing the SPEED DIAL key
before each number. (If you enter less
than 3 digits, press the START key to
complete the entry.)
•• Enter one or more full fax numbers
with the numeric keys, pressing the
START key after each full number.
•• Press one or more Group Keys.
3 Press the START key. Reception will
START
4-12 SPECIAL FUNCTIONS
begin.
Page 59

<P=002>
Serial Poll ing usi ng a Group Ke y
If the fax machines you want to poll have all been programmed into one Group Key,
you can poll them by simply pressing that Group Key.
♦ Make sure no documents are in the feeder before you press the Group Key.
Being polled (Memory polling)
To let another fax machine poll your fax, you must first store the doc ument in memory
as shown in the procedure below. Transmission will take place when the other fax
calls your fax and activates polling. You can choose whether to allow polling only
once, or an unlimited number of times. In the latter case, your fax can be used as an
electronic "bulletin board".
POLLING
♦ Only one document can be stored at a time for memory p olling.
♦ If you allow polling only once, the document will be automatically cleared from
memory after polling. If you allow polling an unlimited number of times, the
document will remain in memory until you clear it using the procedure described in
"Clearing a document" which follows.
1 Load the document and set the
FUNCTION
1
1
reception mode to AUTO (press
FUNCTION, "1", and "1").
•• Set the resolution and/or contrast if desired.
2 Press the FUNCTION key and the "9"
FUNCTION
9
key.
•• MEMORY POLL MODE will appear in
the display.
3 Press "1" to select SET .
1
4 Press "1" to allow polling to be done
1
or
2
SPECIAL FUNCTIONS 4-13
only once, or "2" to allo w pollin g to be
done an unlimited number of times.
Page 60

POLLING
<P=003>
5 Press the START key twice.
START START
•• The document will be scanned into
memory, and your fax will go on polling
standby.
To clear a docume nt
Step Press these keys: Comments
FUNCTION
1
2
2
START
9
3
MEMORY POLL MODE w ill appear in the
display.
Select CLEAR.
The document will be cleared .
Polling Security
Polling Security allows you to prevent unauthorized polling of your fax. When this
function is activated, polling will only take place when one of the following conditions
is met:
♦ The fax number of the polling fax machine has been stored in your fax’s list of
permitted fax numbers (called "passcode numbers"). The polling fax must also have
its fax number programmed in itself, as described in "Entering your name and fax
number" in Chapter 2.
♦ A System number has been programmed in the polling fax machine which matches
your fax’s System number or one of your ID numbers.
♦ An ID number has been programmed in the polling fax machine which matches
your fax’s System number.
System and ID numbers are 4-digit numbers which provide you with an alternate
means of giving and receiving polling permission when you don’t want to use fax
numbers. The steps for programming these numbers are described in the following
pages.
Note:
System and I D num be rs can only be used if the oth er fax machine is also a Sha rp
machine.
Turning Polli ng Securi ty on and o ff
Polling Security is turned on or off with Option Setting 8. The procedure is described in
Chapter 5, "Optional Settings".
4-14 SPECIAL FUNCTIONS
Page 61

<P=004>
Storing and cleari ng fax numbe rs for polli ng permission
You can store up to 10 fax numbers in your fax’s list of permitted numbers.
Step Press these keys: Comments
POLLING
1
FUNCTION
2
3
1
0
2
3
or
2
1
4
(Example)
5
5
5
5
START
1
3
2
(Example)
ENTRY MODE will appear in the display.
PASSCODE # MODE will appear in the display.
Press "1" to set a number, or "2" to clear a
number.
Storing: Ent er a 2-digit number (from 01 t o 10).
This number identifies t he f ax nu mber you will
enter in the next step.
Clearing: Enter the 2-digit number which
identifies the fax number you want to clear, and
go to Ste p 6.
4
Enter the fax number (max. 20 digits).
6
STOP
7
Step 4 or
Return to Step 4 to enter another number, or
press STOP one or mo re times u n til you r etur n
to the date and time display.
Programming and clearing a System number
One 4-digit System number can be programmed in your fax for giving and receiving
polling permission. Polling will take place if your System number mat ches the other
fax’s System number or one of its ID numbers.
Step Press these keys: Comments
1
FUNCTION
2
3
1
3
6
or
2
SPECIAL FUNCTIONS 4-15
ENTRY MODE will appear in the display.
SYSTEM # MODE will appear in the display.
Press "1" to prog ra m the System numb e r, or "2"
to cl ear it.
If you pressed "2", go t o Step 5.
Page 62

<P=005>
POLLING
1
2
4
START
3
4
(Example)
Enter the number (4 digits) with the num er ic
keys.
5
STOP
6
Storing and cleari ng ID number s for polling perm is sion
Up to five 4-digit ID numbers can be programmed in your fax for giving and receiving
polling permission. Polling will take place if one of your ID numbers matches the other
fax’s System number.
Step Press these keys: Comments
1
FUNCTION
3
Press STOP one or more times until you return
to the date and time display.
ENTRY MODE will appear in the display.
2
3
5
or
1
2
1
4
(Example)
1
5
2
START
3
4
(Example)
ID # MODE will appear in the display.
Press "1" to program an ID number, or "2" to
clear an ID num ber.
Storing: Enter a nu mber f r om 1 to 5. T his
number identifies the ID num ber you will enter in
the next step.
Clearing: Ent er t he num ber which ident ifies the
ID number you wa n t to clear, and go to Step 6.
Enter the ID number (4 digits) with the numeric
keys.
6
STOP
7
Step 4 or
Return to Step 4 to enter another number, or
press STOP one or mo re times u n til you r etur n
to the date and time display.
4-16 SPECIAL FUNCTIONS
Page 63

YF <P=001>
UX5000U-SFTI
TIMER OPERATIONS
The Timer function allows you to set an operation to be performed automatically at a
time you specify. Up to 48 operations can be set at any one time, and the time of each
can be set up to a week in advance.
You can use this function to take advantage of lower nighttime rates without having to
be there when the operation is performed.
Note:
The
DOCUMENT
key cannot be used for a timer tran sm ission.
Initial procedure
To set a timer operation, first perform the following procedure. After you have
completed it, go to the procedure for the specific operation you want to set (see the
following pages).
♦ Code numbers are used to specify days of the week. Refer to the table below when
making time settings which include a specified day:
Day SUN MON TUE WED THU FRI SAT
Code 0123456
Step Press these keys: Comments
1
2
TIMER
T
1
TIMER MODE will appear in the display.
Select SET.
Press the appropriate key one or more times as
shown below to select the type of operation.
• Transm ission
• Confiden tial tra nsm ission
3
START
• Polling
• Serial Polling
• Broadc ast in g
• Relay Req uest
4
SPECIAL FUNCTIONS 4-17
Page 64

<P=002>
TIMER OPERAT IONS
5
6
1
0 0
7
0
or
4
8
(Example : Thur sday)
START
9
Transmi ssio n
(Continued from "Initial procedure".)
10
SPEED DIAL
START
1
11
(Example)
(Example)
START
(Example)
Enter the hour (2 digits - "01" to "12").
Enter the minute (2 digits - "00" to "59").
Press "*" to select A.M., or "#" to select P.M.
Enter the day of the wee k by enter ing th e
appropr iat e code num ber (see ab ove t able) .
(Skip this step if the oper atio n will be done within
the next 24 hour s.)
Continue with the sp ecif ic procedu re for your
operat io n (s ee the f o llo w ing pag e s) .
Enter the fax number of the receiving machine
using one of the fo llow ing met hods :
• Press a Rapid Key.
• Press SPEED DIA L and ente r a Spe ed
number. (If you enter les s than 3 digit s,
press START to complet e the
entry.)
• Enter a full num b er.
RESOLUTION
12
START
CONTRAST
Q
Adjust the resolution and contras t if desired
(otherwise sk ip this step).
13
14
15
4-18 SPECIAL FUNCTIONS
Load the document
START
The document will be scanned into memo ry .
Page 65

<P=003>
Confidential transmission
(Continued from "Initial procedure".)
TIMER OPERATIONS
10
11
12
13
14
15
16
17
0
START
SPEED DIAL
START
RESOLUTION
START
1
1
Load the document
START
START
(Example )
CONTRAST
Q
Enter the mailbox nu m ber (2 digits). (Skip this
step if the receiving machine doe s not have
mailboxes.)
Enter the fax number of the receiving machine
using one of the fo llow ing met hods :
• Press a Rapid Key.
• Press SPEED DIA L and ente r a Spe ed
number. (If you enter les s than 3 digit s,
press START to complet e the
entry.)
• Enter a full num b er.
Adjust the resolution and contras t if desired
(otherwise sk ip this step).
The document will be scanned into memo ry .
SPECIAL FUNCTIONS 4-19
Page 66

<P=004>
TIMER OPERAT IONS
Polling
(Continued from "Initial procedure".)
SPEED DIAL
1
10
START
11
START
(Example)
Enter the fax number of the machine to be polled
using one of the fo llow ing met hods :
• Press a Rapid Key.
• Press SPEED DIA L and ente r a Spe ed
number. (If you enter les s than 3 digit s,
press START to complet e the
entry.)
• Enter a full num b er.
Serial Polling
(Continued from "Initial procedure".)
START
2
10
SPEED DIAL
START
1
SPEED DIAL
11
START
(Example)
Enter the fax numb ers of the machines to be
polled using one or more of the fol lowing
methods:
• Press on e or mo re Rapid Keys.
• Enter one or m or e Speed Dial number s,
pressing SPEED DIAL befor e e ach
number. (If you enter les s than 3 digit s fo r
a number, press START to
complete the en tr y.)
• Enter one or m or e f u l l num ber s, pr essing
START after each full n um ber.
• Press on e or more Gro u p Keys.
4-20 SPECIAL FUNCTIONS
Page 67

<P=005>
Broadcasting
(Continued from "Initial procedure".)
SPEED DIAL
10
1
SPEED DIAL
START
2
11
START
(Example)
START
TIMER OPERATIONS
Enter the numb er s of the receiving mach in es
using one or more of the following methods:
• Press on e or mo re Rapid Keys.
• Enter one or m or e Speed Dial number s,
pressing SPEED DIAL befor e e ach
number. (If you enter les s than 3 digit s fo r
a number, press START to
complete the en tr y.)
• Enter one or m or e f u l l num ber s, pr essing
START after each full n um ber.
• Press on e or more Gro u p Keys.
RESOLUTION
12
START
CONTRAST
Q
Adjust the resolution and contras t if desired
(otherwise sk ip this step).
13
14
15
Load the document
START
The document will be scanned into memo ry .
Relay Request
(Continued from "Initial procedure".)
Step Press these keys: Comments
10
0
START
1
(Example)
Enter the appropria te relay group numb er.
11
12
RESOLUTION
CONTRAST
Q
Adjust the resolution and contras t if desired
(otherwise sk ip this step).
SPECIAL FUNCTIONS 4-21
Page 68

<P=006>
TIMER OPERAT IONS
13
START
14
15
Load the document
START
The document will be scanned into memo ry .
Canceling a timer operation
If you need to cancel a timer operation before it is performed, use the procedure
shown below.
♦ You need to know the number assigned to the operation in order to cancel it. If you
don’t remember the number (it appears in the display when you set the operation),
print out the Timer List (see Chapter 6, "Printing Out Reports and Lists").
Step Press these keys: Comments
TIMER
1
2
3
T
2
0
START
1
(Example)
TIMER MODE will appear in the display.
Select CLEAR.
Enter the 2-digit number ass igned t o the
oper ation.
4
STOP
5
4-22 SPECIAL FUNCTIONS
Press STOP one or more times until you return
to the date and time display.
Page 69

YF <P=001>
UX5000U-SFBT
BATCH TRANSMISSION
Batch transmission allows you to store a number of documents in memory at different
times for automatic transmission to one location at a set time. If you often send
documents to a particular location, this function helps reduce telephone line costs by
allowing you to conveniently send multiple documents on one connection.
♦ If the telephone billing function is turned on, the batch transmission function cannot
be used.
Entering a batc h progra m
To perform a batch transmission, you must first program the number of the receiving
machine and the time of transmission into a Batch Key. Any Rapid Key which has not
already been programmed can be used as a Batch Key.
♦ If you specify a day-of-the-week in your program, the transmission will be per-
formed every week on that day. If you do not specify a day-of-the-week, the transmission will be performed every day.
To program a Batch Key, follow the procedure for entering programs described in
"Entering and Using Programs" in this chapter. In Step 12 of the initial prodedure,
select "Batch transmission".
Clearing a Ba tch Key
To clear a Batch Key, follow the procedure described in "Clearing a Program Key" in
"Entering and using programs" in this chapter.
Storing documents for transmission
Up to 50 documents can be held in memory for batch transmissions at any one time,
regardless of the number of Batch Keys used. When you store a document, it is given
a message number to distinguish it from other documents sent in the same batch.
♦ If no documents have been stored under a Batch Key when the time for transmis-
sion arrives, no transmission will take place.
1 Load the document.
SPECIAL FUNCTIONS 4-23
Page 70

<P=002>
BATCH TRANSMISSION
2 Press the approp riate Batch Key.
02
01
B
A
10
09
J
I
18
17
R
Q
26
25
Z
Y
05
04
03
E
D
C
13
12
11
M
L
K
21
20
19
U
T
S
27 28 29 30 31 32
08
07
06
H
G
F
16
15
14
P
O
N
24
23
22
X
W
V
CLEARSPSHIFTSPACE
•• After scanning, the message number
assigned to your document will appear
in the display.
(Example)
3 Press the STOP key.
STOP
•• The document will be transmitted along
with any other documents stored under
the same key at the designated time.
After transmission, all documents in
the batch will be cleared from memory.
Clearing a doc ume nt store d for batch trans mi ssi on
If necessary, you can clear a document stored for a batch transmission before
transmission takes place. To do so, you need to know the message number assigned
to the document.
♦ If you don’t remember the message number, print out the Batch Transm ission List
(see "Batch Transmission List" in Chapter 6).
1 Press the Batch Key in which the
02
01
B
A
10
09
J
I
18
17
R
Q
26
25
Z
Y
05
04
03
C
D
E
13
12
11
K
L
M
21
20
19
S
T
U
27 28 29 30 31 32
08
07
06
F
G
H
16
15
14
N
O
P
24
23
22
V
W
X
CLEARSPSHIFTSPACE
document you want to clear has been
stored.
•• Make sure no documents are in the
feeder.
(Example)
2 Enter the 3-digit message number
0
1
2
(Example)
3 Press the START key.
START
assigned to the documen t.
4-24 SPECIAL FUNCTIONS
Page 71

YF <P=001>
UX5000U-SFEP
ENTERING AND USING PROGRAMS
If you frequently perform the same operation involving the same party, you can
program all the steps of the operation into one Program Key. This allows you to
perform the oper ation by simply pressing that key.
Any Rapid Key which is not already programmed as a Rapid Key or a Group Key can
be used as a Program Key.
♦ You can also include a timer setting in the program to have the operation performed
automatically at a selected time.
STOP
♦ To clear a mistake, press the
Initial procedure
key.
To program an operation, first perform the following procedure. After you have
completed it, go to the procedure for the specific operation you want to program.
♦ Code numbers are used to set days of the week. Refer to the table below when
making time settings which include a specified day:
Day SUN MON TUE WED THU FRI SAT
Code 0123456
Step Press these keys: Comments
FUNCTION
1
2
3
4
1
1
1
A
7
(Example)
"PROGRAM/GRO UP MODE" will appear in the
display.
"PROGRAM ENTRY MODE" will appear in the
display.
Select SET.
Select a Program Key by pressing the
appropriat e Rapid Key.
S
H
……
P
5
(Example)
START
Enter a name for t he program ( m ax. of 20
letters). (See "Ent ering Let t ers for Nam es" in
Chapter 2.)
Skip this step if you don’t want to enter a name.
6
7
1
0
(Example)
SPECIAL FUNCTIONS 4-25
Enter the hour (2 digits: "01" to "12"). If you don’t
want to make a timer setting, go to Step 11.
Page 72

<P=002>
ENTERING AND USING PROGRAMS
8
9
10
11
12
13
1
START
START
5
(Example)
or
4
(Example)
Enter the minute (2 digits - "00" to "59").
Press "*" to select A.M., or "#" to select P.M.
Enter the day of the wee k by enter ing th e
appropr iat e code num ber (see ab ove t able) .
(Skip this step if the oper atio n will be done within
24 hours of pressing the Program Key.)
Pres s the "# " key or "*" key until the desired
operation appe ar s in the display. The op er atio ns
will appear in the following order:
• Transm ission
• Confiden tial tra nsm ission
• Polling
• Serial Polling
• Broadc ast in g
• Relay Req uest
• Batch tr ansm ission (this will only appear
if a timer setting was ma de)
• Memory Polling (this will not appear
if a timer setting was ma de)
Continue with the sp ecif ic procedu re for your
operat io n (s ee the f o llo w ing pag e s) .
Transmission
(Continued from "Initial procedure".)
Enter the fax number of the receiving machine
1
A
14
(Example)
START
using one of the fo llow ing met hods :
• Press a Rapid Key.
• Press SPEED DIA L and ente r a Spe ed
number. (If you enter les s than 3 digit s,
press START to complet e the
entry.)
• Enter a full num be r.
15
16
RESOLUTION
4-26 SPECIAL FUNCTIONS
CONTRAST
Q
Adjust the resolution and contras t if desired
(otherwise sk ip this step).
Page 73

17
<P=003>
ENTERING AND USING PROG RAM S
START
START
18
STOP
or
19
Confidential transmission
(Continued from "Initial procedure".)
14
0
1
START
15
SPEED DIAL
1
16
START
17
DOCUMENT
(Example)
START
(Example )
If you want the doc ument to be sen t fr om
memory, press START.
If you want the doc ument to be sen t fr om th e
feed er , pr ess DOCUMENT. (This is not possible
if you made a timer setting.)
Press STOP one or more times until you return
to the date and time display.
Enter the mailbox nu m ber (2 digits). (Skip this
step if the receiving machine doe s not have
mailboxes.)
Enter the fax number of the receiving machine
using one of the fo llow ing met hods :
• Press a Rapid Key.
• Press SPEED DIA L and ente r a Spe ed
number. (If you enter les s than 3 digit s,
press START to complet e the
entry.)
• Enter a full num be r.
18
19
20
21
RESOLUTION
START
START
STOP
CONTRAST
Q
DOCUMENT
or
Adjust the resolution and contras t if desired
(otherwise sk ip this step).
If you want the doc ument to be sen t fr om
memory, press START.
If you want the doc ument to be sen t fr om th e
feed er , pr ess DOCUMENT. (This is not possible
if you made a timer setting.)
Press STOP one or more times until you return
to the date and time display.
SPECIAL FUNCTIONS 4-27
Page 74

<P=004>
ENTERING AND USING PROGRAMS
Polling
(Continued from "Initial procedure".)
START
(Example)
14
SPEED DIAL
START
1
15
STOP
16
Enter the fax number of the machine to be polled
using one of the fo llow ing met hods :
• Press a Rapid Key.
• Press SPEED DIA L and ente r a Spe ed
number. (If you enter les s than 3 digit s,
press START to complet e the ent r y.)
• Enter a full num b er.
Press STOP one or more times until you return
to the date and time display.
Serial Polling
(Continued from "Initial procedure".)
1
A
14
SPEED DIAL
4
START
15
STOP
16
START
(Example)
Enter the fax numb ers of the machines to be
polled using one or more of the fol lowing
methods:
• Press on e or mo re Rapid Keys.
• Enter one or m or e Speed Dial number s,
pressing SPEED DIAL befor e e ach
number. (If you enter les s than 3 digit s fo r
a number, press START to
complete the en tr y.)
• Enter one or m or e f u l l num ber s, pr essing
START after each full n um ber.
• Press on e or more Gro u p Keys.
Press STOP one or more times until you return
to the date and time display.
4-28 SPECIAL FUNCTIONS
Page 75

<P=005>
Broadcasting
(Continued from "Initial procedure".)
2
B
14
SPEED DIAL
START
1
15
START
(Example)
ENTERING AND USING PROG RAM S
Enter the numb er s of the receiving mach in es
using one or more of the following methods:
• Press on e or mo re Rapid Keys.
• Enter one or m or e Speed Dial number s,
pressing SPEED DIAL befor e e ach
number. (If you enter les s than 3 digit s fo r
a number, press START to
complete the en tr y.)
• Enter one or m or e f u l l num ber s, pr essing
START after each full n um ber.
• Press on e or more Gro u p Keys.
RESOLUTION
CONTRAST
16
START
17
START
18
STOP
19
Relay Request
(Continued from "Initial procedure".)
14
0
1
START
15
Q
(Example)
Adjust the resolution and contras t if desired
(otherwise sk ip this step).
Press STOP one or more times until you return
to the date and time display.
Enter the appropria te relay group numb er.
16
17
RESOLUTION
START
CONTRAST
Q
Adjust the resolution and contras t if desired
(otherwise sk ip this step).
SPECIAL FUNCTIONS 4-29
Page 76

<P=006>
ENTERING AND USING PROGRAMS
START
18
or
STOP
19
Batch transmission
(Continued from "Initial procedure".)
SPEED DIAL
14
1
START
15
DOCUMENT
START
(Example)
If you want the doc ument to be sen t fr om
memory, press START.
If you want the doc ument to be sen t fr om th e
feed er , pr ess DOCUMENT. (This is not possible
if you made a timer setting.)
Press STOP one or more times until you return
to the date and time display.
Enter the fax number of the receiving machine
using one of the fo llow ing met hods :
• Press a Rapid Key.
• Press SPEED DIA L and ente r a Spe ed
number. (If you enter les s than 3 digit s,
press START to complet e the
entry.)
• Enter a full num be r.
16
RESOLUTION
START
CONTRAST
Q
Adjust the resolution and contras t if desired
(otherwise sk ip this step).
17
START
18
STOP
19
4-30 SPECIAL FUNCTIONS
Press STOP one or more times until you return
to the date and time display.
Page 77

<P=007>
Being polled (Memory polling)
(Continued from "Initial procedure".)
ENTERING AND USING PROG RAM S
14
1
START
2
or
15
16
RESOLUTION
START
CONTRAST
Q
17
START
18
STOP
19
Clearing a Program Key
To clear a Program key, follow these steps:
Press "1" to allow polling to be done on ly once,
or "2" to allow it to be done repeatedly.
Adjust the resolution and contras t if desired
(otherwise sk ip this step).
Press STOP one or more times until you return
to the date and time display.
Step Press these keys: Comments
FUNCTION
1
2
3
4
1
2
2
B
START
7
(Example)
Enter PROGRAM/GROUP MO DE m o d e.
PROGRAM ENTRY MODE w ill appear in the
display.
Select CLEAR.
Press the Prog ram Key you wan t to clear.
5
STOP
6
SPECIAL FUNCTIONS 4-31
Press STOP one or more times until you return
to the date and time display.
Page 78

<P=008>
ENTERING AND USING PROGRAMS
Using a Program Key
A programmed operation is performed as follows:
1 Load the document.
•• Skip this step if the operation is a polling operation.
2 Press the appropriate Pro g ram Key.
08
07
06
05
04
03
02
01
C
D
E
F
G
B
A
10
09
J
I
18
17
R
Q
26
25
Z
Y
13
12
11
K
L
M
21
20
19
S
T
U
27 28 29 30 31 32
To cancel a programmed ti mer operat ion
If a Program Key has been pressed for a timer operation and you need to cancel the
operation before it is performed, follow these steps:
Note:
This proced ure w ill not work for a batc h progr am . To can cel a bat ch tr ansm iss ion
operation, see "Clear ing a docum ent stored f or batch tr ansm issio n" in "Batch
Transmission " in this chapter.
05
04
03
02
1 Press the Program Key.
01
C
B
A
11
10
09
K
J
I
19
18
17
S
R
Q
27 28 29 30 31 32
26
25
Z
Y
D
E
13
12
L
M
21
20
T
U
H
16
15
14
N
O
P
24
23
22
V
W
X
CLEARSPSHIFTSPACE
(Example)
08
07
06
F
G
H
16
15
14
N
O
P
24
23
22
V
W
X
CLEARSPSHIFTSPACE
(Example)
2 Press the START key.
START
4-32 SPECIAL FUNCTIONS
Page 79

YF <P=001>
UX5000U-SFDC
DEPARTMENT CONTROL
Department Control is used to limit the use of the fax to authorized personnel. When it
is activated, a department code must be entered before an operation can be
performed with the fax.
Department Control can only be activated by Sharp dealer service. If you want to use
this function, contact your dealer.
♦ Department Control allows you to track the number of pages transmitted as well as
the transmission time for each authorized department or person. See "Departm ent
Usage List" in Chapter 6.
Entering Depa rtment Codes
Up to 30 different Department Codes can be entered to allow access to the machine.
Transmitted pages and transmission time w ill be kept track of separately for each
code. After you enter a code, inform the appropriate group or individual.
♦ A name must be entered for each code. Only the name, not the code, will appear
on the Department Usage List.
♦ Be sure to keep a record of each code and name. If you misplace the record, con-
tact your dealer.
Step Press these keys: Comments
FUNCTION
or
3
2
1
(Example)
1
2
3
4
8
1
0
"ENTRY MODE" will appear in the display.
"DEPT. CODE MODE" will appear in the display.
Press "1" to set a Departm ent Code , or "2" to
clear a Department Code.
Entering: Enter a 2-digit number with the
numeric keys. This number identifies the
Department Code you will enter in the next step.
Clearing: Enter the 2-digit number which
identifies the Departm en t Cod e you wan t to clear.
5
6
Entering: Enter a Departm ent Code (4 digit s or
1
0
START
1
0
(Example)
SPECIAL FUNCTIONS 4-33
the number of digits set by Option Setting 28 ).
Clearing: Enter the Depar t m ent Code you want
to clear, and go to Step 8.
Page 80

<P=002>
DEPARTME NT CO NTRO L
S
H
7
START
…
(Example)
P
Enter a name for the Department Code (max. of
20 letters) . (See "Entering let t er s for nam es" in
Chapter 2.)
8
STOP
9
Step 4 or
Return to Step 4 to enter (or clear) another
Department Code, or press STOP one or more
times until y ou ret ur n to the date and t im e
display.
Accessing the machin e
When Department Control is activated, you must enter your Department Code before
performing an operation.
Note:
You do not have to enter a Departmen t Cod e to receive faxes manually ( by picking up
the handset and pre ssing the
START
key).
Enter your Department Code by
1
2
3
4
pressing the numeric keys, and then
perform the desired operation.
(Example)
•• If you do not begin the operation within
one minute after entering the code, the
fax will return to controlled access
mode.
Telephone billing
If you are using the Department Control function, you can use Department Codes for
billing on a PBX. When this feature is turned on, the fax machine will send the
Department Code to the PBX each time a member of an authorized department dials
to make a telephone call, send a fax, or initiate polling. The PBX can then use the
code to bill the call to that department. To turn this feature on, set Option Setting 27 as
explained in Chapter 5, "Optional Settings".
4-34 SPECIAL FUNCTIONS
Page 81

YF <P=001>
UX5000U-SFAJ
ANTI JUNK FAX
The Anti Junk Fax function allows you to block reception of faxes from parties which
you specify. This saves paper by not printing out unwanted "junk" faxes.
To use this function, first turn it on by setting Option Setting 21 t o YES as described in
Chapter 5, and then enter the fax numbers from which you do not want to receive
faxes as shown below.
Comments:
••
Up to 50 number s can be ent er ed in the Ant i Junk Number List .
••
To clear a numbe r from the Ant i Junk Numbe r List , you ne ed to know t he 2-digit num be r
which identifies it. If you have f orgot t en this num b er , print out the Ant i Junk Num be r List as
described in Chapt er 6.
Step Press these keys: Comments
FUNCTION
1
2
3
7
1
0
4
5
5
5
START
3
or
2
1
(Example)
1
5
3
2
(Example)
ENTRY MODE will appear in the display.
STORE JUNK FAX # will appear in the display.
Press "1" to store a fax number in the Anti Junk
Fax List, or "2" to clear a fax numbe r from the list.
Storing: Ent er a num be r fr om "0 1" to "50". This
number identifies the f ax numb er you will store
in the next step.
Clearing: Ent er t he num ber which ident ifies the
fax number you want to clear , and go to Step 6.
4
Enter the fax number (max. of 20 digits).
6
STOP
7
Step 4 or
Return to Step 4 to enter (or clear) another
number, or press STO P one or more times until
you return to the date and time display .
SPECIAL FUNCTIONS 4-35
Page 82

DD <P=001>
Distinctive ring is a service offered by some local telephone companies which allows
you to use up to four different telephone numbers, each with a different ring pattern,
on your regular single line. If you subscribe to a distinctive ring service you can set
your fax to automatically answer when it detects one of those ring patterns, there by
allowing you to use the number corresponding to that pattern as an exclusive fax
number.
Important:
••
To use distinctive ring , you must subs crib e to a distinctive ring serv ice from yo ur local phone
company. Do not mak e this setting if you do not subscribe to a distinctive r ing service .
••
Your fax may not be compatible with some distinct ive r ing services .
If this feature is turned on, your fax will automatically answer and begin reception after
one ring when your designated fax number is dialed. Note that other devices on the
same line will also ring until your fax answers. If one of your other numbers is dialed,
the fax will ring; however, it will not answer.
UX5000U-IPDR
DISTINCTIVE RING
To use distinctive ring, you must set Option Setting 29 to the desired ring pattern for
your fax. The procedure for accessing Option Setting 29 is described in Chapter 5,
"Optional Settings". When you have accessed Option Setting 29, set the desired
pattern by entering a number from "1" to "5" as shown below.
1. RING PATTERN 1:
2. RING PATTERN 2:
3. RING PATTERN 3:
4. STANDARD RING:
5. OFF SETTING:
Your fax has been set to "5" at the factory.
Two short rings.
One short, one long, and one short ring.
Two short rings and one long ring.
Your standard (n orm al) r ing pat ter n.
Answer all ring patterns (this turns distinct ive r ing off ).
4-36 SPECIAL FUNCTIONS
Page 83

YF <P=001>
5 OPTIONAL SETTINGS
A variety of optional settings are available which you can use to customize your fax to
better suit your needs. The settings are made by pressing the panel keys, and each
setting is described in the list below.
Accessing the settings
Step Press these keys: Comments
UX5000U-OSOS
FUNCTION
1
2
3
STOP
4
or
START
2
STOP
4
(Example)
OPTIONAL SETTING will appear in the display.
Move through the list of settings by pressing "#"
to move forward, or "*" to move backward. The
settings will appear in the order listed below.
Press START when the desired setting appear s.
Or, you can also go direct ly to a setting by
entering the number of th e settin g (do not pr ess
START in this case). If the number is less then
10, enter "0" first.
When the desired set ting app ear s in the display,
change it appropriately as described below.
Press STOP to return to the date and time
display.
Settings
Setting 1: FINE RESO LUTI ON PRIO RI TY
This sets the defa u lt resolut ion (t he r esolution us ed if a se tting is not made with the
RESOLUTIO N key) fo r transm it t ing docu m ent s. Pre ss "1" (YES) to set it to FINE, or "2" (NO) to
set it to STANDARD.
Factory setting: "2"
•
Setting 2: NUMBER O F RINGS AUTO RECEPTION
This sets the number of rings your fax allows before answering an incoming call in AUTO
receive mode . Enter a numb er from "0" to "9" (if "0" is entered your fax will answer with out
ringing).
Factory setting: "1"
•
Setting 3: NUMBER O F RINGS MANUAL RECEPTI ON
This sets your fax to autom a tica lly answer a call after a certain num b er of rings whe n it is in
manual recep tion mode. Any num b er from "0" to "9" can be entered (ent er "0" if you don’t want
your fax to a nswer automatically).
Factory setting: "0"
•
OPTION SETTINGS 5-1
Page 84

<P=002>
OPTIONAL SETTINGS
Setting 4: ACTIVI TY REPO RT AUTO PRINT OUT
Press "1" (YES) to have your fax auto mat ica lly print an Act ivit y Report once ever y 30
send/rece ive oper ations . (The repor t can still be print ed on dem and at any time. ) Press "2" (NO )
to turn aut om atic print - out of f.
Factory setting: "2"
•
Setting 5: TRANSACTION REPO RT PRINT SELECT
This sets the condition for print ing out a Transa ctio n Report . Ente r a number from "1" to "5" as
follows:
"1" (ERROR/TI MER/
MEMORY):
A report will be printed after an error, timer operation, or
memor y operat ion.
2" (SEND ONLY):
"
3" (ALWAYS PRINTS):
"
4" (NEVER PRINTS):
"
5" (ERROR ONLY):
"
•
Factory setting: "5"
Setting 6: RECALL TI ME S
This sets the maximum num ber of times your fax will automatically re dial if the line is busy.
Enter any number from "00" to "14".
Factory setting: "02"
•
Setting 7: RECALL I NTERVAL
This sets the am ou nt of time your fax w ill wait bet ween au to mat ic redia ls when t he l ine is busy.
Enter "01" for 1 minute, "02" for 2 minutes, etc., up to a maximum of 15 m inutes .
Factory setting: "05"
•
Setting 8: SECURI TY SELECTION
Press "1" (ON) to turn polling secur ity on, or "2" (OFF) to turn it off.
Factory setting: "1"
•
Setting 9: ERROR CORRECTI ON MODE (ECM )
Press "1" (YES) to have any distortions in a transmiss ion due to noise on the telephon e line be
corrected befor e the docum ent is print ed out. This is only ef fective when the other machine ha s
ECM as well. Press "2" (NO ) to turn the f unc tion off.
Factory setting: "1"
•
A report will be printed only after a transmission.
A report will be print ed af ter each t r ans mis sion, recep tion ,
or error.
A report will never be printed.
A report will be print ed on ly after an er ror occu rs.
Setting 10 : AUTO COVER SHEET
Press "1" (YES) to have the fax aut oma tica lly ge nerat e a cover sheet and send it as the last
page of each tran smission. Pr ess " 2" (NO) to turn the function off.
Factory setting: "2"
•
5-2 OPTION SETTINGS
Page 85

<P=003>
OPTIONAL SETTINGS
Setting 11 : MEM O RY SCANNING
Press "2" (REDUCE) to have the fax reduce the size of documents wider than 8.9" (226 mm)
when it scans them int o mem or y for tran smission o p erat io ns. If "1" (1:1) is pressed, the
docume nt will be stored at actual size, and if the receiving ma chine only us es 8.3" (2 10 m m)
paper, the par t s outside of that width will not be printe d.
Factory setting: "2"
•
Setting 12 : CO PY SCANNING
This sets the amou nt by which copie s are reduce d bef or e print ing to ensure that dat a on the
edges is not cut off. Enter a number from " 1" to "5" as follows:
"1":
2":
"
Automatic reduction depending on the size of the original
and the pr int ing pa pe r.
No reduction.
3":
"
"
4":
5":
"
•
Factory setting: "2"
Setting 13 : CO PY CUT-OFF
Press "1" (CONTI NUE) to have document s longer than the printing paper be contin ued on a
second page when cop ied. Press "2" (CUT-OFF) to have the part outside that length not printe d.
Factory setting: "2"
•
Setting 14 : RECEI VE REDUCE
This sets the amou nt by which receive d docu ment s are reduc ed bef or e print ing to ensu re that
data on t he e dges is not cut off. Enter a numbe r from "1" t o " 5" as follows:
"
1":
2":
"
3":
"
"
4":
5":
"
•
Factory setting: "1"
Slight reduction of letter originals. (Letter originals are
reduced slight ly to ensur e that data on t he edges is not cut
off.)
Reduction of A4 size originals to let ter size.
Reduction of legal size originals t o lette r size.
Automatic reduction depending on the size of the original
and the pr int ing pa pe r.
No reduction.
Slight reduction of letter originals. (Letter originals are
reduced slight ly to ensur e that data on t he edges is not cut
off.)
Reduction of A4 size originals to let ter size.
Reduction of legal size originals t o lette r size.
Setting 15 : IMAGE MEM ORY PRINT
Press "1" (YES) to have part of the first page tr ansm it ted pr int ed when a Transac tion Report is
printed out. Press "2" (NO ) to turn th e function of f . This is only effec tive when t ransm it ting from
memory.
Factory setting: "1"
•
OPTION SETTINGS 5-3
Page 86

<P=004>
OPTIONAL SETTINGS
Setting 16 : CASSETT E SELECTION
Press "1" if you want the f ax to aut omat ically selec t the sour ce fro m which it draws pa per for
printing ac cor ding to the size of the doc um ent receive d or copied. Press " 2" if you want to give
priorit y to the paper casset te (p aper wi ll be drawn from the cas set te re gar dless of the size of the
received docum en t), or press "3" if you wan t to give prior ity to the pa per tray .
Factory setting: "1"
•
Setting 17 : CASSETT E CHANGEO VE R
Press "1" to have the fax start drawing paper from the other paper sourc e if the currently use d
source runs out of paper. Press "2" to stop change over to the ot her source (in this case ,
received documen ts will be stored in memor y).
Factory setting: "1"
•
Setting 18 : RETRANSM ISSION TIMES
This sets the number of times the fax wi ll reatt em pt a mem ory t ransm ission whic h has been
interrupt ed b y a line error or power failure. Enter any number fro m "00" to "14" ("00" disables t he
function).
Factory setting: "10"
•
Setting 19 : RETRANSM ISSIO N INTERVAL
If desired, you can have th e fax wait a certain nu m ber of minu tes bet ween each mem o ry
retransm ission at tem pt. Enter "01" for 1 minute, "02" for 2 minutes, etc., up to a maximum of 15
minutes. If you do not want the fax to wait between attempts, enter "00".
Factory setting: "00"
•
Setting 20 : HEATER M O DE
To conserve electr icity , you can tur n off the laser print er hea ter in your fax. W hen this is done , it
will turn on automatically when yo u receive a docum en t (there w ill be a slight delay before
printing while it warm s up) and turn off once prin ting is complet ed. You can also set the heater
to automat ica lly turn on and off at two selected tim es each da y. Enter a num ber from " 1" to "3"
as follows:
1" (ALWAYS ON):
"
2" (ALWAYS OFF ):
"
3" (SLEEP MODE TIMER) :
"
•
Factory setting: "2"
The heater will remain on constantly.
The heater will turn on only to print documents.
The heater will turn on and off at two selected times each
day. Af ter you pr ess "
to turn o n, and t hen the time y ou want it to turn of f. F or each
time, enter 2 digits f or the ho ur, 2 digits for the m inute, and
then "*" for A.M., or "
3", enter the time you want t he heater
#" for P.M.
5-4 OPTION SETTINGS
Page 87

<P=005>
OPTIONAL SETTINGS
Setting 21 : JUNK FAX NUMBER CHECK
Press "1" to prevent recept ion f rom fax num ber s ente re d in the Anti Junk Fax List . Pre ss "2" to
allow reception from all numbers.
Factory setting: "2"
•
Setting 22 : ALARM VO LUM E
This sets the volume of the beep sound which alert s you to error cond itions and infor ms you
that oper at ions hav e be en complet ed. Pr ess " 1" for high, "2" for middle, "3" for low, or "4" to turn
the alarm off.
Factory setting: "3"
•
Setting 23 : DI AL M O D E
This sets the m ode of dialing. Pr ess " 1" if you are on a touch- tone line, or "2" if you are on a
pulse dial line. (If you don’t know which type of line you have, try making ph one ca lls with bot h
settings and see which one works.)
Factory setting: "1"
•
Setting 24 : QUI CK O N LINE
When you tr ansmit a multi- pag e docu ment , this setting de te rmin e s whether you r fax will dial the
receiving party and begin transm it ting while scanning is still in progress, or wait unti l all pages
have been sca nn ed befor e dialing. Press "1" to have the fax dial and begin transm ission while
scanning is still in progress, or "2" to have it wait until al l pages ha ve bee n scanned.
Factory setting: "1"
•
Setting 25 : MULT I TTI
If you are using Depar tm ent Contr ol, you can pre ss "1" to have the department name (the name
correspon ding to the depa rtm en t code ent ered by the operat or) appe ar at the top of eac h
transmitt ed do cumen t. This will appear in place of the nam e enter ed in "En tering Your Name
and Fax Number" in Chapter 2. Press "2" to turn Mu lti T TI of f (t he sender’s nam e e n te red in
Chapter 2 will be used).
Factory setting: "2"
•
Setting 26 : BEEP LENGTH
This sets the durat ion of the bee p which signa ls the end of tran smission, r eception , or cop ying.
Press "1" for 3 seco nds, "2" for 1 sec ond, or "3" for no beep.
Factory setting: "1"
•
Setting 27 : TEL EPHO NE BI LL ING CO D E
If you are using the Departm ent Contr ol funct ion, this setting will allow you to use Departmen t
Codes for te lephon e bi lling on a PBX. Press " 1" to turn teleph one billing on, or "2" to turn it off.
Factory setting: "2"
•
If you pres sed "1", the BILLING CODE DI AL select ion will subsequently app ear . Press "1" i f
your PBX must receive the billing code before dialing a telephone number, or "2" if i t mu st
receive the billing code after dialling a telephone number. (Refer to your PBX manual or consult
your PBX adm inst r at or for this in fo rmation.)
Note:
If you select "AFTE R" for the BIL LING CODE DIAL selec tion , you must pr ess the
REDIAL
key after dia ling if you us e th e hand set or the
SPEAKER
key to dial.
OPTION SETTINGS 5-5
Page 88

<P=006>
OPTIONAL SETTINGS
Setting 28 : DEPARTM ENT CODE DIGITS
Use this setting if you are using Teleph one Bi lling and nee d to change the num ber of digits used
for Department Codes to accord with your PBX’s telephone billing system. Enter any number
from "3" to "9".
Factory setting: "4"
•
Setting 29 : DI STINCTIVE RING
This sets the r ing pat t ern to which your fax w ill answer if you subscr ibe t o a distinct ive r in g
service. Enter a number from "1" to 5" to select a pattern . See "Distinctive Ring" in Chapter 2 for
more details.
Factory setting: "5"
•
5-6 OPTION SETTINGS
Page 89

UX5000U-PRPR
YF
<P=001>
6 PRINTING OUT REPORTS AND LISTS
You can print a variety of lists showing settings and information entered in the fax.
You can also print out reports on recent activity and reports on individual transactions
after they are made. Each list and report is described below.
Printing out a list
Step Press these keys: Comments
FUNCTION
1
2
START
3
or
2
"LISTING MODE" will appear in the display.
Move through t he list s by press ing "#" o r "*".
Stop when the desired list appears in the display.
Print out the list.
Activi ty Repor t
This report shows information on your most recently perfor med send and receive
operations (a combined maximum of 30 operations can appear). The report is divided
into two parts: the SEND REPORT, which shows information on transmissions, and
the RECEIVE REPORT, which shows information on receptions.
♦ If Option Setting 4 is set to "YES", a report will be automatically printed out when-
ever information on 30 operations has accumulated. (A report can still be printed on
demand at any time.)
♦ All information is erased after a report is printed out. If automatic print-out is turned
off and print-out has not been done manually for 30 operations, the information on
the oldest operation will be overwritten each time a new operation is performed.
Explanation of headings
SENDER/
RECEIVER
START The time at which transm ission/ recep tion started .
TX/RX TIME Total time taken for transmission/reception.
PAGES Number of pages transmitted/ r eceived.
TYPE CONF. TX - A confidential operation was performed.
NOTE OK - Transmission/ re ception was normal.
The nam e or fax number of the othe r machine involved in t he transact ion. If that machine
does not have an ID function, the comm unication mode w ill appear (for example, "G3").
RELAY TX - A relay operation was perfo rme d.
(T) - A timer operation was pe rform ed .
(D) - The document was sent direct ly fro m the feeder , not from m emor y.
P.FAIL - A p ower failure occurr ed.
JAM - A problem with the printing paper or document occurred.
PRINTING OUT REPORTS AND LI ST S 6-1
Page 90

<P=
002
>
PRINTING OUT REPORTS AND LI ST S
BUSY - The line was busy.
COM.E- 0 to COM .E-14 - A telephone line error pr evented th e transact ion. Explan ations
of the error numbers are given in the following tables, however, these are primarily for
use by service e nginee rs. I n gener al, y ou will wa nt to sim ply tr y th e trans act ion again. If
necessary, check with t he other party to make sure the ir machine is funct ioning prope rly.
CANCEL - Transmission was cancelled because the STOP key was pressed, no
document was in the feeder, or the other machine requested transmission using a
function whic h your fax doe s not have.
CANCEL 3 - Confidential transmission was cancelled because the receiving machine
does not have a confidential function, a confidential passcode is not programmed in it,
its memory is full, or it is not a Sharp model.
CANCEL 4 - Confidential transmission was cancelled because an incorrect mailbox
number was enter e d for a fax mach in e w ith conf id ent ial ma ilbo xes.
CANCEL 5 - A relay request was not successful because the machine to which the
request was made has no relay fu nction, it is not a Sharp model, or its mem ory was ful l.
CANCEL 6 - A relay request was not successful because your machine’s fax number
has not been entered into the relay machine’s list of permitted numbers, an automatic
dialing number not stored in the relay machine was specified, or your fax number has
not been entered in your machine as descr ibed in Chapter 2.
Transmission error s
Able to recognize handsh ake signa l, but it has
E-0
errors.
Cannot recognize the handshake signal from
E-1
the receiver side.
E-2 Line disconnected during transmission.
E-3
Line disconnected after modem speed fall-back.
Line disconnected during multi-page
E-4
transmission.
Cannot recognize the handshake signal for
E-6
next page at receiver side.
No response from receiver side or "disconnect
E-7
signal" is received at transmitter side.
Error was not corrected after the predetermined
number of retries because of an error in a part
E-8
of a page.
Error occurred after or while reception by the
E-11
remote (receiving) machine was revealed to be
impossible.
E-12 Error occurred just after fall-back.
Error occurred after a response to a
E-13
retransmission end command was received.
Reception errors
Able to recognize handsh ake signa l, but it has
E-0
errors.
E-1 Line disconnected during reception.
Cannot recognize the handshake signal from
E-2
the transmitter side.
Cannot recognize the last handshake signal
E-3
from the tran sm it ter sid e.
Cannot recognize the handshake signal for
E-4
next page from the transmitter side in the case
of mode change.
Cannot recognize the handshake signal for
E-5
next page from transmitter side.
No response from transm it ter or "disconne ct
E-7
signal" is received at receiver side.
Error occurred upon completion of reception of
E-8
all pa ges.
Error occurred when mode was changed or
transmission/reception switching was
E-9
performed.
Error occurred during partial page or physical
E-10
page reception.
Error occurred after or during inquiry from the
remote (transmitting) machine as to whether
E-11
reception was possible or not.
E-12
Error occurred during or just after fallback.
Error occurred after retransmission end
E-13
command was received.
Error occurred after voice communication
E-14
command was received.
6-2 PRINTING OUT REPORTS AND LISTS
Page 91

<P=
003
>
Timer li s t
This list shows the timer operations which are currently set.
PRINTING OUT REPO RT S AND LIST S
Telephone Numbe r Lis t
This list shows the fax and voice numbers which have been stored for automatic
dialing.
Relay Group List
This list shows the relay groups which have been stored.
PRINTING OUT REPORTS AND LI ST S 6-3
Page 92

<P=
004
PRINTING OUT REPORTS AND LI ST S
>
Passcode List
This list shows s ettings made for polling security, your name and fax number as
entered in the fax machine, a sample of the header printed at the top of every page
you transmit (HEADER PRINT), and the numbers entered in the relay passcode list.
Optional Setting List
This list shows the current status of the optional settings.
Program and Group List
The top part of this list shows the programs which have been entered. The bottom part
shows the fax numbers which have been stored in each Group Key.
6-4 PRINTING OUT REPORTS AND LISTS
Page 93

<P=
005
>
PRINTING OUT REPO RT S AND LIST S
Batch Transmission List
To check the documents which have been stored for batch transmission, you can print
out the Batch Transmission List.
Department Usage List
This list shows total transmission time and pages transmitted (including polling time
and pages polled) for each department during the period indicated on the list. The
information is only available if Department Control has been activated. The bottom
part of the list shows information about relay broadcast operations performed on the
request of other fax machines.
♦ Each time you print out t he report, the data is cleared and a new period begins.
Confidential Reception List
This list shows which mailboxes have received confidential documents and the total
number of pages received. Print this out whenever RCVD CONFIDENTIAL RX
appears in the display.
PRINTING OUT REPORTS AND LI ST S 6-5
Page 94

<P=
006
PRINTING OUT REPORTS AND LI ST S
>
Anti Junk Number List
This list shows the fax numbers from which reception is not allowed.
Transaction Report
This report is printed out automatically after an operation is completed to allow you to
check the result. Your fax is set at the factory to print out the report only when an error
occurs, but you can change the setting to have it printed out after every operation,
only after certain types of operations, or not at all. This is done by changing Option
Setting 5 as described in Chapter 5.
♦ You can also print out the Transaction Report manually by pressing the REPORT
key after the operation is completed.
♦ The same headings appear in the Transaction Report as in the Activity Report. See
"Activity Report" in this chapter for an explanation of the headings.
♦ The top part of the first page of the document will also appear below the report if the
document was sent from memory. If confidentiality is required, you can prevent
printing of the top part of the document by changing Option Setting 15.
6-6 PRINTING OUT REPORTS AND LISTS
Page 95

RT <P=001>
UX5000U-MAMA
7 MAINTENANCE
Reading glass and rollers
Clean the reading glass and rollers frequently to ensure the quality of transmitte d
images and copies. Rotate the received document tray back, open the operation panel
by squeezing the operation panel release on the right side of the operation panel
(marked "PULL OPEN"), and clean the parts as shown below.
Docum en t
rollers
White backplat e
Wipe the reading glass, white
backplate, and rollers w ith a soft cloth.
•• Make sure that all dirt and stains (such
as correcting fluid) are removed, as
these will cause vertical lines on transmitted images and copies.
Reading glass
The housing
Wipe the external parts and surface of the machine with a dry cloth.
Caution!
••
Do not use benzene or thinner. These solvents may dama ge or discolor the machin e.
MAINTENANCE 7-1
Page 96

MAINTENANCE
Notes
7-2 MAINTENANCE
Page 97

RT <P=001>
8 TROUBLESHOOTING
Problem Check and remedy
UX5000U-TSPS
PROBLEMS AND SOLUTIONS
Nothing appears in the display.
The fax does not respond when you
press any of its key s.
Automatic docu ment feeding do es
not work for transmiss io n or copying.
Dialing is not possible.
Nothing is printed at the receiving
end.
The power is on, bu t no
transmission takes place.
•• Make sure the power cord is proper ly plugg ed int o a power
outlet.
•• Make sure the power switch has be en swit ched to the "ON "
position.
•• Connect another electrical appliance to the outlet to see if it
has power.
•• If a beep sound is not made when you press the keys, turn
off the power and then turn it back on sever al seconds later .
•• Check the size and weight of the document (see
"Transmitt able doc ument s" in Chapt er 3).
•• Make sure the power is on.
•• Make sure that the telephone line is pr oper ly con nect ed to
both the TEL. LINE jack and the wall jack.
•• Make sure that the f ax is set to th e cor rect dialing mode for
your telephone line. See Opt ion Set tin g 23 in Chapter 5.
•• Make sure that the docum en t for tran sm ission is place d face
down in the feeder.
•• Make sure that the printing pap er is prop erly loaded in the
receiving machine.
•• Make sure that the receiving m achine has print in g paper.
A distorted image is received at the
other end.
•• If the receiving machine is in manual mode with no
attendant, receptio n will not be possible.
•• If the receiving machine is not a Sharp mod el, m ak e sure it is
G3 compatible.
•• Check the display for error messages.
•• Pick up the handset and check for a dial tone.
•• Noise on the telephone line may cause distor tion. Tr y
sending the docum ent again.
•• Make a copy of the document on you r fax. If the co py is also
distorted, your fax m ay ha ve a pr oblem .
TROUBLESHOOTING 8-1
Page 98

<P=002>
PROBLEMS AND SOLUTIONS
The printing paper does no t come
out.
The printing paper comes out blank
when you try to receive a docume nt.
The received doc um ent is faint.
Received images are distor ted.
•• The printing paper may be jammed. See "Clear ing Jamm e d
Printing Paper" in this chapter.
•• Make sure that the printing pap er is prop erly loaded in you r
machine.
•• Make sure the power is on.
•• Make sure that the documen t is loaded pr oper ly in the
feeder of the tra nsm it ting machine. Make a copy to con fir m
the printing ability of your machine.
•• Ask the other party to send higher cont r ast docum ent s. If the
contrast is still too low, your fax may hav e a problem . Make
a copy to check it.
•• The toner cartridge may need replac em ent .
•• Noise on the telephone line may cause distor tion. Have th e
other party try sending the document again.
•• If the other fax machine also has ECM, make sure th is
feature is enab le d in both fa xes ( see Option Setting 9 in
Chapter 5).
•• Make a copy of anothe r docum en t on your fax. If the copy is
also distorted, you r fax may have a pro b lem .
•• The photoconductor drum may be damaged. Try a new
drum cartridge.
Dots appear at regular intervals on
received docume nts and co pies.
No confidential transm ission or
relay broadcast occurs .
•• The photoconductor drum may be damage d. Replace t he
drum cartridge.
•• Check the message in the display. See the nex t section,
"Display Messages ".
8-2 TROUBLESHOOTING
Page 99

DD <P=001>
Display messages
CHECK XXXX (paper source)
CONF REFUSED
CONF. RX ERROR
UX5000U-TSDM
MESSAGES AND SIGNALS
Either or bot h of the p ap er sour ces (the cassette or tray ) will
appear in place of "XXXX". This indicates that the paper
source is not prop er ly insta lled in the mac hine, or a paper jam
has occurred in th at sour ce.
A confidential transmission ha s been denied becaus e you
entered an incorrect mailbox numbe r for a machine with
mailboxes.
Confidential recept ion was cancelled because the m ailbox
number specif ie d by the tra nsm it ting machine is not
program m ed in your fax.
COVER OPEN The operation panel is open. Close it.
DRUM LIFE OVER The drum cartridge mus t be replaced.
A fax has been received in memo ry because the t oner
FAX RCVD IN MEMORY
FUNCTION MODE The FUNCTION key has been pressed.
LINE ERROR
MEMORY FULL
NO CONF. FUNC
NO PAPER
cartridge needs replacem e nt, you have run out of printing
paper, or the paper is jammed. The fax will automatically pr int
out when the proble m is fixed.
Transmiss io n or recept ion was n o t succes sful. Pr ess STOP to
clear the message, and then try again.
The memory is full. See "Dual access" in "Sending
Documents" in Chapter 3.
Confidential transmission was cance lled because the receiving
machine does not have a confide nt ial function , a confid ent ia l
passcode is not program med in it, its memo ry is full, or it is not
a Sharp model.
This message will be followed by one of the paper sour ces in
parenthe ses, and infor m s yo u that the paper sou rce is out of
paper. If no paper source is indicat ed, both paper sour ces are
out of paper .
NO RELAY FUNC
A relay request has been denied bec ause the other machine
does not have a relay broa dcas t function , its mem or y is full, or
it is not a Sharp machine.
TROUBLESHOOTING 8-3
Page 100

<P=002>
DISPLAY MESSAGES
OFF HOOK DIAL MODE
ON HOOK DIAL MODE
PAPER JAM
RCVD CONF. FAX
RCVD RELAY REQUEST
RELAY REFUSED
REMOVE ORIGI NAL( S)
SIZE ERROR
The handset has been lift ed and the f ax is waiting for you to
dial.
The SPEAKER key has been pressed and t he fax is waiting
for you to dial.
The printing pape r is jammed. See the following sec tion ,
"Clearing Paper Jams".
A confidential fax has been re ceived in memory . Print it out as
explained in "Confidential Oper ations " in Chapter 4.
Your fax machine ha s received a Relay Broadca st request and
is transmit tin g the reques ted docu ment to the end receiving
machines. See "Relay Broadcast" in "Relay Reque st" in
Chapt er 4.
A relay request has be en den ied beca use yo ur fax num ber
has not been ent er ed in the r elay mach in e’s list of perm itte d
numbers, an automatic dialing number not stored in the relay
machine was specif ied, or your fax num be r has not been
entered in your m ach ine.
The original document is jammed. See the following section,
"Clearing Paper Jams".
This message w i ll be followed by one of th e paper sour ces i n
parent hes es, and infor m s you tha t the pa per loaded in that
source is not all the same size.
REPLACE TONER The toner cartridge m ust be r eplaced.
Audible signals
Continuous tone 3 seconds
Intermitte nt tone
(3 beeps)
Rapid intermittent tone
5 seconds
(1 second on,
1 second off)
35 seconds
(0.7 seconds on,
0.3 seconds off)
8-4 TROUBLESHOOTING
Indicates the en d of transm ission, re cept ion, or
copying.
Indicates incomplet e transm ission, recep tion, or
copying.
Indicates that the han dset is of f hook.
 Loading...