

Page 1
Facsimile Guide
MODEL:
MX-FXX1
Page 2

TABLE OF CONTENTS
ABOUT THIS MANUAL . . . . . . . . . . . . . . . . . . . . . . . . 4
• MANUALS PROVIDED WITH THE MACHINE . . . 4
BEFORE USING THE MACHINE AS A
1
FAX
BASE SCREEN OF FAX MODE . . . . . . . . . . . . . . . . . 6
• BASE SCREEN OF FAX MODE . . . . . . . . . . . . . . 7
• ADDRESS BOOK SCREEN. . . . . . . . . . . . . . . . . . 9
• CHANGING THE DISPLAY OF ONE-TOUCH
KEYS IN THE ADDRESS BOOK SCREEN . . . . . 10
FAX TRANSMISSION SEQUENCE . . . . . . . . . . . . . . 12
ENTERING DESTINATIONS
2
ENTERING A FAX NUMBER WITH THE
NUMERIC KEYS. . . . . . . . . . . . . . . . . . . . . . . . . . . . . 15
RETRIEVING A FAX NUMBER FROM THE
ADDRESS BOOK. . . . . . . . . . . . . . . . . . . . . . . . . . . . 16
• RETRIEVING A STORED DESTINATION . . . . . . 17
• CHECKING AND DELETING ENTERED
DESTINATIONS . . . . . . . . . . . . . . . . . . . . . . . . . . 18
USING A SEARCH NUMBER TO RETRIEVE A
DESTINATION . . . . . . . . . . . . . . . . . . . . . . . . . . . . . . 19
RETRIEVING A DESTINATION FROM A
GLOBAL ADDRESS BOOK. . . . . . . . . . . . . . . . . . . . 20
USING THE RESEND FUNCTION . . . . . . . . . . . . . . . 22
CHAIN DIALLING . . . . . . . . . . . . . . . . . . . . . . . . . . . . 23
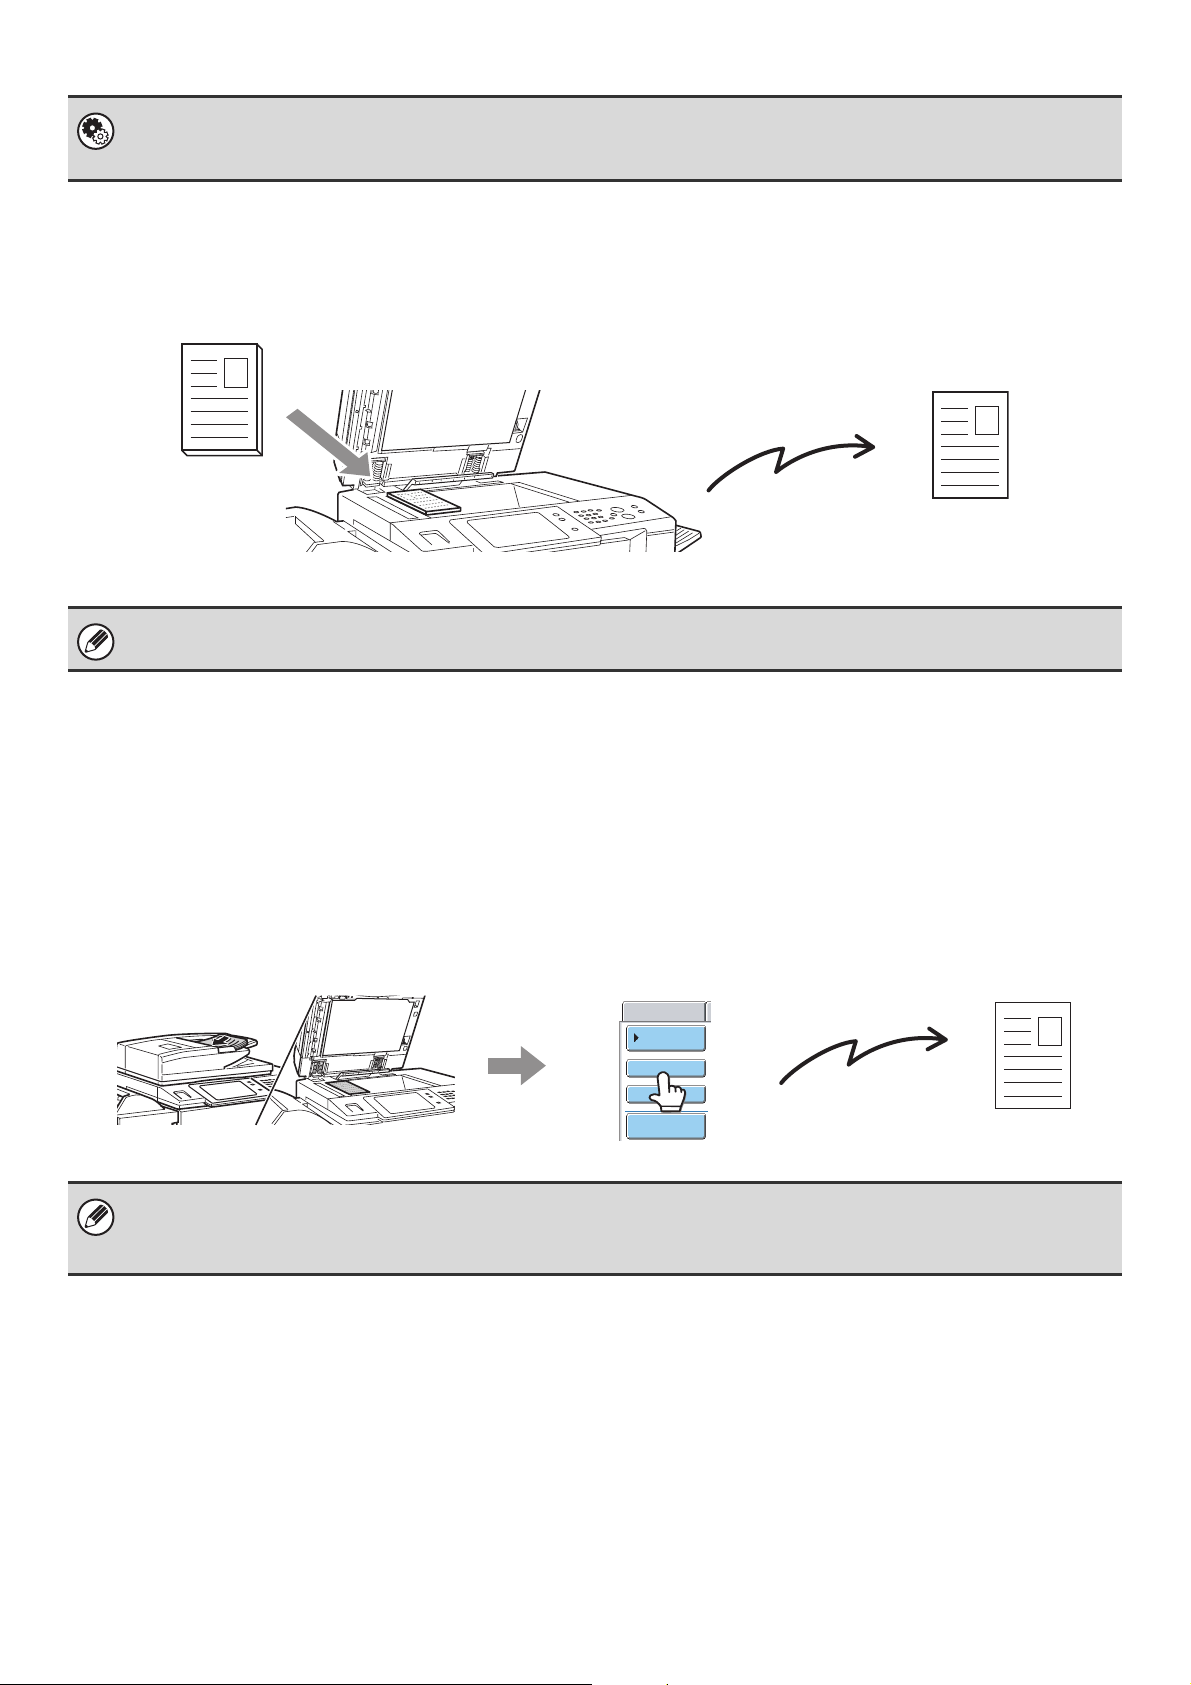
USING THE DOCUMENT GLASS FOR
TRANSMISSION. . . . . . . . . . . . . . . . . . . . . . . . . . . . . 32
• USING THE DOCUMENT GLASS TO SEND A
FAX IN DIRECT TRANSMISSION MODE . . . . . . 34
TRANSMISSION USING THE SPEAKER . . . . . . . . . 36
SENDING THE SAME FAX TO MULTIPLE
DESTINATIONS (Broadcast Transmission) . . . . . . 37
SENDING A FAX DIRECTLY FROM A
COMPUTER (PC-Fax) . . . . . . . . . . . . . . . . . . . . . . . . 42
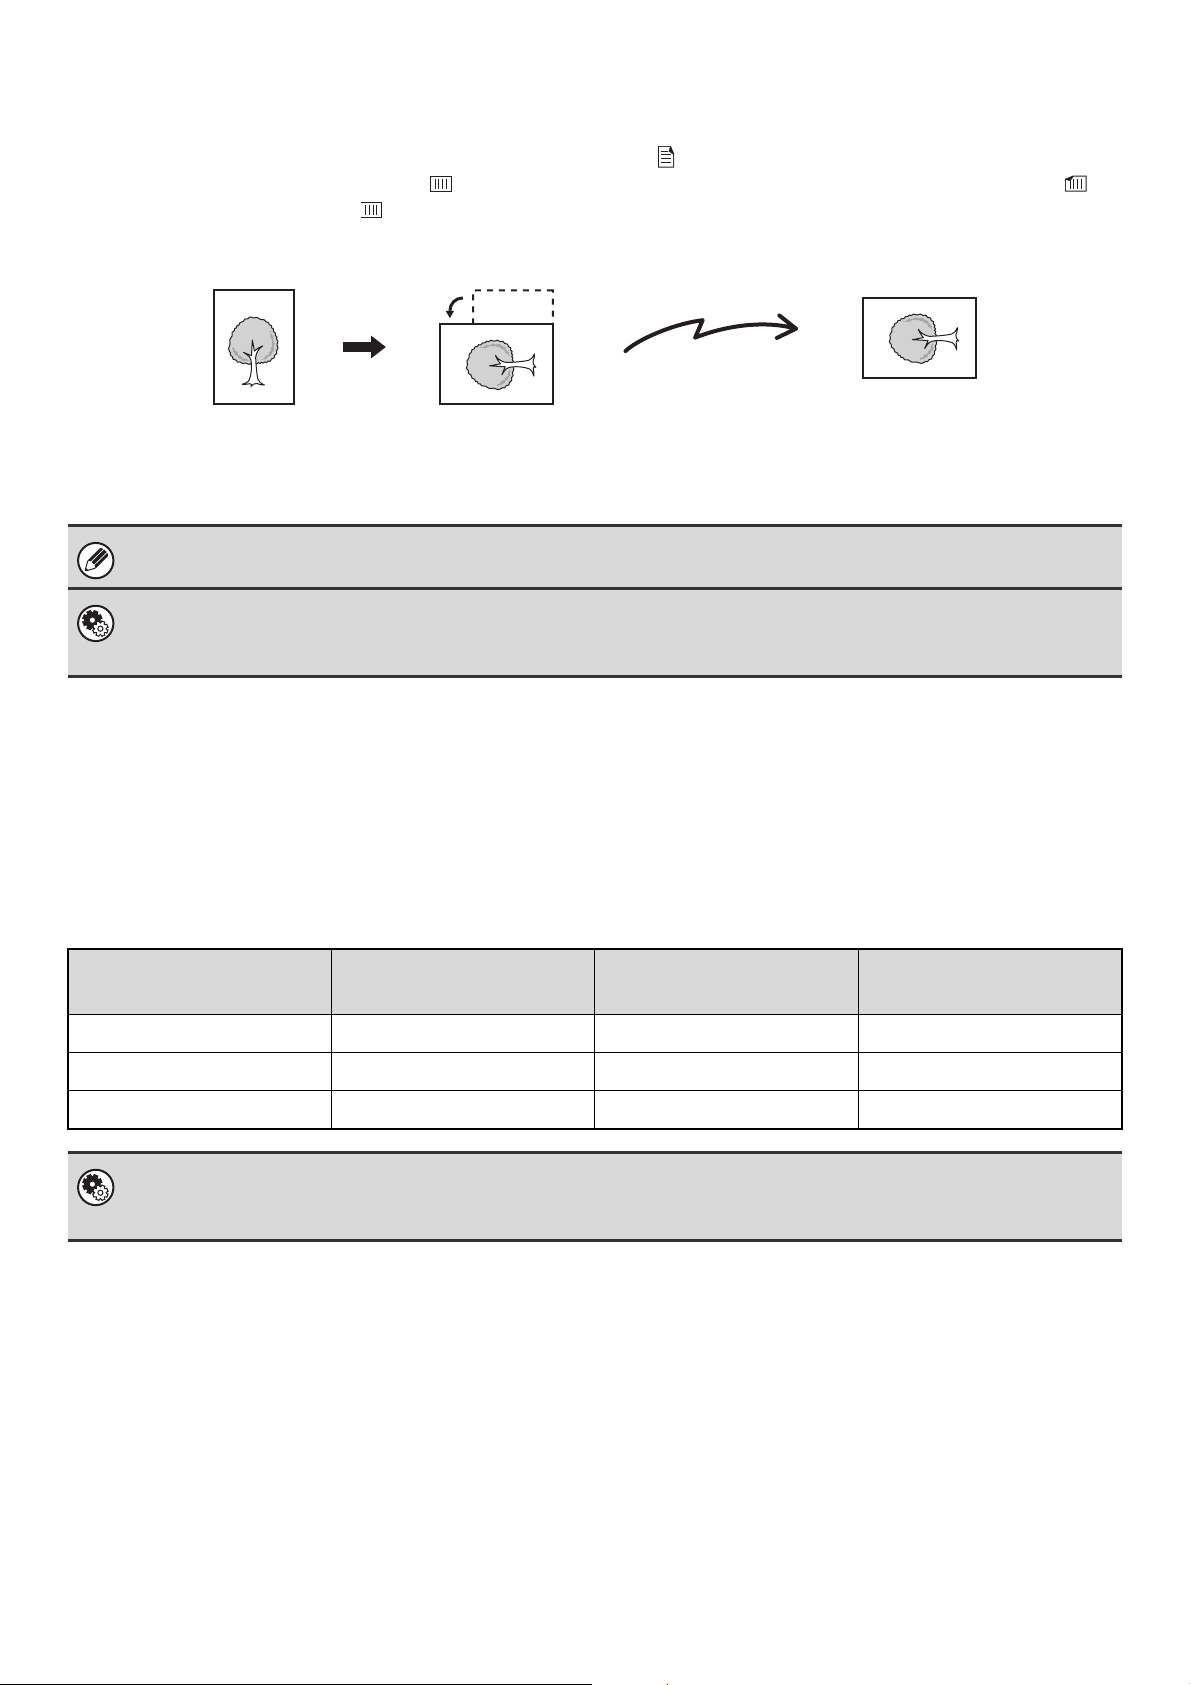
IMAGE SETTINGS . . . . . . . . . . . . . . . . . . . . . . . . . . . 43
• AUTOMATICALLY SCANNING BOTH SIDES
OF AN ORIGINAL (2-Sided Original) . . . . . . . . . . 44
• SPECIFYING THE SCAN SIZE AND SEND
SIZE (Enlarge/Reduce Transmission) . . . . . . . . . 45
• CHANGING THE EXPOSURE . . . . . . . . . . . . . . . 52
• CHANGING THE RESOLUTION . . . . . . . . . . . . . 53
FAX RECEPTION
4
RECEIVING FAXES . . . . . . . . . . . . . . . . . . . . . . . . . . 55
• RECEIVING A FAX . . . . . . . . . . . . . . . . . . . . . . . 56
• RECEIVING A FAX MANUALLY . . . . . . . . . . . . . 57
• PRINTING A PASSWORD-PROTECTED FAX
(Hold Setting For Received Data Print) . . . . . . . . 57
FORWARDING RECEIVED FAXES (Fax Data
Forward). . . . . . . . . . . . . . . . . . . . . . . . . . . . . . . . . . . 58
FORWARDING A RECEIVED FAX TO AN E-MAIL
ADDRESS (Inbound Routing Settings) . . . . . . . . . . 59
BASIC TRANSMISSION METHODS
3
TRANSMISSION METHODS . . . . . . . . . . . . . . . . . . . 24
• PLACEMENT ORIENTATION OF THE
ORIGINAL . . . . . . . . . . . . . . . . . . . . . . . . . . . . . . 26
• AUTOMATIC REDUCTION OF THE
TRANSMITTED IMAGE . . . . . . . . . . . . . . . . . . . . 26
• TRANSMITTABLE ORIGINAL SIZES . . . . . . . . . 27
• THE SIZE OF THE PLACED ORIGINAL . . . . . . . 27
• WHEN THE LINE IS BUSY . . . . . . . . . . . . . . . . . 28
• WHEN A COMMUNICATION ERROR
OCCURS . . . . . . . . . . . . . . . . . . . . . . . . . . . . . . . 28
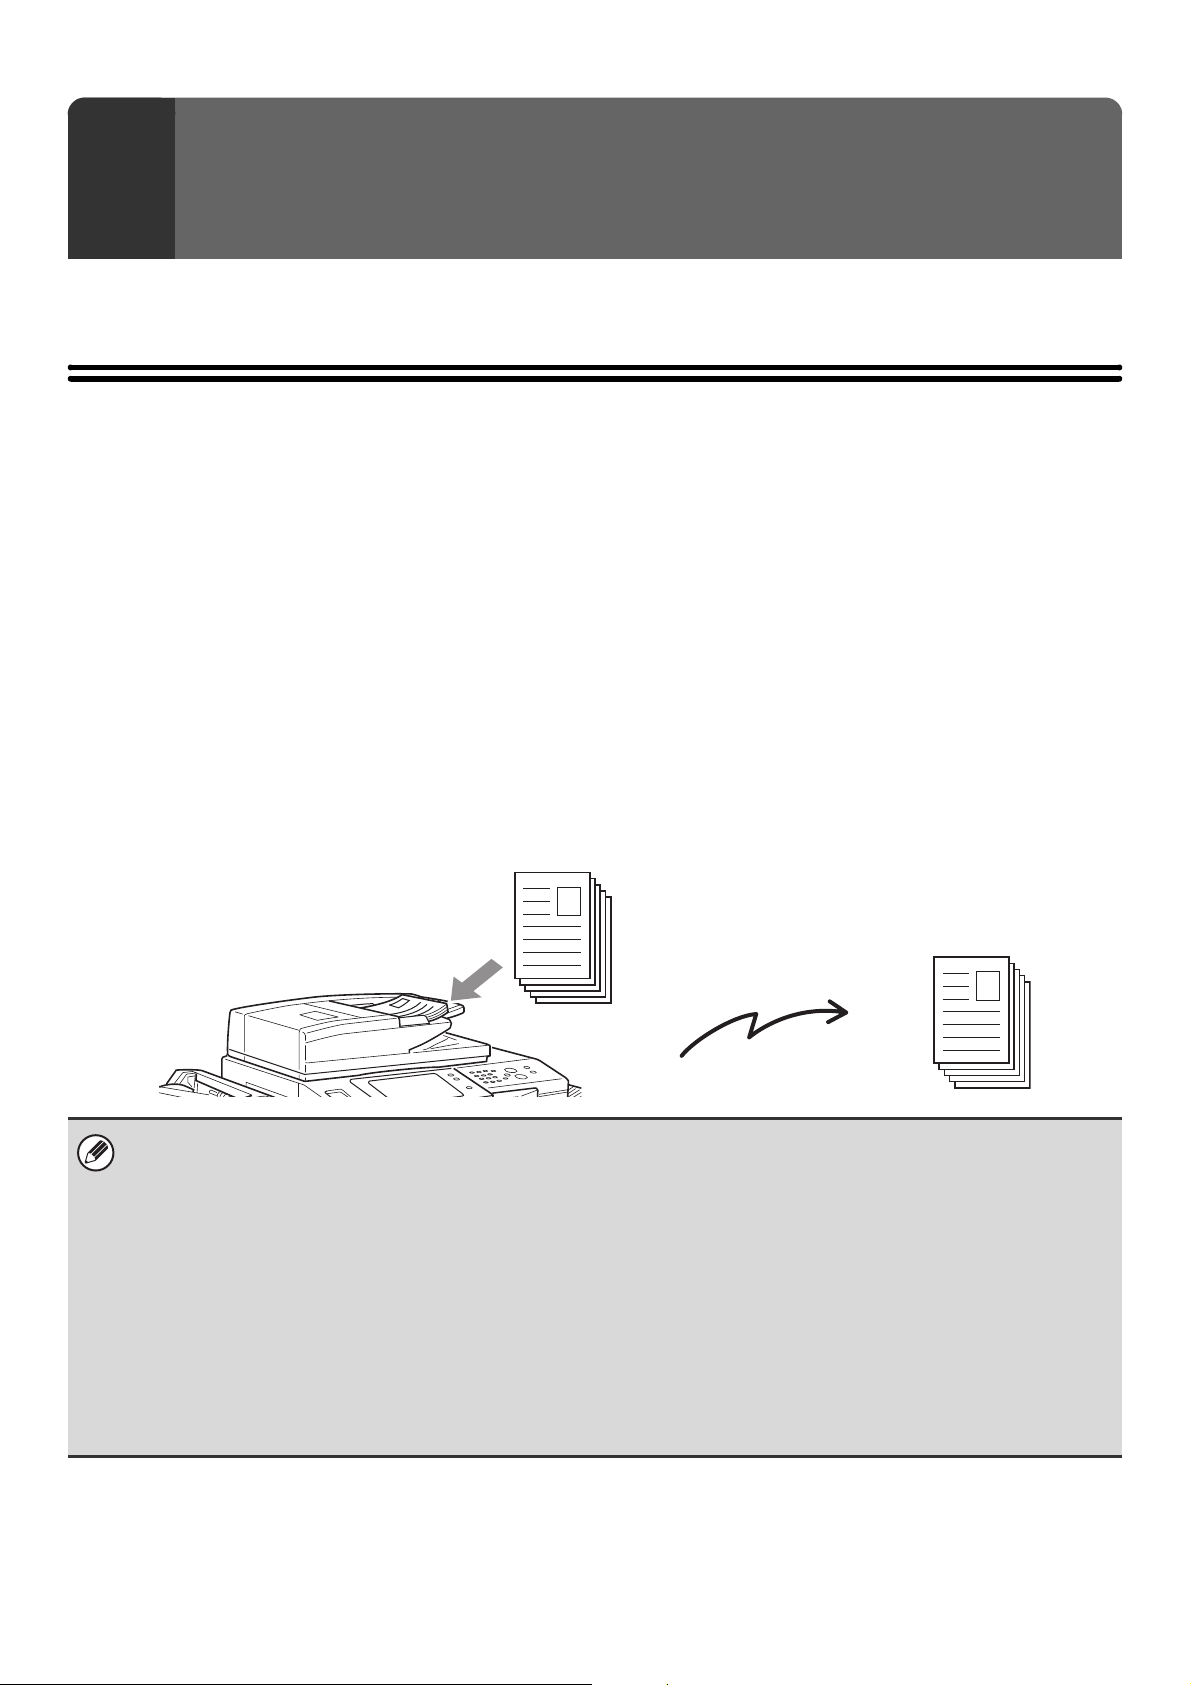
USING THE AUTOMATIC DOCUMENT FEEDER
FOR TRANSMISSION . . . . . . . . . . . . . . . . . . . . . . . . 29
• USING THE AUTOMATIC DOCUMENT
FEEDER TO SEND A FAX IN DIRECT
TRANSMISSION MODE . . . . . . . . . . . . . . . . . . . 30
SPECIAL MODES
5
SPECIAL MODES . . . . . . . . . . . . . . . . . . . . . . . . . . . 60
STORING FAX OPERATIONS (Program). . . . . . . . . 62
• USING A PROGRAM TO SEND A FAX . . . . . . . . 63
ERASING PERIPHERAL SHADOWS ON THE
IMAGE (Erase) . . . . . . . . . . . . . . . . . . . . . . . . . . . . . . 65
TRANSMITTING AN ORIGINAL AS TWO
SEPARATE PAGES (Dual Page Scan). . . . . . . . . . . 67
SENDING A FAX AT A SPECIFIED TIME (Timer) . . 70
SENDING TWO PAGES AS A SINGLE PAGE
(2in1). . . . . . . . . . . . . . . . . . . . . . . . . . . . . . . . . . . . . . 73
SENDING BOTH SIDES OF A CARD AS A
SINGLE PAGE (Card Shot) . . . . . . . . . . . . . . . . . . . . 76
SENDING A LARGE NUMBER OF PAGES (Job
Build) . . . . . . . . . . . . . . . . . . . . . . . . . . . . . . . . . . . . . 79
2
Page 3

TRANSMITTING ORIGINALS OF DIFFERENT
SIZES (Mixed Size Original) . . . . . . . . . . . . . . . . . . . 82
USING AN EXTENSION PHONE
7
FAXING THIN ORIGINALS (Slow Scan Mode). . . . . 84
ADDING YOUR SENDER INFORMATION TO
FAXES (Own number sending) . . . . . . . . . . . . . . . . 86
• TEMPORARILY CHANGING THE SENDER
INFORMATION (Own Name Select) . . . . . . . . . . 87
CALLING A FAX MACHINE AND INITIATING
RECEPTION (Polling) . . . . . . . . . . . . . . . . . . . . . . . . 88
• INITIATING POLLING RECEPTION
MANUALLY . . . . . . . . . . . . . . . . . . . . . . . . . . . . . 90
SENDING A FAX WHEN ANOTHER MACHINE
POLLS YOUR MACHINE (Polling Memory) . . . . . . . 91
• RESTRICTING POLLING ACCESS (Polling
security) . . . . . . . . . . . . . . . . . . . . . . . . . . . . . . . . 91
• SCANNING A DOCUMENT INTO POLLING
MEMORY . . . . . . . . . . . . . . . . . . . . . . . . . . . . . . . 92
• PRINTING A DOCUMENT STORED IN THE
PUBLIC BOX . . . . . . . . . . . . . . . . . . . . . . . . . . . . 94
• DELETING A DOCUMENT FROM THE
PUBLIC BOX . . . . . . . . . . . . . . . . . . . . . . . . . . . . 95
PERFORMING F-CODE
6
COMMUNICATION
F-CODE COMMUNICATION . . . . . . . . . . . . . . . . . . . 96
• HOW F-CODES WORK . . . . . . . . . . . . . . . . . . . . 96
• CREATING MEMORY BOXES IN THE
MACHINE FOR F-CODE COMMUNICATION . . . 97
• F-CODE DIALLING . . . . . . . . . . . . . . . . . . . . . . . 97
CONFIDENTIAL COMMUNICATION USING
F-CODES . . . . . . . . . . . . . . . . . . . . . . . . . . . . . . . . . . 98
• F-CODE CONFIDENTIAL TRANSMISSION . . . . 99
• PRINTING A FAX RECEIVED BY F-CODE
CONFIDENTIAL RECEPTION . . . . . . . . . . . . . . 100
POLLING RECEPTION USING F-CODES. . . . . . . . 102
CONNECTING AND USING AN EXISTING
PHONE (Extension Phone Connection) . . . . . . . . 112
• RECEIVING A FAX AFTER ANSWERING A
CALL ON THE EXTENSION PHONE (Remote
Reception) . . . . . . . . . . . . . . . . . . . . . . . . . . . . . 113
• MAKING AND RECEIVING PHONE CALLS . . . 113
CHECKING THE STATUS OF FAX
8
JOBS
JOB STATUS SCREEN . . . . . . . . . . . . . . . . . . . . . . 114
• JOB QUEUE SCREEN AND COMPLETED
JOB SCREEN. . . . . . . . . . . . . . . . . . . . . . . . . . . 115
• OPERATION WHEN A JOB IN THE JOB
QUEUE IS COMPLETED . . . . . . . . . . . . . . . . . . 118
• CHECKING A RESERVED JOB OR THE JOB
IN PROGRESS. . . . . . . . . . . . . . . . . . . . . . . . . . 119
• CHECKING COMPLETED JOBS . . . . . . . . . . . . 120
CANCELLING A FAX IN PROGRESS OR A
RESERVED FAX . . . . . . . . . . . . . . . . . . . . . . . . . . . 121
GIVING PRIORITY TO A RESERVED FAX JOB. . . 123
PRINTING A TRANSACTION
REPORT / IMAGE SENDING
9
ACTIVITY REPORT
TRANSACTION REPORT . . . . . . . . . . . . . . . . . . . . 124
• CHANGING THE TRANSACTION REPORT
PRINT CONDITION FOR A SINGLE
TRANSMISSION . . . . . . . . . . . . . . . . . . . . . . . . 125
• INFORMATION APPEARING IN THE RESULT
COLUMN . . . . . . . . . . . . . . . . . . . . . . . . . . . . . . 126
IMAGE SENDING ACTIVITY REPORT . . . . . . . . . . 127
POLLING MEMORY TRANSMISSION USING
F-CODES . . . . . . . . . . . . . . . . . . . . . . . . . . . . . . . . . 104
• SCANNING A DOCUMENT INTO A MEMORY
BOX FOR F-CODE POLLING
TRANSMISSION . . . . . . . . . . . . . . . . . . . . . . . . 104
• PRINTING A DOCUMENT STORED FOR
F-CODE POLLING TRANSMISSION . . . . . . . . . 107
• DELETING A DOCUMENT STORED FOR
F-CODE POLLING TRANSMISSION . . . . . . . . . 108
RELAY REQUEST TRANSMISSION USING
F-CODES . . . . . . . . . . . . . . . . . . . . . . . . . . . . . . . . . 109
RELAY BROADCAST TRANSMISSION USING
F-CODES . . . . . . . . . . . . . . . . . . . . . . . . . . . . . . . . . 111
IF THE MACHINE IS MOVED
10
CONNECTIONS AND SETTINGS AFTER THE
MACHINE IS MOVED . . . . . . . . . . . . . . . . . . . . . . . . 128
• CONNECTION TO THE TELEPHONE LINE . . . 128
• MAKE SURE THE MAIN POWER SWITCH IS
IN THE "ON" POSITION. . . . . . . . . . . . . . . . . . . 129
• CHECKING THE DATE AND TIME . . . . . . . . . . 130
• CHANGING THE SENDER FAX NUMBER . . . . 130
3
Page 4
ABOUT THIS MANUAL
Please note
• For information on installing the drivers and software cited in this manual, please refer to the Software Setup Guide.
• For information on your operating system, please refer to your operating system manual or the online Help function.
• Considerable care has been taken in preparing this manual. If you have any comments or concerns about the manual, please
contact your dealer or nearest authorised service representative.
• This product has undergone strict quality control and inspection procedures. In the unlikely event that a defect or other problem
is discovered, please contact your dealer or nearest authorised service representative.
• Aside from instances provided for by law, SHARP is not responsible for failures occurring during the use of the product or its
options, or failures due to incorrect operation of the product and its options, or other failures, or for any damage that occurs due
to use of the product.
Warning
• Reproduction, adaptation or translation of the contents of the manual without prior written permission is prohibited, except as
allowed under copyright laws.
• All information in this manual is subject to change without notice.
Illustrations and the operation panel and touch panel shown in this manual
The peripheral devices are generally optional, however, some models include certain peripheral devices as standard equipment.
The explanations in this manual assume that a saddle stitch finisher, punch module, and inserter are installed on the machine.
For some functions and procedures, the explanations assume that devices other than the above are installed.
The display screens, messages, and key names shown in the manual may differ from those on the actual machine
due to product improvements and modifications.
MANUALS PROVIDED WITH THE MACHINE
Printed manuals and manuals stored in PDF format on the machine's hard drive are provided with the machine. When
using the machine, read the appropriate manual for the feature you are using.
Printed manuals
Manual name Contents
Safety Guide
Software Setup
Guide
Quick Start Guide
Troubleshooting
This manual contains instructions for using the machine safely and lists the specifications of the machine
and its peripheral devices.
This manual explains how to install the software and configure settings to use the machine as a printer or
scanner.
This manual provides easy-to-understand explanations of all the functions of the machine in a single
volume.
Detailed explanations of each of the functions can be found in the manuals in PDF format.
This manual explains how to remove paper misfeeds and provides answers to frequently asked questions
regarding the operation of the machine in each mode. Refer to this manual when you have difficulty using
the machine.
4
Page 5
Operation manuals in PDF format
The manuals in PDF format provide detailed explanations of the procedures for using the machine in each mode. To
view the PDF manuals, download them from the hard drive in the machine. The procedure for downloading the manuals
is explained in "How to download the manuals in PDF format" in the Quick Start Guide.
Manual name Contents
User's Guide
Copier Guide This manual provides detailed explanations of the procedures for using the copy function.
Printer Guide This manual provides detailed explanations of the procedures for using the printer function.
Facsimile Guide
(This manual)
Scanner Guide
Document Filing
Guide
System Settings
Guide
This manual provides information, such as basic operation procedures, how to load paper, and machine
maintenance.
This manual provides detailed explanations of the procedures for using the fax function.
This manual provides detailed explanations of the procedures for using the scanner function and the
Internet fax function.
This manual provides detailed explanations of the procedures for using the document filing function. The
document filing function allows you to save the document data of a copy or fax job, or the data of a print
job, as a file on the machine's hard drive. The file can be called up as needed.
This manual explains the "System Settings", which are used to configure a variety of parameters to suit
the aims and the needs of your workplace. Current settings can be displayed or printed out from the
"System Settings".
Icons used in the manuals
The icons in the manuals indicate the following types of information:
This alerts you to a situation where there is a
risk of machine damage or failure.
This provides a supplemental explanation of a
function or procedure.
This explains how to cancel or correct an
operation.
This indicates the name of a system setting and a provides a
brief explanation of the setting.
For detailed information on each system setting, see the
System Settings Guide.
When "System Settings:" appears:
A general setting is explained.
When "System Settings (Administrator):" appears:
A setting that can only be configured by an administrator is
explained.
5
Page 6
BEFORE USING THE MACHINE
1
AS A FAX
This section provides information that you should know before using the machine as a fax machine.
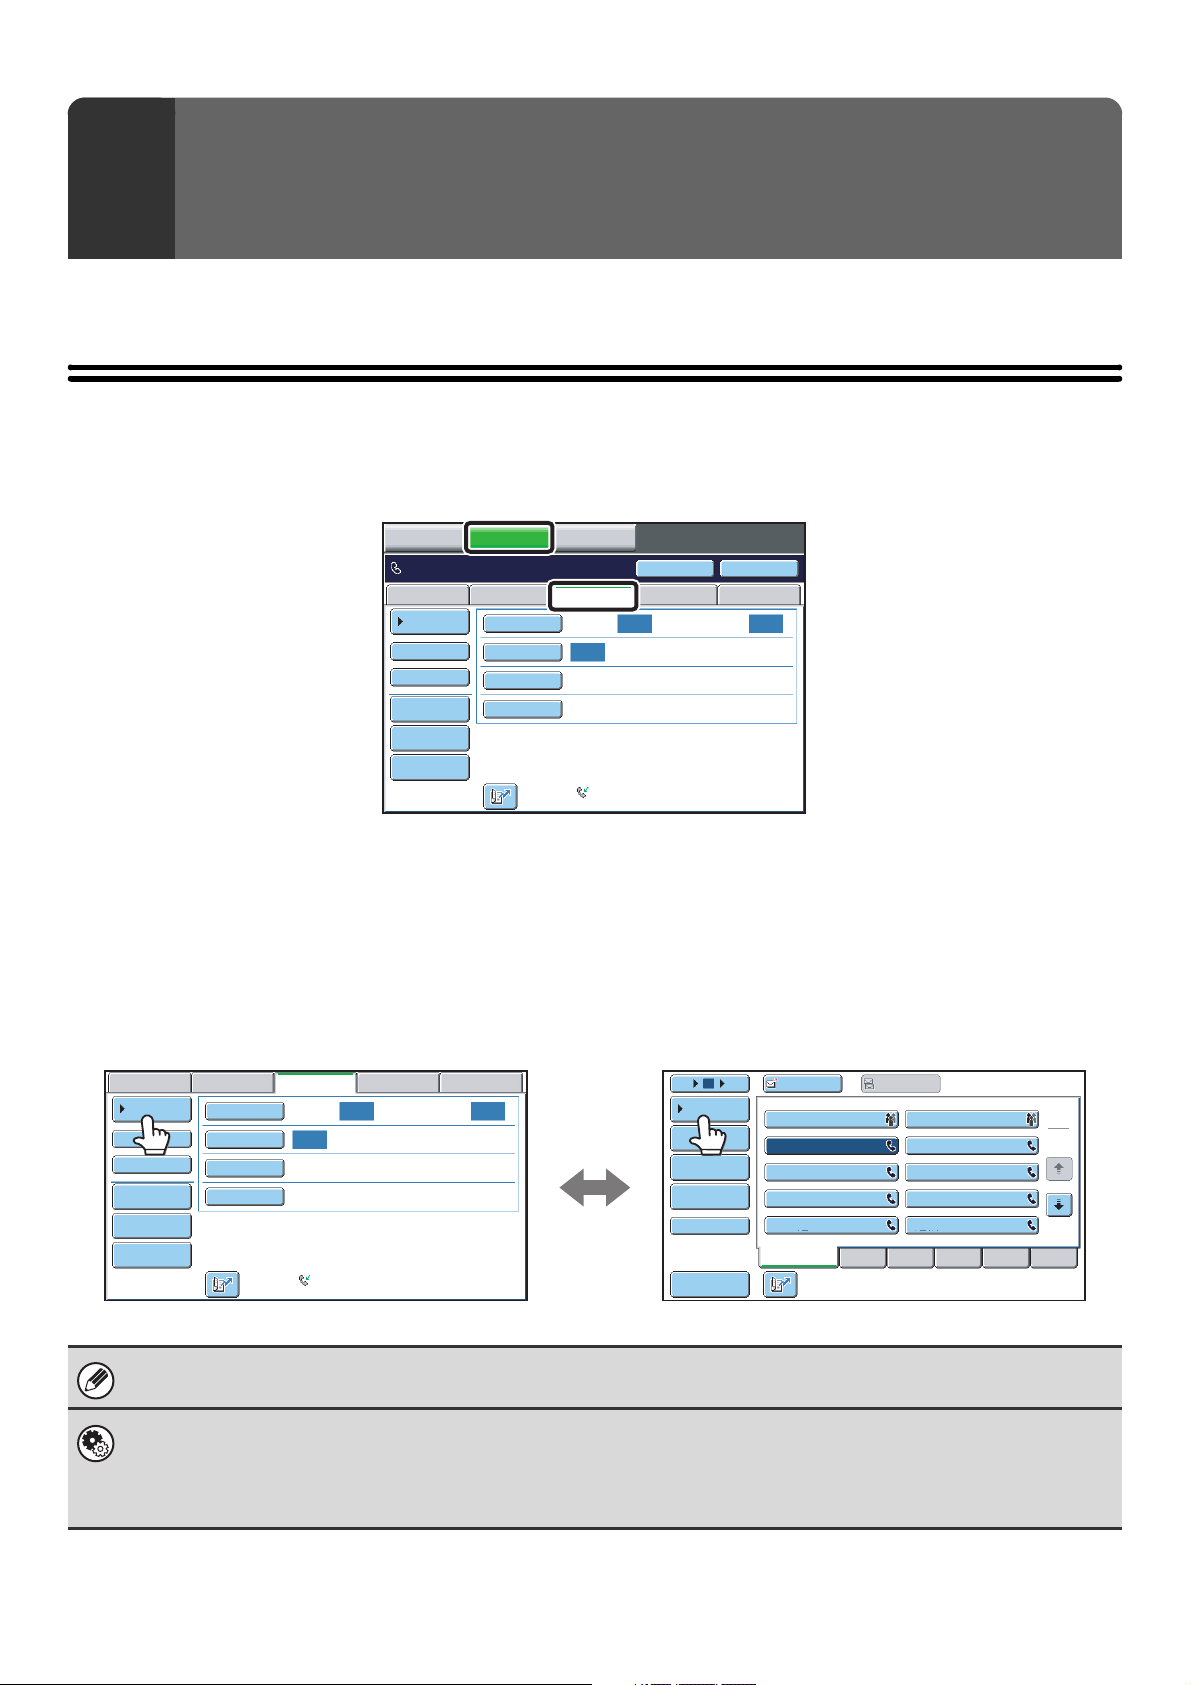
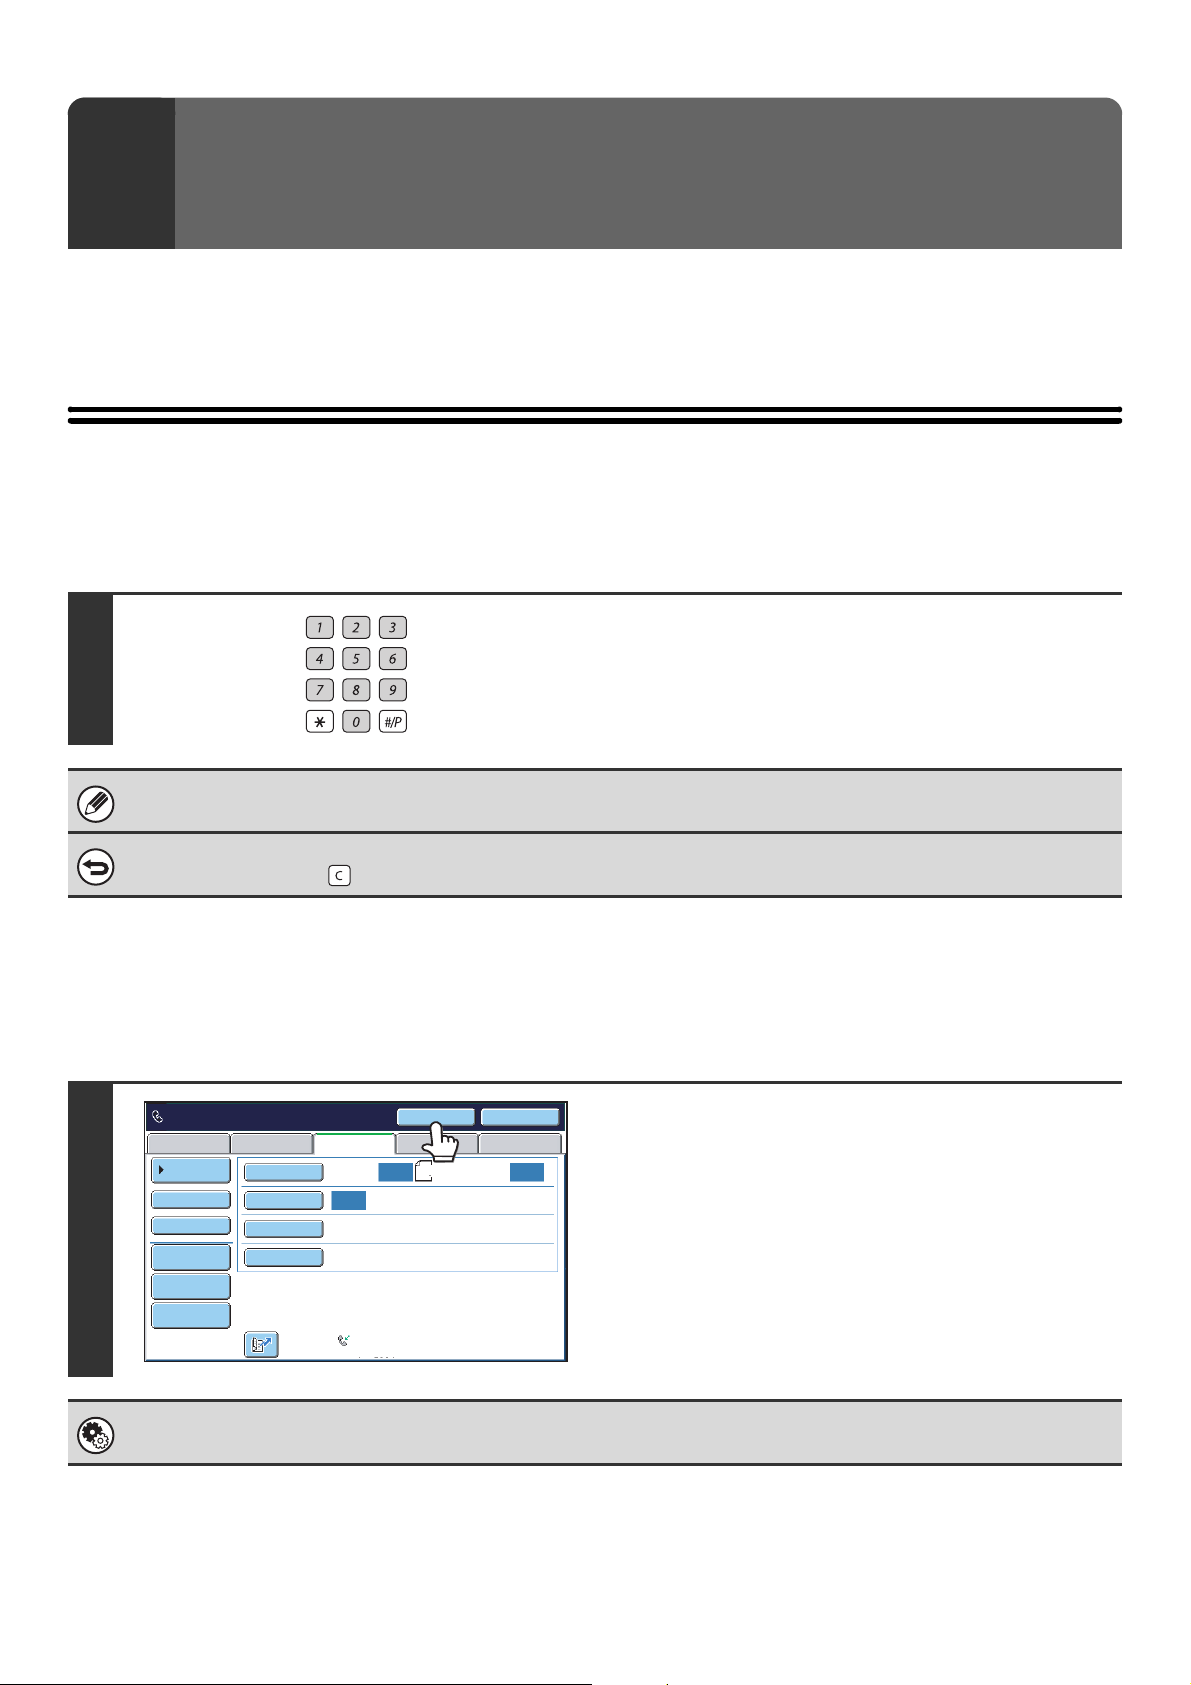
BASE SCREEN OF FAX MODE
To use the fax function, select settings and operations in the base screen of fax mode. To display the base screen of fax
mode, touch the [IMAGE SEND] key and then touch the [Fax] tab.
COPY
Ready to send.
Scan
Address Book
Direct TX
Sub Address
Address Review
File
Quick File
IMAGE SEND
Original
Exposure
Resolution
Special Modes
DOCUMENT
FILING
USB Mem. ScanFaxInternet Fax PC Scan
Auto Auto
Scan:
Auto
Standard
Auto Reception
Fax Memory:100%
Speaker
Resend
Send:
This screen only appears
when the fax function or
Internet fax function has been
installed.
The contents of the screen
will vary depending on the
devices that are installed.
Each of the other modes that can be displayed by pressing the [IMAGE SEND] key (scan, Internet fax, USB memory,
and PC scan modes) also have base screens.
Transmission destinations can be stored in one-touch keys in the address book and retrieved from the address book
screen when you need to use them. The address book is shared by fax mode, scan mode, and Internet fax mode.
To display the address book screen, touch the [Address Book] key in the base screen. To display the base screen, touch
the [Condition Settings] key in the address book screen. This manual refers to the base screen of fax mode as the "base
screen".
Base screen of fax mode Address book screen
Scan
Address Book
Direct TX
Sub Address
Address Review
File
Quick File
Original
Exposure
Resolution
Special Modes
Scan:
Auto
Standard
Fax Memory:100%
The procedures in this manual begin from the base screen of fax mode.
System Settings (Administrator): Default Display Settings
One of the following screens can be selected for the initial screen that appears when the [IMAGE SEND] key is touched.
• Base screen of each mode (scan, Internet fax, fax, or data entry mode)
• Address book screen (alphabetical/custom index)
USB Mem. ScanFaxInternet Fax PC Scan
Auto Auto
Auto Reception
Send:
105 15
Condition
Settings
Address Review
Address Entry
Global
Address Search
Sub Address
Sort Address
To
AAA AAA
CCC CCC
EEE EEE
GGG GGG
III III
Frequent Use
Cc
BBB BBB
DDD DDD
FFF FFF
HHH HHH
JJJ JJJ
ABCD EFGHI JKLMN OPQRST UVWXYZ
1
2
6
Page 7
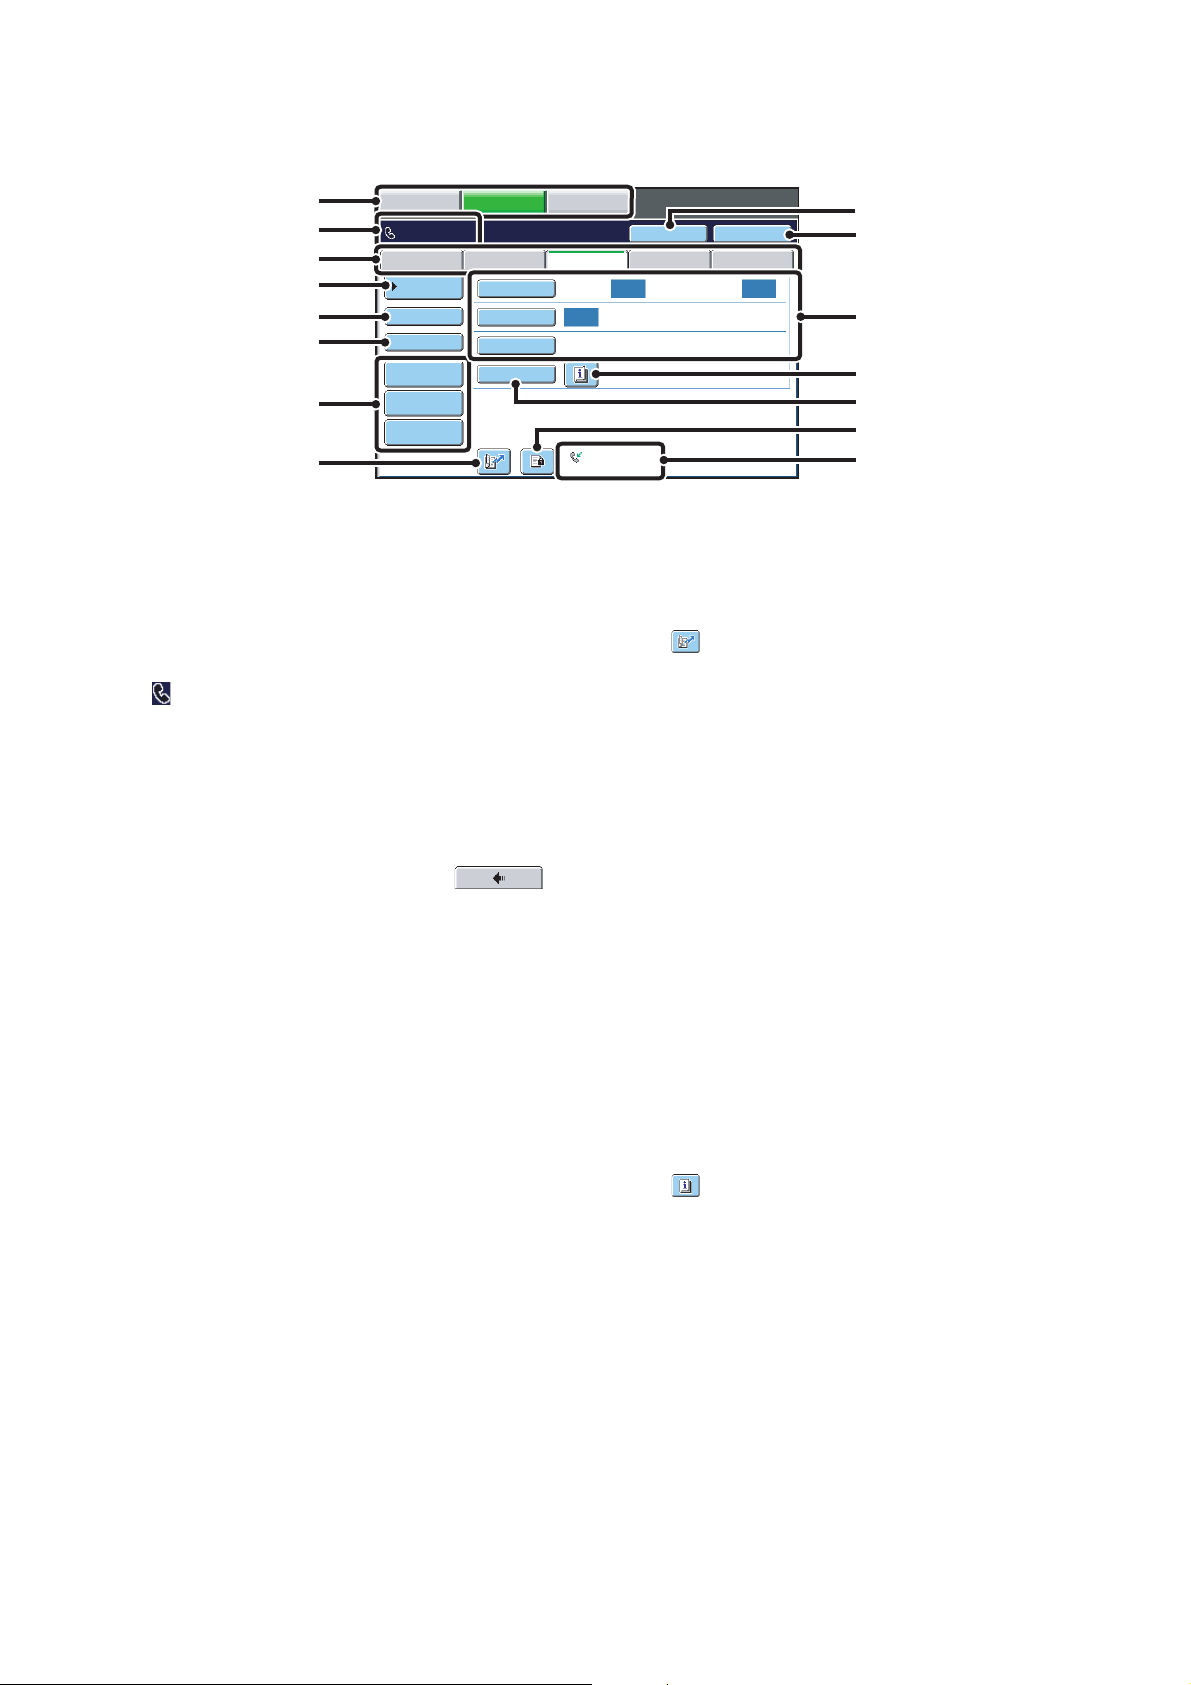
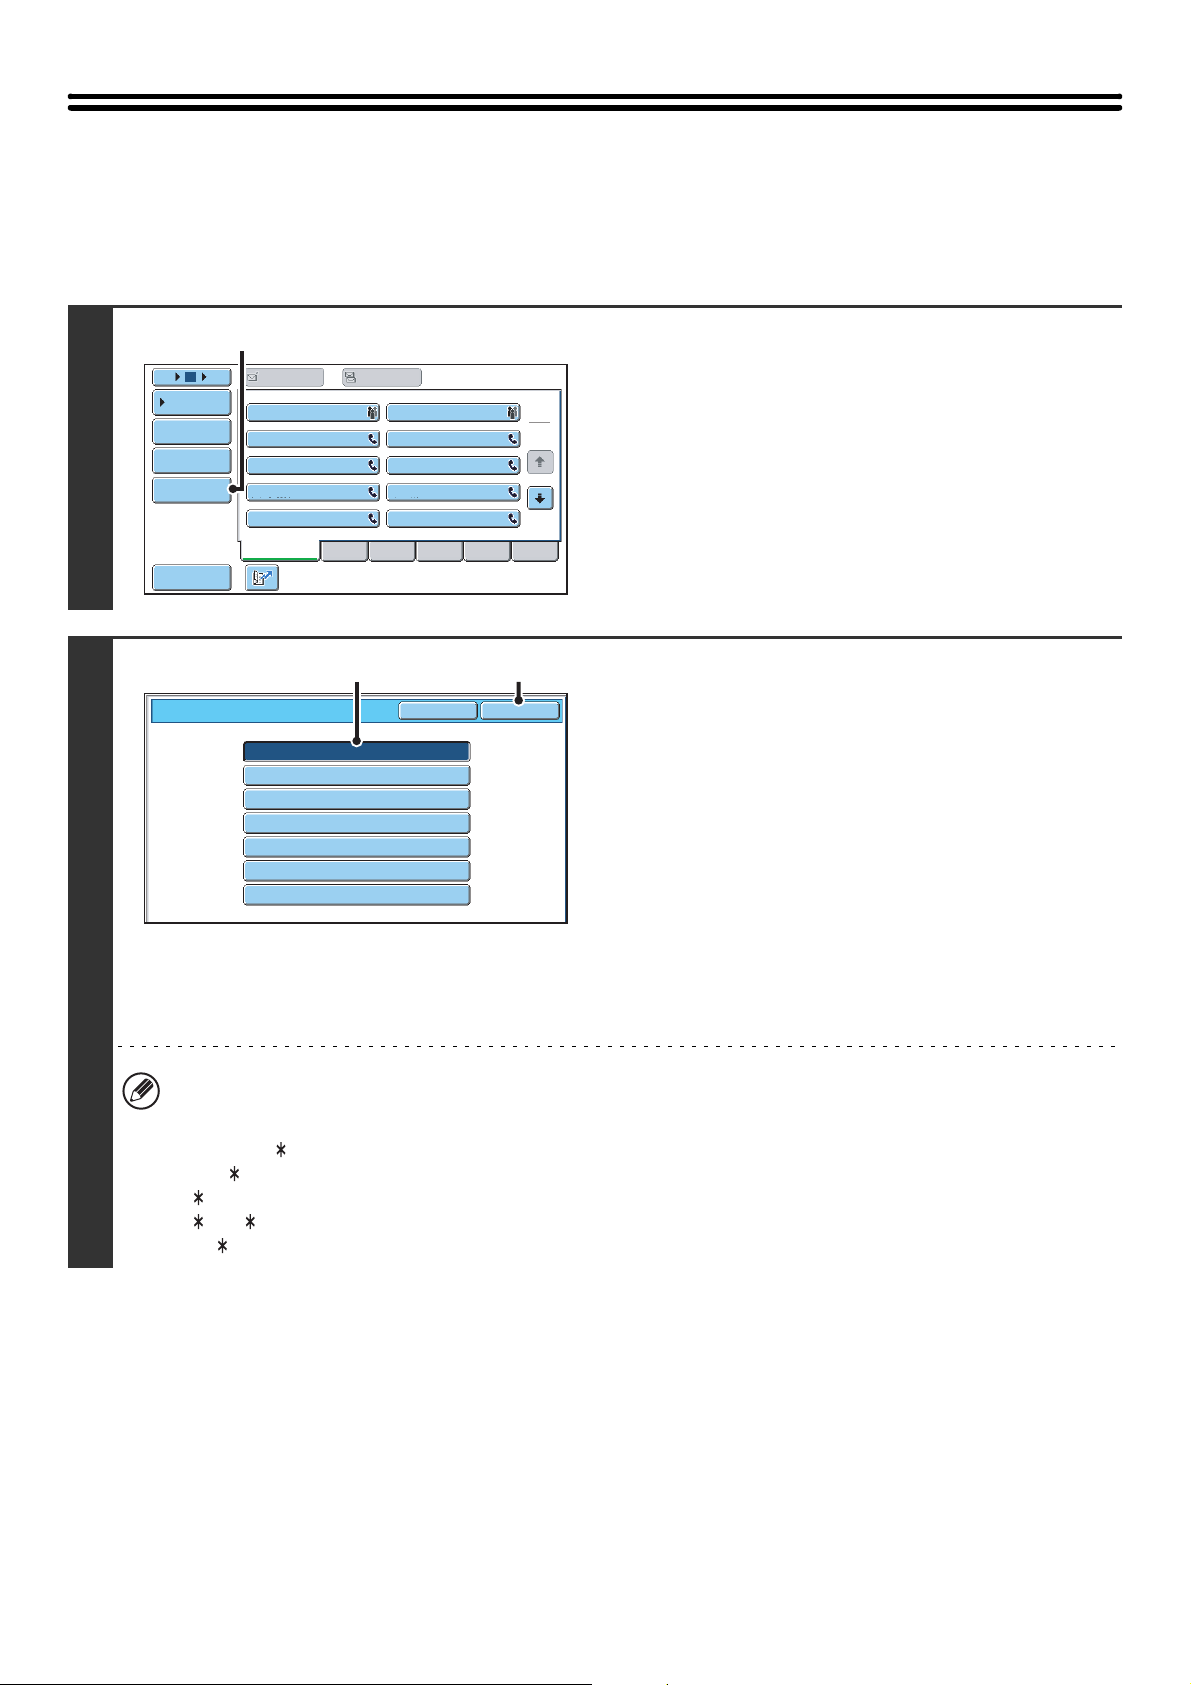
BASE SCREEN OF FAX MODE
This screen is used to select settings and operations in fax mode.
(1)
(2)
(3)
(4)
(5)
(6)
(7)
COPY
Ready to send.
Scan
Address Book
Direct TX
Sub Address
Address Review
File
Quick File
IMAGE SEND
Original
Exposure
Resolution
Special Modes
(8)
(1) Mode select keys
Use these keys to switch between copy, image send, and
document filing modes.
To switch to fax mode, touch the [IMAGE SEND] key.
(2) This shows various messages and the destinations
that have been entered.
The icon on the left indicates fax mode.
(3) Send mode tabs
Use these keys to change the mode of the image send
function. Tabs of modes that cannot be used because the
appropriate options (Internet fax expansion kit,
application integration module) are not installed do not
appear.
If the [Fax] tab does not appear, touch the
tab to move the screen.
☞ BASE SCREEN OF FAX MODE (page 6)
(4) [Address Book] key
Touch this key to dial using a one-touch key or group
key. When the key is touched, the address book screen
appears.
☞ RETRIEVING A FAX NUMBER FROM THE
ADDRESS BOOK (page 16)
(5) [Direct TX] key
Touch this key to send a fax by direct transmission.
When the [Direct TX] key is not highlighted, normal
transmission (memory TX mode) is selected.
☞ To fax a large number of sheet originals, use the
automatic document feeder. (page 24)
☞ If you wish to send a fax ahead of other previously
reserved fax transmissions, use direct transmission
mode. (page 25)
(6) [Sub Address] key
Touch this key to enter a sub-address and passcode for
F-code transmission.
☞ F-CODE DIALLING (page 97)
DOCUMENT
FILING
USB Mem. ScanFaxInternet Fax PC Scan
Auto Auto
Scan:
Auto
Standard
Auto Reception
Fax Memory:100%
(7) Customized keys
(8) key
(9) [Speaker] key / [Pause] key / [Space] key
(10) [Resend] key / [Next Address] key
(11) Image settings
(12) key
(13) [Special Modes] key
(9)
Send:
Resend
(10)
Speaker
(11)
(12)
(13)
(14)
(15)
The keys that appear here can be changed to show
settings or functions that you prefer.
☞ Customizing displayed keys (page 8)
Touch this key to dial a fax destination using a search
number.
☞ USING A SEARCH NUMBER TO RETRIEVE A
DESTINATION (page 19)
Touch this key to dial using the speaker.
When entering a fax number to be dialled, the key
changes to the [Pause] key. When entering a
sub-address, the key changes to the [Space] key.
☞ TRANSMISSION USING THE SPEAKER (page 36)
Touch this key to redial a fax number. When entering a
fax number to be dialled, this key changes to the [Next
Address] key.
☞ USING THE RESEND FUNCTION (page 22)
Image settings (original size, exposure, resolution) can
be selected.
☞ IMAGE SETTINGS (page 43)
This key appears when a special mode or 2-sided
scanning is selected. Touch the key to display the
selected special modes.
☞ Checking what special modes are selected (page 8)
Touch this key to use a special mode.
☞ 5. SPECIAL MODES (page 60)
7
Page 8
(14) key
When "Hold Setting for Received Data Print" is enabled,
this appears when a fax has been received. Touch this
(15) This shows the currently selected fax reception
mode and the amount of free memory remaining.
☞ RECEIVING FAXES (page 55)
key to open a password entry screen. Enter the set
password to print the received fax.
☞ PRINTING A PASSWORD-PROTECTED FAX (Hold
Setting For Received Data Print) (page 57)
Customizing displayed keys
Special mode keys and other keys can be displayed in the base screen. You can assign frequently used functions to these
keys to access the functions with a single touch. To change the function that is assigned to a key, use "Customize Key
Setting" in the Web pages. The following keys appear by factory default:
• [Address Review] key
Touch this key to display a list of the destinations that have been selected in the address book. This is the same key
as the [Address Review] key in the address book screen.
• [File] key, [Quick File] key
Touch either key to use Quick File or File in document filing mode. For more information on the document filing
function, see the Document Filing Guide.
Example: When "Dual Page Scan", "Job Build", and "Mixed Size Original" are assigned to the customized
keys.
USB Mem. ScanFaxInternet Fax Internet Fax
Auto Auto
Auto Reception
Send:
These 3 keys can be changed
as desired.
Scan
Address Book
Direct TX
Sub Address
Dual Page
Scan
Job Build
Mixed Size
Org
Original
Exposure
Resolution
Special Modes
Scan:
Auto
Standard
Fax Memory:100%
Displaying a program key in the base screen will enable you to call up the program by simply touching the key.
☞ STORING FAX OPERATIONS (Program) (page 62)
System Settings (Administrator): Customize Key Setting
Registration is performed in [System Settings] - [Operation Settings] - "Customize Key Setting" in the Web page menu.
Checking what special modes are selected
The key appears in the base screen when a special mode or 2-sided scanning is selected.
The key can be touched to display the selected special modes. To close the screen, touch the [OK] key.
Scan
Address Book
Direct TX
Sub Address
Address Review
File
Quick File
Original
Exposure
Resolution
Special Modes
Scan:
Auto
Standard
Fax Memory:100%
USB Mem. ScanFaxInternet Fax PC Scan
Auto Auto
Auto Reception
Send:
Function Review
Erase
Timer
Mixed Size
Original
Edge:10mm
:
Centre:10mm
Day of the Week:Monday
:
Time: 21:30
:
On
OK
1
1
The special mode settings cannot be changed from the function review screen. To change a setting, touch the [OK] key to
close the function review screen and then touch the [Special Modes] key and select the setting that you wish to change.
8
Page 9
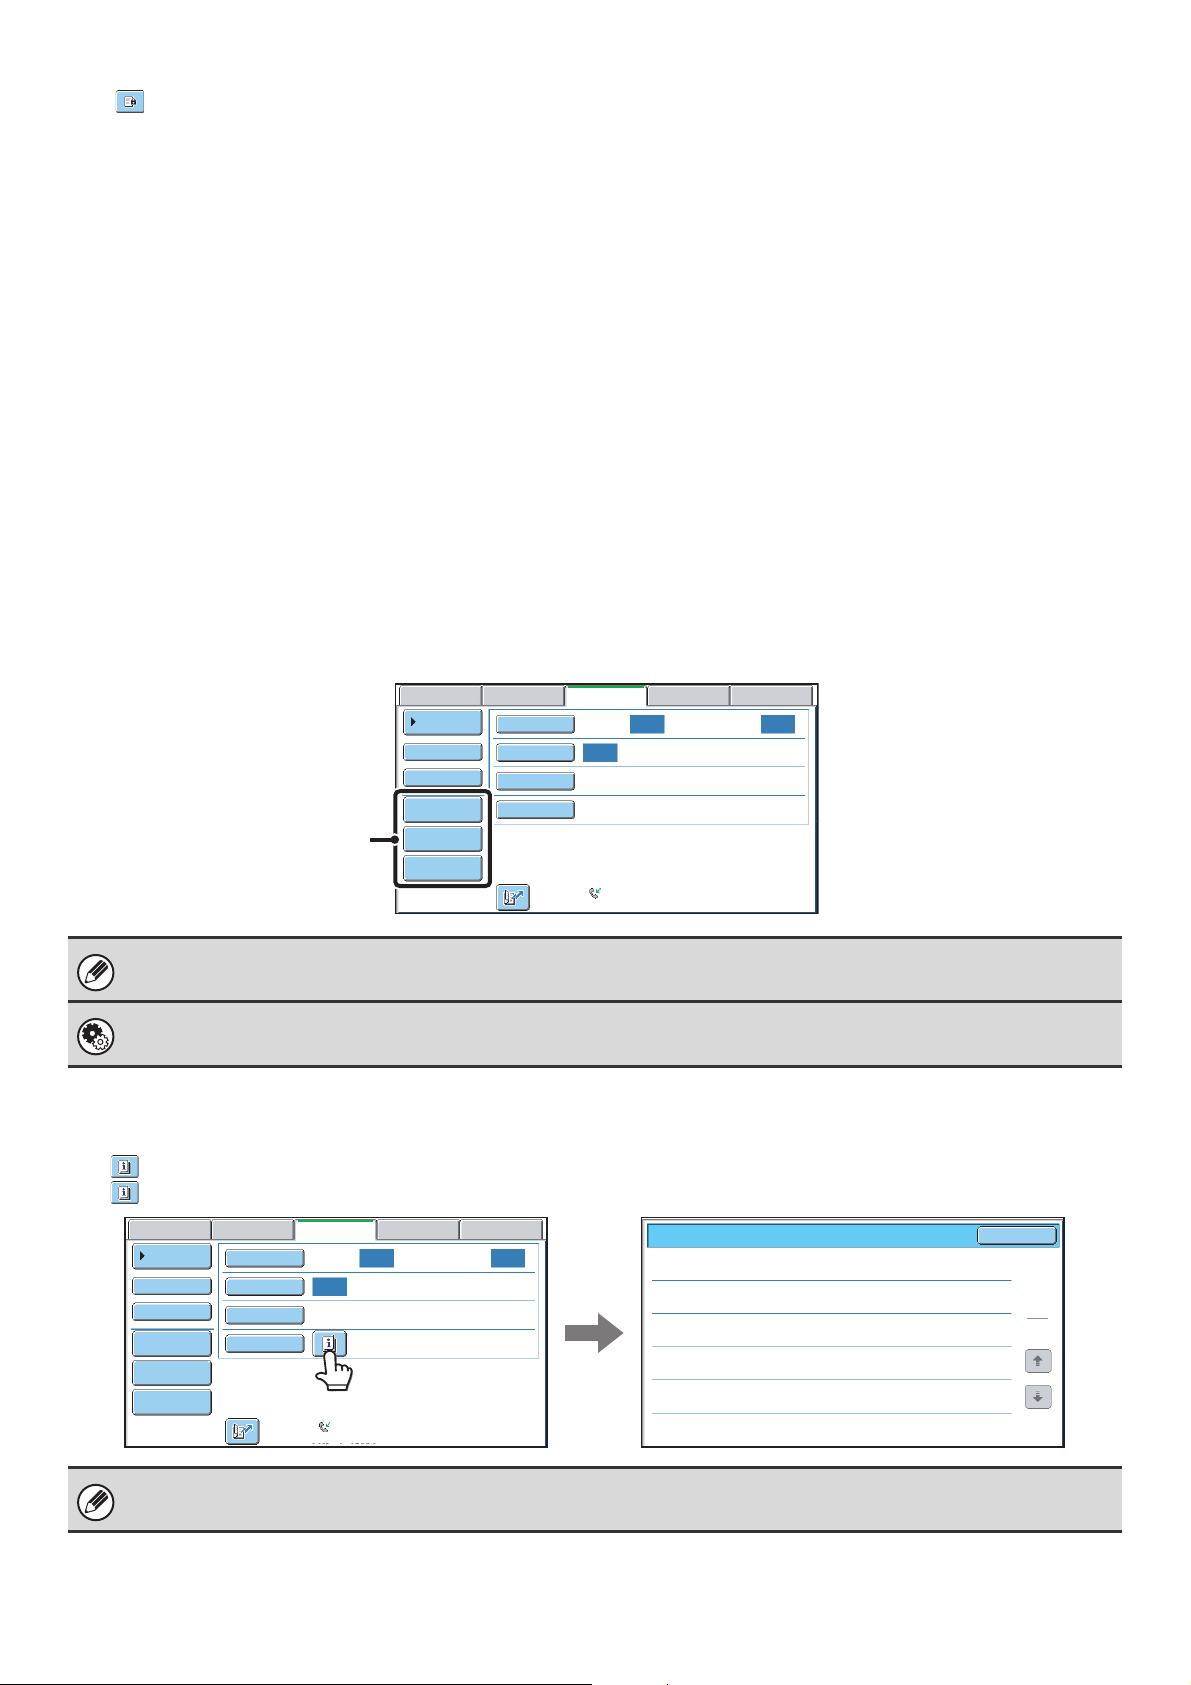
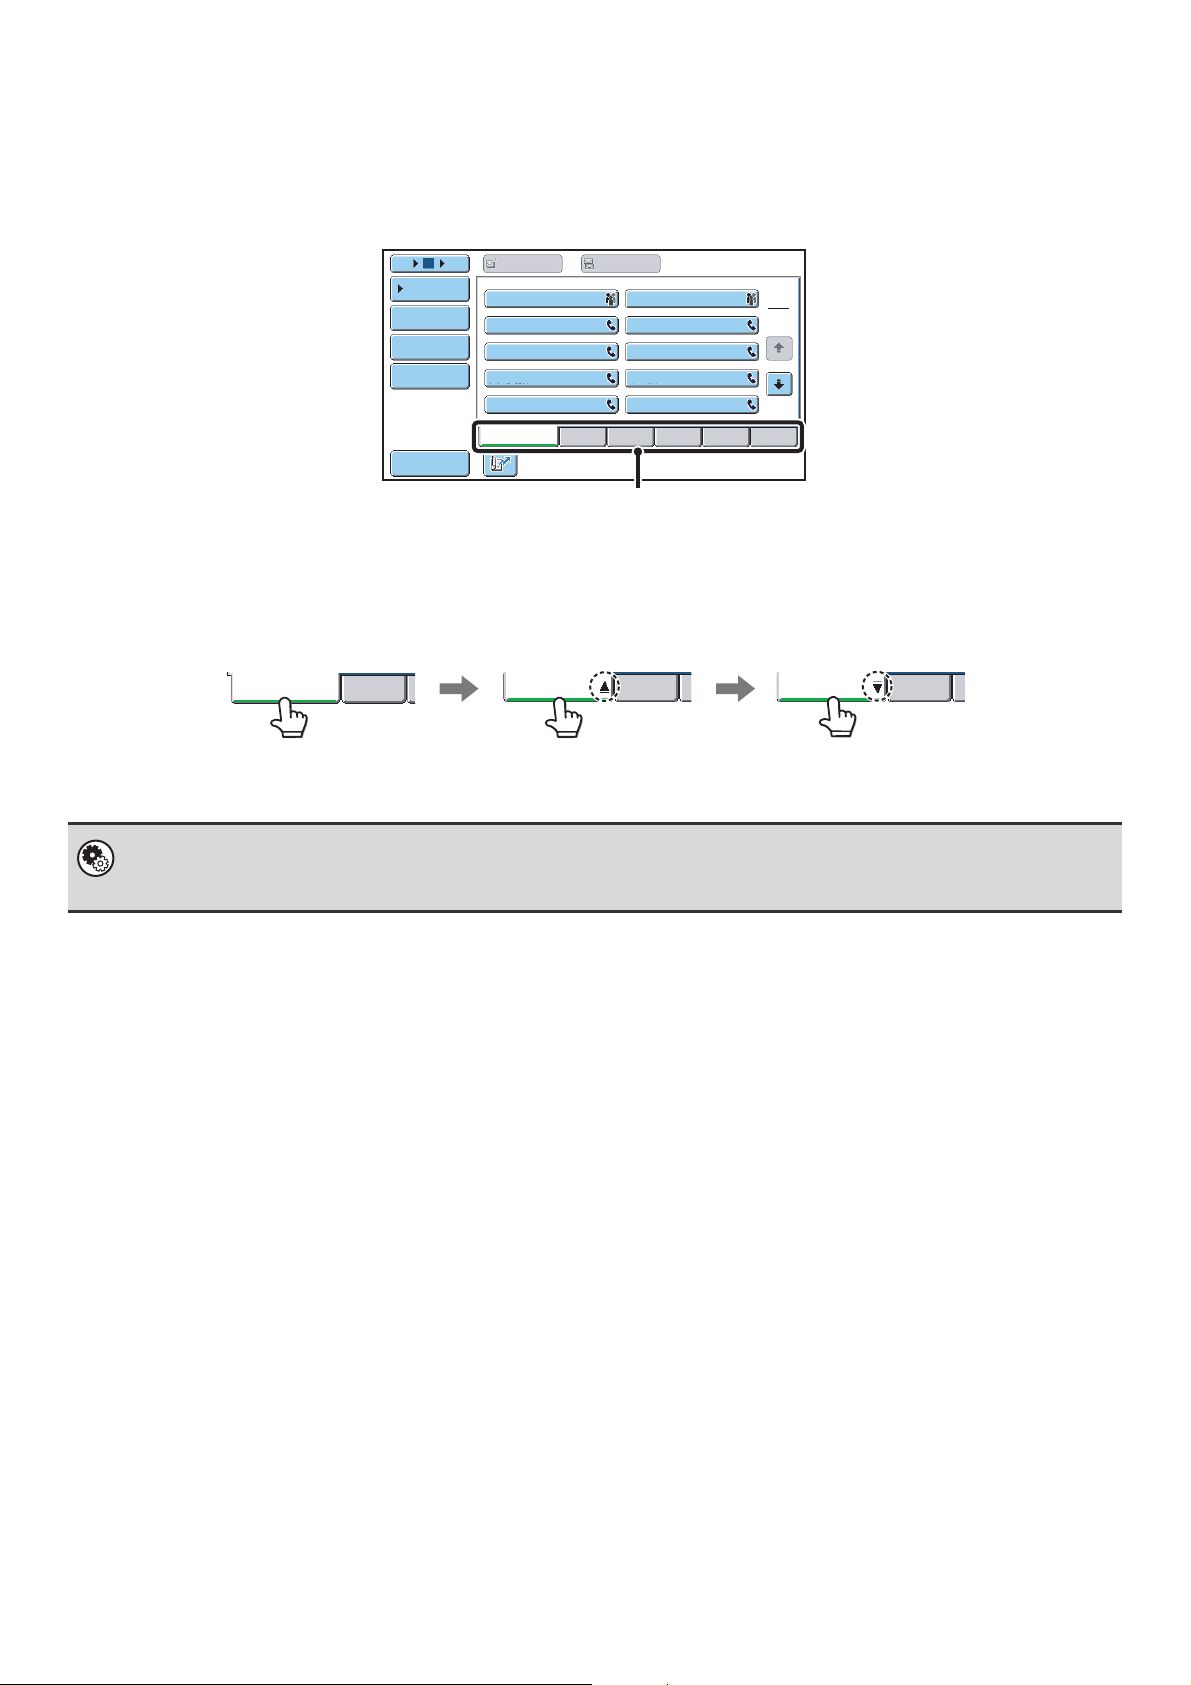
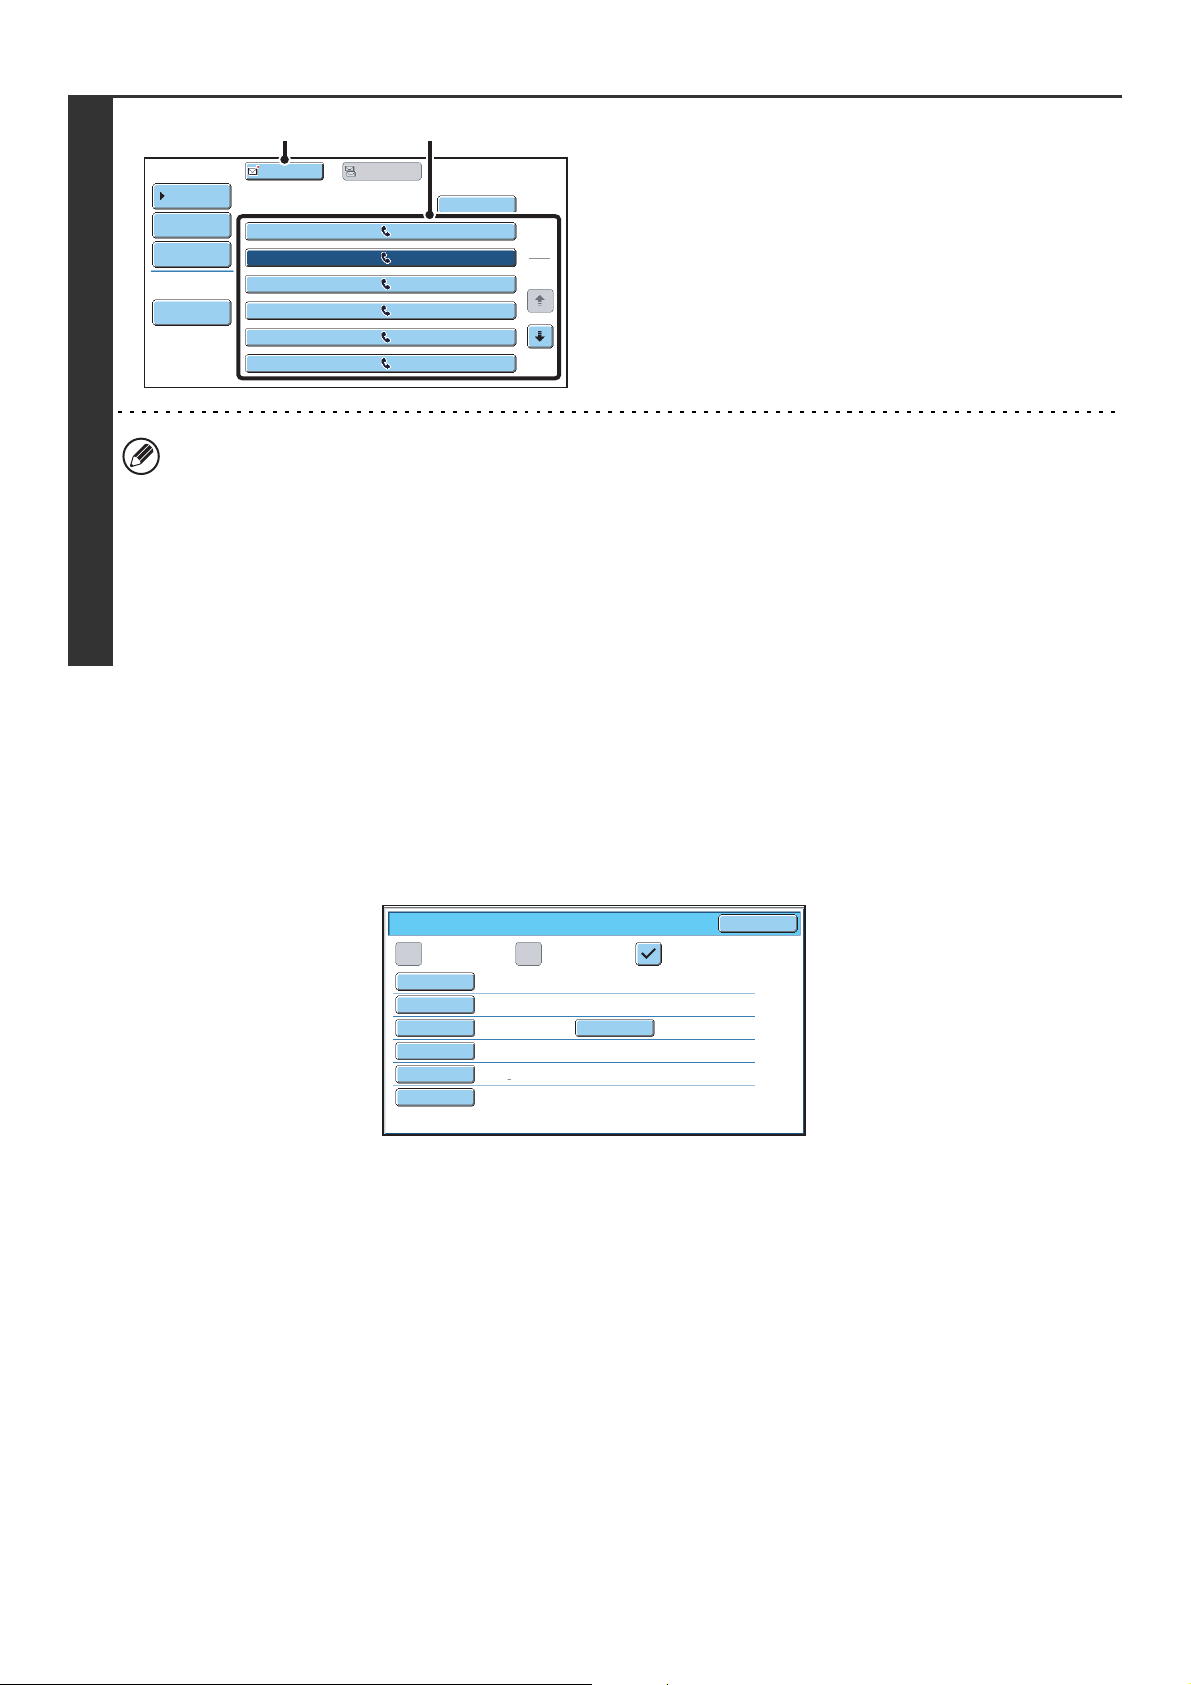
ADDRESS BOOK SCREEN
This screen is used to select a destination from the list of stored destinations.
(9)
(1)
(2)
(3)
(4)
(5)
(6)
(7)
(8)
CCC CCC
0123456789
105 15
Condition
Settings
Address Review
Address Entry
Global
Address Search
Sub Address
Sort Address
To
AAA AAA
CCC CCC
EEE EEE
GGG GGG
III III
Frequent Use
(13)
(1) This shows the destination that has been selected.
(2) Number of displayed items selector key
Touch to change the number of destinations (one-touch
keys) displayed in the address book screen. Select 5, 10,
or 15 destinations.
(3) [Condition Settings] key
Touch this key to select transmission settings and
operations. When the key is touched, the base screen
appears.
☞ BASE SCREEN OF FAX MODE (page 7)
(4) [Address Review] key
Touch this key to view a list of the selected destinations.
The selected destinations can be changed.
☞ CHECKING AND DELETING ENTERED
DESTINATIONS (page 18)
(5) [Address Entry] key
Not used in fax mode.
(6) [Global Address Search] key
When the use of an LDAP server has been enabled in
the machine's Web page, a fax number can be obtained
from a global address book.
☞ RETRIEVING A DESTINATION FROM A GLOBAL
ADDRESS BOOK (page 20)
(7) [Sub Address] key
Touch this key to enter a sub-address and passcode for
F-code transmission.
☞ F-CODE DIALLING (page 97)
(10)
Cc
BBB BBB
DDD DDD
FFF FFF
HHH HHH
JJJ JJJ
ABCD EFGHI JKLMN OPQRST UVWXYZ
1
2
(8) [Sort Address] key
Touch this key to change the index tabs to custom
indexes or to display one-touch keys by send mode.
☞ CHANGING THE DISPLAY OF ONE-TOUCH KEYS
IN THE ADDRESS BOOK SCREEN (page 10)
(9) [To] key
Touch this key to enter a selected destination (one-touch
key).
☞ RETRIEVING A STORED DESTINATION (page 17)
(10) [Cc] key
Not used in fax mode.
(11) One-touch key display
This shows the one-touch keys of the destinations that
have been stored in the address book. This manual
refers to keys in which single destinations and groups are
stored as one touch keys. Keys that have fax numbers
stored are indicated by .
☞ RETRIEVING A STORED DESTINATION (page 17)
(12) Index tabs
Touch this to change indexes.
☞ RETRIEVING A STORED DESTINATION (page 17)
(13) key
Touch this key to retrieve a destination using a search
number.
☞ USING A SEARCH NUMBER TO RETRIEVE A
DESTINATION (page 19)
(11)
(12)
9
Page 10
Destinations stored for the network scanner and Internet fax functions are indicated by a different icon.
☞ RETRIEVING A FAX NUMBER FROM THE ADDRESS BOOK (page 16)
• System Settings: Address Book
This is used to store fax numbers in one-touch keys.
• System Settings (Administrator): The Number of Direct Address Keys Displayed Setting
This is used to change the default setting for the number of one-touch keys displayed in the address book screen.
• System Settings (Administrator): Default Display Settings
One of the following screens can be selected for the initial screen that appears when the [IMAGE SEND] key is touched.
• Base screen of each mode (scan, Internet fax, fax, or data entry mode)
• Address book screen (alphabetical/custom index)
CHANGING THE DISPLAY OF ONE-TOUCH KEYS IN THE ADDRESS BOOK SCREEN
You can show only destinations of a specific transmission mode in the address book screen, or change the displayed
index tabs from the alphabetical tabs to the custom tabs. The procedure for selecting destinations does not change.
1
2
105 15
Condition
Settings
Address Review
Address Entry
Global
Address Search
Sort Address
Sort Address
Tab Switch
ABC
User
To
AAA AAA
CCC CCC
EEE EEE
GGG GGG
III III
Frequent Use
Address Type
Internet Fax
Cc
BBB BBB
DDD DDD
FFF FFF
HHH HHH
JJJ JJJ
ABCD EFGHI JKLMN OPQRST UVWXYZ
All
E-mail
Group
FTP/Desktop
Fax
Network Folder
Touch the [Sort Address] key.
1
2
(2)(1)
OK
Change the display mode.
(1) Touch the key of the mode or tab that you
wish to display.
• To show only the one-touch keys of a particular send
mode, touch the desired mode key under "Address
Type".
• To change the index tabs to the custom indexes, touch
the [User] key under "Tab Switch".
(2) Touch the [OK] key.
10
Page 11
Index display
Indexes make it easy to search for a destination (one-touch key). Destinations are grouped on alphabetical index tabs
by their initials. To display a stored destination, touch the appropriate index tab. It is convenient to store frequently used
destinations in the [Frequent Use] index. Specify that a destination be displayed in the [Frequent Use] index when you
store the destination.
105 15
Condition
Settings
Address Review
Address Entry
Global
Address Search
Sort Address
To
AAA AAA
CCC CCC
EEE EEE
GGG GGG
III III
Frequent Use
Cc
BBB BBB
DDD DDD
FFF FFF
HHH HHH
JJJ JJJ
ABCD EFGHI JKLMN OPQRST UVWXYZ
1
2
Index tabs
The destinations can be displayed in alphabetical order by their initials.
Each time the displayed index tab is touched, the display order changes in the following order: search numbers (page
19), ascending names, descending names, search numbers... When the display order is changed, the display order of
the other index tabs also changes.
Ordered by search number (default) Ascending names Descending names
Frequent Use
ABCD
Frequent Use Frequent Use
ABCD
ABCD
Index names can be changed using "Custom Index" in the system settings, allowing you to create groups of one-touch
keys that can be easily recognized. For more information on "Custom Index", see the System Settings Guide.
System Settings: Custom Index
This is used to store custom index names. The custom index where a one-touch key appears is specified when the
transmission destination is stored in the key.
11
Page 12
FAX TRANSMISSION SEQUENCE
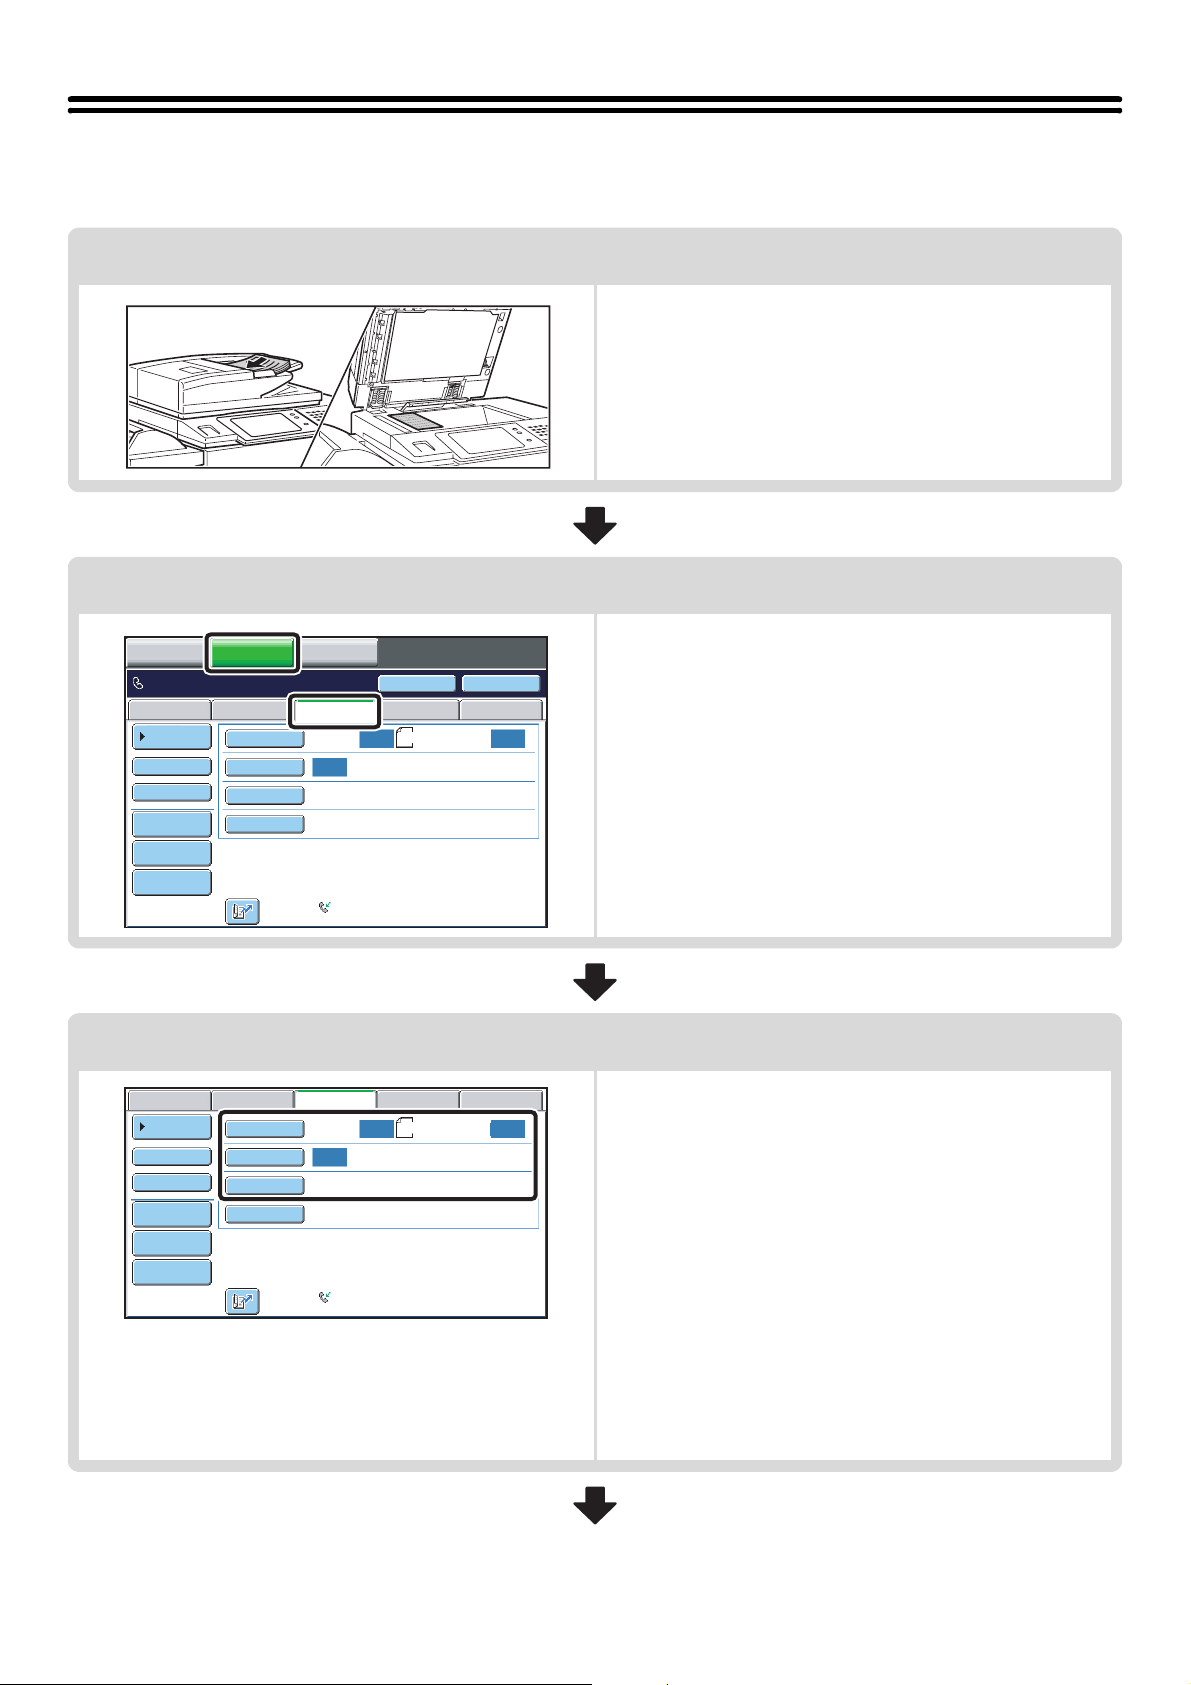
This section explains the basic procedure for sending a fax.
Place the original.
Place the original in the document feeder tray of the automatic
document feeder, or on the document glass.
Change the mode.
Ready to send.
Scan
Address Book
Direct TX
Sub Address
Address Review
File
Quick File
Scan
Address Book
Direct TX
Sub Address
Address Review
File
Quick File
IMAGE SENDCOPY
Original
Exposure
Resolution
Special Modes
Original
Exposure
Resolution
Special Modes
DOCUMENT
FILING
USB Mem. ScanFaxInternet Fax PC Scan
Auto Auto
Scan:
Auto
Standard
Auto Reception
Fax Memory:100%
USB Mem. ScanFaxInternet Fax PC Scan
Auto Auto
Scan:
Auto
Standard
Auto Reception
Fax Memory:100%
Speaker
A4
A4
Change to fax mode.
Touch the [IMAGE SEND] key and then the [Fax] tab.
Resend
Scan:
☞ BASE SCREEN OF FAX MODE (page 6)
Select image settings.
Select settings for the original to be faxed.
Send:
• [Original] key: Use this key to select the original size, the
• [Exposure] key: Use this key to adjust the exposure of the
• [Resolution] key: Use this key to adjust the resolution of the
original send size, and 2-sided original
scanning.
☞ SPECIFYING THE SCAN SIZE AND
SEND SIZE (Enlarge/Reduce
Transmission) (page 45),
AUTOMATICALLY SCANNING BOTH
SIDES OF AN ORIGINAL (2-Sided
Original) (page 44)
image.
☞
CHANGING THE EXPOSURE (page 52)
image.
☞ CHANGING THE RESOLUTION
(page 53)
12
Page 13
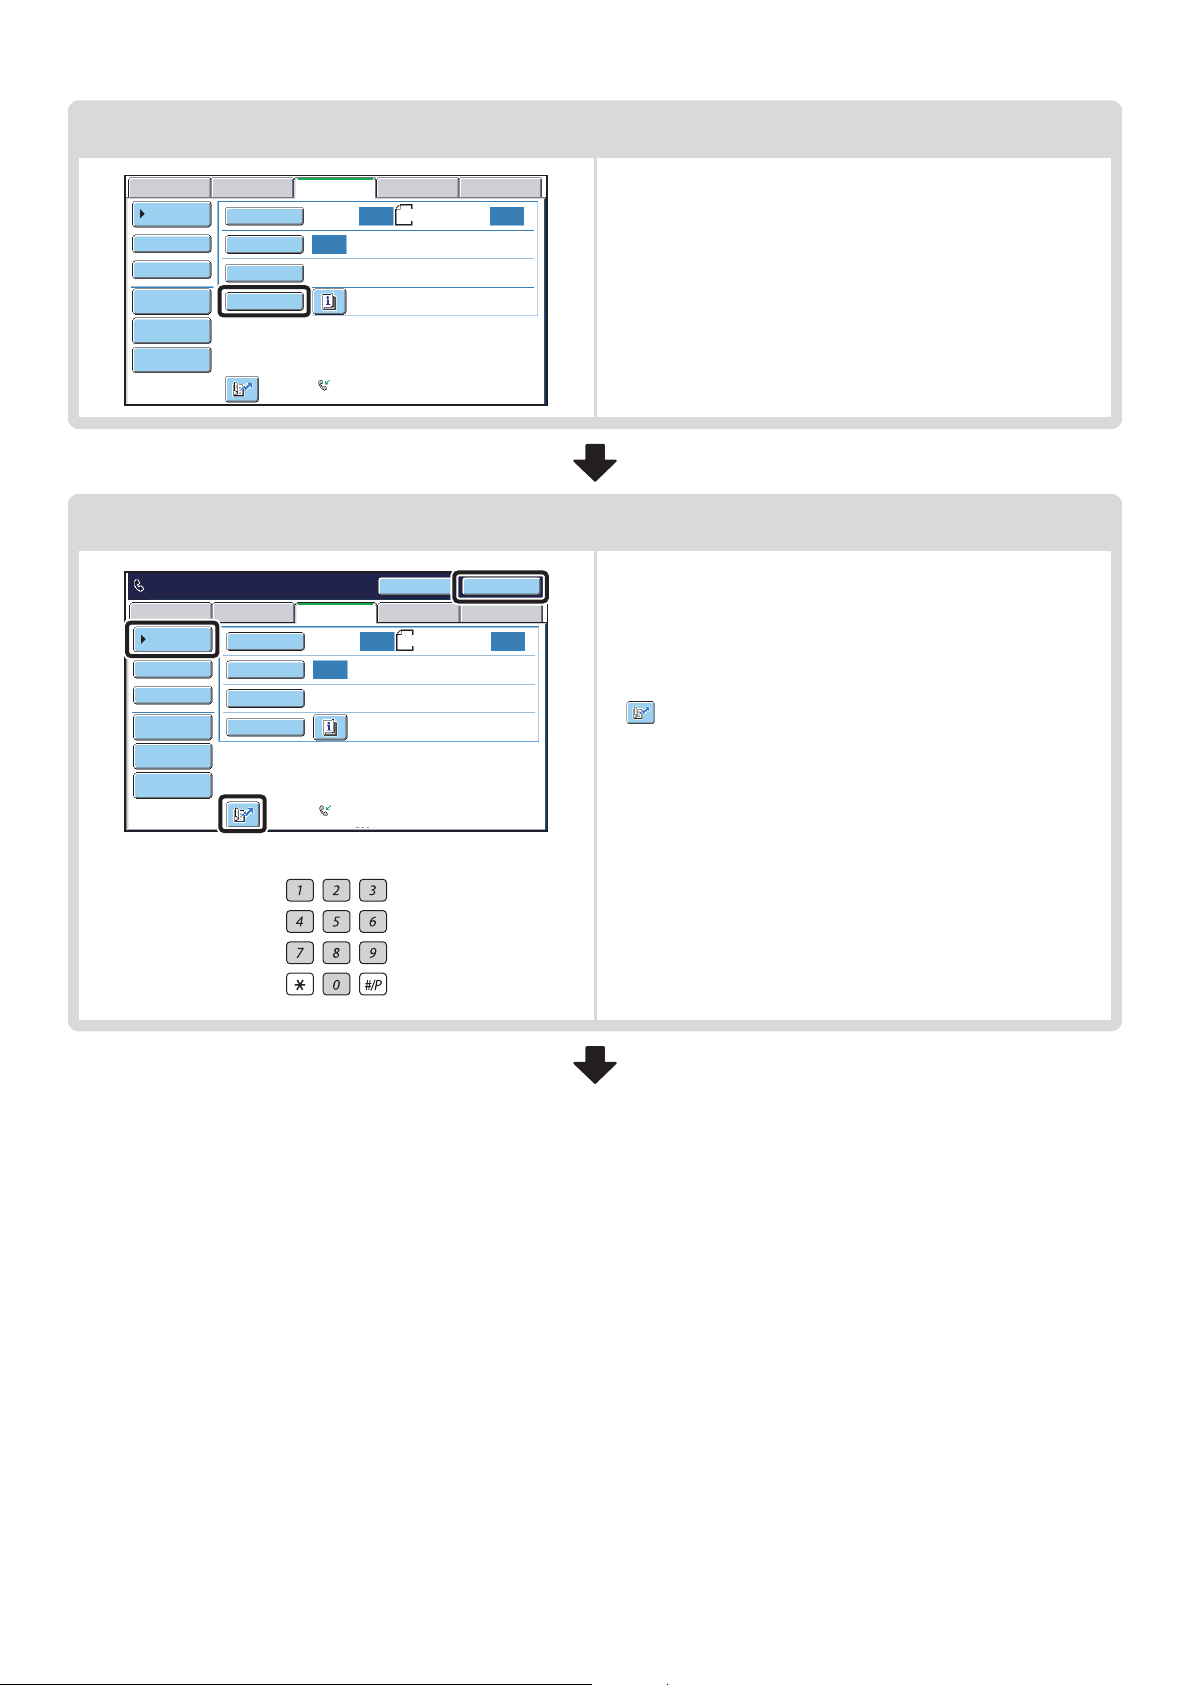
Special mode settings
Scan
Address Book
Direct TX
Sub Address
Address Review
File
Quick File
Ready to send.
Scan
Address Book
Direct TX
Sub Address
Address Review
File
Quick File
Original
Exposure
Resolution
Special Modes
Original
Exposure
Resolution
Special Modes
USB Mem. ScanFaxInternet Fax PC Scan
Auto Auto
Scan:
Auto
Standard
Auto Reception
Fax Memory:100%
Enter the destination fax number
USB Mem. ScanFaxInternet Fax PC Scan
Scan:
Auto Auto
Auto
Standard
Auto Reception
Fax Memory:100%
or
A4
Speaker
A4
Send:
Send:
Resend
Touch the [Special Modes] key to select special modes such
as timer transmission and the erase function.
• [Address Book] key: Select a destination that is stored in
the address book or look up a
destination in a global address book.
☞ RETRIEVING A FAX NUMBER
FROM THE ADDRESS BOOK
(page 16)
• key: Use a search number to specify a destination
stored in the address book.
☞ USING A SEARCH NUMBER TO RETRIEVE
A DESTINATION (page 19)
• [Resend] key: Select a fax number from the last eight
destinations used for transmission.
☞ USING THE RESEND FUNCTION (page
22)
• Numeric keys: Enter a fax number.
☞ ENTERING A FAX NUMBER WITH THE
NUMERIC KEYS (page 15)
13
Page 14
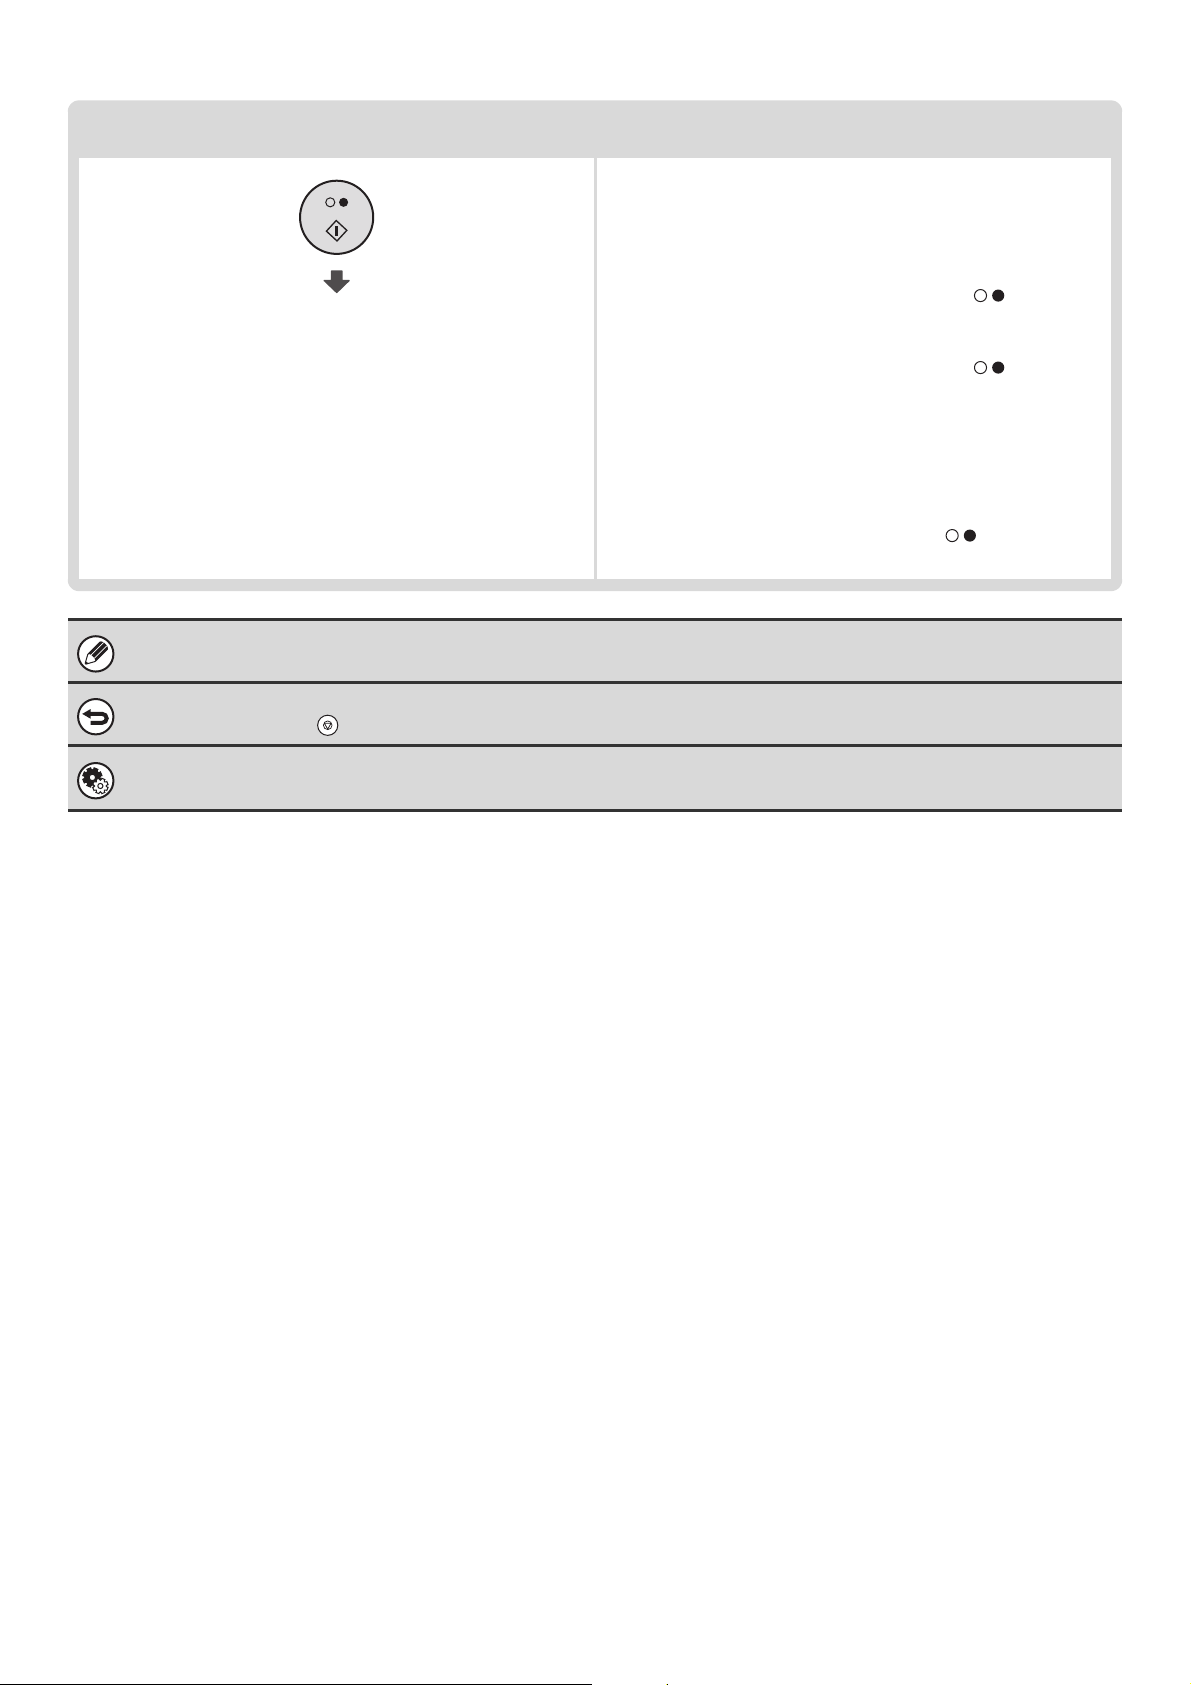
Begin transmission
Scan the original and send the fax.
If the original is placed on the document glass, follow these
steps to start scanning and transmission:
When sending a fax normally (memory transmission)
Transmission begins
When transmission ends, image settings and convenient special mode settings are cleared.
To cancel scanning...
Press the [STOP] key ( ).
(1) Press the [BLACK & WHITE START] key ( ).
(2) When scanning is finished, replace the original with the
next original.
(3) Press the [BLACK & WHITE START] key ( ).
(4) Repeat steps (2) and (3) until all originals have been
scanned.
(5) Touch the [Read-End] key.
When sending a fax in direct transmission mode
Multiple originals cannot be scanned in direct transmission
mode.
Press the [BLACK & WHITE START] key ( ) to start
transmission.
System Settings (Administrator): Default Display Settings
The settings can be kept in effect a fixed period of time after scanning is completed.
14
Page 15
ENTERING DESTINATIONS
2
This chapter explains how to enter destination fax numbers.
Destination fax numbers can be entered using the numeric keys, or by retrieving a previously stored fax number using
the address book or a search number.
ENTERING A FAX NUMBER WITH THE NUMERIC KEYS
Enter the destination fax number with
the numeric keys.
Take care to enter the correct number.
If an incorrect number is entered...
Press the [CLEAR] key ( ) to clear the number and then enter the correct number.
Entering a pause between digits of the number
Enter a pause after the number used to dial out from a PBX (for example, after "0"), or after the country code when
dialling an international number.
1234567890-
Scan
Address Book
Direct TX
Sub Address
Address Review
File
Quick File
Original
Exposure
Resolution
Special Modes
USB Mem. ScanFaxInternet Fax PC Scan
Auto Auto
Scan:
Auto
Standard
Auto Reception
Fax Memory:100%
Pause
A4
Next Address
Send:
Touch the [Pause] key.
A hyphen "-" is entered when the [Pause] key is touched once.
System Settings (Administrator): Pause Time Setting
This is used to set the length of pauses. The default setting is 2 seconds.
15
Page 16
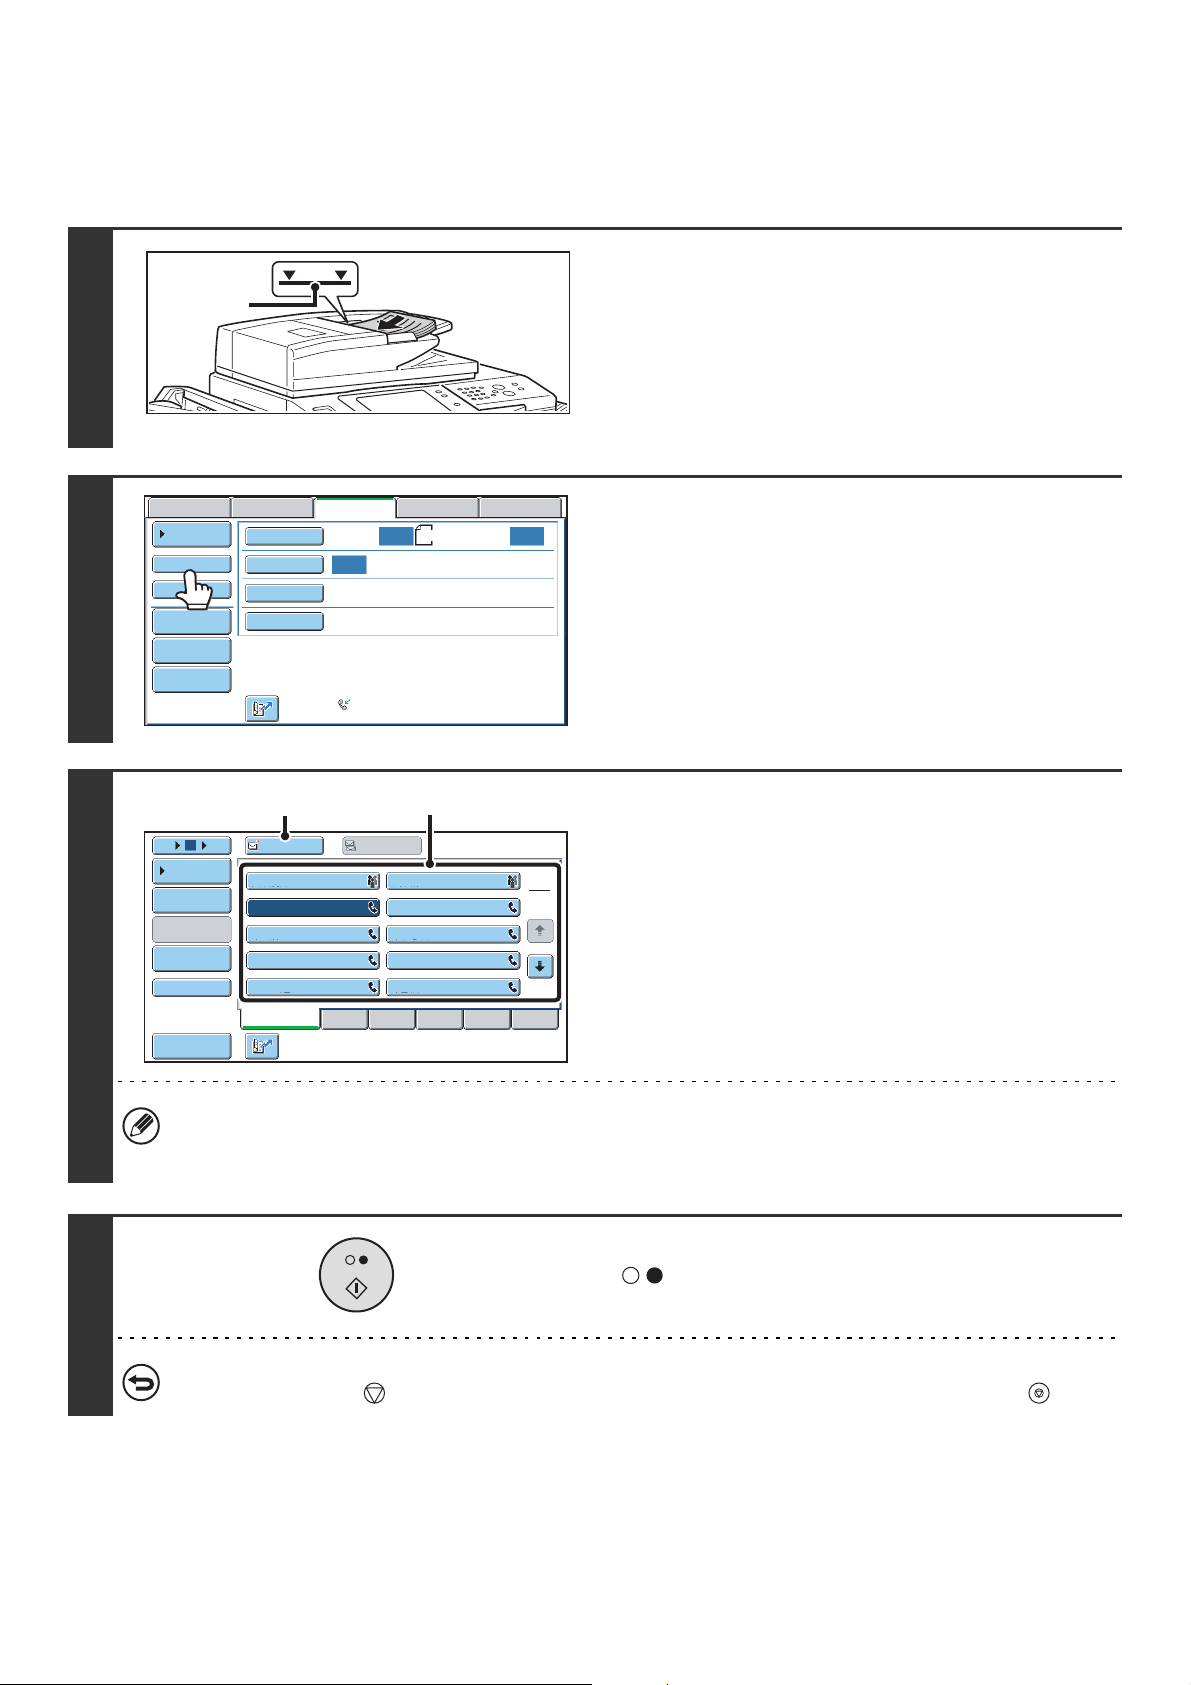
RETRIEVING A FAX NUMBER FROM THE ADDRESS BOOK
The address book screen shows stored destinations as one-touch keys.
A destination fax number is retrieved by simply touching the one-touch key of that destination. This is called "one-touch
dialling". It is also possible to store multiple fax numbers in a one-touch key, allowing you to retrieve all the numbers by
simply touching the key. This is called "group dialling". This dialling method is convenient when you wish to send a fax to
(or poll) multiple fax destinations.
One-touch keys are grouped on alphabetical index tabs to make it easy to find a destination.
105 15
Condition
Settings
Address Review
Address Entry
Global
Address Search
Sort Address
To
AAA AAA
CCC CCC
EEE EEE
GGG GGG
III III
Frequent Use
Cc
BBB BBB
DDD DDD
FFF FFF
HHH HHH
JJJ JJJ
ABCD EFGHI JKLMN OPQRST UVWXYZ
1
2
When destinations of other scan modes are stored in addition to fax destinations, an icon indicating the mode appears
together with the name of the destination in each one-touch key.
Icon Mode
Fax
When multiple destinations are stored
Scan to E-mail
Internet Fax
Scan to FTP
Scan to Network Folder
Scan to Desktop
System Settings: Address Book
This is used to store destinations (names and fax numbers) in the address book.
16
Page 17

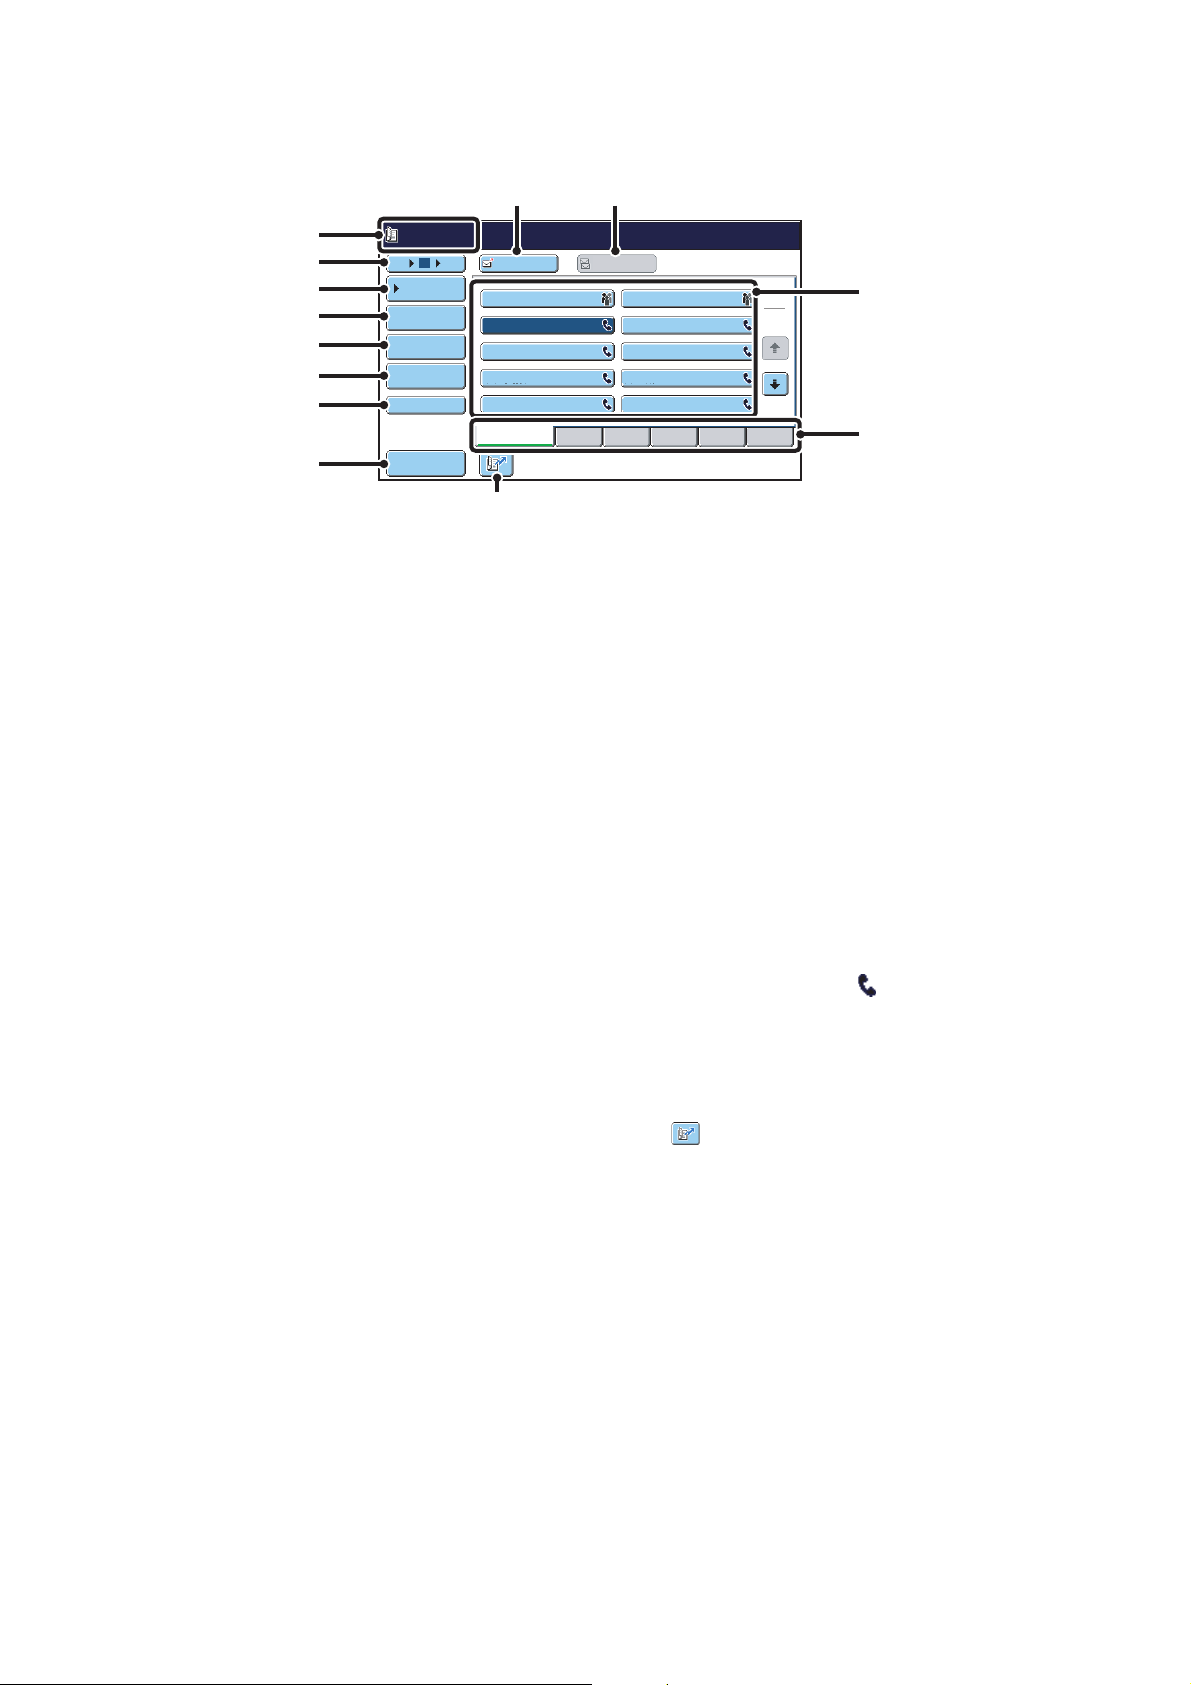
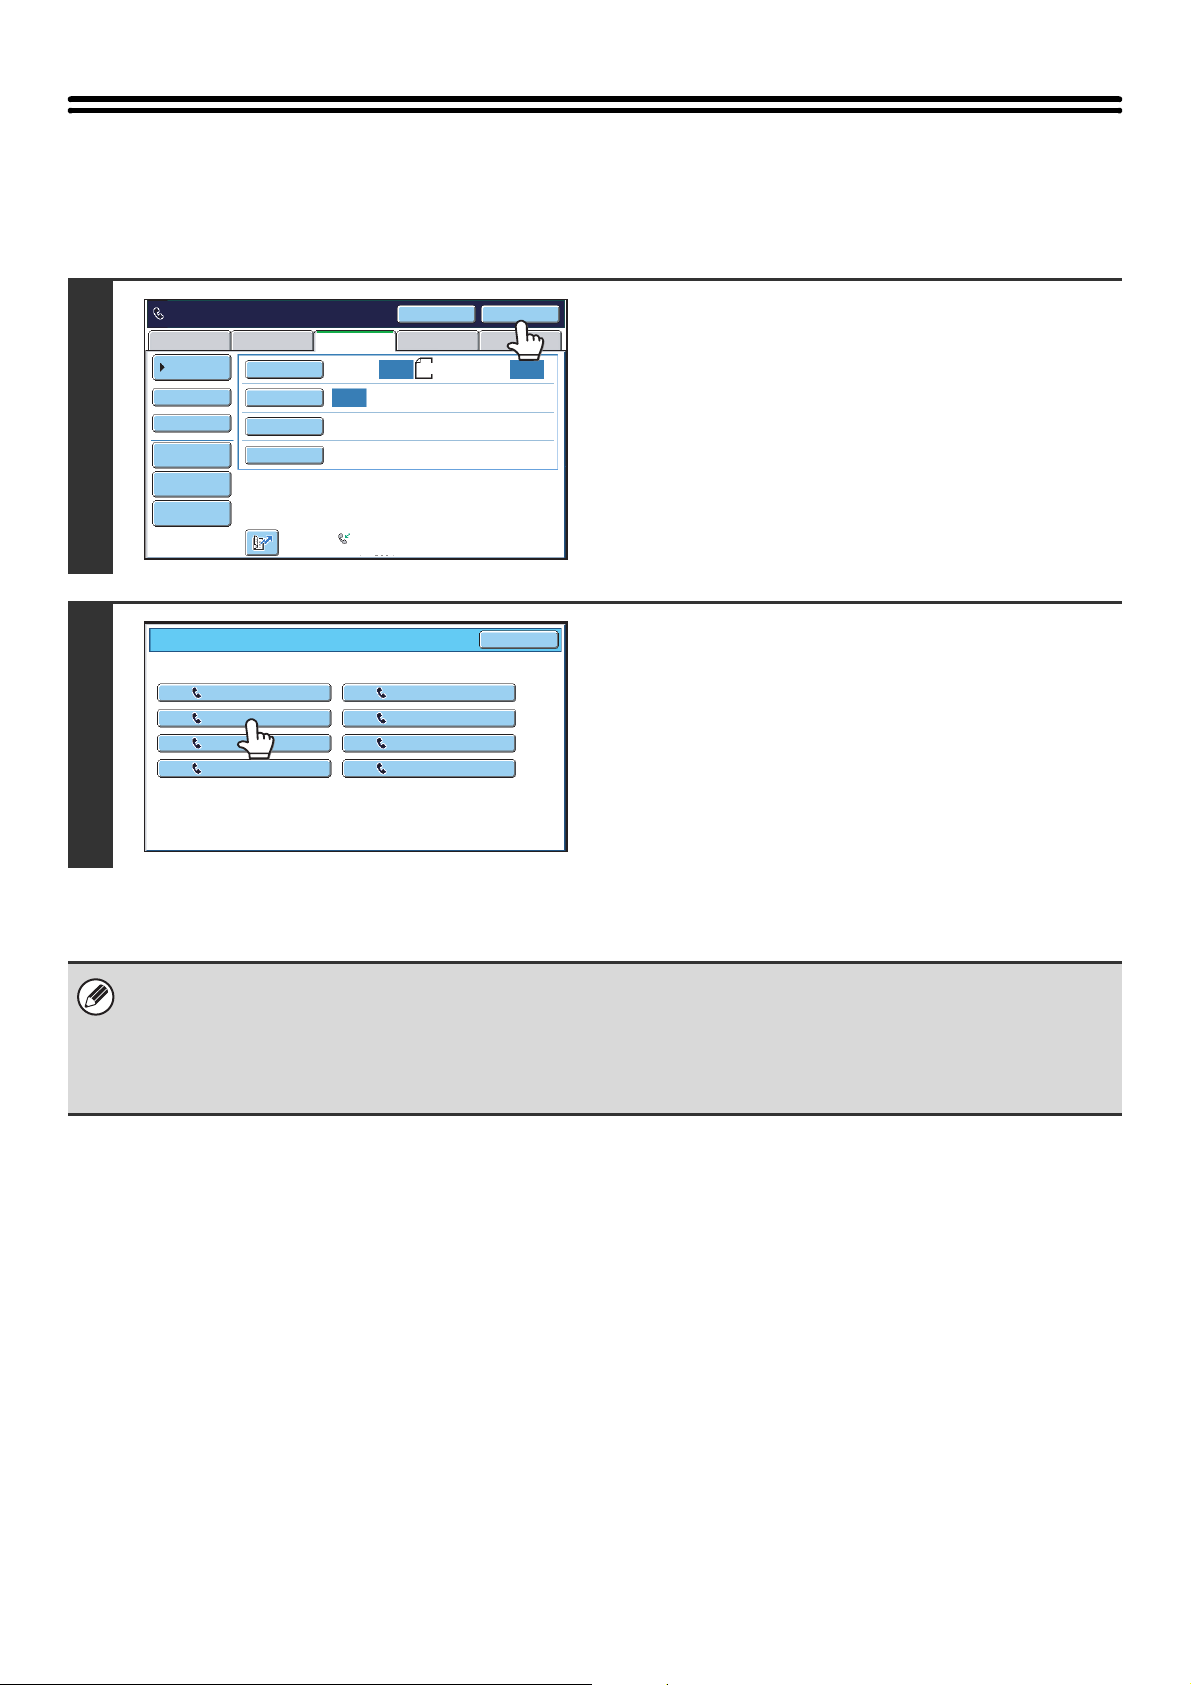
RETRIEVING A STORED DESTINATION
A destination fax number is retrieved by simply touching the one-touch key of that destination.
1
2
Scan
Address Book
Direct TX
Sub Address
Address Review
File
Quick File
105 15
Condition
Settings
Address Review
Address Entry
Global
Address Search
Sub Address
Sort Address
Original
Exposure
Resolution
Special Modes
To
AAA AAA
CCC CCC
EEE EEE
GGG GGG
III III
Frequent Use
USB Mem. ScanFaxInternet Fax PC Scan
A4
Auto Auto
Scan:
Auto
Standard
Auto Reception
Fax Memory:100%
Send:
(2)(3)
Cc
BBB BBB
DDD DDD
FFF FFF
HHH HHH
JJJ JJJ
ABCD EFGHI JKLMN OPQRST UVWXYZ
(1)
Touch the [Address Book] key.
Select the destination.
(1) Touch the index tab where the destination
1
2
is stored.
(2) Touch the one-touch key of the desired
destination.
If you select an incorrect destination, touch the key again
to cancel the selection.
(3) Touch the [To] key.
This enters the selected destination.
• Frequently used destinations can be displayed in the [Frequent Use] index. Specify that a destination be displayed
in the [Frequent Use] index when you store the destination.
• To continue specifying other destinations...
Touch the [Next Address] key and repeat (2) and (3) of this step.
• System Settings (Administrator): Must Input Next Address Key at Broadcast Setting
This setting determines whether or not the [Next Address] key can be omitted before specifying the next destination.
Factory default setting: The [Next Address] key can be omitted.
• System Settings (Administrator): Disable Switching of Display Order
This is used to disable switching of the order of display of the one-touch keys in the address book screen. The currently
selected display order will be the order that is used after this setting is enabled.
17
Page 18
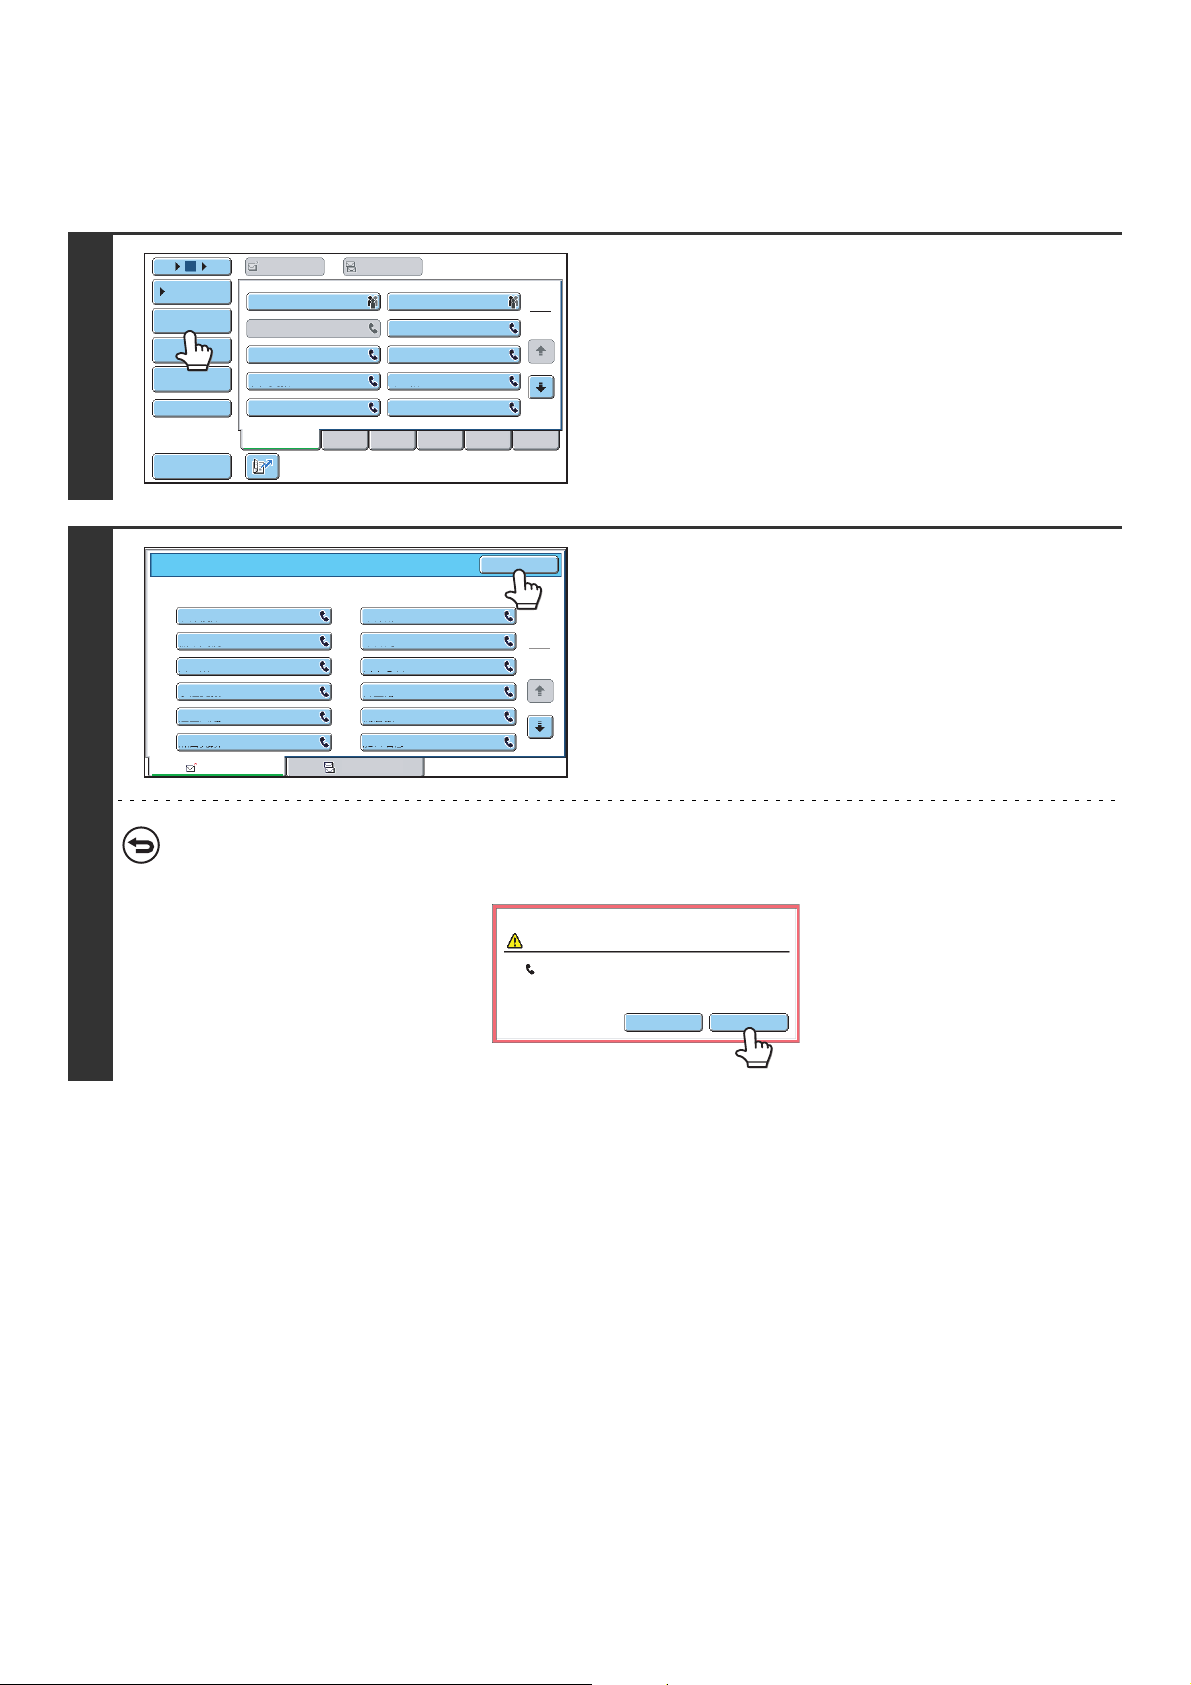
CHECKING AND DELETING ENTERED DESTINATIONS
When multiple destinations have been entered, you can display and check the destinations. You can also delete a
destination (cancel selection of the destination).
1
2
105 15
Condition
Settings
Address Review
Address Entry
Global
Address Search
Sub Address
Sort Address
Address Review
To
AAA AAA
CCC CCC
EEE EEE
GGG GGG
III III
Frequent Use
Cc
BBB BBB
DDD DDD
FFF FFF
HHH HHH
JJJ JJJ
ABCD EFGHI JKLMN OPQRST UVWXYZ
1
2
OK
Touch the [Address Review] key.
Check the destinations and then touch
the [OK] key.
CCC CCC
001
LLL LLL
003
NNN NNN
005
PPP PPP
007
RRR RRR
009
TTT TTT
011
To
To delete a destination...
Touch the one-touch key of the destination that you wish to delete. A message will appear to confirm the deletion.
Touch the [YES] key.
002
004
006
008
010
012
Cc
KKK KKK
MMM MMM
OOO OOO
QQQ QQQ
SSS SSS
UUU UUU
1
2
Deselect the address?
BBB BBB
No
Yes
18
Page 19
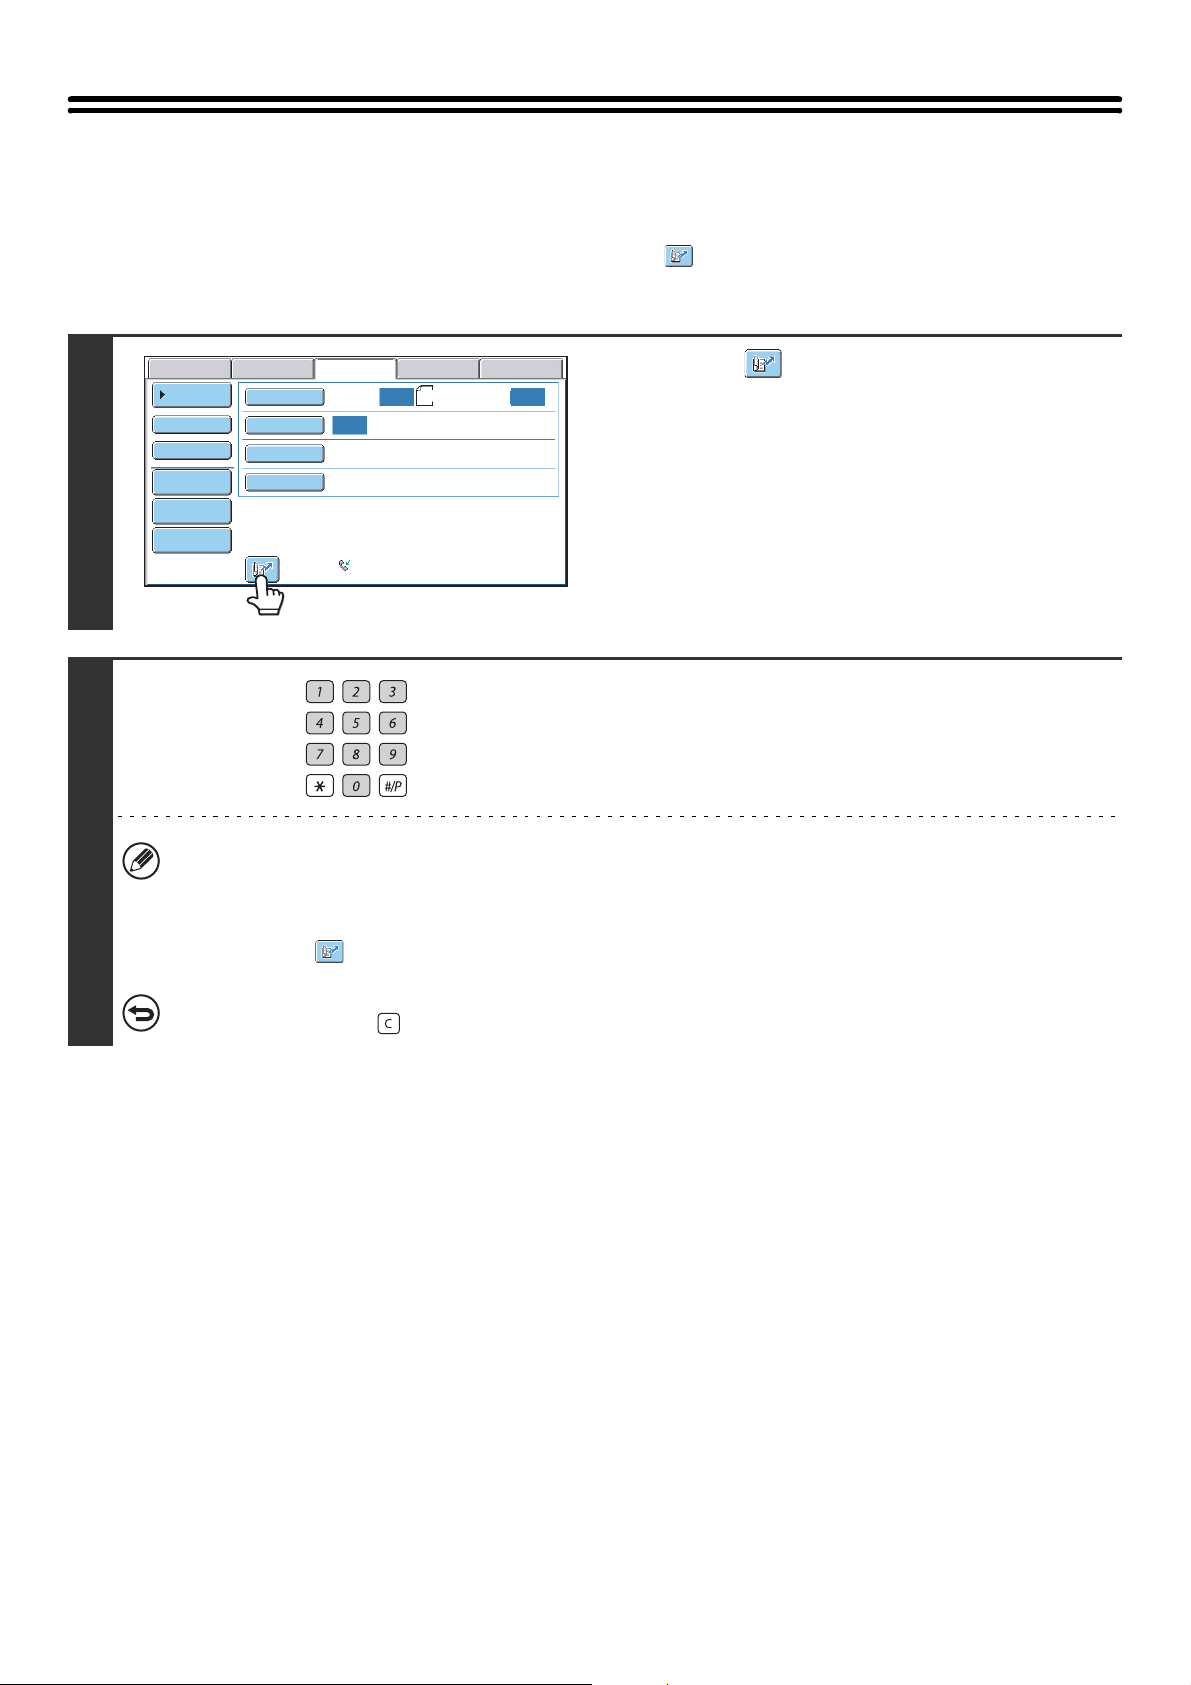
USING A SEARCH NUMBER TO RETRIEVE A DESTINATION
A destination stored in the address book can be retrieved using the key. This can be done in the base screen of fax
mode or in the address book screen.
1
2
Scan
Address Book
Direct TX
Sub Address
Address Review
File
Quick File
Original
Exposure
Resolution
Special Modes
Scan:
Auto
Standard
Fax Memory:100%
USB Mem. ScanFaxInternet Fax PC Scan
A4
Auto Auto
Auto Reception
Touch the key.
Send:
Enter the 3-digit search number of the
address with the numeric keys.
When the 3-digit search number is entered, the stored address
is retrieved and specified as a destination.
• The search number is programmed when the destination is stored in the address book.
• If you do not know the search number, print the one-touch address list using "Sending Address List" in the system
settings.
• When entering search numbers such as "001" and "011", "0" can be omitted. For example, to enter "001", enter "1"
and touch the key or the [Next Address] key.
If an incorrect search number is entered...
Press the [CLEAR] key ( ) to clear the number and enter the correct number.
19
Page 20
RETRIEVING A DESTINATION FROM A GLOBAL ADDRESS BOOK
If an LDAP server is stored in the Web pages, you can look up a destination fax number in a global address book.
1
2
105 15
Condition
Settings
Address Review
Address Entry
Global
Address Search
Sort Address
Server Change
(2)
To
AAA AAA
CCC CCC
EEE EEE
GGG GGG
III III
Frequent Use
Server 1
Server 2
Server 3
Server 4
Server 5
Server 6
Server 7
Cc
BBB BBB
DDD DDD
FFF FFF
HHH HHH
JJJ JJJ
ABCD EFGHI JKLMN OPQRST UVWXYZ
1
2
(2)(1)
Cancel
OK
Open the global address search screen.
(1) Touch the [Address Book] key in the base
screen.
(2) Touch the [Global Address Search] key.
Search for the destination.
If only one LDAP server has been stored, (1) and (2) are not
necessary. Go directly to (3).
(1) Touch the key of the LDAP server that you
wish to use.
(2) Touch the [OK] key.
(3) Search for the destination in the search
screen.
Enter search characters for the destination and touch the
[Search] key. The search results will appear after a brief
interval.
For the procedure for entering text, see "6. ENTERING
TEXT" in the User's Guide.
How to search
Enter a maximum of 64 characters for the search characters. The system will look for names starting with the entered
letters.
An asterisk can be used as follows:
XXX : Names beginning with "XXX".
XXX: Names that end with "XXX".
XXX : Names that include "XXX".
AA XX: Names that start with "AA" and end with "XX".
20
Page 21
(1)(2)
Select the destination.
(1) Touch the key of the desired destination.
If no names are found that match the search letters, a
message will appear. Touch the [OK] key to close the
message and touch the [Search Again] key to search
again.
(2) Touch the [To] key.
This enters the selected destination.
If you wish to select another destination, repeat steps (1)
and (2) above.
3
Condition
Settings
Address Review
Search Again
Address Book
To
XXX
XXX AAA
XXX BBB
XXX CCC
XXX DDD
XXX EEE
XXX FFF
Cc
0123456789
9876543210
0612345678
0687654321
0676543210
0601234567
Detail
1
2
• If more than 30 matches are found, a message will appear in the screen. Touch the [OK] key to close the message.
A maximum of 300 search results are displayed. If the desired destination was not found, touch the [Search Again]
key to add more search letters.
• To check the information stored in a destination...
Touch the key of the destination and then touch the [Detail] key. The information stored for the selected destination
will appear. Check the information and then touch the [OK] key to return to the search results screen.
• If a screen for selecting the item to be used appears...
If the selected destination includes an E-mail address or other address in addition to the fax number or telephone
number, you will need to select which item you wish to use. Touch the [Fax] key to retrieve the fax number.
Storing a destination from a global address book in the machine's
address book
A destination from a global address book can be stored in the machine's address book as a one-touch key.
Touch the [Detail] key in the search results screen of the global address book (the screen of step 3 above) to display
information on the selected destination. Touch the [Register] key in the detailed information screen and then touch the
item to be used (the [Fax] key in this case). The following screen will appear.
Direct Address / Individual
E-mail Internet Fax Fax
Search Number
Initial
Fax No.
Key Name
001
Name
AAA AAA
A User 1
0123456789
AAA AAA
Mode
33.6 kbps/None
Index
Exit
The information stored in the global address book is automatically entered. (The settings can be changed if needed. For
detailed information on each item, see "Address Control" in the System Settings Guide.) However, configure the items
below manually. To complete the storing procedure, touch the [Exit] key.
• [Initial] key: Touch this key to enter the initials that determine where the destination will appear in the alphabetical
index and the order of one-touch key display.
• [Index] key: Touch this key to select the custom index in which the address will appear. You can also select whether
or not the destination will be included on the [Frequent Use] tab of the address book.
• [Mode] key: Touch this key to configure the "Transmission Speed" and "International Correspondence Mode"
settings. These settings have already been configured, however, if the destination is an international
destination, or if you find that communication errors frequently occur when communicating with that
destination, you can try changing the settings.
21
Page 22
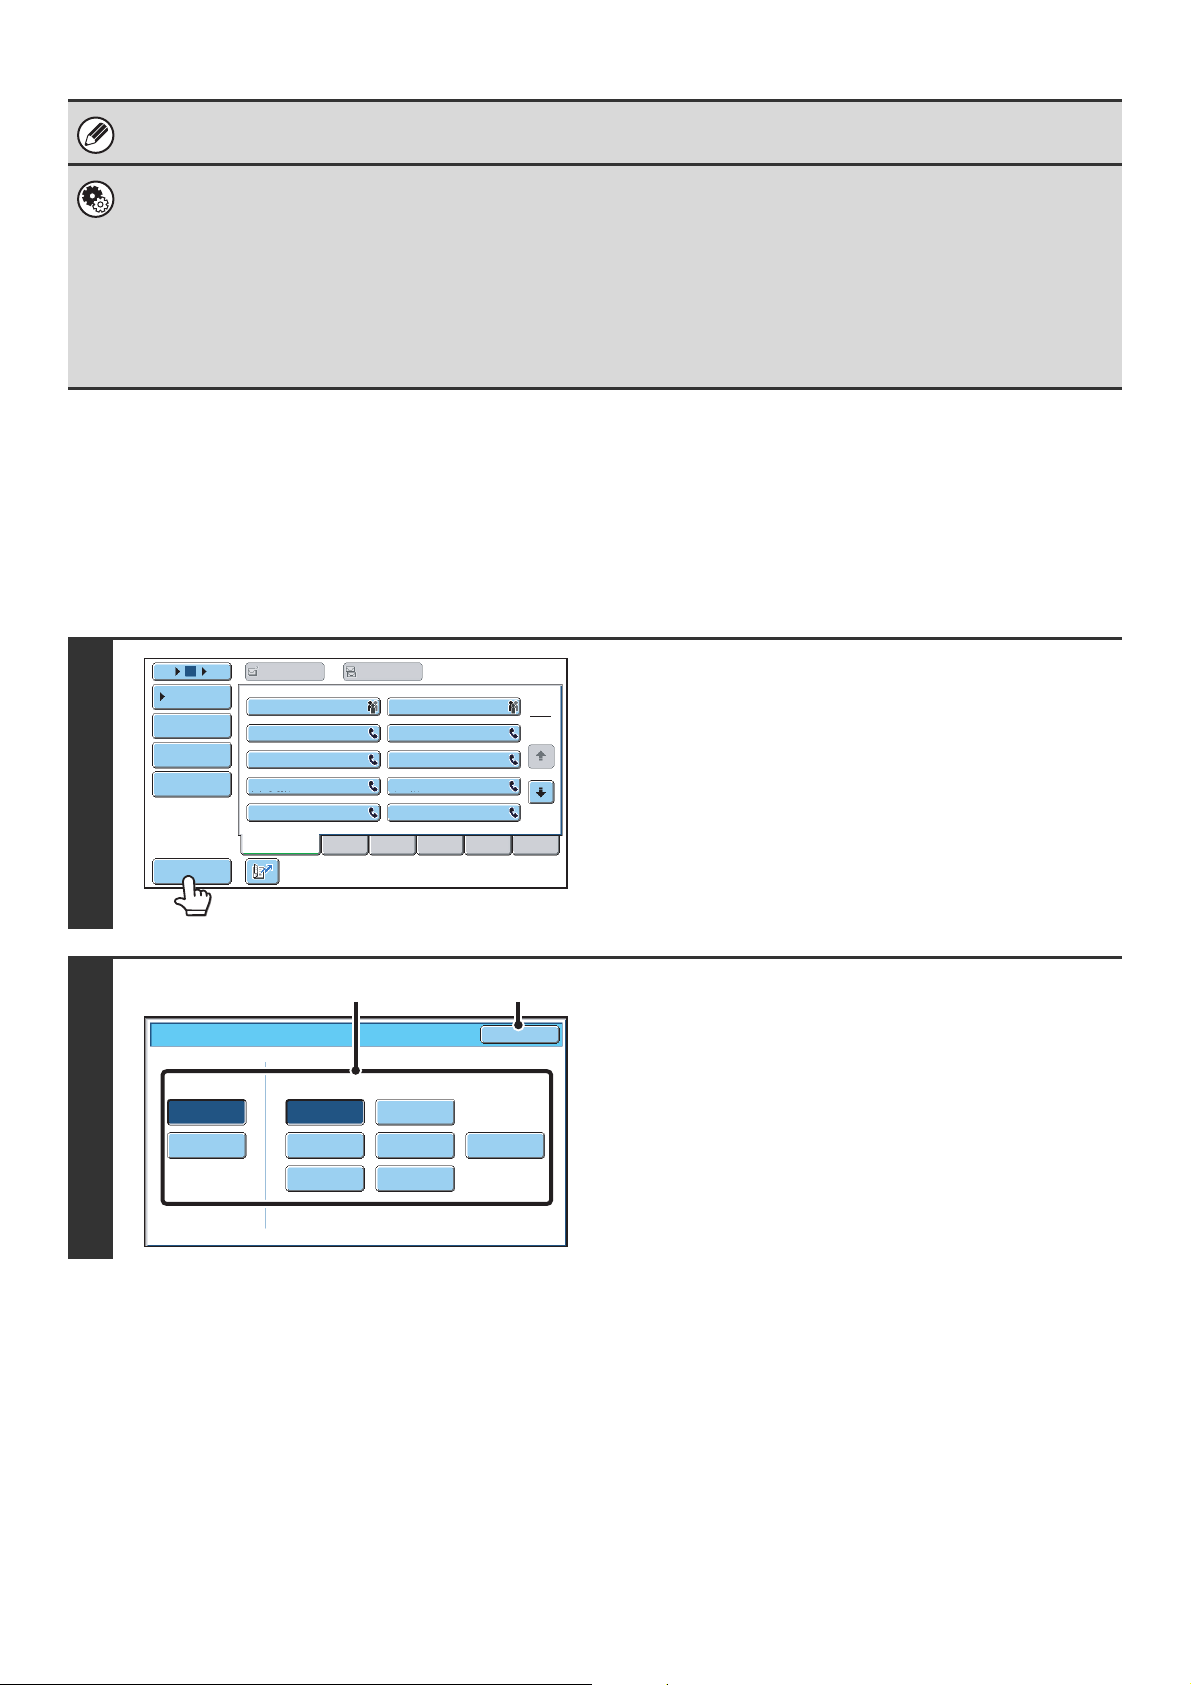
USING THE RESEND FUNCTION
The destinations of the most recent 8 transmissions by fax, Scan to E-mail, and/or Internet fax are stored. One of these
can be selected to resend to that destination.
1
2
Ready to send.
Scan
Address Book
Direct TX
Sub Address
Address Review
File
Quick File
Resend
AAA AAANo.01
CCC CCC
No.03
No.05
EEE EEE
No.07
GGG GGG
Speaker
Internet Fax PC Scan
Original
Exposure
Resolution
Special Modes
Scan:
Auto
Standard
Fax Memory:100%
USB Mem. ScanFax
A4
Auto Auto
Auto Reception
BBB BBB
No.02
DDD DDD
No.04
No.06
FFF FFF
No.08
HHH HHH
Resend
Send:
Cancel
Touch the [Resend] key.
Touch the key of the fax destination that
you wish to redial.
The last 8 transmission destinations appear.
• If numeric keys were pressed during the previous transmission, the [Resend] key may not dial the correct number.
• The following types of addresses are not stored for resending.
• A one-touch key in which multiple destinations are stored (group key).
• Broadcast destinations
• Destinations transmitted to using a program
22
Page 23
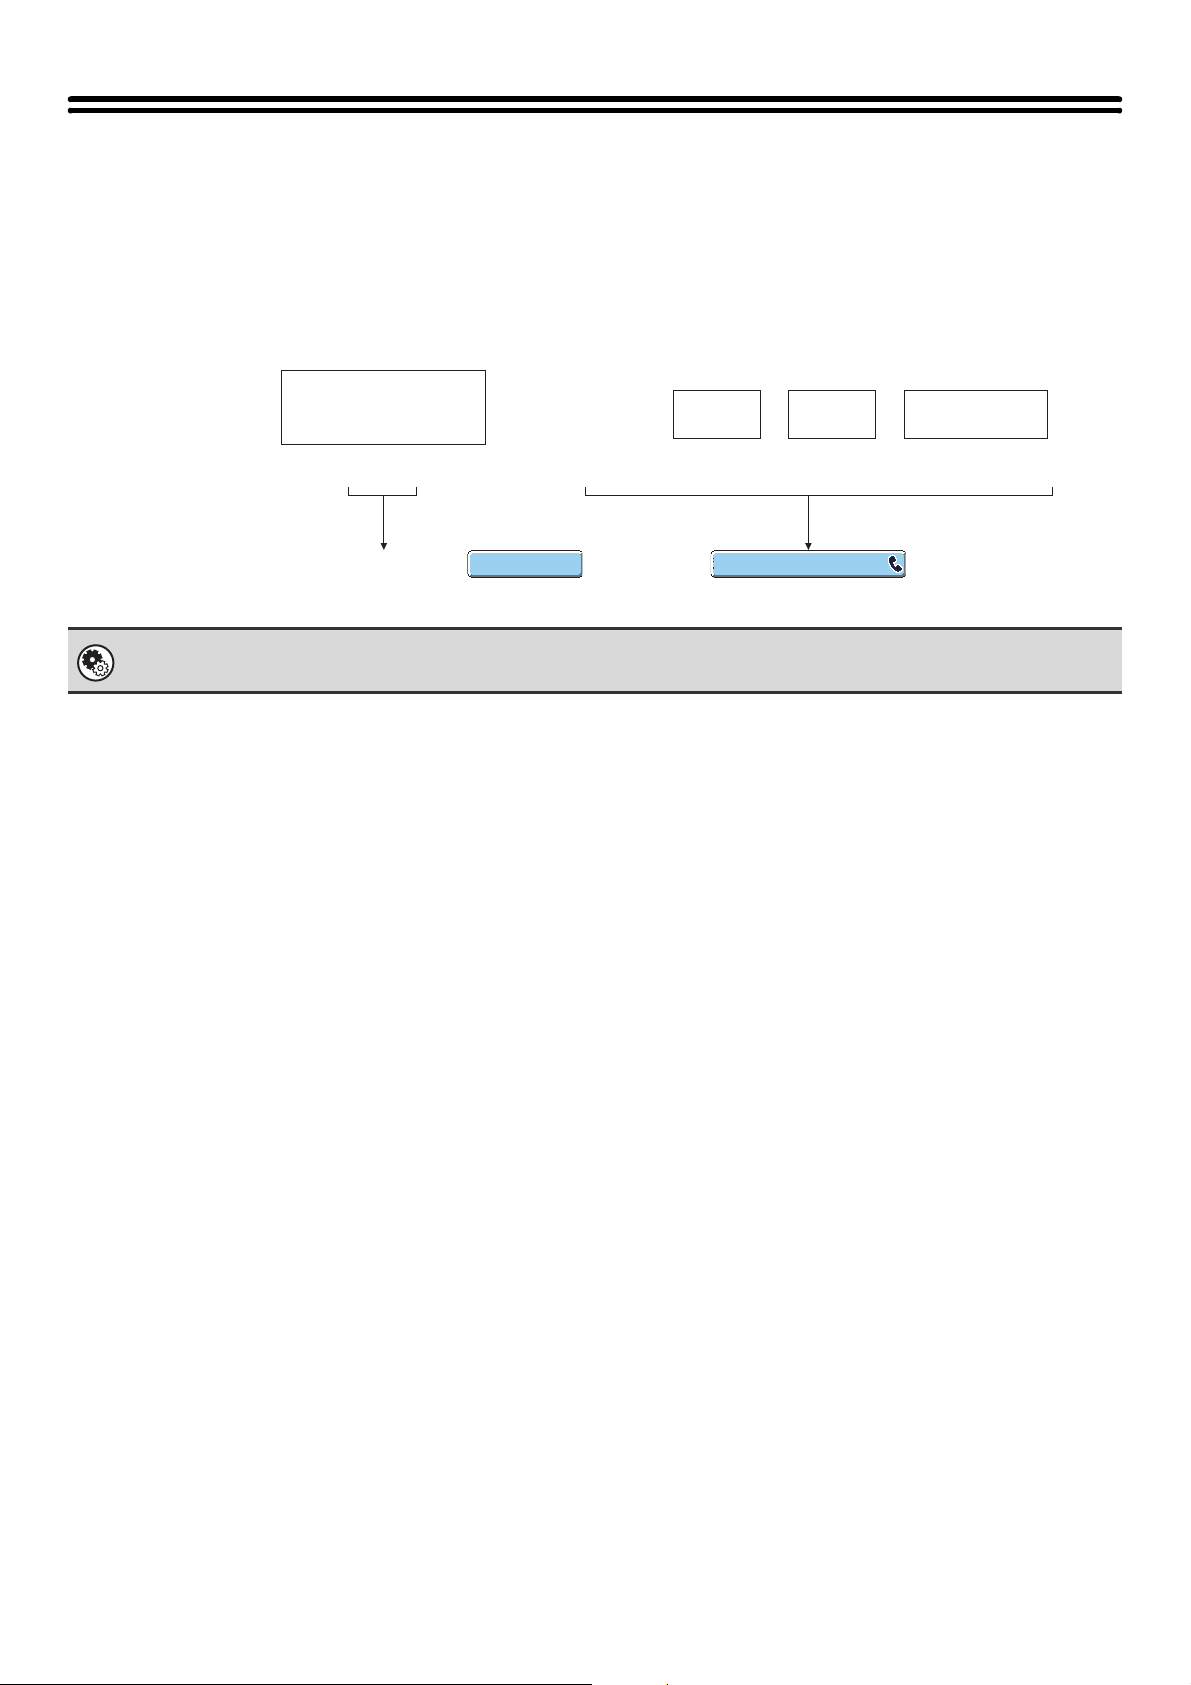
CHAIN DIALLING
Number sequences entered with the numeric keys and/or one-touch keys can be linked together with pauses and dialled
as a single number.
Use chain dialling to dial a long number (such as an international number) when the country code and/or area code are
stored separately in one-touch keys.
Example: Using chain dialling to dial an international number
Number to access
international telephone
service
Number to be dialled
Entry
System Settings (Administrator): Pause Time Setting
This is used to set the length of pauses. The default setting is 2 seconds.
XXX 010
Using the
numeric keys
XXX
Pause
010
Country
code
Area code
Number of other
party
00 XX XXXX
Using a one-touch
key
CCC CCC
23
Page 24
BASIC TRANSMISSION
3
This chapter explains the basic procedures for sending a fax.
METHODS
TRANSMISSION METHODS
The methods that can be used to send a fax from the machine are explained below. Select the method that best suits
your needs.
To fax a large number of sheet originals, use the automatic document feeder.
The originals will be scanned into memory and then transmitted (memory transmission).
When memory transmission is selected and multiple originals are placed in the automatic document feeder (and the line
is free), transmission will begin as soon as the first page is scanned and will take place while the remaining pages are
being scanned (Quick Online transmission).
If transmission cannot begin immediately because the line is in use, all pages will be scanned into memory and the
transmission will be reserved.
☞ USING THE AUTOMATIC DOCUMENT FEEDER FOR TRANSMISSION (page 29)
When a fax transmission or reception is already in progress, the following procedure can be performed to reserve a
transmission job. To check reserved transmission jobs, display the job status screen.
☞ 8. CHECKING THE STATUS OF FAX JOBS (page 114)
Transmission
• If memory becomes full while the first original page is being scanned, transmission will stop.
• In the following situations, the transmission will be automatically reserved (memory transmission)
• When the line is busy or a communication error occurs and automatic resending is enabled.
☞ WHEN THE LINE IS BUSY (page 28), WHEN A COMMUNICATION ERROR OCCURS (page 28)
• The machine is already using the line to send or receive a fax.
• Another fax transmission was reserved ahead of your fax.
• One of the following functions is being used for transmission.
Broadcast transmission, F-code transmission, timer transmission, Dual Page Scan, 2in1, Card Shot, Job Build
• The document glass is being used (except when the speaker is being used to dial).
• Up to 94 transmission jobs can be reserved.
• When the transmission is finished, the scanned original pages are cleared from memory. However, when the document
filing function is used, the transmitted fax is stored.
☞ Document Filing Guide
24
Page 25
System Settings (Administrator): Quick On Line Sending
This is used to disable Quick Online transmission. In this case, fax transmissions will be sent by memory transmission
(reserved and then transmitted).
To fax thick originals or pages of a book, use the document glass.
The transmission will be reserved after all pages are scanned (memory transmission).
☞ USING THE DOCUMENT GLASS FOR TRANSMISSION (page 32)
Transmission
When the document glass is being used for a transmission, Quick Online transmission will not operate.
If you wish to send a fax ahead of other previously reserved fax
transmissions, use direct transmission mode.
The original is transmitted directly to the receiving fax machine without being scanned into memory.
When direct transmission mode is used, transmission will begin as soon as the transmission in progress is completed
(ahead of any previously reserved transmissions).
To send a fax by direct transmission, touch the [Direct TX] key in the base screen.
☞ USING THE AUTOMATIC DOCUMENT FEEDER TO SEND A FAX IN DIRECT TRANSMISSION MODE (page 30),
USING THE DOCUMENT GLASS TO SEND A FAX IN DIRECT TRANSMISSION MODE (page 34)
Scan
Address Book
Direct TX
Sub Address
Address Review
• When transmission in direct transmission mode ends, the mode automatically changes back to memory transmission
mode.
• When the document glass is used, multiple original pages cannot be scanned.
Transmission
25
Page 26
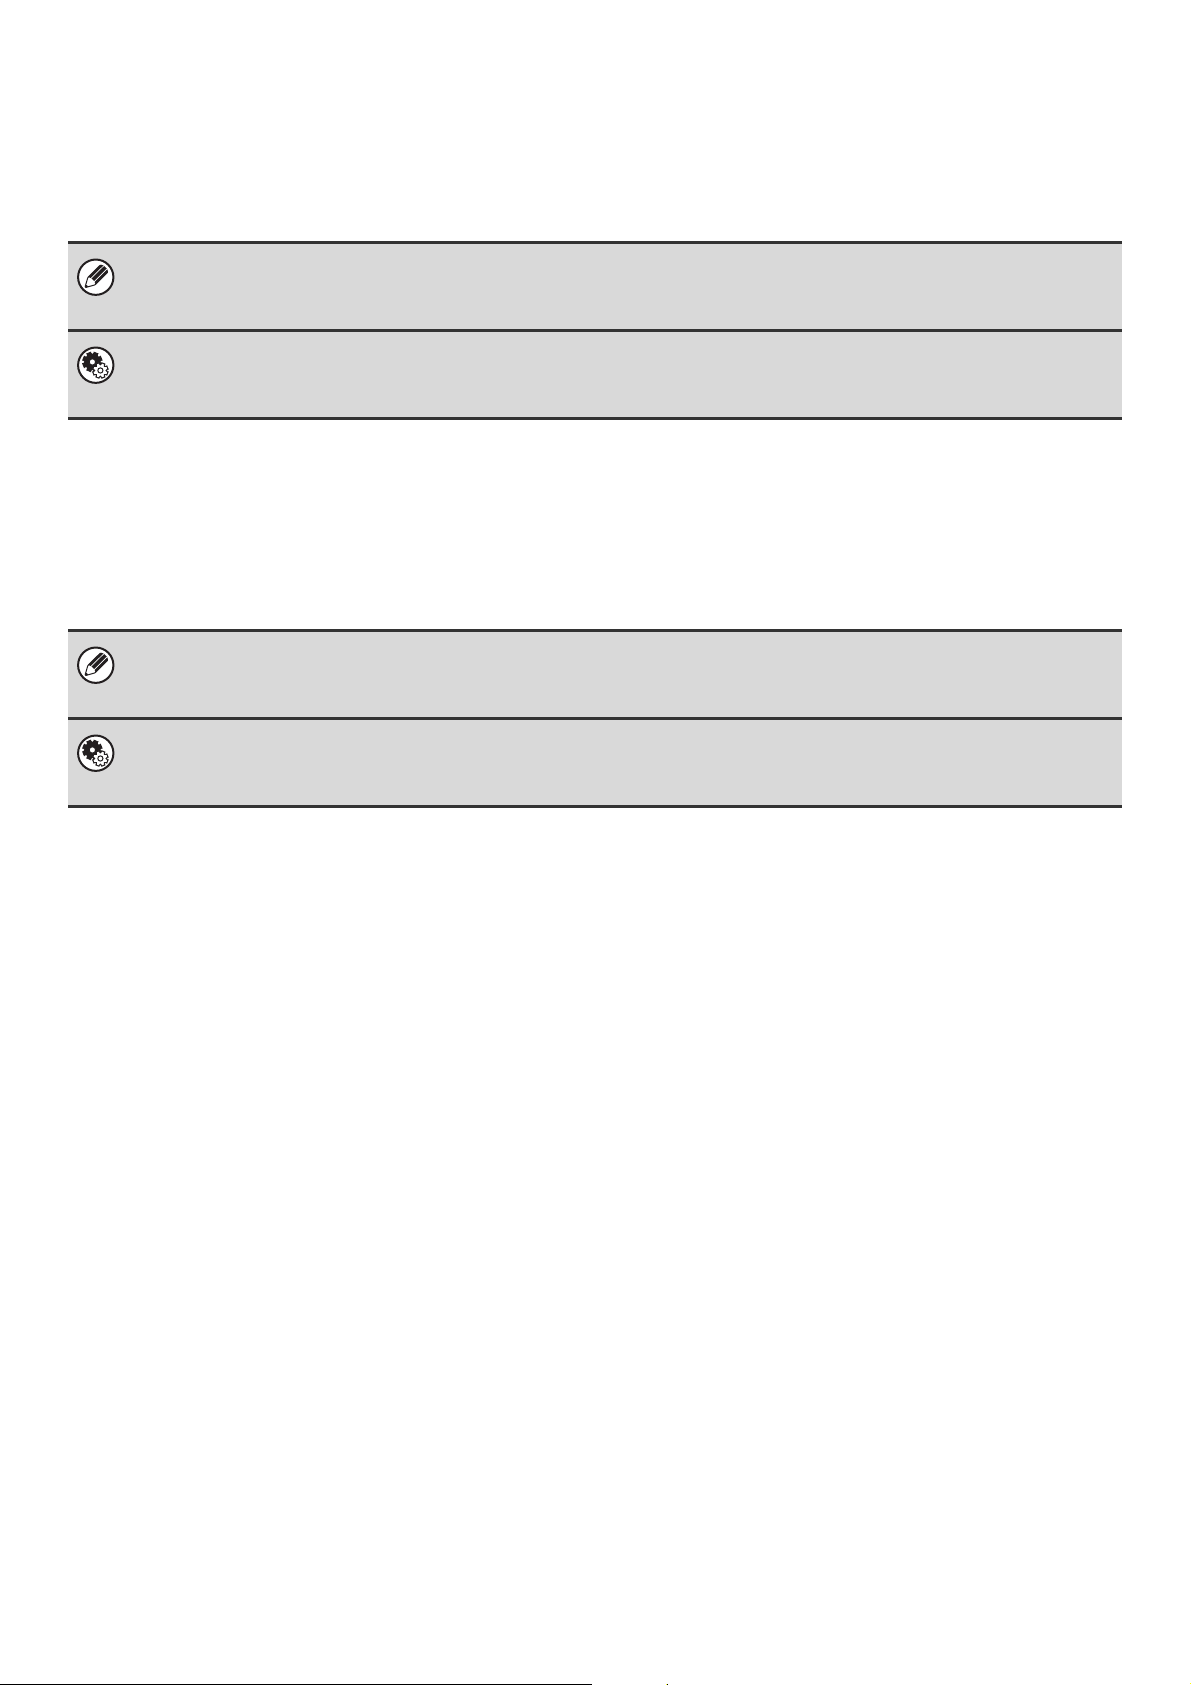
PLACEMENT ORIENTATION OF THE ORIGINAL
When an A4 (8-1/2" x 11") original is placed in vertical orientation ( ), the image is automatically rotated 90 degrees
and transmitted in horizontal orientation ( ) (Rotation Sending). If the original is placed in horizontal orientation ( ), it
is transmitted in that orientation ( ) without being rotated.
Transmission
A4 (8-1/2" x 11")
A4R, B5 and A5 (8-1/2" x 11"R and 5-1/2" x 8-1/2") size originals are not rotated for transmission.
System Settings (Administrator): Rotation Sending Setting
The factory default setting is rotate before transmission. If this setting is disabled, the original will be transmitted in the
orientation in which it is placed.
Rotated to A4R
(8-1/2" x 11"R)
orientation
A4R (8-1/2" x 11"R)
image is transmitted.
AUTOMATIC REDUCTION OF THE TRANSMITTED IMAGE
If the width of the transmitted image is larger than the width of the paper in the receiving machine, the image will be
automatically reduced to fit the receiving machine's paper width.
Example: Reduced sizes and reduction ratios
Transmitted image
width
Receiving machine's
paper width
Reduced size Ratio
A3 B4 B4 1 : 0.84
A3 (11" x 17")
B4 A4 A4R 1 : 0.84
System Settings (Administrator): Auto Reduction Sending Setting
The factory default setting is automatic reduction enabled. If this setting is disabled, the image will be sent at full size and part
of the image may be cut off.
A4 (8-1/2" x 14", 8-1/2" x 11")
A4R (8-1/2" x 14", 8-1/2" x 11"R)
1 : 0.71
26
Page 27

TRANSMITTABLE ORIGINAL SIZES
The following original sizes can be transmitted.
Minimum original size Maximum original size
Using the automatic document
feeder
Using the document glass
*When transmitting a long original (page 46)
131 mm (height) x 140 mm (width)
(5-1/8" (height) x 5-1/2" (width))
–
297 mm (height) x 800 mm* (width)
(11" (height) x 31-1/2"* (width))
297 mm (height) x 432 mm (width)
(11" (height) x 17" (width))
THE SIZE OF THE PLACED ORIGINAL
When a standard size original is placed, the original size is automatically detected and displayed in "Scan" in the base
screen.
When the automatic original detection function is operating and the original is a non-standard size, the closest standard
size may be displayed or the original size may not appear. In this event, manually set the correct original size.
☞ Specifying the original scan size (by paper size) (page 46)
Specifying the original scan size (by numerical values) (page 48)
STANDARD SIZES
Standard sizes are sizes that the machine can automatically detect. The standard sizes are set in "Original Size
Detector Setting" in the system settings (administrator). The factory default setting is "AB-1".
List of original size detector settings
Standard sizes (detected original sizes)
Selections
Document glass
Document feeder tray
(automatic document feeder)
AB-1 A3, A4, A4R, A5, B4, B5, B5R A3, A4, A4R, A5, B4, B5, B5R, 8-1/2" x 11",
8-1/2" x 14", 11" x 17"
AB-2 A3, A4, A4R, A5, B5, B5R, 216 mm x 330 mm
(8-1/2" x 13")
AB-3 A4, A4R, A5, B4, 8K, 16K, 16KR A3, A4, A4R, A5, B4, 8K, 16K, 16KR, 8-1/2" x 11",
Inch-1 11" x 17", 8-1/2" x 14", 8-1/2" x 11", 8-1/2" x 11"R,
5-1/2" x 8-1/2"
Inch-2 11" x 17", 8-1/2" x 13" (216 mm x 330 mm),
8-1/2" x 11", 8-1/2" x 11"R, 5-1/2" x 8-1/2"
A3, A4, A4R, A5, B4, B5, B5R, 8-1/2" x 11",
11" x 17", 216 mm x 330 mm (8-1/2" x 13")
11" x 17", 216 mm x 330 mm (8-1/2" x 13")
11" x 17", 8-1/2" x 14", 8-1/2" x 11", 8-1/2" x 11"R,
5-1/2" x 8-1/2", A4, A3
11" x 17", 8-1/2" x 13" (216 mm x 330 mm),
8-1/2" x 11", 8-1/2" x 11"R, 5-1/2" x 8-1/2", A4, A3
27
Page 28
WHEN THE LINE IS BUSY
If the line is busy when you send a fax, transmission will be re-attempted automatically after a preset interval. This
function only operates in memory transmission mode. In direct transmission mode or manual transmission mode, the
transmission will be cancelled. Wait briefly and then try sending the fax again.
To cancel transmission...
Cancel the transmission from the job status screen.
☞ CANCELLING A FAX IN PROGRESS OR A RESERVED FAX (page 121)
System Settings (Administrator): Recall in Case of Line Busy
This is used to set the number of recall attempts and the interval between attempts when the connection cannot be
established because the line is busy. The factory default setting is 2 attempts at an interval of 3 minutes.
WHEN A COMMUNICATION ERROR OCCURS
If a communication error occurs or the other fax machine does not answer the call within a preset period of time,
transmission will be re-attempted automatically after a preset interval. This function only operates in memory
transmission mode.
To cancel transmission...
Cancel the transmission from the job status screen.
☞ CANCELLING A FAX IN PROGRESS OR A RESERVED FAX (page 121)
System Settings (Administrator): Recall in Case of Communication Error
This is used to set the number of recall attempts and the interval between attempts when a transmission fails due to an error.
The factory default setting is attempt at an interval of 1 minute.
28
Page 29
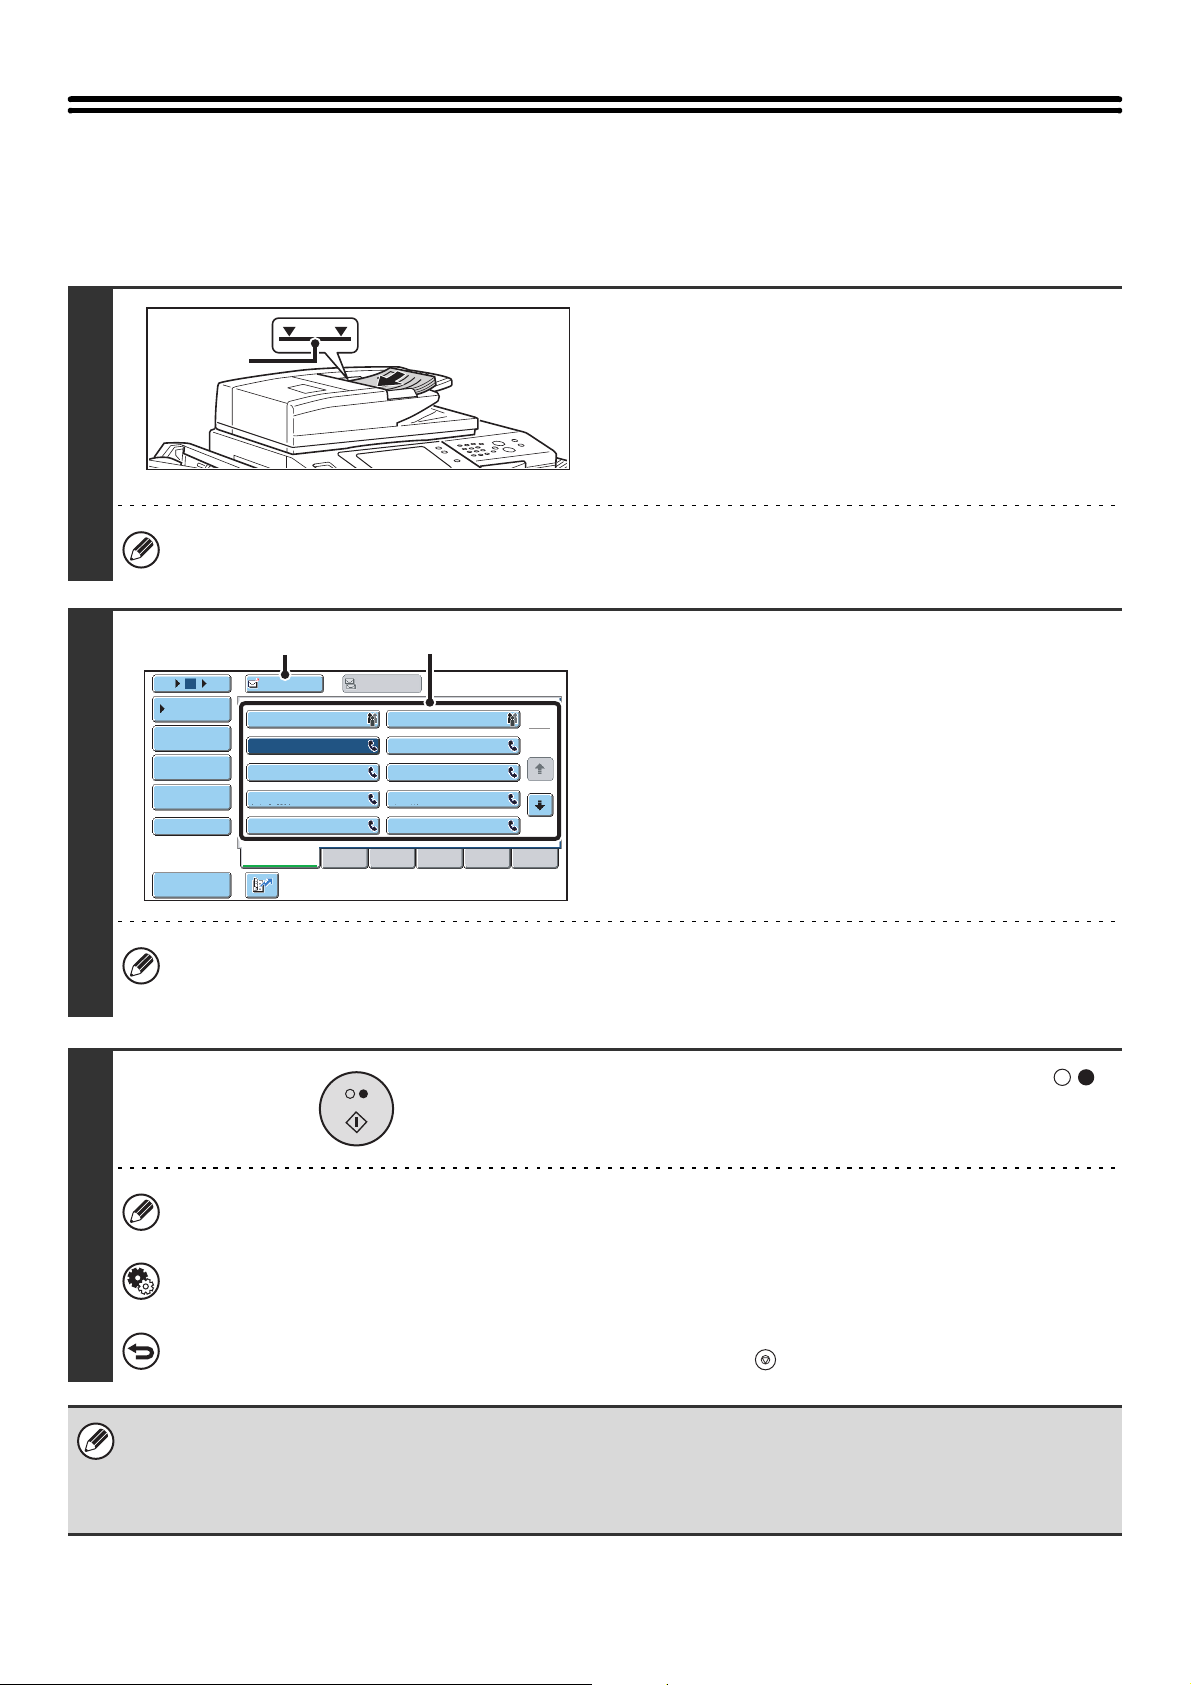
USING THE AUTOMATIC DOCUMENT FEEDER FOR TRANSMISSION
This section explains how to use the automatic document feeder to send a fax.
Place the originals face up in the
Indicator
line
1
When sending a multi-page fax, the automatic document feeder and the document glass cannot both be used to scan
the original pages.
document feeder tray with the edges
aligned evenly.
Insert the originals all the way into the document feeder tray.
Multiple originals can be placed in the document feeder tray.
The stack of originals must not be higher than the indicator line
on the tray.
2
3
Enter the destination fax number
(1) Touch the [Address Book] key in the base
screen.
(2) Touch the one-touch key of the desired
destination.
(3) Touch the [To] key.
BBB BBB
DDD DDD
FFF FFF
HHH HHH
JJJ JJJ
(2)
1
2
(3)
105 15
Condition
Settings
Address Review
Address Entry
Global
Address Search
Sub Address
Sort Address
In addition to specification by one-touch key, a destination can also be specified using a search number. You can also
directly enter a fax number with the numeric keys or look up a destination in a global address book. For more
information, see "2. ENTERING DESTINATIONS" (page 15).
To
AAA AAA
CCC CCC
EEE EEE
GGG GGG
III III
Frequent Use
Cc
ABCD EFGHI JKLMN OPQRST UVWXYZ
Press the [BLACK & WHITE START] key ( ).
Scanning begins.
When scanning is completed, the machine sounds a beep.
When scanning is completed, "Job stored." will be displayed together with a job control number. This number can be
used to locate the job in the Transaction Report or in the Image Sending Activity Report.
System Settings (Administrator): Scan Complete Sound Setting
The scan complete sound can be selected.
To cancel scanning...
While "Scanning original" appears in the display, press the [STOP] key ( ).
• If a fax is being received when the transmission operation is performed, the transmission will be reserved and transmitted
after fax reception is completed.
• If the memory becomes full while the originals are being scanned, a message will appear and scanning will stop. If Quick
Online transmission is taking place, the originals that were scanned will be transmitted. If Quick Online is not enabled, the
transmission will be cancelled.
29
Page 30
USING THE AUTOMATIC DOCUMENT FEEDER TO SEND A FAX IN DIRECT TRANSMISSION MODE
Place the originals face up in the
Indicator
line
1
document feeder tray with the edges
aligned evenly.
Insert the originals all the way into the document feeder tray.
Multiple originals can be placed in the document feeder tray.
The stack of originals must not be higher than the indicator line
on the tray.
2
3
Scan
Address Book
Direct TX
Sub Address
Address Review
File
Quick File
105 15
Condition
Settings
Address Review
Address Entry
Global
Address Search
Sub Address
Sort Address
Original
Exposure
Resolution
Special Modes
(3)
To
AAA AAA
CCC CCC
EEE EEE
GGG GGG
III III
Frequent Use
USB Mem. ScanFaxInternet Fax PC Scan
Auto
Scan:
Auto
Standard
Auto Reception
Fax Memory:100%
A4
Send:
Auto
(2)
Cc
BBB BBB
DDD DDD
FFF FFF
HHH HHH
JJJ JJJ
ABCD EFGHI JKLMN OPQRST UVWXYZ
Touch the [Direct TX] key.
Enter the destination fax number
(1) Touch the [Address Book] key in the base
1
2
screen.
(2) Touch the one-touch key of the desired
destination.
(3) Touch the [To] key.
4
In addition to specification by one-touch key, a destination can also be specified using a search number. You can also
directly enter a fax number with the numeric keys or look up a destination in a global address book. For more
information, see "2. ENTERING DESTINATIONS" (page 15).
Press the [BLACK & WHITE START] key
().
Transmission begins.
To cancel transmission...
While "Dialling. Press [ ] to cancel" appears or while the fax is being transmitted, press the [STOP] key ( ).
30
Page 31

• Only one destination can be entered.
• The following functions cannot be used with direct transmission:
Program, Timer Transmission, 2in1, Card Shot, Job Build, Polling Memory, File, Quick File, 2-Sided Original Scanning,
Global Address Search
• Resending will not take place when a direct transmission is not successful due to a communication error or other reason.
• If a fax transmission is already in progress when the direct transmission operation is performed, the direct transmission will
wait until the previous transmission is finished. When the previous transmission is completed, the direct transmission will
begin. While the direct transmission is waiting, the [JOB STATUS] key can be pressed to display the job status screen. No
other operations are possible.
☞ 8. CHECKING THE STATUS OF FAX JOBS (page 114)
31
Page 32

USING THE DOCUMENT GLASS FOR TRANSMISSION
To fax a thick original or other original that cannot be fed through the automatic document feeder, open the automatic
document feeder and place the original on the document glass.
1
Original size
detector
place the original face down on the
document glass, and then gently close
the automatic document feeder.
Open the automatic document feeder,
Document glass scale
mark
A5
(5-1/2" x 8-1/2")
B5
A4 (8-1/2" x 11")
• Align the corner of the original with the tip of the arrow mark
on the document glass scale.
• Place the original in the appropriate position for its size as
shown above.
Do not place any objects under the original size detector. Closing the automatic document feeder with an object
underneath may damage the original size detector plate and prevent correct detection of the document size.
• When faxing a multi-page original, scan each page in order starting from the first page.
• When sending a multi-page fax, the automatic document feeder and the document glass cannot both be used to
scan the original pages.
Document glass scale
mark
A4R (8-1/2" x 11"R)
B5R
B4 (8-1/2" x 14")
A3 (11" x 17")
2
Enter the destination fax number
(1) Touch the [Address Book] key in the base
screen.
(2) Touch the one-touch key of the desired
destination.
(3) Touch the [To] key.
105 15
Condition
Settings
Address Review
Address Entry
Global
Address Search
Sub Address
Sort Address
(3)
To
AAA AAA
CCC CCC
EEE EEE
GGG GGG
III III
Frequent Use
(2)
Cc
BBB BBB
DDD DDD
FFF FFF
HHH HHH
JJJ JJJ
ABCD EFGHI JKLMN OPQRST UVWXYZ
1
2
In addition to specification by one-touch key, a destination can also be specified using a search number. You can also
directly enter a fax number with the numeric keys or look up a destination in a global address book. For more
information, see "2. ENTERING DESTINATIONS" (page 15).
32
Page 33

3
4
Press the [BLACK & WHITE START] key
().
Scanning begins.
If you have another page to scan,
change pages and then press the
[BLACK & WHITE START] key ( ).
Repeat until all originals have been scanned.
If no action is taken for one minute, scanning automatically ends and the transmission is reserved.
Touch the [Read-End] key.
Place next original.
Press [Start].
When finished, press [Read-End].
(Pg.No.x)
Configure Read-End
A beep sounds.
Open the automatic document feeder and remove the original.
5
• When scanning is completed, "Job stored." will be displayed together with a job control number.
This number can be used to locate the job in the Transaction Report or in the Image Sending Activity Report.
• If no action is taken for one minute after the confirmation screen appears, scanning automatically ends and the
transmission is reserved.
• The [Configure] key can be touched to change the exposure, resolution, scan size, and send size for each original
page scanned. However, when "2in1" or "Card Shot" is selected in the special modes, only the exposure can be
changed, and this can only be done when scanning each even page number of the original pages.
To cancel transmission...
Press the [STOP] key ( ) before the [Read-End] key is touched.
• If a fax is being received when the transmission operation is performed, the transmission will be reserved and transmission
will take place after fax reception is completed.
• If the memory becomes full while the originals are being scanned, a message will appear and transmission will be
cancelled.
33
Page 34

USING THE DOCUMENT GLASS TO SEND A FAX IN DIRECT TRANSMISSION MODE
When sending a fax from the document glass in direct transmission mode, only one page can be transmitted.
1
Original size
detector
place the original face down on the
document glass, and then gently close
the automatic document feeder.
Document glass scale Document glass scale
Open the automatic document feeder,
mark
A5
(5-1/2" x 8-1/2")
B5
A4 (8-1/2" x 11")
• Align the corner of the original with the tip of the arrow mark
on the document glass scale.
• Place the original in the appropriate position for its size as
shown above.
Do not place any objects under the original size detector. Closing the automatic document feeder with an object
underneath may damage the original size detector plate and prevent correct detection of the document size.
mark
A4R (8-1/2" x 11"R)
B5R
B4 (8-1/2" x 14")
A3 (11" x 17")
2
Scan
Address Book
Direct TX
Sub Address
Address Review
File
Quick File
Original
Exposure
Resolution
Special Modes
Auto
Scan:
Auto
Standard
Auto Reception
Fax Memory:100%
USB Mem. ScanFaxInternet Fax PC Scan
A4
Send:
Auto
Touch the [Direct TX] key.
34
Page 35

(3)
(2)
Enter the destination fax number
3
4
105 15
Condition
Settings
Address Review
Address Entry
Global
Address Search
Sub Address
Sort Address
To
AAA AAA
CCC CCC
EEE EEE
GGG GGG
III III
Frequent Use
Cc
BBB BBB
DDD DDD
FFF FFF
HHH HHH
JJJ JJJ
ABCD EFGHI JKLMN OPQRST UVWXYZ
1
2
(1) Touch the [Address Book] key in the base
screen.
(2) Touch the one-touch key of the desired
destination.
(3) Touch the [To] key.
• Only one destination can be entered. A one-touch key in which multiple destinations are stored (group key) cannot
be used.
• In addition to specification by one-touch key, a destination can also be specified using a search number. You can
also directly enter a fax number with the numeric keys or look up a destination in a global address book. For more
information, see "2. ENTERING DESTINATIONS" (page 15).
Press the [BLACK & WHITE START] key
().
Transmission begins.
To cancel transmission...
While "Dialling. Press [ ] to cancel" appears in the display, press the [STOP] key ( ).
• The following functions cannot be used with direct transmission:
Program, Timer Transmission, 2in1, Card Shot, Job Build, Polling Memory, File, Quick File, 2-Sided Original Scanning,
Global Address Search
• Resending will not take place when a direct transmission is not successful due to a communication error or other reason.
• If a fax transmission is already in progress when the direct transmission operation is performed, the direct transmission will
wait until the previous transmission is finished. When the previous transmission is completed, the direct transmission will
begin. While the direct transmission is waiting, the [JOB STATUS] key can be pressed to display the job status screen. No
other operations are possible.
☞ 8. CHECKING THE STATUS OF FAX JOBS (page 114)
35
Page 36

TRANSMISSION USING THE SPEAKER
When the speaker is used to dial, the fax is sent after the number is dialled and the connection is established. If a person
answers, you will be able to hear his or her voice, but you will not be able to speak.
Place the original.
Place the original face up in the document feeder tray, or face
down on the document glass.
1
When the document glass is used, only one page can be
transmitted.
2
3
Telephone mode.
105 15
Condition
Settings
Speaker Volume
Sort Address
(3) (1)
To Cc
AAA AAA
CCC CCC
EEE EEE
GGG GGG
III III
Frequent Use
ResendSpeaker
BBB BBB
DDD DDD
FFF FFF
HHH HHH
JJJ JJJ
ABCD EFGHI JKLMN OPQRST UVWXYZ
1
2
Fax Manual
Reception
Enter the destination fax number
(1) Touch the [Speaker] key.
You will hear the dial tone through the machine's speaker.
(2) Touch the [Address Book] key in the base
screen.
(3) Touch the one-touch key of the desired
destination.
A group key cannot be used.
• In addition to specification by one-touch key, a destination can also be specified using a search number. You can
also directly enter a fax number with the numeric keys or look up a destination in a global address book. For more
information, see "2. ENTERING DESTINATIONS" (page 15).
• After touching the [Speaker] key, you can touch the [Speaker Volume] key to adjust the volume of the speaker. The
speaker volume changes each time the [Speaker Volume] key is touched. Adjust the volume to the desired level.
Wait until the connection is made and
then press the [BLACK & WHITE START]
key ( ).
Transmission begins.
To cancel transmission...
Touch the [Speaker] key before the [BLACK & WHITE START] key ( ) is pressed. The line will be disconnected
and transmission will stop.
• When the speaker is used, transmission takes place without scanning the original into memory.
• A destination that includes an F-code (sub-address and passcode) cannot be used.
• A one-touch key that has multiple destinations or has a non-fax destination cannot be used.
System Settings (Administrator): Speaker Settings
The default volume level of the speaker can be changed in the "Speaker Settings".
36
Page 37

SENDING THE SAME FAX TO MULTIPLE DESTINATIONS (Broadcast Transmission)
This function is convenient when you need to send the same fax to multiple destinations, such as sending a report to
branch offices in different regions. You can transmit to as many as 500 destinations in one broadcast operation.
Transmission
Originals
It is convenient to store destinations to which you frequently send faxes by broadcast transmission in group keys. Group
dialling allows you to retrieve multiple fax numbers stored in a one-touch key by simply pressing the one-touch key. To
store group keys, see "Address Control" in the system settings.
When a group key is used to dial, the number of fax numbers that are dialled is the number of destinations that are
stored in the group key. When a group key that has 10 destinations is used, 10 fax numbers are dialled.
1
Place the original.
Place the original face up in the document feeder tray, or face
down on the document glass.
37
Page 38

(2)(3)
Enter the destination fax number
2
CCC CCC
0123456789
105 15
Condition
Settings
Address Review
Address Entry
Global
Address Search
Sub Address
Sort Address
To
AAA AAA
CCC CCC
EEE EEE
GGG GGG
III III
Frequent Use
Pause Next Address
Cc
BBB BBB
DDD DDD
FFF FFF
HHH HHH
JJJ JJJ
ABCD EFGHI JKLMN OPQRST UVWXYZ
1
2
(1) Touch the [Address Book] key in the base
screen.
(2) Touch the one-touch key of the desired
destination.
(3) Touch the [To] key.
The destination is specified.
(4) Repeat steps (2) and (3) until all
destinations are selected.
• In addition to specification by one-touch key, a destination can also be specified using a search number. You can
also directly enter a fax number with the numeric keys or look up a destination in a global address book. For more
information, see "2. ENTERING DESTINATIONS" (page 15).
• It is convenient to use a group key to enter the destinations.
• Touch the [Next Address] key before entering the next destination.
The [Next Address] key can be omitted before and after a destination entered with a one-touch key.
Fax number entered
with the numeric keys
[Next Address]
key
Fax number
entered with the
[Next Address]
key
Destination entered with
a one-touch key
numeric keys
3
(Cannot be omitted) (Can be omitted)
System Settings (Administrator): Must Input Next Address Key at Broadcast Setting
This setting is used to prohibit omission of the [Next Address] key when entering destinations for broadcast
transmissions.
105 15
Condition
Settings
Address Review
Address Entry
Global
Address Search
Sub Address
Sort Address
To
AAA AAA
CCC CCC
EEE EEE
GGG GGG
III III
Frequent Use
Cc
BBB BBB
DDD DDD
FFF FFF
HHH HHH
JJJ JJJ
ABCD EFGHI JKLMN OPQRST UVWXYZ
1
2
Touch the [Address Review] key.
38
Page 39

4
5
Address Review
OK
Check the destinations and then touch
the [OK] key.
CCC CCC
001
LLL LLL
003
NNN NNN
005
PPP PPP
007
RRR RRR
009
TTT TTT
011
To
To cancel a specified destination...
Touch the key of the destination that you wish to cancel. A message will appear to confirm the deletion. Touch the
[Yes] key.
002
004
006
008
010
012
Cc
KKK KKK
MMM MMM
OOO OOO
QQQ QQQ
SSS SSS
UUU UUU
1
2
☞ CHECKING AND DELETING ENTERED DESTINATIONS (page 18)
Press the [BLACK & WHITE START] key
().
Scanning begins.
• If you inserted the original pages in the document feeder
tray, all pages are scanned.
A beep will sound to indicate that scanning is finished.
• If you are scanning the original on the document glass, scan
each page one page at a time.
When scanning finishes, place the next original and press
the [BLACK & WHITE START] key ( ). Repeat until all
pages have been scanned and then touch the [Read-End]
key.
A beep will sound to indicate that scanning is finished.
To cancel scanning...
Press the [STOP] key ( ).
• A broadcast transmission takes place by memory transmission only.
• A broadcast transmission can be used in combination with the timer transmission function to transmit at night or any other
desired time. A broadcast transmission can also be used in combination with other convenient functions.
• The broadcast transmission can include Scan to E-mail and Internet fax destinations. In this case, the image sent to the
Scan to E-mail and Internet fax destinations will be black and white.
39
Page 40

Resending to unsuccessful broadcast transmission destinations
The results of a completed broadcast transmission can be checked in the job status screen. If transmission to any of the
destinations failed, resend the fax to those destinations.
1
2
3
2
3
4
5
Address
Broadcast00011
0123456789
AAA AAA
BBB BBB
Broadcast0002
JOB STATUS
Fax JobScan toPrint Job Internet Fax
Set Time Pages Status
10:00 04/01 020/003 Connecting
04/01
10:05
10:22
10:30
10:33
04/01
04/01
04/01
000/004
000/004
000/010
000/010
Waiting
Waiting
Waiting
Waiting
1
1
Job Queue
Complete
Detail
Priority
Stop/Delete
Press the [JOB STATUS] key.
Touch the [Complete] key.
If the job status screen of fax mode does not appear, touch the
[Fax Job] tab.
If the broadcast transmission included destinations of different modes, the same broadcast transmission key will
appear in each of those modes.
(1)
Scan toPrint Job
Address
Broadcast0001 10:00 04/01 010/003 NG000000
Broadcast0002
CCC CCC
0123456789
Start Time Pages Status
10:05
10:22
10:30
04/01
04/01
04/01
Fax Job
001/001
004/004
010/010
Send OK
Send OK
Send OK
(2)
Internet Fax
1
1
Job Queue
Complete
Detail
Display details on the broadcast
transmission.
(1) Touch the key of the completed broadcast
transmission.
(2) Touch the [Detail] key.
Call
"Broadcastxxxx" will appear as the destination of the broadcast job key. The job control number that appeared in the
touch panel when scanning ended appears in "xxxx".
40
Page 41
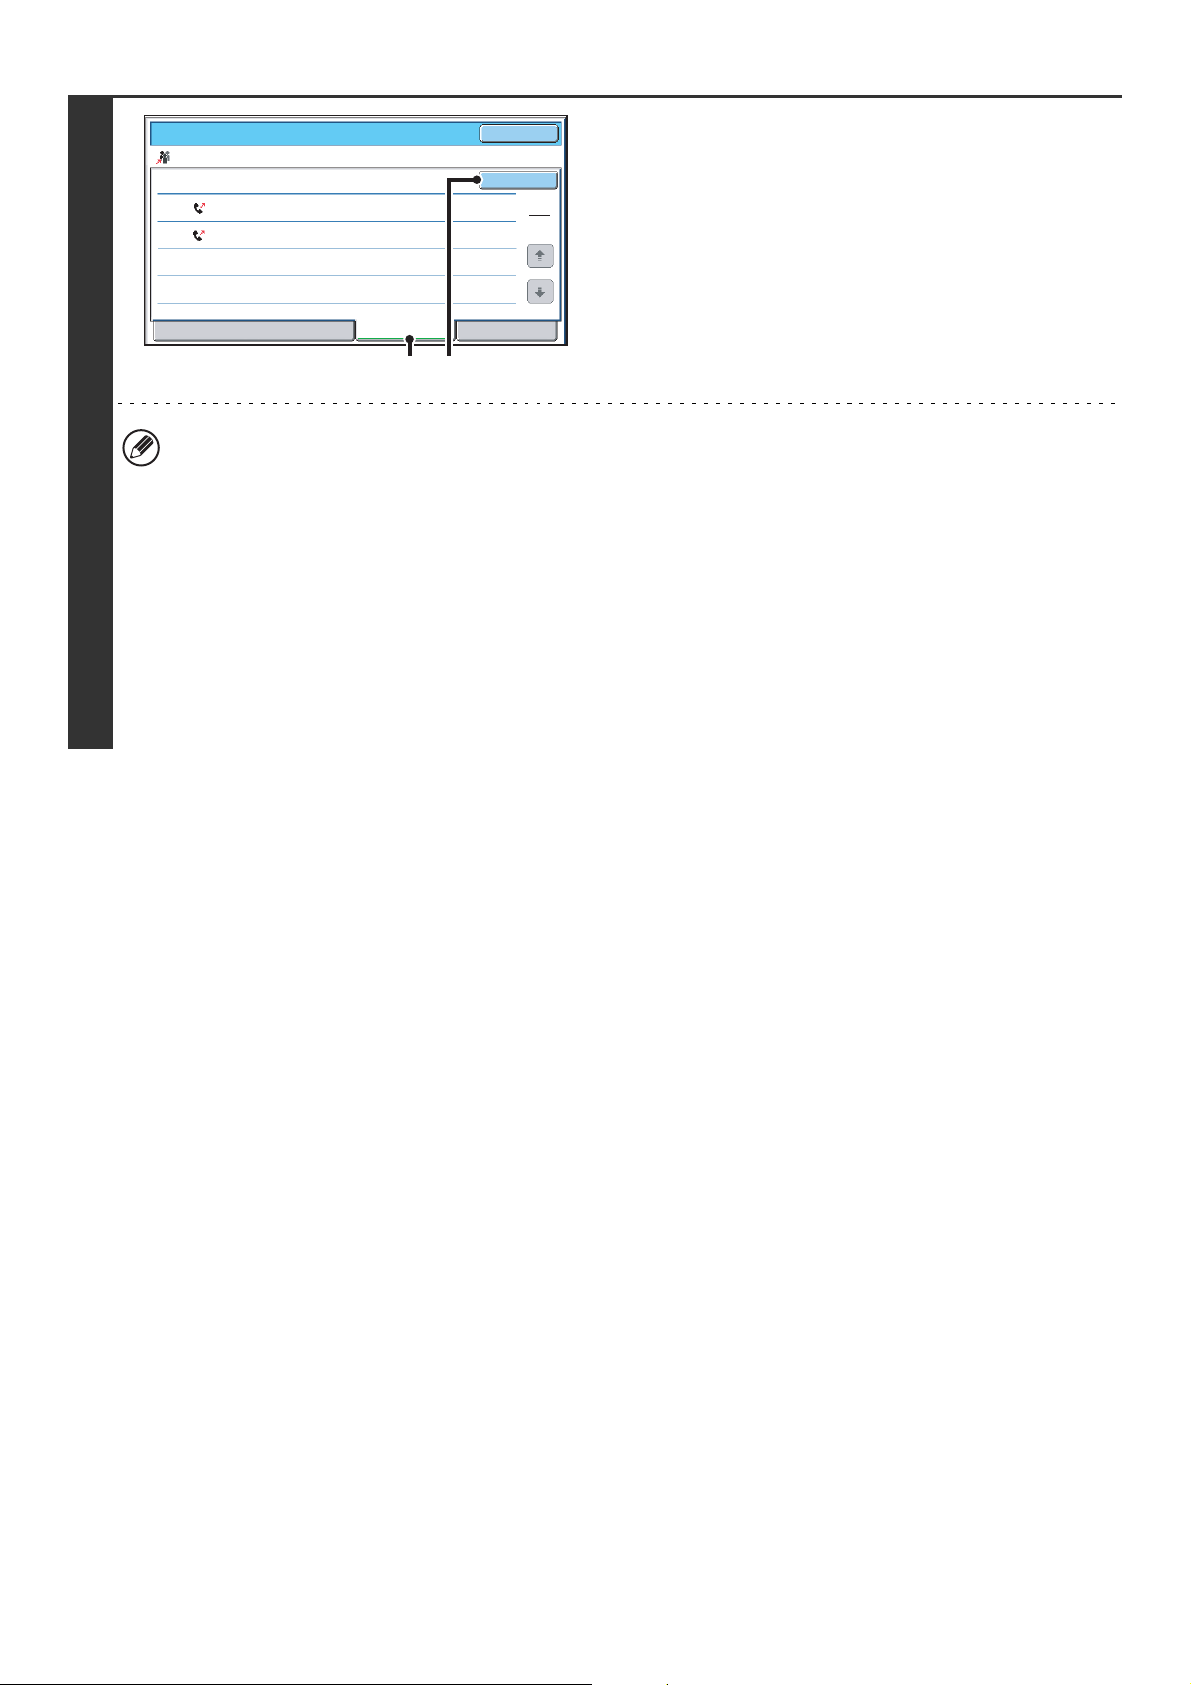
Detail
Broadcast0001
002
010
Address
DDD DDD
EEE EEE
File Failed All Destinations
Start Time
10:01
04/01
10:10
04/01
Status
NG00000
NG00000
(1) (2)
OK
Retry
Resend to unsuccessful destinations.
(1) Touch the [Failed] tab.
1
1
(2) Touch the [Retry] key.
4
• The procedure after the [Retry] key is touched varies depending on whether or not the document filing function was
used.
Not using document filing
You will return to the base screen with the unsuccessful destinations entered. Place the original and perform the
broadcast transmission operation.
Using document filing
The document filing operation selection screen will appear with the unsuccessful destinations entered. Perform the
document filing resend procedure. (There is no need to rescan the original.)
If the job was stored in a confidential folder or was stored as confidential file, a password entry screen will appear
after you touch the [Retry] key. Enter the password.
For more information, see the Document Filing Guide.
• If the [All Destinations] key is touched in (1), all destinations will be displayed. The [Retry] key that appears in the
screen can be touched to resend to all destinations.
41
Page 42
SENDING A FAX DIRECTLY FROM A COMPUTER (PC-Fax)
A document in a computer can be transmitted via the machine as a fax. Faxes are sent using the PC-Fax function in the
same way as documents are printed. Select the PC-Fax driver as the printer driver on your computer and then select the
Print command in the software application. Image data for transmission will be created and sent as a fax.
Fax transmission
For more information on using PC-Fax, see the Help file for the PC-Fax driver.
• To use the PC-Fax function, the PC-Fax driver must be installed. For more information, see the Software Setup Guide.
• This function can only be used on a Windows® computer.
• This function can only be used for transmission. Faxes cannot be received to your computer.
42
Page 43

IMAGE SETTINGS
Settings for scanning the original are selected in the base screen of each mode. The current state of each setting
appears to the right of the key used to select the setting.
Scan
Address Book
Direct TX
Sub Address
Address Review
File
Quick File
(1) [Original] key
Touch this key to set the scan size, send size, and
orientation of the original, and select 2-sided scanning
settings.
☞ AUTOMATICALLY SCANNING BOTH SIDES OF
AN ORIGINAL (2-Sided Original) (page 44),
SPECIFYING THE SCAN SIZE AND SEND SIZE
(Enlarge/Reduce Transmission) (page 45)
(2) [Exposure] key
Touch this key to select the exposure for scanning.
☞ CHANGING THE EXPOSURE (page 52)
(3) [Resolution] key
Touch this key to select the scanning resolution.
☞ CHANGING THE RESOLUTION (page 53)
Original
Exposure
Resolution
Special Modes
USB Mem. ScanFaxInternet Fax PC Scan
Auto Auto
Scan:
Auto
Standard
Auto Reception
Fax Memory:100%
Send:
(1)
(2)
(3)
43
Page 44

AUTOMATICALLY SCANNING BOTH SIDES OF AN ORIGINAL (2-Sided Original)
The automatic document feeder will automatically scan both sides of the document.
Transmission
2-sided original Front and back are
sent as two pages
1
2
Address Book
Direct TX
Sub Address
Address Review
File
Quick File
Fax/Original
2-Sided
Booklet
Internet Fax PC Scan
Original
Exposure
Resolution
Special Modes
Scan Size Send Size100%
Auto A4
Scan: Send:
Auto
Standard
Fax Memory:100%
2-Sided
Tablet
USB Mem. ScanFaxScan
Auto
Auto Reception
Auto
Image Orientation
A4
Auto
OK
(1) (2) (3)
Touch the [Original] key.
Specify the binding style of the 2-sided
original (book or tablet) and the
orientation in which the original is placed.
(1) Touch the [2-Sided Booklet] key or the
[2-Sided Tablet] key.
A book and a tablet are bound as shown below.
Booklet Tablet
A
C
E
G
J
L
AB
EF
KL
(2)
Touch the appropriate [Image Orientation] key.
If the wrong orientation is selected here, the image may
not be sent properly.
(3) Touch the [OK] key.
To cancel 2-sided scanning, touch the highlighted key so that it is no longer highlighted.
• 2-sided scanning automatically turns off after the transmission operation is completed.
• When direct transmission mode is selected, 2-sided scanning cannot be used.
44
Page 45
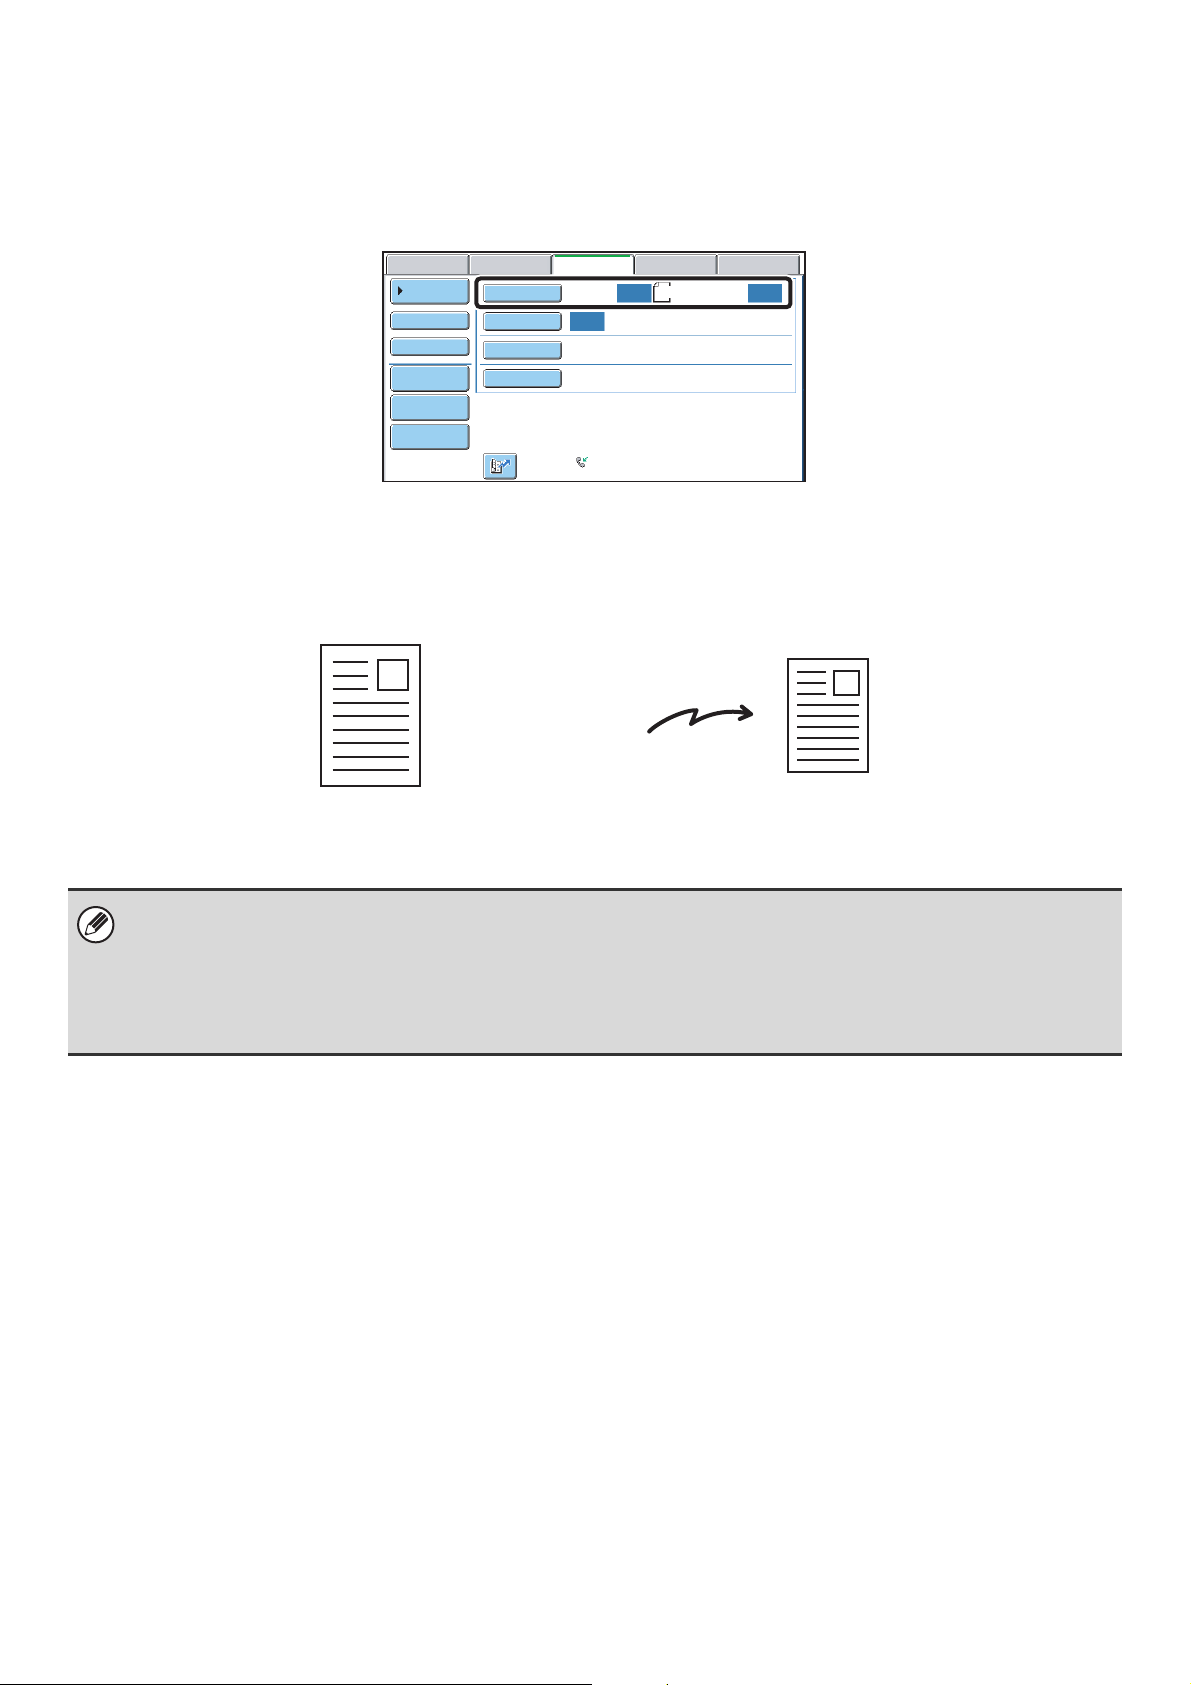
SPECIFYING THE SCAN SIZE AND SEND SIZE (Enlarge/Reduce Transmission)
When the original is placed, its size is automatically detected and displayed in the base screen.
The size of the placed original is indicated as the scan size, and the size to be transmitted is indicated as the send size.
USB Mem. ScanFaxScan
A4
Auto Auto
Auto Reception
Address Book
Direct TX
Sub Address
Address Review
File
Quick File
Internet Fax PC Scan
Original
Exposure
Resolution
Special Modes
Scan: Send:
Auto
Standard
Fax Memory:100%
In the above screen, the scan size (the placed original) is A4 (8-1/2" x 11") and the send size is auto. If, for example, the
scan size were A4 (8-1/2" x 11") and the send size were B5 (5-1/2" x 8-1/2"), the image would be reduced before
transmission.
"Scan Size"
Transmission
"Send Size" is set to
B5 (5-1/2" x 8-1/2")
A4 (8-1/2" x 11")
The image is reduced
to B5 (5-1/2" x 8-1/2")
before transmission
• Only standard original sizes can be automatically detected.
☞ STANDARD SIZES (page 27)
• When the original size is a non-standard size, or if the size is not detected correctly, manually specify the original scan
size.
☞ Specifying the original scan size (by paper size) (page 46)
Specifying the original scan size (by numerical values) (page 48)
45
Page 46
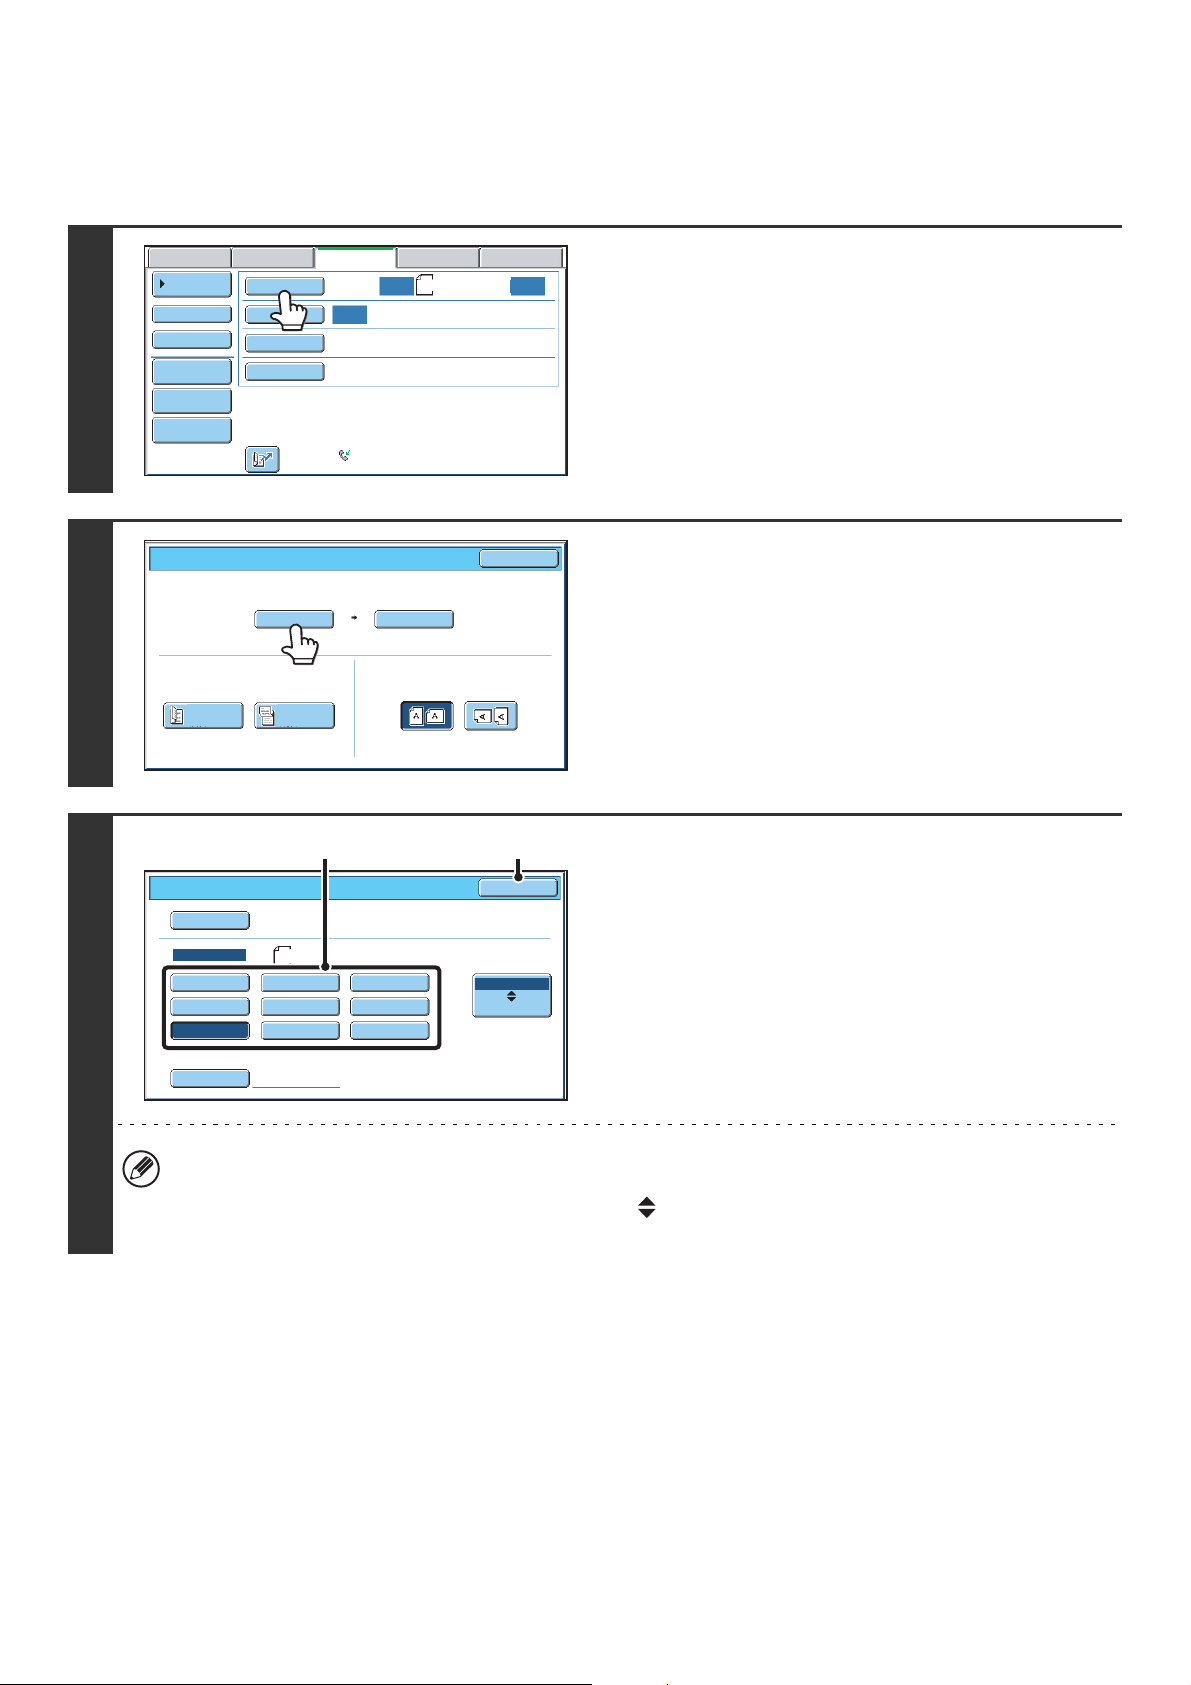
Specifying the original scan size (by paper size)
If the original is a non-standard size or you wish to change the scan size, touch the [Original] key to specify the original
size manually. Place the original in the document feeder tray or on the document glass and follow the steps below.
1
2
Address Book
Direct TX
Sub Address
Address Review
File
Quick File
Fax/Original
2-Sided
Booklet
Internet Fax PC Scan
Original
Exposure
Resolution
Special Modes
Scan Size Send Size100%
Auto A4
Scan: Send:
Auto
Standard
Fax Memory:100%
2-Sided
Tablet
USB Mem. ScanFaxScan
Auto
Auto Reception
Auto
Image Orientation
A4
Auto
OK
Touch the [Original] key.
The automatically detected original size appears to the right of
the [Original] key.
Touch the [Scan Size] key.
3
Fax/Original
Auto
Manual
Size Input
Manual
B5RA5 B4
A4A5R
A4RB5 Long Size
(2)(1)
OK
AB
A3
Inch
Specify the scan size.
(1) Touch the appropriate original size key.
(2) Touch the [OK] key.
• If you are sending a long original, touch the [Long Size] key. Use the automatic document feeder to scan a long
original. The maximum length that can be scanned is 800 mm (31-1/2") (the maximum height is 297 mm (11-5/8")).
• To specify an Inch size for the scan size, touch the [AB Inch] key to highlight the [Inch] side and then specify the
scan size.
46
Page 47
Fax/Original
Scan Size Send Size100%
B5
Auto
OK
Touch the [OK] key.
4
2-Sided
Booklet
2-Sided
Tablet
Image Orientation
When [Long Size] is selected, the 2-sided scanning setting and send size cannot be changed.
47
Page 48

Specifying the original scan size (by numerical values)
When scanning a non-standard size original such as a postcard or card, follow these steps to specify the original size.
The width can be from 64 mm to 432 mm (2-1/2" to 17"), and the height can be from 64 mm to 297 mm (2-1/2" to
11-5/8").
1
2
Address Book
Direct TX
Sub Address
Address Review
File
Quick File
Fax/Original
2-Sided
Booklet
Internet Fax PC Scan
Original
Exposure
Resolution
Special Modes
Scan Size Send Size100%
Auto A4
Scan: Send:
Auto
Standard
Fax Memory:100%
2-Sided
Tablet
USB Mem. ScanFaxScan
Auto
Auto Reception
Auto
Image Orientation
A4
Auto
OK
Touch the [Original] key.
The automatically detected original size appears to the right of
the [Original] key.
Touch the [Scan Size] key.
3
4
Fax/Original
Auto
Manual
Size Input
Fax/Original
Size Input
A4
B5RA5 B4
A4A5R
A4RB5
(1), (2) (3)
X
Y
A3
Long Size
420
297
(64~432)
mm
(64~297)
mm
AB
Inch
OK
Touch the [Size Input] key.
Enter the scan size.
OK
OKCancel
(1) Touch the [X] key and enter the X
(horizontal) dimension with the keys.
(2) Touch the [Y] key and enter the Y (vertical)
dimension with the keys.
(3) Touch the [OK] key.
To complete the setting and return to the screen of step 3,
touch the [OK] key next to the [Cancel] key.
System Settings (Administrator): Original Size Detector Setting
This is used to set the size entry screen to "inch units" or "mm units".
48
Page 49

Fax/Original
Scan Size Send Size
X420 Y297
Auto
OK
Touch the [OK] key.
The specified size appears in the [Scan Size] key.
5
2-Sided
Booklet
2-Sided
Tablet
Image Orientation
• When the scan size is specified by numerical values, the send size cannot be specified.
• When the automatic document feeder is used, an original longer that 432 mm (17") can be scanned (maximum width
800 mm (31-1/2")). In this case, touch the [Long Size] key in the screen of step 3.
☞ Specifying the original scan size (by paper size) (page 46)
49
Page 50

Specifying the send size of the original
Specify the send size as a paper size. If a send size bigger than the scan size is selected, the image will be enlarged. If
a send size smaller than the scan size is selected, the image will be reduced.
The send size cannot be specified when [Long Size] is selected for the scan size, or when the scan size is specified by
numerical values.
1
2
Address Book
Direct TX
Sub Address
Address Review
File
Quick File
Fax/Original
2-Sided
Booklet
Internet Fax PC Scan
Original
Exposure
Resolution
Special Modes
Scan Size Send Size100%
Auto A4
Scan: Send:
Auto
Standard
Fax Memory:100%
2-Sided
Tablet
USB Mem. ScanFaxScan
Auto
Auto Reception
Auto
Image Orientation
A4
Auto
OK
Touch the [Original] key.
Touch the [Send Size] key.
3
Fax/Original
Auto
Manual
A5R
(2)(1)
OK
A4
B5RA5
A4
A4RB5
B4
A3
AB
Inch
Specify the send size.
(1) Touch the desired send size key.
(2) Touch the [OK] key.
• Depending on the "Scan Size" setting, it may not be possible to select some sizes for the "Send Size". Size keys
that cannot be specified for the "Send Size" are greyed out to prevent selection.
• To specify an Inch size for the send size, touch the [AB Inch] key to highlight the [Inch] side and then specify the
send size.
50
Page 51

4
Fax/Original
Scan Size Send Size141%
Auto A4
(2)(1)
OK
A3
Specify the orientation in which the
original is placed.
(1) Touch the appropriate [Image Orientation]
key.
If the wrong orientation is selected here, the image may
not be sent properly when using enlargement/reduction.
(2) Touch the [OK] key.
2-Sided
Booklet
2-Sided
Tablet
Image Orientation
The ratio used for reduction or enlargement of the original will appear between the "Scan Size" and the "Send Size".
51
Page 52

CHANGING THE EXPOSURE
The exposure can be changed to match the darkness of the original.
1
2
Address Book
Direct TX
Sub Address
Address Review
File
Quick File
Fax/Exposure
Internet Fax PC Scan
Original
Exposure
Resolution
Special Modes
Scan:
Auto
Standard
Fax Memory:100%
USB Mem. ScanFaxScan
A4
Auto Auto
Auto Reception
Send:
(3)(1) (2)
OK
Auto
Manual
1 53
Touch the [Exposure] key.
The current exposure setting appears to the right of the
[Exposure] key.
Select the exposure.
(1) Touch the [Manual] key.
(2) Adjust the exposure with the keys.
When the exposure is set to [Auto], the keys
cannot be used.
The exposure darkens when the key is touched,
and lightens when the key is touched.
To return to auto exposure adjustment, touch the [Auto]
key.
(3) Touch the [OK] key.
When using the document glass to scan multiple original pages, the exposure setting can be changed each time you change
pages. When using the automatic document feeder, the exposure setting cannot be changed once scanning has begun.
(However, when "Job Build" in the special modes is used, the exposure can be changed each time a new set of originals is
inserted.)
System Settings (Administrator): Default Exposure Settings
This is used to change the default exposure setting.
Exposure settings
Exposure When to select
Auto This setting automatically adjusts the exposure for light and dark parts of the original.
1-2 Select this setting when the original consists of dark text.
Manual
3 Select this setting for a normal original (neither dark nor light).
4-5 Select this setting when the original consists of faint text.
52
Page 53

CHANGING THE RESOLUTION
The resolution can be selected to match the characteristics of the original, such as text or photo, the size of the text, and
the darkness of the image.
1
2
Address Book
Direct TX
Sub Address
Address Review
File
Quick File
Fax/Resolution
Internet Fax PC Scan
Original
Exposure
Resolution
Special Modes
Scan: Send:
Auto
Standard
Fax Memory:100%
USB Mem. ScanFaxScan
Auto Auto
A4
Auto Reception
(1) (2)
OK
Standard
Fine
Super Fine Half Tone
Ultra Fine
Touch the [Resolution] key.
The current resolution setting appears to the right of the
[Resolution] key.
Select the resolution.
(1) Touch the key of the desired resolution.
(2) Touch the [OK] key.
When [Fine], [Super Fine], or [Ultra Fine] is selected, the [Half Tone] key can be touched to select halftone.
• When using the document glass to scan multiple original pages, the resolution setting can be changed each time you
change pages. When using the automatic document feeder, the resolution setting cannot be changed once scanning has
begun. (However, when "Job Build" in the special modes is used, the resolution can be changed each time a new set of
originals is inserted.)
• When a fax is sent at [Ultra Fine], [Super Fine], or [Fine] resolution, a lower resolution will be used if the receiving machine
does not have that resolution.
System Settings (Administrator): Initial Resolution Setting
This is used to change the default resolution setting.
53
Page 54

Resolution settings
Resolution When to select
Standard Select this setting when your original consists of normal-sized text (like the text in this
manual).
Fine Select this setting when your original has small text or diagrams with fine lines.
The original will be scanned at twice the resolution of the [Standard] setting.
Super Fine Select this setting when your original has intricate pictures or diagrams.
A higher-quality image will be produced than with the [Fine] setting.
Ultra Fine Select this setting when your original has intricate pictures or diagrams.
This setting gives the best image quality. However, transmission will take longer than with the
other settings.
Half Tone Select this setting when your original is a photograph or has gradations of colour (such as a
colour original).
This setting will produce a clearer image than [Fine], [Super Fine], or [Ultra Fine] used alone.
Halftone cannot be selected when [Standard] is used.
54
Page 55

FAX RECEPTION
4
This chapter explains the basic procedures for receiving faxes.
RECEIVING FAXES
When the reception mode is set to "Auto Reception", the machine will receive and print faxes automatically. The fax
reception mode is displayed in the base screen.
USB Mem. ScanFaxScan
Auto Auto
Auto Reception
This shows the current fax
reception mode and the amount
of free memory remaining.
Address Book
Direct TX
Sub Address
Address Review
File
Quick File
Internet Fax PC Scan
Original
Exposure
Resolution
Special Modes
Scan: Send:
Auto
Standard
Fax Memory:100%
• When fax reception is in progress, it is possible to reserve a transmission by performing the transmission in memory
transmission mode.
☞ TRANSMISSION METHODS (page 24)
• To print received faxes, make sure that the required paper is loaded in the machine's paper trays. It is not necessary to
load A4 (8-1/2" x 11") paper and B5 (5-1/2" x 8-1/2") paper in both the vertical ( ) and horizontal ( ) orientations.
Differences in orientation are automatically adjusted when faxes are received.
When a fax smaller than A4 (8-1/2" x 11") size is received, the size of the paper used for printing will vary depending on the
orientation (vertical or horizontal) in which the sender placed the original.
• System Settings: Receive Setting
This is used to change the fax reception mode. "Auto Reception" should normally be used.
Select "Manual Reception" when an extension phone is connected to the machine.
• System Settings (Administrator): Anti Junk Fax Setting
This setting is used to enter fax numbers from which you wish to block reception.
55
Page 56

RECEIVING A FAX
When a fax is transmitted to the machine, the machine automatically receives and prints the fax.
The machine rings and fax reception
Beep
1
• System Settings (Administrator): Speaker Settings
This is used to change the volume and tone of the reception beep.
• System Settings (Administrator): Number of Calls in Auto Reception
This is used to change the number of rings on which fax reception begins automatically. To receive faxes without
the machine ringing, select "0" rings.
begins automatically.
A beep sounds when reception ends.
The fax is automatically printed.
2
• If a password entry screen appears...
A password must be entered to print the received fax. When the correct password is entered, the received fax is
printed.
☞ PRINTING A PASSWORD-PROTECTED FAX (Hold Setting For Received Data Print) (page 57)
• The output tray and stapling (when a finisher is installed) can be selected.
The number of copies of received faxes that are printed and the output tray can be selected. When a finisher is
installed, the number of copies printed, the output tray, and stapling can be selected. For more information, see the
System Settings Guide.
• If printing of a copy job or print job is in progress when a fax is received, the fax will not be printed until the previously
reserved job is completed.
• Received faxes will not be printed when the machine cannot print due to an error condition such as out of paper, out of
toner, or a paper misfeed. The faxes will be printed automatically when the error condition is cleared. (If the machine ran
out of paper, touch the [OK] key in the touch panel after loading paper.
• When received faxes cannot be printed, the faxes can be forwarded to another fax machine.
☞ FORWARDING RECEIVED FAXES (Fax Data Forward) (page 58)
System Settings (Administrator): Duplex Reception Setting
This is used to have received faxes printed on both sides of the paper.
56
Page 57

RECEIVING A FAX MANUALLY
A fax can be received manually using the touch panel. While the machine rings, touch the [Speaker] key in the base
screen and then touch the [Fax Manual Reception] key that appears.
Telephone mode.
Scan
Address Book
Speaker Volume
Address Review
File
Quick File
Internet Fax PC Scan
Original
Exposure
Resolution
Special Modes
Scan: Send:
Auto
Standard
Fax Memory:100%
Speaker
USB Mem. ScanFax
Auto Auto
• When a call is answered by touching the [Speaker] key, you will be able to hear the other party, however, you will not be
able to speak.
• Even when you use an extension phone to answer a call, you can touch the [Fax Manual Reception] key in the touch panel
to begin fax reception. You can also use the extension phone to begin fax reception.
☞ RECEIVING A FAX AFTER ANSWERING A CALL ON THE EXTENSION PHONE (Remote Reception) (page 113)
Resend
Fax Manual
Reception
PRINTING A PASSWORD-PROTECTED FAX (Hold Setting For Received Data Print)
"Hold Setting for Received Data Print" can be enabled in the system settings (administrator) to have faxes received to
memory without being printed. To print the faxes, a password must be entered. When this function is used, a password
entry screen appears in the touch panel when a fax is received.
Received data is stored.
Enter password via the 10-key.
Cancel
When the previously programmed 4-digit password is entered with the numeric keys, printing begins.
The [Cancel] key can be touched to close the password entry screen. If this is done, the data in memory key ( ) will
blink in the touch panel. The password entry screen will reappear when you touch the blinking key ( ) or change
modes.
• The received faxes will be retained in memory regardless of whether they were received automatically or manually. If a
transaction report is set to print when a fax is received, the transaction report will also be retained in memory.
• If "Fax Data Receive/Forward" is executed in the system settings to forward received faxes to another machine, faxes
retained in memory will also be forwarded. At that time, the same password entry screen as for printing will appear.
Forwarding will not take place unless the password is entered.
System Settings (Administrator): Hold Setting for Received Data Print
Enable this setting to have received faxes retained in memory until a password is entered. This setting is also used to
program the password.
57
Page 58

FORWARDING RECEIVED FAXES (Fax Data Forward)
When the machine cannot print because it is out of paper or out of toner, received faxes can be forwarded to another
previously programmed fax machine.
This function is convenient in an office or work area that has two or more telephone lines and another fax machine is
connected to a different line than the machine.
The machine
Forwarding of received faxes is executed in the system settings of the machine. Touch the [SYSTEM SETTINGS] key
on the operation panel to display the system setting menu screen in the touch panel. Select [Fax Data Receive/Forward]
- [Fax Settings], and then touch the key that executes received fax forwarding.
• If some pages of a fax that is being forwarded were successfully printed, only those pages that were not printed will be
forwarded.
• A forwarded fax becomes a fax transmission job. If transmission does not take place because the transmission was
cancelled or an error occurred, the fax will be held in memory until it can be printed.
• All faxes received are forwarded. Note, however, that faxes received to an F-code confidential memory box cannot be
forwarded.
• If a password entry screen appears after touching the [OK] key, "Hold Setting for Received Data Print" has been enabled.
Enter the password with the numeric keys to begin forwarding.
The machine cannot print
Forwarding
destination
Forwarding
Printing
Received fax
☞ PRINTING A PASSWORD-PROTECTED FAX (Hold Setting For Received Data Print) (page 57)
• System Settings: Fax Data Receive/Forward
Use this to forward received faxes when the machine is unable to print.
• System Settings (Administrator): Set the Telephone Number for Data Forwarding
This is used to store the forwarding fax number.
58
Page 59

FORWARDING A RECEIVED FAX TO AN E-MAIL ADDRESS (Inbound Routing Settings)
Received faxes can be automatically forwarded to a specified E-mail address. This function can be used to forward
received faxes directly to an e-mail address without printing the faxes.
The machine
Forwarding
Received fax
To configure inbound routing settings, click [Application Settings] and then [Inbound Routing Settings] in the Web page
menu. (Administrator rights are required.)
• The format of the forwarded file is TIFF-F.
• This function cannot be used for faxes received by confidential reception.
59
Page 60
SPECIAL MODES
5
This chapter explains special modes that can be used for fax transmission.
SPECIAL MODES
When the [Special Modes] key is pressed in the base screen, the special modes menu screen appears. The special
modes menu consists of two screens. Touch the keys to move between the screens. After selecting special
mode settings, touch the [OK] key in the special modes menu screen to complete the settings and return to the base
screen of fax mode.
Special modes menu (1st screen)
USB Mem. ScanFaxScan
A4
Auto Auto
Auto Reception
Send:
Address Book
Direct TX
Sub Address
Address Review
File
Quick File
Internet Fax PC Scan
Original
Exposure
Resolution
Special Modes
Scan:
Auto
Standard
Fax Memory:100%
(1) [Program] key
☞ STORING FAX OPERATIONS (Program) (page 62)
(2) [Erase] key
☞ ERASING PERIPHERAL SHADOWS ON THE
IMAGE (Erase) (page 65)
(3) [Dual Page Scan] key
☞ TRANSMITTING AN ORIGINAL AS TWO
SEPARATE PAGES (Dual Page Scan) (page 67)
(4) [Timer] key
☞ SENDING A FAX AT A SPECIFIED TIME (Timer)
(page 70)
(5) [2in1] key
☞ SENDING TWO PAGES AS A SINGLE PAGE (2in1)
(page 73)
(6) [Card Shot] key
☞ SENDING BOTH SIDES OF A CARD AS A SINGLE
PAGE (Card Shot) (page 76)
Fax/Special Modes
(1) (2) (3)
Program
(4) (5) (6)
Timer
(7) (8) (9)
Job
Build
(10) (11)
File
Erase
2in1
Mixed Size
Original
Quick File
Dual Page
Scan
Card Shot
Slow Scan
Mode
☞ Special modes menu (2nd screen)
(page 61)
(7) [Job Build] key
☞ SENDING A LARGE NUMBER OF PAGES (Job
Build) (page 79)
(8) [Mixed Size Original] key
☞ TRANSMITTING ORIGINALS OF DIFFERENT
SIZES (Mixed Size Original) (page 82)
(9) [Slow Scan Mode] key
☞ FAXING THIN ORIGINALS (Slow Scan Mode) (page
84)
(10) [File] key
Touch this to use the File function of document filing
mode. For more information on File, see the Document
Filing Guide.
(11) [Quick File] key
Touch this to use the Quick File function of document
filing mode. For more information on Quick File, see the
Document Filing Guide.
OK
1
2
60
Page 61
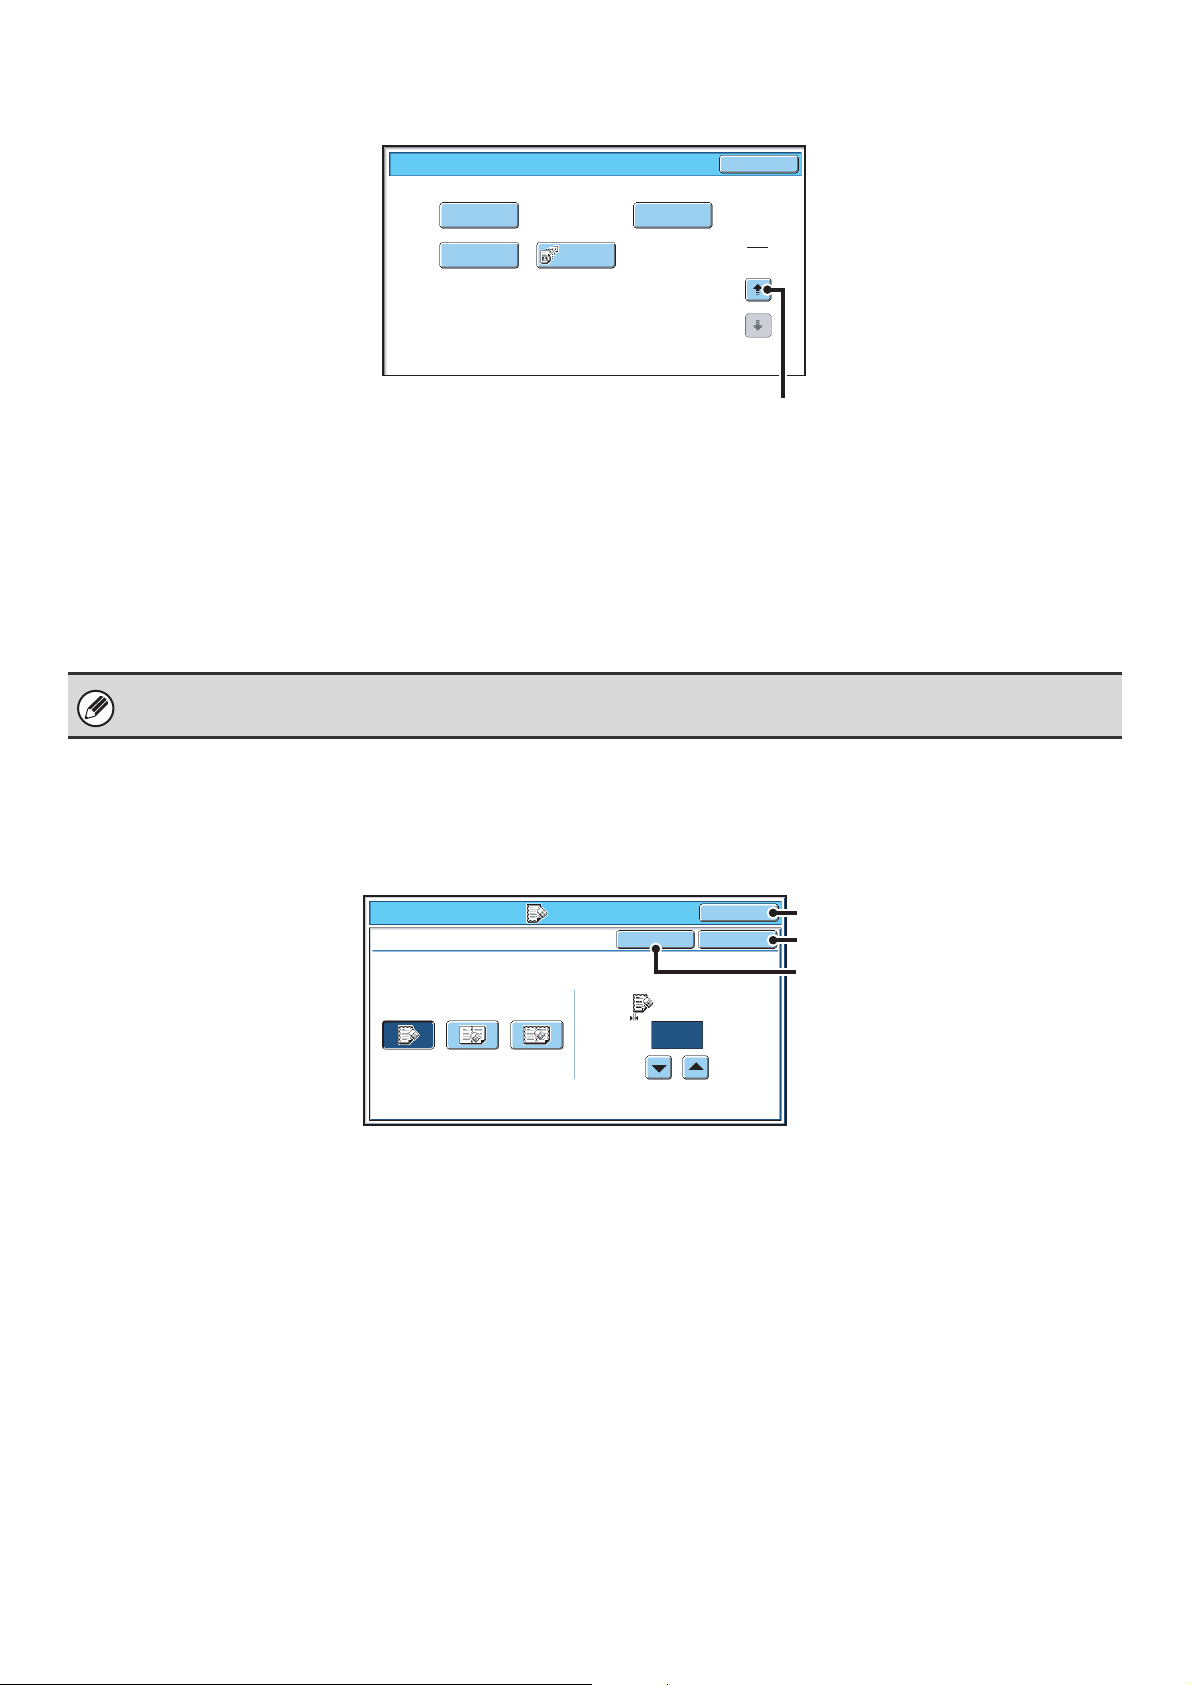
Special modes menu (2nd screen)
Fax/Special Modes
(1) (2)
(3) (4)
(1) [Transaction Report] key
☞ CHANGING THE TRANSACTION REPORT PRINT
CONDITION FOR A SINGLE TRANSMISSION
(page 125)
(2) [Own Name Select] key
☞ TEMPORARILY CHANGING THE SENDER
INFORMATION (Own Name Select) (page 87)
Special modes can generally be combined with other special modes, however, there are some combinations that are not
possible. If a prohibited combination is selected, a message will appear in the touch panel.
Transaction
Report
Memory Box
Own Name
Select
Polling
☞ Special modes menu (1st screen) (page 60)
(3) [Memory Box] key
☞ SENDING A FAX WHEN ANOTHER MACHINE
(4) [Polling] key
☞ CALLING A FAX MACHINE AND INITIATING
OK
2
2
POLLS YOUR MACHINE (Polling Memory) (page
91)
RECEPTION (Polling) (page 88)
[OK] key and [Cancel] key
In some cases two [OK] keys and one [Cancel] key will appear in the special mode screens. The keys are used as
follows:
(0~20)
mm
OK
OK
(A)
(B)
(C)
Fax/Special Modes
Erase
Edge
Erase
Centre
Erase
Edge+Centre
Erase
Cancel
Edge
10
(A) Enter the selected special mode setting and return to the base screen.
(B) Enter the selected special mode setting and return to the special modes menu screen. Touch this key when you
wish to continue selecting other special mode settings.
(C) During selection of special mode settings, this key returns you to the special modes menu screen without saving the
settings. When settings have been completed, this cancels the settings and returns you to the special modes menu
screen.
61
Page 62

STORING FAX OPERATIONS (Program)
A program is a group of transmission settings stored together. When transmission settings are stored in a program, the
settings can be retrieved and used for a fax job by means of a simple operation.
For example, suppose that the same A4 (8-1/2" x 11") size documents are distributed to branch offices in various
regions once a month.
(1) The same documents are faxed to each branch office
(2) To save paper, two document pages are faxed as a single page
(3) Smudges on the edges of the documents are erased before transmission
A4 (8-1/2" x 11") size
Fax received by recipients.
documents to be distributed
1 2
1 2
1 2
When a job program is not stored When a job program is stored
Enter the fax numbers of the branch offices
Select the 2in1 function.
Select erase settings
Press the [BLACK & WHITE START] key ( ).
Retrieve the stored program.
The originals are scanned and transmitted.
Press the [BLACK & WHITE START] key ( ).
The originals are scanned and transmitted.
Considerable time is required to send the documents each
month because the above settings must be selected.
In addition, mistakes may occasionally be made when
selecting the settings, so incorrect transmissions may occur.
• Programs are stored, edited, and deleted using "Address Control" in the system settings. See "Program" in the
System Settings Guide.
Programs can also be stored using the Web pages. Click [Job Programs] and then [Program Registration] in the Web page menu.
•
• The settings stored in a program will be retained even after the program is used for transmission. The same settings can
be used repeatedly for transmission.
• The following settings can be stored in programs.
Destinations: One-touch keys, group keys, search numbers
Image settings: Resolution and exposure settings
Special modes: Polling reception, Erase, Dual Page Scan, 2in1
F-code communication: A destination that includes an F-code can be stored to perform an F-code operation.
• Up to 48 programs can be stored.
• Up to 500 destinations can be stored in each program.
When a program is stored, settings are selected with ease by
simply pressing the program key.
In addition, transmission takes place based on the stored
settings so there are no chances for mistakes.
62
Page 63

USING A PROGRAM TO SEND A FAX
Place the original.
Place the original in the document feeder tray or on the document glass as appropriate for the functions stored in the
1
program.
Select the special modes.
(1) Touch the [Special Modes] key.
2
(2) Touch the [Program] key.
☞ Special modes menu (1st screen) (page 60)
3
4
Program
Program A
Program C
Program E
Program G
Program I
Program K
Program : Program C
0123456789
Scan
Address Review
Quick File
Internet Fax PC Scan
File
Original
Exposure
Resolution
Special Modes
(1) (2)
Program B
Program D
Program F
Program H
Program J
Program L
USB Mem. ScanFax
A4
Auto
Scan: Send:
Auto
Standard
Auto Reception
Fax Memory:100%
OK
Auto
Retrieve the stored program.
(1) Touch the desired program key.
(2) Touch the [OK] key.
1
2
Select additional settings.
Select any settings or functions that you wish to use that cannot
be stored in a program. The following items can be selected.
• Image settings: original scan size, send size, 2-sided
scanning
• Special modes: Timer Transmission, Card Shot, Job Build,
Mixed Size Original, Slow Scan Mode, Own
Name Select, Transaction Report, File,
Quick File
• The screen that appears will vary depending on the destination stored in the program.
• The mode cannot be changed here.
• Functions stored in the program cannot be cancelled here.
63
Page 64

5
Press the [BLACK & WHITE START] key
().
Scanning begins.
• If you inserted the original pages in the document feeder
tray, all pages are scanned.
A beep will sound to indicate that scanning is finished.
• If you are scanning the original on the document glass, scan
each page one page at a time.
When scanning finishes, place the next original and press
the [BLACK & WHITE START] key ( ). Repeat until all
pages have been scanned and then touch the [Read-End]
key.
A beep will sound to indicate that scanning is finished.
To cancel scanning...
Press the [STOP] key ( ).
64
Page 65
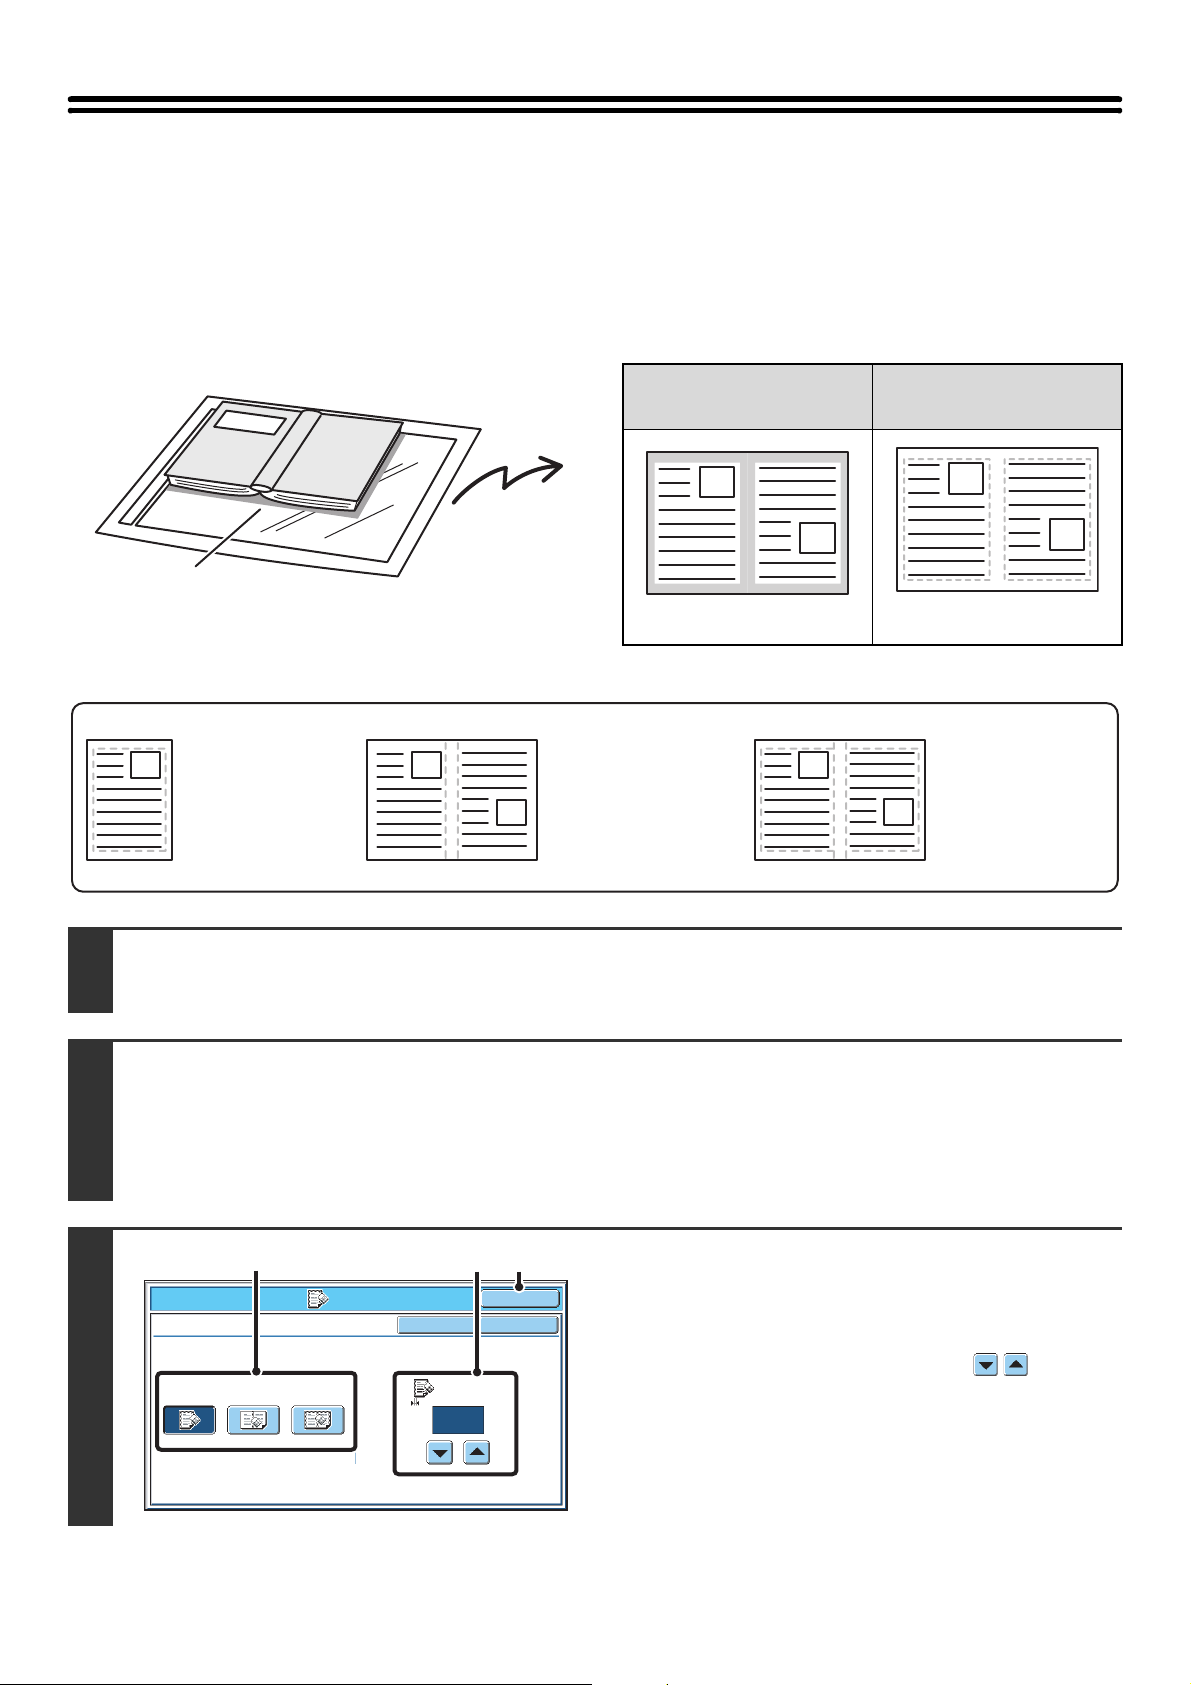
ERASING PERIPHERAL SHADOWS ON THE IMAGE (Erase)
The erase function is used to erase shadows on images produced when scanning thick originals or books.
(This function erases the parts of the image where shadows tend to form. The function does not detect shadows and
erase only the shadows.)
Scanning a thick book
Not using the erase
function
Shadows appear here.
Shadows appear in the image.
Erase modes
Edge Erase
This erases shadows
that appear at the
edges of the image
when thick originals
or books are faxed.
Centre Erase
This erases shadows
at the bindings of
books or other bound
documents.
Place the original.
1
Place the original face up in the document feeder tray, or face down on the document glass.
Using the erase
function
No shadows appear.
Edge + Centre
Erase
This erases shadows
at both the edges
and the binding.
Select the special modes.
(1) Touch the [Special Modes] key.
2
(2) Touch the [Erase] key.
☞ Special modes menu (1st screen) (page 60)
(1)
Fax/Special Modes
Erase
3
Edge
Erase
Centre
Erase
Edge+Centre
Erase
Cancel
Edge
(2) (3)
10
(0~20)
mm
Select the erase settings.
OK
OK
(1) Touch the desired erase mode.
Select one of the three erase modes.
(2) Set the erasure width with the keys.
0 mm to 20 mm (0" to 1") can be entered.
(3) Touch the [OK] key.
65
Page 66

(3)
(2)
Enter the destination fax number
4
5
105 15
Condition
Settings
Address Review
Address Entry
Global
Address Search
Sub Address
Sort Address
To
AAA AAA
CCC CCC
EEE EEE
GGG GGG
III III
Frequent Use
Cc
BBB BBB
DDD DDD
FFF FFF
HHH HHH
JJJ JJJ
ABCD EFGHI JKLMN OPQRST UVWXYZ
1
2
(1) Touch the [Address Book] key in the base
screen.
(2) Touch the one-touch key of the desired
destination.
(3) Touch the [To] key.
In addition to specification by one-touch key, a destination can also be specified using a search number. You can also
directly enter a fax number with the numeric keys or look up a destination in a global address book. For more
information, see "2. ENTERING DESTINATIONS" (page 15).
Press the [BLACK & WHITE START] key
().
Scanning begins.
• If you inserted the original pages in the document feeder
tray, all pages are scanned.
A beep will sound to indicate that scanning is finished.
• If you are scanning the original on the document glass, scan
each page one page at a time.
When scanning finishes, place the next original and press
the [BLACK & WHITE START] key ( ). Repeat until all
pages have been scanned and then touch the [Read-End]
key.
A beep will sound to indicate that scanning is finished.
To cancel scanning...
Press the [STOP] key ( ).
When the erase function is used, erase takes place at the edges of the original image. If you also use a reduction or an
enlargement setting, the erase width will change according to the selected ratio. For example, if the erase width setting is
20 mm (1") and the image is reduced to 50%, the erase width will be 10 mm (1/2").
To cancel an erase setting...
Touch the [Cancel] key in the screen of step 3.
System Settings (Administrator): Erase Width Adjustment
The default erase width setting is linked to the copy mode system setting, and can be set from 0 mm to 20 mm (0" to 1"). The
factory default setting is 10 mm (1/2").
66
Page 67
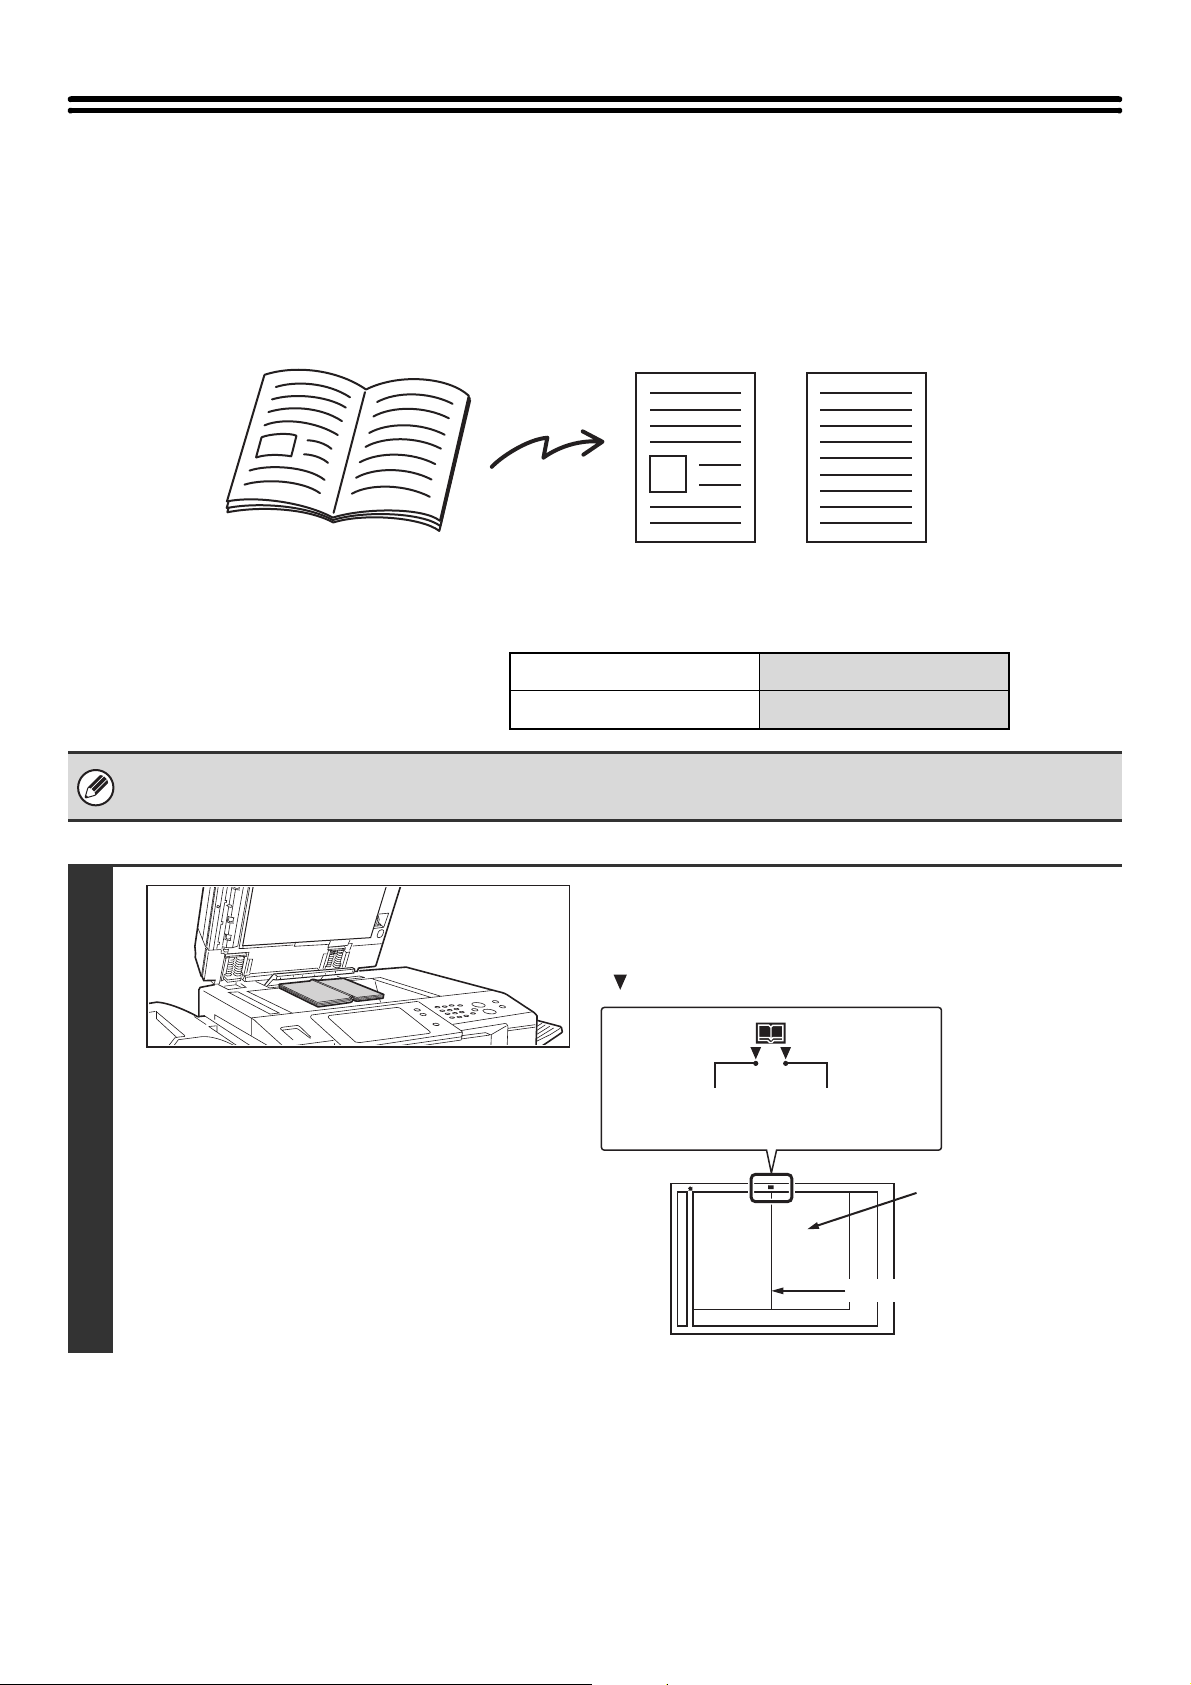
TRANSMITTING AN ORIGINAL AS TWO SEPARATE PAGES (Dual Page Scan)
The left and right sides of an original can be transmitted as two separate pages. This function is useful when you wish to
fax the left and right pages of a book or other bound document as separate pages.
Example: Faxing the left and right pages of a book
Book or bound document
Example:
• When using dual page scan, the original must be placed on the document glass.
• The send size cannot be changed.
The left and right pages are sent as two pages.
Original scan size Transmitted image
A3 (11" x 17") x 1 page A4 (8-1/2" x 11") x 2 pages
Place the original face down on the
document glass.
Align the centre of the original with the appropriate size mark
.
Size mark
Centreline of
1
A3 original
Centreline of
11" x 17" original
67
A3 (11" x 17")
The page on this side
is scanned first.
Centreline of original
Page 68

(3)(2)
Select Dual Page Scan.
2
3
Fax/Special Modes
Program
Timer
Job
Build
File
105 15
Condition
Settings
Address Review
Address Entry
Global
Address Search
Sub Address
Sort Address
(3)
To
AAA AAA
CCC CCC
EEE EEE
GGG GGG
III III
Frequent Use
Erase
2in1
Mixed Size
Original
Quick File
Dual Page
Scan
Card Shot
Slow Scan
Mode
(2)
Cc
BBB BBB
DDD DDD
FFF FFF
HHH HHH
JJJ JJJ
ABCD EFGHI JKLMN OPQRST UVWXYZ
OK
(1) Touch the [Special Modes] key.
☞ SPECIAL MODES (page 60)
1
2
(2) Touch the [Dual Page Scan] key so that it is
highlighted.
(3) Touch the [OK] key.
Enter the destination fax number
(1) Touch the [Address Book] key in the base
1
2
screen.
(2) Touch the one-touch key of the desired
destination.
(3) Touch the [To] key.
4
5
In addition to specification by one-touch key, a destination can also be specified using a search number. You can also
directly enter a fax number with the numeric keys or look up a destination in a global address book. For more
information, see "2. ENTERING DESTINATIONS" (page 15).
Press the [BLACK & WHITE START] key
( ) to scan the first original.
To cancel scanning...
Press the [STOP] key ( ).
If you have more pages to scan, change
pages and then press the [BLACK &
WHITE START] key ( ).
Repeat this step until all pages have been scanned.
68
Page 69

Touch the [Read-End] key.
Place next original.
Press [Start].
When finished, press [Read-End].
(Pg.No.x)
Configure Read-End
6
The [Configure] key can be touched to change the exposure, resolution, scan size, and send size for each original
page scanned.
• To erase shadows caused by the binding of a book or other bound document, use the erase function. (Note, however, that
"Centre Erase" and "Edge + Centre Erase" cannot be used.)
• When the scan size of the original is specified by numerical values, this function cannot be used.
To cancel Dual Page Scan...
Touch the [Dual Page Scan] key in the screen of step 2 so that it is not highlighted.
69
Page 70

SENDING A FAX AT A SPECIFIED TIME (Timer)
When this function is used, transmission takes place automatically at a specified time.
The timer transmission function makes it easy to perform reserved transmissions, broadcast transmissions and other
transmissions at night or other times when phone rates are low.
A timer setting can also be specified for polling reception to receive a fax when you are not present.
During the day, set up a
broadcast transmission to
take place at 20:00
• When a timer transmission is set, keep the main power switch "on". Transmission will not take place if the main power is
turned off at the specified time.
• When performing a timer transmission, you must scan the original into memory when you set up the transmission. It is not
possible to leave the document in the auto document feeder or on the document glass and have it scanned at the reserved
time of transmission.
• Settings selected for a timer transmission (exposure, resolution, special modes, etc.) are automatically cleared after the
transmission is finished. (However, when the document filing function is used, the scanned original and settings are stored
on the built-in hard drive. For more information on the document filing function, see the Document Filing Guide.)
At 20:00, the broadcast
transmission begins automatically
(Transmission to the first destination
takes place)
Place the original.
1
Place the original face up in the document feeder tray, or face down on the document glass.
Select the special modes.
(1) Touch the [Special Modes] key.
2
(2) Touch the [Timer] key.
☞ Special modes menu (1st screen) (page 60)
70
Page 71
(1)
(2) (3)
Set the time with the keys.
3
4
Fax/Special Modes
Timer
Cancel
OK
OK
(1) Specify the day.
If you do not wish to specify a day, select [---]. In this
case, transmission will begin when the time specified in
Day of the Week
Time
10--- 00
hh. mm.
(2) arrives.
(2) Specify the time (hour, minute)
Select the time in 24-hour format.
(3) Touch the [OK] key.
When this screen is opened, the setting will show the current time. If the time is not correct, press the [CLEAR ALL]
key ( ) to cancel the operation. Correct the time in the system settings and then perform the timer transmission
procedure.
☞ CHECKING THE DATE AND TIME (page 130)
Enter the destination fax number
(1) Touch the [Address Book] key in the base
screen.
(2) Touch the one-touch key of the desired
destination.
(3) Touch the [To] key.
105 15
Condition
Settings
Address Review
Address Entry
Global
Address Search
Sub Address
Sort Address
(3)
To
AAA AAA
CCC CCC
EEE EEE
GGG GGG
III III
Frequent Use
(2)
Cc
BBB BBB
DDD DDD
FFF FFF
HHH HHH
JJJ JJJ
ABCD EFGHI JKLMN OPQRST UVWXYZ
1
2
5
In addition to specification by one-touch key, a destination can also be specified using a search number. You can also
directly enter a fax number with the numeric keys or look up a destination in a global address book. For more
information, see "2. ENTERING DESTINATIONS" (page 15).
Press the [BLACK & WHITE START] key
().
Scanning begins.
• If you inserted the original pages in the document feeder
tray, all pages are scanned.
A beep will sound to indicate that scanning is finished.
• If you are scanning the original on the document glass, scan
each page one page at a time.
When scanning finishes, place the next original and press
the [BLACK & WHITE START] key ( ). Repeat until all
pages have been scanned and then touch the [Read-End]
key.
A beep will sound to indicate that scanning is finished.
71
Page 72

• The time can be specified up to a week in advance.
• Up to 94 timer transmissions can be stored at once.
• Only one timer polling operation can be stored at once. If you wish to poll multiple machines, store a serial polling timer
operation.
• If another transmission is in progress when the specified time arrives, the timer operation will begin after that transmission
is finished.
• Other operations can be performed after a timer transmission is set up.
• This function cannot be used in direct transmission mode or when the speaker is used to dial.
• If a timer transmission is given priority in the job status screen, the time specification is cancelled. The transmission will
begin as soon as the job in progress is completed.
☞ GIVING PRIORITY TO A RESERVED FAX JOB (page 123)
To cancel timer transmission...
Touch the [Cancel] key in the screen of step 3.
72
Page 73

SENDING TWO PAGES AS A SINGLE PAGE (2in1)
Two original pages can be reduced and sent as a single page. This function is convenient when you have a large
number of original pages and wish to reduce the number of pages sent.
Portrait-oriented originals
Transmission
Landscape-oriented originals
Place the original.
When placing the originals, orient them as shown below.
Portrait orientation
1
1 2
1 2
Originals
1 2
Transmission
Document feeder tray
Place the originals face up.
1
1 2
1
2
Document glass
Place the originals face down.
1
Landscape orientation
1 2
73
1
1
Page 74

(3)(2)
Select 2in1.
2
3
4
Fax/Special Modes
Program
Timer
Job
Build
File
Internet Fax PC Scan
Address Book
Direct TX
Sub Address
Address Review
File
Quick File
Fax/Original
2-Sided
Booklet
Erase
2in1
Mixed Size
Original
Quick File
Original
Exposure
Resolution
Special Modes
Scan Size Send Size100%
Auto A4
Scan: Send:
Auto
Standard
Fax Memory:100%
2-Sided
Tablet
Card Shot
USB Mem. ScanFaxScan
Auto
Auto Reception
Auto
Image Orientation
Dual Page
Scan
Slow Scan
Mode
A4
(1) (2)
OK
1
2
Auto
OK
(1) Touch the [Special Modes] key.
☞ SPECIAL MODES (page 60)
(2) Touch the [2in1] key so that it is
highlighted.
(3) Touch the [OK] key.
Touch the [Original] key.
Specify the orientation in which the
original is placed.
(1) Touch the appropriate [Image Orientation]
key.
If this setting is not correct, a suitable image may not be
transmitted.
(2) Touch the [OK] key.
5
Enter the destination fax number
(1) Touch the [Address Book] key in the base
screen.
(2) Touch the one-touch key of the desired
destination.
(3) Touch the [To] key.
105 15
Condition
Settings
Address Review
Address Entry
Global
Address Search
Sub Address
Sort Address
(3)
To
AAA AAA
CCC CCC
EEE EEE
GGG GGG
III III
Frequent Use
(2)
Cc
BBB BBB
DDD DDD
FFF FFF
HHH HHH
JJJ JJJ
ABCD EFGHI JKLMN OPQRST UVWXYZ
1
2
In addition to specification by one-touch key, a destination can also be specified using a search number. You can also
directly enter a fax number with the numeric keys or look up a destination in a global address book. For more
information, see "2. ENTERING DESTINATIONS" (page 15).
74
Page 75

6
Press the [BLACK & WHITE START] key
().
Scanning begins.
• If you inserted the original pages in the document feeder
tray, all pages are scanned.
A beep will sound to indicate that scanning is finished.
• If you are scanning the original on the document glass, scan
each page one page at a time.
When scanning finishes, place the next original and press
the [BLACK & WHITE START] key ( ). Repeat until all
pages have been scanned and then touch the [Read-End]
key.
A beep will sound to indicate that scanning is finished.
The [Configure] key can be touched in the scan-end confirmation screen to change the exposure, resolution, scan
size, and send size. (However, when scanning each even-numbered page of the original, only the exposure can be
changed.)
To cancel scanning...
Press the [STOP] key ( ).
• Transmission is not possible at a size smaller than the original size.
• This function cannot be used in direct transmission mode or when the speaker is used to dial.
• The 2in1 function cannot be used when the original is other than A4, B5 and A5 (8-1/2" x 11" and 5-1/2" x 8-1/2") size.
• When the scan size of the original is specified by numerical values, this function cannot be used.
To cancel 2in1...
Touch the [2in1] key in the screen of step 2 so that it is not highlighted.
75
Page 76
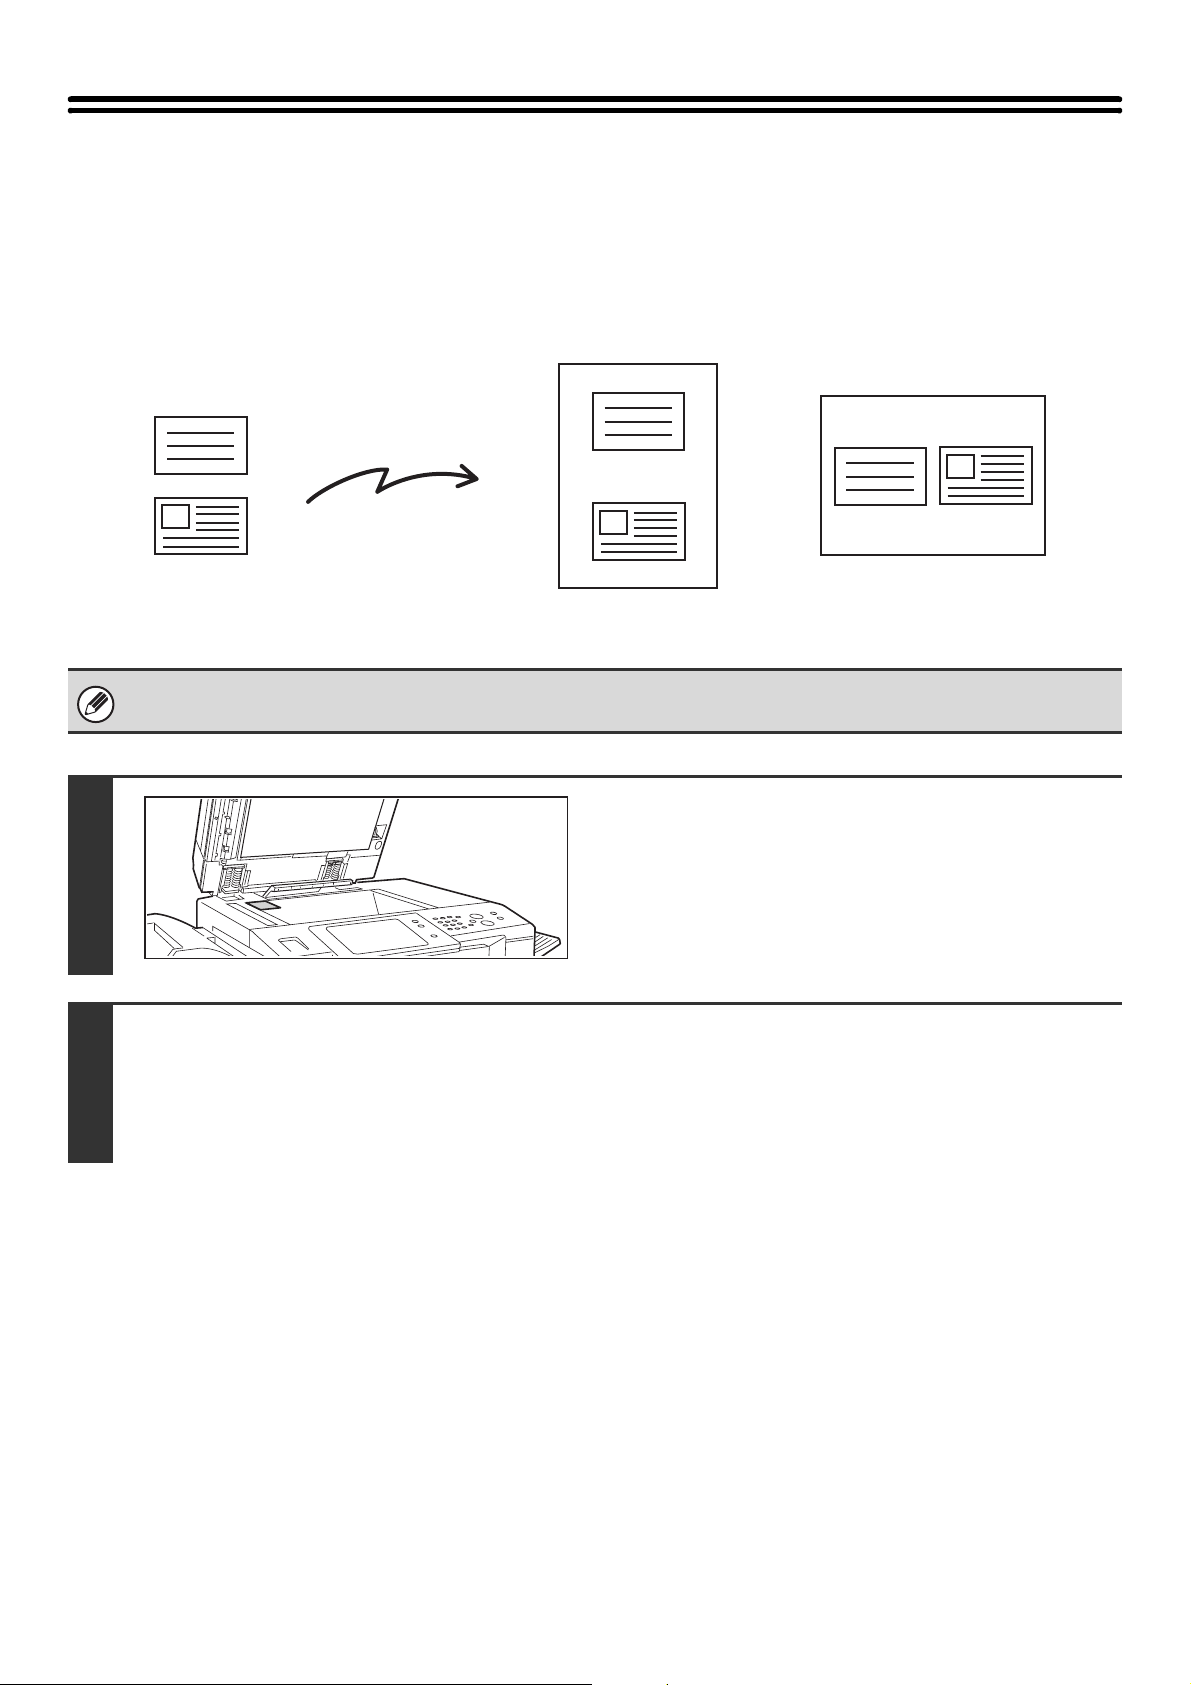
SENDING BOTH SIDES OF A CARD AS A SINGLE PAGE (Card Shot)
This function lets you send the front and reverse sides of a card as a single page, without the need to send each side
separately.
Transmitted image
Originals
Front
Back
When using card shot, the original must be scanned on the document glass.
Transmission
Example of an A4 (8-1/2" x 11")
size portrait scan transmission
Place the original (card) face down on
the document glass.
1
Example of an A4 (8-1/2" x 11")
size landscape scan transmission
Select the special modes.
(1) Touch the [Special Modes] key.
2
(2) Touch the [Card Shot] key.
☞ Special modes menu (1st screen) (page 60)
76
Page 77

(A)
(2)(B)(1)
Specify the original size.
3
Fax/Special Modes
Card Shot
Cancel
OK
OK
(1) Enter the original size.
• Touch the [X] key and enter the horizontal dimension
(X) of the original with the keys.
86
54
(25~210)
mm
(25~210)
mm
Fit to
Send Size
Size Reset
X
Y
• Touch the [Y] key and enter the vertical dimension (Y)
of the original with the keys.
(A) To return the original size to the default size, touch
the [Size Reset] key.
(B) To automatically enlarge or reduce the image size to
the send size, touch the [Fit to Send Size] key. Do not
touch this key if you wish to scan the original at the
original size that you entered.
(2) Touch the [OK] key.
Y
X
• The send size is automatically selected based on the original size you entered.
• After selecting Card Shot, you can touch the [Original] key in the base screen to change the original scan size or the
send size. In this case, the screen of step 3 appears when you touch the scan size key. For the procedure for
setting the send size, see "Specifying the send size of the original" (page 50).
4
Enter the destination fax number
(1) Touch the [Address Book] key in the base
screen.
(2) Touch the one-touch key of the desired
destination.
(3) Touch the [To] key.
105 15
Condition
Settings
Address Review
Address Entry
Global
Address Search
Sub Address
Sort Address
(3)
To
AAA AAA
CCC CCC
EEE EEE
GGG GGG
III III
Frequent Use
(2)
Cc
BBB BBB
DDD DDD
FFF FFF
HHH HHH
JJJ JJJ
ABCD EFGHI JKLMN OPQRST UVWXYZ
1
2
In addition to specification by one-touch key, a destination can also be specified using a search number. You can also
directly enter a fax number with the numeric keys or look up a destination in a global address book. For more
information, see "2. ENTERING DESTINATIONS" (page 15).
77
Page 78

5
6
Press the [BLACK & WHITE START] key
( ) to scan the front of the card.
To cancel scanning...
Press the [STOP] key ( ).
Turn the card over so that the back is
face down, and press the [BLACK &
WHITE START] key ( ) to scan the
back of the card.
Before scanning the back of the card, you can touch the [Configure] key in the touch panel to change the exposure.
To cancel scanning...
Press the [STOP] key ( ).
Touch the [Read-End] key.
Place next original.
Press [Start].
When finished, press [Read-End].
(Pg.No.x)
Configure Read-End
7
If you will continue by scanning the front of the card, you can touch the [Configure] key to change the exposure,
resolution, scan size, and send size.
• The ratio cannot be specified and "Rotation Sending Setting" cannot be selected.
• This function cannot be used in direct transmission mode or when the speaker is used to dial.
To cancel Card Shot...
Touch the [Cancel] key in the screen of step 3.
78
Page 79

SENDING A LARGE NUMBER OF PAGES (Job Build)
This function lets you separate an original consisting of numerous pages into sets, scan each set using the automatic
document feeder, and transmit the pages in a single transmission. Use this function when there are more original pages
than can be placed at once in the auto document feeder.
When scanning originals that are separated into sets, scan the set that has the first page first. The settings that you
select for the first set can be used for all remaining sets.
Originals
Originals are
scanned in
1
1
101
separate sets.
All originals can
be sent in one
operation.
Up to 999 pages can be scanned. Note that when the memory is being used for other jobs, fewer pages can be scanned.
Insert the originals face up in the
Indicator
line
1
(3)(2)
document feeder tray.
Insert the originals all the way into the document feeder tray.
Multiple originals can be placed in the document feeder tray.
The stack of originals must not be higher than the indicator line
on the tray.
Select job build mode.
1
1
2
Fax/Special Modes
Program
Timer
Job
Build
File
Erase
2in1
Mixed Size
Original
Quick File
Dual Page
Scan
Card Shot
Slow Scan
Mode
OK
(1) Touch the [Special Modes] key.
☞ SPECIAL MODES (page 60)
1
2
(2) Touch the [Job Build] key so that it is
highlighted.
(3) Touch the [OK] key.
79
Page 80

(3)
(2)
Enter the destination fax number
3
4
105 15
Condition
Settings
Address Review
Address Entry
Global
Address Search
Sub Address
Sort Address
To
AAA AAA
CCC CCC
EEE EEE
GGG GGG
III III
Frequent Use
Cc
BBB BBB
DDD DDD
FFF FFF
HHH HHH
JJJ JJJ
ABCD EFGHI JKLMN OPQRST UVWXYZ
1
2
(1) Touch the [Address Book] key in the base
screen.
(2) Touch the one-touch key of the desired
destination.
(3) Touch the [To] key.
In addition to specification by one-touch key, a destination can also be specified using a search number. You can also
directly enter a fax number with the numeric keys or look up a destination in a global address book. For more
information, see "2. ENTERING DESTINATIONS" (page 15).
Press the [BLACK & WHITE START] key
( ) to scan the first set.
To cancel scanning...
Press the [STOP] key ( ).
5
Insert the next set of originals and press
the [BLACK & WHITE START] key ( ).
Repeat this step until all originals have been scanned.
To cancel scanning...
Press the [STOP] key ( ). All scanned data will be cleared.
80
Page 81
Touch the [Read-End] key.
Place next original.
Press [Start].
When finished, press [Read-End].
(Pg.No.x)
Configure Read-End
6
• If no action is taken for one minute after the confirmation screen appears, scanning automatically ends and the
transmission is reserved.
• The [Configure] key can be touched to change the exposure, resolution, scan size, and send size for each original
page scanned. However, when Job Build is used in combination with 2in1 in the special modes, only the exposure
can be changed when scanning each even-numbered page of the original pages.
• If the memory becomes full during scanning, a message will appear and the transmission will be cancelled.
• This function cannot be used in direct transmission mode or when the speaker is used to dial.
To cancel Job Build....
Touch the [Job Build] key in the screen of step 2 so that it is not highlighted.
81
Page 82

TRANSMITTING ORIGINALS OF DIFFERENT SIZES (Mixed Size Original)
This feature lets you scan and transmit originals of different sizes at the same time; for example, B4 (8-1/2" x 14") size
originals mixed together with A3 (11" x 17") size originals. When scanning the originals, the machine automatically
detects the size of each original.
B4
A3
B4
A3
This feature can only be used with the following combinations of original sizes:
• A3 and B4 • A3 and B5 • B4 and A4 • A4 and B5
• A4R and B5 • B4 and A4R • B4 and A5 • B5 and A5
• 11" x 17" and 8-1/2" x 14" • 11" x 17" and 8-1/2" x 13" • 11" x 17" and 5-1/2" x 8-1/2"
Insert the originals face up in the
document feeder tray.
Insert the originals with the corners aligned together in the far
left corner of the document feeder tray.
1
B4
(8-1/2" x 14")
Place the originals with
the corners aligned
together in the far left
corner.
B4
(8-1/2" x 14")
A3 (11" x 17")
2
(3)(2)
Fax/Special Modes
Program
Timer
Job
Build
File
If an original scan size has been specified, a message will appear when the [Mixed Size Original] key is touched. To
enable the Mixed Size Original setting, change the scan size setting to auto and then touch the [Mixed Size Original]
key again.
Erase
2in1
Mixed Size
Original
Quick File
Dual Page
Scan
Card Shot
Slow Scan
Mode
OK
1
2
Select the mixed size original setting.
(1) Touch the [Special Modes] key.
☞ SPECIAL MODES (page 60)
(2) Touch the [Mixed Size Original] key so that
it is highlighted.
(3) Touch the [OK] key.
82
Page 83
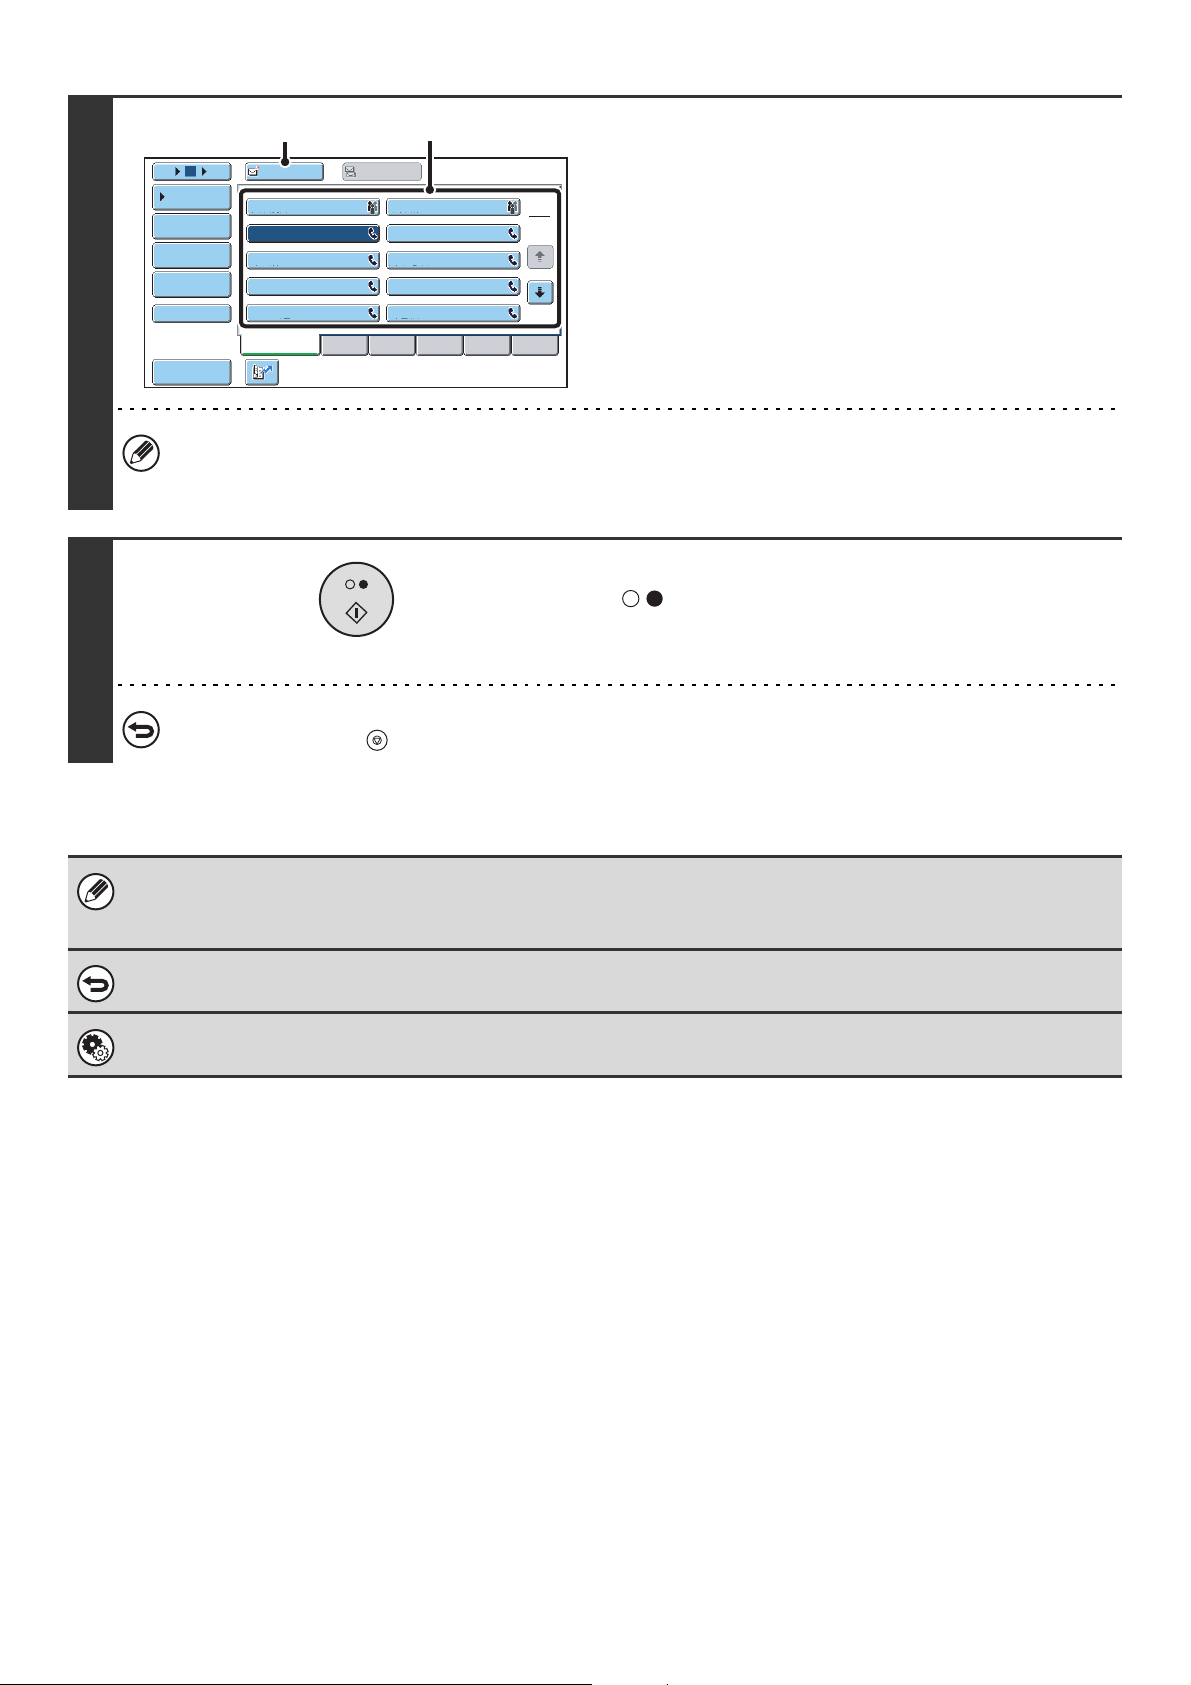
(3)
(2)
Enter the destination fax number.
3
4
105 15
Condition
Settings
Address Review
Address Entry
Global
Address Search
Sub Address
Sort Address
To
AAA AAA
CCC CCC
EEE EEE
GGG GGG
III III
Frequent Use
Cc
BBB BBB
DDD DDD
FFF FFF
HHH HHH
JJJ JJJ
ABCD EFGHI JKLMN OPQRST UVWXYZ
1
2
(1) Touch the [Address Book] key in the base
screen.
(2) Touch the one-touch key of the desired
destination.
(3) Touch the [To] key.
In addition to specification by one-touch key, a destination can also be specified using a search number. You can also
directly enter a fax number with the numeric keys or look up a destination in a global address book. For more
information, see "2. ENTERING DESTINATIONS" (page 15).
Press the [BLACK & WHITE START] key
().
Scanning begins. A beep will sound to indicate that scanning is
finished.
To cancel scanning...
Press the [STOP] key ( ).
• If an original scan size is specified after selecting the Mixed Size Original setting, the original scan size setting will be
enabled and the Mixed Size Original setting will be cleared.
• When the mixed size original setting is selected, rotation sending does not operate.
To cancel the mixed size original setting...
Touch the [Mixed Size Original] key in the screen of step 2 so that it is not highlighted.
System Settings (Administrator): Original Feeding Mode
The original feeding mode can be set to always scan mixed size originals.
83
Page 84
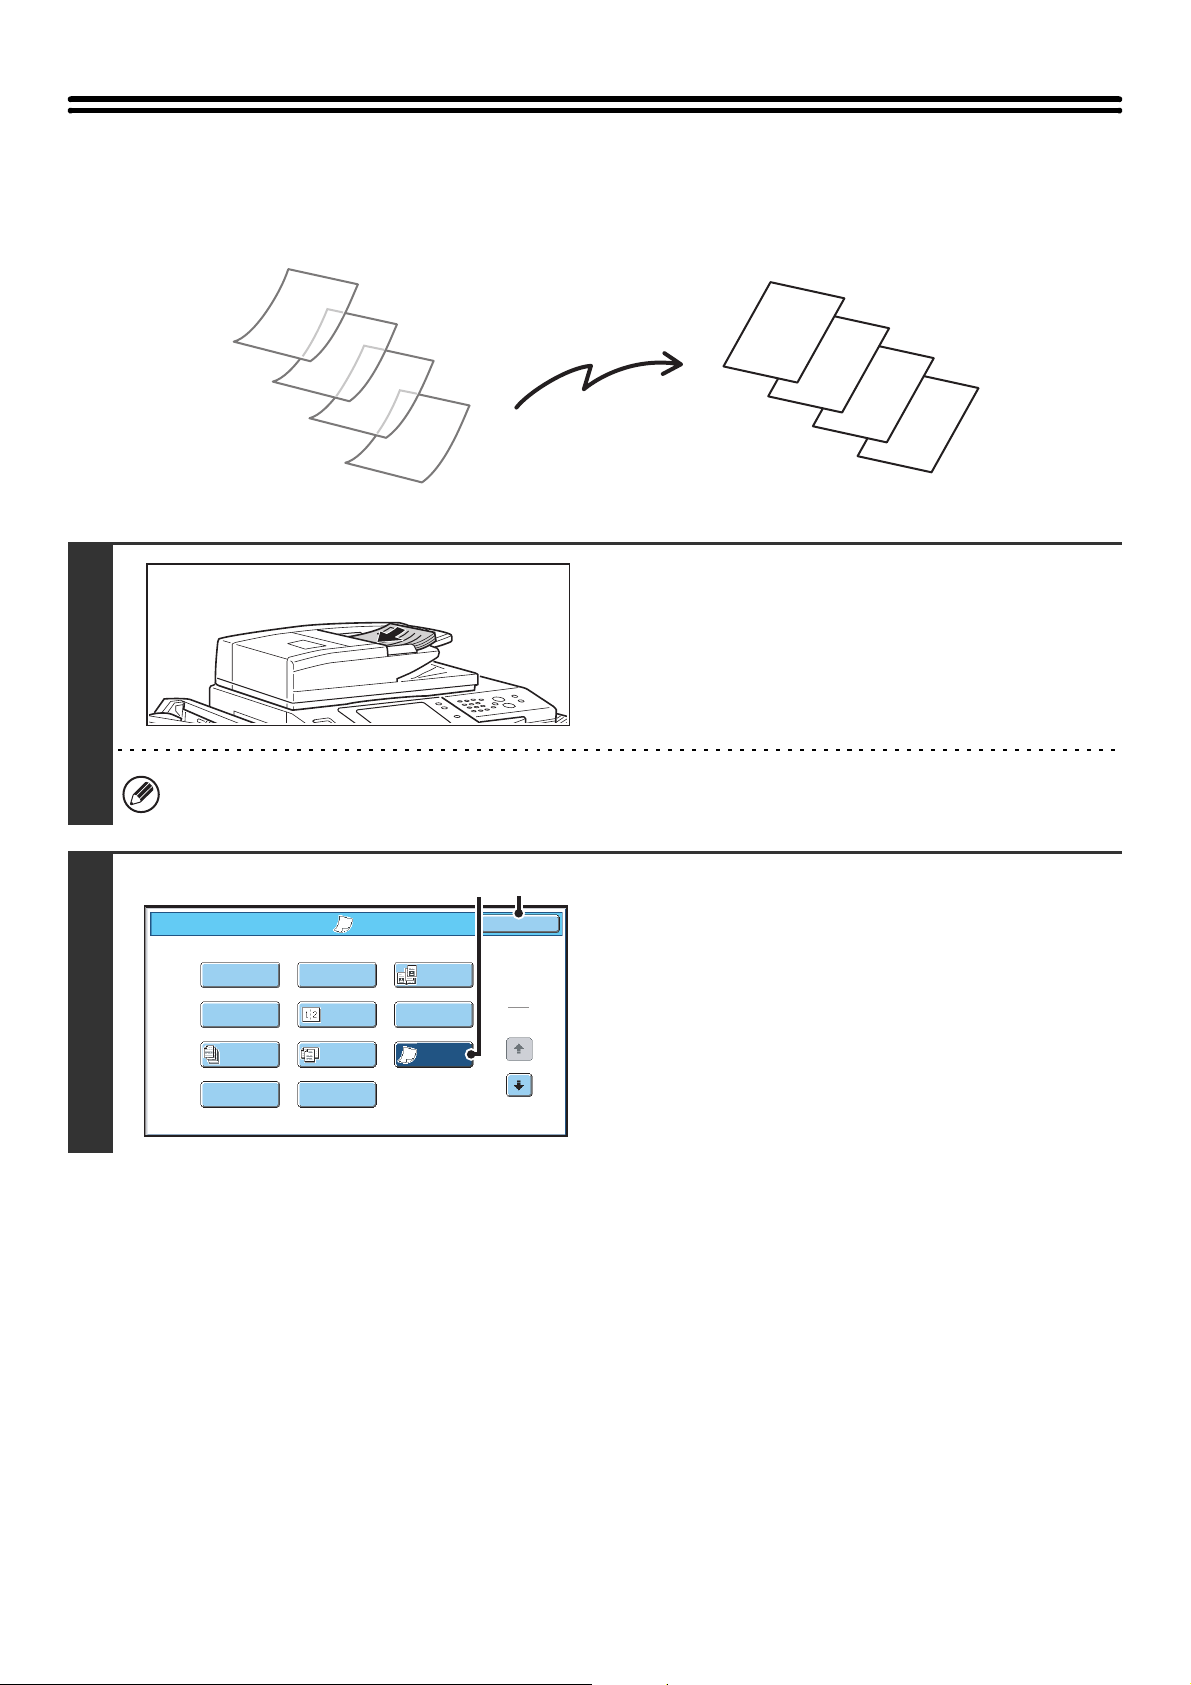
FAXING THIN ORIGINALS (Slow Scan Mode)
Use this function when you wish to scan thin originals using the automatic document feeder. This function helps prevent
thin originals from misfeeding.
1
A
A
B
C
D
Insert the originals face up in the
document feeder tray.
Adjust the document guides slowly.
If the originals are inserted with too much force, they may crumple and misfeed.
(3)(2)
Select slow scan mode.
B
C
D
2
Fax/Special Modes
Program
Timer
Job
Build
File
Erase
2in1
Mixed Size
Original
Quick File
Dual Page
Scan
Card Shot
Slow Scan
Mode
OK
(1) Touch the [Special Modes] key.
☞ SPECIAL MODES (page 60)
1
2
(2) Touch the [Slow Scan Mode] key so that it is
highlighted.
(3) Touch the [OK] key.
84
Page 85

(3)
(2)
Enter the destination fax number.
3
4
105 15
Condition
Settings
Address Review
Address Entry
Global
Address Search
Sub Address
Sort Address
To
AAA AAA
CCC CCC
EEE EEE
GGG GGG
III III
Frequent Use
Cc
BBB BBB
DDD DDD
FFF FFF
HHH HHH
JJJ JJJ
ABCD EFGHI JKLMN OPQRST UVWXYZ
1
2
(1) Touch the [Address Book] key in the base
screen.
(2) Touch the one-touch key of the desired
destination.
(3) Touch the [To] key.
In addition to specification by one-touch key, a destination can also be specified using a search number. You can also
directly enter a fax number with the numeric keys or look up a destination in a global address book. For more
information, see "2. ENTERING DESTINATIONS" (page 15).
Press the [BLACK & WHITE START] key
().
Scanning begins. A beep will sound to indicate that scanning is
finished.
To cancel scanning...
Press the [STOP] key ( ).
When this function is selected, automatic 2-sided scanning is not possible.
To cancel slow scan mode...
Touch the [Slow Scan Mode] key in the screen of step 2 so that it is not highlighted.
System Settings (Administrator): Original Feeding Mode
This is used to have scanning always take place using slow scan mode.
85
Page 86
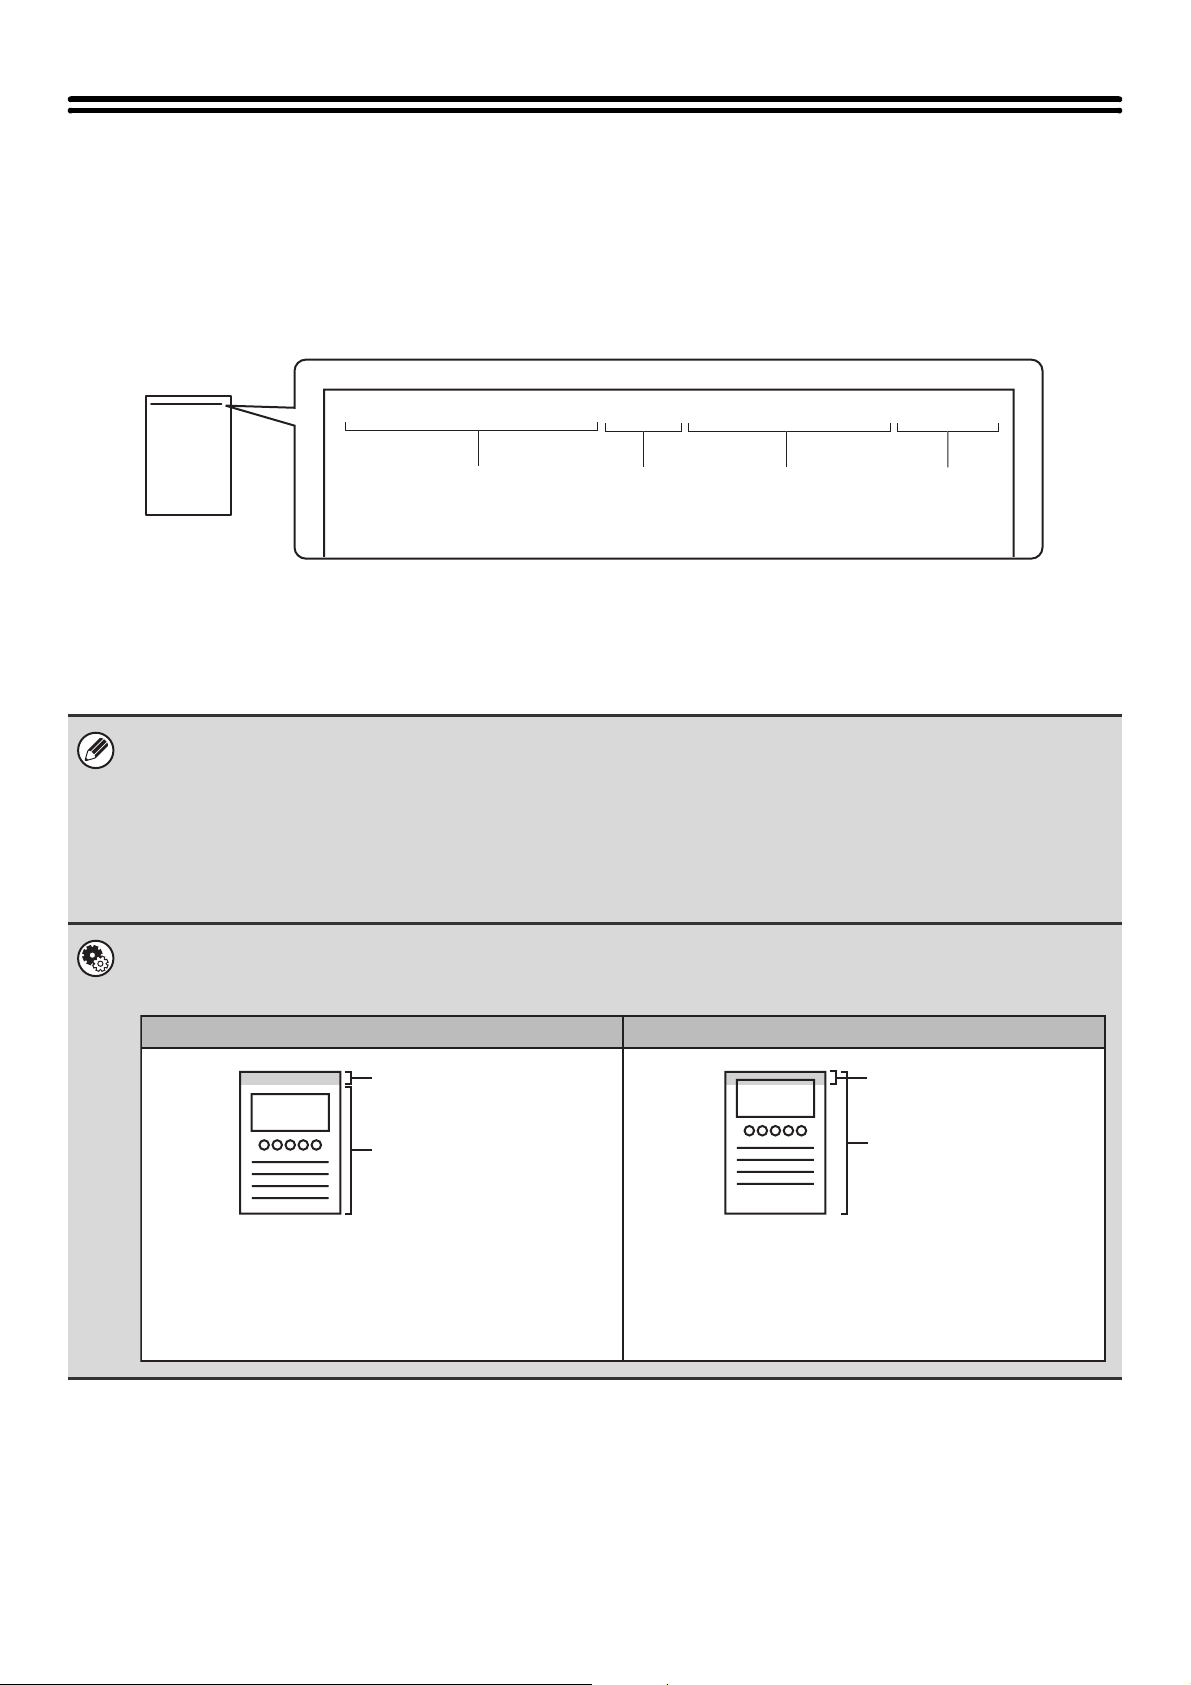
ADDING YOUR SENDER INFORMATION TO FAXES (Own number sending)
Your sender information (date, time, sender name, sender fax number, number of pages) is automatically added to the
top of each fax page you transmit.
Example of the sender information printed
01/APR/2006/Sat 3:00 PM AAAAA FAX No. 0123456789 P.001/001
(1) (2) (3)
(1) Date, time: The date and time of transmission.
(2) Sender name: The sender name programmed in the machine.
(3) Sender fax number: The sender fax number programmed in the machine.
(4) Page numbers: Page number / total pages (the total page number is only printed
when the fax is sent by memory transmission.)
Information programmed in Own Number Sending
Date, time: To set or check the date and time, see the System Settings Guide.
Sender name, sender fax number: Program the sender name and fax number in "Fax Own Name and Number Set" in the
system settings (administrator).
Page numbers: Select whether or not to include page numbers in "Printing Page Number at Receiver" in
the system settings (administrator).
Page numbers appear in the format "page number / total pages". Only the page number
is printed when manual transmission or quick online transmission is used.
System Settings (Administrator): Date/Own Number Print Position Setting
This is used to set the position where the sender information is printed. The sender information can be printed outside the
scanned original image or inside the scanned original image.
Outside scanned image (factory default setting) Inside scanned image
Sender
information
Sender
information
(4)
Originals
The transmitted image length will be: length of sender
information + length of original image. When the fax is
printed by the receiving machine, it may be reduced or
divided onto two pages.
86
Originals
The sender information is printed inside the original
image, and thus the transmitted image length is the
length of the original. Note that the sender information
will overlap part of the original image (the overlapped
part of the original image will not appear).
Page 87

TEMPORARILY CHANGING THE SENDER INFORMATION (Own Name Select)
You can select the sender information printed on a transmitted fax from a list of stored senders.
Select the special modes.
(1) Touch the [Special Modes] key.
(2) Touch the keys to switch through the screens.
1
(3) Touch the [Own Name Select] key.
☞ Special modes menu (2nd screen) (page 61)
2
3
Own Name Select
AAAAA
CCCCC
EEEEE
GGGGG
IIIII
KKKKK
Fax/Special Modes
Transaction
Report
Memory Box
(1) (2)
Cancel
BBBBB
DDDDD
FFFFF
HHHHH
JJJJJ
LLLLL
Own Name
Select
Polling
Select the sender information.
OK
1
2
OK
2
2
(1) Touch the desired sender information key.
(2) Touch the [OK] key.
Touch the [OK] key.
System Settings (Administrator): Registration of Own Name Select
This is used to store sender information for Own Name Select.
87
Page 88

CALLING A FAX MACHINE AND INITIATING RECEPTION (Polling)
The Polling function allows the receiving machine to call the transmitting machine and initiate reception of a document in
that machine.
Because the receiving machine initiates reception of a document, this is called "Polling Reception".
(1) Requests fax transmission.
(3) The fax is received.
Make sure that an original is not placed in the machine when using the polling reception function.
(2) (4)(3)
Fax/Special Modes
OK
Transmission
(2) The previously prepared
Select polling reception.
(1) Touch the [Special Modes] key.
☞ SPECIAL MODES (page 60)
Own Name
Select
2
2
screens.
(3) Touch the [Polling] key so that it is
highlighted.
(4) Touch the [OK] key.
(2) Touch the keys to switch through the
1
Transaction
Report
Memory Box
Polling
document is transmitted.
88
Page 89
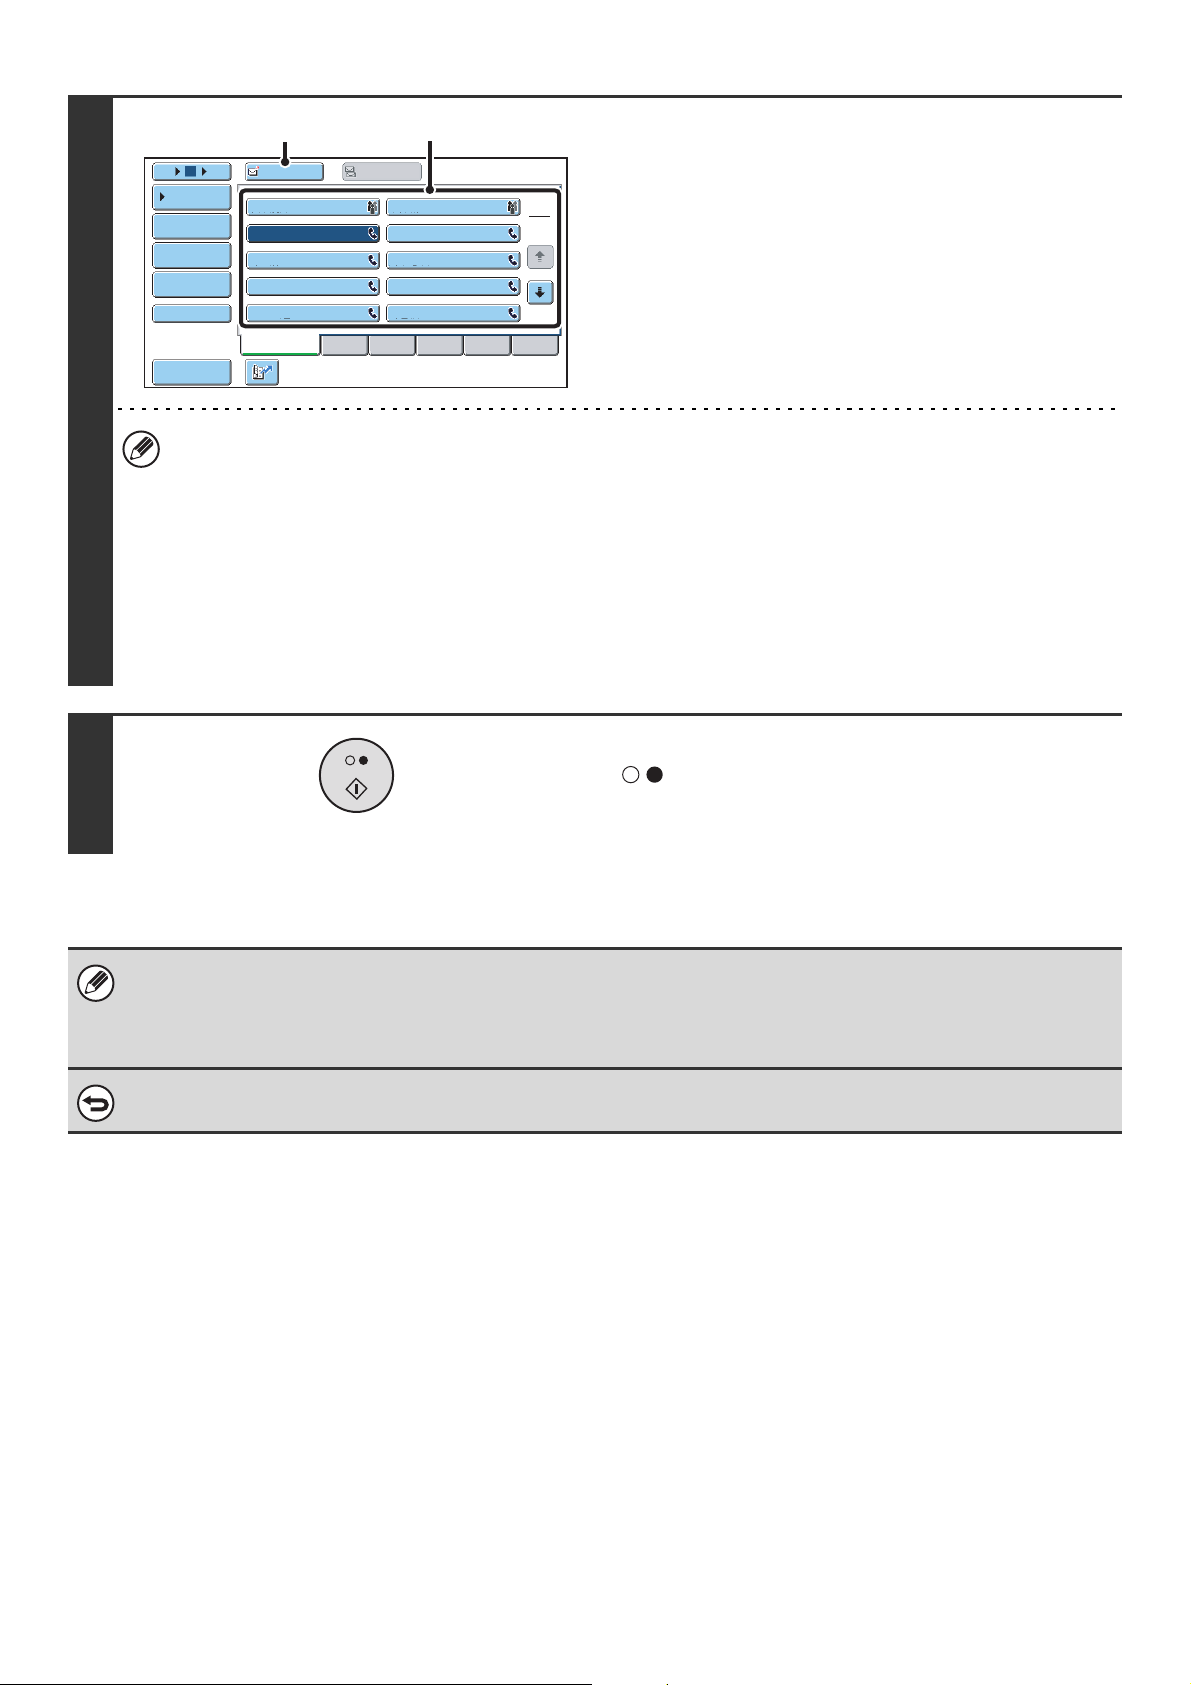
(3)
(2)
Enter the destination fax number.
2
3
105 15
Condition
Settings
Address Review
Address Entry
Global
Address Search
Sub Address
Sort Address
To
AAA AAA
CCC CCC
EEE EEE
GGG GGG
III III
Frequent Use
Cc
BBB BBB
DDD DDD
FFF FFF
HHH HHH
JJJ JJJ
ABCD EFGHI JKLMN OPQRST UVWXYZ
1
2
(1) Touch the [Address Book] key in the base
screen.
(2) Touch the one-touch key of the desired
destination.
(3) Touch the [To] key.
If you wish to enter multiple fax numbers, repeat steps (2)
and (3) above to enter each number.
• In addition to specification by one-touch key, a destination can also be specified using a search number. You can
also directly enter a fax number with the numeric keys or look up a destination in a global address book. For more
information, see "2. ENTERING DESTINATIONS" (page 15).
• Multiple fax numbers can be entered.
Polling will take place in the order that the numbers were entered.
Polling multiple machines is called "Serial Polling".
Up to 500 fax numbers can be entered. In this procedure, one-touch keys that have a sub-address and passcode
cannot be used.
• To enter multiple fax numbers, touch the [Next Address] key after entering a fax number and enter the next fax
number.
Press the [BLACK & WHITE START] key
().
Your machine will call the other machine and initiate reception
of the fax.
• Polling reception can be used in combination with the timer function to poll at any specified time, such as at night or when
you are not present.
• This function can only be used when the other machine is Super G3 or G3 compatible and has a polling function.
• The receiving machine bears the expense (phone charges) of the polling reception.
To cancel polling reception...
Touch the [Polling] key in the screen of step 1 so that it is not highlighted.
89
Page 90

INITIATING POLLING RECEPTION MANUALLY
Use this procedure when you must start polling after listening to a recorded greeting, such as when using a fax
information service.
• Make sure that an original is not placed in the machine when using the polling reception function.
• This function cannot be used to poll multiple machines (serial polling).
1
2
Telephone mode.
105 15
Condition
Settings
Speaker Volume
Sort Address
(3) (1)
To Cc
AAA AAA
CCC CCC
EEE EEE
GGG GGG
III III
Frequent Use
Speaker
BBB BBB
DDD DDD
FFF FFF
HHH HHH
JJJ JJJ
ABCD EFGHI JKLMN OPQRST UVWXYZ
Resend
1
2
Fax Manual
Reception
Enter the destination fax number.
(1) Touch the [Speaker] key.
You will hear the dial tone through the machine's speaker.
(2) Touch the [Address Book] key in the base
screen.
(3) Touch the one-touch key of the desired
destination.
A group key cannot be used.
• In addition to specification by one-touch key, a destination can also be specified using a search number. You can
also directly enter a fax number with the numeric keys or look up a destination in a global address book. For more
information, see "2. ENTERING DESTINATIONS" (page 15).
• After touching the [Speaker] key, you can touch the [Speaker Volume] key to adjust the volume of the speaker. The
speaker volume changes each time the [Speaker Volume] key is touched. Adjust the volume to the desired level.
Follow the instructions in the recorded
greeting.
Fax/Special Modes
(2)(3)
OK
Receive the fax.
(1) Touch the [Special Modes] key.
☞ SPECIAL MODES (page 60)
Transaction
Report
3
Memory Box
Polling
• This function can only be used when the other machine is Super G3 or G3 compatible and has a polling function.
• The receiving machine bears the expense (phone charges) of the polling reception.
Own Name
Select
2
2
(2) Touch the keys to switch through the
screens.
(3) When you hear the fax tone, touch the
[Polling] key.
The fax is received.
90
Page 91
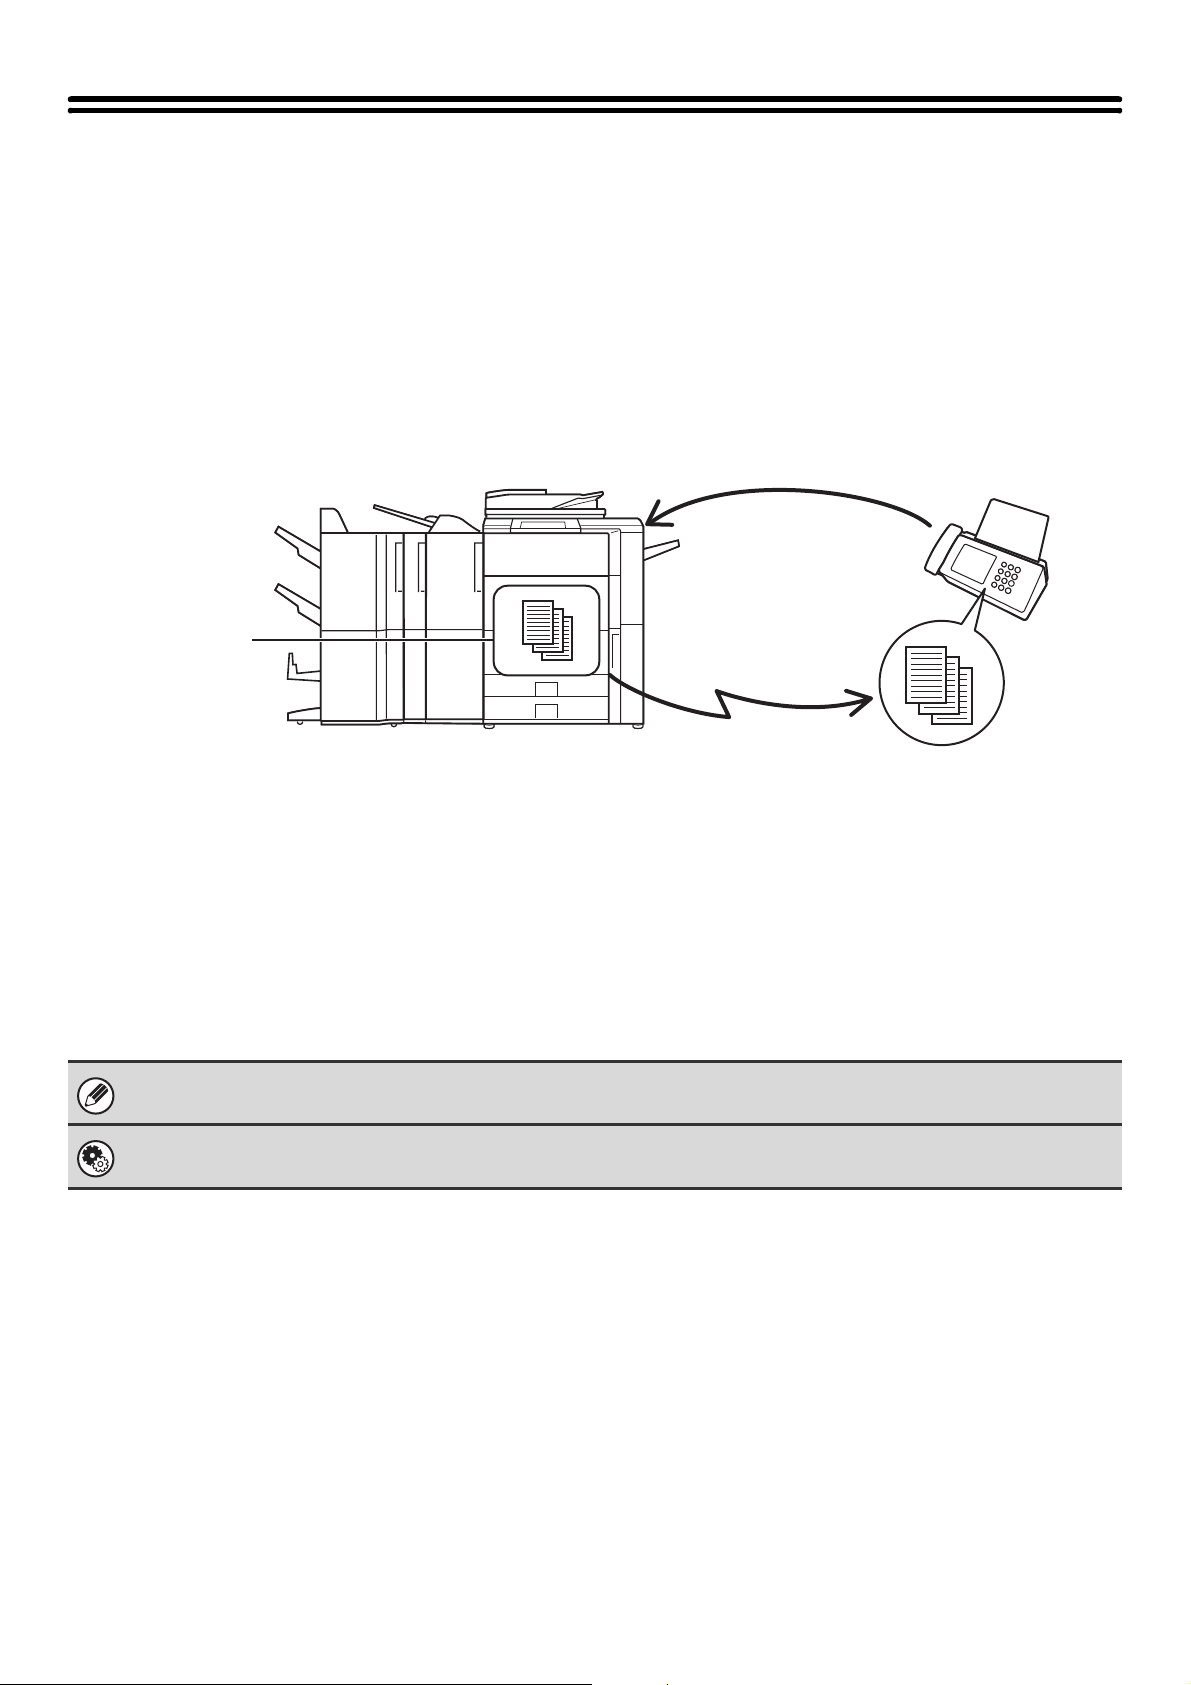
SENDING A FAX WHEN ANOTHER MACHINE POLLS YOUR MACHINE (Polling Memory)
Sending a document that has been scanned into memory when another machine polls your machine is called "Polling
Memory".
Prior to polling, the document that will be faxed to the other machine must be scanned into a polling memory box.
This function can only be used when the other machine is Super G3 or G3 compatible and has a polling function.
(1) Requests fax transmission.
Polling
memory box
(2) The document in the memory box is
transmitted.
Transmission
(3) The fax is received.
RESTRICTING POLLING ACCESS (Polling security)
To only allow specified machines to poll your machine, you can restrict polling to machines whose programmed sender
fax number matches a fax number stored in your machine as a polling passcode number. This is called "Polling
Security".
To use this function, first store polling passcode numbers (the sender fax numbers programmed in the other machines)
in the machine's system settings, and then enable polling security.
Up to 10 fax numbers can be stored as polling passcode numbers.
System Settings (Administrator): Fax Polling Security
This is used to enable polling security. This is used to store fax numbers as polling passcode numbers.
91
Page 92

SCANNING A DOCUMENT INTO POLLING MEMORY
Follow these steps to scan a document into the memory box for polling transmission (Public Box).
Place the original.
1
Place the original face up in the document feeder tray, or face down on the document glass.
Select the special modes.
(1) Touch the [Special Modes] key.
(2) Touch the keys to switch through the screens.
2
(3) Touch the [Memory Box] key.
☞ Special modes menu (2nd screen) (page 61)
3
4
Memory Box
Polling Memory
Data Store
Memory Box - Data Store
Box 1
Box 3
Box 5
Box 7
Box 9
Box 11
Print Data Delete Data
Exit
Confidential
Reception
Print Data
Back
Public Box
Box 2
Box 4
Box 6
Box 8
Box 10
Box 12
(1) (2)
Touch the [Data Store] key.
Touch the [Public Box] key.
1
2
Specify the number of polling times.
5
Memory Box - Data Store
Once
Unlimited
OK
(1) Touch the key for the desired number of
times.
Touch the [Once] key if you want the document cleared
from memory after it is transmitted. Touch the [Unlimited]
key to allow polling an unlimited number of times.
(2) Touch the [OK] key.
92
Page 93

6
7
Memory Box - Data Store
Memory Box
List
Original
Exposure
Resolution
Special Modes
A4
Auto
Scan: Send:
Auto
Standard
Auto Reception
Fax Memory:100%
Auto
Select image settings and special
modes.
• The following functions can be selected:
Erase, Dual Page Scan, 2in1, Card Shot, Job Build, Mixed Size Original, Slow Scan Mode, Own Name Select.
• To return to the screen of step 4, touch the [Memory Box List] key.
Press the [BLACK & WHITE START] key
().
Scanning begins.
• If you inserted the original pages in the document feeder
tray, all pages are scanned.
• If you are scanning the original on the document glass, scan
each page one page at a time.
When scanning finishes, place the next original and press
the [BLACK & WHITE START] key ( ). Repeat until all
pages have been scanned and then touch the [Read-End]
key.
To cancel scanning...
Press the [STOP] key ( ) while the original is being scanned.
If another document remains in the memory box (Public Box), the newly scanned document is added to the previous
document. In this case, the number of polling times will be the number set for the newly scanned document.
93
Page 94

PRINTING A DOCUMENT STORED IN THE PUBLIC BOX
To check a document stored in the Public Box for polling transmission, follow the steps below to print the document.
Select the special modes.
(1) Touch the [Special Modes] key.
(2) Touch the keys to switch through the screens.
1
(3) Touch the [Memory Box] key.
☞ Special modes menu (2nd screen) (page 61)
2
3
Memory Box
Polling Memory
Data Store
Memory Box - Print Data
Box 1
Box 3
Box 5
Box 7
Box 9
Box 11
Print Data
Delete Data
Box 2
Box 4
Box 6
Box 8
Box 10
Box 12
Public Box
Exit
Confidential
Reception
Print Data
Back
1
2
Touch the [Print Data] key.
Touch the [Public Box] key.
When nothing is stored in the Public Box, the [Public Box] key will be greyed out.
4
Press the [BLACK & WHITE START] key
().
The stored document is printed.
To cancel printing...
Touch the [Cancel] key in the touch panel.
94
Page 95

DELETING A DOCUMENT FROM THE PUBLIC BOX
Delete a document from the Public Box when it is no longer needed.
Select the special modes.
(1) Touch the [Special Modes] key.
(2) Touch the keys to switch through the screens.
1
(3) Touch the [Memory Box] key.
☞ Special modes menu (2nd screen) (page 61)
2
3
Memory Box
Polling Memory
Print Data Delete DataData Store
Memory Box - Delete Data
Box 1
Box 3
Box 5
Box 7
Box 9
Box 11
Box 2
Box 4
Box 6
Box 8
Box 10
Box 12
Public Box
Exit
Confidential
Reception
Print Data
Back
1
2
Touch the [Delete Data] key.
Touch the [Public Box] key.
When nothing is stored in the Public Box, the [Public Box] key will be greyed out.
4
Touch the [Yes] key.
Delete the data in the memory box?
Public Box
No
Yes
To cancel the deletion...
Touch the [No] key. You will return to the screen of step 3.
The document is deleted and you return to the screen of step 3.
95
Page 96

PERFORMING F-CODE
6
This chapter explains how to perform F-code communication operations. F-code communication is possible with
machines of other manufacturers that also support F-code communication.
COMMUNICATION
F-CODE COMMUNICATION
Exchange of confidential documents (confidential communication), retrieval (polling) and distribution (polling memory) of
information, distribution of information to multiple destinations (relay broadcast transmission) are possible with other
machines that support F-code communication.
An F-code* is specified in each communication, enabling a higher level of security.
* F-code is a communication function based on the G3 standard of the ITU-T.
The ITU-T is a United Nations organization that establishes communications standards. It is a department of the International
Telecommunication Union (ITU), which coordinates global telecommunications networks and services.
HOW F-CODES WORK
A fax that is transmitted with an F-code is received to the memory box in the receiving machine specified by the F-code
(sub-address and passcode). If the F-code sent by the transmitting machine does not match the F-code in the receiving
machine, reception will not take place.
The fax is received to
the memory box
specified by the
F-code
Fax number of other
machine
F-code
Sub-address: AAAAAAAA
Passcode: XXXXXXXX
The products of other manufacturers may use different terms for "sub-address" and "passcode". If you need to contact the
operator of another machine regarding sub-addresses and passcodes, refer to the terms used by the ITU-T in the table below.
The machine ITU-T
Sub Address SEP SUB SUB
+
F-code polling memory box F-code confidential box
Passcode PWD SID SID
Memory box for F-code
communication
Box name: BBBB
Sub-address: AAAAAAAA
Passcode: XXXXXXXX
F-code relay broadcast
memory box
An F-code consists of a sub-address and passcode, and cannot be longer than 20 digits.
96
Page 97

CREATING MEMORY BOXES IN THE MACHINE FOR F-CODE COMMUNICATION
Before the F-code communication function can be used, special memory boxes must be created using "F-Code Memory
Box" in the system settings.
A box name and F-code (sub-address and passcode) are programmed in each box, and an F-code communication
function is assigned to each box.
After you have created a memory box, inform the other party of the sub-address and passcode of the box.
Memory box for F-code
communication
To use the following F-code communication functions, F-code memory boxes must be created in your machine.
F-code confidential reception, F-code polling memory, F-code relay broadcast transmission
To use the following F-code communication functions, F-code memory boxes must be created in the other machine.
F-code confidential transmission, F-code polling reception, F-code relay request transmission
•Box Name
• Sub Address
•Passcode
• End receiving machines (only in an
F-code relay broadcast memory box)
• Print PIN (only for F-code confidential
reception)
System Settings: F-Code Memory Box
This is used to configure memory boxes for F-code communication.
• Up to 100 memory boxes can be created.
• The memory box name cannot be longer than 18 characters, and the sub-address and passcode cannot be longer than 20
digits.
F-CODE DIALLING
When performing an F-code operation, the F-code (sub-address and passcode) is appended to the fax number that is
dialled. Check the F-code (sub-address and passcode) programmed in the memory box in the other machine before you
perform an F-code transmission. It is convenient to store an F-code together with the fax number in a one-touch key or
group key.
0123456789
Fax number of other
machine
When the following F-code functions are used, your machine dials the other machine.
F-code confidential transmission, F-code polling reception, F-code relay request transmission
When the following F-code functions are used, the other machine dials your machine.
F-code confidential reception, F-code polling memory, F-code relay broadcast transmission
/ AAAAAAAA
*
Sub Address Passcode
/
XXXXXXXX
*
* Touch the [Sub Address]
key in the screen to enter
"/".
• If the destination machine does not have a passcode configured in the F-code, do not enter a passcode when dialling that
machine.
• F-code communication cannot be performed when using the speaker or performing manual transmission.
System Settings: Address Book
This is used to store and edit one-touch keys and group keys.
97
Page 98

CONFIDENTIAL COMMUNICATION USING F-CODES
By sending a fax to an F-code memory box (confidential) in the receiving machine (your machine or the other machine),
the sender can direct the transmission specifically to the user of the box.
This is convenient for sending sensitive documents that you do not wish people other than the recipient to see, or when
the receiving machine is shared by multiple departments.
To print an F-code confidential fax, the print passcode must be entered.
Receiver
Transmission with an
F-code
Sub-address: AAAAAAAA
Passcode: XXXXXXXX
Sender
Sub-address: AAAAAAAA
Passcode: XXXXXXXX
Reception in F-code Memory Box
Print passcode: Enter BBBB
The fax is printed.
The F-code (sub-address and passcode) of the memory box to be used should be verified by the sender and the recipient
before the fax is sent.
System Settings: F-Code Memory Box
This is used to create memory boxes for F-code confidential communication (confidential reception).
A memory box name, sub-address, passcode, and print passcode are programmed in each box.
98
Page 99

F-CODE CONFIDENTIAL TRANSMISSION
Follow the steps below to send a confidential fax by adding an F-code to the fax number.
Place the original.
1
Place the original face up in the document feeder tray, or face down on the document glass.
2
105 15
Condition
Settings
Address Review
Address Entry
Global
Address Search
Sub Address
Sort Address
(4), (6)
To
AAA AAA
CCC CCC
EEE EEE
GGG GGG
III III
Frequent Use
(2)(3)
Cc
BBB BBB
DDD DDD
FFF FFF
HHH HHH
JJJ JJJ
ABCD EFGHI JKLMN OPQRST UVWXYZ
Enter the destination fax number.
(1) Touch the [Address Book] key in the base
1
2
screen.
(2) Touch the one-touch key of the desired
destination.
If the destination is not stored in the address book, enter
the fax number with the numeric keys.
(3) Touch the [To] key.
If you entered the fax number with the numeric keys, this
is not necessary.
If the sub-address and passcode are stored in the one-touch
key, the following sub-steps are not necessary. Go to step 3.
(4) Touch the [Sub Address] key.
"/" appears.
(5) Enter the sub-address with the numeric
keys.
(6) Touch the [Sub Address] key.
"/" appears.
(7) Enter the passcode with the numeric keys.
If a passcode has been omitted in the memory box of the other machine, (6) and (7) are not necessary.
Press the [BLACK & WHITE START] key
().
Scanning begins.
• If you inserted the original pages in the document feeder
tray, all pages are scanned.
3
This function can be used in combination with a broadcast transmission or timer transmission. This function can also be
stored in a program.
A beep will sound to indicate that scanning is finished.
If you are scanning the original on the document glass, scan
each page one page at a time.
When scanning finishes, place the next original and press the
[BLACK & WHITE START] key ( ). Repeat until all pages
have been scanned and then touch the [Read-End] key.
A beep will sound to indicate that scanning is finished.
99
Page 100
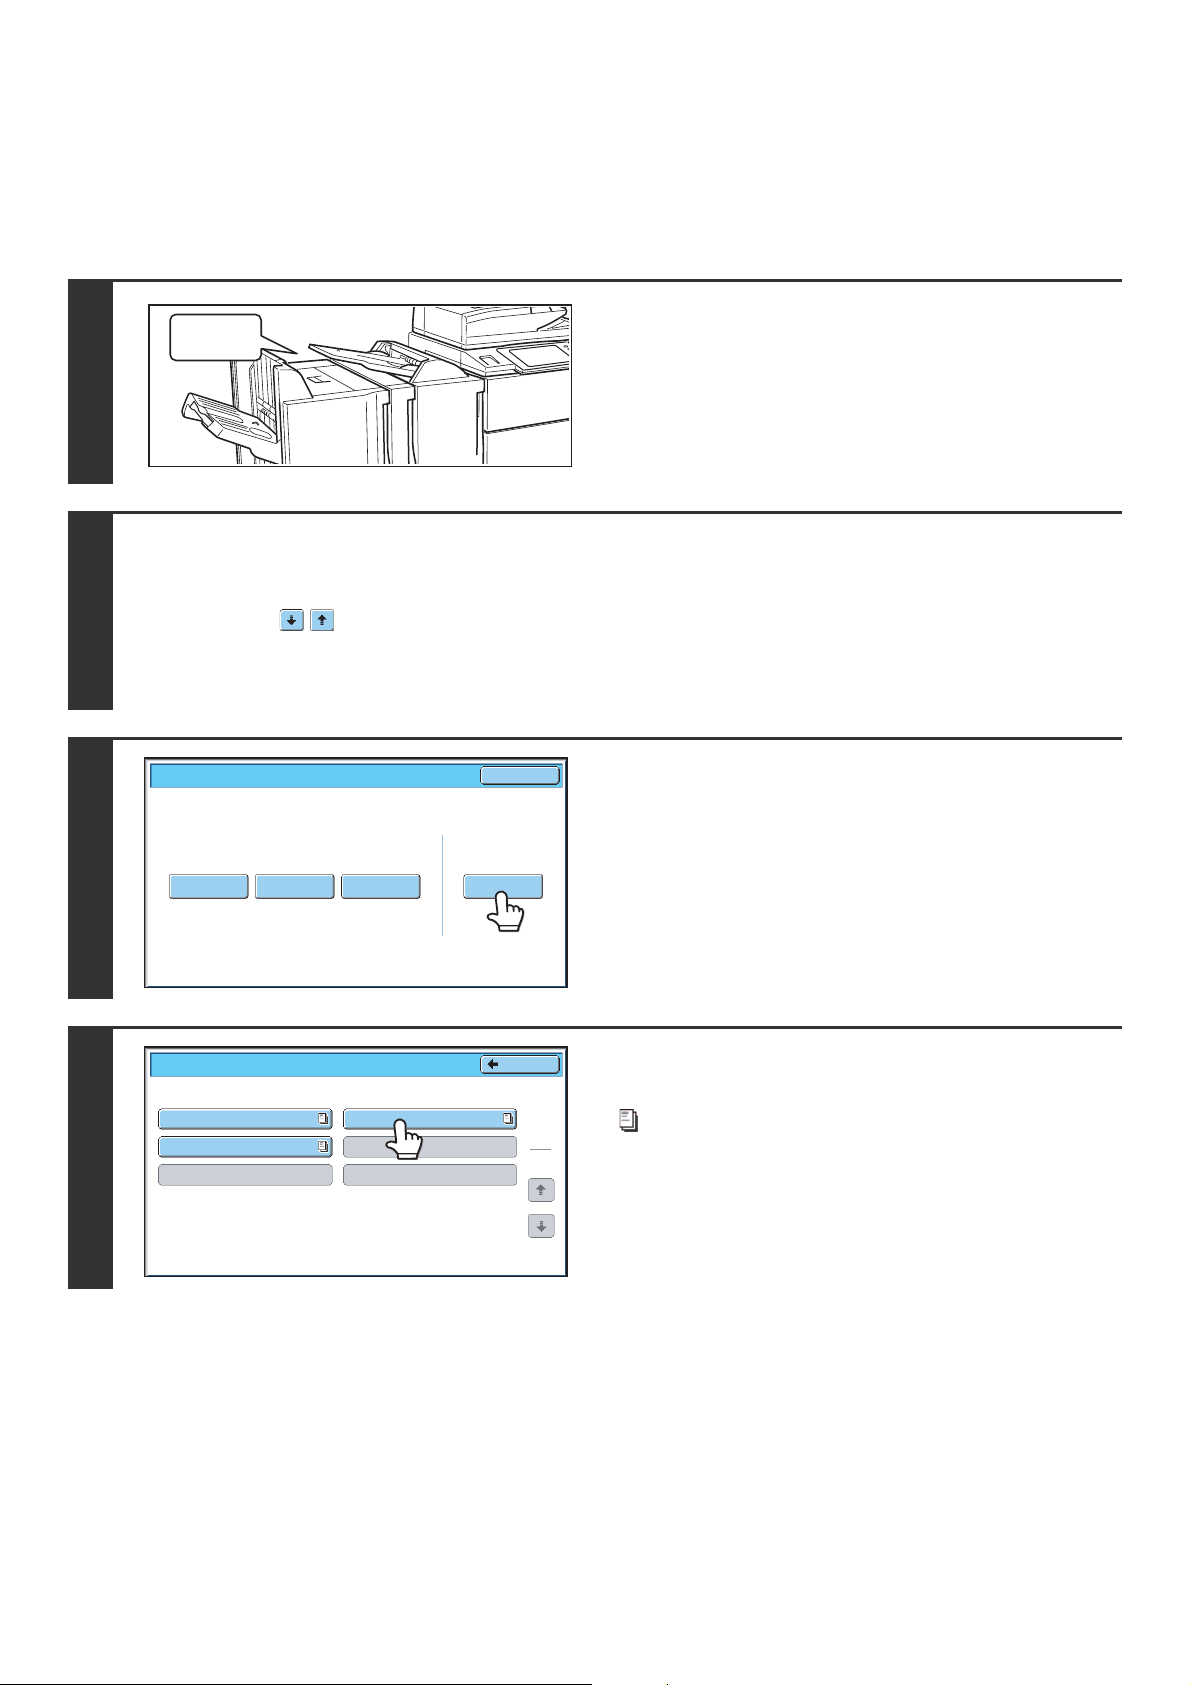
PRINTING A FAX RECEIVED BY F-CODE CONFIDENTIAL RECEPTION
When an F-code confidential fax is sent to your machine, the fax is received to the memory box specified by the F-code.
To print the received fax, enter the print passcode.
The machine rings and the fax is
Beep
1
Select the special modes.
(1) Touch the [Special Modes] key.
(2) Touch the keys to switch through the screens.
2
(3) Touch the [Memory Box] key.
☞ Special modes menu (2nd screen) (page 61)
received.
A beep sounds when reception ends.
3
4
Memory Box
Polling Memory
Data Store
Memory Box - Confidential Reception
Box 1
Box 3
Box 5
Print Data Delete Data
Box 2
Box 4
Box 6
Exit
Confidential
Reception
Print Data
Back
Touch the [Print Data] key.
Touch the key of the memory box
containing the confidential fax.
1
1
" " appears in the keys of memory boxes that have received
faxes. The keys of memory boxes that have not received faxes
are greyed out and cannot be selected.
100
 Loading...