

Page 1

ELECTRONIC PRINTING CALCULATOR
DRUCKENDER TISCHRECHNER
CALCULATRICE IMPRIMANTE ÉLECTRONIQUE
CALCOLATRICE ELETTRONICA STAMPANTE
ELEKTRONISCHE REKENMACHINE MET AFDRUK
ENGLISH .................................................... Page 1
CALCULATION EXAMPLES ..................... Page 56
DEUTSCH .................................................. Seite 12
RECHNUNGSBEISPIELE ......................... Seite 56
FRANÇAIS ................................................. Page 23
EXEMPLES DE CALCULS ........................ Page 57
ITALIANO ................................................... Pagina 34
ESEMPI DI CALCOLO ............................... Pagina 57
NEDERLANDS ........................................... Pagina 45
REKENVOORBEELDEN ........................... Pagina 58
EL-1611P
OPERATION MANUAL
BEDIENUNGSANLEITUNG
MODE D’EMPLOI
MANUALE DI ISTRUZIONI
GEBRUIKSAANWIJZING
Page 2

Page 3

ENGLISH
OPERATIONAL NOTES
Thank you for your purchase of the SHARP electronic printing
calculator, model EL-1611P.
To insure trouble-free operation of your SHARP calculator, we
recommend the following:
1. The calculator should be kept in areas free from extreme
temperature changes, moisture, and dust.
2. A soft, dry cloth should be used to clean the calculator. Do
not use solvents or a wet cloth.
3. Since this product is not waterproof, do not use it or store it
where fluids, for example water, can splash onto it.
Raindrops, water spray, juice, coffee, steam, perspiration,
etc. will also cause malfunction.
4. If service should be required, use only a SHARP servicing
dealer, a SHARP approved service facility or SHARP repair
service.
5. If you pull out the power cord to cut electricity completely or
replace the batteries, the presently stored tax rate will be
cleared.
6. This product, including accessories, may change due to
upgrading without prior notice.
CONTENTS
Page
OPERATING CONTROLS ....................................................... 2
INK ROLLER REPLACEMENT ................................................ 3
PAPER ROLL REPLACEMENT ............................................... 5
POWER SUPPLY ..................................................................... 7
ERRORS .................................................................................. 9
SPECIFICATIONS.................................................................... 10
RESETTING THE UNIT ........................................................... 11
CALCULATION EXAMPLES.................................................... 56
TAX RATE CALCULATIONS.................................................... 62
1
Page 4
OPERATING CONTROLS
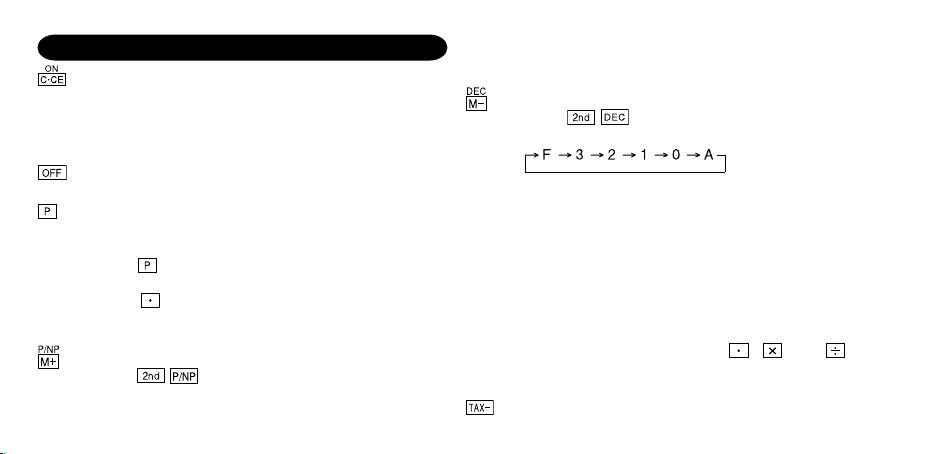
POWER ON KEY / CLEAR / CLEAR ENTRY KEY:
Clear – This key also serves as a clear key for the
calculation register and resets an error condition.
Clear entry – When pressed after a number and before a
function, clear the number.
POWER OFF KEY:
When this key is pressed, the power is turned off.
PRINT KEY:
To save paper you can only print what is displayed, even
in non-print mode.
Pressing
with the symbol “#” even in non-print mode.
Pressing
such as a code, date, etc. Separators are displayed as a
period and dashes but printed as periods.
MEMORY + KEY / PRINT ON / OFF KEY:
Pressing
Cause the calculator to operate in a display / print or
display only mode, depending upon the calculator’s
2
after the entry of a number will print the entry
will insert a separator into a number entry
selects print mode or non-print mode.
present state.
“P” on the display: Print mode.
“NP” on the display: Non-print mode.
MEMORY – KEY / DECIMAL SELECTION KEY:
Pressing
sets the number of decimal places in
the result.
“F” on the display:
The answer is displayed in the floating decimal system.
“3, 2, 1, 0” on the display:
Presets the number of decimal places in the answer.
“A” on the display (Add mode):
The decimal point in addition and subtraction entries is
automatically positioned to the 2nd digit from the lowest
digit of entry number. Use of the add mode permits
addition and subtraction of numbers without entry of
the decimal point. Use of
, and will
automatically override the add mode and decimally
correct answers will be printed.
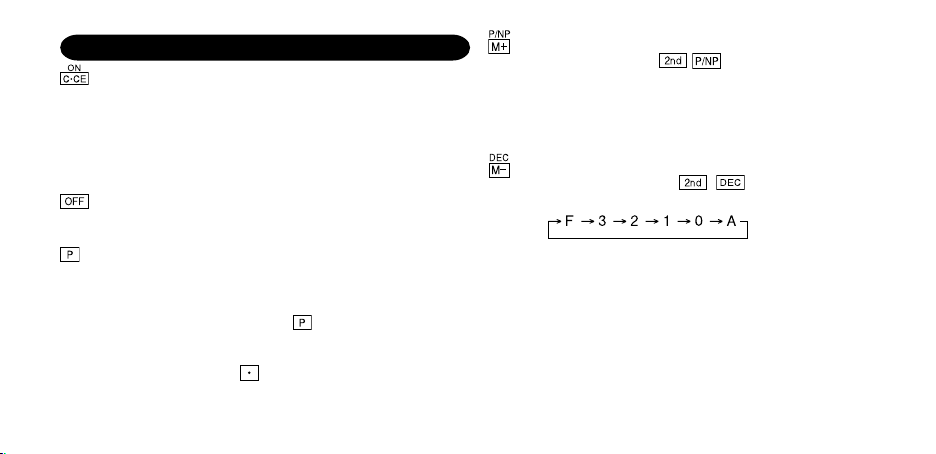
PRE-TAX KEY
Page 5
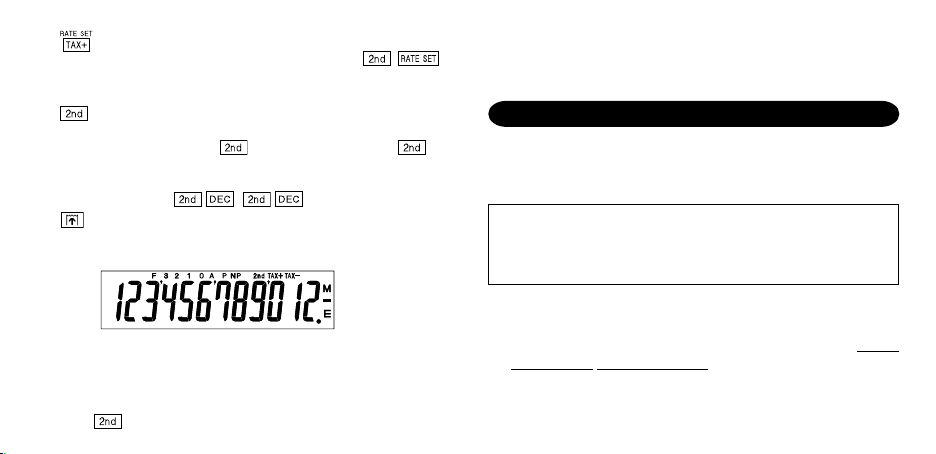
TAX-INCLUDING KEY / TAX RATE SET KEY:
You can set the tax rate by pressing
maximum of 4 digits excluding the decimal point can be
stored as the tax rate.)
2nd FUNCTION KEY:
To use the functions shown above the keys, such as
“DEC”, press the
pressed, “2nd” will appear at the top of the display.)
Example: To change decimal place setting from F to 2
PAPER FEED KEY:
When pressed, the paper tape advances.
DISPLAY:
F: Floating decimal mode TAX+: Incl. tax
3, 2, 1, 0: Preset decimal mode TAX–: Pre-tax
A: Add mode TAX : Tax rate
P: Print mode M: Memory
NP: Non-print mode –: Minus
2nd:
functions are available E: Error
key first. (When the key is
,
. (A
• For illustration purposes, all the relevant symbols are visible
in the display above. However, in actual use, this would never
happen.
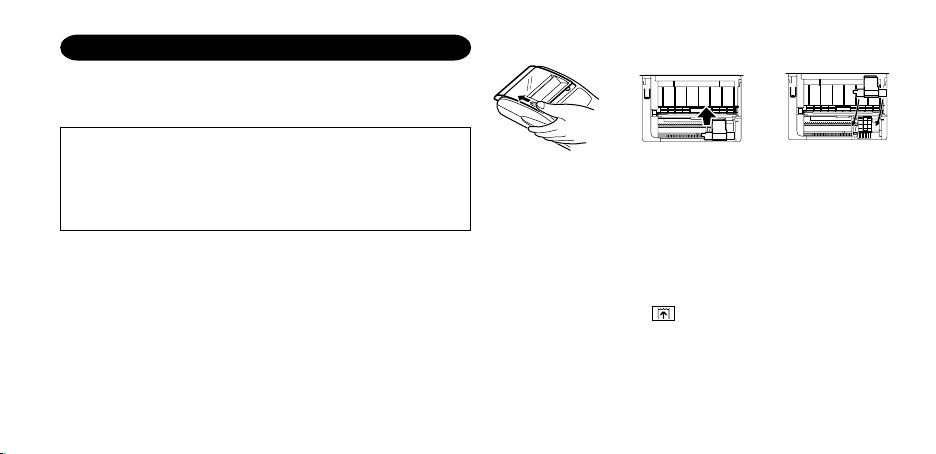
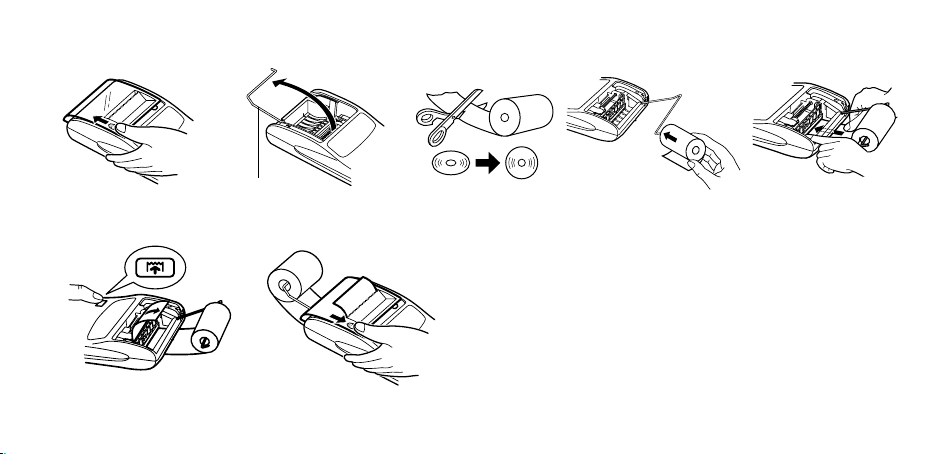
INK ROLLER REPLACEMENT
If printing is blurry even when the ink roller is in the proper
position, replace the roller.
Ink roller: Type EA-772R
WARNING
APPLYING INK TO WORN INK ROLLER OR USE OF
UNAPPROVED INK ROLLER MAY CAUSE SERIOUS
DAMAGE TO PRINTER.
1) Turn the power off.
2) Remove the printer cover. (Fig. 1)
3) Hold the top of the ink roller and remove the roller by
it toward you and then upward. (Fig. 2)
4) Install the new ink roller in the correct position. Make sure
that the roller is securely in place. (Fig. 3)
5) Put back the printer cover.
pulling
3
Page 6
Fig. 1 Fig. 2
4
Fig. 3
Cleaning the printing mechanism
If the print becomes dull after long time usage, clean the
printing wheel according to the following procedures:
1) Remove the printer cover and the ink roller.
2) Install the paper roll and feed it until it comes out of the front
of the printing mechanism.
3) Put a small brush (like a tooth brush) lightly to the printing
wheel and clean it by pressing
4) Put back the ink roller and the printer cover.
Note: • Do not rotate the printing mechanism manually, this
may damage the printer.
.
Page 7

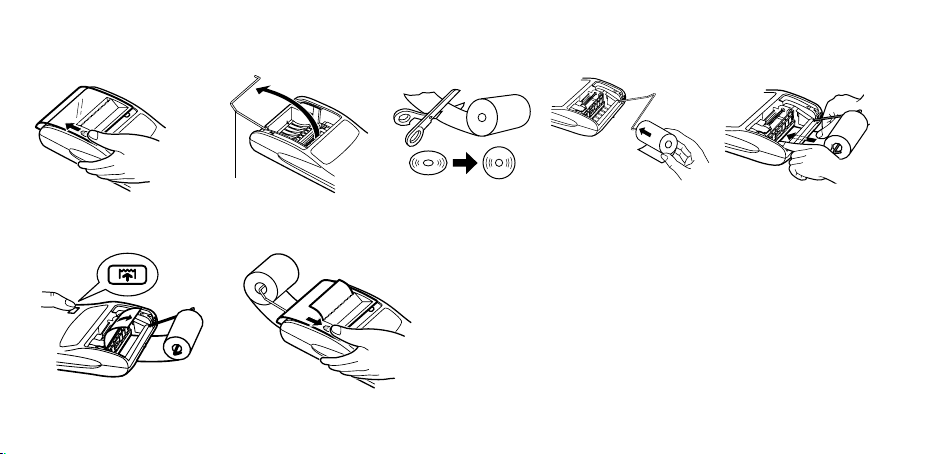
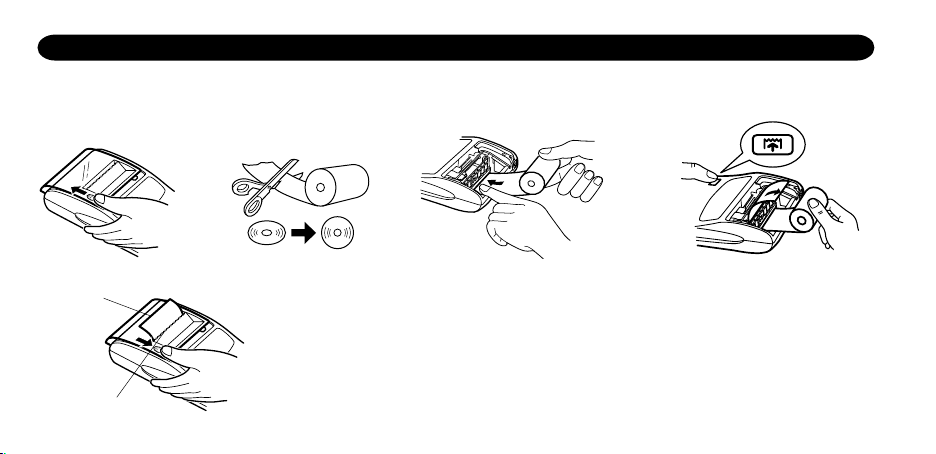
PAPER ROLL REPLACEMENT
Never insert paper roll if torn. Doing so will cause paper to jam. Always cut leading edge with scissors first.
♦ When using the paper roll that is less than or equals to 25 mm (31/32") in outside diameter:
Paper roll : Type EA-7100P
STEP 1
leading edge
Paper
cutter
STEP 4
STEP 2 STEP 3
Note: Paper tape replacement rolls are available where the EL-1611P calculator is sold.
5
Page 8
♦ When using the paper roll that is 12mm (15/32") in inside diameter and up to 80mm (3-5/32") in outside diameter:
Paper holder
STEP 1
STEP 2
STEP 3 STEP 4
Caution: • Never use the supplied paper (25 mm (31/32") in
6
STEP 5
STEP 6
outside diameter) in the holder.
• When replacing the paper, touching the inside of the
printer may damage it.
• The calculator has a free-paper mechanism. When
drawing out the paper tape, pull it straight forward on
the paper cutter side.
Page 9
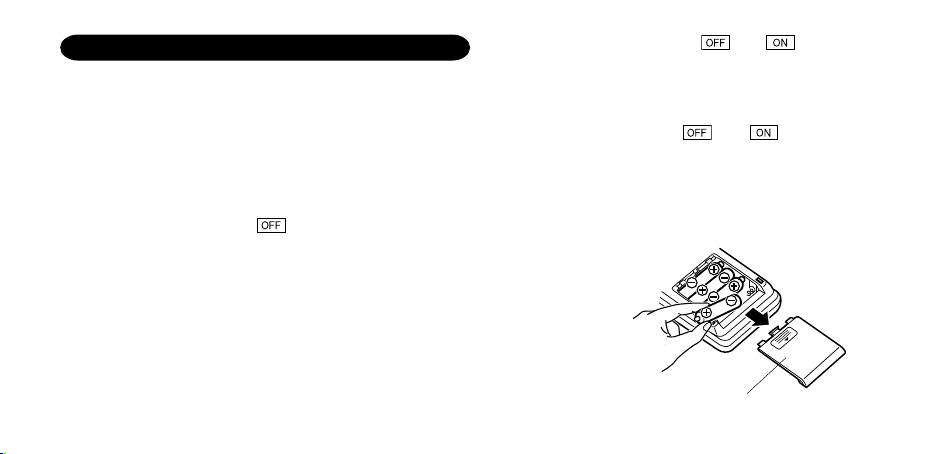
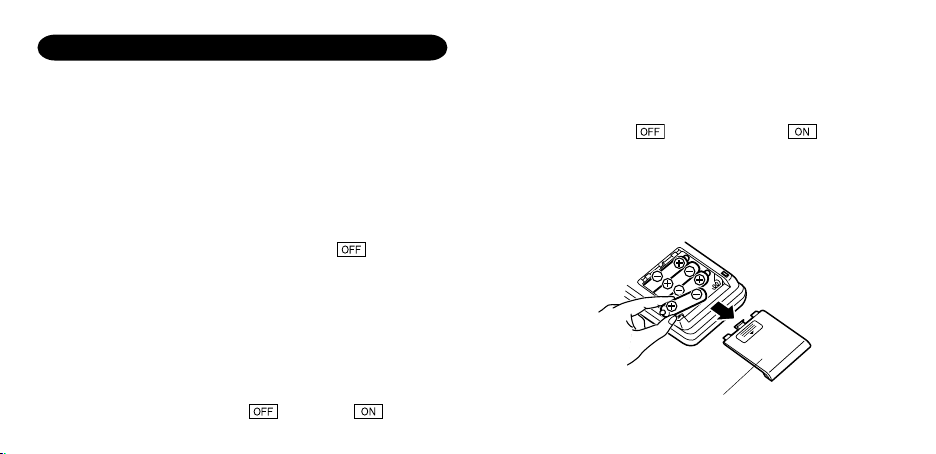
POWER SUPPLY
This calculator operates on dry batteries.
The calculator can also be operated on AC power through use
of an AC adaptor.
BATTERY OPERATION
If the display becomes dim or the printer stops before or during
printing, the batteries should be replaced.
Battery: Heavy-duty manganese battery, size AA (or R6)
1. Turn off power by pressing
2. Remove the battery cover by sliding it in the direction of the
arrow on the cover.
3. Replace the batteries. Be sure that the “+” and “–” marks on
the battery correspond to the “+” and “–” marks in the
calculator. Always put back the 4 batteries at the same time.
4. Put back the battery cover.
.
××
× 4
××
5. After the replacement, press and in this order to
clear the calculator.
When the batteries are correctly installed “0.” will be
displayed. (If the display is blank, displays any other symbol
or the keys become inoperative, remove the batteries and
install them again. Press
check the display again.)
Note: Due to solvent leakage of the battery, keeping a used
battery in the battery compartment may result in damage
to the calculator. Remove a used battery promptly.
and in this order and
Battery cover
7
Page 10

AC POWER OPERATION (OPTION)
AC adaptor: Model EA-28A
When the AC adaptor is connected to the calculator, the power
source is automatically switched over from dry batteries to AC
power source.
HOW TO CONNECT THE AC ADAPTOR
AC adaptor
connecting
terminal
Make sure that you turn the calculator’s power off when
connecting or disconnecting the AC adaptor.
To connect the AC adaptor, follow steps
To disconnect the AC adaptor, simply reverse the procedure.
8
and ➁.
➀
Notes: • When the calculator is not in use, be sure to remove
the adaptor from the calculator and the wall outlet.
• Never use any other AC adaptor except EA-28A.
CAUTION
Use of other than the AC adaptor EA-28A may apply
improper voltage to your SHARP calculator and will cause
damage.
Page 11

ERRORS
There are several situations which will cause an overflow or an
error condition.
When this occurs, an error symbol “E” will be displayed and
“- - - - - - -” will be printed, and all keys will electronically lock
except
The contents of the memory at the time of the error are retained.
1. When the integer portion of an answer exceeds 12 digits and
2. When any number is divided by zero (Ex. 5 0 ).
3. When the contents of the memory exceed 12 integers.
4. When the integer portion of a quotient in percentage
, and .
must be depressed to restart the calculation.
does not exceed 24 digits.
OVERFLOW CALCULATION
Ex. Select decimal position “F”.
888888888888
(1.23456781234 × 1,000,000,000,000 = 1,234,567,812,340)
(Ex.
999999999999 1 )
calculation is 25 digits.
(Ex. 100000000000
345678923456 → 1.23456781234E
0.00000000001 )
• When the paper jams, the printer stops and the error symbol
“P.E” appears. Turn off the calculator. Tear off the paper tape
and then pull the remaining part of the paper forward and
completely out of the printer.
9
Page 12

SPECIFICATIONS
Operating capacity: 12 digits
Power source: 6V
Operation: Heavy-duty manganese battery, size
10
(DC): Heavy-duty manganese
battery, size AA (or R6) × 4
AC: Local voltage with AC adaptor EA28A (Option)
AA (or R6)
Approx. 5,000 hours (in non-print
mode, displaying 555’555 at 25°C
(77°F) ambient temperature)
Operating time depends on the type of
battery and type of use.
Automatic Power-Off
Function (APO): To save your batteries, this function
automatically turns off the machine
approximately 12 minutes after the last
key operation.
Calculations: Four arithmetic, constant, square,
chain, power, percentage, reciprocal,
add-on, discount, memory, tax, etc.
SHARP will not be liable nor responsible for any
incidental or consequential economic or property
damage caused by misuse and/or malfunctions of
this product and its peripherals, unless such liability
is acknowledged by law.
Page 13

PRINTING SECTION
Printing speed: Heavy-duty manganese battery, size
AA (or R6)
Approx. 2.1 lines/sec. (At temperature
25°C(77°F), when “741 • 9
+” is printed.
Printing speed will vary with the
number of rows, different figure types
to be printed, and the charge level of
the batteries.)
Printing paper: 57 mm (2-1/4") – 58 mm (2-9/32") wide
80 mm (3-5/32") in diameter (max.)
Operating temperature: 0°C – 40°C (32°F – 104°F)
Power consumption: 6V
(DC): 1.7 W
Dimensions: 99 (W) × 191 (D) × 42 (H) mm
3-29/32" (W) × 7-17/32" (D) × 1-21/32" (H)
Weight: Approx. 238 g (0.53 lb.) (with batteries)
Accessories: Ink roller
×
1 (installed), Paper roll × 1,
Dry battery (R6)
×
4 and Operation
manual
RESETTING THE UNIT
Strong impacts, exposure to electrical fields, or other unusual
conditions may render the unit inoperative, and pressing the
keys will have no effect. If this occurs, you will have to press the
RESET switch on the bottom of the unit. The RESET switch
should be pressed only when:
• an abnormal event occurs and all keys are disabled.
• you install or replace the batteries.
Notes:
• Pressing the RESET switch will clear the stored tax rate and
other data stored in the memory.
• Use only a ballpoint pen to press the RESET switch. Do not
use anything breakable or anything with a sharp tip, such as
a needle.
• After pressing the RESET switch, press
that “0.” is indicated.
to make sure
11
Page 14

DEUTSCH
BEDIENUNGSHINWEISE
Wir danken lhnen für den Kauf des elektronischen Rechners EL1611P von SHARP.
Um den störungsfreien Betrieb lhres SHARP-Rechners
sicherzustellen, beachten Sie die folgenden Punkte:
1. Den Rechner nicht an Orten aufbewahren, wo er extrem
hohen Temperaturschwankungen, Feuchtigkeit oder Staub
ausgesetzt ist.
2. Zum Reinigen des Rechners verwendet man ein trockenes,
weiches Tuch. Keine Lösungsmittel oder feuchte Lappen
verwenden.
3. Da dieses Produkt nicht wasserdicht ist, sollten Sie es nicht
an Orten benutzen oder lagern, die extremer Feuchtigkeit
ausgesetzt sind. Schützen Sie das Gerät vor Wasser,
Regentropfen, Sprühwasser, Saft, Kaffee, Dampf, Schweiß
usw., da der Eintritt von irgendwelcher FIüssigkeit zu
Funktionsstörungen führen kann.
4. Sollte eine Reparatur dieses Gerätes erforderlich sein,
wenden Sie sich nur an einen SHARP-Fachhändler, eine
zugelassene SHARP-Reparaturwerkstatt oder an eine
12
SHARP-Kundendienststelle.
5. Wenn Sie das Netzkabel von der Steckdose abtrennen, um
die Stromversorgung vollständig zu unterbrechen, oder die
Batterie erseizen, wird der aktuell gespeicherte Steuersaiz
gelöscht.
6. Produktverbesserungen dieses Gerätes, einschließlich des
Zubehörs, bleiben ohne Vorankündigung vorbehalten.
INHALT
Seite
BEDIENUNGSELEMENTE ...................................................... 13
AUSTAUSCH DER TINTENROLLE ......................................... 15
AUSTAUSCH DER PAPIERROLLE......................................... 16
SPANNUNGSVERSORGUNG................................................. 18
FEHLER.................................................................................... 20
TECHNISCHE DATEN ............................................................. 21
RÜCKSTELLUNG DES GERÄTES ......................................... 22
RECHNUNGSBEISPIELE ........................................................ 56
STEUER-BERECHNUNGEN ................................................... 62
Page 15
BEDIENUNGSELEMENTE
EINSCHALTTASTE / LÖSCHEN / EINGABE LÖSCHEN:
Löschen – Diese Taste dient als Löschtaste für das
Rechenregister sowie für die Rückstellung und
Fehlerzustände.
Eingabe Löschen – Bei Betätigung nach Eingabe einer
Zahl und vor Eingabe einer Funktion wird die Zahl
gelöscht.
AUSSCHALTTASTE:
Durch Drücken dieser Taste wird der Rechner
abgeschaltet.
DRUCKTASTE:
Sogar in der Non-Print-Betriebsart kann die angezeigte
Zahl ausgedruckt und auf diese Weise der Ausdruck auf
das wesentliche beschränkt werden.
Durch Drücken der Taste
Eingabe einer Zahl wird die Eingabe mit dem Symbol #
ausgedruckt.
Durch Drücken von
Zahleneingabe wie Code, Datum usw. eingefügt.
Trennzeichen werden als Bindestrich angezeigt, aber als
Punkt gedruckt.
unmittelbar nach der
wird ein Trennzeichen in eine
SPEICHER + TASTE / DRUCKWERK EIN / AUS-TASTE:
Durch Drücken von
wird der Druckmodus bzw.
der Nichtdruckmodus gewählt.
Zum Umschalten der Betriebsarten Anzeige/Druck und
Nur-Anzeige, je nach dem gegenwärtigen Status des
Rechners. Anziege von “P”: Druckmodus
Anziege von “NP”: Nichtdruckmodus.
SPEICHER – TASTE / DEZIMALWAHL-TASTE:
Durch Drücken von
wird die Anzahl der
Dezimalstellen im Ergebnis gewählt.
Anzeige von “F”:
Das Ergebnis wird in Dezimalsystem mit Fließkomma
angezeigt.
Anzeige von “3, 2, 1, 0”:
Voreinstellen der Anzahl der Dezimalstellen im
Ergebnis.
Anzeige von “A” (Addiermodus):
Das Komma bei Addier- und Subtrahiereingaben wird
automatisch vor der zweitletzten Stelle der
eingegebenen Zahl positioniert. Die Verwendung des
13
Page 16

Addiermodus dient zum Addieren und Subtrahieren von
Zahlen ohne Eingabe des Kommas.
Durch Verwendung von
Additionshilfe automatsch übergangen und das
Ergebnis mit korrekter Dezimalpunktsetzung nach
Fließkommasystem ausgedruckt.
OHNE-STEUERN-TASTE
TASTE “EINSCHLIESSLICH STEUER” / STEUERSATZ-
EINGABETASTE:
Durch Drücken von
eingegeben. (Als Steuersatz kann eine Zahl mit maximal
vier Stellen, ausschließlich des Dezimalpunktes,
gespeichert werden.)
TASTE FÜR 2. FUNKTION:
Zur Verwendung der Funktion, die über einer Taste
angegeben ist, z.B. “DEC” wird zuerst die Taste
gedrückt. (Wenn gedrückt wird, erscheint “2nd” oben
auf der Anzeige.)
Beispiel: Verändern der Dezimalstelleneinstellung von F
auf 2.
,
14
, und wird die
wird der Steuersatz
PAPIERVORSCHUB-TASTE:
Drücken dieser Taste bewirkt den Vorschub des
Papierstreifens.
ANZEIGEFORMAT:
F: Fließdezimalpunkt-Betriebsart TAX+: Einschließlich Steuer
3, 2, 1, 0:Voreingestellter TAX–: Vor Steuer
A: Additions-Betriebsart M: Speicherbelegung
P: Drucken –: Minus
NP: Nicht Drucken E: Fehler
2nd:
• Zur Illustration werden alle relevanten Symbole auf der obigen
Dezimalpunkt TAX : Steuersaiz
Funktionen stehen zur
Verfügung
Anzeige dargestellt. Beim normalen Betrieb kommt dies
allerdings nicht vor.
Page 17
AUSTAUSCH DER TINTENROLLE
Wenn der Ausdruck undeutlich ist, sollte die Tintendruckwalze
ausgetauscht werden, auch wenn sie richtig eingesetzt ist.
FARBROLLE: TYP EA-772R
WARNUNG
DAS AUFBRINGEN VON TINTE AUF EINE VERBRAUCHTE
FARBROLLE ODER DIE VERWENDUNG EINER NICHT
EMPFOHLENEN FARBROLLE KANN ZU SCHWEREN
BESCHÄDIGUNGEN DES DRUCKERS FÜHREN.
1) Die Spannungsversorgung ausschalten.
2) Entfernen Sie die Abdeckung des Druckers. (Abb. 1)
3) Erfassen Sie die Oberseite der Farbrolle und entfernen Sie
die Farbrolle durch Abziehen nach vorne und oben. (Abb. 2)
4) Setzen Sie die neue Farbrolle richtig ein. Stellen Sie sicher,
dass die Rolle richtig befestigt ist. (Abb. 3)
5) Bringen Sie die Druckerabdeckung wieder an.
Abb. 1 Abb. 2 Abb. 3
Reinigung des Druckermechanismus
Falls der Ausdruck nach längerem Gebrauch unscharf wird,
empfiehlt es sich, die Druckwalze nach folgendem
Verfahren zu reinigen.
1) Die Abdeckung des Druckers und die Tintenrolle entfernen.
2) Die Papierrolle anbringen und den Papiervorschub betreiben,
bis der Papieranfang an der Vorderseite des Druckers erscheint.
3) Eine kleine Bürste (z.B. Zahnbürste) an die Druckwalze halten
und durch Drücken der
4) Tintenrolle und Abdeckung wieder anbringen.
Hinweis: • Drehen Sie das Druckerrad nicht von Hand, dies
kann zu Beschädigungen des Druckers führen.
-Taste die Reinigung vornehmen.
15
Page 18
AUSTAUSCH DER PAPIERROLLE
Niemals eine gerissene Papierrolle einlegen. Dadurch kann es zu Papierstau kommen.
Immer zuerst die Papierkante mit einer Schere gerade schneiden.
♦ Bei Verwendung von Papierrollen mit einem Außendurchmesser kleiner oder gleich 25 mm:
Papierrolle: Typ EA-7100P
SCHRITT 1 SCHRITT 2 SCHRITT 3
Papiervorderkante
Hinweis: Die Papierrolle ist dort erhältlich, wo auch der EL-1611P verkauft wird.
Schneidwerk
16
SCHRITT 4
Page 19
♦ Bei Verwendung von Papier, dessen Innendurchmesser 12 mm und dessen Außendurchmesser max. 80 mm beträgt.
Papierrollenhalter
SCHRITT 1
SCHRITT 2
SCHRITT 3 SCHRITT 4
SCHRITT 5
SCHRITT 6
Vorsicht: • Das mitgelieferte Papier (25 mm Durchmesser) auf
keinen Fall in der Halterung verwenden.
• Beim Wechsel des Papiers die Innenteile des
Druckers nicht berühren, da andernfails Beschädigung
verursacht werden kann.
• Der Rechner ist mit einem Freipapier-Mechanismus
ausgerüstet. Beim Herausziehen des Papierstreifens
diesen an der Papierabschneider-Seite gerade nach
vorn ziehen.
17
Page 20
SPANNUNGSVERSORGUNG
Dieses Gerät wird mit Trockenbatterien betrieben.
Man kann den Rechner auch über einen Netzadapter mit
Netzspannung betreiben.
BATTERIEBETRIEB
Falls die Anzeige schwach wird oder der Drucker vor oder
während des Druckens stehen bleibt, sind die Batterien zu
ersetzen.
Batterie: Hochleistungs-Manganbatterie Größe AA (oder
1. Schalten Sie das Gerät durch Drücken von
2. Entfernen Sie den Batteriefachdeckel, indem Sie ihn in
Pfeilrichtung schieben.
3. Setzen Sie wieder die Batterien ein. Achten Sie auf richtige
Polstellung, d.h. die Marken “+” und “–” auf den Batterien
müssen denjenigen im Batteriefach entsprechen. Setzen Sie
stets gleichzeitig wieder die 4 Batterien ein.
4. Setzen Sie wieder den Batteriefachdeckel ein.
5. Drücken Sie nach dem Auswechseln der Batterien zum
Löschen des Rechners die
18
R6)
××
× 4
××
aus.
und dann in dieser
Reihenfolge.
Wenn die Batterien richtig eingesetzt sind, erscheint “0.” in
der Anzeige. (Falls nichts oder ein anderes Symbol
angezeigt wird oder sich die Tasten nicht betätigen lassen,
nehmen Sie die Batterien heraus und setzen Sie sie wieder
ein. Drücken Sie dann
Reihenfolge und überprüfen Sie wieder die Anzeige.)
Hinweis: Entfernen Sie verbrauchte Batterien sofort aus dem
Batteriefach, weil sonst der Rechner wegen des
Auslaufens elektrolytischer Flüssigkeit beschädigt
werden kann.
und anschließend in dieser
Batteriefachdeckel
Page 21

BETRIEB MIT NETZSPANNUNG (WAHLWEISE ERHÄLTLICH)
Netzstrom-Adapter: Model EA-28A
Durch Anschluß des Netzstrom-Adapters an den Rechner wird
die Stromversorgung automatisch von Trockenbatterien auf
Netzstrom umgeschaltet.
ANSCHLUSS DES NETZSTROMADAPTERS
NetzstromadapterAnschlußbuchse
Stellen Sie sicher, daß der Rechner beim Anschließen oder
Abtrennen des Wechselstromadapters ausgeschaltet ist.
Zum Anschluß des Wechselstromadapters den Schritten
folgen.
➁
Zum Abtrennen des Wechselstromadapters die Schritte
umgekehrt ausführen.
und
➀
Hinweise: • Wenn das Gerät nicht verwendet wird, auf jeden
Fall den Adapter vom Rechner und von der
Wandsteckdose abtrennen.
• Auf keinen Fall andere Netzstromadapter als den
EA-28A verwenden.
WARNUNG
Durch Verwendung von anderen Netzstromadaptern als dem
EA-28A könnte der SHARP-Rechner mit falscher Spannung
versorgt und dadurch beschädigt werden.
19
Page 22

FEHLER
Ein Überlauf oder Fehler kann mehrere Ursachen haben.
Beim Auftreten eines Überlaufs oder Fehlers wird das FehlerSymbol “E” angezeigt und das Zeichen “- - - - - - -” gedruckt. Mit
Ausnahme von
elektronisch gesperrt. Um die Berechnung zu beginnen, muß
verwendet werden.
Selbst beim Auftreten des Fehlers bleibt der Speicherinhalt
unverändert.
1. Wenn der ganzzahlige Teil eines Ergebnisses 12 Stellen
überschreitet und 24 Stellen nicht überschreitet.
RESTSTELLENERMITTLUNG
Bsp. Die Dezimalstellung “F” wählen.
888888888888
(1,23456781234 × 1.000.000.000.000 = 1.234.567.812.340)
2. Wenn eine beliebige Zahl durch Null dividiert wird:
(Bsp. 5
3. Wenn der Ganzzahlanteil des Speicherinhaltes 12 Stellen
überschreitet. (Bsp.
20
, und werden dann alle Tasten
345678923456 → 1,23456781234E
0 ).
999999999999 1 )
4. Wenn bei der Prozentrechnung der Ganzzahlanteil eines
Quotienten 25 Stellen beträgt.
(Bsp. 100000000000
• Beim Auftreten des Papierstaus stoppt der Drucker mit dem
Erscheinen des Fehlersymbols “P.E”. Schalten Sie dann den
Rechner aus. Reißen Sie den Papierstreifen ab und ziehen
Sie dann den restlichen Teil des Papiers nach vorn, um
diesen ganz aus dem Drucker zu entfernen.
0,00000000001 )
Page 23

TECHNISCHE DATEN
Betriebskapazität: 12 Stellen
Stromversorgung: 6V
Betriebsdauer: Hochleistungs-Manganbatterie Größe
(Gleichstrom):
Hochleistungs-Manganbatterie Größe
AA (oder R6) × 4
Netz: mit Netzgerät EA-28A
(wahlweise erhältlich)
AA (oder R6)
Ca. 5.000 Stunden (in der
Druckerpause-Betriebsart wird 555’555
bei 25°C Umgebungstemperatur
angezeigt)
Die Betriebszeit ist abhängig vom
Batterietyp und der Verwendungsart.
Ausschaltautomatik
(A.P.O.): Mit dieser Funktion wird das Gerät ca.
12 Minuten nach der letzten
Tastenbetätigung automatisch
abgeschaltet, um Batteriestrom zu
sparen.
Rechenleistung: Vier Grundrechenarten, Konstant,
Quadrieren, Ketten, Potenzieren,
Prozentsatz, Reziprok, Aufschlag,
Abschlag, Steuerberechnung, Speicher
usw.
SHARP übernimmt keine Verantwortung oder Haftung
für irgendwelche zufälligen oder aus der Verwendung
folgenden wirtschaftlichen oder sachlichen Schäden,
die aufgrund der falschen Verwendung bzw. Durch
Fehlfunktionen dieses Gerätes und dessen Zubehör
auftreten, ausgenommen diese Haftung ist gesetzlich
festgelegt.
21
Page 24

DRUCKWERK
Druckgeschwindigkeit: Hochleistungs-Manganbatterie Größe
AA (oder R6)
Ca. 2,1 Zeilen/S (Bei einer
Temperatur von 25°C, wenn “741 • 9 +”
gedruckt wird. Die
Druckgeschwindigkeit kann wegen
der Zeilenzahl, der zu druckenden
unterschiedlichen Buchstabentypen
und dem Ladepegel der Batterien
Unterschiede aufweisen.)
Papier: 57 mm – 58 mm breit, maximaler
Außendurchmesser 80 mm
Betriebstemperatur: 0°C – 40°C
Stromverbrauch: 6V
Abmessungen: 99 (B)
(Gleichstrom): 1,7 W
×
191 (T) × 42 (H) mm
Gewicht: Ca. 238 g (mit Batterien)
Zubehör: Tintenrolle
Papierrolle
×
4 und Bedienungsanleitung
×
1 (eingebaut),
×
1, Trockenbatterie (R6)
Geräuschpegel: 60 dB (Drucken), gemessen nach
22
DIN 45635
RÜCKSTELLUNG DES GERÄTES
Durch starke Stöße, elektromagnetische Felder oder aus
anderen Ursachen kann es vorkommen, daß das Gerät nicht
mehr funktioniert und daß keine der Tasten mehr anspricht. In
diesem Fall muß das Gerät durch Eindrücken des RESETSchalters auf der Geräteunterseite zurückgestellt werden. Den
RESET-Schalter nur in den folgenden Fällen eindrücken:
• Wenn eine außergewöhnliche Situation eintritt und keine der
Tasten mehr anspricht.
• Die Batterien werden eingesetzt oder ausgetauscht.
Hinweise:
• Durch Drücken des RESET-Schalters werden der
gespeicherte Steuersatz und andere gespeicherte
Informationen gelöscht.
• Zum Eindrücken des RESET-Schalters nur einen
Kugelschreiber verwenden. Keine leicht brechbaren
Gegenstände oder Gegenstände mit dünnen Spitzen, z.B.
Nadeln, verwenden.
• Anschließend an die RESET-Taste
sicherzustellen, daß das Display “0.” zeigt.
drücken, um
Page 25

FRANÇAIS
NOTES SUR L’UTILISATION
Nous vous remercions sincèrement de l’achat de la calculatrice
éléctronique SHARP EL-1611P.
Dans le but d’utiliser votre calculatrice SHARP sans incident,
veuillez suivre les conseils suivants.
1. Ne pas laisser la calculatrice dans les endroits sujets à de
forts changements de température, à l’humidité, et à la
poussière.
2. Pour le nettoyage de la calculatrice, utiliser un chiffon doux
et sec. Ne pas utiliser de solvants ni un chiffon humide.
3. Cet appareil n’étant pas étanche, il ne faut pas l’utiliser ou
l’entreposer dans des endroits où il risquerait d’étre mouillé,
par exemple par de l’eau. La pluie, l’eau brumisée,
l’humidité, le café, la vapeur, la transpiration, etc. sont à
l’origine de dysfonctionnements.
4. Si une réparation s’avérait nécessaire, confier l’appareil à un
distributeur agréé par SHARP et assurant l’entretien, à un
service d’entretien agréé par SHARP, ou à un centre
d’entretien SHARP.
5. Si la fiche du cordon d’alimentation est débranchée, ou des
piles retirées de telle sorte que l’alimentation électrique se
trouve complètement coupée, le taux de taxe présentement
mis en mémoire est effacé.
6. Ce produit, y compris les accessoires, peut varier suite à
une amelioration sans préavis.
SOMMAIRE
Page
LES COMMANDES .................................................................. 24
REMPLACEMENT DU CYLINDRE ENCREUR ...................... 26
REMPLACEMENT DU ROULEAU DE PAPIER ...................... 27
ALIMENTATION ....................................................................... 29
ERREURS ................................................................................ 31
FICHE TECHNIQUE ................................................................ 32
RÉNITIALISATION DE L’APPAREIL ....................................... 33
EXEMPLES DE CALCULS ...................................................... 57
CALCULS DE TAXE ................................................................. 62
23
Page 26

LES COMMANDES
TOUCHE DE MISE SOUS TENSION / TOUCHE
D’EFFACEMENT / TOUCHE D’EFFACEMENT D’UNE
ENTREÉS:
Effacement - Cette touche sert également de touche
d’effacement des registres de calcul et annule une
condition d’erreur.
Effacement des entrées - Efface un nombre qui a été
introduit avant l’utilisation d’une touche de fonction.
TOUCHE DE MISE HORS TENSION:
Lorsqu’on appuie sur cette touche, la calculatrice est mise
hors circuit.
TOUCHE D’IMPRESSION:
Peut n’imprimer que les paramètres visualisés à
l’affichage, ceci même en mode de non-impression et afin
d’économiser du papier.
En appuyant sur
commande l’impression de ce nombre accompagné du
symbole “#”, même si on a choisi lemode de nonimpression.
24
après la frappe d’un nombre, on
En appuyant sur la touche , un signe de séparation est
inséré dans une entrée de nombre tel un code, une date,
etc. Les signes de séparation sont affichés sous forme de
traits d’union mais sont imprimés sous forme de points.
TOUCHE DE MÉMOIRE + / TOUCHE DE MARCHE /
ARRÊT D’IMPRESSION:
La combinaison
d’impression ou de non-impression.
Permet de choisir entre l’utilisation de la calculatrice avec
affichage et impression ou affichage seul, ceci étant
fonction du mode d’utilisation présent.
“P” est affichée: Impression
“NP” est affichée: Pas d’impression
TOUCHE DE MÉMOIRE – / TOUCHE DE SÉLECTION
DÉCIMALE:
La combinaison
décimale.
“F” est saffiche:
Le résultat est affiché dans le système à virgule flottante.
permet de choisir le mode
permet de choisir le nombre de
Page 27

“3, 2, 1, 0” est s’affiche:
ll préétablit le nombre de décimales dans le résultat.
“A” est s’affiche (Mode d’addition):
Lors des opérations d’addition et de soustraction, le
point décimal est automatiquement placé à gauche du
2ème chiffre en partant de la droite. Le mode addition
permet l’addition et la soustraction de nombres sans
que la frappe du point décimal soit nécessaire. L’emploi
des
, et annule automatiquement le mode
addition et permet l’impression du résultat, le point
décimale étant placé à l’endroit approprié.
TOUCHE DE PRÉTAXE
TOUCHE DE TAX+ (TOUCHE DE TAXE INCLUSE) /
TOUCHE DE TAUX DE TAXE:
La combinaison
taxe. (Le taux de la taxe ne peut pas comporter plus de 4
chiffres; Ie point décimal ne compte pas comme un chiffre.)
TOUCHE DE SECONDE FONCTION:
Pour utiliser les fonctions gravées au-dessus des touches,
par example “DEC”, appuyez tout d’abord sur la touche
.
permet de définir le taux de la
(Après avoir appuyé sur la touche
s’affiche à la partie supérieure de l’écran.)
Exemple: Pour changer la décimale, déplacer de F à 2
,
TOUCHE DE MONTÉE DE PAPIER:
Appuyer sur cette touche pour faire avancer le papier.
FORMAT D’AFFICHAGE:
F: Décimale flottante TAX+: Taxe comprise
3, 2, 1, 0: Décimale TAX–: Taxe non comprise
présélectionnée TAX : Taux de taxe
A: Addition M: Speicherbelegung
P: Impression –: Moins
NP: Non-impression E: Erreur
2nd: Les secondes fonctions sont
disponibles
• A titre explicatif, tous les symboles sont représentés sur
l’illustration ci-dessus. Dans la réalité, cela ne peut jamais se
produire.
, l’indicaion “2nd”
25
Page 28

REMPLACEMENT DU CYLINDRE ENCREUR
Si l’impression est floue bien que le cylindre encreur soit dans la
position convenable, remplacer ce cylindre.
Ruban encreur: Type EA-772R
AVERTISSEMENT
ENCRER UN RUBAN ENCREUR USÉ OU UTILISER UN
RUBAN ENCREUR NON AGRÉÉ PEUT GRAVEMENT
ENDOMMAGER L’IMPRIMANTE.
1) Couper l’alimentation.
2) Déposez le couvercle de l’imprimante. (Fig. 1)
3) Tenez le haut du ruban encreur et retirez le ruban en le tirant
vers vous puis vers le haut. (Fig. 2)
4) Installez le nouveau ruban encreur dans la bonne position.
Assurez-vous que le ruban est bien fixé en place. (Fig. 3)
5) Remettez en place le ouvercle de l’impri-mante.
26
Fig. 1 Fig. 2 Fig. 3
Nettoyage du mécanisme d’impression
Si l’impression devient faible après une longue période
d’utilisation, nettoyer la roue imprimante en suivant les
instructions ci-dessous:
1) Retirer le couvercle de l’imprimante et le cylindre encreur.
2) Mettre le rouleau de papier en place et faire avancer le
papier jusqu’à ce qu’il sorte par l’avant du mécanisme
d’impression.
3) Placer une petite brosse (telle qu’une brosse à dents) sur la
roue imprimante et la nettoyer en appuyant sur
4) Remettre le cylindre encreur et le couvercle de l’imprimante
en place.
Remarque: • Ne faites pas tourner manuellement le
mécanisme d’impression sous peine
d’endommager l’imprimante.
.
Page 29

REMPLACEMENT DU ROULEAU DE PAPIER
Ne tentez pas d’introduire le papier s’il est déchiré. En procédant ainsi, vous risquez un bourrage.
Avant tout, coupez soigneusement te début de la bande au moyen d’une paire de ciseaux.
♦ En cas d’utilisation de papier de diamètre extérieur inférieur ou égal à 25 mm:
Rouleau de papier: Type EA-7100P
ETAPE 1 ETAPE 2 ETAPE 3
Amorce
Note: Les rouleaux de papier sont en vente dans le magasin où la EL-1611P est vendue.
Coupe-papier
ETAPE 4
27
Page 30

♦ En eas d’utilisation de papier de 12 mm de diamètre intérieur et jusqu’à 80 mm de diamètre extérieur.
Porterouleau
ETAPE 1
ETAPE 2
ETAPE 3 ETAPE 4
Attention: • Ne jamais utiliser le papier inclus (25 mm de
28
ETAPE 5
ETAPE 6
diamètre) dans le porte-rouleau.
• Lors du remplacement du papier, prendre garde de
ne pas toucher l’intérieur de l’imprimante, sous risque
de l’endommager.
• Cette calculatrice est pourvue du mécanisme à papier
libre. En sortant la bande de papier, la tirer droit en
avant du côté du coupe-papier.
Page 31

ALIMENTATION
Cet appareil fonctionne sur piles sèches.
Cet appareil peut également fonctionner sur secteur en utilisant
un adaptateur C.A.
FONCTIONNEMENT SUR PILES
Si l’affichage pâlit ou encore si l’impression n’a pas lieu ou
s’interrompt, Ies piles doivent être remplacées.
Piles: Pile manganèse de grande puissance, format AA (ou
1. Eteindre la calculatrice en appuyant sur la touche de mise
2. Retirer le couvercle du logement des piles en le faisant
3. Remettre les piles en place. S’assurer que leurs polarités “+”
4. Remettre le couvercle en place.
××
R6)
× 4
××
hors tension
glisser dans le sens de la flèche qui se trouve sur le
couvercle.
et “–” soient conformes aux marques du logement. Toujours
replacer les 4 piles en même temps.
.
5. Après avoir remplacé les piles, appuyer sur et
dans cet ordre de manière à effacer la calculatrice.
Si les piles sont correctement installées, “0.” sera affiché. (Si
rien n’apparaît sur l’affichage ou si un autre symbole est
affiché, ou si les touches sont inutilisables, retirer les piles et
les réinstaller. Appuyer de nouveau sur
cet ordre et revérifier l’affichage.)
Note: Le fait de laisser les piles usagées dans le logement des
piles risque d’endommager la calculatrice à cause de la
fuite du solvant des piles. Retirer donc les piles usagées
dès que possible.
Couvercle
et dans
29
Page 32

FONCTIONNEMENT SUR SECTEUR (EN OPTION)
Adaptateur CA: modèle EA-28A
Lorsque l’adaptateur CA est branché à la calculatrice,
l’alimentation passe automatiquement des piles sur celle du
secteur.
BRANCHEMENT DE L’ADAPTATEUR CA
Borne de branchement
d’adaptateur CA
Avant de brancher ou de débrancher l’adaptateur secteur,
veillez à mettre la calculatrice hors tension.
Pour brancher l’adaptateur secteur, procédez aux opérations
et ➁.
Pour débrancher l’adaptateur secteur, inversez l’ordre de la
procédure.
30
Notes: • Lorsque la calculatrice n’est pas utilisée, ne pas
oublier de débrancher l’adaptateur de sa borne et de
la prise secteur.
• Ne jamais utiliser d’adaptateur CA autre que le EA28A.
PRECAUTIONS A PRENDRE
L’emploi d’un adaptateur CA autre que le EA-28A pourrait
envoyer une tension inadéquate à cette calculatrice SHARP
et l’endommager.
➀
Page 33

ERREURS
Il existe divers cas qui causeront un dépassement de capacité
ou une situation d’erreur.
Lorsque cela se produit, le symbole d’erreur “E” sera affiché et
“- - - - - - -” sera imprimé, et toutes les touches seront
électroniquement verrouillées a l’exception des
.
doit alors être utilisée pour recommencer le calcul.
Le contenu de la mémoire au moment de l’erreur est retenu.
1. Lorsque la partie entière d’un résultat dépasse 12 chiftres, et
ne dépasse pas 24 chiffres.
CALCULS AVEC DEPASSEMENT DE CAPACITE
Ex. Choisir le position de virgule “F”.
888888888888
(1,23456781234 × 1.000.000.000.000 = 1.234.567.812.340)
2. Lorsqu’un nombre est divisé par “zéro”. (Ex. 5 0 ).
3. Lorsque le contenu de la mémoire dépasse 12 nombres
entiers. (Ex.
4. Lorsque la partie entière d’un quotient dans le calcul de
pourcentage est de 25 chiffres.
345678923456 → 1,23456781234E
999999999999 1 )
, et
(Ex. 100000000000
• Lorsque le papier est bloqué, l’imprimante s’arrête et le
symbole d’erreur “P.E” apparaît. Eteindre la calculatrice.
Déchirer la bande de papier, tirer la partie restante du papier
vers l’avant et puis le sortir complètement de l’imprimante.
0,00000000001 )
31
Page 34

FICHE TECHNIQUE
Capacité d’opération: 12 chiffres
Alimentation: 6V
Fonctionnement: Pile manganèse de grande
32
(CC): Pile manganèse de
grande puissance, format AA (ou R6)
× 4
CA: Tension locale avec l’adaptateur
EA-28A (Option)
puissance, format AA (ou R6)
Env. 5.000 heures (sans impression,
avec affichage de 555’555, à la
température ambiante de 25°C)
Le durée de service dépend du type
de pile et de l’emploi qui est fait de
l’appareil.
Fonction de mise hors
tension automatique (A.P.O.): Cette fonction, introduite afin
d’économiser les piles, met la
calculatrice automatiquement
hors tension environ 12 minutes
après la dernière manoeuvre.
Calculs: Quatre opérations arithmétiques,
constante, carrés, chaîne,
puissances, pourcentages,
inverse, bénéfices, escompte,
mémoire, taxe, etc.
SHARP ne peut pas être tenu responsable pour tout
incident ou dommage économique consécutif ou
matériels, causés par une mauvaise utilisation et/ou un
mauvais fonctionnement de cet appareil et de ses
périphériques, à moins qu’une telle responsabilité ne
soit reconnue par la loi.
Page 35

SECTION IMPRIMANTE
Vitesse d’impression: Pile manganèse de grande
puissance, format AA (ou R6)
Env. 2,1 lignes/s (À une température
de 25°C et quand “741 • 9
+” est
imprimé. La vitesse d’impression
varie en fonction du nombre de
lignes, du type des différentes figures
à imprimer et du niveau de charge
des piles.)
Papier d’impression: 57 mm – 58 mm de largeur, 80 mm
de diamètre extérieur. (max.)
Te mpérature de
fonctionnement: 0°C – 40°C
Consommation: 6V
Dimensions: 99 (L)
(CC): 1,7 W
×
191 (P) × 42 (H) mm
Poids: Env. 238 g (avec les piles)
Accessoires: 1 cylindre encreur (installé), 1
rouleau de papier, 4 piles sèches
(R6) et mode d’emploi
RÉINITIALISATION DE L’APPAREIL
Un choc violent, l’exposition à un champ électrique et d’autres
conditions inhabituelles, peuvent empêcher le fonctionnement
de l’appareil et rendre les touches inopérantes. En ce cas,
appuyez sur le bouton RESET, placé à la partie inférieure de
l’appareil. Ce bouton RESET ne doit être utilisé que dans les
cas suivants:
• Une situation inhabituelle s’est développée et toutes les
touches sont inopérantes.
• Vous avez mis en place les piles, ou vous les avez
remplacées.
Notes:
• Une poussée sur le bouton RESET efface le taux de taxe
mémorisé, et toutes les autres données placées en mémoire.
• Pour appuyer sur le bouton RESET, n’utilisez que la pointe
d’un stylo à bille. N’utilisez pas un instrument susceptible de
se casser, ni un instrument pointu tel qu’une aiguille.
• Après avoir appuyé sur le bouton RESET, appuyer sur
pour vous assurer que “0.” est affiché.
33
Page 36

ITALIANO
NOTE INTRODUTTIVE
Complimenti per l’ottimo acquisto della calcolatrice elettronica
con stampante EL-1611P della Sharp.
Per mantenere la calcolatrice nelle migliori condizioni, si
consiglia di osservare la precauzioni seguenti.
1. Non conservare la calcolatrice in luoghi soggetti a forti
variazioni di temperatura, umidi o polverosi.
2. Per pulire la calcolatrice, usare soltando un panno morbido
ed asciutto. Non usare solventi e non inumidire il panno.
3. Poichè il prodotto non è impermeabibe non utilizzarlo o
riporlo in luoghi in cui si può bagnare. Anche gocce di
pioggia, spruzzi d’acqua, succhi, caffè, vapore, esalazioni,
etc. possono causare malfunzionamenti.
4. Se questo prodotto dovesse richiedere degli interventi
tecnici, riovolgersi esclusivamente ad un rivenditore SHARP,
ad un centro di assistenza autorizzato SHARP o ad un
centro riparazioni SHARP, dove disponibile.
5. Se si stacca il cavo di alimentazione per interrompere
completamente il flusso di corrente, o si sostituiscono le
34
batterie, il tasso di tassazione correntemente memorizzato si
cancella.
6. Questo prodotto e i relativi accessori possono essere
soggeti a modifiche e aggiornamenti senza preavviso.
INDICE
Pag.
COMANDI E FUNZIONI ........................................................... 35
SOSTITUZIONE DEL NASTRO INCHIOSTRATO .................. 37
SOSTITUZIONE DEL RULLO CARTA .................................... 38
ALIMENTAZIONE..................................................................... 40
ERRORI .................................................................................... 42
DATI TECNICI .......................................................................... 43
INIZIALIZZAZIONE DELL’UNITÁ ............................................ 44
ESEMPI DI CALCOLO ............................................................. 57
CALCOLI DEL TASSO DI TASSAZIONE ................................ 62
Page 37

COMANDI E FUNZIONI
TASTO ACCENSIONE / TASTO CANCELLAZIONE /
CANCELLA IMMISSIONE:
Azzeramento - Questo tasto serve anche a cancellare /
azzerare il registro di calcolo e per il ripristino /
resettaggio doppo una condizione di errore.
Cancellazione immissione - Quando questo tasto viene
premuto dopo l’immissione di un numero e prima di una
funzione esso cancella il numero inviato.
TASTO DI SPEGNIMENTO:
Premendo questo tasto si spegne la calcolatrice.
TASTO DI STAMPA:
O pure capace di stampare solo il numero visualizzato,
anche se non è inserita la funzione di stampa, in modo da
economizzare la carta di stampa.
Premendo
impostato viene stampato accompaganto dal simbolo #.
Premendo
separatore, come per esempio un codice, una data, ecc. I
separatori vengono visualizzati come dai trattini, ma
vengono stampati come punti.
dopo un’impostazione numerica, il numero
, nel numero i postato viene inserito un
TASTO MEMORIA + / TASTO ON/OFF STAMPA:
Premendo
si seleziona la modalità con stampa
o senza stampa.
Per inserire ia funzione di viualizzazione / stampa o quella
di visualizzazione de sola.
“P” sul display: Modo Stampa.
“NP” sul display: Modo Non Stampa.
TASTO MEMORIA – / TASTO NUMERO DI DECIMALI:
Premendo
si imposta il numero di decimali nel
risultato.
“F” sul display:
La risposta viene visualizzata sul sistema decimale a
virgola variabile (“virgola flottante”).
“3, 2, 1, 0” sul display:
Preimposta il numero delle posizioni decimali nella
risposta.
“A” sul display (modo Addizione):
La virgola decimale (indicata da un punto sul display),
delle immissioni di addizione e di sottrazione viene
35
Page 38

posizionata automaticamente dalla seconda cifra, al 2º
posto, partendo da destra dall’ultima cifra di valore
corrispondente al valore più basso del numero di
immissione. L’uso del modo di addizione consente
l’addizione e la sottrazione di numeri senza dovere
inviare la posizione decimale. L’uso di
disattiva automaticamente la virgola ad inserimento
fisso; I risultati vengono cioè stampati correttamente,
con la virgola nella posizione determinata dalla
posizione del selettore corrispondente nel sistema
decimale a virgola mobile.
TASTO PRE-TAX (SENZA TASSE)
TASTO TASSE INCLUSE / TASTO DI IMPOSTAZIONE
TASSO DI TASSAZIONE:
Premendo
valuta. (Come tasso di tassazione è possibile memorizzare
un valore a 4 cifre, decimali esclusi.)
TASTO 2nd FUNZIONE (seconda funzione):
Per attivare le funzioni indicate in alto sui tasti, guali
“DEC”, premere prima il tasto
premuto il tasto
36
si imposta il tasso di tassazione
, (Dopo che si è
sul display, in alto, appare “2nd”.)
, e
Esempio: Per cambiare l’impostazione delle posizioni
TASTO D’AVANZAMENTO DELLA CARTA:
Premendo questo tasto, la carta avanza.
FORMATO DEL DISPLAY:
F: modo a virgola mobile TAX+: Tasse comprese
3, 2, 1, 0: posto della virgola TAX–: Tasse escluse
A: virgola automatica M: memoria
P: modo con stampa –: meno
NP: modo senza stampa E: errore
2nd: Le funzioni
disponibili
• A scopo dell’illustrazione, tutti i simboli pertinenti sono visibili
sul display sopra. In realtà, ciò non devrebbe però mai
accadere.
decimali da F a 2.
,
preselezionato TA X : Tasso di tassazione
sono
Page 39

SOSTITUZIONE DEL NASTRO INCHIOSTRATO
Se la stampa è sfocata anche se il nastro inchiostrato si trova
sulla posizione corretta, sostituire il nastro.
Rullo inchiostrato: tipo EA-772R
AVVERTENZA
L'APPLICAZIONE DI INCHIOSTRO AL RULLO
CONSUMATO O L'UTILIZZO DI UN RULLO
INCHIOSTRATO NON APPROVATO PUÒ PROVOCARE
SERI DANNI ALLA STAMPANTE.
1) Spegnere la calcolatrice.
2) Rimuovere il coperchio della stampante (Fig. 1).
3) Afferrare il rullo inchiostrato tenendolo per la parte superiore
e rimuoverlo tirandolo prima verso di sé e quindi verso l'alto
(Fig. 2).
4) Installare il nuovo rullo nella posizione corretta. Accertarsi
che sia inserito
completamente (Fig. 3).
5) Rimettere il coperchio del rullo.
Fig. 1 Fig. 2
Pullizia del meccanisma di stampa
Se dopo un certo tempo d’uso della calcolatrice la stampa
diviene opaca, pulire il cilindro di stampa nel modo indicato
di seguito:
1) Togliere il coperchio della stampante ed il rullo inchiostrato.
2) Inserire il rotolo di carta e far avanzare la carta fino a quando
l’estremità fucriesce sul davanti del meccanismo di stampa.
3) Disporre una piccola spazzola (tipo spazzolino da denti) in
modo leggero sul cilindro di stampa e pulirlo premendo il
tasto
4) Rimettere il rullo inchiostrato e il coperchio della calcolatrice.
Nota: • Non ruotare il meccanismo di stampa manualmente, in
.
quanto ciò potrebbe danneggiare la stampante.
Fig. 3
37
Page 40

SOSTITUZIONE DEL RULLO CARTA
Assolutamente non inserire un rotolo se la carta è strappata. Sarebbe causa di inceppemento.
Prima d’inserire la carta, tagliare sempre il bordo d’entrata con le forbici.
♦ Uso di un rotolo di carta di 25 mm di diametro o meno.
Rotolo di carta: Tipo EA-7100P
FASE 1 FASE 2 FASE 3
Tagliacarta
Nota: Ulteriori rotoli di carta sono disponibili nel negozio d’acuisto dell’ EL-1611P.
38
Tagliacarta
FASE 4
Page 41

♦ Usando carta di 12 mm diametro interno e fino a 80 mm di diametro esterno.
Portacarta
FASE 1
FASE 2
FASE 3 FASE 4
FASE 5
FASE 6
Attenzione: • Non usare la carta inclusa nel supporto (25 mm di
diametro).
• Durante la sostituzione della carta, non toccare i
meccanismi interni della calcolatrice. Ciò potrebbe
causare dei danni.
• La calcolatrice è dotata del meccanismo di carta
libera. Estraendo la carta, tirarla in modo diritto,
verso l’avanti, sul lato del tagliacarta.
39
Page 42

ALIMENTAZIONE
Questo apparecchio funzione a batterie secche.
Esso può comunque essere alimentato anche con corrente di
rete, usando un adattore CA.
ALIMENTAZIONE A BATTERIA
Se il display si affievolisce oppure se la stampante cessa di
funzionare prima di stampare o durante la stampa, Ie pile
dovranno essere sostituite.
Batterie: Pila al manganese di lunga durata, formato AA (o
1. Spegnere la calcolatrice premendo
2. Togliere il coperchio delle batterie facendolo scorrere nella
direzione della freccia.
3. Reinserire le pile. Far corrispondere i simboli “+” e “–” sulle
bafterie con gli stessi simboli all’interno dello scompartimento.
Inserire sempre 4 pile allo stesso tempo.
4. Ricollocare in posizione il coperchio delle pile.
5. Dopo la sostituzione delle batterie, premere
Se le batterie sono state inserite correttamente, nel quadrante
40
××
R6)
× 4
××
, per azzerare completamente la calcolatrice.
.
e quindi
appare il “0.”. Se invece non appare niente, se fosse
visualizzato un altro simbolo, oppure se i tasti dovessero
rimanere inoperativi, togliere le batterie e inserirle di nuovo;
premere quindi ancora una volta
controllare la visualizzazione nel quadrante.
Nota: Se si lasciano bauerie consumate nello scompartimento,
è possibile causare dei danni dovuti alla fuoriuscita del
materiale chimico. Evitare di sostituire le batterie in
ritardo.
Coperchio delle batterie
e quindi e
Page 43

ALIMENTAZIONE CON CORRENTE DI RETE (FACOLTATIVO)
Adattatore CA: modello EA-28A
Collegando questo adattatore alla calcolatrice, l’alimentazione a
mezzo batterie viene automaticamente disinserita.
COLLEGAMENTO DELL’ADATTATORE CA
Presa di
collegamento
dell’adattatore CA
Prima di collegare l’adattatore CA alla calcolatrice, e prima di
scollegario, contollare che la calcolatrice sia spenta.
Per collegare l’adattatore CA, eseguire i passi
Per scollegare l’adattatore CA, ripetere la procedura
all’incontrario.
➀
e ➁.
Notas: • Quando non si usa la calcolatrice, disinserire
l’adattatore CA dalla calcolatrice stessa e dalla presa di
corrente.
• Usare esclusivamente l’adattatore EA-28A.
PRECAUZIONI
Usando un adattatore diverso dell’EA-28A è possibile che si
applichi un voltaggio inappropriato, causando così dei danni
all’apparecchio.
41
Page 44

ERRORI
In certe situazioni, si causa una condizione di errore o di
accedenza di capacità della calcolatrice.
Quando ciò succede, nel quadrante appare il simbolo d’errore
E, mentre sulla carta viene stampato “- - - - - - -”. Tutti i tasti,
eccetto
Per continuare a calcolare, premere
Il materiale immesso nella memoria fino al momento in cui è
stato causato l’errore, viene conservato.
1. Quando la parte intera di un risultato consiste di più di 12
2. Quando si divide un qualsiasi numero per zero
3. Quando il contenuto della memoria eccede le 12 cifre.
42
, e , vengono bloccati elettronicamente.
cifre, ma di meno di 24.
CALCOLI IN ECCEDENZA
Es.: Selezionare la posizione decimale “F”.
888888888888
(1,23456781234 × 1.000.000.000.000 = 1.234.567.812.340)
(Es. 5
(Es.
0 ).
999999999999 1 )
345678923456 → 1,23456781234E
.
4. Quando la parte intera de un quoziente, in un calcolo di
percentuale, consiste di 25 cifre.
(Es. 100000000000
• In caso di inceppamento dovuto ala carta, Ia stampatrice si
arresta ed appare il simbolo “P.E”. Spegnere allora la
calcolatrice, strappare la striscia di carta e togliere la parte
rimanente tirandola verso l’avanti.
0,00000000001 )
Page 45

DATI TECNICI
Capacità di calcolo: 12 cifre
Alimentazione: 6V
Funzionamento: Pila al manganese di lunga durata,
(CC): Pila al manganese di
lunga durata, formato AA (o R6) × 4
CA: Con adattatore CA, EA-28A
(Facoltativo)
formato AA (o R6)
Ca. 5.000 ore (in modalità senza
stampa, visualizzazione continua di
555’555 a temperatura ambiente di
25°C)
Il tempo operativo varia in funzione
del tipo di pila e di uso.
Funzione A.P.O.
(di spegnimento automatico): Grazie a questa funzione, la
calcolatrice si spegne
automaticamente circa 12 minuti
dopo l’attivazione ell’ultimo
comando, in modo da non
consumare inutilmente le batterie.
Calcoli: Quattro operazioni aritmetiche,
costante, radici, catena, potenze,
percentuale, reciproco,
maggiorazione e sconto,
sottrazioni, memoria, tasse, ecc.
SHARP respinge ogni responsabilità per qualsiasi
incidente o danno economico o materiale causato da
errato impiego e/o malfunzionamento di questo
prodotto e delle sue periferiche salvo che la
responsabilità sia riconosciuta dalla legge.
43
Page 46

SEZIONE DI STAMPA
Velocità di stampa: Pila al manganese di lunga durata,
formato AA (o R6)
Ca. 2,1 righe/sec. (Alla temperatura
di 25°C, in caso di stampa alla voce
“741 • 9
+”. La velocità di stampa può
variare in relazione al numero di
righe, alla presenza o assenza di vari
tipi di figure e disegni, ed al livello di
carica delle batterie.)
Carta da stampa: 57 – 58 mm larghezza
80 mm diametro esterno (max.)
Temperatura di
funzionamento: 0°C – 40°C
Consumo: 6V
Dimensioni: 99 (Iarg)
(CC): 1,7 W
×
191 (prof) × 42 (alt) mm
Peso: Ca. 238 g (con batterie)
Accessori: Rullo inchiostrato (inserito), 1 rotolo
di carta, 4 batterie secche (R6) e
manuale di istruzioni
44
INIZIALIZZAZIONE DELL’UNITÁ
Se sottoposta a colpi, urti violenti, esposta a campi
elettromagnetici, o in condizioni fuori dalla norma l’unità
potrebbe non essere più operativa e non rispondere alla
pressione dei tasti. Se questo accadesse, premere il tasto
RESET che si trova sul fondo dell’unità. ll tasto RESET deve
essere premuto solo quando:
• si è verificato un evento anormale.
• si è provveduto all’installazione o alla sostituzione delle
batterie.
Note:
• Premendo il tasto RESET verranno cancellati il tasso di
tassazione ed altri dati nella memoria.
• Per premere il tasto RESET utilizzare solo la punta di una
penna a sfera. Non usare oggetti che possano rompersi
oppure siano appuntiti, come gli aghi.
• Dopo aver pigiato l’interruttore di RESET, pigiare
assicurarsi che lo “0.” sia indicato.
per
Page 47

NEDERLANDS
BEDIENINGSAANWIJZINGEN
Dank u voor het aanschaffen van de SHARP electronische
printercalculator, model EL-1611P.
Voor een probleemloze werking van uw SHARP calculator,
raden wij het volgende aan:
1. Stel de calculator niet bloot aan extreme temperatuurswisselingen en houd hem uit de buurt van vochtige en stoffige
plaatsen.
2. De calculator kan met een zachte, droge doek worden
schoongemaakt. Gebruik geen oplosmiddelen of een natte
doek.
3. Omdat dit product niet waterbestendig is mag het niet
gebruikt of bewaard worden waar vloeistoffen, bijv, water,
erop kunnen spatten Regendruppels, waternevel, sap, koffie,
stoom, zweet, enz zullen storingen veroorzaken.
4. Indien de calculator defect is, dient u deze naar een SHARP
service-dealer, een officieel SHARP service-centrum of een
SHARP reparatiecentrum te brengen.
5. Als u de stekker uit het stopcontact trekt of de batterijen
vervangt, wordt het ingestelde belastingtarief gewist.
6. Dit product, met ingebrip van toebehoren, kan ter
productverbetering zonder voorafgaande kennisgeving
worden veranderd.
INHOUDSOPGAVE
Pagina
BEDIENINGSORGANEN ......................................................... 46
VERVANGEN VAN INKTROL .................................................. 48
VERVANGEN VAN PAPIERROL ............................................. 49
VOEDING ................................................................................. 51
FOUTEN ................................................................................... 53
TECHNISCHE GEGEVENS..................................................... 54
TERUGSTELLEN VAN HET APPARAAT (RESET) ................. 55
REKENVOORBEELDEN ......................................................... 58
BEREKENING VAN BELASTINGTARIEVEN .......................... 62
45
Page 48

BEDIENINGSORGANEN
AAN-TOETS / WISSEN / INGAVE-WISSENTOETS:
Wissen - Deze toets is tevens de wistoets voor het
berekeningsregister en resets een foutstoestand.
Ingave wissen - Wanneer op deze toets wordt gedrukt
nadat een cijfer, maar voordat een functie is ingegeven,
dan wordt dit cijfer gewist.
UIT-TOETS:
Wanneer op deze toets wordt gedrukt, dan wordt de
calculator uitgeschakeld.
PRINT-TOETS:
Ter bezuining op het papiergebruik, kan worden
aangegeven dat alleen dat wat op het display verschijnt,
moet worden geprint, zelfs in de niet-printenmodus.
Door na het ingeven van een nummer op
zal dit nummer worden afgedrukt met het symbool #.
Door op
aangebracht in een ingegeven nummer, zoals een codo,
datum, etc. Scheidingstekens worden op het display als
punten en streepjes aangegeven, maar worden alleen als
punten afgedrukt.
46
te drukken, zal een scheidingsteken worden
te drukken,
GEHEUGEN + TOETS / PRINTEN AAN / UIT-TOETS:
Druk op
om de “printen” of “niet printen”
gebruiksstand in te schakelen.
Hiermee kan de calculator in de “display/printen-” of in de
“alleen display”-modus worden gezet, afhankelijk welke
modus was ingeschakeld.
“P” op het display: printen ingesehakeld.
“NP” op het display: printen uitgeschakeld.
GEHEUGEN – TOETS / DECIMALEN-SELECTIETOETS:
Druk op
om het aantal decimaalplaatsen in de
uitkomst in te stellen.
“F” op het display:
Het antwoord wordt aangegeven in het zwevende
decimalensysteem.
“3, 2, 1, 0” op het display:
Stelt van te voren het aantal decimalen voor het
antwoord in.
“A” op het display (optelmodus):
Het decimaalteken wordt bij optellen en aftrekken
automatisch links van het tweede cijfer, geteld vanaf
rechts, geplaatst. Bij gebruik van de decimaalteken-
Page 49

invoegingsfunctie kunnen getallen worden opgeteld of
afgetrokken zonder dat het decimaalteken wordt
ingevoerd. Bij gebruik van
functie automatisch opgeheven en wordt de decimaal
correcte uitkomst in het drijvende decimaalsysteem
afgedrukt.
VÓÓR-BELASTING TOETS
INCLUSIEF-BELASTING TOETS / BELASTINGTARIEFINSTELTOETS:
Druk op
(Voor het belastingtarief kunnen maximaal 4 cijfers plus
het decimaalteken worden ingevoerd.)
TOETS VOOR TWEEDE FUNCTIE:
Druk eerst op de
die boven de toetsen staan aangegeven, zoals “DEC”. (Bij
indrukken van de
het display.)
Voorbeeld: Om de instelling voor cijfers achter de
om het belastingtarief in te stellen.
toets voor gebruik van de functies
toets verschijnt “2nd” bovenaan op
komma te veranderen van F naar 2.
,
, of wordt deze
PAPIERDOORVOER-TOETS:
Wanneer op deze toets wordt gedrukt, wordt het papier
een stukje doorgevoerd.
DISPLAY:
F: Zwevende decimale punt TAX+: Inclusief belasting
3, 2, 1, 0:Vooraf ingestelde TAX–: Vóór belasting
A: Optelmodus M: Geheugen (memory)
P: Printen –: Min
NP: Niet printen E: Fout
2nd:
• Voor illustratiedoeleinden zijn alle relevante symbolen op het
decimale punt TAX : Belastingtarief
functies zijn
beschikbaar
bovenstaande display aangegeven. In werkelijkheid zal dit
echter nooit voorkomen.
47
Page 50

VERVANNGEN VAN INKTROL
Als de cijfers niet duidelijk worden afgedrukt maar de inktrol juist
geplaatst is, moet de inktrol worden vervangen.
Inktrol: Type EA-772R
WAARSCHUWING
HET AANBRENGEN VAN INKT OP EEN VERSLETEN
INKTROL OF HET GEBRUIK VAN EEN NIET
VOORGESCHREVEN INKTROL KAN RESULTEREN IN
ERNSTIGE BESCHADIGINGEN AAN DE PRINTER.
1) Schakel de calculator uit.
2) Verwijder het printerdeksel. (Afb. 1)
3) Pak de bovenkant van de inktrol vast en verwijder de inktrol
door deze naar u toe te trekken en dan naar boven. (Afb. 2)
4) Plaats de nieuwe inktrol in de juiste positie. Zorg dat de rol
stevig op z'n plaats zit.
(Afb. 3)
5) Breng het printerdeksel weer aan.
48
Afb. 1 Afb. 2 Afb. 3
Reinigen van het afdrukmechanisme
Indien de afdruk na langdurig gebruik wazig wordt, dient u
het drukwiel als volgt te reinigen:
1) Verwijder het afdekkapje van de printer en de inktrol.
2) Plaats de papierrol en voer het papier door tot dit uit de
voorzijde van het afdrukmechanisme komt.
3) Duw een kleine borstel (zoals een tandenborstel) lichtjes
tegen het drukwiel en reinig het wiel door op
4) Breng de inktrol en het afdekkapje weer aan.
Opmerking: • Draai het afdrukmechanisme niet met de hand
rond, want dit kan beschadiging van de printer
veroorzaken.
te drukken.
Page 51

VERVANGEN VAN PAPIERROL
Plaats geen papierrol waarvan het papier gescheurd is. Het papier kan dan namelijk vastlopen.
Knip altijd eerst de aanloopstrook met een schaar af.
♦ Wanneer een papierrol wordt gebruikt met een maximale buitendiameter van 25 mm:
Rol papier: Type EA-7100P
STAP 1 STAP 2 STAP 3
Papierrand
N.B.: Vervangingsrollen zijn daar verkrijgbaar waar de EL-1611P calculator wordt verkocht.
Papiersnijder
STAP 4
49
Page 52

♦ Wanneer een papierrol wordt gebruikt met een binnendiameter van 12 mm en een maximale buitendiameter van 80 mm:
Papierhouder
STAP 1
STAP 2
STAP 3 STAP 4
Let op: • Plaats nooit het bijgeleverde papier (buitendiameter van
50
STAP 5
STAP 6
25 mm) in de houder.
• Wanneer bij het vervangen van het papier de binnenzijde
van de printer wordt aangeraakt, dan kan de printer
worden beschadigd.
• De calculator beschikt over een “papier vrij”-mechanisme.
Trek bij het verwijderen van het papier, het papier aan de
papiersnijderzijde recht naar buiten.
Page 53

VOEDING
Deze eenheid werkt op batterijen.
De eenheid kan ook via een AC-adapter op een AC-voedingsbron
worden aangesloten.
WERKING OP BATTERIJEN
Wanneer de weergave op het scherm vaag wordt of de printer
voor of tijdens het afdrukken zomaar stopt, moeten de batterijen
vervangen worden.
Batterij: Heavy-duty mangaanbatterij, AA-formaat (of R6)
1. Schakel de calculator uit door op
2. Verwijder het batterijdeksel door dit in de richting van de pijl
op het deksel te schuiven.
3. Plaats de batterijen. Controleer of de “+” en “–” markeringen
op de batterijen overeenkomen met de “+” and “–”
markeringen in de eenheid. Vervang de 4 batterijen altijd
tegelijkertijd.
4. Breng het batterijdeksel aan.
5. Druk na het vervangen op
om de calculator te wissen.
te drukken.
en , in deze volgorde,
××
× 4
××
Wanneer de batterijen goed zijn aangebracht, verschijnt “0.”
op het display. (Indien er niets of een ander symbool op het
display verschijnt, of wanneer de toetsen niet werken,
vervang dan de batterijen en plaats deze opnieuw. Druk op
en , in deze volgorde, en controleer het display
opnieuw.)
N.B.: Doordat uit een lege batterij de vloeistof weglekt, kan het
niet-vervangen van een lege batterij schade toebrengen
aan de calculator. Verwijder een lege batterij onmiddellijk.
Batterijdeksel
51
Page 54

WERKING VIA AC-VOEDING (OPTIONEEL)
AC-adapter: Modet EA-28A
Wanneer een AC-adapter op de calculator is aangesloten, dan
wordt automatisch van de batterijen op de AC-voedingsbron
overgeschakeld.
DE AC-ADAPTER AANSLUITEN
Aansluitpunt voor
AC-adaptor
Controleer of de calculator uitgeschakeld is voordat u de
netadapter aansluit of losmaakt.
Om de netadapter aan te sluiten, volgt u de stappen
Om de netadapter los te maken, voert u de procedure in de
omgekeerde volgorde uit.
52
➀
en ➁.
N.B.: • Wanneer de eenheid niet wordt gebruikt, verwijder de
adapter dan uit de calculator en het stopcontact.
• Gebruik alleen een EA-28 AC-adapter.
LET OP
Wanneer een andere AC-adapter dan de EA-28A wordt
gebruikt, kan er een ongeschikte voeding op uw SHARP
calculator komen te staan en zal deze worden beschadigd.
Page 55

FOUTEN
Er zijn verschillende situaties tijdens welke een fouttoestand zal
optreden. Wanneer dit gebeurt, zal het foutsymbool “E” op het
display verschijnen en zal “- - - - - - -” worden afgedrukt. Ook
zullen alle toetsen, behalve
worden geblokkeerd.
Druk op
De inhoud van het geheugen ten tijde van de fout, is bewaard.
1. Wanneer het hele getai van een antwoord langer is dan 12
tekens en korter dan 24 tekens.
OVERFLOW-BEREKENING
2. Wanneer een cijfer door nul wordt gedeeld
(bijv. 5
3. Wanneer de inhoud van het geheugen meer is dan 12 hele
getallen (bijv.
om het berekenen opnieuw te starten.
bijv. Stel de positie voor het decimaalteken in op “F”.
888888888888
(1,23456781234 × 1.000.000.000.000 = 1.234.567.812.340)
0 ).
345678923456 → 1,23456781234E
999999999999 1 )
, en elektronisch
4. Wanneer het hele getal van een quotiënt in een
percentageberekening uit 25 tekens bestaat
(bijv. 100000000000
• Wanneer het papier vastloopt, de printer stopt en het
foutsymbool “P.E” verschijnt. Schakel de calculator uit.
Scheur het doorgevoerde papier af en trek het resterende
deel van het papier naar voren en uit de printer.
0,00000000001 )
53
Page 56

TECHNISCHE GEGEVENS
Verwerkingscapaciteit: 12 tekens cijfers
Voeding: 6V
Werking: Heavy-duty mangaanbatterij, AA-
Automatische
uitschakelfunctie (APO): Om uw batterijen te sparen, schakelt
54
(gelijkspanning): Heavy-duty
mangaanbatterij, AA-formaat (of R6)
× 4
AC: plaatselijke spanning met ACadapter EA-28A (optioneel)
formaat (of R6)
Ong. 5.000 uren (in niet-afdrukken
stand, weergeven van 555’555 bij
25°C omgevingstemperatuur)
De gebruiksduur hangt af van het
type batterijen en de wijze van
gebruik.
deze functie de eenheid uit circa 12
minuten nadat de laatste keer een
toets is ingedrukt.
Berekeningen: Vier rekenkundige functies,
constanten, kwadraat, reeksen,
macht, percentage, omgekeerde
getallen, toeslag, korting, geheugen,
belasting, etc.
SHARP kan niet aansprakelijk worden gesteld voor
directe of indirecte financiële verliezen of
beschadigingen veroorzaakt door een verkeerd gebruik
en/of defect van dit product en de bijbehorende
randapparatuur, tenzij deze aansprakelijkheid wettelijk
erkend is.
Page 57

PRINTGEDEELTE
Printsnelheid: Heavy-duty mangaanbatterij, AA-
formaat (of R6)
Ong. 2,1 regels/sec. (Bij een
omgevingstemperatuur van 25°C,
wanneer “741 • 9
+” wordt afgedrukt.
De afdruksnelheid varieert afhankelijk
van het aantal rijen dat wordt
afgedrukt, de verschillende
cijfertypen die gebruikt worden en het
laadniveau van de batterijen.)
Printpapier: 57 mm – 58 mm breed diameter van
80 mm (max.)
Bedrijfstemperatuur: 0°C – 40°C
Stroomverbruik: 6V
(gelijkspanning): 1,7 W
Afmetingen: 99 (W) × 191 (D) × 42 (H) mm
Gewicht: Ong. 238 g (met batterijen)
Accessoires: 1 × inktrol (aangebracht), 1 × rol
papier, 4 × batterij (R6) en
gebruiksaanwijzing
TERUGSTELLEN VAN HET APPARAAT (RESET)
Als het apparaat tijdens het gebruik wordt blootgesteld aan
sterke schokken, krachtige elektrische velden of een andere
ongewone toestand, kan het gebeuren dat geen van de toetsen
meer werkt. Macht dit voorkomen, druk dan op de RESET
schakelaar aan de onderkant van het apparaat. De RESET
schakelaar mag alleen worden ingedrukt:
• indien er een abnormale situatie optreedt en geen van de
toetsen meer werkt.
• wanneer u de batterijen gaat aanbrengen of vervangen.
Opmerkingen:
• Bij indrukken van de RESET schakelaar worden het
vastgelegde belastingtarief en eventuele opgeslagen gegevens
gewist.
• Gebruik enkel een balpen om de RESET schakelaar in te
drukken. Gebruik geen voorwerp waarvan de punt kan
afbreken of een voorwerp met een erg spitse punt, zoals een
naald.
• Druk op
controleer of er inderdaad “0.” verschijnt.
nadat u het RESET switch heeft ingedrukt en
55
Page 58

CALCULATION EXAMPLES RECHNUNGSBEISPIELE
1. To insure that each calculation is performed correctly, press
firmly before starting the calculation.
2. Press
appears in print mode and “NP” appears in non-print mode.
Unless otherwise stated, it is assumed the calculator is in
print mode.
3. Example procedures are listed in following manner unless
otherwise specified.
4. The symbols on the display, such as “F”, “P”, and “TAX+”,
etc., are abbreviated here — only “M” is indicated.
Decimal position
(F, 3, 2, 1, 0, A)
56
to select print mode or non-print mode. “P”
Operation Display Print
1. Um sicherzugehen, daß die Berechnung richtig durchgeführt
wird, vor jeder Berechnung
2. Durch Drücken von
Nicht-Drucken umgeschaltet. “P” erscheint in der Betriebsart
Drucken und “NP” erscheint bei Wahl von “Nicht Drucken”.
Wenn nicht anders angegeben, wird davon ausgegangen,
daß der Rechner in der Drucken-Betriebsart ist.
3. Beispiele für das Vorgehen werden folgendermaßen
dargestellt, wenn nicht anders angegeben.
4. Die Symbole auf der Anzeige, z.B. “F”, “P”, “TAX+” usw.
werden hier abgekürzt und nur “M” wird angezeigt.
Ziffernstelle
(F, 3, 2, 1, 0, A)
Bedienung Anzeige Druck
fest drücken.
wird zwischen Drucken und
Page 59

EXEMPLES DE CALCULS
1. Afin de s’assurer que chaque opération est effectuée
correctement, bien appuyer sur
commencer le calcul.
2. Pour sélectionner le mode impression ou le mode nonimpression, appuyer sur
du mode d’impression, “NP” dans le cas du mode de nonimpression. Sauf indication contraire, la calculatrice est
supposée être dans le mode impression.
3. Sauf indication contraire, les méthodes figurent de la
maniète suivante.
4. Les symboles sur l’affichage, tels que “F”, “P”, “TAX+”, etc.
sont abrégés ici – seul “M” est indiqué.
. “P” s’affiche dans le cas
avant de
ESEMPI DI CALCOLO
1. Per assicurare che ogni calcolo venga eseguito in modo
corretto, prima di cominciare a calcolare, premere
con decisione.
2. Premere
senza stampa. “P” appare nel modo di stampa e “NP”
appare nel modo di non-stampa. Se non è specificato niente
in contrario, si assume che la calcolatrice sia usata nel modo
di stampa.
3. Le procedure di esempio sono elencate nel modo seguente,
a meno che diversamente specificato.
4. I simboli sul display tipo “F”, “P” e “TAX+”, etc., sono
abbreviati qui solo “M” è indicato.
per scegliere il modo con stampa o
Place de la
virgule Opération Affichage Impression
(F, 3, 2, 1, 0, A)
Posizione
decimal Operazione Display Stampa
(F, 3, 2, 1, 0, A)
57
Page 60

REKENVOORBEELDEN
1. Om er zeker van te gaan dat een berekening correct zal
worden uitgevoerd, dient
ingedrukt alvorens met de berekening wordt begonnen.
2. Druk op
selecteren. In de printmodus verschijnt “P” en in de niet
printen-modus verschijnt “NP” op het display. Tenzij anders
aangegeven, wordt aangenomen dat de calculator in de
printmodus staat.
3. De annwijzingen in de voorbeelden zijn als volgt
gerangschikt, tenzij anders aangegeven.
4. De symbolen op het display, zoals “F”, “P” en “TAX+” enz.,
zijn hier afgekort – alleen “M” is aangegeven.
Positie van
decimale punt Bediening Display Afdruk
om de print- of de niet printen-modus te
goed te worden
(F, 3, 2, 1, 0, A)
58
NON-ADD PRINT / NICHTRECHNEND-DRUCK /
IMPRESSION DE NON-ADDITION / STAMPA DATI SENZA
ADDIZIONAMENTO / NIET-TOEVOEGEN-PRINTMODUS
No. 1 2 3
6. 20. 2013
123
F
6
20 2013 6.20-2013 #6.20.2013
ADDITION AND SUBTRACTION WITH ADD MODE /
ADDITION UND SUBTRAKTION MIT ADDITIONSHILFE /
ADDITION ET SOUSTRACTION AVEC MODE D’ADDITION /
ADDIZIONI E SOTTRAZIONI CON VIRGOLA AUTOMATICA /
OPTELLEN EN AFTREKKEN MET DE DECIMAALINVOEGINGSFUNCTIE
2.50 + 4.50 – 3.00 =
250 450
A
300 4.00 4.00 ∗
123. #123
.............
.......
Page 61

Note: was not used in the entries.
Hinweis:
Note: La
Nota:
Opmerking:
MIXED CALCULATIONS / GEMISCHTE RECHNUNG /
CALCUL COMPLEXE / CALCOLI MISTI /
GEMENGDE BEREKENINGEN
12 × 45
÷ 4 =
0 12 45 4 135. 135
wurde nicht für die Eingabe verwendet.
n’a pas été utilisée dans les entrées.
non è stato usato per l’impostazione.
werd niet gebruikt tijdens het invoeren van de
getallen.
POWER / POTENZBERECHNUNGEN / PUISSANCE /
POTENZE / MACHTSVERHEFFEN
2
2
= 2 × 2 =
23 = 2 × 2 × 2 =
0
.
∗
➀
➁
(Non-print mode /
Nicht-Drucken-Betriebsart /
Mode non-impression /
Modo senza stampa /
Niet printen-modus)
2 4.
8.
➀
➁
.
8
➁
59
Page 62

CONSTANT / KONSTANTEN / CONSTANTE / CONSTANTI /
CONSTANTEN
295 × 8 =
295 × 6 =
8 2’360. 2’360
295
18 ÷ 2 =
12
60
0
÷ 2 =
0
6 1’770. 1’770
18 2 9. 9
12 6. 6
ADD-ON AND DISCOUNT / AUFSCHLAG UND ABSCHLAG /
MAJORATION ET RABAIS / MAGGIORAZIONE E SCONTO /
OPSLAG EN KORTING
A. 15% add-on to 1200. / Ein Aufschlag von 15% zu 1200. /
Majoration de 15% de 1200. / Una maggiorazione del 15% su
.
1200. / Een opslag van 15% op 1200.
∗
.
∗
1200 15 1’380.00 1’380.00∗
2 (1200 15 180.00 180.00∗
.
∗
B. 10% discount on 1200. / Abschlag von 10% von 1200. /
.
∗
Rabais de 10% sur 1200. / Uno sconto del 10% su 1200. /
Een korting van 10% op 1200.
1200 10 1’080.00 1’080.00∗
2 (1200 10 120.00 120.00∗
) 1’380.00 1’380.00∗
) 1’080.00 1’080.00∗
Page 63

RECIPROCAL / REZIPROKRECHNUNGEN / INVERSES /
RECIPROCI / RECIPROQUE BEREKENINGEN
1
=
7
F7 0.14285714285 0.14285714285∗
PERCENT / PROZENT / POURCENTAGE / PERCENTUALI /
PROCENTBEREKENINGEN
650 × 15% =
2 650 15 97.50 97.50∗
123
÷ 1368 = (%)
2 123 1368 8.99 8.99∗
MEMORY / SPEICHERRECHNUNG / MÉMOIRE / MEMORIA /
GEHEUGENBEREKENINGEN
+) 125
–) 72
46
× 78 = ①
÷ 5= ②
× 8= ③
Total = ④
• Press
starting a memory calculation.
• Zum Löschen aller früheren Eingaben in
den Speicher drückt man
• Effacer le contenu de la mémoire (
avant de procéder à un calcul avec
mémoire.
• Prima di eseguire il calcolo con memoria,
premere
• Druk op
alvorens met een berekening te beginnen
waarbij het geheugen zal worden gobruikt.
to clear the memory before
.
per azzerare quest’ultima.
om het geheugen te wissen
)
61
Page 64

0
46 78 3’588.
125
5 25.
72
8 576.
3’037.
M
M
M
M
3’588
576
3’037
25
.
.
.
.
TAX RATE CALCULATIONS / STEUER-BERECHNUNGEN /
CALCULS DE TAXE /
+
M ①
CALCOLI DEL TASSO DI TASSAZIONE /
+
M ②
BEREKENING VAN BELASTINGTARIEVEN
–M ③
◊
M ④
EXAMPLE 1: Set a 5% tax rate.
Culculate the total amount for adding a 5% tax
to $800.
BEISPIEL 1: Die Steuerrate wird auf 5% festgelegt.
Berechne den Gesamtbetrag bei einen
Aufschlag von 5% Steuern auf $800.
EXEMPLE 1: Choisir une taxe de 5%.
Calculer le montant d’un article à $800 avec
cette taxe.
ESEMPIO 1: Impostare un tasso di tassazione del 5%.
Calcolare l’ammontare dell’aggiunta di una
tassa del 5% a $800.
VOORBEELD 1: Stel een 5% belastingtarief in.
Bereken het totaalbedrag bij 5% belasting op
$800.
62
Page 65

F5 5.
- - - - - - - - - - - - - - - - - - - - - - - - - - - - - - - - - - - - - - - - - - - - 800 800
EXAMPLE 2: Perform two calculations using $840 and $525,
BEISPIEL 2: Zwei Berechnung mit $840 und $525 ausführen,
EXEMPLE 2: Réalise deux calculs en utilisant $840 et $525, les
both of which already include tax. Calculate the
tax on the total and the total without tax. (tax
rate: 5%)
die beide jeweils den Steueranteil enthalten.
Berechne die Steuern für die Gesamtsumme und
die Gesamtsumme ohne Steuern. (Steuerrate ist
5%)
deux incluant déjà la taxe. Calcule la taxe sur le
total et le total sans la taxe. (taux de la taxe: 5%)
5.000
840. 840
...5.
000%
...40.
ESEMPIO 2: Eseguire due calcoli usando i valori 840 $ e 525 $,
VOORBEELD 2: Voer twee berekeningen uit met $840 en $525;
.
.
F 840 840. 840
525 1’365. 525
1’365
entrambi con tasse incluse. Calcolare le tasse che
sono incluse nel totale e il totale senza tasse.
(Aliquota d’imposta: 5%)
beide bedragen zijn inclusief belasting. Bereken
de belasting op het totaal en het totaal zonder
belasting. (Belastingtarief: 5%)
1’300. 1’300
1’365
...65.
.
+
.
=
.
∗
.
–
.
63
Page 66

64
Page 67

Page 68

PRINTED IN CHINA / GEDRUCKT IN CHINA / IMPRIMÉ EN CHINE / STAMPATO IN CINA / GEDRUKT IN CHINA
12GT(TINSZA005EHZZ)
 Loading...