

Page 1

ELECTRONIC PRINTING CALCULATOR
DRUCKENDER TISCHRECHNER
CALCULATRICE IMPRIMANTE ÉLECTRONIQUE
CALCULADORA IMPRESORA ELECTRÓNICA
CALCOLATRICE ELETTRONICA STAMPANTE
ELEKTRONISK SKRIVANDE OCH VISANDE RÄKNARE
ELEKTRONISCHE REKENMACHINE MET AFDRUK
ELEKTRONISESTI TULOSTAVA LASKIN
EL-1611P
ENGLISH .................................................... Page 1
CALCULATION EXAMPLES ..................... Page 89
DEUTSCH .................................................. Seite 12
RECHNUNGSBEISPIELE ......................... Seite 89
FRANÇAIS ................................................. Page 23
EXEMPLES DE CALCULS ........................ Page 90
ESPAÑOL ................................................... Página 34
EJEMPLOS DE CALCULOS ..................... Página 90
ITALIANO ................................................... Pagina 45
ESEMPI DI CALCOLO ............................... Pagina 91
SVENSKA ................................................... Sida 56
GRUNDLÄGGANDE RÄKNEEXEMPEL ... Sida 91
NEDERLANDS ........................................... Pagina 67
REKENVOORBEELDEN ........................... Pagina 92
SUOMI ........................................................ Sivu 78
LASKENTAESIMERKKEJÄ ....................... Sivu 92
OPERATION MANUAL
BEDIENUNGSANLEITUNG
MODE D’EMPLOI
MANUAL DE MANEJO
MANUALE DI ISTRUZIONI
BRUKSANVISNING
GEBRUIKSAANWIJZING
KÄYTTÖOHJE
Page 2

This equipment complies with the requirements of Directive 89/336/EEC as amended by 93/68/EEC.
Dieses Gerät entspricht den Anforderungen der EG-Richtlinie 89/336/EWG mit Änderung 93/68/EWG.
Ce matériel répond aux exigences contenues dans la directive 89/336/CEE modifiée par la directive
93/68/CEE.
Dit apparaat voldoet aan de eisen van de richtlijn 89/336/EEG, gewijzigd door 93/68/EEG.
Dette udstyr overholder kravene i direktiv nr. 89/336/EEC med tillæg nr. 93/68/EEC.
Quest’ apparecchio è conforme ai requisiti della direttiva 89/336/EEC come emendata dalla direttiva
93/68/EEC.
∏ ВБО·Щ¿ЫЩ·ЫЛ ·˘Щ‹ ·УЩ·ФОЪ›УВЩ·И ЫЩИ˜ ··ИЩ‹ЫВИ˜ ЩˆУ Ф‰ЛБИТУ ЩЛ˜ ∂˘Ъˆ·˚О‹˜ ∂УˆЫЛ˜
89/336/∂√∫, fiˆ˜ Ф О·УФУИЫМfi˜ ·˘Щfi˜ Ы˘МПЛЪТıЛОВ ·fi ЩЛУ Ф‰ЛБ›· 93/68/∂√K.
Este equipamento obedece às exigências da directiva 89/336/CEE na sua versão corrigida pela directiva
93/68/CEE.
Este aparato satisface las exigencias de la Directiva 89/336/CEE modificada por medio de la 93/68/CEE.
Denna utrustning uppfyller kraven enligt riktlinjen 89/336/EEC så som kompletteras av 93/68/EEC.
Dette produktet oppfyller betingelsene i direktivet 89/336/EEC i endringen 93/68/EEC.
Tämä laite täyttää direktiivin 89/336/EEC vaatimukset, jota on muutettu direktiivillä 93/68/EEC.
Page 3

ENGLISH
OPERATIONAL NOTES CONTENTS
Thank you for your purchase of the SHARP electronic printing
calculator, model EL-1611P.
To insure trouble-free operation of your SHARP calculator, we
recommend the following:
1. The calculator should be kept in areas free from extreme
temperature changes, moisture, and dust.
2. A soft, dry cloth should be used to clean the calculator. Do
not use solvents or a wet cloth.
3. Since this product is not waterproof, do not use it or store it
where fluids, for example water, can splash onto it.
Raindrops, water spray, juice, coffee, steam, perspiration,
etc. will also cause malfunction.
4. If service should be required, use only a SHARP servicing
dealer, a SHARP approved service facility or SHARP repair
service.
5. If you pull out the power cord to cut electricity completely or
replace the batteries, the presently stored tax rate will be
cleared.
OPERATING CONTROLS ....................................................... 2
Page
INK ROLLER REPLACEMENT ................................................ 3
PAPER ROLL REPLACEMENT ............................................... 5
POWER SUPPLY ..................................................................... 7
ERRORS .................................................................................. 9
SPECIFICATIONS.................................................................... 10
RESETTING THE UNIT ........................................................... 11
CALCULATION EXAMPLES .................................................... 89
TAX RATE CALCULATIONS .................................................... 98
1
Page 4
OPERATING CONTROLS
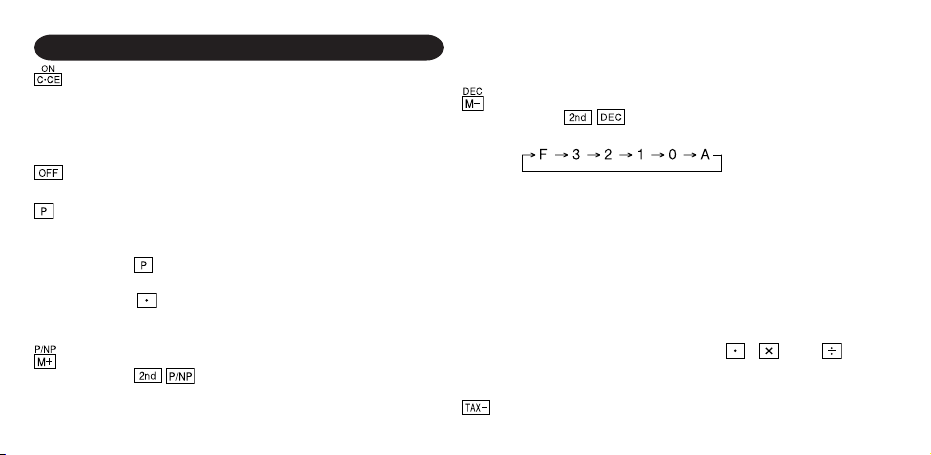
POWER ON KEY / CLEAR / CLEAR ENTRY KEY:
Clear – This key also serves as a clear key for the
calculation register and resets an error condition.
Clear entry – When pressed after a number and before a
function, clear the number.
POWER OFF KEY:
When this key is pressed, the power is turned off.
PRINT KEY:
To save paper you can only print what is displayed, even
in non-print mode.
Pressing
after the entry of a number will print the entry
with the symbol “#” even in non-print mode.
Pressing will insert a separator into a number entry
such as a code, date, etc. Separators are displayed as a
period and dashes but printed as periods.
MEMORY + KEY / PRINT ON / OFF KEY:
Pressing selects print mode or non-print mode.
Cause the calculator to operate in a display / print or
display only mode, depending upon the calculator’s
2
present state.
“P” on the display: Print mode.
“NP” on the display: Non-print mode.
MEMORY – KEY / DECIMAL SELECTION KEY:
Pressing sets the number of decimal places in
the result.
“F” on the display:
The answer is displayed in the floating decimal system.
“3, 2, 1, 0” on the display:
Presets the number of decimal places in the answer.
“A” on the display (Add mode):
The decimal point in addition and subtraction entries is
automatically positioned to the 2nd digit from the lowest
digit of entry number. Use of the add mode permits
addition and subtraction of numbers without entry of
the decimal point. Use of
, and will
automatically override the add mode and decimally
correct answers will be printed.
PRE-TAX KEY
Page 5
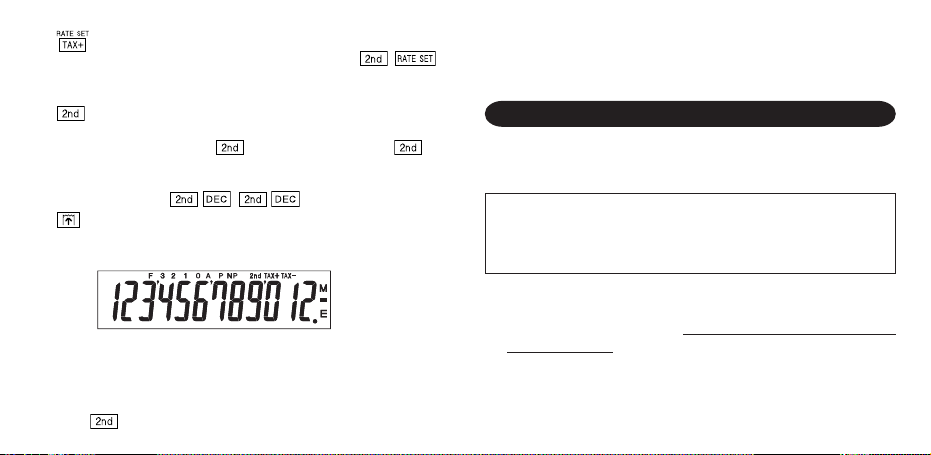
TAX-INCLUDING KEY / TAX RATE SET KEY:
You can set the tax rate by pressing
maximum of 4 digits excluding the decimal point can be
stored as the tax rate.)
2nd FUNCTION KEY:
To use the functions shown above the keys, such as
“DEC”, press the
pressed, “2nd” will appear at the top of the display.)
Example: To change decimal place setting from F to 2
PAPER FEED KEY:
When pressed, the paper tape advances.
DISPLAY:
F: Floating decimal mode TAX+: Incl. tax
3, 2, 1, 0: Preset decimal mode TAX–: Pre-tax
A: Add mode TAX : Tax rate
P: Print mode M: Memory
NP: Non-print mode –: Minus
2nd:
functions are available E: Error
key first. (When the key is
,
. (A
• For illustration purposes, all the relevant symbols are visible
in the display above. However, in actual use, this would never
happen.
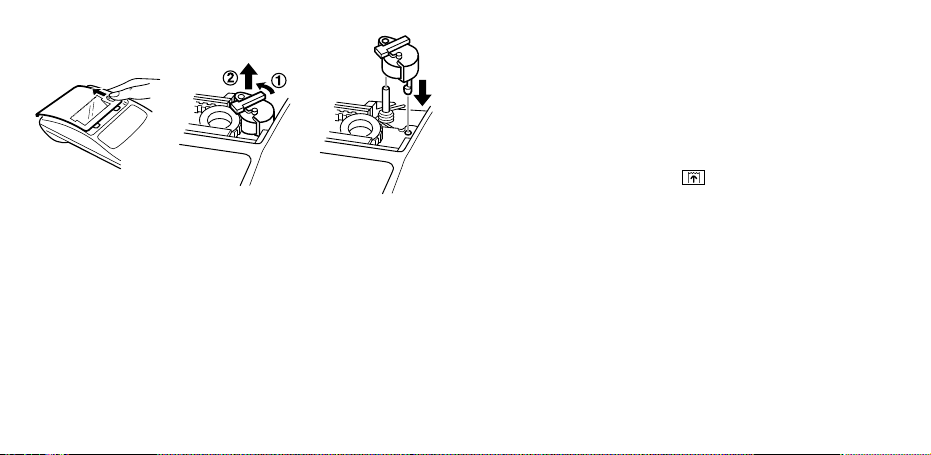
INK ROLLER REPLACEMENT
If printing is blurry even when the ink roller is in the proper
position, replace the roller.
Ink roller: Type EA-732R
WARNING
APPLYING INK TO WORN INK ROLLER OR USE OF
UNAPPROVED INK ROLLER MAY CAUSE SERIOUS
DAMAGE TO PRINTER.
1) Turn the power off.
2) Remove the printer cover. (Fig. 1)
3) Remove the ink roller by turning it counterclockwise and
pulling it upward. (Fig. 2)
4) Install the new ink roller and press it in the correct position.
Make sure that the ink roller is securely in place. (Fig. 3)
5) Put back the printer cover.
3
Page 6
Cleaning the printing mechanism
If the print becomes dull after long time usage, clean the
printing wheel according to the following procedures:
1) Remove the printer cover and the ink roller.
2) Install the paper roll and feed it until it comes out of the front
3) Put a small brush (like a tooth brush) lightly to the printing
4) Put back the ink roller and the printer cover.
Fig. 1 Fig. 2 Fig. 3
4
Notes: • Never attempt to turn the printing belt or restrict its
of the printing mechanism.
wheel and clean it by pressing .
movement while printing. This may cause incorrect
printing.
• Do not rotate the printing mechanism manually, this
may damage the printer.
Page 7
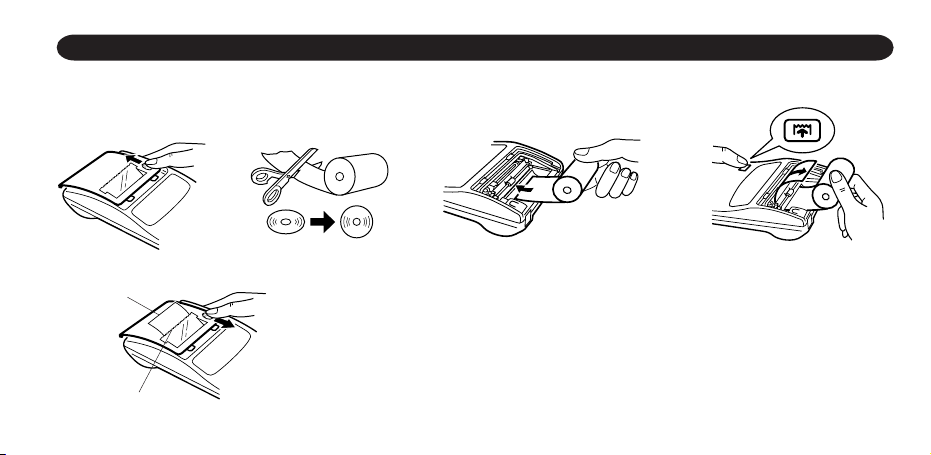
PAPER ROLL REPLACEMENT
Never insert paper roll if torn. Doing so will cause paper to jam. Always cut leading edge with scissors first.
♦ When using the paper roll that is less than or equals to 25 mm (31/32") in outside diameter:
Paper roll : Type EA-7100P
STEP 1 STEP 2 STEP 3
leading edge
Note: Paper tape replacement rolls are available where the EL-1611P calculator is sold.
Paper
STEP 4
cutter
5
Page 8
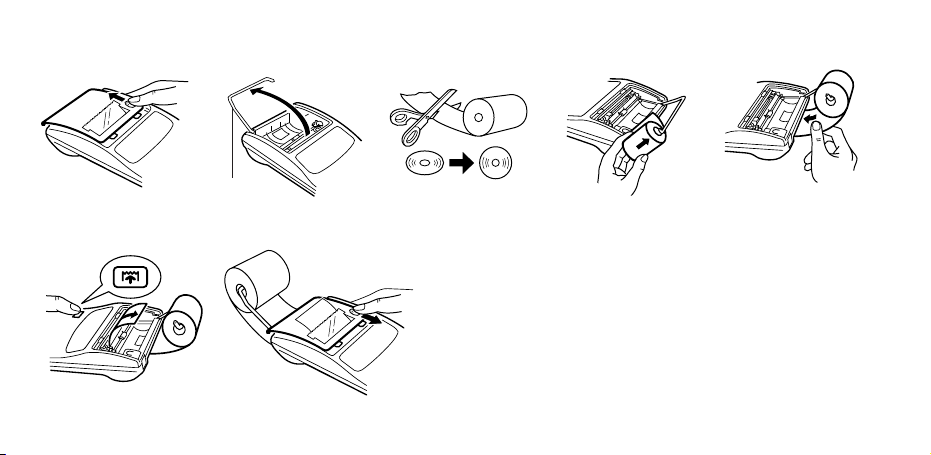
♦ When using the paper roll that is 12mm (15/32") in inside diameter and up to 80mm (3-5/32") in outside diameter:
Paper holder
STEP 1
STEP 2
STEP 3 STEP 4
Caution: • Never use the supplied paper (25 mm (31/32") in
STEP 5 STEP 6
6
outside diameter) in the holder.
• When replacing the paper, touching the inside of the
printer may damage it.
• The calculator has a free-paper mechanism. When
drawing out the paper tape, pull it straight forward on
the paper cutter side.
Page 9

POWER SUPPLY
This calculator operates on dry batteries.
The calculator can also be operated on AC power through use
of an AC adaptor.
BATTERY OPERATION
If the display becomes dim or the printer stops before or during
printing, the batteries should be replaced.
Battery: Heavy-duty manganese battery, size AA (or R6) × 4
1. Turn off power by pressing
2. Remove the battery cover by sliding it in the direction of the
arrow on the cover.
3. Replace the batteries. Be sure that the “+” and “–” marks on
the battery correspond to the “+” and “–” marks in the
calculator. Always put back the 4 batteries at the same time.
4. Put back the battery cover.
.
5. After the replacement, press and in this order to
clear the calculator.
When the batteries are correctly installed “0.” will be
displayed. (If the display is blank, displays any other symbol
or the keys become inoperative, remove the batteries and
install them again. Press and in this order and
check the display again.)
Note: Due to solvent leakage of the battery, keeping a used
battery in the battery compartment may result in damage
to the calculator. Remove a used battery promptly.
Battery cover
7
Page 10

AC POWER OPERATION (OPTION)
AC adaptor: Model EA-28A
When the AC adaptor is connected to the calculator, the power
source is automatically switched over from dry batteries to AC
power source.
HOW TO CONNECT THE AC ADAPTOR
Notes: • When the calculator is not in use, be sure to remove
CAUTION
➀
AC adaptor
connecting
terminal
Make sure that you turn the calculator’s power off when
connecting or disconnecting the AC adaptor.
To connect the AC adaptor, follow steps
To disconnect the AC adaptor, simply reverse the procedure.
8
➁
and ➁.
➀
the adaptor from the calculator and the wall outlet.
• Never use any other AC adaptor except EA-28A.
Use of other than the AC adaptor EA-28A may apply
improper voltage to your SHARP calculator and will cause
damage.
Page 11

ERRORS
There are several situations which will cause an overflow or an
error condition.
When this occurs, an error symbol “E” will be displayed and
“- - - - - - -” will be printed, and all keys will electronically lock
except , and .
must be depressed to restart the calculation.
The contents of the memory at the time of the error are retained.
1. When the integer portion of an answer exceeds 12 digits and
does not exceed 24 digits.
OVERFLOW CALCULATION
Ex. Select decimal position “F”.
888888888888 345678923456 → 1.23456781234E
(1.23456781234 × 1,000,000,000,000 = 1,234,567,812,340)
2. When any number is divided by zero (Ex. 5 0 ).
3. When the contents of the memory exceed 12 integers.
(Ex. 999999999999 1 )
4. When the integer portion of a quotient in percentage
calculation is 25 digits.
(Ex. 100000000000 0.00000000001 )
• When the paper jams, the printer stops and the error symbol
“P.E” appears. Turn off the calculator. Tear off the paper tape
and then pull the remaining part of the paper forward and
completely out of the printer.
9
Page 12

SPECIFICATIONS
Operating capacity: 12 digits
Power source: 6V (DC): Heavy-duty manganese
battery, size AA (or R6) × 4
AC: Local voltage with AC adaptor EA28A (Option)
Operation: Heavy-duty manganese battery, size
AA (or R6)
Approx. 5,000 hours (in non-print
mode, displaying 555’555 at 25°C
(77°F) ambient temperature)
Operating time depends on the type of
battery and type of use.
10
Automatic Power-Off
Function (APO): To save your batteries, this function
Calculations: Four arithmetic, constant, square,
automatically turns off the machine
approximately 12 minutes after the last
key operation.
chain, power, percentage, reciprocal,
add-on, discount, memory, tax, etc.
Page 13

PRINTING SECTION
Printing speed: Approx. 1.4 lines/sec. (Printing speed
changes slightly depending upon the
printing digits per line.)
Printing paper: 57 mm (2-1/4") – 58 mm (2-9/32") wide
80 mm (3-5/32") in diameter (max.)
Operating temperature: 0°C – 40°C (32°F – 104°F)
Power consumption: 6V
(DC): 1.7 W
Dimensions: 96 (W) × 191 (D) × 40 (H) mm
3-25/32" (W) × 7-17/32" (D) × 1-9/16" (H)
Weight: Approx. 315 g (0.69 lb.) (with batteries)
Accessories: Ink roller × 1 (installed), Paper roll × 1,
×
Dry battery (R6)
4 and Operation
manual
RESETTING THE UNIT
Strong impacts, exposure to electrical fields, or other unusual
conditions may render the unit inoperative, and pressing the
keys will have no effect. If this occurs, you will have to press the
RESET switch on the bottom of the unit. The RESET switch
should be pressed only when:
• an abnormal event occurs and all keys are disabled.
• you install or replace the batteries.
Notes:
• Pressing the RESET switch will clear the stored tax rate and
other data stored in the memory.
• Use only a ballpoint pen to press the RESET switch. Do not
use anything breakable or anything with a sharp tip, such as
a needle.
• After pressing the RESET switch, press
that “0.” is indicated.
to make sure
11
Page 14

CALCULATION EXAMPLES RECHNUNGSBEISPIELE
1. To insure that each calculation is performed correctly, press
firmly before starting the calculation.
2. Press to select print mode or non-print mode. “P”
appears in print mode and “NP” appears in non-print mode.
Unless otherwise stated, it is assumed the calculator is in
print mode.
3. Example procedures are listed in following manner unless
otherwise specified.
4. The symbols on the display, such as “F”, “P”, and “TAX+”,
etc., are abbreviated here — only “M” is indicated.
Decimal position
(F, 3, 2, 1, 0, A)
Operation Display Print
1. Um sicherzugehen, daß die Berechnung richtig durchgeführt
wird, vor jeder Berechnung
2. Durch Drücken von wird zwischen Drucken und
Nicht-Drucken umgeschaltet. “P” erscheint in der Betriebsart
Drucken und “NP” erscheint bei Wahl von “Nicht Drucken”.
Wenn nicht anders angegeben, wird davon ausgegangen,
daß der Rechner in der Drucken-Betriebsart ist.
3. Beispiele für das Vorgehen werden folgendermaßen
dargestellt, wenn nicht anders angegeben.
4. Die Symbole auf der Anzeige, z.B. “F”, “P”, “TAX+” usw.
werden hier abgekürzt und nur “M” wird angezeigt.
Ziffernstelle
(F, 3, 2, 1, 0, A)
Bedienung Anzeige Druck
fest drücken.
89
Page 15

NON-ADD PRINT / NICHTRECHNEND-DRUCK /
IMPRESSION DE NON-ADDITION / IMPRESIÓN DE NO SUMA /
STAMPA DATI SENZA ADDIZIONAMENTO /
UTSKRIFT I NON-ADD FUNKTION /
NIET-TOEVOEGEN-PRINTMODUS /
TULOSTUS ILMAN LISÄYSTÄ
No. 1 2 3
6. 20. 2001
123
F
ADDITION AND SUBTRACTION WITH ADD MODE /
ADDITION UND SUBTRAKTION MIT ADDITIONSHILFE /
ADDITION ET SOUSTRACTION AVEC MODE D’ADDITION /
SUMA Y RESTA CON MODO DE SUMA /
ADDIZIONI E SOTTRAZIONI CON VIRGOLA AUTOMATICA /
ADDITION OCH SUBTRAKTION I ADD-LÄGE /
OPTELLEN EN AFTREKKEN MET DE DECIMAALINVOEGINGSFUNCTIE /
YHTEEN- JA VÄHENNYSLASKU LISÄYSMUODOLLA
20 2001 6.20 -2001 6.20.2001#
6
123. 123.#
2.50 + 4.50 – 3.00 =
250 450
A
300 4.00 4.00 ∗
Note: was not used in the entries.
Hinweis: wurde nicht für die Eingabe verwendet.
Note: La n’a pas été utilisée dans les entrées.
Nota: La no ha sido usada en los registros.
Nota: non è stato usato per l’impostazione.
Anm.: Tangenten användes ej vid inslagningen av
Opmerking: werd niet gebruikt tijdens het invoeren van de
Huomautus: ei ole käytetty näppäiltäessä.
talen.
getallen.
93
Page 16

MIXED CALCULATIONS / GEMISCHTE RECHNUNG /
CALCUL COMPLEXE / CALCULOS MIXTOS / CALCOLI MISTI /
BLANDAD RÄKNING / GEMENGDE BEREKENINGEN /
SEKALAISIA LASKUTOIMITUKSIA
12 × 45 ÷ 4 =
0 12 45 4 135. 135
POWER / POTENZBERECHNUNGEN / PUISSANCE /
POTENCIA CALCOLI DELLE / POTENZE / POTENSRÄKNING /
MACHTSVERHEFFEN / POTENSSI
2
2
= 2 × 2 =
23 = 2 × 2 × 2 =
94
➀
➁
(Non-print mode /
Nicht-Drucken-Betriebsart /
Mode non-impression /
Modalidad de no-impresión /
Modo senza stampa /
Ingen utskrift /
.
∗
CONSTANT / KONSTANTEN / CONSTANTE / CONSTANTE /
CONSTANTI / KONSTANTER / CONSTANTEN / VAKIO
295 × 8 =
295 × 6 =
18 ÷ 2 =
12 ÷ 2 =
Niet printen-modus /
Muoto, jolla tulostusta ei
tapahdu)
0
2 4.
8.
295
0
0
8 2’360. 2360
6
2 9. 9
18
12 6. 6
➀
➁
1’770. 1770
.
8
➁
.
∗
.
∗
.
∗
.
∗
Page 17

ADD-ON AND DISCOUNT / AUFSCHLAG UND ABSCHLAG /
MAJORATION ET RABAIS / RECARGOS Y DESCUENTOS /
MAGGIORAZIONE E SCONTO / PÅLÄGG OCH RABATT /
OPSLAG EN KORTING / LISÄYS JA VÄHENNYS
A. 15% add-on to 1200. / Ein Aufschlag von 15% zu 1200. /
Majoration de 15% de 1200. / Un 15% de recargo sobre 1200. /
Una maggiorazione del 15% su 1200. / 15% pålägg på 1200. /
Een opslag van 15% op 1200. / 15% lisätään 1200:aan
B. 10% discount on 1200. / Abschlag von 10% von 1200. /
Rabais de 10% sur 1200. / Un 10% de descuento sobre 1200. /
Uno sconto del 10% su 1200. / 10% rabatt på 1200. /
Een korting van 10% op 1200. / 10 % vähennys 1200:sta
1200 10 1’080.00 1080.00∗
2 (1200
10 120.00 120.00∗
) 1’080.00 1080.00∗
1200 15 1’380.00 1380.00∗
2 (1200
15 180.00 180.00∗
) 1’380.00 1380.00∗
RECIPROCAL / REZIPROKRECHNUNGEN / INVERSES /
RECIPROCOS / RECIPROCI / RÄKNING /
RECIPROQUE BEREKENINGEN / KÄÄNTEISARVO
1
=
7
F7 0.14285714285 0.14285714285∗
95
Page 18

PERCENT / PROZENT / POURCENTAGE / PORCENTAJES /
PERCENTUALI / PROCENT / PROCENTBEREKENINGEN /
PROSENTTI
650 × 15% =
2 650 15 97.50 97.50∗
123 ÷ 1368 = (%)
2 123 1368 8.99 8.99∗
96
MEMORY / SPEICHERRECHNUNG / MÉMOIRE / MEMORIA /
MEMORIA / MINNE / GEHEUGENBEREKENINGEN / MUISTI
46 × 78 = ①
+) 125 ÷ 5= ②
–) 72 × 8= ③
Total = ④
• Press
starting a memory calculation.
• Zum Löschen aller früheren Eingaben in
den Speicher drückt man .
• Effacer le contenu de la mémoire ( )
avant de procéder à un calcul avec
mémoire.
• Apretar para cancelar la memoria antes
de empezar a efectuar un cálculo con
memoria.
• Prima di eseguire il calcolo con memoria,
premere
• Tryck ned för att rensa minnet innan
räkning med minnet påbörjas.
• Druk op om het geheugen te wissen
alvorens met een berekening te beginnen
waarbij het geheugen zal worden gobruikt.
• Tyhjennä muisti painamalla näppäintä
ennen muistilaskelman aloittamista.
to clear the memory before
per azzerare quest’ultima.
Page 19

0
46 78 3’588.
5 25.
125
8 576.
72
3’037.
M
M
M
M
3588
576
3037
M
.
①
M
.
25
②
M
.
③
M
.
④
◊
97
Page 20

TAX RATE CALCULATIONS / STEUER-BERECHNUNGEN /
ESEMPIO 1: Impostare un tasso di tassazione del 5%.
CALCULS DE TAXE /
CALCULOS CON EL TIPO DE IMPUESTO /
CALCOLI DEL TASSO DI TASSAZIONE /
EXEMPEL 1: Ställ in en skatfesats på 5%.
RÄKING MED SKATTESATSER /
BEREKENING VAN BELASTINGTARIEVEN /
VEROPROSENTTILASKELMAT
EXAMPLE 1: Set a 5% tax rate.
Culculate the total amount for adding a 5% tax
to $800.
BEISPIEL 1: Die Steuerrate wird auf 5% festgelegt.
Berechne den Gesamtbetrag bei einen
Aufschlag von 5% Steuern auf $800.
EXEMPLE 1: Choisir une taxe de 5%.
Calculer le montant d’un article à $800 avec
cette taxe.
EJEMPLO 1: Fijar el tipo de impuesto al 5%.
Calcular la cantidad total resultante de añadir
el impuesto del 5% a $800.
98
VOORBEELD 1: Stel een 5% belastingtarief in.
ESIMERKKI 1: Säädä 5% veroprosentti.
Calcolare l’ammontare dell’aggiunta di una
tassa del 5% a $800.
Räkna ut slutsumman när 5% skatt läggs till
$800.
Bereken het totaalbedrag bij 5% belasting op
$800.
Lasketaan vero 800$:sta ja veron sisältävä
kokonaissumma.
F5 5.
- - - - - - - - - - - - - - - - - - - - - - - - - - - - - - - - - - - - - - - - - - - - 800
5.000
840. 840
...5.
000%
800
...40.
.
.
Page 21

EXAMPLE 2: Perform two calculations using $840 and $525,
both of which already include tax. Calculate the
tax on the total and the total without tax. (tax
rate: 5%)
BEISPIEL 2: Zwei Berechnung mit $840 und $525 ausführen,
die beide jeweils den Steueranteil enthalten.
Berechne die Steuern für die Gesamtsumme und
die Gesamtsumme ohne Steuern. (Steuerrate ist
5%)
EXEMPLE 2: Réalise deux calculs en utilisant $840 et $525, les
deux incluant déjà la taxe. Calcule la taxe sur le
total et le total sans la taxe. (taux de la taxe: 5%)
EJEMPLO 2: Realice dos cálculos utilizando $840 y $525, los
cuales ya incluyen impuesto. Calcule et impuesto
sobre el total y el total sin impuesto. (Tasa de
impuestos: 5%)
ESEMPIO 2: Eseguire due calcoli usando i valori 840 $ e 525 $,
entrambi con tasse incluse. Calcolare le tasse che
sono incluse nel totale e il totale senza tasse.
(Aliquota d’imposta: 5%)
EXEMPEL 2: Utför två beräkningar med $840 och $525, vilka
VOORBEELD 2: Voer twee berekeningen uit met $840 en $525;
ESIMERKKI 2: Suoritetaan kaksi laskutoimitusta käyttämällä
F 840 840. 840
525
båda redan inkluderar skatt. Beräkna skatten på
summan samt summan utan skatt. (skattesats: 5%)
beide bedragen zijn inclusief belasting. Bereken
de belasting op het totaal en het totaal zonder
belasting. (Belastingtarief: 5%)
lukuja 840$ ja 525$, joista kummassakin on jo vero.
Laske vero kokonaissummasta ja ilman veroa
oleva arvo (veroprosentti 5 %).
.
+
1365
...65.
.
=
.
∗
–
.
1’365. 525
1’300. 1300
99
Page 22

MEMO / NOTIZEN / BLOC-NOTES / NOTAS / PROMEMORIA / ANTECKNINGAR / MEMO / MUISTIO
100
Page 23

Page 24

SHARP CORPORATION
PRINTED IN CHINA / IMPRIMÉ EN CHINE / IMPRESO EN CHINA
02AT(TINSZ0519EHZZ)
Page 25

documentation manual, user maintenance, brochure, user reference, pdf manual
This file has been downloaded from:
User Manual and User Guide for many equipments like mobile phones, photo cameras, monther board, monitors, software, tv, dvd, and othes..
Manual users, user manuals, user guide manual, owners manual, instruction manual, manual owner, manual owner's, manual guide,
manual operation, operating manual, user's manual, operating instructions, manual operators, manual operator, manual product,
 Loading...