

Page 1

ELECTRONIC PRINTING CALCULATOR
CALCULADORA IMPRESORA ELECTRÓNICA
SZALAGOS ASZTALI KALKULÁTOR
EL-1611E
ENGLISH .................................................................... Page 1
CALCULATION EXAMPLES ...................................... Page 34
ESPAÑOL ................................................................... Página 12
EJEMPLOS DE CÁLCULOS ...................................... Página 34
MAGYAR .................................................................... Oldal 23
PÉLDASZÁMÍTÁSOK ................................................ Oldal 35
OPERATION MANUAL
MANUAL DE MANEJO
HASZNÁLATI ÚTMUTATÓ
Page 2

Page 3

ENGLISH
OPERATIONAL NOTES CONTENTS
Thank you for your purchase of the SHARP electronic printing
calculator, model EL-1611E.
To insure trouble-free operation of your SHARP calculator, we
recommend the following:
1. The calculator should be kept in areas free from extreme
temperature changes, moisture, and dust.
2. A soft, dry cloth should be used to clean the calculator. Do not
use solvents or a wet cloth.
3. Since this product is not waterproof, do not use it or store it
where fluids, for example water, can splash onto it. Raindrops,
water spray, juice, coffee, steam, perspiration, etc. will also
cause malfunction.
4. If service should be required, use only a SHARP servicing
dealer, a SHARP approved service facility or SHARP repair
service.
5. If you pull out the power cord to cut electricity completely or
replace the batteries, the presently stored tax rate will be
cleared.
6. This product, including accessories, may change due to
upgrading without prior notice.
Page
OPERATING CONTROLS......................................................... 2
INK ROLLER REPLACEMENT ................................................. 3
PAPER ROLL REPLACEMENT ................................................ 5
POWER SUPPLY ...................................................................... 7
ERRORS ................................................................................... 9
SPECIFICATIONS..................................................................... 10
RESETTING THE UNIT ............................................................ 11
CALCULATION EXAMPLES ..................................................... 34
EURO CURRENCY RATES ...................................................... 40
1
Page 4
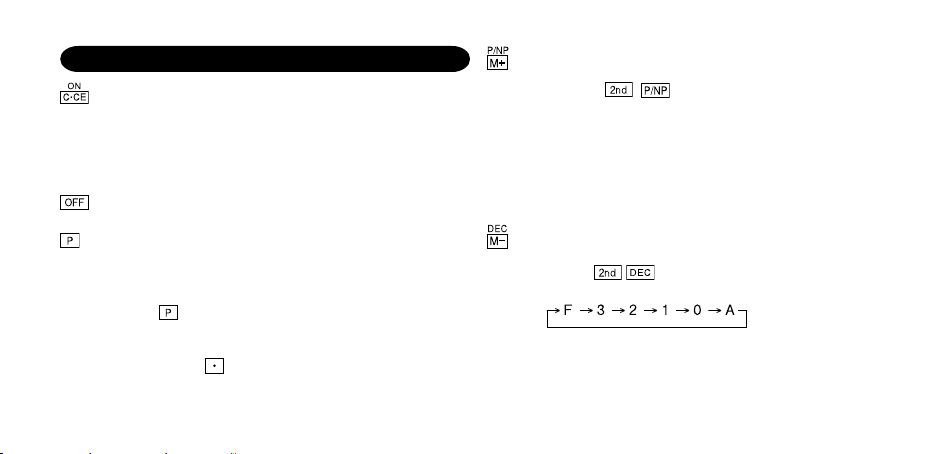
OPERATING CONTROLS
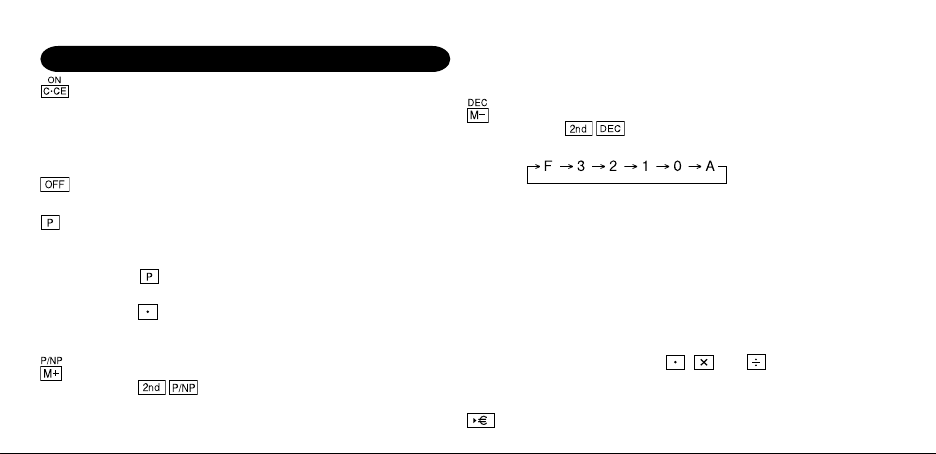
POWER ON KEY / CLEAR / CLEAR ENTRY KEY:
Clear – This key also serves as a clear key for the calculation
register and resets an error condition.
Clear entry – When pressed after a number and before a
function, clear the number.
POWER OFF KEY:
When this key is pressed, the power is turned off.
PRINT KEY:
To save paper you can only print what is displayed, even in
non-print mode.
Pressing
with the symbol “#” even in non-print mode.
Pressing
as a code, date, etc. Separators are displayed as a period
and dashes but printed as periods.
MEMORY + KEY / PRINT ON / OFF KEY:
Pressing
Cause the calculator to operate in a display / print or display
2
after the entry of a number will print the entry
will insert a separator into a number entry such
selects print mode or non-print mode.
only mode, depending upon the calculator’s present state.
“P” on the display: Print mode.
“NP” on the display: Non-print mode.
MEMORY – KEY / DECIMAL SELECTION KEY:
Pressing
sets the number of decimal places in the
result.
“F” on the display:
The answer is displayed in the floating decimal system.
“3, 2, 1, 0” on the display:
Presets the number of decimal places in the answer.
“A” on the display (Add mode):
The decimal point in addition and subtraction entries is
automatically positioned to the 2nd digit from the lowest
digit of entry number. Use of the add mode permits
addition and subtraction of numbers without entry of the
decimal point. Use of
, and will automatically
override the add mode and decimally correct answers will
be printed.
CONVERSION KEY (TO THE EURO CURRENCY) :
Page 5
CONVERSION KEY (TO A NATIONAL CURRENCY) /
CONVERSION RATE SETTING KEY:
You can set the exchange rate by pressing . (A
maximum of 6 digits excluding the decimal point can be
stored as the exchange rate.)
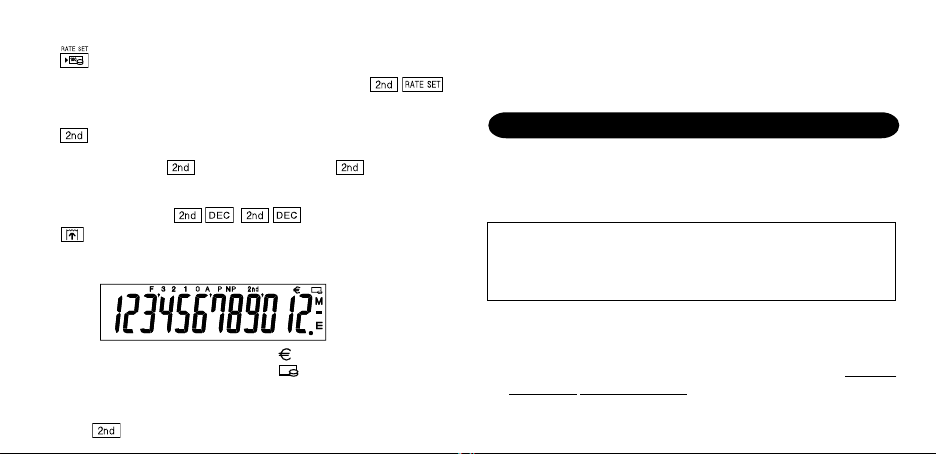
2nd FUNCTION KEY:
To use the functions shown above the keys, such as “DEC”,
press the key first. (When the key is pressed,
“2nd” will appear at the top of the display.)
Example: To change decimal place setting from F to 2
PAPER FEED KEY:
When pressed, the paper tape advances.
DISPLAY:
F: Floating decimal mode : Euro Currency Symbol
3, 2, 1, 0: Preset decimal mode
A: Add mode M: Memory
P: Print mode –: Minus
NP: Non-print mode E: Error
2nd:
functions are available
,
:
National Currency Symbol
• For illustration purposes, all the relevant symbols are visible in
the display above. However, in actual use, this would never
happen.
INK ROLLER REPLACEMENT
If printing is blurry even when the ink roller is in the proper position,
replace the roller.
Ink roller: Type EA-772R
WARNING
APPLYING INK TO WORN INK ROLLER OR USE OF
UNAPPROVED INK ROLLER MAY CAUSE SERIOUS
DAMAGE TO PRINTER.
1) Turn the power off.
2) Remove the printer cover. (Fig. 1)
3) Hold the top of the ink roller and remove the roller by
toward you and then upward. (Fig. 2)
pulling it
3
Page 6
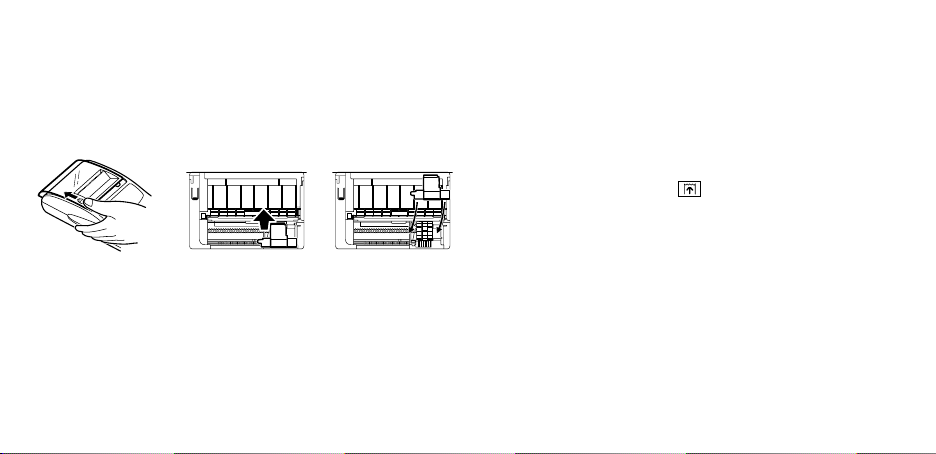
4) Install the new ink roller in the correct position. Make sure that
the roller is securely in place. (Fig. 3)
5) Put back the printer cover.
Fig. 1 Fig. 2 Fig. 3
4
Cleaning the printing mechanism
If the print becomes dull after long time usage, clean the
printing wheel according to the following procedures:
1) Remove the printer cover and the ink roller.
2) Install the paper roll and feed it until it comes out of the front of
the printing mechanism.
3) Put a small brush (like a tooth brush) lightly to the printing
wheel and clean it by pressing
4) Put back the ink roller and the printer cover.
Note: • Do not rotate the printing mechanism manually, this may
damage the printer.
.
Page 7
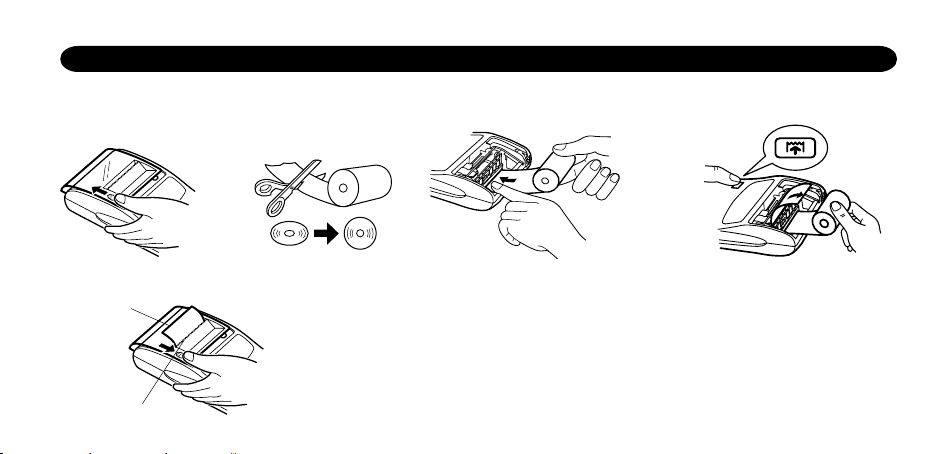
PAPER ROLL REPLACEMENT
Never insert paper roll if torn. Doing so will cause paper to jam. Always cut leading edge with scissors first.
♦ When using the paper that is less than or equals to 25 mm (31/32") in outside diameter:
Paper roll : Type EA-7100P
STEP 1 STEP 2 STEP 3
leading edge
Note: Paper tape replacement rolls are available where the EL-1611E calculator is sold.
Paper
STEP 4
cutter
5
Page 8
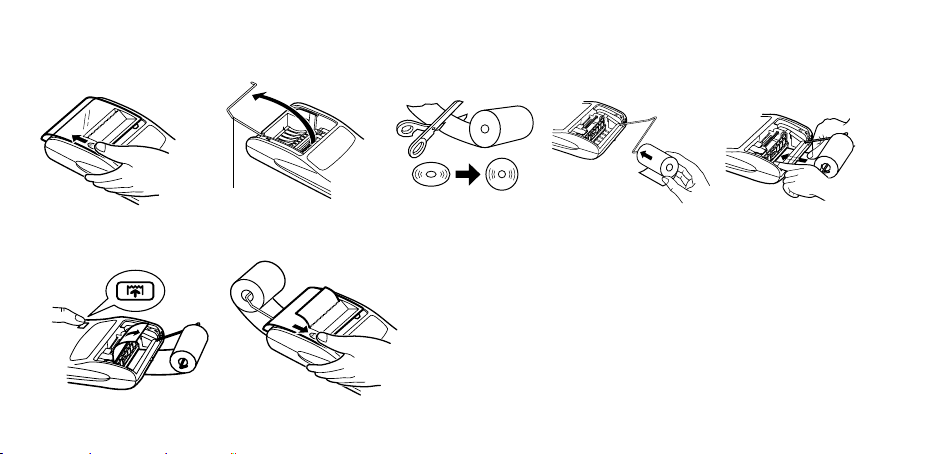
♦ When using the paper that is 12mm (15/32") in inside diameter and up to 80mm (3-5/32") in outside diameter:
Paper holder
STEP 1 STEP 2 STEP 3 STEP 4
Caution: • Never use the supplied paper (25 mm (31/32") in outside
STEP 5 STEP 6
6
diameter) in the holder.
• When replacing the paper, touching the inside of the
printer may damage it.
• The calculator has a free-paper mechanism. When
drawing out the paper tape, pull it straight forward on the
paper cutter side.
Page 9
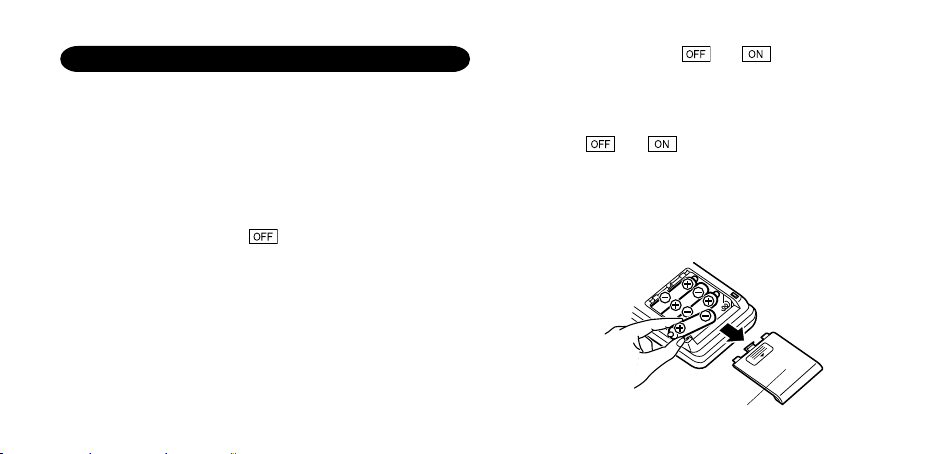
POWER SUPPLY
This calculator operates on dry batteries.
The calculator can also be operated on AC power through use of
an AC adaptor.
BATTERY OPERATION
If the display becomes dim or the printer stops before or during
printing, the batteries should be replaced.
Battery: Heavy-duty manganese battery AA (or R6) × 4
1. Turn off power by pressing
2. Remove the battery cover by sliding it in the direction of the
arrow on the cover.
3. Replace the batteries. Be sure that the “+” and “–” marks on the
battery correspond to the “+” and “–” marks in the calculator.
Always put back the 4 batteries at the same time.
4. Put back the battery cover.
.
5. After the replacement, press
the calculator.
When the batteries are correctly installed “0.” will be displayed.
(If the display is blank, displays any other symbol or the keys
become inoperative, remove the batteries and install them
again. Press
again.)
Note: Due to solvent leakage of the battery, keeping a used
battery in the battery compartment may result in damage to
the calculator. Remove a used battery promptly.
and in this order and check the display
and in this order to clear
Battery cover
7
Page 10
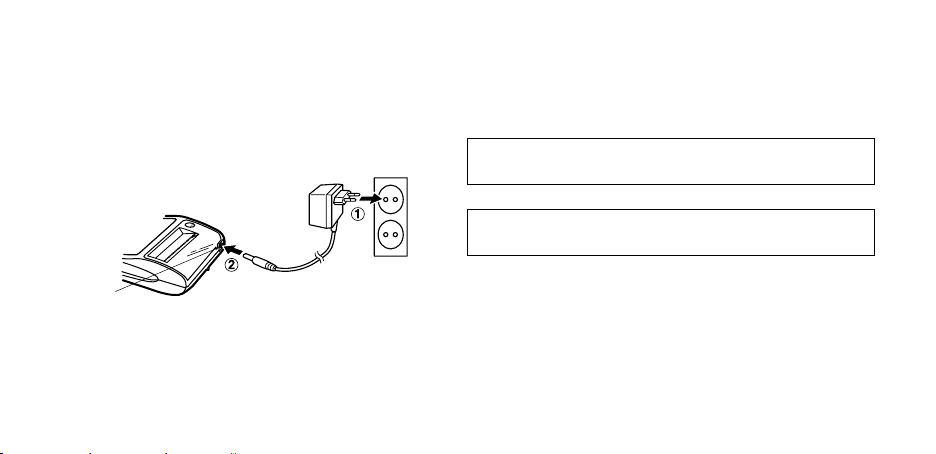
AC POWER OPERATION (OPTION)
AC adaptor: Model EA-28A
When the AC adaptor is connected to the calculator, the power
source is automatically switched over from dry batteries to AC
power source.
HOW TO CONNECT THE AC ADAPTOR
AC adaptor
connecting
terminal
Make sure that you turn the calculator’s power off when connecting
or disconnecting the AC adaptor.
To connect the AC adaptor, follow steps
To disconnect the AC adaptor, simply reverse the procedure.
8
and ➁.
➀
Notes: • When the calculator is not in use, be sure to remove the
adaptor from the calculator and the wall outlet.
• Never use any other AC adaptor except EA-28A.
CAUTION
Use of other than the AC adaptor EA-28A may apply improper
voltage to your SHARP calculator and will cause damage.
This optional AC adaptor is not available in some regions.
Please ask your Sharp dealer for details.
Page 11
ERRORS
There are several situations which will cause an overflow or an
error condition.
When this occurs, an error symbol “E” will be displayed and
“- - - - - - -” will be printed, and all keys will electronically lock
except
The contents of the memory at the time of the error are retained.
1. When the integer portion of an answer exceeds 12 digits and
2. When any number is divided by zero (Ex. 5 0 ).
3. When the contents of the memory exceed 12 integers.
4. When the integer portion of a quotient in percentage calculation
, and .
must be depressed to restart the calculation.
does not exceed 24 digits.
OVERFLOW CALCULATION
Ex. Select decimal position “F”.
888888888888
(1.23456781234 × 1,000,000,000,000 = 1,234,567,812,340)
999999999999 1 )
(Ex.
is 25 digits.
(Ex. 100000000000
345678923456 → 1.23456781234E
0.00000000001 )
• When the paper jams, the printer stops and the error symbol
“P.E” appears. Turn off the calculator. Tear off the paper tape
and then pull the remaining part of the paper forward and
completely out of the printer.
9
Page 12

SPECIFICATIONS
Operating capacity: 12 digits
Power supply: 6V
Operation: Heavy-duty manganese battery, size AA
10
(DC): Heavy-duty manganese
battery, size AA (or R6) × 4
AC: Local voltage with AC adaptor EA28A (Option)
(or R6)
Approx. 5,000 hours (in non-print mode,
displaying 555’555 at 25°C (77°F)
ambient temperature)
Operating time depends on the type of
battery and type of use.
Automatic Power-Off
Function (APO): To save your batteries, this function
automatically turns off the machine
approximately 12 minutes after the last
key operation.
Calculations: Four arithmetic, constant, square, chain,
power, percentage, reciprocal, add-on,
discount, memory, conversion between a
national and the euro currency, etc.
SHARP will not be liable nor responsible for any incidental
or consequential economic or property damage caused by
misuse and/or malfunctions of this product and its
peripherals, unless such liability is acknowledged by law.
Page 13

PRINTING SECTION
Printing speed: Heavy-duty manganese battery, size AA
(or R6)
Approx. 2.1 lines/sec. (At temperature
25°C(77°F), when “741 • 9
+” is printed.
Printing speed will vary with the number
of rows, different figure types to be
printed, and the charge level of the
batteries.)
Printing paper: 57 mm (2-1/4") – 58 mm (2-9/32") wide
80 mm (3-5/32") in diameter (max.)
Operating temperature: 0°C – 40°C (32°F – 104°F)
Power consumption: 6V
(DC): 1.7 W
Dimensions: 99 (W) × 191 (D) × 42 (H) mm
3-29/32" (W) × 7-17/32" (D) × 1-21/32" (H)
Weight: Approx. 238 g (0.53 lb.) (with batteries)
Accessories: Ink roller
×
1 (installed), Paper roll × 1,
Dry battery (R6)
×
4 and Operation
manual
RESETTING THE UNIT
Strong impacts, exposure to electrical fields, or other unusual
conditions may render the unit inoperative, and pressing the keys
will have no effect. If this occurs, you will have to press the RESET
switch on the bottom of the unit. The RESET switch should be
pressed only when:
• an abnormal event occurs and all keys are disabled.
• you install or replace the batteries.
Notes:
• Pressing the RESET switch will clear the stored exchange rate
and other data stored in the memory.
• Use only a ballpoint pen to press the RESET switch. Do not use
anything breakable or anything with a sharp tip, such as a needle.
• After pressing the RESET switch, press
“0.” is indicated.
to make sure that
11
Page 14
ESPAÑOL
NOTAS SOBRE EL USO DE LA CALCULADORA
Gracias por habernos honrado con la adquisición de la calculadora
electrónica de SHARP, modelo EL-1611E.
A fin de asegurar el uso sin averías de su calculadora SHARP, le
recomendamos lo siguiente:
1. Evite dejar la calculadora en ambientes en que haya cambios
de temperatura, humedad y polvo bastante notables.
2. Al limpiar la calculadora, utilice un paño suave y seco. No use
disolventes ni tampoco un paño húmedo.
3. Debido a que este producto no es a prueba de agua, no
deberá ser utilizado o guardado en lugares donde pudiera ser
salpicado por líquidos, por ejemplo agua. Gotas de lluvia,
salpicaduras de agua, jugos o zumos, café, vapor,
transpiración, etc. también perjudican el funcionamiento del
producto.
4. Si necesita reparar esta unidad, dirijase sólo a un distribuidor
SHARP, a un centro de servicio autorizado por SHARP o a un
centro de reparaciones SHARP.
12
5. Si desconecta el cable de alimentación para desconectar
completamente la electricidad o sustituye las pilas, la tasa de
cambio almacenada actualmente se borrará.
6. Este producto, incluyendo los accesorios, puede sufrir cambios
debidos a mejoras sin previo aviso.
ÍNDICE
Página
CONTROLES DE FUNCIONAMIENTO ..................................... 13
CAMBIO DEL RODILLO ENTINTADOR .................................... 15
CAMBIO DEL ROLLO DEL PAPEL ........................................... 16
FUENTE DE ALIMENTACIÓN ................................................... 18
ERRORES ................................................................................ 20
ESPECIFICACIONES TÉCNICAS ............................................ 21
REPOSICIÓN DE LA UNIDAD .................................................. 22
EJEMPLOS DE CÁLCULOS ..................................................... 34
TIPOS DE CAMBIOS DEL EURO ............................................. 40
Page 15
CONTROLES DE FUNCIONAMIENTO
TECLA DE ENCENDIDO / TECLA DE BORRADO /
BORRADO DE ENTRADA:
Borrado – Esta tecla también sirve de tecla de borrado para
los registros de cálculos y anula un estado de error.
Borrado de entrada – Cuando se aprieta después de un
número y antes de una función, borra el número.
TECLA DE APAGADO:
Apretando esta tecla se apagará la calculadora.
TECLA DE IMPRESIÓN:
Puede también imprimir sólo lo que aparece en la pantalla
de exhibición, incluso en la modalidad de no impresión, para
ahorrar papel.
Al pulsar
la entrada con el símbolo “#” aun estando en la modalidad
de no impresión.
Al pulsar la tecla
de un número tal como un código, fecha, etc. Los
separadores se visualizan como guiones pero se imprimen
como puntos.
después de introducir un número, se imprimirá
se insertará un separador en la entrada
TECLA DE MEMORIA + / TECLA DE ENCENDIDO /
APAGADO DE LA MODALIDAD DE IMPRESIÓN:
Al apretar
se selecciona la modalidad de
impresión o la modalidad de no impresión.
Hace que la calculadora funcione en la modalidad de
exhibición / impresión o en la de exhibición solamente
dependiendo del estado en el que se encuentra la
calculadora.
“P” en la pantalla: Modo de impresión
“NP” en la pantalla: Modo de no impresión
TECLA DE MEMORIA – / TECLA DE SELECCIÓN DE
DECIMALES:
Al apretar
se establece el número de decimales
en el resultado.
“F” en la pantalla:
La respuesta aparecerá en la exhibición en el sistema
decimal flotante.
“3, 2, 1, 0” en la pantalla:
Prefija el número de lugares decimales de la respuesta.
13
Page 16

“A” en la pantalla (Modo de suma):
El punto decimal en los registros de suma y resta se
coloca automáticamente en la segunda cifra a partir de la
cifra más baja del número registrado. Utilizando elmodo
de suma se pueden sumar y restar números sin registrar
el punto decimal. El uso de
automáticamente el modo de la suma e imprime las
respuestas decimalmente correctas.
TECLA DE CONVERSIÓN (AL EURO)
TECLA DE CONVERSIÓN (A UNA DIVISA NACIONAL) /
TECLA DE SELECCIÓN DE LA TASA DE CAMBIO:
Usted podrá fijar la tasa de cambio pulsando
(Como tasa de cambio se puede almacenar un máximo de 4
cifras excluyendo el punto decimal.)
TECLA DE SEGUNDA FUNCIÓN:
Para usar la función mostrada encima de las teclas como,
por ejemplo, “DEC”, apriete primero la tecla
se apriete la tecla
de la pantalla.)
Ejemplo: Para cambiar el valor del lugar decimal desde F
hasta 2.
14
, “2nd” aparecerá en la parte superior
,
, y anula
.
. (Cuando
TECLA DE AVANCE DEL PAPEL:
Al apretarla, el papel avanza.
FORMATO DE LA EXHIBICIÓN:
F: Modalidad decimal flotante
3, 2, 1, 0: Modalidad decimal
preajustada
A: Modalidad de la suma
P: Modalidad de impresión
NP: Modalidad de no
impresión
2nd: Están disponibles las
funciones
• Por motivos de ilustración, todos los símbolos pertinentes son
visibles en la visualización anterior. Sin embargo, durante la
utilización normal de la calculadora, esto nunca ocurrirá.
: Símbolo de la Divisa Euro
:Símbolo de la Divisa
Nacional
M: Memoria
–: Negativo
E: Error
Page 17

CAMBIO DEL RODILLO ENTINTADOR
Si la impresión queda borrosa aunque esté bien colocador el
rodillo entintador, reemplace el rodillo.
Rodillo entintador: Tipo EA-772R
ADVERTENCIA
ECHANDO TINTA EN UN RODILLO ENTINTADOR ROTO O
USANDO UN RODILLO ENTINTADOR NO AUTORIZADO
PUEDE CAUSAR DETERIOROS GRAVES EN LA IMPRESORA.
1) Desconectar el interruptor de corriente.
2) Saque la tapa de la impresora. (Fig. 1)
3) Sujete la parte superior del rodillo entintador y extraiga el
4) Instale el nuevo rodillo entintador en la posición correcta.
5) Ponga de nuevo en su lugar la
tirando de él hacia usted y hacia arriba. (Fig. 2)
rodillo
Cerciórese de que el rodillo esté firmemente colocado en su
sitio. (Fig. 3)
tapa de la impresora.
Fig. 1 Fig. 2 Fig. 3
Limpieza del mecanismo de impresión
Si la impresión se debilita después de usar la calculadora
durante un largo tiempo, limpiar la rueda de impresión de
acuerdo con el siguiente procedimiento:
1) Quitar la tapa de la impresora y el rodillo entintador.
2) Instalar el rollo de papel y hacerlo avanzar hasta que salga por
la parte delantera del mecanismo de impresión.
3) Apoyar un cepillo pequeño (similar a un cepillo de dientes)
ligeramente sobre la rueda de impresión y limpiarla apretando
4) Volver a colocar el rodillo entintador y la tapa de la impresora.
Nota: • No trate de girar la rueda de impresión manualmente,
ya que de lo contrario podría dañar la impresora.
.
15
Page 18

CAMBIO DEL ROLLO DEL PAPEL
Nunca introduzca un rollo de papel roto. Esto causar á atascos del papel.
Corte siempre en primer lugar el borde anterior.
♦ Cuando utilice papel que tenga 25 mm o menos de diámetro exterior:
Rollo de papel: Tipo EA-7100P
PASO 1
Borde delantero
16
Corta-papel
PASO 2 PASO 3
Nota: Se puede obtener cinta de papel en los lugares de venta de la EL-1611E.
PASO 4
Page 19

♦ Cuando utilice papel que tenga 12 mm de diámetro interior y hasta 80 mm de diámetro exterior.
Sujetapapel
PASO 1 PASO 2 PASO 3 PASO 4
PASO 5
PASO 6
Precauciones: • No utilizar nunca el papel incluído (de 25 mm de
diámetro) en el sujetapapel.
• Cuando sustituya el papel, pueda que la
impresora sufra desperfectos si toca el interior de
la misma.
• La calculadora tiene un mecanismo de liberación
del papel. Al sacar la cinta, tirar de ella hacia
adelante por el lado del cortapapel.
17
Page 20

FUENTE DE ALIMENTACIÓN
Este aparato funciona con pilas secas.
El aparato puede también funcionar con alimentación de CA
usando un adaptador de CA.
FUNCIONAMIENTO CON PILAS
Si la pantalla pierde brillo o la impresora se para antes o durante la
impresión, las pilas tendrán que cambiarse.
Pilas: 4 pilas manganesas de gran capacidad (AA o R6)
1. Desconectar la corriente apretando
2. Sacar la tapita de las pilas haciéndola correr en la dirección
indicada por la flecha de la tapita.
3. Coloque nuevamente las pilas. Cercionarse de que las marcas
“+” y “–” de las pilas correspondan a las marcas “+” y “–” de la
cajita. Siempre coloque las 4 pilas al mismo tiempo.
4. Coloque nuevamente la tapa de las pilas.
.
5. Después de cambiar las pilas apretar y en este orden
para borrar los contenidos de la calculadora.
Cuando las pilas estén correctamente instaladas, aparecerá en
la exhibición el “0.”. (Si en la exhibición no aparece nada o
aparece cualquier otro símbolo, o las teclas no pueden
apretarse, quitar las pilas e instalarlas de nuevo. Apretar
en este orden y comprobar la exhibición).
Nota: En caso de dejar las pilas usadas en el compartimento
destinado a las mismas en la calculadora, podría suceder
que la calculadora se dañase debido a la fuga de solvente
de las pilas. Quite sin demora las pilas agotadas.
y
18
Tapita de las pilas
Page 21

FUNCIONAMIENTO CON CORRIENTE ALTERNA (OPCIONAL)
Adaptador de CA: Modelo EA-28A
Cuando el adaptador de CA está conectado a la calculadora, la
fuente de alimentación se conmuta automáticamente de pilas
secas a corriente alterna.
MANERA DE CONECTAR AL ADAPTADOR DE CA
Borne de conexión para
el adaptador de CA
Asegúrese de desconectar la alimentación de la calculadora
cuando conecte o desconecte el adaptador de CA.
Para conectar el adaptador de CA, siga los pasos
Para desconectar el adaptador de CA, invierta simplemente el
procedimiento.
➀
y ➁.
Notas: • Cuando no se utiliza la calculadora, asegúrese de
desenchufar el adaptador de la misma y del
tomacorrientes de la pared.
• No usar nunca ningún adaptador de CA distinto al EA28A.
PRECAUCIONES
El uso de otro adaptador que no sea el EA-28A podría
ocasionar la entrada de una tensión inadecuada a su
calculadora SHARP y provocar deterioros en la misma.
19
Page 22

ERRORES
Existen diversos casos en que ocurre un exceso de capacidad o
un estado de error.
Cuando se produce ésto, en la exhibición aparecerá el símbolo de
error “E” imprimiéndose “- - - - - - -” y todas las teclas quedarán
electrónicamente enclavadas a excepción de
Entonces
El contenido de la memoria al ocurrir el error queda retenido.
1. Cuando la parte entera de un resultado excede las 12 cifras y
no excede las 24 cifras.
CÁLCULOS APROXIMATIVOS
2. Cuando se divide un número cualquiera siendo el divisor cero.
(Ej. 5
3. Cuando el contenido de la memoria excede los 12 números
enteros. (Ej.
4. Cuando la parte entera de un cociente en el cálculo de porcentaje
es de 25 cifras. (Ej. 100000000000
20
se debe utilizar para volver a empezar el cálculo.
Ej. Seleccione la posición decimal “F”.
888888888888
(1,23456781234 × 1.000.000.000.000 = 1.234.567.812.340)
0 ).
345678923456 → 1,23456781234E
999999999999 1 )
, y .
0,00000000001 )
• Al atascarse en papel, la impresora cesará de funcionar
apareciendo el símbolo de error “P.E”. En tal caso primero habrá
que apagar la calculadora y luego arrancar la cinta de papel
pasando a sacar la parte restante del papel hacia adelante y
completamente fuera de la impresora.
Page 23

ESPECIFICACIONES TÉCNICAS
Capacidad de operación: 12 dígitos
Alimentación de corriente: 6V
Funcionamiento: Pila de manganeso de gran
(CC): 4 pilas de manganeso de
gran potencia tamaño AA (o R6)
CA: Voltaje local usando el adaptador
de CA, EA-28A (Opción)
resistencia tamaño AA (o R6)
5.000 horas aproximadamente (en el
modo de no impresión, visualizando
555’555 con una temperatura
ambiental de 25°C)
El tiempo de funcionamiento depende
del tipo de pila y la forma de
utilización.
Función de apagado
automático de la
alimentación (A.P.O.): Esta función desconecta
automáticamente la alimentación de
la calculadora unos 12 minutos
después de apretada la última tecla
Cálculos realizables: Las cuatro operaciones aritméticas,
SHARP no será responsable de ningún daño imprevisto o
resultante, en lo económico o en propiedades, debido al mal
uso de este producto y sus periféricos, a menos que tal
responsabilidad sea reconocida por la ley.
para ahorrar pilas.
constante, elevación al cuadrado,
cadena, potencia, porcentaje,
recíprocos, recargos, descuentos,
memoria, conversión entre una divisa
nacional y el euro, etc.
21
Page 24

SECCIÓN IMPRESORA
Velocidad de impresión: Pilas de manganeso de gran
capacidad, tamaño AA (o R6)
Aprox. 2,1 líneas/seg. (A una
temperatura de 25°C, cuando se
imprima “741 • 9
+”. La velocidad de
impresión cambiará según el número
de filas, los diferentes tipos de cifras
que vayan a imprimirse y el nivel de
carga de las pilas.)
Papel para imprimir: 57 mm – 58 mm de ancho, 80 mm de
diámetro exterior (máx.).
Temperatura de
funcionamiento: 0°C – 40°C
Consumo de corriente: 6V
(CC): 1,7 W
Dimensiones: 99 (An.) × 191 (Pr.) × 42 (Al.) mm
Peso: Aprox. 238 g (con pilas)
Accesorios: 1 rodillo entintador (instalado), 1
rollodel papel, 4 pilas secas (R6) y
manual de manejo
22
REPOSICIÓN DE LA UNIDAD
Los impactos fuertes, la exposición a campos eléctricos u otras
condiciones inusuales pueden ser la causa de que la unidad no
funcione, y presionar las teclas no servirá de nada. Si pasa esto,
tendrá que presionar el interruptor RESET de la parte inferior de la
unidad. El interruptor RESET sólo deberá presionarse cuando:
• Se produzca alguna anormalidad y no funcione ninguna tecla.
• Instala o sustituye las pilas.
Notas:
• Al presionar el interruptor RESET se borrarán todas las tasas de
cambio almacenadas y otros datos almacenados en la
memoria.
• Use solamente un bolígrafo para presionar el interruptor
RESET. No use nada que pueda romperse ni tampoco algo muy
puntiagudo como, por ejemplo, una aguja.
• Luego de presionar el interruptor de RESET, presione
asegurarse que aparezca “0.” en la pantalla.
para
Page 25

MAGYAR
BEVEZETÉS
Köszönjük, hogy megvásárolta a SHARP EL-1611E típusú
szalagos asztali számológépet.
SHARP számológépének problémamentes működése érdekében
a következőket ajánljuka figyelmébe:
1. A számológépet ne tartsa olyan helyen, ahol nagy
hőingadozásnak, nedvességnek vagy pornak van kitéve.
2. A számológép tisztításához puha, száraz törlőkendőt
használjon. Ne használjon oldószereket vagy nedves
törlőkendőt.
3. Mivel a készülék nem vízálló, ne használja, ne tárolja olyan
helyen, ahol folyadék – peldaul viz – kerulhet ra. Esőcseppek,
vízpermet, gyümölcslé, kávé, gőz, izzadság stb. szintén a
készülék hibás működését okozhatják.
4. Ha szükségessé válik a számológép karbantartása, azt csak
SHARP- márkakereskedővel, a SHARP cég által megbízott
szervizzel vagy SHARP- vevőszolgálattal végeztesse el.
5. Ha teljes áramtalanításhoz kihúzza a hálózati kábelt, vagy
elemet cserél, az aktuálisan tárolt átváltási árfolyam törlődik.
6. A termek es tartozekai előzetes bejelentes nelkul a fejlesztes
erdekeben modosithatok.
TARTALOM
Oldal
KEZELŐSZERVEK MŰKÖDTETÉSE ....................................... 24
A FESTÉKHENGER CSERÉJE ................................................ 26
A PAPÍRTEKERCS CSERÉJE .................................................. 27
ÁRAMELLÁTÁS ........................................................................ 29
HIBÁK ....................................................................................... 31
MŰSZAKI ADATOK ................................................................... 32
A KÉSZÜLÉK ÚJRAINDÍTÁSA ................................................. 33
PÉLDASZÁMÍTÁSOK ............................................................... 35
EURO VALUTAÁRFOLYAMOK ................................................ 40
23
Page 26

KEZELŐSZERVEK MŰKÖDTETÉSE
BEKAPCSOLÁS GOMB/TÖRLÉS/BEÍRÁS TÖRLÉSE
GOMB:
Törlés – Ez a gomb a számítási memória törlésére szolgál,
valamint hibaállapotot is töröl.
Beírás törlése – Ha számbeírás után és műveleti gomb
használata előtt nyomja meg, akkor a gép törli a számot.
KIKAPCSOLÁS GOMB:
Ha ezt a gombot megnyomja, a számológép kikapcsol.
NYOMTATÁS GOMB:
Papírtakarékossági okokból csak azt nyomtatja ki, ami
megjelenik a kijelzőn – még nem-nyomtatási üzemmódban
is.
gomb megnyomásával kinyomtatja a beírt számot a
A
“#” jellel együtt – még nem-nyomtatási üzemmódban is.
gomb megnyomásával elválasztójelet írhat számokba,
A
pl. kódok, dátumok stb. esetén. Az elválasztójelek a kijelzőn
pont-vonalként, de nyomtatásban pontokként jelennek meg.
24
MEMÓRIA + GOMB / NYOMTATÁS BE/KI GOMB:
gombokkal válthat a nyomtatási és nem-
A
nyomtatási üzemmódok között.
A számológép aktuális állapotától függően dolgozhat
kijelzés/nyomtatás vagy csak kijelzés üzemmódban.
“P” látható a kijelzőn: Nyomtatási üzemmód
“NP” látható a kijelzőn: Nem-nyomtatási üzemmód
MEMÓRIA – GOMB / TIZEDESHELY VÁLASZTÓ GOMB:
gombok megnyomásával kiválaszthatja az
A
eredmény tizedeshelyeinek a számát.
“F” látható a kijelzőn:
Az eredmény lebegőpontos ábrázolással kerül kiírásra.
“3, 2, 1, 0” látható a kijelzőn:
Az eredmény tizedesjegyeinek számát állítja be.
“A” látható a kijelzőn (Összeadási üzemmód)
Adatbevitelkor összeadás és kivonás esetén
automatikusan a 2 utolsó számjegy lesz a tizedes érték.
Az “A” állásban összeadáskor és kivonáskor nem kell
Page 27

tizedesvesszőt beírni. Amennyiben használja a
és gombokat, úgy az “A” üzemmód automatikusan
kikapcsol, és a megfelelő tizedeshelyeken kerül kiírásra
az eredmény.
VALUTAVÁLTÓ GOMB (EURORA):
VALUTAVÁLTÓ GOMB (A NEMZETI VALUTÁRA) /
ÁTVÁLTÁSI ÁRFOLYAM BEÁLLÍTÓ GOMB:
megnyomásával beállíthatja az átváltási
A
árfolyamot. (A tizedesvesszőt nem számítva maximum 6
számjegyen tárolható az átváltási árfolyam.)
A 2nd FUNKCIÓ GOMB:
A gombok felett jelzett funkciók használatához – mint pl. a
“DEC” – először nyomja meg a gombot. (Amikor megnyomja
a gombot, a kijelző felső részén megjelenik a “2nd” felirat.)
Példa: A tizedeshely beállítás megváltoztatása F-ről 2-re
PAPÍRTOVÁBBÍTÓ GOMB:
Megnyomásával a papír előre halad.
,
,
KIJELZŐ:
2nd2nd
2nd:
FF
F: Lebegőpontos ábrázolás
FF
üzemmód
3, 2, 1, 03, 2, 1, 0
3, 2, 1, 0: Beállított
3, 2, 1, 03, 2, 1, 0
AA
A: Összeadási üzemmód
AA
PP
P: Nyomtatási üzemmód
PP
NPNP
NP: Nem-nyomtatási
NPNP
• Illusztrációként valamennyi lényeges jel látható a fenti kijelzőn.
tizedeshely
üzemmód
üzemmód
Azonban a valóságban így együtt soha nem láthatók.
2nd2nd
MM
M: Memória
MM
––
–: Mínusz
––
EE
E: Hiba
EE
funkciók
(másodlagos
billentyűparancsok)
elérhetőek
: Euro jele
: Nemzeti valuta jele
25
Page 28

A FESTÉKHENGER CSERÉJE
Ha a nyomtatás nem látható elég jól, még akkor sem, ha a
festékhenger a megfelelő helyzetben van, cserélje ki a hengert.
Festékhenger: EA-772R típusú
VIGYÁZAT
AZ ELHASZNÁLT FESTÉKHENGER ÚJRAFESTÉKEZÉSE
VAGY NEM EREDETI FESTÉKHENGER HASZNÁLATA A
SZÁMOLÓGÉP SÚLYOS KÁROSODÁSÁT OKOZHATJA.
1) Kapcsolja ki a számológépet.
2) Távolítsa el a nyomtató fedelét. (1. ábra)
3) Fogja meg a tintahenger tetejét és vegye ki úgy, hogy először
maga felé, majd felfelé húzza. (2. ábra)
4) Helyezze be az új tintahengert a megfelelőállásban. Ellenőrizze,
hogy stabilan a helyére került-e. (3. ábra)
5) Helyezze vissza a nyomtatófedelet.
26
1. ábra 2. ábra
A nyomtató mechanikájának tisztítása
Ha a nyomtatás huzamosabb használat után halvánnyá válik,
tisztítsa meg a nyomtatóhengert a következők szerint:
1) Távolítsa el a nyomtató fedelét és a festékhengert.
2) Helyezze be a papírtekercset és addig továbbítsa, amíg a
nyomtató elején kibújik.
3) Helyezzen egy kis kefét (akkorát mint egy fogkefe) finoman a
nyomtatóhengerre, és tisztítsa meg a
tartásával.
4) Helyezze vissza a festékhengert és a nyomtató fedelét.
Megjegyzések: • Ne tekerje kézzel a nyomtató mechanikáját,
mert ezzel megsérülhet a nyomtató.
3. ábra
gomb nyomva
Page 29

A PAPÍRTEKERCS CSERÉJE
Soha ne használjon szakadt papírtekercset. Ezáltal elakadhat a papír.
A papírtekercs bevezető élét először mindig vágja le ollóval.
♦ 25 mm-es vagy kisebb külső átmérőjű papír használata:
Papírtekercs: EA-7100P típusú
1. LÉPÉS
Bevezető él
Papírvágó
4. LÉPÉS
2. LÉPÉS 3. LÉPÉS
Megjegyzés: Szükség esetén az EL-1611E számológép vásárlásának helyén szerezhet be
papírtekercseket.
27
Page 30

♦ 12 mm belső átmérőjű és maximum 80 mm külső átmérőjű papír használata:
Papírtartó
1. LÉPÉS 2. LÉPÉS 3. LÉPÉS 4. LÉPÉS
Figyelmeztetés: • A mellékelt papírt (25 mm külső átmérő) soha ne
5. LÉPÉS
28
6. LÉPÉS
tegye a papírtartóba.
• Ha a papír cseréjekor megérinti a nyomtató
belső részét, károsíthatja azt.
• A számológépnek szabadonfutó papírtovábbító
mechanizmusa van. Amikor kihúzza a
papírszalagot, húzza azt a papírvágó oldalán
egyenesen előre.
Page 31

ÁRAMELLÁTÁS
A számológép szárazelemmel működik.
A számológép váltóáramú hálózatból is működtethető hálózati
adapter segítségével.
MŰKÖDTETÉS ELEMEKRŐL
Ha a kijelző elhalványul, vagy a nyomtató elakad nyomtatás előtt
vagy közben, akkor az elemeket ki kell cserélni.
Elem: Hosszú élettartamú mangán elem, 4db AA (vagy R6)
típusú
1. Kapcsolja ki a számológépet az
2. Távolítsa el az elemek fedelét a fedélen látható nyíl irányába
csúsztatva.
3. Cserélje ki az elemeket. Győződjön meg róla, hogy az elem “+”
és “–” jelei a számológép “+” és “–” jelzéseinek megfelelően
helyezkednek el. Mindig egyszerre helyezze vissza a 4 elemet.
4. Helyezze vissza az elemek fedelét.
megnyomásával.
5. Elemcsere után nyomja meg az
a sorrendben, hogy törölje a számológépet.
Ha az elemek megfelelően lettek behelyezve, akkor “0.” látható
a kijelzőn. (Ha a kijelző üres, más szimbólumok jelennek meg
vagy a gombok nem működnek, akkor vegye ki az elemeket,
majd tegye be azokat újra. Nyomja meg az
gombokat ebben a sorendben, majd ellenőrizze ismét a kijelzőt.)
Megjegyzés: Ha elhasznált elemet tárol az elemtartóban, az
károsíthatja a számológépet az elem esetleges
szivárgása miatt. Az elhasznált elemet azonnal
távolítsa el.
és gombokat ebben
és
Elemek fedele
29
Page 32

MŰKÖDÉS HÁLÓZATI ÁRAMRÓL (OPCIONÁLIS)
Hálózati adapter: Modell: EA-28A
Ha hálózati adaptert csatlakoztat a számológéphez, az áramellátás
automatikusan átvált szárazelemről hálózati ellátásra.
HÁLÓZATI ADAPTER CSATLAKOZTATÁSA
Hálózati adapter
csatlakozó aljzat
Az adapter csatlakoztatásakor vagy eltávolításakor a hálózati
kapcsoló mindig legyen kikapcsolva.
Hálózati adapter csatlakoztatásához kövesse az
lépéseket.
Az adapter eltávolításához egyszerűen haladjon fordított
sorrendben.
30
➀
és
Megjegyzések: • Amikor a számológépet nem használja, az
adapter mindig legyen kihúzva a fali
csatlakozóból és a számológépből.
• Soha nem használjon az EA-28A-tól eltérő
adaptert.
FIGYELMEZTETÉS
Az EA-28A típusú adaptertől eltérő adapter használata nem
megfelelő feszültséggel terhelheti SHARP számológépét,
amely károsodást okoz.
➁
Page 33

HIBÁK
Számos eset okozhat túlcsordulást vagy hibás állapotot.
Ha ez megtörténik, a kijelzőn megjelenik az “E” hibajel, és
“- - - - - - -” kerül kinyomtatásra, valamint az összes billentyű
elektronikusan zárolásra kerül a
A számolás újrakezdéséhez a
Hiba esetén a memória tartalma megmarad.
1. Ha az eredmény egész része hosszabb, mint 12, de nem
hosszabb, mint 24 számjegy.
TÚLCSORDULÁSOS SZÁMÍTÁS
Pl. Válassza az “F” tizedeshely beállítást.
888888888888
(1,23456781234 × 1.000.000.000.000 = 1.234.567.812.340)
2. Nullával való osztás esetén(Pl. 5 0 ).
3. Ha a memóriában lévő szám több, mint 12 számjegy.
4. Ha százalékszámításnál a hányados egész része 25 számjegy
999999999999 1 )
(Pl.
hosszú. (Pl. 100000000000
345678923456 → 1,23456781234E
, és kivételével.
gombot kell megnyomni.
0,00000000001 )
• Ha a papír beszorul, a nyomtató megáll és a “P.E” hibajel válik
láthatóvá. Kapcsolja ki a számológépet. Tépje el a papírt, majd
a maradék részt előre fele húzza ki teljesen a számológépből.
31
Page 34

MŰSZAKI ADATOK
Számítási kapacitás: 12 számjegy
Áramellátás: 6V
Működés: Hosszú élettartamú mangán elem, típus:
32
(egyenáram): Hosszú élettartamú
mangán elem, 4db AA (vagy R6) típusú
Váltóáram: Helyi hálózati feszültség
hálózati adapterrel, EA-28A típus
(opcionális)
AA (vagy R6)
Kb. 5.000 óra (nem nyomtatási
üzemmódban, 25°C környezeti
hőmérsékleten 555’555 kijelzéssel a
kijelzőn)
A működési idő függ az elemtípustól és a
használattól.
Automatikus kikapcsolás
funkció (APO): Az elemek kímélése érdekében ez a
funkció az utolsó billentyű lenyomásától
számítva kb. 12 perc után automatikusan
kikapcsolja a számológépet.
Számítások: Négy alapművelet, konstans, négyzet,
műveleti sorrend, hatvány, százalék,
reciprok, áremelés, árengedmény,
memória, átváltás a nemzeti valuta és
euro között stb.
A SHARP nem vállal felelősséget a készülék vagy tartozékai
helytelen vagy hibás használatából eredő semminemű véletlen
kárért, illetve szándékos károkozásért, hacsak a vonatkozó
törvény előírásai erre nem kötelezik.
Page 35

NYOMTATÓ EGYSÉG
Nyomtatási sebesség: Hosszú élettartamú mangán elem,
típus: AA (vagy R6)
Kb. 2,1 sor/mp (25°C-on, “741 • 9
+”
nyomtatásakor. A nyomtatási sebesség
függ a sorok számától, a
megjelenítendő karakterektől és az
elemek állapotától.)
Nyomtató papír: 57 – 58 mm széles
80 mm átmérőjű (max.)
Üzemi hőmérséklet: 0°C – 40°C
Áramfogyasztás: 6V
(egyenáram): 1,7 W
Külső méretek: 99 mm (Sz) × 191 mm (Mélys.) × 42
mm (M)
Tömeg: Kb. 238 g (elemekkel)
Tartozékok: 1db festékhenger (számológépben), 1
db papírtekercs, 4 db R6 szárazelem
és Használati útmutató
A KÉSZÜLÉK ÚJRAINDÍTÁSA (RESET)
Erős behatás, elektromos mező vagy más szokatlan körülmény a
készüléket működésképtelenné teheti, hogy még a gombok sem
reagálnak. Amennyiben ez történik, nyomja meg a RESET gombot
a készülék alján. A RESET kapcsolót csak akkor nyomja meg, ha:
• szokatlan esemény történik, és a számológép nem reagál a
gombok megnyomására.
• elemet cserél vagy helyez be.
Megjegyzések:
• A RESET gomb megnyomásával az eltárolt átváltási árfolyam
és más, a memóriában tárolt adatok elvesznek.
• Csak golyóstollal nyomja meg a RESET kapcsolót. Ne
használjon törékeny vagy hegyes tárgyat, pl. tűt.
• A RESET gomb megnyomása után nyomja meg a
és ellenőrizze, hogy a “0.” jelenik meg a kijelzőn.
gombot
33
Page 36

CALCULATION EXAMPLES
1. To insure that each calculation is performed correctly, press
firmly before starting the calculation.
2. Press
appears in print mode and “NP” appears in non-print mode.
Unless otherwise stated, it is assumed the calculator is in
print mode.
3. Example procedures are listed in following manner unless
otherwise specified.
Decimal position
(F, 3, 2, 1, 0, A)
34
to select print mode or non-print mode. “P”
Operation Display Print
EJEMPLOS DE CÁLCULOS
1. Para asegurarse de que cada cálculo se efectúa
correctamente, presione
empezar el cálculo.
2. Presione
de no impresión. “P” aparece en la modalidad de impresión
y “NP” aparece en la modalidad de no impresión. Excepto
que se indique lo contrario se supone que la calculadora
está en el modo de impresión.
3. Los procedimientos de ejemplos están puestos de la
siguiente manera, a menos que se especifique lo contrario.
Posición
decimal Operación Exhibición Impresión
par seleccionar el modo de impresión o
firmemente antes de
(F, 3, 2, 1, 0, A)
Page 37

PÉLDASZÁMÍTÁSOK
1. Az egyes számítások tökéletes elvégzése érdekében a
számítás előtt kétszer, határozottan nyomja meg a
gombot.
2. A nyomtatási vagy nem-nyomtatási üzemmód kiválasztásához
nyomja meg a
“P”, nem-nyomtatási üzemmódban “NP” jelenik meg. Amíg
másként nincs jelezve, feltételezzük, hogy a számológép
nyomtatási üzemmódban van.
3. A példák a következők szerint kerülnek felsorolásra, ha
másként nincs meghatározva.
gombokat. Nyomtatási üzemmódban
Tizedeshely
kapcsoló helyzete Művelet Kijelző Nyomtatás
(F, 3, 2, 1, 0, A)
NON-ADD PRINT / IMPRESIÓN DE NO SUMA / NYOMTATÁS
NEM HOZZÁADANDÓ MÓDON
No. 1 2 3
6.20.2013
123
F
6
20 2013 6.20 - 2013 #6.20.2013
ADDITION AND SUBTRACTION WITH ADD MODE /
SUMA Y RESTA CON MODO DE SUMA /
ÖSSZADÁS ÉS KIVONÁS A TIZEDESVESSZŐ NÉLKÜLI
MÓDBAN
2.50 + 4.50 – 3.00 =
A
Note: was not used in the entries.
Nota: La
Megjegyzés:
250 450
300 4.00 4.00 ∗
no ha sido usada en los registros.
Bevitelnél a tizedespont nem használható.
123. #123
.............
.......
35
Page 38

MIXED CALCULATIONS / CALCULOS MIXTOS /
VEGYES SZÁMÍTÁSOK
÷ 4 =
12 × 45
0 12 45 4 135. 135
CONSTANT / CONSTANTE / KONSTANS SZÁMÍTÁSOK
295 × 8 =
295 × 6 =
.
∗
0
8 2’360. 2’360
295
6 1’770. 1’770
.
∗
.
∗
POWER / POTENCIA / HATVÁNYOZÁS
2
= 2 × 2 =
2
23 = 2 × 2 × 2 =
0
36
➀
➁
(Non-print mode /
Modalidad de no-impresión /
Nem-nyomtatási üzemmód)
2 4.
8.
18 ÷ 2 =
÷ 2 =
12
18 2 9. 9
0
12 6. 6
➀
➁
.
8
➁
.
∗
.
∗
Page 39

ADD-ON AND DISCOUNT / RECARGOS Y DESCUENTOS /
ÁREMELÉS ÉS ÁRENGEDMÉNY
A. 15% add-on to 1200. / Un 15% de recargo sobre 1200. /
15%-kal növelje mega 1200 egységárat.
1200 15 1’380.00 1’380.00∗
2 (1200 15 180.00 180.00∗
) 1’380.00 1’380.00∗
RECIPROCAL / RECÍPROCOS / RECIPROKSZÁMÍTÁS
1
=
7
F7 0.14285714285 0.14285714285∗
PERCENT / PORCENTAJES / SZÁZALÉKSZÁMÍTÁS
650 × 15% =
B. 10% discount on 1200. / Un 10% de descuento sobre 1200. /
Számoljon ki 10% árengedményt 1200 egységárra.
1200 10 1’080.00 1’080.00∗
2 (1200 10 120.00 120.00∗
) 1’080.00 1’080.00∗
2 650 15 97.50 97.50∗
÷ 1368 = (%)
123
2 123 1368 8.99 8.99∗
37
Page 40

MEMORY / MEMORIA / MEMÓRIA
46 × 78 =
+) 125 ÷ 5=
–) 72 × 8=
Total =
• Press
➀
starting a memory calculation.
➁
• Apretar
➂
de empezar a efectuar un cálculo con
➃
memoria.
• A memória segítségével történő számítás
előtt nyomja meg a
törléséhez.
0
46 78 3’588.
5 25.
125
72
8 576.
38
to clear the memory before
para cancelar la memoria antes
gombot a memória
3’037.
M
M
M
M
3’588
25
576
3’037
.
+
.
+
.
–M ③
.
◊
M ①
M ②
M ④
CURRENCY CONVERSION / CONVERSIÓN DE DIVISAS /
VALUTAVÁLTÁS
EXAMPLE 1: Set the following rate provisionally: 1 euro =
1.95583 DM. Convert 1,000 euro to DM.
EJEMPLO 1: Ponga provisionalmente el tipo de cambio
siguiente: 1 euro = 1,95583 marcos alemanes.
Convierta 1.000 euros a marcos alemanes.
1. PÉLDA:
Ideiglenesen állítsa be a következő árfolyamot:
1 euro = 1,95583 DM. Váltson át 1.000 eurot
német márkára.
2 1.95583 1.95583
∆
1.95583 1.95583 =
- - - - - - - - - - - - - - - - - - - - - - - - - - - - - - - - - - - - - - - - - - - - 1000
1’000
.
1.95583 1’955.83 ∆
Page 41

EXAMPLE 2: Convert 1,000 DM to the euro currency (1
EJEMPLO 2: Convierta 1.000 marcos alemanes a euros (1
2. PÉLDA: Váltson át 1.000 német márkát eurora. (1 euro
euro = 1.95583 DM, provisionally).
euro = 1,95583 marcos alemanes, provisionalmente).
= 1,95583 DM, ideiglenesen).
2 1000 1’000
511.29 511.29 ∆∆
.
39
Page 42

Euro Currency Rates / Tipos de cambios del euro / Euro valutaárfolyamok
Country / País /
Belgium / Bélgica / Belgium 1 EUR = 40.3399 BEF
France / Francia / Franciaország 1 EUR = 6.55957 FRF
Germany / Alemania / Németország 1 EUR = 1.95583 DEM
Ireland / Irlanda / Írország 1 EUR = 0.787564 IEP
Italy / Italia / Olaszország 1 EUR = 1936.27 ITL
Netherlands / Holanda / Hollandia 1 EUR = 2.20371 NLG
Portugal / Portugal / Portugália 1 EUR = 200.482 PTE
Spain / España / Spanyolország 1 EUR = 166.386 ESP
Finland / Finlandia / Finnország 1 EUR = 5.94573 FIM
Austria / Austria / Ausztria 1 EUR = 13.7603 ATS
Luxembourg / Luxemburgo / Luxemburg 1 EUR = 40.3399 LUF
Greece / Grecia / Görögország 1 EUR = 340.750 GRD
Slovenia / Eslovenia / Szlovénia 1 EUR = 239.640 SIT
40
Ország Tipo de cambio del euro /
Euro currency conversion rate /
Euro valutaváltási ráta
Page 43

MEMO / NOTAS / EMLÉKEZTETŐ
41
Page 44

MEMO / NOTAS / EMLÉKEZTETŐ
42
Page 45

43
Page 46

44
Page 47

Page 48

PRINTED IN CHINA / IMPRESO EN CHINA
12GT(TINSZA008EHZZ)
 Loading...