Seca 664, 665 NEC1 Service Manual

Service Manual
Variants:
6641321004
6641321104
6641321134
6641321364
6642521004
6642521104
6642521134
6657021004
6657021009
6657021094
6657021099
6657021194
6657021199
6657021244
6657021249
6657521004
6657521009
6657521094
6657521099
6657521194
6657521199
Content:
for seca 664 / 665
Service Manual Number
17-05-01-292-L
Valid as of: 01.03.2011
Description:
Electronic wheelchair scale, collabsible, vertical stand up and easily
manoeuvrable. Pre tara function with three adjustable values with chipcardreader.
Turnable display and operating housing.
Description chipcard module 30-34-00-685
Description NEC I Elektronik 30-34-00-779
Description of faults 30-34-00-588 d
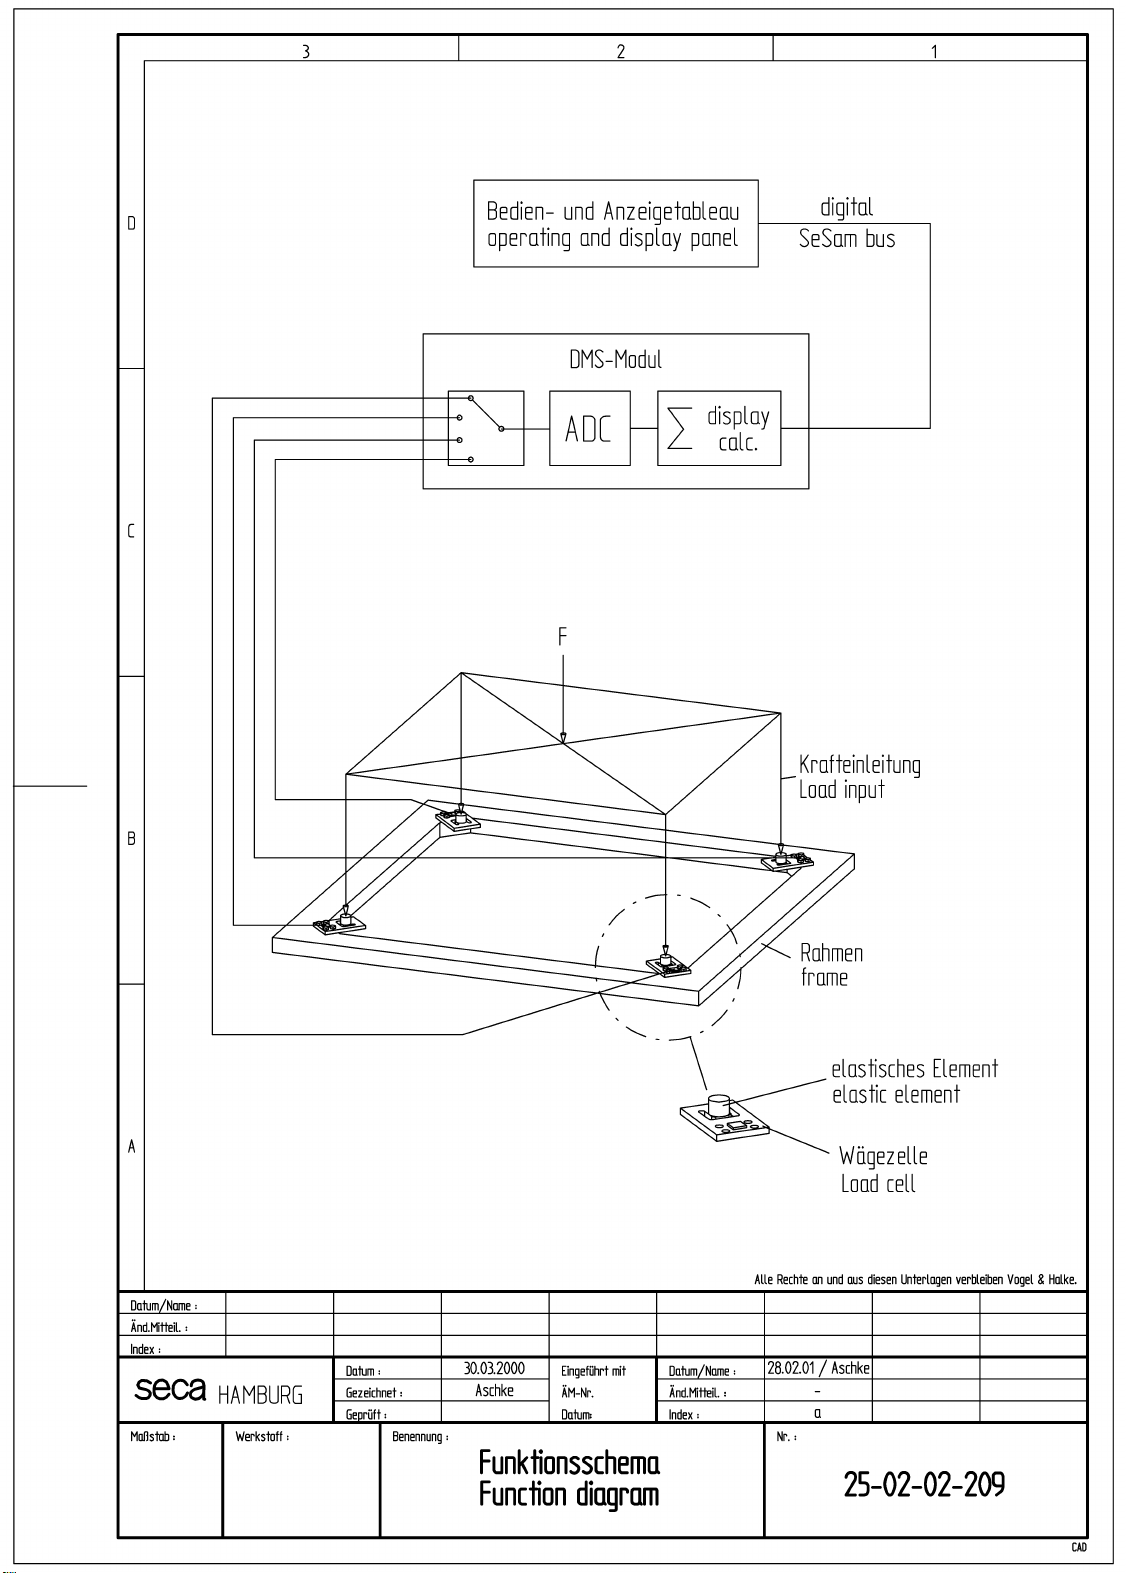
Function diagram 25-02-02-209 a
Calibration 30-34-00-603
PC configuration program 30-34-00-672 b
Cable plan 08-02-06-022 c
Cable plan chipcardreader
Replacement
Spare parts
Manual number: 17-05-01-292-L
08-02-06-025
30-34-00-673 d
30-34-00-669 k

Brief Description of the Chip Card Module
Introduction
The chip card module belongs to the family of seca electronic modules and is used to write data to and
to read data from chip cards. It works together with the extended display module which contains the
operating functions for chip card handling.
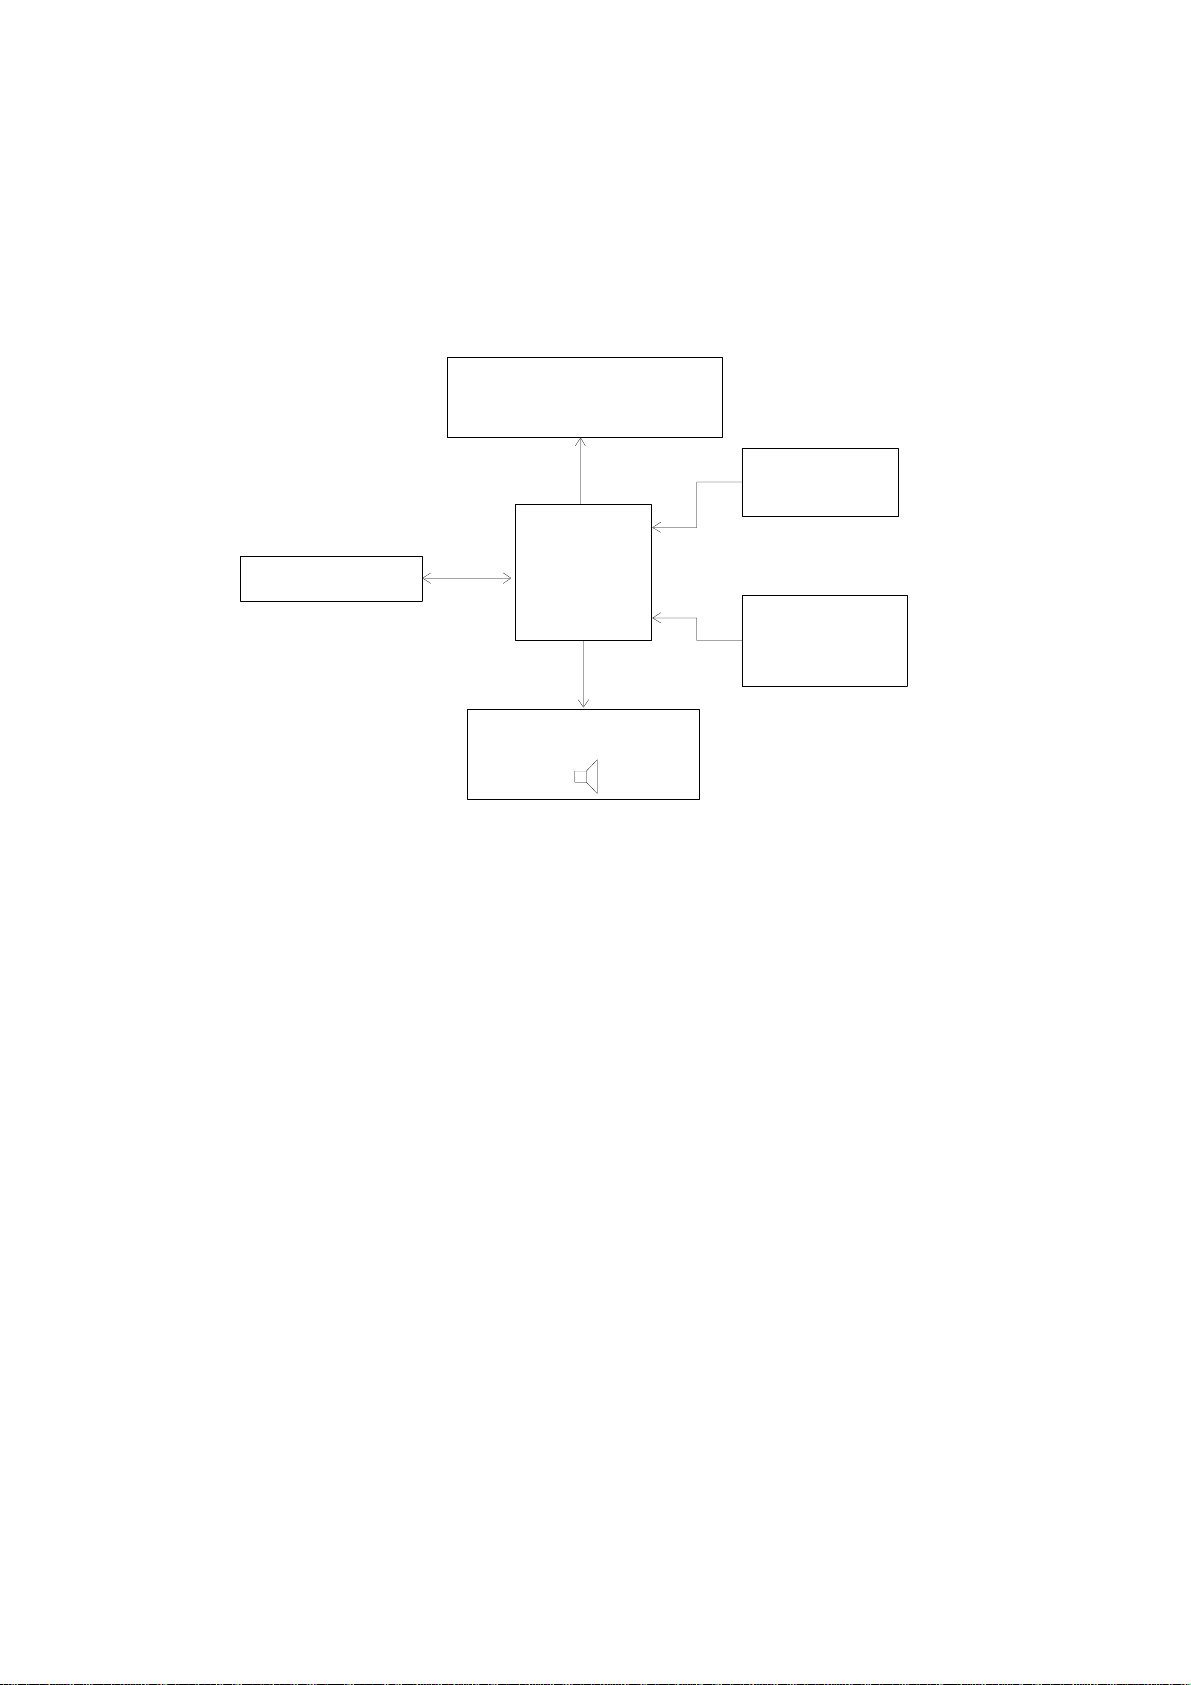
The following block diagram shows the most important function blocks of the module:
chipcard contact
crystal
oscillator
SeSAM Bus
µC
resetcircuit
signal transmitter
Chip card contact
Lowering contacts are used for the card allowing 200 000 insertion cycles. It can communicate with all
memory cards with an extended I²C bus which have been configured according to the memory
structure defined by seca.
Power supply
The required voltage of 3V is supplied via the SeSAM bus.
SeSAM bus
The SeSAM bus connects the module to the other modules. On this bus the stabilized and nonstabilized supply voltages are available. All relevant data is exchanged via a data and a clock pulse
line. The scale can be switched on or the module can signal that it wishes to send data via a special
start line.
Signal transmitter
The chip card module is equipped with a signal transmitter. It can be activated via software if the
display module used does not have a signal transmitter. A piezo diaphragm is used which is controlled
with a 4 kHz square-wave signal.
Reset circuit
If the supply voltage is applied or the start key is pressed for longer than 10 seconds, a reset signal for
the micro controller is generated.
Fault handling
If faults occur, the SeSAM bus initiates a fault message with the relevant fault code. Furthermore, each
fault message includes the number of the module type on which the fault has occurred and a code
which indicates how long the message is to stay on display and which displays are to be suppressed.
The module type for the chip card module is 5.
The module can generate the following faults:
30-34-00-685 05.02.2002
EE/Jensen
1

30 General bus fault
32 Command buffer full
50 Rom checksum fault
52 Chip card not valid
100 Note, chip card saving
Time base
From the quartz’s 4.19MHz a time base is derived which controls all timed processes in the scale.
These are, for instance, various timeouts. If a clock module is connected, the seconds to the next full
minute are automatically counted up.
Data on the chip card
Default settings for the upper limit and the pre-tare function as well as the body height as the initial
value for the body mass index and the ideal weight can be stored on the card. Measured values for
subsequent evaluation at the PC can also be registered on the smart card.
Additionally, information about the chip card's owner can be stored on the card, which is required for
evaluation at the PC but is ignored by the scale.
Functions
The functionality of the chip card is programmed in the measured value detection module using an
EEPROM entry. This entry always takes effect if no other functionality is given by the chip card.
If you insert the chip card into the scale, the scale is started automatically. In addition, one of the menu
functions can immediately be displayed if required. The default setting retrieved from the card can be
edited in advance if required.
The chip card can also be used to restrict the functions of the scale to be used by the owner and it can
be determined which data can be saved at what time.
Technical data
Supply voltage: 3 V via SeSAM bus
Supply current: typ. 0.6mA
Zero-signal current: < 1µA
Operating temperature: approx. 0°C to 50°C
Storage temperature: -10°C to 60°C
Dimensions: 71mm x 60mm x 14mm
30-34-00-685 05.02.2002
EE/Jensen
2

Service manual Electronics description
Servicing seca electronic modules
seca electronic modules allow you to measure the signals of the weight sensor and to display the
weight values resulting from this. Depending on the design of the scale, both functions can be
combined on one module or distributed on different modules.
The configuration and adjustment data is stored on the module to which the weight sensor will be
connected. If this module is replaced, the replacement module must be configured and adjusted. This
is done using a PC configuration program called “serva”. Modules that only perform display functions
can simply be replaced.
When accumulator batteries are connected to the relevant connections, these batteries are charged
by the power supply unit with a 40 mA trickle charging current. Therefore make sure never to connect
batteries to the connections provided for accumulator batteries as the batteries would be destroyed by
the charging current and run out.
If, instead of the original seca power supply unit, a power supply unit is used that supplies an output
voltage of more than 12V, the electronics can be destroyed. Warning: There are many 12V power
supply units that supply more than 12V if there is no sufficient load on them. Therefore make sure only
to use original seca power supply units. If the electronics module was damaged as a result of a wrong
type of power supply unit being used, it must be replaced. Electronics that were damaged in this way
will usually draw so much current from the power supply unit that the power supply unit will cease to
function after a short while.
Identifying defective load cells
If you assume that a load cell may be defective, it is not always easy, especially on scales with four
load cells, to determine which of them is faulty.
In many cases a digital multimeter will help.
Unsolder the load cells you suspect to be faulty one after the other and measure the resistance
between the different connecting leads. On load cells that are typically used in scales with four load
cells the reading should be approx. 1200Ω between the supply connections, approx. 1000Ω between
the outputs and approx. 850Ω between a supply line and an output line. For platform load cells which
are typically fitted in scales with just one load cell, the readings should be approx. 1/3 of these values.
It is even easier to determine which load cell is defective if an oscilloscope is available. As grounding
contact you can use the grounding connection of the power supply unit, battery or accumulator
battery. Use the measuring head to measure the operational amplifier’s output signal at pin 7 of the 8leg IC with the number 2051 or 1112 printed on it. Make sure to pierce the paint with the test probe.
On the oscilloscope you should now see recurrent ramps starting from a 2.5V line, the height of which
depends on the load on the load cells. When you press on a load cell, the corresponding ramp
increases. If load cells are defective, this is usually easy to identify. Some distort the signal to such an
extent that the ramps no longer start at 2.5V. If you press on all cells in succession you will see which
cell responds as it should and which cell causes an incorrect signal.
21.11.08 / EE/Jensen 30-34-00-779
1

Service manual Description of faults
Please refer to the operating instructions to make sure that scale malfunctions are not
caused by operation faults. Should any faults occur, the following table will help you to
identify the cause of the fault.
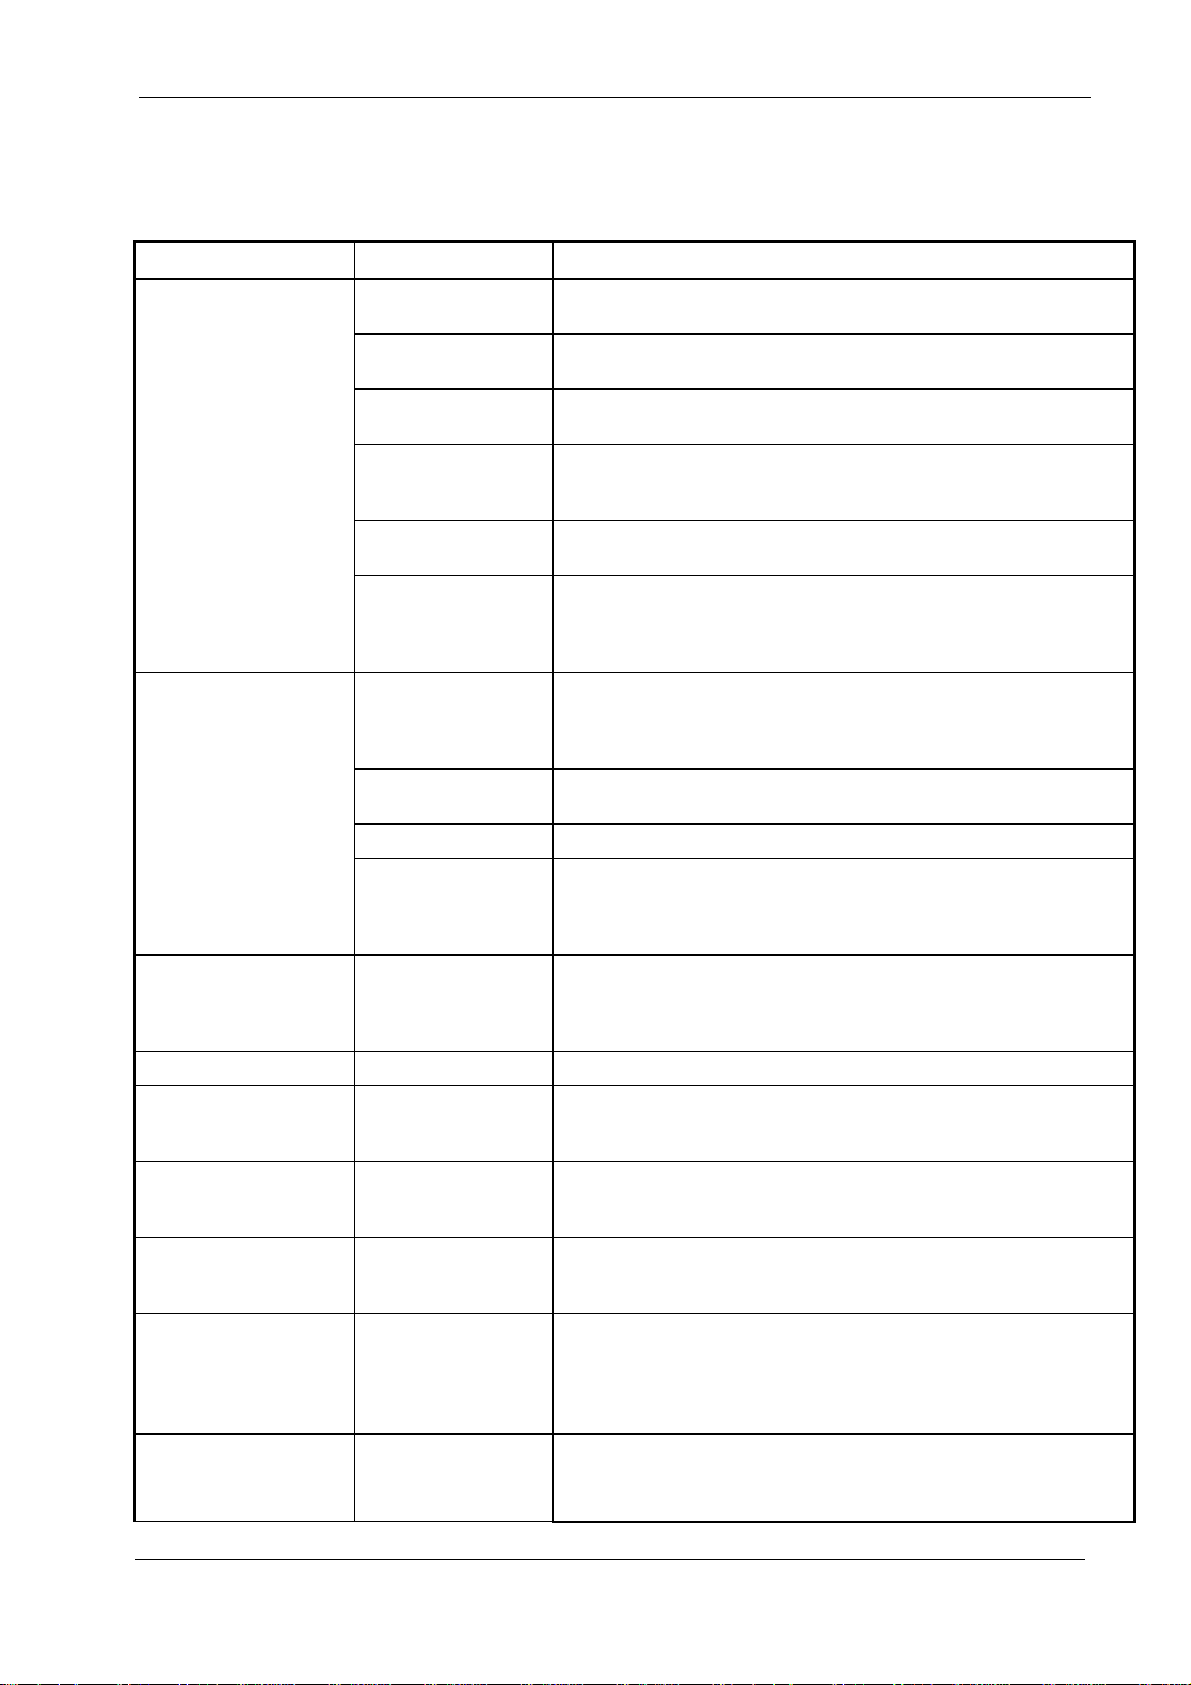
Fault description Possible cause Remedy
Scale does not start Battery not inserted
or flat
Voltage supply
defective
Bus connecting
cable defective
Keyboard defective
or not connected
Bus fault Disconnect power supply unit and battery from the scale, wait for 60
Electronics
damaged by a
wrong type of power
supply unit
Scale repeatedly shows
no weight or an incorrect
weight
Scale not correctly
Sensor damaged Replace the sensor and readjust the scale
Lever system
Packaging /
transport locking
device not removed
completey
adjusted
damaged or load
transmission to
sensor interrupted
Check the batteries
Check the voltage at the relevant electronics connections, correct
the interruption
Check the plug-in connections, check the cable for interruptions,
replace if necessary
Check the cable connections, check cable and keyboard for
interruptions, replace if necessary. (If possible please state the
number of the keyboard when ordering a replacement.)
seconds, then reconnect.
Replace the electronics. (Warning: The damaged electronics can
draw so much current that the power supply unit is also damaged.)
Check the scale
Recalibrate the scale
Check the base frame (and tie rod if present) for damage or incorrect
assembly
Scale remains in the
segment test or
measured values
fluctuate heavily
Display incomplete Display defective Replace the electronics
Scale does not respond
to keystrokes
Faults occur during the
weighing operation
Er:X:10
Er:X:11
Short-circuit
between sensor
cable and housing
Keyboard defective
or not connected
Display:
Er:x:no
Sensor defective or
connected
incorrectly
Sensor defective,
supply lines
damaged or
electronics defective
Look where the insulation is damaged (using a multimeter if
necessary) and repair it.
Check the cable connections, check cable and keyboard for
interruptions, replace if necessary. (If possible please state the
number of the keyboard when ordering a replacement.)
Electronics detecting a fault.
X : Module number
No Fault number
Check the sensor and replace it if necessary (readjustment required
after replacement).
Check supply lines, check sensor and replace as required
(readjustment required after replacement)
If several load cells are fitted, check the allocation (colour codes)
Replace the electronics
Er:X:12
Initial load too high Check the initial load
Check the load levers (jammed or bent), sensor damaged, replace
and readjust if necessary
21.11.08- Winterberg/Jen
1(2)
30-34-00-588 Index: d

Service manual Description of faults
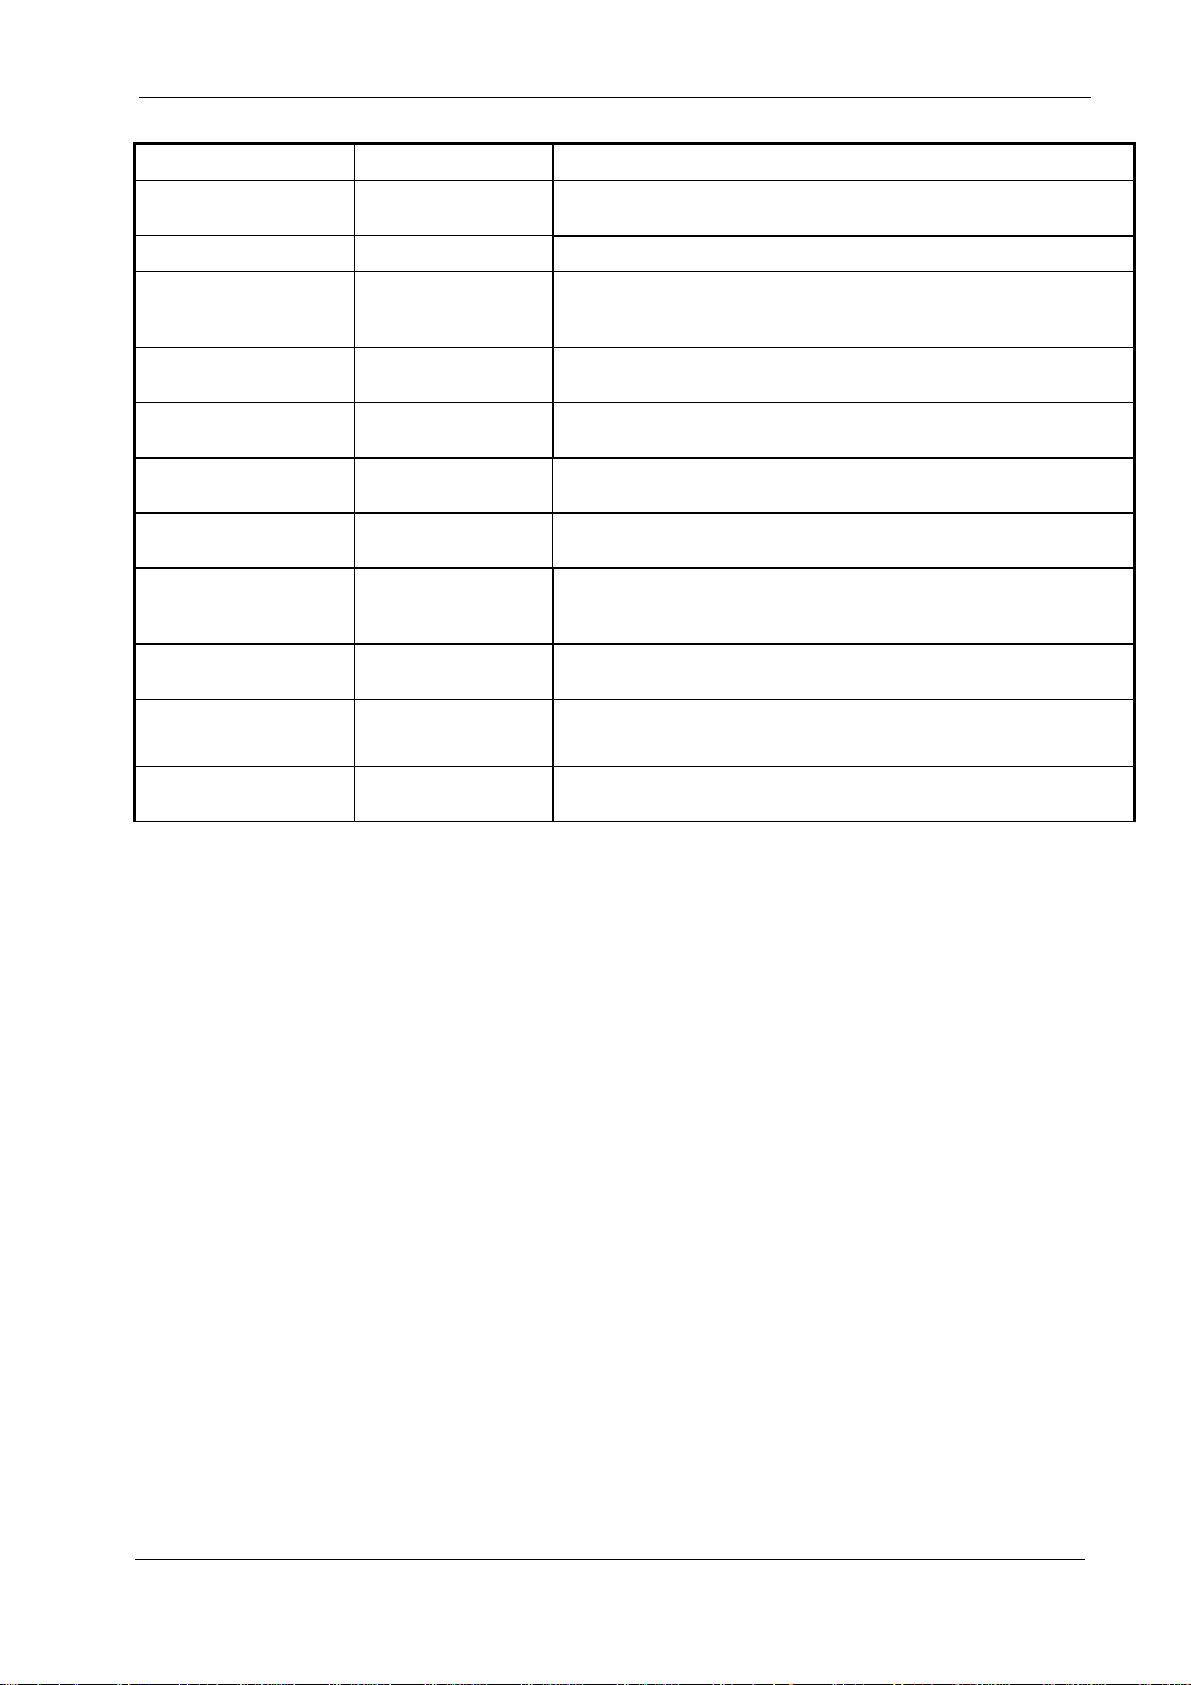
Fault description Possible cause Remedy
Er:X:14
Er:X:15
Er:X:21
Er:X:22
Er:X:30
Er:X:32
Er:X:33
Er:X:40
Er:X:41
Er:X:50
Fault in the kg value
calculation
Recalibration fault Reference weight outside the permitted range or operating fault
Fault in battery
voltage
measurement
Temperature
measurement error
Data transmission
interrupted.
Command buffer
overflow fault
To many modules
connected to bus
No data on
EEPROM / data
deleted
Incorrect EEPROM
access
Software checksum
not correct
Wrong coefficients in the module’s ROM, reprogram and readjust the
scale
Battery voltage much too low < 2.5 V or electronics defective
-> Replace the electronics
Replace the electronics
Check the bus connection, remove external sources of faults.
Check the bus cabling, eliminate the EMC fault, de-energize the
electronics for a short instant (60 secs)
Reduce the number of modules connected to the bus.
Readjust the scale or reload the scale adjustment data to the
EEPROM via the service interface
One of the modules connected accesses the memory in an incorrect
way. Determine the faulty module and replace it.
Fault immediately after switch-on -> wrong checksum in the ROM
-> Replace the electronics
Er:X:51
Menu fault Fault when operating the menu functions (impermissible values or
similar)
21.11.08- Winterberg/Jen
2(2)
30-34-00-588 Index: d


Vogel & Halke
Created on: 30.06.1998
Holger Panier / SE
File: 00603_e1.doc
Printed on: 07.07.1999
seca
Description of the calibration mode for scales with modularDescription of the calibration mode for scales with modular
electronicselectronics
General:General:
Seca scales with modular electronics are fitted with a software-controlled calibration device
that is operated using the existing controls. This device can be used to recalibrate the
scales or to set the scales to different GAL values. During development of the calibration
device, special attention was paid to the following requirements:
• It must be possible to recalibrate the scales without any additional external
equipment/tools.
• It must be possible to calibrate the calibration device.
• It must be possible to recalibrate the scales without calibrated test weights.
• The calibration device shall be protected against inadvertent use.
Calibration counterCalibration counter
The scales fitted with the new, modular electronics are equipped with a calibration counter
allowing a software recalibration to be carried out according to the requirements for
calibrated scales. To carry out such a recalibration, the calibration counter setting can be
called up on the display of the scales and compared to the data given on the calibration
label mark (applies only for calibrated products). If the values are identical, the scales are
calibrated; whereas differing values match the situation of a broken calibration seal. Each
completed recalibration procedure is registered by the calibration counter, i.e. the number is
automatically incremented by 1.
Recalibrating the scalesRecalibrating the scales
Before the scales can be recalibrated, they must be switched to the calibration mode:
To do so, switch on the scales using the appropriate control. While doing so, simultaneously
press another control key (for example, the kg/lbs key). This causes the contents of the
calibration counter (i.e. the number of calibration procedures carried out so far) to be
displayed for five seconds (flashing).
During the 5 seconds the contents is displayed, press the kg/lbs key again and keep it
depressed (for more than 1.5 seconds) to switch the scales to the calibration mode.
If the kg/lbs key is not pressed within these 5 seconds, the scales are automatically
switched back to normal weighing operation.
When switched to the calibration mode, the scales first are in a decrementing state. This
state is indicated by a flashing "dec" that alternates with the currently measured weight.
Now place a test weight onto the scales. This test weight should have a weight of at least
25% of the maximum permissible load for the weight (we recommend a weight of approx.
66-75%). The weight shown on the display must match the test weight; otherwise, the
scales are maladjusted and the recalibration procedure must carried out in full length. To do
so, change the weight shown on the display using the kg/lbs key until it matches the test
weight.
If the value shown on the display differs from the test weight (if not, recalibration is not
required), estimate whether the required nominal weight is easier to reach by decrementing
or by incrementing. To toggle from the decrementing mode to the incrementing mode or
vice versa, press the kg/lbs key for more than 1.5 seconds (display indicates dec or inc).
Page -1-
00603_e1.doc

Vogel & Halke
Created on: 30.06.1998
Holger Panier / SE
Pressing the kg/lbs key for less than 1.5 seconds causes the weight shown on the display
to be increased or decreased by 10 g (depending on the mode currently selected). As the
resolution of the display is lower, the displayed value will not necessarily be increased or
decreased each time the kg/lbs key is pressed. Repeat the above procedure until the
displayed weight and the test weight match. Set the scales to the middle between two
division values by additionally incrementing or decrementing the value by n=d/(2*10). The
calibration process can now be completed by pressing the kg/lbs key for at least five
seconds. The scales compute and store a new linearity coefficient and will then be switched
off automatically. The scales are now calibrated. Remove the test weight.
File: 00603_e1.doc
Printed on: 07.07.1999
seca
Note:
To prevent improper calibration by improper use, a timeout control has been implemented
in the calibration mode, i.e. the time that passes until the next key is pressed must never
exceed five seconds.
However, this timeout control is only active for the phase when switching to the calibration
mode.
If, during this phase, 5 seconds have passed and no key has been pressed, the scales are
automatically restored to the weighing mode so that the procedure must be repeated.
To reduce calibration errors to a minimum, recalibration is only possible using a test weight
of more than 25% and less than 100% of the max. load; otherwise, “Er:0:15” will appear
on the display.
If the scales need to be set to a different GAL value, the displayed value must be matched
to the test weight value adapted to the GAL value correction.
Example of a recalibration procedure:
The selected test weight is 100 kg.
The current weight shown on the display is 99.7 kg (max. difference of 300 g).
In this example, you must switch the scales to the incrementing mode to carry out the
recalibration procedure. After the kg/lbs key has been pressed (for more than 1.5 seconds),
a flashing "inc" is shown.
Now increase the value by the first 10 g (by briefly pressing the kg/lbs key). After this has
been done thirty times, the value 100.0 (rounded!) appears on the display although the
internal measured value still is 99.95 kg (not rounded!).
To correct this rounding error, increase the value by another 10 g to get exactly 100.00 as
the calculated value.
Terminate the recalibration procedure as described above.
Page -2-
00603_e1.doc

Vogel & Halke
Created on: 30.06.1998
Holger Panier / SE
File: 00603_e1.doc
Printed on: 07.07.1999
seca
Summary of a typical recalibration sequence:Summary of a typical recalibration sequence:
Action carried out by the user Result
The scales are switched off. No values or characters on the display.
Press the kg/lbs key and keep it depressed
while simultaneously pressing the start key.
Release both keys. The contents of the calibration counter is
Press the kg/lbs key for more than
1.5 seconds within the next 5 seconds.
5 seconds have passed and no key has
been pressed.
Place the test weight onto the scales. The measured weight of the test weight
Decide whether to decrement or to
increment:
Incrementing:
Press the kg/lbs key for more than 1.5
seconds.
The contents of the calibration counter is
shown on the display for 5 seconds
(flashing).
shown on the display for 5 seconds
(flashing).
The system switches to the calibration mode:
first "dec" appears on the display (flashing)
and then the current weight (0.0 - also
flashing).
The scales are switched back to normal
weighing operation.
appears on the display (flashing).
The incrementing mode is activated; "inc"
appears on the display.
Decrementing:
No action required as the scales are already
in the dec mode.
Decrementing or incrementing:
Again briefly press the kg/lbs key (for less
than 1.5 seconds).
Repeat this step until the measured weight
matches the test weight (format: xx.0 kg).
To correct this rounding error, decrement or
increment the value five times by another
10 g.
After the fifth time the value has been
decremented or incremented, the measured
weight appears; it now matches the test
weight.
Press the kg/lbs key for at least 5 seconds
until the system is switched off.
No output on the display.
The measured weight is decreased or
increased by 10 g. Please remember that
pressing the key does not always change the
value on the display due to the low display
resolution. Only the rounded value is given.
The display indicates the test weight (format:
xx.0 kg).
The display output does not change the first
four times.
The display indicates the exact test weight
(format: xx.00 kg).
The display does not show any characters or
values any more.
Page -3-
00603_e1.doc
 Loading...