

Page 1

003-3790.060112.D
Page 2

ParaobtenerestemanualenEspañolLatinoAmericanovayaa:http://www.schwinnfitness.com.
able
of
T TTable able
Contents
of of
Contents Contents
BeforeAssembly
ImportantSafetyInstructions
SpecificationsandT ools
Parts
Nautilus,Inc.,(800)NAUTILUS/(800)628-8458,www.NautilusInc.com-CustomerService:NorthAmerica(800)605-3369,customerservice@schwinnfitness.com|AsiaPacific&LatinAmerica(360)
859-5180,technics-APLA@nautilus.com|Patentinformation:ThisproductmaybecoveredbyUSandForeignPatentsandPatentsPending.SeeProductformoreinformation.|PrintedinChina|©2010
Nautilus,Inc.,Allrightsreserved.™and®indicateatrademarkorregisteredtrademark.Nautilus,Inc.(www.NautilusInc.com)trademarksincludeNAUTILUS®,BOWFLEX®,SCHWINN®and
UNIVERSAL®andrespectivelogos.Othertrademarksarethepropertyoftheirrespectiveowners.
Before
Before Before
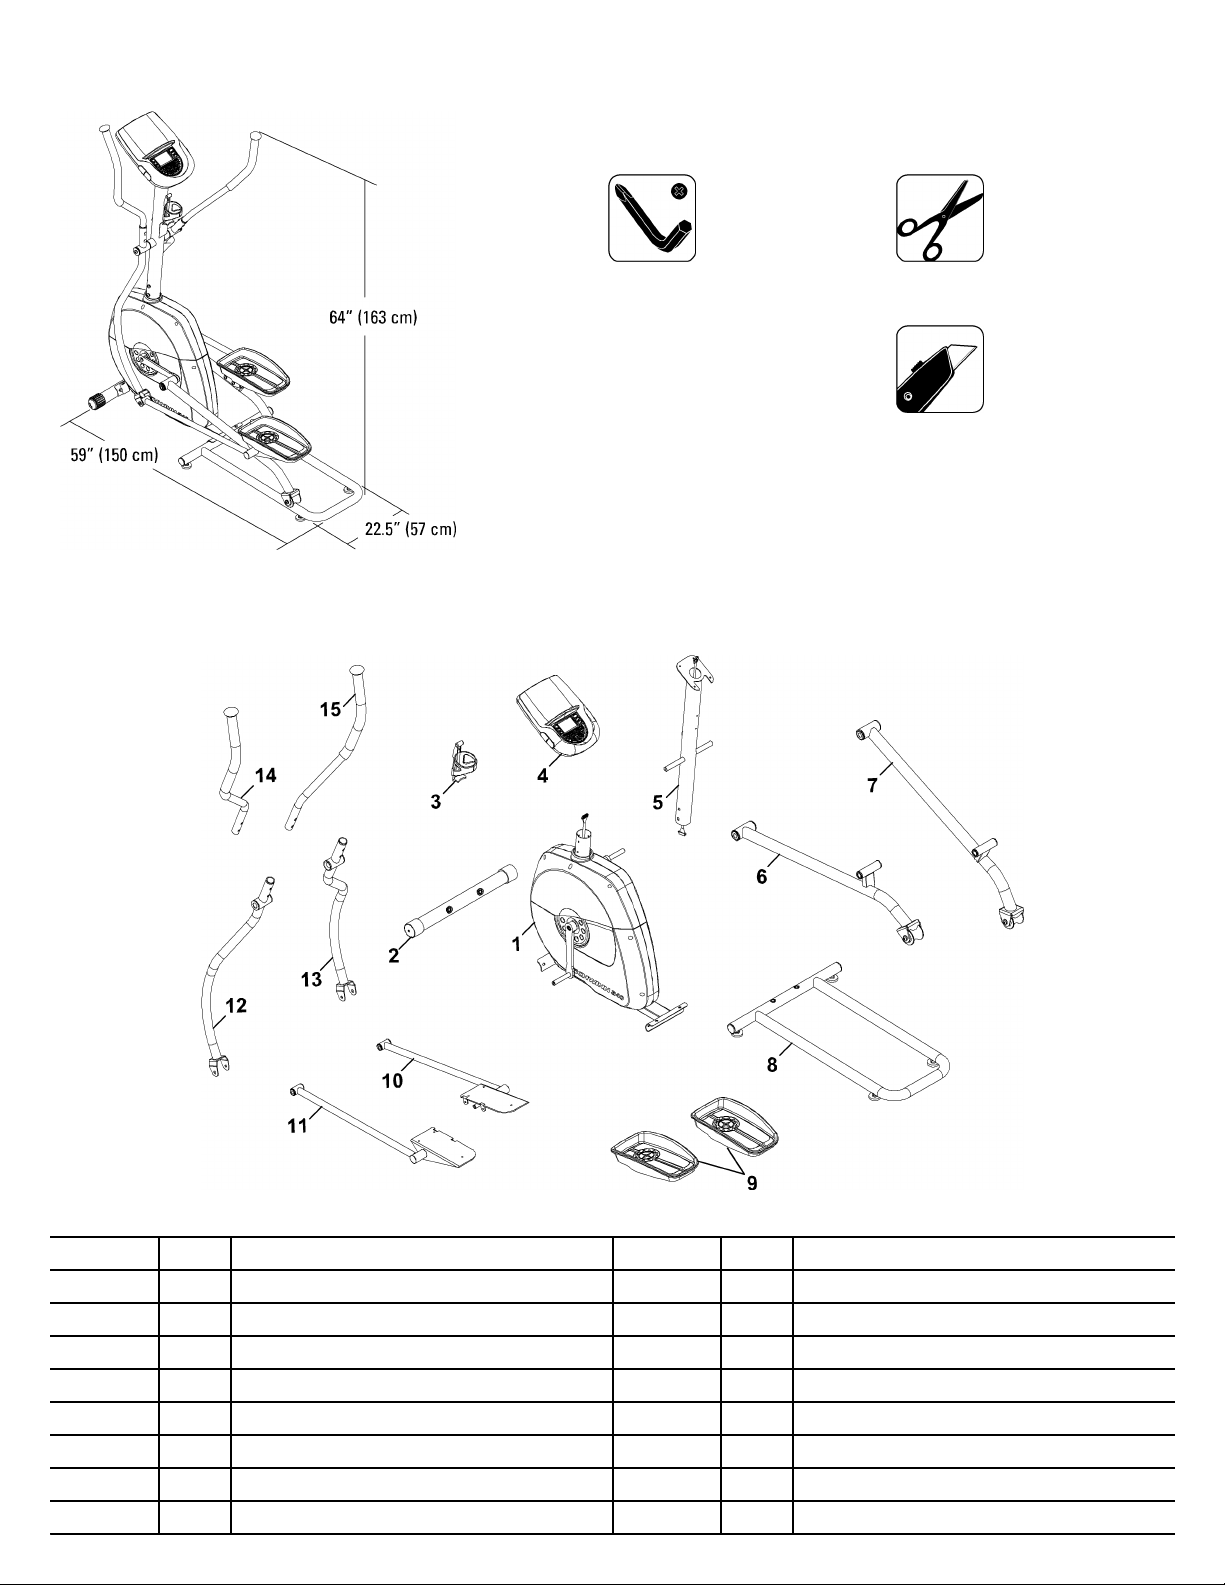
Selecttheareawhereyouaregoingtosetupandoperateyourmachine.Forsafeoperation,thelocationmustbeonahard,levelsurface.Allowaworkoutarea
ofminimum70.5”x107”(179cmx272cm).
Followthesebasicpointswhenyouassembleyourmachine:
1.Readandunderstandthe“ImportantSafetyInstructions”beforeassembly.
2.Collectallthepiecesnecessaryforeachassemblystep.
3.Usingtherecommendedwrenches,turntheboltsandnutstotheright(clockwise)totighten,andtheleft(counterclockwise)toloosen,unlessinstructedotherwise.
4.Whenattaching2pieces,lightlyliftandlookthroughtheboltholestohelpinserttheboltthroughtheholes.
5.Theassemblyrequires2people.
Assembly
Assembly Assembly
2
2
3
3
Hardware
Assembly
Adjustments
4
4
12
Important
Important Important
•Readandunderstandallwarningsonthismachine.
•CarefullyreadandunderstandtheAssemblyManual.
•Keepbystandersandchildrenawayfromtheproductyouareassemblingatalltimes.
•Donotconnectpowersupplytothemachineuntilinstructedtodoso.
•Donotassemblethismachineoutdoorsorinawetormoistlocation.
•Makesureassemblyisdoneinanappropriateworkspaceawayfromfoottrafficandexposuretobystanders.
•Somecomponentsofthemachinecanbeheavyorawkward.Useasecondpersonwhendoingtheassemblystepsinvolvingtheseparts.Donotdostepsthat
involveheavyliftingorawkwardmovementsonyourown.
•Setupthismachineonasolid,level,horizontalsurface.
•Donottrytochangethedesignorfunctionalityofthismachine.Thiscouldcompromisethesafetyofthismachineandcanvoidthewarranty .
•IfreplacementpartsarenecessaryuseonlygenuineNautilus
themachinefromoperatingcorrectlyandvoidthewarranty.
•DonotusethemachineuntilithasbeenfullyassembledandinspectedforcorrectperformanceinaccordancewiththeOwner’ sManual.
•ReadandunderstandthecompleteOwner’ sManualsuppliedwiththismachinebeforefirstuse.KeeptheOwner’sandAssemblyManualsforfuturereference.
•Doallassemblystepsinthesequencegiven.Incorrectassemblycanleadtoinjury .
Safety
Safety Safety
Thisiconmeansapotentiallyhazardoussituationwhich,ifnotavoided,couldresultindeathorseriousinjury .Obeythefollowingwarnings:
Instructions
Instructions Instructions
®
replacementpartsandhardware.Failuretousegenuinereplacementpartscancausearisktousers,keep
2
2 2
Page 3
Specifications
Specifications Specifications
and
ools
and and
T TTools ools
Included
Included Included
#2
4mm
5mm
6mm(x2)
Parts
Parts Parts
Not
Included
Not Not
Included Included
(recommended)
(recommended)
Adecalhasbeenappliedtoallright(“R RR”)andleft(“L LL”)partstoassistwithassembly.
Item
Item Item
11
2
3
41
51
6
71
8
Description
Qty
Description Description
Qty Qty
Frame
1
FrontStabilizer
1
WaterBottleHolder
Console
ConsoleMast
1
PedalArm,Left
PedalArm,Right
1
RailAssembly
3
3 3
Item
Item Item
92
10
111
12
13
141
151
Qty
Qty Qty
1
1
1
Description
Description Description
Pedals
Leg,Right
Leg,Left
LowerLeftHandlebarArm
LowerRightHandlebarArm
UpperLeftHandlebarArm
UpperRightHandlebarArm
Page 4
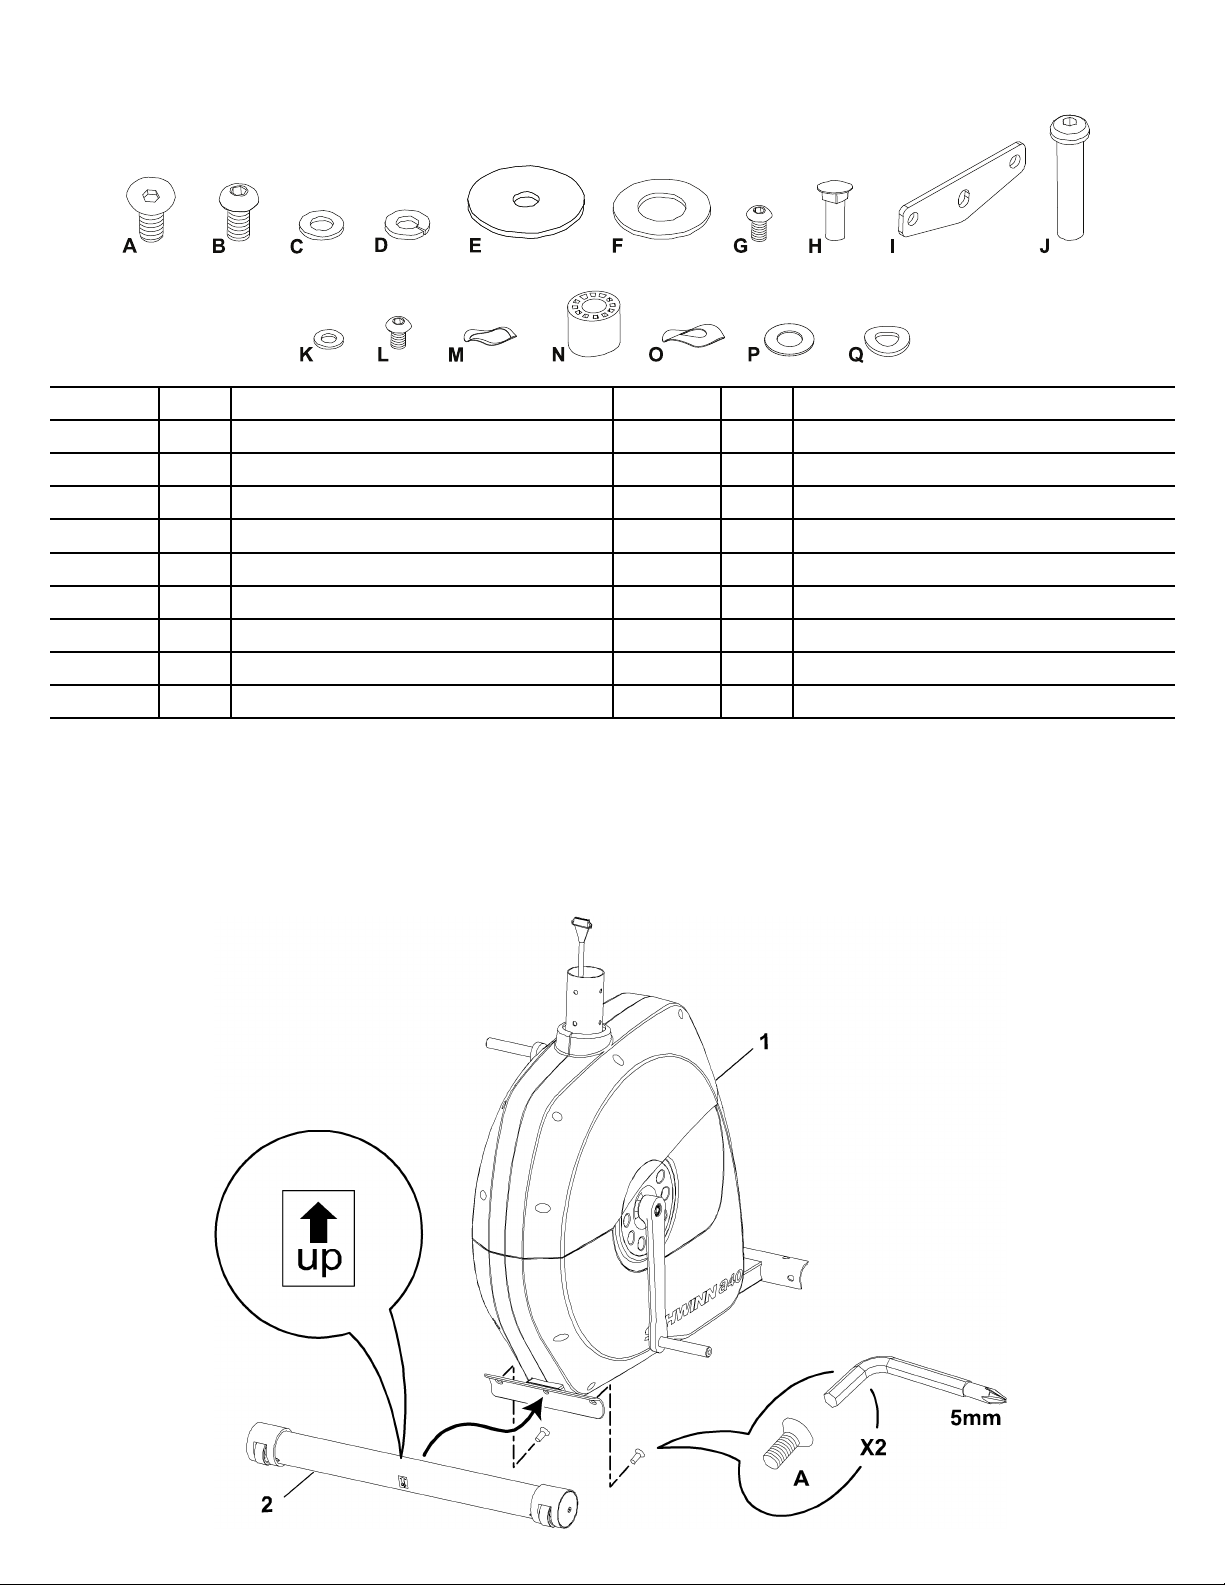
Hardware
Hardware Hardware
Item
Item Item
A
B
C
D
E
F
G
H
I
Assembly
Assembly Assembly
Attach
1. 1.1.Attach Attach
Front
Front Front
Description
Qty
Description Description
Qty Qty
6
FlatHeadHexScrew,M8x25 J
18
ButtonHeadHexScrew,M8x15
8
FlatWasher,M8L
18
SpringWasher,M8
4
FlatWasher,WideN
2
Washer O 2WaveWasher,Large (D20)
6
ButtonHeadHexScrew,M6x15
4
CarriageBolt,M6x25Q
2
PedalMountPlate
Note:
Note: Note:
Stabilizer
Stabilizer Stabilizer
DonotfullytightentheHardwareuntilthemachineiscompletelyassembled.
Frame
to totoFrame Frame
Item
Item Item
2
K
M
P
Description
Qty
Description Description
Qty Qty
Shaft
6
FlatWasher,M6
4
ButtonHeadHexScrew,M6x12
2
WaveWasher,Small(D16.5)
2
Sleeve,Plastic
4
PlasticWasher(D16.2)
6
Washer,Curved
4
4 4
Page 5
Attach
Rail
2. 2.2.Attach Attach
Assembly
Rail Rail
Assembly Assembly
Frame
to totoFrame Frame
Assembly
Assembly Assembly
Connect
3. 3.3.Connect Connect
the
Console
the the
Console Console
Cable
Cable Cable
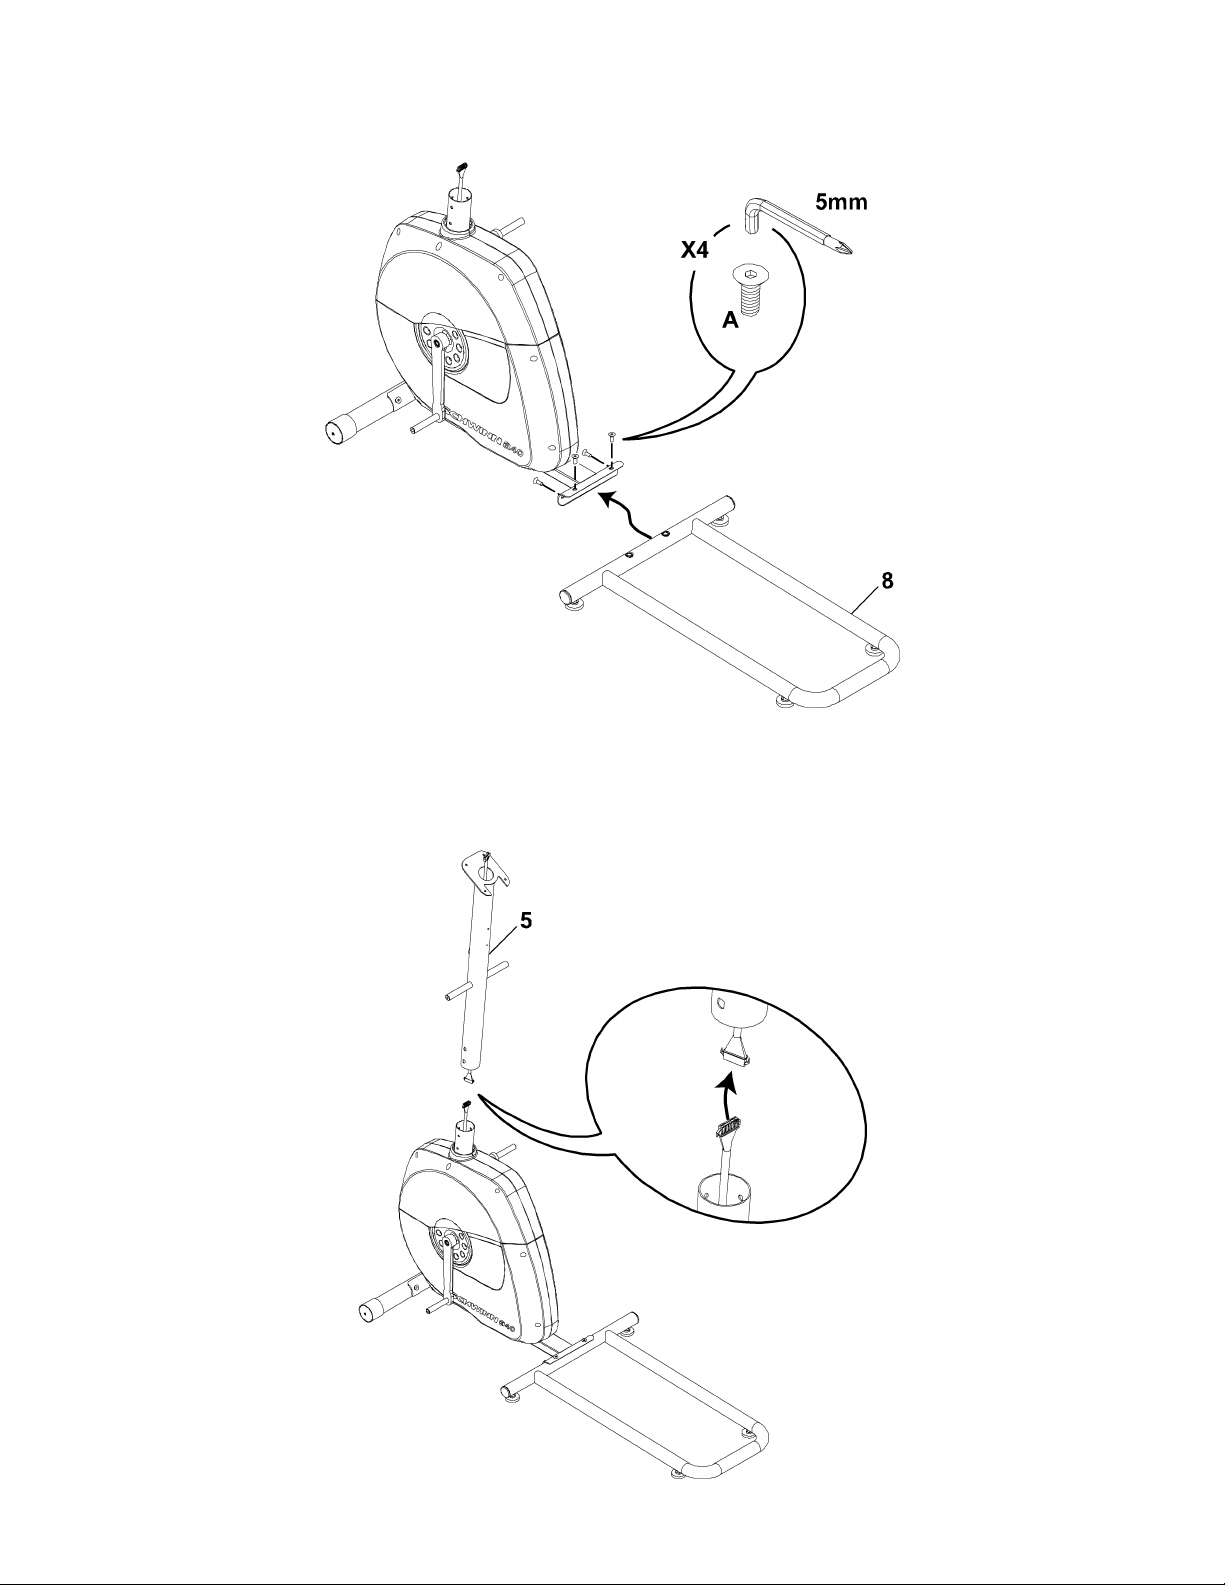
Note:
Note: Note:
ThecablesmustbefullyconnectedfortheConsoletooperate.DonotcrimptheConsoleCable.
5
5 5
Page 6

Attach
4. 4.4.Attach Attach
Console
Console Console
Mast
Mast Mast
Note:
Note: Note:
Frame
to totoFrame Frame
Assembly
Assembly Assembly
DonotcrimptheConsoleCable.
Attach
Lower
5. 5.5.Attach Attach
Handlebar
Lower Lower
Handlebar Handlebar
Note:
Note: Note:
Arms
Arms Arms
Frame
to totoFrame Frame
Assembly
Assembly Assembly
OnlytightenthisHardwareuntilsecure.
6
6 6
Page 7

Attach
Upper
6. 6.6.Attach Attach
Handlebar
Upper Upper
Handlebar Handlebar
Arms
Arms Arms
Frame
to totoFrame Frame
Assembly
Assembly Assembly
Attach
Pedal
7. 7.7.Attach Attach
Arms
Pedal Pedal
Arms Arms
Note:
Note: Note:
Frame
to totoFrame Frame
Assembly
Assembly Assembly
OnlytightenthisHardwareuntilsecure.
7
7 7
Page 8

Attach
8. 8.8.Attach Attach
Legs
Legs Legs
Frame
to totoFrame Frame
Assembly
Assembly Assembly
Attach
9. 9.9.Attach Attach
Pedals
Pedals Pedals
Legs
to totoLegs Legs
8
8 8
Page 9

10.
Attach
10. 10.
Console
Attach Attach
Console Console
Frame
to totoFrame Frame
Note:
Note: Note:
Assembly
Assembly Assembly
BesuretheswitchonthebackoftheConsoleissettoE EE.ThecablesmustbefullyconnectedfortheConsoletooperate.Donotcrimpthe
ConsoleCable.
* **Hardwareispre-installedonConsoleandnotontheHardwareCard.
11.
Attach
11. 11.
Attach Attach
ater
Bottle
W WWater ater
Holder
Bottle Bottle
Holder Holder
Frame
to totoFrame Frame
* **Hardwareispre-installedandnotontheHardwareCard.
Assembly
Assembly Assembly
9
9 9
Page 10

12.
ighten
all
12. 12.
T TTighten ighten
13.
Install
13. 13.
Install Install
Hardware
all all
Hardware Hardware
Note:
Note: Note:
Batteries
Batteries Batteries
Note:
Note: Note:
FullytightenallHardwarefromthepreviousstepsexceptwherenotedtoonlysecure.
Console
in ininConsole Console
TheconsoleusesDsizebatteries(LR20),whicharenotincluded.Makesurethatthebatteriespointinthedirectionofthe+/–indicatorsin
thebatterybay.Ifyouuserechargeablebatteries,theoptionalpoweradapterwillnotrechargethebatteries.
Donotmixoldandnewbatteries.
Donotmixalkaline,standard(carbon-zinc),orrechargeable(Ni-Cd,Ni-MH,etc)batteries.
Final
Inspection
Final Final
Inspection Inspection
Inspectyourmachinetoensurethatallfastenersaretightandcomponentsareproperlyassembled.
DonotuseuntilthemachinehasbeenfullyassembledandinspectedforcorrectperformanceinaccordancewiththeOwner’ sManual.
10
10 10
Page 11

Optional
Optional Optional
TheconsoleforyourmachinecanoperateonbatterypowerorACpower.ForACpower,itisnecessarytoordertheoptionalPowerAdapter .IfbatteriesandthePower
Adapterareinstalled,theconsolewillusethePowerAdaptertooperate.
Afterthemachineisfullyassembled,connectthePowerAdaptortotheconsoleandthewalloutlet.
Power
Power Power
Adapter
Adapter Adapter
Note:
Note: Note:
Ifyouuserechargeablebatteries,theoptionalPowerAdapterwillnotrechargethebatteries.
NOTICE:
Ifyouuseapoweradapterforyourelliptical,makesurethatthecordstaysclearofthepathofthearmsandpedals.Attachthecordto
themachineasshown:
NOTICE:
ToordertheoptionalPowerAdapter,goto:
www.schwinnfitness.com/powersupply
Orcall1(800)605–3369.
FCC
Compliance
FCC FCC
Compliance Compliance
Changesormodificationstothisunitnotexpresslyapprovedbythepartyresponsibleforcompliancecouldvoidtheuser’ sauthoritytooperatetheequipment.
Note:
Note: Note:
Itisrecommendedtoremovebatterieswhentheyarenotused,toavoiddamagefrombatterycorrosion.
ThisequipmenthasbeentestedandfoundtocomplywiththelimitsforaClassBdigitaldevice,pursuanttoPart15oftheFCCRules.These
limitsaredesignedtoprovidereasonableprotectionagainstharmfulinterferenceinaresidentialinstallation.Thisequipmentgenerates,uses
andcanradiateradiofrequencyenergyand,ifnotinstalledandusedinaccordancewiththeinstructions,maycauseharmfulinterferenceto
radiocommunications.
However,thereisnoguaranteethatinterferencewillnotoccurinaparticularinstallation.Ifthisequipmentdoescauseharmfulinterference
toradioortelevisionreception,whichcanbedeterminedbyturningtheequipmentoffandon,theuserisencouragedtotrytocorrectthe
interferencebyoneormoreofthefollowingmeasures:
•Reorientorrelocatethereceivingantenna.
•Increasetheseparationbetweentheequipmentandreceiver .
•Connecttheequipmentintoanoutletonacircuitdifferentfromthattowhichthereceiverisconnected.
Consultthedealeroranexperiencedradio/TVtechnicianforhelp.
11
11 11
Page 12

Adjustments
Adjustments Adjustments
Moving
Moving Moving
1.Removethepowercord(ifequipped).
2.UsethebackoftheRailAssemblytocarefullyliftthemachineontothetransport
3.Pushthemachineintoposition.
4.Carefullylowerthemachineintoposition.
Leveling
Leveling Leveling
ThemachineneedstobeleveledifyourworkoutareaisunevenoriftheRailAssemblyis
slightlyoffthefloor.Toadjust:
1.Placethemachineinyourworkoutarea.
2.StandontheRailAssemblyforapproximately20seconds.
3.Stepoffofthemachine
4.Loosenthelocknutandadjustthelevelersuntiltheyallcontactthefloor .
5.Adjustuntilthemachineislevel.Tightenlocknuts.
the
Machine
the the
Machine Machine
Donotmovethemachinewithoutaid.Injurytoyouordamagetothemachine
canoccur .
rollers.
the
Machine
the the
Machine Machine
12
12 12
Page 13

13
13 13
Page 14

14
14 14
Page 15

15
15 15
Page 16

PrintedinChina
 Loading...