

Page 1
Bedienungsanleitung
für Wärmepumpentrockner im Eigenheim
Mode d’emploi pour sèche-linges
à thermopompe dans maisons individuelles
Istruzioni per l’uso di asciugatrici
a termopompa in case monofamiliari
Instructions for the use
of heat pump dryers in private homes
Sicherheitshinweise beachten!
Respecter les consignes de sécurité!
Seguire le indicazioni di sicurezza!
Follow the safety instructions!
Gerät erst nach dem Lesen
dieser Anleitung in Betrieb nehmen!
Ne mettre en marche l’appareil qu’une fois
après avoir lu ce mode d‘emploi!
Mettere in funzione l’apparecchio
solo dopo aver letto queste istruzioni!
Only use appliance after rst reading
these instructions!
Produkte-Nr.
N° de produit 7315.1
No. di prodotto
Product No.
Spirit xTra
TW 7315
Instruktions-Nr.
N° d’instruction 637 321.AE
No. dell’istruzione
Instruction No.
WT11 EFH W
Page 2

Page 3

Liebe Kundin, lieber Kunde
Wir freuen uns, dass Sie sich für einen SchulthessWäschetrockner entschieden haben.
Ihr neuer Wäschetrockner entstand in mehrjähriger
Entwicklungsarbeit. Höchste Qualitätsansprüche sowohl
in der Entwicklung als auch in der Fertigung garantieren
ihm eine lange Lebensdauer.
Seine Konzeption erfüllt alle heutigen und zukünftigen
Anforderungen moderner Wäschepege. Sie ermöglicht
Ihnen eine vielfältige und individuelle Programmwahl.
Sparsamster Energieverbrauch und kurze Trocknungs-
zeiten sichern Ihnen beim Betrieb Ihres Wäschetrockners
höchste Wirtschaftlichkeit.
Chère cliente, cher client
Nous sommes fort heureux que vous vous soyez décidé
pour un sèche-linge Schulthess.
Votre nouvelle acquisition est le fruit de plusieurs années
d’efforts de développement. Des normes de qualité
extrêmement rigoureuses en matière de mise au point
comme de fabrication lui garantiront une longue durée
de vie.
Sa conception répond à toutes les exigences actuelles
et futures de l’entretien moderne du linge. Elle permet
un choix varié et personnalisé entre ses programmes.
Sa sobriété en matière de consommation d’énergie et
la brièveté de ses temps de séchage vous garantiront un
fonctionnement particulièrement économique.
Bitte lesen Sie diese Bedienungsanleitung sorgfältig
durch, um alle Möglichkeiten und Vorteile Ihres neuen
Wäsche trockners nutzen zu können.
Beachten Sie insbesondere das Kapitel «Sicherheitshinweise» sowie das beiliegende Garantie- und Kundendienstheft.
Wir wünschen Ihnen viel Freude an Ihrem neuen
Schulthess-Gerät.
Ihre
Schulthess Maschinen AG
Nous vous prions de lire avec soin le présent mode
d’emploi, an que vous puissiez proter de tous les
avantages et possibilités de votre nouveau sèche-linge.
Observez notamment le chapitre «Conseils de sécurité»
et le livret de garantie et d’assistance ci-joint.
Nous vous souhaitons beaucoup de plaisir avec votre
nouvelle machine Schulthess.
Cordialement
Schulthess Maschinen SA
Cara cliente, caro cliente
Siamo lieti che abbiate scelto un’asciugatrice Schulthess.
La vostra nuova asciugatrice e nata dopo molti anni
di ricerche. Le alte esigenze di qualità richieste e durante
la fase di fabbricazione vi garantiscono un apparecchio
di lunga durata.
La sua concezione soddisfa tutte le richieste odierne e
future per un moderno trattamento della biancheria.
Vi consente di selezionare i programmi in modo vario e
personalizzato.
Il forte risparmio di energia e tempi di asciugatura più
brevi vi garantiscono la massima economicità durante il
funzionamento della vostra asciugatrice.
Dear Customer
We are pleased that you have chosen a Schulthess dryer.
Your new dryer is the result of many years of development work. The highest quality requirements, both in
de velop ment and manufacture, guarantee a long lifetime.
Its design meets all the current and future demands
of modern laundry care. It offers you a varied and individual choice of programmes.
Sparing use of energy and short drying times help to
ensure that you can use your dryer as economically as
possible.
Vi preghiamo di leggere attentamente queste istruzioni
per l’uso, per poter sfruttare tutte le possibilità ed i
vantaggi che vi offre la vostra nuova asciugatrice.
Osservare particolarmente il capitolo «Istruzioni per la
sicurezza» come anche il libretto del Servizio Assistenza
ed il certicato di garanzia allegati.
Vi auguriamo di poter utilizzare con gioia la vostra
nuova macchina Schulthess.
Vostra
Schulthess Maschinen SA
Please read these instructions carefully to enable you to
use all the possibilities and advantages of your new dryer.
Please note in particular the chapter «Safety information»
and the enclosed guarantee and customer services
booklet.
We hope you will be very happy with your new
Schulthess machine.
Yours
Schulthess Maschinen AG
Page 4

4
Page 5
Inhaltsverzeichnis
D EUTSCH
Verwendete Symbole 6
Entsorgungshinweise
X Verpackung des Neugerätes 6
X Entsorgung des Altgerätes 6
Sicherheitshinweise
X Allgemeine Sicherheitshinweise 6/7
X Vor der Inbetriebnahme beachten 7
X Beim Trocknen beachten 7
X Bei einem Transport beachten 7
So trocknen Sie richtig und umweltfreundlich
X Wäsche sortieren 8
X Beladung 8
X Tipps zum Trocknen 8
X Diese Textilien nicht im Gerät trocknen 8
Inbetriebnahme
X Vorbereitung 8
X Einfülltür öffnen 8
X Einfülltür schliessen 8
Gerätebeschreibung
X Bedienungs- und Anzeigefeld 9
Programmtabelle 10/11
Programm wählen
X Standard-Programme wählen 12
X Spezial-Programme 12
Zusatzfunktionen
X Pegeleicht 12
X Mix 12
X Zeitwahl 12
X Startzeitvorwahl 12
X Schnellgang 12
Z Hinweis für Prünstitute und
Anwender 15
Z Verbrauch gemäss Richtlinie
2010 / 30 / EU 15
Reinigung und Pege
X Fillterhalter reinigen 16
X Feuchtigkeitssensor reinigen 16
X Gerät reinigen 16
X Entleerung bei Frostschutz
oder Transport 16
Störungen
X Störungsmeldungen 17
X Störungen beheben 17
Kundendienst
X Produkte- und Geräte-Nr. 18
Garantieabonnement 18
Notizen 18
Sommaire français
X Voir page 19
Programm starten
X Programm wählen 13
X Zusatzfunktion wählen 13
X Programm vor dem Programmstart
ändern 13
X Wäsche einfüllen 13
X Programm starten 13
X Programmablauf / Programmstand 13
X Wäsche nachlegen 13
X Programm abbrechen 13
X Programmende 13
X Wäsche entnehmen 13
X Filter reinigen 13/14
X Gerät ausschalten 14
Grundeinstellungen
Z Anfangsfeuchte 14
Z Trocknungsgrad 14
Z Knitterschutz 14
Z Uhrzeit 14
Z Sprache 15
X Erweiterte Grundeinstellungen
Z Kindersicherung 15
Z Tastenspeicher 15
Z LCD Helligkeit 15
Z LCD Kontrast 15
Z Summer-Lautstärke 15
Z Standby-Funktion 15
Z Optische Schnittstelle 15
Z Defaultsprache 15
Sommario italiano
X Vedere pagina 33
Contents english
X See page 47
Page 6
6
Verwendete Symbole
signalisiert Sicherheitshinweise und
Warnungen
X verweist auf Arbeitsschritte, die der Reihe
nach aus geführt werden müssen
kennzeichnet Aufzählungen sowie
allgemeine nützliche Hinweise
Entsorgungshinweise
Verpackung des Neugerätes
Verpackungsmaterial ordnungsgemäss
entsorgen.
Verpackungsmaterial ist kein Spielzeug.
Durch die Aufbereitung und Wiederverwendung werden Rohstoffe eingespart
und Abfallvolumen verringert.
Die Ver packung kann dem Fachhändler
oder Lieferanten zurückgegeben werden.
Alle verwendeten Verpackungsmaterialien
sind umweltverträglich und wiederverwendbar. Der Karton besteht aus 80% bis 100%
Altpapier.
Holzteile sind nicht chemisch behandelt.
Die Folien sind aus Polyethylen (PE), die
Umbänderung aus Polypropylen (PP).
Diese Materialien sind reine Kohlenwasser stoff-Verbindungen und recycelbar.
Entsorgung des Altgerätes
Ausgediente Geräte sind unbrauchbar zu
machen:
Nachdem der Netzstecker gezogen bzw.
der Anschluss vom Elektriker demontiert
worden ist, Netzkabel durch trennen und
entfernen. Türschloss zerstören oder entfernen, damit spielende Kinder sich nicht
einsperren und in Lebensgefahr geraten.
Komponenten des Altgerätes dürfen nicht
weiter verwendet werden.
Das Altgerät enthält wertvolle Werkstoffe,
die einer Wieder verwertung zugeführt
werden sollten.
Stellen Sie sicher, dass Ihr altes Gerät
ordnungsgemäss entsorgt wird.
Bewahren Sie Ihr Altgerät nicht auf und
geben Sie es keinesfalls in den normalen
Abfall.
Anschriften von Sammelstellen oder Rücknahmeorten für die Entsorgung von
geräten erfahren Sie bei Ihrer Gemeindeverwaltung.
Bitte helfen Sie auf diese Weise bei einer
umweltverträg lichen Entsorgung bzw.
Wiederverwertung mit.
Alt-
Sicherheitshinweise
Dieses Gerät entspricht den einschlägigen
Sicherheits bestimmungen für Elektrogeräte.
Es ist nicht für die Benut zung durch Personen (einschliesslich Kinder) mit verringerten
physischen, sensorischen oder mentalen
Fähigkeiten bzw. mit mangelnden
Erfahrungen und Kennt nissen geeignet.
Bitte beachten Sie die Sicherheits hin weise
in dieser Bedienungsanleitung und der
dazugehörenden Aufstellanleitung.
Allgemeine Sicherheitshinweise:
Nicht auf das Gerät steigen.
Setzen, lehnen oder stützen Sie sich nicht
auf die Einfüll tür. (Kippgefahr!)
Der Trockner darf nur von eingewiesenen,
geschulten Personen (Mindestalter 8 Jahre)
bedient werden.
Kinder unter 3 Jahren vom Gerät fernhalten
oder ständig beaufsichtigen.
Kinder dürfen nicht mit dem Gerät spielen.
Keinesfalls das Gerät mit Wasser abspritzen
oder mit einem Dampfreiniger reinigen.
Reinigung und Benutzerwartung dürfen
nicht von Kindern ohne Beaufsichtigung
durchgeführt werden.
Wird das Gerät für längere Zeit nicht
gebraucht, ist es vom Strom zu trennen.
Netzstecker nur mit trockenen Händen
anfassen.
Nur am Stecker, nie am Kabel ziehen.
Page 7
7
Reparaturen dürfen nur von geschultem
Fachpersonal durchgeführt und defekte
Bauteile nur gegen Original-Ersatzteile des
Geräteherstellers ausgetauscht werden.
Durch unsachgemässe Reparaturen oder
Fremd-Ersatz teile können erhebliche Sachschäden und Gefahren für den Benutzer
entstehen. Modikationen am Gerät sind
nur in Absprache mit dem Hersteller
z ulässig.
Wenn die Netzanschlussleitung dieses
Gerätes beschädigt wird, muss sie durch
eine besondere Anschlussleitung ersetzt
werden, die beim Hersteller oder seinem
Kunden dienst erhältlich ist.
Vor der Inbetriebnahme beachten:
Lesen Sie die beiliegenden Druckschriften
sorgfältig durch, bevor Sie Ihren Trockner
in Betrieb nehmen. Sie enthalten wichtige
Informationen zu Installation, zum
Gebrauch und zur Sicherheit des Gerätes.
Druckschriften für Mitbenützer oder
Nachbesitzer sorg fältig aufbewahren.
Das Gerät durch geschultes Fachpersonal
und entspre chend der Aufstellanleitung
installieren lassen.
Ein Gerät mit sichtbaren Schäden nicht
anschliessen.
Der Raum um den Trockner ist von Flusen
freizuhalten.
Beim Trocknen beachten:
Gegenstände wie Schaumgummi (Latex-
Schaumgummi), Duschhauben, wasserdichte Textilien, gummierte Artikel sowie
Kleidungsstücke oder Kopfkissen mit
Schaum gummi ocken sollten nicht im
Trockner getrocknet werden.
Weichspüler oder ähnliche Produkte
sollten gemäss ihrer Anweisungen verwendet werden.
Ein Trocknungsgang sollte immer mit
vollständig erfolgtem Abkühlschritt
enden, damit die Wäschestücke bei einer
Temperatur bleiben, welche sie nicht
beschädigt. Sollte der Trocknungsgang
vorzeitig ohne Abkühlen beendet werden,
müssen alle Wäschestücke rasch entnommen und so ausgebreitet werden, dass die
Wärme a bgegeben werden kann.
Dabei ist zu beachten, dass die Wäsche-
stücke aufgrund ihrer Temperatur und
Feuchte bei Haut kontakt Verbrennungen
verursachen können. Es ist daher für
entsprechenden Handschutz zu sorgen.
Haustiere vom Gerät fernhalten.
Das Gerät nur im Haushalt zum Trocknen
von Textilien benutzen.
Nach Programmende nicht in die drehende
Trommel greifen.
Bei einem Transport beachten:
Vorsicht beim Transport des Gerätes!
(Verletzungsgefahr!)
Das Gerät nicht an vorstehenden Bau-
teilen anheben!
Vor dem Start eines Trockenprogrammes
sicherstellen, dass sich keine Fremdkörper
in der Trommel benden.
Nur saubere Wäschestücke im Trockner
trocknen.
Der Trockner darf nicht benutzt werden,
wenn Chemi
benutzt worden sind. Wäsche stücke,
die mit Speiseöl, Aceton, Alkohol, Benzin,
leum, Kerosin, Fleckenentferner,
Petro
Terpentin, Wachs oder
verschmutzt sind, sollten vor dem Trocknen
im Trockner in warmem Wasser mit
zusätzlichen Menge Waschmittel
einer
gewaschen werden.
ka lien für die Reinigung
Wachs entferner
Page 8
8
So trocknen Sie richtig und
umweltfreundlich
Wäsche sortieren
Beachten Sie die Trocknungs-Symbole
in den Textilien.
Trocknen mit normaler Temperatur.
Trocknen mit niedriger Temperatur.
Nicht maschinell Trocknen.
Nur Textilien, die mit Wasser gewaschen wurden, im
Gerät trocknen.
Um ein gleichmässiges Trocknungsergebnis zu erzielen,
die Wäsche nach Gewebeart und gewünschtem Trocknungsziel sortieren.
Beladung
Am sparsamsten und umweltfreundlichsten trocknen
Sie, wenn Sie die maximale Wäschemenge einfüllen
(siehe Kapitel «Programmtabelle»).
Maximale Beladungsmengen nicht überschreiten, da
Überfüllen das Trocknungsergebnis beeinträchtigt und
die Wäsche stark knittert.
Die Wäsche vor dem Trocknen durch Schleudern in
der Waschmaschine oder einer Wäsche schleu der gründlich entwässern. Je höher die Schleuder drehzahl, desto
kürzer ist die Trocknungszeit und umso geringer der
Stromverbrauch.
Auch pegeleichte Wäsche schleudern.
Tipps zum Trocknen
Schliessen Sie Reissverschlüsse, Haken und Ösen.
Knöpfen Sie Duvet- und Kissenbezüge zu. Lose Gürtel,
Schürzenbänder usw. zusammenbinden.
Pegeleichte Wäsche möglichst in leicht feuchtem
Zu stand (Trocknungsziel «Leichttrocken» wählen) aus
dem Gerät nehmen und an der Luft kurz nachtrocknen
lassen. Bei Übertrocknen besteht Knittergefahr.
Wäschestücke, die nach dem Trocknen eines Wäsche-
postens mit stark unterschiedlichen Gewebearten noch zu
feucht sind, können mit dem Programm «Zeit trock nen»
nachgetrocknet werden.
Gewirkte Textilien, z.B. Trikotwäsche, können beim
Trocknen etwas einlaufen. Für diese Textilien kein Programm «Extratrocken»
Wolle oder Textilien mit Wollanteil nur mit dem
Spezial programm «Wolle nish» trocknen: Verlzungsgefahr!
Wenn ein einzelnes Wäschestück getrocknet werden
muss, so wird es gleichmässiger getrocknet, wenn Sie
zusätzliche Wäschestücke als Ballast beigeben, z. B. zwei
Frotteetücher.
verwenden.
Diese Textilien nicht im Gerät trocknen
Tropfnasse Wäsche: Energieverschwendung!
Wäsche, die mit entzündlichen Lösungsmitteln behan-
delt wurde, z.B. mit Fleckenentferner oder Waschbenzin,
nicht im Gerät trocknen (Explosionsgefahr!).
Textilien, die Schaumgummi enthalten oder die mit
Haarfestiger, Nagellackentferner oder ähnlichen Mitteln
behaftet sind, nicht im Gerät trocknen (Brandgefahr!).
Inbetriebnahme
Das Gerät entsprechend der Aufstellanleitung installieren.
Bevor das Gerät das erste Mal in Betrieb genommen wird,
Trommel mit einem feuchten Tuch auswischen.
Vorbereitung
Überprüfen Sie:
X ob der Flusenlter eingesetzt ist (siehe Kapitel «Pro-
gramm starten»).
X ob der Netzstecker eingesteckt oder der Wandschalter
eingeschaltet ist.
Wenn alle Kontroll lampen blinken, ist das Gerät betriebsbereit.
X Leuchtet eine Kontrolllampe dauernd, tippen Sie die
Schnellgangtaste an, bis «Programm wählen» angezeigt
wird.
Hinweis
Ist das Display dunkel, kann es durch Antippen einer
beliebigen Taste aktiviert werden.
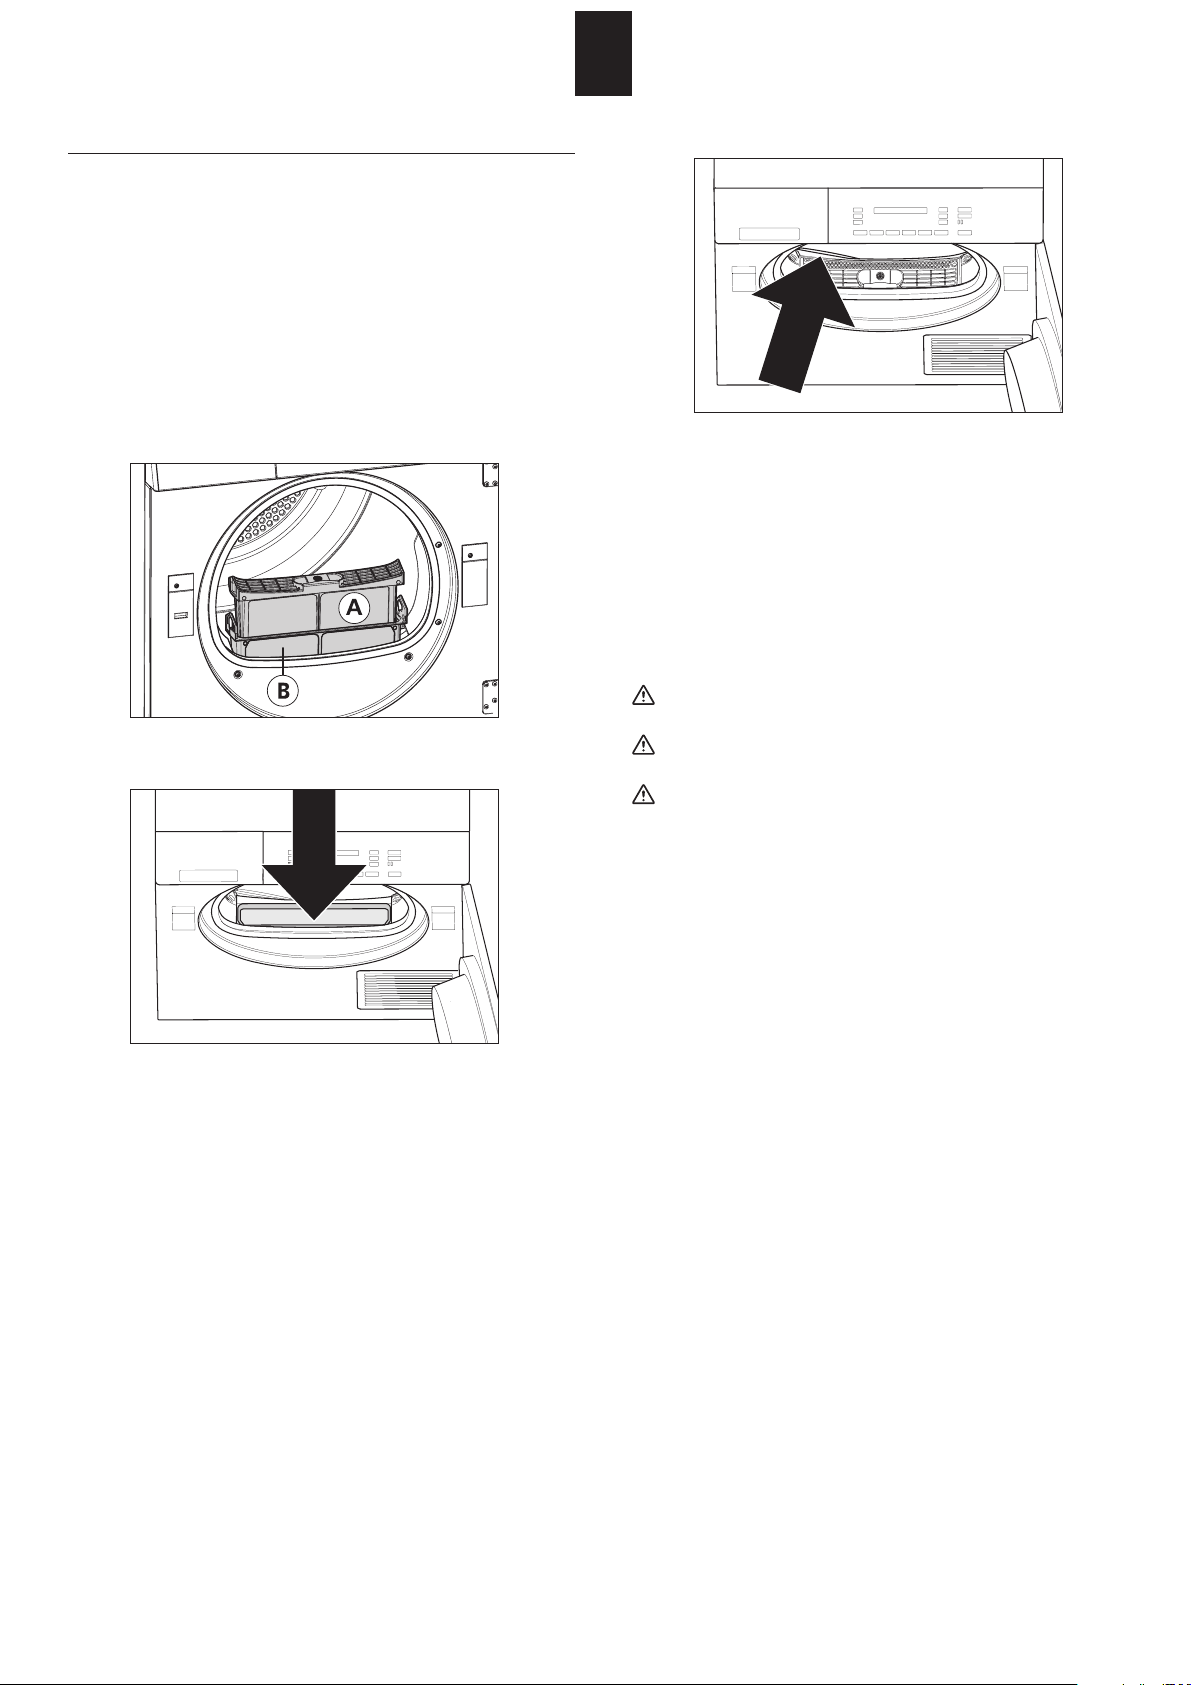
Einfülltür öffnen
X Drücken Sie die Taste «Einfülltür öffnen».
Die Einfülltür springt auf.
X Achtung: Die Tür springt nur auf, wenn die Haupt-
strom zufuhr eingeschaltet ist. Sollte vor dem Tür öffnen
kein Strom vorhanden sein, kann die Tür manuell durch
einen kurzen Druck auf Höhe des Verschlussriegels
geöffnet werden.
Die Trommelbeleuchtung wird beim Öffnen der Tür
eingeschaltet.
Einfülltür schliessen
X Schliessen Sie die Einfülltür, indem Sie diese zudrücken,
bis der Verschluss hörbar einschnappt.
Achten Sie darauf, dass beim Schliessen der Einfülltür
keine Wäschestücke eingeklemmt werden.
Bei nicht geschlossener Tür verhindert ein Sicherheits-
schalter die Inbetriebnahme des Gerätes.
Page 9
Gerätebeschreibung
Bedienungs- und Anzeigefeld
9
Programme
1 Spezialprogramme
2 Bügelfeucht
3 Schranktrocken
4 Extratrocken
Zusatzfunktionen
5 Pegeleicht
6 Startzeitvorwahl
7 Mix-Wäsche
8 Zeitwahl
9 Programmstart
10 Einfülltür öffnen
11 Schnellgang
Anzeigen
12 Display-Anzeige
Schnittstellen
13 SCS-Schulthess Control System
(PC-Schnittstelle für Kundendienst)
Bedienungs- und Anzeigefeld
Filter
Einfülltür
Kühlgitter
Page 10
Dauer
ca. Min
Strom-
verbrauch
ca. kWh
Geschleudert in
der Waschmaschine
bei U/min
80
96
1,2
1,5
1600
1200
112
128
1,6
2,0
1600
1200
120
137
1,8
2,2
1600
1200
34
0,4
800
40
0,5
600
51
0,6
800
59
0,7
600
10
58
66
0,8
0,9
800
600
800 0,6 48
800 1,0 65
800 1,2 73
Tasten für
Programmwahl
Programme
Trocknungsziel
Bügelfeucht
X für Wäsche, die mit einem Bügeleisen
X für Wäsche, die nicht gebügelt werden soll Schranktrocken
gebügelt werden soll
X für besonders dicke oder mehrlagige Stoffe Extratrocken
+
Bügelfeucht
X für Wäsche, die nicht gebügelt werden soll Schranktrocken
gebügelt werden soll
+
+
+
+
Bügelfeucht
X für Wäsche, die nicht gebügelt werden soll Schranktrocken
gebügelt werden soll
+
Beachten Sie bitte stets die Pege kenn zeichen der Textilien
Baumwolle und Leinen
Textilien / Wäscheart
max.
Wäsche-
menge
7 kg Bett- und Tischwäsche, Handtücher, T-Shirts,
Programmtabelle
Pege
kennzeichen
Oberhemden, Blusen, Sportbekleidung,
Frottier-, Geschirr- und Handtücher, Bettwä-
Polohemden, Arbeitskleidung
Frottier-Bademäntel und -Bettwäsche
sche, Unterwäsche, Baumwollsocken
keine Unterwäsche und Socken
Pegeleichte (bügelfreie) Wäsche aus Synthetic und Mischgewebe sowie
Baumwolle mit Bügelfreiausrüstung z. B. Viskose, Cupro, Modal, Polyester
3,5 kg Hosen, Kleider, Röcke, Hemden X für Wäsche, die mit einem Bügeleisen
Anoraks, Decken X für besonders dicke oder mehrlagige Stoffe Extratrocken
Bett- und Tischwäsche, Trainingsanzüge
Mixwäsche aus Baumwolle und pegeleichten Textilien
Oberhemden, Blusen, Sportbekleidung,
Anoraks, Decken X für besonders dicke oder mehrlagige Stoffe Extratrocken
Bett- und Tischwäsche, Trainingsanzüge
3,5 kg Hosen, Kleider, Röcke, Hemden X für Wäsche, die mit einem Bügeleisen
Page 11
Dauer
ca. Min
Strom-
verbrauch
ca. kWh
119
1,8
11
132
2,0
Geschleudert in
der Waschmaschine
bei U/min
Tasten für
Programmwahl
Programme
Trocknungsziel
+
1x
Auffrischen
Zeittrocknen warm
Zeittrocknen kalt
20-90min
+
+
+
2x
2x
20-150min
Zeittrocknen warm
20-150min
400 0,9 55
3x
Hemden/Blusen
Bügelfeucht
800
600
200 1,0 49
5x
4x
Synthetics
Schranktrocken
Schranktrocken
800 0,1 7
6x
Wolle nish
Flauschtrocken
(nur angetrocknet)
Beachten Sie bitte stets die Pege kenn zeichen der Textilien
Spezialprogramme
Textilien / Wäscheart
-
max.
Wäsche
menge
1,5 kg Auffrischen X Die Wäsche wird gelüftet, ohne zusätzliche Temperatur
Programmtabelle
Pege
kennzeichen
einzubringen.
ohne die Restfeuchte zu überprüfen.
7,0 kg Baumwolle X Die Wäsche wird mit der eingestellten Zeit getrocknet,
4,5 kg Jeans X Jeans werden durchgetrocknet. Jeans
X Zum Trocknen von Seide, Feinwäsche, Dessous, Gardinen u.ä.
2,3 kg Synthetics
ohne die Restfeuchte zu überprüfen.
Das Programm mindert Faltenbildung, schont die Wäsche und
erleichtert zusätzlich das Bügeln.
3,5 kg Pegeleicht X Die Wäsche wird mit der eingestellten Zeit getrocknet,
3,5 kg Hemden/ Blusen X Hemden und Blusen werden bis «Bügelfeucht» getrocknet.
X Die Wäsche wird auschiger, aber nicht getrocknet.
Wäsche direkt nach Programmende entnehmen und auf einem
Frottéetuch ach zum Trocknen auslegen.
feste Wolle
3,5 kg Waschmaschinen-
Page 12
12
Programm wählen
Standard-Programme wählen
Das elektronische Abtastsystem kontrolliert laufend die
aktuelle Feuchte Ihrer Wäsche und beendet das Pro gramm
automatisch beim Erreichen des eingestellten Trock nungs
ziels.
X Programmtaste antippen, entsprechend gewünschtem
Trock nungs grad.
Die Kontrolllampe des gewählten Programmes leuchtet.
X Für pegeleichte Textilien Zu satzfunktion «Pegeleicht»
wählen.
X Für gemischte Wäscheposten Zusatzfunktion «Mix-
Wäsche» wählen.
Spezial-Programme
Mit den Spezialprogrammen können Textilien besonders
wäschegerecht getrocknet werden.
Taste
Programm auf dem Display erscheint (siehe Programmtabelle).
wiederholt antippen, bis das gewünschte
Zeitwahl
Falls Sie bei den Spezialprogrammen ein zeitgesteuertes
Trockenprogramm angewählt haben, können Sie mit der
Taste «Zeitwahl» die Programmdauer festlegen.
Die einzustellende Trocknungszeit richtet sich nach der
-
Startzeitvorwahl
Wäscheart, der Wäschemenge und -feuchtigkeit.
X Programmtaste antippen.
Die Kontrolllampe «Zeitwahl» blinkt und die minimale
Trocknungszeit wird angezeigt.
X Trocknungszeit durch wiederholtes Antippen der
Taste «Zeitwahl» wählen.
Durch ein- oder mehrmaliges Antippen der Taste «Start-
zeitvorwahl» kann die Programmstartzeit um bis zu
23,5 Stunden verzögert werden.
Dies ermöglicht z.B. das Ausnützen des Niedertarifs
für Nachtstrom. Beginn und damit auch Ende eines
Programms können an individuelle Lebensgewohnheiten
angepasst werden.
In der Displayanzeige wird die Startzeit und die zu er wartende Zeit für das Programmende angezeigt.
Nach dem Betätigen der Starttaste beginnt die Vorwahlzeit.
Beim Erreichen der Startzeit startet das gewählte Programm automatisch. Die aktuelle Programmdauer wird
angezeigt.
Bei einem Stromunterbruch bleibt die aktuelle Zeit
gespeichert. Die Dauer des Stromunterbruchs wird nicht
berücksichtigt.
Zusatzfunktionen
Neben den verschiedenen Standard-Programmen bietet
Ihnen Ihr Wäschetrockner die Möglichkeit einer individuellen Programmgestaltung.
Wählen Sie zuerst ein Standard- oder Spezialprogramm
an. Durch die Wahl einer oder mehrerer Zusatzfunktionen
kön nen Sie dieses Trocknungs programm gezielt auf die
jewei ligen Besonderheiten Ihrer Wäsche abstimmen.
Die Zusatzfunktionen bleiben nur für dieses eine Trockenprogramm aktiv.
X Sie haben zudem die Möglichkeit, Ihren Wäsche trockner
durch Veränderung der Grundeinstellungen Ihren Bedürf
nissen anzupassen (siehe Kapitel «Grundeinstellungen»).
Änderungen an der Grundeinstellung bleiben aktiv, bis
Sie sie wieder ändern.
Pegeleicht
Für pegeleichte Textilien aus Synthetic- oder Misch -
gewebe, sowie Baumwolle mit Bügelfrei-Ausrüstung.
Mix-Wäsche
Für gemischte Wäscheposten, welche sowohl pege-
leichte Textilien aus Synthetic- oder Mischgewebe, als
auch Baumwolle enthalten.
Schnellgang
Das Programm kann durch Betätigen der Schnell gang-
taste verkürzt oder abgebrochen werden.
Programm starten
Programm wählen
-
Zusatzfunktionen wählen
Programm vor dem Programmstart ändern
Wäsche einfüllen
Siehe Kapitel «Programm wählen»
Siehe Kapitel «Zusatzfunktionen»
X Gewünschte Programmtaste erneut antippen.
Alle Kontrolllampen der wählbaren Zusatzfunktionen
blinken wieder und alle Einstellungen sind gelöscht.
X Allfällige Zusatzfunktionen wählen.
Nur Textilien, die mit Wasser gewaschen wurden, im
Gerät trocknen.
X Legen Sie die Wäsche gut aufgelockert in die Trommel,
grosse und kleine Stücke gemischt.
Page 13
13
Programm starten
X Starttaste antippen.
Die Kontrolllampe leuchtet und das Programm läuft
automatisch ab.
Bei aktiver Kindersicherung:
X Starttaste gedrückt halten.
X Gleichzeitig Schnell gangtaste antippen.
Programmablauf / Programmstand
X Bei feuchtegesteuerten Programmen wird die Wäsche-
feuchtigkeit durch ein elektronisches Abtast system ständig kontrolliert.
Die verbleibende Programmdauer wird angezeigt.
Diese Restzeit wird während des Trocknens mehrmals
neu berechnet, das effektive Programmende variiert
deshalb um wenige Minuten.
X Bei Zeitprogrammen wird die Restzeit bis zum
Programmende angezeigt.
Programmende
Das Programmende wird durch den Anzeigewert
«00:00h», die Displayanzeige «Programm ende» sowie
eine blinkende Kontrolllampe angezeigt.
Signal ertönt (nur bei eingeschalteter Summerfunktion).
Die Trommel dreht sich nach Programmende in kurzen
Ab ständen weiter, damit die Wäsche nicht k nittert (nur
bei eingeschaltetem Knitterschutz, 30 oder 60 Minuten
lang).
Spätestens jetzt sollte die Wäsche entnommen werden.
Wäsche entnehmen
X Drücken Sie die Türöffnungstaste.
Die Trommel wird beleuchtet.
X Entnehmen Sie die Wäsche.
X Reinigen Sie die Filter.
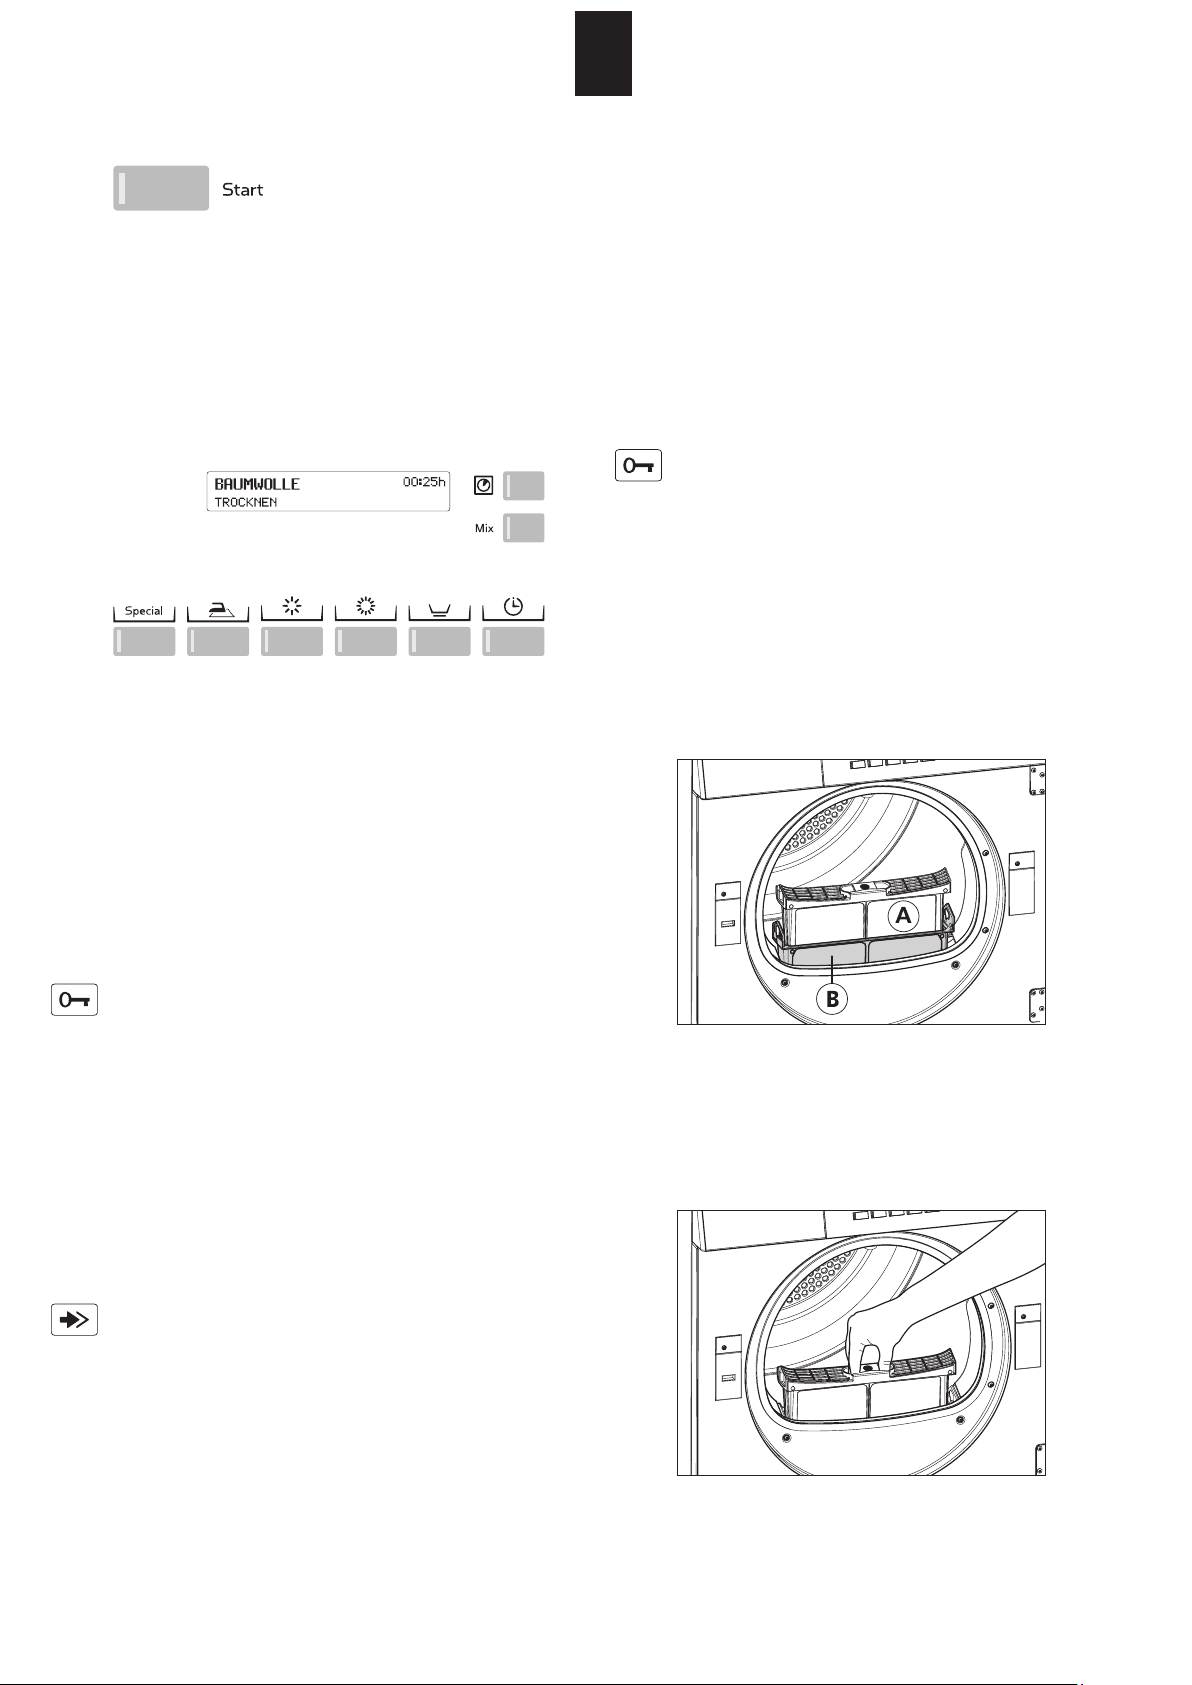
Filter reinigen
Beim Gebrauch der Wäsche entsteht Faserabrieb (Wäsche
usen), der beim Trocknen frei wird und sich im Filter in
der Türöffnung sammelt.
Der innere, feine Filter (A) muss deshalb nach jeder Trock
nung gereinigt werden.
-
-
Wäsche nachlegen
ist jederzeit möglich.
X Drücken Sie die Türöffnungstaste.
Die Trommel bleibt stehen.
X Legen Sie die Wäsche ein.
X Schliessen Sie die Tür.
X Drücken Sie die Starttaste.
Bei aktiver Kindersicherung:
X gleichzeitig Start- und Schnellgangtaste gedrückt
halten.
Der Trocknungsvorgang wird fortgesetzt
Programm abbrechen
X Programm durch mehrmaliges Antippen der Schnell -
gangtaste abbrechen, bis «Programm ende» auf dem
Dis play erscheint.
Bei aktiver Kindersicherung:
X Starttaste gedrückt halten.
X Gleichzeitig Schnell gangtaste antippen.
Filter A reinigen
Trockenprogramm
X Drücken Sie die Taste «Tür öffnen».
X Ziehen Sie den inneren, feinen Filter heraus und klappen
Sie ihn auf.
/ Reinigung nach jedem
Page 14
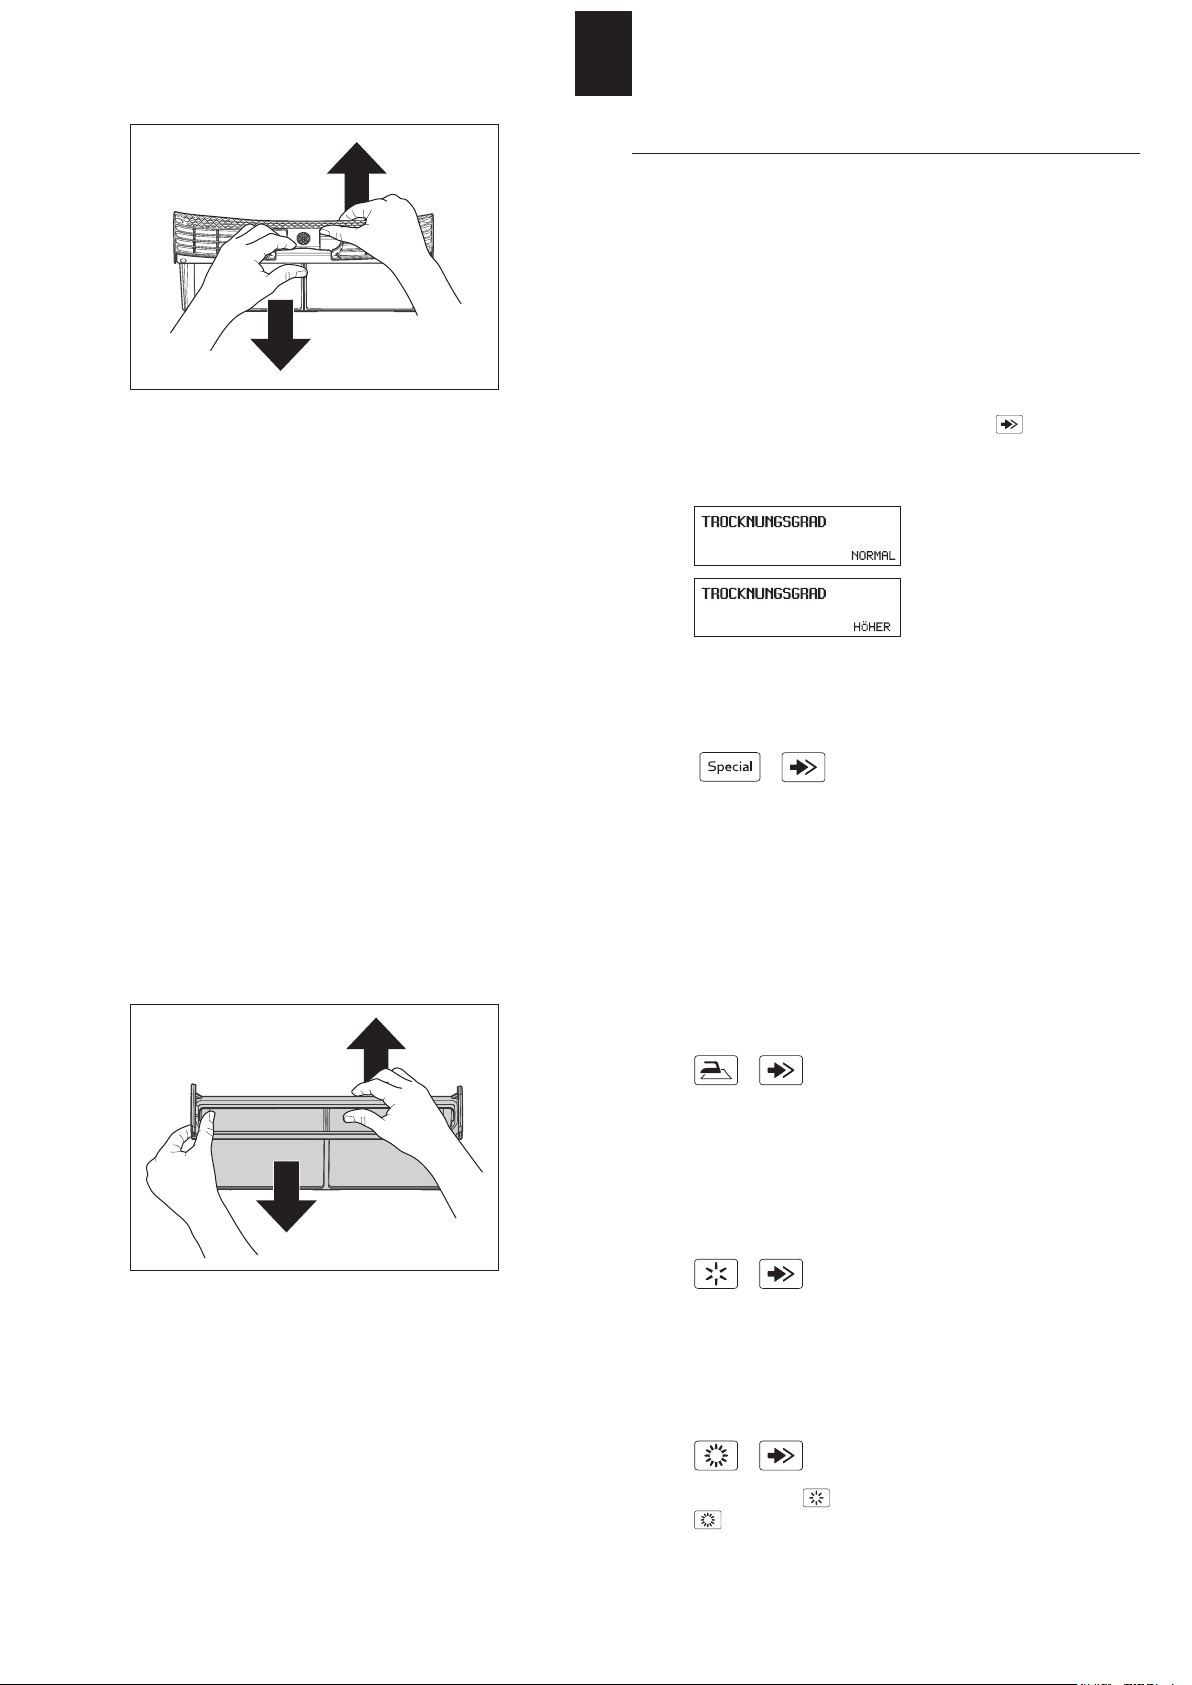
X Streichen Sie mit der Hand über den Filter und ent-
fernen Sie so die Flusen.
Es kann durchaus vorkommen, dass ein vermeintlich
or dent lich gereinigter Filter undurchlässig wird, auf
Grund eines feinen, unsichtbaren Belages, der in den
Filter maschen zurückbleibt.
X Halten Sie den Filter mit einer Fläche nach oben und
giessen Sie etwas Wasser darüber. Ist er nicht durchlässig,
reinigen Sie den Filter mit einer Bürste unter iessendem
Wasser.
Lässt sich der Belag nicht wegbürsten, muss er mit
einem handelsüblichen Kalkentfernerspray aufgelöst
werden.
X Sprühen Sie Kalkentferner auf die gesamte Filteräche
und lassen Sie ihn einwirken. Bei hartnäckigem Belag
legen Sie eine Lage Haushaltpapier auf die Filteräche
und sprühen Sie dieses auch ein, so dass der Filter
befeuchtet ist. Lassen Sie den Kalkentferner über Nacht
einwirken. Reinigen Sie dann den Filter unter iessendem
Wasser mit einer feinen Bürste.
Filter B reinigen
Der äussere, grobe Filter (B) muss einmal täglich herausgenommen und gereinigt werden.
/ Reinigung täglich
14
Grundeinstellungen
Das Gerät hat eine Grundeinstellung ab Werk. Es kann
bei der Inbetriebnahme oder später anhand der nachstehenden Funktionen auf individuelle Bedürfnisse angepasst werden.
Die Grundeinstellungen können nur verändert werden,
wenn kein Trocknungsprogramm läuft. Um eine Grundeinstellung zu ändern, muss zuerst die Programmtaste in
gedrückter Stellung ge halten und zugleich die Schnellgangtaste betätigt werden. Die entsprechenden Funktionen werden auf dem Display angezeigt. Durch mehrmaliges Antippen der Schnellgangtaste bei gehaltener
Programm taste ändert die Anzeige.
Beispiel:
Anfangsfeuchte (ab Werk 50%)
Die Genauigkeit der Restzeitanzeige wird erhöht,
wenn der Trockner an die Schleuderdrehzahl Ihrer
Wasch maschine angepasst wird.
Schleuderdrehzahl 1600 U/min. bzw. 50% Anfangsfeuchte
Schleuderdrehzahl 1200 U/min. bzw. 60% Anfangsfeuchte
+
Funktion ausgeschaltet
Funktion eingeschaltet
Gerät ausschalten
X Schliessen Sie die Tür.
X Schalten Sie den Wandschalter aus.
Ist kein Wandschalter vorhanden, erlischt das Anzeige-
feld automatisch und der Trockner wechselt in den OFFModus (siehe Kapitel «Erweiterte Grundeinstellungen /
Standby-Funktion»).
Trocknungsgrad (ab Werk NORMAL)
+
Ist der Trocknungsgrad «Höher» gewählt, wird die
Wäsche in den feuchtegesteuerten Programmen
«Schrank trocken» und «Extra trocken» etwas trockener.
Knitterschutz (ab Werk 30MIN)
+
Bei eingeschalteter Funktion beginnt am Programmende
die Knitterschutzphase von max. 60 Minuten.
Uhrzeit (ab Werk ist die Uhr nicht eingestellt)
+
Mit der Taste können die Stunden und mit der Taste
die Minuten eingestellt werden.
Page 15
15
Sprache (ab Werk DEUTSCH)
+ ÷
Diese Einstellung gilt temporär für das gewählte Programm
und wechselt einige Minuten nach Programm ende zur
Defaultsprache zurück.
(Siehe Kapitel «Erweiterte Grundeinstellungen/ Defaultsprache»)
Erweiterte Grundeinstellungen
+ +
X Durch gleichzeitiges Antippen dieser drei Tasten erfolgt
die Anzeige der erweiterten Grundeinstellungen.
X Wiederholtes Antippen der
möglichen Einstellungen an.
X Das Antippen der
der Einstellungen.
X Durch Antippen der
Einstellungen abgebrochen.
Kindersicherung (ab Werk AUS)
«Erweiterte Grundeinstellungen» wählen!
Die Kindersicherung soll zufälliges Starten, Verändern
oder Löschen eines Programmes durch Kleinkinder verhindern.
Programmstart bei eingeschalteter Kindersicherung:
+
Halten Sie die Starttaste gedrückt und betätigen Sie die
Schnellgangtaste.
Tastenspeicher (ab Werk AUS)
«Erweiterte Grundeinstellungen» wählen!
Bei eingeschalteter Tastenspeicher-Funktion wird das
zuletzt ausgeführte Spezialprogramm gespeichert und
erscheint beim nächsten Drücken der
Erstes wieder auf dem Display. Durch wieder holtes
Antippen können die darauf folgenden Programme
angewählt werden.
Ein häug benutztes Spezialprogramm kann so durch
einen einzigen Tastendruck aufgerufen werden.
Bei ausgeschalteter Funktion erscheint als Erstes das
Programm «Auffrischen».
-Taste ermöglicht das Verändern
-Taste wird die Anzeige der
-Taste zeigt die
-Taste als
SummerLautstärke (ab Werk LAUTSTÄRKE 2)
«Erweiterte Grundeinstellungen» wählen!
Bei eingeschaltetem Summer ertönt am Programmende
in regelmässigen Abständen ein Signal.
Die Lautstärke ist in 3 Stufen einstellbar:
AUS
LAUTSTÄRKE 1
LAUTSTÄRKE 2
LAUTSTÄRKE 3
StandbyFunktion (ab Werk OFF-MODE)
«Erweiterte Grundeinstellungen» wählen!
"AUS"
Optische Schnittstelle (ab Werk AUS)
Defaultsprache (ab Werk DEUTSCH)
Das Gerät bleibt immer eingeschaltet. Das Display
leuchtet.
"STANDBY-MODE"
Max. 4 Minuten nach Programmende schaltet das Gerät
automatisch in den Energiespar-Zustand. Auf dem Display
wird «Zzz» angezeigt.
"OFF-MODE"
Max. 4 Minuten nach Programmende wird das Gerät
automatisch ausgeschaltet. Das Display wird dunkel.
"STANDBY + OFF-MODE"
Max. 4 Minuten nach Programmende schaltet das Gerät
automatisch in den Energiespar-Zustand. Auf dem Display
wird «Zzz» angezeigt.
Max. 10 Minuten später wird das Gerät automatisch ausgeschaltet. Das Display wird dunkel.
Hinweis
Ist das Display dunkel, kann es durch Antippen einer
beliebigen Taste aktiviert werden.
«Erweiterte Grundeinstellungen» wählen!
Wenn die optische Schnittstelle (SCS) eingeschaltet ist,
kann der Kundendienst über einen PC mit der Maschine
kommunizieren.
«Erweiterte Grundeinstellungen» wählen!
Wird mit den Tasten
andere Sprache gewählt, wechselt die Einstellung
nach Programmende, im Stand by-Modus oder nach
längerem Stillstand zur Defaultsprache zurück.
und temporär eine
LCDHelligkeit (ab Werk 150)
«Erweiterte Grundeinstellungen» wählen!
Mit der
Display verändert werden.
LCDKontrast (ab Werk 26)
«Erweiterte Grundeinstellungen» wählen!
Mit der
verändert werden.
-Taste kann die Helligkeit der Schrift auf dem
-Taste kann der Kontrast der Displayanzeige
Hinweis für Prünstitute und Anwender
Das Standard-Baumwollprogramm wird auf dem Display
und in dieser Bedienungsanleitung als «BAUMWOLLE,
SCHRANKTROCKEN» bezeichnet.
Verbrauch gemäss Richtlinie 2010 / 30 / EU
Mittlere Programmdauer bei
Halb- und Vollbeladung 99 Min.
Jahresenergieverbrauch 239 kWh
Page 16
16
Reinigung und Pege
Filter reinigen
Siehe Kapitel «Programm starten».
Filterhalter reinigen
Von Zeit zu Zeit ist es erforderlich, auch die im Inneren
des Filterhalters angesammelten Flusen zu entfernen.
Verwen den Sie dazu einen Staub sauger oder Reini gungs
pinsel.
X Entfernen Sie Filter A und B aus dem Filterhalter in der
Türöffnung.
X Führen Sie das Staubsaugerrohr bzw. den Reinigungs-
pinsel in die Vertiefung des Filterhalters.
Feuchtigkeitssensor reinigen
-
Gerät reinigen
Nach längerer Betriebszeit können sich auf den beiden
länglichen Feuchtig keits sensoren an der Front-Innen seite
der Trommel feine Ab lagerungen
veredler)
dazu führen, dass das gewünschte Trocknungsziel nicht
erreicht wird.
Ablagerungen mit einem in Essig getränkten Tuch abwischen.
Vor Reinigungs-, Pege- und Wartungsarbeiten ist dar-
auf zu achten, dass die Stromzufuhr ausgeschaltet ist.
Keinesfalls das Gerät mit Wasser abspritzen oder mit
einem Dampfreiniger reinigen.
Keine Lösungsmittel verwenden! Diese Mittel können
Geräteteile beschädigen, entwickeln giftige Dämpfe und
sind explosionsgefährlich!
Gehäuse und Bedienteile nur mit Seifenlauge oder mit
einem handelsüblichen lösungsmittelfreien, nicht scheuernden Reinigungsmittel reinigen.
. Bei feuchtegesteuerten Programmen kann dies
bilden
(Kalk, Gewebe-
X Entfernen Sie gründlich die liegengebliebenen Flusen.
X Setzen Sie die beiden Filter wieder richtig ein.
X Schliessen Sie die Tür.
Entleerung bei Frostschutz oder Transport
Steht das Gerät in einem frostgefährdeten Raum oder
soll es transportiert werden, muss es vollständig entleert
werden.
1. Starten Sie bei leerer Trommel das Programm «Koch-/
Buntwäsche, bügelfeucht».
2. Drücken Sie einmal die Schnellgangtaste, um das
Programm abzukürzen.
3. In den letzten 4 Minuten des Programms wird allfälliges
Wasser aus der Maschine abgepumpt.
Page 17

17
Störungen
Störungsmeldungen
Bei den nachstehenden Störungsanzeigen kann das
Programm nach Beheben der Störung durch Betätigen
der Starttaste wieder gestartet werden.
«KINDERSICHERUNG AKTIV»
X Halten Sie die Starttaste gedrückt und betätigen Sie
die Schnellgangtaste.
«BITTE TÜR SCHLIESSEN»
X Tür zudrücken, bis der Verschluss richtig einschnappt.
«KONDENSWASSER VOLL»
X Kondenswasserpumpe läuft nicht.
Überprüfen Sie, ob der Wasserablaufschlauch geknickt
oder der bauseitige Wasserablauf verstopft ist.
X Drücken Sie die Starttaste, um die Meldung zu
quittieren.
X Das Programm läuft weiter.
Falls das Gerät eine Funktionsstörung F – – anzeigt:
X Brechen Sie das Programm mit der Schnellgangtaste
ab und wählen Sie ein neues Programm.
Bei wiederholter Fehleranzeige:
X Stromzufuhr für ca. 1 Minute unterbrechen und wie-
der einschalten (Netzstecker ziehen oder Wand schalter
ausschalten).
Das Gerät ist wieder betriebsbereit, wenn die Kontrol
lampen der Programme blinken.
X Wählen Sie ein neues Programm.
Bei nochmaliger Fehleranzeige:
X Fehlermeldung notieren.
X Netzstecker ziehen oder Wandschalter ausschalten.
X Kundendienst benachrichtigen.
Störungen beheben
Reparaturen, Änderungen oder Eingriffe an Elektro -
geräten dürfen nur von geschultem Fachpersonal durchgeführt werden. Durch unsachgemässe Reparaturen
können erheb liche Sachschäden und Gefahren für den
Benutzer entstehen.
Bei Reparaturen dürfen nur Originalersatzteile eingesetzt
werden.
Kleine Störungen selbst beheben
Das Gerät geht nach Betätigen einer
Programm taste nicht in Betrieb:
X Überprüfen Sie, ob der Wandschalter eingeschaltet
und der Netzstecker eingesteckt ist.
X Überprüfen Sie, ob alle Sicherungen intakt sind oder
ob der Sicherungsautomat ausgelöst hat.
Das Display ist dunkel:
X Das Gerät ist im OFF-Modus. Kein Fehler; aktivieren
Sie das Display durch Antippen einer beliebigen Taste.
Das Gerät läuft nicht an:
X Starttaste nicht gedrückt.
X Startzeitvorwahl eingestellt. Kein Fehler; Start erst
nach Ablauf der vorgewählten Startzeit.
Das Gerät lässt sich nicht einschalten, das Display bleibt nach Betätigen einer Taste dunkel:
X Überprüfen Sie, ob der Wandschalter eingeschaltet
und der Netzstecker eingesteckt ist.
X Überprüfen Sie, ob alle Sicherungen intakt sind oder
ob der Sicherungsautomat ausgelöst hat.
X Netzsperrung, in der Regel um die Mittagszeit. Betrei-
ben Sie das Geräte nach Ende der Netz sperrungs zeit.
Das Trocknungsziel wurde nicht erreicht:
X Warme Wäsche fühlt sich feuchter an, als sie tatsäch-
lich ist! Lassen Sie die Wäsche ausserhalb des Trockners
fertig abkühlen.
Falls sie dann immer noch zu feucht ist:
X Filter reinigen (siehe Kapitel «Programm starten»).
X Trocknungsgrad erhöhen (siehe Kapitel «Grund ein-
stellungen»).
X Feuchtigkeitssensor reinigen (siehe Kapitel «Reinigung
und Pege»).
Einzelstück erreicht das Trocknungsziel nicht:
X Muss ein einzelnes Wäschestück getrocknet werden,
wird es gleichmässiger getrocknet, wenn Sie zusätzliche
Wäschestücke als Ballast beigeben, z.B. zwei Frottéetücher.
Die Trocknungszeit dauert zu lange:
X Filter reinigen (siehe Kapitel «Programm starten»).
X Stromausfall (Sperrzeiten des EW beachten).
l-
Die Wäsche wird bei der maximal möglichen
Einstellung nicht trocken:
X Trommel überladen (siehe Kapitel «Programmtabelle»).
X Wäsche nicht ausreichend geschleudert.
X Raumbelüftung nicht ausreichend (Tür oder Fenster
öffnen).
X Filter durch Flusen oder Kalkbelag verstopft (siehe
Kapitel «Programm
Das Gerät macht kurzzeitig eine lautes
Geräusch:
X In der Mitte und am Ende eines Trockenprogramms
ndet eine Reinigung des Wärmetauschers statt. Der
Hub magnet, welcher die Reinigung auslöst, ist deutlich
hörbar. Dies ist kein Fehler und ganz normal. Während
der Reinigung erscheint auf dem Display die Meldung
«Reinigung läuft».
Trommelbeleuchtung funktioniert nicht:
X Glühlampe defekt. Aus Sicherheitsgründen darf die
Lampe nur durch den Kundendienst oder einen Fachmann ausgewechselt werden.
Feuchtigkeit im Raum steigt stark an:
X Raum nicht genügend belüftet. Für ausreichende
Belüf tung sorgen.
Tür geht nicht auf:
X Sollte vor dem Tür öffnen kein Strom vorhanden sein,
kann die Tür manuell
Druck auf Höhe
starten»).
geöffnet werden
des Verschlussriegels.
durch kurzen
Page 18
18
Kundendienst
Bevor Sie den Kundendienst rufen, prüfen Sie, ob Sie
die Störung selbst beheben können (siehe Kapitel
«Störun gen»).
In Beratungsfällen entstehen Ihnen auch während der
Garantiezeit Kosten bei Einsatz eines Service-Technikers.
Wenn Sie eine Störung nicht selbst beheben können,
Netz stecker ziehen oder Wandschalter ausschalten,
Wasser hahn schliessen und den Kundendienst rufen.
Wählen Sie die zentrale Kundendienst-Nummer (siehe
Um schlag-Rückseite). Sie werden automatisch mit der
zuständigen Kundendienst-Niederlassung in Ihrer Region
verbunden.
Geben Sie bitte dem Kundendienst die Produkte- und
Gerätenummer an. Sie nden diese Angaben auf dem
Typenschild auf der Innenseite der Tür.
Notieren Sie hier die Nummer Ihres Gerätes.
Produkte-Nr.
Geräte-Nr.
Notizen / Notes / Note
Garantieabonnement
Nach Ablauf der normalen Garantiezeit von 2 Jahren
kann diese durch ein Garantieabonnement beliebig verlängert werden. Wir senden Ihnen gerne die gewünschten
Unterlagen. Beachten Sie dazu das beiliegende Garantieund Kundendienstheft.
Page 19
Sommaire
F RANÇAIS
Symboles utilisés 20
Conseils pour la mise au rebut
X Emballage de votre nouvelle machine 20
X Elimination de l’ancien appareil 20
Consignes de sécurité
X Consignes de sécurité générales 20/21
X À observer avant la mise en service 21
X À observer lors du séchage 21
X À observer lors du transport 21
Séchage correct et respectueux de l’environnement
X Tri du linge 22
X Charge 22
X Conseils pour le séchage 22
X Ne pas sécher à la machine les textiles
suivants 22
Mise en service
X Préparation 22
X Ouverture de la porte 22
X Fermeture de la porte 22
Description de la machine
X Commandes et afchage 23
Tableau des programmes 24/25
Sélection du programme
X Sélection des programmes standard 26
X Programmes spéciaux 26
Nettoyage et entretien
X Nettoyage du support du ltre 30
X Nettoyage du capteur d'humidité 31
X Nettoyage de l’appareil 31
X Vidange en cas de danger de gel ou de
transport 31
Pannes
X Messages de panne 31
X Conseils en cas de panne 31/32
Service après-vente
X Numéro du produit et de l' appareil 32
Contrat de garantie 32
Inhaltsverzeichnis deutsch
X Siehe Seite 5
Fonctions additionnelles
X Entretien facile 26
X Linge mixte 26
X Sélection de durée 26
X Démarrage différé 26
X Marche rapide 26
Démarrage du programme
X Sélection du programme 27
X Sélection des fonctions additionnelles 27
X Modication du programme 27
X Chargement du linge 27
X Démarrage du programme 27
X Déroulement/Etat du programme 27
X Rajout de linge 27
X Interruption du programme 27
X Fin du programme 27
X Enlèvement du linge 27
X Nettoyage du ltre 28
X Mise hors tension de l’appareil 28
Réglages de base
Z Humidité initiale 29
Z Degré de séchage 29
Z Anti-froissement 29
Z Heure 29
Z Langue 29
X Réglages de base étendus
Z Sécurité enfants 29
Z Mémoire touches 29
Z Luminosité LCD 29
Z Contraste LCD 29
Z Volume signal sonore 30
Z Fonction stand-by 30
Z Interface optique 30
Z Langue de défaut 30
Z Information pour instituts d'essais et
utilisateurs 30
Z Consommation selon la directive
2010 / 30 / EU 30
Sommario italiano
X Vedere pagina 33
Contents english
X See page 47
Page 20
20
Symboles utilisés
Consignes de sécurité et avertissements
X caractérise des étapes de travail à
effectuer l’un après l’autre
énumérations, informations générales
utiles
Conseils pour la mise au rebut
Emballage de votre nouvel appareil
Débarrassez-vous de l’emballage comme il
se doit.
Les matériaux de l’emballage ne sont pas
des jouets.
Le recyclage de l’emballage permet
d’épargner des matiè res premières et de
réduire les volumes de déchets.
L’emballage pourra être restitué au
commerçant spécialisé ou au fournisseur.
Tous les matériaux d’emballage utilisés
sont écologiques et recyclables. Le carton
est constitué de 80 à 100% de vieux
papiers.
Les pièces en bois n’ont pas été traitées
chimiquement. Les feuilles sont en polyéthylène (PE); les banderoles, en polypropylène (PP). Ces matériaux, recyclables,
sont exclusivement des composés d’hydrocarbures.
Elimination de l’ancien appareil
Les appareils mis au rebut doivent être
rendus inutilisables.
Après avoir tiré la che réseau, ou fait
défaire le bran che ment par l’électricien,
sectionnez et enlevez le câble
Détruisez la serrure pour éviter que, en
jouant,
mettent leur vie en danger.
Les composants de l’ancien appareil ne
doivent plus être utilisés ultérieurement.
Votre ancien appareil contient des
matières précieuses, qu’il convient d’envoyer au recyclage.
Assurez que votre ancien appareil est
éliminé correctement.
des enfants s’y enferment et
de réseau.
Ne conservez pas votre ancien appareil et
ne le jetez pas aux ordures ménagères.
Vous trouverez davantage d’informations
sur le recyclage de ce produit en vous
adressant à votre commune, au service
d’en lèvement des ordures ou au magasin
dans lequel vous avez acheté le produit.
Cela vous permettra d’attribuer à une
limination ou un recyclage respectueux de
l’environnement.
Consignes de sécurité
Cet appareil est conforme aux normes de
sécurité des appareils électriques. Il n’est
pas destiné à être utilisé par des personnes
(y compris les enfants) dont les capacités
physiques, sensorielles ou mentales sont
réduites ou qui manquent d’expérience
et de connaissance. Veuillez respecter les
consignes de sécurité du présent mode
d’emploi et de la notice d’installation correspondante.
Consignes de sécurité générales:
Ne grimpez pas sur l’appareil.
Ne vous asseyez pas et ne vous appuyez
pas sur la porte (danger de basculement!).
Le
Ne pas laisser les enfants jouer avec la
N’aspergez en aucun cas l’appareil avec
Ne touchez la che secteur qu’avec des
sèche-linge
par des personnes instruites et formées
(âge minimum 8 ans).
Tenir éloignés de l’appareil les enfants de
moins de 3 ans ou les garder sous surveil-
.
lance
machine.
de l’eau ou ne le nettoyez pas au karcher
Le nettoyag
pas être réalisés par des enfants sans la
présence d’un ad
Si l’appareil n’est pas utilisé pour une
période prolongée,
tension.
mains sèches. Ne retirez que la che,
jamais le câble.
ne peut être utilisée que
e et l’entretien ne peuvent
ulte.
il faut le mettre hors
Page 21

21
Les réparations ne doivent être effectuées
que par un personnel spécialisé formé
et les pièces défectueuses ne doivent être
remplacées que par des pièces de rechange
originales du fabricant des appareils.
Mal effectuées, elles peuvent entraîner
de notables dégâts matériels et de graves
dangers pour l’utilisateur. Il n’est autorisé
de modier l’appareil qu’avec l’accord du
fabricant.
Si le câble d’alimentation électrique de
cet appareil est endommagé, il doit être
remplacé par un câble de raccor dement
spécial disponible chez le fabricant ou
auprès de son service après-vente.
À observer avant la mise en service!
Lisez attentivement les notices jointes
avant de mettre en service votre sèchelinge. Elles contiennent des informations
importantes pour l’in sta llation, l’utilisation
et la sécurité de l’appareil. Conservez
soigneusement les notices, à l’intention
des autres utilisateurs actuels et futurs.
Faites installer l’appareil par un personnel
spécialisé formé
notice d’installation. Ne branchez pas un
appareil visiblement endommagé.
L’espace autour du sèche-linge doit être
dégagé de toute
et conformément à la
bouloche de déchets.
Des objets comme le caoutchouc mousse
(caoutchouc mousse latex), les bonnets de
bain, les textiles imper mé ables, articles
caoutchoutés tels que les vêtements ou
les coussins contenant des billes de caoutchouc mousse ne doivent pas être séchés
au sèche-linge.
Les adoucissants ou les produits similaires
doivent être utilisés conformément à leurs
instructions.
Un cycle de séchage doit toujours se
terminer par la réalisation d’une étape
complète de refroidissement an que les
vêtements restent à une température qui
ne les
séchage devait se terminer
sans étape de refroidissement, tous les
vêtements doivent être alors retirés rapidement et être étalés de telle sorte que la
chaleur puisse s’évacuer. Dans ce cas, il
faut tenir compte du fait que les vêtements
peuvent entraîner des brûlures lors d’un
contact avec la peau en raison de leur
température et humidité. C’est pourquoi il
est nécessaire de prévoir des protège-mains
appropriés.
Éloignez les animaux domestiques de
l’appareil.
N’utilisez l’appareil qu’en milieu domes-
tique, pour sécher des textiles.
A la n du programme, ne mettez pas la
main dans le tambour lorsqu’il tourne.
endom mage pas. Si le cycle de
prématurément
À observer lors du séchage:
Assurez-vous qu’aucun corps étranger
n’est présent dans
que des animaux y sont enfermés.
Ne séchez que des vêtements propres dans
le sèche-linge.
Le sèche-linge ne doit pas être utilisé si
des produits chimi ques ont été utilisés
pour le nettoyage.
Les vêtements qui ont des taches d’huile
alimentaire, d’acé tone, d’alcool, d’essence,
de pétrole, de kérosène, de déta chant,
d’essence de térébenthine, de cire ou de
produits destinés à éliminer la cire, devraient être nettoyés à l’eau chaude avec
une quantité supplémentaire de lessive
avant d’être séchés dans le sèche-linge.
le tambour, ou même
À observer lors du transport:
Attention lors du transport de l’appareil!
(risque de blessure!)
Ne soulevez pas l’appareil avec les parties
avant!
Page 22

22
Séchage correct et respectueux
de l’environnement
Tri du linge
Tenez compte des symboles d’entretien
gurant sur les textiles.
Séchage à température normale.
Séchage à basse température.
Ne pas sécher à la machine.
Ne séchez que des textiles lavés à l’eau dans l’appareil.
An d’obtenir un résultat de séchage uniforme, triez le
linge selon le type de tissu et l’objectif de séchage désiré.
Charge
Vous sécherez avec le maximum d’économie, et en
préservant au mieux l’environnement, si vous chargez la
machine avec le plus possible de linge. (Voir chapitre
«Tableau des programmes»)
Ne dépassez pas les quantités maximales, car la
sur charge nuit au résultat du séchage et le linge sera
complètement froissé.
Avant le séchage, débarrassez complètement le linge
de son eau par essorage dans un lave-linge ou une essoreuse. Plus la vitesse d’essorage sera élevée, plus le temps
de séchage sera bref, et moins vous consommerez
d’électricité.
Essorez également le linge d’entretien facile.
Conseils pour le séchage
Fermez fermetures-éclair, crochets et oeillets. Bou ton-
nez les housses de duvet et coussins. Nouez les rubans
de tablier et les ceintures qui sont détachées, etc.
Pour les tissus d’entretien facile, sortez-les de l’appareil,
si possible, à l’état légèrement humide ( objectif de
séchage: «Légèrement sec» ), et complétez par un bref
séchage à l’air. Un séchage excessif entraîne des risques
de froissage.
Les pièces de linge encore trop humides après le
séchage d’un lot à base de types de tissu très différents
peuvent subir un complément de séchage en programme
«Séchage chronométré».
Les textiles tricotés peuvent rétrécir un peu au séchage.
Ne pas utiliser le programme «Extra sec»
matériaux.
Ne sécher la laine et les tissus à base de laine qu’avec le
programme spécial «Finition laine»: danger de feutrage!
Si une pièce de linge individuelle doit être séchée, elle
est séchée régulièrement lorsque vous ajoutez des pièces
de linge supplémentaires comme ballast, p. ex. deux
ser viettes éponge.
pour ces
Ne pas sécher à la machine les textiles suivants:
Le linge dégoulinant: gaspillage d’énergie!
Ne séchez pas le linge ayant été traité au moyen de
solvants inammables, p.ex. détacheur ou essence de
lavage, dans l’appareil (risque d'explosion!).
Ne séchez pas les textiles contenant du caoutchouc
mousse ou présentant des traces de laque, de dissolvant
ou de produits similaires, dans l'appareil (risque
d'incendie!).
Mise en service
v Installez la machine conformément aux instructions de
montage.
Avant de mettre la machine en service pour la première
fois, essuyer le tambour au moyen d’un linge humide.
Préparation
Vériez:
X si le ltre à peluches est en place (voir chapitre
«Démarrage du programme»).
X si la che réseau est branchée ou si l’interrupteur
mural est allumé.
Quand tous les voyants clignotent, la machine est prêt à
l’emploi.
Ouverture de la porte
Fermeture de la porte
X Si un témoin reste allumé en permanence, pressez
plusieurs fois sur la touche de marche rapide jusqu’au
message «Selectionner programme».
Indication
Si l’écran est sombre,
que pour faire fonctionner l'appareil.
X Pressez la touche «Ouverture de la porte».
La porte s’ouvre d’un coup.
X Attention: elle ne s’ouvre que si l’alimentation princi-
pale en courant est assurée. Si, avant l’ouverture de la
porte, il n’y a plus de courant (par exemple, les pièces de
monnaie sont épuisées), il est possible d’ouvrir la porte
manuellement en appuyant brièvement au niveau du
verrou de fermeture.
L’éclairage du tambour s’allume à l’ouverture de la
porte.
X Fermez la porte, en la poussant en position jusqu’à ce
que la fermeture émette un déclic audible.
Veillez à ce qu’aucune pièce de linge ne reste coincée
lors de la fermeture de la porte.
Si la porte n’est pas fermée, un interrupteur de sécurité
empêche la mise en service de l’appareil.
appuyez sur une touche quelcon-
Page 23

Description de la machine
Commandes et afchage
23
Programmes
1 Programmes spéciaux
2 Prêt à repasser
3 Prêt à ranger
4 Extra sec
Fonctions additionnelles
5 Linge d'entretien facile
6 Démarrage différé
7 Linge mixte
8 Sélection de durée
9 Démarrage du programme
10 Ouverture de la porte
11 Marche rapide
Afchages
12 Afcheur
Interfaces
13 SCS-Schulthess Control System
(interface PC pour le S.A.V)
Commandes et afchage
Filtre
Porte
Grille d'aération
Page 24

Durée
approx.
en min.
Consomm.
d’électricité
kWh, env.
Vitesse d’essorage
dans le lave-linge
en t/min.
80
1,2
1600
96
1,5
1200
112
128
1,6
2,0
1600
1200
120
1,8
1600
137
2,2
1200
34
0,4
800
40
0,5
600
51
0,6
800
24
59
0,7
600
58
0,8
800
66
0,9
600
800 0,6 48
800 1,0 65
800 1,2 73
Touches de sélection
des programmes
Programmes
de séchage
Objectifs
X Pour linge à repasser au fer Prêt à repasser
X Pour linge n’exigeant pas de repassage Prêt à ranger
Extra sec
X Pour tissus particulièrement épais ou en
plusieurs couches
+
+
+
Extra sec
X Pour linge n’exigeant pas de repassage Prêt à ranger
plusieurs couches
+
+
+
Extra sec
X Pour linge n’exigeant pas de repassage Prêt à ranger
plusieurs couches
Veuillez toujours observer le symbole d’entretien des textiles
Textiles/type de linge
Quantité
max. de
linge
Tableau des programmes
Conseil
d’entretien
Coton ou en lin
Serviettes éponge, torchons à vaiselle,
polos, vêtements de travail
torchons à main, literie, sous-vêtements,
chaussettes en coton
7 kg Literie et linge de table, serviettes, t-shirts,
Chemises, chemisiers, vêtements de sport,
Peignoirs et literie en tissu-éponge,
pas les sous-vêtements et les chaussettes
Linge d’entretien facile (sans repassage) en synthétique et bres mélangées,
ainsi qu’en coton à apprêt éliminant le repassage, tels que (viscose, bre acrylique,
polyester)
3,5 kg Pantalons, robes, jupes, chemises X Pour linge à repasser au fer Prêt à repasser
Anoraks, couvertures X Pour tissus particulièrement épais ou en
literie et linge de table, survêtements
Linge mixte en coton ou en bres d’entretien facile
Chemises, chemisiers, vêtements de sport,
literie et linge de table, survêtements
3,5 kg Pantalons, robes, jupes, chemises X Pour linge à repasser au fer Prêt à repasser
Anoraks, couvertures X Pour tissus particulièrement épais ou en
Page 25

Durée
Consomm.
approx.
en min.
d’électricité
kWh, env.
119
1,8
25
132
2,0
Vitesse d’essorage
dans le lave-linge
en t/min.
des programmes
Touches de sélection
Objectifs de séchage
Programmes
+
+
1x
Séchage programmé
+
2x
froid 20-90min
Séchage programmé
chaud 20-150min
+
2x
Séchage programmé
chaud 20-150min
400 0,9 55
3x
Chemises/Blouses
Prêt à repasser
800
600
200 1,0 49
4x
Prêt à ranger
Synthétique
800 0,1 7
5x
Finition laine
Séchage délicat
Prêt à ranger
6x
(seulement séchage
initial)
Veuillez toujours observer le symbole d’entretien des textiles
Textiles/type de linge
Quantité
max. de
linge
Tableau des programmes
Conseil
d’entretien
l’humidité résiduelle.
Programmes spéciaux
1,5 kg Rafraîchir X Le linge est aéré sans ajouter de la température. Rafraîchir
7,0 kg Coton X Le linge est séché avec le temps réglé sans contrôler
». Le programme diminue la formation
Prêt à repasser
X Le linge est séché avec le temps réglé sans contrôler
l’humidité résiduelle.
soient «
de plis, n’abîme pas le linge et facilite également le repassage.
facile
3,5 kg Linge d’entretien
3,5 kg Chemises/ Blouses X Les chemises et blouses sont séchées jusqu’à ce qu’elles
4,5 kg Jeans X Les jeans sont séchés. Jeans
etc.
2,3 kg Synthétique X Pour sécher la soie, le linge délicat, la lingerie, les rideaux,
machine. Retirer le linge juste après la n du programme et
l’étendre sur une serviette-éponge pour qu’il sèche.
3,5 kg Laine lavable X Le linge devient plus moelleux, mais sans sécher en
Page 26

26
Sélection du programme
Sélection des programmes standard
Le système électronique de palpation évalue en continu
le degré d’humidité momen tané de votre linge, et met
automatiquement n au programme dès qu’est atteint
l’objectif de séchage imposé.
X Pressez la touche de programme conformément au
degré de séchage désiré.
Le témoin du programme choisi s’allume.
X Pour les tissus synthétiques, choisir la fonction addi-
tionnelle «Entretien facile»
X Pour linge mélangé choisir la fonction additionelle
«Linge mixte».
Programmes spéciaux
Les programmes spéciaux servent à sécher correctement
certains textiles. Appuyer plusieurs fois sur la touche
,
jusqu'à ce que le programme voulu s'afche à
l'écran (Voir tableau des programmes).
.
Fonctions additionnelles
Sélection de durée
Si vous avez sélectionné un programme de séchage tem-
porisé parmi les programmes spéciaux, vous pouvez
dénir la durée du programme en appuyant sur la touche
«Sélection de durée».
La durée de séchage sera choisie d’après le type et la
quan tité de linge ainsi qu’en fonction de l’humidité de
celui-ci.
X Pressez la touche du programme.
Le témoin du programme chronométré clignote, et la
durée minimale de séchage s’afche.
X Imposez la durée du séchage en pressant la touche de
façon répétée.
Démarrage différé
En pressant une ou plusieurs fois la touche de démarrage
différé, on peut retarder jusqu’à 23,5 heures le démarrage
du programme
Ceci permet par ex. de proter du tarif réduit de nuit pour
l’électricité. On peut adapter le début et donc aussi la n
d’un programme à ses habitudes individuelles de vie.
L’écran indique l’heure de démarrage et l’heure prévue
de la n du programme.
Après avoir appuyé sur la touche de démarrage, le compte
à rebours commence.
Une fois l’heure de démarrage atteinte, le programme
sélectionné démarre automatiquement et l’afchage
indi que la durée du programme.
En cas de coupure de courant, le temps choisi demeure
en mémoire. La durée de la coupure n’est pas prise en
considération.
Outre les divers programmes standard, votre sèche-linge
vous offre la possibilité de personnaliser ses programmes.
Sélectionnez d’abord un programme standard ou spécial.
Le choix d’une ou plusieurs fonctions additionnelles vous
permettra d’ajuster ce programme de séchage d’après
les particularités spéciques de votre linge.
Ces fonctions additionnelles restent actives pour ce programme de séchage uniquement.
X Vous avez en outre la possibilité d’adapter votre
sèche-linge à vos besoins en modiant ses réglages de
base (Voir chapitre «Réglages de base»). Les modica-
tions apportées au réglages de base restent actives
jusqu'à ce que vous les modiiez une nouvelle fois.
Entretien facile
Pour les textiles d’entretien facile en tissu synthétique ou
bres mélangées, ainsi que pour le coton à apprêt éliminant le repassage.
Linge mixte
Pour linge mélangé qui contient des textiles d’entretien
facile en bres synthétiques ou mélangées ainsi que du
coton.
Marche rapide
On peut abréger ou interrompre le programme en
pressant la touche de marche rapide.
Page 27

27
Démarrage du programme
Sélection du programme
Voir chapitre «Sélection du programme»
Sélection des fonctions additionnelles
Voir chapitre «Fonctions additionnelles»
Modication du programme avant son démarrage
X Pressez à nouveau la touche du programme désiré.
Tous les témoins des fonctions additionnelles choisis-
sables se remettent à clignoter, et tous les réglages sont
effacés.
X Choisissez éventuellement les fonctions additionnelles.
Chargement du linge
Ne séchez dans l’appareil que des textiles ayant été lavés
à l’eau.
X Placez le linge de façon bien aérée dans le tambour,
petites et grandes pièces mélangées.
Rajouts de linge
Possibles à tout moment.
X Pressez la touche d’ouverture de la porte.
Le tambour s’arrête.
X Rajoutez le linge.
X Refermez la porte.
X Pressez la touche de démarrage.
Si la sécurité enfants est activée:
X Tenez pressée la touche de démarrage.
X Appuyez en même temps sur la touche «Marche
rapide».
X Le séchage reprend.
Interruption du programme
X Pour interrompre le programme, pressez à plusieurs
reprises la touche de marche rapide, jusqu’à ce que le
message «Fin du programme» est afché.
Si la sécurité enfants est activée:
X Tenez pressée la touche de démarrage.
X Appuyez en même temps sur la touche «Marche
rapide».
Démarrage du programme
X Pressez la touche de démarrage.
Le témoin s’allume, et le programme se déroule auto-
matiquement.
Si la sécurité enfants est activée:
X Tenez pressée la touche de démarrage.
X Appuyez en même temps sur la touche «Marche
rapide».
Déroulement du programme/ Etat du programme
X Dans les programmes pilotés par le taux d'humidité,
l’humidité du linge est constamment contrôlée par un
système électronique de palpation.
La durée restante du programme est afchée. Ce
temps restant est recalculé plusieurs fois au cours du
cycle de séchage, la n effective du programme varie
donc de quelques minutes.
X Dans les programmes chronométrés, le temps restant
demeure afché jusqu’à la n du programme.
Fin du programme
La n du programme est indiquée par la valeur
«00:00h», le message «Fin du programme» à l'écran et
le clignotement du voyant.
Un signal résonne (seulement si le signal sonore a été
enclenché).
A la n du programme, le tambour continue à tourner
à des intervalles courts pour éviter un froissement du linge
(uniquement en cas d’antifroissement activé, pendant
30 ou 60 minutes).
C’est au plus tard à ce moment qu’il conviendra d’enlever
le linge.
Enlèvement du linge
X Pressez la touche d’ouverture de la porte.
X L’éclairage s’allume dans le tambour.
X Enlevez le linge.
X Nettoyez les ltres.
Page 28

28
Nettoyage du ltre
Pendant l’emploi du linge, il se forme sur le linge, par
frottement, des peluches. Celles-ci s'en détachent
pendant le séchage et s'accumulent dans le ltre dans le
hublot.
Pour cette raison, le ltre n intérieur (A) doit être
nettoyé après chaque séchage.
Nettoyage du ltre A
programme de séchage
X Pressez la touche «Ouverture de la porte».
X Retirer le ltre n intérieur et le déplier.
/ Nettoyage après chaque
X Pulvérisez le détartrant sur toute la surface du ltre et
laissez-le agir. Lorsque le dépôt est difcile à éliminer,
posez une couche d'essuie-tout sur la surface du ltre et
pulvérisez le détartrant également sur cette couche si
bien que le ltre soit mouillé. Laissez-agir le détartrant
pendant la nuit. Puis nettoyez le ltre sous l'eau courante
et à l'aide d'une brosse.
Nettoyage du ltre B / Nettoyer
Le ltre grossier extérieur (B) doit être retiré et nettoyé
une fois par jour.
Le ltre grossier extérieur (B) ne doit être retiré et nettoyé
qu'une fois par semaine.
chaque
jour
X Passez la main sur le ltre: ceci en détachera les
peluches.
Il peut arriver qu'un ltre apparemment propre soit
colmaté en raison d'un dépôt très n et invisible dans
les mailles du ltre.
X Tenez le ltre, l’une de ses surfaces étant orientée
vers le haut, et versez un peu d’eau par-dessus. S’il ne
laisse pas passer l’eau, il convient de le nettoyer par voie
humide, éventuellement au moyen d’une brosse.
Lorsque le dépôt ne peut pas être éliminé par la brosse,
il doit être dissolu à l'aide d'un détartrant.
Mise hors service de l’appareil
X Refermez la porte
X Eteignez l’interrupteur mural.
S’il n’y a pas d'interrupteur mural, l’écran s'éteint
automatiquement, et le sèche-linge passe en mode «OFF»
(voir chapitre «Réglages de base étendues / Fonction
stand-by»).
Page 29

29
Réglages de base
Le réglage de base de l'appareil a été effectué en usine,
mais on peut l'adapter selon ses exigences individuelles,
lors de la mise en service ou ultérieurement, au moyen
des fonctions suivantes.
Les réglages de base ne peuvent être modiés que si aucun programme de séchage n'est en cours. Pour modi-
er un réglage de base, il faut tout d'abord maintenir la
touche de programme enfoncée, puis appuyer sur la
touche de marche rapide. Les fonctions correspondantes
s'afchent alors sur l'afcheur numérique.
de manière répétée sur la touche de marche
la touche de programme demeurant enfoncée,
change.
Exemple:
Fonction désactivée
Fonction activée
En ap puyant
rapide ,
l'afchage
Langue (en usine DEUTSCH)
+ ÷
Ce réglage s’applique provisoirement au programme
sélectionné et revient à la langue par défaut quelque
minutes après la n du programme.
(Voir chapitre «Réglages de base étendus/Langue de
défaut»)
Réglages de base étendus
+ +
X Pour accéder aux autres réglages de base, appuyer
simultanément sur ces trois touches.
X Une pression répétée sur la touche
réglages possibles.
X Pour modier les réglages, appuyer sur la touche
X Pour mettre n à l'afchage des réglages, appuyer sur
la touche
.
montre les
.
Humidité initiale (en usine 50%)
L'exactitude du temps restant afché est optimisée
lorsque le sèche-linge s'ajuste à la vitesse d'essorage de
votre lave-linge.
Essorage à 1600 t/min, respectivement 50% d'humidit
initiale
Essorage à 1200 t/min, respectivement 60% d'humidit
initiale
Degré de séchage (en usine NORMALE)
Si vous sélectionnez le degré de séchage «Plus fort»,
le linge sèche un peu plus avec les programmes pilotés
par le taux d'humidité «Prêt à ranger» et «Extra sec».
Antifroissement (en usine 30MIN)
Lorsque la fonction est activée, la phase de défroissage
de 60 minutes commence à la n du programme.
Heure (non effectué en usine)
+
+
+
+
Sécurité enfants (en usine OFF)
Sélectionner «Réglages de base étendus»!
La sécurité enfants vous protège contre tout démarrage,
modication ou annulation fortuit(e)s du programme
par les enfants.
Démarrage d'un programme lorsque la sécurité enfants
est activée:
é
é
Mémoire touches (en usine OFF)
Luminosité LCD (en usine 150)
+
Maintenir la touche «Start» enfoncée et appuyez sur la
touche «Marche rapide».
Sélectionner «Réglages de base étendus»!
Si la fonction d'enregistrement est activée, le dernier
programme spécial exécuté est mémorisé et apparaît
en premier à l'écran lors d'une prochaine pression sur
la touche
tionner successivement les programmes suivants.
Cela permet d'accéder par pression sur une seule touche
à un programme spécial utilisé fréquemment.
Si cette fonction est désactivée, le premier programme
afché est «Rafraîchir».
Sélectionner «Réglages de base étendus»!
La touche
l'afchage.
. Une pression répétée permet de sélec-
permet de régler la lumino sité de
La touche permet de régler les heures et la touche
les minutes.
Contraste LCD (en usine 26)
Sélectionner «Réglages de base étendus»!
La touche permet de régler le contraste de l'afchage.
Page 30

30
Volume signal sonore (en usine VOLUME 2)
Sélectionner «Réglages de base étendus»!
Signal sonore activé, la n du programme est indiquée
par un signal acoustique retentissant à intervalles réguliers.
Le volume de ce signal peut être réglé sur 3 niveaux
OFF
VOLUME 1
VOLUME 2
VOLUME 3
Fonction standby (en usine OFF-MODE)
Sélectionner «Réglages de base étendus»!
"OFF"
L’appareil reste toujours en marche. L’écran est allumé.
"STANDBY-MODE"
Max. 4 minutes après la n du programme
passe
automatiquement en mode économie d’énergie.
L’écran indique «ZZZ».
"OFF-MODE"
Max. 4 minutes après la n du programme
se met automatiquement hors marche. L’écran s’éteint.
"STANDBY + OFF-MODE"
Max. 4 minutes après la n du programme
passe
automatiquement en mode économie d’énergie.
L’écran indique «ZZZ».
Max. 10
quement hors marche. L’écran s’éteint.
Indication
Si l’écran est sombre,
que pour faire fonctionner l
minutes
plus tard
le lave-linge
appuyez sur une touche quelcon-
’
appareil.
le lave-linge
le lave-linge
le lave-linge
se met automati-
Nettoyage et entretien
Nettoyage des ltres
Voir chapitre «Démarrage du programme».
.
Nettoyage du support du ltre
De temps à autre, veillez à éliminer les peluches s'accu-
mulant à l'intérieur du support du ltre. Pour cela, utilisez
un aspirateur ou un pinceau.
X Sortez les ltres A et B du support du ltre dans le
hublot.
X Introduisez le tube de l'aspirateur ou le pinceau de
nettoy age dans l'ouverture du ltre à peluches.
Interface optique (en usine OFF)
Sélectionner «Réglages de base étendus»!
Interface optique (SCS) activée, le S.A.V. peut communiquer avec la machine via un PC.
Langue de défaut (en usine DEUTSCH)
Sélectionner «Réglages de base étendus»!
Si une autre langue est sélectionnée provisoirement à
l’aide des touches
langue par défaut après la n du programme, dans le
mode stand-by ou après un arrêt prolongé.
Information pour instituts d'essais et utilisateurs
Dans ce mode d’emploi et sur l’écran, le programme
standard coton est identié par «COTON, PRET A
RANGER».
Consommation selon la directive 2010 / 30 / EU
Durée moyenne du programme
en demi-charge et pleine charge 99 min.
Consommation annuelle 239 kWh
et , le réglage revient à la
X Enlevez toutes les peluches incrustées.
X Remettez le deux ltres correctement en place.
X Refermez la porte.
Page 31

31
Nettoyage du capteur d’humidité
Après une certaine période de fonctionnement, des
minces dépôts (calcaire, adoucissants) peuvent se former
à la surface des capteurs d'humidité situés en façade
à l'intérieur du tambour. Lorsque vous utilisez un programme piloté par le taux d'humidité, ceci peut empêcher l’obtention du résultat de séchage désiré.
Eliminer les dépôts en essuyant au moyen d’un linge imbibé de vinaigre.
Nettoyage de l’appareil
Avant toute opération d’entretien, maintenance ou
nettoy age, assurez-vous que l’alimentation électrique a
été coupée.
N’aspergez en aucun cas l’appareil avec de l’eau ou ne
le nettoyez pas au karcher.
N’utilisez pas de solvants! Ces produits peuvent endom-
mager des pièces de l’appareil, dégagent des vapeurs
toxiques et engendrent un danger d’explosion!
Ne nettoyez le corps de l’appareil et les éléments de
commande qu’au moyen d’eau savonneuse ou d’un nettoyant commercial non abrasif et exempt de solvants.
Vidange en cas de danger de gel ou de transport
Si l’appareil se trouve dans un local exposé au gel ou
doit être transporté, il faudra le vidanger complètement.
1. Tambour vide, lancez le programme «Blanc /Couleurs,
prêt à repasser».
2. Appuyez une fois sur la touche de marche rapide pour
raccourcir la durée du programme.
3. Au cours des 4 dernières minutes du programme, les
éventuels restes d’eau sont évacués de la machine par la
pompe de vidange.
Pannes
Messages de panne
En présence des messages de panne suivants, on peut
remettre le programme en marche en pressant la touche
de démarrage, après élimination des pannes.
«SECURITE ENFANTS ACTIVE»
Maintenir la touche «Start» enfoncée et appuyez sur la
touche «Marche rapide».
«VEUILLEZ FERMER LA PORTE»
X Poussez sur la porte jusqu’à ce que la fermeture s’en-
cliquette correctement.
«EAU CONDENS. PLEIN»
X La pompe d'eau de condensation ne fonctionne pas.
Vériez si le tuyau d'écoulement est plié ou l'écoulement
obturé.
X Appuyez sur la touche «Start» pour annuler le
message.
X Le programme reprend.
Si l’appareil afche une panne de fonctionnement F– –:
X Interrompez le programme au moyen de la touche
«Marche rapide» et choisissez un nouveau programme.
En cas de message répété de panne:
X Coupez l’alimentation électrique pendant 1 minute
environ, puis rétablissez-la (retirez la che réseau ou
fermez l’interrupteur mural).
L’appareil est de nouveau prêt à fonctionner dès que
les témoins des programmes clignotent.
X Choisissez un nouveau programme.
Si le message de panne se répète encore:
X Notez le message de panne.
X Fermez le robinet de l’eau et retirez la che réseau ou
fermez l’interrupteur mural.
X Informez le service après-vente.
Conseils en cas de panne
Les réparations, modications et interventions sur des
appareils électriques ne doivent être effectuées que par
du personnel spécialisé dûment formé. Des réparations
mal faites peuvent entraîner de considérables dommages matériels et des risques élevés pour l’utilisateur.
On utilisera seulement des pièces originales lors des
répa rations.
Réparer soimême les petites pannes
L’appareil ne se met pas en marche après
avoir pressé une touche de programme:
X Vériez si l’interrupteur mural est allumé, et si la che
réseau est branchée.
X Vériez si tous les fusibles sont intacts et si le disjonc-
teur automatique ne s’est pas déclenché.
L’écran est sombre:
X L’appareil est en mode «OFF». Aucune erreur,
appuyez sur une touche quelconque pour activer l'écran.
Page 32

32
L’appareil ne démarre pas:
X Touche de démarrage non actionnée.
X Démarrage différé inséré. Le démarrage n’aura lieu
qu’après le retard imposé.
Il est impossible de mettre en marche l'appareil,
l'écran reste sombre après l'actionnement
d'une touche:
X Vériez si l’interrupteur mural est allumé, et si la che
réseau est branchée.
X Vériez si tous les fusibles sont intacts et si le disjonc-
teur automatique ne s’est pas déclenché.
X Blocage réseau, en règle générale vers midi. Faites
fonctionner l’appareil à la n de la période de blocage
réseau.
Le séchage attendu n'est pas atteint:
X Le linge chaud a l’air plus humide que ce qu’il est
vraiment! Laissez refroidir le linge en dehors du sèchelinge.
S'il est toujours trop humide:
X Nettoyer le ltre (voir chapitre «Démarrage du pro-
gramme»).
X Augmenter le degré de séchage (voir chapitre
«Réglages de base»).
X Nettoyer le capteur d'humidité (voir chapitre
«Nettoyage et entretien»).
La pièce de linge individuelle n’atteint pas le
but de séchage:
X Lorsqu’une pièce de séchage individuelle doit être
séchée, elle est séchée uniformément lorsque vous
ajoutez des pièces de linge supplémentaires comme
ballast, par exemple deux serviettes éponge.
Le séchage dure trop longtemps:
X Nettoyer le ltre (voir chapitre «Démarrage du
programme»).
X Coupure de courant (heures de coupure des compa-
gnies électriques).
Le linge n’est pas sec même à la puissance
maximale de séchage possible:
X Tambour surchargé (voir chapitre «Tableau des
programmes»).
X Linge insufsamment essoré.
X Aération de la pièce insufsante (ouvrir porte et
fenêtre).
X Filtre bouché par des peluches ou des dépôts calcaires
(voir chapitre «Démarrage du programme»).
L’appareil fait un bruit fort en peu de temps:
X Au milieu et à la n d’un programme de séchage,
l'échangeur de chaleur est nettoyé. L'aimant de levage
déclenchant le nettoyage fait un bruit audible. Pendant
le nettoyage, le message «Nettoyage en cours» apparaît
sur l’écran.
L’éclairage ne s’allume pas dans le tambour:
X Ampoule défaillante. Pour des raisons de sécurité, elle
ne pourra être remplacée que par le service après-vente
ou par un technicien.
L’humidité monte fortement dans le local:
X Local pas assez aéré. Assurez une ventilation suf-
sante.
La porte ne s’ouvre pas:
X Si, avant l’ouverture de la porte, il n’y a plus de
cou rant, il est possible d’ouvrir la porte manuellement
en appuyant brièvement au niveau du verrou de fermeture.
Service après-vente
Avant d’appeler le service après-vente, vériez si vous ne
pouvez pas remédier vous-même à la panne (voir chapitre
«Pannes»).
Si vous faites appel à un technicien d’assistance, des coûts
vous seront facturés pour ses conseils même pendant la
période de garantie.
Si vous ne pouvez réparer vous-même la panne, retirez
la che réseau ou fermez l’interrupteur mural, fermez le
robinet de l’eau et appelez le service après-vente.
Composez le numéro central de celui-ci (voir verso de la
couverture). Vous serez automatiquement mis en rapport avec le point d’assistance compétent pour votre
région.
Indiquez au service après-vente le numéro du produit et
celui de l’appareil. Vous trouverez ces données sur la
plaque signalétique visible dans le cadre de la porte
quand elle est ouverte.
Notez ici le numéro de votre appareil:
Numéro de produit
Numéro de l’appareil
Abonnement de garantie
Après l’expiration de la période normale de garantie,
2 ans, celle-ci pourra être prolongée sans limites au
moyen d’un abonnement de garantie. C’est avec plaisir
que nous vous enverrons les documents nécessaires.
Observez à ce propos ce qui est mentionné dans le livret
de garantie et d’assistance ci-joint.
Page 33

Indice
Simboli impiegati 34
Consigli per il riciclo
X Imballaggio della nuova asciugatrice 34
X Smaltimento del vecchio apparecchio 34
Istruzioni per la sicurezza
X Istruzioni generali per la sicurezza 34/35
X Cosa fare prima della messa in funzione 35
X Durante l’asciugatura fare attenzione
a quanto segue 35
X Durante il trasporto fare attenzione
a quanto segue 35
Per asciugare correttamente rispettando l’ambiente
X Selezione dei capi 36
X Caricamento 36
X Consigli per l’asciugazione 36
X Non utilizzare l’asciugatrice per i
seguenti tessuti 36
I TALIANO
Z Indicazioni per istituti di prova e
utilizzatori 44
Z Consumi secondo Direttiva
2010 / 30 / EU 44
Pulizia e manutenzione
X Pulizia del supporto del ltro 44
X Pulizia dei rilevatori d'umidità 45
X Pulizia dell'apparecchio 45
X Svuotare in caso di gelo o prima del
trasporto 45
Anomalie di funzionamento
X Segnalazioni di guasto 45
X Guida in caso di guasti 45/46
Servizio assistenza
X Numero di prodotto e dell' apparecchio 46
Garanzia in abbonamento 46
Messa in funzione
X Preparazione 36
X Apertura del sportello 36
X Chiusura del sportello 36
Descrizione dell'asciugatrice
X Pannello di comando e visualizzazione 37
Tabella dei programmi 38/39
Selezione del programma
X Selezione dei programmi standard 40
X Programmi speciali 40
Funzioni supplementari
X Sintetici 40
X Biancheria mista 40
X Imposta durata 40
X Selezionare ora di avvio 40
X Ciclo veloce 40
Avvio del programma
X Selezione del programma 41
X Selezione di funzioni supplementari 41
X Cambiare programma prima dell’avvio 41
X Inserimento della biancheria 41
X Avvio del programma 41
X Durata e fase di svolgimento del
programma 41
X Aggiunta di biancheria 41
X Interruzione del programma 41
X Fine programma 41
X Togliere la biancheria 41
X Pulizia dei ltri 41/42
X Spegnere l'asciugatrice 42
Inhaltsverzeichnis deutsch
X Siehe Seite 5
Sommaire français
X Voir page 19
Contents english
X See page 47
Impostazione di base
Z Umidità iniziale 43
Z Grado di asciugatura 43
Z Antipiega 43
Z Ora 43
Z Lingua 43
X Altre impostazione di base
Z Sicurezza bambini 43
Z Memoria tasti 43
Z Luminosità LCD 43
Z Contrasto LCD 43
Z Volume segnale acustico 44
Z Funzione stand-by 44
Z Interfaccia ottica 44
Z Lingua default 44
Page 34

34
Simboli impiegati
Istruzioni per la sicurezza ed avvertimenti
X indica fasi di lavoro da eseguire secondo
la successione indicata
conteggi, informazioni generali utili
Consigli per il riciclo
Imballaggio dell’asciugatrice nuova
Smaltimento del vecchio apparecchio
Smaltire il materiale d’imballaggio secondo
le norme.
Il materiale d’imballaggio non è un giocat-
tolo.
Attraverso il suo trattamento e recupero si
risparmiano materie prime e si riduce il
volume dei riuti.
L’imballaggio può essere restituito al rivenditore o al fornitore.
Tutti i materiali d’imballaggio utilizzati sono
compatibili con l’ambiente e riciclabili.
Il cartone è costituito dall’80% al 100%
da carta riciclata.
Le parti in legno non sono state trattate
chimicamente.
I fogli sono in polietilene (PE), i nastri di
fasciatura in poli propilene (PP) e le imbottiture, prive di CFC, sono in polistirolo
espanso (PS). Questi materiali sono composti puri di idrocarburi e sono riciclabili.
Rendere inutilizzabili gli apparecchi fuori
uso.
Dopo aver slato la spina, o dopo che l’e-
lettricista ha smontato il cavo d’allacciamento, tagliare e togliere il cavo di connessione. Distruggere o togliere la
serratura dello sportello, per evitare che i
bambini giocando ri man gano imprigionati
e possano rischiare la vita.
I componenti del vecchio apparecchio non
possono più essere
Il vostro vecchio apparecchio contiene
materiali preziosi, che devono essere inviati
ad un centro di recupero.
Assicurarsi che il proprio apparecchio in
disuso venga smaltito in modo appropriato.
utilizzati.
Non conservarlo, né gettarlo con i riuti
normali.
Per ulteriori informazioni sul riciclaggio di
questo prodotto si rivolga al suo comune,
all’azienda addetta alla raccolta dei riuti
o al negozio presso il quale ha acquistato
il prodotto.
Vi preghiamo di collaborare allo smaltimento o al riciclaggio ecologici dell’apparecchio.
Istruzioni per la sicurezza
Questo apparecchio soddisfa le norme per
la sicurezza relative agli apparecchi elettrici.
Non si intende nalizzato
di persone (inclusi i bambini) con ridotte
capacità siche, sensoriali o mentali, o con
carenza di espe rienza e conoscenza.
Osservare le istruzioni di sicu rezza riportate
nel presente manuale e le successive istru-
Istruzioni generali per la sicurezza:
zioni per il posizionamento.
Non salire sulla macchina.
Non sedersi, né sorreggersi, né appoggiar-
si sul sportello. (Pericolo di ribaltamento!)
L’asciugatrice deve essere utilizzata soltanto
da persone che abbiano ricevuto le istruzioni e la formazione necessarie (età minima
8 anni).
Tenere fuori dalla portata dei bambini di
età inferiore a 3 anni o tenere sotto stretta
sorveglianza.
Non lasciar giocare i bambini con l'appa-
recchio.
Non spruzzare mai acqua sull’apparecchio,
né pulire con un pulitore ad alta pressione
Pulizia e manutenzione non devono essere
effettuate da bambini senza la sorveglianza
di un adulto.
Se l’apparecchio non viene usato per lungo
tempo, deve essere staccato dall'alimentazione di corrente.
Toccare la presa di corrente solo con mani
perfettamente
tirando esclusivamente alla presa di corrente
e mai il cavo stesso.
asciutte. Staccare la spina,
all’uso da parte
Page 35

35
Le riparazioni devono essere condotte
esclusivamente da personale esperto e le
parti danneggiate devono essere sostituite
esclusivamente da pezzi di ricambio originali del fabbricante dei apparecchi.
Le riparazioni non idonee possono provocare gravi danni materiali e causare
li per l’utente. Modiche all’apparecchio
sono possibili solo previo consenso del
produttore.
In caso in cui il cavo per l’allacciamento alla
rete di questo
giato, questo deve essere sostituito con un
cavo di allacciamento particolare, ottenibile
presso il produttore o presso il servizio
clienti.
Cosa fare prima della messa in funzione:
Leggere attentamente le istruzioni allegate,
prima di mettere in funzione la vostra
asciugatrice. Ci sono importanti informa-
relative all’installazione, all’uso ed
zioni
alla sicurezza dell’apparecchio. Conservare
con cura tutta la documentazione per
altre persone che utilizzano l’asciugatrice
o per eventuali proprie tari futuri.
Lasciare installare l’apparecchio a personale
esperto e qua li cato, nel rispetto delle
Istruzioni per il posizionamento fornite
insieme alla macchina. Non collegare un
apparecchio che presenti danni evidenti.
Lo spazio intorno all’asciugatrice deve
essere sempre libero da lamenti.
apparecchio venga danneg-
perico-
Oggetti come la gomma piuma (gomma
piuma in lattice),
impermeabili, articoli in gomma come capi
d’abbigliamento o cuscini contenenti occhi
di gomma piuma non devono venire
asciugati nell'asciugatrice.
Ammorbidenti o prodotti simili possono
essere utilizzati seguendo le rispettive
istruzioni per l’uso.
Un processo di asciugatura dovrebbe
sempre concludersi con la fase di raffreddamento completamente riuscita, cosicché
Durante il trasporto fare attenzione a
quanto segue:
la biancheria rimanga ad una temperatura
tale da non essere danneggiata. Se l’asciugatura viene interrotta prima e senza che
sia stato eseguito il processo di raffreddamento, la biancheria va estratta rapidamente e stesa in modo da permettere al
calore di disperdersi. In questo caso è
necessario considerare che i capi, in base
alla loro temperatura e umidità, in caso di
contatto con la pelle potrebbero causare
delle ustioni. Si consiglia quindi di indossare
dei guanti adatti.
Tenere gli animali domestici lontani
dall’apparecchio.
L’apparecchio è concepito esclusivamente
per l’asciugatura domestica di tessuti.
Al termine del programma, non introdurre
la mano nel cestello ancora rotante.
cufe da doccia, tessuti
Durante l’asciugatura fare attenzione a
quanto segue:
Prima di caricare il bucato, accertarsi che
non vi siano corpi estranei o eventualmente
animali intrappolati nel cestello. Asciugare
nell’asciugatrice solo capi puliti.
Asciugare nell’asciugatrice solo capi puliti.
L’asciugatrice non deve essere utilizzata se
per il lavaggio sono stati usati prodotti
chimici. Biancheria venuta a con tatto con
olio da tavola, acetone, alcol, benzina,
petrolio, cherosene, smacchiatori, tremen-
tina, cera o olio toglicera, prima dell'asciu-
gatura nell'asciugatrice devono venire lavati
in acqua tiepida con una dose aggiuntiva
di detersivo.
Attenzione durante il trasporto dell’asciu-
gatrice:
pericolo di ferirsi! Non sollevare l’apparecchio facendo presa sulle parti sporgenti!
Page 36

36
Per asciugare correttamente
rispettando l’ambiente
Selezione dei capi
Controllare i simboli di asciugatura sulle
etichette dei tessuti.
Asciugatura a temperatura normale.
Asciugatura a bassa temperatura.
Non asciugare con l’asciugatrice.
Asciugare nell’asciugatrice solo capi che sono stati lavati
con acqua.
Per ottenere un’asciugatura uniforme, suddividere la
biancheria per tipo di tessuto e per grado d’asciugatura
desiderato.
Caricamento
Il sistema d’asciugatura più economico e meno nocivo
per l’ambiente è quello di caricare la quantità massima
di biancheria consentita (vedi capitolo «Tabella dei programmi»).
Non superare la quantità massima di carico consentita,
poiché il sovraccarico pregiudica i risultati dell'asciugatura
e sgualcisce molto la biancheria.
Centrifugare i capi in lavatrice o in una centrifuga
prima di asciugarli, per eliminare completamente l’acqua.
Maggiore è la velocità di centrifugazione, minori saranno
i tempi di asciugatura e, di conseguenza, i consumi
d’ener gia elettrica.
Centrifugare anche i capi delicati.
Consigli per l’asciugatura
Chiudere le cerniere lampo, i ganci e gli occhielli.
Per favore chiudere i bottoni degli copripiumini e federe.
Allacciare le cinture aperte, legare insieme i nastri dei
grembiuli, ecc.
Se possibile, togliere i capi delicati dall’asciugatrice
ancora leggermente umidi (selezionare il grado «Asciugatura leggera»). In caso d’eccessiva asciugatura c’è il
rischio che si sgualciscano.
I capi che risultassero ancora umidi al termine del ciclo
d’asciugatura (carico misto cotonati) possono essere
asciu gati con il programma «Asciugatura a tempo».
I tessuti lavorati, ad. es. i capi in maglia, potrebbero
restringersi con l’asciugatura. Per questo tipo di tessuti
non utilizzare il programma «Asciugatura forte»
Asciugare la lana o i tessuti in misto lana solo con il
programma «Lana nish»): pericolo d’infeltrimento!
Se si desidera asciugare solamente un capo, allora
questo si può asciugare in modo uniforme, solo se si
integrano altri capi per equilibrare il peso, quali panni di
spugna.
Non utilizzare l’asciugatrice per i seguenti tessuti:
Biancheria troppo bagnata: spreco di energia!
I capi trattati con solventi inammabili, es. smacchianti
o benzina solvente, non devono essere asciugati nella
macchina (rischio di esplosione!) e neppure i capi che
contengono gommapiuma o schiuma per capelli, solvente
per smalto o sostanze simili (rischio di incendio!).
Messa in funzione
Installare l’asciugatrice seguendo le relative istruzioni.
Prima di mettere in funzione l’asciugatrice per la prima
volta, pulire il cestello con un panno umido.
Preparazione
Controllare che:
X Sia inserito il ltro per i pelucchi (vedi capitolo «Avvio
del programma»).
X La spina sia inserita o l’interruttore a parete acceso.
Quando tutte le spie lampeggiano la lavatrice è pronta
per entrare in funzione.
X Nel caso che una spia rimanga continuamente accesa,
premere il tasto «Ciclo veloce», nché viene indicato
«Selezionare un programma».
Apertura del sportello
Chiusura del sportello
.
Avvertenza
X Nel caso che il display è oscurato basta premere qua-
lunque tasto per riattivare l’apparecchio.
X Premere il tasto «Apertura del sportello».
Il sportello si apre.
X Attenzione: Il sportello si apre solamente se è inserita
l’alimentazione di corrente principale. Se dovesse essere
mancata la corrente prima dell’apertura del sportello,
allora può essere aperto manualmente premendo
all’altezza del bloccaggio del sportello.
La luce del cestello si accende al momento dell’apertura
del sportello.
X Per chiudere il sportello, premerlo nché non si sente
scattare chiaramente la serratura.
Accertarsi che nel chiudere il sportello non vi rimangano
impigliati dei capi.
Se lo sportello non è stato chiuso, un dispositivo di sicu-
rezza impedisce la messa in funzione dell’apparecchio.
Page 37

Descrizione dell'asciugatrice
Pannello di comando e visualizzazione
37
Programmi
1 Programmi speciali
2 Umido per stiratura
3 Asciugatura normale
4 Asciugatura forte
Funzioni supplementari
5 Sintetici
6 Impostazione timer
7 Biancheria mista
8 Imposta durata
9 Avvio del programma
10 Apertura del sportello
11 Ciclo veloce
Indicatori
12 Display digitale
Interfacce
13 SCS-Schulthess Control System
(interfaccia PC per assistenza clienti)
Pannello di comando e
visualizzazione
Filtro
Sportello di riempimento
Griglia di raffreddamento
Page 38

Durata in
min. circa
Consumo
in kWh ca.
di corrente
alla
Centrifugato in
lavatrice
velocità giri/min.
80
96
1,2
1,5
1600
1200
112
128
1,6
2,0
1600
1200
120
1,8
1600
137
2,2
1200
34
0,4
800
40
0,5
600
51
0,6
800
59
0,7
600
38
58
66
0,8
0,9
800
600
800 0,6 48
800 1,0 65
800 1,2 73
asti per la selezione
T
del programma
Grado
d’asciugatura
del programma
Umido per
stiratura
X Per capi da stirare con ferro
normale
X Per capi che non devono essere stirati Asciugatura
+
normale
+
forte
+
forte
X Tessuti particolarmente spessi o à più strati Asciugatura
Umido per
stiratura
X Per capi che non devono essere stirati Asciugatura
+
Umido per
stiratura
X Per capi che non devono essere stirati Asciugatura
+
normale
+
forte
Vi preghiamo di controllare sempre i simboli riportati sulle etichette dei tessuti.
Quantità
max. di
Tabella dei programmi
Simbolo
Cotone o lino
Tessuto/Tipo di biancheria
bianch.
sull’etichetta
magliette polo, vestiti da lavoro
7 kg Lenzuola, tovaglie, asciugamani, T-Shirts.
Asciugamani di spugna e non, canovacci per
Accappatoi e lenzuola in spugna
Mai biancheria intima e calze
Sintetici (che non si stirano) in tessuto sintetico e misto, cotone da non stirare,
piatti, lenzuola, biancheria intima, calzini in
cotone
ad es. viscosa, cupro, modal, poliestere
3,5 kg Pantaloni, abiti, gonne, camicie X Per capi da stirare con ferro
Giacche a vento, coperto X Tessuti particolarmente spessi o à più strati Asciugatura
Camicie da uomo, bluse, capi di abbigliamento
sportivo, lenzuola, tovaglie, tute sportive
Biancheria mista in cotone e tessuti sintetici
3,5 kg Pantaloni, abiti, gonne, camicie X Per capi da stirare con ferro
Giacche a vento, coperto X Tessuti particolarmente spessi o à più strati Asciugatura
Camicie da uomo, bluse, capi di abbigliamento
sportivo, lenzuola, tovaglie, tute sportive
Page 39

Durata in
Consumo di
corrente in
min. circa
kWh ca.
giri/min.
119
1,8
39
132
2,0
lavatrice alla
Centrifugato in
Tasti per la selezione
Grado d’asciugatura
velocità
del programma
del programma
400 0,9 55
+
+
1x
Asciugatura a tempo
freddo 20-90min
+
+
2x
Asciugatura a tempo
caldo 20-150min
2x
Asciugatura a tempo
caldo 20-150min
Bluse/Camice
800
600
200 1,0 49
3x
Umido per stiratura
5x
4x
Sintetico
Asciugatura normale
800 0,1 7
6x
Asciugatura normale
Lana nish
Asciugatura morbida
(non completamente
asciutta)
Vi preghiamo di controllare sempre i simboli riportati sulle etichette dei tessuti.
Quantità
max. di
Tabella dei programmi
Simbolo
Programmi speciali
Tessuto/Tipo di biancheria
bianch.
sull’etichetta
1,5 kg Rinfrescare X Il bucato viene ventilato, senza apportare ulteriore calore. Rinfrescare
dell’umidità residua.
7,0 kg Cotone X Il bucato si asciuga all’ora impostata, senza il controllo
dell’umidità residua.
Il programma riduce la formazione di pieghe, non danneggia il
bucato e facilita anche la successiva stiratura.
3,5 kg Sintetici X Il bucato si asciuga all’ora impostata, senza il controllo
3,5 kg Bluse/ Camice X Le camicie si asciugano no al livello «Umido per stiratura».
4,5 kg Jeans I jeans si asciugano completamente. Jeans
X Il bucato diventa più morbido, ma non è completamente
tende e simili.
2,3 kg Sintetico X Per asciugare capi in seta, capi delicati e biancheria intima,
3,5 kg Lana resistente al
asciutto. Estrarre il bucato subito dopo la ne del programma
e disporre orizzontalmente sul panno di spugna.
lavaggio meccanico
Page 40

40
Selezione del programma
Selezione dei programmi standard
Il sistema di rilevamento elettronico controlla costantemente il grado di umidità dei vostri capi e termina il
programma automaticamente al
raggiunto il grado d’asciugatura
X Premere il tasto del programma corrispondente al grado
di asciugatura desiderato.
Si accende la spia luminosa del programma selezionato.
X Per i tessuti delicati selezionare la funzione supple-
mentare «Sintetici»
X Per capi misti selezionare la funzione supplementare
«Biancheria mista».
Programmi speciali
Con i programmi speciali si possono asciugare in modo
mirato alcuni tipi di tessuto.
Premere ripetutamente il tasto
appare il programma desiderato. (vedi tabella dei programmi).
.
impostato.
Funzioni supplementari
momento in cui è stato
f
inché sul display
Imposta durata
Se tra i programmi speciali avete selezionato un pro-
gramma di asciugatura temporizzato, potete stabilire la
durata del programma con il tasto «Imposta durata».
Il tempo d’asciugazione da impostare dipende dal tipo di
biancheria, dalla quantità di biancheria e dal conte nuto
di umidità.
X Premere il tasto del programma.
La spia luminosa «Imposta durata» lampeggia ed il
tempo d’asciugatura minimo viene indicato.
X Selezionare il tempo d’asciugazione premendo più
Selezionare ora di avvio
volte il tasto «Imposta durata».
Premendo una o più volte il tasto «Selezionare ora di
avvio» si può impostare l’ora d’avvio in modo che l'asciugatrice
entri in funzione entro le 23,5 ore successive.
Questo consente, ad esempio, di sfruttare la tariffa ridotta
per la corrente erogata durante la notte. L’inizio e la n
di un programma possono quindi essere adeguati alle
proprie abitudini di vita.
Nel display viene visualizzato il tempo di avvio ed il tempo
residuo per nire il programma.
L’ora preselezionata inizia a decorrere dopo l’attivazione
del tasto di avvio.
Una volta raggiunta l’ora di avvio, il programma si attiva
automaticamente e viene visualizzata la sua durata
effettiva.
In caso d’interruzione di corrente rimane memorizzato
il tempo attuale. Non viene tenuta in considerazione la
durata dell’interruzione di corrente.
e
Oltre ai diversi programmi standard la vostra asciu gatrice
vi offre la possibilità di creare pro grammi persona lizzati.
Selezionare primo un programma standard o speciale.
Selezionando una o più funzioni supplementari potete
impostare questo programma di asciugatura in base alle
caratteristiche speciche della vostra biancheria.
Tali funzioni supplementari rimangono attive esclusivamente per questo programma di asciugatura.
X Avete inoltre la possibilità di standardizzare la vostra
asciugatrice alle vostre necessità personali, cambiando le
impostazioni di base (vedi capitolo «Impostazioni di
base»). I cambiamenti effettuati sulla programmazione
di base rimangono attivi no a quando non verranno
nuovamente cambiati.
Sintetici
Per capi delicati in tessuto sintetico, tessuti misti o cotone
da non stirare.
Biancheria mista
Per biancheria mista in tessuto normale sintetico o misto
o cotone.
Ciclo veloce
Il programma può essere ridotto o interrotto, premendo
il tasto «Ciclo veloce».
Page 41

41
Avvio del programma
Selezione del programma
Vedi capitolo «Selezione del programma»
Selezione di funzioni supplementari
Vedi capitolo «funzioni supplementari»
Cambiare programma prima dell’avvio del programma
X Premere nuovamente il tasto del programma desiderato.
Lampeggiano nuovamente tutte le spie di controllo
delle funzioni supplementari che possono essere selezionate e tutte le impostazioni vengono cancellate.
X Selezionare le funzioni supplementari eventuali.
Inserimento della biancheria
Utilizzare l’asciugatrice solo per i capi che sono stati
lavati ad acqua.
X Inserire nel cestello i capi ben aperti, mischiando i capi
grandi e piccoli.
Avvio del programma
X Premere il tasto «Start».
La spia luminosa si accende ed il programma parte
automaticamente.
Se è inserito il dispositivo di sicurezza per i bambini:
X Tenere premuto il tasto «Start» e azionare il tasto
«Ciclo
veloce».
Svolgimento del programma / Fase del programma
Aggiunta di biancheria
effettuabile in ogni momento.
X Premere il tasto «Apertura del sportello».
Il tamburo si ferma.
X Introdurre la biancheria.
X Chiudere lo sportello.
X Premere il tasto «Start».
Se è inserito il dispositivo di sicurezza per i bambini:
X Tenere premuto il tasto «Start» e azionare il tasto
«Ciclo
veloce».
Il processo di asciugatura riprende.
Interruzione del programma
X
Interrompere il programma premendo più volte il tasto
«Ciclo veloce», nché sul display compare «Fine programma».
Se è inserito il dispositivo di sicurezza per i bambini:
X Tenere premuto il tasto «Start» e azionare il tasto
«Ciclo
veloce».
Fine programma
La ne del programma viene visualizzata dal valore
«
00:00h»,
lampeggia.
Viene emesso un segnale acustico (solamente nel caso
in cui è inserita l’apposita funzione di segnalazione.)
Alla ne del programma, il cestello continua a muoversi
a intervalli brevi, per evitare che il bucato non si pieghi
(solo con funzione antipieghe attivata, 30 o 60 minuti).
Dopodiché la biancheria dovrebbe essere rimossa.
Togliere la biancheria
X Premere il tasto «Apertura del sportello».
Il tamburo viene illuminato.
X Togliere la biancheria.
X Pulire i ltri
il display indica «Fine programma» e la spia
X Nei programmi in base all'umidità residua il sistema di
rilevamento elettronico controlla costantemente il grado
d’umidità della biancheria.
Viene visualizzata la durata residua del programma.
Questo tempo residuo viene ricalcolato più volte durante
l'asciugatura, pertanto l'effettiva ne del programma
v aria di alcuni minuti.
X Nei programmi a tempo viene indicato il tempo che
rimane prima della ne del programma.
Pulizia dei ltri
Utilizzando i capi di biancheria, si vengono a creare dei
lamenti, che durante l’asciugatura si staccano e vanno
a depositarsi nell’apertura dello sportello.
Quindi il ltro interno a maglia stretta (A) deve essere
pulito dopo ogni ciclo d’asciugatura.
Page 42

42
Pulizia del ltro A / Pulizia dopo ogni
programma
X Premere il tasto «Apertura del sportello».
X Estrarre il ltro interno a maglia stretta e capovolgerlo.
di asciugatura
Pulizia del ltro B /
Il ltro esterno a maglia larga (B) deve essere estratto e
pulito giornalmente.
Spegnere l’asciugatrice
X Chiudere lo sportello
X Spegnere l’interruttore a parete.
Se non è presente un interruttore a parete, il display
scompare automaticamente e l’asciugatrice passa alla
modalità «OFF» (vedi capitolo «Impostazione estese /
Funzione stand-by»).
Pulizia
ogni giorno
X Passare la mano sul ltro e rimuovere in questo modo
i lamenti di tessuto.
Può anche accadere che il ltro, anche se apparente-
mente sottoposto a regolare pulizia, diventi impermea-
bile a causa di un ne sedimento invi sibile depositatosi
nella mascherina del ltro.
X Tenere il ltro con una supercie rivolta verso l’alto e
versarvi sopra dell’acqua . Se non lascia passare l’acqua,
il ltro deve essere pulito con una spazzola sotto l’acqua
corrente.
Nel caso non si riesca a spazzolare via lo sporco depo-
sitatosi sul ltro, si deve rimuoverlo con uno spray anticalcare in commercio.
X Spruzzare l’anticalcare su tutta la supercie del ltro e
lasciare agire il prodotto. Nel caso di sporco ostinato,
appoggiare sul ltro un foglio di carta assorbente e
spruzzare l’anticalcare in modo che il ltro rimanga umido.
Fare agire il prodotto per tutta la notte. Inne pulire il
ltro con una spazzola ne sotto l’acqua corrente.
Page 43

43
Impostazioni di base
Sebbene i parametri base dell'asciugatrice siano già stati
predisposti in fabbrica, prima dell'avviamento o in qualsi asi momento successivo le funzioni di seguito elencate
vi permettono di adattarli alle vostre esigenze personali.
Le impostazioni di base possono essere cambiate solamente
se nessun programma di asciugatura è in esecuzione. Per cambiare un'impostazione di base si deve
sempre
mantenere premuto il tasto di programma e poi
at tivare il tasto «Ciclo veloce». Le relative funzioni
ven go no visualizzate sul display. Tenendo premuto il
tasto di programma e premendo più
veloce»
Esempio:
Umidità iniziale (valore preimpostato 50%)
L'indicazione del tempo residuo sarà più esatta se le
impostazioni dell'asciugatrice vengono adattate alla
velocità di centrifugazione della vostra lavatrice.
Una velocità di centrifugazione di 1600 giri/min.
corrisponde al 50% di umidità iniziale
Una velocità di centrifugazione di 1200 giri/min.
corrisponde al 60% di umidità iniziale
Grado di asciugatura (valore preimpostato NORMALE)
la visualizzazione cambia.
Funzione disinserita
Funzione inserita
+
volte il tasto «Ciclo
Lingua (valore preimpostato DEUTSCH)
+ ÷
Questa impostazione vale temporaneamente per il
programma selezionato e alcuni minuti dopo la ne del
programma si passa nuovamente alla lingua di default.
(Vedi capitolo «Altre impostazioni di base/Lingua
default»).
Altre impostazioni di base
+ +
X La pressione contemporanea su questi tre tasti attiva
la visualizzazione delle altre impostazioni di base.
X La pressione ripetuta sul tasto
stazioni disponibili.
X La pressione sul tasto
varie impostazioni.
X Con la pressione sul tasto termina la visualizzazione
delle impostazioni.
Sicurezza bambini (valore preimpostato OFF)
Selezionare «Altre impostazioni di base»!
Il dispositivo di sicurezza per i bambini serve ad evitare
che i bambini facciano partire casualmente il programma,
oppure lo cambino o lo cancellino.
Avvio di un programma quando è inserito il dispositivo
di sicurezza per i bambini:
+
Tenere premuto il tasto «Start» e azionare il tasto «Ciclo
veloce».
permette di modicare le
visualizza le impo-
+
Se è inserito «Piu alto», nei programmi in base all'umidità
residua
biancheria risulta un po' più asciutta.
Antipiega (valore preimpostato 30MIN)
Attivando questa funzione, alla ne del programma inizia
una fase di protezione antipiega della durata di 60 min.
Ora (non preimpostata in fabbrica)
Il tasto consente di regolare le ore e il tasto di
regolare i minuti.
«Asciugatura normale» e «Asciugatura
+
+
forte» la
Memoria tasti (valore preimpostato OFF)
Luminosità LCD (valore preimpostato 150)
Contrasto LCD (valore preimpostato 26)
Selezionare «Altre impostazioni di base»!
Inserendo la funzione «Memoria tasti» viene salvato il
programma speciale eseguito per ultimo, che compare
per primo sul display la volta successiva in cui si preme
il tasto
zionare in successione i programmi che seguono.
Un programma speciale utilizzato frequentemente può
essere richiamato con una sola pressione su un tasto.
A funzione disinserita compare per primo il programma
«Rinfrescare».
Selezionare «Altre impostazioni di base»!
Questo tasto
dei carattere visualizzati.
Selezionare «Altre impostazioni di base»!
Questo tasto
trasto del display.
. Premendo ripetutamente si possono sele-
consente di modicare la luminosità
consente di modicare il livello di con-
Page 44

44
Volume segnale acustico
(valore preimpostato VOLUME 2
Selezionare «Impostazioni estese»!
Con segnale attivato, al termine del programma viene
emesso un segnale acustico ad intervalli regolari.
Il volume può essere regolato su 3 livelli:
OFF
VOLUME 1
VOLUME 2
VOLUME 3
Funzione standby (valore preimpostato: OFF-MODE)
Selezionare «Impostazioni estese»!
"OFF"
L’apparecchio rimane sempre attivato. Il display e attivo.
"STANDBY-MODE"
Max. 4 minuti dopo la ne del programma l’apparecchio
passa automaticamente alla modalità di risparmio energetico. Nel display viene visualizzato il messaggio «ZZZ».
"OFF-MODE"
Max. 4 minuti dopo la ne del programma l’apparecchio
viene automaticamente spento. Il display e oscurato.
"STANDBY + OFF-MODE"
Max. 4 minuti dopo la ne del programma l’apparecchio
passa automaticamente alla modalità di risparmio energetico. Nel display viene visualizzato il messaggio «ZZZ».
Max. 10
mente spento. Il display e oscurato.
Avvertenza
Nel caso che il display è oscurato basta premere qualunque tasto per riattivare l’apparecchio.
minuti
dopo
l›apparecchio viene automatica-
Pulizia e manutenzione
Pulizia dei ltri
Vedi capitolo «Avvio del programma».
Pulizia del supporto del ltro
Ogni tanto è necessario rimuovere i la menti che si sono
depositati sul supporto. Per questa operazione utilizzare
un'aspirapolvere o un pennello per spolverare.
X Rimuovere il ltro A e B dal supporto degli ltri
nell’apertura dello sportello.
X Introdurre il tubo dell’aspirapolvere o il pennello per
spolverare nella cavità del supporto degli ltri.
Interfaccia ottica (valore preimpostato OFF)
Selezionare «Altre impostazioni di base»!
L'attivazione dell'interfaccia ottica (SCS) consente
al Servizio Assistenza di comunicare con la macchina
tramite PC.
Lingua default (valore preimpostato DEUTSCH)
Selezionare «Altre impostazioni di base»!
Se si seleziona temporaneamente un’altra lingua tramite
i tasti
lità stand-by o dopo mancato funzionamento per un lungo
periodo si passa nuovamente alla lingua di default.
Indicazioni per istituti di prova e utilizzatori
Sul display e in queste istruzioni per l'uso, il programma
normale Cotone è indicato come «COTONE, ASCIUGATURA NORMALE»
Consumi secondo Direttiva 2010 / 30 / EU
Durata media di un programma
a mezzo carico e pieno carico 99 min.
Consumo annuale di energia 239 kWh
e , dopo la ne del programma, in moda-
X Rimuovere interamente i lamenti residui.
X Rimontare i due ltri in modo corretto.
X Chiudere lo sportello.
Page 45

45
Pulizia dei rilevatori d’umidità
Dopo un uso prolungato si possono formare dei ni
sedimenti di calcare o ammorbidente sulla parte frontale
ed interna del tamburo, su entrambi i rilevatori d'umidità.
Nei programmi in base all'umidità residua questo può
comportare il mancato raggiungimento del grado di
asciu gatura desiderato.
Togliere i sedimenti con un panno imbevuto in aceto.
Pulizia dell’apparecchio
Prima di pulire l’apparecchio o eseguire lavori di manu-
tenzione, accertarsi che la corrente sia disinserita.
Non spruzzare mai acqua sull’apparecchio, né pulire con
un pulitore ad alta pressione
Non utilizzare solventi! Queste sostanze potrebbero
danneggiare alcuni componenti dell’asciugatrice; sviluppano vapori tossici e possono provocare un’esplosione!
Pulire la parte esterna ed i comandi dell’asciugatrice
semplicemente con acqua saponata o con un normale
detergente in commercio che non contenga solventi o
che non sia abrasivo.
Anomalie di funzionamento
Segnalazioni di guasto
Nel caso vengano segnalate le seguenti anomalie, il
programma può essere fatto ripartire, premendo il tasto
«Start», dopo aver eliminato l’anomalia.
«SICUREZZA BAMBINI ATTIVA»
X Mantenere premuto il tasto «Start» e azionare il tasto
«Ciclo veloce».
«CHIUDERE SPORTELLO»
X Premero lo sportello nché la chiusura non si inserisce
correttamente.
«AQUA CONDENSA PIENO»
X La pompa dell'acqua di condensa non funziona.
Vericareche il tubo essibile dell'acqua di scarico non
sia piegato o lo scarico sull'immobile non sia ostruito.
X Premere il tasto «Start», per confermare la ricezione
del messaggio.
X Il programma riprende.
Se l’apparecchio segnala un messaggio di guasto F– – :
X Interrompere il programma con il tasto «Ciclo veloce»
e selezionare un nuovo programma.
Se la segnalazione di guasto viene ripetuta:
X Interrompere per circa 1 minuto l’alimentazione di
corrente e poi reinserirla (slare la spina o spegnere
l’interruttore a parete).
L’apparecchio è nuovamente pronto ad entrare in
funzione, se le spie luminose dei programmi lampeggiano.
X Selezionare un nuovo programma.
Svuotare in caso di gelo o prima del trasporto
Se l’asciugatrice si trova in un locale dove la tempe
può andare sotto zero, oppure deve essere traspor tata, è
necessario svuotare completamente l’apparecchio.
1. Con tamburo vuoto, avviare il programma «Capi resi-
stenti e colorati, umido per stiratura».
2. Per abbreviare il programma, premere una volta il tasto
«Ciclo veloce».
3. L’eventuale acqua ancora presente verrà pompata fuori
dalla macchina negli ultimi 4 minuti del programma.
ratura
Se viene ancora indicata la segnalazione di guasto:
X Annotarsi il tipo di segnalazione di guasto.
X Slare la spina o spegnere l’interruttore a parete.
X Avvisare il Servizio Assistenza.
Guida in caso di guasti
Riparazioni, modiche o interventi su apparecchi elettrici
devono essere eseguiti esclusivamente da personale
specializzato. Le riparazioni non idonee possono provocare gravi danni materiali e causare pericoli per l’utente.
Per le riparazioni devono essere utilizzati solamente
ricambi originali.
Come eliminare da soli piccole anomalie
La macchina non entra in funzione dopo aver
premuto un tasto del programma:
X Controllare che l’interruttore a parete sia acceso e la
spina sia inserita.
X Controllare che tutti i fusibili siano intatti oppure che
sia scattato il salvavita.
Il display è oscurato:
X L’apparecchio è in modalità OFF. Non si tratta di un er-
rore, basta premere un tasto per riattivare l’apparecchio.
Page 46

46
L’apparecchio non entra in funzione:
X Non è stato premuto il tasto «Start».
X È impostata un’ora d’avvio. Non si tratta di un errore,
parte solamente dopo che è trascorso il tempo d’avvio
selezionato.
L’apparecchio non si accende, il display rimane
oscurato, anche dopo aver premuto un tasto:
X Controllare che l’interruttore a parete sia acceso e la
spina sia inserita.
X Controllare che tutti i fusibili siano intatti oppure che
sia scattato il salvavita.
X Blocco di rete, di regola avviene intorno a mezzogiorno
Riattivare l’apparecchio una volta trascorso il periodo del
blocco di rete.
Il grado di asciugatura non è stato raggiunto:
Il bucato ancora caldo si percepisce più umido di
quello che in realtà è! Lasciare raffreddare il bucato
fuori dall’asciugatrice.
Se continua ad essere troppo umido:
X Pulire il ltro (vedi capitolo «Avvio del programma»).
X Aumentare il grado d'asciugatura (vedi capitolo
«Impostazione di base»).
X Pulire i rilevatori d'umidità (vedi capitolo «Pulizia e
manutenzione»).
Il singolo capo non raggiunge l’asciugatura
desiderata:
X Se si desidera asciugare solamente un capo, allora
questo si può asciugare in modo uniforme, solo se si
integrano altri capi per equilibrare il peso, quali ad
esempio panni di spugna.
Il tempo di asciugatura è troppo lungo:
X Pulire il ltro (vedi capitolo «Avvio del programma»).
X Mancanza di corrente (controllare i blocchi da parte
della Società Elettrica).
La biancheria non si asciuga nonostante sia stato
impostato il massimo grado di asciugatura:
X Il cestello è sovraccarico (vedi capitolo «Tabella dei
programmi»).
X La biancheria non è stata centrifugata a sufcienza.
X L’aerazione dell’ambiente non è sufciente (aprire la
porta o la nestra).
X Il ltro è otturato da lamenti di tessuto o di sedimento
di calcio (vedi capitolo «Avvio del programma»).
L’apparecchio emette improvvisamente un
forte rumore:
X In mezzo e alla ne di un programma di asciugatura,
avviene la pulizia dello scambiatore di calore. Il sollevatore elettromagnetico che fa scattare la pulizia è chiaramente rumoroso. Non si tratta di un errore ed è normale.
Durante la pulizia, sul display compare il messaggio
«Lavaggio in corso».
L’illuminazione del cestello non funziona:
X La lampadina è guasta. Per motivi di sicurezza la
lampadina deve essere sostituita soltanto dal Servizio
Assistenza o da un tecnico.
Consistente aumento d’umidità nell’ambiente:
X L’ambiente non è aerato sufcientemente. Provvedere
ad una sufciente aerazione dell’ambiente.
Il
sportello è bloccato:
X Se dovesse essere mancata la corrente prima dell’aper-
tura dello sportello, allo ra può essere aperto manualmente premendo all’al tez za del bloccaggio dello sportello.
Servizio assistenza
Prima di rivolgervi al Servizio Assistenza, vericate se
potete eliminare da soli l’anomalia (vedi capitolo «Anomalie di funzionamento»).
In caso di consulenza, anche durante il periodo di garanzia,
vi saranno addebitati i costi per l’intervento di un tecnico.
Nel caso non siate in grado di eliminare da soli il guasto,
slare la spina o spegnere l’interruttore a parete e rivol-
.
gersi al Servizio Assistenza.
Comporre il numero della sede centrale del Servizio
Assi stenza (vedi retro della busta). Sarete collegati automaticamente con la liale del Servizio Assistenza competente per la vostra zona.
Vi preghiamo di indicare al Servizio Assistenza il numero
di prodotto ed il numero dell’apparecchio. Troverete
questi dati sulla targa di identicazione situata all’interno
dello sportello.
Segnare qui i numeri del vostro apparecchio.
No. di prodotto
No. di apparecchio
Abbonamento di garanzia
Trascorso il normale periodo di garanzia di 2 anni, questo
può essere prolungato a scelta con un abbonamento di
garanzia. Siamo lieti di spedirvi la relativa documentazione.
Conservare il libretto del Servizio Assistenza ed il certicato di garanzia allegati.
Page 47

Contents
E NGLISH
Used symbols 48
Waste disposal advice
X Packaging from your new machine 48
X Disposal of your old machine 48
Safety information
X General safety information 48/49
X Observe before start-up 49
X Observe when drying 49
X When transporting your machine 49
How to dry correctly and environmentally friendly
X Sorting the laundry 50
X Load 50
X Tips for drying 50
X Do not dry the following fabrics in the
machine 50
Start up
X Preparation 50
X Opening the door 50
X Closing the door 50
Machine description
X Control and display area 51
Programme table 52/53
Selecting programmes
X Selecting standard programmes 54
X Special programmes 54
Z Information for testing institutes
and users 58
Z Consumption according to Directive
2010 / 30 / EU 58
Cleaning and Care
X Cleaning the lter support 58
X Cleaning the moisture sensor 58
X Cleaning the machine 59
X Emptying for frost protection or transport 59
Problems
X Error messages 59
X Troubleshooting 59/60
Customer services
X Product and machine numbers 60
Guarantee subscription 60
Notes 61/62
Inhaltsverzeichnis deutsch
X Siehe Seite 5
Additional functions
X Easy care 54
X Mixed wash 54
X Time selection 54
X Start time preselection 54
X Fast forward 54
Starting the programme
X Selecting programmes 55
X Selecting additional functions 55
X Changing the programme before
the start 55
X Adding laundry 55
X Start the programme 55
X Programme progress/Programme status 55
X Adding more laundry 55
X Interrupting the programme 55
X Programme end 55
X Removing the laundry 55
X Cleaning the lters 55/56
X Switching off the machine 56
Basic settings
Z Initial moisture content 57
Z Drying level 57
Z Crease protection 57
Z Time 57
Z Language 57
X Extended basic settings
Z Child lock 57
Z Memory function 57
Z LCD Brightness 57
Z LCD Contrast 57
Z Alarm volume 58
Z Standby function 58
Z Optical interface 58
Z Default language 58
Sommaire français
X Voir page 19
Sommario italiano
X Vedere pagina 33
Page 48

48
Used symbols
Safety information and warnings
X indicates work steps which must be
executed one after the other
enumerations, general useful hints
Waste Disposal Advice
Packaging from your new machine
Dispose of all packaging materials properly.
Packaging materials are not toys.
Processing and reuse saves raw materials
and reduces waste volumes.
The packaging can be returned to the retailer or supplier.
All packaging materials used are environmentally friendly
made of 80-100% recycled paper.
Wood is not chemically treated. Films are
made of polyethylene (PE), banding is
made of polypropylene (PP). These materials are pure hydrocarbon compounds and
are recyclable.
Disposal of your old machine
Worn out machines should be made
unusable:
After unplugging the machine or after an
electrician has removed the connection,
cut through and remove the mains cable.
Destroy or remove the door lock so that
playing children cannot become locked in
and put their lives at risk.
Components from your old machine must
not be reused.
The old machine contains valuable materials
which should be sent for recycling.
Please ensure that your old machine is
disposed of pro perly.
and reusable. All card is
Please do not keep your old machine and
under no circumstances dispose of it in
your normal waste.
Additional information on the recyc ling of
this product can be obtained from your
commune, your waste disposal contractor
or the shop in which you bought the
product.
In this way you can help to ensure environ
mentally friendly disposal and/or recycling
methods.
-
Safety Information
This machine meets the stringent safety
regulations for electronic devices. It is not
intended for use by persons (including
children) with reduced physical, sensory or
mental capabilities, or lack of experience
and knowledge. Please observe the safety
instructions in these operating instructions
and the appurtenant mounting instructions.
General safety information:
Do not stand on the machine.
Do not sit, lean or support yourself on the
loading door (danger of tipping!).
The dryer may only be operated by instruct-
ed, trained persons (at least 8 years of age).
Keep out of the reach of children under 3
years of age, or make sure they are under
constant adult supervision
Children may not play with the device.
Under no circumstances spray the machine
with water or clean it with a steam cleaner.
Cleaning and user maintenance may not be
performed by children without supervision.
If the machine is not needed for a longer
period of time, disconnect it from the
power supply.
Touch the power plug with dry hands only.
Only pull the plug, do not pull the cable.
Repair work may only be executed by
qualied and trained personnel and defective components may only be replaced
with original spare parts by the original
equipment manufacturer.
.
Page 49

49
Inexpert repairs can cause considerable
damage and risk to the user. Modications
to the appliance are only admissible after
consultation with the manufacturer.
If the mains lead to this device becomes
damaged, it must be replaced with a special lead available from the manufacturer
or the manufacture’s customer service.
Observe before start-up:
Read the enclosed documents carefully
before using your dryer. They contain
important information on the installation,
use and safety of the machine. Keep the
documents safe for other users or subsequent owners.
Have the machine installed according to
the mounting instructions by qualied
and trained personnel. Do not connect an
appliance which displays visible damage.
The lint must not to be allowed to accu-
mulate around the tumble dryer.
A drying procedure should always end
When transporting your machine:
with fully completed cooling-off, so that
the laundry remains at a temperature that
does not damage them. If the drying
procedure is ended prematurely without
cooling-off, all of the laundry must be
removed quickly and spread out so that
the heat can be given off. Here one should
be aware that the laundry can cause burns
upon contact with skin due to its tempera-
and moisture. Appropriate hand pro-
ture
tection is therefore to be worn.
Keep pets away from the machine.
Only use the machine in the home for
drying textiles.
Do not reach into the rotating drum after
the end of the programme.
Take care when transporting the machine!
(risk of injury!)
Do not lift the machine by the ttings on
the front!
Observe when drying:
Before loading the machine make sure
that there is no foreign body or maybe a
trapped animal in the drum.
Dry clean laundry in the dryer only.
The tumbler dryer is not to be used if
chemicals have been used for cleaning.
ltems
ces such
petrol,
ne, waxes
washed in hot water with an extra amount
of detergent before being dried in the
tumble dryer.
ltems such as foam rubber (latex foam),
shower caps, water proof textiles, rubber
backed articles and clothes or pillows tted
with foam rubber pads should not be
dried in the tumble dryer.
Fabric softeners, or similar products,
should be used as specied by the fabric
softener instructions.
that have been soiled with substan-
as cooking oil, acetone, alcohol,
kero sene, spot removers, turpenti-
and wax removers should be
Page 50

50
How to dry correctly
and environmentally friendly
Sorting the laundry
Pay attention to the drying symbols on your
fabrics.
Dry at normal temperature.
Dry at low temperature
Do not tumble dry.
Dry textiles only which have been washed in water.
To achieve even drying results, sort the laundry by fabric
type and desired level of dryness.
Load
Your dryer will be most environmentally friendly and
economical if you ll the machine with the maximum
laundry load (see chapter «Programme table»).
Do not exceed the maximum load, because overlling
affects the drying result and severely creases the laundry.
Remove as much water as possible from the laundry
before drying by spinning in a washing machine or spin
dryer. The higher the spin speed, the shorter the drying
time and lower the energy consumption.
You should also spin easy care laundry.
Tips for drying
Do up all zips, hooks and eyes. Button up duvet
covers and pillowcases. Tie together loose belts, apron
strings etc.
Remove easy care laundry from the dryer in a slightly
damp state if possible (select target dryness «Slight
drying») and allow to nish drying in the air. Over drying
causes creases.
Laundry which is still too damp after drying a load of
widely varying fabrics can be dried further using the
programme «Time drying».
Knitted fabrics, e.g. jersey underwear, can shrink
slightly during drying. Do not use the «Extra Dry»
programme for these fabrics.
Dry wool or textiles containing wool with the special
programme «Wool Finish» only: risk of felting!
If one single piece is to be dried in the dryer, it will be
dried more evenly by adding additional pieces as ballast,
e.g. two terry towels.
ly
Do not dry the following fabrics in the machine:
Wringing wet laundry: waste of energy!
Do not dry laundry in the machine which was treated
with inammable solvents, e.g. with stain remover or
spirit vinegar (explosion hazard!).
Do not dry textiles in the dryer which contain any
foam rubber or have been in contact / covered with
setting lotion, nail polish remover or similar agents (re
hazard!).
Start-up
Install the machine according to the installation instruc-
tions.
Before using the machine for the rst time, wipe the
in side of the drum with a damp cloth.
Preparation
Check whether:
X The uff lter is in place (see chapter «Selecting pro-
grammes/Cleaning the lters»).
X The machine is plugged in or switched on at the wall.
When all pilot lamps are ashing, the machine is ready
for use.
X If one of the control lights stays on, press the «Quick
Wash» button until the message «Please select programme» is displayed.
Note
If the display is dark, it can be activated by pressing
any button.
Open the door
X Press the «Open door» button.
The door pops open.
Close the door
X Caution: The door only pops open if the mains power
supply is switched on. If there is no power to open the
door, the door can be opened manually by pressing next
to the lock.
The drum light comes on when the door is opened.
X Close the door by pushing it until the lock audibly
engages.
Ensure when closing the door that no laundry gets shut
in it.
If the door is not closed, the safety switch will prevent
the machine from operating.
Page 51

Machine description
Control and display area
51
Programmes
1 Special programmes
2 Iron damp
3 Cabinet dry
4 Extra dry
Additional functions
5 Easy care
6 Start time preselect
7 Mixed wash
8 Time selection
9 Programme start
10 Open door
11 Fast forward
Displays
12 Display
Interfaces
13 SCS-Schulthess Control System (PC-Interface)
Control and display area
Filter
Door
Cooling grid
Page 52

Approx.
Approx.
Spun
duration
power
in washing machine
min.
cons. kWh
at rpm
80
1,2
1600
96
1,5
1200
112
128
1,6
2,0
1600
1200
120
137
1,8
2,2
1600
1200
34
0,4
800
40
0,5
600
51
0,6
800
59
0,7
600
52
58
66
0,8
0,9
800
600
800 0,6 48
800 1,0 65
800 1,2 73
Programme
selection button
Programmes
drying target
X for laundry to be ironed Iron damp
X for laundry which will not be ironed Cabinet dry
X for particularly thick or multilayered fabrics Extra dry
+
X for laundry which will not be ironed Cabinet dry
+
+
+
+
+
X for laundry which will not be ironed Cabinet dry
Always check the care symbols on the fabrics
Cotton or linen
Textile/Wash Type
Max.
Load
7 kg Bed and table linen, towels, T-shirts, polo
Programme table
Care
Symbol
Flannels, tea towels and towels, bed linen,
shirts, work wear
Towelling bathrobs and bed linen
underwear, cotton socks
no underwear or socks
Over shirts, blouses, sportswear, bed and
Anoraks, covers X for particularly thick or multilayered fabrics Extra dry
Easy care (noniron) laundry made of synthetic and mixed bres and cotton
with non-iron trim, e.g. viscose, cupro, modal, polyester
3,5 kg Trousers, dresses, skirts, shirts X for laundry to be ironed Iron damp
table linen, tracksuits
Mixed laundry made of cotton and easy care bres
Over shirts, blouses, sportswear, bed and
3,5 kg Trousers, dresses, skirts, shirts X for laundry to be ironed Iron damp
Anoraks, covers X for particularly thick or multilayered fabrics Extra dry
table linen, tracksuits
Page 53

Approx.
duration
min.
Approx.
power
cons. kWh
Spun in washing
machine at rpm
53
119
132
1,8
2,0
400 0,9 55
800
600
200 1,0 49
800 0,1 7
+
+
+
+
Programme
selection button
Programmes
drying target
Time drying cold
1x
2x
Time drying warm
20-90min
2x
20-150min
Time drying warm
20-150min
3x
Shirts/blouses
Iron damp
4x
5x
Cabinet dry
Cabinet dry
6x
Wool nish
Tumble Dry
(only part-dried)
Always check the care symbols on the fabrics
Special programmes
Textile/Wash Type
Max.
Load
1,5 kg Reconditioning X The laundry is aired without adding additional temperature. Reconditioning
Programme table
Care
Symbol
the residual moisture.
the residual moisture.
7,0 kg Cotton X The laundry is dried for the set time period without checking
3,5 kg Easy care X The laundry is dried for the set time period without checking
3,5 kg Shirts/ blouses X Shirts and blouses are dried «Iron dry». The programme
reduces creasing, is gentle to the laundry and facilitates ironing.
4,5 kg Jeans X Jeans are dried completely. Jeans
Remove the laundry immediately after the programme has ended
and place it on a at terry towel for drying.
3,5 kg Washable wool X The laundry becomes more uffy, but is not dried.
2,3 kg Synthetics X Drying of silk, delicates, lingerie, curtains and the likes. Synthetics
Page 54

54
Selecting programmes
Selecting standard programmes
The electronic sampling system continually checks the
current level of dryness of your laundry and automati-
cally stops the programme when it reaches the specied
level of dryness.
X Press the programme button corresponding to the
desired drying level.
The control light for the selected programme lights up.
X For easy care fabrics, select the additional «Easy care»
function .
X For mixed items select the additional function «Mixed
wash».
Special programmes
Using the special programmes, certain textiles can be
dried especially adapted to the laundry.
Tip the button
gramme appears on the display (see programme table).
repeatedly until the desired pro-
Additional Functions
Alongside the various standard programmes, your dryer
also offers you the opportunity to design your own programmes.
Select rst a standard or special programme. By selecting
one or more additional functions, you can tailor this
drying programme to the specics of your laundry.
These additional functions are only active for this one
drying programme.
X You have the opportunity to tailor your dryer to your
needs by changing the basic settings (see chapter «Basic
settings»). Adjustments to basic settings remain active
until you change them again.
Easy care
For easy care fabrics made of synthetic or mixed bres,
and cotton with a non-iron nish.
Mixed wash
For mixed items containing easy care fabrics made of
synthetic or mixed bre as well as cotton.
Time selection
If you have chosen a time-controlled drying programme
from the special programmes you can set the length of
the programme with the «Time selection» button.
The drying time required depends on the type and amount
of laundry and how damp it is.
X Press the programme button.
The «Time selection» control light ashes and the
mini mum drying time is displayed.
X Select the drying time by repeatedly pressing the
button «Time selection».
Start time preselection
By pressing the «Start time preselection» button one or
more times, the programme start time can be delayed
by up to 23,5 hours.
This makes it possible to take advantage of cheaper
night-time electricity, for example. The start time and
consequently also the end time of a programme can be
tailored to your individual lifestyle.
The display shows the start time and anticipated programme time end.
The preselected time starts when the start button is
pressed.
When the start time is reached, the selected programme
starts automatically. The current programme duration
will be displayed.
In the event of a power cut, the current time is stored.
The duration of the power cut is not taken into account.
Fast forward
The programme can be shortened or interrupted by
pressing the fast forward button.
Page 55

55
Starting the programme
Selecting programmes
See chapter «Selecting programmes»
Selecting additional functions
See chapter «Additional functions»
Changing a programme before the start
X Press the desired programme button again.
All control lights for the available additional functions
ash again and all settings are deleted.
X Select any additional functions.
Adding laundry
Only dry fabrics which have been washed with water in
the dryer.
X Place the laundry loosely in the drum, mixing large
and small items
Adding more laundry
This is possible at any time.
X Press the «Open door» button.
Wait for the drum to stop.
X Add your laundry.
X Close the door again.
X Press the start button.
If the child lock is activated:
X Hold the start button down.
X Simultaneously tip the fast forward button.
The drying process is continued.
Interrupting the programme
X Interrupt the programme by pressing the fast forward
button repeatedly, until «Programme end» appears on
the display.
If the child lock is activated:
X Hold the start button down.
X Simultaneously tip the fast forward button.
Start programme
X Press the start button.
The control light is illuminated and the programme
starts automatically.
If the child lock is activated:
X Hold the start button down.
X Simultaneously tip the fast forward button.
Programme progress / Programme status
X With the moisture controlled programmes the damp-
ness of the laundry is continually monitored by an electronic sampling system.
The programme time remaining is displayed.
This remaining time is recalculated several times during
drying, so the effective programme end will therefore
vary by a few minutes.
X For time programmes, the time remaining to the end
of the programme is displayed.
Programme end
The programme end is indicated by the display value
«00:00h», the display of «Programme end» as well as a
ashing control light.
An audible signal (only if summer function is switched
on).
The drum continues to rotate periodically after the
programme has ended to prevent the laundry from
creasing (only if crease protection has been switched on,
for 30 or 60 minutes).
The washing should be taken out now at the latest.
Remove the laundry
X Press the «Open door» button.
The drum light comes on.
X Remove the laundry.
X Clean the lters.
Cleaning the lters
When fabrics are used, the bres are rubbed (laundry
uff), which are released when the fabrics are dried, collecting in the lter in the door opening.
The inner, ne lter (A) must therefore be cleaned after
each drying process.
Page 56

56
Cleaning the lter A
programme
X Press the «Open door» button..
X Pull out the inner, ne lter and swing it open.
/ Clean after every drying
Switching off the machine
X Close the door.
X Switch the machine off at the wall.
If there is not wall switch, the display eld will auto-
matically go out, and the dryer will switch to OFF mode
(see chapter «sExtended basic settings/ Standby function»).
X Rub your hand over the lter and remove the uff.
It may happen that a supposedly proper cleaned lter becomes impermeable, due to a ne, invisible coat
remaining in the lter meshes.
X Hold the lter with one at surface up wards and pour
a little water on to it. If it is impermeable, clean the lter
with a brush under running water.
If the coat cannot be brushed away, a commercial
descaler spray must be used to dissolve it.
X Spray the descaler on the entire lter surface and
leave
it to take effect. In case of stubborn coats place
one layer
descaler on it to ensure the lter is moist. Leave the
descaler to
under running
Cleaning the lter B
The outer coarse lter (B) must be removed and cleaned
every day.
of kitchen roll onto the lter surface and spray
take effect overnight. Then clean the lter
water with a ne brush.
/ Clean
daily
Page 57

57
Basic Settings
The machine has basic settings from the factory. It can
be adapted to the user's individual needs either when
rst used or later using the following functions.
The basic settings can only be changed if no dry pro-
gramme is running. To change a basic setting, it is rst
necessary to hold the programme button pressed and
then press the fast forward button. The corresponding
function is shown on the digital display. The display
changes when the fast forward button
repeatedly with the programme button held down.
Example:
Function switched off
Function switched on
Initial dampness (ex factory 50%)
is pressed
Language (ex factory DEUTSCH)
+ ÷
This setting is temporarily valid for the selected programme and reverts back to the default language a few
minutes after completion of the programme.
See chapter «Advanced basic settings/Default language»
Extended basic settings
+ +
By pressing these three buttons at the same time, the
display shows the extended basic settings.
X Repeatedly pressing the button shows the possible
settings.
X Pressing the
changed.
X Pressing the
settings.
button allows the settings to be
button ends the display of the
The accuracy of the time remaining is increased if the
dryer is adjusted to the spin speed of your washing
machine.
Spin speed 1600 rpm - 50% residual moisture
Spin speed 1200 rpm - 60% residual moisture
Drying level (ex factory NORMAL)
If the drying level is set to «Higher», with the moisture
controlled programmes «Cabinet dry» and «Extra dry»
the laundry will be slightly drier.
Crease protection (ex factory 30MIN)
When this function is switched on, a crease protection
phase of max. 60 minutes begins at the end of the programme.
Time (the time is not set ex factory)
+
+
+
+
Child lock (ex factory OFF)
Select «Extended basic settings»!
The child lock is to prevent accidental starting, changing
or deletion of a programme by small children.
Start a programme with the child lock switched on:
+
Hold the start button down and press the fast forward
button.
Memory function (ex factory OFF)
Select «Extended basic settings»!
With switched on memory button function, the special
programme last used is stored and appears again as
rst on the display when next pressing the
Following this, the consecutive programmes can then be
selected through repeatedly pressing the button.
This way, a frequently used special programme can be
called up with only one press of the button.
With switched off function the «Reconditioning» pro-
gramme appears as rst.
LCD Brightness (ex factory 150)
Select «Extended basic settings»!
The
the text on the display.
button can be used to alter the brightness of
button.
The hours can be set using the button and the
minutes using the
button.
LCD Contrast (ex factory 26)
Select «Extended basic settings»!
The
display.
button can be used to alter the contrast on the
Page 58

58
Alarm volume (ex factory VOLUME 2)
Select «Extended basic settings»!
With the alarm setting switched on, a signal sounds at
regular intervals at the end of the programme.
The level can be adjusted in 3 steps.
Off
VOLUME 1
VOLUME 2
VOLUME 3
Standby function (ex factory OFF-MODE)
Select «Extended basic settings»!
"OFF"
The machine always remains switched on. The display
stays switched on (?).
"STANDBY-MODE"
Max. 4 minutes after the end of the programme the
machine switches off in energy saving mode. The display
will show «ZZZ».
"OFF-MODE"
Max. 4 minutes after the end of the programme the
machine automatically switches off. The display will be
dark.
"STANDBY + OFF-MODE"
Max. 4 minutes after the end of the programme the
machine switches off in energy saving mode. The display
will show «ZZZ».
Max. 10 minutes later the machine automatically switches
off. The display will be dark.
Note
If the display is dark, it can be activated by pressing
any
button
.
Cleaning and Care
Cleaning the lters
See chapter «Start programme».
Cleaning the lter support
From time to time it is necessary to remove uffs that
have accumulated inside the lter support. To do so, use
a vacuum cleaner or a cleaning brush.
X Pull the lters A and B out of the lter support in the
door opening.
X Run the pipe of the vacuum cleaner or the brush around
the well of the
lter support.
Optical interface (ex factory OFF)
Select «Extended basic settings»!
If the optical interface (SCS) is switched on, customer
services can communicate with the machine by PC.
Default language (ex factory DEUTSCH)
Select «Extended basic settings»!
If another language is temporarily selected via the
buttons
mode or after a long standstill, the setting reverts back
to the default language.
Information for testing institutes and users
The standard cotton programme is called «COTTON,
CABINET DRY» on the display and in the operating
instructions.
Consumption according to Directive 2010 / 30 / EU
Average programme duration
at half and full load 99 min.
Annual energy consumption 239 kWh
and , after programme end, in standby
X Remove any residual uff.
X Replace the two lters properly.
X Close the door.
Cleaning the moisture sensor
After longer operation, small deposits (lime, fabric
rener) can form on the front inner side of the drum
on both sides of the longish moisture sensors. With
moisture controlled programmes, this can result in the
desired level of dryness not being reached.
Wipe deposits away with a cloth soaked in vinegar.
Page 59

59
Cleaning the machine
Ensure that the power supply is switched off before any
cleaning, care or maintenance work.
Under no circumstances spray the machine with water
or clean it with a steam cleaner.
Do not use solvents! These substances can damage
parts of the machine, produce poisonous vapour and
carry the risk of explosion!
Casings and control areas should only be cleaned with
soap or a commercially available, solvent-free, non-ab rasive cleaning product.
Emptying for frost protection or transport
If the machine is in a room susceptible to frost or is to
be transported, it must be completely emptied.
1. With drum empty, start program «Boil and coloured
wash, iron damp».
2. Press the fast forward button once to shorten the
programme.
3. During the last 4 minutes of the programme, any water
will be pumped out of the machine.
Problems
Error messages
If the following error messages are displayed, the programme can be restarted by pressing the start button
once the error has been rectied.
«CHILD LOCK ACTIVE»
X Hold the start button down and press the fast
forward button (see chapter «Basic settings»).
«PLEASE CLOSE DOOR»
X Push door closed until lock engages.
«COND. WATER FULL»
X Condensate water pump is not running.
Check if the water discharge hose is bent or the water
discharge provided by the customer is clogged.
X Press the start button to acknowledge the message.
X The programme continues.
If the machine displays an F - - error message:
X Interrupt the programme using the fast forward button
and select a new programme.
If error messages appear repeatedly:
X Switch off the power for around 1 minute and switch
it back on again (pull out the plug or switch off at the
wall).
The machine is ready for use again when the pro-
gramme control lights ash.
X Select a new programme.
If an error message appears again:
X Make a note of the error message.
X Unplug the machine or switch it off at the wall.
X Notify customer services.
Troubleshooting
Repairs, alterations or intervention on electronic equip-
ment should only be carried out by qualied specialists.
Inexpert repairs can cause considerable damage and risk
to the user.
Only original spare parts should be used for repairs.
Rectifying minor faults yourself
The machine does not start after pressing a
programme button:
X Check whether the mains power is switched on at the
wall and the plug is in.
X Check whether all the fuses are intact or the safety
switch has tripped.
Display is dark:
X The machine is in «OFF» mode. No error. To activate
the display press any button.
The machine does not start:
X The start button has not been pressed.
X Start time preselect has been set. Only starts at the
preselected start time.
Page 60

60
The machine cannot be switched on, display
remains dark even after pressing a button:
X Check whether the mains power is switched on at the
wall and the plug is in.
X Check whether all the fuses are intact or the safety
switch has tripped.
X Mains blockage, generally at noon. Operate the
machine after the mains blockage has ended.
The drying target was not achieved:
When warm, laundry feels more moist than it actually is!
Remove the laundry from the dryer and let it cool.
When still moist:
X Clean lter (see chapter «Starting the programme»).
X Increase degree of drying (see chapter «Basic set-
tings»).
X Clean moisture sensor (see chapter «Cleaning and
Care»).
The individual laundry piece does not reach
the set drying target:
X If one single piece is to be dried in the dryer, it will be
dried more evenly by adding additional pieces as ballast,
e.g. two terry towels.
The drying takes too long:
X Clean lter (see chapter «Starting the programme»).
X Power failure (note lock times of EW).
The laundry is not dry after the maximum
possible settings:
X Drum is overloaded (see chapter «Programme table»).
X Laundry not sufciently spun.
X Insufcient room ventilation (open a window or
door).
X The lter is blocked with uff or scale deposits (see
chapter «Starting the programme»).
The machine makes a short loud noise :
X Towards the middle and the end of a drying pro-
gramme, the heat exchanger is cleaned. The lifting magnet, triggering the cleaning process, is clearly audible.
This is no error, but quite normal. During cleaning the
message «Cleaning in process» is displayed.
Drum lighting does not work:
X Faulty light bulb. For safety reasons, the lamp should
only be replaced by customer services or a specialist.
Dampness in the room increases signicantly:
X The room does not have sufcient ventilation.
Ensure adequate ventilation.
Door does not open:
X If no power is available to open the door, you can
open the door manually by pressing next to the door
lock.
Customer Services
Before you call customer services, check whether you
can rectify the problem yourself (see chapter «Problems»).
If advice is required, costs may be incurred if a service
technician is required, even during the guarantee period.
If you cannot rectify a problem yourself, unplug the
machine or switch it off at the wall and call customer
services.
Dial the central customer services number (see back
cover). You will be automatically connected to the
customer ser vices branch for your region.
Give customer services product and machine numbers.
You will nd this information on the type label on the
inside of the door.
Note the numbers for your machine here.
Product No.
Machine No.
Guarantee subscription
After the end of the normal 2 years guarantee period,
this can be extended if required with a guarantee
sub scription. We will be happy to send you the relevant
documents. Please see also the enclosed guarantee and
customer services booklet.
Page 61

Notizen / Notes / Note
61
Page 62

Notizen / Notes / Note
62
Page 63

Page 64

Kundendienst
Tel. 0844 888 222 (24 h-Servicetelefon)
Fax 0844 888 223
Service après-vente
Tel. 0844 888 222 (Service téléphonique 24/24 h)
Fax 0844 888 223
Servizio assistenza
Tel. 0844 888 222 (Servizio telefonico 24 ore su 24)
Fax 0844 888 223
Customer Service
Tel. 0844 888 222 (24 h telephone service)
Fax 0844 888 223
Hauptsitz und Produktion
Schulthess Maschinen AG / SA
Landstrasse 37, 8633 Wolfhausen ZH
Tel. + 41 (0) 55 253 51 11
Fax + 41 (0) 55 253 54 70
info@schulthess.ch
www.schulthess.ch
Österreich
Schulthess Maschinen GmbH
A-1130 Wien, Hetzendorferstrasse 191
Tel. + 43 (0) 1 803 98 00
verkauf@schulthess.at
www.schulthess.at
Original-Bedienungsanleitung / Traduction du mode d’emploi original / Traduzione dall‘ originale delle istruzioni per l‘uso / Translation of the original Operating Instructions
12.13 d/ f/i /e Printed in Switzerland Subject to change without notice
 Loading...