

Page 1
06490268001 Iss A 09/19
CCTFR6100© Schneider-Electric 201406490268001 Iss A09/19
CCTFR6100
8 s
1
ABC
DE
FG H
IJ
M30 x 1,5 mm Danfoss RA
2 s
3 s
+2 °C (1 h) -2 °C (1 h)
<1 s
<1 s
CCTFR6100© Schneider-Electric 201406490268001 Iss A09/19
• A Wiser Hub is required, either Wiser Home Touch,
Wiser Heat Hub or Wiser Heat Hub
R
. Hereafter
these are referred to as Wiser Hub).
• If you have a Wiser Home Touch device, download the
Wiser app to your smartphone. If you have a Wiser
Heat Hub or Wiser Heat Hub
R
, download the Wiser
Heat app.You can use the app to join, set up and control Wiser devices.
The Wiser radiator thermostat (hereinafter referred to as
thermostat) uses integrated temperature sensors to
control the flow of water through a radiator, thereby regulating the temperature in a room. The target temperature and switching times are set in the Wiser app or
Wiser Heat app (hereafter, both apps are referred to as
Wiser app).
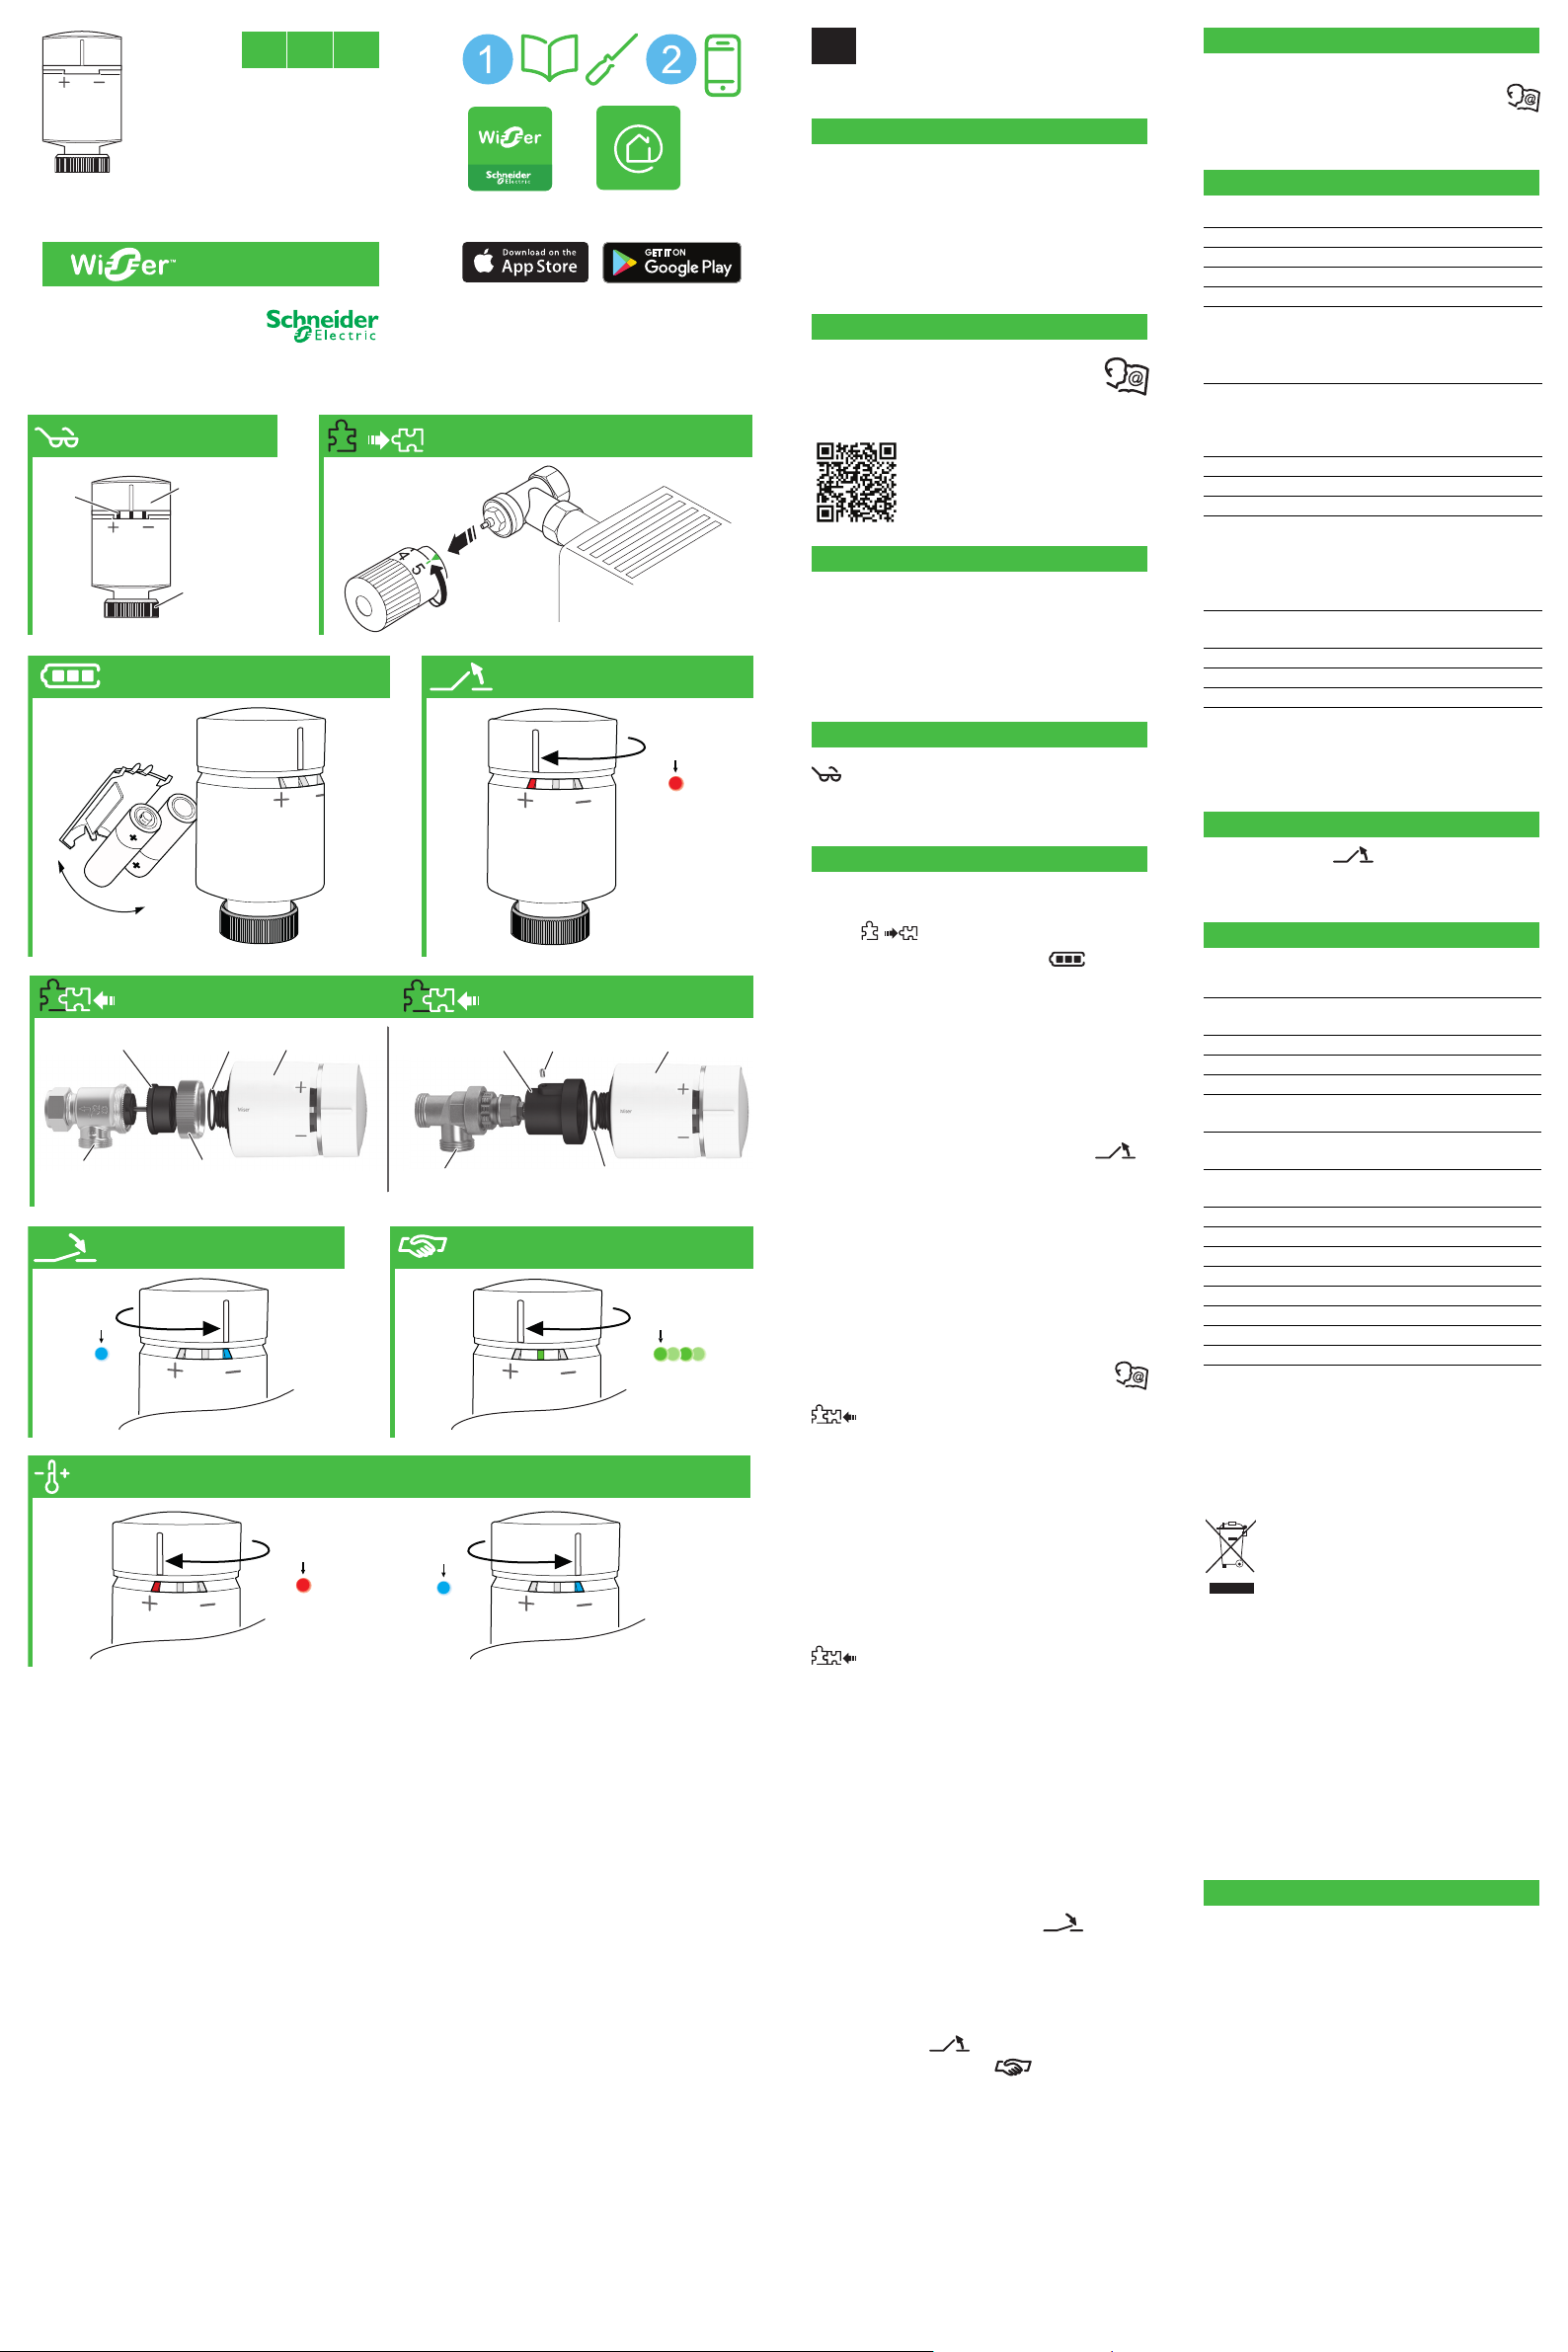
Removing the old radiator thermostat
Open the valve of the radiator thermostat to facilitate removal.
Inserting/replacing batteries
|
When inserting batteries, ensure the correct polarity. Dispose of the batteries according to statutory regulations. Batteries must not be placed in
normal household waste.
Do not use rechargeable batteries
Opening the valve
On installing the batteries, the thermostat moves to the
“valve open” position. The thermostat is now ready for installation. This process can be done manually:
Install the adapter and thermostat
|
Risk of damage
• Do not use tools, such as pliers, for installation.
• Make sure that the O-ring is seated firmly on
the thread.
• Tighten the ring nut by hand only.
|
If the thermostat cannot be installed: see instructions under “Calibrating the thermostat”
M30x1.5 mm adapter
Installation:
1 Place the valve adapter on the valve.
2 Screw ring nut loosely onto the valve adapter.
3 Screw on thermostat and tighten by hand.
Set the LEDs in the desired direction: slightly loosen the
ring nut, turn the thermostat to the desired position and
tighten the ring nut again.
Danfoss RA
Installation:
1 Push the Danfoss adapter over the Danfoss valve,
narrow end first.
Set the LEDs in the desired direction: Make sure the hole
with the grub screw faces away from you.
2 Tighten the grub screw with a 2 mm Allen key.
3 Screw on thermostat and tighten by hand.
Calibrating the thermostat (close valve)
Start calibration following installation:
|
Calibration starts automatically 5 minutes after
the batteries have been inserted. In this position
(“valve closed”), the thermostat cannot be installed.
• To install the thermostat, move it to the open
position:
Joining the thermostat
The Wiser app prompts you to join the thermostat with a
Wiser Hub. You can then control the thermostat via the
Wiser app.
Wiser radiator thermostat
CCTFR6100
Prerequisites and accessories
Product information is available
More detailed product information is available on the Internet -> Download document
http://download.schneider-electric.com/
files?p_Doc_Ref=WiserHeat_SUG_EN
Getting to know the thermostat
Operating elements
A 3 status LEDs
B Twistable cap
C Ring nut (only
used with
M30x1.5mm
valve adapter)
Commissioning the thermostat
The valve adapters supplied cover most valves.
Should they not fit
-> see Product information
A Valve adapter
B O-ring (pre-installed)
C Thermostat
D Ring nut
E Valve M30 x 1.5 mm
F Danfoss adapter
G Grub screw
H Thermostat
I O-ring (pre-installed)
J Danfoss valve
en
Open the valve first:
The removal sequence is the reverse of the installation
sequence.
Trademarks
• Apple® and App Store®are brand names or registered trademarks of Apple Inc.
• Google Play™ Store and Android™ are brand names
or registered trademarks of Google Inc.
Other brands and registered trademarks are the property
of the relevant owners.
EU Declaration of conformity
Hereby, Schneider Electric Industries, declares that this
product is in compliance with the essential requirements
and other relevant provisions of RADIO EQUIPMENT DIRECTIVE 2014/53/EU. Declaration of conformity can be
downloaded on: schneider-electric.com/docs.
If you have technical questions, please contact the Customer Care Centre in your country.
schneider-electric.com/contact
Schneider Electric Industries SAS
35 rue Joseph Monier
F - 92500 Rueil-Malmaison
www.se.com
Operating the thermostat
-> see Product information
More detailed product information is available on
the internet
Behaviour of the status LEDs
First step
User action Insert batteries
Left LED Red
Middle LED Green
Right LED Blue
Behaviour of the LED
Light up briefly. Motor
opens the valve.
Open valve
User action
Automatically after the
battery is inserted.OR:
Turn the cap in the plus di-
rection for 8 s.
Left LED Red
Middle LED Right LED -
Behaviour of the LED
Lights up until the valve is
opened.
Ready for installation on
the valve
User action
The valve should be
opened.
Left LED Red
Middle LED Green or orange
Right LED Blue
Behaviour of the LED
Flash red/blue for approx.
5 minutes.Lights up green
= connected to hub.Lights
up orange = not connect-
ed to hub.
Removing the thermostat
Technical data
Power supply:
2x 1.5 V IEC LR6 (AA) alkaline batteries
Without power supply:
Connection data are re-
tained
Temperature setting range: 5 °C - 30 °C
Temperature resolution 0.5 °C
Control accuracy: < 0.8 °C at 4 °C/h
Surface temperature
at place of installation: max. 93 °C
Water temperature:
max. 110 °C,
max. continuous 73 °C
Ambient operating
temperature: 0 °C to 45 °C
Frequency band: 2.4 GHz, bidirectional
Transmission power: max. 20 mW (13 dBm)
Degree of contamination: 2
Radio range: 30 m free field
Energy class: IV - 2%
Software class: A
Protection rating: IP 30
Dimensions (Hx): 93x51 mm
Relevant directives:
Radio Equipment Directive
(RED) 2014/53/EU
Batteries Directive 2006/66/
EC
RoHS Directive 2011/65/
EU + 2015/863/EU
WEEE2 2012/19/EU
Dispose of the device separately from household waste at an official collection point. Professional recycling protects people and the
environment against potential negative effects.
Schneider Electric Industries SAS
A
B
C
en
esfr
Wiser App
Wiser Heat
App
2
1
Page 2
06490268001 Iss A 09/19
CCTFR6100© Schneider-Electric 201406490268001 Iss A09/19
• Se requiere un Wiser Hub, ya sea Wiser Home
Touch, Wiser Heat Hub o Wiser Heat Hub
R
. (En
adelante, denominado Wiser Hub).
• Si tiene un dispositivo Wiser Home Touch, descargue
la app Wiser en su smartphone. Si tiene un Wiser
Heat Hub o un Wiser Heat Hub
R
, descargue la app
Wiser Heat.Puede usar la aplicación para combinar,
configurar y controlar dispositivos Wiser.
El termostato del radiador Wiser (en adelante denominado termostato) utiliza sensores de temperatura integrados para controlar el flujo de agua a través de un
radiador, regulando así la temperatura de una habitación. La temperatura objetivo y las horas de conmutación se establecen en la aplicación Wiser o en la
aplicación Wiser Heat (en adelante, ambas aplicaciones
se denominarán app Wiser).
Extracción del termostato del radiador antiguo
Abra la válvula del termostato del radiador para facilitar
su extracción.
Introducción/sustitución de las pilas
|
Al introducir las pilas, asegúrese de que la polaridad es la correcta. Elimine las pilas de acuerdo
con las disposiciones legales. Las pilas no deben
estar con la basura doméstica normal.
No utilice pilas recargables
Apertura de la válvula
Al introducir las pilas, el termostato se mueve a la posición «válvula abierta». El termostato ya está listo para la
instalación. Este proceso se puede realizar manualmente:
Instale el adaptador y el termostato
|
Riesgo de daños
• No utilice herramientas, como alicates, para la
instalación.
• Asegúrese de que la junta tórica queda firmemente asentada en la rosca.
• Apriete la virola únicamente de forma manual.
|
Si el termostato no puede instalarse: consulte las
instrucciones en «Calibración del termostato»
Adaptador M30x1,5 mm
Instalación:
1 Coloque el adaptador de válvula en la válvula.
2 Atornille la virola sin apretarla en el adaptador de
válvula.
3 Atornille el termostato y apriételo manualmente.
Ajuste los LED en la dirección deseada: afloje ligera-
mente la virola, gire el termostato a la posición deseada
y apriete de nuevo la virola.
Danfoss RA
Instalación:
1 Empuje el adaptador Danfoss sobre la válvula Dan-
foss, el extremo estrecho primero.
Ajuste los LED en la dirección deseada: Asegúrese de
que el orificio con el tornillo prisionero queda lejos de usted.
2 Apriete el tornillo prisionero con una llave Allen de
2 mm.
3 Atornille el termostato y apriételo manualmente.
Calibración del termostato (cerrar la válvula)
Comenzar la calibración después de la instalación:
|
La calibración se inicia automáticamente 5 minutos después de introducir las pilas. En esta posición («válvula cerrada»), el termostato no puede
instalarse.
• Para instalar el termostato, muévala a la posición de apertura:
Termostato del radiador Wiser
CCTFR6100
Requisitos previos y accesorios
La información de producto está
disponible
Existe información más detallada del producto en Internet -> descargar documento
http://download.schneider-electric.com/
files?p_Doc_Ref=WiserHeat_SUG_ES
Información sobre el termostato
Elementos de mando
A 3 LED de estado
B Tapa giratoria
C Virola (solo se
utiliza con el
adaptador de
válvula
M30x1,5 mm)
Puesta en marcha del termostato
Los adaptadores de válvulas suministrados cubren la mayoría de las válvulas. En caso de que
no se ajusten
-> consulte la información del producto
A Adaptador de válvula
B Junta tórica (preinstala-
da)
C Termostato
D Virola
E Válvula M30 x
1,5 mm
F Adaptador Dan-
foss
G Tornillo prisione-
ro
H Termostato
I Junta tórica (preinstalada)
J Válvula Danfoss
es
Conexión del termostato
La aplicación Wiser le solicita que conecte el termostato
con un Wiser Hub. A continuación, podrá controlar el termostato a través de la aplicación Wiser.
Primero abra la válvula:
La secuencia de desmontaje es la inversa de la secuen-
cia de instalación.
Marcas registradas
• Apple® y App Store®son nombres comerciales o
marcas registradas de Apple Inc.
• Google Play™ Store y Android™ son nombres comerciales o marcas registradas de Google Inc.
Otros nombres y marcas registradas pertenecen a sus
respectivos propietarios.
Declaración UE de conformidad
Por la presente, Schneider Electric Industries declara
que este producto cumple con los requisitos esenciales
y otras disposiciones aplicables de la DIRECTIVA DE
EQUIPOS RADIOELÉCTRICOS 2014/53/UE. La declaración de conformidad se puede descargar en: schneider-electric.com/docs.
Si tiene consultas técnicas, llame al servicio de atención
comercial de su país.
schneider-electric.com/contact
Schneider Electric Industries SAS
35 rue Joseph Monier
F - 92500 Rueil-Malmaison
www.se.com
Manejo del termostato
-> Consulte la información del producto
Encontrará más información del producto en in-
ternet
Comportamiento de los LED de estado
Primer paso
Acción del usuario Introducir las pilas
LED izquierdo Rojo
LED intermedio Verde
LED derecho Azul
Comportamiento del LED
Se enciende brevemente.
El motor abre la válvula.
Abre la válvula
Acción del usuario
Automáticamente después de introducir las pilas.O: Gire la tapa en la
dirección positiva durante
8 s.
LED izquierdo Rojo
LED intermedio LED derecho -
Comportamiento del LED
Se ilumina hasta que se
abre la válvula.
Preparado para la instalación en la válvula
Acción del usuario La válvula debe abrirse.
LED izquierdo Rojo
LED intermedio Verde o naranja
LED derecho Azul
Comportamiento del LED
Parpadea en rojo/azul durante aproximadamente 5
minutos. Se ilumina en
verde = conectado al
hub.Se ilumina en naranja
= no conectado al hub.
Retirada del termostato
Datos técnicos
Tensión de alimentación:
2 pilas alcalinas IEC LR6
(AA) de 1,5 V
Sin suministro de energía:
Los datos de conexión se
mantienen
Rango de ajuste de la temperatura: 5 °C - 30 °C
Resolución de la temperatura 0,5 °C
Precisión de control: < 0,8 °C a 4 °C/h
Temperatura de la superficie
en el lugar de la instalación: máx. 93 °C
Temperatura del agua:
máx. 110 °C,
máx. continuo 73 °C
Temperatura
ambiente de funcionamiento: de 0 °C a 45 °C
Banda de frecuencia: 2,4 GHz, bidireccional
Potencia de transmisión: máx. 20 mW (13 dBm)
Grado de contaminación: 2
Alcance de radio: 30 m de campo libre
Clase energética: IV - 2%
Clase de software: A
Grado de protección: IP 30
Dimensiones (alto x ): 93X51 mm
Directivas relevantes:
Directiva de aparatos de
radio (RED) 2014/53/EU
Directiva de la batería
2006/66/EC
RoHS Directiva 2011/65/
EU + 2015/863/EU
WEEE2 2012/19/EU
Elimine el dispositivo separado de la basura
doméstica en los puntos de recogida oficiales. El reciclado profesional protege a las
personas y al medio ambiente de posibles
efectos negativos.
Schneider Electric Industries SAS
CCTFR6100© Schneider-Electric 201406490268001 Iss A09/19
• Un élément central Wiser Hub est nécessaire, Wiser
Home Touch, Wiser Heat Hub ou Wiser Heat
Hub
R
. (Ils seront désignés par la suite par Wiser
Hub).
• Si vous avez un appareil Wiser Home Touch, téléchargez l’application Wiser app sur votre smartphone. Si
vous avez un Wiser Heat Hub ou un Wiser Heat Hub
R
,
téléchargez l’application Wiser Heat.Vous pouvez utiliser l’application pour coupler, configurer et contrôler
les appareils Wiser.
Le thermostat du radiateur Wiser (désigné par la suite
par thermostat) utilise des capteurs de température intégrés pour contrôler le débit d’eau dans un radiateur,
afin de réguler la température dans une pièce. La température cible et les heures de commutation sont réglées
dans l’application Wiser ou l’application Wiser Heat (les
deux applications sont désignées par la suite par appli-
cation Wiser).
Démontage de l’ancien thermostat du radiateur
Ouvrez la vanne du thermostat du radiateur pour faciliter
le retrait.
Insertion/remplacement des piles
|
Lors de la mise en place des piles, veillez à la polarité correcte. Mettez les piles au rebut conformément aux réglementations en vigueur. Les
piles ne doivent pas être jetées avec les déchets
ménagers ordinaires.
Ne pas utiliser de piles rechargeables
Ouverture de la vanne
Lors de l’installation des batteries, le thermostat se déplace vers la position « vanne ouverte ». Le thermostat
est maintenant prêt à être installé. Ce processus peut
être effectué manuellement :
Installez l’adaptateur et le thermostat
|
Risque de dommage
• Ne pas utiliser d’outils, comme des pinces,
pour l’installation.
• Assurez-vous que le joint torique est installé
correctement sur le filetage.
• Serrez l’écrou à œil à la main uniquement.
|
Si le thermostat ne peut pas être installé : voir les
instructions dans « Etalonnage du thermostat »
Adaptateur M30x1,5 mm
Montage :
1 Placez l’adaptateur de vanne sur la vanne.
2 Vissez sans le serrer l’écrou à œil sur l’adaptateur
de vanne.
3 Vissez le thermostat et serrez à la main.
Orientez les LED dans la direction souhaitée : desserrez
légèrement l’écrou à œil, tournez le thermostat dans la
position souhaitée et serrez à nouveau l’écrou à œil.
Danfoss RA
Montage :
1 Poussez l’adaptateur Danfoss sur la vanne
Danfoss, en commençant par l’extrémité fine.
Réglez les LED dans la direction souhaitée : Veillez à ce
que le trou avec la vis sans tête soit à l’opposé de vous.
2 Serrez la vis sans tête à l’aide d’une clé Allen 2 mm.
3 Vissez le thermostat et serrez à la main.
Etalonnage du thermostat (fermer la vanne)
Démarrez l’étalonnage après l’installation :
|
L’étalonnage démarre automatiquement 5 minutes après l’insertion des piles. Dans cette position (« vanne fermée »), le thermostat ne peut
pas être installé.
• Pour installer le thermostat, amenez-le en position ouverte :
Connexion du thermostat
L’application Wiser vous invite à connecter le thermostat
à un Wiser Hub. Vous pouvez alors contrôler le thermostat à l’aide de l’application Wiser.
Thermostat radiateur Wiser
CCTFR6100
Prérequis et accessoires
Informations sur le produit disponibles
Vous trouverez de plus amples informations
sur le produit sur Internet -> Télécharger document
http://download.schneider-electric.com/
files?p_Doc_Ref=WiserHeat_SUG_FR
Fonction du thermostat
Éléments de commande
A 3 LED d’état
B Bouchon tournant
C Ecrou à œil (uni-
quement utilisé
avec adaptateur
de vanne
M30x1,5 mm)
Mise en service du thermostat
Les adaptateurs de vanne fournis couvrent la
plupart des vannes. S’ils ne conviennent pas
-> voir Informations sur le produit
A Adaptateur de vanne
B Joint torique (pré-installé)
C Thermostat
D Ecrou à œil
E Vanne M30 x
1,5 mm
F Adaptateur
Danfoss
G Vis sans tête
H Thermostat
I Joint torique (pré-installé)
J Vanne Danfoss
fr
Ouvrez d’abord la vanne :
La séquence de retrait est l’inverse de la séquence d’ins-
tallation.
Marques
• Apple® et App Store® sont des noms de marque ou
des marques déposées d’Apple Inc.
• Google Play™ Store et Android™ sont des marques
enregistrées de Google Inc.
Les autres marques et marques enregistrées sont la propriété des propriétaires correspondants.
Déclaration de conformité UE
Par la présente, Schneider Electric Industries, déclare
que ce produit est conforme aux exigences essentielles
et aux autres dispositions pertinentes de la DIRECTIVE
SUR L'EQUIPEMENT RADIO 2014/53/UE. La déclaration de conformité peut être téléchargée sur : schneiderelectric.com/docs.
En cas de questions techniques, veuillez contacter le
Support Clients de votre pays.
schneider-electric.com/contact
Schneider Electric Industries SAS
35 rue Joseph Monier
F - 92500 Rueil-Malmaison
www.se.com
CCTFR6100© Schneider-Electric 201406490268001 Iss A09/19
Utilisation du thermostat
-> voir les informations produit
Des renseignements plus détaillés sur les pro-
duits sont disponibles sur Internet.
Comportement des LED d’état
Première étape
Action utilisateur Insertion des piles
LED gauche Rouge
LED centrale Vert
LED droite Bleu
Comportement de la LED
S’allume brièvement. Le
moteur ouvre la vanne.
Ouvrir la vanne
Action utilisateur
Automatiquement après
l’insertion de la batterie.OU : Tournez le bouchon dans le sens positif
pendant 8 s.
LED gauche Rouge
LED centrale LED droite -
Comportement de la LED
S’allume jusqu’à ce que la
vanne soit ouverte.
Prêt pour l’installation sur
la vanne
Action utilisateur La vanne doit être ouverte.
LED gauche Rouge
LED centrale Vert ou orange
LED droite Bleu
Comportement de la LED
Clignotement rouge/bleu
pendant environ 5 mi-
nutes. S’allume en vert =
connecté à l’élément cen-
tral. S’allume en orange =
non connecté à l’élément
central.
Démontage du thermostat
Caractéristiques techniques
Alimentation :
2x piles alcalines 1,5 V IEC
LR6 (AA)
Sans alimentation :
Les données de connexion
sont conservées
Plage de réglage de la
température :
5 °C - 30 °C
Résolution de température 0,5 °C
Précision du contrôle de
température :
< 0,8 °C à 4 °C/h
Température de surface
sur le lieu d’installation : max. 93 °C
Température de l’eau :
max. 110 °C,
max. continue 73 °C
Température ambiante
de fonctionnement : 0 °C à 45 °C
Bande de fréquence : 2,4 GHz, bidirectionnelle
Puissance de transmission: max. 20 mW (13 dBm)
Niveau de contamination : 2
Portée radio : 30 m, champ extérieur
Classe d’énergie : IV - 2 %
Classe de logiciel : A
Indice de protection : IP 30
Dimensions (Hx) : 93x51 mm
Directives pertinentes :
Directive sur les équipements radio (RED) 2014/
53/EU
Directive Batterie 2006/66/
EC
Directive RoHS 2011/65/
EU + 2015/863/EU
WEEE2 2012/19/EU
Ne pas jeter l’appareil avec les déchets ménagers ordinaires mais le mettre au rebut en
le déposant dans un centre de collecte publique. Un recyclage professionnel protège
les personnes et l’environnement contre de
potentiels effets négatifs.
Schneider Electric Industries SAS
Page 3

06490268001 Iss A 09/19
nl
8 s
1
ABC
DE
FG H
IJ
M30 x 1,5 mm
Danfoss RA
2 s
3 s
+2 °C (1 h) -2 °C (1 h)
<1 s
<1 s
CCTFR6100© Schneider-Electric 201406490268001 Iss A09/19
• Een Wiser hub is vereist, hetzij Wiser Home Touch,
Wiser Heat hub of Wiser Heat hub
R
. Daarna wor-
den deze genoemd als Wiser hub).
• Als u een Wiser Home Touch-apparaat hebt, kunt u de
Wiser-app naar uw smartphone downloaden. Als u
een Wiser Heat hub of Wiser Heat hub
R
hebt, dient u
de Wiser Heat app te downloaden. U kunt de app gebruiken om Wiser-apparaten te koppelen, in te stellen
en te regelen.
De Wiser radiatorthermostaat (hierna thermostaat genoemd) gebruikt geïntegreerde temperatuursensoren
om de stroming van water door een radiator te regelen,
waarbij de temperatuur in een kamer wordt geregeld. De
doeltemperatuur- en schakeltijden worden ingesteld in
de Wiser-app of Wiser Heat app (hierna worden beide
apps als Wiser-app aangeduid).
De thermostaat van de oude radiator verwijderen
Open de klep van de thermostaat van de radiator om het
verwijderen te vergemakkelijken.
Batterijen plaatsen/vervangen
|
Let erop dat bij het plaatsen van batterijen de polen juist zijn. Gooi de batterijen weg volgens de
wettelijke bepalingen. Batterijen mogen niet met
normaal huisvuil worden weggegooid.
Gebruik geen oplaadbare batterijen
Klep openen
Bij het installeren van de batterijen beweegt de thermostaat naar de positie "klep open". De thermostaat is nu
gereed voor installatie. Dit proces kan handmatig worden uitgevoerd:
Installeer de adapter en de thermostaat
|
Risico op schade
• Gebruik geen gereedschap, zoals tangen, voor
installatie.
• Zorg ervoor dat de O-ring stevig op de schroefdraad is geplaatst.
• Draai de ringmoer uitsluitend met de hand vast.
|
Als de thermostaat niet kan worden geïnstalleerd:
zie instructies onder "De thermostaat kalibreren"
M30x1,5 mm adapter
Montage:
1 Plaats de klepadapter op de klep.
2 Schroef de ringmoer losjes op de klepadapter.
3 Op de thermostaat schroeven en met de hand vast-
draaien.
Stel de LED's in de gewenste richting in: maak de ringmoer iets los, draai de thermostaat in de gewenste positie en draai de ringmoer opnieuw vast.
Danfoss RA
Montage:
1 Druk de Danfoss-adapter over de Danfoss-klep, het
nauwe uiteinde eerst.
Stel de LED's in de gewenste richting in: Controleer dat
het gat met de stelschroeven van u weg wijst.
2 Schroef de stelschroef vast met een 2 mm inbus-
sleutel.
3 Op de thermostaat schroeven en met de hand vast-
draaien.
De thermostaat kalibreren (sluit klep)
Kalibreren starten na installatie:
|
De kalibratie start automatisch 5 minuten nadat
de batterijen geplaatst zijn. In deze positie (“klep
gesloten”) kan de thermostaat niet worden geïnstalleerd.
• Verplaats de thermostaat in de open stand om
deze te installeren:
De thermostaat koppelen
De Wiser-app vraagt u om de thermostaat met een Wiser hub te koppelen. U kunt de thermostaat dan regelen
via de Wiser-app.
Thermostaat Wiser-radiator
CCTFR6100
Voorwaarden vooraf en accessoires
Productinformatie is beschikbaar
Meer gedetailleerde productinformatie vindt
u op het internet -> Document downloaden
http://download.schneider-electric.com/
files?p_Doc_Ref=WiserHeat_SUG_NL
Kennismaken met de thermostaat
Bedieningselementen
A 3 statusleds
B Draaibare kap
C Ringmoer (al-
leen gebruikt
met M30x1,5
mm klepadapter)
De thermostaat in bedrijf stellen
De klepadapters bij de levering gelden voor de
meeste kleppen. Als deze niet passen
-> zie productinformatie
A Klepadapter
B O-ring (vooraf geïnstal-
leerd)
C Thermostaat
D Ringmoer
E Klep M30 x 1,5 mm
F Danfoss adapter
G Stelschroef
H Thermostaat
I O-ring (vooraf geïnstal-
leerd)
J Danfoss klep
nl
Open eerst de klep:
De verwijderingscyclus is het omgekeerde van de instal-
latiecyclus.
Handelsmerken
• Apple® en App Store® zijn merknamen of geregistreerde handelsmerken van Apple Inc.
• Google Play™ Store en Android™ zijn merknamen of
geregistreerde handelsmerken van Google Inc.
Andere merken en geregistreerde handelsmerken zijn
het eigendom van de desbetreffende eigenaar.
EU-verklaring van overeenstemming
Schneider Electric Industries verklaart hierbij dat dit product voldoet aan de essentiële vereisten en andere relevante bepalingen van RICHTLIJN 2014/53/EU VOOR
RADIOAPPARATUUR. De verklaring van overeenstemming kan worden gedownload via: schneider-electric.com/docs.
Neem bij technische vragen contact op met de klantenservice in uw land.
schneider-electric.com/contact
Schneider Electric Industries SAS
35 rue Joseph Monier
F - 92500 Rueil-Malmaison
www.se.com
De thermostaat bedienen
-> zie productinformatie
Meer gedetailleerde productinformatie is be-
schikbaar op het internet
Gedrag van de statusleds
Eerste stap
Gebruikersactie Plaats batterijen
Linker LED Rood
Middelste LED Groen
Rechter LED Blauw
Gedrag van de LED
Licht kort op. De motor
opent de klep.
Klep openen
Gebruikersactie
Automatisch nadat de batterij is geplaatst.OF: Draai
de kap gedurende 8 s in
de plus richting.
Linker LED Rood
Middelste LED Rechter LED -
Gedrag van de LED
Licht op totdat de klep is
geopend.
Klaar voor installatie op
de klep
Gebruikersactie
De klep moet geopend
zijn.
Linker LED Rood
Middelste LED Groen of oranje
Rechter LED Blauw
Gedrag van de LED
Knippert rood/blauw ge-
durende ongeveer 5 minu-
ten. Licht groen op =
verbonden met hub.Licht
oranje op = niet verbon-
den met hub.
De thermostaat verwijderen
Technische gegevens
Voeding:
2x 1,5 V IEC LR6 (AA) alkaline batterijen
Zonder voeding:
Verbindingsgegevens worden bewaard
Instelbereik temperatuur: 5 °C - 30 °C
Temperatuurresolutie 0,5 °C
Nauwkeurigheid regeling: < 0,8 °C bij 4 °C/h
Oppervlaktetemperatuur
op plaats van installatie: max. 93 °C
Watertemperatuur:
max. 110 °C,
max. continu 73 °C
Omgevingstemperatuur
tijdens bedrijf 0 °C tot 45 °C
Frequentieband: 2.4 GHz, bidirectioneel
Transmissievermogen: max. 20 mW (13 dBm)
Verontreinigingsgraad: 2
RF-bereik: 30 m vrij veld
Energieklasse: IV - 2%
Softwareklasse: A
Beschermingsgraad: IP 30
Afmetingen (Hx ): 93x51 mm
Relevante richtlijnen:
Richtlijn radioapparatuur
(RED) 2014/53/EU
Batterijrichtlijn 2006/66/EC
RoHS Richtlijn 2011/65/EU
+ 2015/863/EU
WEEE2 2012/19/EU
Het apparaat niet met het huishoudelijk afval
afvoeren maar naar een officieel verzamelpunt brengen. Professionele recycling beschermt mens en milieu tegen potentiële
negatieve effecten.
Schneider Electric Industries SAS
CCTFR6100
A
B
C
svit
Wiser App
Wiser Heat
App
2
1
Page 4

06490268001 Iss A 09/19
CCTFR6100© Schneider-Electric 201406490268001 Iss A09/19
• Det krävs en Wiser-hubb, antingen Wiser Home
Touch, Wiser Heat Hub eller Wiser Heat Hub
R
.
(Dessa kallas hädanefter Wiser-hubb ).
• Om du har en Wiser Home Touch-enhet hämtar du
Wiser-appen till din smartphone. Om du har Wiser
Heat Hub eller Wiser Heat Hub
R
hämtar du Wiser
Heat-appen. Du kan använda appen för att koppla,
ställa in och styra Wiser-enheter.
Wiser-elementtermostaten (nedan kallad termostaten)
använder integrerade temperatursensorer för att styra
vattenflödet genom ett element och därmed reglera temperaturen i ett rum. Måltemperaturen och omkopplingstiderna ställs in i Wiser-appen eller Wiser-värmeappen
(hädanefter kallas båda apparna för Wiser-appen ).
Ta bort den gamla elementtermostaten
Öppna ventilen på elementtermostaten för att underlätta
borttagningen.
Sätta i/byta batterier
|
Kontrollera att batterierna har rätt polaritet när du
sätter i dem. Kassera batterierna enligt gällande
föreskrifter. Batterier får inte slängas bland vanligt
hushållsavfall.
Använd inte uppladdningsbara batterier
Öppna ventilen
Vid installation av batterierna flyttas termostaten till läget
”öppen ventil”. Termostaten är nu klar för installation.
Den här proceduren kan utföras manuellt:
Installera adaptern och termostaten
|
Risk för skada
• Använd inte verktyg, till exempel tänger, för installation.
• Kontrollera att O-ringen sitter fast på gängan.
• Dra åt ringmuttern för hand.
|
Om termostaten inte kan installeras: se instruktionerna under ”Kalibrera termostaten”
M30x1,5 mm-adapter
Montering:
1 Sätt ventiladaptern på ventilen.
2 Skruva på ringmuttern löst på ventiladaptern.
3 Skruva på termostaten och dra åt för hand.
Ställ in LED-lamporna i önskad riktning: lossa ringmuttern något, vrid termostaten till önskat läge och dra åt
ringmuttern igen.
Danfoss RA
Montering:
1 Tr yck Danfoss-adaptern över Danfoss-ventilen med
den smala änden först.
Ställ in LED-lamporna i önskad riktning: Se till att hålet
med gängstiftet pekar bort från dig.
2 Dra åt gängstiftet med en sexkantsnyckel på 2 mm.
3 Skruva på termostaten och dra åt för hand.
Kalibrera termostaten (stäng ventil)
Starta kalibreringen efter installationen:
|
Kalibreringen startar automatiskt 5 minuter efter
att batterierna har satts i. I detta läge (”stängd
ventil”) kan termostaten inte installeras.
• För att installera termostaten flyttar du den till
öppet läge:
Ansluta termostaten
Wiser-appen uppmanar dig att ansluta till termostaten till
en Wiser-hubb. Du kan sedan styra termostaten via Wiser-appen.
Wiser-elementtermostat
CCTFR6100
Förutsättningar och tillbehör
Produktinformation tillgänglig
Mer detaljerad produktinformation finns på
internet -> Ladda ner dokumentet.
http://download.schneider-electric.com/
files?p_Doc_Ref=WiserHeat_SUG_SV
Lär känna termostaten
Manöverelement
A 3 status-LED
B Vridbart lock
C Ringmutter (an-
vänds endast
med
M30x1,5 mm
ventiladapter)
Driftsättning av termostaten
De ventiladaptrar som levereras täcker de flesta
ventiler. Om de inte passar
-> se Produktinformation
A Ventiladapter
B O-ring (förinstallerad)
C Termostat
D Ringmutter
E Ventil M30 x 1,5 mm
F Danfoss-adapter
G Gängstift
H Termostat
I O-ring (förinstallerad)
J Danfoss-ventil
sv
Öppna ventilen först:
Borttagningssekvensen är installationssekvensen i om-
vänd ordning.
Varumärken
• Apple® och App Store® är märkesnamn eller registrerade varumärken som tillhör Apple Inc.
• Google Play™ Store och Android™ är märkesnamn
eller registrerade varumärken som tillhör Google Inc.
Andra märken och registrerade varumärken tillhör respektive ägare.
EU-försäkran om överensstämmelse
Härmed försäkrar Schneider Electric Industries att denna produkt överensstämmer med de väsentliga kraven
och andra relevanta bestämmelser i RADIOUTRUSTNINGSDIREKTIVET 2014/53/EU. Försäkran om överensstämmelse kan laddas ned på följande adress:
schneider-electric.com/docs.
Kontakta kundservicecentret i ditt land om du har några
tekniska frågor.
schneider-electric.com/contact
Schneider Electric Industries SAS
35 rue Joseph Monier
F - 92500 Rueil-Malmaison
www.se.com
Manövrering av termostaten
-> se Produktinformation
Mer detaljerad produktinformation finns på inter-
net
Status-LED-beteende
Första steget
Användaråtgärd Sätt i batterier
Vänster LED Röd
Mitten-LED Grön
Höger LED Blå
LED-beteende
Tänd snabbt. Motorn öpp-
nar ventilen.
Öppen ventil
Användaråtgärd
Automatiskt efter att batteriet satts i.ELLER: Vrid
locket i plusriktningen i 8
sek.
Vänster LED Röd
Mitten-LED Höger LED -
LED-beteende
Tänds tills ventilen öpp-
nas.
Redo för installation i ventilen
Användaråtgärd Ventilen ska öppnas.
Vänster LED Röd
Mitten-LED Grön eller orange
Höger LED Blå
LED-beteende
Blinkar rött/blått i ca 5 mi-
nuter.Tänds grönt = anslu-
ten till hubb.Tänds orange
= inte ansluten till hubb.
Ta bort termostaten
Tekniska data
Strömförsörjning:
2x 1,5 V IEC LR6 (AA) al-
kaliska batterier
Utan strömförsörjning: Anslutningsdata behålls
Temperaturinställningsområ-
de: 5–30 °C
Temperaturupplösning 0,5 °C
Noggrannhet: < 0,8 °C vid 4 °C/h
Yttemperatur
på installationsplatsen: max. 93 °C
Vattentemperatur:
max. 110 °C,
max. kontinuerlig 73 °C
Omgivningstemperatur:
0–45 °C
Frekvensband: 2,4 GHz, dubbelriktad
Överföringseffekt: max. 20 mW (13 dBm)
Föroreningsgrad: 2
Radioområde: 30 m fritt fält
Energiklass: IV – 2 %
Mjukvaruklass: A
Kapslingsklass: IP 30
Mått (H x ): 93x51 mm
Relevanta direktiv:
Radioutrustningsdirektiv
(RED) 2014/53/EU
Batteridirektivet 2006/66/
EC
RoHS-direktivet 2011/65/
EU + 2015/863/EU
WEEE2 2012/19/EU
Återvinn utrustningen separat från hushållsavfallet vid ett officiellt uppsamlingsställe.
Professionell återvinning skyddar människor
och miljö mot de negativa effekter som kan
uppstå.
Schneider Electric Industries SAS
CCTFR6100© Schneider-Electric 201406490268001 Iss A09/19
• È necessario un hub Wiser, ad esempio Wiser Home
Touch, Wiser Heat Hub o Wiser Heat Hub
R
. (Di se-
guito denominato hub Wiser).
• Se si dispone di un dispositivo Wiser Home Touch,
scaricare l’app Wiser sullo smartphone. Se si dispone di un hub del tipo Wiser Heat Hub o Wiser Heat Hub
R
, scaricare l’app Wiser Heat. Con questa app è
possibile connettere, configurare e controllare i dispositivi Wiser.
Il termostato per radiatore Wiser (di seguito denominato
termostato) utilizza sensori di temperatura integrati per
controllare il flusso d’acqua attraverso un radiatore, regolando in tal modo la temperatura in un ambiente. La
temperatura finale e i tempi di commutazione sono impostati nell’app Wiser o nell’app Wiser Heat (di seguito, entrambe le app sono denominate app Wiser).
Rimozione del vecchio termostato del radiatore
Aprire la valvola del termostato del radiatore per facilitare
la rimozione.
Inserimento/sostituzione delle batterie
|
Quando si inseriscono le batterie, verificare la
corretta polarità. Smaltire le batterie in base alle
normative vigenti. Non gettare le batterie con i
normali rifiuti domestici.
Non utilizzare batterie ricaricabili
Apertura della valvola
Quando si installano le batterie, il termostato si sposta
nella posizione “valvola aperta”. Ora il termostato è pronto per l’installazione. Questo processo può essere eseguito manualmente:
Installazione dell’adattatore e del termostato
|
Rischio di danni
• Per l’installazione non utilizzare attrezzi quali
pinze.
• Assicurarsi che l’anello O-ring sia posizionato
saldamente sulla filettatura.
• Serrare la ghiera solo a mano.
|
Se non è possibile installare il termostato: vedere
le istruzioni in “Calibrazione del termostato”
Adattatore M30x1,5 mm
Installazione:
1 Posizionare l’adattatore sulla valvola.
2 Avvitare leggermente la ghiera sull’adattatore della
valvola.
3 Avvitare il termostato e serrarlo a mano.
Impostare i LED nella direzione desiderata: allentare leg-
germente la ghiera, ruotare il termostato nella posizione
desiderata e serrare nuovamente la ghiera.
Danfoss RA
Installazione:
1 Spingere l’estremità più stretta dell’adattatore Dan-
foss sulla valvola Danfoss.
Impostare i LED nella direzione desiderata: assicurarsi
che il foro con il grano filettato si trovi sul lato opposto.
2 Serrare il grano filettato con una chiave a brugola da
2 mm.
3 Avvitare il termostato e serrarlo a mano.
Calibrazione del termostato (chiusura valvola)
Avvio della calibrazione dopo l’installazione:
|
La calibrazione inizia automaticamente 5 minuti
dopo l’inserimento delle batterie. In questa posizione (“valvola chiusa”), il termostato non può
essere installato.
• Per installare il termostato è necessario spostarlo in posizione di apertura:
Termostato per radiatore Wiser
CCTFR6100
Prerequisiti e accessori
Sono disponibili informazioni sul
prodotto
Informazioni più dettagliate sul prodotto
sono disponibili su Internet -> Scarica documento
http://download.schneider-electric.com/
files?p_Doc_Ref=WiserHeat_SUG_IT
Descrizione del termostato
Elementi di comando
A 3 LED di stato
B Manopola rotante
C Ghiera (solo con
l’adattatore valvola
M30x1,5 mm)
Messa in funzione del termostato
Gli adattatori forniti in dotazione sono adatti per la
maggior parte delle valvole. Qualora non fossero
adatti
-> vedere Informazioni sul prodotto
A Adattatore valvola
B O-ring (preinstallato)
C Termostato
D Ghiera
E Valvola M30 x
1,5 mm
F Adattatore Dan-
foss
G Grano filettato
H Termostato
I O-ring (preinstallato)
J Valvola Danfoss
it
Connessione del termostato
L’app Wiser richiede di connettere il termostato a un hub
Wiser. In questo modo è possibile controllare il termostato tramite l’app Wiser.
Aprire prima la valvola:
La sequenza di rimozione è inversa rispetto alla sequen-
za di installazione.
Marchi
• Apple® e App Store® sono marchi o marchi registrati
di Apple Inc.
• Google Play™ Store e Android™ sono marchi o marchi registrati di Google Inc.
Altri marchi e marchi registrati appartengono ai rispettivi
proprietari.
Dichiarazione di conformità UE
Schneider Electric Industries dichiara che questo prodotto è conforme ai requisiti essenziali e alle altre disposizioni pertinenti della DIRETTIVA SULLE
APPARECCHIATURE RADIO (RED) 2014/53/UE. La dichiarazione di conformità può essere scaricata dal sito:
schneider-electric.com/docs.
In caso di domande tecniche si prega di contattare il
Centro Servizio Clienti del proprio paese.
schneider-electric.com/contact
Schneider Electric Industries SAS
35 rue Joseph Monier
F - 92500 Rueil-Malmaison
www.se.com
Funzionamento del termostato
-> vedere Informazioni sul prodotto
Informazioni più dettagliate sui prodotti sono di-
sponibili in Internet
Comportamento dei LED di stato
Primo passaggio
Azione dell’utente Inserire le batterie
LED sinistro Rosso
LED centrale Verde
LED destro Blu
Comportamento del LED
Si accende brevemente. Il
motorino apre la valvola.
Apertura valvola
Azione dell’utente
Automaticamente dopo
l’inserimento della batteria, OPPURE: ruotare la
manopola in direzione del
segno più (+) per 8 s.
LED sinistro Rosso
LED centrale LED destro -
Comportamento del LED
Si illumina finché la valvo-
la non è aperta.
Pronto per l’installazione
sulla valvola
Azione dell’utente
La valvola deve essere
aperta.
LED sinistro Rosso
LED centrale Verde o arancione
LED destro Blu
Comportamento del LED
Lampeggio rosso/blu per
circa 5 minuti. Illuminato in
verde = connesso all’hub.
Illuminato in arancione =
non connesso all’hub.
Rimozione del termostato
Dati tecnici
Alimentazione:
2 batterie alcaline IEC LR6
(AA) da 1,5 V
Senza alimentazione:
I dati di connessione ven-
gono mantenuti
Campo di impostazione del-
la temperatura: 5 °C - 30 °C
Risoluzione della temperatu-
ra 0,5 °C
Precisione di controllo: < 0,8 °C a 4 °C/h
Temperatura superficiale
nel luogo d’installazione: max 93 °C
Temperatura dell’acqua:
max. 110 °C,
max. continua 73 °C
Temperatura ambiente
di funzionamento: da 0 °C a 45 °C
Banda di frequenza: 2,4 GHz, bidirezionale
Potenza di trasmissione: max 20 mW (13 dBm)
Grado di contaminazione: 2
Intervallo radio: 30 m in campo libero
Classe energetica: IV - 2%
Classe di software: A
Grado di protezione: IP 30
Dimensioni (Hx): 93x51 mm
Direttive pertinenti:
Direttiva sulle apparec-
chiature radio (RED) 2014/
53/EU
Direttiva sulle batterie
2006/66/EC
RoHS Direttiva 2011/65/
EU + 2015/863/EU
WEEE2 2012/19/EU
Non smaltire l’apparecchio con i rifiuti domestici, ma consegnarlo a un centro di raccolta
ufficiale. Il riciclaggio professionale contribuisce alla tutela delle persone e dell’ambiente
dagli eventuali effetti nocivi.
Schneider Electric Industries SAS
 Loading...