

Page 1

AT-2
6-Channel Electrocardiograph
6-Kanal-Elektrokardiograph
Electrocardiographe à 6 canaux
Page 2

AT-2 User Guide - English
AT-2 Gebrauchsanweisung -Deutsch
Guide de l’Utilisateur pour l’AT-2 - Français
Article Number 2. 510199e
Sept.95, March 96, June 2000,
May 2001, August 2001
Associated Documents
Guide to the SCHILLER Interpretation and Measurement Program E/ D/ F
Article Number 2. 510 179
SCHILLER AG
Altgasse 68
6341 Baar, Switzerland
Phone: ++ 41 41 766 42 42
Fax: ++ 41 41 761 08 80
www.schiller.ch
Page 3
Where to Obtain Service and Sales Advice
Kundendienst und Verkaufs-/Beratungsstellen
Coordonnées de nos services d’assistance technique et commerciale
WELCH ALLYN SCHILLER Inc., 7420 Carroll Road, San Diego, CA , US-92121-2334 USA
USA / Canada
Asia Pacific
Austria
France
Germany
(EU authorized
representative)
India
Italy
Switzerland
All other countries
Tel.: +1 858 635 6023 Fax : +1 858 635 6611
Home Page : www.welchallyn.com
SCHILLER Asia Pacific, 10 Jalan SS 3/33, Taman Universiti, 47300 Petaling Jaya, Selangor, Malaysia
Tel.: + 603 7877 5336 Fax : + 603 7877 5744
SCHILLER HmbH, Kampmüllerweg 24, A-4044 Linz, Austria
Tel.: + 43 732 709 90 Fax : + 43 732 757 000
SCHILLER Medical S.A, BP 50, 19, Avenue de la Gare, F-67162 Wissembourg / Cedex, France
Tel.: +33 3 88 63 36 00 Fax : +33 3 88 94 12 82
SCHILLER Medizintechnik GmbH, Rudolf-Diesel Strasse 14, D-85521 Ottobrunn, Germany
Tel.: + 4989 629 981 0 Fax : + 4989 609 509 0
SCHILLER Healthcare India Pvt. Ltd.,D.C.Silk Mills Compound, 'A' Wing, 1st floor, 5, Chunawala Estate,
Kondivitta Lane, Andheri - Kurla Road, Andheri (E, Mumbai - 400 059, India
Tel.: + 9122 826 3520 Fax : + 9122 826 3525
ESAOTE Spa (SCHILLER), Via di Caciolle 15, I-50127 Firenze, Italy
Tel.: + 39055 4229 201 Fax : + 39055 4229 208
SCHILLER Reomed AG, Riedstrasse 14, CH-8953 Dietikon, Switzerland
Tel.: +411 744 3000 Fax : + 411 740 3710
SCHILLER AG, Altgasse 68, CH-6341 Baar, Switzerland
Tel.: + 4141 766 4242 Fax : + 4141 761 0880
Home Page : www.schiller.ch
Page 4

This equipment has been tested and found to comply with the limits for a class A digital device, pursuant to both Part 15 of
the FCC (Federal Communications Commission) Rules and the radio interference regulations of the Canadian Department of
Communications. These limits are designed to provide reasonable protection against harmful interference when the equipment
is operated in a commercial environment. This equipment generates, uses and can radiate radio frequency energy and, if not
installed and used in accordance with this instruction manual, may cause harmful interference to radio communications.
Operation of this equipment in a residential area is likely to cause harmful interference in which case the user will be required
to correct the interference at his own expense.
Battery Care and Disposal Instructions
Disposal Instructions
and Battery Care
° DO NOT DISPOSE OF THE BATTERY BY FIRE OR INCINERATOR -
DANGER OF EXPLOSION
° DO NOT ATTEMPT TO RECHARGE THE BATTERY - DANGER OF
EXPLOSION
° DO NOT OPEN THE BATTERY CASING - DANGER OF ACID BURN
Only dispose of the battery in official recycling centres or municipally approved areas.
Alternatively, used batteries can be returned to Schiller AG for disposal.
Unit Disposal Instructions
Units no longer required can be returned to Schiller AG for disposal. Alternatively
dispose of the unit in municipally approved recycling centres.
Page 5

Power Supply
The mains connection is on the rear of the unit.
The power supply voltage is set by the factory for100-115V(nom. 110V) or 220-240V (nom. 230V) working.
The setting is indicated by the indented metal strip on the fuse panel. Contact your dealer if the voltage
needs to be changed.
The mains indicator lamp on the keyboard is always lit when the unit is connected to the mains supply. The unit
can either be operated from the mains supply or from the built-in rechargeable battery.
Changing a Mains Fuse
If it is necessary to change a fuse, always replace with the correct rating i.e 2x200mAT for 230V, or
2x315mAT for 110V .
To change a fuse press the two retaining lugs on side of the fuse panel (situated below the mains connector on the
back panel. Remove the fuse panel and replace the fuse(s). Click back the fuse panel.
Intended Use
The CARDIOVIT AT-2 is a 6-channel ECG recorder with all (12) ECG signals simultaneously processed to provide
instant ECG recordings. Two automatic recording modes can be individually preset to enable one button ECG
recording of preferred print formats.
Page 6

Terms of Warranty
The SCHILLER AT-2 is warranted against defects in material and
manufacture for the duration of one year (as from date of purchase).
Excluded from this guarantee is damage caused by an accident or as a
result of improper handling. The warranty entitles free replacement of
the defective part. Any liability for subsequent damage is excluded. The
warranty is void if unauthorized or unqualified persons attempt to make
repairs.
In case of a defect, contact your dealer or the manufacturer.
The manufacturer can only be held responsible for the safety, reliability,
and performance of the apparatus if:
• assembly operations, extensions, readjustments, modifications,
or repairs are carried out by persons authorized by him, and
• the AT-2 and approved attached equipment are used in
accordance with the manufacturers instructions.
THERE ARE NO EXPRESS OR IMPLIED WARRANTIES WHICH
EXTEND BEYOND THE WARRANTIES HEREINABOVE SET FORTH.
SCHILLER MAKES NO WARRANTY OF MERCHANTABILITY OR
FITNESS FOR A PARTICULAR PURPOSE WITH RESPECT TO THE
PRODUCT OR PARTS THEREOF.
About this Handbook
The philosophy of SCHILLER is one of continuous improvement. Our
aim is to provide the user with the most up-to-date information and the
latest technological developments.
Your suggestions and comments are welcome on all SCHILLER
documentation. Please contact the SCHILLER Technical Documentation
Department.
PHYSICIAN‘S RESPONSIBILITY
THE AT-2 ELECTROCARDIOGRAPH IS
PROVIDED FOR THE EXCLUSIVE USE OF
QUALIFIED PHYSICIANS OR PERSONNEL
UNDER THEIR DIRECT SUPERVISION. THE
NUMERICAL AND GRAPHICAL RESULTS FROM
A RECORDING MUST BE EXAMINED WITH
RESPECT TO THE PATIENTS OVERALL
CLINICAL CONDITION. THE RECORDING
PREPARATION QUALITY AND THE GENERAL
RECORDED DATA QUALITY, WHICH COULD
EFFECT THE REPORT DATA ACCURACY, MUST
ALSO BE TAKEN INTO ACCOUNT.
IT IS THE PHYSICIANS RESPONSIBILITY TO
MAKE THE DIAGNOSIS OR TO OBTAIN EXPERT
OPINION ON THE RESULTS, AND TO
INSTITUTE CORRECT TREATMENT IF
INDICATED.
FEDERAL LAW IN THE USA RESTRICTS THIS
DEVICE TO SALE BY OR ON THE ORDER OF A
PHYSICIAN
Page 7

Safety Notices
TO PREVENT ELECTRIC SHOCK DO NOT DISASSEMBLE THE UNIT. NO SERVICEABLE PARTS INSIDE. REFER SERVICING
TO QUALIFIED PERSONNEL ONLY.
DO NOT USE THIS UNIT IN AREAS WHERE THERE IS ANY DANGER OF EXPLOSION OR THE PRESENCE OF FLAMMABLE
GASES SUCH AS ANAESTHETIC AGENTS.
IN THE EVENT OF ACCIDENTAL LCD BREAKAGE AND RESULTANT LEAKAGE OF FLUID, DO NOT INHALE, INGEST OR
MAKE CONTACT WITH THE SKIN. IF CONTACT IS MADE RINSE IMMEDIATELY.
THIS PRODUCT IS NOT DESIGNED FOR STERILE USE.
THIS PRODUCT IS NOT DESIGNED FOR OUTDOOR USE.
SWITCH THE UNIT OFF BEFORE CLEANING AND DISCONNECT FROM THE MAINS.
DO NOT, UNDER ANY CIRCUMSTANCES, IMMERSE THE UNIT OR CABLE ASSEMBLIES IN LIQUID.
THE DEVICE MUST ONLY BE OPERATED USING BATTERY POWER IF THE EARTH CONNECTION IS SUSPECT OR IF THE
MAINS LEAD IS DAMAGED OR SUSPECTED OF BEING DAMAGED.
DO NOT USE HIGH TEMPERATURE STERILISATION PROCESSES (SUCH AS AUTOCLAVING). DO NOT USE E-BEAM OR
GAMMA RADIATION STERILISATION.
DO NOT USE SOLVENT CLEANERS
USE ONLY ACCESSORIES AND OTHER PARTS RECOMMENDED OR SUPPLIED BY SCHILLER AG. USE OF OTHER THAN
RECOMMENDED OR SUPPLIED PARTS MAY RESULT IN INJURY INACCURATE INFORMATION AND/ OR DAMAGE TO THE
UNIT.
THE AT-2 COMPLIES WITH EMC REGULATIONS FOR MEDICAL PRODUCTS WHICH AFFORDS PROTECTION AGAINST
EMISSIONS AND ELECTRICAL INTERFERENCE. HOWEVER SPECIAL CARE MUST BE EXERCISED WHEN THE UNIT IS
USED WITH HIGH FREQUENCY EQUIPMENT.
IT MUST BE ENSURED THAT NEITHER THE PATIENT NOR THE ELECTRODES (INCLUDING THE NEUTRAL ELECTRODE)
COME INTO CONTACT WITH OTHER PERSONS OR CONDUCTING OBJECTS (EVEN IF THESE ARE EARTHED).
THERE IS NO DANGER WHEN USING THE ECG UNIT FOR A PACEMAKER PATIENT OR WITH SIMULTANEOUS USE OF
OTHER ELECTRICAL STIMULATION EQUIPMENT. HOWEVER, THE STIMULATION UNITS SHOULD ONLY BE USED AT A
SUFFICIENT DISTANCE FROM THE ELECTRODES. IN CASE OF DOUBT, THE PATIENT SHOULD BE DISCONNECTED
FROM THE RECORDER.
THIS UNIT IS CF CLASSIFIED ACCORDING TO IEC 601-1. THIS MEANS THAT THE PATIENT CONNECTION IS
FULLY ISOLATED AND DEFIBRILLATION PROTECTED. SCHILLER CAN ONLY GUARANTEE PROTECTION AGAINST
DEFIBRILLATION VOLTAGE HOWEVER, WHEN THE ORIGINAL SCHILLER PATIENT CABLE IS USED.
IF SEVERAL UNITS ARE COUPLED THERE IS A DANGER OF SUMMATION OF LEAKAGE CURRENT
DO NOT TOUCH THE CASING DURING DEFIBRILLATION
IF THE PATIENT CABLE SHOULD BECOME DEFECTIVE AFTER DEFIBRILLATION, LEAD OFF WILL BE DISPLAYED
AND AN ACOUSTIC ALARM GIVEN
Page 8

DAS GERÄT ENTSPRICHT DEN EMV-BESTIMMUNGEN FÜR MEDIZINPRODUKTE ZUM SCHUTZ VON
EMISSIONEN UND EINSTRAHLUNGEN. BEI DER VERWENDUNG ZUSAMMEN MIT HOCHFREQUENZGERÄTEN
IST MIT BESONDERER VORSICHT VORZUGEHEN.
Anleitungen zur Batterieentsorgung und Sicherheitshinweise
° DIE BA TTERIE DARF NICHT MITTELS FEUER ODER IN EINER VER-
BRENNUNGSANLAGE ENTSORGT WERDEN - EXPLOSIONSGEFAHR
Entsorgungshinweise für
Batterien und Geräte
° VERSUCHEN SIE NICHT, DIE BATTERIE WIEDER AUFZULADEN -
EXPLOSIONSGEFAHR
° VERSUCHEN SIE NICHT, DIE BATTERIEHÜLLE ZU ÖFFNEN -
GEFAHR VON VERÄTZUNGEN
Ensorgen Sie die Batterie in einer offiziellen Recyclingsstelle oder in einer
anerkannten städtischen Entsorgungsstelle. Es besteht die Möglichkeit, die entladene
Batterie an Schiller AG zur Entsorgung einzusenden.
Anleitungen für die Entsorgung des Gerätes
Geräte, die nicht mehr verwendet werden, können an Schiller AG zwecks
Entsorgung retourniert werden. Es besteht die Möglichkeit, das Gerät in einer
anerkannten städtischen Entsorgungstelle abzugeben.
Page 9

Stromversorgung
Der Netzanschluss befindet sich auf der Rückseite des Gerätes.
Die Stromspannung des Gerätes ist vom Hersteller für 100-115V(nom. 110V) oder 220-240V (nom. 230V) eingestellt.
Die Einstellung ist anhand des versenkte Metallanzeigers auf dem Sicherungshalter ersichtlich. Kontaktieren
Sie Ihre Verkaufsstelle, wenn die Spannung geändert werden muss.
Die Kontrollanzeige auf der Tastatur ist immer an, wenn das Gerät ans Netz angeschlossen ist. Das Gerät kann entweder
übers Netz oder die eingebaute, wiederaufladbare Batterie betrieben werden.
Auswechseln einer Netzsicherung
Wenn eine Sicherung ersetzt werden muss, achten Sie auf dieAufschrift, damit die richtige Sicherung eingesetzt
wird, d.h. 2x200mAT für 230V, oder 2x315mAT für 110V .
Um eine Sicherung auszuwechseln, drücken Sie die beiden senkrechten Sperrvorrichtungen, die sich seitlich des
Sicherungshalters (auf der Geräterückseite neben dem Netzanschluss) befinden, um den Halter aus dem Steckplatz
herauszuheben. Ersetzen Sie die Sicherung(en) und setzen Sie den Sicherungshalter wieder in den Steckplatz zurück.
Einleitung
Der CARDIOVIT AT-2 ist ein 6-Kanal EKG-Rekorder. Dank simultaner Verarbeitungstechnik der EKG-Signale stehen 12
synchrone Standard-Ableitungen für die Aufzeichnung zur Verfügung. Für den automatischen Aufnahmemodus können
zwei Druckformate individuell definiert werden - Aufzeichnung und Ausdruck im Format 1 oder 2 werden dann bequem per
Tastendruck gestartet.
Page 10

Garantiebestimmungen
Für Ihren AT-2 besteht für die Dauer eines Jahres (ab Kaufdatum)
Garantie auf Material- und Fabrikationsfehler. Davon ausgenommen
sind Schäden, die durch Unachtsamkeit oder unsachgemässen Gebrauch
verursacht werden. Die Garantie erstreckt sich auf den kostenlosen
Ersatz des defekten Teils. Eine Haftung für Folgeschäden ist dabei
ausgeschlossen. Der Garantieanspruch entfällt, wenn Reparaturversuche
durch nicht autorisierte oder unqualifizierte Personen vorgenommen
werden.
Im Falle eines Defekts ist das beanstandete Gerät an die nächste
SCHILLER-Vertretung oder direkt an den Hersteller zu senden.
SCHILLER kann die Sicherheit, Zuverlässigkeit und
Funktionstüchtigkeit des Gerätes nur dann gewährleisten, wenn
• Montagearbeiten, Ergänzungen, Neueinstellungen,
Modifikationen oder Reparaturen von Personen durchgeführt
werden, die von SCHILLER hierzu ermächtigt sind, und
• das Gerät und die vom Hersteller zugelassenen Zubehörteile
entsprechend den Anweisungen des Herstellers verwendet
werden.
ES WERDEN KEINE WEITEREN GARANTIEN, WEDER
AUSDRÜCKLICH NOCH IMPLIZIERT, AUSSER DEN GENANNTEN
ÜBERNOMMEN. SCHILLER ÜBERNIMMT KEINE GARANTIE FÜR
DIE GEWERBLICHE NUTZUNGSFÄHIGKEIT UND EIGNUNG FÜR
EINEN BESTIMMTEN ZWECK DES PRODUKTES ODER DER
PRODUKTKOMPONENTEN.
Über diese Gebrauchsanweisung ......
Konsequente Weiterentwicklung ist charakteristisch für die Philosophie
des Hauses SCHILLER. Unser Ziel ist es, den Benutzern jeweils die
aktuellsten Informationen und neuesten Technologien zur Verfügung
zu stellen. Ihre Vorschläge und Kommentare zu unseren
Dokumentationen sind uns jederzeit willkommen. Bitte wenden Sie
sich an unsere Technische Redaktion. Fax-Nr. ++41 (0)41 761 0334.
VERANTWORTUNG DES ARZTES
DER AT-2 DARF NUR VON ÄRZTEN ODER
DEREN DIREKT UNTERSTELLTEM
PERSONAL VERWENDET WERDEN. DIE
NUMERISCHEN UND GRAFISCHEN
ERGEBNISSE SOWIE DIE VOM GERÄT BEREIT GESTELLTEN BEFUNDHINWEISE FÜR DIE
AUFNAHME DÜRFEN NICHT ISOLIERT
BETRACHTET WERDEN, SONDERN IMMER
NUR IM ZUSAM-MENHANG MIT DER
GESAMTHEIT DER VOR-LIEGENDEN DATEN
DES PATIENTEN. DIE AUFNAHMEVORBEREITUNG SOWIE DIE
QUALITÄT DER AUFZEICHNUNG, DIE DIE
GENAUIGKEIT DER AUFNAHMEDATEN
BEEINFLUSSEN, SIND EBEN-FALLS
FAKTOREN, DIE BERÜCKSICHTIGT
WERDEN MÜSSEN.
DIE DIAGNOSESTELLUNG ODER DAS
HINZUZIEHEN EINES FACHARZTES ZUR
BEURTEILUNG DER ERGEBNISSE SOWIE DIE
EINLEITUNG GEEIGNETER
BEHANDLUNGSMETHODEN FALLEN
AUSSCHLIESS-LICH IN DIE ZUSTÄNDIGKEIT
DES ARZTES.
Page 11

Sicherheitshinweise
ZUR VERMEIDUNG VON ELEKTROSCHOCKS DARF DAS GERÄT NICHT DEMONTIERT WERDEN. ES ENTHÄLT KEINE TEILE, DIE VON
LAIEN REPARIERT WERDEN KÖNNEN. SERVICEARBEITEN SIND NUR QUALIFIZIERTEM FACHPERSONAL VORBEHALTEN.
DAS GERÄT IST NICHT FÜR DEN BETRIEB IN EXPLOSIONSGEFÄHRDETER UMGEBUNG BESTIMMT ODER IN BEREICHEN, WO
ENTZÜNDBARE GASE, WIE Z.B. ANÄSTHESIEGASE, VERWENDET WERDEN.
BEI EINER ZERSTÖRUNG DES BILDSCHIRMS UND EVENTUELLEM AUSLAUFEN VON FLÜSSIGKEIT DÄMPFE NICHT EINATMEN,
FLÜSSIGKEIT NICHT EINNEHMEN ODER MIT DER HAUT IN BERÜHURNG BRINGEN. BEI HAUTKONTAKT SOFORT ABSPÜLEN.
DIESES GERÄT IST NICHT FÜR DEN STERILEN EINSATZ BESTIMMT.
DIESES GERÄT IST NICHT FÜR DEN GEBRAUCH IM FREIEN BESTIMMT.
VOR DER REINIGUNG IST DAS GERÄT AUSZUSCHALTEN UND DER NETZSTECKER ZU ZIEHEN.
UNTER KEINEN UMSTÄNDEN DÜRFEN DAS GERÄT ODER DIE KABEL IN EINE REINIGUNGSFLÜSSIGKEIT EINGETAUCHT WERDEN.
DAS GERÄT DARF NICHT VERWENDET WERDEN, WENN ZWEIFEL AN DER ISOLIERUNG GEGEN ERDE ODER DER INTEGRITÄT DES
NETZKABELS BESTEHEN.
ES DARF KEINE HOCHTEMPERATUR-STERILISATION (WIE AUTOCLAVING) VORGENOMMEN WERDEN, EBENSOWENIG WIE EINE
STERILISATION MIT E-STRAHL ODER GAMMASTRAHLEN.
VERWENDEN SIE KEINE LÖSLICHEN REINIGUNGSMITTEL.
VERWENDEN SIE NUR DAS VON SCHILLER GELIEFERTE ODER EMPFOHLENE ZUBEHÖR ODER VERBRAUCHSMATERIAL. DIE
VERWENDUNG VON FREMDZUBEHÖR ODER VERBRAUCHSMATERIAL KANN ZU UNGENAUEN INFORMATIONEN UND/ODER
BESCHÄDIGUNG DES GERÄTES FÜHREN.
DAS GERÄT ENTSPRICHT DEN EMV-BESTIMMUNGEN FÜR MEDIZINPRODUKTE ZUM SCHUTZ VOR EMISSIONEN UND STÖRUNGEN.
BEI VERWENDUNG VON HOCHFREQUENZ-GERÄTEN ZUSAMMEN MIT DEM AT-2 IST MIT BESONDERER VORSICHT VORZUGEHEN.
ES IST SICHERZUSTELLEN, DASS WEDER DER PATIENT NOCH DIE LEITFÄHIGEN TEILE DES PATIENTENANSCHLUSSES ODER DER
ELEKTRODEN (AUCH DER NEUTRALEN ELEKTRODE) MIT ANDEREN LEITFÄHIGEN GEGENSTÄNDEN (AUCH WENN DIESE GEERDET
SIND) ODER PERSONEN IN BERÜHRUNG KOMMEN.
BEI VERWENDUNG DES AT-2 FÜR EINEN HERZSCHRITTMACHER-PATIENTEN ODER AUCH BEI VERWENDUNG ANDERER
ELEKTRISCHER STIMULATIONSGERÄTE BESTEHT KEINE GEFÄHRDUNG. ABER AUCH HIER IST EINE GEWISSE VORSICHT GEBOTEN.
DIE STIMULATIONS- GERÄTE SOLLTEN NUR IN GENÜGENDEM ABSTAND ZU DEN ABLEITELEKTRODEN VERWENDET WERDEN. IM
ZWEIFELSFALL IST DER PATIENT VOM AUFNAHMEGERÄT ZU TRENNEN.
ES HANDELT SICH UM EIN GERÄT DES TYPS CF NACH IEC 601-1. DAS BEDEUTET , DASS DER PA TIENTENANSCHLUSS VOLLISOLIERT
UND DEFIBRILLATIONSFEST IST. SCHILLER KANN DEN DEFIBRILLATIONSSCHUTZ JEDOCH NUR GEWÄHRLEISTEN, WENN DAS
ORIGINAL-SCHILLER-PATIENTENKABEL VERWENDET WIRD.
BEI KOPPLUNG VON MEHREREN GERÄTEN BESTEHT DIE GEF AHR, DASS SICH DIE ABLEITSTRÖME SUMMIEREN. WENN ZWEI ODER
MEHR GERÄTE GEKOPPELT SIND, MUSS EIN ISOLIERTRANSFORMATOR IN DER STROMMZUFUHR ZWISCHENGESCHALTET WERDEN.
DAS GEHÄUSE DARF WÄHREND DER DEFIBRILLATION NICHT BERÜHRT WERDEN
WENN DAS PATIENTENKABEL NACH EINER DEFIBRILLATION BESCHÄDIGT IST, WIRD DIE MELDUNG "ELEKTRODE LOSE" ANGEZEIGT
UND EIN AKUSTISCHER ALARM AUSGELÖST.
Page 12

Cet équipement a àtà testé et il a été montré qu'il respecte les limites d'un appareil digital de classe A, conformément aux règles
de la section 15 de la FCC (Federal Communications Commission) et aux régulations relatives aux interférences radio du
Service Canadien des Télécommunications. Ces limites sont établies dans le but de fournir une protection suffisante contre les
interférences dangereuses lorque lpappareil est utilisé dans un contexte commerical. Cet appareil génère, émet et emploi de
l'énergie de fréquence radio et il peut êter la cause d'interférences nuisibles aux communications radio. L'utilisation de cet
appareil dans une zone résidentielle est susceptible de créer des parasites dont l'utilisateur devra rectifier les effets à ses
propres frais.
Elimination et Manipulation de la Pile
Elimination et
Manipulation de la Pile
° NE JAMAIS JETER LA PILE OU BATTERIE DANS LE FEU OU DANS UN
INCINERATEUR - DANGER D'EXPLOSION
° NE JAMAIS RECHARGER LA PILE OU BATTERIE - DANGER D'EXPLOSION
° NE JAMAIS OUVRIR LE BOITIER DE LA PILE - DANGER DE BRULURE A
L'ACIDE
N'éliminer la pile ou batterie que dans les centres de recyclages officiels ou dans les zones
autorisées par la municipalité. Il est aussi possible de renvoyer à Schiller AG les piles ou
batteries usagées.
Elimination des Appareils
Les appareils qui ne sont plus en usage peuvent être renvoyés à Schiller AG qui se
chargera de leur recyclage. vous pouvez aussi les déposer aux centres de recyclage de la
municipalité.
Page 13

Alimentation Electrique
Le branchement secteur se trouve à l'arrière de l'appareil.
Le voltage est fixé par l'entreprise à 100-115V (nom. 110V) ou 220-240V (nom. 230V).
Le réglage est indiqué à l'aide de la petite bande de métal qui se trouve sur la plaque de fusibles. Appeler votre
agent Schiller, si vous devez changer le voltage.
Le voyant lumineux du secteur, sur le clavier, s'allume dès que l'appareil est branché. L'appareil peut être alimenté soit par
le secteur soit par la batterie interne rechargeable.
Changement de fusible secteur
S'il est nécessaire de changer un fusible, remplacez le toujours avec la référence correcte, c'est à dire 2x200mAT
pour 230V ou 2x315mAT pour 110V.
Pour changer un fusible, appuyer sur les deux languettes de chaque côté du fusible (sous le connecteur secteur à l'arrière).
Enlever la plaquette du fusible et remplacer le(s) fusible(s). Replacer la plaquette du fusible.
Introduction
Le CARDIOVIT AT-2 est un enregistreur d’ECG à 6 canaux, qui assure le traitement simultané des 12 signaux d’ECG, pour
fournir des enregistrements d’ECG instantanés. Deux modes d’enregistrement automatique peuvent être préréglés séparément,
pour permettre, en utilisant un seul bouton, de réaliser des enregistrements d’ECG dans les formats d’impression les plus
utilisés.
Page 14

Conditions de garantie
L’appareil SCHILLER AT-2 est garanti contre les défauts de matériaux et
les vices de fabrication pour une durée d’un an (à partir de la date d’achat).
Les dommages causés par un accident ou résultant d’une manipulation
incorrecte sont exclus de cette garantie. La garantie donne droit au
remplacement gratuit de la pièce défectueuse. Toute responsabilité
relativement à des dommages ultérieurs est exclue. La garantie est annulée
si des personnes non autorisées ou non qualifiées tentent de faire des
réparations.
En cas de défectuosité, contactez votre revendeur ou le fabricant.
Le fabricant ne peut être tenu responsable de la sûreté, de la fiabilité et des
performances de l’appareil que si :
• les opérations d’assemblage, les extensions, les réajustements, les
modifications ou les réparations sont exécutés par des personnes
qu’il a autorisées, et
• l’AT-2 et le matériel agréé qui y est monté sont utilisés
conformément aux instructions du fabricant.
AUCUNE GARANTIE EXPLICITE OU IMPLICITE NE DEPASSE LES
GARANTIES PRESENTEES CI-DESSUS.
SCHILLER N’OFFRE AUCUNE GARANTIE DE QUALITE LOYALE ET
MARCHANDE OU D’APTITUDE A UNE FONCTION PARTICULIERE
RELATIVEMENT AU PRODUIT OU A DES PIECES DU PRODUIT.
A propos de ce manuel
SCHILLER a pour principe d’améliorer continuellement ses produits.
Notre objectif est de fournir à l’utilisateur les informations les à jour et les
tout derniers progrès technologiques.
Vos suggestions et commentaires concernant la documentation de
SCHILLER sont les bienvenus. Veuillez contacter le service de
documentation technique de SCHILLER (Technical Documentation
Department). Faxez au +41 (0)41 761 03 34.
RESPONSABILITE DU MEDECIN
L’ELECTROCARDIOGRAMME DE L’AT-2
EST DESTINE A L’USAGE EXCLUSIF DE
MEDECINS QUALIFIES, OU DE PERSONNEL
PLACE DIRECTEMENT SOUS LES ORDRES
DE CES MEDECINS. LES RESULTATS
NUMERIQUES ET GRAPHIQUES D’UN
ENREGISTREMENT DOIVENT ETRE
ETUDIES RELATIVEMENT A L’ETAT
CLINIQUE GLOBAL DU PATIENT. LA
QUALITE DE LA PREPARATION DE
L’ENREGISTREMENT ET LA QUALITE
GENERALE DES DONNEES ENREGISTREES,
QUI PEUVENT INFLUENCER
L’EXACTITUDE DES DONNEES DU
RAPPORT, DOIVENT EGALEMENT ETRE
PRISES EN COMPTE.
IL INCOMBE AU MEDECIN DE FAIRE LE
DIAGNOSTIC OU D’OBTENIR L’OPINION
D’UN EXPERT SUR LES RESULTATS, ET
D’ENTREPRENDRE UN TRAITEMENT
ADEQUAT LE CAS ECHEANT.
AUX USA, LA LOI FEDERALE LIMITE LA
COMMERCIALISATION DE CET APPAREIL
A LA VENTE PAR UN MEDECIN, OU SUR
COMMANDE D’UN MEDECIN.
Page 15

Avis concernant la sécurité
POUR EVITER LES DECHARGES ELECTRIQUES, NE DEMONTEZ PAS L’APPAREIL. IL NE CONTIENT AUCUNE PIECE
REPARABLE. LES REPARATIONS SONT STRICTEMENT RESERVEES A UN PERSONNEL QUALIFIE.
N’UTILISEZ PAS CET APPAREIL DANS DES ZONES OU IL EXISTE UN RISQUE D’EXPLOSION QUELCONQUE, OU EN
PRESENCE DE GAZ INFLAMMABLES COMME LES AGENTS ANESTHESIQUES.
SI L’AFFICHAGE A CRISTAUX LIQUIDES EST CASSE ACCIDENTELLEMENT, EN CAS DE FUITE DU LIQUIDE, N’INHALEZ
PAS CE LIQUIDE, NE L’INGEREZ PAS, ET NE LE LAISSEZ PAS ENTRER EN CONTACT AVEC LA PEAU. EN CAS DE CONTACT
CUTANE, RINCEZ IMMEDIATEMENT.
CE PRODUIT N’EST PAS CONCU POUR UNE UTILISATION ASEPTIQUE.
AVANT DE NETTOYER L’APPAREIL, STOPPEZ-LE ET DEBRANCHEZ-LE DU SECTEUR.
VOUS NE DEVEZ EN AUCUN CAS PLONGER L’APPAREIL OU LES CABLES DANS DU LIQUIDE.
N’ACTIONNEZ PAS L’APPAREIL SI LE BRANCHEMENT DE TERRE EST SUSPECT, OU SI LE CABLE DU SECTEUR EST
ENDOMMAGE, OU SI VOUS PENSEZ QU’IL EST ENDOMMAGE.
N’UTILISEZ PAS DE PROCEDES DE STERILISATION A HAUTE TEMPERATURE (P.EX. L’AUTOCLAVAGE). N’UTILISEZ
PAS LA STERILISATION PAR FAISCEAU ELECTRONIQUE OU AUX RAYONS GAMMA.
N’UTILISEZ PAS DE PRODUITS DE NETTOYAGE A BASE DE SOLVANTS.
UTILISEZ EXCLUSIVEMENT DES ACCESSOIRES ET AUTRES PIECES RECOMMANDES OU FOURNIS PAR SCHILLER AG.
L’UTILISATION DE PIECES AUTRES QUE LES PIECES RECOMMANDEES OU FOURNIES RISQUE D’ENTRAINER DES
LESIONS, DE FAUSSER LES INFORMATIONS ET/OU D’ENDOMMAGER L’APPAREIL.
L’APPAREIL AT-2 EST CONFORME AUX REGLEMENTS SUR LA COMPATIBILITE ELECTROMAGNETIQUE VISANT LES
PRODUITS MEDICAUX, CE QUI OFFRE UNE PROTECTION CONTRE LES EMISSIONS ET INTERFERENCES ELECTRIQUES.
IL FAUT TOUTEFOIS ETRE PARTICULIEREMENT VIGILANT LORSQUE L’APPAREIL EST UTILISE AVEC DU MATERIEL
HAUTE FREQUENCE.
IL FAUT S’ASSURER QUE NI LE PATIENT NI LES ELECTRODES (Y COMPRIS L’ELECTRODE NEUTRE) N’ENTRENT EN
CONTACT AVEC D’AUTRES PERSONNES OU AVEC DES OBJETS CONDUCTEURS (MEME SI CEUX-CI SONT MIS A LA
TERRE).
IL N’Y A AUCUN DANGER EN CAS D’UTILISATION DE L’APPAREIL ECG SUR UN PATIENT PORTANT UN PACEMAKER
OU DURANT L’UTILISATION D’AUTRES DISPOSITIFS DE STIMULATION CARDIAQUE. TOUTEFOIS, LES APPAREILS DE
STIMULATION NE DEVRAIENT ETRE UTILISES QU’A UNE DISTANCE SUFFISANTE DES ELECTRODES. EN CAS DE
DOUTE, IL FAUT DEBRANCHER LE PATIENT DE L’ENREGISTREUR.
L’APPAREIL EST CLASSE CF CONFORMEMENT A IEC 601-1. CELA SIGNIFIE QUE LA CONNEXION DU PATIENT EST
TOTALEMENT ISOLEE ET PROTEGEE CONTRE LA DEFIBRILLATION. SCHILLER NE PEUT TOUTEFOIS GARANTIR LA
PROTECTION CONTRE LA TENSION DE DEFIBRILLATION QUE LORSQUE LE CABLE DE PATIENT D’ORIGINE DE SCHILLER
EST UTILISE.
Page 16

Page 17

Contents - User Guide AT-2
INTRODUCTION ................................................................2
OPERATION MODES ......................................................... 4
Automatic Mode ............................................................ 4
Manual Mode ................................................................5
LOCATION & POWER ........................................................ 6
Location ........................................................................ 6
Power Supply ...............................................................6
BASIC INFORMATION ....................................................... 7
Switching On and Off .................................................... 7
Potential Equalisation ................................................... 7
KEYBOARD ........................................................................ 8
INDICATORS .................................................................... 10
GENERAL SETTINGS ...................................................... 11
Defaults ......................................................................12
Language .................................................................... 15
Baseline Filter .............................................................16
Mains Filter ................................................................. 17
Myogram Filter ............................................................ 18
Defining Lead Sequence & Printout ...........................19
Acoustic QRS Indication .............................................20
Time / Date ................................................................. 21
SETTINGS FOR AUTOMATIC MODE .............................. 22
Average Cycles........................................................... 23
Measurements and Markings ..................................... 24
Interpretation .............................................................. 25
Interpretation Settings ................................................ 26
Selecting Rhythm Leads ............................................. 27
PATIENT CABLE CONNECTIONS ................................... 28
Standard Leads .......................................................... 30
RECORDING AN ECG IN AUTOMATIC MODE ............... 31
RECORDING AN ECG IN MANUAL MODE ..................... 33
CARE & MAINTENANCE .................................................35
Care of your CARDIOVIT AT-2 ................................... 35
Self-test ...................................................................... 35
12 Monthly Check .......................................................36
Cleaning the Print Head ............................................. 36
REPLACING THE RECORDING PAPER .........................38
TROUBLE SHOOTING .....................................................39
ORDERING INFORMATION............................................. 40
TECHNICAL DATA............................................................ 41
ENGLISH
CARDIOVIT AT-2 Page 1
8.2001
Page 18
Introduction
PAPER RELEASE CATCH
MAINS AND
POTENTIAL EQUALISATION
CONNECTORS
PATIENT CABLE CONNECTOR
LEAD INDICATORS
POWER INDICATORS
SYSTEM INDICATORS
Page 2 CARDIOVIT AT-2
8.2001
Page 19

Introduction
The CARDIOVIT AT-2 is a 6-channel ECG recorder. All ECG signals are simultaneously
processed to provide instant ECG recordings. Two automatic recording modes can be
individually preset to enable one button ECG recording of preferred print formats .
Individual lamps are provided to give power, paper error, filter, lead group and lead off
indications.
In addition, any detected disturbance (i.e. loose electrode or end of paper), gives an audible
alarm and the corresponding indicator lamp flashes.
The AT-2 includes the following features:
• Low weight and compact dimensions
• Large A4 size printout from integrated quality thermal printer
• Built-in rechargeable battery for mains-independent use
• Simple one key operation
• Automatic or manual recording modes
• Selectable printing formats
• ECG memory for easy copying
• Interpretation program option (including measurements)
ENGLISH
CARDIOVIT AT-2 Page 3
8.2001
Page 20
Operation Modes
Automatic Mode
Automatic Mode provides a printout
giving 10 seconds of ECG recording of
all 12 leads in 2 different formats.
The following can be programmed freely
in each of the formats before recording:
• Lead Format
• Chart Speed
• With the optional interpretation
program installed it is also possible
to select the measurement table,
average cycles with optional
markings and interpretation
statements for the printout.
For further information see paragraph
"Settings for Automatic Mode".
Auto Mode Recording
Settings
Pages 11 to 27
AUTO
START
Automatic Recording
in Format 1
Pages 31 to 32
Connect Patient
Pages 28 to30
Switch Unit ON
Automatic Recording
12 lead printout
in Format 2
Pages 31 to 32
ALT
AUTO
START
Page 4 CARDIOVIT AT-2
8.2001
Page 21
Operation Modes
Manual Mode
Manual Mode provides a real
time printout of 6 leads that
are selected and indicated on
the keyboard.
The following can be freely
selected before or during
recording:
• Lead Group
• Chart Speed
• Sensitivity
• Myogram Filter
For further information see
paragraph "ECG Recording
in Manual Mode".
Manual Mode Recording
Connect Patient
Pages 28 to 30
Switch Unit ON
Settings
Pages 11 to 21
Manual Recording
Pages 33 and 34
Leads,
Speed,
Sensitivity
Myogram filter
Pages 18 + 33
Continuous printout of 6 leads
MAN
START
STOP
ENGLISH
CARDIOVIT AT-2 Page 5
8.2001
Page 22

Location & Power
Location
Do not keep or operate the apparatus in a wet, moist, or dusty environment. Also, avoid
exposure to direct sunlight or heat from other sources. Do not allow the unit to come into
contact with acidic vapours or liquids, as such contact may cause irreparable damage. The
unit should not be placed near X-ray or diathermy units, large transformers or motors.
The unit must be placed on a flat surface. The unit should not be operated in areas where
there is any danger of explosion.
Power Supply
The unit can either be operated from the built-in rechargeable battery, or from the mains.
The mains connection is on the rear of the unit. The mains indicator lamp is always lit when
the unit is connected to the mains supply.
A battery indicator lamp confirms battery operation. When the battery capacity is limited, the
indicator flashes. To recharge the battery, connect the apparatus to the mains supply by
means of the supplied power cable. A totally discharged battery needs less than 15 hours
to be fully recharged (60% in less than 3 hours, 90% in less than 7 hours).
A fully charged battery lasts approximately 6 hours of normal use. The unit can remain
connected to the mains supply without any danger of damage to either the battery or the unit.
Page 6 CARDIOVIT AT-2
8.2001
Page 23

Basic Information
Switching On and Off
The CARDIOVIT AT-2 is switched on by means of the green key and off by means
of the red key.
The unit is switched off after 5 minutes (30 seconds if battery capacity is limited) if no key is
pressed and the patient cable is not connected.
Potential Equalisation
If the AT-2 is used in conjunction with other patient connected equipment, we recommend
that the potential equalisation stud (
building common ground with the yellow/green ground cable (Part-no. 2.310005).
When working from an emergency vehicle, the vehicle common ground can be used.
ENGLISH
) on the rear of the unit is connected to the hospital/
CARDIOVIT AT-2 Page 7
8.2001
Page 24
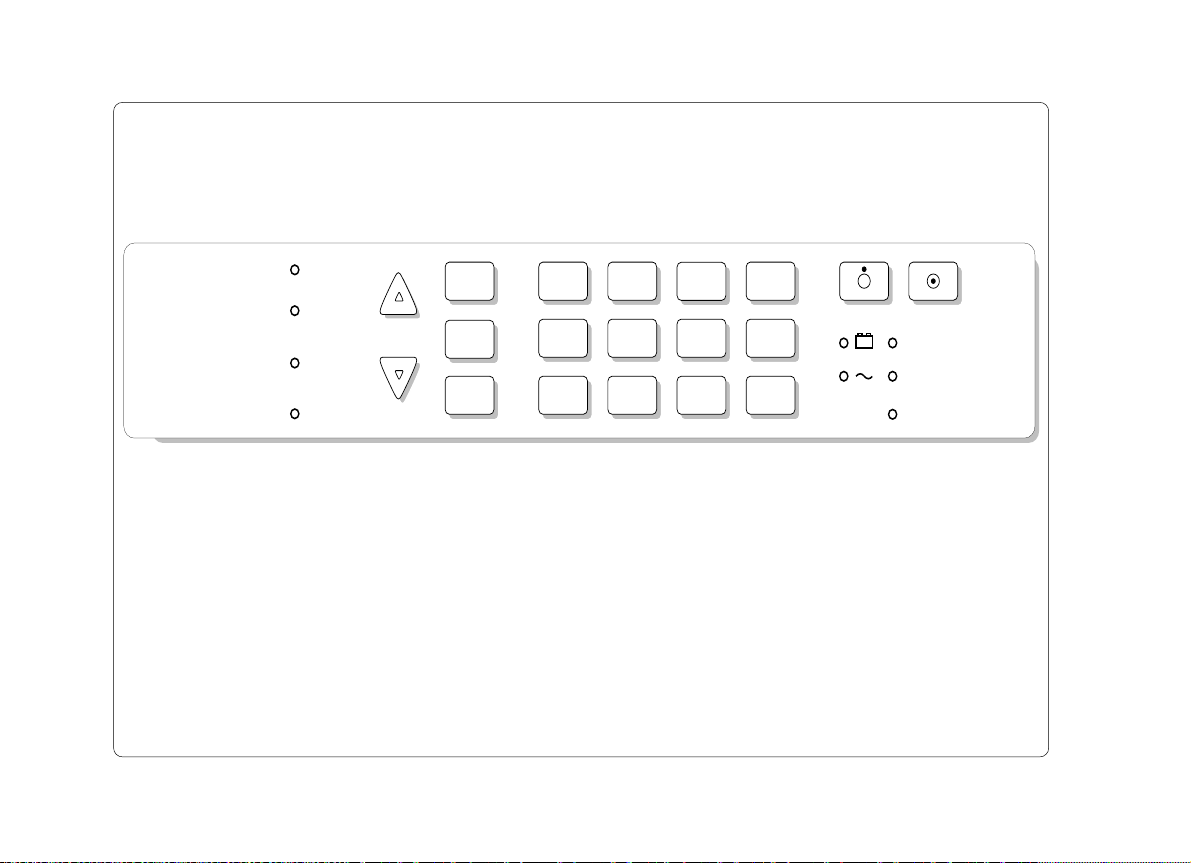
Keyboard
I II III
aVR aVL aVF
V1 V2 V3
V4 V5 V6
II aVF III
V2 V4 V5
V4 V5 V6
V7 V8 V9
AUTO
START
MAN
START
STOP
COPY
AUTO
GAIN
FILT
-
0
ALT
5
mm/mV
5
mm/s
87
QRS
BEEP
54
10
mm/mV20mm/mV
21
25
mm/s50mm/s
1mV
9
6
3
LEAD OFF
PAPER
FILTER
Page 8 CARDIOVIT AT-2
8.2001
Page 25
Keyboard
COPY
AUTO
START
MAN
START
STOP
FILT
Switch unit on
Switch unit off
Copy stored ECG
Start automatic recording
Start manual recording
Stop recording/move paper to start position
Switch myogram filter (muscle tremor filter)
on or off
Lead group selector (forward)
Lead group selector (backward)
QRS
BEEP
AUTO
GAIN
mm/mV10mm/mV20mm/mV
mm/s
Cancel or enable QRS beeper
Automatic ECG sensitivity adjustment from
10 to 5 mm/mV in order to avoid overlapping traces in automatic mode only
5
5
25
mm/s
Key for 1 mV indication mark on output
1mV
during manual recording. Use this key also
50
mm/s
for baseline recentering
Key for initiation of setups and selection
ALT
of second format for printout
ENGLISH
ECG sensitivity selector
(5, 10 or 20 mm/mV)
manual recording only
Chart speed selector
(5, 25 or 50 mm/s)
manual recording only
CARDIOVIT AT-2 Page 9
8.2001
Page 26
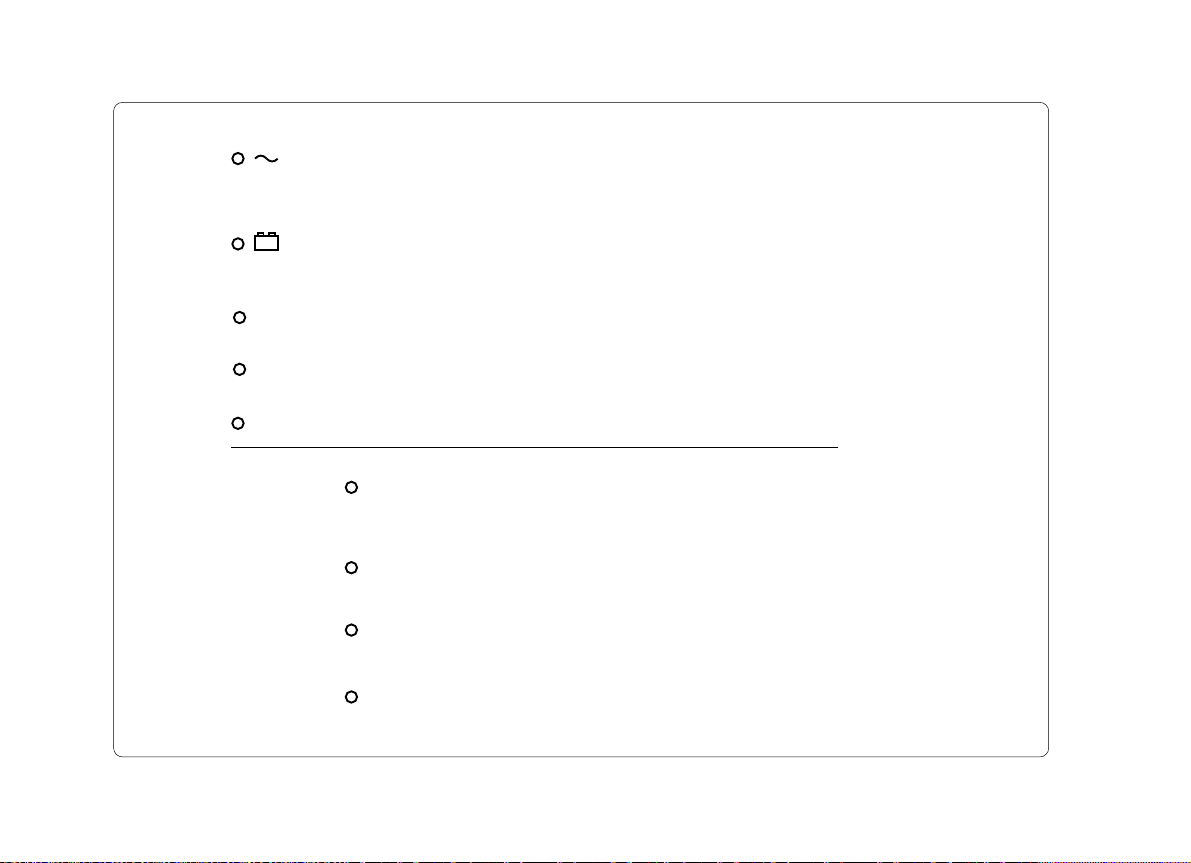
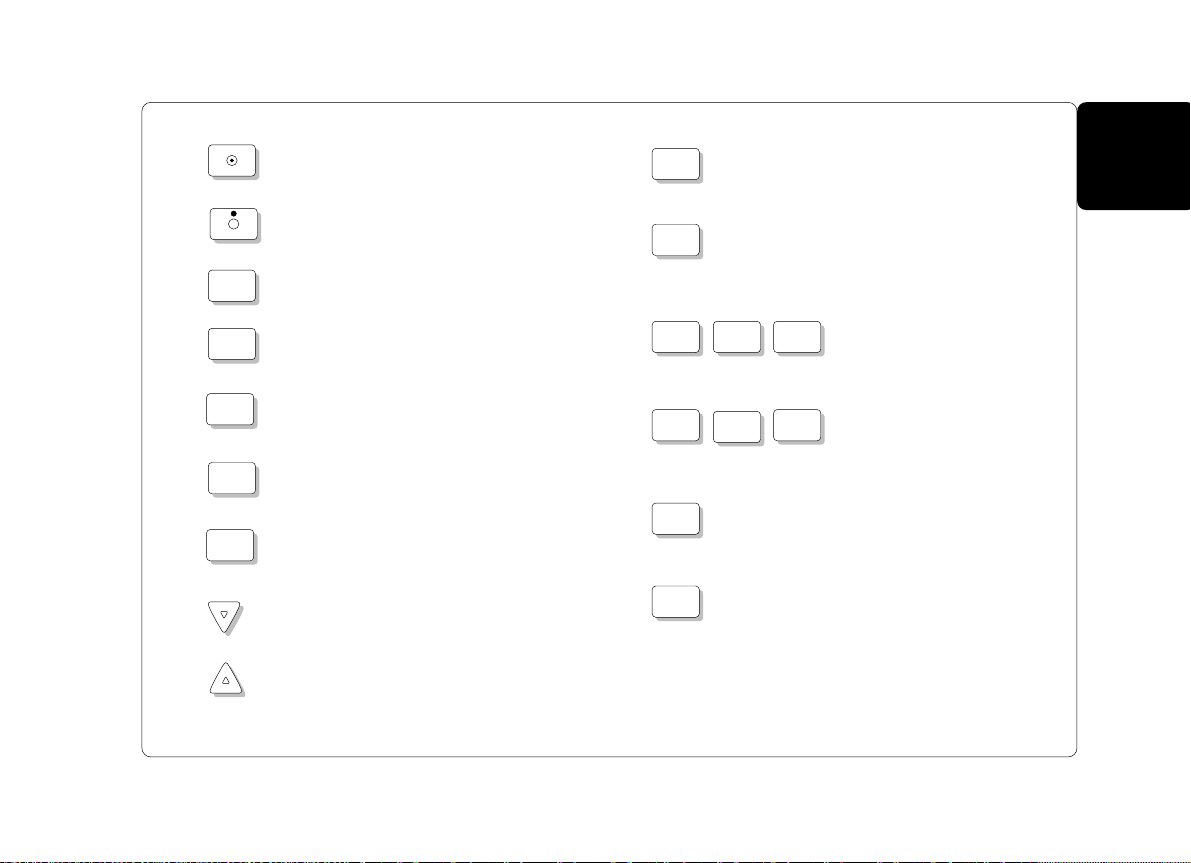
Indicators
Mains indicator (lit when mains connected)
Battery lamp (lit when running on battery power - mains
not connected) (blinking when battery capacity is limited)
LEAD OFF
PAPER
FILT
I II III
aVR aVL aVF
V1 V2 V3
V4 V5 V6
II aVF III
V2 V4 V5
V4 V5 V6
V7 V8 V9
Warning lamp for loose electrode connection or poor
electrode contact
Warning lamp for end of paper or paper jam
Myogram filter (lit when filter ON)
Indicator lamp for selected lead group (Standard)
(Cabrera: aVL, I, -aVR, II, aVF, III) in manual mode only
Indicator lamp for selected lead group (Standard) (in manual
mode only
Indicator lamp for selected lead group in manual mode only
Indicator lamp for selected lead group in manual mode only
Page 10 CARDIOVIT AT-2
8.2001
Page 27
General Settings
Each parameter is set by means of a code. This code comprises a combination starting with
the ALT key followed by a number of keys and is always confirmed with the STOP key. As
soon as the ALT key is pressed, the keyboard is dedicated to the programming function.
The setting is remembered and the keyboard is only released for other functions when the
STOP key is pressed. Once the settings have been confirmed, they are stored in the memory
even when the unit is switched off. As an example, if you want to set the language on your
AT-2 to English, proceed as follows:
ENGLISH
ALT
Start programming /
Switch to numerical keyboard
0
Key 0 Key 2 Key 2
Program sequence
25
mm/s
2
25
mm/s
2
STOPFILT
CONFIRM SETTING
On the following pages the programmable parameters and the programming sequences are
described in detail.
STOP
NOTE THAT THE SETTINGS ARE ALWAYS CONFIRMED BY PRESSING THE
KEY.
CARDIOVIT AT-2 Page 11
8.2001
Page 28
General Settings
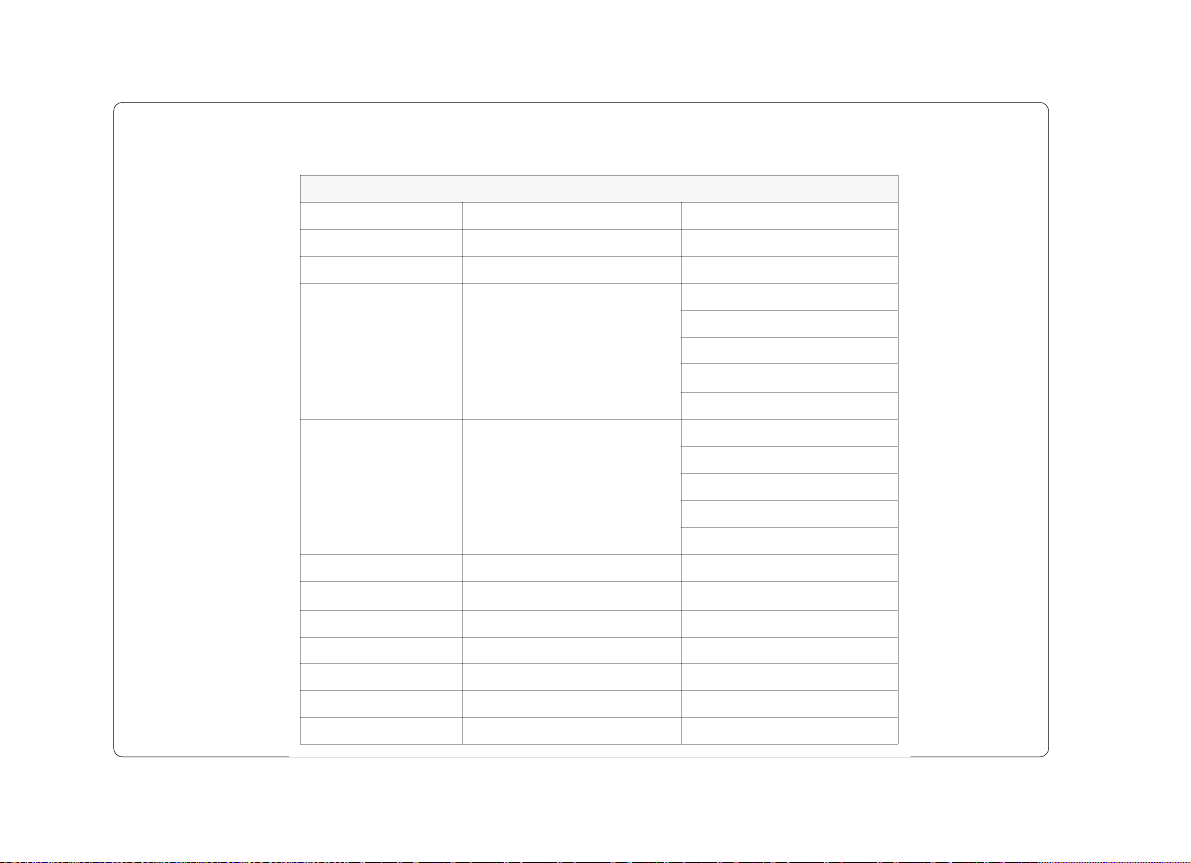
Defaults
Default Settings
Setting AT-2 AT-2 with Interpretation Option
Language English English
Leads Standard (S) Standard (S)
ECG: 25 mm/s, short (o)
MECG: 2 x 6 (25 mm/s) + 2
Format 1 ECG: 25mm/s short (o)
Format 2 ECG: 25 mm/s, long (ooo)
Rhythm Leads V1 = ECG; V1, II = MECG V1 = ECG; V1, II = MECG
Autom. Centering Enabled (+) Enabled (+)
Printout of Signals Sequential Sequential
Baseline Filter Setting 0.05 Hz 0.05 Hz
Mains Filter Setting 50 Hz (USA - 60Hz) 50 Hz (USA - 60Hz)
Myogram Filter Setting 35 Hz, OFF 35 Hz, OFF
Interpretation Settings N/A: - U: + A30: - S: -
Measurements: suppressed (-)
Marks: enabled (+)
Interpretation: enabled (+)
ECG: 25 mm/s, long (ooo)
MECG: none (-)
Measurements: disabled (-)
Marks: enabled (+)
Interpretation: disabled (-)
Page 12 CARDIOVIT AT-2
8.2001
Page 29

General Settings
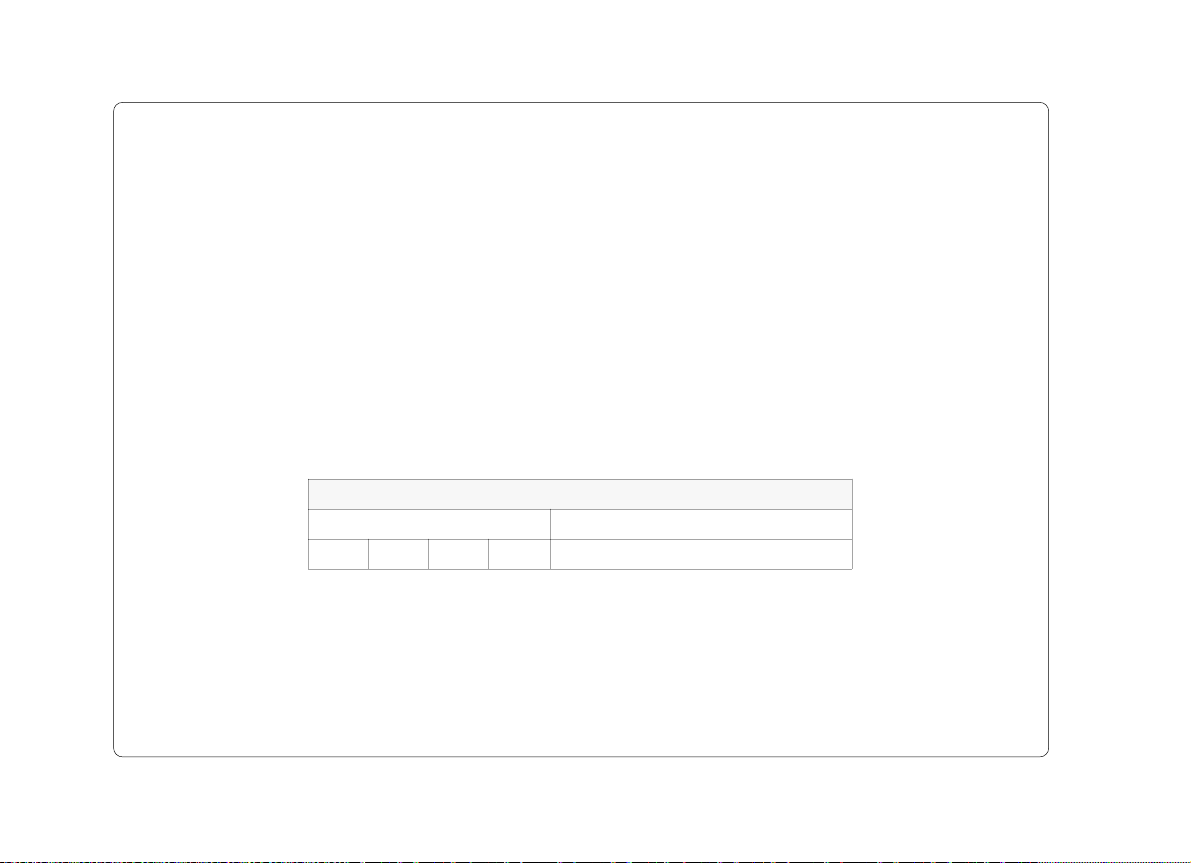
The defined formats and settings can be checked as follows:
Setup Printout
Entry Key Sequence Action
ALT 0 1 1 Printout of programmed settings
A printout of the defined settings will be produced and gives the following information,
depending on the installed software:
Unit designation (AT-2), Software option installed (C = Interpretation) and Software
version
Serial number
Leads Standard (S) or Cabrera (C)
ECG Format Long (ooo), Short (o) or Suppressed (-)
MECG Average cycles as defined in auto ECG recording setup (e.g.
4 * 3 (25 mm/s)+2)
Measurements Enabled (+) or Suppressed (-)
Marks Enabled (+) or Suppressed (-)
Interpretation Enabled (+) or Suppressed (-)
Selected Rhythm leads Leads selected for R1, R2 resp.
Automatic Centering Enabled (+) or Suppressed (-)
Printout of signals Sequential or Simultaneous
ENGLISH
CARDIOVIT AT-2 Page 13
8.2001
Page 30
General Settings
Baseline Filter 0.05, 0.15 or 0.30 Hz
Mains Filter 50, 60 Hz or OFF (-)
Myogram Filter 25 or 35 Hz, ON (+) or OFF (-)
Interpretation settings: N/A: +/- ('normal/abnormal' is written (+) or suppressed (-);
To reset the unit to the basic default settings, proceed as follows:
U: +/- ('unconfirmed report' is written (+) or suppressed (-);
A30: +/- (patient age is assumed to be < 30 (-) or >30 (+);
S: +/- (low (-) or high (+) sensitivity)
Reset Setup
Entry Key Sequence Action
ALT 0 6 6 Reset to default base settings.
Page 14 CARDIOVIT AT-2
8.2001
Page 31

General Settings
Language
The language is selected as follows:
Select Language
Entry Key Sequence Language Confirm
1 German
2 English
3 French
Press
STOP
Key
ALT 0 2
4 Swedish
5 American
6 Italian
7 Spanish
8 Portuguese
Confirm the selection by pressing STOP.
Note: Once selected, the language remains active. However, when the unit is reset
to the default settings, the default language will be English.
ENGLISH
CARDIOVIT AT-2 Page 15
8.2001
Page 32

General Settings
There are three different filters which can be set individually as follows:
• Baseline filter
• Mains filter
• Myogram filter
The setting for each filter is given on the setup printout.
Baseline Filter
The digital Baseline filter suppresses excessive baseline drifts. The setting options are as
follows:
The set value is the lower limit of the frequency range and is normally set to 0.05 Hz. The
settings 0.15 and 0.30 Hz should only be used when absolutely necessary, as the possibility
exists that they could affect the original ECG signal, especially the ST segments.
Baseline Filter
Entry Key Sequence Filter Setting Confirm
ALT 5
0 0.05 Hz (Default)
1 0.15 Hz
3 0.30 Hz
Press
STOP
Key
Confirm the selection by pressing STOP.
Page 16 CARDIOVIT AT-2
8.2001
Page 33

General Settings
Mains Filter
The Mains filter is an adaptive digital interference filter designed to suppress AC interference
without attenuating or distorting the ECG.
Set the mains filter in accordance with the frequency of your local mains supply as follows:
Mains Filter
Entry Key Sequence Filter Setting Confirm
ALT 8
5 Mains Filter 50 Hz
6 Mains Filter 60 Hz
9 Mains Filter off
Press
STOP
Key
ENGLISH
CARDIOVIT AT-2 Page 17
8.2001
Page 34

General Settings
Myogram Filter
The Myogram filter suppresses disturbances caused by strong muscle tremor. The cutoff
frequency of the myogram filter is set to 25 or 35 Hz.The myogram filter is switched on and
off manually with the FILT key. Switching on or off can also be programmed as default when
the unit is switched on. When the filter is active, the 'FILTER' lamp on the unit is lit.
Confirm the selection by pressing STOP.
An ECG recorded in auto mode is stored unfiltered. It is therefore possible to print the stored
ECG either with or without passing the myogram filter.
Myogram Filter
Entry Key Sequence Setting Confirm
2 Myogram Filter 25 Hz
ALT 8
3 Myogram Filter 35 Hz
Myo. Filt. ON when switching on unit
1
8
(marked on printout with +)
Myo. Filt. OFF when switching on unit
(marked on printout with –)
Press
STOP
Key
Page 18 CARDIOVIT AT-2
8.2001
Page 35

General Settings
Defining Lead Sequence & Printout
The required settings can be selected as follows:
Sequences & Print
Entry Key Sequence Definition Confirm
1 Standard Lead Sequence
2 Cabrera Lead Sequence
ALT 7
3 Simultaneous Print
4 Sequential Print
5 Auto-Centering ON
6 Auto-Centering OFF
Confirm the selection by pressing STOP.
The selectable lead groups for the AT-2 are:
Lead Groups
Standard Cabrera
I
II
III
aVR
aVL
aVF
V1
V2
V3
V4
V5
V6
II
aVF
III
V2
V4
V5
V4
V5
V6
V7
V8
V9
aVL
I
-aVR
II
aVF
III
V1
V2
V3
V4
V5
V6
II
aVF
III
V2
V4
V5
ENGLISH
Press
STOP
Key
V4
V5
V6
V7
V8
V9
CARDIOVIT AT-2 Page 19
8.2001
Page 36

General Settings
The selectable printout forms are:
Simultaneous All ECG leads are printed in the same time segment (in
Sequential Each group is a contiguous time segment of approximately 2.5
Auto-Centering ON All ECG traces are centred dynamically for optimal use of
Auto-Centering OFF ECG traces are set to a fixed baseline position and may
Acoustic QRS Indication
The acoustic QRS indication can be switched on or off at any time by pressing the
key.
automatic mode only).
or 5 seconds (in automatic mode only).
paper width.
possibly overlap.
QRS
BEEP
Page 20 CARDIOVIT AT-2
8.2001
Page 37

General Settings
Time / Date
CHANGE TIME / DATE
Time:
ALT 9 1 1 HHMMSS beep
Date:
ALT 9 2 2 DDMMYY beep
Wintertime to Summertime (+1 Hr)
ALT 9 4 4
Summertime to Wintertime (-1 Hr)
ALT 9 5 5
ENGLISH
CARDIOVIT AT-2 Page 21
8.2001
Page 38

Settings for Automatic Mode
Two separate formats for the automatic ECG output can be selected as follows:
Entry Key
Sequence
ALT
With this the 2 automatic mode formats are defined as detailed on the following pages.
The ECG format is set as follows:
Entry Key Sequence Output Format Confirm
5 No leads are printed
6 Leads are printed in short form (1 sheet)
ALT1or
2
7 Leads are printed in long form (2 sheets)
1
8 Chart speed is 25 mm/s
9 Chart speed is 50 mm/s
0 Leads are printed in format 4 x 3 + 1 Rhy
Automatic ECG Format
Setup Format
1 Setup Format 1
2 Setup Format 2
ECG Format
Press
STOP
Key
Confirm the selection by pressing STOP.
Note: Lead selection for the rhythm lead is defined on page 27.
Page 22 CARDIOVIT AT-2
8.2001
Page 39

Settings for Automatic Mode
Average Cycles
The Average cycles are defined as follows:
Average Cycles (Interpretation Option only)
Entry Key Sequence Output Format Confirm
5 No average cycles are printed.
4 * 3 (25 mm/s) + 2 * Rhy (25 mm/s)
6
The average complexes are printed out in four groups of three
leads with 2 rhythm leads at a chart speed of 25 mm/s.
ALT1or
2
2
4 * 3 (50 mm/s) + 2 * Rhy (25 mm/s)
7
The average complexes are printed out in four groups of three
leads with 2 rhythm leads at a chart speed of 50 mm/s.
2 * 6 (50 mm/s) + 2 * Rhy (25 mm/s)
8
The average complexes are printed out in two groups of six
leads with two rhythm leads at a chart speed of 50 mm/s.
Confirm the selection by pressing STOP.
Note: Lead selection for the 2 rhythm leads is defined on page 27.
ENGLISH
Press
STOP
Key
CARDIOVIT AT-2 Page 23
8.2001
Page 40

Settings for Automatic Mode
Measurements and Markings
To define the measurements and markings proceed as follows:
Measurements and Markings (Interpretation Option only)
Entry Key Sequence Output Format Confirm
5
ALT1or
2
Confirm the selection by pressing STOP.
6 Detailed table of measurement results is printed.
3
7
8
Detailed table of measurement results is omitted
(However, the values of electrical axes, intervals, and
heart rate are not suppressed.).
Reference markings (beginning and end of P wave and
QRS as well as end of T wave) are omitted.
Reference markings (beginning and end of P wave and
QRS as well as end of T wave) are added to ECG cycles.
Press
STOP
Key
Page 24 CARDIOVIT AT-2
8.2001
Page 41

Settings for Automatic Mode
Interpretation
To print or suppress interpretation statements on the printout proceed as follows:
Interpretation
Entry Key Sequence Output Format Confirm
Press
STOP
Key6 Interpretation is printed.
ALT1or
4
5 Interpretation is omitted.
2
Confirm the selection by pressing STOP.
Full details of the interpretation option are given in the SCHILLER ECG Measurement and
Interpretation booklet (art. no. 2.510 179).
ENGLISH
CARDIOVIT AT-2 Page 25
8.2001
Page 42

Settings for Automatic Mode
Interpretation Settings
The interpretation settings enable the user to determine whether or not certain comments will be
added to the interpretation statements on the ECG printout. Furthermore, the patient's age can
be defined (< or > 30) and if low or high sensitivity should be applied. Low sensitivity will suppress
certain nonspecific ECG diagnosis; this may be advisable when carrying out ECGs for screening.
Entry Key Sequence Setting Confirm
1 'Normal/abnormal' is not printed
2 'Normal/abnormal' is printed.
3 'Unconfirmed report' is not printed.
4 'Unconfirmed report' is printed.
ALT 6
5 Patient age is assumed to be < 30
6 Patient age is assumed to be > 30
7 Low sensitivity
8 High sensitivity
Interpretation Settings
Press STOP
Key
Page 26 CARDIOVIT AT-2
8.2001
Page 43

Settings for Automatic Mode
Selecting Rhythm Leads
The rhythm leads are printed out as defined. Two separate rhythm leads can be selected.
The following formats can be set:
Entry Key
Sequence
ALT
The 2 rhythm leads are defined as follows:
Extremity Leads
Entry Key Sequence Lead Confirm
1I
2II
ALT3or
4
8
3 III
4 aVR
5 aVL
6 aVF
Confirm the selection by pressing STOP.
Rhythm Leads
Setup Lead
3 Setup Rhythm Lead 1
4 Setup Rhythm Lead 2
Entry Key Sequence Lead Confirm
Press
STOP
Key
ALT3or
4
Precordial Leads
1V1
2V2
3V3
9
4V4
5V5
6V6
ENGLISH
Press
STOP
Key
CARDIOVIT AT-2 Page 27
8.2001
Page 44

Patient Cable Connections
The accessory kit of the electrocardiograph includes a 10-lead patient cable. This cable is
plugged into the patient cable socket on the right-hand side of the unit and secured with the
two screws.
The CARDIOVIT AT-2 is CF rated. The patient connection is fully isolated and defibrillation
protected. Protection against defibrillation voltage is however only ensured, if the original
SCHILLER patient cable (Part-no. 2.400070 / USA: 2.400071) is used. Make sure that during
ECG recording neither the patient nor the conducting parts of the patient connection or the
electrodes (including the neutral electrode) come into contact with other persons or
conducting objects (even if these are earthed).
Page 28 CARDIOVIT AT-2
8.2001
Page 45

Patient Cable Connections
The quality of the ECG is dependent on the preparation and the resistance between the skin
and the electrode. To ensure a good quality ECG and minimise the skin/electrode resistance,
remember the following points:
1. Ensure that the patient is warm and relaxed.
2. Shave electrode area before cleaning.
3. Thoroughly clean the area with alcohol.
4. Place the C4 electrode first - in the fifth intercostal space on midclavicular line.
Then place:
• C1 in fourth intercostal space at the right sternal border
• C2 in fourth intercostal space at the left sternal border
• C3 between, and equidistant to, C4 and C2
• C6 on left midaxillary line on the same level as C4
• C5 between, and equidistant to, C4 and C6
Following these simple guidelines will ensure good results every time.
ENGLISH
CARDIOVIT AT-2 Page 29
8.2001
Page 46

Patient Cable Connections
Standard Leads
C3 - GREEN
C1 - RED
1
2
3
4
5
C4 - BROWN
C6 - VIOLET
IEC AHA
N Black RL Green
R Red RA White
C1 White/Red V1 Brown/Red
C2 - YELLOW
RIGHT ARM - RED
C5 - BLACK
LEFT ARM - YELLOW
C2 White/Yellow V2 Brown/Yellow
C3 White/Green V3 Brown/Green
C4 White/Brown V4 Brown/Blue
C5 White/Black V5 Brown/Orange
C6 White/Violet V6 Brown/Violet
L Yellow LA Black
F Green LL Red
RIGHT LEG - BLACK LEFT LEG - GREEN
Page 30 CARDIOVIT AT-2
8.2001
Page 47

Recording an ECG in Automatic Mode
In automatic mode, a full 12-lead ECG is printed in one of two predefined formats with a
sensitivity of 10 mm/mV. These two formats are selected by the user to suit his specific needs
and requirements (as detailed previously).
AUTO
When the
large waveform amplitudes and sets the sensitivity for the extremity and/or precordial leads
to 5 mm/mV to reduce the overlapping of traces.
To start the automatic ECG recording in Format 1, simply press
GAIN
key is pressed before recording in automatic mode, the unit detects very
AUTO
START
ENGLISH
.
To start the automatic recording in the second format, press
AUTO
START
.
ALT
followed by
CARDIOVIT AT-2 Page 31
8.2001
Page 48

Recording an ECG in Automatic Mode
The printout provides you with the following information:
- ECG recording of all leads in either Standard or Cabrera format according to
selection
- Sensitivity
- Heart Rate
- Speed
- Filter Settings
- Patient Data field to manually insert patient data
and if set:
- Average Cycles (Interpretation option only)
- Intervals (Interpretation option only)
- Axis (Interpretation option only)
- Sokolow Index (ECG index for hypertrophy; Interpretation option only)
- Detailed Measurement Table (Interpretation option only)
- Interpretation (Interpretation option only)
• To obtain an extra printout of the ECG recording in Format 1, simply press
COPY
.
• To obtain an extra printout of the second format, press
ALT
followed by
COPY
.
Page 32 CARDIOVIT AT-2
8.2001
Page 49

Recording an ECG in Manual Mode
Manual mode provides a direct printout of the real-time ECG with full control of parameter
selection.
The following can be freely chosen during or before the recording:
ENGLISH
• Lead Group (by means of the
and keys)
The following lead groups are selectable:
- I, II, III, aVR, aVL, aVF (Cabrera: aVL, I, -aVR, II, aVF, III)
- V1, V2, V3, V4, V5, V6
- II, aVF, III, V2, V4, V5
- V4, V5, V6, V7, V8, V9
• Chart Speed (by means of the
• Sensitivity (by means of the
5
mm/s
5
mm/mV
,
,
25
mm/s
10
mm/mV
and
and
50
mm/s
20
mm/mV
keys)
keys)
• Filter see page 18.
CARDIOVIT AT-2 Page 33
8.2001
Page 50

Recording an ECG in Manual Mode
To start the manual recording of a real-time ECG, press the
The printout provides you with the following information:
- The group of the six selected leads with lead identification.
- On the lower edge chart speed, sensitivity and filter settings (if on) are given.
- At the top, the heart rate as current average of 4 beats is shown.
MAN
START
key.
STOP
1mV
key during operation.
key.
To re-centre the ECG traces, press the
Finish the recording by pressing the
WARNING:
AFTER HEAVY ARTEFACTS OR LEAD OFF, THE INDICATION OF THE HEART RATE
MAY NOT BE RELIABLE.
Page 34 CARDIOVIT AT-2
8.2001
Page 51

Care & Maintenance
Care of your CARDIOVIT AT-2
The patient cable should not be exposed to excessive mechanical stress. Whenever
disconnecting the leads, hold the plugs and not the cables. Align the leads in such a way as
to prevent anyone stumbling over them or any damage caused by the wheels of instrument
trolleys. The cable can be wiped with soapy water. Sterilization, if required, should be done
with gas only and not with steam. To disinfect, wipe the cable with any standard hospital
disinfectant.
The casing of the CARDIOVIT AT-2 should be cleaned with a soft cloth on the surface only.
DISCONNECT THE UNIT BEFORE CLEANING.DO NOT, UNDER ANY CIRCUMSTANCES,
IMMERSE THE APPARATUS INTO A CLEANING LIQUID OR STERILIZE WITH HOT
WATER, STEAM, OR AIR.
Self-test
Initiate a self-test of the AT-2 as follows:
Initiate Self-Test
Entry Key Sequence Action
ALT 0 3 3 Printout of Self-test
A table giving information for the service staff is printed out.
ENGLISH
CARDIOVIT AT-2 Page 35
8.2001
Page 52

Care & Maintenance
12 Monthly Check
The unit should undergo a technical safety check every 12 months. This safety check should
extend to include the following:
• Visual inspection of the unit and cables.
• Electrical safety tests according to IEC 601-1 and IEC 601-2-25.
• Functional tests according to the Service Handbook.
The test results must be documented.
Cleaning the Print Head
If the printer is used a lot, a residue of printers ink (from the grid on the printer paper) can build
up on the the print head. This can cause the print quality to deteriorate. We recommend
therefore that every month the print head is cleaned with alcohol as follows:
• Remove the paper tray. The printhead is found under, and in from, the paper tray
release catch.
• With a tissue dampened with alcohol, gently rub the print head to remove the ink
residue. If the printhead is badly soiled, the colour of the grid ink will show on the
tissue.
Page 36 CARDIOVIT AT-2
8.2001
Page 53

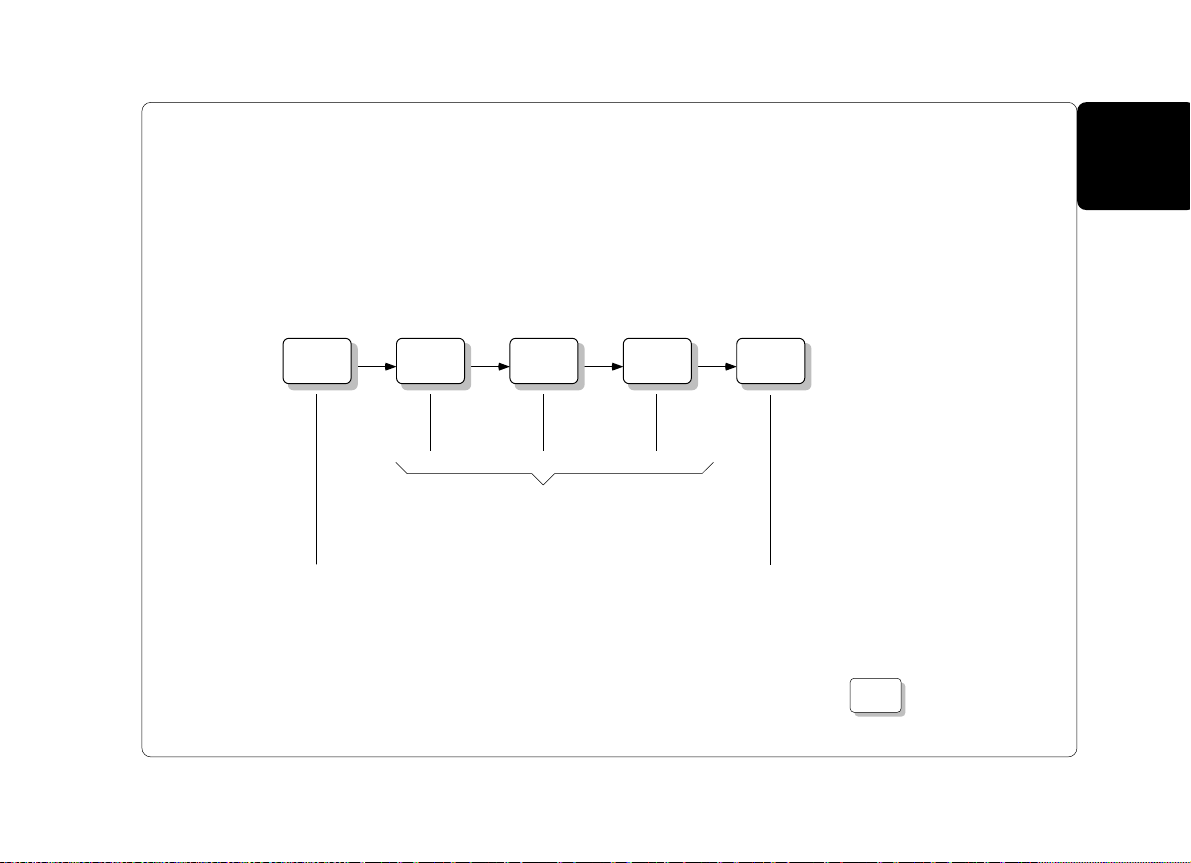
Replacing the Recording Paper
The recording paper must be replaced as soon as the end of the paper is indicated by a red
stripe on the lower edge. After the indication first appears, there are about 8 pages left.
However, we recommend that the paper be replaced immediately.
If no paper is left, the printing process is interrupted and the paper warning lamp starts to
blink. After the paper has been replaced, the printout is restarted by pressing COPY or MAN
START or AUTO START.
A step-by-step description of how to change the paper is given on the next page.
ENGLISH
CARDIOVIT AT-2 Page 37
8.2001
Page 54

Replacing the Recording Paper
• Place fingers under the retaining bar and pull directly
upwards. The paper tray cover releases.
• Withdraw the cover from the unit. DO NOT FORCE,
THE PAPER TRAY COVER RUNS FREELY OVER
THE DEDICATED RUNNERS.
• Remove any remaining
paper from the paper tray.
• Place a new paper pack
into the paper tray with
the printed (grid) side
facing upwards.
• Place the beginning of
the paper over the black
paper roller on the paper
tray cover.
• Return the paper tray
cover in position and
press firmly until secure.
• Press the STOP key to
transport the paper to the
start position.
PAPER TRAY COVER
SCHILLER can only guarantee perfect printouts when SCHILLER original chart paper or chart
paper of the same quality is used.
Page 38 CARDIOVIT AT-2
8.2001
Page 55

Trouble Shooting
Problem What to Check
Unit does not switch On/ Mains
Indicator Lamp is not lit
"Noisy" traces
ECG trace 'wanders' away from
centre
Poor quality printout / ECG
traces 'breaking up'
No printout
ENGLISH
Check if mains cable is plugged in.
Call your local SCHILLER dealer if problem is still present.
CHECK ELECTRODE CONTACT. As much as possible, ensure
that patient is relaxed and warm. Activate myogram filter to reduce
muscle tremor. Check mains filter to 50 or 60 Hz according to local
power supply.
Baseline drift - check electrode contact. Press 1mV key to reset
baseline. Select a higher baseline frequency.
Thermal print head dirty - clean printhead with alcohol. Possible
faulty printhead, contact local service centre. Ensure that the
paper tray cover is clicked into place
Connect unit to the mains supply. Ensure that the paper tray cover
is clicked into place. Check paper level.
CARDIOVIT AT-2 Page 39
8.2001
Page 56

Ordering Information
Your local representative stocks all the disposables and accessories available for the AT-
2. In case of difficulty or to obtain the address of your local dealer, please contact the head
office. Our staff will be pleased to help process your order or to provide any details for all
SCHILLER products.
DESCRIPTION PART-NO.
10-lead Patient Cable, Standard 2.400070
10-lead Patient Cable, USA 2.400071
Electrodes (box of 500 clip electrodes) 2.155031
Mains (Power) Cable (Germany) 2.300005
Mains (Power) Cable (Switzerland) 2.300003
Mains (Power) Cable (USA) 2.300001
Potential Equalisation (Ground) cable 2.310005
Recording Paper, Z-folded 2. 15 017
User Guide (English / German / French) 2.510 199
User Guide (Italian / Spanish / Portuguese) 2.510 200
Software (C) Interpretation 5. 020002
Guide to the Interpretation and Measurements Programs 2.510179
(English /German / French)
Page 40 CARDIOVIT AT-2
8.2001
Page 57

Technical Data
Technical data subject to change without notice.
Dimensions 400 x 330 x 100 mm
Weight 4.25 kg ( 5.05 kg with full paper tray)
Mains Supply 100 to 115 / 220 to 240 VAC, 50/60 Hz
Battery Built-in 12 V lead-acid battery (rechargeable)
Power Consumption Recording: 28 VA max
Leads Standard / Cabrera
Paper Speed 5 / 25 / 50 mm/s (direct)
Sensitivity 5 /10 / 20 mm/mV, either automatically adjusted or manually
selected
Chart Paper Thermoreactive - Z-folded, 210 mm wide, perforation 280 mm
Printing Process High-resolution thermal print head, 8 dots per mm
Recording Tracks 6 channels, positioned at optimal width on 200 mm, automatic
baseline adjustment
Automatic Lead Programs 6 channel representation of 12 simultaneously acquired
standard leads
ENGLISH
CARDIOVIT AT-2 Page 41
8.2001
Page 58

Technical Data
Data Record: Listing of ECG recording data
ECG Storage: Memory for 10 s, 12-lead ECG
Frequency Range of Digital Recorder:
Version C: ECG measurement results (intervals, amplitudes,
electrical axes), Sokolow Index, average complexes with
optional measurement reference markings, and interpretation.
Circular input memory for 10 s, 12-lead ECG.
0 to 150 Hz (IEC)
0 to 150 Hz (AHA)
Page 42 CARDIOVIT AT-2
8.2001
Page 59

Technical Data
ECG Amplifier: Simultaneous, synchronous registration of all 9 active electrode
Myogram Filter (muscle tremor filter)
Line Frequency Filter: Distortion-free suppression of superimposed 50 or 60 Hz
signals (= 12 standard leads)
Sampling frequency: 1000 Hz
Digital resolution: 5 µV
Dynamic range: ±10 mVAC
Max. electrode potential: ±300 mVDC
Time constant: 3.2 s
Frequency response: 0.05 to 150 Hz (-3 dB)
Input impedance: >10 MΩ
25 Hz or 35 Hz, programmable (not active on averaged
waveform). The stored ECGs can be printed with or without
filter.
sinusoidal interferences by means of an adaptive digital filter.
ENGLISH
Patient Input: Fully floating and isolated, defibrillation protected.
Patient Leakage Current: <5 µA
CARDIOVIT AT-2 Page 43
8.2001
Page 60

Technical Data
Safety Standard: CF according to IEC and complying with the following
EMC: CISPR 111: 1985, EN 55011: 1992
Safety Class: I according to IEC 601-1 (with internal power supply)
Environmental Conditions: Temperature, Operating: 10° to 40° C
RL 93/42/EEC
EN 60601-1:1990
IEC 601-1
IEC 601-2-25:1993
pr EN 1441:1994
IEC 801-2: 1991
IEC 801-3: 1984
IEC 801-4: 1988
IEC 801-5:
IIa according to RL 93/42/EEC, CE-0123
Temperature, Storage: -10° to 50° C
Relative humidity: 25 to 95% (non condensing)
Atmospheric pressure: 700 to 1060 hPa
Control Panel: Rubber keys
Technical data subject to change without notice.
Page 44 CARDIOVIT AT-2
8.2001
Page 61

Technical Data
Available Configurations
The CARDIOVIT AT-2 is available in two versions:
Standard Version: Unit with ECG recording and printout capabilities.
Version C: Unit with additional ECG Interpretation program (including
measurements).
ENGLISH
CARDIOVIT AT-2 Page 45
8.2001
Page 62

Page 46 CARDIOVIT AT-2
8.2001
Page 63

Inhalt - Gebrauchsanweisung AT-2
EINLEITUNG ....................................................................49
BETRIEBSARTEN ............................................................ 50
Automatische EKG-Aufnahme .................................... 50
Manuelle Aufnahme .................................................... 51
BASISINFORMATIONEN.................................................. 52
Aufstellungsort ............................................................52
Stromversorgung ........................................................ 52
Ein- und Ausschalten .................................................. 53
Potentialausgleich ......................................................53
TASTATUR ........................................................................ 54
KONTROLLANZEIGEN .................................................... 56
ALLGEMEINE EINSTELLUNGEN .................................... 57
AT-2-Grundeinstellung ................................................ 58
Sprache ...................................................................... 61
Basislinienfilter ............................................................ 62
Netzfilter .....................................................................63
Myogrammfilter ...........................................................64
Ableitungsfolge & Ausdruckform................................. 65
Akustische QRS-Anzeige ........................................... 66
Zeit/Datum .................................................................. 67
EINSTELLUNGEN FÜR AUTOMATISCHE
AUFNAHMEN ................................................................... 68
EKG-Format ............................................................... 68
Mittelwertzyklen .......................................................... 69
Messresultate und Marken ......................................... 70
Interpretation .............................................................. 71
Interpretationsparameter ............................................ 72
Rhythmusableitungen wählen .................................... 73
PATIENTENANSCHLÜSSE.............................................. 74
Standardableitungen .................................................. 76
AUTOMATISCHE EKG-AUFNAHME ................................ 77
MANUELLE EKG-AUFNAHME ......................................... 79
PFLEGE UND UNTERHALT .............................................81
Pflege des CARDIOVIT AT-2 ......................................81
Gerätetest ...................................................................81
Sicherheitstechnische Kontrolle ................................. 82
Reinigen des Druckerkopfes ...................................... 82
AUSWECHSELN DES REGISTRIERPAPIERS ................ 83
FEHLERBEHEBUNG ........................................................ 85
BESTELLINFORMATIONEN ............................................ 86
TECHNISCHE DATEN...................................................... 87
DEUTSCH
CARDIOVIT AT-2 Seite 47
8.2001
Page 64

Einleitung
ANSCHLÜSSE FÜR NETZKABEL UND POTENTIALAUSGLEICH
ENTRIEGELUNG FÜR PAPIERFACHDECKEL
ANSCHLUSS FÜR PATIENTENKABEL
KONTROLLAMPEN
FÜR ABLEITUNGEN
KONTROLLAMPEN FÜR
NETZ-/BATTERIEBETRIEB
SYSTEM-ANZEIGEN
Seite 48 CARDIOVIT AT-2
8.2001
Page 65

Einleitung
Der CARDIOVIT AT-2 ist ein 6-Kanal EKG-Aufnahmegerät. Alle EKG-Signale werden simultan
verarbeitet, so dass ein vollständiges EKG unmittelbar erstellt werden kann. Zwei automatische
Aufzeichnungsarten können einzeln voreingestellt werden; das gewünschte Druckformat 1 oder
2 wird per Tastendruck aufgenommen und ausgedruckt.
Die Art der Stromversorgung, die momentan aktivierte Ableitungskombination, lose Elektroden,
Papierende/-stau, Status Myogrammfilter werden durch Aufleuchten der entsprechenden
Kontrollampen angezeigt.
Zusätzlich lösen alle erkannten Störungen (wie z. B. lose Elektroden oder Papierende) einen
akustischen Alarm aus, und die entsprechende Kontrollampe blinkt.
Der AT-2 weist u.a. die folgenden Leistungsmerkmale auf:
• geringes Gewicht und kompakte Dimensionen
• grosser DIN A4 Ausdruck über den eingebauten Qualitäts-Thermodrucker
• eingebaute wiederaufladbare Batterie für netzunabhängigen Betrieb
• einfache Bedienung
• automatische oder manuelle Aufzeichnung
• wählbare Druckformate
• EKG-Speicher für Kopiermöglichkeit
• optionales Interpretationsprogramm (schliesst Vermessung ein)
CARDIOVIT AT-2 Seite 49
8.2001
DEUTSCH
Page 66

Betriebsarten
Automatische EKG-Aufnahme
Der automatische Aufnahmemodus
bietet einen EKG-Ausschrieb von 10
Sekunden aus dem Speicher aller 12
Ableitungen in 2 verschiedenen
Formaten.
Vor Beginn der Aufnahme können
die folgenden Aufnahmeparameter
frei programmiert werden:
• EKG-Ableitungsformat
• Geschwindigkeit
• Mittelwertzyklen mit optionalen
Messreferenzpunkten, detaillierte Messwertetabelle und
Interpretationshinweise können
ebenfalls für den Ausdruck
gewählt werden, sofern die Option
"Interpretation" integriert ist.
Ausführliche Informationen sind im
Abschnitt "Einstellungen für
automatische Aufnahmen" enthalten.
Automatische Aufnahme
Einstellungen
Seite 57-73
AUTO
START
Autom. Aufnahme
im Format 1
Seite 77/78 Seite 77/78
Ausdruck aller 12 Ableitungen
Patient anschliessen
Seite 74-76
Gerät einschalten
Autom. Aufnahme
im Format 2
ALT
AUTO
START
Seite 50 CARDIOVIT AT-2
8.2001
Page 67

Betriebsarten
Manuelle Aufnahme
Manuelle Aufnahme
Im manuellen Modus erfolgt eine Echtzeit-Darstellung von 6 Ableitungen.
Patient anschliessen
Seite 74-76
Die folgenden Parameter können während der Aufnahme frei gewählt werden:
• Ableitungsgruppe
• Geschwindigkeit
• Empfindlichkeit
• Myogrammfilter
Einstellungen
Seite 57-67
Gerät einschalten
Manuelle Aufnahme
Seite 79/80
MAN
START
Für ausführlichere Informationen siehe
"Manuelle EKG-Aufnahme".
Ableitungen,
Geschwindigkeit
Empfindlichkeit
Myogrammfilter
Ausdruck von 6 Ableitungen
STOP
CARDIOVIT AT-2 Seite 51
8.2001
DEUTSCH
Page 68

Basisinformationen
Aufstellungsort
Das Gerät sollte weder in nasser, feuchter noch staubiger Umgebung gelagert oder betrieben
werden. Zudem ist zu vermeiden, dass das Gerät direkter Sonneneinstrahlung oder der Hitze anderer Wärmequellen ausgesetzt ist. Säurehaltige Dämpfe oder Flüssigkeiten sollten unter keinen
Umständen mit dem Gerät in Berührung kommen, da sonst irreparable Schäden auftreten könnten. Das Gerät sollte nicht in der Nähe von Röntgen- oder Diathermieanlagen, grossen Transformatoren oder Motoren aufgestellt werden.
Es ist darauf zu achten, dass das Gerät auf einer ebenen Fläche steht.
Das Gerät darf nicht in Räumen betrieben werden, wo Explosionsgefahr herrscht.
Stromversorgung
Das Gerät kann entweder über die eingebaute wiederaufladbare Batterie betrieben oder direkt mit
dem Netzkabel an das Stromnetz angeschlossen werden.
Der Anschluss für das Netzkabel befindet sich auf der Rückseite des Gerätes. Bei Netzbetrieb
leuchtet die entsprechende Kontrollampe für Netzbetrieb.
Wird das Gerät per Batterie betrieben, so leuchet die Batterie-Kontrollampe. Sobald die Batterieladung ein bestimmtes Minimum unterschreitet, blinkt diese Kontrollampe. Für das Wiederaufladen der Batterie ist das Gerät mit dem Netzkabel an das Stromnetz anzuschliessen. Eine entladene Batterie wird innerhalb von 15 Stunden wieder vollständig aufgeladen (60% in weniger als 3
Stunden, 90% in weniger als 7 Stunden).
Eine voll aufgeladene Batterie ermöglicht einen ununterbrochenen Betrieb von ca. 6 Stunden.
Das Gerät kann permanent am Netz angeschlossen bleiben, ohne dass dabei Schäden an der
Batterie oder am Gerät entstehen.
Seite 52 CARDIOVIT AT-2
8.2001
Page 69

Basisinformationen
Ein- und Ausschalten
Der CARDIOVIT AT-2 wird mit der grünen Taste
ausgeschaltet.
Das Gerät schaltet sich selbsttätig nach 5 Minuten (30 Sekunden bei eingeschränkter Batteriekapazität) aus, sofern keine Tasteneingabe erfolgte und das Patientenkabel nicht angeschlossen
ist.
Potentialausgleich
Wenn der AT-2 in Kombination mit anderen Patienten-Überwachungssystemen verwendet wird,
empfehlen wir den Gebrauch des Potentialausgleichskabels ( Artikel-Nr. 2.310005).
Das gelb-grüne Erdungskabel wird an eine Potentialausgleichsleitung und dann an den Anschluss-Stecker auf der Rückseite des AT-2 angeschlossen.
Beim Einsatz in einem Rettungsfahrzeug ist der Potentialausgleich über die Fahrzeugerdung herzustellen.
CARDIOVIT AT-2 Seite 53
8.2001
eingeschaltet und mit der roten Taste
DEUTSCH
Page 70

Tastatur
I II III
aVR aVL aVF
V1 V2 V3
V4 V5 V6
II aVF III
V2 V4 V5
V4 V5 V6
V7 V8 V9
AUTO
START
MAN
START
STOP FILT
KOPIE
AUTO
mm/mV
-
0
ALT
5
mm/mV
5
mm/s
87
QRS
TON
54
10
mm/mV20mm/mV
21
25
mm/s
1mV
50
mm/s
9
6
3
ELEKTRODE
LOSE
PAPIER
FILTER
Seite 54 CARDIOVIT AT-2
8.2001
Page 71

Tastatur
KOPIE
AUTO
START
MAN
START
STOP
FILT
Gerät einschalten
Gerät abschalten
Gespeichertes EKG nochmals drucken
Automatische Aufnahme starten
Manuelle Aufnahme starten
Aufnahme beenden/Papiervorschub auf
Beginn einer neuen Seite
Myogrammfilter ein- oder ausschalten
Ableitungsgruppe wählen (vorwärts)
Ableitungsgruppe wählen (rückwärts)
QRS
TON
AUTO
mm/mV
Akustische QRS-Anzeige aktivieren/deaktivieren
Nur im Automatikbetrieb: Autom. Reduktion der Empfindlichkeit von 10 auf 5 mm/mV
zur Vermeidung von Überlappungen
5
mm/mV10mm/mV20mm/mV
5
mm/s
1mV
ALT
25
mm/s
Manuelles 1 mV Eichsignal
Programmierung beginnen / zweites Druckformat wählen
50
mm/s
Nur im manuellen Betrieb:
Empfindlichkeit wählen (5, 10
oder 20 mm/mV)
Nur im manuellen Betrieb:
Schreibgeschwindigkeit
wählen (5, 25 oder 50 mm/s)
DEUTSCH
CARDIOVIT AT-2 Seite 55
8.2001
Page 72

Kontrollanzeigen
Kontrollampe für Netzbetrieb (leuchtet bei Netzbetrieb)
Kontrollampe für Batteriebetrieb (leuchtet bei Batteriebetrieb,
blinkt bei begrenzter Batteriespannung)
ELEKTRODE
LOSE
PAPIER
FILTER
I II III
aVR aVL aVF
V1 V2 V3
V4 V5 V6
Warnlampe für losen Elektrodenanschluss oder schlechte Elektrodenkontakte
Warnlampe für Papierende oder Papierstau
Myogrammfilter (leuchtet wenn Filter EIN)
Nur im manuellen Betrieb: Kontrollampe für Standard-
Ableitungsgruppe (Cabrera: aVL, I, -aVR, II, aVF, III)
Nur im manuellen Betrieb: Kontrollampe für Standard-
Ableitungsgruppe
II aVF III
V2 V4 V5
V4 V5 V6
V7 V8 V9
Nur im manuellen Betrieb: Kontrollampe für Ableitungsgruppe
Nur im manuellen Betrieb: Kontrollampe für Ableitungsgruppe
Seite 56 CARDIOVIT AT-2
8.2001
Page 73

Allgemeine Einstellungen
Die Parameter werden mit Hilfe einer Zahlenkombination eingestellt. Diese Kombination besteht
immer zuerst aus der Taste ALT, einer Tastenkombination und endet mit der Taste STOP.
Sobald die Taste ALT betätigt wird, nimmt die Tastatur Programmierfunktion an.
Die Einstellungen werden erst gespeichert und die Tastatur für andere Funktionen freigegeben,
nachdem
Speicher, auch wenn das Gerät ausgeschaltet wird.
Um z.B. die Sprache an Ihrem AT-2 auf Deutsch einzustellen, ist wie folgt vorzugehen:
die Taste STOP betätigt wurde. Nach Bestätigung der Einstellungen bleiben diese im
ALT
Programmierung beginnen /
Umschalten auf numerische Tastatur
0
Taste 0 Taste 2 Taste 1
Programmsequenz
25
mm/s
2
5
mm/s
1
STOPFILT
EINGABE BESTÄTIGEN
Auf den folgenden Seiten werden die programmierbaren Parameter und die Programm-Sequenzen detailliert beschrieben.
ALLE TASTENKOMBINATIONEN WERDEN MIT DER TASTE
STOP
ABGESCHLOSSEN.
CARDIOVIT AT-2 Seite 57
8.2001
DEUTSCH
Page 74

Allgemeine Einstellungen
AT-2-Grundeinstellung
Einstellung AT-2 AT-2 mit Interpretations-Option
Sprache Deutsch Deutsch
Ableitungen Standard (S) Standard (S)
Format 1 EKG: 25 mm/s, kurz (o)
Format 2 EKG: 25 mm/s, lang (ooo)
Rhythmusableitungen V1 = EKG, V1,II = MEKG V1 = EKG, V1,II = MEKG
Autom. Zentrierung aktiviert (+) aktiviert (+)
Signalausdruck sequenziell sequenziell
Basislinienfilter-Einst. 0.05 Hz 0.05 Hz
Netzfilter-Einstellung 50 Hz (USA: 60 Hz) 50 Hz (USA: 60 Hz)
Myogrammfilter-Einst. 35 Hz, AUS (-) 35 Hz, AUS (-)
Interpretationsparam. N/A: - U: + A30: - S: -
Grundeinstellungen
EKG: 25 mm/s, kurz (o)
MEKG: 2*6 (25 mm/s)+2
Messresultate: unterdrückt (-)
Marken: aktiviert (+)
Interpretation: aktiviert (+)
EKG: 25 mm/s, lang (ooo)
MEKG: keine (-)
Messresultate: unterdrückt (-)
Marken: aktiviert (+)
Interpretation: unterdrückt (-)
Seite 58 CARDIOVIT AT-2
8.2001
Page 75

Allgemeine Einstellungen
Die definierten Formate und Einstellungen können wie folgt überprüft werden:
Tastenfolge Aktion
ALT 0 1 1 Ausdruck der gewählten Einstellungen
Ein Ausdruck der Einstellungen wird erstellt und enthält (je nach installierter Software) die folgenden Informationen:
Einstellungen ausdrucken
- Gerätebezeichnung (AT-2), Software-Option (C=Interpretation) und Software-Version
- Serien-Nummer
- Ableitungen: Standard (S) oder Cabrera (C)
- EKG Format: lang (ooo), kurz (o) oder unterdrückt (-)
- MEKG: Mittelwertzyklen gem. Einstellung (z.B. 4 * 3 ,25 mm/s, + 2 Rhy)
- Messresultate: aktiviert (+) oder unterdrückt (-)
- Marken: Referenzmarken in Mittelwertzyklen: aktiviert (+) oder unterdrückt
(-)
- Interpretation: aktiviert (+) oder unterdrückt (-)
- Gewählte Rhythmusabl. gewählte Ableitung für R1, R2
- Autom. Zentrierung: aktiviert (+) oder unterdrückt (-)
- Signal-Ausdruck: sequenziell oder simultan
CARDIOVIT AT-2 Seite 59
8.2001
DEUTSCH
Page 76

Allgemeine Einstellungen
- Basislinien-Filter: 0.05, 0.15 oder 0.30 Hz
- Netz-Filter: 50, 60 Hz oder AUS (-)
- Myogramm-Filter: 25 oder 35 Hz, EIN (+) oder AUS (-)
- Interpretationseinstellungen: N/A: +/- (Ausdruck 'normales/abnormes EKG' ; Ja+/Nein -);
Um das Gerät wieder auf die ursprünglichen Einstellungen (siehe AT-2-Grundeinstellung weiter
vorne) zurückzustellen, gehen Sie wie folgt vor:
ALT 0 6 6 Grundeinstellung wird wieder aktiviert
Tastenfolge Aktion
U: +/- (Ausdruck 'bestätigter/unbestätigter Bericht' ; Ja+/Nein-);
A30: +/- (Patientenalter über (+) oder unter 30 (-));
S: +/- (Auswahl niedrige (-) oder hohe (+) Empfindlichkeit)
AT-2 Grundeinstellung wieder aktivieren
Seite 60 CARDIOVIT AT-2
8.2001
Page 77

Allgemeine Einstellungen
Sprache
Die Sprache wird wie folgt eingestellt:
ALT 0 2
Die Einstellung mit STOP bestätigen.
Hinweis: Die gewählte Sprache bleibt erhalten. Werden jedoch die AT-2 Grundeinstellungen
wieder aktiviert, so wird auch die standardmässig eingestellte Sprache (hier
Deutsch) wieder aktiviert.
Sprachenauswahl
Tastenfolge Sprache Bestätigen
1 Deutsch
2 Englisch
3 Französisch
4 Schwedisch
5 Amerikanisch
6 Italienisch
7 Spanisch
8 Portugiesisch
STOP-
Taste
drücken
DEUTSCH
CARDIOVIT AT-2 Seite 61
8.2001
Page 78

Allgemeine Einstellungen
Es gibt drei verschiedene Filter, die individuell eingestellt werden können.
Dies sind:
• der Basislinienfilter
• der Netzfilter
• der Myogrammfilter
Die Filtereinstellungen werden in dem Ausdruck der Einstellungen für den AT-2 angegeben. Um
die verschiedenen Filter einzustellen, gehen Sie wie folgt vor:
Basislinienfilter
Der digitale Basislinienfilter hat die Funktion, Basislinienverschiebungen zu unterdrücken. Die
Einstellung erfolgt wie folgt:
Tastenfolge Filtereinstellung Bestätigen
ALT 5
Der eingegebene Wert ist die untere Grenze des Frequenzbereichs und wird normalerweise auf
0.05 Hz eingestellt. Die Einstellungen 0.15 und 0.30 Hz sollten nur verwendet werden, sofern
absolut erforderlich, da die Gefahr besteht, dass sie die Original-EKG-Signale beeinträchtigen
können, speziell die ST-Segmente.
Nach Beendigung der Eingabe wird die Einstellung mit der Taste STOP bestätigt.
Basislinienfilter
0 0.05 Hz (Grundeinst.)
STOP-Taste1 0.15 Hz
3 0.30 Hz
Seite 62 CARDIOVIT AT-2
8.2001
Page 79

Allgemeine Einstellungen
Netzfilter
Der Netzfilter ist ein adaptiver digitaler Störfilter mit der Funktion, Störungen durch das Stromnetz zu unterdrücken, ohne das EKG abzuschwächen oder zu verzerren.
Stellen Sie den Netzfilter entsprechend der lokalen Netzfrequenz ein.
Tastenfolge Filtereinstellung Bestätigen
ALT 8
Netzfilter
5 Netzfilter 50 Hz
9 Netzfilter aus
STOP-Taste drücken6 Netzfilter 60 Hz
DEUTSCH
CARDIOVIT AT-2 Seite 63
8.2001
Page 80

Allgemeine Einstellungen
Myogrammfilter
Der Myogrammfilter unterdrückt Störungen, die durch starkes Muskelzittern verursacht werden.
Es kann ein Wert von 25 oder 35 Hz eingestellt werden, der dann als obere Grenze des Frequenzbereichs gilt. Das Ein- oder Ausschalten des Filters erfolgt entweder manuell durch Drükken der Taste FILT. oder automatisch durch entsprechende Programmierung des Gerätes. Über
die Kontrollampe 'FILTER' wird der jeweilige Filterzustand angezeigt: Lampe an = Filter eingeschaltet, Lampe aus = Filter ausgeschaltet.
Stellen Sie den Myogrammfilter wie folgt ein:
Tastenfolge Einstellung Bestätigen
2 Myogrammfilter 25 Hz
3 Myogrammfilter 35 Hz
ALT 8
Da das EKG im Automatikmodus ungefiltert gespeichert wird, ist es möglich, die Daten mit oder
ohne Filter auszudrucken.
1
8
Myogrammfilter
Filter automatisch eingeschaltet, wenn das Gerät
eingeschaltet wird (Kennzeichnung Ausdruck
Einstellungen: +)
Filter ausgeschaltet ,wenn das Gerät
eingeschaltet wird (Kennzeichnung Ausdruck
Einstellungen: –)
STOP-Taste drücken
Seite 64 CARDIOVIT AT-2
8.2001
Page 81

Allgemeine Einstellungen
Ableitungsfolge & Ausdruckform
Die gewünschten Einstellungen werden wie folgt definiert:
Ableitungsfolge & Ausdruck
Tastenfolge Definition Bestätigen
1 Standard Ableitungen
2 Cabrera Ableitungen
ALT 7
Nach Beendigung der Eingabe wird die Einstellung mit der Taste STOP bestätigt.
Die wählbaren Ableitungsgruppen für den AT-2 sind:
3 Simultaner Ausdruck
4 Sequenzieller Ausdruck
5 Auto-Zentrierung EIN
6 Auto-Zentrierung AUS
Ableitungsgruppen
Standard Cabrera
STOP-
Taste
drücken
DEUTSCH
I
II
III
aVR
aVL
aVF
V1
V2
V3
V4
V5
V6
II
aVF
III
V2
V4
V5
V4
V5
V6
V7
V8
V9
aVL
I
-aVR
II
aVF
III
V1
V2
V3
V4
V5
V6
II
aVF
III
V2
V4
V5
V4
V5
V6
V7
V8
V9
CARDIOVIT AT-2 Seite 65
8.2001
Page 82

Allgemeine Einstellungen
Die wählbaren Ausdruckformen sind:
- Simultan Alle 12 Ableitungen werden in 4 Kolonnen zu 3 Ableitungen
- Sequenziell Alle 12 Ableitungen werden in 4 Kolonnen zu 3 Ableitungen
- Auto-Zentrierung EIN Alle Ableitungen werden auf dem Ausdruck dynamisch
- Auto-Zentrierung AUS Die Ableitungen werden auf die Basislinie ausgerichtet.
Akustische QRS-Anzeige
Die akustische QRS-Anzeige kann jederzeit durch Betätigung der Taste
schaltet werden.
ausgedruckt. Alle Ableitungen werden im gleichen Zeitabschnitt gedruckt (nur im Automatikbetrieb).
ausgedruckt. Jede Kolonne ist ein fortlaufender Zeitabschnitt von etwa 2.5 resp. 5 Sekunden (nur im Automatik-
betrieb).
ausgerichtet, um eine optimale Ausnutzung der Papierbreite zu erreichen.
QRS
TON
ein- oder ausge-
Seite 66 CARDIOVIT AT-2
8.2001
Page 83

Allgemeine Einstellungen
Zeit/Datum
Zeit:
ALT 9 1 1 HHMMSS Piepton
Datum:
ALT 9 2 2 TTMMJJ Piepton
Winterzeit auf Sommerzeit (+1 Std.)
ALT 9 4 4
Sommerzeit auf Winterzeit (-1 Std.)
ALT 9 5 5
ZEIT/DATUM ÄNDERN
DEUTSCH
CARDIOVIT AT-2 Seite 67
8.2001
Page 84

Einstellungen für automatische Aufnahmen
Für den automatischen EKG-Ausdruck können zwei verschiedene Formate wie folgt gewählt und
definiert werden:
Automatisches Format
Tastenfolge Formateinstellung
ALT
1 Format 1 wählen
2 Format 2 wählen
Damit werden die 2 Formate im Automatikbetrieb, wie auf den folgenden Seiten im Detail beschrieben, gewählt.
EKG-Ableitungsformat
Das EKG-Format wird wie folgt definiert:
EKG Format
Tastenfolge Ausgabeformat Bestätigen
0 Ableitungen werden im Format 4 x 3 + 1 Rhy gedruckt
5 Keine Ableitungen werden gedruckt
ALT1oder21
6 Ableitungen werden im Kurzform (1 Seite) gedruckt
7 Ableitungen werden im Langformat (2 Seiten) gedruckt
8 Papiergeschwindigkeit beträgt 25 mm/s
9 Papiergeschwindigkeit beträgt 50 mm/s
STOP-
Taste
drücken
Nach Beendigung der Eingabe wird die Einstellung mit der Taste STOP bestätigt.
HINWEIS: Die Definition der Rhythmusableitung erfolgt wie auf Seite 73 beschrieben.
Seite 68 CARDIOVIT AT-2
8.2001
Page 85

Einstellungen für automatische Aufnahmen
Mittelwertzyklen
Die Mittelwertzyklen werden wie folgt definiert:
Mittelwertzyklen (nur mit Option Interpretation)
Tastenfolge Ausgabeformat Bestätigen
5 Keine Mittelwertzyklen werden gedruckt.
4 * 3 (25 mm/s) + 2 Rhy
Mittelwertzyklen werden in 4 Gruppen zu 3 Ableitungen mit einer
6
Papiergeschwindigkeit von 25 mm/s gedruckt. Zusätzlich werden
zwei Rhythmusstreifen ausgedruckt.
ALT1oder22
4 * 3 (50 mm/s)+ 2 Rhy
Mittelwertzyklen werden in 4 Gruppen zu 3 Ableitungen mit einer
7
Papiergeschwindigkeit von 50 mm/s gedruckt. Zusätzlich werden
zwei Rhythmusstreifen ausgedruckt.
6 * 2 (50 mm/s) + 2 Rhy
Mittelwertzyklen werden in 6 Gruppen zu 2 Ableitungen mit einer
8
Papiergeschwindigkeit von 50 mm/s gedruckt. Zusätzlich werden
zwei Rhythmusstreifen ausgedruckt.
STOP-Taste drücken
Nach Beendigung der Eingabe wird die Einstellung mit der Taste STOP bestätigt.
HINWEIS: Die Definition der Rhythmusableitungen erfolgt wie auf Seite 73 beschrieben.
CARDIOVIT AT-2 Seite 69
8.2001
DEUTSCH
Page 86

Einstellungen für automatische Aufnahmen
Messresultate und Marken
Die Messresultate und Messreferenzpunkte für die Mittelwertzyklen werden wie folgt definiert:
Messresultate und Messreferenzpunkte (nur mit Interpretations-Option)
Tastenfolge Ausgabeformat Bestätigen
Die detaillierte Tabelle der Messresultate entfällt.
5
Die Werte der elektrischen Achsen, Intervalle und der
Herzfrequenz werden jedoch aufgeführt.
6 Die detaillierte Tabelle der Messresultate wird gedruckt.
ALT1oder23
Nach Beendigung der Eingabe wird die Einstellung mit der Taste STOP bestätigt.
Die Messreferenzpunkte (Anfang und Ende von P-Welle und
7
QRS, sowie das Ende der T-Welle) entfallen.
Die Messreferenzpunkte (Anfang und Ende von P-Welle und
8
QRS, sowie das Ende der T-Welle) erscheinen in den
Mittelwertzyklen.
STOP-Taste drücken
Seite 70 CARDIOVIT AT-2
8.2001
Page 87

Einstellungen für automatische Aufnahmen
Interpretation
Um Befundhinweise im EKG auszudrucken oder zu unterdrücken, sind folgende Einstellungen
vorzunehmen:
Interpretation (nur mit entsprechender Option)
Tastenfolge Interpretation im Ausdruck Bestätigen
Interpretationshinweise werden
5
ALT1oder
2
4
6
Nach Beendigung der Eingabe wird die Einstellung mit der Taste STOP bestätigt.
nicht ausgedruckt
Interpretationshinweise werden
ausgedruckt
STOP-
Taste
drücken
Ausführliche Informationen zu der Option Interpretation finden Sie in der Publikation 'Anleitung
für das SCHILLER EKG-Vermessungsprogramm und Interpretationsprogramm' (Artikel- Nr.
2.510 179).
CARDIOVIT AT-2 Seite 71
8.2001
DEUTSCH
Page 88

Einstellungen für automatische Aufnahmen
Interpretationsparameter
Für die Befundhinweise können zusätzlich folgende Angaben und Auswertungskriterien definiert
werden:
Interpretationsparameter
Tastenfolge Einstellung Bestätigen
1 Ausdruck 'Normales/abnormes EKG' wird unterdrückt
2 'Normales oder abnormes EKG' wird ausgedruckt
3 Angabe 'Unbestätigter Bericht' wird nicht ausgedruckt
4 Angabe 'Unbestätigter Bericht' wird ausgedruckt
ALT 6
5 Das Patientenalter ist unter 30
6 Das Patientenalter ist über 30
7 niedrige Sensitivität
8 hohe Sensitivität
STOP-Taste
drücken
Das Patientenalter und die Einstellung einer hohen oder niedrigen Sensitivität beeinflussen die
EKG-Befundung. Bei Auswahl einer niedrigen Sensitivität werden gewisse nicht spezifische
EKG-Befunde unterdrückt; dies ist beispielsweise bei Massenaufnahmen empfehlenswert.
Seite 72 CARDIOVIT AT-2
8.2001
Page 89

Einstellungen für automatische Aufnahmen
Rhythmusableitungen wählen
Zwei Rhythmusableitungen können wie folgt gewählt werden:
Rhythmusableitungen
Tastenfolge Ableitungseinstellung
3 Rhythmusableitung 1
4 Rhythmusableitung 2
STOP-Taste
drücken
ALT
Rhythmusableitung 1 und 2 werden wie folgt definiert:
Extremitätenableitungen
Tastenfolge Ableitung Bestätigen
1I
2II
ALT3oder48
3 III
4 aVR
5 aVL
6 aVF
Brustwandableitungen
Tastenfolge Ableitung Bestätigen
1V1
2V2
ALT3oder49
3V3
4V4
5V5
6V6
DEUTSCH
STOP-Taste
drücken
Nach Beendigung der Eingabe wird die Einstellung mit der Taste STOP bestätigt.
CARDIOVIT AT-2 Seite 73
8.2001
Page 90

Patientenanschlüsse
Das Zubehör-Set des Elektrokardiographen beinhaltet ein 10-adriges Patientenkabel. Dieses Kabel wird in den Patientenanschluss auf der rechten Seite des Gerätes eingesteckt und mit den
zwei Schrauben gesichert.
Der CARDIOVIT AT-2 ist CF klassiert. Das bedeutet, dass der Patientenanschluss vollisoliert und
defibrillationsfest ist. Der Schutz gegen Defibrillationsspannungen ist jedoch nur gewährleistet,
wenn das dazugehörige Original-Patientenkabel von SCHILLER (Artikel-Nr. 2.400070 [USA:
2.400071]) verwendet wird. Bei der EKG-Aufnahme ist darauf zu achten, dass weder der Patient
noch die leitfähigen Teile des Patientenanschlusses oder der Elektroden (auch der neutralen
Elektrode) mit anderen leitfähigen Gegenständen (auch wenn diese geerdet sind) oder Personen
in Berührung kommen.
Seite 74 CARDIOVIT AT-2
8.2001
Page 91

Patientenanschlüsse
Die Qualität der EKG-Aufnahme hängt insbesondere von der Vorbereitung der Haut und dem Widerstand zwischen Hautoberfläche und Elektroden ab. Je niedriger der Widerstand zwischen Haut
und Elektrode, desto besser die Qualität. Beachten Sie deshalb folgendes:
1. Stellen Sie sicher, dass der Patient entspannt ist und nicht friert.
2. Entfernen Sie den Haarwuchs an den Hautstellen, an denen die Elektroden angebracht werden.
3. Reinigen Sie diese Hautstellen gründlich mit Alkohol.
4. Beginnen Sie mit dem Anbringen der Elektrode C4 im Schnittpunkt des 5. Interkostalraumes
(ICR) mit der Medioclavicularlinie, so dass ihre Position in etwa auf einer vertikalen Linie zur
Mitte des Schlüsselbeines liegt.
Plazieren Sie nun:
• C1 im 4. ICR parastemal rechts
• C2 im 4. ICR parastemal links
• C3 in der Mitte zwischen C4 und C2
• C6 in der Axillarlinie in gleicher Höhe wie C4
• C5 zwischen C4 und C6 im gleichen Abstand
Bei Beachten dieser einfachen Richtlinien werden die Ergebnisse immer einwandfrei sein.
DEUTSCH
CARDIOVIT AT-2 Seite 75
8.2001
Page 92

Patientenanschlüsse
Standardableitungen
C3 - GRÜN
C1 - ROT
1
2
3
4
5
C4 - BRAUN
C6 - VIOLETT
IEC AHA
N Schwarz RL Grün
R Rot RA Weiss
C2 - GELB
R - RECHTER ARM ROT
C5 - SCHWARZ
L - LINKER ARM - GELB
C1 Weiss/Rot V1 Braun/Rot
C2 Weiss/Gelb V2 Braun/Gelb
C3 Weiss/Grün V3 Braun/Grün
C4 Weiss/Braun V4 Braun/Blau
C5 Weiss/Schwarz V5 Braun/Orange
C6 Weiss/Violett V6 Braun/Violett
L Gelb LA Schwarz
FGrün LL Rot
N - RECHTES BEIN SCHWARZ
F- LINKES BEIN GRÜN
Seite 76 CARDIOVIT AT-2
8.2001
Page 93

Automatische EKG-Aufnahme
Im Automatikbetrieb wird ein vollständiges EKG mit 12 Ableitungen in einem von zwei vordefinierten Formaten mit einer Empfindlichkeit von 10 mm/mV ausgedruckt. Die zwei Formate
können vom Benutzer so eingestellt werden, dass sie seinen Anforderungen und Wünschen entsprechen (die entsprechenden Einstellungen wurden auf den vorhergehenden Seiten detailliert
beschrieben).
Vor Beginn der Aufnahme kann mit der Taste
anpassung eingeschaltet werden. Bei übergrossen Signalamplituden, die zu einer Überlappung
der QRS-Amplituden führen, wird die Empfindlichkeit dann automatisch auf 5 mm/mV reduziert.
AUTO
mm/mV
die automatische Empfindlichkeits-
AUTO
Um die automatische Aufnahme im Format 1 zu starten, Taste
Für die automatische Aufnahme im Format 2, Tasten
ALT
START
und
drücken.
AUTO
START
drücken.
CARDIOVIT AT-2 Seite 77
8.2001
DEUTSCH
Page 94

Automatische EKG-Aufnahme
Der Ausdruck beinhaltet die folgenden Informationen:
- EKG-Aufnahme aller Standard- bzw. Cabrera-Ableitungen im gewählten Format
- Empfindlichkeit
- Herzfrequenz
- Geschwindigkeit
- Filtereinstellungen
- Patientendatenfeld für die manuelle Eintragung
und, sofern eingestellt:
- Mittelwertzyklen (nur mit Option Interpretation)
- Intervalle (nur mit Option Interpretation)
- Achsen (nur mit Option Interpretation)
- Sokolow-Index (EKG-Index für die Herzhypertrophie; nur mit Option Interpretation)
- Detaillierte Messwertetabelle (nur mit Option Interpretation)
- Interpretation (nur mit entsprechender Option)
• Um eine Kopie der Aufnahme im Format 1 zu erhalten, Taste
KOPIE
drücken.
• Um eine Kopie im Format 2 zu erhalten, Tasten
ALT
und
KOPIE
drücken.
Seite 78 CARDIOVIT AT-2
8.2001
Page 95

Manuelle EKG-Aufnahme
Im manuellen Betrieb kann direkt ein Echtzeit-EKG ausgedruckt werden.
Die folgenden Parameter können vor oder während der Aufnahme frei gewählt werden:
• Ableitungsgruppe (mit den Tasten
und )
Die folgenden Ableitungsgruppen sind wählbar:
- I, II, III, aVR, aVL, aVF (Cabrera: aVL, I, -aVR, II, aVF, III)
- V1, V2, V3, V4, V5, V6
- II, aVF, III, V2, V4, V5
- V4, V5, V6, V7, V8, V9
• Papiergeschwindigkeit (mit den Tasten
• Empfindlichkeit (mit denTasten
5
mm/s
5
mm/mV
,
,
25
mm/s
10
mm/mV
und
und
50
mm/s
20
mm/mV
)
)
• Filter siehe Seite 64
CARDIOVIT AT-2 Seite 79
8.2001
DEUTSCH
Page 96

Manuelle EKG-Aufnahme
Um die manuelle Aufnahme zu starten, wird die Taste
Der Ausdruck beinhaltet die folgenden Informationen:
- Die gewählte Gruppe der 6 Ableitungen mit Ableitungsidentifikation.
- Im unteren Bereich werden Papiergeschwindigkeit, Empfindlichkeit und Filtereinstellungen
gedruckt.
- Oben wird die Herzfrequenz in Schlägen pro Minute (gemittelt über 4 Schläge) angegeben.
Um die Ableitungen auf dem Ausdruck auszurichten, wird die Taste
MAN
START
gedrückt.
1mV
gedrückt.
Die Aufnahme wird mit der Taste
STOP
beendet.
ACHTUNG:
Kurz nach heftigen Artefakten oder losen Elektroden-Kontakten ist die Angabe der
Herzfrequenz nicht in jedem Fall korrekt.
Seite 80 CARDIOVIT AT-2
8.2001
Page 97

Pflege und Unterhalt
Pflege des CARDIOVIT AT-2
Die Patientenleitungen dürfen nicht zu grossen mechanischen Belastungen ausgesetzt werden.
Beim Lösen der Steckerverbindungen sollte grundsätzlich an den Steckern und nicht an den Leitungen gezogen werden. Die Leitungen sollen stets so gelegt werden, dass niemand darüber stolpert oder mit dem Gerätewagen darüberfährt und sie beschädigt. Zum Reinigen kann das Kabel
mit Seifenwasser abgerieben werden. Eine allfällige Sterilisation darf nur mit Gas und nicht mit
Dampf vorgenommen werden. Zur Desinfektion wird das Kabel mit einem in Spitälern und Praxen
üblichen Desinfektionsmittel abgerieben.
Das Gehäuse des CARDIOVIT AT-2 wird nur mit einem weichen Lappen abgerieben.
VOR DER REINIGUNG IST DAS GERÄT VOM NETZ ZU TRENNEN.
STÄNDEN DARF DAS GERÄT IN EINE REINIGUNGSFLÜSSIGKEIT EINGETAUCHT ODER
MIT HEISSEM WASSER, DAMPF ODER LUFT STERILISIERT WERDEN.
Gerätetest
Ein Gerätetest für den AT-2 wird wie folgt ausgelöst:
ALT 0 3 3 Ausdruck für Servicepersonal
Eine Tabelle, die dem Service-Personal Hinweise auf mögliche Störungen gibt, wird ausgedruckt.
UNTER KEINEN UM-
DEUTSCH
Selbsttest
Tastenfolge Aktion
CARDIOVIT AT-2 Seite 81
8.2001
Page 98

Pflege und Unterhalt
Sicherheitstechnische Kontrolle
Das Gerät sollte in Abständen von 12 Monaten einer sicherheitstechnischen Kontrolle unterzogen
werden, die folgende Punkte umfasst:
- Optische Prüfung des Gerätes und des Patientenkabels.
-Prüfung nach IEC 601-1 und IEC 601-2-25.
- Funktionsprüfungen gemäss Anleitung im Servicehandbuch.
Die Testresultate müssen schriftlich festgehalten werden.
Reinigen des Druckerkopfes
Wird der Drucker oft verwendet, so können sich Farbdruckreste des Papiers (von der bedruckten
Seite) auf dem Druckerkopf ablagern. Dadurch kann die Druckqualität beeinträchtigt werden. Wir
empfehlen daher, den Druckerkopf einmal monatlich mit Alkohol wie folgt zu reinigen:
• Nehmen Sie den Deckel des Papierbehälter heraus. Der Druckerkopf befindet sich innen
gelagert, unterhalb der Entriegelungsvorrichtung für den Deckel.
• Reiben Sie den Druckerkopf mit einem mit Alkohol angefeuchteten Tuch leicht ab, um Reste der
Farbe zu entfernen. Wenn der Druckerkopf stark verschmutzt ist, zeigen sich Spuren der Farbe
auf dem Tuch.
Seite 82 CARDIOVIT AT-2
8.2001
Page 99

Auswechseln des Registrierpapiers
Das Registrierpapier sollte ausgewechselt werden, sobald das Papierende am unteren Rand
durch einen roten Streifen angezeigt wird. Erscheint dieser Streifen, so sind im Papierbehälter
noch ca. 8 Seiten vorhanden.
Wenn kein Papier mehr vorhanden ist, wird der Druckprozess unterbrochen und die Kontrollampe
'PAPIER' beginnt zu blinken. Nachdem ein neues Paket Papier eingelegt wurde, kann der Ausdruck mit KOPIE oder MAN START oder AUTO START wieder gestartet werden.
Eine schrittweise Erläuterung des Papierwechsels finden Sie auf der folgenden Seite.
DEUTSCH
CARDIOVIT AT-2 Seite 83
8.2001
Page 100

Auswechseln des Registrierpapiers
• Greifen Sie mit den Fingern unter die
Entriegelungsvorrichtung für den Deckel. Ein leichtes
Anheben genügt, um den Deckel zu lösen. Fassen Sie in
die Mulde des Deckels und ziehen ihn vom Gerät weg.
NICHT MIT GEWALT ZIEHEN - WENN DER DECKEL
GELÖST IST, LÄUFT ER MÜHELOS ENTLANG DER
SCHIENE.
• Nehmen Sie das restliche
Papier aus dem Papier fach.
• Legen Sie ein neues Paket Papier ein.
• Achten Sie darauf, dass
die bedruckte Seite
(Millimeterrasterung)
nach oben weist und
ziehen Sie den
Papieranfang über den
schwarzen Papierroller
am Papierfachdeckel.
• Schieben Sie den Deckel
wieder ein, bis er fest
eingerastet ist.
• Drücken Sie die STOPTaste, um das Papier
zum nächsten Seitenanfang zu transportieren.
PAPIERFACH-DECKEL
SCHILLER kann eine einwandfreie Druckqualität nur dann gewährleisten, wenn das Originalpapier
oder Papier gleicher Qualität verwendet wird.
Seite 84 CARDIOVIT AT-2
8.2001
 Loading...