

Samsung VP-M2050B, VP-M2050S, VP-M2100B, VP-M2100S, VP-M2200B Owner Manual
...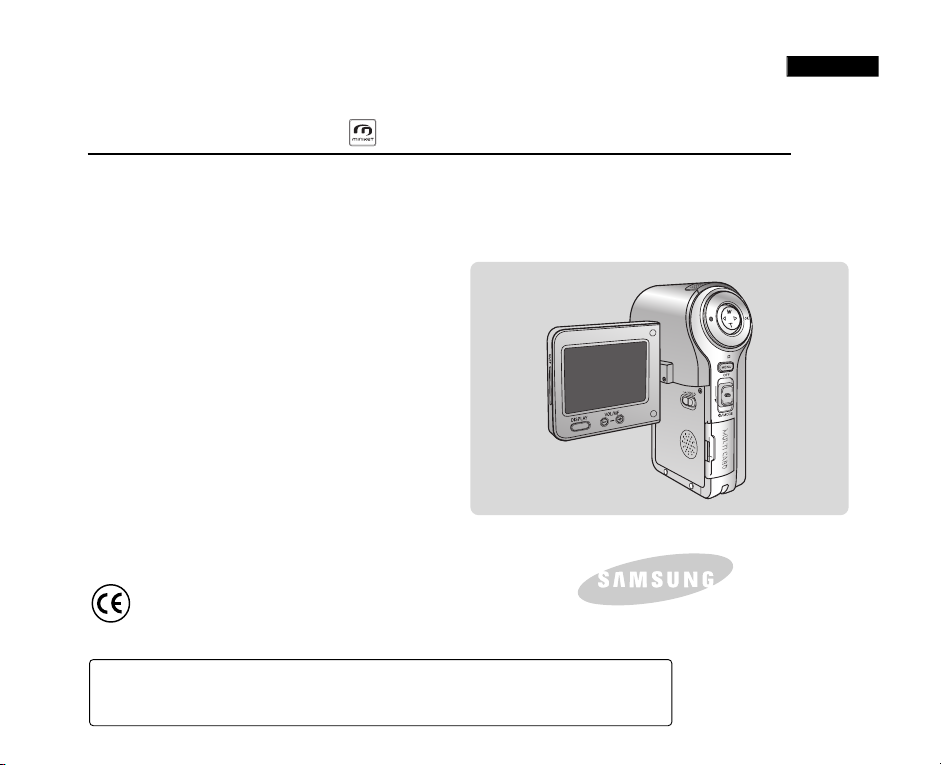
Digital Camcorder
VP-M2050S(B)/M2100S(B)/M2200S(B)
AF Auto Focus
CCD Charge Coupled Device
LCD Liquid Crystal Display
Owner’s Instruction Book
Before operating the unit, please read this
Instruction Book thoroughly, and retain it for
future reference.
This product meets the intent of
Directive 89/ 336 CEE, 73/ 23 CEE, 93/ 68 CEE.
ENGLISH
Use only approved battery packs.
Otherwise there is a danger of overheating, fire or explosion.
Samsung is not responsible for problems occurring due to using unapproved batteries.

ENGLISH
Contents
Notices and Safety Precautions 8
Precautions on the CAM Care ....................................................................................................................................................................................8
Notes Regarding COPYRIGHT....................................................................................................................................................................................9
Notes Regarding Moisture Condensation.................................................................................................................................................................9
Notes Regarding the CAM...........................................................................................................................................................................................9
Notes Regarding the Battery Pack...........................................................................................................................................................................10
Note Regarding a Trademark....................................................................................................................................................................................10
Note Regarding the Lens...........................................................................................................................................................................................11
Notes Regarding the LCD Display ...........................................................................................................................................................................11
Precautions Regarding Service................................................................................................................................................................................11
Precautions Regarding Replacement Parts............................................................................................................................................................11
Getting to know your CAM 12
Features.......................................................................................................................................................................................................................12
Accessories Supplied with the CAM .......................................................................................................................................................................13
Name of Each Part 14
Rear & Left View.........................................................................................................................................................................................................14
Right & Bottom View..................................................................................................................................................................................................15
LCD Display ................................................................................................................................................................................................................16
OSD(On Screen Display in Video Record Mode/Video Play Mode) ..................................................................................................................16
OSD(On Screen Display in Photo Capture Mode/Photo View Mode)................................................................................................................17
OSD(On Screen Display in MP3 Play Mode/Voice Record Mode/ Voice Play Mode).......................................................................................18
How to Use the Battery Pack 19
Battery Pack Installation / Ejection..........................................................................................................................................................................19
Maintain the Battery Pack .........................................................................................................................................................................................20
Charging the Battery Pack........................................................................................................................................................................................23
Using Hardware Reset Function ..............................................................................................................................................................................23
Getting Started 24
The Colour of the LED ...............................................................................................................................................................................................24
22

ENGLISH
Contents
Using the LCD Monitor ..............................................................................................................................................................................................24
Before You Start Operating the CAM.......................................................................................................................................................................25
Using the Function Button........................................................................................................................................................................................26
Using the DISPLAY Button ........................................................................................................................................................................................27
Adjusting the LCD Monitor .......................................................................................................................................................................................28
Structure of the Folders and Files ...........................................................................................................................................................................29
Recording Time and Capacity .................................................................................................................................................................................30
Selecting the Memory Type.......................................................................................................................................................................................32
Using a Memory Card (Optional Accessory) ..........................................................................................................................................................33
Mode and Menu Selection.........................................................................................................................................................................................34
Video Mode 35
Recording....................................................................................................................................................................................................................36
Recording ..............................................................................................................................................................................................................36
Zooming In and Out ..............................................................................................................................................................................................37
Playing .........................................................................................................................................................................................................................38
Playing on the LCD Monitor..................................................................................................................................................................................38
Selecting File Options ...............................................................................................................................................................................................40
Deleting Video files ...............................................................................................................................................................................................40
Locking Video files ................................................................................................................................................................................................41
Copying Video files ...............................................................................................................................................................................................42
Setting Multi Selection ..........................................................................................................................................................................................43
Setting the PB Option ...........................................................................................................................................................................................44
Setting Various Functions.........................................................................................................................................................................................45
Setting the Video file Size.....................................................................................................................................................................................45
Setting the Video file Quality.................................................................................................................................................................................46
Setting the Video file Record mode......................................................................................................................................................................47
Setting the External Input/Output .........................................................................................................................................................................48
Setting the Focus ..................................................................................................................................................................................................49
Setting the EIS (Electronic Image Stabilizer) .......................................................................................................................................................50
Setting the White Balance ....................................................................................................................................................................................51
Setting the Program AE (Programmed Auto Exposure) ......................................................................................................................................52
33

ENGLISH
Contents
Setting the BLC (Backlight Compensation)..........................................................................................................................................................53
Setting the Effect...................................................................................................................................................................................................54
Setting the Digital Zoom .......................................................................................................................................................................................55
Setting the Backlight Auto Control........................................................................................................................................................................56
Photo Mode 57
Capturing.....................................................................................................................................................................................................................58
Capturing Images..................................................................................................................................................................................................58
Zooming In and Out ..............................................................................................................................................................................................59
Viewing ........................................................................................................................................................................................................................60
Viewing Photo files on the LCD Monitor...............................................................................................................................................................60
Selecting File Options ...............................................................................................................................................................................................61
Deleting Photo files ...............................................................................................................................................................................................61
Locking Photo files................................................................................................................................................................................................62
Copying Photo files ...............................................................................................................................................................................................63
Setting DPOF(Digital Print Order Format) Function ............................................................................................................................................64
Setting Multi Selection ..........................................................................................................................................................................................65
Setting Various Functions.........................................................................................................................................................................................66
Setting the Photo file Size ....................................................................................................................................................................................66
Setting the Flash ...................................................................................................................................................................................................67
Setting the Focus ..................................................................................................................................................................................................68
Setting the White Balance ....................................................................................................................................................................................69
Setting the BLC (Backlight Compensation)..........................................................................................................................................................70
Setting the Backlight Auto Control........................................................................................................................................................................71
MP3 Mode/Voice Recorder Mode/Using File Browser 72
MP3 Mode ..................................................................................................................................................................................................................73
Storing Music in the CAM .........................................................................................................................................................................................73
Copying Music files to the CAM ...........................................................................................................................................................................73
Playing .........................................................................................................................................................................................................................74
Playing Music files ................................................................................................................................................................................................74
44

ENGLISH
Contents
Selecting File Options ...............................................................................................................................................................................................75
Setting Repeat Play ..............................................................................................................................................................................................75
Deleting Music files ...............................................................................................................................................................................................76
Locking Music files................................................................................................................................................................................................77
Copying Music files ...............................................................................................................................................................................................78
Setting Random Play ............................................................................................................................................................................................79
Voice Recorder Mode 80
Recording....................................................................................................................................................................................................................80
Recording Voice....................................................................................................................................................................................................80
Playing .........................................................................................................................................................................................................................81
Playing Voice files.................................................................................................................................................................................................81
Selecting File Options ...............................................................................................................................................................................................82
Deleting Voice files................................................................................................................................................................................................82
Locking Voice files ................................................................................................................................................................................................83
Copying Voice files................................................................................................................................................................................................84
Using File Browser 85
Deleting Files or Folders ...........................................................................................................................................................................................85
Locking Files...............................................................................................................................................................................................................86
Copying Files or Folders...........................................................................................................................................................................................87
Viewing File Information............................................................................................................................................................................................88
Setting the CAM 89
Adjusting the LCD Monitor .......................................................................................................................................................................................90
Adjusting the LCD Brightness...............................................................................................................................................................................90
Adjusting the LCD Colour .....................................................................................................................................................................................91
Adjusting Date/Time...................................................................................................................................................................................................92
Setting Time ..........................................................................................................................................................................................................92
Setting Date ..........................................................................................................................................................................................................93
Setting Date Format..............................................................................................................................................................................................94
Setting Time Format..............................................................................................................................................................................................95
55

ENGLISH
Contents
Setting the System.....................................................................................................................................................................................................96
Setting the Auto Shut off.......................................................................................................................................................................................96
Setting the Demonstration Function .....................................................................................................................................................................97
Setting Start-up Mode...........................................................................................................................................................................................98
Setting the File No. Function ................................................................................................................................................................................99
Setting the Beep Sound......................................................................................................................................................................................100
Viewing Version Information ..............................................................................................................................................................................101
Setting Memory ........................................................................................................................................................................................................102
Selecting the Storage Type ................................................................................................................................................................................102
Formatting the Memory.......................................................................................................................................................................................103
Viewing Memory Space......................................................................................................................................................................................104
Setting Language .....................................................................................................................................................................................................105
Selecting Language ............................................................................................................................................................................................105
Using USB Mode ......................................................................................................................................................................................................106
Transferring files to a computer..........................................................................................................................................................................106
USB connection to a computer...........................................................................................................................................................................107
System Environment...........................................................................................................................................................................................107
Using PC Cam ....................................................................................................................................................................................................108
Connecting the CAM to a Printer .......................................................................................................................................................................109
Miscellaneous Information 110
Connecting the CAM with other Devices...............................................................................................................................................................111
Connecting the CAM to TV ................................................................................................................................................................................111
Connecting the CAM to VCR..............................................................................................................................................................................112
Copying Video files to a VCR Tape ....................................................................................................................................................................113
Recording unscramble contents from other digital devices ...............................................................................................................................114
Connecting the CAM to a PC using the USB cable...........................................................................................................................................115
Installing Programs ..................................................................................................................................................................................................116
Installing DV Media Pro 1.0 ................................................................................................................................................................................116
USB Interface for Data Transfer .........................................................................................................................................................................117
Printing Photos.........................................................................................................................................................................................................119
Printing with PictBridge Function ........................................................................................................................................................................119
66

ENGLISH
Contents
Printing Photos with DPOF Files ........................................................................................................................................................................120
Maintenance 121
Cleaning and Maintaining the CAM .......................................................................................................................................................................121
After using the CAM............................................................................................................................................................................................121
Cleaning the Body .............................................................................................................................................................................................122
Using the Built-in Rechargeable Battery ............................................................................................................................................................122
Regarding the Battery.........................................................................................................................................................................................123
Using the CAM Abroad.......................................................................................................................................................................................124
Troubleshooting 125
Self Diagnosis Display ............................................................................................................................................................................................125
Using the Menu 127
Specifications 129
Index 131
Power Sources (United Kingdom Only) 133
77

ENGLISH
Notices and Safety Precautions
Precautions on the CAM Care
✤ Please note the following precautions for use:
✤ Please keep this device in a safe place. The device contains a lens that can be damaged by shock.
Keep out of reach from children.
■
Do not place your device in a wet place. Moisture and water may cause the device to malfunction.
■
To avoid electric shock, do not touch your device or power cable with wet hands.
■
Do not use the flash close to another’s eyes. The flash emits a strong light that may cause damage similar to direct
sunlight on one’s eyesight. Particular care should be observed if photographing infants, when the flash should be no less
than 3 feet from your subject.
■
If the device is not working properly, please consult your nearest dealer or authorized Samsung service centre.
Disassembling the device yourself may cause irrecoverable damage which will be difficult to repair.
■
Clean the device with a dry, soft cloth. Use a soft cloth moistened with a mild detergent solution for removing stains.
Do not use any type of solvent, especially benzene, as they may seriously damage the finish.
■
Keep your device away from rain and saltwater. After using, clean the device. Saltwater may cause the parts to corrode.
88

ENGLISH
Notices and Safety Precautions
Notes Regarding COPYRIGHT
✤ Television programmes, movie video tapes, DVD titles, films and other program materials may be copyrighted.
Unauthorized recording of copyrighted materials may infringe on the rights of the Copyright owners and is contrary to
copyright laws.
✤ All the trade names and registered trademarks mentioned in this manual or other documentation provided with your
Samsung product are trademarks or registered trademarks of their respective holders.
Notes Regarding Moisture Condensation
1. A sudden rise in atmospheric temperature may cause condensation to form inside the CAM.
For Example:
✤ Entering or leaving a heated place on a cold day might cause condensation inside the product.
✤ To prevent condensation, place the product in a carrying case or a plastic bag before exposing it to a sudden change of
temperature.
Notes Regarding the CAM
1. Do not leave the CAM exposed to high temperature (above 60°C or 140°F).
For example, in a parked closed car in summer or exposed to direct sunlight.
2. Do not let the CAM get wet.
Keep the CAM away from rain, salt water, or any other form of moisture.
The CAM will be damaged if immersed in water or subjected to high levels of moisture.
99

ENGLISH
Notices and Safety Precautions
Notes Regarding the Battery Pack
✤ It is recommended to use original Battery Pack that is available at SAMSUNG service centre.
✤ Make sure the Battery Pack is fully charged before starting to record.
✤ To preserve battery power, keep the CAM turned off when you are not operating it.
✤ If your device is left in STBY mode without being operated for more than 5 minutes, it will automatically turn itself off to
protect against unnecessary battery discharge.
✤ Make sure that the Battery Pack is attached firmly in place.
✤ The new Battery Pack provided with the product is not charged.
Before using the Battery Pack, you need to fully charge it.
✤ Do not drop the Battery Pack. Dropping the Battery Pack may damage it.
✤ Fully discharging a Lithium Polymer battery damages the internal cells. The Battery Pack may be prone to leakage when
fully discharged.
✤ To avoid damage to the Battery Pack, make sure to remove the battery when no charge remains.
✤ Clean the terminal to remove foreign substances before inserting the Battery Pack.
✳
When the battery reaches the end of its life, please contact your local dealer.
Batteries must be disposed of as chemical waste.
✳
Be careful not to drop the Battery Pack when you release it from the CAM.
Note Regarding a Trademark
✤ The logos regarding DivX, DivX Licensed are the trademark of DivX, Network, Inc and can be used after contracting
license.
1010

ENGLISH
Notices and Safety Precautions
Note Regarding the Lens
✤ Do not film with the CAM lens pointing directly at the sun.
Direct sunlight can damage the CCD (Charge Coupled Device, the imaging sensor).
Notes Regarding the LCD Display
1. The LCD monitor has been manufactured using the high precision technology. However, there may be tiny dots
(red, blue or green in colour) that appear on the LCD monitor. These dots are normal and do not affect the recorded
picture in any way.
2. When you use the LCD monitor under direct sunlight or outdoors, it may be difficult to see the picture clearly.
3. Direct sunlight can damage the LCD monitor.
Precautions Regarding Service
✤ Do not attempt to service the CAM yourself.
✤ Opening or removing covers may expose you to dangerous voltage or other hazards.
✤ Refer all servicing to qualified service personnel.
Precautions Regarding Replacement Parts
✤ When replacement parts are required, be sure the service technician has used replacement parts specified by the
manufacturer and having the same characteristics as the original part.
✤ Unauthorized substitutions may result in fire, electric shock or other hazards.
Correct Disposal of This Product
(Waste Electrical & Electronic Equipment)
(Applicable in the European Union and other European countries with separate collection systems)
This marking shown on the product or its literature, indicates that it should not be disposed with other household wastes at the end of its
working life. To prevent possible harm to the environment or human health from uncontrolled waste disposal, please separate this from
other types of wastes and recycle it responsibly to promote the sustainable reuse of material resources.Household users should contact
either the retailer where they purchased this product, or their local government office, for details of where and how they can take this
item for environmentally safe recycling. Business users should contact their supplier and check the terms and conditions of the
purchase contract. This product should not be mixed with other commercial wastes for disposal.
1111

ENGLISH
Getting to know your CAM
Features
●
Integrated Digital CAM/ DSC operation
An integrated digital imaging device that easily converts between a Digital CAM and a Digital Still Camera with
comfortable and easy recording.
●
High Resolution Image Quality (Digital Still Camera)
Employing 2110K CCD Pixel, a maximum resolution of 2400x1800 is available.
●
x100 Digital Zoom
Allows the user to magnify an image up to x100 its original size.
●
Colourful TFT LCD
A high-resolution(210K) colourful TFT LCD gives you clean, sharp images as well as the ability to review your recorded
files immediately.
●
Electronic Image Stabilizer (EIS)
With the CAM, you can reduce unstable images by minimizing the effect of natural shaking movements.
●
Various Digital Effects
The DSE (Digital Special Effects) allows you to give the film a special look by adding various special effects.
●
USB Interface for Data Transfer
You can transfer still images and video files or any other files to a PC using the USB interface.
●
PC Cam for multi-entertaining
You can use the CAM as a PC camera for video chatting, video conference and other PC camera applications.
●
Voice Record / Playback with vast memory
You can record voice and store it in the internal memory, SD, MMC, Memory Stick and Memory Stick Pro(Option) and
play back the recorded voice.
●
Plus Advantage, MP3
With the CAM, you can play back MP3 files stored in the internal memory, SD, MMC, Memory Stick and Memory Stick
Pro(Option). Enjoy your favorite songs with the MP3 files with the CAM.
●
PictBridge/DPOF Function
When you connect the CAM to a PictBridge supported printer and DPOF (Digital Printing Order Format) function using
a USB cable, you can print your stored pictures without PC.
1212

Getting to know your CAM
Accessories Supplied with the CAM
✤
Make sure that the following basic accessories are supplied with your CAM.
1
.
Basic Accessories
1. Lithium Polymer Battery Pack
2. AC Power Adapter
3. Audio/Video Cable
4. USB Cable
5. Earphones
6. Hand Strap/Necklace Strap
7. Carrying Case
8. Instruction Book/Quick Guide
9. Software CD
10. Lens Cover
11. Tripod Gender
Optional Accessories
12. Scart Adapter
13. Extended life Battery Pack
Lithium Polymer Battery Pack
5
.
Earphones
9
. Software CD
13. Extended life Battery Pack
(Option)
2
. AC Power Adapter
6
. Hand Strap/Necklace Strap
10
. Lens Cover
3
. Audio/Video Cable
7
. Carrying Case
11
. Tripod Gender
ENGLISH
4
. USB Cable
8
.
Instruction Book/Quick Guide
12. Scart Adapter (Option)
1313
ENGLISH
Name of Each Part
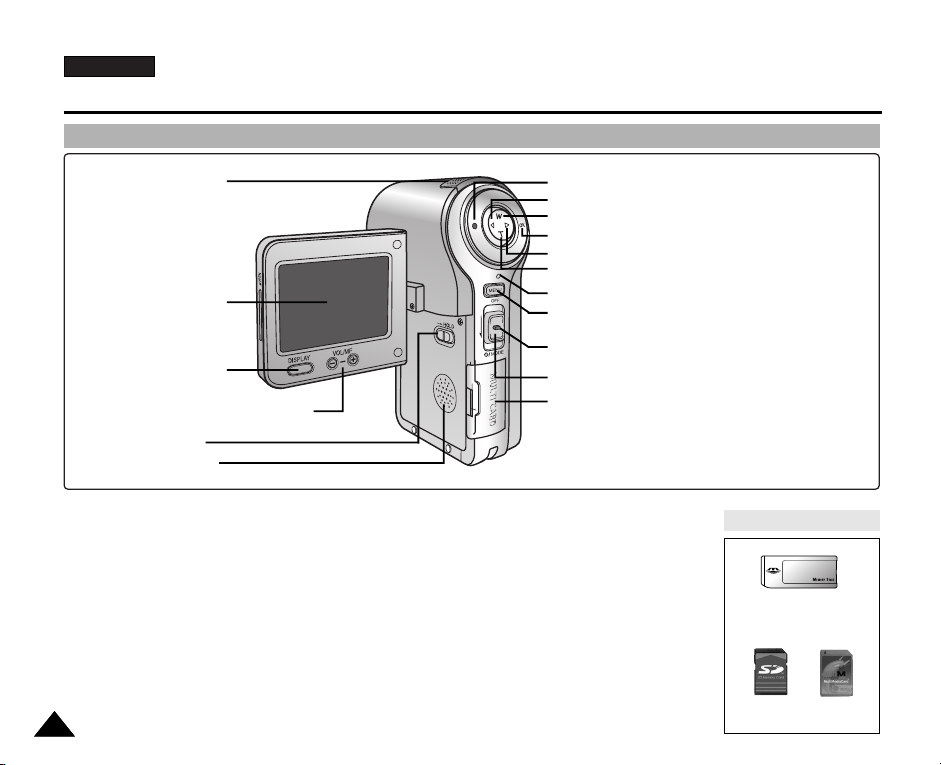
Rear & Left View
1. Built-in MIC
2. LCD Monitor
3. DISPLAY button
(Volume/Manual Focus) button
5. HOLD switch
6. Built-in Speaker
4. VOL +,-/MF +,
1. Built-in MIC
2. LCD Monitor
3. DISPLAY button
4. VOL +,
-
/MF +,-(Volume/Manual Focus) button
5. HOLD switch
6. Built-in Speaker
7. Record/Stop button
8. [ œœ] button (Move backward, RPS)
9. W button
(Zoom out, Multi-play screen, Move up)
1414
7. Record/Stop button
8. [ œœ] button (Move backward, RPS)
9. W button (Zoom out, Multi-play screen, Move up)
10. OK button (Play, Pause)
√√
11. [
] button (Move forward, FPS)
12. T button (Zoom in, Move down)
13. Record/Power/Charging indicator
14. MENU button
15. Lock/Release button
16. POWER/MODE Selector
-
10. OK button (Play, Pause)
√√
11. [
] button (Move forward, FPS)
17. MULTI CARD slot
Usable Memory Card
12. T button (Zoom in, Move down)
13. Record/Power/Charging indicator
14. MENU button
15. Lock/Release button
Memory Stick
Memory Stick PRO
16. POWER/MODE Selector
17. MULTI CARD slot
SD MMC
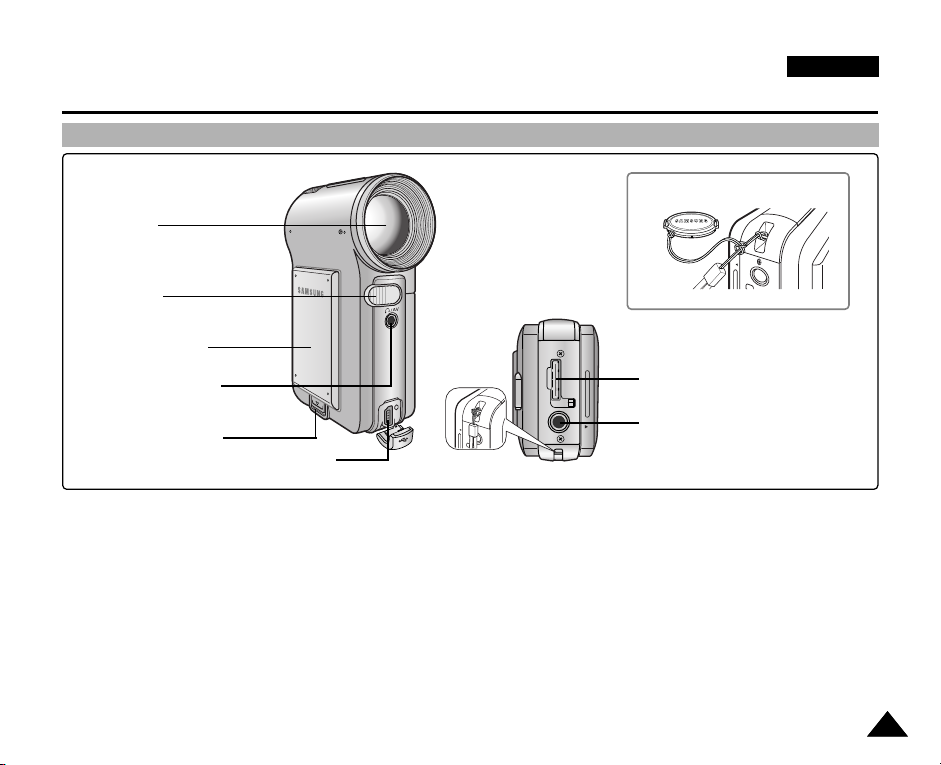
Name of Each Part
Right & Bottom View
1. Lens
2. Flash
3. Battery Pack
4. Earphones and
AV jack
5. Battery ejection
button
6. USB Port
ENGLISH
Hanging Lens Cover on the CAM
8. Power Adapter Receptacle
9. Tripod Receptacle
7. Strap Hook
1. Lens
2. Flash
3. Battery Pack
4. Earphones and AV jack
5. Battery ejection button
6. USB Port
7. Strap Hook
8. Power Adapter Receptacle
9. Tripod Receptacle
1515

ENGLISH
00:00:02 / 00:43:39
F / 720i
Video Record
Recording...
STBY
Sepia
BLC
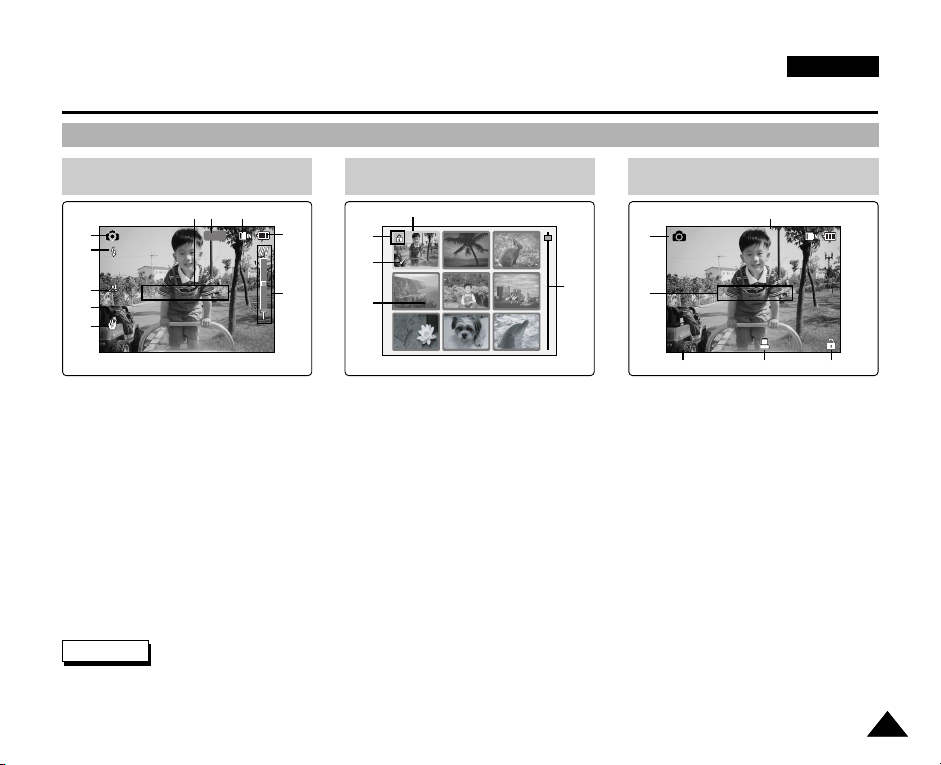
Name of Each Part : LCD Display
OSD (On Screen Display in Video Record Mode/ Video Play Mode)
Video Record Mode
1
2
3
4
5
6
78
1. Mode indicator
2. EIS indicator
3. Program AE indicator
4. White Balance indicator
5. BLC indicator*
6. Focus indicator*
7. Counter
(Elapsed time / Remaining time)
8. Record/Standby indicator
9. Effect indicator
10. Zoom in/ out indicator
11. Digital Zoom indicator
12. Battery life indicator
13. Memory type indicator
14. Image Quality/Size/Record Mode
indicator
15. Warning and note indicator
1616
Video Play Mode
131415
12
10
11
9
1. Current display indicator
2. Lock indicator
1
2
13
12
8. Image size indicator
9. Counter
3. Mode indicator
4. Image counter (Current image)
10. Operation indicator
5. Memory type indicator
6. Battery life indicator
7. Warning and note indicator
11. Volume indicator
12. Scroll Bar
Video Play Mode
4 5
3
Video Play
7
720x576
8
00:00:02/00:10:50
100-0055
Low Battery
9
10
(Elapsed time/Recorded time)
(Play/Pause/Stop/RPS/FPS)
6
11
2
13. Multi Selection indicator
Notes
✤ Functions not indicated with * will be retained when the CAM is turned off.
✤ The OSD indicators of this product are based on the model VP-M2100S(B).
✤ The OSD indicators are based on internal memory.
Name of Each Part : LCD Display
OSD (On Screen Display in Photo Capture Mode/ Photo View Mode)
ENGLISH
Photo Capture Mode
1
2
3
4
5
Photo Capture
BLC
1600
Capturing...
1. Mode indicator
2. Flash indicator
3. White balance indicator
4. BLC indicator*
8910
7
6
Photo View Mode
1
5
8
3
1. Current display indicator
2. Mode indicator
3. Number of print
4. Printer indicator
5. Focus indicator*
6. Zoom in / out indicator
7. Battery life indicator
8. Memory type indicator
9. Image Size indicator
10. Warning and note indicator
Note
✤ Functions not indicated with * will be retained when the CAM is turned off.
Photo View Mode
6
2
Photo View
7
9
1 Copies
100-0019
Wait please...
43
5
5. Lock indicator
6. Image counter (Current image)
7. Scroll bar
8. Multi Selection indicator
9. Warning and note indicator
1717
ENGLISH
Name of Each Part : LCD Display
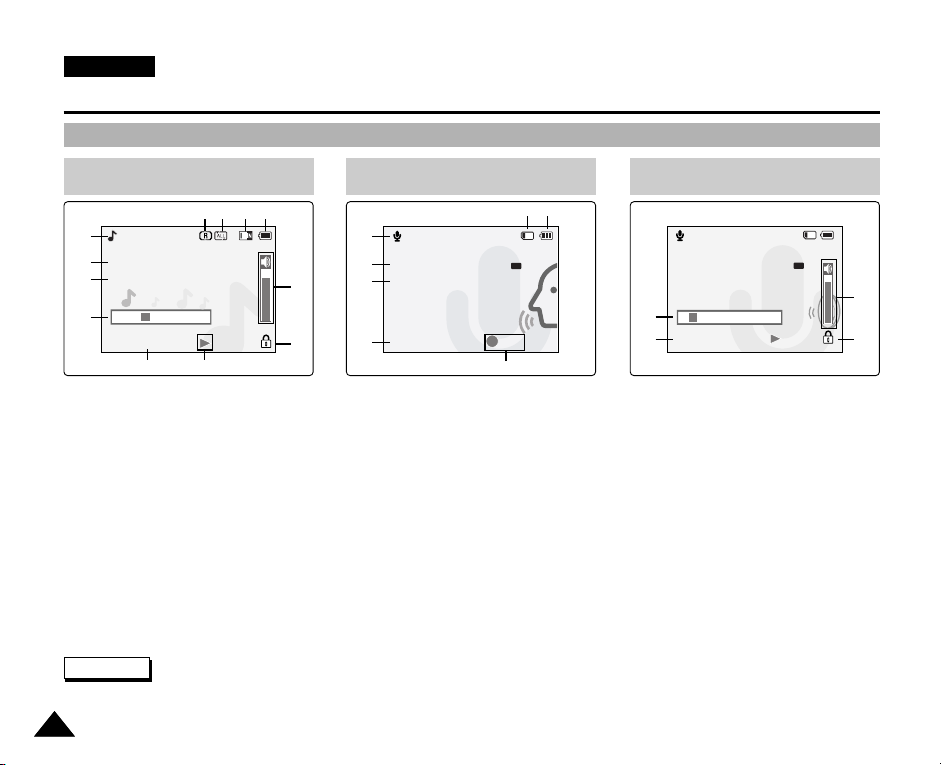
OSD (On Screen Display in MP3 Play Mode/ Voice Record Mode/ Voice Play Mode)
MP3 Play Mode
101112 9
1
MP3
Play
2
I believe i can fly.mp3
Stereo 44.1KHz 128Kbps
3
4
00:00:34 / 00:03:46
65
1. Mode indicator
2. File name / File format
3. Sampling Rate/Bit Rate
4. Progress Bar
5. Elapsed time/Full time
6. Operation indicator
7. Lock indicator
8
7
1. Mode indicator
2. File number / Date and Time
3. Sampling Rate/Bit Rate
4. Elapsed time/Remaining time
5. Operation indicator
6. Battery life indicator
7. Memory type indicator
8. Volume indicator
9. Battery life indicator
10. Memory type indicator
11. Repeat All/One indicator
12. Random Play indicator
Note
✤ Functions will be retained when the CAM is turned off.
1818
Voice Record Mode
1
Voice Record
2
2 2005/01/01 12:51:04
Stereo 8KHz 64Kbps
3
4
00:00:12/35:17:51
REC
5
Voice Play Mode
7 6
Voice Play
AM
2 2005/01/01 12:51:04
5.0 Kbytes
Stereo 8KHz 64Kbps
1
4
00:00:12/00:05:12
AM
2
3
1. Progress Bar
2. Volume indicator
3. Lock indicator
4. Elapsed time/Recorded time
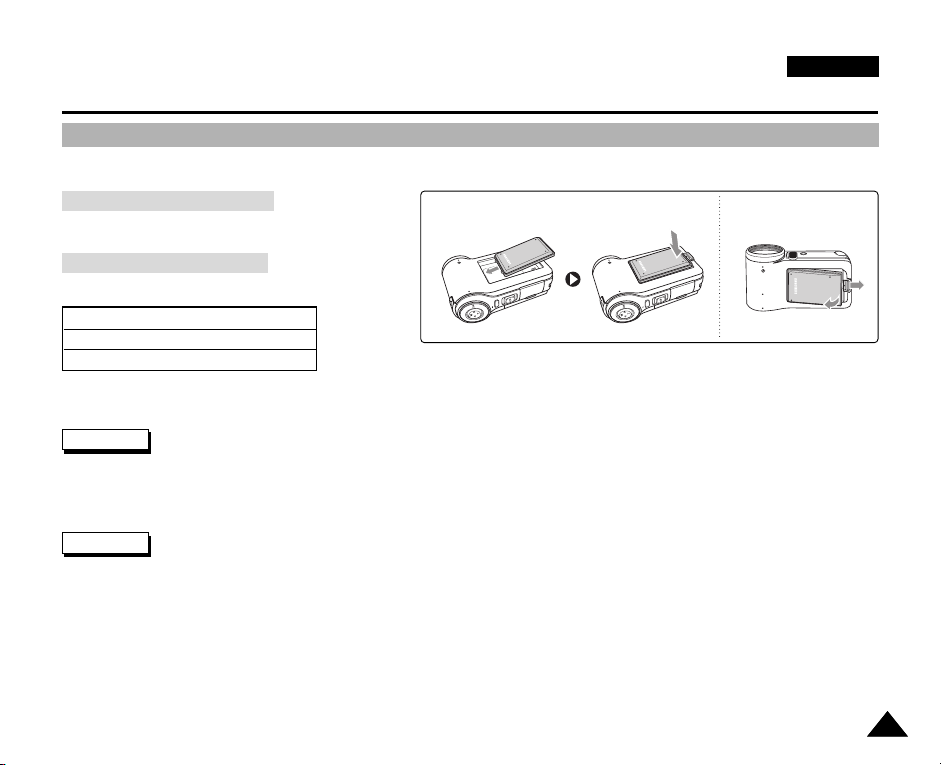
How to Use the Battery Pack
Battery Pack Installation / Ejection
It is recommended you purchase one or more additional Battery Packs to allow continuous use of your CAM.
ENGLISH
To insert the Battery Pack
Move the Battery Pack into the groove until it clicks.
<Insert> <Eject>
To eject the Battery Pack
Pull the [Battery ejection] button to eject the Battery Pack.
Battery
Standard Battery Pack
Extended life Battery Pack (option)
Notes
✤ Clean the terminals to remove foreign substances before inserting the Battery Pack.
✤ If the CAM will not be in use for a while, remove the Battery Pack from the CAM.
Warning
✤ When you eject the Battery Pack from the CAM, hold the Battery Pack to prevent it dropping to the floor.
1919

ENGLISH
How to Use the Battery Pack
Maintain the Battery Pack
✤ The Battery Pack should be recharged in an environment of between 32°F(0°C) and 104°F(40°C).
✤ The Battery Pack should never be charged in a room temperature that is below 32°F(0°C).
✤ The life and capacity of the Battery Pack will be reduced if it is used in temperatures below 32°F(0°C) or left in temperatures
above 104°F(40°C) for a long period.
✤ Do not put the Battery Pack near any heat sources (fire or flames, for example).
✤ Do not disassemble, process, press or heat the Battery Pack.
✤ Do not allow the + and
induce fire and overheating.
✤ It is recommended to use original Battery Pack that is available at SAMSUNG service centre.
-
terminals of the Battery Pack to be short-circuited. It may cause leakage, heat generation,
2020
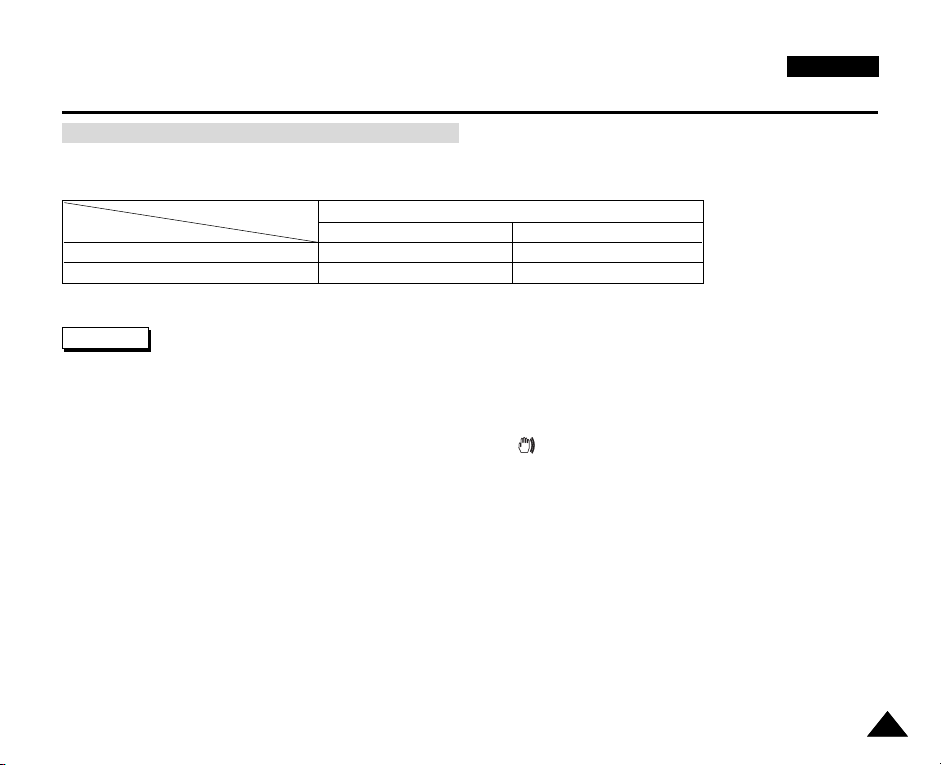
How to Use the Battery Pack
Continuous recording time based on battery type
If you close the LCD screen, it switches off automatically.
The continuous recording times given in the table below are approximations. Actual recording time depends on usage.
ENGLISH
Battery
Time
Standard Battery Pack
Extended life Battery Pack (option)
Continuous Recording Time
LCD ON Backlight OFF
Approx. 50 min.
Approx. 80 min.
Approx. 60 min.
Approx. 100 min.
Notes
✤ Prepare an extra battery if you use the CAM outdoors.
✤ Contact the Samsung service centre to purchase new Battery Pack.
✤ If you zoom in or out, the recording time becomes shorter.
✤ ‘Continuous Recording Time’ indicates the time that you neither use zooming function
nor play video files and record the video file continuously when the EIS( ) function is off.
2121

ENGLISH
1600
Photo Capture
How to Use the Battery Pack
Battery Level Display
The Battery Level Display shows the amount of battery power remaining in the Battery Pack.
Battery Level Indicator
State
Fully charged
40~60% used
60~80% used
80~95% used
Message
-
-
-
-
Exhausted(flickers)
The device will soon turn off.
Change the Battery Pack
-
as soon as possible.
(flickers)
The device will be forced to
“Low battery”
turn off after 5 seconds.
Tips for Battery Identification
A charge indicator is provided on the Battery Pack to help you remember whether it has been charged or not.
If the battery has been fully charged, the charge indicator is green. If you are charging the battery,
the colour of the charge indicator is orange. The charge indicator flickers if the battery is abnormal.
Charging time based on battery type
Capacity
Standard Battery Pack
Extended life Battery Pack (option)
2222
Power On Power Off
Approx. 7 hr.
Approx. 13 hr.
Approx. 1 hr. 50 min
Approx. 3 hr. 20 min

How to Use the Battery Pack
Charging the Battery Pack
1. Attach the Battery Pack to the CAM.
2. Move [POWER/MODE Selector] up to turn the CAM off.
ENGLISH
Charging directly to the CAM
3. Connect the AC Power Adapter with the CAM.
◆ You can detach the AC adapter by pressing the buttons on the sides of
the adapter cable plug while pulling it out.
4. Insert the AC Power Adapter into the outlet.
Note
✤ You can charge the Battery Pack when you use the CAM, but it takes a long time
relatively.
Warning
✤ It is recommended you fully charge the Battery Pack before use.
✤ You should only charge the battery in an environment between 0
°
C and 40°C.
Using Hardware Reset Function
1. Remove the Battery Pack and the AC Power Adapter.
2. Press and hold the [RESET] button over one second.
Note
✤ If you reset the CAM, all functions you set are initialized.
4
1
3
2323

ENGLISH
Getting Started
The Colour of the LED
The colour of the LED varies depending on the state of power or charging.
When the AC Power Adapter is plugged in (When the Battery Pack is inserted.)
LED Colour
Red
Green
Orange
Green
Orange Blink
Power
Video / Voice Record
On
Off
Off
-
When the Battery Pack is inserted (When the AC Power Adapter is unplugged.)
LED Colour
Red
Green
Power
Video / Voice Record
On
Using the LCD Monitor
1. Move the LCD Monitor up to open.
It opens up to the angle of 90
2. Turn the LCD Monitor up.
It turns up to the angle of 270
You can close it at the angle of 180
°.
°.
°.
Charging state
-
-
Charging
Fully charged
Error
Charging state
-
-
2424

ENGLISH
Video
Getting Started
Before You Start Operating the CAM
Before using the CAM, refer to this page for easy operation. The Memory Card is an optional accessory and not included.
1. Install the Battery Pack and insert a Memory Card into the MULTI CARD slot. (Refer to page 33)
2. Charge the Battery Pack by connecting AC Power Adapter with the CAM directly. (Refer to page 23)
3. Move [POWER/MODE Selector] down to turn on the CAM and move it down again.
◆ You can select Video mode or Previous mode as the start-up mode in System Settings. (Refer to page 98)
4. Move the [W/T] button to select the desired mode and press the [OK] button.
◆ The system is automatically converted into the selected mode in two seconds even when the [OK] button is not pressed.
5. Press the [OK ] button to take pictures, record, hear music or record voice.
Press the [MENU ] button to view the menu.
6. When finished, move [POWER/MODE Selector] up to turn the CAM off.
For example:If you want to select Video Mode
1
2
3
4
5
6
1. Video: You can record and play video files.
2. Photo: You can take and view photo files.
3. MP3: You can download and hear the music.
4. Voice Recorder: You can record and hear the voice.
5. File Browser: You can delete, lock, copy the file and view the file information.
6. System Settings: You can set the LCD monitor brightness/colour, date/time, system, memory and language.
2525
ENGLISH
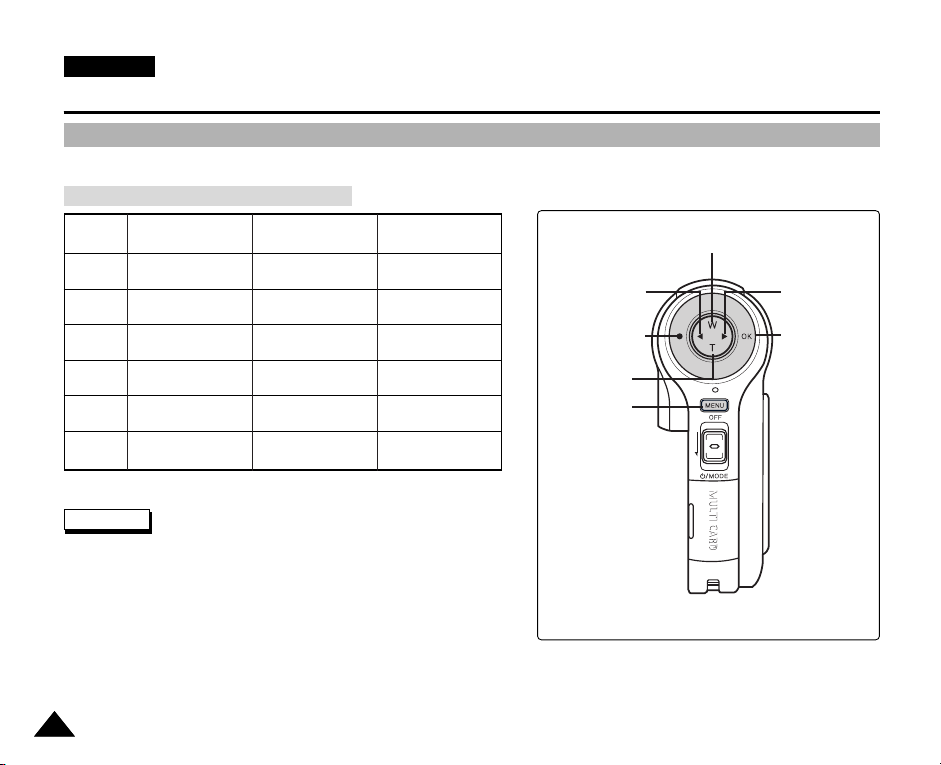
Getting Started
Using the Function Button
The Function button is used to make a selection, move the cursor, select the functions and exit from the menu.
The Use of Various Function button
Button
W
T
œ
√
●
OK
Record/
Capture Mode
Zoom out (W)
Zoom in (T)
-
-
Recording
Move to the last
recorded file
Play Mode
Multi-play screen
-
RPS(œœ)/
Move backward
FPS(√√)/
Move forward
Move to
Record mode
Pause
Notes
✤ If there is no file when you press the [OK] button in Video Record/Photo
Capture, the message as “No Files...” appears.
✤ Refer to page 39 for further details about the function button.
Menu Selection
Mode
Select up
Select down
Return to
previous menu
Select menu
Move to record
Confirm selecting
Return to
previous menu
Move to record
Select down
Select
menu
Select up
Select menu
Confirm
selecting
2626

Getting Started
Using the DISPLAY Button
You can use various functions by pressing the [ DISPLAY] button.
1. Open the LCD monitor.
2. Move [POWER/MODE Selector] down to turn on the CAM.
◆ The Video Record screen appears.
◆ You can select Video mode or Previous mode
as the start-up mode in System Settings.
(Refer to page 98)
3. Press the [DISPLAY] button.
Record/Capture Mode
Zoom out
Record/
Capture
Zoom in
Move to
the last
recorded
file
Move
backward/
RPS
Move to
Record mode
ENGLISH
Play Mode
Multi-play screen
Move
forward/FPS/
Slow play
Play/Pause
If you press the [DISPLAY] button
Video/Photo mode
✤ Once: The display indicator disappears.
✤ Twice: The back light turns off.
✤ 3 times: The LCD monitor turns off.
✤ 4 times: It turns to the initial screen.
MP3/Voice Recorder/File Browser/
System Settings mode
✤ Once: The back light turns off.
✤ Twice: The LCD monitor turns off.
✤ 3 times: It turns to the initial screen.
MP3 Play mode
RPS
Move to Video
Record mode
Play list
FPS
Play/Pause
Voice Record mode
Record
Move to the
last voice file
list
Power Saving Function
The LCD monitor is turned off after a certain period of time has passed in
each mode in order to prevent unnecessary battery power consumption.
Press any button to go back to the previous mode.
2727
ENGLISH
Memory
System
System
Date/TimeDate/Time
System
Memory
LanguageLanguage EnglishEnglishEnglish
Display
System SettingsSystem Settings
Settings: DisplaySettings: Display
System
BackBack
LCD BrightnessLCD Brightness
20 %
20 %
LCD Colour
50 %
Settings: DisplaySettings: Display
System
20 %20 %
60 %
LCD Colour
BackBack
LCD BrightnessLCD Brightness
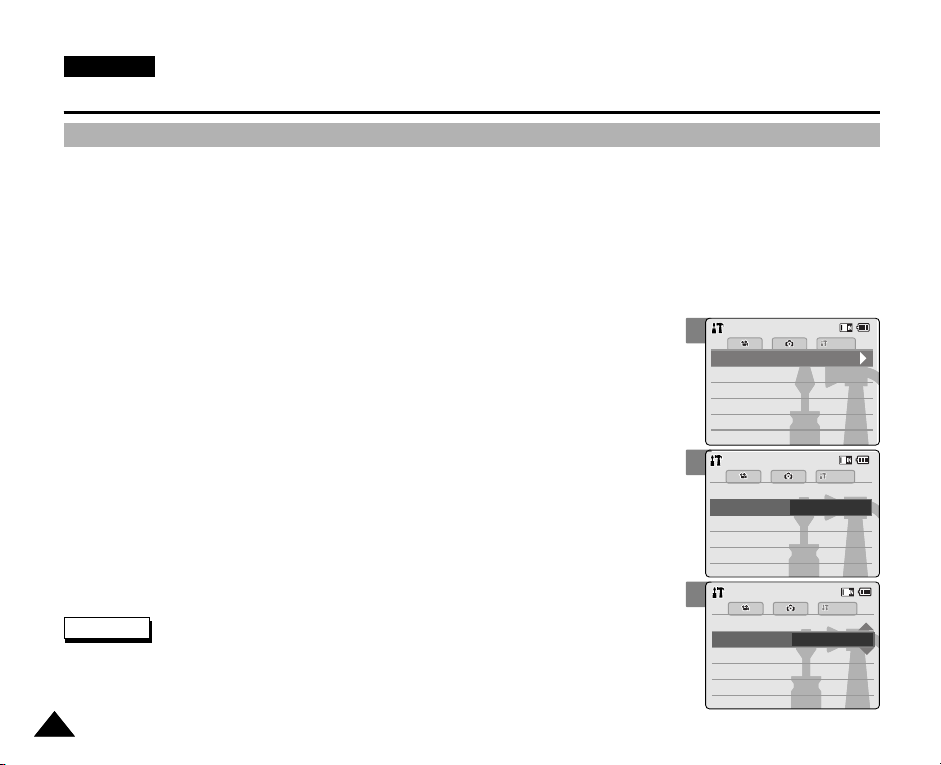
Getting Started
Adjusting the LCD Monitor
Your CAM is equipped with a colour Liquid Crystal Display monitor, which enables you to view directly what you are recording or
playing back. Depending on the conditions under which you are using the CAM (indoors or outdoors for example), you can
adjust the LCD Brightness or Colour.
1. Move [POWER/MODE Selector ] down to turn on the CAM.
2. Move [POWER/MODE Selector] down to select System Settings and
press the [OK ] button.
◆ The system is automatically converted into the selected mode in two seconds even
when the [OK] button is not pressed.
3
3. Move the [
4. Move the [
W/T
] button to select <Display > and press the [√] button.
W/T
] button to select <LCD Brightness > or < LCD Colour>
and press the [OK ] button.
5. Move the [
W/T
] button to select desired brightness or colour and
press the [OK ] button.
◆ Refer to pages 90~91 for details.
Notes
✤ If you select [œ] button in the menu, the previous menu appears.
✤ If it is too bright, adjust the LCD Brightness.
2828
4
5

Getting Started
Structure of the Folders and Files
The video files and photo files are stored in internal memory or external memory(Memory Card) as below.
Notes
✤ Refer to page 33 for details about Memory Card.
✤ You can store general data in files and folders of the CAM.
✤ The number of the file is up to 9,999 and folder is up to 999.
✤ DCAM✽✽✽✽.JPG: Photo file
SMOV✽✽✽✽.AVI: Video file
SWAV✽✽✽✽.WAV: Voice file
✽✽✽✽✽✽✽✽.MP3: MP3 file
✤ MISC: DPOF files are stored.
✤ Do not change the file or folder name except 'Free'.
✤ You can freely change the file or folder name of 'Free'.
✤ Video files that you have not made with the CAM may not
be able to be played.
ENGLISH
Photo file
MP3 file
Warning
✤ Do not turn the power off while recording, playing, erasing
file or formatting.
✤ Turn the power off before you insert or eject the
Memory Card to avoid losing data.
✤ Save important files separately.
Video
file
Voice
file
2929
ENGLISH
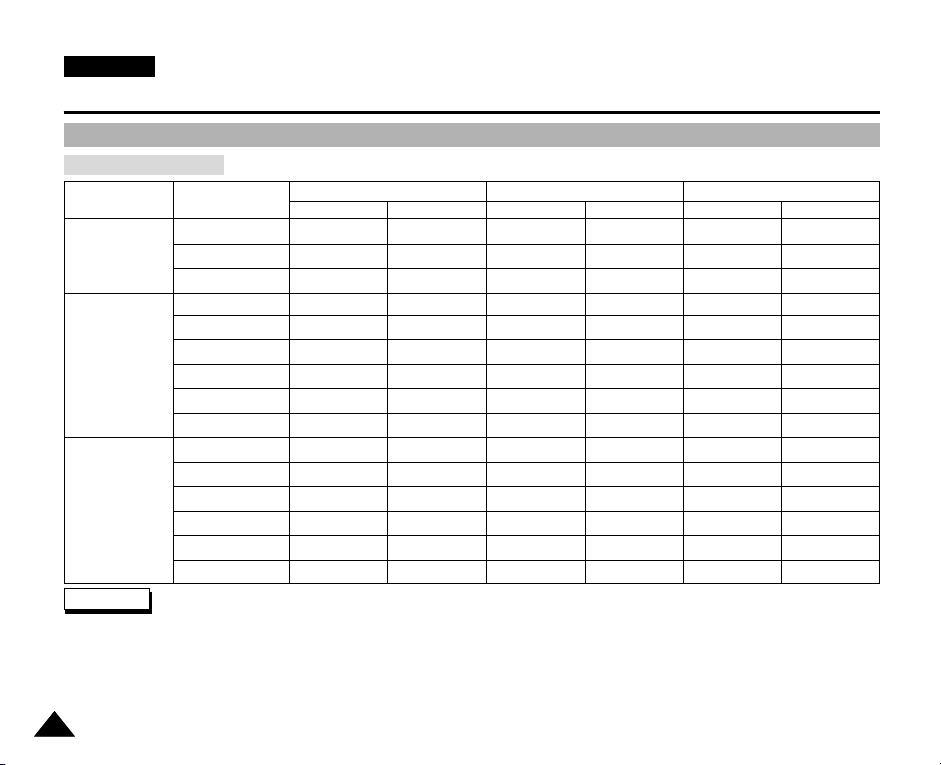
Getting Started
Recording Time and Capacity
Video Record Time
Media
Internal Memory
Memory Stick
SD/MMC
Capacity
512MB (VP-M2050S(B))
1GB (VP-M2100S(B))
2GB (VP-M2200S(B))
approx. 21min.
approx. 43min.
approx. 86min.
32MB
64MB
128MB
256MB
512MB
1GB
32MB
64MB
128MB
256MB
512MB
1GB
approx. 10min.
approx. 21min.
approx. 43min.
approx. 1min. 20sec.
approx. 3min.
approx. 4min.
approx. 11min.
approx. 21min.
approx. 43min.
352p
X
X
X
Super Fine
720i/720p
approx. 14min.
approx. 29min.
approx. 58min.
approx. 6min.
approx. 14min.
approx. 29min.
approx. 50sec.
approx. 2min.
approx. 3min.
approx. 7min.
approx. 14min.
approx. 29min.
X
X
X
approx. 32min.
approx. 65min.
approx. 130min.
approx. 2min.
approx. 4min.
approx. 8min.
approx. 15min.
approx. 32min.
approx. 65min.
approx. 2min.
approx. 4min.
approx. 7min.
approx. 17min.
approx. 32min.
approx. 65min.
352p
Fine
720i/720p
approx. 21min.
approx. 43min.
approx. 86min.
X
X
X
approx. 10min.
approx. 21min.
approx. 43min.
approx. 1min. 20sec.
approx. 3min.
approx. 4min.
approx. 11min.
approx. 21min.
approx. 43min.
approx. 65min.
approx. 131min.
approx. 262min.
approx. 4min.
approx. 8min.
approx. 16min.
approx. 30min.
approx. 64min.
approx. 131min.
approx. 4min.
approx. 7min.
approx. 17min.
approx. 32min.
approx. 65min.
approx. 131min.
Warning
✤ Supports 2GB memory cards and lower. Any other above 2GB may not record or play properly.
✤ The compression is changed automatically depending on the recorded images and the maximum recording time and capacity can be
changed in ‘Video Record’.
✤
You can record video files with size of 720i/Normal, 720p/Normal, 352p/Fine, and 352p/Normal in Memory Card but the quality is not guaranteed.
✤ If you record video files with the quality of Normal(352p, 720i, 720p) in the internal memory or a Memory Card, the recording time becomes
longer but the video may have lower quality than other quality level.
✤ The recording time and capacity may vary if bad sectors are generated when you record video files to a Memory Card.
3030
352p
Normal
720i/720p
approx. 32min.
approx. 65min.
approx. 130min.
approx. 2min.
approx. 4min.
approx. 8min.
approx. 15min.
approx. 32min.
approx. 65min.
approx. 2min.
approx. 4min.
approx. 7min.
approx. 17min.
approx. 32min.
approx. 65min.
 Loading...