

Page 1
SNH-1011N English
Quick Start
Guide
If you have any questions or need help
installing your new product please contact
our free technical support.
Telephone : 1-877-349-3149
9am - 9pm EST, Monday - Friday
Internet : http://www.samsungsv.com/Support/Index
Related manual can be downloaded from
https://www.samsungsmartcam.com/web.
The SmartCam webpage and mobile menu may be subject to change
without prior notice.
Thank you for purchasing the Samsung
SmartCam Wifi Home Security Camera.
Follow the simple
steps in this guide to set
up and start using your new SmartCam.
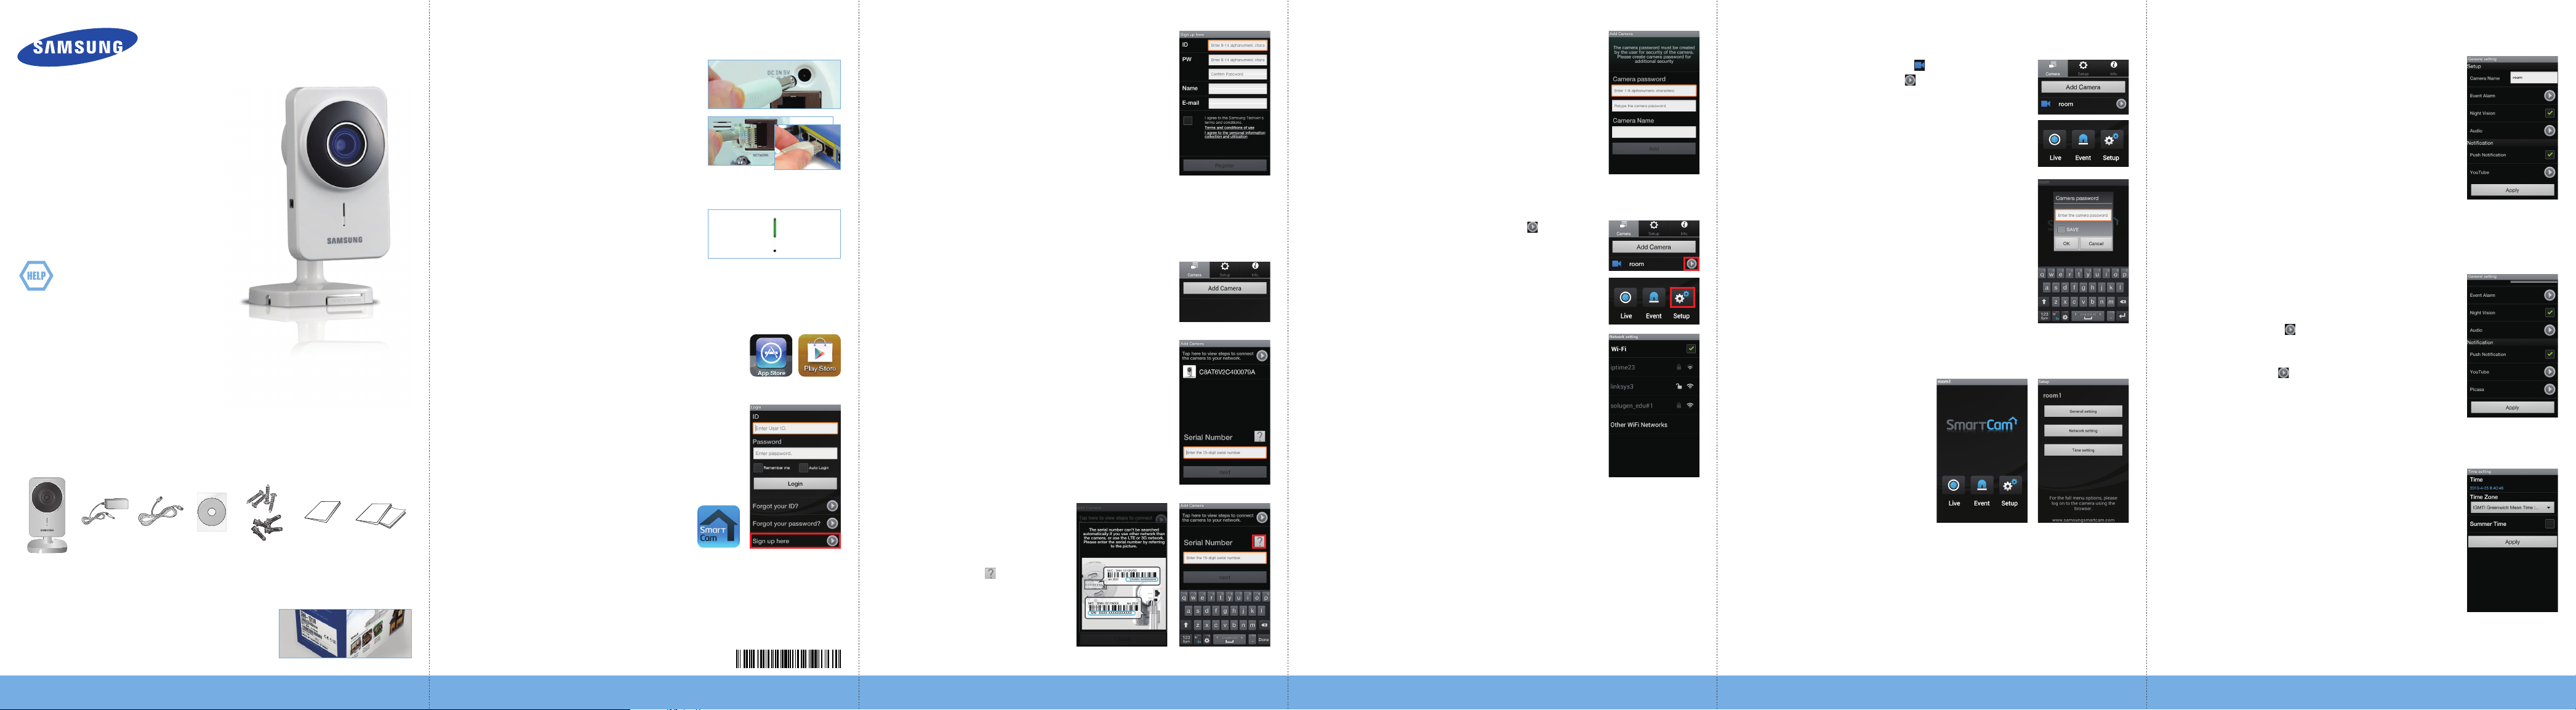
UNPACKING
Make sure all following items are in the packaging:
Camera Adapter Network Cable
Double Sided
Tap e
Screws /
Wall anchors
Quick Start
Guide
Warranty Card /
GPL License
JSave the packaging for later use.
You will need the serial number found on the side of
the packaging.
1.
CONNECTING THE CAMERA TO YOUR ROUTER
1) Connect the power adapter to the
camera.
2) Connect one end of the network cable
to your camera and the other to an
open port on your router.
Once setup is compete, you will no longer
need the network cable and the camera will connect to your WiFi network.
3) The camera status LED will be red for
about one minute. When the camera
is ready for use, the status LED will
change to solid green.
JIf your WiFi router supports WPS feature, refer to the user manual to connect
via WPS button.
2-1.
SETTING UP YOUR ACCOUNT FROM MOBILE PHONE
Download the Samsung Smartcam App on to your
Android phone or your iPhone.
Search keywords for the application: “Samsung
SmartCam”, “Smartcam”, “SAMSUNG TECHWIN”, “TECHWIN”.
1) Run the downloaded application.
2) Tap <Sign up here>.
3) Enter requested information.
4) Check “Agree to the terms and conditions”, and
tap <Register>.
• ID : Create user ID using letters, numbers and periods between
8 -14 characters.
• PW : Create password using letters and numbers except colons
and commas between 8-14 characters.
• Confirm Password : Checks whether your password is entered
correctly.
• Name : Enter your name.
• E-mail : Email address is used to recover your account password.
2-2.
ADDING YOUR CAMERA
1) Log-in.
2) Tap <Add Camera>.
3) Select the camera found and tap <next>.
When your smartphone is connected to the same
WiFi network as the camera, it will automatically
search for the camera.
4) If the camera is not
detected, please enter
the camera serial number
manually.
Tap on [ ] for more
information.
5) Create the <Camera password> and <Camera
Name>, and then tap <Add>.
Create camera password using alphanumeric
characters between 1 to 8 without any space.
Example: 1234
6) Tap <Go To Camera List>.
If you want to add another camera, Tap <Register
new camera>.
2-3.
CONNECTING CAMERA TO WI-FI NETWORK
1) From the camera list, tap on the [ ] for camera
options.
2) Tap on <Setup> icon.
3) Enter the camera password you created for this
camera and Tap <OK>.
4) Tap on <Network setting>.
5) Turn WiFi on.
6) Select your WiFi network and enter your WiFi
network password.
• Other WiFi Networks : Enter the SSID name and password to
connect to the network.
7)
Tap <OK> and unplug the network cable from
the camera and the router.
The camera LED will change from flashing blue to solid green within 30
seconds. This confirms the camera is connected to your WiFi network. You
can now unplug the camera and place the camera anywhere within your
wireless network range. If the camera LED did not change to solid green,
please contact our tech support at 1-877-349-3149.
8) Tap <Back> and select <Live> to see the video.
2-4.
VIEWING LIVE VIDEO
1) Tap on the camera icon [ ] to view live video.
Tap on the arrow icon [ ] for camera options.
2)
Enter the <Camera password> for the camera
selected. This is the same camera password you
created at the time you registered the camera.
Check the <SAVE> option to save the camera
password. Within 20 seconds, it will start streaming.
Video loading time will vary depending on your
internet connection.
2-5.
CAMERA SETUP
Tap the <Setup> icon to
configure a camera to be
monitored.
General setting
1) Tap <General setting>.
2) Configure the basic camera settings.
•
Camera Name : Camera name is used to easily identify the
camera when you have more than one. i.e., Living room, Kitchen,
Bedroom.
• Event Alarm : Specify whether to trigger the alarm or not, and
specify the sensitivity.
The higher the sensitivity is, the subtler motion/audio events will
be detected.
• Night Vision : Set the IR lighting.
Check <Night Vision> to set the camera to switch to the night vision mode automatically.
• Audio : Adjust the volume of the built-in microphone and speaker of the camera as
appropriate.
3) Configure the notification.
• Push Notification : Check to receive push notification to your
phone.
• YouTube : Tap [ ] to enter your YouTube account information
to upload 30 video clips to your YouTube account when event is
detected.
• Picasa : Tap [ ] to enter your Picasa account information to
upload a picture to your Picasa account when event is detected.
4) Tap <Apply>.
Time setting
1) Tap <Time setting>.
2) Set the camera’s clock.
• Time Zone : Select your region.
• Summer Time : Check this option if you live in a country or
region where DST(Daylight Saving Time) is applied.
PT01-001758A
Page 2
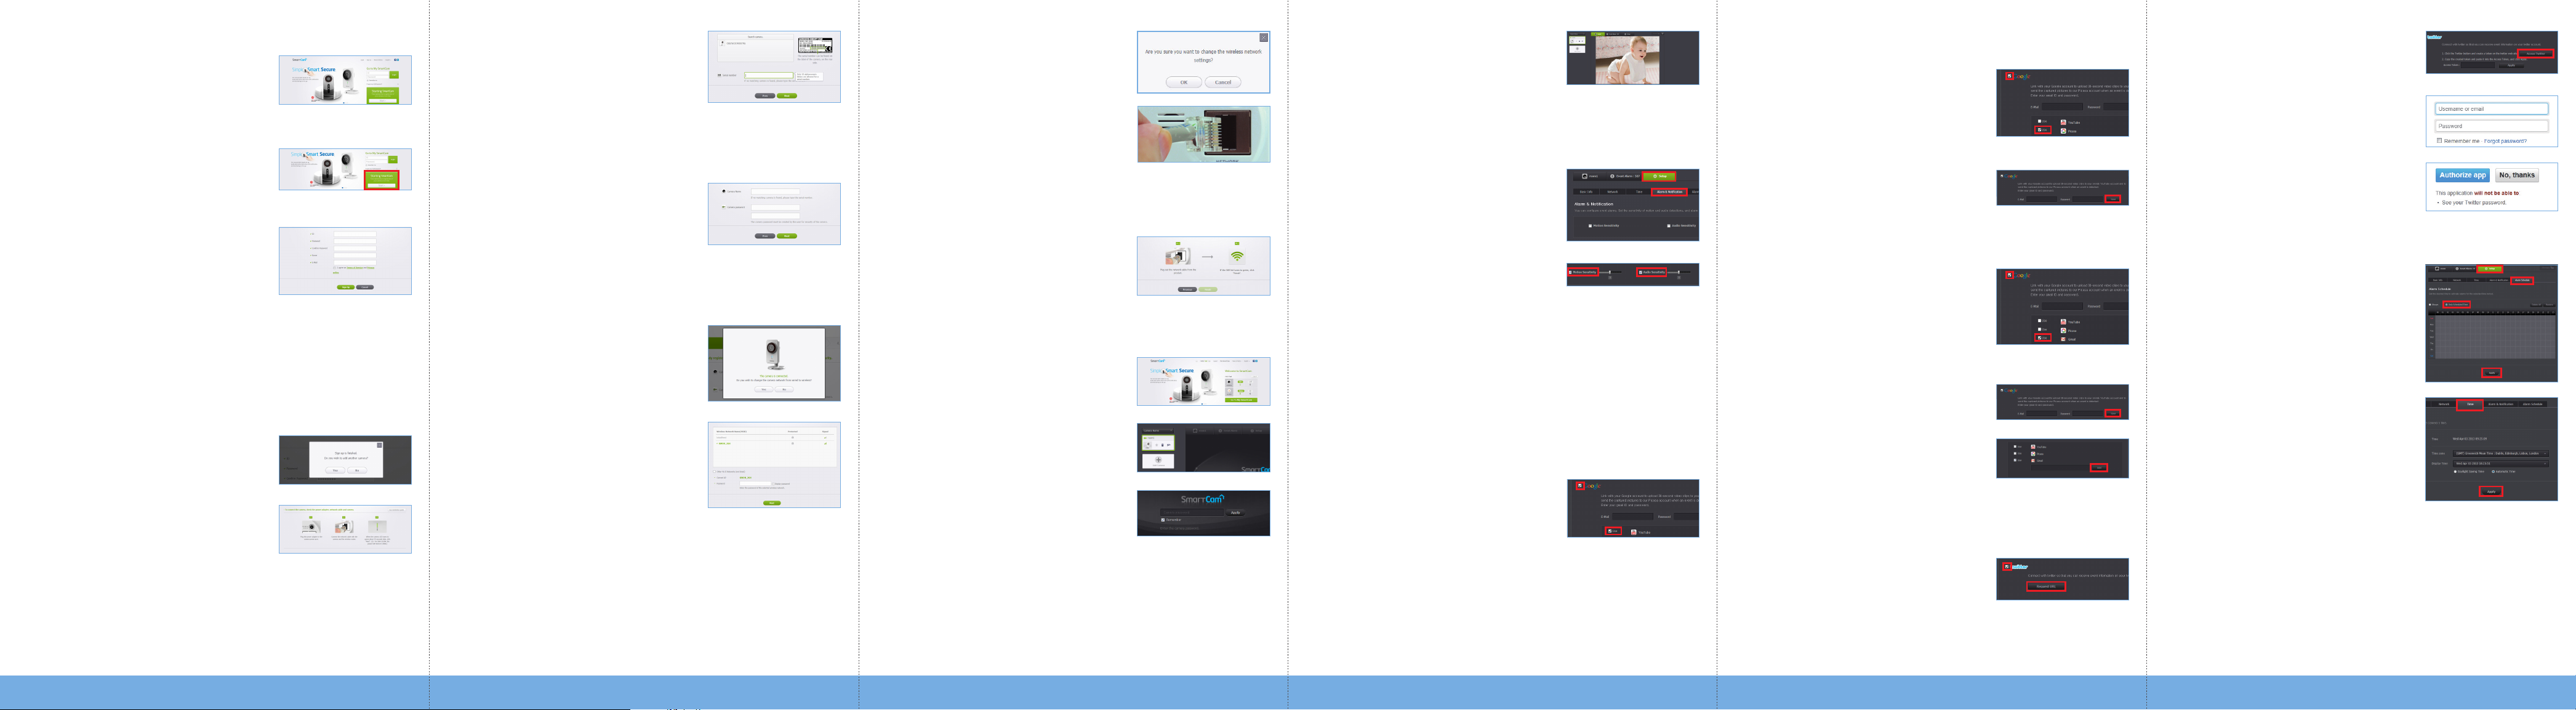
3-1.
SETTING UP YOUR ACCOUNT FROM COMPUTER
1)
From your PC, launch your web browser.
Supported browsers: Internet Explorer 8+,
Chrome, FireFox, Safari
2) Go to http://www.samsungsmartcam.com.
3) Click <Starting SmartCam>.
You need to install your plug in to
automatically search for cameras connected
to the network and view the video in your camera.
4) Create user ID between 8 to 14
alphanumeric character. You can use
letters, numbers and periods.
5) Create password between 8 to 14
alphanumeric character. You can use letters, numbers, periods and
commas between 8-14 characters.
6) Confirm Password.
7) Enter rest of the requested information and click <Sign Up>.
3-2.
ADDING YOUR CAMERA
1) Click <Yes> in the pop-up window of
camera registration after completing
your member sign-up.
2) Click <Next> if the camera LED status
is solid green.
3) Select the serial number of the camera
to be added from the camera search
list.
If the camera is not found, enter the
serial number manually.
The computer and the camera has to be on the same network router to
auto detect the cameras.
4) Click <Next>.
5) Create <Camera Name> and <Camera
password>.
Create camera password using
alphanumeric characters between 1 to 8
without any space. Example: 1234
6)
Click <Next>.
3-3.
CONNECTING CAMERA TO WI-FI NETWORK
1) After adding the camera, click <Yes>
in the wireless network setup pop-up
window.
2)
Select your Wireless Network from the
list.
If your Wireless Network is hidden, select
<Other Wi-Fi Networks (not listed)>.
3)
Enter the password of your Wireless
Network and click <Next>.
Select <Display password> to display the password.
4)
Click <OK>.
5)
Unplug the network cable from the
camera and the router.
The camera LED will turn from flashing
blue to solid green in 30 seconds. This
confirms the camera is connected to your wireless network. You can now
unplug and place the camera anywhere within your wireless network
range. If the camera LED did not turn solid green, please contact our tech
support at 1-877-349-3149.
6) Click <Finish> if the <Finish> button is
activated.
3-4.
VIEWING LIVE VIDEO
1) Click <Go To My SmartCam>.
2) Select a camera from the camera list at
the upper left hand of the screen.
3)
Enter the camera password and click
<Apply>.
JIf you forget the camera password, it must be
reset.
Please refer to the user manual for details.
Check <Remember> to connect the camera without entering the camera
password.
4) When viewing the camera for the first
time, you must install the web viewer
plug-in. Please click on the <Download
Plug-in> and install the plug-in.
Browser will be restarted and you have
to re-login to your account.
3-5.
ALARM & NOTIFICATION
1) Click <Setup>.
2) Select the <Alarm & Notification> tab.
3) Check <Motion Sensitivity> for motion
detection.
Check <Audio Sensitivity> for audio detection.
4) Adjust the sensitivity.
5) Configure the alarm receipt method.
JConfigure Gmail account and password first to use YouTube/Picasa/Gmail.
3-6.
ALARM RECEIPT SETTING
YouTube
Automatically
uploads 30 second clip to your private YouTube
account.
1) Select the Google.
2) Check <Use> of YouTube.
3)
Enter your Gmail address and password.
4) Click <Save to Google>.
JIf you do not have a YouTube account, please go to YouTube.com and register
an account. The recorded videos are 30sec clips.
Picasa
Automatically uploads a image to your private Picasa account.
1) Select the Google.
2) Check <Use> of Picasa.
3)
Enter your Gmail address and password.
If your Google email ID and password are saved, check the use of Picasa only.
4) Click <Save>.
JThe Picasa account information of the user is
the same as the YouTube account.
Gmail
The event alarm is sent through Gmail.
1) Select the Google.
2) Check <Use> of Gmail.
3)
Enter your Gmail address and password.
If your Google email ID and password are
saved, check the use of Gmail only.
4) Click <Save>.
5) Enter your Gmail address to receive the
notification e-mail and click <Add>.
Twitter
When an event is detected, the notification message is sent to
the user’s Twitter account.
1) Select the Twitter.
2) Click <Request URL>.
3) Click <Access Twitter>.
4) Enter the Twitter ID and password.
5) Click <Authorize app>.
3-7.
ALARM SCHEDULE SETTING
1) Click <Setup>.
2) Click the <Alarm Schedule> tab.
3) Select <Only Scheduled Time>.
Select the time slot to enable detection.
4) Click <Apply>.
5) Select the <Time> tab.
6) Select the user’s time zone in <Time
Zone> and click <Apply>.
 Loading...