

Page 1

Electronic Reading & Writing Device
SNE-50K
Contents
Safety precautions
Get started
Books
Memo
Scheduler
User manual
Images
Settings
Appendix
Read this manual thoroughly for proper
use and maintenance instructions.
Page 2

Contents
............................................
Safety precautions
Get started
Unpack
.....................................
.........................................
......................
Get to know your device
Remove the leather case
Insert the battery
Charge the battery
Turn on the device
Use the stylus
..........................
.......................
.....................
............................
Get to know the main menu
........................................
screen
Customize basic settings
Copy files
...................................
..............
.............
...........
3
5
5
6
7
8
9
12
13
14
15
16
Books
View books
Use bookmarks
Delete books
Memo
Create memos
View memos
Delete memos
Scheduler
Create events
View events
Delete events
................................
..............................
............................................
..............................
.....................................
.............................
................................
.............................
...........................
............................
Instructional icons
Before you start, familiarize yourself with the icons you will see in this manual:
Note - notes, usage tips, or additional information
[ ]
Square brackets - device keys; for example: [
(represents the Power key)
]
..........................
20
20
22
Images
View images
Delete images
23
Settings
24
24
25
28
29
29
30
31
©2009 SAMSUNG ELECTRONICS CO., LTD.
•
It is strictly forbidden to copy or use any parts of this manual
without permission from SAMSUNG ELECTRONICS CO., LTD
•
Product specifications or contents of this manual may be
changed without prior notice due to upgrade of product
functions.
Appendix
Reset the device
Use Virtual Printer Driver
Update firmware
Troubleshooting
Specifications
Recycling information
..........................................
...............................
............................
........................................
......................................
........................
............
........................
.........................
.............................
................
32
32
33
34
37
37
38
40
42
43
44
Page 3

Safety precautions
Read the following carefully to ensure your safety and prevent damge to property.
Warning Comply with the following precautions to avoid injuries to yourself or others.
•
Do not touch the USB cable with wet hands, as it may
result in electric shock.
•
Place the USB cable and product away from traffic areas
and other objects so that they are not likely to be stepped
on or pinched by items placed on or against them.
•
Always turn the power off and disconnect the USB cable
when moving the product to reduce the risk of electric
shock, fire, or malfunction of the product.
•
To reduce the risk of fire, do not place the product,
battery or USB cable in direct sun light or near heat
sources such as heaters, candles, mosquito coils.
•
Do not drop the product or subject the product to any
strong impacts.
If the product is damaged, contact a dealer or an authorized service center.
•
If there are unusual noises, a burning smell, or smoke
coming from the product, turn the power off immediately
and contact a dealer or an authorized service center.
•
Do not disassemble, repair, or alter the product on your
own.
If the product is damaged, contact a dealer or an authorized service center.
•
Be careful about the use of batteries.
Using approved batteries may result in explosion. Do not puncture the battery with sharp objects or subject the battery to any strong impacts.
Do not leave the battery in a high temperature environment.
Do not allow the battery to come in contact with water.
Keep the battery away from children and pets. Do not allow the battery terminals to come in contact with metals.
•
Do not apply water or cleanser directly to the product
when cleaning as this may cause the surface of the
product to deteriorate or the product logo and button
indicators to fade.
3
Page 4

Safety precautions
Caution Comply with the following precautions to avoid damage to your device or other equipment.
•
Do not disconnect the USB cable while the file transfer is
in progress, as this may corrupt or erase your data.
•
Do not connect the product to a USB hub.
•
Do not leave the product in high or low temperature
environments or in places with high humidity or exposure
to water sources.
•
Do not place objects with strong magnetic fields near the
product.
•
Do not lay the product face down.
•
Use only Samsung-approved batteries and accessories.
•
Keep all accessories out of the reach of children.
•
Do not expose the product to any chemicals, such as
waxes, benzene, alcohol, thinners, insecticides, air
fresheners, lubricants, or detergents.
•
Use only a soft, dry cloth when cleaning the product, so
it does not scratch the product.
4
Page 5
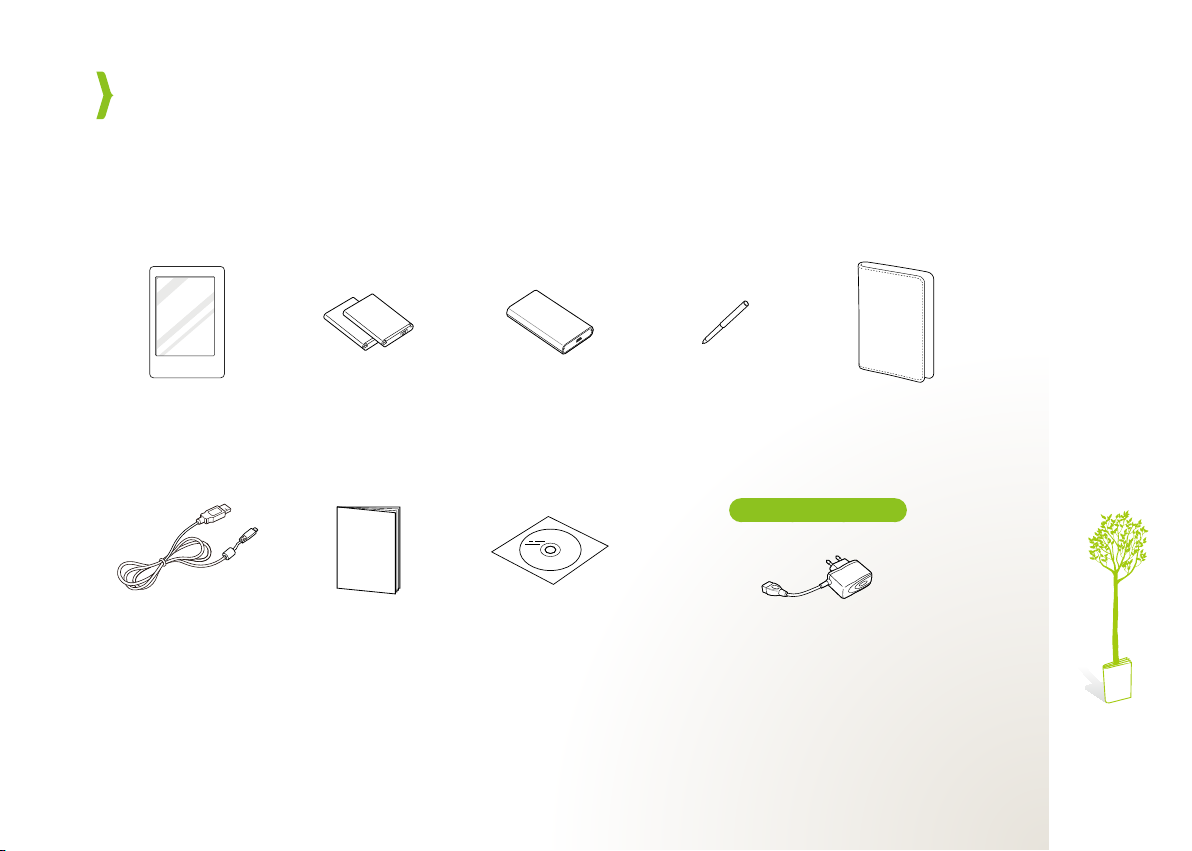
Get started
Unpack
e-Paper Device Batteries (2) Charging cradle Stylus Leather case
USB cable Quick Start Guide
.......................................................................................................................................................................................
Optional accessory
and Warranty
CD-ROM
(User manual and
Virtual Printer Driver)
Adapter
5
Page 6

Get started
Get to know your device
Power button
●
]: Turn the device on or off;
[
Touch screen
Touch buttons
●
[
]/[ ]: (for Books, Images) View previous or next page or image
●
]: (for Books) Add or delete bookmarks (p. 22)
[
.................................................................................................................................
Lock or unlock the touch
screen and buttons
The device is shipped in a leather case. Remove the
device from the leather case before inserting or
removing the battery (p. 7).
When using the touch buttons
●
Operate the touch buttons only with your fingers.
Make sure your hands are clean and dry when
Reset button
USB cable
connection port
Stylus slot
using the touch buttons.
●
Lightly touch the button that corresponds to the
desired function.
●
The touch sensor may not work properly when
wet or in humid places.
6
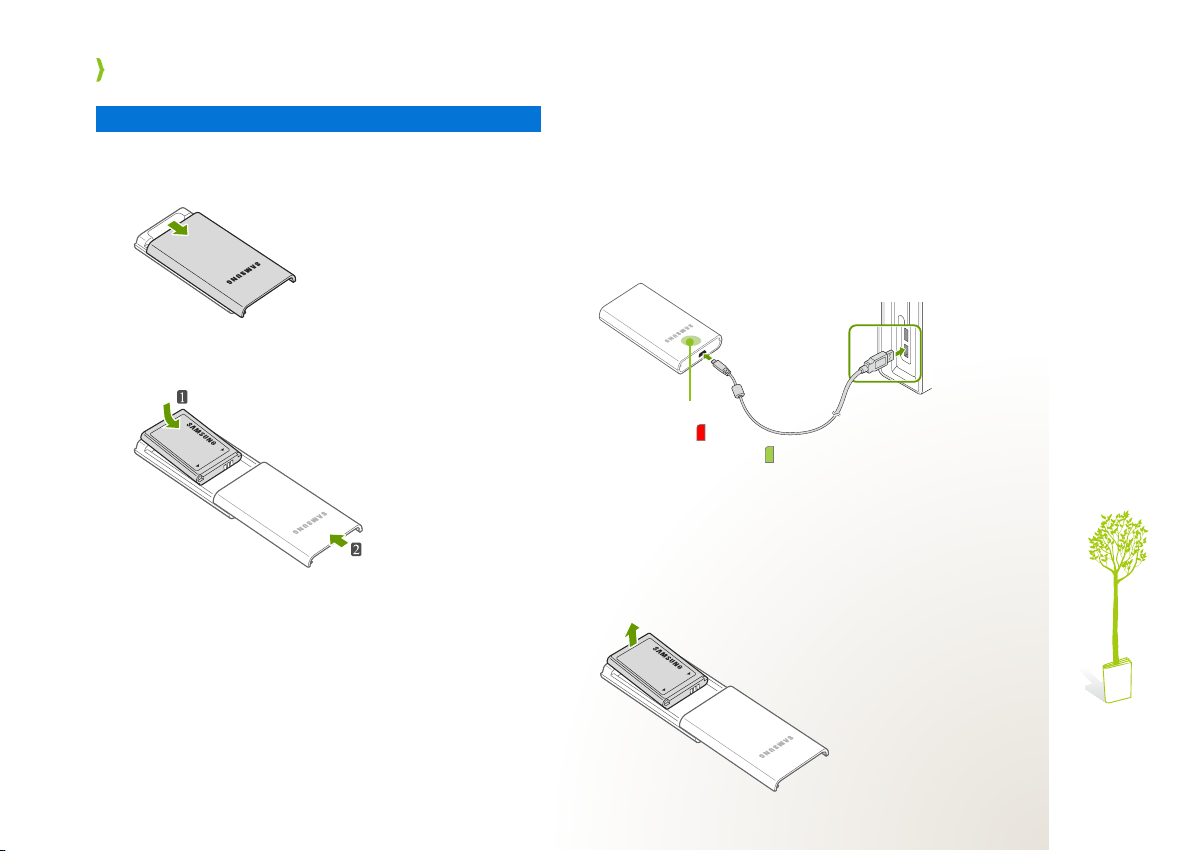
Page 7
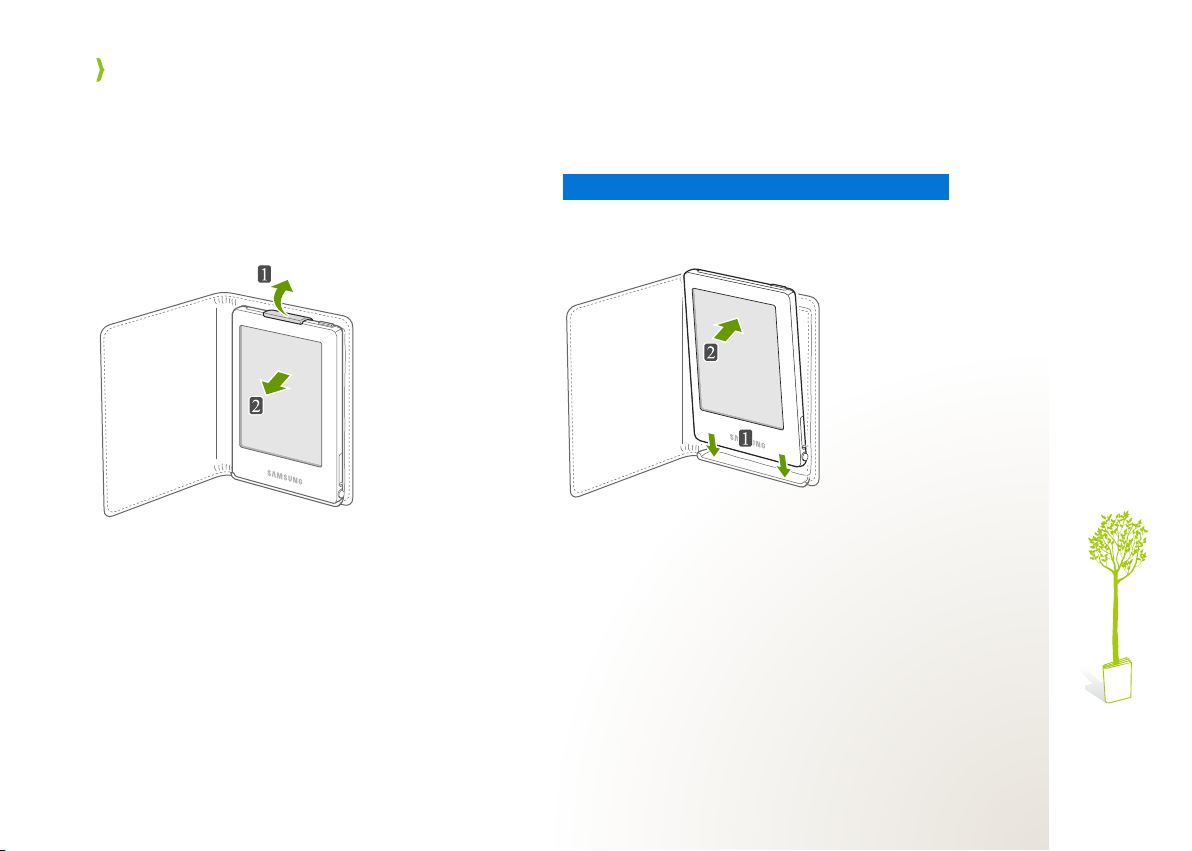
Get started
Remove the leather case
...................................................................................................................................
Put the device inside the leather case
When you carry the device with you, put it in the
leather case for protection.
7
Page 8
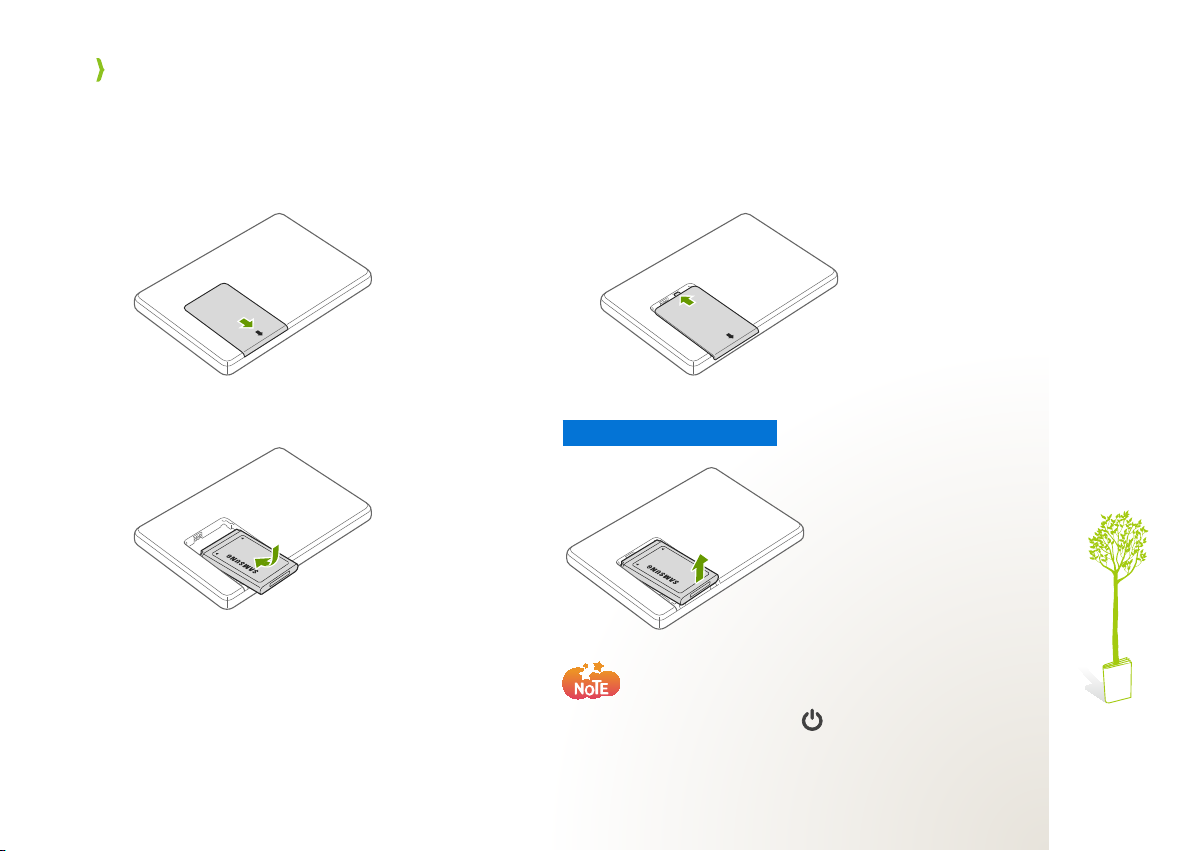
Get started
Insert the battery
Remove the battery cover.
1
Insert the battery.
2
.........................................................................................................................................................
Replace the battery cover.
3
Remove the battery
If the device is on, press and hold [ ] to turn it off.
8
Page 9
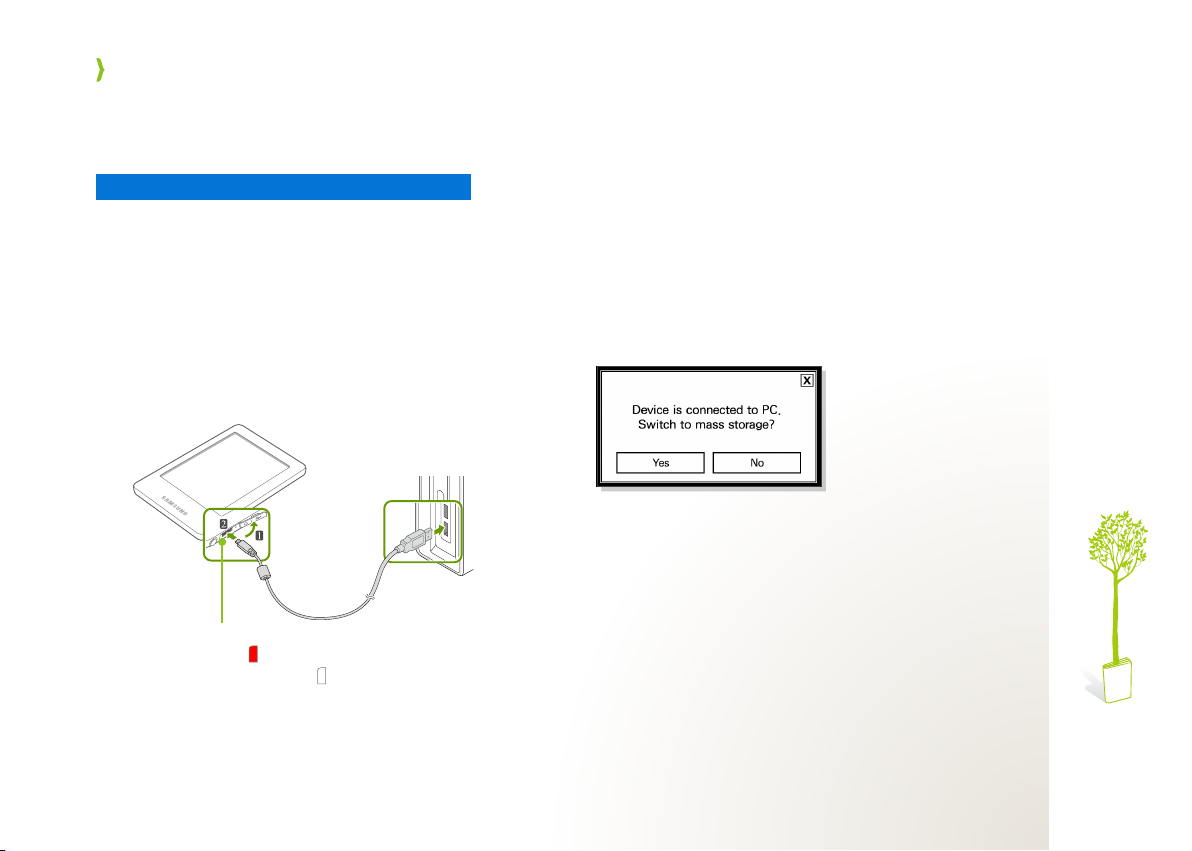
Get started
Charge the battery
Charge the battery inside the device
Open the cover of the USB connection
1
port.
Connect the smaller end of the USB cable
2
to the device and the larger end to the USB
port of a PC.
●
The device will turn on automatically and the
charging indicator will turn red.
Charging indicator
●
Charging:
●
Charging complete:
....................................................................................................................................................
When the pop-up window appears:
3
Select ●Yes
a removable disk.
●
Select
device’s functions. The charging cord will display
on the battery icon.
Disconnect the USB cable when charging
4
is complete.
●
When charging is complete, the charging
indicator will turn off.
to charge the device while using it as
No
to charge the device while using the
9
Page 10
Get started
Charge the battery with the charging cradle
Remove the cover of the charging cradle.
1
Insert the battery and replace the cover.
2
Connect the smaller end of the USB cable
3
to the charging cradle and the larger end to
the USB port of a PC.
●
The charging indicator will turn red.
Charging indicator
●
Charging:
●
Charging complete:
Disconnect the USB cable when the
4
charging is complete, and remove the
battery from the charging cradle.
●
When the charging is complete, the charging
indicator will turn green.
10
Page 11

Get started
Charging and operating time of the battery
●
Do not connect the device to a USB hub.
●
Charging time is approximately 2 hours and 30 minutes.
●
If you use a fully charged battery, you can view approximately 4230 screens (pages or images) for 5 seconds.
●
The charging and operating time of the battery may vary according to the charging condition, environment, and length of use.
●
When charging the battery with a laptop, ensure that the laptop has adequate power.
●
You can charge the battery by connecting the device directly to a power outlet with a third-party adapter.
●
The battery will consume power even when the device is not in use and the maximum operating time will gradually shorten.
If the maximum operating time decreases by more than half, it is time to buy a new battery.
11
Page 12
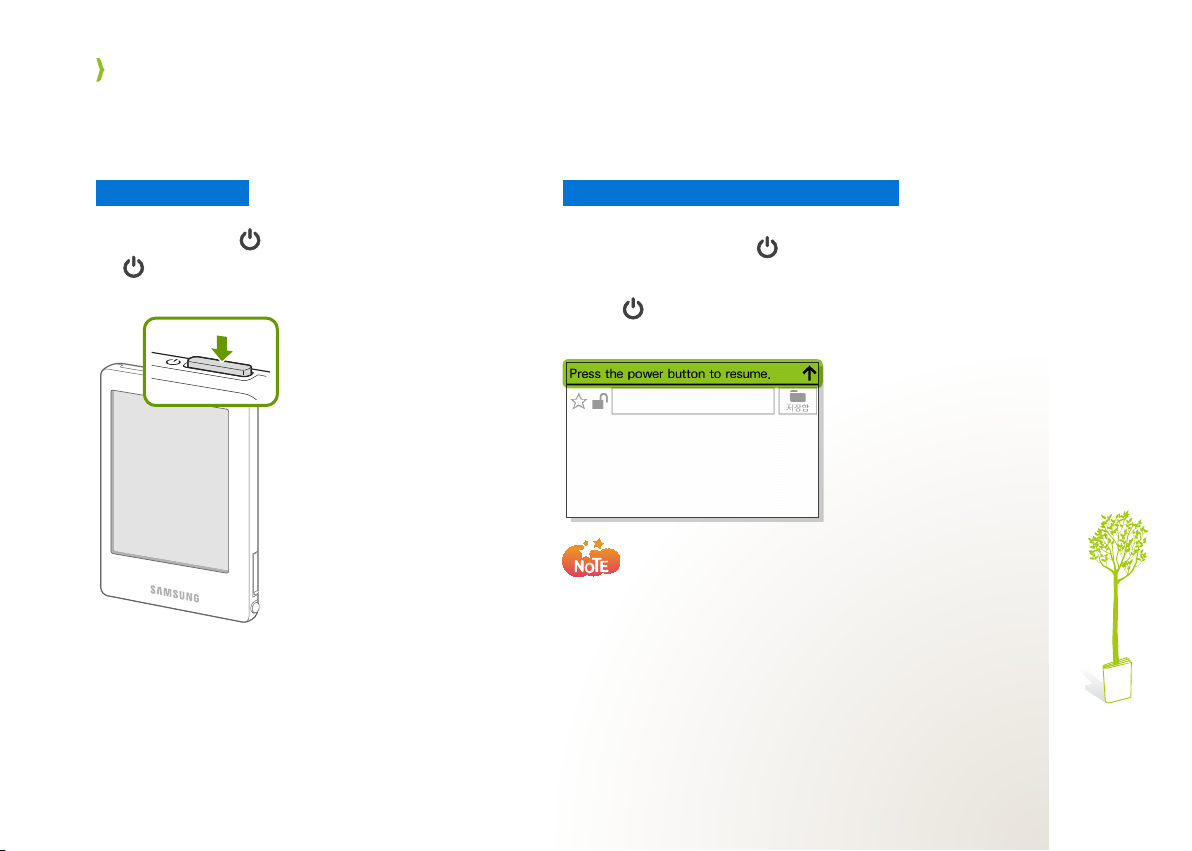
Get started
Turn on the device
Turn on or off
Press and hold [ ] to turn the device on or off.
[ ●] will turn blue and the main menu screen will
display.
....................................................................................................................................................
Lock or unlock the touch screen
When you do not use the screen for a certain
period of time or press [
the touch screen and buttons will be locked.
Press [ ] to unlock the touch screen and
buttons.
You can change the time delay before the touch screen and
buttons are locked (Sleep Time Setting → p. 35).
] while using the device,
12
Page 13

Get started
Use the stylus
With the stylus, you can select menus, perform functions, or write on the screen.
Romove or store the stylus
....................................................................................................................................................................
Work with the stylus
To remove the stylus,
push it gently until it
disengages from the
device, and then pull
the stylus out of the
stylus slot.
To store the stylus,
push the stylus into
the stylus slot until it
locks in place.
Write characters on the touch screen.
ABC
The device only recognizes inputs from the provided stylus.
Be careful not to lose it. If you lose your stylus, you can buy
a new one from a Samsung service center.
Tap menus or options
with the tip of the stylus.
●
The stylus may not work properly when wet. Do not allow
the stylus to come in contact with water.
●
The touch screen may not recognize the stylus’ inputs if you
hold it at an extreme angle. For example, there may be a
maximum 2 mm error with a 30° angle of the stylus.
13
Page 14
Get started
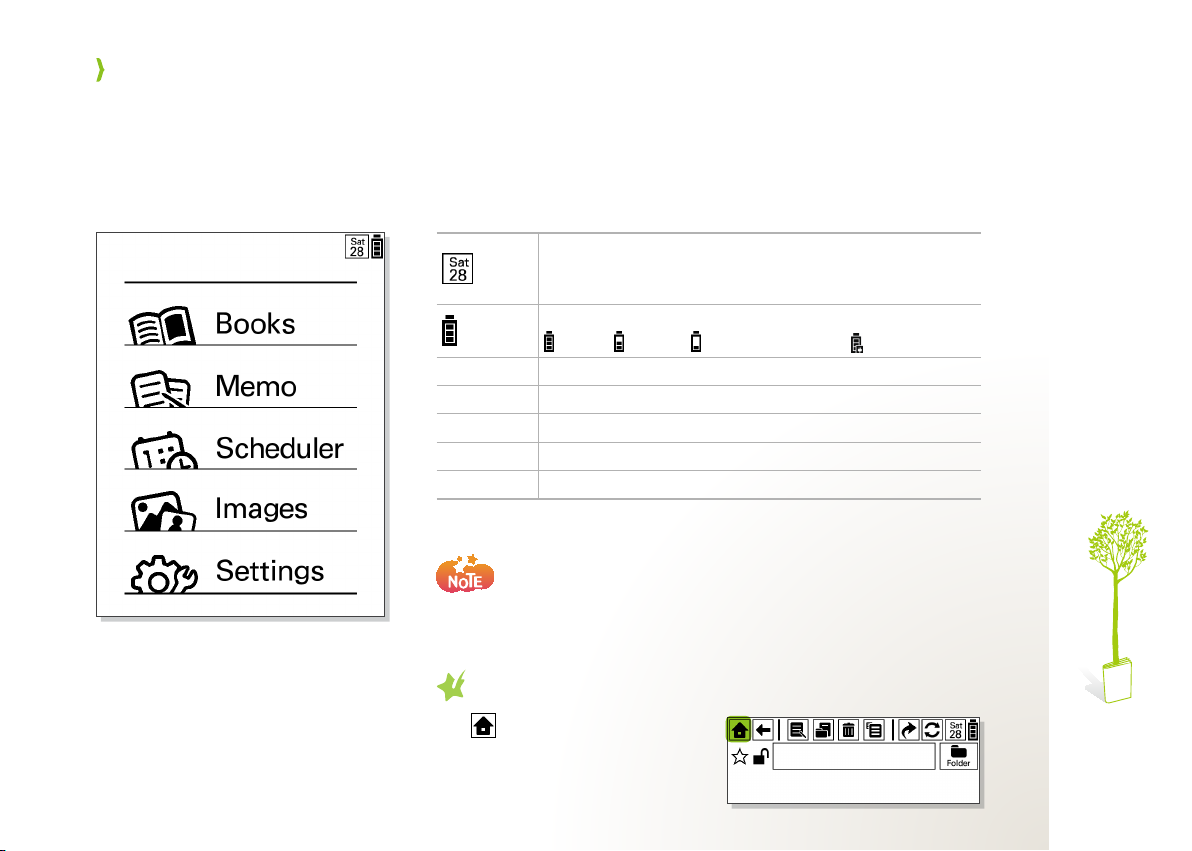
Get to know the main menu screen
The main menu screen will display when the device turns on. You can view books or images, create memos
or events, and customize device settings.
Books
Memo
Scheduler
Images
Settings
* When the USB cable is connected, the same icons will display even when the
battery is not inside the device.
You can set other functions to be activated instead of the main menu when you
turn on the device (Starting Mode → p. 35).
Directly access the main menu screen
..............................................................................................
Display the current date and day (p. 15)
●
Tap to display detailed information such as the current
time.
Battery icon
: Full : Low : Needs charging *: Charging
View books (ePUB, TXT) (p. 20)
Create and view memos (p. 24)
Manage events (p. 29)
View images (BMP) (p. 32)
Customize settings (p. 34)
while you are using any
Tap
other functions.
14
Page 15

Get started
Customize basic settings
Select a language and set the current date and time.
Select a language
In the main menu screen, tap 1 Settings
Language
Tap
2
●
The language setting will save automatically.
.
한국어 or
English
.
.................................................................................................................................
→
Set the current date and time
In the main menu screen, tap 1 Settings
Clock Set
Tap
2
and time.
●
The date and time settings weill save
automatically.
.
or to set the current date
→
Date
Time
15
Page 16

Get started
Copy les
Transfer files from a PC to view on your device. You can also transfer memo or schedule files to a PC.
Connect the device to a PC with the USB cable.
1
When the pop-up window appears, tap 2 Yes
The message ‘ ●Connected to PC
Click 3 My Computer
●
The name of the removable disk may vary by the PC.
................................................................................................................................................................................
to connect .
’ will display on the screen.
on the PC and select the new removable disk.
16
Page 17

Get started
Open a folder to view files.
4
Firmware_Update
Books/Images/
Memo/Scheduler*
* Do not change the folder or file names. The device may not work properly or it may take longer for the device to turn on
after ending the mass storage connection.
New firmware files to be upgraded
Book/image/memo/event files saved in the device
17
Page 18

Get started
Transfer files from the PC to the device or vice versa.
5
●
If you transfer a file with a format that is not supported by the device, it may not display on the file list.
Check the file formats supported by the device (Books → p. 20, Images → p. 32).
●
The maximum capacity for a removable disk is 430MB. New files will not be saved when this limit is reached.
●
Do not connect the device to a USB hub.
18
Page 19

Get started
End the mass storage connection
Make sure to end the connection properly to prevent damage to the device or your data.
Click 1 on the Windows taskbar.
Click the pop-up message.
2
Disconnect the USB cable only when the message says that it is safe to remove the hardware.
3
●
Do not disconnect the USB cable while the files are being transferred as this could result in loss of data or damage to the device.
●
The connection will not end if you have device files open on the PC. Close all device files and try again.
19
Page 20

Books
View document files (ePUB, TXT format) saved in the device (Copy files → p. 16).
View books
Title
Author
Publisher and
date saved
To download book contents, refer to the
instructions provided by the content provider.
...........................................................................................................................................................................
Current list/Total number of lists
In the main menu screen, tap 1 Books
Tap a tab you want.
2
Recently
Downloaded
By Title
TXT File
Tap a book title.
3
Select ●Last Viewed
document you viewed last.
/
/
View ePUB files by date downloaded
View ePUB files in alphabetical order
View TXT files
when you want to return to the
Go to the main menu screen
Return to the previous screen
Access the
Refresh the current screen
View the previous or next list
View the first or last list
Memo, Scheduler
.
, or
Images
menu
20
Page 21

Books
View the book.
4
When the document size is large, the message ‘ ●Loading
temporarily display at the bottom of the screen. While loading the
document, you can view the contents or access other pages.
Go to the main menu screen
Return to the previous screen
Select a font size
Add or remove bookmarks (p. 22)
View the bookmarks list
View the table of contents for the current document
...
’ will
Current list/Total number of lists
Access the
Refresh the current screen
View the previous or next screen
/
/
View the table of contents
Select
●
A table of contents will not be provided for TXT files.
Tap the list number on the bottom of the screen and enter the
number of the specific page you want to access.
to view the table of contents for the current document.
Access a specific screen
●
You can also touch [
Skip chapters
Memo, Scheduler
]/[ ].
, or
Images
menu
21
Page 22

Books
Use bookmarks
Add bookmarks to directly access corresponding pages.
Add a bookmark
Add a bookmark at an important location.
Locate a page that you want to bookmark.
1
Tap 2 or touch [ ] at the bottom of the
device.
The message ‘ ●Bookmarked
bottom center of the screen.
●
Tap
or touch [ ] to delete the bookmark.
..............................................................................................................................................................
’ will display at the
View a bookmarked page
Directly access a bookmarked page.
Tap 1 or touch [ ] at the bottom of the
device while viewing a book.
Tap a bookmark on the bookmark list.
2
●
The corresponding page will display.
View the book.
3
Delete a bookmark
Delete a bookmark that you added previously.
Tap 1 or touch [ ] at the bottom of the
device while viewing a book.
2
3
Tap
list.
Tap
on one of the bookmarks on the
Yes
to confirm deleting.
You can tap or touch [ ] at the bottom of the device to
delete a bookmark on the current page.
22
Page 23

Books
Delete books
Delete a book file.
......................................................................................................................................................................
In the book list, tap a tab.
1
Recently
Downloaded
By Title
TXT File
Tap 2 to the right of of a book title.
Yes
Select
3
View ePUB files by date downloaded
View ePUB files in alphabetical order
View TXT files
to confirm deleting.
23
Page 24

Memo
Write important information in your device, save it, and view it whenever you want.
Create memos
Title input
field
Text input
field
Pen thickness Eraser size
Memos will be saved in
to change the folder where memors are saved
(Use memo folders → p. 26).
ABC
Select a pen thickness
and write a memo with
the stylus.
..................................................................................................................................................................
Default Folder
. Tap
In the main menu screen, tap 1 Memo
Tap
2
Using the stylus, write the memo in the text input field.
3
and then tap
●
If this is your first memo, you can skip this step.
Go to the main menu
screen
Return to the previous
screen
Create a new memo
View a list of saved
memos
Delete the current page
View full screen;
View default screen
Access the
Images
, or
menu
Refresh the current
screen
Yes
Scheduler
Books
on the pop-up window.
,
.
Add or remove the
current from to the
/
favorites list
Lock or unlock the
/
memo
Select a folder to save
the current memo
View the previous or
next memo; View the
previous or next page
/
of the current memo;
Skip 5 pages backward
or forward
Add a new page to the
current memo
Clear all inputs on the
current page
Select a memo layout
24
Page 25

Memo
View memos
View memos saved in the device.
Dates with
saved memos
The currently
selected date
Today’s date
Memo list
▲Viewof
......................................................................................................................................................................
Search By Date
Tap 1 on the memo input screen.
Tap a tab.
2
All List
Folder List
Search By
Date
List
★
Tap a memo title.
3
For ●Folder List
or a date.
View the memo.
4
Tap ● to create a new memo (Create memos → p. 24).
View all saved memos
View folders to locate memos
View memos by date saved
View memos on the favorites list (p. 27).
and
Search By Date
tabs, first tap a folder
25
Page 26

Memo
Use memo folders
Select a folder where memos will be saved and manage folders.
Tap 1 on the memo input screen.
Tap a tab and a memo title.
2
Tap 3 .
Manage memo folders with the following options.
4
/
/
Select a folder where memos will be saved
Move a folder up or down the list
Change a folder name
Delete a folder
Add a folder
●
You can add up to 30 folders.
When you are finished, tap 5 .
You can tap ● while writing a memo to change the memo folder (p. 24).
●
The memos will be saved in
specified.
●
When you delete a memo folder, any memos storeed in the folder will
automatically be moved to
Default Folder
Default Folder
when a memo folder is not
.
26
Page 27

Memo
Save memos in the favorites list
Save the memos you frequently use in a favorites
list to access them quickly and easily.
On any of your memors, tap .
●
The memo will be saved in the
●
to remove the memo from the list.
Tap
In the favorite list
Not in the favorites list
★
List
folder.
Lock memos
Lock memos so no one can access them without
a password except you.
On any of your memos, tap .
Tap ● to unlock the memo.
Locked memos
Unlocked memos
27
Page 28

Memo
Delete memos
Select and delete a memo.
..................................................................................................................................................................
Saved dates
Delete memos
Tap 1 on the memo input screen.
Tap a memo title, and then tap
2
Tap
Yes
3
Delete a single page of a memo
Tap 1 on the memo input screen.
Tap a memo title.
2
Tap 3 / to move to a page, and then tap .
Tap
4
to confirm deleting.
Yes
to confirm deleting.
.
28
Page 29

Scheduler
Create events or anniversaries to manage your schedule.
Create events
YEAR
▲
view
ABC
.....................................................................................................................................................................
D-Day
MONTH
▲
Birthday
Holiday
view
Text input field
Eraser sizePen thickness
In the main menu screen, tap
1
Tap a tab (
2
Tap a date and write details with the stylus.
3
For ●YEAR
calendar.
●
For
bottom of the screen.
* Not displayed on the
Year, Month, or Day).
and
MONTH
DAY
view, write on the text input field at the
Go to the main menu screen
Return to the previous screen
Access the
menu
Refresh the current screen
/
View the next or previous month*
Clear the input on the current page
views, write directly on the
Images, Books
Year
view.
Scheduler.
, or
Memo
29
▲
DAY
view
Page 30

Scheduler
View events
Dates with
events
Currently
selected date
Today’s date
Text input field
..........................................................................................................................................................................
View yearly or monthly events
ABC
In the main menu screen, tap 1 Scheduler
YEAR
or
Tap the
2
Tap
3
event.
View daily events
In the main menu screen, tap 1 Scheduler
Tap the
2
Tap
3
Tap a date.
4
/ to scroll to year or month and view an
DAY
/ to scroll to year or month.
Dates with an event will be marked with ● in the top left
corner.
MONTH
tab.
tab.
.
.
▲
DAY
view
30
Page 31

Scheduler
Delete events
ABC
DAY
view
▲
......................................................................................................................................................................
In the main menu screen, tap
1
Tap a tab (
2
Tap date.
3
Tap an eraser size and use the stylus to delete your input.
4
●
Tap
Year, Month, or Day).
→
Yes
to clear all inputs on the selected date.
Scheduler.
31
Page 32

Images
View images (BMP format) saved in the device (Copy files → p. 16).
View images
........................................................................................................................................................................
In the main menu screen, tap 1 Images
Go to the main menu screen
Return to the previous screen
Refresh the current screen
Tap an image.
2
View the image.
3
Return to the previous screen
Access the
View the previous or next image
/
The maximum resolution supported by the device is 600 × 800.
This is also the optimal resolution for the device. You can automatically convert
the resolution and format of the image to be optimal for the device by using the
Virtual Printer Driver provided on the CD-ROM (Use Virtual Printer Driver → p. 38).
●
You can also touch [
Books, Memo
]/[ ].
.
, or
Scheduler
menu
32
Page 33

Images
Delete images
Delete an image.
...................................................................................................................................................................
In the main menu screen, tap
1
In the image list screen, tap
2
name.
Tap
Yes
3
to confirm deleting.
Image.
to the night of an image
33
Page 34

Settings
Customize the screen settings such as language, starting mode, and sleep time setting, upgrade firmware, or
reset settings.
In the main menu screen, tap 1 Settings
Go to the main menu screen
Return to the previous screen
Refresh the current screen
Tap an option to customize the settings.
2
.
34
Page 35

Settings
Language
Starting Mode
Auto Refresh
Setting
Clock Set
Sleep Time Setting
Select a language to display (p. 15).
Select a menu to display when the device turns on.
Home ●: View the main menu screen (p. 14).
Books ●: Activate the books menu (p. 20).
Memo ●: Activate the memo menu (p. 24).
Last Mode ●: Activate the last function used.
When
Books
or
Therefore, if you turn the device off and on while reading a book, the device will load
the last page you were viewing and it may take some time.
Set the screen to refresh after a selected number of pages.
Every Single Page ●: Refresh every time the screen changes.
Every Third Page ●: Refresh when the screen changes 3 times.
Every Fifth Page ●: Refresh when the screen changes 5 times.
Every Tenth Page ●: Refresh when the screen changes 10 times.
Off ●: Deactivate the auto refresh function.
●
The screen will blink briefly after the selected interval.
●
You can see an after-image due to the characteristics of the screen.
To remove any after-image, refresh the screen by selecting .
Set the current date and time (p. 15).
Set the screen to lock automatically after a certain period of time
(
5 min, 10 min, 20 min, 30 min
Last Mode
is selected, the device will save the last function you used.
).
35
Page 36

Settings
Manage Password
Set a password (4-digit number) to lock memos.
Enter the current password by tapping the virtual keys.
1
●
The default password is 0000.
Enter a new password.
2
Enter the new password again.
3
Tap 4 OK
to confirm.
Currently selected cell
Delete all numbers entered
Delete the previous digit
Device Lock
Firmware Update
Reset setting
Product
Information
Set the device to ask the password when the device turns on.
Update the device with the latest firmware (p. 40).
Reset all settings to the default settings (p. 37).
View product information, such as model name, memory usage, firmware version, or copyright.
36
Page 37

Appendix
Reset the device
Use the reset hole
When the device does not respond properly or will
not turn off, press and hold the reset button to
reset the device. The saved files and customized
settings will be maintained.
............................................................................................................................................................
Press and hold the
reset button with
your stylus.
Reset all settings
Reset all settings to the factory defaults.
In the main menu screen, tap 1 Settings
Reset setting
Yes
Tap
2
●
All customized settings will be reset.
When you are finished, tap 3 OK
.
to confirm.
.
→
37
Page 38

Appendix
Use Virtual Printer Driver
Virtual Printer Driver is provided on the CD-ROM. You can use this driver to automatically convert the
resolution and format of book and image files for viewing on your device.
To install the program, insert the CD-ROM into a PC, select install
Connect the device to a PC using the USB cable.
1
When the pop-up appears, tap 2 Yes
The message ‘ ●Connected to PC
Open a book or image file on the PC.
3
5
Click 4 File
Select
→
Print
to open the printing dialog box.
SNE-Series Virtual Printer
’ will display on the screen.
............................................................................................................................
Virtual Printer Driver
to connect.
from the printer drop-down menu.
, and follow the on-screen instructions.
38
Page 39

Appendix
Click 6 OK
When the pop-up window appears, click
7
●
Double-click the file name to preview the converted file.
8
Click 9 Continue
.
OK
.
Check the checkbox and enter a new name to rename the converted file.
.
The converted files will be saved in the ●Images
Images
accessing the
folder.
folder of your the device. You can view the converted files by
39
Page 40

Appendix
Update rmware
Download and install the latest firmware from the Samsung Electronics web page
(http://www.samsung.com/sec/).
Connect the device to a PC using the USB cable.
1
●
If the device is turned off, it will turn on automatically when connected to the PC.
When the pop-up window appears, tap 2 Yes
The message ‘ ●Connected to PC
..........................................................................................................................................................
.
’ will display on the screen.
Use your browser to access the Samsung Electronics web page.
3
Enter the model name (4 SNE-50K
) to search for the firmware.
40
Page 41

Appendix
Open 5 My Computer
●
The name of the removable disk may vary by the PC.
Transfer the new firmware to the 6 Firmware
Safely remove the removable disk from the PC and disconnect the USB cable (p. 7 19).
In the main menu screen of your device, tap
8
When the pop-up window appears, tap
9
●
The firmware will be updated.
on the PC and select the new removable disk.
folder.
OK
Settings
.
→
Firmware Update
.
●
When the update is complete, the device will be restarted automatically.
●
Do not disconnect the USB cable or turn the device off while the update is in progress.
You can check the current firmware in ●Product Information
(p. 36).
41
Page 42

Appendix
Troubleshooting
If you are having trouble with your device, try these troubleshooting before contacting a service professonal.
Issue
I pressed the power button but
the device will not turn on.
The device will not charge even
with the USB cable connected.
The device will not turn on even
with the USB cable connected.
The screen is constantly locked.
The time setting is not correct.
Image files in BMP format will
not display on the screen.
...........................................................................................................................................................
Resolution
●
Connect the USB cable to charge the battery.
Disconnect the USB cable and then press the reset button with the stylus (p. ●37).
Ensure the USB cable is connected properly.
Check the connection between the device and the USB cable.
In the main menu screen, select
delay.
The current time settings may be lost when the battery discharges completely. Set
the current time again.
The maximum resolution supported by the device is 600 x 800. Image files with a
higher resolution will appear on the file list, but the image itself will not display on the
screen.
Settings
→
Sleep Time Setting
to change the time
42
Page 43

Appendix
Specications
Model name
Panel
Hardware
Touch
screen
Software
Product
USB cable
* Specifications are subject to change without prior notice.
SNE-50K (Sevice model name: LD05E5)
Type Active Matrix Electrophoretic Display
Resolution 600 x 800 pixels
Color 8-Level Gray Scale
Flash memory 512MB (Removable disk memory: 430MB)
USB Device 2.0
Voltage When connected to a PC USB 5V
Battery Li-Ion 960mAh
Type Electro-Magnetic Resonance (EMR)
Resolution 2028ppi
OS Linux 2.6.12
Dimensions
(W x H x D)
Weight 0.2kg
1.5M /Micro-B type
....................................................................................................................................................................
96mm x 143mm x 9mm
43
Page 44

Appendix
Recycling information
●
If you buy a new product from a Samsung dealer, we will take the old one for free when delivering the new
product.
●
If you dispose of the old product without buying a new one, you need to contact your local office or
recylcling centre for details.
........................................................................................................................................
Green Business of Samsung Electronics
Samsung set up an its environmental policy to prevent polluting the environment
in June, 1992 and announced ‘Green Business’ initiative in May, 1996.
The Green Business mark represents that Samsung regards environmental
protection, safety, and health as inherent factors of its production activities.
Samsung is dedicated to developing environmentally-friendly products and
raising awareness of environmentally-sound production practices.
Class B Digital Device (Broadcasting and communication appliance)
This device has been tested and found to comply with the limits for a Class B Digital Device.
This device is marketed for installation and use in residential areas (Class B digital devices must meet stricter
RF emission limits than Class A digital devices.).
Software License
This product uses parts of the software from the Independent JPEG Group.•
This product uses parts of the software from the Mozilla Public License.•
This product uses parts of the software owned by the Freetype Project (www.freetype.org). •
This product uses some software programs which are distributed under the GPL/LGPL license. •
Accordingly, the following GPL and LGPL software source codes that have been used in this product can be provided after
asking to vdswmanager@samsung.com.
GPL software: Linux Kernel, Busybox, Binutils / LGPL software: Glibc
44
Page 45

Samsung service center
1588-3366
Contact the Samsung service
center to get more information
or solve problems with your
device.
Call center
02) 541-3000
080) 022-3000
Samsung Electronics web page
http://samsung.com/sec/
The company that provides
high-quality customer services
The mark, issued by the Korean
Ministry of Knowledge Economy,
recognizes companies that
provide high-quality customer
services.
 Loading...