


Features of your new Refrigerator
KEY FEATURES OF YOUR NEW REFRIGERATOR
Your Samsung French Door Refrigerator comes equipped with various innovative storage and energy-efficient features.
t Twin Cooling System
The Refrigerator and Freezer have separate evaporators. Due to this independent cooling system, the Freezer and Refrigerator cool more efficiently.
Additionally, this separate air flow system prevents food odor of one compartment from seeping into other compartments.
t $PPM 4FMFDU 1BOUSZ 3'
The Cool Select pantryTM is a full-width drawer with adjustable temperature control.
t #JHHFS 8JEFS 4QBDF
The wide shelf area and pantry provide enough space for larger items like a pizza box, etc. The wide freezer drawer also provides enough space for 2~3 turkeys.
t 4FDVSF "VUP $MPTF
The Secure Auto Close feature will automatically close a door that is slightly open.
t $PNQBDU *DF .BLFS
The Ice maker can dispense cubed or crushed ice.
t %JHJUBM %JTQMBZ BOE 5FNQFSBUVSF $POUSPM t 8BUFS 'JMUSBUJPO 4ZTUFN
t %PPS "MBSN
A helpful beeper alerts you if door is ajar.
t 5JMUJOH 1PDLFU
The Tilting pocket can be used to store up to a 16” pizza.
t "VUP 1VMM 0VU %SBXFS
The upper drawer in the freezer comes out automatically as you just open the freezer door.
t &BTZ )BOEMF
Freezer door can be opened with less effort.
t &OFSHZ 4UBS
Energy star labeled this product could save your energy costs.
For easy future reference, write the model and |
Model # |
|
serial number down which can be found on the left |
Serial # |
|
side of the refrigerator. |
|
|
|
||
2_ Features
Safety Information
4"'&5: */'03."5*0/
Before using your new Samsung French Door Refrigerator, please read this manual thoroughly to ensure that you know how to safely and efficiently operate the features and functions that your new appliance offers.
Because the following instruction covers various models, the characteristics of your Refrigerator may differ slightly from the Refrigerator described in this manual. If you have any question, contact us at 1-800-SAMSUNG or find help and information online at www.samsung.com.
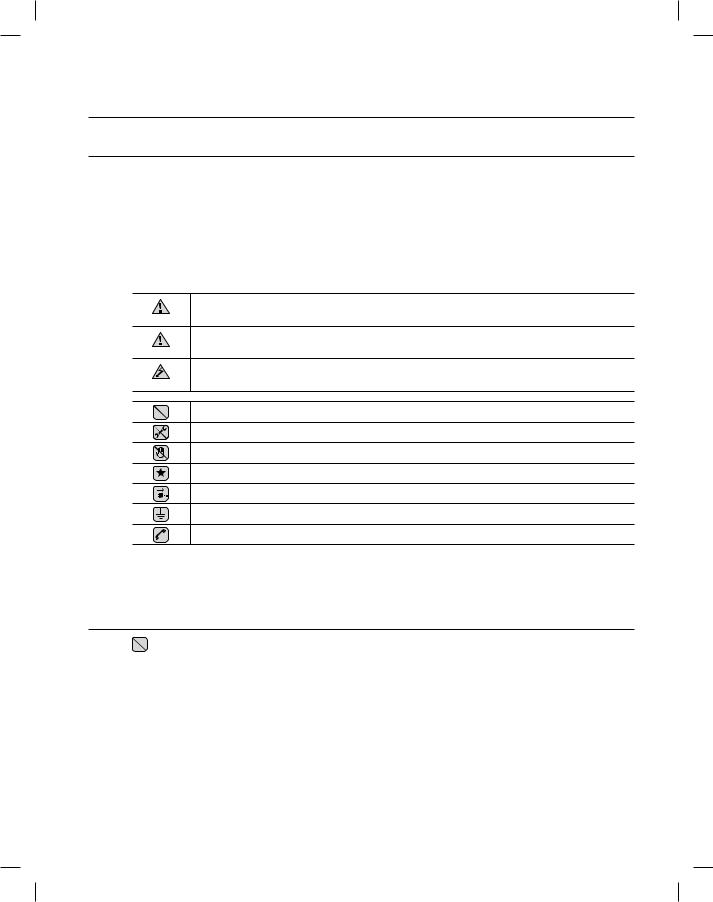
What the icons and signs in this user manual mean :
WARNING Hazards or unsafe practices that may result in TFWFSF QFSTPOBM JOKVSZ PS EFBUI.
Hazards or unsafe practices that may result in NJOPS QFSTPOBM JOKVSZ PS QSPQFSUZ
CAUTION EBNBHF.
To reduce the risk of fire, explosion, electric shock, or personal injury when using your CAUTION refrigerator, follow these basic safety precautions:
Do NOT attempt.
Do NOT disassemble.
Do NOT touch.
Follow directions explicitly.
Unplug the power plug from the wall socket.
Make sure the machine is grounded to prevent electric shock.
Call the service center for help.
5IFTF XBSOJOH TJHOT BSF IFSF UP QSFWFOU JOKVSZ UP ZPV BOE PUIFST 1MFBTF GPMMPX UIFN FYQMJDJUMZ ,FFQ UIJT NBOVBM JO B TBGF QMBDF GPS GVUVSF SFGFSFODF
SEVERE WARNING SIGNS
%P OPU QMVH TFWFSBM BQQMJBODFT JOUP UIF TBNF QPXFS SFDFQUBDMF
t Large appliances draw a lot of power. Powering more than one appliance or machine from a single power source could cause overheating and cause a fire.
.BLF TVSF UIBU UIF QPXFS QMVH JT OPU LJOLFE PS EBNBHFE CZ UIF CBDL PG UIF 3FGSJHFSBUPS t " EBNBHFE QPXFS QMVH NBZ PWFSIFBU BOE DBVTF B mSF
%P OPU TQSBZ XBUFS EJSFDUMZ JOUP PS PO UIF PVUTJEF PG UIF 3FGSJHFSBUPS 'SFF[FS ESBXFS t 8BUFS DPVME HFU JOUP UIF JOUFSJPS NBDIJOF QBSUT BOE DBVTF FMFDUSJD TIPDL
%P OPU VTF BFSPTPMT OFBS UIF 3FGSJHFSBUPS t "FSPTPMT VTFE OFBS UIF 3FGSJHFSBUPS NBZ DBVTF BO FYQMPTJPO PS mSF
Safety Information _3
Safety Information
%P OPU QVU VOEVF TUSFTT PO UIF QPXFS DPSE PS QMBDF IFBWZ BSUJDMFT PO JU tPlacing heavy articles on the power cord create the risk of explosion or fire.
%P OPU JOTFSU UIF QPXFS QMVH XJUI XFU IBOET t It may cause electric shock.
%P OPU QVU B DPOUBJOFS mMMFE XJUI XBUFS PO UIF 3FGSJHFSBUPS t If it spills, it may cause fire or electric shock.
%P OPU JOTUBMM UIF 3FGSJHFSBUPS JO B EBNQ QMBDF PS XBUFS DMPTFE QMBDFT
t Wet and/or deteriorated insulation of the internal electrical parts may cause electric shock or fire.
%P OPU TUPSF WPMBUJMF nBNNBCMF PS IJHI FWBQPSBUJOH TVCTUBODFT JO UIF SFGSJHFSBUPS t Storing benzene, thinner, alcohol, ether, LP gas, dryice, and other such products may cause explosions.
 %P OPU EJTBTTFNCMF PS SFQBJS UIF 3FGSJHFSBUPS CZ ZPVSTFMG
t You run the risk of fire, appliance malfunctions and/or personal injury. Call your nearest service center for help from a qualified service technician.
 6OQMVH UIF 3FGSJHFSBUPS CFGPSF DIBOHJOH UIF JOUFSJPS MJHIU
t Changing the light while the Refrigerator is plugged in may cause electric shock.
*G ZPV XJTI UP EJTQPTF PG UIF 3FGSJHFSBUPS SFNPWF UIF EPPST BOE TFBMT CFGPSF UISPXJOH JU BXBZ
t The doors(and their seals) can entrap a child if they climb into the Refrigerator.
Make sure that the doors are off, and ensure that no one is suffocated by being locked inside.
 5IF 3FGSJHFSBUPS NVTU CF TBGFMZ HSPVOEFE
t Always make sure that you have grounded the Refrigerator before attempting to investigate or repair any part of the appliance. Power leakages can cause severe electric shock.
/FWFS VTF HBT QJQFT UFMFQIPOF MJOFT PS PUIFS QPUFOUJBM MJHIUOJOH BUUSBDUPST BT BO FMFDUSJDBM HSPVOE
t Improper use of the grounding plug can result in a risk of electric shock. If it is necessary to use an extension cord to power the Refrigerator, use only a 3-wire extension cord that has a 3-blade ground plug and a 3-slot receptacle that will accept the plug on the appliance. The marked rating of the extention cord should be AC 115V~120V, 10A, or more. Additionally, if a grounding adapter is used, make sure the receptacle box is also fully grounded.
4_ Safety Information

CAUTION SIGNS
 6TF HPPE KVEHNFOU XIFO mMMJOH UIF 3FGSJHFSBUPS XJUI GPPE BOE ESJOLT
t In an overfull Refrigerator, heavy, fragile, bulky or breakable items may fall out and cause personal injury and/or damage to surrounding objects.
%P OPU QVU CPUUMFT PS HMBTT DPOUBJOFST JO UIF 'SFF[FS ESBXFS
t When the contents freeze and then expand, the glass may break and cause personal injury or leave dangerous glass shards in the Freezer.
*G UIF FMFDUSJDBM XBMM TPDLFU JT MPPTF EP OPU JOTFSU UIF QPXFS QMVH
t There is a risk of electric shock or fire. Have the plug looked at by a licensed electrician.
 /FWFS VOQMVH ZPVS 3FGSJHFSBUPS CZ QVMMJOH PO UIF QPXFS DPSE
t Always grip the power cord firmly and pull straight out from the outlet. Yanking or pulling on the power cord may cause a short-circuit, fire and/or electric shock.
t A damaged power cord must be replaced by the manufacturer, a certified service agent or qualified service personnel.
%P OPU TUPSF BSUJDMFT PO UIF UPQ PG UIF BQQMJBODF
t When you open or close the door, the articles may fall and cause personal injury and /or damage to surrounding objects.
%P OPU TUPSF QIBSNBDFVUJDBM QSPEVDUT TDJFOUJmD NBUFSJBMT BOE UFNQFSBUVSF TFOTJUJWF QSPEVDUT JO UIF SFGSJHFSBUPS
t Products that require exact temperature controls should not be stored in the Refrigerator.
%P OPU BMMPX DIJMESFO UP DMJNC TUBOE PS IBOH PO TIFMWFT BOE IBOEMFT PG UIF CAUTION3FGSJHFSBUPS 5IFZ DPVME EBNBHF UIF 3FGSJHFSBUPS BOE TFSJPVTMZ JOKVSF UIFNTFMWFT
%P OPU TJU PO UIF GSFF[FS EPPS 5IF EPPS NBZ CSFBL
%P OPU BMMPX DIJMESFO UP DMJNC JOUP UIF GSFF[FS CBTLFU
*G ZPV OPUJDF B DIFNJDBM PS CVSOJOH QMBTUJD TNFMM PS TFF TNPLF VOQMVH UIF 3FGSJHFSBUPS JNNFEJBUFMZ BOE DPOUBDU ZPVS 4BNTVOH &MFDUSPOJDT 4FSWJDF $FOUFS
"GUFS ZPVS 3FGSJHFSBUPS JT JO PQFSBUJPO EP OPU UPVDI UIF DPME TVSGBDFT JO UIF 'SFF[FS DPNQBSUNFOU 1BSUJDVMBSMZ XIFO IBOET BSF EBNQ PS XFU TLJO NBZ BEIFSF UP UIFTF FYUSFNFMZ DPME TVSGBDFT
t Skin may stick to the surface and you may get frostbite.
%P OPU QVU ZPVS IBOET VOEFS UIF BQQMJBODF t Any sharp edges may cause personal injury.
Safety Information _5
Safety Information
/FWFS QVU mOHFST PS PUIFS PCKFDUT JOUP UIF XBUFS EJTQFOTFS IPMF PS JDF DIVUF t It may cause personal injury and/or material damage.
 *G UIF 3FGSJHFSBUPS XJMM OPU CF VTFE GPS B MPOH QFSJPE PG UJNF GPS FYBNQMF PWFS TFWFSBM NPOUIT VOQMVH UIF QPXFS GSPN UIF XBMM
t Over time, deterioration in the power cord insulation may cause fire.
 %P OPU VTF B XFU PS EBNQ DMPUI XIFO DMFBOJOH UIF QMVH
3FNPWF BOZ EVTU PS GPSFJHO NBUUFS GSPN UIF QPXFS QMVH QJOT t A Dirty power plug can increase the risk of fire.
*G UIF 3FGSJHFSBUPS JT EJTDPOOFDUFE GSPN UIF QPXFS TVQQMZ ZPV TIPVME XBJU GPS BU MFBTU mWF NJOVUFT CFGPSF QMVHHJOH JU CBDL JO
 %P OPU QMBDF UIF FRVJQNFOU EJSFDUMZ JO TVOMJHIU 5IF BQQMJBODF NVTU CF QPTJUJPOFE GPS FBTZ BDDFTT UP QPXFS TPVSDF
*G UIF QPXFS DPSE JT EBNBHFE JU NVTU CF SFQMBDFE CZ UIF NBOVGBDUVSFS B DFSUJmFE TFSWJDF BHFOU PS RVBMJmFE TFSWJDF QFSTPOOFM
*G ZPV IBWF B MPOH WBDBUJPO QMBOOFE FNQUZ UIF 3FGSJHFSBUPS BOE UVSO JU PGG
Wipe excess moisture from the inside and leave the doors open to keep odor and mold from developing.
 4FSWJDF 8BSSBOUZ BOE .PEJmDBUJPO
t Any changes or modifications performed by a 3rd party on this finished appliance is not covered under Samsung warranty service, nor can Samsung be responsible for safety issues that result from 3rd party modifications.
 $IJMESFO DBO HFU USBQQFE JOTJEF 3FGSJHFSBUPST
CAUTIONBefore you throw away your old Refrigerator or Freezer, make sure that you;
t Take off the doors.
t Leave all shelves in places so that children may not easily climb inside and shut the door while they are inside.
This appliance is not intended for use by small children or infirm persons without capable, adult supervision. Small children should be supervised when using the appliance.
6_ Safety Information
Contents
|
08 |
Getting ready to install the refrigerator |
|
09 |
Removing the refrigerator doors |
08 |
11 |
Disassemble the freezer drawer |
12 |
Reattaching the refrigerator doors |
|
14 |
Assemble the freezer drawer |
|
15 |
Adjusting the doors |
|
|
15 |
Adjusting the support for extension shelf |
|
16 |
Making minor adjustments between doors |
|
17 |
Adjusting the freezer drawer level |
|
18 |
Checking the water dispenser line |
|
19 |
Installing the water line |
|
21 |
Using the control panel |
|
22 |
Using the digital display |
21 |
23 |
Controlling the temperature |
24 |
Using the ice and cold water dispenser |
|
26 |
Parts and Features(RF267) |
|
27 |
Parts and Features(RF26X) |
|
|
28 |
Storing food |
|
29 |
Using the Cool Select Pantry™ |
|
29 |
Using the tilting pocket |
|
30 |
Removing the refrigerator accessories |
|
31 |
Using the doors |
|
32 |
Removing the freezer accessories |
|
33 |
Cleaning the refrigerator |
|
34 |
Changing the interior lights |
|
34 |
Normal Operate Sound. |
|
35 |
Changing the water filter |
|
40 |
Troubleshooting |
40
41
41 Warranty
43 Wiring Diagram
Contents _7
Setting up your French Door Refrigerator
(&55*/( 3&"%: 50 */45"-- 5)& 3&'3*(&3"503
Congratulations on your purchase of the Samsung French Door Refrigerator. We hope you enjoy the state-of-art features and efficiencies that this new appliance offers.
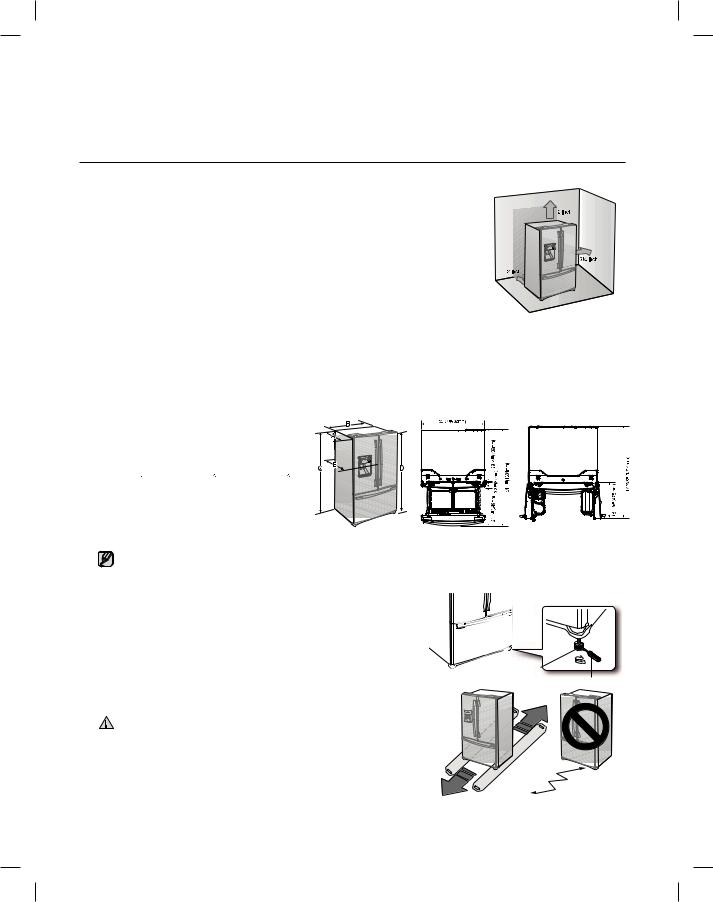
4FMFDUJOH UIF CFTU MPDBUJPO GPS UIF 3FGSJHFSBUPS t " location with easy access to the water supply.
t " location without direct exposure to sunlight. t " location with level (or nearly level) flooring. t " location with enough space for the Refrigerator doors to open easily. t Allow sufficient space for air circulation of the internal cooling system.
If the Refrigerator does not have enough space, the internal cooling system may not work properly.
If your refrigerator has an ice maker, allow extra space at the back for the water line connections. When you install the refrigerator next to a fixed wall, minimum clearance is 3 ¾” (95mm) between the refrigerator and wall to allow the door to swing open.
First thing! Make sure that you can easily move your Refrigerator to its final location by measuring doorways (both width and height), thresholds, ceilings, stairways, etc.
The following chart details the exact height and depth of Samsung French Door Refrigerator.
Model |
Depth |
Width |
Height |
Overall |
Depth |
|
“A” |
“B” |
“C” |
Height “D” |
“E” |
||
|
||||||
|
|
|
|
|
|
|
RF267 |
29- ” |
35-¾” |
68- ” |
69-¾” |
35- ” |
|
RF26X |
(73.5cm) |
(90.8cm) |
(174.4cm) |
(177.4cm) |
(90.5cm) |
|
|
|
|
|
|
|
t Allow clearance to the right, left, back and top when installing. This will help reduce power consumption and keep your energy bills lower.
t %P OPU JOTUBMM UIF 3FGSJHFSBUPS XIFSF UIF UFNQFSBUVSF XJMM HP CFMPX ' $
7HEN MOVINGMYOUR REFRIGERATOR |
|
|
To prevent floor damage be sure the front levelling legs are |
|
|
in the up position (above the floor). Refer to ‘Levelling the |
|
|
refrigerator’ in the manual. |
|
|
To protect the finish of the flooring, place the protection |
$POUSPM -FWFS |
|
sheet such as packing carton under the refrigerator. |
||
4DSFXESJWFS |
||
|
||
When installing, servicing or cleaning behind the refrigerator, |
|
|
CAUTION be sure to pull the unit straight out and push back in straight |
|
|
after finishing. |
|
8_ Setting Up
4&55*/( 61 5)& 3&'3*(&3"503
Now that you have your new Refrigerator installed in place, you are ready to set up and enjoy the features and functions of the appliance. By completing the following steps, your Refrigerator should be fully operational.
1. |
Place the Refrigerator in an appropriate location with reasonable clearance between the wall and the |
|
|
Refrigerator. Refer to installation instructions in this manual. |
|
2. |
Once the Refrigerator is plugged in, make sure the interior light comes on when you open the doors. |
|
3. |
Set the Temperature control to the coldest temperature and wait for an hour. The Freezer will get slightly chilled |
614&55*/(01 |
|
and the motor will run smoothly. See Controlling the Temperature Section (Page 23). |
|
|
|
|
4. |
After powering the Refrigerator, it will take a few hours to reach the appropriate temperature. You can store |
|
|
food and drinks in the Refrigerator after the temperature is sufficiently cool. |
|
5. Assembly the water line to the refrigerator and verify that the couples are correctly assembled without water leakage.
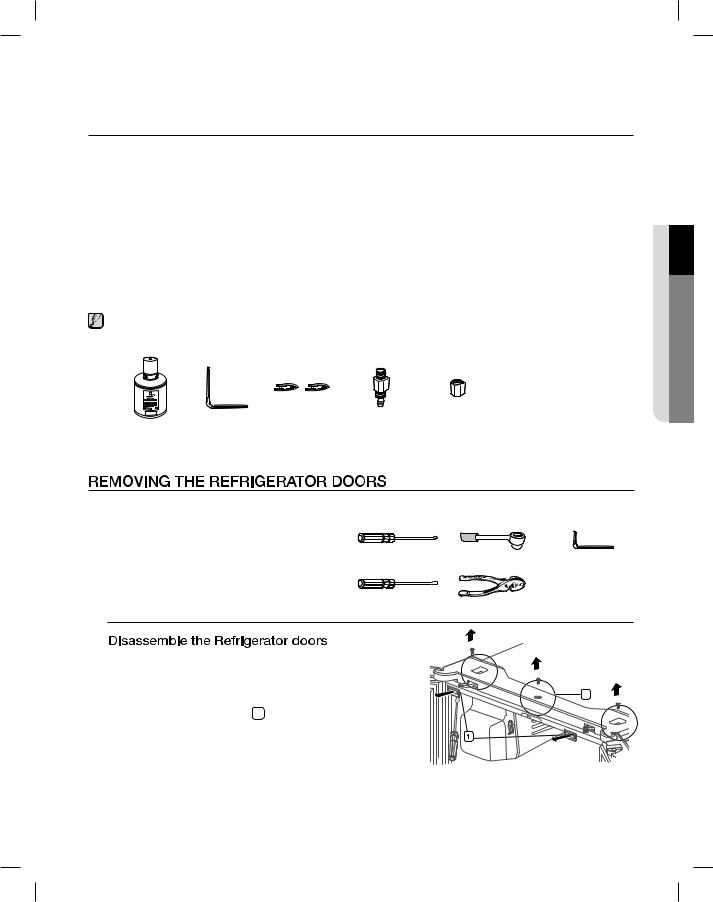
 Check the accessory list below.
Water filter |
Hex wrench |
Fastener |
Compressin fitting |
Compression nut |
(DA29-00003B) |
(DA80-00002C) |
(DA60-00143B) |
(DA62-00305A) |
(DA74-00070B) |
If the Refrigerator is too large to pass through your doorway easily, you can remove the refrigerator doors.
5PPMT ZPV XJMM OFFE
Philips screwdriver |
10mm Socket Wrench |
Allen wrench(3/16”) |
Flat-blade screwdriver |
Pliers |
|
1.With the door opened, remove the Top Table cap
( ) with a Flat head screwdriver, and close the door.
Remove only the 3 screws holding down the Top Table |
2 |
|
|
and remove the Top Table ( 2 ) AS SHOWN IN THE |
|
PICTURE. |
|
Setting Up _9
Setting up your French Door Refrigerator
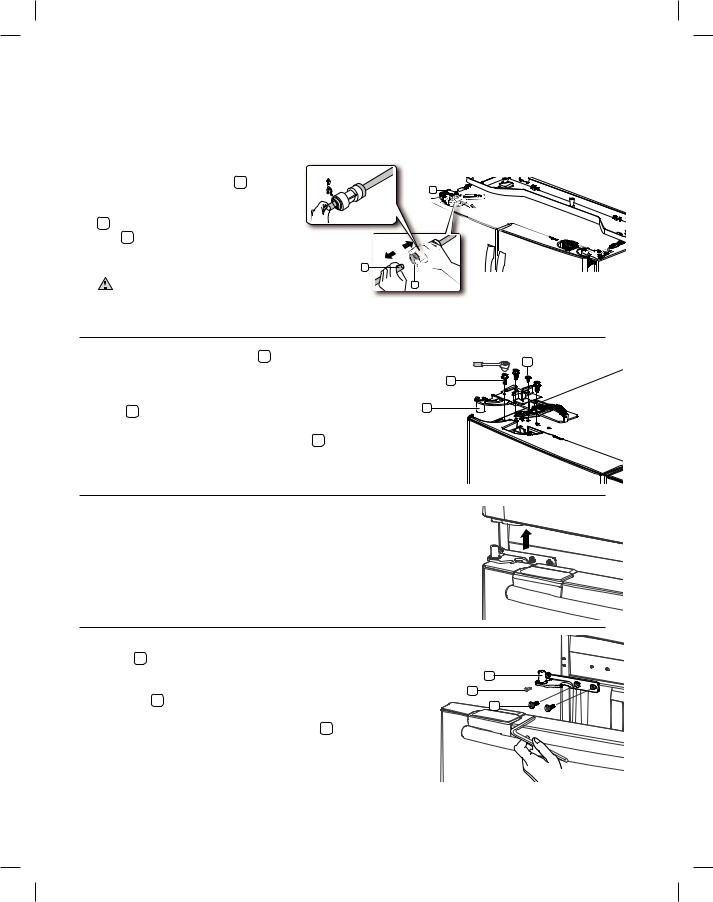
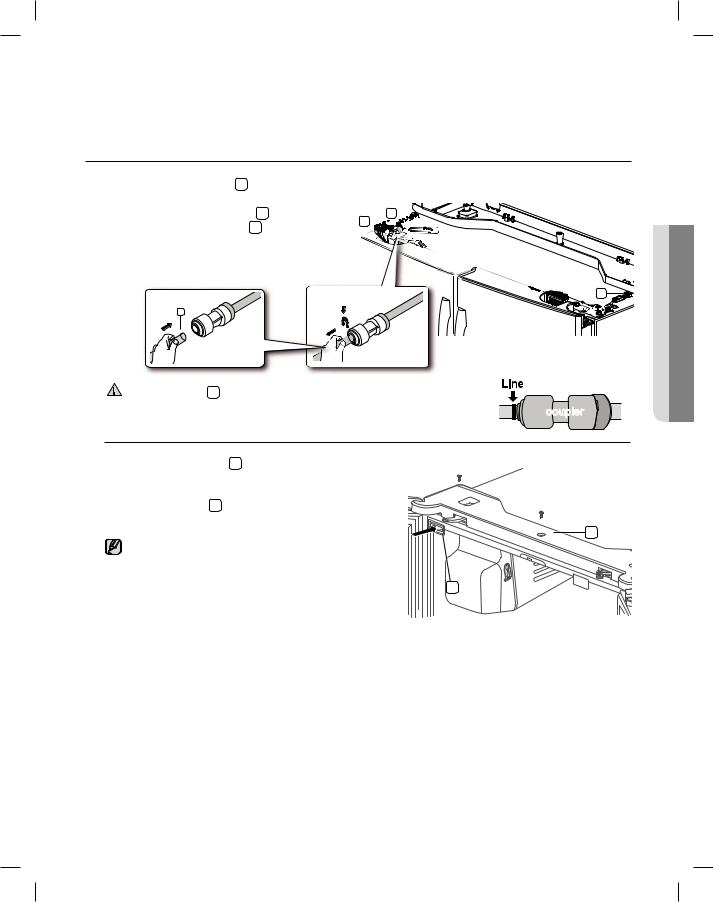
2.Disconnect the one connector ( 3 ) on left side door, pressing the middle
part while is taking away. Remove the tube
( 4 ) with pressing strongly the dark gray color ( 5 ) of the water line couple, take away the hose at the same time.
Red Clip |
|
(1/4”) |
3 |
|
4 |
|
|
If a red clip is on the coupler, it must be removed |
5 |
|
CAUTION before removing the tube. |
|
|
Be sure to close the door to prevent doors damage. |
|
|
3. Remove the three hex head bolts( 6 ) attached |
7 |
|
to the upper left and right door hinges with a |
||
|
||
Wrench(10mm). |
6 |
|
With a Philips head screwdriver, remove the ground |
|
|
screw( 7 ) attached to the upper left and right door |
8 |
|
|
||
hinges. |
|
|
Remove the upper left and right door hinges( 8 ). |
|
4. Lift the door straight up to remove.
First Disassembling the right door to avoid door dent.
5.With a Philips head scr ewdriver, r emove the two scr ews( 9 ) attached to the lower left and right door hinges.
With an Allen Wrench(3/16”), r emove the two hex
head bolts( 10 ) attached to the lower left and right door hinges.
Remove the lower left and right door hinges( 11 ).
11
9
 10
10
 setting up
%*4"44&.#-& 5)& '3&&;&3 %3"8&3
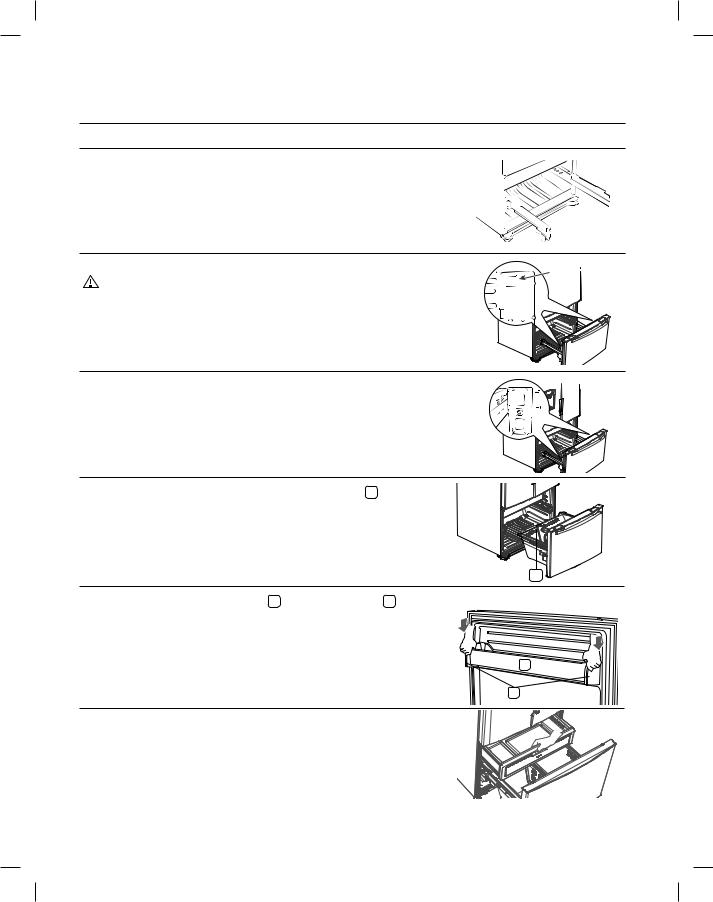
1. Take out the upper drawer by lifting it up.
2. Remove the tilting pocket( ) by pulling strongly on both brackets( 2 ) upward at the same time.
2 


3. Take out the lower basket( 3 ) by lifting the basket up from rail system.
3


4. Remove four 10mm hex-head bolts from both sides.
5. Lift the freezer door up from the rails.
 614&55*/(01
setting up @
Setting up your French Door Refrigerator
3&"55"$)*/( 5)& 3&'3*(&3"503 %0034
"TTFNCMF UIF 3FGSJHFSBUPS EPPST |
|
1. Reattach the lower left and right door hinges( ). |
|
With a Philips head screwdriver, insert and tighten a |
|
screw( ) into the lower left and right door hinges. |
|
With a Allen Wrench(3/16”), insert and tighten the two |
|
hex head bolts( ) into the lower left and right door |
|
hinges. |
|
|
2.Place the hole in the bottom of the door over the lower hinge( ).
Be careful not to miss the hinge cap because it can be easily taken off.
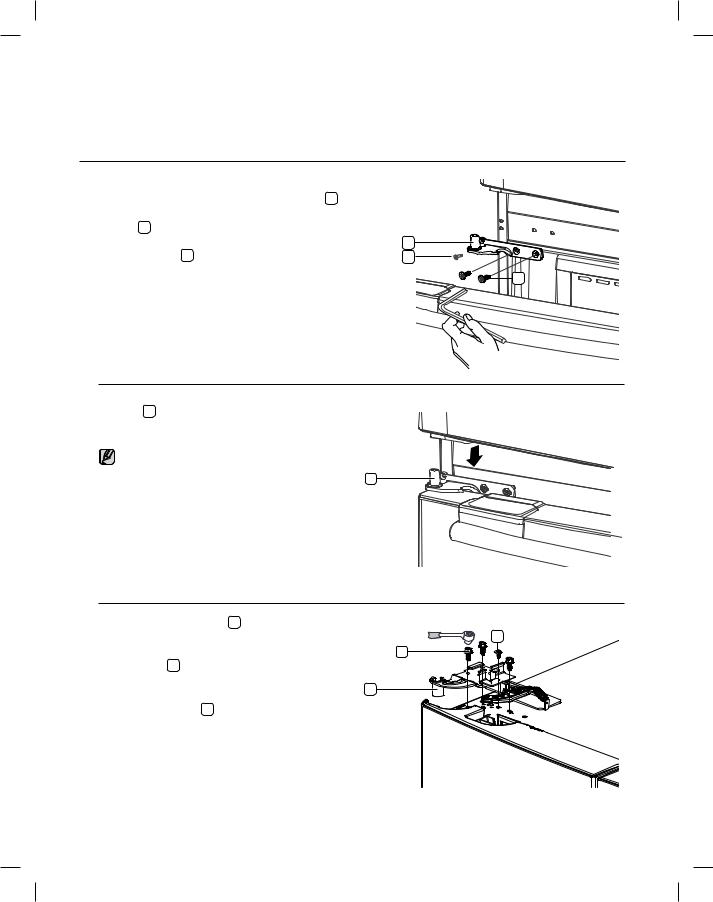
3. Insert the upper hinges( 9 ) into the holes at the top |
|
of the doors. |
8 |
With a Wrench(10mm), insert and tighten the 3 hex |
7 |
head bolts( 7 ) into the upper left and right door |
|
hinges. |
9 |
With a Philips head screwdriver, insert and tighten |
|
the ground screw( 8 ) into the upper left and right |
|
door hinges. |
|
@ Setting Up
3&"55"$)*/( 5)& 3&'3*(&3"503 %0034
4.Connect the water line ( 5 ) and then insert a clip on the coupler with pulling tube. Connect the one connector( 4 ) on left side
door and two connectors ( 3 ) at each side of the top cap.
 The clip is enveloped inside of the top cap.
5 |
Cabinet |
|
Tube |
Dispenser
Door Tube
3 

 4
4 


3
Red Clip
(1/4”)
The water line ( 5 ) must be fully inserted to the marked line to prevent
CAUTION water leakage from the dispenser. |
DPVQMFS |
|
Be sure to sensor (yellow cable) is inside the top table. |
||
|
5. Position the Top Table( 2 ) in place.
With a Philips head screwdriver, insert and tighten the 3 screws into the Top Table. With the door opened, reinsert the Top Table cap( ) and close the doors.
2
When reattaching the top table, make sure that the wires are not pressed or damaged by the top table.

 614&55*/(01
Setting Up @
Setting up your French Door Refrigerator
"44&.#-& 5)& '3&&;&3 %3"8&3
1. Pull out the rails to the full length on each side of the cabinet evenly.
2. Hang the freezer door front onto open slots on the sides. |
SlotSlot |
|
Make sure the door is well assembled on the rail |
||
|
||
CAUTION |
|
3. Tighten four 10mm hex-head screws completely.
4. With the drawer pulled out fully, insert the lower basket ( 6 ) into the rail system.
 If the drawer is not properly assembled on the rail, the door CAUTION will not close and it will cause frost.
6
5. Hook the ends of the tilting pocket ( 7 ) into both brackets ( 8 ), and push down until they lock into place.
7
8
6. Insert the upper drawer.
@ Setting Up
"%+645*/( 5)& %0034
Now that the doors are back on the Refrigerator, you want to make sure the Refrigerator is level so that you can make final adjustments. If the Refrigerator is not level, it will not be possible to get the doors perfectly even.
8IFO UIF -FGU EPPS JT MPXFS UIBO UIF 3JHIU EPPS
Insert a flat-blade screwdriver into a notch on the left control lever, turn it clockwise or counter-clockwise to level the left door.
614&55*/(01
$POUSPM -FWFS
4DSFXESJWFS
8IFO UIF -FGU EPPS JT IJHIFS UIBO UIF 3JHIU EPPS
Insert a flat-blade screwdriver into a notch on the right control lever, turn it clockwise or counter-clockwise to level the right door.
$POUSPM -FWFS
4DSFXESJWFS
We do not recommend making small adjustments with the control lever. Instead, refer to the next page for the best way to make minor adjustments to the doors.
"%+645*/( 5)& 4611035 '03 &95&/4*0/ 4)&-' 3' 9
1.Remove the extension shelf.
2.Press the hook and lower down the 2 movable supporter.
3.Hang the extension shelf at the lower position.
|
2 |
Setting Up @
Setting up your French Door Refrigerator
.",*/( .*/03 "%+645.&/54 #&58&&/ %0034
Remember a level Refrigerator is necessary for getting the doors perfectly even. If you need help, review the previous section on leveling the Refrigerator.
When the left |
|
When the left |
door is lower |
|
door is higher |
than the right |
|
than the right |
door. |
|
door. |
|
|
Adjustment |
|
Adjustment |
part |
|
|
|
|
part |
|
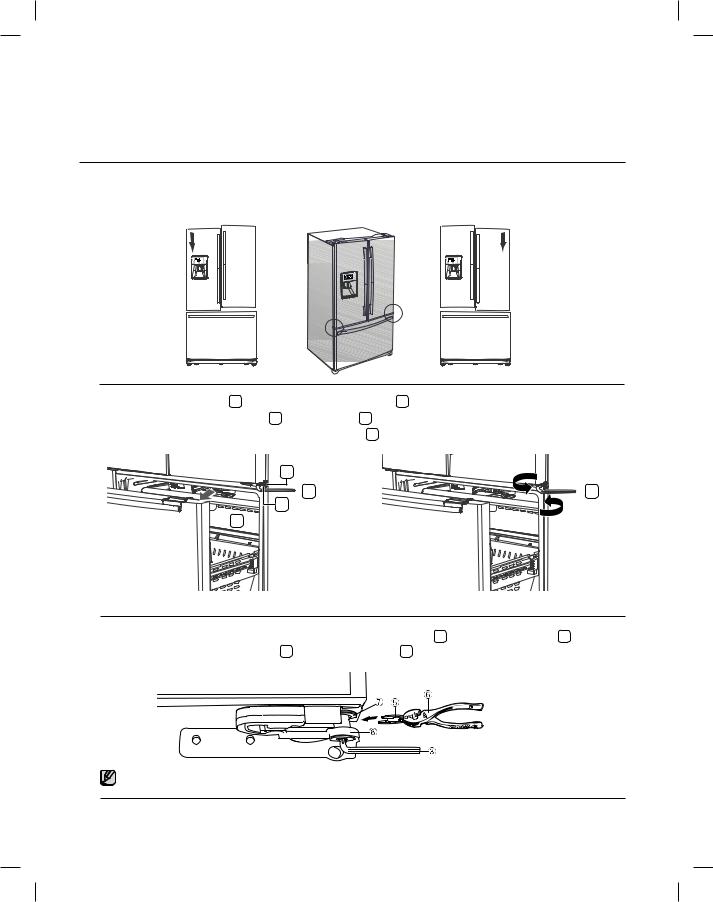
1.If you open the drawer ( ), you can see the lower hinge ( 2 ).
2.Insert the supplied hex wrench ( 3 ) into the shaft ( 4 ) of the lower hinge.
3.Please adjust the height by turning the hex wrench ( 3 ) clockwise( ) or counter-clockwise(
 ).
).
2 |
|
3 |
3 |
4 |
|
 when you turn the hex wrench counter-clockwise(
 ), the door will move up.
1.After adjusting the doors, please insert the supplied fastener-ring ( 5 ) using a pair of pliers ( 6 ) in the
gap between the hinge-grommet ( 7 ) and the lower hinge( 8 ). The number of fastener-rings you’ll need to insert depends on the gap.
Two fastener-rings are enclosed with the refrigerator.
The thickness of each fastener-ring is 0.04 inch.
@ Setting Up
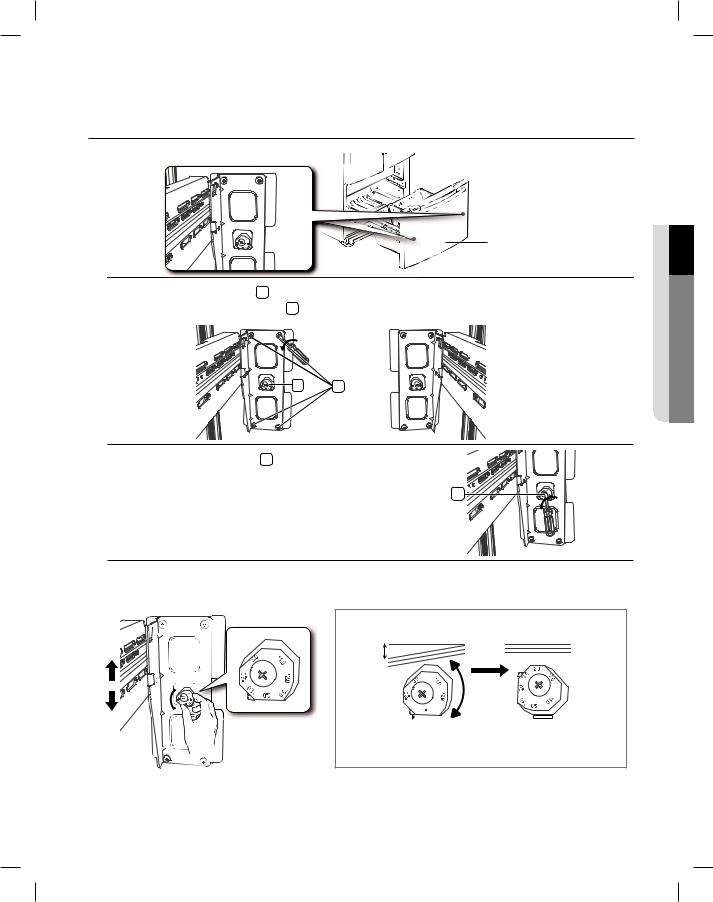
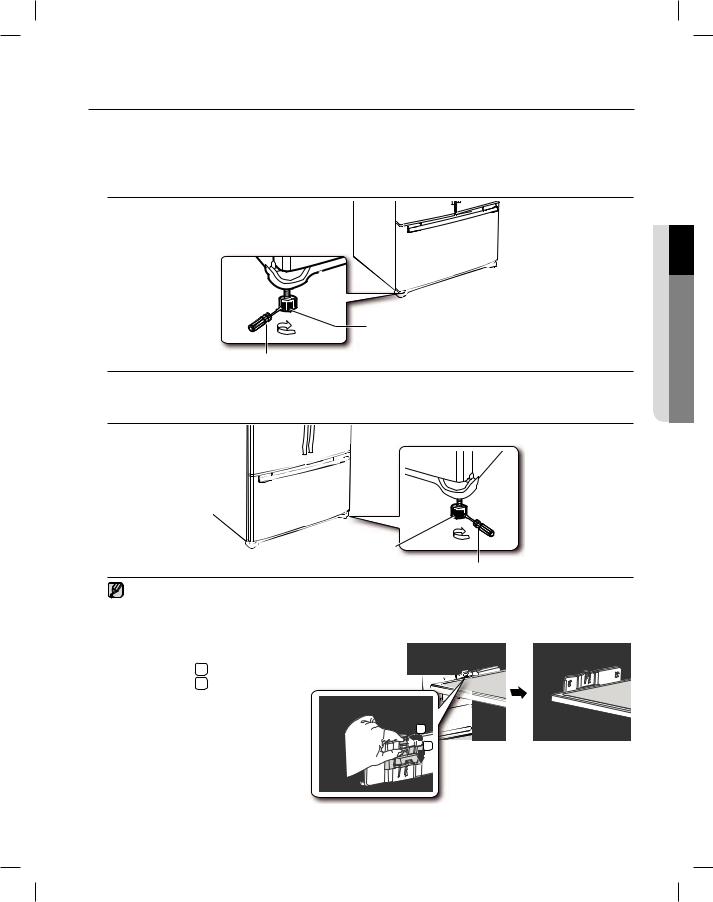
"%+645*/( 5)& '3&&;&3 %3"8&3 -&7&-
Adjustment part
Freezer Drawer |
4&55*/(6101 |
|
1. Locate the height-adjuster ( ) in the freezer drawer.
Unscrew the four Phillips screws ( 2 ) slightly to loosen the door.
2
2. Loosen the controller screw( 3 ) with a Phillips screwdriver.
3 
3. Find the best level to align the door slope.
Example) The slope is about 2mm (0.08inch) as shown below.
Slope
Reference 

 plane
plane 

- Rotate the Height Adjuster to +2.0 to reduce the door slope.
Setting Up @
Setting up your French Door Refrigerator
$)&$,*/( 5)& 8"5&3 %*41&/4&3 -*/&
A water dispenser is one of the helpful features on your new Samsung Refrigerator. To help promote better health, the Samsung water filter removes unwanted particles from your water. However, it does not sterilize or destroy microorganisms. You may need to purchase a water purifying system to do that.
In order for the ice maker to operate properly, a water pressure of 20~125 psi (pound per square inch) is required.
Under normal conditions, a 170 cc (5.75 oz.) paper cup can be filled in 10 seconds.
If the Refrigerator is installed in an area with low water pressure (below 20psi), you can install a booster pump to compensate for the low pressure.
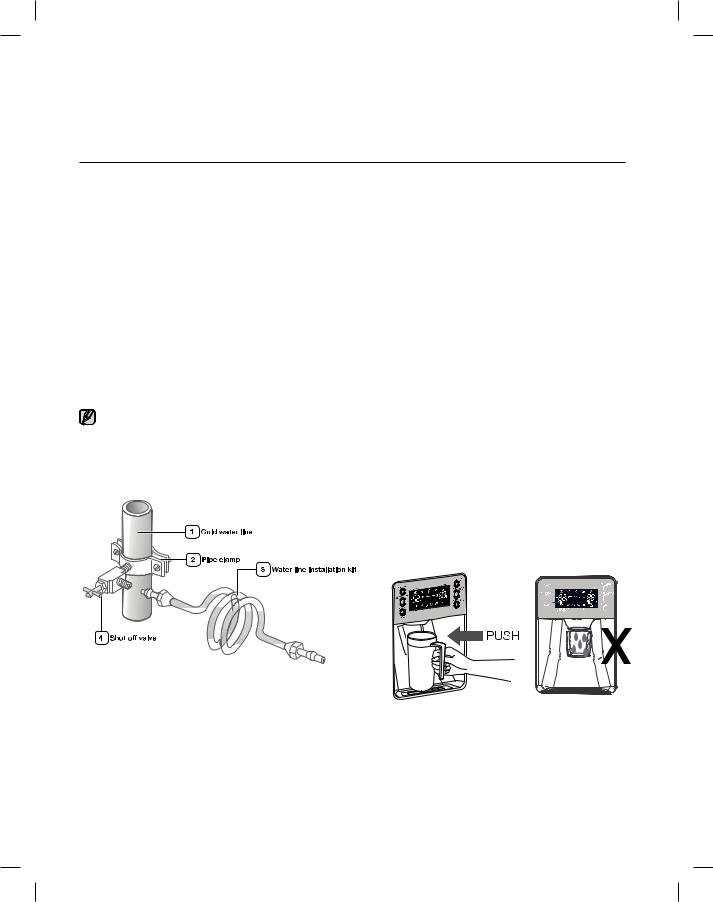
$POOFDUJOH UP UIF XBUFS TVQQMZ MJOF
1.First, shut off the housemain watermainsupplywater supplyline and. turn the ice-maker off.
2.Locate the nearest cold, drinking water line.
3.After complennecteingthethewatersupplyplyinstallationto the water(Waterfilter,Lineturn&yourFilter),mainturnwateryour supplymainwaterbacksupplyon andbatckleaston and gallon of water (2~3minutes) into a bucket to clear and prime the water filter. Otherwise, water may drip after dispensing water.
Water line installation kits are available at extra cost from your dealer. We recommend using a water supply kit that contains copper tubing.
@ Setting Up
*/45"--*/( 5)& 8"5&3 -*/&
$POOFDUJOH UIF XBUFS MJOF UP UIF 3FGSJHFSBUPS
There are several items that you need to purchase to complete this connection. You may find these items sold as a kit at your local hardware store.
 1/4” compression nut
  copper tubing
  plastic tubing


3FGSJHFSBUPS
Plastic tubing (Supplied)

 Compression nut (1/4”) (Supplied)
 Compression fitting
  (Supplied)
Ferrule |
Bulb |
|
|
(Not supplied) |
|
|
Compression nut |
|
(1/4”) (Not supplied) |
$PQQFS UVCJOH or 1MBTUJD UVCJOH |
|
(Not supplied) |
(Not supplied) |
)PVTFIPME XBUFS MJOF
1.Slip the compression nut through the supplied plastic tubing .
2.Tighten the compression nut onto the 1/4” compression fitting.
-If you are using copper tubing, slip the compression nut (not included) and ferrule (not included) on copper tubing (not included) as shown.
-If you are using plastic tubing , insert the molded end(Bulb) of the plastic tubing into the compression fitting.
CAUTION Do not use without the molded end(Bulb) of the plastic tubing .
3.Tighten the compression nut onto the compression fitting. Do not over-tighten the compression nut .
4.Turn water on and check for any leakage.
Only connect the water line to a drinkable water source.
If you have to repair or disassemble the water line, cut off 1/4“ of the plastic tubing to make sure you get a snug, leak-free connection.
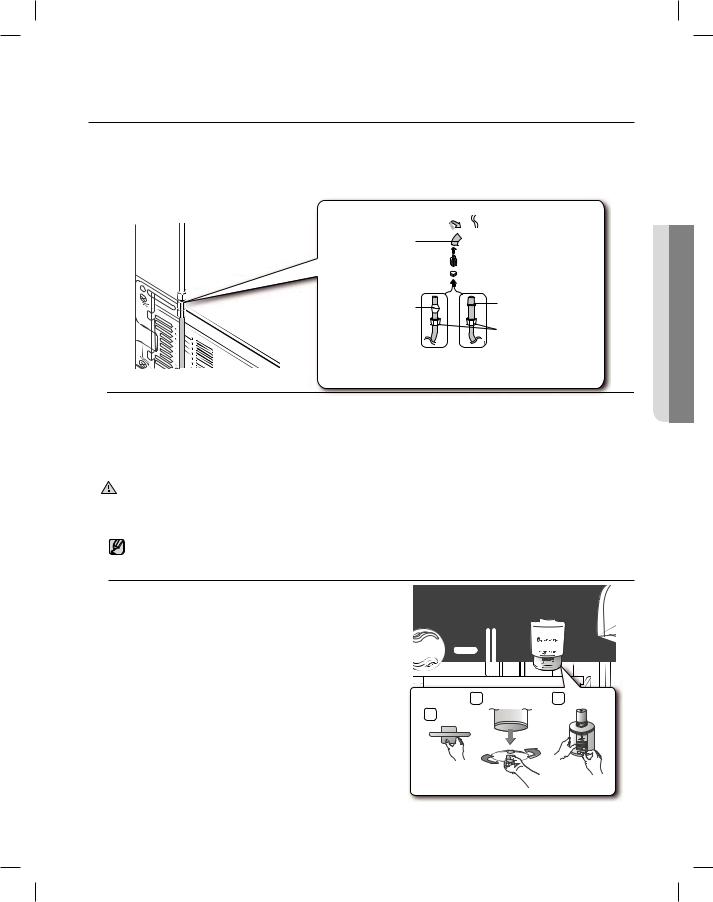
*OTUBMMJOH UIF XBUFS mMUFS
21. Remove the fixedprotectionap bycapturningby turningit counterit counterclockwiseclockwise. .
Keep the cap in a safe place for later use if you don’t use the filter.
2.Remove the water filter from the box and put a replacement indicator sticker on the filter as shown. Place a sticker on the filter that dates six months in the future. For example, if you install the water filter in March, put the “SEP” sticker on the filter to remind you to replace it in September. That way you’ll know when it is time to replace the filter. Normally, a filter life is about 6 months.
2 |
3 |
|
|
Sticker  (month indicator)
 614&55*/(01
Setting Up @
Setting up your French Door Refrigerator
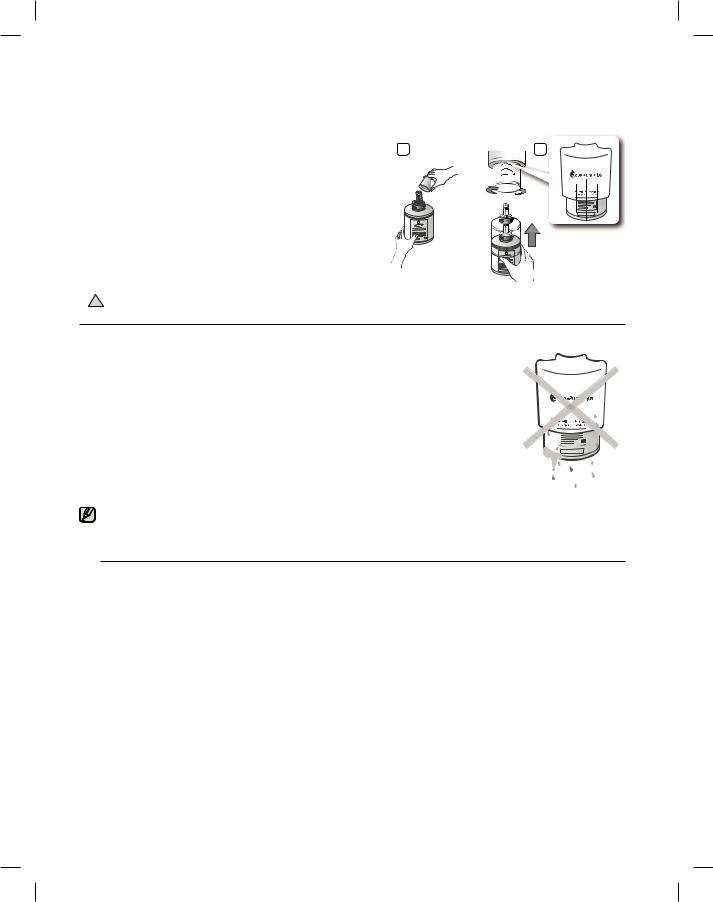
4.Remove the filter cap and insert the filter into the filter housing.
5.Slowly turn the water filter 90º clockwise to align with the printing mark on the cover, locking the filter in position. Make sure to align the water filter label mark with center of cover filter printing as illustrated. Remember, do not overtighten.
4 |
Cover filter. 5 |
Turn until the
labels are aligned.
Separation of red cap.
 You shouldYou shouldremoveremovethe rightthe rightside sideupperupperglassglassshelfshbeforelf beforeinstallinginstallingwaterwatfilterrsfilters. .
CAUTION
3FNPWJOH BOZ SFTJEVBM NBUUFS JOTJEF UIF XBUFS TVQQMZ MJOF BGUFS JOTUBMMJOH UIF XBUFS mMUFS
1. Turn ON the main water supply.& turn OFF the valve to the water supply line.
2. Flush 3 gallons through filter before use (flush approximately 6 minutes).
This will clean the house water supply system and remove air from the lines. 3. Additional flushing may be required in some households.
4. Open the Refrigerator door and make sure there are no water leaks coming from the water filter.
Be sure to flush the dispenser thoroughly, otherwise water may drip from the dispenser.
This means that there is still air in the line.
3FWFSTF 0TNPTJT 8BUFS 4VQQMZ
*.1035"/5 The pressure of the water supply coming out of a reverse osmosis system going to the water inlet valve of the refrigerator needs to be between 35 and 120 psi (241 and 827 kPa).
If a reverse osmosis water filtration system is connected to your cold water supply, the water pressure to the reverse osmosis system needs to be a minimum of 40 to 60 psi (276 to 414 kPa.)
If the water pressure to the reverse osmosis system is less than 40 to 60 psi (276 to 414 kPa):
t $IFDL UP TFF XIFUIFS UIF TFEJNFOU mMUFS JO UIF SFWFSTF PTNPTJT TZTUFN JT CMPDLFE 3FQMBDF UIF mMUFS JG necessary.
t "MMPX UIF TUPSBHF UBOL PO UIF SFWFSTF PTNPTJT TZTUFN UP SFmMM BGUFS IFBWZ VTBHF
t *G ZPVS SFGSJHFSBUPS IBT B XBUFS mMUFS JU NBZ GVSUIFS SFEVDF UIF XBUFS QSFTTVSF XIFO VTFE JO DPOKVODUJPO with a reverse osmosis system. Remove the water filter.
If you have questions about your water pressure, call a licensed, qualified plumber.
@ Setting Up
Operating your SAMSUNG French Door Refrigerator
64*/( 5)& $0/530- 1"/&-
|
4 |
2 |
5 |
3 |
6 |
( ) Energy Saver |
For better energy efficiency, press the &OFSHZ 4BWFS button. If condensation occurs on the doors, |
|
Button |
turn the &OFSHZ 4BWFS function off. |
|
|
Press the 'SFF[FS 1PXFS 'SFF[F button to set the Freezer to your desired temperature. |
|
|
||
( 2 ) Freezer / Power |
You can set the temperature between 8°F and -14°F |
|
Press and hold the 'SFF[FS 1PXFS 'SFF[F Button for 3 seconds, to speed up the time needed to |
||
Freeze Button |
||
freeze products in the Freezer. It can be helpful if you need to quickly freeze easily spoiled items or if |
||
|
||
|
the temperature in the Freezer has warmed dramatically (For example, if the door was left open). |
|
|
|
|
|
Press the *DF 8BUFS button to select the ice or water function. You can select water or the types of |
|
|
||
( 3 ) Ice / Water Button |
ice(cube/crushed ice). |
|
|
After making a selection, press the dispenser lever. |
|
|
|
|
|
Press the "MBSN -JHIUJOH button to turn off the door open alarm. Initially the "MBSN is set to on. |
|
( 4 ) Alarm / Lighting Button |
||
If you press and hold the "MBSN -JHIUJOH button for 3 seconds, the Dispenser LED Lamp will stay on. |
||
|
||
|
|
|
|
Press the 'SJEHF 1PXFS $PPM button to set the fridge to your desired temperature. |
|
|
||
|
You can set the temperature between 34°F and 46°F. |
|
( 5 ) Fridge / Power Cool |
Press and hold the 'SJEHF 1PXFS $PPM button for 3 seconds, to speed up the time needed to cool |
|
Button |
products in the Refrigerator. It can be helpful if you need to quickly cool easily spoiled items or if the |
|
|
temperature in the fridge has warmed dramatically (For example, if the door was left open). |
|
|
|
|
|
Press the *DF 0GG -PDL button to turn the ice making function off. |
|
( 6 ) Ice Off / Lock Button |
||
If you press and hold the *DF 0GG -PDL button for 3 seconds, the Display and Dispenser will be locked. |
||
|
||
|
|
01&3"5*/(02
Operating @

When not in use the Display will turn off, this is normal.
This icon will light up when you activate the  feature.
  is great when you need a lot of ice.
When you have enough ice, just press the button again to cancel the |
mode. |
If you select  , the inside temperature of the Freezer will decrease for about two and a half hours.
$VCFE *DF $SVTIFE *DF 8BUFS 
Enjoy cubed or crushed ice by selecting your preference from the digital control panel. If you don’t need ice, turn the feature off to save on water and energy consumption. The Ice type light indicates the type of ice(or no ice) that is currently chosen.
1PXFS $PPM 
This icon will light up when you activate the i1PXFS $PPMw button. For a quick fridge cool down, use i1PXFS $PPMw.
If you select i1PXFS $PPMw, the inside temperature of the Fridge will decrease for about two and a half hours.
'JMUFS *OEJDBUPS 


When the filter indicator light is on, it is time to change the filter. Typically this happens about every 6 months.
The filter Indicator will be Blue when you initially insert the water filter.
The filter Indicator will be Light Pink when you have used your water filter for 5 months. The filter Indicator will be Red when you have used your water filter for 6 months.
After removing the old water filter and installing a new one (see page 33 for instructions on how to do this), reset the indicator by pressing and holding the i*DF 8BUFSw button for 3 seconds.
$PPMJOH 0GG .PEF i0' 0'w DPEF PO UIF EJTQMBZ
This function is for store display refrigerators. It is not for customer use.
In Cooling Off Mode, the refrigerator works but doesn’t make cool air. To cancel this mode, CAUTIONpress the Power Freeze and Freezer buttons at the same time for 3 seconds until a “Ding-dong”
sound is heard and the unit will now cool.
22_ Operating
Operating your SAMSUNG French Door Refrigerator
&OFSHZ 4BWFS 
This icon will light up when you activate the “Energy Saver” function is automatically set to “ON” when poer is supplied to the Refrigerator. If condensation occurs on the doors, turn the Energy Saver function off.
-JHIUJOH 


This icon will light up when you activate the “Lighting” feature. In this case, the dispenser light(under the display) will be on constantly. If you would like the dispenser light to come on only when using the dispenser, turn the “Lighting” feature off.
"MBSN 

This icon will light up when you activate the “Alarm” feature. The door alarm will sound if any door is open for more than 3 minutes. The beeping stops when you close the door. Initially the Alarm is set to on.
*DF 0GG 
This icon will light up when you activate the “Ice Off” feature. In this case, the ice will not be produced.
-PDL 
This icon will light up when you activate the “Lock” feature. In this case, you won’t to be able to use the control panel. If you press and hold the Ice Off / Lock button for 3 seconds, you will be able to use the control panel again.
$0/530--*/( 5)& 5&.1&3"563&
The basic temperature and/or recommended temperature of Freezer and Refrigerator Compartments are -2°F and 38°F respectively.
If the temperature of Freezer and Refrigerator Compartments are too high or low, adjust the temperature manually.
The Freezer temperature can be set between 8°F and -14°F to suit your particular needs. Press the Freezer button repeatedly until the desired temperature is shown in the temperature display. Keep in mind that foods like ice cream may melt at 4°F.
The temperature display will move sequentially from -14°F to 8°F. When the display reaches 8°F, it will begin again at -14°F.
The Refrigerator temperature can be set between 46°F and 34°F as your particular needs. Press the Fridge button repeatedly until the desired temperature is shown in the temperature display.
The temperature control process for the Fridge works just like the Freezer process.
Press the Fridge button to set your desired temperature. After a few seconds, the Fridge will begin adjusting towards the newly set temperature. This will be reflected in the digital display.
 The temperature of the Freezer or the Refrigerator may rise when you open the doors too frequently, or if a large amount of warm or hot food is placed in either side.
This may cause the digital display to blink. Once the Freezer and Refrigerator temperature return to their normal set temperatures, the blinking will stop.
If the blinking continues, you may need to “reset” the Refrigerator. Try unplugging the appliance, wait for around 10 minutes and then plug the power cord back in.
Operating _23
02
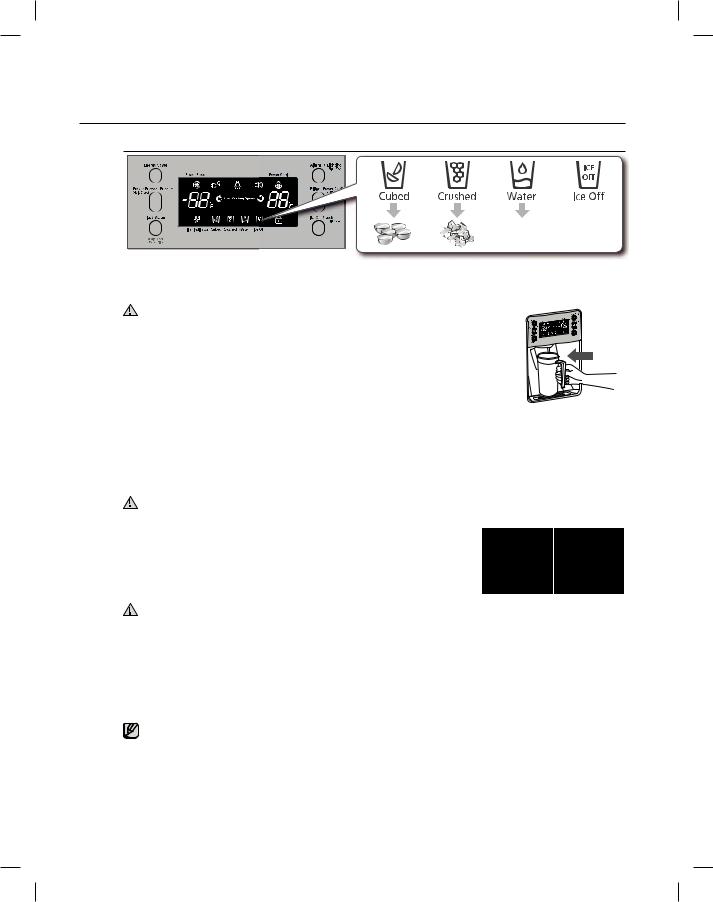
64*/( 5)& *$& "/% $0-% 8"5&3 %*41&/4&3
Press the Ice / Water button to select the type of you want
/P *$& 
Select this if you
want to turn ice
maker off.
6TJOH UIF *DF %JTQFOTFS
Place a glass underneath the ice dispenser and push gently against the dispenser lever with your glass. Make sure the glass is in line with the dispenser to prevent the ice from bouncing out.
If the Freezer door is left open for a long time, condensation may form or the ice CAUTION inside the Ice-Maker may clump. Please close the door as soon as possible.
The Ice Dispenser may eject only a few ice cubes if there is not enough ice in the |
|
Ice-Maker. |
PUSH |
Use the Ice Dispenser when there is enough ice. |
|
If the Freezer door is open for a long time or a lot of ice is dispensed at once, |
|
condensation may trickle down the Dispenser lever. |
|
6TJOH UIF 8BUFS EJTQFOTFS
Place a glass underneath the water outlet and push gently against the water dispenser lever with your glass. Make sure the glass is in line with the dispenser to prevent the water from splashing out.
If you have just installed the Refrigerator or just installed a new water filter, pour out the first six glassfuls of water to flush out impurities in the water supply system. Make sure water flows cleanly before drinking.
When you do not use the water dispenser for 2~3 days (especially during the summer), the dispensed water may have a CAUTION funny smell or taste. If this occurs, we recommend that you discard the first 1~2 glasses for better tasting water.
6TJOH UIF *DF 0GG 'VODUJPO
When selecting the Ice Off mode, remove all ice cubes from the bucket. If you are not using the ice dispenser the ice cubes may clump together. Pull the lock lever forward to throw away ice cubes or remove clumped ice from the bucket. Push the bucket back until you hear a click.
If you have a long vacation or business trip, close the water valve and shut off the water supply to the Refrigerator. This
CAUTION will help prevent accidental leakages.
Do not put your fingers, hands or any other unsuitable objects in the chute or ice-maker bucket. - It may result in personal injury or material damage.
Never put your finger or any other objects in the dispenser opening. - It may cause injury.
Do not disassemble the Ice Maker personally. It may cause disorder. Do not wash or spray the ice bucket with water.
Just wipe it with a dry cloth. In order to operate the ice maker properly, water pressure of 138~862 Kpa is required.
8BUFS DMPVEJOH QIFOPNFOPO
All water provided to refrigerators flows through the core filter which is an alkaline water filter. In this process, the pressure in the water that has flowed out of the filter gets increased, and oxygen and nitrogen become saturated. When this water flows out in the air, the pressure plummets and the oxygen and nitrogen get supersaturated so that they turn into gas bubbles. The water could look misty due to these oxygen bubbles. The water may look temporarily cloudy due to these oxygen bubbles. After a few seconds, the water will look clear.
24_ Operating
Operating your SAMSUNG French Door Refrigerator
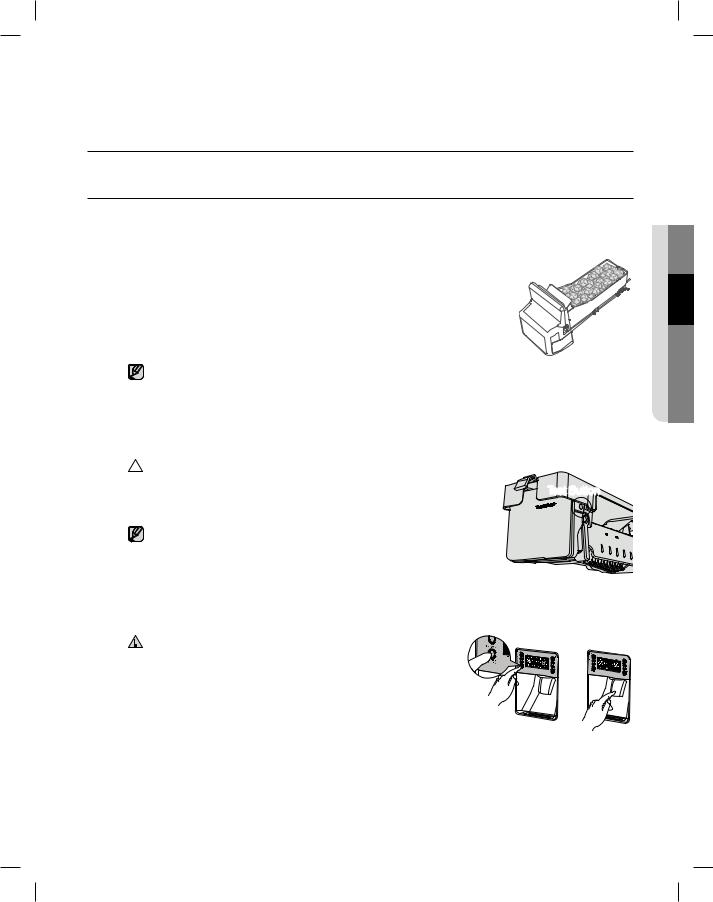
*$& 130%6$5*0/
/PSNBM 6TF
To fill ice bucket to maximum capacity after installation, make sure to do the following steps.
1. Allow your refrigerator to operate and cool down for 24 hours (or 1 full day). 2. Waiting 24 hours will allow your ice maker to cool properly.
3. Dispense 4 to 6 ice cubes into the glass.
4. After 8 and 16 hours, dispense a full glass of ice at each time.
Whenever all ice is used at one time, the above step 3 and 4 must be repeated (before dispense the first 4 to 6 ice cubes, it needs waiting 8 hours). This will replenish the ice cubes and ensure maximum ice production.
 5FTU CVUUPO
CAUTION In case ice doesn’t come out, pull out the ice bucket and press test button |
Test Button |
located on the right side of ice maker. |
Please wait 1 second before removing the cup after dispensing water to prevent spills. Do not pull out the lever dispenser after taking out ice or water. It comes back automatically. Ice is made in cubes. When you select “Crushed”, the icemaker grinds the ice cubes into crushed ice.
When you dump the ice from the ice bucket, you should press the
CAUTION dispenser lever once with ‘ICE CUBED’ or ‘CRUSHED’ function ON to get new ice faster after replacing the ice bucket in the refrigerator.
01&3"5*/(02
Operating _25

Operating your SAMSUNG French Door Refrigerator wherever it appears
Use this page to become more familiar with the parts and features of the Refrigerator.
|
Light |
|
|
Auto Door Closer |
|
Ice-Maker |
Dairy Compartment |
|
|
||
Foldable-Shelf |
Water Filter |
|
|
Slide-Shelf |
3 |
Slide-Shelf |
|
|
|
Door Bins |
2 |
|
Quick-Space |
|
|
Glass Shelf |
|
4 Vegetable & Fruit |
|
|
Drawers |
|
|
|
Cool Select |
|
|
PantryTM 5 |
|
|
Light |
|
FZ Ice-Maker
Ice Bucket
Auto Pull Out Drawer 6
7 Tilting Pocket
Freezer Drawer Bin 8
When closing the door, make sure the Vertical Hinged Section is in the correct position to avoid scratching
the other door.
If the Vertical Hinged Section is reversed, put it back to the right position and close the door.
Moisture may occur at times on the Vertical Hinged Section.
The door handle may become loose over time.
If this happens, tighten the bolts found on the inside of the door.
If you close one door with a lot of force, the other door may open.
26_ Operating
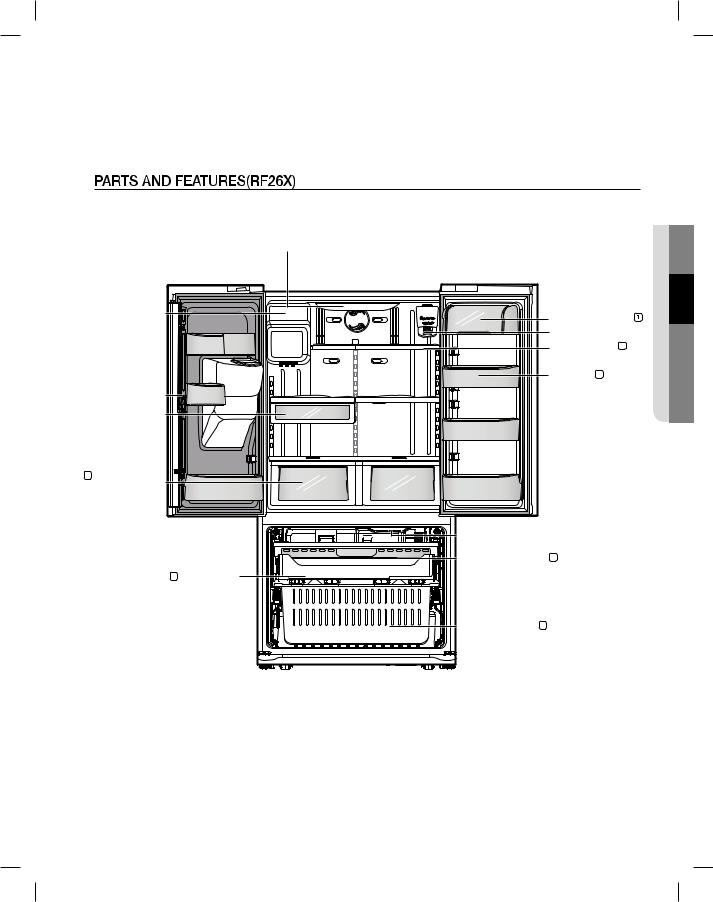
Use this page to become more familiar with the parts and features of the Refrigerator.
Ice-Maker
Vertical Hinged
Section
Deli Drawer
4
Vegetable & Fruit
Drawers
Light |
02 |
|
01&3"5*/( |
||
|
||
Dairy Compartment |
||
Water Filter |
|
|
Extension-Shelf |
3 |
|
Door Bins 2 |
|
|
Light |
|
|
5
Auto Pull Out Drawer
6
Tilting Pocket
7
Freezer Drawer Bin
Operating _27
 Loading...