

Page 1
8
8
8-1
Samsung Electronics
Troubleshooting
Service Manual
8. Troubleshooting
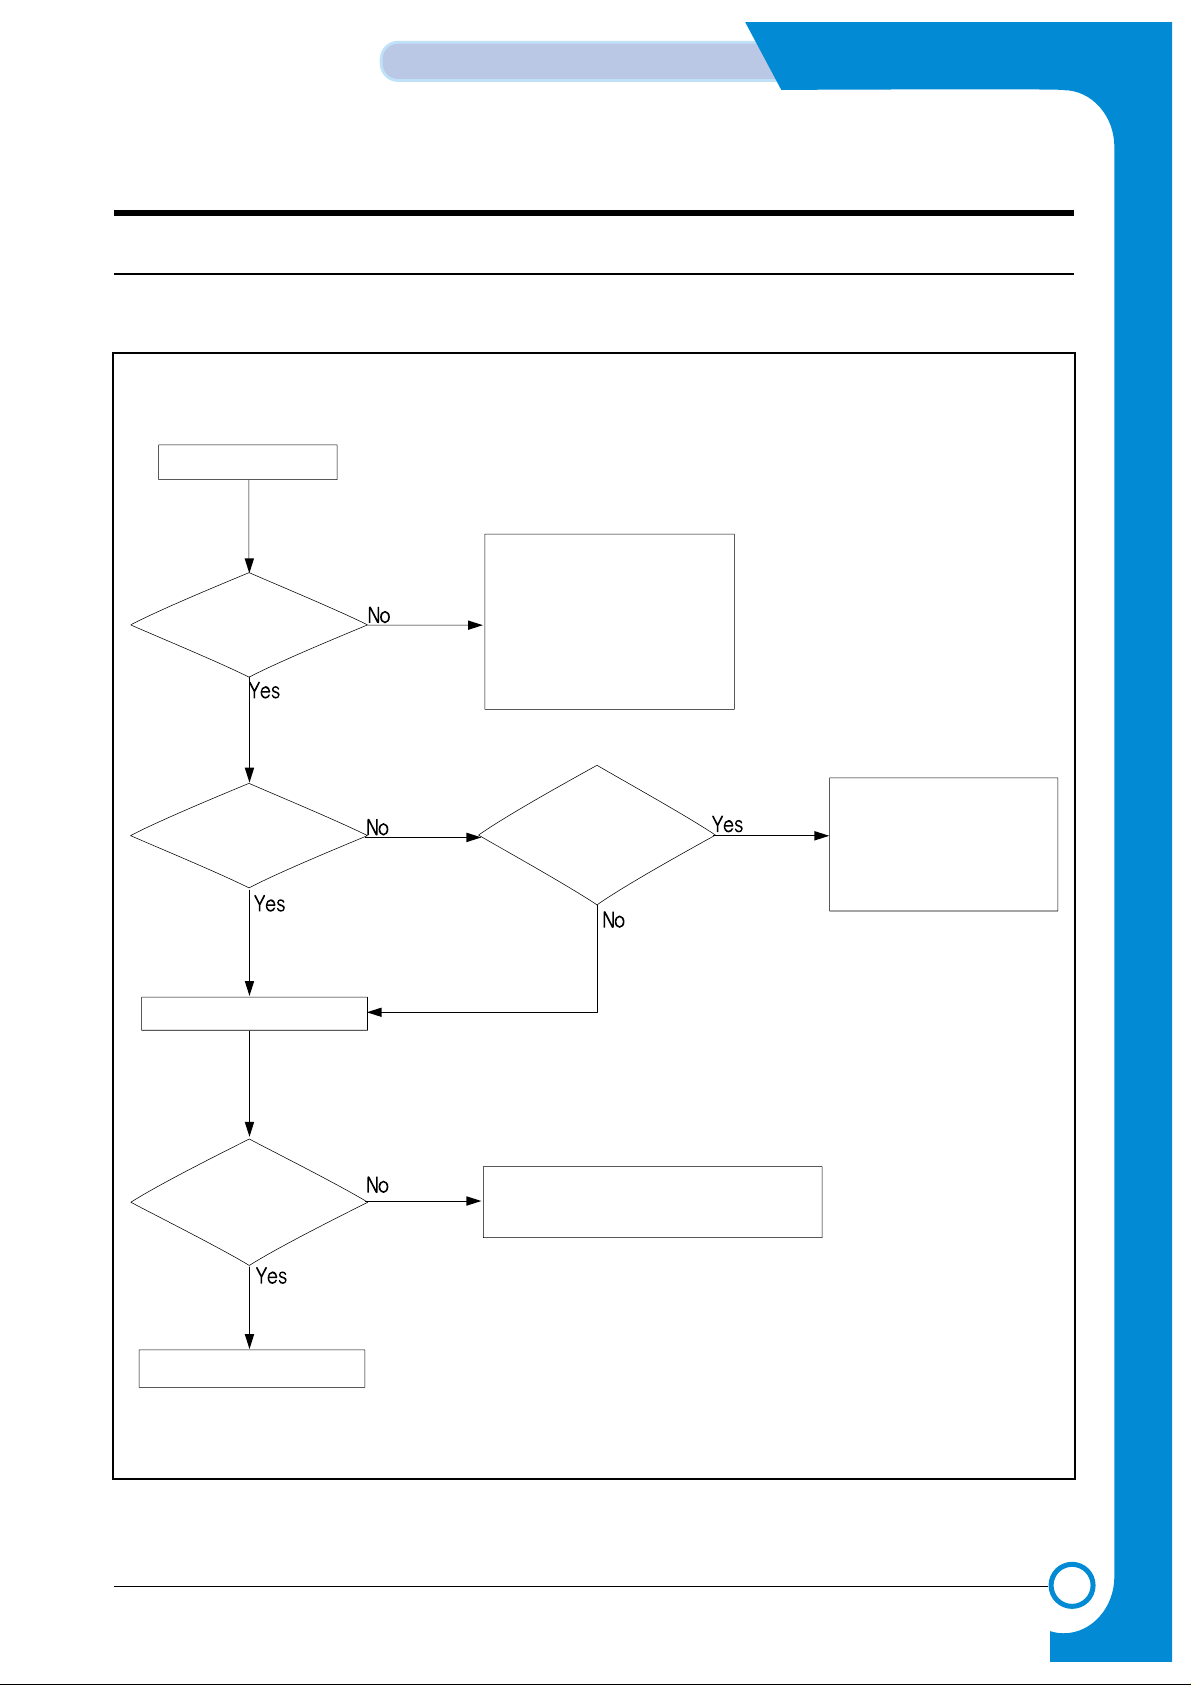
8.1 Procedure of Checking the Symptoms
Before attempting to repair the printer first obtain a detailed description of the problem from the customer.
OP Panel
ON?
Refer to
"8.1.1 Basic Check List"
Print
Printing
guality is
normal?
END
Ready
or
Power Save
Indicate
"Error Message"
Power On
- No Power
- LCD Module
- Main PBA
Refer to
"8.5 Error Message"
Refer to
"8.2 Solution of Image Problem"
Page 2

8-2
Troubleshooting
Samsung Electronics
Service Manual
8.1.1 Basic Check List
1. Check the Power.
• Does "Warming Up" appear on the display?
--> If not check power cable, switch or SMPS. (see section 8.1.2 below)
--> Does the wall socket work?
• Do the Motors or other components initialize (listen for main motor, fan and LSU sounds)?
--> If not or there are none of the normal startup sounds check cable, switch or SMPS.
--> Does the wall socket work?
2. Check the LCD Panel.
• Is there any display at all?
--> If not check power cable, switch or SMPS. (see section 8.1.2 below)
--> Does the wall socket work?
• Is the display a meaningful message (are there any broken or badly formed characters)?
--> Check the main PBA and cable harness.
• Is the message on the LCD Panel a standard error message?
--> Refer to section 8.4 or 8.5 (Page 8-14 or 8-18).
3. Check the Paper Path
• Is there a Paper Jam?
--> Remove any paper fragments caught in the paper path.
--> Refer to section 8.3 (Page 8-10).
• Paper Jam occurs repeatedly at a specific point in the Paper Path
--> Dismantle the machine and carefully inspect the region where the jam occurs.
(Especially, check if paper fragments are caught in the Fuser
4. Print the Information Page (Configuration).
• Is there a problem?
--> If there is an error see section 2) or 3) above.
• Try printing a test page from a computer.
--> If there is an error check cables and driver installation.
5. Check the Print Quality.
•Is there are a Print Quality Problem?
--> Refer to section 8.2 (Page 8-5).
6. Check consumables (toner etc.).
•Using the keys print the Information Page.
--> Refer to 8.1.4 below and to section 3.5 (Page 3-3) for expected life of various consumable parts, compare this with
the figures printed and replace as required
Page 3

8-3
Samsung Electronics
Troubleshooting
Service Manual
8.1.2 Initial Inspection
1. Check Power part
1. The printer does not work no matter how long you wait.
A. Is the Power Switch (printer and wall socket) turned on ?
B. Is the Power Cord connected to the printer correctly ?
C. Is the Power cord connected to the wall socket correctly ?
D. Is wall socket working ?
E. Is the unit rated at the same voltage as the supply ?
2. Does the Fan work when power is turned on?
A. Check the connectors on the SMPS.
B. Check the fuses in the SMPS.
C. Check any error message display on the LCD panel and refer to the troubleshooting section 8.4 or 8.5 (Page 8-14 or 8-18).
2. Check the Installation Environment.
1. Ensure the installation surface is flat, level and free from vibration.
If necessary move the printer.
2. Ensure that the temperature and humidity of the surroundings are within specification
If necessary move the printer.
3. Ensure that the printer is position away from any air conditioning or other heating or cooling equipment. Also ensure
that is not positioned in a direct draft from any air conditioning, fan or open window.
If necessary move the printer.
4. Ensure the printer is not positioned in direct sunlight.
If it is unavoidable use a curtain to shade the printer.
5. Ensure the printer is installed in a clean dust free environment.
Move the printer to clean area if necessary.
6. Some industrial or cleaning processes give of fumes which can affect the printer.
Move the printer away from this type of air pollution
3. Check paper type.
1. Use only paper which is of a suitable quality, weight and size?
See the user guide.
4. Check the overall condition of the printer
1. Is the printer properly maintained ?
Clean the Paper Transport Passages.
Any rollers with dirt surfaces should be cleaned or replaced.
Page 4

8-4
Troubleshooting
Samsung Electronics
Service Manual
8.1.3 Check the length of life of components
The length of life of consumable components is displayed either by operating time (% of life) or quantity of output. The
printer will not work if any of these parts have exceeded there expected life. When a user replaces any of these consumable
parts they must reset the appropriate counter using the maintenance menus (see section 7.4, page 7-13).
The printer calculates the working time and quantity of output for each component and saves this information.
1. The Working time for each component (OPC Drum, Toner Cartridge, Image Transfer Belt, Fuser Unit) is measured
every 30 seconds when the Transport Motor and Fusing Contact Motor are active.
2. In order to calculate the number of images printed 1 is added to the appropriate counter every 30 seconds. The
amount of waste toner is calculated based on the number of pixels in the image.
3. When the user replaces any of the consumable parts and resets the appropriate counter it starts again from 0.
Page 5
8-5
Samsung Electronics
Troubleshooting
Service Manual
8.2 Solution of Image Problem
Cause Sequence of Treatment
Driver Installation Problem.
Toner cartridge contacts dirty or not making
good contact or empty Toner Cartridge
(when printing a single color image)
ITB cartridge contacts dirty or not making
good contact or Faulty ITB unit
LSU cable harness plugs not fitted properly
or faulty LSU.
Toner transfer problem
Try printing a Demo Page.
Check that the operating system driver was
installed correctly.
Check and clean the toner contacts.
Re-seat the Toner Cartridge.
Replace the Toner cartridge
Check and clean the ITB contacts.
Re-seat the ITB Unit.
Replace ITB Unit
Check the connectors on the LSU Unit and
main PWAare properly inserted.
Replace the LSU Unit, cables or MAIN PWA
as required
Check all HV contacts and cables.
Replace the HVPS.
- No Image
Cause Sequence of Treatment
OPC Drum BIAS contacts dirty or not making good contact.
Charge Voltage of the OPC Drum is unstable.
Clean Drum contacts..
Replace the OPC Drum.
Replace the HVPS Board.
- Completely Black Image
Cause Sequence of Treatment
Contamination of the internal mechanism of the
toner cartridge
OPC Drum surface contaminated or damaged.
ITB Unit belt is contaminated or damaged.
Fuser Unit is contaminated.
Replace the Toner Cartridge.
Replace the OPC Drum.
Replace the ITB Unit Belt.
Clean or replace the Fuser Unit.
- White Spots / Black Spots / Colored Spots
Page 6
8-6
Troubleshooting
Samsung Electronics
Service Manual
Cause Sequence of Treatment
Paper Path is contaminated.
ITB Unit Belt is contaminated.
Pressure Roller of Fuser Unit is contaminated.
Open covers fully and clean the Paper Path.
Clean or replace the ITB Unit.
Clean or replace the Fuser Unit.
- Toner Smudges on the reverse side.
Cause Sequence of Treatment
If the background is contaminated with only
one color.
If the background is generally contaminated
with all color.
If Printing Density is dark(one color only).
If Printing Density is dark(all colors).
Replace the appropriate Toner Cartridge
Ensure TDC process is enabled.
If problem persists replace the OPC Drum
Replace the appropriate Toner Cartridge
Ensure TDC process is enabled.
If problem persists replace the OPC Drum
- Foggy back ground
Cause Sequence of Treatment
Poor toner transfer to OPC-one color only
Poor toner transfer to OPC- al colors
Poor toner transfer to ITB Unit
ITB Bias voltage incorrect.
Check and clean Toner contacts
Replace the appropriate Toner Cartridge
Check and clean Toner, ITB and OPC unit
contacts
Ensure TDC process is enabled.
If problem persists replace the OPC Drum
Check and clean ITB Unit contacts.
Re-install or replace the ITB Unit.
Check and clean ITB Unit contact.
Replace the HVPS.
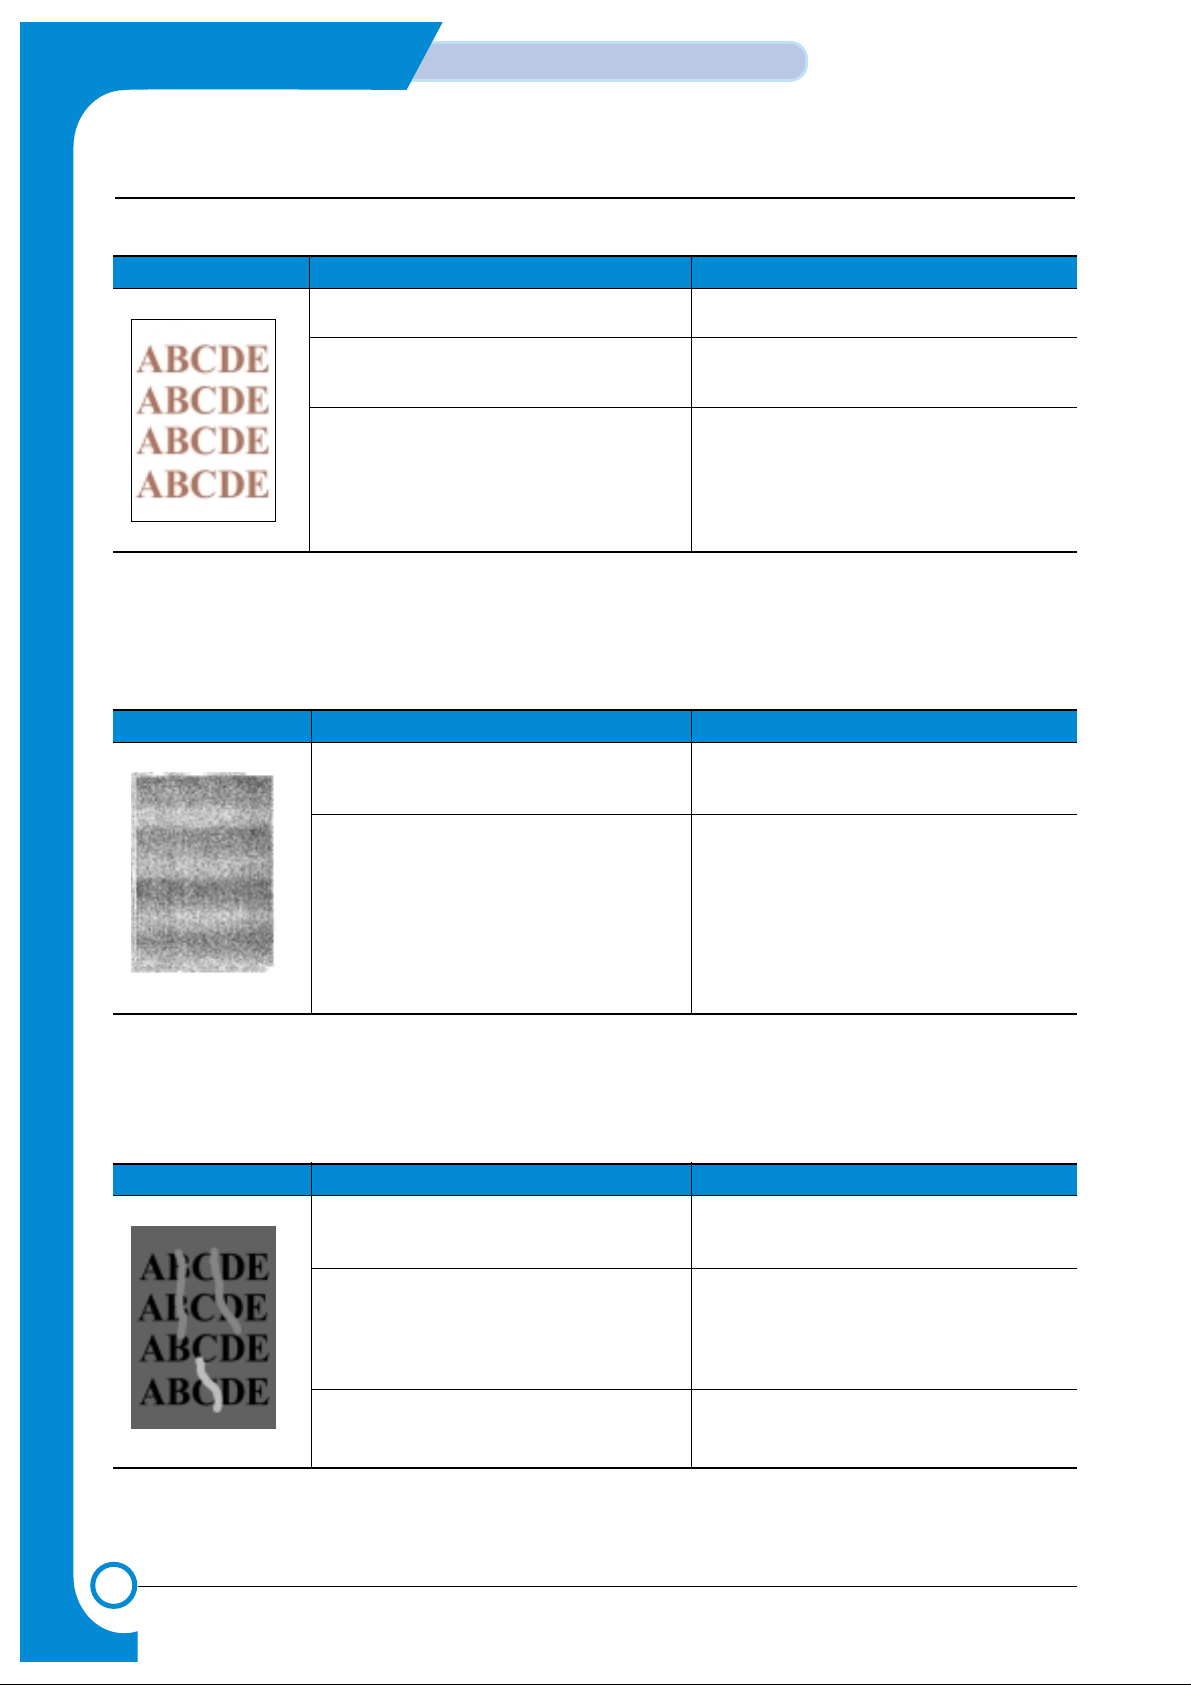
- Low image density
Page 7
8-7
Samsung Electronics
Troubleshooting
Service Manual
Cause Sequence of Treatment
Developing process is contaminated.
ITB Unit is damaged or dirty
Fuser Unit is damaged or dirty
Lens Cover of LSU is damaged or dirty.
Replace the Toner Cartridge.
Replace the OPC Drum.
Replace the ITB Unit.
Clean or Replace the Fuser Unit.
Clean the Lens Cover of LSU.
Replace the LSU if the glass is damaged
- Black / White / Colored Lines and Bands
Cause Sequence of Treatment
Afterimage on the OPC
Afterimage on the ITB Unit.
Toner Cartridge is installed incorrectly.
Individual color layers offset.
Replace the OPC Drum.
Re-install or replace the ITB Unit.
Re-set the Toner Cartridge.
Replace ITB Unit.
- Offset Image
Cause Sequence of Treatment
Problem transferring intermediate images to
the ITB .
Contamination of the Paper Path.
Problem transferring intermediate image onto
paper
Check and clean ITB contacts
Re-install or replace the ITB Unit.
Open the covers, check and clean the Paper
Path.
Check and clean T2 roller contacts
Check T2 Solenoid and cam operation - ensure
T2 comes properly into contact when solenoid
operates.
- Deterioration of Print Quality for all Colors.
Page 8
8-8
Troubleshooting
Samsung Electronics
Service Manual
Cause Sequence of Treatment
If the of Toner Cartridge is bad
If the alignment betweem the OPC and ITB
Units is not carrect.
Uneven contact between OPC and ITB or
between ITB and T2 roller .
Check or replace the Toner Cartridge.
Re-install the OPC and ITB Units.
Re-install or replace the ITB Unit.
Check T2 roller , solenoid and cam operation.
- Deterioration of Printing Quality for Specific Color.
Cause Sequence of Treatment
Uneven contact between OPC and ITB or
between ITB and T2 roller.
Uneven color may occur when a toner
cartridge has just been installed.
Re-install or replace the ITB Unit.
Check T2 roller, solenoid and cam operation.
Make test printing a couple of times.
- Uneven Color Density
Cause Sequence of Treatment
Moisture or wet paper.
Creases in paper.
Fault occurs in Duplex Printing only.
Ensure paper is stored properly and is not damp.
Check paper storage conditions.
1) Creases : Replace the Guide Input.
2) Replace the Fuser Unit.
3) Check OPC, Drum, Toner Cartridge and ITB
Unit for contamination and replace as required.
Replace the Duplex Unit.
- Whited out area
Page 9

8-9
Samsung Electronics
Troubleshooting
Service Manual
Cause Sequence of Treatment
Contamination or damage to rollers.
Measure distance between lines.
Laser Unit damaged
Damage or contemination of OPC drum
Refer to Table of Circumferences of Rollers.
- Mark in same position on every page.
Replace ITB Unit
Replace OPC Drum
- Mark every 75.36 mm
Replace T2 roller
- Mark every 29.28 mm
Replace Toner cartridge
Line repeats every 1~2 mmReplace the LSU Unit.
Random line spacingReplace the OPC Drum.
- Lateral Lines
Cause Sequence of Treatment
Contamination or damage to rollers.
Measure distance between lines.
Laser Unit damaged
Damage or contemination of OPC drum
Refer to Table of Circumferences of Rollers.
- Mark in same position on every page.
Replace ITB Unit
Replace OPC Drum
- Mark every 75.36 mm
Replace T2 roller
- Mark every 29.28 mm
Replace Toner cartridge
Line repeats every 1~2 mmReplace the LSU Unit.
Random line spacingReplace the OPC Drum.
- Regularly repeating image defect
Page 10

8-10
Troubleshooting
Samsung Electronics
Service Manual
Symptoms :
Printing begins at wrong position on the paper.
Check and Cause Solution
Wrong sensor timing caused by defective feed sensor
actuator.
Replace the defective actuator
8.3.2 JAM 0
Symptoms
1. Paper has not exited from the cassette.
2. "Jam-0" occurs even though the paper feeds into the printer.
8.3.1 Top Margin Error.
8.3 Paper Feeding Problems and Troubleshooting
Pick-up
Roller
Check and Cause Solution
1. Check the Feed Solenoid or PickUp using EDS Mode.
2. Check that the Separator Pad has
not become loose.
3. Check if the surface of the Pick-Up
Roller is clean.
4. Check the Feed Sensor is not
sticking by using the EDC Mode
(When “JAM-0” occurs even
though the paper feeds into the
printer.)
1. Replace the Solenoid.
2. Replace the Separator - Pad
(inside the Cassette).
3. Clean the surface of the Pick-Up
Roller with IPA or water.
4. Replace the main PBA or Sensor.
Paper Empty Sensor
Feed Sensor
Page 11

8-11
Samsung Electronics
Troubleshooting
Service Manual
8.3.3 JAM1(JAM inside pinter)
Symptoms
Paper is jammed in front of the Fuser or under the T2 Roller.
Check and Cause Solution
1. If the paper is jammed in front of or
inside the Fuser
2. If the paper is caught in the Exit
Roller and the Fuser check the
Feed Sensor actuator opens and
closes freely.
1. Replace the SMPS.
2. - Re-assembly the Feed Actuator
and Spring, or clean the Hinge
with a lint free cloth.
- Replace the Main PBA.
8.3.4 JAM 2 (Jam in Exit Area)
Symptoms
1. Paper is jammed inside the Fuser.
2. Paper is caught in the Exit Sensor Actuator.
3. Paper is caught in the Exit Roller and Fuser, after passing through the Feed Sensor actuator
Check and Cause Solution
1. The Exit Sensor is defective if Jam
2 occurs after the paper is
completely fed out of the printer.
This can happen if the actuator
sticks open or is slow to close.
2. Paper is rolled into the Fuser.
• “Accordion” folding occurs
repeatedly .
• Fuser temperature is too high
due to failure or other abnormal
conditions.
• If the Heat Roller or Pressure
Roller is conteminated hard
because of Toner.
3. If there are “Accordion” paper folds
inside the Fuser.
4. If the Exit Sensor is defective. a
Jam In Exit Area will occur and
printing will stop.
1. Check if the Exit Sensor Actuator is
broken or damaged.
• Check if the Exit Sensor Actuator
is deformed (Check that the senor
arms are not deformed).
• Check for Burrs or rough edges in
the Exit Actuator assembly, and
check that the sensor arms are
free to move.
• Check for foreign objects
obstructing the Exit actuator.
2. Replace the Fuser.
3. • Replace the Exit Guide.
• Check that the Exit unit is assem-
bled properly and full functioning
and replace if necessary.
4. Replace the Exit Sensor.
Exit Sensor
Feed Sensor
Exit Sensor
Page 12

8-12
Troubleshooting
Samsung Electronics
Service Manual
8.3.5 JAM Duplex
Symptoms
Indicated "Jam in Duplex Area" on the LCD indicator.
Check and Cause Solution
1. Paper in the duplex path fails to
operate the Feed Sensor.
2. Paper in the duplex path fails to
reach the Feed Sensor because of
jamming in the Duplex Path.
1. Replace the Feed Sensor or Exit
Sensor.
2. Check that there are no foreign
objects or fragments of paper in the
Duplex Path. If necessary replace
the Duplex Unit.
8.3.6 Multi-Feeding
Symptoms
Multiple sheets of paper are picked up and fed simultaneously.
Check and Cause Solution
1. Check the On/Off operation of the pick-up Solenoid
using the EDC Mode.
2. Check the Friction Pad surface for dirt or other contamination.
3. Check that the paper is not creased, folded or
curved.
4. Check that the Paper Guide in the cassette is properly
adjusted and that paper is poperly loaded.
5. Influence of Static Electricity.
1. Replace the Solenoid, harness or Main PBA.
2. Clean the Pad-Friction using a lint free cloth and
water or IPA.
3. Use fresh paper.
4. Adjust the Paper Guide and load paper under the
Finger.
5. Fan paper before loading to reduce the effects of static
electricity .
Exit Sensor
Feed Sensor
Page 13

8-13
Samsung Electronics
Troubleshooting
Service Manual
8.3.7 Paper rolling in the Fuser.
Symptoms
Paper is rolled in the Fuser.
Check and Cause Solution
1. If the Heat Roller is conteminated.
(Background, Hot off set)
2. If “Accordion” folding occurs between the Fuser and
the Exit Unit repeatedly.
3. If the Bearing - Fuser or Gear - Fuser is damaged or
melted by excessive heat.
1. Replace the Fuser.
2. Check if the Paper Guide Ribs on the Exit Unit are
damaged or contaminated, and check the condition
and operation of the Exit Roller.
3. Check the SMPS and Main PBA if the Bearing Gear
is melted.
Page 14

8-14
Troubleshooting
Samsung Electronics
Service Manual
8.4.1 Fuser Error
8.4 Symptoms of Bad Operation and Troubleshooting.
Symptoms
Open Fuser / Over Heat / Low Heat displayed on the LCD Panel.
Check and Cause Solution
1. Check the continuity of the Thermostat, AC Wire and
Heat Lamp.
2. Check the continuity of the Thermistor and thermistor
harness / contacts.
3. Test the Heat Lamps and the overheat circuitry.
4. Check the fuser for any evidence of damage due to
overheating or melting.
1. Replace the whole Fuser assembly if the Thermostat
is open circuit, otherwise replace heat lamps as
required..
2. Replace broken thermistor or cables as necessary.
3. Replace the main PBA id the overheat circuit is faulty..
4. Replace the Fuser.
8.4.2 LSU Error
Symptoms
Engine LSU Error displayed on the LCD Panel.
Check and Cause Solution
1. Check the LSU Connector.
2. Check the LSU Motor.
3. Check the HSYNC signal.
4. Check the Deve Cover Micro switch.
1. Replace the LSU.
2. If the same error recurs replace the main PBA.
8.4.3 Fuser does not work due to the drive gear melting.
Symptoms
The fuser gears melt and the roller drive fails.
Check and Cause Solution
1. The Fuser makes a noise and fails to operate, rollers
may not rotate.
- Replace the Fuser.
- Replace the Main PBA.
- Replace the SMPS.
Page 15

8-15
Samsung Electronics
Troubleshooting
Service Manual
8.4.4 Paper Empty
Symptoms
LCD shows "Paper Empty" even though paper is ready.
Check and Cause Solution
1. Check for a broken or distorted paper empty sensor
actuator. Check that the actuator is not jammed
2. Check the sensor connectors and cable harness.
Ensure that a signal reaches the main PBA
3. Use the EDC mode to test the actuator.
1. Replace the Paper Empty Sensor actuator.
2. Replace the harness.
3. Replace the Sensor Board.
8.4.5 Paper Empty without indication.
Symptoms
The machine remains 'Ready; even when the paper cassette is empty.
Check and Cause Solution
1. Check for a broken or distorted paper empty sensor
actuator. Check that the actuator is not jammed.
2. Check the sensor connectors and cable harness.
Ensure that a signal reaches the main PBA
3. Use the EDC mode to test the actuator.
1. Replace the Paper Empty Sensor actuator.
2. Replace the harness.
3. Replace the Sensor Board.
8.4.6 Cover Open
Symptoms
LCD displays "Cover Open" error even though the cover is closed.
Check and Cause Solution
1. Check if the Hook Lever inside the Duplex Cover is
broken or distorted.
2. Check the Cover Open sensor, connectors and cable
harness. Ensure that a signal reaches the main PBA
3. Use the EDC mode to test the actuator.
1. Replace the Duplex Cover.
2. Replace the harness or microswitch as necessary.
3. Replace the Sensor Board.
Page 16

8-16
Troubleshooting
Samsung Electronics
Service Manual
8.4.7. Can not sense when the Cover is Opened.
Symptoms
LCD Indicates "Ready" even when cover is opened.
Check and Cause Solution
1. Check if the Hook Lever inside the Duplex Cover is
broken or distorted.
2. Check the Cover Open sensor, connectors and cable
harness. Ensure that a signal reaches the main PBA
3. Use the EDC mode to test the actuator.
1. Replace the Duplex Cover.
2. Replace the harness or microswitch as necessary.
3. Replace the Sensor Board.
8.4.8 Defective Motor
Symptoms
Main Motor does not work and paper does not feed when printing. Jam 0 is displayed.
Check and Cause Solution
1. Check if the Motor Harness or Motor PCB is broken
or not.
2. Test the Motor using EDC Mode.
1. Replace the Motor or Motor Harness.
2. Replace the Main PBA.
8.4.9 No Power
Symptoms
Power is not supplied to the set, or the LCD display is not on.
Check and Cause Solution
1. Check the power supply input and DC voltage output
from the SMPS. Check the fuses in the SMPS.
Check the wall socket.
2. If the SMPS supply is OK, and the LCD still does not
work check the display connectors and cable harness
3. Check if +24VDC or other Power Supplies are shorted
out.
1. Replace the Power Cable. Replace SMPS fuses. If
the fault recurs replace the SMPS.
2. Replace cables or LCD Panel Ass'y. Replace the
Main PBA.
3. Replace the components used for +24VDC.
Page 17

8-17
Samsung Electronics
Troubleshooting
Service Manual
8.4.10 Curved or Distorted Vertical Lines
Symptoms
Curved, wavy or distorted vertical lines.
Check and Cause Solution
1. Use EDC Mode to test the LSU. Check that the
+24VCD signal between the main PBAand the LSU
is stable
2. Check that the LSU clock is stable.
1. Replace the LSU or Main PBA.
2. Replace the Main PBA.
8.4.11 Low Toner
Symptoms
"Ready Replace [Color]" is displayed on the LCD Panel.
Check and Cause Solution
1. "Low Toner" is displayed when under 500page or
less toner remains (in any of the cartridges).
2. Check the condition of the contacts on the DEVE
PBA.
1. Using the keypad check which toner is empty and
replace the Toner Cartridge.
- Replace the Toner Joint PBA.
- Replace the Main PBA.
8.4.12 Replace Toner[CART].
Symptoms
LCD displays "Ready Replace [CART]".
Check and Cause Solution
1. “Ready Replace CART” is displayed when the OPC
Image Count value is over 50,000. Image Density
may be reduced. It is possible to continue to print one
Page at a time by pressing the “On-Line” button when
it flashes.
1. Replace the OPC Drum.
Page 18

8-18
Troubleshooting
Samsung Electronics
Service Manual
ADC Not Confirm Error
The ADC(Analog -to - Digital Conversion) is defective.
1. Turn the printer off, wait 30 secs and then turn it back on.
2. Replace the Main PBA if the same symptoms recur.
Cover Open
One of the covers is not properly closed
1. DEVE Cover or Duplex Cover is open. Check and close it correctly.
2. Check the condition of the Cover Open Sensor assembly.
--> Replace if it is damaged or nor correctly fitted.
Dev. Motor Error
The developer motor may stop working because of a harness or connector fault, increased torque in any one of the toner cartridges due to
rollers sticking, a power supply fault or a fault on the main PBA.
1. Open the Deve Cover and check each Toner Cartridge to ensure that the rollers rotate.
--> Turn the rollers by hand and check how difficult it is to rotate the rollers.
--> Replace the toner cartridge if it seems excessively tight.
2. Open the Rear Cover and check if the Deve Motor Harness is assembled correctly.
3. Open the Main PBA Cover and check if the Harness (20pins) connected to the Deve Drive PBA is assembled correctly.
--> Replace the Harness if there are damaged or badly fitted parts.
4. Check the Power Supply to the Main PBA.
--> Replace the SMPS if the Power Supply is out of specification.
--> Replace the Main PBA if the Power Supply from the SMPS is OK.
Engine Fuser Low Heat Error
* The temperature of the Fuser is lower than the Printing temperature.
* The Fuser harness is not connected properly.
1. Check that the Fuser is installed correctly.
--> If not, re-install.
2. Check the AC power to the Fuser (Copper contact.)
--> If it is no good go to step 3 below otherwise go to step 5.
3. Check the Thermostat on the Fuser.
--> If it is open circuit replace the Thermostat.
4. Check that the Thermostat on the Fuser is properly positioned and assembled.
--> Replace the Thermostat if it is not.
5. Check both of the fuser Heat Lamps.
--> Replace any faulty lamps.
6. Check the Harness connected to the SMPS and Fuser.
--> Refit the harness or replace if damaged.
7. Replace the Main PBA.
8. Replace the SMPS.
8.5 Treatment of Error Message.
Page 19

8-19
Samsung Electronics
Troubleshooting
Service Manual
Engine FuserOver Heat Error
The temperature of Fuser is higher than the Printing temperature.
1. Check both of the Thermostats on the Fuser.
--> If it is open circuit replace the Thermostat.
2. Check that the Thermostat on the Fuser is properly positioned and assembled.
--> Replace the Thermostat if it is not.
3. Check the Harness connected to the SMPS and Fuser.
--> Refit the harness or replace if damaged.
4. Check the Fan and the Fan Harness
--> Refit or replace as required
5. Replace the Main PBA.
6. Replace the SMPS.
Warning : You must replace the complete Fuser Ass'y if Over Heat Error has occurred.
Do not replace only the Thermistor.
Engine LSU Error
There is a fault in the LSU unit.
1. Use EDC mode to test the HSYNC signal and LSU Motor.
2. Check the Harness connected to the Engine Controller and LSU.
--> Refit the harness or replace it if it is damaged..
3. Replace the LSU.
Main Motor Error
The Main Motor that drives the OPC, ITB and Pick-Up is faulty.
1. Open the Deve Cover and Top Cover and then check the OPC Unit and ITB Unit.
--> Re-install if they are not correctly fitted or are damaged.
2. Open the Rear Cover and then check the Main Motor Harness.
--> Refit the harness or replace it if it is damaged.
3. Check if the Power Supply from the SMPS to the Main PBA.
--> Replace the SMPS if the voltages are outside specification.
4) Check if the No. 7 of CN27 on the Main PBAis near 0V while Main Motor is powered on under the Mode EDC.
--> Replace the Main PBA if the voltage is near 5V
5) Check if the Motor Clock is generated at the No. 9 of CN27 on the Main PBAwhile Main Motor is powered on under
the Mode EDC.
--> Replace the Main PBA if isn't generated.
Page 20

8-20
Troubleshooting
Samsung Electronics
Service Manual
Waste Motor Error
This error is caused by open circuit of Waste Motor Harness or the
motor stalling due to increased Waste Motor torque during operation.
1. Open the Front Cover and then check if the Waste Toner Tank is full or the waste inlets are blocked with the W aste Toner.
--> Replace the Waste Toner Tank and unblock waste inlet feeds.
2. Open the Top Cover and then remove the ITB Unit and OPC Unit and check if the OPC waste toner outlet blocked.
3. Remove the Front Cover and then check the Waste Motor Harness.
--> Refit or replace the harness if it is damaged.
4. Remove the HVPS Cover and then check that the HVPS OEM Harness is correctly fitted.
--> Refit or replace the harness if it is damaged.
5. Measure the Voltage on CN2 Pin1 and Pin3 of OEM PBA. (Normal : Over +10VDC)
--> replace the OEM PBA if there is no output.
Image Transfer Error
This is caused by a badly fitted or unlocked ITB unit or a faulty ITB
Home Sensor.
1. Open Top Cover and then check that the ITB unit properly fitted and locked in position.
--> Remove, replace and re-lock the ITB unit.
--> If the same fault recurs regularly replace the ITB unit.
2. Check the condition of the ITB Harness (especially if replacing the ITB does not resolve the problem).
--> Refit or replace the harness if it is damaged.
3. Check the signal on Pin 1 of CN10 on the Main PBA.
--> Replace the Main PBA if the signal is Active Low.
Invalid Drum Cartridge
Can not communicate with the OPC Unit.
*This is caused by a wrong value of OEM Resistor in the OPC Unit.
*It is also caused by miss-reading the value of the OEM Resistor because of contamination of the contact points.
1. Check that an original Samsung Drum Cartridge is fitted.
--> If not replace the OPC drum.
2. Clean the OPC unit contact points.
3. Check the Harness connected between the Main PBAand Toner OPC Unit.
--> Refit or replace the harness if it is damaged.
4. Check the “R150” on the Engine Controller.
--> Replace the Engine Controller.
Page 21

8-21
Samsung Electronics
Troubleshooting
Service Manual
Invalid Image Transfer
Can not communicate with ITB Unit.
*This may be caused by a wrong value of OEM Resistor in the OPC Unit.
1. Open the Top Cover and then check that it is correctly locked in position.
--> Remove, replace and re-lock the ITB unit.
2. Replace the ITB Unit.
3. If the fault continues after re-fitting the ITB unit several times check the voltage on Pin4 of CN10 on the Main PBA.
--> Replace the ITB Harness if the voltage is not correct.
4. Replace the Main PBA.
Invalid Toner [Color]
This is caused by a wrong value of OEM Resistor in the Toner
Cartridge.
1. Clean the 3 contact points on the Toner Cartridge and then re-install.
2. Replace the Toner Cartridge if the same error recurs.
3. Remove the Front Cover and then check the condition of the contacts between the OEM PBAand Terminal if the
same error occurs.
--> Clean or Re-assemble.
4. Replace the OEM PBA, HVPS and Main PBAin order if the same error recurs.
Invalid NEW Toner [Color]
This occurs when the Fusible Resistor in the Toner Cartridge does not
become open circuit within regulation time.
1. Clean the 3 contact points on the Toner Cartridge and then re-install.
2. Replace the Toner Cartridge if the same error recurs.
3. Replace the OEM PBA, HVPS and Main PBAin order if the same error recurs.
Jam 0 In [Tray]
Paper is caught in the tray.
1. Open the Duplex Cover and then remove the paper stuck in the machine.
2. Open the Cassette and after removing any trapped paper ensure that the cassette is properly loaded, not overfilled
and that paper guides are properly adjusted.
3. Check that the location of Lever of the Feed Sensor is normal.
4. Check that the operation of the Pick-Up Clutch under the Cassette is normal.
5. If the Clutch does not work check the condition of the cable harness to the Main PBA.
6. Replace the Main PBA if the voltage on Pin 2 of CN32, CN25 on the Main PBAis +24VDC.
(Normal Output : Pin 1 = +24VDC, Pin 2 = 0V)
Page 22

8-22
Troubleshooting
Samsung Electronics
Service Manual
8-22
Chapter 8. Troubleshooting
Samsung Electronics
Jam In Duplex Path
Paper is caught while printing side 2.
1. Open the Duplex Cover and then remove the paper.
2. Remove any foreign objects in the Duplex Path.
Jam In Exit Area
Paper is caught in the Exit Area.
1. Check the Exit Sensor actuator.
--> Replace the Fuser if the Exit Sensor actuator is damaged or bent.
2. Check that the Paper Guide Rib of the Output Guide is clean, and not damaged or distorted.
--> Replace the Fuser or Exit Ass'y if it is not normal.
3. Check the condition and operation of the Fuser Rollers.
Jam Inside Printer
Paper is caught inside printer
1. Open the Duplex Cover and then remove the paper.
2. Check the Feed sensor actuator.
--> Replace the Feed Sensor if it is damaged or distorted.
Load Manual
Press Cont Key
This is only displayed when printing in Manual Feed mode and the
MPF tray is empty..
Load a sheet of print material and press the On-Line/Continue button. You need to press the button for each page to
be printed.
Load [Size] In [Tray]
The size of paper in the tray and the size of paper required by the document being printed are different.
*In this case the size of paper and tray is indicated.
Load the correct size of paper.
Page 23

8-23
Samsung Electronics
Troubleshooting
Service Manual
Memory Overflow
Not enough Memory Capacity.
The printer has insufficient memory to build the page image. The print process will be cancelled automatically and the
printer will return to the Wait Mode. Add more memory to the printer.
Page Too Complex
The layout of document is to complex.
Try to print again after making the layout simpler and erasing any unnecessary images. If the message is appear
repeatedly you will need to add extra memory to the printer.
Press Cont Key
Replace [Ctrl]
Not enough Toner
* Press the [On-Line/Continue] button to continue printing.
* Replace the Toner Cartridge when the image quality becomes unacceptable.
* You can select if this message will be displayed on the LCD Pane or not.
Press Cont Key
Replace Drum
The OPC drum is coming to the end of its usable life and will need
replacing soon.
* Press the [On-Line/Continue] button to continue printing.
* Replace the OPC Drum when the image quality becomes unacceptable.
* You can select if this message will be displayed on the LCD Pane or not.
Press Cont Key
Replace Transfer
The ITB Unit is coming to the end of its usable life and will need
replacing soon.
* Press the [On-Line/Continue] button to continue printing.
* Replace the ITB Unit when the image quality becomes unacceptable.
* You can select if this message will be displayed on the LCD Pane or not.
Page 24

8-24
Troubleshooting
Samsung Electronics
Service Manual
Press Cont Key
Replace T2 Roller
The T2 roller is coming to the end of its usable life and will need
replacing soon.
* Press the [On-Line/Continue] button to continue printing.
* Replace the T2 roller when the image quality becomes unacceptable.
* You can select if this message will be displayed on the LCD Pane or not.
Ready IP Conflict
IP address conflict with the address of another device on the network.
This only occurs when the optional network interface is connected and configured for TCP/IPsupport. Change the IP
Address.
Ready [CMYK] Low Toner
The indicated Toner Color cartridge is almost empty.
Replace the indicated Color Toner Cartridge.
To temporarily improve printing for a short time remove the indicated toner cartridge and rock it gently from side to side
for a short time before replacing it.
Replace Drum Cartridge
This occurs when the OPC drum is not correctly installed.
1. Check that the OPC Unit is installed and locked correctly.
2. Check the OPC OEM Harness to the Main PBA.
--> Refit or replace the harness if it is damaged.
3. Replace the Main PBA.
Replace Image Transfer
There is a problem with the ITB Unit installation.
* This occurs when the ITB Unit is not correctly installed and locked
* This occurs when the value of the OEM Resistor in the ITB Unit is incorrectly detected due to contamination of the
contact.
1. Open the Top Cover and then check that the ITB Unit is installed and locked correctly.
2. Clean the contacts on the ITB Unit
3. Replace the ITB unit.
Page 25

8-25
Samsung Electronics
Troubleshooting
Service Manual
Replace Toner [Color]
It occurs when the Toner Cartridge of indicated Color is not installed.
*If the Toner Cartridge does not be installed
*The value of OEM Resistor be recognized by the value of opened due to the contamination of Contact point.
1. Open the Deve Cover and then check if the Toner Cartridge is installed.
2. Check if the contact point is contaminated.
3. Replace the Toner Cartridge.
4. Replace the OEM PBA, HVPS and Main PBAin order.
Tray2 Error
This occurs when Tray2 is not installed correctly.
Turn the printer off and re-install Tray2.
Tray2 Jam Cover Open
The cover on Tray 2 is open.
Check and ensure that the cover of Tray2 is closed properly.
Waste Toner Full/Not Install
Waste Toner Tank is full or not installed.
1. Check and replace the Waste Toner Tank or install it correctly.
2. Check that the Waste Toner Sensor actuator lever is free and not damaged or distorted.
3. Check the condition of the waste toner sensor cable harness and refit or replace if it is damaged.
Page 26

8-26
Troubleshooting
Samsung Electronics
Service Manual
MEMO
 Loading...