

Samsung CLP365W, CLP365 Users Manual

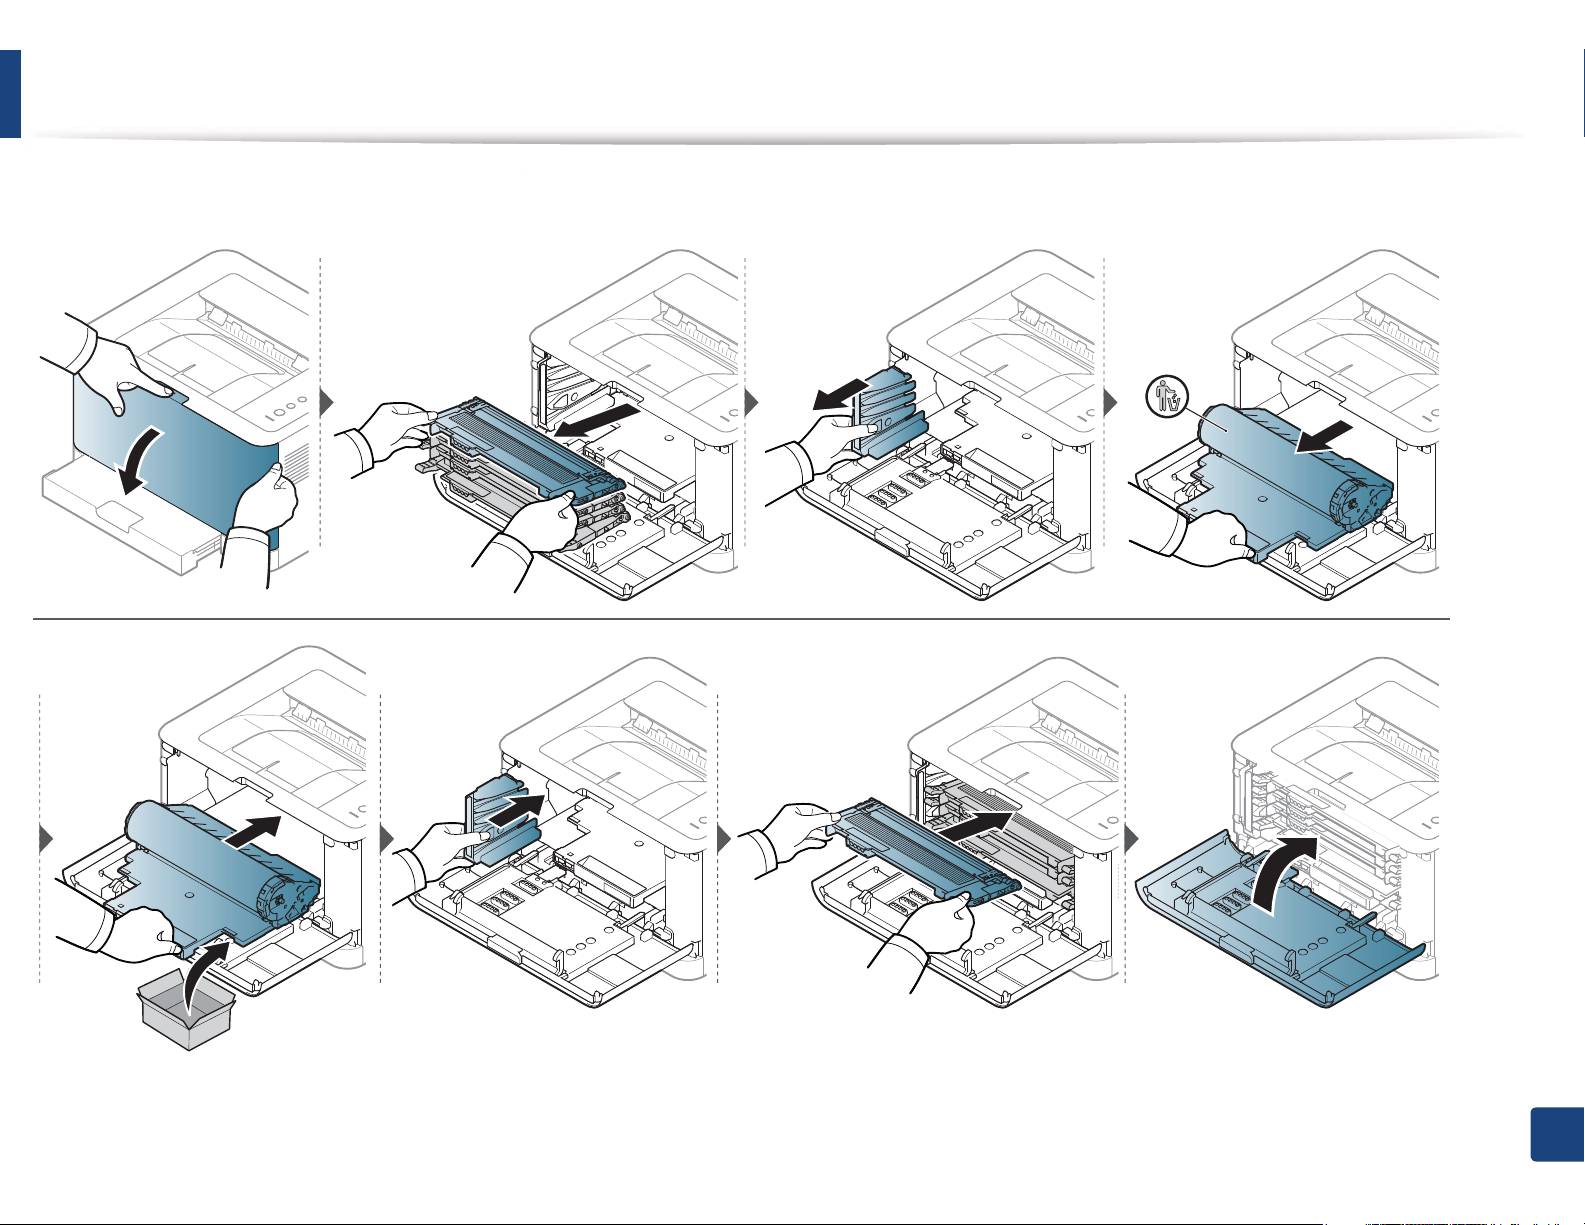
Replacing the imaging unit
When the life span of the imaging unit has expired, the Smart Panel program window appears on the computer, indicating the imaging unit needs to be placed.
Otherwise, your machine stops printing.
• Don’t use sharp objects such as a knife or scissors to open the imaging unit package. You could damage the surface of the imaging unit.
• Be careful not to scratch the surface of the imaging unit.
• To prevent damage, do not expose the imaging unit to light for more than a few minutes. Cover it with a piece of paper to protect it if necessary.
• Before closing the front cover, make sure all toner cartridges are installed properly.
3. Maintenance
51
Replacing the imaging unit
3. Maintenance
52
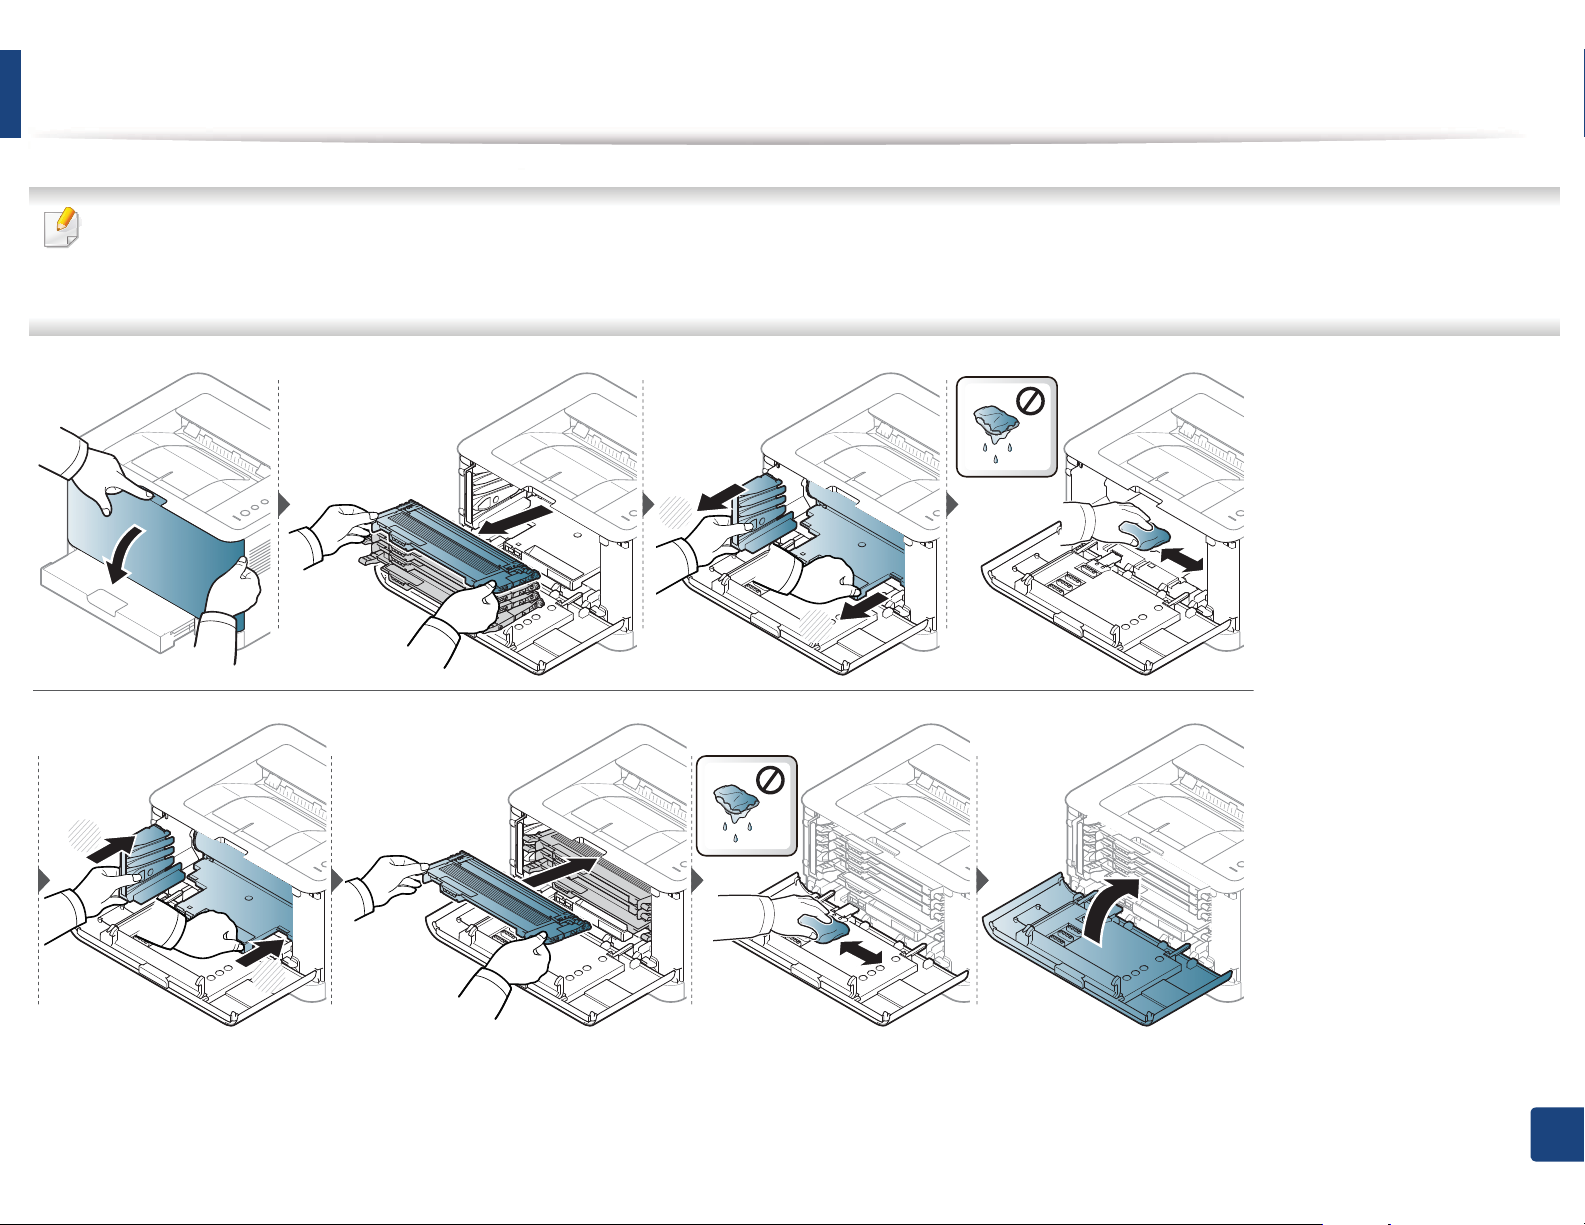
Cleaning the machine
If printing quality problems occur or if you use your machine in a dusty environment, you need to clean your machine regularly to keep it in the best printing
condition and use your machine longer.
• Cleaning the cabinet of the machine with cleaning materials containing large amounts of alcohol, solvents, or other strong substances can discolor or distort the
cabinet.
• If your machine or the surrounding area is contaminated with toner, we recommend you use a cloth or tissue dampened with water to clean it. If you use a vacuum
cleaner, toner blows in the air and might be harmful to you.
• During the printing process, paper, toner, and dust particles can accumulate inside the machine. This buildup can cause print quality problems, such as toner
specks or smearing. Cleaning the inside of the machine clears and reduces these problems.
4
Cleaning the outside
Clean the machine cabinet with a soft, lint-free cloth. Dampen the cloth slightly with water, but be careful not to let any water drip onto or into the machine.
5
Cleaning the inside
During the printing process, paper, toner, and dust particles can accumulate inside the machine. This buildup can cause print quality problems, such as toner specks
or smearing. Cleaning the inside of the machine clears and reduces these problems.
3. Maintenance
53
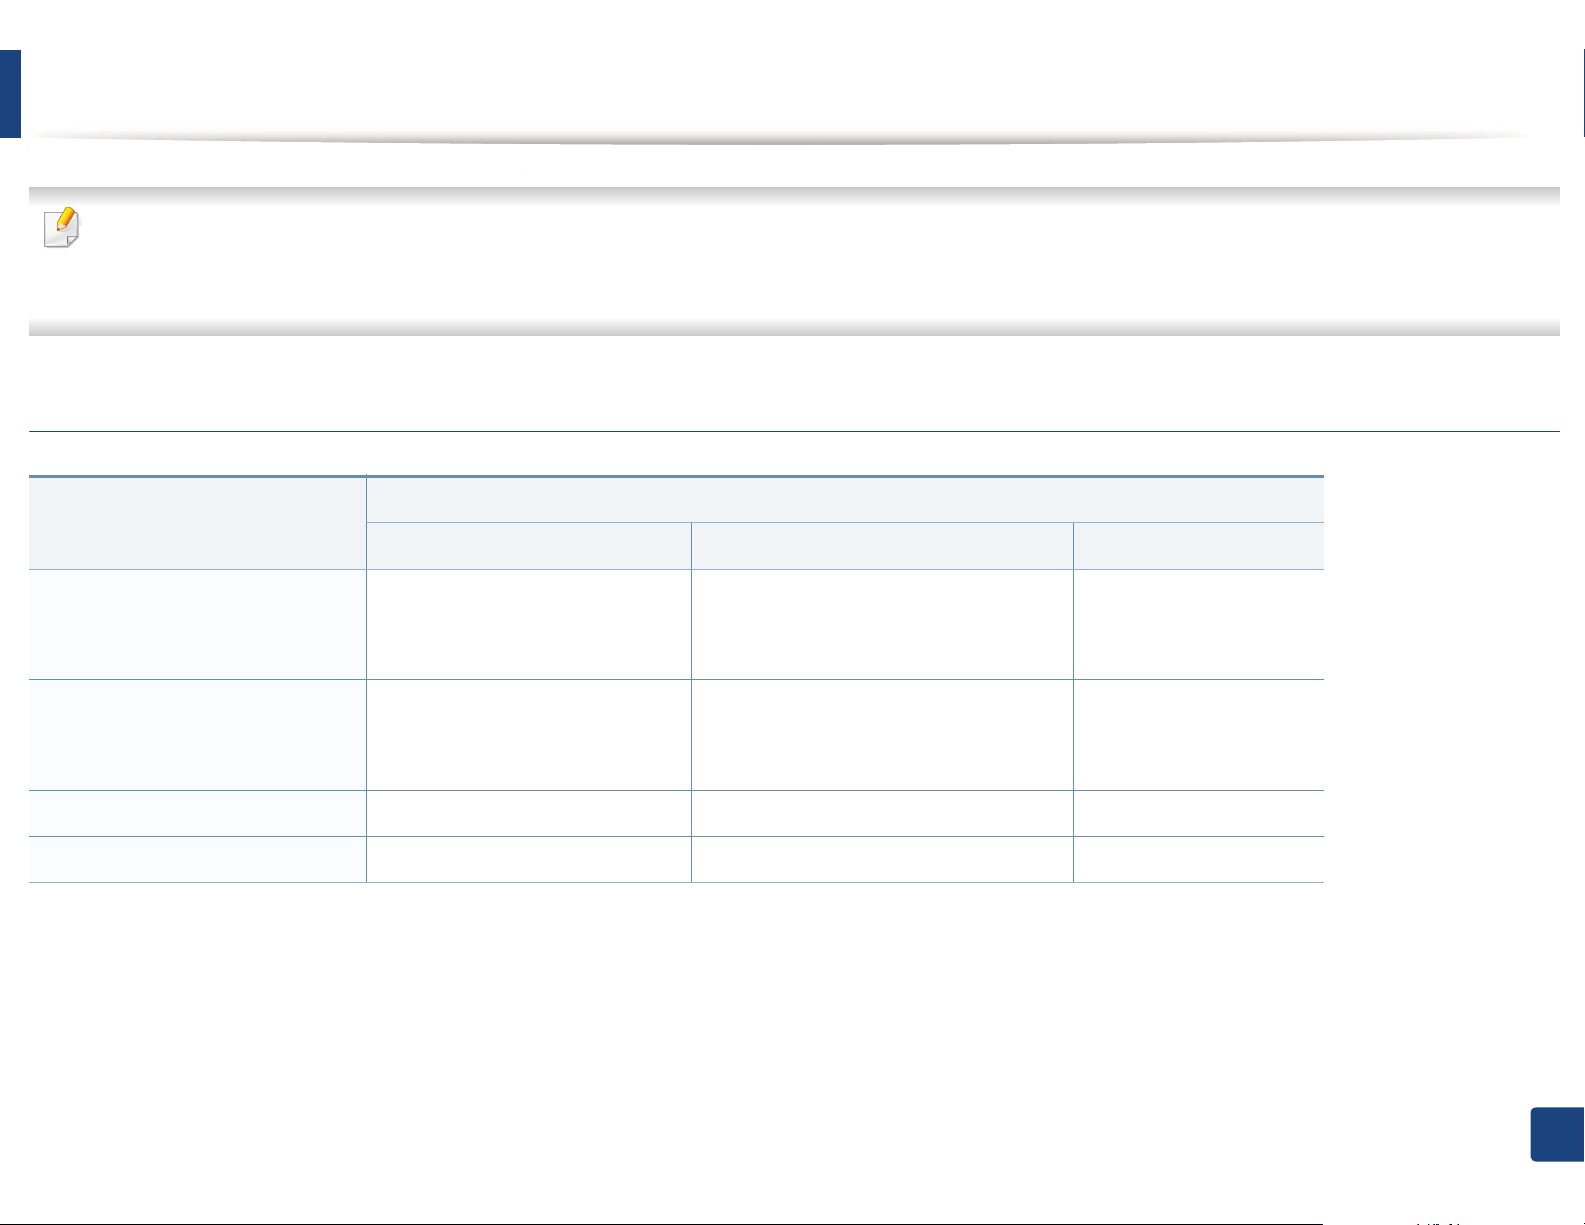
Cleaning the machine
• Use a dry lint-free cloth to clean the machine.
• If your machine has a power switch, turn the power switch off before cleaning the machine.
• Before opening the top cover, close the output support first.
1
2
2
1
3. Maintenance
54

Tips for moving & storing your machine
• When moving the machine, do not tilt or turn it upside down. Otherwise, the inside of the machine may be contaminated by toner, which can cause damage to
the machine or reduce print quality.
• When moving the machine, make sure at least two people are holding the machine securely.
3. Maintenance
55
4. Troubleshooting
This chapter gives helpful information for what to do if you encounter an error.
• Tips for avoiding paper jams 57
• Clearing paper jams 58
• Understanding the status LED 61
This chapter gives helpful information for what to do if you encounter an error.
If your machine has a display screen, check the message on the display screen first to solve the
error. If you cannot find a solution to your problem in this chapter, refer to the
Troubleshooting chapter in the Advanced User's Guide (see "Troubleshooting" on page 163).
If you cannot find a solution in the User's Guide or the problem persists, call for service.

Tips for avoiding paper jams
By selecting the correct media types, most paper jams can be avoided. To avoid paper jams, refer to the following guidelines:
• Ensure that the adjustable guides are positioned correctly (see "Tray overview" on page 26).
• Do not overload the tray. Ensure that the paper level is below the paper capacity mark on the inside of the tray.
• Do not remove paper from the tray while your machine is printing.
• Flex, fan, and straighten paper before loading.
• Do not use creased, damp, or highly curled paper.
• Do not mix paper types in a tray.
• Use only recommended print media (see "Print media specifications" on page 67).
4. Troubleshooting
57
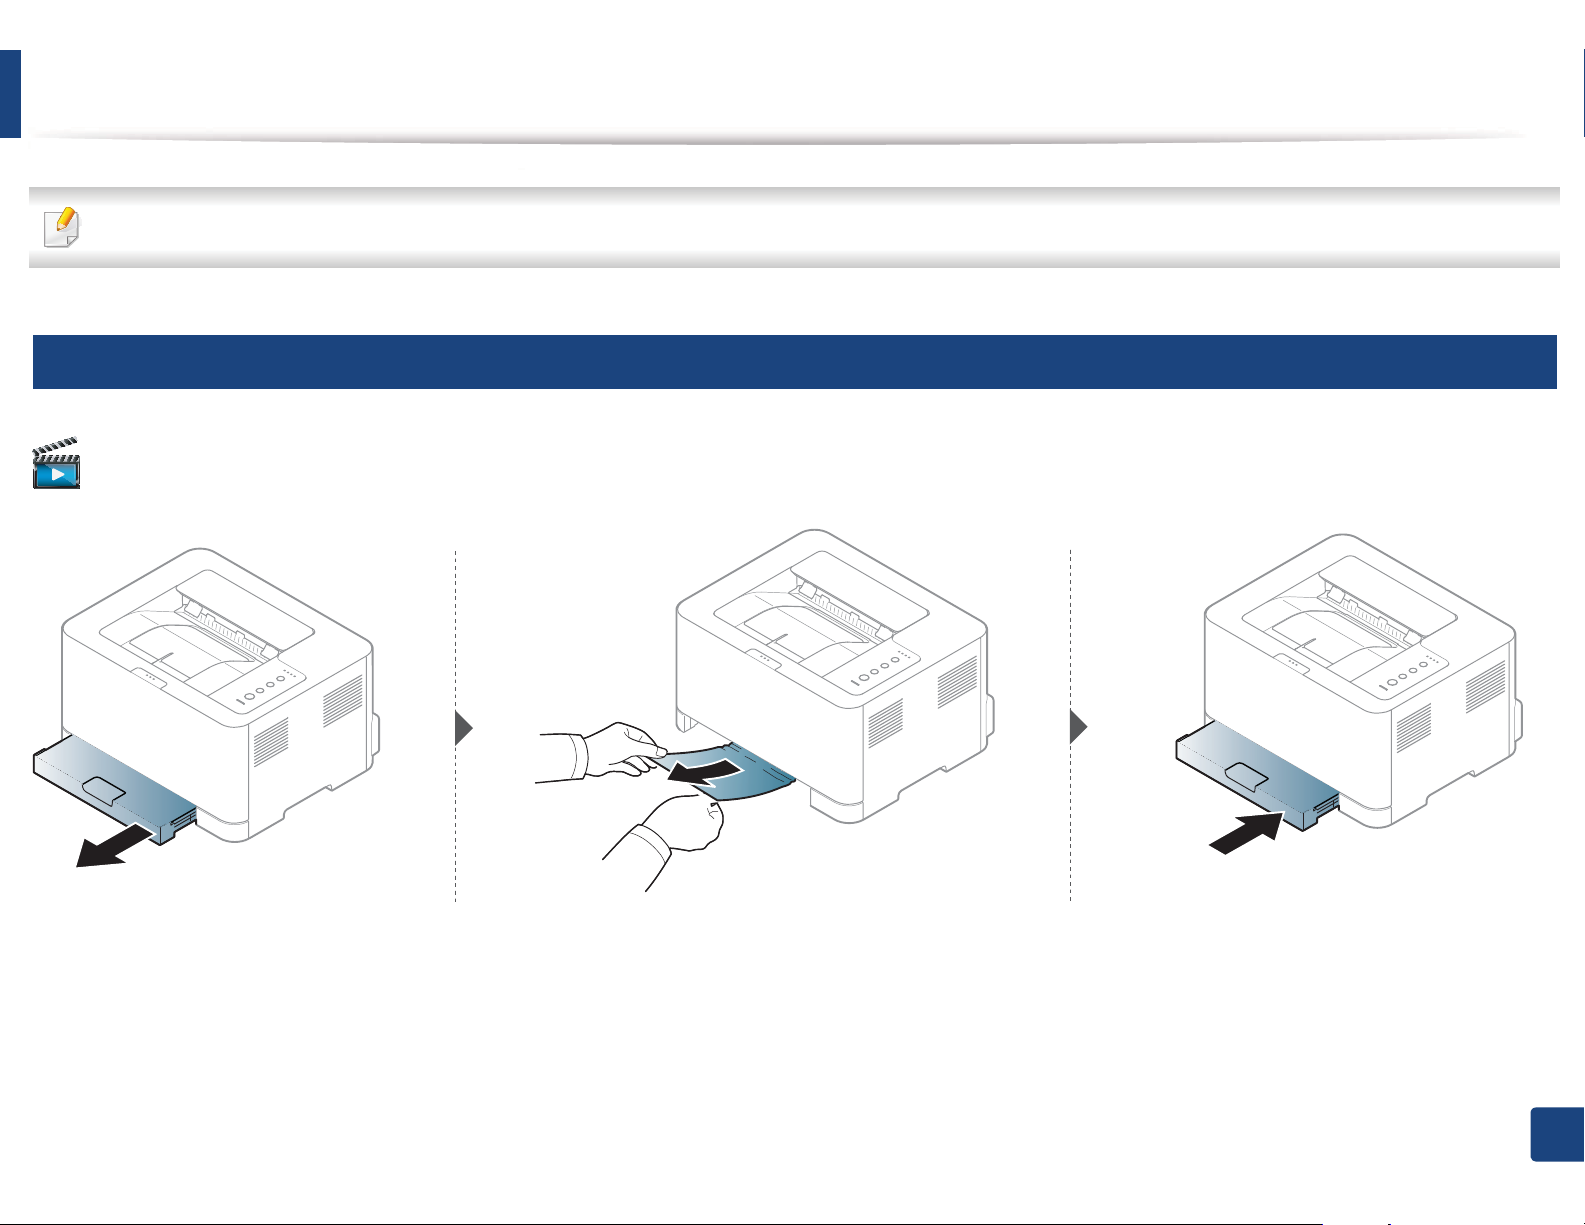
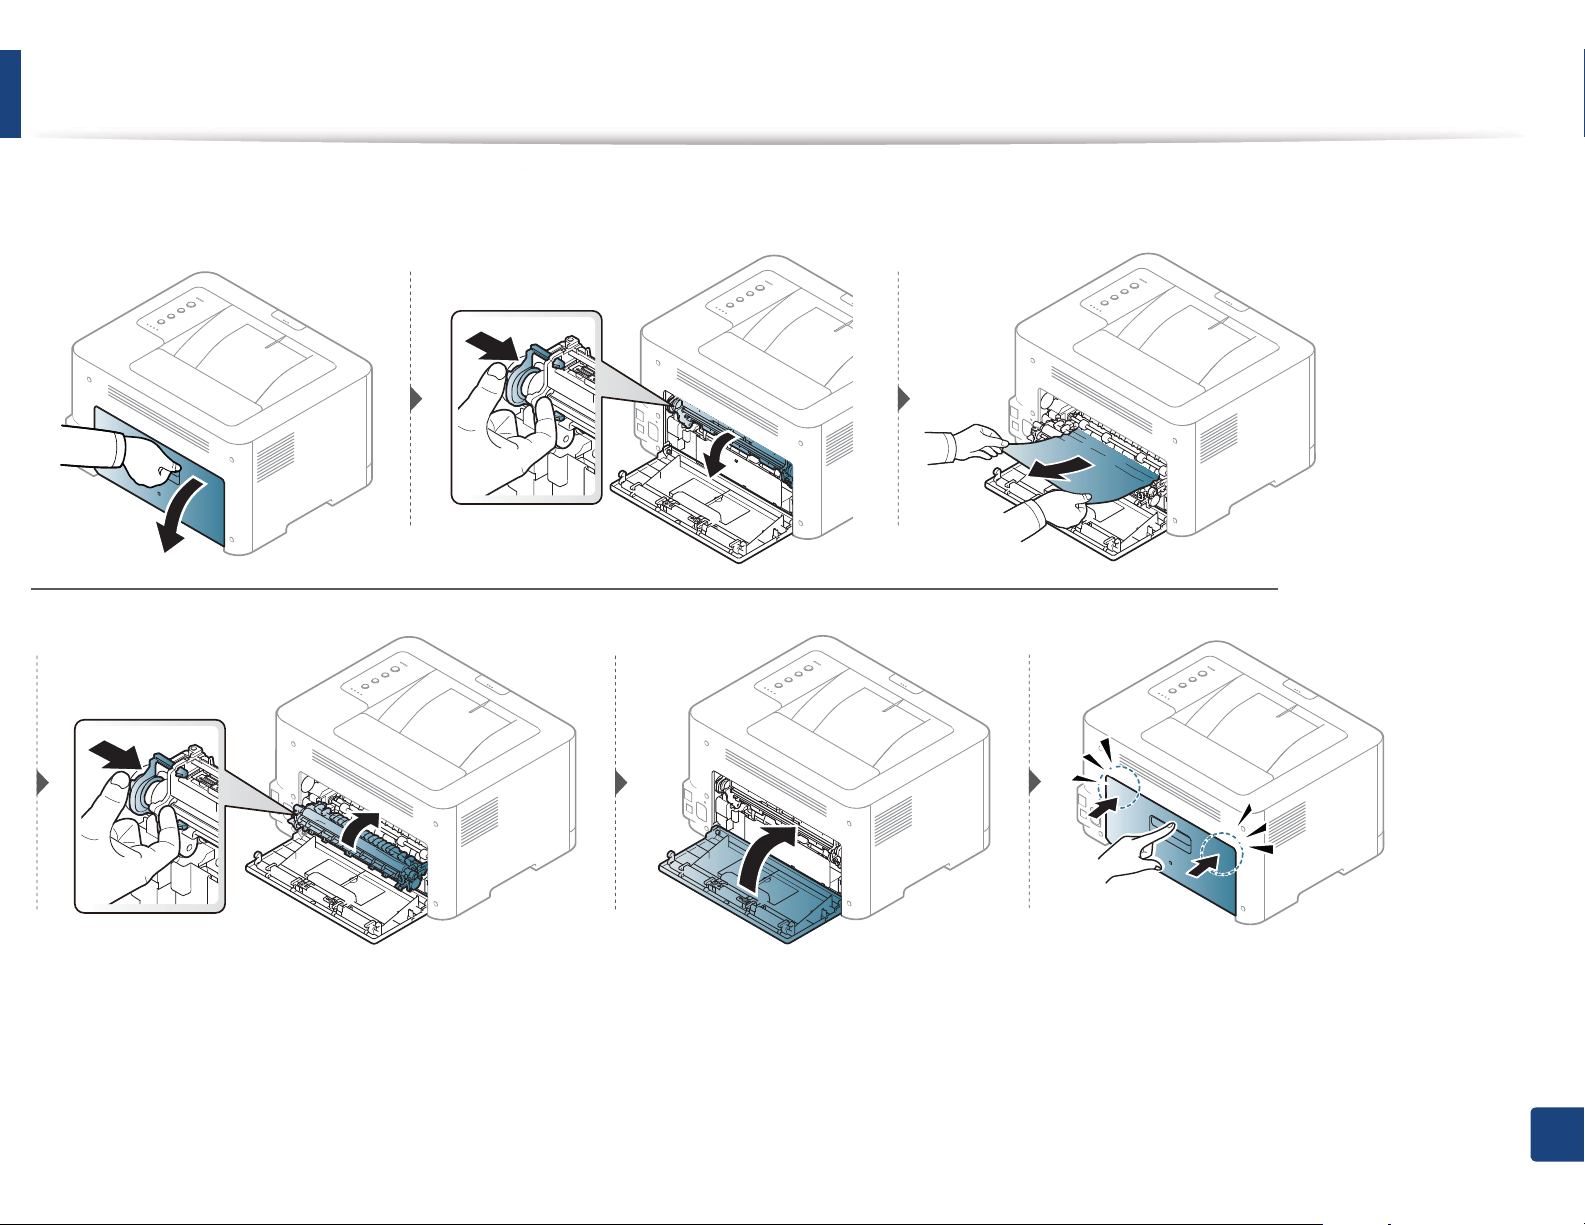
Clearing paper jams
To avoid tearing the paper, pull the jammed paper out slowly and gently.
1
In tray
Click this link to open an animation about clearing a jam.
4. Troubleshooting
58
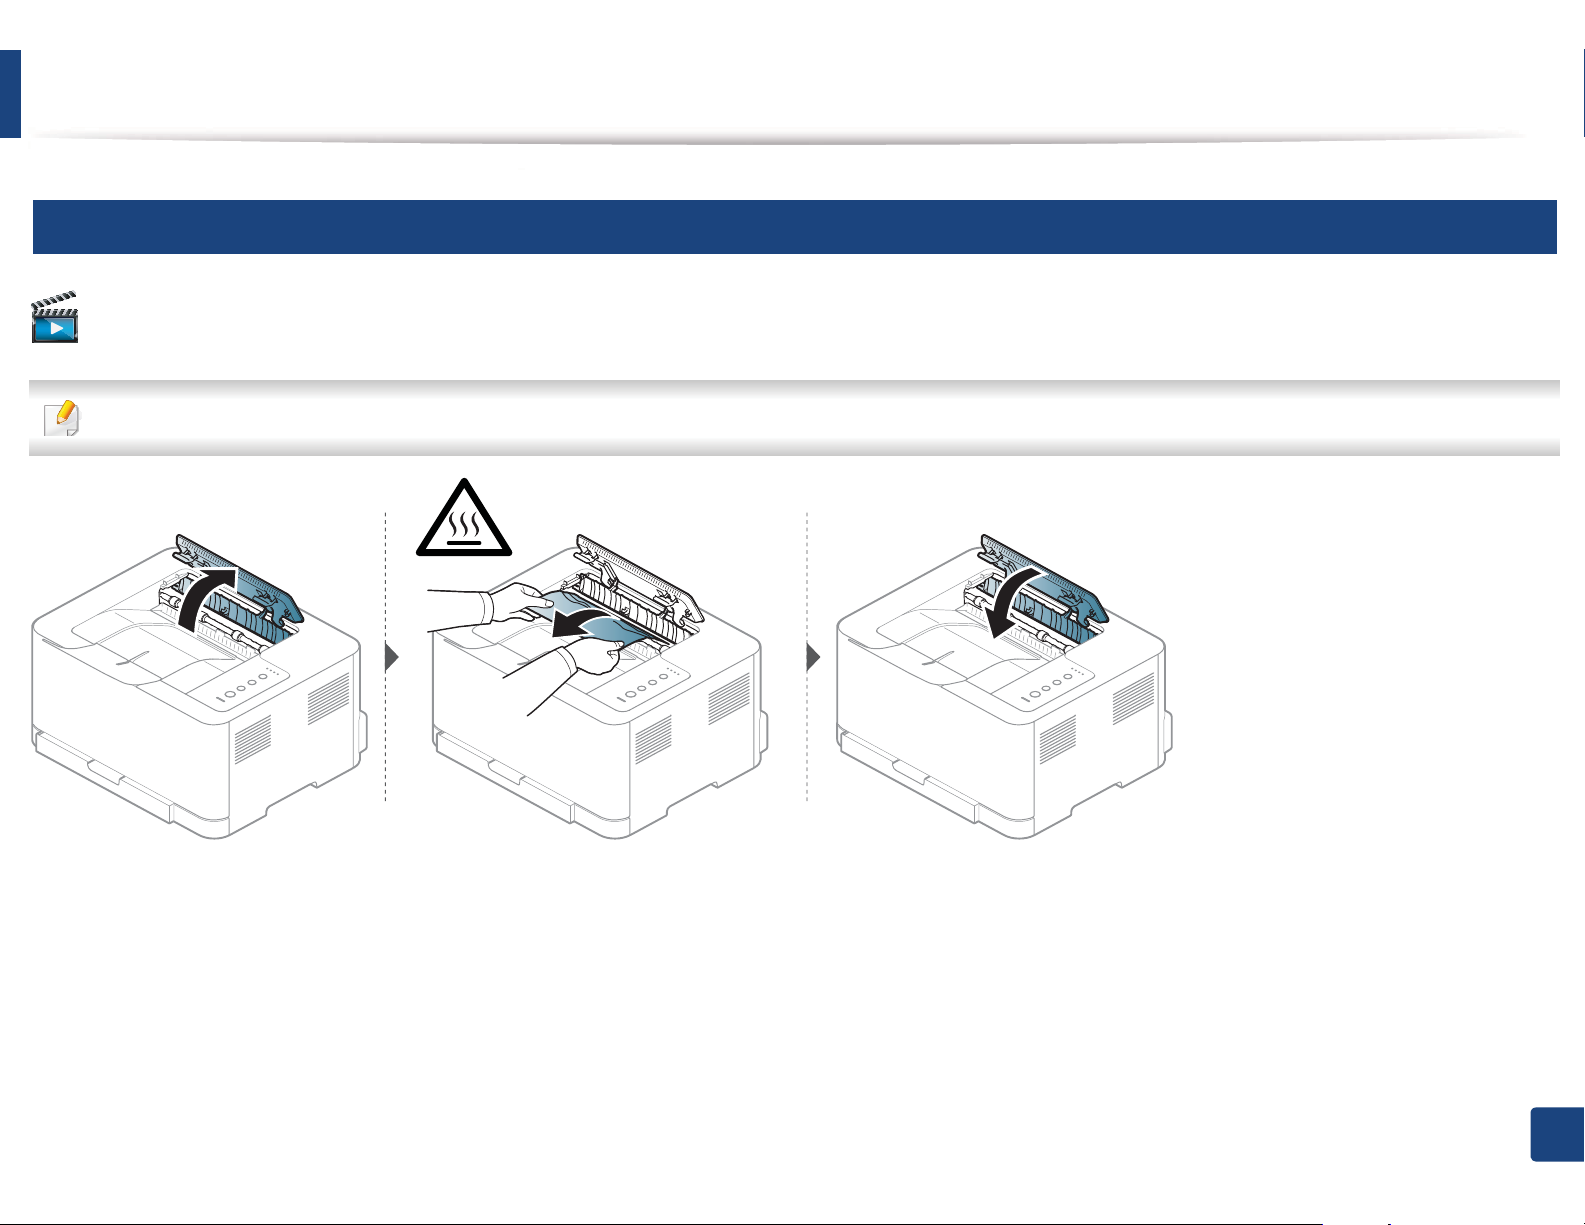
Clearing paper jams
2
Inside the machine
Click this link to open an animation about clearing a jam.
• The fuser area is hot. Take care when removing paper from the machine.
4. Troubleshooting
59
Clearing paper jams
If you do not see the paper in this area, stop and go to next step:
4. Troubleshooting
60

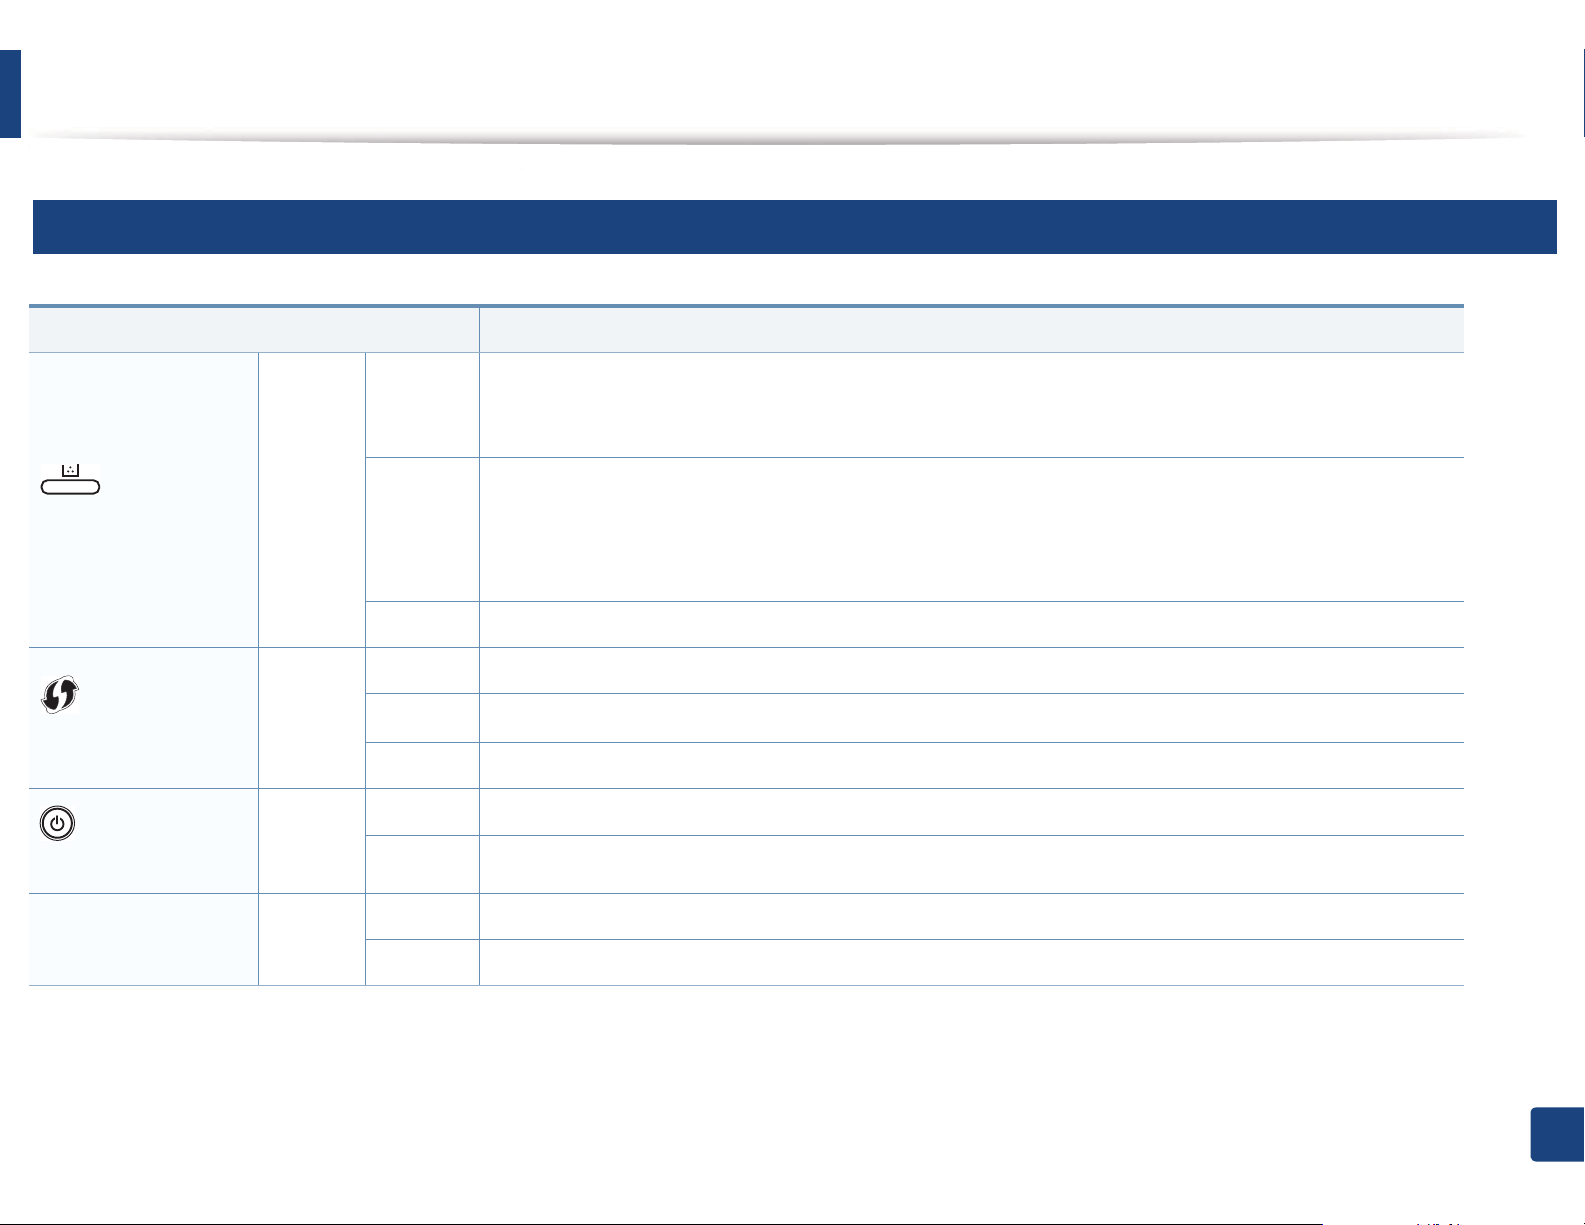
Understanding the status LED
The color of the LED indicates the machine's current status.
• Some LEDs may not be available depending on model or country (see "Control panel overview" on page 19).
• To resolve the error, look at the error message and its instructions from the troubleshooting part (see "Troubleshooting" on page 163).
• You also can resolve the error with the guideline from the computers’s Samsung Printing Status program window (see "Using Samsung Printer Status" on page
158).
• If the problem persists, call a service representative.
4. Troubleshooting
61
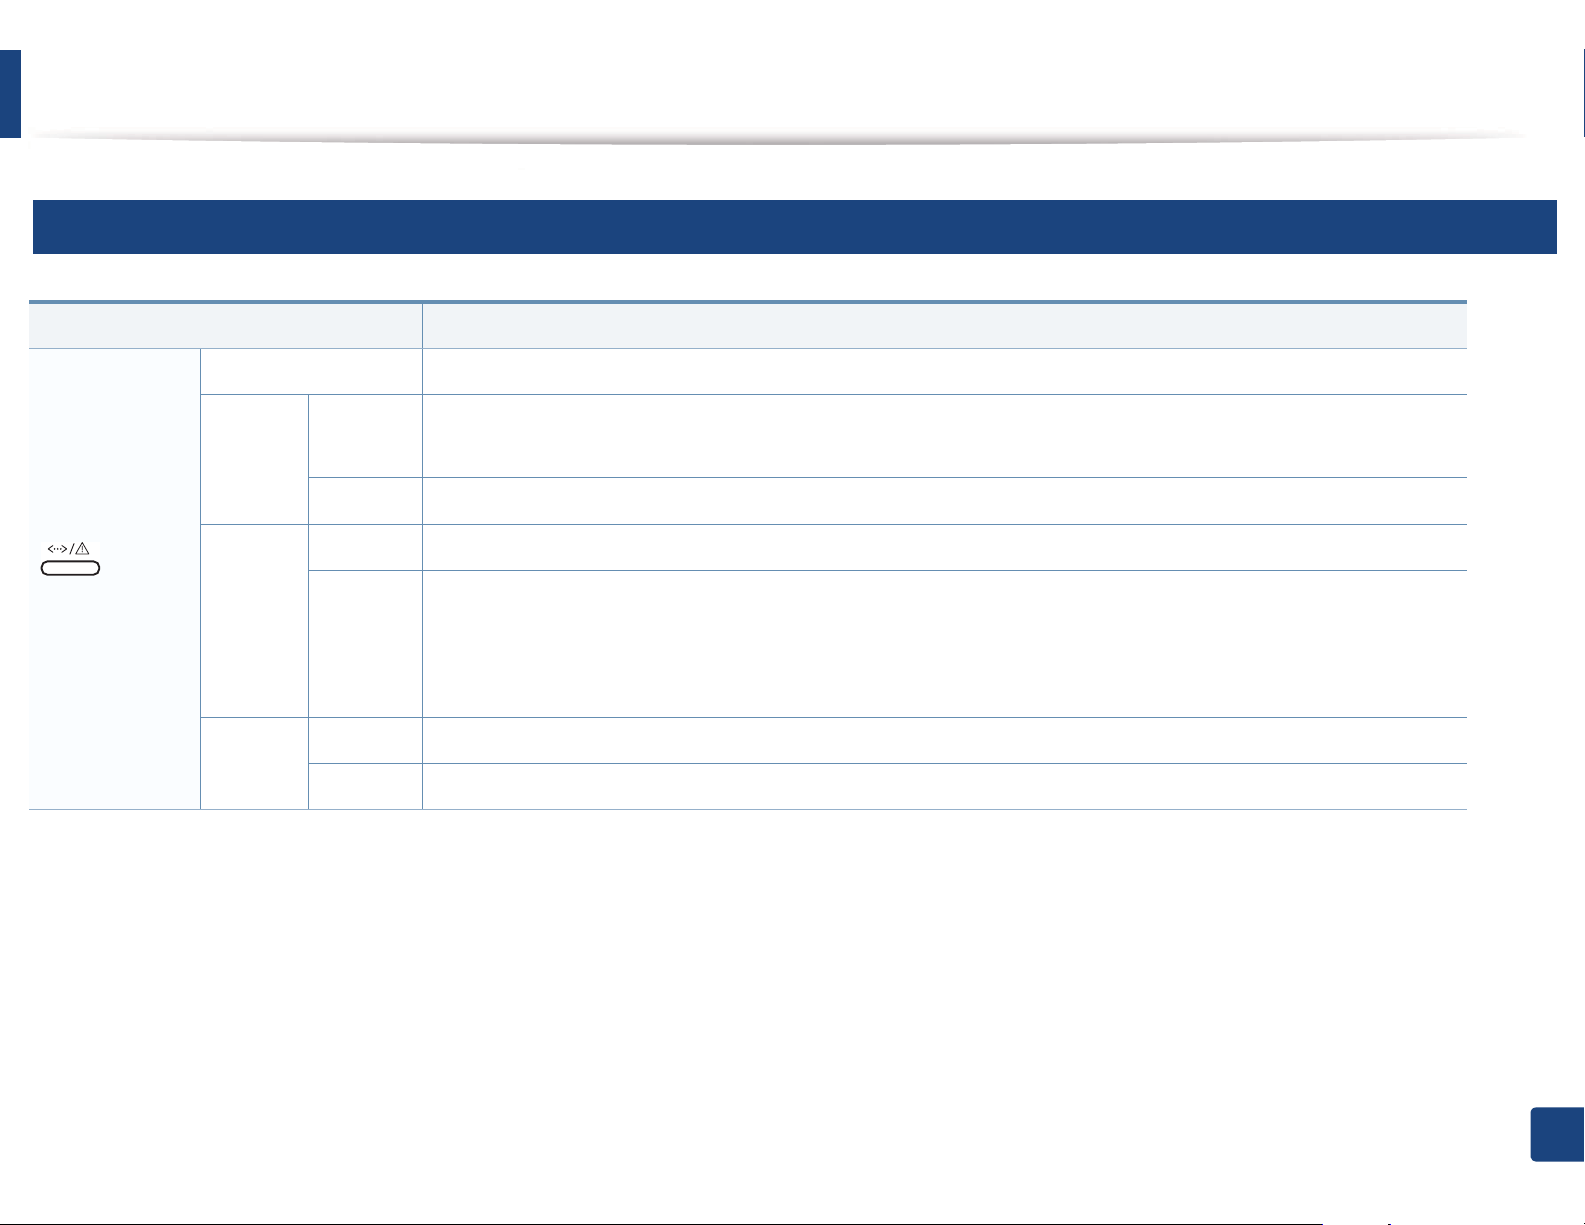
Understanding the status LED
3
Status LED
Status Description
Off The machine is off-line or save mode.
(Status LED)
Green
Red
Orange
Blinking
On The machine is on-line and can be used.
Blinking The machine is on manual printing or manual duplex printing.
On
Blinking Upgrading firmware.
On A paper jam has occurred (see "Clearing paper jams" on page 58).
• The machine is receiving data from the computer.
• The machine is printing data.
• The cover is opened. Close the cover (see "Machine overview" on page 16).
• There is no paper in the tray when receiving or printing data. Load paper in the tray (see "Loading paper in the
tray" on page 27).
• The machine has stopped due to a major error.
4. Troubleshooting
62
Understanding the status LED
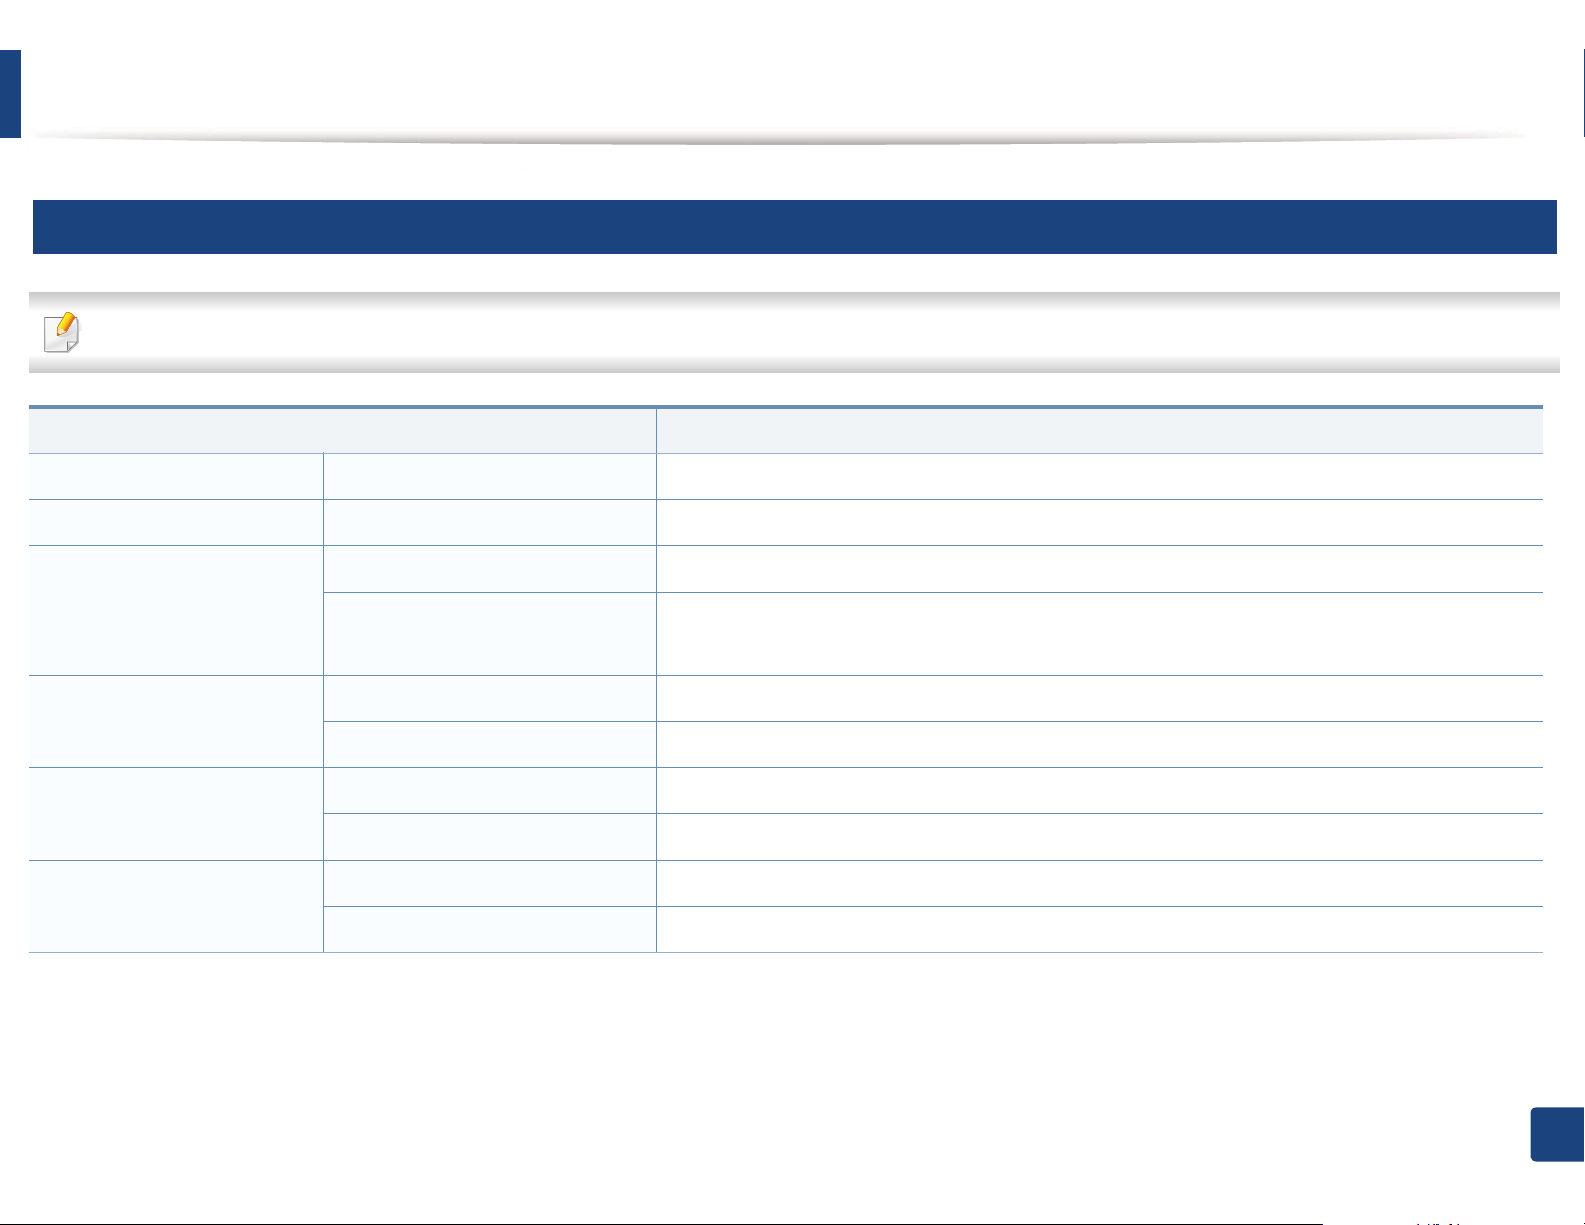
4
Toner / WPS VGPower / Eco LED
Status Description
Small amount of toner is left in the cartridge. The estimated cartridge life of toner is close. Prepare a new
Blinking
cartridge for replacement. You may temporarily increase the printing quality by redistributing the toner (see
"Redistributing toner" on page 45).
Orange
(Toner LED)
Blue
(WPS LED)
(Power/Wakeup LED)
Eco Green
a. Estimated cartridge life means the expected or estimated toner cartridge life, which indicates the average capacity of print-outs and is designed pursuant to ISO/IEC 197`_. The
number of pages may be affected by operating environment, printing interval, graphics, media type and media size. Some amount of toner may remain in the cartridge even when
red LED is on and the printer stops printing.
b. Wireless model only (see "Features by models" on page 6).
b
Blue
On
Off All toner cartridges are at normal capacity.
Blinking The machine is connecting to a wireless network.
On
Off The machine is disconnected from a wireless network.
On The machine is in power save mode.
Off
On Eco mode is on (see "Eco printing" on page 36).
Off Eco mode is off.
• A toner cartridge has almost reached its estimated cartridge life
cartridge (see "Replacing the toner cartridge" on page 47).
• The toner cartridge is not installed or the wrong toner cartridge is installed (see "Replacing the toner
cartridge" on page 47).
The machine is connected to a wireless networkGOsee "Using the WPS button" on page 108).
The machine is in ready modeGor the machine’s power is off.
a
. It is recommended to replace the toner
4. Troubleshooting
63

5. Appendix
This chapter provides product specifications and information concerning applicable regulations.
•Specifications 65
• Regulatory information 74
•Copyright 84
Specifications
1
General specifications
The specification values listed below are subject to change without notice. See www.samsung.com for possible changes in information.
Items Description
Dimension Width x Length x Height 388 x 313 x 243 mm (15.3 x 12.3 x 9.6 inches)
Weight Machine with consumables 11 kg (24.3 lbs)
Ready mode Less than 26 dB (A)
Noise Level
a
Temperature
Humidity
Power rating
Print mode
• color printing: Less than 46 dB (A)
• black and white printing: Less than 48 dB (A)
Operation 10 to 32°C (50 to 90°F)
Storage (packed) -20 to 40°C (-4 to 104°F)
Operation 10 to 80% RH
Storage (packed) 20 to 95% RH
b
110 volt models AC 110 - 127 V
220 volt models AC 220 - 240 V
5. Appendix
65
Specifications
Items Description
Power consumption
Wireless
a. Sound Pressure Level, ISO 7779. Configuration tested: basic machine installation, A4 paper, simplex printing.
b. See the rating label on the machine for the correct voltage (V), frequency (hertz) and type of current (A) for your machine.
c. Wireless model only (see "Features by models" on page 6).
c
Average operating mode Less than 290W
Ready mode Less than 60 W
Power save mode Less than 1.0 W (CLP-36x Series), Less than 1.4 W (CLP-36xW Series)
Power off mode 0.45 W
Module
SPW-B4319S
5. Appendix
66
Specifications
2
Print media specifications
Type Size Dimensions
Plain paper
Thick paper
Letter 216 x 279 mm (8.5 x 11 inches)
Legal 216 x 356 mm (8.5 x 14 inches)
US Folio 216 x 330 mm (8.5 x 13 inches)
A4 210 x 297 mm (8.27 x 11.69 inches)
Oficio 216 x 343 mm (8.5 x 13.5 inches)
JIS B5 182 x 257 mm (7.17 x 10.12 inches)
ISO B5 176 x 250 mm (6.93 x 9.84 inches)
Executive 184 x 267 mm (7.25 x 10.5 inches)
A5 148 x 210 mm (5.83 x 8.27 inches)
A6 105 x 148 mm (4.13 x 5.83 inches)
Refer to the Plain paper section
Refer to the Plain
paper section
Print media weight/Capacity
Tray
2
60 to 85 g/m
(16 to 23 lbs
bond)
• 130 sheets of 80 g/m
bond)
86 to 120 g/m
2
(23 to 32 lbs
bond)
• 50 sheets of 120 g/m
bond)
2
(21 lbs
2
(32 lbs
Manual feeding in tray
60 to 85 g/m
• 1 sheet
86 to 120 g/m
• 1 sheet
a
2
(16 to 23 lbs bond)
2
(23 to 32 lbs bond)
b
5. Appendix
67

Specifications
Type Size Dimensions
Thin paper
Cotton
Colored,
Pre-printed,
Recycled
Labels
c
Refer to the Plain
paper section
Refer to the Plain
paper section
Refer to the Plain
paper section
Letter, Legal, Oficio,
US Folio, A4, JIS B5,
ISO B5, Executive,
A5
Refer to the Plain paper section
Refer to the Plain paper section
Refer to the Plain paper section
Refer to the Plain paper section
Print media weight/Capacity
Tray
2
60 to 70 g/m
(16 to 19 lbs bond)
• 150 sheets of 60 g/m
bond)
2
75 to 90 g/m
(20 to 24 lbs bond)
• 130 sheets of 80 g/m
bond)
60 to 85 g/m
2
(16 to 24 lbs bond)
• 130 sheets of 80 g/m
bond)
2
120 to 150 g/m
(32 to 40 lbs
bond)
• 5 sheets
2
(16 lbs
2
(21 lbs
2
(21 lbs
Manual feeding in tray
60 to 70 g/m
2
• 1 sheet
75 to 90 g/m
2
• 1 sheet
60 to 85 g/m
2
• 1 sheet
120 to 150 g/m
• 1 sheet
a
(16 to 19 lbs bond)
(20 to 24 lbs bond)
(16 to 24 lbs bond)
2
(32 to 40 lbs bond)
b
Card stock
Bond paper
Letter, Legal, Oficio,
US Folio, A4, JIS B5,
ISO B5, Executive,
A5,
Postcard 4x6
Refer to the Plain
paper section
Refer to the Plain paper section
Refer to the Plain paper section
121 to 163 g/m
bond)
• 5 sheets
105 to 120 g/m
bond)
• 10 sheets
2
(32 to 43 lbs
2
(28 to 32 lbs
121 to 163 g/m
• 1 sheet
• 1 sheet
2
(32 to 43 lbs bond)
5. Appendix
68
Specifications
Type Size Dimensions
Tray
2
(18.6 to 24 lbs
Archive
Refer to the Plain
paper section
Refer to the Plain paper section
70 to 90 g/m
bond)
• 100 sheets
Glossy
Letter, A4,
Refer to the Plain paper section
Photo,Matte
Photo
Postcard 4x6
Minimum size (custom) 76 x 152 mm (3 x 6 inches)
111 to 220 g/m
bond)
• 1 sheets
60 to 120 g/m
2
Maximum size (custom) 216 x 356 mm (8.5 x 14 inches)
a. Maximum capacity may differ depending on media weight, thickness, and environmental conditions.
b. Feed one sheet at a time.
c. The smoothness of the labels used in this machine is 100 to 250 (sheffield). This means the numeric level of smoothness.
Print media weight/Capacity
• 1 sheet
2
(30 to 58 lbs
111 to 220 g/m
• 1 sheet
(16 to 32 lbs bond)
a
Manual feeding in tray
2
(30 to 58 lbs bond)
b
If media weight is over 120 g/m2 (32 lbs bond), load a paper into the tray one by one.
5. Appendix
69
Specifications
3
System requirements
Microsoft® Windows®
Requirement (recommended)
Operating system
CPU RAM free HDD space
Windows® XP Intel® Pentium® III 933 MHz (Pentium IV 1 GHz) 128 MB (256 MB) 1.5 GB
Windows Server® 2003 Intel® Pentium® III 933 MHz (Pentium IV 1 GHz) 128 MB (512 MB) 1.25 GB to 2 GB
Windows Server® 2008 Intel® Pentium® IV 1 GHz (Pentium IV 2 GHz) 512 MB (2 GB) 10 GB
Windows Vista® Intel® Pentium® IV 3 GHz 512 MB (1 GB) 15 GB
Intel® Pentium® IV 1 GHz 32-bit or 64-bit processor or higher 1 GB (2 GB) 16 GB
Windows® 7
• Support for DirectX® 9 graphics with 128 MB memory (to enable the Aero theme).
•DVD-R/W Drive
Windows Server® 2008 R2 Intel® Pentium® IV 1 GHz (x86) or 1.4 GHz (x64) processors (2 GHz or faster) 512 MB (2 GB) 10 GB
5. Appendix
70
Specifications
• Internet Explorer 6.0 or higher is the minimum requirement for all Windows operating systems.
• Users who have administrator rights can install the software.
• Windows Terminal Services is compatible with your machine.
Macintosh
Operating system
Requirements (Recommended)
CPU RAM Free HDD space
Mac OS X 10.4
• Intel® processors
•PowerPC G4/ G5
• 128 MB for a powerPC based Mac
(512 MB)
1 GB
• 512 MB for an Intel-based Mac (1 GB)
Mac OS X 10.5
• Intel® processors
• 867 MHz or faster Power PC G4/
512 MB (1 GB) 1 GB
G5
Mac OS X 10.6 • Intel® processors 1 GB (2 GB) 1 GB
Mac OS X 10.7 • Intel® processors 2 GB 4 GB
5. Appendix
71

Specifications
Linux
Items Requirements
Fedora 5~13 (32/ 64 bit)
OpenSuSE® 10.2, 10.3, 11.0, 11.1, 11.2 (32/64 bit)
SuSE 10.1 (32 bit)
Operating system
CPU Pentium IV 2.4GHz (Intel Core™2)
RAM 512 MB (1 GB)
Free HDD space 1 GB (2 GB)
Ubuntu 6.06, 6.10, 7.04, 7.10, 8.04, 8.10, 9.04, 9.10, 10.04 (32/64 bit)
Mandriva 2007, 2008, 2009, 2009.1, 2010 (32/64 bit)
Debian 4.0, 5.0 (32/64 bit)
Redhat® Enterprise Linux WS 4, 5 (32/64 bit)
SuSE Linux Enterprise Desktop 10, 11 (32/64 bit)
5. Appendix
72
Specifications
4
Network environment
Network and wireless models only (see "Features by models" on page 6).
You need to set up the network protocols on the machine to use it as your network machine. The following table shows the network environments supported by the
machine.
Items Specifications
Network interface •802.11b/g/n Wireless LAN
Network operating system
Network protocols
Wireless security
•Windows
®
XP, Windows Server® 2003, Windows Vista®, Windows® 7, Windows Server® 2008 R2
•Various Linux OS
• Mac OS X 10.4 ~ 10.7
•TCP/IPv4
• DHCP, BOOTP
• DNS, WINS, Bonjour, SLP, UPnP
• Standard TCP/IP Printing (RAW), LPR, IPP, WSD
• SNMPv 1/2/3, HTTP
• TCP/IPv6 (DHCP, DNS, RAW, LPR, SNMPv 1/2/3, HTTP)
• Authentication: Open System, Shared Key, WPA Personal, WPA2 Personal (PSK)
• Encryption: WEP64, WEP128, TKIP, AES
5. Appendix
73
Regulatory information
This machine is designed for a normal work environment and certified with
several regulatory statements.
5
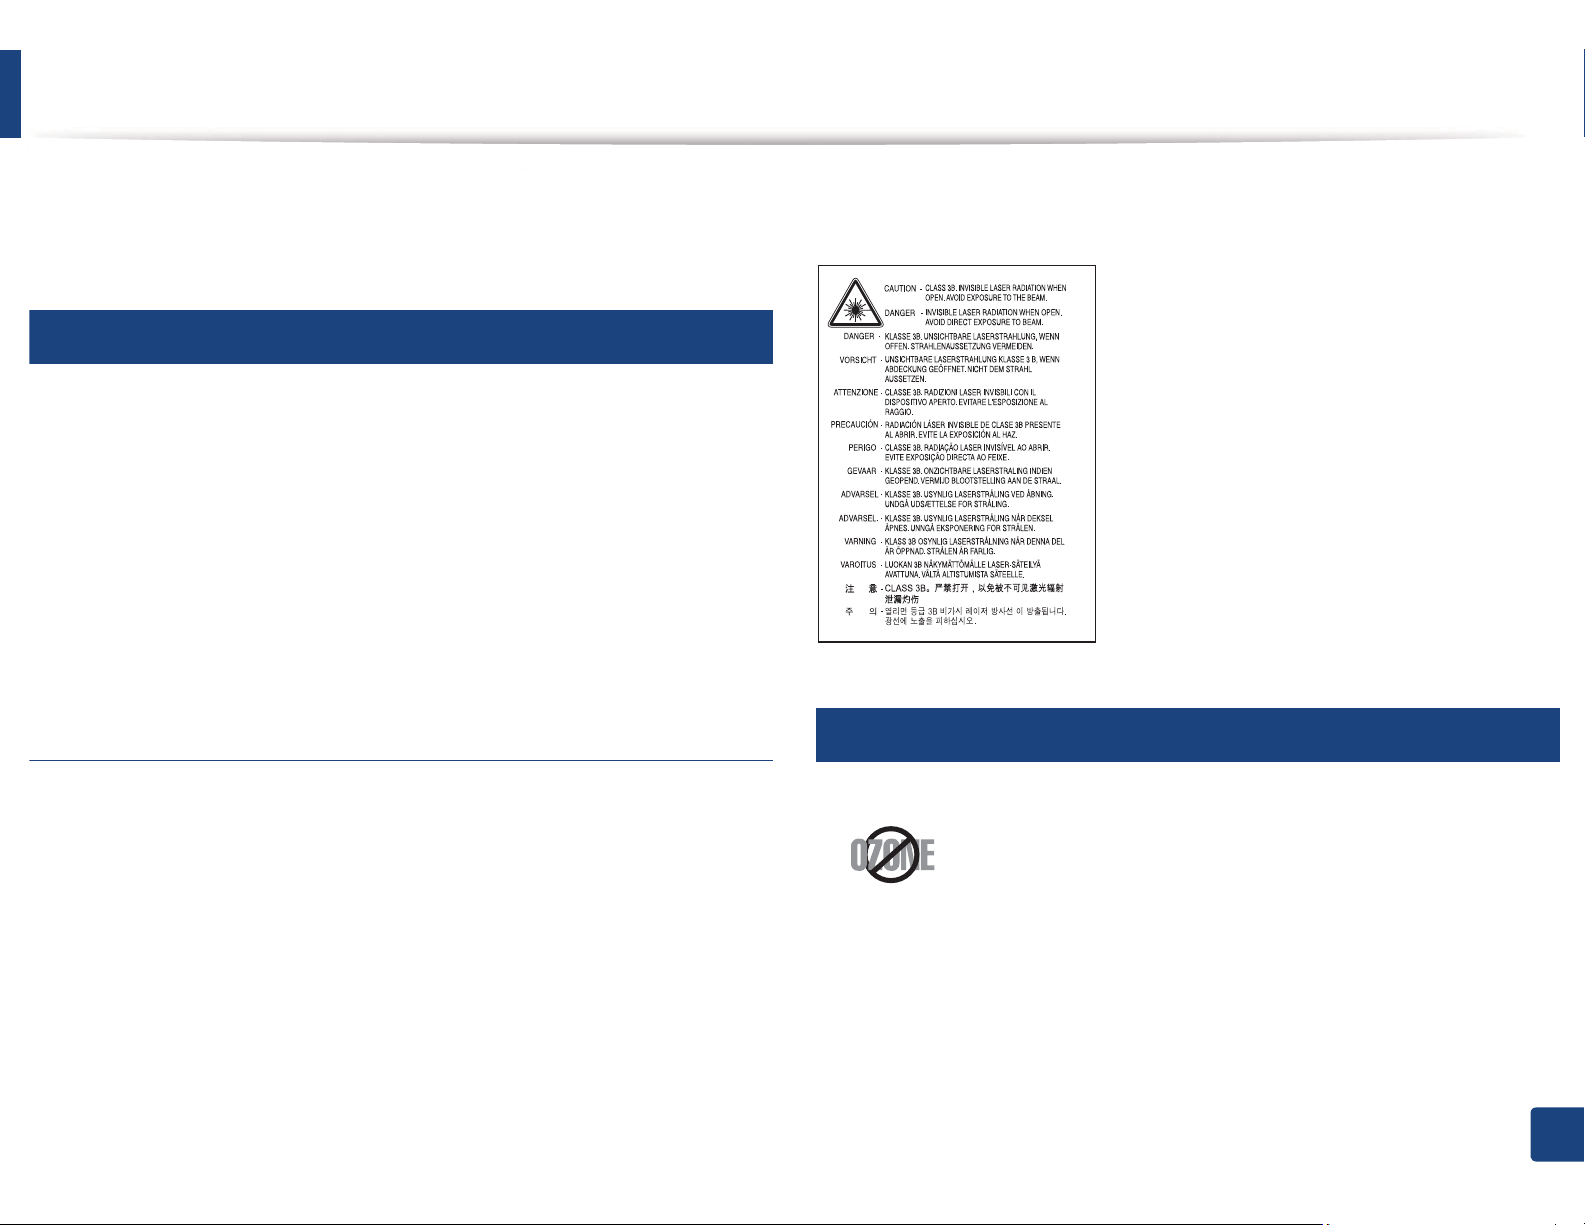
Laser safety statement
The printer is certified in the U.S. to conform to the requirements of DHHS 21
CFR, chapter 1 Subchapter J for Class I(1) laser products, and elsewhere is
certified as a Class I laser product conforming to the requirements of IEC 608251 : 2007.
Class I laser products are not considered to be hazardous. The laser system and
printer are designed so there is never any human access to laser radiation above
a Class I level during normal operation, user maintenance or prescribed service
condition.
Warning
When using this product, these basic safety precautions should always be
followed to reduce risk of fire, electric shock, and injury to persons:
6
Ozone safety
Never operate or service the printer with the protective cover removed from
laser/scanner assembly. The reflected beam, although invisible, can damage
your eyes.
This product's ozone emission rate is under 0.1 ppm. Because
ozone is heavier than air, keep the product in a place with good
ventilation.
5. Appendix
74
Regulatory information
7
Power saver
8
9
China only
This printer contains advanced energy conservation technology
that reduces power consumption when it is not in active use.
When the printer does not receive data for an extended period of
time, power consumption is automatically lowered.
ENERGY STAR and the ENERGY STAR mark are registered U.S.
marks.
For more information on the ENERGY STAR program see http://
www.energystar.gov
For ENERGY STAR certified models, the ENERGY STAR label will be
on your machine. Check if your machine is ENERGY STAR
certified.
Recycling
Recycle or dispose of the packaging material for this product in an
environmentally responsible manner.
5. Appendix
75
Regulatory information
10
Correct disposal of this product (Waste electrical &
electronic equipment)
(Applicable in the european union and other
european countries with separate collection
systems)
This marking on the product, accessories or literature indicates that the
product and its electronic accessories (e.g. charger, headset, USB cable)
should not be disposed of with other household waste at the end of
their working life. To prevent possible harm to the environment or
human health from uncontrolled waste disposal, please separate these
items from other types of waste and recycle them responsibly to
promote the sustainable reuse of material resources.
Household users should contact either the retailer where they
purchased this product, or their local government office, for details of
where and how they can take these items for environmentally safe
recycling.
The United States of America only
Dispose unwanted electronics through an approved recycler. To find the nearest
recycling location, go to our website:www.samsung.com/recyclingdirect Or call,
(877) 278 - 0799
11
Radio frequency emissions
FCC information to the user
This device complies with Part 15 of the FCC Rules. Operation is subject to the
following two conditions:
• This device may not cause harmful interference, and
• This device must accept any interference received, including interference
that may cause undesired operation.
Business users should contact their supplier and check the terms and
conditions of the purchase contract. This product and its electronic
accessories should not be mixed with other commercial wastes for
disposal.
5. Appendix
76

Regulatory information
This equipment has been tested and found to comply with the limits for a Class
B digital device, pursuant to Part 15 of the FCC Rules. These limits are designed
to provide reasonable protection against harmful interference in a residential
installation. This equipment generates, uses and can radiate radio frequency
energy and, if not installed and used in accordance with the instructions, may
cause harmful interference to radio communications. However, there is no
guarantee that interference will not occur in a particular installation. If this
equipment does cause harmful interference to radio or television reception,
which can be determined by turning the equipment off and on, the user is
encouraged to try to correct the interference by one or more of the following
measures:
• Reorient or relocate the receiving antenna.
• Increase the separation between the equipment and receiver.
• Connect the equipment into an outlet on a circuit different from that to
which the receiver is connected.
• Consult the dealer or experienced radio TV technician for help.
Change or modifications not expressly approved by the manufacturer
responsible for compliance could void the user's authority to operate the
equipment.
Canadian radio interference regulations
This digital apparatus does not exceed the Class B limits for radio noise
emissions from digital apparatus as set out in the interference-causing
equipment standard entitled “Digital Apparatus”, ICES-003 of the Industry and
Science Canada.
Cet appareil numérique respecte les limites de bruits radioélectriques
applicables aux appareils numériques de Classe B prescrites dans la norme sur le
matériel brouilleur: “Appareils Numériques”, ICES-003 édictée par l’Industrie et
Sciences Canada.
12
United states of america
Federal communications commission (FCC)
Intentional emitter per FCC Part 15
Low power, Radio LAN type devices (radio frequency (RF) wireless
communication devices), operating in the 2.4 GHz/5 GHz Band, may be present
(embedded) in your printer system. This section is only applicable if these
devices are present. Refer to the system label to verify the presence of wireless
devices.
Wireless devices that may be in your system are only qualified for use in the
United States of America if an FCC ID number is on the system label.
5. Appendix
77
Regulatory information
The FCC has set a general guideline of 20 cm (8 inches) separation between the
device and the body, for use of a wireless device near the body (this does not
include extremities). This device should be used more than 20 cm (8 inches)
from the body when wireless devices are on. The power output of the wireless
device (or devices), which may be embedded in your printer, is well below the
RF exposure limits as set by the FCC.
This transmitter must not be collocated or operation in conjunction with any
other antenna or transmitter.
Operation of this device is subject to the following two conditions: (1) This
device may not cause harmful interference, and (2) this device must accept any
interference received, including interference that may cause undesired
operation of the device.
Wireless devices are not user serviceable. Do not modify them in any way.
Modification to a wireless device will void the authorization to use it.
Contact manufacturer for service.
FCC statement for wireless LAN use:
While installing and operating this transmitter and antenna combination
the radio frequency exposure limit of 1m W/cm2 may be exceeded at
distances close to the antenna installed. Therefore, the user must maintain
a minimum distance of 20cm from the antenna at all times. This device
cannot be colocated with another transmitter and transmitting antenna.
13
Russia only
14
Germany only
5. Appendix
78
Regulatory information
15
Turkey only
16
Replacing the fitted plug (for UK only)
Important
The mains lead for this machine is fitted with a standard (BS 1363) 13 amp plug
and has a 13 amp fuse. When you change or examine the fuse, you must re-fit
the correct 13 amp fuse. You then need to replace the fuse cover. If you have lost
the fuse cover, do not use the plug until you have another fuse cover.
Contact the people from you purchased the machine.
If you cut off the moulded plug, get rid of it straight away.
You cannot rewire the plug and you may receive an electric shock if you
plug it into a socket.
Important warning:
You must earth this machine.
The wires in the mains lead have the following color code:
• Green and Yellow: Earth
• Blue: Neutral
• Brown: Live
If the wires in the mains lead do not match the colors marked in your plug, do
the following:
You must connect the green and yellow wire to the pin marked by the letter “E”
or by the safety ‘Earth symbol’ or colored green and yellow or green.
The 13 amp plug is the most widely used type in the UK and should be suitable.
However, some buildings (mainly old ones) do not have normal 13 amp plug
sockets. You need to buy a suitable plug adaptor. Do not remove the moulded
plug.
You must connect the blue wire to the pin which is marked with the letter “N” or
colored black.
You must connect the brown wire to the pin which is marked with the letter “L”
or colored red.
You must have a 13 amp fuse in the plug, adaptor, or at the distribution board.
5. Appendix
79
Regulatory information
17
Declaration of conformity (European countries)
Approvals and Certifications
• Hereby, Samsung Electronics, declares that this [CLP-36x Series] is
in compliance with the essential requirements and other relevant
provisions of Low Voltage Directive (2006/95/EC), EMC Directive
(2004/108/EC).
• Hereby, Samsung Electronics, declares that this [CLP-36xW Series]
is in compliance with the essential requirements and other
relevant provisions of R&TTE Directive 1999/5/EC.
The declaration of conformity may be consulted at
www.samsung.com, go to Support > Download center and enter
your printer (MFP) name to browse the EuDoC.
January 1, 1995: Council Directive 2006/95/EC Approximation of the laws of
the member states related to low voltage equipment.
January 1, 1996: Council Directive 2004/108/EC, approximation of the laws of
the Member States related to electromagnetic compatibility.
EC Certification
Certification to 1999/5/EC Radio Equipment & Telecommunications Terminal
Equipment Directive (FAX)
This Samsung product has been self-certified by Samsung for pan-European
single terminal connection to the analogue public switched telephone network
(PSTN) in accordance with Directive 1999/5/EC. The product has been designed
to work with the national PSTNs and compatible PBXs of the European
countries:
In the event of problems, you should contact the Euro QA Lab of Samsung
Electronics Co., Ltd. in the first instance.
The product has been tested against TBR21. To assist in the use and application
of terminal equipment which complies with this standard, the European
Telecommunication Standards Institute (ETSI) has issued an advisory document
(EG 201 121) which contains notes and additional requirements to ensure
network compatibility of TBR21 terminals. The product has been designed
against, and is fully compliant with, all of the relevant advisory notes contained
in this document.
March 9, 1999: Council Directive 1999/5/EC on radio equipment and
telecommunications terminal equipment and the mutual recognition of their
conformity. A full declaration, defining the relevant Directives and referenced
standards can be obtained from your Samsung Electronics Co., Ltd.
representative.
5. Appendix
80
 Loading...