

Page 1

B220
User Instructions
Counting Scale
ENGLISH
Brisch number 76103-383 Issue 1 11/07/01
*76103-383*
Page 2

Page 3

Table of Contents
Warnings 1
Cleaning the scale 1
Installation 1
Switching the scale on 2
Bleeps 3
Testing the display/Selecting sleep mode 3
Error messages 3
Using the scale
Zeroing the scale 4
Using the clear key 4
Clearing a numeric entry 4
Using tares
Creating a tare 4
Creating a keyboard entered tare 4
Cancelling a tare 5
Sampling
Fast sampling 5
Normal sampling 6
Re-sampling 6
Keyboard entered item weights 6
Viewing the item weight 6
Clearing the item weight 6
Counting
Setting an item limit 7
Viewing the item limit 7
Clearing the item limit 7
Forward counting 7
Reverse counting 7
Batch counting 8
4
4
5
7
i
Page 4

Batch counting 8
Totalising 8
Using PLUs
Programming a PLU hot key 9
Programming a keyboard PLU 9
Using a PLU hot key 9
Using a keyboard entered PLU 9
Clearing a PLU hot key 9
Clearing a keyboard entered PLU 10
Clearing a keyboard entered PLU 10
User Calibration Adjustment 10
To Cancel A User Calibration Adjustment 10
Weights For Calibration Adjustment 10
Management mode
Zero Indicator 11
Zero Tracking 12
Automatic Zero Self Balance 12
Standard Filter 12
Intelligent Filter Setup 12
Weight Steady 12
Switching the bleeper alarm on/off 13
Switching the keyboard bleeper on/off 13
Weight limit bleep 13
Error bleeper 13
Changing the bleeper volume 13
Changing the backlight time 13
Changing the sleep time 13
9
11
ii
Page 5

Changing the duration of a ‘Long’ press 14
Changing the minimum sample weight 14
Changing the manual re-sampling range 14
Changing the automatic re-sampling range 14
Changing PLUs
Changing a PLU item weight 14
Changing a PLU tare 15
Protecting a PLU 15
14
Declaration of Conformity non-approved
Declaration of Conformity approved
iii
16
17
Page 6
Warnings
For your protection, all mains (110V or 230V) equipment used where
damp or wet conditions may occur, must be supplied from a correctly
fused source and protected by an approved RCD to BS7071 or BS7288
or IEC1008-2-2 BS EN 61008:1995. IF IN DOUBT SEEK ADVICE
FROM A QUALIFIED ELECTRICIAN.
To avoid the possibility of electric shock or damage to the machine,
always isolate from the mains power supply before carrying out any
routine maintenance.
Cleaning the scale
Harsh abrasives, solvents, scouring cleaners and alkaline cleaning
solutions, such as washing soda, should not be used especially on the
display windows. Under no circumstances should you attempt to wipe
the inside of the machine.
The outside of the machine may be wiped down with a clean cloth
moistened with water containing a small amount of washing up liquid.
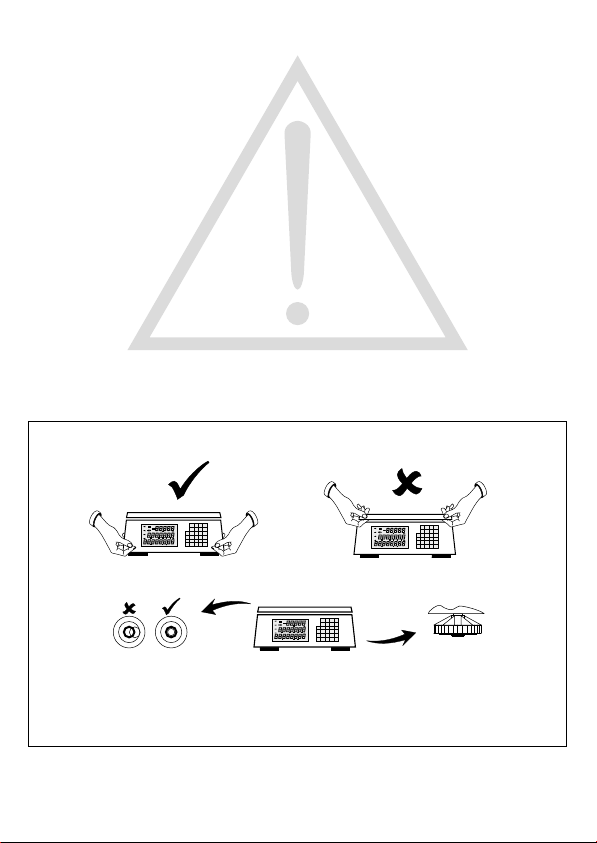
Installation
Make sure that the work surface is firm, steady and free from vibration
and draughts.
To avoid the risk of RSI (Repetitive Strain Injury) it is important to
ensure that the machine is placed on a surface which is ergonomically
satisfactory to the user. In cases where usage is prolonged EN614-1
recommends frequent breaks for the user.
1
Page 7

Switching the scale on
Connecting to the mains - Plug the adaptor lead into the scale,
replace the cover and weighplate and then plug the adaptor into the
power supply.
: Do not use the mains adaptor if it is damaged.Warning
Using batteries
pack into the recess. Replace the cover and weighplate.
Caution:
remove flat or damaged batteries immediately.
When you see the symbol flashing on the display, then you must
either replace the batteries (or recharge the rechargeable batteries).
Using a rechargeable battery pack
battery pack into the scale and place the pack into the recess. Replace
the cover and weighplate.
- Plug the battery pack into the scale and place the
NiCad
To avoid damage to the scale caused by leaking batteries,
- Plug the rechargeable
Recharging the battery pack
bottom of the scale, then switch on using the mains ON/OFF switch.
Note:
You can still use the scale while the battery is being charged.
- Plug in the mains cable to the
2
Page 8

Bleeps
Short press (Press once)
Long press (Press and hold)
Testing the display/Selecting sleep mode
Short
press
Long
press
SLEEP
Wake up:
Service
information:
Short
press x 2
Short
press
101d
0-6-0
Error messages
If a persistent error message appears or the scale locks up,
E30
Error codes:
E 0 Disconnect then reconnect the scale to the power supply.
E 5 Disconnect then reconnect the scale to the power supply.
E 10 Battery failure. Recharge or replace the batteries.
E 11 Power supply voltage is too high.
E 15 Contact your authorised service agent.
E 20 Weight error. Remove all items from the weighplate and press
E 30 Contact your authorised service agent.
E 35 Contact your authorised service agent.
E 100 Invalid PLU contents. Re-program the PLU.
E 101 Transaction failed. Remove all items from the weighplate and
E 102 PLU write failed. The PLU is protected in management mode
E 103 Tare failed. Remove all items from the weighplate and press the
disconnect then reconnect the scale to the power supply. If
the scale remains inoperative, contact your authorised
service agent.
Temporary
error
Weight
unsteady
Balance
failed
Under
range
the clear key (long press).
press the clear key (long press).
(see Page 15).
clear key (long press).
3
Over
range
1
Page 9

Using the scale
Zeroing the scale
Make sure that the scale is at zero before weighing.
Short
press
0.000
Using the clear key
To clear all active PLUs, tares and item weights:
CE
Long
press
0.000
Clearing a numeric entry
To clear the
last entry:
CE
Enter
value
1.26
Short
press
Using tares
Creating a tare
TT
T
T
Short
press
Short
press
0.150
Creating a keyboard entered tare
Tare value
(kg)
1.2
NET
PT
To clear the
entire entry:
CE
Long
press
0.000
0
4
Page 10

Cancelling a tare
NET
-0.150
T
T
Short
press
0.000
Sampling
The method that you use to sample will depend on whether the items
that you intend to count are high or low value and whether the items
vary slightly in weight:
Value
Normal
sampling
Gold
coins
Currency
notes
Fast
sampling
Nuts/
bolts
Small
Sample weight*
Plastic
Mouldings
Large
Sample weight*
Weight
variation
*See management mode.
When sampling items that have a large weight variation it is advisable
to use a large sample size and either manual or automatic re-sampling.
Fast sampling
The greater the number of items used to sample with, the more
accurate the scale will be.
Short
press
1.0
Note: If the minimum sample weight in management mode is active
(see Page 14), then If the sample weight is too light, the scale will ask
you to put some more items onto the scale:
Add 15
=15
The scale is now
Short
ready for counting.
press
5
Short
press
1.345
10
Page 11

Normal sampling
Add or remove items
Short
press
Items added
or removed
Short
press
Short
press
The scale is now
ready for counting.
SPLE
1.345
Re-sampling
Once you have sampled a group of items, you can add an equal or
greater amount to the scale and then re-sample. This will increase the
sample size and improve the counting accuracy.
Sample the items
as shown above
1.345
10
=10
2,690
20
See management mode (Page 14) for details on how to set the scale
to automatically re-sample.
Keyboard entered item weights
Enter the item weight in grams.
Item
weight (g)
Short
press
Viewing the item weight
Short
press
2.35
Item
weight
Clearing the item weight
CE
Short
press
6
Short
press
2.35
Long
press
Page 12

Counting
Setting an item limit
You can set an item limit before or after sampling.
number
of items
Short
press
Viewing the item limit
Item
Short
press
300
limit
Clearing the item limit
CE
Short
press
Short
press
300
Forward counting
Sample the items to be counted (see page 5).
?
1.345
Weight
Items
4
Reverse counting
Sample the items to be counted (see page 5).
TT
NET
Short
press
- 0.345
Items
120
Short
press
NET
?
0.000
0
7
Page 13

Batch counting
Sample the items to be counted (see page 5).
Short
press
NET
TT
Short
press
0.000
Repeat until all batches have been counted
Add or remove items
0
Totalising
Sample the items to be counted (see page 5).
Short
press
NET
NET
0.000
0
TT
or
NET
120
Weight
Items
NET
0.128
after 2 sec.
n
t
250
2
500
- 0.345
Number of
n
1
transactions
t
250
Total
Short
press
Reviewing Totals
Short
press
t
2 sec.
n
3
890
Clearing Totals
Short
press
CE
Short
press
Note: Components of different piece weights can be added together.
8
Page 14

Using PLUs
There are thirty five PLUs that can be programmed to include either a
tare, an item weight or both.
All PLUs can be protected to avoid being accidentally changed or
cleared in management mode (see page 15).
Programming a PLU hot key
Create
a tare
And/or
Whatever tare and/or item weight is active will be entered into the
selected PLU hot key.
Programming a keyboard PLU
Sample or
enter an
an item weight
Long
press
Create
a tare
And/or
Sample or
enter an
an item weight
Using a PLU hot key
PLu 2
Short
press
Using a keyboard entered PLU
PLU
number
Short
press
Clearing a PLU hot key
NET
CE
Long
press
9
PLu 2
0.000
PLU
number
0
Long
press
Long
press
Page 15

Clearing a keyboard entered PLU
NET
CE
Long
press
0.000
User Calibration Adjustment
0
PLU
number
Long
press
Short press
Short press
CE
Short press
done
Short press
CAL
Short press
To Cancel A User Calibration Adjustment
C
Short press
C
Short press
Short press
Weights For Calibration Adjustment
6kg capacity Any weight in 1kg steps
15/30kg capacity Any weight in 1kg steps above a minimum
Note: shaded items are not available in approved models
of 12% of scale capacity
Short press
10
Page 16

Management mode
Branch
CE
19.00
6231
Zero Indicator
Controls when the zero indicator is displayed
6.00
Appears within
+/- 0.25 divisions
0
Sub-branch
Value
1
Enter management mode
Go to the next branch (long press)
Go to next sub-branch (short press)
Go to the previous branch (long press)
Go to previous sub-branch (short press)
Select value to be changed (short press)
Return to Branch 00 (Long press)
Increment the value (short press)
Increment the value X10 (long press)
Change the value (short press)
Note: After changing a value, you must go to the next
branch to accept the value.
Exit management mode
Note: BoldAll factory settings are shown in .
Note: shaded items are not available
6.00
in approved models
Appears within
+/- 0.5 divisions
1
11
Page 17

Zero Tracking
This is used to account for minor weight changes due to temperature
variations
6.01
6.01
Disabled
0
Fast Narrow
Mode
5
6.01
6.01
Fast Wide
Mode
1
Slow Narrow
Mode
7
6.01
Slow Wide
Mode
3
Automatic Zero Self Balance
Scale automatically re-zeros if a consistent negative gross weight is
detected
6.03
Disabled
0
6.03
Enabled
1
Standard Filter
Filter level: 1-6
6.08
Default = 4
4
Intelligent Filter Setup
6.11
0
Disabled
Filter reset: 1-255 divisions
Weight Steady
The weight must be constant within this limit before being considered
steady for a set time
6.12
6.12
0
4
+/- 0.1
divisions
+/- 1.5
divisions
6.12
6.12
+/- 0.25
divisions
1
+/- 2
divisions
5
6.12
6.12
2
6
+/- 0.5
divisions
+/- 3
divisions
6.12
6.12
3
7
+/- 1
divisions
+/- 5
divisions
12
Page 18

Switching the bleeper alarm on/off
Go to branch 19, Sub-branch 00
19.00
0 =Off
1=On
1
Switching the keyboard bleeper on/off
Go to branch 19, Sub-branch 01
19.01
0=Off
=On1
1
Weight limit bleep
Go to branch 19, Sub-branch 02
19.02
0=Off
=On1
1
Error bleeper
Go to branch 19, Sub-branch 03
19.03
0=Off
=On1
1
Changing the bleeper volume
Go to branch 19, Sub-branch 04
1
0 = Quiet
= Loud1
19.04
Changing the backlight time
Go to branch 20, Sub-branch 00
20.00
1
0 = always off
1 = 5 seconds
2 = 1 minute
3 = 5 minutes
= always on4
Changing the sleep time
Go to branch 20, Sub-branch 01
20.01
1
0 = none
1 = 1 minute
2 = 5 minutes
3 = 30 minutes
13
Page 19

Changing the duration of a 'Long' press
Go to branch 29, Sub-branch 00
For example :
29.00
200
200 = 2 seconds
150 = 1½ seconds
= ½ second50
Changing the minimum sample weight
Go to branch 61, Sub-branch 00
61.00
Enter the minimum sample weight in grams.
10
For example:
g10
Changing the manual re-sampling range
Go to branch 61, Sub-branch 01
61.01
100
0 = Manual re-sampling off
100-1000=%ofinitial sample size ( )150
Changing the automatic re-sampling range
Go to branch 61, Sub-branch 02
61.02
100
0 = Automatic re-sampling off
100-1000=%ofinitial sample size ( )0
Changing PLUs
Branch numbers for PLUs =100 plus the PLU number.
For example: PLU 5 = 105, PLU 19 = 119.
Changing a PLU item weight
Go to PLU branch number. For example PLU5
Sub-branch 00
Enter the weight (g)
105.00
145
Sub-branch 01
Enter the number of decimal places
105.01
14
2
Page 20

Changing a PLU tare
Go to PLU branch number. For example PLU5
Sub-branch 02
Enter the weight (kg)
105.02
145
Sub-branch 03
Enter the number of decimal places
105.03
2
Protecting a PLU
Go to the PLU branch number. For example PLU5
Sub-branch 04
105.04
0 = Not protected
1 = Protected
1
15
Page 21

Declaration of Conformity
The non-automatic weighing instrument
Manufacturer Salter
Brecknell
Type B220
corresponds to the requirements of the following EC directives:
EMC Directive 89/336/EEC
Low Voltage Directive 73/23/EEC
The applicable harmonised standards are: EN60 950
EN 50 081-1
EN 50 082-1
The displayed weight may change under the following conditions:
i) Radiated electromagnetic fields
- up to 1% of the weighing capacity.
ii) Electrostatic discharge or fast mains supply transients
- up to 10 s disturbance of display.
There will be no permanent change of operating state or data.
A copy of the original signed declaration for this instrument is available
from: PO Box 9533, Smethwick, West Midlands, B66 2TE
This document contains a general guide only of the product and shall not form any contract unless specifically agreed
by Salter Brecknell Weighing in writing in each case on the Order Acknowledgment. The specification of the products
Email:sales@salterbrecknell.com
described herein may vary from time to time and may be altered without notice.
Salter Brecknell Weighing
PO Box 9533
Smethwick
West Midlands B66 2 TE
Tel: +44 (0) 121 623 6675
Fax: +44 (0) 121 623 6629
Page 22

Declaration of Conformity
The non-automatic weighing instrument
Manufacturer Salter
Brecknell
Type B220
No. of EC type approval certificate T5532
Corresponds to the requirements of the following EC directives:
Non-Automatic Weighing Instruments Directive 90/384/EEC1
EMC Directive 89/336/EEC
Low Voltage Directive 73/23/EEC
The applicable harmonised standards are: EN 45 501
EN 50 081-1
EN 60 950
Note 1:
This declaration is only valid if the non-automatic weighing instrument
was verified by the manufacturer with a certificate of conformity
or
issued by a notified authority.
A copy of the original signed declaration for this instrument is available
from: PO Box 9533, Smethwick, West Midlands, B66 2TE
This document contains a general guide only of the product and shall not form any contract unless specifically agreed
by Salter Brecknell Weighing in writing in each case on the Order Acknowledgment. The specification of the products
Email:sales@salterbrecknell.com
described herein may vary from time to time and may be altered without notice.
Salter Brecknell Weighing
PO Box 9533
Smethwick
West Midlands B66 2 TE
Tel: +44 (0) 121 623 6675
Fax: +44 (0) 121 623 6629
 Loading...