

Page 1
SAGEM
MFJ Pro 321
Instructions for use
Page 2
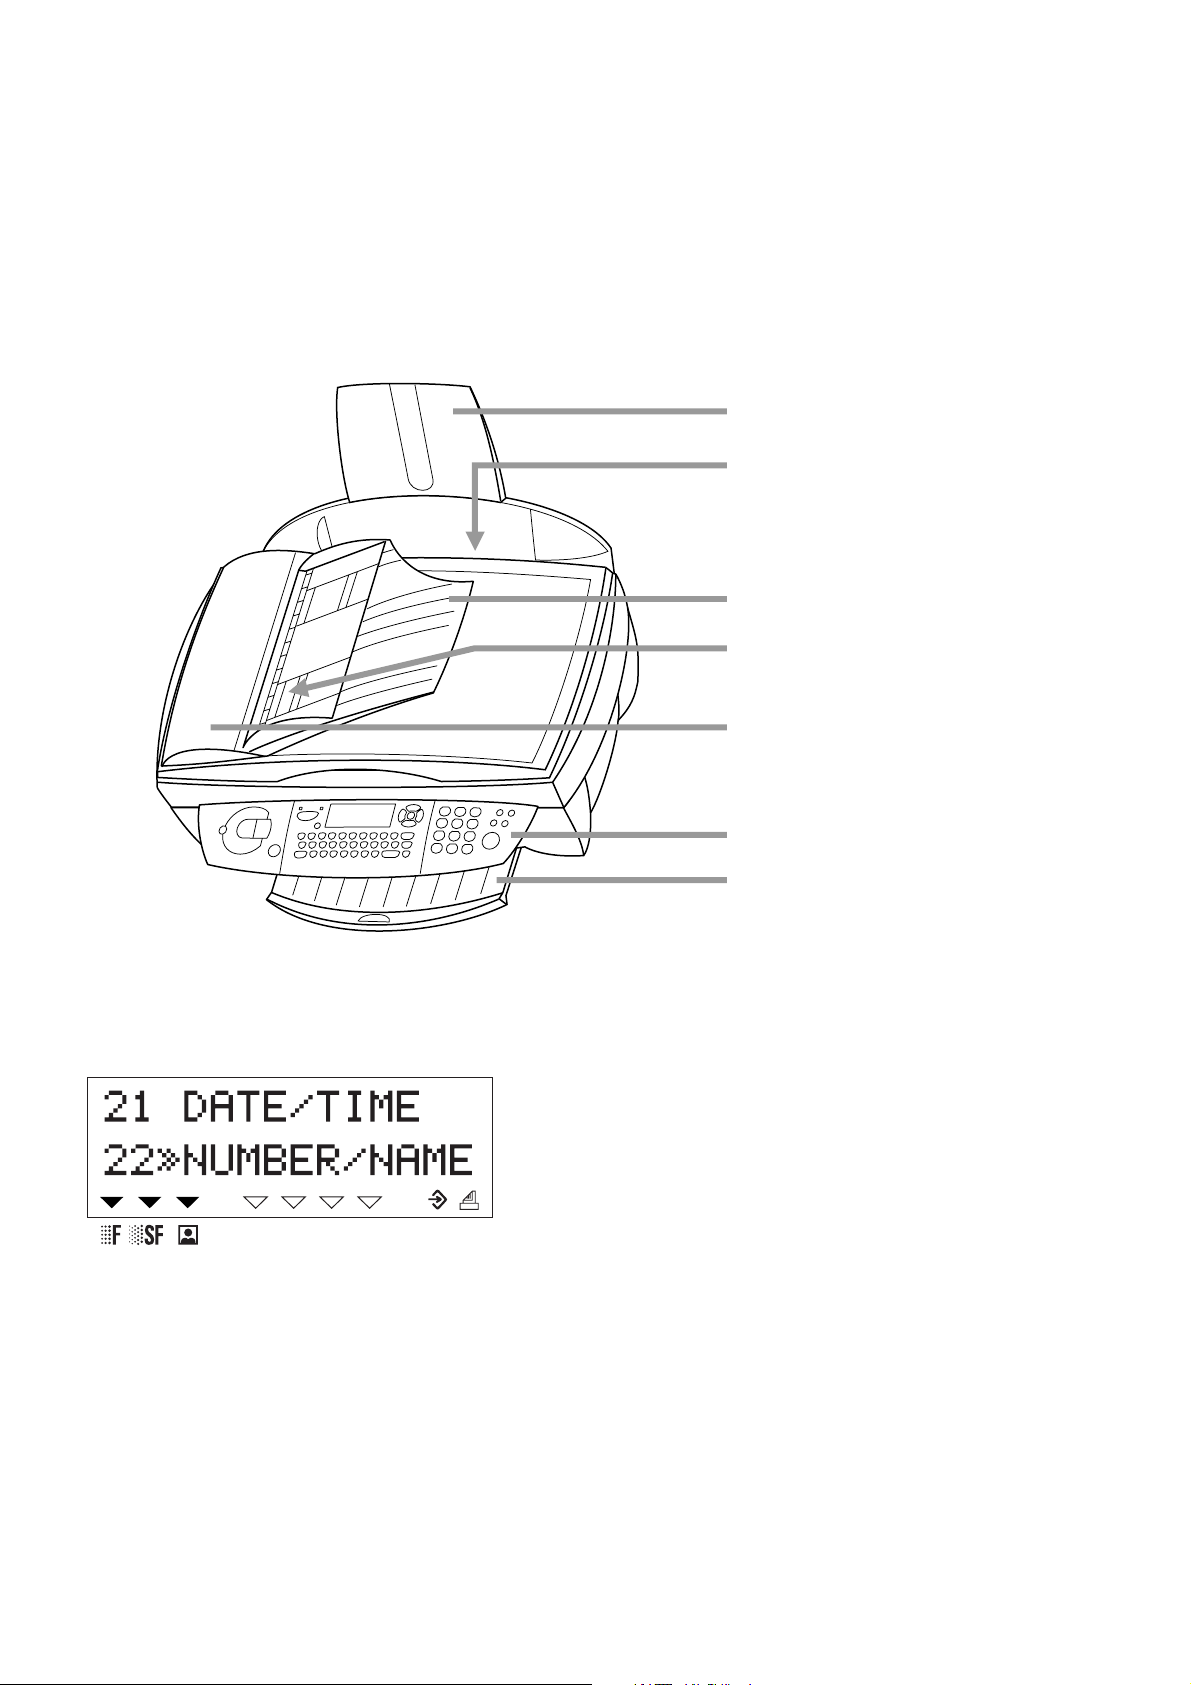
Description of the machine
paper tray
paper feeder
document tray
automatic document feeder
Symbols on the display
Selected options will be highlighted with an arrow (»).
resolution:
f for text and graphics
% for very small print and graphics
F for photographs
scanner cover
control panel
paper exit tray
; on: faxes will be received automatically
blinking: faxes are stored in the memory
off: memory is full or faxes will be received with a modem
: transmission of faxes or SMS
The arrows (d) on the right in the display show the memory capacity.
Page 3
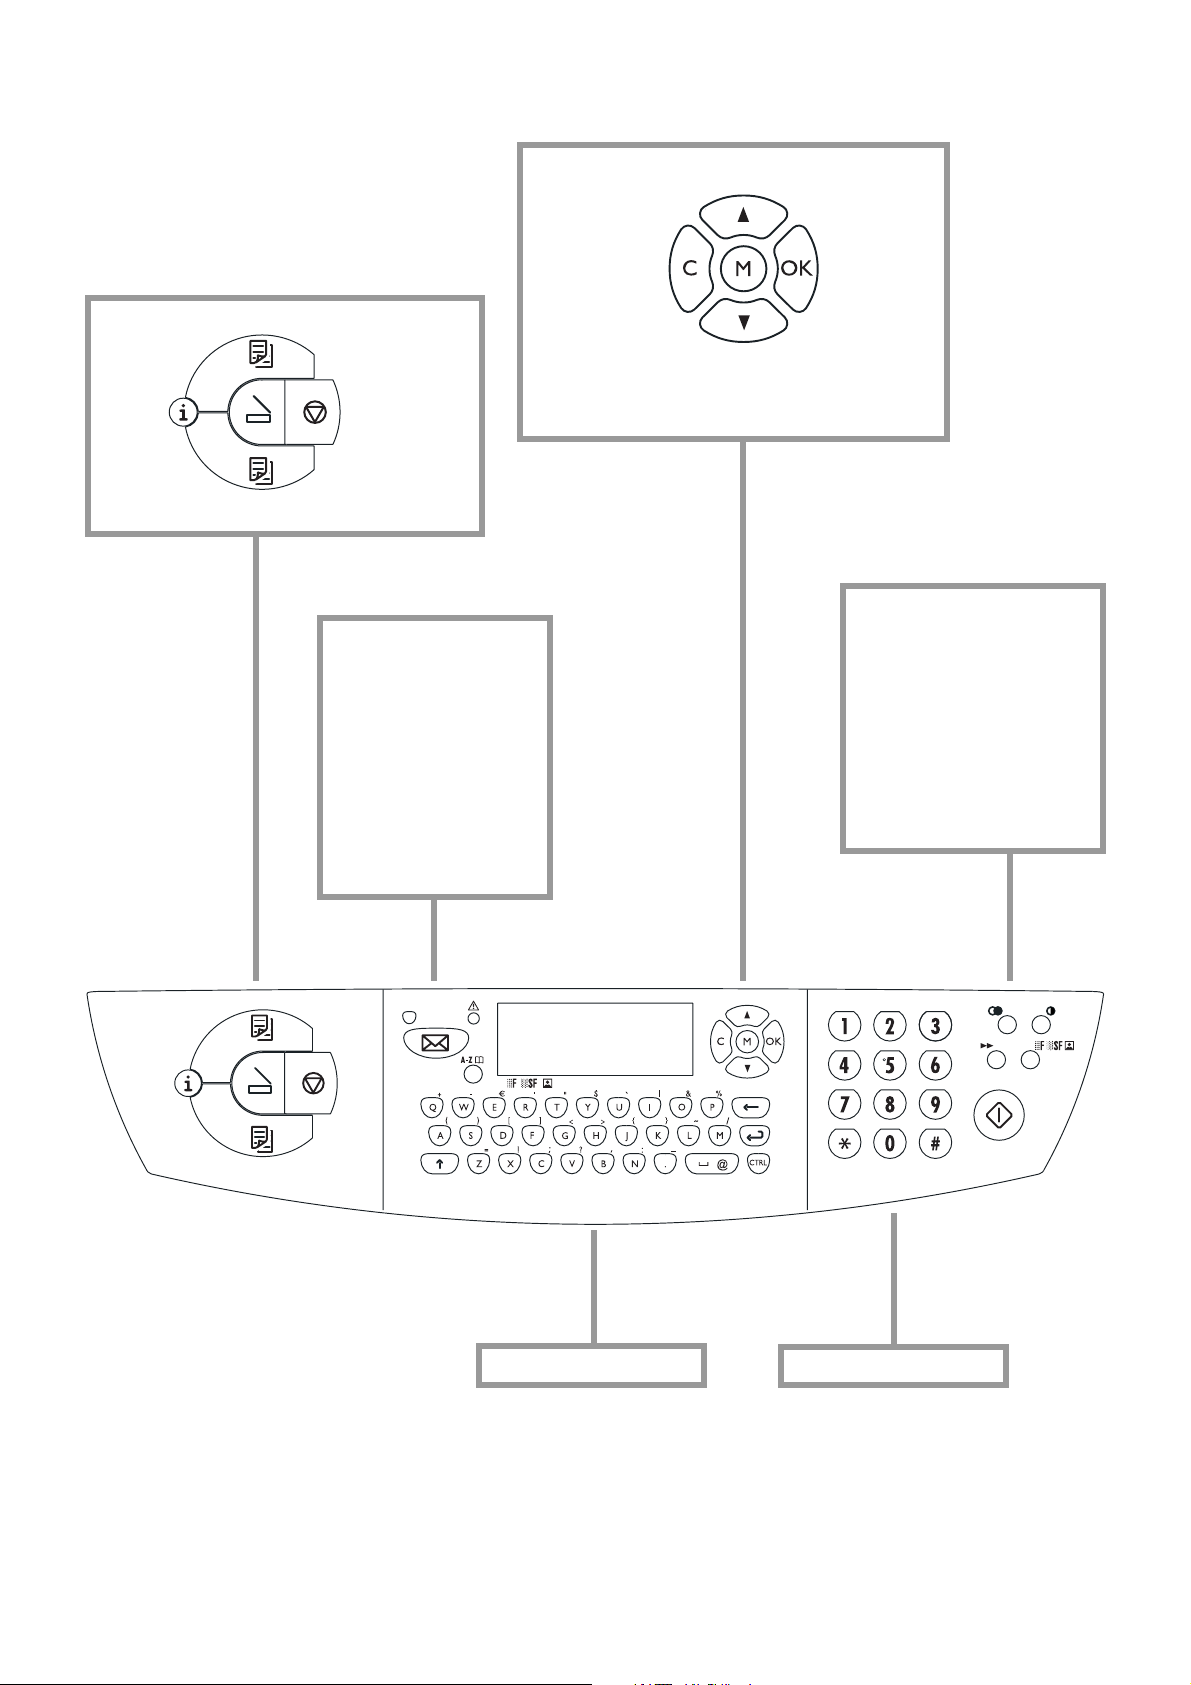
Overview of functions
M select functions
K colour copy
i help
K black-and-white copy
C return to pre-
Z scan to PC
X stop, return
to stand-by
mode
W send an SMS; the
lamp next to the key
will fl ash when messages are received
v If this symbol fl ash-
es please read the
display
a call up directory
entries
vious menu
/ choose between op-
OK confi rm
selection
tions, move the cursor on the display
L redial
O contrast
& broadcast – send a fax
or SMS to several recipients
f%F resolution
Y start fax transmission
keypad for numbers keyboard for text input
3
Page 4

Inhalt
Safety instructions ......... 5
Installation...................... 6
Unpacking ....................................................6
Set-up...........................................................6
Loading paper ..............................................7
Connections .................................................7
Additional devices ........................................8
Power supply................................................8
Country selection..........................................8
Inserting cartridges.......................................8
Cartridge alignment......................................9
Your name and number ................................9
Time and date..............................................10
PC connection.............................................10
Software installation ....................................10
SMS ................................ 20
Send SMS ...................................................20
Receiving an SMS ......................................20
Advanced settings......... 21
Settings list..................................................21
Fax settings.................................................21
SMS settings ...............................................21
Scan settings...............................................21
Printer settings ............................................22
Hints & tips.................... 23
Ordering information....................................23
Change cartridges.......................................23
Cartridge capacity .......................................24
Logs.............................................................24
Commands..................................................24
Lock.............................................................25
Care and maintenance................................25
Settings.......................... 11
Date and time..............................................11
Your number and name ............................... 11
Network type (PABX)...................................11
Country and language.................................11
Additional telephone....................................11
Contents
Directory ........................ 12
Add name....................................................12
Add list.........................................................12
Print.............................................................12
Cancel .........................................................12
Modify..........................................................12
Transfer to a PC..........................................12
Fax.................................. 13
Sending a fax Y .........................................13
Directory a ..........................................13
Redial L ...................................................14
Broadcast & .............................................14
Resolution f%F ....................................14
Contrast O ..................................................14
Receiving faxes...........................................14
Fax answering device..................................14
Send report..................................................14
Delayed transmission..................................15
Polling..........................................................15
Additional telephone....................................15
Appendix ........................ 27
Functions list ...............................................27
Technical settings ........................................28
Technical data .............................................28
Guarantee ...................................................28
Index............................................................30
4
Copy ............................... 16
Inserting a document...................................16
Standard copy K ........................................16
“Creative” copy K .......................................16
Scan to PC ..................... 18
Inserting a document...................................18
Open the scan window................................18
Page 5

Safety
instructions
Please read and follow all warning notices and
instructions.
In a thunderstorm, disconnect the MFJ Pro 321
from both the mains and the telephone line. If
you are unable to disconnect the MFJ Pro 321,
avoid using the fax machine or the telephone
during the storm. There is a risk of electric
shock from lightning and risk of damage to the
machine.
The MFJ Pro 321 should be installed on a lev-
el and stable surface. The surface should be
smooth and horizontal. The machine may be
damaged if it falls and may cause serious injury,
especially to small children. Place the MFJ Pro
321 at least 10 cm away from other electrical
devices and objects.
Do not place the MFJ Pro 321 in direct sunlight.
Do not place it near to a radiator, heater, radio,
television or air conditioning unit. Do not allow it
to come into contact with dust, water or chemicals.
Make sure that air can circulate freely around
the MFJ Pro 321. Do not operate the MFJ Pro
321 in enclosed spaces such as boxes, cupboards, cabinets etc. Do not cover the MFJ
Pro 321. Do not place the MFJ Pro 321 on soft
surfaces such as beds, duvets, cushions, sofas or carpets as there is a risk of overheating
and fi re.
Only use the power supply included with the
product. Using an unauthorised power supply
may damage the MFJ Pro 321.
Your MFJ Pro 321 is only intended for use in the
country in which it was purchased. It may only
be operated with telephone systems and power
equipment which meet these standards.
Do not touch telephone wires or mains cables
where the insulation is missing or damaged un-
less they are already disconnected.
If the housing of your MFJ Pro 321 or the power supply—in particular the power or telephone
cables—, are damaged, please unplug the MFJ
Pro 321. The housing of the MFJ Pro 321 may
only be opened by authorised service personnel.
Unplug the MFJ Pro 321 from the mains and
telephone line before cleaning. Do not use liquid or aerosol cleaning agents such as sprays,
or polishes.
Do not expose the MFJ Pro 321 to rain or any
other form of moisture. There is a risk of electric
shock or fi re. If any liquid is accidentally spilled
into the MFJ Pro 321, immediately remove the
power plug and have the MFJ Pro 321 professionally inspected.
Your MFJ Pro 321 has been tested to EN 60950
or IEC 60950 and may only be operated on telephone networks and power supplies that conform to these standards.
Safety instructions
5
Page 6
Installation
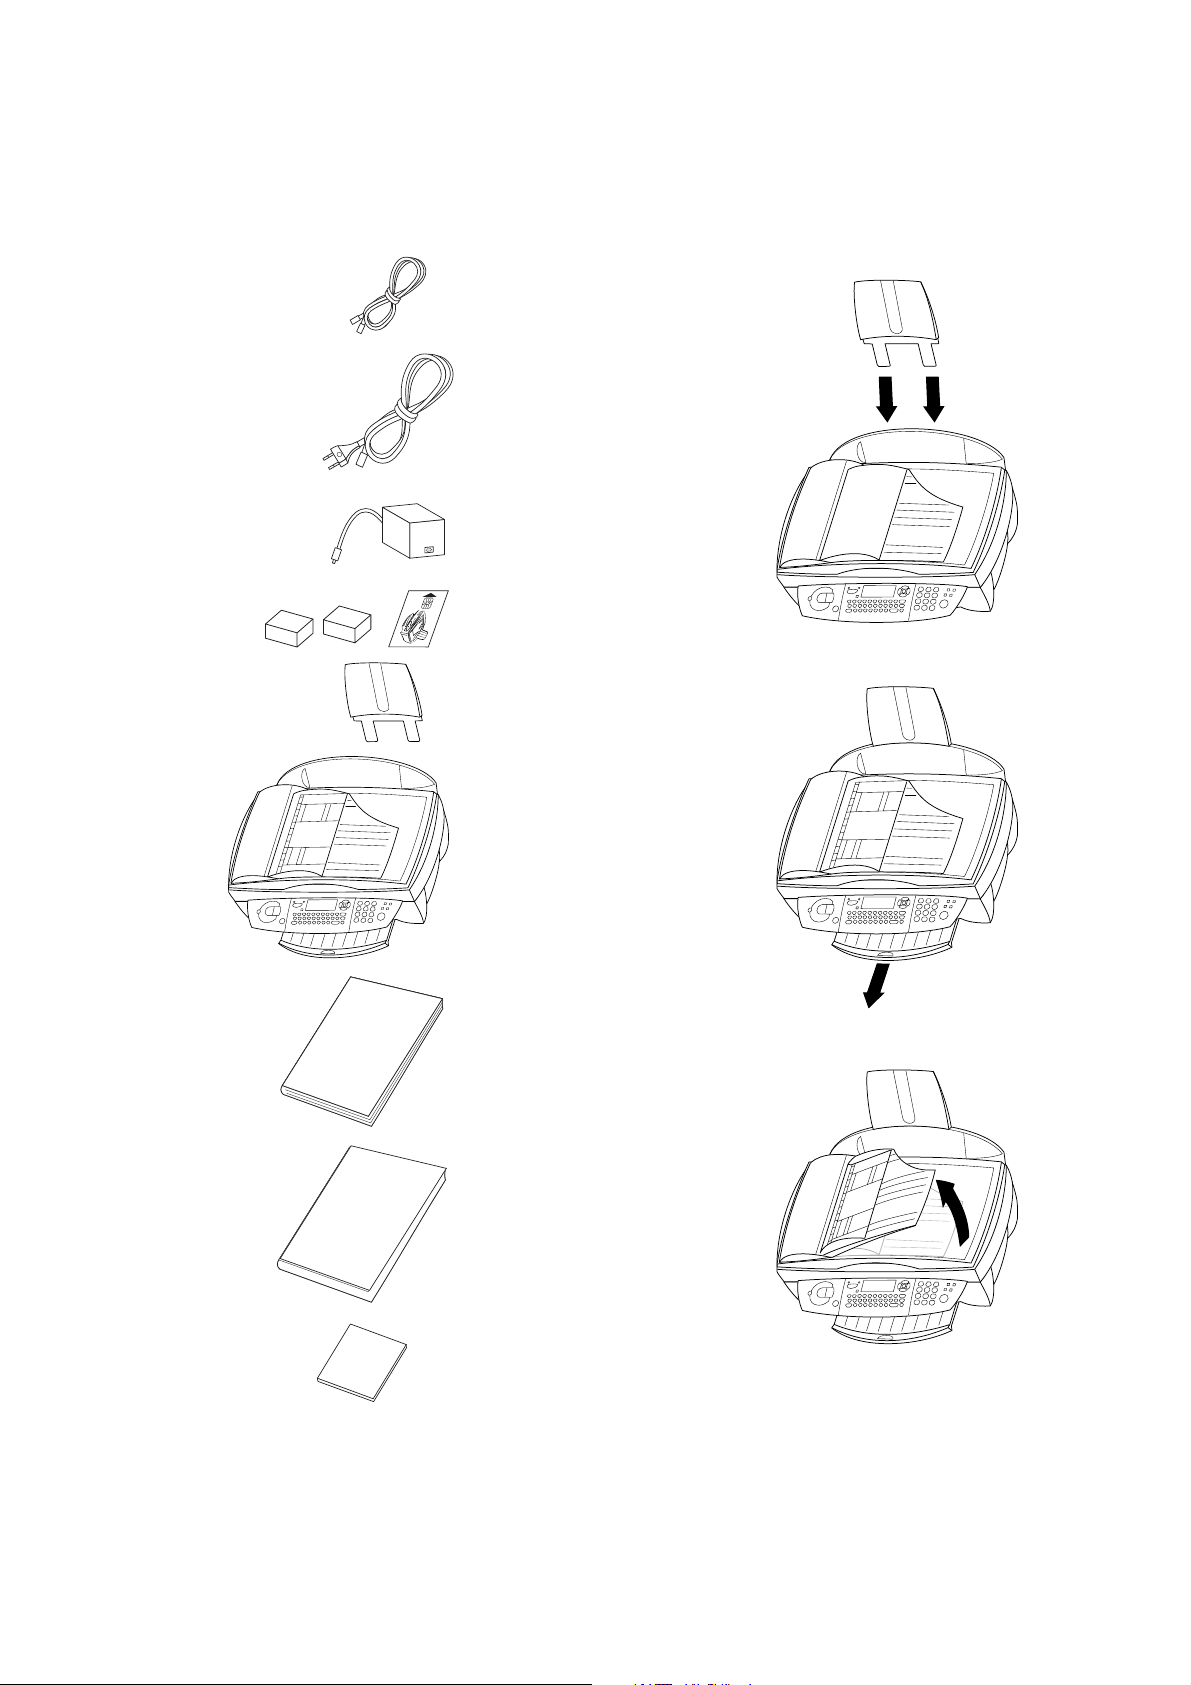
Unpacking
Unpack the box and check that it includes the
following:
telephone cable
mains cable
power supply
ink cartridges
and chip card
“Plug ’n Print”
Set-up
Please read all warning notices and instructions and follow them precisely.
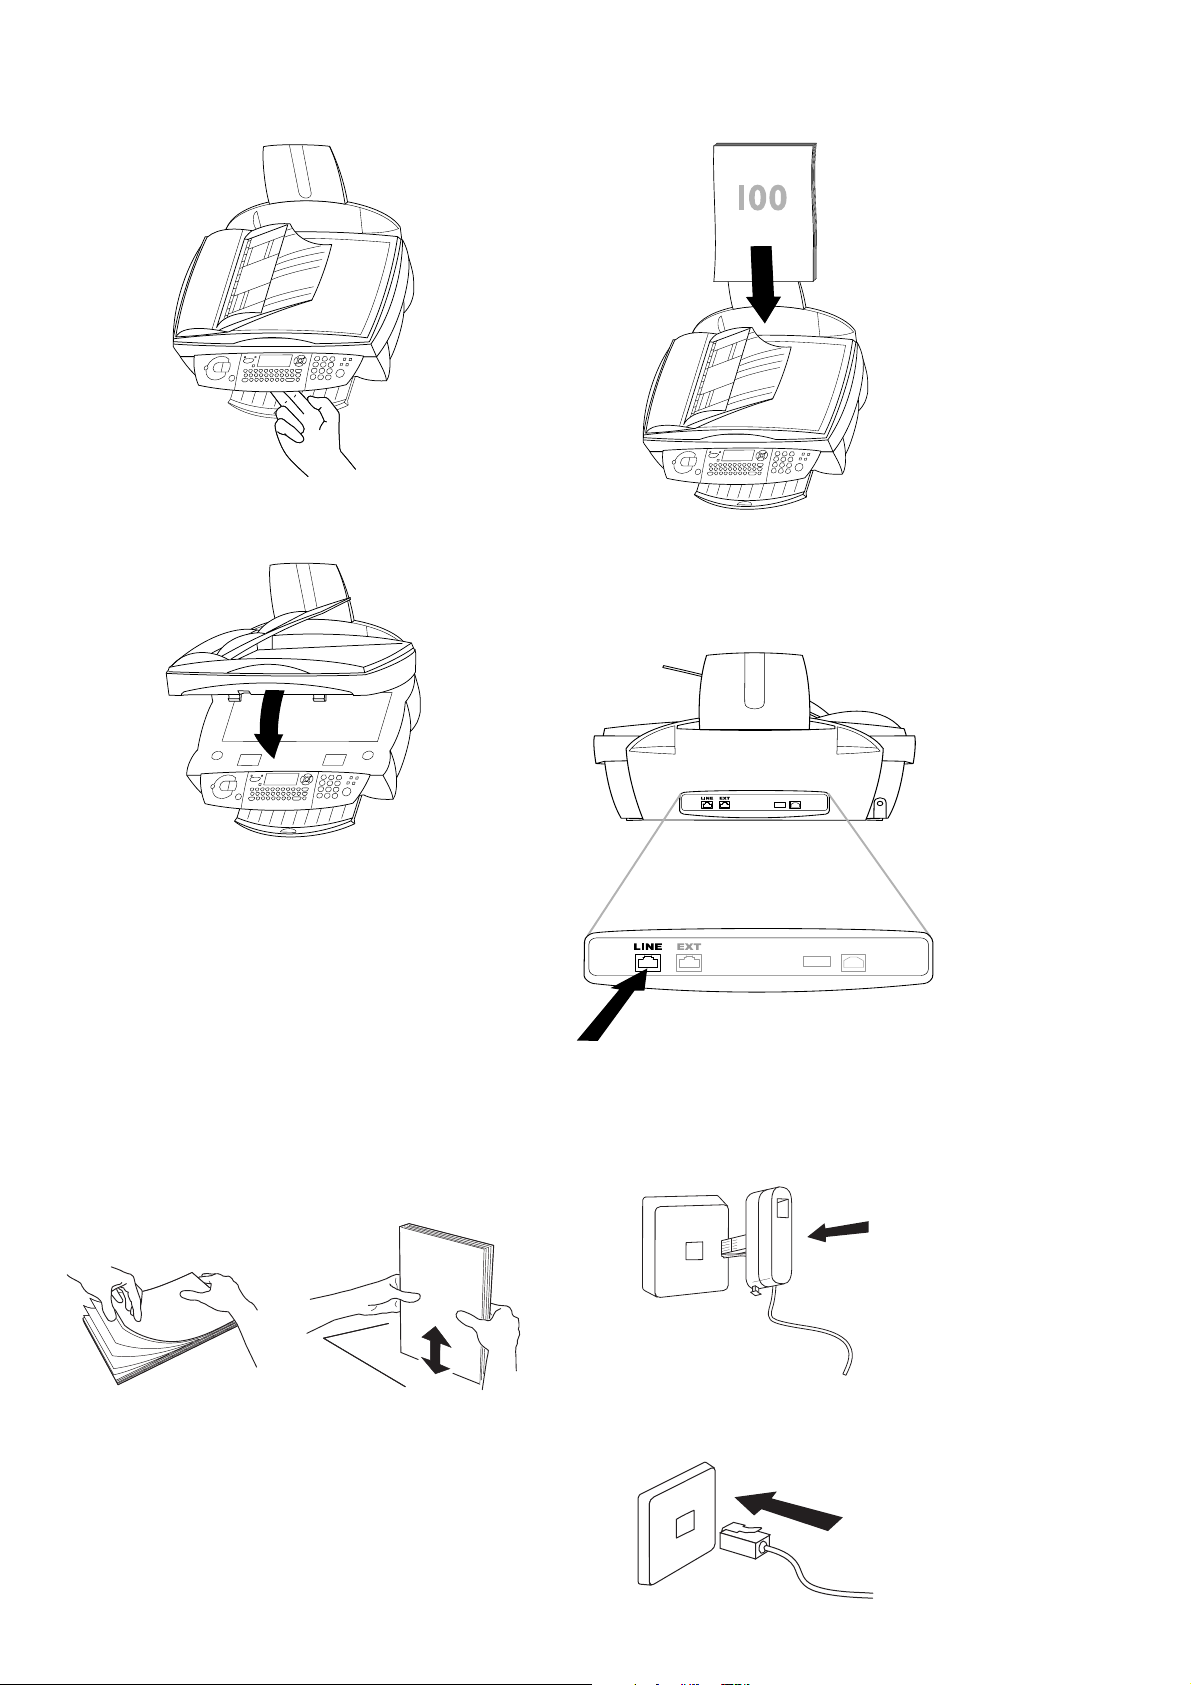
1 Remove the transport protection strips.
2 Insert the paper tray in the slots provided be-
hind the paper feed mechanism.
3 Pull out the paper exit tray.
Installation
paper tray
machine
user guide
installation guide
4 Pull up the document tray.
6
CD-ROM
Page 7
5 Open the machine by pulling the lever under
the control panel.
6 Remove the protective tapes from the car-
tridge holder and close the machine.
2 Insert up to 100 sheets of paper up to
the end-stop in the paper feed mechanism.
Connections
First connect the telephone cable plug socket
labelled LINE on the back of the machine.
Loading paper
Please use only paper which is specifi cally intended for use with ink cartridge printers (standard format is A4 210×297 mm, 80 g/m²). Follow
the instructions of the manufacturer.
Do not load paper while the MFJ Pro 321 is
printing!
1 To prevent several sheets being drawn into
the machine at once, fi rst fan out the paper
to separate the sheets and then straighten
the stack on a fl at surface before inserting it
into the paper feed.
Installation
Next connect the telephone plug to the line
socket on the wall.
In the UK
For all other countries
7
Page 8

Additional devices
Power supply
In addition to your fax machine, you can also
connect other devices such as additional telephones, call-fee indicators answering machines
or modems to a single telephone line (also see
Settings/Additional telephone).
If you intend using special auxiliary devices with
your fax machine, please contact your dealer.
If you wish to receive faxes via modem, you must
set your fax machine to MANUAL RECEPTION.
Same socket
(not in all countries)
You can connect additional devices to the same
telephone socket. Make sure the fax machine is
the fi rst device connected to the line.
Connect the power supply unit to the MFJ Pro
321, then use the mains cable to connect the
power supply unit to the mains.
Installation
Connecting additional devices to the same
socket ensures you the optimal functionality of
your active fax switch (e.g. call transfer). Your
fax machine can control the additional devices.
v If you want to connect the MFJ Pro 321
to a PC, please refer to the chapter PC
connection. You must install the software
fi rst and then connect the MFJ Pro 321
to the PC!
After you have connected the MFJ Pro
321 to the mains, it will prompt you to
make some basic settings as follows.
Country selection
1 Press OK.
2 Use / to choose your country.
3 Press OK twice.
Inserting cartridges
Before you can print documents, there have to
be ink cartridges in your MFJ Pro 321. Therefore two free cartridges for a few test pages are
included with your machine.
The display will indicate if one of the cartridges
is empty or if there is no cartridge in the MFJ
Pro 321.
8
Page 9
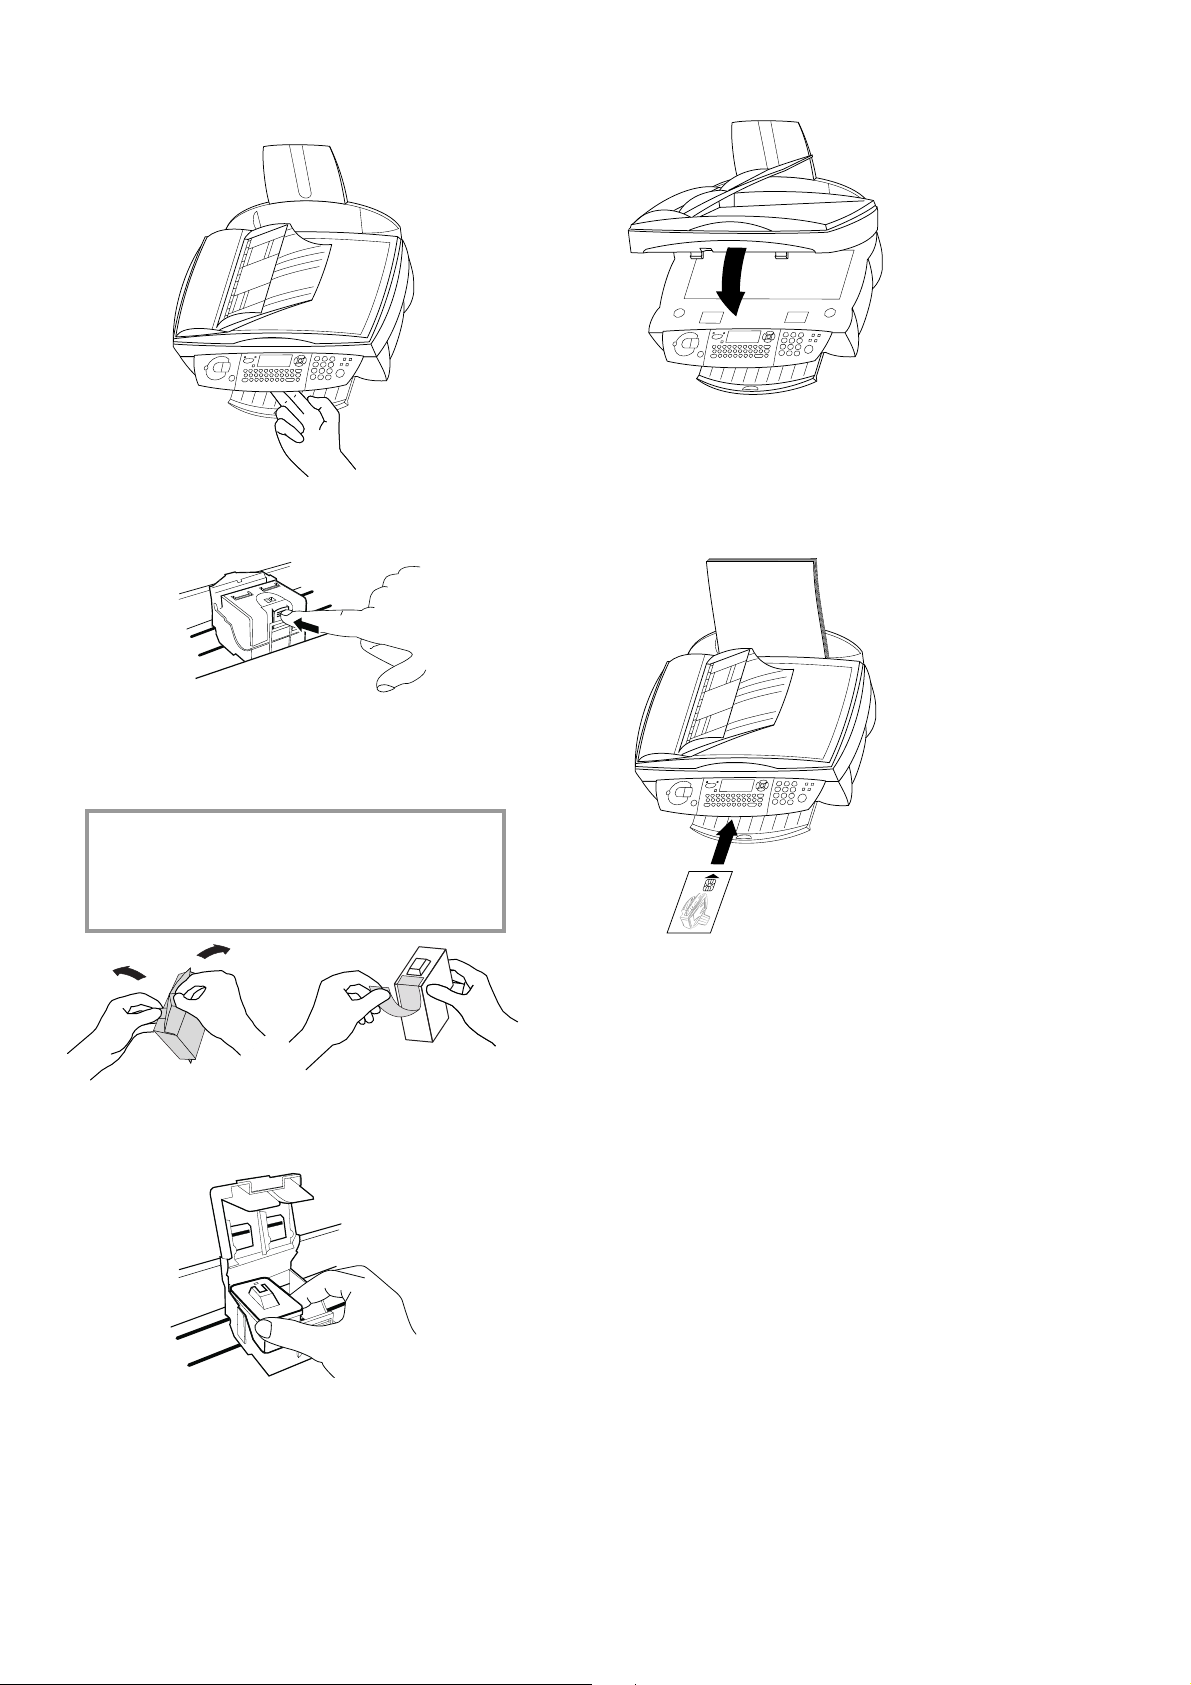
1 Open the machine by pulling the lever under
the control panel.
2 Press the lever in the middle of the cartridge
holder to open the holder.
6 Close the machine.
7 Insert the chip card “Plug ’n Print” with the
contacts facing up into the slot under the
control panel and confi rm with OK. Remove
the cartridge and repeat the process for the
second cartridge.
3 Take the ink cartridges out of their packag-
ing and remove the protective strip.
v Please make sure that the protective strip
was removed completely.
Be careful not to touch the nozzle or the
contacts!
4 Insert the colour cartridge with the con-
tacts forward and the “nose” down into the
left compartment of the cartridge holder.
Installation
Cartridge alignment
1 After inserting the cartridges for the fi rst
time, the machine will print out a page to
check their alignment. VALUE A
2 Enter the value A where the image is the
clearest.
3 Confi rm with OK and repeat these steps for
values B, C and D. VALUE B
Your name and number
1 Enter your fax number (max. twenty digits)
and press OK (to enter a plus sign hold
down the CTRL key and press Q; to enter a
blank space, press the _@ key).
5 Insert the black cartridge into the right
compartment. Close the cartridge holder.
You’ll hear a click when it snaps home.
2 Enter your name by using the keyboard for
text input (max. twenty characters). You can
also enter a plus sign (CTRL and Q) or a
slash (CTRL and M). Press OK.
9
Page 10
Time and date
Enter the date and time and confi rm with OK,
e. g. 12 05 03 16 30 OK for May
12th 2003, 4:30 p. m.
PC connection
v Don’t connect the MFJ Pro 321 to a PC
before installing the software!
Minimum confi guration
Your PC must have the following minimum con-
fi guration:
• Pentium processor, 200 MHz or higher
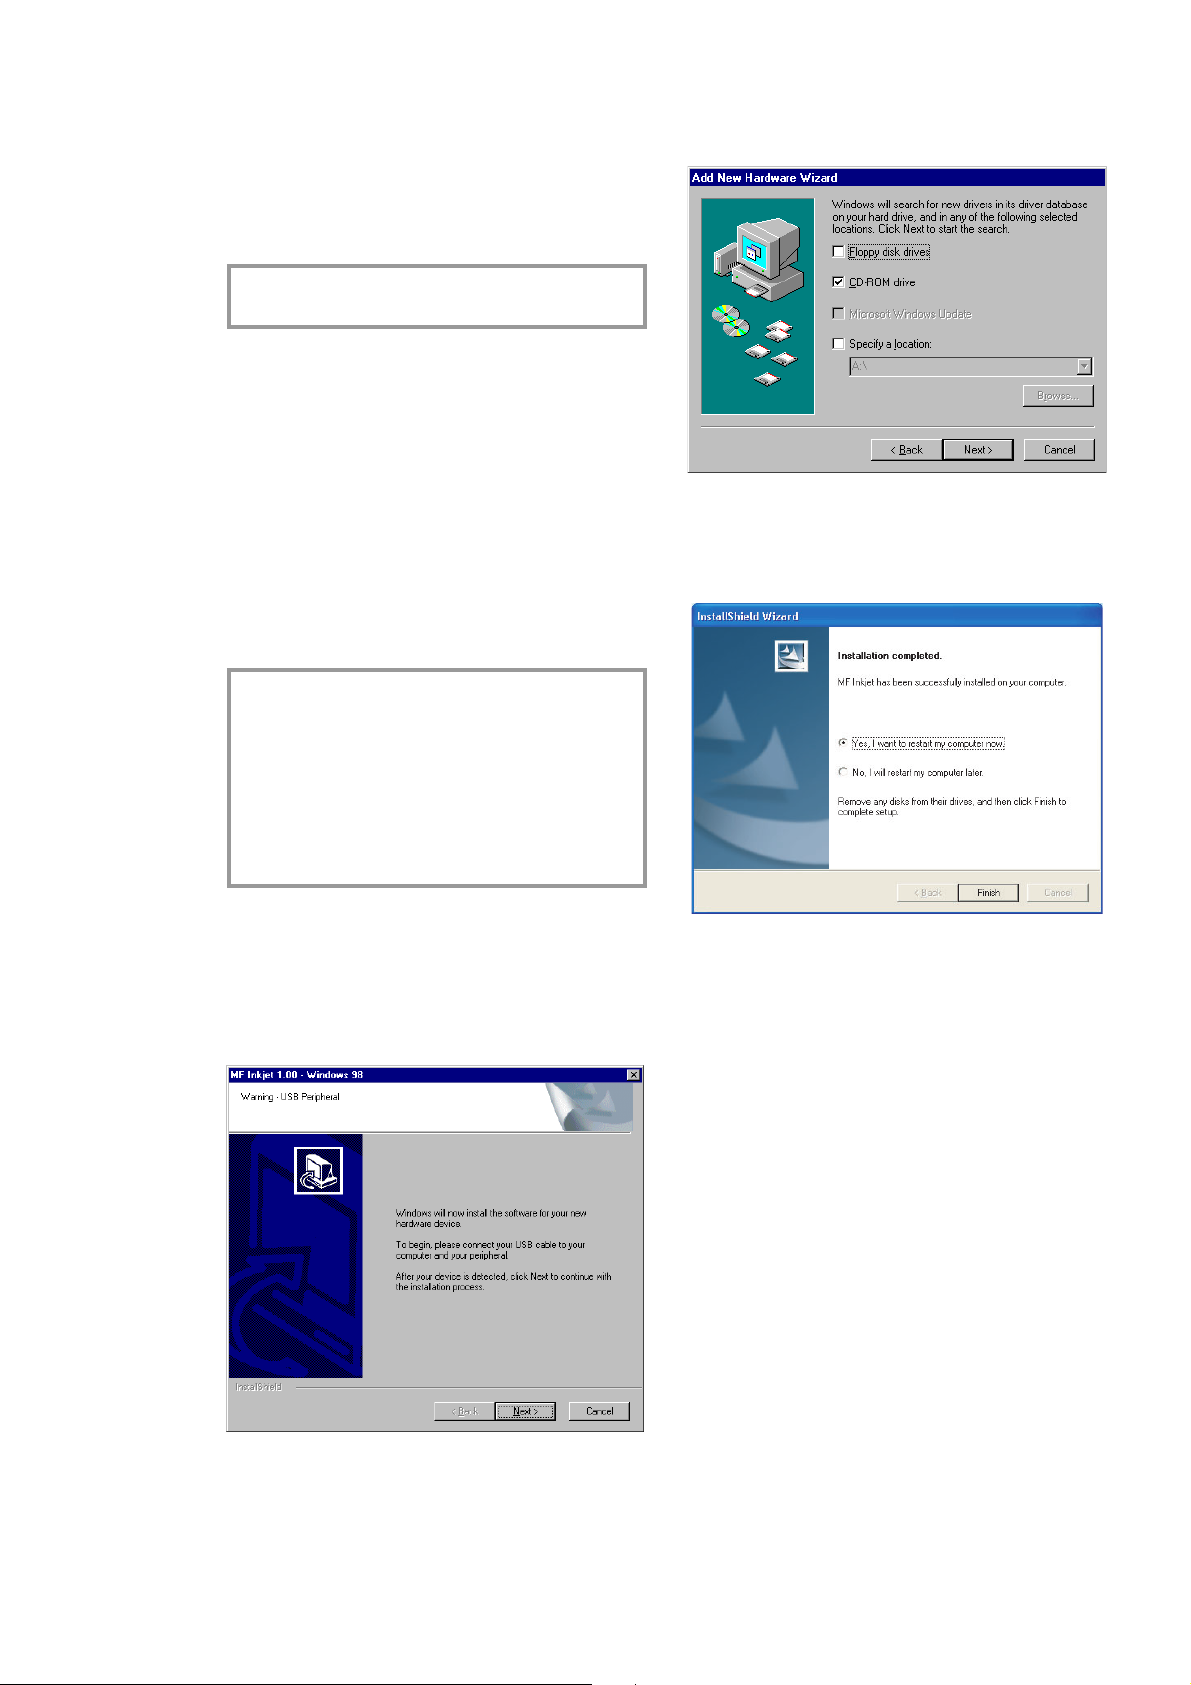
3 Click “Next” and follow the instructions.
Choose to search for the driver on the CDROM:
• Windows 98/2000/ME/XP and 128 MB
RAM
• 80 MB free disk space for the installation
• USB port
Software installation
v Don’t connect the MFJ Pro 321 to a PC
before installing the software!
If you receive a warning message that the
peripheral hasn’t passed Windows Logo
testing, choose “Continue Anyway”. Your
multifunctional device has been tested for
PHILIPS and is fully compatible with Windows XP.
1 Insert the CD-ROM into your PC. The instal-
Installation
lation procedure will start automatically. Follow the instructions on the screen.
2 Connect the MFJ Pro 321 to your PC with
a USB cable when you are prompted to do
so.
4 Click “Next” and follow the instructions on
the screen. You will be prompted to accept a
license agreement. After the installation has
fi nished, the PC has to be rebooted.
10
Page 11

Settings
You can print out a list of the current parameter
settings by pressing M, 54 and OK.
Country and language
These settings will determine the language of
the display and the local telephone network settings.
v To return to stand-by mode, press X as
often as necessary.
Date and time
1 Press M, 21 and OK.
2 Enter the date and time and confi rm with
OK, e. g. 12 05 03 16 30 OK
for May 12th 2003, 4:30 p. m.
Your number and name
1 Press M, 22 and OK.
2 Enter your fax number (max. twenty digits)
and press OK. (To enter a plus sign hold
down the CTRL key and press Q; to enter a
blank space, press the _@ key.)
3 Set your name by using the keyboard for
text input (max. twenty characters). You can
also enter a plus sign (CTRL and Q) or a
slash (CTRL and M on the keyboard for
text input). Press OK.
With C you can delete a wrong character.
1 Press M, 201 and OK. Use / to select
your country. It is important that you choose
the country where you are using the MFJ
Pro 321! Press OK twice.
2 To set another language, use / to select
function 202»LANGUAGE and press OK.
Choose with / and press OK.
Additional telephone
If you have connected an additional telephone
to the same telephone line (see chapter Installation / Connections), you can adjust the
number of rings you will hear in case of an incoming call.
1 Press M, 2912 and OK.
2 Change the value (3, 4 or 5) and press OK.
Settings
Network type ( PABX)
Private branch exchange systems are very
common in large companies. To get a connection from a private branch exchange to the pub-
lic network you have to dial a key to obtain the
outside line.
(An additional telephone connected to a normal
telephone line together with your MFJ Pro 321
must not be confused with a private branch exchange.)
If you connect the MFJ Pro 321 to a PABX, you
can set the prefi x for an outside line. The MFJ
Pro 321 will automatically dial the prefi x with
each number that exceeds a certain amount
of digits.
1 Press M, 251 and OK. Use / to select
PABX and confi rm with OK.
2 Select function 252»PREFIX using / and
press OK. Enter the number of digits and
press OK (e. g. if internal numbers consist
of four digits, enter 5).
3 Press the key you need to reach an outside
line. This is usually 0. Confi rm with OK.
If the number of digits for an internal call is exceeded, the prefi x for an outside line will be automatically added.
11
Page 12

Directory
Your MFJ Pro 321 lets you create a directory by
memorising single entries and lists of entries.
2 The directory appears in alphabetic order.
Use / to select the entry or list you wish to
delete.
3 Press OK.
Your machine can store up to 200 entries with
names and fax numbers. You may also group
several names together to create a list.
When entering a name, you can use + to type
capital letters (press and hold the + key and
type the desired key).
With CTRL you can type special characters
(e. g. hold down CTRL and press W to type a
hyphen).
With / you can move the cursor within an entry and with \ you can delete a character.
Add name
For each record, you must store a name and
fax number.
1 Press M, 11 and OK. Enter a name and
2 The MFJ Pro 321 automatically assigns
Directory
3 Use / to choose W.ASSOC.KEY if you
press OK. Enter a fax number and press
OK.
a number to the record. To modify this
number enter the digit required and press
OK.
want to assign a shortcut key (letter) for
quick access to the record. Press OK.
4 Confi rm with OK.
Modify
1 Press M, 13 and OK.
2 The directory appears in alphabetic order.
Use / to select the entry or list you wish to
modify. Press OK.
3 Modify the entry and confi rm each step with
OK.
Transfer to a PC
If you have connected your MFJ Pro 321 to a
PC, you can transfer the directory to the PC to
edit it.
On your PC, click on Start > Programs > MF
Inkjet > Directory.
You can transfer the directory from the PC to
the MFJ Pro 321 (and vice versa) by clicking on
the icons on the bottom of the window.
4 If need be, select the appropriate transmis-
sion speed to send your faxes. With a good
telephone connection, the appropriate rate
is the highest one. Press OK.
Add list
You can group several directory entries together
f.e. to send a fax to several persons at once.
1 Press M, 12 and OK. Enter a name for
this list and press OK.
2 Press a shortcut number, a letter or use /
and OK to select entries to add them to the
list. Press OK.
3 The list ID number will automatically appear
on the display. If you wish to modify this
number, you may do so. Confi rm with OK.
Print
Press M, 15 and OK. The directory is printed.
12
Cancel
1 Press M, 14 and OK.
Page 13

Fax
a
u
r
ea
p
rim
a
s
a
t
a
estæ
t
a
sq
u
æ
vi
ndi
c
en
u
l
l
os
pon
t
e
s
u
a
s
i
n
e
l
e
g
e
f
id
e
m
rect
um
q
u
e
col
e
b
a
t
a
u
r
e
ap
rim
a
s
ata
e
s
t
æt
a
s
q
u
æ
v
i
nd
i
c
e
n
u
l
l
osp
ontes
u
a
s
i
n
e
le
g
e
fidem
r
e
ct
u
m
q
u
e
c
o
l
e
b
a
t
a
u
r
e
a
p
r
imas
at
a
e
s
t
æta
sq
uæ
vin
d
i
ce
n
u
l
los
p
o
n
t
e
s
u
a
s
i
n
e
l
e
g
e
f
i
de
m
r
e
ctu
m
q
u
e
c
oleb
a
t
a
u
re
a
p
ri
ma
s
a
t
a
e
s
t
æ
t
a
sq
uæ
vin
d
i
ce
n
u
l
los
p
ontes
u
a
s
i
n
e
leg
e
fide
m
r
e
c
t
um
q
u
e
co
l
eb
a
t
a
u
r
e
a
p
ri
m
as
a
ta
e
s
t
æt
a
s
q
u
æ
v
i
nd
ic
e
nu
ll
o
s
p
o
n
t
e
s
u
a
s
i
n
ele
g
e
fidem
r
e
ct
u
m
q
u
e
co
l
e
b
a
ta
u
r
e
a
p
r
i
m
a
s
a
t
a
e
s
tæta
sq
u
ævin
di
ce
nu
ll
os
p
on
t
e
s
u
a
s
i
n
e
l
e
g
e
f
idemr
e
ct
u
m
qu
e
col
e
b
a
t
a
u
r
e
a
prim
a
s
at
a
es
t
æ
t
a
sq
u
æv
i
n
dicenu
l
lo
s
p
o
n
t
e
s
u
as
i
ne
l
eg
e
f
i
de
m
r
e
ctumqu
e
cole
b
a
t
a
u
r
ea
p
ri
m
a
s
at
a
e
s
t
æ
t
a
s
q
uæ
vi
n
d
i
ce
n
ullos
p
o
n
t
e
s
u
as
i
n
el
e
g
e
f
i
d
e
m
rect
u
mq
u
e
col
e
b
a
t
a
u
r
e
a
p
r
i
m
a
s
a
t
a
es
t
æ
t
a
sq
u
æv
i
n
di
ce
n
u
l
los
p
o
n
t
e
s
u
a
s
i
n
e
l
eg
ef
i
dem
rec
t
u
m
q
ue
cole
b
a
t
a
u
r
e
ap
r
i
m
a
s
a
t
a
e
s
tæ
t
a
s
quævin
di
cenu
l
lo
s
pon
t
e
s
u
a
s
i
n
e
l
e
gefi
de
m
r
e
c
tumq
u
e
co
l
e
b
a
t
a
u
r
e
a
p
ri
ma
s
a
t
a
e
s
t
æta
s
q
u
ævin
di
cen
u
ll
os
p
on
t
esua
s
i
n
e
l
egef
i
de
m
re
ct
u
m
q
u
e
co
l
eb
a
t
au
r
e
a
p
r
i
ma
s
ata
es
t
æ
t
a
s
q
u
æ
vi
n
dice
n
u
llo
s
p
o
n
t
e
s
u
a
s
i
n
e
le
g
ef
ide
m
rec
t
u
mque
c
o
l
e
b
a
ta
ure
a
p
ri
m
a
s
at
a
e
st
æ
t
a
s
q
u
æ
vin
di
ce
n
u
l
l
osp
on
t
es
u
a
s
i
n
e
l
eg
ef
i
d
e
m
r
ec
t
u
mq
u
e
co
l
eba
t
a
u
r
ea
a
u
r
e
a
pr
im
a
s
at
a
e
s
t
æ
t
a
sq
u
ævi
ndi
cenu
s
i
n
e
l
e
g
e
fide
m
re
ct
u
m
q
u
e
c
ol
e
b
a
t
a
u
r
e
a
p
ri
m
a
s
a
t
a
e
s
t
æ
t
a
s
q
u
æ
vindi
ce
nu
l
los
p
o
nt
e
s
u
a
s
i
n
e
l
e
g
efidemr
e
ct
u
mq
u
e
c
o
l
e
b
a
t
a
ure
a
p
r
i
ma
s
a
t
a
e
s
t
æ
t
a
sq
u
ævin
d
icen
u
l
lo
s
p
ontes
u
a
s
i
n
e
leg
e
fid
emr
e
ct
u
m
que
co
l
e
b
a
t
a
u
r
e
a
p
r
i
ma
s
a
t
a
e
s
t
æ
t
a
sq
u
æv
i
n
di
ce
n
u
ll
o
s
p
o
ntes
u
a
s
i
n
e
l
e
g
e
f
idem
r
e
ctum
q
u
e
cole
b
a
t
a
u
rea
p
ri
ma
s
a
t
a
e
s
t
æt
a
s
q
uæ
vi
n
d
i
ce
n
ullo
s
pon
t
e
s
u
a
s
i
n
e
l
e
g
e
fi
de
m
r
e
ct
u
m
q
u
ecol
e
b
a
t
a
u
r
e
ap
ri
ma
s
a
t
a
e
s
t
æt
a
s
q
u
ævi
n
d
i
ce
n
u
l
l
o
s
p
o
n
t
e
s
u
a
s
i
n
e
le
gefi
de
m
r
e
ct
u
m
q
u
e
cole
bat
a
u
r
e
ap
rim
a
s
at
a
e
s
tæ
t
a
s
q
u
ævi
ndi
cen
u
l
lo
s
p
o
n
t
es
u
a
s
i
n
e
l
e
g
e
f
i
demr
e
ct
u
mq
u
e
c
o
le
b
a
t
a
ureap
rim
a
s
a
t
a
e
s
t
æt
a
s
q
uævin
d
i
c
e
nu
l
l
o
s
p
o
n
t
e
s
u
as
i
n
e
l
e
g
e
fid
e
m
re
ctu
m
q
u
e
cole
b
a
t
a
u
r
e
a
p
rim
a
s
a
t
a
e
s
tæ
t
a
s
quævin
di
ce
n
u
l
l
os
p
o
n
t
e
s
u
a
s
i
n
e
l
e
g
ef
i
d
em
r
e
ct
u
mq
u
e
cole
b
a
t
a
u
r
ea
p
ri
ma
s
a
t
a
e
s
tæ
t
a
s
q
u
æ
vin
di
c
e
nu
l
l
o
s
p
o
n
t
e
s
u
a
s
ine
l
e
g
e
f
id
e
m
re
ct
umq
u
e
cole
b
a
t
a
u
r
ea
p
ri
m
a
s
a
t
a
est
æ
t
a
s
q
u
æ
v
i
n
dicenu
l
l
os
po
ntesua si
n
ele
g
e
fide
m
r
e
ct
u
m
q
u
e
col
e
b
a
t
a
u
r
e
a
pri
ma
s
a
t
a
es
t
æta
squ
æv
i
n
d
ice
nul
l
o
s
p
on
t
esu
a
s
i
n
e
le
g
ef
i
de
m
rec
t
u
m
q
u
e
cole
b
a
ta
u
rea
prim
a
s
a
t
a
estæt
a
s
q
u
æ
vin
di
cen
u
l
l
col
e
b
a
t
a
ure
a
10
Sending a fax Y
There are two ways to fax a document: You can
place it onto the scanner glass (fl atbed scanner) directly or load it into the automatic document feeder.
5 If you want to send just one page, use / to
choose DONE and press OK. If you want to
send further pages, choose NEXT PAGE and
insert another page. Then press OK.
After transmission, the MFJ Pro 321 will auto-
matically print a transmission report.
If you want to cancel the transmission, press
X twice.
Flatbed scanner
1 Open the fl atbed scanner cover. Please
make sure that the scanner glass is clean
before placing the original.
2 Place the document face down onto the
glass.
Automatic feeder
If you are working with originals of an odd size
or photos, please use the fl at-bed scanner.
A5 size documents should be inserted land-
scape.
The following points are the most common
causes of problems when inserting documents into the feeder. Do not insert ...
• pages that are smaller than A5.
• pages from newspapers (printer’s ink).
• stapled pages or pages with paper clips.
• creased or torn pages.
• wet pages or pages with corrections
made with correction fl uid; dirty pages
or pages with a glossy or laminated surface.
• pages joined with sticky tape or glue, with
adhesive stickers such as “post-it
®
” notes,
or pages which are too thin or too thick.
Fax
3 Align it with back left corner of the scanner
(marked with arrows).
If you want to scan small three-dimensional objects (such as coins or fl owers), use transparent
fi lm to protect the scanner glass.
4 Choose a fax number and press Y.
1 Place the document face up into the docu-
ment feeder (up to 10 pages printed on
60–90 g/m² paper).
2 Dial the fax number.
3 Press Y to start the transmission.
After transmission, the MFJ Pro 321 will auto-
matically print a transmission report.
If you want to cancel the transmission, press
X twice.
Directory a
1 Insert a document.
13
Page 14

2 Press a and use /, a letter or a
number key to choose a record or a list from
the directory.
3 Press Y to start the transmission.
After inserting paper or cartridges, start printing
by pressing Y.
To change the fax reception settings, please re-
fer to Advanced settings / Fax settings.
Redial L
The last ten numbers dialled on the MFJ Pro
321 will be stored in the redial memory.
1 Insert a document.
Fax
2 Press L as often as necessary. When
Broadcast &
You may choose to send a document to several
recipients.
1 Insert a document.
2 Dial a number (or use the directory or L)
3 If you want to cancel the transmission, press
Resolution f%F
If necessary, you may change the resolution.
Press f%F as many times as necessary to
select the required mode. An icon on the display will show the current mode. If no icon is
highlighted, the document will be sent in standard resolution.
the desired number appears on the display,
press Y to start the transmission.
and press &. Repeat this step for up to ten
recipients. Press Y.
X twice.
Fax answering device
The fax answering device allows you to keep
documents confi dential by storing them. They
need not be printed as soon as you receive
them. The ; symbol on the display lets you
know the state of the fax answering device:
; on—fax answering machine is on
; blinking—documents are in the memory or
are being received
; off—memory is full
You can ensure document confi dentiality by us-
ing the four-digit code. Once stored, this code is
required to print fax messages and to activate/
deactivate the fax answering device.
Storing an answer code
Press M, 343 and OK. Enter a four-digit
code and press OK.
Activate/deactivate
Press M, 342 and OK. If you have stored
an access code, enter it and press OK. Use /
to select WITH or WITHOUT and press OK.
Printing messages
Press M, 341 and OK. If you have stored
an answer code, enter it and press OK. Documents received and stored in the memory are
printed and then deleted from the memory.
14
standard—for good quality documents, without
drawings or small details
f—for documents with drawings or small characters
%—for documents with very fi ne or small
drawings
F—for photos
Contrast O
If the document is too light or too dark, you may
change the contrast. Press O as many times as
necessary to choose the desired contrast. The
current setting is shown on the display.
Receiving faxes
If you don’t change the factory settings, faxes
will be automatically printed. If the MFJ Pro 321
has run out of paper or ink, incoming faxes will
be stored in the memory.
Send report
The MFJ Pro 321 can print a transmission re-
port every time you have sent a document. This
way you are given confi rmation that your document has been received.
1 Press M, 231 and OK. Select one of the
following options:
WITH—a report is given when the transmission
was completed successfully or when it is completely abandoned.
WITHOUT—no transmission report; however,
your MFJ Pro 321 notes all transmissions that
took place in its log (see Hints & tips / Logs).
ALWAYS—a report is printed with each transmission.
ON ERROR—a report is only printed if the transmission failed or is abandoned.
2 Confi rm with OK.
Page 15

Delayed transmission
Additional telephone
1 Press M, 31 and OK.
2 Enter the fax number and press OK.
3 Enter the time you want the fax to be sent
(within 24 hours), e. g. 17 30 for 5
p. m. Press OK.
4 Set the contrast and other settings and con-
fi rm each entry with OK.
30
Polling
By means of this function documents which
have been prepared for collection from another
fax machine can be retrieved. You can also al-
low a document to be polled from your fax ma-
chine.
Polling reception
1 Press M, 32 and OK.
2 Enter the polling number and press Y.
Delayed polling
1 Press M, 32 and OK.
You can connect an additional telephone on the
same line as your MFJ Pro 321. When a call
comes in, the additional telephone will ring a
few times, then the machine switches to fax reception. If necessary, the number of rings can
be changed in the technical settings (see Settings / Additional telephone).
Fax
2 Enter the polling number and press OK.
3 Enter the time (within 24 hours) you wish to
poll the document—e. g. 17 30 for 530
p. m.—and press Y.
Polling transmission
You may place a document in your MFJ Pro 321
and make it available to one or more recipients
who can obtain a fax of this document by calling
your MFJ Pro 321 with the polling function.
1 Insert a document in the feeder.
2 Press M, 33 and OK.
3 Use / to choose between the two options:
SIMPLE—the document may be transmitted
only once (from the memory or feeder). Press
OK.
MULTIPLE—the document may be polled as
many times as necessary (from the memory).
Press OK.
4 If necessary, adjust the contrast and press
OK.
5 Enter the number of pages and press OK
(this is only necessary when you have chosen MULTIPLE above).
15
Page 16

Copy
a
u
r
ea
p
rim
a
s
a
t
a
estæ
t
a
sq
u
æ
vi
ndi
c
en
u
l
los
pon
t
e
s
u
a
s
i
n
e
l
e
g
e
f
i
d
e
m
rect
um
q
u
e
col
e
b
a
t
a
u
r
e
ap
rim
a
s
ata
e
s
t
æ
t
a
s
q
u
æ
v
i
nd
i
c
e
n
u
l
l
osp
ontes
u
a
s
i
n
e
le
g
e
fidem
r
e
ctu
m
q
u
e
c
o
le
b
a
t
a
u
r
e
a
p
r
imas
at
a
e
s
t
æta
sq
uæ
vin
d
i
ce
n
u
l
los
p
o
n
t
e
s
u
a
s
i
n
e
l
e
g
e
f
i
de
m
r
e
ctu
m
q
u
e
c
oleb
a
t
a
u
r
e
a
p
ri
ma
s
a
t
a
e
s
t
æ
t
a
sq
u
æ
vin
d
i
ce
nul
los
p
ontes
u
a
s
i
n
e
leg
e
fide
m
re
c
t
um
q
u
e
co
l
eb
a
t
a
u
r
e
a
p
ri
m
as
a
ta
e
s
t
æta
s
q
u
æ
v
indic
e
nu
ll
o
sp
o
n
t
e
s
u
a
s
i
n
ele
g
e
fide
mr
e
ctu
m
q
u
e
co
l
e
b
a
ta
u
r
e
a
p
r
i
m
a
s
a
t
a
e
s
tæ
ta
sq
u
ævin
di
ce
nu
l
los
pon
t
e
sua
s
i
n
e
l
e
g
e
f
idemr
e
ct
u
m
qu
e
col
e
b
a
t
a
u
r
e
a
prim
a
s
at
a
es
t
æ
t
a
sq
u
æv
i
n
dice
nu
ll
o
s
p
o
n
t
e
s
u
as
i
ne
l
ege
f
i
dem
r
e
ctumqu
e
cole
b
a
t
a
u
r
ea
p
ri
m
a
s
at
a
e
s
t
æ
t
a
s
q
uæ
vi
n
d
i
ce
n
ullos
p
o
n
t
e
s
u
as
i
n
el
e
g
e
f
i
d
e
m
rect
u
mq
u
e
col
e
b
a
t
a
u
r
e
a
p
r
i
m
a
s
a
t
a
es
t
æ
t
a
sq
u
æv
i
n
di
ce
n
u
l
los
p
o
n
t
e
s
u
a
s
i
n
e
l
eg
e
f
i
de
m
rec
t
u
m
q
ue
cole
b
a
t
a
u
r
e
ap
r
i
m
a
sa
t
a
e
s
tæ
t
a
s
quævin
di
cenu
l
lo
s
pon
t
e
s
u
a
s
in
e
le
g
ef
i
de
m
r
e
ctumq
u
e
co
l
e
b
a
t
a
u
r
e
a
p
ri
ma
s
a
t
a
e
s
t
æta
s
q
u
ævin
di
cen
u
l
l
os
p
on
t
esua
s
i
n
e
legef
i
de
m
re
ct
u
m
q
u
e
co
l
eb
a
t
au
r
e
a
p
r
i
ma
s
ataes
t
æ
t
a
s
q
u
æ
vi
n
dice
n
u
llo
s
p
o
n
t
e
s
u
a
s
i
n
e
le
g
ef
ide
m
rec
t
u
mque
col
e
b
a
ta
ure
a
p
ri
mas
at
a
e
st
æ
t
a
s
q
u
æ
vin
dice
n
u
l
l
osp
on
t
es
u
a
si
n
e
l
egef
i
d
e
m
r
ec
t
u
mq
u
e
co
l
eb
a
t
a
u
rea
a
u
r
e
a
pr
im
a
s
at
a
e
s
t
æ
t
a
sq
u
ævi
ndicenu
s
i
n
e
l
e
g
e
fide
m
r
e
ct
u
m
q
u
e
c
ol
e
b
a
t
a
u
r
e
a
p
ri
m
a
s
a
t
a
e
s
t
æ
t
a
sq
u
æ
vi
n
di
ce
nu
l
los
p
o
nt
e
s
u
a
s
i
n
e
l
e
g
efidemr
e
ct
u
mq
u
e
c
o
le
b
a
t
a
ure
a
p
r
i
ma
s
a
t
a
e
s
t
æ
t
a
sq
u
ævin
d
icen
u
l
lo
s
p
ontes
u
a
s
i
n
e
leg
e
fid
emr
e
ct
u
m
que
co
l
e
b
a
t
a
u
r
e
a
p
r
i
ma
s
a
t
a
e
s
t
æ
t
a
sq
u
æv
i
n
di
ce
n
u
ll
o
s
p
o
ntes
u
a
si
n
e
l
e
g
e
f
idem
r
e
ctum
q
u
e
cole
b
a
t
a
u
rea
p
ri
ma
s
a
t
a
e
s
t
æta
s
q
u
æ
vi
n
d
i
ce
n
ullo
s
p
on
t
e
s
u
a
s
i
n
e
l
e
g
e
fi
de
m
r
e
ct
u
m
q
u
ecol
e
b
a
t
a
u
r
e
ap
ri
ma
s
a
t
a
e
s
t
æt
a
s
q
u
ævi
n
d
i
ce
n
u
ll
os
p
o
n
t
e
s
ua
s
i
n
e
le
g
efi
de
m
r
e
ct
u
m
q
u
e
cole
b
a
t
a
u
r
e
ap
rim
a
s
at
a
e
s
tæ
t
a
s
q
u
ævi
ndi
cen
u
l
lo
s
p
o
n
t
es
u
a
s
i
n
e
l
e
g
e
f
i
demr
e
ct
u
mq
u
e
c
o
le
b
a
t
a
u
rea
p
rim
a
s
a
t
a
e
s
t
æ
t
a
s
q
uævin
d
i
c
e
nu
l
l
o
s
p
o
n
t
e
s
u
as
i
n
e
le
g
e
fid
e
m
re
ctu
m
q
u
e
cole
b
a
t
a
u
r
e
a
p
rim
a
s
a
t
a
e
s
tæ
t
a
s
quævin
di
ce
n
u
l
l
os
p
o
n
t
e
s
u
a
s
i
n
e
le
g
ef
id
em
r
e
ct
u
mq
u
e
cole
b
a
t
a
u
r
ea
p
ri
ma
s
a
t
a
e
s
tæ
t
a
s
q
u
æ
vin
di
c
e
nu
l
l
o
s
p
o
n
t
e
s
u
a
s
i
n
e
l
e
g
e
f
id
e
m
re
ct
umq
u
e
cole
b
a
t
a
u
r
ea
p
ri
m
a
s
a
t
a
est
æ
t
a
s
q
u
æ
v
i
n
di
cen
u
l
l
os
po
ntesua si
n
ele
g
e
fidem
r
e
ct
u
m
q
u
e
col
e
b
a
t
a
u
r
e
a
pri
ma
s
a
t
a
es
t
æ
t
a
squ
æv
i
n
d
i
ce
n
u
l
l
os
p
on
t
esua
s
i
n
e
l
e
g
ef
i
de
mrec
t
u
m
q
u
e
cole
b
a
ta
u
r
ea
prim
a
s
a
t
a
estæt
a
sq
u
æ
vin
di
cen
u
ll
col
e
b
a
t
a
ure
a
10
Inserting a document
There are two ways to copy a document: You
can place it onto the scanner glass (fl atbed
scanner) directly or load it into the automatic
document feeder.
Flatbed scanner
1 Open the fl atbed scanner cover. Please
Copy
Automatic feeder
Place the document face up into the document feeder (up to 10 pages on 60–90 g/m²
paper).
make sure that the scanner glass is clean
before placing the original.
If you are working with originals of an odd size
or photos, please use the fl at-bed scanner.
A5 size documents should be inserted landscape.
The following points are the most common
causes of problems when inserting documents into the feeder. Do not insert ...
2 Place the document face down onto the
glass.
3 Align it with back left corner of the scanner
(marked with arrows).
• pages that are smaller than A5.
• pages from newspapers (printer’s ink).
• stapled pages or pages with paper clips.
• creased or torn pages.
• wet pages or pages with corrections
made with correction fl uid; dirty pages
or pages with a glossy or laminated surface.
• pages joined with sticky tape or glue, with
adhesive stickers such as “post-it®” notes,
or pages which are too thin or too thick.
Standard copy K
1 Insert a document (see above).
2 Choose one of the K keys (copying in colour
or black and white) and press it twice.
“Creative” copy K
1 Insert a document (see above).
2 Press one of the K keys (copying in col-
our or black and white) once. You can now
make the following settings:
16
3 Enter the desired number of copies and
If you want to scan small three-dimensional objects (such as coins or fl owers), use transparent
fi lm to protect the scanner glass.
press OK. NUMBER OF COPIES
4 The copying quality of the MFJ Pro 321 is
higher than the resolutions used for fax
transmission. Use / or f%F to choose
the resolution: RESOLUTION
FAST—for good quality documents, without
drawings or small details
Page 17

NORMAL—for documents with drawings or small
characters
QUALITY—for maximal resolution
Press OK.
5 Your MFJ Pro 321 can reduce or magnify
a specifi c part of a document from 25% to
400%. Set the desired zoom value with the
key pad and press OK. ZOOMING
6 You can change the origin of the fl at-bed
scanner (by default, this is the back left angle of the scanner window marked with arrows).
10 You can adjust the luminosity (brightness) of
the printer. Use / to change the setting: - is
darker, + is lighter. Press OK. LUMINOSITY
11 Use / to set whether you use plain, coat-
ed, or photo paper, or transparent fi lm and
press OK. »PLAIN PAPER
Copy
By entering new values of x and y given
in millimetres, you will move the scanning
zone as shown on the fi gure below. Confi rm
the entries with OK. ORIGIN
7 If the document is too light or too dark, you
may change the scanning contrast. Press /
or O as many times as necessary to choose
the desired contrast, as shown by the position of the cursor. Press OK. CONTRAST
8 You can adjust the saturation. Saturation is
the colourfulness judged in proportion to its
brightness. Use / to change the setting: is more grey, + is more saturated. Confi rm
with OK. SATURATION
9 If you have chosen colour copy, you can ad-
just the RGB values. All colours can be defi ned as combinations of red (R), green (G)
and blue (B). You can change the values for
each of these basic colours with /. Press
OK. R.G.B.
17
Page 18

Scan to PC
a
u
r
ea
p
rim
a
sa
t
a
estæ
t
a
sq
u
æ
vi
ndi
c
en
u
l
l
os
pon
t
e
s
u
a
s
i
n
e
l
e
g
e
f
i
d
e
m
rect
um
q
u
e
col
e
b
a
t
a
u
r
e
ap
rim
a
s
ata
e
s
t
æ
t
a
s
q
u
æ
v
i
nd
i
c
e
n
u
l
l
osp
ontes
u
a
s
i
n
e
le
g
e
fidem
r
e
ct
u
m
q
u
e
c
o
le
b
a
t
a
u
r
e
a
p
r
imas
at
a
e
s
t
æta
sq
uæ
vin
d
i
ce
nu
l
los
p
o
n
t
e
s
u
a
s
i
n
e
l
e
g
e
f
i
d
e
m
re
ctu
m
q
u
e
c
oleb
a
t
a
u
re
a
p
ri
ma
s
a
t
a
e
s
t
æ
t
a
sq
uæ
vin
d
i
ce
nul
los
p
ontes
u
a
s
i
n
e
leg
e
fide
m
re
c
t
u
m
q
u
e
co
l
eb
a
t
a
u
r
e
a
p
ri
m
as
a
ta
e
s
t
æ
t
a
s
q
u
æ
v
indic
e
nu
ll
o
s
p
o
n
t
e
s
u
a
s
i
n
ele
g
e
fide
m
r
e
ctu
m
q
u
e
co
l
e
b
a
ta
u
r
e
a
p
r
i
m
a
s
a
t
a
e
s
tæ
ta
sq
u
ævin
di
ce
nu
l
los
pon
t
e
s
u
a
s
i
n
e
l
e
g
e
f
idemr
e
ct
u
m
qu
e
col
e
b
a
t
a
u
r
e
a
prim
a
s
at
a
es
t
æ
t
a
sq
u
æv
i
n
dice
nu
ll
o
s
p
o
n
t
e
s
u
as
i
ne
l
eg
e
f
i
dem
r
e
ctumqu
e
cole
b
a
t
a
u
r
ea
p
ri
m
a
s
at
a
e
s
t
æ
t
a
s
q
uæ
vi
n
d
i
ce
n
ullos
p
o
n
t
e
s
u
as
i
n
el
e
g
e
f
i
d
e
m
rect
u
mq
u
e
col
e
b
a
t
a
u
r
e
a
p
r
i
m
a
s
a
t
a
es
t
æ
t
a
sq
u
æv
i
n
di
ce
n
u
l
los
p
o
n
t
e
s
u
a
s
i
n
e
l
eg
ef
i
de
m
rec
t
u
m
q
ue
cole
b
a
t
a
u
r
e
ap
r
i
m
a
s
a
t
a
e
s
tæ
t
a
squævin
di
cenu
l
lo
s
pon
t
e
s
u
a
s
in
e
le
g
e
f
i
de
m
r
e
ctumq
u
e
co
l
e
b
a
t
a
u
r
e
a
p
ri
ma
s
a
t
a
e
s
t
æta
s
q
u
ævin
di
cen
u
l
l
os
p
on
t
es
ua
s
i
n
e
legefidem
re
ct
u
m
q
u
e
co
l
eb
a
t
au
r
e
a
p
r
i
ma
s
ata
es
t
æ
t
a
s
q
u
æ
vi
n
dice
n
u
llo
s
p
o
n
t
e
s
u
a
s
i
n
e
le
g
ef
ide
m
rec
t
u
mq
u
e
col
e
b
a
ta
ure
a
p
ri
m
a
s
at
a
e
st
æ
t
a
s
q
u
æ
vin
dice
n
u
l
l
osp
on
t
es
u
a
s
i
n
e
l
eg
ef
i
d
e
mr
ec
t
u
mq
u
e
co
l
eb
a
t
a
u
rea
a
u
r
e
a
p
r
i
m
a
s
at
a
e
s
t
æ
t
a
sq
u
ævi
ndi
cen
u
s
i
n
e
l
e
g
e
fide
m
r
e
ct
u
m
q
u
e
c
ol
e
b
a
t
a
u
r
e
a
p
ri
m
a
s
a
t
a
e
s
t
æ
t
a
s
q
u
æ
v
i
n
di
ce
nu
l
los
p
o
nt
e
s
u
a
s
i
n
e
l
e
g
efidem r
e
ctu
mq
u
e
c
o
le
b
a
t
a
ure
a
p
r
i
ma
s
a
t
a
e
s
t
æ
t
a
sq
u
ævin
d
icen
u
l
lo
s
p
ontes
u
a
s
i
n
e
leg
e
fid
emr
e
ct
u
m
qu
e
co
l
e
b
a
t
a
u
r
e
a
p
r
i
ma
sa
t
a
e
s
t
æ
t
a
sq
u
æv
i
n
di
ce
n
u
ll
o
s
p
o
ntes
u
a
si
n
e
l
e
g
e
f
idem
r
e
c
tum
q
u
e
cole
b
a
t
a
u
rea
p
ri
ma
s
a
t
a
e
s
t
æta
s
q
uæ
vi
n
d
i
ce
n
ullo
s
p
on
t
e
s
u
a
s
i
n
e
l
e
g
e
fi
de
m
r
e
ct
u
m
q
u
ecol
e
b
a
t
a
u
r
e
ap
ri
ma
s
a
t
a
e
s
t
æt
a
s
q
u
ævi
n
d
i
ce
n
u
l
l
os
p
o
n
t
e
s
ua
s
i
n
e
le
g
efi
de
m
r
e
ct
u
m
q
u
e
cole
bat
a
u
r
e
ap
rim
a
s
at
a
e
s
tæ
t
a
s
q
u
ævi
ndi
cen
u
l
lo
s
p
o
n
t
e
s
u
a
s
i
n
e
l
e
g
e
f
i
demr
e
ct
u
mq
u
e
c
o
le
b
a
t
a
u
rea
p
rim
a
s
a
t
a
e
s
t
æta
s
q
uævin
d
i
c
e
nu
l
l
o
s
p
o
n
t
e
s
u
as
i
n
e
l
e
g
e
fid
e
m
re
ctu
m
q
u
e
cole
b
a
t
a
u
r
e
ap
rim
a
s
a
t
a
e
s
tæ
t
a
s
q
u
ævin
di
ce
n
u
l
l
o
s
p
o
n
t
e
s
u
a
s
i
n
e
le
g
ef
id
em
r
e
ct
u
mq
u
e
cole
b
a
t
a
u
r
ea
p
ri
ma
s
a
t
a
e
s
tæ
t
a
s
q
u
æ
vin
di
c
e
nu
l
l
o
s
p
o
n
t
e
s
u
a
s
i
ne
l
e
g
e
f
id
e
m
re
ct
u
mq
u
e
cole
b
a
t
a
u
r
ea
p
ri
m
a
s
a
t
a
est
æ
t
a
s
q
u
æ
v
i
n
di
cen
u
l
l
os
po
n
tes
uasi
n
ele
g
e
fidem
r
e
ct
u
m
q
u
e
col
e
b
a
t
a
u
r
e
a
pri
ma
s
a
t
a
es
t
æ
t
a
s
q
u
æv
i
n
d
i
ce
n
u
l
l
os
p
on
t
esua
s
i
n
e
l
e
g
ef
i
de
m
rec
t
u
mq
u
e
cole
b
a
ta
u
r
ea
prim
a
s
a
t
a
estæt
a
s
q
u
æ
vin
di
cen
u
ll
col
e
b
a
t
a
ure
a
10
You can use the MFJ Pro 321 to scan docu-
ments and edit the document with a PC (see Installation / PC connection).
Inserting a document
There are two ways to scan a document: You
can place it onto the scanner glass (fl atbed
scanner) directly or load it into the automatic
document feeder.
Flatbed scanner
1 Open the fl atbed scanner cover. Please
make sure that the scanner glass is clean
before placing the original.
If you want to scan small three-dimensional objects (such as coins or fl owers), use transparent
fi lm to protect the scanner glass.
Automatic feeder
Place the document face up into the document feeder (up to 10 pages on 60–90 g/m²
paper).
If you are working with originals of an odd size
or photos, please use the fl at-bed scanner.
A5 size documents should be inserted landscape.
2 Place the document face down onto the
glass.
Scan to PC
3 Align it with back left corner of the scanner
(marked with arrows).
The following points are the most common
causes of problems when inserting documents into the feeder. Do not insert ...
• pages that are smaller than A5.
• pages from newspapers (printer’s ink).
• stapled pages or pages with paper clips.
• creased or torn pages.
• wet pages or pages with corrections
made with correction fl uid; dirty pages
or pages with a glossy or laminated surface.
• pages joined with sticky tape or glue, with
®
adhesive stickers such as “post-it
” notes,
or pages which are too thin or too thick.
Open the scan window
Press Z to open the scan window on the PC.
To edit the scanned document, open a graph-
ic application and choose the scan function.
Choose the MFJ Pro 321 TWAIN driver to start
scanning.
18
Page 19

Click on the lower left icon to create a preview,
click on the lower right icon to start scanning.
Click on “Profi le” to create different profi le for
different document types you want to scan. A
profi le contains all important settings for a certain type of document. To create a profi le, fi rst
make all settings and then choose “New” profi le. Enter a profi le name and click “Save”.
Scan to PC
19
Page 20

SMS
Your MFJ Pro 321 lets you send SMS mes-
sages all over the world. SMS (Short Message Service) was originally devised for mobile
communication, but it is now available in many
countries via regular telephone lines. Availability of the SMS service depends on the country
and operator. Your MFJ Pro 321 has been preset to use the SMS service in your country. If
it does not work correctly, please contact your
SMS service provider and change these settings (see Advanced settings / SMS settings).
SMS
Send SMS
One recipient
1 Press W twice.
2 Type the message you want to send.
To type capital letters, hold down + and press
the desired key. To type special characters,
hold down CTRL and press the desired key
(e. g. to enter a question mark, hold down
CTRL and press V). You can move the cursor
with / and delete characters with \.
3 Press W.
4 Enter the telephone number.
If you want to send an SMS to a phone abroad,
you should dial the number in its international
form (e. g. 0049… for Germany).
5 Press W to send the message. The MFJ
Pro 321 will print a transmission report.
This function can be deactivated (see Fax /
Send report).
Directory a
1 Press W twice.
2 Press W and enter the fi rst telephone
number.
3 Press & and enter another telephone
number (max. 10).
4 Press W to send your message.
Receiving an SMS
Received SMS messages will be printed automatically. (You can change this setting—see
Advanced settings / SMS settings.) If you switch
off automatic printing, messages will be stored
in the memory. If SMS messages are stored,
the lamp next to the W key will fl ash.
Reading an SMS
1 Press W and OK.
2 Use / to choose a message and press
OK.
3 You can scroll up and down within the mes-
sage with /.
Printing an SMS
1 Press W and K.
2 Use / to choose a message and press
OK.
Deleting an SMS
1 Press M, 43 and OK.
2 You can now choose which messages to de-
lete using /:
SELECTED—press OK and choose the mes-
sages to delete using /. Confi rm with OK.
ALREADY READ—press OK to delete the mes-
sages that you have already read.
ALL—press OK. All messages will be deleted.
20
2 Type your message and press W.
3 To select a number from the directory, press
a and use / to select an entry.
4 Press W to send your message.
Redial L
The last ten numbers dialled on the MFJ Pro
321 will be stored in the redial memory.
1 Press W twice and type your message.
2 Press W.
3 Press L as often as necessary, until the
desired number appears.
4 Press W to send your message.
Several recipients &
1 Press W twice and type your message.
Page 21

Advanced
settings
Settings list
You may print a list of your MFJ Pro 321’s pa-
rameter settings to monitor any changes made
to the default parameters!
Press M, 54 and OK.
SMS settings
When you select your country when setting
up the MFJ Pro 321, the parameters for SMS
emission and reception will be pre-set. If these
settings do not work or if you want to use another provider, you will need to change these
settings. Your SMS service provider will provide
the numbers you need.
SMS emission
1 Press M, 4611 and OK.
Fax settings
Reception mode
If you want to receive fax messages with a modem (with a PC) connected on the same telephone line as the MFJ Pro 321, you must disable automatic fax reception.
Press M, 241 and OK. Use / to choose
MANUAL (to disable automatic reception) or FAX
(to receive faxes on the MFJ Pro 321 automatically).
Memory fax reception ( without paper)
When the paper is fi nished or the cartridges are
empty, faxes will be stored in the memory. You
can disactivate this function.
1 Press M, 242 and OK. Use / to
choose one of the following options:
WITHOUT PAP—faxes will be stored in the
memory if the printer is not available.
WITH PAPER—fax reception will be refused if
the printer is not available.
2 Confi rm with OK.
Number of copies
You may print incoming documents more than
once.
2 Enter the telephone number your machine
has to dial to send SMS messages. Press
OK.
SMS reception
1 Press M, 4612 and OK.
2 Enter the telephone number to receive SMS
messages. Press OK.
SMS alternative reception
You might wish to receive SMS from a sec-
ond provider. In that case you will have to enter a second telephone number to receive SMS
messages.
1 Press M, 4621 and OK.
2 Enter the second telephone number for
SMS reception and press OK.
Automatic printing
Press M, 451 and OK. Use / to choose
whether SMS messages should be printed out
automatically or not and press OK.
Beep
Press M, 452 and OK. Use / to choose
whether the MFJ Pro 321 should emit a beep to
notify you when an SMS message is received
and press OK.
Press M, 243 and OK. Enter a number (1
to 99) and press OK.
Sorted printing
When you receive documents of several pages,
they will be received in the memory and then
printed out in the correct order. You can avoid
this by de-activating sorted printing:
Press M, 244 and OK. Use / to choose
WITH or WITHOUT and press OK.
Sorted sending
Documents of several pages are scanned into
the memory and then sent. You can disable this
function.
Press M, 232 and OK. Use / to choose
WITH or WITHOUT and press OK.
Sender name
Press M, 453 and OK. Use / to choose
whether SMS messages that you send should
include your name. Confi rm with OK. (Enter
the name using function 22)
Scan settings
Flat-bed scanning
M, 271, OK—Resolution
M, 272, OK—Zooming
M, 273, OK—Origin
M, 274, OK—Contrast
M, 275, OK—Saturation
Advanced settings
21
Page 22

Saturation is the colour judged in proportion to
its brightness: closer to - is greyer, + has greater saturation.
M, 276, OK—RGB
All colours can be defi ned as combinations of
red (R), green (G) and blue (B). You can change
the values for each of these basic colours.
M, 277, OK—Luminosity
Luminosity is brightness: - is darker, + is light-
er
M, 278, OK—Left/right margins
Automatic feeder scanning
M, 281, OK—Resolution
M, 282, OK—Zooming
M, 283, OK—Origin
M, 284, OK—Contrast
M, 285, OK—Saturation
M, 286, OK—RGB
M, 287, OK—Luminosity
M, 288, OK—Left/right margins
Printer settings
M, 261, OK—Paper size
M, 262, OK—Paper type
M, 263, OK—Reduction
M, 264, OK—Left/right margins
22
Advanced settings
Page 23

Hints & tips
Paper feed
In case of a paper jam, try to pull out the paper.
If this is not possible, press M, 74 and OK to
eject the paper.
If a document is not drawn in correctly by the
automatic feeder, press the button on the scanner cover and open the scanner cover.
Press the small lever and carefully remove the
document.
Vertical stripes
If your MFJ Pro 321 makes vertical stripes
when copying, scanning or faxing, the scanner
class might be dirty.
Horizontal stripes
When your MFJ Pro 321 makes horizontal
stripes when copying, scanning or faxing, the
scanner might be locked.
Before you call the technical service
If you can’t solve your problem with the proposals above, please unplug your MF-jet from the
mains and reconnect it after a few minutes.
Ordering information
You can order original cartridges directly by call-
ing 0800 358 08 07.
Change cartridges
The display will indicate if one of the cartridges
is empty.
Please use only original PHILIPS ink cartridg-
es!
1 Open the machine by pulling the lever under
the control panel.
1 Open the printer cover.
2 Unlock the scanner with the lever on the un-
derside of the printer cover and close the
machine.
The machine doesn’t print
If your MF-jet doesn’t print correctly, the reason
might be that the protective strips were not removed completely from the printing cartridge.
Open the printer cover and remove the cartridges. Remove fi lm residue, replace the cartridges
and close the machine.
2 The position of the cartridge holder will show
you which cartridge needs to be replaced.
The arrows point to the cartridge that is emp-
ty:
Hints & tips
Manual call
If sending a fax fails, you can check the line by
using the manual call function.
1 Insert a document.
2 Press M, 35 and OK. The built-in loud-
speaker will be turned on and you should
hear the dial tone.
3 Dial the desired number and press Y. You
will be able to hear how the connection is
established.
23
Page 24

3 Open the cartridge holder.
4 Remove the empty cartridge.
5 Take the ink cartridge out of its packaging
and remove the protective strip. Be careful
not to touch the nozzles and the contacts.
9 Insert the chip card “Plug ’n Print” with the
contacts facing up into the slot below the
control panel to update the cartridge information. Press OK.
Cartridge capacity
Press M, 73 and OK. Press / to see the
current capacity of the black and the colour cartridges.
6 Insert the cartridge with the contacts forward
and the “nose” down into the cartridge holder - the colour cartridge left and the black
cartridge right.
Hints & tips
7 Close the cartridge holder. You will hear a
click when it snaps home.
8 Close the machine.
Logs
The logs list the last 30 incoming and outgo-
ing transmissions made by your machine. A
report will be automatically printed after every
30 transmissions. However, you may request a
print-out at any time.
Press M, 52 and OK. The logs are printed.
Commands
Your device will fi le all transmission commands
(including faxes ready for polling or for delayed
sending) in a list, the waiting queue.
Consulting or modifying
Documents in the waiting queue may have the
following status:
TX—transmission
DOC—in deposit
POL—polling
TR—ongoing commands
24
SMS—SMS transmission
Press M, 62 and OK. Use / to select a
document from the waiting queue and confi rm
with OK. Modify the parameters and confi rm
with OK.
Page 25

Immediate transmission
A
Press M, 61 and OK. Use / to select the
document in the waiting queue and confi rm with
Y or OK to immediately perform the selected
fax or SMS transmission.
Cancelling a transmission
2 Enter the four-digit interlock code and press
OK.
3 Use / to select DIRECTORY ONLY and
press OK.
v After each operation, the machine locks
automatically.
Press M, 63 and OK. Use / to select the
document in the waiting queue and confi rm with
OK.
Printing a document
Press M, 64 and OK. Use / to select the
document in the waiting queue and confi rm with
OK.
Print the waiting queue
Press M, 65 and OK. A list of the documents
queuing for transmission will be printed.
Lock
You can block access to the keypad for num-
bers or to the whole keyboard of your MFJ Pro
321.
Locking code
Insert the code that will be needed to temporarily unlock the keyboard.
1 Press M, 711 and OK.
To unlock the keyboard, enter FREE in
point 3.
Care and maintenance
Cleaning the machine
Use a soft, fl uff-free cloth lightly moistened with
a little alcohol (96%). Do not allow any moisture
to enter the machine.
Cleaning the scanner glass
1 Open the scanner without pressing the but-
ton.
2 Enter the four-digit interlock code and press
OK.
3 Enter the code one more time and press
OK.
When a code is already registered, the machine asks you fi rst to give the old code before
allowing you to modify it.
Locking the keyboard
The access code must be entered each time
the machine is used.
1 Press M, 712 and OK.
2 Enter the four-digit interlock code and press
OK.
3 Use / to select WITH and press OK.
v After each operation, the machine locks
automatically.
To unlock the keyboard, enter WITHOUT in
step 3.
Locking numbers
You can also just lock the keypad for numbers
with a code. Transmissions are only possible
from numbers included in the directory.
1 Press M, 713 and OK.
2 Use a cloth to lightly wipe the scanner glass
(A).
3 Close the scanner.
Cleaning and aligning the cartridges
If the quality of printed documents deteriorates,
the cartridges should be cleaned and aligned.
1 Press M, 72111 and OK. The car-
tridge will be cleaned automatically.
2 Press M, 72121 and OK. The ma-
chine will print out a page to check the alignment. VALUE A
Hints & tips
25
Page 26

3 Enter the value for A where the image is the
clearest.
4 Confi rm with OK and repeat these steps for
values B, C and D. VALUE B
If the printing quality is still not satisfactory, you
need to clean the cartridges manually:
1 Open the machine, release the cartridges
from their holder (see Hints & Tips / Change
cartridges) and clean the contacts (A) with a
dry, fl uff-free cloth.
v Never touch the nozzles and contacts
with your fi ngers and avoid shaking the
cartridge!
2 Clean the golden contacts of the holder be-
fore re-inserting the cartridge.
3 Use / to choose BLACK=OLD and press
twice OK.
4 Use / to choose COLOR=OLD and press
twice OK.
Hints & tips
26
Page 27

Appendix
35 MANUAL CALL....................................... 23
Start fax transmission manually
Functions list
Press M, 51 and OK to print a function list.
The list will be printed.
Directory
11 ADD NAME ............................................ 12
Add a name with a number to the directory
12 ADD LIST ............................................... 12
Join several directory entries to form a list
13 MODIFY ................................................. 12
Modify directory entries or lists
14 CANCEL................................................. 12
Delete directory entries or lists
15 PRINT..................................................... 12
Print the directory
Setup
21 DATE/TIME .............................................11
Set the current date and time
22 NUMBER/NAME .................................... 22
Set your telephone number and your name
23 SEND ..................................................... 21
Set parameters for sending faxes
24 RECEPTION .......................................... 21
Set parameters for receiving faxes
25 TEL. NETWORK .....................................11
Settings for a private branch exchange sys-
tem
26 PRINTER................................................ 22
Settings for the printer
27 FLAT BED SCAN.................................... 21
Settings for fl at-bed scanning
28 ADF SCAN ............................................. 22
Settings for scanning with the automatic
feeder
29 TECHNICALS....................................11, 28
Advanced technical settings
20 GEOGRAPHICAL....................................11
Set country and language
Fax
31 TRANSMISSION.................................... 13
Send a fax
32 POLLING RX.......................................... 15
Retrieve a fax from a polling provider
33 POLLING TX .......................................... 15
Provide a fax for polling
34 FAX ANSW............................................. 14
Set fax memory reception
SMS
41 SEND SMS............................................. 20
Send an SMS message
42 READ SMS............................................. 20
Read SMS messages
43 DELETE SMS......................................... 20
Delete SMS messages from the memory
44 PRINT SMS............................................ 20
Print-out SMS messages
45 PARAMETERS....................................... 21
Settings for sending SMS
46 SMS CENTERS ..................................... 21
Set access numbers for SMS
Print
51 FUNCTIONS LIST.................................. 27
Print a list of functions
52 LOGS ..................................................... 24
Print a log of the last transmissions
53 DIRECTORY .......................................... 12
Print the directory
54 SETUP ................................................... 21
Print the settings
55 COMMANDS.......................................... 25
Print a list of the commands in the waiting
queue
Commands
61 PERFORM ............................................. 25
Immediately perform a command in the wait-
ing queue
62 MODIFY ................................................. 24
Modify a command in the waiting queue
63 CANCEL................................................. 25
Delete a command from the waiting queue
64 PRINT..................................................... 25
Print details of a command in the waiting
queue
65 PRINT LIST............................................ 25
Print a list of the commands in the waiting
queue
Others
71 LOCK...................................................... 25
Limit the access to the machine
72 PRINT. CARTR. ..................................... 25
Clean, align and exchange cartridges
73 CART CAPACITY................................... 24
Check the capacity of the ink cartridges
74 PAPER FEED......................................... 23
Feed paper through the mechanism
Appendix
27
Page 28

Technical settings
Printer
Your MFJ Pro 321 is delivered with factory-de-
fault settings. However, you may adjust it to
meet your requirements by changing the technical parameters.
v Only change the technical settings if
Press M, 29 and OK. Use / to select and
modify the desired parameter and press OK.
Technical data
General
Dimensions
(W×D×H)
Weight approx. 8 kg
Power supply 220–240 V / 50–60 Hz
Power consumption
in stand-by mode
Memory 8 MB
Directory capacity 200 entries
Telephone
connection type
Chip card ISO 7816-4
Appendix
prompted to do so by authorised service
personnel!
460×397×190 mm
approx. 10 W
PSTN/PABX
Type colour bubble ink-jet
Resolution 600×600 dpi
Printing speed b/w up to 9 pages/
minute, colour up to 5
pages/minute
Printing width 203.2 mm
Printing length b/w 284.3 mm, colour
279.1 mm
Paper dimensions width: 88.9–215.6 mm
length: 127–431.8 mm
Fax
Fax type ITU T30, G3
Connection type PSTN/PABX
Dialling type DTMF
Modulation V17/V21/V29/V27ter/
V34
Coding scheme MH, MR, MMR
Modem speed 33k6 bps
Resolution normal mode: 200×100
dpi
fi ne/photo mode:
200×200 dpi
super fi ne mode:
200×400 dpi
PC connection
Connection type USB slave 1.1
Operating systems Windows 98/2000/ME/
XP
Scanner driver TWAIN/WIA
Scanner
Type CCD colour
Resolution 600×600 dpi
Scanning area 216×297 mm
Scanning width 206 mm
ADF capacity 10 sheets max.
Flatbed scanning
speed
b/w 10.5 seconds/
page, colour 17.5
seconds/page
Guarantee
In order to apply the guarantee, you should
contact your dealer. Proof of purchase will be
required. Should malfunctioning arise, the dealer will advise you what to do.
If you bought your equipment from SAGEM directly, the following shall apply:
A SAGEM undertakes to remedy by repair,
free of charge for labour and replacement parts,
any defects in the equipment during a period
of twelve (12) months from the date of original
delivery of the equipment, where those defects
are a result of faulty workmanship.
During this twelve month guarantee period, the
defective equipment will be repaired free of
charge; the customer must however return the
defective equipment at his/her own expense, to
the address given by SAGEM After Sales Department, the phone number of which can be
found on the delivery slip.
Unless the customer has concluded with SAGEM a maintenance contract in respect of
the equipment which specifi cally provides for
repairs to be carried out at the customer’s
premises, the repairs will not be carried out on
the equipment at the customer’s premises.
28
Page 29

The following sentence applies to purchases of
equipment for the customer’s trade, business
or profession. Except as otherwise expressly
provided in this document and to the extent
permitted by law, SAGEM makes no representations or warranties, express or implied, statutory or otherwise, and to such extent, all terms
and conditions implied by law are hereby excluded. This guarantee does not affect the customer’s statutory rights.
B Exclusions from guarantee
SAGEM shall have no liability under the guar-
antee in respect of:
• damage, defects breakdown or malfunction
due to:
· failure to properly follow the installation
process and instructions for use; or
· an external cause to the equipment (including but not limited to, lightening, fi re, shock
or water damage of any nature); or
· modifi cations made without the written approval of SAGEM; or
• the normal servicing (as defi ned in the user
guide supplied with the equipment) as well
as malfunctioning due to servicing not being
carried out, servicing costs are in any event
always borne by the customer.
C In the cases set forth in § B as well as after expiry of the twelve month guarantee period, the customer must ask SAGEM for an estimate, and he/she must accept the estimate and
agree to pay the charges mentioned in it before
returning the equipment to SAGEM. The repair
and delivery costs will be invoiced to the customer.
The foregoing shall apply unless otherwise
agreed in writing with the customer and only for
the UK. If any provision of this guarantee shall
be held to be in whole or in part invalid or illegal
due to an obligatory rule applicable to consumers pursuant to their national legislation, such
invalidity or illegality shall not impair or affect
the remaining provisions or parts of this guarantee.
· a failure or neglect to maintain the equipment or inappropriate maintenance; or
· unsuitable operating conditions, particularly
of temperature and humidity; or
· repair or maintenance of the equipment by
persons not authorised by SAGEM; or
• wear and tear from normal daily use of the
equipment and its accessories
• damage due to insuffi cient or bad packaging
of equipment when returned to SAGEM
• supply of new versions of software
• work on any equipment or software modifi ed
or added without the prior written consent of
SAGEM
• malfunctions not resulting from the equipment or from software installed in user workstations for the purpose of use of the equipment
• communication problems related to an unsuitable environment, including:
Appendix
· problems related to access and/or connection to the Internet such as interruptions by
access networks or malfunction of the line
used by the subscriber or his correspondent
· transmission faults (for example poor geographical coverage by radio transmitters, interference or poor line quality)
· the local network fault (wiring, servers, workstations) or the failure of the transmission
network
29
Page 30

30
30
Index
A
additional devices 8
additional telephone
11, 15
add list 12
add name 12
aligning the cartridges 25
answering device 14
answer code 14
automatic document
feeder 2
automatic feeder 18
automatic printing 21
B
beep 21
broadcast 3, 14
C
“creative” copy 16
cancel 12
cancelling a transmission 25
capacity 24
care and maintenance
25
Appendix
Appendix
cartridges 23
cartridge alignment 9
cartridge capacity 24
CD-ROM 10
change cartridges 23
chip card 6
cleaning the machine
25
commands 24
confi rm 3
connections 7
contrast 3, 14
control panel 2
copy 3, 16
country 11
country selection 8
cover 2
cursor 3
D
date and time 11
delayed transmission
15
deleting an SMS 20
directory 3, 12, 13
display 2
document feeder 2
document tray 2
E
exit tray 2
F
fax 13
fax answering device
14
fax settings 21
fax without paper 21
fl atbed scanner 18
functions 3
functions list 27
G
guarantee 28
H
help 3
horizontal stripes 23
I
immediate transmission 25
ink cartridges 6
inserting a document
16
inserting cartridges 8
installation 6, 10
K
keyboard 3, 25
L
lamp 3
language 11
LINE 7
loading paper 7
lock 25
logs 24
M
mains cable 6
maintenance 25
manual call 23
memory 2
memory fax reception 21
minimum confi guration 10
modify 12
N
network type 11
nozzles 26
numbers 3
number of copies 21
O
ordering information
23
P
PABX 11
panel 2
paper exit tray 2
paper feed 23
paper feeder 2
paper tray 2, 6
PC 12
PC connection 10
polling 15
power supply 6, 8
printer settings 22
printing an SMS 20
printing a document
25
printing messages 14
print directory 12
print the waiting
queue 25
R
receiving an SMS 20
receiving faxes 14
reception mode 21
redial 3, 14
resolution 2, 3, 14
return 3
S
safety instructions 5
scan 3, 18
scanner cover 2
scanner glass 25
scan settings 21
sender name 21
sending a fax 13
send report 14
Send SMS 20
set-up 6
settings 11
settings list 21
SMS 3, 20
SMS settings 21
software installation
10
sorted printing 21
sorted sending 21
standard copy 16
start 3
stop 3
stripes 23
T
technical data 28
technical service 23
technical settings 28
telephone cable 6
text input 3
time and date 10
transfer to a PC 12
transmission 2, 25
tray 2
TWAIN driver 18
U
unpacking 6
V
vertical stripes 23
W
waiting queue 24
Page 31

Appendix
Appendix
31
31
Page 32

The CE mark confi rms that the machine corre-
sponds to the relevant European Union guide-
lines.
DECLARATION OF CONFORMITY (DoC)
Hereby, SAGEM Communication Austria
GmbH, declares that this SAGEM MFJ 321
is in compliance with the essential requirements and other relevant provisions of Directive 1999/5/EC.
Should you require a copy of the original DoC,
please visit our web site.
This product is intended for use on an analogue
public switched network (PSTN) and for use in
the country indicated on the label of the box.
The machine may not work in other countries.
United Kingdom:
Tel.: 0870 124 37 37
Fax: 0870 124 02 02
SAGEM Communication Austria GmbH
place of business:
Gutheil-Schoder-Gasse 17, A–1232 Wien, Austria
Technical changes and errors excepted.
non-contractual document
Copyright © 2003 Sagem Communication Aus-
tria GmbH
For further information please contact your national technical support centre. Initially contact
your dealer if problems occur during operation.
This operating manual has been printed on
chlorine-free recycled paper to meet the highest environmental standards.
The cardboard box and the protective card-
board can be recycled as waste paper; corresponding to your country’s demands dispose
the plastic foils either for recycling or with your
rubbish.
This electronic facility contains recyclable mate-
rial. At the end of use of this facility please inform yourself about the corresponding recycling
demands of your country.
www.sagem.com
E-mail: dti.faxinfoline@sagem.com
5103 506 4002.1 GB (Sa C5)
 Loading...