


INSTRUCTIONS AND WARRANTY
Instructions & Recipes

2

Congratulations on purchasing our Russell Hobbs Glow Smoothie Maker. Each unit is manufactured to ensure safety and reliability. Before using this hand mixer for the first time, please read the instruction manual carefully and keep it for future reference.
Read the instructions and keep them safe. If you pass the smoothie maker on, pass on the instructions too. Remove all packaging, but keep it till you know the smoothie maker works.
Important Safeguards
Follow basic safety precautions, including:
1This smoothie maker must only be used by a responsible adult.
2Don’t put the motor unit in liquid, don’t use it in a bathroom, near water, or outdoors.
3Unplug before dismantling or cleaning.
4The smoothie maker is fitted with a safety switch to prevent the motor operating unless the jug is in place. Don’t use this to switch the smoothie maker on and off.
5Switch off (press and release Y) before fitting the jug to the motor unit.
6Switch off (press and release Y), and wait till the blades come to a stop before removing the lid from the jug, or removing the jug from the motor unit.
7Don’t use the smoothie maker unless the lid is in place.
8Don’t fill with anything hotter than you can comfortably handle (i.e. liquid temperature below 40°C).
9When blending hot liquids, put a hand on the lid to hold it in place.
10Don’t put your hand into the jug, even after you’ve removed it from the motor unit
– the blades are sharp.
11Don’t put any implement (spoon, spatula, etc.), other than the stirrer, into the jug while the smoothie maker is plugged in.
12Don’t leave the smoothie maker unattended while plugged in.
13Sit the motor unit on a dry, firm, level surface, near a power socket.
14Route the cable so it doesn’t overhang, and can’t be tripped over or caught.
15Don’t let the jug overflow. If liquid gets under the motor unit, it may be sucked into the motor, damaging it.
16Don’t fill the jug above the 1.7l mark – if you do, the contents may force the lid off when you start the motor.
17Don’t run the motor for more than three minutes at a time, then leave it for a minute to cool down before using it again.
18Don’t run the smoothie maker empty, it may overheat.
19Keep the smoothie maker and the cable away from hotplates, hobs or burners.
20Don’t fit any attachment or accessory other than those we supply.
21Don’t use the smoothie maker for any purpose other than those described in these instructions.
22Don’t operate the smoothie maker if it’s damaged or malfunctions.
23If the cable is damaged, the smoothie maker must be returned, in order to avoid hazard.
3

Household use only
Before using for the first time
1Turn to “care & maintenance” on page 6, and clean the smoothie maker and attachments thoroughly, to remove manufacturing dust, etc.
Preparation
2Sit the motor unit on a dry, firm, level surface, near a power socket.
3Route the cable so it doesn’t overhang, and can’t be tripped over or caught.
4 |
Press and release |
to ensure everything’s off. |
5 |
Put the plug into the power socket. |
|
Fit the jug
6When you fit the jug to the motor unit, the illuminated panel will glow, and will stay on till you remove the jug, or unplug the smoothie maker.
7In normal use, you should treat the jug, jug base, and tap as a single unit. They should only be separated when you come to clean them.
8You may fit the jug with the tap to the right or left.
9There are two sets of padlock markings  on the base of the jug, one at the back, and one at the front.
10Hold the jug above the motor unit, with the tap to the side you want.
11Align the open padlock  facing you with the
  on the motor unit.
12Lower the jug on to the motor unit, then turn the jug to align the closed padlock  with the .
Fill the jug
13Lift the lid off the jug.
14You’ll find it’s quite stiff (it has be, to keep the ingredients from escaping when you turn the motor on).
15Put the ingredients into the jug.
16These should be a mixture of liquids and solids (frozen ingredients count as solids).
17Don’t fill past the 1.7 mark. If you do, the contents may force the lid off when you start the motor.
Fit the lid
18Put the lid on the jug, and press it down.
19Don’t use the smoothie maker without fitting the lid. The contents may escape; you may hurt someone; you may be tempted to put a hand into the jug.
The cap
4

20The cap fits into the hole in the lid. Generally, use the cap if you’re using the smoothie maker as a blender, use the stirrer if you’re making drinks or smoothies.
21If you’re making mayonnaise, you can fit the cap upside down, and drizzle oil into the mix through the small hole in the cap.
The stirrer
22If you’re making drinks or smoothies, instead of fitting the cap, drop the long end of the stirrer into the hole.
23If solid ingredients aren’t getting down to the blades, give them a poke with the stirrer to chivvy them along.
24Rolling the stirrer anti-clockwise (the opposite way to the blades), against the jug wall, will help with thicker mixtures.
25Don’t bash it against the wall of the jug.
26Don’t run the smoothie maker without fitting either the cap or the stirrer, otherwise solid ingredients may be ejected through the hole when they hit the blades.
The controls
27The controls are:
top button – low speed, for lighter jobs, using mainly liquid ingredients. If you’re using
the tap to dispense really thick smoothies, running the motor on low speed |
will help |
the flow. |
|
 bottom button – high speed, for heavier jobs, using mainly solid ingredients You can swap directly between □ and
  pressing either button cancels the other.
middle button – this button is spring-loaded, it has two functions: it returns both □ and buttons to “off”, and switches the motor off it also acts as a pulse button – press to run the motor, let go to stop.
Use the button, for instance, to reduce ice to slush, for icy drinks.
Use it in bursts – press, let go, check the results, repeat, till you’ve reached the degree of slushiness you want.
28Don’t run the motor for more than three minutes at a time, then leave it for a minute to cool down before using it again.
Adding ingredients
29To add ingredients while the smoothie maker is working:
cap - lift the cap off, pour/drop the new ingredients through the hole, then replace the cap in the hole
stirrer - lift the stirrer out of the hole, scrape it against the side of the hole on the way out, to remove drips, then pour/drop the new ingredients through the hole, and replace the stirrer in the hole.
30Check that the added ingredients don’t push the volume in the jug past the 1.7l mark.
Finished?
5
31 Switch off (press and release , and wait till the blades come to a stop before removing the lid from the jug, or removing the jug from the motor unit.
The tap
32You can rotate the tap lever to whatever side or angle you find convenient.
33To open the tap, press the lever.
34To lock it open, press as far as it’ll go.
35When dispensing thick smoothies, it helps to run the motor at low speed (1). If they’re really thick, use the stirrer as well (use it via the hole, don’t remove the lid).
36When dispensing thick smoothies, remember that you’ll need one hand for the tap, and one for the stirrer, so find a stable, flat-bottomed glass, cup, or container, to sit on the work surface, under the tap, for the smoothie.
Hot liquids
37No matter how careful you are, some splashing is inevitable. At higher temperatures, splashes on skin can hurt. In extreme cases, they may scald, so, when using hot liquids:
a)before pouring into the jug, let the liquid cool down to the sort of temperature you can handle comfortably (i.e. liquid temperature below 40°C)
b)run the motor only when the cap is fitted – to add ingredients, stop the motor, remove the cap, add the ingredients, replace the cap, then re-start the motor
c)put a hand on the lid, to hold it in place while blending
d)if the lid is too hot for comfort, remove it and let the liquid cool down further – replace the lid before blending.
Crushed Ice
38Before using the smoothie maker to crush ice, make sure it’s clean and rinse it out thoroughly. The slightest trace of detergent may affect the taste of the crushed ice and will flatten any drink to which it is added
39Ice “cubes” come in many shapes and sizes. You’ll have to experiment with the ice from your ice cube tray.
40Start with half to three quarters of a cup of ice or 4 – 6 cubes and add 15 ml (1 Tablespoon) of fresh cold water.
41Put the lid on the jug, then press the pulse button  3 or 4 times, with short pauses between.
42Check the results, and adjust. Too much blending will reduce the ice to liquid, too little will merely chip the edges/corners off the ice.
43Don’t try to crush ice without adding water to the jug.
44Don’t be tempted simply to increase the amount of ice and blend for longer. This won’t work. Too much ice will never give you satisfactory results.
Care and maintenance
1Switch the smoothie maker off, and unplug it.
2Clean as soon after use as possible, to prevent residues setting inside the jug.
6

3Turn the jug to align  on the bottom of the jug base with
  on the motor unit, then lift the jug and base off the motor unit.
4Remove the lid and cap or stirrer.
Caution - take great care when handling the blade unit.
5Remove the blade unit from the base before removing the base from the jug.
6Turn the jug upside down, so you can see the underside of the blade unit.
7Hold the jug handle with one hand, hold the underside of the blade unit with the other hand, and turn the blade unit clockwise to release it – it’s quite stiff.
8Carefully lift the blade unit out of the jug.
9Keep hold of the jug handle – grip the jug base, and turn it anti-clockwise to release.
10Lift the seal off the blade unit – mind the blades, they’re sharp!
11Unscrew the tap from the jug base – it takes 2 complete turns to unscrew
12Unscrew the lever and its retaining ring from the tap – this takes½turnsabout. 2
13Wash the cap, lid, stirrer, tap parts, jug, blade unit, and seal in warm soapy water, and leave them to drain dry.
14Don’t use a cloth for drying. You may leave lint on the inside surfaces, and you’ll probably cut yourself on the blades.
15Use a bottle brush on the hole in the jug that the tap fits into.
16Your bottle-brush may also come in handy when cleaning the inside of the tap.
17If you’ve left it too long before cleaning, and bits have glued themselves to the inside of the jug, use a nylon brush. If that doesn’t work, crush some ice cubes in it – that’ll shift anything.
18Don’t put any part of the smoothie maker in a dishwasher.
19The extreme environment inside the dishwasher can affect the surface finishes.
20Wipe the outside of the motor unit with a clean damp cloth.
21Don’t put the motor unit in water or any other liquid.
22Don’t use harsh or abrasive cleaning agents or solvents.
Reassembly
23Wait till everything’s dry.
24Fit the jug base to the jug before replacing the blade unit.
25Reseat the seal on top of the jug base – this seal is flat, with a ribbed upper surface.
26Align the q on the glass part of the jug with the open padlock on the top of the jug base.
Jug base.
27Lower the glass part of the jug into the jug base.
28Turn the jug to bring the q over the closed padlock on the top of the jug base.
29The jug must be turned far enough round to allow the safety switch actuator to move freely. You can see it if you look down into the jug from behind the handle.
30If you can’t move the actuator, you haven’t turned the jug far enough round.
31Replace the seal round the blade unit – keep your fingers clear of the blades.
7
32It’s easier to replace the blade unit in the jug by holding the jug upright, and putting the blade unit up into the bottom of the jug. This prevents the seal from falling out.
33When the blade unit is in place, it’s easier to the jug upside down to tighten the blade unit – it’s a bayonet-type fitting, and it tightens anti-clockwise.
34Turn the jug the right way up.
35Screw the tap lever back into the tap – abo½turnst2 of the retaining ring. Don’t overtighten it. If you do, our spares department will be delighted to sell you a new tap. They love people who break things.
36To replace the tap, hold it upright, put it into the hole in the jug base, then turn it 2 complete turns clockwise – no more.
âIf the tap lock comes loose, turn the jug and base upside down, hold the tap lock flat side down, with the pip towards the inside, then slide it back into the jug base.
Staining
37Carotenoids, which are found in many other vegetables as well as carrots, can cause severe staining. This staining may be impossible to remove. Don’t worry about it, it won’t affect the operation of the smoothie maker.
38If you want to try, then you could try soaking the stained parts overnight in one of the following:
a)quarter of a cup of household bleach in a sink full of warm water
b)a mixture of 1 part white vinegar to two parts warm water
c)half a small packet of baking soda in enough warm water to cover the parts
Caution Don’t try to mix these methods. You may make a mess, you may cause nasty eyewatering, breath-catching fumes, and you may harm the parts you’re trying to clean.
8
Recipes
Fresh fruit smoothies – these make 2 large smoothies
Strawberry & banana smoothie
300ml milk
1 large banana, roughly chopped
12 strawberries, stalks removed
4 ice cubes
Put everything into the jug, ice cubes last. Run at low for 10 seconds, then high for 10 seconds.
Banana, vanilla & honey smoothie
400ml milk
1 large banana, roughly chopped
4 tsp honey
2 tsp vanilla extract
6 ice cubes
Put everything into the jug, ice cubes last. Run at low for 10 seconds, then high for 5 seconds.
Apple & mango smoothie
600ml apple juice 1 ripe mango
6 ice cubes
Stone, peel and roughly chop the mango. Put everything into the jug, ice cubes last. Run at low for 10 seconds, then high for 10 seconds.
Creamy blueberry & vanilla smoothie
360ml lemonade 125g vanilla ice cream 70g blueberries
Put everything into the jug. Run at low for 10 seconds, then high for 10 seconds.
Breakfast smoothie
4 tbsp natural yogurt 200ml milk
2 tbsp oatmeal or porridge oats
1 large banana, roughly chopped
2 tsp honey
2 apples, cored and roughly chopped
4 ice cubes
Put everything into the jug, ice cubes last. Run at low for 10 seconds, then high for 15 seconds.
9
Berry fruity smoothie
300ml apple juice 90g raspberries
12 strawberries, stalks removed
4 ice cubes
Put everything into the jug, ice cubes last. Run at low for 15 seconds, then high for 15 seconds.
Chocolate orange smoothie
170g chocolate ice cream 300ml orange juice
4 ice cubes
Put everything into the jug, ice cubes last. Run at low for 10 seconds, then high (2 for 5 seconds.
Nutty banana smoothie
150g hazlenut yogurt
1 large banana, roughly chopped 200ml milk
6 ice cubes
Put everything into the jug, ice cubes last. Run at low (1) for 10 seconds, then high (2) for 5 seconds.
Chocolate pear smoothie
300ml chocolate milk
2 pears, peeled, cored and roughly chopped
10 ice cubes
Put everything into the jug, ice cubes last. Run at low (1) for 15 seconds, then high (2) for 5 seconds.
Mango lassi
200ml natural yogurt 1 ripe mango
200ml milk 2 tsp honey 10 ice cubes
Stone, peel and roughly chop the mango. Put everything into the jug, ice cubes last. Run at low (1) for 10 seconds, then high (2) for 5 seconds.
10
Cranberry, orange & banana smoothie
300ml orange juice 300ml cranberry juice
1 small banana, roughly chopped
6 ice cubes
Put everything into the jug, ice cubes last. Run at low for 10 seconds, then high for 5 seconds.
Peach & apricot smoothie
4 halves of tinned apricot (in juice) 80ml apricot juice (from tin)
2 peaches
4 tbsp natural yogurt 200ml milk
2 tsp honey
6 ice cubes
Stone and roughly chop the peaches. Put everything into the jug, ice cubes last. Run at low for 15 seconds, then high for 15 seconds.
Apple, melon & kiwi fruit smoothie
400ml apple juice
1 kiwi fruit, peeled and roughly chopped
150g melon, roughly chopped
6 ice cubes
Put everything into the jug, ice cubes last. Run at low for 10 seconds, then high for 10 seconds.
Very chocolatey cherry smoothie
350ml lemonade
125ml chocolate ice cream 100g cherries, stoned
Put everything into the jug, ice cubes last. Run at low for 10 seconds, then high for 10 seconds.
Adult only smoothies – these make 2 glasses
Tropical cocktail
200ml ginger beer
150g melon, roughly chopped 40ml rum
5 ice cubes
Put everything into the jug, ice cubes last. Run at low for 10 seconds, then high for 10 seconds.
11
Cosmopolitan
100ml cranberry juice 50ml vodka
50ml cointreau
Put everything into the jug. Run at low for 10 seconds.
Baileys coffee cocktail
100ml milk
40g vanilla ice cream ½tsp instant coffee
40ml baileys or irish cream liqueur 3 ice cubes
Put everything into the jug, ice cubes last. Run at low for 10 seconds, then high for 5 seconds.
Strawberry gin fizz
100ml lemonade 60ml gin
1 tsp lemon juice
6 strawberries, stalks removed
5 ice cubes
Put everything into the jug, ice cubes last. Run at low for 10 seconds, then high for 10 seconds.
Mango & rum cocktail
100ml pineapple juice
½ripe mango, stone removed, peeled and roughly chopped 1 small banana, roughly chopped
40ml rum
3 tbsp natural yogurt
5 ice cubes
Stone, peel and roughly chop the mango. Put everything into the jug, ice cubes last. Run at low for 10 seconds, then high for 10 seconds.
La mumba
300ml chocolate milk 50ml brandy
3 ice cubes
Put everything into the jug, ice cubes last. Run at low for 10 seconds, then high for 10 seconds.
12
Pina colada
200ml pineapple juice 100ml malibu
30ml single cream 4 ice cubes
Put everything into the jug, ice cubes last. Run at low for 15 seconds, then high for 10 seconds.
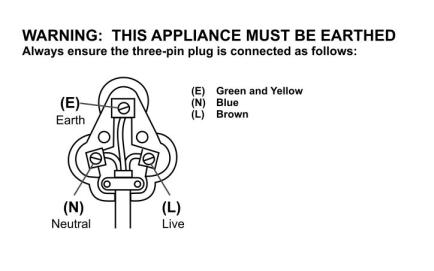
Changing the fitted/molded plug
Should the need arise to change the fitted/molded plug, follow these instructions:
Mains (AC) Operation
This unit is designed to operate on 220-240V current only. Connecting to other power sources may damage the unit.
Connect three-pin plug as follows:
The wires in this mains lead are coloured in accordance with the following code: Green/Yellow = Earth Blue = Neutral Brown = Live
Service
There are no user serviceable parts in this appliance. If the appliance is not operating correctly, please check that:
1.You have followed the instructions correctly.
2.Is the plug or cord are not damaged in any way?
3.Are the mains power supply On.
If the appliance still does not work:
In the first instance, consult your retailer for possible repair or replacement. If your retailer fails to solve your problem and you need to return the appliance, make sure that:
1.The unit is packed carefully back into its original packaging.
2.Proof of purchase is attached.
3.Give the reason why you are returning it.
13
If the supply cord is damaged, it must be replaced by the manufacturer or its service agents in order to avoid a hazard. If service becomes necessary within the warranty period the appliance should be returned to an approved
Amalgamated Appliances (Pty) Ltd service centre. Servicing outside the warranty period is still available, however it will be chargeable.
14

PLEASE AFFIX YOUR PROOF OF PURCHASE/RECEIPT HERE
IN THE EVENT OF A CLAIM UNDER WARRANTY THIS RECEIPT MUST BE PRODUCED.
W A R R A N T Y
1.Tedelex Trading (Pty) Limited (“Tedelex”) warrants to the original purchaser of this product (“the customer”) that this product will be free of defects in quality and workmanship which under normal personal, family or household use and purpose may manifest within a period of 1 (one) year from the date of purchase (“warranty period”).
2.Where the customer has purchased a product and it breaks, is defective or does not work properly for the intended purpose, the customer must notify the supplier from whom the customer bought the product (“the supplier”) thereof within the warranty period. Any claim in terms of this warranty must be supported by a proof of purchase. If proof of purchase is not available, then repair, and/or service charges may be payable by the customer to the supplier.
3.The faulty product must be taken to the supplier's service centre to exercise the warranty.
4.The supplier will refund, repair or exchange the product in terms of this warranty subject to legislative requirements. This warranty shall be valid only where the customer has not broken the product himself, or used the product for something that it is not supposed to be used for. The warranty does not include and will not be construed to cover products damaged as a result of disaster, misuse, tamper, abuse or any unauthorised modification or repair of the product.
5.This warranty will extend only to the product provided at the date of the purchase and not to any expendables attached or installed by the customer.
6.If the customer requests that the supplier repairs the product and the product breaks or fails to work properly within 3 (three) months of the repair and not as a result of misuse, tampering or modification by or on behalf of the customer, then the supplier may replace the product or pay a refund to the customer.
15
 Loading...