


Owner’s Handbook Instruktieboekje Manuel du Conducteur Betriebsanleitung Manuale di Istruzioni Manual del Conductor Manual do Proprietário

Owner’s Handbook
Publication Part No. RCL 0306ENG - 3rd Edition
Published by Rover Group After Sales - Technical Communication
© Rover Group Limited 1999
All rights reserved. No part of this publication may be reproduced, stored in a retrieval system or transmitted in any form, electronic, mechanical, recording or other means without prior written permission from Rover Group Limited.
As part of Rover Cars environmental policy, this publication is printed on paper made from chlorine free pulp.

Congratulations on your choice of a Rover 75
We very much hope that this handbook, together with the other publications included in the literature pack, will provide the information you need in order to derive maximum pleasure from owning and driving your new car.
For your convenience, the handbook is divided into sections, each dealing with a different aspect of driving or caring for the car. Take a little time to read each one and get to know your new Rover as soon as you possibly can.
∙‘Before you drive’ - includes seat adjustment, seat belts and heating controls and deals with everything you need to know in order to settle comfortably into the car before you drive.
∙‘Driving controls’ - here the functions and operation of the switches, instruments and driving controls are explained.
∙‘Maintenance’ - includes information about the checks that you should carry out on a regular basis.
∙‘Emergency information’ - will help to solve some of those unavoidable little emergencies that occur from time to time, like replacing bulbs and fuses, or changing a wheel.
∙‘Technical Data’ - includes the technical specification for your car.
This warning symbol identifies procedures that must be followed precisely, or information that must be considered with great care, in order to reduce the risk
of personal injury or serious damage to the car.
 This symbol identifies those features that can be adjusted or disabled/enabled by a Rover dealer.
An asterisk appearing in the text, identifies features or items of equipment that are either optional, or are only fitted to some cars in the model range.
IMPORTANT
The specification of each Rover vehicle will vary according to territorial requirements and also from model to model within the vehicle range. Some of the information published in this handbook, therefore, may not apply to your vehicle. Contact your dealer if you are in any doubt.
Rover operate a policy of constant product improvement and therefore reserve the right to change specifications without notice at any time. Whilst every effort is made to ensure complete accuracy of the information in this handbook, no liabilities for inaccuracies or the consequences thereof, including loss or damage to property, or injury to persons, can be accepted by the manufacturer or the dealer who supplied the handbook, except in respect of personal injury caused by the negligence of the manufacturer or dealer.
2

Contents
1 BEFORE YOU DRIVE |
|
Controls ........................................ |
4 |
Locks & Alarm .............................. |
5 |
Seats ............................................ |
17 |
Seat Belts ..................................... |
24 |
Airbag SRS .................................. |
30 |
Steering Column ......................... |
38 |
Mirrors ........................................ |
39 |
Windows ..................................... |
43 |
Sunroof ....................................... |
45 |
Heating & Ventilation ................. |
47 |
Interior Equipment ...................... |
57 |
Audio System .............................. |
65 |
In-Car Telephones ...................... |
66 |
Load Carrying ............................. |
67 |
Towing ....................................... |
71 |
2 DRIVING CONTROLS |
|
Instruments .................................. |
72 |
Trip Computer ............................ |
76 |
Warning Lights ............................ |
79 |
Message Centre ........................... |
86 |
Starting & Driving ....................... |
95 |
Environmental Driving ................ |
99 |
Catalytic Converter ................... |
101 |
Automatic Transmission ............. |
103 |
Manual Gearbox ........................ |
109 |
Fuel System ............................... |
110 |
Lights & Indicators ..................... |
114 |
Horn ......................................... |
120 |
Wipers & Washers ..................... |
121 |
Cruise Control .......................... |
123 |
Brakes ........................................ |
125 |
Traction Control ....................... |
130 |
Parking Aid ............................... |
132 |
3 |
MAINTENANCE |
|
|
Maintenance ............................... |
134 |
|
Engine Compartment ................. |
139 |
|
Engine ........................................ |
143 |
|
Cooling System .......................... |
145 |
|
Brakes ........................................ |
147 |
|
Power Steering ........................... |
148 |
|
Battery ....................................... |
150 |
|
Washers ...................................... |
154 |
|
Wipers ........................................ |
155 |
|
Tyres .......................................... |
156 |
|
Cleaning & Vehicle Care ............ |
159 |
4 EMERGENCY INFORMATION |
|
Wheel Changing ........................ |
163 |
Emergency Starting .................... |
168 |
Vehicle Recovery ....................... |
171 |
Fuses .......................................... |
174 |
Bulb Replacement ...................... |
179 |
Parts & Accessories ..................... |
191 |
Identification Numbers ............... |
192 |
5 TECHNICAL DATA |
|
Technical Data ........................... |
194 |
Index........................................... |
205 |

Controls |
|
|
|
|
|
|
|
|
|
1 |
2 |
3 |
4 |
5 |
6 |
7 |
8 |
9 10 11 12 |
13 |
|
26 25 24 |
23 |
22 |
21 |
20 |
19 |
18 |
17 16 |
15 |
14 |
|
H2744 |
|
|
|
|
|
|
|
|
|
1. |
Passenger airbag SRS |
|
|
|
14. |
Window controls |
|
|
||
2. |
Audio system |
|
|
|
|
15. |
Boot release |
|
|
|
3. |
Clock |
|
|
|
|
16. |
Headlight adjuster |
|
|
|
4. |
Horn |
|
|
|
|
17. |
Instrument dimmer control |
|
||
5. |
Direction indicators |
|
|
|
18. |
Cruise control switches* |
|
|||
6. |
Instrument panel |
|
|
|
|
19. |
Steering column adjustment lever |
|||
7. |
Driver airbag SRS |
|
|
|
20. |
Audio controls |
|
|
||
8. |
Starter switch |
|
|
|
|
21. |
Heating/air conditioning controls |
|||
9. |
Wiper/washer controls |
|
|
22. |
Switch panel |
|
|
|||
10. |
Front* and rear fog light switches |
23. |
Hazard warning light switch |
|
||||||
11. |
Main lighting switch |
|
|
|
24. |
Interior door lock switch |
|
|||
12. |
Bonnet release |
|
|
|
|
25. |
Gear lever |
|
|
|
13. |
Mirror controls |
|
|
|
|
26. |
Handbrake |
|
|
|
4
Locks & Alarm
ALARM SYSTEM
Your car is fitted with a sophisticated electronic anti-theft alarm and engine immobilisation system. There are also a number of additional security features, some of which are selectable options. In order to ensure maximum security and operating convenience, you are strongly advised to gain a full understanding of the features and alternatives available, by thoroughly reading this section of the handbook.
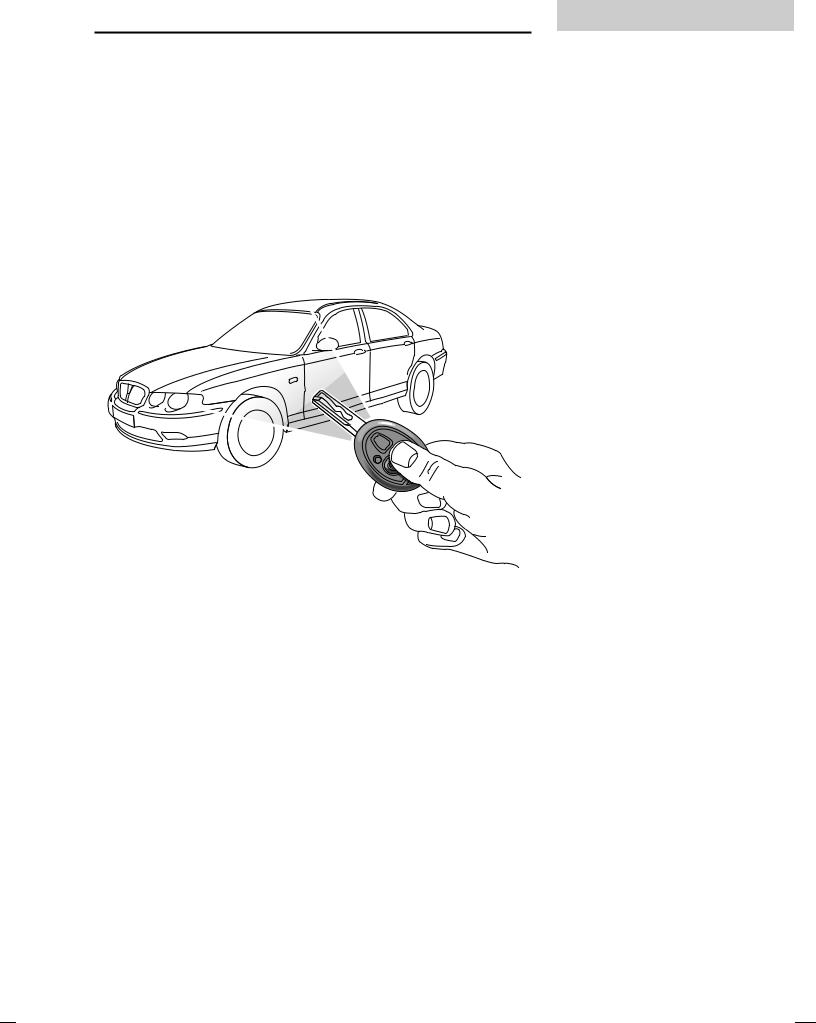
Locking
H2698
With the remote handset:
1.Shut the doors, bonnet and luggage compartment.
2.Press the lock (padlock symbol) button once:
∙all doors are superlocked (see ‘Superlocking’)
∙perimetric alarm activated (protects the doors, bonnet and boot)
∙interior space protection activated*
3.The direction indicator lights flash three times to confirm that the car is securely locked and the anti-theft alarm indicator light (in the instrument panel) starts to flash.
1
NOTE: FOR MAXIMUM SECURITY ALWAYS SUPERLOCK THE VEHICLE USING THE REMOTE HANDSET (except when passengers are to be left inside the car).
5

Locks & Alarm
With the key:
1.Insert the key and turn the door lock towards the rear of the car:
∙all doors locked (not superlocked)
∙perimetric alarm activated (protects the doors, bonnet and boot)
∙NO INTERIOR SPACE PROTECTION
2.The direction indicator lights flash three times to confirm that the car is securely locked and the anti-theft alarm indicator light (in the instrument panel) starts to flash.
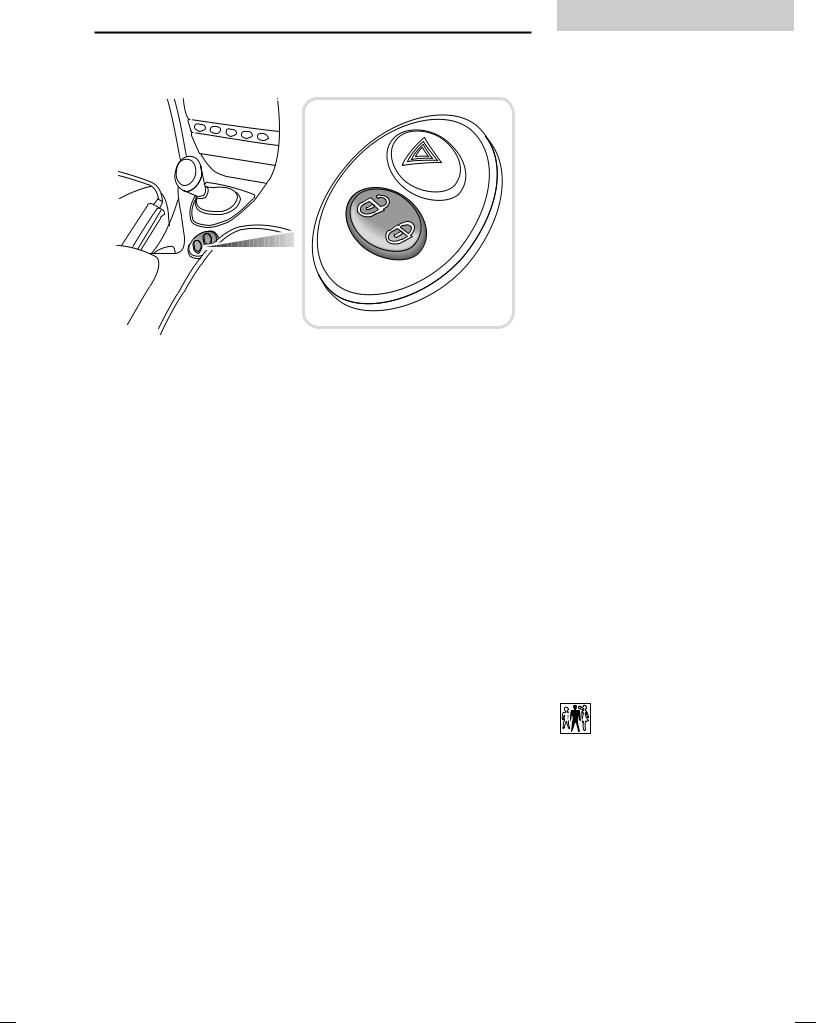
Unlocking
With the remote handset:
∙Press the unlock (Rover) button once. This will disarm the alarm and unlock the driver’s door only (see ‘Single point entry’).
∙Press the unlock button twice to disarm the alarm and unlock ALL the doors.
In either case, the direction indicator lights flash once and the interior lights illuminate.
With the key:
∙Turn the key in the driver’s door lock towards the front of the car to disarm the alarm and unlock the driver’s door only (see ‘Single point entry’).
∙Turn the key twice (or press the interior locking button), to unlock ALL the doors.
Using the remote handset
While it is not necessary to point the handset at the car, the handset must be within range when the buttons are pressed. Note that the operating range may vary depending upon handset battery condition and may sometimes be limited by physical and geographical factors beyond your control. From a security point of view, it may not be wise to unlock unless you are within a few feet of the car.
Operating tip: Locking with the key will not activate superlocking.
6
Locks & Alarm
Superlocking
Provided all the doors are fully closed, the superlocking feature is activated automatically whenever the car is locked using the remote handset. Superlocking immobilises the interior door handles, thereby preventing an intruder from gaining entry by smashing a window and reaching inside the car to operate the door handles.
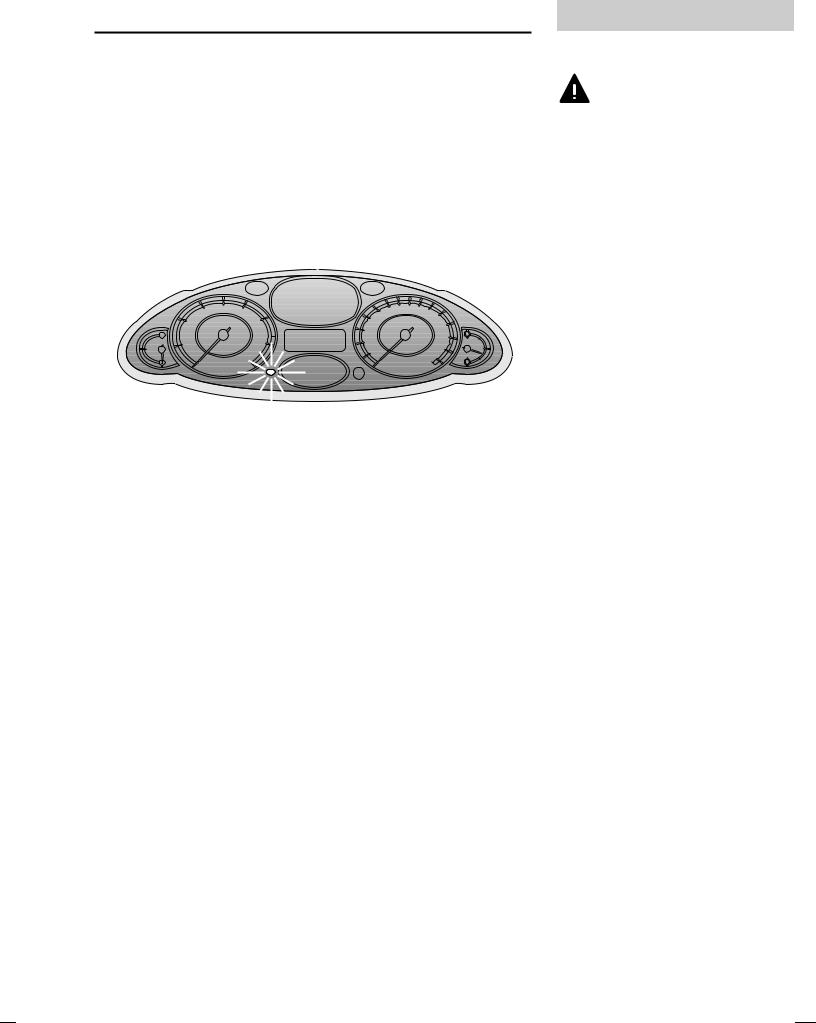
Anti-theft alarm indicator light
H2775
This light provides information about the status of the alarm system, as follows:
∙When the alarm is armed:
The light flashes RAPIDLY while the alarm is arming itself. After ten seconds, the light adjusts to a slower frequency and continues to flash as an anti-theft deterrent until the alarm is disarmed.
∙When the alarm is partially armed: (mislock)
The light flashes SLOWLY for 10 seconds, then flashes as an anti-theft deterrent (as above) until the alarm is disarmed.
∙When the alarm has been triggered:
If the light flashes after the car is unlocked, this indicates that the alarm has been triggered during the driver’s absence. The light will flash for up to one minute or until the starter switch is turned on.
1
For safety, NEVER use Superlocking if
passengers are to remain inside the car - in an emergency they would not be able to escape. Also, on cars fitted with interior space protection, any movement from inside the car would activate the alarm.
7

Locks & Alarm
Mislock
If the driver’s door is not fully closed when the handset lock button is pressed, the alarm sounder or vehicle horn will sound once, indicating a mislock. In this case, none of the doors will lock and the alarm system will not be armed.
If a passenger door, bonnet or boot lid is not fully closed when the handset lock button is pressed, the alarm sounder or vehicle horn will sound once, indicating a mislock. However, the ‘partial arming’ attributes of the security system will enable as much of the system to be armed as possible (all fully closed door, bonnet or boot apertures will be protected, but an open door will not!). As soon as the open aperture is closed, the system will automatically revert to an armed state.
If the alarm sounds
If the alarm is triggered, the alarm sounder or vehicle horn will sound for 30 seconds before switching off and resetting itself to the same protection status that existed prior to the alarm being triggered.To silence the alarm, press either button on the remote handset, or lock/unlock the door using the key.
Single point entry
This is a personal security feature, which enables the driver's door alone to be unlocked, leaving the other doors in a locked state. It can be operated by the remote handset as follows:
Press the unlock button once (or turn the key in the driver’s door lock towards the front of the car) to unlock the driver’s door. Press the unlock button (or turn the key) a second time to unlock the remaining doors.
8
NOTE: If a mislock occurs as a result of an open door, the superlocking and interior space protection features will not be activated, until the door is closed and the locking process is repeated.
This feature can be disabled by a Rover dealer.
Locks & Alarm
Interior locking switch
H2781
This is a personal security feature which allows the driver to lock (or unlock) all the doors from inside the car (while driving or with the car stationary). Press the closed padlock symbol on the switch to lock (the alarm will not be armed), and the open padlock symbol to unlock.
Interior door handles and door sill locking buttons
From inside the car, each door can be individually locked by depressing the appropriate door sill button. However, doors cannot be unlocked by raising the sill button.
Use the door handles to unlock, as follows:
1.First operation of the door handle unlocks the door.
2.Second operation of the door handle opens the door.
Speed-related locking*
This security feature locks all the doors automatically when the road speed exceeds 4 mph (7 km/h).
Note that this feature is not selectable by the driver, and that operation of the door locks by any other means (interior locking switch on the centre console, for example) will disable the speed-related locking function for the remainder of the journey, or until the starter switch is turned off and on again.
1
NOTE: The locking switch will not operate the locks if the alarm has been armed.
Speed related locking can be selected or deselected by a Rover dealer.
9
Locks & Alarm
Interior space protection*
Never activate interior space protection if
passengers are to be left inside the car - any movement will activate the alarm.
H2700
Interior space protection (ultrasonics) is designed to protect the interior of the car from intrusion (entry by a thief through a smashed window, for example). A pair of ultrasonic sensors monitor the interior space and activate the alarm if air movement is detected in the passenger compartment.
Using the handset: Interior space protection is activated automatically whenever the remote handset is used to set the alarm.
Key operation: Using the key will NOT activate interior space protection.
ENGINE IMMOBILISATION
Engine immobilisation is an important aspect of the security system, it is designed to safeguard the vehicle from theft, should the driver forget to lock the doors and prevents the engine from being started unless the GENUINE handset key is inserted into the starter switch. Engine immobilisation is automatic whenever any of the following conditions occur.
∙Three seconds after the starter switch has been turned off.
∙If the key is removed from the starter switch.
The engine will be re-mobilised automatically whenever the genuine handset key is inserted into the starter switch and turned to the first position.
10
NOTE: Interior space protection cannot be activated if a door, window or sunroof is open, or if the starter switch is turned on.
NOTE: If the handset is lost or fails to operate, the emergency key can be used to re-mobilise and start the engine.
Locks & Alarm
REMOTE HANDSET BATTERY
The battery should last for approximately three years dependent upon use. Always fit a Rover YWK10003 or a Panasonic CR2032 replacement battery (available from a Rover dealer).
When the battery needs replacing it will be apparent from a gradual deterioration in range and performance.
On cars fitted with a message centre, a warning icon and message will be displayed when the battery needs replacing (see ‘Message centre’).
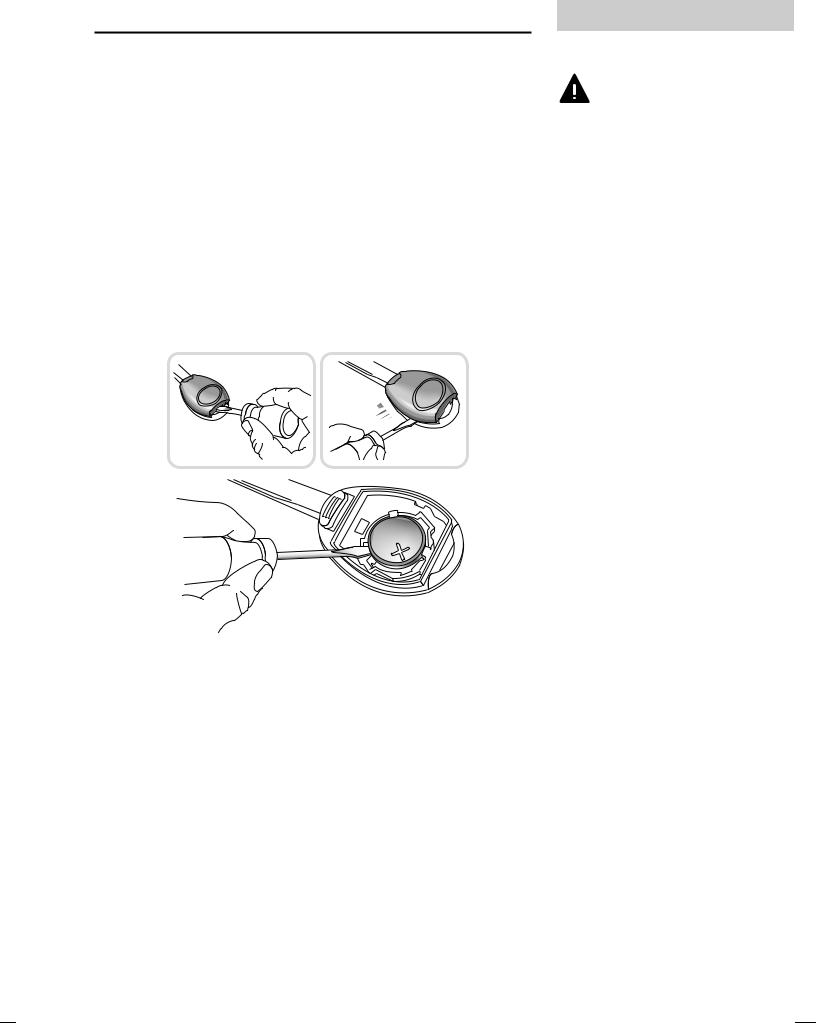
Battery renewal
H2692
1.Insert the blade of a small flat-bladed screwdriver into the slot at the rear of the handset (see illustration) and prise the rear of the back upwards.
2.Insert the screwdriver blade horizontally into the side of the handset and then slide it towards the key. Lift off the back of the handset.
3.Use a small flat-bladed screwdriver to prise the battery from its mounting (see illustration), taking care to avoid touching the circuit board or the metal battery contacts.
1
The handset contains delicate electronic
circuits and must be protected from impact and water damage, high temperatures and humidity, direct sunlight and the effects of solvents, waxes and abrasive cleaners.
11

Locks & Alarm
4.Fit the new battery, ensuring that correct polarity is maintained (‘+’ side facing up).
5.Press the two halves of the handset firmly together and ensure that both halves are fully joined to prevent dirt or moisture from entering the handset.
6.To resynchronise the handset, operate either button four times in quick succession. On the fourth press the door should lock or unlock, confirming resynchronisation.
The handset is now ready for use.
12
Care point: Finger marks will adversely affect battery life; if possible, avoid touching the flat surfaces of the battery and wipe them clean before fitting.

Locks & Alarm
KEYS AND HANDSETS
You have been supplied with two remote handsets with integral keys which operate all locks.
The keys supplied with your car are programmed to your security system - they CANNOT be re-programmed and the engine cannot be started without a key programmed to your car. If a key is lost or broken, a replacement can only be ordered from a Rover dealer.
If you lose a key, contact your Rover dealer; a key reported lost will be deactivated. If the key is recovered, your Rover dealer can have it reactivated.
1
Keep the spare handset key in a safe place - NOT
IN THE VEHICLE!
NOTE: Rover dealers do not stock spare keys, time has to be allowed for replacements to be programmed to your security system and then delivered to the dealer.
13
Locks & Alarm
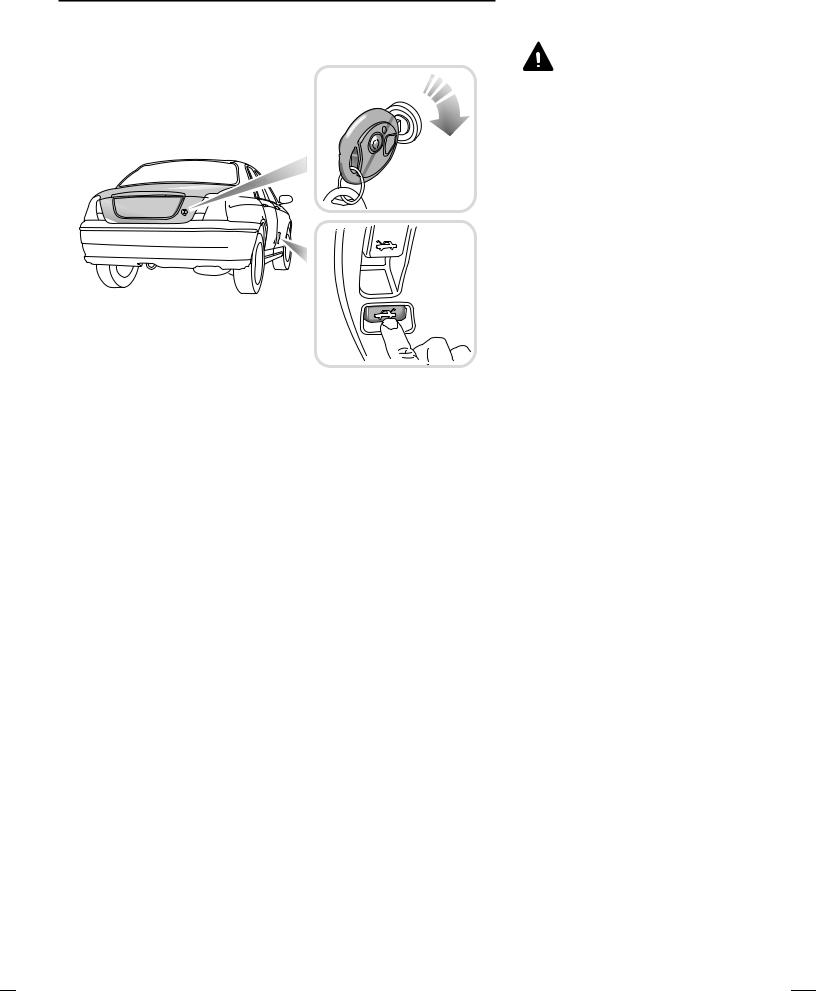
LUGGAGE COMPARTMENT
Do not drive with the luggage compartment
open, as poisonous exhaust gases will enter the car.
H2706
To open, turn the key clockwise in the lock or, from inside the car, press the release button in the driver’s footwell. The luggage compartment and interior lights switch on automatically when the boot lid is opened.
The luggage compartment is automatically locked when the boot lid is closed.
For convenience, with the alarm system armed, the luggage compartment can be unlocked and opened USING THE KEY, without activating the alarm (the rest of the car will remain protected and the engine immobilised during this process). The alarm will automatically rearm as soon as the boot lid is closed.
14
Operating tip: The interior release button is not operational when the alarm system is armed.
Locks & Alarm |
|
1 |
|
|
|
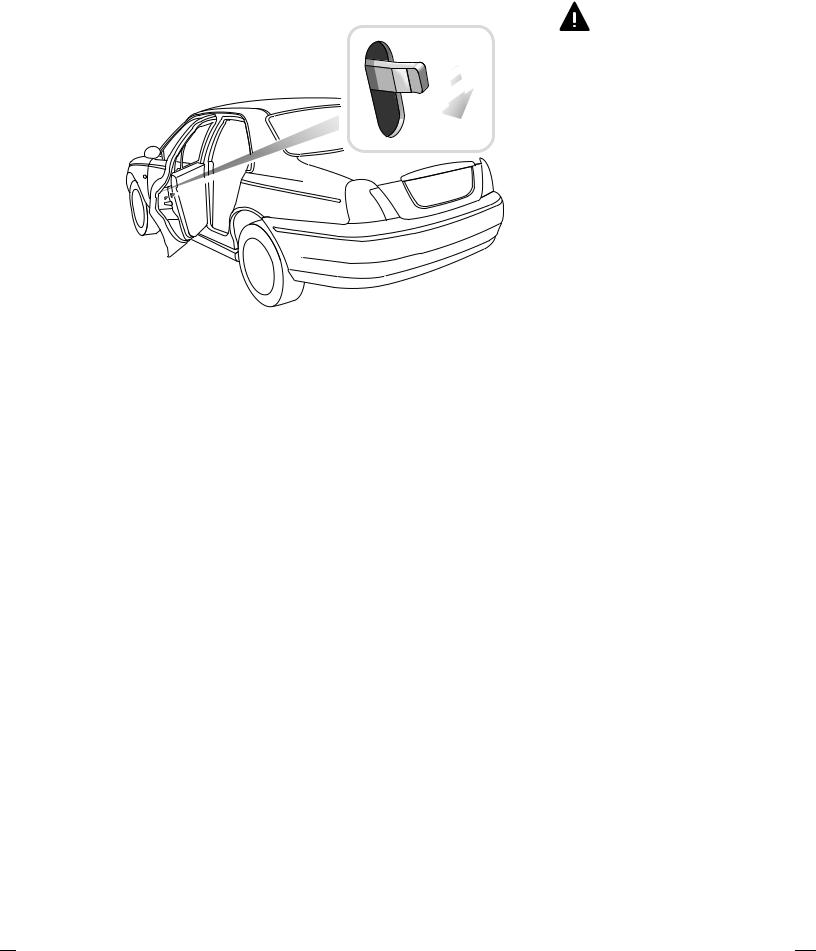
CHILD-PROOF LOCKS
NEVER leave children unsupervised in the
vehicle.
H2691
Move the locking levers on the rear doors down to engage the child locks.
With the child-proof locks engaged, the rear doors cannot be opened from inside the car, thereby avoiding the risk of a door being opened accidentally while the car is moving.
15
Locks & Alarm
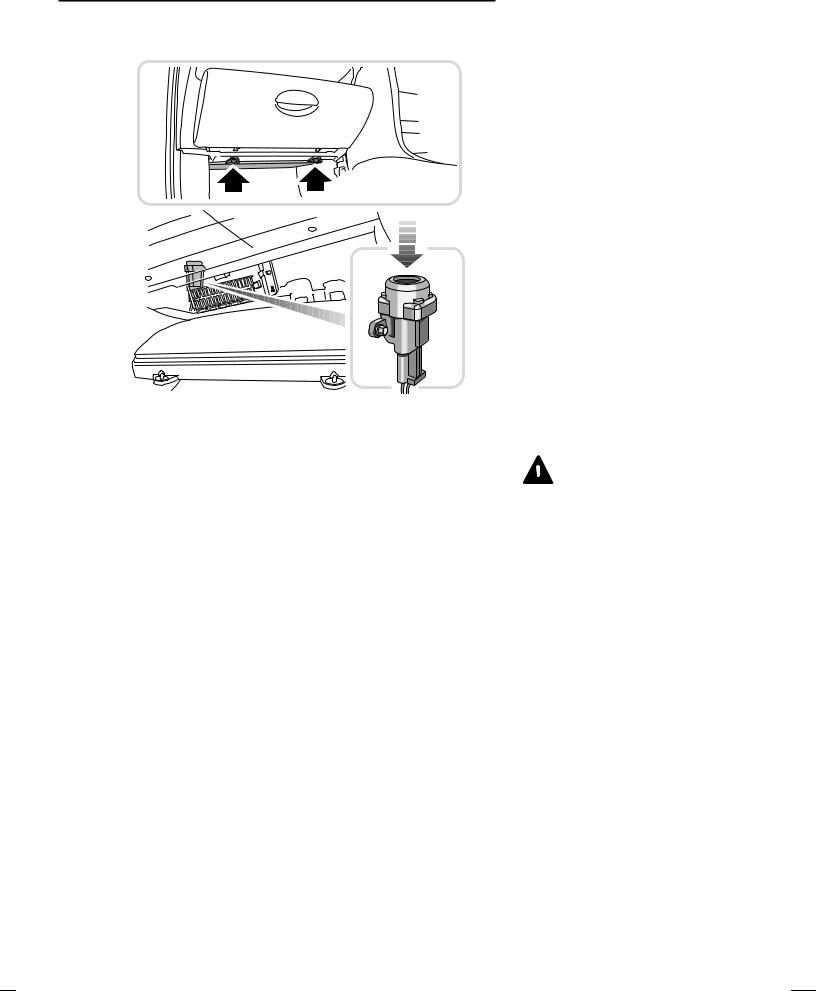
DOOR LOCKING CUT-OFF SWITCH
H2682
An inertia switch, operational only with the alarm disarmed, will unlock the doors in the event of an accident or sudden impact.
When the switch operates, the interior lights illuminate until the system is reset by pressing the rubber top (arrowed in illustration). In addition, the hazard warning lights flash until switched off.
The inertia switch is located behind the glovebox and can be reached from underneath by releasing the four fixings securing the access cover.
The inertia switch also cuts off the fuel supply (see ‘Fuel cut-off switch’ ).
Always check for fuel
 leaks before resetting the switch!
16
Seats
MANUALLY OPERATED FRONT SEATS* Forward/rearward adjustment
H2746
Lift the lever and slide the seat into position. Make sure the seat is locked in position before driving.
Height adjustment (Driver’s seat only)
H2745
Ensure the seat is occupied before adjusting the height. Lift the lever and apply weight to lower the seat rearwards, or allow the seat to rise forwards, as required.
1
Your car is fitted with side impact airbags. Refer to
the Airbag SRS section of this handbook before fitting seat covers, or carrying out any repair or retrimming operations to the seat or seat covers.
DO NOT adjust the seats while the car is moving.
Take care when adjusting the height of the driver’s
seat - a rear seat passenger’s feet might become trapped when lowering the seat rearwards.
Operating tip: While adjusting the height, grip the steering wheel to more accurately control the rate of rise and fall.
17
Seats
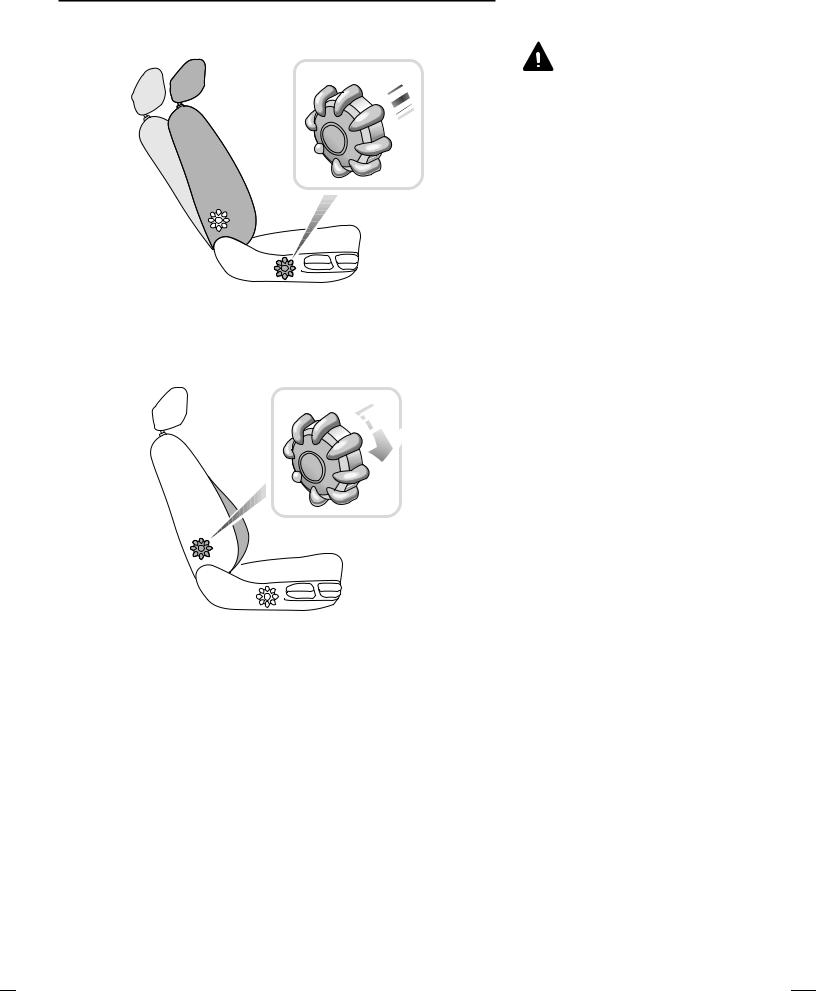
Backrest adjustment
DO NOT allow front seat occupants to travel with
the seat backs reclined steeply rearwards. Optimum benefit is obtained from the seat belt with the backrest angle set to approximately 25° from the upright (vertical).
H2747
Rotate the handwheel to adjust.
Lumbar support adjustment*
H2748
Rotate the handwheel to increase or decrease support to the lumbar region of the back.
18
Seats
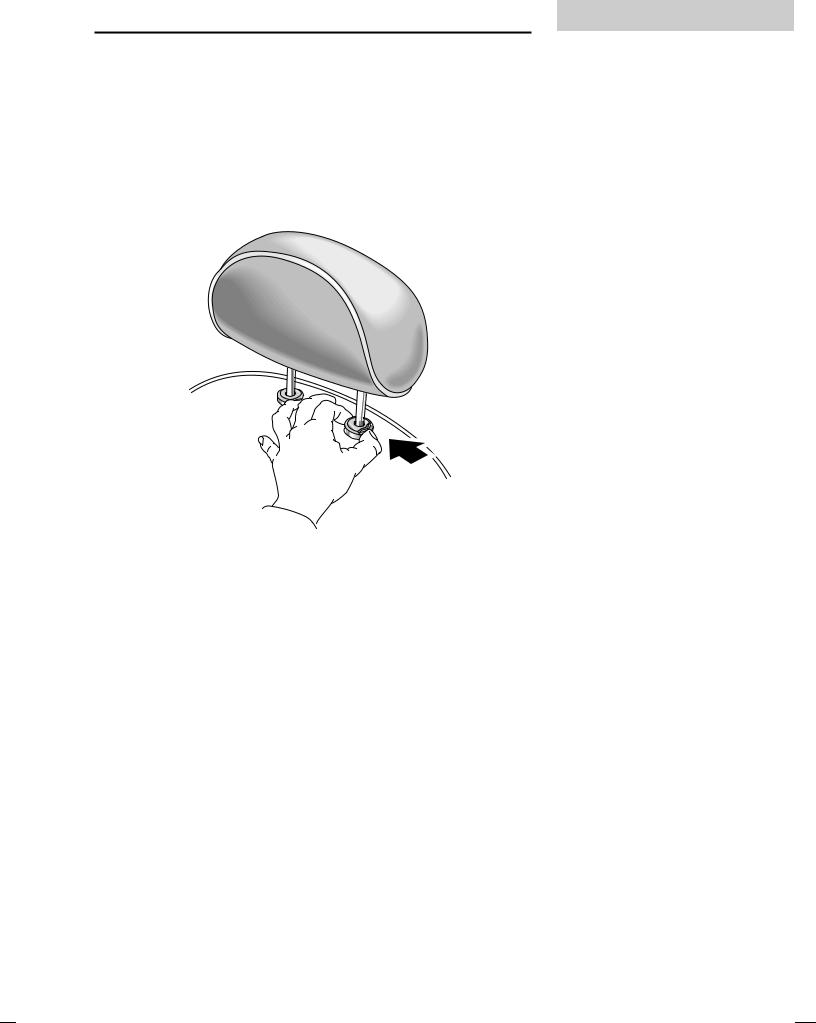
HEAD RESTRAINTS
Head restraints are designed to restrain rearward movement of the head in the event of an accident or sudden stop - a properly adjusted head restraint can considerably reduce the risk of neck and head injuries.
Head restraint adjustment
H3248
1
NOTE: Where possible, adjust the head restraint so that the cushion is level with the back of the head - NOT THE NECK!
Raise or lower the restraint until the cushion is level with the back of the head.
To lower the restraint, depress the button (arrowed) and push the restraint downwards. To raise the restraint, pull the restraint upwards without depressing the button.
On some models the angle of the restraint can be adjusted. Tilt the restraint to ensure it is as close to the back of the head as possible.
To remove the head restraint, depress the button on the left hand mounting and pull the restraint upwards.
19
Seats
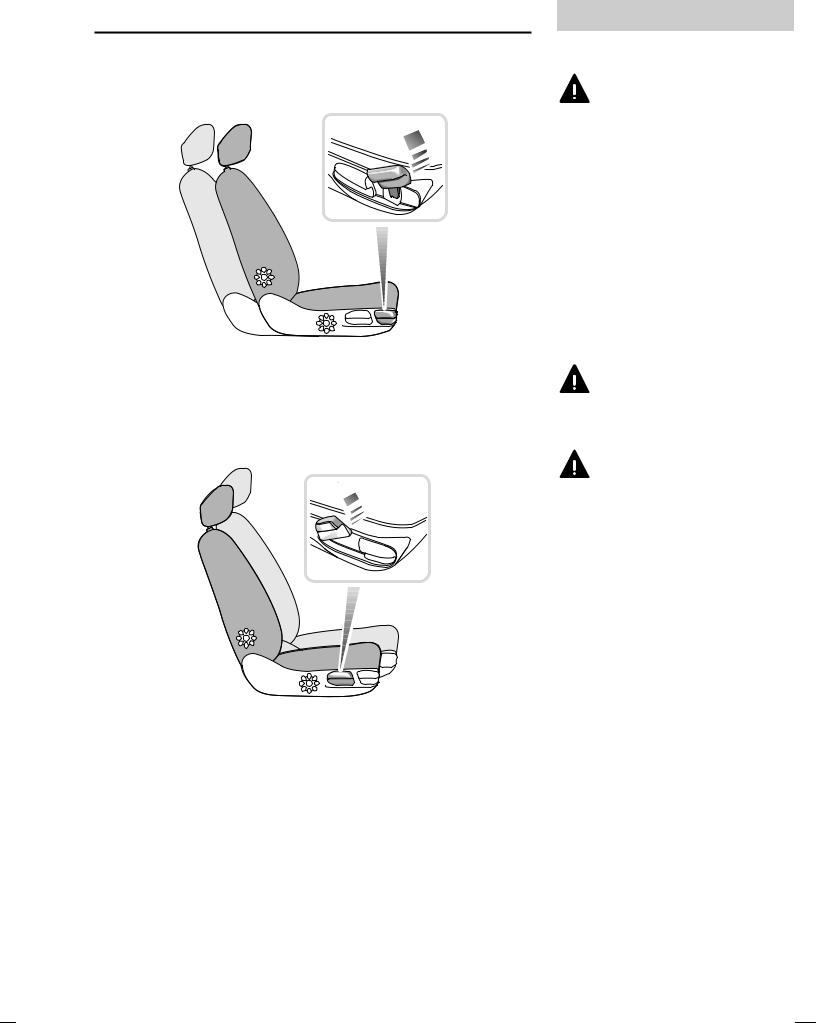
POWER-OPERATED FRONT SEATS*
Seat adjustment is available when the starter switch is in the second position.
If the driver’s seat is equipped with the memory facility, it can also be adjusted when the starter switch is in the first position, or with a front door open when the starter switch is off.
Information on operating the heated front seats* can be found in the ‘Heating & ventilation’ section of the handbook.
Forward/rearward adjustment
H2750
Push and hold the switch forwards or rearwards to move the seat to the desired position.
Lumbar support and head restraints
For information on adjusting lumbar support and head restraints, please refer to ‘Manually operated front seats’, earlier in this section.
20
Your car is fitted with side impact airbags. Refer to
the Airbag SRS section of this handbook before fitting seat covers, or carrying out any repair or retrimming operations to the seat or seat covers.
DO NOT adjust the seats while the car is moving.
Seats |
|
1 |
|
|
|
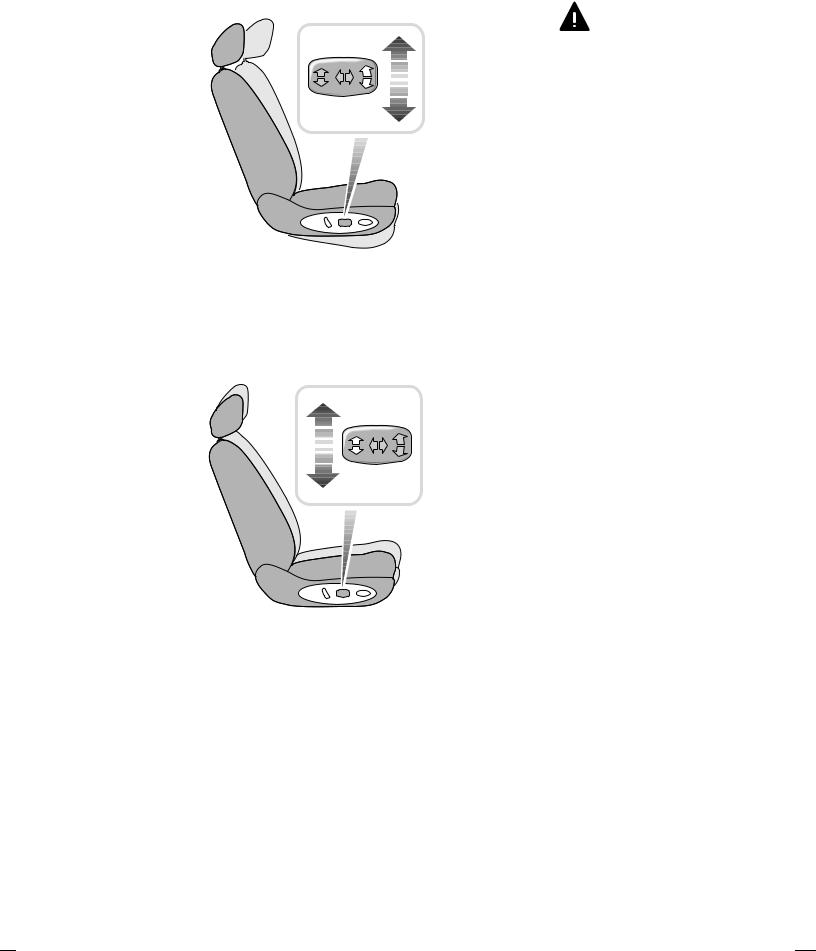
Seat cushion angle (Driver’s seat only)
DO NOT adjust the seats while the car is moving.
H2752a
Push the front of the switch up or down to tilt the seat cushion to the desired position.
Seat cushion height (Driver’s seat only)
H2753
Push the switch up or down to raise or lower the cushion.
21
Seats
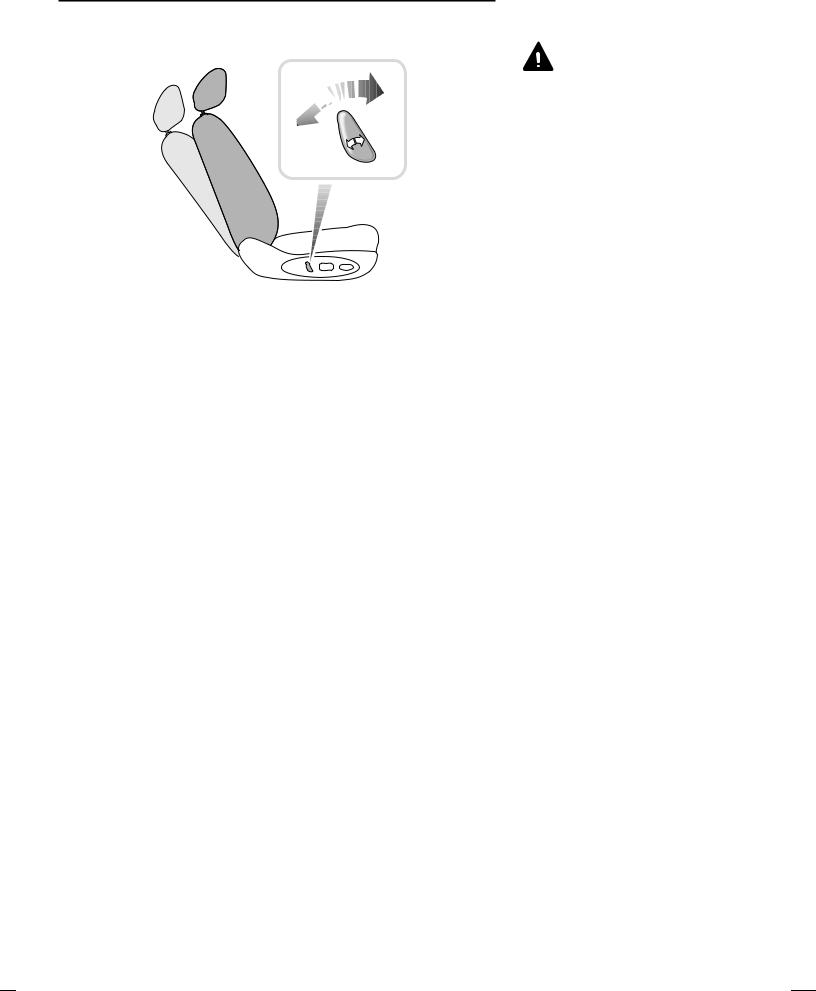
Backrest adjustment
DO NOT allow front seat occupants to travel with
seat backs reclined steeply rearwards. Optimum benefit is obtained from the seat belt, with the backrest angle set to approximately 25° from the upright (vertical).
H2754
Twist the switch forward or backwards until the desired angle is achieved.
22
Seats
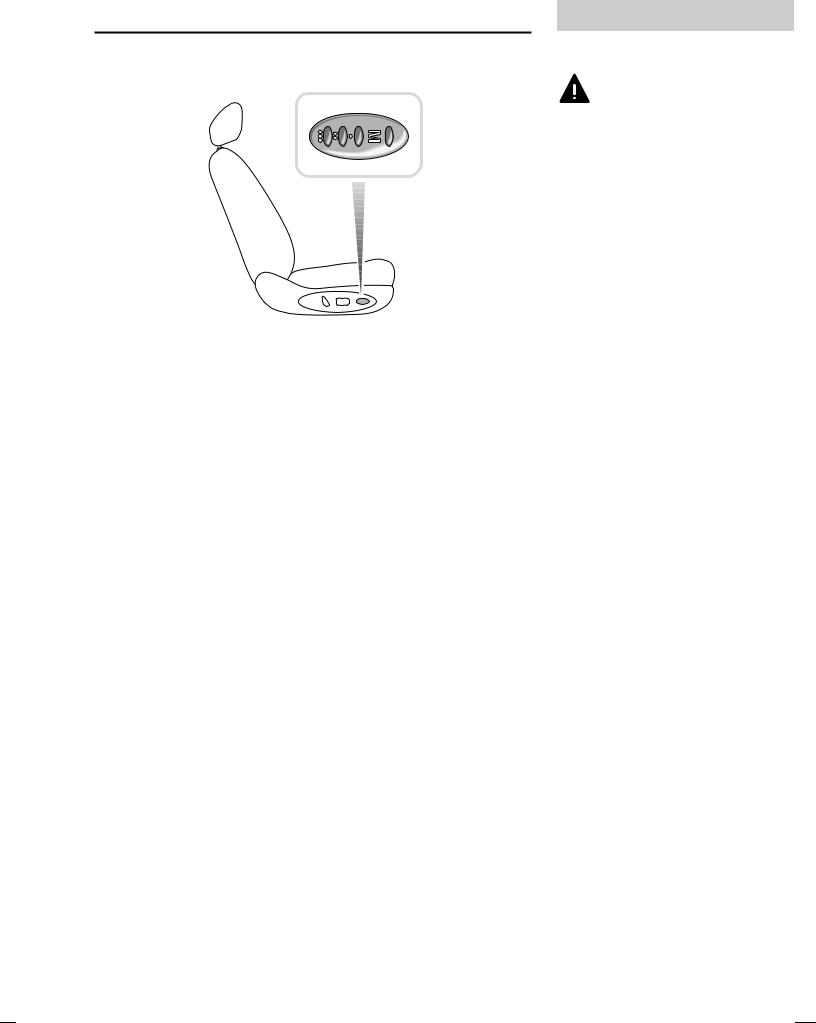
DRIVER’S SEAT MEMORY FACILITY*
H2755
Your car can memorise three different driver seating positions. To store the positions in the system memory, the starter switch must be turned to the first or second position.
Adjust the seat to the required position and store the settings by pressing and holding the memory store switch (‘M’) and, with the memory store switch still depressed, press and release one of the pre-set buttons (‘I’, ‘II’ or ‘III’). Finally, release the memory store switch; a single chime will sound to confirm that the operation was successful.
To recall a stored position after the seat has been moved by another driver, open the driver’s door and press the appropriate memory pre-set button. The seat will return to the position stored by that memory pre-set, a double chime will sound to confirm that the operation is complete.
Lazy seats
The lazy seat facility enables the handsets or keys to be used to recall seat positions, when you unlock the doors.
Press and hold the handset unlock button or turn and hold the key in the unlock position, the driver's seat moves to the position stored in pre-set 1. An alternative driver's setting can be programmed using pre-set 2. As before, position the seat and programme pre-set 2 then, when the spare key is used to activate ‘Lazy seats’, pre-set 2 will be selected.
1
DO NOT adjust the seats while the car is moving.
Before activating the seat memory and lazy seat functions, ensure that the area immediately surrounding the seat is clear of obstructions and that all occupants are clear of moving parts.
Operating tip: If a pre-set is selected accidentally, stop seat movement by pressing any of the seat control buttons.
NOTE: If the car is in motion, the pre-set will need to be pressed and held for the seat to move. This is to prevent inadvertent operation of the memory pre-sets, which could cause the seat to move into a position in which the driver is unable to drive safely.
23

Seat Belts
SEAT BELT SAFETY
The seat belts fitted to your car are intended for use by adult sized occupants and must be used by one occupant only.
Ensure that all passengers are correctly strapped in at all times and be sure to observe the following precautions:
∙DO NOT allow occupants to travel with the seat backs reclined steeply rearwards. Optimum benefit is obtained from the seat belt with the backrest angle set to approximately 25° from the upright (vertical).
∙Adjust seat belts to eliminate any slack. Do not pull the belt away from the body while travelling - to be fully effective, the seat belt must remain in full contact with the body at all times.
∙Fit the lap strap across the PELVIS (never across the abdomen), ensuring that the diagonal strap passes across the CHEST and SHOULDER without bearing on the neck.
∙DO NOT wear seat belts over hard, sharp or fragile items in clothing, such as pens, keys, spectacles etc.
∙Ensure that seat belts are not twisted or obstructed in any way.
∙Always replace a seat belt assembly that has withstood the strain of a severe vehicle impact, or if the webbing shows signs of fraying.
∙Where possible, use the seat belts to secure luggage carried on the seats - in an accident, loose items can be thrown around inside the car, causing serious injury.
∙In most countries, all occupants are required by law to wear a seat belt, unless they have been issued with a medical exemption certificate.
∙During pregnancy, women should wear the lap belt across the hips below the baby, with the diagonal belt passing across the shoulder, between the breasts and to one side of the baby - if in doubt, consult a doctor.
The airbag supplementary restraint system (SRS) is
designed to add to the overall effectiveness of the seat belts. It does not replace them. SEAT BELTS MUST ALWAYS BE WORN!
24

Seat Belts
SEAT BELTS
To minimise injury in the event of an accident, it is important that seat belts are worn correctly. Read the instructions below and the advice contained under the heading ‘Seat belt safety’ on a previous page.
Fastening the belt
H2731
Pull the seat belt steadily over the shoulder and across the chest and, ensuring the webbing is not twisted, insert the metal tongue plate into the appropriate buckle - a ‘click’ indicates that the belt is securely locked.
Seat belts are designed to bear upon the bony structure of the body (pelvis, chest and shoulders) and can only be worn safely with the seats in a near-upright position; DO NOT allow the front passenger to travel with the seat steeply reclined (see also ‘Seating positions’ in the ‘Airbag SRS’ section of this handbook).
Releasing the belt
Press the red button on the seat belt buckle.
1
Ensure that all seat belts are worn correctly - an
improperly worn seat belt increases the risk of death or serious injury in the event of a collision.
NOTE: Do not allow foreign matter (particularly sugary food and drink particles) to enter the seat belt buckles - such substances can render the buckles inoperative.
NOTE: Where possible, rear seat passengers should adjust their position to enable the seat belt webbing to cross the shoulder without pressing on the neck.
25

Seat Belts
Upper anchorage height adjustment
To reduce the likelihood of injury in an accident, the height of the front seat belt upper anchorage adjusts automatically as the seat is moved either forwards or backwards. The height CANNOT BE ADJUSTED MANUALLY!
CHILD SEATS
Children are more likely to receive injuries from inflating airbags than taller occupants (see ‘Airbag). For thisSRS’ reason, it is recommended that children should always be seated in the rear of the vehicle, in a child safety seat or restraint system appropriate to their age and size. The range of safety seats approved for use in your car is outlined in the Rover accessories brochure, which is available from your Rover dealer.
For optimum protection, it is recommended that children weighing up to 13 kg (29 lb - or approximately 18 months of age) are restrained in a Rover approved rear facing child seat in an outer rear seating position.
All infant and child restraint systems are designed to be secured in the car by means of an adult seat belt.
When installing and using any infant or child restraint system, always follow the manufacturer’s instructions. Failure to properly secure the child restraint system can endanger the child in a collision or sudden stop and cause injury to other passengers.
The above symbol affixed to the fascia panel of your car, warns against the use of a REAR FACING child seat in the front passenger seat. This type of child seat could cause serious injury to your child in the event of an airbag deployment.
NOTE: Accident statistics show that children are safer when properly restrained in the rear seating positions than in the front.
DO NOT install a rearward facing child seat in the
front passenger seat - an inflating airbag could impact with the seat. Failure to follow this advice could result in serious injury, or even death for the child.
26

Seat Belts
Seat belt locking mechanism
All passenger seat belts have a special locking mechanism which aids the retention of child seats. The procedure to install a child seat is as follows:
1.Install the child seat in the car, attach the seat belt and secure the buckle in accordance with the manufacturer’s fitting instructions.
2.Pull on the shoulder section of the belt to unreel all of the remaining webbing to the limit of its travel. This will engage the automatic locking feature, which then acts as a ratchet, only allowing the webbing to retract.
3.Allow the seat belt to retract onto the child seat (a
‘clicking’ sound will confirm that the ratchet has engaged), firmly pushing the child seat into the seat.
4.Ensure that there is no slack in the seat belt by pulling upwards on the shoulder belt, immediately above the child restraint. The seat belt should now be locked and the child seat held firmly in position.
Once the child seat is removed and all the seat belt webbing is allowed to retract, the seat belt locking mechanism reverts to normal operation.
1
NOTE: The automatic locking mechanism should also be used when securing large items of luggage to a seat.
27

Seat Belts
CARING FOR SEAT BELTS
Regularly inspect the webbing for signs of fraying, cuts and wear, also pay particular attention to the condition of the fixing points and adjusters.
Avoid contaminating the webbing with polish, oil and chemicals (see ‘Cleaning & vehicle care’).
Three tests for checking seat belts
1.With the seat belt fastened, give the webbing nearest the buckle a quick pull - the buckle should remain securely locked.
2.With the seat belt unfastened, unreel the webbing to the limit of its travel. Check that unreeling is free from snags and snatches and further check the webbing for visual signs of wear or fraying.
Driver’s seat belt: Allow the webbing to retract, checking that retraction is smooth, continuous and complete.
Passenger seat belts: Allow the webbing to retract approximately 200 mm (8 in), then give the tongue plate a quick forward pull - the mechanism must lock automatically and prevent further unreeling. Allow the webbing to retract a further 200 mm and repeat the process. Finally, allow the belt to retract fully and pull the webbing out slightly to check that the locking mechanism is disabled.
3.With the webbing half unreeled, hold the tongue plate and give it a quick forward pull - the mechanism must lock automatically and prevent any further unreeling.
If a seat belt should fail any of these tests, contact your dealer immediately.
Always replace a seat belt assembly where the
webbing shows signs of fraying.
28

Seat Belts
SEAT BELT PRE-TENSIONERS
The seat belt pre-tensioners activate in conjunction with the airbag SRS to provide additional protection in the event of a severe frontal, rear or side impact on the vehicle (see ‘Airbag SRS’). The pre-tensioners automatically retract the seat belts. This reduces any slack in both the lap and diagonal portions of the belts, thereby reducing forward movement of the belt wearer in the event of a severe collision, helping to protect the occupants in most crash conditions.
The airbag SRS warning light on the instrument panel, will alert you to any malfunction of the seat belt pre-tensioners (see ‘Airbag SRS warning light’).
If the pre-tensioners have been activated, the seat belts will still function as restraints, and must be worn in the event that the vehicle remains in a driveable condition.
Disposing of vehicles
If you sell your car, be sure to inform the new owner that the vehicle is fitted with pre-tensioners, and make the new owner aware that the pre-tensioners must be examined and replaced by qualified personnel after a period of 15 years.
If your car is to be scrapped, unactivated pre-tensioners are potentially very dangerous and must be safely deployed in a controlled environment by qualified personnel, before it is scrapped.
1
The seat belt pre-tensioners will only
be activated once and then MUST BE REPLACED by a Rover dealer. Failure to replace the pre-tensioners will reduce the efficiency of the car’s front restraint systems.
NOTE: The seat belt pre-tensioners will NOT be activated by minor impacts.
NOTE: After any impact, always have the seat belts and pre-tensioners checked and, if necessary, replaced by a Rover dealer.
29
 Loading...