


Owners Manual
TM
RRiiddee--oonn MMoowweerr
GRASS CATCHER
MODEL No. 108 - 109
Rover Mowers Limited Ride-on Mower Grass Catcher Rover Mowers Limited Ride-on Mower Grass Catcher
PREFACE
Congratulations on your purchase of a quality Australian made and owned ROVER product.
This manual covers the operation and maintenance of the Rover Ride-on Mower Grass Catcher.
Please read and understand this Owner’s Manual before using this grass catcher.
If any point is unclear, contact Rover Mowers Limited or any authorised Rover Mower Service Dealer.
Rover Mowers Limited reserves the right to make changes and improvements to its products at any time, without
notice or obligation. The Company also reserves the right to discontinue the manufacture of any product at its
discretion at any time.
To emphasise special information, the words WARNING and CAUTION are used.
WARNING
The safety of the user and others
involved. Personal injury may result
should this information be disregarded.
CONTENTS PAGE
Preface................................................................. i
Safety Instructions .............................................. ii
1. Setting Up
1.1 Grass Catcher selection ............................ 1
1.2 Loose parts kit Model 108 ....................... 1
1.3 Loose parts kit Model 109 ....................... 1
2. Retrofitting
2.1 Cutterhead modifications ......................... 2
3. Assembly
3.1 Towbar Installation ................................... 2
3.2 Installing the Support Bracket.................. 3
3.3 Installing the Fan Disc Assembly ............ 3
3.4 Blade Installation...................................... 3
3.5 Mounting the Grass Catcher .................... 4
3.6 Frame Assembly....................................... 4
3.7 Frame Installation..................................... 4
3.8 Outlet Chute Installation .......................... 5
3.9 Grass Transfer Tube ................................. 5
3.10 Skirt Installation ..................................... 5
4. Operation
4.1 To Collect Grass ....................................... 6
4.2 Emptying the Grass Catcher .................... 6
5. Maintenance
5.1 Cleaning the Grass Catcher...................... 7
5.2 Cleaning the Transfer Tube ...................... 7
5.3 General ..................................................... 7
CAUTION
Follow these instructions to avoid
mower damage and possible loss of
warranty.
ILLUSTRATION PAGE
Figure 3.1 Towbar Installation........................... 2
Figure 3.2a Towbar Installation .......................... 3
Figure 3.2b Support Bracket............................... 3
Figure 3.3 Grass Catcher Support .................... 4
Figure 3.4 Mounting the Catcher Assembly..... 4
Figure 3.5 Internal Frame Assembly................ 4
Figure 3.6 Frame Installation ........................... 4
Figure 3.7 Outlet Chute Installation ................. 5
Figure 3.8 Fitting the Transfer Tube................. 5
Figure 3.9 Skirt Installation.............................. 5
Figure 4.1 Emptying the Grass Catcher ........... 6
WARNING
With the added load of a grass catcher
mounted on the back of a ride-on mower
the handling characteristics of the
mower can be affected. Therefore the
operator must be aware of this fact and
take extra care when operating the rideon, this is especially evident when
cornering, traversing up and down
slopes and braking.
For operators who experience handling
problems with their Rancher or Lawn
KingTMride-on mowers with the Grass
Catcher mounted on the back, a Rover
ride-on Counterweight can be fitted,
model No. 111. The counterweight can
be purchased from any authorised Rover
dealer and fitting can be arranged.
i Page 8

SAFETY INSTRUCTIONS
Know your controls. Read the Owners Manual carefully. Learn how to stop the engine quickly in any emergency.
Do not allow children or people unfamiliar with these instructions to use the mower. Do not carry passengers.
Make sure the lawn is clear of sticks, stones, bones, wire and debris. They could be thrown by the blade.
Do not mow whilst people, especially children or pets are in the mowing area.
Never mow across the face of the slope, unless the mower is designed for this purpose.
Exercise extreme caution when on slopes.
Reduce speed on slopes and in sharp turns to prevent overturning or loss of control.
Do not stop or start suddenly when going uphill or downhill.
Stay alert for holes in the terrain and other hidden hazards.
Use care when pulling loads or using heavy equipment.
(a) use only approved drawbar hitch points
(b) limit loads to those you can safely control
(c) do not turn sharply
(d) use care when backing up, and
(e) use counterweight(s) or wheel weights when suggested in the owners manual.
Watch out for traffic when crossing or operating the mower near roadways.
Stop the blades rotating before crossing surfaces other than grass.
When using any attachments, never direct discharge of material toward bystanders nor allow anyone near the
machine while it is in operation.
Before leaving the operator’s position:
(a) disengage all clutches and secure cutting units
(b) change into neutral and set the parking brake, and
(c) stop the engine and remove the key.
Stop the engine and disengage the drive to attachments:
(a) before refuelling
(b) before making height adjustment unless adjustment can be made from the operator’s position
(c) before clearing blockages
(d) before checking, cleaning or working on the mower
(e) after striking a foreign object (inspect the mower for damage and make repairs before restarting and
operating the equipment) and
(f) if machine starts to vibrate abnormally (check immediately).
Disengage the drive to the attachments when transporting or not in use.
A mower operator should be in good physical and mental health and not under the influence of any drug or alcohol
which might impair vision, co-ordination of judgement.
Never mow while barefoot or wearing open sandals or thongs. Wear long trousers and heavy shoes.
It is advisable to wear suitable eye protection when operating a mower.
Mow only in good daylight.
Before using, always visually inspect to see that the blades, blade bolts and cutter assembly are not worn or damaged.
(Replace worn or damaged blades and bolts in sets to preserve balance).
WARNING
Damaged Blades and Worn Bolts
are Major Hazards
Check all nuts, bolts and screws often. Always be sure the mower is in a safe operating condition.
Keep safety devices (guards and switches) in place and in working order.
Never use the mower unless the grass catcher or guards provided by the manufacturer are in position.
Ensure that any spare parts used comply with the original manufacturer’s recommendations and specifications.
Replace worn or faulty silencer.
Keep engine free of grass, leaves or excessive grease. These can be a fire hazard.
Refuel outdoors only. Do not smoke while refuelling engine. Never remove the cap of the fuel tank or add petrol
while the engine is running or the engine is hot. Remove the fuel cap slowly to relieve any tank pressure. If petrol is
spilled, do not attempt to start the engine but move the machine away from the area of the spill and avoid creating
any source of ignition until the petrol vapours have dissipated.
Check for fuel leaks while refuelling or using the mower. If a fuel leak is found, do not start or run the engine until
the fuel leak is fixed and spilled fuel is wiped away.
Do not operate the engine in a confined space where exhaust fumes (carbon monoxide) can collect.
Always mount the mower on the opposite side to the discharge chute.
Stop the engine whenever you leave the mower, even for a moment.
Store the mower in a well ventilated room away from naked flames such as may be found in hot water heaters.
Do not lend or sell the mower without the Owner’s Manual.

Rover Mowers Limited Ride-on Mower Grass Catcher Rover Mowers Limited Ride-on Mower Grass Catcher
The Rover Ride-on Mower Grass Catcher has been designed to be fitted to and used with the Rover Rancher
TM
RaiderTMand Lawn KingTM, fitted with either the 30” or the 38” pressed steel cutterheads.
The correct model grass catcher to suit the Rover RancherTM, RaiderTMand Lawn KingTMmodels and cutterhead
combination can be selected from the “Grass Catcher Selection Chart” (See Section 1.1 below)
Some Rover Ride-on Mowers will need to have a towbar fitted and/or the use of a different mount support bracket before
the Rover Grass Catcher can be correctly mounted. These mowers are identified in the chart below by an asterisk *
1. SETTING UP
1.1 Grass Catcher Selection
Mount
Support
Bracket
A12942
Rover Ride-on Mower Model No.
Rancher Selector Drive
TM
17166 180 108 *
Cutterhead
Model No.
Catcher
Model No.
Towbar
Model 110
Required
198 109 *
Rancher Selector Drive
TM
17188 180 108 *
198 109 *
Rancher Selector Drive
TM
All model 180 108 *
271** 198 109 *
Rancher Auto Drive
TM
18166 180 108 *
198 109 *
Rancher Auto Drive
TM
18188 180 108 *
198 109 *
Rancher Auto Drive
TM
All model 180 108 *
281** 198 109 *
Rancher Hydro
TM
All model 180 108 *
282**
TM
Raider
Lawn King
TM
(Hydro) 2950 180 108
4078 180 108 *
198 109
Lawn King
TM
(Hydro) All model 180 108
292** 198 109
,
WARNING
The Rover Grass Catcher Models 108 and 109 are designed for
front engine ride-on mowers ONLY!
DO NOT FIT 108/109 Grass Catchers to rear engine mowers.
Before proceeding with the assembly of the grass catcher, remove the loose parts kit from the carton.
1.2 Loose parts kit - Model 108 (30” Cutterhead) 1.3 Loose parts kit - Model 109 (38” Cutterhead)
ItemItem No. SuppliedNo. Supplied
Transfer tube 1
Transfer tube 1
Chute Assembly 1
Rod-outlet chute 1
Fan discs assembly 1
Grass catcher assembly 1
Support bracket 1
Owner’s manual 1
Side frame 2
Spreader 1
Bolt - 3/8 x 1” unc. 2
Nycloc nut - 3/8” unc. 3
Nyloc nut - 1/4” unc. 4
Screw - 3/16” x 1” unc. RH. 4
Nyloc nut - 3/16” unc. 4
Washer - 3/8” flat 2
Chute Assembly 1
Rod-outlet chute 1
Grass catcher assembly 1
Support bracket 1
Owner’s manual 1
Side frame 2
Spreader 1
Bolt - 3/8” x 1” 2
Nycloc nut - 3/8” unc. 3
Nyloc nut - 1/4” unc. 4
Screw - 3/16” x 1’ unc RH. 4
Nyloc nut - 3/16” unc. 4
Skirt 1
Bolt - 5/16” x 3/4” cuphead 2
Washer - 5/16” flat 2
Nyloc nut - 5/16” unc. 2
Washer - 3/8” flat 4
Page 1 Page 6

2. RETROFITTING
2.1 Cutterhead modifications - (Model 180 cutterhead only)
All Rover Ride-on Mowers manufactured
before September 1989 must be modified to take
advantage of the Rover Ride-on Mower Grass
Catcher i.e.:
TM
Rancher
12hp Auto-Drive Model: 1866/180
Cutterhead modifications
RancherTM12hp Selector Drive Model: 1766/180
Cutterhead modifications
3. ASSEMBLY
3.1 Towbar Installation (Refer to Selection Chart - Section 1.1)
A towbar may need to be fitted to some models of
TM
the Rover Rancher
and RaiderTMRide-on
Mower to facilitate the mounting of the Ride-on
Mower Grass Catcher.
The mounting position of the rear bumper bar
varies between models of Rover ride-on mowers.
Due to this configuration the rear bumper bar
model 110 has three sets of mounting holes in the
side mounting flanges, which suit all front engine
RanchersTMand LawnkingTMmowers currently
manufactured by Rover. (Refer to Figure 3.1).
This modification allows maximum air velocity to be achieved
at the outlet chute necessary for the grass catcher to effectively
collect grass cuttings.
These modifications involve the cutting of air intake ports into
the top of the Model 180 (30”) cutterhead and welding in
stiffeners.
CAUTION
Modifications to the cutterhead must be
carried out by an Authorised Rover
Service Dealer or Warranty on products
will be void.
1. Slide the towbar over the rear of the chassis with the
side brackets pointing upwards.
2. Align the holes in the towbar side brackets with the
holes in the rear of the chassis. Retain the towbar
with the four bolts, shakeproof washers and nuts
supplied.
Ride-on Chassis
The Rear Bumper Bar Model 110 is fitted as a
standard feature on the Lawn KingTMand is an
option on RancherTMRide-ons and the Raider
Ride-on.
CAUTION
Towbar brackets have 3 sets of
holes per side.
Lawn King has the towbar fitted
as standard.
TM
1
2
3
1
2
3
Towbar Assembly
Model 110
Transaxle
Figure 3.1 - Towbar Installation
T
owbar mounting holes
Rancher
1
Raider
Rancher
2
Lawn King
3
Lawn King
TM
Selector Drive, Auto Drive.
TM
Ride-ons.
TM
Hydro.
TM
ride-ons - 18” DIA. Rear Tyres.
TM
ride-ons - 20” DIA. Rear Tyres.
Rover Mowers Limited Ride-on Mower Grass Catcher Rover Mowers Limited Ride-on Mower Grass Catcher
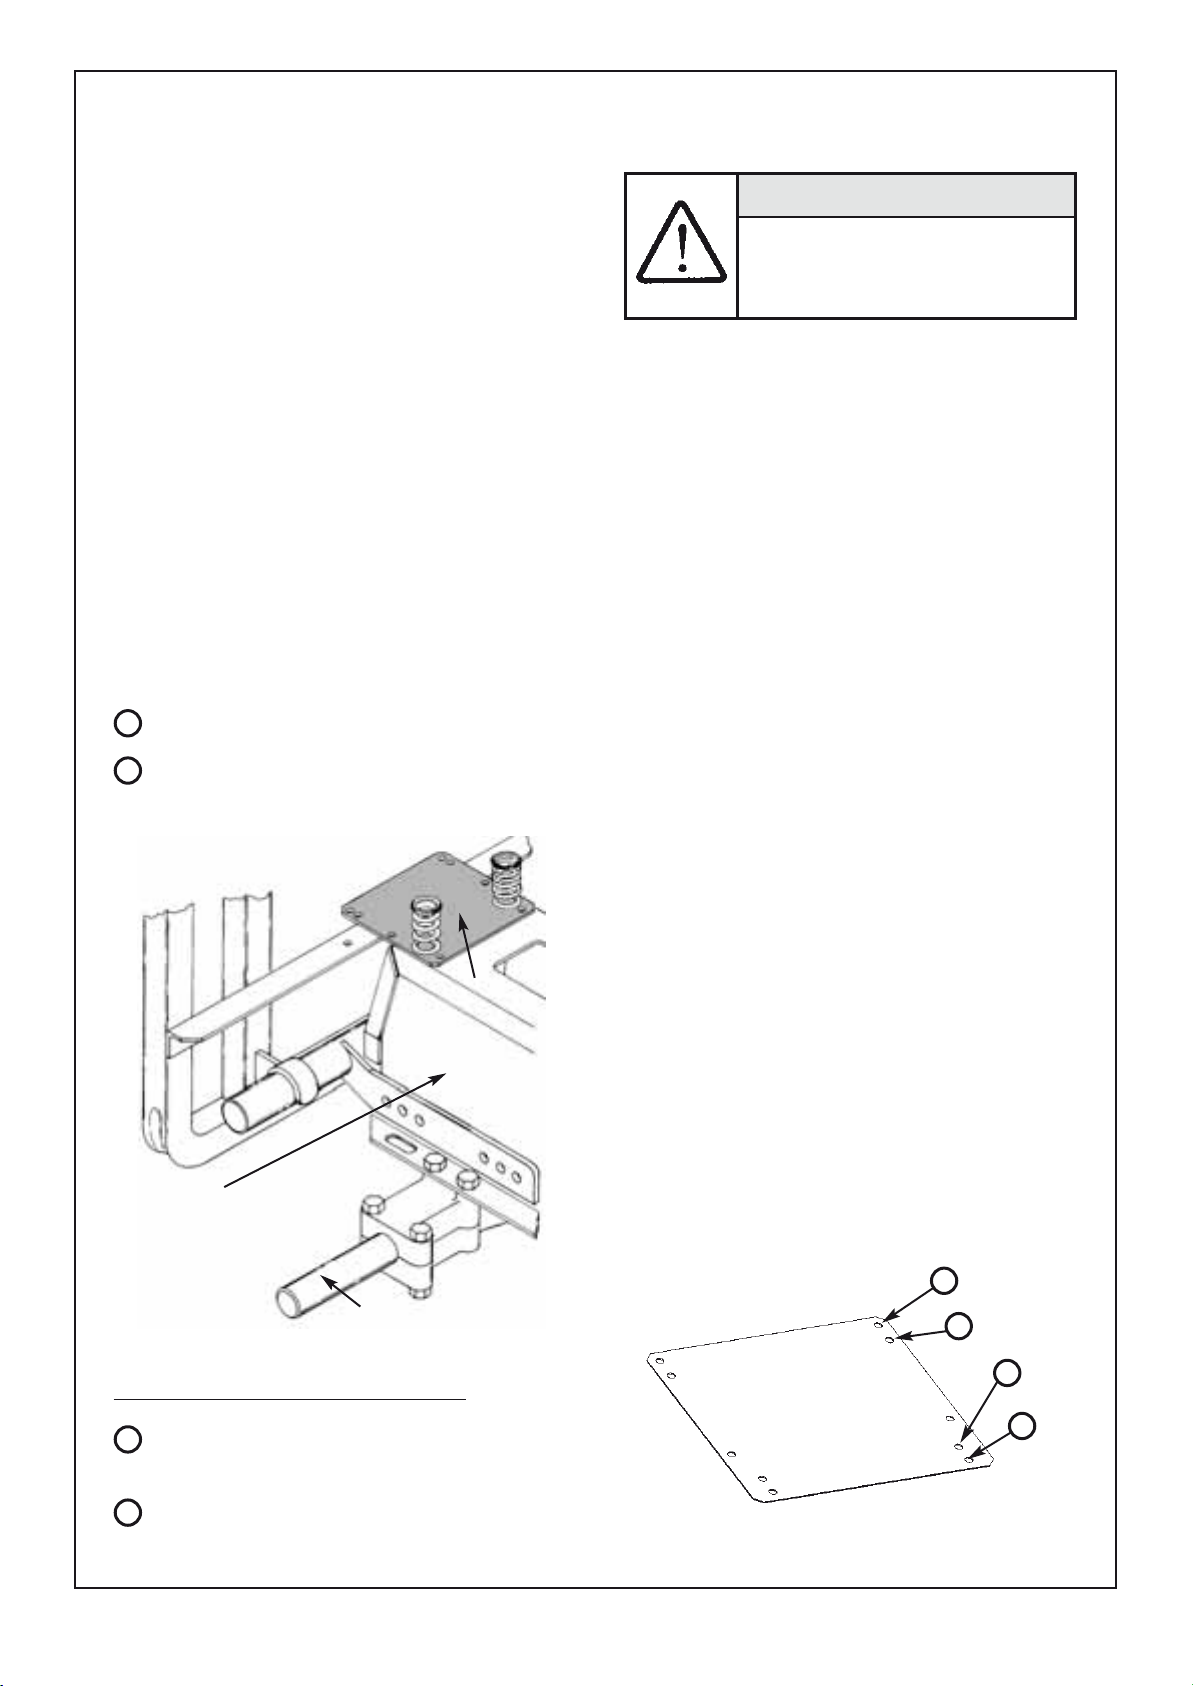
3.2 Installing the Support Bracket
The Grass Catcher mount support plate part No:
A12666 has four sets of mounting holes to suit all
front engine Rover ride-on mowers currently
manufactured by Rover. Refer figures 3.2a and 3.3b.
To fit the grass catcher to 17 and 18 series Rover rideon mowers the support mount plate supplied with the
grass catcher has to be replaced with the support
mount plate part No: A12942 which can be purchased
from any Authorised Rover Service Dealer.
1. Tilt the mower seat forward.
2. Remove the seat springs / buffers from the
mower by unbolting the centre retaining bolt
and nut.
3. Position the support bracket over the two seat
spring/buffer mounting holes. Retain the
support bracket by replacing the seat
springs/buffer and retaining nuts. (Figure 3.2a)
Mounting Holes - Support Bracket to Chassis
Refer figure 3.2b.
Lawn King
1
Rancher
2
Raider
TM
- fitted with 20” Rear Tyre
TM
Auto, Selector & Hydro Drive
TM
LawnkingTM- 18” Rear Tyres.
3.3 Installing the fan disc assembly
Model 180 (30” Cutterhead only)
CAUTION
Modifications to the cutterhead must be
carried out by an Authorised Rover
Service Dealer or Warranty on products
will be void.
1. Raise the front of the ride-on and support so as
to give access to the cutterhead disc.
2. Remove the existing cutter disc by unbolting the
four 3/8” unf. setscrews which hold the cutter
disc to the disc boss assembly.
3. Locate the new Fan Disc Assembly supplied
with the grass catcher and fit this to the
cutterhead assembly in place of the cutter disc
removed in Step 2.
4. Attach the Fan disc assembly to the disc boss
assembly using four 3/8” unf. setscrews. Torque
these setscrews to 46 Nm. (35Ft/lbs).
5. Four fluted blades should be fitted to the Fan
disc assembly to maximise grass cutting and
collecting. These fluted blades are available
from Rover service dealers and agents.
Support Bracket
Ride-on Chassis
Transaxle
Figure 3.2a - Towbar Installation
Grass Catcher Mount Support Plate Holes
TM
Selector Drive and Auto Drive.
TM
3
Rancher
Raider
6. Lower the ride-on to the ground and check the
cutterhead tilt and level, as per the Ride-on
Owners Manual.
3.4 Blade Installation
Model 198 (38” Cutterhead)
1. Raise the cutterhead to the high cut position.
2. Raise the front of the ride-on to give access to
the cutterhead discs and blades.
3. Remove the existing blades and replace with
four fluted blades using new blade bolts,
washers and nuts, on each disc. Fluted blades
are available from Rover service dealers and
agents.
4
3
2
1
Rancher
4
Lawn King
TM
Hydro.
TM
18” and 20” Rear Tyres.
Figure 3.2b Support Bracket
Page 3 Page 4

3.5 Installing the Support Bracket
3.6 Frame Assembly
The Grass Catcher is supported off the rear towbar of
the Rover RancherTM, RaiderTMand Lawn KingTMrideon mowers. Refer figure 3.3.
1. Lift the grass catcher assembly onto the mower,
positioning the support saddles on the rear
towbar on the mower.
2. Secure the grass catcher to the support bracket
by two 3/8” x 1” unc bolts and 3/8” unc nyloc
nuts. Placing a 3/8” flat washer under the nut
and bolt head.
Grass Catcher
Model 108 & 109
The internal frame assembly consists of the two side
frames (A) and spreader plate (B).
These components are fastened together using 3/16”
x 1” round head screws (C) and 3/16” unc. nyloc nuts
(D) (Refer Figure 3.5).
Figure 3.5 - Internal Frame Assembly
3.7 Frame Installation
Ride-on
Chassis
Transaxle
Figure 3.3 - Grass Catcher Support
1. With the grass catcher assembly mounted on the
mower, open up the grass catcher fully. To hold
the grass catcher open, tighten the pivot bolts.
(Refer Figure 3.6)
2. Insert the internal frame assembly (A) into the
grass catcher, aligning the mounting holes on
the internal frame over the locating bolts on the
catcher assembly.
3. Secure using four 1/4” nyloc nuts (B). (Refer
Figure 3.6)
4. Loosen the two pivot bolts so that the catcher
bag assembly swings easily.
Figure 3.4 - Mounting the Catcher Assembly
B
Pivot
Bolts
Figure 3.6 - Frame Installation

Rover Mowers Limited Ride-on Mower Grass Catcher Rover Mowers Limited Ride-on Mower Grass Catcher
3.8 Outlet Chute Installation
WARNING
When working on the cutterhead the
mower must be:
Stationary with the park brake
applied.
The engine switched off.
The ignition key removed.
1. Raise the stone guard (A) fitted to the mower
cutterhead and slip the tongue (B) of the outlet
chute between the stone guard and the mower
cutterhead.
(Refer Figure 3.7)
2. Lower the cutterhead stone guard (A) and slide
the outlet chute rod (C) into the tongue of the
outlet chute.
3. Retain the outlet chute rod by fitting the small
spring clip (D) into the eye of the rod.
A
C
B
Figure 3.8 - Fitting the Transfer Tube
3.10 Skirt Installation (Model 198 cutterhead only)
1. Raise the cutterhead of the mower to the highest
cut position.
Figure 3.7 - Outlet Chute Installation
3.9 Grass Transfer Tube
1. Hold the grass transfer tube by the handle (A)
and slide the tube into the opening in the front
panel of the grass catcher front plate. Then slide
the tube forward over the open end of the outlet
chute till it engages with the stop on the outlet
chute.
(Refer Figure 3.8)
2. Position the skirt on the underside of the front of
the cutterhead and attach using the two 5/16” x
3/4” cuphead bolts (A), pushed in from the
underside of the cutterhead so that the flat
washer (B) and nyloc nut (C) are on the top side
of the cutterhead.
(Refer Figure 3.9)
2. Retain the tube by clipping the elasticised strap
(B) on the outlet chute over the retaining button
on the transfer tube (C).
(Refer Figure 3.8)
Figure 3.9 - Skirt Installation
Page 5 Page 2
4. OPERATION
4.1 To Collect the Grass
1. Ensure that the outlet chute and transfer tube are
correctly positioned in accordance with the
procedures in Section 3.8 and 3.9.
2. Select the required height of cut on the ride-on
mower.
(a) On the first usage of the grass catcher, the
grass to be cut and collected should be taken
down to the required length over several
stages. This will reduce overload on the
grass catcher outlet chute.
(b) Once an area has been cut and the grass has
been collected, this area should be regularly
mowed to maintain an even grass length.
3. Select the ground speed on the ride-on mower.
(a) Initially a slow speed will have to be used
with the grass catcher to assist in grass
pickup and improve efficiency.
(b) Once the grass catcher has been used on an
area which is regularly maintained the
ground speed may be increased.
4. When cutting grass and using the grass catcher
try to maintain an even ground speed over the
area being cut and collected. This ensures a
continuous flow of cut grass being deposited
into the catcher.
5. When cutting and catching wet or damp grass it
is advisable to reduce the ground speed of the
mower. Clogging of either the outlet chute or the
transfer tube may occur if ground speed is too
fast under these conditions.
6. If the outlet chute or transfer tube should clog,
clear as follows:
(a) Disengage the cutterhead drive.
(b) Shift the speed selector to neutral.
(c) Apply the parking brake.
8. When turning your mower, with the grass
catcher mounted on your ride-on mower, always
visually check that the grass catcher will not
collide with any obstruction that could damage
it.
9. When using the grass catcher, check the transfer
tube from time to time to ensure that grass is
being collected and flowing up the grass transfer
tube.
10. It is recommended that the cutterhead cutting
discs be fitted with fluted blades for maximum
grass cutting and catching efficiency. Fluted
blades are available from Rover service agents
and dealers.
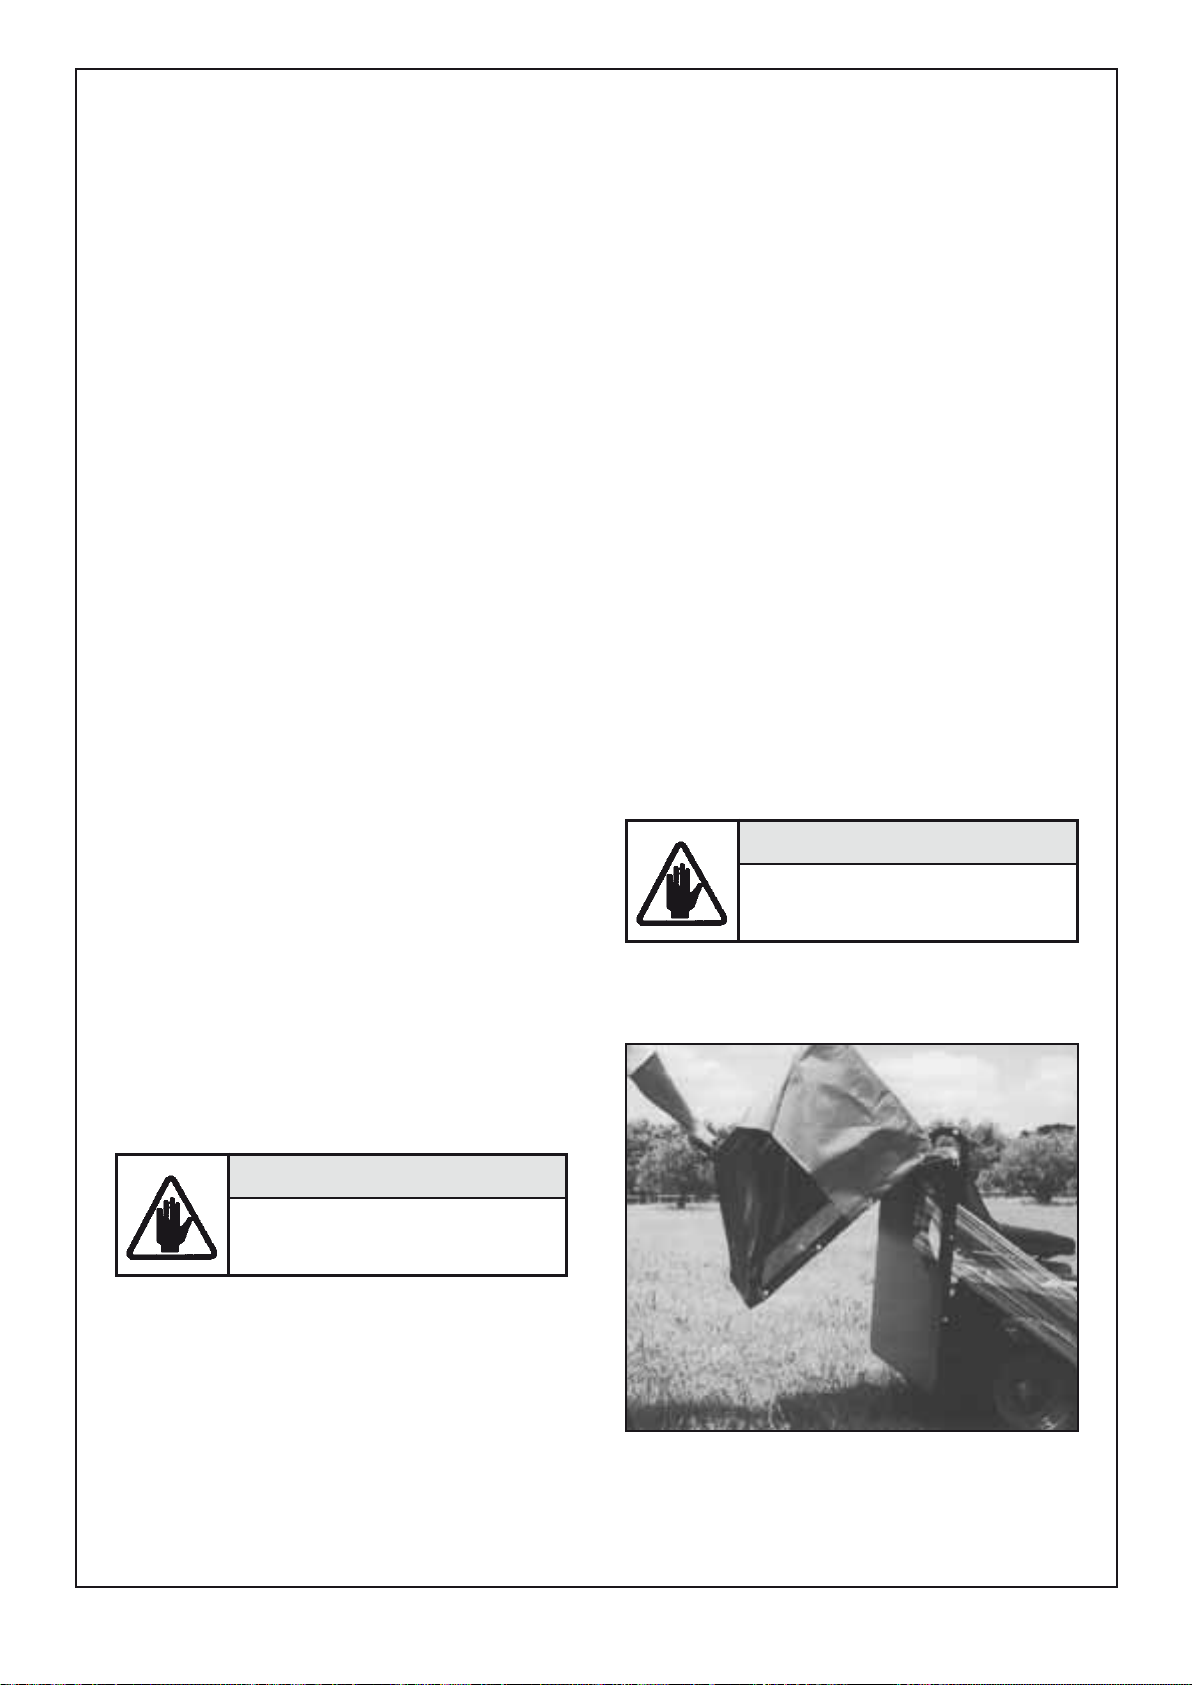
4.2 Emptying the Grass Catcher
1. Disengage the cutter drive on the mower when
the grass catcher is full or the area to be cut and
collected is complete.
2. Select a suitable site where the cut grass is to be
emptied and proceed to the selected site.
WARNING
Shift the speed selector on the mower
to neutral and apply the parking brake.
3. Dismount from the mower and empty the grass
catcher by opening the catcher, using the strap at
the back of the grass catcher. (Refer Figure 4.1)
WARNING
Switch the engine off.
Remove the ignition key.
(d) Remove the transfer tube and outlet chute.
(e) Clear the blockage.
7. Where possible, mow in an anticlockwise
direction to avoid objects lying in the grass,
which could damage the outlet chute, transfer
tube or grass catcher.
Figure 4.1 - Emptying the Grass Catcher

Rover Mowers Limited Ride-on Mower Grass Catcher Rover Mowers Limited Ride-on Mower Grass Catcher
5. MAINTENANCE
5.1 Cleaning the Grass Catcher
WARNING
The mower must be stationary with the
park brake applied, the engine switched
off and the ignition key removed.
1. Hose down the outside of the grass catcher
to keep it free of debris and any build-up of
grass or dirt
2. Open up the grass catcher and hose the
inside of the grass catcher to prevent any
build-up of dirt within the mesh of the grass
catcher. This could effect the free flow of
exhausted air from within the grass catcher.
5.2 Cleaning the Transfer Tube
CAUTION
Do not use any powder abrasive cleaners
or solvents (kerosene, petrol, etc.) to
clean the transfer tube as these scratch
and damage its clarity.
5.3 General
1. After each day’s use, the ride-on mower
should be cleaned down. Paying particular
attention to the build-up of any foreign
matter around the air intake ports in the top
of the cutterhead and around the engine
exhaust pipe and muffler.
2. Check the condition of the safety instruction
decals on the grass catcher and the transfer
tube and replace any that become difficult to
read.
3. Inspect the grass catcher lining for signs of
wear and tear caused by the conditions under
which it is used. If and when a replacement
grass catcher lining is required, replacement
grass catcher linings are available from
Rover Authorised dealers and service agents.
Wash out the inside of the transfer tube with a mild liquid
detergent and dry to maintain the transparency of the
tube.
Page 7 ii

NOTES

Warranty Conditions
GWAIL GROUP
AUSTRALIA &NEW ZEALAND ONLY
Rover Mowers Limited warrant that this machine is free from
defects in material and workmanship. This warranty is limited
to making good or replacing any part which appears upon
inspection by the manufacturer or his agent to be defective in
material or workmanship.
The engine used to power this machine is warranted by the
manufacturer whose warranty statement has been included
with the machine. As the warranty for the engine may differ
from the warranty for the other components, you are advised to
read the engine manufacturer’s warranty carefully
For other items this warranty shall apply for a period of 12
months from the date of purchase except for products used
commercially where the warranty is limited to 90 days.
This warranty does not obligate the manufacturer, his agents or
dealers to bear the transport costs incurred in the repair or
replacement of any defective part.
For your record:
Dealer’s Name:..............................................................................................................
This warranty excludes fair wear and tear, or any damage
caused by misuse or abuse. Parts such as blades, blade bolts, vbelts and spark plugs, which can be subjected to use beyond
their normal intended working capacity are also excluded.
This warranty is void if parts other than genuine have been
used or if repairs or alterations have been made without the
manufacturer’s written authority.
The above warranty does not exclude any condition or
warranty implied by the Trade Practices Act 1974 or any other
relevant legislation which implies any condition which cannot
be excluded.
REMEMBER:
PROOF OF PURCHASE IS THE RESPONSIBILITY OF THE OWNER AND
IS NECESSARY PRIOR TO WARRANTY WORK BEING UNDERTAKEN.
REPAIRS MUST BE CARRIED OUT BY AN AUTHORISED ROVER
DEALER /SERVICE AGENT AND GENUINE SPARE PARTS MUST BE
USED OR YOUR WARRANTY WILL BE VOID.
Dealer’s Address: ..........................................................................................................
Dealer’s Phone No: .......................................................................................................
Product Model No:........................................................................................................
Product Serial No: .........................................................................................................
Date of Purchase: ..........................................................................................................
Rover Mowers Limited reserves the right to make changes of and add
improvements upon its product at any time without notice or
obligation. The Company also reserves the right to discontinue
manufacture of any product at its discretion at any time.
ISO 9001 Lic 10168
Standards Australia
A.B.N. 11 000 257 303
Rover Mowers Australia Rover Mowers New Zealand
PO Box 1235 East Tamaki,
Eagle Farm. Qld 4009 Auckland.
Australia. New Zealand.
This Rover Owners Manual has been printed on 100% Australian
recycled paper as a sign of Rover Mowers’ commitment to Greening
RECYCLED PAPER
Australia and New Zealand.
04012664 Rev. D © Copyright 1/2006
PRINTED IN AUSTRALIA
 Loading...