

Page 1

™
DOMESTIC ROTARY LAWNMOWER
OWNER’S MANUAL
Model No: 10124
Page 2

SAFETY INSTRUCTIONS
• Never mow while barefoot or wearing open sandals or thongs. Wear long trousers and heavy
shoes
• Know your controls. Read the owner’s manual carefully. Learn how to stop the engine quickly
in any emergency
• Make sure the lawn is clear of sticks, stones, bones, wire and debris. They could be thrown by
the blade
• Stop the engine and disconnect the spark plug wire before clearing blockages, checking or
working on the mower.
• Before using, always inspect to see that blades, blade bolts and cutter assembly are not worn
or damaged. Replace worn or damaged blade to preserve balance.
• Check all nuts, bolts and screws often; always be sure the mower is in a safe operating
condition. Use only genuine replacement parts.
• Refuel outdoors only. Do not smoke while fuelling engine. Add fuel before starting the engine.
Never remove the cap off the fuel tank or add petrol while the engine is running or the engine
is hot. If petrol is spilled, do not attempt to start the engine but move the machine away from
the area of the spill and avoid creating any source of ignition until petrol vapours have
dissipated.
• Do not mow whilst people, especially children or pets are in the mowing area.
• Replace worn or faulty silencers (muffler)
• Mow only in good daylight.
• Never use the mower unless the grass catcher or guards (rear flap) provided by the
manufacturer are in position.
• Start the engine carefully with feet well away from the blade.
• Do not operate the engine in a confined space where exhaust fumes (carbon monoxide) can
collect.
• Stop the engine whenever you leave the mower, even for a moment.
• Do not allow children or people unfamiliar with these instructions to use the mower.
• Store the mower in a well-ventilated room away from naked flames such as may be found in
hot water heaters.
• Do not over-speed the engine or alter governor settings. Excessive speed is dangerous and
shortens the mower life.
• It is advisable to wear suitable eye protection when operating a mower.
• Turn the fuel off at the conclusion of mowing and reduce the throttle setting during engine
run-out.
• Store fuel in a cool place in a container specifically designed for the purpose. In general,
plastic containers are unsuitable.
• Stop the engine, disconnect the spark plug wire and inspect the mower if :
• Never cut grass while walking backwards.
• Stop the engine before pushing the mower across gravel drives, walkways or roads.
• Walk, never run.
• Mow across the face of slopes, never up and down. Exercise extreme caution when changing
direction on slopes. Do not mow excessively steep slopes.
• Never pick up or carry a mower when it is operating.
DAMAGED BLADES AND WORN BOLTS ARE MAJOR HAZARDS.
a) the mower begins to vibrate abnormally; or
b) after striking a foreign object.
CAUTION
To avoid engine damage drain the oil and fuel from the
engine before turning the lawnmower over in any direction.
Page 3
INTRODUCTION
Congratulations on your purchase of a Rover Mowers domestic rotary lawnmower.
This manual covers the setting up, operation and maintenance of the Rover domestic
rotary lawnmower. Please read and understand this owner’s manual before using the
mower. If any point is unclear, contact Rover Mowers or any Rover Mowers
authorized service dealer or agent.
To emphasise special information the following WARNING and CAUTION highlights
are used.
WARNING
The safety of the user and
others involved. Personal
injury may result should
this information be
disregarded.
CAUTION
Follow these instructions
to avoid mower damage
and possible loss of
warranty.
MANUAL CONTENTS Page
• Safety instructions 1
• Introduction 2
• Setting up 3
• Operation 4 & 5
• Maintenance 5 & 6
• Warranty conditions 7
CARTON CONTENTS: Quantity
• Rover domestic rotary lawnmower 1
• Rover owner’s manual 1
• Engine manufacturer owner’s manual 1
• Fabric grass catcher and metal internal frame 1
• Cuphead bolts- lower handle bars to mower base 4
• Washer face hex nuts- lower handle bars to mower base 4
If when unpacking your new lawnmower it is found that there are items missing
contact your nearest authorized Rover Mowers service dealer or agent.
2
Page 4

SETTING UP
With the aid of a second person remove the lawnmower from the carton and proceed to
assemble the handle bars to the mower.
Handle bar assembly- refer figure 1
• Fold the handle bars out straight, taking care not to
damage the throttle cable which is looped around the
engine for transit. Tighten the handle bar knobs.
• Position the throttle cable and throttle control to the right
hand side of the mower for assembly to the mower
Handle bar knob
Figure 1. Handle bar knobs
• Align the lower handle bars against
the inner face of the mower brackets,
located at the rear of the mower base.
Insert the four cuphead bolts from the
outside through the mower brackets
first and into the lower handle bars,
and retain with the four washer face
hex nuts on the inside of the lower
handle bar and tighten.
Refer to figure 2
Mower bracket
Cuphead bolts
and washer
face hex nuts
Figure 2. Handle bar assembly
Lower handle bar
Engine oil
Oil must be added before attempting to start the engine otherwise
damage to engine will occur.
Refer to the engine manufacturer owner’s manual
The 4 stroke engine fitted to the Rover lawnmower is shipped with no oil in the sump.
Engine fuel
Refer to the engine manufacturer owner’s manual
Use only fresh unleaded petrol in the lawnmower engine.
3 4
Page 5

OPERATION
WARNING
Under normal usage the grass catcher material is subject to deterioration
and wear, and should be frequently checked for wear or damage.
Replace with a genuine Rover grass catcher if found to be damaged.
Installing the grass catcher- refer figure 3
• Move the throttle control lever to the stop position and wait till the blades have come to a
complete stop
• Raise the rear flap of the mower with one hand and with the other hand raise and position
the grass catcher against the rear of the mower.
• Locate the two hooks on the front of the grass catcher frame into the slots on either side of
the rear flap and over the rear flap pivot rod.
Slot in flap
Hook
Figure 3. Grass catcher fitment
Flap rod
Slot in flap
Grass catcher
handle
Removing the grass catcher– refer figure 3
• Move the throttle control lever to the stop position and wait till the blades have come to a
complete stop
• Raise the flap of the mower with one hand and with the other hand lift the grass catcher
up and away from the rear of the mower.
• Lower the rear flap against the rear of the mower.
The grass catcher should only be fitted or removed when
the engine is stopped. Never raise the rear flap when the
engine is running
WARNING
Hook
Page 6

Adjusting the height of cut- refer figure 4
The Rover lawnmower has nine height settings controlled by
the height adjustment lever located at the rear right hand
wheel.
• Grasp the height adjustment lever and pull the lever away
from the base to disengage it from the locating holes in
the base.
• Move the lever either forwards or
backwards to the desired position
and release the lever so as to
engage in the base.
Height
adjustment lever
Figure 4. height adjustment
Starting the engine
Refer to the engine manufacturer owner’s manual for detailed starting procedure.
Ensure that the engine oil is at the correct level and that the fuel tank is full of fresh unleaded petrol.
• Move the throttle control lever to the “START” position.
• Prime the engine in accordance with the engine manufacture’s instructions
• Grasp the starter cord handle and pull with a quick firm action. Allow the starter cord to recoil
back into its housing whilst retaining a grip on the handle. If the engine fails to start repeat till the
engine starts
Stopping the engine
Move the throttle control lever to the “STOP” position
Wait till the engine comes to a complete stop before removing or fitting the grass catcher to the
mower or attempting any maintenance work on the mower.
MAINTENANCE
WARNING
Before carrying out any maintenance on the mower remove the spark
plug lead from the spark plug to prevent accidental starting
Engine air cleaner
Refer to the engine manufacturer owner’s manual for detailed maintenance instructions. The engine
air cleaner element must be serviced after every 25 hours of normal mowing. The air cleaner
element must be serviced more regularly if the mower is used in dusty conditions. Replace
immediately if the air cleaner element is damaged.
Blade- refer figure 4
Check the condition of the blade and central fastener at regular intervals, or after striking a solid
object, or if the mower begins to vibrate abnormally. The blade with use, will loose it’s sharp edge
and the quality of the grass finish will deteriorate. When this happens the blade should be removed
and sharpened or replaced with a new blade.
CAUTION
The blade must be balanced after sharpening
5
Page 7
Blades should only be sharpened and balanced by
an authorized service dealer.
WARNING
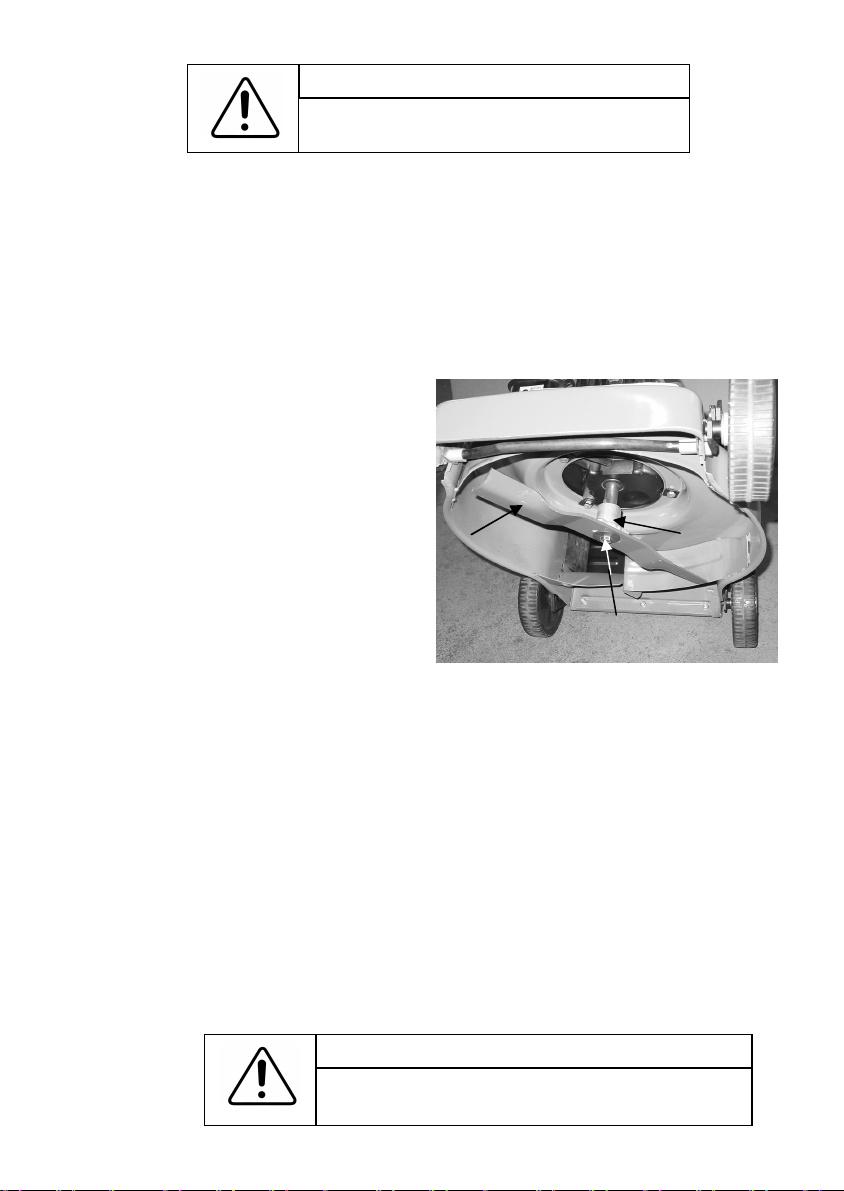
Blade removal- refer figure 5
• Move the throttle control to the stop position and remove the spark plug lead from the spark plug
• Tilt the mower back on it’s handle bars with the spark plug upwards and secure safely in
position
• Remove the single central retaining bolt and large domed washer and remove the blade from
the blade boss
• Check the condition of the blade and replace the blade if badly damaged or return to an
authorized service dealer for blade sharpening and balancing
Blade fitting- refer figure 5
• Move the throttle control to the stop position
and remove the spark lead from the spark plug
• Tilt the mower back on it’s handle bars with the
spark plug upwards and secure safely
• Check the condition of all components before
fitting to the engine shaft and
replace any if damaged
Blade Blade boss
• Ensure that the key is located in the
engine shaft if the blade boss has been re-
moved
• Fit the blade to the bottom side of the blade
boss aligning the two spigots on the blade
boss with the two holes in the blade. The flutes
at the ends of the blade should be facing into
the mower base.
• Fit the centre bolt with the large domed washer
through the centre of the blade and into the
engine shaft and torque to 57 to 62Nm (42 to 46 ft.lbs). Note: the domed washer needs to be
fitted to the blade with the raised dome pointing away from the blade bottom face
Figure 5. Underside of mower base
Centre bolt & domed
washer
• Lower the mower to the ground and fit the spark plug lead to the spark plug
Cleaning
To prevent the build up of grass under the deck and to maintain the appearance of the mower it
should be cleaned at the end of each days mowing.
• Stop the engine and remove the spark plug lead when the blade has stopped
• Remove the grass catcher and tilt the mower back on it’s handle bars
• Hose the underside of the mower housing to remove all grass build up
• Lower the mower to the ground and fit the spark plug lead to the spark plug
• Hose the fabric grass catcher inside and out to remove all grass debris and hang up to dry
before storage
CAUTION
Do not hose the engine as water can damage the air
cleaner and ignition system
Page 8

Warranty Conditions
Australia & New Zealand Only
Rover Mowers Limited warrant that this machine is free from defects in material and workmanship.
This warranty is limited to making good or replacing any part which appears upon inspection by
the manufacturer or his agent to be defective in material or workmanship.
The engine used to power this machine is warranted by the manufacturer whose warranty
statement has been included with the machine. As the warranty for the engine may differ from the
warranty for the other components, you are advised to read the engine manufacturer’s
warranty carefully.
For other items this warranty shall apply for a period of 12 months from date of purchase for
domestic use only. However these items are not warranted for commercial or industrial use.
This warranty does not obligate the manufacturer, his agents or dealers to bear the transport costs
incurred in the repair or replacement of any defective part. This warranty excludes fair wear and
tear, or any damage caused by misuse or abuse. Parts such as blades, blade bolts, and spark
plugs, which can be subjected to use beyond their normal intended working capacity are also
excluded.
This warranty is void if parts other than genuine have been used or if repairs or alterations have
been made without the manufacturer’s written authority. The above warranty does not exclude any
condition or warranty implied by the Trade Practices Act 1974 or any other relevant
legislation which implies any condition which cannot be excluded.
REMEMBER:
PROOF OF PURCHASE IS THE RESPONSIBILITY OF THE OWNER AND IS NECESSARY
PRIOR TO WARRANTY WORK BEING UNDERTAKEN. REPAIRS MUST BE CARRIED OUT
BY AN AUTHORISED DEALER OR AGENT AND GENUINE SPARE PARTS MUST BE USED
OR YOUR WARRANTY WILL BE VOID.
Rover Mowers Limited reserves the right to make changes and add improvements to its product at any time
without notice or obligation. The Company also reserves the right to discontinue manufacture of any product at
its discretion at any time.
For your Record:
Retailers Name: .............................................Address: ...................................................................
Phone No: ......................................................Model No: ................................................................
Serial No: .......................................................Date of Purchase: ....................................................
A.B.N. 11 000 257 303
Rover Mowers Limited, PO. Box 1235, Eagle Farm. Qld. Australia. 4009
Phone: 07 3213 0233
PO. Box 58-774, Greenmount, Auckland. New Zealand.
Phone: 09 274 7400
04016520 © Copyright
Revision A 2005
™
7
 Loading...