

Page 1
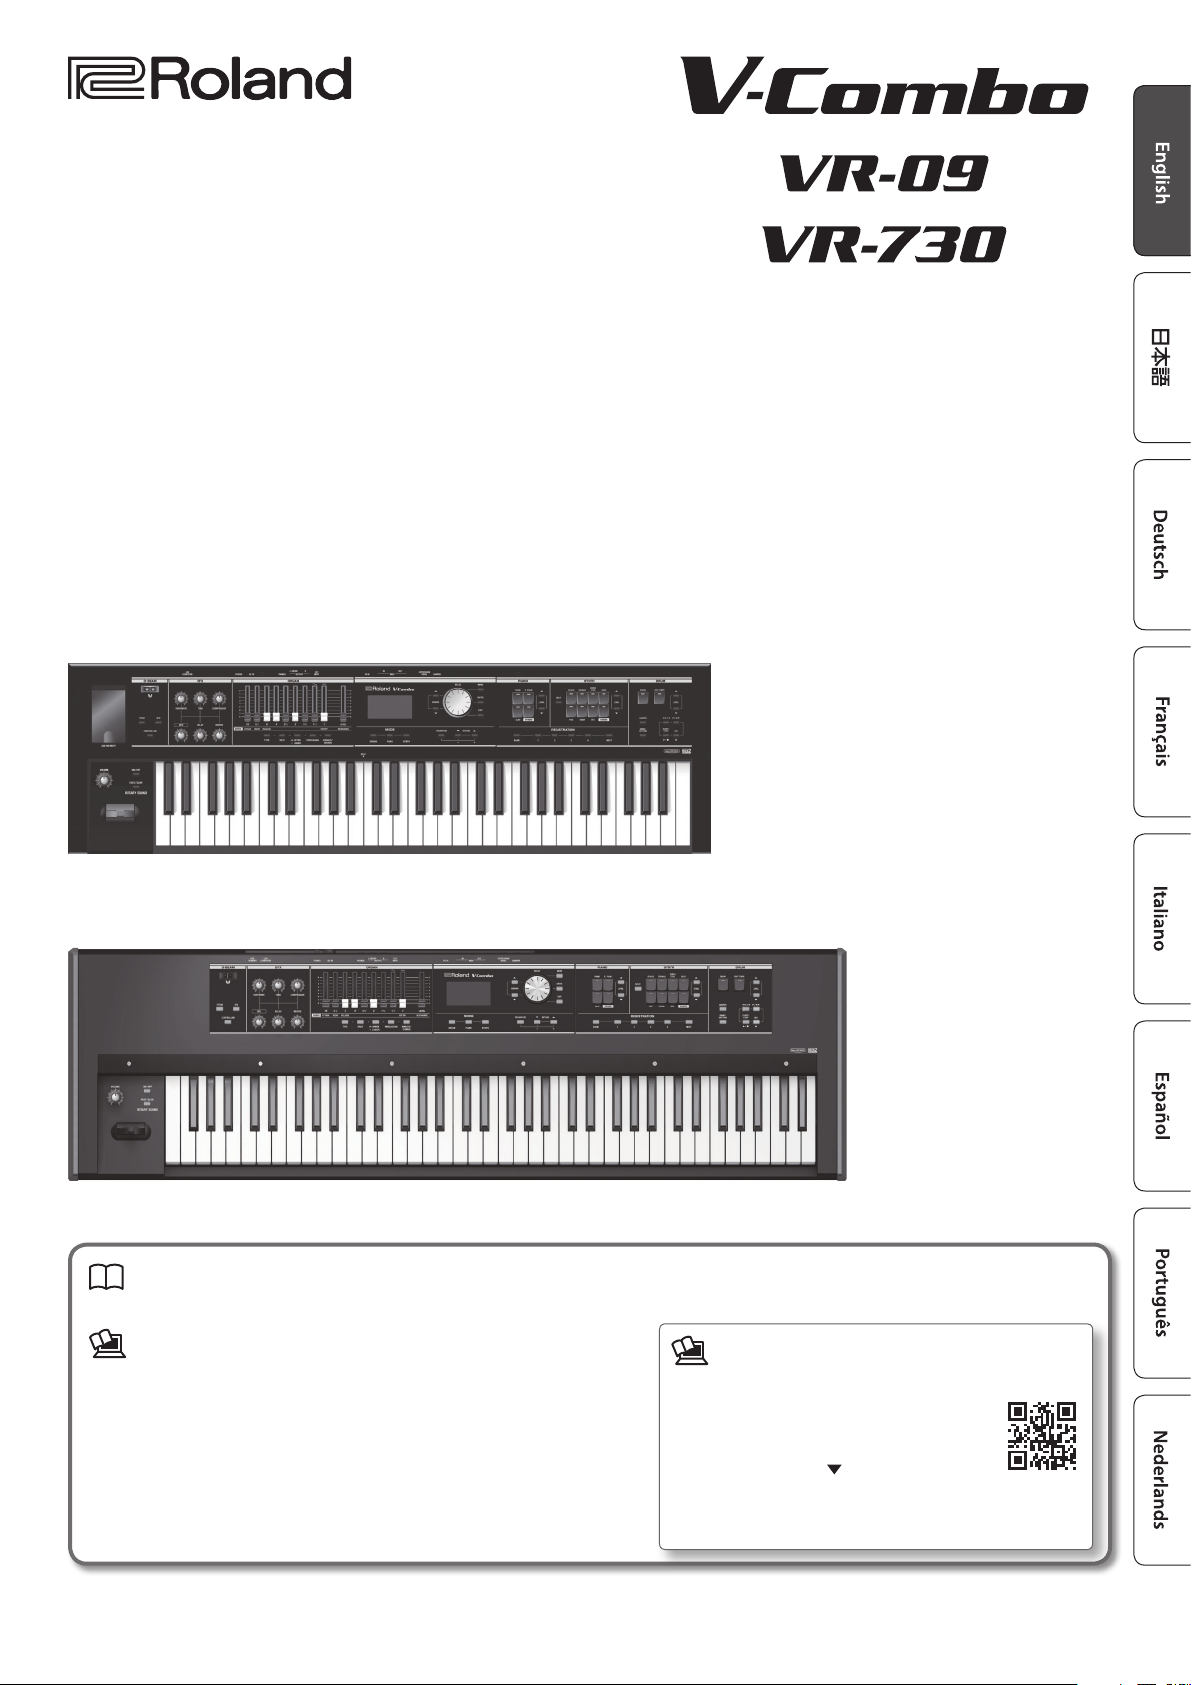
VR-09
Owner’s Manual
VR-730
Owner’s Manual (this document)
Read this rst. It explains the basic things you need to know in order to use the unit.
PDF Manual (download from the Web)
• Reference Manual
This explains all functions of the unit.
• Data List
This is a list of the sounds, drum kits, rhythm patterns, and sound eects built
into the unit.
• MIDI Implementation
This is detailed information about MIDI messages.
To obtain the PDF manual
Enter the following URL in your
1.
computer.
http://roland.cm/om
2. Choose “V-Combo VR-09” or
“V-Combo VR-730” as the product name.
Before using this unit, carefully read “USING THE UNIT SAFELY” and “IMPORTANT NOTES” (the leaet “USING THE UNIT SAFELY” and the Owner’s Manual (p. 32)). After reading, keep
the document(s) where it will be available for immediate reference.
Copyright © 2017 ROLAND CORPORATION
Page 2
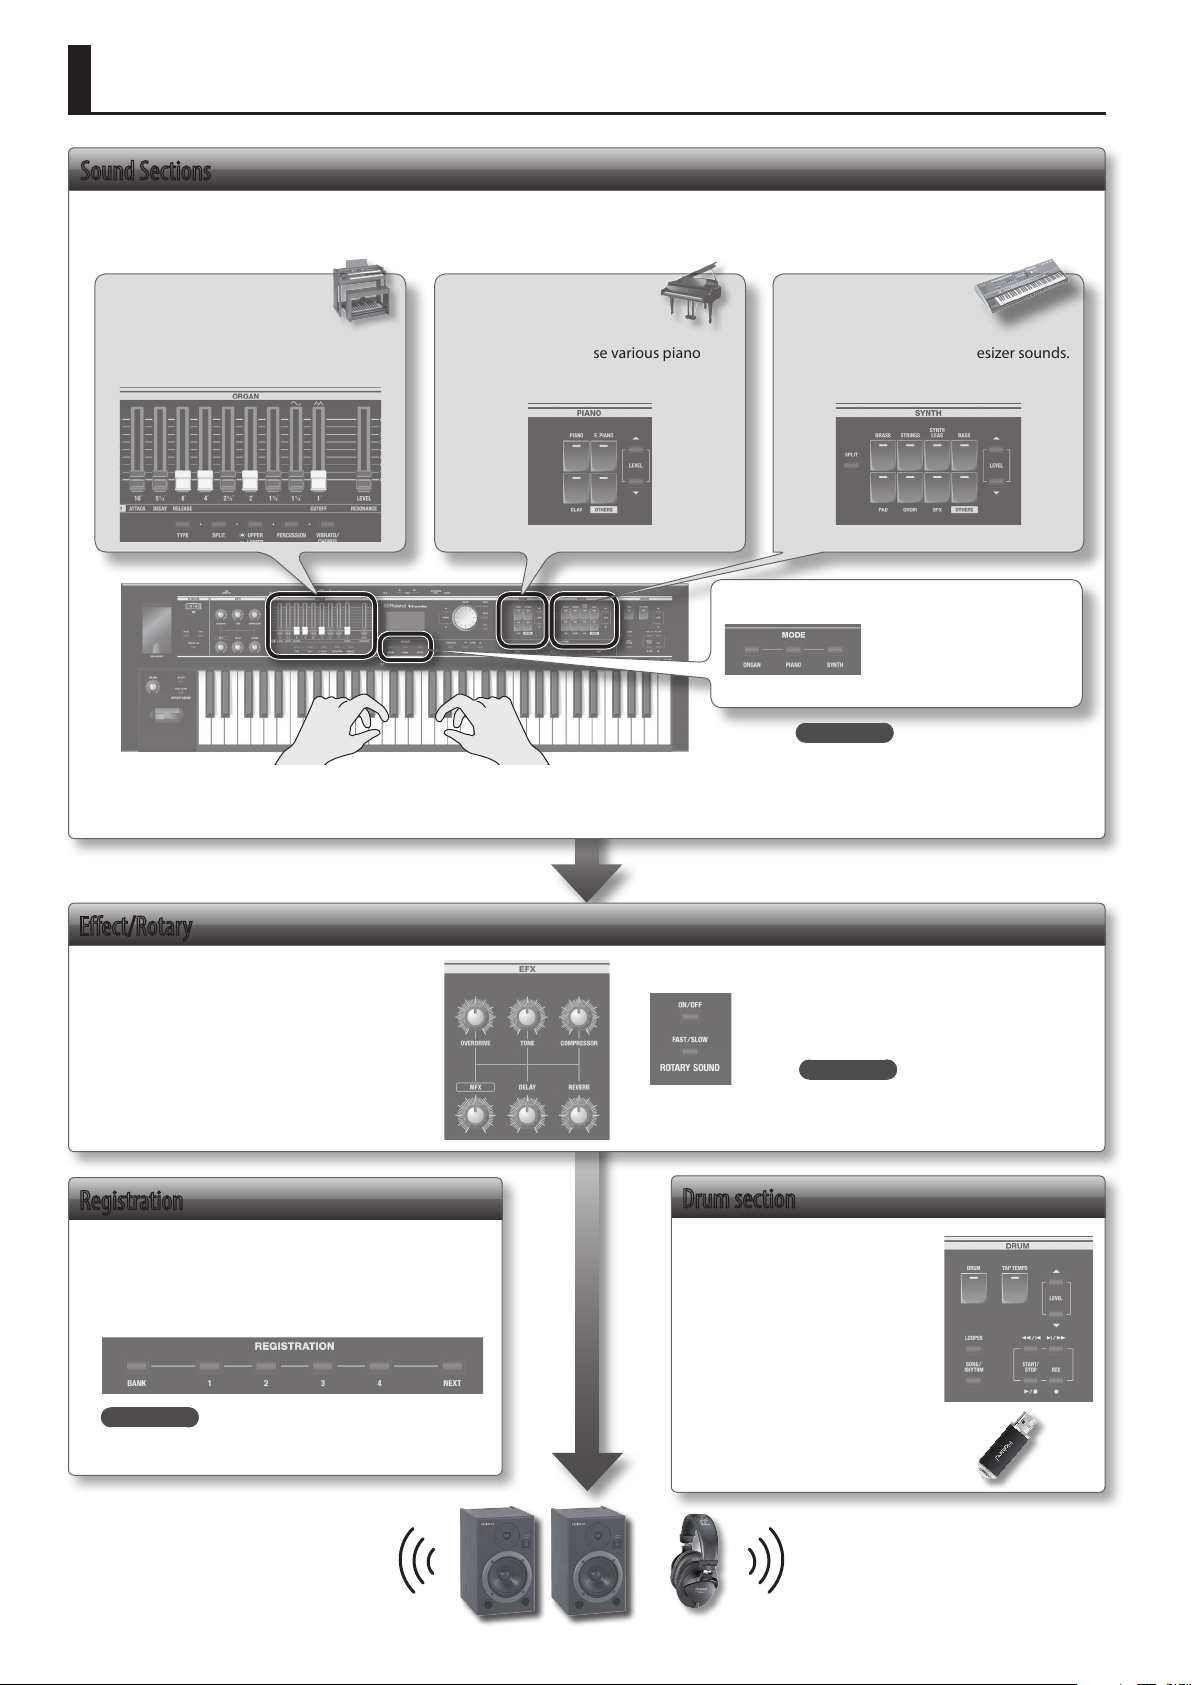
An Overview of This Unit
Sound Sections
This unit has three sound sections—organ, piano, and synthesizer—and each section occupies a separate area of the panel.
You can also play two sounds simultaneously, or divide the keyboard into two regions and play dierent sounds in the left and right regions.
Organ section
Here you can use the harmonic bars to
shape the organ sound to your taste.
* The illustration shows the VR-09.
Piano section
Here you can choose various piano
sounds.
Synthesizer section
Here you can select synthesizer sounds.
MODE buttons
Here you can select an
individual organ sound,
piano sound, or synthesizer
sound at a single touch.
REFERENCE
• “Selecting Sounds” (p. 9)
• “Modifying the Organ Sound” (p. 12)
• “Modifying the Synthesizer Sound” (p. 13)
• “Combining Two Sounds” (p. 18)
Eect/Rotary
You can apply eects and a rotary speaker
simulation.
By operating the knobs and buttons you can
make the sound change in real time.
Registration
Sound and eect settings as well as combinations of
sounds can be stored as a “registration.”
You can easily switch between sounds by recalling a
previously-stored registration.
REFERENCE
“Selecting Your Favorite Sounds (Registration)” (p. 10)
REFERENCE
• “Adding Eects to the Sound” (p. 14)
• “Using the Rotary Eect” (p. 12)
Drum section
The drum section lets you do the
following.
• Play drum sounds or sound
eects from the keyboard (p. 11).
• Perform while playing back
internal rhythm patterns or
songs from a USB ash drive
(p. 22, p. 24).
• Record your performance (p. 23).
• Perform using the looper (p. 26).
2
Page 3

Contents
An Overview of This Unit .........................................2
Panel Descriptions ...............................................4
Front Panel ......................................................4
Rear Panel (Connecting Devices) .................................6
Getting Ready ...................................................7
Installing Batteries ..............................................7
Attaching the Ferrite Core .......................................7
Turning the Power On/O .......................................8
Turning the Power On .....................................8
Turning the Power O .....................................8
Listening to the Demo Songs ....................................8
Using the Included USB Memory Protector .......................8
Selecting Sounds ................................................9
Selecting Sounds with One Touch. . . . . . . . . . . . . . . . . . . . . . . . . . . . . . . . 9
Selecting Organ Sounds ...................................9
Selecting Piano Sounds ....................................9
Selecting Synthesizer Sounds .............................10
Selecting Your Favorite Sounds (Registration) ...................10
Recalling a Registration ...................................10
Switching Registration Banks .............................11
Storing a Registration ....................................11
Selecting Drum Sounds ........................................11
Modifying the Organ Sound .....................................12
Using the Harmonic Bars .......................................12
Using the Rotary Eect .........................................12
Using Percussion ...............................................12
Using Vibrato/Chorus ...........................................12
Modifying the Synthesizer Sound ................................13
Changing the Volume Envelope (ATTACK, DECAY, RELEASE) ......13
Adjusting the Tonal Character (CUTOFF, RESONANCE) ...........13
Adding Eects to the Sound .....................................14
Applying Eects (EFX) ..........................................14
Modifying the Sound / Producing Sound Eects (D-BEAM
Controller) .....................................................15
D-BEAM Controller Settings ...............................15
Changing the Pitch/Applying Vibrato (Pitch Bend/Modulation
Lever) ..........................................................16
Making the Pitch Change Smoothly (Portamento) ...............16
Specifying the Time of Pitch Change ......................16
Changing the Key Range ........................................17
Raising or Lowering the Range in Octaves (Octave) ..............17
Transposing the Key (Transpose) ................................17
Combining Two Sounds .........................................18
Layering Two Sounds (Dual) ....................................18
Layering a Piano Sound and Synthesizer Sound ...........18
Combining an Organ Sound with a Piano Sound or
Synthesizer Sound .......................................18
Cancelling Dual ..........................................18
Playing Dierent Sounds in the Left and Right Hands (Split) .....19
Assigning the Dual Sounds to the Left and Right Regions ..19
Combining Two Organ Sounds. . . . . . . . . . . . . . . . . . . . . . . . . . . .19
Combining a Piano Sound and Synthesizer Sound .........20
Combining an Organ Sound with a Piano Sound or
Synthesizer Sound .......................................20
Playing Drum Sounds in the Lower Part ...................21
Changing the Split Point ..................................21
Cancelling Split ..........................................21
Performing with Rhythm Pattern ................................22
Selecting/Playing Rhythm Pattern ..............................22
Changing the Tempo of the Rhythm Pattern .....................22
Adjusting the Volume of the Rhythm Pattern ....................22
Recording Your Per formance ....................................23
Recording ......................................................23
Playing a Song .................................................24
Renaming a Song ..............................................24
Deleting a Song ................................................24
Using the Looper ...............................................26
Recording with the Looper .....................................26
Recording While a Rhythm Pattern Plays ..................27
Loading an Audio File for Playback or Recording ...........27
Deleting the Phrase ......................................27
Saving a Phrase ................................................27
Convenient Functions ...........................................28
Making the Power Automatically Turn O After a Time (Auto O) 28
Saving Registrations to a USB Flash Drive (Save Registration) ....28
Loading Saved Registrations from a USB Flash Drive (Load
Registration) ...................................................29
Individually Loading Registrations from a USB Flash Drive (Load
One Regist) ....................................................29
Formatting a USB Flash Drive (Format USB) ......................30
Initializing a Synthesizer Sound .................................30
Restoring the Factory Settings (Factory Reset) ...................30
Detailed Settings for All Functions (Menu) ........................31
Main Specications .............................................31
USING THE UNIT SAFELY .........................................32
IMPORTANT NOTES .............................................32
3
Page 4

Panel Descriptions
Front Panel
1
13 14
2 3 4
15
5
6
7
8
9 10
11
* The illustration shows the VR-09.
Number
Name Explanation Page
Connect a USB ash drive (sold separately) here.
You can save or play back songs you’ve recorded, and save or load registration sets.
If you connect a wireless USB adapter (WNA1100-RL; sold separately), you’ll be able to use
USB MEMORY port
1
D-BEAM controller
You can apply various eects to the sound by positioning your hand above the D-BEAM controller.
[PITCH] button If this is on, the D-BEAM controller will control the pitch.
2
[CONTROLLER] button If this is on, the D-BEAM controller will control the eect you’ve assigned.
Eect section
Here you can apply eects to the sound.
[OVERDRIVE] knob Applies a distortion eect.
[TONE] knob Adjusts the tonal character.
3
[COMPRESSOR] knob Makes the sound more consistent.
[MFX] knob Applies a multi-eect (multiple eects).
[DELAY] knob Delays the sound to create an echo-like eect.
[REVERB] knob Applies reverberation to the sound.
Organ section
Here you can select organ sounds. You can also create your own organ sounds, and adjust the volume.
Harmonic bars
[LEVEL] bar Adjusts the volume of the organ section. —
4
[TYPE] button Selects the variation of organ sounds. p. 9
ORGAN [SPLIT] button Divides the organ into two keyboard regions. p. 19
[UPPER/LOWER] button Selects the part when using the harmonic bars to shape the sound. p. 19
[PERCUSSION] button Turns the percussion eect of the organ sound on/o. p. 12
[VIBRATO/CHORUS] button Turns the vibrato or chorus eect of the organ sound on/o. p. 12
Display
5
Display Sound names and other settings are shown here. —
MODE [ORGAN] button Allows you to play organ sounds. p. 9
MODE [PIANO] button Allows you to play piano sounds. p. 9
6
MODE [SYNTH] button Allows you to play synthesizer sounds. p. 10
applications that support wireless.
* The VR-730’s USB MEMORY port is located at the right side of the rear panel.
Use these to shape the organ sound.
You can modify the sound in real time as you play.
12
p. 23
p. 28
p. 15[SFX] button If this is on, the D-BEAM controller will control the sound eects.
p. 14
p. 12
4
Page 5
Panel Descriptions
Number
Name Explanation Page
CURSOR [
[VALUE] dial Use this to modify a value. —
7
[MENU] button Accesses the menu screen. p. 28
[ENTER] button Conrms a value or executes an operation. —
[EXIT] button Returns to the previous screen, or cancels an operation. —
[TRANSPOSE] button Raises or lowers the keyboard range in steps of one semitone. p. 17
8
OCTAVE [DOWN] [UP] buttons Raise or lower the keyboard range in steps of one octave. p. 17
Piano section
Here you can select piano sounds and adjust the volume of the piano sound.
[PIANO] button Selects piano sounds.
[E. PIANO] button Selects electric piano sounds.
9
[CLAV] button Selects clavi sounds.
[OTHERS] button Selects piano sounds that are not shown on the panel.
PIANO LEVEL [
Synthesizer section
Here you can select synthesizer sounds and adjust the volume of the synthesizer sound.
SYNTH [SPLIT] button Divides the keyboard, allowing you to play two dierent sounds. p. 19
[BRASS] button Selects brass sounds.
[STRINGS] button Selects strings sounds.
[SYNTH LEAD] button Selects synth lead sounds.
10
[BASS] button Selects bass sounds.
[PAD] button Selects synth pad sounds.
[CHOIR] button Selects choir sounds.
[SFX] button Selects sound eects.
[OTHERS] button Selects synthesizer sounds that are not shown on the panel.
SYNTH LEVEL [
Registration
Here you can store and recall your favorite sound settings.
11
[BANK] button Selects the registration bank. p. 11
[1]–[4] buttons Select a registration (1–4). p. 10
[NEXT] button Selects the next registration. p. 10
Drum section
Here you can select drum kits or rhythm patterns, and select and play songs.
[RHYTHM] button Selects drum kits. p. 11
[TAP TEMPO] button Species the tempo of the rhythm pattern. p. 22
DRUM LEVEL [
[LOOPER] button Turns the looper function on/o. p. 26
12
[SONG/RHYTHM] button Selects songs or rhythm patterns.
[
[
[
Controllers at the left of the keyboard
13
[VOLUME] knob Adjusts the overall volume. —
ROTARY SOUND [ON/OFF] button Turns the rotary speaker (modulation eect) on/o. p. 12
14
ROTARY SOUND [FAST/SLOW]
button
Pitch bend/Modulation lever You can use the lever to modify the sound in real time. p. 16
15
] [ ] buttons
] [ ] buttons
] [ ] buttons
] [ ] buttons
] (REC) button
] (START/STOP) button
] [ ] buttons
Use these to select parameters. —
Adjust the volume of the piano section. —
Adjusts the volume of the synthesizer section. —
Adjust the volume of the drum kit, song, or rhythm pattern. p. 22
Records your performance.
Starts/stops recording or playback. p. 24
Move the playback position of the song. p. 24
Changes the speed of the rotary speaker. p. 12
p. 9
p. 10
p. 22
p. 24
p. 23
p. 26
5
Page 6

Panel Descriptions
Rear Panel (Connecting Devices)
DAMPER jack
You can connect a pedal switch or a damper
pedal (DP series; sold separately) here.
The pedal switch can be used to sustain the
notes.
While you continue holding down the pedal,
notes will continue sounding even after you
take your ngers o the keys.
You can also use the pedal switch to control
the looper (Damper Assign: &PDF).
EXPRESSION PEDAL jack
Connect an expression pedal (EV series; sold
separately) to this jack.
You can use the expression pedal to control
the volume.
* Use only the specied expression pedal (EV
series; sold separately). By connecting any
other expression pedal, you risk causing
malfunction and/or damage to the unit.
MEMO
You can also connect a
pedal switch (DP-2; sold
separately) here to control
the looper (Expression
Assign :&PDF).
PK IN connector
Connect a pedalboard (PK-9; sold separately)
to this connector.
This allows you to play the pedal part of the
organ.
PHONES jack
Connect you headphones (sold
separately) to this jack.
MIDI connectors
Connect an external MIDI device here to
transfer performance data.
* The MIDI connectors and the MIDI
functionality of the USB COMPUTER
port cannot be used simultaneously.
&
PDF
EXT INPUT jack
If you use a stereo mini-plug cable to
connect your audio player or other
audio source here, the sound from the
connected device will be output from
the OUTPUT jacks. Use the controls
of the connected device to adjust its
volume.
* This sound cannot be recorded.
DC IN jack
Connect the included AC adaptor to this jack.
Place the AC adaptor so the
side with the indicator faces
upwards and the side with
textual information faces
downwards.
The indicator will light when
you plug the AC adaptor into
an AC outlet.
6
OUTPUT jacks
Connect an amp or
mixer to these jacks to
output the sound.
* To prevent malfunction and equipment failure, always turn down the volume, and turn o all the
units before making any connections.
* If you turn the power of this instrument on/o while a MIDI device is connected to the MIDI OUT
connector, unexpected data might be transmitted from the MIDI OUT connector. If a problem
occurs, disconnect the MIDI device while this instrument is still powered-on.
* When you operate the expression pedal, please be careful not to get your ngers pinched between
the movable part and the panel. In places where small children are present, make sure that an adult
provides supervision and guidance.
If you connect a
USB cable, you
must attach the
ferrite core (VR-730
only: p. 7).
[POWER] switch
Press this switch to turn it on/o.
USB COMPUTER port
You can use a commercially available USB
cable to connect this unit to your computer
so that performance data (MIDI data) can be
transmitted and received.
* The MIDI connectors and the MIDI
functionality of the USB COMPUTER port
cannot be used simultaneously.
page 8
&
PDF
Page 7
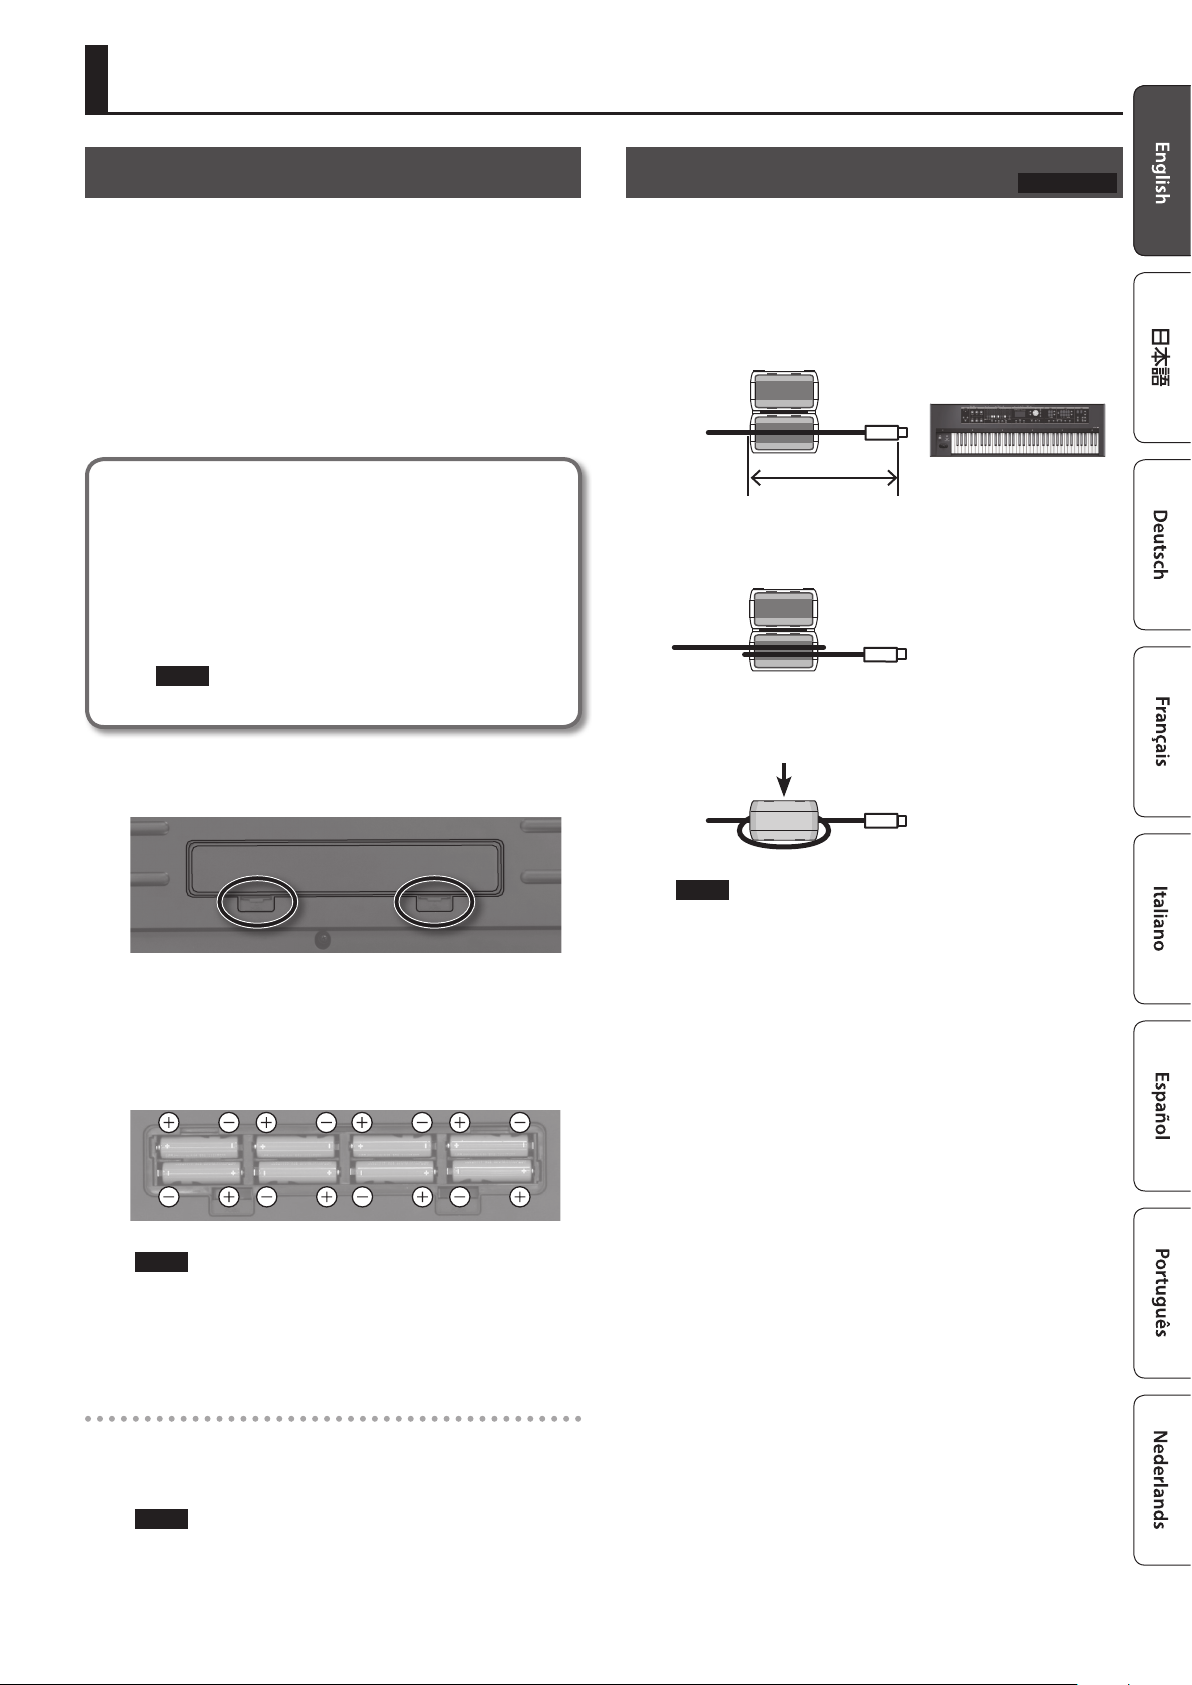
Getting Ready
Installing Batteries
If eight commercially available rechargeable Ni-MH batteries
(AA, HR6) are installed, you’ll be able to play this unit without
connecting the AC adaptor.
* If you handle batteries improperly, you risk explosion and uid
leakage. Make sure that you carefully observe all of the items
related to batteries that are listed in “USING THE UNIT SAFELY”
and “IMPORTANT NOTES” (leaet “USING THE UNIT SAFELY” and
Owner’s manual (p. 32)).
* We recommend that you keep batteries installed in the unit
even though you’ll be powering it with the AC adaptor. That
way, you’ll be able to continue a performance even if the cord of
the AC adaptor gets accidently disconnected from the unit.
Types of batteries that can be used
If operating this unit on batteries, please use rechargeable
Ni-MH batteries.
Using rechargeable Ni-MH batteries will allow approximately
5 hours of continuous operation at room temperature.
(However, the duration will be approximately 3 hours if
USB ash drive is connected. The duration of continuous
operation may dier depending on the conditions of use.)
NOTE
Do not use alkaline batteries or carbon-zinc battery batteries.
1. While pressing the tabs of the battery compartment cover
on this unit’s bottom panel, remove the cover.
Attaching the Ferrite Core
If you use the USB cable, you must attach the included ferrite core.
This is for the purpose of preventing electromagnetic noise; do not
remove it.
VR-730 only
1. Open the ferrite core and position it over the cable.
* You must attach the ferrite core near the plug (10 cm or less)
that is connected to this unit.
10 cm or less
2. Wrap the cable around the ferrite core; one turn is
enough.
3. Close it rmly; you should hear a distinct sound as it clicks
shut.
* When turning the unit over, be careful so as to protect the
buttons and knobs from damage. Also, handle the unit carefully;
do not drop it.
2. Insert the batteries into the battery compartment, taking
care to observe the correct polarity (+/- orientation).
NOTE
Carefully follow the installation instructions for batteries, and
make sure you observe the correct polarity.
3. Securely close the battery compartment cover.
When to Replace the Batteries
When the batteries run low, the display will indicate “Charge
Battery.”
Stop use, and recharge the batteries.
NOTE
• Take care not to get your ngers pinched when attaching the
ferrite core.
• Make sure you don’t apply undue force and damage the cable
when clamping on the ferrite core.
Depending on the thickness of the cable, you might not be able
to close the ferrite core with the cable wrapped once around
it. Use a cable of a thickness that allows the ferrite core to be
attached with the cable wrapped once around it.
NOTE
If you continue using the unit after the “Charge Battery”
indication appears, the “Battery Low!” indication will appear, and
further operation will not be possible.
7
Page 8
Getting Ready
Turning the Power On/O
Turning the Power On
1. Before turning on this unit’s power, consider these two
questions:
• Is the AC adaptor and any other equipment connected
correctly?
• Have the volume controls of this unit and all connected audio
devices been turned to their lowest settings?
2. Press the [POWER] switch of this unit to turn it on.
3. Turn on the power for any connected audio devices.
4. While playing the keyboard and listening to the sound,
slowly increase the volume of this unit and the volume
of the connected equipment until you obtain the desired
volume.
Turning the Power O
1. Before turning o the power, consider the following
question:
• Have the volume controls of this unit and all connected audio
devices been turned to their lowest settings?
2. Turn o the power for all connected audio devices.
3. Turn o the [POWER] switch of this unit.
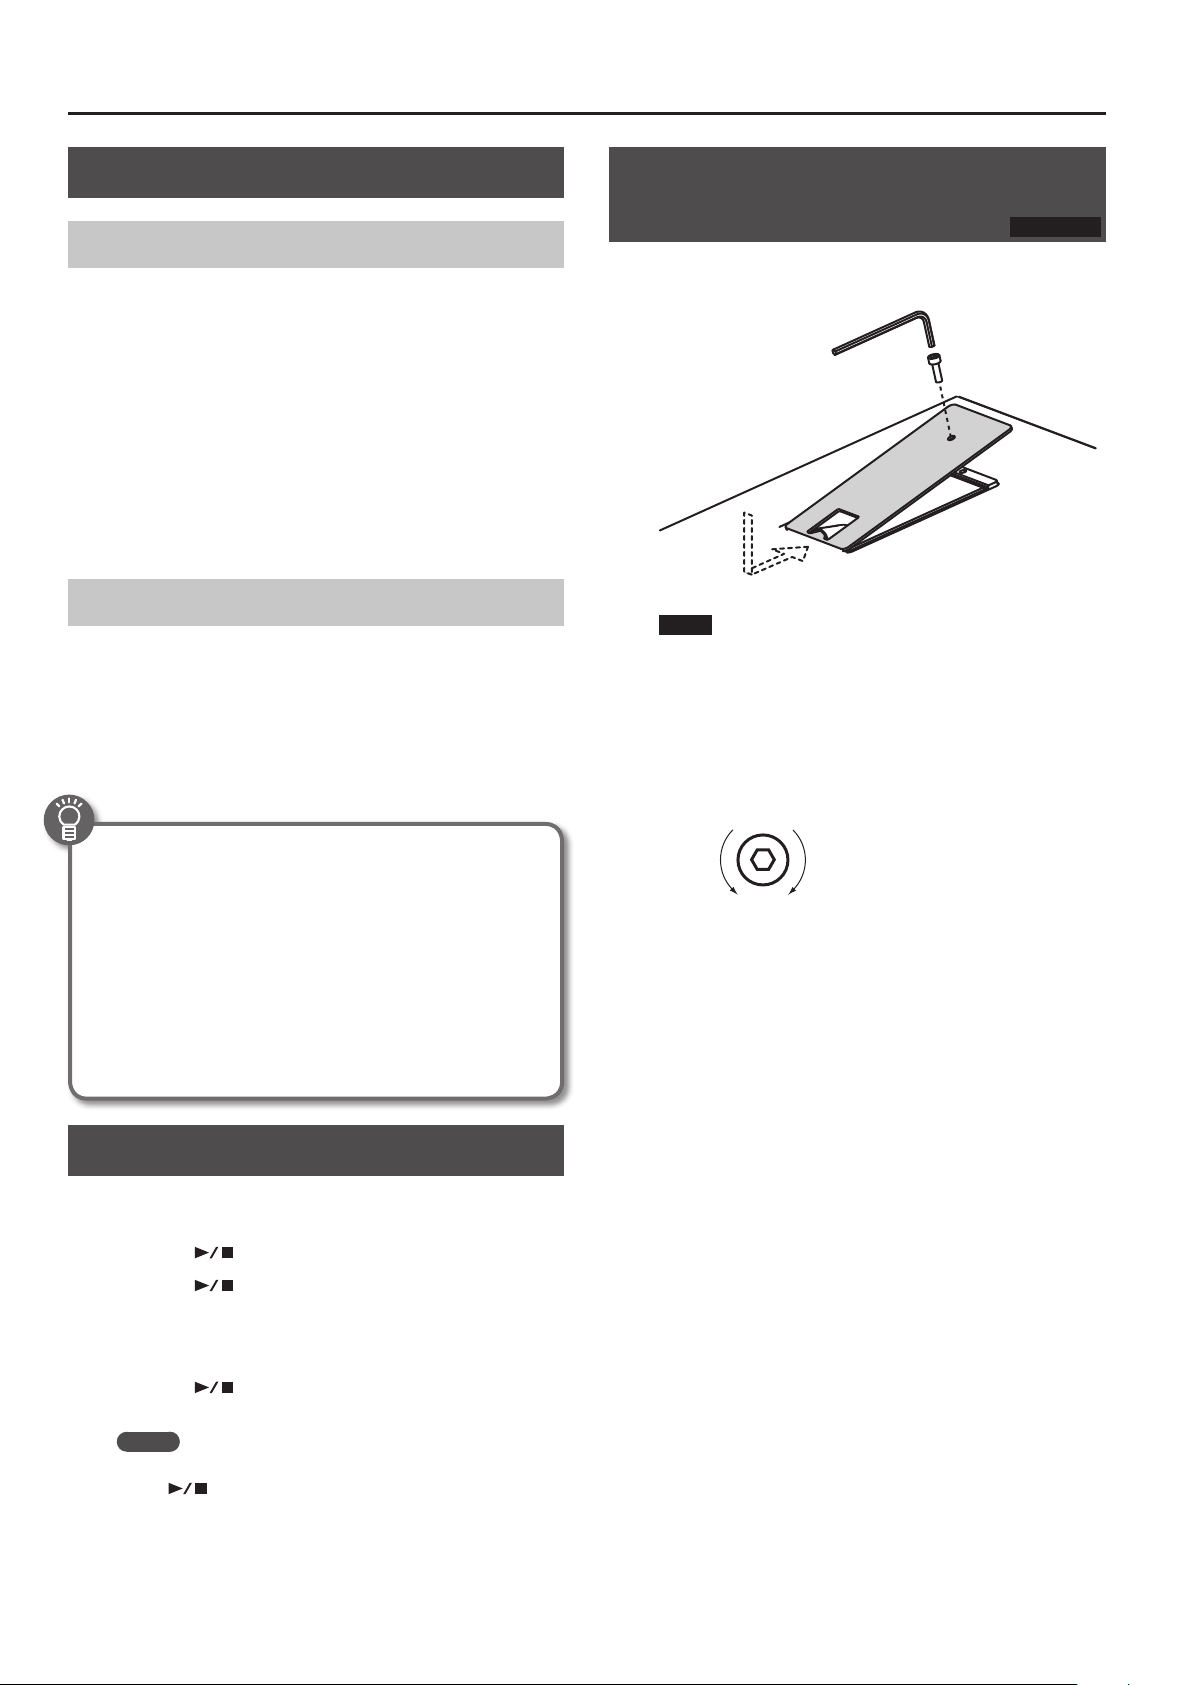
Using the Included USB Memory Protector
You can use the included USB memory protector to prevent theft of
the USB ash drive connected to the VR-09.
NOTE
• You must use the included screws.
• You must use the included Allen wrench to tighten or remove
the screws. Using a tool that does not match the screw heads
will damage them.
• Be careful not to over-tighten the screws. Doing so may damage
the screw’s head, causing the wrench to rotate uselessly.
• To tighten the screws, turn the Allen wrench clockwise. To
loosen the screws, turn the Allen wrench counter-clockwise.
VR-09 only
Concerning the Auto O function
The power to this unit will be turned o automatically after a
predetermined amount of time has passed since it was last used
for playing music, or its buttons or controls were operated (Auto
O function).
If you do not want the power to be turned o automatically,
disengage the Auto O function (p. 28).
• Any settings that you are in the process of editing will be lost
when the power is turned o. If you have any settings that you
want to keep, you should save them beforehand.
• To restore power, turn the power on again.
Listening to the Demo Songs
Here’s how to listen to the demo songs.
1. Turn the power on.
2. Press the [ ] (START/STOP) button.
3. Press the [ ] (START/STOP) button.
Demo playback starts.
When the selected demo song nishes playing, the next demo song
will begin playing.
4. Press the [ ] (START/STOP) button.
The demo song will stop playing.
loosen tighten
• Keep the removed screws out of the reach of small children to
ensure they are not swallowed accidentally.
• Never allow foreign objects (e.g., coins, wires) to enter the USB
memory box.
• When opening/closing the USB ash drive cover, please be
careful not to get your ngers pinched between the movable
part and the panel. In places where small children are present,
make sure that an adult provides supervision and guidance.
MEMO
If the [LOOPER] button or [SONG/RHYTHM] button is lit, pressing
the [
screen.
* All rights reserved. Unauthorized use of this material for
purposes other than private, personal enjoyment is a violation
of applicable laws.
8
] (START/STOP) button will not bring up the demo
Page 9
Selecting Sounds
Selecting Sounds with One Touch
By using the Mode buttons you can play organ, piano, and
synthesizer sounds individually.
REFERENCE
For details about the sounds, refer to “Sound List” in the “Data
List” (PDF).
You can download the “Data List” (PDF) from the Roland website.
http://www.roland.com/manuals/
Selecting Organ Sounds
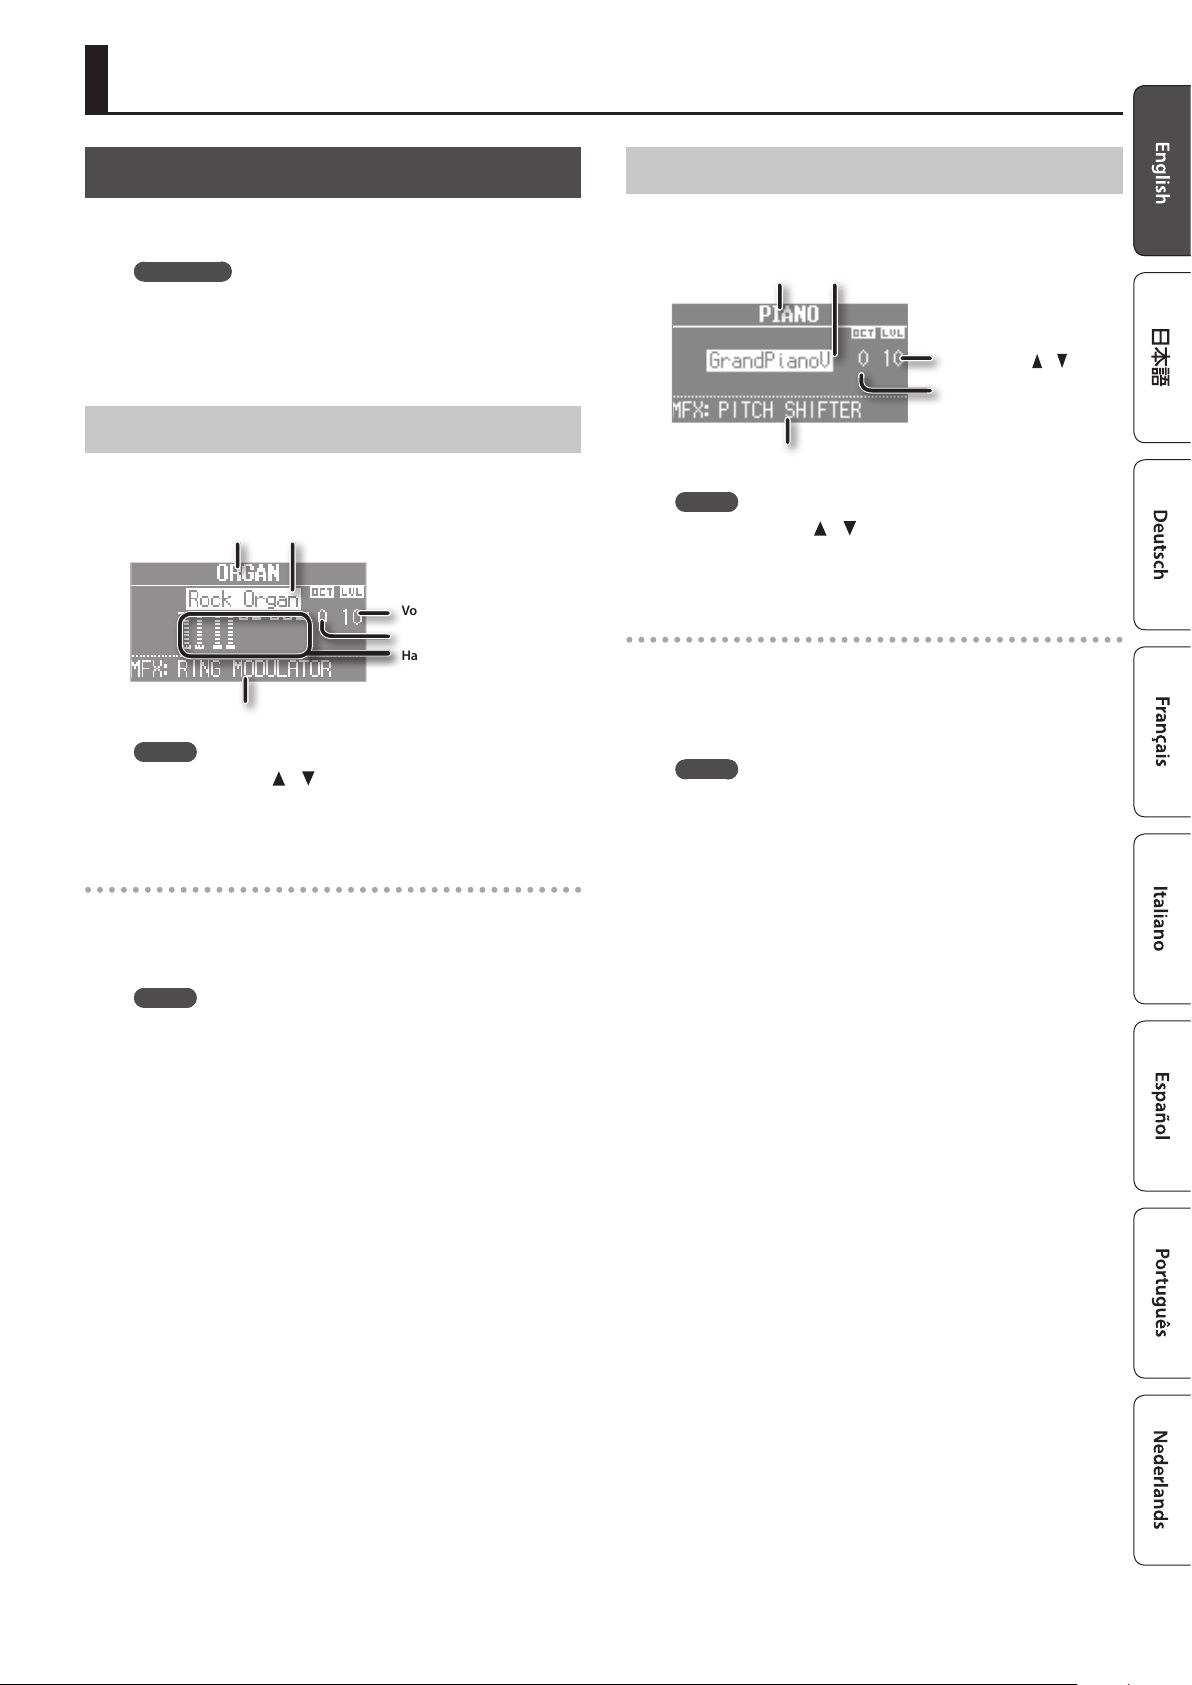
1. Press the MODE [ORGAN] button.
The MODE [ORGAN] button will light.
Sound
Multi-eect type (&PDF)
MEMO
Use the CURSOR [
and turn the [VALUE] dial to change the sound variation/multieect type.
Selecting the organ sound variation
Sound variation
Volume ([LEVEL] bar)
Octave (p. 17)
Harmonic bars (p. 12)
] [ ] buttons to move the cursor to an item,
Selecting Piano Sounds
1. Press the MODE [PIANO] button.
The MODE [PIANO] button will light.
Sound
Multi-eect type (&PDF)
MEMO
Use the CURSOR [
and turn the [VALUE] dial to change the sound variation/multieect type.
Selecting the piano sound variation
1. Press one of the sound buttons in the piano section.
2. Turn the [VALUE] dial to select the desired sound
variation.
MEMO
• You can play the keyboard to audition the sound at which the
cursor is located.
• If you press the [TRANSPOSE] button while the sound variation
select screen is shown, the select screen will be held. Press the
[EXIT] button to return to the previous screen.
Sound variation
Volume
(PIANO LEVEL
Octave (p. 17)
] [ ] buttons to move the cursor to an item,
[ ] [ ]
button)
1. In the organ section, press the [TYPE] button.
2. Turn the [VALUE] dial to select the desired type of sound.
MEMO
• You can play the keyboard to audition the sound at which the
cursor is located.
• If you press the [TRANSPOSE] button while the ORGAN TYPE
screen is shown, it will be held. Press the [EXIT] button to return
to the previous screen.
• The organ sounds of this unit reproduce the distinctive way in
which notes played on a vintage organ are triggered even by a
shallow key-press. This is called the “quick ring function.”
• The organ sounds of this unit are produced by a “virtual
tonewheel sound engine” that uses digital technology to
faithfully simulate the way in which a tonewheel organ
generates sound.
9
Page 10
Selecting Sounds
Selecting Synthesizer Sounds
1. Press the MODE [SYNTH] button.
The MODE [SYNTH] button will light.
Sound
Multi-eect type (&PDF)
MEMO
Use the CURSOR [
and turn the [VALUE] dial to change the sound variation/multieect type.
Selecting the Synthesizer sound variation
1. Press one of the sound buttons in the synthesizer section.
2. Turn the [VALUE] dial to select the desired sound
variation.
MEMO
• You can play the keyboard to audition the sound at which the
cursor is located.
• If you press the [TRANSPOSE] button while the sound variation
select screen is shown, the select screen will be held. Press the
[EXIT] button to return to the previous screen.
Sound variation
Volume
(SYNTH LEVEL [ ] [ ] button)
Octave (p. 17)
] [ ] buttons to move the cursor to an item,
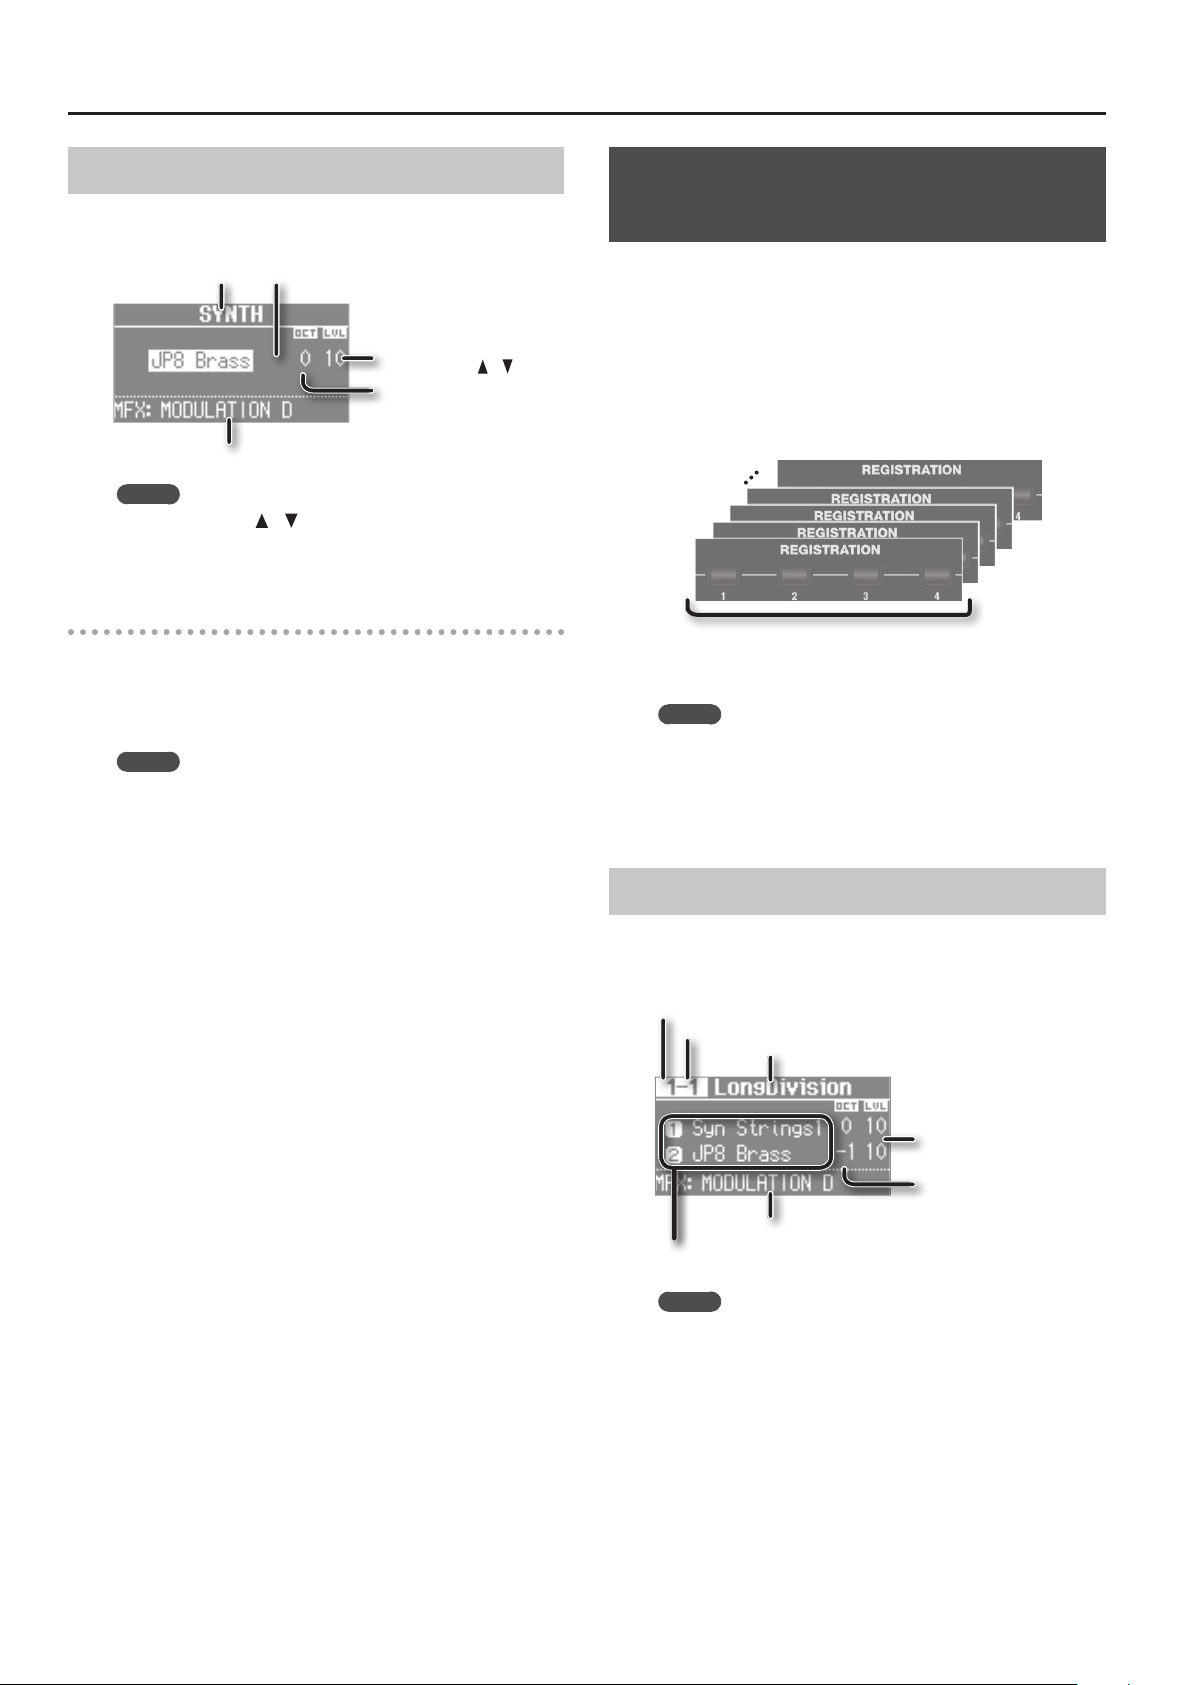
Selecting Your Favorite Sounds (Registration)
You can assign a name to your favorite organ, piano, and
synthesizer sounds (or combination of sounds), and store it as a
“registration.”
A registration can be recalled instantly by pressing a single button.
This is a convenient way to switch sounds for each song, or to
instantly switch between settings during a live performance.
Registrations are organized into banks, with 4 registrations in each
bank.
There are 25 banks, allowing you to store a total of 100 registrations.
25
Bank
MEMO
• When this unit is shipped from the factory, several banks contain
• Sets of registrations can be saved on a USB ash drive (p. 28).
• Sets of registrations saved on a USB ash drive can be loaded
Recalling a Registration
4
3
2
1
4 registrations
=
Bank
registrations with the same settings.
back into this unit (p. 29).
1. Press the [1]–[4] buttons to select a registration.
The registration screen is shown in the display.
Bank number
Registration number
Registration name
Volume
Octave (p. 17)
Multi-eect type (&PDF)
Split or Dual setting (p. 18)
MEMO
• You can select a registration by moving the cursor to the
registration number and turning the [VALUE] dial.
• You can select the next registration by pressing the [NEXT]
button.
• If registration 4 is selected, pressing the [NEXT] button will
select registration 1 of the next bank.
10
Page 11

Selecting Sounds
Switching Registration Banks
Switching banks (Banks 1–4)
1. Press the [BANK] button.
The BANK screen is shown in the display.
Currently selected bank number
2. Press the [1]–[4] buttons to select the desired bank.
3. Press the [1]–[4] buttons to select a registration.
You’ll switch to a registration of the bank you selected.
Switching banks (Banks 5–25)
1. Press the [BANK] button.
The BANK screen is shown in the display.
2. Turn the [VALUE] dial to select the desired bank.
Selecting Drum Sounds
You can play drum sounds and sound eects from this unit’s
keyboard.
A drum kit lets you choose from a selection of sounds.
When you switch drum kits, the sounds assigned to each key will
change.
REFERENCE
Refer to “Drum Kit List” in the “Data List” (PDF) for details on the
percussion instrument sounds that are assigned to each key.
You can download the “Data List” (PDF) from the Roland website.
http://www.roland.com/manuals/
1. Press the [DRUM] button to make it light.
The DRUM screen appears.
2. Turn the [VALUE] dial to select a drum kit.
Drum kit
3. Press the [ENTER] button.
4. Press the [1]–[4] buttons to select a registration.
You’ll switch to a registration of the bank you selected.
Storing a Registration
1. Select the desired sounds and eect settings.
2. Hold down one of the [1]–[4] buttons until the following
screen appears.
3. Select the store-destination.
Use the CURSOR [ ] [ ] buttons and the [VALUE] dial to select the
store-destination bank and registration number.
4. Specify a name for the registration.
Button/Dial Operation
CURSOR [
buttons
[VALUE] dial Changes the character.
MODE [ORGAN] (Del)
button
MODE [PIANO] (Space)
button
] [ ]
Select the character that you want to change.
Delete the character.
Inserts a space.
Volume
(DRUM LEVEL [ ] [ ] button)
Octave (p. 17)
Multi-eect type (&PDF)
MEMO
• By using the looper function (p. 26) to overdub-record drum
sounds, you can create rhythm patterns using these sounds.
• You can play the keyboard to audition the sound at which the
cursor is located.
• If you press the [TRANSPOSE] button while the DRUM screen is
shown, the DRUM screen will be held. Press the [EXIT] button to
return to the previous screen.
• You can use the DRUM LEVEL [
volume of the drum kit (p. 22).
] [ ] buttons to adjust the
5. Press the [ENTER] button or the MODE [SYNTH] (Write)
button.
Your settings will be stored in the selected registration.
REFERENCE
About the settings stored in a registration, refer to “Reference
Manual” (PDF).
11
Page 12

Modifying the Organ Sound
Using the Harmonic Bars
The harmonic bars are assigned to sounds of dierent footage
(pitch). You can create a wide variety of organ sounds by layering
these sounds.
The volume will be loudest when the harmonic bars are fully
lowered; there will be no sound when the harmonic bars are fully
raised.
Raised
(minimum
volume)
MEMO
• You can make separate settings for the tweeter and the woofer
to specify their rotation speeds at the fast and slow settings, as
well as the time it will take for the tweeter and woofer to change
their speed when you switch the rotary eect (ROTARY:&PDF).
• If you’re playing only organ sounds, you can use the pitch bend/
modulation lever to control the rotary eect. Move the lever
away from yourself to turn the rotary eect on/o or apply the
brake; move the lever to left or right to switch between fast/
slow speeds. For more about the rotary eect controlled by the
modulation lever, refer to “Reference Manual” (PDF).
• You can also use a pedal switch (DP series; sold separately), an
expression pedal (EV series; sold separately), the footswitch of a
pedal keyboard (PK-9; sold separately), or the D-BEAM controller
to switch between fast and slow (p. 12, &PDF).
Lowered
(maximum
volume)
1. Select an organ sound (p. 9).
2. Slide the harmonic bars to adjust the sound.
The volume of each footage is shown numerically.
When you’ve selected “Transistor Organ” as the
organ sound
The footage structure will be dierent for Transistor organ.
You’ll be able to operate the following harmonic bars. The other
harmonic bars will be unavailable.
Part (p. 19) Harmonic bars that can be operated
Upper part 16’,
Lower part 8’, 4’, 2’, 1 3/5’ (4 bars)
The bars at the right with the “ ” and “ ” icons will respectively
adjust the volume of “mellow sound” and “bright sound.”
If these two bars are fully raised, no organ sound will be heard.
8’, 4’,
2 2/3’, 2’ (5 bars)
Using the Rotary Eect
This eect adds modulation to the sound as if you were using a
rotary speaker.
Using Percussion
This adds an attack to the beginning of each note, making the
sound more crisp and percussive.
1. Press the [PERCUSSION] button to make it light.
2. Use the CURSOR [ ] [ ] buttons and the [VALUE] dial to
select the desired eect.
* If you turn percussion on, the harmonic bar 1’ sound will not be
heard.
MEMO
If you press the [TRANSPOSE] button while the PERCUSSION
screen is shown, the PERCUSSION screen will be held. Press the
[EXIT] button to return to the previous screen.
Using Vibrato/Chorus
Here’s how to apply vibrato (cyclic modulation of the pitch). You can
also apply chorus, which mixes vibrato sound with unprocessed
sound to produce greater depth and spaciousness.
1. Press the [VIBRATO/CHORUS] button to make it light.
2. Turn the [VALUE] dial to select the desired eect.
Value Explanation
V-1 Applies a slight vibrato eect.
V-2
V-3 Applies a strong vibrato eect.
C-1 Applies a slight chorus eect.
C-2 Applies a medium chorus eect.
C-3 Applies a strong chorus eect.
Applies a medium vibrato eect.
1. Press the ROTARY SOUND [ON/OFF] button to make it
light.
The rotary eect will be added to the sound.
2. Press the ROTARY SOUND [FAST/SLOW] button to switch it
between lit/unlit.
ROTARY SOUND
[FAST/SLOW ] button
Lit (Fast)
Unlit (Slow)
When you switch the rotary eect from “Fast” to “Slow,” the
modulation will gradually slow down. When you switch it from
“Slow” to “Fast,” the modulation will gradually speed up.
12
Explanation
Produces the eect of making the rotary
speaker spin rapidly.
Produces the eect of making the rotary
speaker spin slowly.
MEMO
If you press the [TRANSPOSE] button while the VIBRATO/
CHORUS screen is shown, the VIBRATO/CHORUS screen will be
held. Press the [EXIT] button to return to the previous screen.
Page 13

Volume
Note-on Note-o
Time
A: AT TACK
Modifying the Synthesizer Sound
This unit lets you use the top panel harmonic bars to modify the
character of the synthesizer sound.
MEMO
• If you’re playing two sounds (split or dual) (p. 12), the settings
will determine which sound is aected.
• If one of the sounds is an organ sound
The bars will operate as harmonic bars for the organ sound.
The synthesizer sound will not change.
• If one of the sounds is a piano sound
The piano sound cannot be changed. The eect will apply
only to the synthesizer sound.
• If two synthesizer sounds are combined
The bars will aect both synthesizer sounds.
• The eect can also be applied when playing a single piano sound.
• For some acoustic sounds (&PDF), DECAY, CUTOFF, and
RESONANCE will have no eect.
Changing the Volume Envelope (ATTACK, DECAY, RELEASE)
The shape that describes how an instrument’s volume changes
over time from the beginning to the end of the note is called the
“envelope.”
On a keyboard instrument, this species the way in which the
volume changes from when you press a key until you release the key.
D: DECAY
S: SUSTAIN
R: RELEASE
S
A D
Sound Ends
R
When you operate a bar, the current value is shown in the screen.
MEMO
• While the value of a parameter is displayed, you can turn the
[VALUE] dial to adjust the value.
• The value of each parameter is shown as an oset relative to the
default value originally specied for each sound. At a value of “0”
(the bar near the center “4” position), that parameter will be in its
original state.
• If you press the [TRANSPOSE] button while the adjustment
screen is shown, the adjustment screen will be held. Press the
[EXIT] button to return to the previous screen.
Adjusting the Tonal Character (CUTOFF, RESONANCE)
The lter determines the tonal character of the sound.
You can use the lter to cut or boost dierent frequency regions of
the sound, thus modifying its character.
Parameter Explanation
CUTOFF
RESONANCE
On this unit you can use the two right-most harmonic bars to adjust
the cuto and resonance of the currently selected sound.
1. Select a sound from the synthesizer section (p. 10).
2. Move the bars to adjust the values of the corresponding
parameters.
Frequency at which the lter takes eect (cuto
frequency)
Amount by which the region near the lter’s cuto
frequency is emphasized
Parameter Explanation
ATTAC K
DECAY
SUSTAIN
RELEASE
On this unit you can use the three left-most harmonic bars to adjust
the ATTACK, DECAY, and RELEASE times of the currently selected
sound.
1. Select a sound from the synthesizer section (p. 10).
2. Move the bars to adjust the values of the corresponding
parameters.
Bar Value Explanation
[AT TACK] bar -64–63
[DECAY] bar -64–63
[RELEASE] bar -64–63
Time from when you press the key until the full
volume is reached
Time over which the volume reaches the SUSTAIN
level following the attack
Volume at which the sound is sustained while you
continue holding the key
Time over which the sound decays to silence after
you release the key
Lowering the bar will shorten the attack
time; raising the bar will lengthen the
time.
Lowering the bar will shorten the time
over which the level falls to the SUSTAIN
level; raising the bar will lengthen the
time.
Lowering the bar will shorten the time
over which the sound disappears; raising
the bar will lengthen the time.
Bar Value Explanation
Species the cuto frequency. Lowering
[CUTOFF] bar -64–63
[RESONANCE]
bar
When you operate a bar, the current value is shown in the screen.
* Some settings may produce noise or high-volume sound. Be
careful of the volume of the connected mixer or amp.
MEMO
• While the value of a parameter is displayed, you can turn the
[VALUE] dial to adjust the value.
• The value of each parameter is shown as an oset relative to the
default value originally specied for each sound. At a value of “0”
(the bar near the center “4” position), that parameter will be in its
original state.
• If you press the [TRANSPOSE] button while the adjustment
screen is shown, the adjustment screen will be held. Press the
[EXIT] button to return to the previous screen.
-64–63
the bar will make the sound darker (more
mellow); raising the bar will make the
sound brighter.
Boosts the sound in the region of the
cuto frequency, producing a distinctive
tonal character. Lowering the bar will
weaken this character, and raising the bar
will strengthen it.
13
Page 14

Adding Eects to the Sound
Applying Eects (EFX)
You can apply eects to the sounds you play. This unit contains 7 eect processors; each can be set independently.
For the six eects other than rotary, you can use “global control” to conveniently apply each eect in an appropriate way.
MEMO
• If you’re playing two sounds (split or dual) (p. 15), the settings will determine which sound is aected.
When using Dual: The same eects will apply to both sounds.
When using Split: The eects will be applied only to the upper part (except for reverb). However if you’ve assigned organ sound to the lower
• The eects are connected in the order shown below.
Play
1. Select a sound (p. 9).
MEMO
Some sounds already have eects applied.
The way in which eects are applied will dier depending on the sound.
part, the same eects will apply to all parts.
MFX (Multi-eect)Compressor Overdrive Rotary (p. 12)
Tone Delay Reverb
SongRhythm pattern
2. Turn the knobs to adjust the depth of each eect.
* The eects may cause noise or loud sounds. To prevent malfunction and/or
damage to speakers, adjust the volume of external mixers and ampliers.
What’s the global control?
This is technology that optimizes multiple parameters of an eect so that
they can be controlled by a single knob.
Knob Explanation
[OVERDRIVE]
knob
[TONE] knob
[COMPRESSOR] knob
[MFX] knob
[DELAY] knob
[REVERB] knob
Produces a natural-sounding distortion as heard from a tube amp.
If the knob is turned all the way to the left, no eect will be applied.
Turning the knob toward the right will increase the depth of distortion.
Adjusts the tonal character of the low and high frequency ranges.
If the knob is set to the center position, the response will be at.
Turning the knob toward the left will boost the mid-range, making the sound punchier. This is appropriate when playing in a band.
Turning the knob toward the right will boost the low and high-frequency ranges, producing a more colorful sound. This is appropriate for solo
performances.
Compresses loud sounds and boosts the level of soft sounds.
This narrows the dynamic range, helping to keep your playing audible within the performance of your band.
If you turn the knob all the way to the left, no compressor eect will be applied.
Turning the knob toward the right will smooth out the overall volume, making your sound more consistent.
This is a general-purpose multi-eect that can change the fundamental character of the sound, transforming it into something quite dierent.
If you turn the knob all the way to the left, no eect will be applied.
MEMO
• The selected type of multi-eect is shown in the bottom line of the display.
• To change the multi-eect type, move the cursor to the lower line of the display and turn the [VALUE] dial.
• The multi-eect gives you a choice of 20 types. You can use the menu to change the multi-eect type (MFX Type:&PDF).
Produces an echo-like eect by delaying the sound.
By layering the delayed sound with the original sound, you can add depth and spaciousness to the sound.
If you turn the knob all the way to the left, no delay eect will be applied.
Turning the knob toward the right will lengthen the delay time (the time from the original sound until the left and right delay sounds are heard).
MEMO
You can choose from six types of delay. Use the menu to change the delay type (Delay Type:&PDF).
Adds reverberation to the original sound, simulating a spacious room.
If you turn the knob all the way to the left, no reverb eect will be applied.
Turning the knob toward the right will make the reverb deeper.
MEMO
You can use the menu to change the reverb type and the wall type (surface material) (Reverb Type:&PDF, Wall Type:&PDF).
14
MEMO
When you turn the [DELAY ] knob or [REVERB] knob, the type will be displayed. You can turn the [VALUE] dial to change the type.
If you press the [TRANSPOSE] button while the adjustment screen is shown, the adjustment screen will be held. Press the [EXIT] button to return
to the previous screen.
Page 15

Adding Eects to the Sound
Modifying the Sound / Producing
Sound Eects (D-BEAM Controller)
By positioning your hand above the front panel’s D-BEAM
controller, you can modify the sound or produce sound eects.
This is a great way to give your live performance more impact.
1. Press one of the D-BEAM [PITCH], [SFX], or [CONTROLLER]
buttons to make it light.
Button Explanation
The pitch will change according to the movement
[PITCH] button
[SFX] button A sound eect will be produced.
[CONTROLLER] button
MEMO
• You can assign the sound eect to the [SFX] button, and assign
various performance-related functions to the [CONTROLLER]
button.
• The volume of the sound eect is linked with the volume of the
drum section. You can use the DRUM LEVEL [
adjust the volume of the sound eect (p. 22).
• If you’re using Split (p. 14), the eect of the [PITCH] button
and [CONTROLLER] button will apply only to the upper part.
2. While playing the keyboard to produce sound, position
your hand above the D-BEAM controller and slowly move
it up and down.
MEMO
You can specify the amount of pitch bend that will occur (Pitch
Bend Range: &PDF).
3. To turn o the D-BEAM controller, press the button you
pressed in step 1 to make it go dark.
of your hand above the D-BEAM controller.
* Pitch will not apply to organ sounds and drum
sounds.
The D-BEAM controller will operate the
performance-related function you’ve assigned.
] [ ] buttons to
D-BEAM Controller Settings
1. Press the D-BEAM [SFX] or [CONTROLLER] button to make
it light.
The D-BEAM screen appears.
2. Turn the [VALUE] dial to select the sound eect or
function that you want to control using the D-BEAM
controller.
Value Explanation
[SFX] button
REFERENCE
For details about the sound eects, refer to “Sound Eect List” in the
“Data List” (PDF).
You can download the “Data List” (PDF) from the Roland website.
http://www.roland.com/manuals/
[CONTROLLER] button
Rotary Fast/Slow
Wheel Brake
Modulation
N.Control 1
N.Control 2
Switches the speed of the rotary speaker between
“fast” and “slow.”
Simulates the way in which the tonewheel
rotation slows and stops when a tonewheel organ
is powered-o (tonewheel brake).
* This has no eect for sounds other than organ
sounds.
Applies a vibrato eect.
* Some sounds will not be aected by vibrato.
For details about the sounds, refer to “Sound
List” in the “Data List” (PDF).
Apply an eect to specic acoustic sounds
(&PDF).
Eective range of the D-BEAM controller
The illustration at right shows the
eective range of the D-BEAM
controller. Moving your hand
outside this range will not
produce any eect.
The eective range of the D-BEAM
controller will be drastically
decreased under strong direct
sunlight. Please be aware of this
when using the D-BEAM controller
outdoors.
MEMO
The sensitivity of the D-BEAM controller will vary
according to the brightness of its surroundings. If it
does not operate as you expect, you can readjust the
sensitivity. Increasing the D-BEAM sensitivity value (p.
18) will make it more sensitive.
3. Press the [EXIT] button to nish the procedure.
15
Page 16

Adding Eects to the Sound
Changing the Pitch/Applying Vibrato (Pitch Bend/Modulation Lever)
While playing the keyboard, move the lever toward the left to lower
the pitch, or toward the right to raise the pitch. This is called “pitch
bend.”
Moving the lever away from yourself will apply vibrato. This is called
“modulation.”
Moving the lever away from yourself while also moving it to left or
right will apply both eects simultaneously.
MEMO
• Pitch bend and modulation do not apply to organ sounds. If
you’re playing only organ sounds, you can use the pitch bend/
modulation lever to control the rotary eect. Move the lever
away from yourself to turn the rotary eect on/o or apply the
brake; move the lever to left or right to switch between fast/
slow speeds.
• If you’re using Split (p. 14), pitch bend and modulation will
apply only to the upper part.
• You can specify the amount of pitch bend that will occur (Pitch
Bend Range: &PDF).
• You can disable the rotary eect on/o switching that’s
controlled by the modulation lever (Modulation Lever:&PDF).
• For the following acoustic sounds, you can use the modulation
lever to produce dynamics eects.
• N.Trumpet
• N.Alto Sax
• N.Flute
Making the Pitch Change Smoothly (Portamento)
Portamento is an eect that produces a smooth change in pitch
between one note and the next.
Portamento can be applied to piano sounds and to synthesizer
sounds.
MEMO
• Some sounds already have portamento applied to them (default
setting).
• When using split (p. 14), portamento will be applied only to
the upper part.
1. Press the [MENU] button.
2. Turn the [VALUE] dial to select “Portamento.”
3. Press the [ENTER] button.
4. Use the CURSOR [ ] [ ] buttons to select “Portamento
Switch.”
5. Turn the [VALUE] dial to change the setting.
Value Explanation
OFF Portamento is o.
ON Portamento is on.
DEFAULT The default setting.
6. Press the [EXIT] button several times to nish the
procedure.
Specifying the Time of Pitch Change
You can specify the time over which the portamento eect will
produce the pitch change.
1. Press the [MENU] button.
2. Turn the [VALUE] dial to select “Portamento.”
3. Press the [ENTER] button.
16
4. Use the CURSOR [ ] [ ] buttons to select “Portamento
Time.”
5. Turn the [VALUE] dial to change the setting.
Value 0 (short)–127 (long)
6. Press the [EXIT] button several times to nish the
procedure.
Page 17

Changing the Key Range
Raising or Lowering the Range in Octaves (Octave)
You can change the pitch of the keyboard in steps of one octave.
1. Press the OCTAVE [ ] or [ ] button.
Value -3–0–3 (octave)
MEMO
• If this setting is other than “0,” the OCTAVE [DOWN] or [UP]
button will light.
• By pressing the OCTAVE [DOWN] and [UP] buttons
simultaneously, you can return the setting to “0.”
• If you’re playing two sounds together, move the cursor to select
the sound whose octave range you want to change.
Transposing the Key (Transpose)
You can transpose the pitch of the keyboard.
This setting species the pitch sounded by the middle C (C4) key.
1. Hold down the [TRANSPOSE] button and press the [–] or
[+] button.
The display will indicate the transpose setting.
Value C0–C8 (semitone)
MEMO
• If this setting is other than “C4,” the [TRANSPOSE] button will
light.
• If you hold down the [TRANSPOSE] button and continuously
press the [–] or [+] button, the setting switches rapidly through
its values, and temporarily stops at the C pitch of each octave.
• If you hold down the [TRANSPOSE] button and press the [–] and
[+] buttons simultaneously, the setting returns to “C4.”
• While the transpose setting is displayed, you can also turn the
[VALUE] dial to change the value.
17
Page 18

Combining Two Sounds
Layering Two Sounds (Dual)
“Dual” refers to settings in which two sounds are layered.
* You can’t layer two organ sounds.
Part 1
Part 2
Layering a Piano Sound and Synthesizer Sound
Piano sound/Synthesizer sound
Piano sound/Synthesizer sound
1. Simultaneously press two sound buttons from the piano
section and synthesizer section.
The sound buttons you selected will light, and the DUAL screen
appears.
Part 1 setting
Part 2 setting
Combining an Organ Sound with a Piano Sound or Synthesizer Sound
Organ sound
Piano sound/Synthesizer sound
1. Simultaneously press the MODE [ORGAN] button and
a sound button in the piano section or the synthesizer
section.
The MODE [ORGAN] button and the sound button you selected will
light, and the DUAL screen appears.
MEMO
• You can also select dual by pressing the MODE [ORGAN] button
and the MODE [PIANO] button or MODE [SYNTH] button
simultaneously.
• The sound of the button you press rst will be assigned to part 1.
Changing the sounds
Multi-eect type (&PDF)
MEMO
• You can also select dual by pressing the MODE [PIANO] button
and MODE [SYNTH] button simultaneously.
• The sound of the button you press rst will be assigned to part
1.
Changing the sounds
Here’s how to change the sounds.
You can also combine two sounds from within the same sound button.
2. Select a sound.
1. Press the CURSOR [ ] [ ] buttons to select the sound that you
want to change.
2. Turn the [VALUE] dial to select a sound.
MEMO
By pressing a sound button that is lit, you can combine two
sounds from within the same sound button.
3. Adjust the volume of each part.
Press the LEVEL [ ] [ ] buttons to adjust the volume (0–12).
MEMO
If you’ve combined two sounds from the same section, the
volume of the sound selected by the cursor will change.
4. Specify the octave of each part.
Use the CURSOR [ ] [ ] buttons to select the sound whose octave
you want to specify, and use the OCTAVE [DOWN] [UP] buttons to
specify the octave.
Here’s how to change the sounds.
2. Select a sound.
1. Press the CURSOR [ ] [ ] buttons to select the part.
2. Use the [TYPE] button, sound buttons, and the [VALUE] dial to
select a sound.
3. Adjust the volume.
Button/Bar Explanation
LEVEL [
[LEVEL] bar
] [ ] button
Adjust the volume (0–12) of the piano
sound or synthesizer sound.
Adjusts the volume (0–12) of the organ
sound.
4. Specify the octave.
Use the OCTAVE [DOWN] [UP] buttons to specify the octave of the
piano sound or synthesizer sound.
Cancelling Dual
Here’s how to cancel Dual.
Operation Explanation
You’ll hear the sound that was assigned
Press any one of the MODE
buttons
Press the [EXIT] button
Press a sound button that is
unlit
to the section whose button you pressed.
If you had been combining two sounds
from the same section, you’ll hear the
sound that had been assigned to part 1.
The sound that had been assigned to part
1 will be heard across the entire range of
the keyboard.
You’ll hear the sound that you selected.
18
Page 19

Combining Two Sounds
Playing Dierent Sounds in the Left and
Right Hands (Split)
“Split” refers to settings that let you play dierent sounds with your
left and right hand.
The keyboard will be divided into two regions; the right is called
the “upper part,” and the left is called the “lower part.” The point at
which the keyboard is divided is called the “split point” (p. 21).
Split point (Power-up default: C4)
C2 C4B2 C3 C6B5
Lower part
Assigning the Dual Sounds to the Left and Right Regions
Here’s how two sounds you’ve layered can be split to the left and
right keyboard regions.
1. Press the two sound buttons or MODE buttons
simultaneously to select the dual setting (p. 18).
Upper part
Combining Two Organ Sounds
Organ sound
1. Select the desired organ sound (p. 9).
2. Press the ORGAN [SPLIT] button to make it light.
The SPLIT screen appears.
Type name of the organ sound
Upper part setting
Organ sound
Volume ([LEVEL] bar)
Lower part setting
MEMO
The sound of the button you press rst will be assigned to part
1.
2. Press the SYNTH [SPLIT] or ORGAN [SPLIT] button to make
it light.
The sound that had been assigned to part 1 of the dual setting
will be assigned to the upper part, and the sound that had been
assigned to part 2 will be assigned to the lower part.
Performing with two-manual setup
You can connect another MIDI keyboard (sold separately)
to this unit’s MIDI IN connector, and perform using a twomanual setup.
This unit
Upper part
MIDI keyboard
Lower part
REFERENCE
For details, refer to “Reference Manual” (PDF).
Multi-eect type (&PDF)
3. Press the [UPPER/LOWER] button to select the part whose
sound you want to change.
[UPPER/LOWER] button Selected part
Lit (Upper) Upper part
Unlit (Lower) Lower part
The cursor will move to the part you selected.
4. Slide the harmonic bars to create the desired organ
sound.
The sound of the selected part will change as you move the
harmonic bars on the panel.
MEMO
• The [PERCUSSION] button is valid only for the organ sound of
the upper part.
• When the organ type is Rock Organ or Jazz Organ, you can
specify the part to which vibrato eect or chorus eect will be
applied (Vibrato/Chorus Part: &PDF).
When the organ type is transistor, the eects will apply to both
the upper part and lower part regardless of this setting.
• Use the [LEVEL] bar to adjust the volume of the organ sound.
The [LEVEL] bar aects all of the organ parts (upper, lower, and
pedal parts)
* All parts will be the same organ type.
19
Page 20

Combining Two Sounds
Combining a Piano Sound and Synthesizer Sound
Piano sound/
Synthesizer sound
1. Select a piano sound or a synthesizer sound (p. 9).
2. Press the SYNTH [SPLIT] button to make it light.
The SPLIT screen appears.
Piano sound/
Synthesizer sound
Combining an Organ Sound with a Piano Sound or Synthesizer Sound
Organ sound
Or
Piano sound/
Synthesizer sound
1. Make settings that combine two organ sounds, or that
combine a piano sound with a synthesizer sound
(p. 19, p. 20).
2. Select a part, and change its sound.
1. Press the CURSOR [ ] [ ] buttons or [UPPER/LOWER] button to
select a part.
2. Use the [TYPE] button, sound buttons, and the [VALUE] dial to
select a sound.
3. Press the [EXIT] button to return to SPLIT screen.
Piano sound/
Synthesizer sound
Organ sound
Changing the sound of each part
The sound you selected in step 1 will be assigned to the upper part.
You can use the following procedure to change the sound of each
part.
You can also combine two sounds within the same sound button.
3. Select the sound for each part.
1. Press the CURSOR [ ] [ ] buttons to select a part.
2. Use the sound button and the [VALUE] dial to select the sound of
each part.
3. Press the [EXIT] button to return to the SPLIT screen.
4. Adjust the volume of each part.
Press the LEVEL [ ] [ ] buttons to adjust the volume (0–12).
MEMO
If you’ve combined two sounds from the same section, the
volume of the sound selected by the cursor will change.
5. Specify the octave of each part.
Use the CURSOR [ ] [ ] buttons to select a part, and use the
OCTAVE [DOWN] [UP] buttons to specify the octave.
3. Adjust the volume.
Button/Bar Explanation
LEVEL [
[LEVEL] bar
] [ ] buttons
Adjust the volume (0–12) of the piano
sound or synthesizer sound.
Adjusts the volume (0–12) of the organ
sound.
4. Specify the octave.
Use the CURSOR [ ] [ ] buttons to select a part, and use the
OCTAVE [DOWN] [UP] buttons to specify the octave.
MEMO
You can also add the organ sound by using the [UPPER/LOWER]
button to select the part to which the organ sound is not
assigned, and then lowering the harmonic bar.
Setting examples:
Organ sound
Piano sound/
Synthesizer sound
+
Organ sound
20
Page 21

Combining Two Sounds
Playing Drum Sounds in the Lower Part
You can play drum sounds in the lower part while playing a
dierent sound in the upper part.
Drum sound
Organ sound, etc.
1. Make split settings (p. 19).
2. Press the [DRUM] button to make it light.
The lower part will automatically switch to a drum sound.
* The sound setting for the upper part will not change.
Changing the Split Point
You can change the split point (the location at which the keyboard
is divided).
VR-09
Range in which you can specify the split point (C#2–C7)
C2 C4B2 C3 C6B5 C7
Cancelling Split
1. Press the [EXIT] button or the lit [SPLIT] button to make it
go dark.
Split will be cancelled.
The sound assigned to the upper part will now be heard across the
entire keyboard.
MEMO
You can also press any one of the MODE buttons to cancel split.
Split point (Power-up: C4, included in left-hand zone)
VR-730
Range in which you can specify the split point
(C#2–E7)
E1 B1 C2 C5B4
Split point (Power-up: C4, included in left-hand zone)
C4B2 C3 E7
1. Press the ORGAN [SPLIT] button or SYNTH [SPLIT] button
to make it light.
2. While holding down the [SPLIT] button you pressed in
step 1, press the key that you want to specify as the split
point.
The key you pressed will become the split point. The split point will
be the lowest key of the upper part.
MEMO
• While the split point screen is displayed, you can also change
the value by turning the [VALUE] dial.
• You can also specify the split point by using the [SPLIT] button
of the organ section or the synthesizer section.
• The split point setting is shared, regardless of the sounds you’re
combining.
21
Page 22

Performing with Rhythm Pattern
Selecting/Playing Rhythm Pattern
This unit can sound a rhythm pattern while you perform.
1. Press the [SONG/RHYTHM] button several times to access
the RHYTHM screen.
2. Turn the [VALUE] dial to select a rhythm pattern.
3. Press the [ ] (START/STOP) button.
The rhythm pattern will begin playing.
4. Press the [ ] (START/STOP) button once again to stop
the rhythm pattern.
REFERENCE
For details on the rhythm patterns, refer to “Rhythm Pattern List”
in the “Data List” (PDF).
You can download the “Data List” (PDF) from the Roland website.
http://www.roland.com/manuals/
What is rhythm pattern?
“Rhythm pattern” refers to repeated phrases played by
rhythm instruments such as drums and percussion.
This unit contains built-in rhythms of numerous styles.
Changing the Tempo of the Rhythm Pattern
You can set the tempo of the rhythm pattern.
This setting species the tempo of the following functions.
• Song (SMF format) recording and playback
• Tempo-synchronized eects
1. Press the [TAP TEMPO] button.
The TEMPO screen appears.
2. Press the [TAP TEMPO] button several times at intervals of
the desired tempo.
The intervals at which you press the button will specify the tempo value.
Value 20–500
MEMO
• While the TEMPO screen is displayed, you can also change the
value by turning the [VALUE] dial.
• If you press the [TRANSPOSE] button while the TEMPO screen is
shown, the TEMPO screen will be held. Press the [EXIT] button to
return to the previous screen.
• The tempo setting can be stored as part of the registration (p.
11).
Adjusting the Volume of the Rhythm Pattern
You can adjust the volume of the rhythm pattern.
This setting species the volume of the following functions.
• The volume of drum sounds and sound eects
• The volume of song (SMF, audio) playback
• The volume of sound eects played by the D-BEAM controller
1. Use the DRUM LEVEL [ ] [ ] buttons.
22
Page 23

Recording Your Performance
This unit lets you record your performance.
You can play back a recorded performance to check your own
playing, or play along with the recorded performance.
This unit can record either SMF or audio.
* In order to use recording, you must connect a USB ash drive
(sold separately) to the USB MEMORY port (p. 4).
* Use USB Flash Memory sold by Roland. We cannot guarantee
operation if other products are used.
SMF and audio recording
File Type Explanation
A collection of data describing everything that
SMF recording
Audio recording
* SMFs (Standard MIDI Files) use a standard format for music le
that was formulated so that les containing music le could be
widely compatible, regardless of the manufacturer of the listening
device. An enormous variety of music is available, whether it be for
listening, for practicing musical instruments, for Karaoke, etc.
happened while the music was played will be
recorded. Such data will include information
about which keys (pitches) were played, for how
long, what amount of force was applied, etc.
An audio le stores actual sound data. You
can play these recordings (WAV les) on your
computer.
Starting/stopping recording
5. Press the [ ] (START/STOP) button.
When recording starts, the [ ] (START/STOP) button will light,
and the recording screen will appear.
The number of measures is shown during SMF recording, and the
recording time is shown during audio recording.
MEMO
If you’re recording in SMF format, a 2 measure count will sound
before recording begins.
6. Press the [ ] (START/STOP) button.
Recording will stop, and the SAVE SONG screen appears.
Recording
Preparations for recording
1. Connect a USB ash drive (sold separately) to the USB
MEMORY port (p. 4).
2. As desired, select a rhythm pattern that will play while
you record (p. 22).
3. Press the [ ] (REC) button.
The [ ] (REC) button will light, the [ ] (START/STOP) button
will blink, and this unit will be in the record-ready condition.
4. Turn the [VALUE] dial to select the recording format.
Value Explanation
SMF SMF recording
Audio Audio recording
Saving your recorded performance
7. Assign a name to the song.
Button/Dial Operation
CURSOR [
buttons
[VALUE] dial Changes the character.
MODE [ORGAN] (Del)
button
MODE [PIANO] (Space)
button
If you don’t want to save the song, press the [EXIT ] button.
8. Press the [ENTER] button or the MODE [SYNTH] (Save)
button.
The song will be saved.
* If you recorded in audio format and an identically-named song
] [ ]
exists on the USB ash drive, you won’t be able to save.
If the following screen appears, press the [ENTER] button and
assign a dierent name.
Select the character that you want to change.
Delete the character.
Inserts a space.
NOTE
Do NOT turn o the power or disconnect the USB ash drive
while “Executing...” is displayed.
23
Page 24

Recording Your Performance
Playing a Song
Here’s how to play back a song that you’ve saved on a USB ash
drive.
1. Connect a USB ash drive (sold separately) to the USB
MEMORY port (p. 4).
2. Press the [SONG/RHYTHM] button several times to access
the SONG screen.
3. Turn the [VALUE] dial to select the song.
MEMO
If you wish to select a song stored in a folder on a USB ash
drive, you can navigate as follows.
• To move to a dierent folder: Use the [VALUE] dial to select the
“
,” and then press the [ENTER] button or the [ ]
(START/STOP) button.
• To select a song within the folder: Use the [VALUE] dial.
• To move out of a folder: Use the [ VALUE] dial to select the
“
,” and then press the [ENTER] button or the [ ]
(START/STOP) button.
4. Press the [ ] (START/STOP) button.
The song will start playing.
The measure number is displayed for SMF-format songs, and the
playback time is displayed for audio-format songs.
Renaming a Song
Here’s how to rename a song.
1. Connect a USB ash drive (sold separately) to the USB
MEMORY port (p. 4).
2. Press the [SONG/RHYTHM] button several times to access
the SONG screen.
3. Turn the [VALUE] dial to select the song.
4. Press the OCTAVE [UP] button.
The RENAME screen appears.
If you decide to cancel, press the [EXIT] button.
5. Assign a name to the song.
Button/Dial Operation
CURSOR [
[VALUE] dial Changes the character.
MODE [ORGAN] (Del) button Delete the character.
MODE [PIANO] (Space) button Inserts a space.
] [ ] buttons
6. Press the [ENTER] button or the MODE [SYNTH] (Save)
button.
The song will be renamed.
Select the character that you want
to change.
5. Press the [ ] (START/STOP) button.
The song will stop playing.
MEMO
• You can change the playback tempo of SMF format songs (p.
22).
• You can use the DRUM LEVEL [
playback volume (p. 22).
• If the song was recorded on this unit as SMF data, you can use
the LEVEL [
adjust the volume.
] [ ] buttons of each section or the [LEVEL] bar to
] [ ] buttons to adjust the
Button operations
Returns to the beginning of the song. If you press
[ ] button
[
[
button
] button
] (START/STOP)
this at the beginning of a song, you’ll move to the
beginning of the preceding song.
Hold down the button to rewind the song.
Moves to the next song. Hold down the button to
fast-forward the song.
Play/stop the song.
Deleting a Song
Here’s how to delete a song that you’ve saved on a USB ash drive.
1. Connect a USB ash drive (sold separately) to the USB
MEMORY port (p. 4).
2. Press the [SONG/RHYTHM] button several times to access
the SONG screen.
3. Turn the [VALUE] dial to select the song.
4. Press the OCTAVE [DOWN] button.
A conrmation message appears.
If you decide to cancel, press the [EXIT] button.
5. Press the [ENTER] button.
The song will be deleted.
NOTE
Do NOT turn o the power or disconnect the USB ash drive
while “Executing...” is displayed.
24
Page 25

Data saved on a USB ash drive
The following data can be saved on a USB ash drive.
• Songs recorded on this unit (p. 23)
• Phrases recorded by the looper (p. 26)
• Registration sets (p. 28)
Root folder (top level)
Song les
Looper phrases
Registration sets
Recording Your Performance
Songs recorded on this unit and phrases recorded by the looper are saved in the root folder
of the USB ash drive.
Registration sets saved by Save Registration (p. 28) will be saved in the root folder of the
USB ash drive.
Load Registration (p. 29)/Delete Registration (&PDF) can only load/delete registration
sets that are saved in the root folder of the USB ash drive.
Playing SMF/audio les from a computer
You can copy audio les ( WAV, MP3, AIFF) or SMF les from your computer to a USB ash drive, and play them on this unit.
You can copy the SMF/audio les to the root folder of your USB ash drive, or you can create a folder on the USB ash drive and copy the les
into the folder.
Copy to a USB ash drive
SMF, MP3, WAV, AIFF
MEMO
• Use only single-byte alphanumeric characters in the le names and folder names.
• A maximum of 99 les can be detected in each folder.
SMF/audio les that can be played
Format
SMF
File size
System exclusive Packet size must be 512 byte or less
WAV/AIFF
Audio
MP3
Sampling frequency 44.1 kHz
Bit rate 16-bit
Format MPEG-1 audio layer 3
Sampling frequency 44.1 kHz
Bit rate 32/40/48/56/64/80/96/112/128/160/192/224/256/320 kbps, VBR (Variable Bit Rate)
Insert USB ash drive
0 or 1
* For an SMF format 1 song that has more than 16 tracks, all of the tracks might not play back
correctly in some cases.
Maximum of approximately 240 KB (this will change somewhat depending on the content of the SMF)
25
Page 26

Using the Looper
The looper is a function that lets you overdub while recording and playing back in real time.
You can take advantage of various performance possibilities, such as performing or adjusting the eects while playing back recorded phrases as a
backing.
* The maximum recording time is approximately 20 seconds.
Recording with the Looper
Record-standby
Press the [LOOPER] button to enter
the record-standby condition.
Overdubbing
Record by layering your performance
onto the loop playback.
Press the [
to loop playback.
] (REC) button to switch
Recording
Recording will begin immediately
when you press the [
STOP) button or play the keyboard.
] (START/
Loop playback
Play back a loop.
Press the [
to overdubbing.
] (REC) button to switch
Press twice
Press twice
Save
Save
If you press the [LOOPER] button while stopped,
the SAVE LOOPER screen appears.
REFERENCE
Exit
MEMO
Steps indicated by
jack.
If you want to use a pedal switch to operate the looper, set Damper Assign (&PDF) or Expression Assign (&PDF) to “LOOPER.”
For more about saving phrases, refer to
“Saving a Phrase” (p. 27).
can also be performed using a pedal switch (DP-2; sold separately) connected to the DAMPER jack or EXPRESSION PEDAL
Stop
During loop playback or overdubbing,
press the [
button to stop.
* If you’re using the pedal switch, press
it twice within one second.
] (START/STOP)
26
Page 27

Using the Looper
Recording While a Rhythm Pattern Plays
1. Press the [SONG/RHYTHM] button several times to access
the RHYTHM screen.
2. Turn the [VALUE] dial to select a rhythm pattern.
3. Record as described in “Recording with the Looper” (p.
26).
When recording begins, the rhythm pattern will also start sounding.
When you nish recording and stop loop playback, the rhythm
pattern will also stop.
* The rhythm pattern will be recorded, but not overdubbed.
MEMO
You can specify the tempo of the rhythm pattern before
recording (p. 22).
Loading an Audio File for Playback or Recording
You can load an audio le from a USB ash drive into this
instrument, and use the looper to play it back or record.
MEMO
Audio le format that can be played back:
WAV/AIFF, 44.1 kHz, 16-bit
1. Press the [SONG/RHYTHM] button several times to access
the SONG screen.
2. Use the [VALUE] dial to select an audio le, and press the
[LOOPER] button.
A conrmation message appears.
Deleting the Phrase
Here’s how to delete the phrase that’s stored in this instrument.
1. In the LOOPER screen, press the [SONG/RHYTHM].
A conrmation message appears.
If you decide to cancel, press the [EXIT] button.
2. Press the [ENTER] button.
The phrase is deleted.
Saving a Phrase
A phrase you record using the looper can be saved as audio data on
your USB ash drive.
* To save a phrase recorded using the looper, you must rst
connect your USB ash drive to the USB MEMORY port.
1. Stop loop playback (p. 26).
2. Press the [LOOPER] button.
If you don’t want to save the phrase to a USB ash drive, press the
[EXIT] button to exit the SAVE LOOPER screen.
MEMO
Even if you exit the looper without saving, the phrase will
remain in this unit’s memory until you turn o the power.
3. Assign a name to the phrase.
If you decide to cancel, press the [EXIT] button.
MEMO
If a previously-recorded phrase is stored in this instrument, the
following screen appears.
When you load an audio le, the phrase stored in this
instrument is deleted.
If you want to keep the phrase, press the [EXIT] button, and save
the phrase to a USB ash drive as described in “Saving a Phrase”
(p. 27).
3. Press the [ENTER] button.
The audio le is loaded.
4. Play back or record as described in “Loop playback” or
“Overdubbing” in “Recording with the Looper” (p. 26)
and subsequent steps.
Button/Dial Operation
CURSOR [
buttons
[VALUE] dial Changes the character.
MODE [ORGAN] (Del)
button
MODE [PIANO] (Space)
button
] [ ]
Select the character that you want to change.
Delete the character.
Inserts a space.
4. Press the [ENTER] button or the MODE [SYNTH] (Save)
button.
The phrase will be saved.
* An identically-named phrase exists on the USB ash drive, you
won’t be able to save.
If the following screen appears, press the [ENTER] button and
assign a dierent name.
NOTE
Do NOT turn o the power or disconnect the USB ash drive
while “Executing...” is displayed.
27
Page 28

Convenient Functions
Making the Power Automatically Turn
O After a Time (Auto O)
With the factory settings, the unit’s power will automatically be
switched o a certain amount of time after you stop playing or
operating the unit.
If you don’t need the power to turn o automatically, set “Auto O ”
to the “OFF” setting as described below.
1. Press the [MENU] button.
2. Turn the [VALUE] dial
3. Press the [ENTER] button.
4. Use the CURSOR [ ] [ ] buttons to select “Auto O.”
5. Turn the [VALUE] dial to change the setting.
Value Explanation
OFF The power will not turn o automatically.
10 min
30 min
240 min (default)
to select “System.”
The power will automatically turn o if no
operation is performed for 10 minutes.
The power will automatically turn o if no
operation is performed for 30 minutes.
The power will automatically turn o if no
operation is performed for 240 minutes (4 hours).
Saving Registrations to a USB Flash Drive (Save Registration)
All registrations stored in this unit can be saved to your USB ash
drive as a set (registration set).
1. Connect a USB ash drive (sold separately) to the USB
MEMORY port (p. 4).
2. Press the [MENU] button.
3. Turn the [VALUE] dial
4. Press the [ENTER] button.
5. Use the CURSOR [ ] [ ] buttons to select “Save
Registration.”
6. Press the [ENTER] button.
The SAVE REGISTRATION screen appears.
7. Turn the [VALUE] dial to select the save-destination number.
Numbers for which a registration set name is shown already contain
a saved registration set.
If you select a previously-saved registration set as the savedestination, the previously-saved registration set will be overwritten.
If you don’t want to overwrite it, select a number for which “----------”
is shown as the save-destination.
to select “Media Utility.”
6. Press the [EXIT] button several times to nish the
procedure.
8. Press the [ENTER] button.
If you select a number in which a registration set is already saved,
the display will ask “Overwrite Registration OK?”
If you are sure you want to overwrite it, press the [ENTER] button. If
you decide to select a dierent number, press the [EXIT ] button.
9. Assign a name to the registration set.
Button/Dial Operation
CURSOR [
buttons
[VALUE] dial Changes the character.
MODE [ORGAN] (Del)
button
MODE [PIANO] (Space)
button
] [ ]
Select the character that you want to change.
Delete the character.
Inserts a space.
10. Press the [ENTER] button or the MODE [SYNTH] (Save)
button.
The registration set will be saved.
NOTE
Do NOT turn o the power or disconnect the USB ash drive
while “Executing...” is displayed.
11. Press the [EXIT] button several times to nish the
procedure.
28
Page 29

Convenient Functions
Loading Saved Registrations from a USB Flash Drive (Load Registration)
Here’s how a registration set saved on a USB ash drive can be
loaded into this unit.
NOTE
When you load a registration set, all registrations stored in this
unit will be overwritten and lost. If you don’t want to lose these
registrations, save them to a USB ash drive (p. 28).
1. Connect a USB ash drive (sold separately) to the USB
MEMORY port (p. 4).
2. Press the [MENU] button.
3. Turn the [VALUE] dial
4. Press the [ENTER] button.
5. Use the CURSOR [ ] [ ] buttons to select “Load
Registration.”
6. Press the [ENTER] button.
The LOAD REGISTRATION screen appears.
to select “Media Utility.”
Individually Loading Registrations from a USB Flash Drive (Load One Regist)
Registrations saved on a USB ash drive can now be loaded
individually into this unit.
NOTE
When you load a registration, the loading-destination
registration will be overwritten and lost. If you don’t want to lose
that registration, save it to a USB ash drive before you proceed.
For details, refer to “Saving Registrations to a USB Flash Drive
(Save Registration)” (p. 28).
1. Connect a USB ash drive (sold separately) to the USB
MEMORY port.
2. Press the [MENU] button.
3. Turn the [VALUE] dial to select “Media Utility.”
4. Press the [ENTER] button.
5. Use the CURSOR [ ] [ ] buttons to select “Load One
Regist.”
6. Press the [ENTER] button.
The LOAD ONE REGIST screen appears.
7. Turn the [VALUE] dial to select the registration set you
want to load.
If you decide to cancel, press the [EXIT] button.
8. Press the [ENTER] button.
The registration set will be loaded.
NOTE
Do NOT turn o the power or disconnect the USB ash drive
while “Executing...” is displayed.
9. Press the [EXIT] button several times to nish the
procedure.
You can download registrations
A wide variety of registrations can be downloaded from the
Axial sound library site and used on this unit.
For details, refer to the Axial site.
http://axial.roland.com/
7. Turn the [VALUE] to select the registration set containing
the registration that you want to load.
8. Press the [ENTER] button.
9. Use the [VALUE] dial and the cursor buttons to select
the loading-source and loading-destination registration
number.
Loading-source
registration
Loading-destination
registration
10. Press the [ENTER] button.
The registration will be loaded.
NOTE
Do NOT turn o the power or disconnect the USB ash drive
while “Executing...” is displayed.
11. Press the [EXIT] button several times to nish the
procedure.
29
Page 30

Convenient Functions
Formatting a USB Flash Drive (Format USB)
“Formatting” is the operation of preparing a USB ash drive for use
with this unit.
If the USB ash drive format does not match this unit’s, you will not
be able to use that USB ash drive with this unit.
NOTE
Be aware that this operation will erase all data that has been
saved on your USB ash drive.
1. Connect a USB ash drive (sold separately) to the USB
MEMORY port (p. 4).
2. Press the [MENU] button.
3. Turn the [VALUE] dial to select “Media Utility.”
4. Press the [ENTER] button.
5. Use the CURSOR [ ] [ ] buttons to select “Format USB.”
6. Press the [ENTER] button.
A conrmation message appears.
Restoring the Factory Settings (Factory Reset)
If desired, you can restore all of this unit’s settings to their factoryset condition. This operation is called “factory reset.”
NOTE
When you execute the factory reset operation, all settings
you’ve previously saved will be lost, and will return to their
factory-set condition.
Registration settings will also return to their factory-set
condition. If you don’t want to lose your registrations, save them
to a USB ash drive before you continue (p. 28).
1. Press the [MENU] button.
2. Turn the [VALUE] dial
3. Press the [ENTER] button.
4. Use the CURSOR [ ] [ ] buttons to select “Factory Reset.”
5. Press the [ENTER] button.
A conrmation message appears.
to select “System.”
If you decide to cancel, press the [EXIT] button.
7. Press the [ENTER] button.
The USB ash drive will be formatted.
NOTE
Do NOT turn o the power or disconnect the USB ash drive
while “Executing...” is displayed.
8. Press the [EXIT] button several times to nish the
procedure.
Initializing a Synthesizer Sound
When you load a sound library from Axial, or use the iPad editor to
edit the sounds, the preset synthesizer sound parameters might be
overwritten.
Here’s how to initialize synthesizer sound parameters to their
factory-set state.
1. Select the synthesizer sound that you want to initialize.
2. Hold down the [SYNTH] button and press the [EXIT]
button.
The screen indicates “INITIALIZE,” and the selected synthesizer
sound is initialized.
If you decide to cancel, press the [EXIT] button.
6. Press the [ENTER] button.
The display will indicate “Turn o the power.”
7. Turn the power o, then on again (p. 8).
This unit’s setting is reset to its factory values.
NOTE
Do NOT turn o the power while “Executing...” is displayed.
MEMO
You can also execute a factory reset by holding down the MODE
[ORGAN] button and pressing the [POWER] switch to turn the
power on.
MEMO
• Synthesizer sounds can be initialized one at a time.
• For details on Axial or the iPad editor, refer to the Roland
website.
http://www.roland.com/
30
Page 31

Detailed Settings for All Functions (Menu)
The menu allows you to edit the performance and sound settings.
1. Press the [MENU] button.
The menu screen appears.
2. Turn the [VALUE] dial to select a category.
3. Press the [ENTER] button.
4. Use the CURSOR [ ] [ ] buttons to select the parameter
that you want to edit.
MEMO
If you’ve selected a parameter for which the display indicates
“Press the [ENTER]” press the [ENTER] button.
5. Turn the [VALUE] dial to change the setting.
MEMO
For details on each menu item, refer to “Reference Manual”
(PDF).
Category Explanation
Organ Settings for organ sounds.
Rotary Settings for the rotary eect.
EFX Eect settings.
Portamento Portamento settings.
Keyboard Keyboard settings.
Controller
PK Setting
Media Utility Save or load registrations (p. 28).
Rhythm
Metronome Metronome settings.
Wireless
MIDI MIDI settings.
System Overall settings for the entire unit.
Settings for controllers such as pedals connected
to this unit, the pitch bend/modulation lever, and
the D-BEAM controller.
Settings for a pedal keyboard connected to this
unit.
Settings for rhythm patterns, and for song
playback/recording.
Settings for a wireless USB adaptor connected
to this unit.
6. Press the [EXIT] button several times to nish the
procedure.
Main Specications
Roland V-Combo VR-09, VR-730: Keyboard
VR-09 VR-730
Keyboard 61 keys (with velocity) 73 keys (semi-weighted waterfall keyboard with velocity)
Maximum Polyphony 128 voices
Parts Organ (3 parts), Piano (2 parts), Synthesizer (2 parts), Drum (1 part), GM2 (16 parts)
Sounds 245 sounds 268 sounds
Power Supply AC adaptor, Rechargeable Ni-MH battery (AA, HR6) x 8
600 mA
Expected battery life under continuous use:
Current Draw
Dimensions
Weight (excluding AC adaptor)
Accessories
Options (sold separately)
* This document explains the specications of the product at the time that the document was issued. For the latest information, refer to the Roland
website.
Rechargeable Ni-MH battery: Approx. 5 hours (approx. 3 hours if USB ash drive is connected)
These gures will vary depending on the specications of the batteries and the actual conditions of use.
* Carbon-zinc batteries and alkaline batteries cannot be used
1,008 (W) x 300 (D) x 106 (H) mm
39-11/16 (W) x 11-13/16 (D) x 4-3/16 (H) inches
5.5 kg
12 lbs 3 oz
Owner’s Manual
Leaet “USING THE UNIT SAFELY”
AC adaptor
Power cord
USB memory protector
Keyboard stand (*1): KS-18Z, KS-12
Damper pedal: DP series
Expression pedal: EV series
Pedalboard: PK-9
USB Flash Memory (*2)
*1: When using the KS-18Z, ensure that the height of the unit is one meter or lower.
*2 Use a commercially available USB ash drive or a USB ash drive sold by Roland. However, we cannot guarantee that all
commercially available USB ash drives will work with this unit.
1,215 (W) x 366 (D) x 124 (H) mm
47-7/8 (W) x 14-7/16 (D) x 4-7/8 (H) inches
9.9 kg
21 lbs 14 oz
Owner’s Manual
Leaet “USING THE UNIT SAFELY”
AC adaptor
Power cord
Ferrite core
31
Page 32

USING THE UNIT SAFELY
WARNING
Concerning the Auto O function
The power to this unit will be turned o
automatically after a predetermined amount
of time has passed since it was last used
for playing music, or its buttons or controls
were operated (Auto O function). If you
do not want the power to be turned o automatically,
disengage the Auto O function (p. 28).
Use only the stand that is recommended
This unit should be used only with a stand
that is recommended by Roland.
Do not place in a location that is unstable
When using the unit with a stand
recommended by Roland, the stand must
be carefully placed so it is level and sure to
remain stable. If not using a stand, you still
need to make sure that any location you
choose for placing the unit provides a level surface
that will properly support the unit, and keep it from
wobbling.
Precautions regarding placement of this unit on a
stand
Be sure to follow the instructions in the
Owner’s Manual carefully when placing this
unit on a stand (“Reference Manual” (PDF)).
If it is not set up properly, you risk creating
an unstable situation which could lead to
the unit falling or the stand toppling, and may result
in injury.
WARNING
Use only the supplied AC adaptor and the correct
voltage
Be sure to use only the AC adaptor
supplied with the unit. Also, make
sure the line voltage at the installation
matches the input voltage specied on
the AC adaptor’s body. Other AC adaptors
may use a dierent polarity, or be designed for a
dierent voltage, so their use could result in damage,
malfunction, or electric shock.
Use only the supplied power cord
Use only the attached power cord. Also,
the supplied power cord must not be used
with any other device.
CAUTION
Use only the specied stand(s)
This unit is designed to be used in
combination with specic stands (KS-18Z,
KS-12) manufactured by Roland. If used
in combination with other stands, you
risk sustaining injuries as the result of this
product dropping down or toppling over due to a lack
of stability.
CAUTION
Evaluate safety issues before using stands
Even if you observe the cautions given
in the “Reference Manual” (PDF), cer tain
types of handling may allow this product
to fall from the stand, or cause the stand to
overturn. Please be mindful of any safety
issues before using this product.
Take care so as not to get ngers pinched
When handling the following moving
parts, take care so as not to get ngers,
toes, etc., pinched. Whenever a child uses
the unit, an adult should be on hand to
provide supervision and guidance.
• USB ash drive cover (p. 8)
• Expression pedal (p. 6)
Keep small items out of the reach of children
To prevent accidental ingestion of the
parts listed below, always keep them out of
the reach of small children.
• Included Parts
• Ferrite core (p. 8)
• Allen wrench (p. 8)
• Screws (p. 8)
IMPORTANT NOTES
Power Supply: Use of Batteries
• If the batteries run extremely low, the sound may
distort, but this does not indicate a malfunction. If
this occurs, please replace the batteries or use the
included AC adaptor.
• If operating this unit on batteries, please use
rechargeable Ni-MH batteries.
Placement
• Do not allow lighting devices that normally are
used while their light source is very close to the unit
(such as a piano light), or powerful spotlights to
shine upon the same area of the unit for extended
periods of time. Excessive heat can deform or
discolor the unit.
• Do not allow objects to remain on top of the
keyboard. This can be the cause of malfunction,
such as keys ceasing to produce sound.
• Depending on the material and temperature of the
surface on which you place the unit, its rubber feet
may discolor or mar the surface.
Maintenance
• To clean the unit, use a dry, soft cloth; or one that
is slightly dampened. Tr y to wipe the entire surface
using an equal amount of strength, moving the
cloth along with the grain of the wood. Rubbing
too hard in the same area can damage the nish.
Repairs and Data
• Before sending the unit away for repairs, be sure to
make a backup of the data stored within it; or you
may prefer to write down the needed information.
Although we will do our utmost to preserve the
data stored in your unit when we carry out repairs,
in some cases, such as when the memory section
is physically damaged, restoration of the stored
content may be impossible. Roland assumes no
liability concerning the restoration of any stored
content that has been lost.
Additional Precautions
• Any data stored within the unit can be lost as the
result of equipment failure, incorrect operation,
etc. To protect yourself against the irretrievable
loss of data, try to make a habit of creating regular
backups of the data you’ve stored in the unit.
• Roland assumes no liability concerning the
restoration of any stored content that has been lost.
• Never strike or apply strong pressure to the display.
• Use only the specied expression pedal. By
connecting any other expression pedals, you risk
causing malfunction and/or damage to the unit.
• The usable range of D-BEAM controller will become
extremely small when used under strong direct
sunlight. Please be aware of this when using the
D-BEAM controller outside.
• The sensitivity of the D-BEAM controller will change
depending on the amount of light in the vicinity of
the unit. If it does not function as you expect, adjust
the sensitivity as appropriate for the brightness of
your location.
• Do not use connection cables that contain a built-in
resistor.
Using External Memories
• Please observe the following precautions when
handling external memory devices. Also, make sure
to carefully observe all the precautions that were
supplied with the external memory device.
• Do not remove the device while reading/writing
is in progress.
• To prevent damage from static electricity,
discharge all static electricity from your person
before handling the device.
Intellectual Property Right
• It is forbidden by law to make an audio recording,
video recording, copy or revision of a third party’s
copyrighted work (musical work, video work,
broadcast, live performance, or other work), whether
in whole or in part, and distribute, sell, lease,
perform or broadcast it without the permission of
the copyright owner.
• Do not use this product for purposes that could
infringe on a copyright held by a third party. We
assume no responsibility whatsoever with regard to
any infringements of third-party copyrights arising
through your use of this product.
• The copyright of content in this product (the sound
waveform data, style data, accompaniment patterns,
phrase data, audio loops and image data) is reserved
by Roland Corporation.
• Purchasers of this product are permitted to utilize
said content (except song data such as Demo
Songs) for the creating, performing, recording and
distributing original musical works.
• Purchasers of this product are NOT permitted to
extract said content in original or modied form, for
the purpose of distributing recorded medium of said
content or making them available on a computer
network.
• Roland, SuperNATURAL and D-BEAM (
either registered trademarks or trademarks of
Roland Corporation in the United States and/or
other countries.
• Company names and product names appearing
in this document are registered trademarks or
trademarks of their respective owners.
) are
32
 Loading...