

Page 1
Page 2
el
ot ae
.
A
g
s
U
p
Adj
.
Wh
ll
H
.
[PITCH] Button p. 60
[PITCH] Button
p. 60
)
[FILTER] Button p. 60
g
.
[EXPRESSION] Button p. 60
[EXPRESSION] Button
p. 60
e
.
T
ty
p
c
[PHANTOM] Button p. 19
[PHANTOM] Button
p. 19
T
m
.
T
.
[INPUT EFFECT] Button p. 32
T
y
[MIC ON/OFF] Button p. 31
[MIC ON/OFF] Button
p. 31
T
[DIRECT] Knob p. 30
[DIRECT] Knob
p. 30
T
m
[LEVEL] Knob/Indicator p. 28
T
.
T
y
.
[AUTO START] Button p. 74
b
.
[STOP] Button p. 75
[STOP] Button
p. 75
T
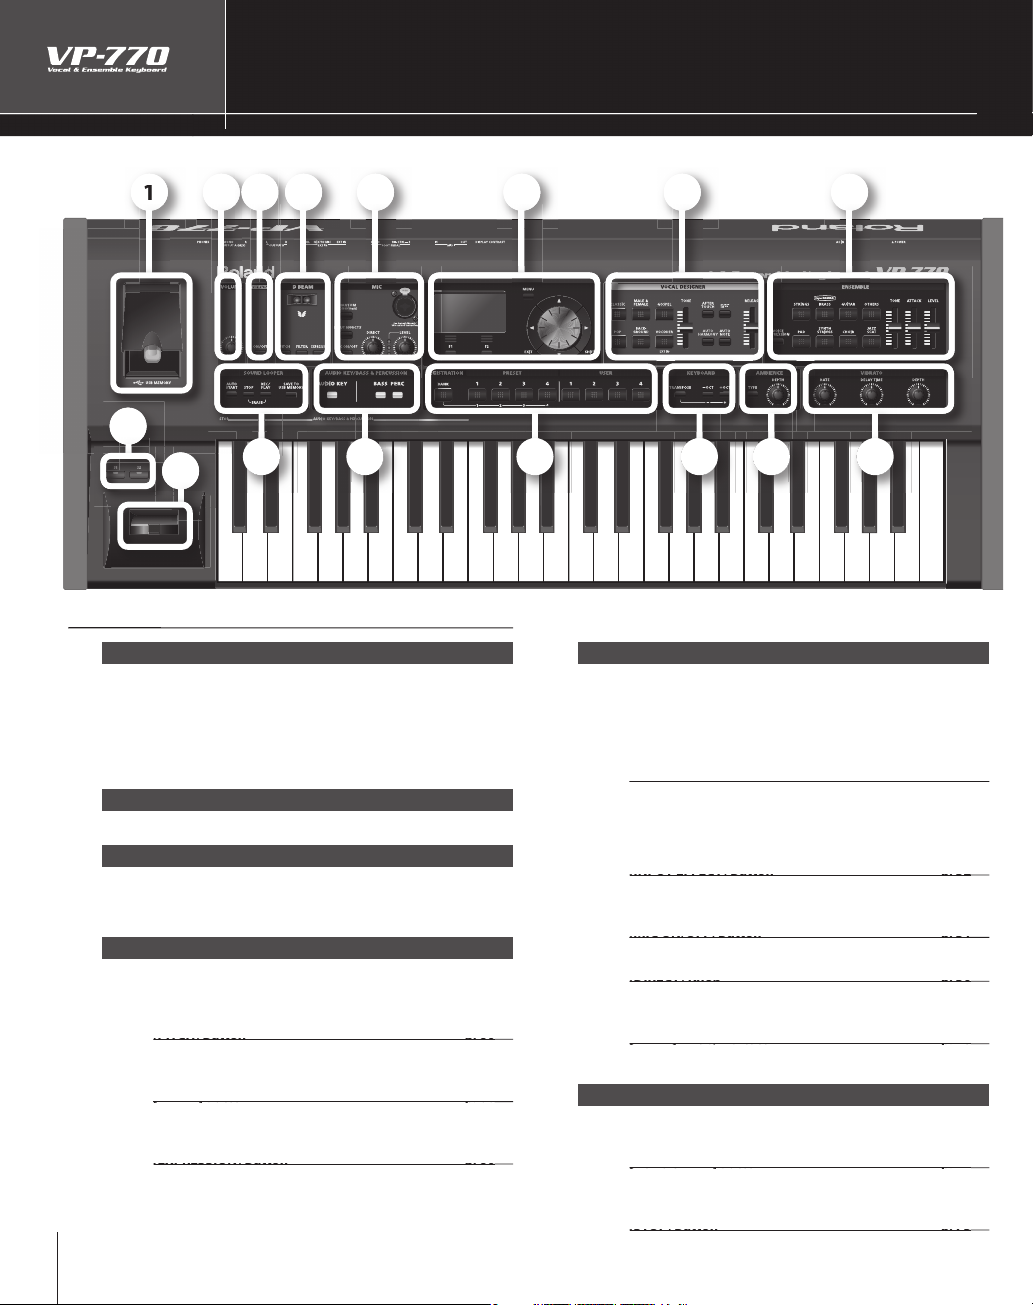
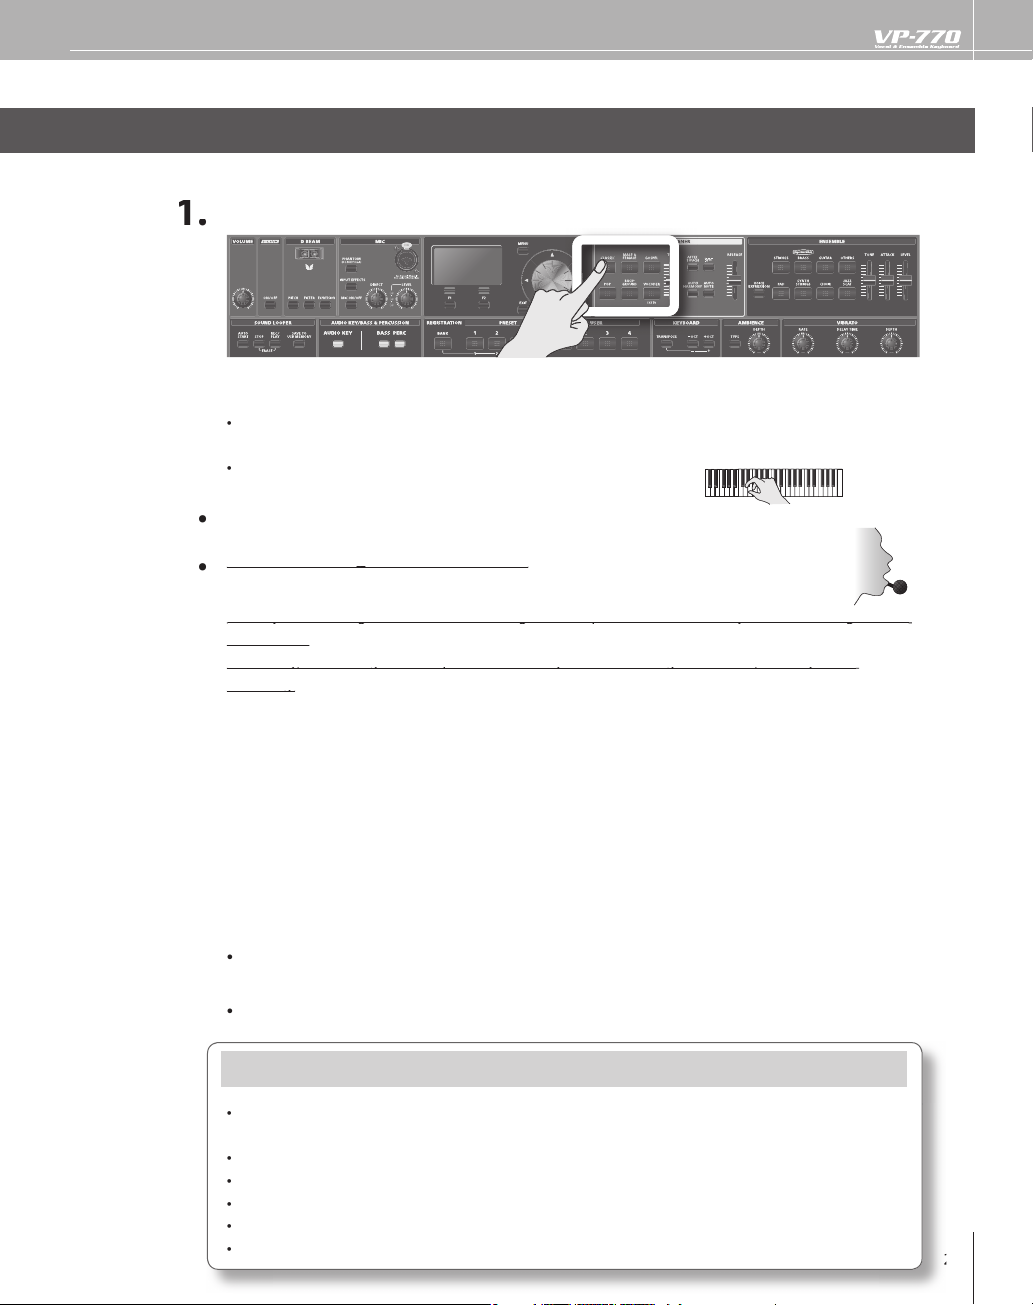
Names of Things and What They Do
2
4
9
3
5
6
1
1
1
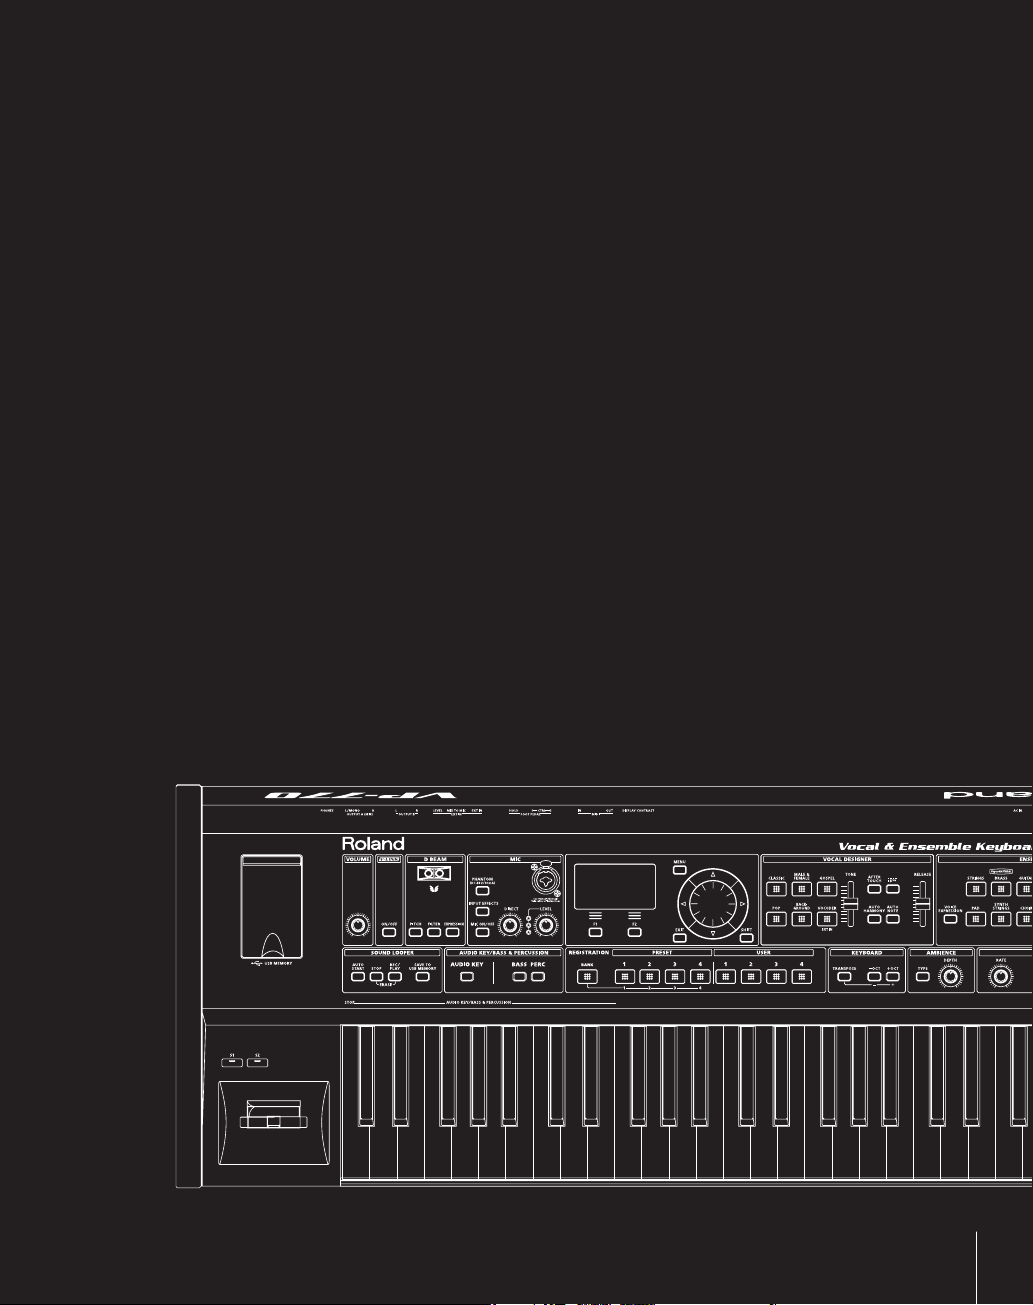
Front Pan
1 USB MEMORY p. 22
Connect USB memory here
udio les saved on USB memory can be played back (p. 68),
and phrases recorded usin
tored on USB memory. You can also save registration sets to
SB memory, or load previously-saved registration sets into
the VP-770 (
2 VOLUME p. 26
3 V-LINK p. 118
This button turns the V-LINK function on/o .
light blue.
4 D BEAM p. 60
ere you can switch the D Beam function on/o . This lets
you apply various e ects to the sound by moving your hand
above the sensor
This lets you use the D Beam controller to control the pitch
(This is the same e ect as the pitch bend lever.
This lets you use the D Beam controller to control the
bri
This lets you use the D Beam controller to control the
xpression.
. 103).
usts the overall volume of the VP-770
en you press this button to turn V-LINK on, the button wi
htness of the sound
1
SOUND LOOPER (p. 74) can be
1
1
1
1
1
5 MIC p. 19
Connect the included microphone here
he MIC input jack supports both XLR type and phone
pe plugs. The XLR type connector provides 48 V phantom
ower, allowing you to connect a phantom-powered
ondenser microphone.
urn this on if you’re using a phantom-powered condenser
icrophone
urn this o if you’re using the included microphone
his applies an e ect to the microphone input. Turn this on if
ou want to use an input e ect.
urn this on if you want to use the microphone.
his adjusts the volume of the live audio from the
icrophone input.
his adjusts/indicates the mic’s input level
6 SOUND LOOPER p. 74
his function lets you record, overdub, and loop-playback
our performance
If you’ve pressed this button to turn it on, recording will
egin the moment you start performing
his stops recording or loop playback.
Page 3
3
T
his starts recording, overdubbing, or playback
.
Th
KEY] Button
p. 68
T
d
T
.
T
.
[F2] Buttons
T
y.
Button
p. 94
.
Button
l
Cursor Buttons
T
y
[
] b
.
Value Dial
y
.
.
[VOCODER] Buttons
p. 27
T
Slider
p. 34
T
Button
p. 64
T
tone.
T
.
T
a
.
NOTE] Button
p. 38
T
d
d.
T
.
.
STRINGS], [CHOIR], [JAZZ SCAT] Buttons p. 42
T
T
.
T
T
T
p
T
d
.
of semitones or octaves.
).
T
T
.
Th
d.
TIME] Knob
p. 41
Th
Knob
p. 41
Th
h.
t
these switches.
Y
.
is saves the recorded phrase to USB memory.
7 AUDIO KEY/ p. 68
BASS & PERCUSSION
he C2–D3 keys of the keyboard will play back audio les
in USB memory.
store
p. 48
10 ENSEMBLE p. 42
Here you can select an Ensemble sound and modify it
STRINGS], [BRASS], [GUITAR], [OTHERS], [PAD],
hese select the sound of the Ensemble part.
his adjusts the tone of the Ensemble part
his adjusts the attack of the Ensemble part.
he C2–E3 keys of the keyboard will play the bass sound
he C2–E3 keys of the keyboard will play percussion.
8 Display
Various information is shown here as you operate the VP-770
hese buttons execute di erent functions according to the
contents shown in the displa
Accesses the MENU screen in the screen
Returns to the previous screen. In some screens, this button
cance
Use this button in conjunction with other buttons.
hese buttons move the cursor position up/down/left/right.
In the EDIT screen,
ressing the cursor [] or
Use this to modify a value.
By holding down the [SHIFT] button and turning the value
ou can change a value in larger steps
dial
s the operation that’s being executed.
ou can change a value in steps of one by
utton
9 VOCAL DESIGNER p. 27
Here you can select a Vocal Designer sound and modify it
CLASSIC], [MALE & FEMALE], [GOSPEL], [POP],
hese select the sound of the Vocal Designer part.
his adjusts the tone of the Vocal Designer.
his lets you use aftertouch to control the Vocal Designer
his adjusts the volume of the Ensemble part.
his lets you use your voice to adjust the volume of the
Ensemble
art.
11 REGISTRATION p. 78
hese buttons let you store di erent combinations of Vocal
Designer an
Ensemble sounds along with various settings
12 KEYBOARD p. 52
Here you can raise or lower the pitch of the keyboard in steps
13 AMBIENCE p. 50
Here you can adjust the type and depth of ambience
reverberation
his selects the type of reverberation.
his adjusts the amount of reverberation
14 VIBRATO p. 41
Here you can adjust the vibrato.
is adjusts the vibrato spee
is adjusts the time until vibrato begins to apply.
is adjusts the vibrato dept
15 [S1], [S2] Buttons p. 58
By pressing the [S1] or [S2] button you can apply an e ect to
he sound or modify it. You can assign various functions to
16 Pitch Bend/Modulation Lever p. 56
ou can use this to modify the pitch or apply vibrato
his shifts the Vocal Designer one octave higher in pitch
his turns on the Auto Harmony function, which
utomatically adds a backing chorus to your vocal
his turns on the Auto Note function that lets you produce
without having to play the keyboar
soun
his adjusts the release of the Vocal Designer and Ensemble
art
Page 4
el
ea a e
.
g
f
“
.
.
A
.
.
lug).
.
OUTPUT A (MIX) (L/MONO, R) p. 18
OUTPUT A (MIX) (L/MONO, R)
p. 18
y
OUTPUT B (L, R) p. 98
OUTPUT B (L, R)
p. 98
jack
f
s
o
that
the screen shots sho
d
f
“
f
A
g
y
p
y
e
d
p
.
y
.
f
All
g
owners.
C
N
O
.
T
.
1
8
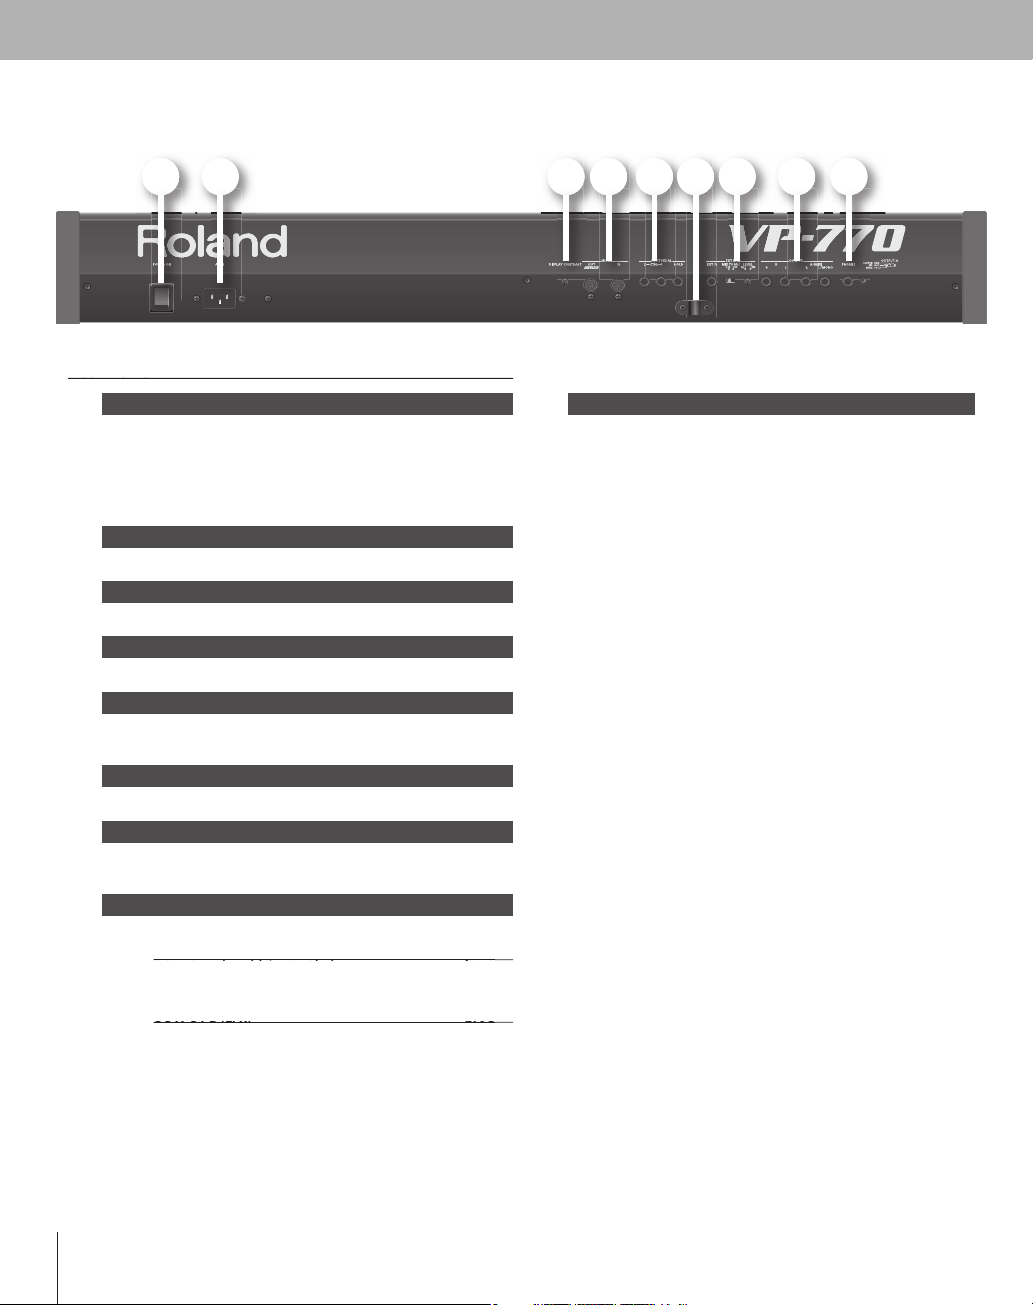
Rear Pan
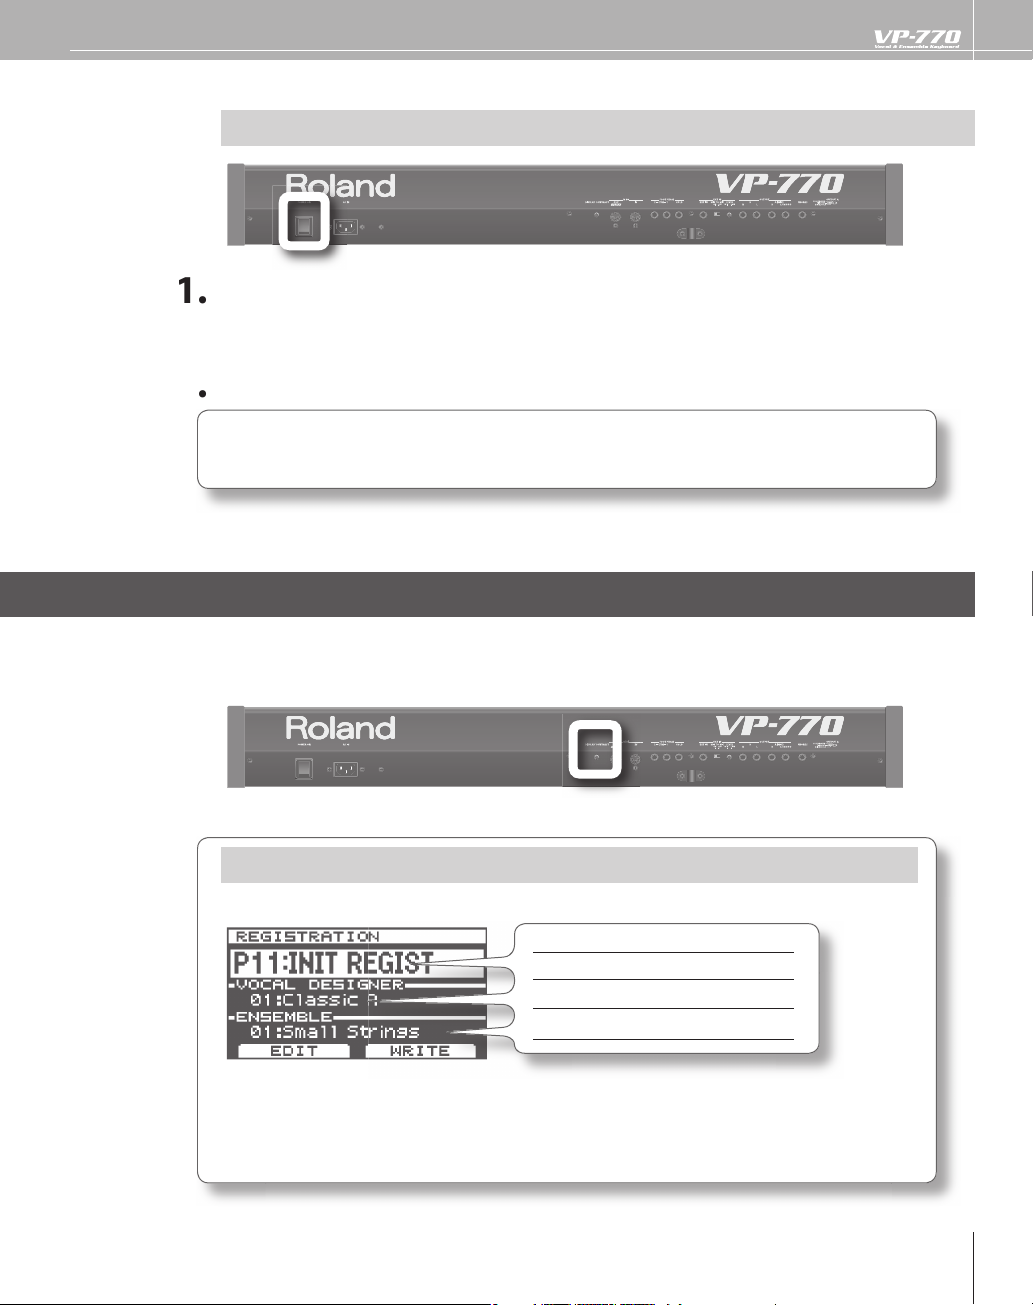
17 [POWER ON] Switch p. 24
This turns the power on/o
f you need to turn o the power completely, rst turn
o the [POWER ON] switch, then unplu
rom the power outlet. Refer to “Power Supply” chapter in
Using the Unit Safely” (separate document)
18 AC IN Connector p. 17
Connect the included power code here
19 [DISPLAY CONTRAST] Knob p. 25
djust the display’s contrast
20 MIDI Connectors p. 116
Connect these to external MIDI devices
21 PEDAL Jacks p. 21, 62
Connect these an expression pedal, foot switch and hold
edal.
22 Cable Clamp p. 21
ass the microphone cable through this clamp.
23 EXT IN Jack p. 20, 112
Connect an external synthesizer or microphone (phone
p
24 OUTPUT Jacks p. 18
These jacks output the VP-770’s sound in stereo (L/R)
These jacks output the audio signal in stereo to your amp or
ou’re outputting in monaural, connect to the L jack.
mixer. If
epending on the system setting “Out B Assign” (p. 98), these
s can independently output the ambience component,
the ensemble part, or the audio signal o
f you connect a plug to the OUTPUT B jack, the audio signal
peci ed by the system setting “Out B Assign” will not be
utput from the OUTPUT A jack.
the audio key.
the power cord
4
25 PHONES Jack p. 18
his is the jack for connecting headphones (sold separately)
be aware
ocument, the registration names and tone names di er from
the
actory settings.
efore using this unit, carefully read the sections entitled:
IMPORTANT SAFETY INSTRUCTIONS”, “USING THE UNIT
SAFELY”, and “IMPORTANT NOTES” chapter in “Using the Unit
ely” (separate document). These sections provide important
Sa
nformation concerning the proper operation of the unit.
dditionally, in order to feel assured that you have gained a
ood grasp of every feature provided by your new unit, Owner’
s Manual should be read in its entiret
saved and ke
MPEG La
from Fraunhofer IIS Corporation and THOMSON Multimedia
Cor
oration
MMP (Moore Microprocessor Portfolio) refers to a patent
ortfolio concerned with microprocessor architecture, which
was developed b
oland has licensed this technology from the TPL Group
MatrixQuest™ 2009 TEPCO UQUEST, LTD. All rights reserved.
The VP-770’s USB
technology from TEPCO UQUEST, LTD.
product names mentioned in this document are
trademarks or re
in
t on hand as a convenient reference.
r-3 audio compression technology is license
Technology Properties Limited (TPL).
unctionality uses MatrixQuest middleware
istered trademarks of their respective
wn in this
. The manual should be
opyright © 2009 ROLAND CORPORATIO
All rights reserved. No part of this publication may be reproduced in any form without the written permission of
LAND CORPORATION
R
Page 5
5
Contents
........................................................................................................
2
..................................................................................................................................
0
..................................................................................................................................
0
0
.........................................................................................................................
....................................................................................................................................
3
1
d
...............................................................
6
)
............................................................................
................................
8
.
9
)
............................
2
ly)
......................................................
2
)
.................................................................................................
A
)
...................................
5
..............................................................................................................
2
6
)
........................................................................
2
d
........................................................................................................
2
Adj
.......................................
8
............................................................................
9
A
.........................................................
3
0
A
....................................
3
Adj
....................
3
4
.......................................
3
5
.................................
3
6
)
...38
A
..............................................................................................................
3
9
Adj
..................................................
4
0
Adj
............................................................................
4
................................................................................................
d
........................................................................................................
......................................................................................
3
A
)
.....................................
4
4
Ad
)
............................................
4
5
Adj
...........................................................
4
6
)
..................................................................................................
)
.............................................................
8
.
4
8
n
.......................................................................
4
9
Adj
............................................................
4
9
.....................................................................................................
5
0
ames of Things and What They Do
The Ancestry of the VP
res of the VP-77
An Overview of the VP-77
About Vocal Designer
ntroducing the Sounds ................................................................................................................................
Making Connections
acing the VP-770 on the KS-12 Stan
Connect the Power Cord (AC IN
Connecting Your Amp or Speakers (OUTPUT/PHONES)
Connecting Your Microphone (MIC)....................................................................
Connecting a Pedal (FOOT PEDAL HOLD/CTRL 1/CTRL 2
Connecting USB Memory (Sold Separate
erforming 2
Turning On/O the Power (POWER ON
djusting the Display Contrast (DISPLAY CONTRAST
Adjusting the Volume (VOLUME)
erforming with Vocal Designer (VOCAL DESIGNER
Selecting a Soun
usting the Microphone Input Level (MIC LEVEL)
erforming with Vocal Designer
dding Your Unprocessed Voice (DIRECT)
Switching O the Microphone (MIC ON/OFF)
pplying E ects to the Microphone (INPUT EFFECT)
usting the Vocal Designer Tone (VOCAL DESIGNER TONE)
aising Vocal Designer’s Pitch by One Octave (8va)
sing the Auto Harmony Function (AUTO HARMONY)
laying the Vocal Designer Using Only the Microphone (AUTO NOTE
dding an E ect when You Apply Pressure to the Keyboard
AFTERTOUCH)
usting the Release of the Notes (RELEASE)
usting the Vibrato (VIBRATO)
erforming with Ensemble (ENSEMBLE)
Selecting a Soun
erforming with Ensemble
djusting the Ensemble Volume (ENSEMBLE LEVEL
justing the Ensemble Tone (ENSEMBLE TONE
usting the Ensemble Attack
sing the Microphone to Add Expression to the Ensemble
VOICE EXPRESSION
erforming with Bass & Percussion (BASS & PERCUSSION
Selecting a sound .......................................................................................................
erforming with Bass & Percussio
usting the Bass & Percussion Volume
Adjusting the Ambience (AMBIENCE)
AT TAC K)
..................................................3
9
2
2
Page 6

6
sing Controllers 5
...........................................................................................
5
f
)
..............................................................................
5
3
................................
5
.
5
5
..................................................................
5
6
)
..........................................................................................................
5
8
)
.......................................................................................................................
6
0
.............................................................................................
6
..................................
6
6
6
.............................................................................................
6
8
y
..............................................
6
8
.....................................................................................
0
..........................................................................
0
A
y
..............................................................
y
..................................................
3
..........................................................................................
4
e
e
........................................................................
5
...........................................
5
.
6
........................................................................
6
Adj
.....................................................................
6
7
...............................................................................................
8
Selecting the Registration Bank
.
9
.............................................................................................
9
n
.............................................................................................................................
8
0
......................................................................................
8
n
....................................................................................................................................
8
s
...............................................................................................................................
8
3
....................................................................................................
8
3
.........................................................................................................
8
3
VOCAL DESIGNER EDIT
..............................................................................................
8
6
............................................................................................................
8
8
........................................................................................................
9
Shifting Octave Up or Down (+OCT/-OCT)
ting Up or Down by Semitones
Shi
Splitting the Keyboard Into Vocal Designer and Ensemble Zones (SPLIT)
Adjusting the Keyboard Sensitivity.........................................................................................................
sing the Pitch Bend / Modulation Lever (PITCH BEND)
sing the [S1]/[S2] Buttons (S1/S2
sing the D Beam ( BEAM
sing Pedals (HOLD PEDAL/CTRL PEDAL)
Adding an E ect by Applying Pressure to the Keyboard (AFTERTOUCH)
sing a Microphone to Control Expression (VOICE EXPRESSION)................................................6
TRANSPOSE
sing Audio Files
erforming with Audio Files (AUDIO KEY)
erforming with Audio Files from USB Memor
Selecting the Audio File Set
Changing the Audio File Settings
djusting the Volume of the Audio Ke
pes of Audio Files That the VP-770 Can Play
T
ecording Loop Phrases (SOUND LOOPER)
ecording a Phras
laying Back the Recorded Phras
Overdubbing Phrases (Recording Another Layer)
rasing the Phrase ......................................................................................................
Saving the Phrase to USB Memory
usting the Volume of the Phrase
2
2
Storing Sounds and Settings (Registration)
ecalling a Registration
nitializing a Registratio
Saving a Registration (REGISTRATION WRITE)
diting a Registratio
egistration Parameter
REGISTRATION)
ecalling a Registration
EGIST CONTROL
............................................................................
Page 7

Menu R
eference
9
..................................................................................................................
9
4
...........................................................................................................................
9
5
)
........................................................................................
9
6
Sy
.
9
SYS
I
SYS
SOU
............................................................................................................
8
SYS
.......................................................................................................
9
....................................................................................................
................................................................................
3
.
3
.....................................................
5
y
..................................................................................................
6
..............
..............................
8
)
...................................................................................
9
T
)
..........................................................................
0
Appl
1
)
........................................................................
2
App
1
.....................................................................................
6
About V-LINK
....................................................................................................................................................
8
........................................................................................................................
0
s
........................................................................................................................................
g
..............................................................................................................................................
s
.................................................................................................................................................
3
4
.......................................................................................................................................................
asic Menu Operation (MENU)
System Settings
Saving the System Settings (SYSTEM WRITE
nput E ect Settings (INPUT EFFECTS)
acking Up to USB Memory (UTILITY–PROJECT)
Transmitting Registration Data to an External MIDI Device (UTILITY–BULK DUMP)
Screensaver Settings (UTILITY–SCREENSAVER
eset to Default Factory Settings (FACTORY RESE
SYSTEM)
stem Parameters ........................................................................................................................................
TEM MID
TEM
ND
TEM CONTROL
acking Up to USB Memory (USER BACKUP) ....................................................
estoring the Backup Data (USER RESTORE)
ormat USB Memor
Checking the VP-770’s Version (UTILITY–VERSION INFO)
ications 1
sing the Sound of an External Synthesizer (EXT IN
“Performing” Sound from Drums or a Portable Music Player
endix 1
Connecting the VP-770 with MIDI Equipment
9
9
9
MIDI Implementation Chart
Main Speci cation
Troubleshootin
rror Message
ndex ....................................................................................................................................................................2
nformation
2
2
Page 8

Play Like You’re Singing.
8
Page 9
The Ancestry of the VP
1939
Subsequently used during World War II as a way to scramble communications, the vocoder
began to achieve popularity as an electronic musical instrument in the 1970’s. Most vocoders of
that time didn’t provide a keyboard or carrier signal (analogous to the vocal cords of a human),
so you had to separately provide a synthesizer in order to produce sound.
1979
vocoder with a strings-type keyboard, making it simple to produce sound without needing
to use other equipment. The VP-330 enabled you to create distinctive vocal sounds without
specialized knowledge of vocoder parameters, and still continues to be loved by musicians
around the world.
2006
modeling technology—a leap beyond vocoding.
2009
and cutting-edge SuperNATURAL technology.
marks the invention of the “vocoder,” a method of compressing a vocal signal.
was the year in which Roland released the VP-330, a new idea that combined a
saw the appearance of the VP-550, featuring Roland’s “Vocal Designer” human vocal
now sees the birth of the VP-770, bringing you a further evolution of Vocal Designer
“Ultimate vocals for all musicians” – that’s the mission of the VP.
9
Page 10
0
Features of the VP-770
hnology
bly
lly
.
f
.
y
.
y
.
-
.
.
f
.
g
The VP-770 is a keyboard featuring cutting-edge “Vocal Designer” human vocal modeling
tec
odel incredi
Highest Quality Vocals
Unlike the choir sounds you’ve heard from samplers and synthesizers, the “Vocal Designer”
odeling technology built into the VP-770 lets you actua
atural and realistic vocals that are simply beyond all comparison with conventional vocoders
In other words, the VP-770 lets you do it all; from beautiful choirs echoing in a cathedral, to funky
gospel, to background choruses
No longer will you need to call multiple vocalists to your live performances or recording sessions.
Simpl
Rich Ensembles
In addition to Vocal Designer, the VP-770 features “ensemble” parts that use SuperNATURAL technology and
carefull
. Just connect a microphone, play the keyboard while you sing, and let the VP-770
realistic and natural vocals.
“sing the lyrics” — and it generates
or pop and rock bands
play the VP-770 and start enjoying the top quality vocal sounds you’ve dreamed of
selected high-quality PCM (digitally sampled) sounds
Brass ensembles using SuperNATURAL technology, richly expressive strings, and a broad range of high
quality choir sounds can be layered with Vocal Designer, allowing you to perform unbelievably rich
ensembles
By using “Bass and Percussion” you can also perform voice bass or voice percussion
In addition, you can use the “Audio Key” function to layer the playback of audio les saved on USB
emory (sold separately).
This means that all by itsel
nd SuperNATURAL Technology
Proprietary Roland sound generation technology that realistically reproduces the tonal
changes and performance techniques distinctive of an acoustic instrument, allowin
you to perform music that is natural and richly expressive.
1
, the VP-770 lets you rival an orchestra or a cappella group
Page 11
An Overview of the VP-770
T
.
.
f
VOC
R
This part lets you play high-quality sounds from the
create eve
sounds.
T
to play the melody.
CE
T
the ambience of a ha
.
C
r
Th
“
v
you play on the keyboard, this
g
t
di
ch
h
a
ato
ese formants to modulate
T
d
A
.
CT
A
a
.
SOU
f
SYS
ly
he VP-770 has three parts, and each part occupies its own section of the front panel
If you turn on a sound button for a part, you’ll be able to play that part
If you turn on a sound button for two or more parts, you’ll be able to play those parts simultaneously.
By combining these parts, you can make the VP-770 produce an incredible range o
vocal sounds.
ROJE
ll settings of the VP-770 can be saved to USB memory as a “project.”
TEM
System memory stores settings that app
REGISTRATION
registration lets you store the “sound and settings” of each part;
you can then use the four banks of eight buttons to instantly recall 32 di erent settings (preset: 16, user: 16)
AL DESIGNE
his part uses the keyboard and the microphone input to model vocal
sounds. Use the keyboard to control the pitch, and use the microphone
to control all other aspects of the sound.
arrie
is has the same role that the
vocal cords” play in a human
oice. According to the pitches
enerates the signal that forms
he basis of the sound (tone and
itch). Use the sound buttons to
switch between
erent vocal
aracters suc
s classic or pop.
eyboard. You can switch sounds (such as a brass
nsemble using SuperNATURAL technology, or a strings
ound) simply by selecting a sound button. By layering
the Ensemble part with the Vocal Designer you can
n richer
l
From the voice you input via the
icrophone input, this extracts
the resonances (formants)
that result from the shape of
your throat and larynx and the
ovement of your mouth, and
the signal produced by the carrier.
his will reproduce not only the
loudness of your voice, but also
et the lyrics be heard clearly an
r
th
AMBIEN
his section applies
or studio to the sound
from the three parts
ll
BASS & PERCUSSION
f you turn on one of these sound buttons, the seventeen
eft-most keys of the keyboard will play voice bass or voice
ercussion sounds. You can easily do things such as using
our left hand to play a bass line while using your right hand
f you turn on the [AUDIO KEY] button, you’ll be able to use
the fteen keys at the left side of the keyboard to play back
udio les saved on USB memory (sold separately)
ND LOOPER
This lets you record a phrase you perform, and then
lay it back repeatedly. You can also save this phrase to
USB memory (sold separately) and use the Audio Key
unction to play it.
Page 12
About Vocal Designer
“
p
.
?
T
a
anyth
f
f
f
y
“
f
a
y
y
voice of an actua
.
V
f
a
y
.
g
V
V
y
y
v
y
T
o
h
Vocal Designer” human vocal modeling technology is a further evolution of the “vocoder.” Here’s a simple
lanation of the vocoder
ex
What’s a Vocoder
he “vocoder” was invented by the physicist H. Dudley in 1939 as a technology for compressing a voice
communication signal. Subsequently, musical instruments based on this technology were developed,
llowing you to play melodies and harmonies using a human voice. Of course, the audio source can be
ing (not just a human voice) but because the vocoder has its basis in the sound-producing structure
of the human voice, we’ll be talking about it in terms of how a human voice is produced.
I
we ignore di erences of loudness, pitch, and variation between individuals, the waveform produced
by our vocal cords is essentially identical regardless o
distinguish spoken or sung words because o
tract (the shape of our throat and the movement of the lar
fricatives,” “plosives,” and “sibilants” that are added in varying ways over time. The e ect of the waveform
created by the vocal cords actually has a rather minimal e ect on what the listener hears.
what you’re saying (e.g., “ahh” or “eeh”). We can
the various resonances (formants) created by our vocal
nx and mouth) and additional sounds called
A vocoder analyzes these time-varying changes, electrically synthesizes the
the throat and movements of the mouth (the formant movements),
shape o
nd uses these formants to modulate a musical signal (the carrier) rather than
the waveform produced b
was closer to that of a robot in a science ction movie rather than the
this wa
l human
ocal Designer uses cutting-edge modeling technology to bring about a
revolutionary leap in the accuracy o
“human voice” that is incomparably more realistic and natural than the
sounds produced b
the vocal cords. The vocoder “voice” produced in
this synthesis, succeeding in generating
vocoders of the past
Resonances (formants)
produced by the vocal
tract (shape of the
throat and larynx) and
movements of the mout
Vocal cords (carrier)
Play Like You’re Singin
ocal Designer is constructed so that elements other than pitch are expressed by your voice via the
microphone. You play the keyboard to control the pitch.
ocal Designer won’t produce sound if you are only vocalizing into the microphone or only playing the
eyboard. This means that in order to take advantage of Vocal Designer, the timing at which you play
board and vocalize into the microphone is extremely important. When you’re performing a rapid
the ke
passage,
Unlike on typical synthesizers, the volume is controlled by the microphone. Use your voice to draw the
curve. Using
ou will probably nd it best to hold down the keys (or press the hold pedal ➞p. 62) and use your
oice to play the rhythm.
our voice, you can produce a range of expression that you might even nd extreme.
he most important technique for taking advantage of Vocal Designer is t
Play like you’re singing”
Page 13
Introducing the Sounds
S
d
CLASSIC
j
h
d.
p
f
.
y
.
C
d
heard.
VOCODER
g
st.
Sound
S
S
.
SS
.
G
R
O
S
Other sounds.
D
sounds.
S
S
Synth
.
CHOIR
S
of
.
J
T
g
VOCAL DESIGNER
oun
ALE &
GOSPEL These choirs include the distinctive phrasings and irregularities that are distinctive of gospel
P
ACKGROUND Sounds suitable for a backing chorus.
Description
arge choirs suitable for classical music. These are also a good choice for any choral sound—not
ust classical—and will match nearly any style of music. They have a clear sound, and are a good
oice when you want the lyrics to be hear
c
ixed choirs with independent male and female parts. With sparser chords, they produce a
er and more three-dimensional sound than “CLASSIC.” You’ll hear the female voices in the
dee
igh range, and the male voices in the low range. Female voices will be heard on the right side
o
the stereo sound eld, while male voices will be on the left side
music. The
hoirs with a fewer number of members, broadly useful for popular music as well as songs that
contain rapi
Vintage vocoder sounds.
or some sounds, you can access a list of variation sounds by holding down the [SHIFT] button and
pressin
li
are an ideal choice for jazz or gospel
passages. The sound is clear, making these a good choice when the lyrics need to
the sound button. Use the value dial or the up/down cursor buttons to select a sound from the
ENSEMBLE
escription
TRING
RA
UITA
THER
A
YNTH STRING
AZZ SCAT
Acoustic string sounds with emphasis placed on the performance techniques that are
nherent to strings
rass sounds that use SuperNATURAL technology
Guitar sounds.
esizer string sounds
ampled choir sounds. You can get an even more majestic e ect by layering these with one
the sounds of the Vocal Designer part
his sound provides samples of jazz scat singing. It’s great for songs that contain rapid
es and for scat soloing.
passa
For some sounds, you can access a list of variation sounds by holding down the [SHIFT] button
and pressing the sound button. Use the value dial or the up/down cursor buttons to select a
sound from the list.
Page 14
BASS & PERCUSSION
S
d
n
SSBass sounds.
C
T
g
.
oun
A
ER
escriptio
his provides a collection of voice percussion sounds.
You can also select a bass sound by holding down the [SHIFT] button and pressing the [BASS] button,
and then turnin
the value dial
Page 15
Making Connections
n this chapter you’ll connect the VP-770 to your external equipment and set it up.
I
15
Page 16
6
Making Connections
.
r
d th
bly
f
.
.
ace the
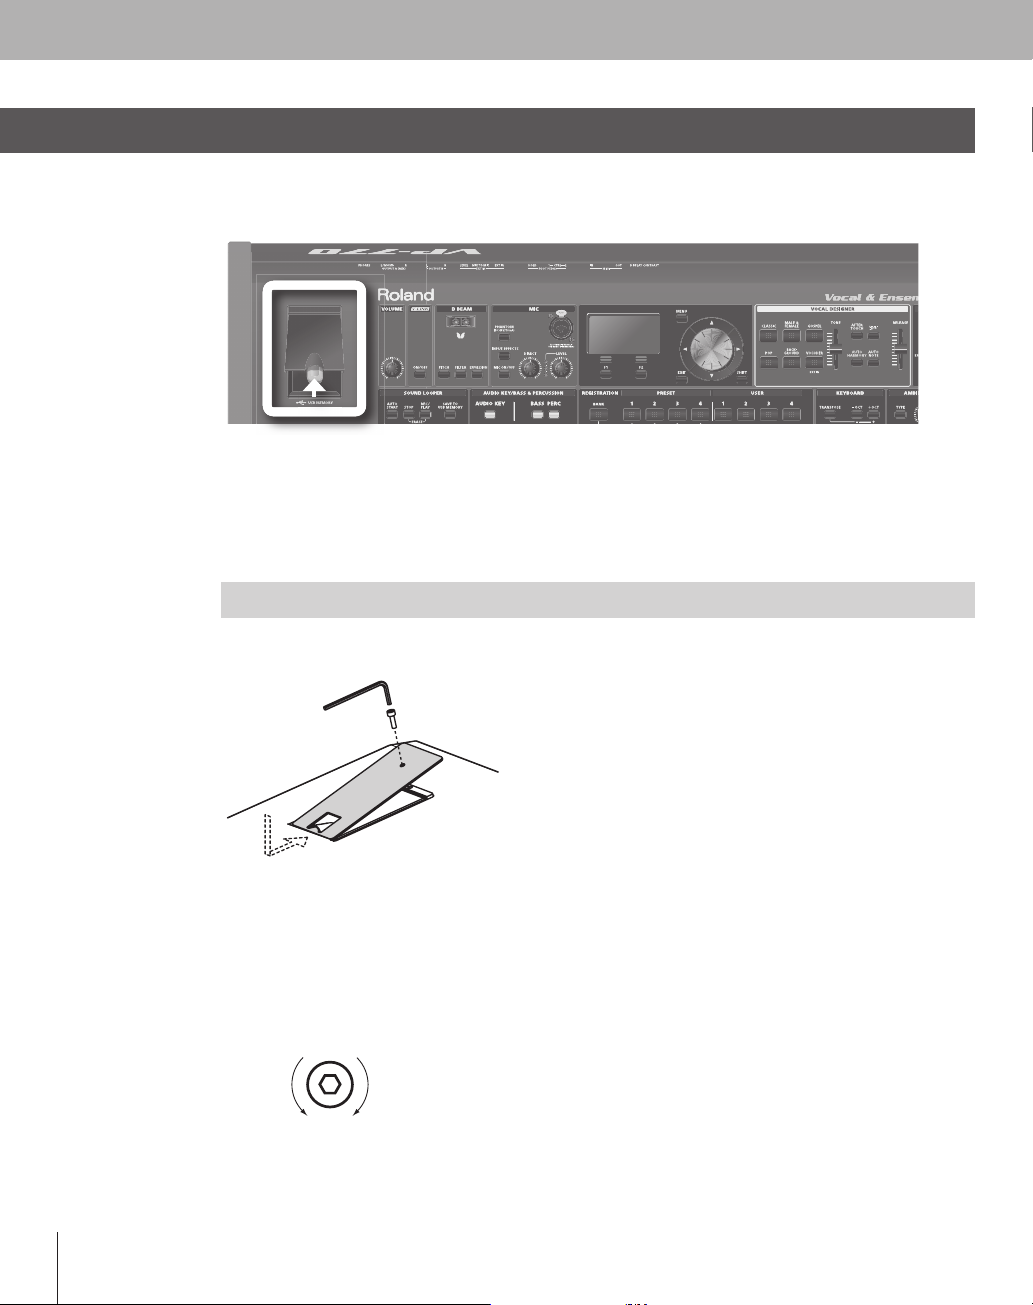
Placing the VP-770 on the KS-12 Stand
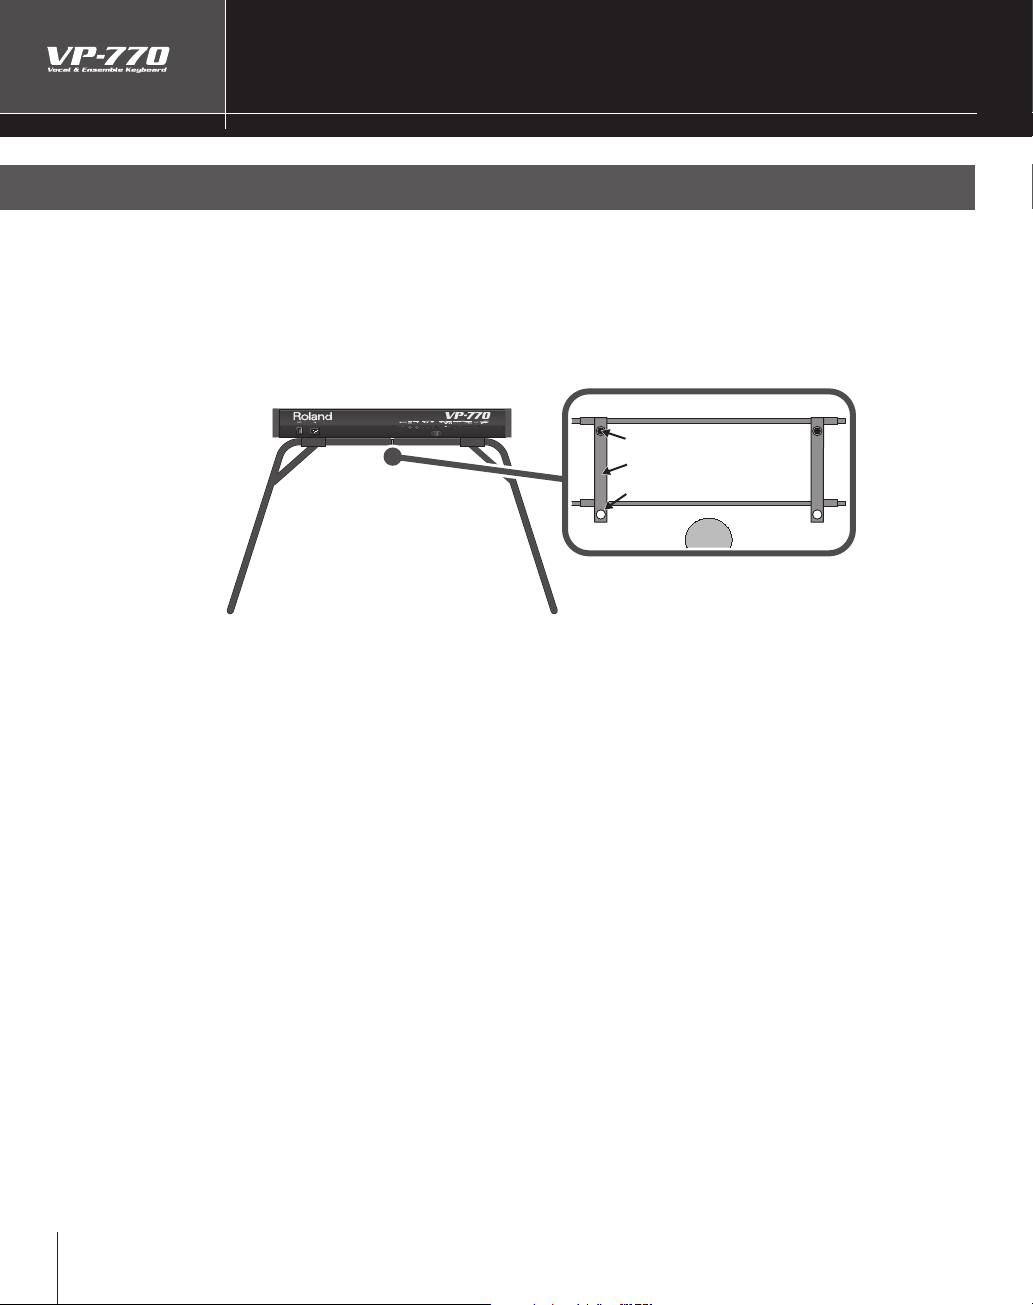
If you place the VP-770 on a stand, you must use the KS-12 (sold separately)
l
een from the rea
Position the stand so that its arms extend
toward the performer.
When placing the VP-770 on the stand, be careful not to pinch your ngers between the instrument
e stand.
an
sing the VP-770 with any other stand may produce an unstable situation, possi
instrument to
or details on how to assemble the stand, refer to the owner’s manual that accompanied the stand
all or overturn, and resulting in injury or damage
VP-770 so that the rear two of
the four rubber feet on the bottom panel
t into the holes on the arms of the stand.
Rubber feet
Arm
Hole
Performer
causing the
1
Page 17
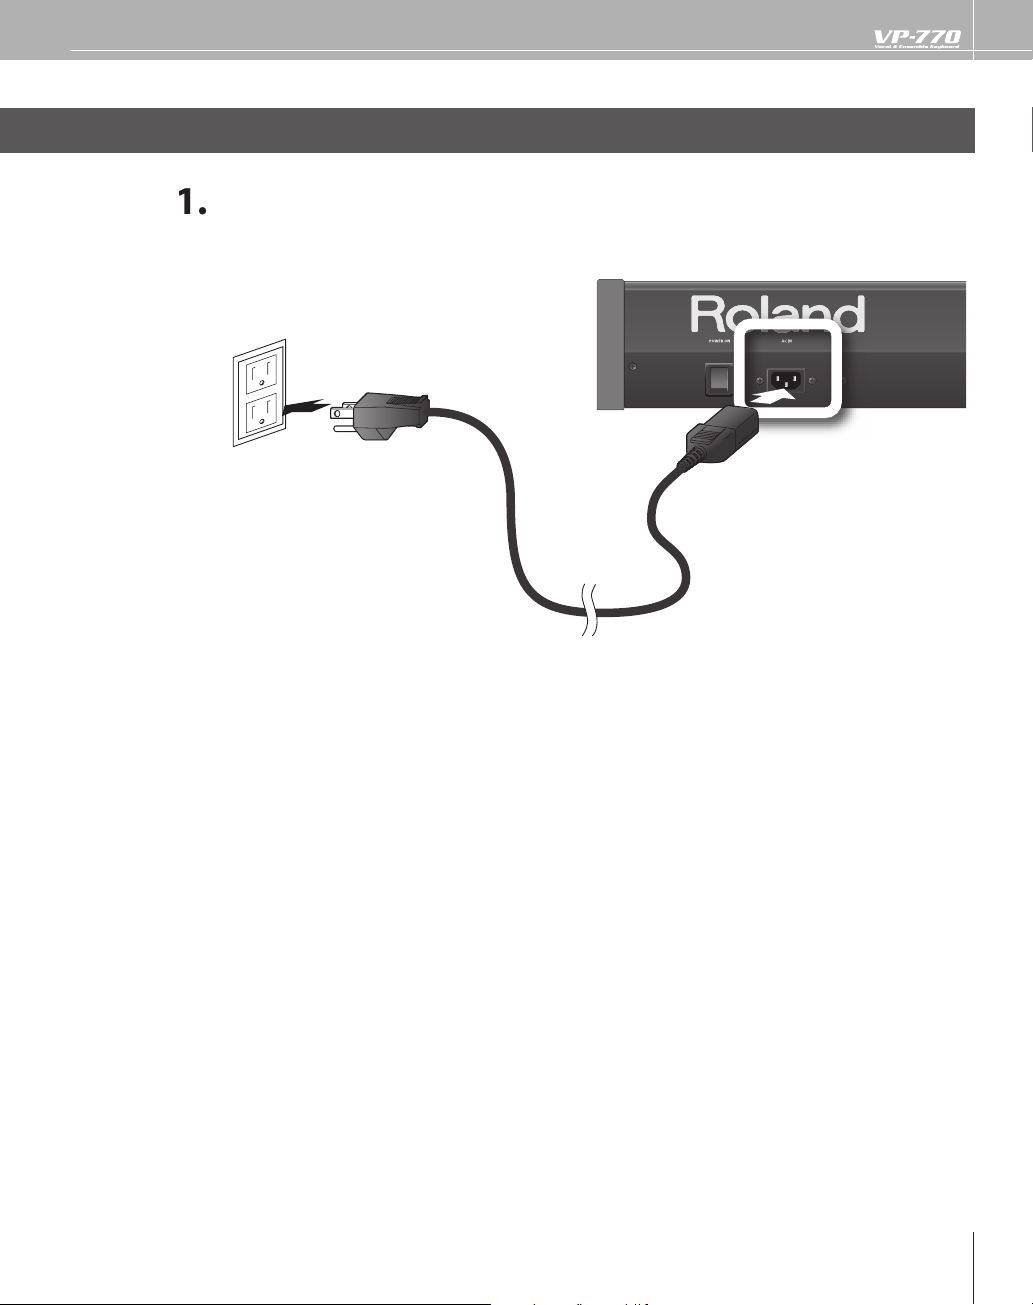
Connect the Power Cord
and plug th
.
( AC IN)
onnect the included power cord to the VP-770’s AC IN connector,
e other end into an AC outlet
to AC outlet
Page 18
8
Connecting Your Amp or Speakers
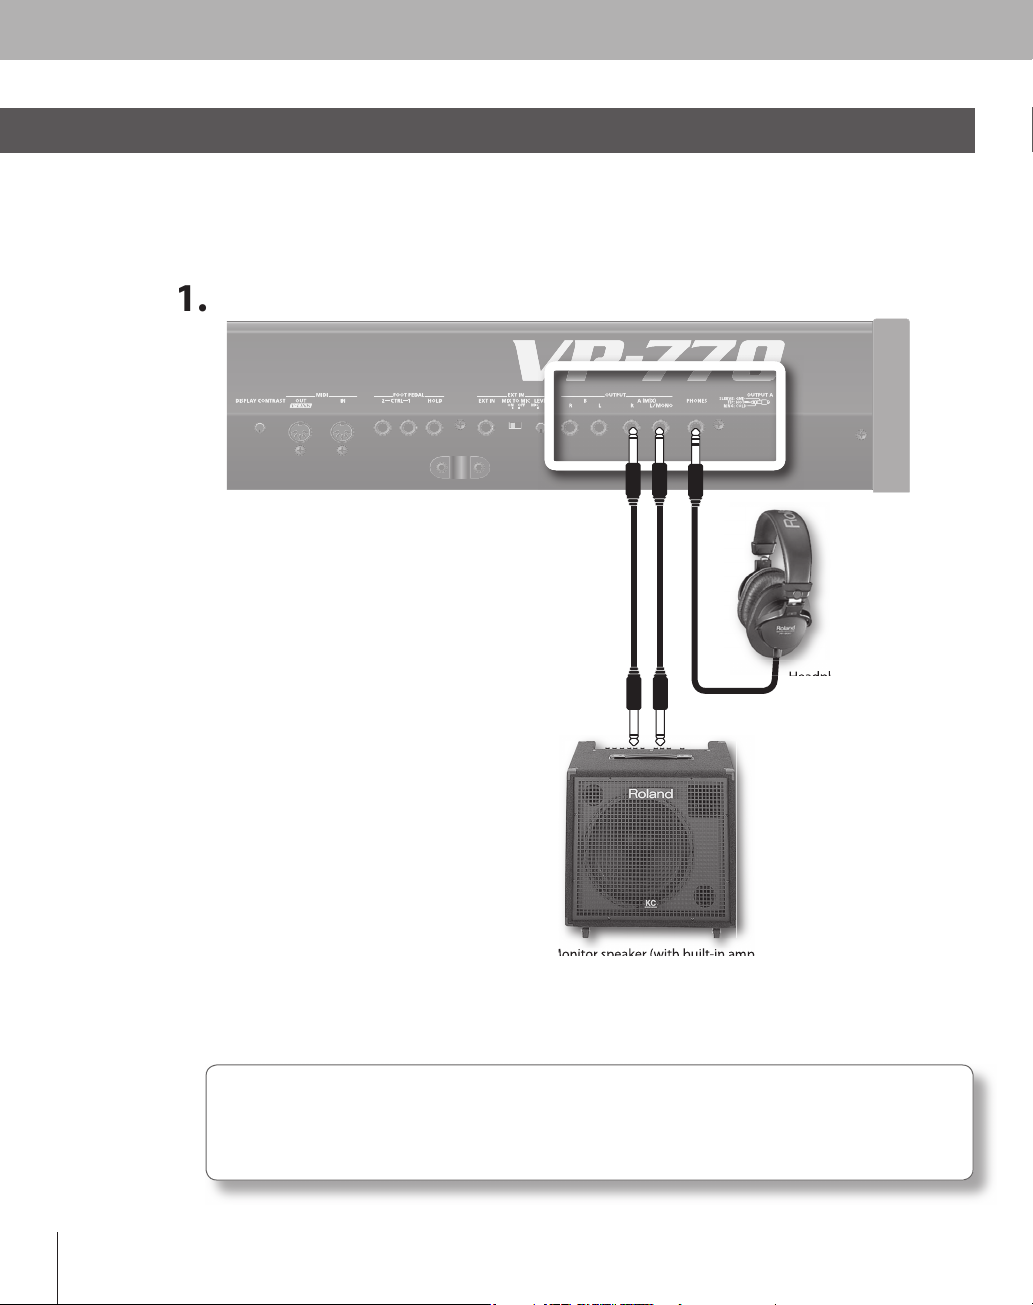
T
.
.
.
.
Aud
dph
.
PUT
he VP-770 doesn’t contain an amp or speakers. In order to hear sound, you’ll need to connect it to monitor
speakers (with a built-in amp), a stereo set or other audio system, or headphones
To prevent malfunction and/or damage to speakers or other devices, always turn down the volume,
and turn o
the power on all devices before making any connections
( OUTPUT/ PHONES)
ake connections as shown
IN
f you’re outputting in mono, connect your equipment to the L/MONO jack
io cables and hea
ately
ones aren’t included with the VP-770. You’ll need to obtain them sepa-
1
Page 19
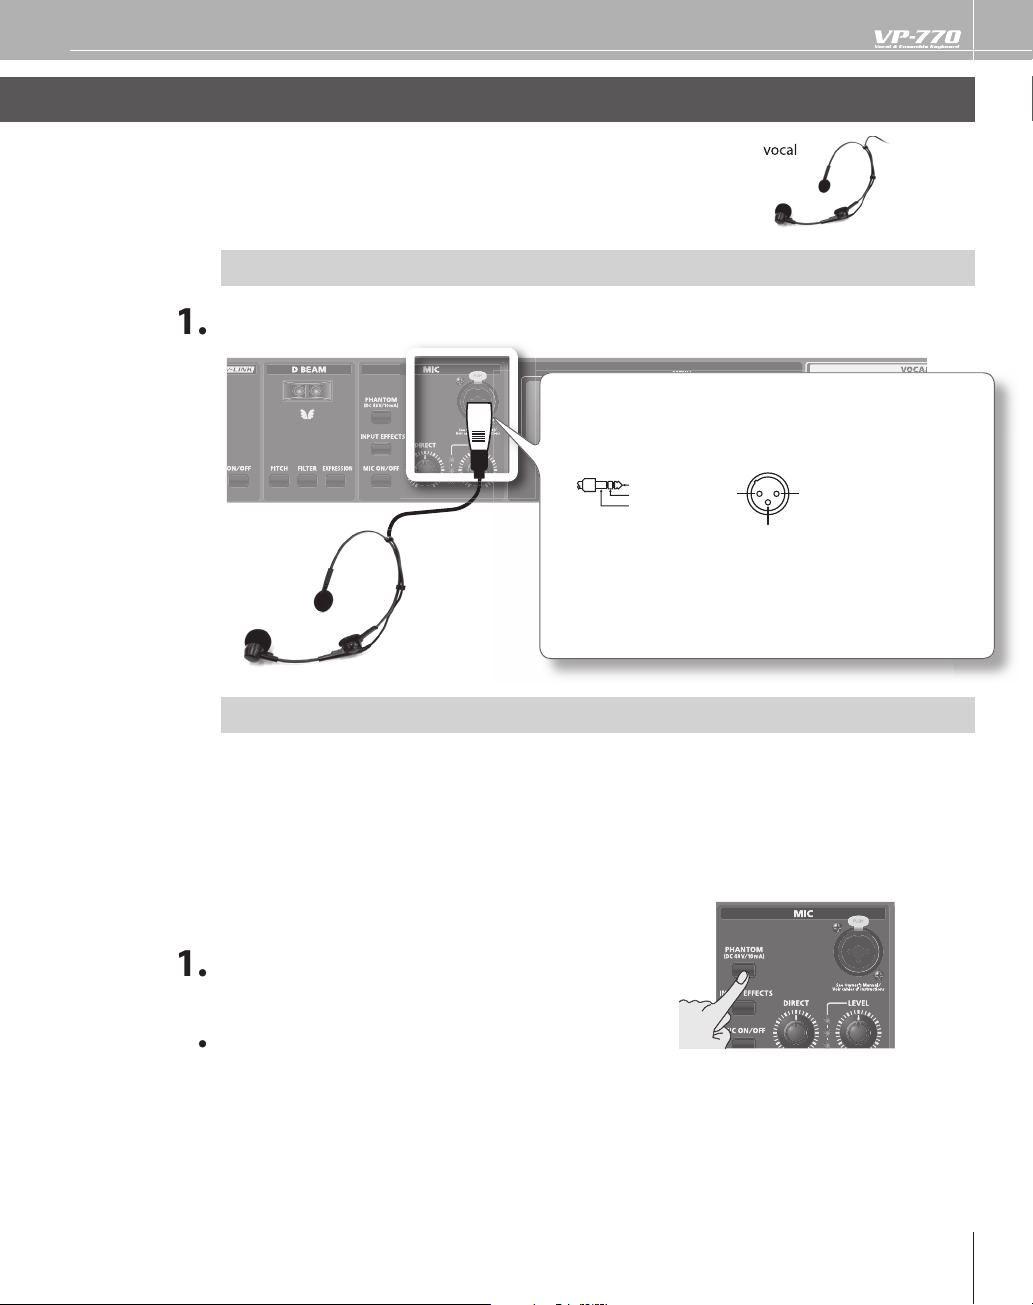
Connecting Your Microphone
v
head
.
Th
.
A
f
dy
s
c
.
)
.
T
.
.
T
.
T
a
ect.
2
A microphone is indispensable for performing with the VP-770. The VP-770 models
sounds by using your voice that’s input via the microphone.
set-type microphone is included with the VP-770
A
( MIC)
If You’re Using the Included Microphone
(MIC)
onnect it to the MIC jack as shown.
his instrument is equipped with balanced (XLR/TRS) type jacks.
Wiring diagrams for these jacks are shown below. Make connections
fter rst checking the wiring diagrams of other equipment you
intend to conn
TIP: HOT
RING: COLD
SLEEVE: GND
owling could be produced depending on the location of
microphones relative to speakers. This can be remedied by:
1. Changing the direction of the microphone(s).
. Relocating microphone(s) at a greater distance from speakers.
3. Lowering volume levels.
If You’re Using a
e VP-770’s MIC jack supports phantom power
Turn this o if you’re using the included microphone.
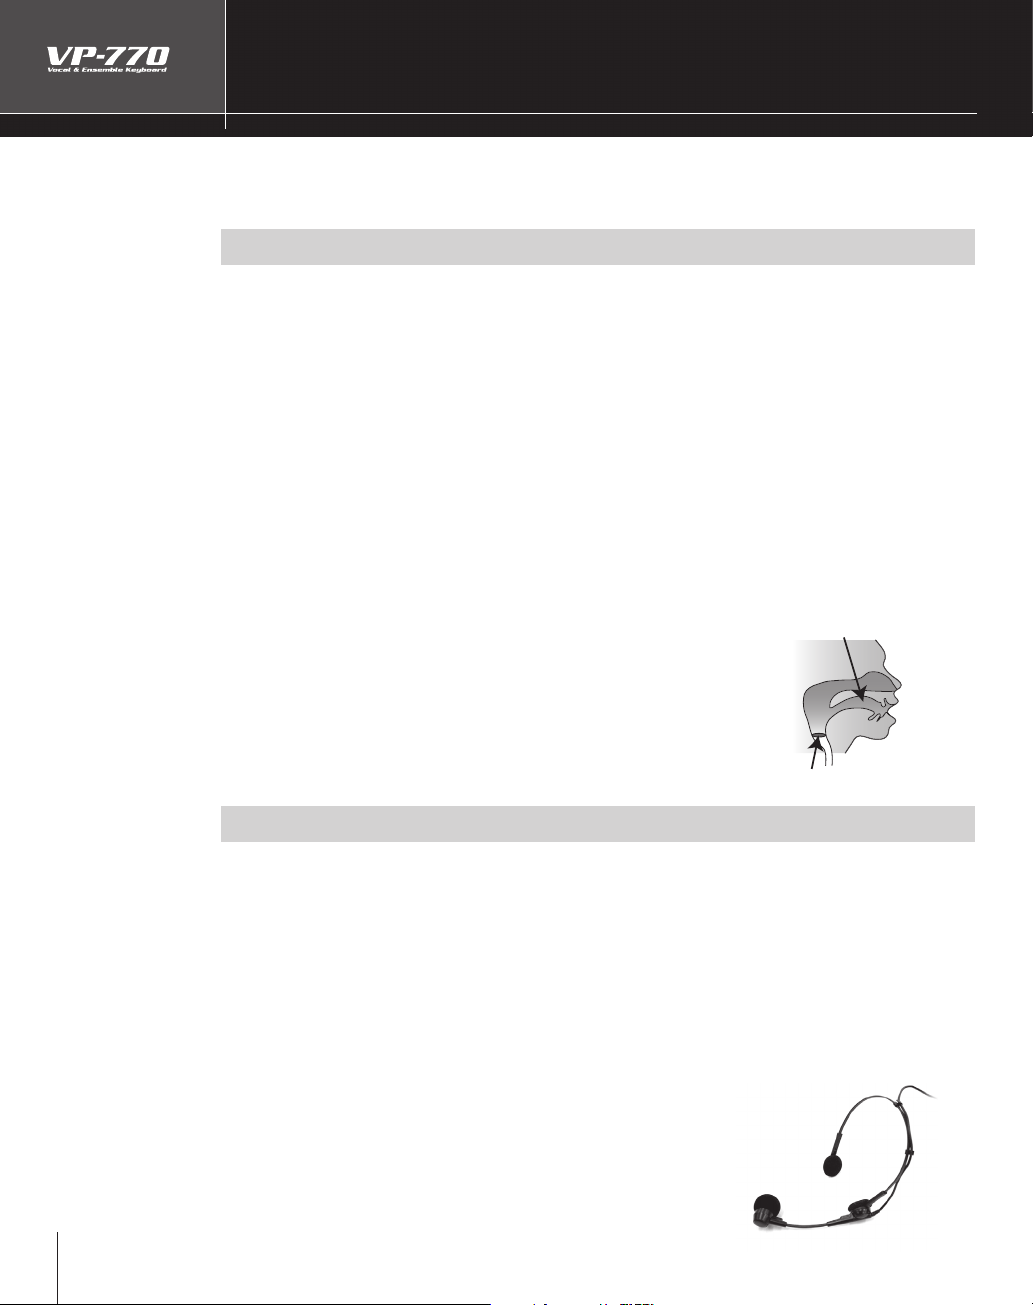
lways turn the phantom power o when connecting any device other than condenser microphones
that require phantom power. You risk causing damage i
namic microphones, audio playback devices, or other devices that don’t require such power. Be
ure to check the speci cations of any microphone you intend to use by referring to the manual that
ame with it
(This instrument’s phantom power: 48 V DC, 10 mA Max
hantom-powered Condenser Mic
you mistakenly supply phantom power to
1: GND2: HOT
3: COLD
ress the [HANTOM] button
he con rmation message will appear
ress the [F1] (OK) button
he [PHANTOM] button will light, and phantom power will be supplied.
mmediately after powering up the VP-770, the phantom power supply will be o
Page 20
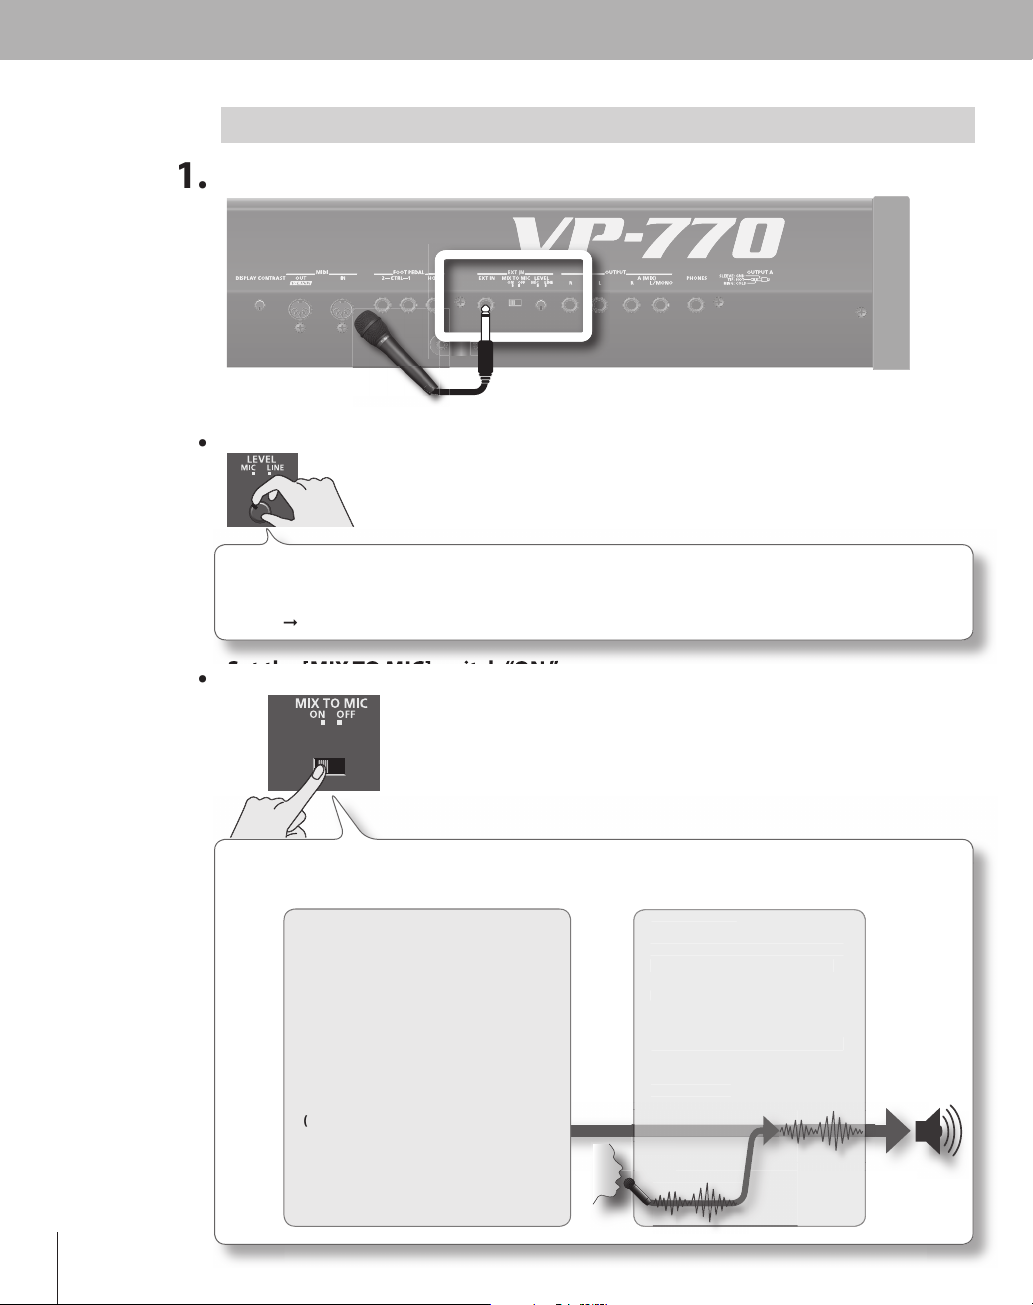
If You’re Connecting Your Microphone to the EXT IN Jack
)
.
”
to “MIC.”
.
[
MIC]
“ON.”
We’ll b
odulator
f
.
(
r
T
d
t
.
t
onnect it to the EXT IN jack as shown
Turn the [EXT IN] knob to “MIC.
This knob adjusts the level of the sound from the EXT IN jack. (Turn the knob toward “MIC” to
ncrease the level, or toward “LINE” to decrease it.) If you’ve connected a mic, you should turn this
Refer to “Adjusting the Microphone Input Level” (p. 28) for more about this adjustment
XT IN
et the
The [MIX TO MIC] switch setting determines whether the sound from the EXT IN jack will be used
as a microphone input (modulator; the ON setting) or as the carrier (the OFF setting).
TO
e using it as a microphone input, so select the “ON” position here.
Carrie
his is the signal that is the basis of the
sound and determines its timbre an
itch. To use the sound from the rear
anel EXT IN jack as the carrier, hold down
he [SHIFT] button, press the [VOCODER]
sound button, and select the bottom
sound in the list that appears
If you want the sound from the rear
panel EXT IN jack to be the carrier, set
he [MIX TO MIC] switch “OFF”
p. 112).
➞
switch
M
The tonal character (formants) of
the voice from the microphone
nput is extracted, and these
ormants are used to modulate
transform) the carrier signal
If you want the sound from the
ear panel EXT IN jack to be the
odulator, set the [MIX TO MIC]
switch “ON”
. 114).
➞
Page 21
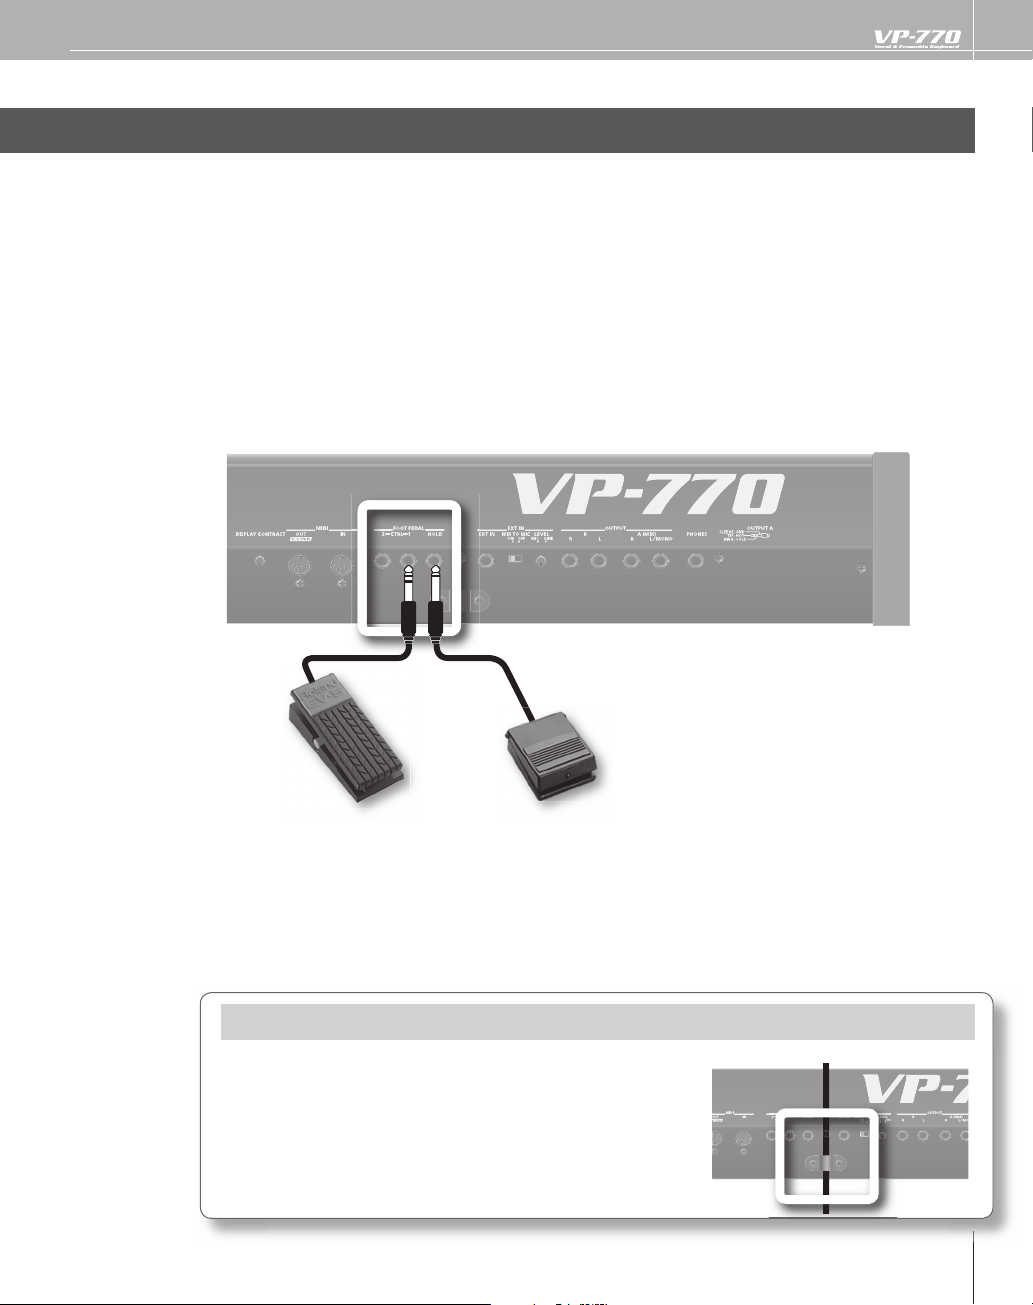
Connecting a Pedal
Y
.
f
f
.
ections as shown.
-
s
.
bout the
p
T
ld
ld
ou can connect a hold pedal (sold separately: DP series) and an expression pedal (sold separately: EV-5) to
the VP-770
If an optional hold pedal (DP series) is connected to the rear panel PEDAL HOLD jack, you can press the
old pedal to cause notes to sustain or “hold” even after their keys have been released.
an optional expression pedal or pedal switch (EV-5, DP series) is connected to the rear panel PEDAL CTRL
I
jack (1, 2), you can use the pedal to control the volume or various
efer to “Using Pedals” (p. 39) for more information.
➞
(FOOT PEDAL HOLD/ CTRL 1/CTRL 2)
unctions
conn
A
o reduce the risk of the microphone being stolen, use the included
Allen wrench to remove the screws from the rear panel cable clamp,
pass the microphone cable through the clamp, and retighten the screws
to secure the cable clamp.
eep the removed screws out of the reach of small children to ensure
they are not swallowed accidentally.
xpression pedal
separately: EV-5)
(so
se only the speci ed expression pedal (EV-5; sold separately). By connecting any other expres
ion pedals, you risk causing malfunction and/or damage to the unit
old pedal
separately: DP series)
(so
Cable Clam
Page 22
Connecting USB Memory (Sold Separately)
a
O
y.
C
C
.
Y
V
Y
Y
g
.
l
g
c
y.
Audio les saved on USB memory (sold separately) can be assigned to the keyboard for playback (p. 68),
nd you can back up all of the VP-770’s settings to USB memory as a “project” (p. 103).
pen the USB MEMORY connector cover and insert the USB memor
e sure to keep the
y.
arefully insert the USB memory all the way in—until it is rmly in place.
onnect the USB memory after you turn on the VP-770’s power. Never disconnect the USB memory
while the VP-770 is powered up
sing the Included
ou can use the included USB memory protector to prevent theft of the USB memory connected to the
P-770.
ou must use the included screw.
ou must use the included Allen wrench to tighten or remove the screw. Using a tool that does not
match the screw head will dama
e careful not to over-tighten the screw. Doing so may damage the screw’s head, causing the wrench
to rotate use
hten the screw, turn the Allen wrench clockwise. To loosen the screw, turn the Allen wrench
To t i
ounter-clockwise.
SB MEMORY connector cover closed when not connecting or disconnecting USB
B Memory Protector
e it
essly.
tightenloosen
eep the included screw out of the reach of small children to ensure it is not swallowed accidentall
Page 23

Performing
n this chapter you’ll learn the basics of playing the VP-770. When you’ve nished it, you will
I
have mastered the basics of the VP-770!
23
Page 24
Turning On/O the Power
r
A
f
d
.
.
?
?
f
y.
g
➞
)
(
).
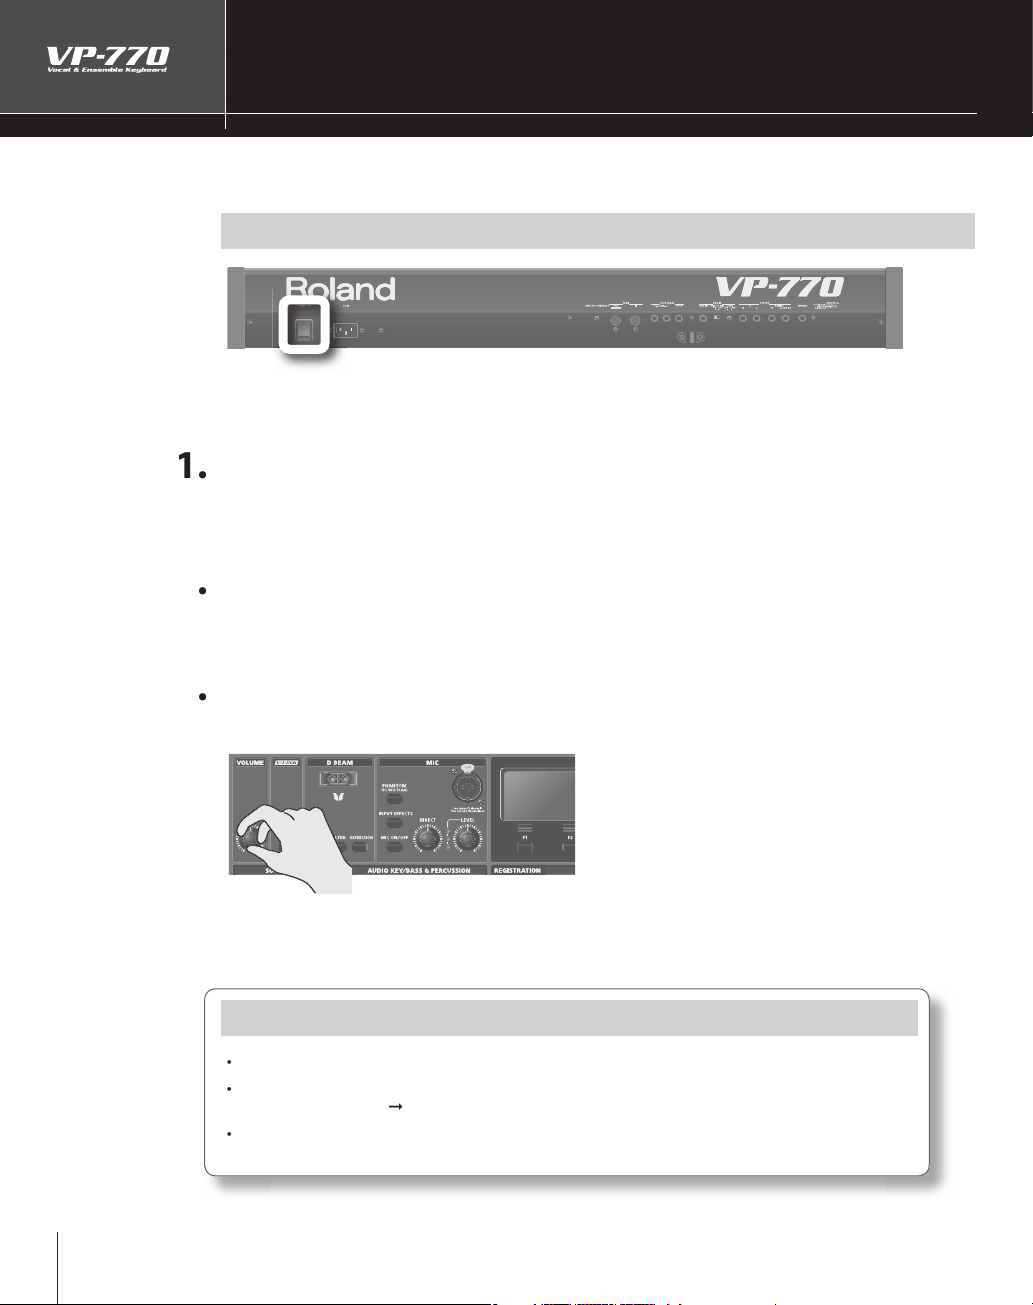
Here’s how to turn the VP-770’s power on or o .
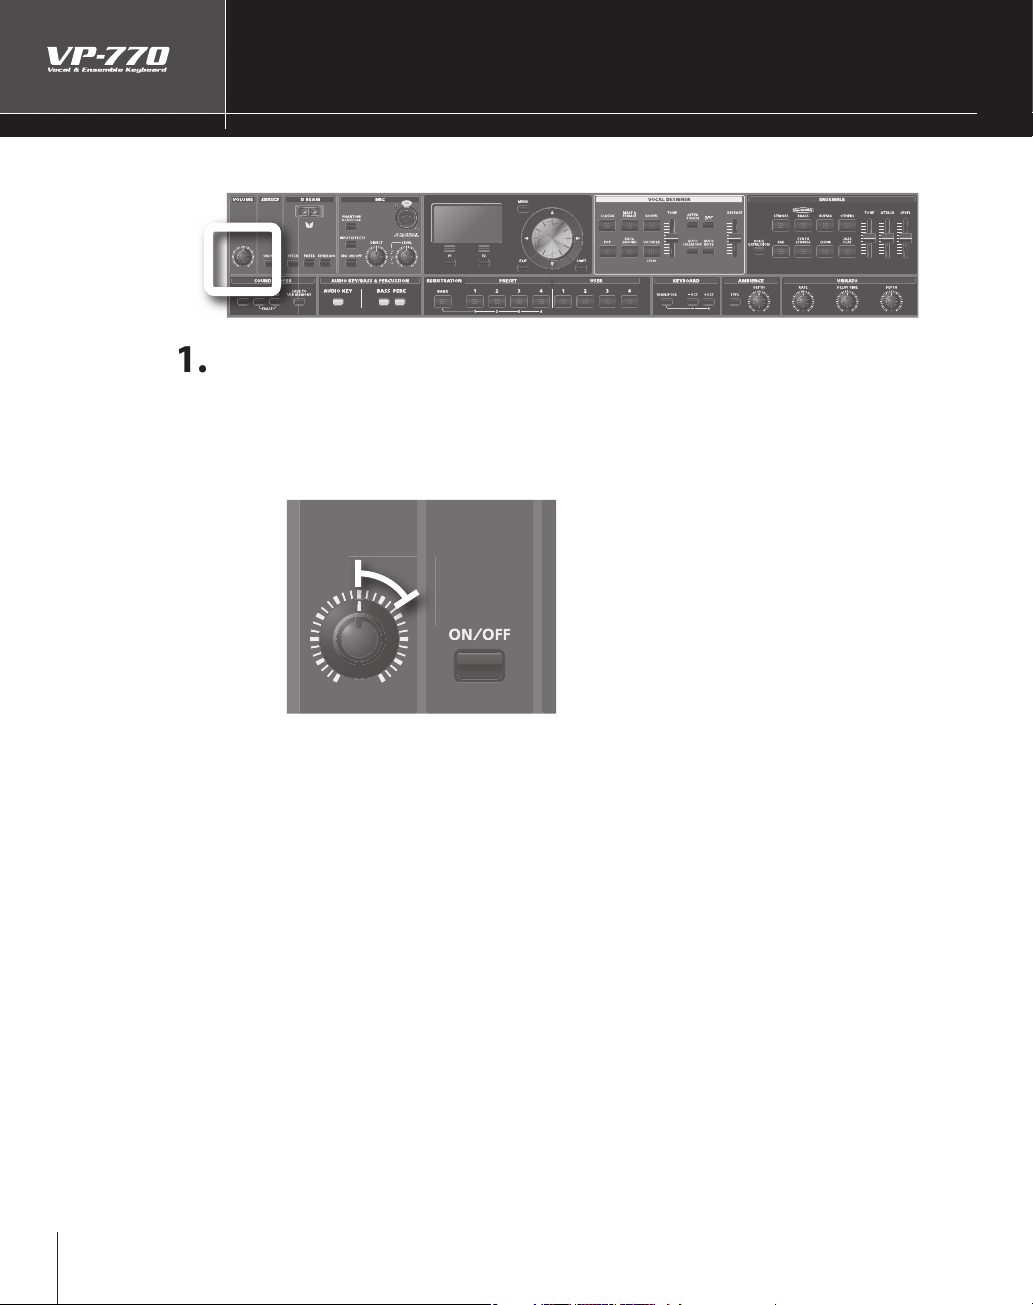
( POWER ON)
Turning On the Powe
fter completing the connection explained in the previous chapter, make sure to turn on the power
by
ollowing the steps below. By turning on devices in the wrong order, you risk causing malfunction
/or damage to speakers and other devices
an
efore you turn on the power, check the following
Is the VP-770 correctly connected to your peripheral equipment
Have you turned down the volume of the VP-770 and the connected audio system to the minimum
settings
n the VP-770’s rear panel, turn the [POWER ON] switch “on.”
This unit is equipped with a protection circuit. A brief interval (a few seconds) after power up is
required be
ore the unit will operate normall
Use the [VOLUME] knob to adjust the volume appropriately.
While you play the keyboard to produce sound, adjust the volume of the VP-770 and of the audio
equipment you’ve connected.
If You Don’t Hear Sound, Check the Followin
s the VP-770 correctly connected to your amp, speaker, or headphones?
The Vocal Designer part won’t produce sound when you play the keyboard unless you are vocalizing
into the microphone.
there’s no microphone connected, try selecting an Ensemble part sound and playing it from the
keyboard
. 42
➞
For details, refer to “Performing with Vocal Designer” (
p. 27
Page 25
Turning O the Power
?
”
T
f
.
bout the
T
n
T
.
Y
d
8
T
7
T
efore you turn o the power, check the following.
Have you turned down the volume of the VP-770 and the connected audio system to the minimum
settings
2
n the VP-770’s rear panel, turn the [POWER ON] switch “o .
f you need to turn o the power completely, rst turn o the [POWER ON] switch, then unplug the
ower cord from the power outlet. Refer to “Power Supply” chapter in “USING THE UNIT SAFELY”
(separate document).
Adjusting the Display Contrast
he characters in the display may be di cult to view immediately after turning on the VP-770’s power
ter extended use. If this occurs, turn the rear panel [DISPLAY CONTRAST] knob to make the display
or a
egible
A
he screen that appears rst when you turn on the power shows the following information
op Scree
nformation
egistration number
one of the Vocal Designer part p. 2
one of the Ensemble part
( DISPLAY CONTRAST)
age
. 7
. 42
ou can select a registration or sound by using the cursor buttons to move the cursor to each item an
then turning the value dial.
lease be aware that in the screen shots shown in this document, the registration names and tone
names di er from the factory settings.
5
Page 26
Adjusting the Volume
.
.
w
Here’s how to adjust the volume of the entire VP-770.
( VOLUME)
Use the [VOLUME] knob to adjust the volume of the entire VP-770
or best results, adjust the volume of your amp or speaker system so that you get the desired
oudness when the [VOLUME] knob is between the 12 o’clock and 2 o’clock positions as shown
Turn the knob toward the right if you want to increase the volume further, or toward the left if you
ant to decrease the volume.
Page 27
( VOCAL DESIGNER)
y
g
.
T
.
f
f
s
Sound
n
CLASSIC
—
g
.
deep
o
OS
T
C
th
.
VOCODER
V
.
Sound
y.
the list.
Performing with Vocal Designer
Let’s go ahead and try performing with the Vocal Designer part. While vocalizing into the microphone, pla
the keyboard and you’ll hear realistic and natural voices.
For more about how Vocal Desi
ner works, refer to “About Vocal Designer” (. 12).
Selecting a Sound
Here’s how to select a Vocal Designer sound
o play the Vocal Designer part, press a Vocal Designer sound button to make it light
If you press the Vocal Designer sound button that’s already lit, the button will go dark and you will no longer
ear the Vocal Designer part.
You can play multiple parts simultaneously by turning on sound buttons
and/or Bass & Percussion part. I
ound buttons of the other parts (make the buttons go dark).
escriptio
Large choirs suitable for classical music. These are also a good choice for any choral sound
ot just classical—and will match nearly any style of music. They have a clear sound, and are a
ood choice when you want the lyrics to be heard
ALE &
G
PEL
P
ACKGROUNDSounds suitable for a backing chorus
Mixed choirs with independent male and female parts. With sparser chords, they produce a
er and more three-dimensional sound than “CLASSIC.” You’ll hear the female voices in the
igh range, and the male voices in the low range. Female voices will be heard on the right side
f the stereo sound eld, while male voices will be on the left side.
hese choirs include the distinctive phrasings and irregularities that are distinctive of gospel
usic. They are an ideal choice for jazz or gospel.
hoirs with a fewer number of members, broadly useful for popular music as well as songs
at contain rapid passages. The sound is clear, making these a good choice when the lyrics
eed to be heard.
intage vocoder sounds
you want to play only the Vocal Designer part by itself, turn o the
Selecting a Variation
old down the [SHIFT] button and press a sound button.
A list of sounds will appear in the displa
or the Ensemble part
2
ress the [F2] (SELECT) button to con rm your choice of sound.
Page 28
Adjusting the Microphone Input Level
.
V
h.
the
cator status.
.
Ye l l o
.
G
A
A
f y
t
adj
l.
.
lly l
t
.
➞
).
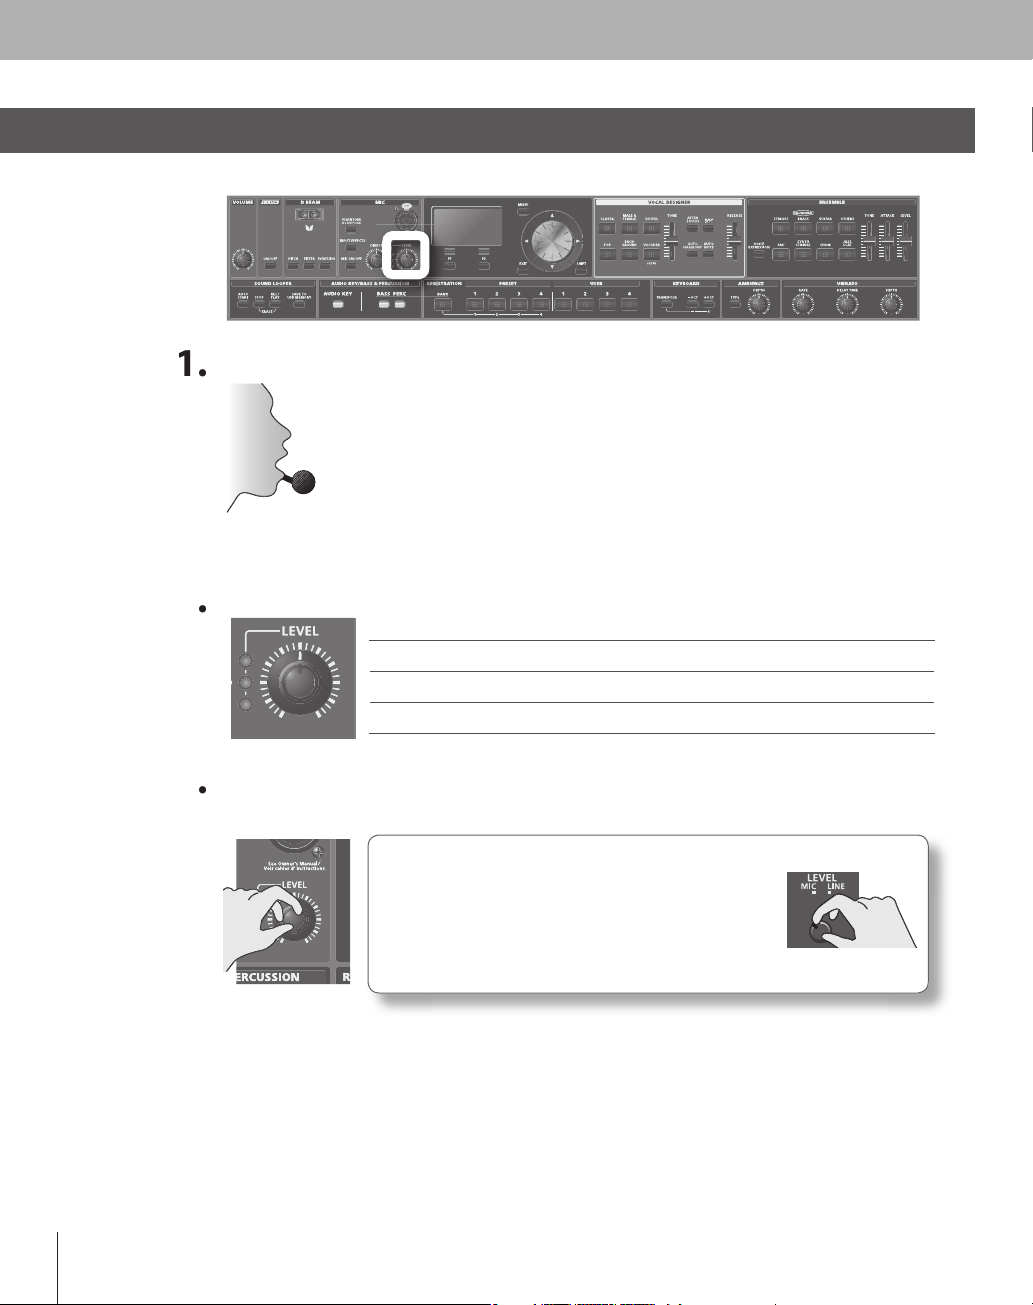
Here’s how to adjust the input level of the microphone connected to the rear panel MIC jack
ocalize into the microphone.
Try to keep a consistent distance between the microphone and your mout
2
indi
LEVEL Indicator signi cance
ed The signal level from the microphone input is too great
w The signal level from the microphone input is just right
reen
signal is being input from the microphone input.
( MIC LEVEL)
djust the [EVEL] knob so that the yellow indicator lights at the
peak o
our vocalizing into the microphone.
The front panelLEVEL] knob doesn’t a ect the rear
anel EXT IN jack. If you’ve connected your microphone
o the EXT IN jack, use the rear panel [LEVEL] knob to
ust the input leve
Turning the knob toward “MIC” will increase the input
evel, and turning the knob toward “LINE” will decrease it
Once you’ve adjusted the microphone input level, you should genera
he [VOLUME] knob if you want to raise or lower the volume of the Vocal Designer part
You can apply an e ect to the microphone input by turning on the [INPUT EFFECT] button
. 32
eave it untouched. Adjust
Page 29
Performing with Vocal Designer
ect a sound.
h
h
While holding down the notes
g
,
.
T
.
yg ,gp y g
p
Conversely, Vocal Designer won’t produce sound if you’re not holding down notes, even if you are
y, g p y g , y
vocalizing.
g
Th
V
y
f
f
.
T
)
g
the
olume raised?
(
)
)
(
➞
Now you’re ready to perform with Vocal Designer.
l
To ensure that you can clearly hear the sound of Vocal Designer, turn o the sound buttons of the
•
nsemble part and the Audio key/Bass & Percussion part.
To ensure that you’re hearing just Vocal Designer and not your own voice, move the [DIRECT] knob
e very lowest position.
to t
e [MIC ON/OFF] button (p. 31) on (lit).
Turn t
old down one or more notes on the keyboard.
vocalize into the microphone
he Vocal Designer part will sound according to the volume of your vocalizing
Play the keyboard to control the pitch. Try vocalizing a continuous “aah” into the microphone while you
erent keys. The pitch will change according to the notes you play.
play di
is time, hold down notes on the keyboard while you vocalize in a more staccato manner; “ah, ah, ah, ...”
ocal Designer will produce sound at the pitches of the chord you’re holding down, but at the staccato
rhythm you vocalized. That’s right — the rhythm is produced by your voice, not by the keyboard. This
technique is particularl
Unlike typical synthesizers, the volume is controlled
curve. Using your voice, you can produce a range o
here are just two secrets to using Vocal Designer skillfully.
useful when you’re performing phrases with rapid passages.
rom the microphone. Use your voice to draw the
expression that you might even nd extreme
atch the timing of the keyboard and your voice
use your voice to play the rhythm
Use your voice to control the volume (expression)
If You Don’t Hear Sound, Check the Followin
s the VP-770 correctly connected to your amp, speaker, or headphones?
VP-770’s v
•
s one of the Vocal Designer sound buttons lit?
s the power switch of your microphone turned on?
s your microphone connected correctly?
s the microphone input level raised? (
s the [MIC ON/OFF] button lit?
. 31)
. 19
➞
. 28
Page 30
30
Adding Your Unprocessed Voice
.
V
Y
T
d
V
y.
).
Now let’s add your voice from the microphone directly to the output
ocalize into the microphone.
Turn the [DIRECT] knob to adjust the volume.
2
( DIRECT)
our voice will be output directly from the VP-770.
his time, try singing a favorite song into the microphone. While doing so, choose one of the Vocal
Designer soun
progressions on the keyboard while you sing. Turning on the [AUTO HARMONY] button (p. 36) will make
this even more e
ocal Designer will add a backing chorus to your vocal according to the chords you pla
s (we recommend GOSPEL, POP or BACKGROUND) and hold down the appropriate chord
ective.
The [DIRECT] knob adjusts the volume of the audio signal you selected in the registration
arameter Input Source (p. 86
Page 31

31
Switching O the Microphone
.
tu
.
when the microphone input is on
( MIC ON/OFF)
ress the [MIC ON/OFF] button to make the button go dark; the
microphone input will turn o .
ress the button again to make it light; the microphone input will
rn on
Page 32

32
Applying E ects to the Microphone
)
S
.
A
.
C
)
.
t
.
p
T
T
.
T
S
.
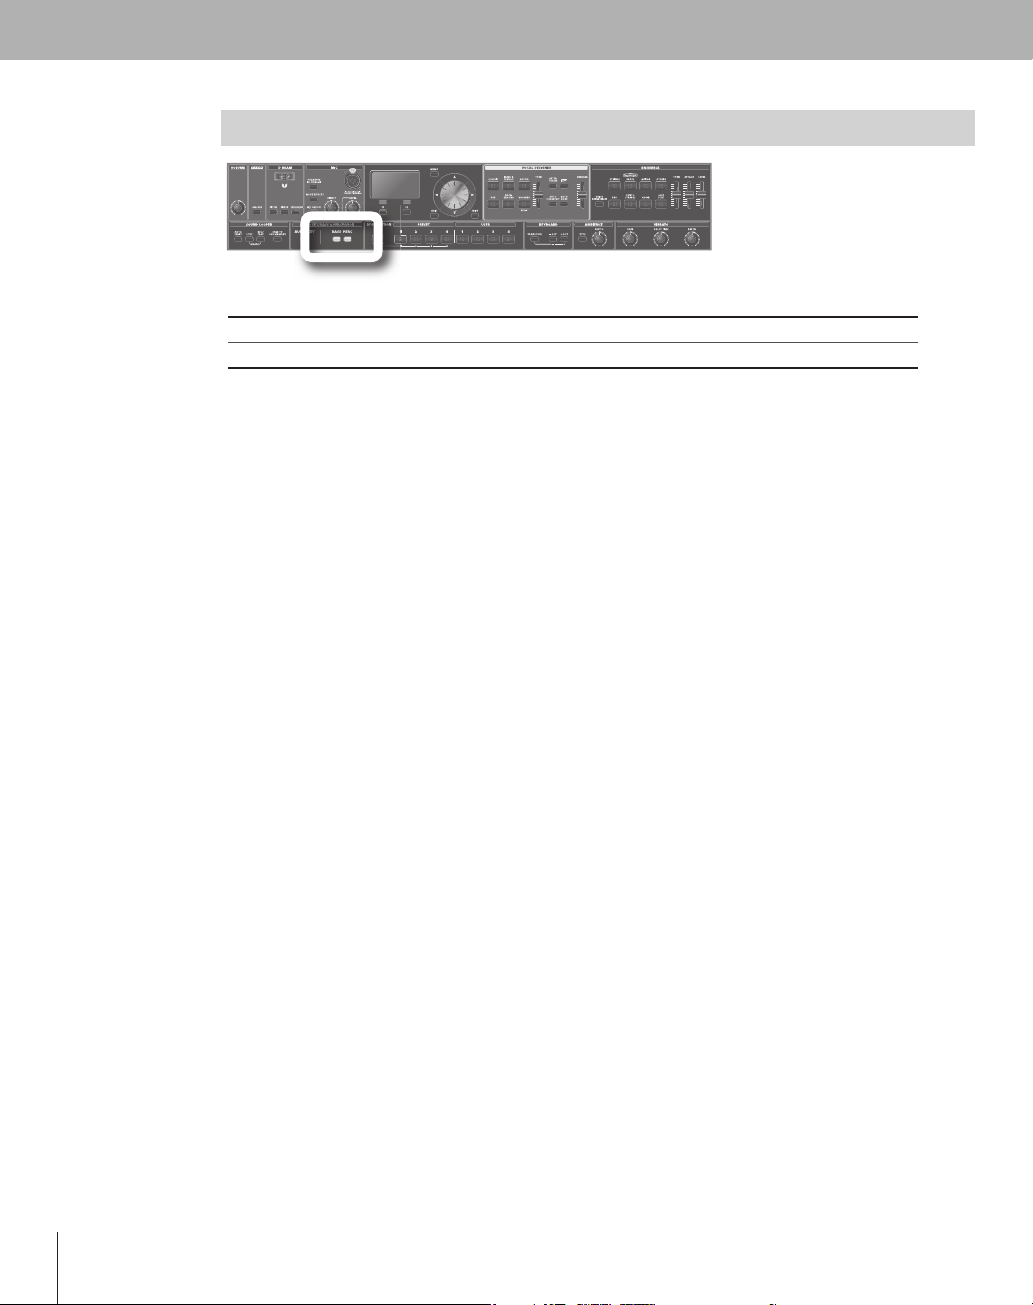
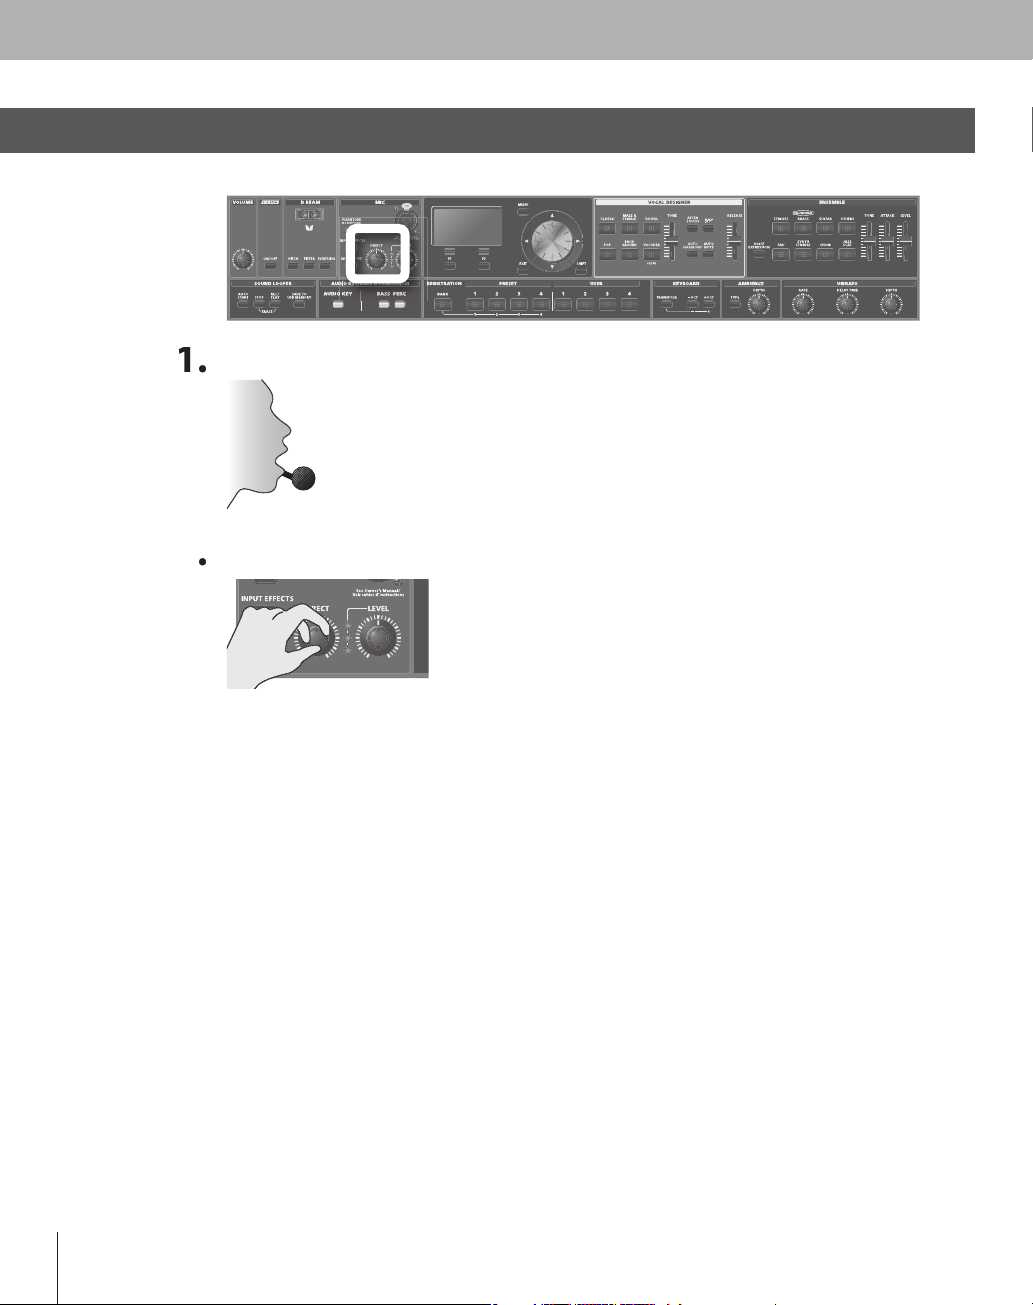
You can apply e ects to the microphone input. You can use three di erent vocal e ects as input e ects.
E ect
OISE SUP (Noise suppressor
Q (3 Band Equalizer)
OMP (Compressor
escription
uppresses noise when no sound is being input
djusts the character of the low, mid, and high-frequency ranges
educes high-level sounds and boosts low-level sounds, thus improving the overall
volume balance of the sound.
( INPUT EFFECT )
Press the [INPUT EFFECTS] button; the button will light, and the
ect will be applied to the microphone
electing the Type of Input E ec
Hold down the [SHIFT] button and press the [INPUT EFFECTS] button.
The INPUT EFFECTS screen will appear.
Use the cursor buttons and the value dial to edit the e ect parameters
o select the e ect type (TYPE 1–4), move the cursor to the
YPE eld and turn the value dial
o turn each e ect on/o , move the cursor to the NOISE
UP, EQ, or COMP elds, and turn the value dial
To make detailed settings for each e ect, move the cursor to the
NOISE SUP, EQ, or COMP elds and
ress the [F1] (EDIT) button.
Page 33

33
Use the cursor buttons and the value dial to change the value.
Value
n
A
k
0
7
S
.
ease
0
7
S
o
rs.
Thres
-60–-36 dB
S
t
(
3
)
V
e
n
q
z
S
.
-15
S
s
d
50–20000
S
.
n
-15
S
s
Q
0.3–20.0
S
q
50–4000 Hz
S
in
-
S
s
.
(
Comp
)
ete
Value
n
Attack0–100
S
l
elease
0–100
S
p
Thres
-36–0 d
S
Sp
.
ain
0
S
.
.
.
.
t
OISE SUP (Noise suppressor)
arameter
ttac
Rel
Q
Band Equalizer
arameter
Hi Fre
Hi Gain
Mi
Freq
Mid Gai
Mid
–12
–12
alu
2000–20000 H
–+15 dB
Hz
–+15 dB
Descriptio
peci es the duration over which the noise suppressor will disable muting
peci es the time from when the noise suppressor begins operating until muting
ccu
peci es the level at which the noise suppressor begins to operate. Sounds below
he speci ed level will be muted.
Descriptio
peci es the center frequency at which the high-frequency range will be adjusted
peci es the gain (amount of boost or cut) for the high-frequency range. Positive
ettings will boost the high-frequency range.
peci es the center frequency at which the mid-frequency range will be adjusted
peci es the gain (amount of boost or cut) for the mid-frequency range. Positive
ettings will boost the mid-frequency range.
peci es the width of the mid-frequency range. Higher settings will narrow the
ow Fre
Low Ga
COMP
ram
R
Ratio 1:1.0–1:INF
G
15–+15 dB
ressor
r
–+24 dB
B
peci es the center frequency at which the low-frequency range will be adjusted.
peci es the gain (amount of boost or cut) for the low-frequency range. Positive
ettings will boost the low-frequency range
Descriptio
peci es the time from when the input exceeds the Threshold (Thres) until the
vo
ume begins to be compressed.
peci es the time it is to take after the input falls below the Threshold (Thres) before
ression ceases.
com
peci es the level at which compression will begin.
eci es the compression ratio
peci es the output gain
f you want to save the edited settings to system memory, press the
[F2] (SYS WRITE) button
The con rmation message will appear, then press the [F1] (OK) button
You can save four types of input e ect settings (TYPE 1–4)
When you’ve nished making settings, press
he [EXIT] button.
Page 34

3
Adjusting the Vocal Designer Tone
Y
.
T
.
d.
S
.
ou can move the [TONE] slider to adjust the tone of the Vocal Designer
ove the [TONE] slider.
he tone setting is shown in the display while you’re moving the slider
oving the slider upward will strengthen the highs, producing a clearer sound.
oving the slider downward will restrain the highs, producing a milder soun
etting the slider value to 0 will use the original setting of the selected sound
(VOCAL DESIGNER TONE)
4
Page 35

3
Raising Vocal Designer’s Pitch by One Octave
se one octave.
ll
.
“
e
.
Here’s how to raise Vocal Designer’s pitch by one octave.
ress the [8va] button; it will light, and the pitch of Vocal Designer
will ri
( 8va)
2
ress the button once again; it will go dark, and Vocal Designer wi
return to its original pitch
8va” is a symbol meaning “play one octave higher.”
nlike the KEYBOARD [-OCT] /[+OCT] buttons, the [8va] button applies only to the Vocal Designer
art. Use this when you want to raise the Vocal Designer part one octave higher than the
nsemble part
5
Page 36

36
( AUTO HARMONY)
T
y
y
y y
.
A
ging
y
Y
added
d.
.
Th
.
a
t
]
Using the Auto Harmony Function
he Auto Harmony function lets you automatically add a backing chorus to your vocal. This function
generates harmon
chords detected from the ke
the melod
nob (p. 30) to combine it with your own actual voice
based on the melody you sing (the pitch detected from the microphone) and the
board. In addition, the harmony will change according to the movement of
ou sing. When using the Auto Harmony function, we recommend that you raise the [DIRECT]
ress the [AUTO HARMONY] button; the button will light and the
uto Harmony function will turn on.
lay a chord on the keyboard, and vocalize into the microphone.
Harmony will be produced based on the chord you play. Try singing a melody into the microphone or
chan
the chord, and listen to the result.
Making Settings for Auto Harmon
ou can choose from several types of harmony to determine the number of harmony voices that will be
to your vocal and how they will be arrange
If you choose a simple type (such as DUET or TRIO), the Vocal Designer function will generate a simple
armony even if you play numerous keys. This prevents the sound from becoming muddy, for example
even when layered with the ensemble sound
Hold down the [SHIFT] button and press the [AUTO HARMONY] button.
e AUTO HARMONY setting screen will appear
When you turn on the [AUTO HARMONY]
utton, play a chord on the keyboard, and
vocalize into the microphone, the [] icon will
ppear on the on-screen keyboard to indicate
he pitch detected from the microphone, and
icons will appear to indicate the generated
armony.
Page 37

37
Use the cursor buttons and the value dial to change the value.
ete
ue
TYPE
,
TRIO
T
Q
,
O
S
.
.
.
.
.
ram
rVal
JAZZ-
UET
,
RIO-UPPER,
UART ET
PEN
escription
witches the type of Auto Harmony
The notation shown below is an example of a C-major scale
The solid black notes indicate the pitch detected from the microphone (this note will not sound *1)
,
The white notes indicate the harmony that was generated (Vocal Designer will sound with these
otes).
or a minor chord, the third will be a minor third rather than a major third.
DUET
TRIO
TRIO-UPPER
QUARTET
MANHATTAN
JAZZ-OPEN
*1 You can sound the black notes by turning on the [AUTO NOTE] button
When you’ve nished making settings, press the [EXIT] button
Page 38

38
Playing the Vocal Designer Using Only the Mic
lly
f
f
v
d
the Auto Note functio
.
e
.
T
e
n
CHRO
C
T
.
C
T
C
,
B
.
W
a [
.
Norma
, Vocal Designer will not sound unless you play the keyboard. However, by using the Auto Note
unction, you can make Vocal Designer produce sound without your having to play the keyboard; i.e., all
you’ll need to do is vocalize into the microphone. The Auto Note
ia the microphone, and automatically sound notes for that pitch.
unction will detect the pitch of your voice
rophone
( AUTO NOTE)
When you press the [AUTO NOTE] button, the button will light an
n will turn on
Making settings for Auto Not
old down the [SHIFT] button and press the [AUTO NOTE] button
2
he AUTO NOTE setting screen will appear.
hen you turn on the [AUTO
NOTE] button and vocalize
into the microphone, the
detected pitch is shown as
] icon on the keyboard
displayed on this screen
Use the cursor buttons and the value dial to change the value.
arameterValu
MODE
KEY
MATI
DIATONI
, C#, D, D#, E, F, F#, G, G#,
A
A#,
escriptio
his is a chromatic scale. The pitch detected from the microphone is converted to
otes at semitone intervals
his is a diatonic scale. The pitch detected from the microphone is converted to notes
at diatonic intervals. You can use the KEY parameter to specify the key of the scale.
Speci es the key when MODE is set to “DIATONIC” (diatonic scale).
When you’ve nished making settings, press the [EXIT] button
Page 39

39
Adding an E ect when You Apply Pressure to the Keyboard
Y
.
➞
.
ou can add an e ect to Vocal Designer by applying pressure (aftertouch) to the keyboard
or details, refer to “Adding an e ect by applying pressure to the keyboard
(AFTERTOUCH)” (p. 64)
(AFTERTOUCH)
Page 40

0
Adjusting the Release of the Notes
Y
f
.
T
g
t
.
.
.
ou can adjust the release for the Vocal Designer and Ensemble by moving the [RELEASE] slider. Release is
the time
rom note-o until the sound has disappeared.
( RELEASE)
ove the [RELEASE] slider
he release value is shown in the display while you move the slider.
The [RELEASE] slider applies a relative chan
he [RELEASE] slider is at zero, the release value will be as speci ed by the settings of that sound
oving the slider upward will lengthen the time from note-o until the sound disappears
oving the slider downward will shorten the time from note-o until the sound disappears
e to the release value speci ed for each sound. When
4
Page 41

Adjusting the Vibrato
atura
ato of a voice.
.
T
y
e
obramete
alue
E
Vibrato Rate
63
Adj
s
w
.
E
Vib
3
A
while l
.
V
63
A
y f
and l
l
y
( VIBRATO)
is an e ect that cyclically modulates the sound. By applying it to the Vocal Designer you can simulate the
l vibr
n
Turn the three [VIBRATO] knobs
he vibrato settings are shown in the display while you turn the knobs.
These three knobs appl
a relative change to the vibrato settings speci ed for each sound. When
ach knob is at zero, the vibrato settings will be as speci ed by the settings of that sound.
n
RAT
ELAY TIM
EPTH
rV
-64–+
rato Delay-64–+6
ibrato Depth-64–+
Description
ust the vibrato speed (the rate at which the sound is modulated). The
ound will be modulated more rapidly for higher settings, and more slowly
ith lower settings
djusts the time delay until the vibrato (sound modulation) e ect begins.
igher settings will produce a longer delay time before vibrato begins,
ower settings produce a shorter time
djusts the depth of the vibrato e ect (the depth at which the sound is
modulated). The sound will be modulated more greatl
ess with lower settings.
or higher settings,
Vibrato is not applied to the solo strings (Solo Violin, Solo Cello) sounds of the Ensemble part when
you play polyphonically (multiple notes). This simulates the way in which vibrato is not applied when
tiple notes are played on a violin or similar instrument. Although turning the [VIBRATO] knobs will
mu
not appl
vibrato, you can apply vibrato by operating the modulation lever (p. 56).
Page 42

Performing with Ensemble
Y
ess a button to select a sound.
T
ll
f
o
.
S
d
S
S
.
SS
.
GU
RGuitar sounds.
O
S
.
D
S
S
S
.
CHOIR
S
o
.
J
T
g
d
d b
.
y.
the list.
Here’s how to play the Ensemble part. This part lets you play high-quality sounds from the keyboard.
ou can switch the sound (e.g., brass ensemble using SuperNATURAL technology, or strings) by selecting a
sound button.
( ENSEMBLE)
Selecting a Sound
Pr
o play an Ensemble sound, press one of the buttons to make it light. If you press a button that’s already lit,
go dark and the Ensemble part will no longer produce sound.
it wi
You can simultaneously play more than one part by turning on a sound button
esigner and/or Bass & Percussion parts. If you want to hear only the Ensemble part, simply turn
the sound buttons for the other parts so that they are dark
oun
TRING
RA
ITA
THER
A
YNTH STRING
AZZ SCAT
escription
Acoustic string sounds with emphasis placed on the performance techniques that are
nherent to strings
rass sounds that use SuperNATURAL technology
Other sounds
ad sounds.
ynthesizer string sounds
ampled choir sounds. You can get an even more majestic e ect by layering these with one
f the sounds of the Vocal Designer part
his sound provides samples of jazz scat singing. It’s great for songs that contain rapid
passa
es and for scat soloing.
Selecting a Variation Soun
old down the [SHIFT] button and press a
soun
A list of sounds will appear in the displa
utton
or the Vocal
Use the value dial or the up/down cursor buttons to select a sound in
ress the [F2] (SELECT) button to con rm your choice of sound.
Page 43

43
Performing with Ensemble
.
ect a sound.
y
.
Y
y
y
b
d
y
h
bly
y
V
g
the
olume raised?
?
Now let’s try performing with the Ensemble part
l
To ensure that you can clearly hear the sound of the Ensemble part, turn o the sound buttons of the
Vocal Designer part and the Audio Ke
aise the Ensemble [LEVEL] slider (p. 44).
/Bass & Percussion part.
lay the keyboard
ou’ll hear the Ensemble part.
ing the Ensemble part by itself will give you a wonderful sound, but layering it with the Vocal Designer
Pla
part will raise this to the level of trul
rass ensemble sounds using SuperNATURAL technology, you’ll probably want to split the keyboar
For
p. 54) and use your left hand to play the Vocal Designer while your right hand plays the brass.
layering powerful strings or beautiful choir sounds together with Vocal Designer, your performance on
B
e VP-770 can sound unbelieva
t
input from the microphone (such as when
you are playing the keyboard (regardless of the microphone input). Layering the Ensemble part with the
ocal Designer ensures that the sound will not be interrupted.
amazing!
rich. Vocal Designer will stop sounding when your voice is not being
ou take a breath), but the Ensemble part will sound as long as
If You Don’t Hear Sound, Check the Followin
s the VP-770 correctly connected to your amp, speaker, or headphones?
VP-770’s v
s the Ensemble [LEVEL] slider raised?
s one of the Ensemble sound buttons lit
Page 44

Adjusting the Ensemble Volume
d.
The l
.
a
f
l!
T
al
Here’s how to adjust the volume of the Ensemble part.
ay the keyboar
( ENSEMBLE LEVEL)
2
ove the [LEVEL] slider to adjust the volume.
evel setting is shown in the display while you move the slider
Unlike the [VOLUME] knob, this slider only a ects the Ensemble part. You can use this slider to make
djustments when you want the Ensemble part to be louder (or softer) than the Vocal Designer or the
direct output o
the microphone (your voice).
Step On a Peda
he expression pedal will vary not only the volume of the Ensemble part but
so its “tone.” This means that using the pedal will make your Ensemble part
performance enormously more expressive.
For details, refer to “Using pedals” (p. 62).
Page 45

4
Adjusting the Ensemble Tone
Y
.
Th
.
.
S
.
ou can use the [TONE] slider to adjust the tone of the Ensemble sound
( ENSEMBLE TONE)
ove the [TONE] slider.
e tone setting is shown in the display while you move the slider
oving the slider upward will strengthen the highs, producing a clearer sound.
oving the slider downward will restrain the highs, producing a milder sound
etting the slider value to 0 will use the original setting of the selected sound
5
Page 46

6
Adjusting the Ensemble Attack
Y
T
f
.
.
T
.
t
s
.
.
.
Y
.
ou can use the [ATTACK] slider to adjust the attack of the Ensemble sound.
he attack is the starting portion of each note. A piano or percussion instrument is said to have a sharp or
ast attack; instruments such as bowed strings are said to have a gentle or slow attack
( ATTACK)
ove the [AT TAC K] slider
he attack setting is shown in the display while you move the slider
The [ATTACK] slider applies a relative change to the attack value speci ed for each sound. When
he [ATTACK] slider is at zero, the attack value will be as speci ed by each sound’s own setting.
Setting the attack to a negative value for a BRASS or STRINGS sound will have no e ect. The
harpest attack will be when the slider is set to zero
oving the slider upward will make the attack more gentle
oving the slider downward will make the attack sharper
ou can also adjust the release.
➞
For details, refer to “Adjusting the release (RELEASE)” (p. 40)
4
Page 47

Using the Microphone to Add Expression to the Ensemble
Y
.
)
Th
y
ass sounds.
V
.
f
a
.
)
T
V
.
Th
ou can use your voice via the microphone to add expression to the sound of the Ensemble part
(VOICE EXPRESSION)
For details, refer to “Using a microphone to control expression (VOICE EXPRESSION)”
(p. 66).
About the SuperNATURAL Brass Sounds (BRASS
e VP-770 uses SuperNATURAL technology to bring you high-qualit
r
arious performance expressions distinctive to brass instruments that
were di cult to play from a keyboard can now be reproduced without
special operations, and expressively played with realistic tone
In addition to playing each instrument solo, you can use the Section
eature to create and play brass sections consisting of up to six “players.”
With this function, the performance of each player in the section will take
dvantage of the distinctive characteristics of the instrument being used.
For details on operation, refer to “Section Mode” (p. 90)
About the String Sounds (TRINGS
he string sounds of the STRINGS allow even richer and more
expressive performance than ever before, without requiring
complex operations from the player. The solo strings (Solo
iolin, Solo Cello) sounds simulate the characteristics of a solo
erformance
e solo strings (Solo Violin, Solo Cello) sounds simulate the way in which a violin or other stringed instrument
is actually played, and will naturally switch between the ways in which vibrato or legato are applied when
playing monophonically or polyphonically.
Page 48

8
Performing with Bass & Percussion
a
ht hand
.
.
d
).
Sound
d
.
buttons to move the cursor to sound name.
.
Sound
n
SSBass sounds.
C
T
.
Y
a
Here’s how to play the Bass & Percussion part. The left-most seventeen notes of the keyboard will play bass
nd voice percussion sounds. This makes it easy to use your left hand to play a bass line while using your
rig
to play the melody
( BASS & PERCUSSION)
Selecting a sound
Here’s how to select a Bass & Percussion sound
When you press a Bass & Percussion sound button to make it light, the left-most seventeen notes of the
eyboard will play bass and percussion sounds.
ou can split the keyboard for the Vocal Designer
nd Ensemble parts (p. 54).
BASS & PERC
If you press a sound button that is already lit, the button will go dark and the Bass & Percussion part will
uce any sound.
not pro
y pressing the [AUDIO KEY] button you can use the same keys to play back audio les from USB
VOCAL DESIGNER
emory (p. 68
ENSEMBLE
Selecting a Variation
old down the [SHIFT] button and press a soun
n
the cursor
In this screen you can also edit the bass and
ercussion sound (p. 92).
Turn the value dial to select a sound
escriptio
A
ER
his provides a collection of voice percussion sounds.
4
Press the [EXIT] button to return to the top screen
Page 49

49
Performing with Bass & Percussion
.
ect a sound.
.
T
.
T
v
f
Y
.
button.
Use the cursor buttons to move the cursor to “
.”
.
.
Now you can try playing the Bass & Percussion part
l
2
ay a note in the keyboard region shown below
he Bass & Percussion part will sound
he Bass & Percussion part is distinctive in that it splits the keyboard to obtain its own dedicated range of
eys. This means that you can use your right hand to play melody or chords while playing a bass line or
oice percussion with your left hand.
In other words, you can simulate an entire a cappella group all by yoursel
!
Adjusting the Bass & Percussion Volume
ou can adjust the volume of the Bass & Percussion part
old down the [SHIFT] button and press a
nd
EVEL
Turn the value dial to adjust the level
If you want to save the setting, press the [F2] (WRITE) button.
For details on saving, refer to “Saving a registration” (p. 81).
Press the [EXIT] button to return to the top screen
Page 50

50
Adjusting the Ambience
T
.
amb
STUDIO
O
T
e
n
.
S
O
.
O
A
.
T
.
T
.
o each part, you can add the acoustic ambience that is typical of a hall or studio.
( AMBIENCE)
witch the type of ambience
Press the [TYPE] button; the display will show the currently selected
ience type. In this state, pressing the [TYPE] button cycles you
through the ambience types in this order:
➞
hese types have the following characters.
Typ
1
HALL 2
TUDI
FF
2
djust the depth of ambience
urn the [
urn the [DEPTH] knob toward the left to make the ambience shallower
EPTH] knob toward the right to make the ambience deeper
escriptio
The reverberation of a church
The reverberation of a large hall.
The reverberation of a studio
Turns the ambience o .
FF
➞
➞
Page 51

Using Controllers
his section explains keyboard settings and the various controllers provided on the VP-770.
T
51
Page 52

52
Shifting Octave Up or Down
Y
.
f
.
Y
T
be s
ted do
octave.
Y
T
ou can shift the keyboard pitch range up or down in a range of ±3 octaves
(+ OCT/-OCT)
Shifting Upward One Octave
ress the [+OCT] button once; the button will light and the keyboard
will be shi
ou can shift up to +3 octaves in this way.
o return the keyboard to its original pitch range, press the [+OCT] and [-OCT ] buttons simultaneously.
ted upward one octave
Shifting Downward One Octave
ress the [-OCT] button once; the button will light and the keyboard
will
ou can shift up to -3 octaves in this way.
o return the keyboard to its original pitch range, press the [+OCT] and [-OCT ] buttons simultaneously.
hif
ressing the [+OCT]/[-OCT] buttons won’t change the range of the Bass & Percussion part.
The octave buttons simultaneously change the pitch range of the Vocal Designer and the
nsemble Part. However, by holding down the [SHIFT] button and pressing the [+OCT] or [-OCT]
utton, you can individually change the pitch range of the Vocal Designer, Ensemble, and Bass &
ercussion parts.
wnward one
Page 53

3
Shifting Up or Down by Semitones
Y
e
f
e.
Y
e
y
.
Y
y.
T
ou can shift the keyboard pitch range up or down in semitone steps.
( TRANSPOSE)
Shifting Upward One Semiton
old down the [TRANSPOSE] button and press the [+OCT] button
once; the button will light and the keyboard will be shi
ne semiton
ou can shift up to +6 semitones in this way.
ted upward
Shifting Downward One Semiton
old down the [TRANSPOSE] button and press the [-OCT] button
once; the button will light and the ke
ownward one semitone
ou can shift up to -5 semitones in this wa
o return the keyboard to its original pitch range, press the [TRANSPOSE] button to turn o its illumination.
ressing the [TRANSPOSE] button won’t change the range of the Percussion part.
board will be shifted
5
Page 54

5
Splitting the Keyboard Into Vocal Designer and Ensemble Zones
ones.
.
”
.
“
.
t
]
.
Here’s how to split the keyboard so the Vocal Designer and Ensemble parts can be played from separate
z
ress [F1] (EDIT) button in the top screen
With the cursor located on the registration number,
press the [F1] (EDIT) button.
ease be aware that in the screen shots shown in this document, the registration names and tone
names di
ress the cursor buttons to move the cursor to “Split.
er from the factory settings.
(SPLIT)
Turn the value dial to turn “Split” ON.
ress the cursor buttons to move the cursor to “Split Point.”
If you set the Split Point to “60 (C4),” the keyboard will be divided as follows
VOCAL DESIGNER
Split Point: C4
ENSEMBLE
Use the value dial to change the value of “Split Point.
When you’ve nished making settings, press the
[EXIT] button
you want to save the edited settings, press the [F2] (WRITE) button
o save the registration.
For details on saving, refer to “Saving a Registration” (p. 81).
If Split is turned on, the [
the top screen
4
icon is shown in
Page 55

Adjusting the Keyboard Sensitivity
.
.
.
.
ete
alue
n
lo
C
h.
T
e
d
n
o
Sens
3
v
l
”
(
.
.
Here’s how to adjust the sensitivity of the keyboard
ress the [MENU] button.
Use the value dial to select “System,” then press the [F2] (ENTER) button
2
Use the value dial to select “Control,” then press the [F2] (ENTER) button
Use the value dial to select “Keyboard,” then press the [F2] (ENTER)
button
Use the cursor buttons and the value dial to change the value.
5
ram
rV
Kbd Ve
urve Adjusts the keyboard’s t ouc
IGH
EDIUM Standar
Kbd Vel
-63– +6
Descriptio
Light weight synthesizer keyboard lik
Acoustic piano simulatio
Adjusts the sensitivity of the keyboard. As you increase this setting, higher
elocity values will be transmitted according to the force with which you
p
ay. Normally you will leave this set at “0.
you want to save the edited setting in system memory, press the
[F2]
SYS WRITE) button
The con rmation message will appear, then press the [F1] (OK)
button
55
Page 56

56
Using the Pitch Bend / Modulation Lever
Y
Y
.
th
ato
V
appl
.
s
T
.
ou can vary the pitch or apply vibrato (pitch modulation).
( PITCH BEND)
Changing the Pitch in Real Time
ou can use the lever to smoothly change the pitch while you perform
While you play the keyboard, move the lever toward the left to lower
e pitch, or toward the right to raise the pitch.
Adding Vibr
ibrato is the e ect of modulating the pitch.
While you play the keyboard, move the lever away from yourself to
y vibrato
Adjusting the Pitch
old down the [SHIFT] button and move the pitch bend lever.
he
ENDER SETTINGS screen will appear
end Setting
Page 57

7
Use the cursor buttons and the value dial to change the value.
s
.
Valu e
0–12
S
d
.
d
.
TYPE
(
,
,
S
,
)
f
w
.
CHRO
l
d
o
ocal correction software.
(
l
y.
applied
t
a
h play
.
2
O
p
.
CO
(
only
.
y
.
.
h
.
itch bend settings can be made individually for each part. In the screen, Voc indicates the Vocal Designer
etting, Ens indicates the Ensemble setting, and B&P indicates the Bass and Percussion setting
or some sounds, not all items can be set. In this case the value will be shown as “---.”
RANGE
VOCAL DESIGNER and
GUITAR
OTHERS, PAD
YNTH STRINGS, CHOIR
JAZZ SCAT ENSEMBLE tone
only
MODE
VOCAL DESIGNER and
ENSEMBLE only)
peci es the degree of pitch change in semitones when the Pitch Bend lever is all the way right/left.
or example, if this parameter is set to “12,” the pitch will rise one octave when the pitch bend lever
is move
to the right-most position
or the SuperNATURAL brass (BRASS) sounds, setting the bend range (RANGE) to 3 or higher will
simulate the discontinuous pitch change that is typical of brass instruments, instead of the normal
smooth pitch change. When you apply a downward bend, the sound will behave in the manner
istinctive of brass instruments, meaning that the volume will also decrease
RMAL The pitch bend lever will operate in the
RMAL The pitch bend lever will operate in the
K1
K
conventional way (movement o
ill produce smooth changes in pitch)
MATICThe pitch bend lever will change the pitch
in semitone steps, simu
f v
conventiona
n this mode, pitch bend will not be
he pitch of a previously played note is
lready being bent. By using this setting
in conjunction wit
can create portamento-like e ects
peration is essentially the same as
OCK1, but there will be no pitch change
in res
returning
wa
to a new note that is played while
onse to the pitch bend lever
the lever
ating the soun
ing legato, you
MBI
BRASS tone
)
This mode allows you to express the subtle pitch changes that are distinctive of a SuperNATURAL
rass instrument
The proportion of breath noise will increase when you operate the bender in the Down direction.
ou freely control the breathiness at the beginning or end of a note
This lets
f you want to save your settings, press the [F2] (WRITE) button
For details on saving, refer to “Saving a Registration” (p. 81).
When you’ve nished making settings,
press t
e [EXIT] button
5
Page 58

58
(S1/S2)
Y
and its value.
f
f
.
s
.
The
Using the [S1]/[S2] Buttons
ou can apply various e ects to the sound by pressing the [S1] /[S2] buttons.
While playing the keyboard, press the [S1] or [S2] button.
When you press a button, the display will indicate the parameter that’s being controlled by that button,
If a SuperNATURAL brass or strings sound is selected for the Ensemble part, pressing the [S1] or [S2]
button will switch the sound between variations such as staccato, pizzicato,
ormance even more expressive
per
all, or tremolo, making your
Making Assignments for the [S1]/[S2] Button
old down the [SHIFT] button and press the [S1] or [S2] button
S1/S2 SETTINGS screen will appear.
Page 59

59
Use the cursor buttons and the value dial to change the value.
ete
ue
Source
y
g
sy
.
ASSIGN
S
O
/STAC
.
.
K
S
O
A
O
S
A
.
OC
A
.
S
.
.
CH
.
.
.
.
s
T
.
.
f
”
n the screen, Sw1 indicates the [S1] button’s assignment, and Sw2 indicates the [S2] button’s
assignment.
ram
rVal
REGIST, SYSTEM The assignments for the [S1]/[S2] buttons can be stored individually in each registration. When
FF O
PIZZ
FAL L/TREM The fall or tremolo sound will be heard (only for supported tones)
NI/ST
IT
D
RT-EN
P
PORT-V
AMB-OFF
DIR-MIC-OFFSwitches the direct microphone when you press the button
MODE Turns the [S1]/[S2] buttons function LATCH/MOMENTARY.
LAT
MENTARYThe status will be on only while you hold down [S1]/[S2] button.
escription
ou select a di erent registration, this setting speci es whether the [S1]/[S2] buttons will be
iven the assignments stored in the registration (REGIST), or the assignments stored in the
stem settings for the entire VP-770 (SYSTEM)
pecify the functions that will be controlled by the [S1]/[S2] buttons.
The pizzicato or staccato sound will be heard (only for supported tones)
witches between unison mode and stack mode (only for supported tones).
pplies the doit e ect (only for supported tones).
pplies the portamento e ect to the Ensemble
pplies the portamento e ect to the Vocal Designer
witches the ambience when you press the button
The on/o status will alternate each time you press [S1]/[S2] button
you want to save your settings, press the [F2] (WRITE or SYS WRITE)
n
For details on saving your settings, refer to “Saving a Registration” (p. 81) or “Saving the System Settings”
p. 96)
When you’ve nished making settings, press the [EXIT] button
System Settings and
he system parameters are a single set of settings that apply in common to the entire VP-770. They include
settings such as those for the keyboard sensitivity, master tuning, and MIDI.
Registrations allow you to save settings that select sounds and specify panel settings
For some controllers (aftertouch, pedal, [S1] /[S2] buttons, D Beam), the settings can be stored either as
system settings for the entire VP-770 or for individual registrations
Use the system parameter “Source” to specify which setting you want to use.
For example, if you want the [S1]/[S2] buttons to always have the same function even when you switch
registrations, you should set the Source as “SYSTEM.” If you want the [S1]/[S2] buttons to change their
unction when you switch registrations, set the Source to “REGIST.
egistration
Page 60

0
Using the D Beam
.
ess a button to select a
ect.
y
While y
oller.
T
y
d
.
o
T
f
.
p
.
,
.
T
t
th
f
By waving your hand above this sensor you can apply a variety of e ects to the VP-770’s sound
( D BEAM)
r
If you press an unlit button, that D Beam e ect (see table; p. 61) will be selected.
ou press a lit button once again, the D Beam will be turned o .
If
You can turn on multiple buttons by pressing them simultaneously.
D Beam e
ou perform, slowly move your hand up and down over the
BEAM contr
he e ect will be applied when you place your hand over the controller, and will revert to the previous
state when
respon
ou move your hand away. The selected button will blink when the D BEAM controller is
ing
The sensitivity of the D Beam controller will change
ft. (appr
depending on the amount of light in the vicinity of
he unit. If it does not function as you expect, adjust
e sensitivity (D Beam Sens; p. 101) as appropriate
or the brightness of your location.
6
he illustration above shows the e ective range of the D BEAM controller. There won’t be any e ect if you
move your hand outside o
this range
D Beam Settings
Here’s how to specify the e ect obtained when you move your hand above the D Beam sensor, and the
th of that e ect
de
old down the [SHIFT] button and press the
[PITCH]
he
[FILTER] or [EXPRESSION] button
BEAM SETTINGS screen will appear.
Page 61

61
Use the cursor buttons and the value dial to change the value.
ete
alue
n
Source
M
T
y
heth
.
ect
3 Select
W
f
1
–
y
T
h
.
C
s
volume.
2
C
s
vol
s
.
P
Ch
s
R
Chang
WAH
.
C
/
.
T
ORT
C
Chang
o
o
o
0
7
.
i
0–127
g
d
y
y
y
S
t
t
t
.
S
OC
S
ects
V
eITCH
y
S
D
)
olume
)
lume
.
.
.
ram
rV
DB1 Sel
DB2 Select
DB
DB1 Asgn
2 Asgn
DB3 Asgn
DB1 Range L
2 Range L
DB3 Range L
DB1 Range Hi
DB2 Range Hi
DB3 Range H
DB1 Polarit
DB2 Polarit
DB3 Polarit
1 Par
DB2 Par
DB3 Par
REGIST, SYSTE
FIX, ASGN
DYN1
YN
EX
FILTE
PIZZ/STA
FAL L
TREM Plays the fall or tremolo sound (only for supported tones).
NI/STK Switches between unison mode and stack mode (only for supported tones)
DOI
P
PIT
H
–12
TANDARD, REVERSEInverts the change that occurs when you move your hand above the sensor.
VOC/EN
V
EN
Descriptio
he assignments for the D beam can be stored individually in each
registration. When
w
er the D beam will be given the assignments stored in the registration
REGIST), or the assignments stored in the system settings for the entire
VP-770 (SYSTEM)
hen a D Beam button is on, this setting speci es whether it will perform
unction printed on the panel (FIX) or the function assigned by the DB
the
3 Asgn settings (ASGN).
You can switch between FIX and ASGN at an
D Beam button for several seconds.
hese settings specify the function that will be controlled by the D Beam
en DB1–3 Select is set to “ASGN.”
w
Applies modulation
hanges the volume. Transmits MIDI message CC#2 (breath control) to the
ound generator section. This is the same operation as Voice Expression
p. 66), and will operate only in the positive (+) direction to increase the
hanges the volume. Transmits MIDI message CC#4 (foot control) to the
ound generator section. For STRINGS and BRASS sounds, this allows the
ume to be controlled in the ± directions (it will not go to zero). For other
ounds, the volume can be controlled only in the “+” direction
anges the volume. Transmits MIDI message CC#11 (expression) to the
ound generator section. The volume is controlled in a range of 0–127.
es the tone.
Applies a wah pedal e ect to sounds that support Wah
Plays the pizzicato or staccato sound (only for supported tones).
Applies a doit e ect (only for supported tones).
Applies a portamento e ect.
es the pitch.
Speci es the depth of the e ect when the D Beam controller is not
responding. Increasing this value will apply an e ect even if the D Beam
controller is not responding at all
Speci es the depth of the e ect when the D Beam controller is respondin
to its maximum extent. Reducing this value will reduce the amount of e ect
pro
uced by the D Beam controller.
Speci es the part(s) that will be controlled by the D Beam
Vocal Designer part and Ensemble part.
Vocal Designer part only.
Ensemble part only.
ou select a di erent registration, this setting speci es
time by holding down the
Beam E
arameter
Polarit
alu
TANDAR
REVERSE
ower the pitch (same as
oving the pitch bend
ever toward the left
aise the pitch (same as
oving the pitch bend
ever toward the right
Modify the tone
Modify the tone
XPRESSION
educe the
v
ncrease the
vo
The range of change for PITCH is determined by the Bend Range setting (p. 57)
f you want to save your settings, press the [F2] (WRITE or SYS WRITE)
utton
For details on saving your settings, refer to “Saving a Registration” (p. 81) or “Saving the System Settings” (p. 96).
When you’ve nished making settings, press the [EXIT] button
Page 62

2
Y
the
f
y
.
s
l.
Th
l.
e
dal
T
tonal character.
gs
.
.
T
t
.
Using Pedals
ou can connect a hold pedal (sold separately: DP series) and an expression pedal (sold separately: EV-5) to
VP-770.
an optional hold pedal (DP series) is connected to the rear panel PEDAL HOLD jack, you can press the
I
old pedal to cause notes to sustain or “hold” even after their keys have been released. If an optional
expression pedal or pedal switch (EV-5, DP series.) is connected to the rear panel PEDAL CTRL jack (1, 2),
ou can use the pedal to control the volume or various functions
( HOLD PEDAL/ CTRL PEDAL)
Holding Note
While playing the keyboard, press the hold peda
e notes will be held while you are pressing the hold peda
You can change the hold pedal settings by editing the registration’s “Hold Mode” (p. 87, p. 89), “Hold
Type” (p. 87), and “Hold Freeze Part” (p. 83) settings.
6
Adding Expression to Your Performanc
While playing the keyboard, raise and lower the
expression pe
he expression pedal will vary not just the volume of the Ensemble part but also the
You can change the pedal settings by editing the system’s polarity settings (Hold Pol, P1 Pol, P2
ol) (p. 100).
.
Pedal Settin
Here’s how to edit the pedal-related settings
old down the [SHIFT] button and press the hold or expression
edal
he display will show the edit screen for the pedal you pressed.
Use the cursor buttons and the value dial
o change the value
Page 63

63
ram
ete
alue
n
Source
M
T
(
).
.
S
.
OC
S
gn
n
.
F
O
.
Chang
s
vol
2
C
s
v
s
.
C
s
R
C
.
/
.
T
ORT
B
C
C
C
P
O
.
W
.
n
n
h
.
Y
y
P
.
t
y
OC/ENS
.
OC
S
.
.
.
rV
REGIST, SYSTE
Hold Part Speci es the part(s) that will be controlled by the hold pedal
VOC/EN
V
EN
P1 As
P2 Asg
P1 Sw Asg
P2 Sw Asg
P1 Par
2 Part
OF
YN1
YN
EXP
FILTE
PIZZ/STAC Plays the pizzicato or staccato sound (only for supported tones).
FAL L
TREM Plays the fall or tremolo sound (only for supported tones).
NI/STK Switches between unison mode and stack mode (only for supported tones)
DOI
P
AM
DIR-MI
PROG-U
G-DOWN Switches to the previous registration (Source: SYSTEM only)
PR
PAN E L- S
REC/PLA
STO
V
V
EN
Descriptio
he assignments for the pedal can be stored individually in each
registration. When you select a di erent registration, this setting speci es
whether the pedal will be given the assignments stored in the registration
REGIST), or the assignments stored in the system settings for the entire
VP-770
SYSTEM
Vocal Designer part and Ensemble part
Vocal Designer part only.
Ensemble part only.
Speci es the function that will be controlled by the control pedal
Applies modulation
es the volume. Transmits MIDI message CC#2 (breath control) to the
ound generator section. This is the same operation as Voice Expression
p. 66), and will operate only in the positive (+) direction to increase the
ume.
hanges the volume. Transmits MIDI message CC#4 (foot control) to the
ound generator section. For STRINGS and BRASS sounds, this allows the
olume to be controlled in the ± directions (it will not go to zero). For other
ounds, the volume can be controlled only in the “+” direction
hanges the volume. Transmits MIDI message CC#11 (expression) to the
ound generator section. The volume is controlled in a range of 0–127.
hanges the tone.
Applies a wah pedal e ect to sounds that support Wah
Applies a doit e ect (only for supported tones).
Applies a portamento e ect.
ontrols the depth of ambience.
ontrols the direct microphone volume.
Switches to the next registration (Source: SYSTEM only).
Performs the operation speci ed for P1 Sw Asgn/P2 Sw Asgn
If P1 Asgn/P2 Asgn is set to “PANEL-SW,” this speci es the operation that
occurs w
en the control pedal turns on
Same operation as Sound Looper [REC/PLAY] button.
pressing the pedal twice performs the same operation as the
Rapidl
[STOP] button.
Perform the same operation as Sound Looper [STOP] button
Speci es the part(s) that will be controlled b
Vocal Designer part and Ensemble part
Vocal Designer part only.
Ensemble part only.
the control 1/2 pedals.
you want to save your settings, press the [F2] (WRITE or SYS WRITE)
n
For details on saving your settings, refer to “Saving a Registration” (p. 81) or “Saving the System Settings”
p. 96)
When you’ve nished making settings, press the
[EXIT] button
Page 64

6
Adding an E ect by Applying Pressure to the Keyboard
Y
.
t
.
T
.
ou can add an e ect to Vocal Designer by applying pressure (aftertouch) to the keyboard
When you press the [AFTERTOUCH] button, the button will light and
he aftertouch function will be turned on for Vocal Designer
Making Aftertouch Settings
old down the [SHIFT] button and press the [AFTERTOUCH] button.
( AFTERTOUCH)
heAFTERTOUCH SETTINGS screen will appear
4
Page 65

6
Use the cursor buttons and the value dial to change the value.
ete
alue
n
Source
M
T
y
g
y
h
.
Af
OFF
O
ppl
1
d
volume.
vol
.
R
.
WAH
.
N
Aft Part
.
VOC/ENS
VOC
S
.
OFF
O
.
).
.
.
ram
rV
EGIST, SYSTE
t Assign Speci es the aftertouch e ect.
OD A
YN
Descriptio
he assignments for the aftertouch can be stored individually in each
registration. When
whether the aftertouch will be
registration (REGIST), or the assignments stored in the s
t
e entire VP-770 (SYSTEM)
ies modulation.
Changes the volume. Transmits MIDI message CC#2 (breath control) to the
generator section. This is the same operation as Voice Expression
soun
p. 66), and will operate only in the positive (+) direction to increase the
ou select a di erent registration, this setting speci es
iven the assignments stored in the
stem settings for
YN2 Changes the volume. Transmits MIDI message CC#4 (foot control) to the
ILTE
END-DOW
END-UP Raises the pitch.
N
sound generator section. For STRINGS and BRASS sounds, this allows the
ume to be controlled in the ± directions (it will not go to zero). For other
sounds, the volume can be controlled only in the “+” direction
Changes the tone.
Applies a wah e ect to sounds that support Wah
Lowers the pitch.
Speci es the part(s) that will be controlled by after touch
Vocal Designer part and Ensemble Part.
Vocal Designer part only.
Ensemble part only
f you want to save your settings, press the [F2] (WRITE or SYS WRITE)
utton
For details on saving your settings, refer to “Saving a Registration” (p. 81) or “Saving the System Settings”
. 96
When you’ve nished making settings, press the [EXIT] button
To adjust the aftertouch sensitivity, use the system setting Aft Sens (p. 99)
5
Page 66

66
Using a Microphone to Control Expression
Y
.
f
.
f
.
y
T
y
.
The
.
V
e
n
Voi
s
0
7
Y
evel.
f y
.
6
)
.
s
).
ou can use the loudness of your voice via the microphone to add expression to the Ensemble part.
( VOICE EXPRESSION)
ress the [VOICE EXPRESSION] button to make it light
To hear the result as clearly as possible, turn on an Ensemble part sound, and turn o the sound buttons o
the Vocal Designer part and the Bass & Percussion part
To hear the result as clearly as possible, turn the [DIRECT] knob (which sends your own voice directly
rom the output) all the way down.
lay the keyboard
While continuing to hold down notes, vocalize into the microphone.
Tr
varying the loudness of your voice.
he volume and tone of the Ensemble part will change according to the loudness of your vocalizing.
Adjusting the Voice Expression Sensitivit
old down the [SHIFT] button and press the [VOICE EXPRESSION]
utton
VOICE EXP SETTINGS screen will appear
Use the value dial to change the value.
arameter
ce Exp Sen
you want to save your settings, press the [F2] (SYS WRITE) button
For details on saving, refer to “Saving the System Settings” (p. 9
When you’ve nished making settings, press the [EXIT] button
The Voice Expression e ect does not apply to some sounds (GUITAR, OTHERS, and decay-type
ounds
alu
–12
escriptio
ou can adjust the Voice Expression sensitivity. Higher sensitivity settings mean that the
Voice Expression e ect will begin applying even when your voice is still at a low loudness
l
Lower sensitivity settings mean that the Voice Expression e ec t will begin applying only
when your voice reaches a fairly high loudness level. You’ll nd it easier to control Voice
Expression i
ou set this to a sensitivity that’s appropriate for your singing voice.
.
Page 67

Using Audio Files
his chapter explains the Audio Key function, which allows audio les saved on USB memory
T
(sold separately) to be assigned to keys for playback; and the Sound Looper function, which lets
you layer the phrases you perform and play them back as a loop.
67
Page 68

8
Performing with Audio Files
T
y
T
a
y
Y
.
.
y
f
g.
y
h
.
.
the US
ecto
).
T
.
( AUDIO KEY)
Never disconnect the USB memory while the Audio Key function is in use.
he VP-770 lets you play audio les saved on USB memory (sold separately) while you perform. This is
called the “Audio Ke
he Audio Key function lets you assign audio les to the lowest fteen keys of the keyboard and play these
udio les by pressing the corresponding key. You can assign various phrases to the keys and play them at
the appropriate moments during
” function.
our performance.
AUDIO KEY
ou can also specify that an audio le play repeatedly, or reserve the audio le that should be played next
Here are some ways in which you can enjoy using the Audio Key function
switching audio les between sections such as Intro, Theme, Break, and Ending as your song
progresses, you can freely change the structure of the song while you perform.
Assign a di erent audio song to each ke
to the accompaniment o
For details on the format of the audio les, refer to “Audio Files that can be Played by the VP-770” (p. 73).
VOCAL DESIGNER
ENSEMBLE
an audio son
, and use the keyboard to switch songs so you can perform
Performing with Audio Files from USB Memory
Here’s how you can perform while playing audio les saved on USB memory (sold separately).
ou begin, install the included “Audio Key Utility 3” into your computer, and prepare the audio le
Before
at you want to play back on the VP-770
set t
For details, refer to “Audio Key Utility 3 Quick Guide” (separate document)
onnect the USB memory containing the audio le set to
B MEMORY conn
ress the [AUDIO KEY] button.
heAUDIO KEY screen will appear
r
p. 22
6
Page 69

69
T
he Audio Key function will be activated, allowing you to play audio les by pressing a key
.
n
O
One-shot Now
.
h
.
.
it
y
y
y.
STO
.
.
T
.
f
.
.
.
.
y
y
t
ayback Mode List
IndicationDescriptio
When you press the key, the audio le will play only once
The audio le will play immediately when you press the key.
OW One-s
P When you press this key, the audio le will stop playing
ot Wait
When you press the key, the audio le will play only once
With this setting, pressing the key while another audio le is playing will reserve the audio le to be played next.
When the currently playing audio le has nished, the reserved audio le will play
oop Now
When you press the key, the audio
The audio le will play immediately when you press the key.
Loop Wa
When you press the key, the audio le will play repeatedly.
With this setting, pressing the ke
When the currentl
playing audio le has nished, the reserved audio le will pla
le will play repeatedly.
while another audio le is playing will reserve the audio le to be played next.
f audio les are not assigned to the C#2–D3 keys, nothing will be shown in the keyboard graphic in
the screen.
lay a key C#2–D3
he audio le assigned to the respective key will play
If a key is assigned to play an audio le, the color of the key in the screen will change. The name and
remaining time o
the currently playing audio le is also shown in the screen
Keys set to “OW” or “LW” let you reserve the audio le that will be played when the currently playing audio
le has nished playing. Keys for which an audio le is reserved are indicated by a bold border
To stop the le that’s playing, press the C2 key.
Audio le playback will stop
n the AUDIO KEY screen you can adjust the Audio Key volume by turning the value dial.
or details on installing the included “Audio Key Utility 3” into your computer, refer to “Audio Key
tility 3 Quick Guide” (separate document)
the connected USB memory does not contain an audio le set created by the “Audio Key Utility 3,”
ou’ll be able to assign audio les from USB memory to each key and play them.
You can also change the settings of the audio les assigned to the ke
hat specify how the audio les will be repeated (p. 70).
s, and change the settings
Page 70

Selecting the Audio File Set
Th
.
T
.
.
.
T
.
y
As d
T
3
th
d
.
Here’s how to select and play an audio le set that’s saved in USB memory.
onnect the USB memory containing the audio le set to the USB
EMORY connector (p. 22).
ress the [AUDIO KEY] button.
e AUDIO KEY screen will appear
ress the [F2] (SELECT) button.
he following screen will appear
If the USB memory does not contain an audio
le set that was created using “Audio Key Utility
,” the display will indicate “External Root.” Even
if the USB memory does not contain an audio
le set, audio les located in the root level of
e USB memory can be assigned to keys an
played
Use the VALUE dial to select an audio le set, and press the [F2 (LOAD)]
n
The con rmation message will appear, then press the [F1] (OK)
button
he le will be loaded into the VP-770
Changing the Audio File Settings
Here’s how you can edit the audio le settings, such as changing the audio le played by each key, or
ing whether the le will be played repeatedly.
specif
escribed in “Selecting the Audio File Set” (on the preceding
page), load the audio le set that you want to edit.
he audio le set will be loaded into the VP-770.
Page 71

ress the [F1] (EDIT) button.
T
.
.
T
y
f
gn.”
.
T
T
.
Th
.
d
y.
he following screen will appear
Now you can change the audio le that is assigned to each key, and specify how it is to be played (the
playback mode).
If the USB memory does not contain an audio
le set, the [WRITE] button is not shown in the
ispla
ress the key whose settings you want to change
he audio le assigned to each key and its playback mode are shown.
Use the VALUE dial to select the audio le that will be played by the
speci ed ke
If you select the “No Assign,” the audio le assigned to that key will be cleared. No playback mode indica-
tion is shown on the graphic
indicate “No Assi
.
or keys to which no audio le is assigned, and the audio le name eld will
ress the [F1] (MODE) button to select play mode
he playback mode (p. 69) will change each time you press the [F1] (MODE) button.
epeat steps 3–5 to edit the settings.
ress the [F2] (WRITE) button.
he con rmation message will appear
If you don’t want to store the settings, press the [F2] (CANCEL) button.
e operation will be cancelled, and you’ll return to the previous screen.
8
ress the [F1] (OK) button to overwrite the settings of the audio le
When the settings have been written, the indicators will go out, and you will return to the previous screen
Page 72

Adjusting the Volume of the Audio Key
Y
.
Y
y
.
T
f
el.”
Y
”
Amb Send” and specify the amount of ambience
.
ou can adjust the volume when using the Audio Key function
ou can adjust the volume of the Audio Key to change the volume balance between your keyboard
performance and the audio le pla
old down the [SHIFT] button and press the [AUDIO KEY] button
he AUDIO KEY LEVEL screen will appear.
back.
2
ress the cursor buttons to move the cursor to “Level.”
Use the value dial to change the value o
ou can specify the volume in a range of “0–127.
n the AUDIO KEY screen you can also change the Audio Key volume by turning the value dial.
“Lev
In the same way, you can move the cursor to
0–127) that will be applied to the audio key
Page 73

3
Types of Audio Files That the VP-770 Can Play
/
S
y
z
h
t
“
P3
at
3
S
y
4
z
6
/
kbp
)
s
.
f
WAV
ampling Frequenc
Bit Dept
File Extension
44.1 kH
16-bi
.wav” “.aif ” “.ai ”
M
rm
ampling Frequenc
Bit Rate 32/40/48/56/64/80/96/112/128/160/192/224/25
File Extension “.mp3”
MPEG-1 audio layer
4.1 kH
320
s, VBR (Variable Bit Rate
Caution when Playing Back Audio File
An MP3 le has little time of the blank at the head and the end of the le. Therefore, the sound might cut
o when an MP3 le played repeatedly with Audio Key function
If this occurs, you may be able to solve the problem by useing WAV/AIFF format data rather than MP3
ormat data
7
Page 74

Recording Loop Phrases
Y
y
f
.
.
Y
Y
.
.
Th
dby
Th
h
g
f
ecord.
lly wh
[
]
.
d
o
ou can record a phrase you perform, and play it back repeatedly as a loop. You can also record additional
phrases la
that is actually being produced, but you can use this looping
The recordable time is approximately 18 seconds
the sound you want to record is output from the OUTPUT A (MIX) jacks (p. 4, 98)
ered onto the recording. When you’re using a microphone it may be di cult to hear the sound
ou can’t change the tempo or time signature of the recorded phrase.
ou can’t record the sound that is output from the OUTPUT B jacks. You’ll need to set things up so that
( SOUND LOOPER)
unction to easily audition your output
Recording a Phrase
Preparations
ress the [EC/PLAY] button
e Sound Looper will enter recording-stan
e LOOPER SETUP screen will appear.
a phrase has already been recorded, recording will start when you press the [REC/PLAY] button.
e
OOPER SETUP screen will not appear.) If you want to record a new phrase, erase the previously-
(T
recorded phrase as described in “Erasin
mode, and the [REC/PLAY] button will start blinking.
You can also access this screen by holding
own the [SHIFT] button and pressing the
REC/PLAY] button.
the Phrase” (p. 76).
Use the cursor buttons and the value dial to make metronome
settings
r
or recording and to specify the length that you want to
f you leave the [AUTO START] button
turned on, recording will start
automatica
The
the level at which triggering will occur
f the pedal setting (P1/P2 Assign) is
“PANEL-SW,” you can perform this
peration using the pedal (p. 63).
en you begin playing.
icon in the level meter indicates
Page 75

arameter
V
e
eat
2
5/8,
,
,
6
S
T
o
25.0–300.0
S
.
h
t
)
S
g
l
0–127
S
.
ain
0
T
.
A
0
S
]
d
.
ode
OFFThe metronome
sound.
Y
Th
Th
.
C
T
.
A
S
Th
.
el
0–10
Adj
etro Sound
6
Selects the sound of the metronome.
g
.
g
.
l
h
k.
.
T
.
.
.
T
.
.
Th
.
S
d
y
B
emp
Lengt
Leve
G
uto Trig Level–1
Metro M
Metro Lev
M
alu
/4, 3/4, 4/4, 5/4, 6/4, 7/4,
6/8, 7/8, 9/8, 12/8
9/16, 11/16, 13/16, 15/16
17/16, 19/1
(depends on the
empo
–+12 [dB]
LAY-ONL
EC-ONLY
LAY&RE
LWAY
TYPE1–
Description
peci es the
peci es the metronome’s tempo
peci es the number of measures that will be recorded. You cannot specify a number
of measures that would cause the recordin
peci es the playback volume for the Sound Looper
his adjust the gain of the looper
pecify this if you’re using Auto Start to initiate recording. Lower values will allow
recording to be triggered even by softer sounds. The [
in
icates the level at which triggering will occur
e metronome will sound only while the Sound Looper is playing back.
e metronome will sound only while the Sound Looper is recording
he metronome will sound while the Sound Looper is playing or recording
e metronome will sound constantly
usts the volume of the metronome.
For details on each value, refer to p. 99.
etronome’s time signature.
will not
Starting/Stopping Recordin
time to exceed 18 seconds.
icon in the level meter
ress the [REC/PLAY] button
After a one-measure count-in, the [REC/PLAY] button will light red, and
recordin
After recording has started and the speci ed number of measures has
e
switc
will start
apsed, the [REC/PLAY] button will turn green and the Sound Looper will
to playbac
you leave the [AUTO
TAR T ] button turne
on, recording will start
automatically when
ou begin playing.
The measure setting is invalid if the metronome is turned o (Metro Mode: OFF, PLAY-ONLY).
To stop recording, press the [STOP] button.
Playing Back the Recorded Phrase
ress the [REC/PLAY] button
he [REC/PLAY] button will turn green, and the phrase will play
To stop playback, press the [STOP] button.
Overdubbing Phrases (Recording Another Layer)
Here’s how to record another phrase onto the previously recorded phrase
ress the [REC/PLAY] button
he [REC/PLAY] button will turn green, and the phrase will play
To begin overdubbing, press the [REC/PLAY] button once again
e [REC/PLAY] button will turn orange, and the Sound Looper will be in overdubbing mode.
To stop playback, press the [STOP] button.
you press the [REC/PLAY] button, recording will end and the phrase will play
75
Page 76

Erasing the Phrase
T
.
Y
.
f
.
.
.
T
.
.
T
.
y.
.
.
.
Th
f
.
old down the [STOP] button and press the [REC/PLAY] button.
he con rmation message will appear
ress the [F1] (OK) button to erase the phrase.
If you decide not to erase the phrase, press the [F2] (CANCEL) button.
ou can’t recover a phrase that has been erased
Saving the Phrase to USB Memory
If you save the recorded phrase to USB memory (sold separately), you’ll be able to use it with the Audio Key
unction (p. 68)
ake sure that the phrase is not playing
ress the [SAVE TO USB MEMORY] button
he WRITE FILE NAME screen will appear
Use the cursor buttons and the value dial to enter a name, and then
ress the [F2] (WRITE) button
For details on assigning names, refer to p. 81.
he con rmation message will appear
ress the [F1] (OK) button to save the phrase to USB memor
When the save is completed, the previous display will reappear
t is not possible to load a phrase from USB memory into the Sound Looper
Adjusting the Volume of the Phrase
old down the [SHIFT] button and press the [REC/PLAY] button
e LOOPER SETUP screen will appear.
2
ress the cursor buttons to move the cursor to “
“Level.”
Use the value dial to change the value o
Press the [EXIT] button to return to the top screen
evel.”
Page 77

Storing Sounds and Settings
(Registration)
ounds and panel settings can be stored as one of thirty-two “registrations” for instant recall
S
using the eight buttons.
77
Page 78

Recalling a Registration
?
gs f
g
h
f
a
T
)
ll.
T
.
T
.
val
T
.
W
.
3
4
6
eset
Y
f
c
a
lease be aware that
the scree
s
d
Here’s how to recall the VP-770’s sounds and panel settings (registrations).
( REGISTRATION)
What is a Registration
A registration is the unit by which the VP-770’s sounds and panel settings can be stored.
In addition to the sounds and settin
istration also saves the state of the panel and various other settings.
re
own in the illustration at right, the registrations are
As s
organized into four preset buttons and four user buttons,
each with
t each button, and instantly recalled by pressing that
button.
our banks. One registration can be stored
or the Vocal Designer, Ensemble, and Bass & Percussion parts, a
Pr
nk 1
ank 2
ank 3
ser
he top screen shows the following information
egistration number (1–4)
ank number (1–4
reset (P) / User (U) indication
Saving a Registration to a
When the VP-770 is in its factory-set condition, you cannot save registrations to the preset buttons.
However, by turning o “Preset Protect” (a System setting), as described below, you’ll be able to store
registrations at the preset buttons as we
reset
ank 4
ou can also select a registration
rom the top screen by moving the
ursor to the registration number
nd turning the value dial.
P
hots shown in this document, the
registration names and tone names
i er from the factory settings.
in
Press the [MENU] button.
urn the value dial to select “System,” and press the [F2] (ENTER) button
urn the value dial to select “Sound,” and press the [F2] (ENTER) button
Press the [] cursor button to move the cursor to “Preset Protect,” and then turn the
ue dial to change the “Preset Protect” setting to “OFF.”
o save the system setting you just edited, press the [F2] (SYS WRITE) button
hen the con rmation screen appears, press the [F1] (OK) button
n
The registration buttons will light red for presets and orange for user registrations. However,
f you’ve disabled Preset Protect, all of the registration buttons will light orange.
Page 79

9
c
.
Selecting the Registration Bank
T
T
.
.
The bank
y
.
d
t
.
T
.
Y
.
here are four registration banks. Press the [BANK] button to switch banks.
ress the [ANK] button.
ou can press the [EXIT]
utton or [BANK] button
to cancel the bank select
procedure
he [BANK] button and the button for the currently selected bank number (one of [1]–[4]) will light green, and
the buttons of the bank numbers that can be selected will blink green
elect the desired bank by pressing a button from [1] through [4]
will be selected, and the registration buttons (PRESET [1]–[4], USER [1]–[4] buttons) will blink.
ou can recall the desired registration as described below
Now
The registration buttons will light red for presets and orange for user registrations. However, if you’ve
isabled Preset Protect (p. 78), all of the registration buttons will light orange.
Recalling a Registration
ress the registration button (PRESET [1]–[4],
SER [1]–[4] buttons) for
he desired registration
holding down the [SHIFT]
utton and pressing a
REGISTRATION] button, you
he button you pressed will light, and the registration will be selected
an view a list of registrations
7
Page 80

80
Initializing a Registration
.
).
l
.
T
.
-
tratio
ed.
.
settings of the currently selected registration to a standard set of values
you want to return all registrations to their factory-set state, execute the Factory Reset operation
. 110
The currently selected registration will be lost when you initialize the registration.
ress a [REGISTRATION] button to select the registration that you
want to initia
ize (p. 78)
2
old down the [SHIFT] button and press the [F2] (INIT) button.
he con rmation message will appear
ress the [F1] (OK) button at the con rmation screen, and the regis
n will be initializ
When the screen indicates “Completed!”, Initialization has been completed.
If you decide not to initialize, press the [EXIT] button to return to the previous screen
Page 81

81
Saving a Registration
f
.
e
d
d by
T
.
Value dial
Chooses characters.
.
n
.
h
(
.
g
-
t
.
T
.
A
i
.
.
t
.
registration (When you edit the registration settings, the “*” symbol will appear in the upper right of the top
screen). I
you want to keep the modi ed registration, you must save it
When you execute the save operation, the registration that had previously been saved to the sav
estination will be overwritten and lost. However, the internal factory-set registrations can be
recovere
executing the Factory Reset operation.
( REGISTRATION WRITE)
ress the [F2] (WRITE) button.
You can also save the registration
pressing the [F2] (WRITE) button
n one of the Vocal Designer,
Ensemble, or Bass & Percussion
editing screens.
he
EGIST NAME screen will appear.
Use the cursor buttons and the value dial to enter a name, and then
ress the [F2] (WRITE) button
Cursor left/right
Cursor up/dow
[SHIFT]+[F1] (DELETE)Deletes the character at the cursor, and
[SHIFT]+[F2]
A screen will appear, allowing you to select the write-
destination re
INSERT)Inserts a space at the cursor location
oves the cursor
Switches between uppercase/lowercase
moves t
e subsequent characters one
place forward.
istration.
Use the cursor buttons or the value dial to select the write-destina
ion registration, and then press the [F2] (EXEC) button
As the destination of a write, you’ll normally only
e able to select a user registration (U11–U44).
However, if you’ve disabled Preset Protect (p. 78), all
egistrations will be available as write destinations
You can also select the write destination by using
he buttons as described on p. 79
he con rmation message will appear
t the con rmation screen, press the [F1] (OK) button to save the
reg
stration.
When the “Completed!” indication appears, the registration has been saved
If you decide not to save, press the [EXIT] button to return to the previous screen.
Page 82

82
Editing a Registration
d
.
.
Op
r
83
VOC
d
86
d
88
.
.
]
f
g
.
[
]
t
t
[
]
d.
-
t
.
Here’s the basic procedure for editing a registration.
ress a [REGISTRATION] button to select the registration that you
want to e
Use the cursor buttons to move the cursor, and then press the [F1]
EDIT) button
it (p. 78)
Cursor location
Registration numbe
AL DESIGNER el
ENSEMBLE el
you want to make settings for the Bass & Percussion part, hold down the [SHIFT] button and
ress the [BASS] or [PERC] button to access the BASS & PERC EDIT screen (p. 92)
eration of the EDIT button
Makes settings for the entire
registration.
Makes settings for the Vocal
esigner part.
Makes settings for the
Ensemble part.
age
p.
p.
p.
Use the cursor buttons to move the cursor to the parameter that you
want to edit
If not all parameters can be shown in a single screen, a scroll bar is shown at the right edge of the screen. In
this case, use the cursor [
You can access a list o
utton in an EDIT screen. From the REGISTRATION EDIT screen, press the [F1] (CONTROL) button to
access the REGIST CONTROL (Re
button to scroll the screen downward.
value by holding down the [SHIFT] button and pressing the [F1] (LIST)
istration Control settings) screen
Use the value dial to change the value.
You can change the value in steps of one by pressing the cursor buttons
o quickly increase the value, hold down [ ] and press []. Conversely, you can quickly decrease
he value by holding down [] and pressing []. You can change the value in larger steps by
olding down [SHIFT] and pressing [] or
.
or []. If you want
epeat steps 3 and 4 to edit the parameters as desire
you want to save the changes you made, refer to “Saving a Regis
ration” (p. 81)
Page 83

83
T
g
.
Th
.
n
Split
ON, O
T
f
.
Spl
t
f
.
t
OFF, VOC,
S
T
Amb
e
OFF
T
.
The reverberation of a church.
T
.
O
T
A
h
0
7
.
l
0–127
(
).
d
0–127
l
.
D
n
Af
OFF
O
ppl
1
d g
vol
d
v
d
.
.
.
N
A
.
VOC/ENS
VOC
S
y.
OFF
O
Registration Parameters
his section explains the functions the di erent registration parameters have, as well as the composition of
these parameters. For details on how to make settin
REGISTRATION EDIT
ese settings apply to the entire registration
arameter Value Descriptio
FF
it Poin
Hold Freeze Par
ience Typ
mbience Dept
Direct Mic Leve
Direct Mic Amb Sen
36 (C2)–84 (C6) Speci es the key at which the keyboard is to be divided into separate zones
EN
HALL1
STUDI
–12
s, refer to “Editing a Registration” (p. 82)
urns on the Split function, which divides the keyboard into separate zones
or the Vocal Designer and Ensemble parts
or the Vocal Designer and Ensemble parts
he speci ed part will not receive note- on messages when the Hold pedal
is pressed.
urns the ambience o
he reverberation of a large hall
he reverberation of a studio.
Adjusts the depth of ambience
Speci es the direct microphone volume (the audio signal selected by the
Input Source
Speci es the level of the signal that is sent from the direct microphone (the
audio signal selected by the Input Source (p. 86) setting) to Ambience.
p. 86) setting
REGIST CONTROL
Here you can make controller settings for the registration.
n the REGISTRATION EDIT screen, you can press the [F1] (CONTROL) button to access the REGIST
CONTROL (Registration Contro
REGIST KEYBOAR
arameter Value Descriptio
t Assign Speci es the aftertouch e ect.
OD A
YN
YN2 Changes the volume. Transmits MIDI message CC#4 (foot control) to the
WAH Applies a wah e ect to sounds that support Wah
END-DOW
END-UP Raises the pitch.
ft Part Speci es the part(s) that will be controlled by aftertouch
N
setting) screen
ies modulation.
Changes the volume. Transmits MIDI message CC#2 (breath control) to the
enerator section. This is the same operation as Voice Expression
soun
p. 66), and will operate only in the positive (+) direction to increase the
ume.
soun
generator section. For STRINGS and BRASS sounds, this allows the
olume to be controlled in the ± directions (it will not go to zero). For other
s, the volume can be controlled only in the “+” direction
soun
Changes the tone
Lowers the pitch.
Vocal Designer part and Ensemble Part.
Vocal Designer part only.
Ensemble part onl
Page 84

8
REGIST PEDAL
ete
alue
n
.
S
OC
S
gn
n
.
OFF
O
D
ppl
.
Ch
s
vol
2
C
s
v
s
.
C
s
C
.
.
C
/
.
T
ORT
B
C
C
C
SW
.
n
gn
.
Y
STOP
.
art
S
OC
S
n
S
gn
S
n
.
OFF
O
/STAC
T
/
T
.
.
T
.
S
O
OC
h
.
S
ode
S
T
.
CH
T
Y
Th
ram
rV
Hold Part Speci es the part(s) that will be controlled by the hold pedal
VOC/EN
V
EN
P1 As
P2 Asg
O
YN1
DYN
PIZZ/STA
FAL L
TREM Plays the fall or tremolo sound (only for supported tones).
NI/STK Switches between unison mode and stack mode (only for supported tones)
DOI
P
AM
DIR-MI
PAN E L-
P1 Sw Asg
P2 Sw As
1 Part
P2 P
REC/PLA
VOC/EN
V
EN
Descriptio
Vocal Designer part and Ensemble part.
Vocal Designer part only.
Ensemble part only.
Speci es the function that will be controlled by the control pedal
A
ies modulation
anges the volume. Transmits MIDI message CC#2 (breath control) to the
ound generator section. This is the same operation as Voice Expression
p. 66), and will operate only in the positive (+) direction to increase the
ume.
hanges the volume. Transmits MIDI message CC#4 (foot control) to the
ound generator section. For STRINGS and BRASS sounds, this allows the
olume to be controlled in the ± directions (it will not go to zero). For other
ounds, the volume can be controlled only in the “+” direction
hanges the volume. Transmits MIDI message CC#11 (expression) to the
ound generator section. The volume is controlled in a range of 0–127.
hanges the tone
Applies a wah pedal e ect to sounds that support Wah
Plays the pizzicato or staccato sound (only for supported tones).
Applies a doit e ect (only for supported tones).
Applies a portamento e ect.
ontrols the depth of ambience.
ontrols the direct microphone volume.
Performs the operation speci ed for P1 Sw Asgn/P2 Sw Asgn
If P1 Asgn/P2 Asgn is set to “PANEL-SW,” this speci es the operation that
occurs when the control pedal turns on
Same operation as Sound Looper [REC/PLAY] button.
apidly pressing the pedal twice performs the same operation as the [STOP] button.
Perform the same operation as Sound Looper [STOP] button
Speci es the part(s) that will be controlled by the control 1/2 pedals.
Vocal Designer part and Ensemble part.
Vocal Designer part only.
Ensemble part only.
REGIST S1/S2
arameter Value Descriptio
w1 Assi
w2 Assig
PIZZ
TREM
FAL L
NI/STK Switches between unison mode and stack mode (only for supported tones)
DOI
PORT-EN
RT-V
P
AMB-OFF Switc
DIR-MIC-OFF Switches the direct microphone when you press the button.
w1 M
w2 Mode
4
LAT
OMENTAR
Specify the functions that will be controlled by the [S1]/[S2] buttons
he pizzicato or staccato sound will be heard (only for supported tones).
he fall or tremolo sound will be heard (only for supported tones)
Applies the doit e ect (only for supported tones)
Applies the portamento e ect to the Ensemble.
Applies the portamento e ect to the Vocal Designer.
es the ambience when you press the button
urns the [S1]/[S2] buttons function LATCH/MOMENTARY
he on/o status will alternate each time you press [S1]/[S2] button.
e status will be on only while you hold down [S1]/[S2] button.
Page 85

8
REGIST D BEA
M
ete
alue
n
ect
Select
, AS
W
1
–
h b
eam butto
seconds.
g
T
e
ect is set to
.
Chang
s
volume.
2
C
s
vol
s
.
Ch
s
R
Ch
.
y
.
T
ORT
Ch
g
o
o
o
0–127
y
ll
ll.
i
i
0
7
g
y
l
y
y
y
S
)
t
t
t
.
OC/ENS
OC
S
ram
rV
DB1 Sel
DB2
DB3 Select
DB1 Asgn
2 Asgn
n
DB3 As
FIX
YN1
GN
Descriptio
hen a D Beam button is on, this setting speci es whether it will perform
the function printed on the panel (FIX) or the function assigned by the DB
3 Asgn settings (ASGN).
You can switc
D B
hese settings specify the function that will be controlled by the D Beam
n DB1–3 Sel
wh
Applies modulation
es the volume. Transmits MIDI message CC#2 (breath control) to the
ound generator section. This is the same operation as Voice Expression
p. 66), and will operate only in the positive (+) direction to increase the
etween FIX and ASGN at any time by holding down the
n for several
“ASGN.”
e L
DB1 Ran
2 Range L
3 Range L
DB1 Range H
DB2 Range Hi
DB3 Range H
DB1 Po
arit
DB2 Polarit
DB3 Polarit
DB1 Par
2 Par
DB3 Par
YN
EXP
FILTE
PIZZ/STAC Plays the pizzicato or staccato sound (only for supported tones).
FALL/TREM Pla
NI/STK Switches between unison mode and stack mode (only for supported tones)
DOI
P
PITCH
–12
TANDARD, REVERSEInverts the change that occurs when you move your hand above the sensor.
V
V
EN
hanges the volume. Transmits MIDI message CC#4 (foot control) to the
ound generator section. For STRINGS and BRASS sounds, this allows the
ume to be controlled in the ± directions (it will not go to zero). For other
ounds, the volume can be controlled only in the “+” direction
anges the volume. Transmits MIDI message CC#11 (expression) to the
ound generator section. The volume is controlled in a range of 0–127.
anges the tone.
Applies a wah pedal e ect to sounds that support Wah
s the fall or tremolo sound (only for supported tones).
Applies a doit e ect (only for supported tones).
Applies a portamento e ect.
anges the pitch.
Speci es the depth of the e ect when the D Beam controller is not
responding. Increasing this value will appl
er is not responding at a
contro
Speci es the depth of the e ect when the D Beam controller is responding
to its maximum extent. Reducin
produced b
For details, refer to the table below, “D Beam E ects.”
Speci es the part(s) that will be controlled by the D Beam
Vocal Designer part and Ensemble part.
Vocal Designer part only.
Ensemble part only.
the D Beam controller.
an e ect even if the D Beam
this value will reduce the amount of e ect
5
Page 86

86
VOCAL DESIGNER EDIT
n
.
T
y
T
T
y
f
.
T
y
h
.
S
T
Th
d.
T
e
g
el
0
an4–0–63
.
d
.
Ambience Send
0
.
C
e
2
ine Tune
50
.
Octave-3–+3
.
T
3
.
d.
Attac
63
h
g
l
e
3
.
l th
.
.
Vib
3
d
i
V
h
63
y f
g
Vib
y
3
ge
0–12
y
h
.
e
T
CHRO
C
T
ode
T
f
.
2
Here you can make settings for the Vocal Designer part.
arameter Value Descriptio
Input Source Selects the modulator (p. 20)
IC-EX
N
PER
Lev
P
Dry Sen
oarse Tun
F
one -64–+6
k -64–+
eas
Re
rato Rate -64–+6
ibrato Dept
rato Dela
Bend Ran
Bend Typ
Bend M
–127 Speci es the volume of the tone.
R Speci es the pan. “L64” is far left, “0” is center, and “63R” is far right
0–127 Speci es the volume of the part
–127 Speci es the level of the signal sent to the ambience
-12–+1
-50–+
-64–+6
-64–+
-64–+6
RMAL
MATI
RMAL
K1 In this mode, pitch bend will not be applied to a new note that is played while
K
he audio signal of the part (AKEY, ENS, LOOPER) selected for Input Source will
be sent to the modulator, and therefore will no longer sound in the usual way;
ou can play the Input Source directly by raising the [DIRECT] knob.
however
he audio signal from the mic jack will be used as the modulator. Normally,
ou can use this setting. By turning on the rear panel [MIX TO MIC] switch, the
audio signal
he audio signal from Audio Key will be used as the modulator. For example,
this lets
t
he audio signal from the Ensemble part will be used as the modulator.
he audio signal from the Sound Looper will be used as the modulator. For
xample, this lets you play Vocal Designer using a vocal that was recorded into
the Sound Looper usin
Adjusts the pitch up or down in semitone steps (+/-1 octave).
Adjusts the pitch up or down in 1-cent steps (+/-50 cents)
One cent is 1/100th of a semitone.
Adjusts the pitch of the sound up or down in units of an octave (+/-3 octaves)
Adjusts the tone.
Increasing the value will strengthen the highs, producing a clearer sound
Decreasing the value will restrain the highs, producing a milder soun
Adjusts the attack.
Increasing t
Decreasin
Adjusts the release
Increasing the value will lengthen the time from note-o (releasing the key)
unti
Decreasing the value will shorten the time from note-o (releasing the key)
until the sound disappears
Adjust the vibrato speed (the rate at which the sound is modulated). The soun
will be modulated more rapidly for higher settings, and more slowly with lower
sett
Adjusts the depth of the vibrato e ect (the depth at which the sound is
modulated). The sound will be modulated more greatl
less with lower settin
Adjusts the time delay until the vibrato (sound modulation) e ect begins.
Higher settings will produce a longer delay time before vibrato begins, while
ower settings produce a shorter time.
Speci es the degree of pitch change in semitones when the Pitch Bend lever is
all the wa
rise one octave w
he pitch bend lever will operate in the conventional way (movement of the
ever will produce smooth changes in pitch).
he pitch bend lever will change the pitch in semitone steps, simulating the
sound of vocal correction software.
he pitch bend lever will operate in the conventional way.
the pitch o
n conjunction with playing legato, you can create portamento-like e ects
Operation is essentially the same as LOCK1, but there will be no pitch change
n response to the pitch bend lever returning.
rom the EXT IN jack can also be used as the modulator
ou use Audio Key to play back a wave le containing a vocal, and use
at sound to play Vocal Designer
e Ensemble part’s Ambience Send will be disable
direct microphone.
e value will make the attack more gentle.
the value will make the attack sharper.
e sound disappears
ngs.
s.
right/left. For example, if this parameter is set to “12,” the pitch will
en the pitch bend lever is moved to the right-most position
a previously played note is already being bent. By using this setting
or higher settings, and
Page 87

87
ram
eter
ue
n
de
L
O
f
ld
e
R
T
.
f
T
.
f
v
.
T
h
.
H
T
.
.
e
0
g th
ext note.
8
ON, O
y
.
A
ON, O
T
.
T
y
y
h
.
e
,
TRIO,
T
,
J
N
T
.
T
T
.
*
Auto Note Sw
ON, O
Turn s the Auto Note function on.
lly
y
p
h
Hold Mo
Typ
Ho
ortamento ON, OFF Speci es whether the portamento e ect will be applied (ON) or not (OFF).
Portamento Tim
va
uto Harmony Sw
Harmony Typ
Val
RMA
EGAT
CAR
RM
T
–127 Speci es the time over which the pitch will change when you play portamento.
FF Speci es the state of the [8va] button. If this is ON, the range of the Vocal
FF
UET
RIO-UPPER
QUARTET,
AZZ-OPE
Descriptio
All notes will be sustained if you press the Hold pedal and play the keyboard.
If you play with the Hold pedal held down, the previous note will disappear the
instant you play the next note, producing a legato per
easier to play particularly when you’re playing chords.
he Hold pedal will sustain the sound of the carrier (the basis of the sound)
If you play the keyboard and then hold down the Hold pedal, you’ll be able to
per
orm simply by using the sound from the microphone, without having to
eep your hand on the keyboard.
he Hold pedal will sustain the sound of the modulator (microphone input)
If you hold down the Hold pedal while vocalizing into the microphone, you’ll
be able to per
ocalizing
he default setting for the modulator is the microphone input, but you can
c
ange this by using the “Input Source” parameter
he Hold pedal will sustain the sounds of both the carrier and the modulator
Portamento is an e ect which smoothly changes the pitch from the rst-played
ey to the next-played key. By applying portamento, you can simulate slide
erformance techniques on a violin or similar instrument
Increasin
n
Designer part will be raised b
urns the Auto Harmony function on/o
he Auto Harmony function lets you automatically add a backing chorus to
our vocal. This function generates harmony based on the melody you sing
the pitch detected from the microphone) and the chords detected from the
ke
t
e melody you sing
Switches the type of Auto Harmony.
he notation shown below is an example of a C-major scale
note will not sound *1).
will sound with these notes).
For a minor chord, the third will be a minor third rather than a major third
orm simply by playing the keyboard, without having to continue
e value will lengthen the time over which the pitch moves to the
one octave
board. In addition, the harmony will change according to the movement of
he solid black notes indicate the pitch detected from the microphone (this
he white notes indicate the harmony that was generated (Vocal Designer
DUET
ormance. This makes it
TRIO
TRIO-UPPER
QUARTET
MANHATTAN
JAZZ-OPEN
1 You can sound the black notes by turning on the [AUTO NOTE] button.
FF
Norma
, Vocal Designer will not sound unless you play the keyboard.
However, by using the Auto Note function, you can make Vocal Designer
produce sound without
to do is vocalize into the micro
pitch of your voice via the microphone, and automatically sound notes for that
.
pitc
our having to play the keyboard; i.e., all you’ll need
hone. The Auto Note function will detect the
Page 88

88
ram
ete
alue
n
At Note Mode
CHRO
C
T
to notes at semitone
als.
C
T
y
fy
.
A
y
, A,
B
.
y
h
d.
y
.
sound.
P
ete
alue
n
el
0
n
R
.
d
.
Ambience Send
0–12
.
C
e
2
ine Tune
50
.
Octave-3–+3
o
Tone-6
63
h
d.
.
A
k
3
g
h
g
e
3
.
l th
.
l th
.
Vibrato Rate
63
y f
y
Vib
h
63
.
Vib
y
3
y
hile l
.
e
0–12
y
ght-
t
l
.
rV
t Note Ke
Note Priorit
Descriptio
MATI
IATONI
C, C#, D, D#, E, F, F#, G,
G#
A#,
ORMAL If you play multiple keys with a monophonic sound, the last-played key will
his is a chromatic scale. The pitch detected from the microphone is converted
his is a diatonic scale. The pitch detected from the microphone is converted
to notes at diatonic intervals. You can use the At Note Ke
the key of the scale
Speci es the key when At Note Mode is set to “DIATONIC” (diatonic scale)
Speci es the priority with which notes will sound when you hold down more
t
an one key when playing a monophonic soun
onophonic sounds are sounds that always produce only one note even
when
ou press multiple keys. It is not possible for the user to specify the
mono/poly setting
interv
parameter to speci
TO
If you play multiple keys with a monophonic sound, the highest key will sound.
ENSEMBLE EDIT
Here you can make settings for the Ensemble part.
ram
rV
Lev
a
Dry Sen
oarse Tun
F
ttac
Releas
rato Dept
rato Dela
Bend Rang
–127 Speci es the volume of the tone.
64–0–63
0–127 Speci es the volume of the part
7 Speci es the level of the signal sent to the ambience
-12–+1
-50–+
4–+
-64–+6
-64–+6
-64–+
-64–+
-64–+6
Descriptio
Speci es the pan. “L64” is far left, “0” is center, and “63R” is far right
Adjusts the pitch up or down in semitone steps (+/-1 octave).
Adjusts the pitch up or down in 1-cent steps (+/-50 cents)
One cent is 1/100th of a semitone.
Adjusts the pitch of the sound up or down in units of an octave (+/-3
ctaves).
Adjusts the tone.
Increasing t
Decreasing the value will restrain the highs, producing a milder sound
Adjusts the attack.
Increasin
Decreasing t
Settin
have no e
Adjusts the release
Increasing the value will lengthen the time from note-o (releasing the key)
unti
Decreasing the value will shorten the time from note-o (releasing the key)
unti
Adjust the vibrato speed (the rate at which the sound is modulated). The
sound will be modulated more rapidl
with lower settings.
Adjusts the depth of the vibrato e ect (the depth at which the sound is
modulated). The sound will be modulated more greatly for higher settings,
and less with lower settings
Adjusts the time delay until the vibrato (sound modulation) e ect begins.
Higher settings will produce a longer dela
w
Speci es the degree of pitch change in semitones when the Pitch Bend
lever is all the wa
pitch will rise one octave when the pitch bend lever is moved to the ri
most position.
e value will strengthen the highs, producing a clearer soun
the value will make the attack more gentle.
e value will make the attack sharper.
the attack to a negative value for a BRASS or STRINGS sound will
ect. The sharpest attack will be when the slider is set to zero.
e sound disappears
e sound disappears
or higher settings, and more slowl
ower settings produce a shorter time
right/left. For example, if this parameter is set to “12,” the
For the SuperNATURAL brass (BRASS) sounds, setting the bend range
RANGE) to 3 or higher will simulate the discontinuous pitch change
hat is typical of brass instruments, instead of the normal smooth pitch
change. When you apply a downward bend, the sound will behave in the
anner distinctive of brass instruments, meaning that the volume will
a
so decrease
time before vibrato begins,
Page 89

89
ram
ete
alue
n
e
(
,
S
ly)
T
CHRO
C
T
sound of vocal correction software.
ode
T
d
h
2
chang
CO
ly)
T
d
T
g
.
,
,
S
ly)
.
d
O
y
.
SECTIO
sounds.
A
P
1
)
.
y
y
f
ortamento
ON, O
.
-
A
)
ON, O
e
,
S
ly)
0–12
c
*
”
rV
Bend Typ
GUITAR, OTHERS, PAD
YNTH STRINGS, CHOIR,
JAZZ SCAT tone on
RMAL
MATI
Descriptio
he pitch bend lever will operate in the conventional way (movement of the
ever will produce smooth changes in pitch).
he pitch bend lever will change the pitch in semitone steps, simulating the
Bend M
Hold Mode
(BRASS SECTION *1,
STRING SECTION *1
GUITAR, OTHERS, PAD
YNTH STRINGS, CHOIR,
JAZZ SCAT tone on
P
uto Portamento
(BRASS tone only
Portamento Tim
(GUITAR, OTHERS, PAD
YNTH STRINGS, CHOIR,
JAZZ SCAT tone on
RMAL
OCK1 In this mode, pitch bend will not be applied to a new note that is playe
K
MBI
(BRASS tone on
ORMAL All sounds will be sustained when you hold down the Hold pedal and play
EGAT
CCOM
(BRASS SECTION *1,
STRING SECTION *
tone only
FF Speci es whether the portamento e ect will be applied (ON) or not (OFF)
FF Portamento will automatically be added when you play rapid legato
7 When portamento is used, this speci es the time over which the pitch will
he pitch bend lever will operate in the conventional way.
while the pitch of a previously played note is already being bent. By using
is setting in conjunction with playing legato, you can create portamento-
t
like e ects.
Operation is essentially the same as LOCK1, but there will be no pitch
e in response to the pitch bend lever returning.
his mode allows you to express the subtle pitch changes that are
istinctive of a SuperNATURAL brass instrument.
he proportion of breath noise will increase when you operate the bender
n the Down direction. This lets you freely control the breathiness at the
inning or end of a note
be
the keyboard
At this time, the “Auto Dynamics” (p. 91) e ect will apply to STRINGS
SECTION *1 soun
If you play with the Hold pedal held down, the previous note will disappear
the instant you play the next note, producing a legato performance. This
makes it easier to pla
At this time, the “Auto Dynamics” (p. 91) e ect will apply to STRINGS
A sostenuto-like e ect will be applied when you play the keyboard and
ress the Hold pedal
For STRINGS SECTION *1 sounds, the volume will decrease slightly when
ou press the pedal. If you release the pedal while continuing to hold the
s, the volume will return to its previous level. Since the volume will
ke
not change
way to emphasize the melody while slightly reducing the volume of the
accompaniment.
Portamento is an e ect which smoothly changes the pitch from the rst
played key to the next-played key. By applying portamento, you can
simulate slide performance techniques on a violin or similar instrument.
s.
, particularly when you’re playing chords
N *1
or notes played after pressing the pedal, this is a convenient
phrases.
hange. Higher settings will cause the pitch change to the next note to take
more time.
1 For the BRASS SECTION and STRING SECTION sounds, refer to the separate “VP-770 Sound List.
Page 90

90
ram
ete
alue
n
S
o
STAC
S
T
s
.
T
added.
.
T
.
SON
-
.
s
pprop
y
group.
s
”
rV
ection Mode
(BRASS SECTION *1 tone
nly)
Descriptio
K
NI
tack Mode
his allows you to successively layer each instrument in the order you’ve
speci ed “Playing settings (Section Style screen)” (p. 29). Using this mode
allows you to simulate the bell tones played by a brass ensemble.
When you play single note
Only the rst instrument will sound
1
When you play a second note as well...
he rst instrument will continue sounding, and the second instrument will
1
2
When you additionally play a third and fourth note..
he sounds of the third and fourth instrument will be successively layered
1
2
3
4
nison Mode
When you play a single key or multiple keys simultaneously with a four
player ensemble setting, the various instruments will be assigned as follows
When you play single note
All assigned instruments will sound at the same pitch. Each instrument will
sound in an octave that’s a
riate for it.
When you play multiple notes simultaneousl
Each instrument will automatically be assigned to a note you play.
nits of instruments automatically assigned to a note you play are called a
Example: If you play two note
*1 For the names of the BRASS SECTION sounds, refer to the separate “VP-770 Sound List.
Page 91

91
ram
ete
alue
n
t
only
E
.
D
y.
AUTO
lay
A
s
(
o
0–12
T
y
y.
T
.
T
c
Th
”
Section Size
(
o
0–12
f
p
Variation
ly)
The normal sound
heard.
STACCATO
ly)
The staccato sound
d.
)
T
T
ly)
The doit sound
d.
O
)
The p
O
(
only
The tremolo sound
heard.
tch
ly)
T
.
T
pp
.
h
ly)
S
T
O
T
.
q
)
200,
z
.
)
dB
q
)
2000, 4000,
8000 Hz
j
.
n
,
SOLO
,
dB
.
*
”
rV
ni Key Shif
(BRASS SECTION *1 tone
)
uto Dynamic
STRING SECTION *1 tone
nly)
STRING SECTION *1 tone
nly)
(BRASS, STRINGS tone on
Descriptio
N
IXE
7
7 Speci es the size of the string section. Higher values will simulate a larger
RMAL
All brass sounds of the brass section will be played by the same key (pitch)
Each brass sound will be played by the speci ed ke
Sounds will be played by the key speci ed for each brass sound only when
p
ing single notes in Unison mode.
his allows string-like expression to be played by adjusting the timing and
speed at which
he volume will swell slightly when you take your nger o the key while
holding down the Hold pedal
he sound will swell more greatly if you release your nger slowly. The
hange will be greater for higher settings of this parameter value.
is is valid when the Hold Mode setting is “NORMAL” or “LEGATO.
section. This can be set in a range
to a full orchestra.
u
ou take your nger o the ke
rom a string ensemble of a few members
will be
Reverb Swi
(BRASS, STRINGS tone on
EQ Switc
(BRASS, STRINGS tone on
EQ Lo Fre
(BRASS, STRINGS tone only
EQ Lo Gain
(BRASS, STRINGS tone only
EQ Hi Fre
(BRASS, STRINGS tone only
EQ Hi Gai
(BRASS SECTION
BRASS,
STRING SECTION
SOLO STRINGS tone only)
(BRASS tone on
(BRASS tone only
I
(BRASS tone on
IZZICAT
(STRINGS tone only
TREMOL
STRING SECTION *1 tone
)
ON, OFF
YPAS
N
400 H
-15 –+15
-15 –+15
he fall sound will be heard.
izzicato sound will be heard.
urns on/o the reverb that is applied only to brass and string sounds
he brass and string sounds have their own reverb e ect that is separate
from the ambience that is a
urns the equalizer o .
urns the equalizer on
Speci es the center frequency at which the low-frequency range will be
adjusted
Speci es the gain (amount of boost or cut) for the low-frequency range.
Speci es the center frequency at which the high-frequency range will be
usted
ad
Speci es the gain (amount of boost or cut) for the high-frequency range
will be hear
will be hear
will be
lied to the overall sound of the VP-770
1 For the BRASS SECTION and STRING SECTION sounds, refer to the separate “VP-770 Sound List.
Page 92

92
BASS & PERC EDIT
.
n
l
0–12
p
an4–0–63
.
0–12
p
.
Amb
d
.
Coarse Tune
i
e
0
.
e
3
o
d
e
2
h
-
Here you can make settings for the Bass and Percussion parts
To access this screen, hold down the [SHIFT] button and press the [BASS] or [PERC] button.
arameter Value Descriptio
Leve
P
Dry Send
ience Sen
F
ne Tun
Octav
Ben
Rang
7S
R Speci es the pan. “L64” is far left, “0” is center, and “63R” is far right
7S
0–127 Speci es the level of the signal sent to the ambience
-
–
-50–+5
-3–+
0–1
eci es the volume of the tone.
eci es the volume of the part
Adjusts the pitch up or down in semitone steps (+/-1 octave).
Adjusts the pitch up or down in 1-cent steps (+/-50 cents)
One cent is 1/100th of a semitone.
Adjusts the pitch of the sound up or down in units of an octave (+/-3
ctaves).
Speci es the degree of pitch change in semitones when the Pitch Bend
lever is all the way right/left. For example, if this parameter is set to “12,” the
will rise one octave when the pitch bend lever is moved to the right
pitc
most position.
Page 93

Menu Reference
his chapter explains what you can do by pressing the [MENU] button.
T
“System” lets you make settings that apply to the entire VP-770, such as tuning and MIDI.
•
“Input E ect” lets you make settings for the e ect that’s applied to the microphone input.
•
“Utility” lets you back up the settings of the VP-770.
•
“Factory Reset” lets you reset the VP-770 to its factory-set state.
•
93
Page 94

9
Basic Menu Operation
T
.
The
.
u
e
S
m
95
s
y
03
t
0
.
he menu contains four groups of functions that will help you use the VP-770 more e ciently. Here is the
basic procedure for using the various menu functions
( MENU)
ress the [MENU] button.
MENU screen will appear.
Use the cursor buttons or the value dial to select menu
en
yste
Input E ect
tilit
Factory Rese
escription
ake settings that apply to the entire VP-770, such as tuning and MIDI.
ake settings for the e ect that’s applied to the mic input.
ack up the VP-770’s settings, and make settings for the screensaver. p. 1
eset the VP-770 to its factory-set state.
ag
.
. 102
. 11
ress the [F2] (ENTER) button to proceed to the selected screen.
ressing the [EXIT] button will return you to the previous screen
4
Page 95

9
System Settings
d
.
.
The
.
T
.
u
ge
7
Sound
8
98
Contro
.
dit.
s
.
t
kly
]. Conversely, you can quickly decrease
t
].
d.
.
message reception. Here we’ll explain the procedure for making system settings and what each system
parameter
oes
( SYSTEM)
ress the [MENU] button to access the MENU screen
Use the cursor buttons or the value dial to select “System,” then press the
F2] (ENTER) button.
SYSTEM screen will appear
Use the cursor buttons or the value dial to select menu, then press the
F2] (ENTER) button.
he parameters are organized into several edit groups
Men
MIDI
Metronome
l
escription Pa
akes settings related to MIDI input/output.
akes settings related to sound output. p. 9
akes metronome-related settings.
akes settings for controllers such as the pedals and D Beam
p. 99
. 9
.
Use the cursor buttons to move the cursor to the parameter that you
want to e
Use the value dial to change the value.
5
epeat steps 3–5 to edit the parameters as desire
f you want to save the changes you made, refer to “Saving the
f not all parameters can be shown in a single screen, a scroll bar is shown at the right edge of the
creen. In this case, use the cursor [ ] button to scroll the screen downward
You can change the value in steps of one by pressing the cursor buttons [] or []. If you want
o quic
increase the value, hold down [ ] and press [
he value by holding down [ ] and pressing [ ]. You can change the value in larger steps by
olding down [SHIFT] and pressing [ ] or [
stem Settings” (p. 96)
5
Page 96

96
Saving the System Settings
C
y
h
.
.
.
T
.
.
O
.
.
hanges you make to the System function settings are only temporary-they will be discarded as soon as
the power is turned o . If
em in internal system memory
t
When you perform the save procedure, the data that previously occupied the save destination will be
ost. However, the factory setting data can be recovered by performing the Factory Reset procedure
ou want to keep any changes you’ve made in the system settings, you must save
( SYSTEM WRITE)
hange the system function settings, and press the [F2] (SYS WRITE)
button
he con rmation message will appear
2
ress the [F1] (OK) button in the con rmation screen to save your
settings
nce the settings have been saved, “Completed!” will appear in the screen
If you decide not to save the settings, press the [EXIT] button to return to the previous screen
Page 97

97
T
h
f
ete
Value
h
Ch
O
g
f
l
e
O
F
S
k
ON, OFF
S
e
O
F
S
.
ON, OFF
S
.
h
Ch
6
S
Voc
Ch
C
6
S
C
6
S
T
t
ON, OFF
S
sy
.
T
ge
ON, OFF
S
.
T
t
ON,
F
S
.
ocal Sw
O
F
S
ll
.
a
s
th
g
th
s
T
ctive Sens
O
F
S
S
gh
ON, OFF
O
evice
32
W
atch the Device
ce.
S
t
ON, OFF
y
and th
System Parameters
his section explains the functions the di erent system parameters have, as well as the composition of
ese parameters.
t
For details on how to make settings, re
SYSTEM MIDI
Here you can make settings for MIDI transmission and reception.
ram
r
Regist Ctrl C
Rx Program Chang
Rx Ban
Select
Rx Control Chang
Rx SysEx
Ens Rx C
Rx
1–Ch16,
FF
N, OF
N, OF
1–Ch1
h1–Ch1
er to “System Settings” (p. 95).
Description
egistration Control Channel selects the MIDI receive channel used during switching
istrations when MIDI messages (Program Change/Bank Select) are sent from an
of re
external MIDI device. Set this to “OFF” i
MIDI device.
externa
peci es whether Program Change messages will be received (ON) or not (OFF).
peci es whether Bank Select messages will be received (ON) or not (OFF).
peci es whether Control Change messages will be received (ON) or not (OFF)
peci es whether System Exclusive messages will be received (ON) or not (OFF)
peci es the receive channel on which the Ensemble part will receive MIDI messages.
peci es the receive channel on which the Vocal Designer part will receive MIDI
registrations are not to be switched from an
B&P Rx Ch
x Edi
x Program Chan
x Bank Selec
L
x A
oft Throu
D
ID 17–
ysEx Protec
h1–Ch1
OF
N, OF
N, OF
peci es the receive channel on which the Bass & Percussion parts will receive MIDI
peci es whether changes you make to the settings of each part will be transmitted as
stem exclusive messages (ON) or not transmitted (OFF)
peci es whether Program Change messages will be transmitted (ON) or not (OFF)
peci es whether Bank Select messages will be transmitted (ON) or not (OFF)
peci es whether the VP-770’s keyboard will play the sounds of each of the VP-770’s
parts (ON) or wi
ormally, you can leave this ON.
erformance data from the VP-770’s keyboard will be sent to each of the VP-770’s parts
nd transmitted from the MIDI OUT connector. If you have connected an external MIDI
equencer, the MIDI messages transmitted from the MIDI OUT connector will be routed
rough your MIDI sequencer and returned to the VP-770’s MIDI IN connector. This can
create problems, such as duplicate MIDI messa
e VP-770’s parts to sound every note twice. In this situation, you can turn the Local Sw
etting OFF so that the performance data from the keyboard will not play the parts.
peci es whether Active Sensing messages will be transmitted (ON) or not (OFF).
Thru function re-transmits all messages received at the MIDI IN connector to the MIDI
UT connector without modifying them in any way.
hen you want to transmit or receive System Exclusive messages, set this parameter to
m
This prevents the settings of user memory from being rewritten by system exclusive
messages transmitted b
not play them (OFF)
ID number of the other MIDI devi
e “OFF” setting allows rewriting.
an external MIDI device. The “ON” setting prevents rewriting,
es being received, which causes each of
Page 98

98
SYSTEM SOUND
ete
Value
n
Master Tune
4
)
h
.
ft
-
4
l
0–127
.
in
-
)
T
.
jacks.
B
s
A
)
Amb
y)
S
s
b
A
f
bl
f
s
A
r
A
0–127
.
Aud
d
0
7
y.
V
s
0–127
Y
y
ly
t
ON, OFF
.
V
e
n
ode
OFFThe metronome
sound.
Y
Th
C-O
T
.
C
Th
.
S
T
y.
el
0–10
Here you can make sound-related settings.
ram
r
15.3–466.2 (Hz
Master Key Shi
Master Leve
Output Ga
Out B Assign Selects the audio signals that will be sent from the rear panel OUTPUT B
24–+2
12–+12 (dB
escriptio
Adjusts the overall tuning of the VP-770. The display shows the frequency of
e A4 note (center A)
t
Shifts the overall pitch of the VP-770 in semitone steps.
Adjusts the volume of the entire VP-770
his adjusts the output gain from the VP-770’s Analog Out and Digital
Out. When, for example, there are relatively few voices being sounded,
oosting the output gain can let you attain the most suitable output level for
ecording and other purposes
udioKey Level
ioKey Amb Sen
oice Exp Sen
reset Protec
AM
EN
AKEY Sound output
–12
Sound output from the OUTPUT A jack
Direct sound (Vocal Designer, Ensemble, Bass & Percussion,
Sound output from the OUTPUT B jacks
Bass & Percussion, Audio Ke
Sound output from the OUTPUT A jack
Vocal Designer, Bass & Percussion, Audio Key, Sound Looper,
am
Sound output
Ensem
Vocal Designer, Ensemble, Bass & Percussion,
ambience component (Vocal Designer, Ensemble,
Bass & Percussion)
Sound output from the OUTPUT B jacks
Speci es the volume of the AudioKey
Speci es the level of the signal sent to the ambience for the AudioKe
ou can adjust the sensitivity at which the Voice Expression (p. 66) e ect will
egin applying in response to changes in microphone input loudness over.
Higher sensitivit
ing even when your voice is still at a low loudness level.
app
Lower sensitivity settings mean that the Voice Expression e ec t will begin
applying only when your voice reaches a fairly high loudness level. You’ll
nd it easier to control Voice Expression if you set this to a sensitivity that’s
appropriate for your singing voice.
With the factory settings, registrations cannot be saved at the preset buttons.
If you turn Preset Protect OFF, registrations can be saved in the preset
uttons as well (p. 78)
udio Key, Sound Looper
ience component (Vocal Designer, Ensemble,
ience component (Vocal Designer, Bass & Percussion,
udio Key)
rom the OUTPUT B jacks
e
rom the OUTPUT A jack
udio Key, Sound Loope
settings mean that the Voice Expression e ect will begin
SYSTEM METRONOME
Here you can make metronome-related settings.
arameter
Metro M
Metro Lev
alu
PLAY-ONL
RE
PLAY&RE
ALWAY
Descriptio
will not
e metronome will sound only while the Sound Looper is playing back.
NLY
he metronome will sound only while the Sound Looper is recording
e metronome will sound while the Sound Looper is playing or recording
he metronome will sound constantl
Adjusts the volume of the metronome.
Page 99

99
ram
ete
Value
n
Sound
Selects the sound of the metronome.
TYPE 1
e
e
TYPE 3Pul
e
T
T
5
Cowbe
sound
TYP
d
.
D
ete
alue
n
o
y
“
y
.
o
Curve
.
T
e
d
n
elo
Sens
63
v
l
”
A
e
M
T
y
f
h
).
Aft Sens
0–100
lly y
”
A
FO
1
volume.
g
v
d
.
R
.
.
N
Af
.
V
S
VOC
S
ly.
OFF
O
r
Metro
YPE 4 Beep tone
YPE
E 6 Stick soun
Descriptio
Electronic metronom
Mechanical metronom
se ton
ll
SYSTEM CONTROL
Here you can make settings for the controllers that are made at the system level
YSTEM KEYBOAR
Here you can make settings for the keyboard and aftertouch.
ram
rV
Kbd Vel
Kbd Vel
Kbd V
ft Sourc
ft Assign Speci es the aftertouch e ect.
EAL, 1–127 Speci es the velocity value that will be transmitted when you play the
IGH
EDIUM Standar
-63– +
EGIST, SYSTE
OF
D Applies modulation.
YN
Descriptio
ke
board. If you want actual keyboard velocity to be transmitted, set this to
REAL.” If you want a xed velocity value to be transmitted regardless of how
ou play, specify the desired value (1–127)
Adjusts the keyboard’s touch
Light weight synthesizer keyboard lik
Acoustic piano simulatio
Adjusts the sensitivity of the keyboard. As you increase this setting, higher
elocity values will be transmitted according to the force with which you
ay. Normally you will leave this set at “0.
p
he assignments for the aftertouch can be stored individually in each
registration. When
whether the a
registration (REGIST), or the assignments stored in the system settings for
e entire VP-770 (SYSTEM
t
Speci es the Aftertouch sensitivity. Higher values will allow Aftertouch to
e applied more easily. Norma
Changes the volume. Transmits MIDI message CC#2 (breath control) to the
sound generator section. This is the same operation as Voice Expression
p. 66), and will operate only in the positive (+) direction to increase the
ou select a di erent registration, this setting speci es
tertouch will be given the assignments stored in the
ou will leave this at “100.
YN2 Changes the volume. Transmits MIDI message CC#4 (foot control) to the
ILTE
END-DOW
END-UP Raises the pitch.
t Part Speci es the part(s) that will be controlled by aftertouch
OC/EN
N
enerator section. For STRINGS and BRASS sounds, this allows the
sound
olume to be controlled in the ± directions (it will not go to zero). For other
s, the volume can be controlled only in the “+” direction
soun
Changes the tone
Applies a wah e ect to sounds that support Wah
Lowers the pitch.
Vocal Designer part and Ensemble Part.
Vocal Designer part only.
Ensemble part on
Page 100

00
YSTEM PEDAL
.
ete
alue
n
Source
M
T
y
ld
l
f y
s
ld
.
S
l
S
Source
e
M
T
y
g
y
h
n
gn
.
OFF
O
.
C
s
volume.
2
C
s
vol
s
.
P
Ch
s
R
Chang
H
.
y
.
T
ORT
B
C
C
C
OG-UP
O
.
SW
.
gn
n
.
Y
.
STOP
.
l
ol
S
y
f y
s
art
t
OC/ENS
OC
S
Here you can specify the functions that will be controlled by the foot pedals
ram
rV
Hold
Ho
Po
Part Speci es the part(s) that will be controlled by the hold pedal
Ho
P1
P2 Sourc
P1 Asg
2 As
P1 Sw As
P2 Sw Asg
P1 Po
P2 P
P1 P
P2 Par
1
REGIST, SYSTE
STANDARD, REVERSESelect the polarity of the Hold pedal. On some pedals, the electrical signal
VOC/EN
VOC Voca
EN
REGIST, SYSTE
YN1
YN
EX
FILTE
WA
PIZZ/STAC Plays the pizzicato or staccato sound (only for supported tones).
FALL/TREM Pla
NI/STK Switches between unison mode and stack mode (only for supported tones)
DOI
P
AM
DIR-MI
PR
PR
G-DOWN Switches to the previous registration
PAN E L-
REC/PLA
TANDARD, REVERSESelects the polarity of the pedal. On some pedals, the electrical signal
V
V
EN
Descriptio
he assignments for the hold pedal can be stored individually in each
registration. When you select a di erent registration, this setting speci es
whether the hold pedal will be given the assignments stored in the
registration (REGIST), or the assignments stored in the s
the entire VP-770 (SYSTEM).
output by the pedal when it is pressed or released is the opposite of other
our pedal has an e ect opposite of what you expect, set this
pedals. I
parameter to “REVERSE.” If you are using a Roland pedal (that has no polarity
witch), set this parameter to “STANDARD.”
Vocal Designer part and Ensemble part.
Designer part only.
Ensemble part only.
he assignments for the control pedal can be stored individually in each
registration. When
whether the control pedal will be
registration (REGIST), or the assignments stored in the s
t
e entire VP-770 (SYSTEM).
Speci es the function that will be controlled by the control pedal
Applies modulation
hanges the volume. Transmits MIDI message CC#2 (breath control) to the
ound generator section. This is the same operation as Voice Expression
p. 66), and will operate only in the positive (+) direction to increase the
hanges the volume. Transmits MIDI message CC#4 (foot control) to the
ound generator section. For STRINGS and BRASS sounds, this allows the
ume to be controlled in the ± directions (it will not go to zero). For other
ounds, the volume can be controlled only in the “+” direction
anges the volume. Transmits MIDI message CC#11 (expression) to the
ound generator section. The volume is controlled in a range of 0–127.
es the tone.
Applies a wah pedal e ect to sounds that support Wah
s the fall or tremolo sound (only for supported tones).
Applies a doit e ect (only for supported tones).
Applies a portamento e ect.
ontrols the depth of ambience.
ontrols the direct microphone volume.
Switches to the next registration.
Performs the operation speci ed for P1 Sw Asgn/P2 Sw Asgn
If P1 Asgn/P2 Asgn is set to “PANEL-SW,” this speci es the operation that
occurs when the control pedal turns on
Same operation as Sound Looper [REC/PLAY] button.
Rapidly pressing the pedal twice performs the same operation as the [STOP] button
Perform the same operation as Sound Looper [STOP] button
output b
pedals. I
parameter to “REVERSE.” If you are using a Roland pedal (that has no polarity
witch), set this parameter to “STANDARD.”
Speci es the part(s) that will be controlled by the control 1/2 pedals.
Vocal Designer part and Ensemble part.
Vocal Designer part only.
Ensemble part only.
ou select a di erent registration, this setting speci es
the pedal when it is pressed or released is the opposite of other
our pedal has an e ect opposite of what you expect, set this
iven the assignments stored in the
stem settings for
stem settings for
 Loading...