

Page 1
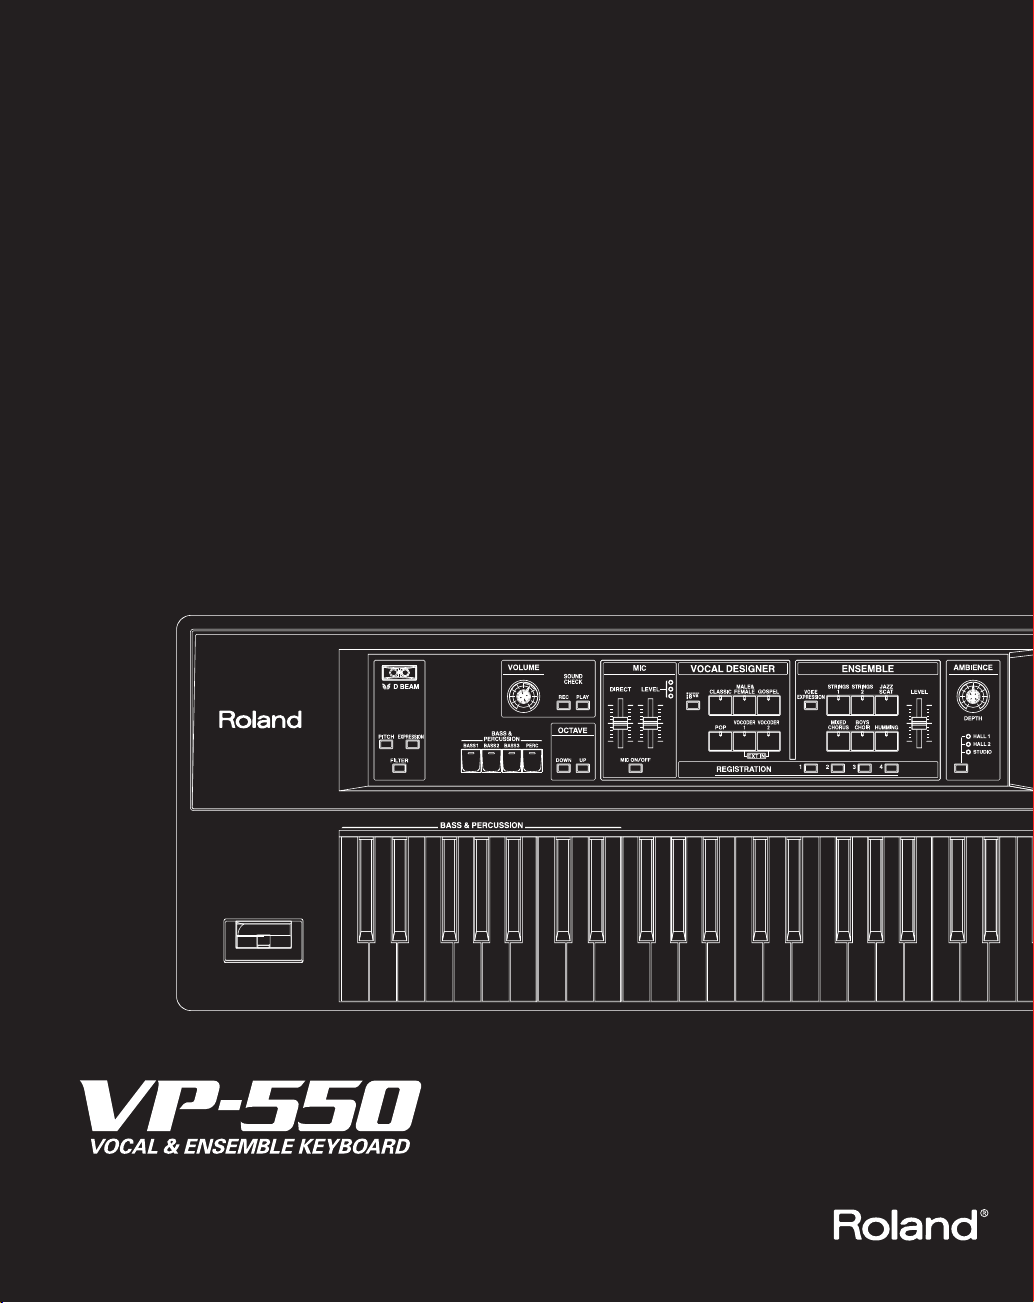
Owner’s Manual
Page 2

10
123 6 79
45 8
11
12 14 16 18 2 0
13 15 17 19
Page 3
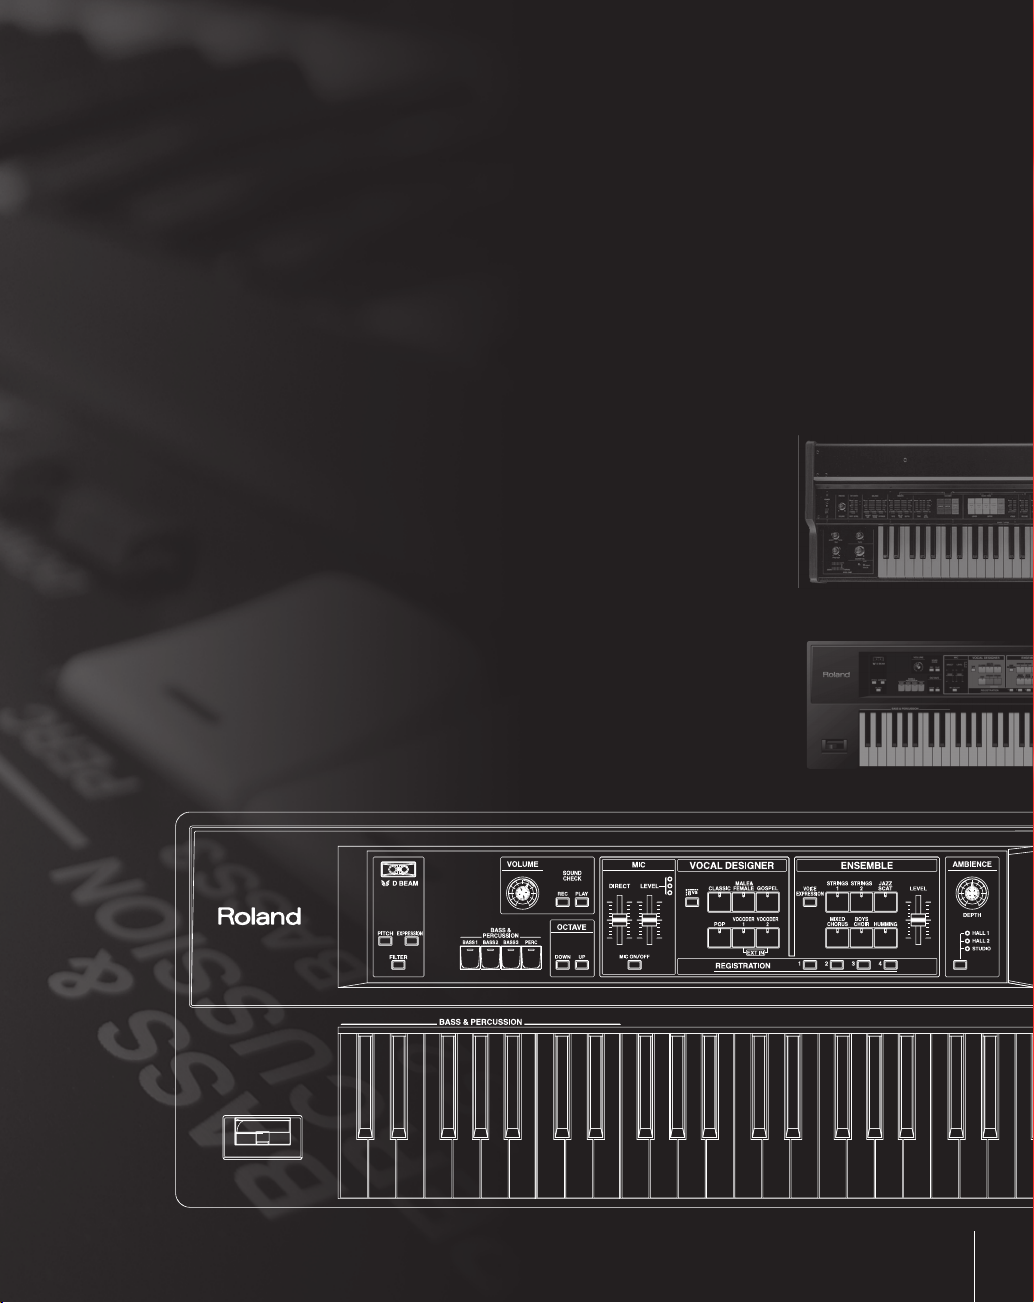
Front panel
1
D BEAM
2
VOLUME
3
SOUND CHECK
4
BASS & PERCUSSION
5
OCTAVE
6
VOCAL DESIGNER
7
ENSEMBLE
8
REGISTRATION
9
AMBIENCE
10
Pitch bend / modulation
11
Keyboard
You can apply various e ects to the sound by waving your hand over this sensor.
This knob adjusts the overall volume of the VP-550.
Here you can record and check the sound that’s sent from the OUTPUT jacks.
These buttons select bass sounds or voice percussion.
These buttons raise or lower the keyboard range in one-octave steps.
Here you can select the tonal character of the vocal designer, and adjust the mic level.
Here you can select the ensemble sound and adjust the volume.
Here you can register combinations of vocal designer and ensemble settings.
Here you can adjust the type and depth of ambience.
Use this lever to vary the pitch or apply vibrato.
* The VP-550’s pitch bend range is xed at a whole note (two semitones).
Perform.
*The VP-550 does not respond to aftertouch.
p. 37
p. 20
p. 34
lever
p. 31
p. 36
p. 21
p. 27
p. 43
p. 33
p. 38
Rear panel
12
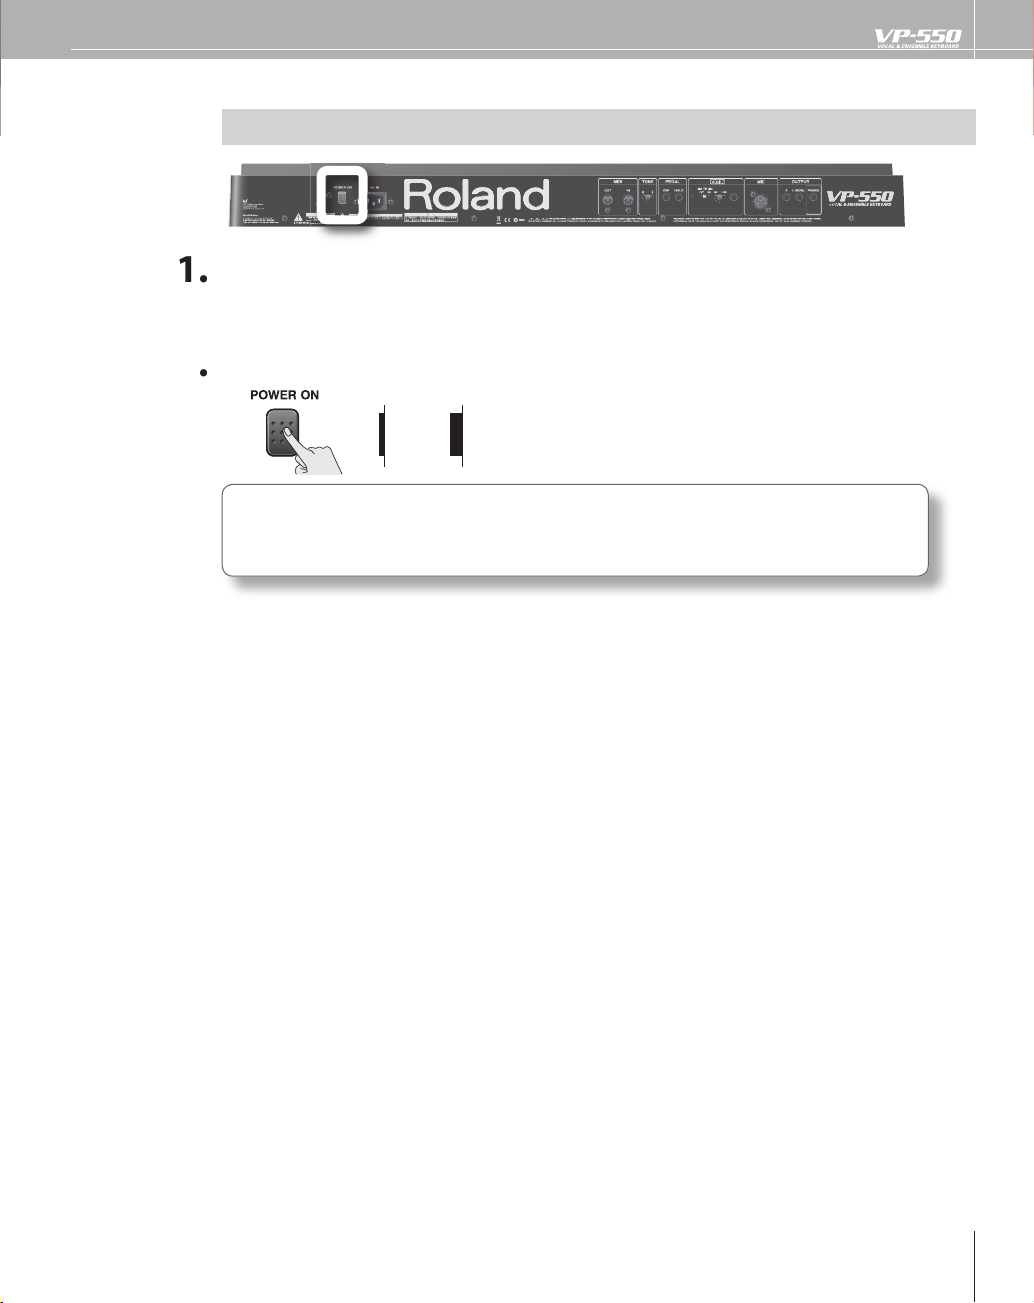
POWER ON
13
AC Inlet
14
MIDI
15
TUNE
16
PEDAL
17
EXT IN
18
MIC
19
OUTPUT
20
PHONES
Switch
Press to turn the power on/o .
Connect the included power cord to this inlet.
connectors
Connect your MIDI equipment to these connectors.
knob
This knob adjusts the pitch of the VP-550 over a range of 415.3 Hz–466.2 Hz.
jacks
Connect an expression pedal and hold pedal to these jacks.
jack
Connect an external synthesizer or mic (phone plug) to this jack.
jack
Connect a mic (XLR plug) to this jack.
jacks
These jacks output the sound of the VP-550 in stereo (L/R).
jack
Connect your headphones to this jack.
p. 18
p. 12
p. 54
p. 42
p. 16, p. 39
p. 15, p. 50
p. 14, p. 22
p. 13
p. 13
1
Page 4

Contents
T
....................................................................................................................
5
F
...................................................................................................................
6
...........................................................................................................
.....................................................................................................................
8
Sound
............................................................................................................................................
9
1
.......................................................................................................................
.
.....................
3
..........................................................................
4
)
...................................
6
1
T
...................................................................................
8
)
...............................................................................................
0
.........................................................
2
Sel
............................................................................................
A
.............................................
r
3
Add
)
..............................................
4
S
)
.........................................................
5
)
............................
6
.................................................................................
S
............................................................................................
8
Adj
.........................
9
)
3
0
A
...................................................
3
0
)
..............................................
3
Sel
............................................................................................
3
...........................................................
3
A
................................................
3
)
.......................................................................................
3
3
C
.......................................................................
3
4
he ancestry of the VP
eatures of the VP-550
An overview of the VP-550
About Vocal Designer
list
Making connections
aking connections
erforming
urning on/o the power (POWER ON)
Adjusting the volume (VOLUME
erforming with Vocal Designer (VOCAL DESIGNER)
erforming with Ensemble (ENSEMBLE)
erforming with Bass & Percussion (BASS & PERCUSSION
Adjusting the ambience (AMBIENCE
hecking the output sound (SOUND CHECK)
Connect the power cord (AC IN)...............................................................
Connecting your amp or speakers (OUTPUT/PHONES)
Connecting your mic (MIC)
Connecting a pedal (HOLD PEDAL/EXP PEDAL
ecting a sound
djusting the mic input level (MIC LEVEL)
erforming with Vocal Designe
ing your unprocessed voice (DIRECT
witching o the mic (MIC ON/OFF
aising Vocal Designer’s pitch by one octave (8va
electing a sound
erforming with Ensemble
usting the Ensemble volume (ENSEMBLE LEVEL)
sing the mic to add expression to the Ensemble
VOICE EXPRESSION
bout the VP-550’s strings (STRINGS 1)
ecting a sound
erforming with Bass & Percussion
djusting the Bass & Percussion volume
2
2
2
2
2
2
2
Page 5

3
sing controllers
3
S
.............................................................................
3
6
)
........................................................................................................
3
)
....................................................
3
8
..............................................................................
3
9
)
...................................................
0
4
T
...................................................................................................................................
...............................................................
4
3
y
.................................................................................
4
4
ppl
4
S
.
6
S
..........................................................................................................
4
...................................................................................
4
8
S
............................................................................................................
9
..........................................................
5
0
.
5
A
5
C
......................................................................
5
4
.....................................................................................................................
5
6
.........................................................................................................
5
8
..........................................................................................................................
5
9
T
...............................................................................................................................
6
0
.....................................................................................................................................................
6
2
........................................................................................................................................
6
“
.
T
o
f
C
N
.
hifting one octave up or down (OCTAVE)
sing the D Beam (D BEAM
sing the pitch bend / modulation lever (PITCH BEND
sing pedals (HOLD PEDAL / EXP PEDAL)
sing a mic to control expression (VOICE EXPRESSION
hanging the settings
uning (TUNE)
egistering sounds and settings (REGISTRATION)
Adjusting the mic expressionsensitivit
4
xample a
ppendix
ications
imulating a large classical choir ..............................................................................................
imulating a gospel chorus
Adding a backing chorus to your voice
imulating a jazz scat solo
sing the sound of an external synthesizer (EXT IN)
“Performing” sound from drums or a portable music player ..........................................
onnecting the VP-550 with MIDI equipment
IDI Implementation
IDI Implementation Chart
ain speci cations
roubleshooting
ndex
nformation
Before using the VP-550, please read the sections, “USING THE UNIT SAFELY” and
IMPORTANT NOTES” (separate sheet)
perations of the VP-550. This Owner’s manual should be read in its entirety in order for you to
nderstand all features and operations. Keep the manual on hand for reference purposes.
All product names mentioned in this document are trademarks or registered trademarks o
espective owners.
opyright © 2006 ROLAND CORPORATIO
All rights reserved. No part of this publication may be reproduced in any form without the written
ermission of ROLAND CORPORATION
hey provide important information concerning proper
their
4
Page 6
Play like you’re singing.
4
Page 7
The ancestry of the VP
1939
used during World War II as a way to scramble communications, the vocoder began to achieve
popularity as an electronic musical instrument in the 1970’s. Most vocoders of that time didn’t provide
a keyboard or carrier signal (analogous to the vocal cords of a human), so you had to separately
provide a synthesizer in order to produce sound.
1979
a strings-type keyboard, making it simple to produce sound without needing to use other equipment.
The VP-330 enabled you to create distinctive vocal sounds without specialized knowledge of vocoder
parameters, and still continues to be loved by musicians around the world.
2006
human vocal modeling technology, and featuring a simple interface designed for musicians.
“Ultimate vocals for all musicians” – that’s the mission of the VP-550.
marks the invention of the “vocoder,” a method of compressing a vocal signal. Subsequently
was the year in which Roland released the VP-330, a new idea that combined a vocoder with
marks the birth of the VP-550, going beyond the vocoder to utilize Roland’s “Vocal Designer”
5
Page 8
6
Features of the VP-550
-
bly
s
lly
d
y
g
.
.
.
s
.
hly
l
.
y
.
-
All y
y
.
The VP-550 is a keyboard featuring cutting-edge “Vocal Designer” human vocal modeling technol
ogy. Just connect a mic, play the keyboard while you sing, and let the VP-550 model incredi
ealistic and natural vocals.
Highest quality vocal
Unlike the choir sounds you’ve heard from samplers and synthesizers, the “Vocal Designer” model-
ng technology built into the VP-550 lets you actua
realistic vocals that are simply beyond all comparison with conventional vocoders.
an
“sing the lyrics” — and it generates natural
In other words, the VP-550 lets
ospel, to background choruses for pop and rock bands
No longer will you need to call multiple vocalists to your live performances or recording sessions
Simply play the VP-550 and start enjoying the top quality vocal sounds you’ve dreamed of
ou do it all; from beautiful choirs echoing in a cathedral, to funky
Rich ensemble
In addition to “Vocal Designer,” the VP-550 also provides an “Ensemble” part with carefully selected
igh-quality PCM sounds (digital sampled sounds)
By using the “Ensemble” part to layer ric
Designer,” you can create unbelievably rich ensembles
In addition, you can use the “Bass & Percussion” part to play voice bass or voice percussion.
This means that all b
itself, the VP-550 lets you rival an orchestra or a cappella group
expressive strings and superb choir sounds with “Voca
Easy operation
The VP-550 doesn’t have the display screen you often see on a synthesizer. Take a look at the panel.
The knobs and buttons you see are all that there is! The complex hierarchies and menus that ob
struct your creativity have been completely eliminated.
ou need to do is connect a mic, use the buttons to select a sound, and then play the keyboard
ou sing
while
Page 9
An overview of the VP-550
T
.
R
SS &
CUSSION
.
f
T
Th
ll
o
E
the ambience of a ha
o
-
the left.
Ca
“
f
cl
.
odulator
-
s
VOC
R
-
s
such
cher sounds.
CUSSIO
s
d
.
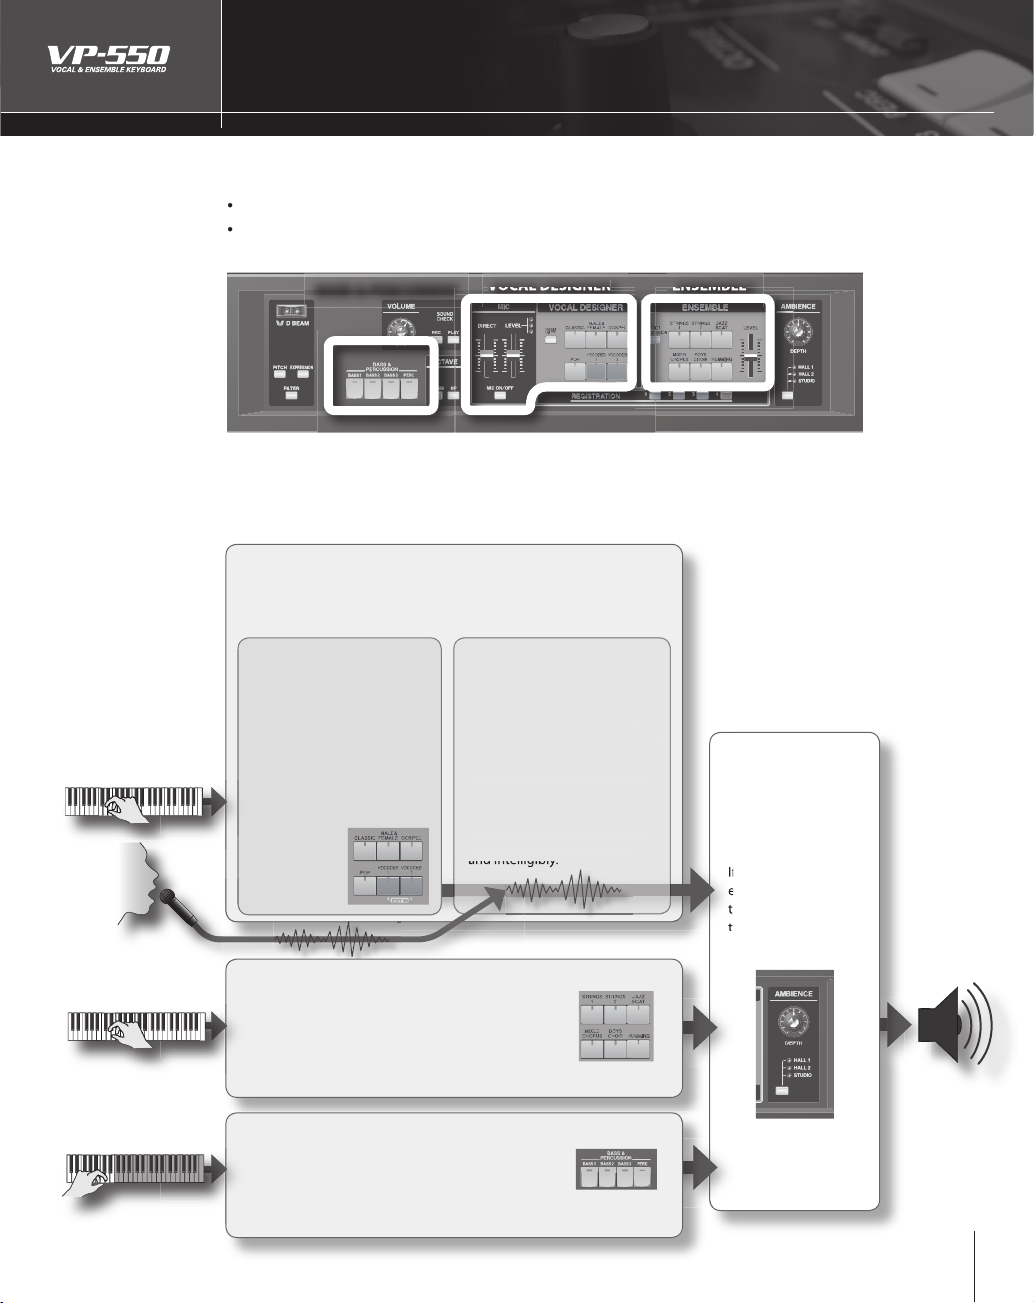
he VP-550 has three parts, and each part occupies its own section of the front panel
VOCAL DESIGNE
ENSEMBLE
•
If you turn on a sound button for a part, you’ll be able to play that part
If you turn on a sound button for two or more parts, you’ll be able to play those parts simultaneously.
By combining these parts, you can make the VP-550 produce an incredible range o
hese parts are mixed as follows.
PER
BA
BASS & PERCUSSION
VOCAL DESIGNER ENSEMBLE
AL DESIGNE
is part uses the keyboard and the mic input to model vocal sounds.
se the keyboard to control the pitch, and use the mic to control a
ther aspects of the sound.
vocal sounds.
rrier
This has the same role that the
vocal cords” play in a human
voice. According to the pitches
you play on the keyboard,
this generates the signal that
orms the basis of the sound
(tone and pitch). Use the sound
buttons to switch between different vocal characters such as
assic or pop
M
From the voice you input via
the mic input, this extracts the
esonances (formants) that
esult from the shape of your
throat and larynx and the move
ent of your mouth, and uses
these formants to modulate the
ignal produced by the carrier.
This will reproduce not only the
oudness of your voice, but also
et the lyrics be heard clearly
NSEMBLE
This part lets you play high-quality PCM sounds (dig
tally sampled sounds) from the keyboard. Use the
ound buttons to switch between sampled sounds
as strings or choir. By layering the Ensemble
part with the Vocal Designer you can create even
ri
ASS & PER
f you turn on one of these sound buttons, the
eventeen left-most keys of the keyboard will play
voice bass or voice percussion sounds. You can easily
o things such as using your left hand to play a bass
ine while using your right hand to play the melody
N
AMBIENC
This section applies
ll
r studio to the sound
from the three parts.
you don’t want ambi
nce to be added, turn
he knob all the way to
Page 10
8
About Vocal Designer
“
p
.
?
T
a
anyth
f
f
-
f
“
y
.
f
a
y
y
voice of an actua
.
V
“
y
V
Y
.
V
T
a
-
ably
➞
hythm.
f
T
o
“Play like y
Vocal Designer” human vocal modeling technology is a further evolution of the “vocoder.” Here’s a simple
lanation of the vocoder
ex
What’s a vocoder
he “vocoder” was invented by the physicist H. Dudley in 1939 as a technology for compressing a voice
communication signal. Subsequently, musical instruments based on this technology were developed,
llowing you to play melodies and harmonies using a human voice. Of course, the audio source can be
ing (not just a human voice) but because the vocoder has its basis in the sound-producing structure
of the human voice, we’ll be talking about it in terms of how a human voice is produced.
we ignore di erences of loudness, pitch, and variation between individuals, the waveform produced by
I
our vocal cords is essentially identical regardless o
guish spoken or sung words because of the various resonances (formants) created by our vocal tract (the
our throat and the movement of the larynx and mouth) and additional sounds called “fricatives,”
shape o
plosives,” and “sibilants” that are added in varying ways over time. The e ect of the waveform created b
the vocal cords actually has a rather minimal e ect on what the listener hears
A vocoder analyzes these time-varying changes, electrically synthesizes the
the throat and movements of the mouth (the formant movements),
shape o
nd uses these formants to modulate a musical signal (the carrier) rather than
the waveform produced b
was closer to that of a robot in a science ction movie rather than the
this wa
l human
the vocal cords. The vocoder “voice” produced in
what you’re saying (e.g., “ahh” or “eeh”). We can distin
Resonances (formants)
produced by the vocal
tract (shape of the
throat and larynx) and
movements of the mouth
ocal Designer uses cutting-edge modeling technology to bring about a revo-
utionary leap in the accuracy of this synthesis, succeeding in generating a
human voice” that is incomparably more realistic and natural than the sounds
produced b
vocoders of the past.
Vocal cords (carrier)
Play like you’re singing
ocal Designer is constructed so that elements other than pitch are expressed by your voice via the mic.
ou play the keyboard to control the pitch
ocal Designer won’t produce sound if you are only vocalizing into the mic or only playing the keyboard.
his means that in order to take advantage of Vocal Designer, the timing at which you play the keyboard
nd vocalize into the mic is extremely important. When you’re performing a rapid passage, you will prob
nd it best to hold down the keys (or press the hold pedal
r
Unlike on typical synthesizers, the volume is controlled by the mic. Use your voice to draw the curve. Using
your voice, you can produce a range o
he most important technique for taking advantage of Vocal Designer is t
expression that you might even nd extreme.
ou’re singing”
. 39) and use your voice to play the
Page 11
9
Sound list
Sound
CLASSIC
A
j
c
.
M
A
deep
o
OS
f
A
c
heard.
VOCO
1
A
lkb
d
.
VOCO
A
-
.
f
(
p
).
Sound
n
Th
y
c
f
S
2
Th
J
T
f
,
”
M
D
CHORUS
T
.
f of
G
Th
f
-
.
VOCAL DESIGNER
escription
large choir suitable for classical music. This is also a good choice for any choral sound — not
ust classical— and will match nearly any style of music. It has a clear sound, and is a good
hoice when you want the lyrics to be heard
ALE &
G
PEL This choir includes the distinctive phrasings and irregularities that are distinctive of gospel
P
DER
DER 2
mixed choir with independent male and female parts. With sparser chords, it produces a
er and more three-dimensional sound than “CLASSIC.” You’ll hear the female voices in the
igh range, and the male voices in the low range. Female voices will be heard in the right side
f the stereo, and male voices in the left side.
music. It’s an ideal choice
choir with a fewer number of members, broadly useful for popular music as well as songs that
ontain rapid passages. The sound is clear, making this a good choice when the lyrics need to
ta
ox sound with a metallic character. This is a more modern sound than “VOCODER 2,” an
s suitable for styles with a groove, such as R&B
vintage vocoder sound, broadly useful for pop music of the 1980’s as well as songs that con
tain rapid passages. It’s a good choice for chordal playing
If you press the [VOCODER 1] and [VOCODER 2] sound buttons simultaneously, the sound being received
rom the rear panel EXT IN jack will be used as the carrier
or jazz or gospel.
. 50
ENSEMBLE
escriptio
STRINGS 1
TRINGS
AZZ SCAT
IXE
YS CHOIRThis is a sampled boys choir. To take the fullest advantage of this sound, play notes in the upper
MMIN
is is an acoustic string sound that emphasizes the expressive playability that is inherent to
strings. Performance nuances such as
ally control the attack, release, legato, and tonal changes of the sound. This sound is suitable
or playing phrases, but can be broadly used for chordal playing and other purposes. (p. 30).
is is a synthesizer string sound. It is a bright string sound that evokes the Roland JP-8000
synthesizer, and is a good choice for chordal playing.
his sound provides samples of jazz scat singing. It’s great for songs that contain rapid passages
or scat soloing. Your keyboard dynamics will switch between long “Doo” sounds, short “Bap”
and
and falls “Fall.
sounds
his provides samples of a large choir that’s excellent for classical music. You can get an even
ore majestic e ect by layering this with one of the sounds of the Vocal Designer part
hal
the keyboard.
is is a sampled humming sound. You can use the expression pedal or the “Voice Expression
unction” (p. 40) to vary the sound through a range of “mmh”
sive performance
our keyboard touch or pedal operation will automati-
“Ooh”
“Aa h” for a very expres
Page 12
0
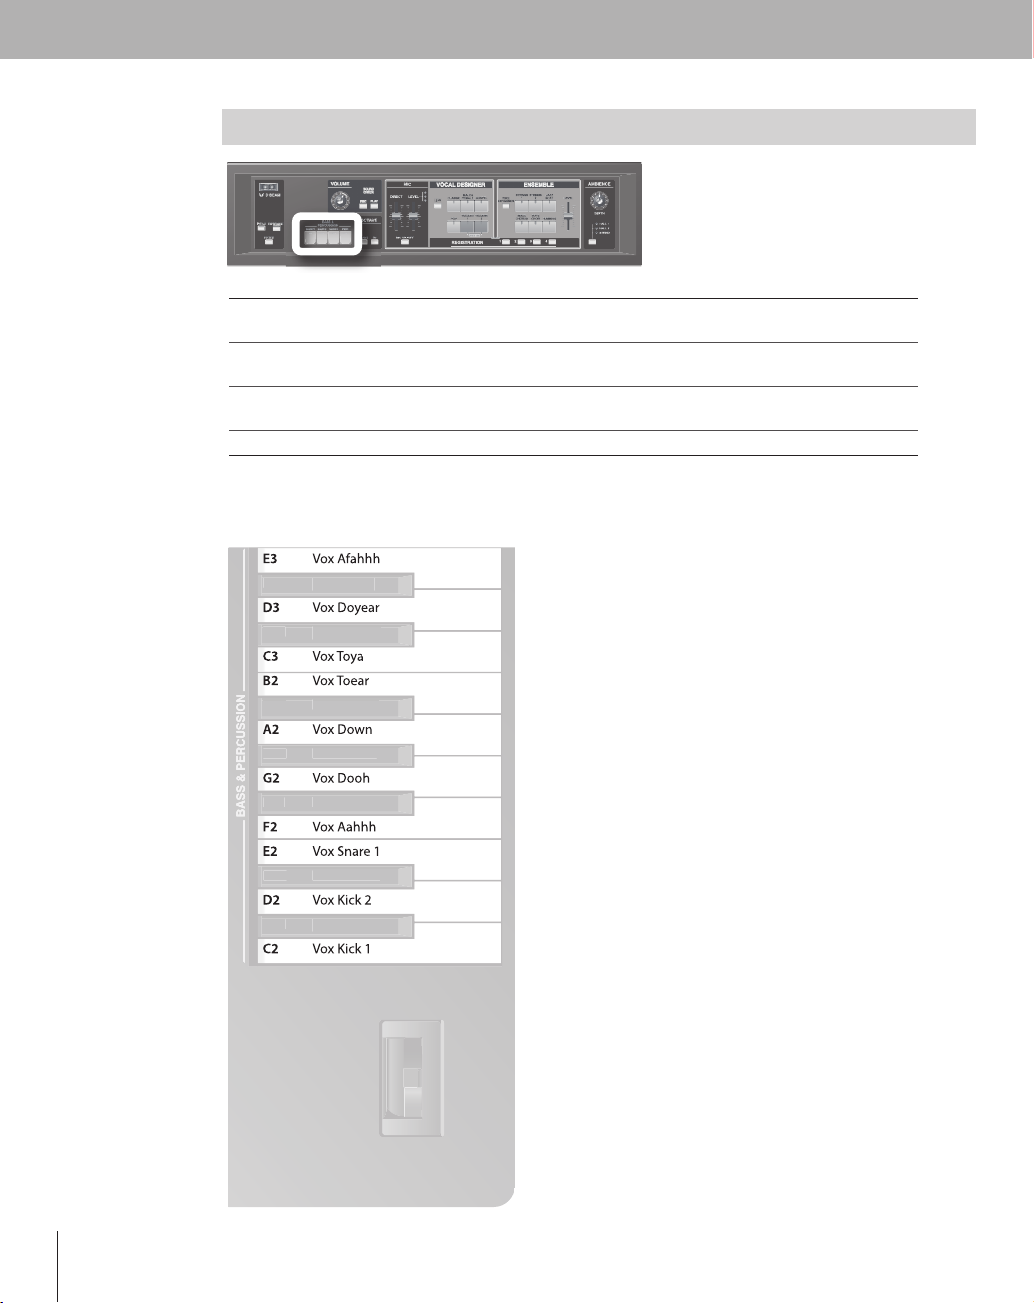
BASS & PERCUSSION
Sound
n
T
les.
2
T
les.
3
Th
p
”
C
T
sounds
d
m
C#3
V
l
V
Hih
3
G
hat 1
2
C#2
p
escriptio
ASS 1
ASS
ASS
ER
ERC
NoteSoun
his is a bass voice with short-duration notes, good for up-tempo songs across a wide range of
sty
his is a bass voice with long-duration notes, good for slower-tempo songs across a wide range of
sty
is is a jazz scat bass sound. Your keyboard dynamics will switch between long “Doo” sounds, short
“Ba
” sounds, and falls “Fall.
his provides a collection of voice percussion sounds.
#3Vox Cym
ox Cymba
ox
at
#2 Vox Hi
Vox Hihat 2
#2 Vox Snare
VoxKickSwee
1
Page 13
Making connections
n this chapter you’ll connect the VP-550 to your external equipment and set it up.
I
11
Page 14
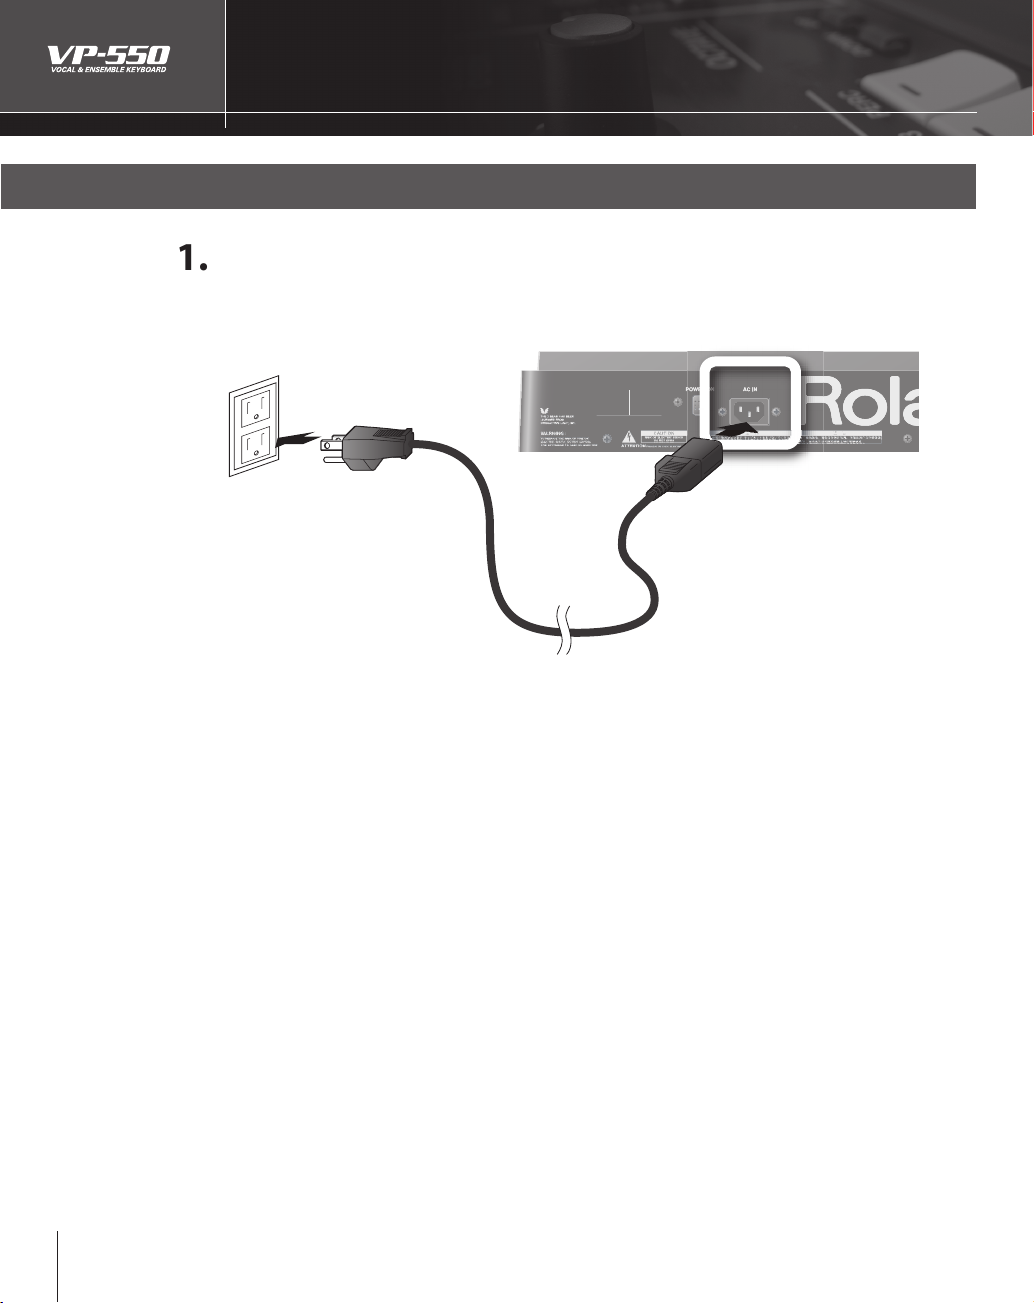
Making connections
C
the other end
outlet.
Connect the power cord
onnect the included power cord to the VP-550’s [AC Inlet], and plug
into an AC
to AC outlet
( AC IN)
Page 15
Connecting your amp or speakers
T
.
.
.
s
T
)
.
A
.
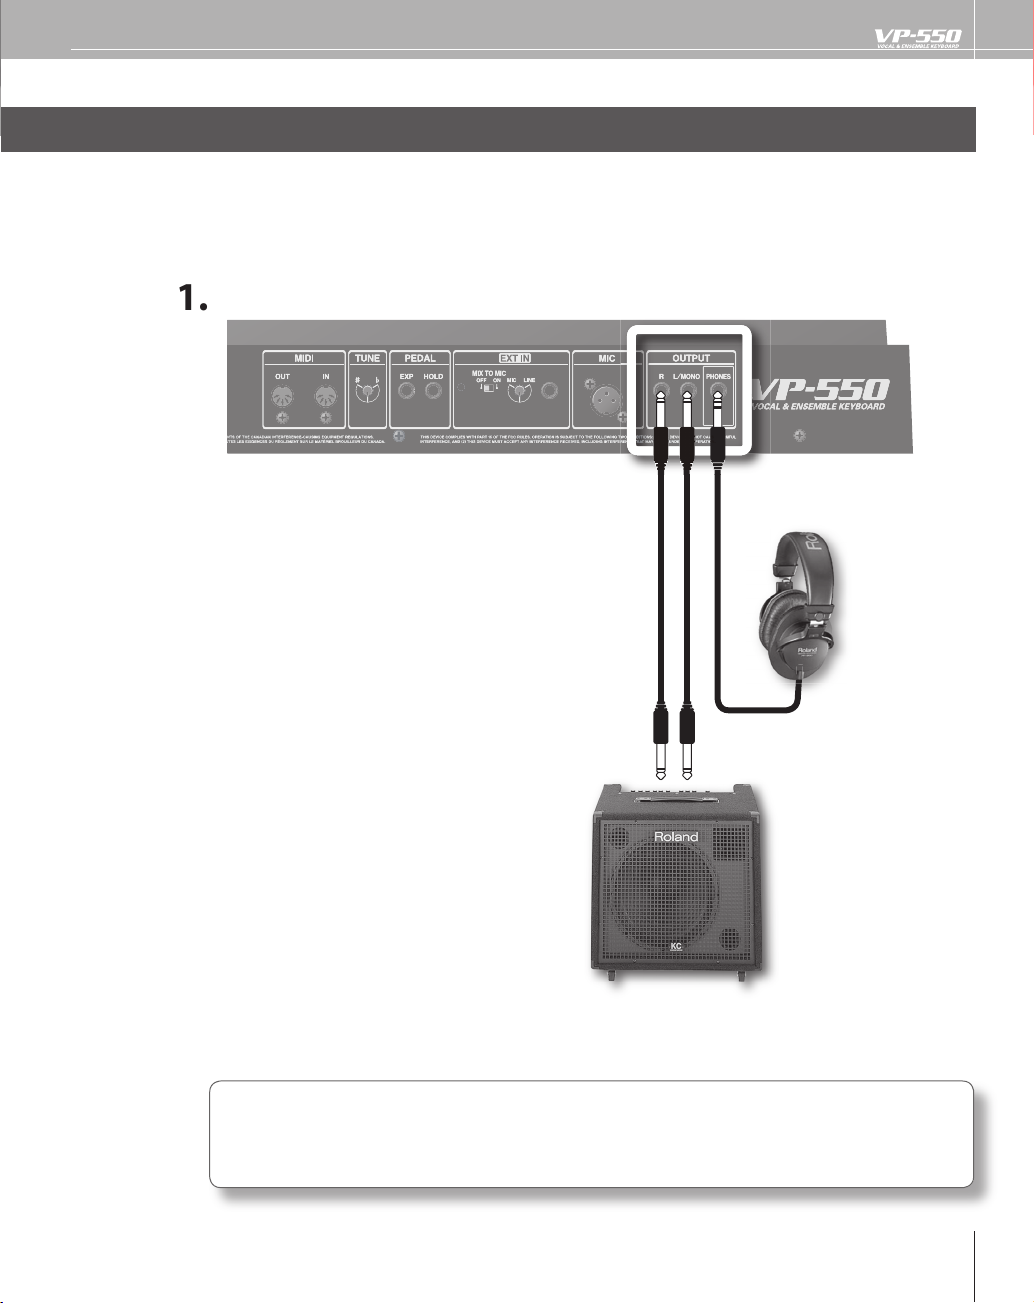
he VP-550 doesn’t contain an amp or speakers. In order to hear sound, you’ll need to connect it to monitor
speakers (with a built-in amp), a stereo set or other audio system, or headphones
To prevent malfunction and/or damage to speakers or other devices, always turn down the volume,
and turn o
the power on all devices before making any connections
( OUTPUT/ PHONES)
ake connections as shown
Headphone
INPU
Monitor speaker (with built-in amp
f you’re outputting in mono, connect your equipment to the [L/MONO] jack
udio cables and headphones aren’t included with the VP-550. You’ll need to obtain them sepa-
ately
Page 16
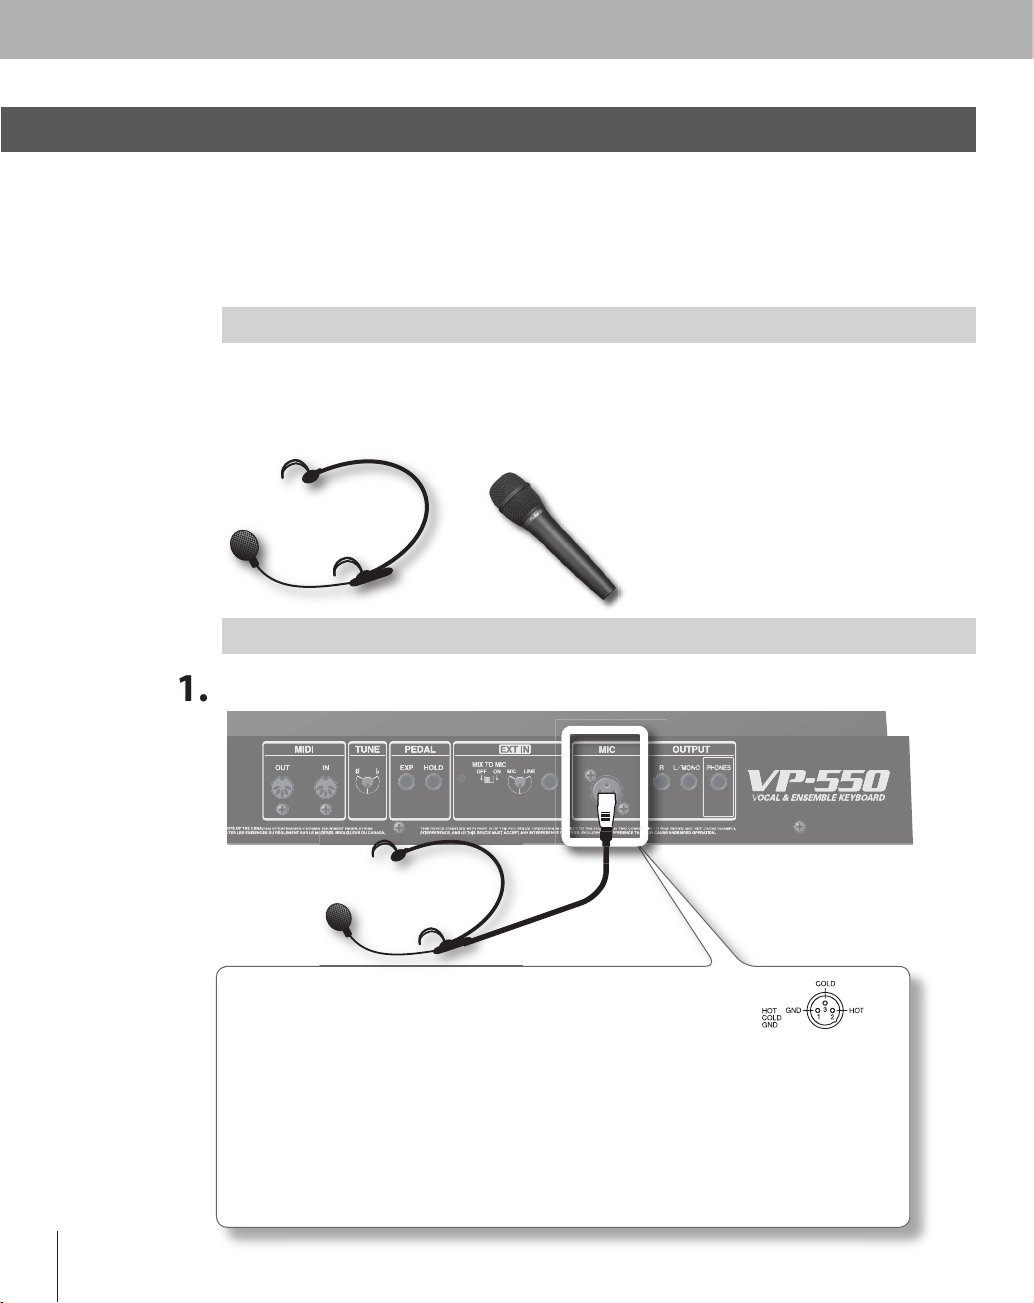
Connecting your mic
y
y
)
”
eadset or hand
c?
T
h
f
)
C
.
T
j
oth
.
T
ob
y:
.
.
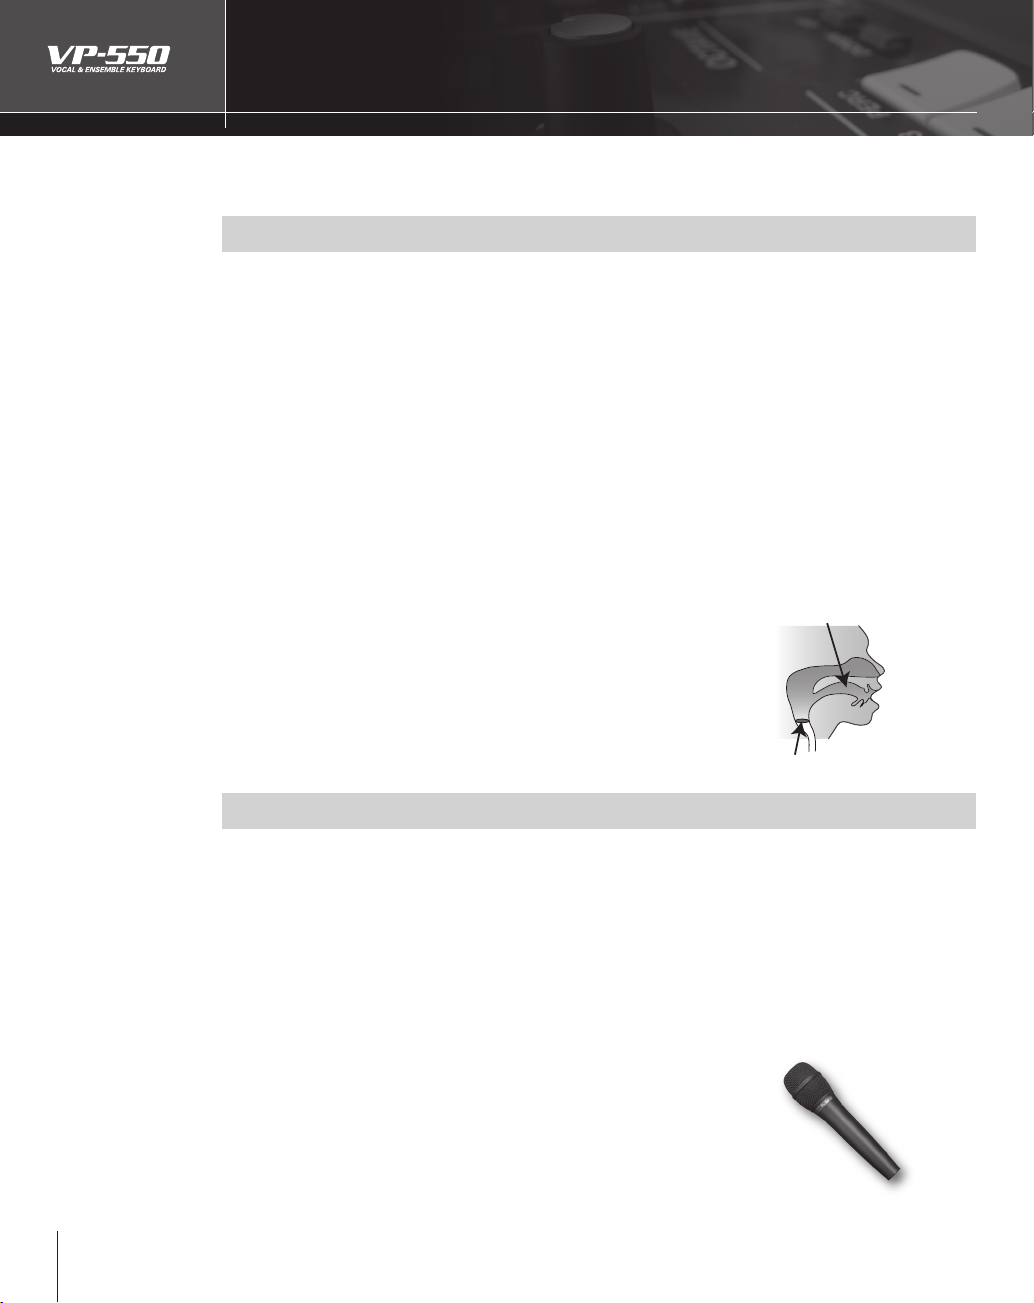
A mic is indispensable for performing with the VP-550. The VP-550 models vocal sounds by using your voice
that’s input via the mic. This means that using a high-quality mic will correspondingly improve the quality
of the result. The connector of the VP-550
order to use the full capabilit
or more about mics recommended for the VP-550, refer to the separate lea et “Mics recommended for the VP-550.
of the VP-550, we recommend using a “balanced (XLR) type” plug.
( MIC)
ou use will depend on the type of plug your mic provides. (In
H
he VP-550 (Vocal Designer) controls the volume of the sound according to the loudness of your voice in
e mic. This means that a headset mic is the ideal choice, since the distance between the mic and your
t
mouth will remain the same even during the most intense moments o
eadset mic, you’ll be free to sing and dance on stage to your heart’s content.
If you’re using a
mi
your keyboard performance! With a
alanced (XLR) plug mic
MIC
onnect it to the [MIC] jack as shown
he VP-550 is equipped with a balanced (XLR) type jack. Wiring diagrams for this
ack is shown at right. Make connections after rst checking the wiring diagrams of
er equipment you intend to connect
he VP-550’s MIC jack does not provide phantom power. If you’re using a condenser mic, you’ll need to
tain a separate phantom power supply unit or switch to using a dynamic mic.
Howling could be produced depending on the location of microphones relative to speakers. This can
be remedied b
. Changing the direction of the microphone(s)
2. Relocating microphone(s) at a greater distance from speakers.
3. Lowering volume levels
Page 17
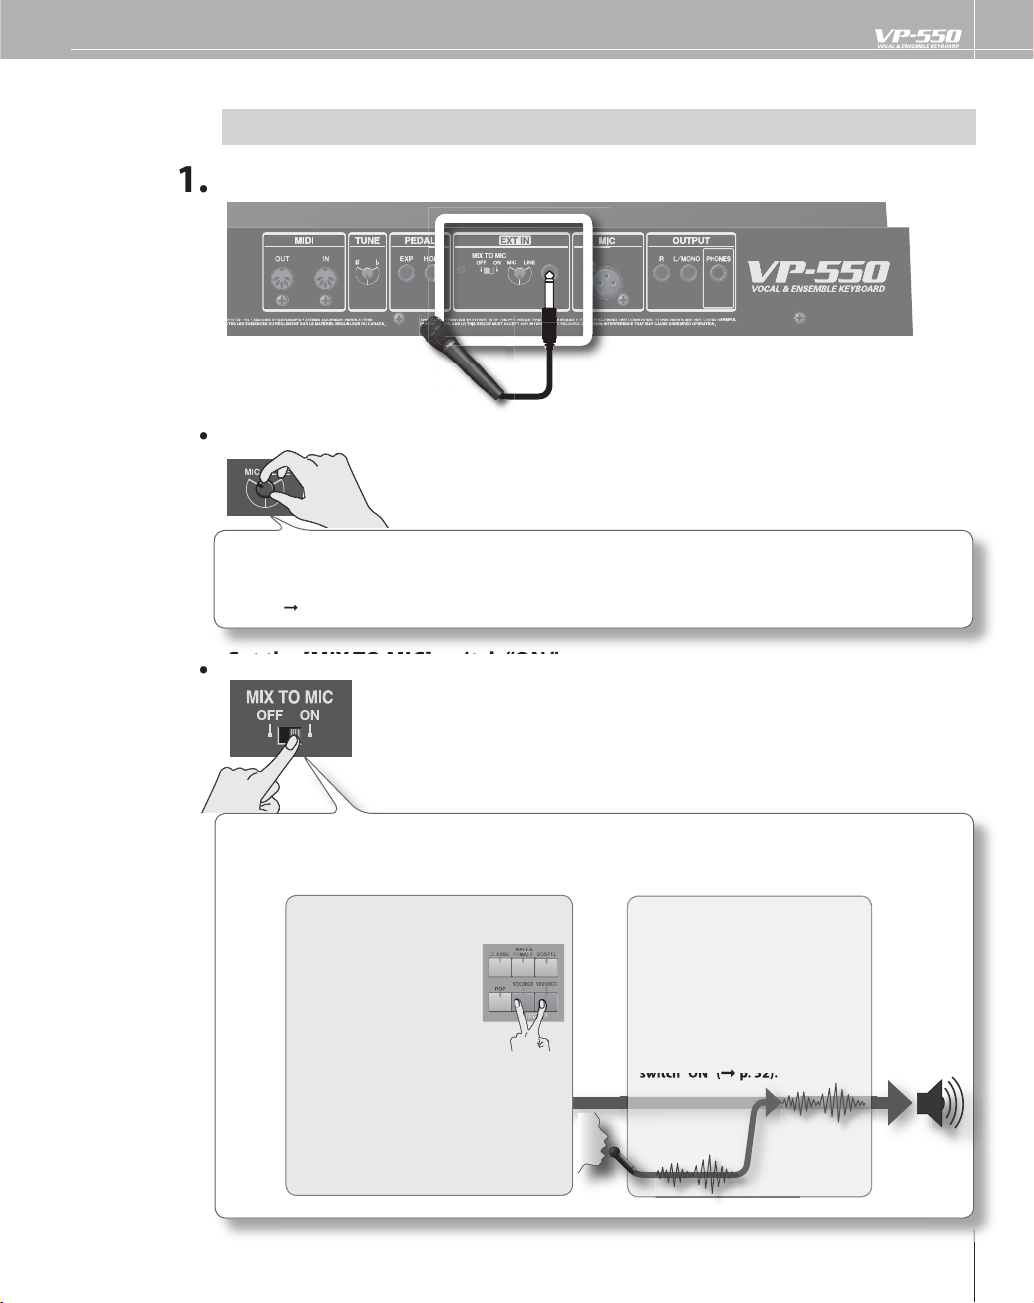
If you’re using a
)
C
.
”
to “
”
[MIX TO MIC]
“ON.”
We’ll b
ato
T
and these formants are used to
signal.
r
Th
sound and deter-
th
ll
used as the ca
.
(
onnect it to the [EXT IN] jack as shown
Turn the [EXT IN] knob to “MIC.
2
This knob adjusts the level of the sound from the [EXT IN] jack. (Turn the knob toward “MIC” to
ncrease the level, or toward “LINE” to decrease it.) If you’ve connected a mic, you should turn this
MIC.
Refer to “Adjusting the mic input level” (p. 22) for more about this adjustment.
hone plug mic
XT IN
et the
The [MIX TO MIC] switch setting determines whether the sound from the [EXT IN] jack will be used
as a mic input (modulator; the ON setting) or as the carrier (the OFF setting).
e using it as a mic input, so select the “ON” position here.
Carrie
is is the signal that is the
is of the
ines its timbre and pitch.
f you press the [VOCODER
and [VOCODER 2] sound
uttons simultaneously, the
sound being received from
e rear panel EXT IN jack wi
f you want the sound from the rear panel
[EXT IN] jack to be the carrier, set the [MIX
TO MIC] switch “OFF”
rrier
switch
p. 50).
➞
l
he tonal character (formants) of the
voice from the mic input is extracted,
modulate (transform) the carrier
f you want the sound from the
ear panel [EXT IN] jack to be the
odulator, set the [MIX TO MIC]
r
“
”
5
Page 18
6
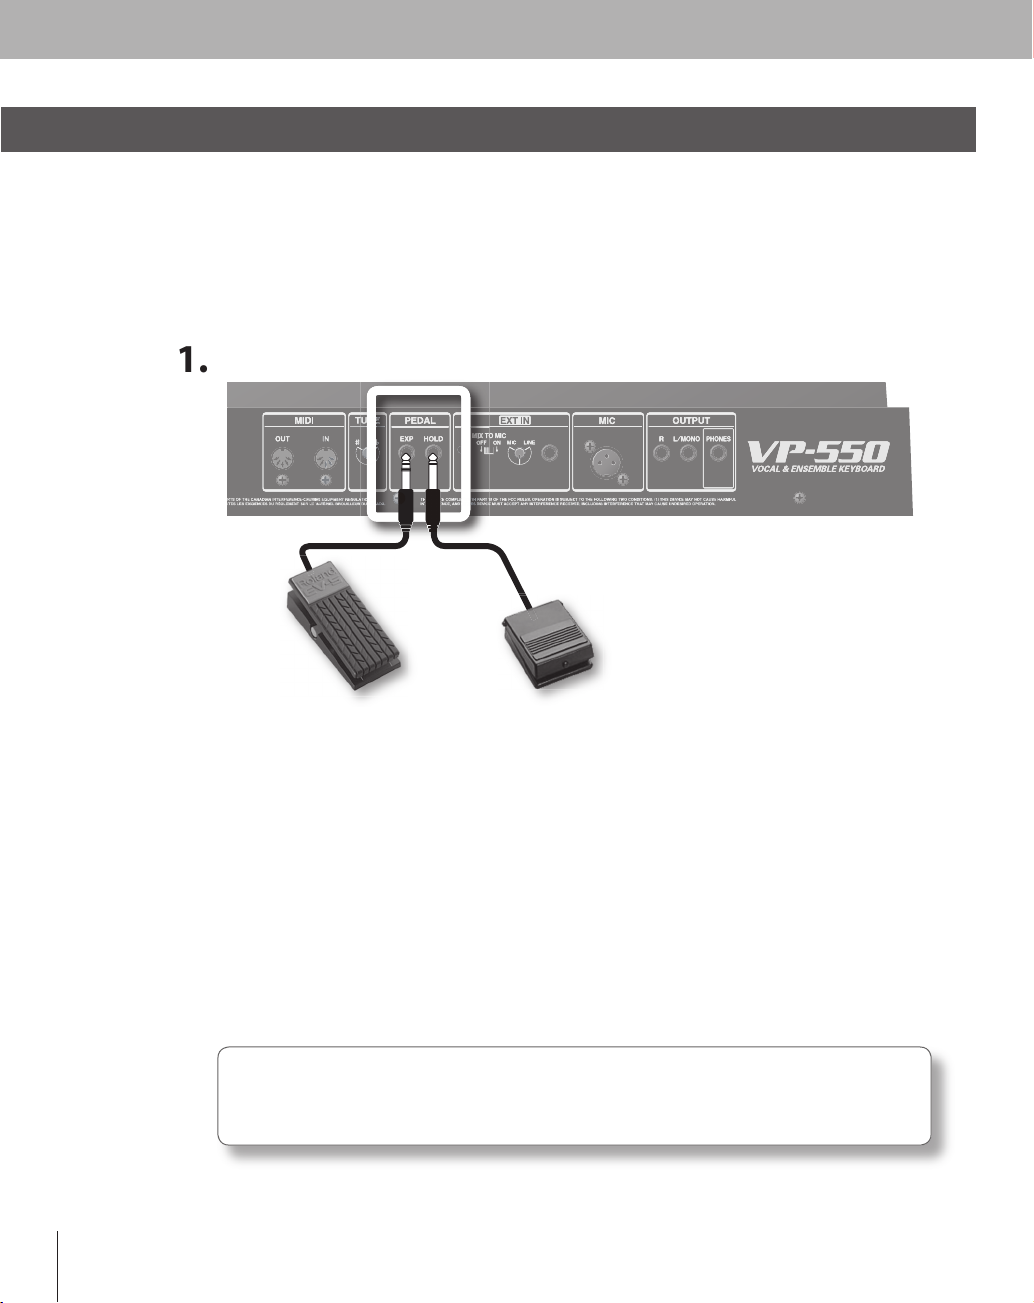
Connecting a pedal
Y
.
.
.
➞
.
ections as shown.
l
)
l
-
s
.
ou can connect a hold pedal (sold separately: DP series, BOSS FS-5U) and an expression pedal (sold sepa-
rately: EV-5) to the VP-550
Using a hold pedal lets you hold the notes
Using an expression pedal lets you add expression to your performance
efer to “Using pedals” (p. 39) for more information
( HOLD PEDAL/ EXP PEDAL)
ke conn
xpression peda
(sold separately: EV-5
se only the speci ed expression pedal (EV-5; sold separately). By connecting any other expres
ion pedals, you risk causing malfunction and/or damage to the unit
(sold separately: DP series, BOSS FS-5U)
Hold peda
1
Page 19

Performing
n this chapter you’ll learn the basics of playing the VP-550. When you’ve nished it, you will
I
have mastered the basics of the VP-550!
17
Page 20
8
Turning on/o the power
r
Af
y
g
.
.
?
-
?
O
q
-
d.
.
the
).
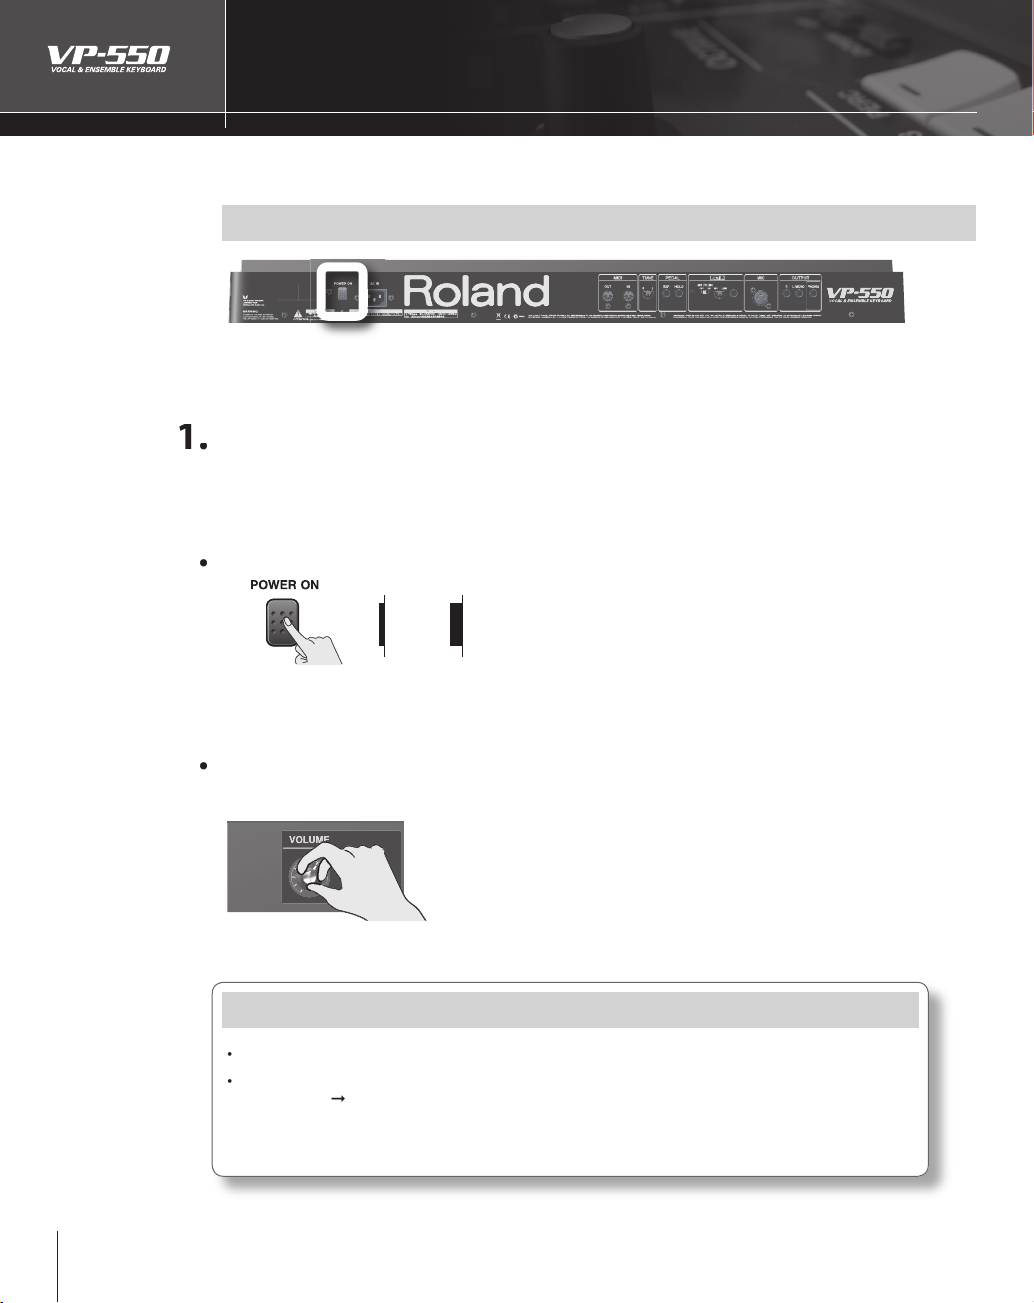
Here’s how to turn the VP-550’s power on or o .
( POWER ON)
Turning on the powe
ter completing the connection explained in the previous chapter, make sure to turn on the power
b
following the steps below. By turning on devices in the wrong order, you risk causing malfunction
and/or dama
efore you turn on the power, check the following
Is the VP-550 correctly connected to your peripheral equipment
Have you turned down the volume of the VP-550 and the connected audio system to the minimum set
tings
n the VP-550’s rear panel, turn the [POWER] switch “on.”
e to speakers and other devices
ON OFF
This unit is equipped with a protection circuit. A brief interval (a few seconds) after power up is re-
uired before the unit will operate normally.
Use the [VOLUME] knob to adjust the volume appropriately.
While you play the keyboard to produce sound, adjust the volume of the VP-550 and of the audio equip
ment you’ve connecte
If you don’t hear sound, check the following
s the VP-550 correctly connected to your amp, speaker, or headphones?
The Vocal Designer part won’t produce sound when you play the keyboard unless you are vocalizing
into
mic. For details, refer to “Performing with Vocal Designer” (➞. 23)
f there’s no mic connected, try selecting an Ensemble part sound and playing it from the keyboard
•
p. 28
1
Page 21
Turning o the powe
r
-
?
O
”
efore you turn o the power, check the following.
Have you turned down the volume of the VP-550 and the connected audio system to the minimum set
tings
n the VP-550’s rear panel, turn the [POWER] switch “o .
ON OFF
f you need to turn o the power completely, rst turn o the POWER switch, then unplug the
ower cord from the power outlet. Refer to Power Supply (separate sheet p. 4, “IMPORTANT
OTES”).
Page 22

20
Adjusting the volume
A
.
.
want to decrease the volume.
Here’s how to adjust the volume of the entire VP-550.
( VOLUME)
djust the volume of the entire VP-550
or best results, adjust the volume of your amp or speaker system so that you get the desired
loudness when the [VOLUME] knob is between the 12 o’clock and 2 o’clock positions as shown
Turn the knob toward the right if you want to increase the volume further, or toward the left if you
Page 23

( VOCAL DESIGNER)
g
.
T
.
-
g
f
t
Sound
CLASSIC
A
j
c
.
M
A
deep
o
OS
f
A
c
heard.
VOCO
1
A
lkb
d
.
VOCO
A
-
.
Performing with Vocal Designer
Let’s go ahead and try performing with the Vocal Designer part. While vocalizing into the mic, play the
eyboard and you’ll hear realistic and natural voices.
For more about how Vocal Desi
ner works, refer to “About Vocal Designer” (. 8).
Selecting a sound
Here’s how to select a Vocal Designer sound
o play the Vocal Designer part, press a Vocal Designer sound button to make it light
If you press the Vocal Designer sound button that’s already lit, the button will go dark and you will no lon
er hear the Vocal Designer part.
You can play multiple parts simultaneously by turning on sound buttons
or the Ensemble part
and/or Bass & Percussion part. If you want to play only the Vocal Designer part by itself, turn o
he sound buttons of the other parts (make the buttons go dark).
escription
large choir suitable for classical music. This is also a good choice for any choral sound — not
ust classical— and will match nearly any style of music. It has a clear sound, and is a good
hoice when you want the lyrics to be heard
ALE &
PEL This choir includes the distinctive phrasings and irregularities that are distinctive of gospel
G
P
DER
DER 2
mixed choir with independent male and female parts. With sparser chords, it produces a
er and more three-dimensional sound than “CLASSIC.” You’ll hear the female voices in the
igh range, and the male voices in the low range. Female voices will be heard in the right side
f the stereo, and male voices in the left side.
music. It’s an ideal choice
choir with a fewer number of members, broadly useful for popular music as well as songs that
ontain rapid passages. The sound is clear, making this a good choice when the lyrics need to
ta
ox sound with a metallic character. This is a more modern sound than “VOCODER 2,” an
s suitable for styles with a groove, such as R&B
vintage vocoder sound, broadly useful for pop music of the 1980’s as well as songs that con
tain rapid passages. It’s a good choice for chordal playing
f you press the [VOCODER 1] and [VOCODER 2] sound buttons simultaneously, the sound beng received from the rear panel EXT IN jack will be used as the carrier (p. 50).
or jazz or gospel.
Page 24

Adjusting the mic input level
Voca
c.
Check th
.
.
Ye l l o
Gree
A
.
A
f y
.
j
.
.
y
.
Here’s how to adjust the input level of the mic connected to the rear panel [MIC] jack.
( MIC LEVEL)
lize into the mi
2
e indicator status
Indicator signi cance
ed The signal level from the mic input is too great
w The signal level from the mic input is just right.
n
signal is being input from the mic input
djust the [LEVEL] slider so that the yellow indicator lights at the
peak o
our vocalizing into the mic
The [LEVEL] slider doesn’t a ect the rear panel [EXT IN]
ack. If you’ve connected your mic to the [EXT IN] jack,
se the rear panel [EXT IN] knob to adjust the input level
Turning the knob toward “MIC” will increase the input
evel, and turning the knob toward “LINE” will decrease it
Once you’ve adjusted the mic input level, you should generally leave it untouched. Adjust the
[VOLUME] knob if
ou want to raise or lower the volume of the Vocal Designer part
Page 25

23
Performing with Vocal Designer
ect a sound.
-
h
.
.
While holding down the notes
g
,
T
.
yg ,gp y g
Conversely, Vocal Designer won’t produce sound if you’re not holding down notes, even if you are vocalizing.
y, g p y g , y g
T
f
v
-
f
y
T
)
?
(
)
➞
)
)
Now you’re ready to perform with Vocal Designer.
l
To ensure that you can clearly hear the sound of Vocal Designer, turn o the sound buttons of the En
semble part and the Bass & Percussion part.
To ensure t
the very lowest position
Turn the [MIC ON/OFF] switch (p. 25) on (lit)
old down one or more notes on the keyboard.
he Vocal Designer part will sound according to the volume of your vocalizing
Play the keyboard to control the pitch. Try vocalizing a continuous “aah” into the mic while you play di erent
eys. The pitch will change according to the notes you play.
his time, hold down notes on the keyboard while you vocalize in a more staccato manner; “ah, ah, ah, ...” Vocal
Designer will produce sound at the pitches o
ocalized. That’s right — the rhythm is produced by your voice, not by the keyboard. This technique is particu
arly useful when you’re performing phrases with rapid passages.
Unlike typical synthesizers, the volume is controlled
our voice, you can produce a range of expression that you might even nd extreme.
here are just two secrets to using Vocal Designer skillfully.
at you’re hearing just Vocal Designer and not your own voice, move the [DIRECT] slider to
vocalize into the mic.
the chord you’re holding down, but at the staccato rhythm you
rom the mic. Use your voice to draw the curve. Using
atch the timing of the keyboard and your voice
•
use your voice to play the rhythm
Use your voice to control the volume (expression)
If you don’t hear sound, check the following
s the VP-550 correctly connected to your amp, speaker, or headphones?
•
s the VP-550’s volume raised
s one of the Vocal Designer sound buttons lit?
s the power switch of your mic turned on?
s your mic connected correctly?
s the mic input level raised? (➞. 22)
s the [MIC ON/OFF] switch lit? (
•
. 14
➞
. 25
You can adjust the sensitivity at which
the volume from the mic will a ect
the expression. (➞. 44
Page 26

Adding your unprocessed voice
.
Voca
c.
Y
T
y
.
V
y.
Now let’s add your voice from the mic directly to the output
lize into the mi
( DIRECT)
our voice will be output directly from the VP-550.
his time, try singing a favorite song into the mic. While doing so, choose one of the Vocal Designer sounds
we recommend [GOSPEL] or [POP]) and hold down the appropriate chord progressions on the keyboard
ou sing
while
ocal Designer will add a backing chorus to your vocal according to the chords you pla
Page 27

2
Switching o the mic
.
ll
tu
.
.
Wh
.
g
(
➞
mic input is on
( MIC ON/OFF)
ress [MIC ON/OFF] to make the button go dark; the mic input wi
rn o
2
ress the button again to make it light; the mic input will turn on
en you power-on the VP-550, this button will be lit and the mic input will be on
You can check the mic expression sensitivity by holding down [MIC ON/OFF] for one second or
er
lon
. 44).
5
Page 28

26
Raising Vocal Designer’s pitch by one octave
.
ll
h.
“
Here’s how to raise Vocal Designer’s pitch by one octave.
ress the [8va] button; it will light, and the pitch of Vocal Designer
will rise one octave
ress the button once again; it will go dark, and Vocal Designer wi
return to its original pitc
( 8va)
8va” is a symbol meaning “play one octave higher.”
nlike the OCTAVE [DOWN]/[UP] buttons, the [8va] button applies only to the Vocal Designer part.
se this when you want to raise the Vocal Designer part one octave higher than the ensemble
art.
Page 29

Performing with Ensemble
the sound buttons to switch sounds.
.
T
ll
-
s
t
.
S
d
n
S
T
f
c
f
S
2
T
y
J
T
f
”
M
D
CHORUS
T
.
G
T
f
Ooh”
-
.
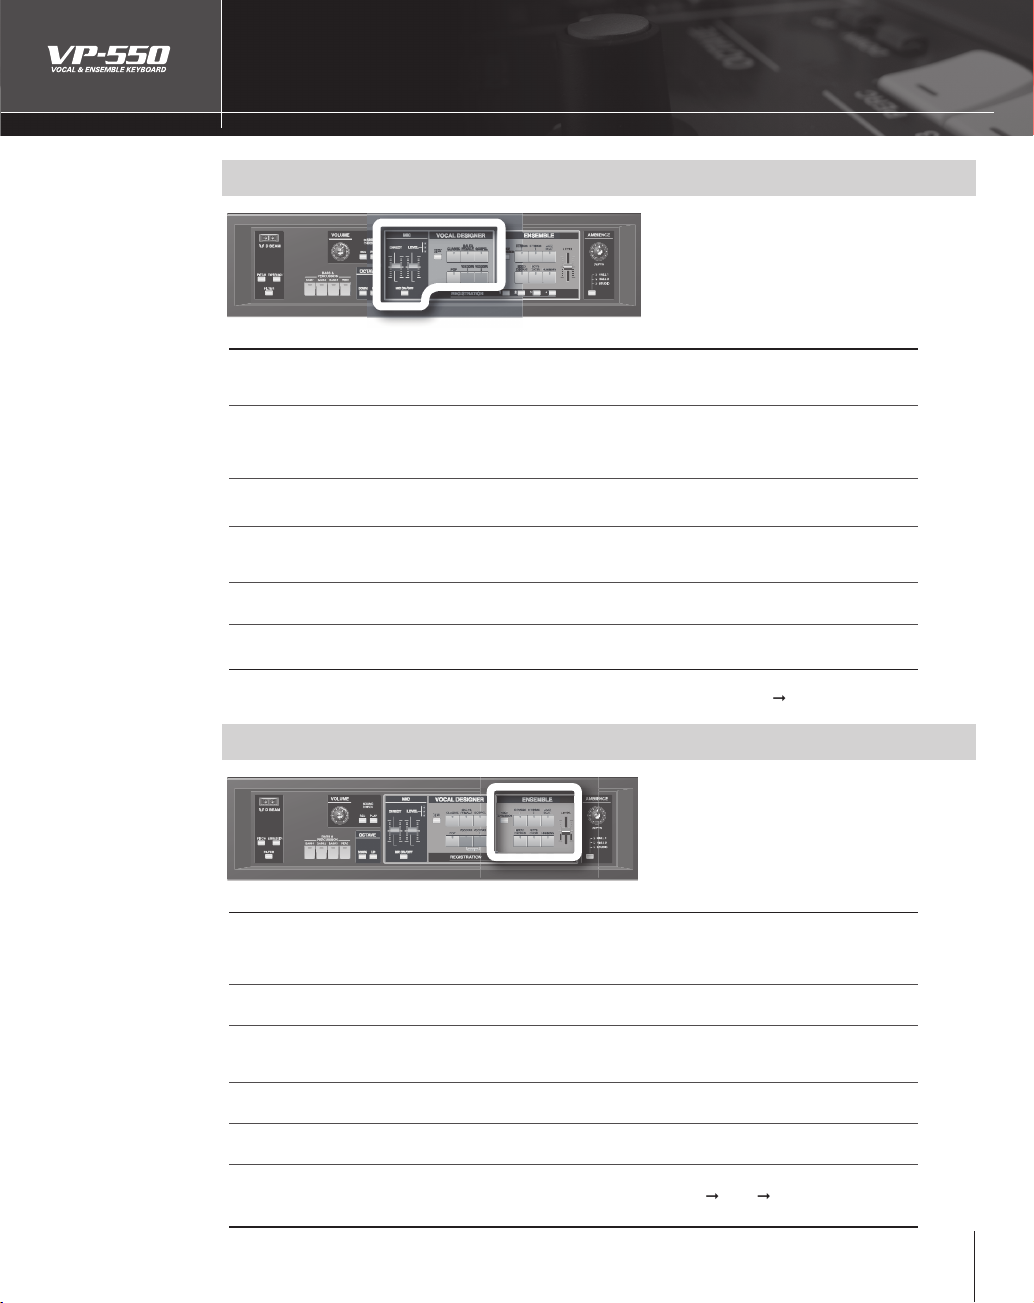
( ENSEMBLE)
Selecting a sound
Press a button to select a sound
o play an Ensemble sound, press one of the buttons to make it light. If you press a button that’s already lit,
go dark and the Ensemble part will no longer produce sound.
it wi
You can simultaneously play more than one part by turning on a sound button for the Vocal De
igner and/or Bass & Percussion parts. If you want to hear only the Ensemble part, simply turn o
he sound buttons for the other parts so that they are dark
oun
TRINGS 1
TRINGS
AZZ SCAT
IXE
YS CHOIRThis is a sampled boys choir. To take the fullest advantage of this sound, play notes in the upper
UMMIN
escriptio
his is an acoustic string sound that emphasizes the expressive playability that is inherent to
strings. Per
ally control the attack, release, legato, and tonal changes of the sound. This sound is suitable
or playing phrases, but can be broadly used for chordal playing and other purposes. (p. 30).
his is a synthesizer string sound. It is a bright string sound that evokes the Roland JP-8000
s
his sound provides samples of jazz scat singing. It’s great for songs that contain rapid passages
and
sounds, and falls “Fall.
his provides samples of a large choir that’s excellent for classical music. You can get an even
half of the keyboard.
his is a sampled humming sound. You can use the expression pedal or the “Voice Expression
unction” (p. 40) to vary the sound through a range of “mmh”
sive performance
ormance nuances such as your keyboard touch or pedal operation will automati-
nthesizer, and is a good choice for chordal playing.
or scat soloing. Your keyboard dynamics will switch between long “Doo” sounds, short “Bap”
ore majestic e ect by layering this with one of the sounds of the Vocal Designer part
“
“Aah” for a very expres
Page 30

28
Performing with Ensemble
.
ect a sound.
g
.
Y
y
y
y
V
a
y
.
?
?
Now let’s try performing with the Ensemble part
l
To ensure that you can clearly hear the sound of the Ensemble part, turn o the sound buttons of the
Vocal Desi
aise the Ensemble [LEVEL] slider (p. 29).
lay the keyboard
ou’ll hear the Ensemble part.
ing the Ensemble part by itself will give you a wonderful sound, but layering it with the Vocal Designer
Pla
part will raise this to the level of trul
together with Vocal Designer,
ner part and the Bass & Percussion part.
amazing! By layering powerful strings or beautiful choir sounds
our performance on the VP-550 can sound unbelievably rich.
ocal Designer will stop sounding when your voice is not being input from the mic (such as when you take
breath), but the Ensemble part will sound as long as you are playing the keyboard (regardless of the mic
input). La
ering the Ensemble part with the Vocal Designer ensures that the sound will not be interrupted
If you don’t hear sound, check the following
s the VP-550 correctly connected to your amp, speaker, or headphones?
s the VP-550’s volume raised
s the Ensemble [LEVEL] slider raised?
s one of the Ensemble sound buttons lit
Page 31

29
Adjusting the Ensemble volume
.
y
y
l!
T
.
Here’s how to adjust the volume of the Ensemble part.
( ENSEMBLE LEVEL)
lay the keyboard
ove the [LEVEL] slider to adjust the volume.
Unlike the [VOLUME] knob, this slider only a ects the Ensemble part. You can use this slider to make adjust-
ments when
output of the mic (
ou want the Ensemble part to be louder (or softer) than the Vocal Designer or the direct
our voice).
Step on a peda
he expression pedal will vary not only the volume of the Ensemble part but also
its “tone.” This means that using the pedal will make your Ensemble part perfor-
mance enormously more expressive
For details, refer to “Using pedals (HOLD PEDAL / EXP PEDAL)” (p. 39).
Page 32

30
Using the mic to add expression to the Ensemble
Y
a
.
T
-
y
y
pond.
l
O
ally b
g
y
l
l
.
o
a
y
-
a
f
ou can use your voice via the mic to add expression to the sound of the Ensemble part.
(VOICE EXPRESSION)
For details, refer to “Using a mic to control expression (VOICE EXPRESSION)” (p. 40).
About the VP-550’s strings ( STRINGS 1)
Just as string sound was provided on the VP-330 that went on sale in 1979, this VP-550
lso provides an extremely powerful string sound. This string sound was newly developed
cally for the VP-550
speci
he sound is distinctive in having a far richer level of performance expression than conven
tional synthesizers. Furthermore, the sound is designed so that this dynamic expression
will naturall
need for complex operations. Simpl
res
become part of your performance without you having to be aware of it. No
play the keyboard like you feel, and the VP-550 will
Dynamics contro
n a conventional synthesizer, the string sound might switch between “softly bowed sounds” and “strongly
bowed sounds” according to your playing dynamics. However, pressing the expression pedal simply changes
the volume without a
ecomes a loud sound.
In contrast, the strin
smoothl
more natura
will occur in a smooth, natural curve that follows the movement of your foot, giving your performance a
whole new dimension of expressive reality
change the sound between “softly bowed sounds” and “strongly bowed sounds,” creating a much
-sounding crescendo or decrescendo. Tonal changes produced by using the expression peda
ecting the tone. This can produce an unnatural impression when a soft sound gradu-
sound built into the VP-550 use the expression pedal (or “Voice Expression” function) to
Intelligent legat
When you play the keyboard legato (pressing the next key before releasing the preceding key), the sound
utomatically switches to a dedicated legato sound that creates a smooth transition between notes. The
degree of expression will change intelligentl
ister, a portamento e ect that smoothly connects the pitch from one note to the next is automatically added
ccording to the content of your performance. Packed inside the VP-550 is a polished string ensemble that’s
or you to direct it.
waiting
according to the speed of your performance. In the violin reg
Page 33

31
Performing with Bass & Percussion
.
.
Sound
n
T
y
.
2
T
y
.
3
Th
p
”
C
T
( BASS & PERCUSSION)
bass and voice percussion sounds. This makes it easy to use your left hand to play a bass line while using
your right hand to play the melody
Selecting a sound
Here’s how to select a Bass & Percussion sound
When you press a Bass & Percussion sound button to make it light, the left-most seventeen notes of the
eyboard will play bass and percussion sounds.
BASS & PERC
VOCAL DESIGNER
ENSEMBLE
If you press a sound button that is already lit, the button will go dark and the Bass & Percussion part will
not produce any sound.
escriptio
ASS 1
ASS
ASS
ER
his is a bass voice with short-duration notes, good for up-tempo songs across a wide range of
st
les
his is a bass voice with long-duration notes, good for slower-tempo songs across a wide range of
les
st
is is a jazz scat bass sound. Your keyboard dynamics will switch between long “Doo” sounds, short
“Ba
” sounds, and falls “Fall.
his provides a collection of voice percussion sounds.
Page 34

32
Performing with Bass & Percussion
.
.
T
.
T
v
f
e
Y
.
sound buttons.
s
y
s
.
ll
.
-
ti
d
.
s
t
Now you can try playing the Bass & Percussion part
elect a sound.
ay a note in the keyboard region shown below
he Bass & Percussion part will sound
he Bass & Percussion part is distinctive in that it splits the keyboard to obtain its own dedicated range of
eys. This means that you can use your right hand to play melody or chords while playing a bass line or
oice percussion with your left hand.
In other words, you can simulate an entire a cappella group all by yoursel
!
Adjusting the Bass & Percussion volum
ou can adjust the volume of the Bass & Percussion part over a range of four steps
While holding down [MIC ON/OFF],
ress one of the Bass & Percussion
The four-stage volume adjustment will be
et to a value corresponding to the button
ou pressed (1–4). Higher numbers corre-
pond to a higher volume (default value: 3)
The sound button you pressed wi
link, and all the remaining sound
uttons will light
This completes the setting. This setting is
emembered even if you turn o the power.
on’t power-o the VP-550 during this
rocess; doing so may cause a malfunc
on.
To check the current setting, hold
own [IC ON/OFF] for one second or
onger
The sound button corresponding to the
current value will blink, and the remaining
ound buttons will light.
You can also press a sound button to change
he setting at this time.
Page 35

33
Adjusting the ambience
T
y
.
T
Type
n
ch
STUDIO
A
.
T
.
T
.
T
T
V
y
.
o each part, you can add the acoustic ambience that is typical of a hall or studio.
ou want to switch the type of ambience, turn the knob all the way toward the left.
When
( AMBIENCE)
witch the type of ambience
Each press of this button cycles the type of ambience as follows:
STUDIO
➞
hese types have the following characters.
HALL 1
HALL 2
The reverberation of a chur
The reverberation of a large hall
The reverberation of a studio
➞
escriptio
djust the depth of ambience
urn the [
urn the [DEPTH] knob toward the left to make the ambience shallower
o switch the ambience o , turn the [DEPTH] knob all the way to the left.
his high-quality ambience e ect that is so indispensable for vocal sounds was newly developed for the
P-550. It processes the sound in stereo rather than in mono, and is tuned so that human voices will reso-
nate as beautifull
EPTH] knob toward the right to make the ambience deeper
as possible. The result is a spacious sound eld with excellent clarity and de nition
Page 36

3
Checking the output sound
y
a
g.
T
Th
.
.
T
.
.
y
-
Here’s how you can record and play back the sound that’s being sent from the [OUTPUT] jacks. While you’re
using a mic, it’s di cult for
n easy and accurate way of checking the output sound.
ou to tell exactly what the audience is really hearing, but this function provides
( SOUND CHECK)
ress the [EC] button to start recordin
he sound being sent from the [OUTPUT] jacks will be recorded.
e [REC] button will light red during recording.
aximum recording time is ten seconds
tart performing.
To stop recording, press the [REC] button once again.
Alternatively, recording will automatically stop after ten seconds
If you press the [PLAY] button during recording, recording will stop and playback will begin.
ress the [LAY] button to play back the recorded sound.
When you’ve held down the [PLAY]
utton for approximately two sec
onds, the button will blink, and loop
ayback will begin.
he [PLAY] button will light green during playback
ress the [PLAY] button once again to stop playback.
Alternatively, playback will automatically stop when it ends
If you press the [REC] button during playback, playback will stop and recording will begin.
The recorded sound is lost when
4
ou turn o the power.
Page 37

Using controllers
his section explains the numerous controllers provided by the VP-550.
T
35
Page 38

36
Shifting one octave up or down
Y
ll
.
ll
s
octave.
h.
ou can shift the pitch of the keyboard higher or lower by one octave.
(OCTAVE)
Shifting one octave upward
ress the [UP] button; the button will light and the keyboard wi
shift upward one octave.
Press the [DOWN] button to return to the original pitch
Shifting one octave downward
ress the [DOWN] button; the button will light and the keyboard wi
hift downward one
Press the [UP] button to return to the original pitc
ressing the [OCTAVE] buttons won’t change the range of the Bass & Percussion part.
Page 39

37
Using the D Beam
.
ess a button to select a
ect.
.
T
h
d
.
The illustration above shows the e ective range of the [D BEAM] controller. There won’t be any e ect if you
.
ects
V
r
&
d
M
e
)
CH
)
0
–
ON
ade out
ade out
)
0–
T
ge
)
0
–
*
.
T
.
)
( D BEAM)
By waving your hand above this sensor you can apply a variety of e ects to the VP-550’s sound
r
D Beam e
If you press an unlit button, that D Beam e ect (see table below) will be selected
If you press a lit button once again, the D Beam will be turned o .
While you perform, slowly move your hand up and down over the
D BEAM] controller.
he e ect will be applied when you place your hand over the controller, and will revert to the previous
en you move your hand away. The selected button will blink when the [D BEAM] controller is
state w
ing
respon
ft. (approx.
move your hand outside of this range
he usable range of D Beam controller will become
extremely small when used under strong direct sunlight.
Please be aware of this when using the D Beam controller
outside
Beam e
ocal
Designe
IT
XPRESSI
ILTER
Pitch down Pitch down
F
onal chan
Ensemble
F
Ton al change
For details on MIDI, refer to “Connecting the VP-550 with MIDI equipment” (p. 54)
ass
ercussion
o change CC#17 (General purpose
o change CC#11 (Expression
o change CC#16 (General purpose
Transmitte
IDI messag
controller 2
controller 1
Range
(initial value: bold
127
127
Page 40

38
Using the pitch bend / modulation lever
Y
Y
.
th
o
V
appl
.
s
Voca
e
ass &
cussion
Transmitted
ge
(
ld)
d
ge
d
-8192–0–819
odulation
atoVibrato
ge
)
0
*
)
ou can vary the pitch or apply vibrato (pitch modulation).
(PITCH BEND)
Changing the pitch in real time
ou can use the lever to smoothly change the pitch while you perform
While you play the keyboard, move the lever toward the left to lower
e pitch, or toward the right to raise the pitch.
* The VP-550’s
itch bend range is xed at one whole step (two semitones).
Adding vibrat
ibrato is the e ect of modulating the pitch.
While you play the keyboard, move the lever away from yourself to
y vibrato
itch bend / modulation lever function
l
esigner
itch ben
M
itch change
Vibr
nsembl
itch change No chan
For details on MIDI, refer to “Connecting the VP-550 with MIDI equipment” (p. 54
B
Per
No chan
MIDI messa
Pitch ben
CC#01 (Modulation
ange
initial value: bo
–127
1
Page 41

39
Th
f
s
.
T
.
otes.
dal
T
tonal character.
T
y
Ooh”
y
)
T
-
lly
f
.
V
e
cussio
)
)
e
)
0
, 12
l
olume and
ge
ge
)
0
–
.
Using pedals
e VP-550 lets you connect a hold pedal (sold separately: DP series, BOSS FS-5U) and an expression pedal
sold separately: EV-5). Using a hold pedal lets you hold the notes. Using an expression pedal lets you add
expression to your per
ormance.
( HOLD PEDAL / EXP PEDAL)
Holding note
While playing the keyboard, press the hold pedal
he notes will be held while you are pressing the hold pedal
Vocal Designer won’t produce sound if you’re not holding down notes, even if you are vocalizing,
ut by pressing the hold pedal at the right moment before releasing a note, you can prevent gaps
ween n
Adding expression to your performance
While playing the keyboard, raise and lower the
expression pe
he expression pedal will vary not just the volume of the Ensemble part but also the
his is particularly easy to experience if you select “HUMMING” for the Ensemble part. Depending on how
ou advance the pedal, the sound will shift through the range of “mmh” ➞ “
conjunction with Vocal Designer
this e ect will di er depending on the sound you choose.
he sustained portion of the “STRINGS 1” sound following your keystroke will also change its tone dynami
ca
according to how you operate the pedal (p. 30). The “STRINGS 1” sound is designed to change their
tone in a smooth, natural curve according to pedal movement. This powerful string sound was newly
developed
old/expression pedal functions
or the VP-550. Try operating the pedal, and experience the di erence
old pedal Carrier hold
xpression
eda
.
ocal
esigner
sustain
o change V
➞ “Aah.” By using this in
ou can achieve an even more expressive performance. (The amount of
nsembl
old (sustain)No chang
tonal chan
* For details on MIDI, refer to “Connecting the VP-550 with MIDI equipment” (p. 54)
Bass &
Per
No chan
n
Transmitted
MIDI message
CC#64 (Hold 1
CC#04 (Foot type
ange
(initial value: bold
7
127
Page 42

0
Using a mic to control expression
Y
.
.
f
.
y f
.
y
T
y
”
Ooh”
f
a
)
T
T
l
ble
&
n
d
MID
e
(
ON
e
e
C
)
0
–127
*
)
-
s
(
ou can use the loudness of your voice via the mic to add expression to the Ensemble part
( VOICE EXPRESSION)
ress the [VOICE EXPRESSION] button to make it light
You can adjust the depth at which the
loudness of the mic will a ect expres
ion
. 44).
➞
To hear the result as clearly as possible, turn on an Ensemble part sound, and turn o the sound but-
the Vocal Designer part and the Bass & Percussion part
tons o
To hear the result as clearly as possible, move the [DIRECT] slider (which sends your own voice direct-
rom the output) all the way down.
l
lay the keyboard
While continuing to hold down notes, vocalize into the mic.
Tr
varying the loudness of your voice.
he volume and tone of the Ensemble part will change according to the loudness of your vocalizing.
It will be particularl
will shift through the range of “mmh
ing this in conjunction with Vocal Designer you can achieve an even more expressive per
mount of this e ect will di er depending on the sound you choose.
he “STRINGS 1” sound will also change its tone dynamically according to the loudness of your voice (p. 30).
his powerful string sound was newly developed for the VP-550. Try vocalizing into the mic. You’ll hear the
erence.
di
Voice Expression functions
VOICE
XPRESSI
easy to experience this e ect if you choose the “HUMMING” sound button. The sound
“
“Aah” according to the loudness of your voice. By us-
ormance. (The
Voca
esigner
o change Volume and
nsem
tone chang
For details on MIDI, refer to “Connecting the VP-550 with MIDI equipment” (p. 54
Bass
Percussio
o chang
Transmitte
I messag
C#02 (Breath type
ange
initial value: bold)
4
Page 43

Changing the settings
he VP-550 has only three things you’ll ever need to set: a tuning knob, four registration
T
buttons, and mic expression sensitivity.
41
Page 44

Tuning
the entire the
550.
T
Tu
the knob toward “
b
”
f
.
T
( TUNE)
Here’s how to tune
VP-
Turn the TUNE knob to raise or lower the overall pitch of the VP-550.
urn the knob toward “#” to raise the pitch.
rn
When the knob is in the center position, the pitch o
he adjustment range is 415.3 Hz–466.2 Hz.
to lower the pitch.
the A4 key (middle A) will be 440.0 Hz
Page 45

43
Registering sounds and settings
Y
.
V
)
*
gs
.
.
ll b
s
ll.
d
)
]
-
ou can register and recall the sound combination and settings you’ve chosen for Vocal Designer and Ensemble.
This will register the following four settings
8va] on/o (p. 26)
ocal Designer sound (p. 21)
VOICE EXPRESSION] on/o (p. 40)
Ensemble sound (p. 27
You can’t register the settings of the ENSEMBLE LEVEL slider and MIC LEVEL slider.
( REGISTRATION)
Registering a combination of sounds and settin
Choose the Vocal Designer and Ensemble sounds and settings that you want to register
Press and hold down the desired [REGISTRATION] button for two seconds or longer
2
When you’ve held down the button for approximately two seconds, the button will blink, and the registration
e completed.
wi
on’t power-o the VP-550 during this process. Doing so may cause a malfunction.
Recalling a combination of sounds and setting
Press the [REGISTRATION] button that you want to reca
Release the button within two seconds. (If you hold down the button for two seconds or longer, the current
s and settings will be registered.
soun
Convenient ways to use [REGISTRATION
[REGISTRATION] number 1 is automatically selected when you power-on the VP-550. You’ll nd it con
venient to register your favorite combination of sounds and settings in number 1.
Page 46

Adjusting the mic expression sensitivity
V
g
a
.
.
s
.
W
T
g
e
e
e
While holding d
one of the
sound buttons.
T
T
.
T
T
T
.
Y
g.
ocal Designer settin
You can adjust the depth to which changes in mic input
loudness a ect Vocal Designer’s expression (dynamics) over
range of six steps
Higher dynamics settings give Vocal Designer a greater
ange between loud and soft sounds, which gives you more
expressive power but also means that you must control the
ic more accurately with the loudness of your voices
Lower dynamics settings give Vocal Designer a narrower
ange of volume change, meaning that you will obtain a
table volume even if there are changes in the loudness of
your voice, making it easier for you to sing
hile holding down [MIC ON/OFF], press
one of the Vocal Designer sound buttons.
he six levels of the dynamics setting correspond
to the numbers (1–6) marked on the buttons in the
llustration. Higher numbers mean greater dynamcs (default: 4).
Voice Expression settin
You can adjust the sensitivity at which the Voice Expression
ect will begin applying in response to changes in mic
nput loudness over a range of six steps.
igher sensitivity settings mean that the Voice Expression
ect will begin applying even when your voice is still at a
low loudness level.
ower sensitivity settings mean that the Voice Expression
ect will begin applying only when your voice reaches a
fairly high loudness level. You’ll nd it easier to control Voice
xpression if you set this to a sensitivity that’s appropriate
for your singing voice.
own [MIC ON/OFF], press
Ensemble
he six sensitivity levels correspond to the numbers
1–6) marked on the buttons in the illustration.
Higher numbers mean higher sensitivity (default: 4).
he sound button you pressed will blink, and all of the other sound buttons will light
2
his completes the setting. This setting will be remembered even when you turn o the power.
on’t power-o the VP-550 during this process. Doing so may cause a malfunction.
o check the current setting, hold down [MIC ON/OFF] for one second or longer.
he sound button corresponding to the current setting will blink, and the remaining sound buttons will light
ou can also press a sound button at this time to change the settin
Page 47

Example applications
ere you’ll learn about some speci c settings for taking advantage of the VP-550.
H
45
Page 48

6
Simulating a large classical choir
“
a
evel do
d.
T
f
.
A
.
“
f
”
cher sound
A
-
“
o
When you need a large classical-style choir, you’ll want to choose the “CLASSIC” Vocal Designer sound.
CLASSIC” has a broad range of usable pitches and will allow the lyrics to be heard clearly, so it’s suitable for
wide variety of styles. To get an even denser sound, choose the “MALE & FEMALE” Ensemble sound.
ELECT [CLASSIC] and [MIXED CHORUS].
While you perform using the mic and keyboard, adjust the Ensemble
2
l
he Ensemble part not only makes the sound richer, but also lls the gaps in the Vocal Designer sound that
occur when you take a breath. You’ll want to set the level
wnwar
airly low (about 2 or 3)
For an even ri
s a combination that’s just as highly recom
mended as “CLASSIC” and “MIXED CHORUS,” we
also suggest “MALE & FEMALE” together with
STRINGS 1.” (In this case, the secret is to raise the
ctave of “MALE & FEMALE” by turning the [8va]
utton on.) The audience will be stunned by the
richness of the sound emanating from you and
the VP-550.
pply the “HALL 1” ambience fairly heavily
HALL 1” simulates the reverberation of a church. Classical music usually has fairly deep reverberation, so
turn the knob toward the right to increase the reverb. I
you want even deeper reverberation, choose “HALL 2.
4
erform.
ake a point of using your voice via the mic to add expression.
Page 49

Simulating a gospel chorus
“
a
”
C
d.
“
Ooh
-
a
.
A
.
.
.
y
?
For gospel-style songs, choose the “GOSPEL” Vocal Designer sound and the “HUMMING” Ensemble sound.
GOSPEL” is a choral sound containing the distinctive upward swoops that occur at the beginning of notes,
nd is a particularly good complement to the softer attacks of “HUMMING.
hoose “GOSPEL” and “HUMMING”
ow about a cappella
you also choose a bass sound in the “Bass &
ercussion” part, you’ll be able to simulate an
a cappella group all by yourself! Play the bass
line with your left hand while you use your
right hand to play the melody and chords.
Use the expression pedal to reduce the volume of the “HUMMING”
soun
HUMMING” will vary its character through the range of “mmh” ➞“
sion pedal, but the “mmh” sound that you get when the pedal is in the fully returned (upward) position is
particularly good with “GOSPEL.” You’ll want to leave the pedal in the upward position most of the time,
nd advance the pedal to accentuate musically intense passages
” ➞“Aah” as you operate the expres
pply an appropriate amount of “HALL 1” ambience
If you want only light reverberation, “STUDIO” is also a good choice
rform
Use your voice via the mic to control the volume. For a funky rhythmic backing chorus, hold down the
chords on the keyboard and use your voice in the mic to produce the rhythm. You’ll also want to use the
pitch bend lever aggressivel
.
Page 50

8
Adding a backing chorus to your voice
Ch
T
y
a
f
g.
.
.
.
Try
he back
V
Here’s how the VP-550 can add a backing chorus to your singing voice via the mic input.
oose [GOSPEL].
he “GOSPEL” sound has an appropriate amount of “irregularity” built into it, and is a good choice for add-
ing a dense backing chorus. If
clearly, you might want to choose “CLASSIC.” For songs with rapid passages, try “POP” which has a faster
ttack and less irregularity. You’ll want to nd the sound that’s most appropriate for the style of song you’re
ormin
per
ou don’t require this much density, or if you want the lyrics to be heard
While you perform using the mic and keyboard, adjust the [DIRECT]
slider
When you raise the DIRECT slider, your singing voice from the mic input will be output from the VP-550. Set
the DIRECT slider fairly low (about 2 or 3) to create the appropriate overall volume balance
rform
singing a favorite song into the mic. While you sing, use the keyboard to play the chord progression for
ing chorus.
t
ocal Designer will add a backing chorus to your voice according to the chords you hold down.
4
Page 51

49
Y
f
T
.
C
.
”
p
.
.
y
y
l
Simulating a jazz scat solo
ou won’t be able to perform skillfully using Vocal Designer unless your mic vocalizing and keyboard per-
ormance are at the appropriate timing. This can make it rather di cult to play rapid solo passages. In such
cases, you can turn up the volume of “JAZZ SCAT,” which has the sharpest attack of the Ensemble sounds.
his setting is ideal for jazz scat solos (which don’t have lyrics)
hoose [POP] and [JAZZ SCAT]
In Vocal Designer choose “POP” (ideal for rapid passages), and for the Ensemble sound choose “JAZZ SCAT.
While you perform using the mic and keyboard, adjust the Ensemble
level u
ward
rform
Being careful to match the timing of your mic and keyboard performance, play fast phrases on the key-
board while you vocalize a rapid passage using “doo ba, doo ba” –type vocalizations. The “JAZZ SCAT” En-
semble part will switch between scat sounds according to
a bit softer without paying too much attention to this. Then, at the moments where you want to add
pla
emphasis to your solo, play the keyboard strongly to produce the “Fall” scat sound. The secret is to
musica
scatter these accents at the appropriate points in your performance.
our keyboard dynamics, but you should simply
Page 52

50
f
p
”
C
.
O
s
.
”
such
.
.
Using the sound of an external synthesizer
If you press the [VOCODER 1] and [VOCODER 2] sound buttons simultaneously, the sound being received
rom the rear panel [EXT IN] jack will be used as the carrier (the signal that is the foundation of the sound).
In this case, turn the rear
onnect your external synthesizer to the [EXT IN] jack as shown
you’re using a mic that’s equipped with a phone plug, you won’t be able to connect your synthesizer
ince the [EXT IN] jack will be occupied by your mic. In order to connect an external synthesizer, you
must use a mic with an XLR plug and connect it to the [MIC] jack
Turn the [EXT IN] knob to “LINE.
anel [MIX TO MIC] switch “OFF.
UTPUT
( EXT IN)
This knob adjusts the level of the signal that’s input from the [EXT IN] jack. (Turn the knob toward
“MIC” to increase the level, or toward “LINE” to decrease it.) If you’re connecting a line-level device
as a synthesizer, set the knob toward the “LINE” position
Turn the [IX TO MIC] switch “OFF.”
The [MIX TO MIC] switch selects whether the sound from the [EXT IN] jack is used as the mic input
(modulator) (ON) or as the carrier (OFF). Since we’re using this sound as the carrier, select the “OFF”
osition.
ress [VOCODER 1] and [VOCODER 2] simultaneously
Page 53

1
lay the keyboard of your external synthesizer
.
.
.
r
A
.
The VP-550’s [MIC LEVEL] indicator won’t respond if the [MIX TO MIC] switch is “OFF,”
[] p[ ] ,
so you’ll need
t
g
)
(
)
While holding down a note, vocalize into the mic
you don’t hear sound, check the followin
s the mic input level raised? (➞p. 22
s the [MIC ON/OFF] switch lit?
You can also connect a synthesizer that doesn’t have a keyboard (often called a “sound module”).
n this case, connect the VP-550’s [MIDI OUT] connector to the [MIDI IN] connector of your sound
odule, and use the VP-550’s keyboard to play the sound module.
Refer to “Connecting the VP-550 with MIDI equipment” (p. 54) for more about MIDI connections
Adjusting the volume of your external synthesize
. 25
➞
djust the volume of your external synthesizer so that the sound isn’t distorted
o make this adjustment in the following way.
Set the [MIX TO MIC] switch “ON.”
Play your external synthesizer, and adjust its volume so that
2
the yellow [LEVEL] indicator lights at the peaks in the sound.
Return the [MIX TO MIC] switch to “OFF.”
5
Page 54

52
“Performing” sound from drums or a portable music player
a
C
t
-
.
d
Ch
d.
Adj
y
d.
T
h
d.
T
.
T
t
g
➞
)
Here’s a really cool trick. The VP-550 lets you “perform” using the sound from a V-drum (electronic drum) or
portable music player connected to the mic input instead of your voice.
onnect your audio source to the [EXT IN] jack as shown.
UTPUT
et the [
This knob adjusts the level of the sound that is input from the [EXT IN] jack. (Turning the knob
oward “MIC” increases the level, and turning it toward “LINE” decreases the level.) If you’ve con
ected a line-level device, you should set this knob to the “LINE” position
“
The [MIX TO MIC] switch speci es whether the sound from the [EXT IN] jack will be used as a mic
nput (modulator; the ON setting) or as the carrier (the OFF setting). Since we’re using the soun
as a mic input, select the “ON” setting.
oose a Vocal Designer soun
he character of the output sound will depend on the sound you choose.
You’ll want to try out various sounds.
ay your audio source.
ust the input level.
While you watch the VP-550’s [LEVEL] indicator, adjust
the volume of
our external audio source.
ay the VP-550’s keyboar
he sound from your external audio source will be heard according
e pitch you play on the keyboar
to t
hat’s right — the VP-550 lets you “perform” absolutely any sound
If you don’t hear sound, check
he followin
s the [MIC ON/OFF] switch lit?
. 25
Page 55

Appendix
ere you’ll nd information about connecting and using external MIDI equipment, the MIDI
H
implementation, troubleshooting, and the main speci cations.
53
Page 56

5
What’s
?
d
.
I
l
.
ections as sho
above.
p
T
T
s
)
V
CH1C
ble
CH2
CH2
CH3C
d.
Y
.
Al
Connecting the VP-550 with MIDI equipment
OUTPUT
synthesizer
T
speaker
)
MIDI
MIDI (Musical Instrument Digital Interface) is a world-wide standard for transferring performance
ata and other musical information between electronic musical instruments and computer. By us-
ng MIDI cables to connect devices that are equipped with a MIDI connector, you can use a single
MIDI keyboard to play multiple instruments, create ensembles using multiple MIDI instruments,
automatically switch settings as a song progresses, and do much more
Connecting a synthesizer via MID
Here’s how you can use the VP-550’s keyboard to play an external MIDI-connected synthesizer, for example
ayer a piano with the VP-550’s vocal sounds
to
MIDI IN
conn
wn
NPU
(with built-in amp
et the “MIDI receive channel” of your external synthesizer to 1, and
select a
he performance data of the Vocal Designer part (MIDI channel 1) will play your external synthesizer.
iano sound.
he VP-550’sMIDI transmit/receive channel
art MIDI transmit channel ( xed) MIDI receive channel ( xed
ocal designer
Ensem
Bass & Percussion
H1
H3
ay the VP-550’s keyboar
ou’ll hear the piano sound from your synthesizer together with the sound of the VP-550
ternatively, you can connect your external MIDI keyboard’s [MIDI OUT] connector to the VP-550’s
[MIDI IN] connector, and use your external MIDI keyboard to play the VP-550.
4
Page 57

Connecting a sequencer via MID
I
Y
y
y
.
.
ections as sho
above.
T
.
Y
)
Y
e
!
T
.
th
e
.
N
T
Audio
face
ou can use your MIDI sequencer to record the keyboard performance data from the VP-550, and record
our vocal via the mic as you listen to the sequencer playback. With the VP-550 connected to your sequenc-
ou’ll be able to use it as part of your studio setup
er,
or details on MIDI messages, refer to “MIDI Implementation” on the following page
inter
Sequencer
ke conn
IDI OUT
INPU
IDI I
wn
Perform on the VP-550 as you listen to the song on your sequencer, and record the
erformance data from the VP-550 on a MIDI track of the sequencer.
here are two advantages to recording just your keyboard performance ahead of time
ou’ll be able to concentrate on the keyboard (or mic
ou’ll be able to use your sequencer to edit (correct) your keyboard performanc
For example if you’ve already recorded the backing chorus or melody, all you have left to do is sing
Play back your sequencer, and vocalize into the mic that’s connected to the VP-550.
hen record the VP-550’s [OUTPUT] signal onto an audio track of your sequencer
An example of more sophisticated studio work
ecord the backing chorus part on a MIDI track, and route the audio track containing a previously-
ecorded main vocal to the VP-550’s rear panel [EXT IN] jack (as the mic input). Now you can listen
rough your monitor speakers while trying out various settings on the VP-550, and continue
xperimenting with di erent variations of backing chorus as long as you wish.
The VP-550 system is extremely simple; the audio from the mic input is played according to the
otes of the MIDI data. This very simplicity allows a virtually in nite range of uses
55
Page 58

56
MIDI Implementation
Model:
550
6
V
C
s
ote O
S
8
kk
n
)
)
)
ote O
S
n
)
)
dul
S
n
dul
h
h.
S
n
)
h
S
n
)
h
S
0B
n
)
g
S
n
l
)
.
S
0
n
l
)
.
S
n
O
ON
ble,
d.
●●●
❍
❍
❍
❍
❍
ge
e
C
H
g
* Switches sounds.
e
ll
h
)
(
)
*
h
A
H
)
*
o
.
H
)
*
b
.
C
e
M
G
G
)
A
)
00H
)
*
c
be continued unt
ese are turned o .
H
)
*
i
00H
)
*
i
.
)
b
*
i
.
00H
)
*
i
●
●
■
●
●●●
●●●
g
Status
*
i
i
g
i
e
by
s
i
t
t
numbers
M
s
(
.
d
l
.
sage
H
s
7
d
(
)
*
ll b
d.
s
e
8
kk
H
)
v
On
e
9
kk
H
)
v
e
M
)
e
0
H
)
v
*
■
●
■
❍●●
●
❍
VP-
Date: Feb. 01, 200
ersion: 1.00
1. Receive Data
hannel Voice Message
N
tatus 2nd byte 3rd byte
nH
9nH kkH 00H
= MIDI channel number: 0H - FH (ch.1 - 16
kk = Note number: 00H - 7FH (0 - 127
vv = Note o velocity: 00H - 7FH (0 - 127
N
n
tatus 2nd byte 3rd byte
9nH kkH vvH
= MIDI channel number: 0H - 2H (ch.1 - ch.3)
= Note number: 00H - 7FH (0 - 127
vv = Note on velocity: 01H - 7FH (1 - 127
Control Change
ation (Controller number 1)
Mo
tatus 2nd byte 3rd byte
BnH 01H vvH
= MIDI channel number: 0H - 1H (ch.1 - ch.2)
ation depth: 00H - 7FH (0 - 127)
vv = Mo
anges the vibrato dept
* C
Breath type (Controller number 2)
tatus 2nd byte 3rd byte
BnH 02H vvH
= MIDI channel number: 1H (ch.2
vv = Control value: 00H - 7FH (0 - 127)
anges the volume and tone.
* C
Foot type (Controller number 4)
❍
tatus 2nd byte 3rd byte
nH 04H vvH
= MIDI channel number: 1H (ch.2
vv = Control value: 00H - 7FH (0 - 127)
anges the volume and tone.
* C
Expression (Controller number 11)
❍
tatus 2nd byte 3rd byte
nH
= MIDI channel number: 0H - 1H (ch.1 - ch.2
vv = Expression: 00H - 7FH (0 - 127)
es the volume.
* Chan
General purpose controller 1 (Controller number 16)
tatus 2nd byte 3rd byte
nH 10H vvH
= MIDI channel number: 0H - 1H (ch.1 - ch.2)
value: 00H - 7FH (0 - 127
vv = Contro
* Changes the tone
General purpose controller 2 (Controller number 17)
tatus 2nd byte 3rd byte
BnH 1
= MIDI channel number: 0H - 1H (ch.1 - ch.2)
value: 00H - 7FH (0 - 127
vv = Contro
* Changes the pitch
Hold 1 (Controller number 64)
tatus 2nd byte 3rd byte
BnH 40H vvH
= MIDI channel number: 0H - 1H (ch.1 - ch.2)
vv = Control value: 00H - 7FH (0 - 127)
0-63 =
* In Vocal Designer, sustains the carrier sound.
* In Ensem
H vvH
H vvH
H vvH
FF, 64-127 =
sustains the soun
Program Chan
Status 2nd byt
nH pp
n = MIDI channel number: 0H - 2H (ch.1 - ch.3)
ram number: 00H - 7FH (prog.1 - prog.128)
pp = Pro
Pitch Bend Chang
Status 2nd byte 3rd byte
nH
annel number: 0H - 1H (ch.1 - ch.2
n = MIDI c
mm, ll = Pitch Bend value: 00 00H - 40 00H - 7F 7FH
-8192 - 0 - +8191
Changes the pitc
H mmH
Channel Mode Messages
ll Sounds O (Controller number 120)
Status 2nd byte 3rd byte
nH 78H 00
n = MIDI channel number: 0H - 2H (ch.1 - ch.3
When this message is received, all notes currently sounding
n the corresponding channel will be turned o
Reset All Controller (Controller number 121)
Status 2nd byte 3rd byte
nH 79H 00
n = MIDI channel number: 0H - 2H (ch.1 - ch.3
When this message is received, the following controllers will
e set to their reset values
ontroller Reset valu
itch Bend Change +/-0 (center)
odulation 0 (o )
reath type 0 (min)
oot type 0 (min)
xpression 127 (max)
eneral purpose controller 1 0 (min)
eneral purpose controller 2 0 (min)
old 1 0 (o
ll Notes O (Controller number 123
Status 2nd byte 3rd byte
nH 7BH
n = MIDI channel number: 0H - 2H (ch.1 - ch.3
When All Notes O is received, all notes on the corresponding
hannel will be turned o . However, if Hold 1 is ON, the sound
will
OMNI O (Controller number 124)
Status 2nd byte 3rd byte
nH 7CH 00
n = MIDI channel number: 0H - 2H (ch.1 - ch.3
The same processing will be carried out as when All Notes O
s received.
OMNI On (Controller number 125)
Status 2nd byte 3rd byte
nH 7DH
n = MIDI channel number: 0H - 2H (ch.1 - ch.3
The same processing will be carried out as when All Notes O
s received. OMNI ON will not be turned on
MONO (Controller number 126
Status 2nd byte 3rd byte
nH 7EH mmH
n = MIDI channel number: 0H - 2H (ch.1 - ch.3)
mm = mono num
The same processing will be carried out as when All Notes O
s received. MONO will not be turned on
POLY (Controller number 127)
Status 2nd byte 3rd byte
nH 7FH
n = MIDI channel number: 0H - 2H (ch.1 - ch.3
The same processing will be carried out as when All Notes O
s received.
il th
er: 00H - 10H (0 - 16)
System Realtime Message
Active Sensin
EH
When Active Sensing is received, the unit will begin monitor-
ng the intervals of all further messages. While monitoring,
f the interval between messages exceeds 420 ms, the same
will be carried out as when All Sounds O , All
processin
otes O and Reset All Controllers are received, and message
nterval monitoring will be halted.
System Exclusive Messag
Status Data
0H iiH, ddH, ......, eeH F7H
0H: System Exclusive Message Statu
i = ID number: an ID number (manufacturer ID) to indicate
d,..., ee = data: 00H - 7FH (0 - 127)
7H: EOX (End Of Exclusive)
Of the System Exclusive messages received by this device, the
Universa
Non-realtime messages
te Status
he manufacturer whose Exclusive message
his is. Roland’s manufacturer ID is 41H. ID
7EH and 7FH are extensions of the
IDI standard; Universal Non-realtime Mes-
ages (7EH) and Universal Realtime Messages
7FH)
niversal Non-realtime System Exclusive Mes-
entity Request Message
Status Data byte Status
0H 7EH, dev, 06H, 01H F7
yte Explanation
0H Exclusive statu
EH ID number (Universal Non-realtime Message)
ev Device ID (dev: 10H, 7FH)
06H Sub ID#1
01H Sub ID#2 (Identity Request)
7H EOX (End Of Exclusive)
When this message is received, Identity Reply message (p. 57)
e transmitte
wi
General Information
2. Data Transmission
Channel Voice Message
O
Status 2nd byte 3rd byt
nH
n = MIDI channel number: 0H - 2H (ch.1 - ch.3)
= Note number: 00H - 7FH (0 - 127
v = Note o velocity: 00H - 7FH (0 - 127)
ote
Status 2nd byte 3rd byt
nH
n = MIDI channel number: 0H - 2H (ch.1 - ch.3
k = Note number: 00H - 7FH (0 - 127)
v = Note on velocity: 01H - 7FH (1 - 127)
Control Chang
odulation (Controller number 1
Status 2nd byte 3rd byt
nH
n = MIDI channel number: 0H - 1H (ch.1 - ch.2
v = Modulation depth: 00H - 7FH (0 - 127)
Transmitted when the Modulation lever is operated.
H vv
H vv
1H vv
Page 59

7
reath type (Controller number 2)
e
0
H
)
v
)
*
e
0
H
v
)
*
.
e
H
v
)
*
.
G
e
H
)
v
*
G
e
H
)
v
*
.
e
H
)
v
)
*
*
e
, ll
H
*
Sy
e
g
*
S
e
y
sage
by
s
,
H
❍
❍
❍
❍
❍
❍
●
●
●
❍
n
7
d
)
b
d)
e
e
00H 0
el
ble
(
)
f
umbers.
|
decimal
l
*
g
i
*
d
o
bb
*
+
b
o
+
would be aa bb
8.
*
i
bbl
the value of a
b.
0
g
?
2
356
val
0D
3
((
5
■
val
0
4
4
,
.
s
9
d
i
p
1
g
-
.
8
l
h
i
(
-3072
g
f
channe
.
4
b
g
a
o
a
.
(B1)
(B1)
i
g
y
g
e
■
Status 2nd byte 3rd byt
nH
n = MIDI channel number: 1H (ch.2
v = Control value: 00H - 7FH (0 - 127
Transmitted according to mic volume when Voice Expression is on.
oot type (Controller number 4)
Status 2nd byte 3rd byt
nH
n = MIDI channel number: 1H (ch.2)
v = Control value: 00H - 7FH (0 - 127
Transmitted when the Expression pedal is operated
xpression (Controller number 11)
Status 2nd byte 3rd byt
BnH 0BH vv
n = MIDI channel number: 0H - 1H (ch.1 - ch.2)
v = Control value: 00H - 7FH (0 - 127
Transmitted when D Beam / Expression is on
eneral purpose controller 1 (Controller number 16)
Status 2nd byte 3rd byt
BnH 10H vv
n = MIDI channel number: 0H - 1H (ch.1 - ch.2
v = Control value: 00H - 7FH (0 - 127)
Transmitted when D Beam / Filter is on.
eneral purpose controller 2 (Controller number 17)
Status 2nd byte 3rd byt
nH 10H vv
n = MIDI channel number: 0H - 1H (ch.1 - ch.2
v = Control value: 00H - 7FH (0 - 127)
Transmitted when D Beam / Pitch is on
old 1 (Controller number 64)
Status 2nd byte 3rd byt
nH 40H vv
n = MIDI channel number: 0H - 1H (ch.1 - ch.2
v = Control value: 00H - 7FH (0 - 127
0-63 = OFF, 64-127 = ON
Transmitted when the Hold pedal is operated.
Control value is transmitted only as 00H (o ) or 7FH (on).
itch Bend Change
Status 2nd byte 3rd byt
n = MIDI channel number: 0H - 1H (ch.1 - ch.2)
= Pitch Bend value: 00 00H - 40 00H - 7F 7F
mm
(-8192 - 0 - +8191)
Transmitted when the pitch bend lever is operated.
2H vv
4H vv
stem Realtime Messag
Active Sensin
Status
This message is transmitted at inter vals of approximately 250
msec.
ystem Exclusive Messag
niversal Non-realtime System Exclusive Message is the only
stem Exclusive messages transmitted by this device.
S
Universal Non-realtime System Exclusive Message
dentity Reply Message
Receiving Identity Request Message, this device send this mes-
.
Status Data
F0H 7EH, dev, 06H, 02H, 41H, 18H, 02H, F7H
00H
te Statu
00H, 00H, 01H, 00H, 00
yte Explanatio
0H Exclusive status
EH ID number (Universal Non-realtime Message)
ev Device ID (dev: 10H
06H Sub ID#1 (General Information)
02H Sub ID#2 (Identity Reply)
41H ID num
18H 02H Device family cod
00H 00H Device family number cod
1H 00H 00H Software revision lev
7H EOX (End Of Exclusive)
er (Rolan
3. Supplementary Material
Decimal and Hexadecimal Ta
An “H” is appended to the end of numbers in hexadecimal
notation.
n MIDI documentation, data values and addresses/sizes of
xclusive messages, etc. are expressed as hexadecimal values
for each 7 bits.
ollowing table shows how these correspond to decimal
The
n
+------+------++------+------++------+------++------+------
D | H || D | H || D | H || D | H
------
------
------
------
------
------
------
------
------
------
------
------
------
------
------
D:
H: hexadecima
Decimal values such as MIDI channel, bank select, and pro-
ram change are listed as one greater than the values given
n the above table.
A 7-bit byte can express data in the range of 128 steps. For
ata where greater precision is required, we must use two
r more bytes. For example, two hexadecimal numbers aa
bbH expressing two 7-bit bytes would indicate a value of aa x
.
128+
I n the case of values which have a +/- sign, 00H = -64, 40H =
/-0, and 7FH = +63, so that the decimal expression would
e 64 less than the value given in the above chart. In the case
f two types, 00 00H = -8192, 40 00H = +/-0, and 7F 7FH =
8191. For example, if aa bbH were expressed as decimal, this
Data marked “Use nibbled data” is expressed in hexadecimal
n 4-bit units. A value expressed as a 2-byte ni
<Example1> What is the decimal expression of 5AH?
rom the preceding table, 5AH = 9
<Example2> What is the decimal expression of the value 12 34H
iven as hexadecimal for each 7 bits
rom the preceding table, since 12H = 18 and 34H = 5
18 x 128+52 = 2
<Example3> What is the decimal expression of the nibbled
ue 0A 03 09 0D?
rom the preceding table, since 0AH = 10, 03H = 3, 09H = 9,
H = 1
10 x 16+3) x 16+9) x 16+13 = 4188
H - 40 00H = aa x 128+bb - 64 x 12
x 16+
------
e 0a 0bH has
<Example4> What is the nibbled expression of the decimal
ue 1258?
6 ) 1258
) 78 ...1
) 4 ...1
0 ...
Since from the preceding table, 0 = 00H, 4 = 04H, 14 = 0EH, 10 =
the result is: 00 04 0E 0AH
0AH
Examples of Actual MIDI Message
<Example1> 92 3E 5F
n is the Note-on status, and n is the MIDI channel number.
Since 2H = 2, 3EH = 62, an
with MIDI CH = 3, note number 62 (note name is D4), and veloc-
ty 95.
le2> C0 0
<Exam
CnH is the Program Change status, and n is the MIDI channel
number. Since 0H = 0, 01H = 01, this is a Pro
sage with MIDI CH = 1, program number 2
<Example3> E1 00 2
nH is the Pitch Bend Change status, and n is the MIDI channe
number. The 2nd byte (00H = 0) is the LSB and the 3rd byte
(28H = 40) is t
n which 40 00H (= 64 x 12+80 = 8192) is 0, so this Pitch Bend
Value is
28 00H - 40 00H = 40 x 12+80 -
f the Pitch Bend Sensitivity is set to 2 semitones, -8192 (00 00H)
will cause the pitch to chan
(-3072) ? (-8192) = -75 cents o
l 11
MIDI
<Example4> B1 01 00 01 01 01 02 01 03 01 0
nH is the Control Change status, and n is the MIDI channel
er. For Control Changes, the 2nd byte is the control num-
num
ber, and the 3rd byte is the value. In a case in which two or more
es consecutive messages have the same status, MIDI has
messa
provision called “running status” which allows the status byte
f the second and following messages to be omitted. Thus, the
bove messages have the following meaning
B1 01 00 MIDI CH = 2 Modulation: 00H
01 01 MIDI CH = 2 Modulation: 01H
(B1) 01 02 MIDI CH = 2 Modulation: 02H
01 03 MIDI CH = 2 Modulation: 03H
(B1) 01 04 MIDI CH = 2 Modulation: 04H
t is not desirable for performance data (such as Standard MIDI
ile data) to contain many events with running status as given
n <Example 4>. This is because if playback is halted during
and then rewound or fast-forwarded, the sequencer
the son
not be able to transmit the correct status, and the sound
ma
enerator will then misinterpret the data. Take care to give each
vent its own status.
5FH = 95, this is a Note-on message
ram Change mes
e MSB, but Pitch Bend Value is a signed number
64 x 12+80) = 5120 - 8192 =
e -200 cents, so in this case -200 x
Pitch Bend is being applied to
5
Page 60

58
MIDI Implementation Chart
Model: VP-550
Transmitted Recognized Remarks
1–3
X
Mode 3
**************
24–96
**************
O
O
X
X
1–3
X
Mode 3
0–127
0–127
O
O
X
X
Basic
Channel
Mode
Note
Number :
Velocity
After
Tou ch
Function...
Default
Changed
Default
Messages
Altered
True Voice
Note On
Note O
Key's
Channel's
Date : Feb. 01, 2006
Version : 1.00
CH1: VOCAL DESIGNER
CH2: ENSEMBLE
CH3: BASS & PERCUSSION
Pitch Bend
Control
Change
Program
Change
System Exclusive
System
Common
System
Realtime
: All Sound O
Aux
Messages
: Reset All Controllers
: Local On/O
: All Notes O
: Active Sensing
: System Reset
Notes
: True Number
: Song Position
: Song Select
: Tune Request
: Clock
: Commands
1
2
4
11
16
17
64
O
O
O
O
O
O
O
O
X
**************
O
X
X
X
X
X
X
X
X
X
O
X
O
O
O
O
O
O
O
O
O
0–6, 7–127
O
X
X
X
X
X
O
O
X
O (123–127)
O
X
Modulation
Breath type
Foot type
Expression
General purpose controller 1
General purpose controller 2
Hold 1
Program No.1–7, OFF
Mode 1 : OMNI ON, POLY
Mode 3 : OMNI OFF, POLY
Mode 2 : OMNI ON, MONO
Mode 4 : OMNI OFF, MONO
O : Yes
X : No
Page 61

9
Main speci cations
V
d
d
Tones
C
VOCO
N
S
S
CHOIR,
Amb
O
y
ces
tech
Controllers
h
r
±1 O
e
4
e
z
Sound Chec
on
.
l
u
u
s
)
O
y
y
,
old Pedal Jack
k
y
)
n
s
8
m
s
Weigh
8
z
Accessories
Owner’s Manual
”
”
d
edal Switch:
es
oot Switch:
OSS FS-5U
5
j
c
.
P-550: Vocal & Ensemble Keyboar
Keyboar
49 keys (with velocity)
Voc al Designer (7 tones)
LASSIC, MALE & FEMALE, GOSPEL, POP, VOCODER 1,
DER 2, EXT I
nsemble (6 tones)
TRINGS 1, STRINGS 2, JAZZ SCAT, MIXED CHORUS, BOY
HUMMING
ass & Percussion (4 sets)
BASS 1, BASS 2, BASS 3, PERC
ience (3 types)
HALL 1, HALL 2, STUDI
aximum Polyphon
128 voi
Changes depending on the sound and the playing
nique)
Connector
Headphones Jack (Stereo 1/4 inch phone type
utput Jacks (L/MONO, R) (1/4 inch phone type)
MIC Jack (XLR t
External Input Jack (1/4 inch phone t
MIDI Connectors (IN
H
Expression Pedal Jac
AC Inlet
pe)
pe)
OUT)
Power Suppl
AC 115 V, AC 117 V, AC 220 V, AC 230 V, AC 240 V (50/60 Hz
Power Consumptio
14 W
Dimension
65.4 (W) x 346.3 (D) x 98.6 (H) m
34-1/8 (W) x 13-11/16 (D) x 3-15/16 (H) inche
t
.5 kg / 18 lbs 12 o
D Beam Controller
Pitc
Bend / Modulation Leve
Octave Shift
ctav
Lea et “USING THE UNIT SAFELY
Lea et “Mics recommended for the VP-550
Power Cor
Options
Number of Registration memories
aster Tun
415.3 Hz to 466.2 H
k Functi
Records OUTPUT signal for 10 seconds and plays it back
Keyboard Stand: KS-12
P
F
Expression Pedal: EV-
* In the interest of product improvement, the speci ca-
tions and/or appearance of this unit are sub
hange without prior notice
DP Seri
B
ect to
Nominal Input Leve
INPUT (MIC): -50 to -10 dB
INPUT (EXT IN): -36 to +4 dB
(0 dBu = 0.775 V rms)
5
Page 62

0
Troubleshooting
n
!
)
sound!
(
V
sound!
y
g
)
y
y
)
)
d!
)
)
cussio
t
sound!
)
.
T
C
M
Th
h
d.
M
ork!
T
f y
(
)
g
t
j
)
V
ork!
)
h
-
Could
l?
t
.
V
too much!
-
V
e
f-
y (
y
roblem
wer won’t turn on
ocal Designer won’t
nsemble won’t soun
& Per
he volume level of the
nstrument connected to
[EXT IN] jack is too low.
ic input level is too low!Could you be using a condenser mic?
ic [LEVEL] slider doesn’t
w
LEVEL] indicator does not
ight!
oice Expression doesn’t
w
oice Expression works
ocal Designer is too
xpressive, making it di
cult to sing!
n won’
xplanatio
Is the power cord connected correctly? (
Is the VP-550 correctly connected to your amp, speaker, or headphones? (
Is the VP-550’s volume raised?
Even if you’re playing the keyboard, the Vocal Designer part won’t sound unless
ou’re vocalizing into the mic.
ner” (p. 23
si
Is a Vocal Designer sound button lit? (p. 23)
our mic switched on?
Is
Is
our mic connected correctly? ( p. 14
Is the mic input level raised? (. 22
Is the [MIC ON/OFF] switch lit? (
Is the Ensemble [LEVEL] slider raised? (. 29
Is an Ensemble sound button lit? (. 28
Is a Bass & Percussion sound button lit? (
Bass & Percussion won’t sound outside its range of keys (p. 31)
ould you be using a connection cable that contains a resistor?
Use a connection cable that does not contain a resistor.
e VP-550’s MIC jack does not supply phantom power. You’ll need to provide a
separate p
he mic [LEVEL] slider does not a ect the rear panel [EXT IN] jack.
I
adjust the mic input level.
If the [MIX TO MIC] switch is “OFF,” the [LEVEL] indicator will no lon
o the sound from the [EXT IN] jack. In this case, temporarily set the [MIX TO MIC]
switch “ON” and ad
Is the mic input level raised? (. 22
Is the [MIC ON/OFF] switch lit? (
Increase t
sion e ect to start applying when your voice is still at a lower volume.
Advancing the Expression pedal all the way to the maximum position means that
he same e ect as Voice Expression is already applied to the maximum extent, so
o further e ect can be obtained
Lower the mic expression sensitivity (. 44). This will prevent the Voice Expres
sion e ect from applying until your voice reaches a louder volume.
Lower the mic expression sensitivit
change in Vocal Designer, producing a more stable volume regardless of how
our voice becomes louder or softer. This will make it easier for you to sing.
antom power supply unit, or use a dynamic mic instea
our mic is connected to the [EXT IN] jack, use the rear panel [EXT IN] knob to
ust the input level. (
e mic expression sensitivity (. 44). This will allow the Voice Expres
you be operating the Expression peda
. 12
p. 13)
p. 20)
For details, refer to “Performing with Vocal De-
. 25)
. 31
. 22
er respond
. 51
. 25)
. 44). This will decrease the volume
6
Page 63

61
roblem
n
c
T
p
Th
g!
Could
Could th
)
)
C
)
Sound continues eve
h
he keyb
Could
land
l.
T
e
sounds!
C
?
g
Th
y
.
S
t
y
y
t does not
cate a malfunction.
When the volume is
Could th
(
.
T
.
-
?
Th
.
?
T
d.
Th
aftertouch.
l?
T
.
Octave buttons and other
ontrollers don’t a ect
the Bass & Percussion!
e pitch is wron
ough I’m not playing
t
oard!
t
he volume decreases
n I switch
wh
e notes sound strange
n the upper registers of
the ke
board
aised, there are noises!
n
Q & A
ow do I perform a fac
tory reset
ow do I change the pitch
end range
s aftertouch supported?
ow do I change the MIDI
eceive/transmit channe
xplanatio
he Bass & Percussion part is not a ected by the octave buttons, pitch bend, D
edals, or Voice Expression (
Beam,
an [OCTAVE] button be on? (
e Vocal Designer [8va] button be on? (p. 26
Is the rear panel [TUNE] knob set correctly? (
ould something be resting on the D Beam? (. 37
you be using a hold pedal that has the incorrect polarity? Please use a
DP series or BOSS FS-5U hold peda
Ro
ould you be pressing the expression pedal
When you switch sounds, the expression pedal value is reset to the minimum
osition. After you’ve switched sounds, please operate the expression pedal once
ain.
a
ometimes when playing the keys in the upper part of the VP-550’s keyboard,
he sound may stop, or the pitch may stop rising; or with certain keys, there ma
e intermittent noise. This occurs mainly when the VP-550’s upper pitch limit is
exceeded, so this issue doesn’t arise in the ranges normall
i
If the [EXT IN] knob
jack, but this not a malfunction. The noise can be reduced in the following way
changed
indi
e [EXT IN] knob on the rear panel be turned all the way to the “MIC” side?
oises. There might be noises even if there is nothing connected to the [EXT IN]
urn the [EXT IN] knob to the “LINE” side until the noise is less noticeable
If a mic is connected to the [MIC] jack, set the [MIX TO MIC] switch to “OFF.”
e VP-550 does not have a
ave complex parameters that would require resetting
he VP-550’s pitch bend range is xed at a whole step (two semitones). This can-
ot be change
e VP-550’s keyboard does not support
he VP-550’s MIDI receive/transmit channels (. 54) are xed. They cannot be
. 15) is set maximum to the “MIC” side, there may be
. 36–40).
. 36)
. 42
used. But, in any case,
actory Reset function. This is because it does not
Page 64

2
8va
2
6
A
ftertouc
6
3
3
SS&
CUSSIO
,0,
3
ass & Percussio
3
2
0
,
3
0
,
3
0
,
3
9
,
C
Ca
CLASSIC
9
,
2
3
3
3
4
3
0
,9,
9
6,3
9
3
5
0
5,5
0
,
5
6
3
G
G
9
,
3
3
3
3
3
9
9
,
2
3
0
J
J
9
,
2
2
,
2
9
9
,
5
4
0
2
2
5,3
2
,
4
4
5
5
6
5
8
5
4
9
,
5
,
5
0,5
3
8
ato
O
O
3
6
O
3
Index
Numerics
OSPEL
AC IN
2
rrier
BEAM
PER
h
N
n volume
1
A
AMBIENCE
BA
B
BASS 1
BASS 2
BASS 3
BOYS CHOIR
DEPTH
DIRECT 2
Dynamics control
ENSEMBLE
ENSEMBLE LEVEL 2
EXP PEDAL
EXPRESSION
External synthesizer
F
Factory Reset
FILTER
ALL 1
2
LD PEDAL 6,
UMMING
ntelligent legato
AZZ SCAT
EVEL
ALE & FEMALE
IC
ic: balanced (XLR) plug
ic: phone plug
c: Voice expression
IC LEVEL 2
IC ON/OFF
c expression sensitivity
IDI
IDI Implementation
IDI Implementation Chart
IDI transmit/receive channels
IXED CHORUS
IX TO MIC
odulation
CTAVE
UT PUT
27
l
r
6
Page 65

63
PEDAL
6
,
3
9
0
,
3
3
3
3
8
3
8
3
4
9
,
8
3
4
3
S
3
9
S
9
,
,
3
0
S
9
,
2
STUDIO
3
3
T
6
0
TU
V
,8,9,
2
d
8
OCO
9
,
OCO
9
,
4
0
2
0
550
PERC
PHONES
PITCH
Pitch bend
Pitch bend range
POP
Portable music player 52
POWER ON 1
REC
REGISTRATION
SOUND CHECK
Sound list
TRINGS 1
TRINGS 2
roubleshooting
2
NE
VOCAL DESIGNER 7
er
Voco
V
DER 1
V
DER 2
VOICE EXPRESSION
VOLUME
VP-
1
Page 66

6
Information
4
Page 67

MIC
Block diagram
MIC
LEVEL
MIC ON / OFF
MIC
LEVEL LED
MIC
MIC
DIRECT
EXT IN
LEVEL
EXT IN
EXP
PEDAL
BASS & PERCUSSION
ON
OFF
MIDI IN
HOLD
PEDAL
MIX TO MIC
PITCH
BEND
ON
OFF
ON / OFF
8va
D-BEAM
DOWN / UP
OCTAVE
EXT IN
KBD
CTRL
MIDI
VOICE EXPRESSION
VOICE EXPRESSION
KBD
CTRL
MIDI
KBD
MIDI
ENSEMBLE
LEVEL
BASS & PERCUSSION
LEVEL
AMBIENCE
DEPTH
REC PLAY
SOUND CHECK
VOLUME
OUTPUT
MIDI OUT
Page 68

*04232878 - 01 *
04232878 ’06-02-1N
 Loading...