

Roland VP-03 Owner’s Manual
VP-03
1
[4]
2 3 4 5 6 7 8 9 10 11 12 13 14 15 16
Owner’s ManualVocoder
English
In order to use this device correctly, please carefully read “USING THE UNIT SAFELY” and “IMPORTANT NOTES” (the “USING THE UNIT SAFELY” leaet) before use.
After reading, keep these instructions at hand for immediate reference.
Introduction
The VP-03 is a sound module that uses cutting-edge modeling technology to faithfully model the Roland
VP-330 which went on sale in 1979. In addition to its compact size, it allows battery-powered operation and
contains a small speaker. It lets you enjoy full-edged vocoder sound anywhere.
In the same way as on the original VP-330, you can use a combination of the vocoder section, the human voice
section which electronically synthesizes a voice, and the strings section. To these sections, we’ve newly added a
step sequencer and a chord memory function.
* The VP-03 can operate on batteries or on USB bus power. If you are using batteries, insert four AA batteries,
making sure that the batteries are oriented correctly.
* If you handle batteries improperly, you risk explosion and uid leakage. Make sure that you carefully
observe all of the items related to batteries that are listed in “USING THE UNIT SAFELY” and “IMPORTANT
NOTES” (leaet “USING THE UNIT SAFELY”).
* When turning the unit over, be careful so as to protect the buttons and knobs from damage. Also, handle
the unit carefully; do not drop it.
* When the batteries run low, the LED above the Ribbon Controller C1 blinks. Install new batteries.
Using the VP-03 in conjunction with the K-25m keyboard
unit (sold separately) or DK-01 Boutique Dock (sold
separately)
&
For installation, refer to the K-25m/DK-01’s Owner’s Manual.
Playing the VP-03 via MIDI or USB
You can also play the VP-03 via MIDI or USB. For details, refer to “Connecting Your Equipment.”
Connecting Your Equipment
* To prevent malfunction and equipment failure, always turn down the volume, and turn o all the units
before making any connections.
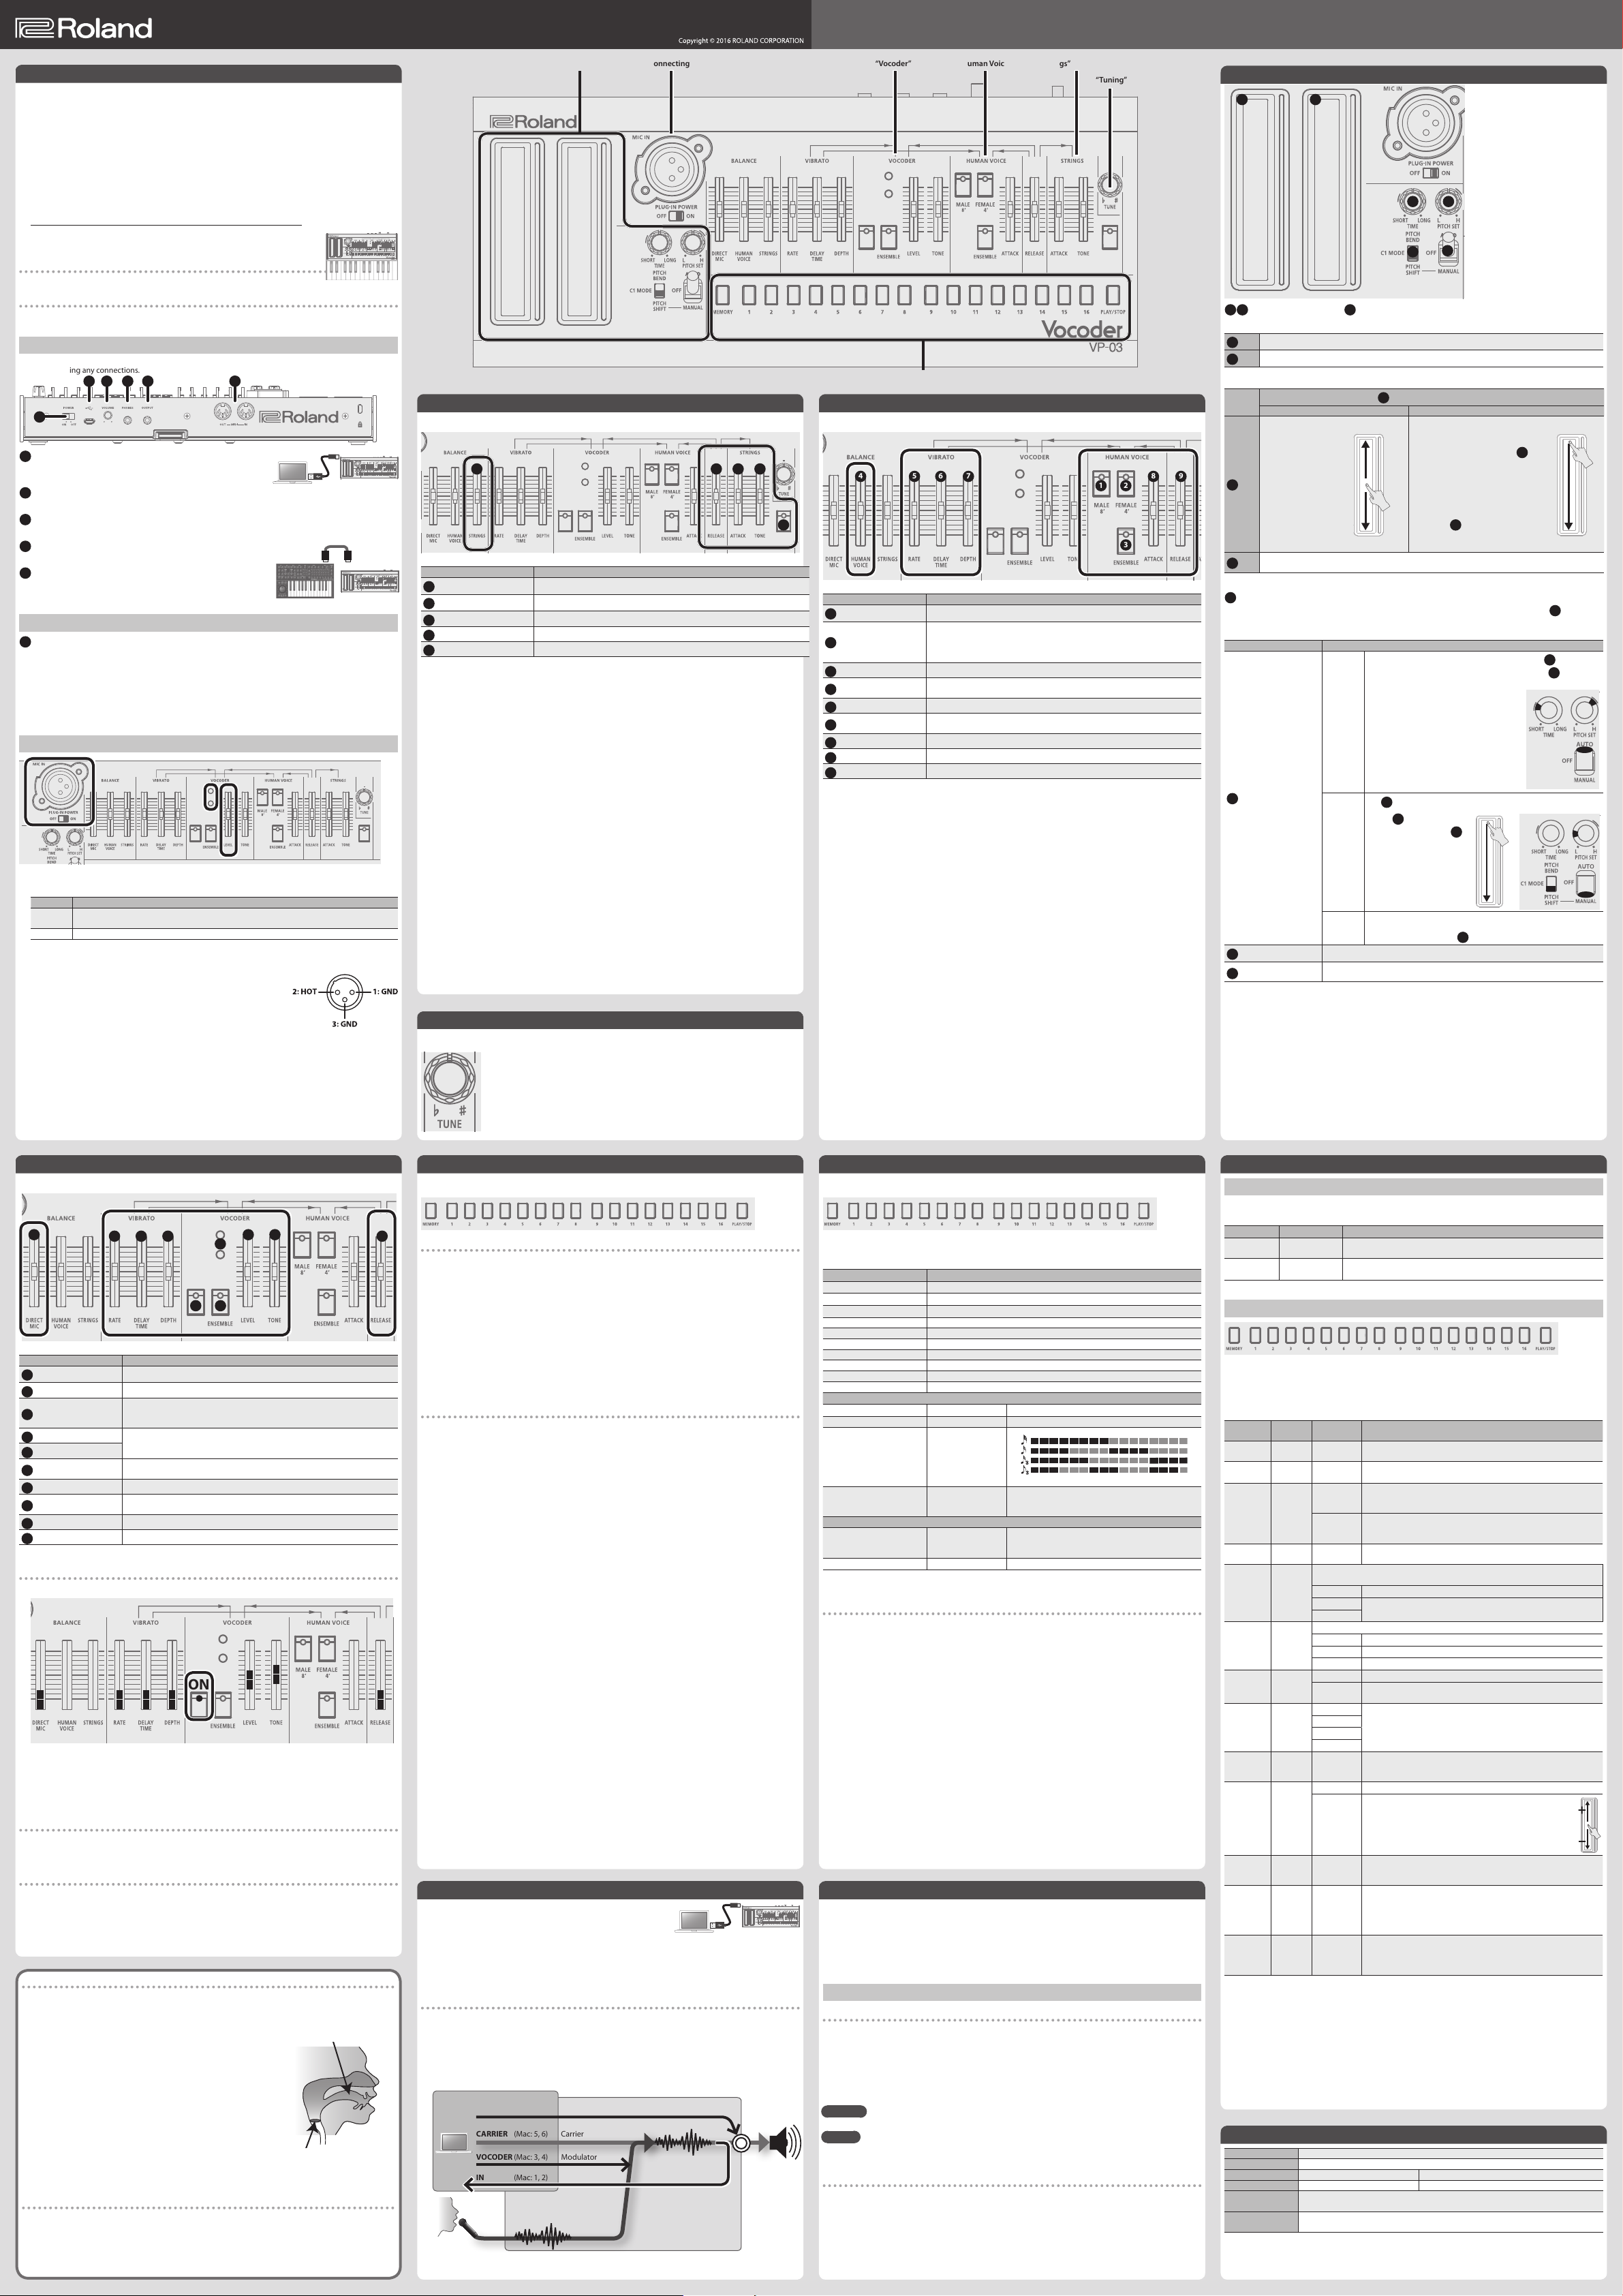
F
A
Micro USB (O) port
Use a commercially available USB 2.0 cable (A-microB) to connect this
port to your computer. & “Connecting via USB”
B
[VOLUME] knob
Adjusts the volume.
C
PHONES jack
Connect headphones (sold separately) here.
D
OUTPUT jack
Connect this jack to your amp or monitor speakers.
E
MIDI connectors
You can play the VP-03 by connecting a MIDI device via a commercially
available MIDI cable.
A B C D E
MIDI INMIDI OUT
VP-03MIDI keyboard
Turning the Power On
F
[POWER] switch
This turns the power on/o.
* After you’ve made connections correctly, be sure to turn on the power in the order of the VP-03 rst, and
then the connected system. Powering-on in the incorrect order may cause malfunctions or damage. When
turning the power o, power-o the connected system rst, and then the VP-03.
* Before turning the unit on/o, always be sure to turn the volume down. Even with the volume turned down,
you might hear some sound when switching the unit on/o. However, this is normal and does not indicate
a malfunction.
Connecting a Microphone
1. Connect the included microphone to the MIC IN connector.
2. Set the [PLUG-IN POWER] switch to “ON.”
Setting Explanation
ON
OFF Commercially available dynamic microphone
Included mic (plug-in power)
If this is ON, 3 V power is supplied via the MIC IN jack.
3. Use the VOCODER [LEVEL] slider to adjust the volume of the microphone.
Adjust this so that when loud sound is input from the mic, the red indicator does not light, but the green
indicator stays lit.
* Pin assignment of the MIC IN connector
“Pitch Shift” “Connecting a Microphone” “Vocoder”
Strings
This provides a smooth and sustaining strings ensemble.
2 34 5
Controller Explanation
1
STRINGS switch Turns on/o the strings.
2
BALANCE [STRINGS] slider Adjusts the volume of the strings.
3
[ATTACK] slider Adjusts the attack of the sound.
4
[RELEASE] slider Adjusts the decay that occurs after you release the key.
5
[TONE] slider Adjusts the brightness of the sound.
“Human Voice” “Strings”
“Tuning”
“Chord Memory” / “Step Sequencer” / “Settings”
Human Voice
This is the human voice section which electronically synthesizes a voice.
4 5 6 7 8 9
1
Controller Explanation
1
[MALE 8’] switch Turns male (male voice) 8’ on/o.
Turns female (female voice) 4’ (male 4’ in the lower region) on/o.
2
[FEMALE 4’] switch
3
[ENSEMBLE] switch Adds a chorus eect to the human voice.
BALANCE [HUMAN
4
VOICE] slider
VIBRATO [RATE] switch Determines the speed of the vibrato.
5
VIBRATO [DELAY TIME]
6
slider
VIBRATO [DEPTH] slider Determines the width of the vibrato pitch change.
7
8
[ATTACK] slider Adjusts the attack of the sound.
9
[RELEASE] slider Adjusts the decay that occurs after you release the key.
* This sound produces a female voice in the region (upper) above the split
point (default value: C4), and a male voice in the region (lower) below the
split point. You can change the split point in “System Settings.”
Adjusts the volume of the Human Voice.
Species the time from when the tone sounds until the vibrato reaches its
maximum amplitude.
1 2
3
Pitch Shift
1 2
5 6
4
3
1 2
Ribbon controller (C1/C2), 3[C1 MODE] switch
When using the VP-03 by itself
1
C1 Preview (notes)
2
C2 Octave shift
When a keyboard is connected
3
The ribbon controller
C1 operates as a
conventional pitch bend.
5 The pitch is controlled
1
C1
5 When you release
5 You can change the
Modulation / Formant
2
C2
&
4
Pitch shift switch
Pitch shift varies the pitch during the attack of the note, either automatically or manually (using
controller C1). In particular when using the vocoder or human voice, this is an eective way to express a human
feeling of unsteadiness at the beginning of the note.
Controller Explanation
4
Pitch shift switch
5
[TIME] knob Species the time over which the pitch changes when using the AUTO setting.
6
[PITCH SET] knob Species the starting pitch (variable range) of the pitch shift.
PITCH BEND PITCH SHIFT
up or down, with the
center as zero.
your nger, the pitch
returns to the center.
bend range in the
system settings.
Refer to “System Settings”-”Ribbon Controller C2 Mode”
AUTO
MANUAL
OFF
[C1 MODE] switch settings
The ribbon controller C1 operates in the
same way as the PITCH SHIFT slider of the
UP
PITCH=0
DOWN
Auto pitch shift occurs at the speed specied by the
The starting pitch of the pitch shift is specied by the 6[PITCH SET]
knob.
Example setting:
This is an example of pitch shift settings that
realistically reproduce the character of a
human voice. This is appropriate for use with
the vocoder or human voice.
* The markings on the panel are general
Use
Set the
to “PITCH SHIFT.” Use the
[PITCH SET] knob to set the
range of pitch change.
Example setting:
You can use ribbon controller
C1 to shift the pitch
downward.
You can use CC4 (Foot Controller) messages from an external MIDI
device to control the pitch. When the CC4 value is 64 or higher, the
pitch is as specied by the
original VP-330.
* It operates only when the
shift switch is in “MANUAL” mode.
5 The top is zero; the controller controls
the pitch only downward.
5 The value is held even if you release
your nger.
6
5 Use the
guidelines. The appropriate settings
depend on the combination of other
settings such as attack, so try dierent
settings to get the sound that you want.
1
ribbon controller C1 to control pitch shift.
3
[C1 MODE] switch
[PITCH SET] knob to
specify the range in which the pitch
will change.
6
6
[PITCH SET] knob.
PITCH=0
DOWN
4
pitch
PITCH=0
1
ribbon
5
[TIME] knob.
DOWN
Vocoder
While vocalizing into the mic, play the keyboard (or ribbon controller).
3 4 6
Controller Explanation
1
VOCODER switch Turns on/o the vocoder.
2
[ENSEMBLE] switch Adds a chorus eect to the vocoder.
BALANCE [DIRECT MIC]
3
slider
[LEVEL] slider
4
Peak indicator
5
[TONE] slider Adjusts the tone of the vocoder.
6
VIBRATO [RATE] slider Determines the speed of the vibrato.
7
VIBRATO [DELAY TIME]
8
slider
VIBRATO [DEPTH] slider Determines the width of the vibrato pitch change.
9
10
[RELEASE] slider Adjusts the decay that occurs after you release the key.
7 8 9 10
Adjusts the volume of the direct microphone.
Raise this slider if you want the voice from the mic to be layered on the vocoder
sound.
Adjusts the volume of the microphone.
Adjust this so that when loud sound is input from the mic, the red indicator
does not light, but the green indicator stays lit.
Species the time from when the tone sounds until the vibrato reaches its
maximum amplitude.
5
1 2
Vocoder performance example
1. Set the sliders as shown in the following gure.
ON
2. Connect the microphone and adjust the level (refer to “Connecting a Microphone”).
3. While vocalizing into the mic, play the keyboard (or ribbon controller).
4. Adjust the [TONE] slider to get the desired sound.
5. Use the VIBRATO slider to adjust the vibrato.
Vocoder hold
You can use CC66 (Sostenuto Pedal) messages from an external MIDI device to hold the vocal character
(formant) that is being input from the mic. The formant is held when the CC66 is 64 or higher.
While vocoder hold is active, you can perform even without inputting your voice from the mic.
Formant (ribbon controller C2)
&
Refer to “System Settings”-”Ribbon Controller C2 Mode”
What’s a Vocoder?
The “vocoder” was invented by the physicist H. Dudley in 1939 as a
technology for compressing a voice communication signal. Subsequently,
musical instruments based on this technology were developed, allowing
you to play melodies and harmonies using a human voice.
If we ignore dierences of loudness, pitch, and variation between
individuals, the waveform produced by our vocal cords is essentially
identical regardless of what you’re saying (e.g., “ahh” or “eeh”). We can
distinguish spoken or sung words because of the various resonances
(formants) created by our vocal tract (the shape of our throat and the
movement of the larynx and mouth) and additional sounds called
“fricatives,” “plosives,” and “sibilants” that are added in varying ways over
time. The eect of the waveform created by the vocal cords actually has a
rather minimal eect on what the listener hears.
A vocoder analyzes these time-varying changes, electrically synthesizes
the shape of the throat and movements of the mouth (the formant
movements), and uses these formants to modulate a musical signal (the
carrier) rather than the waveform produced by the vocal cords.
Performance tips
Vocoder is constructed so that elements other than pitch are expressed by your voice via the microphone.
You play the keyboard to control the pitch.
Vocoder won’t produce sound if you are only vocalizing into the microphone or only playing the keyboard.
This means that in order to take advantage of Vocoder, the timing at which you play the keyboard and
vocalize into the microphone is extremely important.
Resonances (formants)
produced by the vocal tract
(shape of the throat and
larynx) and movements of
the mouth
Vocal cords (carrier)
Tuning
Adjusts the VP-03’s overall pitch.
Chord Memory
Chord memory is a function that lets you sound a previously-registered chord simply by playing a single key.
The VP-03 lets you register 16 chord memories.
Using the chord memory function
1. Press the [MEMORY] button to make it light.
The VP-03 is in chord memory mode.
2. Press one of the [1]–[16] buttons to make it light.
The selected chord memory is active.
For details, refer to “VP-03 Chord Memory List” (PDF).
&
http://www.roland.com/manuals/
3. Play a single note on the keyboard.
You hear the chord that’s registered in the selected chord memory.
If you’re not using the keyboard, you can also use ribbon controller C1 to perform.
4. To turn o the chord memory function, press the lit number button ([1]–[16]) to make it go dark.
Registering a chord memory
In addition to using the chord memory function to produce chords with the factory-set notes, you can also
overwrite these with your own chords.
1. Press the [MEMORY] button to make it light.
The VP-03 is in chord memory mode.
2. Hold down the chord memory button ([1]–[16]) in which you want to register your own chord, and press
the [PLAY/STOP] button.
The selected button ([1]–[16]) blinks.
3. Play a chord on the keyboard.
Specify the chord that is heard when you play middle C (C4).
While the button is blinking, you can press other notes to add them to the chord. Up to six notes can be
registered in the chord.
4. To complete the chord memory registration, press the button that’s blinking ([1]–[16]) to make it light
steadily.
Connecting via USB
Use a commercially available USB 2.0 cable (A-microB) to connect this
port to your computer.
It can be used to transfer USB MIDI and USB audio data. You must
install the USB driver when connecting the VP-03 to your computer.
Download the USB driver from the Roland website. For details, refer to Readme.htm which is included in the
download.
&
http://www.roland.com/support/
* Do not use a micro USB cable that is designed only for charging a device. Charge-only cables cannot
transmit data.
Using USB audio as the carrier/modulator
Carrier
The carrier is the signal (tonality and pitch) that is the basis of the sound. The sound of an external synthesizer
that’s input via the USB port “CARRIER” can be used as the carrier.
Modulator
The vocal characteristics (formants) are extracted from the mic input, and these formants are used to modulate
the carrier signal. The sound that’s input via the USB port “VOCODER” can be used as the modulator.
USB (O)
MIC IN
(Mac: 1, 2)
OUT
(Mac: 5, 6)
CARRIER Carrier
(Mac: 3, 4)
(Mac: 1, 2)
IN
ModulatorVOCODER
OUTPUT
Step Sequencer
The step sequencer lets you input a note and voice at each of up to 16 steps, and play back the notes as a loop.
You can change the number of steps between 1 and 16. Up to 16 patterns can be stored.
1. Press the [MEMORY] button, to make it go dark.
The VP-03 is in step sequencer mode.
* You can also operate the [PLAY/STOP] button even when the VP-03 is not in step sequencer mode.
Function Controller
Play start/stop
Tempo
Set the gate time of all steps [PLAY/STOP] + C2
On/o status of each step [1]–[16]
Enter a note [1]–[16] + C1 (or keyboard)
Enter a voice [1]–[16] + [PLAY/STOP] + Voice input from the microphone
Enter a tie Step button + Next step button (e.g.: [1] + [2])
Enter a gate time [1]–[16] + C2
Select a pattern (1–16) [MEMORY] + [1]–[16]
Write the pattern (1–16) [MEMORY] + [1]–[16] (long-press)
Pattern settings
Number of steps (1–16)
Shue
Scale
Sample playback mode
Sequencer settings *1
Step order type
O step mode
*1 Sequencer settings return to the default setting when the power is turned o.
[PLAY/STOP]
[PLAY/STOP] + C1
[PLAY/STOP] + [1]
[PLAY/STOP] + [2]
[PLAY/STOP] + [3]
[PLAY/STOP] + [4]
[PLAY/STOP] + [15]
[PLAY/STOP] + [16]
&
[1]–[16]
&
[4]–[12] (default: [8])
[1]
[2]
&
[3]
(default: [2])
[1] NOTE + VOICE (default)
&
[2] NOTE only
[3] VOICE only
[1] Normal (default), [2] Even/Odd reverse, [3] Odd only,
&
[4] Even only, [5] Odd only 0 Even only,
[6] Even only 0 Odd only, [7] Random
&
[1] Rest (default), [2] Skip
Inputting steps
1. Hold down the step button ([1]–[16] buttons) at which you want to enter a note.
2. While holding down the step button, play the keyboard. Alternatively, use the C1 ribbon controller to
specify the note.
5 You can also enter chords as well as single notes.
5 To enter audio, hold down a step button ([1]–[16]) and the [PLAY/STOP] button, and input audio via the mic.
When sound enters the mic, recording starts automatically (the indicator is lit green). When the sound ends,
recording also stops automatically.
5 To delete the audio from a step, hold down the button ([1]–[16]) and press the [PLAY/STOP] button, and
then release the [PLAY/STOP] button without inputting audio from the mic.
5 To specify the gate time, hold down the step button and use ribbon controller C2.
5 To delete the note at a step, turn o a step button ([1]–[16]) that contains a note (making the button go
dark).
3. Press the [PLAY/STOP] button to play back.
4. To save the pattern, hold down the [MEMORY] button and long-press the save-destination step button
([1]–[16]).
Restoring the Factory Settings (Factory Reset)
Here’s how to return the VP-03 to its factory-set state.
1. While holding down the [2] button, turn on the power.
The [PLAY/STOP] button blinks.
If you decide to cancel the factory reset, turn o the power.
2. Press the [PLAY/STOP] button to execute the factory reset.
3. When all buttons blink, turn the VP-03’s power o, then on again.
Data Backup/Restore
Backup
1. Connect your computer to the VP-03’s USB port via USB cable.
2. While holding down the [MEMORY] button, turn on the power.
3. Open the “VP-03” drive on your computer.
The backup les are located in the “BACKUP” folder of the “VP-03” drive.
4. Copy the backup les into your computer.
5. After copying is completed, eject the USB drive and then disconnect the USB cable.
Windows
Right-click on the “VP-03” icon in “Computer” and execute “Eject.”
Mac OS
Drag the “VP-03” icon to the Trash icon in the Dock.
6. Turn the VP-03 power o.
Restore
1. As described in the procedure for “Backup” Step 1–3, open the “VP-03” drive on your computer.
2. Copy the VP-03 backup les into the “BACKUP” folder of the “VP-03” drive.
* If “Not Enough Space” message appears, delete all les in the “BACKUP” folder of the “VP-03” drive rst, and
then copy the VP-03 backup les into the “BACKUP” folder.
3. After copying is completed, eject the USB drive and then press the [PLAY/STOP] button.
4. After the LEDs have completely stopped blinking, turn o the power.
Settings
Portamento
1.
Press the [MEMORY] button to make it light.
2. While holding down the [MEMORY] button, specify the value by using the C1/C2 ribbon controller.
Parameter Value setting Explanation
Portamento
Switch
Portamento
Time
C1
(OFF/ON)
C2
(0–100)
Creates a smooth change in pitch between one key and the next key
played.
Adjusts the time required for the pitch change.
System Settings
1. Press the [MEMORY] button to make it light.
2. While holding down the [MEMORY] button, press one of the numeric buttons shown in the following
table to select the parameter.
* Keep holding down the [MEMORY] button.
3. Press a numeric button to select the value, and release the [MEMORY] button to conrm the value.
Parameter Select
Master
Tune
MIDI
Channel
MIDI Clock
Source
Transpose*1[MEMORY]
Key Velocity*1[MEMORY]
Velocity
Curve
*1
Auto O
LED Demo
Octave
Shift
*1
Ribbon
Controller
C2 Mode
Bend Range
Mic Gain
Split Point
*1 Only when using the K-25m keyboard unit (sold separately)
[MEMORY]
+ [1]
[MEMORY]
+ [2]
[MEMORY]
+ [3]
+ [4]
+ [5]
[MEMORY]
+ [6]
[MEMORY]
+ [7]
[MEMORY]
+ [8]
[MEMORY]
+ [9]
[MEMORY]
+ [10]
[MEMORY]
+ [11]
[MEMORY]
+ [12]
[MEMORY]
+ [13]
Value
setting
[1]–[16]
(433–448 Hz)
[1]–[16] Species the MIDI transmit/receive channel (1–16).
[1] (AUTO)
[2]
[2]–[13]
(-6–+5)
Adjusts the velocity value that will be transmitted when you play the keyboard.
* The velocity of the VP-03’s own sound generator is always xed.
[1] (TOUCH) Actual keyboard velocity will be transmitted.
[2] (64)
[3] (127)
Sets the keyboard’s touch.
[1] (LIGHT) Sets the keyboard to a light touch.
[2] (MEDIUM) Sets the keyboard to the standard touch.
[3] (HEAVY) Sets the keyboard to a heavy touch.
[1] (OFF) The power does not turn o automatically.
[2] (30 min)
[1] (OFF)
[2] (1 min)
[3] (3 min)
[4] (10 min)
[5]–[11]
(-3–+3)
[1] (MOD) Modulation (default)
[2]
(FORMANT)
[1]–[12],
[13] (2 oct),
[16] (OFF)
[1]–[16]
(1–16)
Press
the MIDI
keyboard
Explanation
Species the master tuning.
For the 440 Hz (default) setting, [8] is lit.
If MIDI clock is being input to the MIDI IN connector or the USB
port, the VP-03’s tempo will automatically synchronize to MIDI clock
(default).
The VP-03 operates at the tempo specied on the unit itself. Choose
(INTERNAL)
the “INTERNAL” setting if you don’t want to synchronize to an external
device.
Transposes the keyboard range in semitones.
For the ±0 (default) setting, [8] is lit.
A xed velocity value (64 or 127) will be transmitted regardless of
how you play.
The power turns o automatically after 30 minutes (default).
* Auto O does not occur while USB-connected.
Species the time until the LED DEMO is shown.
Shifts the keyboard range in steps of one octave.
For the ±0 (default) setting, [8] is lit.
Adjusts the formant.
Negative (“-”) settings produce a masculine character; positive
(“+”) produce a feminine character.
If the [C1 MODE] switch is set to “PITCH BEND,” this sets the pitch bend
range of ribbon controller C1 in semitone units.
(default: [2])
Adjusts the input gain of the mic.
If the level of the connected mic does not reach the maximum even
when the VOCODER [LEVEL] slider is maximized, raise the mic gain
value. If the level of the connected mic is too loud, lower the mic gain
value. (default: [8])
Species the split point for the human voice. (default: C4)
All of the number buttons [1]–[16] are blinked. When you press the
MIDI keyboard, the split point is set (the specied note is included in
the upper), and you exit the setting mode.
Main Specications Roland VP-03: Vocoder
Power Supply Rechargeable Ni-MH battery (AA, HR6) x 4, Alkaline battery (AA, LR6) x 4, USB bus power
Current Draw 500 mA (USB bus power)
Dimensions 300 (W ) x 128 (D) x 46 (H) mm 11-13/16 (W) x 5-1/16 (D) x 1-13/16 (H) inches
Weight 940 g (including batteries) 2 lbs 2 oz
Accessories
Options
(sold separately)
* This document explains the specications of the product at the time that the document was issued. For the
latest information, refer to the Roland website.
Dedicated microphone, Owner’s Manual, Leaet “USING THE UNIT SAFELY,” Alkaline
battery (AA, LR6) x 4
Keyboard unit: K-25m, Boutique Dock: DK-01
 Loading...