

Page 1
®ÂØÒňÎ
Fantom-G Workstation Keyboard
®
Workshop
Power User Control 2: The Pads
© 2008 Roland Corporation U.S.
All rights reserved. No part of this publication may be reproduced in any form without the
written permission of Roland Corporation U.S.
FGWS03
1
Page 2
About the Workshop Booklets
Roland’s Fantom G6, G7, and G8—the Fantom-G family—set a new standard
for excellence in workstation keyboards, with spectacular sounds and
incredible built-in effect-processing muscle. A beautiful full-color LCD
display and innovative performance features make getting around a pleasure
and make the G6, G7, and G8 a dream to play. For recording, the Fantom-G
contains a powerful 128 MIDI/audio track sequencer. Each Fantom-G can
also host two Roland ARX SuperNATURAL™ cards whose breakthrough
modeling technology provides sounds with amazing sonic detail, expressive
possibilities, and sound-design opportunities.
Introducing the DYNAMIC PADS
Each Fantom-G Workshop Series booklet focuses on one Fantom-G topic,
and is intended as a companion to the Fantom G6/G7/G8 Owner’s Manual.
This booklet requires Fantom-G Operating System v1.10 or higher. You can
download the latest Fantom-G O.S. for free from www.RolandUS.com.
About This Booklet
The previous Workshop booklet introduced a variety of methods to help you
take control of the Fantom-G. If there’s one area of the Fantom-G panel that’s
absolutely packed with power user controls, though, its the DYNAMIC PADS
area. This booklet is all about the Fantom-G DYNAMIC PADS.
Understanding the Symbols in This Booklet
Throughout this booklet, you’ll come across information that deserves
special attention—that’s the reason it’s labeled with one of the following
symbols.
A note is something that adds information about the topic at hand.
A tip offers suggestions for using the feature being discussed.
The pads in the DYNAMIC PADS area can play drum sounds—which are
called “rhythms” on the Fantom-G—and rhythm patterns, as you might
imagine. Really, though, they can do so much more. In fact, the pads are a
key ingredient in mastering the Fantom-G. Once you get comfortable with
them and the things they can do, you’ll be whipping around the Fantom-G
at blinding speed.
Let’s get started.
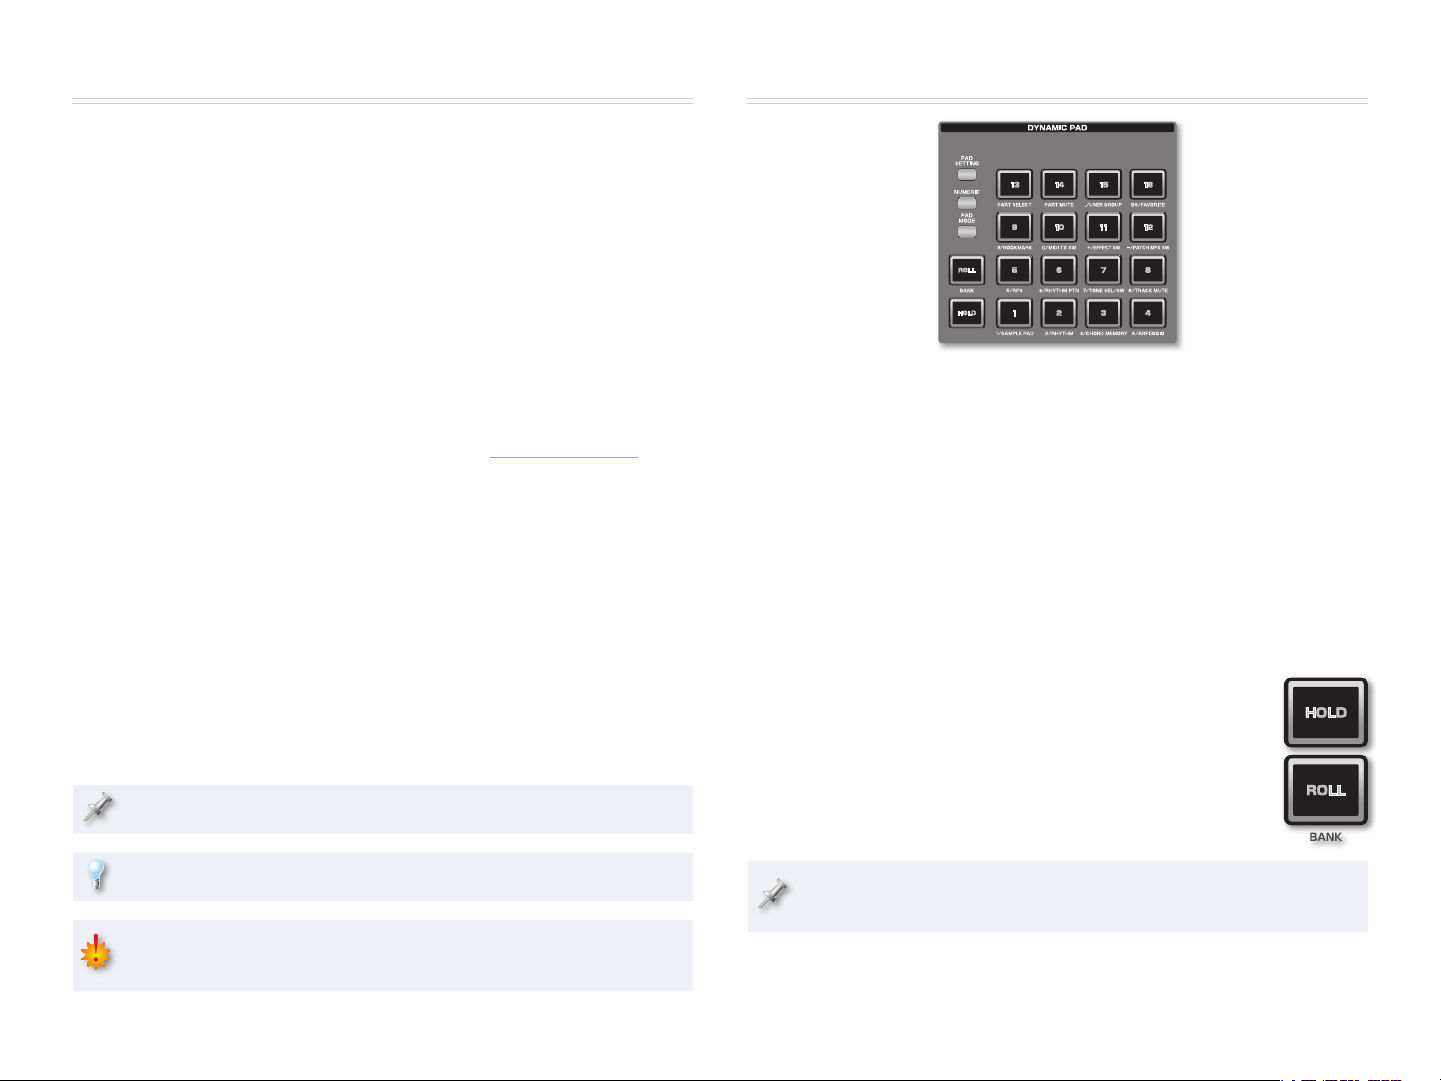
The ROLL and HOLD Buttons
The ROLL and HOLD buttons affect the manner in which the 16 pads work
when they’re playing sounds. When
• the pad acts as if you’re continuing to press
HOLD is lit—
the pad even after you remove your finger. This can be
especially useful for playing sampled loops.
• the sound produced by any pad you strike
ROLL is lit—
repeats, creating a drum-roll-type effect until you
release the pad or turn off the HOLD button.
These two buttons also perform some other functions, as we’ll see
later on.
Warnings contain important information that can help you avoid
possible damage to your equipment, your data, or yourself.
2
Page 3
Pad Modes
Who Controls the Pads’ Mode?
The Fantom-G’s 16 DYNAMIC PADS can work together to
accomplish a variety of tasks quickly and easily. Each of these
tasks, or “modes,” is called a “pad “mode.” There are 16 different pad
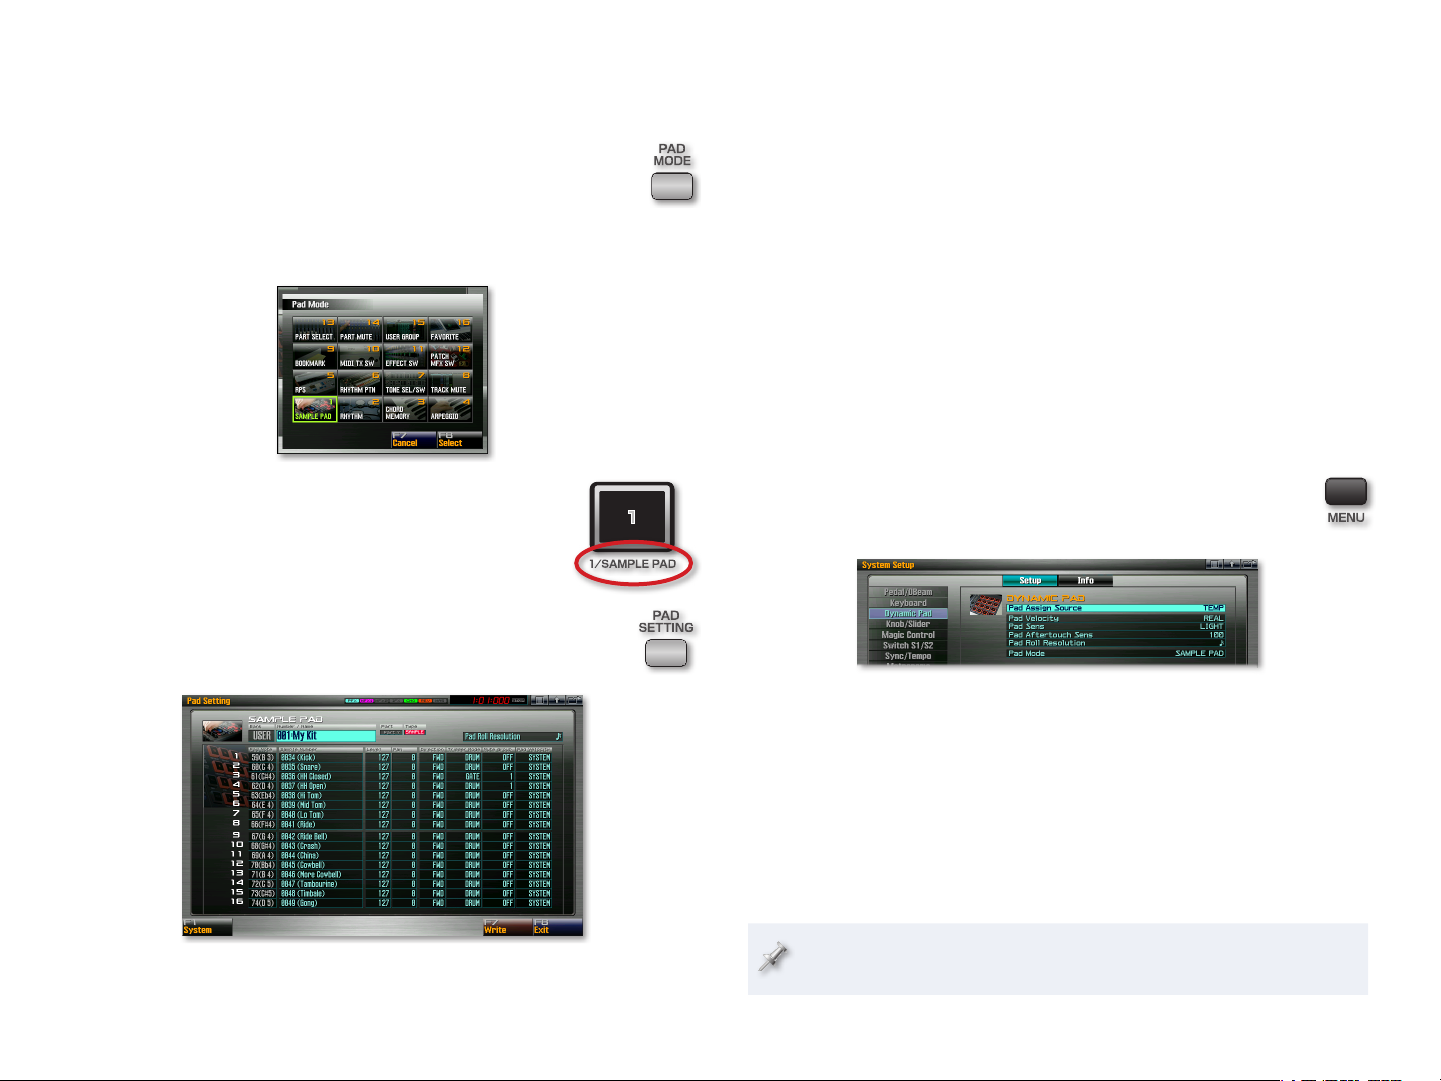
modes. The fastest way to get to the Pad Mode window is to press
the PAD MODE button in the DYNAMIC PADS area.
When you press PAD MODE, you display the Pad Mode window.:
When you’re viewing the Pad Mode window, each of the
16 pads acts as a button that selects a behavior for the
entire set of pads—beneath each pad, you can see the
mode it selects. When the Pad Mode window‘s visible,
the currently selected mode’s pad flashes. To select a
new pad mode, hit the corresponding pad.
Each pad mode has its own settings you can display by pressing
the PAD SETTINGS button.
Each live set, studio set, and patch in the Fantom-G has its own Pad Mode
setting for the behavior of the pads, and the Fantom-G can automatically
switch to this new setting when you select a live set, studio set, or patch. This
can be handy when you know you’ll always want to use the pads a particular
way each time you call up a certain live set, studio set, or patch.
There may be other occasions, though, when you’ll want to set up the pads
a particular way and have them retain that behavior even as you select
different live sets, studio sets, or patches.
The System Pad Assign Source parameter determines whether or not the
pads use a global setup or the settings belonging to individual live sets,
studio sets, and patches. Here’s how to set this parameter:
1 If you’re:
• press F1 (System).
on the Pad Settings screen—
• press MENU, press F2 (System), and
somewhere else—
then press F2 (Group/Down) to select the Dynamic
Pad parameter group.
Select the Pad Assign Source parameter if it’s not already selected 2
and set it as desired. For the pads’ mode to:
•
change to the Pad Mode setting of each live set, studio set, or patch
you select—set the parameter to TEMP.
• set
remain at the global Pad Mode setting you set on this screen—
the parameter to SYS.
3
If you’ve selected SYS, set the Pad Mode and Pad Roll Resolution
parameters as desired.
This is the Pad Setting window for Sample Pad mode.
Pad Roll Resolution sets the speed of the roll created when you strike
a rhythm- or sample-mode pad with the ROLL button lit.
3
Page 4

The Other Dynamic Pad System Settings
Pad Exchange
The other parameters on this screen are always globally set, and don’t
change with different live sets, studio sets, or patches. They are:
• This parameter turns the pads’ velocity sensitivity on or
Pad Velocity—
off. When it’s set to REAL, the pads respond according to the force with
which you strike them. To have them act as if you’re always hitting them
with the same force, select that amount of force with this parameter.
On a synth like the Fantom-G, the force with which you strike a pad or
key is measured in MIDI “velocity” values from 1-127. Sounds are often
programmed to respond to different velocity values, in the same way
that physical instruments respond to soft or hard playing.
Pad Sens—• This parameter select the average force you want to use
when you’re playing the pads. Technically, it sets how hard you have to
whack the pads to reach a velocity value of 127. You can set it to:
• —If you’d like to use a generally softer touch on the pads.
LIGHT
• —if the pads work for you easily as they are (this is the
MEDIUM
default setting).
• —if you don’t want sounds to respond with too much
HEAVY
sensitivity in response to your forceful playing style.
• The Fantom-G pads can produce “aftertouch”
Pad Aftertouch Sens—
data that’s produced by pressing down on a pad after striking it. Some
sounds respond to this type of MIDI message. The Pad Aftertouch Sens
parameter sets the amount of force with which you’ve got to hold down
the pads to reach the maximum aftertouch value of 127.
Saving Your System Settings
To store your current Dynamic Pad System settings in your project, press F7
(Sys Write) to write your new System setting into the Fantom-G’s memory.
In the Pad Setting window for a number of
pad modes, you’ll find F2 (Pad Exchg), a handy
little organizational tool. When you press F2
(Pad Exchg), the Pad Exchange window opens,
where you can dial in any pair of pads and swap
whatever it is they’re assigned to do. Press F8
(Execute) to perform the swap.
Pad Mode 1—Sample Pad
You can play your own samples—or samples you’ve
imported into the Fantom-G—from the pads in Sample Pad
mode. In this mode, each pad plays one of the 16 samples
in a sample set. (A sample set is a collection of 16 samples,
as we’ll discuss further in the Sampling Workshop booklet.)
To play samples from the pads in Live or Studio modes, a sample set
has to first be assigned to the live or studio set’s sample pad part.
As a pad plays its sample, the pad flashes.
Once you’re in Sample Pad mode, here’s what the parameters in the Pad
Settings window do.
Global Sample Pad Settings
With this parameter: You can:
Number/Name select a sample set from the current
project.
Pad Roll Resolution set the speed of the roll created when
you strike a pad with the ROLL button lit.
When you select a new sample set in Live or Studio mode using the Pad
Settings window’s Number/Name parameter, the sample pad part also
switches to the newly selected sample set.
4
Page 5

Sample Pad 1-16 Settings
With this parameter: You can:
Sample Number select any sample in the current project
to be played by the pad.
Level set the level of the pad’s sample.
Pan set the stereo position of the sample.
Direction set the sample to play forwards or
backwards.
Trigger Mode program the sample to play in either of
two ways. When Trigger Mode is set to:
GATE—• the sample plays for as long
as you hold down the pad. Use this
setting for playing beat loops or
pitched notes.
• the sample plays through to
DRUM—
the end each time you strike its pad.
Use this for short percussive sounds.
Mute Group stop certain sample pads from playing at
the same time. Use this when you have
multiple versions of a single sound—such
as closed and open samples of a hi-hat—
and want only one to play at a time.
Pad Velocity set the pad to respond to your playing
velocity, or not. For velocity response,
set the parameter to SYSTEM and set the
System Pad Velocity parameter, described
earlier, to REAL. To have the pad always
play at a fixed velocity value, select the
value you want.
The Sample Pad mode Pad Settings window is an easy place to construct
a sample set, since you have access to the most important sample set
parameters there. To build a new sample set, select an unused sampleset memory location—one whose name includes “INITIAL SAMPLE”—and
use the Sample Number parameter to dial in the samples you want.
Pad Mode 2—Rhythm
If you’d like the pads to play percussion sounds from a
rhythm set, select the Rhythm pad mode. In Live and Studio
modes, the pads play the sound assigned to the rhythm
part. In Single mode, the pads play the sound assigned to
the current patch’s Dynamic Pad part.
Though the Rhythm pad mode is meant for percussive sounds, you can
play single notes on the pads from any kind of sound, not just rhythm
sets, by assigning the desired patch or sample set to the rhythm part in
Live or Studio mode or to the DYNAMIC PADS part in Single mode.
Once you’re in the Rhythm pad mode, here’s what the parameters in the Pad
Settings window do.
Global Rhythm Pad Mode Settings
With this parameter: You can:
Number/Name select a rhythm set to play on the pads
Pad Roll Resolution set the speed of the roll created when
you strike a pad with the ROLL button lit.
Rhythm Pad 1-16 Settings
With this parameter: You can:
Pad Note Number choose the note—and therefore the
sound—to be played on the pad from the
selected rhythm set.
Pad Velocity set the pad to respond to your playing
velocity, or not. For velocity response,
set this parameter to SYSTEM, and the
System Pad Velocity parameter to REAL.
For the pad to always produce a fixed
velocity value, select that value.
5
Page 6

Quick Setup
In Rhythm pad mode, the Pad
Settings window also offers a
Quick Setup tool: F3 (Quick Setup).
Pressing this button reveals the
Quick Setup window that has some
templates for quickly configuring
the pads for rhythm sounds.
Start by setting the Template parameter. To have the pads:
• select Rhythm.
play 16 sounds that form a drum/percussion kit—
•
play sounds from 16 consecutive notes in the current rhythm set on
the 16 pads—select Note, and use the Base Note parameter to
choose the note to be played by Pad 1.
•
play the same sound on all of the pads at 16 different velocities—
select Multi Velo, and use the Base Note parameter to choose
the sound to be played.
Pad Mode 3—Chord Memory
The Chord Memory feature lets you trigger a full chord from
a single key on the keyboard, based on the note you play.
The Fantom-G contains a set of pre-programmed chord
structures—called “chord forms”—you can use, and you
can make your own on the Chord Memory screen.
You can use chord forms with the Fantom-G arpeggiator to construct
complicated arpeggiated pitch patterns.
Each pad can be programmed to choose a specific chord form so that you
can select the desired chord form by striking its pad with your right hand
before you play its key with your left. You can also select new chord forms
using the pads as a chord is playing to make the Fantom-G seamlessly switch
to the new chord. The currently selected form’s pad always flashes to help
you identify the current chord form.
When you select the Chord Memory pad mode, the CHORD MEMORY
button automatically lights as the Chord Memory feature’s turned on.
For the Chord Memory pad mode, there are just two parameters on the Pad
Setting screen:
• This parameter allows you to select a set of chord
Set Number/Name—
forms you’ve already created and stored in the current project.
• Use this parameter to choose the chord form to
Pad 1-16 Chord Form—
be selected by each pad.
You can store your own sets of chord forms from the Pad Settings
screen. Create the desired set using the Pad 1-16 Chord Form
parameters, and then hit F7 (Write) to store the chord-form set in the
current project.
To jump quickly to the Chord Memory screen, hold
down SHIFT and press the CHORD MEMORY button.
Pad Mode 4—Arpeggio
When the ARPEGGIO button is lit, notes you play on the
keyboard serve as the basis for the currently selected
arpeggio “style.” You can choose an arpeggio style as you
play by striking the style’s pad in Arpeggio pad mode—the
pad for the currently selected style flashes.
Arpeggios are edited on the Arpeggio screen, shown on the next page. To
get there, hold down SHIFT while pressing the ARPEGGIO button.
6
Page 7

When you select the Arpeggio pad mode, the ARPEGGIO button
automatically lights and the arpeggiator is automatically turned on.
In the Arpeggio Pad mode, you’ll find these two parameters on the Pad
Settings screen:
• You can select a set of 16 arpeggio styles stored in
Set Number/Name—
the current project.
• You can dial in the arpeggio style you want
Pad 1-16 Arpeggio Number—
for each pad using these parameters.
When you construct a set of arpeggio styles you’d like to keep, press
F7 (Write) to store it in the current project.
Pad Mode 5—RPS
The Fantom-G’s RPS (Realtime Phrase Synthesis) lets you
trigger a sequencer phrase from a pad. Since each phrase
in the Fantom-G can contain multiple MIDI channels of
data—with each channel playing a different part sound—a
phrase can hold an arrangement of any complexity.
Using the pads for RPS playback, you can:
• onstage or in the studio.
trigger pre-sequenced hard-to-play passages—
• by assigning a phrase for each of
lay out and sequence a song structure—
the song’s sections to a pad, and then sequencing your triggering of the
sections in the desired order.
As an RPS phrase plays, its pad flashes.
RPS phrases are really just standard phrases that contain musical
passages. If there aren’t any phrases in the current project, there’s
nothing there to use as an RPS phrase.
Here are the available pad settings for the RPS pad mode:
Global RPS Mode Settings
With this parameter: You can:
RPS Set Number/Name select an RPS set to play on the pads
Trigger Quantize set the way in which your phrases start.
You can choose:
REAL—• so that the phrase begins
playing as soon as you hit its pad.
• so that the phrase starts
BEAT—
playing at the next beat after you
press its pad.
• so that the phrase starts
MEASURE—
playing at the next measure after you
press its pad.
Velocity Sens determine the amount of velocity with
which the pad’s sounds play. Select:
OFF—• to have the sounds play at
the velocity with which they were
sequenced. When you’re constructing
a song using RPS, use this setting.
• to play the phrase’s sounds
LOW—
with a minimum of velocity.
• to play the phrase’s sounds
MID—
with medium velocity.
• to play the phrase’s sounds at
HIGH—
maximum velocity.
7
Page 8

RPS Pad 1-16 Settings
With this parameter: You can:
Phrase Number choose the phrase to be played on the
pad.
Play Mode set how the phrase plays. To have it play:
play over and over—• for as long as you
hold down its pad, set Play Mode to
LOOP1.
• with each press of
toggle on and off—
its pad, set Play Mode to LOOP2.
•
play all the way through once and then
stop—set Play Mode to ONCE.
Mute Group set up phrases so they mute each other
without overlapping: triggering a new
phrase causes the currently playing
phrase to stop. This is especially useful
when you’re sequencing a song structure.
If you construct a set of RPS phrases you’d like to keep, press F7
(Write) to store it in the current project.
Pad Mode 6—Rhythm Ptn (“Pattern”)
If you have sequenced phrases in a project that contain
beats, you can play them as rhythm patterns from the pads.
When a pad’s rhythm is playing, the pad flashes.
You can sequence the drum track for a song on the fly by triggering
rhythm patterns from the pads, and sequencing this “performance.”
Rhythm patterns are really just standard sequencer phrases that
contain beats. If there aren’t any phrases in the current project,
there’s nothing there to use as a rhythm pattern.
The difference between rhythm-pattern pad playback and RPS pad
playback is the set of playback options available for each.
Here are the rhythm-pattern pad settings:
Global Rhythm Pattern Pad Mode Settings
With this parameter: You can:
Rhythm Pattern Set Number select a set of rhythm patterns to play
on the pads
Trigger Quantize set the way in which your rhythm
patterns start. You can choose:
REAL—• so that each rhythm pattern
begins playing as soon as you hit
its pad.
• so that each rhythm pattern
BEAT—
starts playing at the next beat after
you press its pad.
• so that each rhythm
MEASURE—
pattern
starts playing at the next
measure after you press its pad.
Velocity Sens determine the amount of velocity with
which the rhythm pattern’s sounds
play. Select:
OFF—• to have the sounds play at
the velocity with which they were
sequenced.
• to play the rhythm pattern’s
LOW—
sounds with a minimum of
velocity.
• to play the rhythm pattern’s
MID—
sounds with medium velocity.
• to play the rhythm pattern’s
HIGH—
sounds at maximum velocity.
8
Page 9

Rhythm Pattern Pad 1-16 Settings
With this parameter: You can:
Rhythm Pattern choose the rhythm pattern to be played
on the pad.
Pad Mode 8—Track Mute
You can use the pads to mute tracks as you sequence or
record. This allows you to quickly switch things on and off
as you refine a song’s arrangement.
If you construct a set of rhythm patterns you’d like to keep, press F7
(Write) to store it in the current project.
Pad Mode 7—Tone Sel/Sw
The Tone Sel/Sw (for “Tone Select/Switch”) pad mode is a
great power tool when you’re editing patches. Each patch
is made up of as many as four “tones.” Tones produce the
sound waves that form the basis of a patch’s sound. The
Tone Sel/Sw pad mode lets you quickly select a tone for
editing, or turn a tone on or off.
If you’re in
• the pads control the tones in the currently selected
Single mode—
patch. If you’re playing a rhythm set on the keyboard, the pads control
the four waves used by the rhythm tone you’ve most recently played.
• the pads control the tones in the patch played by
Live or Studio mode—
the currently selected part. If you’ve selected a part that uses a rhythm
set and the part’s KBD switch is on, the pads control the waves in the
last-played rhythm tone.
CUTOUT
• turn Tones 1-4, respectively, on or off.
Pads 1-4—
• select Tones 1-4, respectively, for editing.
Pads 5-8—
When a track is muted, its pad flashes. You can also go to the Pad
Setting screen to see which tracks are currently muted.
Pad Mode 9—Bookmark
On the Fantom-G, you can bookmark screens you often
re-visit. Once you’ve bookmarked a screen, you can quickly
jump back there by striking its pad in the Bookmark pad
mode. You can have up to 128 bookmarked screens in a
project, organized in eight banks of 16 bookmarks each.
Bookmarking a Screen
Set the pads to the Bookmark pad mode.1
Press PAD SETTINGS, and then use the ROLL and/or HOLD button to 2
select the bank in which you like to store your bookmark.
3
Navigate to the screen you want to bookmark.
Hold down the PAD SETTING button, and without letting go, strike 4
the pad you want to use for the bookmark.
5
Let go of the PAD SETTING button—the Pad Setting screen appears,
and you can see your bookmark assigned to its pad.
6
Press F8 (Exit) to store the bookmark in the project and leave the
screen.
In a rhythm set, each key on the keyboard plays a different rhythm
tone that can use up to four sound waves.
When a tone is selected or turned off, its pad is unlit. You can also see
the state of your tones on the Pad Setting screen.
During many Fantom-G operations, hitting F8 (Exit) to leave a screen
doesn’t really matter too much, but here it does. Your bookmark won’t
be properly saved if you leave the Pad Setting screen without hitting
F8 (Exit).
9
Page 10

To clear an already bookmarked screen, while holding down PAD
SETTING, press the bookmark’s pad.
If you’d like to swap the pads to which a pair of bookmarks are
currently assigned, press F2 (Pad Exchg) on the Pad Settings screen,
and then select the two pads whose bookmarks you want to trade.
Pad Mode 11—Effect Switch
When you’re programming sounds, sequencing, recording,
or mixing, the Effect Switch pad mode lets you turn most
the Fantom-G’s effect processors on and off with the touch
of a button. (The PFX have their own pad mode, described
next.) When a processor is on, its pad is lit in Effect Switch
mode. To turn off the processor, press its pad so it’s unlit.
Jumping to a Bookmarked Screen
Make sure the pads are in the Bookmark pad mode.1
Press PAD SETTING to open the Pad Setting screen and reveal your 2
bookmarks.
3
To change bookmark banks, use the ROLL or HOLD button to move
up or down in the banks list, respectively.
4
Press your bookmark’s pad to jump to its screen.
Pad Mode 10—MIDI TX Switch
When you’re controlling external devices via MIDI onstage
or in the studio—or sending MIDI data to an external
sequencer—the MIDI TX Switch pad mode makes it easy to
turn the transmission of MIDI data on or off for any channel.
The MIDI TX Switch pad mode’s especially handy with Single mode,
where the transmission of MIDI data is turned off by default—this
provides a quick way to turn it on as needed.
With this simple pad mode, the 16 pads correspond to MIDI Channels 1-16.
To send MIDI data on a channel, press its pad so it lights. For a bird’s-eye view
of the transmission status for all 16 MIDI channels, press PAD SETTING.
To switch: On or off, press:
Input effect Pad 1
Chorus Pad 2
Reverb Pad 3
Mastering Pad 4
MFX 1 Pad 5
Studio mode MFX 2 Pad 6
The Pad Setting screen provides an overview of the state of the
processors that the Effect Switch pad mode controls.
Pad Mode 12—Patch MXF Switch
In the Patch MFX Switch pad mode, you can quickly turn the
PFX processor for a patch on or off. In
• Pads 1-8 control the PFX for the sounds in Parts 1-8,
Live mode—
respectively.
• Pad 1 controls the PFX for the current keyboard sound.
Single mode—
• Pads 1-16 control the PFX for Internal Parts 1-16,
Studio mode—
respectively.
When a PFX is turned on in this mode, its pad is lit. When it’s switched off,
its pad is unlit.
The Pad Setting screen provides an overview of the state of your
current mode’s PFX processors.
10
Page 11

Pad Mode 13—Part Select
This pad mode is killer time-saver when you’re working
in Live or Studio modes, especially when you’re putting
together or editing a live set or studio set. In the Part Select
pad mode, you can use the pads to quickly select the part
you want to edit. When a part is selected, its pad flashes.
In
• Pads 1-8 select Parts 1-8, respectively.
Live mode—
• Pads 1-16 select Parts 1-16, respectively.
Studio mode—
Pad Mode 14—Part Mute
You can use the Part Mute pad mode to quickly mute parts
at any time to make hearing the remaining parts easier.
When a part is muted, its pad flashes. In
• Pads 1-8 mute or un-mute Parts 1-8, respectively.
Live mode—
• Pad 1 mutes or un-mutes the keyboard part, Pad 7 does
Single mode—
the same for Part 7 (the Single-mode sample-set part), and Pad 10
mutes or un-mutes the rhythm part, Part 10.
• Pads 1-16 mute or un-mute Parts 1-16, respectively.
Studio mode—
Pad Mode 15—User Group
In
Single mode—• User Groups can contain patches, rhythm sets, and
sample sets.
• User Groups can contain live sets.
Live mode—
• User Groups can contain studio sets.
Studio mode—
There can be up to 16 sounds in each User Group bank, and each mode has
its own set of four User Group banks.
Once you’re in the User Group pad mode, you can grab User Group sounds
from the current User Group bank without going to the Pad Setting screen.
The Pad Setting screen, though, is where you set up User Group sounds and
change User Group banks.
The Fantom-G’s User Group pad mode allows you to use the
pads to quickly select sounds from User Groups you’ve set
up. When you select a User Group sound, its pad flashes.
The Power User Control Workshop booklet explains the difference
between User Groups and Favorites and explains how to use
Favorites.
In addition to pressing PAD SETTING when you’re in the User Group pad
mode, you can get to this screen by pressing F6 (User Group) from the
Patch List, Live Set List, and Studio Set List screens.
As we discussed in “Who Controls the Pads’ Mode?” on Page 3, each
sound and studio set can have its own pad mode. Therefore, when
you’re working in the User Group pad mode, we recommend setting the
System Pad Assign Source parameter to SYS and the System Pad Mode
parameter to USER GROUP to keep from being inadvertently yanked
out of User Group mode each time you select a new sound.
11
Page 12

Setting Up User Group Sounds
To add a sound to a User Group, you register the sound in the desired User
Group bank. Here’s how:
1
Set the pads to the User Group pad mode.
In2
Single mode—• select the desired patch, rhythm set, or sample set
as your keyboard sound.
• select the desired live set.
Live mode—
• select the desired studio set.
Studio mode—
3
Press PAD SETTING to display the Pad Setting screen.
To select the User Group bank in which you want to register your 4
selection, press F1 (Bank/Up) or F2 (Bank/Down), or click the desired
bank’s name with your mouse.
5
Selected the User Group location in which you want to register your
sound—each of the 16 locations corresponds to the same-numbered
pad.
6
Press or click F5 (Regist) to add the sound to the current User Group
bank.
Removing Sounds from a User Group
On the User Group Pad Setting screen, select the sound you want to 1
take out of your User Group.
2
Press F4 (Remove).
Recalling User Group Sounds
Instead of pressing a pad in Step 3 above, you could also select the
sound onscreen and press or click F8 (Select), but striking a sound’s
pad is usually quicker and easier.
Pad Mode 16—Favorite
You can select your Favorite patches, live sets, and studio
sets from the pads using the Favorites pad mode. When you
select a Favorite, its pad flashes.
The Power User Control Workshop booklet contains an explanation of
Favorites.
As with User Groups, when you’re selecting Favorites from the pads,
we recommend setting the System Pad Assign Source parameter to SYS
and the System Pad Mode parameter to FAVORITE to keep from being
yanked out of Favorite mode when you select a new sound.
To select a Favorite:
1
Switch to the Favorite pad mode.
To see your current Favorites—or to change Favorite banks—press PAD
SETTING to display the Favorite Edit screen.
Hit the pad that selects the desired Favorite from the currently 2
selected Favorites bank.
To recall a User Group sound from the currently selected User Group bank:
1
In the User Group pad mode, press the sound’s pad.
To recall a User Group sound from a different User Group bank:
1
In the User Group pad mode, press PAD SETTING to display the Pad
Setting screen.
2
Select the desired User Group bank.
Press the desired sound’s pad.3
12
Page 13

Numeric Entry
One more thing: You can enter values on the pads, speeding up lots of
things you do on the Fantom-G—we recommend you get used to using this
feature, since it can be such a time-saver.
When you’re on the
• you can select any live set by its number.
Live Play screen—
• you can select patches by number.
Single Play screen—
• you can select studio sets by number.
Studio Play screen—
Whenever you’ve highlighted a parameter that has numbered values or is an
on/off switch, you can type the desired value using the pads.
To use the pads for typing numbers, press NUMERIC so it
lights.—the 1-10 pads light up. Pads 1-9 types the digits 1-9,
respectively. Beyond that:
This pad: Does this:
Pad 10 types 0
Pad 11 types + when you want to enter a positive value
for a parameter that can have either a negative or
positive value.
Pad 12 types - when you want to enter a negative value
for a parameter that can have either a negative or
positive value.
Pad 15 types a comma
Pad 16 types a backspace
If you start by typing characters from Pads 11, 12, 15, and 16, the pads
won’t begin to flash until you type the digit(s) that follow.
The End
We hope you’ve found this workshop helpful. Keep an eye out for other
Fantom-G Workshop booklets available for downloading at www.RolandUS.
com.
When a selected parameter is an on/off switch, Pad 1 turns the
parameter on, and Pad 10 turns it off.
As soon as you begin typing numbers on the pads, the pads flash. When
you’re done entering the desired characters and/or numbers press HOLD to
enter them, or press ROLL to cancel them.
13
 Loading...