


RF-NBCAM - combined.fm Page 1 Friday, August 11, 2006 11:27 AM
Notebook Web Camera
Caméra Web pour ordinateur portatif
Cámara Web para PC portátil
|
RF-NBCAM |
User Guide Guide de l’utilisateur Guía del Usuario |
||||||
|
|
|
|
|
|
|
|
|
|
|
|
|
|
|
|
|
|
|
|
|
|
|
|
|
|
|

RF-NBCAM - combined.fm Page 2 Friday, August 11, 2006 11:27 AM
Rocketfish RF-NBCAM
Notebook Web Camera
Contents |
|
Important safety instructions |
..................................... 2 |
Web camera components ............................................ |
3 |
Setting up the Web camera ......................................... |
4 |
Using the Web camera................................................... |
6 |
Legal notices ................................................................... |
16 |
Warranty ........................................................................... |
19 |
Français.................................................. |
21 |
Español .................................................. |
41 |
Important safety instructions
Do not attempt to open the Web camera. Doing so voids your warranty.
Do not allow moisture of any kind to come in contact with the Web camera. Keep away from humidity and never immerse in water.
Do not drop the Web camera. A severe jolt may cause permanent damage and is not covered by your warranty.
Place the Web camera on a flat, stable surface before setting it up.
Follow this User Guide carefully and keep it for future reference. Follow the correct procedures when setting up the Web camera.
Have the Web camera checked by a service technician if any the following conditions are true:
•The Web camera has been exposed to moisture
•The Web camera has been dropped and damaged.
2
RF-NBCAM - combined.fm Page 3 Friday, August 11, 2006 11:27 AM
•The Web camera has obvious signs of breakage.
•The Web camera is not working correctly or you can’t get it to work according to this User Manual.
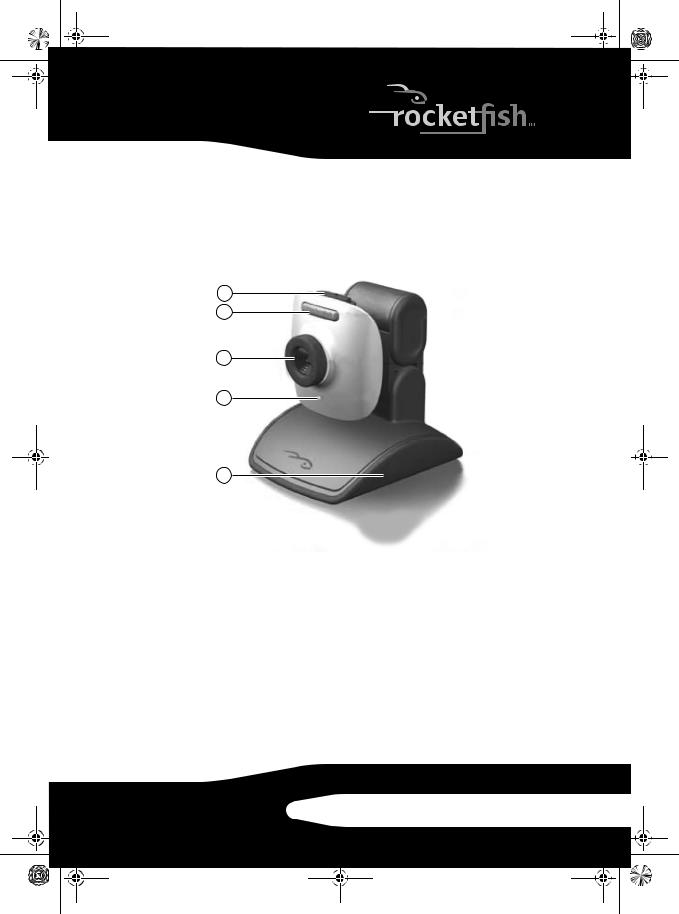
Web camera components
1
2
3
4
5
Item |
Description |
Function |
|
|
|
1 |
Snapshot button |
Use to capture still images. |
|
|
|
2 |
LED indicator |
Turns on when the Web camera is connected. |
|
|
|
3 |
Lens |
Provides the image to the Web camera. |
|
|
|
4 |
Microphone |
Provides sound reception for the Web camera. |
|
|
|
5 |
Removable base |
The base can be removed so you can clip the camera to your |
|
|
notebook computer. |
|
|
|
RF-NBCAM 3
RF-NBCAM - combined.fm Page 4 Friday, August 11, 2006 11:27 AM
Setting up the Web camera
Installing the driver
Note: Install the driver first, then connect the Web camera to a USB port on your computer.
Windows Environment
To install the Windows driver:
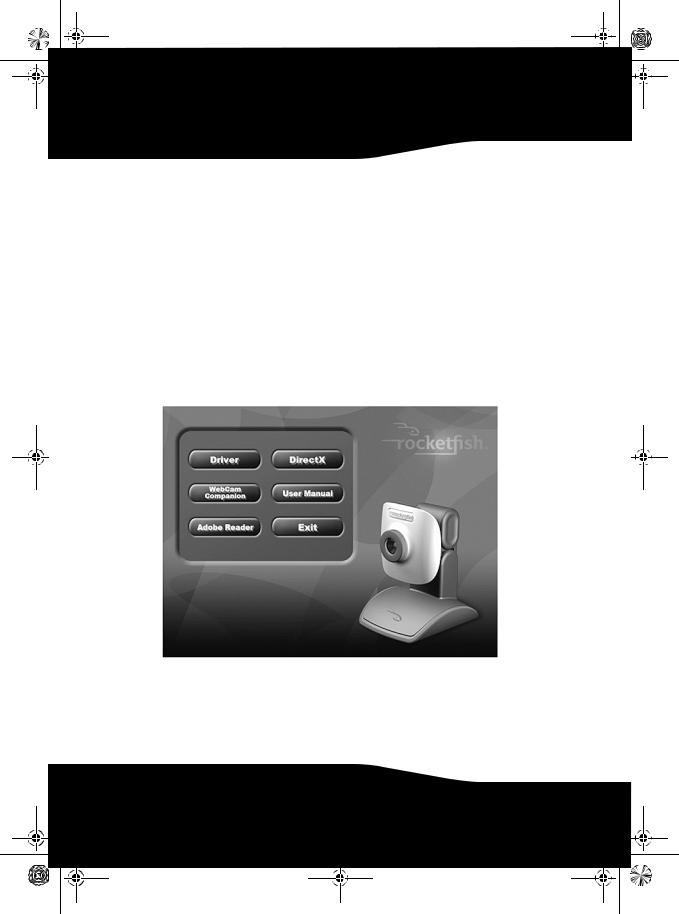
1Insert the Rocketfish Installation CD into the CD drive in your computer. The installation program automatically starts.
If the installation program does not start automatically, click Start, Run, type D:\Setup.exe (where “D” is your CD drive), then press Enter. The installation screen opens.
2 Click Driver, then follow the on-screen instructions.
3Install DirectX from the CD, if necessary.
Note: To remove the Windows driver, click Start, All Programs, Rocketfish, then click Uninstall. Follow the on-screen instructions to remove the driver.
4
RF-NBCAM - combined.fm Page 5 Friday, August 11, 2006 11:27 AM
Mac Environment
To install the Mac driver:
1Insert the Rocketfish Installation CD into the CD-ROM drive in your computer, then double click on the CD-ROM drive.
2 Click the Rocketfish Driver OSX 1.0 file folder.
3Click on Rocketfish Driver Install, then follow the on-screen instructions.
Note: This Rocketfish Web camera is not compatible with iChat, because iChat only supports Apple’s Web cameras or IEEE 1394 Web cameras.
To uninstall the Mac driver:
1Insert the Rocketfish Installation CD into the CD-ROM drive in your computer, then double click on the CD-ROM drive.
2 Click the Rocketfish Driver OSX 1.0 file folder.
3 Click on Rocketfish Driver Uninstall, then follow the on-screen instructions.
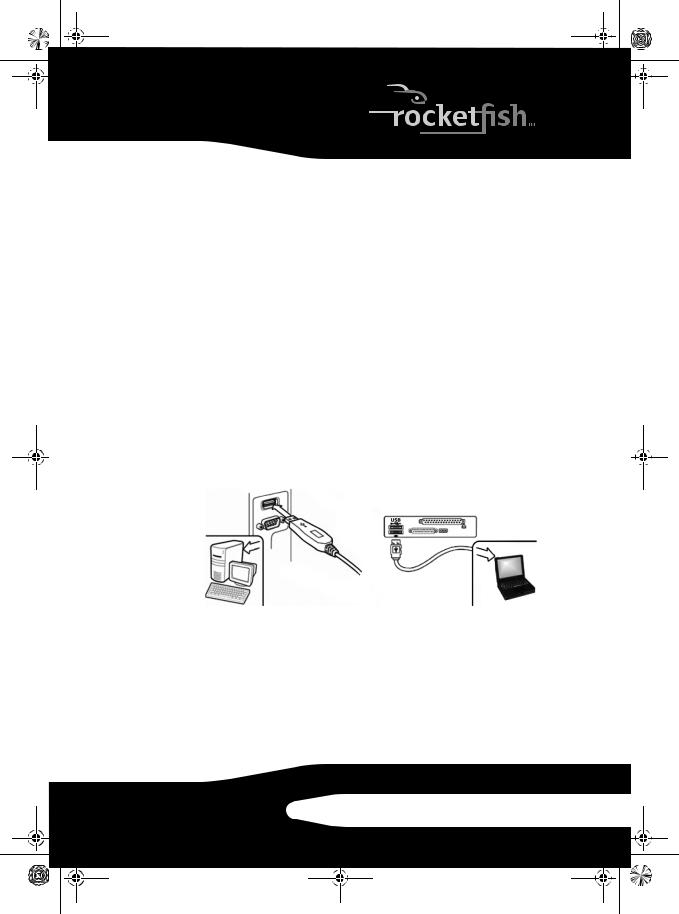
Installing the hardware
To install the hardware:
1 Insert the Web camera’s USB cable into your computer’s USB port.
2 Place the Web camera on your desk with the lens facing you.
Third-party software
You can install your choice of software for video conferencing or video chat. For more information on video chat software, see “Video chat” on page15.
RF-NBCAM 5
RF-NBCAM - combined.fm Page 6 Friday, August 11, 2006 11:27 AM
Using the Web camera
The Rocketfish Web camera interface (Windows only)
You can use the Rocketfish Web camera interface (provided) to capture real-time images, record images, or execute the security function.
To start the interface:
• Click Start, All Programs, Rocketfish, then click Rocketfish. - OR -
You can also start the program by clicking the Rocketfish shortcut.
Note: After installing the Rocketfish Windows driver, the system automatically creates a folder (C:\My Documents\WebCam Center)to save the images you take using the Rocketfish software.
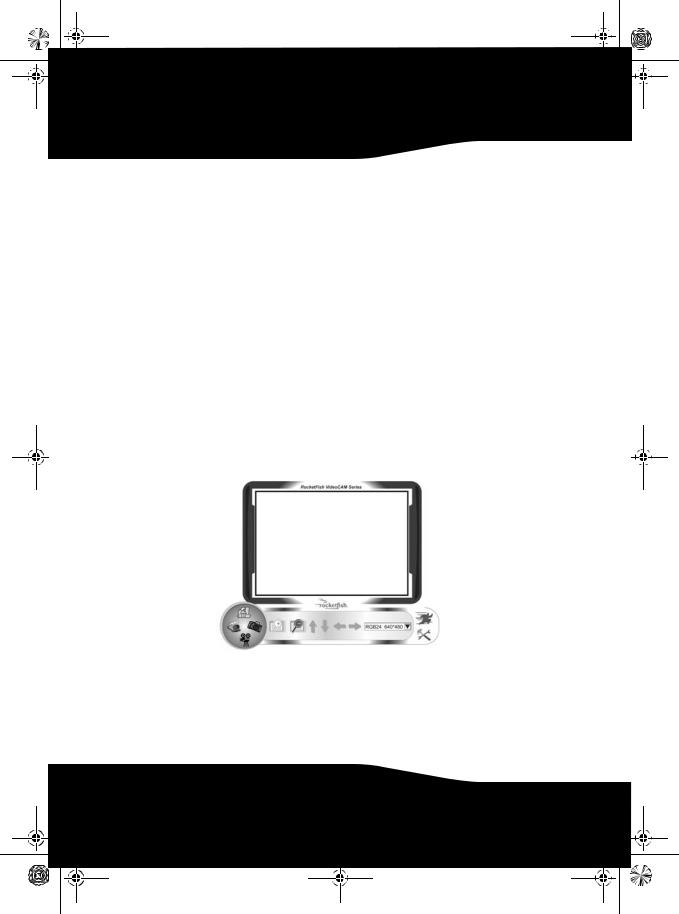
The main interface screen
The following interface screen (in Preview mode) opens when you start the program:
6
RF-NBCAM - combined.fm Page 7 Friday, August 11, 2006 11:27 AM
Interface screen icons
The following icons appear on the interface screen. Click the icon to enter the mode you want:
Icon |
Description |
||||
|
|
|
|
|
|
|
|
|
|
|
Preview mode. |
|
|
|
|
|
|
|
|
|
|
|
|
|
|
|
|
|
|
|
|
|
|
|
Snapshot mode. |
|
|
|
|
|
|
|
|
|
|
|
|
|
|
|
|
|
|
|
|
|
|
|
Video Clip mode. |
|
|
|
|
|
|
|
|
|
|
|
|
|
|
|
|
|
|
|
|
|
|
|
Security Monitoring mode. |
|
|
|
|
|
|
|
|
|
|
|
|
|
|
|
|
|
|
|
|
|
|
|
Exit. |
|
|
|
|
|
|
|
|
|
|
|
|
|
|
|
|
|
|
|
|
|
|
|
Camera control. |
|
|
|
|
|
|
|
|
|
|
|
|
|
|
|
|
|
|
RF-NBCAM 7
RF-NBCAM - combined.fm Page 8 Friday, August 11, 2006 11:27 AM
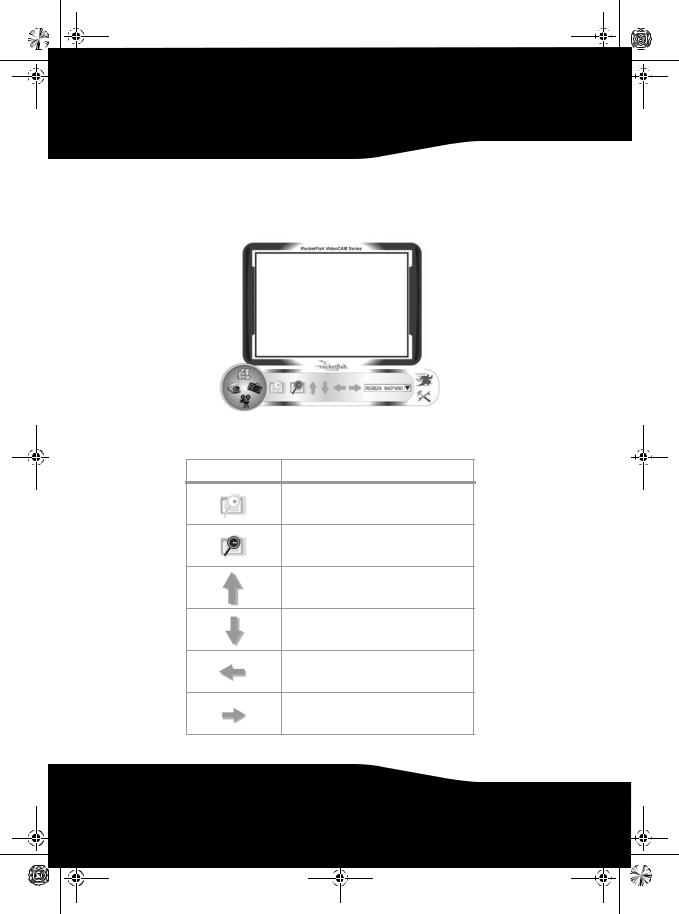
Preview mode
The following Preview mode screen opens when you first open the application, or when you click the Preview mode icon  :
:
Preview mode control buttons
The following buttons are available when you are in Preview mode:
Button Description
Zoom in on the subject.
Zoom out from the subject.
Move the image up.
Move the image down.
Move the image to the left.
Move the image to the right.
8
RF-NBCAM - combined.fm Page 9 Friday, August 11, 2006 11:27 AM
Button Description
Select the resolution. Choose between RGB24 and I420, then select one of five resolutions.
Note: The file sizes of I420 images are smaller, so it may be a better choice for image transmission.
SnapShot mode
The following SnapShot mode screen opens when you click the
SnapShot mode icon  :
:
Use the SnapShot mode to take one or more pictures.
SnapShot mode control buttons
The following buttons are available when you are in SnapShot mode:
Button Description
Send the photo by e-mail.
Shoot continuously.
Shows the choice you made in Preview mode.
Note: To change the resolution, go back to
Preview mode and make the change there.
RF-NBCAM 9
RF-NBCAM - combined.fm Page 10 Friday, August 11, 2006 11:27 AM
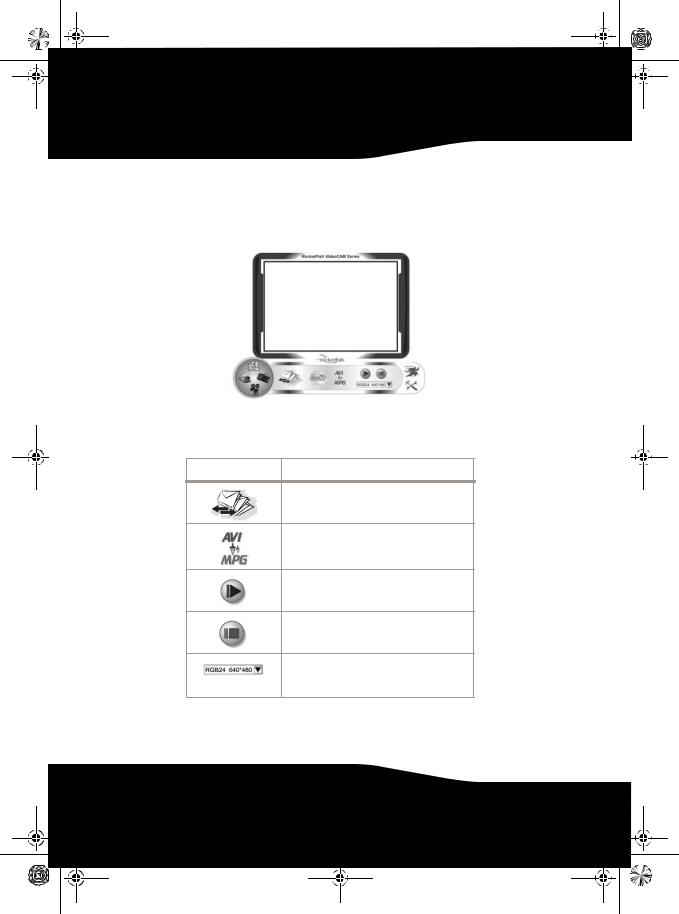
Video Clip mode
The following Video Clip mode screen opens when you click the Video Clip mode icon  :
:
Video Clip mode control buttons
The following buttons are available when you are in Video Clip mode:
Button Description
Send video clip by e-mail.
Convert AVI files to MPEG-1 format.
Start recording.
Stop recording.
Exit the Video Clip mode.
Shows the choice you made in Preview mode.
Note: To change the resolution, go back to
Preview mode and make the change there.
10
RF-NBCAM - combined.fm Page 11 Friday, August 11, 2006 11:27 AM
To create animation:
1 Press  to start the animation.
2 Press  to stop the animation.
3Press  to return to the Video Clip mode.
Note: In order for the animation to work, the resolution must be lower than 320 × 240 (in either RGB24 or I420). Make sure the resolution is correct before using this function.
Security Monitoring mode
The following Security Monitoring mode screen opens when you click the Security Monitoring mode icon  :
:
Security Monitoring mode control buttons
The following buttons are available when you are in Security Monitoring mode:
Button Description
Start recording.
Stop recording.
Set up time parameters of the security monitoring system.
RF-NBCAM 11

RF-NBCAM - combined.fm Page 12 Friday, August 11, 2006 11:27 AM
Button Description
Sets the degree of variance for every second of the recording image. When the variance is over a set threshold, the system alerts you.
Set up alert sound effects.
Note: You can use any image resolution in the Security Monitoring mode. To change the resolution, go back to Preview mode and make the change there.
Camera control mode
In Camera Control mode you can personalize your camera settings for different circumstances.
Settings tab
1 |
5 |
2 |
|
|
6 |
3 |
|
4 |
7 |
Setting Function
1Image Mirror—Flip the image horizontally. Image Flip—Flip the image vertically.
Low Light—Select to get a clear image in low light situations.
2Adjust the picture elements to your personal preferences.
12

RF-NBCAM - combined.fm Page 13 Friday, August 11, 2006 11:27 AM
Setting Function
3Adjust the resolution from 640 × 480 to 1280 × 960.
4Adjust the white balance in the image. Click to remove the check in Auto to adjust.
5Click Default to return to the manufacturer’s settings. Click Load to return to the previous settings.
Click Save to save the values you set up.
6Outdoor/Indoor—Set based on where your Web camera is located.
Flicker—Select the correct frequency according to the country where you are using the Web camera. (Before doing this, you need to select Indoor.)
7Backlight Comp.—If your Web camera is located in backlight position, select this to get a sharper image.
B/W Mode—Select to get a black-and-white photo effect.
Effects tab
1
2
3
Setting Function
1Effects—Select from 16 different video effects. Frame—Select from 10 different video frames.
Note: These effects and frames can also be applied to video chat software, such as MSN Messenger. Also, you can directly connect to this Effects page from the video chat software.
RF-NBCAM 13
RF-NBCAM - combined.fm Page 14 Friday, August 11, 2006 11:27 AM
Setting Function
2Customized Frame—You can use a customized frame that you create and access from this box.
Note: The image area of the frame must be Pantone 255 and the frame size must be 640 × 480.
3Auto Change—Select to automatically alternate between the available video effects and frames.
No effect & frame—Select this to cancel video effects and frames.
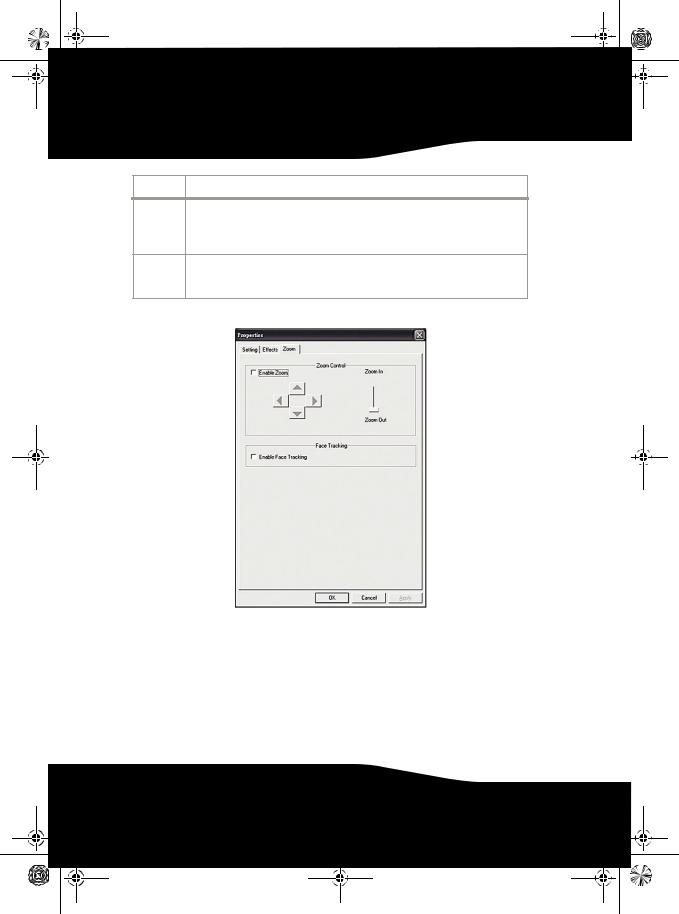
Zoom tab
Use this screen to enable the zoom function and control the image.
To use the zoom function:
1 Click Enable Zoom to turn on the zoom function. 2 Click and drag the bar to zoom in or zoom out.
3 Click the direction arrows to move the image up, down, left, or right.
4Click Enable Face Tracking to automatically center your face in the image window when using video chat.
14
RF-NBCAM - combined.fm Page 15 Friday, August 11, 2006 11:27 AM
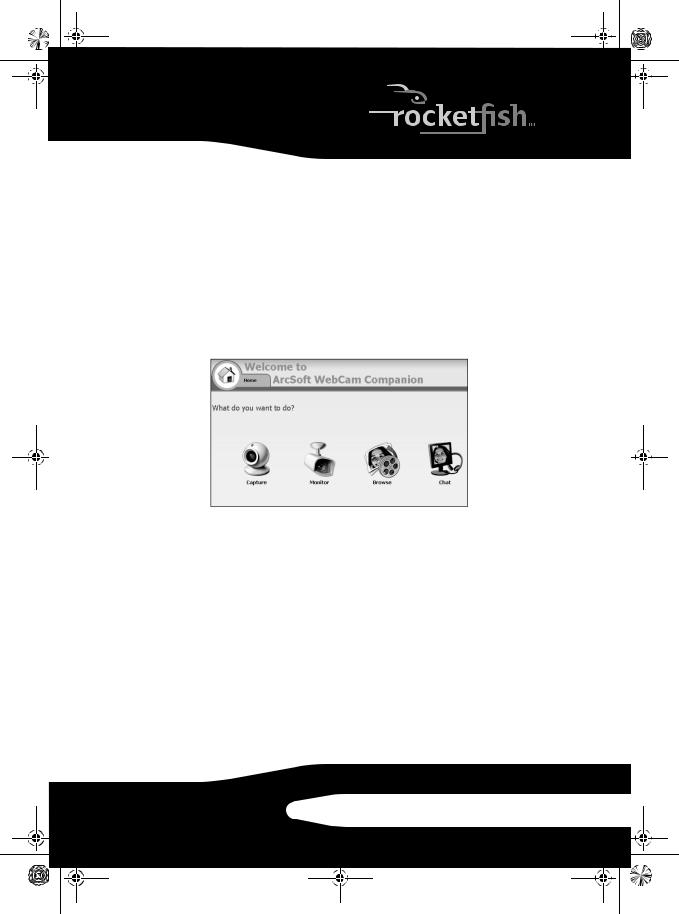
ArcSoft WebCam Companion
This program offers a broad range of functions designed and optimized for Webcam use. Whether you use it to launch a video chat client or to automatically record movement detected by the device, WebCam Companion lets you get the most out of any Webcam.
If you would like to know more about WebCam Companion, use the built-in Help file. You can access it from the Help menu along the top of the program screen or by pressing F1. It explains each button and option and also shows you how to perform most common operations and individual commands.
Video chat
Video chat using MSN Messenger
To use MSN Messenger:
1If you don’t have MSN Messenger version 6.0 or later, go to http://messenger.msn.com to download it.
2After you download and install the software, sign on to the MSN Messenger service.
3 Choose a friend on your contact list, then click OK to confirm.
4Double-click a friend on your contact list who is available to chat, then click on the Webcam icon. Your friend receives an invitation message to chat with you.
5When your friend accepts, the video chat starts.
For additional information, go to http://messenger.msn.com .
RF-NBCAM 15

RF-NBCAM - combined.fm Page 16 Friday, August 11, 2006 11:27 AM
Video chat using Yahoo Messenger
To use Yahoo Messenger:
1If you don’t have Yahoo Messenger, go to http://messenger.yahoo.com to download it.
2After you register, download, and install the software, sign on to the Yahoo Messenger service.
3 From the main window, click Tools, then select Start My Webcam.
4Right-click on a friend’s name in your Messenger List, then choose View Webcam. Your friend receives an invitation message to chat with you.
5When your friend clicks YES, the video chat starts.
For additional information, go to http://messenger.yahoo.com .
Video chat using AOL Instant Messenger
To use AOL Instant Messenger:
1If you don’t have AOL Instant Messenger, go to http://www.aim.com to download it.
2After you register, download, and install the software, sign on to the AOL Instant Messenger service.
3Click Show Messenger Lists, then choose the friend you want to video chat with. Your friend receives an invitation message to chat with you.
4When your friend accepts, the video chat starts.
For additional information, go to http://www.aim.com .
Legal notices
FCC statement
United States Regulatory Information
This device complies with part 15 of the FCC Rules. Operation is subject to the following two conditions: (1) This device may not cause harmful interference, and (2) this device must accept any interference received, including interference that may cause undesired operation.
16

RF-NBCAM - combined.fm Page 17 Friday, August 11, 2006 11:27 AM
ICES-003 Statement:
This Class B digital apparatus complies with Canadian ICES-003. Cet appareil numérique de la classe B est conforme à la norme NMB-003 du Canada.
RSS Statement:
Operation is subject to the following two conditions : (1) this device may not cause interference, and (2) this device must accept any interference, including interference that may cause undesired operation of the device.
Copyright
© 2006 Rocketfish. Rocketfish and the Rocketfish logo are trademarks of Best Buy Enterprise Services, Inc. Other brands and product names are trademarks or registered trademarks of their respective holders.
Specifications and features are subject to change without notice or obligation.
For service and support call (800) 305-2204.
RF-NBCAM 17

RF-NBCAM - combined.fm Page 18 Friday, August 11, 2006 11:27 AM
18
RF-NBCAM - combined.fm Page 19 Friday, August 11, 2006 11:27 AM
Warranty
1 Year Limited Warranty
Rocketfish Products (“Rocketfish”) warrants to you, the original purchaser of this new RF-NBCAM Notebook Web Camera (“Product”), that the Product shall be free of defects in the original manufacture of the material or workmanship for one (1) year from the purchase of the Product (“Warranty Period”). This Product must be purchased from an authorized dealer of Rocketfish brand products and packaged with this warranty statement. This warranty does not cover refurbished Product. If you notify Rocketfish during the Warranty Period of a defect covered by this warranty that requires service, terms of this warranty apply.
HOW LONG DOES THE COVERAGE LAST?
The Warranty Period lasts for one year (365 days), beginning on the date you purchased the Product. The purchase date is printed on the receipt you received with the product.
WHAT DOES THIS WARRANTY COVER?
During the Warranty Period, if the original manufacture of the material or workmanship of the Product is determined to be defective by an authorized Rocketfish repair center or store personnel, Rocketfish will (at its sole option): (1) repair the Product with new or rebuilt parts; or (2) replace the Product at no charge with new or rebuilt comparable products or parts. Products and parts replaced under this warranty become the property of Rocketfish and are not returned to you. If service of Products and parts are required after the Warranty Period expires, you must pay all labor and parts charges. This warranty lasts as long as you own your Rocketfish Product during the Warranty Period. Warranty coverage terminates if you sell or otherwise transfer the Product.
HOW TO OBTAIN WARRANTY SERVICE?
If you purchased the Product at a retail store location, take your original receipt and the Product to the store you purchased it from. Make sure that you place the Product in its original packaging or packaging that provides the same amount of protection as the original packaging. If you purchased the Product from an online web site, mail your original receipt and the Product to the address listed on the web site. Make sure that you put the Product in its original packaging or packaging that provides the same amount of protection as the original packaging.
WHERE IS THE WARRANTY VALID?
This warranty is valid only to the original purchaser of the Product in the United States and Canada.
WHAT DOES THE WARRANTY NOT COVER?
This warranty does not cover:
•Customer instruction
•Installation
•Set up adjustments
•Cosmetic damage
•Damage due to acts of God, such as lightning strikes
RF-NBCAM 19
 Loading...