


USB 3.0 3.5" SATA Hard Disk Drive Enclosure
RF-HD3035 |
User Guide |

USB 3.0 3.5" SATA Hard Disk Drive Enclosure
Contents |
|
Introduction ............................................................................................................ |
3 |
Safety information ................................................................................................ |
3 |
Important safety instructions ................................................................. |
3 |
Features..................................................................................................................... |
3 |
Package contents ........................................................................................ |
3 |
System requirements ................................................................................. |
3 |
Setting up your hard drive enclosure ............................................................ |
4 |
Installing your hard drive in the enclosure ........................................ |
4 |
Connecting the enclosure to your computer.................................... |
5 |
Installing the software............................................................................... |
8 |
Using your enclosure ........................................................................................... |
9 |
Backing up your files............................................................................................ |
9 |
Starting Roxio Back On Track .................................................................. |
9 |
Selecting files to back up....................................................................... |
10 |
Creating a new Backup Files project ................................................. |
11 |
Using the Backup Files scheduler....................................................... |
12 |
Backup Files options................................................................................ |
13 |
Restoring files ............................................................................................ |
14 |
Disconnecting the enclosure from your computer ............................... |
14 |
Uninstalling the backup software ...................................................... |
14 |
Troubleshooting ................................................................................................. |
15 |
Specifications....................................................................................................... |
15 |
Legal notices ........................................................................................................ |
15 |
One-year limited warranty.............................................................................. |
17 |
2
Introduction
Congratulations on the purchase of your new Rocketfish RF-HD3035 external hard drive enclosure kit.
The USB 3.0 Rocketfish 3.5" SATA hard drive enclosure lets you install a high-speed SATA hard drive and connect it to a computer via a USB 3.0 port. The enclosure has a built-in USB 2.0 hub and a memory card reader.
SuperSpeed USB 3.0 transfers data at 5 gigabits per second. That's up to 10 times faster than USB 2.0.
The performance may vary, based on your system configuration.
Safety information
Warning: To reduce the risk of fire or electric shock, do not expose this device to rain or moisture.
CAUTION
RISK OF ELECTRIC SHOCK
DO NOT OPEN
This symbol indicates that dangerous voltage constituting a risk of electric shock is present within your hard drive enclosure.
This symbol indicates that there are important operating and maintenance instructions in the literature accompanying your hard drive enclosure.
Important safety instructions
•This device is to be used in temperatures of 41~95°F (5~35°C). Temperatures exceeding these limits may damage your hard drive or the enclosure. Avoid heat sources or direct sunlight.
•This device can be stored in a humidity range of between 10% and 90%, and can be operated in a humidity range of between 5% and 80%.
•Do not connect the device to your computer without taking precautions to avoid electrostatic discharge or short circuits, which could damage the device or your computer.
•Do not place this device close to a source of strong magnetic fields (such as a computer screen, TV, radio, or speaker). Strong magnetic fields can affect the reliability of data transfer to and from the device.
•Do not place anything heavy on top of the device.
•Use only the accessories provided in the accessory package.
•Before you install or use the device, read the user manual and assemble the enclosure carefully.
•To prevent short circuits, do not leave any metal objects inside the enclosure when installing the hard drive.
•To prevent short circuits, do not use the device close to water, rain, or high humidity.
Features
•Multi-function storage solution for your computer.
•Supports up to 2 TB 3.5" SATA interface hard drive.
•Provides a two-slot USB 3.0 card reader that supports SDXC, SDHC, SD, MMC, MS, MS PRO, xD, Compact Flash (UDMA, Type I / II), and IBM Microdrive.
•Provides two external USB 3.0 downstream ports.
•Can stand up or lie down while operating.
•One-button backup to easily backup, restore, and synchronize data between your Windows PC and the enclosure.
•Has one power-on LED, with backup active indicator.
•Metal design facilitates rapid heat dissipation.
•Supports Plug-and-Play and is hot-swappable.
Package contents
•USB 3.0 3.5" SATA hard drive enclosure
•USB 3.0 A-B cable
•AC power adapter
•Utility CD (User Guide and software)
•Quick setup guide
•Stand
•Accessories
•Plastic brackets (2)
•Screws and screwdriver
•Rubber pads (4)
System requirements
•One formatted 3.5" SATA hard drive.
•PC or Macintosh computer with an available USB 3.0 port. (You can connect to a USB 2.0 port, but it will only run at USB 2.0 speeds).
RF-HD3035 3

•Supports Microsoft Windows XP, Windows Vista, and Windows 7 operating systems.
•Supports MAC OS X version 10.4 or higher operating system (USB 2.0 only).
For highest performance and reliability, install the latest updates and service pack (SP). For Windows, go to the Start menu and select Windows Update.
Physical description
Front
Backup button
Card reader access LED
CF/MD
SD/MMC/MS/MS PRO/xD
USB 3.0 hub port
USB 3.0 hub port
Back
Power button
USB 3.0 port
12V DC in port
Status indicators
The following table describes the power-on and backup active LED.
LED indicator |
LED status |
Description |
|
Solid |
The hard drive is turned on. |
|
|
|
Backup button |
Flashing |
Data is being transmitted between your computer |
|
and the hard drive. |
|
|
|
|
|
Off |
The hard drive is turned off. |
|
|
|
|
Solid |
A memory card is in the reader. |
Card reader |
Flashing |
Data is being transmitted between your computer |
|
and the memory card. |
|
|
|
|
|
|
|
|
Off |
The memory card reader slot is empty. |
|
|
|
|
|
|
Setting up your hard drive enclosure
Installing your hard drive in the enclosure
Read the safety precautions before you install your hard drive in the enclosure:
•Use only the accessories provided in the accessory package.
•Always unplug the AC adapter before installing the hard drive.
•Do not use a power supply with a different voltage rating.
4

•Make sure that you first touch an unpainted, grounded metal object to discharge any static electricity stored on your clothing or body before touching any electronic components.
•Handle the printed circuit board (PCB) edges only. Avoid touching the onboard electronic components.
To install your hard drive in the enclosure:
1Remove the four (4) screws from the bottom of the enclosure, then open the top cover plate.
2Insert the plastic braces (2) into the holes on both sides of the hard drive.
3Slide the drive into the enclosure, then firmly connect the drive to the SATA connector.
4Replace the top cover (make sure to place it in the correct direction), then secure it with the four screws that you previously removed.
5Attach the four rubber pads to the back of the enclosure to protect the surface.
Connecting the enclosure to your computer
Notes:
Make sure that you have already installed a hard drive into the enclosure before you connect your enclosure to your computer.
For new hard drives, you need to initialize and partition your hard drive before it will appear in Windows Explorer or on your Mac desktop. Refer to your hard drive manufacturer's documentation or see “Creating A New Partition” on page 6.
For optimal performance, make sure that your laptop or PC has USB 3.0 ports. If your computer does not have USB 3.0 capability, you can plug the USB 3.0 cable into any available USB 2.0 port.
To connect the enclosure to your computer:
1Plug the power cord into the enclosure, then plug the AC power adapter into an AC power outlet.
RF-HD3035 5
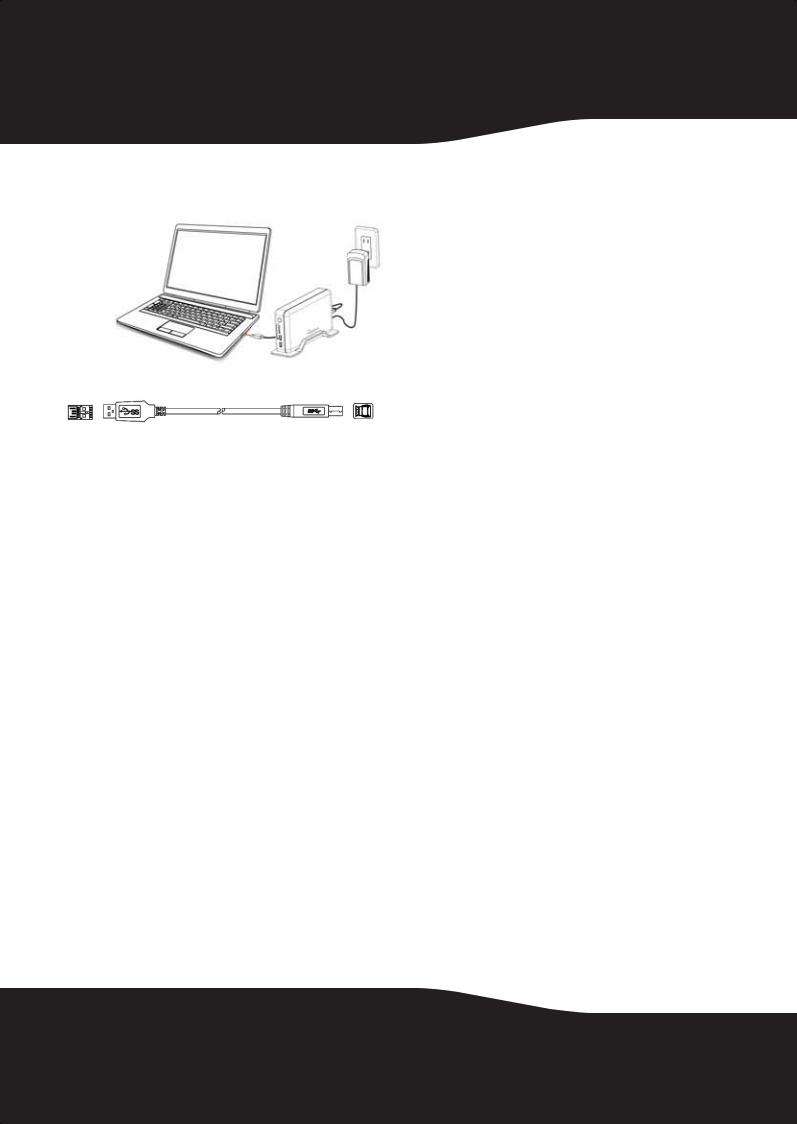
2Plug the USB 3.0 B type connector into the USB port on the enclosure, then plug the USB 3.0 A type connector into an available USB 3.0 port on your computer.
|
|
|
|
|
|
|
|
|
|
|
|
USB 3.0 A-type connector |
USB 3.0 B-type connector |
||
3Press the Power button on the enclosure. The operating system automatically detects and sets up the new drive.
If the drive is correctly detected, a new drive letter is assigned to the enclosure.
•For Macintosh computers, the new drive letter appears on the desktop.
•For PCs, the Safely Remove Hardware icon appears on your taskbar.
Note for Windows users: If you do not see an additional drive in your system, you must format the new drive. See Windows online help for more information.
Notes for Macintosh users: Select Disk Utilities from the Utilities folder, then select the external enclosure and format the drive to meet your requirements.
Creating A New Partition
Note: For new hard drives, you need to initialize and partition your hard drive before it will appear in Windows Explorer.
The best way to partition a new hard drive is by using the manufacturer’s program. Most hard drives should come with a CD that includes its installation program. If not, visit the manufacturer's website to see if a download is available. If the manufacturer’s program is not available, try the following instead:
Caution: Doing the following will erase any existing data on the drive. If the drive is damaged and you wish to recover the data, continuing may overwrite the existing information!
Creating a new partition in
Windows XP/Vista/7
To create a new partition in Windows XP/Vista/7:
1 Right click My Computer, then click Manage.
2Select Disk Management under Storage on the left pane.
Windows should now give you the option to initialize the disk. If not, locate the new drive, right click on the new disk (where it says “New Simple Volume”) and choose Initialize.(This step may not be required for some hard drives)
3 Follow the prompts in the wizard.
4Once complete, locate your hard drive in the bottom right pane. Right-click on the area with a status bar (to the right of the “New Simple Volume” area) and click New Partition.
5Continue following the directions of the wizard. The recommended partition type is “primary” and the recommended file system is “NTFS.” Note that Windows XP limits FAT32 partitions to only 32 GB.
You should now be able to see the drive in Windows Explorer.
Formatting the hard drive in Windows
To format the hard drive using Windows:
Note: Formatting is only required for a new hard drive. Do not format a drive that contains valuable data that you want to save.
1 Click Start, then click Control Panel.
2Click Performance and Maintenance (in Windows 7 click System and Security), then click Administrative Tools.
3Click Computer Management, then click Disk Management from the menu on the left side of the screen.
4Click on the new drive, then click on the Action tab at the top of the screen.
5Go to All Tasks, then click on Format from the menu.
6Select the file system and other choices you want, then click OK.
Creating a new partition in Mac OS X 10.4 or higher
If you are using a new hard drive, you may need to initialize it first. Initialize your internal hard drive using Drive Setup from the Mac OS CD that came with your computer.
To initialize a Hard Drive:
1 Start your computer from the Mac OS CD.
2Locate the Utilities folder on the Mac OS CD and double-click it to open the folder.
6
 Loading...