


Enjoy Listening
ROBERTS
DAB / FM RDS Digital Radio with built-in battery charger
Please read this manual before use
Contents |
|
Controls ....................................................................... |
2-3 |
Battery operation using alkaline batteries....................... |
4 |
Battery operation using rechargeable batteries........... |
5-6 |
Using the AC adaptor ..................................................... |
6 |
Operating your radio - DAB ............................................ |
7 |
Selecting a station - DAB................................................ |
8 |
Display modes - DAB ..................................................... |
9 |
Finding new stations - DAB .......................................... |
10 |
Secondary services - DAB............................................ |
10 |
Manual tuning - DAB .................................................... |
11 |
Signal strength display - DAB....................................... |
11 |
Dynamic range control (DRC) settings - DAB .............. |
12 |
Operating your radio - Search tuning - FM................... |
13 |
Manual tuning - FM....................................................... |
14 |
Display modes - FM...................................................... |
15 |
Favourite button............................................................ |
16 |
Recalling your favourite station .................................... |
16 |
Preset stations DAB and FM ........................................ |
17 |
Stereo / Mono setting - FM........................................... |
18 |
Scan sensitivity setting - FM......................................... |
19 |
Software version........................................................... |
20 |
System reset................................................................. |
21 |
Headphone socket........................................................ |
22 |
Auxiliary input socket.................................................... |
22 |
Line out socket ............................................................. |
22 |
A few words about batteries .................................... |
23-24 |
Display backlight........................................................... |
25 |
USB socket for software upgrades............................... |
25 |
General......................................................................... |
26 |
Specifications ............................................................... |
26 |
Circuit features ............................................................. |
26 |
Guarantee........................................................ |
Back page |
1

Controls
(Top)
12 11
13 |
|
|
|
|
|
|
|
|
10 |
|
|
|
|
|
|
|
|
|
9 |
|
1 |
2 |
3 |
4 |
5 |
6 |
7 |
8 |
|
1. |
Speaker |
|
6. |
Auto Tune button |
|
|
10. |
Auxiliary input socket |
|
2. |
Volume control |
|
7. |
Info button |
|
|
|
11. |
LCD display |
3. |
On/Off button |
|
8. |
Preset button |
|
|
12. |
Charge / Low battery indicator |
|
4. |
Favourite button |
|
9. |
Tuning / Select control |
|
13. |
Headphone socket |
||
5. |
DAB/FM button |
|
|
|
|
|
|
|
|
If you need any further advice, please call our Technical Helpline on :- |
2 |
020 8758 0338 (Mon-Fri) |
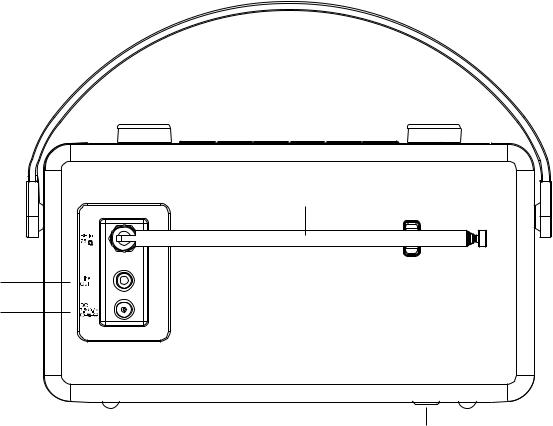
Controls
(Rear)
14
15
16
14. Telescopic aerial
15. Line output socket
16. DC input socket
17. Battery compartment screw
17
3
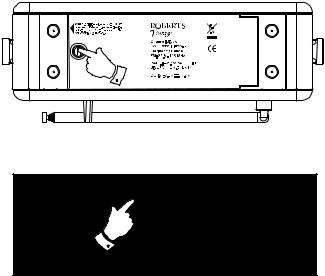
Battery operation using alkaline batteries (also see page 23)
1.Ensure your radio is disconnected from the mains supply and the aerial is fully retracted.
2.Open the battery cover on the base of the unit by using a flat bladed screwdriver to loosen the screw securing the battery cover.
3.Slide the switch inside the battery compartment to the Alkaline position.
4.Insert four LR14 (C size) Alkaline batteries into the spaces in the compartment. Take care to ensure all batteries are inserted with the correct polarity as shown inside the battery compartment.
5.Close the battery cover and gently tighten the screw using a flat bladed screwdriver. Do not overtighten.
•Important: when using Alkaline batteries the battery switch must be placed in the Alkaline position. Failure to do so could result in serious damage to the batteries or radio.
•When the batteries are exhausted, the charge/low battery indicator will show red for a short while. The radio will then switch itself off. It may not be possible to switch the radio back on until the batteries are replaced, or until the radio is connected to the mains adaptor.
•If the radio is not to be used for any extended period of time it is recommended that the batteries are removed from the radio.
•We would recommend for economy that the Vintage is used via the
AC adaptor whenever possible with battery operation for occasional use only. If extended listening using batteries is anticipated, then the use of rechargeable batteries is recommended.
2 |
3 |
If you need any further advice, please call our Technical Helpline on :- |
4 |
020 8758 0338 (Mon-Fri) |
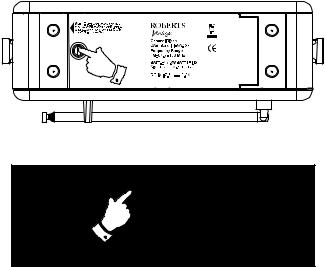
Battery operation using rechargeable batteries (also see page 23)
The first few times that you charge a new set of batteries, you may find that the charge and play times are very short. Normal operation should be achieved after 3 or 4 charge - discharge cycles.
Batteries are only charged while the radio is connected to the mains supply via its adaptor and it is switched off using the On/Off button.
1.Ensure your radio is disconnected from the mains supply and the aerial is fully retracted.
2.Open the battery cover on the base of the unit by using a flat bladed screwdriver to loosen the screw securing the battery cover.
3.Slide the switch inside the battery compartment to the NiMH position.
4.Insert four Rechargeable LR14 (C size) batteries into the spaces in the compartment. Take care to ensure all batteries are inserted with the correct polarity as shown inside the battery compartment. The radio is designed to be used with Nickel Metal Hydride (NiMH) rechargeable batteries.
5.Close the battery cover and gently tighten the screw using a flat bladed screwdriver. Do not overtighten.
6.Plug the mains adaptor into your radio and then plug the adaptor into the mains.
7.The Charge light will flash green indicating that the batteries are charging. Batteries will be fully charged in around 3 - 7 hours depending on their capacity. The charge light shows a steady green light when the battery charging is complete.
•Important: when using rechargeable batteries the battery switch must be placed in the NiMH position. Batteries will only be charged when the radio is switched off and connected to the AC adaptor.
2 |
3 |
5

Battery operation using rechargeable batteries cont.
•When the batteries are exhausted, the charge/low battery indicator light will show red for a short while. The radio will then switch itself off. It may not be possible to switch the radio back on until the batteries are recharged, or until the radio is connected to the mains adaptor.
•If the radio is not to be used for any extended period of time it is recommended that the batteries are removed from the radio.
IMPORTANT: The batteries should not be exposed to excessive heat such as sunshine, fire or the like. After use, disposable batteries should if possible be taken to a suitable recycling centre. On no account should batteries be disposed of by incineration.
Using the AC adaptor
1.Insert the adaptor plug into the DC in socket on the rear of your radio.
2.Plug the adaptor into a standard 13A mains socket outlet. Whenever the adaptor is plugged in to the radio and switched on at the mains the batteries are automatically disconnected. If the adaptor is plugged in to the radio but not switched on then the radio will run from the batteries if fitted.
The AC adaptor should be disconnected from the mains supply and the radio when not in use.
•IMPORTANT: The mains adaptor is used as the means of connecting
the radio to the mains supply. The mains socket used for the radio must remain accessible during normal use. In order to disconnect the radio from the mains completely, the mains adaptor should be removed from the mains socket outlet completely.
If you need any further advice, please call our Technical Helpline on :- |
6 |
020 8758 0338 (Mon-Fri) |

Operating your radio - DAB
1.Carefully extend the telescopic aerial.
2.Press the On/Off button to switch on your radio. The display will show
'Welcome to DAB'.
2
3. If this is the first time the radio is used a quick scan of the Band III DAB channels will be carried out. If the radio has been used before the last used station will be selected.
4. During the scanning process, the lower line of the display shows a bar-graph indicating progress of the scan.
5. When the scanning is completed the first station (in numeric-alpha order 0...9...A....Z) will be selected.
6. If the station list is still empty after the scan your radio will display
'Service not available'.
7. If no signals are found it may be necessary to relocate your radio to a position giving better reception. Then, either switch your radio off and on again, or press the Auto Tune button to repeat the scan.
7
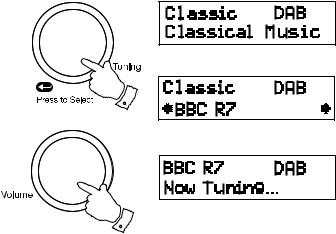
Selecting a station - DAB
1.The top line of the display shows the name of the station currently selected.
2.Rotate the Tuning control to scroll through the list of available stations on the lower line of the display. Stop rotating the Tuning control when you find the station that you wish to hear.
3.Press and release the Tuning control to select the station. The display may show 'Now Tuning...' while your radio finds the new station.
4.Adjust the Volume control to the required setting.
Note: If after selecting a station the display shows 'Service not available' it may be necessary to relocate your radio to a position giving better reception.
The use of radio station presets for selecting your preferred radio stations is described on page 17.
2,3
4
If you need any further advice, please call our Technical Helpline on :- |
8 |
020 8758 0338 (Mon-Fri) |
 Loading...