


ROBERTS |
Sound for Generations |
RD-41
DAB / FM RDS / MP3 / WMA / EPG digital radio with timed recording and 
Please read this manual before use

Contents |
|
Controls .................................................................................... |
2-3 |
Digital radio features ................................................................... |
4 |
Battery operation ......................................................................... |
5 |
Using the AC adaptor .................................................................. |
6 |
Using your radio for the fi rst time - DAB...................................... |
7 |
Operation modes......................................................................... |
8 |
Operating your radio - DAB ......................................................... |
8 |
Selecting a station - DAB ............................................................ |
9 |
Finding new stations - DAB ....................................................... |
10 |
Manual tuning - DAB .................................................................. |
11 |
Secondary services - DAB ........................................................ |
12 |
Display modes - DAB ................................................................ |
12 |
Using your radios Pause Plus feature - DAB ....................... |
13-14 |
Using an SD memory card with your radio................................ |
15 |
Recording a radio programme - DAB ........................................ |
16 |
Timed recording - DAB......................................................... |
17-27 |
SD card format ..................................................................... |
28-29 |
Dynamic Range Control (DRC) settings - DAB ......................... |
30 |
File playback - DAB.............................................................. |
31-34 |
Using the (Electronic programme guide) EPG - DAB........... |
35-36 |
Operating your radio FM - auto search ..................................... |
37 |
Operating your radio FM - manual tune .................................... |
38 |
Presetting stations DAB and FM ............................................... |
39 |
Recalling a preset station .......................................................... |
39 |
Clock settings ............................................................................ |
40 |
Setting the clock automatically .................................................. |
40 |
Setting the clock manually.................................................... |
41-42 |
Alarms .................................................................................. |
43-51 |
Cancelling alarms...................................................................... |
51 |
Snooze function......................................................................... |
51 |
Sleep timer ................................................................................ |
52 |
Clear station list......................................................................... |
53 |
Audio mode - FM....................................................................... |
54 |
Display settings backlight .......................................................... |
55 |
Display settings contrast ........................................................... |
56 |
Factory reset ............................................................................. |
57 |
Connecting to an external amplifi er or recorder ........................ |
58 |
Headphone socket .................................................................... |
58 |
Auxiliary input ............................................................................ |
59 |
Lock switch................................................................................ |
60 |
Standby display ......................................................................... |
60 |
USB connection......................................................................... |
61 |
General...................................................................................... |
62 |
Specifi cations ............................................................................ |
62 |
Circuit features .......................................................................... |
62 |
Guarantee .................................................................... |
Back page |
1
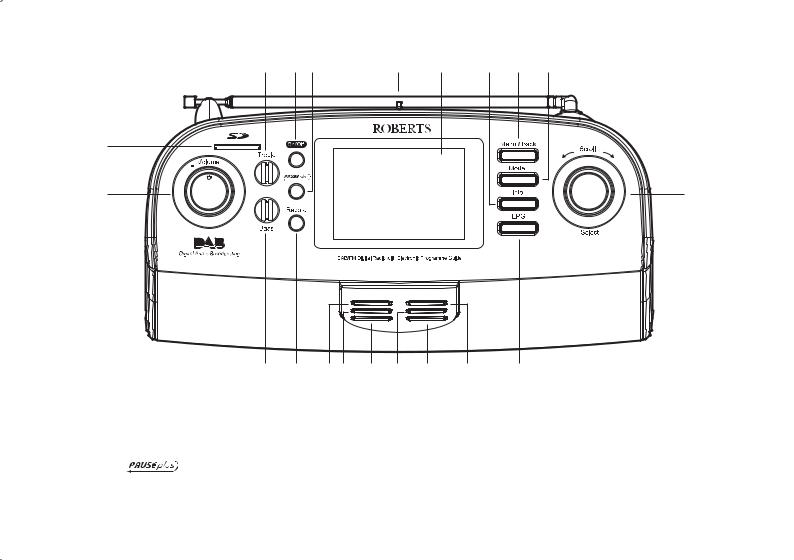
Controls (top and front) |
|
|
|
|
|
|
|
3 |
4 |
5 |
6 |
7 |
8 |
9 |
10 |
2 |
|
|
|
|
|
|
|
1 |
|
|
|
|
|
|
11 |
|
20 |
19 |
18 17 |
16 |
15 |
14 |
13 |
|
12 |
1. |
Volume control |
8. |
Info button |
|
|
|
15. |
Preset 4/Fastforward button |
|
2. |
SD card slot |
9. |
Menu/Back button |
|
|
16. |
Preset 5/Repeat mode button |
||
3. |
Treble control |
10. |
Mode button |
|
|
|
17. |
Preset 3/Rewind button |
|
4. |
On/Off/Power button |
11. |
Tuning/Select control |
|
|
18. |
Preset 1/PlayPause button |
||
5. |
button |
12. |
EPG button |
|
|
|
19. |
Record button |
|
6. |
Telescopic aerial |
13. |
Preset 2/Stop button |
|
|
20. |
Bass control |
||
7. |
LCD display |
14. |
Preset 6/Delete button |
|
|
|
|||
If you need any further advice, please call our Technical Helpline on :-
2
020 8758 0338 (Mon-Fri)

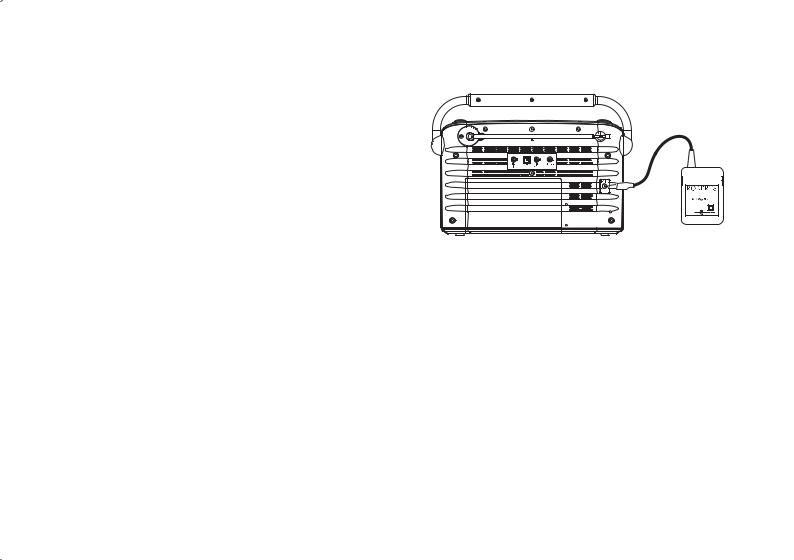
Controls (back)
21 |
22 |
23 |
24 |
25
27 |
26 |
21. |
Auxiliary input socket |
25. |
DC input socket |
22. |
USB connector |
26. |
Keylock switch |
23. Line out socket |
27. |
Battery compartment |
|
24. |
Headphone socket |
|
|
3

RD-41 Digital radio features
The Roberts RD-41 radio provides the following features in an attractive compact unit.
Radio
The RD-41 can receive DAB and FM (with RDS) wavebands.
High resolution display
Alarge display panel provides an easy-to-read clock display when the radio is in standby mode. When the radio is in use, the large display makes it easier to choose which radio station to listen to and allows text messages which are broadcast to be read without scrolling.
Electronic programme guide (EPG)
Theelectronicprogrammeguideprovidesstart/stoptimesandprogram information similar to that provided for digital TV broadcasts. The EPG typically provides programme information for up to seven days.
SD card
An SD card can be used in your radio for recording, playing back previously recorded radio programs or playing back MP2, MP3 and WMA files transferred from a PC.
Record timers
The RD-41 has twelve timers which can be used to record from DAB radio to SD card. Timers may be set using the Electronic Program Guide (EPG), or to specifi ed times. The timers allow repeated recordings to be made of broadcast series (daily, weekly, weekdays or weekends).
Alarms
The RD-41 has twelve alarms which can be set to wake you to either a radio station, playlist (SD card fi les) or a buzzer.
If you need any further advice, please call our Technical Helpline on :-
Auxiliary input
The RD-41 can be used as an amplifi er and loudspeaker system for external MP3 players, compact disc players and similar devices.
Headphone output
A standard 3.5mm headphone socket is provided for private listening.
Line output socket
A standard 3.5mm Line output socket is provided for connecting the audio signal from the radio to an external amplifi er or recorder.
USB socket
Your radio has a USB connection to connect your PC. The USB port can be used to copy fi les to and from your SD card.
4
020 8758 0338 (Mon-Fri)

Battery operation
1.Remove the Battery cover on the rear of the unit by pushing battery door in and downwards.
2.InsertsixLR20(Dsize)batteriesintothespacesinthecompartment. Take care to ensure all batteries are inserted with the correct polarity as shown inside the battery compartment. Replace the battery cover.
3.Reducedpower,alowbatteryindicator 
 ,distortionora‘stuttering’ sound are all signs that the batteries may need replacing.
4.If the radio is not to be used for any extended period of time it is recommended that the batteries are removed from the radio.
IMPORTANT: The batteries should not be exposed to excessive heat such as sunshine, fi re or the like.After use, disposable batteries should if possible be taken to a suitable recycling centre. On no account should batteries be disposed of by incineration.
5
Using the AC adaptor
1.Place your radio on a fl at surface and insert the adaptor plug into the DC socket located on the left side of your radio. The adpator for use with your RD-41 should provide 9 volts DC output at 1.2 amps, centre pin positive.
2.Plug the adaptor into a standard 13 amp mains socket outlet. Whenever the adaptor is used the batteries are automatically disconnected.
We would recommend for economy that your radio is used via the ACadaptorwheneverpossiblewithbatteryoperationforoccasional use only.
IMPORTANT: The mains adaptor is used as the means of connecting the radio to the mains supply. The mains socket used for the radio must remain accessible during normal use. In order to disconnect the radio from the mains completely, the mains adaptor should be removed from the mains socket outlet completely.
If you need any further advice, please call our Technical Helpline on :-
6
020 8758 0338 (Mon-Fri)

Using your radio for the first time - DAB
Your radio is supplied with a mains adaptor
1.Place your radio on a fl at surface. Insert the adaptor plug into the DC socket located on the rear of your radio.
2.Fully extend the telescopic aerial. The aerial should be fully extended and positioned for optimum reception.
3.Plug the adaptor into a standard 13 amp mains socket outlet.
4.When your radio is fi rst switched on the display will show "Roberts" and a quick scan of UK band III DAB and FM channels will be carried out. Note that if the radio has been used before the last used mode will be selected.
5.DuringAuto Tune as each group of stations is detected the display will show the number of stations found and a bargraph indicating progress of the Autotune.
6.When theAuto Tune is complete the fi rst station (in numeric-alpha order 0...9...A....Z) will be selected.
7.If the station list is still empty after the DAB Auto Tune your radio will display "No Signal".
8.If no signals are found it may be necessary to relocate your radio to a position giving better reception.
7
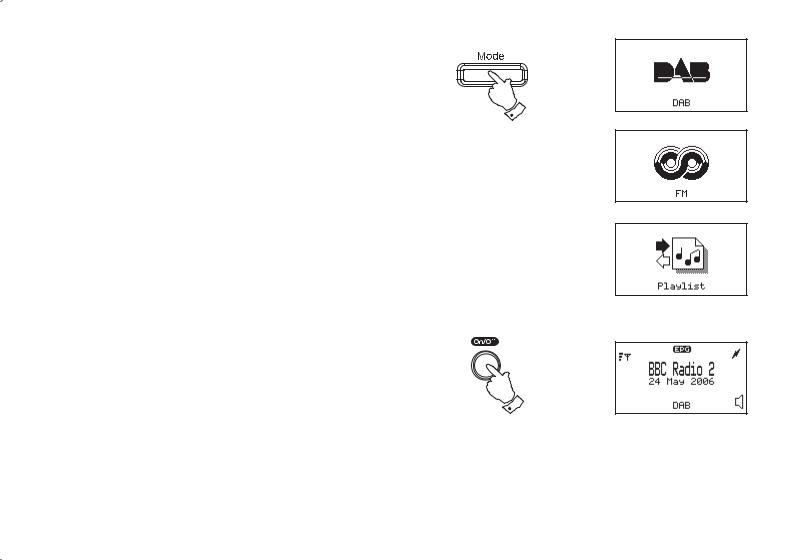
Operation modes
Your radio has 3 operation modes, DAB, FM and Playlist mode. |
|
1. Press the Mode button to change the operation mode between |
1 |
DAB, FM and Playlist. |
|
•DAB mode is used for listening to Digital Radio broadcasts and for recording programmes to a memory card.
•FM mode is used for listening to FM radio broadcasts.
•Playlist mode is used to play back digitally recorded programmes and for listening to MP3 and WMA audio fi les.
Operating your radio - DAB
1.Fully extend the telescopic aerial. The aerial should be fully extended and positioned for optimum reception.
2.PressthePower/Standbybuttontoswitchonyourradio.Iftheradio has been used before, the last used mode will be selected.
3.If necessary, press the Mode button until DAB mode is selected.
2
4.The radio will then tune to the DAB station most recently listened to. The display will show the station name in the fi rst line of the display and other information in the second line.
5.If no signals are found "No Signal' will be displayed and it may be necessary to relocate your radio to a position giving better reception. You should then carry out an autoscan to fi nd stations as described on page 9.
If you need any further advice, please call our Technical Helpline on :-
8
020 8758 0338 (Mon-Fri)
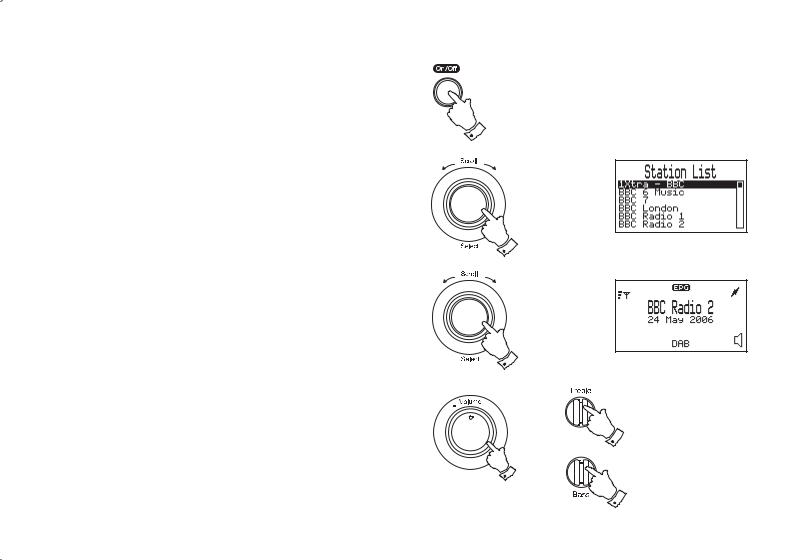
Selecting a station - DAB
1. Fully extend the telescopic aerial.
2. Press the Power/Standby button to switch on your radio. |
2 |
|
3.Rotate the Tuning/Select control until the station list appears.
4.Continue to rotate the Tuning/Select control until the required station is highlighted on the display.
5.Press and release the Tuning/Selectcontrolto select the station. The required station will be selected and after a few seconds the station name will appear on the display.
6.Adjust the Volume, Bass and Treble controls to the required settings.
Note: To return to the normal display mode from the station list without selecting a station press and release the Menu/Back button or simply wait a few seconds.
3,4
5
6
6
6
9
Finding new stations - DAB
As time passes new stations may become available. To fi nd new stations proceed as follows:-
1.Press the Mode button until the DAB mode is selected.
2.Press the Menu/Back button to enter the main DAB menu.
3.Rotate the Tuning/Select control until "Stations" is highlighted on the display. Press and release the Tuning/Select control and the stations menu will appear on the display.
4.Rotate the Tuning/Select control until "Autoscan" is highlighted on the display. Press and release theTuning/Select control.
5.Rotate the Tuning/Select control until "Band III" is highlighted on the display. Press and release the Tuning/Select control.
6.Your radio will carry out a scan of the entire band III UK frequencies. "Station Scan" will appear on the display. A progress bar will be shown on the display indicating autotune progress and number of stations found.
7.The scan can be cancelled at any time by pressing the Menu/Back button.
If you need any further advice, please call our Technical Helpline on :-
1
2
3,4
5
7
10
020 8758 0338 (Mon-Fri)
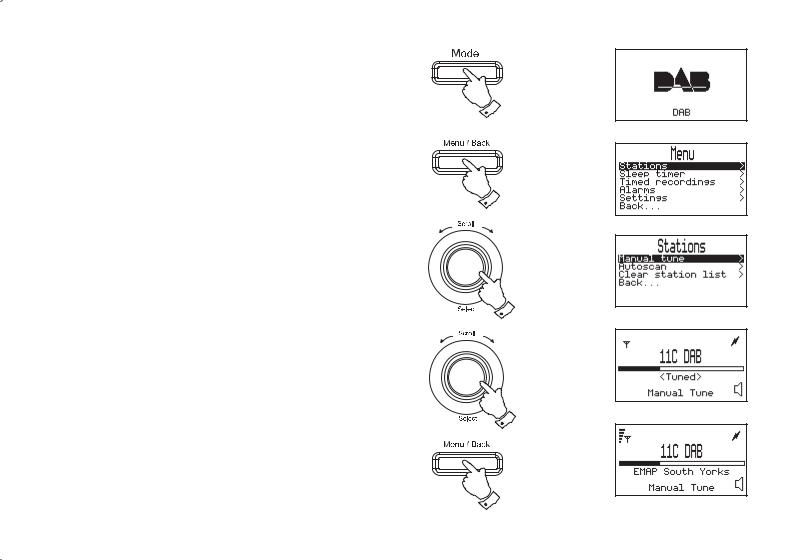
Manual Tuning - DAB
Manual tuning allows you to tune directly to the various DAB Band III channels. UK DAB stations are currently located in the range 11B to
12D.
1. |
Press the Mode button until the DAB mode is selected. |
2. |
Press the Menu/Back button to enter the main DAB menu. |
3. |
Rotate the Tuning/Select control until "Stations" is highlighted |
|
on the display. Press and release the Tuning/Select control the |
|
stations menu will appear on the display. |
4.RotatetheTuning/Selectcontroluntil"Manualtune"ishighlighted on the display. Press and release the Tuning/Select control.
5.Rotate the Tuning/Select control until the required channel is highlighted. If the channel can be received the Ensemble (group of stations) name will appear. The radio will attempt to tune to one of the stations. The service database will be updated and the display will show the station name. The new station will be added to the list.
6.You can exit the Manual tune mode by pressing the Menu/Back button.
Note: Manual tuning can also be access simply by pressing and holding the Tuning/Select control while tuned to a DAB station with the normal radio station name display.
1
2
3,4
5
6
11
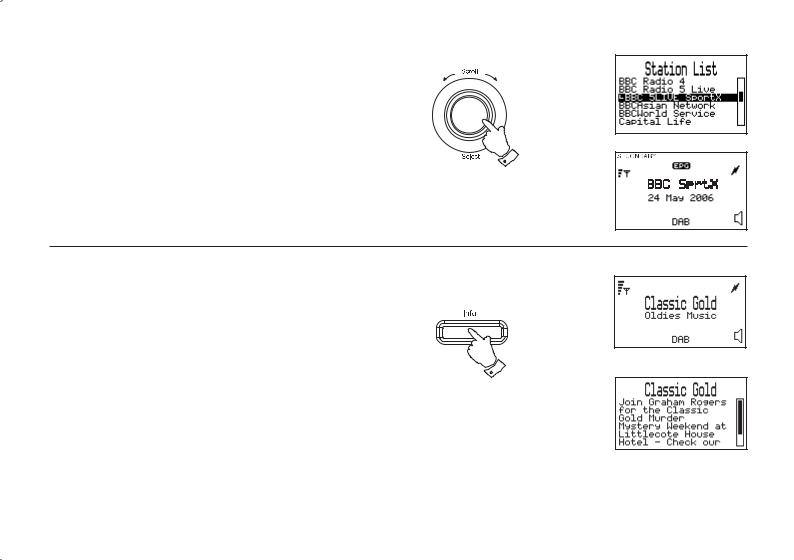
Secondary services - DAB
1. When transmitted, secondary services will be added to the service list and will appear indented beneath their associated primary service. They can be selected by pressing the Tuning/Select control.
1
2.The secondary service icon will appear in the display.
3.Afterasecondarybroadcasthasfinished,theradiowillautomatically re-tune to the associated primary service.
Display modes - DAB
Your radio has two display modes when listening to DAB. The default |
|
display is a full information display which shows station name, signal |
|
strength, program type, date and time, and a mains / battery status |
|
indicator. An optional full text display shows a full text display which |
1,2 |
the broadcaster may use to provide information related to their |
|
programmes.
1.Press the Info button to display the full text mode. If there is more information than can be fi tted into the display, rotate the Tuning/Select control to scroll the text up or down.
2.Press the Info button again to return to the full information display.
If you need any further advice, please call our Technical Helpline on :-
12
020 8758 0338 (Mon-Fri)

Using your radio's Pause Plus feature - DAB
How many times has your favourite radio station been interrupted by that phone call from a double glazing fi rm or someone selling that must have item? Sound familiar? With a single press of the  button you can put your favourite station on hold while you answer that important call. After the call or other important task is finished simply press the
  button to return to your favourite station exactly where you left off so that you never miss a single word.
Radio stations can effectively be put on hold for typically 5 minutes.
Note the  feature only operates on the DAB waveband.
1.Toplaceyourradioin modesimplypressthe
 button, the sound from the loudspeaker will be muted. The length of the delay is shown on the right hand side of the display. The additional possible delay time will show on the left hand side.
•If the radio is paused and the buffer becomes full then the radio will automatically start to play audio again.
2.To return to the radio station that you were listening to simply press
the  button and your radio will continue playing from where you left off. The display will show the amount by which you are behind real time together with the remaining pause time.
3.Toreturntoreal-timelisteningpressandreleasetheTuning/Select control, the radio will revert to the normal station name display.
1
1
13

Pause Plus Rewind and fastforward - DAB
1.As soon as you switch on your radio the  feature is working silently in the background so if, for example, you want to hear a news item again press the Pauseplus button. Press the
Rewind or Fast Forward button or rotate the Tuning control to scroll forward or backward to the item you wish to listen to. The display will show the amount of time you have scrolled back together with the maximum time you can rewind back to.
Note the  rewind memory only starts when your radio is switched on.
2.To return to real-time listening press the Tuning/Select control.
3.The rewind memory capacity is approximately 5 minutes.
Note the  rewind feature only operates on the DAB waveband.
1
11
1
If you need any further advice, please call our Technical Helpline on :-
14
020 8758 0338 (Mon-Fri)

Using an SD memory card with your radio
An SD card can be used in your radio for recording, playing back previously recorded radio programs, or playing back MP2/MP3/WMA fi les transferred from a PC.
Depending on the radio station a 512MB SD card will give typically 8 - 16 hours of recording time. If you are using a new SD card ensure that it is formatted correctly (see page 28)
Many different brands and capacities of SD card are available. Your RD-41 can use cards up to 2 GB. However, there are many different card variants available and not all cards can be guaranteed to work in the RD-41. In this application there is no performance benefi t in using high-speed cards. Note that the RD-41 is not compatible with very high capacity cards using the SDHC standard.
Inserting and removing a card
To insert an SD card into your radio carefully push the card into the SD card slot until it clicks. The card must be inserted gold contacts fi rst and with the label side to the rear of the radio. The SD card slot is on the top left side of your radio.
To remove the card push the card in slightly and the eject mechanism will lift it slightly allowing easy removal.
Note: The SD card should not be removed during a recording as damage or corruption of fi les on the card may occur.
15
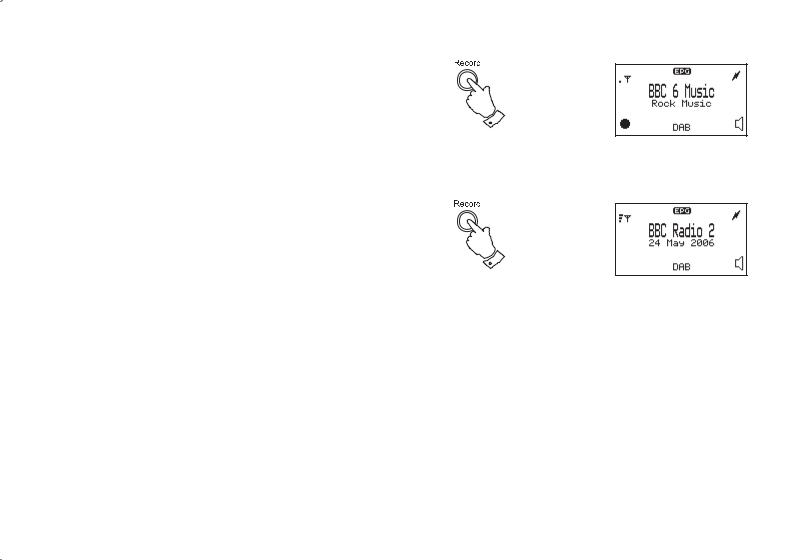
Recording a radio program (DAB only)
1. Tune to the DAB station you want to record.
2
2. Press the Record button to start recording. The record icon  will fl ash in the display.
3. Press the Record button to stop recording. The recording will be saved on your SD card.
4. The recording showing the station name, date and time will be added to your playlist. (see page 31)
3
Note: Recordings can be set in advance using the Electronic Program Guide EPG (see page 35) or by setting up a timed recording (see page 17).
If your radio is not recording correctly check the following:
-The card is the correct format (reformat as described on page 28).
-The card has enough recording space available.
-The card has not become corrupted (possibly by removing the card during recording). Reformat the card if necessary.
If you need any further advice, please call our Technical Helpline on :-
16
020 8758 0338 (Mon-Fri)
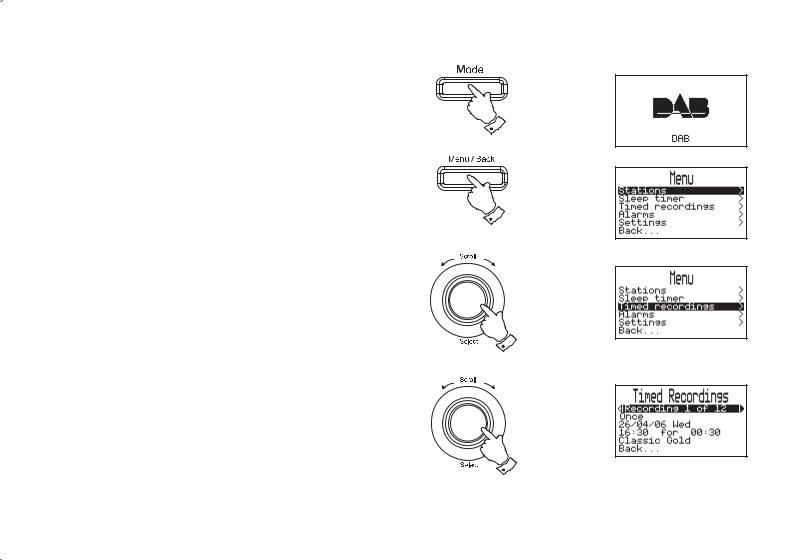
Timed recording - DAB
Note: Timer record is only available on DAB via SD card and is provided for personal use only.
Your radio has twelve recording timers which can be set to activate at different times and with fi ve different day options.
1.Insert an SDcardwithsufficient capacity for therequired recording (approx. 64MB per 1 hour at 128 kbits/sec, or 2 hours at 64 kbits/ sec).
Note: If you do not insert an SD card your recording will not take place and a warning "Memory card not detected" will be shown on the display.
2.Press the Mode button to enter DAB mode.
3.Press the Menu/Back button to enter the main DAB menu.
4.Rotate the Tuning/Select control until "Timed Recordings" is highlighted on the display. Press and release the Tuning/Select control to confi rm the selection.
5.Rotate the Tuning/Select control until "Recording 1 of 12" is highlighted on the display. Press and release the Tuning/Select control to enter setup.
6.Rotate the Tuning/Select control to select the required timer (1-12). Press and release the Tuning/Select control.
continued on next page
2
3
4,5
6
17
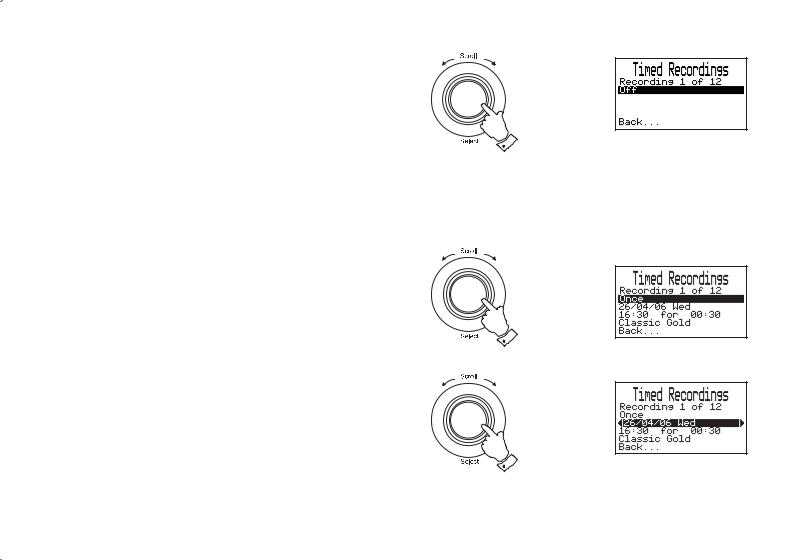
7.RotatetheTuning/Selectcontroluntilthedayoptionishighlighted on the display. To adjust the day option setting press the Select/ Tuning control. By default, record timers are be set to "Off".
•Each of the 12 timers can be set to one of the following modes:-
Off |
- Will disable the timer |
Once |
- Will record at one time only |
Every day |
- Will record every day |
Weekly |
- Will record once every week |
Weekdays |
- Will record on weekdays (Monday - Friday) |
Weekends |
- Will record on Saturday and Sunday |
Timer set to Once
1.Rotate the Tuning/Select control until "Once" is highlighted on the display. Press and release theTuning/Select control.
2.Rotate the Tuning/Select control until the date is highlighted on the display. Press and release theTuning/Select control to enter date setup.
3.Rotate the Tuning/Select control to select the required date. Press and release theTuning/Select control.
Note: Your radio allows recording to be scheduled 60 days ahead of current date.
continued on next page
If you need any further advice, please call our Technical Helpline on :-
7
1
2,3
18
020 8758 0338 (Mon-Fri)
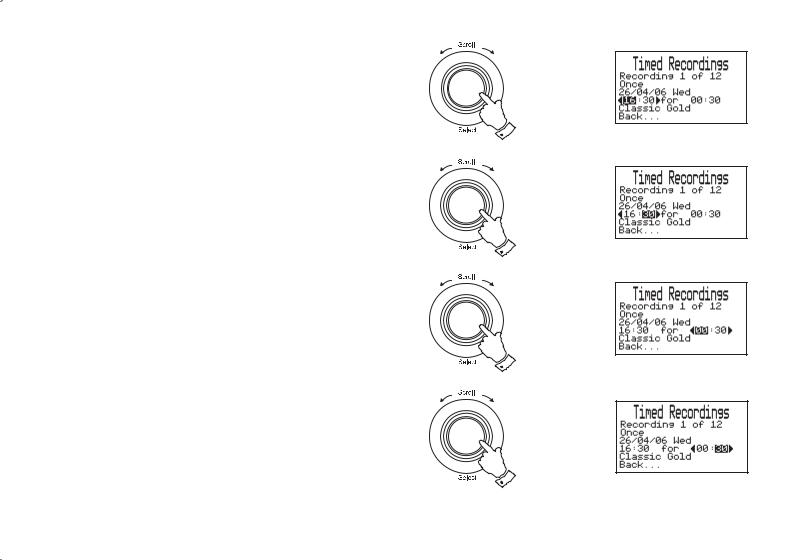
4.Rotate the Tuning/Select control until the hour digits are highlighted on the display. Press and release the Tuning/Select control.
5.Rotate the Tuning/Select control to select the required hour. Press and release the Tuning/Select control.
6.Rotate the Tuning/Select control until the minute digits are highlighted on the display. Press and release theTuning/Select control.
7.Rotate the Tuning/Select control to select the required minute. Press and release the Tuning/Select control.
8.Rotate the Tuning/Select control until the duration hour digits are highlighted on the display. Press and release the Tuning/Select control.
9.Rotate the Tuning/Select control to select the required hour. Press and release theTuning/Select control.
10.Rotate the Tuning/Select control until the duration minute digits arehighlightedonthedisplay. PressandreleasetheTuning/Select control.
11.Rotate the Tuning/Select control to select the required minute. Press and release the Tuning/Select control.
continued on next page
4,5
6,7
8,9
10,11
19
 Loading...