


RD-1

RD-1
FM /DAB digital radio
with
Please read this manual before use
ROBERTS
Sound for Generations
Gemini 1

Controls ............................................................................... 2-4
Battery operation .................................................................... 5
Using the AC adaptor ............................................................ 4
Operating your radio - DAB ................................................ 6-7
Secondary services - DAB ..................................................... 8
Display modes - DAB ............................................................ 8
Using your radios Pause Plus feature - DAB........................ 9
Pause Plus - rewind - DAB................................................... 10
Pause Plus - record (internal memory) - DAB .................... 11
Pause Plus - play (internal memory) - DAB ........................ 11
Pause Plus - record (SD card) - DAB .................................. 12
Pause Plus - play (SD card) - DAB...................................... 12
Pause Plus - storage settings - DAB ..............................13-16
Record Timer - DAB ....................................................... 17-19
SD Card format - DAB .................................................... 20-21
Programme type - DAB ....................................................... 22
Favourites - DAB .................................................................. 23
Manual tuning - DAB ............................................................ 24
Service status - DAB ....................................................... 25-26
Dynamic Range Control (DRC) settings - DAB .................. 27
Tuning range - DAB ............................................................. 28
Digital output - DAB ............................................................. 29
Radio Data Interface (RDI) output - DAB ........................... 30
Contents
Audio outputs ....................................................................... 31
Audio 2 setup - DAB ............................................................ 31
Operating your radio autosearch - FM................................ 32
Operating your radio manual tune - FM .............................. 33
Presetting stations - DAB & FM............................................ 34
Recalling preset stations - DAB & FM ................................. 34
Clock settings .................................................................. 35-37
Alarms .................................................................................. 38
Buzzer alarm .................................................................. 38-39
Radio alarm .................................................................... 40-42
Snooze function ................................................................... 43
Sleep timer ...................................................................... 43-44
Display settings .................................................................... 45
Display settings - Display saving ........................................ 45
Display settings - Display backlight .................................... 46
Display settings - Contrast................................................... 47
Keypress settings - Timeout ................................................ 48
Keypress settings - KeyBeep............................................... 49
Factory default...................................................................... 50
Headphone socket............................................................... 51
General ................................................................................. 52
Circuit features ..................................................................... 52
Guarantee ............................................................................ 54
1
If you need any further advice, please call our Technical Helpline on :-
020 8758 0338 (Mon-Fri)
Pause
Rewind
Play
stop
Record
FM/DAB Digital Radio
RD-1
Station Presets
1
2
3
4
5
6
Band
Display
Set-up
2
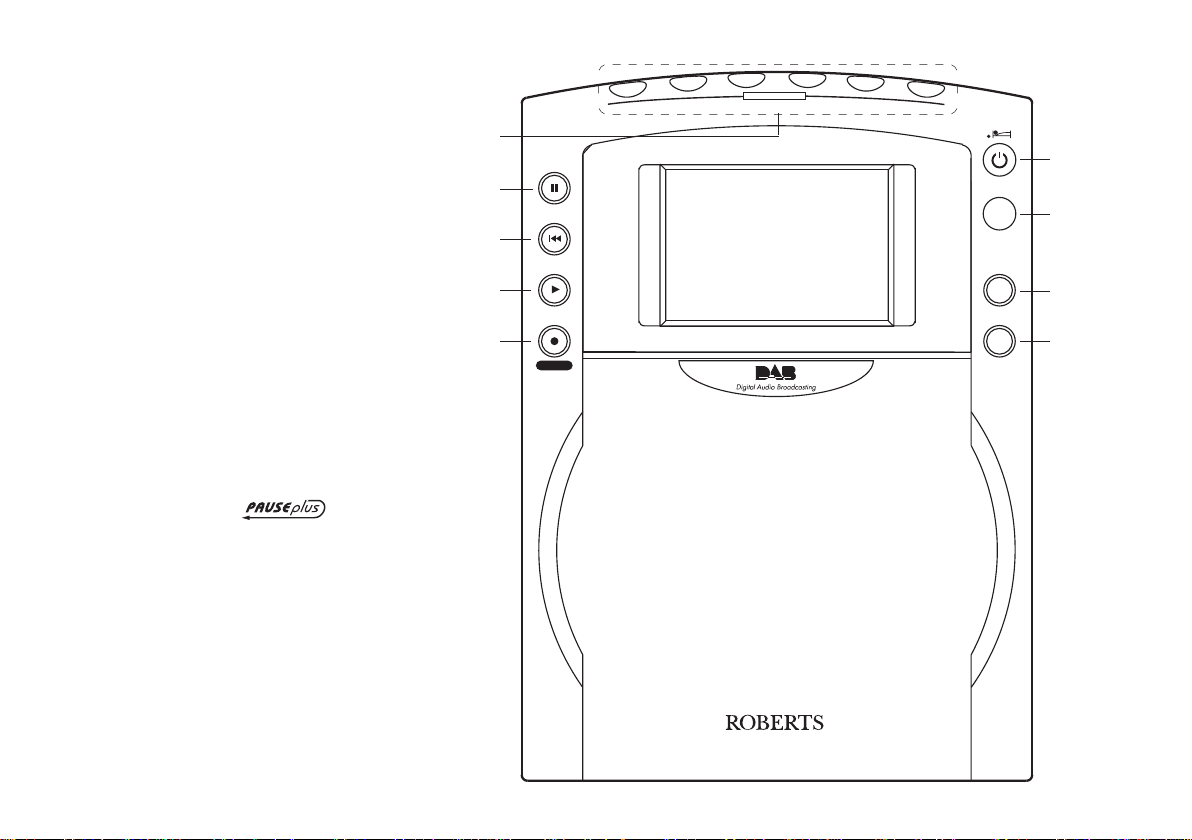
Controls
1. Record button
2. Play button
3. Rewind button
4. button
5. Preset buttons
6. On/Off and sleep button
7. Band button
8. Display button
9. Set-up button
(Front)
1
2
3
5
6
4
7
8
9
3
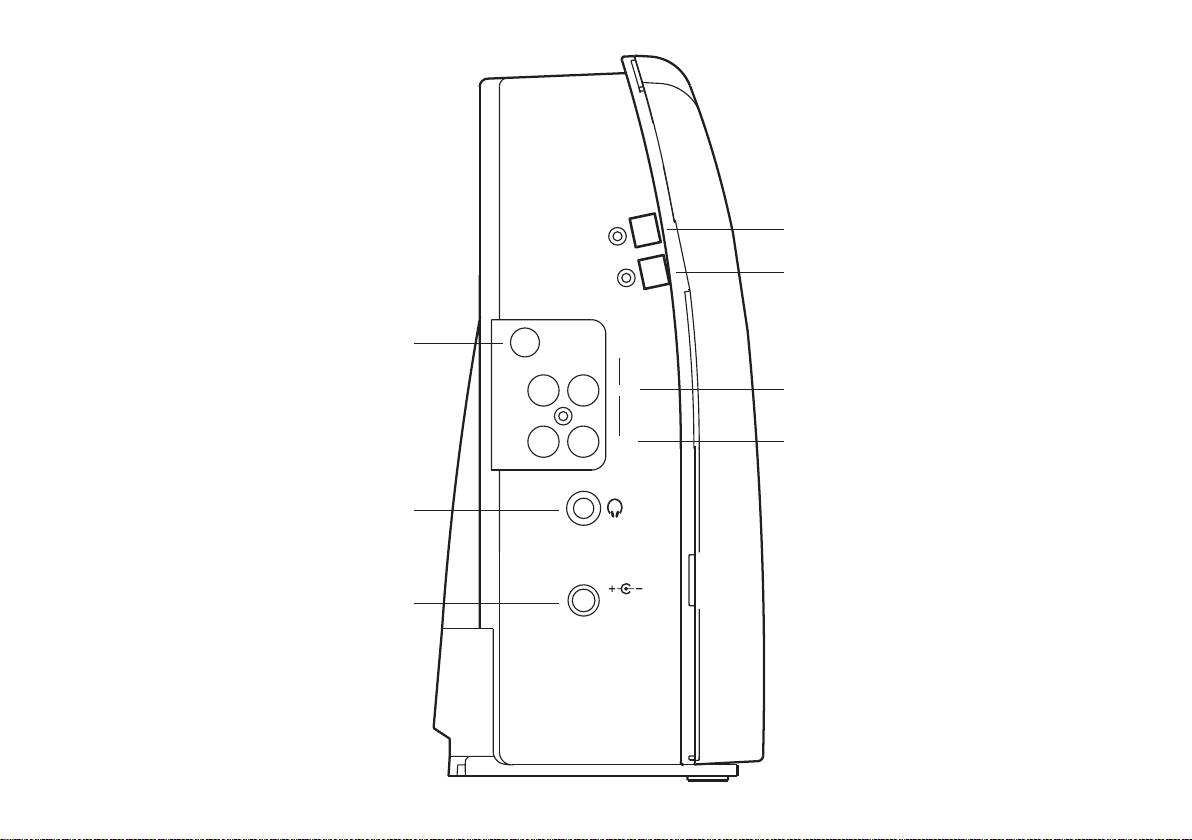
Controls (Left side)
9. DC input socket
10. Headphone socket
11. Telescopic aerial
12. RDI output socket
13. Digital audio output socket
14. Analogue audio 2 output socket
15. Analogue audio 1 output socket
12
11
10
9
13
14
15
2
1
LEFT
DC IN
9~12V 2A
RDI
Aerial
RIGHT
Analogue
Audio Out
Digital Audio
Out

If you need any further advice, please call our Technical Helpline on :-
020 8758 0338 (Mon-Fri)
4
TREBLE
BASS
Max
Min
VOLUME
Press
to select
TUNING
16
17
18
19
20
21
22
16. Bass control
17. Treble control
18. Volume control
19. Tuning control
20. SD card socket
21. Lock Switch
22. Battery compartment
Controls (Right side)
5
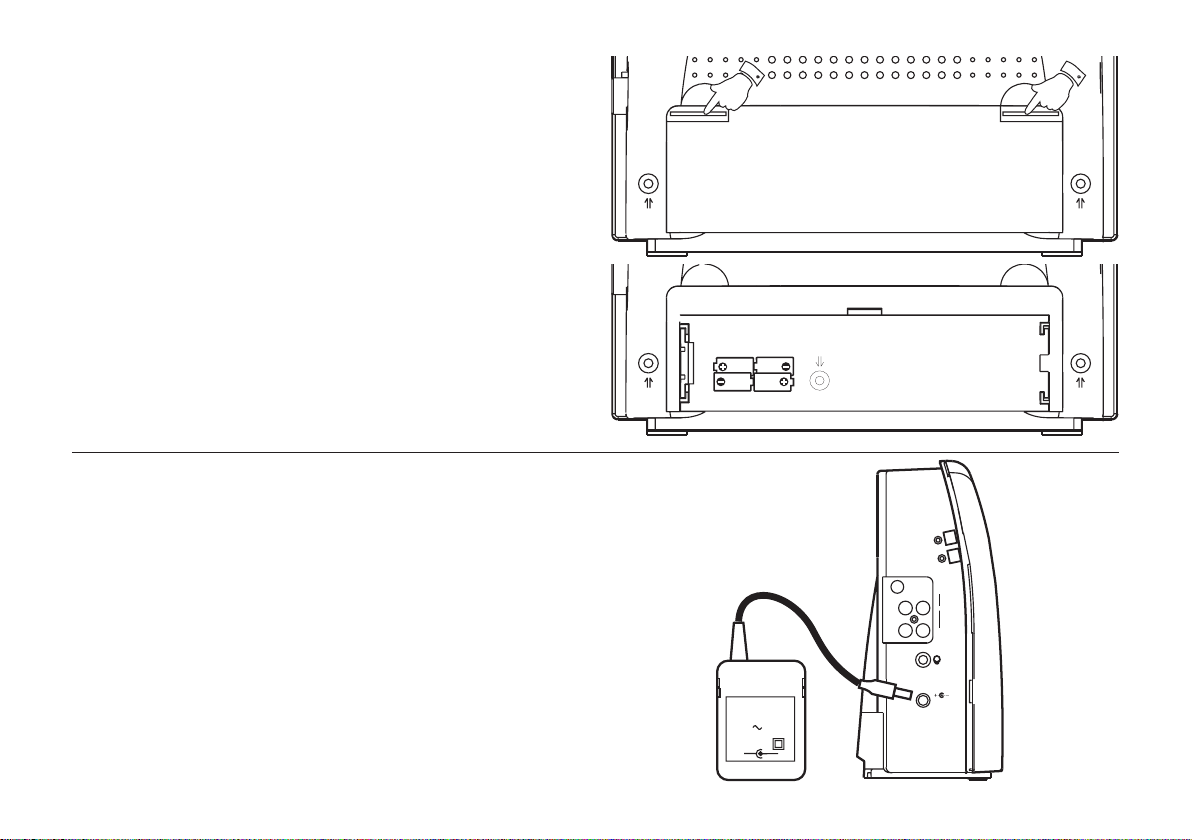
Battery operation
1. Remove the Battery cover on the rear of the unit by pushing the
catches as shown.
2. Insert four LR20 (D size) batteries into the spaces in the compart-
ment. Take care to ensure all batteries are inserted with the correct
polarity as shown inside the battery compartment. Replace the
battery cover.
3. Reduced power, distortion and a ‘stuttering’ sound are all signs that
the batteries may need replacing.
4. If the radio is not to be used for any extended period of time it is
recommended that the batteries are removed from the radio.
Battery life
BATTERIES:
4x 1.5vSiz e D / UM-1 / R20
Using the AC adaptor
1. Place your radio on a flat surface.
2. Insert the adaptor plug into the DC socket located on the left side of
your radio.
3. Plug the adaptor into a standard 13 amp mains socket outlet.
Whenever the adaptor is used the batteries are automatically
disconnected.
The AC adaptor should be disconnected from the mains supply and
the radio when not in use.
We would recommend for economy that your radio is used
via the AC adaptor whenever possible with battery operation
for occasional or stand-by use only.
1
1
2
1
LEFT
DC IN
9~12V 2A
RDI
Aerial
RIGHT
Analogue
AudioOut
DigitalAudio
Out
230V 50Hz
-
+
ROBERTS
If you need any further advice, please call our Technical Helpline on :-
020 8758 0338 (Mon-Fri)
6
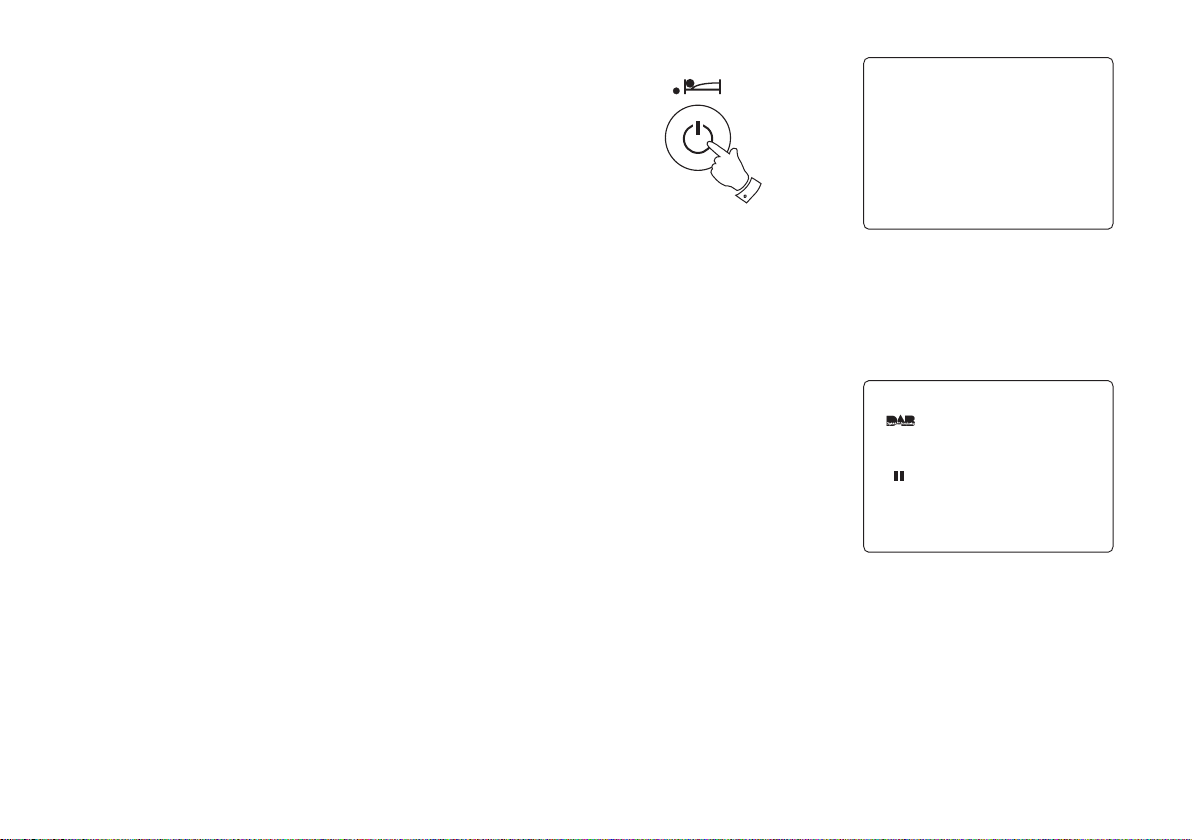
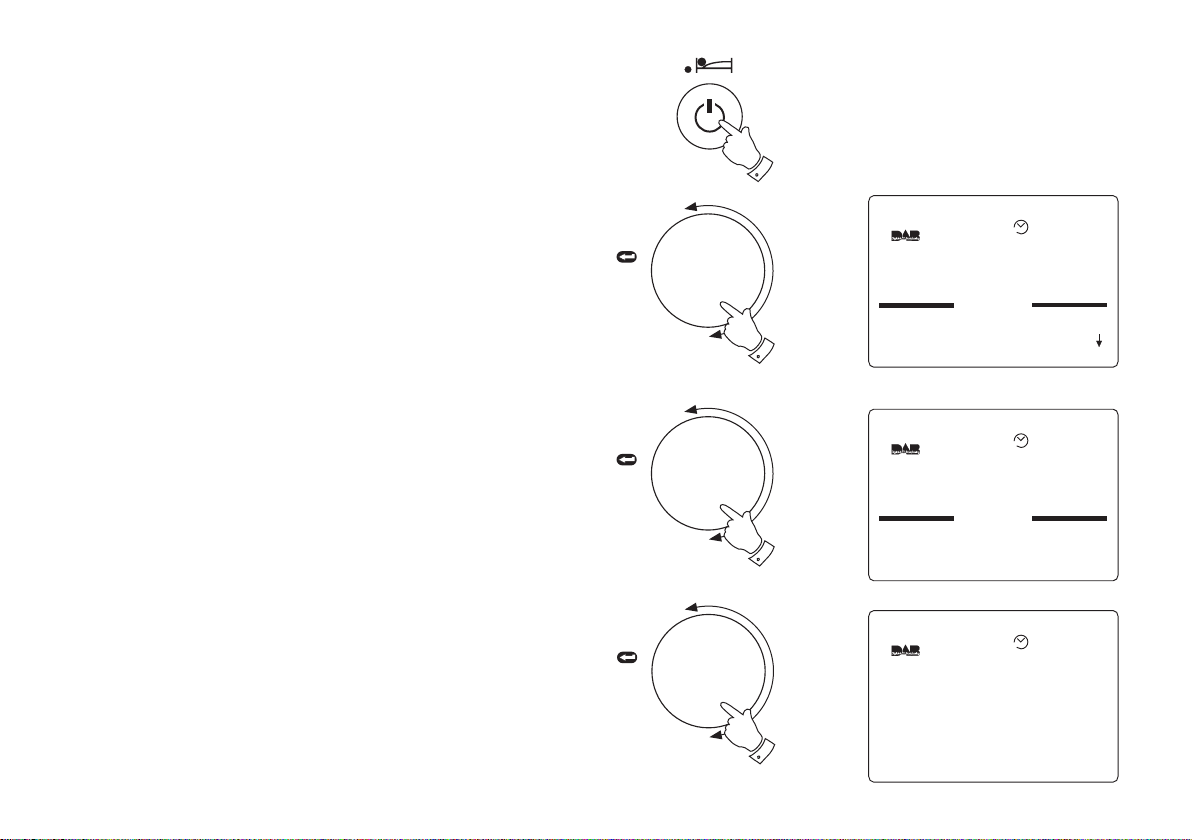
Operating your radio - DAB
1. Fully extend the telescopic aerial.
2. Press the On/Off button to switch on your radio. If this is the first
time the radio is used the display will show DAB Auto Tune and a
quick scan of UK Band III DAB channels will be carried out.
If the radio has been used before the last used station will be
selected.
4. During Auto Tune as each group of stations is detected the bottom
line of the display will show the number of stations found. The
display will also show a bargraph indicating progress of the
Autotune.
5. When the Auto Tune is complete the first station (in numeric-alpha
order 0...9...A....Z) will be selected.
6. If the station list is still empty after the DAB Auto Tune your radio will
display No DAB Service.
7. If no signals are found it may be necessary to relocate your radio
to a position giving better reception.
12:00
Wednesday
06-March-2002
DAB Auto Tune
0% 100%
Scanning 11d
Services Found :20
2
7
Operating your radio - DAB
1. Fully extend the telescopic aerial.
2. Press the On/Off button to switch on your radio.
3. Rotate the Tuning control until the station list appears.
4. Continue to rotate the Tuning control until the required station
appears between the two black bars on the display.
5. Press in and release the Tuning control to select the station. The
required station will be selected and after a few seconds the
Dynamic Label System text (DLS) will appear on the display.
6. Adjust the Volume, Bass and Treble controls to the required
settings.
Note: To return to normal station mode from station list
without selecting a station press and release the Display
button.
1Xtra - BBC
1Xtra - BBC
AbracaDabra
BBC Radio 1
BBC Radio 2
BBC Radio 3
AUTO
BBC Radio 1
The Radio 1 Breakfast Show
with Chris Moyles
- the studio webcam is at
www.bbc.co.uk/radio1
09:05 18-May-2004
AUTO
1Xtra - BBC
1Xtra - BBC
AbracaDabra
BBC Radio 1
AUTO
All
Press
to select
TUNING
Press
to select
TUNING
Press
to select
TUNING
2
3
4
5

If you need any further advice, please call our Technical Helpline on :-
020 8758 0338 (Mon-Fri)
8
BBC Radio 1
Pop Music
BBC National DAB
Signal:
Battery:
09:05 18-May-2004
I I I I I I I
I I I I I I I I I I I I I I I I I I
I I I I I I I
I I I I I I I I I I I I I I I I I I
AUTO
Display
1
BBC Radio 1
The Radio 1 Breakfast Show
with Chris Moyles
- the studio webcam is at
www.bbc.co.uk/radio1
09:05 18-May-2004
AUTO
Display
2
Display modes - DAB
Your radio has two display modes - normal mode shows Station name
and information text (DLS) - extended mode shows extra information
such as Programme type, Multiplex name, Signal strength and Battery
level.
1. Press the Display button to change display mode
2. Press the Display button to change back to original display mode.
Secondary services - DAB
1. Certain radio stations have one or more secondary services
associated with them. If a station has a secondary service the top
line of the display will show Secondary. To select the secondary
service Press in and release the Tuning control.
2. To change back to the primary service Press in and release the
Tuning control.
BBC Radio 4
Rumpole or the Bailey
Coming next - Life Death and
Sex with Mike and Sue
09:45 25-May-2004
AUTO
Secondary
Daily Service
09:45 25-May-2004
AUTO
Press
to select
TUNING
1
Press
to select
TUNING
2
9
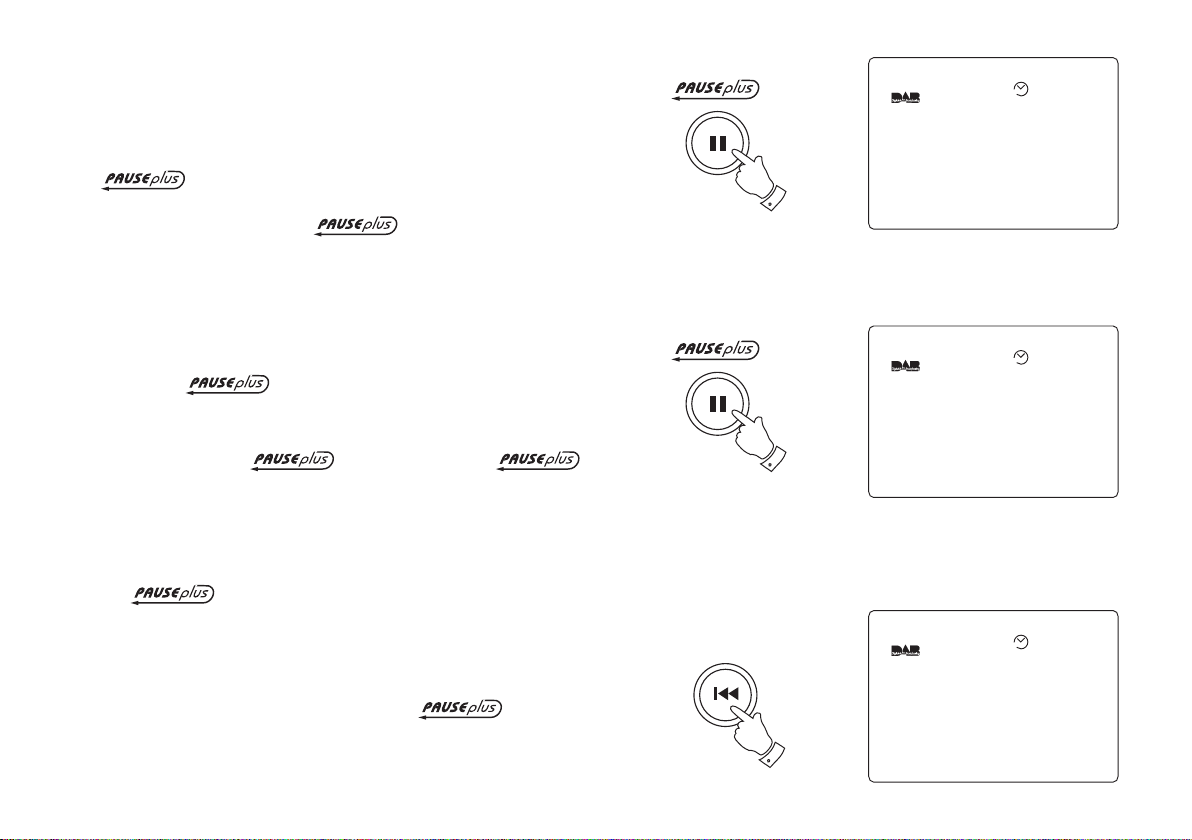
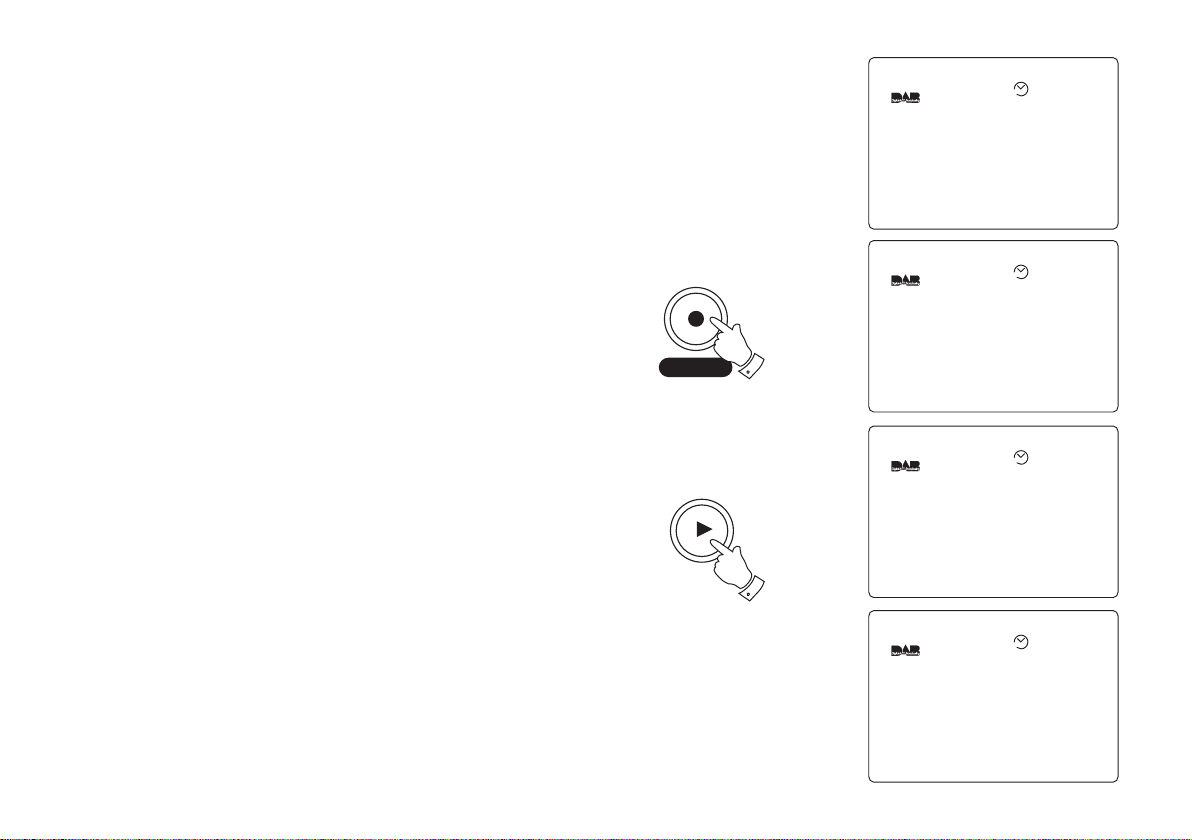
Using your radio's Pause Plus feature - DAB
How many times has your favourite radio station been interrupted
by that phone call from a double glazing firm or someone selling that
must have item? Sound familiar? Now with a single press of the
button you can put your favourite station on hold while
you answer that important call. After the call or other important task
is finished simply press the button to return to your
favourite station exactly where you left off so that you never miss
a single word.
Radio stations can effectively be put on hold for typically 15 minutes
but can be up to 30 minutes depending on the DAB storage settings
(see page 13)
Note the feature only operates on the DAB
waveband.
1. To place your radio in mode simply press the
button, the sound from the loudspeaker will be muted. The display
will show the time station was paused, duration of pause and
remaining pause time available.
2. To return to the radio station that you were listening to simply press
the button and your radio will continue playing from
where you left off. The display will show the amount by which you
are behind real time together with the remaining pause time.
3. To return to real time press and release the Rewind button, the
display will return to previous mode prior to operation.
BBC Radio 1
Paused From : 10:10
For : 01:15 (15:00)
Available : 13:45
10:10 18-May-2004
AUTO
BBC Radio 1
Rewind : 01:15
Available : 13:45 (15:00)
10:10 18-May-2004
AUTO
Rewind
BBC Radio 1
The Radio 1 Breakfast Show
with Chris Moyles
- the studio webcam is at
www.bbc.co.uk/radio1
09:05 18-May-2004
AUTO
1
2
3
If you need any further advice, please call our Technical Helpline on :-
020 8758 0338 (Mon-Fri)
10
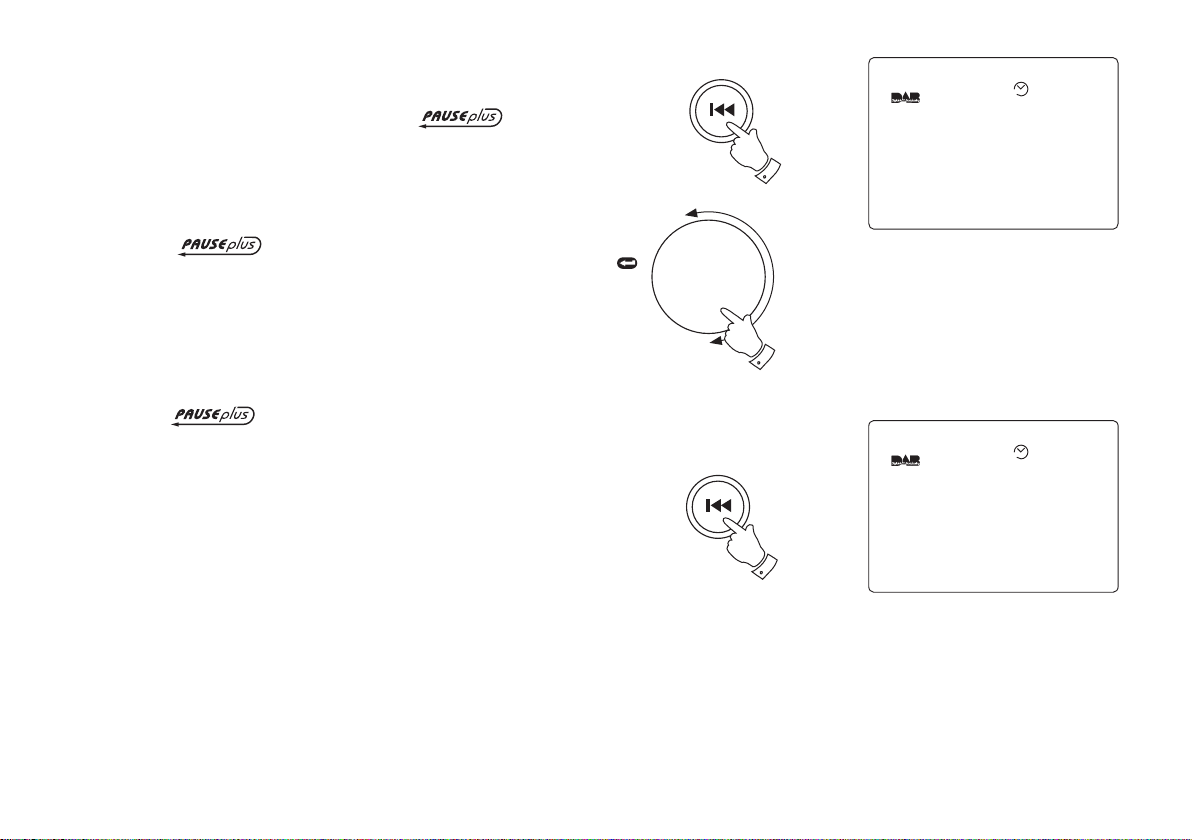
Pause Plus Rewind - DAB
1. As soon as you switch on your radio the feature is
working silently in the background so, say for example, you want
to hear a news item again press the Rewind button and rotate the
tuning control clockwise to scroll back to the item you wish to listen.
The display will show the amount of time you have scrolled back
together with the maximum time you can rewind back to.
Note the rewind memory only starts when your
radio is switched on.
2. To return to real time press the Rewind button.
3. Rewind memory is typically 15 minutes but can be up to 30 minutes
depending on the DAB storage settings (see page 13)
Note the rewind feature only operates on the DAB
waveband.
Rewind
Press
to select
TUNING
1
BBC 7
Rewind : 01:15
Available : 13:45 (15:00)
11:01 18-May-2004
AUTO
BBC 7
The Brighton Mystery
Journalist Polly solves murder
mysteries with the help of a
mystery Man in a tea room
11:10 18-May-2004
AUTO
Rewind
1
2
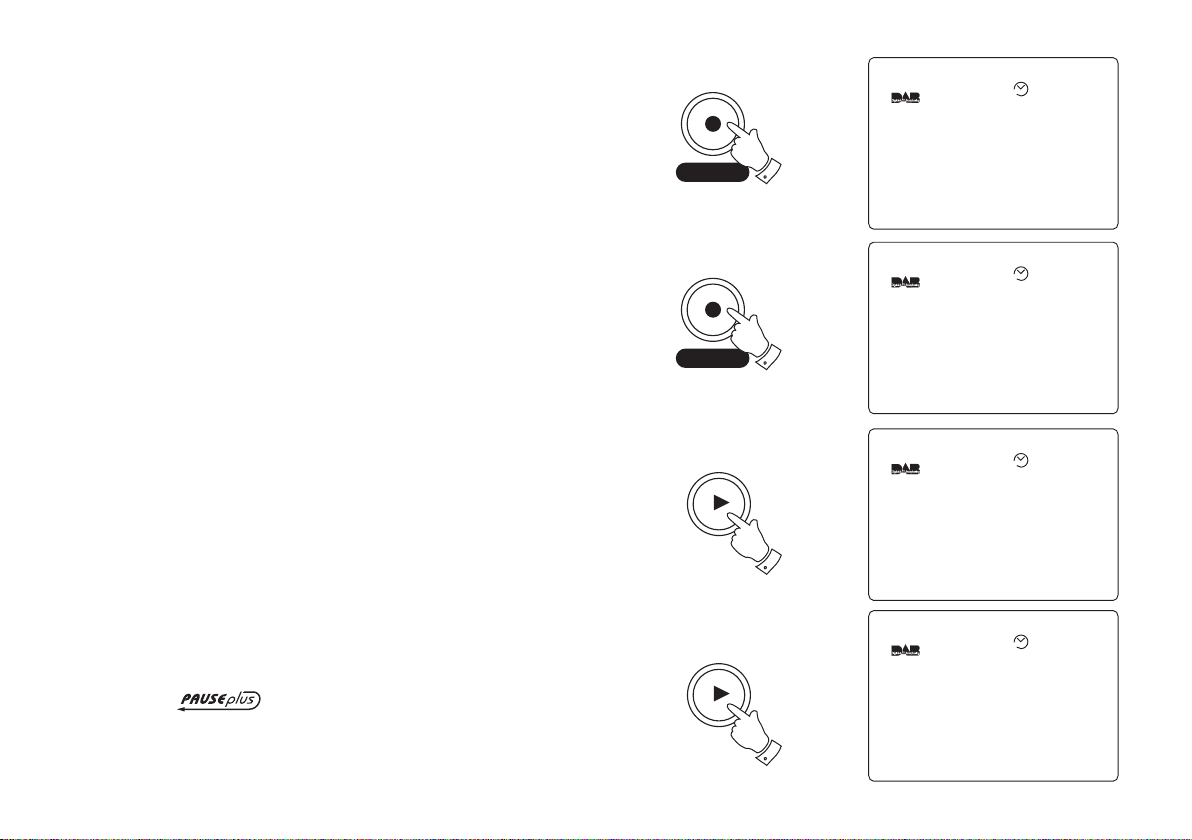
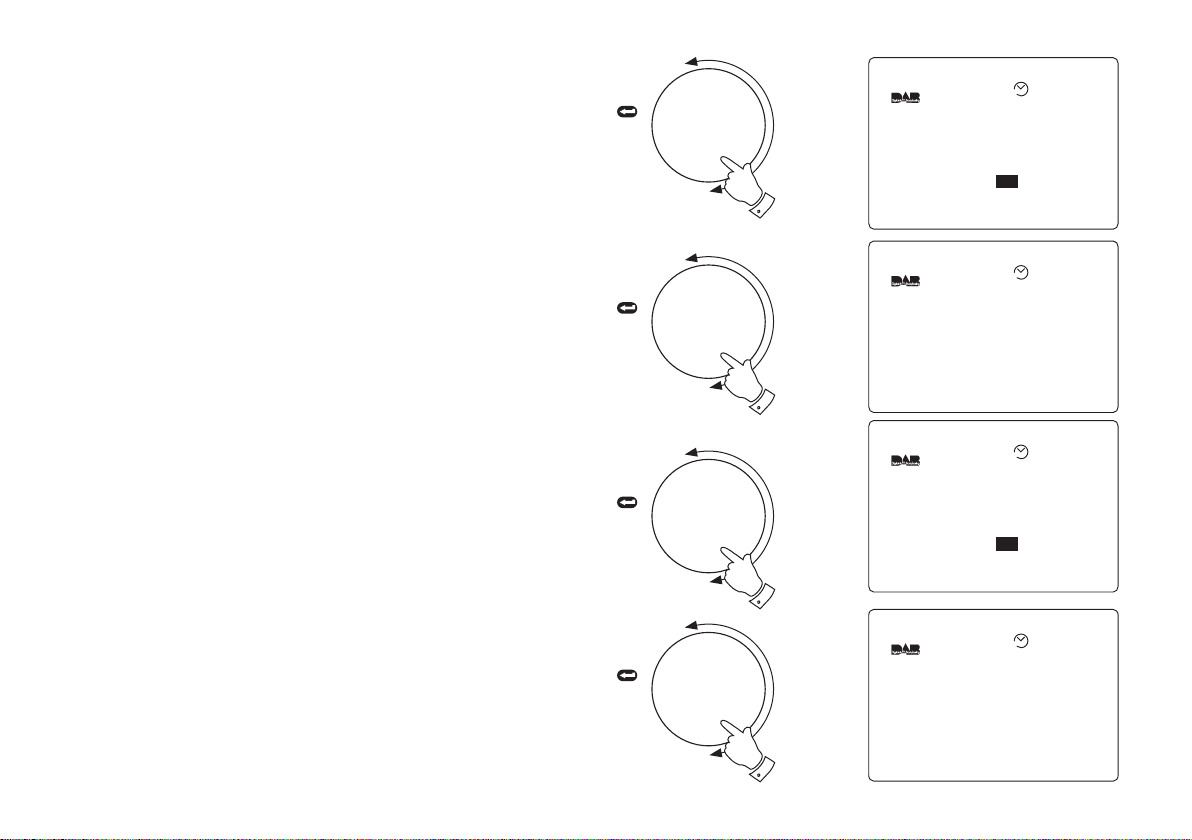
Pause Plus Record (internal memory) - DAB
1. Your radio can record to its internal memory for typically 30 minutes
but can be up to 1 hour depending on DAB storage settings (see page
13) and the programme you are listening to.
2. Press and hold in the Record button until the display shows
Recording.
3. The display will show the recording duration together with the
remaining record time available.
4. Press the Record button to stop the recording.
Note: If the SD card becomes full during the recording the
display will show Memory Full. Press the Record button to
stop the recording and press again to return to normal
mode.
11
Record
Recording
BBC 7
Recording 0:01:00
Rec Available 0:51:00
13:57 18-May-2004
AUTO
BBC 7
Rumpole or the Bailey
Coming next - Life Death and
Sex with Mike and Sue
13:58 18-May-2004
AUTO
Warning
End of File
14:57 18-May-2004
AUTO
Playback
BBC 7
Playback 0:01:00
Duration 0:30:00
14:06 18-May-2004
AUTO
Record
Play
Play
2
4
1
3
Pause Plus - play (internal memory)
1. Press the Play button to commence playback of a previous
recording.
2. When the playback has finished the display will show Warning End
of File.
3. Press the Play button twice, after a few seconds your radio will
return to normal radio mode.
Note the record/play internal memory is cleared
when changing band or switching off your radio
If you need any further advice, please call our Technical Helpline on :-
020 8758 0338 (Mon-Fri)
12
Pause Plus - record (SD card)
Your radio is supplied with a 32MB SD card which will give typically 30
minutes record time but can be over 1 hour depending on program type.
1. Insert the SD card into the slot located on the top right side of your
radio. The display will show SDCard Inserted.
2. Press and hold in the Record button until the display shows
Recording.
3. The display will show the recording duration together with the
remaining record time available.
4. Press the Record button to stop the recording.
Note: Record function is provided for personal use only
Pause Plus - play (SD card)
1. Ensure that an SD card is inserted into the slot located on the top
right side of your radio. The display will show SDCard Inserted.
2. Press the Play button to commence playback of previous recording.
3. When the playback has finished the display will show Warning End
of File.
4. Press the Play button twice, after a few seconds your radio will
return to normal radio mode.
Information
SDCard Inserted
14:46 18-May-2004
AUTO
Recording
BBC Radio 5 Live
Recording 0:01:00
Rec Available 0:52:00
14:50 18-May-2004
AUTO
Playback
BBC Radio 5 Live
Playback 0:01:00
Duration 0:59:00
14:56 18-May-2004
AUTO
Warning
End of File
14:57 18-May-2004
AUTO
Play
Record
2
2
13
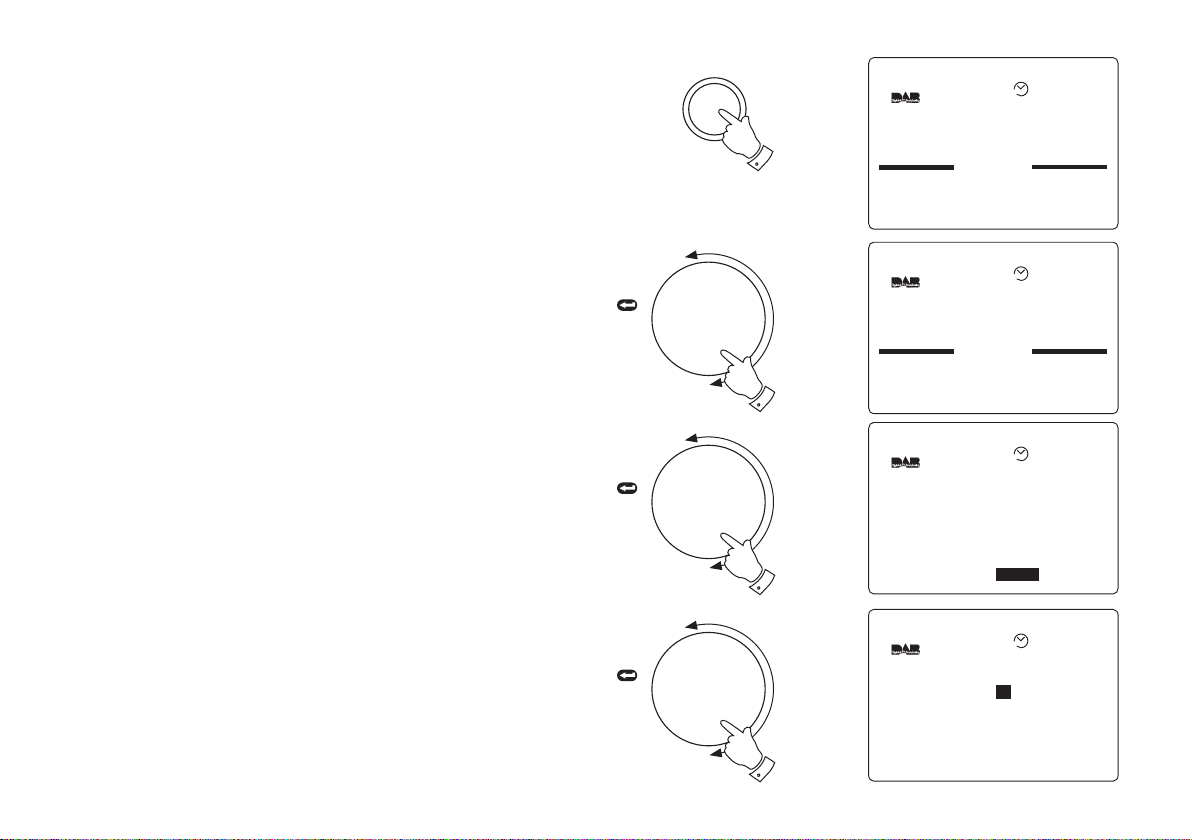
Pause Plus storage settings - DAB
Your radio's Pause Plus internal storage can be allocated to either Pause/
Rewind or to Record. By default the settings are 50% Pause/Rewind and
50% Record.
The default settings are allocated so as to allow typically 15 minutes
Pause/Rewind and 15 minutes Record but can be up to 30 minutes for
each depending on storage settings, station type and programme
content.
Changing the settings to 95% Record (the maximum) will give a record
time of typically 30 minutes but can be up to 1 hour depending on station
and programme content.
1. Press the Setup button to enter the Setup menu.
2. Rotate the Tuning control until the DAB section appears between
the two black lines on the display.
3. Press in and release the Tuning control to select the DAB section.
4. Rotate the Tuning control anti-clockwise until More... is high-
lighted on the display.
5. Press in and release the Tuning control to select the More..
section.
Set-Up
Record Timer
Clock
DAB
Display
Sleep
12:22 16-May-2004
AUTO
Set-up
Set-Up
Buzzer Alarm
Radio Alarm
Record Timer
12:22 16-May-2004
AUTO
Press
to select
TUNING
Press
to select
TUNING
DAB
Programme Type All
Favourites Yes
DRC Enable 0
Tuning Range 11B-12D
Manual Tune ...
More...
AUTO
Press
to select
TUNING
DAB
Audio 2
Optical output No
RDI Enable No
Storage On
Storage Control ...
Service Status ...
...
AUTO
1
2
4
5
If you need any further advice, please call our Technical Helpline on :-
020 8758 0338 (Mon-Fri)
14
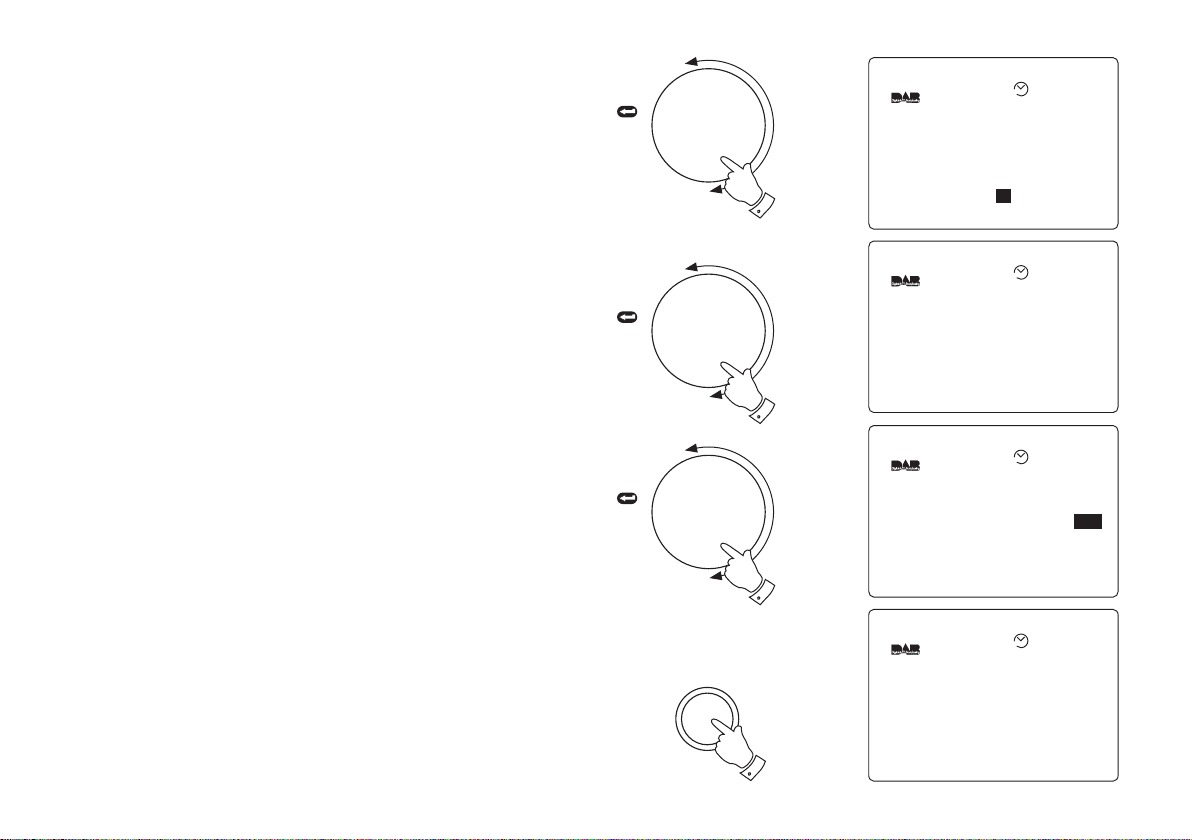
Pause Plus storage settings - DAB (cont.)
6. Rotate the Tuning control until the highlight appears on the
Storage Control line.
7. Press in and release the Tuning control to select the Storage
Control section.
8. Rotate the Tuning control until the highlight appears on either the
Rewind or Record storage settings line.
9. Press in and release the Tuning control to select the required
storage setting and rotate the Tuning control to adjust the setting.
10. Press in and release the Tuning control to store the change.
11. Repeatedly press and release the Setup button until the display
returns to show normal station mode.
DAB
Audio 2 ...
Optical output No
RDI Enable No
Storage On
Storage Control
Service Status ...
...
AUTO
Press
to select
TUNING
Press
to select
TUNING
Storage Control
Rewind
ecord 50%
SDCard Format ...
I I I I I I I I I I I I I I 50%
R I I I I I I I I I I I I I I
I I I I I I I I I I I I I I
I I I I I I I I I I I I I I
AUTO
Storage Control
Rewind
ecord
SDCard Format ...
I
I I I I I I I I I I I I I I
5%
R I I I I I I I I I I I I I 95%
I
I I I I I I I I I I I I I I I I I I I I I I I I I I I
AUTO
Press
to select
TUNING
Set-up
BBC 7
Rumpole or the Bailey
Coming next - Life Death and
Sex with Mike and Sue
13:58 18-May-2004
AUTO
6
7
9
11
15
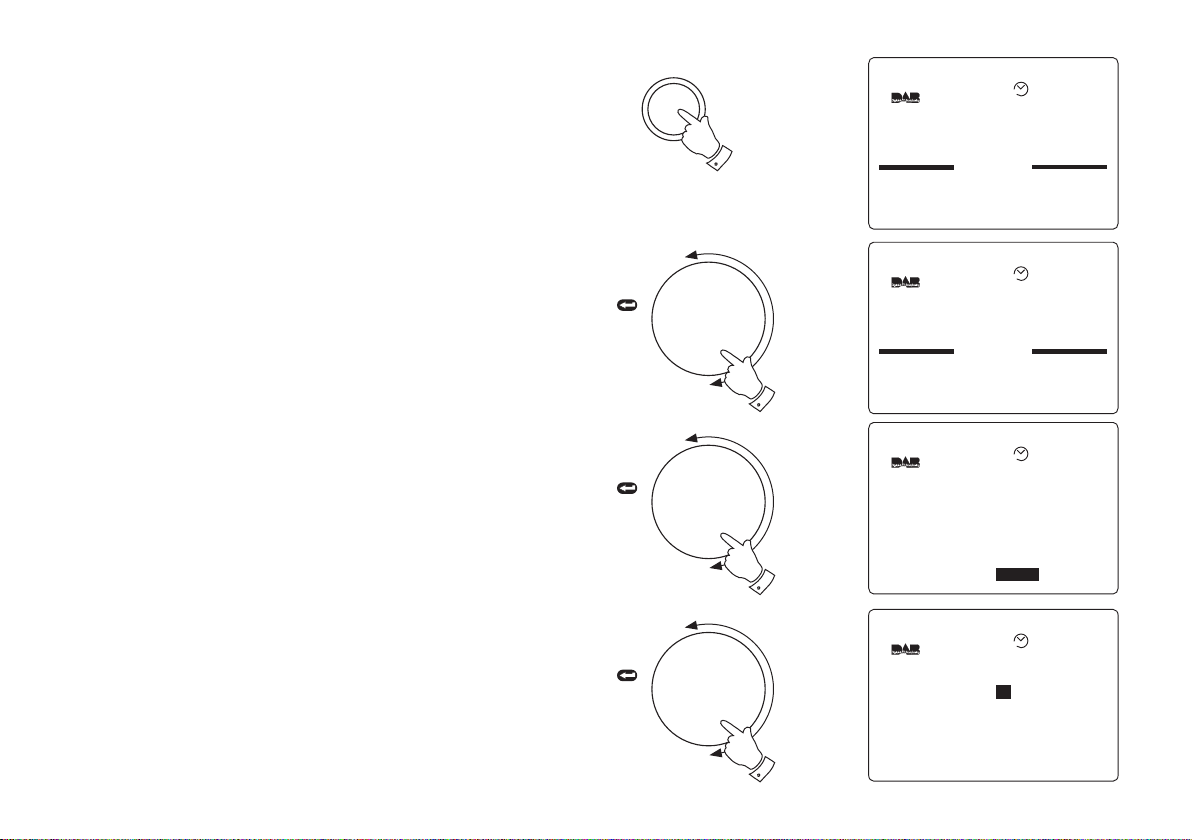
Pause Plus Storage settings - DAB (cont.)
Your radio has three settings for Pause Plus storage. The settings are
Off, On and On with AC. With the Pause Plus storage Off the battery
life will be extended (typically 25 hours).
1. Press the Setup button to enter the Setup menu.
2. Rotate the Tuning control until the DAB section appears between
the two black lines on the display.
3. Press in and release the Tuning control to select the DAB section.
4. Rotate the Tuning control until More... is highlighted on the display.
5. Press in and release the Tuning control to select the More..
section.
Set-Up
Record Timer
Clock
DAB
Display
Sleep
AUTO
Set-up
Set-Up
Buzzer Alarm
Radio Alarm
Record Timer
AUTO
Press
to select
TUNING
Press
to select
TUNING
DAB
Programme Type All
Favourites Yes
DRC Enable 0
Tuning Range 11B-12D
Manual Tune ...
More...
AUTO
Press
to select
TUNING
DAB
Audio 2
Optical output No
RDI Enable No
Storage On
Storage Control ...
Service Status ...
...
AUTO
1
2
4
5
If you need any further advice, please call our Technical Helpline on :-
020 8758 0338 (Mon-Fri)
16
Pause Plus Storage settings - DAB (cont.)
6. Rotate the Tuning control until the highlight appears on the
Storage line.
7. Press in and release the Tuning control to select the Storage
section.
8. Rotate the Tuning control to change the Storage to the required
setting e.g.. On, Off or On with AC.
9. Press in and release the Tuning control to store the change.
10. Repeatedly press and release the Setup button until the display
returns to show normal station mode
Press
to select
TUNING
Audio 2 ...
Optical output No
RDI Enable No
Storage
Storage Control ...
Service Status ...
Off
DAB
AUTO
Press
to select
TUNING
Audio 2 ...
Optical output No
RDI Enable No
Storage
Storage Control ...
Service Status ...
On
DAB
AUTO
Audio 2 ...
Optical output No
RDI Enable No
Storage Off
Storage Control ...
Service Status ...
DAB
AUTO
Press
to select
TUNING
Press
to select
TUNING
Audio 2 ...
Optical output No
RDI Enable No
Storage On
Storage Control ...
Service Status ...
DAB
AUTO
6
7
8
9
 Loading...