


Sound for Generations
ROBERTS
CR9936
Dual Alarm CD Clock Radio
With Night Light
Please read this manual before use
Contents |
|
Contents ............................................................................ |
1 |
Controls .......................................................................... |
2-3 |
Switching on and setting the time .................................... |
4 |
Listening to the radio ........................................................ |
5 |
Compact discs .................................................................. |
6 |
CD-R/CD-RW discs........................................................... |
6 |
Inserting a CD ................................................................... |
7 |
Playing a CD ...................................................................... |
8 |
Selecting a track ............................................................... |
9 |
Search function ................................................................. |
9 |
CD repeat mode .............................................................. |
10 |
CD random play ............................................................... |
10 |
Warning............................................................................ |
10 |
Programmed play ............................................................ |
11 |
Checking a programme ................................................... |
11 |
Erasing a programme ...................................................... |
11 |
Setting alarm times ......................................................... |
12 |
Setting alarm 1 ................................................................ |
12 |
Setting alarm 2 ................................................................ |
12 |
Checking alarm times ..................................................... |
13 |
Setting alarms to wake to buzzer .................................. |
14 |
Setting alarms to wake to radio ...................................... |
15 |
Setting alarms to wake to CD ........................................ |
16 |
Setting alarms to wake to CD programme ..................... |
17 |
Snooze control ................................................................ |
18 |
Sleep function ................................................................. |
18 |
Auto dimmer .................................................................... |
19 |
Night light ........................................................................ |
19 |
Headphones .................................................................... |
19 |
Specifications .................................................................. |
20 |
Circuit features ................................................................ |
20 |
General ............................................................................ |
21 |
Guarantee ........................................................................ |
22 |
1

Controls |
16 |
17 |
18 |
19 |
20 |
21 |
||||||
|
|
|
|
|
|
|
|
|
|
|
|
|
|
|
|
|
|
|
|
|
|
|
|
|
|
|
|
|
|
|
|
|
|
|
|
|
|
|
15 |
14 |
|
7 |
|
6 |
8 |
13 |
5 |
9 |
|
4 |
|
|
3 |
10 |
|
2 |
11 |
|
1 |
12 |
|
|
|
22 |
23 |
24 |
1. |
Night Light button |
6. |
B.Skip/down button |
11. |
CD display button |
16. |
On indicator |
21. |
Sleep indicator |
2. |
On/Off button |
7. |
Play/Pause button |
12. |
Time set button |
17. |
FM stereo indicator |
22. |
Alarm 2 indicator |
3. |
Sleep button |
8. |
F.Skip/up button |
13. |
Snooze button |
18. |
Programme indicator |
23. |
Auto dimmer |
4. |
Repeat button |
9. |
CD Stop button |
14. |
Alarm 1 indicator |
19. |
Repeat indicator |
24. |
Dial pointer |
5. |
CD mode button |
10. |
Memory button |
15. |
PM indicator |
20. |
Random indicator |
|
|
2

Controls
27 |
30 |
31 |
|
||
26 |
|
32 |
|
|
|
25 |
28 |
|
|
|
|
29 |
|
|
|
|
|
|
|
|
|
|
|
|
|
|
|
|
|
|
|
|
|
|
|
|
|
|
|
|
|
|
|
|
|
|
33 |
|
25. |
Buzz/Music switch |
30. |
Tuning control |
||||
26. |
Alarm 2 |
function switch |
31. |
Volume control |
|||
27. |
Alarm 1 |
function switch |
32. |
Function switch |
|||
28. |
Headphone socket |
33. |
Battery compartment (on underside) |
||||
29. |
Night Light |
|
|
|
|
|
|
3

Switching on and setting the time
Before using your CD clock radio you must first set the correct time.
1. Place the unit on a flat surface. Plug the mains lead into a wall socket and switch on the wall socket.
2.The clock display will show 12:00. Ensure that the Alarm 1 and Alarm 2 function switches are set to the 'Off' position.
3. Press and hold down the Time Set button. The time will flash in the display.
4. Whilst holding down the Time Set button press the up button to set the hour and the down button to set the minutes. Release the buttons when the correct time is reached. The clock uses a 12 hour display with a PM indicator. Ensure that the correct 12 hour cycle is selected.
2 2
 3
3
4 |
4 |
If you need any further advice, please call our Technical Helpline on :-
020 8758 0338 (Mon-Fri) |
4 |
|

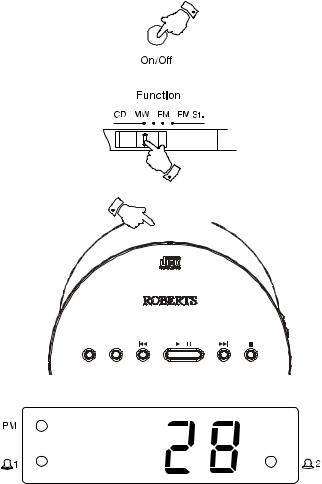
Listening to the Radio
1.Switch on your CD clock radio by pressing the On/Off button. The
On indicator LED will light.
2.Slide the Function switch to the required waveband.
3.Tune in to the desired station by rotating the Tuning control. The station frequency is indicated in the dial scale.
The Wire aerial located on the rear of your CD clock radio is for FM reception. The wire should be fully extended and positioned for optimum reception.
For MW reception there is a built in ferrite aerial. Rotate your CD clock radio to the position giving best reception.
4.Adjust the volume by rotating the Volume control.
5.When listening to FM stereo stations (Function switch in FM St. position) and the station being received is weak, some hiss may be audible. To reduce the hiss slide the Function switch to the FM position. The stereo indicator will switch off and reception will be in continue in mono.
6.The radio can be switched off by pressing the On/Off button. The On indicator will switch off.
 1
1
2
3
4 |
5 |
 6
6
5

Compactdiscs
Use only Digital Audio CDs which have the 


 symbol.
Never write on a CD or attach any sticker to the CD. Always hold the CD at the edge and store it in its box after use with the label facing up.
To remove dust and dirt, breathe on the CD and wipe it with a soft, lintfree cloth in a straight line from the centre towards the edge.
Cleaning agents may damage the CD
Do not expose the CD to rain, moisture, sand, or to excessive heat. (e.g. from heating equipment or in motor cars parked in the sun).
CD-R/CD-RWdiscs
Your CD clock radio can playback CD-DA format audio CD-R/CD-RW discs that have been finalised* upon completion of recording.
Your CD clock radio may fail to playback some CD-R/CD-RW discs due to poor recording of the CD-R/CD-RW disc.
*Finalising enables a CD-R/CD-RW disc to playback on audio CD players such as your CD clock radio.
If you need any further advice, please call our Technical Helpline on :-
020 8758 0338 (Mon-Fri) |
6 |
|
Inserting a CD
1.Press the On/Off button to switch on your CD clock radio. The On indicator will light.
2.Set the Function switch to CD.
3.To open the CD compartment, lift the CD door on the rear edge as shown.
4.Press the CD onto the spindle until it clicks into place. Close the CD door. The CD player will scan the contents of the CD and the total number of tracks will appear on the display.
 1
1
2
3


CR 9936
Programm able CD Clock Radio with Dual Alarm
|
down |
|
up |
|
Repeat |
CD Mode |
|
|
|
|
B.Skip |
Play/Pause |
F.Skip |
CD Stop |
7
 Loading...