


HRA-1500D+
Vintage Style DAB+ Radio
User manual
Bedienungsanleitung
Manuel d’instructions
Manuale d’istruzioni
Manual de instrucciones
Manual de instruҫões
Gebruiksaanwijzing
Návod k použití
Návod na použitie
www.roadstar.com
INDEX
English |
Page |
1 |
|
|
|
Deutsch |
Seite |
5 |
|
|
|
Français |
Page |
9 |
|
|
|
Italiano |
Pagina |
13 |
|
|
|
Español |
Página |
17 |
|
|
|
Portugues |
Pagina |
21 |
|
|
|
Nederlands |
Page |
25 |
|
|
|
Čeština |
Strana |
29 |
|
|
|
Slovenský |
Strana |
33 |
|
|
|
•Your new unit was manufactured and assembled under strict ROADSTAR quality control. Thank-you for purchasing our product for your music enjoyment. Before operating the unit, please read this instruction manual carefully. Keep it also handy for further future references.
•Votre nouvel appareil a été fabriqué et monté en étant soumis aux nombreaux tests ROADSTAR. Nous espérons que cet appareil vous donnera entière satisfaction. Avant de vous adonner à ces activités, veuillez lire attentivement ce manuel d’instructions. Conservez-le à portée de main à fin de référence ultérieure.
•Vuestro nuevo sistema ha sido construido según las normas estrictas de control de calidad ROADSTAR. Le felicitamos y le damos las gracias por su elección de este aparado. Por favor leer el manual antes de poner en funcionamiento el equipo y guardar esta documentación en case de que se necesite nuevamente.
•Ihr neues Gerät wurde unter Beachtung der strengen ROADSTAR Qualitätsvorschriften gefertigt. Wir danken Ihnen für den Kauf unseres Produktes und wünschen Ihnen optimalen Hörgenuss. Bitte lesen Sie diese Bedienungsanleitung durch, und heben Sie sie auf, um jederzeit darin nachschlagen zu können.
•Il vostro nuovo apparecchio é stato prodotto ed assemblato sotto lo stretto controllo di qualità ROADSTAR. Vi ringraziamo di aver acquistato un nostro prodotto per il vostro piacere d’ascolto. Prima di procedere all'utilizzo dell'apparecchio, leggete attentamente il manuale d’istruzioni e tenetelo sempre a portata di mano per futuri riferimenti.
•Seu novo aparelho foi construido e montado sob o estrito controle de qualidade da ROADSTAR. Agradecemos por ter comprado nosso produto para a sua diversão. Antes de usar esta unidade é necessário ler com atençâo este manual de instruções pare que possa ser usada apropriadamente; mantenha o manual ao seu alcance para outras informações.

HRA-1500D+
FRONT
REAR SIDE

1 English
LOCATION OF CONTROLS
1.POWER ON - OFF / VOLUME KNOB
2.SPEAKER
3.DISPLAY
4.MODE BUTTON
5.SLEEP FUNCTION BUTTON
6.AUTOMATIC SCAN BUTTON
7.ALARM BUTTON
8.PRESET
9.MENU / INFO
10.3.5mm JACK HEADPHONES OUT
11.TUNING KNOB / ENTER / SNOOZE FUNCTION
12.3.5mm JACK AUXILIARY INPUT
13.DC SOCKET (FOR THE AC/DC ADAPTOR)
14.ANTENNA
PRECAUTIONS
•INSTRUCTIONS - All the safety and operating instructions should be read before the radio is operated. The manual should be retained for future reference.
•HEED WARNINGS - All warnings on the appliance and in the operating instructions should be adhered to.
•WATER AND MOISTURE - The appliance should not be used near liquids or in rooms with a high level of humidity.
•VENTILATION - The appliance should be situated so that its location or position does not interfere with its proper ventilation.
•HEAT - The appliance should be situated away from heat sources such as radiators, stoves or other appliances that produce heat.
•POWER SOURCE - The radio should be connected to power supply only of the type described in the operating instructions or as marked on the appliance.
•POWER CORD PROTECTION - Power supply cord should be routed so that it is not likely to be walked on or pinched by items placed upon/against them.
•OBJECT AND LIQUID ENTRY - Care should be taken so that objects do not fall and liquids are not spilled into the enclosure through openings.
•SERVICING - The user should not attempt to service the appliance beyond that descrive in the
user operating instructions. All the servicing should be referred to qualified service personnel. Note: If the display does not function properly or no reaction to operation of any control may due to the electrostatic discharge. Switch off and disconnect the AC cord then turn the power back on after a few seconds.
POWER SOURCE
This unit works with an AC/DC adaptor of 6V - 1A. Connect the adaptor to the DC input (13) at the back of the unit and into a wall AC power outlet.
Check that the rated voltage of the adaptor matches your local voltage. Make sure that the DC plug is fully inserted into the appliance.
TO USE THE RADIO
1.Press the [POWER] button (1) to power ON;
2.(The first time you power on the radio, the radio will scan the DAB radio stations auto-

English 2
matically. It will display and play the first station after the scan is done);
3.Select the desired audio source by pressing the [MODE] button (4);
4.(Please see detailed instructions for each Source in the following chapters);
5.Adjust the volume with the [VOLUME KNOB] (1) to the desired level;
6.To power OFF the radio, press the [POWER] button (1).
Note: For a better reception reorient the antenna (14).
DAB RADIO OPERATION
1.Use the [TUNING KNOB] (11) to select the desired radio station.
2.Confirm with the [ENTER] button (11).
Note: In case there is No DAB Service, press & hold the [MENU] button (9) and select “Station Scan” and then “Full Scan” to start scanning.
FM RADIO OPERATION
•Use the [TUNING KNOB] (11) to fine tune the frequency in a step of 0.05 MHz or
•Press [SCAN] button (6) to scan the previous/next available station.
PRESET
There are 10 presets available for DAB and 10 presets for FM.
1.Set the desired radio station frequency as explained previously;
2.Press the [PRESET] button (8);
3.Choose the number of preset using the [TUNING KNOB] (11);
4.Press and hold the [ENTER] button (11) until the display shows “Preset Stored”.
RECALL A PRESET STATION
1.Press the [PRESET] button (8);
2.Select the desired preset using the [TUNING KNOB] (11);
3.Confirm with the [ENTER] button (11).
INFO
When the radio station is playing, press the [INFO] button (9) repeatedly to cycle through the information broadcasted by the radio.
AUX-IN OPERATION
1.Use one male to male 3.5mm jack cable (not included) to connect any external audio device to the [AUX-IN SOCKET] (12);
2.Select “AUX” mode by pressing repeatedly the [MODE] button (4).
Note: Music control (play, pause, etc) must be done from your external device.
NAVIGATE INTO THE MENU
1.Press and hold the [MENU] button (9) to access to the options;
2.Use the [TUNING KNOB] (11) to navigate into the options;
3.Press [ENTER] (11) to select the options;
4.Press [MENU] (9) to exit the menu.
CLOCK AND DATE SETTING
When the radio is ON:
1.Press and hold [MENU] (9) to access to the menu;
2.Use the [TUNING KNOB] (11) to select “System”;
3.Confirm with the [ENTER] button (11);
4.Use the [TUNING KNOB] (11) to select “Time Setup”;
5.Confirm with the [ENTER] button (11);

3 English
6.Use the [TUNING KNOB] (11) to select “Set Clock”;
7.Confirm with the [ENTER] button (11);
8.Use the [TUNING KNOB] buttons (11) to adjust the hour;
9.Confirm with the [ENTER] button (11);
10.Use the [TUNING KNOB] buttons (11) to adjust the minutes;
11.Confirm with the [ENTER] button (11);
12.Repeat steps 10 and 11 to set the date.
ALARM SETTING
1.Press the [ALARM] button (7);
2.Use the [TUNING KNOB] (11) to select “Alarm 1” or “Alarm 2” setup;
3.Confirm with the [ENTER] button (11) to enter into the Alarm setting;
4.Use the [TUNING KNOB] (11) to select ON or OFF;
5.Confirm with the [ENTER] button (11);
6.Use the [TUNING KNOB] (11) to adjust the hour;
7.Confirm with the [ENTER] button (11);
8.Use the [TUNING KNOB] (11) to adjust the minutes;
9.Confirm with the [ENTER] button (11);
10.Use the [TUNING KNOB] (11) to set the days as follow:
•Daily (Whole week).
•Once (One day of the week).
•Weekdays (Monday to Friday).
•Weekends.
11.Confirm with the [ENTER] button (11);
12.Use the [TUNING KNOB] (11) to choose the alarm mode (Buzzer, FM or DAB);
13.Confirm with the [ENTER] button (11);
14.Use the [TUNING KNOB] (11) to adjust the volume;
15.Confirm with the [ENTER] button (11).
Note: To set the second Alarm, repeat all the steps with “Alarm2” instead of “Alarm1”.
ALARM OFF:
During Alarm on, press [ALARM] button (7) to deactivate the alarm sound (the Alarm setting remains) or press [SNOOZE] button (11) to postpone the alarm for 5 minutes.
DEACTIVATE ALARM SETTINGS:
ENTER the ALARM setup and at step 4 select “OFF” instead of “ON”.
SLEEP TIMER
The sleep timer switches the radio off automatically after an adjustable time.
When the radio is ON press repeatedly the [SLEEP] (5) to choose the desired timer. Note: To remove the sleep timer select “Sleep OFF”.
FACTORY RESET
When the radio is ON:
1.Press and hold [MENU] (9) to access to the menu;
2.Use the [TUNING KNOB] (11) to navigate into the options and select “System”;
3.Confirm with the [ENTER] button (11);
4.Use the [TUNING KNOB] (11) to select “Factory Reset”;
5.Confirm with the [ENTER] button (11);
6.Use the [TUNING KNOB] (11) to select “yes”;
7.Confirm with the [ENTER] button (11).
|
|
English |
|
4 |
|
TECNICAL SPECIFICATIONS |
|
|
|
|
|
|
|
|
|
|
|
|
|
|
|
||
Power Supply: |
AC 230V ~ 50Hz (AC/DC 6 V = 1A adaptor). |
|
|
||
Radio Frequency Coverage |
|
|
|
|
|
DAB+ / DAB: |
BAND III 174.928MHz - 239.200MHz. |
|
|
||
FM: |
87.5 - 108 MHz. |
|
|
||
Speaker |
|
|
|
|
|
Output Power: |
1 x 2 Watt RMS. |
|
|
||
General |
|
|
|
|
|
Aux-In: |
3.5mm jack plug. |
|
|
||
Earphone Out: |
3.5mm jack plug. |
|
|
||
Specifications and design are subject to possible modifications without notice due to improvement.
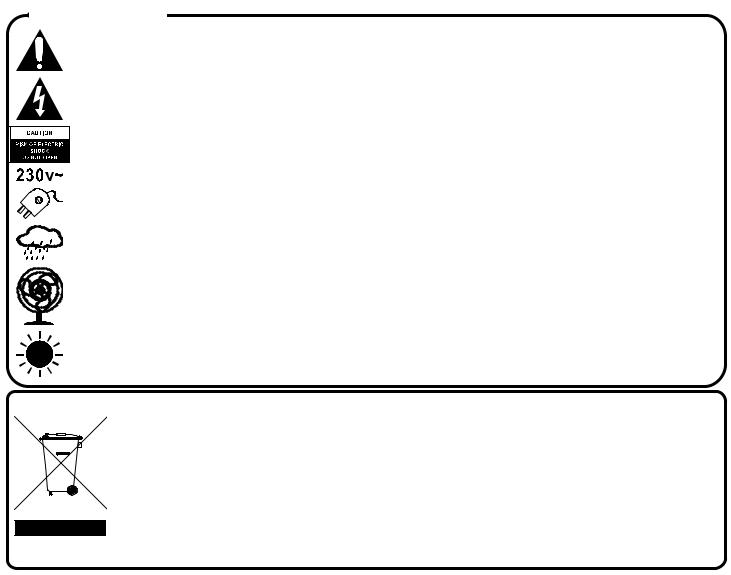
WARNINGS
The exclamation point within the triangle is a warning sign alerting the user of important instructions accompanying the product.
The lightening flash with arrowhead symbol within the triangle is a warning sign alerting the user of “dangerous voltage” inside the unit.
To reduce the risk of electric shock, do not remove the cover. No user serviceable parts inside the unit. Refer all servicing to qualified personnel.
This unit operates on 230V ~ 50Hz. If the unit is not used for a long period of time, remove the plug from the AC mains.
Ensure all connections are properly made before operating the unit.
This unit must not be exposed to moisture or rain.
This unit should be positioned so that it is properly ventilated. Avoid placing it, for example, close to curtains, on the carpet or in a built-in installation such as a bookcase.
Do not expose this unit to direct sunlight or heat radiating sources.
CORRECT DISPOSAL OF THIS PRODUCT
(Waste Electrical & Electronic Equipment)
This marking shown on the product or its literature, indicates that it should not be disposed with other household wastes at the end of its working life. To prevent possible harm to the environment or human health from uncontrolled waste disposal, please separate this from other types of wastes and recycle it responsibly to promote the sustainable reuse of material resources. Household users should contact the retailer where they purchased this product, or their local government office, for details of where and how they can take this item for environmentally safe recycling. Business users should contact their supplier and check the terms and conditions of the purchase contract. This product should not be mixed with other commercial wastes for disposal.

5 Deutsch
ORT DER BEDIENELEMENTE
1.POWER EIN - AUS / LAUTSTÄRKE REGLER
2.LAUTSPRECHER
3.LCD ANZEIGE
4.MODE (MODUS)
5.SLEEP TIMER
6.SCAN (AUTOMATISCHE FUNKSUCHE)
7.ALARM
8.PRESET (VOREINSTELLUNGEN)
9.MENU / INFO
10.KOPFHÖRERAUSGANG (3.5mm JACK)
11.TUNING REGLER / ENTER (EINGABE) / SNOOZE
12.AUX-IN EINGANG (3.5mm JACK)
13.DC BUCHSE
14.ANTENNE
ENERGIEVERSORGUNG
Dieses Gerät arbeitet mit einem AC/DC Adapter von 6V - 1A.
Verbinden Sie den Adapter mit dem Gleichstromeingang (13) auf der Rückseite des Geräts und mit einer Wandsteckdose.
Überprüfen Sie, ob die Nennspannung des Adapters Ihrer lokalen Spannung entspricht.
RADIO BENUTZUNG
1.Drücken Sie zum Einschalten die Taste [POWER] (1);
2.(Wenn Sie das Radio zum ersten Mal einschalten, sucht das Gerät nach DABRadiosendern. Wenn die Suche abgeschlossen ist, wird der erste Sender angezeigt und gespielt);
3.Wählen Sie die gewünschte Audioquelle durch Drücken der Taste [MODE] (4) aus;
4.(Detailierte Anweisungen für die verschiedenen Quellen finden Sie in den folgenden Kapiteln );
5.Ändern Sie die Lautst. mit den [LAUTSTÄRKE REGLER] (1) auf die gewünschte Pegel;
6.Drücken Sie die Taste [POWER] (1) zum Ausschalten des Radios.
Hinweis: Richten Sie die Antenne (14) für einen besseren Empfang aus.
DAB-RADIOBETRIEB
1.Drehen Sie den [TUNING REGLER] (11), um den gewünschten Radiosender auszuwählen;
2.Drücken Sie zur Bestätigung die Taste [ENTER] (11).
Hinweis: Wenn kein DAB-Signal vorhanden ist, drücken und halten Sie die Taste [MENU]
(9) und wählen Sie „Station Scan“ und dann „Full Scan“, um den Scan-Vorgang zu starten.
UKW RADIOBETRIEB
•Zur manuellen Suche drehen Sie den [TUNING REGLER] (11), wobei eine Feinabstimmung der Frequenz in Schritten von 0,05 MHz vorgenommen wird, oder
•Drücken Sie die Taste [SCAN] (6), und den nächsten verfügbaren Sender zu suchen.

Deutsch 6
VOREINSTELLUNG
Es stehen 10 Voreinstellungen für DAB und 10 für UKW zur Verfügung.
1.Ändern die Funkfrequenz bis zur gewünschte Funkstation wie zuvor beschrieben ein;
2.Drücken Sie die Taste [PRESET] (8);
3.Wählen Sie die Nummer für die Voreinstellung durch Drehen den [TUNING REGLER] (11);
4.Halten Sie die Taste [ENTER] (11), bis „Preset Stored“ („Gespeichert“) angezeigt wird.
GESPEICHERTEN SENDER AUFZURUFEN
1.Drücken Sie die Taste [PRESET] (8);
2.Wählen Sie das gewünschte Preset durch Drehen den [TUNING REGLER] (11);
3.Drücken Sie zur Bestätigung die Taste [ENTER] (11).
INFO
Wenn der Radiosender wiedergegeben wird, drücken Sie wiederholt die Taste [INFO] (9), um auf die vom Radio übertragenen Info.
AUX-IN BETRIEB
1.Verwenden Sie ein 3,5-mm-Klinkenkabel (nicht im Lieferumfang enthalten), um ein externes Audiogerät an die [AUX IN BUCHSE] (12) anzuschließen;
2.Wählen Sie den "AUX" Modus durch wiederholtes Drücken der Taste [MODE] (4) aus; Hinweis: Die Musikbedienung (Wiedergabe, Pause usw.) muss von Ihrem ext. Gerät aus erfolgen.
MENU-NAVIGATION
1.Drücken un halten Sie die Taste [MENU] (9) um das Menu einzuloggen;
2.Drehen Sie den [TUNING REGLER] (11), um die Optionen zu wählen;
3.Drücken Sie die Taste [ENTER] (11) um eine Option auszuwählen;
4.Drücken Sie noch die Taste [MENU] (9) um das Menu zu verlassen.
UHREINSTELLUNG
Wenn das Radio eingeschaltet ist:
1.Drücken und halten Sie die Taste [MENU] (9);
2.Verwenden Sie [TUNING REGLER] (11) zur Auswahl von "System";
3.Drücken Sie die Taste [ENTER] (11), um zu bestätigen;
4.Verwenden Sie [TUNING REGLER] (11) zur Auswahl von "Time Setup";
5.Drücken Sie die Taste [ENTER] (11), um zu bestätigen;
6.Verwenden Sie [TUNING REGLER] (11) zur Auswahl von "Set Clock";
7.Drücken Sie die Taste [ENTER] (11), um zu bestätigen;
8.Die Stundenanzeige auf dem Display blinkt. Verwenden Sie [TUNING REGLER] (11), um die richtige Stunde einzustellen;
9.Drücken Sie die Taste [ENTER] (11), um zu bestätigen;
10.Die Minutenanzeige auf dem Display beginnt zu blinken. Verwenden Sie [TUNING REGLER] (11), um die richtige Minuten einzustellen;
11.Drücken Sie die Taste [ENTER] (11), um zu bestätigen;
12.Wiederholen Sie Schritt 10 und 11, um das Datum anzupassen.

7 Deutsch
ALARMEINSTELLUNG
Wenn das Radio eingeschaltet ist:
1.Drücken Sie die Taste [ALARM] (7),
2.Drehen Sie den [TUNING REGLER] (11), um "Alarm 1" oder "Alarm 2" einzustellen;
3.Drücken Sie die Taste [ENTER] (11), um zu bestätigen;
4.Drehen Sie den [TUNING REGLER] (11), um “Alarm ON” (aktiviert) oder “Alarm OFF” (deaktiviert) zu wählen;
5.Drücken Sie die Taste [ENTER] (11), um zu bestätigen;
6.Drehen Sie den [TUNING REGLER] (11), um die Stunden einzustellen;
7.Drücken Sie die Taste [ENTER] (11), um zu bestätigen;
8.Drehen Sie den [TUNING REGLER] (11), um die Minuten einzustellen;
9.Drücken Sie die Taste [ENTER] (11), um zu bestätigen;
10.Drehen Sie den [TUNING REGLER] (11), um die Tage wie folgt festzulegen:
•Daily - Ganze Woche;
•Once - Ein Tag der Woche;
•Weekend - Wochenende;
•Weekdays - Montag bis Freitag.
11.Drücken Sie die Taste [ENTER] (11), um zu bestätigen;
12.Drehen Sie den [TUNING REGLER] (11), um den Alarm-modus (Buzzer, FM oder DAB) zu wählen;
13.Drücken Sie die Taste [ENTER] (11), um zu bestätigen;
14.Ändern Sie die Lautstarke mit den [TUNING REGLER] (11) auf die gewünschte Pegel;
15.Drücken Sie die Taste [ENTER] (11), um zu bestätigen.
Hinweis: Um den zweiten Alarm einzustellen, wiederholen Sie alle Schritte mit "Alarm 2" ananstelle von "Alarm 1".
ALARM AUS
Um den Alarm zu deaktivieren, drücken Sie die Taste [ALARM] (7) (der Alarm stoppt, aber die Einstellung bleibt bestehen) oder drücken Sie die Taste [SNOOZE] (11) um den Alarm für 5 Minuten zu verschieben.
ALARMEINSTELLUNGEN DEAKTIVIEREN:
In das Alarm einstellungen einsteten, und im schritt 4 “OFF” wählen statt “ON”.
SLEEP-TIMER
Der Sleep-Timer schaltet das Radio automatisch nach einer einstellbaren Zeit ab.
Wenn das Radio eingeschaltet ist, drücken Sie wiederholt die Taste [SLEEP] (5), um den gewünschten Timer auszuwählen.
Hinweis: Um den Sleep-Timer zu entfernen, wählen Sie „Sleep OFF“.
ZURÜCKSETZEN AUF WERKSEINSTELLUNGEN
Wenn das Radio eingeschaltet ist:
1.Drücken und halten Sie die Taste [MENU] (9);
2.Drehen Sie den [TUNING REGLER] (11), um “System” zu wählen;
3.Drücken Sie die Taste [ENTER] (11) zu bestätigen;
4.Drehen Sie den [TUNING REGLER] (11), um "Factory Reset" („Zurücksetzen auf Werkseinstellungen“) zu wählen;
5.Drücken Sie die Taste [ENTER] (11) zu bestätigen;
6.Drehen Sie den [TUNING REGLER] (11), um "Yes” (“Ja”) zu wählen;
7.Drücken Sie die Taste [ENTER] (11) zu bestätigen.
|
|
Deutsch |
|
8 |
|
TECHNISCHE DATEN |
|
|
|
|
|
|
|
|
|
|
|
|
|
|
|
||
Stromversorgung: |
AC 230V ~ 50Hz (AC/DC 6V = 1A adapter). |
|
|
||
Radiofrequenzabdeckung |
|
|
|
|
|
DAB+ / DAB: |
BAND III 174.928MHz - 239.200MHz . |
|
|
||
FM: |
87.5 - 108 MHz. |
|
|
||
Lautsprecher |
|
|
|
|
|
Musikleistung: |
1 x 2 Watt RMS. |
|
|
||
Sonstiges |
|
|
|
|
|
Aux Eingang: |
3.5mm Buchse. |
|
|
||
Kopfhörer: |
3.5mm jack plug. |
|
|
||
Spezifikationen und Design unterliegen möglichen Änderungen ohne vorherige Ankündigung aufgrund von Verbesserungen.
SICHERHEITSHINWEISE
Das Ausrufszeichen im Dreieck weist den Benutzer auf wichtige Bedienungsund Wartungsanweisungen (Service) in diesem Handbuch hin, die unbedingt zu befolgen sind.
Um die Gefahr elektrischer Schläge auszuschliessen, Gehäuse auf keinen Fall abnehmen.
Im Innem befinden sich keine vom Benutzer selbst instandsetz-baren Teile. Reparaturen dürfen nur von einer autorisierten Fachwerkstatt durchgeführt werden.
Dieses Gerät ist für 230V ~ 50Hz Netzspannung ausgelegt. Bei längerer Nichtbenutzung des Geräts ziehen Sie den Stecker aus der Steckdose.
Setzen Sie das Gerät weder Feuchtigkeit noch Regen aus.
Schalten Sie das System erst dann ein, wenn Sie alle Verbindungen genau geprüft haben.
Stellen Sie das Gerät so auf, dass immer eine ungestörte Frischluftzufuhr sichergestellt ist. Es ist zum beispiel keinesfalls auf Teppiche und in der Nähe von Gardinen zu stellen oder in Bücherregale einzubauen.
Setzen Sie das Gerät weder direkter Sonneneinstrahlung noch Wärmequellen aus.
KORREKTE ENTSORGUNG DIESES PRODUKTS (Elektromüll)
Die Kennzeichnung auf dem Produkt bzw. auf der dazugehörigen Literatur gibt an, dass es nach seiner Lebensdauer nicht zusammen mit dem normalen HaushaltsmüIl entsorgt werden darf. Entsorgen Sie dieses Gerat bitte getrennt von anderen Abfallen, um der Umwelt bzw. der menschl i chen Gesundhei t ni cht durch unkontrol l i erte Mül l besei ti gung zu schaden. Recycel n Si e das Gerät, um di e nachhaltige Wiederverwertung von stofflichen Ressourcen zu fördern. Private Nutzer sollten den Händler, bei dem das Produkt gekauft wurde, oder die zuständigen Behörden kontaktieren, um in Erfahrung zu bringen, wie sie das Gerät auf umweltfreundliche Weise recyceln können. Gewerbliche Nutzer sollten sich an Ihren Lieferanten wenden und die Bedingungen des Verkaufsvertrags konsultieren. Dieses Produkt darf nicht zusammen mit anderem Gewerbemüll entsorgt werden.

9 Français
L'EMPLACEMENT DES COMMANDES
1.POWER (MARCHE - ARRÊT) / COMMANDE DE VOLUME
2.HAUT-PARLEUR
3.AFFICHAGE LCD
4.MODE
5.SLEEP TIMER
6.SCAN (BALAYAGE AUTOMATIQUE)
7.ALARM (ALARME)
8.PRESET (PRÉRÉGLAGES)
9.MENU / INFO
10.SORTIE ÉCOUTEURS (3.5mm JACK)
11.COMMANDE DE SYNTONISATION/ ENTER (CONFIRME) / SNOOZE FUNCTION
12.PRISE D'ENTRÉE AUXILIAIRE (3.5mm JACK)
13.FICHE DC
14.ANTENNE
PUISSANCE
Cet appareil fonctionne avec un adaptateur AC/DC de 6V - 1A. Connectez l’adapteur à l’entrée CC (13) à l’arrière de l’appareil et à une prise électrique.
Vérifiez que la tension nominale de l'adaptateur correspond à votre tension locale.
UTILISER LA RADIO
1.Appuyer sur le bouton [POWER] (1) pour la mise sous tension;
2.(Lors de la première mise sous tension de la radio, celle-ci balaie automatiquement les stations de radio DAB. Elle affichera et lancera la première station à la fin du balayage);
3.Sélectionnez la source audio désirée avec le bouton [MODE] (4);
4.(Veuillez consulter les instructions détaillées pour chaque source dans les chapitres suivants);
5.Réglez le volume avec les touches [COMMANDE VOLUME] (1) au niveau souhaité;
6.Pour éteindre la radio, appuyer sur le bouton [POWER] (1).
Remarque: Pour une meilleure réception, réorientez l'antenne (14).
FONCTIONNEMENT DE LA RADIO DAB
1.Utilisez la [COMMANDE DE SYNTONISATION] (11) pour choisir la chaine radio;
2.Appuyer sur le bouton [ENTER] (11) pour confirmer.
Remarque: Dans le cas où il n'y a pas de service DAB, appuyer et maintenir enfoncé le bouton [MENU] (9), sélectionnez „Station Scan“ et puis „Full Scan“, pour lancer le balayage.
FONCTIONNEMENT DE LA RADIO FM
•Pour un balayage manuel, utiliser le [COMMANDE DE SYNTONISATION] (11) et il affinera la fréquence par incrément de 0,05 MHz, ou
•Appuyez sur le bouton [SCAN] (6) et il balayera la prochaine station disponible.

Français 10
PRÉRÉGLAGE
Il y a 10 préréglages disponibles pour la DAB et 10 préréglages pour la FM.
1.Réglez la fréquence sur la station désirée comme expliqué précédemment;
2.Appuyer sur le bouton [PRESET] (8);
2.Choisir le numéro de préréglage avec la [COMMANDE DE SYNTONISATION] (11);
3.Appuyer et maintenir enfoncé le bouton [ENTER] (11) jusqu'à ce qu'il affiche "Saved" ("Mémorisé").
RAPPELER UN PRESET
1.Appuyer sur le bouton [PRESET] (8);
2.Utiliser la [COMMANDE DE SYNTONISATION] (11) pour choisir la chaine radio;
3.Appuyer sur le bouton [ENTER] (11) pour confirmer.
INFO
Lorsque la station de radio est en cours de diffusion, appuyer plusieurs fois le bouton [INFO]
(9) pour parcourir les informations diffusées.
FONCTIONNEMENT DU AUX-IN
1.Utiliser un câble mâle vers un câble jack mâle de 3,5 mm (non fourni) pour connecter un périphérique audio externe à la [PRISE AUX] (12).
2.Sélectionnez le mode “AUX” en utilisant le bouton [MODE] (4);
Remarque: La commande de la musique (lecture, pause, etc.) doit être effectué à partir de cet appareil externe.
NAVIGUER LE MENU
1.Appuyer et maintenir enfoncé le bouton [MENU] (9) pour accéder au menu.
2.Utilisez la [COMMANDE DE SYNTONISATION] (11) pour faire défiler les options.
3.Appuyez sur [ENTER] (11) pour sélectionner un élément.
4.Appuyez sur [MENU] (9) pour quitter le menu.
RÉGLAGE DE L'HORLOGE
Quand la radio est allumée:
1.Appuyer et maintenir enfoncé le bouton [MENU] (9);
2.Utilisez la [COMMANDE DE SYNTONISATION] (11) pour sélectionner "System";
3.Appuyez sur [ENTER] (11) pour confirmer;
4.Utilisez la [COMMANDE DE SYNTONISATION] (11) pour sélectionner "Time Setup";
5.Appuyez sur [ENTER] (11) pour confirmer;
6.Utilisez la [COMMANDE DE SYNTONISATION] (11) pour sélectionner "Set Clock";
7.Appuyez sur [ENTER] (11) pour confirmer;
8.Les chiffres des heures clignotent sur l'écran. Utilisez la [COMMANDE DE SYNTONISATION] (11) pour sélectionner l’heure;
9.Appuyez sur [ENTER] (11) pour confirmer;
10.Les chiffres des minutes clignotent sur l'écran. Utilisez la [COMMANDE DE SYNTONISATION] (11) pour sélectionner les minutes;
11.Appuyez sur [ENTER] (11) pour confirmer;
12.Répéter les étapes 10 et 11 pour ajuster la date.
 Loading...