


Roadstar Management SA, via Passeggiata 7 CH 6883 Novazzano (Switzerland)
is a registered Trademark of Roadstar S.A. - Switzerland. All rights reserved.
CLR-725BT/BK
User manual
Bedienungsanleitung
Manuel d’instructions
Manuale d’istruzioni
Gebruiksaanwijzing
Návod k použití
Návod na použitie

INDEX
English Page 1
Deutsch Seite 9
Francais Page 17
Italiano Pagina 25
Nederlands Pagina 41
Čeština Strana 47
Slovenský Strana 55
• Your new unit was manufactured and assembled under strict ROADSTAR quality control.
Thank-you for purchasing our product for
your music enjoyment. Before operating the
unit, please read this instruction manual carefully. Keep it also handy for further future references.
• Votre nouvel appareil a été fabriqué et monté
en étant soumis aux nombreaux tests ROADSTAR. Nous espérons que cet appareil vous
donnera entière satisfaction. Avant de vous
adonner à ces activités, veuillez lire attentivement ce manuel d’instructions. Conservez-le
à portée de main à fin de référence ultérieure.
• Vuestro nuevo sistema ha sido construido
según las normas estrictas de control de calidad ROADSTAR. Le felicitamos y le damos
las gracias por su elección de este aparado.
Por favor leer el manual antes de poner en
funcionamiento el equipo y guardar esta documentación en case de que se necesite
nuevamente.
• Ihr neues Gerät wurde unter Beachtung der
strengen ROADSTAR Qualitätsvorschriften
gefertigt. Wir danken Ihnen für den Kauf unseres Produktes und wünschen Ihnen optimalen Hörgenuss. Bitte lesen Sie diese Bedienungsanleitung durch, und heben Sie sie
auf, um jederzeit darin nachschlagen zu
können.
• Il vostro nuovo apparecchio é stato prodotto
ed assemblato sotto lo stretto controllo di
qualità ROADSTAR. Vi ringraziamo di aver
acquistato un nostro prodotto per il vostro
piacere d’ascolto. Prima di procedere all'utilizzo dell'apparecchio, leggete attentamente il
manuale d’istruzioni e tenetelo sempre a portata di mano per futuri riferimenti.
CLR-725BT/BK
17
16
18
REAR
FRONT

1 English
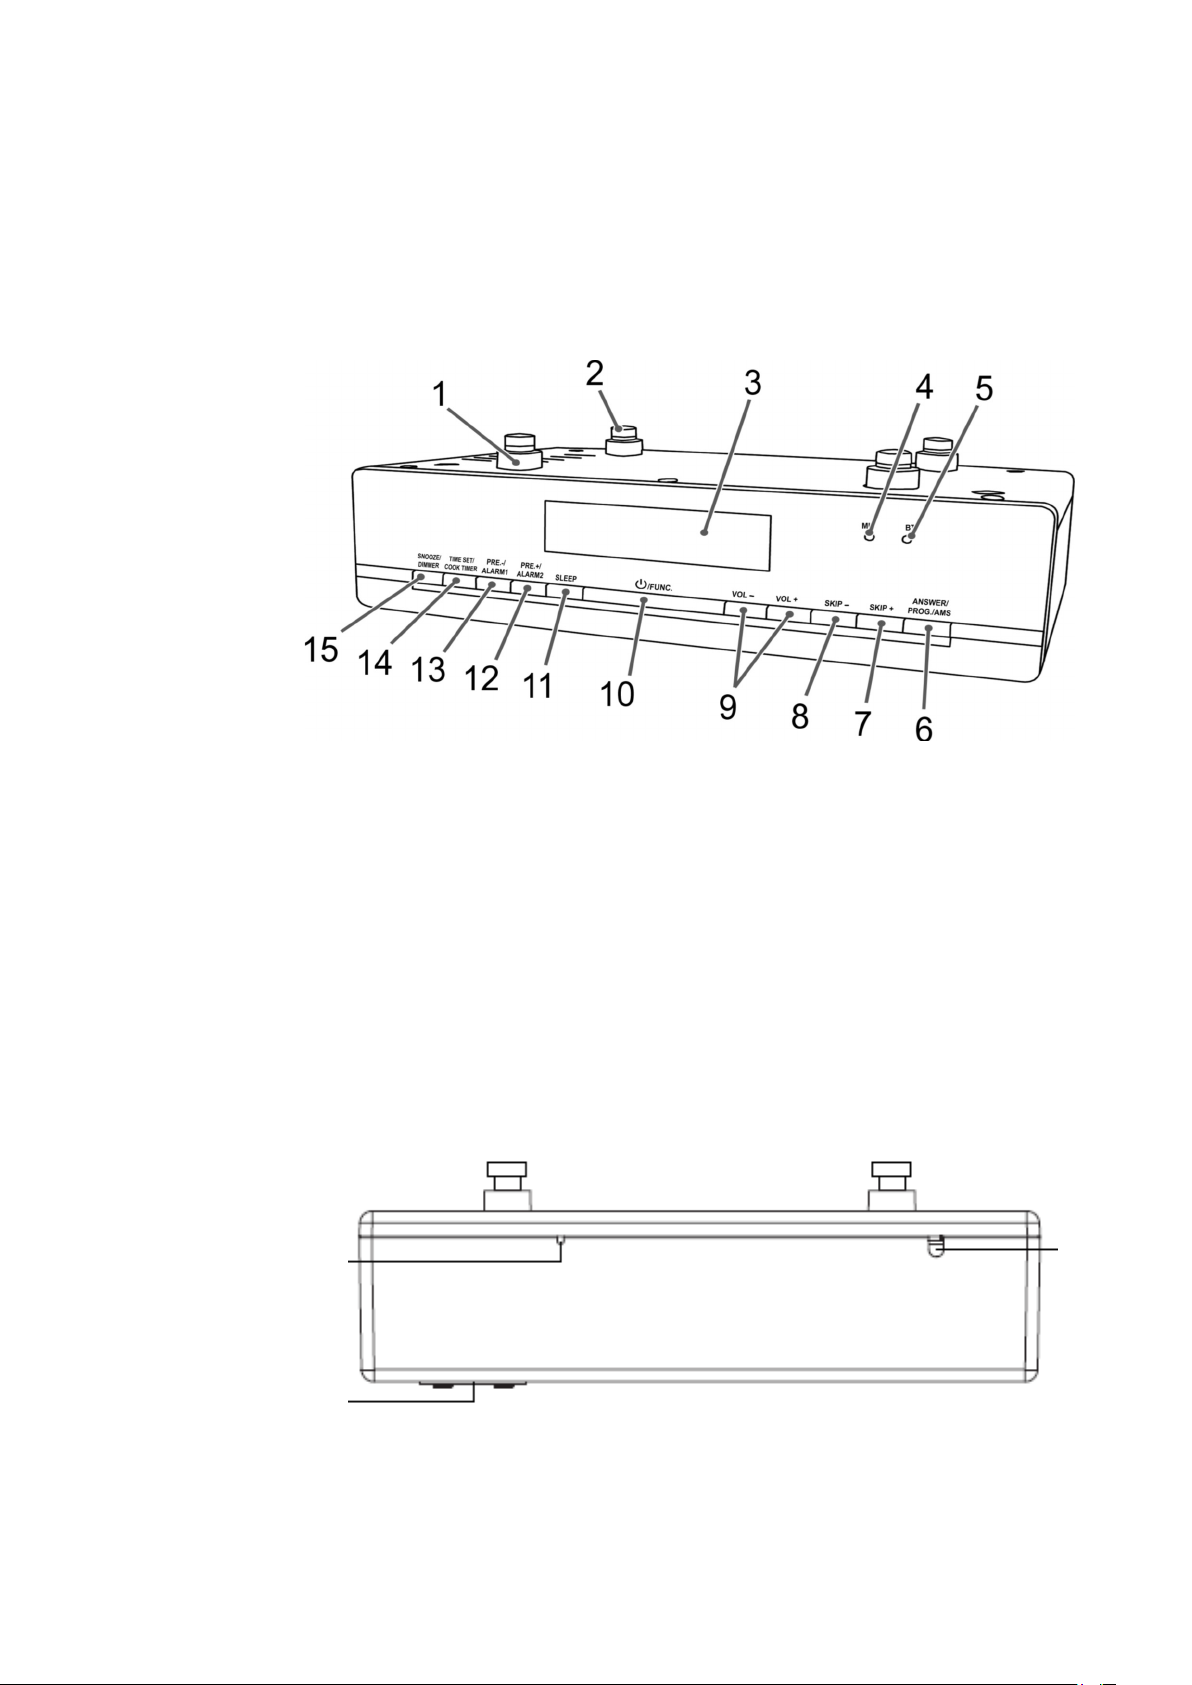
LOCATION OF CONTROLS
1. Spacers for sub - assembly
2. Screw for sub - assembly
3. LCD Display
4. MIC (Microphone)
5. BT indicator light
6. ANSWER/PROG./AMS button (accept call/presetting of
7. SKIP+ button
8. SKIP- button
9. VOL+/VOL- buttons (volume)
10. POWER/FUNCTION (on/off/standby/function mode))
11. SLEEP button (sleep timer)
12. PRE.+/ALARM 2 button
13. PRE.-/ALARM 1 button
14. TIME SET/COOK TIMER button (time setting/timer)
15. 15 SNOOZE/DIMMER button (Snooze/display illumination)
16. BATTERY BACKUP
17. AC POWER CORD
18. FM ANTENNA
MOUNTING INSTRUCTIONS
For the installation the cupboard must fulfil the following conditions:
• Thickness of the cupboard floor between 16 mm and 20 mm.
• The wall mounting of the cupboard must be stable and anchored firmly in
the wall with at least 2 screws.
• Important! Do not install the device above a cooker!
• When installing the device it must be ensured that there is a power soc-
ket within reach.
• The mains socket must be within easy reach, so that the plug can be
quickly removed in an emergency.
• Important! Do not connect the device to the mains power supply until af-
ter installation!
• The device cannot be installed under cupboards under which there is a
lighting strip.
• For mounting, you may need the following supplies: A drill with 6 mm drill
bit, pilot drill or nail, Allen key, tape measure, adhesive tape, scissors, safety goggles.

2 English
Supplied Mounting Accessories
• 4 Screws
• 4 Spacers
• 1 Drilling template
CAUTION:
• Please adhere to the dimensions stated in the installation instructions.
• You should use only the installation accessories supplied.
• Tape the template firmly down to the shelf with ahesive tape. With the
help of a gimlet or nail pierce the crosses at the attachment points and
use it to mark the holes.
• Remove the template and drill the holes into the wall cupboard.
• Insert the spacer into the holes provided on the device.
NOTE:
• Sufficient ventilation is only guaranteed with a spacer.
• Countersink the screws into the holes in the cupboard.
• Using the 4 screws and the spacers, attach the kitchen
• radio to the bottom of the cupboard.
• Tighten the screws hand-tight with an Allen wrench.
• CAUTION:
• Use an Allen wrench and not an electric screwdriver.
MAINS (AC) OPERATION
Make sure that the device is adequately ventilated!
If applicable, remove the protective film from the display.
Power Supply
Please ensure that the mains voltage corresponds to the information on the
type plate. Plug the power plug into a properly installed socket.
Inserting the Power Reserve Battery
(Battery not included in scope of delivery)
During a power outage, or when the power plug is pulled from the socket, the
clock time and the alarm times will be lost. To prevent this, insert a power re-
serve battery as follows.
• Open the battery compartment on the bottom. Turn the battery com-
partment lid in the direction “OPEN”.
• Insert a button cell battery of the type CR 2025 3 V. Ensure the correct

3 English
polarity (see battery compartment lid)!
• Close the battery compartment again
WARNING:
The batteries shall not be exposed to excessive heat such as sunshine, fire
or the like. Danger of explosion!
CAUTION:
• Batteries may leak out and lose battery acid. If the device is not used for a
longer period of time, remove the battery.
• Batteries do not belong in the household waste. Dispose of spent batteries
at the designated collection points or at the dealer.
SWITCH THE DEVICE ON/OFF
Turn on the device by pressing the POWER/FUNC button. [10]
• To turn off the device, keep the POWER/FUNC button pressed for about
3 seconds.
NOTE:
After about 20 minutes without signal, or if the signal is too low, the device will
switch to Standby automatically.
SELECTING THE OPERATING MODE
• When the device is turned off, you can switch between radio and Blue-
tooth mode by pressing the POWER/FUNC. Button repeatedly. [10]
SETTING OF THE CLOCK (24H)
• Hold down the TIME SET/COOK TIMER button (14) for approx. 3 se-
conds. The notification “24H” will appear in the display.
Select the time format with the SKIP+/SKIP- buttons (7/8).
NOTE:
• “PM” will show in the display in the afternoon with the 12-hour indication.
• Press the TIME SET/COOK TIMER button to confirm.
• The hour setting will blink in the display.
• Adjust the setting with the SKIP+/SKIP- buttons (7/8).
• Press the TIME SET/COOK TIMER button for confirmation.
• The minute indicator will flash on the display.
• Adjust the setting with the SKIP+/SKIP- buttons (7/8).

4 English
• Save the time setting by pressing the TIME SET/COOK TIMER button
again.
VOLUME ADJUSTING
Use the VOL+/VOL- buttons (9) to adjust the volume.
DISPLAY BRIGHTNESS
You can use the SNOOZE/DIMMER button (15) to adjust the brightness of
the display and of the light strip beneath the operating keys.
LISTENING TO THE RADIO
Scanning stations
• Use the POWER/FUNC button (10) to select the radio mode.
• Tune the desired stations with the SKIP+ (7) and SKIP- (8) buttons.
When holding down either of the buttons, the device will start scanning
until the next radio station is found. The display will show the respective
frequency.
• If there is interference on the received station, try to improve the recep-
tion by rotating, winding or unwinding the wire antenna.
Presetting Radio Stations
The device can preset up to 30 radio stations. To preset a station, follow the
steps below:
• Search for a station as described in “Scanning stations”.
• Press the ANSWER/PROG/AMS button (6). The display will show PRO-
GRAM and the respective preset location will begin to flash.
• Use the PRE.+/ALARM 2 (12) and PRE.-/ALARM 1 (13) buttons to
choose the preset location for the corresponding station.
• Press the ANSWER/PROG/AMS button again. The station will be preset.
The PROGRAM indicator and the preset location will disappear.
Recalling Preset Radio Stations
Use the PRE+/ALARM 2 (12) and PRE-/ALARM 1 (13) buttons to select the
memory locations.
Automatic station scan
Important! Any previously stored radio stations will be overwritten.
When holding down the ANSWER/PROG/AMS button (6) for approx. 3 seconds, the device will start the automatic station scan searching the entire
frequency range automatically for stations. The stations found will be stored

5 English
on the preset locations 1-30 in ascending order.
NOTE:
The order cannot be changed once set.
BLUETOOTH FUNCTION
Logging on Devices (Pairing)
Before you listen to music via the unit, you must pair the devices.
• Ensure, that the Bluetooth function is activated in your player (e.g. mobile
phone). For this, refer to the operation manual of your player.
• Press the POWER/FUNC button (10) repeatedly, until “bt” is shown on
the display. The BT indicator light (5) blinks. This signalizes that the device is in pairing mode.
• Choose the Bluetooth menu in your player and register the device in your
player. For this, refer to the operation manual of your player. The device
“CLR-725BT” will show in your player as a selection.
NOTE:
Only one playback device may be connected to the device at one time. If the
device is already connected to another playback device, then the device will
not appear in the BT selection menu.
Now enter the password “0000” in your player, depending on the device ma-
nufacturers, model, and software version.
If the pairing was done successfully, a beeping sound can be heard and the
BT indicator light will be lit. For the further procedure, please refer to the user
manual of the playback unit. If possible, adjust the volume of the external unit
to a comfortable level.
Description of the Operating Buttons for Bluetooth
ANSWER/PROG/AMS (6)
You can pause and continue music playback. Press again to continue play-
back. If a phone call is received during music playback, you can use this button to receive the call.
SETTING THE ALARM TIME (24H) (IN STANDBY MODE)

6 English
You can set up to two alarms. As follows:
• Hold down the ALARM1 or the ALARM2 button (13/12) for approx. 3 se-
conds. “ALARM 1” or “ALARM 2” will blink in the display and the alarm signal is shown.
• You can now perform the settings for the alarm signal, the hours, and the
minutes by pressing the SKIP+ (7) and SKIP- (8) buttons successively.
With regard to the alarm, you can choose between buzzer ( BELL) and
radio (FN ).
BELL: Upon reaching the alarm time, a buzzer will sound. The volume will in-
crease slowly.
FN: Upon reaching the alarm time, the last preset radio station will sound.
The volume will increase slowly.
• Confirm each entry with the ALARM1 or ALARM2 button.
Snooze Function
The automatic alarm can be switched off using the SNOOZE/DIMMER button
(15) for approx. 9 minutes.
Switch Off the Buzzer In order to switch off the alarm until the following day
please press the POWER/FUNC button.
NOTE:
If you have been awakened by radio, the volume will be set to the last set volume after pressing the POWER/FUNC button.
Press the POWER/FUNC button again to shut off the alarm until the next day.
Disabling the Alarm
To disable the alarm completely, choose standby mode and press the ALARM
1 or ALARM 2 button (13/12).
Delayed Shut-Off
You can use the function for delayed power-off with radio operation. The unit
is switched off automatically when the selected time is reached.
• Select the time after which the unit is switched off by repeatedly pressing
the SLEEP button (11). The following selections can be made: 120, 110, 100,
90, 80, 70, 60, 50, 40, 30, 20 and 10 minutes. OFF = function is disabled.
TIMER FUNCTION
You can use this function, for example, to keep an overview of a specific cooking time. You can select between 180 to 10 minutes in steps of 10. The shortest time available to you is 5 minutes.
1. Press the TIME SET/COOK TIMER button (14) repeatedly.

7 English
“C” and the set time will appear in the display, starting with “C 180”.
2. As soon as the set time has elapsed, a signal tone will sound. Press any
key to turn off the signal tone.
NOTE:
In order to stop the function ahead of time, press the TIME SET/COOK TIMER button until “OFF” is shown in the display.
TECNICAL SPECIFICATIONS
Power Supply: AC 230V ~ 50Hz.
Radio Frequency Coverage
FM: 87.5 - 108 MHz.
Speaker
Output Power: 1 Watt RMS.
General
BT Maximum radiated Power: < 4 dBm (2.5 mW).
Specifications and design are subject to possible modifications without notice due to improvement.
This marking shown on the product or its literature, indicates that it should not be disposed with other household wastes at the end of its working
life. To prevent possible harm to the environment or human health from uncontrolled waste disposal, please separate this from other types of wastes and recycle it responsibly to promote the sustainable reuse of material resources. Household users should contact the retailer where they
purchased this product, or their local government office, for details of where and how they can take this item for environmentally safe recycling.
Business users should contact their supplier and check the terms and conditions of the purchase contract. This product should not be mixed with
other commercial wastes for disposal.
CORRECT DISPOSAL OF THIS PRODUCT (Waste Electrical & Electronic Equipment)
The exclamation point within the triangle is a warning sign alerting the user of important instructions accompanying the product.
The lightening flash with arrowhead symbol within the triangle is a warning sign alerting the user
of “dangerous voltage” inside the unit.
To reduce the risk of electric shock, do not remove the cover. No user serviceable parts inside
the unit. Refer all servicing to qualified personnel.
This unit operates on 230V ~ 50Hz. If the unit is not used for a long period of time, remove the
plug from the AC mains.
Ensure all connections are properly made before operating the unit.
This unit must not be exposed to moisture or rain.
This unit should be positioned so that it is properly ventilated. Avoid placing it, for example, close to curtains, on the carpet or in a built-in installation such as a bookcase.
Do not expose this unit to direct sunlight or heat radiating sources.

8 Deutsch
UBERSICHT DER BEDIENELEMENTE
1. ABSTANDSHALTER FÜR UNTERBAU-MONTAGE
2. SCHRAUBE ZUR UNTERBAU-MONTAGE
3. LCD DISPLAY
4. MIC (MIKROFON)
5. BT KONTROLLLEUCHTE
6. ANSWER/PROG./AMS TASTE (GESPRÄCH ANNEHMEN/
RADIOSENDER SPEICHERN/RADIOSENDER AUTOMATISCH
ABSPEICHERN)
7. SKIP+ TASTE
8. SKIP- TASTE
9. VOL+/VOL- TASTEN (LAUTSTÄRKE)
10. POWER/FUNC. TASTE (EIN-/BETRIEBSBEREITSCHAFT / FUNKTION-
SMODUS)
11. SLEEP TASTE (EINSCHLAFTIMER)
12. PRE.+/ALARM 2 TASTE
13. PRE.-/ALARM 1 TASTE
14. TIME SET/COOK TIMER TASTE (ZEITEINSTELLUNG/
KURZZEITWECKER)
15. SNOOZE/DIMMER TASTE (SCHLUMMER/DISPLAY-BELEUCHTUNG)
16. BATTERIE BACKUP
17. ACHSADAPTER
18. FM ANTENNE
MONTAGEANLEITUNG
ACHTUNG:
Achten Sie darauf, dass wahrend der Montage der Netzstecker nicht eingesteckt ist!
• Entnehmen Sie dem Oberschrank alle Gegenstände, sowie den angren-
zenden Schränken alles Zerbrechliche.
• Für die Montage muss der Oberschrank folgende Voraussetzungen
erfüllen:
Stärke des Schrankbodens von 16 mm bis 20 mm.
• Die Wandaufhängung des Oberschrankes muss stabil und mit minde-
stens 2 Schrauben fest in der Wand verankert sein.
• Wichtig! Montieren Sie das Gerat nicht uber einer Kochstelle!
• Zur Montage des Gerätes muss sichergestellt sein, dass eine Steckdose
in Reichweite der Zuleitung vorhanden ist.

9 Deutsch
• Die Steckdose muss gut erreichbar sein, so dass man im Notfall schnell
den Netzstecker ziehen kann.
• Wichtig! Das Gerat erst nach der Montage anschliesen!
• Das Gerät kann nicht unter Oberschränke montiert werden, die nach un-
ten mit einer Lichtleiste abschließen.
• Für die Montage benötigen Sie ggfs. folgende Utensilien:
• Eine Bohrmaschine mit 6 mm Bohrspitze, Vorbohrer oder Nagel, Inbus-
schlüssel, Maßband, Klebeband, Schere, Sicherheitsbrille.
Mitgeliefertes Montage-Zubehor
4 Schrauben
4 Abstandshalter
1 Bohrschablone
ACHTUNG:
Halten Sie sich an die in der Montageanleitung angegeben Maße.
• Verwenden Sie ausschließlich das mitgelieferte Montagezubehör.
Montage
• Kleben Sie die Schablone mit einem Klebeband im Schrank fest. Stechen
Sie mit Hilfe eines Vorbohrers oder Nagel die Kreuze an den Befestigungspunkten durch
• und markieren Sie damit die Löcher.
• Entfernen Sie die Schablone und bohren Sie die Löcher in den Hänge-
schrank.
• Stecken Sie die Abstandhalter in die vorgesehen Löcher am Gerät.
HINWEIS:
• Nur mit Abstandshalter ist eine ausreichende Belüftung gewährleistet.
• Versenken Sie die Schrauben in die Löcher im Schrank.
• Mittels den 4 Schrauben und den Abstandshaltern,
• befestigen Sie das Küchenradio am Schrankboden.
• Drehen Sie die Schrauben mit einem Inbusschlüssel
• handfest.
ACHTUNG:
Benutzen Sie einen Inbusschlüssel und keinen Akkuschrauber
INBETRIEBNAHME DES GERATES/EINFUHRUNG

10 Deutsch
• Achten Sie darauf, dass das Gerät ausreichend belüftet wird!
• • Entfernen Sie, falls vorhanden, die Schutzfolie vom Display.
Stromversorgung
• Achten Sie darauf, dass die Netzspannung mit den Angaben auf dem Ty-
penschild übereinstimmt. Stecken Sie den Netzstecker in eine vorschriftsmäßig installierte Steckdose.
Einlegen der Gangreservebatterie
(Batterie nicht im Lieferumfang enthalten)
Bei einem Stromausfall, oder wenn der Netzstecker aus der Steckdose gezogen wird, gehen die Uhrzeit und Alarmzeiten verloren. Um dies zu verhindern,
legen Sie wie folgt eine Gangreservebatterie ein.
• Öffnen Sie das Batteriefach auf der Unterseite. Drehen Sie den Batterie-
fachdeckel in Richtung „OPEN“.
• Legen Sie eine Knopfzelle vom Typ CR 2025 3V ein. Achten Sie auf die
richtige Polarität (siehe Batteriefachdeckel)!
• Schließen Sie das Batteriefach wieder.
WARNUNG:
Setzen Sie Batterien keiner hohen Wärme, wie z.B. Sonnenschein, Feuer
oder ähnlichem aus. Es besteht Explosionsgefahr!
ACHTUNG:
• Batterien können auslaufen und Batteriesäure verlieren. Wird das Gerät
längere Zeit nicht genutzt, entnehmen Sie die Batterie.
• Batterien gehören nicht in den Hausmüll. Geben Sie verbrauchte Batte-
rien bei zuständigen Sammelstellen oder beim Händler ab.
Gerat aus- /einschalten (10)
• Schalten Sie das Gerät ein, indem Sie die POWER/FUNC. Taste drüc-
ken.
• Um das Gerät auszuschalten, halten Sie die POWER/FUNC. Taste ca. 3
Sekunden gedrückt.
HINWEIS:
Nach ca. 20 Minuten ohne Signal oder mit zu geringem Signal schaltet sich
das Gerät automatisch in Standby.
Betriebsmodus auswahlen (10)
Wenn das Gerät eingeschaltet ist, können Sie durch wiederholtes Drücken

11 Deutsch
der POWER/FUNC. Taste zwischen dem Radio-/ und Bluetooth-Modus
auswählen.
Einstellen der Uhrzeit (24 h)
• Halten Sie die TIME SET/COOK TIMER Taste (14) ca. Sekunden
gedrückt. Im Display erscheint die Anzeige „24H“.
• Wählen Sie mit den SKIP+/SKIP- Tasten (7/8) das Uhrzeitformat aus.
HINWEIS:
Bei der 12 Stunden Anzeige erscheint im Display „PM“ für Nachmittags.
• Drücken Sie zur Bestätigung die TIME SET/COOK TIMER Taste. Im Di-
splay blinkt die Stundenanzeige.
• Nehmen Sie mit den SKIP+/SKIP- Tasten (7/8) die Einstellung vor.
• Drücken Sie zur Bestätigung die TIME SET/COOK TIMER Taste. Im Di-
splay blinkt die Minutenanzeige.
• Nehmen Sie mit den SKIP+/SKIP- Tasten (7/8) die Einstellung vor.
• Speichern Sie die Uhrzeit, in dem Sie erneut die TIME SET/COOK TI-
MER Taste drücken.
Lautstarke einstellen
Mit den VOL+/VOL- Tasten (9) können Sie die Lautstärke einstellen.
Display-Helligkeit
Mit der SNOOZE/DIMMER Taste (15) können Sie die Helligkeit des Displays
und der Lichtleiste, unterhalb der Bedientasten, einstellen.
RADIO HOREN
Sender suchen
• Wählen Sie mir der POWER/FUNC. Taste (10) den Radiomodusaus.
• Stimmen Sie mit den Tasten SKIP+ (7) und SKIP- (8) den gewünschten
Sender ab. Halten Sie eine der Tasten gedrückt, sucht das Gerät bis zum
nächsten Radiosender. Im Display wird die jeweilige Frequenz angezeigt.
• Rauscht der empfangene Sender, versuchen Sie durch Drehen und ab-
bzw. aufwickeln der Wurfantenne den Empfang zu verbessern.
Radiosender speichern
Das Gerät kann bis zu 30 Radiosender speichern. Zum Speichern eines Senders gehen Sie wie folgt vor:
• Suchen Sie einen Sender wie unter „Sender suchen“ beschrieben.

12 Deutsch
• Drücken Sie die ANSWER/PROG/AMS Taste (6). Im Display erscheint
die Anzeige PROGRAM und der Speicherplatz beginnt zu blinken.
• Wählen Sie mit den Tasten PRE.+/ALARM 2 (12) und PRE.-/ALARM 1
(13) den Speicherplatz aus, auf dem der Sender gespeichert werden soll.
• Drücken Sie die ANSWER/PROG/AMS Taste erneut. Der Sender wird
gespeichert. Die Anzeige PROGRAM und der Speicherplatz erlöschen.
Gespeicherte Radiosender abrufen
Mit den Tasten PRE+/ALARM 2 (12) und PRE-/ALARM 1 (13) wählen Sie die
Speicherplätze aus.
Automatischer Sendersuchlauf
Wichtig! Eventuell zuvor gespeicherte Radiosender werden überspeichert.
Drücken Sie die ANSWER/PROG/AMS Taste (6) für ca.
3 Sekunden, beginnt das Gerät mit dem automatischen Sendersuchlauf. Der
gesamte Frequenzbereich wird dabei automatisch nach Sendern durchsucht.
Die gefundenen Sender werden dabei in aufsteigender Reihenfolge auf den
Speicherplätzen 1-30 gespeichert.
HINWEIS:
Eine nachträgliche Änderung der Reihenfolge ist nicht möglich.
BLUETOOTH FUNKTION
Gerate anmelden (Pairing)
Bevor Sie über das Gerät Musik hören können, müssen Sie die Geräte untereinander anmelden.
• Stellen Sie sicher, dass die Bluetooth-Funktion in Ihrem Abspielgerät
(z.B. Mobiltelefon) aktiviert ist. Beachten Sie hierfür die Bedienungsanleitung Ihres Abspielgerätes.
• Drücken Sie wiederholt die POWER/FUNC. Taste (10), bis im Display „bt“
angezeigt wird. Die BT Kontrollleuchte (5) blinkt. Dies signalisiert dass
sich das Gerät im Paring- Modus befindet.
• Wählen Sie in Ihrem Abspielgeräte das Bluetooth Menü und melden Sie
das Gerät in Ihrem Abspielgerät an. Beachten Sie hierfür die Bedienung-
sanleitung Ihres Abspielgerätes. Als Auswahl erscheint das Gerät „CLR-
725BT“ in Ihrem Abspielgerät.
HINWEIS:
Es kann immer nur ein Abspielgerät mit dem Gerät verbunden werden. Ist
das Gerät bereits mit einem anderen Abspielgerät verbunden, erscheint das

13 Deutsch
Gerät nicht im BT Auswahl-Menü.
• Je nach Gerätehersteller, Modelle und Softwareversionen geben Sie nun
das Passwort „0000“ in Ihrem Abspielgerät ein.
Wurde die Anmeldung erfolgreich durchgeführt, ist ein Piepton zu hören und
die BT Kontrollleuchte leuchtet. Die weitere Vorgehensweise entnehmen Sie
bitte der Bedienungsanleitung des Abspielgerätes. Stellen Sie, falls möglich,
die Lautstärke des Abspielgerätes auf eine hörgerechte Lautstärke.
HINWEIS:
• Je nach Gerätehersteller müssen Sie die Anmeldung (PAIRING) erneut
durchführen, um die Geräte zu verbinden.
• Bei Problemen mit der Anmeldung eines Wiedergabegerätes deaktivieren
Sie die WiFi-/ und Mobile Daten- Funktion in Ihrem Wiedergabegerät.
• Die Bluetooth-Kompatibilität kann nicht für zukünftig erscheinende
Abspielgeräte (z.B. Mobiltelefone) gewährleistet werden.
• Um eine optimale Verbindung zu gewährleisten, achten Sie darauf dass
der Akku Ihres Abspielgerätes vollständig geladen ist.
• Einige Mobiltelefonmarken verfügen über einen Energiesparmodus.
Deaktivieren Sie den Energiesparmodus, da es ansonsten zu Problemen
bei der Datenübertragung über Bluetooth kommen kann.
• Um Audiodaten übertragen zu können, muss Bluetooth in Ihrem Abspiel-
gerät aktiviert bleiben. Beachten Sie die Bedienungsanleitung Ihres
Abspielgerätes.
HINWEIS:
• Verwenden Sie zur Musikwiedergabe ein Mobiltelefon, bei dem ein Tele-
fonat eingeht, wird die Wiedergabe unterbrochen. Drücken Sie die ANSWER/PROG/AMS Taste (6), um das Gespräch entgegen zu nehmen.
Der Ton wird über das Radio wiedergegeben. Sprechen Sie in Richtung
des Mikrofons oder übertragen Sie das Gespräch an Ihr Mobiltelefon.
Beachten Sie dafür die Einblendung im Display Ihres Mobiltelefons. Nachdem Sie das Telefonat beendet haben wird die Wiedergabe fortgesetzt.
Beschreibung der Bedientasten fur Bluetooth
HINWEIS:
Ihr Bluetooth-Abspielgerät muss die nachfolgenden Funktionen unterstützen.
ANSWER/PROG/AMS (6)
Sie können die Wiedergabe kurz unterbrechen und wieder starten. Nochmaliges Drücken der Taste setzt die Wiedergabe an derselben Stelle fort.

14 Deutsch
Geht während der Musikwiedergabe ein Telefonat ein, können Sie mit dieser
Taste das Gespräch entgegen nehmen
EINSTELLEN DER ALARMZEIT (24 H) (IM STANDBY-MODUS)
Sie haben die Möglichkeit bis zu zwei Weckzeiten einzustellen.
Gehen Sie dazu wie folgt vor:
Halten Sie die ALARM1 bzw. ALARM2 Taste (13/12) ca. 3 Sekunden
gedrückt. Im Display blinkt „ALARM 1“ bzw. „ALARM 2“ und das Wecksignal
wird angezeigt.
• Sie können nun nacheinander mit den Tasten SKIP+ (7) und SKIP- (8) die
Einstellungen für das Wecksignal, die Stunden und Minuten vornehmen.
Beim Wecksignal können Sie zwischen Signalton ( ) und Radio ( ) wählen.
BELL = Beim Erreichen der Alarmzeit ist ein Signalton
zu hören. Die Lautstärke steigt langsam
an.
FN= Beim Erreichen der Alarmzeit ertönt der zuletzt eingestellte Radiosender. Die Lautstärke steigt langsam an.
• Bestätigen Sie Ihre Eingabe jeweils mit der ALARM 1 bzw. ALARM 2 Ta-
ste.
Intervall-Weckautomatik
Die automatisch eingestellte Weckfunktion kann mit der SNOOZE/DIMMER
Taste (15) für ca. 9 Minuten ausgeschaltet werden.
ABSTELLEN DES WECKSIGNALS
Um den Alarm bis zum nächsten Tag auszuschalten, drückenSie die POWER/FUNC. Taste.
HINWEIS:
Haben Sie sich mit Radio wecken lassen, wird die Lautstärke nach Drücken
der POWER/FUNC. Taste auf die zuletzt eingestellte Lautstärke eingestellt.
Drücken Sie die POWER/FUNC. Taste erneut, um den Alarm bis zum nächsten Tag auszuschalten.
Weckfunktion deaktivieren
Um den Alarm komplett zu deaktivieren, drücken Sie im Standby-Modus die
ALARM 1 bzw. ALARM 2 Taste (13/12).
VERZOGERTES AUSSCHALTEN
Die Funktion verzögertes Ausschalten können Sie im Radiobetrieb verwen-

15 Deutsch
Die Kennzeichnung auf dem Produkt bzw. auf der dazugehörigen Literatur gibt an, dass es nach seiner Lebensdauer nicht
zusammen mit dem normalen HaushaltsmüIl entsorgt werden darf. Entsorgen Sie dieses Gerat bitte getrennt von anderen Abfallen, um der Umwelt bzw. der menschl i chen Gesundhei t ni cht durch unkontrol l i erte Mül l besei ti gung zu schaden. Recycel n
Si e das Gerät, um di e nachhaltige Wiederverwertung von stofflichen Ressourcen zu fördern. Private Nutzer sollten den Händler,
bei dem das Produkt gekauft wurde, oder die zuständigen Behörden kontaktieren, um in Erfahrung zu bringen, wie sie das Gerät
auf umweltfreundliche Weise recyceln können. Gewerbliche Nutzer sollten sich an Ihren Lieferanten wenden und die Bedingungen des Verkaufsvertrags konsultieren. Dieses Produkt darf nicht zusammen mit anderem Gewerbemüll entsorgt werden.
KORREKTE ENTSORGUNG DIESES PRODUKTS
(Elektromüll)
SICHERHEITSHINWEISE
Das Ausrufszeichen im Dreieck weist den Benutzer auf wichtige Bedienungs- und Wartungsanweisungen (Service) in diesem Handbuch hin, die unbedingt zu befolgen sind.
Um die Gefahr elektrischer Schläge auszuschliessen, Gehäuse auf keinen Fall abnehmen.
Im Innem befinden sich keine vom Benutzer selbst instandsetz-baren Teile. Reparaturen dürfen nur von einer autorisierten
Fachwerkstatt durchgeführt werden.
Dieses Gerät ist für 230V ~ 50Hz Netzspannung ausgelegt. Bei längerer Nichtbenutzung des Geräts ziehen Sie den Stecker aus der Steckdose.
Setzen Sie das Gerät weder Feuchtigkeit noch Regen aus.
Schalten Sie das System erst dann ein, wenn Sie alle Verbindungen genau geprüft haben.
Stellen Sie das Gerät so auf, dass immer eine ungestörte Frischluftzufuhr sichergestellt ist. Es ist zum beispiel keinesfalls
auf Teppiche und in der Nähe von Gardinen zu stellen oder in Bücherregale einzubauen.
Setzen Sie das Gerät weder direkter Sonneneinstrahlung noch Wärmequellen aus.
TECHNISCHE DATEN
Power
Stromversorgung: AC 230V ~ 50Hz.
Radiofrequenzabdeckung
FM: 87.5 - 108 MHz.
Lautsprecher
Musikleistung: 1 Watt rms.
Sonstiges
BT Maximum radiated Power: 2.5 mW (4dBm).
Spezifikationen und Design unterliegen möglichen Änderungen ohne vorherige Ankündigung aufgrund von Verbesserungen.

16 Français
POSITIONNEMENT DES COMMANDES
1. ENTRETOISES POUR SOUS-ENSEMBLE
2. VIS POUR SOUS-ENSEMBLE
3. ÉCRAN LCD
4. MIC (MICROPHONE)
5. INDICATEUR LUMINEUX BT
6. BOUTON ANSWER/PROG./AMS (ACCEPTER UN APPEL/PRÉRÉGLAGE
DES STATIONS DE RADIO/ENREGISTRER AUTOMATIQUEMENT DES
STATIONS DE RADIO)
7. BOUTON SKIP+
8. BOUTON SKIP-
9. BOUTONS VOL+/VOL- (VOLUME)
10. BOUTON FUNC. (ON/VEILLE / FONCTION)
11. BOUTON SLEEP (MINUTERIE DE MISE EN SOMMEIL)
12. BOUTON PRE.+/ALARM 2
13. BOUTON PRE.-/ALARM 1
14. BOUTON TIME SET/COOK TIMER (RÉGLAGE DE L‘HEURE/MINUTERIE)
15. BOUTON SNOOZE/DIMMER (RAPPEL D‘ALARME/ÉCLAIRAGEDE
L‘ÉCRAN)
16. BATTERIE DE SECOURS
17. AC POWER CORD
18. FM ANTENNA
INSTRUCTIONS DE MONTAGE
• Enlevez du placard au-dessus tous les objets et tous les objets fragiles des
placards adjacents.
• Le placard au-dessus doit remplir les conditions suivantes pour le montage :
Épaisseur du fond du placard 16 mm a 20 mm.
• Le support mural du placard au-dessus doit etre stable et solidement ancré au
mur a l’aide de 2 vis minimum.
• Important ! Ne pas monter l’appareil au-dessus d’une plaque de cuisine !
Pour le montage de l’appareil, il faut s’assurer de l’existence d’une prise électrique
a proximité du conducteur d’amenée.
La prise électrique doit etre facile d’acces pour permettre un débranchement rapide du câble en cas d’urgence.
• Important ! Ne brancher l’appareil qu’apres le montage !
• Ne pas monter l’appareil sous des placards presentant une barre d’eclairage
sur la face inferieure.
• Pour le montage, il vous faut éventuellement les outils suivants : une perceuse

17 Français
avec une meche, gabarit 6 mm, un foret pilote ou un clou, une clé hexagonale,
un metre, un ruban adhésif, des ciseaux, des lunettes de protection.
Accessoires de montage fournis
4 vis
4 entretoises
1 gabarit de perçage
ATTENTION :
Conformez-vous aux dimensions indiquées dans la notice de montage.
Utilisez exclusivement les accessoires de montage fournis.
Montage
1. Fixez solidement le gabarit sous l’étagere a l’aide d’un ruban adhésif. Servezvous d’un amorçoir ou d’un clou pour percer les croix sur les points de fixation et
marquezen les trous.
2. Enlevez le gabarit et percez les trous dans l’armoire suspendue.
3. Placez les entretoises dans les trous prévus sur l’appareil.
NOTE :
Seule l’installation des entretoises assure une aération suffisante.
4. Noyez les vis dans les trous de l’armoire.
5. Fixez la radio de cuisine sur le fond de l’armoire a l’aide des 4 vis et des entretoises.
6. Serrez les vis a la main avec une clé hexagonale.
ATTENTION :
Utilisez une clé hexagonale et non un tournevis électrique
AVANT LA PREMIERE UTILISATION / INTRODUCTION
Veillez a ce que l’appareil soit suffisamment ventilé !
Le cas échéant, retirez le film de protection de l’écran.
Alimentation electrique
Veillez a ce que la tension électrique corresponde aux données indiquées sur la
plaque signalétique. Branchez la fiche d’alimentation a une prise en bon état de
fonctionnement. Inserer la pile de reserve (Pile non incluse dans la livraison)
En cas de panne d’électricité, ou lorsque la fiche d’alimentation est débranchée,
l’heure et les heures de l’alarme seront perdues. Pour empecher cela, insérez une
pile de réserve comme suit.
1. Ouvrez le compartiment de la pile situé en bas. Tournez le couvercle du compar-
timent de la pile dans le sens “OPEN”.
2. Insérez une pile bouton de type CR 2025 3 V. Respectez la bonne polarité (voir
le couvercle du compartiment de la pile) !
3. Refermez le compartiment de la pile.
AVERTISSEMENT :

18 Français
N’exposez pas les piles a une source intense de chaleur telle que p. ex. le soleil, le
feu ou toute autre source similaire.
Il y a un risque d’explosion !
ATTENTION :
• Les piles peuvent fuir et perdre de l’acide. Si l’appareil n’est pas utilisé pendant
une période plus longue, enlevez la pile.
• Ne jetez pas les piles dans les déchets ménagers.
Déposez les piles usagées a un centre de collecte adapté ou aupres du concessionnaire.
Mettre en marche / arreter l’appareil (10)
Allumez l’appareil en appuyant sur le bouton FUNC.
Pour éteindre l’appareil, maintenez le bouton FUNC enfoncé pendant environ 3 secondes.
NOTE :
Apres environ 20 minutes sans signal, ou si le signal est trop lent, l’appareil passera automatiquement en mode Veille.
Selectionner le mode de fonctionnement (10) Lorsque l’appareil est éteint, vous
pouvez alterner entre les modes radio et Bluetooth en appuyant plusieurs fois sur
le bouton /FUNC
PROGRAMMATION DE L’HEURE (24 H)
1. Maintenez le bouton TIME SET/COOK TIMER (14) enfoncé pendant environ 3
secondes. La notification “24H” s’affichera.
2. Sélectionnez le format de l’heure a l’aide des boutons SKIP+/SKIP- (7/8).
NOTE :
“PM” s’affichera pour l’apres-midi avec l’indication 12-heures.
3. Appuyez sur le bouton TIME SET/COOK TIMER pour confirmer. Le réglage de
l’heure clignotera a l’écran.
4. Ajustez le réglage a l’aide des boutons SKIP+/SKIP- (7/8).
5. Appuyez sur le bouton TIME SET/COOK TIMER pour confirmer. L’indicateur
de minutes clignotera sur l’écran.
6. Ajustez le réglage a l’aide des boutons SKIP+/SKIP- (7/8).
7. Enregistrez le réglage de l’heure en appuyant a nouveau sur le bouton TIME
SET/COOK TIMER.
Regler le volume
Utilisez les boutons VOL+/VOL- (9) pour régler le volume.
Luminosite de l‘ecran
Utilisez le bouton SNOOZE/DIMMER (15) pour régler les luminosités de l’écran et
de la barre lumineuse sous les touches de fonctionnement.

19 Français
ECOUTER LA RADIO
Balayer les stations
1. Utilisez le bouton /FUNC. (10) pour sélectionner le mode radio.
2. Réglez les stations souhaitées a l’aide des boutons SKIP+ (7) et SKIP- (8).
Lorsque vous maintenez l’un des boutons enfoncé, l’appareil commencera a
balayer jusqu’a ce qu’il trouve la prochaine station de radio. L’écran indiquera
la fréquence correspondante.
3. En cas d’interférences sur la station reçue, essayez d’améliorer la réception
en tournant, roulant ou déroulant l’antenne filaire.
Preregler les stations de radio
L’appareil peut prérégler jusqu’a 30 stations de radio. Pour prérégler une station,
suivez les étapes suivantes :
1. 1Recherchez une station comme indiqué dans „Balayer les stations“.
2. Appuyez sur le bouton ANSWER/PROG/AMS (6). L’écran indiquera PRO-
GRAM et l’emplacement préréglé correspondant commencera a clignoter.
3. Utilisez les boutons PRE.+/ALARM 2 (12) et PRE.-/ALARM 1 (13) pour sélec-
tionner l’emplacement préréglé de la station correspondante.
4. Appuyez a nouveau sur le bouton ANSWER/PROG/AMS. La station sera pré-
réglée. L’indicateur PROGRAM et l’emplacement préréglé disparaîtront.
Rappeler les stations de radio prereglees
Utilisez les boutons PRE+/ALARM 2 (12) et PRE-/ALARM 1 (13) pour sélectionner
les emplacements de mémoire.
Balayage automatique des stations Important ! Toute station de radio précédemment enregistrée sera écrasée.
Lorsque vous maintenez le bouton ANSWER/PROG/AMS (6) enfoncé pendant environ 3 secondes, l’appareil commencera le balayage automatique des stations en
recherchant automatiquement toute la gamme de fréquences des stations.
Les stations trouvées seront stockées aux emplacements préréglés 1-30 par ordre
croissant.
NOTE :
Une fois réglé, l’ordre ne peut pas changer.
FONCTION BLUETOOTH
Se connecter aux appareils (Pairage)

20 Français
Avant d’écouter de la musique avec l’appareil, vous devez appairer les appareils.
1. N‘oubliez pas d’activer la fonction Bluetooth de votre lecteur (p. ex. téléphone
portable). Pour cela, consultez le mode d’emploi de votre lecteur.
2. Appuyez plusieurs fois sur le bouton /FUNC (10) jusqu’a ce que “bt” s’affiche.
L’indicateur lumineux BT (5) clignote. Cela indique que l’appareil est en mode
d’appairage.
3. Sélectionnez le menu Bluetooth de votre lecteur et enregistrez l’appareil dans
votre lecteur. Pour cela, consultez le mode d’emploi de votre lecteur. L’appa-
reil “CLR-725BT”
sera affiché sur votre lecteur comme sélection.
NOTE :
Un seul lecteur a la fois peut etre connecté a l’appareil. Si l’appareil est déja connecté a un autre lecteur, alors l’appareil n’apparaîtra pas dans le menu de sélection BT.
4. Saisissez maintenant le mot de passe “0000” dans votre lecteur selon le fabricant de l’appareil, le modele et la version du logiciel.
Si l’appairage a réussi, vous entendez un avertisseur sonore et l’indicateur lumi-
neux BT est allumé. Dans la suite de la procédure, référez-vous au mode d’emploi
du lecteur. Si possible, réglez le volume de l’appareil externe a un niveau confortable.
NOTE :
• En fonction du fabricant de l’appareil, vous devez effectuer a nouveau l’enregi-
strement (PAIRING) pour brancher les appareils.
• En cas de problemes avec l’enregistrement d’un lecteur, désactivez la fonction
de données mobiles/ Wi-Fi de votre lecteur.
• La compatibilité Bluetooth ne peut pas etre assurée pour les appareils (p. ex.
téléphones portables) mis sur le marché dans un futur proche.
• Pour garantir une connexion optimale, assurez-vous que la batterie de votre
lecteur est entierement chargée.
• • Certaines marques de téléphones portables ont un mode d’économie d’éner-
gie. Désactivez-le car, sinon, cela peut créer des problemes pendant le transfert de
données via Bluetooth.
• Pour pouvoir transférer des données audio, le systeme Bluetooth doit rester ac
tivé sur votre lecteur. Respectez le mode d’emploi de votre lecteur.
• Si un téléphone portable sur lequel vous jouez de la musique reçoit un appel,
la musique sera interrompue.
• Appuyez sur le bouton ANSWER/PROG/AMS (6) pour recevoir l’appel. Le son
sera émis via la radio. Parlez en direction du microphone ou transférez l’appel sur
votre télephone portable. En faisant ainsi, veuillez consulter la fenetre de votre
téléphone portable. Lorsque vous avez mis fin a l’appel téléphonique, la lecture re-

21 Français
prendra.
Description des boutons de fonctionnement pour le Bluetooth
NOTE :
• otre lecteur Bluetooth doit prendre en charge les fonctions suivantes.
ANSWER/PROG/AMS (6)
• Mise en pause et reprise de la lecture. Appuyer pour reprendre la lecture.
• Si vous recevez un appel téléphonique lorsque vous écoutez de la musique, uti-
lisez ce bouton pour recevoir l’appel.
REGLER L’HEURE DE L’ALARME (24 H) (EN MODE STANDBY)
Vous pouvez régler jusqu’a deux alarmes. Procédez pour cela de la maniere suivantes :
1. Maintenez le bouton ALARM1 ou ALARM2 enfoncé, (13/12) pendant environ 3
secondes. “ALARM 1” ou “ALARM 2” clignote a l’écran et le signal de l’alarme s’affiche.
• Vous pouvez maintenant régler le signal de l’alarme, les heures et les minutes en
appuyant successivement sur les boutons SKIP+ (7) et SKIP- (8). Concernant l’a-
larme, vous pouvez sélectionner le bip ( ) et la radio ( ).
BELL = Une fois l’heure de l’alarme atteinte, un bip retentira. Le volume augmentera lentement.
FN= Une fois l’heure de l’alarme atteinte, la derniere station de radio préréglée retentira.Le volume augmentera lentement.
• Confirmez chaque entrée a l’aide du bouton ALARM1 ou ALARM2.
Fonction rappel d’alarme
L’alarme automatique peut s’éteindre a l’aide du bouton SNOOZE/DIMMER (15)
pendant environ 9 minutes.
Eteindre le bip
Enfoncez la touche /FUNC pour désactiver le réveil jusqu’au lendemain.
NOTE :
Si vous avez été réveillé par la radio, le volume sera établi par rapport au dernier
volume défini apres avoir appuyé sur le bouton /FUNC. Appuyez a nouveau sur le
bouton / FUNC pour éteindre l’alarme jusqu’au jour suivant.
Desactiver l’alarme
Pour désactiver entierement l’alarme, sélectionnez le mode veille et appuyez sur le
bouton ALARM 1 ou ALARM 2 (13/12).
ARRET DIFFERE
Vous pouvez utiliser cette fonction pour retarder l’arret du fonctionnement de la ra-

22 Français
dio. L’appareil s’éteint automatiquement, lorsque le délai sélectionné est écoulé.
• Sélectionnez le temps auquel l’appareil doit s’éteindre en appuyant sur le bouton
SLEEP (11) de maniere répétée.
Les sélections suivantes peuvent etre effectuées : 120, 110, 100, 90, 80, 70, 60,
50, 40, 30, 20 et 10 minutes. OFF = fonction désactivée.
FONCTION DE LA MINUTERIE
Vous pouvez utiliser cette fonction, par exemple, pour avoir une vision globale sur
un temps de cuisson précis. Sélectionnez entre 180 et 10 minutes par tranches de
10. La durée la plus courte a votre disposition est 5 minutes.
1. Appuyez plusieurs fois sur le bouton TIME SET/COOK TIMER (14). “C” et la
durée programmée s’afficheront, en commençant par “C 180”.
2. Une fois la durée programmée écoulée, un signal sonore retentit. Appuyez sur
une touche pour éteindre le signal sonore.
NOTE :
Pour arreter a l’avance la fonction, appuyez sur le bouton TIME SET/COOK TIMER jusqu’a ce que “OFF” s’affiche.
Nettoyage
ATTENTION :
Ne plongez jamais l’appareil dans l’eau.
• Débranchez toujours l’appareil avant de le nettoyer.
Ce symbole sur le produit ou sa documentation indique qu'il ne doit pas être éliminé en fin de vie avec les autres déchets
ménagers. L' élimination incontrôlée des déchetspouvant porter préjudice a l'environnement ou a la santé humaine, veuillez le séparer des autres types de déchets et le recycler defaçon responsable. Vous favoriserez ainsi la réutilisation durable desressources matérielles. Les particuliers sont invites a contacter le distributeur leur ayant vendu le produit ou a
se renseigner auprès de leur mairie pour savoir ou et comment ils peuvent se débarrasser de ce produit afin qu'il soit
recycle en respectant l'environnement. Les entreprises sont invitées a contacter leurs fournisseurs et aconsulter les conditions de leur contrat de vente. Ce produit ne doit pas être éliminé avec les autres déchets commerciaux.
COMMENT ÉLIMINER CE PRODUIT
(déchets d'équipements électriques et électroniques)
ATTENTION
Le symbole “point d’exclamation” à l’intérieur d’un triangle avertit l’utilisateur que d’importantes instructions d’utilisation et
de maintenance sont contenues dans le mode d’emploi.
Le symbole “éclair” à l’intérieur d’un triangle sert à avertir l’utilisateur de la présence du courant à l’intérieur du l’appareil qui
pourrait constituer un risque.
Afin de minimiser les risques, ne pas ouvrir le boîtier ni ôter le dos de l’appareil. En case de panne, faites appel aux techniciens qualifiés pour les réparations. L’appareil ne renferme aucune pièce reparable par l’utilisateur.
Cet appareil a été conçu pour une tension d’alimentation de 230V ~ 50Hz. Débranchez la prise de courant quand on
prévoit de ne pas utiliser l’appareil pendant un certain temps.
Mettez l’appareil sous tension seulement après avoir vérifié que tous les raccordements soient corrects.
L’unité ne doit pas être exposée à l’humidité ou à la pluie.
L’appareil doit être gardé dans un endroit suffisamment ventilé. Ne le gardez jamais par exemple près des rideaux, sur un
tapis ou dans des meubles, tels qu’une bibliothèque.
L’unité ne doit pas être exposée à la lumière directe du soleil ou à des sources de chaleur.

23 Italiano
LOCALIZZAZIONE DEI CONTROLLI
1. Spaziatori per assemblaggio secondario
2. Viti per assemblaggio secondario
3. Display LCD
4. MIC (Microfono)
5. Spia BT
6. Tasto ANSWER/PROG./AMS (Accetta chiamate/Preimpostazione delle stazioni
radio/Memorizza stazioni radio automaticamente)
7. Tasto SKIP+
8. Tasto SKIP-
9. Tasti VOL+/VOL- (volume)
10.Tasto /FUNC. (Accensione/standby / Modalita Funzione)
11.Tasto SLEEP (timer sleep)
12.Tasto PRE.+/ALARM 2
13.Tasto PRE.-/ALARM 1
14.Tasto TIME SET/COOK TIMER (Impostazione ora/Timer)
15.Tasto SNOOZE/DIMMER (Snooze/Illuminazione del display)
16. BATTERIA DI BACKUP
17.CAVO DI CORRENTE
18. ANTENNA FM
ISTRUZIONI DI MONTAGGIO
ATTENZIONE:
Fare attenzione che durante il montaggio la spina sia staccata.
• Estrarre tutti gli oggetti dall’ armadio pensile e togliere qualsiasi oggetto fragile
dagli armadi in vicinanza.
• Per il montaggio e necessario che l’ armadio pensile risponda ai requisiti se-
guenti:
• Spessore del suolo dell’ armadio da 16 mm a 20 mm.
• Il supporto per pareti dell’ armadio pensile deve essere stabile e ben avvitato
con al minimo 2 viti nella parete.
• Importante! Non montare l’ apparecchio al di sopra dei fornelli!
• Per il montaggio dell’ apparecchio, assicurarsi che ci sia una presa in vicinanza
della condotta d’ immissione.
• La presa deve essere raggiungibile, per poter estrarre velocemente la spina in
caso d’ emergenza.
• Importante! Collegare l’ apparecchio solo dopo il montaggio!
• L’ apparecchio non puo essere montato sotto armadi pensili che hanno come
profilo una bordatura luminosa.
• Per il montaggio e necessario quanto segue: Un trapano con punta 6 mm,
punta principale o chiodo, chiave di Allen, metro, nastro adesivo, forbici, oc-

24 Italiano
chiali di sicurezza.
Accessori di montaggio forniti
4 viti
4 spaziatori
1 modello punte
ATTENZIONE:
• Osservare le misure indicate nelle istruzioni di montaggio.
• Impiegare esclusivamente gli utensili per il montaggio acclusi alla fornitura.
Montaggio
1. Fermare il modello verso il basso alla mensola con del nastro adesivo. Servendosi di un maschio sbozzatore o di un chiodo bucare i punti di fissaggio ed evidenziare cosi i fori.
2. Rimuovere la sagoma e praticare i fori nell’armadio pensile.
3. Inserire i distanziatori nei fori previsti dell‘apparecchio.
NOTA:
Solo con il distanziatore e garantita una ventilazione sufficiente.
4. Abbassare le viti nei fori nell‘armadio.
5. Con le 4 viti e i distanziatori fissare la radio da cucina sul fondo dell’armadio.
6. Avvitare le viti manualmente con un CACCIAVITE.
ATTENZIONE:
Utilizzare una chiave e non un giravite elettrico.
MESSA IN FUNZIONE DELL’APPARECCHIO /INTRODUZIONE
Fare attenzione che l’apparecchio sia sufficientemente aerato!
• Se presente, rimuovere la pellicola protettiva dal display.
Alimentazione
Badare che la tensione di rete coincida con i dati sulla matricola. Collegare la spina di alimentazione in una presa installata correttamente.
Inserimento della batteria di riserva (Batteria non inclusa nella dotazione)
Durante un blackout o quando la spina di corrente viene estratta dalla presa elettrica, l’ora dell’orologio e della sveglia verranno persi. Per prevenire cio, inserisci
una batteria di riserva come segue.
1. Apri il vano batteria in basso. Ruota il coperchio del vano batteria verso
“OPEN”.
2. Inserisci una batteria a cellula di tipo CR 2025 3 V. Assicurati che la polarita sia
corretta (vedi il coperchio del vano batteria)!
3. Chiudi di nuovo il coperchio del vano batteria.

25 Italiano
AVVISO:
Non esporre le batterie a nessuna fonte di calore intense come ad esempio luce
solare diretta, fuoco o simili. C’e rischio di esplosione!
ATTENZIONE:
• Le batterie possono avere delle fuoriuscite e perdere dell’acido. Se il dispositivo
non e usato per un lungo periodo di tempo, rimuovi la batteria.
• Le batterie non appartengono ai rifiuti domestici. Smaltire le batterie usate presso gli appositi centri di raccolta o presso il rivenditore.
.Accendere / spegnere l’apparecchio (10)
• Accendi il dispositivo premendo il tasto FUNC.
• Per spegnere il dispositivo, tieni premuto il tasto FUNC
premuto per circa 3 secondi.
NOTA:
Dopo circa 20 minuti senza segnale o se il segnale e troppo basso, il dispositivo
passera in Standby automaticamente.
Selezionare la modalita di funzionamento (10) Quando il dispositivo e spento,
puoi passare dalla modalita radio e Bluetooth e viceversa premendo ripetutamente il tasto FUNC.
Impostazione dell’ora (24 h)
1. Tenere premuto il tasto TIME SET/COOK TIMER (14) per ca. 3 secondi. Apparira la notifica “24H” sul display.
2. Seleziona il formato orario con i tasti SKIP+/SKIP- (7/8).
NOTA:
“PM” apparira sul display nel pomeriggio nel formato di 12 ore.
3. Premi il tasto TIME SET/COOK TIMER per confermare. L’impostazione lampeggera sul display.
4. Regolare l’impostazione con i tasti SKIP+/SKIP- (7/8).
5. Premere il tasto TIME SET/COOK TIMER per conferma.
L’indicatore dei minuti lampeggia sul display.
6. Regolare l’impostazione con i tasti SKIP+/SKIP- (7/8).
7. Salvare l’impostazione dell’ora premendo nuovamente il tasto TIME SET/
COOK TIMER.
Regolazione del volume
Usare i tasti VOL+/VOL- (9) per regolare il volume.
Luminosita del display
Puoi usare il tasto SNOOZE/DIMMER (15) per regolare la luminosita del display e
della striscia di luce sotto i tasti di funzionamento.

26 Italiano
COME ASCOLTARE LA RADIO
Ricerca di stazioni
1. Usa il tasto /FUNC. (10) per selezionare la modalita radio.
2. Sintonizzarsi sulle stazioni desiderate con i tasti SKIP+ (7) e SKIP- (8). Te-
nendo premuti i tasti, il dispositivo avviera la scansione finché non arriva alla
prossima stazione radio. Il display indichera la rispettiva frequenza.
3. Se c’e un’interferenza sulla stazione ricevuta, provare a migliorare la ricezio-
ne ruotando, piegando o tirando l’intera antenna.
Come preimpostare le stazioni radio
L’apparecchio puo preimpostare fino a 30 stazioni radio. Per preimpostare una
stazione, seguire i seguenti passaggi:
1. Cercare una stazione come descritto in “Ricerca di stazioni”.
2. Premere il tasto ANSWER/PROG/AMS (6). Il display mostrera PROGRAM e
la rispettiva posizione di preimpostazione iniziera a lampeggiare.
3. Usare i tasti PRE.+/ALARM 2 (12) e PRE.-/ALARM 1 (13) per scegliere la po-
sizione di preimpostazione per la stazione corrispondente.
4. Premere nuovamente il tasto ANSWER/PROG/AMS. La stazione sara preim-
postata. L’indicatore di PROGRAM e la posizione di preimpostazione scom-
pariranno.
Richiamare le stazioni radio preimpostate
Usa i tasti PRE+/ALARM 2 (12) e PRE-/ALARM 1 (13) per selezionare le stazioni
memorizzate.
Scansione automatica delle stazioni
Importante! Qualsiasi stazione radio memorizzata in precedenza verra sovrascritta.
Quando si tiene premuto il tasto ANSWER/PROG/AMS (6) per ca. 3 secondi, l’apparecchio iniziera la ricerca automatica delle stazioni cercando sull’intera gamma
di frequenza per le stazioni. Le stazioni trovate saranno salvate su posizioni di
preimpostazione da 1 a 30 in ordine ascendente.
NOTA:
L’ordine non puo essere modificato dopo essere stato impostato.
FUNZIONE BLUETOOTH

27 Italiano
Logging su dispositivi (Accoppiamento)
Prima di poter ascoltare la musica tramite l’apparecchio, e necessario accoppiare
gli apparecchi.
1. Controllare che la funzione Bluetooth sia attivata nellettore (per es. il telefono
cellulare). A questo scopo, fare riferimento al manuale istruzioni del dispositi-
vo di riproduzione.
2. Premere il tasto /FUNC (10) ripetutamente, finché “bt” non compare sul di-
splay. La spia BT (5) lampeggia.
Questo segnala che il dispositivo e in modalita unione.
3. Selezionare il menu Bluetooth nel lettore e registrare l’apparecchio nel letto-
re. A questo scopo, fare riferimento al manuale istruzioni del lettore. Il disposi-
tivo “CLR-725BT” viene visualizzato nel lettore come selezionato.
NOTA:
3. E possibile collegare solo un dispositivo di riproduzione alla volta ad un di-
spositivo. Se il dispositivo è già connesso ad un altro dispositivo di riproduzio-
ne, il dispositivo non mostrerà il menu di selezione BT.
4. Inserire la password “0000” nel lettore a seconda dei produttori dell’apparec-
chio, del modello e della versione software.
Se l’unione e stata effettuata con successo, si puo udire un bip e la spia BT si accendera. Per la procedura fate riferimento al manuale dell’utente dell’unita di riproduzione. Se possibile, regolate il volume dell’unita esterna ad un livello comodo.
NOTA:
• A seconda dei produttori, e necessario effettuare nuovamente la registrazio-
ne (PAIRING) prima di collegare gli apparecchi.
• In caso di problemi con la registrazione di un dispositivo di riproduzione, di-
sattivare la funzione WiFi-/ e mobile del dispositivo di riproduzione.
• La compatibilita Bluetooth non puo essere garantita per apparecchi (ad es.
telefoni cellulari) messi in commercio in futuro.
• Per garantire un collegamento ottimale, controllare che la batteria del lettore
sia completamente carica.
• Alcune marche di telefoni cellulati presentano il modo risparmio energetico,
disattivare il modo risparmio energetico per evitare eventuali problemi duran-
te il trasferimento di dati tramite Bluetooth.
• Per trasferire i dati audio, Bluetooth deve rimanere attivato sul lettore. Fare
riferimento al manuale istruzioni del lettore.
• Se un telefono cellulare sul quale si sta riproducendo musica riceve una chia-
mata, la musica viene interrotta.
Premi il tasto ANSWER/PROG/AMS (6) per ricevere la chiamata. L’audio sara
emesso attraverso la radio.

28 Italiano
Parlare attraverso il microfono o trasferire la chiamata al telefono mobile. Durante
questa operazione, far riferimento alla dissolvenza sul display del telefono cellulare. Dopo che hai terminato la chiamata, riprenderà la riproduzione.
Descrizione dei tasti operativi Bluetooth
NOTA:
Il dispositivo di riproduzione Bluetooth deve supportare le seguenti funzioni.
ANSWER/PROG/AMS (6)
E possibile mettere in pausa o continuare la riproduzione musicale. Premere nuovamente per continuare la riproduzione.
Se viene ricevuta una chiamata durante la riproduzione musicale, puoi usare questo pulsante per ricevere la chiamata.
IMPOSTARE LA SVEGLIA (24 H) (NEL MODO STANDBY)
E possibile impostare fino a due sveglie. Proseguire nel modo:
1. Tenere premuto il tasto ALARM1 o ALARM2, (13/12) per ca. 3 secondi.
“ALARM 1” o “ALARM 2” lampeggerà sul display e apparirà il segnale della sveglia.
• Puoi ora eseguire le impostazioni per il segnale di sveglia, le ore e i minuti pre-
mendo i tasti SKIP+ (7) e SKIP- (8) in successione. Per quanto riguarda la sveglia, e possibile scegliere tra buzzer ( BELL) e radio ( FN).
BELL= Al raggiungimento dell’orario della sveglia, sara emesso un buzzer. Il volume aumenta lentamente.
FN= Al raggiungimento dell’orario della sveglia, l’ultima stazione radio preimpostata sarà riprodotta. Il volume aumenta lentamente.
• Confermare l’immissione con il tasto ALARM1 o ALARM2.
Funzione Snooze
La sveglia automatica puo essere disattivata tramite il tasto SNOOZE/DIMMER
(15) per ca. 9 minuti.
Disattivazione del buzzer
Per spegnere la sveglia fino al giorno seguente, premere il tasto FUNC.
NOTA:
Se sei stato svegliato dalla radio, il volume sara impostato secondo l’ultima impostazione dopo aver premuto il tasto /FUNC. Premi il tasto /FUNC di nuovo per
spegnere la sveglia fino al giorno successivo.
Disattivazione della sveglia
Per disattivare la sveglia completamente, selezionare la modalita di standby e
premere il tasto ALARM 1 o ALARM 2 (13/12)

29 Italiano
REGOLAZIONE DEL VOLUME
Premere TASTO VOLUME+ (5)/VOLUME- (4) sull’unità o (3)/(7) sul telecomando
per aumentare o diminuire il volume. Premere TASTO MUTE (6) o (12)sul telecomando per disattivare l’audio. Premerlo di nuovo per riattivarlo.
SPEGNIMENTO A TEMPO
E possibile usare la funzione per spegnimento ritardato con funzione radio. L’unita si spegne automaticamente al raggiungimento delliorario selezionato.
• Selezionare l’orario dopo il quale l’unita si spegne premendo ripetutamente il ta-
sto SLEEP (11). E possibile effettuare le seguenti selezioni: 120, 110, 100, 90, 80,
70, 60, 50, 40, 30, 20 e 10 minuti. OFF = la funzione e disattivata.
Puoi usare questa funzione, per esempio, per mantenere una panoramica di un
tempo di cottura specifico. Puoi scegliere tra 180 a 10 minuti in scatti di 10 minuti
ognuno. Il tempo minore disponibile e 5 minuti.
1. Premi il tasto TIME SET/COOK TIMER (14) ripetutamente. “C” e il tempo impostato appariranno sul display, a partire da “C 180”.
2. Non appena il tempo impostato e trascorso, sentirai un suono. Premi un tasto
qualsiasi per spegnere il segnale audio.
NOTA:
Per interrompere la funzione in anticipo, premi il tasto TIME SET/COOK TIMER
fino a che “OFF” appare sul display.
II marchio riportato sul prodotto e sulla sua documentazione indica che il prodotto non deve essere smaltito can altri rifiuti
domestici al termine del ciclo di vita. Per evitare eventuali danni all'ambiente o alla salute causati dall'inopportuno smaltimento dei rifiuti, si invita l'utente a separare questo prodotto da altri tipi di rifiuti e di riciclarlo in maniera responsabile per
favorire il riutilizzo sostenibile delle risorse materiali. Gli utenti domestici sono invitati a contattare il rivenditore presso il
quale e stato acquistato il prodotto a l'ufficio locale preposto per tutte le informazioni relative alla raccolta differenziata e
al riciclaggio per questo tipo di prodotto. Gli utenti aziendali sono invitati a contattare il proprio fornitore e verificare i termini e le condizioni del contratto di acquisto. Questo prodotto non deve essere smaltito unitamente ad altri rifiuti commerciali.
CORRETTO SMALTIMENTO DEL PRODOTTO
(rifiuti elettrici ed elettronici)
ATTENZIONE
Il punto esclamativo all’interno di un triangolo avverte l’utente che il libretto d’istruzioni contiene delle importanti istruzioni per l’uso e la manutenzione.
Il simbolo del fulmine all’interno di un triangolo avverte l’utente della presenza di una pericolosa tensione all’interno
dell’apparecchio.
Per ridurre i rischi di scosse elettriche, non aprire l’apparecchio. L’apparecchio non contiene parti riparabili dall’utente.
In caso di guasto fare appello a tecnici qualificati per le riparazioni.
Questo apparecchio è stato progettato per funzionare a 230V ~ 50Hz. Se non si intende utilizzare l’apparecchio per un
lungo periodo di tempo, rimuovere la spina dalla presa di corrente.
Utilizzare l’apparecchio solo dopo aver verificato che tutte le connessioni siano state eseguite correttamente.
Non esporre l’apparecchio alla pioggia o all’umidità.
Posizionare l’apparecchio in un luogo sufficientemente ventilato. Evitare di sistemarlo vicino a tende, sul tappeto o
all’interno di un mobile quale, ad esempio, una libreria.
Non esporre l’apparecchio alla luce diretta del sole o a fonti di calore.

30 Nederlands
LOCATIE VAN DE BESTURINGSELEMENTEN
Afstandhouders voor sub - montage
Schroeven voor sub - montage
LCD scherm
MIC (Microfoon)
BT indicatielampje
ANSWER/PROG./AMS -toets (Oproep beantwoorden/ voorinstellen van ra-
dio stations/Radiostations automatisch opslaan)
SKIP+ toets
SKIP- toets
VOL+/VOL- toetsen (volume)
FUNC. toets (aan/standby / Functiemodus)
SLEEP toets (sleep timer)
PRE.+/ALARM 2 toets
PRE.-/ALARM 1 toets
TIME SET/COOK TIMER toets (tijdinstelling/Timer)
SNOOZE/DIMMER toets (Snooze/schermverlichting)
RESERVEBATTERJ
AC POWER CORD
FM ANTENNA
MONTAGE-INSTRUCTIES
LET OP:
Let op dat de stroomtoevoer tijdens de montage onderbroken is!
• Verwijder alle voorwerpen uit de bovenkast en alle breekbare voorwerpen
uit de aangrenzende kasten.
Voor de montage moet de bovenkast aan de volgende voorwaarden voldoen:
dikte van de kastbodem: 16 mm tot 20 mm.
• De wandophanging van de kast moet stabiel en met minimaal 2 schroeven
vast in de wand verankerd zijn.
• Belangrijk! Monteer het apparaat niet boven een kookplaats!
• Voor de montage van het apparaat moet gewaarborgd zijn dat een contactdoos binnen reikwijdte van de voedingskabel voorhanden is.
• De contactdoos moet goed toegankelijk zijn, zodat u in een noodgeval snel de
steker uit de contactdoos kunt trekken.
• Belangrijk! Sluit het apparaat pas na de montage aan!
• Het apparaat kan niet onder hangkasten worden gemonteerd die naar beneden met een lichtlijst afsluiten.

31 Nederlands
• Voor de montage heeft u mogelijk de volgende hulpmiddelen nodig: Een
boormachine met 6 mm boortjes, schroefboor of spijkers, inbussleutel,
meetlint, plakband, schaar, veiligheidsbril.
Bijgeleverde montageaccessoires
4 Schroeven
4 Afstandhouders
1 Boorsjabloon
LET OP:
Houd de in de montagehandleiding vermelde maten aan.
Gebruik uitsluitend het bijgeleverde montagetoebehoren.
Montage
1. Plak de sjabloon stevig vast met plakband onder de plank. Steek met behulp
van een voorboor of spijker door de kruisen langs de bevestigingspunten en
kenmerk op deze wijze de gaten.
2. Verwijder de sjabloon en boor de gaten in de hangkast.
3. Steek de afstandshouder in de dienovereenkomstige gaten aan het apparaat.
OPMERKING:
Alléén met afstandhouders is voldoende ventilatie
mogelijk.
4. Draai de schroeven in de gaten van de kast.
5. Monteer de keukenradio met behulp van de 4 schroeven en de afstandhouders in de kastbodem.
6. Draai de schroeven handvast vast met een inbussleutel.
LET OP:
Gebruik een moersleutel en geen elektrische schroevendraaier.
INGEBRUIKNAME VAN HET APPARAAT/INLEIDING
Let op een goede beluchting van het apparaat!
Verwijder, indien van toepassing, de beschermende folie van het scherm.
Stroomtoevoer
Let op dat de netspanning overeenstemt met de gegevens op het typeplaatje.
Steek de stekker in een correct geinstalleerd stopcontact.
De back-up batterij invoeren
(Batterij niet bij levering inbegrepen)

32 Nederlands
Tijdens een stroomstoring of als de stekker uit het stopcontact wordt getrokken,
zullen de klok- en alarmtijden verloren gaan. Om dit te voorkomen, dient er als
volgt een back-up batterij te worden ingevoerd.
1. Open het batterijcompartiment aan de onderkant. Draai het klepje van het
batterijcompartiment in de richting van “OPEN”.
2. Voer een knoopcelbatterij van het type CR 2025 3V in. Controleer op de juiste polariteit (zie klep batterijcompartiment)!
3. Sluit het batterijcompartiment.
WAARSCHUWING:
Stel de batterijen niet bloot aan intense warmtebronne, zoals zonlicht, vuur en
dergelijke. Er bestaat een risico voor explosie!
LET OP:
• Batterijen kunnen lekken en accuzuur verliezen. Als het apparaat voor een langere tijd niet wordt gebruikt, dient de batterij te worden verwijderd.
Lege batterijen horen niet in het huisafval. Lever gebruikte batterijen bij de aangewezen inzamelpunten of bij de dealer in.
Apparaat in-/uitschakelen (10)
Schakel het apparaat in door op de FUNC toets te drukken.
Houd de /FUNC toets ongeveer 3 seconden ingedrukt om het apparaat uit te
schakelen.
OPMERKING:
Na 20 minuten zonder signaal, of als het signaal te zwak is, zal het apparaat automatisch overschakelen naar Stand-by.
Selecteer de werkingsmodus (10)
Als het apparaat is uitgeschakeld, kunt u schakelen tussen de radio- en Bluetooth-modus door herhaaldelijk op de FUNC. toets te drukken.
De kloktijd instellen (24 h)
1. Houd de TIME SET/COOK TIMER toets (14) ingedrukt voor ca. 3 seconden.
De melding “24H” verschijnt op het display.
2. Selecteer het tijdformaat met de SKIP+/SKIP- toetsen (7/8).
OPMERKING:
“PM” staat voor de middag, wanneer is gekozen voor de 12-uur aanduiding.
3. Druk op de TIME SET/COOK TIMER toets om te bevestigen. De uurinstelling
zal gaan knipperen op het display.

33 Nederlands
4. Pas de instelling aan met de SKIP+/SKIP- toetsen (7/8).
5. Druk op de TIME SET/COOK TIMER toets voor bevestiging. De minuutindicator zal gaan knipperen op het scherm.
6. Pas de instelling aan met de SKIP+/SKIP- toetsen (7/8).
7. Sla de tijdinstelling op door nogmaals op de TIME SET/ COOK TIMER te
drukken. Het volume instellen Gebruik de VOL+/VOL- toetsen (9) om het volume in te stellen.
Schermhelderheid
U kunt de SNOOZE/DIMMER toets (15) gebruiken om de helderheid van het
scherm en van de lichtstrip onder de bedieningsknoppen aan te passen.
LUISTEREN NAAR DE RADIO
Stations scannen
1. Gebruik de FUNC. toets (10) om de radiomodus te selecteren.
2. Stem af op de gewenste stations met de SKIP+ (7) en SKIP- (8) toets. Door
één van deze toetsen ingedrukt te houden, zal het apparaat beginnen met scannen totdat het volgende radiostation gevonden is. De respectievelijke frequentie
zal op het scherm worden getoond.
3. In geval van interferentie op het ontvangen station, dient u te proberen om de
ontvangst te verbeteren, door de draadantenne te draaien of op- of af te wikkelen.
Voorinstellen radiostations
Het apparaat kan tot 30 radiostations voorinstellen. Volg de stappen hieronder,
voor het voorinstellen van een station:
1. Zoek naar een station zoals omschreven onder “Stations scannen”.
2. Druk op de ANSWER/PROG/AMS toets (6). Het scherm zal PROGRAM to-
nen en de respectievelijke voorinstellocatie zal gaan knipperen.
3. Gebruik de PRE.+/ALARM 2 (12) en PRE.-/ALARM 1 (13), om de gewenste
voorinstellocatie te selecteren voor het overeenkomstige station.
4. Druk nogmaals op de ANSWER/PROG/AMS toets. Het station is nu vooringesteld. De PROGRAM indicator en de voorinstellocatie zullen verdwijnen.Vooringestelde radiostations oproepen Gebruik de PRE+/ALARM 2 (12) en
PRE-/ALARM 1 (13) toetsen om de geheugenlocaties te selecteren.
Automatisch scannen station
Belangrijk! Voorheen opgeslagen radiostations worden overgeschreven.
Wanneer de ANSWER/PROG/AMS toets (6) voor ca.
3 seconden wordt ingedrukt, zal het apparaat automatisch starten met het scannen naar radiostations op alle frequentiebereiken.
De gevonden stations zullen op volgorde worden opgeslagen op de voorinstellocaties 1-30.

34 Nederlands
OPMERKING:
De volgorde kan niet meer worden gewijzigd, zodra deze is ingesteld.
BLUETOOTH-FUNCTIE
Op apparaten inloggen (Pairing)
Voordat u via het apparaat naar muziek kunt luisteren dient u de luidsprekers te
pairen.
1. Zorg ervoor dat de Bluetooth-functie is geactiveerd in uw speler (bijv. mobiele
telefoon). Raadpleeg hiervoor de handleiding van uw speler.
Druk herhaaldelijk op de FUNC toets (10) totdat “bt” op de display wordt getoond. Het BT indicatielampje (5) knippert. Dit geeft aan dat het apparaat in de
koppelmodus is.
3. Kies het Bluetooth menu op uw speler en registreer het apparaat op uw spe-
ler. Gebruik hiervoor de gebruiksaanwijzing van uw speler. Het apparaat “CLR725BT” wordt op uw speler als keuze weergegeven.
OPMERKING:
U kunt gelijktijdig slechts één afspeelapparaat op het apparaat aansluiten. Als
het apparaat al op een ander afspeelapparaat aangesloten is, wordt het apparaat niet weergegeven in het BT-keuzemenu.
4. Geef nu het wachtwoord “0000” in op uw speler, hoe, is afhankelijk van de fa-
brikant, het model en de softwareversie van het apparaat.
Als het koppelen succesvol is voltooid, klinkt er een piep en licht het BT indicatielampje op. Raadpleeg de gebruikershandleiding van het afspeelapparaat voor
de verdere procedure. Pas het volume van het externe apparaat naar een aangenaam niveau aan.
OPMERKING:
• Afhankelijk van de fabrikant van het apparaat dient u de registratie (PAIRING)
tussen de apparaten opnieuw uit te voeren.
• Als er problemen zijn met het registreren van het afspeelapparaat, de WiFi-/
en mobiele datafunctie op uw afspeelapparaat uitschakelen.
• Bluetooth ondersteuning kan niet worden gegarandeerd voor apparaten (bijv.
mobiele telefoons) die in de toekomst op de markt komen.
• Om een optimale verbinding te garanderen dient uervoor te zorgen dat de batterij van uw speler volledig is opgeladen.
• Sommige merken van mobiele telefoons hebben een energie spaarstand.

35 Nederlands
Schakel de energie spaarstand uit, dit kan namelijk voor problemen zorgen tijdens de gegevensoverdracht via Bluetooth.
• Om audiogegevens te kunnen sturen, dient Bluetooth ingeschakeld te blijven
op uw speler. Bestudeer de gebruiksaanwijzing van uw speler.
• Als een mobiele telefoon van waaraf u muziek afspeelt een gesprek ontvangt
wordt de muziek onderbroken.
Druk op de ANSWER/PROG/AMS toets (6) om de oproep te ontvangen. Het geluid wordt afgespeeld via de radio. Spreek in de microfoon of schakel het
gesprek door naar uw mobiele telefoon. Verwijs daarbij naar de fade-in op het
scherm van uw mobiele telefoon. Nadat u het telefoongesprek hebt beëindigd,
zal het afspelen worden hervat.
Beschrijving van de functietoetsen voor Bluetooth OPMERKING:
Uw Bluetooth-afspeelapparaat moet ondersteuning bieden voor de onderstaande functies.
• ANSWER/PROG/AMS (6)
Muziekweergave onderbreken en hervatten. Druk weer op de toets om de weergave te hervatten.
Als u een oproep ontvangt tijdens het afspelen van muziek, kunt u deze knop
gebruiken om de oproep te ontvangen.
INSTELLEN VAN DE ALARMTIJD (24 H) (IN STANDBY-MODUS)
U kunt tot twee alarmen instellen. Doe dit als volgt:
Houd de ALARM1 of ALARM2 toets (13/12) ingedrukt voor ca. 3 seconden.
“ALARM 1” of “ALARM 2” toetsen op het display en het alarmsignaal wordt getoond.
U kunt nu de instellingen voor het alarmsignaal, de uren en de minuten uitvoe-
ren, door achtereenvolgend op de SKIP+ (7) en SKIP- (8) toetsen te drukken.
Wat betreft het alarm kunt u kiezen tussen de zoemer (BELL ) en de radio ( FN).
BELL= Zodra de alarmtijd is bereikt, zal er een zoemer klinken. Het volume zal
geleidelijk oplopen.
FN= Zodra de alarmtijd is bereikt, zal het laatste vooringestelde radiostation
klinken. Het volume zal geleidelijk oplopen.
Bevestig elke invoer met de ALARM1 of ALARM 2 toets.
Snooze functie
Het automatische alarm kan voor ca. 9 minuten worden uitgeschakeld door de
SNOOZE/DIMMER toets (15) te gebruiken.
De zoemer uitschakelen
Om het alarm tot de volgende dag uit te schakelen, drukt u op de toets FUNC.
OPMERKING:

36 Nederlands
INSLAAPFUNCTIE
U kunt de vertraagd afsluiten functie gebruiken terwijl de radio in gebruik is. Het
apparaat wordt automatisch uitgeschakeld als de geselecteerde tijd is bereikt.
Selecteer de tijd waarna het apparaat uitschakelt door herhaaldelijk op de
SLEEP toets (11) te drukken. De volgende selecties zijn mogelijk: 120, 110, 100,
90, 80, 70, 60, 50, 40, 30, 20 en 10 minuten. OFF = Functie is uitgeschakeld.
Timer-functie
U kunt deze functie gebruiken om bijvoorbeeld een specifieke kooktijd in te stellen. U kunt een keuze maken uit 180 tot 10 minuten in stappen van 10. De kortste beschikbare tijd is 5 minuten.
1. Druk herhaaldelijk op de TIME SET/COOK TIMER toets (14). “C” en de ingestelde tijd verschijnen op het display, te beginnen met “C 180”.
2. Zodra de ingestelde tijd is verstreken, klinkt er een signaaltoon. Druk op een
willekeurige toets om de signaaltoon uit te schakelen.
OPMERKING:
Om de functie voortijds te onderbreken, dient u op de TIME SET/COOK TIMER
toets te drukken totdat “OFF” wordt getoond op het display.
TECHNISCHE SPECIFICATIES
AC: 230V ~ 50 Hz
FM: 87,5- 108 MHz
Speaker
Luidsprekeruitgang: 1 Watt RMS.
General
Maximaal vermogen BT < 4 dBm (2.5 mW).
Dit symbool dat staat weergegeven op het product en in de documentatie ervan, duidt erop dat het product niet kan worden weggegooid met het gewone huisvuil aan het einde van de levensduur. Om schade aan het milieu of aan de gezondheid door ongepaste afvalverwijdering te voorkomen, dient de gebruiker dit product te scheiden van andere soorten afval op verantwoorde wijze ter
bevordering van duurzaam hergebruik van de materiële hulpbronnen. De thuisgebruiker dient contact op te nemen met de verkoper
van het apparaat of met de lokale gemeente voor informatie met betrekking tot het scheiden en recyclen van dit type product. Zakelijke gebruikers dienen contact op te nemen met hun leverancier en de algemene voorwaarden van de verkoopovereenkomst te
raadplegen. Dit product dient niet te worden gemengd met ander bedrijfsafval voor de verwijdering.
CORRECTE AFVALVERWERKING VAN HET PRODUCT
(elektrisch en elektronisch afval)
WAARSCHUWING
Het uitroepteken in een gelijkzijdige driehoek is bedoeld om de gebruiker erop attent te maken dat de gebruikershandleiding belangrijke instructies
bevat voor het gebruik en het onderhoud.
De bliksemschicht in een gelijkzijdige driehoek is bedoeld om de gebruiker te waarschuwen voor de aanwezigheid van gevaarlijk e spanning binnen in
het apparaat.
Om het risico op elektrische schokken te reduceren, dient het apparaat niet te worden geopend. Het apparaat bevat geen onderdelen die gerepareerd
kunnen worden door de gebruiker. In het geval van een defect dient contact opgenomen te worden met een gekwalificeerde techni cus voor de reparatie.
Dit apparaat is ontworpen om te werken op 230v~ 50Hz. Als het apparaat voor een langere tijd niet gebruikt gaat worden, dient de stekker uit het stopcontact te worden gehaald.
Stel het apparaat niet bloot aan regen of vocht.
Gebruik het apparaat uitsluitend nadat is gecontroleerd dat alle aansluitingen correct zijn uitgevoerd.
Plaats het apparaat op een voldoende geventileerde plek. Plaats het apparaat niet in de buurt van gordijnen, op het tapijt of in in een stuk meubilair,
zoals bijvoorbeeld een boekenkast.
Stel het apparaat niet bloot aan direct zonlicht of aan warmtebronnen.

37 Čeština
POPIS OVLÁDACÍCH PRVKŮ
Distanční sloupky pro sekundární montáž
Šrouby pro sekundární montáž
LCD displej
MIC (mikrofon)
BT indikátor
Tlačítko ODPOVĚĎ / PROG. / AMS (Přijímat hovory / Předvolby Rozhlasové sta-
nice / Uložte rozhlasové stanice Automaticky)
Tlačítko SKIP +
Tlačítko SKIP
tlačítek VOL + / VOL- (hlasitost)
Klávesa 10 / FUNC. (Režim zapnutí / pohotovostní režim / funkční režim)
Tlačítko SLEEP (časovač vypnutí)
Tlačítko PRE. + / ALARM 2
Tlačítko PRE .- / ALARM 1
Tlačítko TIME SET / COOK TIMER
Tlačítko SNOOZE / DIMMER (Snooze / Illumination Zobrazit)
Chcete-li přístroj provozovat pomocí dálkového ovládání, namiřte dálkový ovladač na
čidlo dálkového ovládání na čelním panelu přístroje a stiskněte příslušné tlačítko na
dálkovém ovladači. Dálkové ovládání nejlépe funguje ze vzdálenosti do 6~7 metrů od
čelního panelu a z úhlu 30 stupňů. Činnost dálkového ovládání mohou ovlivňovat
ostré sluneční světlo či světelné podmínky v místnosti. Pokud dálkový ovladač nefunguje řádně, nebo zcela přestane fungovat, nejprve zkuste vyměnit baterie v ovladači.
Pak snižte světelné podmínky v místnosti.
LADĚNÍ ROZHLASOVÝCH STANIC
Dodávané příslušenství
4 šrouby
4 podložky
1 šablona
POZOR:
Dodržujte rozměry uvedené v montážních pokynech.
Používejte pouze dodané instalační příslušenství.
Šablonu pevně přilepte na polici pomocí lepicí pásky. Pomocí hřebíku propíchněte
kříže v bodech připojení a použijte ho k označení otvorů.
Vyjměte šablonu a vyvrtejte otvory.
Vložte rozpěrku do otvorů na zařízení.
POZNÁMKA:
Dostatečné větrání je zaručeno pouze pomocí rozpěrky.
ašroubujte šrouby do otvorů

38 Čeština
Pomocí 4 šroubů a rozpěrek připevněte kuchyňské rádio na spodní část skříňky.
Šrouby utáhněte rukou imbusovým klíčem.
UPOZORNĚNÍ:
Používejte imbusový klíč, ne elektrický šroubovák.
AC) PROVOZ
Ujistěte se, že je zařízení dostatečně větrané!
Pokud je to možné, odstraňte ochrannou fólii z displeje.
Zdroj napájení
Ujistěte se, že síťové napětí odpovídá údajům na typovém štítku. Zapojte napájecí
zástrčku do správně nainstalované zásuvky.
Vložení záložní baterie (Baterie není součástí dodávky)
Během výpadku napájení nebo při vytažení zástrčky ze zásuvky dojde ke ztrátě času
a času budíku. Chcete-li tomu zabránit, vložte baterii pro opakované napájení
následujícím způsobem.
Otevřete přihrádku na baterie na spodní straně. Víko přihrádky na baterie otočte ve
směru „open“.
•Vložte knoflíkovou baterii typu CR 2025 3 V. Zajistěte správnou polaritu (viz víko
přihrádky na baterie)!
•Znovu uzavřete prostor pro baterie
VAROVÁNÍ:
Baterie nesmí být vystaveny nadměrnému teplu, jako je sluneční světlo, oheň nebo
podobně. Hrozí nebezpečí výbuchu!
POZOR:
Baterie mohou vytéct. Pokud se zařízení nepoužívá delší dobu, vyjměte baterie.
Baterie nepatří do domovního odpadu. Vybité baterie zlikvidujte na určených
sběrných místech nebo u prodejce.
ZAPNUTÍ / VYPNUTÍ ZAŘÍZENÍ
Zapněte zařízení stisknutím tlačítka POWER / FUNC. [10]
• Chcete-li zařízení vypnout, podržte tlačítko POWER / FUNC stisknuté asi 3 sekundy.
POZNÁMKA:
Přibližně po 20 minutách bez signálu nebo pokud je signál příliš nízký, se zařízení
automaticky přepne do pohotovostního režimu.
VÝBĚR PROVOZNÍHO REŽIMU
• Když je zařízení vypnuto, můžete přepínat mezi režimem rádia a režimem Bluetooth
stisknutím tlačítka POWER / FUNC. Tlačítko opakovaně. [10]
NASTAVENÍ HODIN (24H)
• Podržte tlačítko TIME SET / COOK TIMER (14) po dobu 3 sec. Na displeji se
zobrazí upozornění „24H“.
Pomocí tlačítek SKIP + / SKIP- (7/8) vyberte formát času.
POZNÁMKA:
• „PM“ se zobrazí na displeji odpoledne s 12hodinovou indikací.

39 Čeština
• Potvrďte stisknutím tlačítka TIME SET / COOK TIMER.
• Na displeji bude blikat nastavení hodin.
• Upravte nastavení pomocí tlačítek SKIP + / SKIP- (7/8).
• Pro potvrzení stiskněte tlačítko TIME SET / COOK TIMER.
• Na displeji bude blikat indikátor minut.
• Upravte nastavení pomocí tlačítek SKIP + / SKIP- (7/8).
• Uložte nastavení času opětovným stisknutím tlačítka TIME SET / COOK TIMER.
NASTAVENÍ HLASITOSTI
Pomocí tlačítek VOL + / VOL- (9) upravte hlasitost.
JAS
Pomocí tlačítka SNOOZE / DIMMER (15) můžete upravit jas displeje a světelného
pruhu pod ovládacími tlačítky.
RÁDIO
Ruční vyhledávání stanice
• Pomocí tlačítka POWER / FUNC (10) vyberte režim rádia.
• Nalaďte požadované stanice tlačítky SKIP + (7) a SKIP- (8). Podržíte-li jedno z
tlačítek, zařízení začne skenovat, dokud nenajde další rozhlasová stanice. Na displeji
se zobrazí příslušná frekvence.
• Pokud na přijímané stanici dochází k rušení, zkuste zlepšit příjem otáčením,
vytáhnutím nebo zasunutím antény.
Přednastavení rozhlasových stanic
Zařízení může přednastavit až 30 rozhlasových stanic. Chcete-li předvolit stanici,
postupujte takto:
• Vyhledejte stanici podle popisu v části „Skenování stanic“.
• Stiskněte tlačítko ANSWER / PROG / AMS (6). Na displeji se zobrazí PROGRAM a
příslušné přednastavené umístění začne blikat.
• Pomocí tlačítek PRE. + / ALARM 2 (12) a PRE .- / ALARM 1 (13) vyberte předvolené
umístění pro odpovídající stanici.
• Stiskněte znovu tlačítko ANSWER / PROG / AMS. Stanice bude přednastavena.
Indikátor PROGRAM a přednastavené umístění zmizí.
Vyvolání předvolených rozhlasových stanic
Pomocí tlačítek PRE + / ALARM 2 (12) a PRE- / ALARM 1 (13) vyberte umístění
paměti.
Automatické vyhledávání stanic
Důležité! Všechny dříve uložené rozhlasové stanice budou přepsány.
Při přidržení tlačítka ANSWER / PROG / AMS (6) po dobu cca. Po 3 sekundách
zařízení spustí automatické vyhledávání stanic a automaticky vyhledá stanice v celém
frekvenčním rozsahu. Nalezené stanice budou uloženy na předvolených místech 1-30
ve vzestupném pořadí.
POZNÁMKA:
Po nastavení nelze pořadí změnit.
FUNKCE BLUETOOTH
Přihlášení do zařízení (párování)

40 Čeština
Předtím, než posloucháte hudbu přes jednotku, musíte zařízení spárovat.
• Ujistěte se, že je v přehrávači aktivována funkce Bluetooth (např. Mobilní telefon).
Viz návod k obsluze vašeho přehrávače.
• Stiskněte opakovaně tlačítko POWER / FUNC (10), dokud se na displeji nezobrazí
„bt“. Kontrolka BT (5) bliká. To signalizuje, že zařízení je v režimu párování.
• V přehrávači vyberte nabídku Bluetooth a zaregistrujte zařízení v přehrávači. Viz
návod k obsluze vašeho přehrávače. Zařízení „CLR-725BT“ se v přehrávači zobrazí
jako výběr.
POZNÁMKA:
K zařízení lze připojit současně pouze jedno přehrávací zařízení. Pokud je zařízení již
připojeno k jinému přehrávacímu zařízení, nezobrazí se v nabídce výběru BT.
Nyní zadejte do přehrávače heslo „0000“, v závislosti na výrobcích zařízení, modelu a
verzi softwaru.
Pokud bylo párování úspěšně provedeno, uslyšíte pípnutí a rozsvítí se kontrolka BT.
Další postup naleznete v uživatelské příručce k přehrávací jednotce. Pokud je to
možné, upravte hlasitost externí jednotky na pohodlnou úroveň.
Popis ovládacích tlačítek pro Bluetooth
ODPOVĚĎ / PROG / AMS (6)
Můžete pozastavit a pokračovat v přehrávání hudby. Opětovným stisknutím
pokračujete v přehrávání. Pokud během přehrávání hudby přijmete telefonní hovor,
můžete k přijetí hovoru použít toto tlačítko.
NASTAVENÍ BUDÍKU (ALARMU) (24 H) (V STANDBY MODE)
Můžete nastavit až dva alarmy.
• Podržte stisknuté tlačítko ALARM1 nebo ALARM2 (13/12) po dobu 3 sec. Na displeji
bude blikat „ALARM 1“ nebo „ALARM 2“ a zobrazí se výstražný symbol.
• Postupným stisknutím tlačítek SKIP + (7) a SKIP- (8) můžete nyní provést nastavení
signálu budíku, hodin a minut. Pokud jde o alarm, můžete si vybrat mezi bzučákem
(BELL) a rádiem (FN).
BELL: Po dosažení času budíku zazní bzučák. Hlasitost se bude pomalu zvyšovat.
FN: Po dosažení času budíku zazní poslední předvolená rozhlasová stanice. Hlasitost
se bude pomalu zvyšovat.
• Každou položku potvrďte tlačítkem ALARM1 nebo ALARM2.
Funkce odložení buzení
Automatický alarm lze vypnout pomocí tlačítka SNOOZE / DIMMER (15) na 9 minut.
Vypnutí alarmu
Chcete-li vypnout budík do následujícího dne, stiskněte tlačítko POWER / FUNC.
POZNÁMKA:
Pokud vás probudilo rádio, hlasitost se nastaví na poslední nastavený hlasitost po
stisknutí tlačítka POWER / FUNC.
Opětovným stisknutím tlačítka POWER / FUNC vypnete budík až do následujícího
dne.
Deaktivace alarmu
Chcete-li alarm úplně deaktivovat, vyberte pohotovostní režim a stiskněte tlačítko
ALARM 1 nebo ALARM 2 (13/12).
Zpožděné vypnutí
Tuto funkci můžete použít pro zpožděné vypnutí při provozu rádiem. Po dosažení

41 Čeština
zvoleného času se jednotka automaticky vypne.
• Opakovaným stisknutím tlačítka SLEEP (11) vyberte čas, po kterém se jednotka
vypne. Lze provést následující výběry: 120, 110, 100, 90, 80, 70, 60, 50, 40, 30,
20 a 10 minut. OFF = funkce je deaktivována.
FUNKCE ČASOVAČE
Tuto funkci můžete použít například k udržení přehledu o konkrétním čase. Můžete si
vybrat mezi 180 až 10 minutami v krocích po 10. Krátký testovací čas, který máte k
dispozici, je 5 minut.
1. Stiskněte opakovaně tlačítko TIME SET / COOK TIMER (14).
Na displeji se zobrazí „C“ a nastavený čas, počínaje „C 180“.
2. Jakmile uplyne nastavený čas, zazní signální tón. Stisknutím libovolné klávesy
vypnete signální tón.
POZNÁMKA:
Chcete-li funkci zastavit v předstihu, stiskněte tlačítko TIME SET / COOK TI-MER,
dokud se na displeji nezobrazí „OFF“.
TECHNICKÉ ÚDAJE
Pásmo FM: 87.5 až 108 MHz
Tento symbol na výrobku, jeho příslušenství nebo obalu označuje, že při pozdější likvidaci výrobku (z jakýchkoliv důvodů) nesmí být s výrobkem zacházeno jako s domovním odpadem. Výrobek zlikvidujte jeho
předáním na sběrné místo pro likvidaci použitých elektrických a elektronických zařízení šetrnou
k životnímu prostředí. Zajištěním jejich správné likvidace zabráníte vzniku potenciálních rizik pro životní
prostředí a lidské zdraví, která by mohla vzniknout nesprávným zacházením s odpady. Kromě toho recyklace odpadových materiálů napomáhá udržení přírodních zdrojů surovin pro příští generace. Podrobné
informace k likvidaci tohoto výrobku šetrné k životnímu prostředí získáte u pracovníka ochrany životního
prostředí místního (městského nebo obvodního) úřadu nebo v prodejně, ve které jste výrobek zakoupili.
POKYNY PRO SPRÁVNOU LIKVIDACI VÝROBKU
(likvidaci použitých elektrických a elektronických zařízení)
UPOZORNĚNÍ
Vykřičník uvnitř trojúhelníka na zadní straně skříňky přístroje upozorňuje uživatele na důležité pokyny pro obsluhu a
ošetřování přístroje, uvedené v jeho doprovodné dokumentaci. čeština
Symbol blesku uvnitř trojúhelníka na zadní straně skříňky přístroje upozorňuje uživatele na existenci životu nebezpečného napětí na některých dílech uvnitř skříňky přístroje.
Nevyjímejte přístroj ze skříňky – riziko úrazu elektrickým proudem. Uvnitř skříňky nejsou díly, které by mohl opravit
nebo seřídit jeho uživatel bez odpovídajícího vybavení a kvalifikace. Bude-li přístroj vyžadovat seřízení nebo opravu
kontaktujte odborný servis. Zásahem do přístroje v době platnosti záruky se vystavujete riziku ztráty event. záručních
plnění.
Přístroj je konstruován pro napájení střídavým napětím 230 V / 50 Hz z elektrické sítě. Pokud nebudete přístroj delší
dobu používat odpojte jej od elektrické sítě vyjmutím vidlice síťového kabelu přístroje ze síťové zásuvky.
Chraňte přístroj před zmoknutím, postříkáním nebo politím jakoukoliv kapalinou.
Vypnutím přístroje není přístroj odpojen od elektrické sítě. Pro odpojení přístroje od elektrické sítě vyjměte vidlici síťového kabelu přístroje ze síťové zásuvky. Před zapnutím přístroje překontrolujte všechna připojení k přístroji.
Okolo přístroje ponechejte na všech stranách dostatečný volný prostor, nutný pro cirkulaci vzduchu okolo přístroje. Je
tak odváděno teplo vznikající během jeho provozu.
Neumísťujte přístroj na přímém slunci nebo v blízkosti zdrojů tepla. Vysokými teplotami je významně zkracována životnost elektronických dílů přístroje.

42 Slovenský
POPIS OVLÁDACÍCH PRVKOV
Dištančné podložky pre sekundárnu montáž
Skrutky pre sekundárnu montáž
LCD displej
MIC (mikrofón)
BT indikátor
Tlačidlo ANSWER / PROG. / AMS (Prijímanie hovorov / Predvoľba rozhlasové
stanice / Uložte rozhlasové stanice automaticky)
Tlačidlo SKIP +
Tlačidlo SKIP
tlačidiel VOL + / VOL- (hlasitosť)
Tlačidlo 10 / FUNC. (Režim zapnutia / pohotovostný režim / funkčný režim)
Tlačidlo SLEEP (časovač vypnutia)
Tlačidlo PRE. + / ALARM 2
Tlačidlo PRE .- / ALARM 1
Tlačidlo TIME SET / COOK TIMER
Tlačidlo SNOOZE / DIMMER (Odloženie / osvetlenie displeja display)
DODÁVANÉ PRÍSLUŠENSTVO
dodávané príslušenstvo
• 4 skrutky
• 4 podložky
• 1 šablóna
POZOR:
Dodržujte rozmery uvedené v montážnych pokynoch.
Používajte iba dodané inštalačné príslušenstvo.
Šablónu pevne prilepte na polici pomocou lepiacej pásky. Pomocou klinca prepichnite
kríža v bodoch pripojenia a použite ho na označenie otvorov.
Vyberte šablónu a vyvŕtajte otvory.
Vložte rozperu do otvorov na zariadení.
POZNÁMKA:
Dostatočné vetranie je zaručené iba pomocou rozperky.
Zaskrutkujte skrutky do otvorov
Pomocou 4 skrutiek a rozperiek pripevnite kuchynské rádio na spodnú časť skrinky.
Skrutky utiahnite rukou imbusovým kľúčom.
UPOZORNENIE:
Používajte imbusový kľúč, nie elektrický skrutkovač.

43 Slovenský
(AC) PREVÁDZKA
Uistite sa, že je zariadenie dostatočne vetrané!
Ak je to možné, odstráňte ochrannú fóliu z displeja.
Zdroj napájania
Uistite sa, že sieťové napätie zodpovedá údajom na typovom štítku. Zapojte napájací
zástrčku do správne nainštalovanej zásuvky.
Vloženie záložnej batérie (Batéria nie je súčasťou dodávky)
Počas výpadku napájania alebo pri vytiahnutí zástrčky zo zásuvky dôjde k strate času
a času budíka. Ak chcete tomu zabrániť, vložte batériu pre opakované napájanie na-
sledujúcim spôsobom.
• Otvorte priehradku na batérie na spodnej strane. Veko priehradky na batérie otočte
v smere "open".
• Vložte gombíkovú batériu typu CR 2025 3 V. Zaistite správnu polaritu (pozri veko
priehradky na batérie)!
• Znovu uzavrite priestor pre batérie
VAROVANIE:
Batérie nesmú byť vystavené nadmernému teplu, ako je slnečné svetlo, oheň alebo
podobne. Hrozí nebezpečenstvo výbuchu!
POZOR:
• Batérie môžu vytiecť. Ak sa zariadenie nepoužíva dlhšiu dobu, vyberte batérie.
• Batérie nepatria do domového odpadu. Vybité batérie zlikvidujte na určených
zberných miestach alebo u predajcu.
ZAPNUTIA / VYPNUTIA ZARIADENIA
Zapnite zariadenie stlačením tlačidla POWER / FUNC. [10]
• Ak chcete zariadenie vypnúť, podržte tlačidlo POWER / FUNC stlačené asi 3 sekundy.
POZNÁMKA:
Približne po 20 minútach bez signálu alebo ak je signál príliš nízky, sa zariadenie automaticky prepne do pohotovostného režimu.
VÝBER REŽIMU PREVÁDZKY
• Keď je zariadenie vypnuté, môžete prepínať medzi režimom rádia a režimom
Bluetooth stlačením tlačidla POWER / FUNC. Tlačidlo opakovane. [10]
NASTAVENIE HODÍN (24H)
• Podržte tlačidlo TIME SET / COOK TIMER (14) po dobu 3 sek. Na displeji sa zo-
brazí upozornenie "24H".
Pomocou tlačidiel SKIP + / SKIP- (7/8) vyberte formát času.
POZNÁMKA:
• "PM" sa zobrazí na displeji popoludnie s 12-hodinovom indikáciou.
• Potvrďte stlačením tlačidla TIME SET / COOK TIMER.
• Na displeji bude blikať nastavenie hodín.

44 Slovenský
• Upravte nastavenie pomocou tlačidiel SKIP + / SKIP- (7/8).
• Pre potvrdenie stlačte tlačidlo TIME SET / COOK TIMER.
• Na displeji bude blikať indikátor minút.
• Upravte nastavenie pomocou tlačidiel SKIP + / SKIP- (7/8).
Uložte nastavenie času opätovným stlačením tlačidla TIME SET / COOK TIMER.
NASTAVENIE HLASITOSTI
Pomocou tlačidiel VOL + / VOL- (9) upravte hlasitosť.
JAS
Pomocou tlačidla SNOOZE / DIMMER (15) môžete upraviť jas displeja a svetelného
pruhu pod ovládacími tlačidlami.
RÁDIO
Ručné vyhľadávanie stanice
• Pomocou tlačidla POWER / FUNC (10) vyberte režim rádia.
• Nalaďte požadovanej stanice tlačidlami SKIP + (7) a SKIP- (8). Ak podržíte jedno z
tlačidiel, zariadenie začne skenovať, kým nenájde ďalšie rozhlasová stanica. Na displeji sa zobrazí príslušná frekvencia.
• Pokiaľ na prijímané stanici dochádza k rušeniu, skúste zlepšiť príjem otáčaním,
vytiahnutím alebo zasunutím antény.
Prednastavenie rozhlasových staníc
Zariadenie môže prednastaviť až 30 rozhlasových staníc. Ak chcete predvoliť stanicu,
postupujte nasledovne:
• Vyhľadajte stanicu podľa popisu v časti "Skenovanie staníc".
• Stlačte tlačidlo ANSWER / PROG / AMS (6). Na displeji sa zobrazí PROGRAM a
príslušné prednastavené umiestnenie začne blikať.
• Pomocou tlačidiel PRE. + / ALARM 2 (12) a PRE .- / ALARM 1 (13) vyberte predvolené umiestnenie pre zodpovedajúcu stanicu.
• Znova stlačte tlačidlo ANSWER / PROG / AMS. Stanica bude prednastavená. In-
dikátor PROGRAM a prednastavené umiestnenie zmizne.
Vyvolanie predvolených rozhlasových staníc
Pomocou tlačidiel PRE + / ALARM 2 (12) a pre- / ALARM 1 (13) vyberte umiestnenie
pamäte.
Automatické vyhľadávanie staníc
Dôležité! Všetky skôr uložené rozhlasové stanice budú prepísané.
Pri pridržaní tlačidla ANSWER / PROG / AMS (6) po dobu cca. Po 3 sekundách zariadenia spustí automatické vyhľadávanie staníc a automaticky vyhľadá stanice v celom
frekvenčnom rozsahu. Nájdené stanice budú uložené na predvolených miestach 1-30
vo vzostupnom poradí.
POZNÁMKA:
Po nastavení nemožno poradí zmeniť.

45 Slovenský
FUNKCIE BLUETOOTH
Prihlásenie do zariadenia (párovanie)
Predtým, než počúvate hudbu cez jednotku, musíte zariadenie spárovať.
• Uistite sa, že je v prehrávači aktivovaná funkcia Bluetooth (napr. Mobilný telefón).
Pozri návod na použitie vášho prehrávača.
• Stláčaním POWER / FUNC (10), kým sa na displeji nezobrazí "bt". Kontrolka BT (5)
bliká. To signalizuje, že zariadenie je v režime párovania.
• V prehrávači vyberte ponuku Bluetooth a zaregistrujte zariadenia v prehrávači. Pozri
návod na použitie vášho prehrávača. Zariadenie "CLR-725BT" sa v prehrávači zobrazí ako výber.
POZNÁMKA:
K zariadeniu je možné pripojiť súčasne iba jedno prehrávacie zariadenie. Pokiaľ je zariadenie už pripojené k inému prehrávacej jednotke, nezobrazí sa v ponuke výberu
BT.
Teraz zadajte do prehrávača heslo "0000", v závislosti na výrobkoch zariadení, modelu a verziu softvéru.
Ak bolo párovanie úspešne vykonané, budete počuť pípnutie a rozsvieti sa kontrolka
BT. Ďalší postup nájdete v užívateľskej príručke k prehrávacie jednotke. Ak je to
možné, upravte hlasitosť externé jednotky na pohodlnú úroveň.
POPIS OVLÁDACÍCH TLAČIDIEL PRE BLUETOOTH
ODPOVEĎ / PROG / AMS (6)
Môžete pozastaviť a pokračovať v prehrávaní hudby. Opätovným stlačením pokračujete v prehrávaní. Ak počas prehrávania hudby prijmete telefónny hovor, môžete
k prijatie hovoru použiť toto tlačidlo.
NASTAVENIE BUDÍKA (ALARMU) (24 H) (V STANDBY MODE)
Môžete nastaviť až dva alarmy.
• Podržte stlačené tlačidlo ALARM1 alebo ALARM2 (13/12) po dobu 3 sek. Na displeji
bude blikať "ALARM 1" alebo "ALARM 2" a zobrazí sa výstražný symbol.
• Postupným stlačením tlačidiel SKIP + (7) a SKIP- (8) môžete teraz vykonať nastavenie signálu budíka, hodín a minút. Pokiaľ ide o alarm, môžete si vybrať medzi
bzučiakom (BELL) a rádiom (FN).
BELL: Po dosiahnutí času budíka zaznie bzučiak. Hlasitosť sa bude pomaly zvyšovať.
FN: Po dosiahnutí času budíka zaznie posledný predvolená rozhlasová stanica. Hlasi-
tosť sa bude pomaly zvyšovať.
• Každú položku potvrďte tlačidlom ALARM1 alebo ALARM2.
Funkcia odloženia budenia
Automatický alarm možné vypnúť pomocou tlačidla SNOOZE / DIMMER (15) na 9
minút.
vypnutie alarmu

46 Slovenský
Ak chcete vypnúť budík do nasledujúceho dňa, stlačte tlačidlo POWER / FUNC.
POZNÁMKA:
Ak vás prebudilo rádio, hlasitosť sa nastaví na posledný nastavený hlasitosť po
stlačení tlačidla POWER / FUNC.
Opätovným stlačením tlačidla POWER / FUNC vypnete budík až do nasledujúceho
dňa.
Deaktivácia alarmu
Ak chcete alarm úplne deaktivovať, vyberte pohotovostný režim a stlačte tlačidlo
ALARM 1 alebo ALARM 2 (13/12).
oneskorené vypnutie
Túto funkciu môžete použiť pre oneskorené vypnutie pri prevádzke rádiom. Po dosiahnutí zvoleného času sa jednotka automaticky vypne.
• Stláčaním SLEEP (11) vyberte čas, po ktorom sa jednotka vypne. Možno vykonať
nasledujúce výbery: 120, 110, 100, 90, 80, 70, 60, 50, 40, 30, 20 a 10 minút. OFF =
funkcia je deaktivovaná.
FUNKCIE ČASOVAČA
Túto funkciu môžete použiť napríklad na udržanie prehľadu o konkrétnom čase.
Môžete si vybrať medzi 180 až 10 minútami v krokoch po 10. Krátky testovací čas,
ktorý máte k dispozícii, je 5 minút.
1. Stlačte opakovane tlačidlo TIME SET / COOK TIMER (14).
Na displeji sa zobrazí "C" a nastavený čas, počínajúc "C 180".
2. Keď uplynie nastavený čas, zaznie signálny tón. Stlačením ľubovoľného klávesu
vypnete signálny tón.
POZNÁMKA:
Tento symbol na výrobku, jeho príslušenstve alebo obale označuje, že pri naskoršej likvidácii výrobku (z akýchkoľvek dôvodov) nesmie byť s výrobkom zachádzané ako s domácim odpadom. Výrobok zlikvidujte jeho odovzdaním na zberné miesto
pre likvidáciu použitých elektrických a elektronických zariadení šetrnú k životnému prostrediu. Zaistením ich správnej likvidácie zabránite vzniku potenciálnych rizík pre životné prostredie a ľudské zdravie, ktorá by mohla vzniknúť nesprávnym
zachádzaním s odpadmi. Okrem toho recyklácia odpadových materiálov napomáha udržaniu prírodných zdrojov surovín pre
budúce generácie. Podrobné informácie k likvidácii tohto výrobku šetrné k životnému prostrediu získate u pracovníka ochrany životného prostredia miestneho (mestského alebo obvodného) úradu alebo v predajni, v ktorej ste výrobok zakúpili.
POKYNY PRE SPRÁVNU LIKVIDÁCIU VÝROBKU
(likvidácii použitých elektrických a elektronických zariadení)
OPOZORILO
Výkričník vo vnútri trojuholníka na skrinke prístroja upozorňuje užívateľa na existenciu dôležitých pokynov pre jeho obsluhu uvedených v návode.
Symbol blesku vo vnútri trojuholníka upozorňuje užívateľa na nebezpečné napätie na niektorých dieloch vo vnútri skrinky prístro-
ja.
Nevyberajte prístroj zo skrinky - riziko úrazu elektrickým prúdom. Vo vnútri skrinky prístroja nie sú diely ktoré by mohol oprav iť
alebo nastaviť jeho užívateľ bez zodpovedajúceho vybavenia a kvalifikácie. Ak bude prístroj vyžadovať nastavenie alebo opravu
kontaktujte odborný servis. Zásahom do prístroja v dobe platnosti záruky sa vystavujete riziku straty príp. záručných plnení.
Chráňte prístroj pred zmoknutím, postriekaním alebo poliatím akoukoľvek kvapalinou - riziko úrazu lektrickým prúdom. Nepoužívajte prístroj mimo miestnosti.
Pre odpojenie prístroja od elektrickej siete vyberte vidlicu sieťového kábla prístroja zo sieťovej zásuvky.
Prístroj umiestenie na dobre vetranom mieste. Nezakrývajte vetracie otvory skrinky prístroja - riziko jeho prehriatia a poškodenia.
Chráňte prístroj pred priamym slnkom, neumiestňujte prístroj v blízkosti zdrojov tepla. Vysokými teplotami je výrazne skracovaná
životnosť elektronických komponentov prístroja.

INTERNATIONAL WARRANTY - INTERNATIONALE GARANTIE
GARANTIE INTERNATIONALE - GARANZIA INTERNAZIONALE
GARANTIA INTERNACIONAL - GARANTIA INTERNACIONAL
ΔΙΕΘΝΗΣ ΕΓΓΥΗΣΗ
is a registered Trademark of Roadstar S.A. - Switzerland. All rights reserved.
Purchase date
Kaufdatum
Date d'achat
Data d'acquisto
Fecha de compra
Data de compra
Ημερομηνία αγοράς
Type of set Geräte
Type d'appareil
Tipo d'apparecchio
Tipo de aparato
Tipo de aparelho
Τύπος συσκευής
Roadstar- by means of its sales organisation, representative or distributor - will take
the necessary actions to restore the perfect functioning of the product. To repair or to
replace is at discretion of Roadstar or it’s reppresentative or distributor.
The warranty period is in accordance with directive 99/44/CE of the European
Union. For all non EU members, please refer to the local law of each country.
This warranty does not cover normal wear and tear of the product and/or its parts,
any damage, failure, or loss caused by accident, misuse, and any other failure not
directly related to a defect of the product.
This warranty does not void consumer's rights in accordance with EU Directive99/4 4/
CE. For further information please visit the website www.roadstar.com, or write to
aftersales@roadstar.com.
DEUTSC H
Allgemeine "Roadstar" Garantiebedingungen
Die Firma "Roadstar" garantiert - durch die eigene Organisation und mit den hier
nachstehend im Detail aufgeführten Modalitäten - die korrekte Funktionsweise und
die EinwandfreiheitderProdukte mitder Markenbezeichnung "Roadstar".
Sollte ein Produkt nicht korrekt funktionieren oder Herstellungsfehleraufweisen,wird
"Roadstar"mit dem eigenen Vertriebsnetz oder durch den eigenen Vertrieb für die
Reparatursorgenoderwenn nicht möglich, fürden Ersatz des Produktes.
Die Garantiezeit ist in Übereinstimmung mit der Direktive 99/44 /CEder Euro-
päischen Union. Für alle nicht Mitgliedsstaaten der EU, gilt die jeweils lokale gesetzlich vorgeschriebene Garantiezeit.
Ausgeschlossen von der Garantie sind Verschleißteile, ästhetische Teile, Produkte
mitbeschädigtem Garantiesiegel oder nicht lesbarerSeriennummer, sowie die Schäden,
die zufällig durch Fahrlässigkeit, unzulässigen Gebrauch, durch den Gebrauch von nicht
originalenErsatzteilen, ungeeigneter Verpackung oder ausirgen deinem Grundverursacht werden, der den "Roadstar" Produkten nicht zu zuschreiben sind.
Diese "Garantie" beeinträchtigt nicht die Rechte des Verbrauchers gemässderDirektive 99/44/CE.
Weitere Informationen finden Sie im Internet unterderAdresse www.roadstar.com
oder richten Sie Ihre Anfragen bitte an die E-Mail Adresse aftersa-
les@roadstar.com.
ESPAÑOL
Condiciones generales de garantía Roadstar
Por medio de su organización con las modalidades precisadas a continuación, Roadstar garantiza el buen funcionamiento y la ausencia de defectos de fabricación en los
productos con marca Roadstar durante el periodo de garantía.
En caso de malfuncionamiento o defecto de fabricación del producto, Roadstar proce-
derá a su reparación y cuando esto no fuese posible, a su sustitución, por medio de su
organización de venta o de su distribuidores.
El período de garantía es el establecido en la Ley9 9/ 44/CE de la Unión Europea.
Para todos los miembros no pertenecientes a la Unión Europea, por favor seguir las
indicaciones marcadas por cada país.
No están cubiertas porla garantía las partes sujetas a desgaste, las partes estéti-
cas, los productos con sello de garantía dañado o número de serie ilegible, además que
los daños provocados por casos fortuitos, negligencias, usos incorrectos, uso de
piezas de recambio no originales, embalajes no adecuados, o cualquier otra causa no
atribuible a defectos del producto Roadstar.
La presente garantía no perjudica los derechos del consumidor según la directiva
99/44/ CE.
Para mayores informaciones consulte el sitio www.roadstar.com o solicite informacio-
nes a la dirección email aftersales@roadstar.com
PORTUGUES
Condições Gerais da Garantia Roadstar
Roadstar- mediantea própria organizaçãoe nas formas logo a seguir pormenorizadas
- garante um bom funcionamento e a ausência de defeitos de fabricação para os
produtos da marca Roadstar durante o prazo de garantia.
No caso demau funcionamento ou de defeito de fabricação o consumidor deverá contactar oDistribuidor Da Roadstar do próprio país, que se encontramediante consulta do
sito www.roadstar.com
O período de garantia está de acordo com a directiva 99/44/CEda União Europeia.
Para os que não são membros da UE, por favor consulte a lei em vigor respeitante a
cada país.
Não estão cobertos pela garantia: as peças sujeitas a desgaste, as peças de
enfeite, os Produtos com lacre degarantia danificado ou número desérie ilegível, além
dos danos provocados por caso fortuito, negligências, utilização imprópria, emprego
de peças de reposição não originais, embalagens impróprias ou de quaisquer outras
causas não imputáveis a defeitos do produto da Roadstar.
A presente "garantia" não prejudica os direitos a que consumidor é titular nos termos
da directiva 99/44/CE .
Para maiores informações consulte o sito www.roadstar.com ou solicite-os ao
endereço de correio electrónico: aftersales@roadstar.com.
ΕΛΛΗΝΙΚΑ
Γενικοί Οροι Εγγύησης Roadstar
Η Εταιρεία (Roadstar) εγγυάται για τα προϊόντα της για τυχόν κατασκευαστικά λάθη,
στα υλικά και / ή στην εργασία κατά την διάρκεια της περιόδου που ισχύει η εγγύηση,
όπως καθορίζεται στο κεφάλαιο (4).
Εάν το προϊόν δεν λειτουργεί σωστά ή έχει κάποιο κατασκευαστικό πρόβλημα και
βρίσκεται εντός εγγυήσεως, όπως περιγράφεται στο κεφάλαιο (4),
η εταιρεία θα λάβει τα απαραίτητα μέτρα για να αποκαταστήσει την σωστή λειτουργία
της συσκευής. Η επιδιόρθωση ή η αντικατάσταση της συσκευής είναι στην κρίση της
εταιρείας. Εάν το προϊόν δεν λειτουργεί σωστά ή έχει κάποιο κατασκευαστικό
πρόβλημα, ο καταναλωτής θα πρέπει να επικοινωνήσει με τον εξουσιοδοτημένο
αντιπρόσωπο.
Η λίστα με τους αντιπροσώπους ανά χώρα μπορεί να αναζητηθεί στην ιστοσελίδα
www.roadstar.com.
Η χρονική διάρκεια της εγγύησης ισχύει σύμφωνα με την οδηγία 99/44/CE της
Ευρωπαϊκής Ένωσης. Για όλες τις χώρες που δεν ανήκουν στην Ευρωπαϊκή
Ένωση, παρακαλώ αναφερθείτε στη νομοθεσία της κάθε χώρας.
Αυτή η εγγύηση δεν καλύπτει την φυσιολογική φθορά της συσκευής και/ ή μέρη
αυτής, οποιαδήποτε ζημιά που έχει προκληθεί από ατύχημα, από κακή χρήση και
κάθε άλλη ζημιά η οποία δεν έχει άμεση σχέση με ελάττωμα της συσκευής.
Αυτή η εγγύηση δεν θίγει τα δικαιώματα του καταναλωτή, σύμφωνα με τον κανονισμό
99/44/CE της Ευρωπαϊκής Ένωσης.
Για περισσότερες πληροφορίες επισκεφθείτε την ιστοσελίδα www.roadstar.com
ή γράψτε στην ηλεκτρονική διεύθυνση aftersales@roadstar.com .
FRANÇAIS
Conditions Générales de Garantie Roadstar
La société Roadstar par le biais de sa propre organisation et avec les modalités indiquées cidessous - garantit le bon fonctionnement et l'absence de défauts de fabrication des produits ayant
la marque Roadstar, pendant la période de garantie. En cas de dysfonctionnement ou de défaut de
fabrication du produit, la société Roadstar, par le biais de son organisation de vente ou de ses
propres distributeurs, prendra à sa charge la réparation et, au cas où cela ne serait pas possible, le
remplacement du produit. La reparation ou le remplacement du produit est a la discretion de Roadstar or de son distributeur.
Le délai de Garantie est conforme à la directive 99/44/CE de l'Union Européenne. Pour les autres
Pays, veuillez vous référer aux lois en vigueur dans chacun d'eux.
Ne sont pas couvertes par la garantie les parties sujettes à usure, les parties esthétiques, les produits ayant un cachet de garantie endommagé ou un numéro de série illisible, ainsi que les dommages provoqués par un cas fortuit, des négligences, un usage impropre, l'emploi de pièces de
rechange non d'origine, ou n'importe quelle autre cause pouvant être attribuée à des défauts du
produit Roadstar.
La présente "garantie" ne préjudicie pas les droits du consommateur énoncés dans la directive
99/44/CE.
Pour toute information supplémentaire, consultez le site www.roadstar.com ou adressez votre
demande par e-mail aftersales@roadstar.com.
ITALIANO
Condizioni Generali Garanzia Roadstar
Roadstar- per mezzo della propria organizzazione e con le modalità qui di seguito precisate garantisce il buon funzionamento e l'assenza di difetti di fabbricazione per i prodotti con marchio Roadstar, durante il periodo di garanzia.
In caso di malfunzionamento o di difetto di fabbricazione del prodotto la Roadstar provvederà,
con la propria organizzazione o il proprio Distributore, alla riparazione e, ove ciò non fosse
possibile, alla sostituzione del prodotto. La riparazione o la sostituzione è a discrezione della
Roadstar o del suo Distributore.
Il periodo di Garanzia segue quanto riportato nella direttiva 99/44/C E dell'Unione Europea.
Per tutti i Paesi non membri della UE, si fà riferimento alle leggi vigenti del paese di appartenenza. La garanzia ha validità solo se il presente certificato è stato compilato in ogni sua parte e accompagnato da idonea prova di acquisto, fiscalmente valida.
Non sono coperti da garanzia le parti soggette ad usura, le parti estetiche, i Prodotti con sigillo
di garanzia danneggiato o numero di serie illeggibile, nonché i danni provocati da caso fortuito,
negligenze, uso improprio, uso di ricambi non originali, imballaggi impropri, o da qualunque altra
causa non imputabile a difetti del prodotto della Roadstar.
La presente "garanzia" non pregiudica i diritti di cui il consumatore è titolare secondo la direttiva
99/44/CE .
Per ulteriori informazioni consultare il sito www.roadstar.com, o inviare richieste all'indirizzo
email aftersales@roadstar.com.
ENGLISH
Roadstar Warranty Terms and Conditions
Roadstar- by means of its sales organisation, representative or distributor- guarantees its
products against manufacturing defects in material and/or workmanship throughout the period of
warranty.
Should the product fail to work or shows manufacturing defect within the warranty period,
Dealer's Stamp / Hàndlerstampel / Timbre du négociant / Timbro del negoziante / Sello del
establecimento vendedor / Carimbo da loja de Venda / Σφραγίδα του καταστήματος
Serial No.
Serien Nr.
No. de série
No. di serie
No. de serie
No. de série
ΑΡΙΘΜΟΣ ΣΕΙΡΑ

Hereby, Roadstar Management SA declares that the radio equipment type CLR-725BT/BK is in
compliance with Directive 2014/53/EU.The full text of the EU declaration of conformity is available
at the following internet address: http://roadstar.com/images/ce/CLR-725BT_BK.pdf or by scan-
ning the following QR Code.
Roadstar Management SA erklärt hiermit, dass das Funkgerät vom Typ CLR-725BT/BK der Richtlinie 2014/53 / EU entspricht.Der vollständige Text der EU-Konformitätserklärung ist unter der
folgenden Internetadresse verfügbar: http://roadstar.com/images/ce/CLR-725BT_BK.pdf oder
durch Scannen des folgenden QR-Codes.
Nous, soussignés Roadstar Management SA, déclarons que l’équipement radio de type CLR725BT/BK est conforme aux exigences de la directive 2014/53/EU.Le texte complet de cette déclaration de conformité EU est disponible à l’adresse internet suivante: http://roadstar.com/
images/ce/CLR-725BT_BK.pdf ou en scannant le code QR suivant.
Con la presente, Roadstar Management SA dichiara che l'apparecchiatura radio del tipo CLR725BT/BK è conforme alla Direttiva 2014/53 / UE.Il testo completo della dichiarazione di conformità UE è disponibile al seguente indirizzo Internet: http://roadstar.com/images/ce/CLR-
725BT_BK.pdf o eseguendo la scansione del seguente codice QR.
Por la presente, Roadstar Management SA declara que el equipo de radio tipo CLR-725BT/BK
cumple con la Directiva 2014/53 / EU.El texto completo de la declaración de conformidad UE está
disponible en la siguiente dirección de Internet: http://roadstar.com/images/ce/CLR-
725BT_BK.pdf o escaneando el siguiente código QR.
Wij, ondergetekende Roadstar Management SA, verklaren dat radioapparatuur van het type CLR-
725BT/BK voldoet aan de vereisten van Richtlijn 2014/53 / EU.De volledige tekst van deze EUconformiteitsverklaring is beschikbaar op het volgende internetadres: httphttp://roadstar.com/
images/ce/CLR-725BT_BK.pdf of door de volgende QR-code te scannen.
Společnost Roadstar Management SA tímto prohlašuje, že rádiové zařízení typu CLR-725BT/BK
je v souladu se směrnicí 2014/53 / EU.Úplné znění prohlášení o shodě EU je k dispozici na této
internetové adrese:http://roadstar.com/images/ce/CLR-725BT_BK.pdf nebo skenováním následujícího QR kódu.
Roadstar Management SA týmto vyhlasuje, že rádiové zariadenie typu CLR-725BT/BK je v súlade
so smernicou 2014/53 / EÚ.Úplné znenie vyhlásenia o zhode EÚ je k dispozícii na tejto interne-
tovej adrese:http://roadstar.com/images/ce/CLR-725BT_BK.pdf alebo skenovaním nasledu-
júceho kódu QR.

is a registered Trademark of Roadstar S.A. - Switzerland All rights reserved
Roadstar Management SA, via Passeggiata 7 CH 6883 Novazzano (Switzerland)
VER.1
25.06.2020
 Loading...