


HRA-1350US/BT
User manual
Bedienungsanleitung
Manuel d’instructions
Manuale d’istruzioni
Manual de instrucciones
Gebruiksaanwijzing
Návod k použití
Návod na použitie
www.roadstar.com

INDEX
English |
Page |
1 |
Deutsch |
Seite |
3 |
Français |
Page |
5 |
Italiano |
Pagina |
7 |
Español |
Página |
9 |
Nederlands |
Pagina |
11 |
Čeština |
Strana |
13 |
Slovenský |
Strana |
15 |
Your new unit was manufactured and assem- |
Ihr neues Gerät wurde unter Beachtung der |
bled under strict ROADSTAR quality control. |
strengen ROADSTAR Qualitätsvorschriften ge- |
Thank-you for purchasing our product for |
fertigt. Wir danken Ihnen für den Kauf unseres |
your music enjoyment. Before operating the |
Produktes und wünschen Ihnen optimalen Hör- |
unit, please read this instruction manual ca- |
genuss. Bitte lesen Sie diese Bedienungsanlei- |
refully. Keep it also handy for further future |
tung durch, und heben Sie sie auf, um jederzeit |
references. |
darin nachschlagen zu können. |
Votre nouvel appareil a été fabriqué et monté |
Il vostro nuovo apparecchio é stato prodotto ed |
en étant soumis aux nombreaux tests ROAD- |
assemblato sotto lo stretto controllo di qualità |
STAR. Nous espérons que cet appareil vous |
ROADSTAR. Vi ringraziamo di aver acquistato |
donnera entière satisfaction. Avant de vous |
un nostro prodotto per il vostro piacere d’ascol- |
adonner à ces activités, veuillez lire attentive- |
to. Prima di procedere all'utilizzo dell'apparec- |
chio, leggete attentamente il manuale d’istru- |
|
ment ce manuel d’instructions. Conservez-le |
zioni e tenetelo sempre a portata di mano per |
à portée de main à fin de référence ultérieu- |
futuri riferimenti. |
re. |
|
Vuestro nuevo sistema ha sido construido según las normas estrictas de control de calidad ROADSTAR. Le felicitamos y le damos las gracias por su elección de este aparado. Por favor leer el manual antes de poner en funcionamiento el equipo y guardar esta documentación en case de que se necesite nuevamente.
Seu novo aparelho foi construido e montado sob o estrito controle de qualidade da ROADSTAR. Agradecemos por ter comprado nosso produto para a sua diversão. Antes de usar esta unidade é necessário ler com atençâo este manual de instruções pare que possa ser usada apropriadamente; mantenha o manual ao seu alcance para outras informações.

HRA-1350US/BT
1
11 |
12 |
13 14 15 |
2 |
3 |
4 |
5 |
6 |
7 8 9 |
10 |
16

1 |
|
|
|
English |
|
|
|
|
|
|
|
||
|
FUNCTION |
|
|
LED (8) COLOUR |
||
|
|
|
|
|
||
|
FM |
|
|
RED |
||
|
|
|
|
|
||
|
BLUETOOTH |
|
|
BLUE |
||
|
|
|
|
|
||
|
USB/SD |
|
|
GREEN |
||
|
|
|
|
|
||
|
AUX-IN |
|
|
ORANGE |
||
|
|
|
|
|
|
|
LOCATION OF CONTROLS
1.SPEAKERS
2.DIAL SCALE
3.DIAL POINTER
4.TUNING KNOB
5.VOLUME KNOB
6.FUNCTION BUTTON
7.PLAY/PAUSE BUTTON
8.FUNCTION LED
9.SKIP+ BUTTON
10.SKIP- BUTTON
11.FM ANTENNA
12.SD SOCKET
13.USB SOCKET
14.AUXILIARY INPUT
15.ON/OFF SWITCH
16.AC CORD
CONNECTING TO POWER
This unit operates from a main supply of 230V ~ 50Hz. Connect the AC power cord to the AC household main outlet. Ensure that the voltage is as indicated on the rating plate on the rear of the unit. Switch ON/OFF SWITCH (15) to ON position to turn the unit ON. Switch ON/OFF SWITCH (15) to OFF position to switch the unit OFF.
VOLUME CONTROL
Turn the VOLUME KNOB (5) to the desired volume level.
LISTENING TO THE RADIO
1.Press FUNCTION BUTTON (6) repeatedly to select FM (RED) mode.
2.Turn TUNING KNOB (4) to select your favourite radio station.
3.For FM reception there is a built in telescopic antenna (11). You may need to adjust the position of the antenna to get optimum reception.
BLUETOOTH OPERATION
1.Press FUNCTION BUTTON (6) repeatedly to select BLUETOOTH (BLUE) mode. The FUNCTION LED (8) will start blinking.
2.Select from your portable device (Smartphone, Tablet...) the ID Bluetooth tagged as HRA-1350US/
BT, then confirm connection.
3.When the pairing is successful the FUNCTION LED (8) will stop blinking.
4.Now you can transfer the music to the HRA-1350US/BT and all operations can only be operated from your mobile device.
AUX-IN
1.This unit provides an auxiliary audio input jack for connecting external audio device like MP3 players, CD players and allow playback of your external source through the system speakers.
English 2
2.Use an audio cable (not included) with 3.5 mm stereo plugs on each end of the cable.
3.Plug one end into the AUX-IN jack on the main unit and plug the other end of the cable into the LI-
NE OUT or HEADPHONE Jack of your external audio device.
4.Turn ON the unit and your external audio device.
5.Press FUNCTION BUTTON (6) repeatedly to select AUX-IN (ORANGE) mode.
6.Start to play the external device (see the user manual of the external device).
PLAYBACK FROM USB
1.Press FUNCTION BUTTON (6) repeatedly to select USB/SD (GREEN) mode.
2.Insert the USB/SD device's plug into the USB/SD socket on the rear of the unit. The unit will start reading the device automatically after the connection. The first track will start playback.
3.Press SKIP +/- BUTTON (9)/(10) to select your favorite tunes.
4.If you hold SKIP +/- BUTTON (9)/(10), the playing track will go fast backward or forward until you release the button.
5.Press PLAY/PAUSE BUTTON (7). The unit will stop playback. Press PLAY/PAUSE BUTTON (7)
again to resume the playback.
Note: The unit will read the last connected device. If you insert a different device while playing another, the unit will stop playback and will start reading the last inserted.
SPECIFICATIONS
AC: |
230V ~ 50Hz |
FM: |
87.5 - 108 MHz |
Specifications and the design are subject to possible modifications without notice due to improvement.
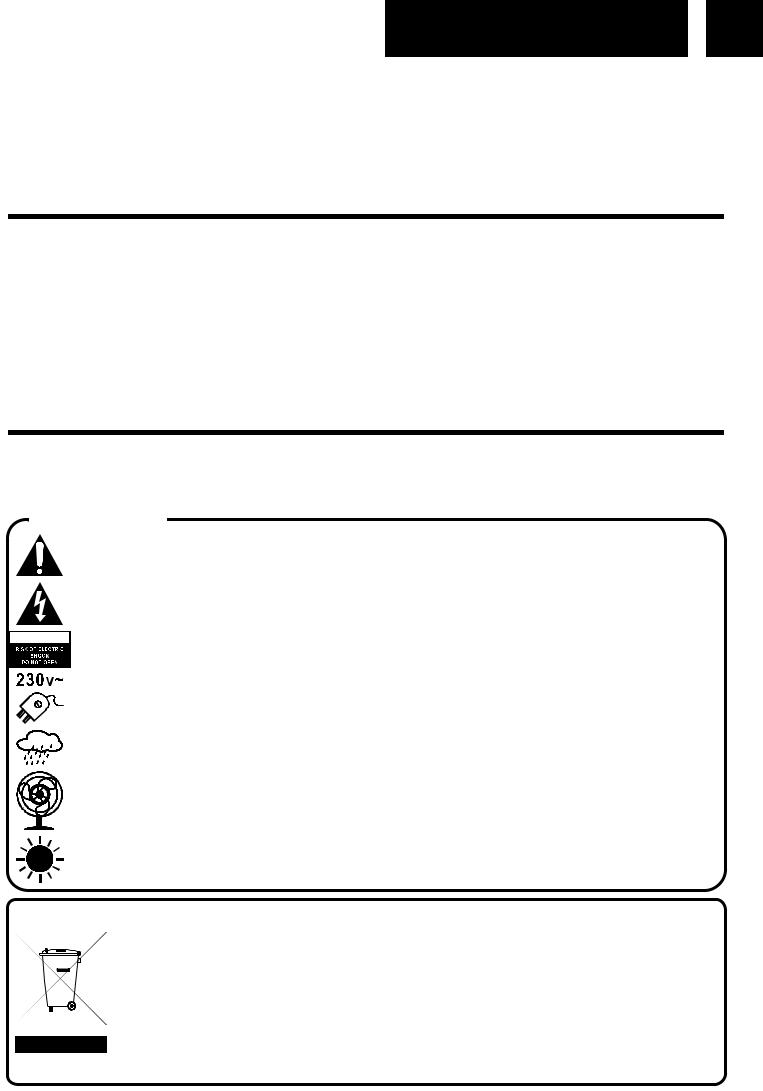
WARNINGS
The exclamation point within the triangle is a warning sign alerting the user of important instructions accompanying the product.
The lightening flash with arrowhead symbol within the triangle is a warning sign alerting the user of “dangerous voltage” inside the unit.
 To reduce the risk of electric shock, do not remove the cover. No user serviceable parts inside the unit. Refer all servicing to qualified personnel.
This unit operates on 230V ~ 50Hz. If the unit is not used for a long period of time, remove the plug from the AC mains.
Ensure all connections are properly made before operating the unit.
This unit must not be exposed to moisture or rain.
This unit should be positioned so that it is properly ventilated. Avoid placing it, for example, close to curtains, on the carpet or in a built-in installation such as a bookcase.
Do not expose this unit to direct sunlight or heat radiating sources.
CORRECT DISPOSAL OF THIS PRODUCT
(Waste Electrical & Electronic Equipment)
This marking shown on the product or its literature, indicates that it should not be disposed with other household wastes at the end of its working life. To prevent possible harm to the environment or human health from uncontrolled waste disposal, please separate this from other types of wastes and recycle it responsibly to promote the sustainable reuse of material resources. Household users should contact the retailer where they purchased this product, or their local government office, for details of where and how they can take this item for environmentally safe recycling. Business users should contact their supplier and check the terms and conditions of the purchase contract. This product should not be mixed with other commercial wastes for disposal.

3 |
|
|
|
Deutsch |
|
|
|
|
|
|
|
||
|
FUNKTION |
|
|
LED (8) FARBE |
||
|
FM |
|
|
ROT |
||
|
|
|
|
|
||
|
BLUETOOTH |
|
|
BLAU |
||
|
|
|
|
|
||
|
USB/SD |
|
|
GRÜN |
||
|
|
|
|
|
||
|
AUX-IN |
|
|
ORANGE |
||
|
|
|
|
|
|
|
LAGE DER BEDIENELEMENTE
1.LAUTSPRECHER
2.SKALENSCHEIBE
3.SKALENZEIGER
4.TUNING-KNOP
5.LAUTSTÄRKEREGLER
6.FUNKTIONSTASTE
7.PLAY/PAUSE-TASTE
8.FUNKTIONS-LED
9.SKIP- TASTE
10.SKIP+ TASTE
11.FM-ANTENNE
12.SD-BUCHSE
13.USB-EINGANG
14.ZUSATZEINGANG
15.AN/AUS-TASTE
16.NETZKABEL
AN DIE STROMZUFUHR ANSCHLIESSEN
Dieses Gerät arbeitet mit einer Hauptversorgung oder 230V ~ 50Hz. Schließen Sie das Netzkabel an den Haupthaushaltssteckdose. Stellen Sie sicher, dass die Spannung auf dem Typenschild auf der Rückseite des Geräts als angegeben. AN/AUS-TASTE (15)-Schalter auf ON um das Gerät einzuschalten. AN/AUS-TASTE (15)-Schalter auf OFF das Gerät auszuschalten.
LAUTSTÄRKEREGELUNG
Drehen Sie LAUTSTÄRKEREGLER (5) die Lautstärke einzustellen.
RADIO HÖREN
1.Drücken Sie die Taste FUNKTIONSTASTE (6) erneut, um den FM (ROT) Modus auszuwählen.
2.Drehen Sie am TUNING-KNOP (4), um Ihren gewünschten Radiosender auszuwählen.
3.Für den UKW-Empfang ist eine Teleskopantenne eingebaut (11). Unter Umständen müssen Sie die Position der Antenne verändern, um einen optimalen Empfang zu erhalten.
BLUETOOTH-BETRIEB
1.Drücken Sie die Taste FUNKTIONSTASTE (6) erneut, um den BLUETOOTH (BLAU) Modus auszuwählen. Die FUNKTIONS-LED (8) beginnt zu blinken.
2.Wählen Sie eines Ihrer tragbaren Geräte aus (Smartphone, Tablet ...), markieren die Bluetooth-ID, die als HRA-1350US/BT bezeichnet ist und bestätigen die Verbindung.
3.Wenn die Paarung erfolgreich ist, wird die FUNKTIONS-LED (8) zu blinken.
4.Jetzt können Sie die Musik in die HRA-1350US/BT übertragen und alles nur noch von Ihrem mobilen
Gerät aus durchführen.
AUX-IN
1.Dieses Gerät bietet einen zusätzlichen Audioeingang zum Anschluss externer Audiogeräte wie MP3- Player, CD-Player und ermöglicht die Wiedergabe aus Ihrer externen Quelle über die Lautsprecher der
Anlage.
2.Verwenden Sie ein Audiokabel (nicht im Lieferumfang enthalten) mit 3,5 mm Stereo-Steckern an beiden
Enden des Kabels.
 Loading...