

Renault CARMINAT TOMTOM DRIVER’S HANDBOOK

CARMINAT TOMTOM
DRIVER’S HANDBOOK
®

Precautions during use . . . . . . . . . . . . . . . . . . . . . . . . . . . . . . . . . . . . . . . . . . . . . . . . . . . . . . . . . . . 2
General information . . . . . . . . . . . . . . . . . . . . . . . . . . . . . . . . . . . . . . . . . . . . . . . . . . . . . . . . . . . . . . 3
General description . . . . . . . . . . . . . . . . . . . . . . . . . . . . . . . . . . . . . . . . . . . . . . . . . . . . . . . . 3
Introduction to the controls . . . . . . . . . . . . . . . . . . . . . . . . . . . . . . . . . . . . . . . . . . . . . . . . . . . 5
Swivel screen . . . . . . . . . . . . . . . . . . . . . . . . . . . . . . . . . . . . . . . . . . . . . . . . . . . . . . . . . . . . . 7
SD card: use, initialisation . . . . . . . . . . . . . . . . . . . . . . . . . . . . . . . . . . . . . . . . . . . . . . . . . . . 8
Switching on, off . . . . . . . . . . . . . . . . . . . . . . . . . . . . . . . . . . . . . . . . . . . . . . . . . . . . . . . . . . . 10
Guided tours . . . . . . . . . . . . . . . . . . . . . . . . . . . . . . . . . . . . . . . . . . . . . . . . . . . . . . . . . . . . . . 11
Operating principles . . . . . . . . . . . . . . . . . . . . . . . . . . . . . . . . . . . . . . . . . . . . . . . . . . . . . . . . 13
Volume and voice . . . . . . . . . . . . . . . . . . . . . . . . . . . . . . . . . . . . . . . . . . . . . . . . . . . . . . . . . . 15
Reading a map . . . . . . . . . . . . . . . . . . . . . . . . . . . . . . . . . . . . . . . . . . . . . . . . . . . . . . . . . . . . 16
Preparing a route . . . . . . . . . . . . . . . . . . . . . . . . . . . . . . . . . . . . . . . . . . . . . . . . . . . . . . . . . . . . . . . . 17
Entering a destination . . . . . . . . . . . . . . . . . . . . . . . . . . . . . . . . . . . . . . . . . . . . . . . . . . . . . . 17
Guidance . . . . . . . . . . . . . . . . . . . . . . . . . . . . . . . . . . . . . . . . . . . . . . . . . . . . . . . . . . . . . . . . 22
Find alternative . . . . . . . . . . . . . . . . . . . . . . . . . . . . . . . . . . . . . . . . . . . . . . . . . . . . . . . . . . . . 26
Traffic information . . . . . . . . . . . . . . . . . . . . . . . . . . . . . . . . . . . . . . . . . . . . . . . . . . . . . . . . . . 27
Browse map . . . . . . . . . . . . . . . . . . . . . . . . . . . . . . . . . . . . . . . . . . . . . . . . . . . . . . . . . . . . . . 30
LIVE Services . . . . . . . . . . . . . . . . . . . . . . . . . . . . . . . . . . . . . . . . . . . . . . . . . . . . . . . . . . . . . . . . . . 32
. . . . . . . . . . . . . . . . . . . . . . . . . . . . . . . . . . . . . . . . . . . . . . . . . . . . . . . . . . . . . . . . . . . . . . . . . . . . . 34
Z.E. Services . . . . . . . . . . . . . . . . . . . . . . . . . . . . . . . . . . . . . . . . . . . . . . . . . . . . . . . . . . . . . . . . . . . 35
Recharging stations . . . . . . . . . . . . . . . . . . . . . . . . . . . . . . . . . . . . . . . . . . . . . . . . . . . . . . . . . . . . . . 36
Range . . . . . . . . . . . . . . . . . . . . . . . . . . . . . . . . . . . . . . . . . . . . . . . . . . . . . . . . . . . . . . . . . . . . . . . . 37
Add and manage favourites. . . . . . . . . . . . . . . . . . . . . . . . . . . . . . . . . . . . . . . . . . . . . . . . . . . . . . . . 38
Help! . . . . . . . . . . . . . . . . . . . . . . . . . . . . . . . . . . . . . . . . . . . . . . . . . . . . . . . . . . . . . . . . . . . . . . . . . 40
Speed camera menu . . . . . . . . . . . . . . . . . . . . . . . . . . . . . . . . . . . . . . . . . . . . . . . . . . . . . . . . . . . . . 41
Image viewer . . . . . . . . . . . . . . . . . . . . . . . . . . . . . . . . . . . . . . . . . . . . . . . . . . . . . . . . . . . . . . . . . . . 43
Reversing camera . . . . . . . . . . . . . . . . . . . . . . . . . . . . . . . . . . . . . . . . . . . . . . . . . . . . . . . . . . . . . . . 44
System settings . . . . . . . . . . . . . . . . . . . . . . . . . . . . . . . . . . . . . . . . . . . . . . . . . . . . . . . . . . . . . . . . . 45
Updating the system . . . . . . . . . . . . . . . . . . . . . . . . . . . . . . . . . . . . . . . . . . . . . . . . . . . . . . . . . . . . . 51
Operating faults . . . . . . . . . . . . . . . . . . . . . . . . . . . . . . . . . . . . . . . . . . . . . . . . . . . . . . . . . . . . . . . . . 56
1
PRECAUTIONS DURING USE
It is essential to follow the precautions below when using the system, both in the interest of safety and to prevent material damage.
You must always comply with the laws of the country in which you are travelling.
Precautions when operating the system
– Operate the controls and read the information on the screen only when road conditions allow.
– Set the volume to a reasonable level so that outside noise can be heard.
– Use of the navigation system does not in any way replace the responsibility or vigilance of the driver when driving the vehi-
– Depending on the geographical area, the map on the SD card may not have the latest information on new roads. Be alert.
Precautions concerning the equipment
– Do not attempt to dismantle or modify the system, as there is a risk of damage to equipment and fire.
– Contact a representative of the manufacturer in the event of malfunction and for all operations involving disassembly.
– Do not insert foreign objects or a damaged or dirty SD card into the reader.
– Allows clean your screen with a microfibre cloth or a soft, moistened cloth.
– Use an SD card which is suitable for your navigation system.
Precautions regarding navigation
cle.
In all cases, Road Traffic Regulations and road signs always take precedence over the directions of the navigation system.
The description of the models given in this manual is based on the specifications at the time of writing. This manual covers all
existing functions for the models described. Whether or not they are fitted depends on the equipment model, options selected
and the country where it is sold. This manual may also contain information about functions to be introduced later in the year.
2

GENERAL DESCRIPTION (1/2)
The navigation system
The navigation system calculates your
position and guides you using data:
– vehicle speed and information from
the gyro (measuring the vehicle di-
rection);
– the digital map;
– the GPS receiver;
– of Z.E. Services (on electric vehicles
only);
– of LIVE Services on subscription.
Note: when using the vehicle for the
first time, the speed information and the
gyro will be undergoing final calibration.
The system may therefore lack accuracy in terms of locations until around
30 miles have been travelled, turning
round 40 sharp corners.
The GPS receiver
The navigation system uses GPS satellites (Global Positioning System) orbiting around Earth.
The GPS receiver receives signals
transmitted from several satellites. The
system can then locate the position of
the vehicle.
Note: after moving a long distance
without driving (ferry, rail freight), the
system may take several minutes to
adjust before retuning to normal operation.
The digital map
The digital map contains the road maps
and town maps that the system requires. This is found on the SD card.
LIVE services
These include road safety alerts, HD
Traffic™, local search and weather. At
the end of a 3-month trial period, you
can extend your subscription online
via TomTom HOME™ (please see the
“System Update” chapter).
Note: these services require a subscription, and use an inaccessible SIM
card integrated into the navigation
system.
When these services are available in
your country, the LIVE Services icon
will be displayed on the browser screen.
Z.E. Services
Z.E. Services provide you with information regarding the availability of recharging stations for your electric vehicle.
The system also informs you when your
destination cannot be reached at your
battery level.
Navigation assistance
function
The system suggests a route to your
chosen destination using:
– its road map (on the SD card);
– the positioning sensors which esti-
mate your location even if the GPS
signals are lost;
– information from the traffic informa-
tion service (depending on country);
– road safety information (speeding
warning, speed limit zone);
– at HD Traffic™, LIVE Services sub-
scription.
Finally, it indicates the route to take,
step by step, using the display screen
and voice messages.
3
GENERAL DESCRIPTION (2/2)
BA
Preferences 1 of 5
Use night
colours
Safety preferences
Show POI
on map
Speech preferences
16:30
1.3
Do not show charging
stations on map
Turn off
sound
C
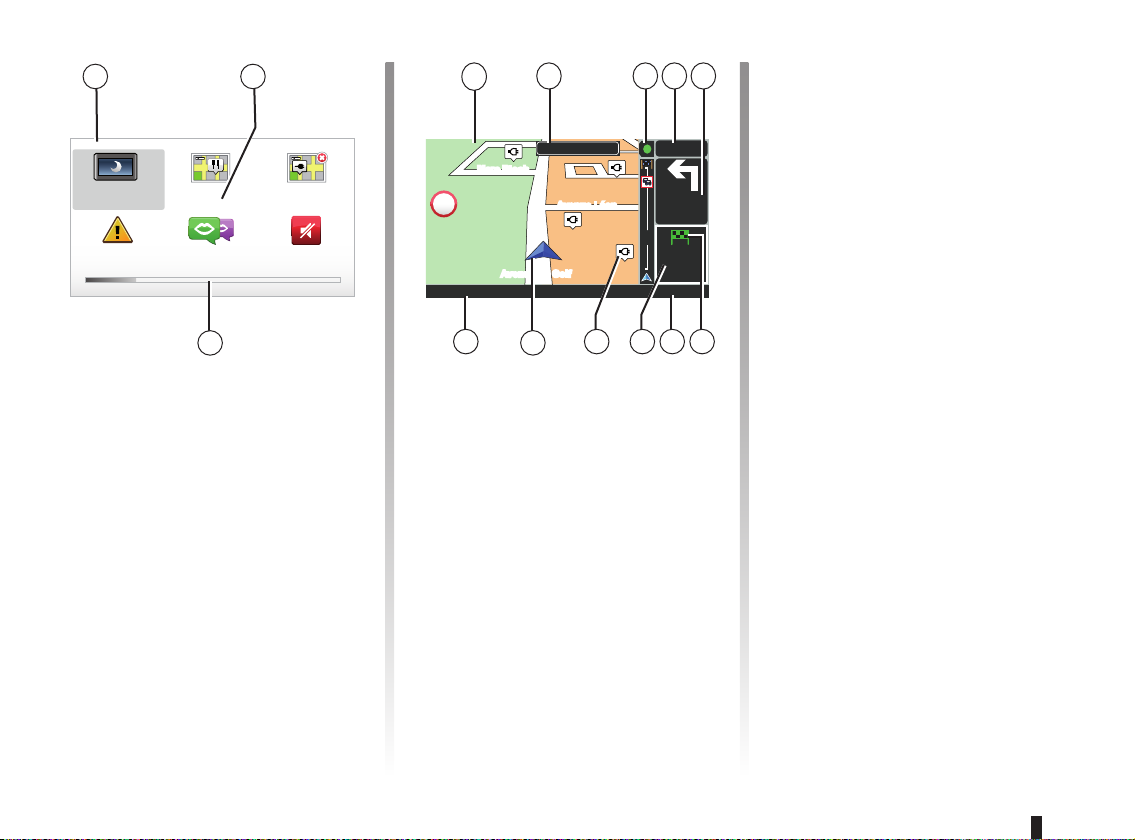
Displays
Menu screen
A Name of menu.
B Name of function or of sub-menu.
C Menu page scroll bar.
Note: a menu may contain several
screen pages.
D
Marc Bloch
Marc Bloch
30
LW 10245 66 RDS-AF 26°C
N
E
A2/E35 Utrecht
Avenue du Golf
Avenue du Golf
M
Avenue Léon
Avenue Léon
F G H
300
14
km
K I
L J
6:47
metres
4.5
6:52
km
Map screen
D Navigation map.
E Indication of the next navigation in-
struction (road sign).
F Traffic information.
G Time.
H Instructions for navigation and dis-
tance to next change of direction.
I Summary of the route, based on
your vehicle’s charge level – a green
flag or a red flag with a flash of lightning will be displayed at your point of
destination.
J Exterior temperature.
K Estimated time of arrival, total re-
maining distance and the possibility
of reaching your destination (green
flag or red flag with flash of lightning).
L Recharging stations on the map.
M Current vehicle position.
N Audio information (depending on the
vehicle).
Note: you can return to the map screen
at any time by pressing the “MAP2D/3D" button on the remote control or
the central control.
If you have just modified a parameter,
remember to confirm it using the soft
buttons before returning to the map
screen.
4
INTRODUCTION TO THE CONTROLS (1/2)
Central control
1 1 2
BACK
BACK
10
MAP
2D/3D
DEST
HOME
REPEAT
MUTE
LIGHT
DARK
MENU
SET
INFO
ROUTE
Function
1 Soft buttons Select and confirm
Accessing traffic information (short press);
Accessing the route summary (long press,
2 INFO/ROUTE
during guidance)/Accessing the attainability information (long press, not during guidance, on electric vehicles only).
Rotate:
– move vertically and horizontally through the menus;
– modify the scale (ZOOM mode).
Rotation, switch
3
and press
Shift (up, down, right, left):
– move vertically or horizontally through the menus;
– move around the map.
Press:
356789
5 MENU/SET
– confirm;
– display the quick menu.
Access the full navigation system menu (short press)/
the system settings (long press).
Change the brightness of the screen (short press)
6 LIGHT/DARK
or activate the standby screen to hide the map (long
press).
7 REPEAT/MUTE
8 DEST/HOME
Repeat the instruction (short press), deactivate the
voice guidance (long press).
Access the “Navigate to...” menu (short press), navigate to your home (long press).
Note: depending on the vehicle, the
system has either a central control
or a remote control.
9 MAP-2D/3D
From a menu: displays the map
From the map: switches the map to 2D/3D mode.
10 BACK Back to previous screen.
5
INTRODUCTION TO THE CONTROLS (2/2)
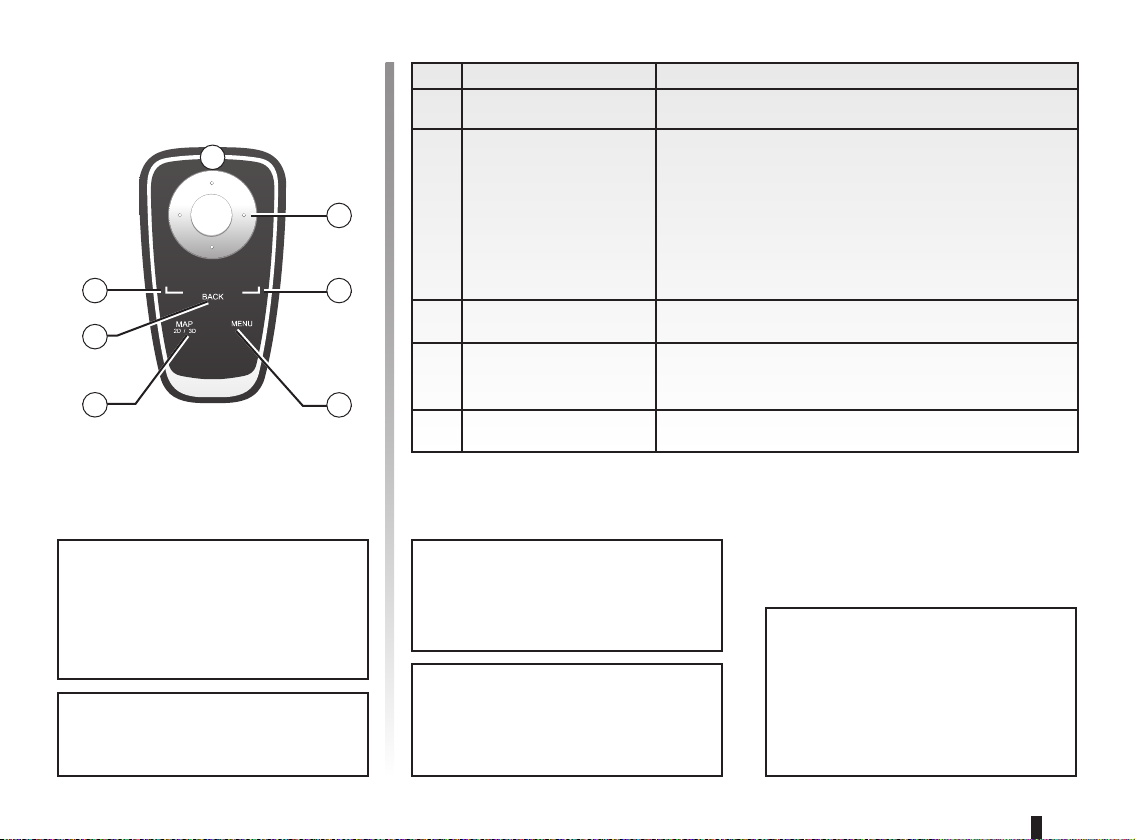
Remote control
A
1
10
9
Note: to connect your remote con-
trol more quickly, press one of the
remote control buttons when the
system starts, before the legal notices appear.
Note: the remote control unit does
not have press and hold functions.
Function
1 Soft buttons Select and confirm
Shift (up, down, right, left):
– move vertically or horizontally through the menu;
4
4 Remote control
– move around the map.
Press the central button:
– confirm;
– displays the quick menu.
1
5 MENU Accesses the full navigation system menu.
9 MAP-2D/3D
From a menu: displays the map
From the map: switches the map to 2D/3D mode.
5
10 BACK Back to previous screen.
Note: depending on the vehicle, the
system has either a central control
or a remote control.
LED A on the remote control flashes
once your navigation system is con-
Store the remote control in its housing, away from sunlight, to ensure
the batteries are not damaged.
nected to it. To replace the batteries,
refer to the section entitled “Remote
control: batteries”.
6
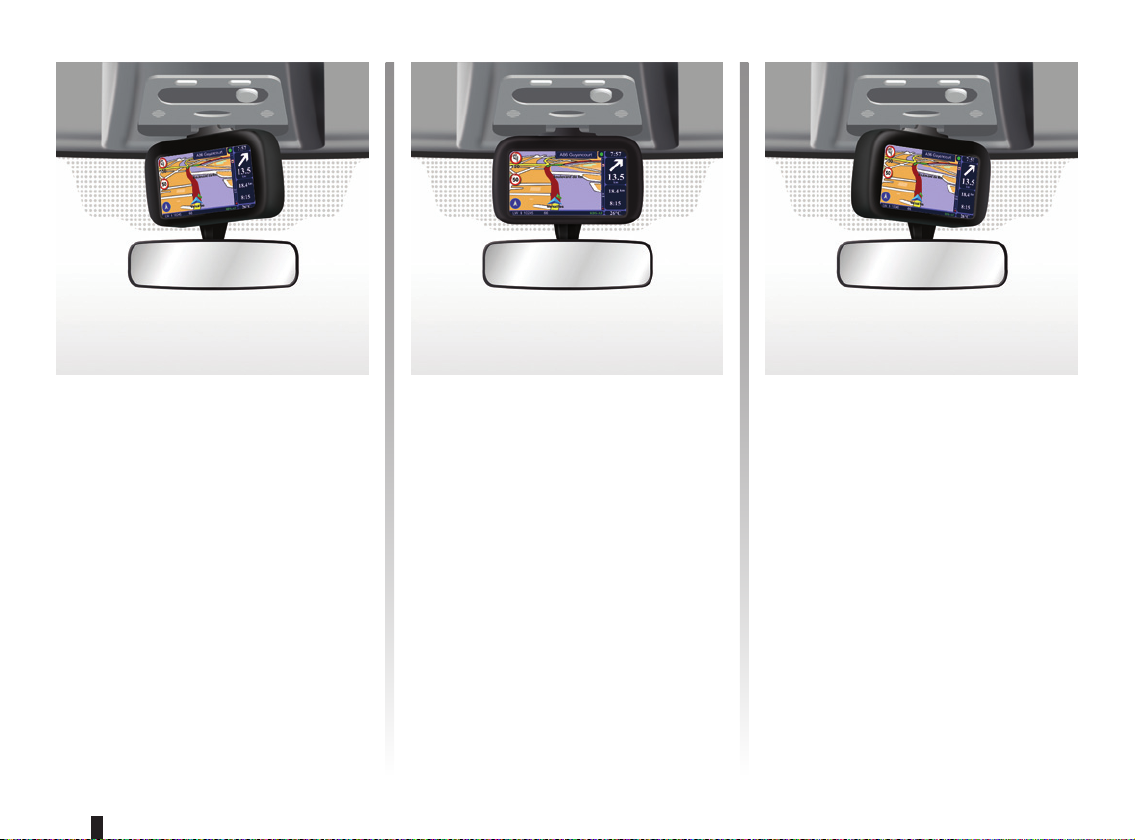
SWIVEL SCREEN
Definition
Depending on the vehicle, your navigation screen can be turned to the left
and right to ensure it can be read with
the utmost comfort under any circumstances.
Manipulation
To avoid any mistakes with the vehicle
trajectory and/or accidents, it is recommended that the screen is moved when
the vehicle is stationary.
Push the screen on the left or right to
swivel it.
7
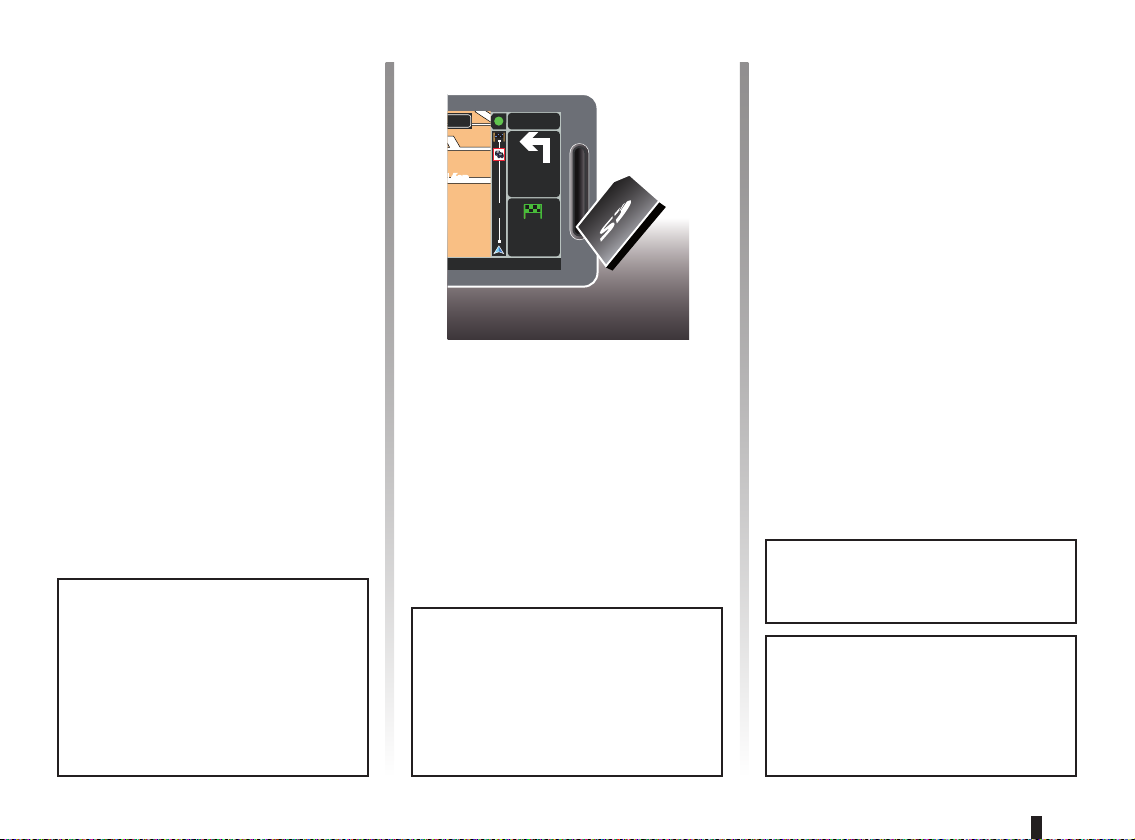
SD CARD: USE, INITIALISATION (1/2)
SD card
An SD card is supplied with the navigation system. It includes, among other
things, a map of your country or group
of countries.
Map and recharging station (for electric
vehicles) updates are regularly issued.
They are only available for download
by inserting your navigation system’s
SD card into your computer and con-
necting to the Internet.
Once your new vehicle has been delivered, you will have a maximum of
60 days in which to update the map for
free. Once this time has elapsed, you
will need to pay for updates.
cht
éon
éon
To update your system and your map,
refer to the section entitled “System
update” in this document.
6:47
300
metres
14
km
4.5
6:52
RDS-AF 26°C
km
Only use an SD card which is compatible with your vehicle's navigation system.
Only use your SD card for operating and updating your navigation
system. Do not insert any other
device (camera, portable GPS,
etc.), or in another vehicle.
8
Remember to back up the data on
the SD card regularly. Refer to the
section entitled “System update” in
your user manual.
You can also download maps covering more countries than your original map (e.g. Western Europe).
SD CARD: USE, INITIALISATION (2/2)
cht
éon
éon
6:47
300
metres
14
km
4.5
6:52
RDS-AF 26°C
A
km
B
Inserting the SD card
Switch off the ignition to switch off the
navigation system and insert the SD
card B in slot A.
Note: do not insert the SD card in another vehicle.
The SD card is fragile; do not bend
it. Insert it the right way round, as
shown in the diagram.
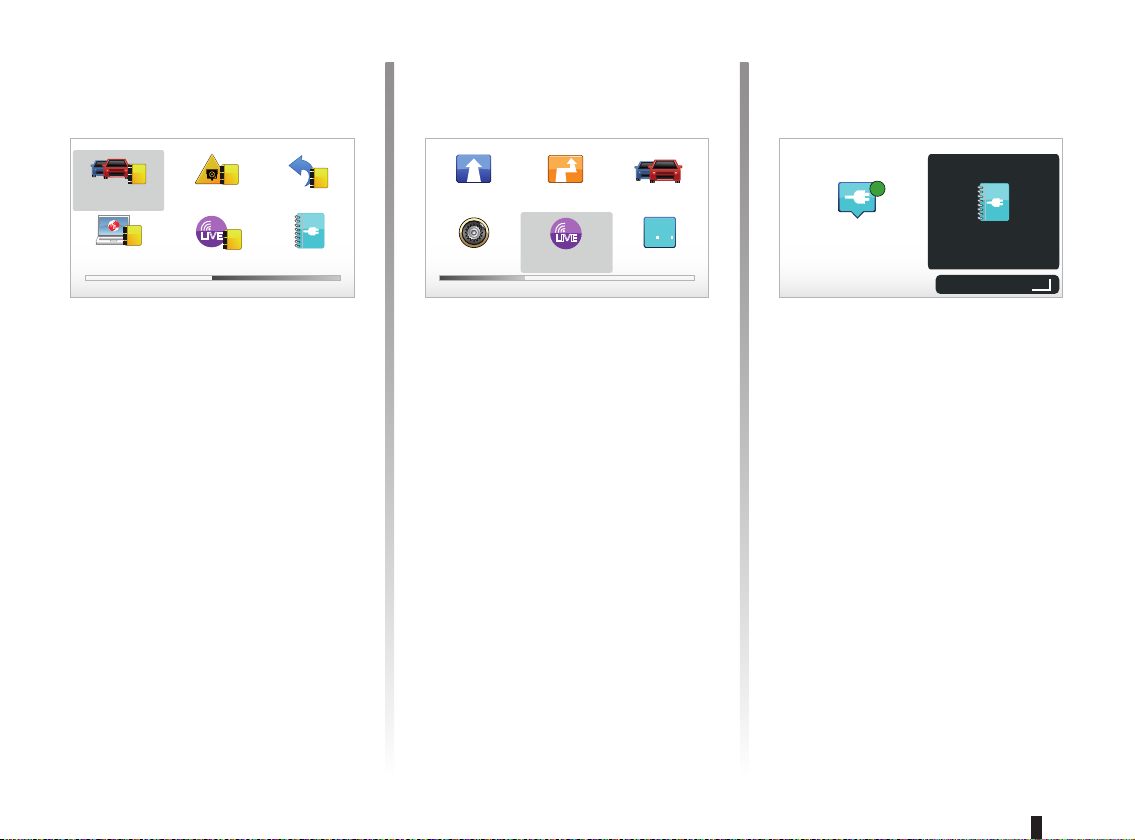
Main Menu 2 of 3
Safety Alerts
Add Favorite
Cancel route
Reachable area
Browse map
Remove SD
card
Removing the SD card
From the main menu, select “Remove
SD card”, then confirm using the righthand soft button. A message informs
you when you can remove the SD card.
To remove the SD card from slot A,
press on the card, then release it. The
card is released a few millimetres.
Pull the card to remove it completely.
To get up-to-date electric vehicle
charging station locations, please
log into the TomTom Home site at
regular intervals using your SD card
from your navigation system.
9

SWITCHING ON/OFF
Switching on
The multimedia system switches on automatically when the ignition is switched
on.
In other cases, press the On/Off button
on your audio system.
Press the On/Off button on your audio
system to make the multimedia system
run for an extra 20 minutes.
Switching off
With the ignition off, the system is deactivated automatically when the driver’s
door is opened.
With the ignition on, press the On/Off
button on your audio system.
12:00
24°C
Exterior temperature/clock
With the ignition on, press the On/
Off button on your audio system. The
system then stops the guidance and
displays a simple clock screen (and the
temperature, depending on the vehicle).
Hiding the map
(depending on the vehicle)
From the quick menu or the Preferences
menu, the “Hide Map” button can be
used to switch off the display screen.
Only the map and the instructions are
hidden. The audible warnings for cameras and the voice guidance instructions remain active, as does the audio
information from the radio.
Press and hold the “LIGHT/DARK”
button on your central control.
Pressing any of the keys will switch the
screen back on.
Resetting the system
To reset all the system parameters and/
or delete all personal data, use the
“MENU/SET” button to access the main
menu and select “Change preferences”
then “Reset factory settings”, then
follow the instructions on the screen
using the soft buttons.
10
GUIDED TOURS (1/2)
Itinerary planning
Help me!
15:15
Main Menu 3 of 3
Map corrections
A
Prepare
route
Photo gallery
B
Status & Information
Your navigation system offers you tutorials so that you can quickly become familiar with the different functions.
Accessing Guided Tours
To access the Guided Tours:
– from your central control or remote
control unit, press the “MENU"
button;
– select “Help me! ”;
– from the “Help me!” menu, select
“Guided tour”
Help me!
sos
Emergency phone
numbers
Where am I?
Drive to help
Guided tour
15:15
sos
?
?
“Central Control operation” or
“Remote control”
This tutorial will teach you to use the
central control and the remote control
for your navigation system.
“Driving view”
This tutorial will teach you about the different areas of your navigation screen
and the best way to use them.
“Menu options”
This tutorial will teach you about the
main functions in the various menus.
Guided tours 1 of 2
Central
control
Browse
map
16:30
Driving view Menu op-
Planning preferences
tions
Itinerary
planning
“Browse map”
This tutorial teaches you how to use the
“Browse map” menu.
“Planning preferences”
This tutorial teaches you how to use the
“Planning preferences” menu.
“Itinerary planning”
This tutorial teaches you how to use the
“Itinerary planning” menu.
11
GUIDED TOURS (2/2)
Guided tours 2 of 2
Traffic information
TomTom HOME
Warnings and
notifications
LIVE
LIVE services
Quick menu
Electric
vehicle
“Traffic information”
This tutorial teaches you how to use the
“Traffic info” menu.
“Warnings and notifications”
This tutorial teaches you about the different notices and information which
appear on the navigation screen.
“Quick menu”
This tutorial teaches you how to use the
“Quick menu” menu.
Main Menu 1 of 3
Navigate to... Find alternative HD Traffic
RENAULT
E
Z
Z.E. Services
Change preferences
Current position:
LIVE
LIVE services
“TomTom HOME”
This tutorial teaches you how to use the
“TomTom HOME™” application.
“LIVE services”
This tutorial teaches you how to use the
“LIVE services” menu.
« Electric vehicle »
This tutorial will teach you about the
special features of your Carminat
TomTom relating to an electric vehicle.
Z.E. Services
Search by availability
Guided tour
Activate
“Z.E. Services”
This tutorial details the “Z.E. Services”.
To access the Guidfed Tours for your
Z.E. Services:
– from your central control or remote
control unit, press the “MENU"
button;
– select “Z.E. Services”;
– from the “Z.E. Services” menu,
select “Guided tour”
Please refer to the “Z.E. Services” section in your Driver’s Handbook.
12
OPERATING PRINCIPLES (1/2)
Central control
1
2
BACK
BACK
1
A
B
MENU
SET
INFO
ROUTE
MAP
2D/3D
DEST
HOME
REPEAT
MUTE
LIGHT
DARK
3
Navigating a menu
Central control
– Turn rotary switch 3 for vertical or
horizontal movement (movement A
or B);
– push 3 to move vertically or horizon-
tally (movement A or B).
Remote control
Press buttons 5 to move vertically or
horizontally (movement A or B).
Remote control
A
5
6
4
B
7
1
1
2
Confirming/cancelling a
selection
Always confirm the selection by pressing 3 or 7. To return to the previous
menu, press 2.
Special features of the
remote control
From the navigation map:
– the left soft button can be used to
repeat the voice instruction;
– the right soft button can be used to
display the programmed route summary during guidance and the attainability without guidance.
9:13am
sec
15
1 2 3 4 5
6 7 8 9 0
Done
C
D
Shortcuts
From the navigation map, some buttons on your remote control unit have
shortcuts giving direct access to menus
and functions.
4 Zoom,
6 Info Menu.
Soft buttons
Soft buttons 1 (ṅ and Ṅ) are
used to select or confirm an action or
selection C or D which appears at the
bottom of the screen.
13
OPERATING PRINCIPLES (2/2)
Quick menu
Charge near my
location
Report safety
camera
Quick menu for vehicles with
central control
From the navigation map, you can
access the quick menu directly by
pressing on the centre button of your
central control.
Disable voice Use night colors
Hide Map
Cancel route
Quick menu
Charge near my
location
Disable voice Use night colors
Hide MapReport safety camera Brightness prefer-
ences
Quick menu for vehicles with
remote control
From the navigation map, you can
access the quick menu directly by
pressing on the centre button of your
remote control.
Description of the menus
Using these menus, and depending on
whether you have a central control or a
remote control, you can quickly access
the following menus:
- Day/night colours: daytime/night-
time display;
- Report safety camera: reports the
presence of a mobile or fixed speed
camera;
- Cancel route: stops the guidance in
progress;
- Disable/activate voice: switches
the guidance instructions on/off;
- Hide map: hides the map;
- Brightness preferences: select the
brightness of your navigation system
depending on the brightness of the
light outside;
- Recharging nearby: the navigation
device shows the recharging sta-
tions closest to your current position
(on electric vehicles only).
14

VOLUME AND VOICE
Preferences 1 of 5
Use night
colors
Safety preferences
Show POI
on map
Speech preferences
Volume
Changing the volume
To change the volume, use the audio
system volume control during a voice
instruction. If the instruction is too quick,
you can repeat it using the “REPEAT/
MUTE” button on your central control
unit, or use the left soft button on your
remote control.
16:30
1.3
Do not show charging
stations on map
Turn off
sound
Speech preferences
Change voice
Disable voice
Speech preferences
15:15
Deactivating the sound
To deactivate sounds, select “Change
preferences” from the main menu, then
“Turn off sound”.
To turn the sound back on, select the
“Turn on sound” heading.
Deactivating the voice
From the central control, press
“REPEAT/MUTE” (long press) or select
the “Change preferences” menu, then
“Disable voice”.
NB: from the remote control and central
control, select “Disable voice” from the
quick menu.
Selecting a voice
Your system allows you to select either
a synthesised or human voice. This
voice is used to give the voice instructions. To change the voice used on your
navigation system, go to the main menu
and select “Change preferences”, then
“Voice preferences” and “Change
voice”. Select a voice from the list.
Synthesised voices
Synthesised voices are generated by
your navigation system. They give you
verbal instructions while you are driving. They can give road directions,
(e.g.: turn right), traffic sign information,
etc.
Recorded human voices
The human voices are recorded by an
actor or actress.
Note: the human voices only give you
simplified guidance instructions.
15
READING A MAP
A
Marc Bloch
Marc Bloch
30
Avenue du Golf
LW 10245 66 RDS-AF 26°C
Avenue du Golf
B D E
C
A2/E35 Utrecht
Avenue Léon
Avenue Léon
14
km
GK
H
6:47
300
metres
km
4.5
6:52
FIJ
Map key
A Warning of the next risk area with
the related distance (fixed or mobile
safety camera, school, etc.).
B Name of the next major road or road
sign information, if applicable.
C Traffic sidebar: display of incidents
on the route, traffic info reception indicator.
D Current time.
E Distance to and indication of next
change of direction.
F Exterior temperature (depending on
the vehicle).
G Journey information such as your ar-
rival time and total distance remaining.
Note: to select what will be shown,
select Change preferences” in the
main menu, then Status bar preferences”.
H Attainability: possibility of reaching
your destination (green flag or red
flag with lightning symbol).
I Audio system information.
J Current location.
K Sign giving the speed limit (the speed
given depends on the unit chosen).
Note: the sign turns red and flashes
if you drive faster than the speed limit
Colour codes
The roads are displayed differently depending on the type of carriageway.
You have the option to change the colours: in the main menu (MENU button),
select “Change preferences” then
“Change map colors”.
K L
A2/E35 Utrecht
Marc Bloch
Marc Bloch
Avenue Léon
Avenue du Golf
Avenue du Golf
Avenue Léon
30
LW 10245 66 RDS-AF 26°C
14
km
6:47
300
metres
km
4.5
6:52
M
Map icons
The navigation system uses icons K to
display points of interest (POI).
Recharging stations
The navigation system uses the L
symbol to display recharging stations.
Compass
To display or remove the compass M,
from the main menu (button “MENU”),
select “Change preferences”, then
“Show compass”.
16
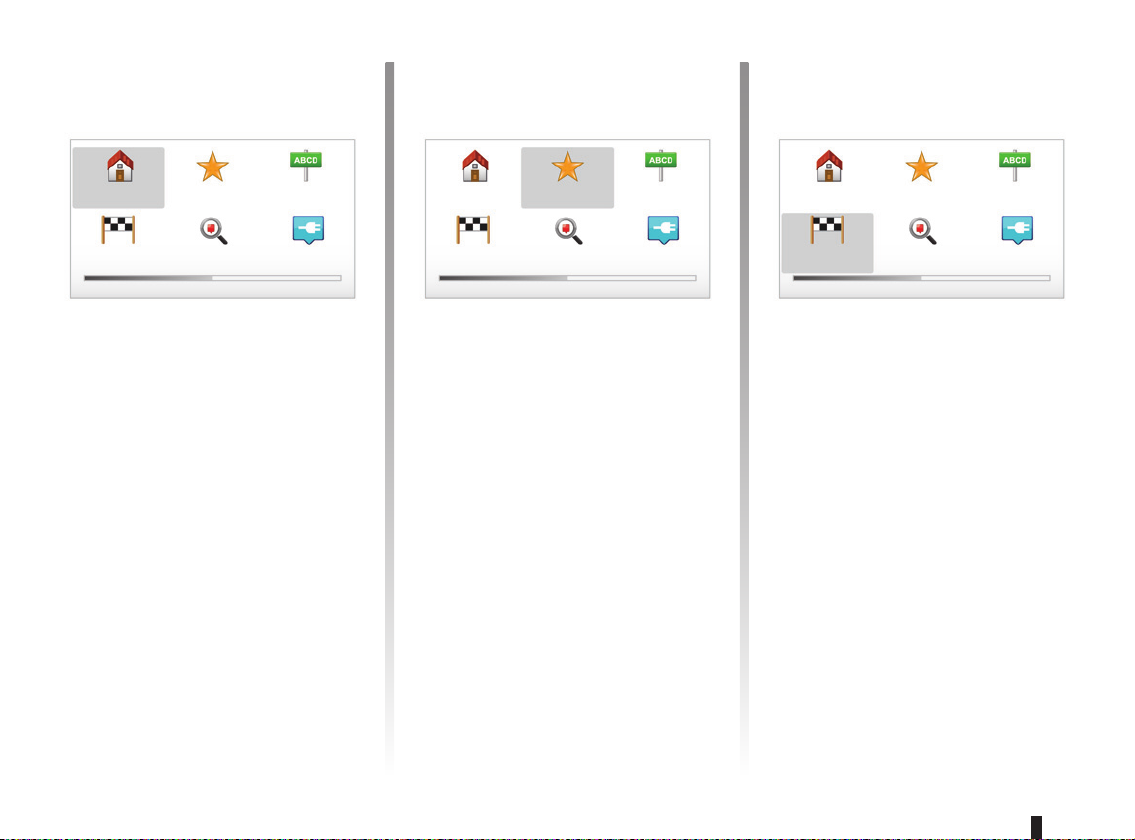
ENTERING A DESTINATION (1/5)
J
O
Q
Main Menu 1 of 3
Navigate to... Find alternative
Change preferences
Current position:
LIVE
LIVE services Z.E. Services
“Navigate to...” menu
Press the “MENU" button to access the
"Navigate to...” menu.
The “Navigate to...” menu offers you
several ways to enter a destination:
– enter an address from the “Address”
section using one of the following
methods:
– entering a full address (City and
street);
– searching by “Zip Code”;
– selecting a “City center”;
– select a “Crossing or intersec-
tion”;
– select a “Home”;
HD Traffic
RENAULT
Z
E
– select an address from the “Favorite”
section;
– select a destination from the loca-
tions in “Recent destination”;
– select an address from the “Point of
Interest” (POI);
– select a “Point on map”;
– select a “Latitude” or a “Longitude”;
– selecting a destination by recharging
station (electric vehicle).
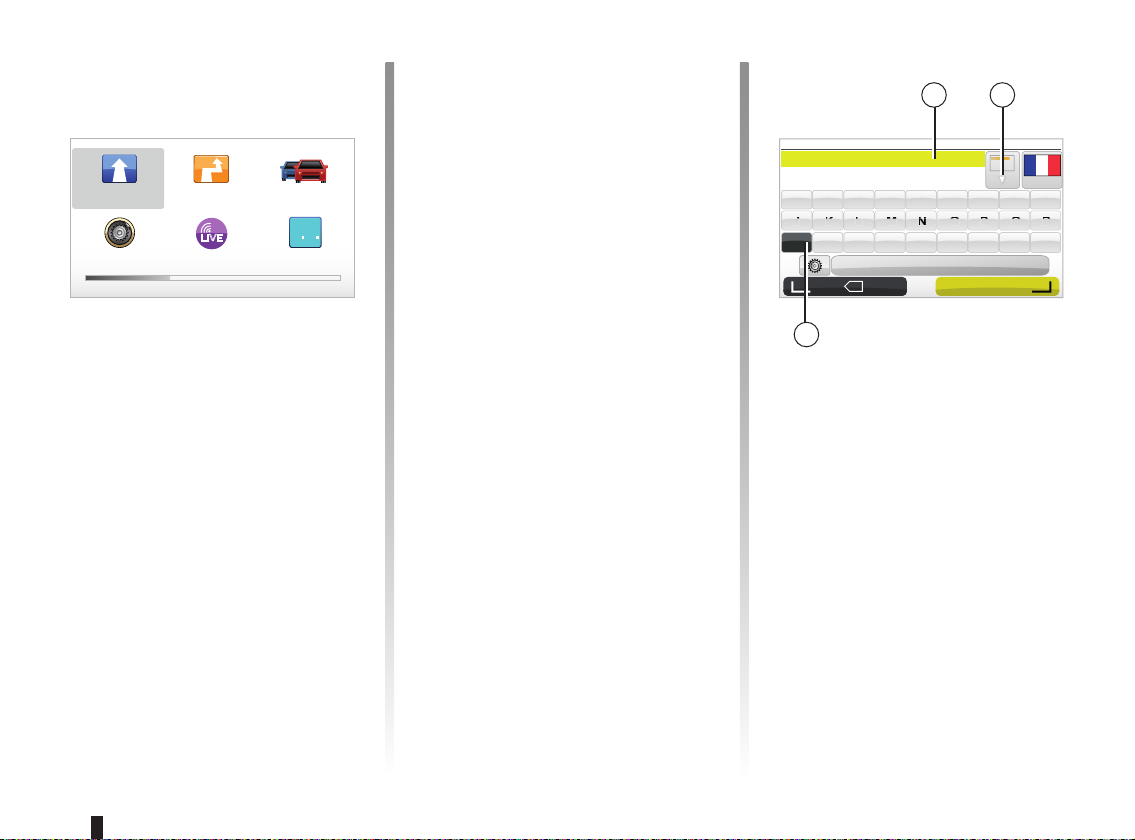
Entering a “New address”
This section allows you to enter all
or part of the address: country, town,
street and number.
Note: only addresses known to the
system through the digital map are authorised.
At the time of the first use:
– choose the country of destination;
– enter the name of the required town/
city using the cursor 3.
The system may suggest several town
names in the area 1.
Done
Formation
3, passage
Mongallet
Fontenay S/
2
France
123
1
Vers
Ville :
Vers (Haute-Savoie)
Vers (Lot)
A B C D E F G H I
S T U V W X Y Z
X
3
– Press button Done to confirm the un-
derlined town/city.
– Access the full list corresponding to
your search by selecting 2 arrow to
the right of the list.
– Select the desired town/city and con-
firm.
– Do the same actions for the “Street”
and “Number” fields.
Note: The system will store the last
towns/cities entered in its memory. You
may directly select one of these by
pressing the 1 zone.
17
ENTERING A DESTINATION (2/5)
Navigate to... 1 of 2
Home
Recent
destination
Favorite Address
Local Search
Charging
station
“Home”
This section allows you to navigate to
your home and you can activate it from
the central control by pressing and
holding the “DEST/HOME” button.
To store the address of your home location, use “Preferences” menu, then
“Change Home location”.
“Favorite”
The “Favorite” section contains the favourite stored destinations and favourites such as your place of work.
Navigate to... 1 of 2
Home
Recent
destination
Favorite
Local Search
Address
Charging
station
– In the main menu, select the heading
“Navigate to...”.
– Select “Favorite” and confirm.
– Select the required destination ad-
dress in the list of stored addresses.
– Confirm.
You can manage your favourites in
the “Preferences” menu, then select
“Manage Favorites”.
Note: the “Favorite” icon will be greyed
out if you have not entered a destination.
Navigate to... 1 of 2
Home
Recent
destination
Favorite Address
Local Search
Charging
station
“Recent destination”
This item enables you to select a destination from the list of addresses last
used. These are automatically stored.
In the main menu, select the heading
“Navigate to...” and then “Recent destination”.
From the list of stored destinations,
select an address then confirm this address as the destination.
18
 Loading...